

Page 1
This quick installation guide provides instructions for installing
your Aurora AGP 16MB/32MB video card in your computer.
Introducing the
Aurora AGP 16MB/32MB
Thank you for your purchase of the Aurora AGP 16MB/32MB
video card, featuring the latest high performance graphic
accelerator. Building around a new 64-bit 3D/2D Graphics and
Video Accelerator, the board provides true 32-bit ARGB
rendering, optimized Direct3D acceleration, trilinear and
bilinear filtering, and a hardware accelerated TwiN Texel
Engine. With 16MB/32MB memory support which enhances
graphics and video performance through crisper images,
realistic 3D effects and more vibrant colors.
Features and Benefits
• Built-in 64-bit super pipeline 3D/2D engine graphic
accelerator
• Software support for Direct3D, DirectDraw, DirectShow,
and OpenGL ICD for Windows NT 4.0
• High performance 3D Acceleration TwiN Texel Engine
• True AGP 4X/2X support, including sideband addressing
and execute mode
• 250 MHz RAMDAC for 16MB
• 300 MHz RAMDAC for 32MB
• Supported Monitors: Standard and Multi-frequency Analog
Monitors and DDC2B Plug and Play
• Supports up to 1600x1280 for Desktop PC CRT Monitor
• Alpha-Blending and Specular Highlights
• Fog, Light, and Mip mapping perspective corrections
• True 32-bit ARGB rendering with designations alpha
• 8-bit Stencil Buffer for the use of real-time shadows in games
• Optimized for 3Dnow 3D instructions
• 16/24-bit Z-buffering
• Multi-texture, Texture modulation, Light, Reflection, and
Environmental maps
• PCI 2.2 bus support including bus mastering
04-0173B
1
Aurora AGP 16MB/32MB
Quick Installation Guide
PRODUCT NAME MODEL NUMBER
Aurora AGP 16MB/32MB VA-397
FCC RULES: TESTED TO COMPLY WITH FCC PAR T 15, CLASS B
OPERA TING ENVIRONMENT: FOR HOME OR OFFICE USE
FCC COMPLIANCE STATEMENT:
This device complies with part 15 of the FCC Rules. Operation is subject to
the following two conditions: (1) This device may not cause harmful
interference, and (2) this device must accept any interference received,
including interference that may cause undesired operation.
FCC NOTICE:
This equipment has been tested and found to comply with the limits for a
Class B digital device, pursuant to part 15 of the FCC Rules. These limits are
designed to provide reasonable protection against harmful interference in a
residential installation. This equipment generates, uses, and can radiate radio
frequency energy and if not installed and used in accordance with the
instructions, may cause harmful interference to radio communications.
However, there is no guarantee that interference will not occur in a particular
installation. If this equipment does cause harmful interference to radio and
television reception, which can be determined by turning the equipment off
and on, the user is encouraged to try to correct the interference by one or more
of the following measures:
• Reorient or relocate the receiving antenna
• Increase the separation between the equipment and the receiver
• Connect the equipment into an outlet on a circuit different from that to
which the receiver is connected
• Consult the dealer or an experienced radio or TV technician for help
Caution:
Any changes or modifications not expressly approved by the party
responsible for compliance could void the user's authority to operate
this equipment
THE PARTY RESPONSIBLE FOR
PRODUCT COMPLIANCE
SIIG, Inc.
6078 Stewart Ave.
Fremont, CA 94538-3152
Aurora AGP 16MB/32MB are trademarks of SIIG, Inc.
SIIG and the SIIG logo are registered trademarks of SIIG, Inc. Microsoft, Windows, and
Windows NT are registered trademarks of Microsoft Corporation. Pentium is a registered
trademark of Intel Corporation. Other names used in this publication are for identification
purposes only and may be trademarks of their respective companies.
March, 2000 Copyright ©2000 by SIIG, Inc. All rights reserved.
Page 2
System Requirements
• Pentium II Class computer with an AGP slot
• Windows 95b or later
• Windows NT 4.0 Service Pack 3 or later
• 32 MB system memory
Resolution and Color Depth
The Aurora AGP comes with either 16MB or 32MB of memory
installed on-board. The chart below describes the colors and
resolutions it supports:
Resoultion 16MB 32MB
640x480 16.7M 16.7M
800x600 16.7M 16.7M
1024x768 16.7M 16.7M
1280x1024 16.7M 16.7M
1600x1200 (NT & W2K only) 16.7M
1920x1440 n/a (NT Only)
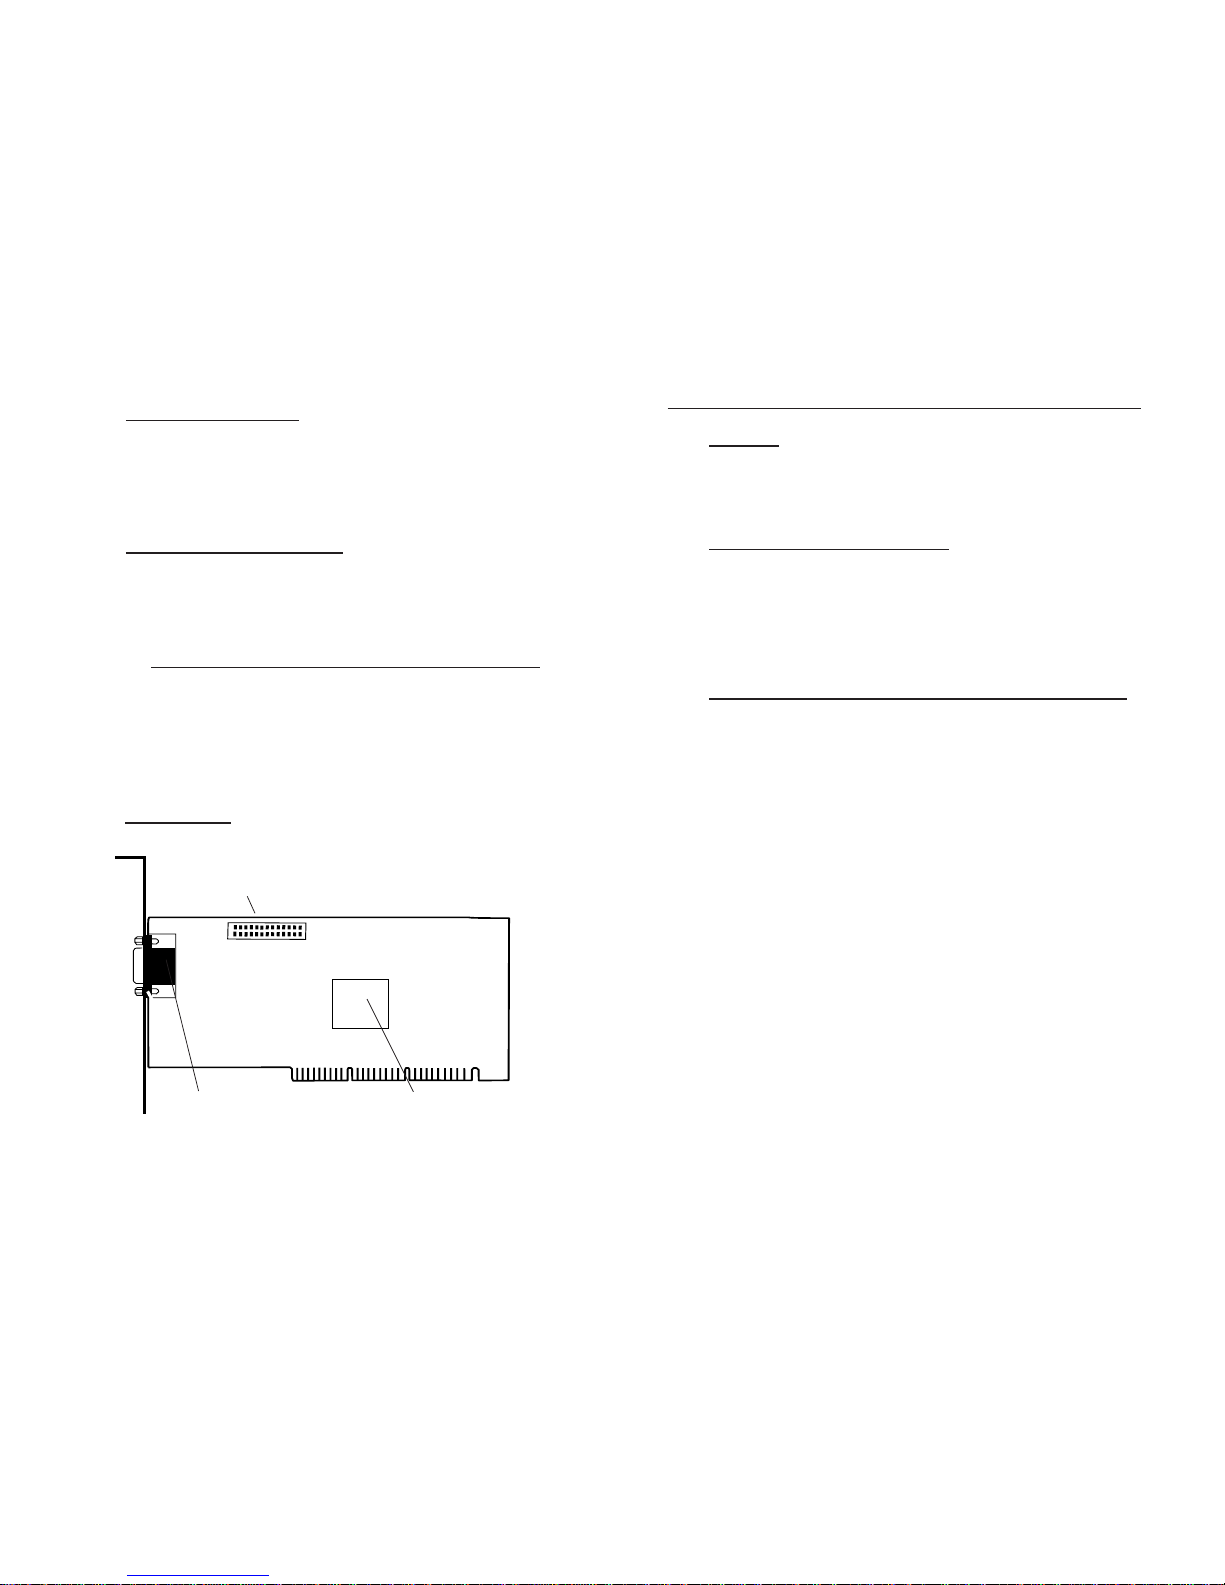
Board Layout
Technical Support
Web Site
Visit SIIG’s Web site at www.siig.com for more product features,
drivers updates, upgrade solutions, FAQs, and where-to-buy
information.
Technical Support Department
For additional support, SIIG's Technical Support Specialists are
available from 8:00 a.m. to 5:00 p.m. Monday through Friday,
Pacific Standard Time.
e-mail: [email protected]
Telephone: (510) 353-7542
Return Merchandise Authorization (RMA) Department
If the Technical Support Specialist determines that the product
may be defective, you can return it for repair or replacement.
Step 1: Call SIIG's RMA Department
Call the RMA Department at (510) 413-5333 for a Return
Merchandise Authorization (RMA) number. Please have the
product serial number available. It is located on the side of the
box and on the back of the product.
Step 2: Complete the RMA form
• Fill out your Return Merchandise Authorization (RMA) form,
and include it in the package along with the original materials.
• Clearly write your RMA number on the outside of the returned
shipping package and on the accompanying RMA form.
SIIG will refuse to accept any shipping package, and not
be responsible for a product returned without a RMA
number posted on the outside of the shipping carton.
Step 3: Ship the
Aurora AGP 16MB/32MB
You are responsible for the cost of shipping the product back to
SIIG at the following address:
SIIG, Inc. RMA#_______________
6078 Stewart Ave.
Fremont, CA 94538
SIIG will ship the repaired or replaced the product via UPS
Ground or US Mail at no cost to you.
2
15-pin Analog
Video Connector
Multimedia
VGA Chip with
heat sink
34-pin Feature
Connector
Figure 1: Board Layout
11
Page 3

10
Hardware Installation
Proceed with the following instructions to install your
Aurora AGP 16MB/32MB in your computer. General instructions
are given since the design of computer cases varies. Refer to your
computer’s reference manual whenever in doubt.
Note Leave the board in its static-resistant bag
until you are ready to install it.
Caution Static Electricity Discharge may
permanently damage your system. In order to
avoid possible static electricity discharge during
installation procedures, please follow the
guidelines below:
• Discharge any static electricity build up in
your body by touching a large grounded metal
surface or the computer’s case (if plugged in),
for a few seconds.
• During installation procedures, avoid any
contact with internal parts. Handle cards only
by their edges.
1. Turn OFF the power to your computer and any other
connected peripheral devices.
2. Unplug the power cord from the back of the computer.
3. Remove your computer’s cover by removing its mounting
screws and sliding off the cover.
4. Remove any existing video graphics adapters that may be in
the system. Disable the motherboard's built-in video, if there
is one.
5. Remove the slot bracket by unscrewing the holding screw
and sliding it out. Save this screw for securing the board after
it’s installed. (See Figure 2.)
3
Uninstall Video Card
This section will guide you through the uninstalling the
software drivers. Follow the procedures listed below to
uninstall the Display drivers and related files:
1. Startup your system.
2. Go to Windows main desktop, click on Start then
Setting then Control Panel from the taskbar.
3. Double click on Add/Remove Programs.
4. Highlight NVIDIA Windows 95/98 Display Drivers
and click on REMOVE, follow onscreen instructions
then restart the system.
5. Now you are ready to reinstall the drivers or follow
other diplay manufacturer to install diplay drivers.
Page 4
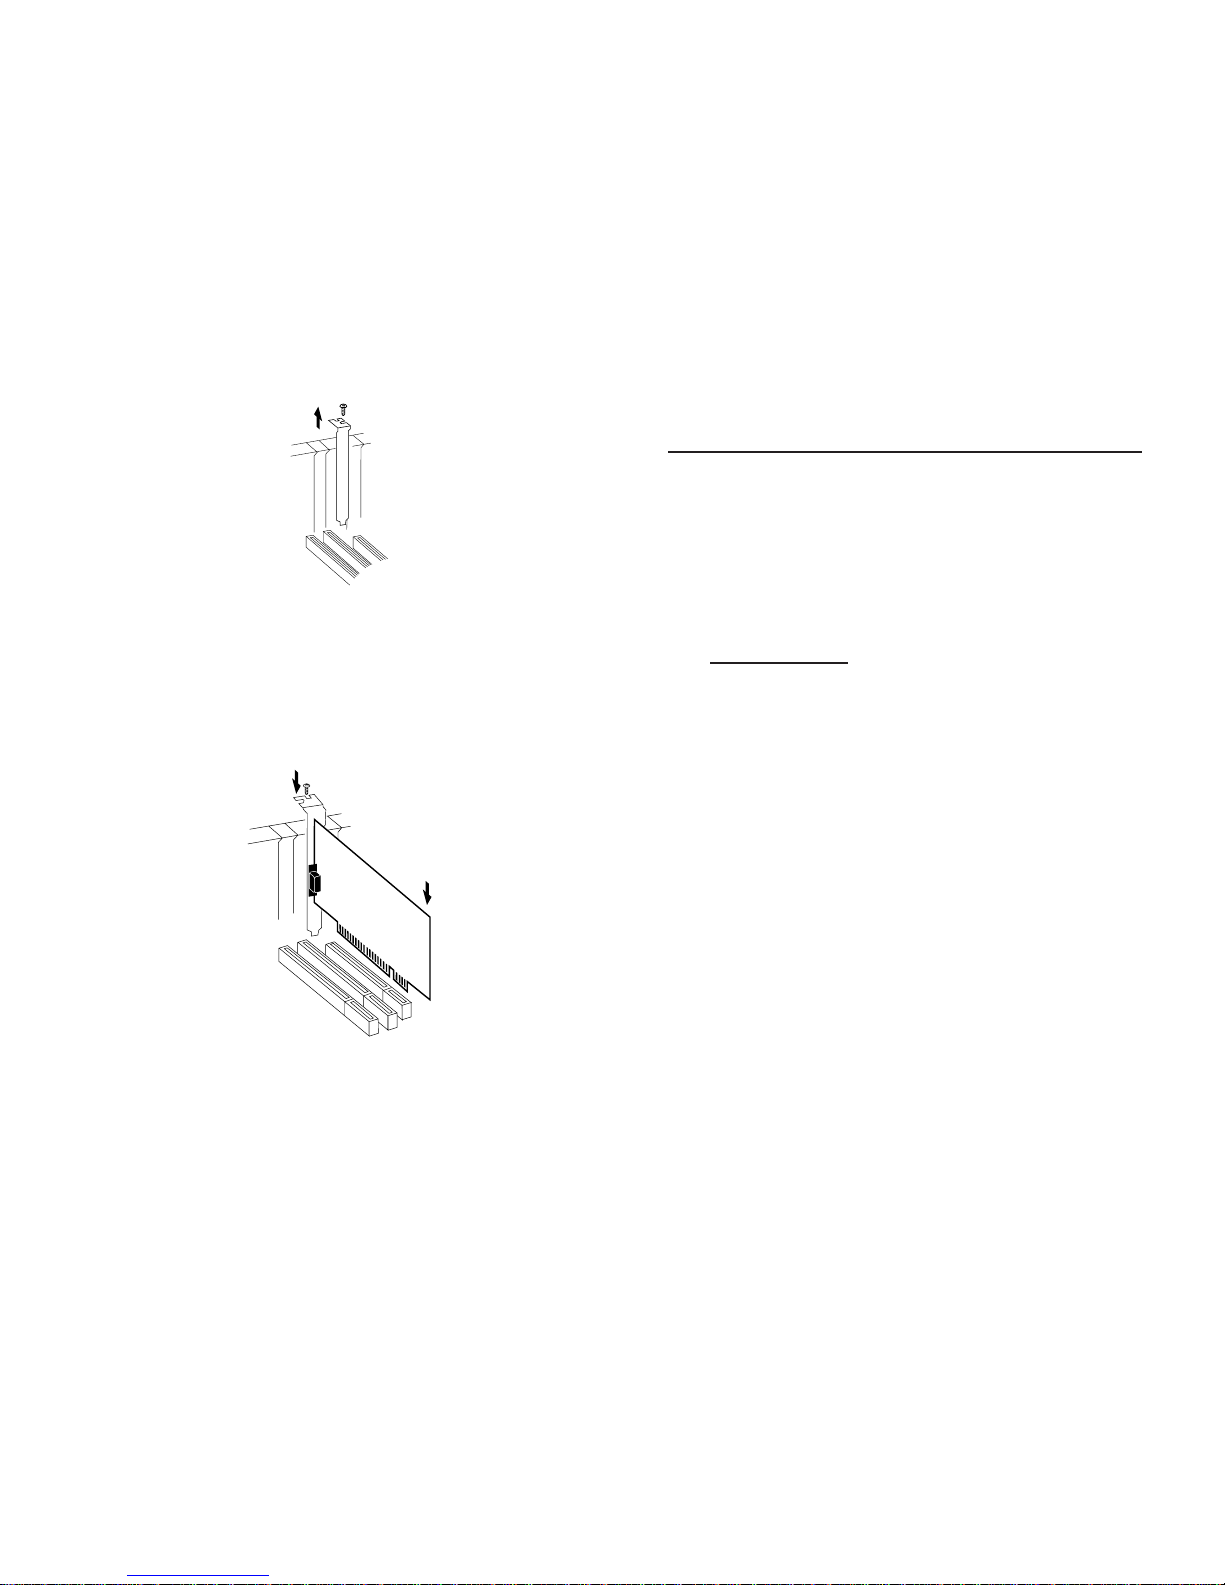
6. To install the board, carefully align the card’s bus connector
to the AGP slot on the motherboard. Push the card down
firmly, but gently, until it is well seated.
Note Hold the card by its external edges only. Try to
avoid touching the components, connectors or pins.
7. Replace the slot bracket's holding screw to secure the board
to the rear slot panel.
8. Replace the computer cover.
The hardware installation have now been complete.
Figure 3: Installing the board
Figure 2: Removing the Slot Bracket
4
9
Software Installation
This section will guide you through the installation of the
following software drivers:
• Windows 95b
• Windows 98 Gold
• Windows 98 SE
• Windows 2000
• Windows NT 4.0
Driver Installation
Follow the procedures listed below to install the Display drivers
and related files:
1. When Windows first restarts after installing the card,
Plug-and-Play will inform you that it has detected a new
video adapter. Click Next to install “Standard PCI Graphic
Adapter (VGA).” Click Finish and Yes to restart the system.
2. Insert the “Daytona Software Driver CD” into the CD-ROM
drive.
3. AutoRun should start automatically. If AutoRun does not
start, go to Windows main desktop, click on Start and then
Run from the taskbar. Type the driver path name:
“d:\Autorun.exe” and click “OK”. (Assuming d: is the
drive letter of your CD-ROM.)
4. A “Daytona Installation” window will pop up.
5. Click on “Driver Install” to load the display driver.
NOTE NT will have problems copying two files and here is
how to resolve. When the error message appear stating that
a file could not be found then click “OK, Browse, Open and
OK” again to continue copying files.
6. Click “OK” to Restart the system for the new configuration
to take effect.
 Loading...