

Page 1

User’s Guide
Seiko Instruments USA Inc.
2990 Lomita Boulevard
Torrance, California 90505
www.seikosmart.com
Page 2

Trademarks and Copyright
SmartPad, the SmartPad logo, InkLink, the InkLink logo, and InkNote Manager, are trademarks of Seiko Instruments USA Inc.
Copyright 2002, Seiko Instruments USA Inc.
All rights reserved. Seiko Instruments products contain certain trade secrets and
confidential and proprietary information. Use, reproduction, disclosure and
distribution by any means are prohibited, except pursuant to a written license from
Seiko Instruments USA Inc. Use of Copyright Notice is precautionary and does not
imply publication or disclosure. Other products and brand names may be
trademarks or registered trademarks of their respective owners.
Disclaimer and Limitation of Liability
Seiko Instruments USA Inc. assumes no responsibility for any damage or loss
resulting from the use of this product.
Seiko Instruments USA Inc. assumes no responsibility for any loss or claims by
third parties that may arise through the use of this software.
Seiko Instruments USA Inc. assumes no responsibility for any damage or loss
caused by deletion of data resulting from malfunction, dead batteries, or repair. Be
sure to make backup copies of all important data on other media to protect against
data loss.
Important: Please read the Seiko Instruments USA Inc. End User Software License
Agreement before using the accompanying software program(s). Using any of the
software indicates that you accept the terms of the End User Software License
Agreement.
Restricted Rights Legend
Use, duplication, or disclosure by the Government is subject as set forth in
subparagraph (c) (1) (ii) of the Rights in Technical Data and Computer Software
clause at DFARS 52.227-7013.
2 www.seikosmart.com
Page 3

Contents
Introduction 9
Introducing the InkLink Handwriting System 10
How InkLink Works 10
InkLink Features 10
Introducing SmartPad 12
How SmartPad Works 12
SmartPad Features 12
Introducing InkNote Manager 14
InkNote Manager Software on your handheld 15
InkNote Manager Software on your Desktop
Computer 15
InkNote Manager Works the Same on Both
Computers 15
InkNote Manager Features 15
Setting Up 17
System Requirements 17
Desktop Computer 18
Pocket PC 18
Palm OS PDA 19
Software Setup 19
Confirming that HotSync is Working 19
Confirming that ActiveSync is Working 20
Installing InkNote Manager Software 20
Setup Tips 21
InkLink Setup 22
Product Box Contents 23
Installing the IrDA Transceiver Battery 23
Install the InkLink Pen Ink Cartridge 24
To install the ink cartridge: 24
Installing InkLink Pen Batteries 25
Attaching the InkLink Data Clip 25
Connecting to a Handheld 27
Connecting to a desktop 28
InkLink Basics 29
Using the InkLink Pen 29
Placing InkLink in the Carrying Case 32
InkNote Manager by Seiko Instruments 3
Page 4

SmartPad Setup 32
Product Box Contents 33
Installing the SmartPad Portfolio Batteries 33
Repositioning the Infrared Transceiver 34
Attaching Your handheld 35
Starting InkNote Manager 36
Starting InkNote Manager on a Pocket PC 37
Starting InkNote Manager on a Palm OS handheld 37
Starting InkNote Manager on a Desktop computer with
InkLink 38
Selecting a handheld as a Partner 38
Getting Started 41
Explorer 41
Note Editor 43
Help 45
Getting Help 45
Creating Ink Notes 47
Ink Notes 48
Selecting a Paper Size 48
Defining a Paper Size 49
Creating an Ink Note 50
Adding a Page 50
Saving an Ink Note 51
Deleting an Ink Note 52
Exporting an Ink Note 52
Closing Note Editor 54
Organizing and Finding Ink
Notes 55
Why Organize? 55
Finding an Ink Note in Explorer 57
Changing Explorer Views 58
Assigning Categories and Keywords 59
4 www.seikosmart.com
Page 5

Setting Up Categories 62
Renaming an Ink Note 62
Creating an Action Item 63
Editing Ink Notes 65
Working with Ink Notes 66
Opening an Ink Note 66
Zooming and Panning 67
Navigating Between Pages 68
Using the Pen Function Keys 69
Using Pen Gestures on SmartPad 70
Displaying or Hiding Ruled Lines 71
Adding to an Ink Note 72
Drawing Straight Lines 73
Straightening Existing Lines 74
Adding a Highlight 74
Setting Ink and Highlight Colors 75
Selecting Parts of an Ink Note 76
Using Cut, Copy, and Paste 77
Moving Part of an Ink Note 78
Grouping and Ungrouping Parts of an Ink Note 78
Undoing an Edit 79
Using Handwriting Recognition 79
Communicating Notes 81
Archiving and Backing Up 85
InkNote Manager by Seiko Instruments 5
Sending Ink Notes 81
E-mailing an Ink Note 82
Beaming an Ink Note 83
Printing an Ink Note 83
Why Archive? 85
Setting Archive Options 86
Viewing Archived Ink Notes 87
Restoring Archived Ink Notes 87
Archiving Intermediate Versions 88
Page 6

Advanced Tasks 89
Other Configuration Options 89
Setting the Default File Name 90
Using the SmartPad Tablet as a Keyboard 90
Power-Saving Features 91
Using InkNote Manager with Multiple handheld
Devices 95
Choosing a Sync Partner 96
Specifying a Storage Location for Your Ink Notes 96
Switching between InkLink and SmartPad 97
InkLink Maintenance Procedures 97
Replacing the InkLink Pen Ink Cartridge 97
Replacing the InkLink Pen Batteries 98
Replacing the InkLink IrDA Transceiver Battery 99
SmartPad Maintenance Procedures 100
Replacing the SmartPad Pen Ink Cartridge 100
Replacing the SmartPad Pen Battery 101
Replacing SmartPad Portfolio Batteries 102
Repositioning the SmartPad2 Infrared
Transceiver 103
Attaching Your handheld To SmartPad 104
InkNote Manager Maintenance 106
Uninstalling InkNote Manager from a Desktop
Computer 106
Uninstalling InkNote Manager from a Pocket PC 106
Uninstalling InkNote Manager from a Palm
device 107
Upgrading InkNote Manager 107
Troubleshooting 109
6 www.seikosmart.com
Testing the handheld and InkLink or SmartPad 110
InkLink Ink Strokes Do Not Appear on the screen 11 0
SmartPad Ink Strokes Do Not Appear on the
screen 11 2
InkLink ink notes do not match paper notes 11 3
InkLink does not work reliably 114
Handheld occasionally beeps when writing with
InkLink 11 4
Page 7

Screen Blanks While Writing 11 5
Straight lines appear when not wanted 115
SmartPad Pen Gestures Don’t Work 115
Ruled Lines on Screen Don’t Match Notepad
Paper 11 6
Computer Doesn’t Beep When Drawing Straight
Lines 116
Windows asks for a Human Interface Device
driver 117
Handheld Does Not Appear in Sync Partner List 11 7
‘Error: Unable to open the port’ Message 11 8
‘Error: No port found’ Message 118
SmartPad Batteries Run Down Quickly 118
Service and Support 121
Contacting Seiko Instruments 121
Purchasing Supplies 122
Repair Information for US and Canada 124
Repair Information for other Regions 125
Warranty Information 127
Other Information 130
FCC Compliance Statement 130
Index 133
InkNote Manager by Seiko Instruments 7
Page 8

8 www.seikosmart.com
Page 9

Introduction
InkLink™ Handwriting System and SmartPad ™, the Connected Notepad,
are two technologies from Seiko Instruments that link plain paper to your
computer.
Using our InkNote Manager software and an ordinary paper writing pad, the
InkLink Handwriting System and SmartPad automatically link to your
Pocket PC, Palm personal digital assistant, notebook, or desktop computer
and store anything that you write. Whether you scribble quick notes, draw
diagrams or maps, or take extensive notes at meetings, your handwritten
information is transferred and stored on your handheld or desktop.
This User’s Guide provides information about three products; InkLink,
SmartPad, and InkNote Manager. You probably have two of these three;
InkLink and InkNote Manager, or SmartPad and InkNote Manager. We
have identified sections that only pertain to InkLink or SmartPad so you can
skip information that you don’t need.
InkNote Manager by Seiko Instruments 9
Page 10

Introduction
Introducing the InkLink Handwriting
System
The InkLink Data Clip attaches to any standard notepad. A special pen is
provided, and it automatically transmits whatever you write through the
IrDA transceiver to your handheld or through the USB cable to your desktop computer. For convenience, the opposite end of the pen contains a stylus
point for use with the handheld.
How InkLink Works
The InkLink Data Clip continuously listens for communications from the
InkLink pen. As you write with the InkLink pen on the paper pad, the
InkLink Data Clip reads the location of the pen tip and communicates its
exact location to your handheld or desktop.
InkLink Features
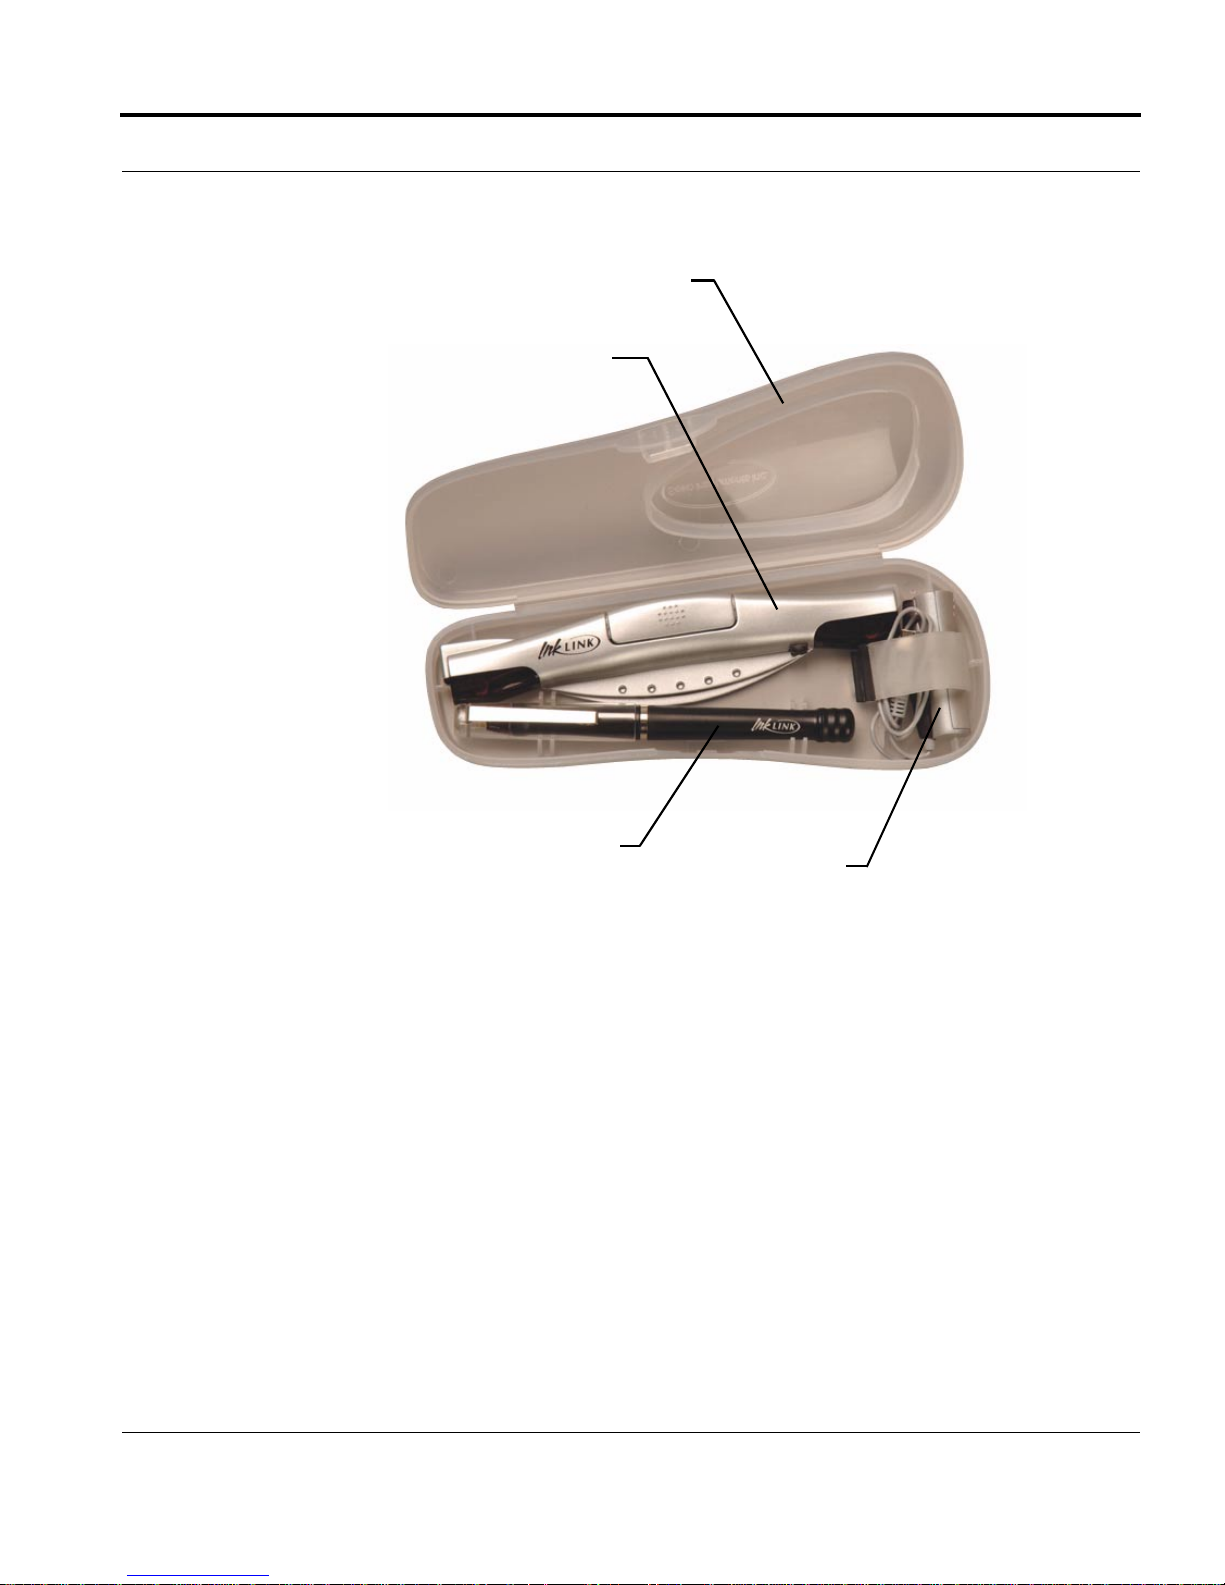
The following diagram points out the InkLink features:
10 www.seikosmart.com
Page 11
Introducing the InkLink Handwriting System
InkLink carrying case
InkLink data clip
InkLink electronic pen
IrDA transceiver
InkLink Carrying Case. The InkLink carrying case protects the InkLink
components you need to use InkLink with your handheld. The case is compact enough to fit into a pocket or purse.
InkLink Data Clip. The InkLink Data Clip clamps on the edge of a standard
notepad and listens for communications from the InkLink pen. It communicates the location of the pen to your handheld or desktop.
InkLink Electronic Pen. The special InkLink electronic pen is used for writ-
ing on the Notepad. The InkLink pen contains a transmitter that communicates with the InkLink data clip. The InkLink pen uses ink cartridges and
three SR41 button batteries that can be easily replaced.
IrDA Transceiver. The IrDA transceiver snaps onto your handheld and com-
municates through the infrared port. No matter where the infrared port is on
your handheld, the IrDA transceiver will fit it.
InkNote Manager by Seiko Instruments 11
Page 12

Introduction
Introducing SmartPad
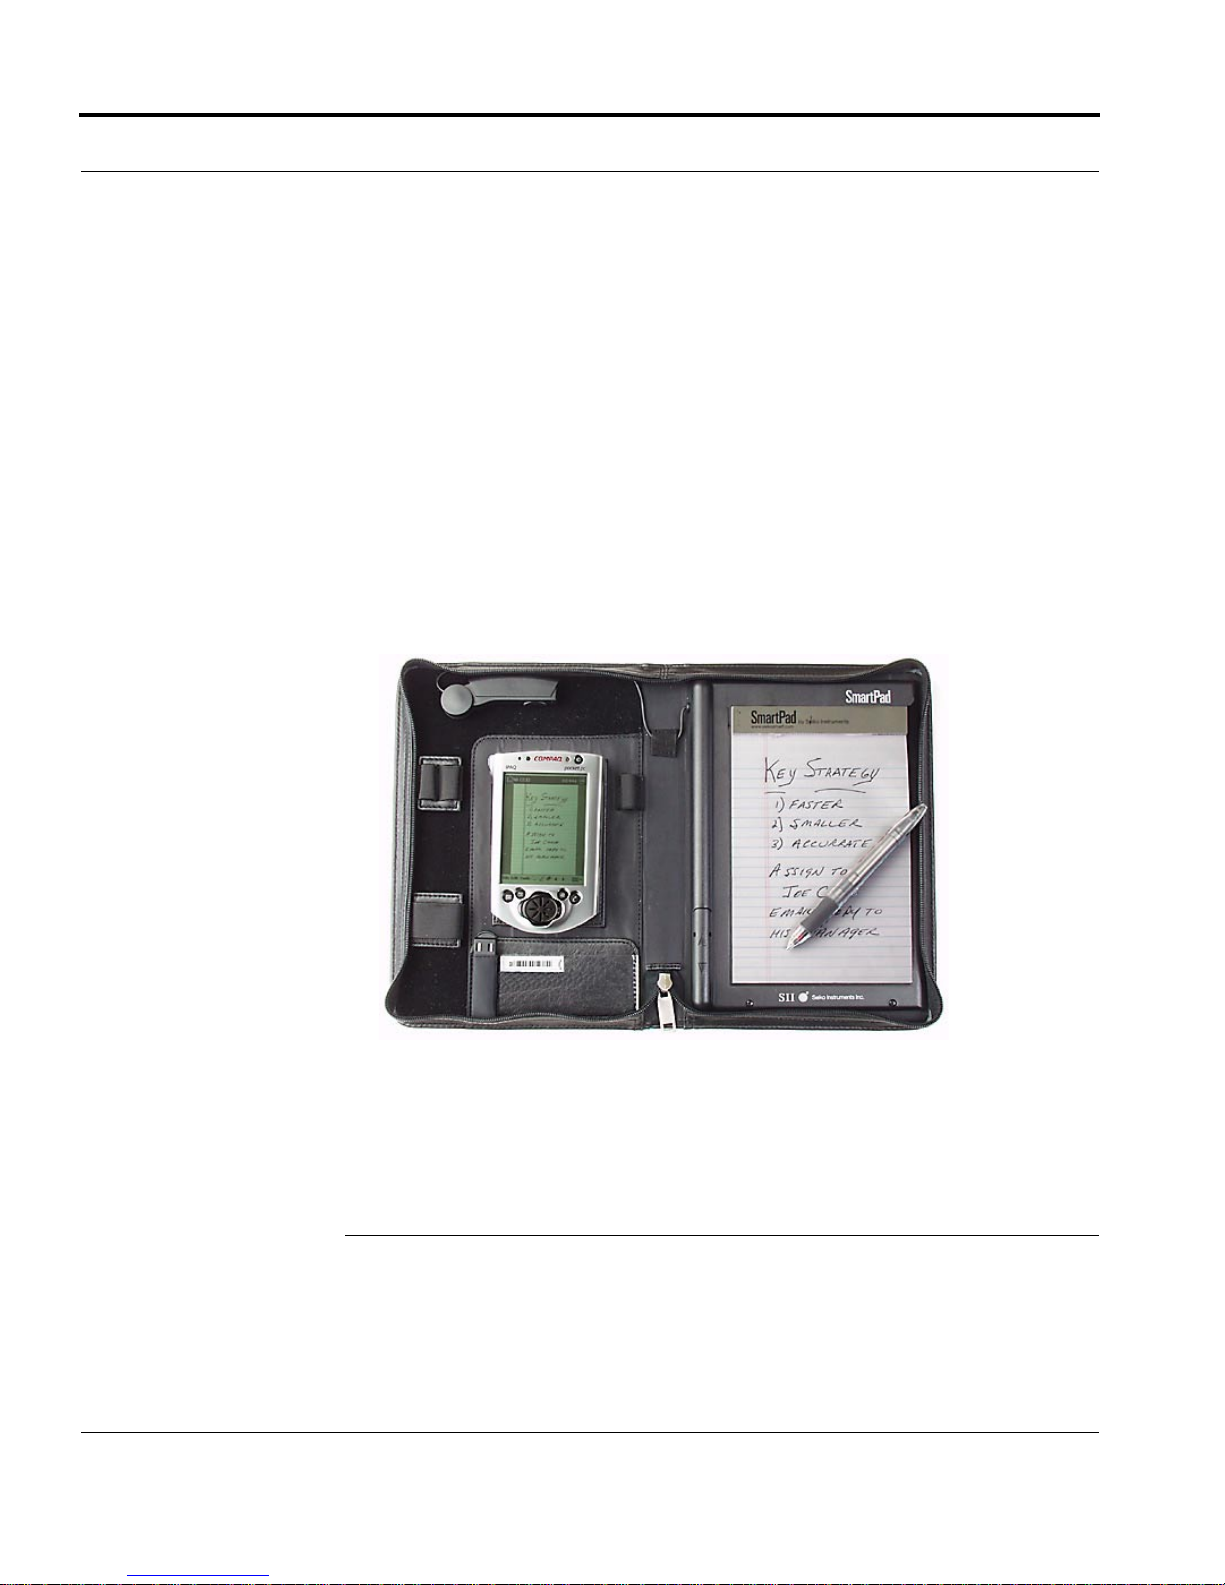
SmartPad consists of an electronic notepad, integrated into an elegant portfolio that also stores and protects your handheld. The paper notepad is a
standard-sized pad; refills are available from any office supplies store. A
special pen is provided, and it automatically transmits whatever you write
through SmartPad and into your handheld. For convenience, the opposite
end of the pen contains a stylus point for use with the handheld.
How SmartPad Works
Located beneath SmartPad’s paper pad is a special digitizer tablet that is
sensitive to the position of the SmartPad pen. As you write with the SmartPad pen on the paper pad, the SmartPad reads the location of the pen tip and
communicates its exact location to your handheld.
SmartPad Features
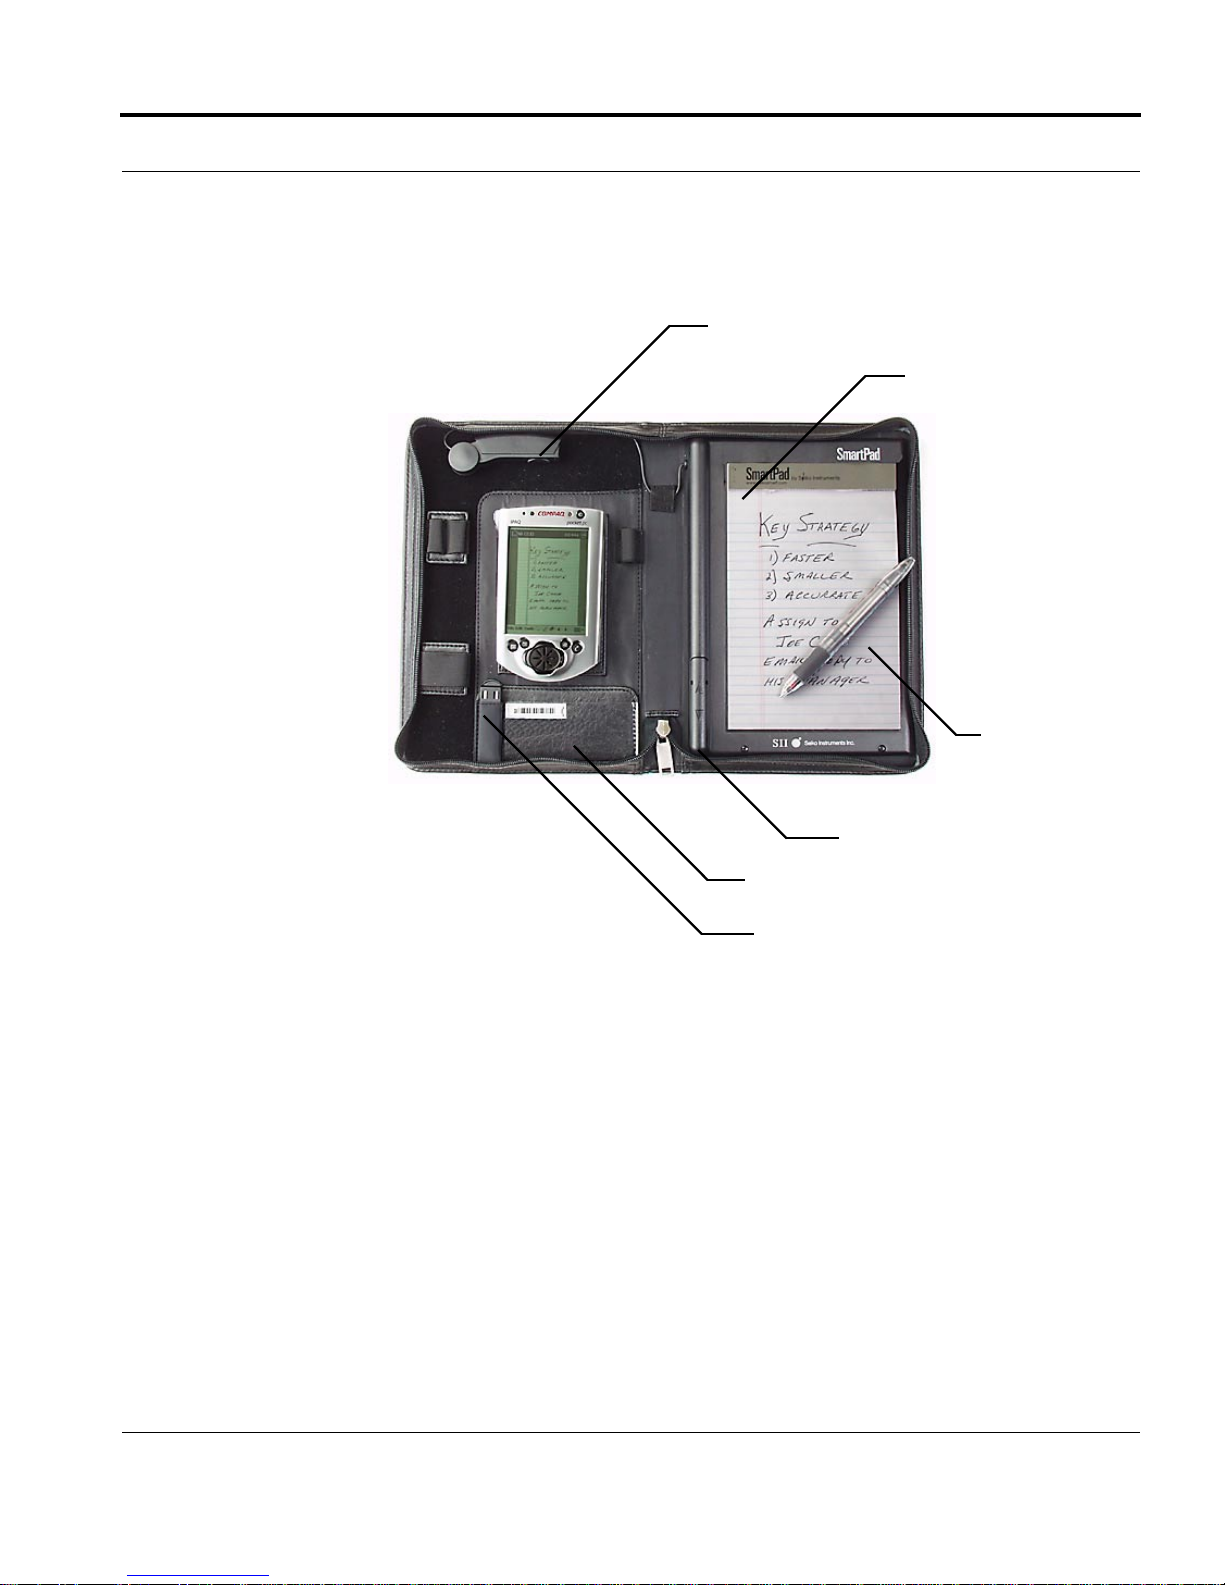
The following diagram points out the SmartPad features:
12 www.seikosmart.com
Page 13
Introducing SmartPad
Infrared transmitter
SmartPad tablet
SmartPad pen
Battery compartment
Business card holder
Ink cartridges
The features of the original SmartPad are quite similar. The main difference
is its infrared transceiver, which is fixed at the top of the handheld. Because
there is more room, the original SmartPad has an additional storage pocket.
Infrared Transceiver. The infrared transceiver communicates information
between SmartPad and the handheld. There must be a clear path between
this infrared transceiver and your handheld. Do not store items in the area
between the infrared transceiver and the handheld.
The infrared transceiver in SmartPad2 is on a rotating arm, which allows
you to set it up for handheld models with an infrared port on the left side as
well as for models with the infrared port at the top.
InkNote Manager by Seiko Instruments 13
Page 14

Introduction
SmartPad Pen. The special SmartPad pen is used for writing on the Note-
pad. The SmartPad pen contains a transmitter that communicates with the
SmartPad. The SmartPad pen uses ink cartridges and an AAAA battery that
can be easily replaced.
Notepad. The Notepad is a standard-sized paper pad. Replacements for this
pad are available from office supplies stores. Any standard paper pad of the
correct dimensions will work just fine with SmartPad.
Battery Compartment. The battery compartment contains the two standard
AAA batteries that power the SmartPad.
Business Card Holder. This pocket provides a convenient place to store busi-
ness cards.
Ink Cartridges. Your SmartPad uses the special SmartPad pen for writing on
the Notepad. This pocket contains spare ink cartridges for the SmartPad
pen.
SmartPad2 includes two sets of elastic loops for holding pens, phones, and
other small items. You can remove these loops and place them anywhere
along the top or left edge of the SmartPad (as long as you don’t block the
infrared transceiver).
The original SmartPad includes a storage pocket that can be used for anything that you want to carry along. Many users find it a convenient place for
a cell phone.
Introducing InkNote Manager
InkNote Manager is the software that communicates with InkLink and
SmartPad. It captures your handwritten notes and helps you to organize and
communicate them.
14 www.seikosmart.com
Page 15

Introducing InkNote Manager
InkNote Manager Software on your handheld
The InkNote Manager software installed on your handheld automatically
recognizes the data transmitted by InkLink or SmartPad, and instantly creates a new ink note. You can synch ink notes with your desktop, e-mail your
ink notes, or beam them to another portable device.
InkNote Manager Software on your Desktop Computer
When you synchronize your handheld with your desktop (or notebook)
computer, all of your ink notes are automatically copied to the computer and
saved for use by the desktop version of InkNote Manager. This software
allows you to view, print, edit, and e-mail your ink notes from your desktop
computer. Connect the InkLink Data Clip to your desktop and it captures
your handwriting.
InkNote Manager Works the Same on Both Computers
The InkNote Manager software on your desktop computer works just like
the InkNote Manager software on your handheld. When you learn how to
use one, you know how to use both. There are differences, of course (for
example, you can beam notes from one handheld to another), but where
they share the same capabilities, they work pretty much the same.
InkNote Manager Features
Once you have installed the InkNote Manager software, InkLink and SmartPad work instantly and automatically to transfer your handwritten notes into
your handheld or desktop computer. InkNote Manager features include:
Easy user interface. Just touch the pen to the pad, and you’re automatically
storing your handwritten data! Once you’ve captured the data, InkNote
Manager lets you organize it for easy retrieval, edit it, copy portions to documents in other applications, and send ink notes to others via e-mail or
beaming.
Multiple Pages. Each ink note can have any number of handwritten pages.
With the handheld you can view the contents of each page, and make additions and changes as necessary.
InkNote Manager by Seiko Instruments 15
Page 16

Introduction
Enlarged View. You can zoom to enlarge the view of the written notes on the
handheld, and pan to move the position of the image on the screen. You can
zoom up to 4x magnification to view the smallest details of your handwritten notes on the handheld.
Integrated Sleep. InkNote Manager’s sleep mode integrates with the hand-
held’s battery-saving features. When you use InkNote Manager’s Explorer
(its screen for displaying and organizing lists of ink notes), the standard
handheld power-management features control the system. A separate timer
that you set in InkNote Manager determines the shutoff time when you use
its Note Editor (its screen for recording and modifying handwritten data).
This gives you optimum power conservation without the system shutting off
during short breaks between writing. In Note Editor, after the screen blanks
you can wake the handheld simply by pressing the pen to the paper for a
moment, and you can continue taking notes. If you don’t use your InkLink
or SmartPad for a longer time (the setting you make in InkNote Manager),
the software turns off the infrared communications with the device and then
completely turns off your handheld. To resume, press the power button. (On
a Pocket PC, press the power button two times.)
Page 8
16 www.seikosmart.com
Page 17

Setting Up
This section explains how to install the InkNote Manager software on your
desktop computer and your handheld and how to set up your InkLink or
SmartPad.
• System Requirements
• Software Setup
• InkLink Setup
• InkLink Basics
• SmartPad Setup
• Starting InkNote Manager
System Requirements
InkLink and SmartPad have the same system requirements. You need the
following:
InkNote Manager by Seiko Instruments 17
Page 18

Setting Up
Desktop Computer
• Desktop or laptop computer with one of the following Microsoft operat-
ing systems:
• Windows 95 (optional serial cable required)
• Windows 98
• Windows 98SE
• Windows Me
• Windows NT Workstation 4.0 with SP6 or later
• Windows 2000
• Windows XP
• System requirements:
• 32 MB memory
• 16 MB hard disk space
• CD-ROM drive
• USB or Serial port
• One of the following Pocket PC handheld devices:
Pocket PC
To use InkLink with a Pocket PC, you need:
• Pocket PC handheld device with:
• Microsoft Windows CE 3.0, Pocket PC 2000, or later
• 1 MB available memory
• IrDA port
• ActiveSync 3.1 or later (version 3.5 recommended)
ActiveSync comes with a Pocket PC; you can download the latest version from Microsoft at www.microsoft.com/mobile/downloads/
18 www.seikosmart.com
Page 19

Software Setup
Palm OS PDA
To use InkLink with a Palm OS PDA, you need:
• Palm OS handheld device with:
• Palm OS version 3.1 or higher
• 1 MB available memory
• IrDA port
• HotSync Manager 3.0.1 or later
HotSync Manager is part of Palm Desktop and comes with a Palm OS
device; you can download the latest version from Palm at
www.palm.com/software/desktop/
Software Setup
Setting up the InkNote Manger requires only a few simple steps:
• Confirm that HotSync is working if you are using a Palm OS handheld
• Confirm that ActiveSync is working if you are using a Pocket PC hand-
held.
• Install the InkNote Manager software
Confirming that HotSync is Working
If you use a Palm OS handheld, Palm HotSync Manager (part of Palm
Desktop) must be installed prior to installing this software. InkNote Manager syncs information on the two computers by having HotSync move the
files back and forth. To confirm that HotSync is installed and running properly, do the following:
1. Put your Palm OS handheld in the cradle or connect the cable.
2. Press the HotSync button on the cradle or cable.
InkNote Manager by Seiko Instruments 19
Page 20

Setting Up
If HotSync is not installed on both computers (or you can’t get the devices
to synchronize), resolve the HotSync problem before proceeding with
InkNote Manager installation.
Confirming that ActiveSync is Working
If you use a Windows Pocket PC handheld, Microsoft ActiveSync (version
3.1 or later) must be installed prior to installing this software. InkNote Manager syncs information on the two computers by having ActiveSync move
the files back and forth. To confirm that ActiveSync is installed and running
properly, do either of the following:
• On the desktop computer, open the Start menu and choose Programs,
Microsoft ActiveSync. Connect the Pocket PC and computer (via cable
or infrared connection) and be sure that the display shows that the
devices are “Connected” and “Synchronized.” Be sure that Files is
selected for synchronization.
• On the Pocket PC, open the Start menu and choose Programs, Connec-
tions. Connect the Pocket PC and computer (via cable or infrared con-
nection), tap ActiveSync, and be sure the display shows that the devices
are “Connected, up-to-date.”
If ActiveSync is not installed on both computers (or you can’t get the
devices to synchronize), resolve the ActiveSync problem before proceeding
with InkNote Manager installation.
NOTE: You must configure ActiveSync to synchronize files. To be sure
ActiveSync is properly configured, on the desktop computer, open ActiveSync. Open the Too ls menu and choose Options. On the Sync Options tab,
select (put a check mark in) the Files check box.
Installing InkNote Manager Software
To install InkNote Manager:
1. Insert the software CD-ROM in your computer’s CD drive.
20 www.seikosmart.com
Page 21

Software Setup
2. If the setup program doesn’t begin running automatically, click Start,
Run. In the Run dialog box, type d:\setup (replace d with the drive letter
of your CD drive) and then click OK.
3. Follow the on-screen instructions.
4. If you have a previous version of InkNote Manager, the setup program
will uninstall it. Once it has been uninstalled, restart Setup by following
the procedure in Step 2.
5. On Palm handhelds, press the HotSync button to install the software. If
you have a previous version of InkNote Manager, HotSync again to sync
the ink notes.
6. On Pocket PC 2002 models only, do the following:
• On the Pocket PC, open the Start menu and tap Settings.
• Tap the Connections tab.
• Tap the Beam icon.
• Clear the Receiving check box.
This allows InkLink or SmartPad to access the handheld’s infrared port.
7. The first time you start InkNote Manager on your handheld you will be
asked to choose the pen hardware you are using; InkLink or SmartPad.
Tap your choice, then tap OK.
Setup Tips
• During setup you might be asked for the hardware serial number.
• On InkLink, the serial number is located on the bottom of the InkLink
data clip.
• On the original SmartPad, the serial number is under the paper writ-
ing pad, in the lower-left corner.
• On the SmartPad2, the serial number is under the paper writing pad,
in the upper-right corner.
• The first part of the serial number might already be displayed in the
form. Be sure you don’t repeat the first few characters.
• You might be asked for a software purchase code during setup.
InkNote Manager by Seiko Instruments 21
Page 22

Setting Up
• If you purchased an InkLink Handwriting System, and have entered
the hardware serial number correctly, you should not see this prompt.
Click Back and correct the hardware serial number.
• If you have a SmartPad that came with InkNote Manager software,
and you have entered the hardware serial number correctly, you
should not see this prompt. Click Back and correct the hardware
serial number.
• If you have a SmartPad that originally supported Palm OS handhelds,
and did not include InkNote Manager software, you must purchase an
upgrade. Go to www.seikosmart.com to get a software purchase code.
• If you have previously purchased an upgrade to InkNote Manager,
enter the software purchase code you received when you purchased
the upgrade.
• If you are going to use your InkLink with a handheld, be sure to check
the appropriate box so setup will install the handheld version of InkNote
Manager.
• On Windows NT, 2000, or XP, you must have administrative rights to
install the software.
• If you get an error during setup, disable your anti-virus program and run
setup again.
See Also
“SmartPad Setup” on page 32
InkLink Setup
Setting up InkLink requires only a few simple steps:
• Check that you received all the components
• Install the IrDA transceiver battery
• Install the InkLink pen cartridge
22 www.seikosmart.com
Page 23

InkLink Setup
• Install the InkLink pen batteries
• Connect the data clip
Product Box Contents
The shipping box for the InkLink should contain the following items:
• InkLink data clip
• InkLink electronic pen
• IrDA transceiver
• USB Cable
• InkLink carrying case
• Three silver oxide SR41 button batteries for InkLink pen
• One 1.5 volt alkaline AAA battery for the IrDA transceiver
• Ink cartridge for InkLink pen
• Quick Start Guide
• InkNote Manager software on CD-ROM
If any of these items is missing, contact the reseller where you purchased
the InkLink.
Keep your InkLink away from small children. There are small parts that
could present a choking hazard.
There is an optional serial cable available for connecting to desktop computers without USB ports. It can be purchased at www.seikosmart.com.
Installing the IrDA Transceiver Battery
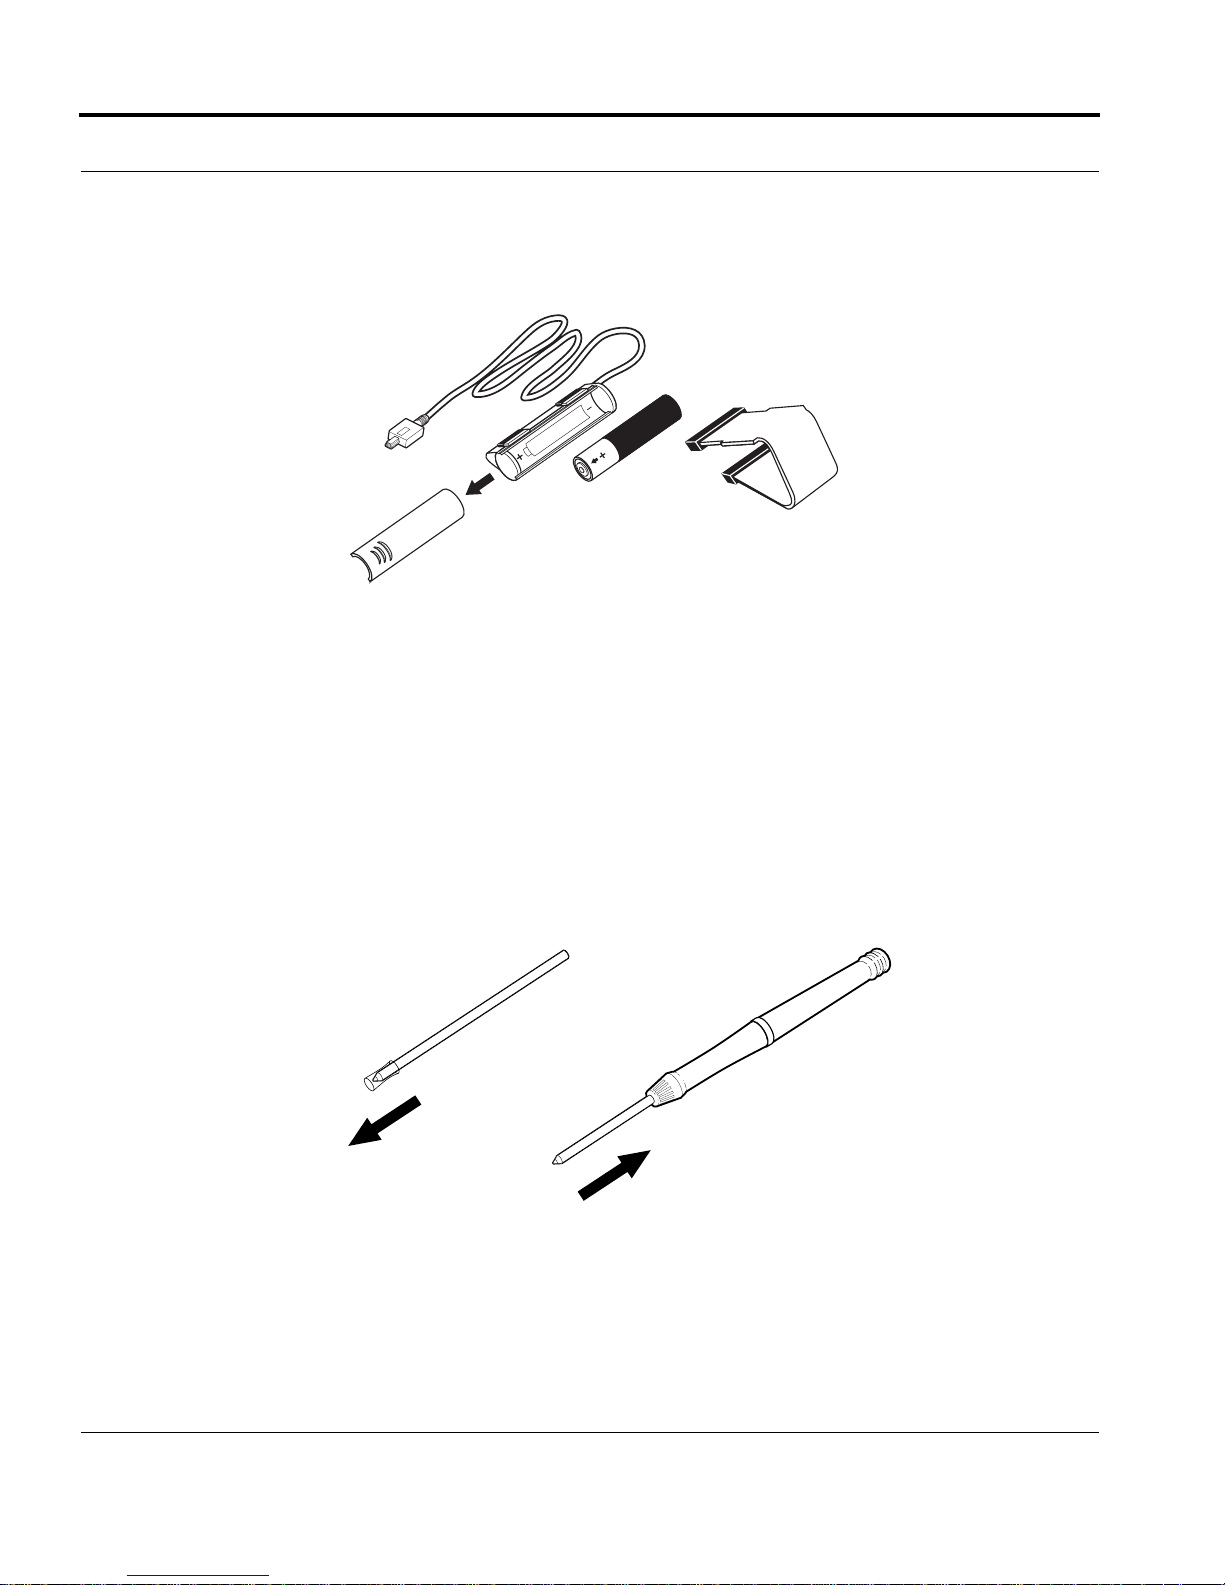
The InkLink data clip is powered by a single AAA battery in the IrDA
transceiver. (When connected to a desktop, it is powered via the cable.) To
install the battery:
1. Remove the clip by sliding it away from the battery case.
InkNote Manager by Seiko Instruments 23
Page 24
Setting Up
2. Slide the battery cover away from the cable to remove the cover.
3. Insert the battery into the battery compartment. Be sure the positive (+)
end of the battery points away from the cable.
4. Replace the battery cover and slide it into place.
5. Replace the clip.
Install the InkLink Pen Ink Cartridge
The InkLink pen uses a Staedtler 930 series ball point pen refill that is
widely available at office supply stores. One cartridge is furnished in the
InkLink case.
To install the ink cartridge:
1. Remove the protective plastic sleeve from the point of the cartridge.
2. Place the fresh ink cartridge into the end of the InkLink pen.
24 www.seikosmart.com
Page 25
InkLink Setup
3. Press the tip of the pen onto a hard surface until the cartridge won’t go in
any further.
Do not attempt to disassemble or “unscrew” the body of your InkLink pen.
The pen body is sealed and cannot be opened without damaging the electronics.
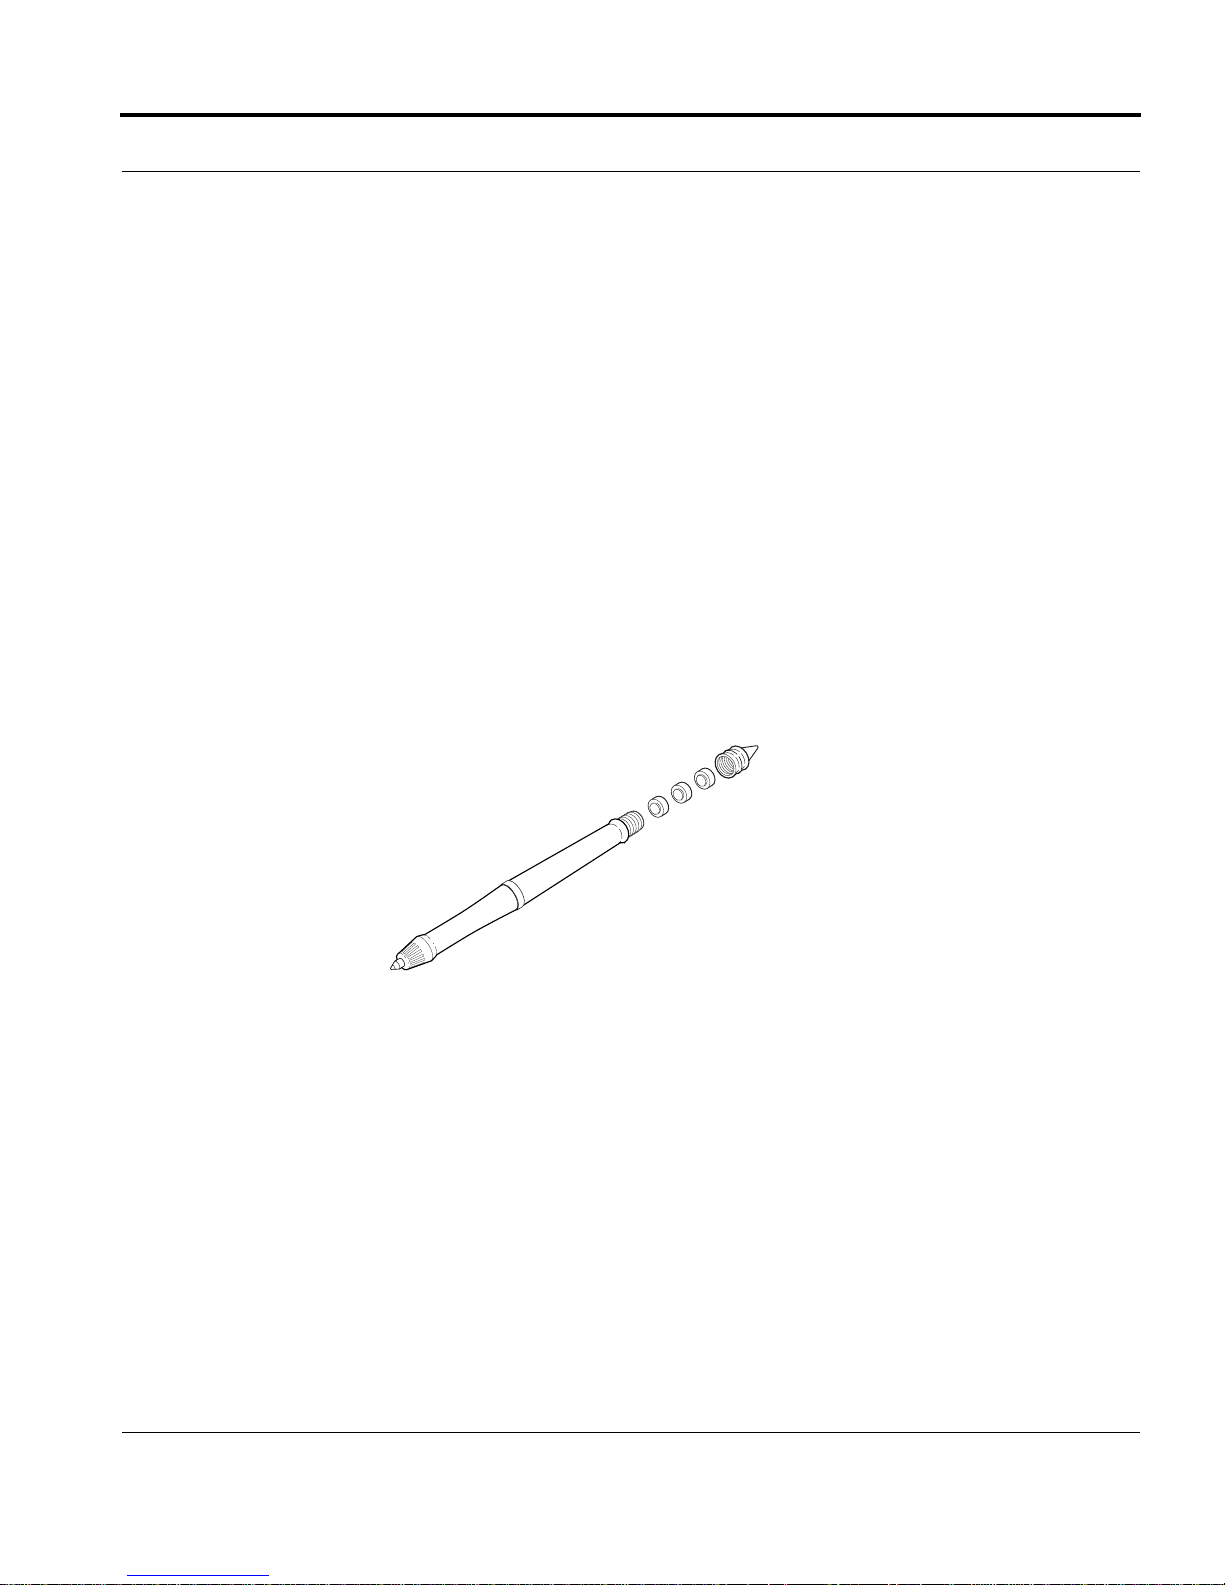
Installing InkLink Pen Batteries
The InkLink pen is powered by three SR41 batteries. With regular use of
your InkLink, these batteries should power the InkLink pen for several
months.
To install the batteries:
1. Unscrew the battery cap from the top of the pen.
2. Insert fresh SR41 batteries. The positive (+) end of the batteries should
3. Screw the battery cap back on the pen.
Attaching the InkLink Data Clip
The InkNote Manager data clip attaches to any notepad or paper. The
default position is on the top at the left edge, but you can clip the data clip
on any side of the page that you like.
Clip the data clip on the whole pad. While you can use the data clip on a single sheet of paper, it clamps more securely on multiple sheets. If the data
clip slips, and changes its position on the page, it will affect your results.
InkNote Manager by Seiko Instruments 25
all be facing up.
Page 26
Setting Up
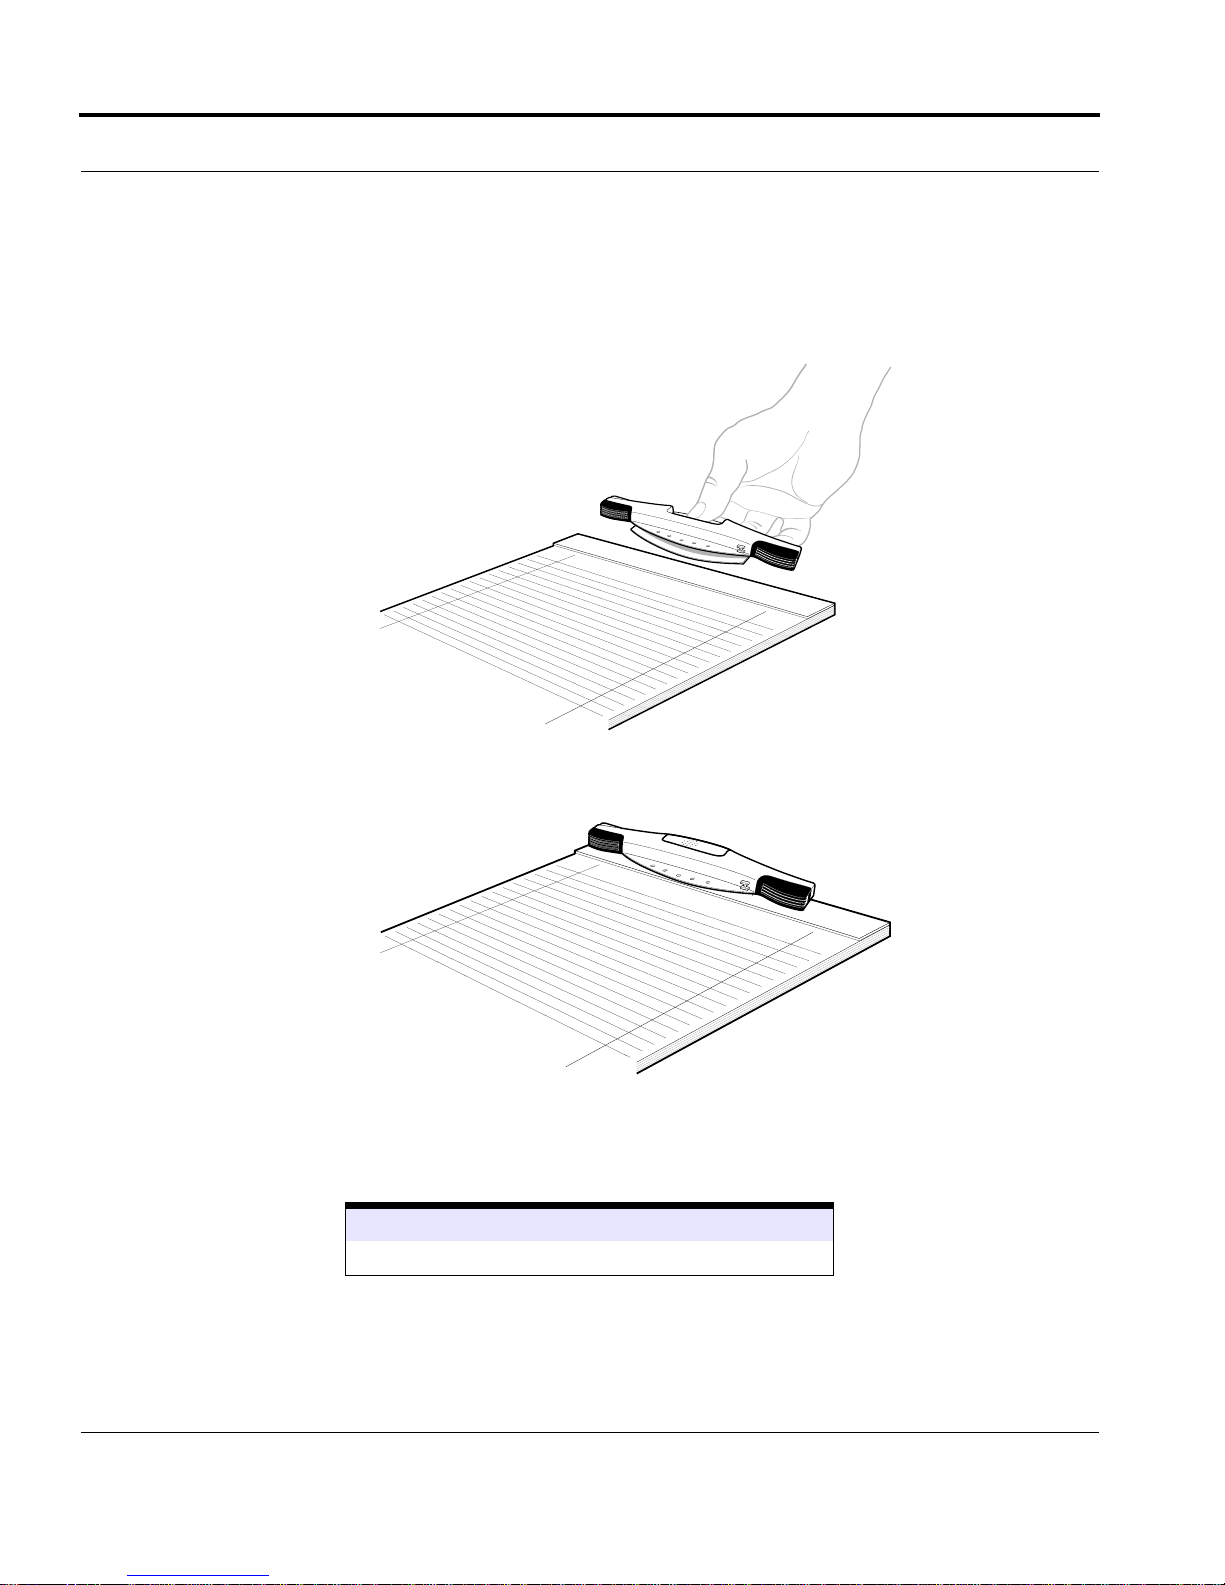
To attach the InkLink data clip:
1. Pinch the button on the back of the data clip between your thumb and
first finger.
2. Place the data clip clamp over the edge of your pad, align the left sides,
and release it.
Aligning the data clip with the left edge of the paper makes it easy to put it
in the same place every time.
See Also
“Defining a Paper Size” on page 49
26 www.seikosmart.com
Page 27
InkLink Setup
Connecting to a Handheld
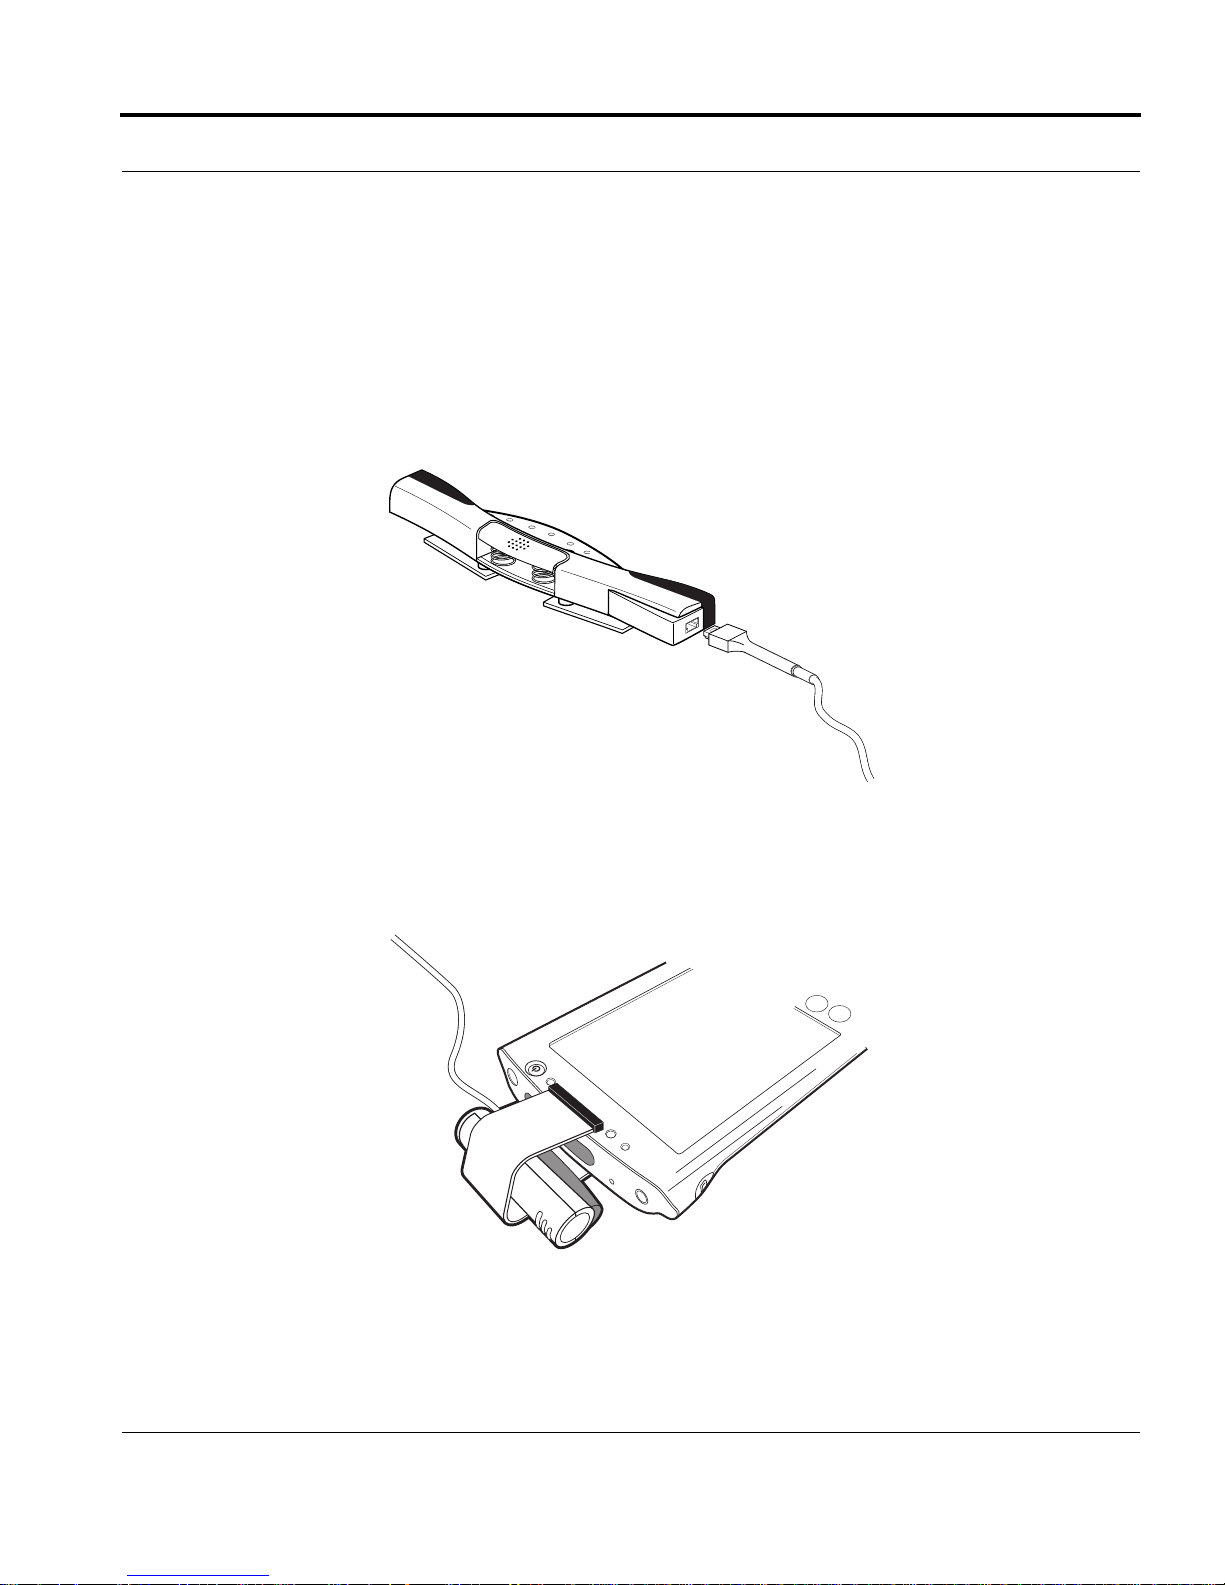
Use the IrDA transceiver to connect the InkLink data clip to a handheld
device. To connect the IrDA transceiver:
1. Connect the cable on the IrDA transceiver to the connector on the left
end of the data clip.
2. Place the IrDA transceiver on the edge of your handheld over the IrDA
port. The positioning is flexible; it doesn’t need to be tight against the
port.
InkNote Manager by Seiko Instruments 27
Page 28
Setting Up
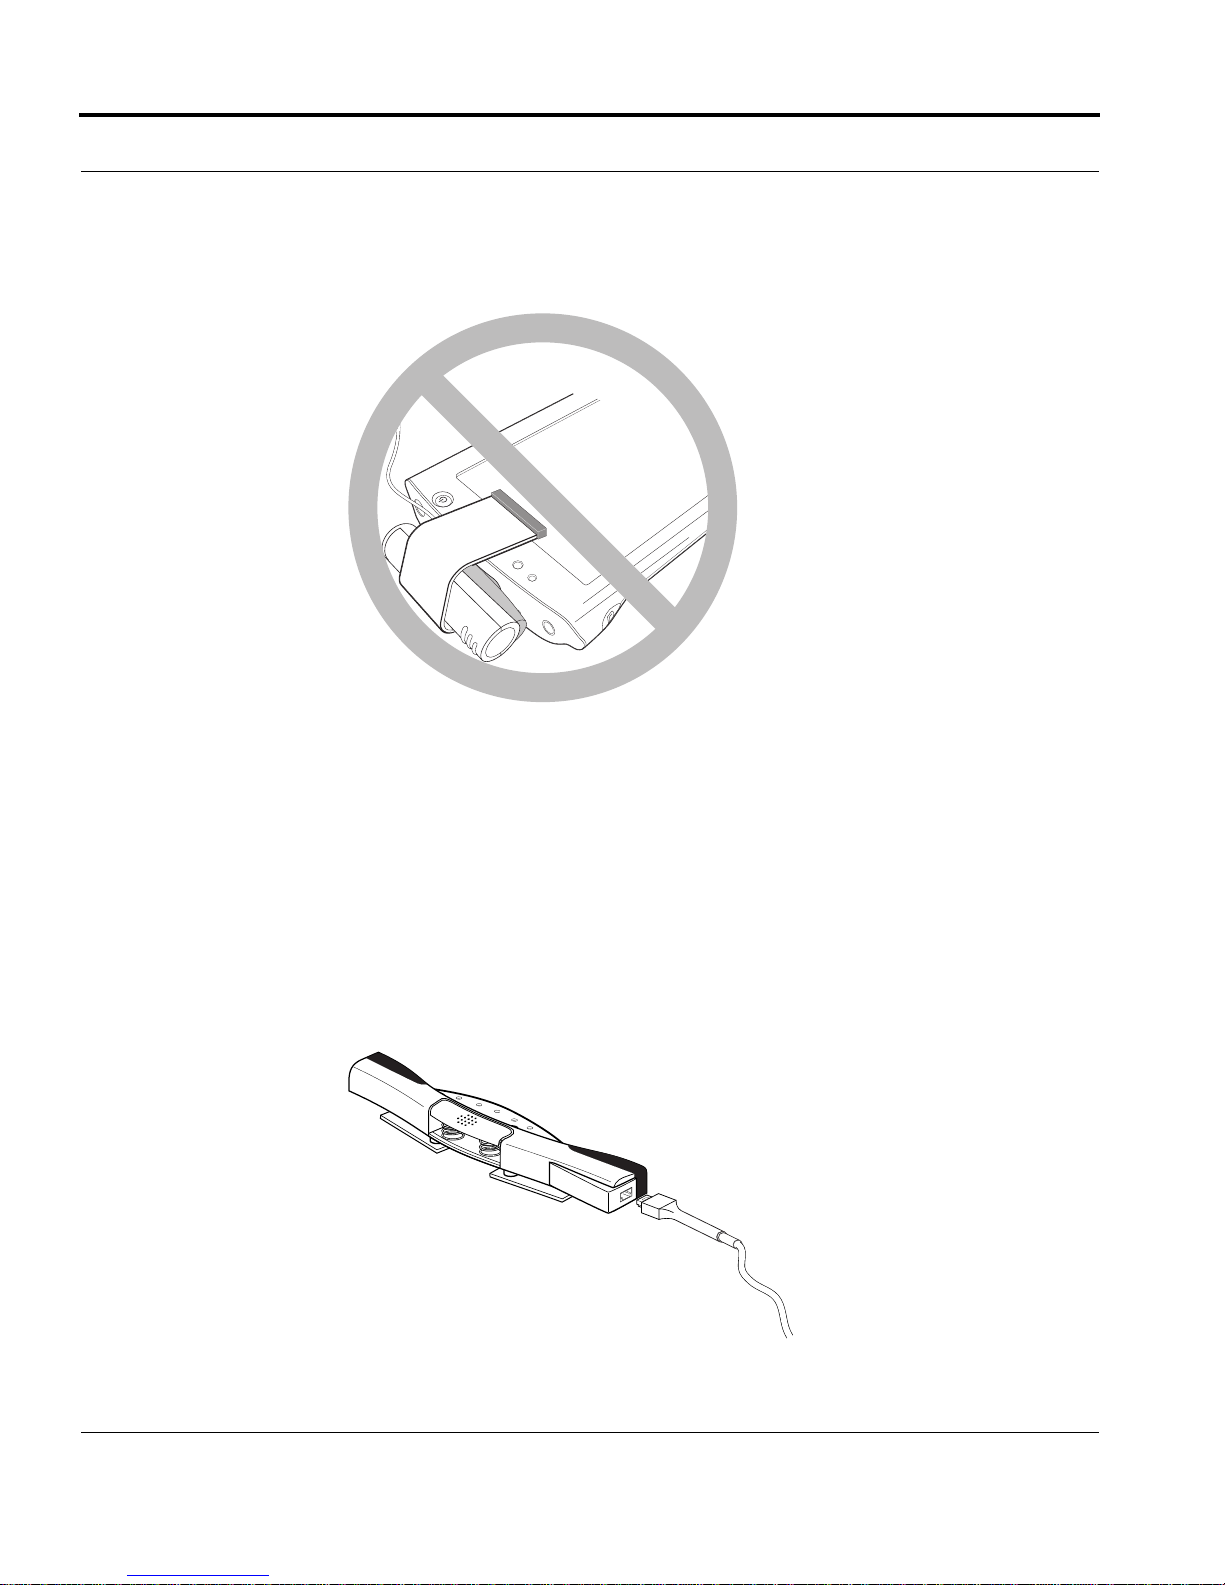
Note: Be sure the end of the clip is not touching the screen.
If you don’t know where the infrared port is on your handheld, check your
user’s guide.
Connecting to a desktop
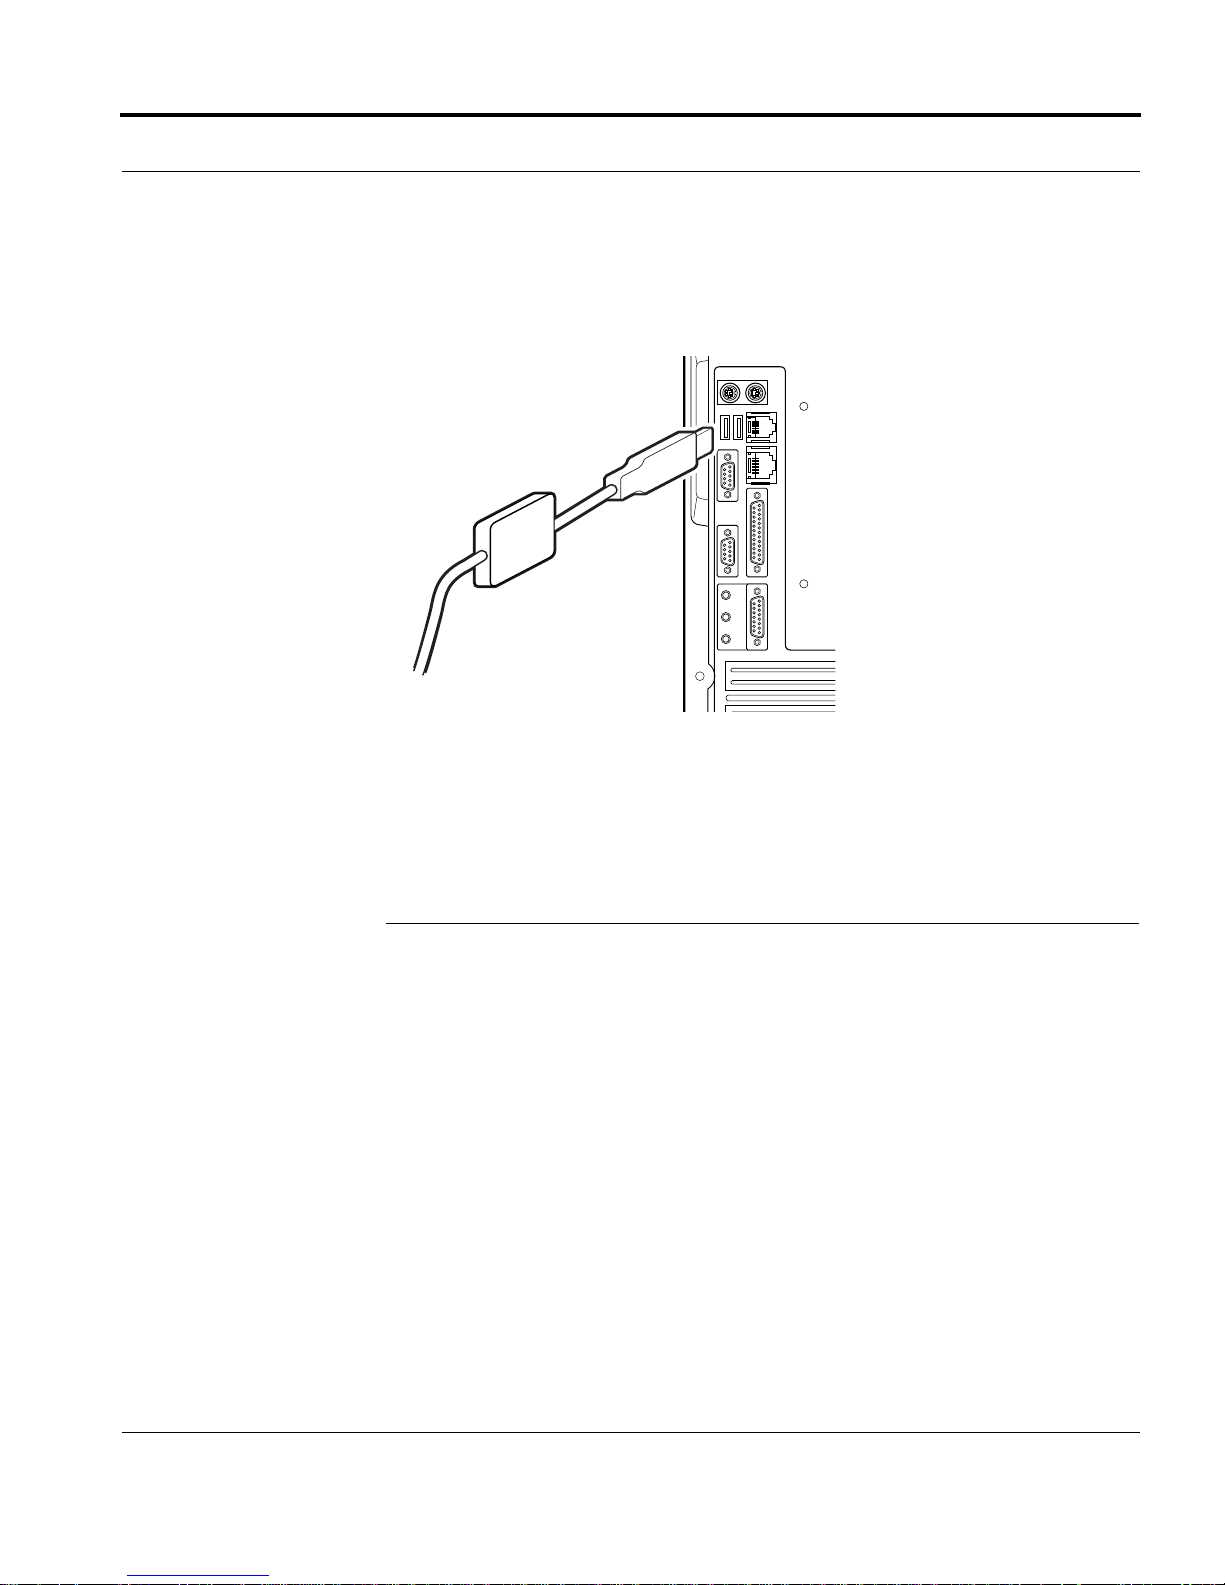
Use the InkLink USB cable, or optional InkLink serial cable, to connect the
InkLink data clip to a desktop or notebook computer. To connect the cable:
1. Connect the small connector on the cable to the connector on the left end
of the data clip.
28 www.seikosmart.com
Page 29
InkLink Basics
2. Connect the other end of the cable to the appropriate port on the desktop
or notebook computer.
USB cables can be connected and disconnected when your computer is running. You should turn your computer off before connecting or disconnecting
a serial cable.
InkLink Basics
• Using the InkLink pen
• Placing InkLink in the carrying case
Using the InkLink Pen
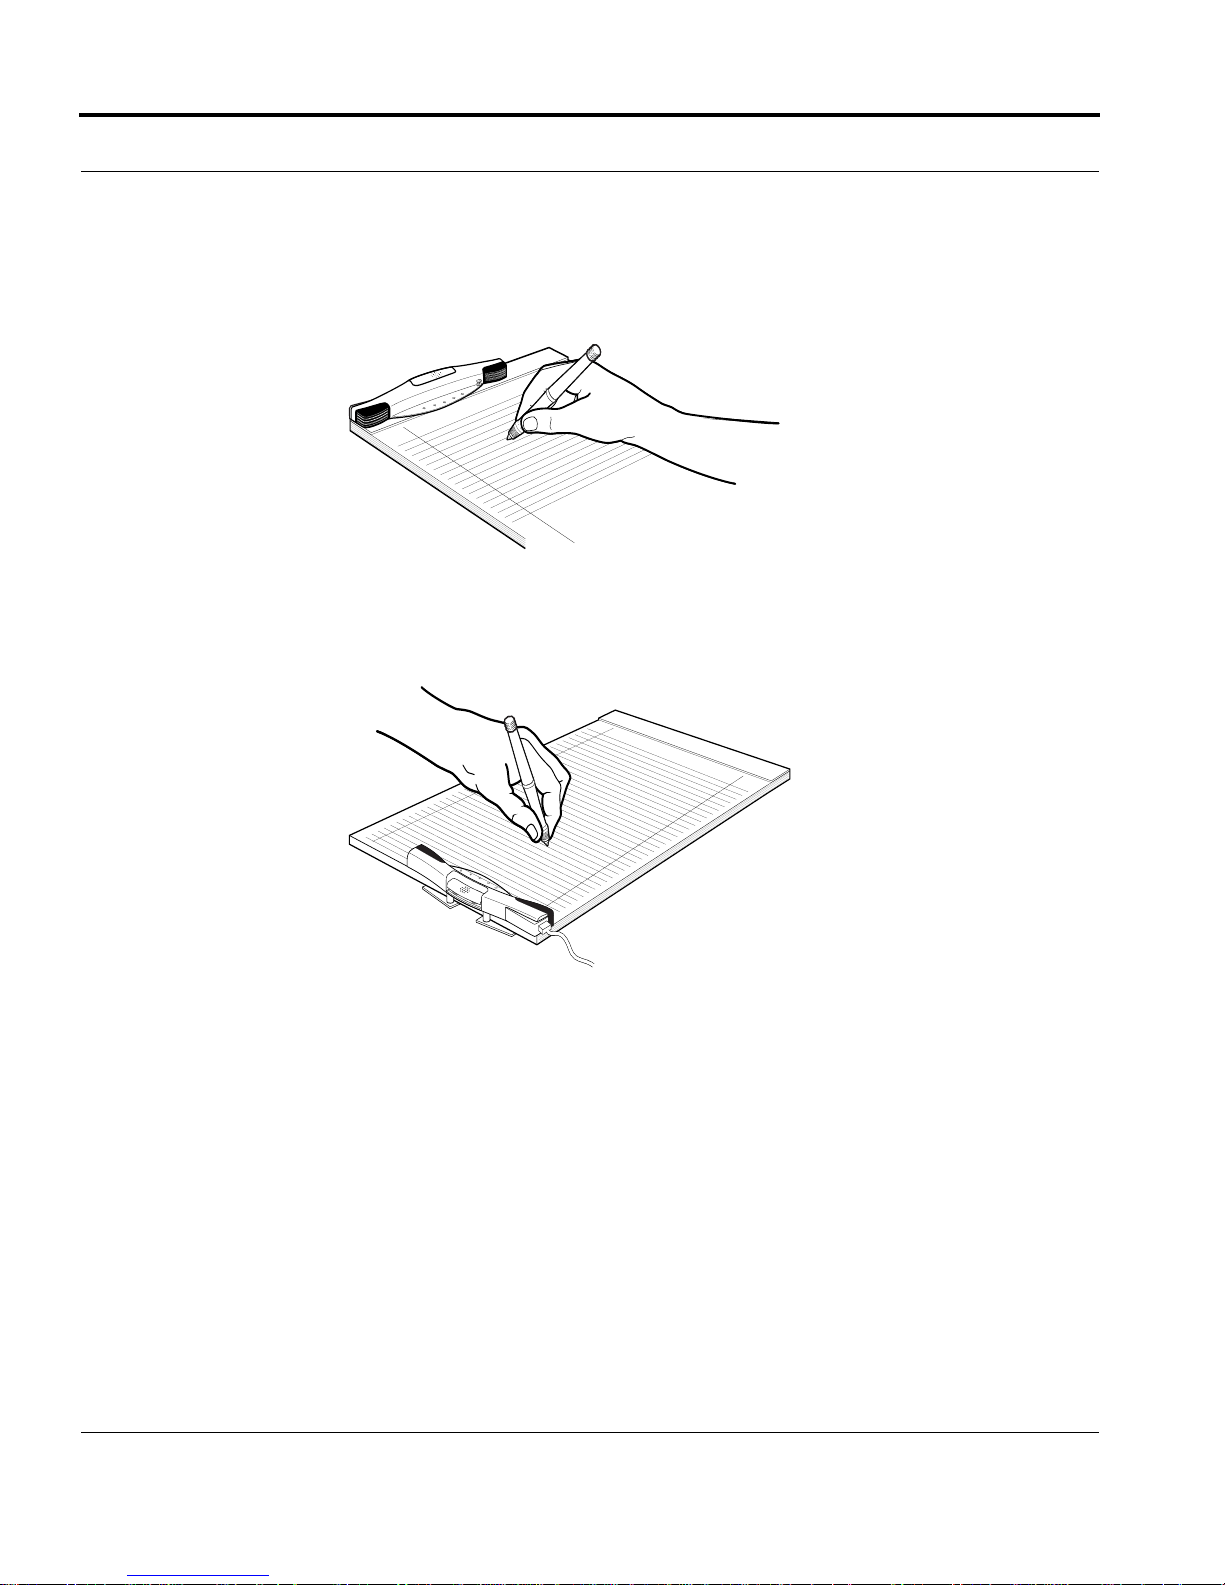
The InkLink pen communicates continuously with the data clip. For best
results:
• Keep your pen at a constant angle while you write.
• Write with even pressure on the pen.
• Leave a half inch margin next to the data clip (leave one inch when it is
clipped to the long side of the page).
InkNote Manager by Seiko Instruments 29
Page 30
Setting Up
The InkLink pen needs an unobstructed view of both ends of the data clip to
operate correctly.
If your writing style obstructs this view, try placing the data clip on a different edge of the paper.
30 www.seikosmart.com
Page 31
InkLink Basics
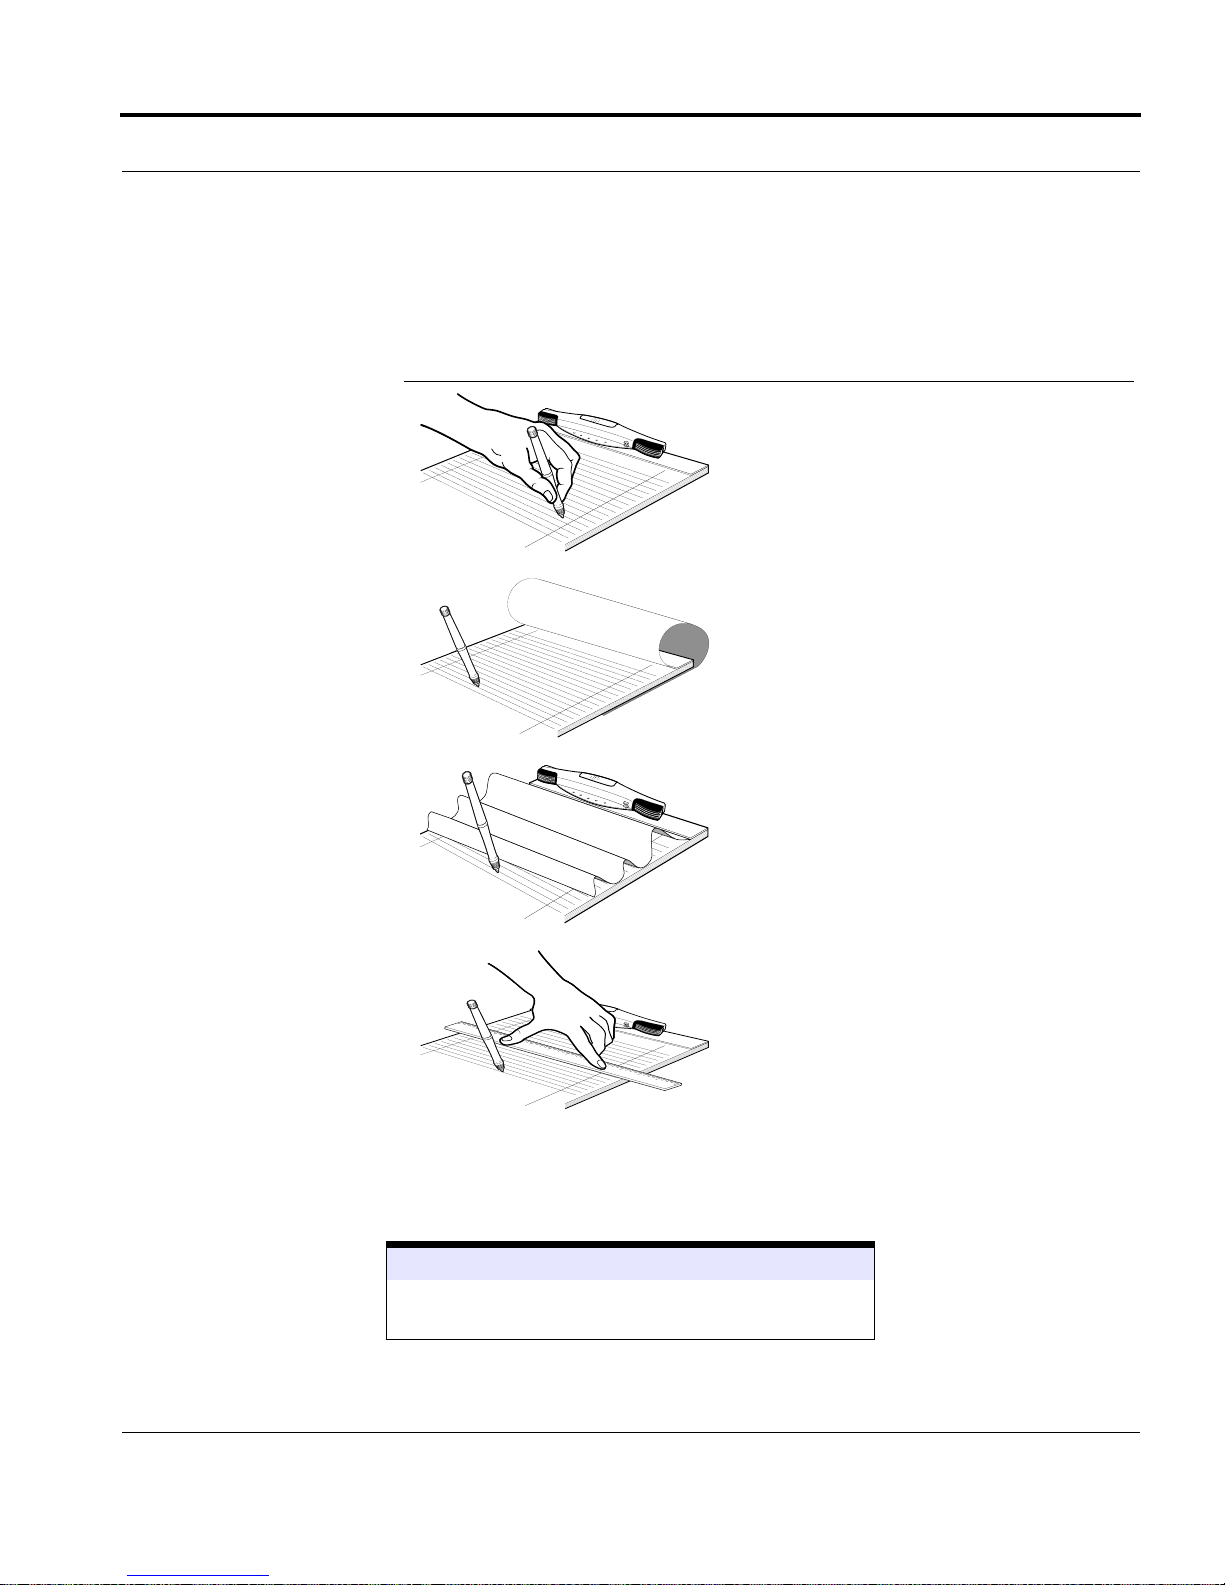
Here are examples of a few other things that might block the data clip’s
view of the pen and prevent the data clip from recording your handwriting
or drawing properly:
Placing an obstruction (such as a
hand) between the pen and the data
clip. If you write with your hand
above the pen, put the data clip on a
side or the bottom of the pad.
Flipping a sheet over the data clip to
write on a sheet below.
Lifting a sheet of paper to write on the
bottom edge or the sheet below, or
bending the writing pad or paper so
the raised center of the sheet blocks
the view.
Holding a ruler between the data clip
and the pen. When the data clip is at
0
1
2
3
4
5
6
7
8
9
10
11
12
the top of the pad, draw lines on the
top edge of the ruler.
Don’t put the InkLink pen in your mouth. It won’t work correctly if it is
wet.
See Also
“InkLink ink notes do not match paper notes” on
page 113
InkNote Manager by Seiko Instruments 31
Page 32
Setting Up
Placing InkLink in the Carrying Case
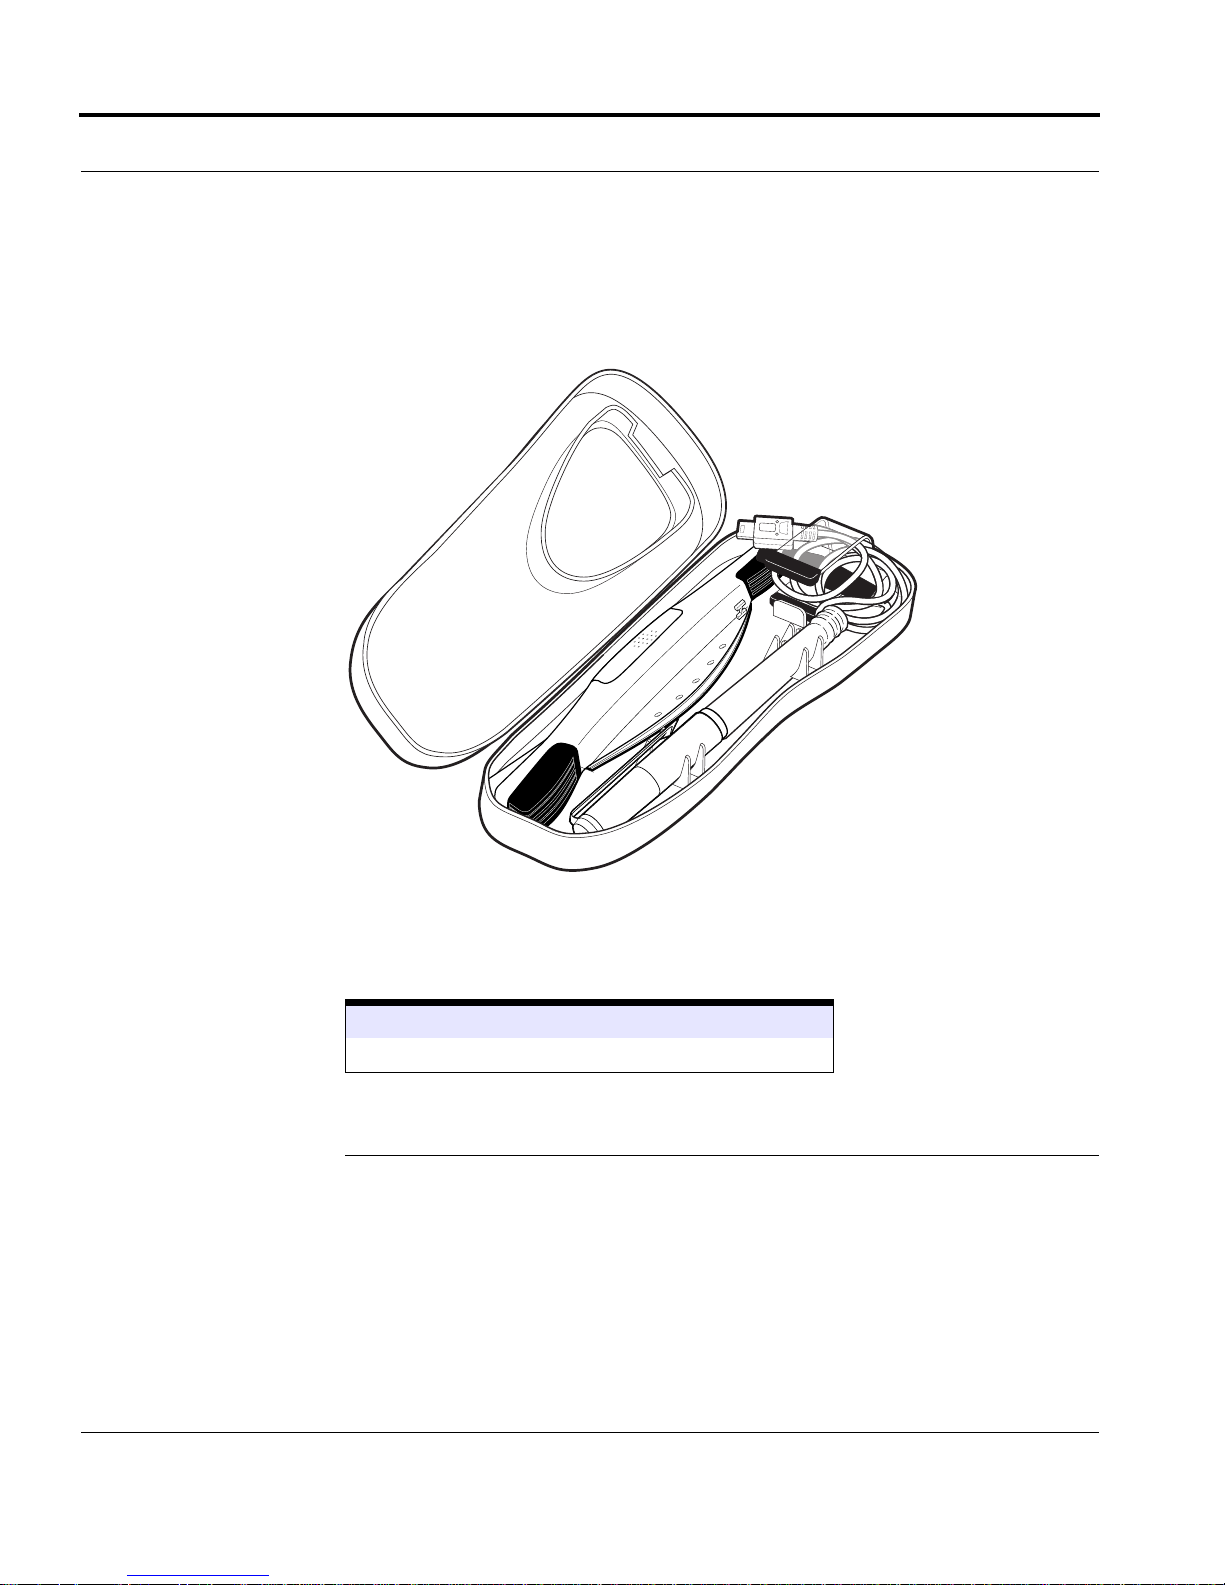
All the InkLink components you need to use InkLink with a handheld fit in
the carrying case for transport.
An easy way to stow the IrDA cable is to place the plug in the IrDA transceiver’s clip, and then coil the cable and place it in the clip.
See Also
“Starting InkNote Manager” on page 36
SmartPad Setup
Setting up the SmartPad requires only a few simple steps:
• Check that you received all the components
• Install the SmartPad portfolio batteries
32 www.seikosmart.com
Page 33

SmartPad Setup
• Attach your handheld to the SmartPad portfolio
Product Box Contents
The shipping box for the SmartPad should contain the following items:
• SmartPad portfolio (with paper tablet installed)
• SmartPad pen (with AAAA battery and ink cartridge installed)
• SmartPad pen refill cartridges (in a holder with a cartridge-replacement
tool)
• Two AAA batteries for the SmartPad portfolio
• Two self-adhesive hook-and-loop strips
• Quick Start Guide
• InkNote Manager software on CD-ROM
If any of these items is missing, contact the reseller where you purchased
the SmartPad.
Installing the SmartPad Portfolio Batteries
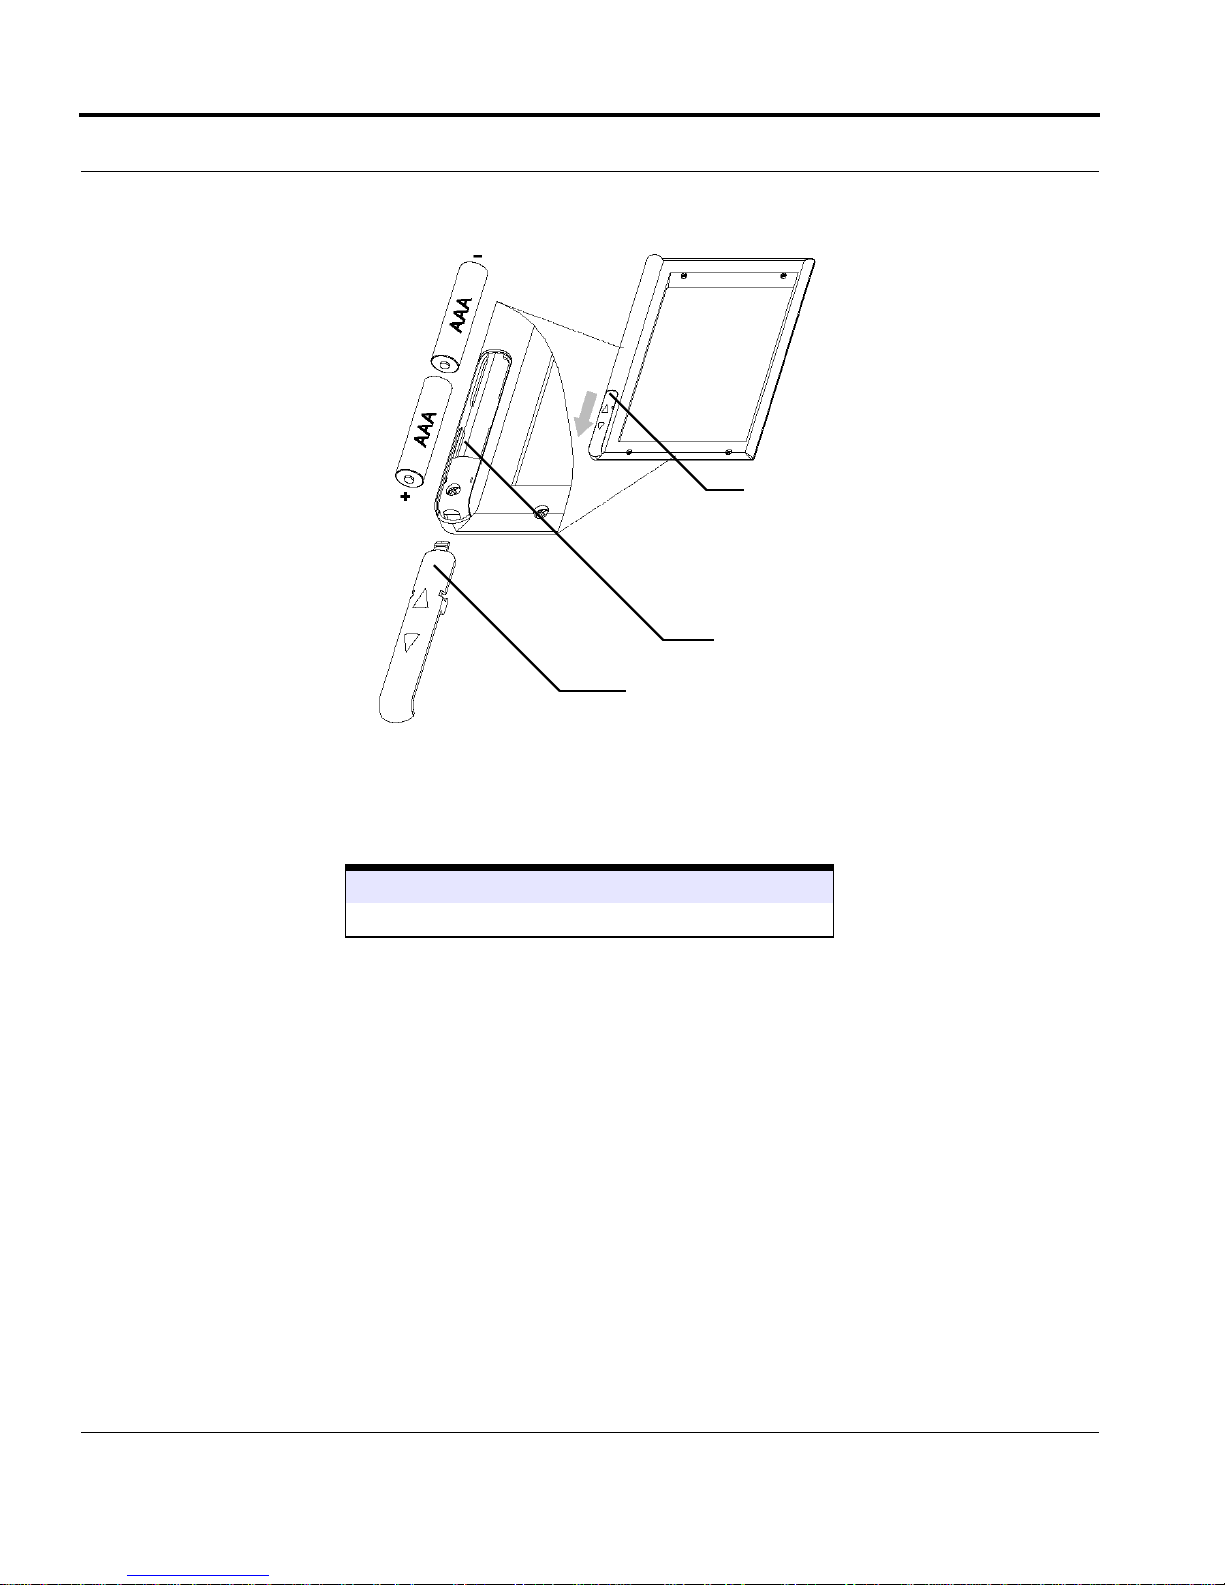
The SmartPad portfolio is powered by two AAA batteries. To install the
batteries in the SmartPad portfolio:
1. Press down on the top edge of the battery cover and then slide the cover
toward the bottom of the portfolio to remove the cover.
InkNote Manager by Seiko Instruments 33
Page 34
Setting Up
Press down
here and slide
to remove
Battery compartment
Cover removed
2. Insert the batteries into the battery compartment. Be sure the positive (+)
end of both batteries points toward the bottom of the portfolio.
3. Replace the battery cover and slide it into place.
See Also
“Replacing the SmartPad Pen Battery” on page 101
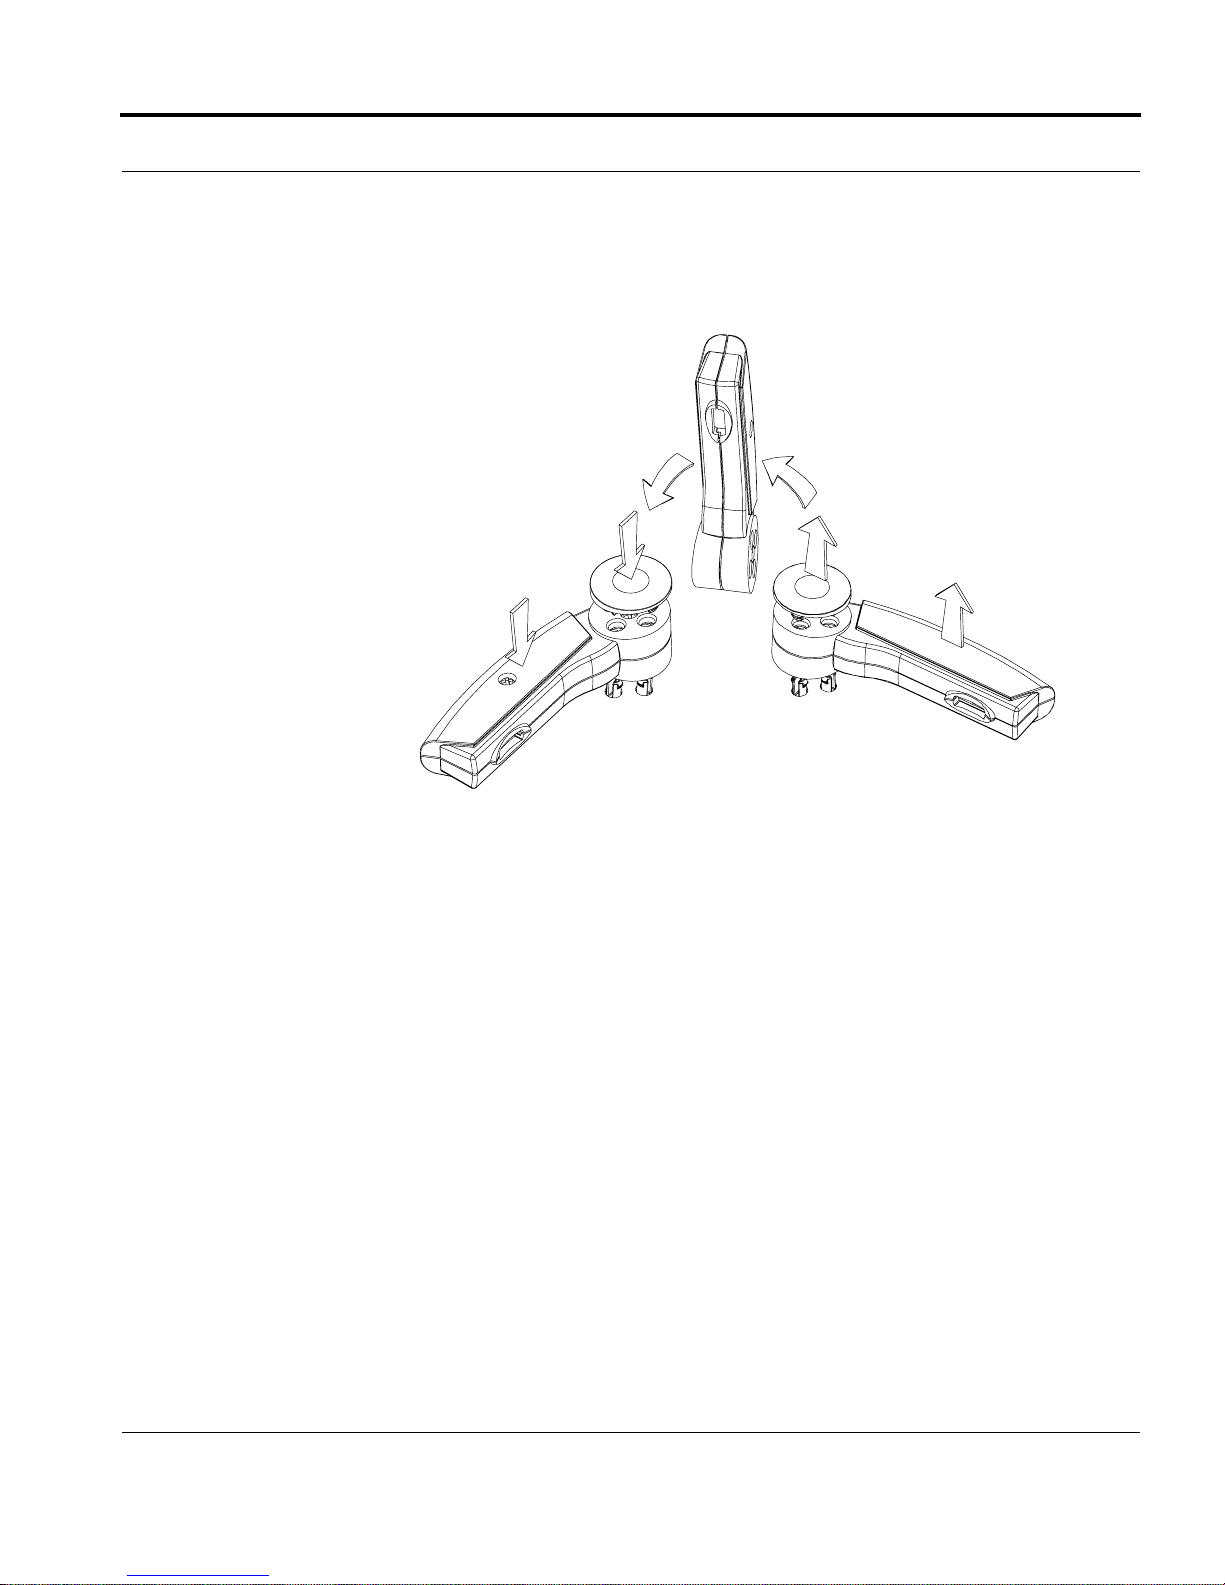
Repositioning the Infrared Transceiver
As shipped, SmartPad2 is set to work with handhelds that have the infrared
port located on the top edge of the handheld. (The original SmartPad works
only with such handhelds.) On some handhelds, the infrared port is located
on the left side. To use SmartPad2 with handhelds that have an infrared port
on the left side, you must reposition SmartPad’s infrared transceiver. To
reposition the transceiver:
1. Pull to remove the round cap on the transceiver.
2. With the round cap removed, pull straight up to remove the arm of the
infrared transceiver from the snap retainers of the SmartPad portfolio. Be
34 www.seikosmart.com
Page 35
SmartPad Setup
aware that a wire connects this arm to the SmartPad portfolio—take care
not to pull on the wire as you remove the arm of the infrared transceiver.
3. Turn the infrared transceiver arm over, and press it down firmly until it
“snaps” into place in the new position in the SmartPad portfolio.
4. You may need to gently feed the wire of the infrared transceiver arm into
the cover of the SmartPad portfolio. Be careful! You want the infrared
arm to be seated firmly and securely into the SmartPad portfolio.
5. Replace the round cap to secure the arm of the infrared transceiver.
Attaching Your handheld
Your handheld must be placed in the designated area of the SmartPad portfolio so the infrared ports of the two devices can communicate properly.
Two self-adhesive strips of hook-and-loop material keep the handheld
securely in place.
The hook-and-loop material provides an extremely aggressive bond. That’s
terrific if you plan to leave your handheld in the SmartPad portfolio nearly
all the time. But if you expect to frequently remove and replace the handheld from the portfolio, we suggest you use only half of the self-adhesive
loop material, as follows:
InkNote Manager by Seiko Instruments 35
Page 36
Setting Up
1. Without separating the backing strips, remove the two loop strips from
the portfolio’s hook strips to which they’re attached.
2. Cut one of the strips in half lengthwise. Save the other strip for future
use.
3. Replace the two half strips on the portfolio’s matching hook material.
4. Continue with the following procedure.
To attach the handheld:
1. Remove the backing from the self-adhesive strips in the SmartPad port-
folio.
2. Place the handheld on the strips, centering it on the pad area to which the
hook-and-loop strips are attached.
3. Press firmly to adhere the strip to your handheld.
4. Remove your handheld from the SmartPad, turn the handheld over, and
press the loop strips so that they’re securely, permanently adhered.
Starting InkNote Manager
Once InkLink or SmartPad is assembled, it’s time to start the InkNote Manager software.
36 www.seikosmart.com
Page 37

Starting InkNote Manager
• Starting InkNote Manager on a Pocket PC
• Starting InkNote Manager on a Palm
• Starting InkNote Manager on a desktop computer
• Selecting a handheld as a Partner
Starting InkNote Manager on a Pocket PC
After your handheld is connected, you should run InkNote Manager on the
handheld. This establishes communication between the handheld and the
device. To start InkNote Manager:
1. Tap the Start menu and choose InkNote Manager.
2. Write on the tablet with the pen. An ink note will appear on the Pocket
PC’s screen.
If an ink note does not appear, follow the procedure detailed in the topic
below.
See Also
“Testing the handheld and InkLink or SmartPad” on
page 110
Starting InkNote Manager on a Palm OS handheld
After your Palm handheld is connected, you should run InkNote Manager
on the handheld. This establishes communication between the handheld and
the device. To start InkNote Manager:
1. Tap the Home icon.
2. Tap the InkNote Manager icon.
3. Write on the tablet with the pen. An ink note will appear on the hand-
held’s screen.
InkNote Manager by Seiko Instruments 37
Page 38

Setting Up
If an ink note does not appear, follow the procedure detailed in the topic
below.
See Also
“Testing the handheld and InkLink or SmartPad” on
page 110
Starting InkNote Manager on a Desktop computer with InkLink
After your desktop computer is connected, you should run InkNote Manager on the desktop computer. This establishes communication between the
desktop and the InkLink data clip. To start InkNote Manager:
1. On your desktop computer, double-click the InkNote Manager icon on
the desktop. (Alternatively, open the Start menu and choose Programs,
InkNote Manager, Run InkNote Manager.)
2. In InkNote Manager, open the Setup menu and choose Tablet Proper-
ties.
3. From Available Ports, choose the port to which you connected the
InkLink cable. Click OK.
InkNote Manager remembers this setting. You only need to do this once.
4. Write on the InkLink tablet with the InkLink pen. An ink note will
appear on the screen.
If an ink note does not appear, follow the procedure detailed in the topic
below.
See Also
“Testing the handheld and InkLink or SmartPad” on
page 110
Selecting a handheld as a Partner
If you have only one handheld that you synchronize with your desktop computer, you’re all set and you can skip this step.
38 www.seikosmart.com
Page 39

Starting InkNote Manager
If you have set up partnerships with more than one handheld, however, you
must select the one that you’ll use with InkNote Manager. To select a partner device:
1. On your desktop computer, double-click the InkNote Manager icon on
the desktop. (Alternatively, open the Start menu and choose Programs,
InkNote Manager, Run InkNote Manager.)
2. In InkNote Manager, open the Setup menu and choose Select Sync
partner.
3. Select the name of your handheld from the list and then click OK.
InkNote Manager thereafter uses as a default storage location for ink notes,
a folder that is synchronized between your desktop and handheld computers.
See Also
“Using InkNote Manager with Multiple handheld
Devices” on page 95
InkNote Manager by Seiko Instruments 39
Page 40

Setting Up
40 www.seikosmart.com
Page 41

Getting Started
InkNote Manager has two basic views:
• Explorer is a file manager that lists the ink notes you have created. It’s
the launch point for creating new ink notes, and it provides various methods for finding existing ink notes.
• Note Editor displays a page of an ink note, and enables you to view,
modify, and work with an ink note in various ways.
This section provides an introduction to the two views, and also explains
how to obtain help.
Explorer
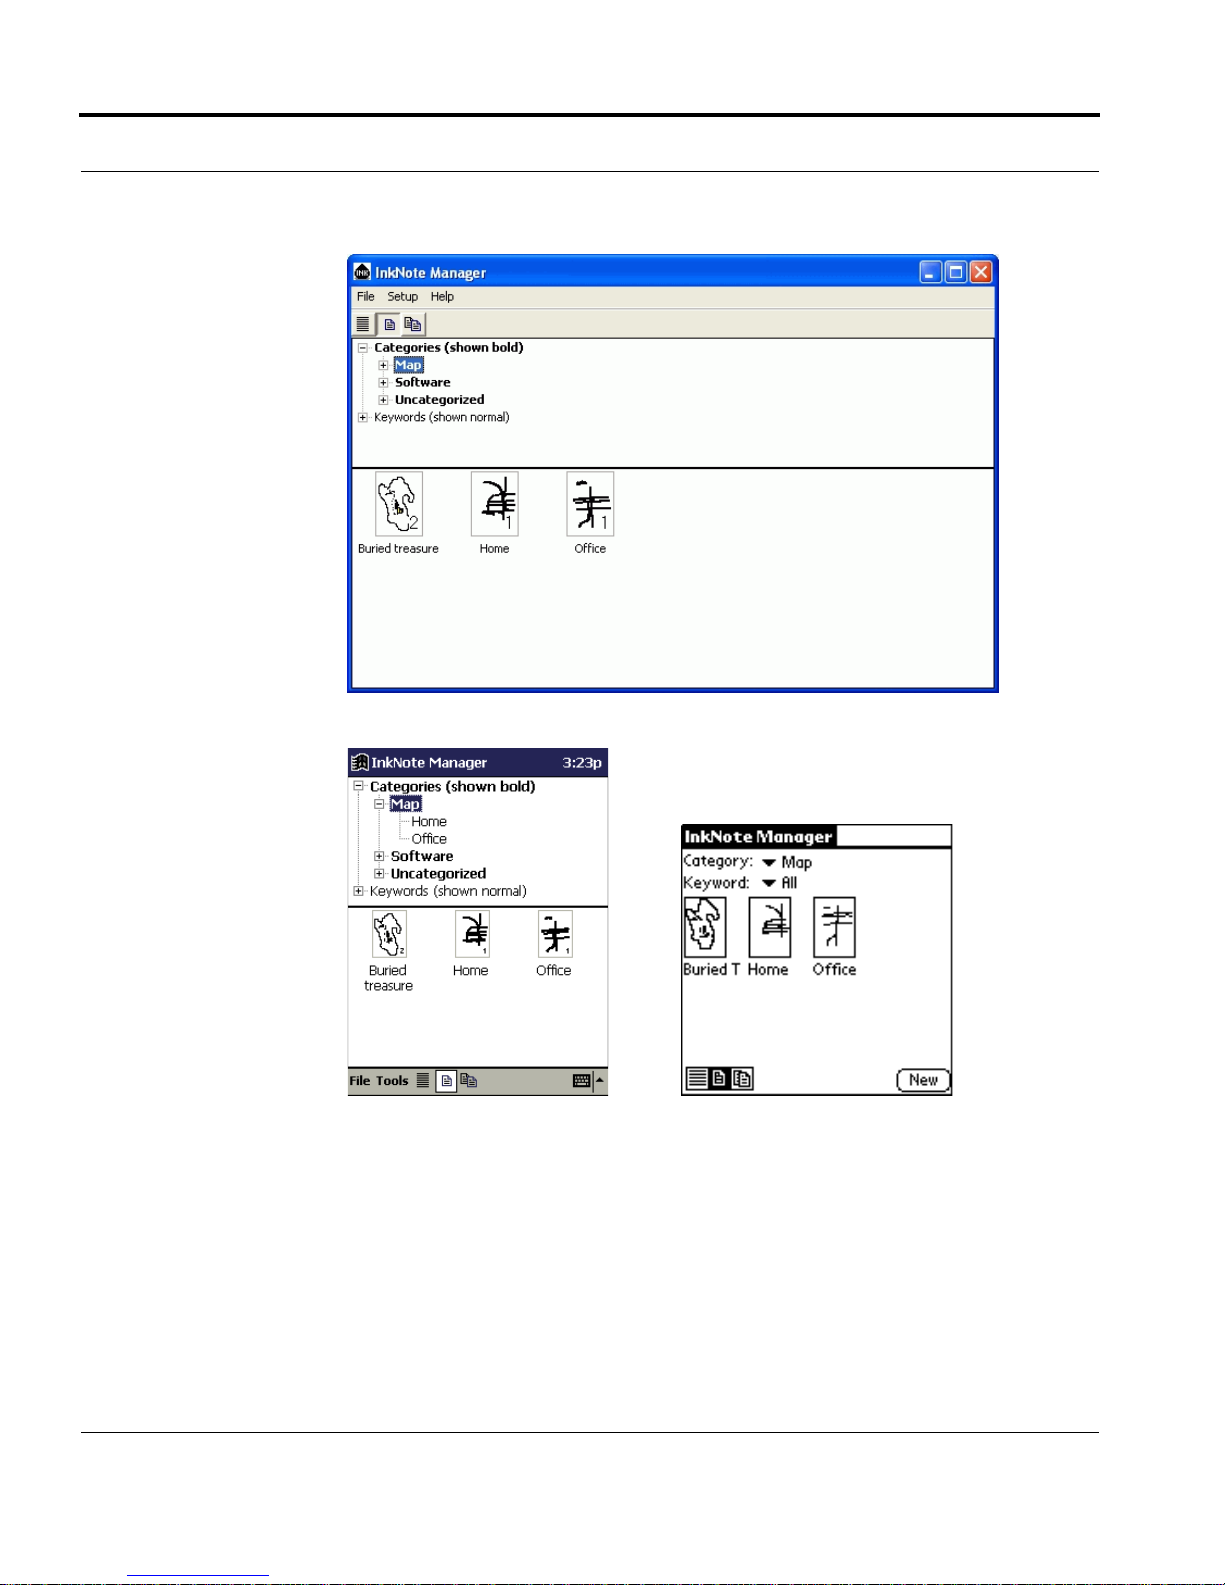
When you start InkNote Manager, it initially displays its Explorer, the tool
that allows you to organize and retrieve your ink notes. The Explorer in the
desktop version of InkNote Manager is nearly identical to that of the handheld versions.
InkNote Manager by Seiko Instruments 41
Page 42
Getting Started
Desktop
Pocket PC Palm
Explorer automatically manages all ink notes that you create with InkNote
Manager. In Explorer, you use the top part of the window to select a category or keyword. (You can assign categories and keywords to each ink
note.) The bottom part of the window displays all the ink notes with the category or keyword you select.
42 www.seikosmart.com
Page 43

Note Editor
When you find the ink note you want, tap or double-click its name or icon;
it then opens in Note Editor.
See Also
“Creating an Ink Note” on page 50
“Finding an Ink Note in Explorer” on page 57
“Changing Explorer Views” on page 58
“Setting Up Categories” on page 62
Note Editor
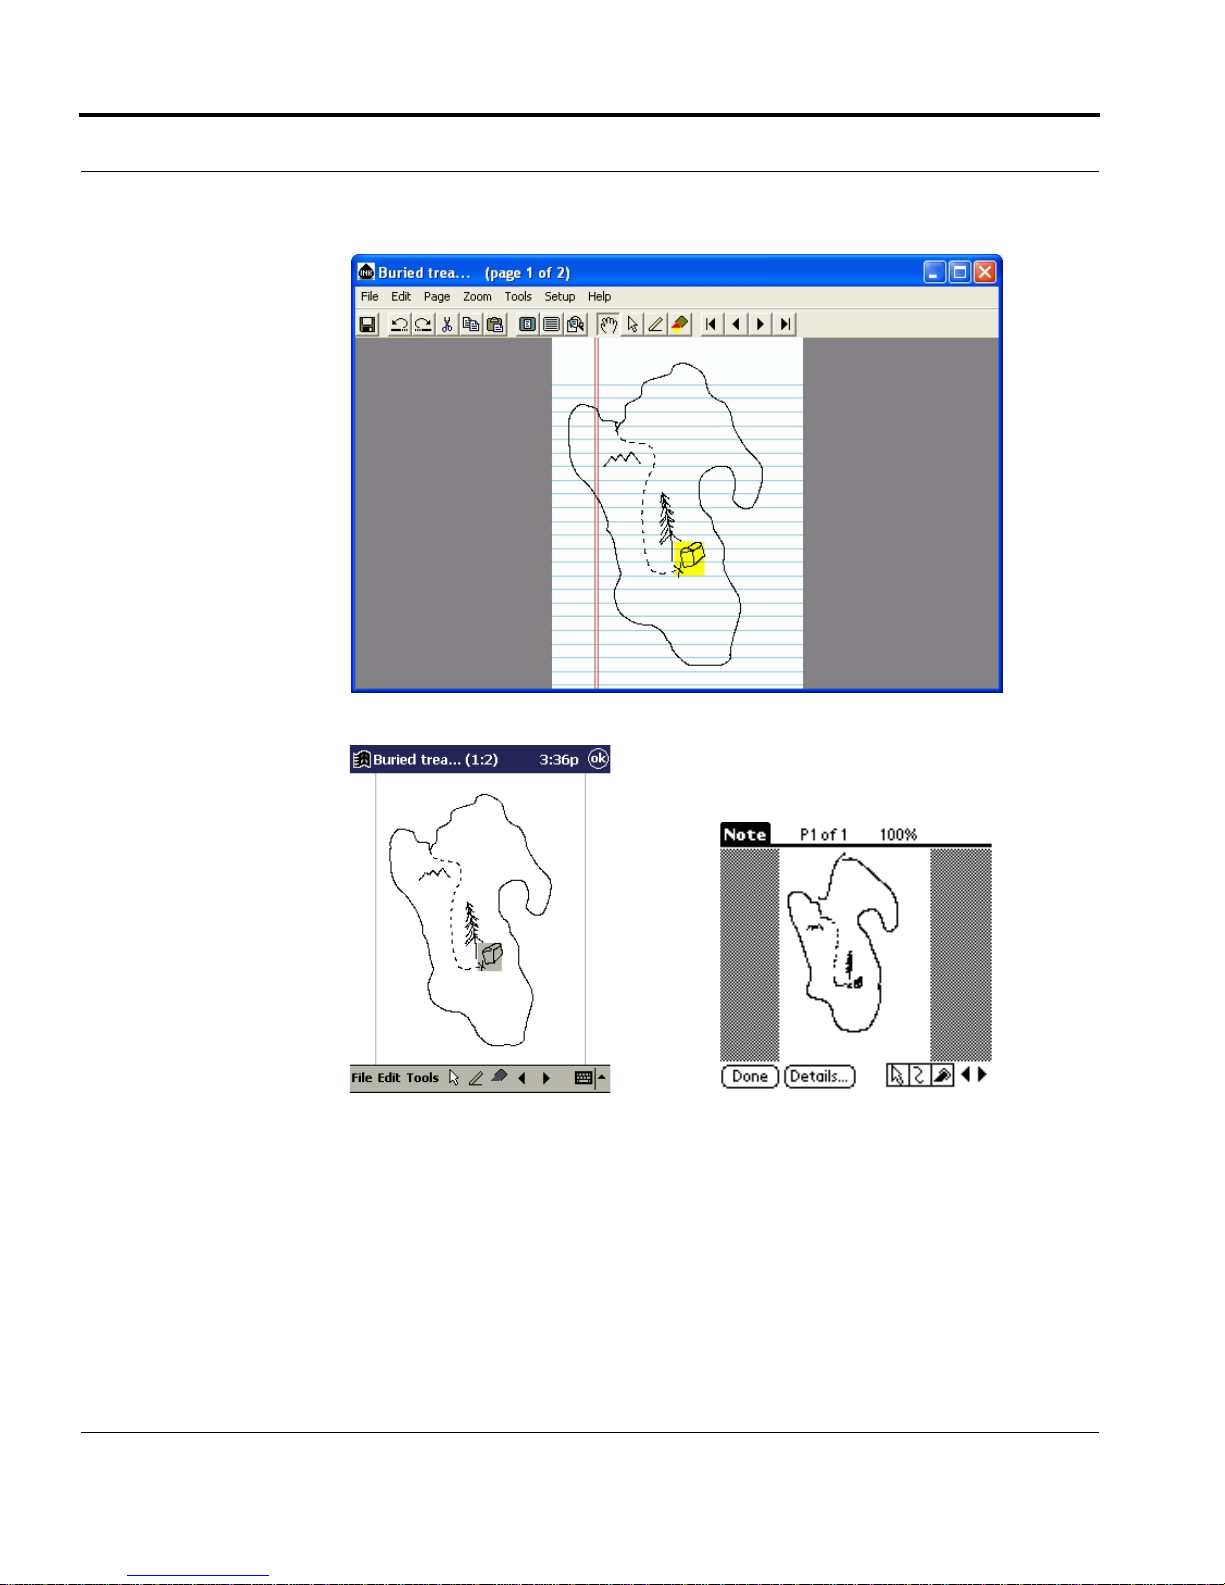
Note Editor appears when you create a new ink note and when you open an
existing one. It mirrors the information that you write on the notepad, and it
also provides tools for modifying ink notes.
InkNote Manager by Seiko Instruments 43
Page 44
Getting Started
Desktop
Pocket PC
Palm
You switch to Note Editor by opening an ink note in Explorer. InkNote
Manager also switches from Explorer to Note Editor automatically when
you begin writing on the notepad.
44 www.seikosmart.com
Page 45

Help
To return to Explorer, in Note Editor tap OK, or Done, or open the File
menu and choose Exit.
See Also
“Creating Ink Notes” on page 47
“Editing Ink Notes” on page 65
Help
In addition to the Quick Start Guide, several online resources are available:
• The User’s Guide is an Acrobat PDF document that contains detailed
information about the hardware and the InkNote Manager software.
• Online help for the desktop version of InkNote Manager contains
detailed information about using the software on your desktop computer.
• Online help for the Pocket PC version of InkNote Manager contains
information you might need while away from your desktop computer,
including detailed procedures for using the software on your Pocket PC
and for replacing the batteries and ink cartridges.
• Online help for the Palm version of InkNote Manager contains tips and
troubleshooting information that you might need while away from your
desktop computer.
• The Web site for Seiko Instruments (www.seikosmart.com) provides
answers to frequently asked questions, software updates, replacement
parts and supplies, and other support information.
Getting Help
To view the User’s Guide on your desktop computer:
• Open the Start menu and choose Programs, Seiko InkNote Manager,
View User Guide. (To view the User’s Guide, you must have Adobe
Acrobat Reader installed on your computer. You can install it from the
CD, or you can download it from www.adobe.com
.)
InkNote Manager by Seiko Instruments 45
Page 46

Getting Started
To view online help for the desktop version of InkNote Manager, do either
of the following:
• Open the Help menu and choose Help Contents.
• Press F1.
To view online help for the Pocket PC version of InkNote Manager, do
either of the following:
• Open the Start menu and choose Help.
• Open the File menu and choose Help.
To view online help for the Palm version of InkNote Manager, do either of
the following:
• Open the File menu and choose Help.
• Open the Note menu and choose Help.
46 www.seikosmart.com
Page 47

Creating Ink Notes
The documents you create and manage with InkNote Manager are called ink
notes. In this section, we explain how to:
• Select a paper size
• Define a paper size
• Create an ink note
• Add a page to an ink note
• Save an ink note
• Delete an ink note
• Export an ink note for use with another program
• Close Note Editor
InkNote Manager by Seiko Instruments 47
Page 48

Creating Ink Notes
Ink Notes
Ink notes are document files used by InkNote Manager; they’re an electronic representation of the images you create using the ink pen provided
with your device. An ink note can contain multiple pages.
Ink notes can contain ink (lines) that you create using the ink pen, the stylus
provided with your handheld, or a mouse or other pointing device connected to your desktop computer. Ink notes can also contain highlights (colored rectangles) that you can use to emphasize certain areas in much the
same way you’d use a yellow highlighter pen. Ink and highlights can be created in any of seven colors.
See Also
“Working with Ink Notes” on page 66
Selecting a Paper Size
InkNote Manager needs to know what size the page is on which you are
writing. Selecting a paper size tells the software what size the page is as
well as where the data clip is placed in relation to the page.
To set the paper size:
1. In Explorer, open the Setup menu and choose Preferences.
2. In Default note size, choose the paper size you want to use.
The pre-defined paper sizes assume that the data clip is placed on the top
edge of the paper and aligned with the left edge of the page. If you prefer to
use a size of paper that is not listed, or to place the data clip in a different
position, you need to re-define the paper size to suit your needs.
See Also
“Defining a Paper Size” on page 49
48 www.seikosmart.com
Page 49

Ink Notes
Defining a Paper Size
If you use the default paper size (Letter for US, A4 for Europe) and place
the data clip in the default position (top edge, left-aligned), then InkNote
Manager automatically knows the paper size and orientation. Just start writing.
If you prefer to place the data clip in a position different from on the top
edge, left-aligned, then you need to re-define a paper size to suit your use.
You can place the data clip on any edge of the page, and use paper up to
legal size (8-1/2” x 14”) in portrait and up to letter size (11” x 8-1/2”) in
landscape. Use this procedure to tell InkNote Manager how big the page is,
and where the data clip is placed. All it takes is two taps of the pen.
The paper sizes listed in InkNote manager are simply labels for the paper
size definitions. You can redefine any listed size to any size of paper. There
are two items in the list that are designed for use with your special sizes of
paper: Custom 1 and Custom 2.
• If you are putting the data clip on the short edge of the page, we recom-
mend you place it at the corner. This makes it easy to put the data clip in
the same position on another page.
• If you are putting the data clip on the long edge of the paper, we recom-
mend you place it in the center. This ensures that the InkLink will produce the best results over the entire page.
To define a paper size:
1. Place the data clip in the position in which you are going to use it on the
page.
2. In Explorer, open the Setup menu and choose Paper Size.
3. Choose the paper size that you want to re-define.
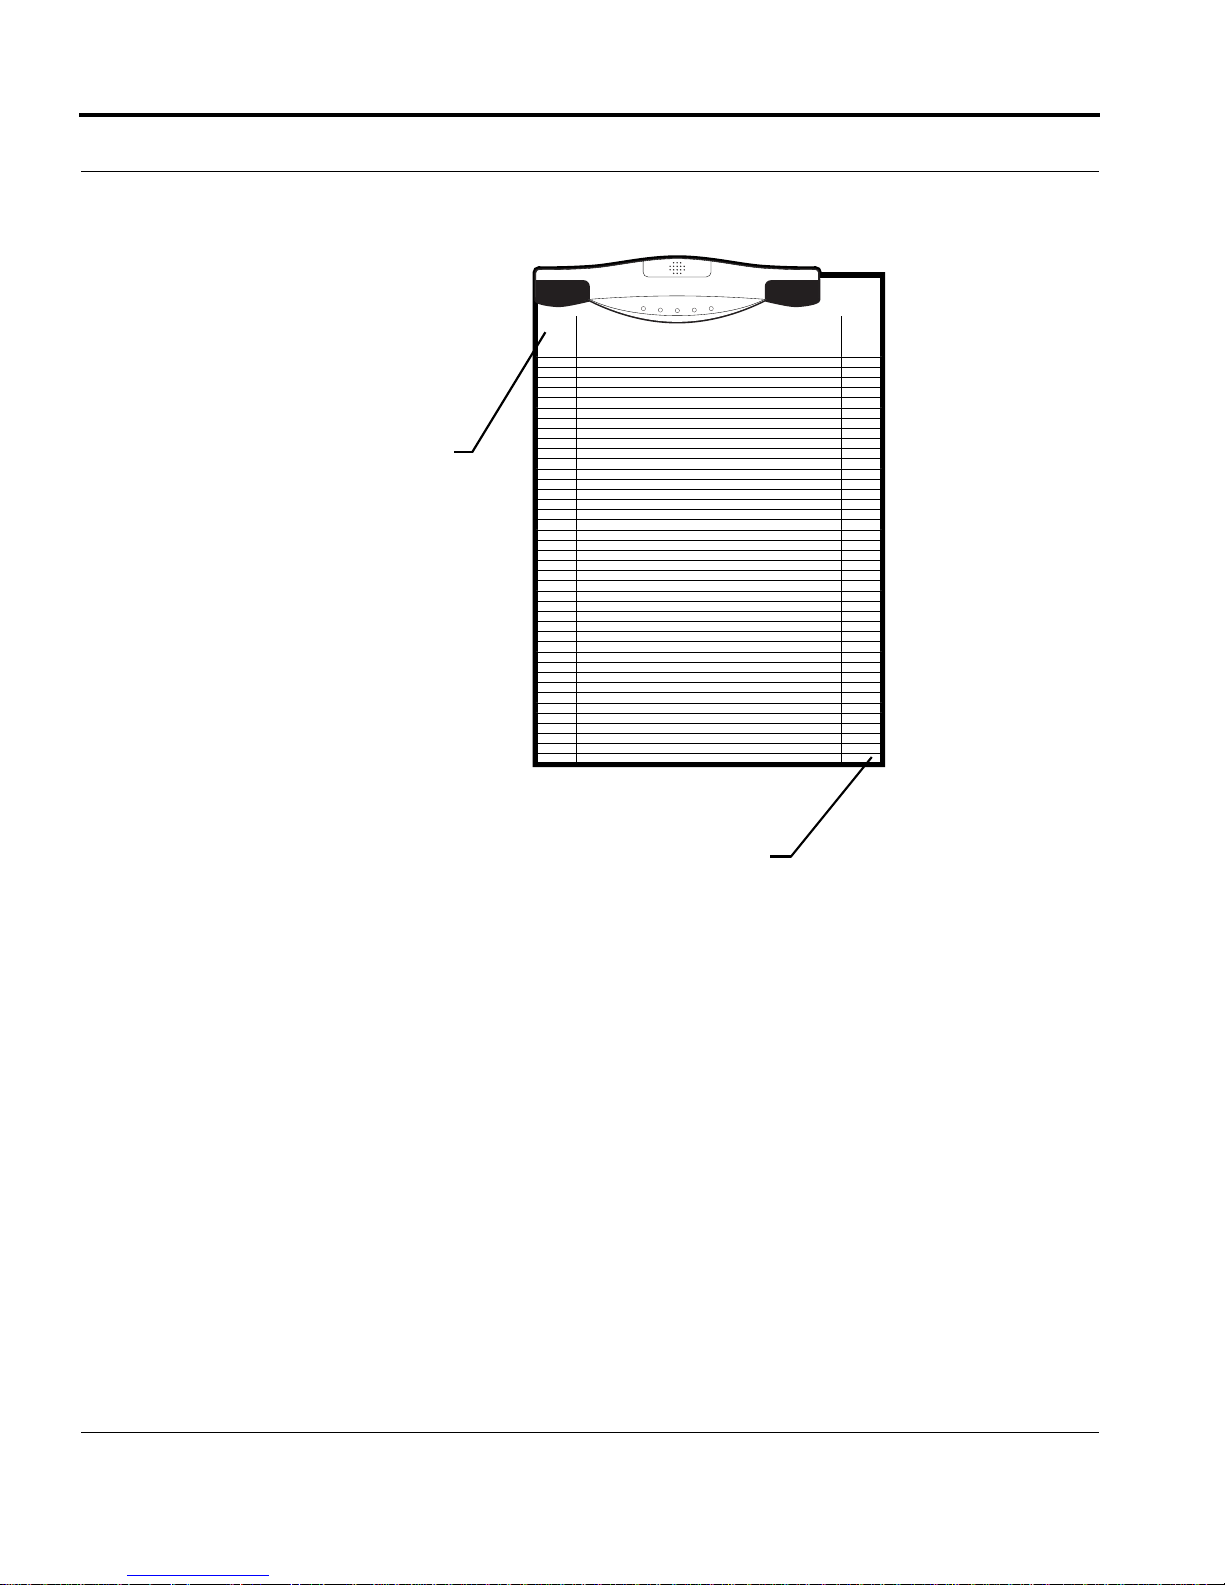
4. Click the InkLink pen in the upper-left corner of the page, staying at
least 1/2” from the data clip. Click Next.
5. Click the InkLink pen in the lower-right corner of the page, staying at
least 1/2” from the data clip.Click Next.
6. Tap OK.
InkNote Manager by Seiko Instruments 49
Page 50
Creating Ink Notes
Click here first
Click here second
Creating an Ink Note
To create a new ink note, do one of the following:
• In Explorer, open the File menu and choose New.
• On a Palm, in Explorer, click New.
• While Explorer is displayed, begin writing on the paper pad.
Adding a Page
To add a page to an ink note, do any of the following:
• Tap the Next Page button, shown below. (This works only if the last
page in the ink note is not blank.)
50 www.seikosmart.com
Page 51

Ink Notes
• On SmartPad, press and hold the SmartPad pen for a few moments in the
lower right corner of the page, until the handheld beeps.
Using this gesture allows you to take notes without having to tap the
handheld screen. You can focus on using the inking pen and working
only on the paper. Although the pen leaves a mark on the paper, InkNote
Manager removes the mark from the ink note as it is stored in memory.
• On a desktop or Pocket PC, open the Edit menu and choose Insert Page.
• On a Palm, open the Page menu and choose Insert Page.
Note that the first two methods append a page after the last page. (If the last
page is not currently displayed, these techniques display the next page
instead of adding a new page.) The Insert Page command inserts a page
before the currently displayed page.
There is no limit to the number of pages in a single ink note, but you
shouldn’t exceed about 16 pages for best performance. Your performance
depends on your system's processor and memory capacity.
Saving an Ink Note
On a Palm, ink notes are saved automatically. On a desktop or Pocket PC,
follow this procedure.
To save an ink note:
1. In the Note Editor, open the File menu and choose Save.
2. Specify a file name if you don’t want to use the default name. Ink notes
are saved with a .ink extension, which is appended automatically.
3. Select the folder where you want to save the file. All folders in the list
are subfolders of My Documents; selecting None saves the file in the My
Documents folder.
See Also
“Setting the Default File Name” on page 90
InkNote Manager by Seiko Instruments 51
Page 52
Creating Ink Notes
Deleting an Ink Note
To delete an ink note on a desktop:
• In Explorer, right-click the ink note you want to delete. (To select more
than one ink note, drag a lasso around the ink notes, or hold Ctrl as you
click each one. Then right-click one of the selected ink notes.)
4. In the shortcut menu, choose Delete.
To delete an ink note on Pocket PC:
1. In Explorer, tap and hold the ink note you want to delete. (To select more
than one ink note, drag a lasso around the files.)
2. In the shortcut menu, choose Delete.
To delete an ink note on a Palm:
1. In the File menu, choose Delete Notes.
2. Tap the note you want to delete.
3. Tap Delete.
Exporting an Ink Note
On a desktop or Pocket PC, you can save notes you create with InkNote
Manager in formats that can be edited and used with other programs. When
you export a note, each page is saved as a separate file. To export a note:
1. In the Note Editor, open the File menu and choose Export.
52 www.seikosmart.com
Page 53

Ink Notes
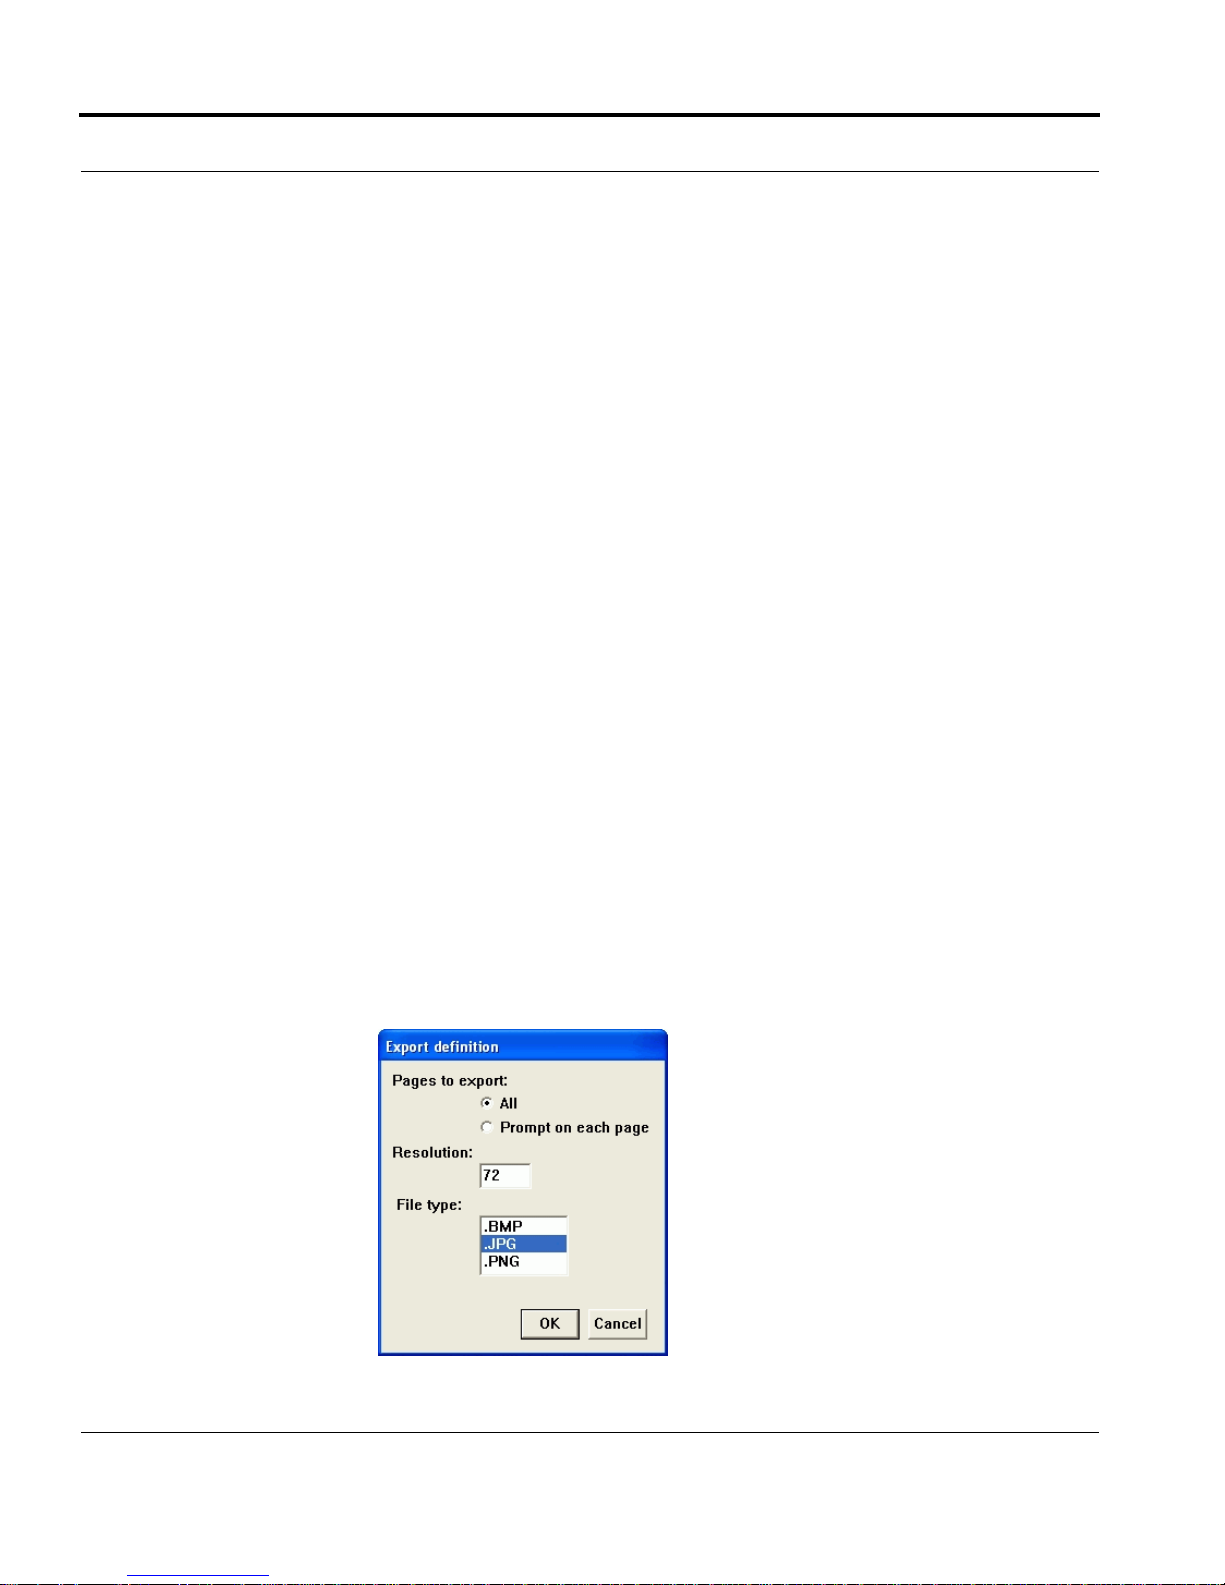
2. Specify whether you want to export all pages of the note—each as a sep-
arate file—or be prompted whether to export each page individually.
3. Specify a resolution, in dots per inch, for the exported file. The value to
use here depends on the program in which you plan to use the exported
file. Higher values produce sharper images, but larger files. Higher values also use more memory. If you get a “Cannot complete process” error,
try a lower resolution. With sufficient memory, values from 50 to 600
dpi are appropriate.
4. Select a file type from the following choices:
• .BMP. Bitmap graphics files (.bmp file name extension) can be edited
with Microsoft Paint and can be embedded in most types of documents.
• .JPG. Files in Joint Photographic Experts Group format (.jpg file
name extension) are considerably smaller than bitmap graphics files
and are more versatile. They can be edited with most graphics-editing
programs and can be embedded in most types of documents, including HTML documents (Web pages).
• .PNG. Portable Network Graphics files (.png file name extension) can
be edited with most modern graphics-editing programs. They can be
used as images in HTML documents (Web pages), but only newer
Web browsers can display them properly.
5. Click OK.
6. Specify a file name if you don’t want to use the default name. InkNote
Manager appends an underscore (_), a letter p, and a sequential page
number to each file that’s generated. For example, if you specify
“Kitchen Plans” as the file name for an export in bitmap format, the first
page would be saved as Kitchen Plans_p1.BMP, the second page as
Kitchen Plans_p2.BMP, and so on.
7. Select the folder where you want to save the file. All folders in the list
are subfolders of My Documents; selecting None saves the file in the My
Documents folder.
See Also
“Setting the Default File Name” on page 90
InkNote Manager by Seiko Instruments 53
Page 54

Creating Ink Notes
Closing Note Editor
When you’re through editing a note, you can close Note Editor and return to
Explorer in any of the following ways:
• Tap OK or Done.
• Click the close button in the upper right corner of the window.
• Open the File menu and choose Exit.
• On SmartPad, press and hold the SmartPad pen for a few moments in the
upper left corner of the page, until the handheld beeps.
Using this gesture allows you to take notes without having to tap the
handheld screen. You can focus on using the inking pen and working
only on the paper. Although the pen leaves a mark on the paper, InkNote
Manager removes the mark from the ink note as it is stored in memory.
See Also
“Using Pen Gestures on SmartPad” on page 70
54 www.seikosmart.com
Page 55

Organizing and Finding Ink Notes
Why Organize?
Many people take copious notes. Unfortunately, writing notes doesn’t make
you organized. The thing that separates note takers from organized people is
how they manage to find information that they have stored.
The greatest strength of InkNote Manager is its ability to retrieve information. Although InkNote Manager provides good tools to capture and edit
handwritten information, the thing that sets it apart is its Explorer and the
way it allows you to easily find information.
InkNote Manager allows you to capture the information in an ink note and
then close and save the ink note. (You can give it a name if you want, or
accept the proposed default name.) Later, when you are organizing your
thoughts and notes, you give InkNote Manager some clues about the information in the ink note. The result is that when you want to find and view
information in the future, you use the tools in InkNote Manager Explorer to
quickly locate the information you need.
InkNote Manager by Seiko Instruments 55
Page 56

Organizing and Finding Ink Notes
In general, you take the steps outlined in the following example to effectively use InkNote Manager:
1. Capture. During your work day, you might dash from one meeting to
another, taking notes at each one. Using InkNote Manager, you do the
same as you would with pen and paper, except that you break your notes
into ink note files. For example, if you take three pages of notes in the
first meeting, you would save those notes in one ink note file having
three pages.
2. Organize. The next step is the one that will make you organized. You go
through each ink note and give InkNote Manager clues about the information.
• You tell InkNote Manager to what category or categories the ink note
belongs. (You can associate an ink note with multiple categories,
which effectively allows you to store the note in several places at
once.)
• You can select keywords in an ink note and use the handheld’s built-
in character recognition to read them and store them as clues. You can
also enter keywords manually.
• You can give a meaningful file name to each ink note instead of using
the default name.
• On a desktop or Pocket PC, you can add action items to your to-do
list as Outlook tasks.
• You can highlight (as with a yellow highlighter pen) parts of your ink
notes or change the color of important sentences. These changes will
be easy to spot in thumbnail views of ink notes.
3. Search. Later, when you want to find information, you use InkNote Man-
ager’s Explorer. Explorer provides a variety of tools and views for
quickly finding the information you want. For example, you can list all
the ink notes that are stored in a certain category, all the ink notes that
have a certain keyword, or all the ink notes that are both in a given category and have a certain keyword. You can display the list in any of three
views:
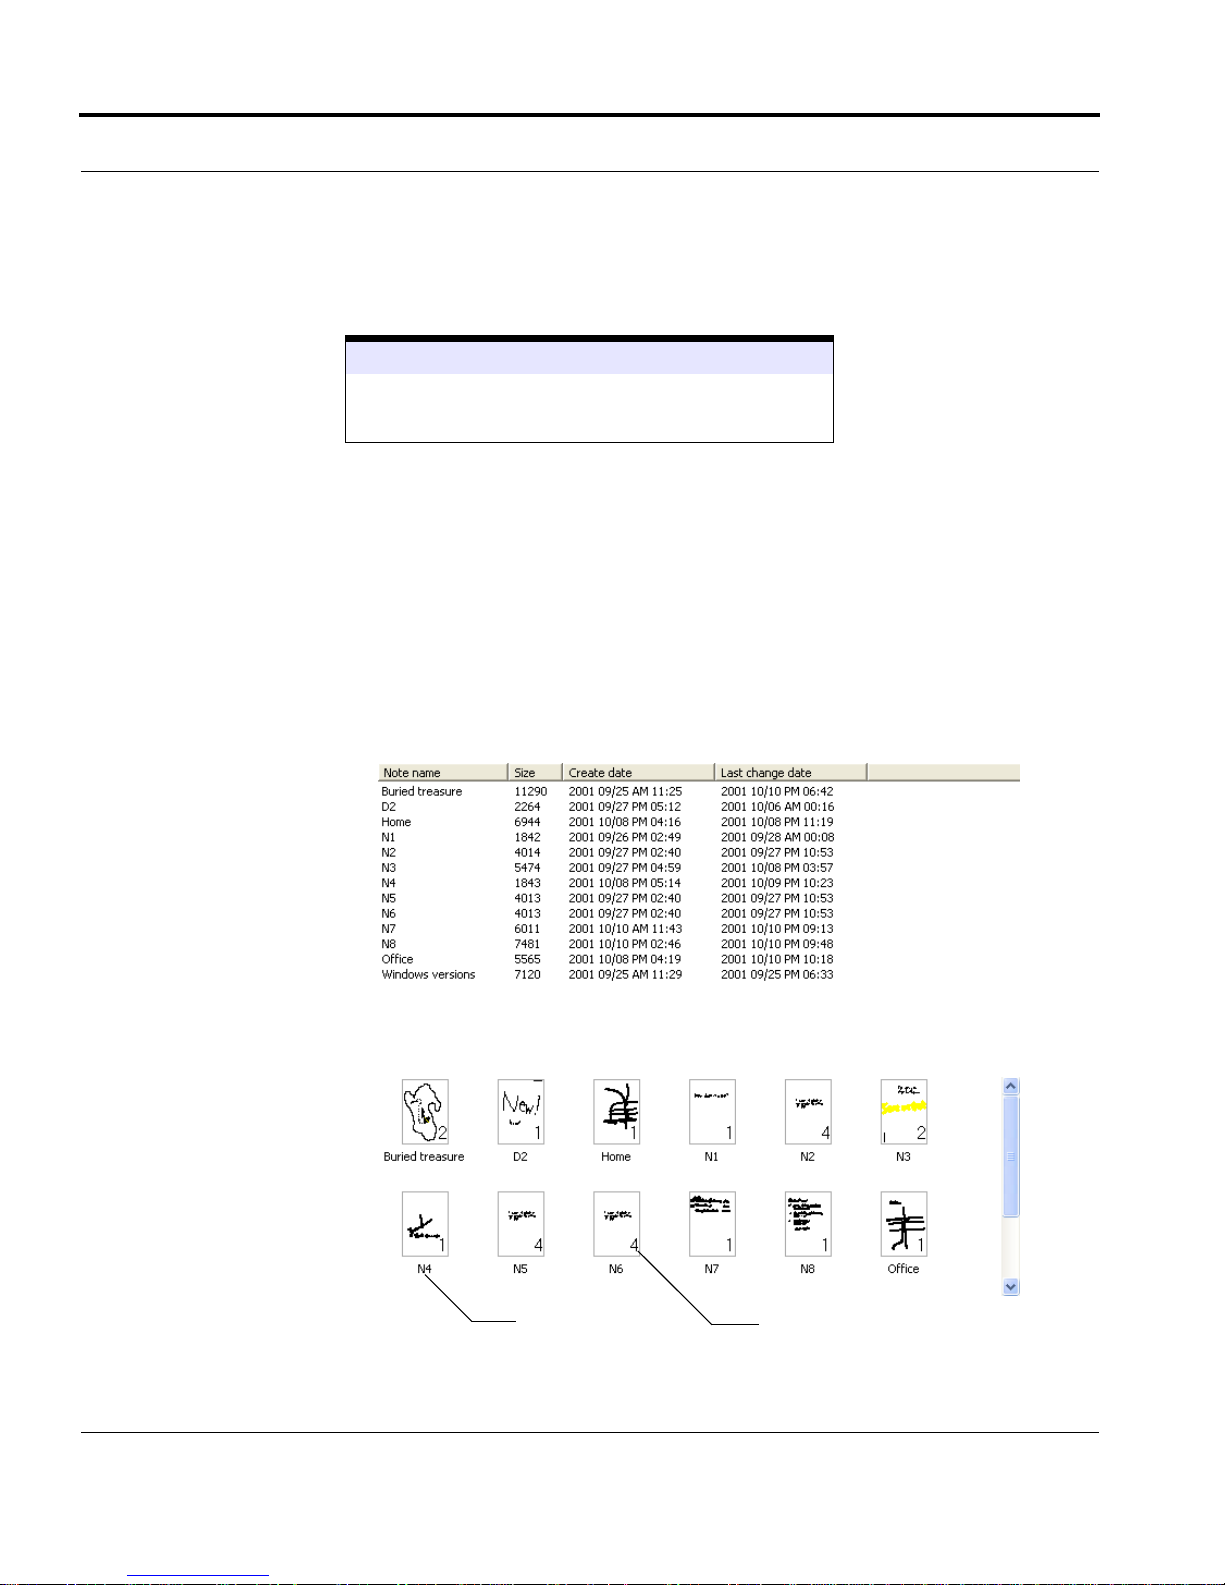
• Detail view shows the file name, size, creation date, and last modifi-
cation date for each ink note in the list. You can sort the list on any
56 www.seikosmart.com
Page 57

Why Organize?
column. For example, you might sort on modified date to find
recently changed ink notes.
• Thumbnail view (first page only) shows a thumbnail-sized represen-
tation of the first page of each ink note in the list. A number in the
lower right corner of the thumbnail indicates the number of pages in
the note.
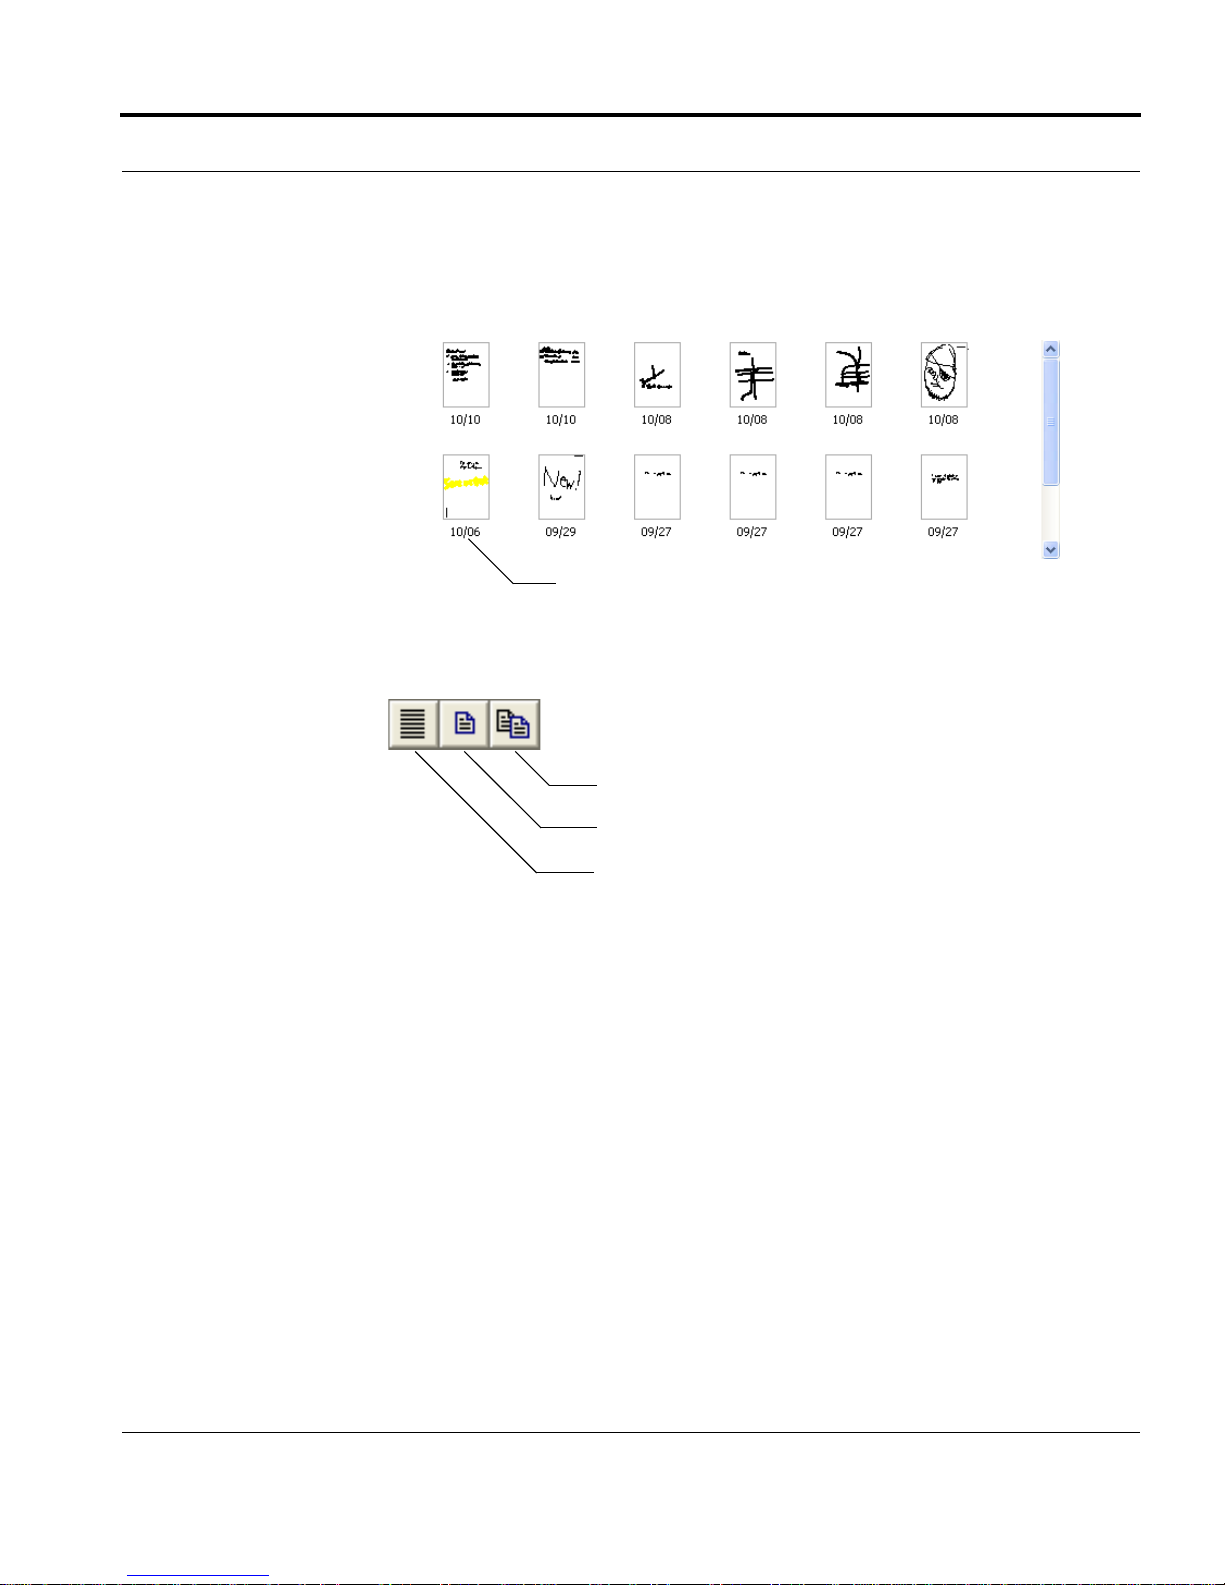
• Thumbnail view (all pages) shows a thumbnail image of every page
of every ink note in the list. Using this view, you can find a note if
you remember what it looks like.
Except for using character recognition to enter keywords, you can perform
all of these steps on the handheld or on your desktop computer. InkNote
Manager has similar capabilities on both platforms.
Finding an Ink Note in Explorer
To find an ink note, work in Explorer’s tree pane (the top part of the screen).
To find an ink note on a desktop or Pocket PC:
1. Click a plus sign to expand a branch of the tree, or click a minus sign to
collapse a branch.
2. When the category or keyword in which you’re interested appears, click
it to select. Ink notes that have the selected category or keyword (or both,
if you’re looking at a keyword within a category or a category within a
keyword) appear at the bottom of the screen.
3. Select a view for the list pane and then scan the list pane for the ink note
you want.
To find an ink note on a Palm:
1. Select a Category and/or Keyword. Ink notes that have the selected cat-
egory or keyword (or both, if you’re looking at a keyword within a category or a category within a keyword) appear at the bottom of the screen.
InkNote Manager by Seiko Instruments 57
Page 58
Organizing and Finding Ink Notes
2. Select a view for the list pane and then scan the list pane for the ink note
you want.
See Also
“Changing Explorer Views” on page 58
“Opening an Ink Note” on page 66
Changing Explorer Views
When you select a category or keyword of interest in the tree pane (at the
top of the screen), all the ink notes that meet the criteria you select appear in
the list pane (at the bottom of the screen). The list pane can be displayed in
any of three views:
• Detail view. Ink notes are initially sorted by name. You can sort the list
on any column by clicking the column heading. Click the column heading again to reverse the sort order.
• Thumbnail view (first page only). Thumbnail images of the first page of
each ink note are sorted by name.
58 www.seikosmart.com
Note name
Number of pages in note
Page 59
Why Organize?
• Thumbnail view (all pages). Thumbnail images of each page are sorted
by last change date, with the most recent notes shown first.
Date of last modification
To switch between views, click one of the toolbar buttons, shown below.
Thumbnail (all pages)
Thumbnail (first page)
Detail
Assigning Categories and Keywords
Categories and keywords provide a powerful way to organize ink notes.
Because you can associate an ink note with multiple categories and multiple
keywords, you can find the ink note in any of several places and you can
easily store ink notes that cover more than one topic. This is much more
flexible than simply using folders to organize notes.
You might want to set up a category for each of your projects and recurring
events. By default, InkNote Manager uses the categories defined in
Microsoft Outlook in addition to any you define in InkNote Manager.
To assign categories and keywords to a note on a desktop or Pocket PC:
1. In Explorer, right-click an ink note and choose Organize notes from the
shortcut menu. If the ink note is already open in Note Editor, open the
InkNote Manager by Seiko Instruments 59
Page 60
Organizing and Finding Ink Notes
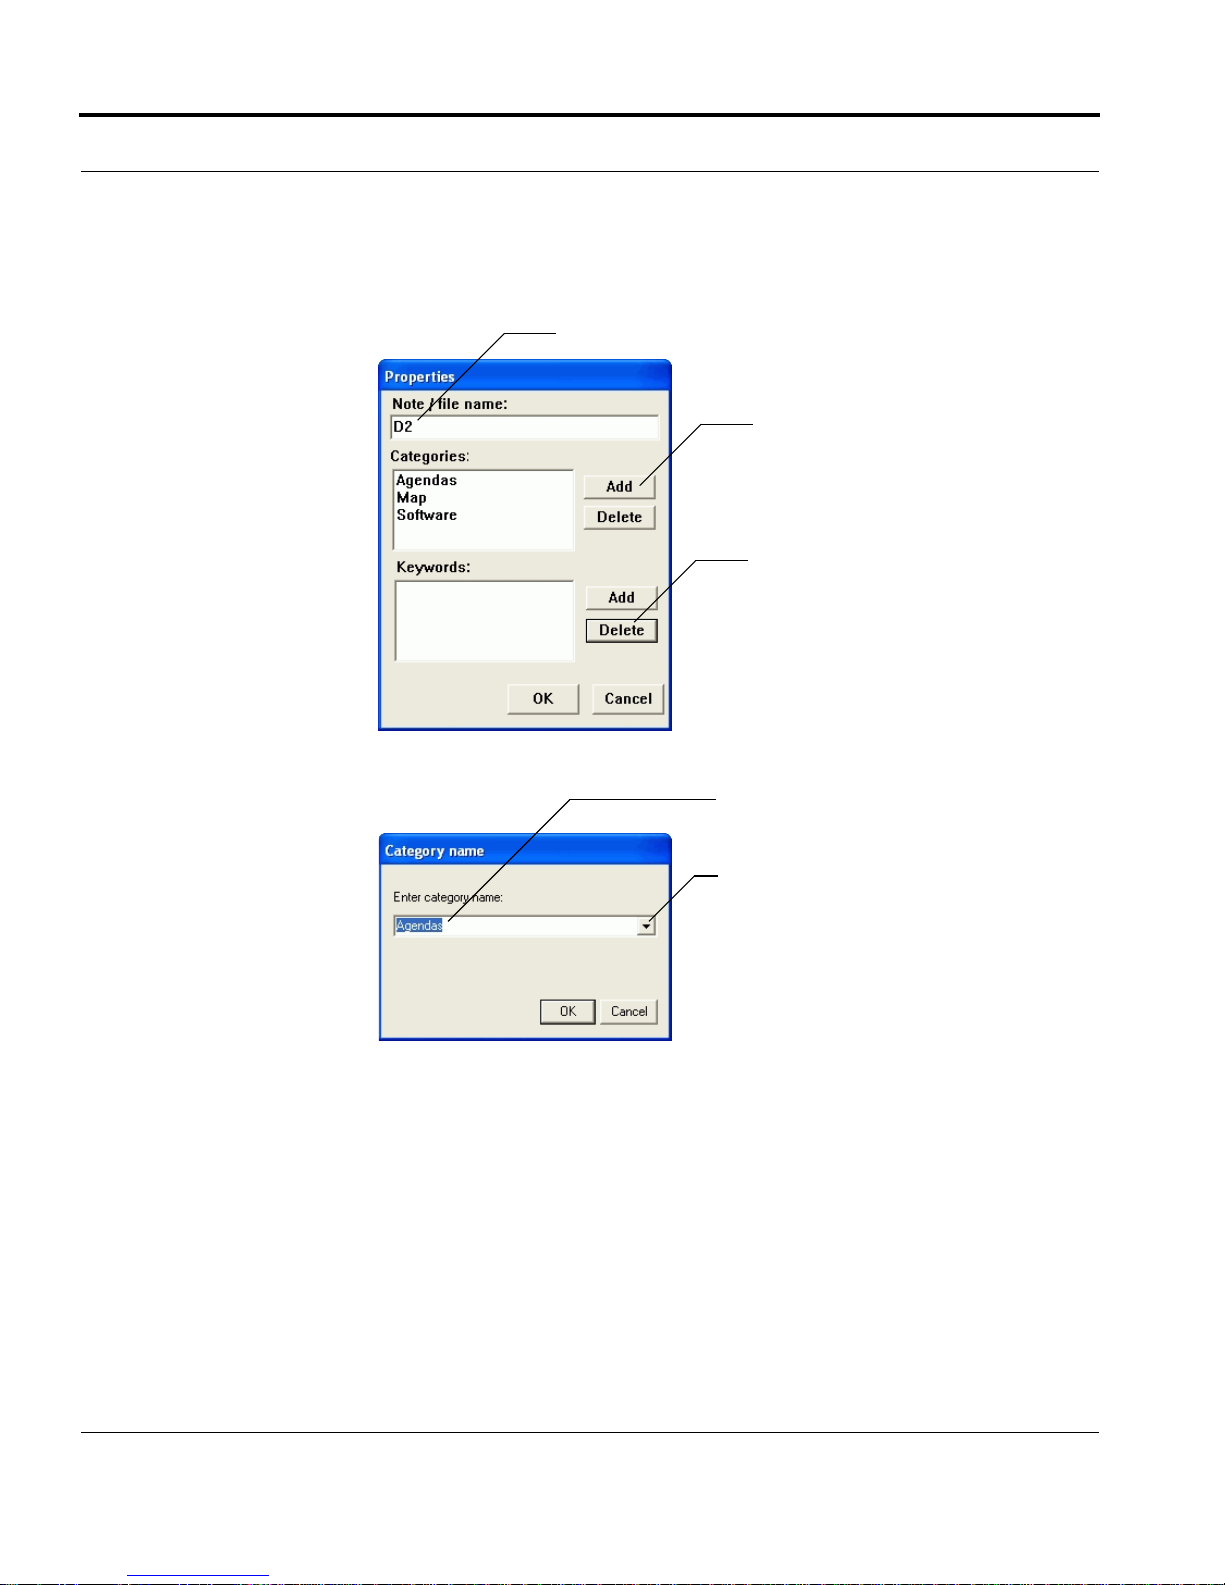
File menu and choose Organize notes. The Properties dialog box
appears.
To change an ink note’s name, type the new name here
To assign a new category or keyword, click Add and then type the
new entry or select it from a list
To remove an existing category or
keyword, select it and click Delete
2. Click the Add button next to the Categories box or the Keywords box.
Type a category name
here, or…
…click the arrow to display
a list of all previously
entered categories plus all
Outlook categories
3. Type a category name or keyword. If you’re assigning a category, you
can select from a list instead of typing.
To assign categories and keywords to a note on a Palm:
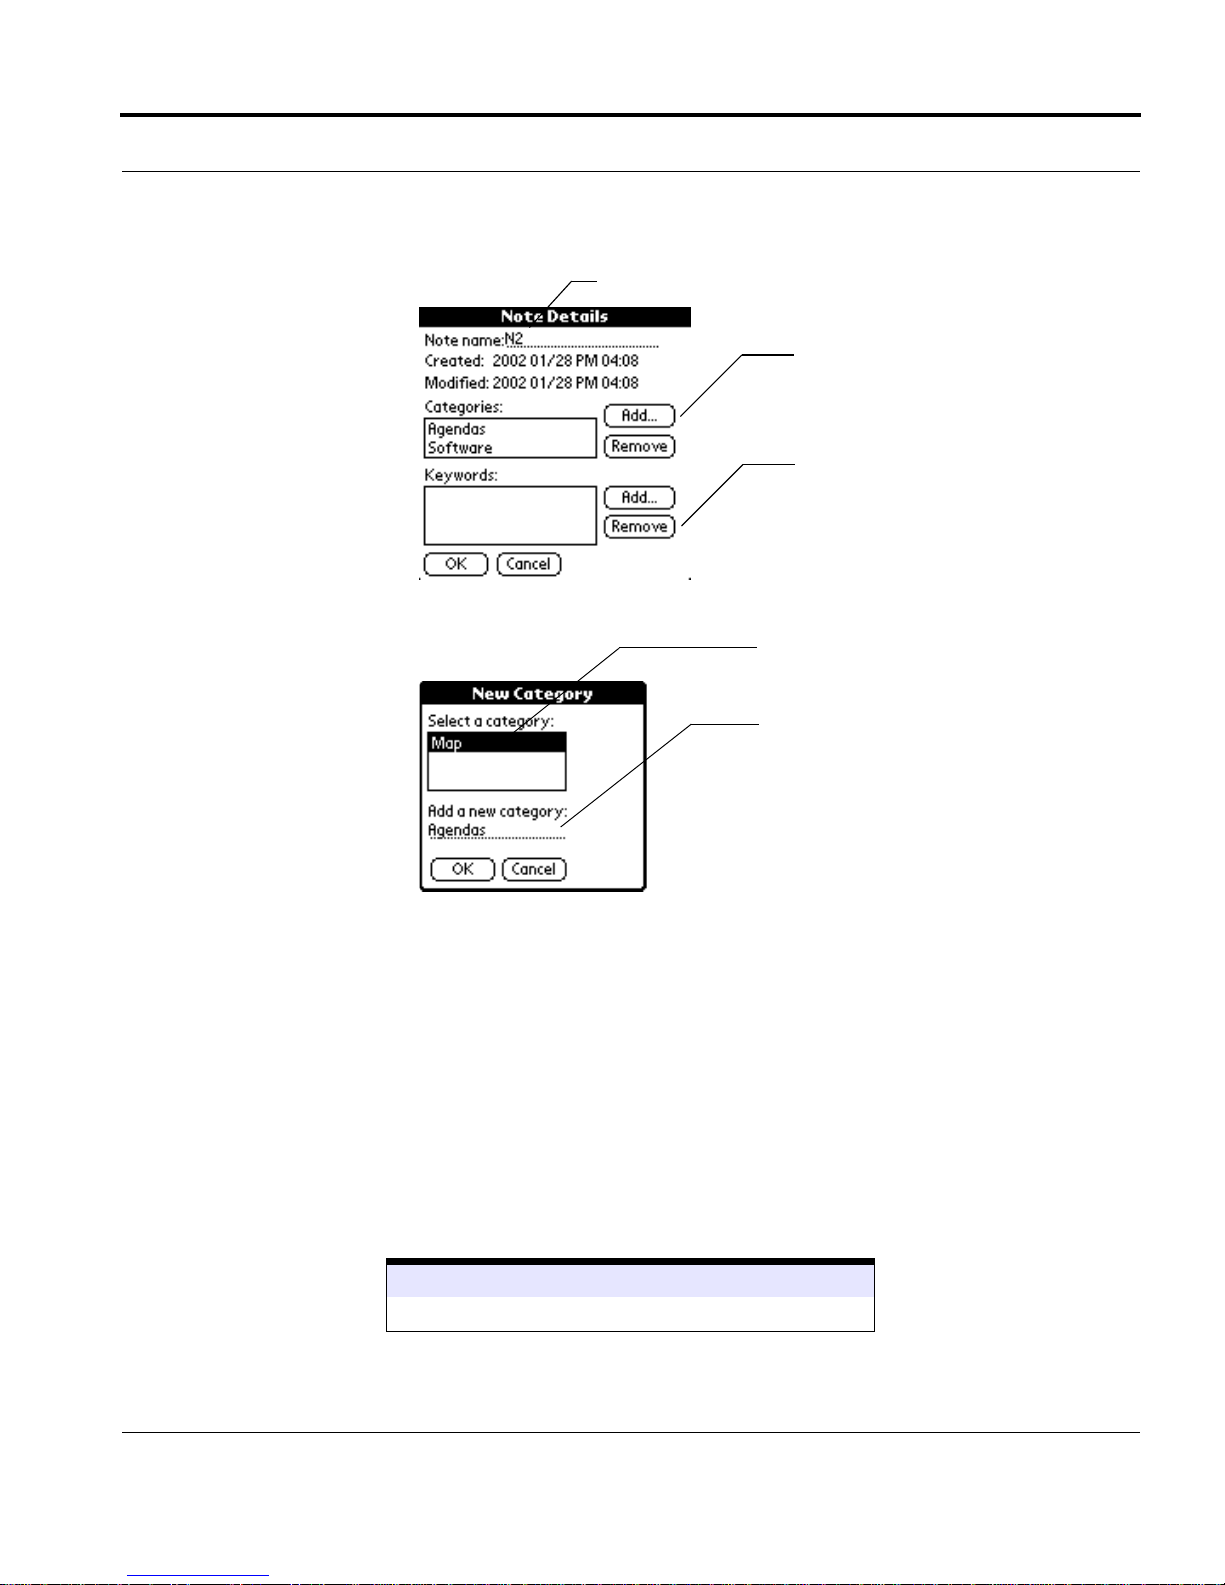
1. In Note Editor, tap Details.
2. The Properties dialog box appears.
60 www.seikosmart.com
Page 61
Why Organize?
To change an ink note’s name, type the new name here
To assign a new category or keyword, click Add and then type the
new entry or select it from a list
To remove an existing category or
keyword, select it and click
Remove
3. Click the Add button next to the Categories box or the Keywords box.
Select a category name
here, or…
...type a new category
name here.
4. Type a category name or keyword. If you’re assigning a category, you
can select from a list instead of typing.
On a Pocket PC, you can use its character recognition capability to create
keywords automatically from an ink note’s content. To add a keyword based
on note content:
1. In Note Editor, select the word you want to use as a keyword.
2. Open the File menu and choose Recognize keywords.
3. After the text is drawn and recognized, edit the text if necessary, and
then tap OK.
See Also
“Selecting Parts of an Ink Note” on page 76
InkNote Manager by Seiko Instruments 61
Page 62

Organizing and Finding Ink Notes
Setting Up Categories
InkNote Manager develops a list of categories. When you want to assign a
category to an ink note, you can simply select a category from the list. The
category list has two sources:
• Categories from Microsoft Outlook. To view Outlook categories, select
any item (such as an e-mail message or contact) in Outlook, open the
Edit menu, and choose Categories. You can add or delete items in Out-
look’s category list by clicking Master Category List.
• Categories you enter. Each new category you assign to an ink note is
added to the list.
If you don’t use Microsoft Outlook or you don’t want to use its categories,
you can prevent InkNote Manager from searching for and including those
categories, as follows:
1. On a desktop or Pocket PC, display Explorer in InkNote Manager.
2. Open the Setup menu and choose Preferences.
3. Clear the Get categories from Outlook check box.
See Also
“Assigning Categories and Keywords” on page 59
Renaming an Ink Note
You can change the file name of an ink note in any of several ways
To change the file name on a desktop or Pocket PC do any of the following:
• In Explorer, right-click an ink note and choose Rename or Organize
notes. (The latter command lets you change categories and keywords in
addition to the file name.)
• In Note Editor, open the File menu and choose Organize notes.
• In Note Editor, open the File menu and choose Save As. (This method
saves the ink note under a new name and also retains the original note.)
62 www.seikosmart.com
Page 63

Why Organize?
To change the file name on a Palm do any of the following:
• In Note Editor, tap Details.
• In Note Editor, open the Note menu and choose Copy Note. (This
method saves the ink note with the word “Copy” appended to its name.)
Creating an Action Item
On a desktop or Pocket PC you can link ink notes to Outlook tasks, enabling
you to incorporate your notes into your to-do list. The task appears in the
Tasks application on the handheld and in Microsoft Outlook on your desktop computer.
To create an action item:
1. Display the note in Note Editor.
2. (Optional) Select the text that you want to be used as the subject line for
the action item. (InkNote Manager uses the handheld’s character recognition capability to convert the handwriting to text, which it enters in the
Subject box. This capability is not available on desktop versions of Windows.)
3. Open the File menu and choose Register note as action item.
4. Enter text in the Subject box (or confirm the text that InkNote Manager
has entered) and click OK.
To view an action item on your handheld:
1. Open the Start menu and choose Ta sks.
2. Tap the task name to open the action item.
InkNote Manager by Seiko Instruments 63
Page 64
Organizing and Finding Ink Notes
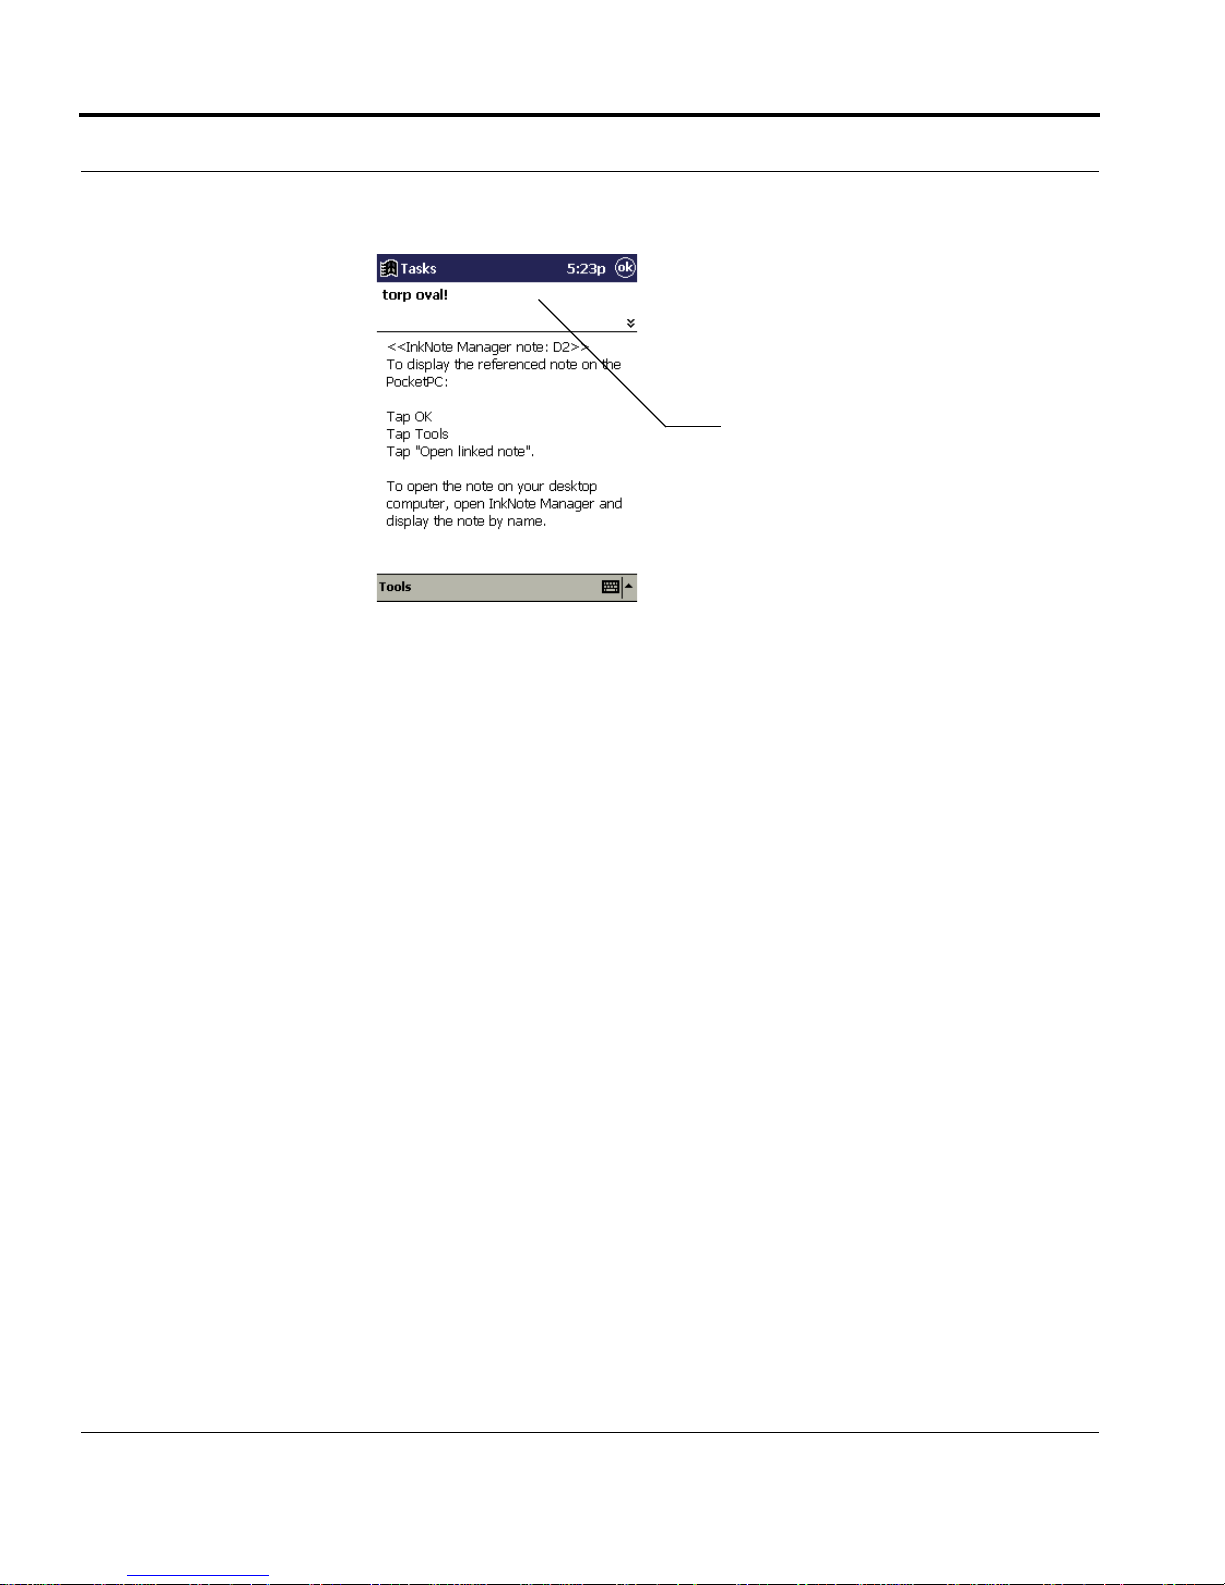
Tap here to display
task details
3. Tap in the top part of the task to display the task details. On the screen
that appears, you can specify priority, due date, and other items; set up a
reminder; and so on.
4. To display the associated ink note, tap OK to close the task. Then, while
the task is highlighted in the main Tasks window, open the Tools menu
and choose Open linked note.
If you don’t need to open the task to set other details, you can open the
linked note directly. In the main Tasks window, tap and hold the task name.
Then choose Open linked note from the shortcut menu.
64 www.seikosmart.com
Page 65

Editing Ink Notes
In this section we explain how to modify ink notes, the documents you create and manage with InkNote Manager. Specifically, we explain how to:
• Open an ink note
• Zoom and pan within an ink note
• Navigate between pages
• Using the pen function keys
• Use pen gestures
• Display or hide ruled lines
• Add lines to an ink note
• Draw Straight Lines
• Straightening Existing Lines
• Add highlights to an ink note
• Specify colors for lines and highlights
• Select parts of an ink note
• Cut or copy selected parts to the Clipboard
InkNote Manager by Seiko Instruments 65
Page 66
Editing Ink Notes
• Move selected parts
• Group parts of an ink note
• Undo edits
• Using Handwriting Recognition
Working with Ink Notes
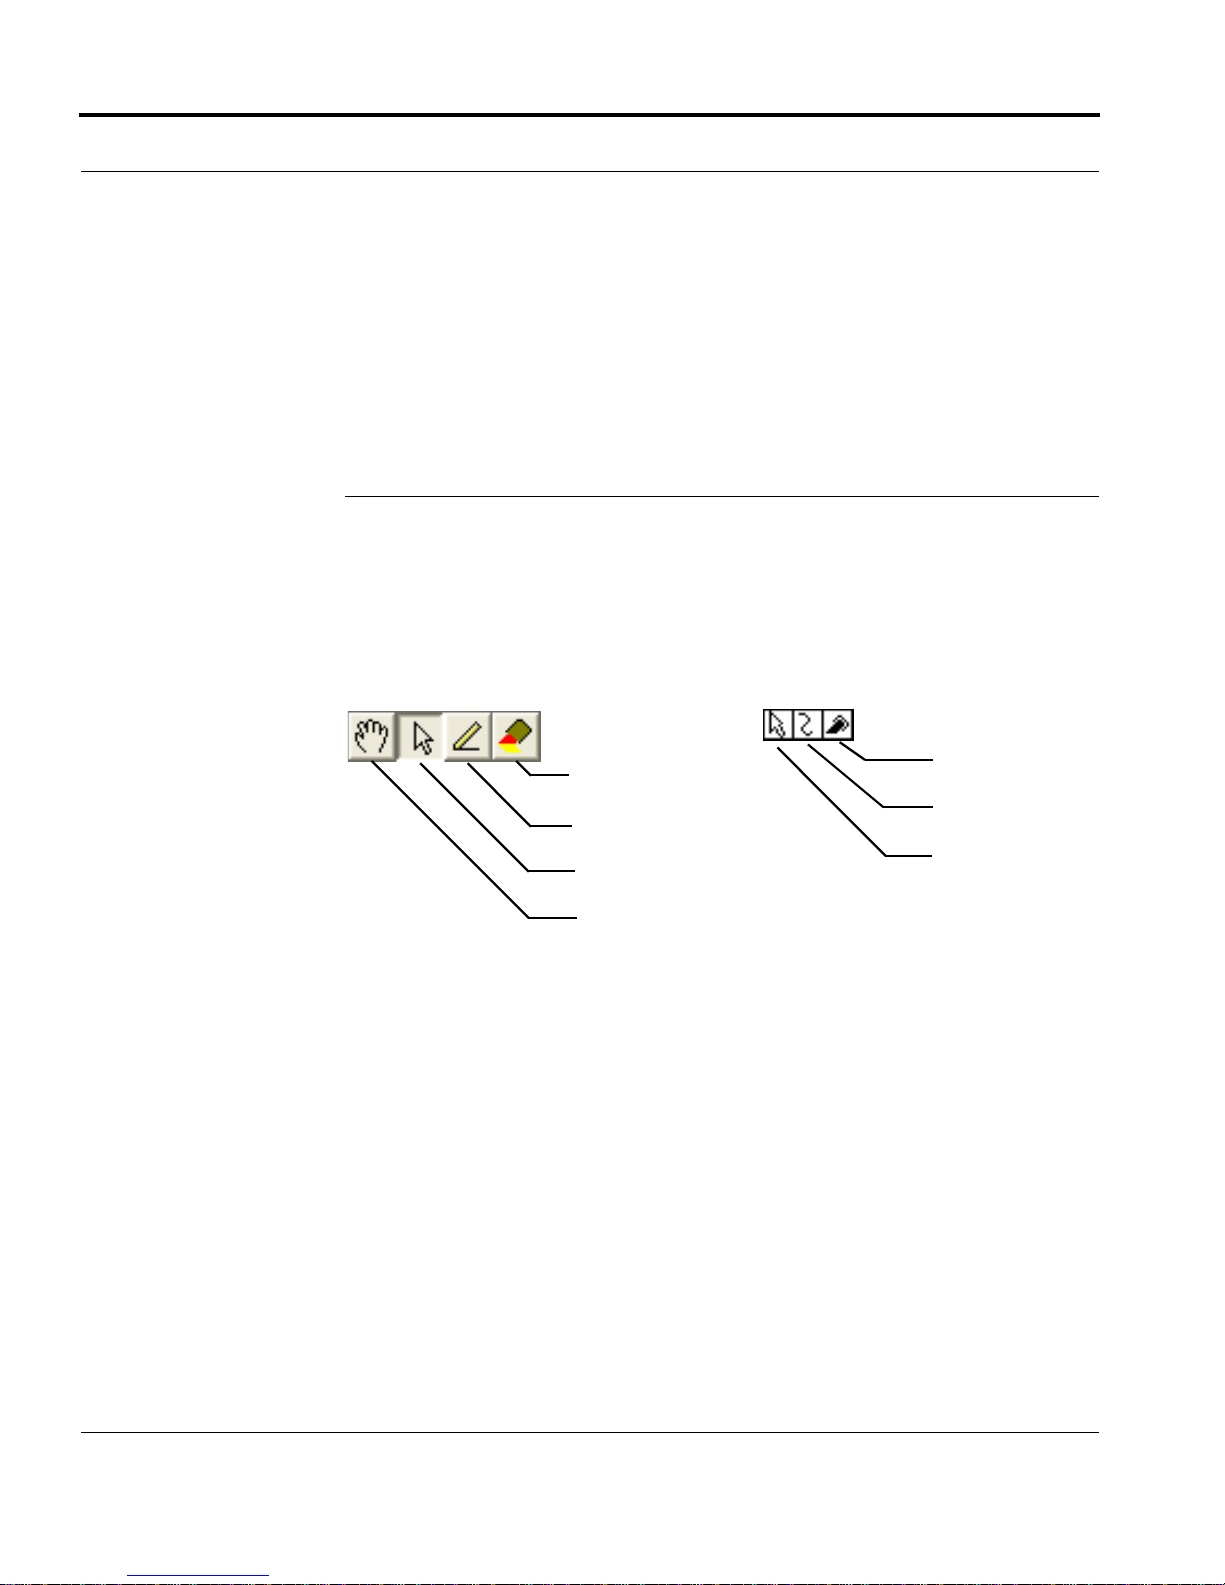
When you work in Note Editor, you’ll be in one of four modes: pan and
zoom, select, write, or highlight. You select a mode by clicking its corresponding toolbar button, shown below. A depressed toolbar button indicates
the currently selected mode.
Highlight
Write
Select
Pan and zoom
Highlight
Write
Select
The Pan and zoom tool doesn’t appear in the handheld application. To
select this mode, tap the currently selected mode. When pan and zoom is
selected, no toolbar buttons are depressed.
Opening an Ink Note
To open an ink note, do any of the following:
• In InkNote Manager’s Explorer, tap or double-click the ink note you
want to open.
• On a desktop or Pocket PC, in InkNote Manager’s Explorer, open the
File menu and choose Open. Select the folder that contains the ink note
66 www.seikosmart.com
Page 67

Working with Ink Notes
you want to open, and then tap the ink note you want to open. (If you
select All Folders in the Folder list, InkNote Manager displays all ink
notes in the My Documents folder and all its subfolders.)
• In File Explorer, navigate to the ink note you want to open. (By default,
ink notes are stored in the My Device\My Documents\Seiko Ink Notes
folder.) Tap the ink note you want to open.
• In Windows Explorer, navigate to the ink note you want to open. (By
default, ink notes are stored in the My Documents\Pocket_PC My Documents\Seiko Ink Notes folder.) Double-click the ink note you want to
open.
Zooming and Panning
When you have an ink note open in the Note Editor, you can zoom in for a
magnified look at your note. Once zoomed in, you can pan (that is, move
up, down, left, or right) to the area of interest.
To zoom in or out using the handheld application, do either of the following:
• Be sure that none of the tools is selected (if one is selected, tap it to dese-
lect it) and then tap the image area of the ink note. This action zooms in
or, if it was already zoomed in, zooms out, toggling between Normal
zoom (in which the full page fits on the screen) and either 200% or 400%
zoom (whichever was last used).
• Open the Tools menu and choose Zoom Normal, Zoom 200%, or
Zoom 400%.
To zoom in or out using the desktop application, do any of the following:
• Be sure the Pan and zoom tool (shown below) is selected. Then click
the image area of the ink note. This action zooms in or, if it was already
zoomed in, zooms out, toggling between Normal zoom (in which the full
page fits in the Note Editor window) and either 200% or 400% zoom
(whichever was last used).
InkNote Manager by Seiko Instruments 67
Page 68
Editing Ink Notes
• Click one of the zoom tools.
Zoom 400%
Zoom 200%
Zoom Normal
• Open the Zoom menu and choose Normal, 200%, or 400%.
Note that you can change the size of the Note Editor window; the image
scales to fit the window.
To pan while the ink note is zoomed in, do either of the following:
• In the handheld application, be sure that none of the tools is selected. In
the desktop application, select the Pan and zoom tool. Then drag the
image in the direction you want to move.
• On a desktop or Pocket PC, use the scroll bars in any of the following
ways:
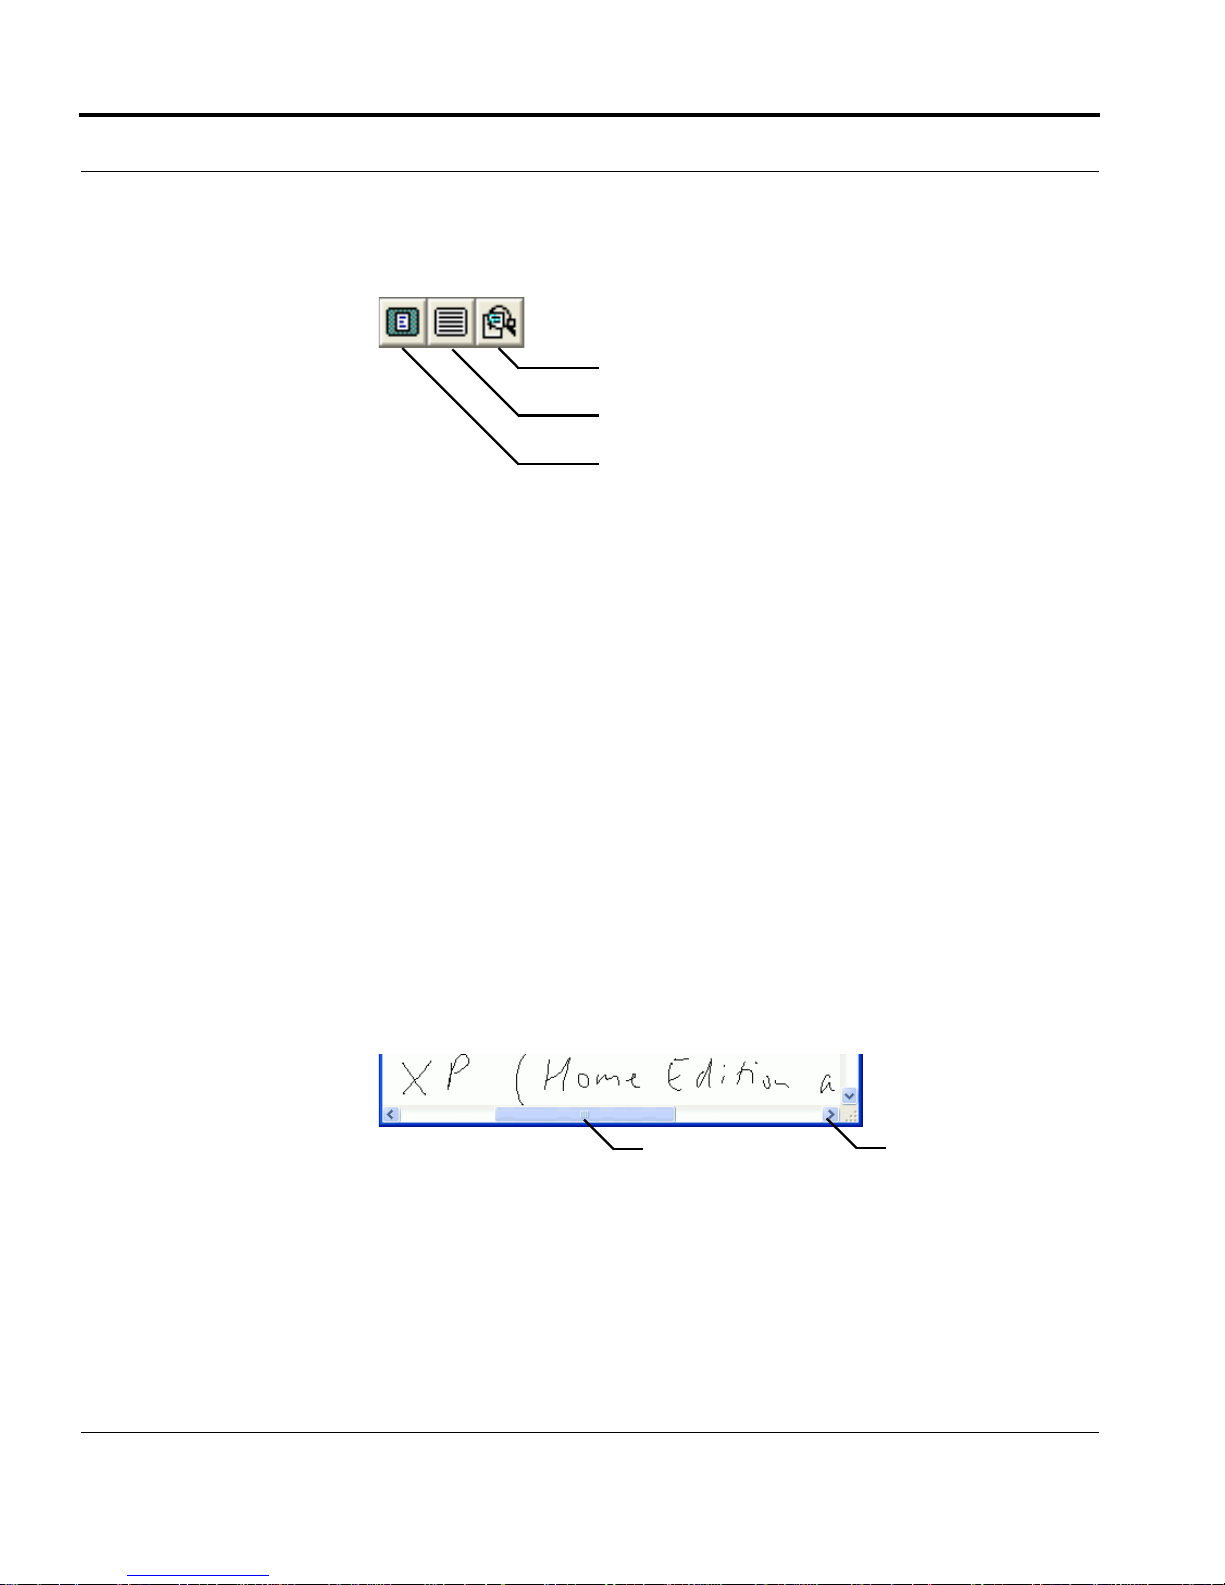
• Drag the scroll box until the part of the image you want to see is dis-
played.
• Click between the scroll box and a scroll arrow to move in large
steps.
• Click a scroll arrow to move in small steps.
Scroll box
Navigating Between Pages
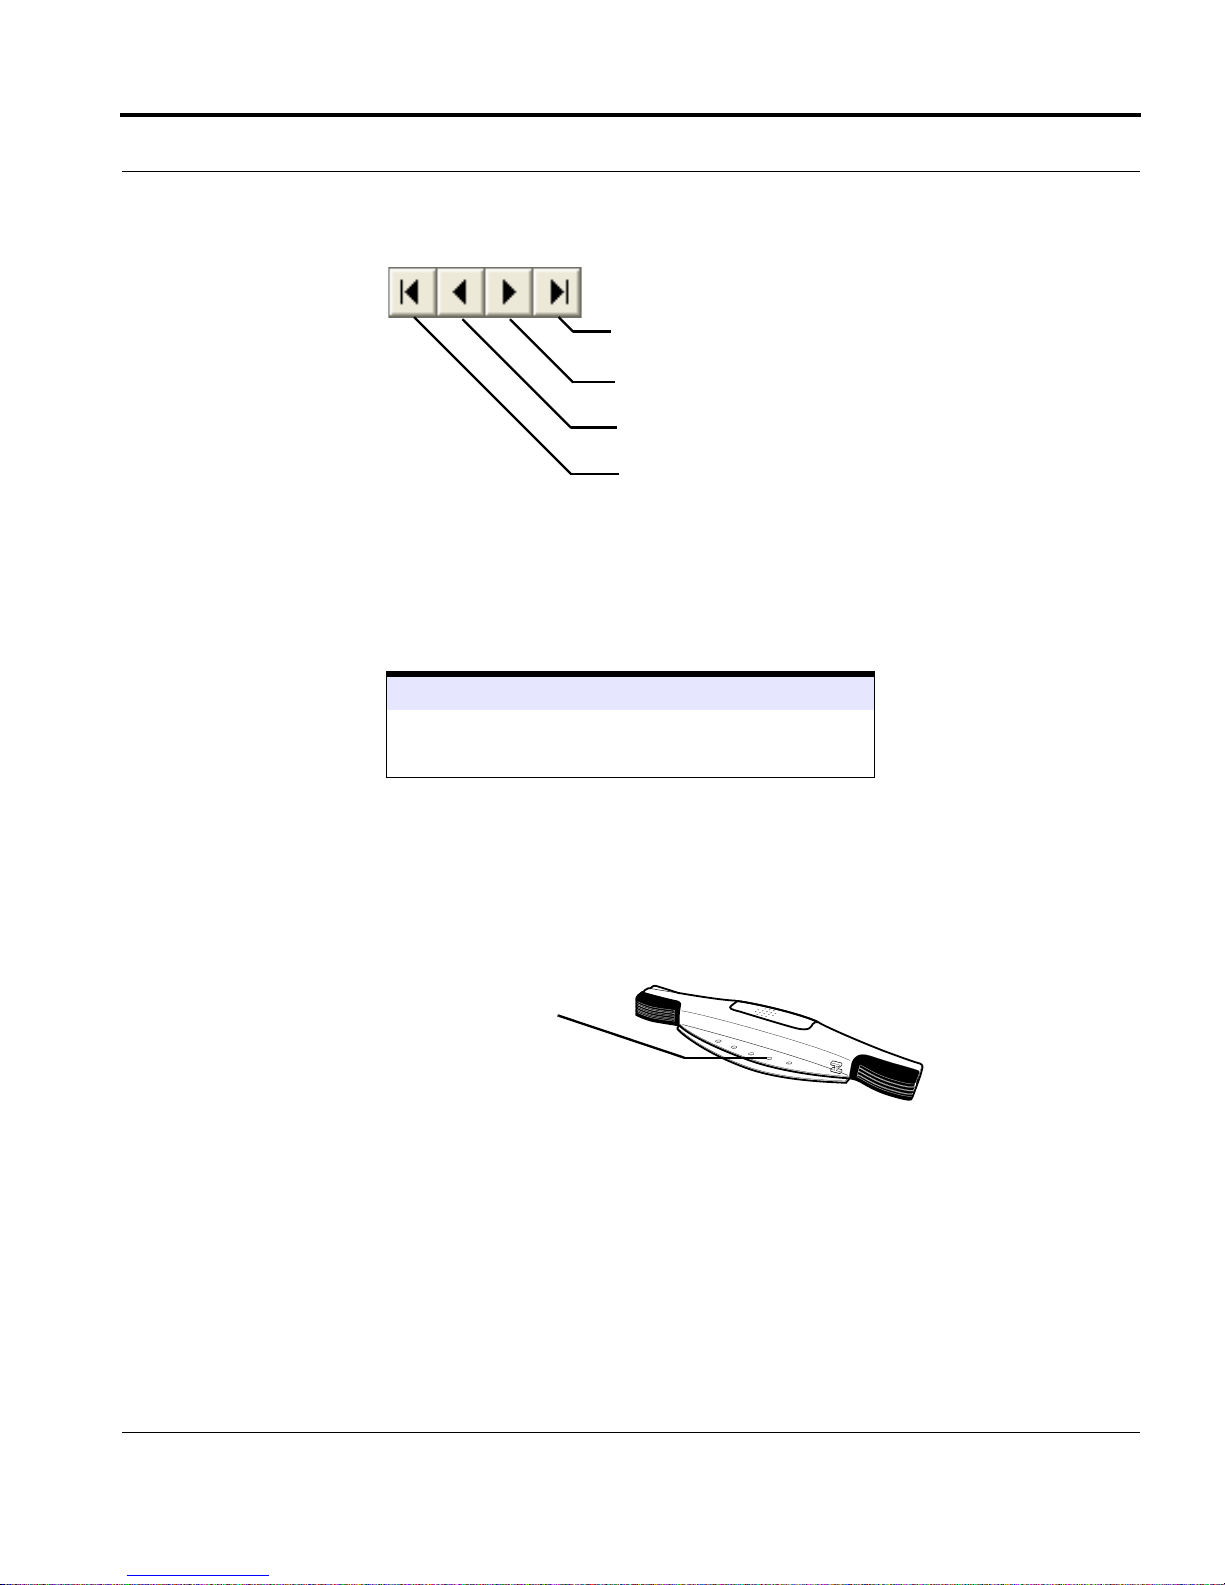
The title bar in Note Editor shows the number of the current page and the
total number of pages in the ink note. To navigate between pages, click the
Go to previous page or Go to next page tool, shown below.
Scroll arrow
68 www.seikosmart.com
Page 69
Working with Ink Notes
Go to last page
Go to next page
Go to previous page
Go to first page
To jump immediately to the first or last page in the handheld application,
open the Edit or Page menu and choose Go to first page or Go to last
page. In the desktop application you can also click the Go to first page or
Go to last page tool.
See Also
“Adding a Page” on page 50
“Using Pen Gestures on SmartPad” on page 70
Using the Pen Function Keys
There are five pen function keys on the InkLink data clip. These work much
like the function keys across the top of your keyboard. To use a pen function
key, place the tip of the pen in the hole and press it down for about a second.
Pen function keys
You can set the function that occurs when you press your pen in these pen
function keys. The default pen function key settings for Explorer are:
• Help
• Assign PF Keys
• Calibrate paper size
• Note thumbnail view
InkNote Manager by Seiko Instruments 69
Page 70

Editing Ink Notes
• Details view
The default pen function key settings for Note Editor are:
• Save
• Undo
• Previous page
• Next page
• Close note
To set a pen function key on a desktop or Pocket PC:
1. In Explorer, open the Setup menu and choose Pen Function Keys.
2. Tap the PFkey you want to set.
3. From Explorer Action, choose the function you want for that PFkey in
Explorer.
4. From Editor Action, choose the function you want for that PFkey in
Note Editor.
To set a pen function key for Explorer on a Palm:
1. In Explorer, open the Setup menu and choose Pen Function Keys.
2. Select the function you want for each function key.
To set a pen function key for Note Editor on a Palm:
1. In Note Editor, open the Too ls menu and choose Pen Function Keys.
2. Select the function you want for each function key.
Using Pen Gestures on SmartPad
As an alternative to tapping toolbar buttons or menu commands, you can
navigate between pages or close Note Editor by using the SmartPad pen.
This feature allows you to work exclusively on the paper without having to
tap the handheld screen.
70 www.seikosmart.com
Page 71

Working with Ink Notes
• Press and hold the pen in the lower left corner of the paper notepad to go
to the previous page. (If the first page of an ink note is displayed, nothing
happens.)
• Press and hold the pen in the lower right corner to go to the next page. (If
the last page of an ink note is displayed, InkNote Manager appends a
new, blank page.)
• Press and hold the pen in the upper left corner to close Note Editor and
return to Explorer.
Close Note Editor
Previous page
Next page or new page
Displaying or Hiding Ruled Lines
On a desktop or Pocket PC, in Note Editor, InkNote Manager can display
ruled lines that represent the preprinted lines on the paper pad. These lines
appear only in Note Editor and in images you export from Note Editor; they
don’t appear when you print an ink note or when you copy part of an ink
note.
InkNote Manager by Seiko Instruments 71
Page 72
Editing Ink Notes
To display or hide the lines:
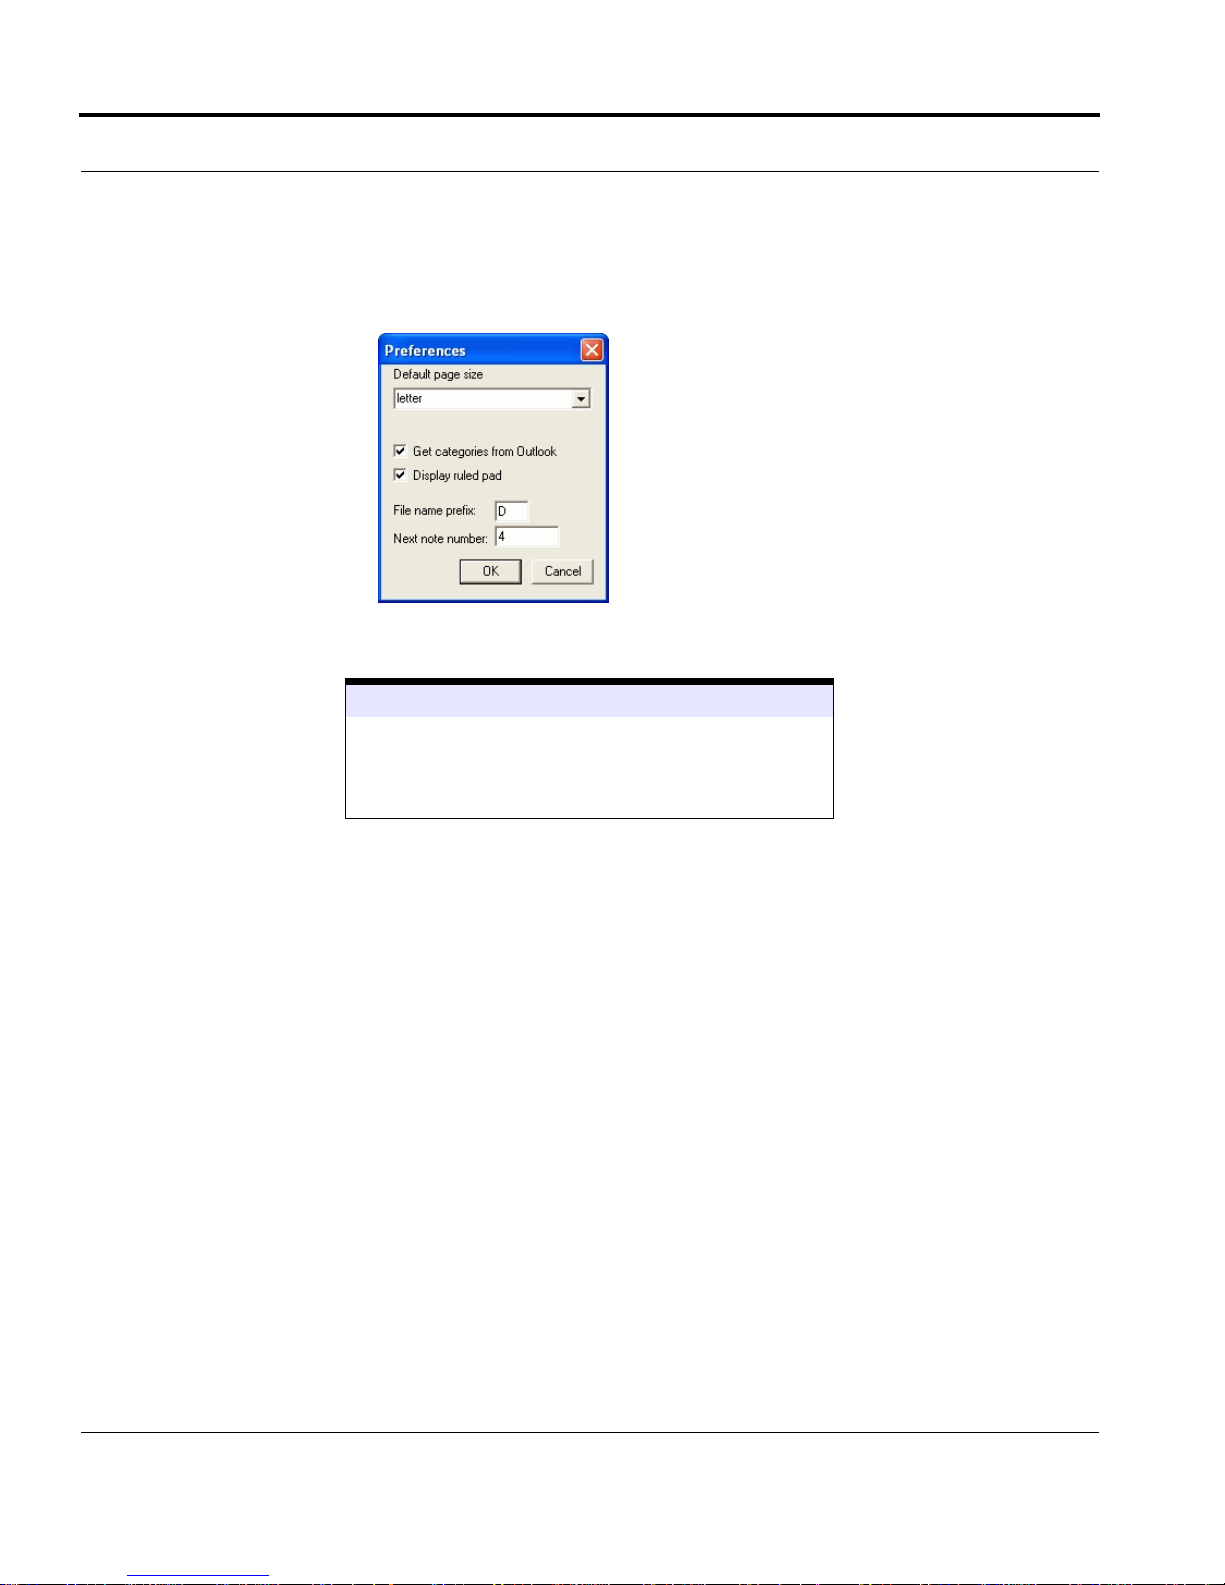
1. In Explorer, open the Setup menu and choose Preferences.
2. Select or clear Display ruled pad.
See Also
“Exporting an Ink Note” on page 52
“Printing an Ink Note” on page 83
“Using Cut, Copy, and Paste” on page 77
Adding to an Ink Note
To add ink to an existing ink note, open the ink note in Note Editor. Then do
either of the following:
• Write on the notepad using the ink pen. This method produces the high-
est resolution inking.
If your writing doesn’t appear in Note Editor, InkNote Manager’s powersaving features have turned off the infrared port. Switch to another application and then switch back, or exit and then restart InkNote Manager.
Either way, InkNote Manager reenables the infrared port.
• Select the Write tool and then use the stylus to draw on the handheld
screen. (In the desktop application, use the mouse or other pointing
device.)
72 www.seikosmart.com
Page 73

Working with Ink Notes
See Also
“Opening an Ink Note” on page 66
“Adding a Page” on page 50
“Drawing Straight Lines” on page 73
“Adding a Highlight” on page 74
“Setting Ink and Highlight Colors” on page 75
Drawing Straight Lines
InkNote Manager can enhance your freehand drawings by inserting perfectly straight line segments in place of ink lines that you draw with the pen,
stylus, or mouse. This feature makes it easy to create professional-looking
floor plans and other illustrations as you sketch.
To draw a straight line:
1. Open the Tools menu and choose Straight lines.
2. If you’re drawing with the stylus or a mouse, select the Write tool.
3. When you want to draw a straight line segment, “double-click” at the
beginning of the line segment. That is, depress the pen point, stylus, or
mouse button; raise the pen point or stylus or release the mouse button;
and then depress it again on the same spot. The computer beeps to confirm that you’re about to create a straight line. (Unlike an ordinary
mouse double-click, you do not release the mouse button—or raise the
pen or stylus—a second time; keep it depressed.)
4. Draw. As you move the pen, stylus, or mouse, a straight line connecting
the beginning of the line segment and the current pen, stylus, or mouse
pointer location appears on the screen.
5. When you reach the end of the line segment, raise the pen point or stylus
or release the mouse button.
6. To draw another straight line, repeat steps 3 through 5.
InkNote Manager by Seiko Instruments 73
Page 74

Editing Ink Notes
Straightening Existing Lines
InkNote Manager can replace existing lines on an ink note with straight
lines. This makes it possible to convert your rough sketches into professional-looking floor plans or other types of illustrations. You can select multiple lines and straighten them all with a single command.
To straighten one or more freehand lines:
1. Select the lines you want to straighten.
2. Open the Edit menu and choose Straighten line.
InkNote Manager replaces each selected line with a straight line that
connects the original line’s starting point and ending point.
Note that InkNote Manager records the starting point and ending point of
each stroke you make with the pen, stylus, or mouse. Therefore, when you
draw polygons or other complex shapes, it’s important to raise the pen point
or stylus or release the mouse button at the end of each line segment. For
example, if you draw a rectangle in one continuous motion and then subsequently select the rectangle and straighten its lines, you’ll be disappointed
with the result. Instead of a neat rectangle, you’ll have a single dot or tiny
line segment directly connecting the points where you began and ended the
original stroke. (If you get such a surprise, you can revert to your original
stroke by opening the Edit menu and choosing Undo straighten line.)
See Also
“Selecting Parts of an Ink Note” on page 76
“Drawing Straight Lines” on page 73
Adding a Highlight
A highlight in an ink note serves a function similar to that of a highlighter
pen on paper documents. A highlight fills a rectangular area with a color of
your choice. As with real felt pens, you’ll get the best results with light colors—yellow, cyan, and magenta. With the other colors, ink strokes in most
colors become difficult or impossible to see.
To add a highlight:
74 www.seikosmart.com
Page 75
Working with Ink Notes
1. Select the Highlight tool.
2. Point at one corner of the area you want to highlight. Drag to the oppo-
site corner.
Setting Ink and Highlight Colors
You can specify any of seven colors for ink strokes and for highlights. Even
if you have a monochrome display on your handheld, InkNote Manager
includes all color information when it saves the file. Therefore, when you
view the ink note on your desktop PC, all colors are properly displayed.
To set colors, follow these steps:
1. Open the Tools menu and choose Writing properties.
2. In Line width, select a width for ink strokes.
3. In Line color, select a color for ink strokes.
4. In Highlight color, select a color for highlights.
The settings you make apply to any lines and highlights that are selected
when you execute the command, as well as lines and highlights you add
thereafter.
Different line widths are not visible on the Palm because of its low screen
resolution, but will appear on the desktop.
InkNote Manager by Seiko Instruments 75
Page 76

Editing Ink Notes
Selecting Parts of an Ink Note
You might want to select some or all of the ink on a note. You need to do
this when you want to move or delete certain parts, or if you want to copy
certain parts to another page, another ink note, or a document in another
application.
Ink that you select appears bold while it’s selected. Selected highlights are
shown as a series of diagonal lines.
To select parts of an ink note, begin by selecting the Select tool.
Then do any of the following:
• To select or deselect an individual ink stroke, click the stroke.
• To select or deselect a highlight, click an edge of the highlight.
• To select all strokes and highlights in an area, drag a rectangle.
• Dragging a rectangle from left to right selects all strokes and high-
lights that fall completely within the rectangle.
• Dragging a rectangle from right to left selects all strokes and high-
lights that are completely or partially in the rectangle.
Items that you select remain selected until you deselect them. You can continue to select multiple items.
To deselect a selected stroke, click it. To deselect a selected highlight, click
one of its edges. To deselect all selected items, click anywhere except on a
stroke.
See Also
“Using Cut, Copy, and Paste” on page 77
“Grouping and Ungrouping Parts of an Ink Note” on
page 78
76 www.seikosmart.com
Page 77
Working with Ink Notes
Using Cut, Copy, and Paste
Once you have selected ink strokes, highlights, or both, you can cut or copy
the selected graphics to the Windows Clipboard. To do so:
• Open the Edit menu and choose Cut or Copy.
• Click the Cut or Copy button on the toolbar (desktop version only).
• Right-click anywhere in the image area and choose Cut or Copy from
the shortcut menu (desktop version only).
Once the selected graphics are on the Clipboard, you can paste them to any
page of any ink note. To paste into an ink note, follow these steps:
1. Display the ink note page where you want the graphics to appear.
2. Open the Edit menu and choose Paste. With the desktop application,
you can use either of these alternative techniques:
• Click the Paste button on the toolbar (desktop version only).
• Right-click anywhere in the image area and choose Paste (desktop
version only).
3. Drag the pasted graphics (which are still selected) to the location you
want.
On a Pocket PC, you can also paste Clipboard contents into other applications that accept stylus input, such as Pocket Word, Contacts (Notes tab
only), and so on. To paste into one of these applications:
1. Select the parts of the ink note that you want to use in another applica-
tion. Cut or copy the information to the Clipboard, as described above.
2. Switch to the other application. Be sure the application is in a mode that
accepts stylus input. (If you’re unsure, try drawing on the screen with the
stylus.)
3. Open the Edit menu and choose Paste.
InkNote Manager by Seiko Instruments 77
Page 78

Editing Ink Notes
Note that you can paste an ink note item from the Clipboard only one
time. (Most types of copied information remain on the Clipboard until
they’re replaced with something else.) If you want to paste an image
more than one time, you’ll need to switch back to InkNote Manager and
recopy it before each paste operation.
See Also
“Selecting Parts of an Ink Note” on page 76
Moving Part of an Ink Note
To move ink strokes, highlights, or both:
1. Select the parts of the note you want to move.
2. Drag to the new location.
See Also
“Selecting Parts of an Ink Note” on page 76
Grouping and Ungrouping Parts of an Ink Note
When you write or draw in InkNote Manager, each ink stroke and highlight
is a separate object that can be independently selected, copied, moved, and
so on. You might want to treat a number of strokes as one object. For example, a signature or a map is easier to deal with as a single object. Grouping
combines multiple ink strokes and highlights into a single object that you
can then select with a single click on any of its component strokes.
To group parts of an ink note:
1. Select the parts of the note you want to group.
2. Open the Edit menu and choose Group Strokes or Group.
To ungroup strokes and highlights that you have previously grouped:
1. Click any of the grouped strokes or the edge of a grouped highlight to
select the group.
78 www.seikosmart.com
Page 79
Working with Ink Notes
2. Open the Edit menu and choose Ungroup Strokes or Ungroup.
See Also
“Selecting Parts of an Ink Note” on page 76
Undoing an Edit
With the exception of adding or deleting a page, you can undo any change
you make in Note Editor. Simply open the Edit menu and choose Undo. On
a Pocket PC or desktop you can choose the command repeatedly to undo
multiple actions. On the Palm there is only one level of undo.
If you undo an edit that you didn’t mean to, open the Edit menu and choose
Redo. You must do so after you choose Undo and before you make any
additional edits.
In the desktop application, you can use the Undo and Redo toolbar buttons
as an alternative to the Edit-menu commands.
Using Handwriting Recognition
On a Pocket PC you can use the operating system’s handwriting recognition
capability to turn your ink notes into text.
Follow these steps to turn ink notes into text:
1. On the Pocket PC, select the text you want to convert.
2. Open the Edit menu and choose Copy.
3. Open the Start menu and choose Notes.
4. Tap New.
5. Open the Edit menu and choose Paste.
InkNote Manager by Seiko Instruments 79
Page 80

Editing Ink Notes
6. Open the Tools menu and choose Recognize.
See Also
“Selecting Parts of an Ink Note” on page 76
80 www.seikosmart.com
Page 81

Communicating Notes
InkNote Manager makes it easy to send ink notes to other computers and
devices. This section explains how to:
• E-mail an ink note
• Beam an ink note
• Print an ink note
Sending Ink Notes
You can send an ink note to other users as an attachment to an e-mail message. To send an ink note to someone who has InkNote Manager, you can
retain its native file format; for others, you can use one of the standard
graphics formats.
If you have another computer with an infrared port, such as a laptop computer or another handheld, you can beam an ink note to that computer. Both
computers must have InkNote Manager installed.
InkNote Manager by Seiko Instruments 81
Page 82

Communicating Notes
And, of course, you can create printed hard copies of your ink notes.
InkNote Manager lets you print multiple note pages on a single printed
page, offers print preview, various zoom levels, and other unique printing
capabilities.
E-mailing an Ink Note
To e-mail an ink note:
1. Open the note in Note Editor.
2. Open the File menu and choose Send via Email or Email Note.
3. Select a file type for the attachment:
• .INK or Native. This is the native file format for InkNote Manager. If
you’re sending to someone who has InkNote Manager, use this format. This is the only format that supports multipage notes in a single
file; the other formats create a separate file for each page. Also, this
format allows the recipient to edit the ink notes with InkNote Manager.
• .BMP. Bitmap graphics files (.bmp file name extension) can be
viewed with Microsoft Paint and most graphics-viewing programs.
The files are quite large.
• .JPG. Files in Joint Photographic Experts Group format (.jpg file
name extension) can be viewed by anyone with a Web browser. (They
can be viewed in most graphics-viewing programs as well.) This format provides fairly small file sizes and excellent compatibility.
• .PNG. Portable Network Graphics files (.png file name extension) can
be viewed with most modern Web browsers and graphics-viewing
programs. Files in this format are small and better quality than .JPG;
some recipients won’t have the appropriate software to view them,
however.
4. On a desktop or Pocket PC, specify the Resolution in dots per inch. (The
default resolution is 72.) Higher numbers produce sharper images, but
larger files.
5. Click OK.
82 www.seikosmart.com
Page 83

Sending Ink Notes
6. Fill in the standard e-mail header address fields: to, cc, and bcc. Tap
Contacts or Lookup to select a name from your Contacts database. Sep-
arate multiple addresses with a semicolon (;).
7. In the subject and body boxes, type a message to go along with your
attached file.
8. Click OK.
Unless your handheld has email capability, the message is now queued to go
to the desktop computer the next time you synchronize. The e-mail program
in your desktop computer actually sends the message.
Beaming an Ink Note
To beam an ink note from one computer to another, both computers must
have infrared ports and have InkNote Manager installed. You must remove
your handheld from the SmartPad portfolio to beam an ink note.
To send an ink note, do either of the following:
• Display the ink note in Note Editor. Open the File or Note menu and
choose Send via Infrared or Beam Note.
• On a Pocket PC, in Explorer, tap and hold the ink note you want to send.
Choose Send via Infrared from the shortcut menu.
To receive a beamed ink note, on the other computer open the File menu
and choose Receive via Infrared.
Align the infrared ports and follow the on-screen instructions.
Printing an Ink Note
In the desktop application, you can print an ink note displayed in Note Editor by opening the File menu and choosing Print. Nothing unusual there, but
when the dialog box appears, you’ll see some options that you might not
have encountered in other applications, as shown below.
InkNote Manager by Seiko Instruments 83
Page 84
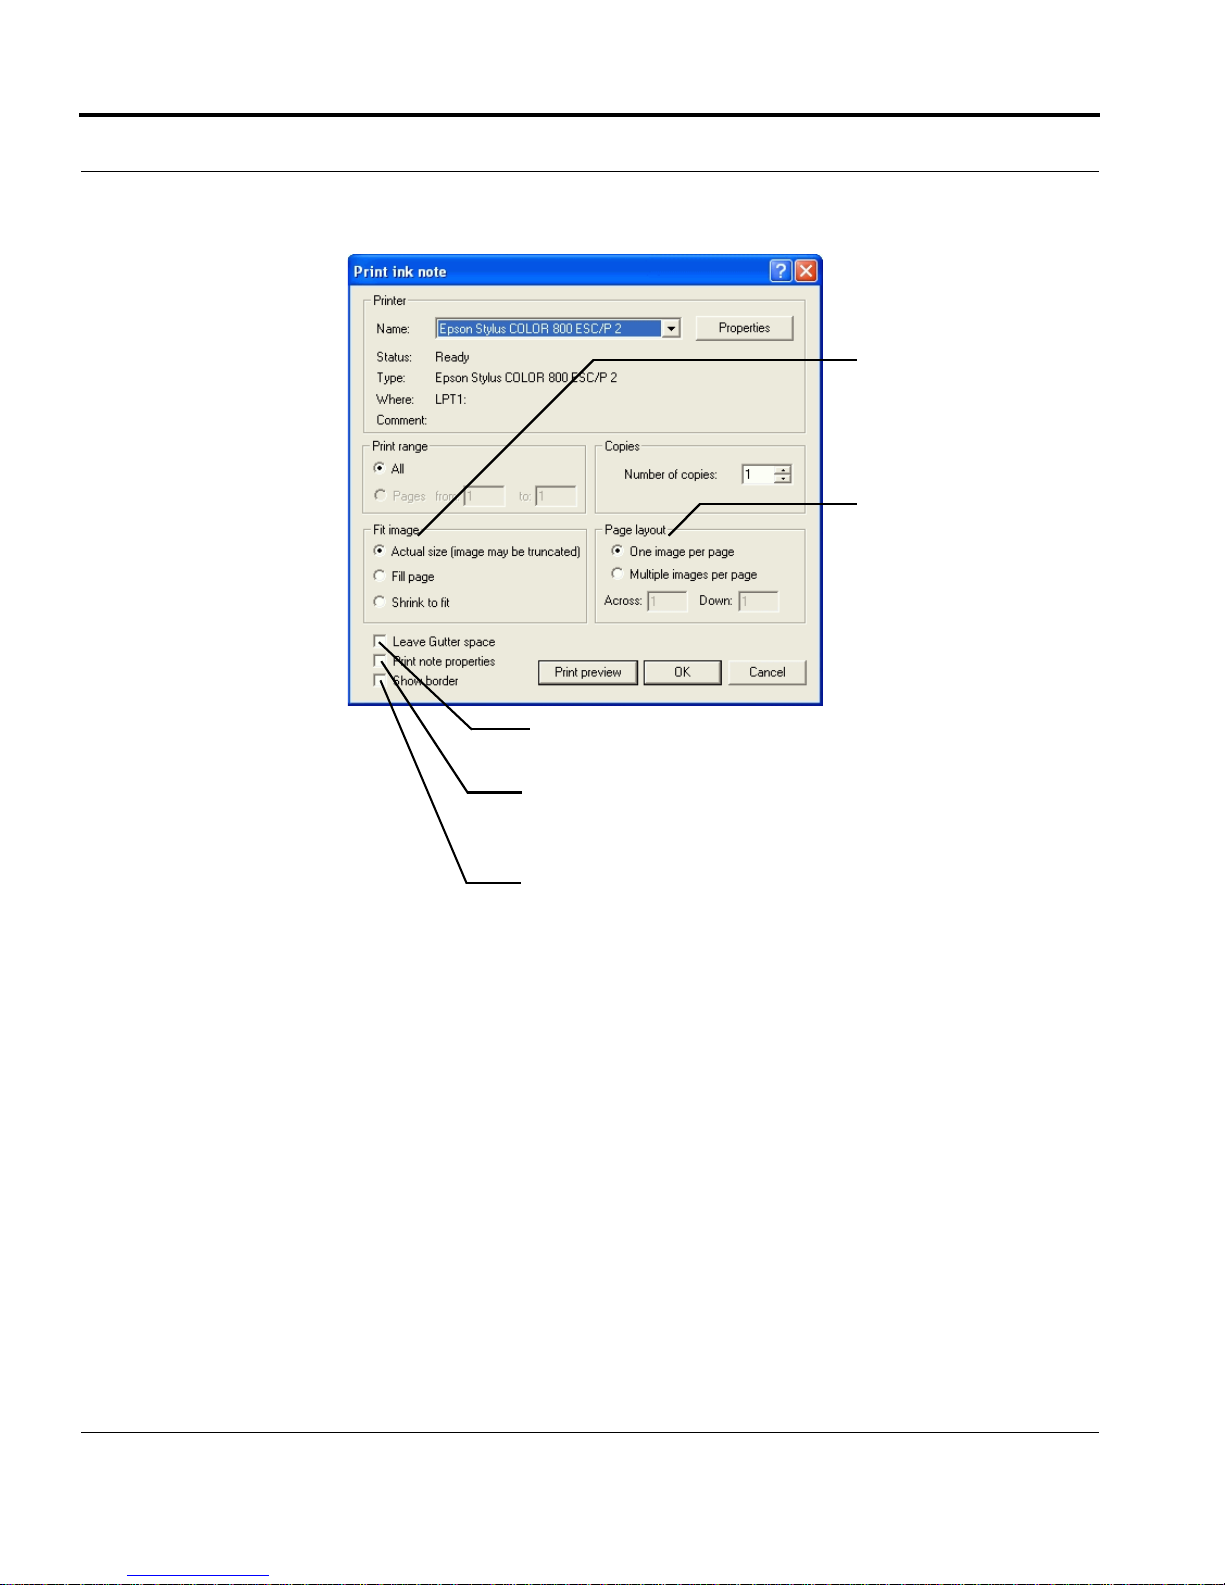
Communicating Notes
These options scale the
image to fit the page.
These options allow you
to print multiple ink note
pages on each printed
page.
Selecting this check box moves the printing to the right,
leaving a binding margin on the left edge of the page.
Selecting this check box causes an ink note’s file name, creation and change dates, categories, and key words to print
at the bottom of each page.
Selecting this check box prints a border around the ink
notes.
84 www.seikosmart.com
Page 85

Archiving and Backing Up
The desktop version of InkNote Manager provides a way to automatically
save ink notes to an archive folder. This section explains how to:
• Set archive options
• View archived ink notes
• Restore archived ink notes
• Archive intermediate versions
Why Archive?
InkNote Manager stores ink notes on your handheld and your desktop computer. They’re easy to find and use.
But at some point you’ll need to delete some older notes. For example, if
your handheld runs low on memory, you might choose to delete some of its
stored ink notes. The next time you connect with ActiveSync, it automatically deletes the same ink notes from your desktop computer. Fortunately,
InkNote Manager by Seiko Instruments 85
Page 86

Archiving and Backing Up
InkNote Manager’s archive feature automatically creates a backup on your
desktop computer.
This feature allows you to keep the collection of ink notes stored on your
handheld lean and small, while still having full access to all your previous
ink notes. Deleting unnecessary ink notes from the handheld provides other,
perhaps unexpected, benefits as well:
• Frees up memory for other applications and documents
• Improves performance because Explorer spends less time reading docu-
ments and creating thumbnail images
• Reduces power consumption, thereby prolonging battery life between
charges
A copy of each ink note that has changed is saved each time you exit
InkNote Manager. To distinguish different versions of the ink notes,
InkNote Manager appends a version number—in the form “(v1),” “(v2),”
and so on—to the file name in the archive folder.
The way the archive feature works is quite simple: when enabled, it retains
a copy of each version of each ink note in a second folder on the desktop
computer. This folder is not synchronized with the handheld by ActiveSync.
You can view the contents of the archive folder in Explorer in exactly the
same way that you view the contents of primary storage location.
Setting Archive Options
To enable or disable automatic archiving:
1. Using Explorer in the desktop version of InkNote Manager, open the
Setup menu and choose Archive options.
86 www.seikosmart.com
Page 87
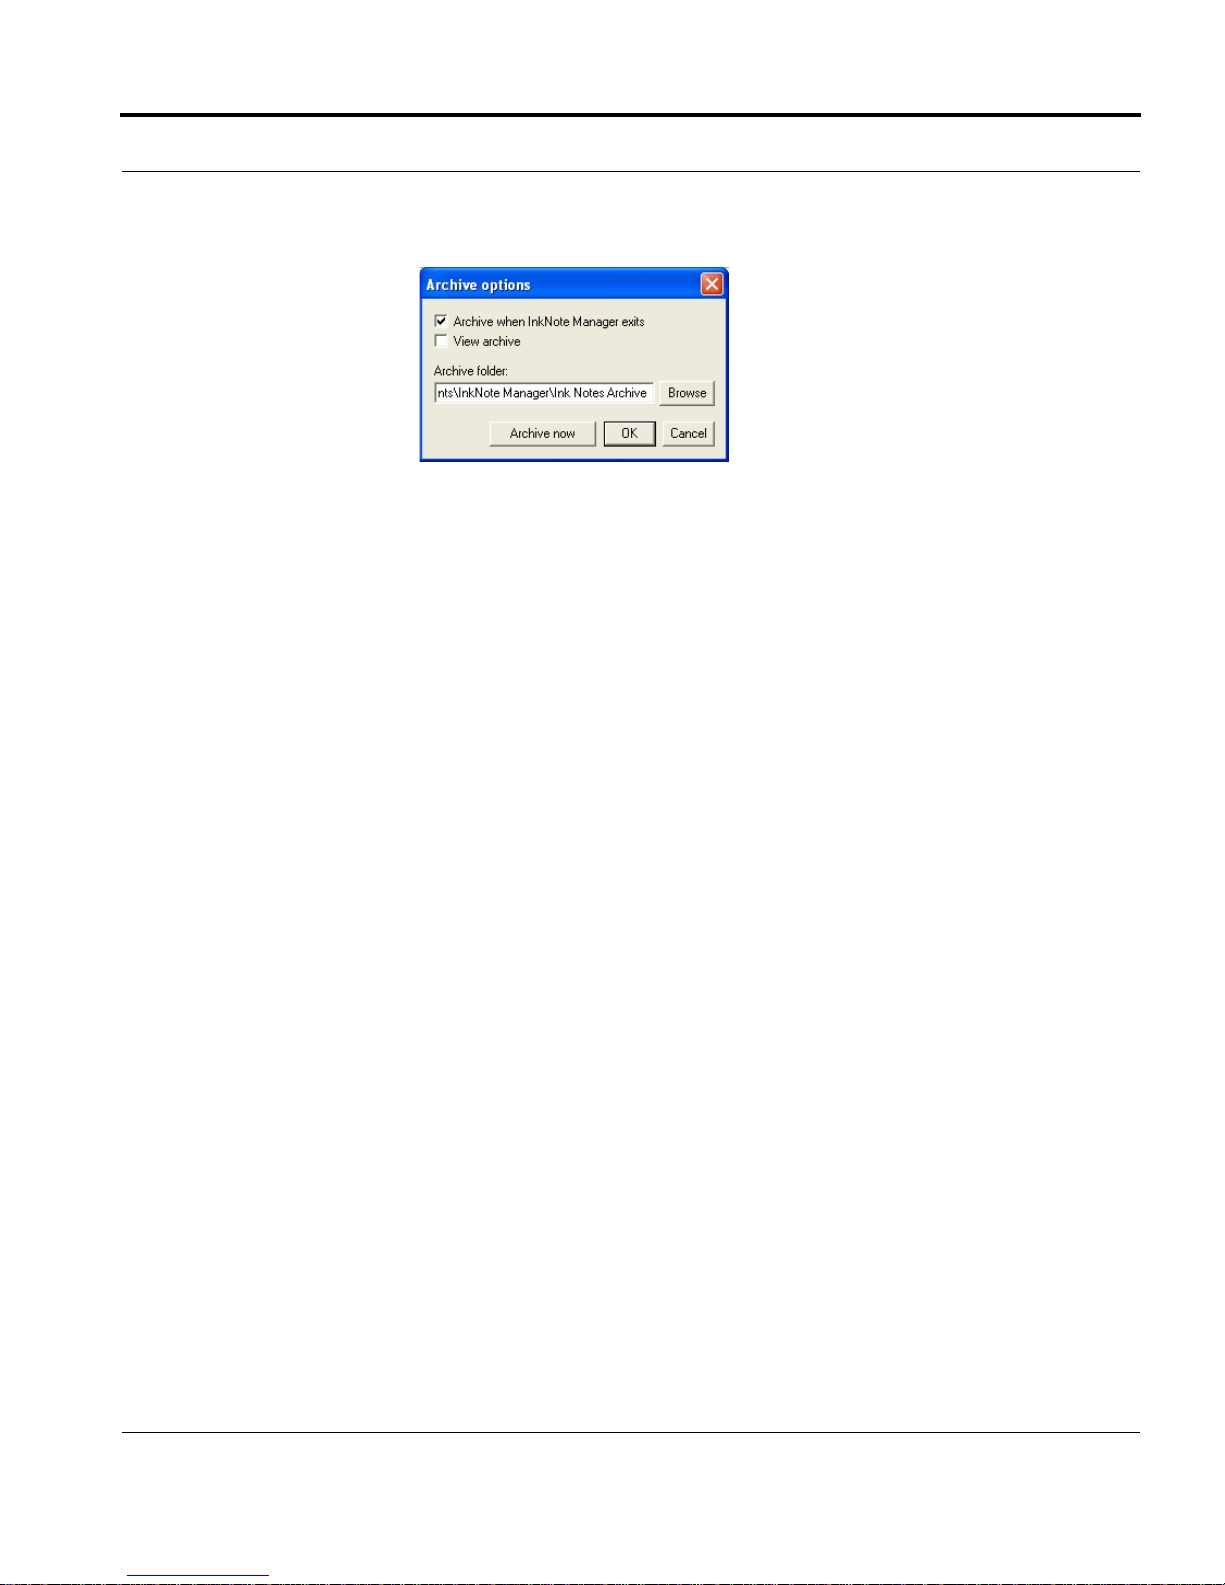
Why Archive?
2. Select or clear Archive when InkNote manager exits.
3. To specify the location of the archive folder, type the path in the Archive
folder box.
Viewing Archived Ink Notes
In Explorer, you can display either the ink notes in the primary storage location (that is, the folder that ActiveSync synchronizes with your handheld) or
the ink notes in the archive folder.
To view the archived ink notes:
1. In Explorer, open the Setup menu and choose Archive options.
2. Select View archive.
3. Click OK.
The title bar in Explorer reads “InkNote Manager (Archive folder)” when
Explorer displays archived ink notes. Each archived ink note is given a
unique name. The names are created by appending “(v1),” “(v2),” and so on
to the name of the original ink note file.
Restoring Archived Ink Notes
If you need to use an archived ink note, you must save it in a different location because archived ink notes are marked read only.
To restore an archived ink note:
1. In Explorer, open the archived ink note that you want to restore.
2. In Note Editor, open the File menu and choose Save As.
3. Enter a name for the ink note.
4. Click Save.
InkNote Manager by Seiko Instruments 87
Page 88

Archiving and Backing Up
This procedure saves the restored ink note in the primary storage location
(that is, the folder that ActiveSync synchronizes with your handheld). It will
appear in Explorer on your Pocket PC the next time you synchronize.
Archiving Intermediate Versions
Ink Note Manager normally archives changed ink notes when you exit the
program. You can also save changed ink notes at other times.
To archive changed ink notes:
1. In Explorer, open the Setup menu and choose Archive options.
2. Click Archive now.
3. Click OK.
88 www.seikosmart.com
Page 89

Advanced Tasks
This section explains additional configuration and maintenance tasks:
• Configure InkNote Manager
• Maintain InkLink
• Maintain SmartPad
• Upgrade or uninstall InkNote Manager
Other Configuration Options
• Set default file name for new ink notes
• Use the SmartPad tablet keyboard
• Configure power-saving options
• Use multiple handhelds
• Use InkNote Manager on a desktop computer only
• Switch between InkLink and SmartPad
InkNote Manager by Seiko Instruments 89
Page 90
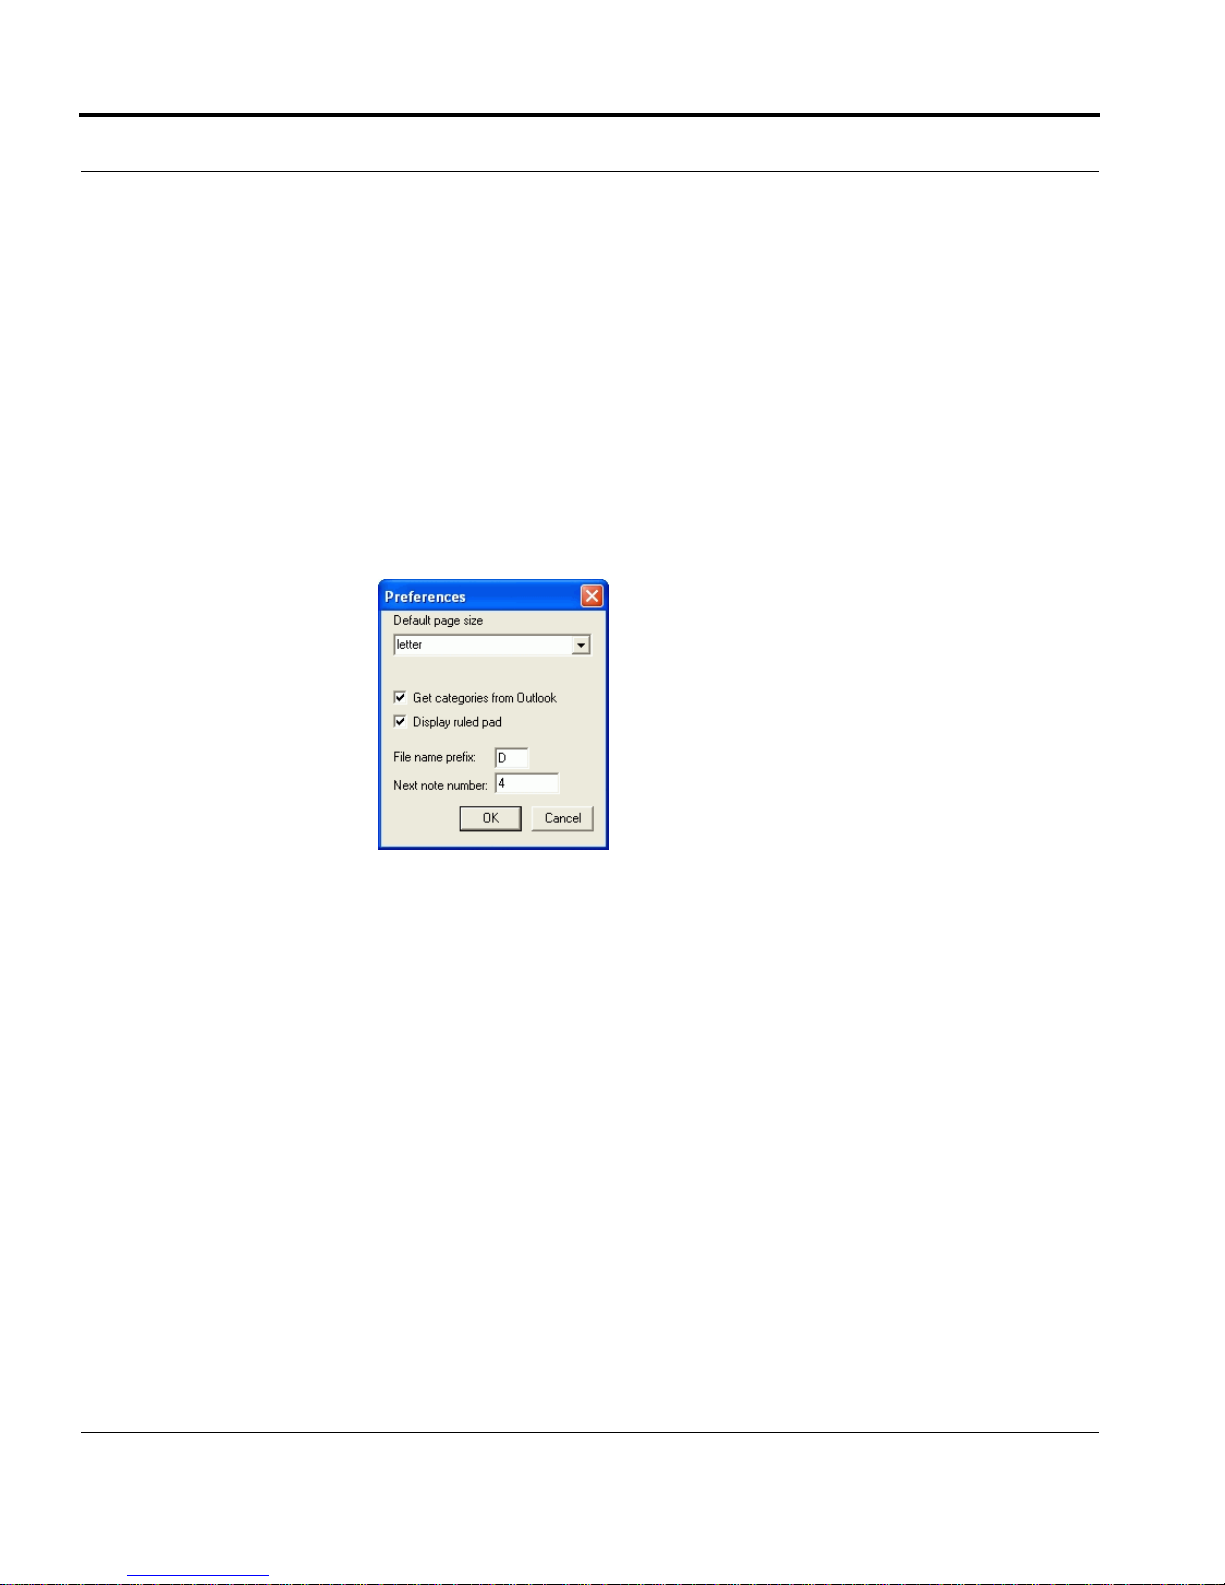
Advanced Tasks
Setting the Default File Name
When you create an ink note, InkNote Manager uses a default file name
when you initially save an ink note. (On a desktop or Pocket PC you can
provide your own more descriptive name when you save a file.) By default,
InkNote Manager uses a letter (N for notes you create on your handheld; D
for notes you create on your desktop computer) followed by a sequential
number.
To change the default file name:
1. In Explorer, open the Setup menu and choose Preferences.
2. Specify the text you want to use at the beginning of each file name in
File name prefix. (On a desktop or Pocket PC you can also set the number of the next note, but this counter increments automatically.)
Using the SmartPad Tablet as a Keyboard
The SmartPad2 portfolio has a keyboard printed on the tablet underneath
the paper pad. On a Pocket PC, you can use this keyboard for entering text
into any program.
SmartPad owners can add this capability using an accessory keyboard label.
The label and installation instructions are included in the SmartPad package.
To configure the tablet keyboard:
90 www.seikosmart.com
Page 91
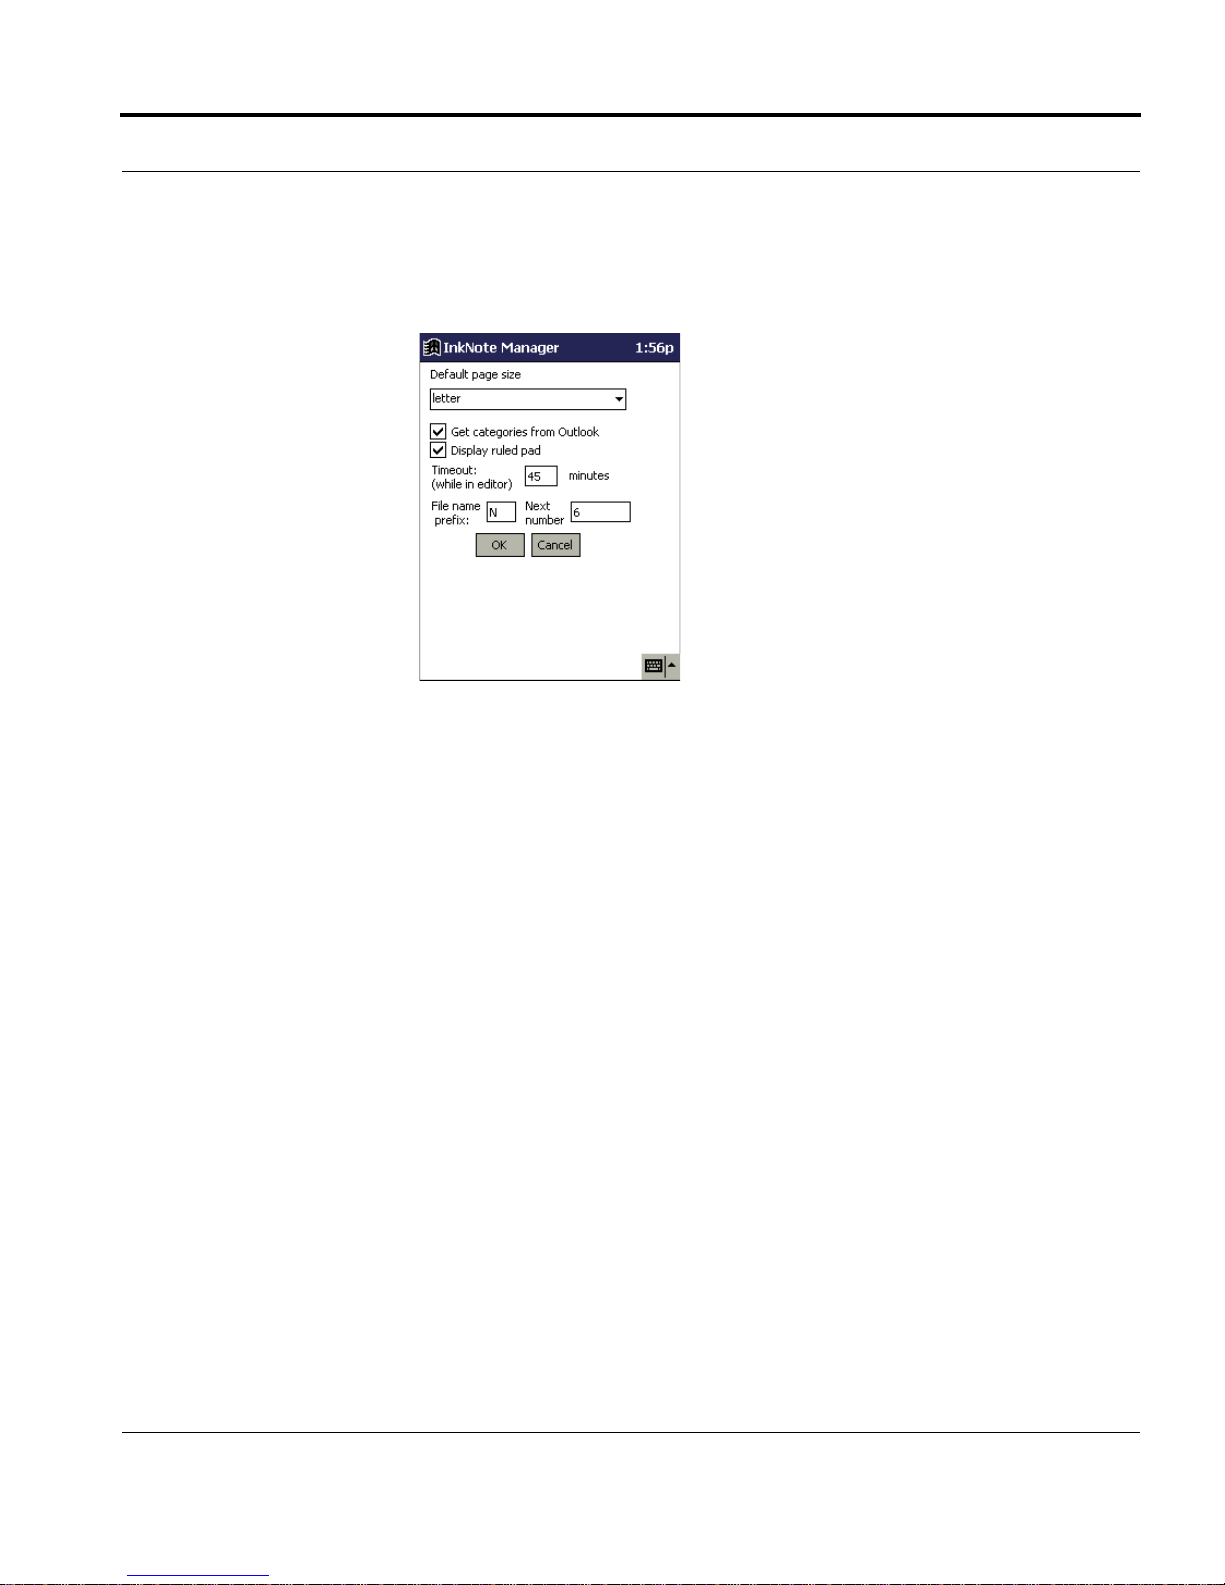
Other Configuration Options
1. In InkNote Manager’s Explorer, open the Setup menu and choose Tabl et
properties.
2. Clear Enable tablet only in InkNoteMgr and select Use tablet as kybd
in other apps.
To use the keyboard tablet:
1. Start InkNote Manager. (Even if you plan to enter text in a different pro-
gram, InkNote Manager must be running, as it provides the tablet driver.
If you exit InkNote Manager, the pen becomes inactive.)
2. Switch to any application.
3. Lift the paper (or remove the pad) and tap the keys using the writing end
of the pen (not the stylus end).
• Tap Int’l to enter the blue characters in the upper right corner of each
key.
• Tap Alpha to switch back to entering the standard black characters.
Power-Saving Features
Using a handheld with InkLink or SmartPad uses more power than using a
handheld alone because they communicate through an infrared link. The
SmartPad tablet and SmartPad pen are self powered. The InkLink pen and
IrDA transceiver are self powered. InkNote Manager includes several features to minimize the power drain on all three devices.
InkNote Manager by Seiko Instruments 91
Page 92
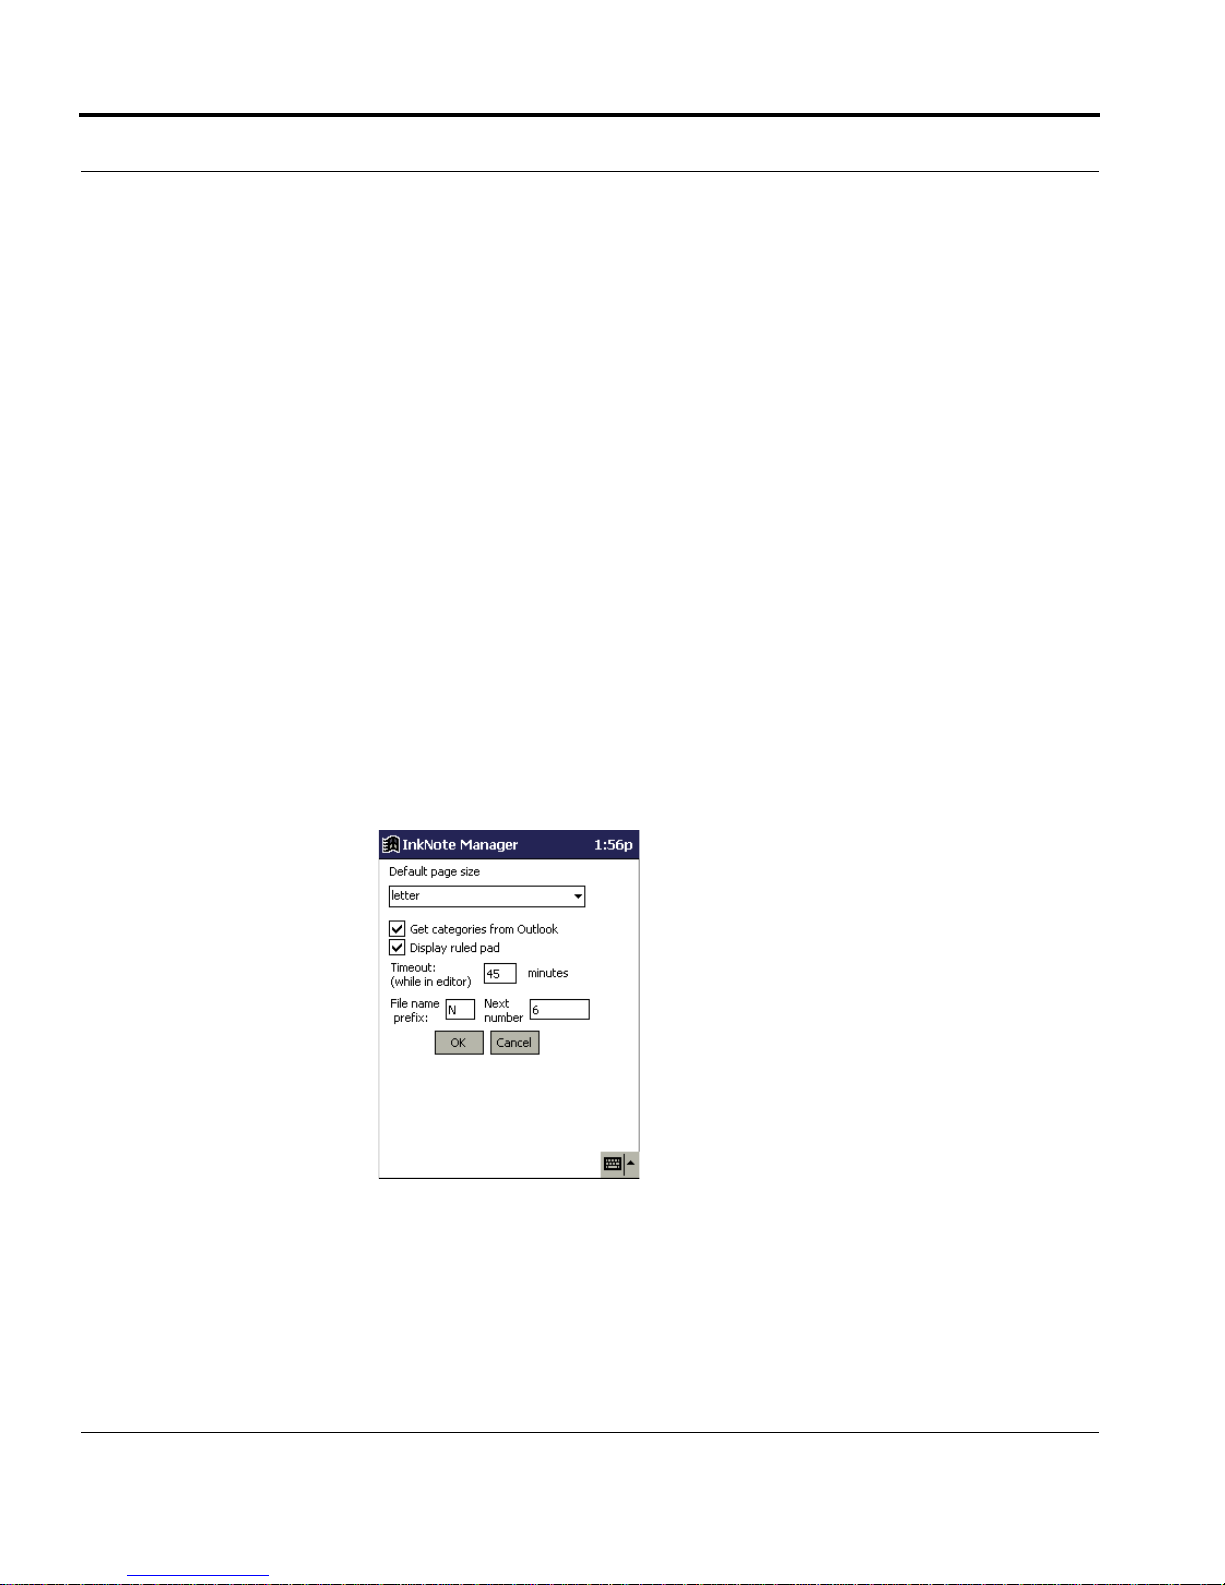
Advanced Tasks
When you use InkNote Manager’s Explorer, the operating system controls
the handheld’s power-management features. To adjust these settings:
1. Open the Start menu and tap Settings.
2. Tap the System tab and tap the Power icon.
3. Specify the time after which the handheld turns off if it’s not used.
Note that when the handheld turns off, the communications link with the
InkLink data clip or SmartPad portfolio is broken. To reestablish communications, tap the File or Setup menu in InkNote Manager. Alternatively, exit
InkNote Manager and restart the program. InkNote Manager always establishes a communications link when the program starts.
When you use InkNote Manager’s Note Editor, a different timer controls
when the handheld turns off. This prevents the handheld from shutting off
too frequently while you’re writing notes.
To set this timer on a Pocket PC:
1. In Explorer, open the Setup menu and choose Preferences.
2. In the Timeout (while in editor) box, specify the time after which the
handheld turns off if it’s not used.
To set this timer on a Palm:
1. Tap the Applications icon.
92 www.seikosmart.com
Page 93
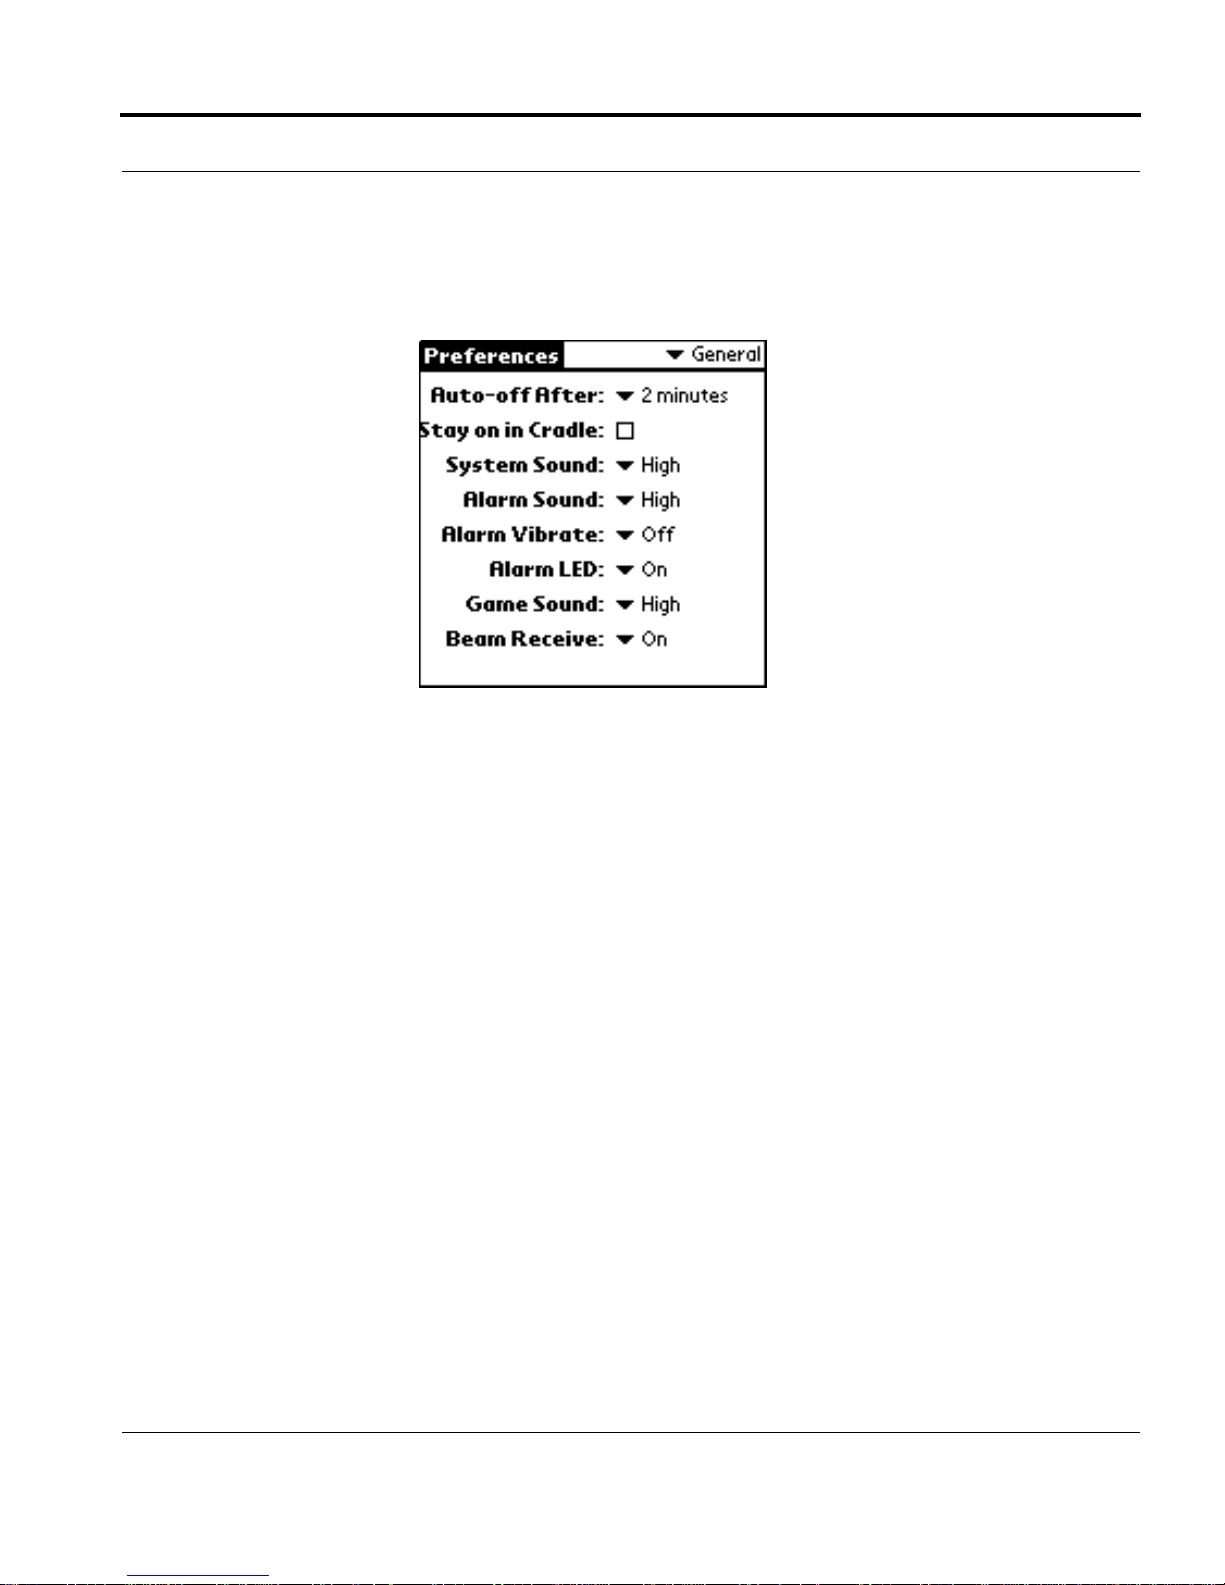
Other Configuration Options
2. Tap the Preferences icon.
3. Tap the pick list in the upper-right corner and select General.
4. In the Auto-Off After pick list, choose a time.
As long as you write on the tablet before the time you specify here elapses,
the handheld screen remains on. (In addition, InkNote Manager prevents the
InkLink data clip or SmartPad portfolio from powering down while Note
Editor is open and the handheld is turned on.) If you pause for a longer time,
the handheld turns off.
If you want to start writing again after the screen has blanked, you must
wake up the InkLink or SmartPad. You do that by pressing the pen to the
paper and holding it until the screen turns on—one to two seconds.
If no pen input is received for a longer period of time, InkNote Manager
closes the port and lets the handheld shut down. To wake the handheld from
this state you must press the power button. (On a Pocket PC, press the
power button two times.)
On a Pocket PC, you can conserve power and extend battery life between
charges in other ways too:
• After syncing with your desktop computer, delete ink notes that you’re
no longer currently using. (The desktop version of InkNote Manager
saves an archive version of deleted ink notes.) This speeds up the pro-
InkNote Manager by Seiko Instruments 93
Page 94
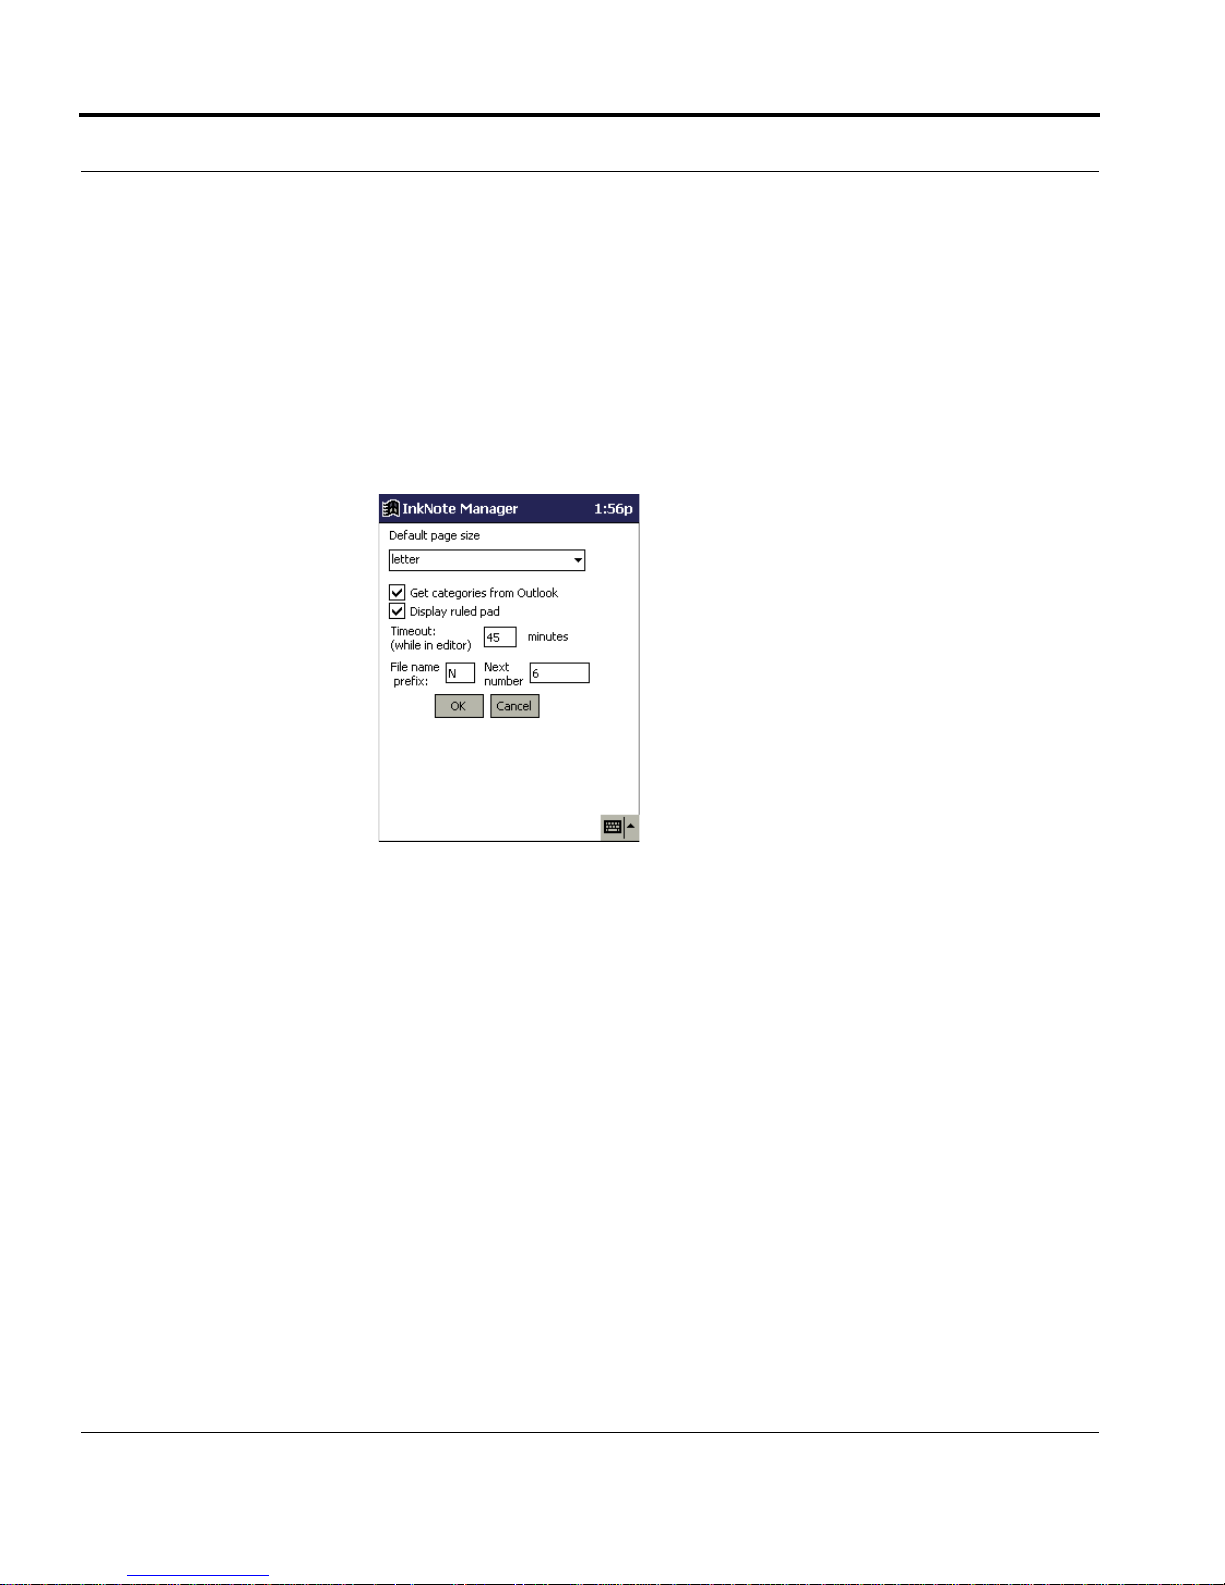
Advanced Tasks
gram and, because it reduces the load on the processor, actually
improves battery performance.
• Exit InkNote Manager when you’re through using it.
You can make other settings in InkNote Manager to conserve battery life on
your Pocket PC:
1. In Explorer, open the Setup menu and choose Tablet properties.
2. Select or clear any of the check boxes:
• Clear Tablet active to disable the device altogether. Doing so turns
off the port and the tablet for maximum power saving; this is effectively the same as closing InkNote Manager. You might want to do
this when you want to write on the tablet without capturing your keystrokes.
• Select Enable tablet only in InkNoteMgr to turn off the port when
you switch to any other program. If this check box is not selected, the
port remains open when you switch to other programs, thereby consuming power. Unless you use the tablet keyboard in other programs,
you should clear this check box.
94 www.seikosmart.com
Page 95

Other Configuration Options
• Select Use tablet as kybd in other apps only if you want to use the
SmartPad keyboard.
See Also
“Using the SmartPad Tablet as a Keyboard” on page 90
Using InkNote Manager with Multiple handheld Devices
You can use InkNote Manager on your desktop to partner with several
handhelds, including both Palm and Pocket PC devices.
Microsoft’s ActiveSync allows you to partner more than one Pocket PC
with a desktop computer—and InkNote Manager supports that feature as
well. ActiveSync assigns a name to each partnered handheld device. It then
uses that name to create a uniquely named folder in your desktop computer’s My Documents folder. That folder contains the files to be synchronized with a particular handheld. (For example, you might have a folder
named My Documents\Color_PocketPC My Documents, which syncs with
the My Documents folder on the device named Color_PocketPC. Other
folders would sync with the My Documents folders of other partnered handhelds.)
Ink notes from a Pocket PC are stored by default in the \My Documents\Seiko Ink Notes folder on a handheld; this folder syncs to the My
Documents\Pocket_PC My Documents\Seiko Ink Notes folder on your
desktop computer, where Pocket_PC is the device name of your handheld.
(Depending on which version of Windows you use, your My Documents
folder might not be in the root directory. But you can always find it by opening My Computer; My Documents appears as a subfolder of Desktop, the
item at the top of the hierarchy.)
To determine (or change) the name of your Pocket PC, follow these steps:
1. On the Pocket PC, open the Start menu and choose Settings.
2. Tap the System tab and then tap About.
3. Tap the Device ID tab.
InkNote Manager by Seiko Instruments 95
Page 96

Advanced Tasks
On a Palm, all of your ink notes are contained inside the InkNote Manager
application. When you sync with your desktop, the ink notes are stored in
the \Program Files\Palm\name\Seiko Ink Notes folder.
To determine the name of your Palm, follow these steps:
1. Put your Palm handheld in the cradle or connect the cable.
2. Press the HotSync button on the cradle or cable.
When HotSync is finished, the device name appears in the upper-right corner of the screen.
Choosing a Sync Partner
Explorer in the desktop version of InkNote Manager displays the notes from
only a single handheld at any time. To select the handheld that interacts with
InkNote Manager:
1. Open the Setup menu and choose Select Sync partner.
2. In the dialog box that appears, select the device you want to sync with.
Specifying a Storage Location for Your Ink Notes
If you use InkNote Manager only on your desktop computer and you do not
synchronize files with a handheld using ActiveSync, you must specify a
storage location for your ink notes before you can create or view ink notes.
To specify a location:
1. On your desktop computer, open the Start menu and choose Programs,
InkNote Manager, Run InkNote Manager.
2. In InkNote Manager, open the Setup menu and choose Define note stor-
age location.
Enter the path to the folder you want to use (or click Browse to navigate to
the folder). Most users prefer to use their My Documents folder or a sub-
96 www.seikosmart.com
Page 97

InkLink Maintenance Procedures
folder of My Documents that they create, such as My Documents\Seiko Ink
Notes.
See Also
“Selecting a handheld as a Partner” on page 38
Switching between InkLink and SmartPad
InkNote Manager works with both InkLink and SmartPad. If you use both,
you can switch between them. To set the pen type:
1. On your handheld, open the Setup menu and choose Select Pen Hard-
ware.
2. In the dialog box that appears, select the device you want to use.
InkLink Maintenance Procedures
• Replace the InkLink pen ink cartridge
• Replace InkLink pen batteries
• Replace InkLink IrDA transceiver batteries
Replacing the InkLink Pen Ink Cartridge
The InkLink pen uses a Staedtler 930 series ball point pen refill that is
widely available at office supply stores. They are available in black, blue,
and red.
To replace an ink cartridge:
1. Fit the tip of the InkLink pen into the center of the top of the cap.
InkNote Manager by Seiko Instruments 97
Page 98
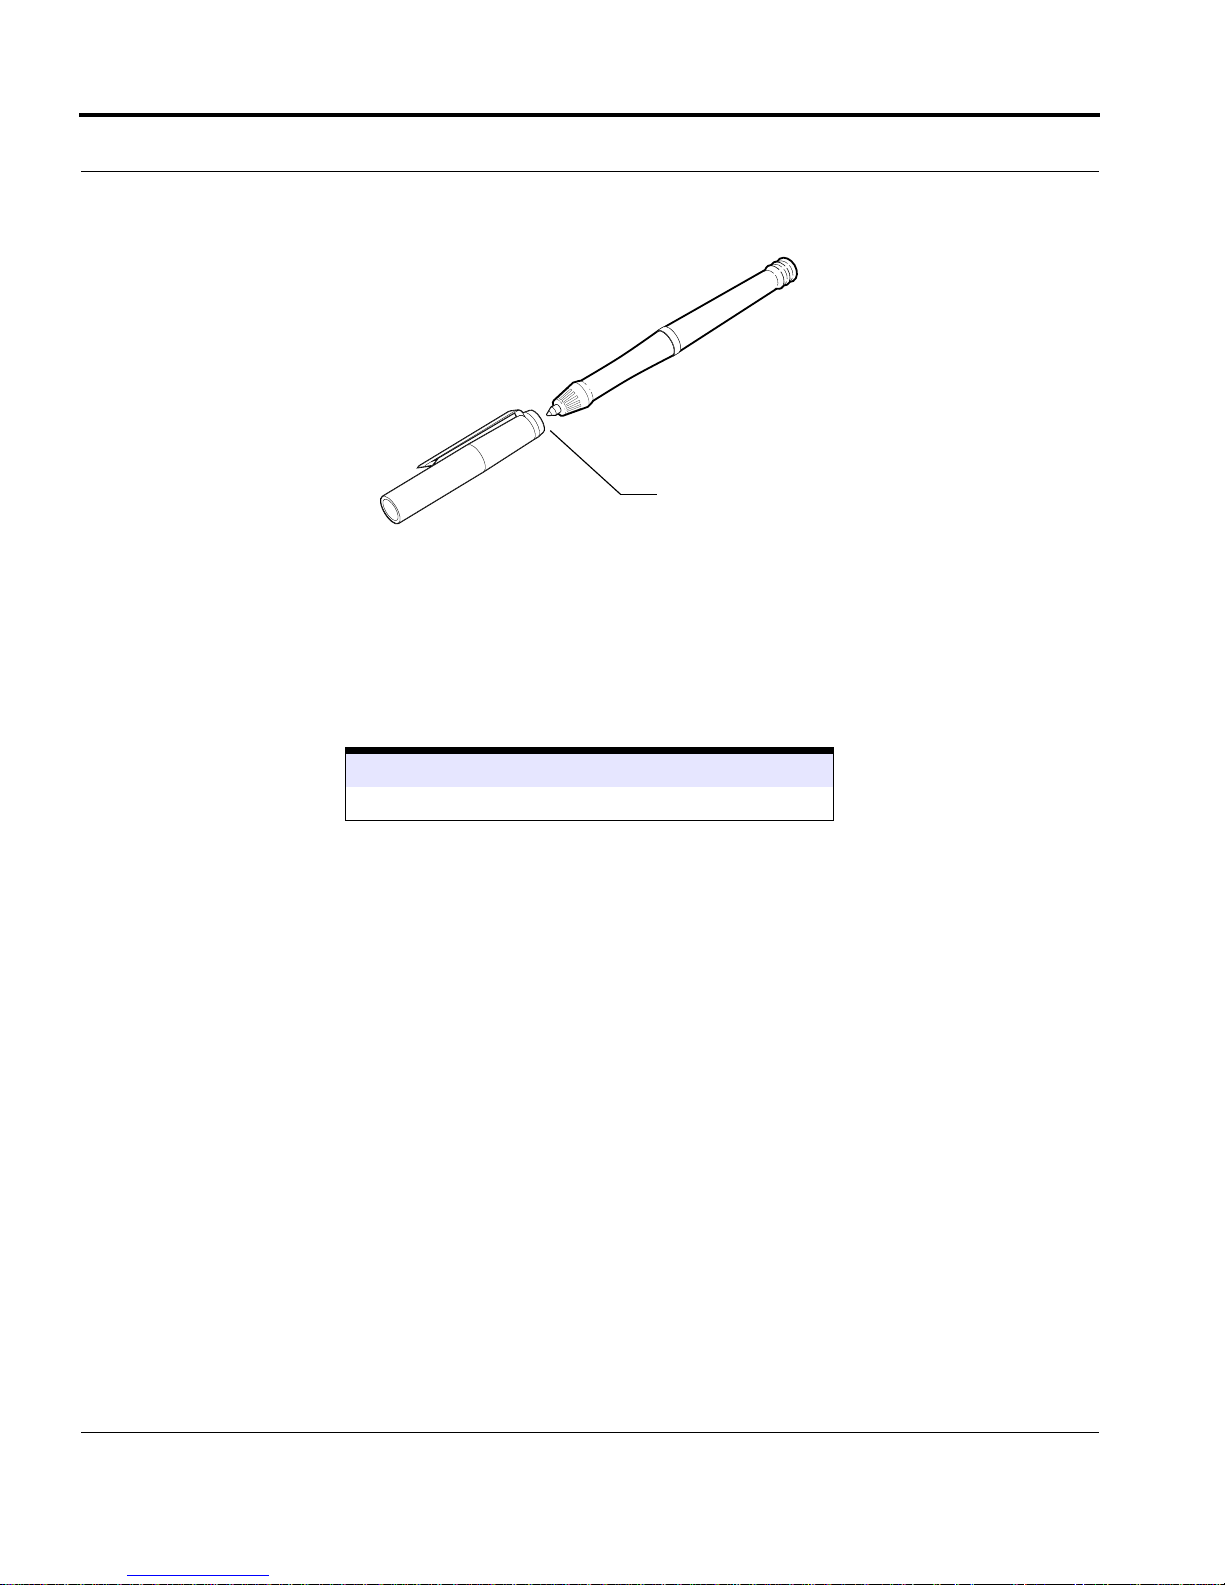
Advanced Tasks
Push point into end of cap.
Pull to remove cartridge.
2. Pull the pen away from the cap holder to extract the cartridge.
3. Remove the protective plastic sleeve from the point of the fresh ink car-
tridge.
4. Place the fresh ink cartridge into the end of the InkLink pen. Press the tip
of the pen onto a hard surface until the cartridge won’t go in any further.
See Also
“Purchasing Supplies” on page 122
Replacing the InkLink Pen Batteries
The InkLink pen is powered by three SR41 button batteries. With regular
use of your InkLink, these batteries should power the InkLink pen for several months.
If you find that your handwritten data no longer appears in InkNote Manager, it’s probably time to replace the batteries in the InkLink pen. You can
find replacement batteries at most stores that sell cameras or electronic
devices.
To replace the batteries:
1. Unscrew the battery cap from the pen.
2. Remove the three batteries. You might have to shake the pen to remove
the batteries.
98 www.seikosmart.com
Page 99
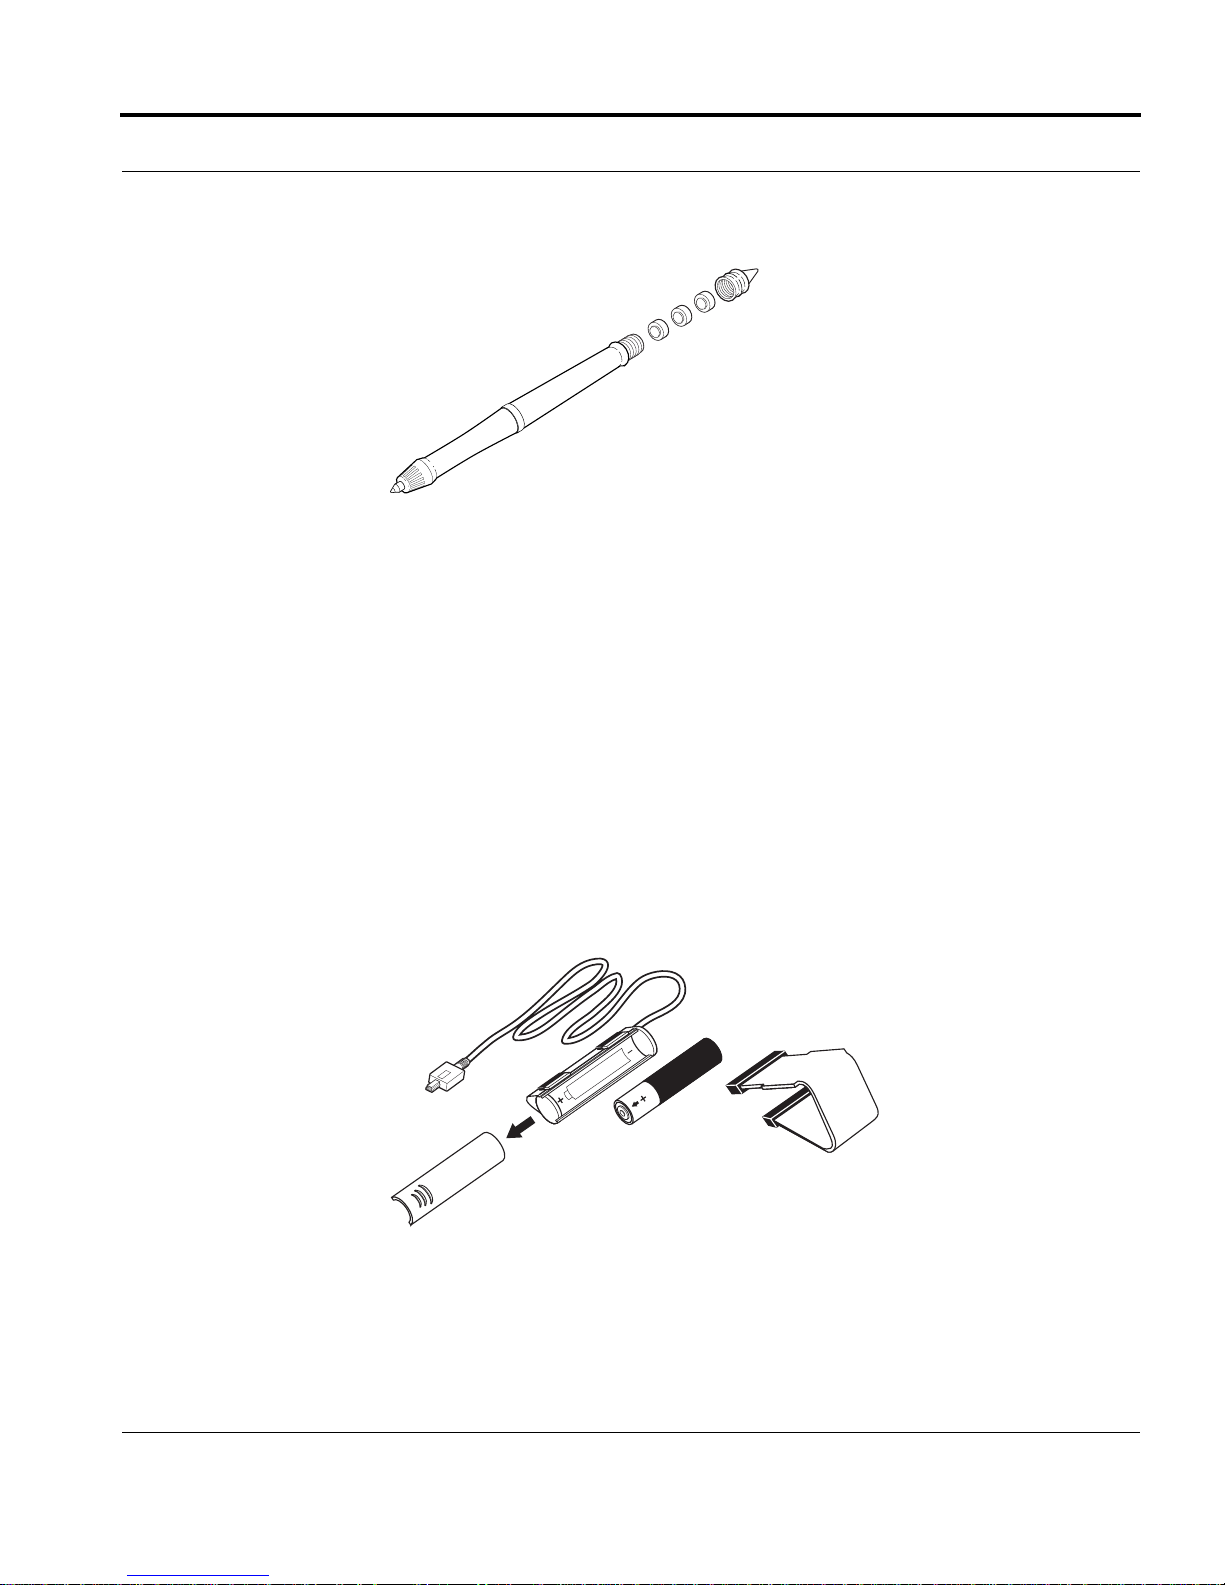
InkLink Maintenance Procedures
3. Insert fresh SR41 batteries. The positive (+) end of the batteries should
all be facing up.
4. Screw the battery cap back on the pen.
Used batteries are hazardous waste and should be disposed of appropriately.
Replacing the InkLink IrDA Transceiver Battery
The InkLink data clip is powered by a single AAA battery in the IrDA
transceiver. (When connected to a desktop, it is powered via the cable.). To
install the battery:
1. Remove the clip by sliding it away from the battery case.
2. Slide the battery cover away from the cable to remove the cover.
3. Insert the battery into the battery compartment. Be sure the positive (+)
end of the battery points away from the cable.
4. Replace the battery cover and slide it into place.
5. Replace the clip.
InkNote Manager by Seiko Instruments 99
Page 100
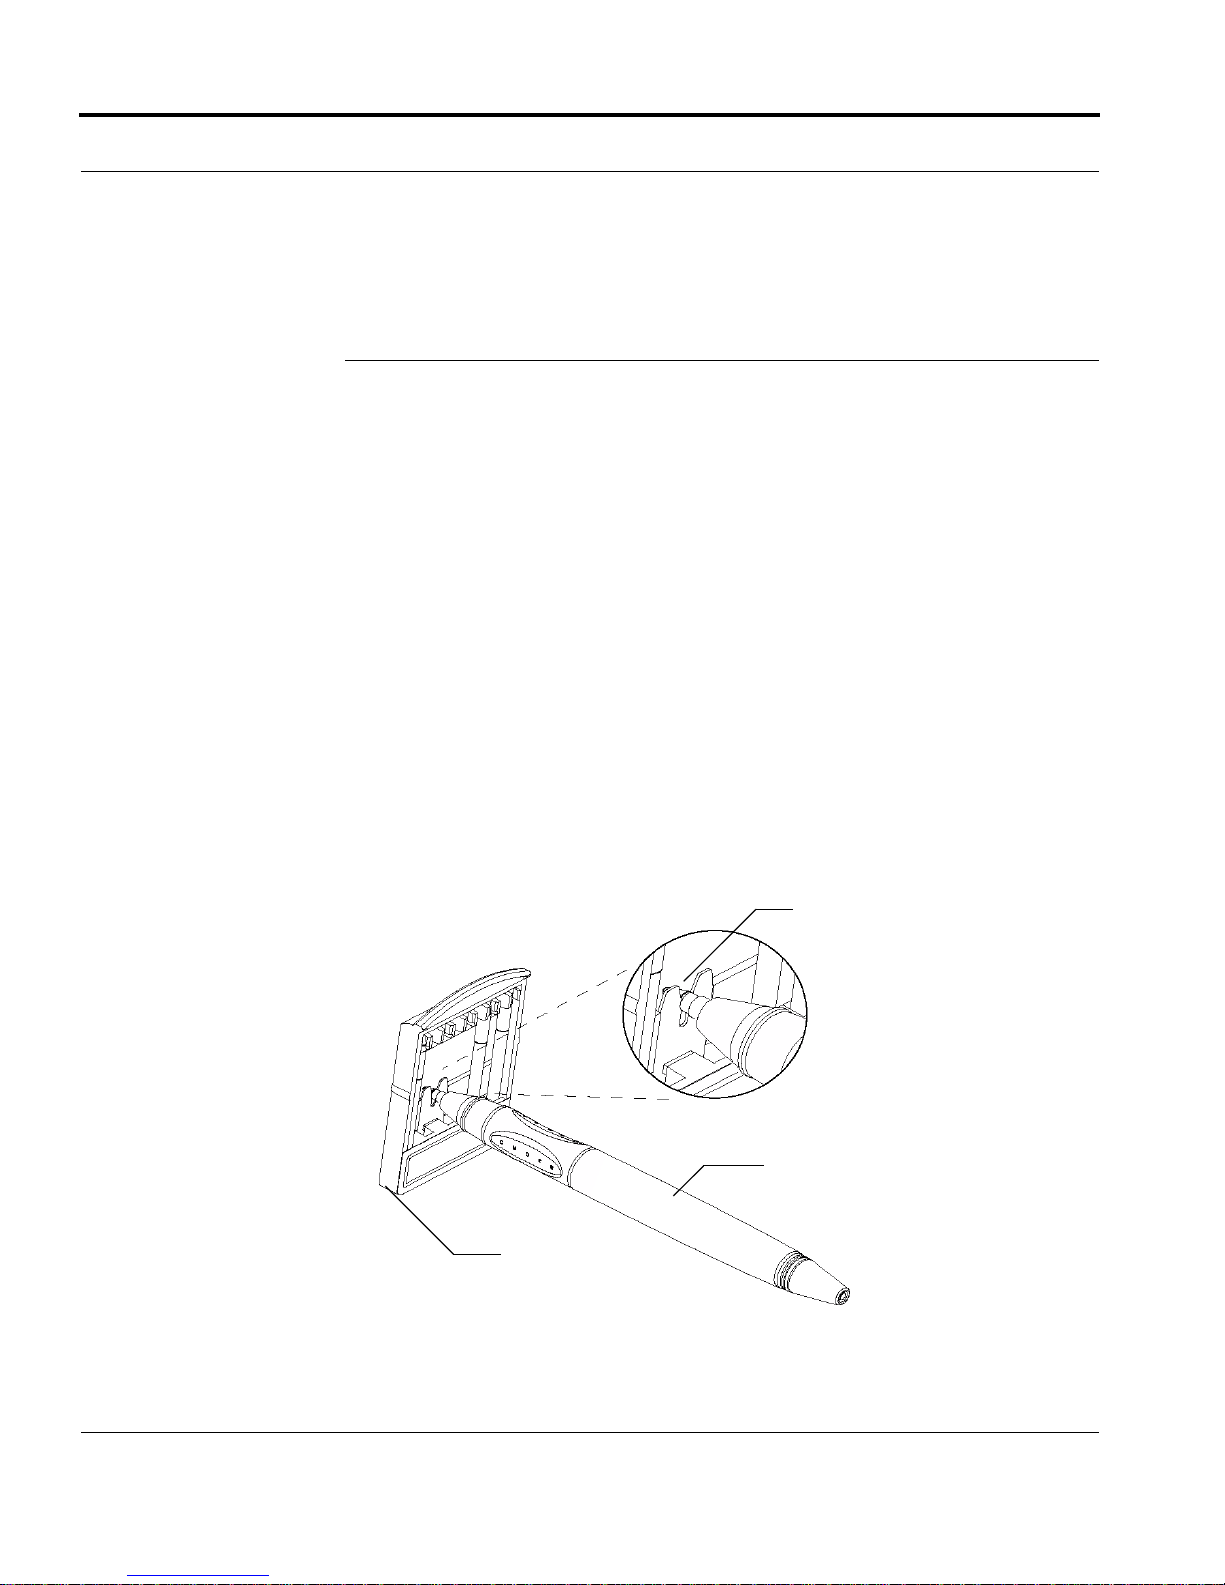
Advanced Tasks
Used batteries are hazardous waste and should be disposed of appropriately.
SmartPad Maintenance Procedures
• Replace the SmartPad pen ink cartridge
• Replace SmartPad pen battery
• Replace SmartPad portfolio batteries
• Attaching Your handheld To SmartPad
Replacing the SmartPad Pen Ink Cartridge
Spare ink cartridges for the SmartPad pen are included with SmartPad. The
spare ink cartridges are located in the storage pocket of the SmartPad portfolio. The spare ink cartridges are stored in a cartridge holder, which also
incorporates a tool that removes expended ink cartridges.
To replace an ink cartridge:
1. Fit the tip of the SmartPad pen into notch of the removal tool.
Fit ridge into tool
SmartPad pen
Cartridge holder
2. Pull the pen away from the cartridge holder to extract the cartridge.
100 www.seikosmart.com
 Loading...