

Page 1
SIGTRONICS “TRANSCOM” CONNECTION & OPERATING INSTRUCTIONS (PORTABLE) SPO-40
Transcom is a voice actuated aircraft intercom with the
capability for transmitting through the aircraft radio by the mere
push of a button. It was designed for simplicity of use. Three
controls are provided on the front panel:
POWER SWITCH —
VOLUME CONTROL —
radio volume is controlled conventionally.)
SQUELCH CONTROL —
turn-on. This control is normally used to adjust for variations in
background noise found in different aircraft.
Two Microphone Input Jacks, labeled
They accept the standard aircraft mike plugs (i.e. carbon or
amplified dynamic microphone).
Two Output Jacks are provided, labeled
the standard .250” aircraft headphone plug.
Two jacks are provided on the panel, labeled
accept the standard aircraft .206” mike plugs such as found on
aircraft push-to-talk switches. Transmitting from both positions
Turns unit on and off. (10-33VDC)
Controls the intercom volume. (The
Controls the threshold of amplifier
MIKE,
HDPH
XMIT SW
are provided.
which accept
which
is possible on a one-at-a-time basis. Each position disables the
other while transmitting. Yoke mounted, built-in switches may
be used, however, the other mike/mikes will not be disabled.
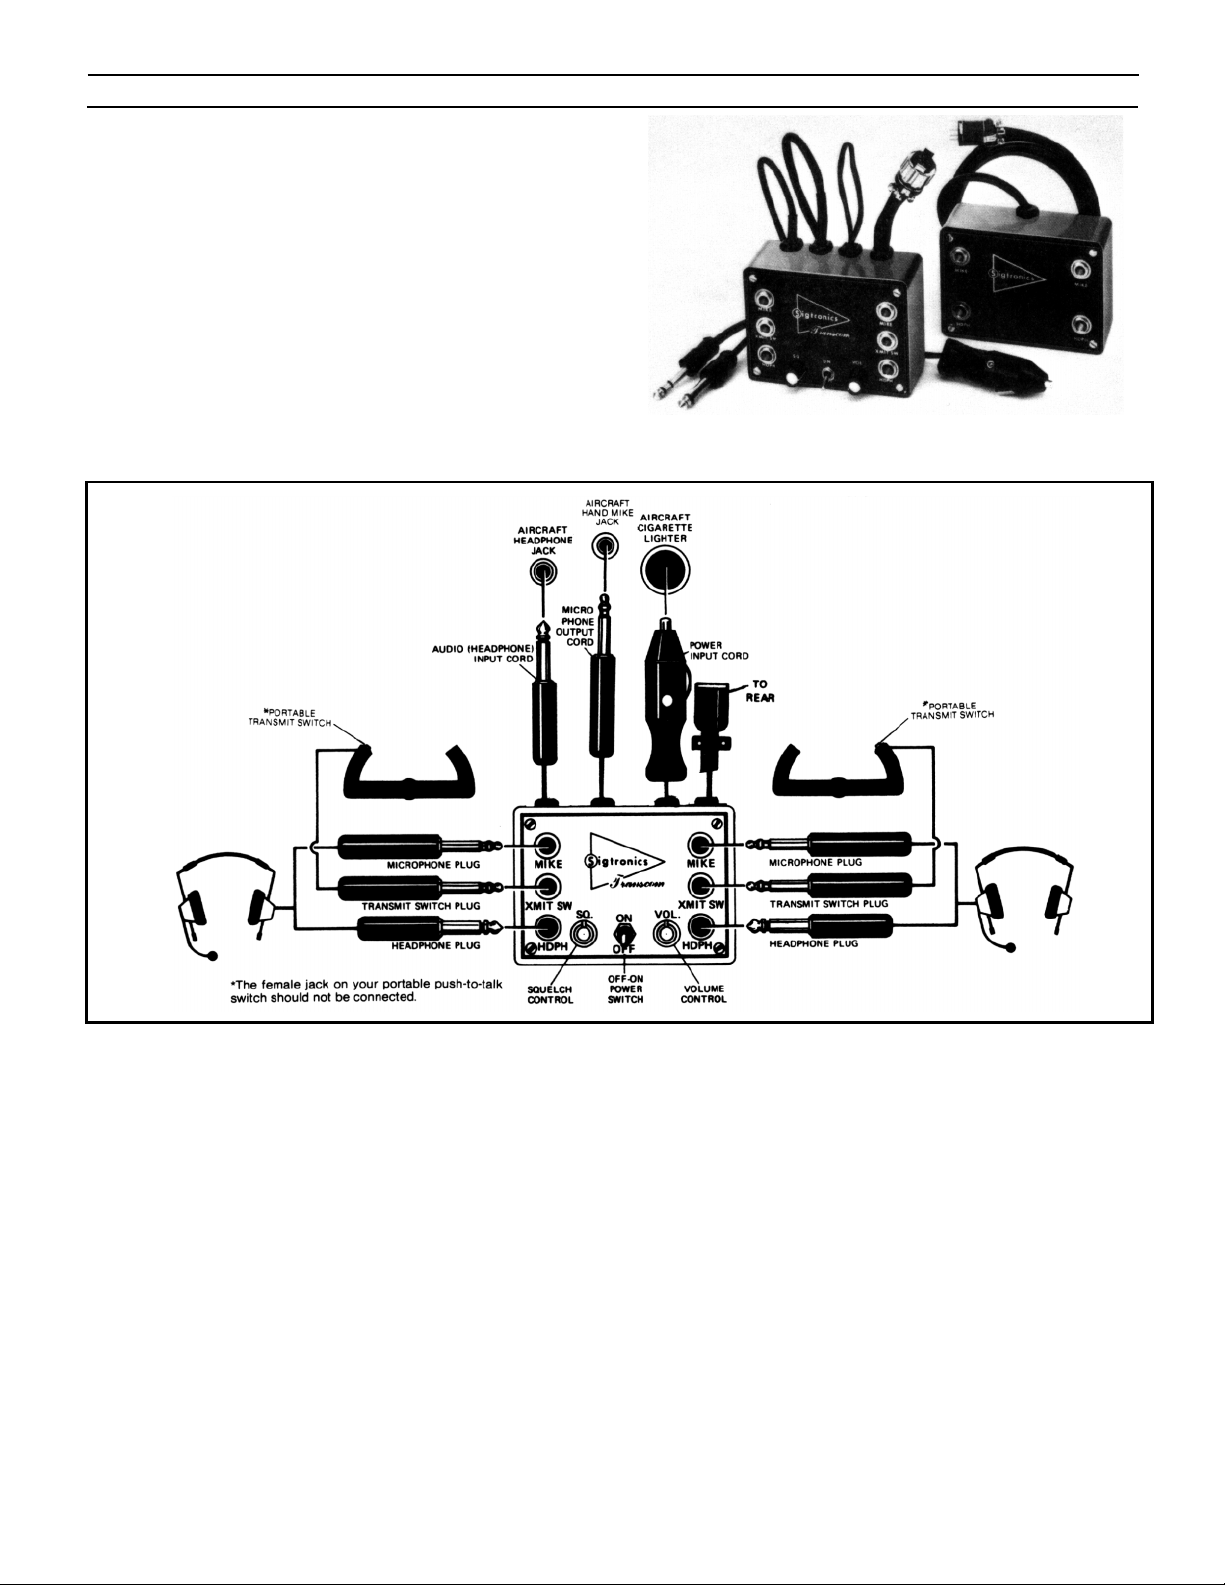
SIGTRONICS TRANSCOM
CONNECTION SCHEMATIC
(PORTABLE)
4-way
HOW TO USE THE TRANSCOM:
STEP 1. — INTERCOM MODE
A. Connect the Sigtronics TRANSCOM as illustrated in the
Transcom Connection Schematic. Be certain that the transmit
switch and corresponding headset mike plugs are connected on
the same side as shown in the schematic, since the mike input
on the opposite side is disabled when a transmit switch is
actuated.
B. Put on headset/s and position the boom mike close to the
mouth, as is the practice with a hand-held mike. Voice clarity is
best when mike is at one side of the mouth and ¼” from the lips.
C. Set audio panel to “Headphone” position, if applicable.
D. Turn power “on” and set Volume Control to a low level. (¼th
1/3
rd open for best signal to noise ratio).
to
E. Adjust Squelch Control clockwise until background noise
becomes audible. Then rotate counter-clockwise
until noise dimishes. Now make
until voice triggers unit on. (This procedure is necessary because
the squelch system is a “fast attack, slow off” circuit). Small
adjustments may be necessary if aircraft background noise
changes significantly; such as from idle to full power.
small, incremental
small
amounts
adjustments
STEP 2. — TRANSMIT MODE
When ready to transmit with the unit connected as in Step 1.,
depress the Transmit Switch and your voice is automatically
transmitted via the aircraft radio. When transmitting, your voice
is heard by all aircraft occupants that are wearing headsets, via
radio sidetone return and “intercom provided” simulated
sidetone. You may also transmit from the pilot’s position with
the unit “off.”
A small square, trimmer potentiometer is provided inside the
unit for adjusting the mike input level to the radio. In the event
of overmodulation or reports of weak transmissions, an
appropriate adjustment can be made. Clockwise rotation of the
screwdriver adjustment increases the mike output level.
STEP 3. — RADIO MONITORING
When the unit is connected as in Step 1., radio monitoring is
automatic. The radio monitor circuit is always active even with
the TRANSCOM power switch in the OFF position, or in the
event of Transcom failure. No switching is necessary. A “fail
safe” feature.
HELPFUL HINTS ON TRANSCOM OPERATION
Position the boom mike in close proximity to the mouth, as is
the practice with a hand-held mike, for best results.
Maintain
A fusing resistor is located within the unit and may be
replaced by a qualified person should the need arise.
minimum acceptable volume.
Form SPO-40-IS, Rev. A
 Loading...