

Page 1
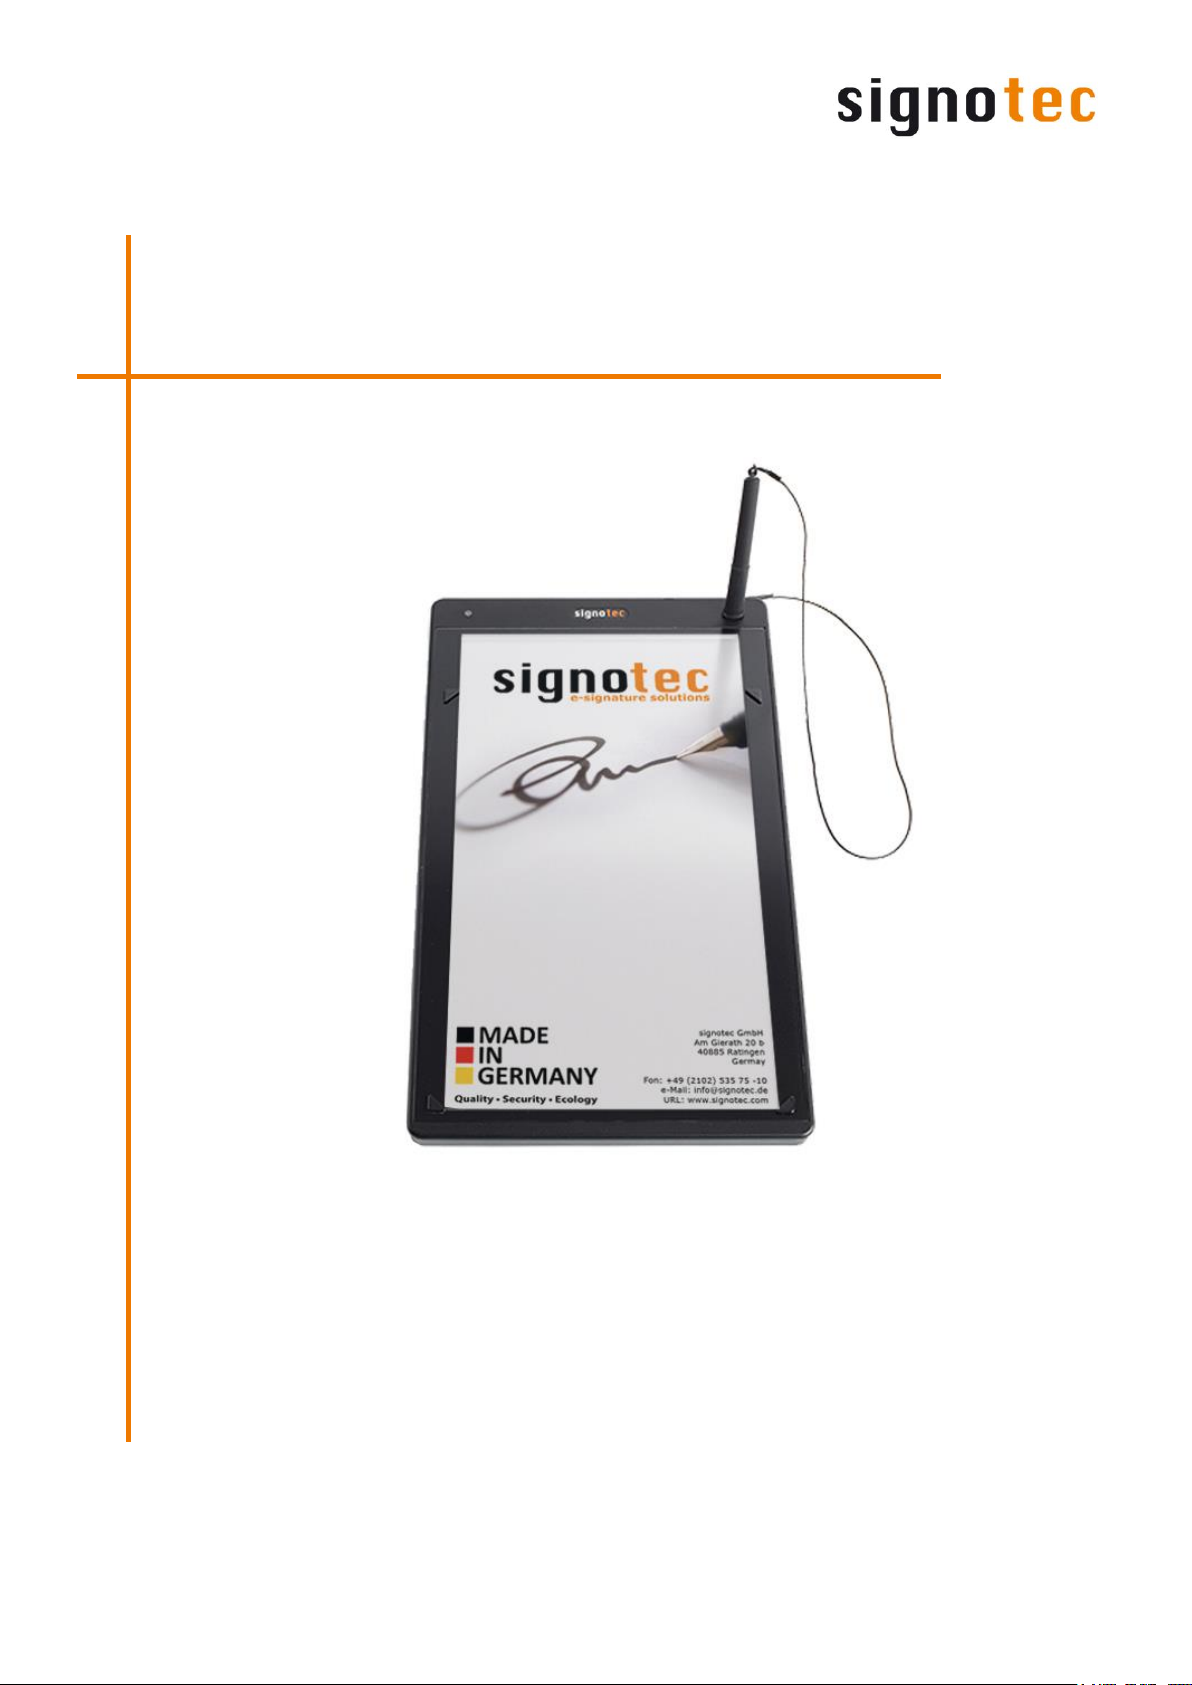
Signature Pad
signotec Alpha
User manual
signotec GmbH
Am Gierath 20 b
40885 Ratingen, Germany
(+49-2102) 535-7510
www.signotec.com
[email protected]
Version 1.8 as of May 15, 2019
Page 2

© 2000 – 2019 signotec GmbH
User manual signotec Alpha
Page 2 of 16
Page 3

© 2000 – 2019 signotec GmbH
User manual signotec Alpha
Page 3 of 16
Contents
1 THANK YOU... 5
2 PRODUCT DESCRIPTION 5
3 CHECKING PRODUCT UPON RECEIPT 5
4 PRODUCT 6
4.1 FRONT VIEW 6
4.2 BACK VIEW 7
4.3 BOTTOM VIEW 8
4.4 POWER SUPPLY 9
4.5 USB CABLE 9
4.6 SPECIAL PEN 9
4.7 REPLACEABLE CARTRIDGES 10
4.8 PAPER GUIDE 10
5 ACCESS TO THE SERVICE MENU 11
5.1 CONNECTION TYPES 11
5.1.1 Ethernet 11
5.1.2 Operation on terminal server or remote desktop (VCOM) 12
5.1.3 USB Connection 13
5.2 ADJUSTING THE CONTRAST 13
6 SENSOR CALIBRATION 14
7 PEN AND PEN HOLDER 14
8 MOUNTING ON DESK MOUNT 15
9 GENERAL SAFETY NOTES 15
10 MAINTENANCE AND CLEANING 15
11 SUPPORT – CONTACT 16
Page 4
© 2000 – 2019 signotec GmbH
User manual signotec Alpha
Page 4 of 16
Legal Notice
All rights reserved. This document and the components it describes are products copyrighted
by signotec GmbH based in Ratingen, Germany. Reproduction of this documentation, in part
or in whole, is subject to prior written approval from signotec GmbH. All hardware and software names used are trade names and/or trademarks of their respective manufacturers/owners. Subject to change at any time without notice. We take no responsibility for any errors
that may appear in this documentation.
Document History
Version
Date
Person responsible
Status/note
1.0
29 November 2013
Loris Soldan
Document created
1.1
28 January 2014
Arne Brandes
Revisions
1.2
24 March 2014
Andreas Brockmöller
Extended Chapter 6.1.2
1.3
26 August 2014
Andreas Brockmöller
Added “Gateway” to Service Menu
Ethernet
1.4
29 July 2016
Peter Oellers
Content reduced (Breakdown to “General Safety Notes” and “User Manual”)
1.5
25 August 2016
Peter Oellers
Several Corrections
1.6
23 January 2017
Peter Oellers
Optimizations
1.7
27 April 2017
Peter Oellers
Optimizations
1.8
15 May 2019
Peter Oellers
Optimizations
Page 5

© 2000 – 2019 signotec GmbH
User manual signotec Alpha
Page 5 of 16
1 Thank you...
... for having chosen one of signotec’s products. You purchased a robust, durable and hightech solution that is unrivaled in this market segment. The LCD Signature Pad signotec Alpha
serves as an input device for signatures and is used to capture writing characteristics (biometrics) accurately and in a high resolution as well as to display textual and graphical information
on the LCD (= Liquid Crystal Display). This LCD visualizes the signature on the pad in real
time. Furthermore, the supplied software displays the signature on the computer monitor in
real time. You can create interactive buttons and navigate through an unlimited number of
pages on the pad. Text, graphics and entire document pages in their original size are displayed and stored in the pad for rapid retrieval. To ensure that the content displayed remains
private, the device has been equipped with the “Privacy Viewing” technology: The contents
on the pad are difficult to see from the side, but are displayed clearly for the signer.
Before you start using the device take note of all information, warnings and precautions to ensure that your pad lasts for many years to come. Failure to comply with these precautions will
result in the loss of your warranty and signotec will not accept any responsibility for the repair
or replacement of the pad.
The LCD Signature Pad signotec Alpha was designed for the use in an office- or at the counterenvironment and was tested in exactly these operating settings. The use of the device in
other fields of application may damage it and is undertaken entirely at the user’s own risk.
Avoid extreme temperature fluctuations. The pad is neither waterproof nor explosion-proof.
The LCD Signature Pad signotec Alpha and the supplied pen were designed for joint use. Using
these two components of the product separately will void your warranty.
2 Product description
The LCD Signature Pad signotec Alpha is an A4-sized pad “Made in Germany” produced by
signotec’s development department. With the background of decades of experience and ex-
pertise the signotec Alpha attracts by its size as well as by the so- called EMR (Electro- Magnetic Resonance) technology used to capture pen coordinates and print parameters.
With its screen size of 15.6” it is the only signature pad on the market that can display A4
documents in their original size. It is not simply a monitor extension, but a ‘genuine’ signature
pad with its known and proven product characteristics and the same free and powerful programming interface.
The device meets the written form requirement that applies to credit agreements, for example: The signer places the original document on the pad and signs the paper as well as the
PDF simultaneously.
3 Checking product upon receipt
Check immediately upon or after receiving the product whether all of its components have
been delivered. If any component is missing, defective or visibly damaged, please contact
signotec or the signotec dealer you bought the product from within one business day. If you
do not report a missing, defective or visibly damaged component within one business day of
receiving the product, the product will be deemed compliant and accepted. After this period of
time, it will be up to the discretion of the dealer whether missing, defective or visibly damaged components will still be supplied subsequently or replaced. It is your responsibility (as
the customer) to demonstrate the non-conformity of the product upon receipt.
Page 6
© 2000 – 2019 signotec GmbH
User manual signotec Alpha
Page 6 of 16
4 Product
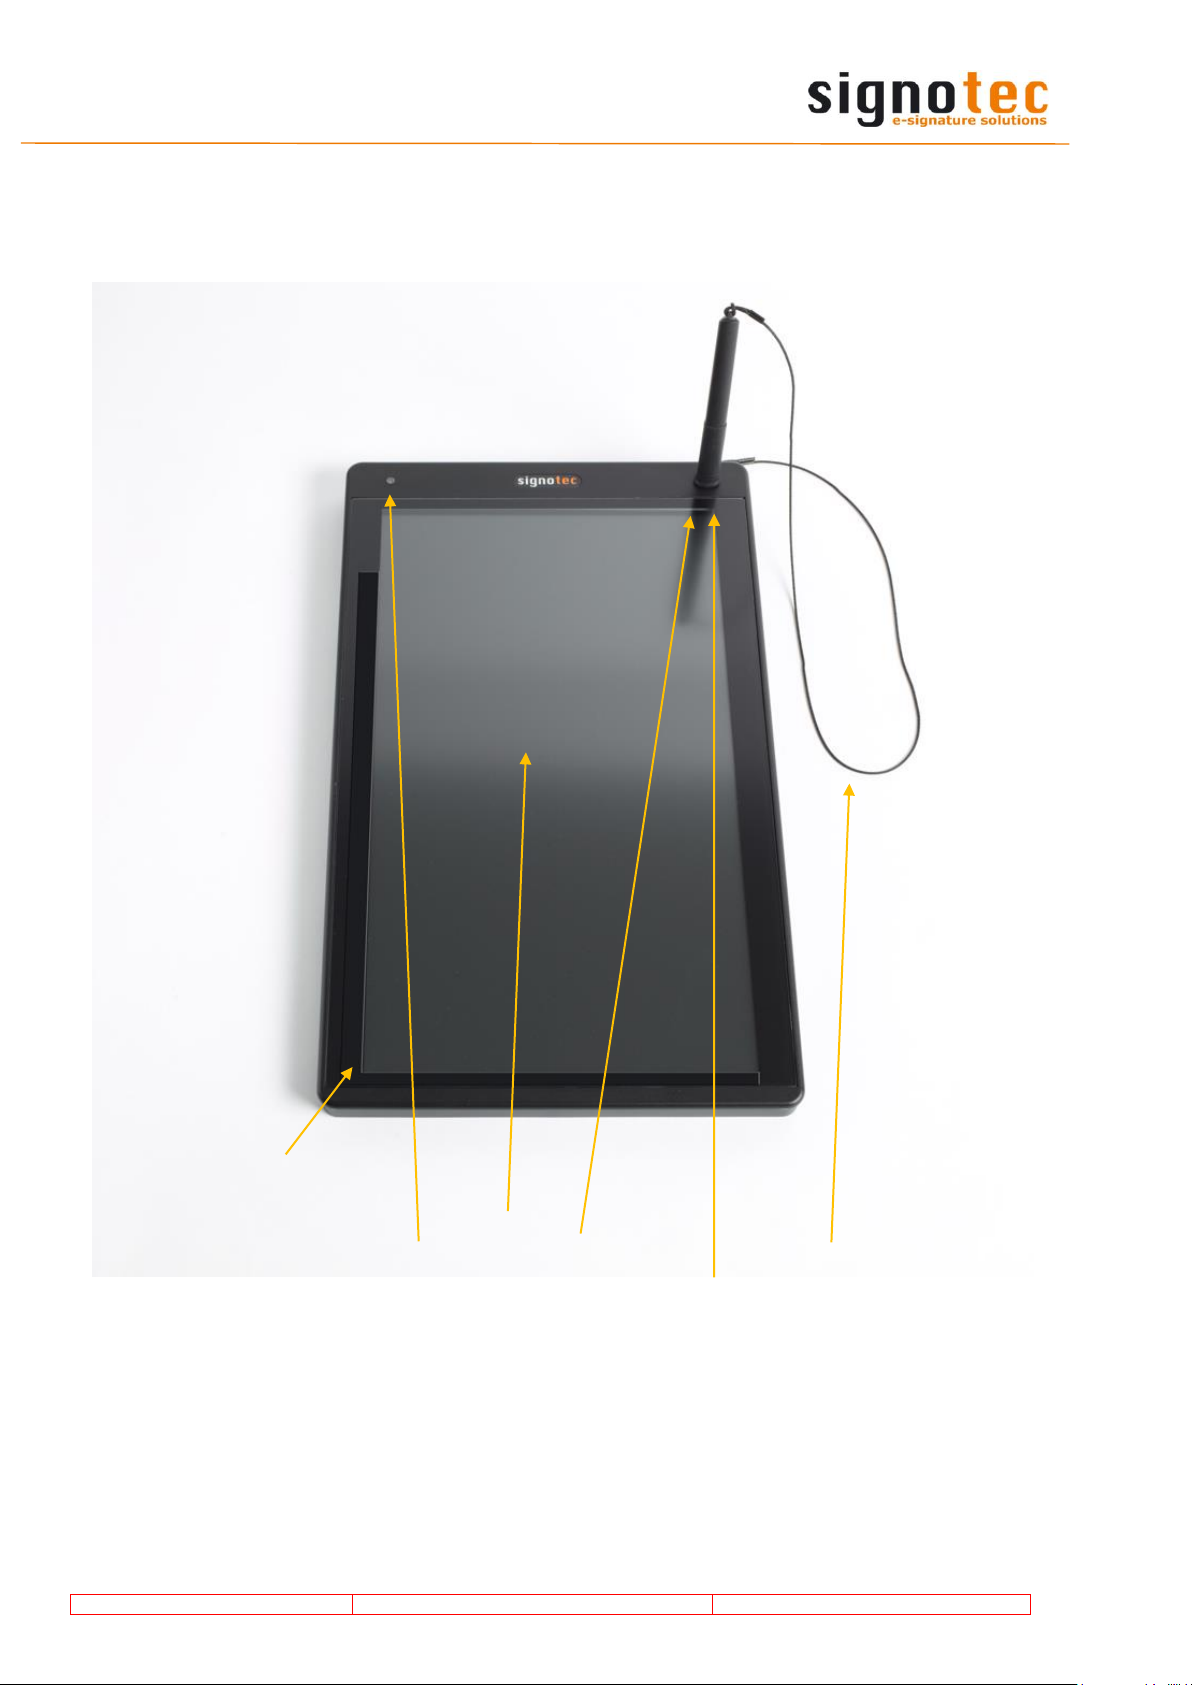
4.1 Front view
a. Paper guide (user can attach one if needed)
b. LED (= Light- Emitting Diode)/control lamp
c. Pen holder
d. Pen
e. Cord
f. LCD (= Liquid Crystal Display)
a
b c d e f
Page 7
© 2000 – 2019 signotec GmbH
User manual signotec Alpha
Page 7 of 16
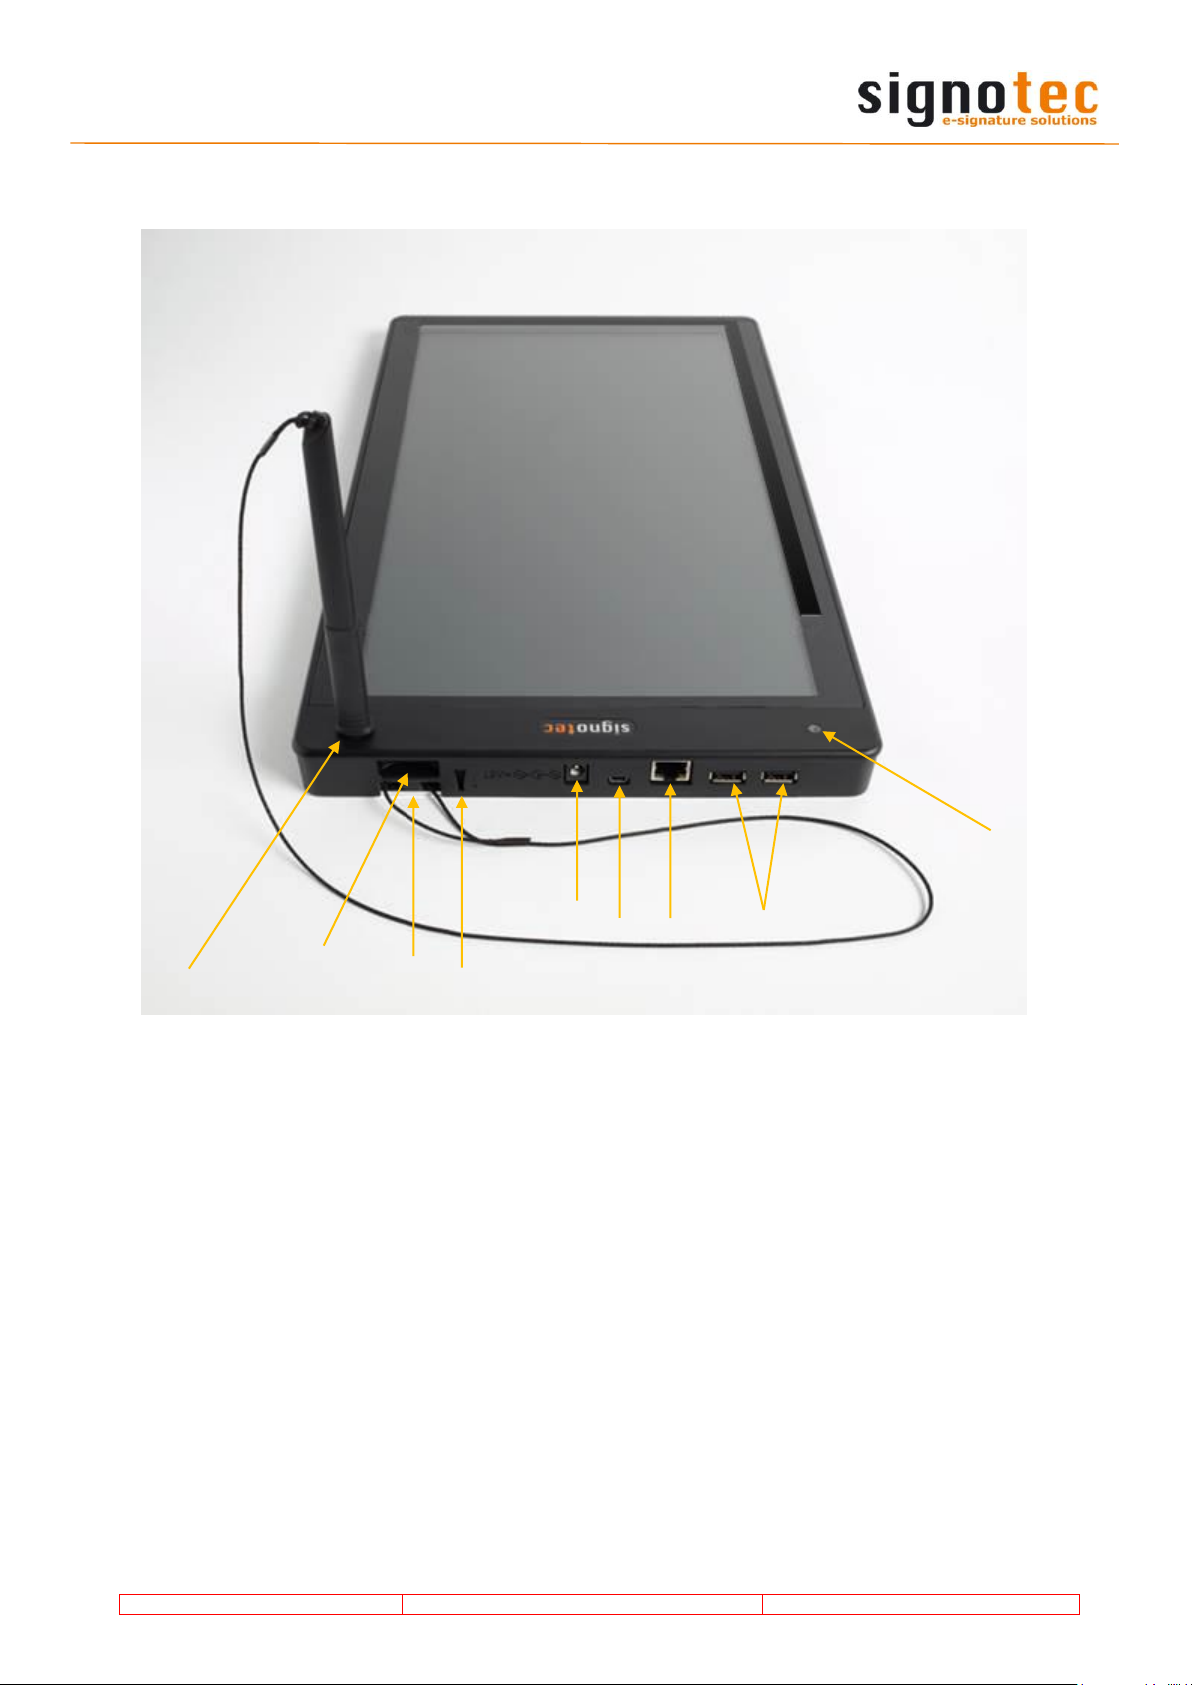
4.2 Back view
a. Pen holder and pen
b. Lifting aid for signature pad
c. Cord grommet
d. Pull-off aid to change cartridge of pen (more under Pt. 7)
e. Power connector
f. USB interface connector
g. Network interface connector
h. USB hub for connecting other PC peripherals (500 mA each)
i. LED (= Light- Emitting Diode)/control lamp
a
c d e
f
g
h
i
b
Page 8
© 2000 – 2019 signotec GmbH
User manual signotec Alpha
Page 8 of 16
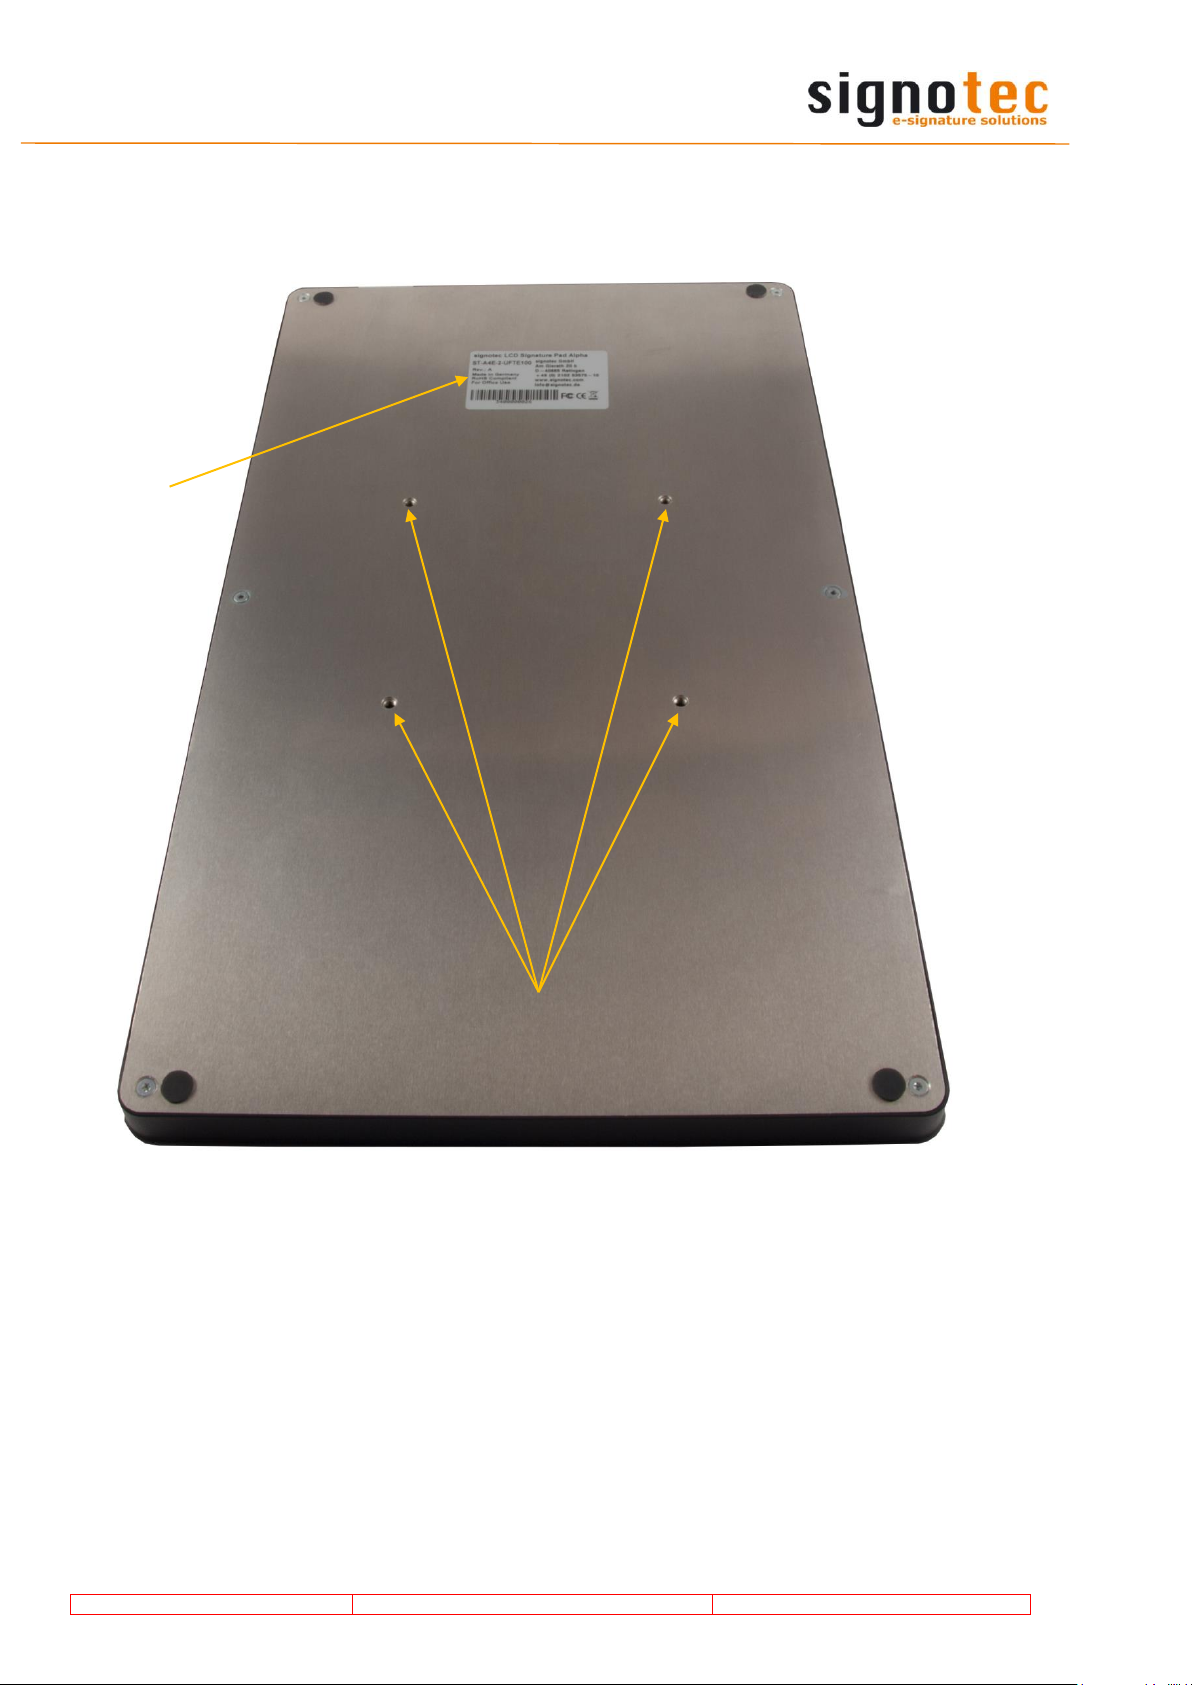
4.3 Bottom view
a. Nameplate with device name and serial number
b. VESA mounting holes (MIS-D standard, 100*100 mm)
a
b
Page 9
© 2000 – 2019 signotec GmbH
User manual signotec Alpha
Page 9 of 16
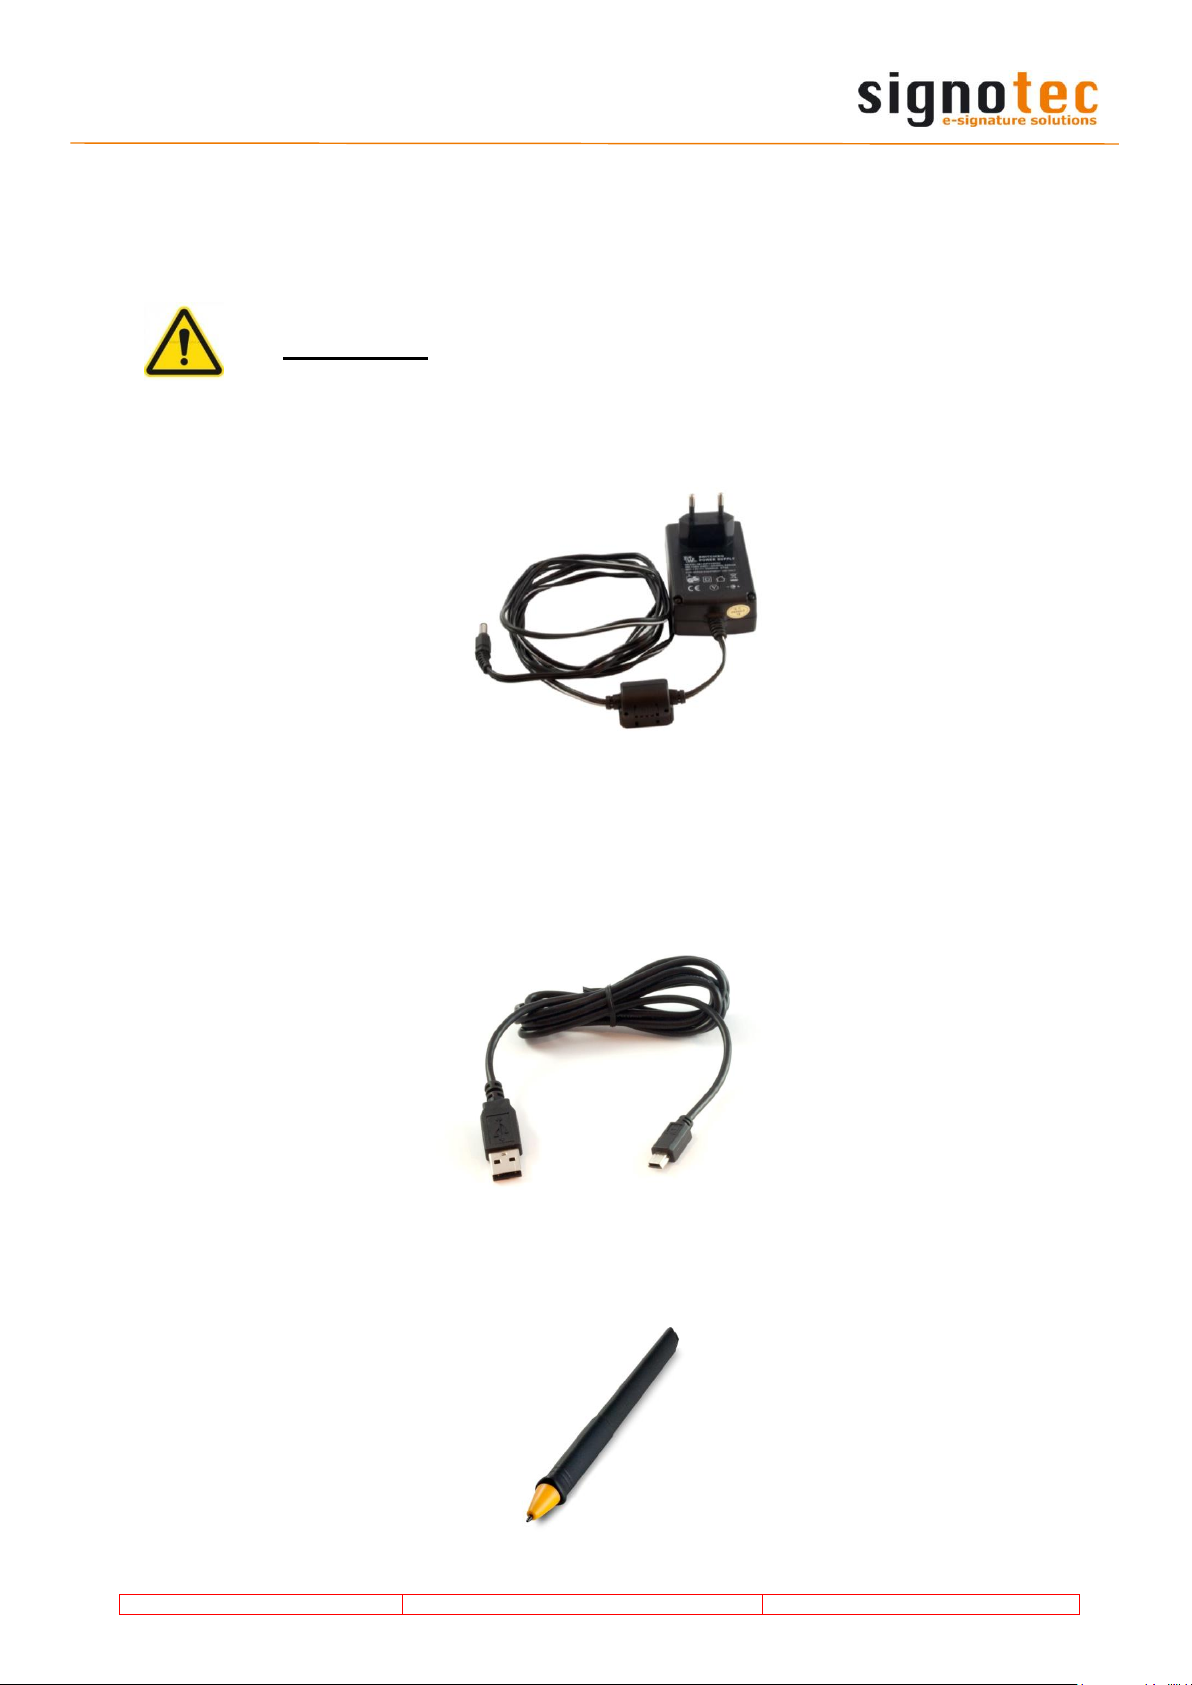
4.4 Power supply
Included with the product is a 12V power supply unit for the LCD Signature Pad signotec Alpha. It is designed that large to offer additional 500 mA per port for further USB ports.
Warning!
Only use the power supply unit included because other power supplies could
damage the device. The device must be connected to an easily accessible supply
socket so that in the event of a hazard the supply plug can be removed quickly.
4.5 USB cable
The USB cable connects the signature pad with the computer client.
In alternative you can use the Ethernet-Port. In this case, the USB cable is not needed.
4.6 Special pen
The special pen is for controlling and signing on the signature pad. Due to the ER-Technology the pad does not respond on fingers or other objects.
Page 10
© 2000 – 2019 signotec GmbH
User manual signotec Alpha
Page 10 of 16
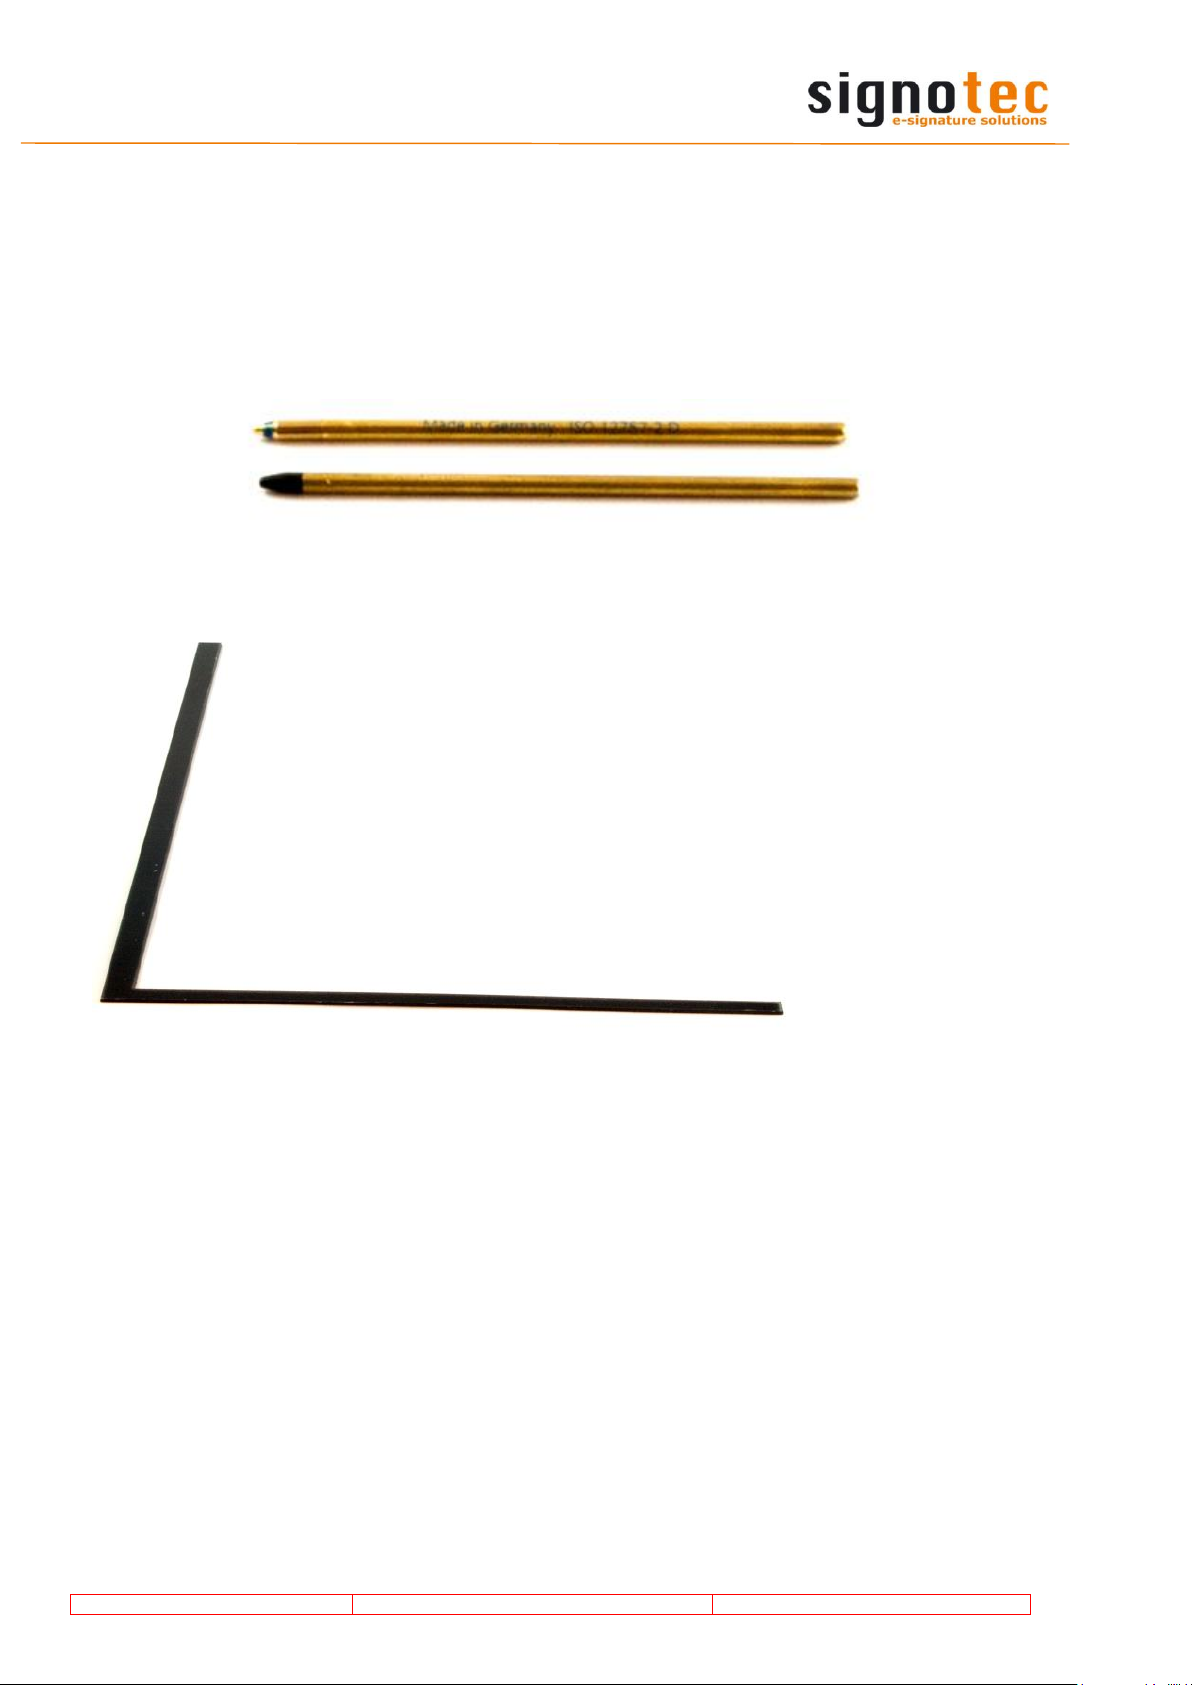
4.7 Replaceable cartridges
The delivery contains a ballpoint and a plastic cartridge. For operating the device and
signing directly on the screen you can use the plastic cartridge. The ballpoint cartridge is
used to sign original paper documents and the digital one at the same time.
How to change the cartridge, you can read see in Pt. 7.
4.8 Paper guide
Page 11
© 2000 – 2019 signotec GmbH
User manual signotec Alpha
Page 11 of 16
5 Access to the service menu
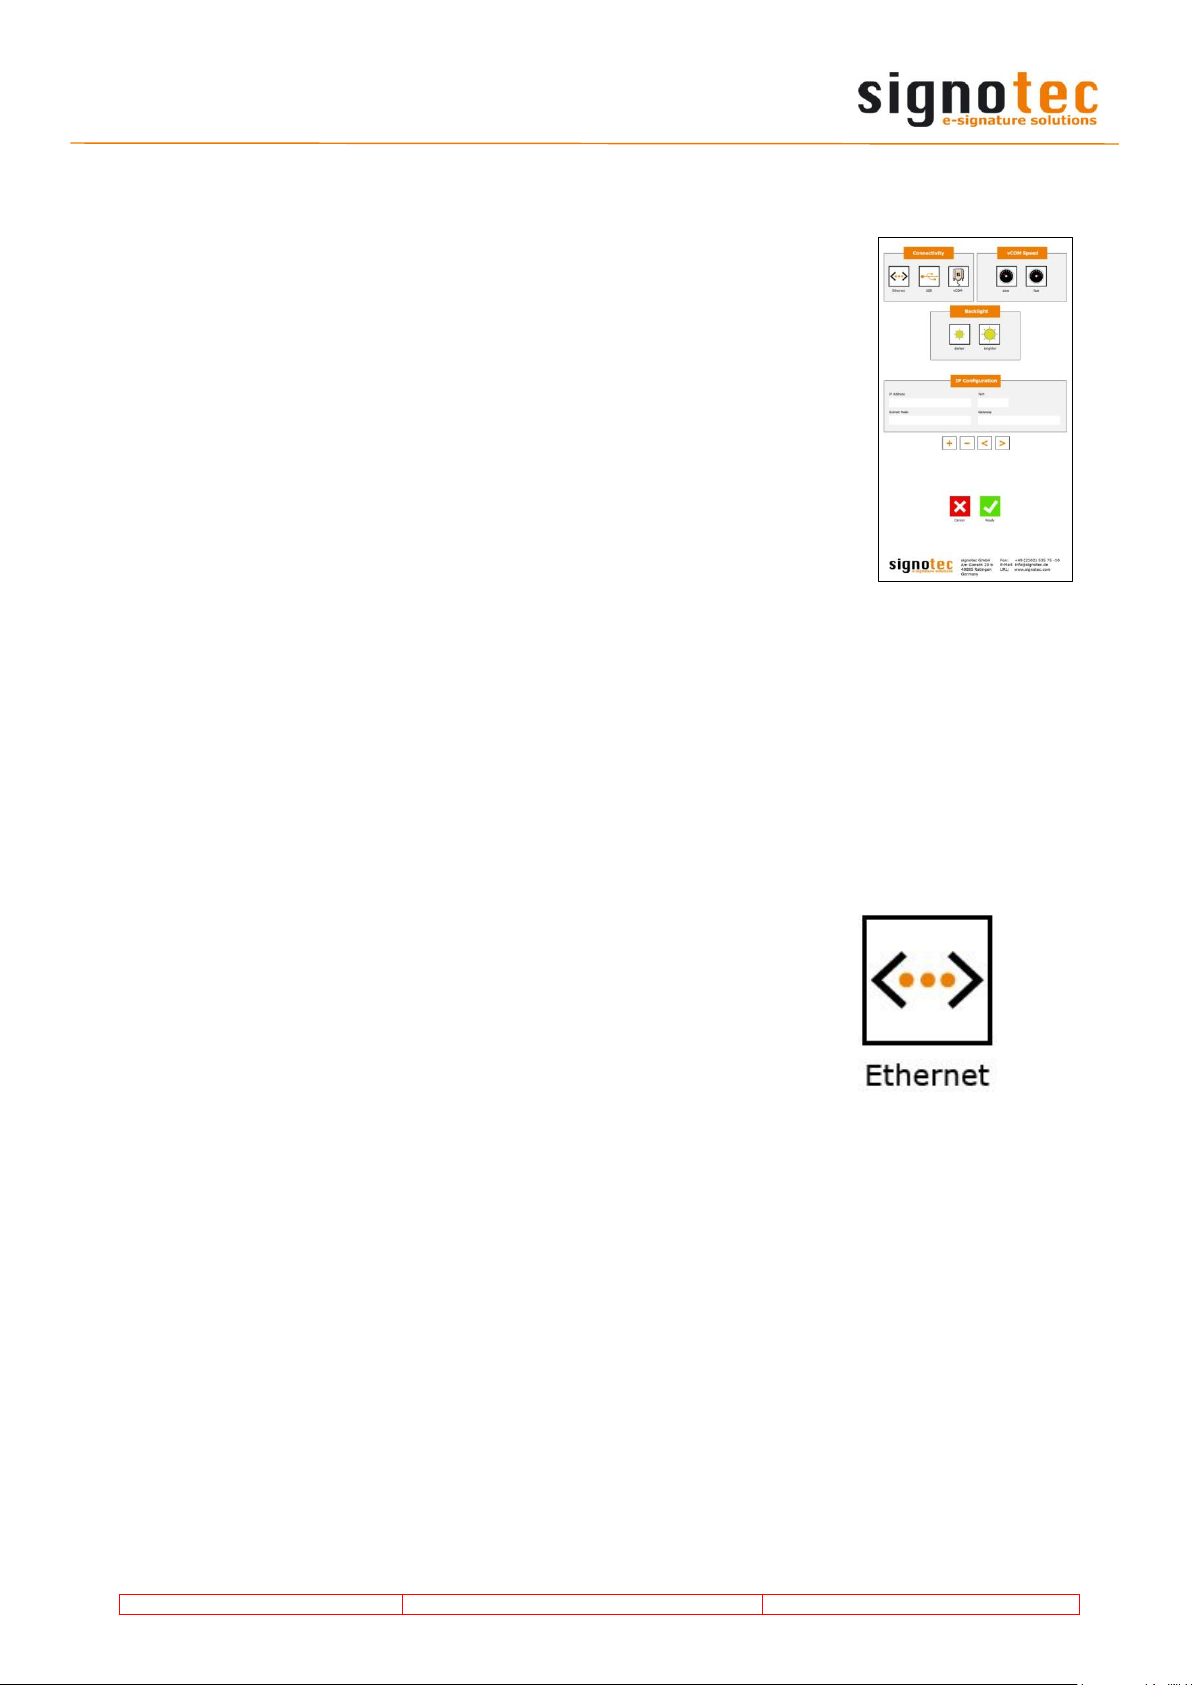
The LCD Signature Pad signotec Alpha can be addressed via three
types of connections. You can configure the connection type via the
service menu.
To access the service menu, disconnect the pad from the power supply. Touch the display with the pen at the top right-hand corner.
While holding the pen reconnect the pad to the power supply. During
the boot-up process the LED lights up red. After booting the LED
turns to orange and the service menu launches. Navigate accordingly by using the pen supplied to do so, please use the plastic cartridge (for changing cartridges see chapter 7 “Pen and pen holder“).
Alternatively, the service menu can be operated via the signoSign/2
application software as well.
5.1 Connection types
The LCD Signature Pad signotec Alpha can be operated in three different modes (depending
on the purchased version with/without Ethernet option). The three modes are Ethernet,
VCOM, and USB. By default, the LCD Signature Pad signotec Alpha comes pre-configured for
the use via the WinUSB port.
5.1.1 Ethernet
If you have chosen the LCD Signature Pad signotec Alpha model
that comes with an additional Ethernet port (ST-A4E-2-UFTE100),
you can configure the operating mode of the device via the service
menu.
Once you have called up the service menu (see chapter 5 “Access
to the service menu“, select the icon ‘Ethernet’ by using the pen
supplied. Upon selection, the icon is selected on the pad and displayed inverted.
Icon for network mode
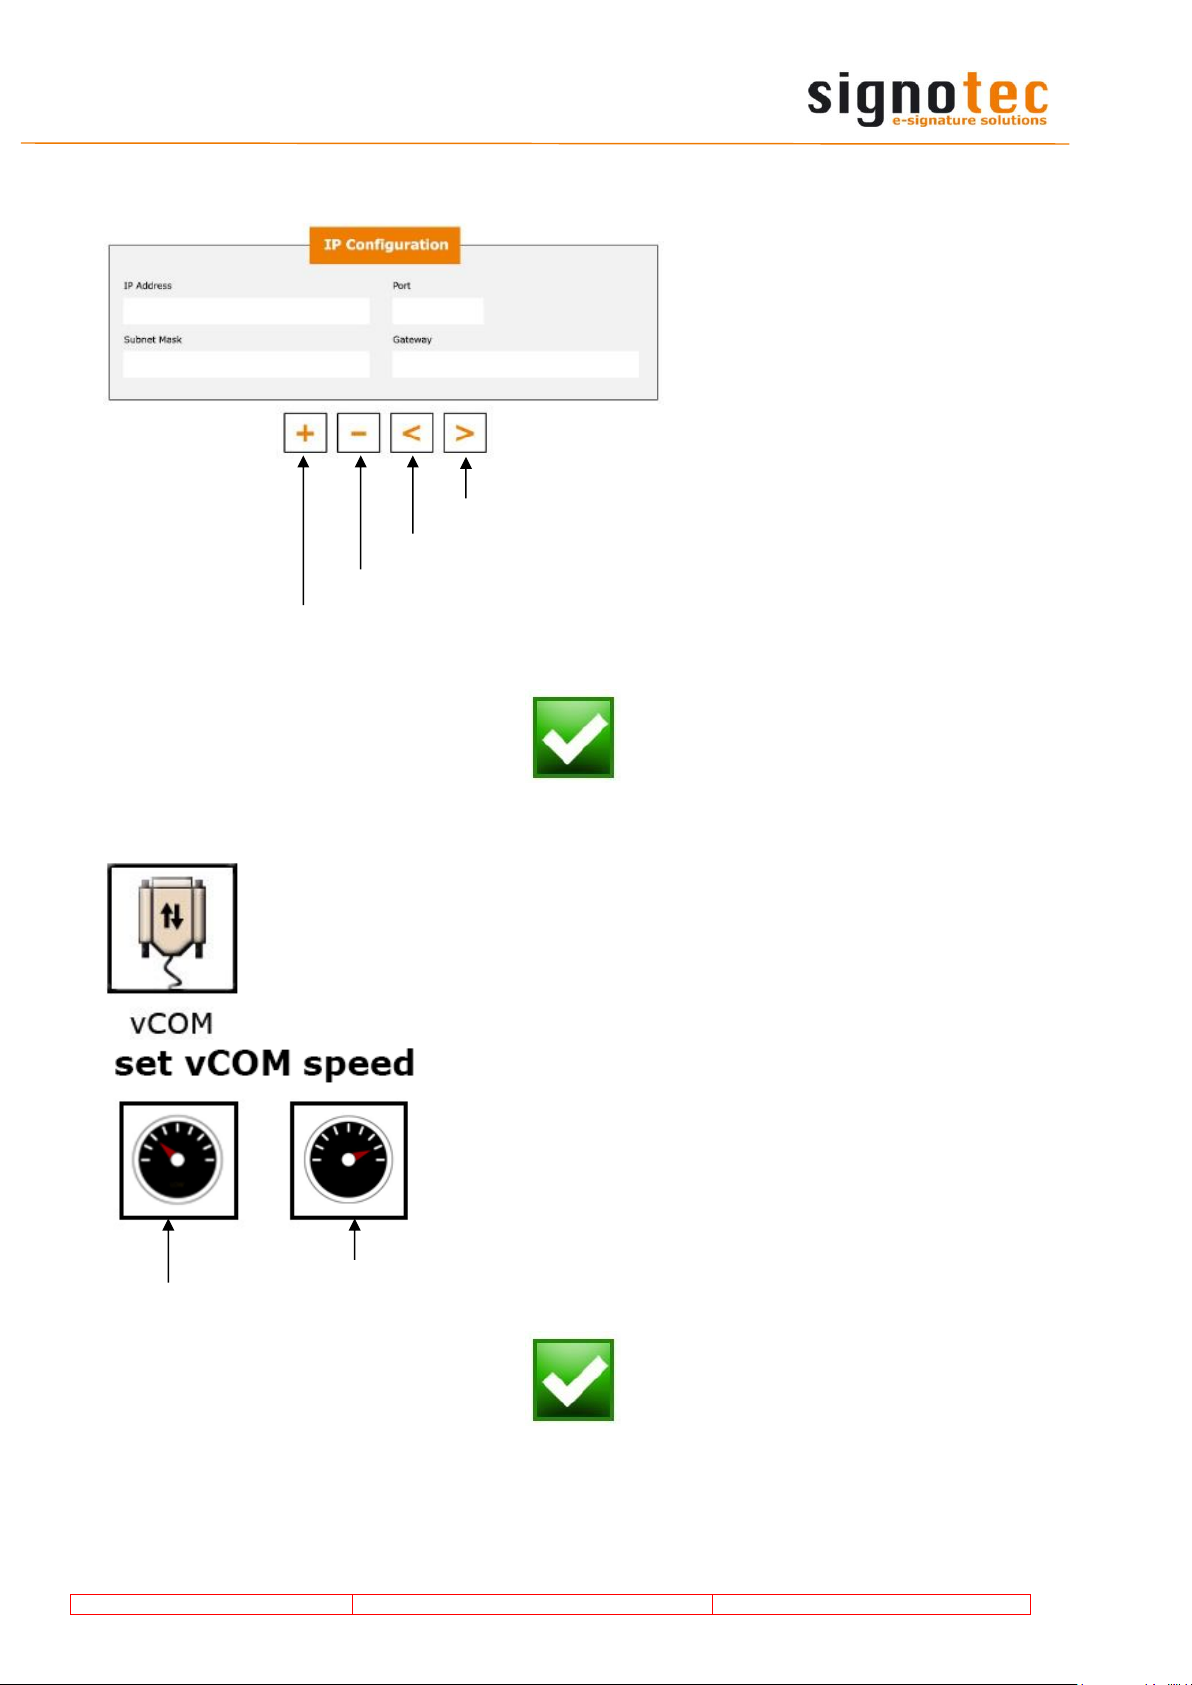
Within the IP configuration you can set the following values:
IP Address: The IP Address is a numerical label assigned to each device.
It has to be unique for each subnet.
Port: The port number expands the IP address. Make sure ports a not blocked by a
firewall or other security software.
Subnet Mask: The subnet mask defines a specific area within an IP network.
Gateway: With a Gateway it is possible to communicate with IP addresses outside the own
address space.
Page 12
© 2000 – 2019 signotec GmbH
User manual signotec Alpha
Page 12 of 16
After selecting the network
mode, the cursor is placed in the
field ‘IP Address’.
You can change the IP address,
the port, the subnet mask as well
as a gateway by operating the
toolbar below using the pen.
After you have completed all settings,
you can finish your input by selecting
the ‘check mark’.
The service menu terminates thereafter
and the LCD Signature Pad signotec Alpha restarts with the modified settings.
5.1.2 Operation on terminal server or remote desktop (VCOM)
Signature pads with a serial interface are required for operating within a Windows terminal server, remote desktop
or Citrix environment. The LCD Signature Pad signotec Alpha can be addressed via a virtual COM port, which is
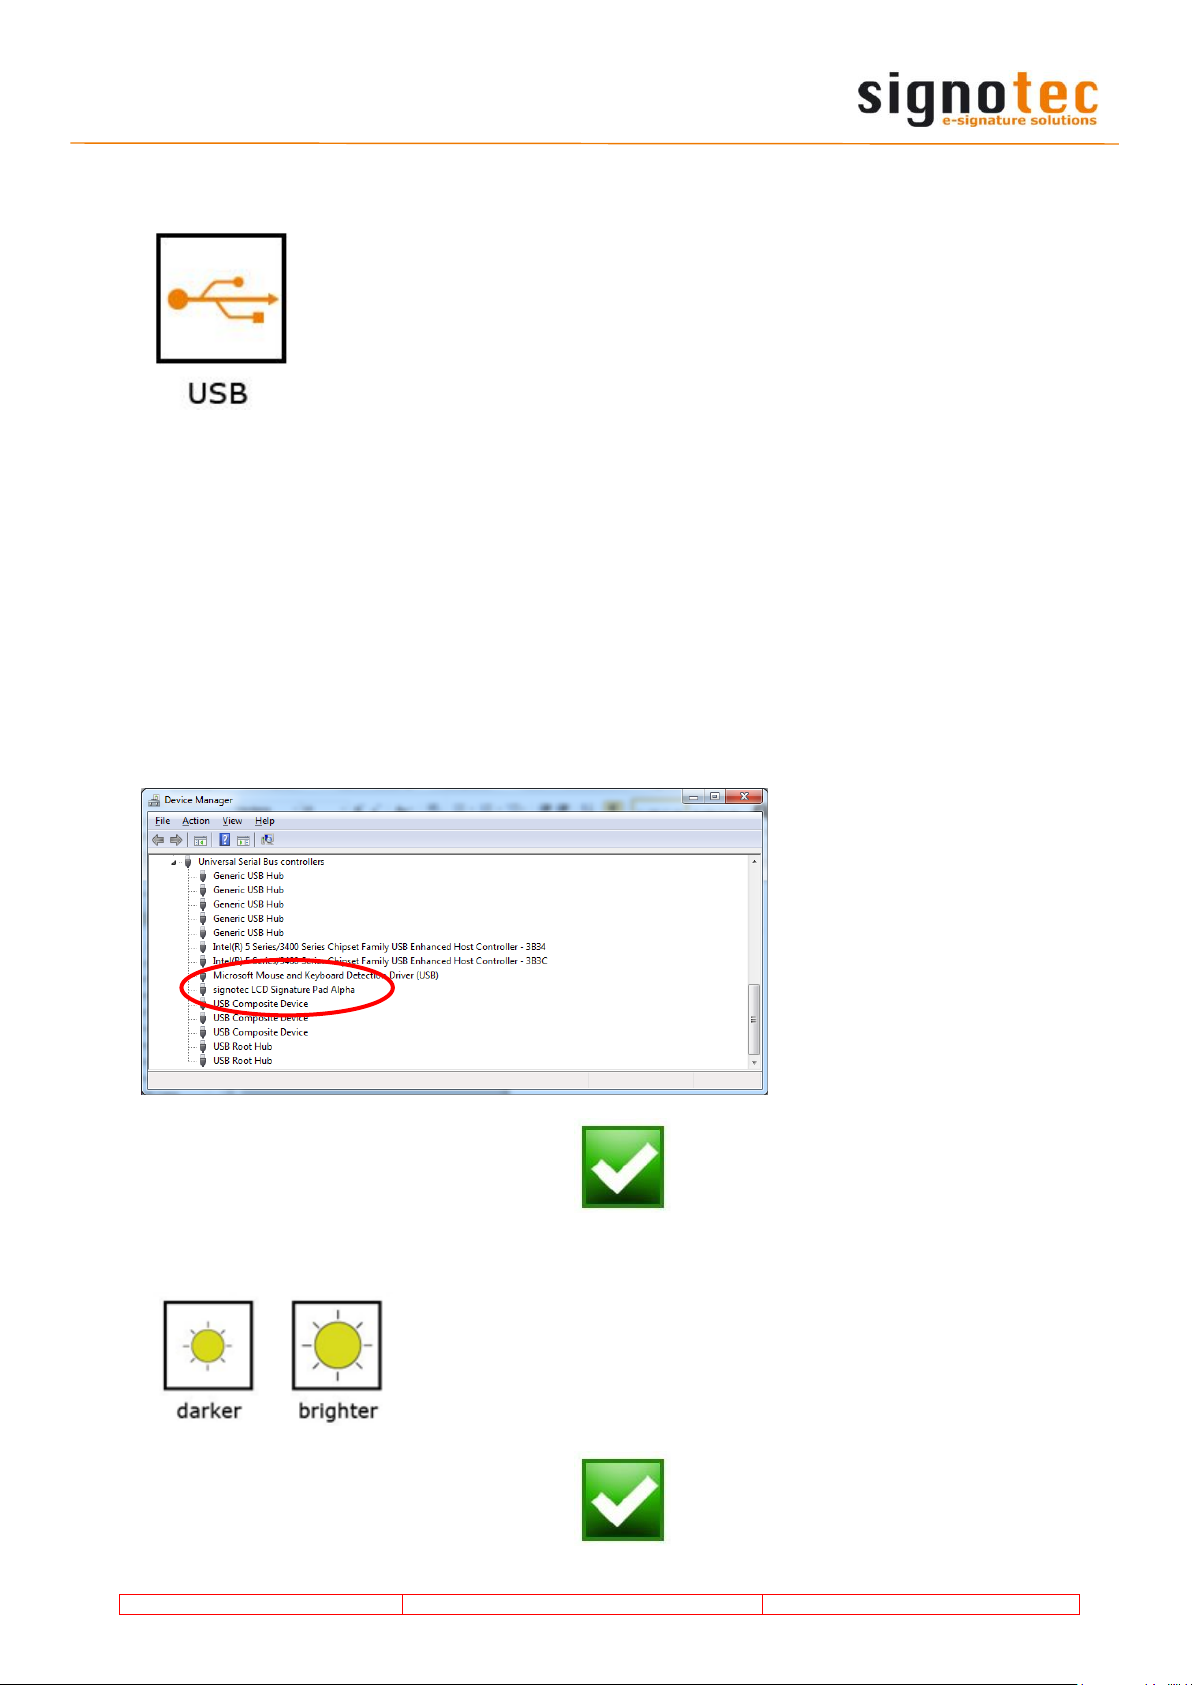
used to simulate the serial port. For this purpose, select
the setting ‘vCOM’ in the service menu.
After selecting the virtual serial interface, you may choose
between slow (115200 Baud) and fast (2MB/s) data
transmission which has an impact on how fast pictures
will be uploaded.
The slow data rate is necessary for Citrix terminal server
environments due to architectural restrictions.
After you have completed all settings,
you can finish your input by selecting
the ‘check mark’.
The service menu terminates thereafter
and the LCD Signature Pad signotec Alpha restarts with the modified settings.
Move cursor to the right
Move cursor to the left
Down
Up
Fast data rate
Slow data rate
Page 13
© 2000 – 2019 signotec GmbH
User manual signotec Alpha
Page 13 of 16
5.1.3 USB Connection
By default, the LCD Signature Pad signotec Alpha comes pre-configured
for the use via WinUSB port. There are two different operating modes
when connected via USB:
- WinUSB
- HID
You need to install a driver to be able to use the LCD Signature Pad
signotec Alpha in a Windows environment. Please install the WinUSB
driver supplied in its latest version for your Windows operating system
(32 or 64-bit) to ensure a fast data transmission (without WinUSB driver
the device operates in the slower HID mode)
The driver is available directly in the download area of the signotec website.
Important: Install the driver before connecting the pad to the PC! If the driver is not installed,
the signotec Alpha will automatically switch to the slower HID mode.
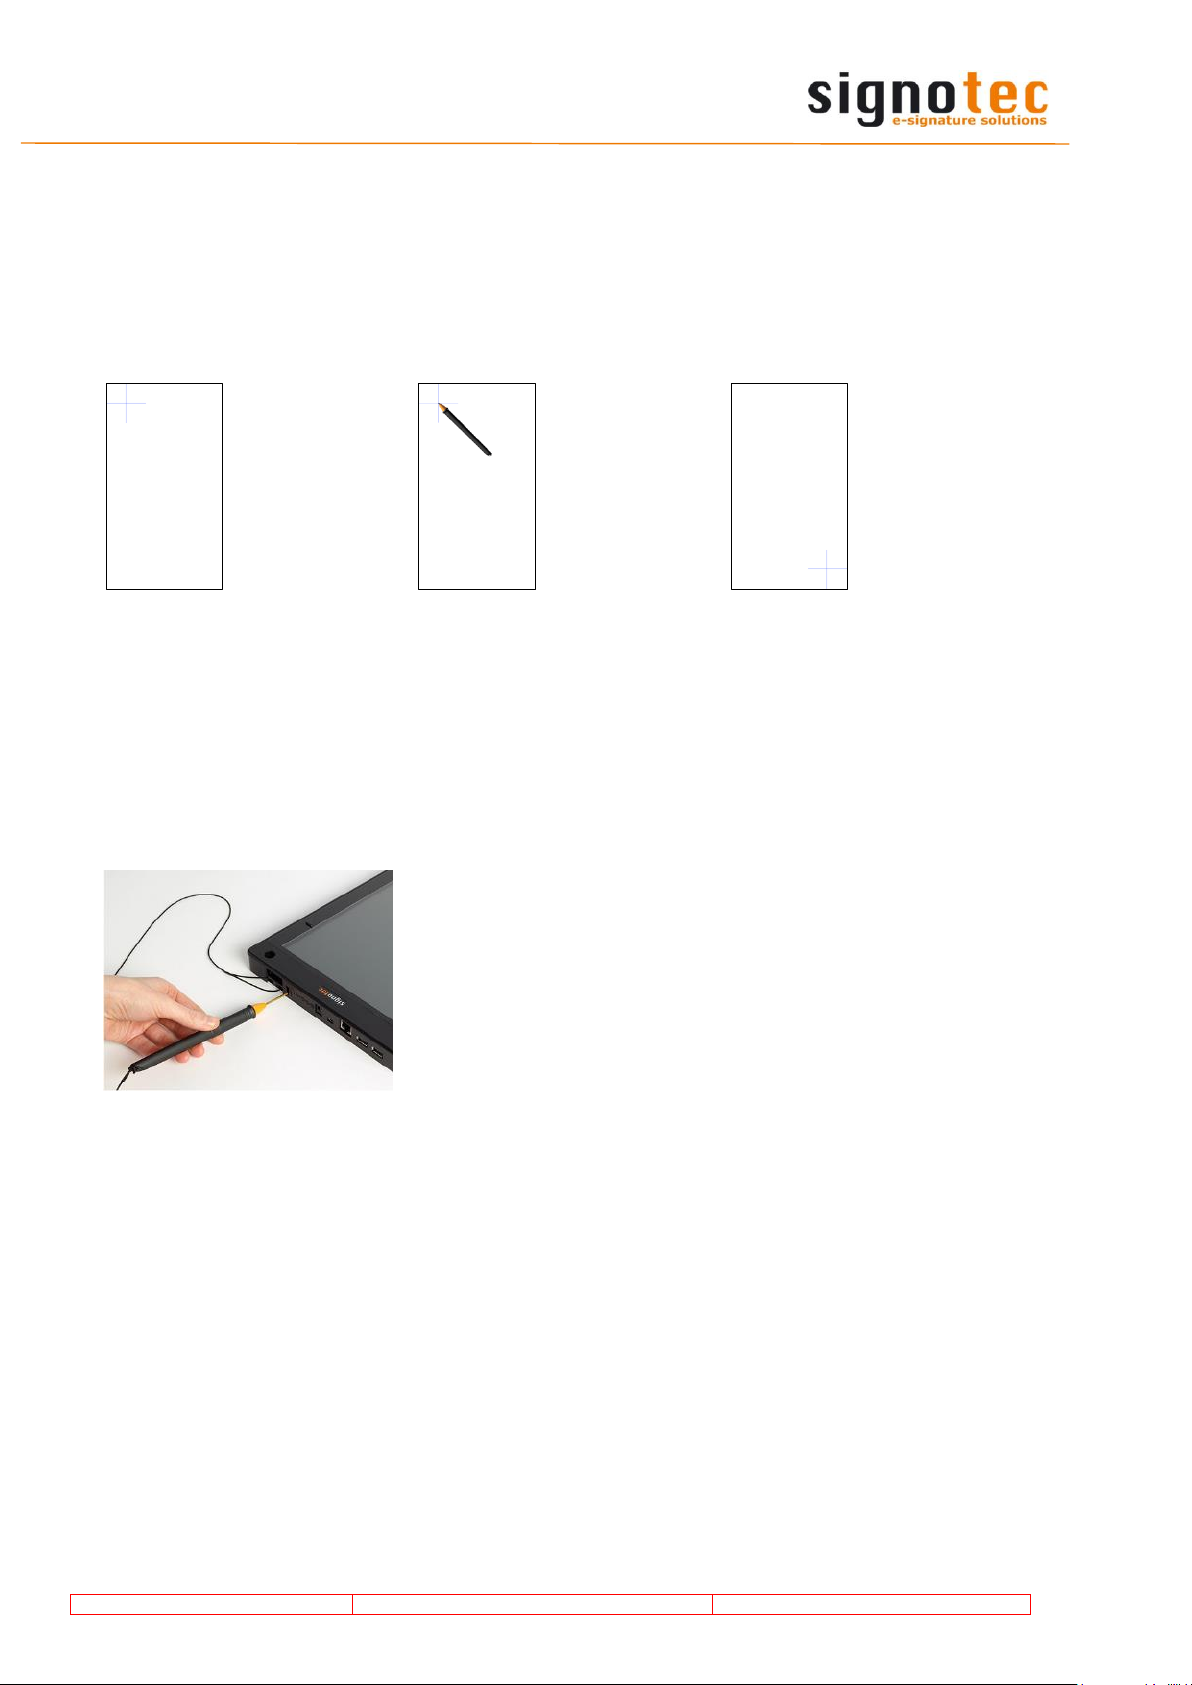
After a successful installation process, you may check if the device is listed in your device
manager. If the LCD Signature Pad signotec Alpha does not appear in the device manager,
you must repeat the driver installation.
After you have completed all settings,
you can finish your input by selecting
the ‘check mark’.
The service menu terminates thereafter
and the LCD Signature Pad signotec Alpha restarts with the modified settings.
5.2 Adjusting the contrast
The configuration of the brightness of the device is carried out via
the service menu. Tap on the desired setting (‘darker’ or
‘brighter’) by using the pen supplied.
After you have completed all settings,
you can finish your input by selecting
the ‘check mark’.
The service menu terminates thereafter
and the LCD Signature Pad signotec Alpha restartes with the modified settings.
Page 14
© 2000 – 2019 signotec GmbH
User manual signotec Alpha
Page 14 of 16
6 Sensor calibration
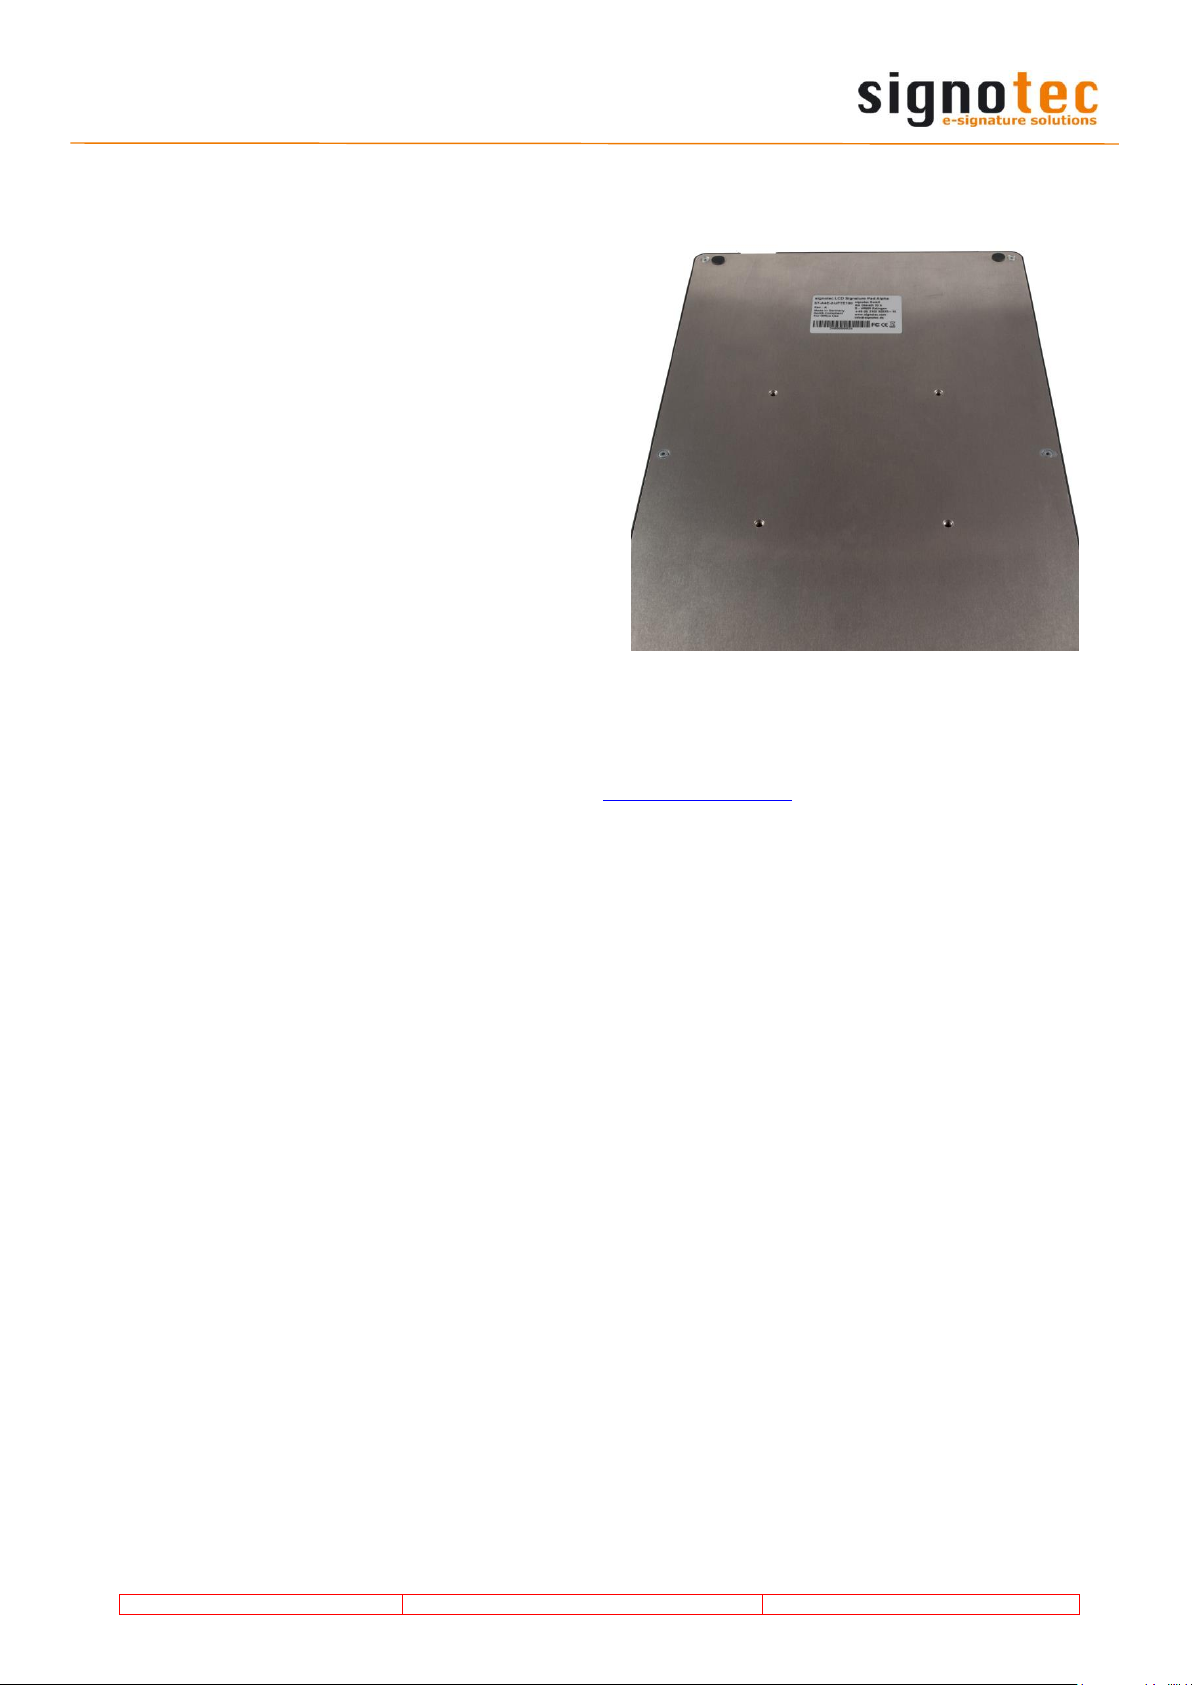
If the signature is not visible exactly under the tip of the pen, you can easily re-calibrate the
pad yourself. Disconnect the pad from the power supply. Touch the display with the pen at the
top left-hand corner. While holding the pen, reconnect the pad to the power supply. After
booting successfully, the LED switches from red to orange. Now two intersecting narrow lines
on a white background appear at the top left- hand corner of the screen.
Tap the center of the
two intersecting lines
with the pen
supplied.
The same intersecting
lines appear
at the bottom righthand corner.
Also tap the
center of these
lines briefly
which completes the calibration.
The pad restarts instantly.
Alternatively, the calibration can be carried out via the signoSign/2 application software.
7 Pen and pen holder
The signotec pads are equipped with a robust and maintenance-free pen that does not require
batteries. With its realistic size it gives the user an optimal writing experience. The pen can be
attached to the pen holder.
The delivery includes a special pen with a replaceable cartridge. The signer places the original contract on the pad on
which the PDF is displayed as well and signs both documents
simultaneously by using the ballpoint pen cartridge. If the
paper document is not required as a result of the principle of
freedom of contract, the ballpoint pen cartridge can simply
be replaced by a plastic one. It is then possible to electronically sign full-page documents directly on the high-resolution
display.
For an easy change of the two different cartridges, a pull-off aid on the back backside of the
signature pad can be used. Place the pen cartridge into the opening and push it down until it
slightly locks into place. By pulling backwards the cartridge is pulled out of the pen. You can
then proceed by replacing the cartridge.
Page 15
© 2000 – 2019 signotec GmbH
User manual signotec Alpha
Page 15 of 16
8 Mounting on desk mount
The LCD Signature Pad signotec Alpha
comes with VESA mounting holes (MIS-D
standard, 100*100 mm) on its bottom side.
The mounting hole pattern allows the use of
commercially available desk mounts.
The pad is equipped with press-fitted open
nuts for an easy installation. The maximum
screw-in depth of the device is 8 mm.
9 General safety notes
Please read the general safety notes carefully.
You can find them in the download section of www.signotec.com.
10 Maintenance and cleaning
Clean your pad regularly. Dust and dirt particles may stick to the glass and pen and considerably wear down the glass surface. The normal wear and tear of the glass or the pen is not
covered by the warranty. The regular cleaning of the surface of the device and pen will prolong the product life.
To clean the device, use very mild and diluted cleaning products only. Otherwise, the device
may be damaged. Use a dry or damp soft cloth to clean the pen. Never use diluents, benzene,
alcohol or other solvents to clean the glass surface or the pen. Use an anti-static cloth or a
damp or dry soft cloth to clean the glass surface instead. Only apply gentle pressure on the
glass of the device and make sure that no moisture forms on the surface.
Damage caused by using the wrong cleaning agent and/or occurring during the cleaning process is not covered by the warranty.
Page 16

© 2000 – 2019 signotec GmbH
User manual signotec Alpha
Page 16 of 16
11 Support – Contact
The products and solutions from signotec are designed to make our customers satisfied users.
If you should encounter an unexpected problem, you can turn to our support pages for the
necessary help and support.
If you need technical assistance, we are pleased to offer telephone support or check the problem
through our remote maintenance tool. This service is provided free of charge for customers with
a valid software maintenance contract.
Please describe the error situation in as much detail as possible, including the description of the
work process, the date of the first occurrence of the error, and any changes made to the affected
workstation/server. To correct an error, it must be reproducible. Please describe how the error
can be reproduced in detail.
In the case of a defective signature pad, use the appropriate pad repair form, which you can
find on our website.
Do you have any further problems with your products, please open a support ticket via the
support contact form on our website.
 Loading...