

Page 1

User Manual
P003948
November 2017
www.signosticsmedical.com
Page 2

P003948 Uscan User Manual Page | ii
CONTENTS
1. Important Information.................................................................................. 1
About the User Manual .................................................................................. 1
Product Description........................................................................................ 1
Intended uses of Uscan ................................................................................. 3
System and Transducer applications ............................................................. 4
Training .......................................................................................................... 5
Contents of the Uscan packages ................................................................... 6
System Features ............................................................................................ 7
Classifications ................................................................................................ 7
Patient Environment....................................................................................... 8
Cautions, Warnings and Contraindications .................................................... 8
Warnings ................................................................................................... 8
Cautions .................................................................................................. 10
Contraindications..................................................................................... 10
Labeling........................................................................................................ 11
Contact information ...................................................................................... 12
Trademarks and document copyright........................................................... 12
2. Getting Started ........................................................................................... 14
Unpacking the Boxes ................................................................................... 14
Options .................................................................................................... 14
Connecting and disconnecting the Power Supply........................................ 14
Setting up the System .................................................................................. 15
Basic Device Control.................................................................................... 16
Settings ........................................................................................................ 17
Network Printer Setup (Optional) ................................................................. 19
Bluetooth Printer Setup (Optional) ............................................................... 19
Bar Code Scanner Setup (Optional) ............................................................ 19
Imaging Screens .......................................................................................... 20
Ultrasound Scan Screens........................................................................ 20
Recommended ultrasound transmission gel ................................................ 23
Recommended ultrasound probe sterile sheaths......................................... 23
3. Scanning ..................................................................................................... 24
Preparing for the Exam ................................................................................ 24
Default Settings............................................................................................ 24
Ultrasound Scanning.................................................................................... 24
Ultrasound Presets .................................................................................. 24
Ultrasound Scanning ............................................................................... 25
Ultrasound measurement ........................................................................ 25
Ultrasound Movies................................................................................... 26
Bladder Scanning......................................................................................... 26
Measuring Bladder Volume ..................................................................... 26
Audio Feedback....................................................................................... 27
Common Functions ...................................................................................... 27
After Use ...................................................................................................... 28
Turning Uscan off......................................................................................... 28
4. Other Functions ......................................................................................... 29
Annotations .................................................................................................. 29
Text Annotations...................................................................................... 29
Voice Annotations.................................................................................... 29
Exam Notes.................................................................................................. 29
Entering Patient Details.......................................
......................................... 30
Printing ......................................................................................................... 30
Page 3

P003948 Uscan User Manual Page | iii
Export........................................................................................................... 31
Scan Review ................................................................................................ 31
Deleting exams and patients........................................................................ 32
Data Security................................................................................................ 32
Setting a Device Password...................................................................... 33
5. Maintenance and Troubleshooting........................................................... 34
Maintenance................................................................................................. 34
Battery Maintenance .................................................................................... 34
Transducer cleaning and disinfection........................................................... 35
Cleaning .................................................................................................. 35
Disinfection .............................................................................................. 35
Troubleshooting ........................................................................................... 36
Clinical Troubleshooting .......................................................................... 36
Signostics Customer Support.................................................................. 36
6. Connectivity And Accessories.................................................................. 37
Accessories.................................................................................................. 37
Power sources ............................................................................................. 37
Internal battery ............................................................................................. 37
Power Supplies (Charger)............................................................................ 37
Mobile Stand Setup...................................................................................... 38
Cleaning .................................................................................................. 39
Disinfection .............................................................................................. 39
7. Specifications............................................................................................. 40
System dimensions ...................................................................................... 40
Environmental Operating and Storage Conditions....................................... 40
Power Supplies (Chargers) .......................................................................... 41
Internal battery ............................................................................................. 41
Measurement accuracy................................................................................ 41
Degree of Protection Against Ingress of Water............................................ 42
8. Safety .......................................................................................................... 43
Ergonomics .................................................................................................. 43
External materials ........................................................................................ 43
Disposal ....................................................................................................... 43
Electrical safety ............................................................................................ 43
Electromagnetic compatibility (EMC) ........................................................... 44
Power Supplies (Chargers) .......................................................................... 46
Biological safety ........................................................................................... 46
Acoustic Output............................................................................................ 46
9. Advanced Device and IT Setup................................................................. 48
Administrator Setup...................................................................................... 48
User Management........................................................................................ 49
Multiple Device Setup .................................................................................. 49
Ultrasound Scanning Restrictions ................................................................ 49
Data Recording Restrictions ........................................................................ 50
Storage Access Restrictions ........................................................................ 50
Device Tracking ........................................................................................... 50
References.................................................................................................. 52
Glossary ....................................................................................................... 53
Index.............................................................................................................. 5
Page 4

P003948 Uscan User Manual Page | 1
1. IMPORTANT INFORMATION
About the User Manual
This User Manual is a reference tool for users of the Uscan; it does not constitute medical advice nor provide
clinical training, instruction in exam protocols, or information on how to interpret scans.
This manual should be read before Uscan is used. The Uscan is intended to be used in a medical facility.
Manual conventions
The following style conventions are used in this manual:
Buttons found on your Uscan are indicated in bold italics, e.g., Scan button. This style is also used to
describe areas of the display touch screen, e.g., Image name.
“Tap” refers to touching the screen quickly with your finger.
“Click” refers to pressing and releasing the button on the probe unit.
“Drag” refers to touching the screen with your finger and then moving your finger across the screen.
“Swipe” refers to moving your finger across the screen quickly.
“Pinch” refers to moving two fingers in a pinch motion or pinch release motion across the screen.
“Check” refers to tapping a checkbox to enable the associated function.
“Uncheck” refers to tapping a checkbox to disable the associated function.
“Select” refers to tapping a menu item from a menu list.
New terms that describe functions for the App are introduced in italics, e.g., exam.
Numbered steps must be performed in a specific order.
Bulleted items are lists in no specific order.
Links to other sections within the manual appear colored and underlined, e.g., see Contact information
(page 12).
Version information
This User Manual applies to Uscan with software version V3.5.x
Warnings, Cautions and Contraindications
A Warning describes precautions a user should take to prevent injury or loss of life.
A Caution describes precautions a user should take to prevent damage to the device.
A Contraindication is a specific situation in which the device should not be used because it may be harmful to
the patient.
Warnings, cautions and contraindications are included throughout this manual along with the content to which
they apply. In addition all warnings and cautions are listed in the
Cautions, Warnings and Contraindications
(page 8).
Product Description
The Uscan consists of a Uscan display running a Signostics App, connected to a Uscan probe via a cable. The
system has been designed for non-invasive urological imaging examinations, and enables users to noninvasively perform general abdominal imaging and measurements at the point-of-care. The Uscan generates
and transmits ultrasound energy in the form of pulses in the 3 to 7MHz range into a patient, detects the
reflected pulses, and processes the information in order to generate ultrasound images and measure anatomical
structures.
Page 5

P003948 Uscan User Manual Page | 2
The Uscan display is an off-the-shelf Android tablet or phone approved, pre-configured, and supplied by
Signostics. The tablet or phone specifications are at least the following:
Processor with processing performance of a dual core 1.5GHz Cortex-A9;
5 inch diagonal color display with 1200 x 780 pixels;
Touch screen interface;
Internal speakers and microphone;
Fully compliant on-the-go (OTG) or host USB 2.0 port;
Android operating system 5.0 or later;
IEC 60950-1 certification (or IEC 60601-1 certification);
Storage specification of -20°C to 50°C, 10-93% non-condensing relative humidity, and 50-101.5kPa
pressure;
Operating specification of 5°C to 40°C, 15-90% non-condensing relative humidity, and 70-101.5kPa
pressure;
Bluetooth 4.0
IEEE 802.11 a/b/g/n/ac
1GByte SDRAM memory;
16GBytes storage; and
Power, volume up and volume down buttons.
The Uscan display is provided with a power supply. When the Uscan display is connected to the Uscan probe
the combination is configured as a medical electrical system.
The Uscan probe contains a probe assembly (P003992 or P003993) attached to an ultrasound transducer (B35 Transducer, P004200). The transducer shall be referenced in this manual when the patient contact part of the
probe and transducer is being described.
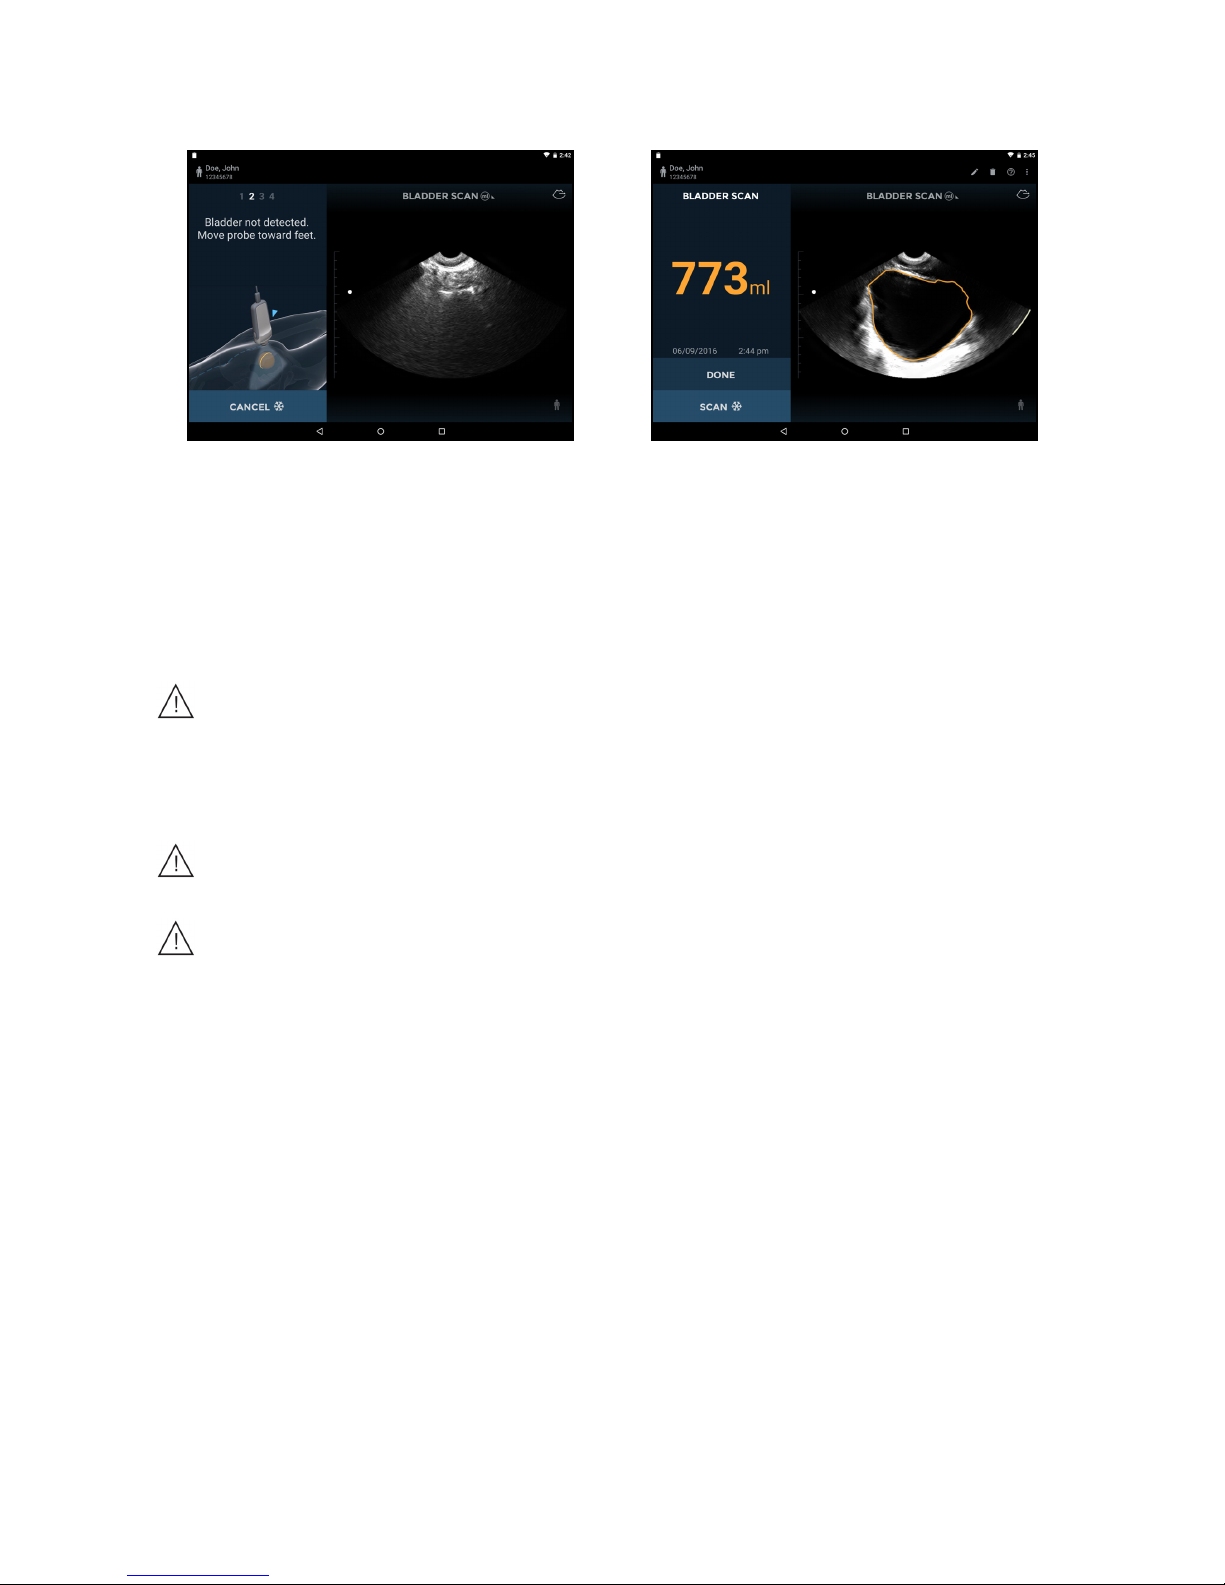
The Uscan enables the user to automatically measure bladder volume with or without a brightness mode (Bmode) image for guidance (
Fig 1.1). The system processes data in real-time, and when the user is not scanning
in the correct location to detect a bladder, the display guides the user to the correct location, reducing
measurement errors.
The user can elect to scan organs beside the bladder, including the kidney and prostate, with controls to change
brightness and depth in this mode.
Images are able to be annotated by using voice or text. Examination notes can be entered.
The Uscan provides optional wireless connectivity allowing remote storage and device tracking.
Accessories for wireless printing, bar code scanning, and a mobile stand are supported and available in some
countries.
The Uscan display and probe are battery powered.
Page 6
P003948 Uscan User Manual Page | 3
Fig 1.1 System User Interface and Display
Intended uses of Uscan
The Uscan is for non-invasive imaging of the human body and is intended for the following applications:
Abdominal, Musculoskeletal, Pediatric, and Small Organ. Users must have ultrasound training for abdominal,
musculoskeletal, pediatric, and small organ imaging.
The Uscan can also be used to obtain an image of the bladder that is used to automatically determine bladder
volume.
Contraindications
The Uscan is designed for percutaneous scanning only. Do not attempt intra-cavity imaging; in partic-
ular, trans-esophageal, trans-vaginal and trans-rectal scans are contraindicated.
The Uscan is not intended for ophthalmic use or any use causing the acoustic beam to pass through the
eye.
Cautions
Federal (USA) law restricts this device to sale by or on the order of a physician.
Warning
Show care when scanning near a wound to avoid damaging or further injuring the affected area.
Review the ultrasound image when measuring bladder volume on pregnant or post-partum patients,
and adjust the bladder outline if it has included amniotic fluid or the uterus in the measurement.
Page 7

P003948 Uscan User Manual Page | 4
System and Transducer applications
Table 1.1 Uscan applications
Clinical Application Mode of Operation
General Specific B-mode
B-mode/
M-mode
B-mode/
PW Doppler
Ophthalmic Ophthalmic
Fetal imaging &
oth
er
Fetal
Abdominal
Intra-operative (specify)
Intra-operative (neuro)
Laparoscopic
Pediatric
Small organ (specify)*
Neonatal cephalic
Adult cephalic
Trans-rectal
Trans-vaginal
Trans-urethral
Trans-oesophageal (non-cardiac)
Musculoskeletal (conventional)
Musculoskeletal (superficial)
Intravascular
Other (specify)
Cardiac
Cardiac adult
Cardiac pediatric
Intravascular (cardiac)
Trans-esophageal (cardiac)
Intra-cardiac
Other (specify)
Peripheral
vessel
Peripheral vessel
Other (specify)
* Small organ use is prostate
Page 8

P003948 Uscan User Manual Page | 5
Table 1.2 Uscan applications for the B3-5 transducer (P004200)
Clinical Application Mode of Operation
General Specific B-mode
B-mode/
M-mode
B-mode/
PW Doppler
Ophthalmic Ophthalmic
Fetal imaging &
oth
er
Fetal
Abdominal
Intra-operative (specify)
Intra-operative (neuro)
Laparoscopic
Pediatric
Small organ (specify)*
Neonatal cephalic
Adult cephalic
Trans-rectal
Trans-vaginal
Trans-urethral
Trans-esophageal (non-cardiac)
Musculoskeletal (conventional)
Musculoskeletal (superficial)
Intravascular
Other (specify)
Cardiac
Cardiac adult
Cardiac pediatric
Intravascular (cardiac)
Trans-esophageal (cardiac)
Intra-cardiac
Other (specify)
Peripheral
vessel
Peripheral vessel
Other (specify)
* Small organ use is prostate
Training
The Uscan device is intended to be used by clinicians with appropriate professional qualifications and clinical
training. Intended users include physicians, nurses, nurses' aides, midwives, and physical therapists.
All users should read the generic
ALARA education program supplied with your Uscan (see enclosed ISBN
1-93004 7-71-1, Medical Ultrasound Safety) or the Health Canada “Guidelines for the Safe Use of Diagnostic
Ultrasound” available on the Health Canada website. This program outlines the guiding principle for
diagnostic ultrasound, where the qualified user keeps ultrasound exposure to “as low as reasonably
achievable” while performing a diagnostic examination.
In addition to the above, users in
tending to use the general imaging must have appropriate training in
ultrasound. Appropriate information on training may be obtained by contacting
Signostics or your local
professional body.
For users measuring bladder volume an understa
nding of anatomy and location of the bladder is required.
Ultrasound training is required if bladder outline adjustments are to be performed.
Warning
Y
ou must have appropriate ultrasound training before using the system for general ultrasound imaging
or adjusting bladder measurement outlines.
Page 9
P003948 Uscan User Manual Page | 6
Contents of the Uscan packages
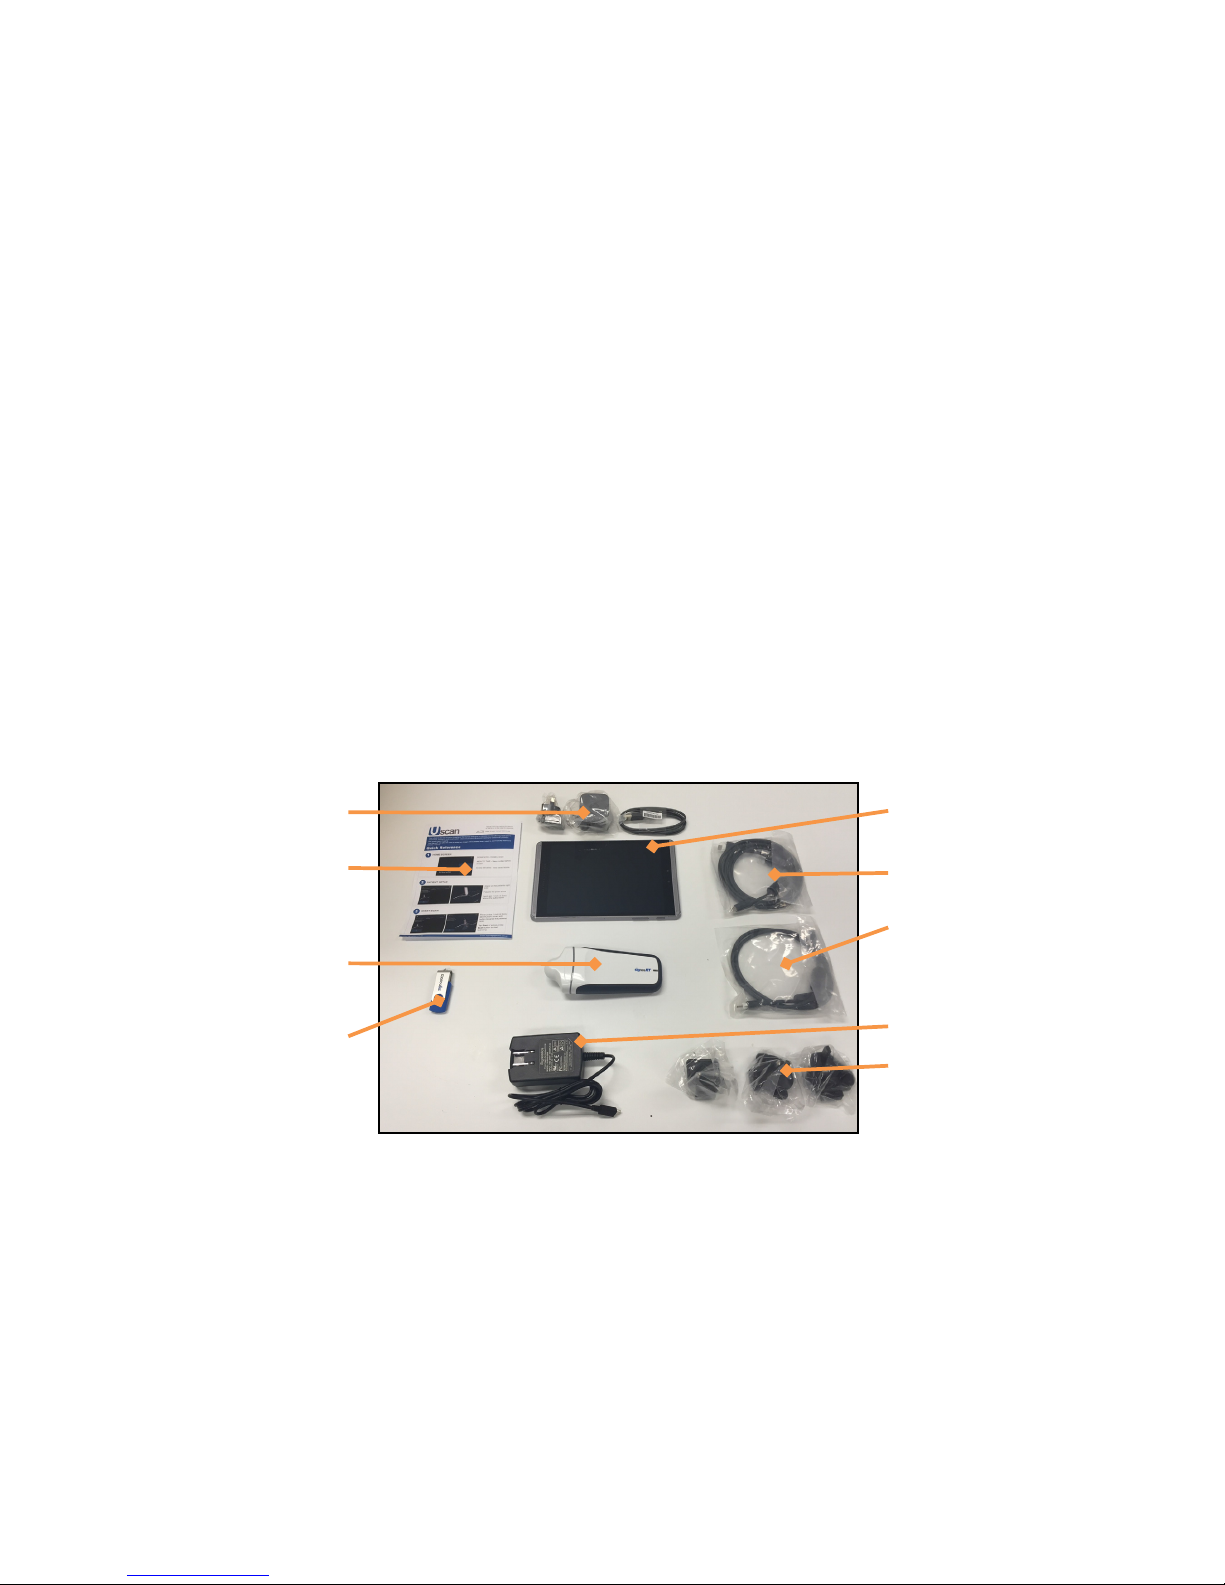
Yo ur Uscan pack contains the Uscan Probe carton with the Uscan probe and accessories, and the Uscan
Display carton with an off-the-shelf tablet (or handheld display) pre-loaded with Signostics software.
The Uscan Probe carton contains the following:
A Uscan probe (with connected transducer);
2 Quick Reference Guides.
A Signostics power supply.
A USB Flash device containing:
The User Manual.
Training materials including:
• A generic ALARA education program (see enclosed ISBN 1-93004 7-71-1, Medical
Ultrasound Safety).
Terms and conditions of Warranty.
Quick Reference and Setup Guides.
The Uscan Display carton contains the following:
A tablet (or handheld display) preconfigured with the Uscan software;
A probe connection cable.
A Signostics power supply.
A setup guide.
Fig 1.2 Uscan Pack Contents
Uscan Display (tablet
shown)
1800mm Probe tablet
connection cable
(P003968 or
P003986)
or
900mm Probe phone
connection cable
(P003969)
Signostics Power
Supply (P003198)
and adaptors
Uscan Display Power
Supply (P003198) and
adaptors
Quick Reference
Guides (P003958 and
P004039) and Setup
Guide (P004040)
Ultrasound probe
(P003992 or P003993)
and transducer
(P004200)
USB Flash
Page 10
P003948 Uscan User Manual Page | 7
System Features
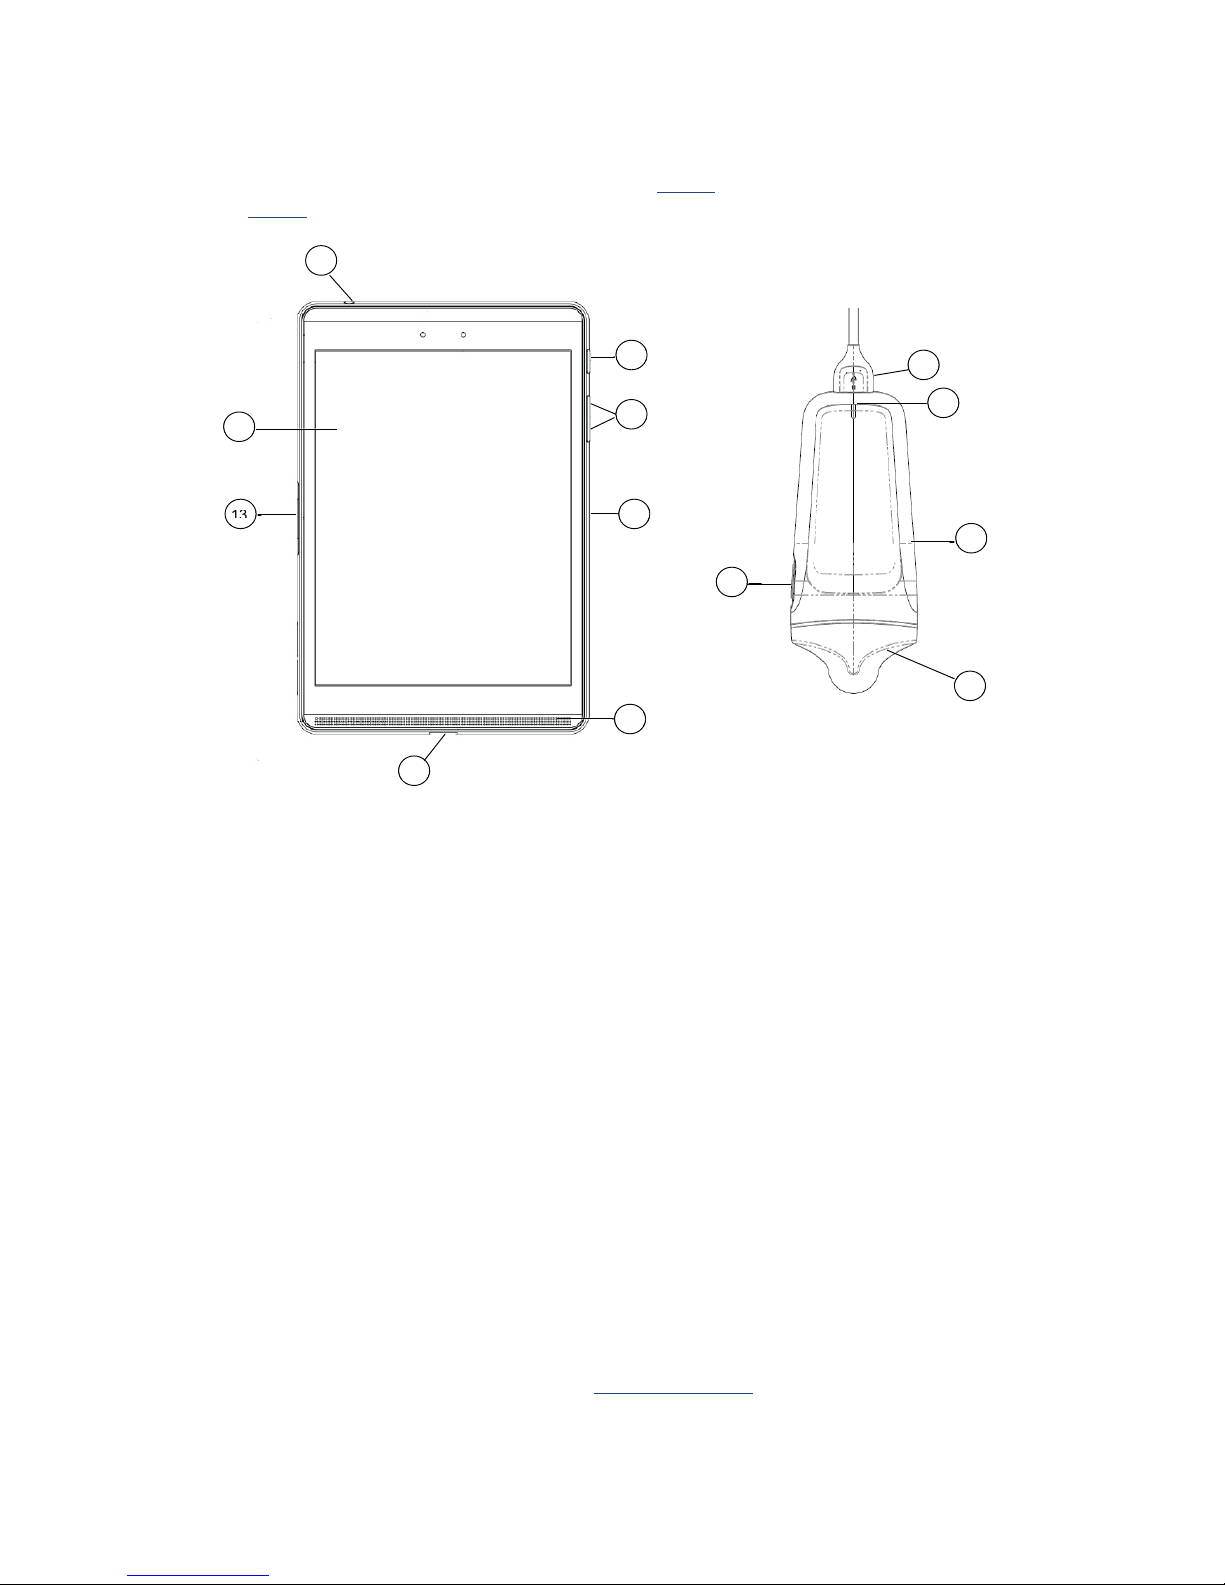
The front of the Uscan tablet display and probe are shown in Fig 1.3. The Uscan handheld display contains the
features in Fig 1.3 except the dock connector but may differ from the layout shown.
Fig 1.3 System Features
1 Audio output/Audio input 8 USB Connector
2 Touch screen 9 Power LED
3 Power On/Off 10 Over-mold
4 Volume Up/Volume Down 11 Transducer
5 Microphone 12 Scan button
6 Speaker 13 Dock Connector
7USB port
Camera for bar code scanning is on the rear of the display.
Classifications
The Uscan is internally battery powered during scanning.
The Signostics Power Supply P003198 classification for Protection against electric shock: Class II
equipment.
The B3-5 Sector (P004200) transducer is: Type BF Applied Part.
The Uscan probe is classified as IPX1.
The Uscan is not for use within an oxygen rich environment.
The Uscan is suitable for non-continuous operation (Mode of Operation (page 41)).
1
2
3
4
6
7
8
9
10
11
12
5 13
Page 11
P003948 Uscan User Manual Page | 8
Patient Environment
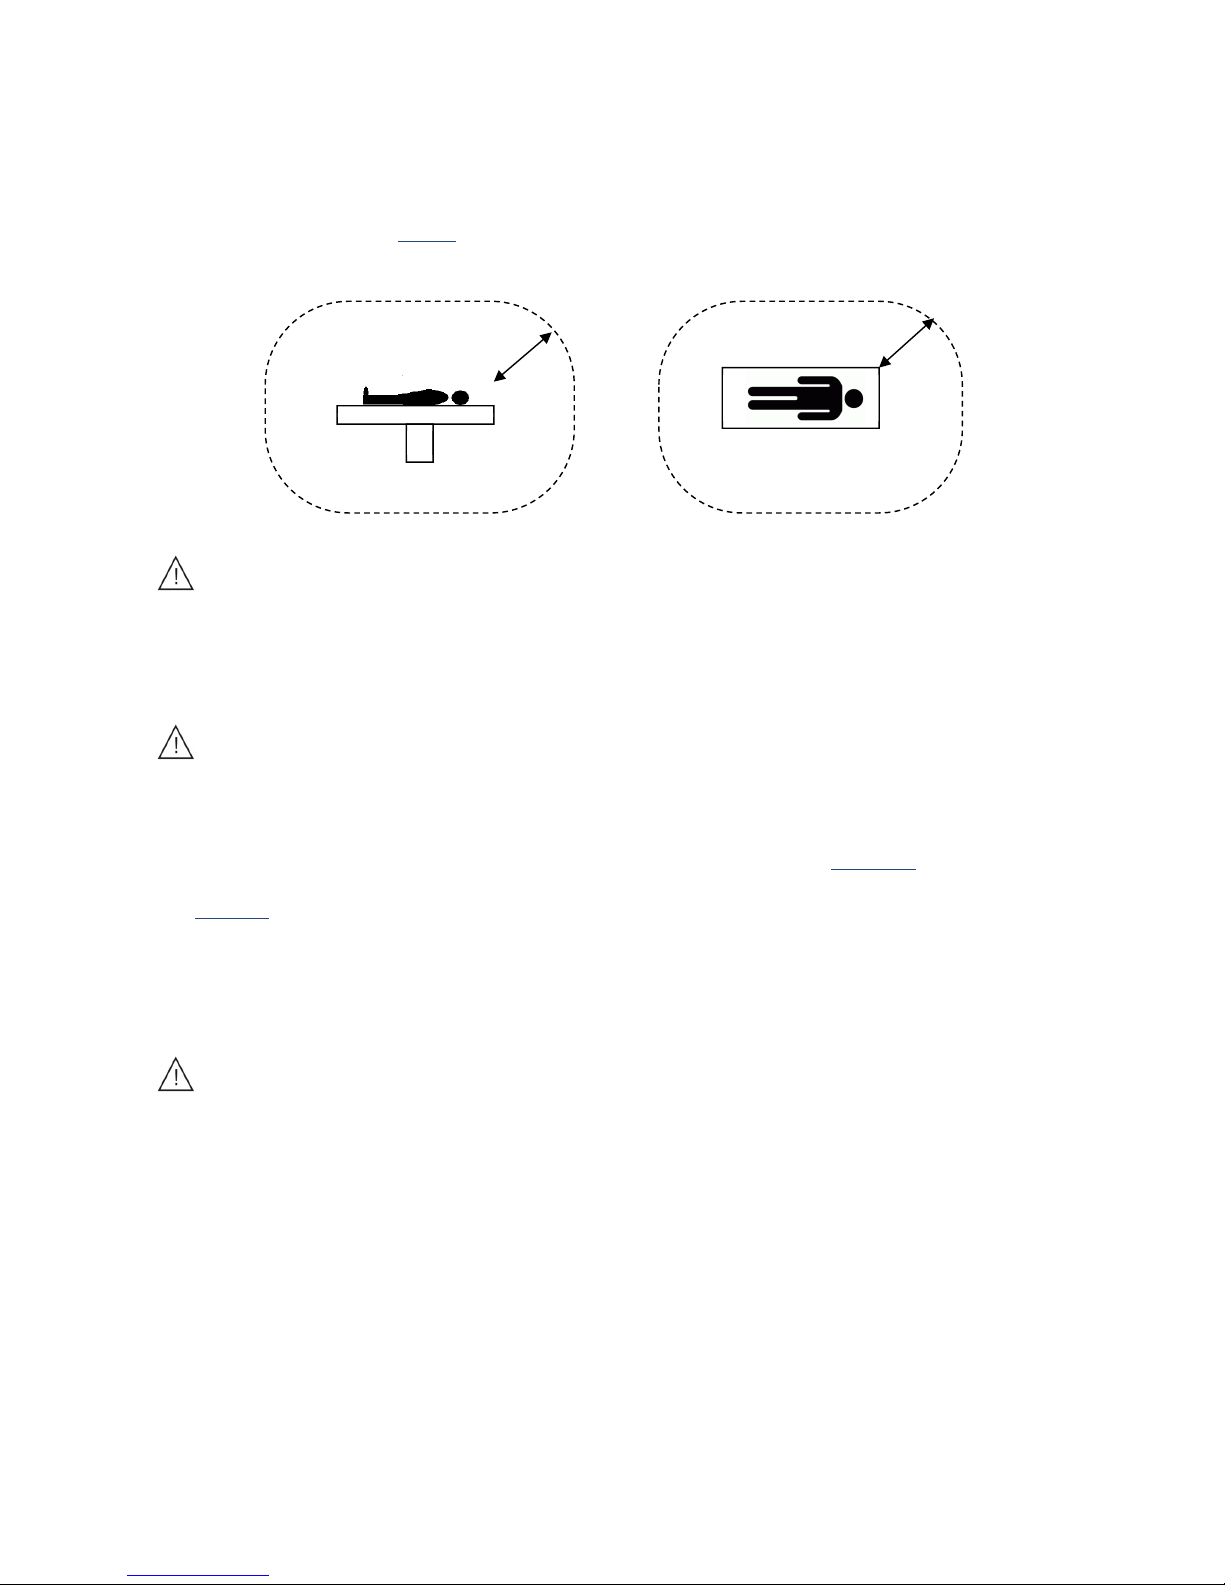
The Uscan is intended to be used in a medical facility. It is battery powered and the user is expected to bring
the system into the patient environment for use. Power supply connections for recharging are to remain outside
the patient environment. See
Fig 1.4 for a drawing of the patient environment. When a power supply is
connected, ensure the connection c
an be easily disconnected.
Fig 1.4 Patient Environment
Warning
Equipment not suitable for use in the presence of a FLAMMABLE ANAESTHETIC
MIXTURE
WITH AIR OR WITH OXYGEN OR NITROUS OXIDE.
Do not use the system near high-fre
quency surgical equipment, as it could create a burn hazard.
Do not recharge the system in the patient environment.
Caution
Do not allow any fluid to enter the USB connector on the probe or
any connectors on the display.
If fluid is spilled on the probe, display
, or cable, immediately remove the fluid with a soft dry cloth. Carefully
inspect the probe USB connector and display connectors for signs of fluid ingress. If there are any signs of
fluid ingress or if the device exhibits any unusual behavior, do not use and contact
Signostics customer support
or your Signostics distributor immediately. If required, also follow the cleaning and disinfection instructions
(see
Cleaning).
Cautions, Warnings and Contraindications
To ensure the device is not damaged and user and patient safety is maintained, please read and follow the
cautions and warnings below.
Warnings
Show care when scanning near a wound to avoid damaging or further injuring the af
fected area.
You must have appropriate ultrasound training before using the s
ystem for general ultrasound imaging
or adjusting bladder measurement outlines.
Review the ultrasound image when measuring bla
dder volume on pregnant or post-partum patients,
and adjust the bladder outline if it has included amniotic fluid or the uterus in the measurement.
Equipment not suitable for use in the presence of a FLAMMABLE ANAESTHETIC
MIXTURE
WITH AIR OR WITH OXYGEN OR NITROUS OXIDE.
Do not use the system near high-fre
quency surgical equipment, as it could create a burn hazard.
Do not recharge the system in the patient environment.
Recharge Uscan o
nly with the Power Supplies (chargers) provided.
The U
scan Power Supply are dedicated units to be used exclusively with the Uscan System only.
Only connect the Power Supplies to a mains supply rated at 100-24
0V and 50-60Hz.
Patient Environment Side View
Patient Environment Top View
1.5m 1.5m
Page 12

P003948 Uscan User Manual Page | 9
Do not use the device or Power Supply if there are signs of damage.
Be aware of latex allergy. Some commercially available transducer covers contain latex. Refer to the
US FDA alert title: “Medical Alert: Allergic Reactions to Latex-Containing Medical Devices”, issued
March 29, 1991.
Check the connecting cable, connectors, and system housings before use for cracks or fraying. Do not
use if damaged.
No modification of this equipment is allowed.
This device contains no user-serviceable parts. Please contact Signostics customer support or your
Signostics distributor for maintenance or repair.
The internal probe battery is not to be replaced by the user – doing so may create fire or explosion
hazard.
Remove all particles and other matter from crevices and surfaces when cleaning the system and
components.
The device is supplied unsterile.
Clean and disinfect the transducer between patients.
Before cleaning or disinfection turn Uscan off and disconnect from the power supply.
Do not submerge the probe, the display or the power supply (charger) as electric shock could result.
The ultrasound probe is IPX1 which allows water falling vertically onto the probe. The display is
IPX0 and has no protection against ingress of water.
Clean and disinfect the system before placing in a bag for transport. Use the supplied Signostics probe
holder to store the probe. Clean and disinfect the probe holder regularly.
After cleaning or disinfection examine the ultrasound probe and display as appropriate for cracks or
leaks, and if damage exists discontinue use of the system and contact
Signostics customer support or
your Signostics distributor.
The user must not touch the any device connectors while in physical contact with the patient.
The Uscan probe is connected to the Uscan display running Signostics software to configure a
medical system. The display has been certified by Signostics as part of a medical system to IEC
60601-1: 3rd edition.
Do not connect the Uscan display to external computers or peripherals using the USB port unless the
system is outside the patient area. Failure to comply with these guidelines may result in electric shock.
Mounting the Uscan display on a mobile stand is configuring a medical system. Only use the
Signostics provided mobile stand accessory (P004013).
Only connect accessories that are specified as being compatible with Uscan. Contact Signostics
customer support or your Signostics distributor for information on compatible accessories and
systems.
If required, recharge the Uscan Probe only with the Signostics power supply (charger) provided
(P003198).
The Uscan power supplies are dedicated units to be used exclusively with the Uscan System only.
Do not open or modify the Signostics Power Supply P003198 or any other supplied power supplies –
Risk of electric shock
When using the optional Signostics mobile stand, if a Multiple Socket Outlet is required only use an
outlet and power cable certified to IEC 60601-1, and fix to the stand using a bolt and tool.
After storage at extreme temperatures, check the transducer surface temperature before applying to a
patient. A cold or hot surface may burn a patient.
Avoid musculoskeletal strain with prolonged use of Uscan.
Page 13

P003948 Uscan User Manual Page | 10
Do not incinerate or discard the device in general waste at end of life. The lithium battery is a potential
environmental and fire safety hazard.
Uscan compl
ies with the requirements of IEC 60601-1:3rd Edition. To avoid the risk of injury or
electrical shock, comply with all safety instruction and warnings.
Uscan compl
ies with the Electromagnetic Compatibility requirements of AS/NZ CISPR 11:2004 and
IEC 60601-1-2:2007. However, electronic and mobile communications equipment may transmit
electromagnetic energy through air and there is no guarantee that interference will not occur in a
particular installation or environment. Interference may result in artifacts, distortion, or degradation of
the ultrasound image. If Uscan is found to cause or respond to interference, try re-orienting Uscan or
the affected device, or increasing the separation distance between the devices. Contact
Signostics
customer support or your Signostics distributor for further information
When using the optional mobi
le stand, the Uscan system can be susceptible to ESD and may require
manual intervention. If ESD results in an error, unplug the probe and plug back in to restore operation.
Neurological use on patients with Creutzfeld-Jacob disease must not be pe
rformed. The device is
unable to be disinfected after such use.
The ALARA principle (As Low As Reasonably Achievable) should be employed for all medical
ultras
ound exposure
Cautions
Federal (USA) law restricts this de
vice to sale by or on the order of a physician.
Ultrasound transducer crystals are
fragile and are easily damaged if knocked, dropped or excessively
vibrated.
Avoid unnecessary bending or winding of the connecting cable.
The Uscan
batteries should be charged every six months at a minimum, even if you are not using your
device. When storing for greater than 3 days, store at ambient or cooler temperature.
Use only recommended disinfection methods.
Use abrasive cleaners, isopropyl
alcohol or solvents sparingly, and if used immediately clean and
remove residual substances from the Uscan.
Do not heat sterilize any part of the Us
can device.
Minimize application of alcohol bas
ed disinfectant to colored overmold materials. Long term use may
result in material degradation. If alcohol based disinfectant is applied to the overmold, immediately
remove by wiping with a damp cloth.
Only operate, charge and store Uscan within
the approved environmental parameters.
Uscan co
ntains sensitive components and circuits. Failure to observe proper static control procedures
may result in damage to the system. Any faults should be reported to
Signostics customer support or
your Signostics distributor for repair.
Contraindications
The U
scan is designed for percutaneous scanning only. Do not attempt intra-cavity imaging; in
particular, trans-esophageal, trans-vaginal and trans-rectal scans are contraindicated.
The Usc
an is not intended for ophthalmic use or any use causing the acoustic beam to pass through the
eye.
Page 14
P003948 Uscan User Manual Page | 11
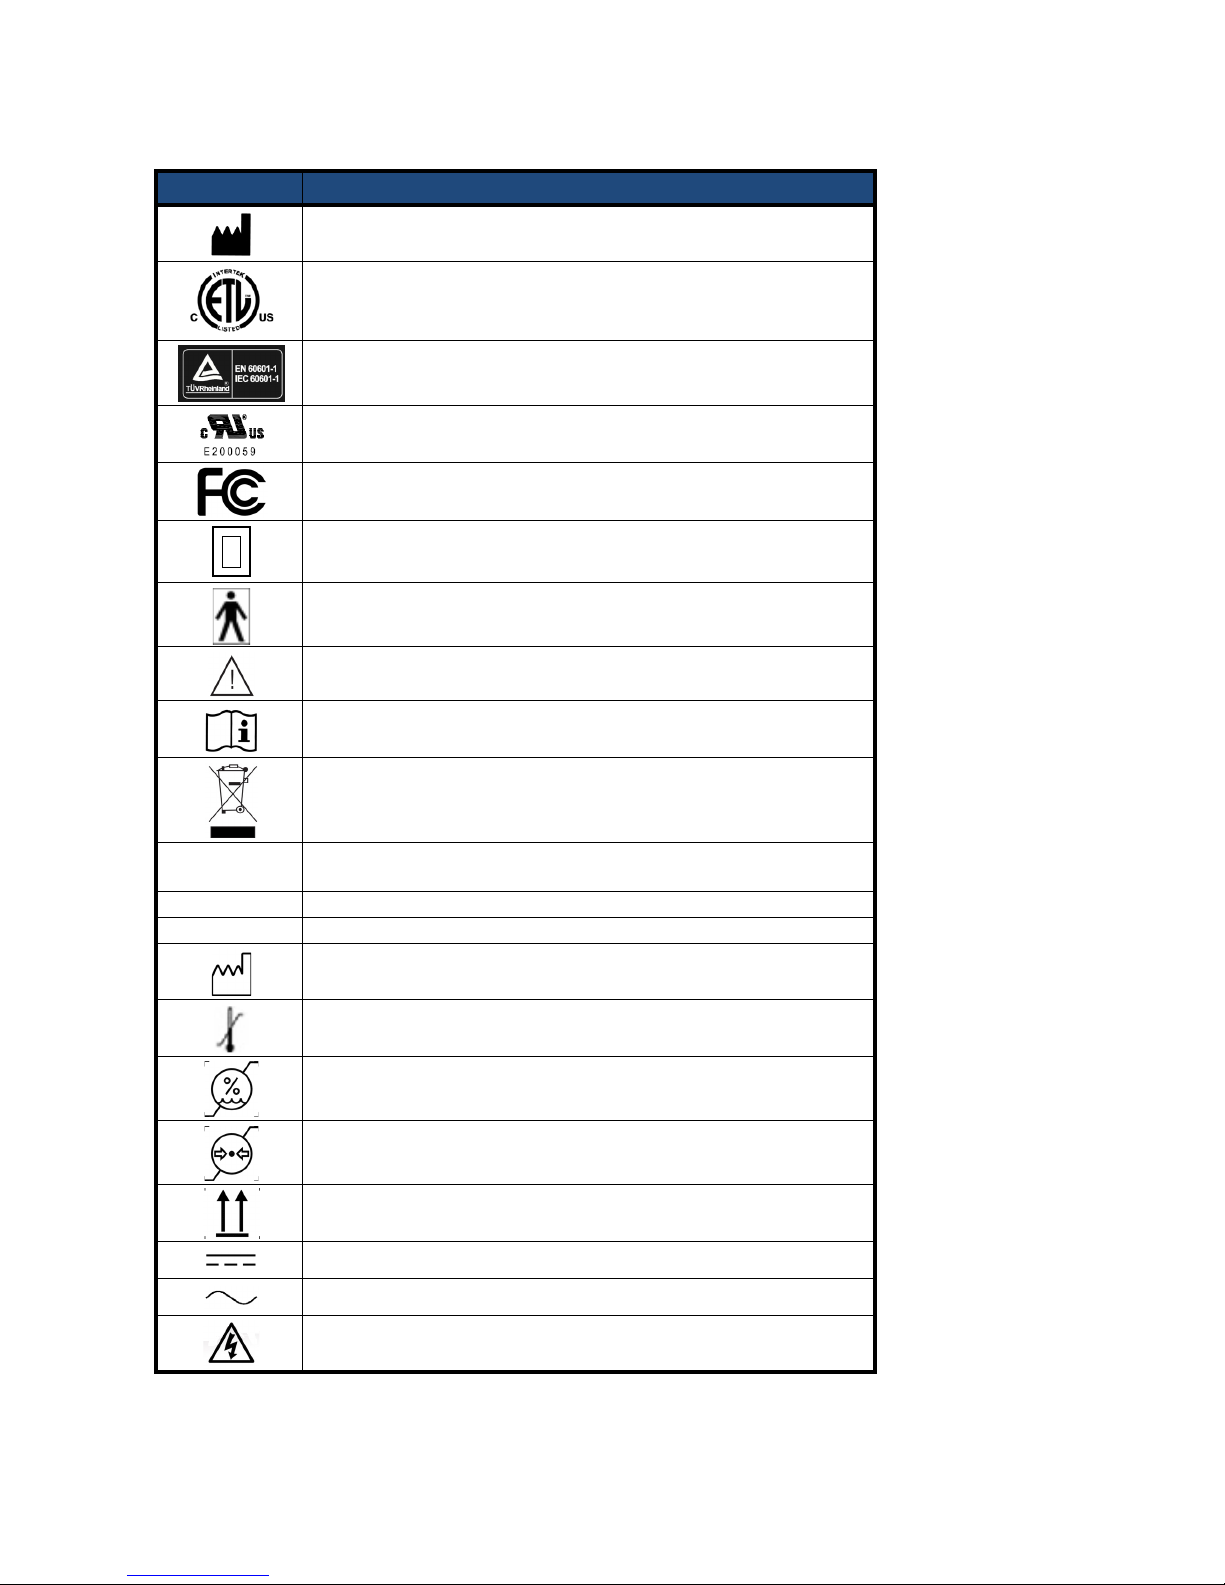
Labeling
Symbol Explanation
Manufacturer
Intertek nationally recognized testing laboratory certification mark for
Canada and United States
TUV Rheinland nationally recognized testing laboratory certification mark
UL Recognized Component mark certifying compliance with Canadian
and United States requirements
Tested to comply with FCC standards
Class II Equipment
Type BF applied part (B – Body, F = floating applied part)
Caution or Warning
Consult instructions for use
Do not dispose of this product in normal trash or landfill (see European
Commission Directive 93/86/EEC). Refer to local regulations for disposal
IPX1
Degree of protection from moisture for the ultrasound probe. The probe is
protected against effects of vertically falling water
REF
Part Number
SN
Serial number
Date of manufacture
max °C
min °C
Temperature limitation
Humidity limitation
Atmospheric pressure limitation
Stack box this way up
Direct Current (DC)
Alternating Current (AC)
Dangerous voltage
Page 15

P003948 Uscan User Manual Page | 12
Contact information
United States
EchoNous Inc.
8310 154th Avenue NE
Building B, Suite 200
Redmond, WA 98052
Technical Support (toll free) 844-502-7094
Sales (toll free) 844-854-0800
Email
Website www.signosticsmedical.com
Trademarks and document copyright
EchoNous®, Uscan®, the EchoNous® Logo and the Uscan® Logo are registered trademarks of EchoNous,
Inc. and its subsidiaries in the United States and other countries. Unauthorized use is strictly prohibited.
Mopria
®
, the Mopria® Logo and the Mopria® Alliance logo are registered trademarks and service marks of
Mopria Alliance, Inc. in the United States and other countries. Unauthorized use is strictly prohibited.
All other trademarks are the property of their respective owners.
© EchoNous, Inc., 2017
Scan button
Rx only
Caution: Federal (USA) law restricts this device to sale by or on the order
of a physician or any other practitioner licensed by law of the State in
which he practices to use or order the device
Symbol Explanation
Page 16
P003948 Uscan User Manual Page | 14
2. GETTING STARTED
Unpacking the Boxes
Yo ur Uscan system is shipped in multiple boxes. Be careful not to insert anything sharp through the top of the
boxes when opening. Check you have received all of the ordered components:
A Uscan display (w
ith pre-installed Signostics software), associated power supply, probe connection
cable, protective cover, and setup guide.
A Uscan p
robe with Signostics power supply, USB Flash drive, and quick reference guide.
Options
Carry bag with probe holder a
nd protective cover.
Wireless printer (Citizen Systems Model CMP-20BTU 2" Mobile Printer with Bluetooth).
Wireless barcode scanner (not available in all countries. Contact
Signostics customer support or your
Signostics distributor for recommended sca
nners).
Mobile stand (P004013) with Signostics power supply and probe connection cable.
If any parts are missing or damaged then contact
Signostics customer support or your Signostics distributor as
soon as possible.
Connecting and disconnecting the Power Supply
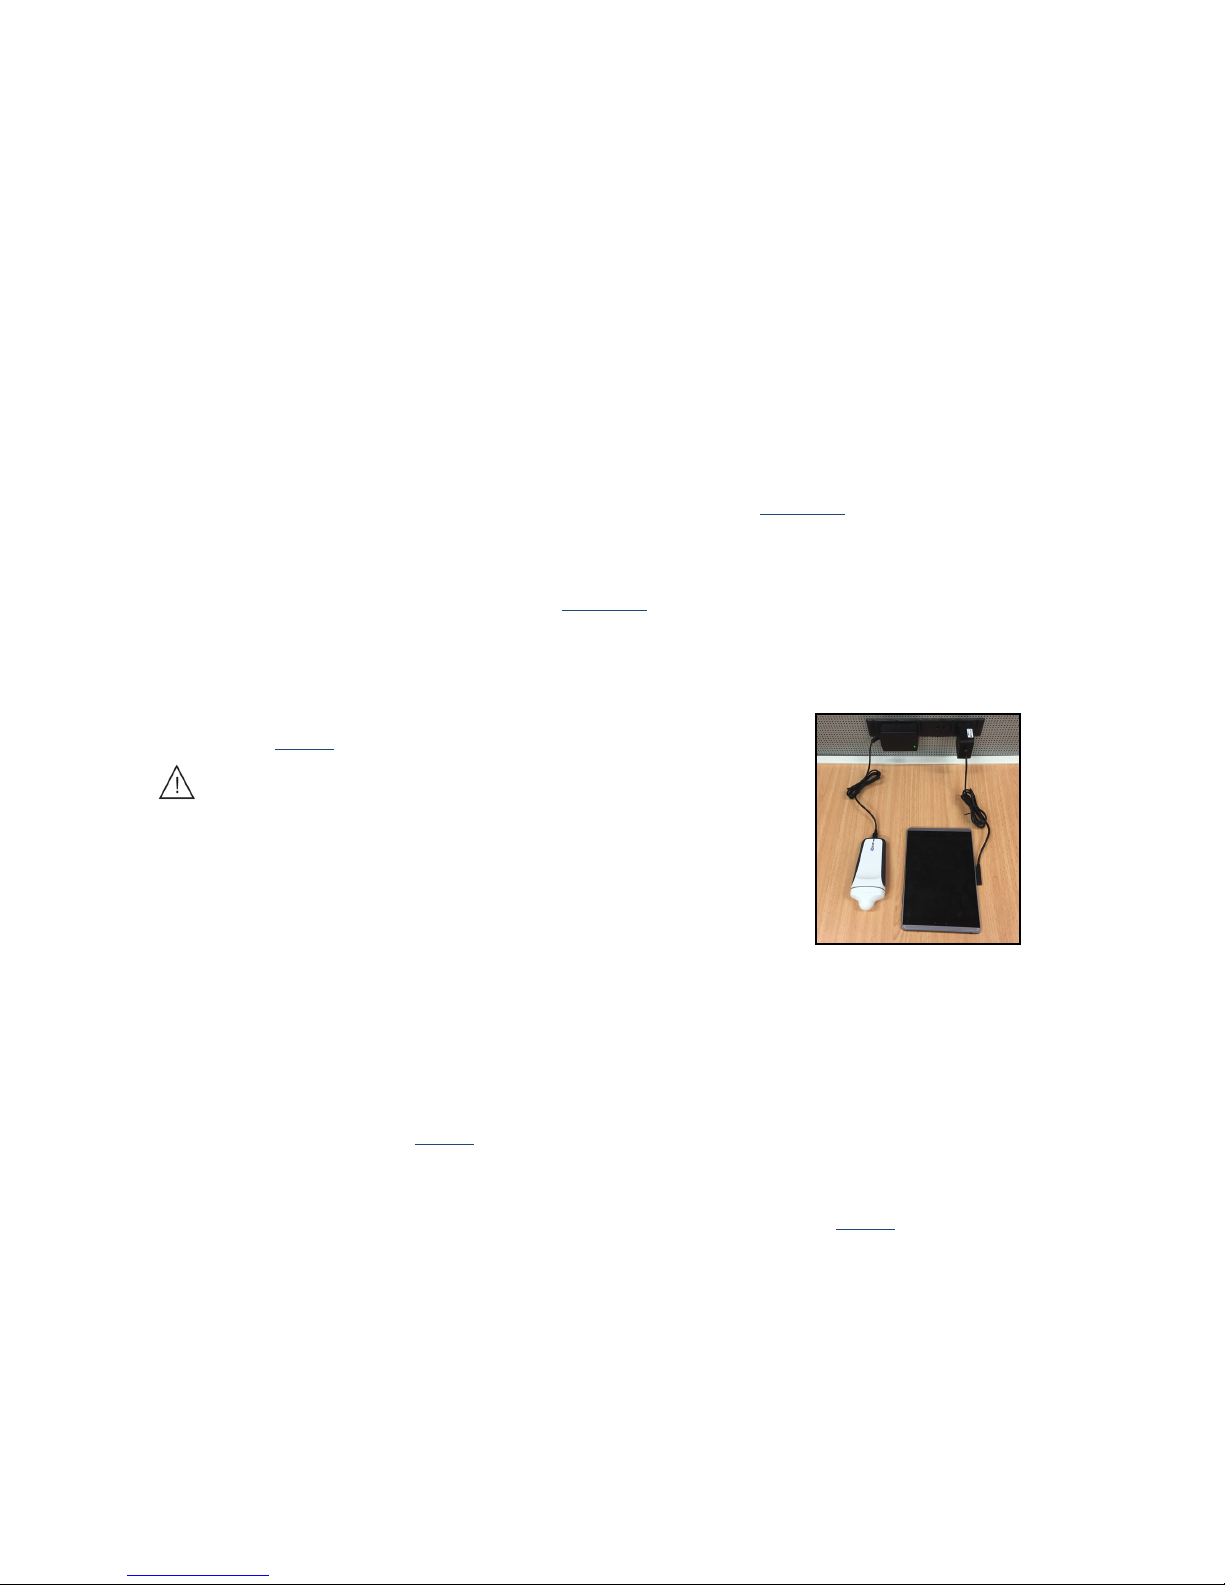
Fig 2.1 Power Supply Connections
(Tablet shown)
You should fully charge the display and probe before using them for the
first time (see
Fig 2.1).
Warning
Recharge Uscan only with the Power Supplies (chargers)
provided.
The Uscan Power Supply is a dedicated unit to be used
exclusively with the Uscan System only.
Only connect the Power Supplies to a mains supply rated at
100-240V and 50-60Hz.
Do not use the device or Power Supply if there are signs of
damage.
Recharge the display using the power supply provided with the dis
play. The connector is magnetic and can
only be connected in one orientation.
The U
scan probe contains an internal rechargeable battery. The probe can be directly charged using the Power
Supply (P003198) as shown in
Fig 2.1. If the probe is connected to the tablet display, and the tablet display is
plugged into its power supply, both the display and ultrasound probe batteries are
recharged together. The
handheld display does not have separate charging and USB ports, so concurrent charging is not possible.
If required, recharge the probe using the Signostics Power Supply
(P003198) (see Fig 2.1). To disconnect all
mains voltages from the equipment remove the display power suppl
y connection and (if applicable) the
probe power supply connection.
Page 17
P003948 Uscan User Manual Page | 15
Setting up the System
To setup the system with the optional mobile stand refer to Mobile Stand Setup. To configure the system for
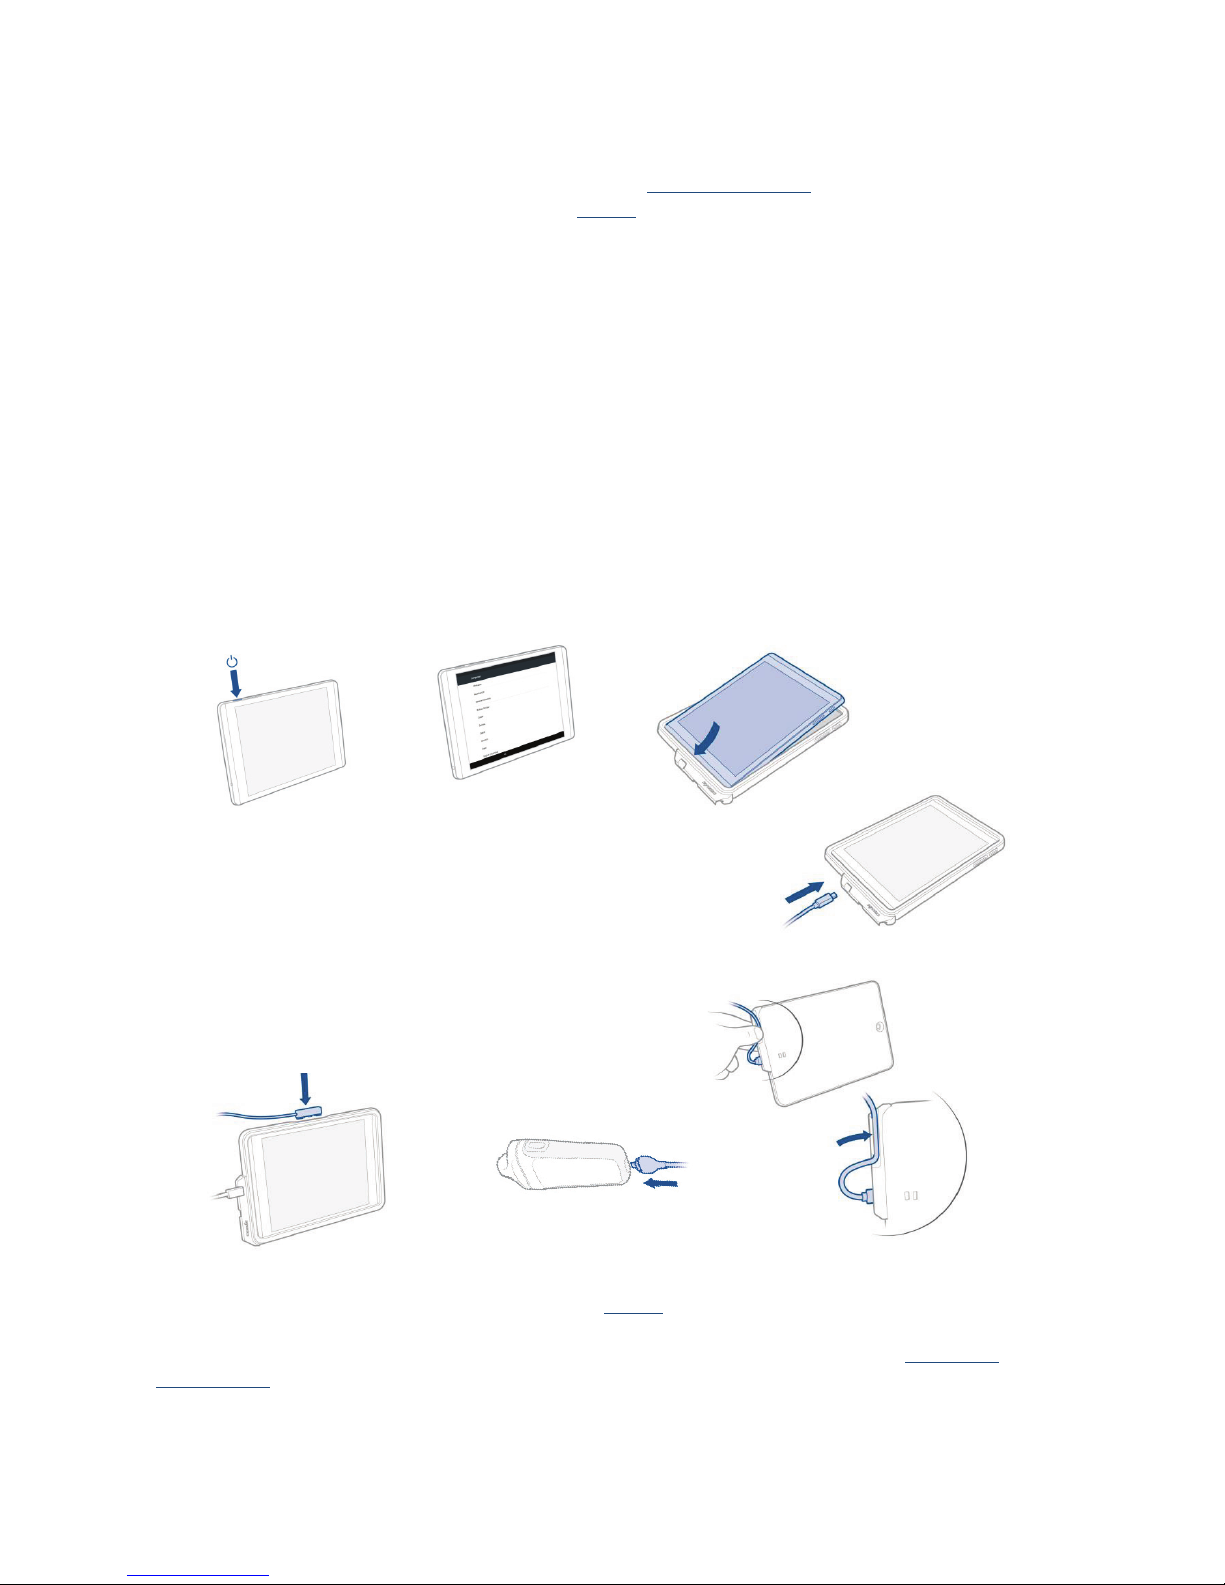
mobile use, follow the instructions below (and see Fig 2.2):
1. Press and hold the Power button for 2 seconds to turn the Uscan Display on.
2. The UScan application setup wizard will run. Setup the following:
2.1 Language.
2.2 Date and time.
2.3 Wi-Fi connectivity.
2.4 Registration information.
3. Insert the display into the cover.
4. Insert the USB cable into the display.
5. Secure the cable in the provide cable clip (tablet only).
6. Insert the other end of the cable into the Uscan probe.
7. Connect the provided display charger to the display and fully charge the system.
Fig 2.2 Display setup
After setup, the Uscan Home screen is displayed (see Fig 2.3) and the device is ready to use with default
settings. The default settings are appropriate where there is a single user of the system and patient data is not
saved to remote servers. The system can be further customized by setting preferences (see
Preference
SetupSettings).
1 2 3
4
5
6
7
Page 18
P003948 Uscan User Manual Page | 16
Basic Device Control
The Uscan communicates with the user in a number of ways.
Menus
Screens and windows
Message boxes
Icons
Navigate by using the touch screen, using common control gestures such as tap, drag, pinch, spread, and
swipe.
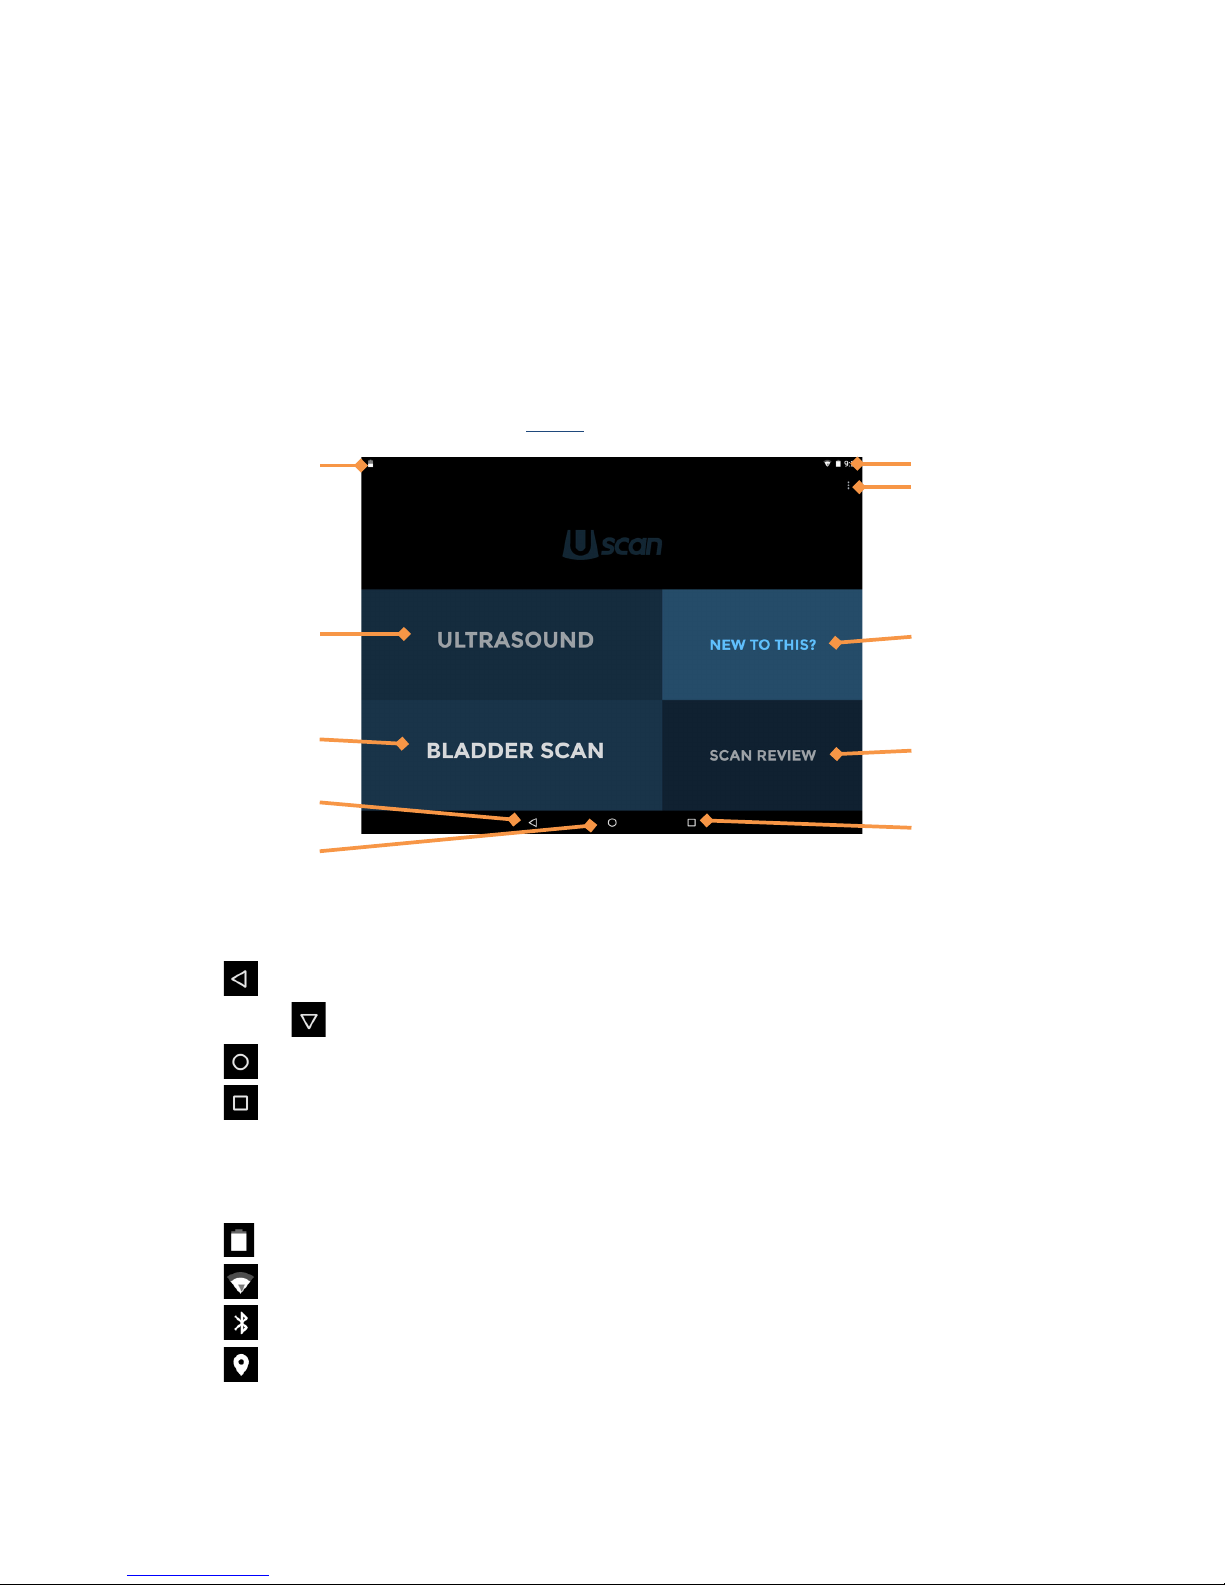
The system controls and status are shown in
Fig 2.3.
Fig 2.3 Uscan Home Screen
System Controls
Three system controls are always avail
able at the bottom of the screen:
Back – tap to return to a previous screen.
Hide –
shown when a keyboard is active. Tap to hide a keyboard.
Home – tap to return to the Home screen.
Tasks – tap to display background tasks (this should not be used except by administrators or
service staff).
System Status Icons
System status icons are shown at the top right of the sc
reen:
Tablet (or phone) battery status.
Wi-Fi status.
Bluetooth status (used for wireless printing and bar code scanning).
Location services – The device GPS is active and transmitting.
System Status
Uscan Menu
Bladder scan
instruction video
Exam review (not
shown in all
configurations)
Show Background
Ta sk s
System Notifications
Initiate ultrasound
scan (not shown in all
configurations)
Initiate bladder
measurement
Back
Home
Page 19

P003948 Uscan User Manual Page | 17
System Notification Icons
System notification icons are shown at t
he top left of the screen:
Probe battery status.
Remote storage upload notification.
Uscan software update notification (not for Japan).
The remote Device Manager has located the device.
Uscan Men
u
Tap
to go to the Uscan menu. The following menu items are available:
Settings – provide
s access to all Uscan application and tablet system settings.
About – displays the
software version number and license keys.
Settings
To setup or change Uscan preferences or tablet system settings, tap from the Home screen and select
Settings.
The following preferences can be configured:
Exam Data Storage – ta
p to see storage preference
Local Storage – check to automatically store patients and images on the tablet (or phone)
internal storage.
Remote Storage – check to automatically store patients and images to a remote server.
Remote Server – Select the type of remote server. Options will only be displayed if
the applicable license has been purchased and installed (see Advanced Device and
IT Setup).
Patient Data – select the source for patient lists (see Advanced Device and IT Setup
).
Exam Patient Details – check to force users to enter patient information before starting a
scan.
Send Anonymized Data to Signostics – check to send anonymized images to Signostics to
enable future product improvements. Check with your institution’s data policies or legal
department before enabling this option.
Send data over metered connection - check to allow data to be sent when connected to a
metered (cellular) connection.
Organization – tap to update registration details including organization name and address. These
details are transferred to Signostics when a network connection is available.
Printing
– select the Printer Type to None, Network Printer (see Network Printer Setup (Optional)), or
Bluetooth Mobile Printer (see
Bluetooth Printer Setup (Optional)).
Display – tap
to see display preferences
Sh
ow Organization and Transducer Frequency - check to display the Organization and
transducer center frequency on the ultrasound image.
Ruler – check to display a cm ruler down the left side of the ultrasound screen.
Show Ultrasound Button – uncheck to remove quick access to ultrasound scans from the
Home screen.
Show Bladder Image by Default – determines whether the ultrasound image is initially
visible when bladder scans are performed.
Page 20

P003948 Uscan User Manual Page | 18
Clinical – tap to see clinical preferences
Default Patient Type – tap to change the default patient type (Normal, Pediatric, Deep,
Pregnant, Phantom, “Use last selected value”, or “Ask each time”).
Strict Probe Positioning Rules - check to prevent fanning for bladder scans unless the bladder
or pubic bone is detected.
Administration – Refer to Advanced Device and IT Setup section for advanced user management and
setting up several devices with the same preferences.
Maintenance – provides maintenance related functionality including access to software updates.
System Settings – provides access to tablet system settings, including Wi-Fi, Bluetooth, Display
settings, Location services, linked Accounts for device tracking, Language, and Date & time.
Page 21
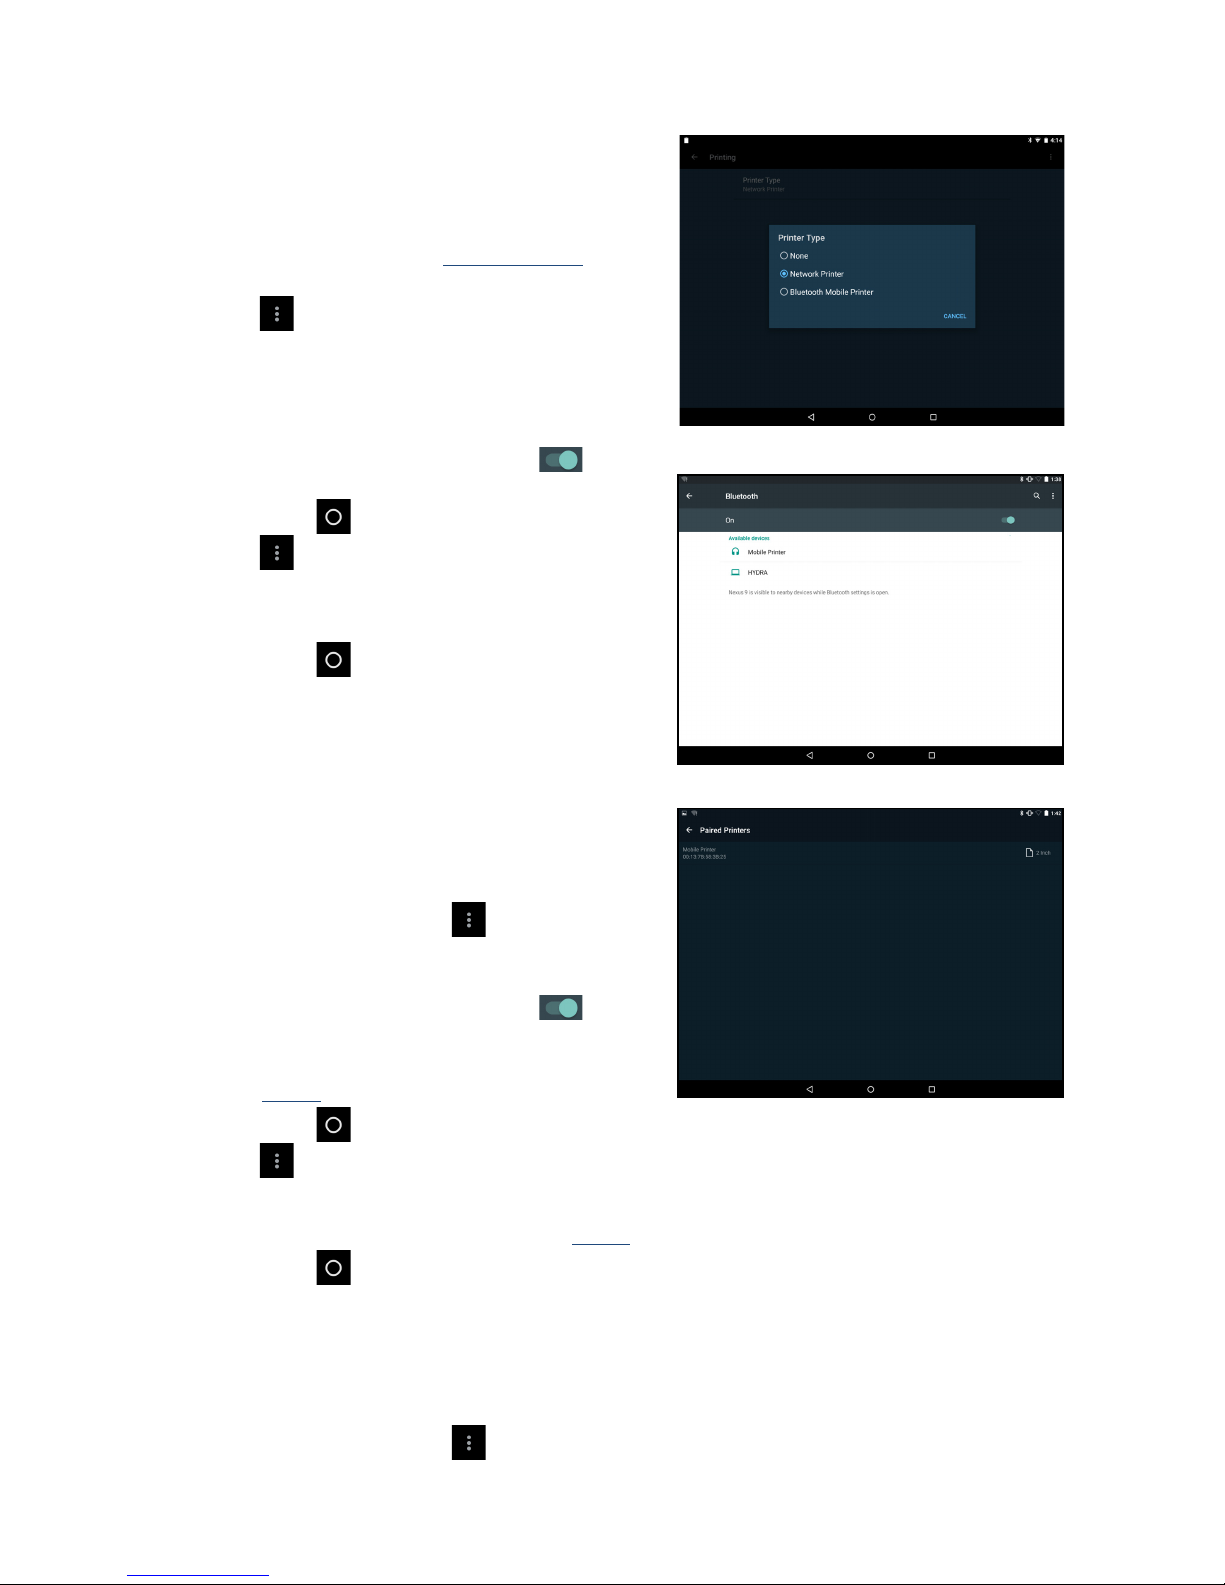
Fig 2.4 Bluetooth Pairing
Fig 2.5 Bluetooth Printer setup
Fig 2.4 Printer Type
P003948 Uscan User Manual Page | 19
Network Printer Setup (Optional)
Network printing enables the Mopria Print Service. The
Mopria Print Service enables printing to Mopria certified
multifunction printers from many manufacturers which are
on a connected WiFi network (see
www.mopria.org).
Follow the instructions below to setup network printing:
Tap
Uscan menu and select Settings.
Tap S
ystem Settings.
Scroll down and tap Pri
nting.
Tap Mopria Print
Service.
Slide the on-screen button
to the right to turn
Mopria Printing on.
Tap Home
to return to Uscan Home screen.
Tap
Uscan menu and select Settings.
Tap P
rinting.
Tap P
rinter Type and select Network Printing.
Tap Home
to return to Uscan Home screen.
A printer icon will be shown on all bladder and
ultras
ound images when Network Printing is
selected.
Bluetooth Printer Setup (Optional)
An optional Bluetooth printer is available. Turn the
wireless printer on and then follow the instructions below
to setup the printer:
From the Home
screen tap Uscan menu and
select S
ettings. Tap System Settings. Tap
Bluetooth.
Slide the on-screen button
to the right to turn
Bluetooth on.
Select Mobile Printer to pair it wi
th the system
(see
Fig 2.4).
Tap Home
to return to Uscan Home screen.
Tap
Uscan menu and select Settings.
Tap P
rinting. Tap Printer Type and select Bluetooth Mobile Printer. Tap Bluetooth Printer.
Select the paired printer from the list (see
Fig 2.5).
Tap Home
to return to Uscan Home screen.
Bar Code Scanner Setup (Optional)
An optional wireless bar code scanner is supported in some countries. Bar code scanning using the device
camera is also supported. To setup the wireless bar code scanner turn the bar code scanner on and follow the
instructions below:
From the Home
screen tap Uscan menu, select Settings, and select System Settings.
Page 22
P003948 Uscan User Manual Page | 20
Tap Bluetooth.
Slide the on-screen button to the right
to turn Bluetooth on.
Select the bar code scanner to pair it with the system.
Tap Home
to return to Uscan Home screen.
Imaging Screens
Ultrasound Scan Screens
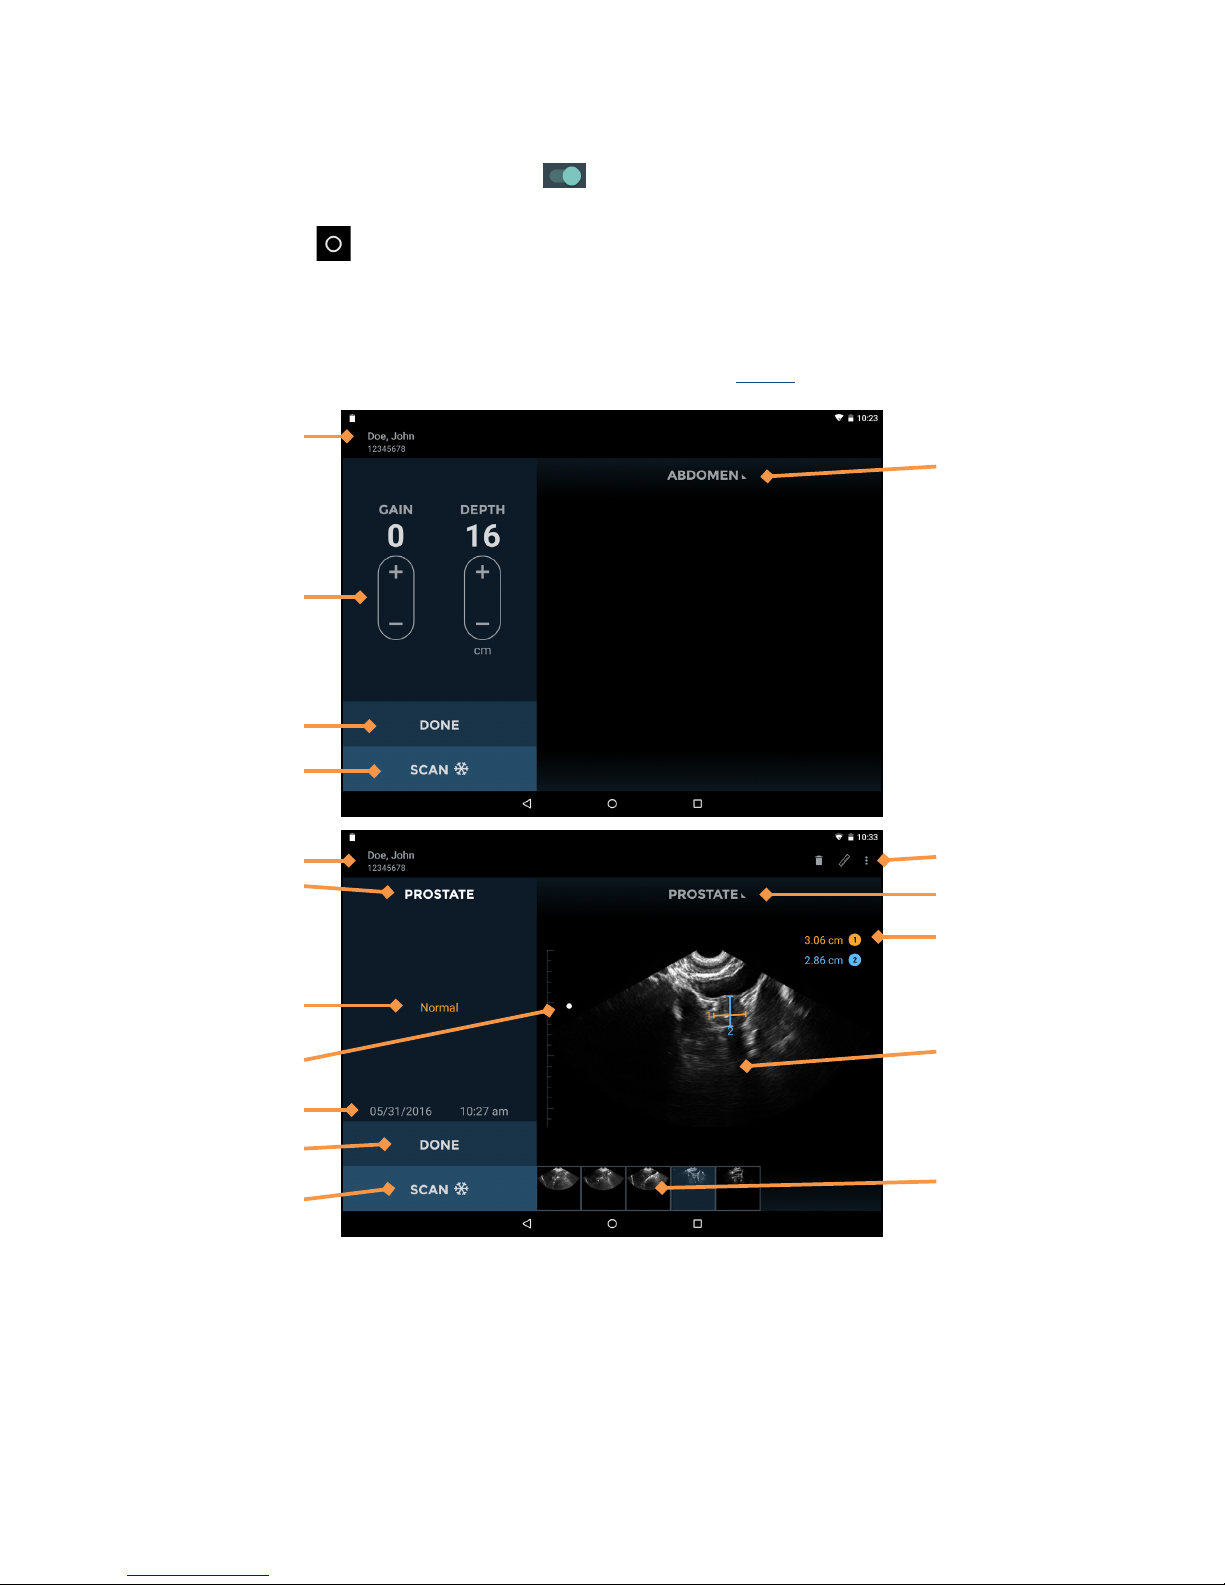
Tap Ultrasound on the Home sc
reen to start an ultrasound exam. See Fig 2.6 for ultrasound screen layouts.
Fig 2.6 Ultrasound Scan Screens
The ultrasound screen layouts contain the following areas:
Patient Details –
displays patient details for the current exam.
Preset Used – dis
plays the scan preset used for the current image.
Image Text Annotation – displays the text annot
ation for the image.
Image Date and Time – displays the date
and time of the image.
Gain and Depth Controls – adjust the
gain (brightness) or the depth for the system.
Scan Preset
Menu
Exam Icons
Scan Preset
Menu
Measurement
Area
Ultrasound Image
area
Ultrasound Image
Thumbnail
Region
Patient Details
Image Gain
(brightness) and
Depth
Done (End Exam)
Freeze (Unfreeze)
Patient Details
Preset Used
Image Text
Annotation
Orientation Mark
Image Date and
Time
Done (End Exam)
Freeze (Unfreeze)
Page 23

P003948 Uscan User Manual Page | 21
Orientation Mark – corresponds to the Scan button orientation on the probe.
Done – tap to end and save the exam.
Scan (Stop) – tap to start (unfreeze) and stop (freeze) scans.
Exam Icons – are displayed depending on the context of the exam. Icons include help, print, measure,
movie, delete, and a menu to access other functions (Annotations, Notes). Tap to activate the function
associated with the icon.
Scan Preset Menu – tap to change to a different scan preset.
Measurement Area – area for displaying caliper measurements.
Ultrasound Image – area for displaying ultrasound images.
Image Thumbnails – will be displayed for multiple images in an exam. Tap a thumbnail to view an
image.
Page 24
P003948 Uscan User Manual Page | 22
Bladder Scan Screens
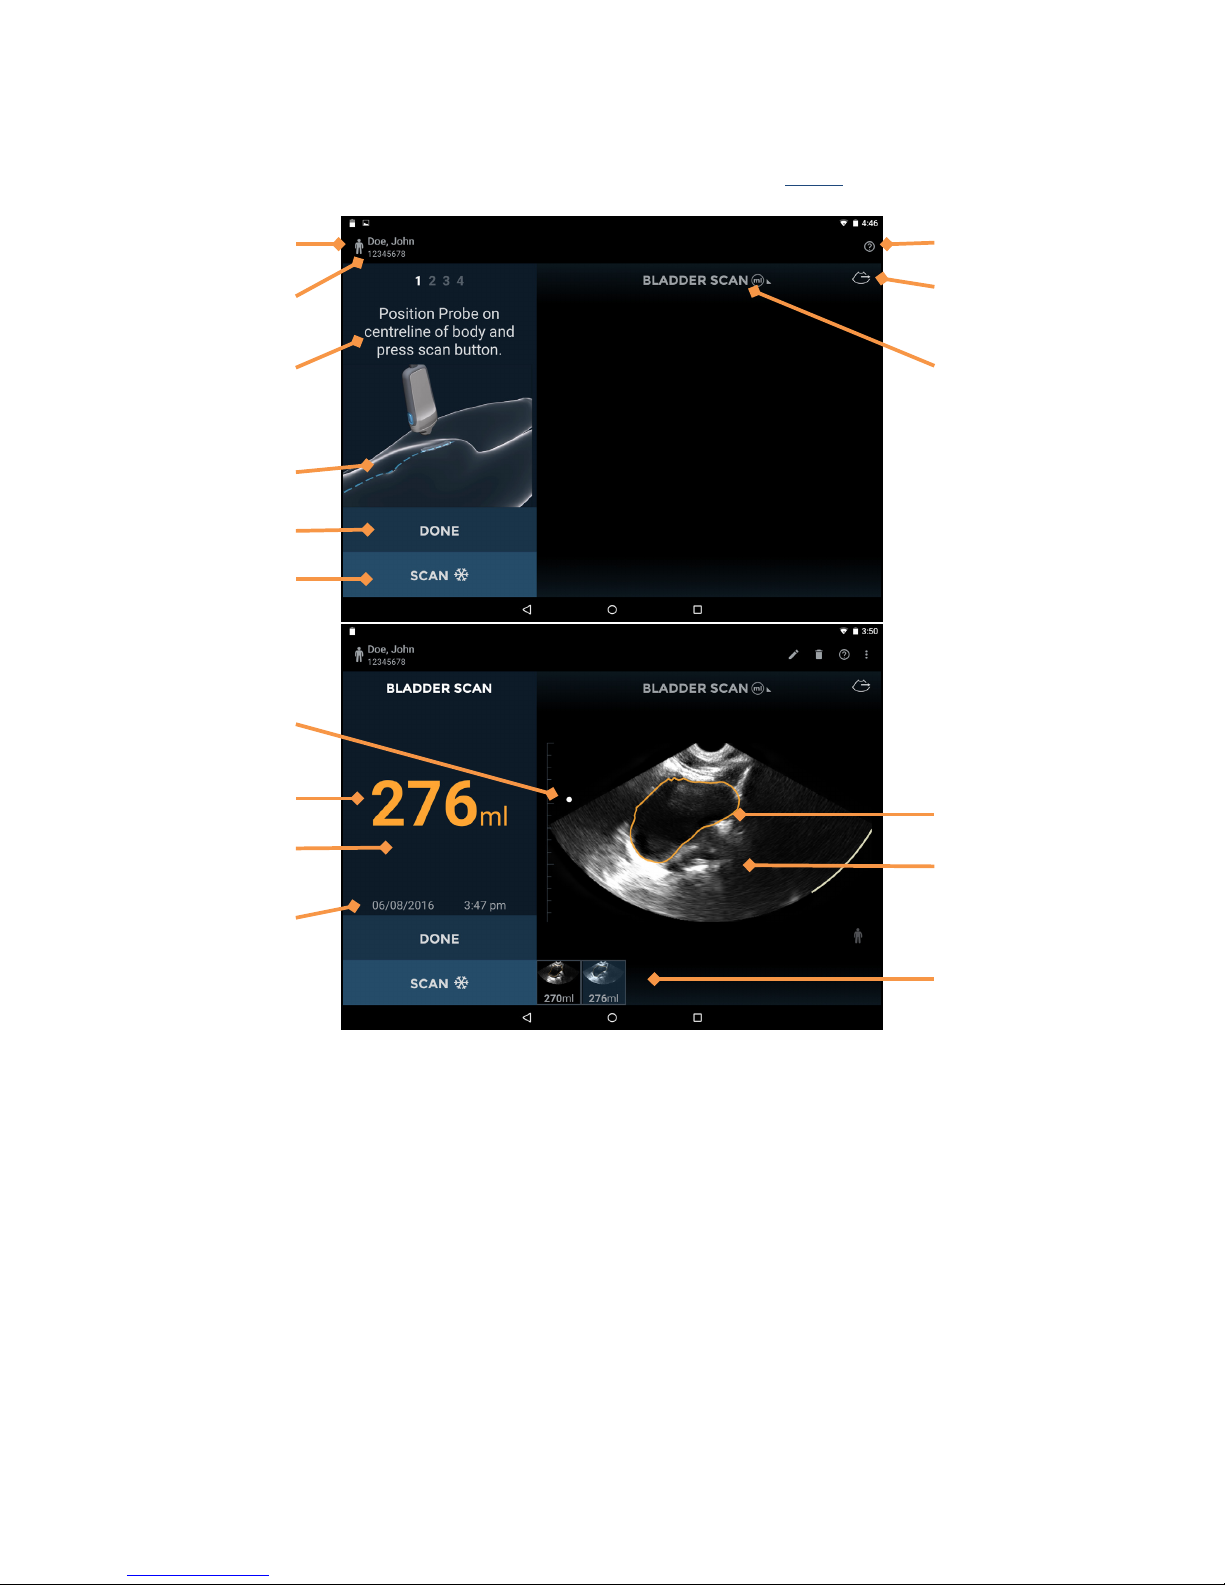
Tap Bladder Scan on the Home screen to start a bladder measurement. See Fig 2.7 for bladder screen layouts.
Fig 2.7 Bladder Scan Screens
The bladder screen layouts contain the following areas:
Patient Type – tap to change the patient type (Normal, pediatric, deep, pregnant, phantom).
Patient Details – displays patient details for the current exam.
Instructions – instructions of current step required for bladder measurement.
Instruction animation – animation of current step required for bladder measurement.
Done – tap to end and save the exam.
Scan (Stop) – tap to start (unfreeze) and stop (freeze) scans.
Orientation Mark – corresponds to the Scan button orientation on the probe.
Measured Volume – measured volume in milliliters.
Image Text Annotation – displays the text annotation for the image.
Image Date and Time – displays the date and time of the image.
Exam Icons
Hide/Unhide
Scan Preset
Menu
Bladder Outline
Ultrasound Image
Ultrasound Image
Thumbnail
Region
Patient Type
Patient Details
Instructions
Instruction
Animation
Done (End Exam)
Freeze (Unfreeze)
Orientation Mark
Measured Volume
Image Text
Annotation
Image Date and
Time
Page 25

P003948 Uscan User Manual Page | 23
Exam Icons – are displayed depending on the context of the exam. Tap to activate the function
associated with the icon.
Hide/Unhide – hide or unhide the ultrasound image area.
Scan Preset Menu – tap to change from bladder scan to an ultrasound scan preset.
Ultrasound Image – area for displaying ultrasound images.
Image Thumbnails – will be displayed for multiple images in an exam. Tap a thumbnail to view an
image.
Recommended ultrasound transmission gel
Signostics recommends the use of Aquasonic 100 Ultrasound Transmission Gel manufactured by Parker
Laboratories, INC. Fairfield, New Jersey 07004.
Recommended ultrasound probe sterile sheaths
Where fluid contamination is possible, the ultrasound probe shall be covered with an appropriate sterile sheath,
which will promote asepsis and minimize cleaning. Refer to
Signostics website for a list of compatible probe
covers in your country.
Warning
Be aware of latex allergy. Some commercially available transducer covers contain latex. Refer to the
US FDA alert title: “Medical Alert: Allergic Reactions to Latex-Containing Medical Devices”, issued
March 29, 1991.
Page 26
P003948 Uscan User Manual Page | 24
3. SCANNING
Warning
Check the connecting cable, connectors, and system housings before use for cracks or fraying. Do not
use if damaged.
Do not connect to the Power Supplies and AC outlets when the system is in the patient environment.
Preparing for the Exam
Before scanning, check you have access to everything you need and the device is ready to scan as follows:
The sy
stem is powered on and has battery charge available to scan (the probes LED is flashing green
and the display battery icons shows charge).
The U
scan transducer has been cleaned or disinfected as appropriate (See Transducer cleaning and
disinfection).
You have suitable ultrasound transmission gel available.
The patient is positioned appropriately in a supine position.
Default Settings
Press the Power button to power up the system. Adjustable settings cannot increase acoustic output, ensuring
the device always operates within safe acoustic output levels. The Home screen appears when the device is on
(Fig
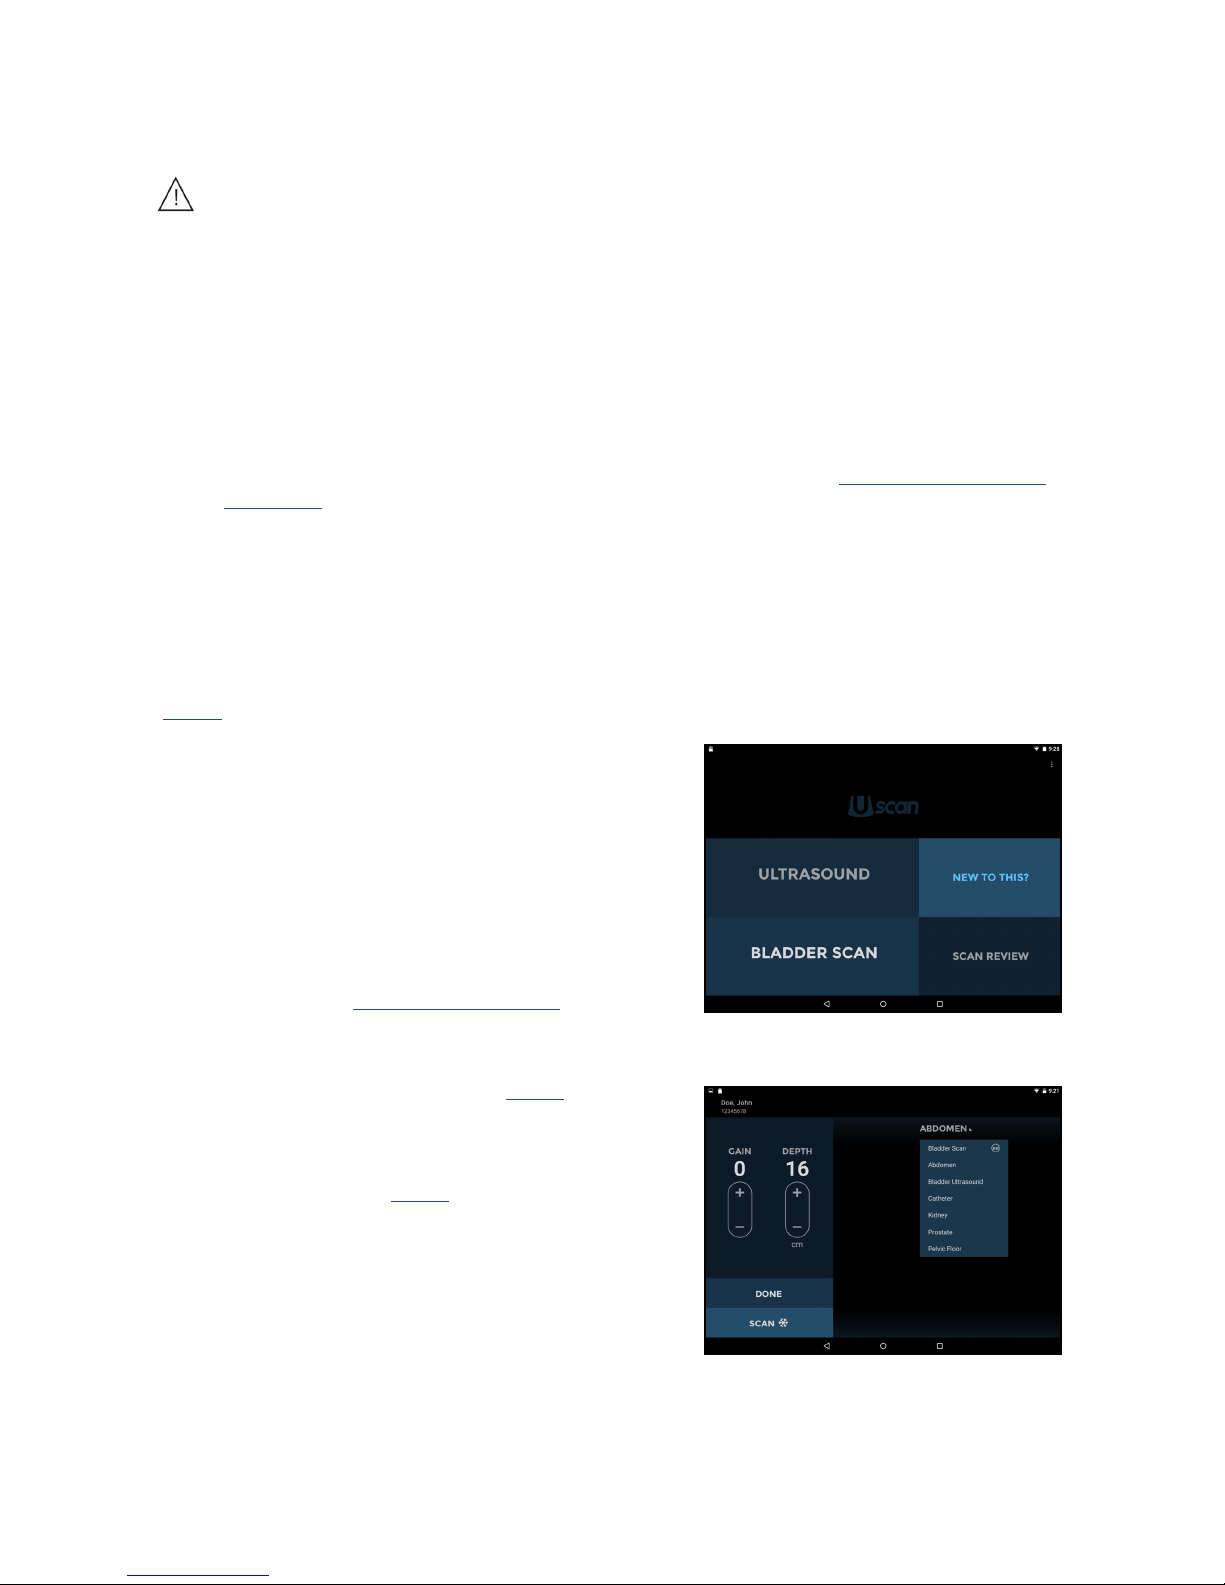
3.1), with four tiles:
Fig 3.1 Home Screen
Tap Ultrasound to perform an examination, with the
default an abdominal scan. This option is
not available
when the Uscan Settings “Show Ultrasound button on
home screen” is unchecked.
Tap Blad
der Scan to perform an examination, with the
default a bladder volume measurement.
Tap New T
o This? to view a help video.
Tap Sc
an Review to review locally stored examinations.
This option is not available if Local Storage is not
enabled during
Preference SetupSettings.
Ultrasound Scanning
Fig 3.2 Selecting Presets
Tap Ultrasound on the Home screen (see Fig 3.1) to initiate an
ultrasound scan.
Ultrasound Presets
Tap th e Scan Preset
Menu (Fig 3.2) to change the preset.
The scan presets are customized ultrasound settings for each
clinical application.
Page 27
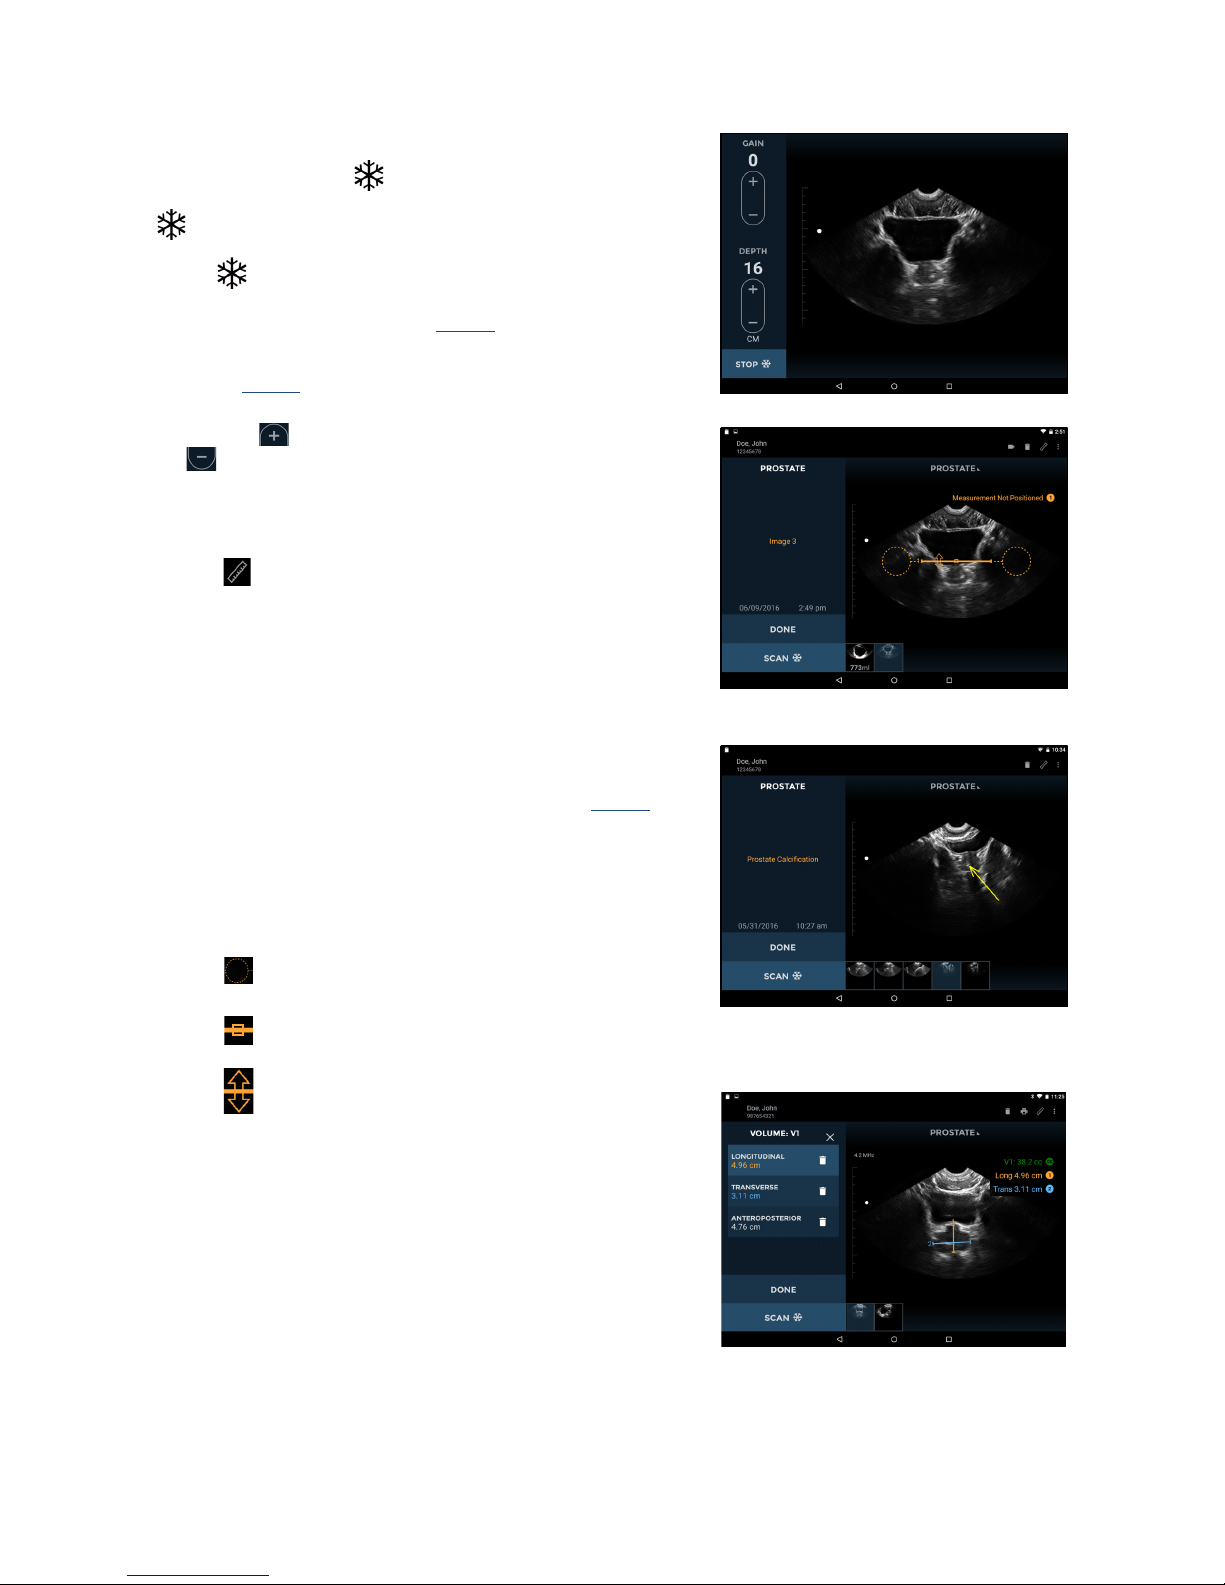
Fig 3.3 Ultrasound Scanning
P003948 Uscan User Manual Page | 25
Ultrasound Scanning
The probe Scan butt
on corresponds to the Orientation
Icon
on the display. The convention is for the Scan button
to be on the patient's right for transverse scans, and
toward the head for sagittal
or coronal scans. Tap the Scan
button
to start (unfreeze) and stop (freeze) ultrasound
scans. The image automatically generated is a sec
tor or pie
shape of approximately 120º (see Fig
3.3).
Controls for changing gain (brightness) and depth are
pro
vided (Fig
3.3).
Fig 3.4 Distance Measurement
Tapping the symbol increases the gain or depth. Tapping
the
symbol decreases the gain or depth.
Use a two finger pinch to zoom in or out of images.
Ultrasound measurement
Tap th e
Measurement icon to insert calipers, arrows, or
volume measurements on images:
Calipers measure a straight line
distance between two
points.
Arrows highlight part of the image, but do not perform a
me
asurement.
Fig 3.5 Arrow
Volume Measurements measure an ellipsoid volume
using 3 caliper measurements (longitudinal, transverse,
and anteroposterior) a
cross two images (see Fig
3.6).
The longitudinal and transverse measurements are
positioned on t
he first image, and the anteroposterior
measurement positioned on the second image. The first
and second images must be orthogonal.
Move the caliper or arrow using the:
Circular handle to position each end of the caliper in
the correct place.
Square handle in the middle to move the entire
caliper around the screen.
Double-arrow handle to rotate the caliper around its
Fig 3.6 Volume Measurement
middle.
You can insert four measurements per image. Tap the image
outside t
he shape to end editing that shape. Tap a shape to re-
select it for editing.
The units of measurement are cm for distance and cc for volume.
Page 28
P003948 Uscan User Manual Page | 26
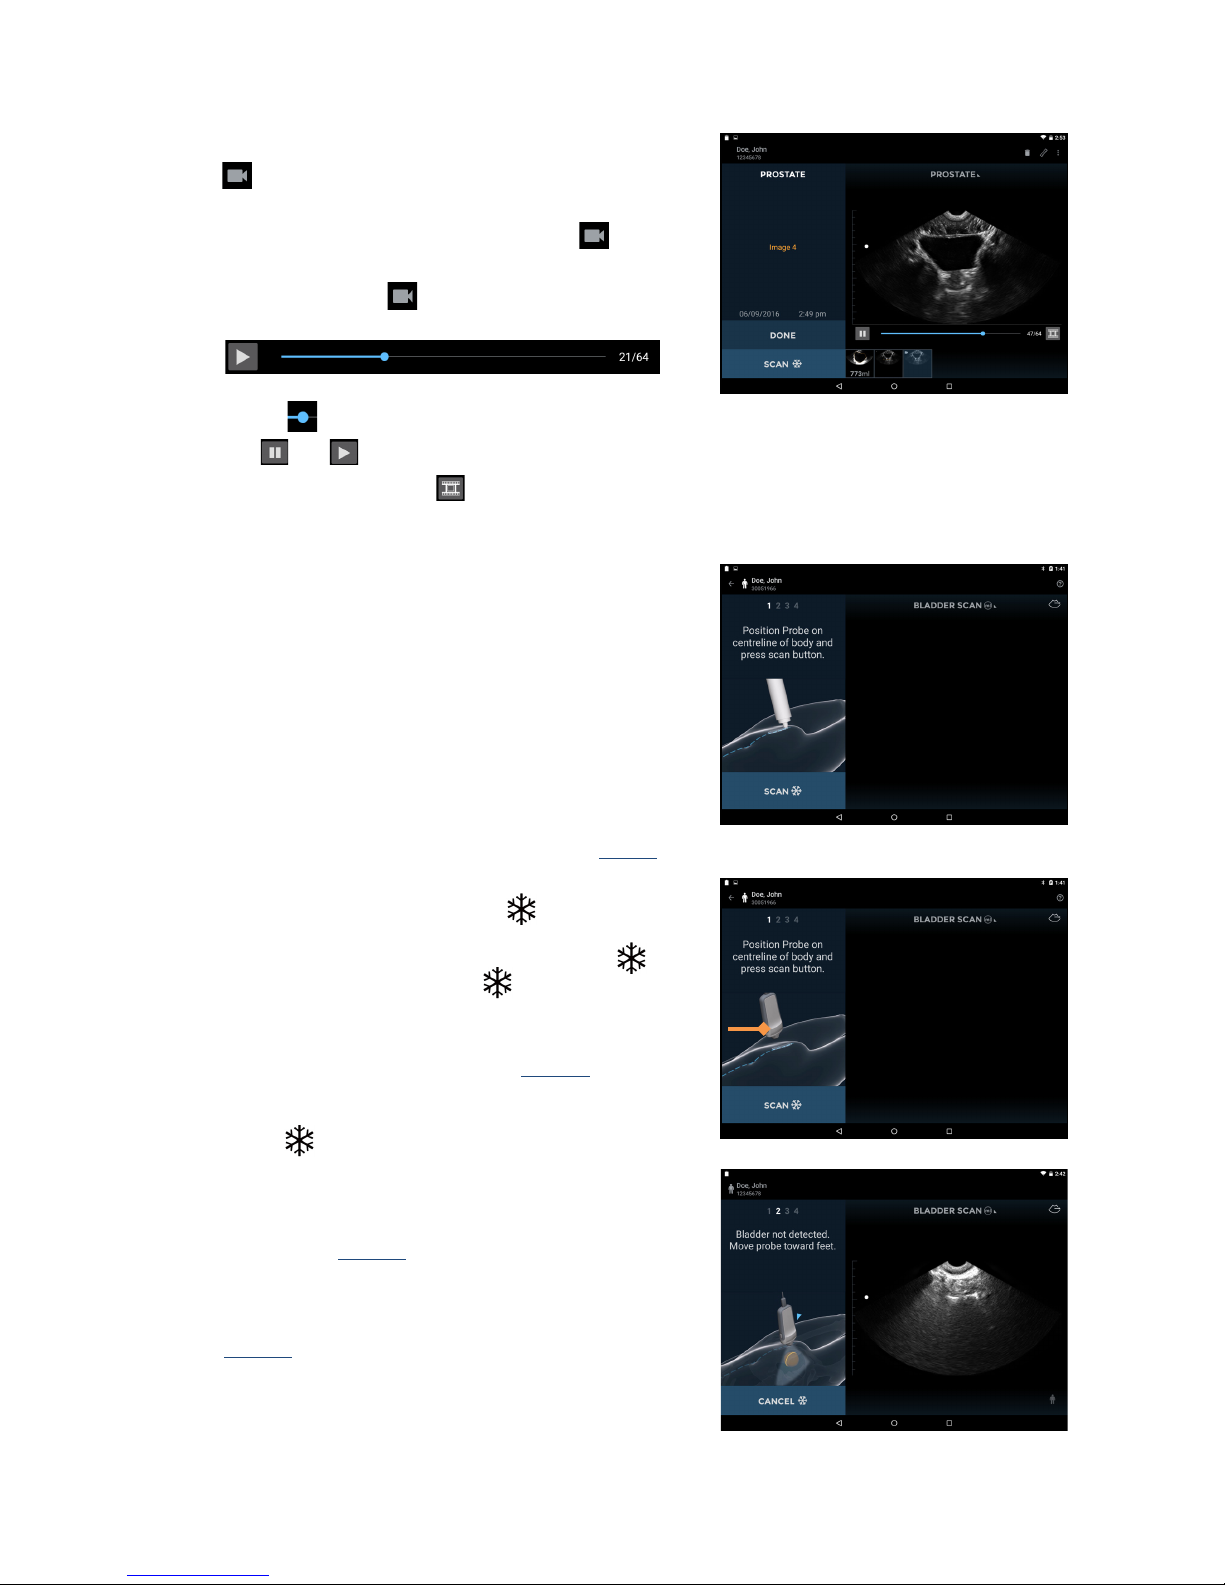
Ultrasound Movies
Fig 3.7 Saved Movie Clip
Tap th e Movie icon to save up to eight seconds of the
ultrasound scan as a movie clip.
The movie clip is saved with
a movie icon in the
bottom left of the image area.
Tap the movie icon
on the image to show the movie
controls.
Scroll through image frames by dragging the progress
marker
.
Tap
and to pause and play the movie clip.
Tap th e Save Movie ic
on to save the currently displayed image frame.
Tap anywhere on the image to hide the movie c
ontrols.
Fig 3.8 Apply gel
Bladder Scanning
Measuring Bladder Volume
On the Home
screen, tap Bladder Scan to start an exam. To
measure bladder volume follow the steps below:
The default patient is displayed as an icon. To change
tap the icon and select the appropriate patient type
(Normal, Pediatri
c, Deep, Pregnant, or Phantom).
Palpate the pubic bone, and plac
e a generous volume of
gel approximately 1 inch (3 cm) above the pubic bone
(between the pubic bone and umbilicus) (see Fig
3.8).
Fig 3.9 Place transducer and start scan
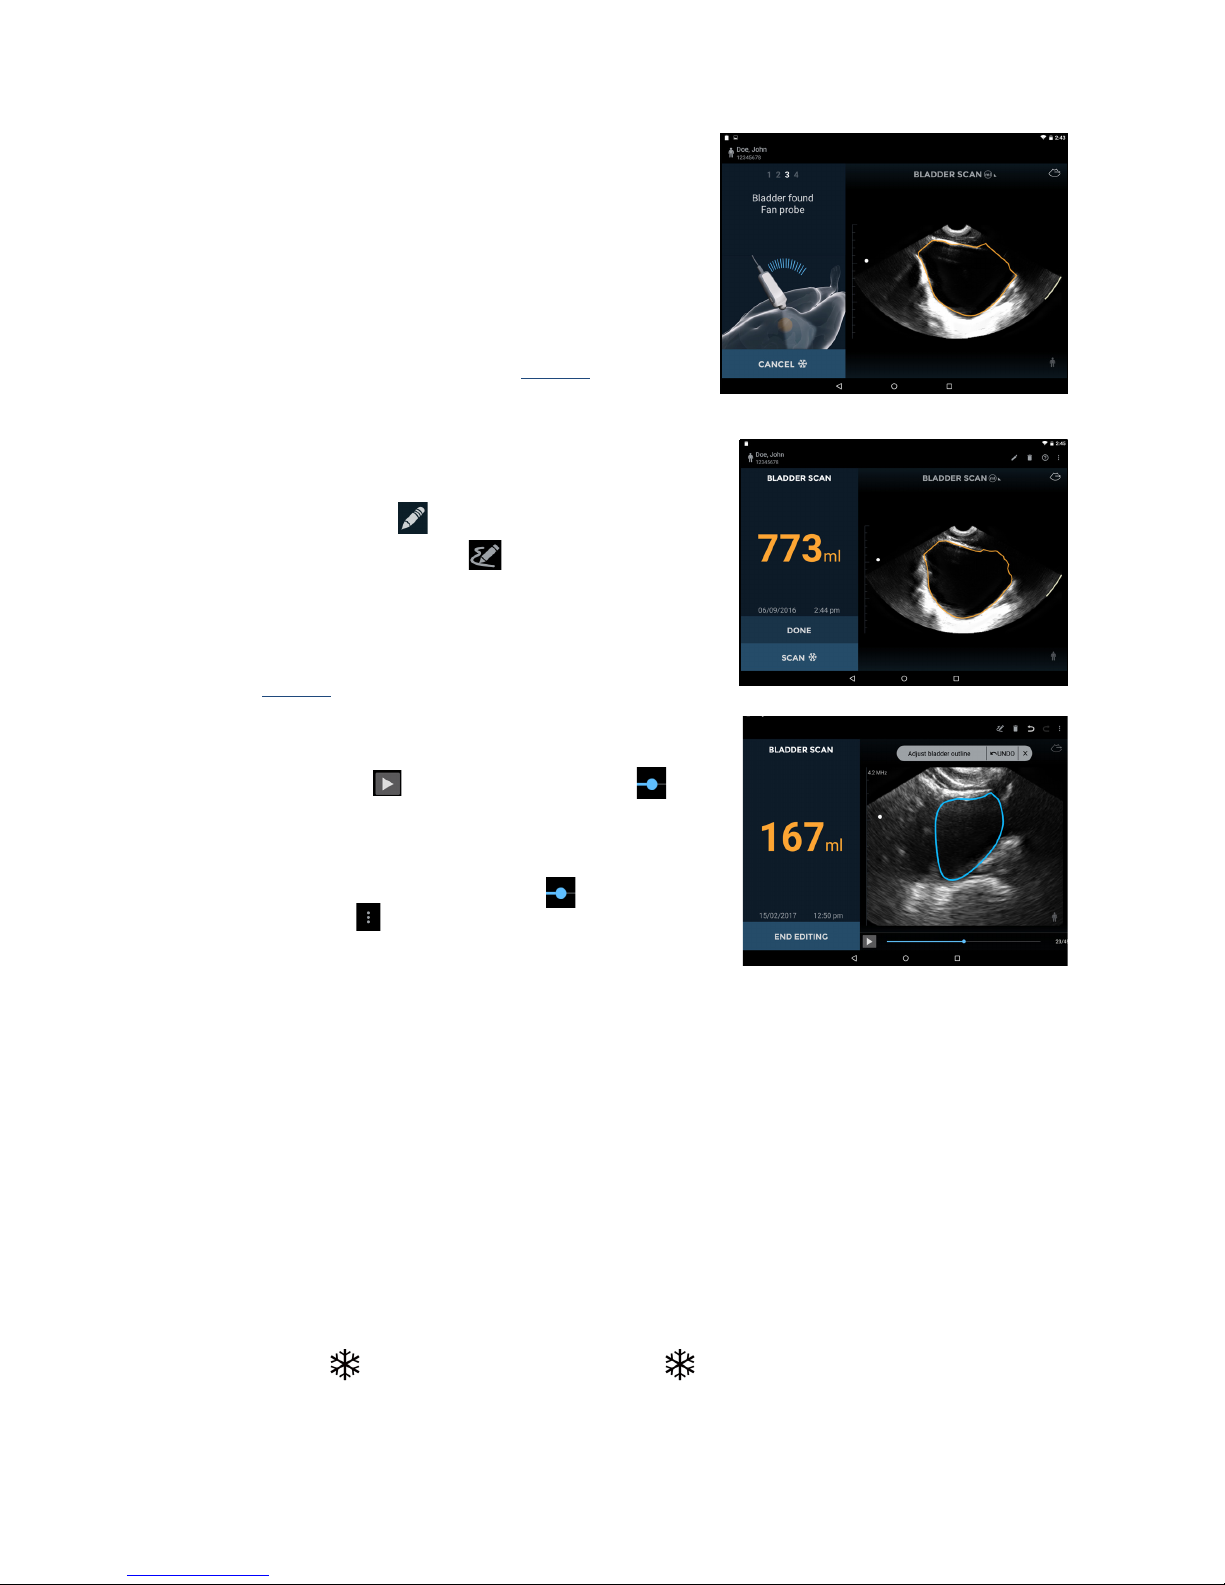
Place the probe on the patient mid-line 1 inch above the
pubic bone, with the Scan
button directed to the
patients head, and angled so the transducer points
slightly
towards the patient's feet. Tap the Scan
icon
or click the probe Scan butto
n to start the
measurement.
If the probe is incorrectly positioned, the display will
pro
mpt the user to move the probe (Fig
3.10). If
required, move the probe up or d
own as instructed by
sliding it along the midline of the body with the Scan
button
always towards the patient's head.
Fig 3.10 Transducer Positioning
When the system detects the probe is in the correct
position, the display will prompt the user to fan the
p
robe left and right to acquire the three dimensional
bladder data (Fig
3.11). The fan is started by tilting the
probe left or right by up to 45 degrees from vertical, and
then
tilting back in the other direction to the other side to
approximately 45 degrees from vertical as shown in
Fig
3.11 allowing the ultrasound beam to scan the full
extent of the bladder. When fanning consider the
following:
Do not allow the transducer to slip across the
patient's skin.
Page 29
P003948 Uscan User Manual Page | 27
Do not fan too fast. As a guideline a complete
fan should take around 3- 5 seconds.
Do not twist the transducer.
Angle the probe so the bladder is in the middle
of the ultrasound image.
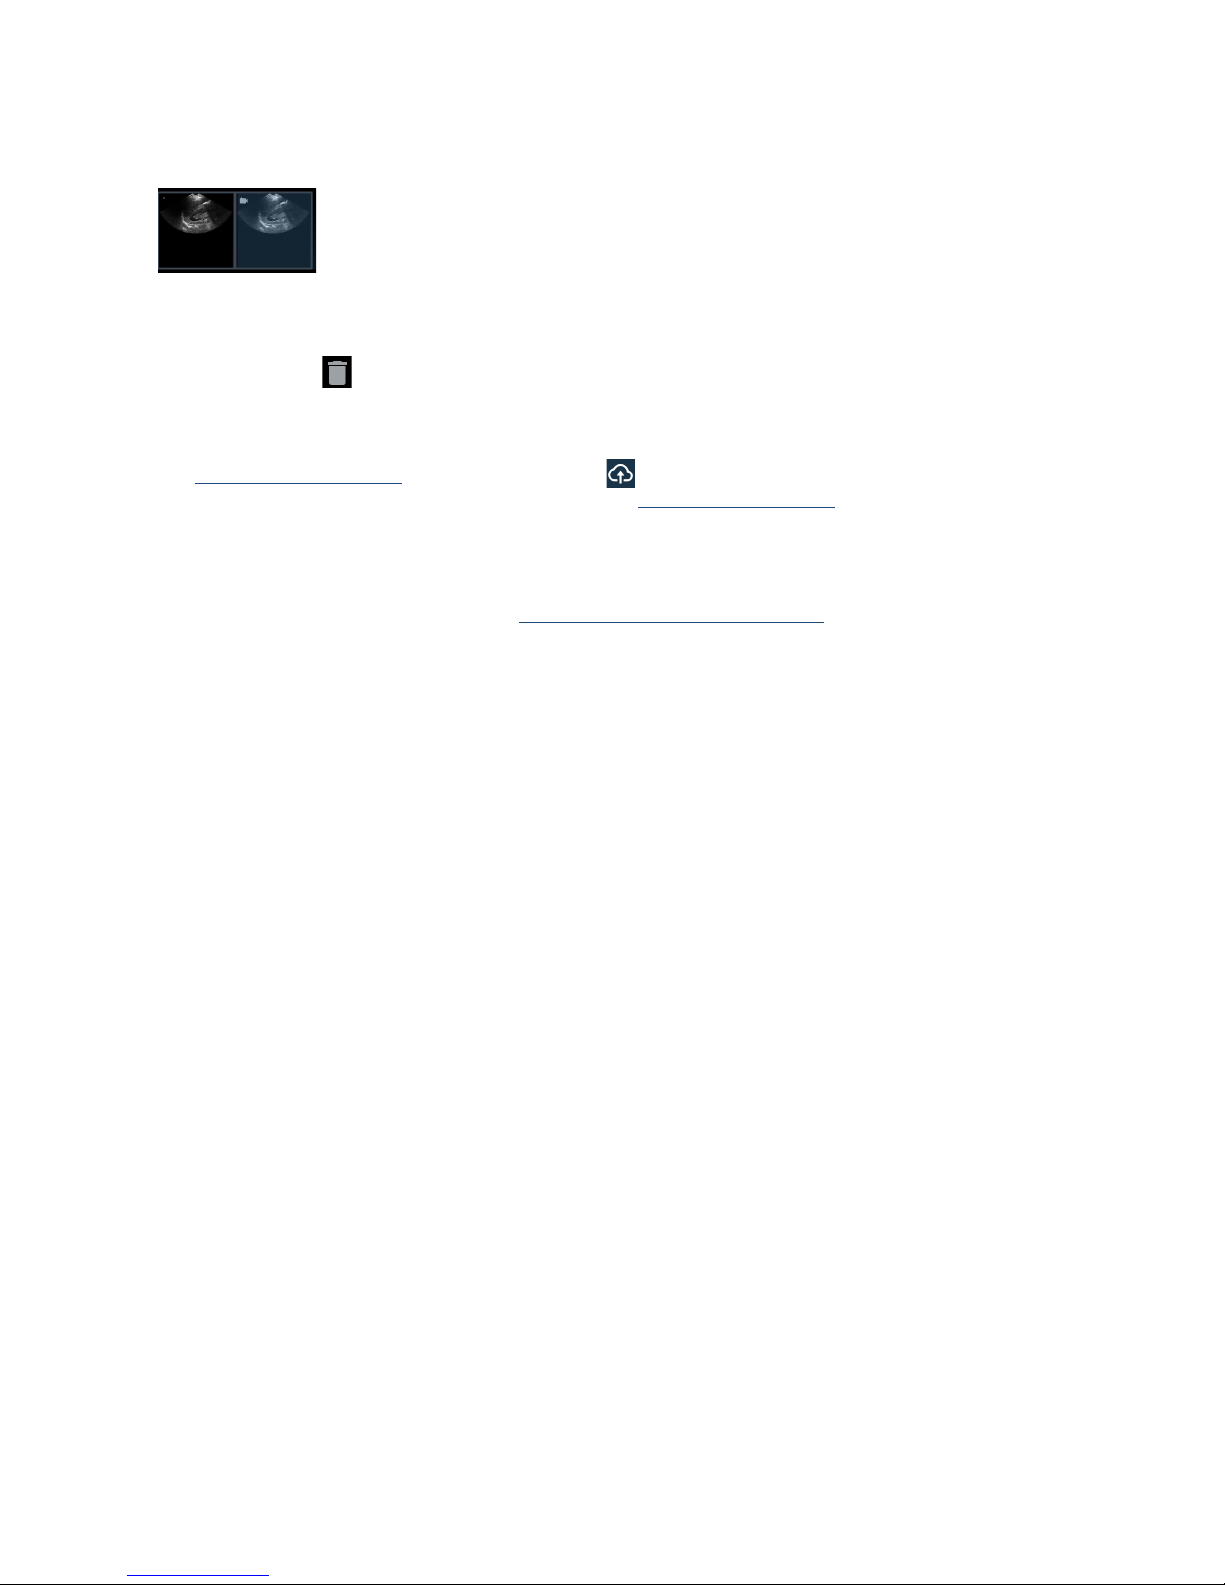
During acquisition, the display will show the fan
position.
When the three dimensional data acquisition is
complete, the system automatically completes the scan
and displays the measured volume (Fig
3.12).
A movie of the complete bladder acquisition i
s displayed.
Bladder Measurement Correction
Correct errors outlining the bladder as follows:
Tap th e Pencil icon (
) to start outline editing.
Tap th e Pencil Redraw icon (
) to delete the existing
outline and redraw; or
Touch the bladder outline t
o adjust the existing outline.
A drag circle will appear. Drag the outline to align with
the bladder wall. Adjusted outlines change color to blue
(see Fig
3.13).
Fig 3.13 Adjusting outline
For fine adjustments, zoom in to enlarge the image then
adjust the outline.
Tap the Pl
ay icon or drag the progress marker to
check other images. Every ima
ge in a measurement can
be adjusted if required.
If a bladder has been outlined where no bl
adder is
present, then drag the progress marker
to the end of
the bladder, tap
and select Mark Bladder End.
Tap En
d Editing to finish.
Audio Feedback
The U
scan provides audio feedback during bladder measurement as follows:
A short double beep sounds when the system has detec
ted a bladder and the user can start the fan of
the probe
A buzzer sounds if a user starts fann
ing the probe before the system has found the bladder
A chime sounds when the system expects the user to change direction
of the fan
A beep sounds at the completion of a
successful scan
A decaying tone sounds at the comple
tion of a 0ml scan
Common Functions
Multiple Scans
Simply tap the Scan
icon or click the probe Scan button to add more bladder volume measurements
or ultrasound scans to the exam.
Fig 3.11 Acquire data
Fig 3.12 Measured volume
Page 30
P003948 Uscan User Manual Page | 28
Image thumbnails are displayed at the bottom of the image area when multiple scans have been performed. A
small movie icon is embedded in movie thumbnails.
Tap a thumbnail to view an image or swipe right to left across the image area to move to the next image.
Deleting Images
Tap th e De
lete icon to delete the displayed image.
Ending/Saving Exams
Tap Do
ne to end the exam. The system will automatically save the exam to local or remote storage if enabled
(see
Preference SetupSettings). A remote storage icon is displayed next to Done when remote storage is
enabled. The user is prompted to ente
r patient details (see Entering Patient Details) if not already entered.
After Use
After each use and between each patient, the probe and transducer must be cleaned and disinfected properly
following the steps in this user manual (see
Transducer cleaning and disinfection).
Turning Uscan off
Hold down the Power button of the Uscan display to turn Uscan off.
Page 31
P003948 Uscan User Manual Page | 29
4. OTHER FUNCTIONS
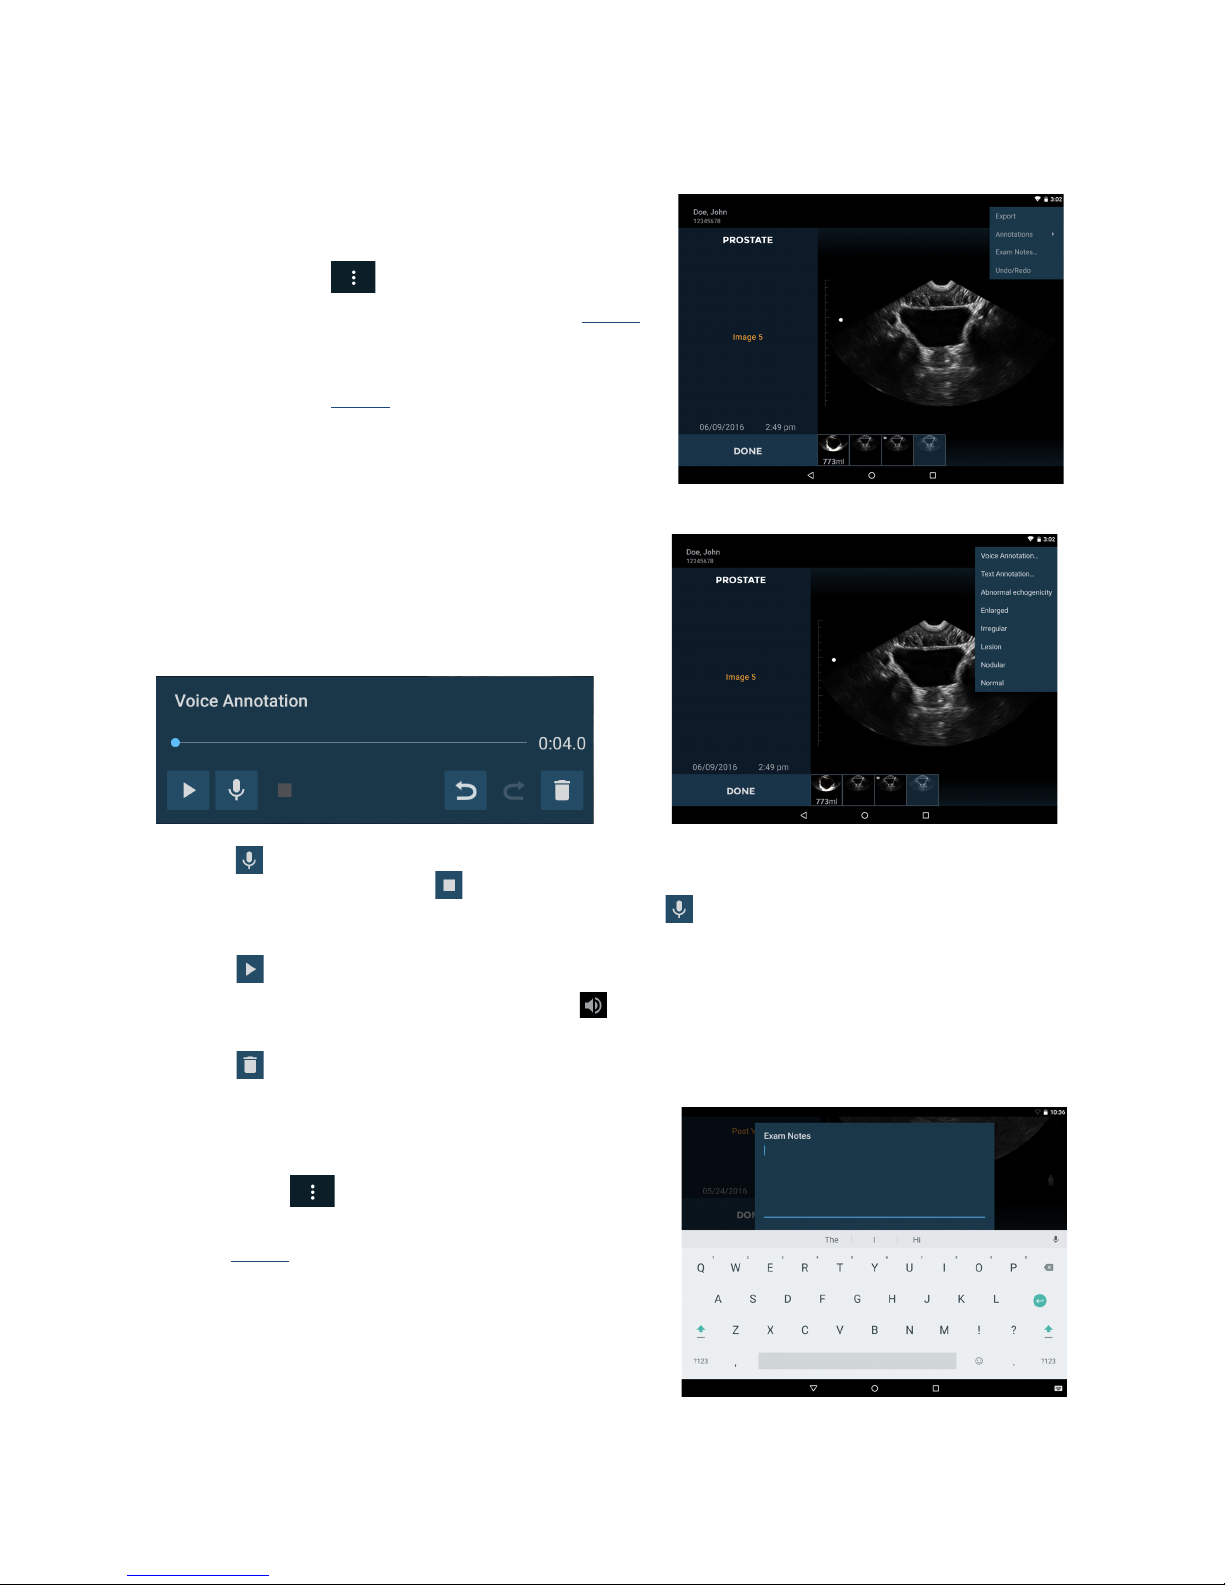
Fig 4.1 Annotating
Annotations
Annotations can be added to individual images.
Tap the icon
to display the Exam menu.
Select An
notation from the drop down list (Fig 4.1).
Select from the predefined set of annotations, or
sele
ct text or voice annotation for custom
annotations (Fig
4.2).
Annotations are applied to individual images.
Text Annotations
Select T
ext Annotation to e
Fig 4.2 Annotation list
nter custom annotations using
the on-screen keyboard.
Voice Annotations
Select V
oice annotation to save a recorded message with an
image. The voice recording controls are displayed.
Press the Microphone icon to record. Speak clearly into
the U
scan microphone. Press the Stop icon to end
recording. The length of the recording is displayed. Press the
Microphone icon again to add to the end of
the voice recordings.
Press the
Play button to play a voice recording.
Images with linked voice recordings wil
l display a Voice Annotation icon in the bottom left corner of the
image. Tap this icon to launch the V
oice Annotation window and play the existing voice annotation.
Press the
Delete icon to delete the recording.
Fig 4.3 Exam notes
Exam Notes
Notes can be added for an examination.
Tap th e
icon to display the Exam menu.
Select Exam Notes from the drop down list
(Fig
4.1).
Use the on-screen keyboard to type notes in the text
bo
x.
Tap th e Microphone icon to use speech recognition
to enter notes (only available wi
th Wi-Fi).
Page 32
P003948 Uscan User Manual Page | 30
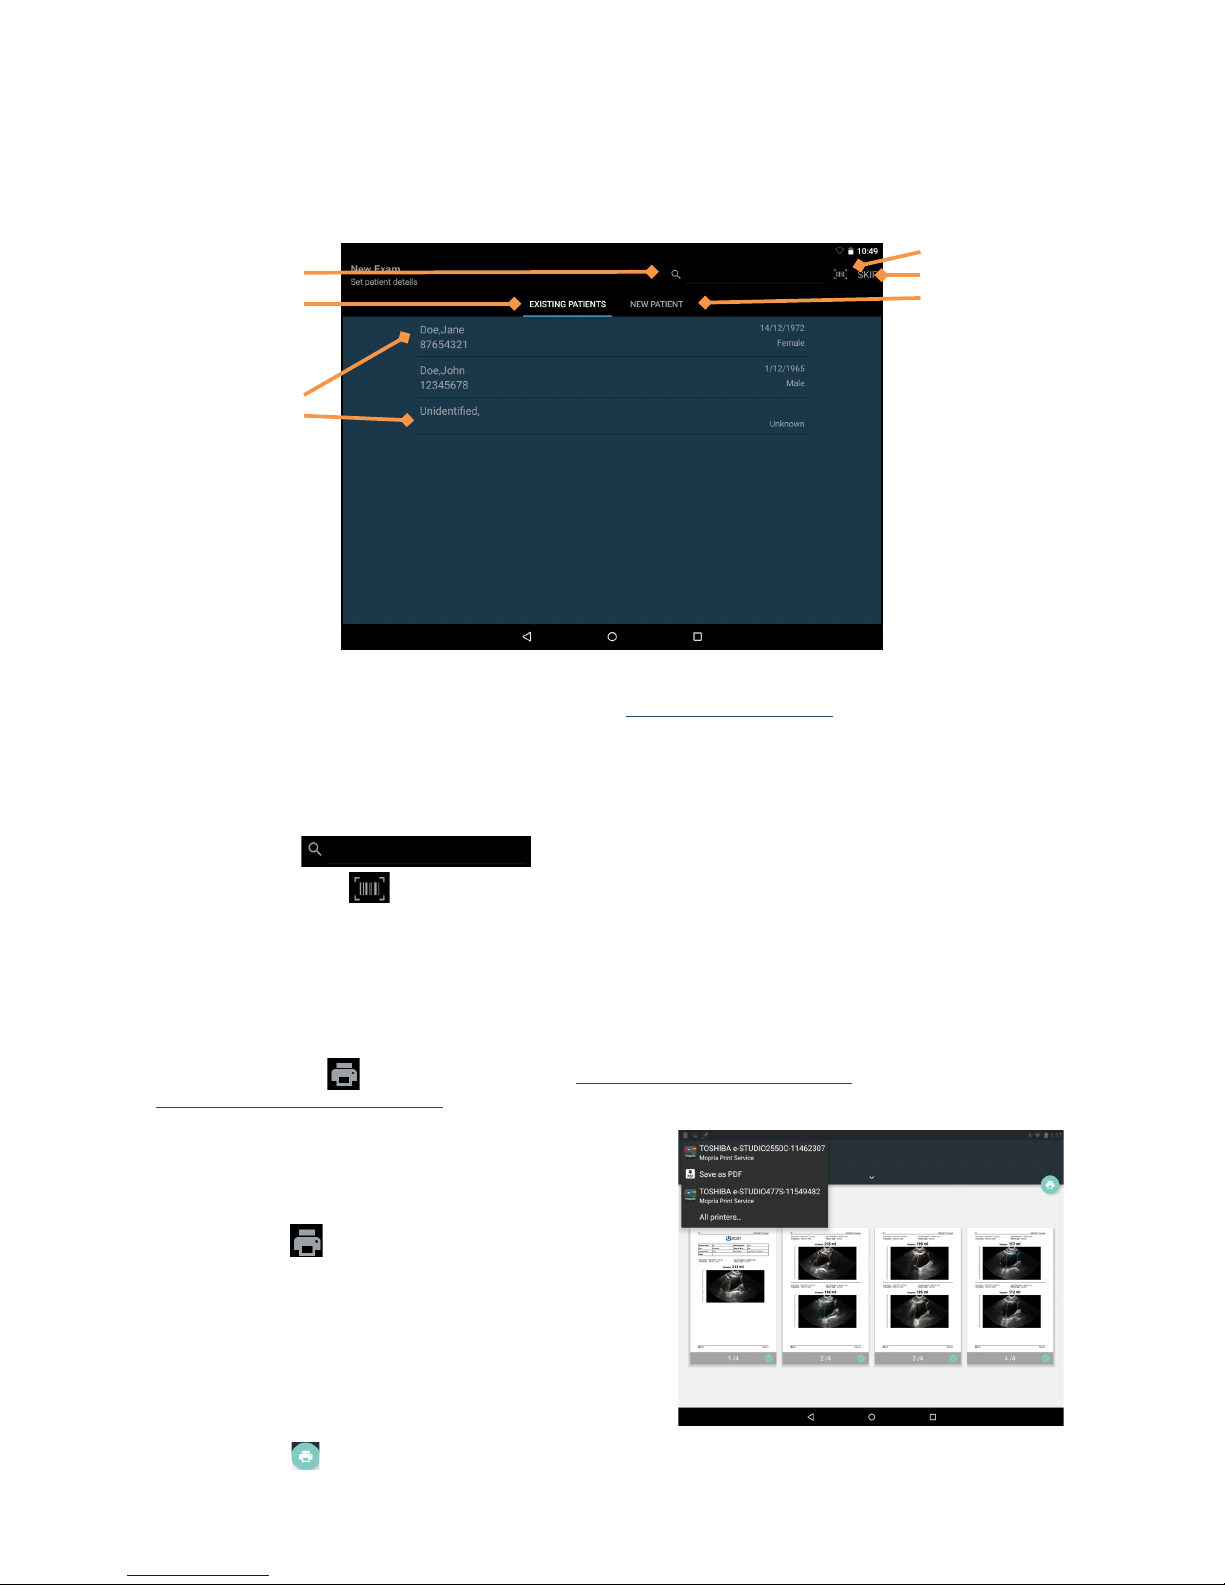
Entering Patient Details
Patient details will be required if data is saved. Patients may already be stored in the system or they may need
to be entered.
Fig 4.4 Entering Patient Details
The source for patient names is a preference setting (see Preference SetupSettings), and may be local storage
or a remote server.
The list of patients is displayed under the Existing Patients tab.
Tap the patient name to select a from the list.
When querying patients from a remote server you may need to type a few letters into the search field to display
patients.
The Search
field can be used to find an existing patient.
Tap th e Bar-code
icon or use a bar-code scanner to search using a patients bar-code.
Tap th e Skip icon to bypass patient data e
ntry. Note: you will be prompted to enter patient details again when
saving the exam.
Tap th e New Patient t
ab to enter the details for a new patient using the on-screen keyboard.
Printing
Tap the Printer icon to print to a Network (see Network Printer Setup (Optional)) or Bluetooth printer (see
Bluetooth Printer Setup (Optional)).
Fig 4.5 Network Printing
Network printing uses a Mopria service (see
www.mopria.org) enabling printing to thousands of
ne
twork printer types. The Uscan needs to be connected
via WiFi to the same network as the printer. To print:
Tap th e
icon.
Tap PR
INT ALL to print all scans, or PRINT
SELECTION to print only selected scans.
Select the printer from the drop down list.
If required, adjust number of copies, paper size,
colo
ur, orientation, or any other options provided
by the printer.
Tap th e
icon to send to the printer.
Bar code Entry
Skip
New Patient Tab
Search for Patient
Existing Patient
Ta b
Patient List
Page 33
P003948 Uscan User Manual Page | 31
Bluetooth printing only prints the current image.
Export
Images, movie clips, and pdf reports can be exported to the displays internal storage for later download to a
computer via USB.
Tap the icon
to display the Exam menu.
Select Export from t
he drop down list.
Select Image/Video or PDF Repo
rt from the drop down list.
Tap EXPORT ALL to export a
ll scans, or EXPORT SELECTION to export only selected scans.
The Images, Videos, or PDF Report are saved to the displays internal storage
in a sub-folder of “Uscan
Export”. The sub-folder is named using the patient name, date, and time of the exam (PatientName YYYYMMDD_HHMMSS).
Scan Review
Scan Review is available when local storage is enabled. Tap the Scan Review icon on the Home screen to
review saved examinations in local storage.
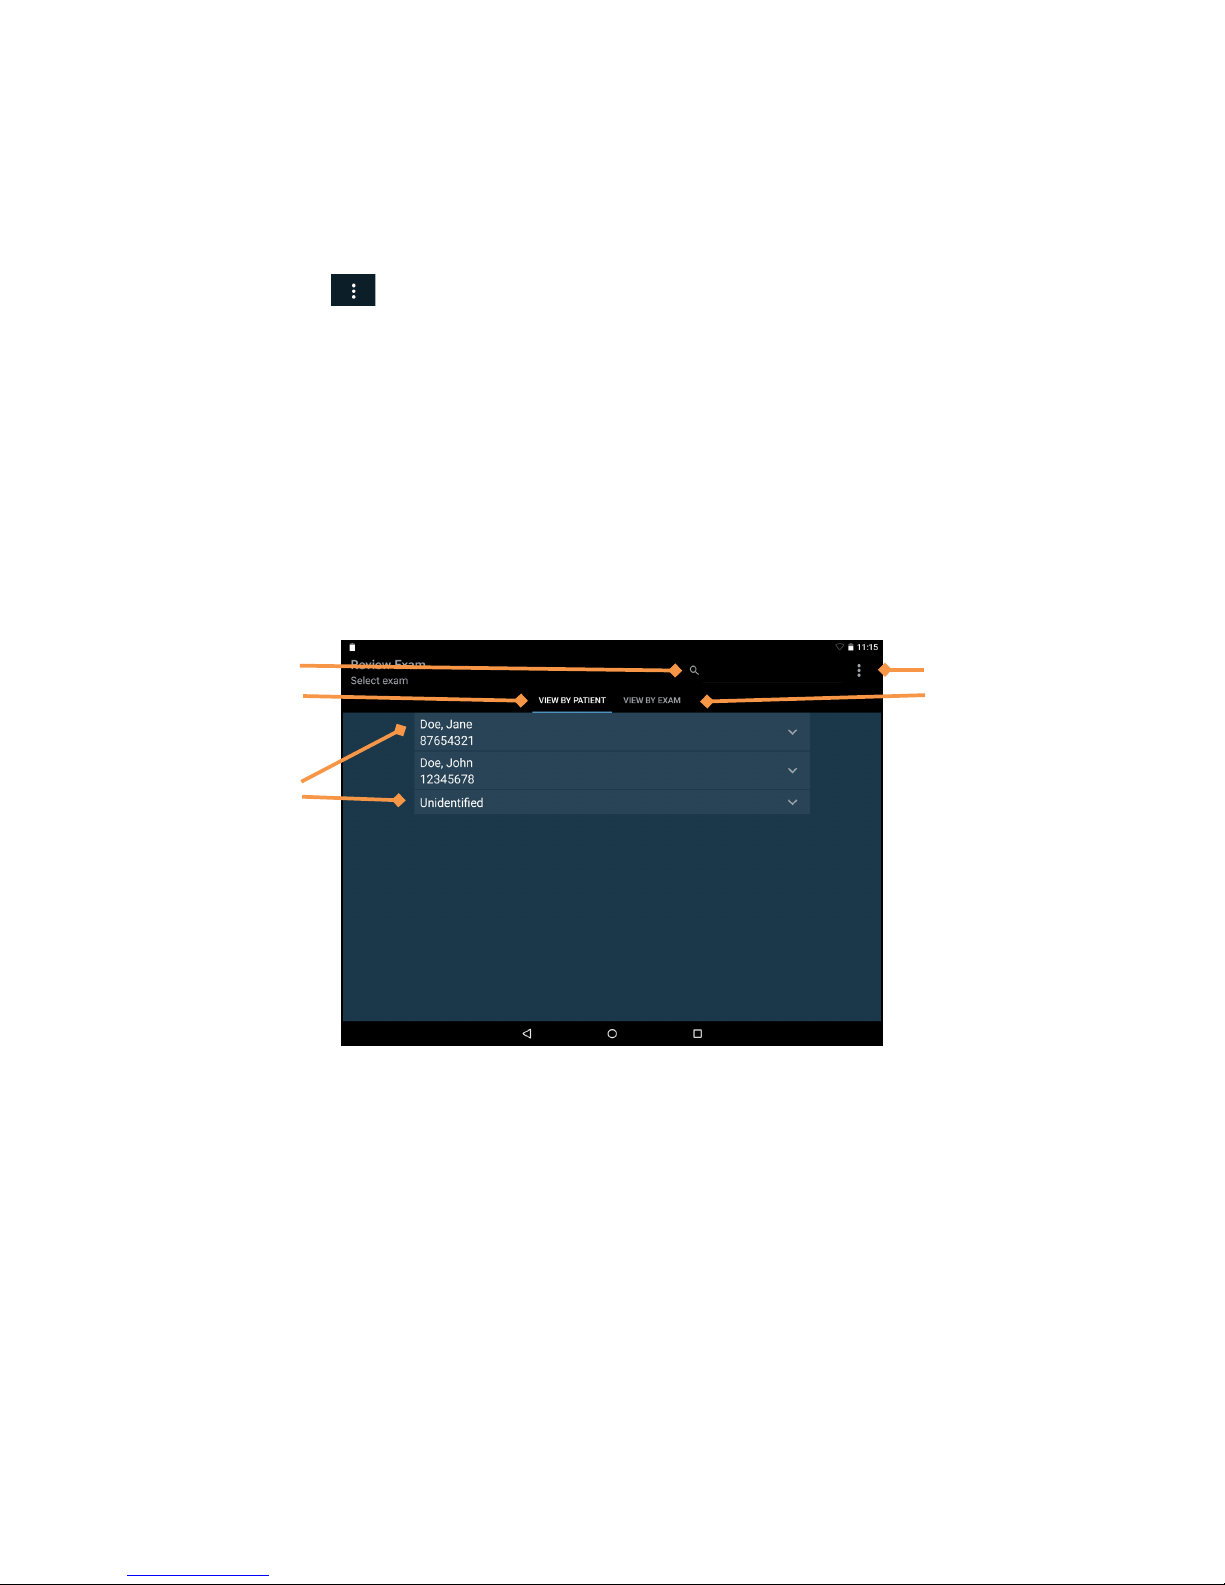
Fig 4.6 Scan Review
The data is arranged under patients, with each patient being able to link one or more examinations, and each
examination containing one or more images and/or movies (an image/movie may be a bladder volume
measurement or an ultrasound scan of another organ).
A list of patients will be displayed. Tap the patient to display
the list of exams attached to that patient. To view
all exams, tap the Vie w by Exam tab.
Skip
Exam Tab
Search for Patient
Patient Tab
Patient List
Page 34
P003948 Uscan User Manual Page | 32
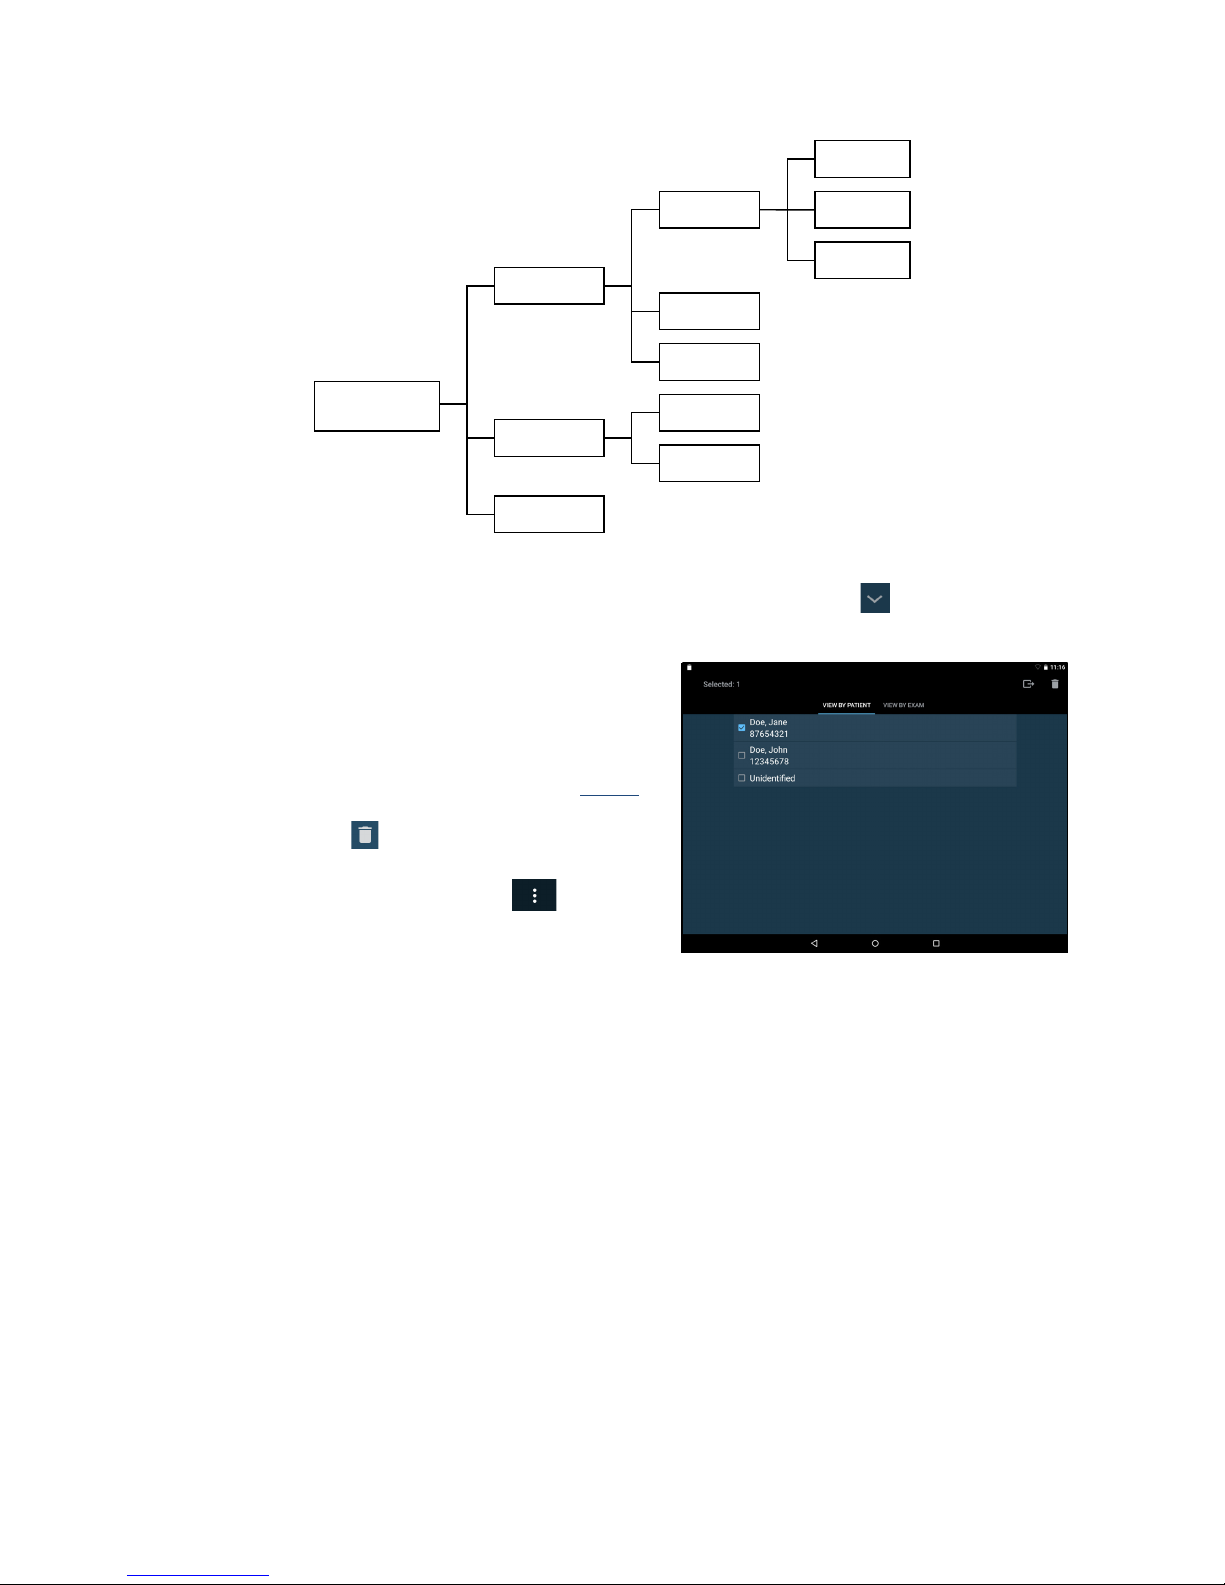
Fig 4.7 Relationship between patients, exams and images
Use the search function to find a patient and associated exams. Tap the patient arrow to view all exams
associated with a patient. Tap the e
xam to open and review the images.
Fig 4.8 Deleting Patients
Deleting exams and patients
To delete an exam or a patient from local storage tap Scan
Review Mode on the Home screen. Tap and hold the exam
or patient. The exam or patient will be checked, and check
boxes appear next to other patients and exams (see Fig
4.8).
Tap other patient and exam checkboxes as required, and then
tap the T
rash can icon
at the top right of the screen to
delete all checked exams and patients.
Alternatively, use the menu by tapping the
icon. The
following menu option
s are available:
Use Delete patients without exams to de
lete any
patients with no associated exams.
Use Delete All to delete al
l but the open exam(s).
Use Delete Oldest to cre
ate space on the local storage. At least 10% of the oldest exams are deleted.
Data Security
Data security is embedded in the system as follows:
The system can be locked by a pin or pass
word. No user will be able to access any data on the system
without access to the pin or password.
All data saved on the system is encryp
ted using FIPS 140-2 Certified VPN (256-bit encryption), 256HW-accelerated encryption for Data-at-Rest (DAR). Where the system has been stolen, no data will be
accessible without the pin or password.
Secure Wi-Fi protocols are support
ed, enabling data to be securely saved to remote storage, with no
local storage of patient data.
No internet ports are open. In the e
vent a third party is able to access the system, they will not be able
to access any data without the pin or password.
No third party applications are able to be installed or run on the system, preventing malware
and
virus’s.
Tablet Storage
Patient A
Patient B
Patient C
Exam 1
Exam 2
Exam 3
Exam 1
Exam 2
Image 1
Image 2
Movie 1
Page 35
P003948 Uscan User Manual Page | 33
Setting a Device Password
To set a device pin or pass
word as follows:
1. From the Home
screen tap Uscan menu, tap Settings, and select System Settings.
2. Select Security
.
3. Tap Screen lock
.
4. Select Pin
or Password .
5. Enter the pin or password.
6. Tap Continue
7. Confirm the pin or password.
8. Tap OK
9. Select your notification content prefe
rence.
10. Tap Home
to return to Uscan Home screen.
Page 36

P003948 Uscan User Manual Page | 34
5. MAINTENANCE AND TROUBLESHOOTING
Maintenance
Warning
No modification of this equipment is allowed.
This device contains no user-serviceable parts. Please contact Signostics
customer support or your
Signostics distributor for maintenance or repair.
The internal probe battery is not to be replaced by the user - doing so may create fire or explosion
hazard.
Uscan requires no routine or periodic maintenance on either hardware or software components.
Inspect the transducer and display unit housings, connectors and cables prior to each use for cracks; if cracks
are found, use of the device should be discontinued immediately. Contact
Signostics Customer Support or your
Signostics distributor to arrange repair or replacement.
If Uscan behaves in an abnormal manner or when damage is suspected use of the device should be
discontinued immediately. Contact
Signostics Customer Support or your Signostics distributor to arrange
repair or replacement.
Uscan must be returned to Signostics Customer Support or your Signostics distributor to arrange battery
replacement. If you plan to dispose of the Uscan, recycle batteries where possible and abide by local disposal
guidelines and directives.
Caution
Ultrasound transducer crystals are fragile and are easily damaged if knocked, dropped or excessively
vibrated.
Avoid unnecessary bending or winding of the connecting cable.
If Uscan is dropped or suffers a heavy knock
Inspect the device. If you discover major damage do not use the device; report the fault to your Uscan
distributor for repair.
Switch on and check normal function of all controls.
Tap Home Menu, and select Maintenance and Probe Calibration to check the probe inertial sensors.
If there are any concerns about operation of the device, report the faults to your Uscan distributor for
inspection and/or repair.
Battery Maintenance
The Uscan batteries cannot be removed by the user. Precautions need to be taken if the device is not used for
long periods of time. Before storage, fully charge the device. Turn the device off when placing in storage, and
store at ambient or cooler temperature. Take the device out of storage at least every six months and recharge
the device.
Caution
The Uscan batteries should be charged every six months at a minimum, even if you are not using your
device. When storing for greater than 3 days, store at ambient or cooler temperature.
Page 37

P003948 Uscan User Manual Page | 35
Transducer cleaning and disinfection
Warning
Remove all particles and other matter from crevices and surfaces when cleaning the system and
components.
The device is supplied unsterile.
Clean and disinfect the transducer between patients
Before cleaning or disinfection turn Uscan off and disconnect from the power supply
Do not submerge the probe, the display unit or the power supply (charger) as electric shock could
result. The ultrasound probe is IPX1 which allows water falling vertically onto the probe. The display
may have no protection against ingress of water. Refer to the display user manual.
Clean and disinfect the system before placing in a bag for transport. Use the supplied Signostics probe
holder to store the probe. Clean and disinfect the probe holder regularly.
Caution
Use only recommended disinfection methods
Use abrasive cleaners, isopropyl alcohol or solvents sparingly, and if used immediately clean and
remove residual substances from the Uscan.
Do not heat sterilize any part of the Uscan device.
Cleaning
Signostics recommends the use of a soft cloth, lightly dampened with warm water or a mild soap solution for
cleaning the probe and transducer. Wipe surfaces with the moist cloth, and towel dry with a soft clean cloth.
For cleaning requirements of the display refer to its user manual.
Disinfection
The following disinfecting means can be used with the Uscan:
T-Spray II by Pharmaceutical Innovations of New Jersey
Sani-Cloth® Active by PDI of Flint, UK
Tuffie 5 Wipes by VernaCare of Lancashire, UK
Protex Disinfectant Wipes by Parker Laboratories of New Jersey
Any Isopropyl alcohol impregnated wipes with <= 70% w/w alcohol
Refer to Signostics website for additional disinfection options.
Caution
Minimize application of alcohol based disinfectant to colored overmold materials. Long term use may
result in material degradation. If alcohol based disinfectant is applied to the overmold, immediately
remove by wiping with a damp cloth.
The ultrasound probe and transducer may be disinfected using a wipe or spray method of disinfection. First
clean the ultrasound probe and transducer as above. Then wipe or spray the probe and transducer with
disinfectant, and leave for the disinfectant manufacturers recommended contact time. Remove any residue
with a soft cloth moistened with water. Do not allow any solutions to dry on the probe and transducer.
Warning
After cleaning or disinfection examine the ultrasound probe and display as appropriate for cracks or
leaks, and if damage exists discontinue use of the system and contact Signostics
customer support or
your Signostics distributor.
Page 38
P003948 Uscan User Manual Page | 36
Troubleshooting
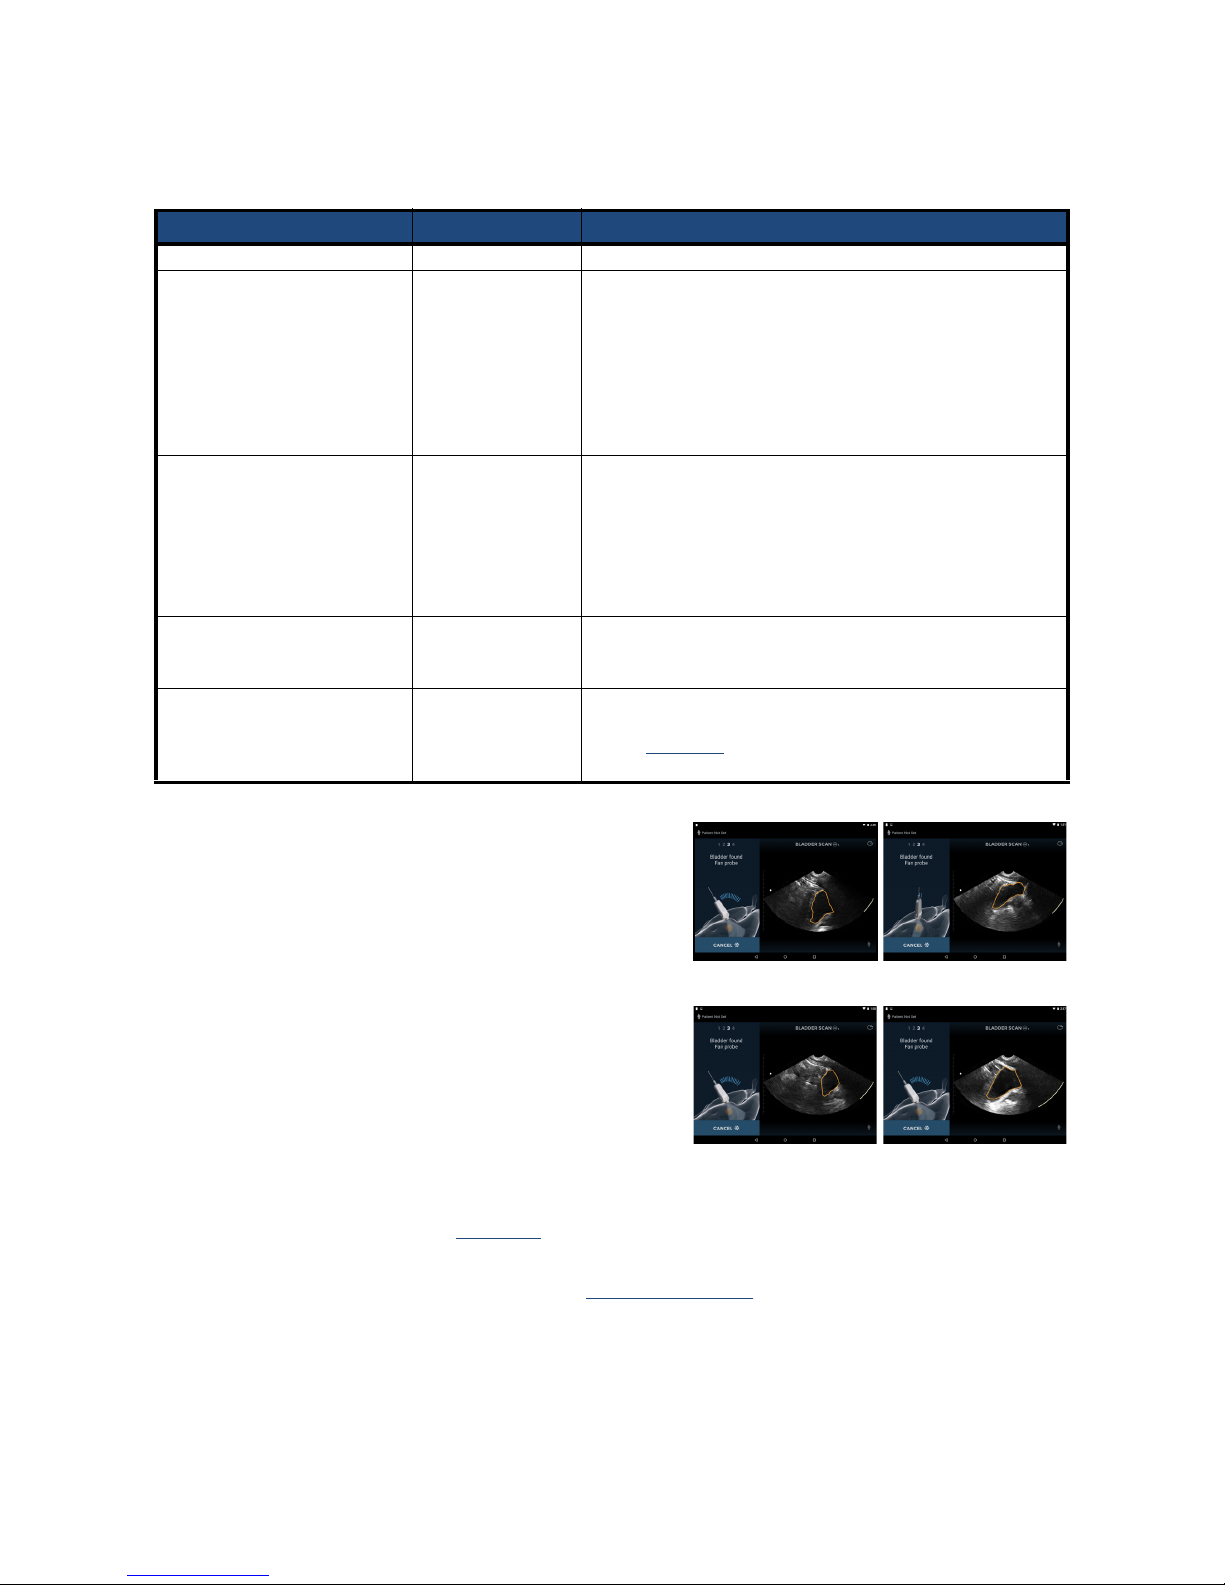
Table 5.1 Troubleshooting guide
Symptom Possible cause Remedy
The Usca
n does not turn on Flat battery Connect to the display charger and turn on.
The Usca
n displays a “Probe
Error” message when starting a
scan or during scanning
Transducer fault.
Low Probe battery.
Unplug the USB connector from the probe, wait 10 seconds,
and reconnect.
Check the battery status and connect the dis
play unit to the
display power supply (charger) if the display or probe battery is
low.
If probe is still not recognized, unpl
ug the probe and connect
directly to the Signostics power supply (P003198) and leave
for 2 hours to charge.
The Usca
n battery fails to
recharge after a period of heavy
use. The battery status indicates
batteries are not recharging
despite the system being
connected to a power supply
(charger)
Battery temperature
exceeds 45ºC
Allow device to cool for 10 - 15 minut
es, then try charging the
battery again.
Uscan becomes non-res
ponsive
or will not power up after
recharge.
Unknown system
error
Shutdown Us
can and reboot.
Any error message not
r
esolved by the actions above
or the action suggested on
screen.
Various errors
Error messages generated by the s
ystem will be accompanied
by a description of the error or an error code. If unresolved,
contact
Signostics customer support or your distributor with
the message and code.
Clinical Troubleshooting
Fig 5.1 Scan Technique
Light downward pressure Firm downward pressure
Bladder off center Bladder centered
Scan technique impacts the quality of the ultrasound image
during a bladder measurement, and therefore impacts the
accuracy of the measurement. The following tips assist in
producing reliable and repeatable measurements:
Move and angle the probe so the center of the
b
ladder is in the center of the ultrasound image
Apply moderate downward pressure. On large
pati
ents, apply firm downward pressure
Fan the probe at a smooth speed, aiming to
complete the
measurement in less than five seconds
Pivot and do not slip or slide t
he tip of the probe
Signostics Customer Support
If problems persist or recur, contact
Signostics Customer
Support or your Signostics distributor.
For other countries, refer to Signostics website (see
Contact information page 12).
Page 39

P003948 Uscan User Manual Page | 37
6. CONNECTIVITY AND ACCESSORIES
Accessories
The following accessories are supported by Uscan:
Wireless printer
Wireless bar code scanner
Signostics mobile stand (P004013)
Signostics Power Supply (P003198)
System connectivity
Warning
The user must not touch the any device connectors while in physical contact with the patient.
The Uscan probe is connected to an Android display running Signostics software to configure a
medical system. The Android display must be certified to the respective IEC standards and particular
national deviations (IEC 60950 or IEC 60601-1:2nd and/or 3rd edition).
Do not connect the Uscan display to external computers or peripherals using the USB port unless the
system is outside the patient area. Failure to comply with these guidelines may result in electric shock.
Mounting the Uscan display on a mobile stand is configuring a medical system. Only use the
Signostics provided mobile stand accessory (P004013).
Only connect accessories or items that are specified as being compatible with Uscan. Contact
Signostics
customer support or your Signostics distributor for information on compatible accessories
and systems.
When using the optional Signostics mobile stand, if a Multiple Socket Outlet is required only use an
outlet and power cable certified to IEC 60601-1, and fix to the stand using a bolt and tool.
Power sources
During operation, Uscan is electrically powered by an internal battery. The battery can be recharged by a
mains-powered supply via the provided power supplies (chargers).
Internal battery
The Uscan displays and the Uscan probe contain internal batteries.
When powered by a fully charged battery, Uscan will run for more than 12 hours with an average operating
regime of 4 x 1 minute scans per hour.
From a fully discharged state, while Uscan is in sleep mode, the battery recharges to 80% capacity when
connected to a display power supply (charger) for 3 hours.
Power Supplies (Charger)
Warning
Recharge Uscan only with the power supplies (chargers) provided.
If required, recharge the Uscan Probe only with the Signostics power supply (charger) provided
(P003198).
The Uscan power supplies are dedicated units to be used exclusively with the Uscan System only.
Do not open or modify the Signostics Power Supply P003198 or any other supplied power supplies -
Risk of electric shock
Page 40

P003948 Uscan User Manual Page | 38
Only connect to an AC supply rated at 100-240V and 50-60Hz.
Do not use the device or power supplies (chargers) if there are signs of damage.
The Signostics power supply (P003198) delivers a charging power to the Uscan Probe of between 0-10W.
From a fully discharged state, full charge of the probe will take approximately 2-3 hours.
Mobile Stand Setup
An optional mobile stand is available (P004013). The mobile stand has a mounting dock for a tablet display, a
mount for an optional wireless printer, a probe holder, a gel holder, a flat work surface, and a tech bay for
mounting multiple socket outlets (if required).
Warning
Mounting the Uscan display on a mobile stand is configuring a medical system. Only use the
Signostics provided mobile stand accessory (P004013).
The Uscan probe is connected to the Uscan display running Signostics software to configure a
medical system. The display has been certified by Signostics as part of a medical system to IEC
60601-1: 3rd edition.
Do not connect the Uscan display to external computers or peripherals using the USB port unless the
system is outside the patient area. Failure to comply with these guidelines may result in electric shock.
Only connect accessories or items that are specified as being compatible with Uscan. Contact
Signostics
customer support or your Signostics distributor for information on compatible accessories
and systems.
When using the optional Signostics mobile stand, if a Multiple Socket Outlet is required only use an
outlet and power cable certified to IEC 60601-1, and fix to the stand using a bolt and tool.
To configure the system for mobile use, follow the instructions below (and see Fig 6.1):
1. Press and hold the Power button for 2 seconds to turn the Uscan Display on.
2. The Uscan application setup wizard will run. Setup the following:
2.1 Language.
2.2 Date and time.
2.3 Wi-Fi connectivity.
2.4 Registration information.
3. Insert the display into the mobile stand dock.
4. Insert the USB cable into the dock and probe.
5. If required mount a medical grade multiple socket outlet in the tech bay using a screw and bolt.
Otherwise, use a medical grade extension cord (2-3m recommended). Plug the Signostics power
supply in and push the cable up the pole.
6. Plug the Signostics power supply DC connector into the dock.
Page 41
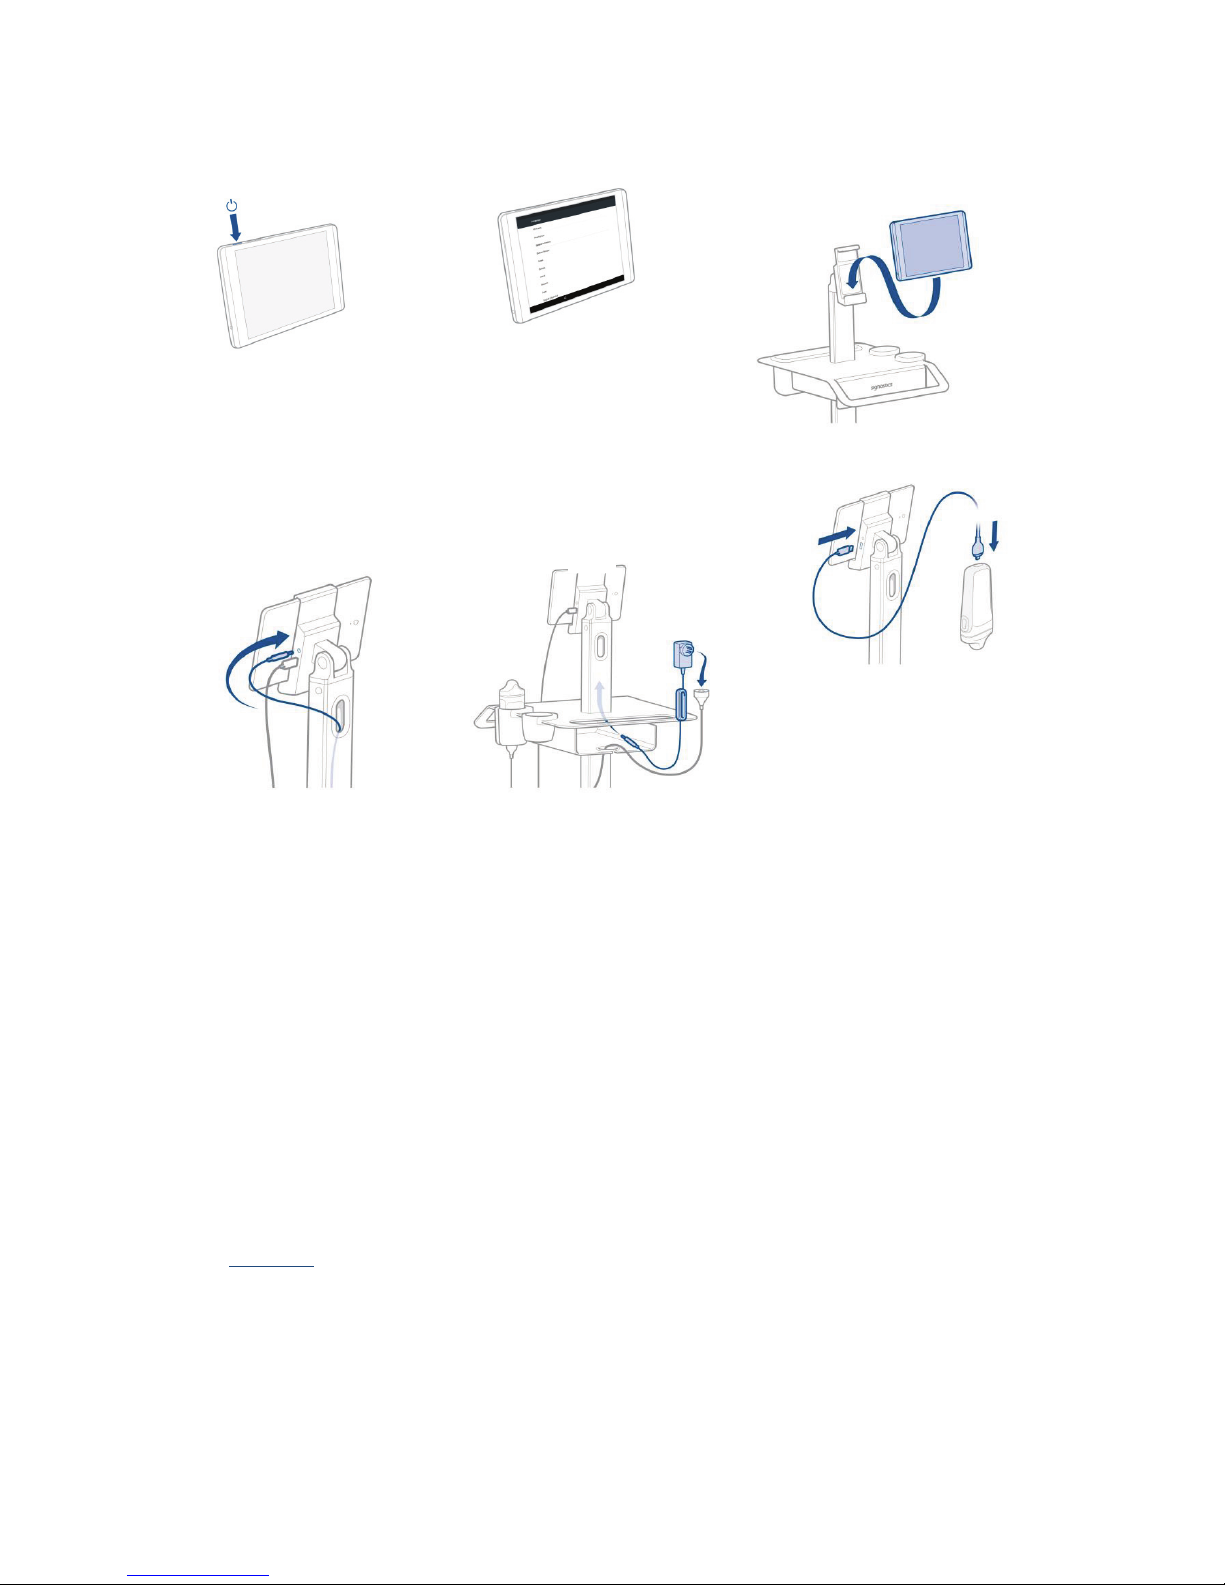
P003948 Uscan User Manual Page | 39
7. Connect to an AC source and fully recharge the system.
Fig 6.1 Mobile stand setup
Cleaning
Signostics recommends the use of a soft cloth, lightly dampened with warm water or a mild soap solution for
cleaning the mobile stand. Wipe surfaces with the moist cloth, and towel dry with a soft clean cloth.
Disinfection
Where bodily fluid or other contamination is expected, the mobile stand can be disinfected using the spray and
wipe method with a variety of disinfection products. Follow the manufacturers recommended method. The
following disinfecting means can be used with the Uscan mobile stand:
T-Spray II by Pharmaceutical Innovations of New Jersey
Sani-Cloth® Active by PDI of Flint, UK
Tuffie 5 Wipes by VernaCare of Lancashire, UK
Protex Disinfectant Wipes by Parker Laboratories of New Jersey
Any Isopropyl alcohol impregnated wipes with <= 70% w/w alcohol
Refer to Signostics website for additional disinfection options.
First clean the mobile stand as above. Then wipe or spray the mobile stand with disinfectant, and leave for the
disinfectant manufacturers recommended contact time. Remove any residue with a soft cloth moistened with
water.
1
2
3
4
5
6
Page 42
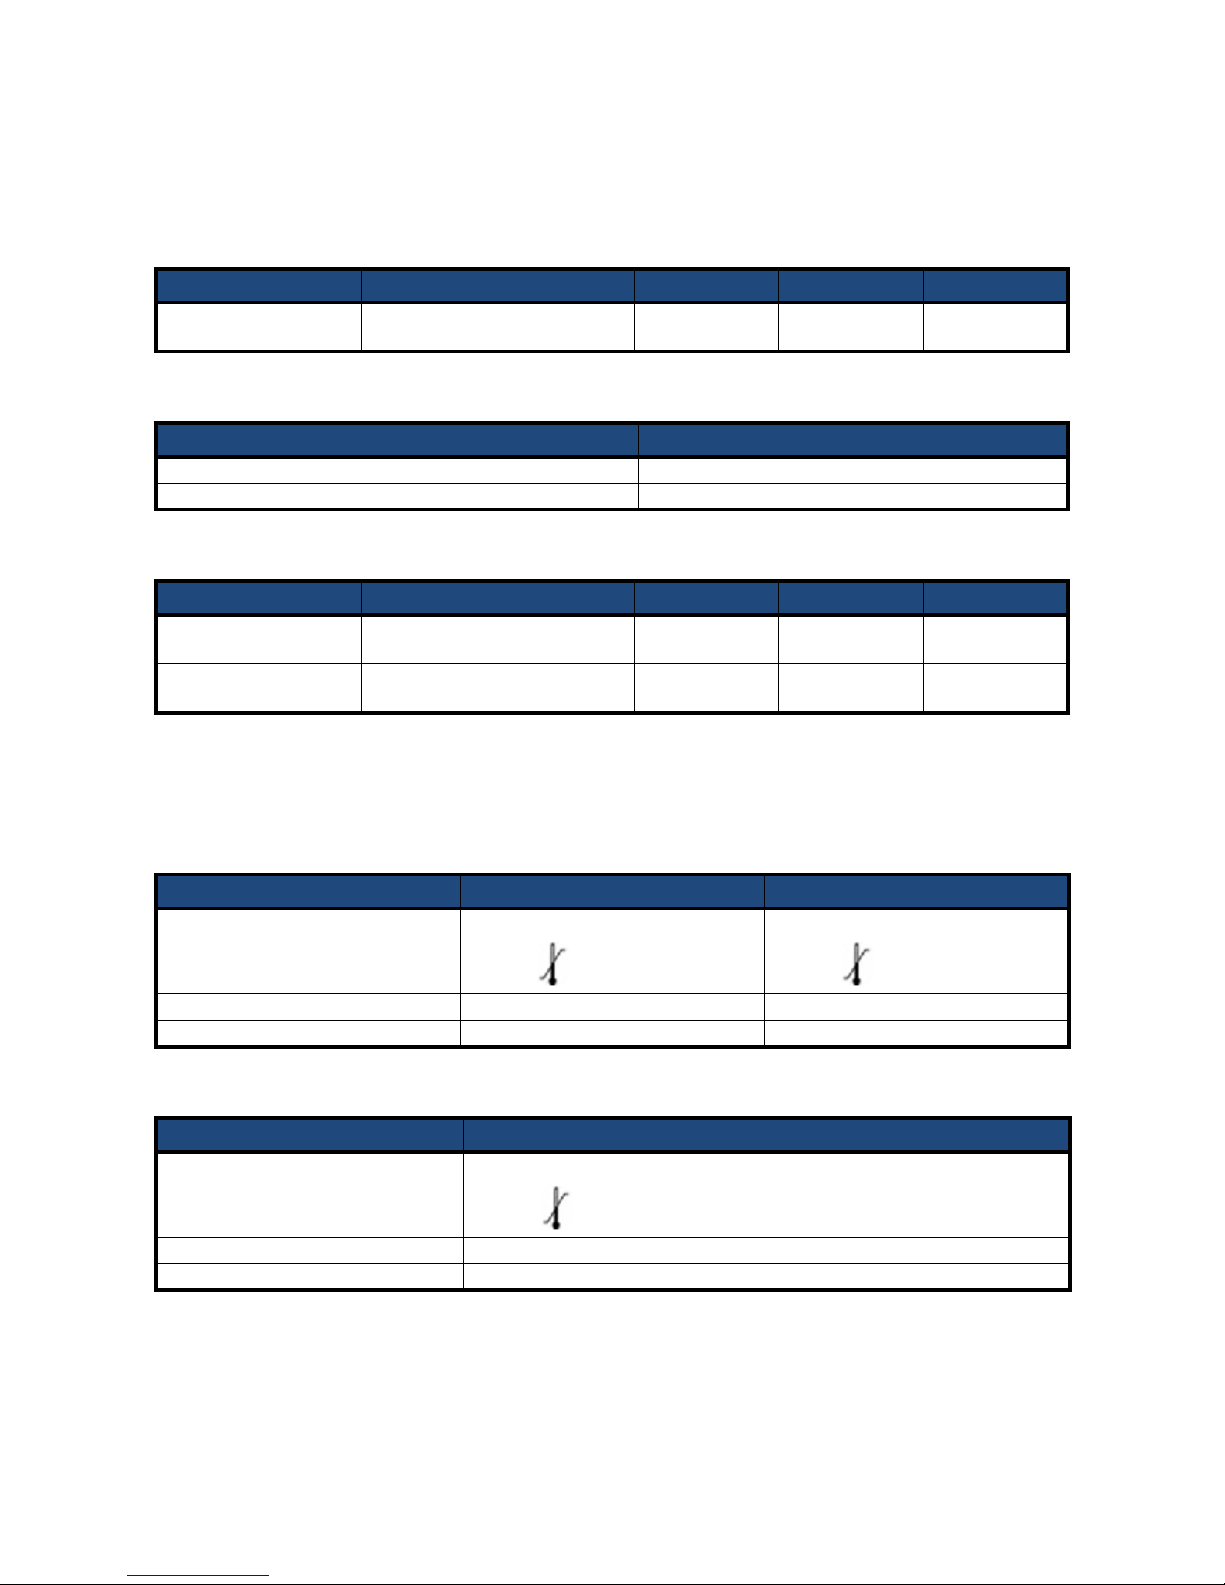
P003948 Uscan User Manual Page | 40
7. SPECIFICATIONS
System dimensions
Table 7.1 Dimensions of probe
Component Height Width Depth Weight
Ultrasound probe
147mm
(5.7
8 inches)
62mm
(2.44 inches)
33mm
(1.3 inches)
~200g
(7.1 oz)
Table 7.2 Dimensions of cable
Component Length
Connecting cable, handheld display 900mm (35.43 inches)
Connecting cable, tablet display 1800mm (70.9 inches)
Table 7.3 Dimensions of displays
Component Height Width Depth Weight
Tab let
207mm
(8.15 inches)
137mm
(5.39 inches)
8mm
(0.31 inches)
350g
(12.3 oz)
Handheld
159.3mm
(6.27 inches)
77.8mm
(3.06 inches)
7.3mm
(0.29 inches)
179g
(6.3 oz)
Environmental Operating and Storage Conditions
The Uscan is intended to be used and stored in normal ambient conditions inside a medical facility.
Table 7.4 Operating, charging, transport and storage condition ranges for Uscan
Operating Transport and Storage
Temperature (°C)
5 (41°F) – 40°C (104°F)
40 °C (104°F)
5°C (41°F)
-20 (-4°F) – 50°C (122°F)
50 °C (122°F)
-20°C (-4°F)
Relative humidity (non-condensing) 15–90% 10–93%
Pressure 70–101.5 kPa (10.3-14.7 psi) 50–101.5 kPa (7.3-14.7 psi)
Table 7.5 Charging condition ranges for Uscan
Charging
Temperature (°C)
5 (41°F) – 40°C (104°F)
40 °C (104°F)
5°C (41°F)
Relative humidity (non-condensing) 20–80%
Pressure 70–101.5 kPa (10.3-14.7 psi)
Page 43

P003948 Uscan User Manual Page | 41
Mode of Operation
NON-CONTINUOUS - The Usc
an enforces non-continuous scanning to maintain safe user enclosure contact
temperatures. Non-continuous scanning is enforced as the enclosure temperature approaches 48°C.
Warning
After storage
at extreme temperatures, check the transducer surface temperature before applying to a
patient. A cold or hot surface may burn a patient.
Caution
Only operate, charge and store Uscan within the approved environmental parameters.
Power Supplies (Chargers)
For the Uscan probe, and tablet the power supply is Signostics Power Supply P003198
Input: 100-240V AC supply 50-60Hz
Output: 5.0V ±0.25V at 2.0A maximum current
The U
scan tablet display may also use the optional HP 18W AC power supply.
Input: 100-240V AC supply 50-60Hz
Output: 12.0V ±0.25V at 1.5A maximum current
For the optional U
scan mobile stand, the power supply is Signostics Power Supply P004016
Input: 100-240V AC supply 50-60Hz
Output: 12.0V ±0.25V at 1.5A maximum current
Internal battery
Ultrasound probe
Signostics Li-ion Polymer Cell
Description: Rechargeable lithium polymer battery
Rating: 3.7V 1350mAh
For the U
scan tablet display, the battery is a 21WHr Li-ion Polymer type.
Measurement accuracy
Measurements reflect a physical property such as area or volume for interpretation by a clinician. They do not
account for variations in acoustic speed of the body, which can vary significantly.
Table 7.6 Accuracy of measurements
Measurement Units Range Accuracy Modes
Distance
Axial cm Full scale ±5% or ± 0.1cm B-mode
Lateral cm Full scale ±5% or ± 0.3cm B-mode
Vo lu me
1
ml 0-999ml ±10% or ± 10ml 3D
1
When used as per instructions scanning a bladder in a tissue equivalent phantom.
Page 44
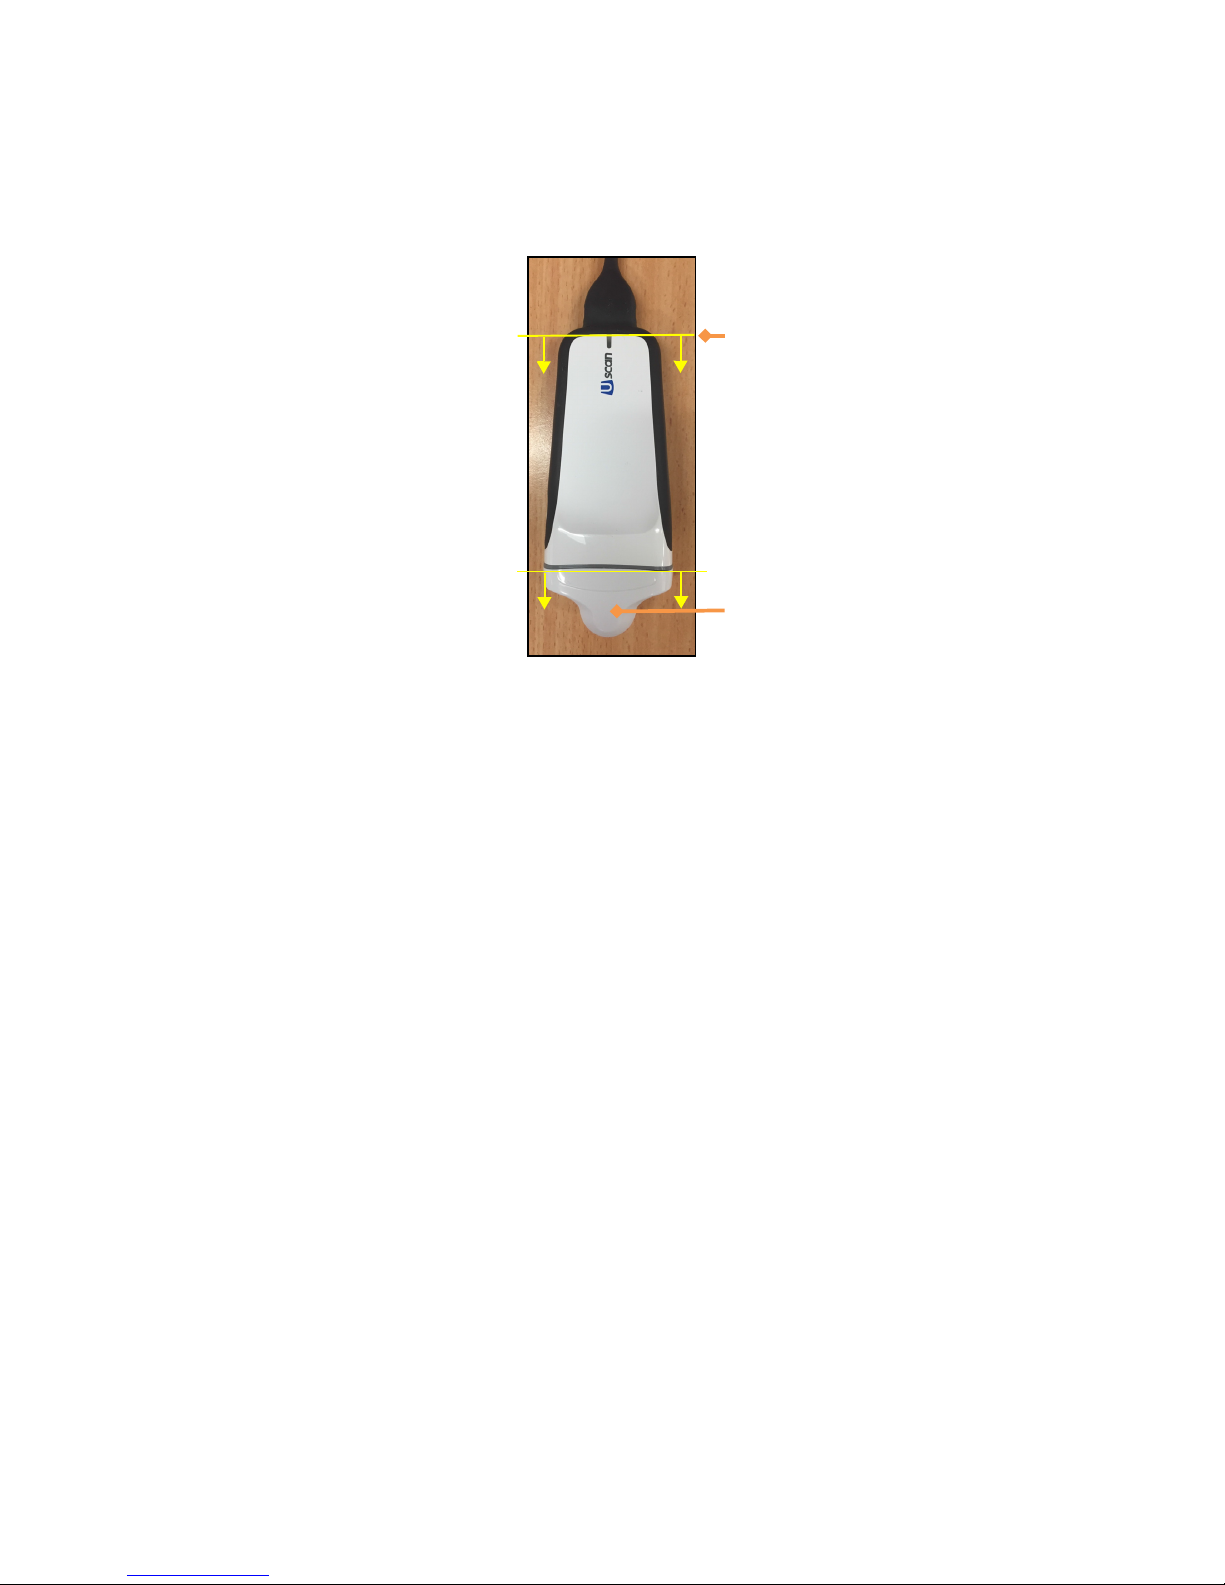
P003948 Uscan User Manual Page | 42
Degree of Protection Against Ingress of Water
The ultrasound probe (P003992 or P003993) is IPX1 below the level of the USB connection.
The transducer lens can be submersed in liquid for testing purposes.
Fig 7.1 Water Protection
IPX1 below this
line
Lens can be
submersed for
testing
Page 45

P003948 Uscan User Manual Page | 43
8. SAFETY
Ergonomics
Warning
Avoid musculoskeletal strain with prolonged use of Uscan. Follow guidelines below.
The Uscan is intended for quick-look applications by qualified health professionals. It is not intended for
continual use in radiology or other departments. If you need to use the device for a continual period, take the
following precautions:
Position yourself comfortably, either with a chair with appropriate lower back support or by sitting or
standing upright.
Minimize twisting, relax your shoulders and support your arm with a cushion.
Hold the probe lightly, keep your wrist straight and minimize the pressure applied to the patient.
Take regular breaks.
External materials
The parts of the device that come into patient contact are biocompatible as assessed in ISO10993-1.
Disposal
Warning
Do not incinerate or discard the device in general waste at end of life. The lithium battery is a potential
environmental and fire safety hazard.
Uscan contains lithium-polymer batteries and the system should be disposed of in an environmentally
responsible manner in compliance with federal and local regulations. It is recommended the system is taken to
a recycling center which specializes in the recycling and disposal of electronic equipment.
Where the device has been exposed to biologically hazardous material it is recommended the device be
disposed of using biohazard containers and in compliance with federal and local regulations. It is
recommended the system is taken to a waste center which specializes in the disposal of biohazard waste.
Electrical safety
Warning
Uscan complies with the requirements of IEC 60601-1:3
rd
Edition. To avoid the risk of injury or
electrical shock, comply with all safety instruction and warnings.
The user must not touch the any device connectors while in physical contact with the patient.
The Uscan probe is connected to an Android display running Signostics software to configure a
medical system. The Android display must be certified to the respective IEC standards and particular
national deviations (IEC 60950 or IEC 60601-1:2nd and/or 3rd edition).
Do not connect the Uscan display to external computers or peripherals using the USB port unless the
system is outside the patient area. Failure to comply with these guidelines may result in electric shock.
Only connect accessories that are specified as being compatible with Uscan. Contact Signostics
customer support or your Signostics distributor for information on compatible accessories and
systems.
When using the optional Signostics mobile stand, if a Multiple Socket Outlet is required only use an
outlet and power cable certified to IEC 60601-1, and fix to the stand using a bolt and tool.
Page 46
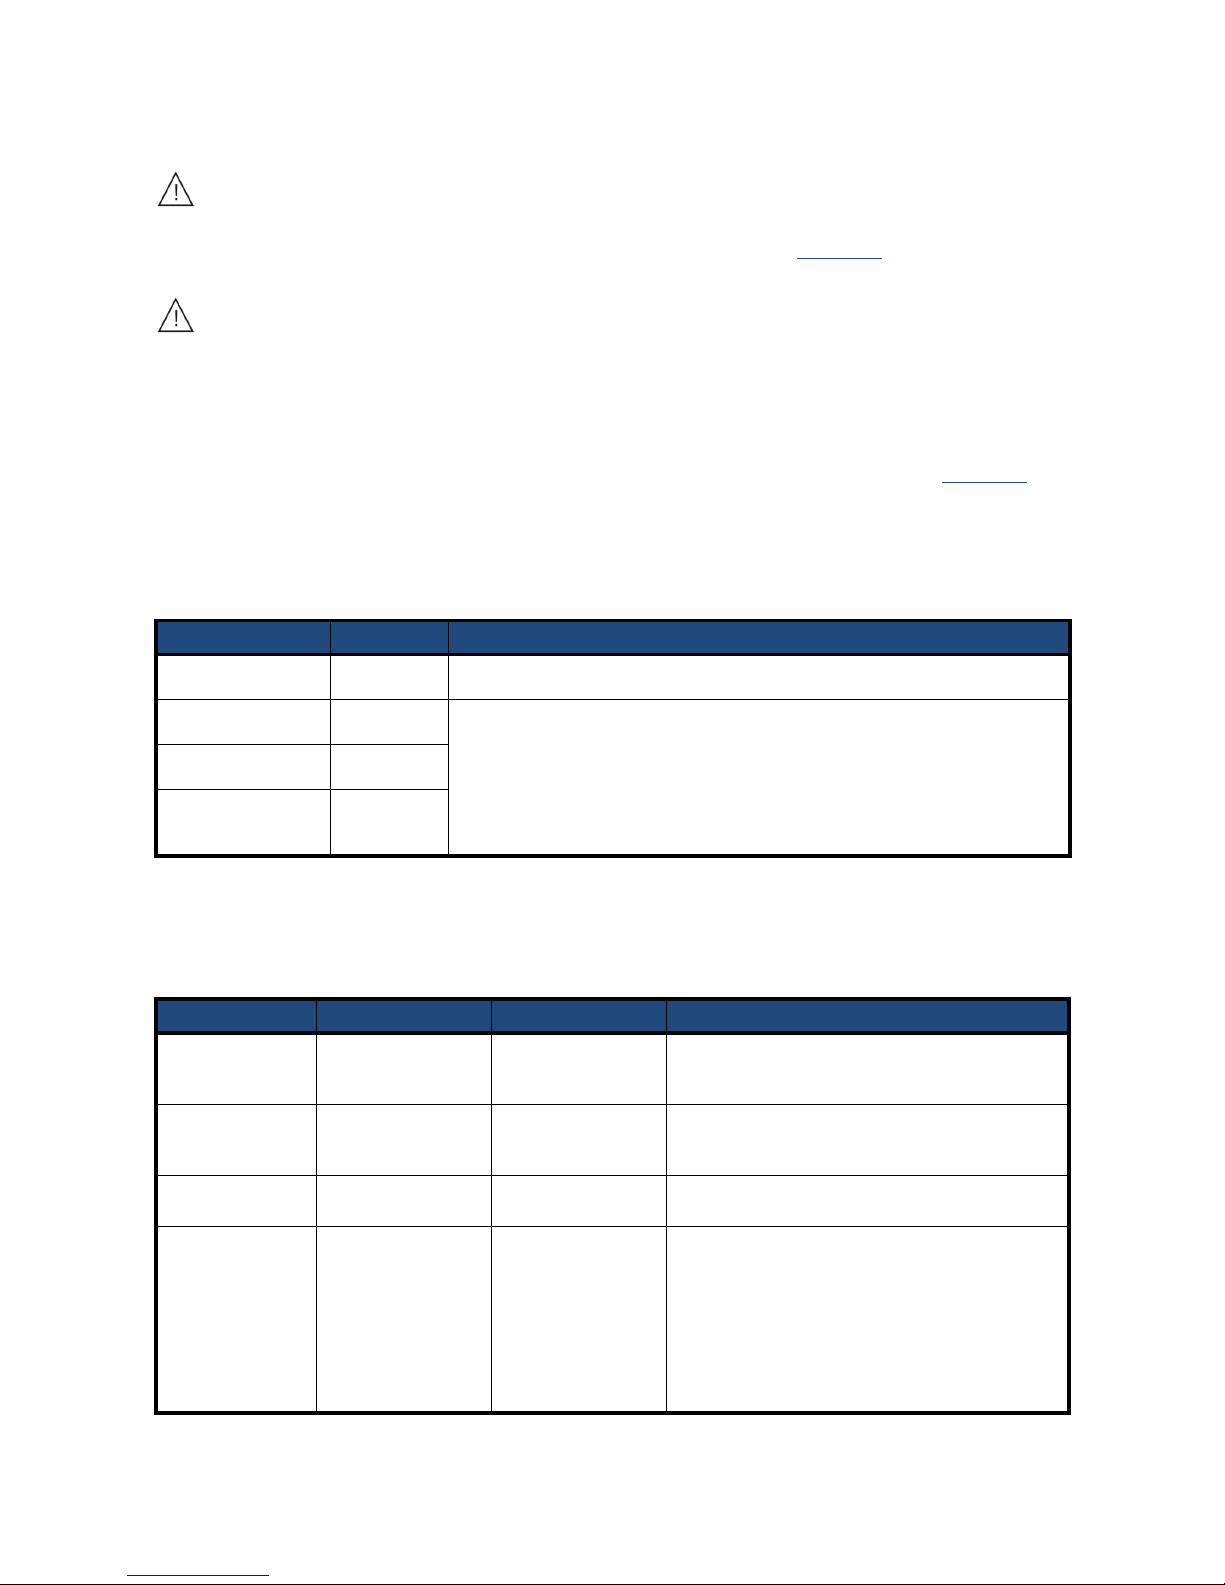
P003948 Uscan User Manual Page | 44
Electromagnetic compatibility (EMC)
Caution
Uscan contains sensitive components and circuits. Failure to observe proper static control procedures
may result in damage to the system. Any faults should be reported to Signostics
or your Uscan
distributor for repair.
Warning
Uscan complies with the Electromagnetic Compatibility requirements of AS/NZ CISPR 11:2004 and
IEC 60601-1-2:2007. However, electronic and mobile communications equipment may transmit
electromagnetic energy through air and there is no guarantee that interference will not occur in a
particular installation or environment. Interference may result in artifacts, distortion, or degradation of
the ultrasound image. If Uscan is found to cause or respond to interference, try re-orienting Uscan or
the affected device, or increasing the separation distance between the devices. Contact Signostics
customer support or your Signostics distributor for further information.
The Uscan is intended for use in the electromagnetic environment specified below. The user of the Uscan
should assure that it is used in such an environment.
Table 8.1 Guidance and manufacturer's declaration: electromagnetic emissions
Emissions test Compliance Electromagnetic environment: guidance
RF emissions
CISPR 11
Group 1 Uscan uses RF energy only for its internal function. Therefore, its RF emissions are very
low and are not likely to cause any interference in nearby electronic equipment.
RF emissions
CISPR 11
Class A Uscan i
s suitable for use in all establishments other than domestic and those directly
connected to the public low-voltage power supply network that supplies buildings used for
domestic purposes.
Harmonic emissions
IEC 61000-3-2
Class A
Voltage fluctuations/
flicker emissions
IEC 61000-3-3
Complies
1
Uscan has Class A compliance in meaning it is suitable for use in all establishments other than domestic and those directly connected to the
public low-voltage power supply network that supplies buildings used for domestic purposes. If Uscan is found to cause or respond to
interference follow the guidelines in the warning section above
Table 8.2 Guidance and manufacturer's declaration: electromagnetic immunity
The user should assure the Uscan is used in the electromagnetic environment specified below.
Immunity test IEC 60601 test level Compliance level Electromagnetic environment: guidance
Electrostatic
discharge (ESD)
IEC 61000-4-2
±6 kV contact
±8kV air
±6 kV contact ±8kV air Floors should be wood, concrete or ceramic tile. If floors
are covered with synthetic material, the relative humidity
should be at least 30%.
Electrical fast
tra
nsient/burst
IEC 61000-4-4
±2 kV for power supply
lines
±2 kV for power supply
lines
Mains power quality should be that of a typical
commercial or hospital environment.
Surge
IEC 61000-4-5
± 1kV line(s) to line(s)
± 2kV line(s) to earth
± 1kV differential mode
± 2kV common mode
Mains power quality should be that of a typical
commercial or hospital environment.
Voltage dips, short
interruptions and
voltage variations on
power supply input
li
nes
IEC 61000-4-11
<5% U
T
1
(>95% dip in
U
T
) for 0.5 cycle
40% U
T
(60% dip in
U
T
) for 5 cycles
70% UT (30% dip in UT
for 25 cycles
<5% U
T
(>95% dip in
U
T
) for 5 sec
<5% U
T
1
(>95% dip in
U
T
) for 0.5 cycle
40% U
T
(60% dip in
U
T
) for 5 cycles
70% UT (30% dip in UT
for 25 cycles
<5% U
T
(>95% dip in
U
T
) for 5 sec
Mains power quality should be that of a typical
commercial or hospital environment.
Page 47
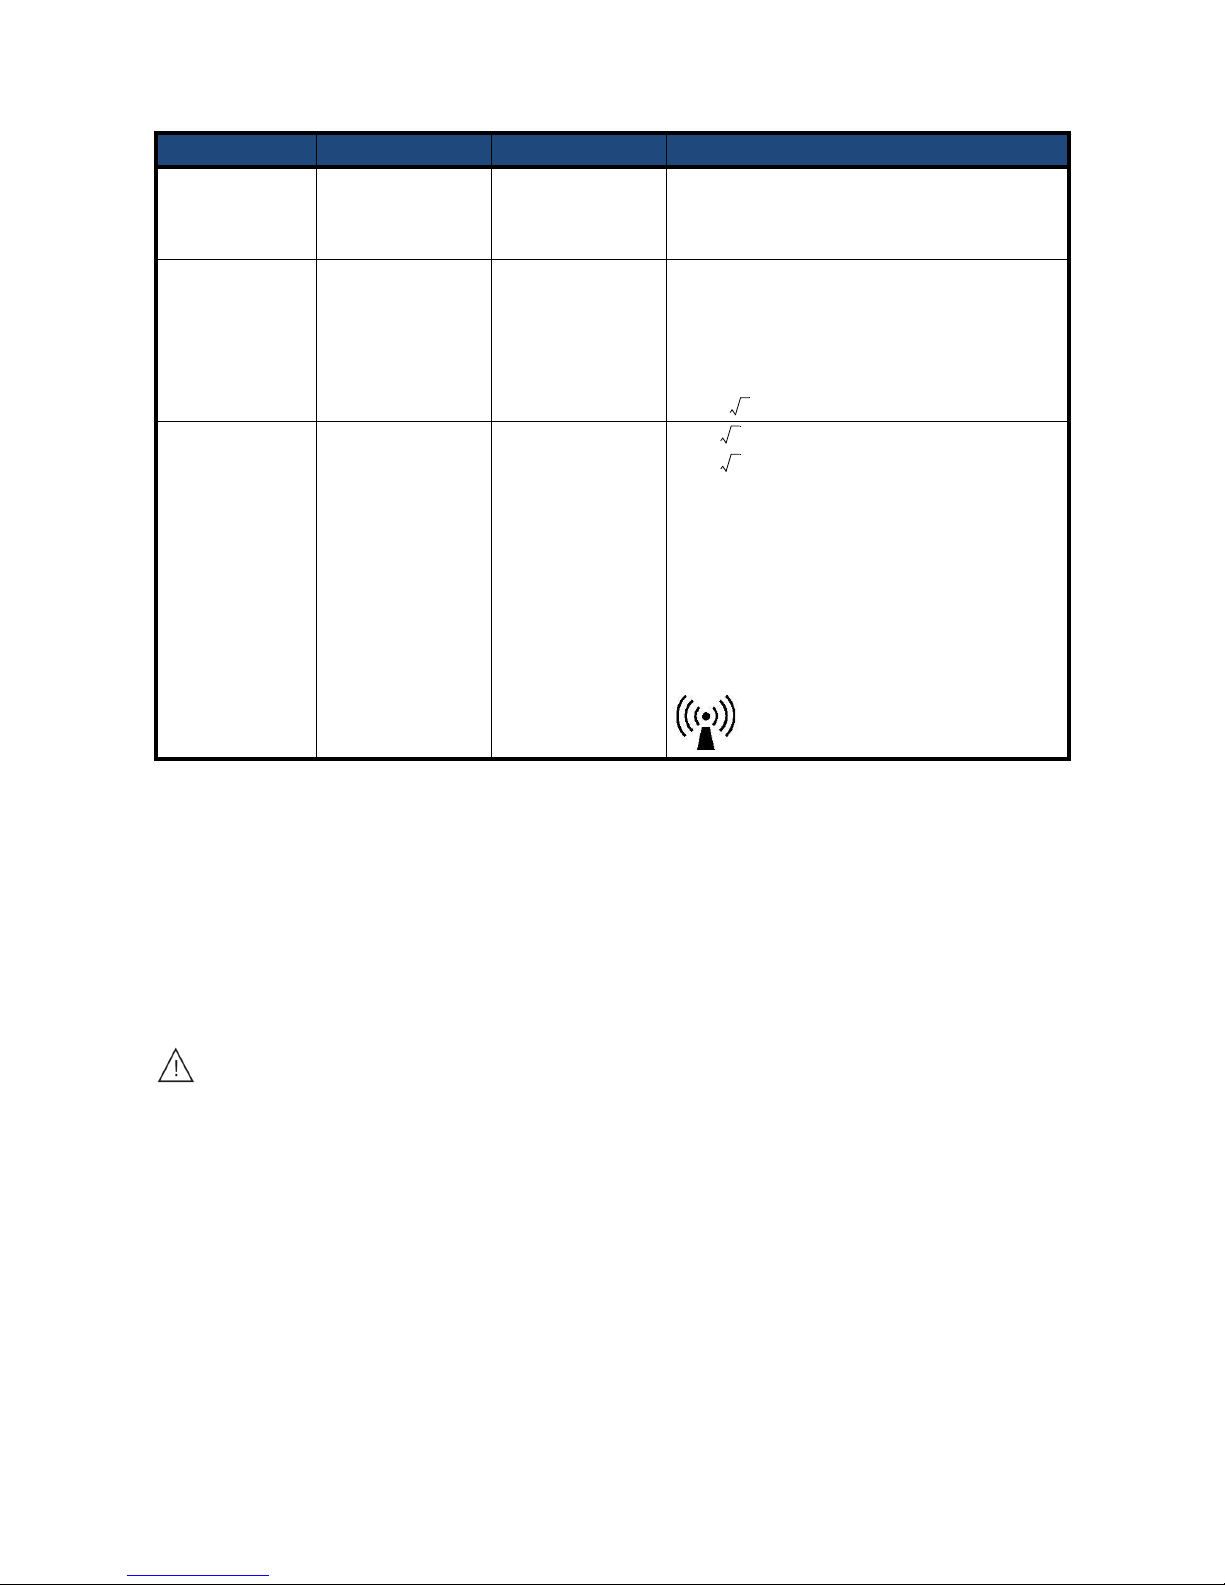
P003948 Uscan User Manual Page | 45
Notes for Table 8.2
1
UT is the AC mains voltage prior to application of the test level
2
At 80MHz and 800 MHz, the higher frequency range applies
3
These guidelines may not apply in all situations. Electromagnetic propagation is affected by absorption and reflection from structures, objects
and people.
4
Field strengths from fixed transmitters, such as base stations for radio (cellular/cordless) telephones and land mobile radios, amateur radio, AM
and FM radio broadcast and TV broadcast cannot be predicted theoretically with accuracy. To assess the electromagnetic environment due to
fixed RF transmitters, an electromagnetic site survey should be considered. If the measured field strength in the location in which Uscan is used
exceeds the applicable RF compliance level above, Uscan should be observed to verify normal operation. If abnormal performance is observed,
additional measures may be necessary, such as re-orientating or relocating Uscan.
5
Over the frequency range 150kHz to 80MHz, field strengths should be less than 3V/m
Warning
When using the optional mobile stand, the Uscan system can be susceptible to ESD and may require
manual intervention. If ESD results in a Uscan error, unplug the probe and plug back in to restore
operation.
Power frequency
(50/60 Hz) magnetic
field
IEC 61000-4-8
3 A/m 3 A/m Power frequency magnetic fields should be at levels
characteristic of a typical location in a typical commercial
or hospital environment.
2,3
Conducted RF
IEC 61000-4-6
3 Vrms
150kHZ 80MHz
3 Vrms Portable and mobile RF communications equipment
should be used no closer to any part of Uscan, including
cables, than the recommended separation distance
calculated from the equation applicable to the frequency
of the transmitter
Recommended separatio
n distance
d = 1.2
P
Radiated RF
IEC 61000-4-3
3 V/m
80MHz 2.5 GHz
3 V/m
d=1.2P 80MHz to 800MHz
d=2.3P 800MHz to 2.5GHz
Where P
is the maximum output power rating of the
transmitter in watts (W) according to the transmitter
manufacturer and d is the recommended separations
distance in meters (m).
Field strengths from fixed RF tra
nsmitters, as determined
by an electromagnetic site survey4, should be less than the
compliance level in each frequency range5.
Interference may occur in the vicinity of equipment
marked with the following symbol.
Immunity test IEC 60601 test level Compliance level Electromagnetic environment: guidance
Page 48
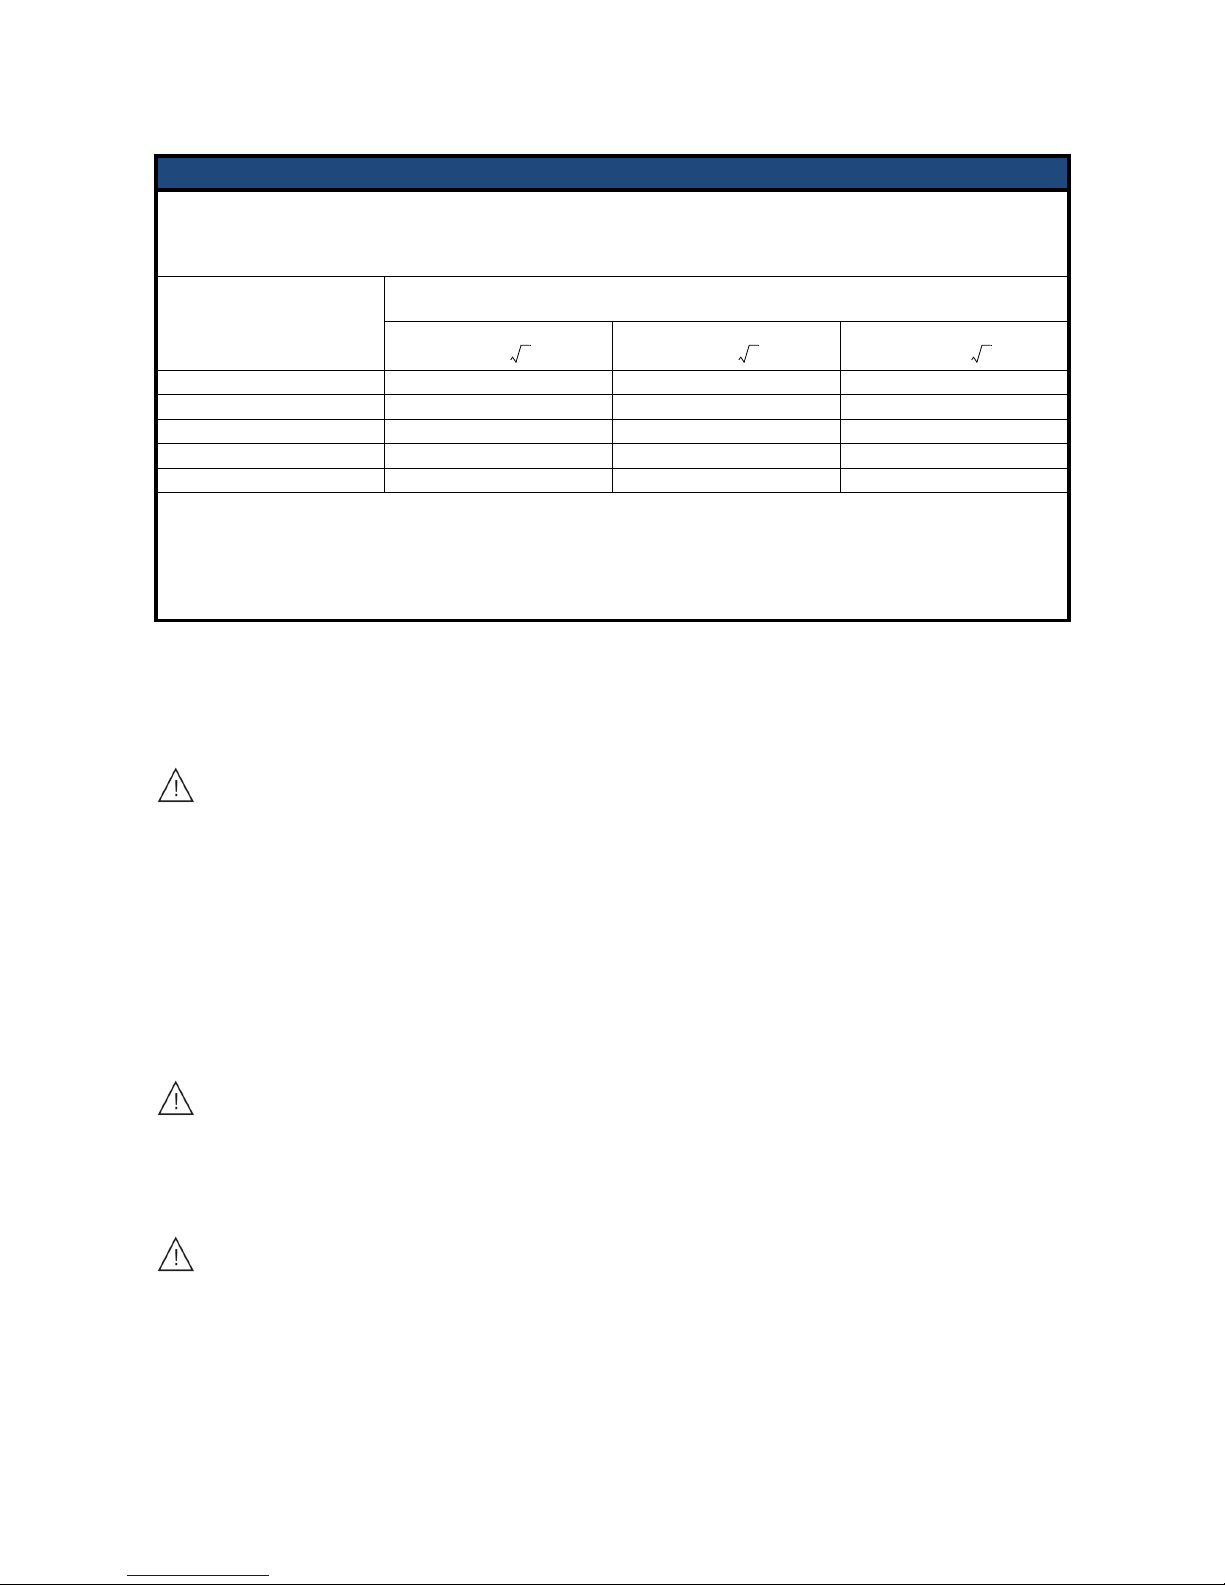
P003948 Uscan User Manual Page | 46
Table 8.3 Separation Distances
Recommended separation distances between portable and mobile RF communications equipment and the Uscan
The Uscan is intended for use in an electromagnetic environment in which radiated RF disturbances are controlled. The customer or
the user of the Uscan can help prevent electromagnetic interference by maintaining a minimum distance between portable and mobile
RF communications equipment (transmitters) and the Uscan as recommended below, according to the maximum output power of the
communications equipment.
Rated maximum output
powe
r of transmitter
W
Separation distance according to frequency of transmitter
m
150 kHz to 80 MHz
d=1.2
P
80 MHz to 800 MHz
d=1.2
P
800 MHz to 2,5 GHz
d=12.3
P
0.01 0.12 0.12 0.23
0.1 0.38 0.38 0.73
1 1.2 1.2 2.3
10 3.8 3.8 7.3
100 12 12 23
For transmitters rated at a maximum output power not listed above, the recommended sepa
ration distance d in meters (m) can be
estimated using the equation applicable to the frequency of the transmitter, where P is the maximum output power rating of the
transmitter in watts (W) according to the transmitter manufacturer.
NOTE 1: At 80 MHz and 800 MHz, the separation distance fo
r the higher frequency range applies.
NOTE 2: These guidelines may not apply in all situations. Electromagnetic propagation is affected by absorption and reflection from
structures, objects and people.
Power Supplies (Chargers)
The external Signostics power supplies (chargers) comply with the requirements of IEC 60601-1. The display
power supply (charger) complies with IEC 60950-1.
Warning
Do
not open or modify the Signostics Power Supply P003198 or any other supplied power supplies -
Risk of electric shock
Biological safety
The device can be disinfected for re-use on immunocompromised and non-immunocompromised patients
after:
Frequent contact with healthy skin (frequent low risk).
Occasional contact with mucous membra
nes or contamination with particularly virulent or readily
transmissible organisms (occasional intermediate risk).
Warning
Neurologic
al use on patients with Creutzfeld-Jacob disease must not be performed. The device is
unable to be disinfected after such use.
Acoustic Output
Warning
The ALARA principle (As Low As Reasonably Achievable) should be employed for all medical
ultrasound exposure
Ultrasound imaging has been in regular use for over 20 years and ha
s an excellent safety record. Even though
there are no known risks of ultrasound imaging, it heats the tissues slightly and may produce small pockets of
gas in body fluids or tissues (cavitation). The long-term effects of tissue heating and cavitation are not known.
Page 49

P003948 Uscan User Manual Page | 47
Given potential does exist for bio-effects with ultrasound exposure, any exposure should be kept As Low As
Reasonably Achievable. Scans should only be performed when there is a medical benefit and in the shortest
time commensurate with obtaining an adequate study. As the acoustic output of the device does not exceed an
MI or TI of 1.0, visual display of MI and TI values is not required. A generic ALARA education program is
supplied with your Uscan (see enclosed ISBN 1-93004 7-71-1, Medical Ultrasound Safety).
Table 8.4 Acoustic output and uncertainties for Uscan
I
SPTA.3
[mw/cm
2
]
TI type TI Value MI
I
PA. 3
@MI
max
[W/cm
2
]
P004200 Output 5.69 TIS 0.09 0.823 143
P004200
Uncertainties ±9.2% ±9.2% ±4.6% ±9.2%
I
SPTA.3
Derated spatial peak, temporal average intensity (milliwatts/cm2)
TI Thermal index
MI Mechanical index
I
PA. 3
@MI
max
Derated spatial-peak pulse-average intensity (watts/cm2)
Uncertainties are the cumulative e
ffect of measurement uncertainties.
Page 50

P003948 Uscan User Manual Page | 48
9. ADVANCED DEVICE AND IT SETUP
The system provides a number of advanced configuration options to enable an institution to setup and manage
the devices in their facility.
Administrators can lock preferences with a password.
Administrators can implement user management.
Multiple devices can be setup with common preferences.
Restrict ultrasound scanning and rest
rict viewing images during bladder scanning.
Restrict recording of ultrasound data and bladder data.
Restrict access to USB storage.
Devices can be linked to a Google acc
ount to enable device tracking, remote alarms, and other
functions to reduce the likelihood of devices being lost.
Administrator Setup
From the Home screen, tap and select Settings.
Select Administration.
Under Secu
rity, tap on Enable Administrator Password.
Enter an administrator password. Ensure you rec
ord the password in a secure location and do not
forget or lose it.
As soon as an administrator password is se
tup, preferences and settings can only be changed by the
administrator.
Software Updates Restrictions
From the Home screen, tap and select Settings
Select Administration.
Automatic Updates Check –
check to automatically check for software updates (updates are not
available in Japan).
Allow USB Software Updates – check to allow installa
tion of software updates via USB.
Page 51
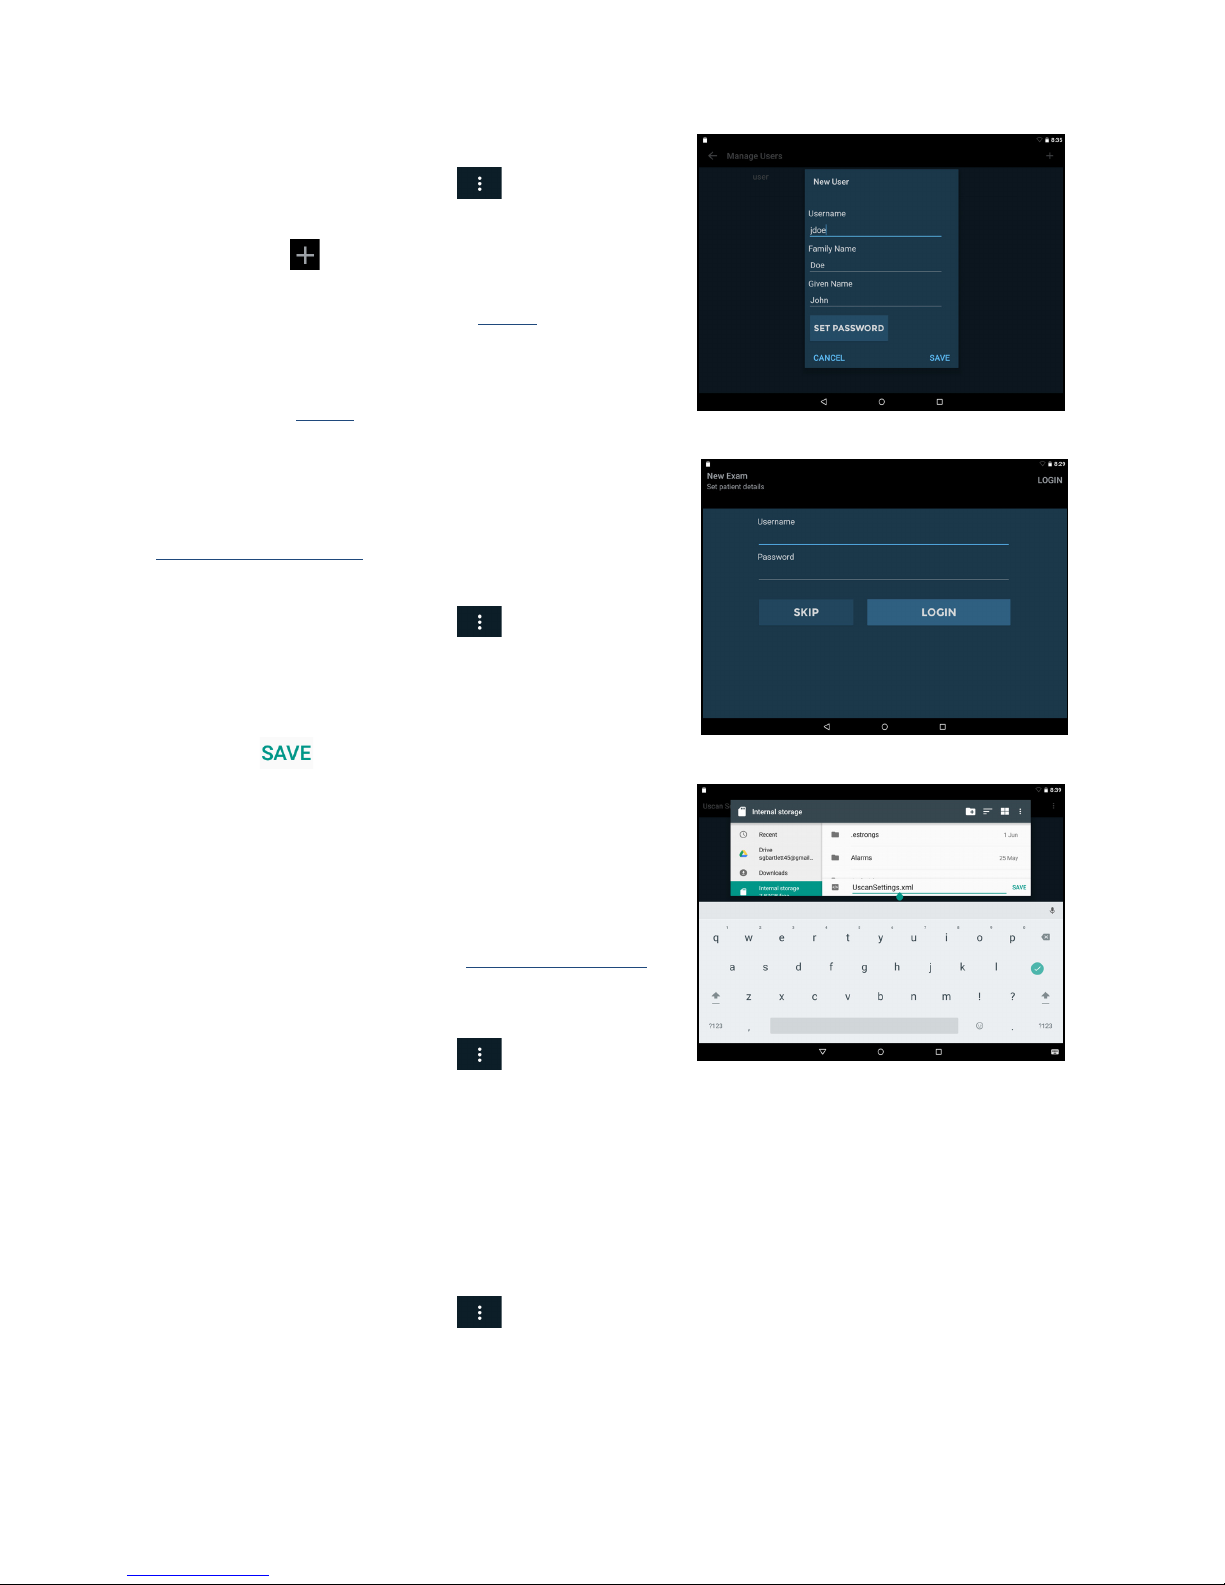
Fig 9.1 Add User
Fig 9.2 User Login
Fig 9.3 Export Settings
P003948 Uscan User Manual Page | 49
User Management
From the Home screen, tap and select Settings.
Select Administration the
n select Manage Users.
Tap th e
icon in the top right of the screen.
Enter a Username, Family name,
Given name, and if
required set the password (see Fig
9.1).
Tap Sa
ve to finish.
The user will need to enter a user name and password to save
pati
ent data (see Fig
9.2).
Multiple Device Setup
To setup multiple devices with identical preferences and users,
first configure one device with the required settings (see
Preference SetupSettings).
Export the settings to a file:
From the Home
screen, tap and select Settings.
Select Administration the
n select Settings
Management.
Select Export
Uscan Settings.
Tap
to write the settings to an xml file.
Copy the xml file from the tablet or handheld display
to a host comput
er (for example by connecting the
tablet to a computer by a USB cable and copying the
file from the tablet to the computer).
On each of the other syst
ems to be setup, import the settings:
Turn the tablet or handheld disp
lay on and follow the
initial setup instructions (see
Setting up the System).
Copy the xml file from the host computer to the
display local st
orage.
From the Home
screen, tap and select Settings.
Select Administration the
n select Settings
Management.
Select Import Scan
Settings.
Select the xml file to import.
Ultrasound Scanning Restrictions
To setup a password for accessing ultrasound scanning functionality:
From the Home
screen, tap and select Settings.
Select Administration the
n select Restrict Ultrasound Scanning.
Enter a password for accessing ultrasound functionality
. Ensure you record the password in a secure
location and do not forget or lose it.
To require ultrasound scanning passw
ord for viewing images during bladder scanning:
Page 52
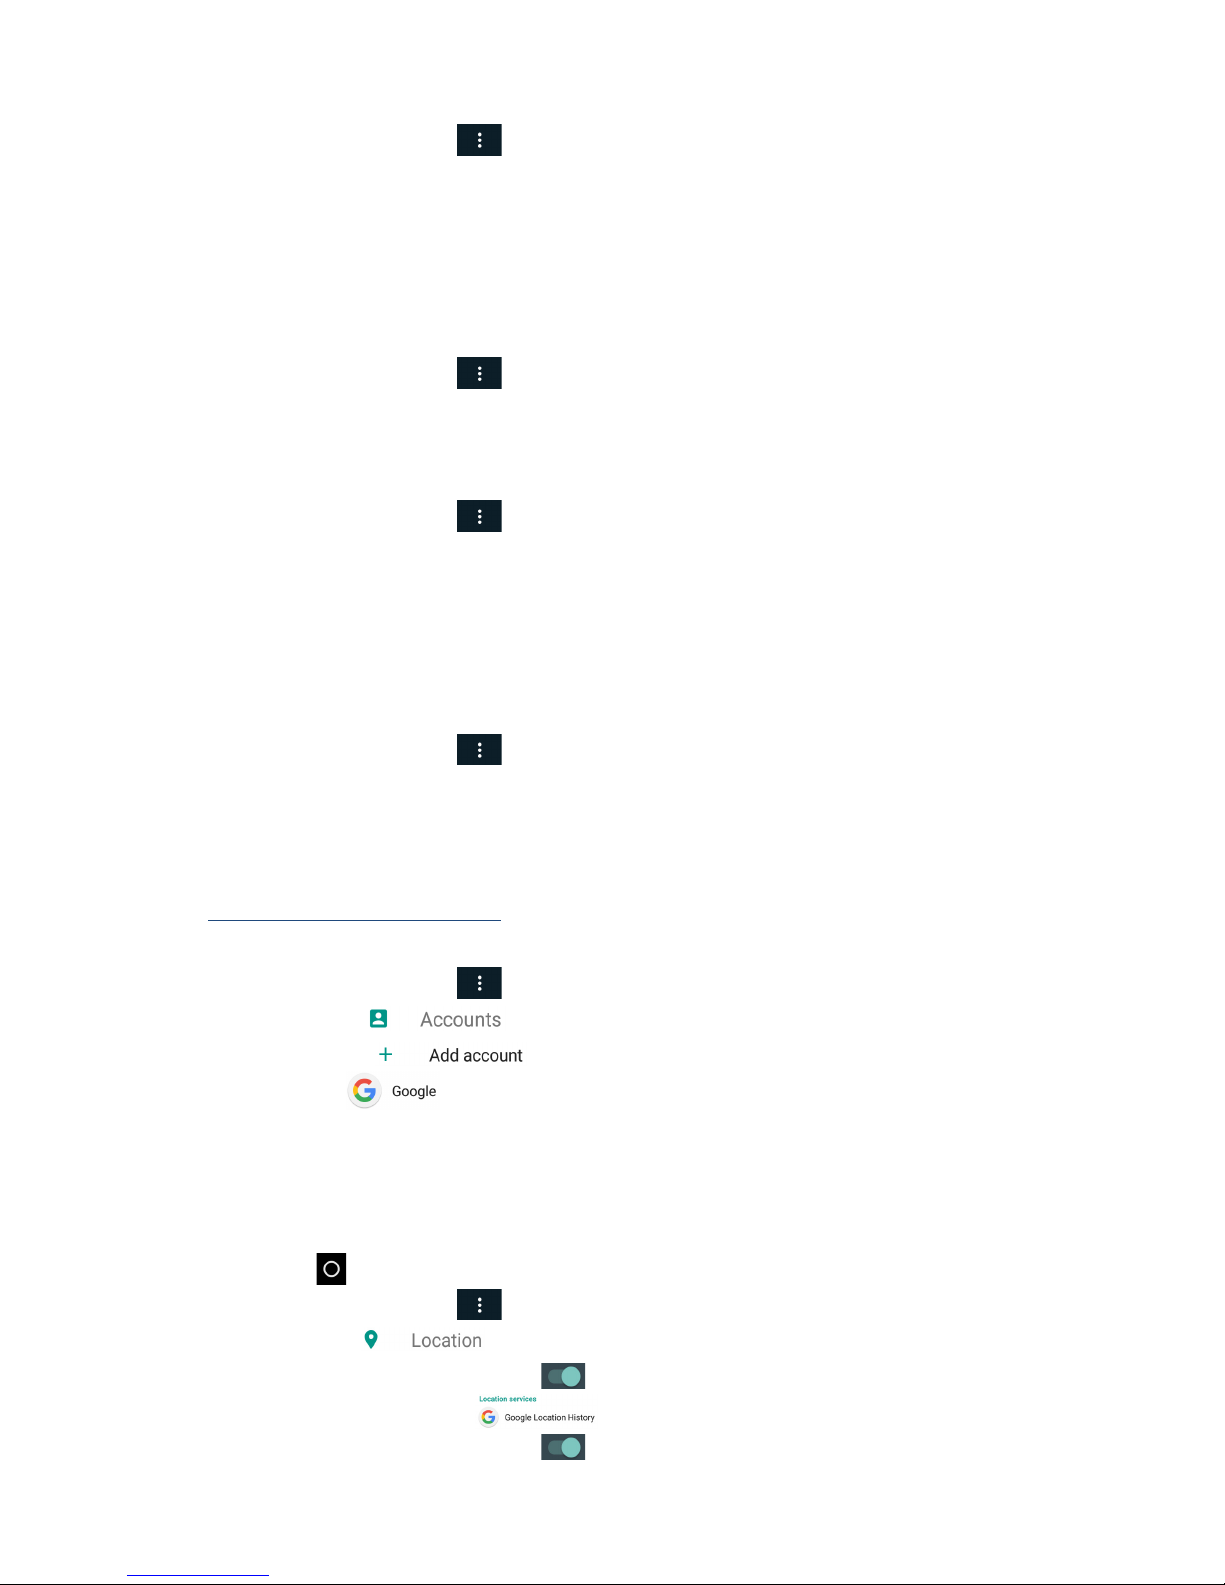
P003948 Uscan User Manual Page | 50
From the Home screen, tap and select Settings.
Select Administration the
n select Restrict Viewing Images during Bladder Scanning.
The ultrasound scanning password w
ill be required to view images during bladder scanning.
Data Recording Restrictions
The Uscan enables institutions to restrict saving, printing, and exporting ultrasound and/or bladder data.
To restrict Ultrasound Data Recording:
From the Home
screen, tap and select Settings.
Select Administration the
n select Ultrasound Data under Recording.
Select Do not allow recording to rest
rict recording ultrasound data.
To restrict Bladder Data Recording:
From the Home
screen, tap and select Settings.
Select Administration the
n select Bladder Data under Recording.
Select Allow rec
ording volume only to restrict recording bladder images but allow recording volumes.
Select Do not allow recording to rest
rict recording all bladder data.
Storage Access Restrictions
To restrict access to exported images via USB:
From the Home
screen, tap and select Settings.
Select Administration the
n select Restrict access to exported images via USB under Storage Access.
Device Tracking
To track a device it needs to be connected to Wi-Fi and linked to a Google account.
Go to
https://accounts.google.com/signup on a computer to create a Google account.
To setup tracking perform the following on the Usc
an display:
From the Home
screen, tap and select Settings then select System Settings.
Select Accounts
Tap Add Account
Select Google
Enter your Google email and tap Next.
Enter your password and tap Next.
Optional – uncheck Google Se
rvices. Tap Next.
Select “No Thanks” for Payment Info.
Tap Next.
Tap Home
to return to the Uscan Home screen.
From the Home
screen, tap and select Settings then select System Settings.
Select Location
Slide the on-screen button to the right
to turn Location Services on.
Tap Go
ogle Location History
Slide the on-screen button to the right
to turn on Google Location History.
Page 53
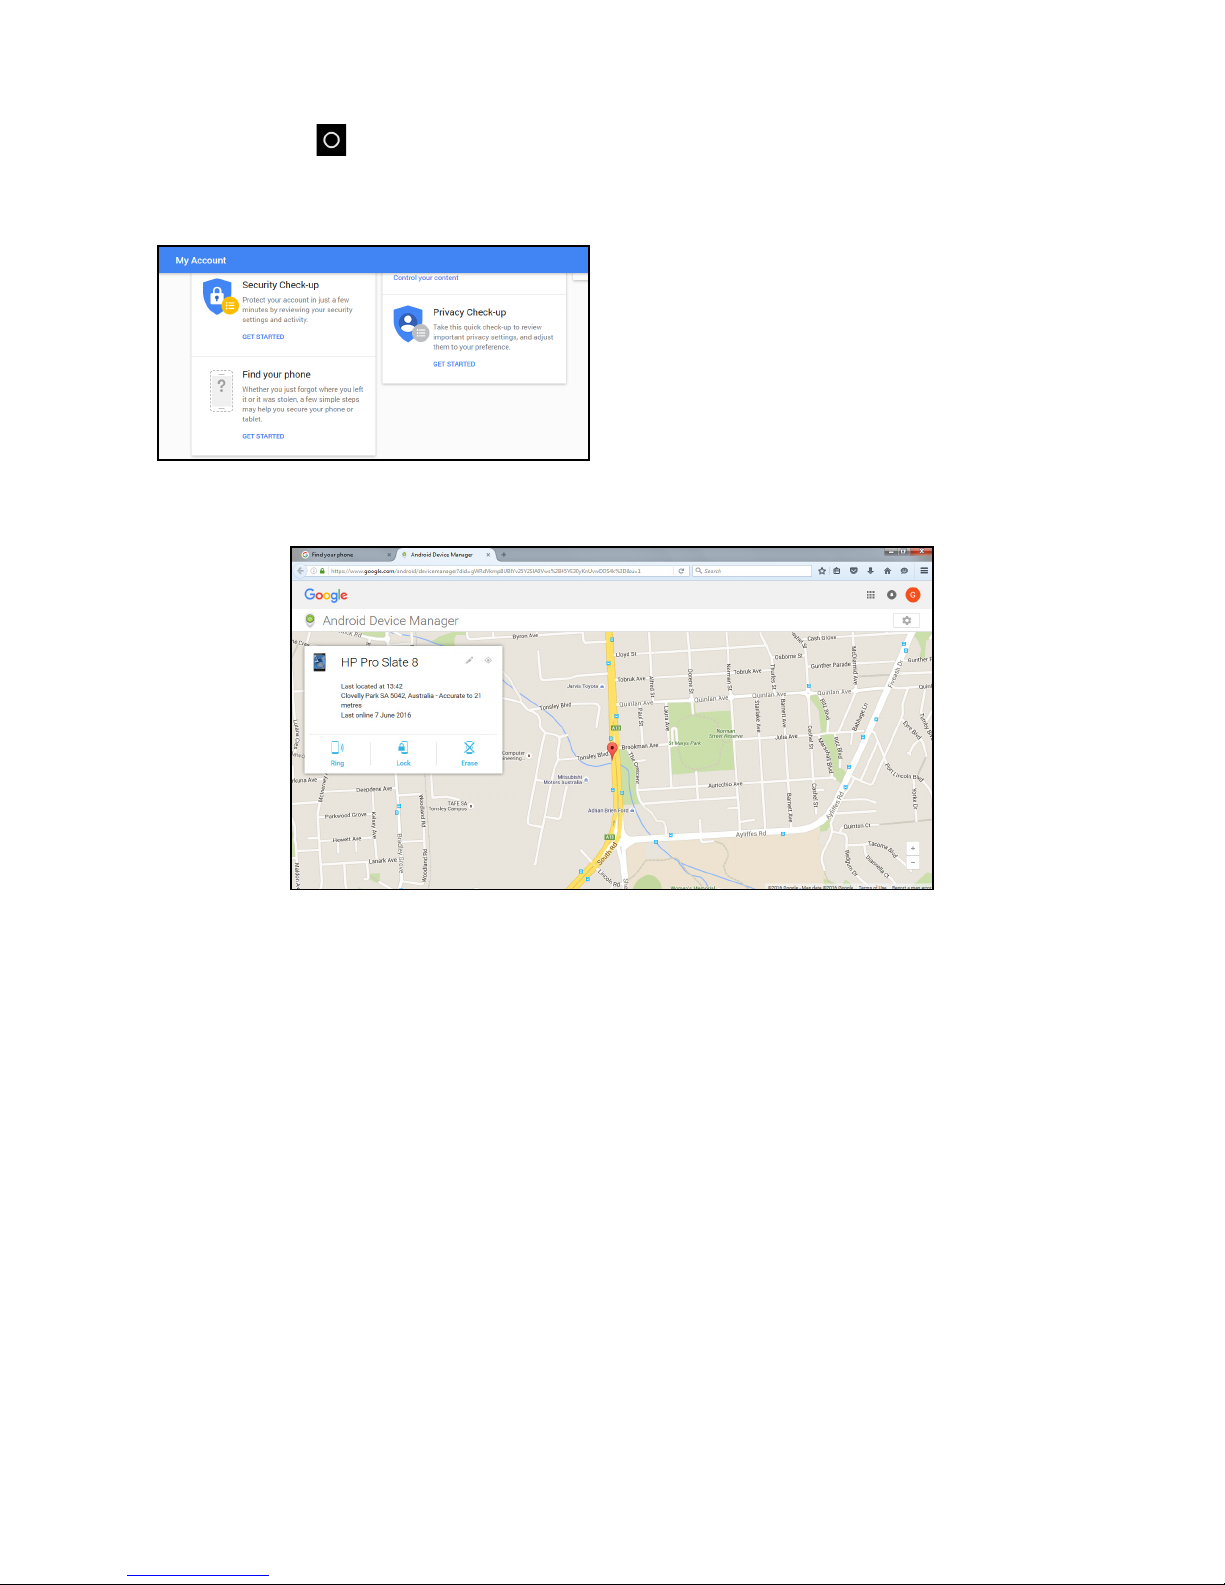
P003948 Uscan User Manual Page | 51
Tap Home to return to Uscan Home screen.
Use any Android device or computer to login to the Google Accoun
t and select “Find your phone”.
All devices linked to the Google Account are tracked and can be made to ring at full volume using a web
browser.
Fig 9.2 Device Tracking
Page 54

P003948 Uscan User Manual Page | 52
REFERENCES
IEC 60601-1:2005 (3rd edition), Medical Electrical Equipment-Part 1. General Requirements for Basic Safety
and Essential Performance.
IEC 60601-1-2:2007 (3rd edition), Medical Electrical Equipment. General Requirements for Basic Safety and
Essential Performance. Collateral Standard. Electromagnetic compatibility requirements and tests.
IEC 60601-2-37:2007 (2nd edition), Particular requirements for the basic safety and essential performance of
ultrasonic medical diagnostic and monitoring equipment.
IEC 60950-1:2005, Information Technology Equipment. Safety-Part 1: General Requirements.
ISO 10993-1: 2003, Biological Evaluation of medical devices
ISBN 1-93004 7-71-1, Medical Ultrasound Safety.
Page 55

P003948 Uscan User Manual Page | 53
Glossary
Bladder volume Volume of urine in the bladder
Exam A unique interaction between a clinician and patient. Up to 50 images may be saved to
each exam. Exams are identified by patient name and/or by date and time of scan.
Patient A single person, with unique details such as name, gender, date of birth and EMR
(electronic medical record).
Page 56

P003948 Uscan User Manual Page | 54
Index
INDEX
A
about
Uscan
......................................................................2
User Manual ................................... See User Manual
accessories
................................................................. 37
acoustic output
...........................................................47
ALARA principle
...................................................... 47
alcohol
.................................................................10, 35
applications ........................................See indended uses
audio feedback
...........................................................27
B
battery
........................................................................41
disposal
............................................................10, 43
recharge
........................................... 8, 9, 14, 37, 38
replacement
...........................................................34
biological safety..............................................See safety
C
calipers...................................... See also Measurement
cautions
......................................................................10
cavitation
...................................................................46
charger ...............................................See mains charger
classifications
..............................................................7
clinical troubleshooting
.............................................36
connecting cable
........................................................ 40
contact information
..............................................12, 36
contraindications.............................................See safety
Customer Support
......................................................36
D
dimensions
................................................................. 40
Display specifications
..................................................2
disposal
......................................................................43
distance ............................................. see Measurement
E
electrical safety ...............................................See safety
electromagnetic compatibility
................................... 44
exams
.........................................................................53
external materials
.......................................................43
I
Image Annotations
voice
......................................................................29
Intended uses
............................................................... 3
IPX Rating
.................................................................42
L
labeling
...................................................................... 11
latex
.......................................................................9, 23
M
mains charger
.............................................................46
input
.......................................................................41
maintenance
...........................................................9, 34
Measurement
accuracy
................................................................41
B-mode
.................................................................. 25
microphone
................................................................29
musculoskeletal strain
...........................................9, 43
N
navigate................................................ See touch screen
P
package contents
.......................................................... 6
patient environment
.....................................................8
patients
.......................................................................53
Power
button
....................................................... 15, 28, 38
sources
.............................................................37, 38
R
recommended gel
...................................................... 23
recording
.................................................................... 29
references
...................................................................52
S
safety
......................................................................... 43
biological
............................................................... 46
contraindications
...............................................3, 10
electrical
..........................................................10, 43
service..................................................See maintenance
setup
........................................................................... 15
shutdown
................................................................... 28
solvents
................................................................10, 35
sterile sheaths
............................................................ 23
support
....................................................................... 36
system features
............................................................ 7
T
touch screen
navigating
..............................................................16
trademarks
................................................................. 12
training
.........................................................................5
turn off
....................................................................... 28
turn on
..................................................................15, 38
U
ultrasound
gel
.......................................................................... 23
probe
......................................................................40
risks
....................................................................... 46
User Manual
................................................................1
conventions
............................................................. 1
version
..................................................................... 1
V
version
User Manual ....................................See User Manual
Page 57

P003948 Uscan User Manual Page | 55
Index
W
warnings
......................................................................8
Z
Zooming
....................................................................25
 Loading...