

SPEAKER
SMART
DJ
YEAR
WARRANTY
ONE
Instruction Manual
EA0944
AFTER SALES SUPPORT
1300 777 137
service@unclebills.com.au
MODEL: EA0944 PRODUCT CODE: 59080 12/2017
AFTER SALES SUPPORT
1300 777 137
02
service@unclebills.com.au
MODEL: EA0944 PRODUCT CODE: 59080 12/2017
Contents
Welcome 03
Warranty Details 04
General Information and Safety Instructions 05
Product Overview 08
Control Panel 08
Rear Panel 09
Remote Control 10
Audio Modes and Unique Features 11
Buttons and Controls 12
Before First Use 16
Operating Instructions 18
Using the Audio Modes 18
AUX Mode 19
FM Radio Mode 19
Bluetooth
®
Mode 20
USB Mode 22
USB Recording 23
Sound Adjustment 24
Sound Effects 25
Using the Party Lights 27
Troubleshooting 28
Repair and Refurbished Goods or Parts Notice 31
Other Useful Information 32
Cleaning and Maintenance 32
Storage 32
Responsible Disposal 32
Trademarks 33
Specication Table 33

03
AFTER SALES SUPPORT
1300 777 137
service@unclebills.com.au
MODEL: EA0944 PRODUCT CODE: 59080 12/2017
Welcome
Congratulations on choosing to buy a Signify® product.
All products brought to you by Signify® are manufactured to the highest standards of performance
and safety, and, as part of our philosophy of customer service and satisfaction, are backed by our
comprehensive 1 Year Warranty.
This comprehensive instruction manual will provide you with a detailed guide on how to operate your
product and will also assist you in troubleshooting any problems that you may encounter.
If you have any queries regarding the use of this product, please feel free to phone our technical
support line for some friendly advice. If you are experiencing difculties or believe that the product
may have a technical fault, we will assist you in rectifying the issue. We can generally solve most
problems simply and quickly over the phone, so please always phone us rst!
We are sure that you will enjoy using this product and you can expect to gain years of service from
this product when it is used and maintained in the correct manner.
AFTER SALES SUPPORT
1300 777 137
04
service@unclebills.com.au
MODEL: EA0944 PRODUCT CODE: 59080 12/2017
Our goods come with guarantees that cannot be excluded under the Australian Consumer Law.
You are entitled to a replacement or refund for a major failure and for compensation for any other
reasonably foreseeable loss or damage. You are also entitled to have the goods repaired or replaced
if the goods fail to be of acceptable quality and the failure does not amount to a major failure.
The product is guaranteed to be free from defects in workmanship and parts for a period of 12
months from the date of purchase. Defects that occur within this warranty period, under normal
use and care, will be repaired, replaced or refunded at our discretion. The benets conferred by this
warranty are in addition to all rights and remedies in respect of the product that the consumer has
under the Competition and Consumer Act 2010 and similar state and territory laws.
Smart DJ Speaker
Warranty Details
05
AFTER SALES SUPPORT
1300 777 137
service@unclebills.com.au
MODEL: EA0944 PRODUCT CODE: 59080 12/2017
General Information and Safety Instructions
RETAIN FOR FUTURE USE
Read this manual thoroughly before rst use, even if you are familiar with this type of product. The
safety precautions enclosed herein reduce the risk of re, electric shock and injury when correctly
adhered to. Please keep this user manual in a safe place along with your purchase receipt and carton
for future reference. If applicable, pass these instructions on to the next owner of the product. Always
follow basic safety precautions and accident prevention measures when using an electrical product.
This lightning ash with arrowhead symbol within an equilateral triangle is intended to alert
the user to the presence of uninsulated dangerous voltage within the product’s enclosure
that may be of sufcient magnitude to constitute a risk of electric shock to persons.
The exclamation point within an equilateral triangle is intended to alert the user to the
presence of important operating and maintenance (servicing) instructions in the literature
accompanying the product.
1. Before using the Smart DJ Speaker, ensure the electrical voltage and circuit frequency
correspond to the voltage stated on the rating label of your product and your power outlet is
properly earthed.
2. Do not use the Smart DJ Speaker with an extension cord unless this cord has been checked and
tested by a qualied electrician. If an extension cord is used, please ensure that it has a rating
equal or exceeding the rating of this product.
3. Do not pull or carry by the cord, use the cord as a handle, close a door on the cord, or pull the
cord around sharp edges or corners. Check the power cord regularly for visible damage. If it is
damaged, please contact the After Sales Support Line for further advice.
4. Only use the AC power cord provided with the Smart DJ Speaker. Check the power cord regularly
for visible damage. If it is damaged, please contact the After Sales Support Line for further
advice.
5. When the Smart DJ Speaker is not in use, switch it off and unplug from the power outlet. To
unplug, grip the adaptor and pull from the power outlet. Never pull by the cord.
6. The power adaptor is not user-serviceable. Contact with high voltage components may cause a
risk of electric shock, therefore do not attempt to open the back cover of the Smart DJ Speaker.
This will void the warranty.
7. The installation of a residual current device (safety switch) is recommended to provide additional
safety protection when using electrical devices. It is advisable that a safety switch with a rated
residual operating current not exceeding 30mA be installed in the electrical circuit supplying the
device. See your qualied electrician for professional advice.
WARNING: To reduce the risk of electric shock do not remove cover (or back). No userserviceable parts inside. Refer servicing to qualied service personnel.

AFTER SALES SUPPORT
1300 777 137
06
service@unclebills.com.au
MODEL: EA0944 PRODUCT CODE: 59080 12/2017
General Information and Safety Instructions (cont.)
8. This Smart DJ Speaker is not intended for use by persons (including children) with reduced
physical, sensory or mental capabilities, or lack of experience and knowledge, unless they have
been given supervision or instruction concerning use of the product by a person responsible for
their safety.
9. Install and operate the Smart DJ Speaker in a cool and sufciently ventilated room to ensure it
does not overheat.
10. Never block the ventilation holes and openings. Do not place this product against soft surfaces,
drapery or fabric that may block the ventilation holes. The product should not be placed in an “inbuilt” installation unless all ventilation holes are provided with adequate ventilation.
11. Do not expose the Smart DJ Speaker to water, rain moisture, liquids or dust. Do not store or use
the Smart DJ Speaker in high moisture environments. Moisture can damage and cause corrosion
to the speaker cone and other internal components.
12. The apparatus should not be exposed to water (dripping or splashing) and objects lled with
liquids, such as vases or drinks, should not be placed on the apparatus.
13. Unplug the Smart DJ Speaker in cases of electrical storms to protect against the possibility of
power surges damaging the device.
14. The manufacturer and retailer are not responsible for any eventual damages caused by improper
or faulty use.
15. Always store the Smart DJ Speaker indoors after use. Never leave the Smart DJ Speaker
outdoors especially when it is raining or there is excess humidity in the air.
16. Never operate the Smart DJ Speaker with wet hands, submerge under water or spill liquids into
or onto the device.
17. Do not place the Smart DJ Speaker near a hot burner (gas or electric), other heat emitting
sources or open ames.
18. Always position the Smart DJ Speaker on a at and stable surface.
19. Be careful when transporting the Smart DJ Speaker. This unit is equipped with wheels and will
roll if it's not secure. Please ensure the device is stable and secure to ensure it does not cause
damage to objects, or injury to persons.
20. If the Smart DJ Speaker has been exposed to strong uctuations in temperature (for example,
after transport), do not switch it on immediately. Moisture and condensation could damage the
equipment. Do not switch on the equipment until it has reached room temperature.
21. Be extremely careful when unpacking or relocating the Smart DJ Speaker. Ensure that the Smart
DJ Speaker is not dropped or bumped and that excessive force is not applied to the unit. Impact
such as these can damage the product and its internal components.
22. Keep the Smart DJ Speaker away from any electromagnetic sources, such as magnets or
electronic motors, or from any other object emitting strong radio waves, like mobile phones and
radios. Strong magnetic elds may cause distorted sound, or failure and damage to the Smart DJ
Speaker.
23. The remote control is powered by 2 x AAA batteries (included). Ensure you observe the polarity
markings before inserting or replacing the batteries.
WARNING: Do not leave batteries in the remote control unused for extended periods of time.
Always ensure when changing the batteries you do not mix old batteries with new batteries .
07
AFTER SALES SUPPORT
1300 777 137
service@unclebills.com.au
MODEL: EA0944 PRODUCT CODE: 59080 12/2017
General Information and Safety Instructions (cont.)
24. Never operate the Smart DJ Speaker in temperatures exceeding 50°C (122°F).
25. Store in a dry, cool place away from heat. If the Smart DJ Speaker is to be stored for the
prolonged periods ensure that the Smart DJ Speaker is not stored in areas that could potentially
reach or exceed 50°C (122°F).
26. The Smart DJ Speaker should always be repacked in its original packaging whenever
transporting to prevent any possible damage to the device.
27. Where the mains plug or an appliance coupler is used as the disconnect device, the disconnect
device shall remain readily operable.
WARNING: Do not expose the batteries to excessive heat, direct sunlight, open ames or any
other heat sources.
IMPORTANT: Dispose of all used batteries at designated disposal points. Never dispose of
batteries in a re as this may cause an explosion or leakage of dangerous chemicals and fumes.
WARNING: To prevent possible hearing damage, avoid listening at high volume levels over long
periods of time. Even exposure to short bursts of loud noise can result in hearing loss. Please
keep the volume consistently at a comfortable level.
REC/PLAY
5V 1A 5V 1A
PLAY
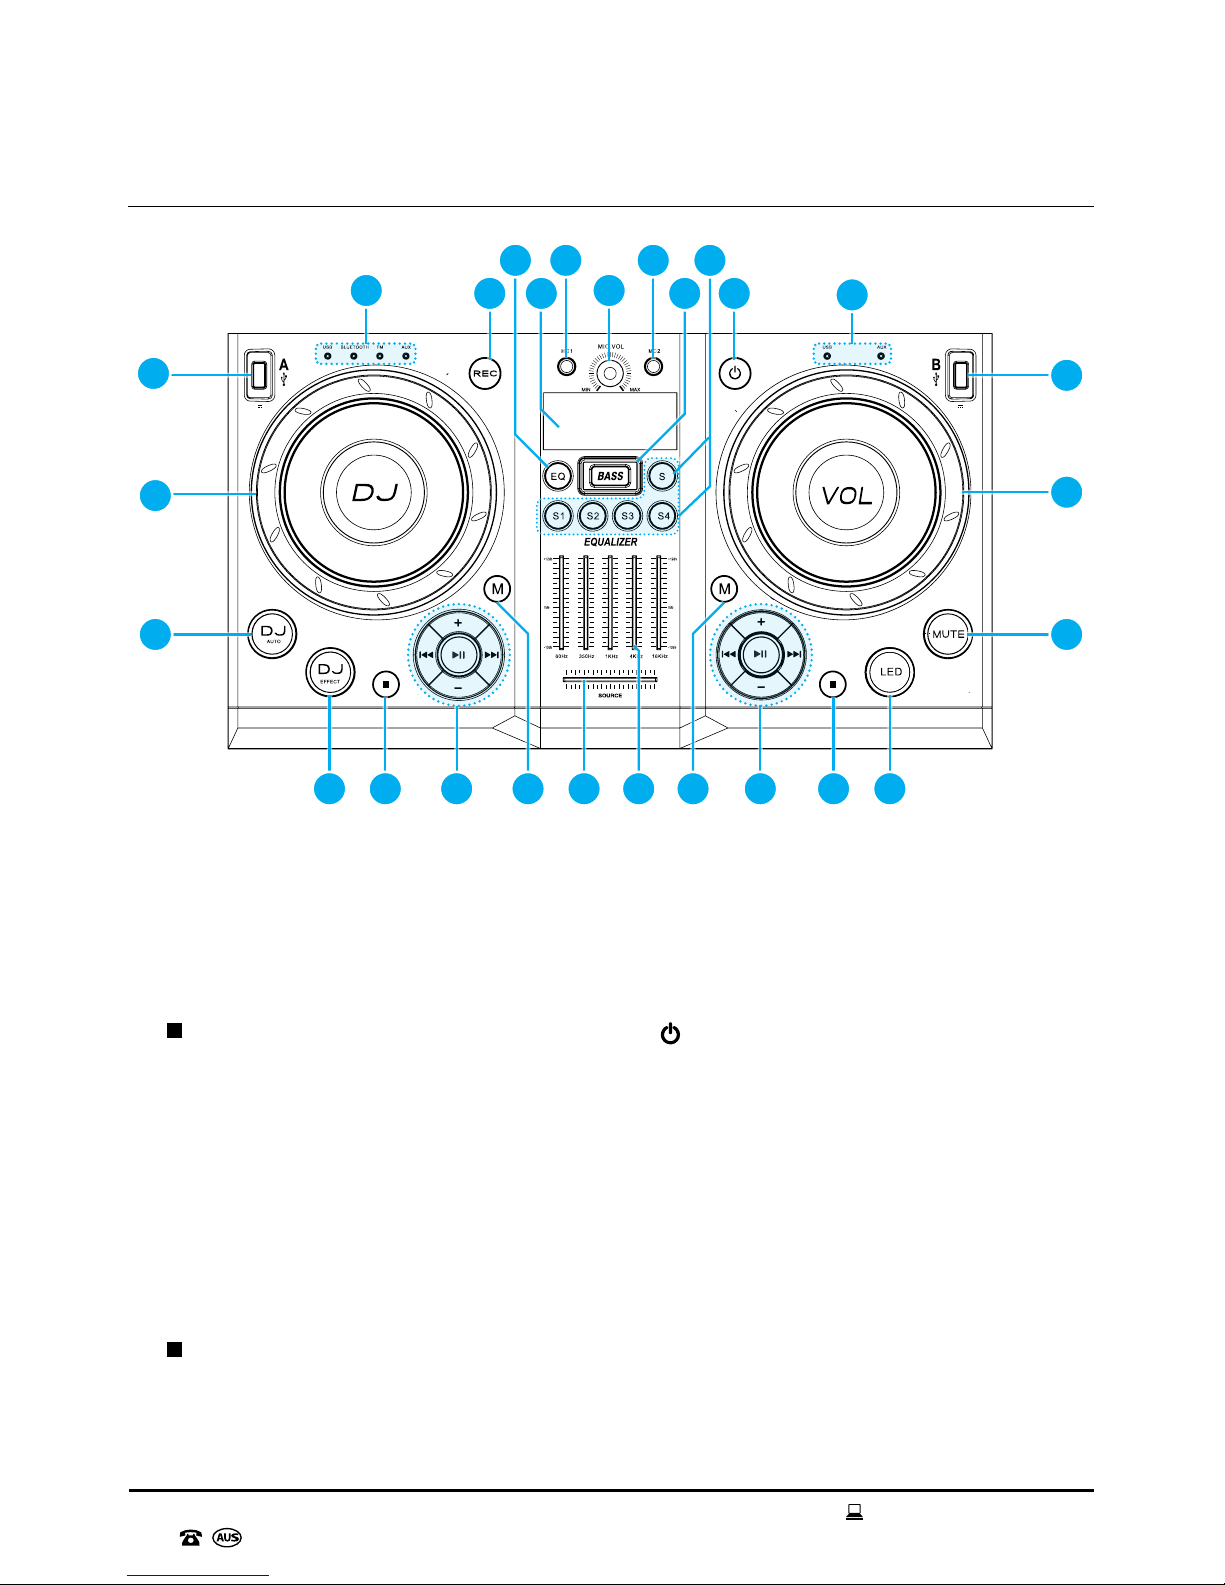
Control Panel Parts List
1. USB-A Input
2. DJ Dial (Source A - DJ Sound Effects)
3. DJ AUTO Button (Source A - USB Mode)
4. DJ EFFECT Button (Source A)
5.
Button (Source A - Stop)
6. Playback Controls (Source A)
See page 15 for detailed instructions
7. M Button (Source A - Mode Selection)
8. Source Control Bar
(Cross Fade Between Source A & B)
9. Master Equalizer Control
10. M Button (Source B - Mode Selection)
11. Playback Controls (Source B)
See page 15 for detailed instructions
12.
Button (Source B - Stop)
13. LED Lights Button
14. MUTE Button
15. VOL Dial (Master Volume)
16. USB-B Input
17. Mode Indicator Lights (Source B)
18.
Button (Standby)
19. S Buttons (Sound Effects)
20. BASS Button
21. MIC 2 Input (Microphone)
22. MIC VOL Dial (Microphone Volume)
23. MIC 1 Input (Microphone)
24. Display Screen
25. EQ Button
26. REC Button (Record)
27. Mode Indicator Lights (Source A)
Control Panel
1
2
3 14
15
16
4 5 6 8 9 11 12 13
17
27 22
2325
1826
21
19
2024
7 10
AFTER SALES SUPPORT
1300 777 137
08
service@unclebills.com.au
MODEL: EA0944 PRODUCT CODE: 59080 12/2017
Product Overview
Included (not pictured): Instruction Manual, AAA Batteries x 2, Allen Key, Screws x 10, Handles x 2, FM Antenna
Cable, AUX Cable and Warranty Card.
09
AFTER SALES SUPPORT
1300 777 137
service@unclebills.com.au
MODEL: EA0944 PRODUCT CODE: 59080 12/2017
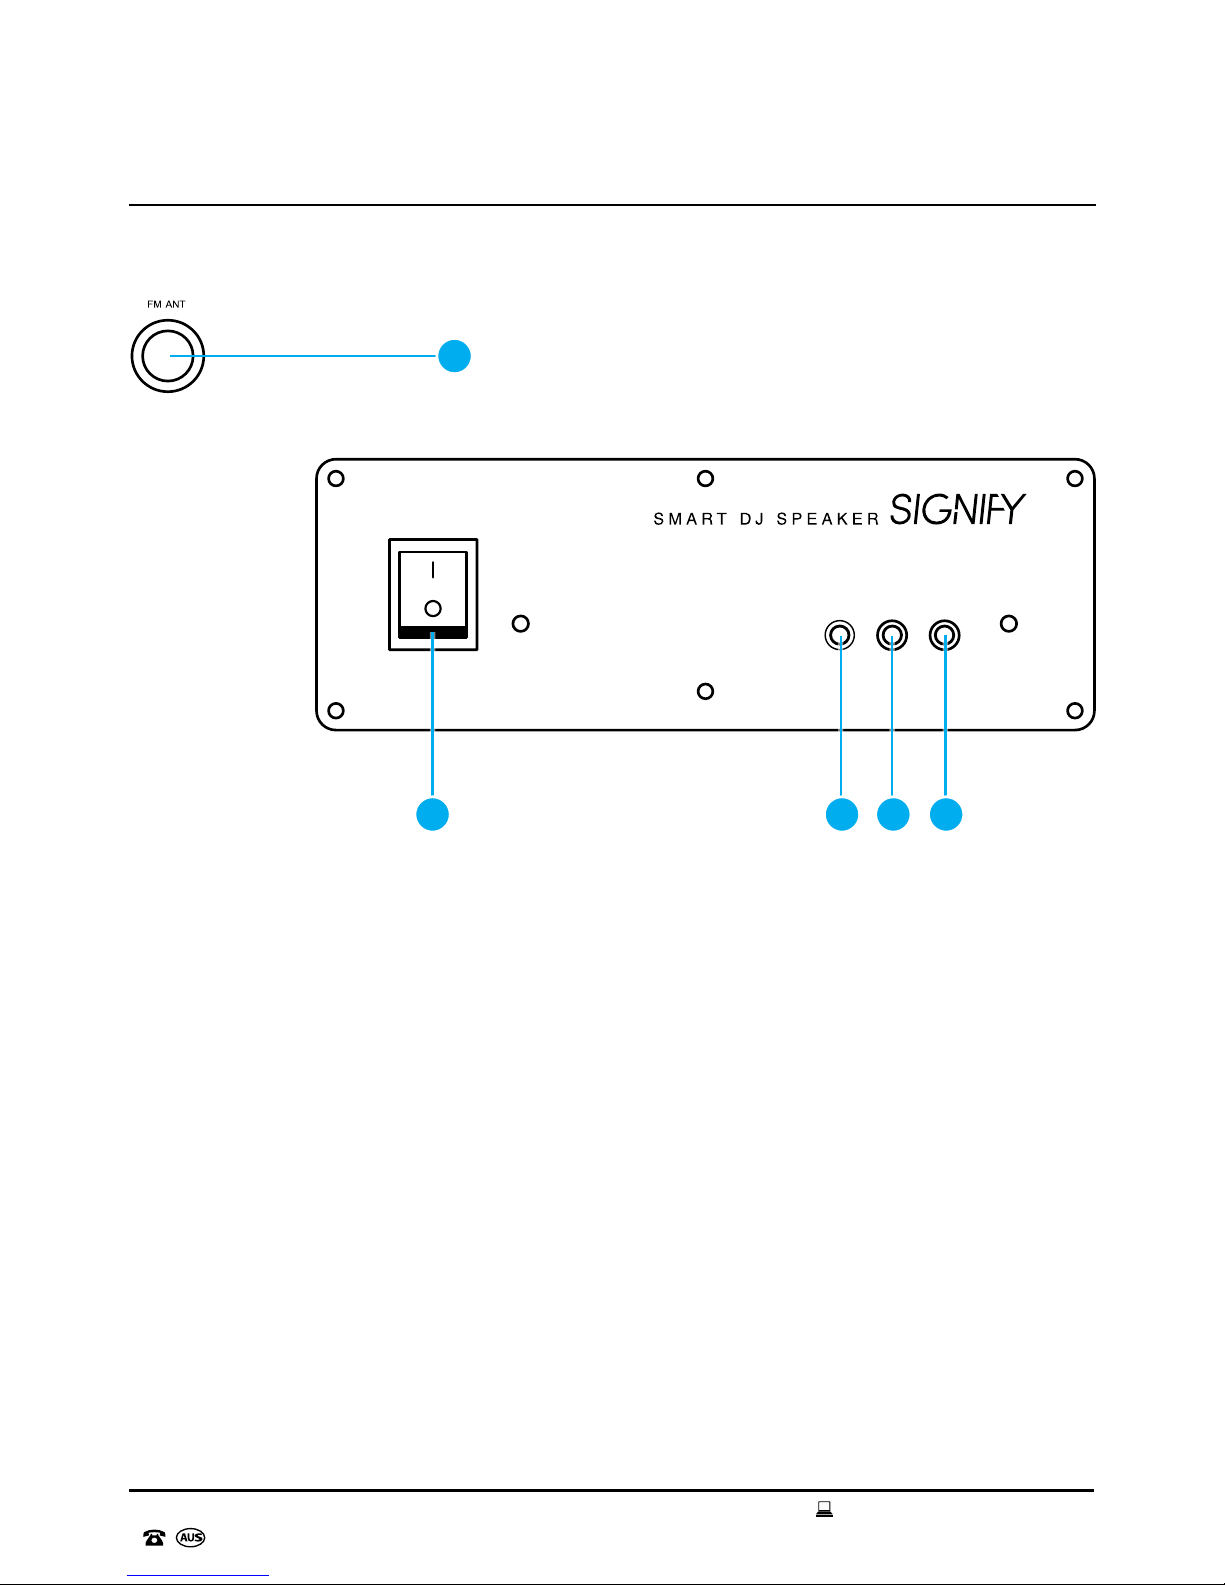
Product Overview (cont.)
Rear Panel Parts List
1. FM Antenna Input
2. POWER Switch (On/Off)
3. AUDIO OUT
4. AUX-A Input
5. AUX-B Input
Rear Panel
AUX-BAUX-A
POWER
ON
OFF
AUDIO OUT
2 3 4 5
1
AFTER SALES SUPPORT
1300 777 137
10
service@unclebills.com.au
MODEL: EA0944 PRODUCT CODE: 59080 12/2017
B
US B
B
AU X
DJ
AUT O
A
A
B
A
US B
A
AU X
FMBT
S+
S1 S2
S4
S3
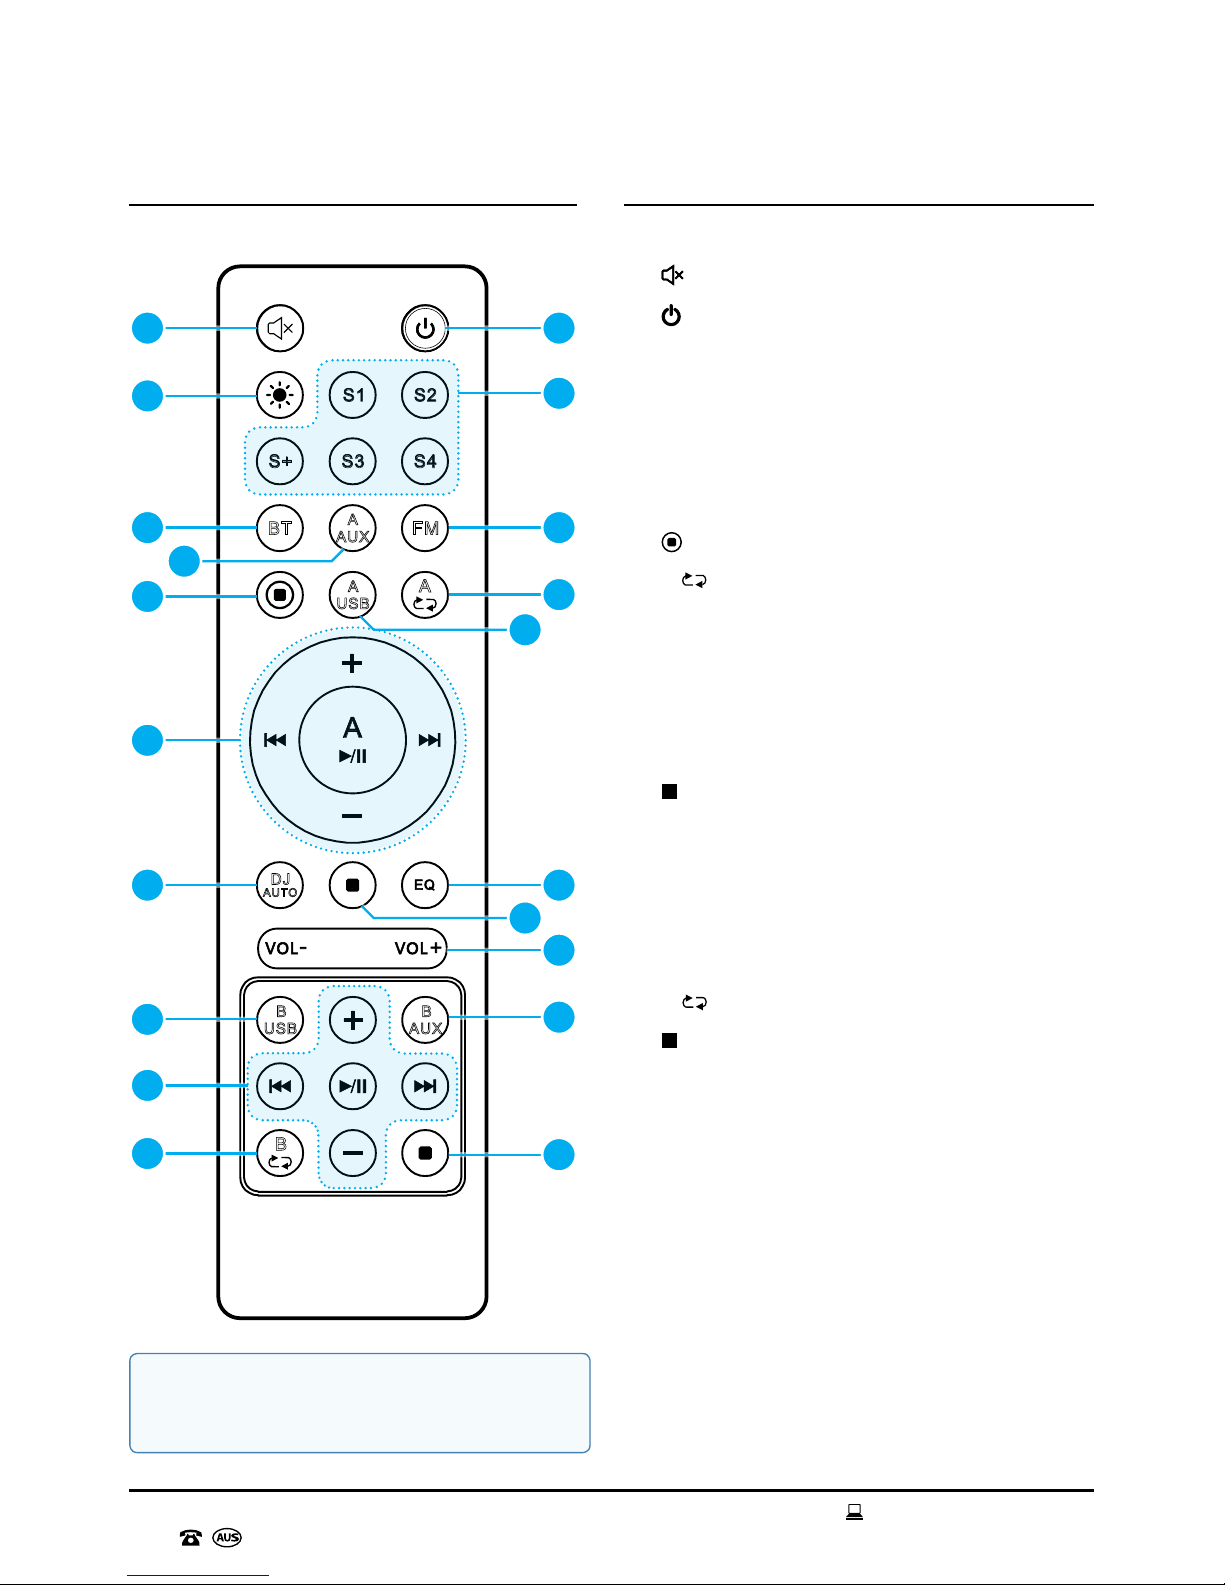
Product Overview (cont.)
Remote Control Remote Control Parts List
1. Mute Button
2.
Button (Standby)
3. LED Light Button
4. S Buttons (Sound Effects)
5. BT Button (Source A - Bluetooth
®
Mode)
6. FM Button (Source A - FM Radio Mode)
7. A AUX Button (Source A - AUX Mode)
8.
Button (Source A - Record)
9. A
Replay Button (Source A - USB Mode)
10. A USB Button (Source A - USB Mode)
11. Playback Controls (Source A)
See page 15 for detailed instructions
12. DJ AUTO Button
13. EQ Button
14.
Button (Source A - Stop)
15. VOL-/VOL+ Button
16. B USB Button (Source B - USB Mode)
17. B AUX Button (Source B - AUX Mode)
18. Playback Controls (Source B)
See page 15 for detailed instructions
19. B
Button (Source B - Replay)
20.
Button (Source B - Stop)
1 2
6
20
17
13
15
9
4
3
8
11
5
12
16
19
7
10
14
18
NOTE: Please always ensure the remote
control is pointed towards the front top of
the Smart DJ Speaker.

11
AFTER SALES SUPPORT
1300 777 137
service@unclebills.com.au
MODEL: EA0944 PRODUCT CODE: 59080 12/2017
Product Overview (cont.)
Audio Modes and Unique Features
The Smart DJ Speaker has multiple audio modes and unique features that enhance the audio
experience and enable users to play and listen to music in a variety of ways. Play up to two audio
sources at once and use the Smart DJ Speaker to create mixes and record/play sound effects.
AUX Mode
The Smart DJ Speaker features two AUX inputs which allow audio playback from various media
devices with a 3.5mm jack such as MP3 players, smart phones, tablets, computers and many more,
by connecting the device to the Smart DJ Speaker via the included AUX cable (see page 19 for
detailed instructions).
FM Radio Mode
The built-in FM tuner, auto-search function, and large 30 station max programmable memory, allows
you to listen to your favourite FM radio stations (see page 19 for detailed instructions).
Bluetooth® Mode
The Smart DJ Speaker features a Bluetooth® receiver which enables it to be connected to compatible
Bluetooth® enabled devices such as smart phones and media players. It also enables the user to
control tracks directly from their Bluetooth® enabled device (see page 20 for detailed instructions).
USB Mode
The Smart DJ Speaker includes two USB inputs which allow MP3 and WMA les to be loaded
on to a USB ash drive and played back through the Smart DJ Speaker (see page 22 for detailed
instructions).
DJ Effects
The Smart DJ Speaker enables users to add in various sound effects to enhance your at-home DJ
experience such as drum beats, sirens, beat box effects and other fun sound effects (see page 26 for
detailed instructions).
Microphone Jacks
The Smart DJ Speaker has two microphone inputs, allowing you to connect up to two wired
microphones (not included). You can also record the microphone playback onto a USB (see page 25
for detailed instructions).
NOTE: Only audio les in MP3 or WMA format can be played successfully on the Smart DJ
Speaker.

AFTER SALES SUPPORT
1300 777 137
12
service@unclebills.com.au
MODEL: EA0944 PRODUCT CODE: 59080 12/2017
Product Overview (cont.)
Buttons and Controls
Power On/Off
Press the POWER switch (No. 2 on the rear panel parts list) to the ON position. After about 5 to
6 seconds, the display screen on the top control panel will illuminate and read 'PRESS STANDBY
BUTTON TO POWER ON', indicating that the Smart DJ Speaker is in standby mode.
To turn the Smart DJ Speaker off, press the POWER switch on the rear panel to the OFF position.
Unplug the power cord from the power outlet and carefully unplug the power cord from the Smart DJ
Speaker.
Standby Mode
Press the button (No. 18 on the control panel parts list, or No. 2 on the remote control parts list) to
wake the unit from standby mode. The Smart DJ Speaker will default into USB mode. Press again to
set the Smart DJ Speaker back into standby mode.
Source Control Bar
Adjusts the input balance between Source A and Source B. Slide
the source control bar to the left to emphasize the output of
Source A, and slide the source control bar to the left to emphasize
the output of Source B.
USB Input
Use the USB inputs to play tracks directly from a USB ash drive. To use the USB function,
insert a USB ash drive into either Source A or Source B and press the M button until
the respective USB mode indicator light illuminates blue. Ensure the source control bar is
adjusted to the correct source and press the
button to begin playing compatible audio
les from the USB ash drive.
NOTE: To disconnect the Smart DJ Speaker completely from power, you will need to switch off
the POWER switch on the back of the unit and then switch off the power at the outlet.
NOTE: Only audio les in MP3 or WMA format can be played successfully on the Smart DJ
Speaker.

13
AFTER SALES SUPPORT
1300 777 137
service@unclebills.com.au
MODEL: EA0944 PRODUCT CODE: 59080 12/2017
Product Overview (cont.)
Microphone Input
The two microphone inputs allow you to connect up to two wired microphones
(not included).
Microphone Volume Dial
Use the MIC VOL dial to control the volume output of the microphones. To
increase the volume, turn the MIC VOL dial clockwise and to decrease the volume,
turn the MIC VOL dial anticlockwise.
Bass Button
Use the BASS button to control the bass output of the Smart DJ Speaker. To
increase the bass output, press the BASS button once, press again to turn off.
Mode Button
Use the M button to select between the different playback modes: USB/Bluetooth®/
FM radio/AUX for Source A and USB/AUX for Source B. Press the M button until the
respective mode indicator light illuminates blue.
Mute Button
Press the MUTE button to mute the audio playback from the Smart DJ Speaker,
regardless of what source is playing (ie. Source A or Source B). Mute will be displayed
on the display screen. Press the button again to unmute the Speaker.
EQ Button
Press the EQ button to select from a range of equalization presets (Normal, Rock, Pop,
Classic and Jazz). Hold the EQ button to activate the master equalization controls (see
page 15 for detailed instructions).
Record Button
You can record from FM radio, AUX A/B, USB B and both MIC inputs directly to a
USB ash drive. Press the REC button to start recording (see page 23 for detailed
instructions).
DJ Auto Button
Press the DJ AUTO button to automatically create effects to your music and blend one
track into the next for seamless music playback from USB-A (see page 25 for detailed
instructions).

AFTER SALES SUPPORT
1300 777 137
14
service@unclebills.com.au
MODEL: EA0944 PRODUCT CODE: 59080 12/2017
Product Overview (cont.)
DJ Effect Button
Press the DJ EFFECT button to set what sound (out of the 6 possible sound
selections) the DJ dial will play if used (see page 26 for detailed instructions).
Sound Effect Buttons
Use the S buttons on the top control panel or the remote control to play different
novelty and drum sound presets (see page 26 for detailed instructions).
Stop Button
Press the button to stop tracks.
LED Lights Button
The Smart DJ Speaker features sound-reactive colour changing LED lights on the
front of the speakers. To turn on the LED lighting effects, simply press the LED button
located on the top control panel. The LED lights will illuminate and follow the rhythm of
the music.
DJ Dial
The DJ dial has two functions:
1. Play the sound effect set by the DJ EFFECT button (see page 26 for detailed
instructions).
2. Adjust how frequently the sound effects set by the DJ AUTO button are
played (see page 25 for detailed instructions).
VOL Dial
Use the VOL dial to control the master volume of the Smart DJ Speaker. To
increase the volume, turn the VOL dial clockwise and to decrease the volume,
turn the VOL dial anticlockwise.

15
AFTER SALES SUPPORT
1300 777 137
service@unclebills.com.au
MODEL: EA0944 PRODUCT CODE: 59080 12/2017
Playback Controls
There are two sets of playback controls on the top control panel the Smart DJ Speaker. The playback
controls on the left side control Source A and the playback controls on the right side control Source B.
There are two sets of playback controls on the remote control. The playback controls towards the
middle of the remote control, control Source A and the playback controls towards the bottom, control
Source B.
Button
In USB or Bluetooth® mode, press the button to play or pause tracks;
In FM radio mode, press the
button to auto-search FM radio stations.
Button
In USB or Bluetooth® mode, press the button to skip to the previous
track and to fast rewind a track;
In FM radio mode, press the
button to skip to the previous strongest FM radio frequency.
Button
In USB or Bluetooth® mode, press the button to skip to the next track and to fast forward a track;
In FM radio mode, press the
button to skip to the next strongest FM radio frequency.
+/- Buttons
In USB mode, press the +/- buttons to navigate to the next/previous audio folder on the USB ash
drive;
In FM radio mode, press the +/- buttons to navigate to the next/previous preset station.
Master Equalization Control
The Smart DJ Speaker features a 5-band custom equalizer. This
allows you to increase or decrease the gain for specic frequency
ranges and adjust the audio output to your own personal listening
preferences (see page 24 for detailed instructions).
Product Overview (cont.)

AFTER SALES SUPPORT
1300 777 137
16
service@unclebills.com.au
MODEL: EA0944 PRODUCT CODE: 59080 12/2017
Before First Use
Prior to using the Smart DJ Speaker, please read all safety and operating instructions thoroughly.
Please ensure you follow the steps below before using this product. We recommend you keep the
original packaging for storing the Smart DJ Speaker when not in use.
1. Before unpacking and installing the Smart DJ Speaker, consider the below tips when choosing a
suitable location.
• Install the Smart DJ Speaker away from TV screens and PC monitors. The speakers contain
magnetic parts, these parts may cause colour irregularity and damage to the TV screens or
PC monitors if the Smart DJ Speaker is located too close.
• Keep the Smart DJ Speaker away from any electromagnetic sources, such as magnets or
electronic motors, or from any other object emitting strong radio waves, like mobile phones
and radios. Strong magnetic elds may cause distorted sound, or failure and damage to the
Smart DJ Speaker.
• Do not use the Smart DJ Speaker in small, enclosed spaces. Allow sufcient ventilation for
the sound to circulate, as listening to the Smart DJ Speaker in enclosed spaces may cause
damage to a person's hearing.
• Install the Smart DJ Speaker on a at, level and stable surface. This unit is equipped with
wheels and will roll if it's not secure. Please ensure the device is stable and secure to ensure
it does not cause damage to objects or injury to persons.
2. Unpack the product but keep all packaging material until you have made sure your new Smart DJ
Speaker is undamaged and in good working order. Plastic wrapping can be a suffocation hazard
for babies and young children so ensure all packaging materials are out of their reach.
3. Make sure you have all parts listed in the Product Overview on pages 8-10 of this instruction
manual.
4. Remove the twist-tie which is securing the electrical cord. Uncoil the cord and straighten it to
remove any kinks. Do not use the product if the cord, plug or unit is damaged, please call the
After Sales Support Line for further advice.
5. To install batteries into the remote control, lift up the locking tab on the battery cover located on
the back of the remote control. Check the inside of the remote control battery chamber for the
polarity symbols, then insert the 2 x AAA batteries (included).
NOTE: The Smart DJ Speaker is large and heavy (as is its packaging), we suggest that two people
assist in removing the Smart DJ Speaker from its packaging and locating it on a at, level surface.
Ensure not to drop, bump or apply any force or impact to the Smart DJ Speaker.
NOTE: Please pay attention to the polarity markings before inserting the batteries into the remote
control.
NOTE: Do not mix old and new batteries, different types of battery (alkaline, carbon-zinc or
rechargeable), or rechargeable batteries of different capacities. Mixing different types of battery
could cause battery leaks or ruptures.

17
AFTER SALES SUPPORT
1300 777 137
service@unclebills.com.au
MODEL: EA0944 PRODUCT CODE: 59080 12/2017
Before First Use (cont.)
Attaching the Handles
Included with your Smart DJ Speaker is 1 x Allen key (Fig. 1) and 10 x screws (Fig. 2). Use these parts
to attach the handles (Fig. 3) to the main body of the Smart DJ Speaker by following the steps below.
Fig. 1
Fig. 2
Fig. 3
1. The side panel of the Smart DJ Speaker features four
holes. Align the holes on the handle to the holes on the
main body of the unit.
2. Using one hand to hold the handle to the main body of
the unit, simultaneously insert the screw through the
hole on the handle so that it also sits in the hole on the
main body of the unit.
3. While still holding the handle against the main body of
the unit, insert the Allen key into the screw and rotate
clockwise until the screw is secure and one corner of
the handle is attached to the main body of the unit.
4. Repeat steps 2-3 for the remaining three holes on the
main body of the unit.
5. Once one side is assembled and secure, attach the
handle to the other side panel, repeating steps 1- 4.
6. Upon completion you will have 2 x spare screws, please
store these safely aside in case you require them at a
later stage.
WARNING: Keep batteries away from children. If you suspect a battery may have been
swallowed, seek immediate medical assistance.
WARNING: Never try to heat, ignite, disassemble or throw the batteries into a re.
IMPORTANT: Ensure NOT to screw in the screw as tight
as possible, as this may damage both the handle and
the main body of the unit.

Turning the Power On/Off
1. Plug the gure 8 connector into the AC power input located on the rear panel of the DJ Speaker.
Ensure it's been inserted fully before you insert the AC plug into a power outlet. Once the gure 8
connector is securely in place, switch the power outlet to the on position.
2. Press the POWER switch (No. 2 on the rear panel parts list) to the ON position. After about 5 to
6 seconds, the display screen on the top control panel will illuminate and read 'PRESS STANDBY
BUTTON TO POWER ON', indicating that the Smart DJ Speaker is in standby mode.
3. Press the
button (No. 18 on the control panel parts list, or No. 2 on the remote control parts
list) to wake the unit from standby mode. The control panel on the top of the unit will illuminate
blue and the LED lights on the front of the speakers will illuminate as well. To turn off the LED
lights, press the LED button on the top control panel.
4. To turn off the Smart DJ Speaker, press the
button on the top control panel to set the unit back
into standby mode, then press the POWER switch on the rear of the unit to the OFF position.
Unplug the power cord from the power outlet and carefully remove the power cord from the
Smart DJ Speaker.
Using the Audio Modes
The Smart DJ Speaker enables users to play two audio sources at the same time, so you can play
music, mix music sources and add DJ effects using the DJ auto/DJ effect features. You can also
play music from a variety of audio devices through the Smart DJ Speaker such as smart phones,
Bluetooth® enabled media players, USB ash drives and media players via the auxiliary inputs
on the back of the unit. You can also connect up to two wired microphones (not included) while
simultaneously playing tracks through the Smart DJ Speaker.
The Smart DJ Speaker has two sides that support different inputs independently or together. The
left side supports inputs and controls for Source A (Source A enables users to play USB, AUX,
Bluetooth
®
and FM radio mode). The right side supports inputs and controls for Source B (Source B
enables users to play USB or AUX).
To play the correct input source, slide the source control bar towards the required input source. For
example, if you have inserted a USB ash drive on the right side of the Smart DJ Speaker (Source
B), slide the source control bar to the right (Source B), or to listen in FM radio mode, slide the source
control bar to the left (Source A).
NOTE: When powering on the Smart DJ Speaker, the initialization of the unit will require 5 to 6
seconds before it enters standby mode. This is normal.
NOTE: To save power, the Smart DJ Speaker will automatically set itself into standby mode if the
audio has come to an end and no controls have been pressed within 15 minutes.
Press the
button to wake the Smart DJ Speaker up from standby mode.
AFTER SALES SUPPORT
1300 777 137
18
service@unclebills.com.au
MODEL: EA0944 PRODUCT CODE: 59080 12/2017
Operating Instructions

19
AFTER SALES SUPPORT
1300 777 137
service@unclebills.com.au
MODEL: EA0944 PRODUCT CODE: 59080 12/2017
Operating Instructions (cont.)
AUX Mode
1. Wake the Smart DJ Speaker from standby mode by pressing the button on the top control
panel or the remote control.
2. Plug the auxiliary cable (included) into the auxiliary input (AUX-A or AUX-B) on the back of the
Smart DJ Speaker. Plug the other end of the auxiliary cable into the desired media device such as
a smart phone, tablet, computer or other AUX compatible device.
3. Slide the source control bar towards the auxiliary input source you have connected to (Source A
or Source B).
4. Press the M button until the auxiliary mode indicator light illuminates blue and the display screen
reads 'AUX-A' or 'AUX-B' (depending on the source you have connected to).
5. Use your connected device to directly control the audio playback.
FM Radio Mode
Auto-Search for FM Radio Stations
The Smart DJ Speaker features a FM tuner with auto-search function to assist in nding radio
stations with a strong enough signal to play.
1. Wake the Smart DJ Speaker from standby mode by pressing the button on the top control
panel or the remote control.
2. Slide the source control bar towards Source A (the left side of the Smart DJ Speaker).
3. Press the M button until the FM mode indicator light illuminates blue and the display screen reads
'FM'.
4. Ensure the FM antenna cable is securely connected to the back of the Smart DJ Speaker.
5. Press the
button on the Source A playback controls to start the auto-search. Once the scan
starts and the display screen reads 'AUTO', the Smart DJ Speaker will automatically search for
stations with a strong enough signal and store them into the 30 station memory of the Smart DJ
Speaker, which will be labelled as 01 – 30 (program 1 to program 30). The rst station that the
auto-search tuner nds will be saved under 01, the second station that the tuner nds will be
saved under 02, and so on. This will continue until the tuner has scanned the entire frequency
and saved as many channels it can detect with a high enough signal, or until all 30 memory slots
are lled. This will take about 1 minute.
NOTE: In AUX mode, you cannot control the audio playback (e.g. next track, play/pause, fast
forward etc.) using the playback controls on the Smart DJ Speaker. Use your connected device to
control the audio playback.
NOTE:
You may need to extend and adjust the FM antenna cable position to get the best reception.

AFTER SALES SUPPORT
1300 777 137
20
service@unclebills.com.au
MODEL: EA0944 PRODUCT CODE: 59080 12/2017
Operating Instructions (cont.)
6. Once the stations are found and saved, the display screen will indicate the frequency of the rst
station playing, such as "FM 95.30".
7. To navigate through the saved stations, use the + button on the top control panel or the remote
control to the skip to the next preset station, and the - button to skip to the previous preset
station.
Manual Searching for FM Radio Stations
To manually search for FM radio stations, press (do not hold) the or button on the top control
panel or the remote control repeatedly. The FM tuner will search up or down the FM band by
0.05MHz increments for each press.
Hold the
button to semi scan to the next strongest radio frequency, let go when the display
screen reads 'SEARCH'. Hold the button to semi scan to the previous strongest radio frequency,
let go when the display screen reads 'SEARCH'.
Bluetooth® Mode
The Smart DJ System features a Bluetooth® receiver which enables it to be wirelessly connected
to compatible Bluetooth® enabled devices such as smart phones and Bluetooth® enabled media
players. To pair the Smart DJ System with a compatible Bluetooth® enabled device, follow the steps
below.
1. Wake the Smart DJ Speaker from standby mode by pressing the
button on the top control
panel or the remote control.
2. Slide the source control bar towards Source A (the left side of the Smart DJ Speaker).
3. Press the M button until the Bluetooth
®
mode indicator light illuminates blue and the display
screen reads 'BT', immediately followed by the word 'SEARCH' (which will be ashing). The
Smart DJ Speaker will now be discoverable to nearby Bluetooth® enabled devices.
4. On the Bluetooth
®
enabled device, activate (or turn ON) the Bluetooth® wireless connection and
search for nearby devices. When the device discovers "Signify Smart DJ", select and connect to
"Signify Smart DJ". The display screen will begin to ash 'SEARCH' until the device is connected.
This process should take a few seconds to connect – no PIN or passcode will be required.
NOTE: If the antenna cable is not installed correctly, the auto-search function will not be able to
nd any stations.
NOTE: Please ensure the remote control is pointed to the front of the Smart DJ Speaker.
IMPORTANT: If the last connected device is within the Bluetooth® reception range of the Smart
DJ Speaker, you will not be able to pair a new device to the Smart DJ Speaker. You will need to
turn off the Bluetooth® connection on the last connected device in order to connect a new device.

21
AFTER SALES SUPPORT
1300 777 137
service@unclebills.com.au
MODEL: EA0944 PRODUCT CODE: 59080 12/2017
Operating Instructions (cont.)
5. When the Smart DJ Speaker and the Bluetooth® enabled device have connected, the display
screen will read 'BT Audio' and your Bluetooth® enabled device will indicate "connected".
6. Now you can open the music application on your device and play or stream music to the Smart
DJ Speaker. Ensure to adjust the volume of your device and the volume of the Smart DJ Speaker
to a proper level.
Play Music from the Connected Device
The tracks from the connected device can be controlled via the playback controls on the top
control panel of the unit, the remote control or the media player on your device. Depending on the
device being used, the device should be able to control skipping tracks, fast forward/rewind tracks,
increasing and decreasing the volume, repeating tracks etc.
Automatic Reconnection
If Bluetooth® is activated on both the Smart DJ Speaker and the Bluetooth® enabled device once
again, the Smart DJ Speaker may automatically reconnect to the Bluetooth® enabled device. If this
does happen, the Bluetooth
®
enabled device will show as being connected to “Signify Smart DJ” and
the display screen on the Smart DJ Speaker will read "BT Audio". This will mean that the tracks on
the Bluetooth
®
enabled device can now be streamed through the Smart DJ Speaker immediately.
Automatic reconnection will ONLY happen if:
1. The Bluetooth
®
enabled device was the last device that the Smart DJ Speaker was connected to.
2. The Bluetooth
®
enabled device has maintained "Signify Smart DJ" as one of its paired devices
(the device should show a list of paired devices in the Bluetooth® menu or settings).
3. The Bluetooth
®
enabled device and the Smart DJ Speaker are in close proximity to one another.
Generally Bluetooth® wireless technology is only operable over an unobstructed distance of
approximately 10m.
Disconnecting the Bluetooth® Connection
To end the connection between the Bluetooth® enabled device and the Smart DJ Speaker, follow the
steps below:
1. Press the M button to enter a different audio function on the Smart DJ Speaker; or
2. Press the
button to set the Smart DJ Speaker into standby mode; or
3. On the Bluetooth
®
enabled device, select "Signify Smart DJ" and then "Disconnect" or "Forget
This Device"; or
4. Simply turn the Bluetooth
®
function off on the Bluetooth® enabled device.
NOTE: Depending on the Bluetooth® enabled device, there may be additional steps required
to connect to the Smart DJ System. Please consult the instruction manual from the Bluetooth®
enabled device if any problems are encountered with playing the audio les through the Smart DJ
Speaker via Bluetooth
®
mode.

AFTER SALES SUPPORT
1300 777 137
22
service@unclebills.com.au
MODEL: EA0944 PRODUCT CODE: 59080 12/2017
Operating Instructions (cont.)
USB Mode
The Smart DJ Speaker features 2 USB inputs which enable MP3 les, or WMA les to be loaded on
to a USB drive and played back through the Smart DJ Speaker.
In order to play MP3/WMA les on the Smart DJ Speaker, rst load them onto a compatible
USB drive. Simply insert the USB drive into a computer, then copy and paste (or drag and drop)
compatible MP3/WMA les on to the USB drive.
1. Wake the Smart DJ Speaker from standby mode by pressing the
button on the top control
panel or the remote control.
2. Insert a compatible USB ash drive into USB-A or USB-B input or two USB ash drives into both
inputs of the Smart DJ Speaker.
3. Use the M button to select the USB mode for each source. Press the
button to start play.
4. Slide the source control bar towards the left side for USB-A, slide towards the right side for
USB-B or in the middle for playback from both USB ash drives at the same time. If no USB ash
drive is connected to the Smart DJ Speaker, the display screen will read 'NO USB'.
5. Use the VOL dial to control the volume for Source A and Source B.
• Press the
button to begin playing. Use the button to skip to a previous track, use the
button to skip to the next track.
• To navigate through the folders, use the +/- buttons.
Playable File Requirements
MP3/WMA Music File requirements.
MP3/WMA le compatibility with this unit is limited as follows:
• Frequency: within 32 to 48 kHz.
• Bit rate: within 32 to 320 kbps (MP3), 40 to 192kbs (WMA).
• File extensions: .mp3 or .wma.
Compatible USB Storage Devices
• USB Flash Drive: supports USB2.0 or USB1.1.
• File System: FAT16/32 (NTFS le system is not supported).
• Maximum les: under 999.
• Maximum folders: under 99.
• External HDD, card readers and locked devices are not supported.
IMPORTANT: For optimum performance it is recommended to only use a USB 2.0 ash drive (not
a 3.0 version).

23
AFTER SALES SUPPORT
1300 777 137
service@unclebills.com.au
MODEL: EA0944 PRODUCT CODE: 59080 12/2017
Operating Instructions (cont.)
USB Recording
The Smart DJ Speaker allows you record from one audio source (i.e. FM radio, USB-B, AUX-A,
AUX-B or MIC 1 and MIC 2) to a USB ash drive.
1. Firstly, ensure the Smart DJ Speaker is turned on and insert a USB ash drive into USB-A input
(left side of the Smart DJ Speaker).
2. Select the audio mode of which you want to record, by pressing the M button to choose from FM
radio, USB-B, AUX-A or AUX-B.
3. Slide the source control bar towards the source you intend to record from; for example, to record
from USB-B, slide the source control bar to Source B (to the right), or to record FM radio, slide
the source control bar to Source A (to the left).
4. Connect a microphone to the MIC 1 or MIC 2 input if you wish to record the microphone sound
output together with your audio source. The microphone recording will be affected by the
microphone volume. Please turn on the MIC VOL dial to your desired volume level.
5. Start playing media from the audio source (FM radio, USB-B, AUX-A or AUX-B). Use the
playback controls for Source A to control the playback of FM radio, and AUX-A. Use the
playback controls for Source B to control the playback of AUX-B and USB-B (see page 15 for
detailed instructions).
6. Press the REC button to start recording. The display screen will read "RECORD" and the unit will
start a timer, indicating the audio is now being recorded onto the USB ash drive.
7. Press the
button to stop recording.
8. Once the recording has stopped, pull the USB ash drive out from the Smart DJ Speaker.
The rst time you record to a USB device, the recorded audio will automatically create and save a
folder labelled "EXT_REC". Each time proceeding the initial use, the recorded audio will automatically
store in sub-folders within "EXT_REC". Files and sub-folders are named numerically in the order in
which they are created.
NOTE: Ensure the USB ash drive is properly formated to FAT16/FAT32 le system before
recording.
NOTE: When inserting a USB ash drive, please ensure that there is enough space to save tracks
on to the drive and that there is no write protection on the drive as this will prevent saving any les
to the drive.
NOTE: Please do not remove the USB ash drive or turn off the unit during USB recording.
Otherwise, the recording le will be not be loaded to the USB ash drive.
NOTE: If the USB recording function does not work, the display screen will read "NO USB" or
"ERROR".

AFTER SALES SUPPORT
1300 777 137
24
service@unclebills.com.au
MODEL: EA0944 PRODUCT CODE: 59080 12/2017
Operating Instructions (cont.)
To playback the recorded les, either load the USB ash drive back into the Smart DJ Speaker itself
and follow regular playback instructions (see page 22 for detailed instructions), or load the USB ash
drive into a PC and search for the newly created folder called "EXT_REC". All recorded les will be
located in this folder.
Sound Adjustment
There are a number of sound adjustments you can use to change the sound output quality to your
desired level.
EQ Selector
The Smart DJ Speaker features a 5-band custom equalizer. This allows you to manually increase or
decrease the gain for specic frequency ranges and adjust the audio output to your own personal
listening preferences.
To activate the custom equalizer settings, press and hold the EQ button for 3 seconds until the
display screen shows 'CUSTOM' and the EQ button starts ashing. Move the slider bars up or down
to change each frequency range to your desired settings. To exit this mode, press the EQ button
again and the EQ button will stop ashing.
Alternatively, you can select between one of the ve preset equalizer settings (Normal, Classic, Rock,
Jazz and Pop) using the EQ button. Each press of the EQ button will select one of the ve preset
equalizer settings.
Bass Control
Use the BASS button to enhance the bass output of the Smart DJ Speaker. To increase the bass
output, press the BASS button once, press again to turn off the bass enhancer.
Master Volume
The VOL dial controls the entire sound volume level of the Smart DJ Speaker, regardless of
whether Source A or Source B is playing. Turn the VOL dial clockwise to increase the volume, and
anticlockwise to decrease volume.
Mute Sound
During playback, press the MUTE button on the top control panel or the remote control to mute or
unmute the sound.
WARNING: To prevent possible hearing damage, avoid listening at high volume levels over long
periods of time. Even exposure to short bursts of loud noise can result in hearing loss. Please
keep the volume consistently at a comfortable level.

Using the Microphone
Two microphone inputs are included on the top control panel to enhance the fun and enjoyment while
using your Smart DJ Speaker.
• To use a microphone (not included) with the Smart DJ Speaker, rstly turn the MIC VOL dial
anticlockwise to turn the volume down.
• Insert up to two microphones (not included) into the microphone inputs on the top control
panel. Ensure you use the MIC VOL dial to adjust the desired volume output level from the
microphone/s.
If a microphone is set too close to the in-built speaker, feedback may be produced (high pitched
sound). In this case, please move the microphone away from the in-built speaker.
If the sound through the microphone is extremely loud, it maybe distorted. Turn the MIC VOL dial
anticlockwise to turn the volume down.
Sound Effects
The Smart DJ Speaker features various sound and playback effects such as DJ Auto, DJ Effect,
Sound Presets and Cross-Fade.
DJ Auto
The DJ auto function automatically applies effects to your music and can blend one track into the
next for seamless music playback. This function only applies to music played from USB-A.
1. During music playback, press the DJ AUTO button to initiate the DJ auto function. The DJ AUTO
button will illuminate blue.
• Press the DJ AUTO button once and the unit will apply "Party" effects.
• Press the DJ AUTO button twice and the unit will apply "Metal" effects.
• Press the DJ AUTO button three times to turn off the DJ auto function.
2. Adjust how frequently the DJ auto sound effects are played, by rotating the DJ dial. There are
three settings; DJ1, DJ2 & DJ3 with DJ1 being the lowest occurrence and frequency and DJ3
being the highest.
NOTE: When not using the microphone/s, turn the MIC VOL dial anticlockwise to turn the volume
down, and remove the microphone/s from the MIC input/s.
NOTE: This function is only applicable for music playback through USB-A input and will not work
with other functions including Bluetooth®.
NOTE: You will not be able to adjust the DJ auto sound effects occurrence/frequency if the DJ
EFFECT button is currently active (see below for detailed instructions). Press the DJ EFFECT
button until the display screen reads “OFF”, only then can you adjust the DJ auto sound effects
occurrence/frequency.
25
AFTER SALES SUPPORT
1300 777 137
service@unclebills.com.au
MODEL: EA0944 PRODUCT CODE: 59080 12/2017
Operating Instructions (cont.)

AFTER SALES SUPPORT
1300 777 137
26
service@unclebills.com.au
MODEL: EA0944 PRODUCT CODE: 59080 12/2017
DJ Effect
Press the DJ EFFECT button to manually apply DJ effects for Source A modes (USB-A, AUX-A,
Bluetooth® and FM radio modes only).
1. Press the DJ EFFECT button to select one of the six different DJ effects. The DJ EFFECT button
will illuminate blue and the display screen will read 'EFFECT 01-06'.
2. Rotate the DJ dial to play the selected sound effect.
Sound Presets
Use the S buttons on the top control panel or the remote control to play different novelty/drum sound
presets. Press the S button on the top control panel, or the S+ button on the remote control to switch
between novelty mode and drum mode. Then, press the S1-S4 buttons to play to below sound
effects.
Novelty Mode (S button on the top control panel is illuminated):
• S1 - Gunshot
• S2 - Horn
• S3 - Siren
• S4 - “DJ” voice sampler
Drum Mode (S button on the top control panel is not illuminated):
• S1 - Bass
• S2 - Snare
• S3 - Hi Hat
• S4 - Cymbal
NOTE: This function is only available for Source A modes.
NOTE: You are only able to play the sound presets for Source A modes (USB-A, Bluetooth®,
FM Radio and AUX).
Operating Instructions (cont.)

27
AFTER SALES SUPPORT
1300 777 137
service@unclebills.com.au
MODEL: EA0944 PRODUCT CODE: 59080 12/2017
Cross-Fade
While playing music from both sources simultaneously, you can use source control bar to prioritise
the play of Source A (USB-A/Bluetooth®/FM radio/AUX-A) or Source B (USB-B/AUX-B) or play them
at the same time.
1. To get started, play music from Source A (left side of the Smart DJ Speaker). Simply connect your
USB ash drive or audio device to the USB-A/AUX-A, connect via Bluetooth
®
or tune into a FM
radio station.
2. Connect a second device to Source B (right side of the Smart DJ Speaker). You can only connect
another USB ash drive or audio device to USB-B/AUX-B.
3. Press the
button on BOTH sets of playback controls on the top control panel (both Source A
and Source B).
4. Adjust the input balance between Source A and Source B during playback by sliding the source
control bar to the left to emphasize the input of Source A, and sliding the source control bar to
the right to emphasize the input of Source B.
Using the Party Lights
The Smart DJ Speaker features a smart pulse LED lighting system (located inside the front grilles of
the Smart DJ Speaker). The LED lights on the Smart DJ Speaker synchronise to the beat of the track
that is playing through the Smart DJ Speaker. To turn on the LED lights, follow the steps below.
1. Wake the Smart DJ Speaker from standby mode by pressing the
button on the top control
panel or the remote control. The LED lights should automatically turn on, but if they do not,
proceed to step 2.
2. Press the LED button on the top control panel of the unit, or the
button on the remote control.
The party lights and the LED back-lit lights on the top control panel will all turn on.
Operating Instructions (cont.)

AFTER SALES SUPPORT
1300 777 137
28
service@unclebills.com.au
MODEL: EA0944 PRODUCT CODE: 59080 12/2017
Problem Solution
I can’t hear any sound
through the Smart DJ
Speaker.
• Adjust the VOL dial by rotating it clockwise to a desired sound
setting.
• Make sure the source control bar has been adjusted correctly towards
the source you are connecting to.
• If the track that is currently playing is connected via Bluetooth
®
or by
an AUX cable, ensure to adjust the volume of your device and the
volume of the Smart DJ Speaker to an adequate level.
I can't hear
microphone volume
through the Smart DJ
Speaker.
• Adjust the MIC VOL dial by rotating it clockwise to a desired sound
setting.
• Check that the microphone you are using is turned on and has
batteries (if required). Check the instructions that should be included
with your microphone for more information.
There is humming or
buzzing through the
Smart DJ Speaker.
• Try to keep the microphone/s, any audio signal cables, mobile phones
or WiFi routers away from the Smart DJ Speaker.
My Smart DJ Speaker
won’t turn on.
• Ensure that you have correctly connected the power cable to the rear
of the unit. It should not be loose.
• Ensure the POWER switch on the back panel of the unit is switched
ON. When switching on the Smart DJ Speaker, the initialization of the
unit will require 5 to 6 seconds before it enters standby mode. This is
normal.
• Make sure the Smart DJ Speaker is out of standby mode. Press the
button on the top control panel, the top control panel will illuminate
blue indicating the Smart DJ Speaker is ready for use.
• Make sure the power is on at the outlet.
The Party Lights or the
LED back-lit lights on
the top control panel
won’t turn on.
• Ensure the POWER switch on the back of the Smart DJ Speaker is
turned on.
• Make sure the power cord is correctly connected and the power is on
at the outlet.
• Make sure the Smart DJ Speaker is out of standby mode. Press the
button on the top control panel, the top control panel will illuminate
blue indicating the Smart DJ Speaker is ready for use.
• Press the LED button on the top control panel of the unit, or the
button on the remote control.
I am not picking up
any radio stations.
• Disconnect the power plug and then reconnect it (the unit may not
be operating properly due to lightning, static electricity or some other
factors).
• Ensure you have connected the FM antenna cable (included) to the
back of the unit. Extend and adjust the FM antenna cable position to
get the best reception.
Troubleshooting

29
AFTER SALES SUPPORT
1300 777 137
service@unclebills.com.au
MODEL: EA0944 PRODUCT CODE: 59080 12/2017
Problem Solution
The Smart DJ Speaker
makes a noise when I
rst turn it on.
• Try to keep any electromagnetic source, such as magnets, appliances
or electronic motors away from the Smart DJ Speaker.
I can’t connect my
mobile phone to the
Smart DJ Speaker via
Bluetooth
®
.
• Ensure the Smart DJ Speaker has been switched to Bluetooth® mode
and that "BT Audio" (and then "SEARCHING") on the display screen.
• Ensure the last mobile phone or Bluetooth
®
device has been
disconnected from the Smart DJ Speaker. If they are in the range, the
speaker will pick up the last connection as default (see page 21 for
detailed instructions).
• Turn off the Bluetooth
®
function, and turn back on again.
• If this still doesn't work, press the
button to set the unit to standby
mode, then turn the unit off by pressing the POWER switch on the
rear of the unit to the OFF position. Turn the unit back on, enter
Bluetooth® mode and try to connect your device again.
The playback controls
won't work.
• Make sure the source control bar has been adjusted correctly towards
the source you are connecting to.
• Make sure you are using the correct playback control buttons for the
source you are connecting to (see pages 8 and 10 for locations of
playback controls).
• Ensure you have entered the correct mode by pressing the M button
until the blue indicator light on the top panel illuminates under the
desired mode.
The remote control
won't work.
• Make sure the source control bar has been adjusted correctly towards
the source you are connecting to before trying to use the remote
control.
• Insert new batteries into the remote control and ensure to follow the
polarity signs (+/-) before installing the batteries inside the remote
control.
• Ensure nothing is obstructing the signal when pointing the remote
control at the Smart DJ Speaker. Ensure you point the remote control
towards the front top of the Smart DJ Speaker.
The Smart DJ Speaker
won't read some of
the les on the USB
ash drive.
• Only audio les in MP3/WMA format can be played successfully on
your Smart DJ Speaker. Please ensure the audio les loaded on the
USB drive are converted to MP3/WMA format before playing through
the Smart DJ Speaker.
• The USB ash drive you are using may not be supported. We
recommend using a USB 2.0 ash drive (not a 3.0 version). Please
refer to page 22 for details about "Playable File Requirements".
Troubleshooting (cont.)

AFTER SALES SUPPORT
1300 777 137
30
service@unclebills.com.au
MODEL: EA0944 PRODUCT CODE: 59080 12/2017
Problem Solution
The radio auto-search
function only picks up
a few radio stations.
• Ensure the FM antenna cable is securely attached to the antenna
input on the back of the Smart DJ Speaker.
• The FM transmission will vary depending on location. The
auto-search function will only save FM frequencies that have a strong
enough signal. Extend and adjust the FM antenna cable position to
get the best reception and try again.
• If the above still doesn't work, you can manually tune the radio (see
page 20 for detailed instructions) to your desired frequency. Once
the desired frequency is showing on the display screen, extend and
adjust the FM antenna cable position to get the best reception.
The radio auto-search
function will not stop
automatically.
• Ensure the FM antenna cable has been connected correctly. The autosearch function can not stop automatically if the FM antenna cable is
not correctly connected to the back of the Smart DJ Speaker.
Troubleshooting (cont.)

AFTER SALES SUPPORT
1300 777 137
31
service@unclebills.com.au
MODEL: EA0944 PRODUCT CODE: 59080 12/2017
Smart DJ Speaker
Repair and Refurbished
Goods or Parts Notice
Unfortunately, from time to time, faulty products are manufactured which need to be returned to the
Supplier for repair.
Please be aware that if your product is capable of retaining user-generated data (such as les stored
on a computer hard drive, telephone numbers stored on a mobile telephone, songs stored on a
portable media player, games saved on a games console or les stored on a USB memory stick)
during the process of repair, some or all of your stored data may be lost.
We recommend you save this data elsewhere prior to sending the product for repair.
You should also be aware that rather than repairing goods, we may replace them with refurbished
goods of the same type or use refurbished parts in the repair process.
Please be assured though, refurbished parts or replacements are only used where
they meet ALDI’s stringent quality specications.
If at any time you feel your repair is being handled unsatisfactorily, you may escalate your complaint.
Please telephone us on 1300 777 137 or write to us at:
UNCLE BILL’S AUSTRALIA PTY LTD
PO Box 6292
Silverwater NSW 1811 Australia
1300 777 137
Opening Hours - 9:00am - 4:30pm (Mon-Fri), 9:00am - 3:00pm (Sat)
service@unclebills.com.au
www.signifyelectronics.com.au

AFTER SALES SUPPORT
1300 777 137
32
service@unclebills.com.au
MODEL: EA0944 PRODUCT CODE: 59080 12/2017
Other Useful Information
Cleaning and Maintenance
Before cleaning the Smart DJ Speaker, ensure the Smart DJ Speaker is switched off and
disconnected from the power source.
The Smart DJ Speaker is likely only to require regular “dusting” to keep it clean. Use a standard
duster, or dry soft microbre cloth to remove the dust from the Smart DJ Speaker. Remove dust from
the Smart DJ Speaker regularly.
If the Smart DJ Speaker becomes soiled with anything other than dust on its exterior, clean the
exterior of the Smart DJ Speaker by wiping over the surface with a slightly damp cloth and then
polish with a soft dry cloth. Ensure that no moisture or liquid enters the Smart DJ Speaker, particularly
around the control panel and buttons.
Be careful when wiping over the Smart DJ Speaker, that you do not apply too much pressure, as
there is a risk that you may break parts.
Do not use detergents or abrasive cleaners, and do not allow moisture, water or other liquid to enter
the Smart DJ Speaker.
Regularly check all fastenings to ensure that they are properly tightened.
Storage
When the Smart DJ Speaker is not in use, disconnect it from the power source and store in a cool,
dry and well ventilated location out of direct sunlight. Ensure that it is not subject to humidity.
Responsible Disposal
At the end of its working life, do not throw this product out with your household rubbish. Electrical
and electronic products contain substances that can have a detrimental effect on the environment
and human health if disposed of inappropriately. Observe any local regulations regarding the disposal
of electrical consumer goods and dispose of it appropriately for recycling. Contact your local
authorities for advice on recycling facilities in your area.
Please keep the original packaging carton and materials in a safe place. It will help to prevent any
damage if the product needs to be transported in the future. In the event it is to be disposed of,
please recycle all packaging material where possible.
If you require another copy of this instruction manual please contact service@unclebills.com.au to
obtain an electronic copy.

33
AFTER SALES SUPPORT
1300 777 137
service@unclebills.com.au
MODEL: EA0944 PRODUCT CODE: 59080 12/2017
Other Useful Information (cont.)
Trademarks
The Bluetooth® word mark and logos are registered trademarks owned by Bluetooth SIG, Inc. and
are for compatibility purposes only. Other trademarks and trade names are those of their respective
owners. These brands are not associated with this product and are not related to Uncle Bill's
Australia Pty Ltd.
The Smart DJ Speaker has been fully tested and meets all requirements as set out by the below
testing standards:
AS/NZS 60065
AS/NZS CISPR 32
AS/NZS 4268
Specication Table
ITEM NUMBER: EA0944
COLOUR: Black
DIMENSIONS: 49.5 x 41 x 131.8cm
NET WEIGHT: 24.7kg
INPUT: 220-240V~ 50-60Hz Class II
POWER RATED CONSUMPTION: 160W
FREQUENCY: FM 87.5-108MHz
WARRANTY: 1 Year
VERSION NO: 1.0
ISSUE DATE: 24
th
August, 2017
 Loading...