

www.hadco.com
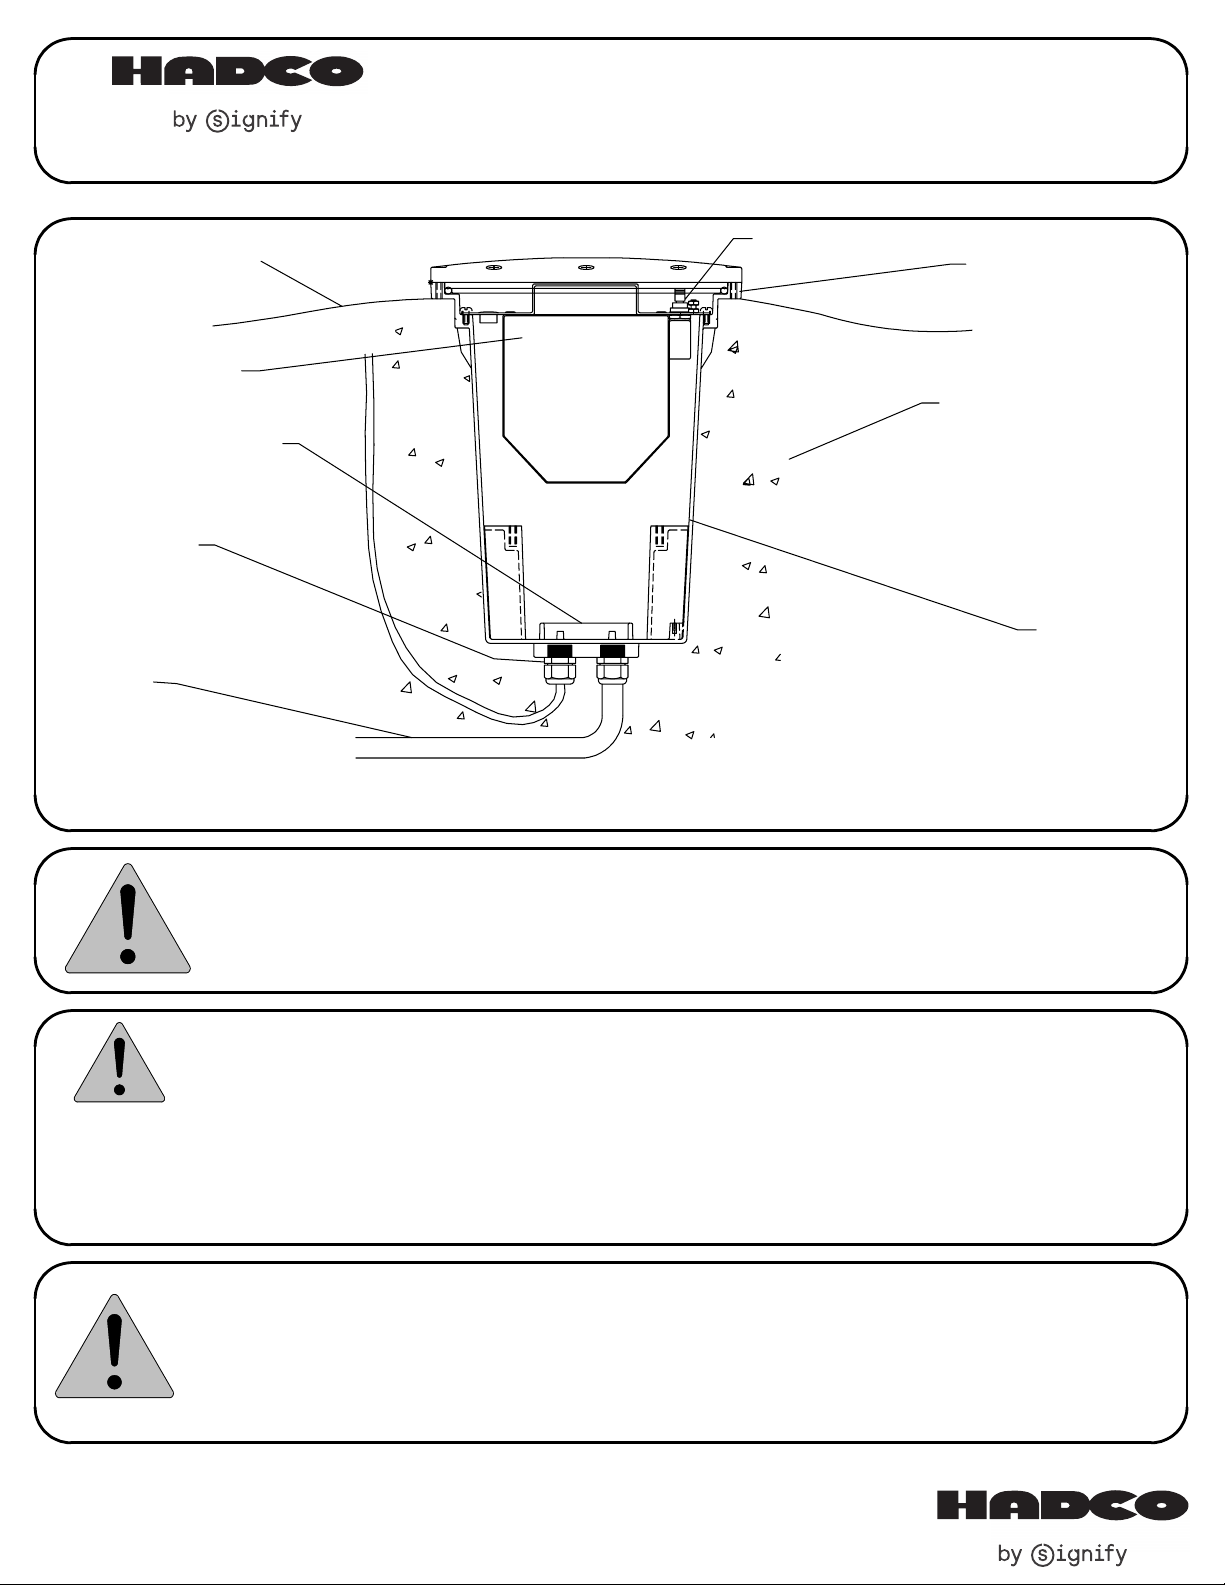
MOUND UP EARTH
AROUND HOUSING
FOR DRAINAGE
ENCAPSULATED
TRANSFORMER
CONDUIT ENTRY
AREAS MUST BE
POTTED
LIQUID TIGHT
CONNECTOR
(BY OTHERS)
CONDUIT
(BY OTHERS)
INSTALLATION INSTRUCTIONS:
INGROUND TRANSFORMER
BOXES
BREAKER SWITCH
HOUSING FLANGE
PLACE 3" OF GRAVEL
AROUND HOUSING FOR
DRAINAGE
HOUSING
12V OUTPUT
120V INPUT
This fixture is intended for installation in accordance with the National Electrical Code and local code
specifications. Failure to adhere to these codes and instructions may result in serious injury and/or damage
to the ballast and void the warranty. These instructions do not purport to cover all details or variations in
equipment, nor to provide for every possible contingency related to installation, operation, maintenance,
or mounting situation. Should specific problems occur that are not addressed by these instructions, contact
your Sales Representative or distributor for assistance. Retain these instructions for future reference.
SAFETY WARNING:
ALWAYS TURN FIXTURE OFF/DISCONNECT POWER AND ALLOW TO COOL BEFORE
PERFORMING ANY MAINTENANCE, INCLUDING RELAMPING AND CLEANING!
This fixture can become very HOT! The fixture housing and lens, especially if it is glass, can become hot enough
to blister hands. Attention should be paid to where the fixture is mounted, particularly if it can be touched by
children or pets. To help prevent premature failure, decreased performance, overheating and risk of fire, keep
fixture and lens clean and free of leaves, mulch, debris and mineral deposits from water. The fixture and lens
can be cleaned using a soft cloth and a solution of mild liquid soap and warm water. Wipe clean and dry with a
soft, lint-free dry cloth. Avoid polishing fixture or lens.
INSTRUCTIONS PERTAINING TO A RISK OF FIRE OR INJURY TO PERSONS
IMPORTANT SAFETY INSTRUCTIONS - SAVE THESE INSTRUCTIONS!
WARNING - Lamp gets HOT quickly! To reduce the risk of FIRE OR INJURY TO PERSONS:
Do not operate fixture with a missing or damaged lens/lens assembly.
Contact only switch or plug when turning fixture on or off. Do NOT touch hot lens or housing.
Turn off or unplug fixture and allow to cool before relamping. Keep lamp away from combustibles.
Do NOT touch lamp with bare hands at any time, use a soft cloth as oil from skin may damage lamp.
Signify North America Corporation
200 Franklin Square Drive
Somerset, NJ 08873, USA
Phone: 855-486-2216
32000856, revision K
Signify Canada Ldt./ Signify Canada Ltée
281 Hillmount Road
Markham ON, Canada L6C 2S3
Phone: 800-668-9008
page 1 of 3
EXCAVATION
Excavate soil for housing placement and conduit runs. Contour the hole to the shape of the transformer
housing, allowing 3" min. around and under the transformer housing for the placement of granular material. It is
recommended that fixtures not be placed in low locations where water could accumulate and stand for long
periods of time.
DRAINAGE
Transformer housing should be surrounded by a 3" minimum layer of gravel or sand to insure proper drainage.
For concrete pour installations, box is to be placed on a 4" minimum bed of gravel with soil below. Use the PVC
Concrete Pour Kit accessory when installing in concrete. When backfilling, flange should be just above ground
level as sown in the illustration. Hilling up earth around the box will promote good water run-off and prevent
debris accumulation.
WIRING: TBC303-15/BTBC303-15
1. Remove packing material from inside housing.
2. Always be sure to turn power OFF when installing or servicing a transformer box.
3. Using a liquid tight connector (not included) in the open threaded hole in the bottom of the box, connect
conduit (by others) containing incoming power to the box.
4. Using wire connectors (not included) connect green ground wire from box to green supply wire. Connect
white supply wire to white wire from box labled, "120V COM". Connect black supply wire to black wire from
box labeled "120 VOLT".
5. Using a liquid tight connector (not included) in one of the plugged holes in the bottom of the box, connect
conduit (by others) containing fixture wires to the box.
6. Using wire connectors (not included) connect ribbed side of low voltage supply cable to white wire from box
labled, "COM". Connect smooth side of low voltage supply cable to black wire from box labled, "12V", "13V",
"14v" or "15V" as desired.
MOUND UP EARTH
AROUND HOUSING
FOR DRAINAGE
ENCAPSULATED
TRANSFORMER
LIQUID TIGHT
CONNECTOR
(BY OTHERS)
CONDUIT
(BY OTHERS)
BREAKER SWITCH
HOUSING FLANGE
PLACE 3" OF GRAVEL
AROUND HOUSING FOR
DRAINAGE
CONDUIT ENTRY
AREAS MUST BE
POTTED
HOUSING
12V OUTPUT
120V INPUT
32000856, revision K
page 2 of 3

WIRING: TBC603-15/BTBC603-15
1. Remove packing material from inside housing.
2. Always be sure to turn power OFF when installing or servicing a transformer box.
3. Using a liquid tight connector (not included) in the open threaded hole in the bottom of the box, connect
conduit (by others) containing incoming power to the box.
4. Using wire connectors (not included) connect green ground wire from box to green supply wire. Connect
white supply wire to white wire from box labled, "120V COM". Connect black supply wire to black wire from box
labeled "120V".
5. Using a liquid tight connector (not included) in one of the plugged holes in the bottom of the box, connect
conduit (by others) containing fixture wires to the box.
6. This transformer contains two seperate 300VA circuits. The wires for one circuit are marked with blue tape to
keep the two circuits separated. Using wire connectors, connect ribbed side of low voltage supply cable to
white wire from box labeled, "COM". Connect smooth side of low voltage supply cable, from the same wire to
black wire from box labeled "12V", "13V", "14V" or "15V" as desired. Repeat with wires from second circuit.
7. Locate 2 white wires with flag terminals and slide them over the open tabs at the bottom of each magnetic
breaker switch. Replace the breaker handle and tighten screws.
CAUTION!
1. Transformer housing should not be installed in insulating materials such as bark, vermiculite, etc. for the full
depth of the housing. This could cause the housing to overheat and void the warranty. Surface use of these
materials is acceptable.
2. Regularly check the lid and keep it cleared of debris (mulch, leaves, etc.) as this could cause a fire.
3. The conduit entries must be potted. Use two part epoxy #MA1 (included) or equivalent.
4. All gasket seating surfaces must be clean and free of debris before attempting to replace the lid. If debris in
the screw holes prevents proper seating of the gasket, holes must be blown clear or cleared with a #10-24 tap.
Insert screws through lid and into housing, and tighten using an alternating torque sequence of 20-30 inch-lbs.
See diagram below.
1
5
3
8
4
67
2
(Order in which to tighten screws)
32000856, revision K
page 3 of 3
 Loading...