

Page 1
Instruction Manual
EA0816
AUS
1300 777 137 service@unclebills.com.au
www.signifyelectronics.com.au
Page 2

02
AUS
1300 777 137 service@unclebills.com.au
www.signifyelectronics.com.au
Contents
Contents 02
Customer Support 04
Warranty Information 05
Safety Warnings 09
Important Safety Instructions 10
Installation 12
TV Overview 17
TV Connections 19
Remote Control 21
Getting Started 23
Turn On the TV 23
First Time Setup 23
Using the Menu 24
Select Input Source 24
Picture Settings 25
Sound Settings 26
Channel Settings 27
Lock System 29
Setup Menu 30
Personal Video Recording (PVR) 33
Recording TV Programs 33
PVR Settings Menu 35
Important Notes for Using PVR/USB/Media Function 39
Page 3

03
AUS
1300 777 137 service@unclebills.com.au
www.signifyelectronics.com.au
Contents (cont)
Electronic Program Guide (EPG) 40
Connecting to a PC 41
Media Centre 42
Media Centre Menu 42
Photos 43
Music 43
Video 44
Text 45
Trouble Shooting 46
Customer Support 48
Product Specifications 49
Page 4

04
AUS
1300 777 137 service@unclebills.com.au
www.signifyelectronics.com.au
Customer Support
Congratulations on choosing to buy a Signify® product.
All products brought to you by Signify
®
are manufactured to the highest standards of performance and safety, and,
as part of our philosophy of customer service and satisfaction, are backed by our comprehensive 1 Year Warranty.
This comprehensive instruction manual will provide you with a detailed guide on how to operate your product and
will also assist you in troubleshooting any problems that you may encounter.
If you have any queries regarding the use of this product, please feel free to phone our technical support line for
some friendly advice. If you are experiencing difficulties or believe that the product may have a technical fault, we
will assist you in rectifying the issue. We can generally solve most problems simply and quickly over the phone, so
please always phone us first!
We are sure that you will enjoy using this product and you can expect to gain years of service from this product
when it is used and maintained in the correct manner.
Should you encounter any problem, before returning the product to the store, please read this user manual carefully,
check our online Q&A’s or contact us directly. Our friendly technical support team will be happy to assist you. In the
event that the product has technical issue and is unrepairable, we will provide you a Return Authorisation Number if
the faulty product needs to be returned to store.
Customer Support Team
1300 777 137
Hours of Operation: 9am – 4:30pm* Monday – Friday
9am – 3pm Saturday
* Hours of Operation are Australian Eastern Standard Time.
service@unclebills.com.au
www.signifyelectronics.com.au
ITEM CODE: EA0816
Page 5

05
AUS
1300 777 137 service@unclebills.com.au
www.signifyelectronics.com.au
Warranty Procedure
Please read the owner’s manual carefully and ensure that you have followed the correct installation and operating
procedures.
1. Please read warranty details below.
2. Please keep your purchase receipt safe. It will help you expedite warranty claim proceedings. If you do not
have your receipt, a claim cannot be undertaken.
3. If you require warranty service, please contact the Signify
®
customer support team at 1300 777 137 for
assistance. Please ensure that you have the model number, serial number (found on the product rating label)
and purchase receipt ready before you call.
Warranty Details
The product is guaranteed to be free from defects in workmanship and parts for a period of 12 months from the date
of purchase. Defects that occur within this warranty period, under normal use and care, will be repaired, replaced
or refunded at our discretion. The benefits conferred by this warranty are in addition to all rights and remedies in
respect of the product that the consumer has under the Competition and Consumer Act 2010 and similar state and
territory laws. Our goods come with guarantees that cannot be excluded under the Australian Consumer Law. You
are entitled to a replacement or refund for a major failure and for compensation for any other reasonably foreseeable
loss or damage. You are also entitled to have the goods repaired or replaced if the goods fail to be of acceptable
quality and the failure does not amount to a major failure.
1. The Signify
®
warranty only applies to Signify products purchased NEW from a Signify® Authorised Retailer
in Australia. This warranty only applies to the original purchaser and cannot be transferred.
2. The benefits to the consumer given by this warranty are in addition to other rights and remedies of the
consumer under a law in relation to goods or services to which the warranty relates, being the Australian
Consumer Law.
3. Refund or replacement via your Signify
®
Authorised Retailer is available for a period of 1 year after purchase
of goods that have been inspected and determined to have a major failure. Refund and exchange is not
applicable for change of mind.
4. Subject to the terms herein, this warranty effectively covers Signify
®
products (excluding products
purchased for commercial purposes) as specified in the Warranty Period Table on the following page from
the date of purchase. Products used for commercial purposes are covered for 6 months only.
Warranty Information
Page 6

06
AUS
1300 777 137 service@unclebills.com.au
www.signifyelectronics.com.au
Warranty Information (cont)
Warranty Period Table
Signify® PRODUCT SIZE WARRANTY PERIOD WARRANTY SERVICE TYPE
TV 42’’ and above 12 months In-Home Service.
TV 19’’ to 40’’ 12 months
Authorised Service Centre or Return to
Store with Return Authorisation Number.
All other Signify
products
12 months Authorised Service Centre or Return
to Store.
Warranty Service Type:
In Home Service/Pick up Service
This service will only be provided as part of this warranty if all the following conditions are met:
a) The product is indicated in the Warranty Period Table;
b) The product is within the warranty period; and
c) The product is located within the normal service area of the local Signify
®
Authorised Service Centre.
If the Signify
®
team determines that the product is not repairable on site, the customer will need to take the product
to a Signify
®
Authorised Service Centre (at customers cost) & the repair will be undertaken at this location. After the
repair, the product will be available for collection or returned to the purchaser at a fee upon request.
Authorised Service Centre/Carry-in Service
The purchaser is required to send the product at their own expense to the nearest Signify
®
Authorised Service
Centre for repair. After the repair, the product will be available for collection or return to the purchaser at a fee upon
request. Signify
®
in-home service can be made available at a fee if requested.
1. A 6-month replacement warranty is applicable to all accessories such as remotes, power adaptors and cables,
as long as all warranty requirements are met. Damage from misuse will not be accepted.
2. Signify
®
will ensure to the best of its abilities that all required parts are made available for any required
service/repair.
3. Signify
®
/Uncle Bills Australia Pty Ltd and its Authorised Service Centres will endeavour to complete product
repairs within a reasonable period based on available resources and workload during the time when service is
requested and performed.
4. Refurbished parts may be used to repair the product. In the case of a replacement, the product may be
replaced, with a refurbished unit of the same type or, if one is unavailable, a similar refurbished model with
equal or better features and specifications.
5. Please be advised that if the product presented for repair is capable of retaining user-generated data, the data
may be lost during servicing. Customers are strongly encouraged to back up all important information/data
before sending the product in for service/repair.
Page 7

07
AUS
1300 777 137 service@unclebills.com.au
www.signifyelectronics.com.au
Warranty Information (cont)
6. Service will be provided only during normal business hours and under safety conditions and circumstances.
Signify
®
and its authorised service agents can refuse any repair if safety, in relation to OH&S, becomes a
concern to its staff or authorised service agents’ personnel.
The warranty is void and warranty claims may be refused, subject to the Australian Consumer Law, if:
• The product was not transported, installed, operated or maintained according to the instruction given by the
manufacturer.
• The product was abused, damaged, tampered with, altered or repaired by any unauthorised persons.
• Product failure is due to accidents during use, installation or transit, power surges, use of defective or
incompatible external devices, exposure to abnormal conditions such as excessive temperatures or humidity,
or entry of liquids, objects or creatures inside the product (eg. cockroach infestations).
• The product has been dropped or has collided with another object, has been used for reasons other than its
intended use, has been accidently or deliberately misused, or for others reasons such as theft, vandalism,
floods, fires, earthquakes, electrical storms or any other act illegal act or war related events.
• The serial number of the product is missing or has been tampered with.
• The product is purchased in an Auction.
• The product is incorrectly assembled or installed.
NOTE: If any repairs or services requested by the customer are outside of the terms and conditions of this
warranty, or where a fault is determined to be outside of the terms and conditions of the warranty during an
in-home service call, the customer shall be charged for the cost of the repair and/or the in-home service call fee.
7. No one is authorised to assume any liability on behalf of Signify
®
or impose any obligation on it, in
connection with the sale of any equipment other than as stated in this warranty and outlined above.
8. Signify
®
and/or its Authorised Service Centres reserve the right to inspect and verify whether the product is
exhibiting a major failure as claimed by customers/retailers.
9. Image retention or burn-in can be a problem for all phosphor based displays. In extreme cases permanent
phosphor burn can occur if still/repetitive images are left on the screen for extended periods of time. Such
damage to the screen is not covered by the warranty. Please ensure that precautions are followed to avoid
permanent damage to your display.
Page 8

08
AUS
1300 777 137 service@unclebills.com.au
www.signifyelectronics.com.au
Warranty Information (cont)
10. All LCD, LED LCD and plasma panels can exhibit some bright, dark or partially lit pixels, a normal limitation
of these technologies and the manufacturing process involved and are usually not noticeable when viewing
normal screen images. Defective pixels are not a warranty issue, unless they exceed the ISO 13406-2*
standard for pixel defects. All panels used for Signify
®
TVs have passed ISO 13406-2 standards.
* To regulate the acceptability of defects and to protect the end user, ISO have created a standard for manufacturers
to follow. ISO 13406-2 recommends how many defaults are acceptable in a display before it should be replaced,
within the terms & conditions of warranty.
11. Where a product has been mounted to a wall, it is your responsibility to remove it from the wall to repair or
service, and re-install the product to the wall after service.
12. If Signify
®
or its Authorised Service Centre determines that your claim of a Signify® consumer product is
invalid, Signify
®
may charge you for any labour, parts or transport costs incurred by Signify® or its agent in
assessing your claim.
If you have any issues with this product or require further information, please contact our helpful customer support
team via phone or email (details below). The product comes with a full 1 year warranty for your piece of mind. In
many cases we will resolve the issue without you having to return the product. Our friendly staff can also help you
with troubleshooting or advice in relation to the use of this product. Please ensure that you have the model number,
serial number and purchase receipt ready before you call.
Customer Support Team
1300 777 137
Hours of Operation: 9am – 4:30pm* Monday – Friday
9am – 3pm Saturday
* Hours of Operation are Australian Eastern Standard Time.
service@unclebills.com.au
www.signifyelectronics.com.au
Page 9
09
AUS
1300 777 137 service@unclebills.com.au
www.signifyelectronics.com.au
Safety Warnings
The safety precautions enclosed herein reduce the risk of fire, electric shock and injury when correctly adhered to.
Follow all instructions and take notice of all the warnings.
CAUTION: To reduce the risk of electric shock, do not remove the rear cover on the back of the TV. There are no
user-serviceable parts contained within. Removing any part of the TV or attempting to modify the product will void
the warranty. Refer servicing to qualified service personnel as recommend by our Service Centre.
The lightning flash with an arrowhead symbol within an equilateral triangle is intended to alert you to
the presence of non-insulated dangerous voltage within the product’s enclosure that may be of sufficient
magnitude to constitute a risk of electric shock to persons.
The exclamation point within an equilateral triangle is intended to alert you to the presence of important
operating and maintenance (servicing) instructions in the literature accompanying the product.
IMPORTANT: Only connect this TV to a mains socket with a protective earthing connection.
• To prevent damage which may result in fire or an electric shock hazard, do not expose this TV to rain or
moisture. Do not place objects filled with liquids, such as vases, on or near the apparatus.
• Do not change or modify the TV in any way.
•
•
•
•
•
•
Only use the attachments or accessories specified by the manufacturer.
Minimum distances around 5cm the apparatus for sufficient ventilation;
The ventilation should not be impeded by covering the ventilation openings with items, such as
newspapers,table-cloths, curtains, etc.;
No naked flame sources, such as lighted candles, should be placed on the apparatus;
Attention should be drawn to the environmental aspects of battery disposal;
The use of apparatus in tropical climates.
CAUTION
Page 10

10
AUS
1300 777 137 service@unclebills.com.au
www.signifyelectronics.com.au
Important Safety Instructions
General Electric Safety:
• Before installing the Signify
®
TV set, make sure your outlet voltage corresponds to the voltage stated on the TV
rating label. Always use the power cord supplied for this TV.
• Do not use an extension cord unless completely necessary with the TV. If an extension cord is used, please
ensure that it has a rating equal or exceeding the rating of this product.
• Unless your home is already fitted with a residual current device (safety switch), we recommend installing an
RCD with a rated residual operating current not exceeding 30mA to provide additional safety protection
when using electrical appliances. See your electrician for professional advice.
• The TV is not intended to be operated by means of an external timer or any type of separate remote control
system.
• Do not bend, twist or squash the power cord and antenna cable under the main unit or place heavy objects on
the cords. Do not use a damaged power cord or plug, and do not try to insert into a loose outlet. Doing so may
create risk of electric shock.
• Do not run the power cord near heat-producing appliances such as radiators, stoves or irons. The excessive
heat could melt the insulation and expose live wires, resulting in risk of fire or electric shock.
• Unplug this TV during lightning storms or when unused for long periods of time. Not doing so may result in
risk of fire or electric shock.
• Always grasp the plug when disconnecting the power cord. Pulling the cord can damage the internal wire and
may cause risk of fire. Never touch the power plug with wet hands.
• The TV is not intended for use by persons (including children) with reduced physical, sensory or mental
capabilities or lack of experience or knowledge unless they have been given supervision or instruction
concerning use of the product by a person responsible for their safety.
• Do not leave the TV unattended when plugged in. Always switch off and unplug when you are not using the TV.
WARNING: Always use a power board equipped with a surge guard system to protect your TV against any
power surges.
Page 11

11
AUS
1300 777 137 service@unclebills.com.au
www.signifyelectronics.com.au
Important Safety Instructions (cont)
Protect from Moisture and Heat
• Avoid exposing the TV to direct sunlight and other sources of heat. Do not place the TV directly on or near other
products that generate heat (eg. microwaves, audio amplifiers and heaters).
• Do not use or store flammable or combustible materials near the TV. Doing so may result in fire or explosion.
Do not place any naked flame sources, such as lit candles, cigarettes or incense sticks on top of the TV set.
• Do not block the ventilation holes located on the rear cover on the TV. Ventilation is essential to prevent failure
of electrical component. Dust the ventilation holes regularly with a static proof cloth or feather duster.
Handling the Antenna
• Install the antenna away from high-voltage power lines and communication cables and make sure it is installed
securely. If the antenna comes into contact with a power line, risk of fire, electric shock or serious injury may
occur.
• Depending on your location and surroundings the TV reception may vary. Always use a qualified antenna
specialist to install or exam your antenna.
Cleaning and Maintenance
• Always unplug this TV from the power outlet when not used for long periods of time. The accumulation of dust
over time may generate heat, deteriorate the insulation and create a risk of electrical fire.
• Always unplug the TV from the power supply before cleaning.
• Only use a soft, dry and static-free cloth for cleaning the cabinet and stand of the TV; do not use a damp cloth.
Never clean with industrial strength polish, wax, benzene, paint thinner, air freshener, lubricant, detergent or
other chemicals. Wipe off any moisture, dirt or dust on the power plug pins with a clean and dry cloth.
• The LED panel used in this product is made of glass. Therefore, it can break when the product is dropped or is
impacted by other products. Take extreme caution when cleaning, moving or installing the TV. Be careful when
handling broken glass pieces in the event that the LED panel breaks.
• If the unit requires repair, contact the Signify
®
customer support team on 1300 777 137. There are no
user-serviceable parts contained within. Removing any part of the TV or attempting to modify the product will
void the warranty. Never attempt to disassemble or modify the unit or attempt to service it yourself.
Page 12

12
AUS
1300 777 137 service@unclebills.com.au
www.signifyelectronics.com.au
Installation
Step 1: Select a Location for Installation
When determining a position to install the TV set, ensure the area is:
• Well ventilated and away from moisture.
• Protected from abnormal heat and away from direct sunlight.
• Away from excessive dust, debris or grease.
WARNING: If the TV is not positioned or installed in a sufficiently safe and stable location, it can create a potential
hazard by falling resulting in injury and damage to the unit and its surroundings, particularly in environments
where children may be present. To prevent injuries from your television falling, take a few simple precautions:
• Monitor children and ensure they keep a safe distance from the TV.
• Do not place the TV on tall furniture or in a confined area (eg. on a cupboard or bookcase) without anchoring
both the furniture and the TV to a suitable support.
• Only use furniture that is stable and can safely support the TV.
• Ensure the TV does not have any overhang of the supporting furniture.
• Educate children about the dangers of climbing onto the furniture to reach TV controls.
• Do not place the TV on cloth, cushions or any other similar materials.
• Never stand on, lean on, or push the unit or its stand.
• If the furniture has to be moved, please first remove the TV and place it in a safe location on the floor.
• Do not cover the TV with a blanket, cloth or other similar materials.
• Do not place the main unit on an unstable stand, shelf or table. Serious injury to an individual and damage to
the TV may result if it should fall. If the TV falls over because of customer error, the warranty will be voided.
CAUTION: Due to the size and weight of this TV, it is highly recommended that 2 people are used to move it.
NOTE: Before unpacking the TV, ensure you have a table or a desk ready to lay the TV on. Ensure the surface is flat
and clean, and lay a soft cloth or blanket over the surface to protect the screen of the TV.
Page 13
13
AUS
1300 777 137 service@unclebills.com.au
www.signifyelectronics.com.au
Installation (cont)
This TV is equipped with standard VESA wall-mounting points, and we recommend that a VESA compatible wall
bracket be installed between the TV and the wall to prevent the TV from falling from a cabinet (bracket not included).
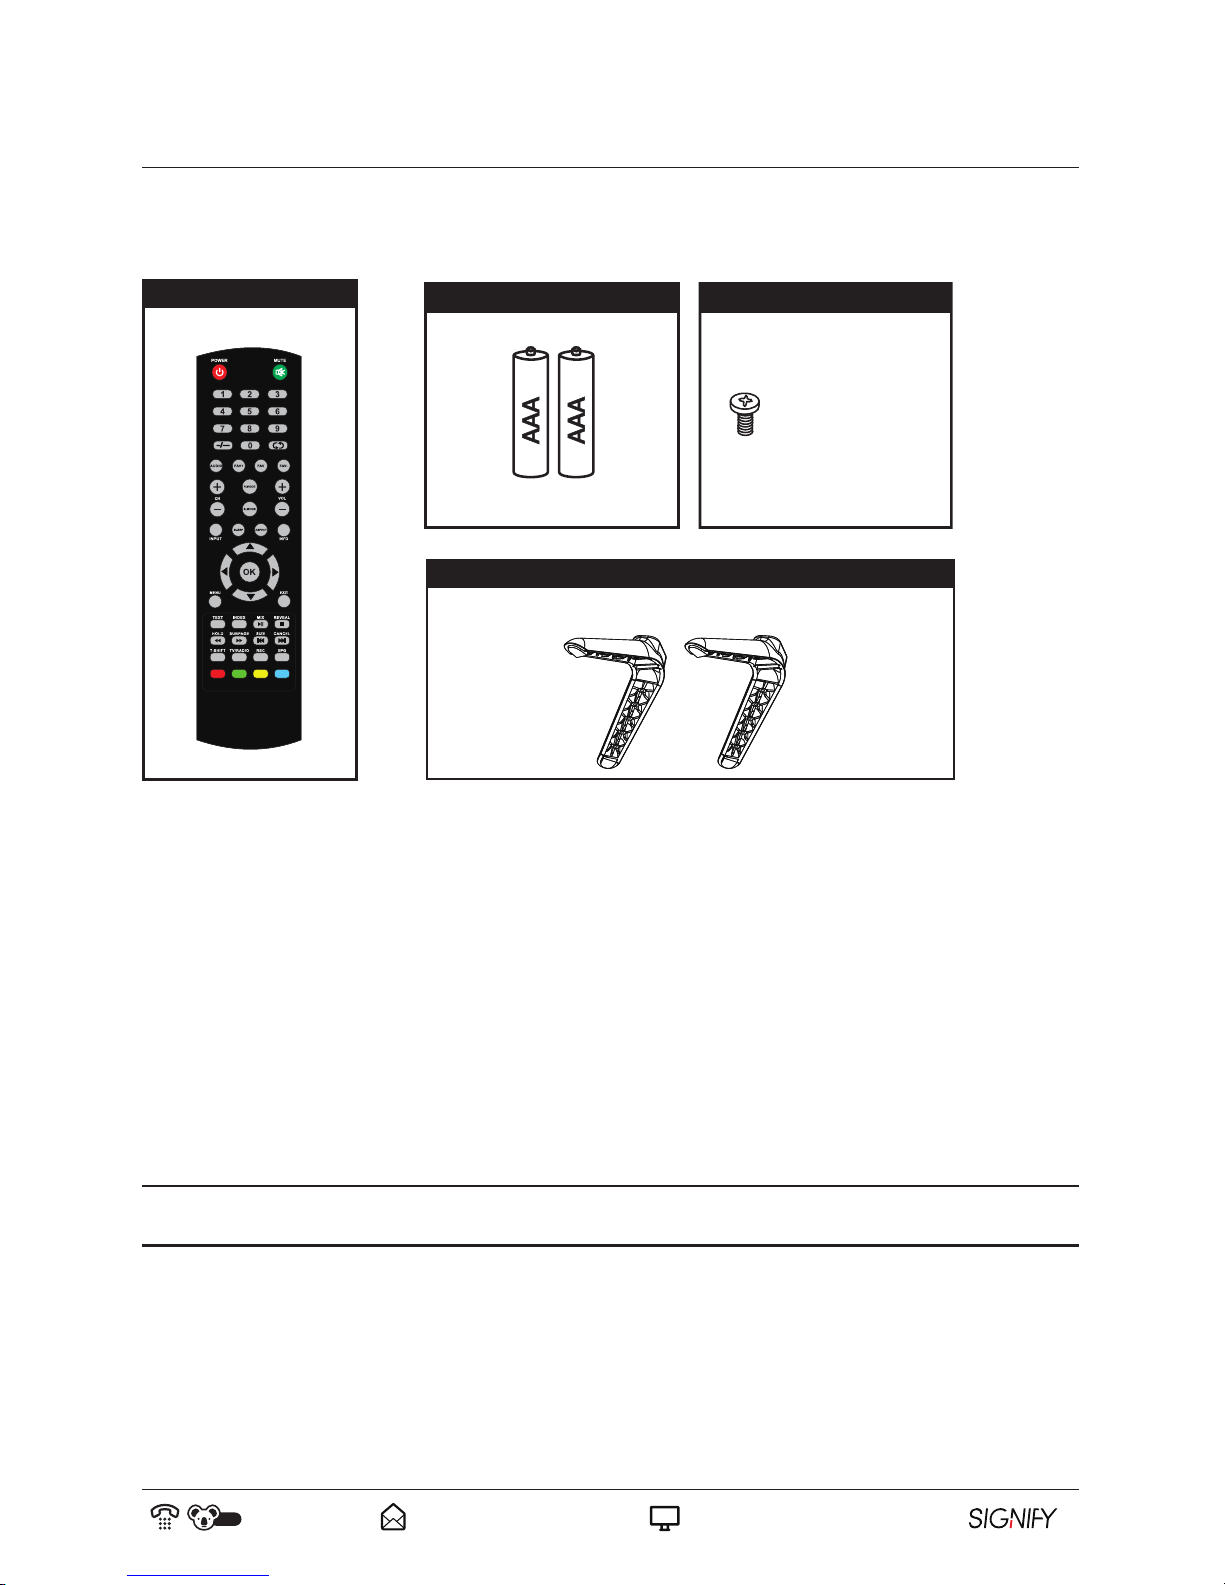
Included but not pictured: User Manual, Warranty Card and Quick Start Guide.
1. Carefully remove the TV from its packaging, take immense caution not to apply any pressure to the front of the
TV screen.
2. Please go through all packaging material and ensure all TV accessories listed above have been unpacked from
the packaging. Some accessories may be located in cut-out sections of the internal packaging, so ensure you
do not miss any items and discard them by mistake. Once all items are removed from the packaging, use the
list above to check that nothing is missing. If any items appear to be missing, contact our Signify
®
Warranty
Service Hotline.
3. Once all accessories have been accounted for, prepare a location where you can attach the stand base to the
bottom of the TV, you will also require a Phillips Head screwdriver to attach the TV stand base.
NOTE: Before proceeding to the installation section of this manual, please ensure that your outdoor TV antenna is
installed correctly and is ready to connect to your TV.
SCREWS
M4x20mm4pcs
Remote Control
2x AAA Batteries
2x TV Stand Base
4x TV Stand Screws
Step 2: Unpack and Check your Accessories
Page 14
14
AUS
1300 777 137 service@unclebills.com.au
www.signifyelectronics.com.au
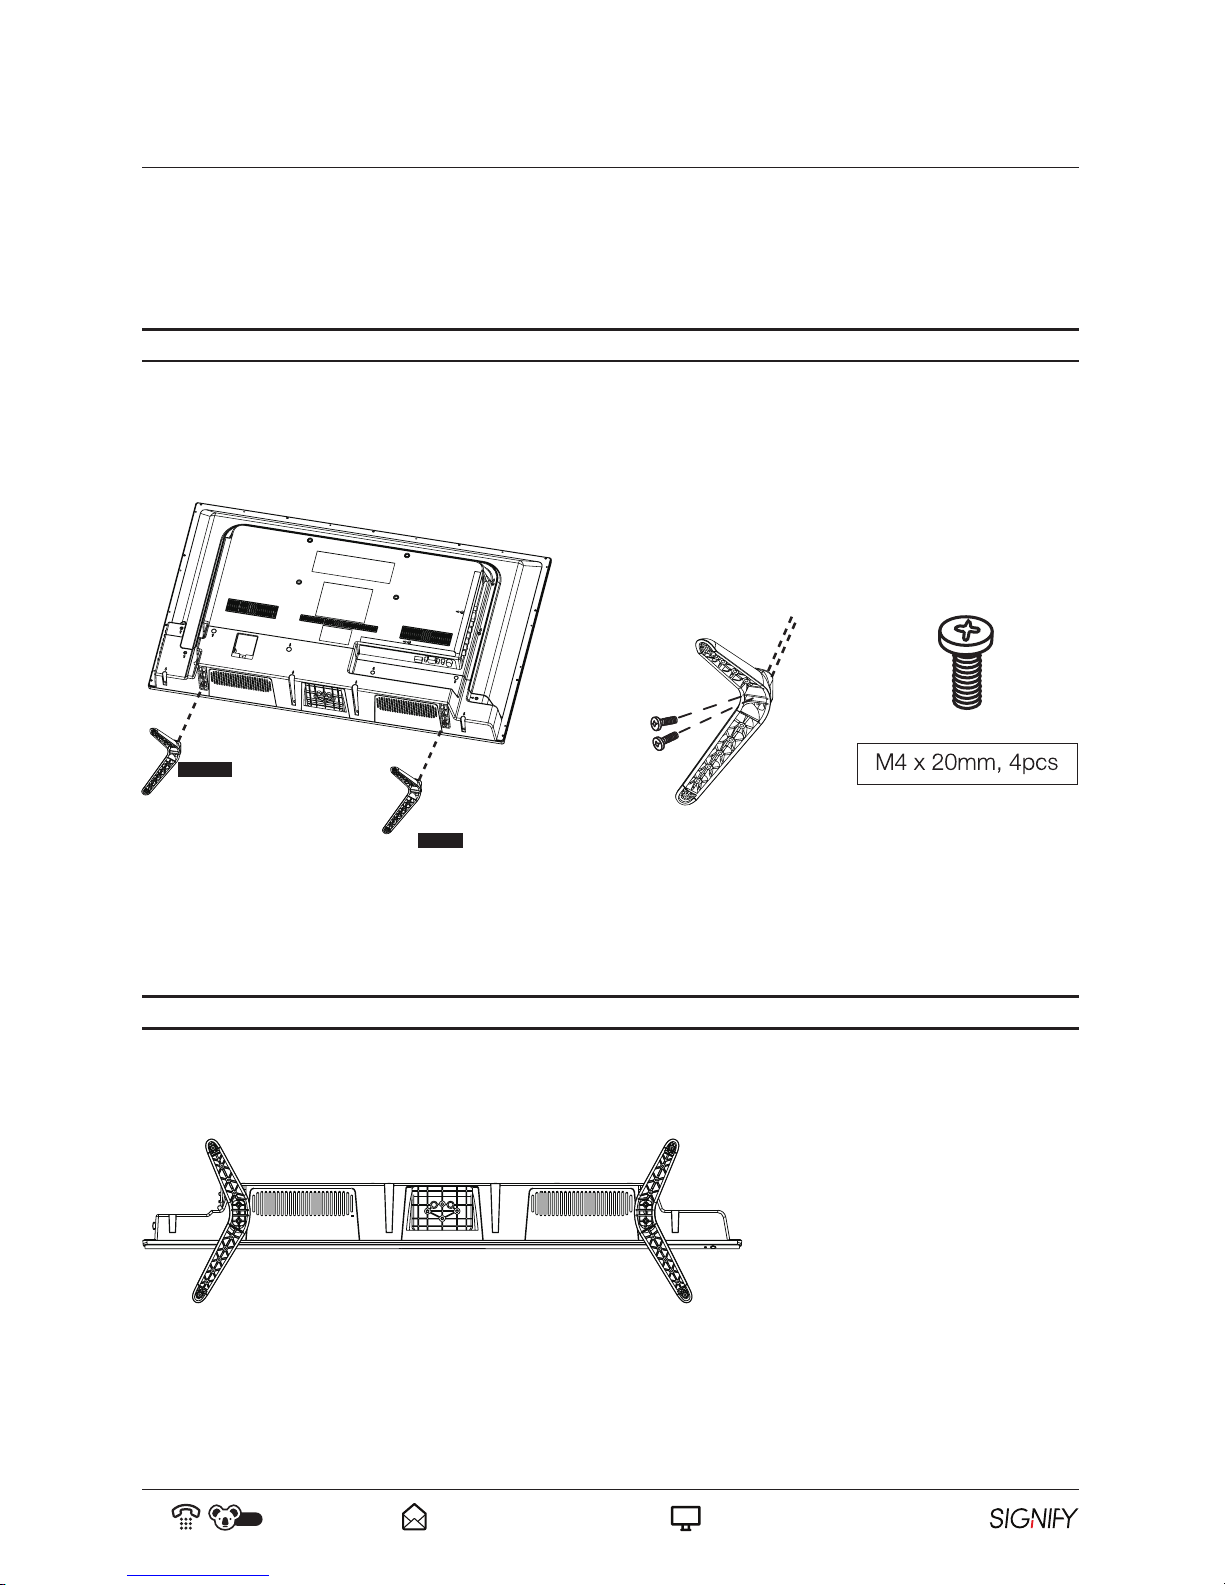
Installation (cont)
3. Insert the TV stand screws into the designated holes in the rear of the TV base stand and tighten the screws
firmly with a Phillips Head screwdriver.
CAUTION: Do not apply excessive force while tightening the screws as this may damage the TV base stand.
4. Ensure the TV base stands are securely attached to the rear of the TV before standing the TV upright.
RIGHT
LEFT
Step 3: Assembling Stand Base/Wall Mount Option
1. Ensure the table or desk you use to unpack the TV is flat, clean and stable. Lay a soft cloth or blanket over the
surface to protect the screen of the TV.
NOTE: Always unplug the TV from power outlet when assembling or moving the TV.
2. Observe the markings ("L" or "R") on the base stand. Ensure the longer leg of each TV base stand is facing
outwards from the front of the TV and slide the rectangular section on the top of the TV base stand into the
designated slot on the rear of the TV.
Page 15

HDMI3
USB
CVBS
IN
L
R
15
AUS
1300 777 137 service@unclebills.com.au
www.signifyelectronics.com.au
Wall Mount Assembly Guideline
NOTE: Wall brackets are not supplied with this product.
If wall mounting the TV is desired please read the following specifications and instructions in conjunction with
the instructions included with the bracket. If you are not confident in your abilities to mount the TV, please seek
assistance from qualified personnel. Signify
®
is not liable for any damage or injury caused by an incorrectly
mounting the TV.
Wall Mount Compatibility Suggested Screw Dimension
VESA 200 * 200 M6 Screws, length 10mm x 2pcs
M6 Screws, length 16mm x 2pcs
NOTE: The TV stand screws in the package are for securing the TV stand ONLY. If you are wall-mounting the TV,
please consult with qualified personnel for further instructions on installing the bracket and wall support.
Remove the TV Stand Base from the TV:
1. Before removing the TV base stands, ensure you have a table or a desk ready to lay the TV on. Ensure the
surface is flat and clean, and lay a soft cloth or blanket over the surface to protect the screen of the TV. The
screen is fragile and must be appropriately protected when removing the TV base stands. Be sure that no hard
or sharp objects can come into contact with the screens surface. Do not exert pressure to the front of the unit
at any time, as this will damage the LCD screen.
2. Using a Phillips Head screwdriver, remove the screws from the rear of the TV stand base. Store the stands and
screws in a safe location for future use.
Installation (cont)
Page 16
16
AUS
1300 777 137 service@unclebills.com.au
www.signifyelectronics.com.au
Installation (cont)
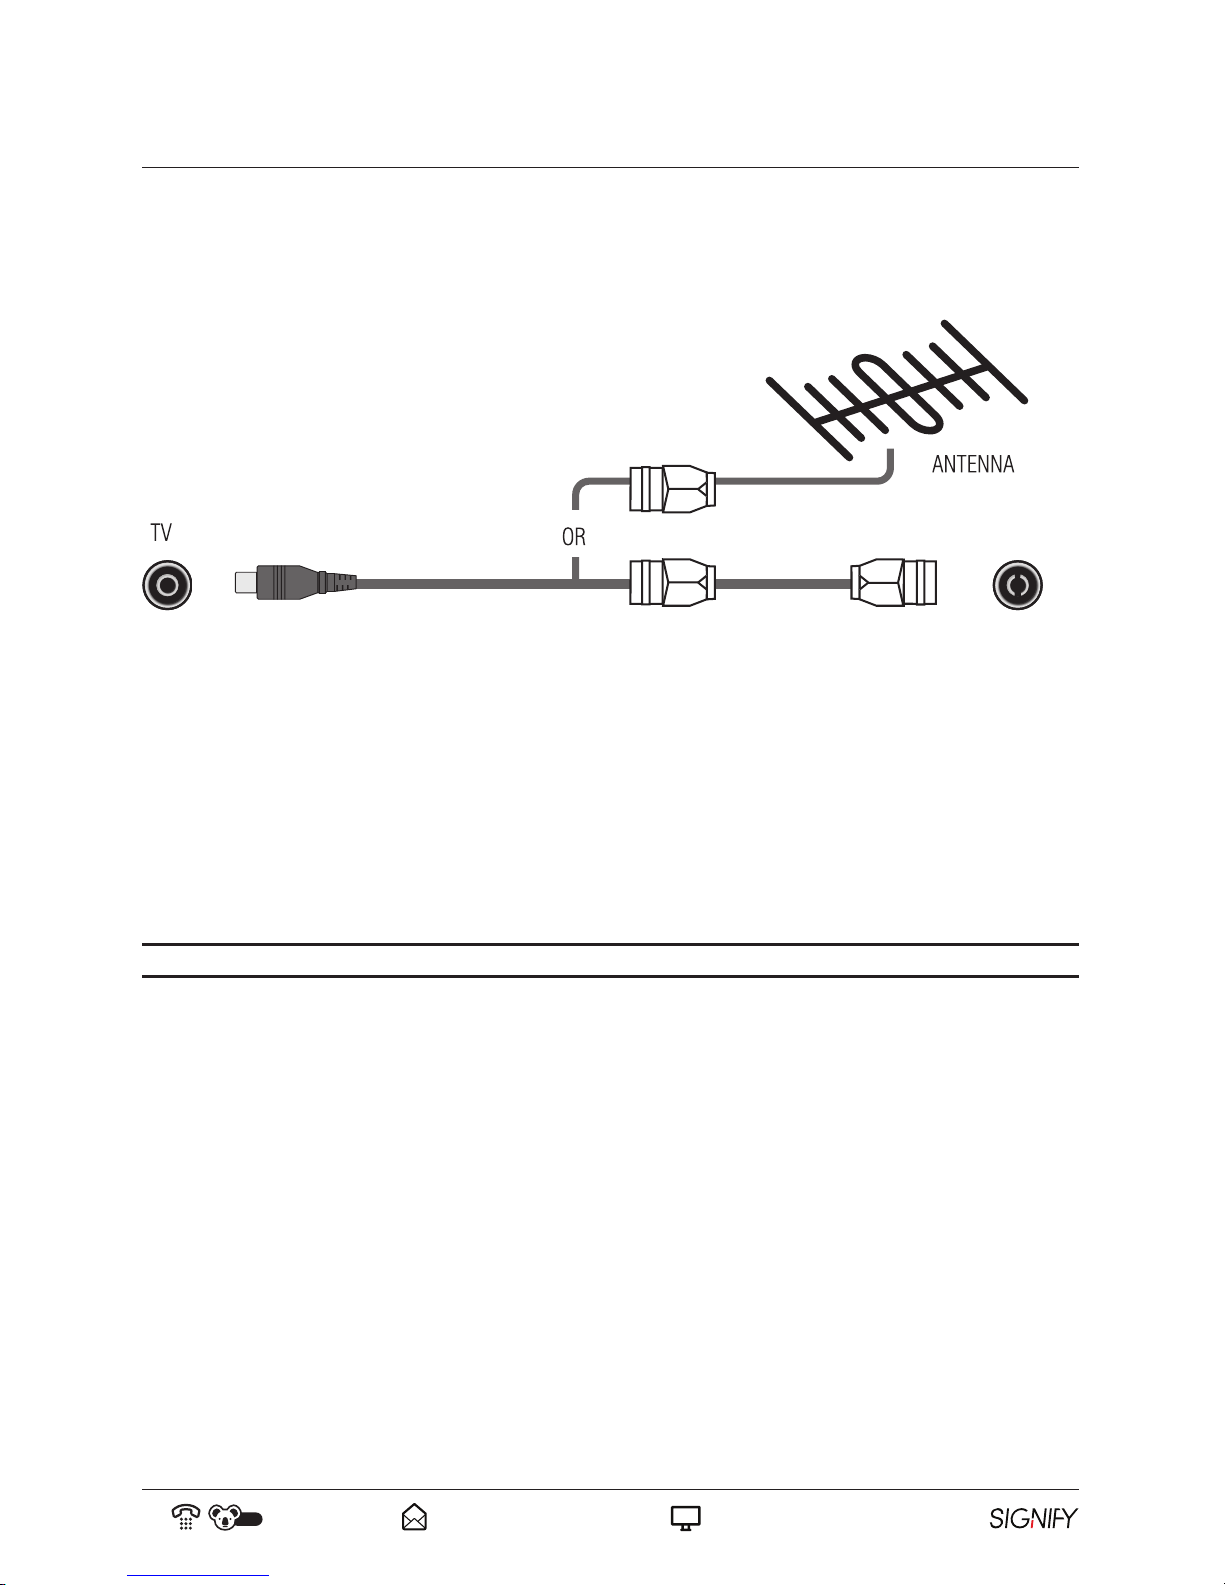
Step 4: Connecting the Antenna
In order to receive TV programs the signal should be received from one of the following signal sources:
• Outdoor antenna
• Cable TV network
• Satellite broadcast network
1. In these three cases, the input cable of antenna or TV network should be plugged into the 75 Ohm coaxial
cable jack at the lower back side of the TV.
NOTE: The antenna cable is not included and can be purchased from all good Electronics retailers.
2. If you are using an indoor antenna and the TV reception is not satisfactory, you can adjust the position of the
antenna but it is strongly suggested to use the outdoor antenna.
Page 17

HDMI2
HDMI3
USB
CVBS
IN
L
R
17
AUS
1300 777 137 service@unclebills.com.au
www.signifyelectronics.com.au
TV Overview
1
9 14
13
1211
3
4
5
6
7
2
8
19
18
17
TV Back View and Connections
TV Front View and Connections
15
10
16
GREEN BLUE RED
ORANGE
RED
WHITE
YELLOW
Page 18

18
AUS
1300 777 137 service@unclebills.com.au
www.signifyelectronics.com.au
TV Overview (cont)
1. LCD Display Screen
2. IR (infra-red) Sensor
3. INPUT: Select the input source.
4. MENU: Enter the setting menu.
5. CH
/ : Select the next/previous channel or move up/down.
6. VOL + / - : Increase/decrease the volume level or move left/right.
7. STANDBY
8. POWER CABLE INPUT
9. EARPHONE OUTPUT
10. Y/Pb/Pr INPUT (COMPONENT): A/V Connection, supports both SD (Standard Definition)
and HD (High Definition) picture quality.
11. PC AUDIO INPUT
12. VGA IN
13. COAXIAL S/PDIF OUTPUT
14. ANTENNA INPUT: Connect to an outdoor VHF/UHF antenna or cable
15. HDMI1
16. VIDEO INPUT (COMPOSITE): Connect to basic A/V devices such as VCR, DVD or camcorder
17. USB INPUT
18. HDMI2
19. HDMI3
Page 19

19
AUS
1300 777 137 service@unclebills.com.au
www.signifyelectronics.com.au
TV Connections
More Information on the Connections
You can connect a HDMI/comp/AV cable from external audio visual equipment to your Signify
®
TV. No sound
connection is needed for a HDMI to HDMI connection. If the signal resolution does not match the specification
table, you will need to change the setting on the device as specified by the table. Please consult your device user
manual for further instructions.
HDMI Input
NOTE: HDMI cable is not included with your Signify
®
TV.
• HDMI (high-definition multimedia interface) allows you to connect devices (such as a Blu-ray players, laptops,
DVD players etc.) to the TV and enables the transmission of digital audio and video signals using a single
HDMI cable without compression.
• Use the HDMI terminal when connecting a compatible device via a HDMI connection. If your external device
has DVI only, you should use a DVI-to-HDMI cable (or adaptor) for the connection, and the “R - AUDIO - L”
terminal on DVI for sound output.
ARC (Audio Return Channel)
Connect a HDMI cable from an external digital audio system. ARC enables the TV to directly output the digital
sound through the HDMI cable. Please note that it works only when the TV is connected to an audio receiver that
supports the ARC function. When the HDMI port is used as the ARC function, it cannot be used as signal input at
the same time.
Y/Pb/Pr Input (COMPONENT)
NOTE: Y/Pb/Pr Input (COMPONENT) cable is not included with your Signify
®
TV.
Connect the component video (not included) to the corresponding inputs “Y”(Green), “Pb”(Blue), “Pr”(Red) to the
rear of your TV, then connect the other ends to the corresponding component video out connectors on your device
for the video. Then connect the RCA audio cables (not included) by connecting the “R (Right/Red) and L (Left/
White)” for the sound.
The Y/Pb/Pr connectors on your devices (PVR or DVD) are sometimes labelled Y, B-Y and R-Y or Y, CB and CR
(colours for inputs and cables must correspond on both devices).
Coax Out
Use a digital coaxial cable (not included) to connect the TV with an amplifier or other audio decoding devices for
digital audio signal output. A coaxial digital audio connection is used to send S/PDIF digital audio signals between
devices. It supports stereo audio as well as DTS and Dolby Digital 5.1/7.1 surround sound signals.
Page 20

20
AUS
1300 777 137 service@unclebills.com.au
www.signifyelectronics.com.au
Video Input (COMPOSITE)
For a basic A/V connection, use a video RCA cable (not included) to connect an appropriate external A/V device
(such as VCR, DVD or camcorder).
Connect the RCA audio cables by connecting the “R (Right/Red) and L (Left/White)” and “CVBS” (Yellow) video
cables into the corresponding coloured video input on the rear of the TV. Connect the other ends to corresponding
audio and video out connectors to the external A/V device.
NOTE: Colours for video inputs and cables must correspond on both devices.
VGA & Audio
Connect a VGA cable (not included) and 3.5mm audio cable (not included) from the PC.
USB Input
NOTE: USB storage device is not included with your Signify
®
TV.
Insert a USB storage device for multimedia file playback, PVR recording and time-shifting into the USB input
located on back of the TV. This USB port also can be used for servicing and updating software on your TV. Please
be aware of the limitation of the USB storage device (see page 39 for Important Notes for Using PVR/USB/
Media Function).
TV Connections (cont)
Page 21

Insert Batteries into the Remote Control
• Use your finger to slide down the cover of the battery compartment cover on the rear of the remote control. The
bottom of the battery compartment cover will click up. You will then need to pull out the battery compartment
cover so that the locking tab releases from the groove inside the remote control.
• Paying attention to the (+/-) polarity markings on the batteries, insert 2x "AAA" batteries to the battery
compartment.
• If the remote control is not working when you are pointing the remote control at the IR sensor on the front of the
TV, remove the batteries and replace with new ones.
NOTE: Remove the batteries if the remote control is not going to be used for a long time.
Remote Control Operating Range
• To use the remote control, point it towards the IR sensor at the front of the TV.
• The remote control can work up to a range of approximately five metres from the TV and at an angle of up to
30° each to the right and left of the IR sensor. The operating distance may vary according to the brightness of
the room.
• The remote control will not operate if the path is blocked.
• Do not drop, step on or otherwise impact the remote control as this may damage the
internal parts and lead to a malfunction.
• Do not point bright lights or lasers at the IR sensor.
• Do not place objects between the remote control and the IR sensor.
• Do not use this remote control while simultaneously operating a remote control of
other devices.
WARNING: Make sure all relevant equipment is properly connected (as illustrated in
this manual) before connecting the unit to a wall socket and turning on the power.
21
AUS
1300 777 137 service@unclebills.com.au
www.signifyelectronics.com.au
Remote Control
Page 22

22
AUS
1300 777 137 service@unclebills.com.au
www.signifyelectronics.com.au
Remote Control (cont)
* NOTE: Teletex Mode (Refer to page
31 for important information about
teletext services in Australia)
Enter or exit into standby mode
Switch the channel digit
FAV+/-: Play next/previous channel
from your favourite list
Select audio option
Play next/previous channel
Select the sleep timer
Go to index page/Enter the recorded list
Switch the input source
Select the sound mode
Enter the main menu for various TV settings
Enter Teletext mode*
Change the size of display*/
Play the previous file
Hold current page*/Move fast backward
Activate time shift function for delayed viewing
Switch between TV and Radio
Red Button
Blue Button
Green Button
Yellow Button
Mute or restore sound
Number Keys 0-9: Use to select channels
Return to the previous channel
Display information of the current program
Switch between the preset display ratio
TV and TXT picture are mixed
together in transparent background*
Turn the volume up/down
Display favourite channel list in DTV mode
Select the picture mode
Exit from the main menu displayed on the screen
Press the RIGHT/LEFT UP/DOWN buttons to
navigate the on-screen menus and adjust the
system settings to your preference.
• Press OK to confirm your selection.
EPG: Electronic Program Guide
Cancel the display*/Play next file
Record TV program in DTV mode
Show subpage*/Move fast forward
Reveal or hide the hidden words*
Page 23

23
AUS
1300 777 137 service@unclebills.com.au
www.signifyelectronics.com.au
Getting Started
Turn On the TV
• Plug the power cord into a suitable power outlet, then turn the outlet on.
• Press the power button located on the right hand lower side of the TV back panel; the indicator light will
illuminate blue indicating the TV is on (if the TV is in standby mode, press the power button on the remote
control to turn the TV on, make sure you aim it at the IR sensor on the front of the TV).
• When the TV is in standby mode, the indicator light will illuminate red.
IMPORTANT: Do not plug several devices into the same power outlet. Doing so may cause the outlet to overheat
and create a risk of fire. Make sure the power outlet is easily accessible during operation.
IMPORTANT: Make sure the power cord is in good working order before inserting it fully into the outlet. Do not
use a damaged power cord or plug, and do not try to insert the power cord into a loose outlet.
First Time Setup
1. When you turn on the TV for the first time (or you have reset the TV to its factory settings), the First Time
Setup menu will pop up on the screen to assist you in setting up your TV, as illustrated below.
2. On the remote control, press the
/ buttons to highlight a menu option and the / buttons to select
desired setting. Press the OK button to go to the next step. Press menu button to go to the previous step.
OSD Language Select your desired OSD language for on-screen display menu. Defaults as English.
Country Select the country where you will operate the TV. Defaults as Australia.
Auto Scan Select your auto scan: ATV, DTV, DTV+ATV. Defaults as DTV+ATV.
LCN Logical Channel Numbers (LCN's) are used in Australia to identify broadcasters and
services, some of which may not be present at all times.
Auto Channel Update Select 'On' or 'Off' to change the channel update setting.
Page 24

24
AUS
1300 777 137 service@unclebills.com.au
www.signifyelectronics.com.au
Getting Started (cont)
NOTE: New TV's may produce an unusual smell or odour when first turned on. Due to the manufacturing process
of components, televisions and other electronic products can have parts that may produce a smell after the product
is first turned on and warms up. The smell will usually dissipate within a few days of use. This is normal and
occurs with many electronic products. Please ensure there is sufficient ventilation around the TV.
Using the Menu
NOTE: When you switch on the TV after re-locating or after a factory reset, you will need to go through the first
time installation and auto-search for all the DTV programs in your area.
• Press the MENU button to open the main menu.
• Press the
/ buttons to highlight a menu option and press the OK button to enter the menu option.
• Press the
/ buttons to adjust the desired value.
• Press EXIT to exit the current menu.
Selecting an Input Source
• Press the INPUT button on the remote, or on the lower right side of the back panel on the TV, to display the
input source list on the TV.
• Press the
/ buttons to select the desired input source, and then press OK to confirm your selection.
3. Select Start to activate Auto Scan. After the scan is completed, the channels are then arranged in a preset
order. If you wish to skip channels, modify the preset order or rename channels, select Programme Edit under
the Channel Settings (refer to page 27 for details). Press the MENU button to return to previous menu. Press
the EXIT button to exit the menu.
Page 25

25
AUS
1300 777 137 service@unclebills.com.au
www.signifyelectronics.com.au
Picture Settings
The picture setting allows you to optimise the picture output quality of your TV. Press the MENU button then use the
button to enter the Picture Setup Menu (please refer to page 24 for detailed instructions for using the menu).
Picture Mode To better suit your environment and personal requirements, you can change the
picture modes by selecting either of the following options: Standard, Mild, Personal or
Dynamic. Custom settings are saved as Personal Mode.
Brightness Adjusts the overall brightness of the picture display.
Contrast Adjusts the difference between the brightest and darkest parts of the picture display.
Sharpness Increase the sharpness to the edges and details in the picture; decrease the sharpness
for softer edges and details.
Saturation Adjusts colour tones to give pictures a more natural appeal.
Hue Adjusts the tints of the picture display (works in NTSC mode only).
Colour Temp Adjusts the colour temperature of the display screen.
Aspect Ratio Changes the ratio size of the picture display. Select either Full, Zoom 1, Zoom 2. Auto,
4:3 or 16:9 (different aspect ratios are available depending on the input source).
Basic Operations
Press the button to access the next menu options.
Screen Mode Controls the screen mode (works in NTSC mode only).
Advanced Setting - NR Select options to reduce video noise: Off, Weak, Medium, Strong.
Advanced Setting Dynamic Contrast
Adjusts the dynamic contrast feature on the screen display: Off, Weak, Medium,
Strong. If this option is 'Off', the TV will automatically adjust the screen contrast.
Page 26

26
AUS
1300 777 137 service@unclebills.com.au
www.signifyelectronics.com.au
Sound Settings
The sound setting allows you to optimise the sound output quality of your TV. Press the MENU button and the
button once then use the
button to enter the Picture Setup Menu (please refer to page 24 for detailed instructions
for using the menu).
Basic Operations (cont)
Press the button to access the next menu options.
Audio Description Turn the audio description mode 'On' or 'Off' or adjust the volume.
Sound Type Switch between Stereo/Dual I/Dual II/Mixed.
Sound Mode Allows the ability to adjust sound modes to match correct use preference: Standard,
Movie, Music and Personal.
Treble Adjusts the relative intensity of higher pitched sounds.
Bass Adjusts the relative intensity of lower pitched sounds.
Balance Adjusts the balance of the left and right speaker. You can also independently turn
off the volume of the left or right sound speaker.
Surround Sound Turns the virtual surround 'On' or 'Off'.
EQ Setting Adjusts the curve of the 7 bands equaliser to optimise sound output.
AVL Audio Volume Level (AVL) enables you to apply a moderate sound control to avoid
sudden volume increases when switching between broadcast channels or during
commercials. When AVL is turned 'On', unexpected volume increases in the sound
modulation are decreased.
SPDIF Transmit digital audio to an external audio system. Select either PCM/Auto/Off.
PCM: PCM outputs two channel audio regardless of the input format.
Auto: Select the digital audio output format.
Page 27

27
AUS
1300 777 137 service@unclebills.com.au
www.signifyelectronics.com.au
Basic Operations (cont)
Channel Settings
Press the MENU button and the button twice, then use the button to enter into the Channel Setup Menu
(please refer to page 24 for detailed instructions for using the menu).
NOTE: If a lock or password protection has been applied to any of the channel settings options, unlock by keying
in the correct password, otherwise the default password is 0000.
Auto Scan Press the OK button to enter into the auto scan setting. Press the / buttons to select the
desired country and mode, then move to START press
to start scanning.
NOTE: If ATV+DTV is selected, the first 50% of the scan will be for ATV tuning, the
second half will be for DTV tuning. If required, the user has the option to exit the tuning
process at any time by pressing the EXIT button.
Manual Scan To make manual fine tuning adjustments of the channels under DTV mode, press OK to
enter into the Manual Scan Setting, then press the
/ buttons to select either Digital
Manual Scan or Analog Manual Scan.
Digital Manual Scan: Press OK to enter into Digital Manual Scan setting. Press
/ to
select the desired channel for the manual scan and select 'Start' to start manual scan.
Analog Manual Scan: No longer used in Australia.
Auto Channel
Update
This mode automatically updates the channel list when a new channel is available. Press
the
/ button to turn 'on' or 'off'.
Page 28

28
AUS
1300 777 137 service@unclebills.com.au
www.signifyelectronics.com.au
Basic Operations (cont)
Channel Edit Allows you to delete unwanted channels and re-organise channels into your desired
sequence. Channel Edit may be locked and password protected. To unlock, key in the
correct password, otherwise the default password is 0000.
Press OK to enter into Channel Edit setting.
• Delete: Press the RED button to delete the channel selection.
• Skip: Press the GREEN button to skip the channel, it will then be displayed in the
channel list but will be marked with “skip”. Press the OK button to confirm the
selection.
• Move: Press the BLUE button and use
and buttons to move the selected
channels to a preferred location in the channel list.
Favourite Manager Allows you to group your preferred channels into favourite list. The password to enter this
mode is 0000. The channels can be marked and organised into four groups. Use the RED
(delete), GREEN (skip), BLUE (move) and YELLOW (rename) buttons to select favourites
1-4. To access the favourite list press FAV in DTV mode. Use
/ buttons to navigate
through the list. Use buttons
/ to select the channel.
Signal Information Displays current channel information including frequency, strength and quality.
Page 29

29
AUS
1300 777 137 service@unclebills.com.au
www.signifyelectronics.com.au
Basic Operations (cont)
Lock System
This option allows users to prevent unauthorised users, such as children, from watching unsuitable programs.
Press the menu button, then the
button three times, then use the button to enter the Lock System setup menu
(please refer to page 24 for detailed instructions for using the menu).
Enter Password When you first use this function you will need to use the default password (0000) to enter
the Lock System menu. You can change the password in the New Password option below.
If you have forgotten your current password, the master password is 4711.
Channel Locks
The lock system must be set to 'On' for this function to operate.
To lock a channel, select On to enable the channel lock. Then use the navigation buttons to
select a channel, and press the OK button to confirm the lock of the channel. A lock icon
will display next to the channel indicating the channel is locked.
To unlock a channel, select Off to disable the channel lock. Then use the navigation buttons
to select the channel you wish to unlock and press OK button to confirm.
NOTE: If a channel is locked, you must enter a password to view the channel.
Page 30

30
AUS
1300 777 137 service@unclebills.com.au
www.signifyelectronics.com.au
Basic Operations (cont)
Parental Rating Allows you to select the program rating threshold to lock programs and channels with age
ratings. It operates according to the information from the broadcasting stations, therefore if
the signal has incorrect or no information, the function will not operate. Selections are:
• No block
• Block G and above
• Block PG and above
• Block M and above
• Block MA and above
• Block AV and above
• Block R and above
NOTE: Once the Parental Guidance mode is turned 'On', you can set viewing restrictions
for DTV TV reception only, but not input source from HDMI or component.
LOCK Keypad Select 'On' or 'Off'. If you turn the keypad on, you can use the keypad to input the
password.
New Password You can set a custom password by keying it in twice.
Clear Lock Press the OK button to erase all password settings, including resetting the password to
default (0000).
Page 31

31
AUS
1300 777 137 service@unclebills.com.au
www.signifyelectronics.com.au
Basic Operations (cont)
Setup Menu
Press the MENU button, then the
button four times, then use the button to enter into the Setup Menu as shown
below (please refer to page 24 for detailed instructions for using the menu). Press the
/ buttons to highlight
the desired options. Press the
/ buttons to adjust the options. Press the MENU button anytime to return to the
previous menu. Press the EXIT button to exit the Setup Menu.
OSD Language Allows you to select your desired OSD language for on-screen display menu. Defaults as
English.
Audio Languages Allows you to select your desired audio languages. Press the
/ buttons to select the
primary and secondary audio language.
Subtitle Allows you to select your desired subtitle language. Press the
/ buttons to select the
primary and secondary subtitle language or the hearing impaired option.
Teletext When teletext is highlighted press the OK button to enter to the menu. Then press the
/
buttons to select the decoding page language: West, East, Cyrillic, Arabic and etc.
*Teletext or Austext is no longer available, nor is there any plan for a replacement teletext
service in Australia. For more information, please visit the websites of the Australian
channel providers. However, one teletext option, “closed captions”, is still working on most
Australian television channels. This service allows you to activate subtitles while watching
normal television programs that provide it.
Blue Screen Activates or deactivates the blue screen during no signal conditions.
Page 32

32
AUS
1300 777 137 service@unclebills.com.au
www.signifyelectronics.com.au
Basic Operations (cont)
Time
Settings
OSD
Timer
Allows you to select how long the on-screen display (Menu) will stay on for each time.
Menu: Off, 10 seconds, 20 seconds, 30 seconds, 60 seconds. The on-screen display will
automatically close/turn off after the preset time has elapsed.
Note: The OSD timer will start from the beginning every time a button is pressed on either
the remote control or the TV.
Sleep
Timer
The clock will be set automatically when receiving a digital signal. The actual time must
be set before using Sleep Timer function. The sleep timer automatically switches the TV to
standby mode after the preset time has elapsed.
Press the
/ buttons to select a period of time after which the TV automatically switches to
standby mode: Off / 5 / 15 / … / 120 / 240 mins. The timer will count down the number of
minutes selected.
NOTE: If you turn the TV 'Off' after setting the sleep timer, the sleep timer setting will
automatically erase.
Auto
Sleep
Select preferred automatic sleep options: Off / 3 hours / 4 hours / 5 hours.
Time
Auto Sync: When 'On' is selected, the TV's date and time will automatically set according to
the information received via the digital signal (DTV). When 'Off' is selected, the date and time
can be manually set (see below).
Date: press the navigation buttons
/ / / or keypad (0-9) on the remote control to set
the date and press the OK button to confirm.
Time: press the navigation buttons
/ / / or keypad (0-9) on the remote control to set
the time, and press the OK button to confirm.
Note: Date and time can only be manually changed if Auto Sync is turned 'Off'.
HDMI
CEC
Control
You can use the TV's remote control to control external devices that are connected to the TV
by a HDMI cable (not included) and support HDMI-CEC.
To control external devices:
• HDMI cables must be used to connect HDMI CEC compatible devices to your TV.
• The connected device’s HDMI CEC function must be turned on.
• If you connect a HDMI device that is not HDMI CEC compatible, the CEC control
function may not work.
• Depending on the connected HDMI device, the CEC control function may not work.
ARC When CEC is turned on and you have connected an audio receiver to your TV, turning on
Audio Return Channel (ARC) allows you use your TV’s remote control to control the volume
on the audio receiver.
CEC
Menu
Control
Consumer Electronics Control (CEC) is a function that allows you to control multiple
devices with the HDMI cable using one remote control by having a secondary device receive
commands from a primary device.
Device
List
Displays a list of HDMI CEC devices that are connected to the TV and allows you to select
the source you want.
Page 33

33
AUS
1300 777 137 service@unclebills.com.au
www.signifyelectronics.com.au
Personal Video Recording (PVR)
PVR (Personal Video Recorder) allows you to record your favourite TV programmes by using a USB storage device
for saving the data. The time shift function is integrated with the PVR function and enables you to pause, fast
forward and rewind live TV, so you don't have to miss any part of your favourite programmes.
IMPORTANT: Before you can record programmes with this TV set (including time-shift recording), you must
insert a formatted USB storage device into the USB port located on the back of the TV. If your USB storage device
cannot be read by the TV, please see Trouble Shooting guide on page 46 for information on how to format your
storage device.
NOTE: USB storage devices are not included with your Signify
®
TV.
Recording TV Program
1. Insert your USB storage device into the USB port located on the back of the TV.
2. Set up PVR by following the instructions below:
Manual Recording when Watching a Program in DTV Mode
• In the channel you are watching, press the REC button on the remote control to start recording directly. There
will be a recording icon displayed on the screen to indicate this channel is currently recording. Press REC
button again to display information about the current recording.
• Press the
(STOP) button to display a dialogue window; select Yes to stop recording and select No to dismiss
the dialogue window.
Scheduled Recording in DTV mode
Refer to the instructions under EPG on page 40 to start scheduled recording by EPG schedule.
To Watch a Recorded Program
• In DTV mode, press the INDEX button on the remote control to display the PVR Settings. Select file manager,
press OK (alternatively, go to MENU > PVR> FILE MANAGER).
• Use the
/ button to select a recorded file and press OK to start playback in full screen mode.
/ Play / Pause
/ Fast Backward / Fast Forward.
NOTE: There are 4 speeds to which the TV can rewind/fast-forward the playback file
(x2, x4, x8, x16). To change speeds, press the
or button until the required
speed is acquired.
/ Skip backward to previous file or skip forward to the next file.
Stop playback.
EXIT
Press once to hide the on-screen menu. Press twice to exit playback file.
Page 34

34
AUS
1300 777 137 service@unclebills.com.au
www.signifyelectronics.com.au
Personal Video Recording (PVR) (cont)
CAUTION:
• DO NOT remove the USB drive while recording is in progress. This may damage the drive. The PVR function is
only available for digital non-encrypted channels.
• Before you connect the USB drive to the TV, make sure you have backed up the data in the drive to avoid the
loss of your important data due to unforeseen malfunction.
• We recommend that you use a USB drive with at least 1GB free space and a disk speed faster than 5.0MB/sec.
• The bigger the USB drive’s free memory is for the PVR function, the longer the recording length will be.
• If you want to change channel or signal source during recording, save and store the recording data first. Save
the recording by pushing the
button.
• The TV cannot play files normally if the parameters of the file exceed the limitations of the system, the file
format is not supported, the file is damaged, or the file cannot be decoded. Please see page 39 for Important
Notes for Using PVR/USB/Media Function.
• You cannot change to another channel or select another function while in recording mode.
• The file recorded can only be used in this TV. Do not copy it to any other device.
Page 35

35
AUS
1300 777 137 service@unclebills.com.au
www.signifyelectronics.com.au
Personal Video Recording (PVR) (cont)
PVR Settings Menu
To access the PVR settings, press the INDEX button on your remote control. Alternatively, go to Menu > Settings >
PVR Settings. The below dialogue box will pop up.
1. Press the / buttons to highlight the desired option.
2. Press the OK button to enter the settings and select options from File Manager/Device List/Scheduled Record.
3. Press the EXIT button to exit.
File Manager
1. Displays the list of files that have been recorded on the storage device.
2. Previews the selected recorded file.
3. Displays information such as channel/program name, recorded time and parental rating of the selected file.
4. Lists the buttons used on the remote control to navigate the File Manager.
• Press the RED/Replay button to replay the selected file.
To access or manage your recorded programs, select the File Manager option. The File Manager dialogue window
displays the list of files that have been recorded on the USB storage device.
Page 36

36
AUS
1300 777 137 service@unclebills.com.au
www.signifyelectronics.com.au
Personal Video Recording (PVR) (cont)
• Press the GREEN/Delete One button to delete the selected file.
• Press the YELLOW/Delete All button to delete all recorded files.
• Press the BLUE/Zoom In/Out gives you the option to go toggle between full screen and the File Manager
screen.
• Press the
button to move up in the list.
• Press the
button to move down in the list.
• Press OK button to play the selected file.
• Press the MENU button to return to the PVR Settings Menu.
• Press the EXIT button to exit.
Device List
Manages the devices connected to the TV.
WARNING: Ensure that no valuable information is currently stored on the USB storage device. Formatting the
device may mean ALL DATA will be ERASED from the memory drive connected to the USB/HDD port. Signify
®
does not take responsibility for any lost data.
1. The USB storage device should already be formatted to work with your Signify TV. If the TV can not read/write
the storage device, the device may need to be formatted. Press the RED/Format button to format the selected
USB storage device connected to your TV.
2. Press the
/ buttons to move up and down to select the device you want to use.
3. Press the OK button to play the selected file.
4. Press the MENU button to return to the PVR Settings Menu.
5. Press the EXIT button to exit.
Page 37

37
AUS
1300 777 137 service@unclebills.com.au
www.signifyelectronics.com.au
Personal Video Recording (PVR) (cont)
1. Press the GREEN/Delete One button to delete the selected item.
2. Press the YELLOW/Delete All button to delete all items.
3. Press the
/ buttons to move up and down.
4. Press the OK button to set up a new scheduled recording in the selected slot. The “Scheduled RecordGroup” dialogue box will pop up.
• Frequency: Select the frequency you would like to record the item (Off/Once/Daily/Weekly).
• Channel: Select the channel you would like to record.
• Start Time date: Press the OK button to open the calender and set the start date (YYYY-MM-DD).
Press the
button to key in the start time (hours/minutes) using the number buttons on the remote
control.
• End Time date: Press the OK button to open the calender and set the end date (YYYY-MM-DD).
Press the button to key in the end time (hours/minutes) using the number buttons on the remote control.
• Save: Save the setting and return to the previous menu.
Scheduled Record
Page 38

38
AUS
1300 777 137 service@unclebills.com.au
www.signifyelectronics.com.au
Personal Video Recording (PVR) (cont)
5. Press the MENU button to return to the PVR Settings Menu.
6. Press the EXIT button to exit.
NOTE: PVR/T-shift doesn’t support NTFS formatted USB storage devices. PVR doesn’t support encryption program
recordings.
NOTE: If channel locks or parental control locks are enabled, the locked programmes and channels can be
recorded, viewed and played back on this TV using password access. Key in your current password when the
password prompt pops up.
NOTE: While recording is in progress for a locked channel, you will still need to key in the password to watch that
channel. This does not interrupt the recording process.
Time-Shift Recording and Playback
The time-shift function allows you to pause live TV and resume playback at your convenience.
IMPORTANT! Before you can record with this TV (including time-shift recording), you must insert a formatted
USB storage device into the USB (USB storage device not included).
1. Insert your formatted USB storage device into the USB port. If your USB storage device cannot be read by the
TV, please see Trouble Shooting guide on page 46 for information on how to format your storage device.
2. While in DTV mode, press the T-SHIFT button on the remote control to initiate time-shift mode and pause the
program; the tool bar pictured below will appear on the screen.
3. Press the
/ button again to resume playback.
4. Use the
/ buttons, then press the OK button to select a function from the on-screen tool bar.
5. To stop time-shift, press the STOP button on the remote control and a confirmation dialogue window will
pop up; select 'Yes' to exit time-shift mode and return to live TV signal, or select 'No' to dismiss the dialogue
window.
Page 39

39
AUS
1300 777 137 service@unclebills.com.au
www.signifyelectronics.com.au
Important Notes for Using PVR/USB/Media Function
NOTE: The USB storage device will not retain recorded data after exiting the time-shift function.
• We strongly recommend you back up all data in the USB storage device to another storage device so you do not
risk losing any data in case of an unexpected device failure or accident. Signify
®
does not assume liability for
any loss of data due to misuse or malfunction. Data backup is your personal responsibility.
• You cannot change to another channel or select another function while in recording mode.
• If the signal is interrupted or removed while in recording mode, the recording will stop until the signal is
established. This may cause you to lose program content.
• The file recorded can only be used in this TV. Do not copy it to any other device.
• When you are in time-shift recording mode, you may experience some difficulty with a scheduled recording
at different times. If you see the message ‘DISK NOT READY’ displayed, remove the device, re-insert it, and
proceed with your recording.
• For large file sizes and large capacity storage devices, the loading speed may be longer. The recognition speed
of a USB storage device may vary depending on the device.
• When connecting or disconnecting the USB storage device, ensure the TV is not in USB mode, otherwise the
USB device or the files stored in it may be damaged.
• Ensure any USB devices connected to the TV do not use/exceed 500mA power rating. In order to operate a
desktop-type of hard drive with the TV, you will need to use a compatible power adaptor.
• If an “Unsupported File” message is displayed, the file format or codec is unsupported or corrupted.
• If you have limited access to the back of the TV, please use a high quality USB extension cord (not included) for
easy access of the USB port.
• CD/DVD drives and other devices connected via USB cannot be used.
• Do not use a device that has security functions or other special functions.
• Do not use a device that is divided into two or more partitions.
• A USB hub cannot be used to connect USB devices to this unit.
• If the file information contains Japanese, Chinese or other double-byte characters, playback is possible but the
name will not be shown correctly.
• The TV USB playback can only support audio formats of single and binary channels.
IMPORTANT: If your USB storage device cannot be read by the TV, please see Trouble Shooting guide on page 46
for information on how to format your storage device.
Page 40

40
AUS
1300 777 137 service@unclebills.com.au
www.signifyelectronics.com.au
Electronic Program Guide (EPG)
Electronic Program Guide (EPG) is supplied by the program providers and offers information about the programs to
be broadcasted. You can access it in digital mode by pressing the EPG button on the remote control.
Press the EPG button to display the EPG interface (below). The area at the top will display information about the
selected program or channel, and the column section below will display the list of available channels and their
programs at various time slots.
NOTE: Before you can view any EPG information, you have to ‘activate’ each channel for which you want to view
program information. To do this, press the
/ buttons to select a channel in the left column, then press OK to
confirm.
• Press the
/ buttons to switch between columns.
• Press the
/ buttons to select a different channel/program in the list and Press OK to activate the channel.
• Press the RED button to display the TV guide from the previous day.
• Press the GREEN button to display the TV guide for the next day.
• Press the YELLOW button to enter the schedule list page.
• Press the BLUE button to schedule a reminder for the selected program.
• Press the REC button to schedule a recording for the selected program.
• Press the INFO button to display full program information.
• Press EXIT to exit the EPG menu.
Page 41

41
AUS
1300 777 137 service@unclebills.com.au
www.signifyelectronics.com.au
Connecting to a PC
Connecting the Computer to the TV
Be sure both the TV and PC are set to the OFF position.
1. Connect a VGA and audio cable to the VGA input on the back of the TV.
2. Connect the TV power cord to an appropriate power outlet and turn the
power on.
3. Turn the TV on from standby mode, and press the INPUT button on the
remote control to select PC mode (see image).
Note: You may need to select the appropriate setting on your PC to
project the image and sound from the PC to the TV. Please refer to the PC
instruction manual for the required setting that needs to be selected.
4. Turn on the PC.
Note: A HDMI cable (not included) can also be used to connect your PC
to the TV as long as the PC is fitted with a HDMI output. Both sound and
picture will be generated through the HDMI cable.
NOTE: This connection and power-up sequence is very important as it will
ensure both devices are protected from power spikes.
PC Display Setting
1. Press the
/ buttons to select a desired option to optimise the display setting.
2. Press the OK button to adjust the display settings.
3. After adjusting the settings, press the OK button to confirm and return to the previous menu.
Auto Adjust
Sets automatic settings based upon the selection of H Position/V Position/Phase/Clock.
Page 42

42
AUS
1300 777 137 service@unclebills.com.au
www.signifyelectronics.com.au
Media Centre
Media Centre Menu
The Media centre allows you to play pictures, music, movie and text file on TV via portable USB storage device.
Insert a formatted storage device (with a standard USB port) into the USB port in the back of the TV. If your USB
storage device cannot be read by the TV, please see Trouble Shooting guide on page 46 for information on how
to format your storage device.
Press the INPUT button on the remote control or on the right side of the TV to display the Source menu, press
the
/ buttons to select the media source, then press the OK button to confirm (to exit Media Centre Menu
press the INPUT button to return back to other sources).
While in Media Centre:
1. Press the
/ buttons to highlight the multimedia type and press the OK button to enter your desired
media type.
2. Press the
/ buttons to navigate through files and then press the OK button to enter the folder or play
the file.
3. Press MENU button to access sound and picture settings.
4. Press the EXIT button to return to the previous directory.
Playable File Format
Photo: .jpg, .jpeg
Music: .mp3, .aac, .wav
Video: .avi, .mpeg, .mpeg4, .mkv, .flv, .rmvb, .vc-1
Text: .txt
NOTE: To play any file in the PVR Folder, please select the "Movie" multimedia type, then select the PVR folder
and choose the program you wish to view.
Page 43

43
AUS
1300 777 137 service@unclebills.com.au
www.signifyelectronics.com.au
Media Centre (cont)
Media Content Control Buttons
When playing the multimedia file, press the play, pause, forward or backward buttons to control the media file.
Alternatively, press the INFO button on the remote control to bring up the file information and on-screen hot keys for
controlling the multimedia files.
Photos
1. Select the photo display option by using the navigation buttons on the remote.
2. Press the
/ buttons on the remote control to select the USB source and then Press the OK button to enter.
3. Use the navigation buttons to select the folder that contains the picture you would like to view.
4. Press the OK button to display picture.
5. Press the EXIT button to exit or return to the previous directory.
While Browsing Photos
• Press the INFO button to display/exit the picture information bar.
• Press the
/ buttons to select the previous/next pictures.
• Press the OK button to pause slide show, and press the
/ buttons to rotate the picture.
• Press the BLUE button to display/exit the Quick Menu.
Music
1. Play music and audio files by using the navigation buttons on the remote control to access music player.
2. Press / buttons on the remote control to select the USB source and then press the OK button to enter.
3. Press the
/ buttons to select the folder that contains the music file you would like to listen to.
4. Press the OK button to select the music file to play.
5. All music is listed on the left display. Press the
/ buttons to select music and press the OK button to
play. You can press the
/ buttons to change the page.
6. Press the BLUE button to display/exit the Quick Menu; press the
/ buttons to select the options in the
menu. Press the
/ buttons to select the settings.
7. Press the EXIT button to exit the music playback interface.
Page 44

44
AUS
1300 777 137 service@unclebills.com.au
www.signifyelectronics.com.au
Media Centre (cont)
Video
1. Select Movie by using the navigation buttons on the remote control.
2. Press the
/ buttons to select the USB source and then press the OK button to enter.
3. Press the
/ buttons to select the folder containing the desired video file.
4. Press the OK button to play the video.
5. Press the EXIT button to exit and return to the previous directory.
6. Press the INFO button to display/exit the picture control bar.
7. Press the Blue Button to display/exit the Quick Menu.
8. Press P.Mode / S.Mode to set desired picture and sound mode.
9. Press Aspect to set display aspect ratio 16:9, 4:3, Zoom 1 and Zoom 2.
10. Press sleep to set sleep timer.
/ Play / Pause
/ Fast Backward / Fast Forward.
NOTE: There are 4 speeds to which the TV can rewind/fast-forward the playback file
(x2, x4, x8, x16). To change speeds, press the
or button until the required
speed is acquired.
Skip backwards to previous file or skip forward to the next file.
Stop playback.
EXIT
Press once to hide the on-screen menu. Press twice to exit playback file.
/
Page 45

45
AUS
1300 777 137 service@unclebills.com.au
www.signifyelectronics.com.au
Text
1. To display text files (most files with the extension .txt), select the Text option by pressing the navigation
buttons on the remote control.
2. Press the
/ button on the remote control to select the USB source and then press the OK button to enter.
3. Press the
/ buttons to select the folder that contains the text you want to view.
4. Press the OK button to browse the text.
5. Press the
/ buttons to select the options in the menu.
6. Press the
/ buttons to select the settings.
7. Press the EXIT button to exit and return to the previous directory.
8. Press the BLUE button to display/exit the Quick Menu.
WARNING: To unplug your USB Storage device, please always exit media centre by pressing the Input button
and return to DTV Mode. Then it is safe to unplug your USB storage device.
Media Centre (cont)
Page 46

46
AUS
1300 777 137 service@unclebills.com.au
www.signifyelectronics.com.au
Problem Solution
No power • Insert the power plug securely into the power outlet and ensure the power outlet
is switched on.
No picture • Ensure that the equipment is connected properly. Adjust the indoor antenna or
use an external antenna.
• Move the TV set away from any product that causes interference.
• Check antenna position, direction and connection. Auto-tune the TV again.
• Try another channel.
No sound or distorted
sound
• Ensure that the equipment is connected properly.
• Ensure that the input setting for the TV is correct.
• Ensure the audio settings are properly set.
• Ensure the volume is not muted. If it is, press the MUTE button on the remote
control to restore the sound.
• Check antenna position, direction and connection.
• If earphones are connected, unplug them.
• Adjust the volume to a suitable level by pressing the VOL+/VOL- button.
No operations can be
performed with the remote
control
• Check the batteries are correctly installed.
• The batteries may be exhausted; replace them.
• Make sure to point the remote control at the remote control sensor and try it
again.
• Make sure to use the remote control at a distance of no more than 5 metres from
the sensor.
• Remove any obstacles between the remote control and remote control sensor.
• Confirm that TV still has power and is operational.
• Operate the remote control within suggested range see page 21.
No key operation (by
the main unit and/or the
remote control) is effective
• Disconnect the power plug and then reconnect it (the unit may not be operating
properly due to lightning, static electricity or some other factors).
Picture contains noise • Electronic equipment near the unit such as appliance or electric tool which may
be causing interface. Relocate the unit or move the equipment.
• Check antenna position, direction and connection.
Trouble Shooting
Page 47

47
Body text
AUS
1300 777 137 service@unclebills.com.au
www.signifyelectronics.com.au
Trouble Shooting (cont)
Horizontal/vertical stripe
on picture or picture is
shaking
• Check antenna position, direction and connection.
Can’t play the USB device • Please refer to page 39 for Important Notes for using PVR/USB/Media function.
Can’t pick up any
channels
• Ensure the TV is connected to a working outdoor digital Antenna.
NOTE: Analog TV broadcasting is no longer in use in Australia, your old
antenna may have worked with your Analogue TV but is not suitable for Digital TV
Broadcasts).
• Once the TV has been connected, please run an “Auto Scan” or “Auto Search” to
scan all channels for first time use.
Some channels appear
pixelated or with "No
Signal?”
• Pixelation of the picture, popping of the sound, or complete drop out from time
to time are all signs of a poor signal coming into the TV. Please check your
antenna or consult with your local antenna technician.
TV will not read/write the
USB storage device
• USB storage device may not be formatted correctly. To format the USB storage
device, on the remote control, press MENU> SETUP> PVR SETTINGS> DEVICE
LIST then press the red button to format the storage device. The popup will
request permission to format your device, select yes to start formatting.
Page 48

48
AUS
1300 777 137 service@unclebills.com.au
www.signifyelectronics.com.au
Customer Support
Thank you for purchasing a Signify® product.
Should you encounter any problem, before returning the product to the store, please read USER MANUAL carefully,
check our online Q&A’s or contact us directly. Our friendly technical support team will be happy to assist you. In the
event that the product has technical issue and is unrepairable, we will provide you a Return Authorisation Number if
the faulty product needs to be returned to store.
Customer Support Team
1300 777 137
Hours of Operation: 9am – 4:30pm* Monday – Friday
9am – 3pm Saturday
* Hours of Operation are Australian Eastern Standard Time.
service@unclebills.com.au
www.signifyelectronics.com.au
ITEM CODE: EA0816
Page 49

49
AUS
1300 777 137 service@unclebills.com.au
www.signifyelectronics.com.au
Product Specifications
Item EA0816
Model D50RWB244-F-T
DISPLAY
Screen Diagonal 50" (127 cm)
Aspect Ratio 16:9
Resolution 1920*1080
Luminance
Typical:160cd/m²; Max: 200+-10%cd/m²
Contrast Ratio
5000:1
Maximum Colors 16.7M
Response Time 8.5ms
Vision angles 176H/176V
PICTURE QUALITY
Display Format 480i, 480p,576i, 576p, 720p, 1080i, 1080p
3D De-interface Yes
3D Com Filter Yes
FEATURES
OSD Language English, French, German, Italian, Spanish, Portuguese.
Picture size 16:9 / 4:3
PVR YES
HDMI 1.4
OTHER EPG, Subtitle, LCN,TELETEXT (Europe), MHEG-5(UK)
TV Input
ATV/DVB-T
Video System ATV:PAL, SECAM
DTV:MPEG-2 MP@ML, MPEG-2 MP@HL, H.264
Sound System ATV:BG, DK, I, L/L', NICAM / A2
DTV:MPEG-1 layer 1/2, DD, DD+, AAC, HE-AAC
Built in Tuner Yes
Input/Output Terminal
Earphone out x1 / PC Audio x1 / VGA x1 / RF x1 / YPbPr in x1 / CVBS in x1 /
COAX out x1 / HDMI x3 / USB x1
Page 50

50
Body text
AUS
1300 777 137 service@unclebills.com.au
www.signifyelectronics.com.au
Product Specifications (cont)
SOUND
Audio Output 8W x2
Stereo Yes
POWER
Working Power consumption ≤135W
Stand by Power consumption ≤0.5W
AC Power Supply 100-240V~ 50Hz
ACCESSORIES
Remote Control Yes
User Manual Yes
Batteries for Remote Control Yes
Page 51

51
AUS
1300 777 137 service@unclebills.com.au
www.signifyelectronics.com.au
Notes
Page 52

52
AUS
1300 777 137 service@unclebills.com.au
www.signifyelectronics.com.au
Notes
 Loading...