

Signet QV-3020 User Manual
1
4 Channel Digital Video
Recorder / Camera Kit
Model No QV-3020
USER’S MANUAL

1
Important Note:
Please keep this manual in a safe location in case you need to refer to it at a later date.

0
INDEX
CHAPTER 1: DVR FEATURES................................................................................................................................. 1
CHAPTER 2: LAYOUT-2.1 FRONT PANEL........................................................................................................... 1
CHAPTER 2: LAYOUT - 2.2 REAR PANEL ............................................................................................................ 2
CHAPTER 2: LAYOUT - 2.3 REMOTE CONTROL ............................................................................................... 2
CHAPTER 3: INSTALLATION - 3.1 HARD DRIVE INSTALLATION ................................................................ 3
CHAPTER 3: INSTALLATION - 3.2 CONNECTING CAMERA AND MONITOR ............................................ 3
CHAPTER 3: INSTALLATION - 3.3 CONNECTING POWER SUPPLY ............................................................. 3
CHAPTER 4: SYSTEM BOOTUP - 4.1 DETECTING INSTALLED HDD ........................................................... 3
CHAPTER 4: SYSTEM BOOTUP - 4.2 RECOVERING FILE SYSTEM ERRORS............................................ 4
CHAPTER 4: SYSTEM BOOT - 4.3 RESTORE RECORDING FEATURE.......................................................... 4
CHAPTER 4: SYSTEM BOOT - 4.4 MAIN SCREEN ............................................................................................. 4
CHAPTER 5: DVR SETUP - 5.1 SETUP MENU ...................................................................................................... 5
CHAPTER 5: DVR SETUP - 5.2 CAMERA SELECT.............................................................................................. 6
CHAPTER 5: DVR SETUP - 5.3 RECORD SELECT .............................................................................................. 6
CHAPTER 5: DVR SETUP - 5.4 RESOLUTION...................................................................................................... 6
CHAPTER 5: DVR SETUP - 5.5 RECORD FRAME ............................................................................................... 7
CHAPTER 5: DVR SETUP - 5.6 RECORD QUALITY ........................................................................................... 7
CHAPTER 5: DVR SETUP - 5.7 SCHEDULE SET.................................................................................................. 8
CHAPTER 5: DVR SETUP - 5.8 MISCELLANEOUS MENU-AUTO RECORD ................................................. 8
CHAPTER 5: DVR SETUP - 5.9 MISCELLANEOUS MENU-PASSWORD ENABLE ....................................... 9
CHAPTER 5: DVR SETUP - 5.10 MISCELLANEOUS MENU-PASSWORD CHANGE .................................... 9
CHAPTER 5: DVR SETUP - 5.11 MISCELLANEOUS MENU-COLOR SET...................................................... 9
CHAPTER 5: DVR SETUP - 5.12 MISCELLANEOUS MENU-TIME SET........................................................ 10
CHAPTER 5: DVR SETUP - 5.13 HARD DRIVE SETUP..................................................................................... 10
CHAPTER 5: DVR SETUP - 5.14 MOTION SET....................................................................................................11
CHAPTER 5: DVR SETUP - 5.15 VIDEO MODE.................................................................................................. 12
CHAPTER 5: DVR SETUP - 5.16 FACTORY RESET........................................................................................... 12
CHAPTER 6: RECORDING - 6.1 START RECORDING ..................................................................................... 13
CHAPTER 6: RECORDING - 6.2 STOP RECORDING........................................................................................ 14
CHAPTER 6: RECORDING - 6.3 RECORDING TIME ON HARD DRIVE ...................................................... 14
CHAPTER 7: PLAYBACK........................................................................................................................................ 15
CHAPTER 8.1: INSTALLING THE PC VIEWER PROGRAM........................................................................... 16
CHAPTER 8.2: PC VIEWER INTERFACE............................................................................................................ 16
CHAPTER 8.3: PC BACKUP.................................................................................................................................... 17
CHAPTER 9.1: DVR SPECIFICATIONS................................................................................................................ 18
CHAPTER 9.2: CAMERA SPECIFICATIONS ...................................................................................................... 18
CHAPTER 10: APPENDIX -10.1 CONNECTION DIAGRAM............................................................................. 19
CHAPTER 10: APPENDIX - 10.2 DVR ACCESSORIES (INCLUDED).............................................................. 19
1
Chapter 1: DVR Features
z Embedded Camera Power Supply.
z Simple Connection Method.
z Motion Detection.
z Scheduled / Motion Triggered Recording.
z PC Backup & Playback.
z Built in 320GB WD AV Surveillance Hard Drive.
z Remote Control.
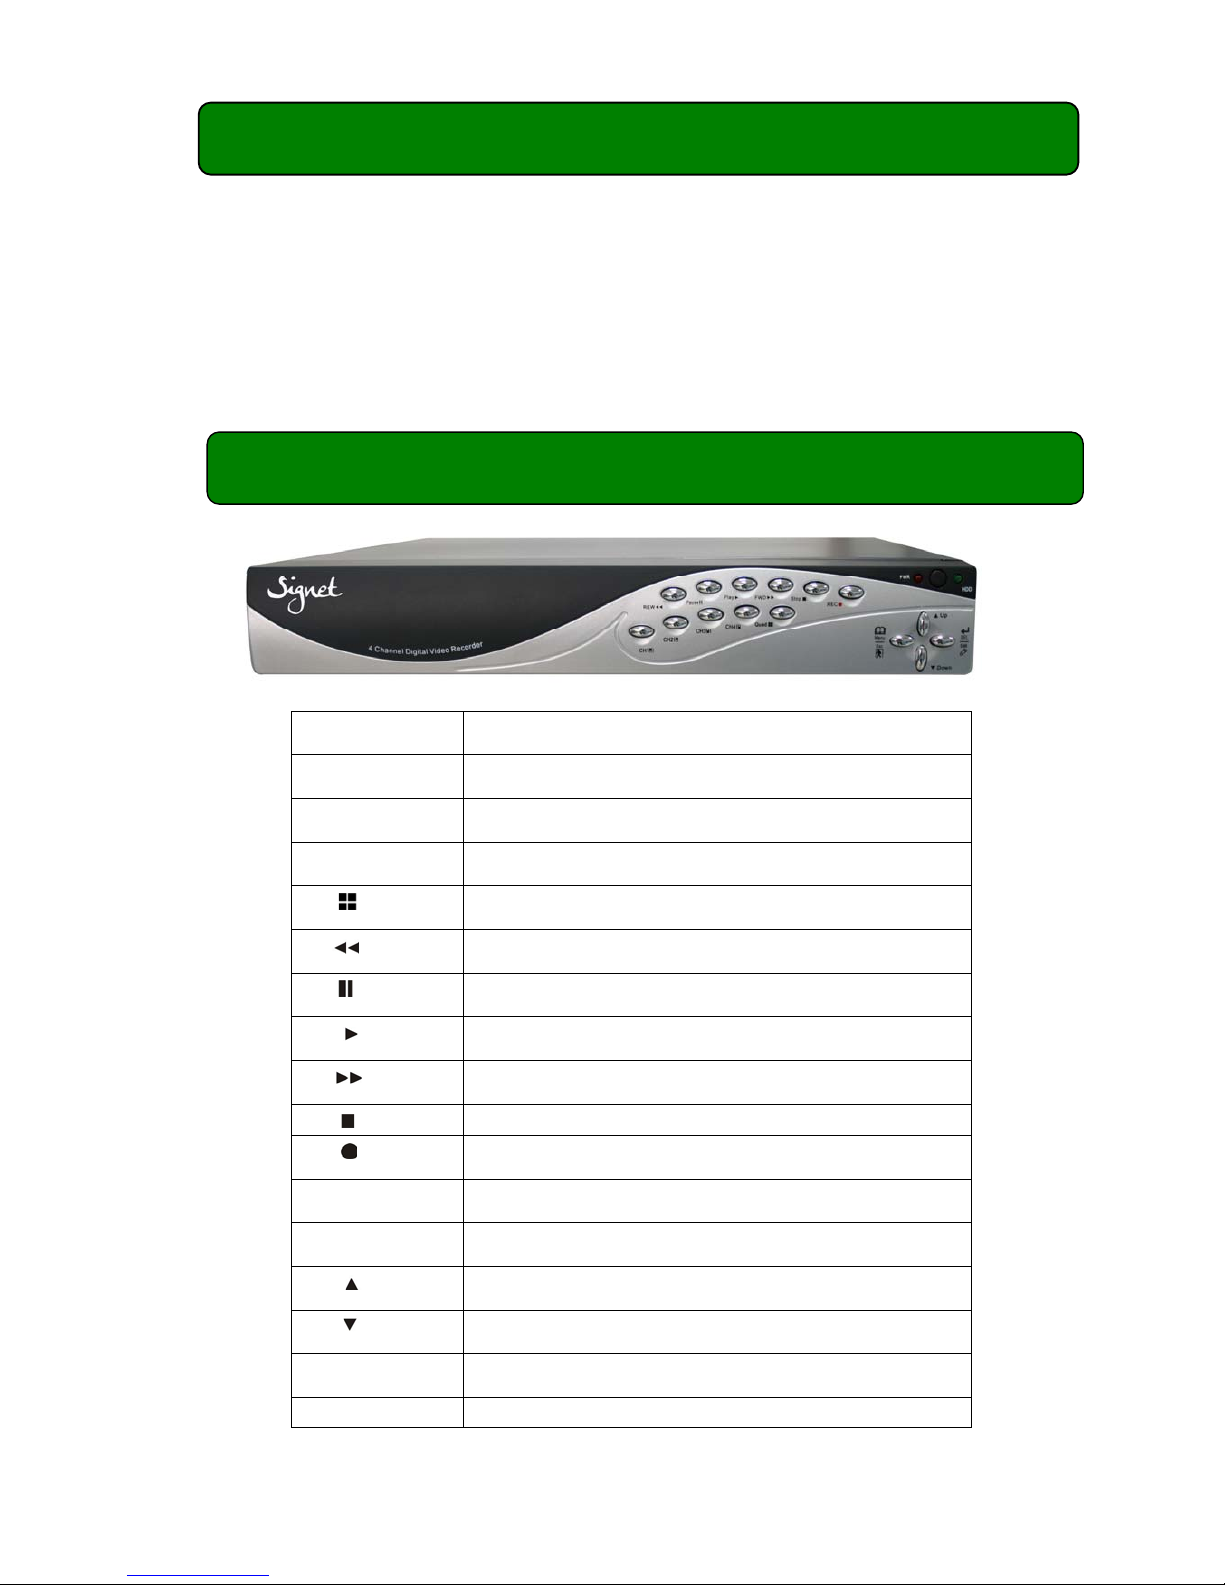
Chapter 2: Layout-2.1 Front Panel
CH1
Select / Display Channel #1
CH2
Select / Display Channel #2
CH3
Select / Display Channel #3
CH4
Select / Display Channel #4
Quad
Quad Display
REW
Rewind
Pause
Pause
Play
Play / List Recordings
FWD
Fast Forward
Stop
Stop Recording / Playback
REC
Record
Menu/Esc
Enter / Exit Menu
SEL/Edit
Select / Modify Item
Up
Move Up / Left
Down
Move Down / Right
PWR
Power Indicator
HDD
Hard Disk Drive Activity LED
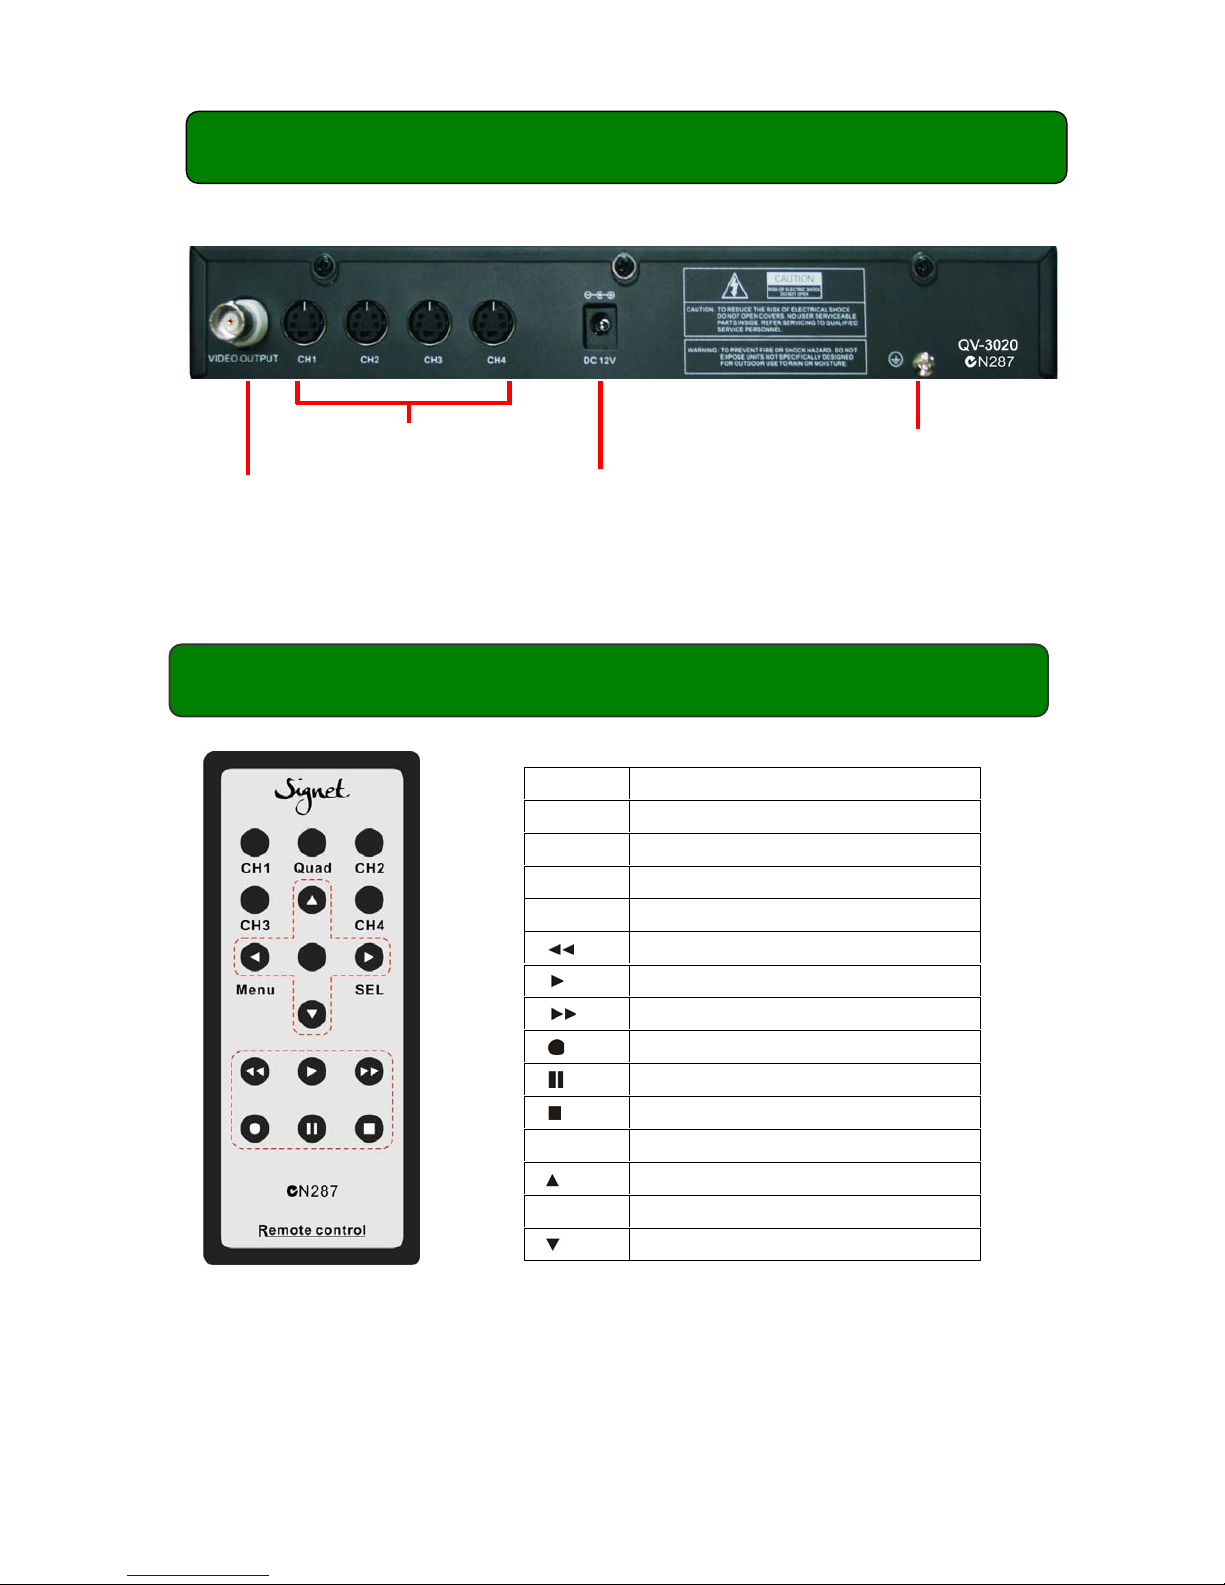
2
Chapter 2: Layout -
2.2 Rear Panel
Note: The USB port is located on the right hand side of the case.
Chapter 2: Layout -
2.3 Remote Control
CH1 Select / Display Channel #1
CH2 Select / Display Channel #2
CH3 Select / Display Channel #3
CH4 Select / Display Channel #4
Quad Quad Display
Rewind
Play / List Recordings
Fast Forward
Record
Pause
Stop Recording / Playback
Menu Enter / Exit Menu
Move Up / Left
SEL Select / Modify Item
Move Down / Right
Power Supply Input
Ground Terminal
Camera Inputs
Video output

3
Chapter 3: Installation -
3.1 Hard Drive Installation
This unit has been factory fitted with a 320GB WD AV Surveillance Hard Disk;
please return to the supplier for service or upgrades.
Chapter 3: Installation -
3.2 Connecting Camera and Monitor
There are 4 camera inputs and 1 video output (Refer to 2.2 Rear Panel).
Chapter 3: Installation -
3.3 Connecting Power Supply
Chapter 4: System Bootup - 4.1 Detecting Installed HDD
(Refer to 2.2 Rear Panel).
Please use only the power adapter supplied.
Use of any other power source may void your warranty.
After connecting power, the system will boot-
up and detect the installed hard drive.
The on screen display will show the hard
drive information.
Please note that the displayed capacity will be
lower than the rated capacity due to space
allocated to the file system.
Checking HDD ……
MASTER…

4
Chapter 4: System Bootup -
4.2 Recovering File System Errors
Chapter 4: System Boot -
4.3 Restore Recording Feature
Chapter 4: System Boot -
4.4 Main Screen
A power failure may cause errors in the file
system. If errors are detected the DVR will
give you the option to repair the errors.
If a power failure occurs whilst the
system is recording the DVR will
automatically resume recording once
power is restored.
Note: If errors are detected these will
need to be corrected first. (Refer to
4.2 Recovering File System Errors)
RECOVER HDD?
04811-101735
(SELECT)YES/(MENU)NO
Power Error Detected
Restore Hard Disk (Master) OK
Restore REC Mode…………
OK
While the DVR is operating the monitor
will display the following information:Upper left: Percent of hard drive space
used.
Middle: Channel name (CH1 - CH4).
Bottom right: Date and Time
Bottom left: System status.
(Refer to 6.1 Start Recording)
5
Chapter 5: DVR Setup - 5.1 Setup Menu
Menu
Directory
CAMERA SELECT
RECORD SELECT
RESOLUTION
RECORD FRAME
VIDEO QUALITY
SCHEDULE SET
MISCELLANEOUS MENU
HARD DISK SET
MOTION SET
VIDEO MODE
FACTORY RESET
[ Menu]: Enter menu.
[
Up] and [ Down]: Move the cursor.
[
SEL]: Select/Modify Settings.
[
Menu]: Press again to exit.
MAIN MENU
CAMERA SELECT 1234
RECORD SELECT 1234
RESOLUTION EACH
RECORD FRAME 25
RECORD QUALITY HIGH
SCHEDULE SET
MISCELLANEOUS MENU
HARD DISK SET
MOTION SET
VIDEO MODE PAL
FACTORY RESET
(UP, DOWN) MOVE (SELECT) CHANGE
PRESS (MENU) TO EXIT
MAIN
MENU
AUTO RECORD
PASSWORD
COLOR SET
TIME SET
 Loading...