

Page 1
Approved Document No. DAU0000567 Rev 5 • Page 1 of 4Approved Document No. DAU0000567 Rev 5 • Page 4 of 4
PL1
PORTABLE INDUCTION LOOP AMPLIFIER
USER INSTRUCTIONS
Please read ALL of these instructions before use - failure to do so may result in poor performance
What is an induction loop system?
Audio frequency induction loop systems (AFILS) work by transmitting amplified sound to
NHS hearing aids. Most hearing aids have a ‘T’ or ‘MT’ switch which allows them to pick up
the electromagnetic signal generated by an induction loop system. The hearing aid converts
this signal into a sound suited to its users specific hearing requirements, allowing them to
participate more fully in general conversation, ordering goods or services, etc.
The PL1 is a compact audio-frequency induction loop amplifier capable of generating a loop
listening field of more than 100mA/M (the level required by BS 7594 : The code of practice for
audio-frequency induction loop systems) at distances greater than 1m from the unit itself.
Suitable for counter, table or desktop use, it is ideal for restricted person to person contact in
areas such as banks, post offices, small meeting rooms, reception desks, open plan offices and
ticket booths.
Its portable, lightweight design and simple one button operation allows it to be moved
easily from location to location and ready for use within seconds, facilitating easy and
economical compliance with the Disability Discrimination Act.
Portable Induction Loop System Specification
© Errors and omissions excepted. These instructions are general and cannot be considered to cover every aspect of AFILS installation.
No responsibility can be accepted by the manufacturer or distributors of this equipment for any misinterpretation of an instruction
or guidance note or for the compliance of the system as a whole. The manufacturer of this equipment operates a policy of continuous
improvement and reserves the right to alter product specifications at its discretion and without prior notice.
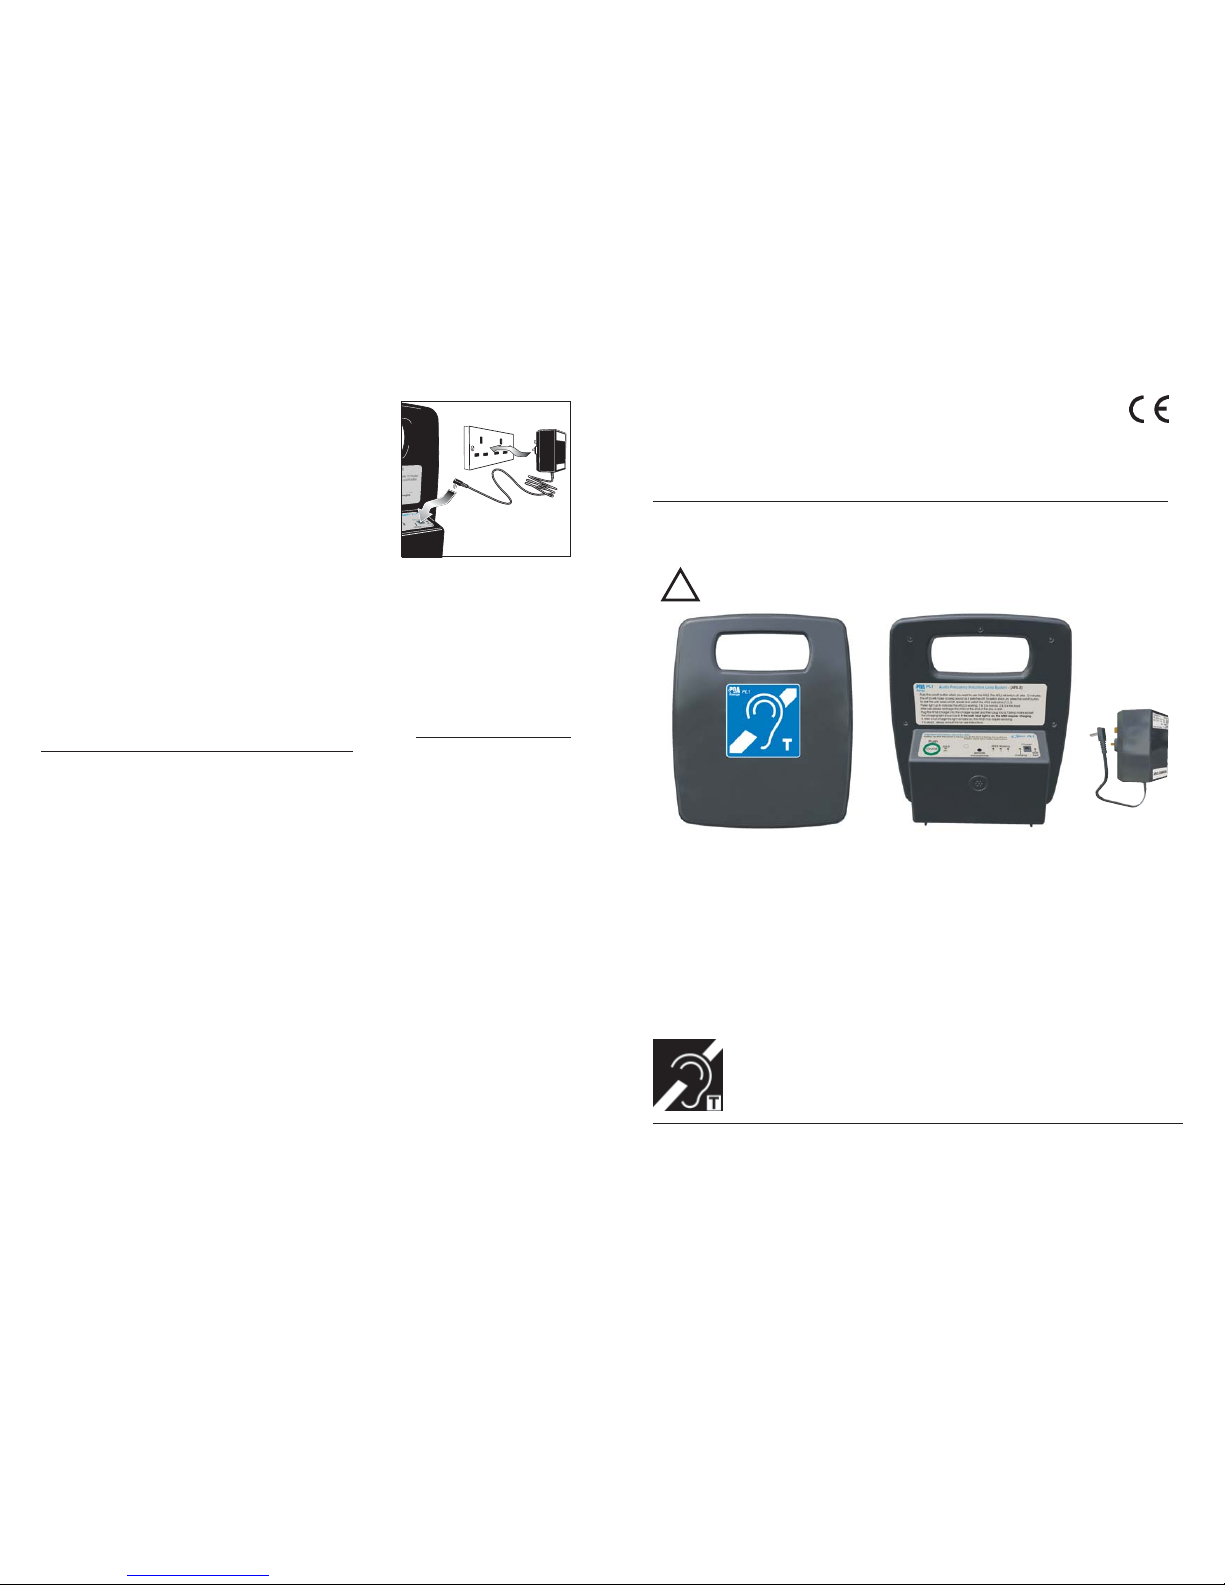
Charging the amplifier
To ensure the amplifier is ready for use at short notice it should
be regularly charged using the PL1/PSU1 plugtop charger.
Simply connect the lead from the PL1/PSU1 plugtop charger to
the socket marked charger on the rear of the amplifier and
the charger itself to a standard 13A mains socket (see right).
Whilst charging, the charging indicator on the rear of the
amplifier will be lit green and the batt.status indicator will
flash yellow. When the batt. status indicator goes out the
amplifier is fully charged and ready for use.
The amplifier can be used as normal when charging or, if desired, remain permanently
connected to the charger with no adverse effects.
To maintain the battery in good condition the amplifier should be charged overnight at least
once a month or more regularly if its usage demands it.
You must charge the amplifier whenever the PL1’s batt.status light is lit yellow as this indicates
the battery is low. Under normal circumstances, there will be enough battery capacity to use the
amplifier for a period of time before it shuts down due to insufficient charge.
If left unused for long periods, e.g. six months, a fully charged battery will slowly discharge itself.
If the amplifier is stored away for over a year without recharging, the battery WILL completely
discharge itself and will need replacing. This will be indicated by the yellow batt. status indicator
being permanently lit after repeated attempts to fully recharge it. Note that a fully discharged
battery must be replaced by a suitably qualified engineer.
Accessories & spares available from your distributor
TEAR-P “AFILS available” sticker; CASE1 Robust plastic storage/carry case; AMT Remote desk/tie
microphone; PL1/PSU1 Replacement PL1 plugtop charger, UK type; PL1 Replacement PL1
amplifier (PSU not included); PL1/BATT Replacement battery for PL1; AHHM/H FoSmeter ‘H’
combined magnetic field strength meter/loop listening device; HEAD1 Headphones for use with
AHHM/H.
Only use the PL1/PSU1
plugtop charger
!
• Internal 12V VRSLA
(Valve Regulated Sealed Lead Acid)
battery - monitored against deep discharge.
• Expected battery life five years under normal operating/charging conditions.
• 230v a.c. separate plugtop charger included in PL1/K1, PL1/K2, PL1/K3 and PL1/K4 kits.
• Automatic shut-off timer (nominally set to 10 minutes, adjustable to 30 minutes or 60 minutes).
• 0.5m optimum internal microphone operating distance.
• 100Hz-5Khz frequency response and fully automatic compressor (up to 5:1 max).
• Nominal 1 metre operating range at 1KHz providing an AFILS field strength of >100mA/M.
• <1% Total harmonic distortion of output current @1Khz, 1M distance & 100mA/M field strength.
• PL1 dimensions (WxHxD) = 250 x 300 x 100mm approx.
• PL1 weight (including battery) = 1.7kg
PL1/
PSU1
!
IMPORTANT: The amplifier must be charged for up to 24 hours upon delivery.
Note that the amplifier can be used as normal whilst it is charging.
Page 2
Approved Document No. DAU0000567 Rev 5 • Page 2 of 4 Approved Document No. DAU0000567 Rev 5 • Page 3 of 4
Familiarisation with your portable loop system
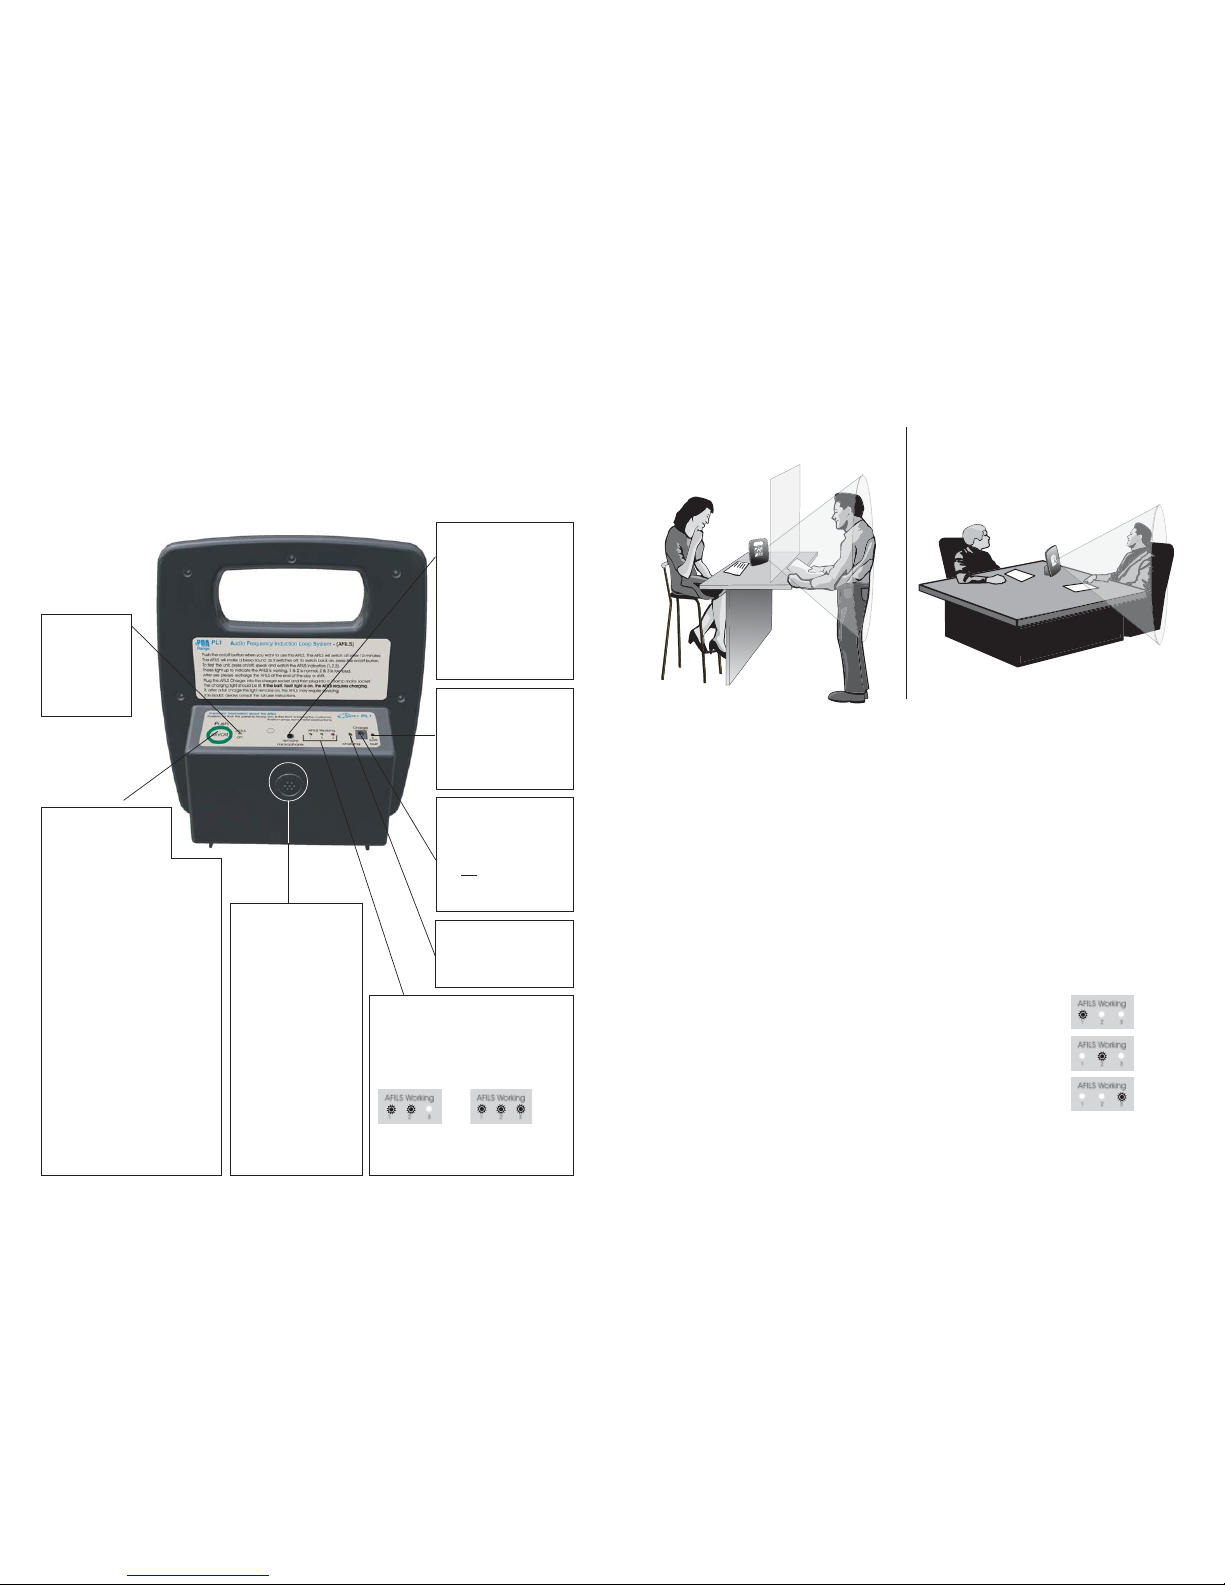
All of the amplifier’s indicators and controls can be found on its rear. Although short form user
instructions also appear on its reverse, we strongly recommend you read the more detailed
information on the following pages before using the system.
Although the unit will operate straight from its storage box, it is advisable to charge the PL1
overnight before using it for the first time (see charging the amplifier section on page 4 for details).
AFILS On
indicator
Lit green when
the amplifier is
switched on and
ready to use
AFILS Working indicator gauge
When the user speaks these indicators
will illuminate to confirm the system is
working correctly. They follow the user’s
speech pattern and measure the
electrical current in the induction loop.
Typical applications
Remote socket
For connection of optional
equipment such as an
AMT tie/desk microphone.
Please note, inserting
ancillary equipment into
this socket will disable the
PL1’s internal microphone.
See page 4 for a list of
ancillary equipment.
Internal microphone
The PL1 contains an
internal speech
compressor / automatic
gain control and, as such,
the user does not have to
direct his or her voice
directly towards this
microphone. This feature
allows the PL1 to be
positioned slightly to one
side of the user as shown
in figures 1 & 2. Optimum
performance is achieved
at speaking distances of
approx. half a metre.
Please also refer to the
AFILS Working gauge to
ensure best performance
If yellow & red (2&3) are predominantly
lit, adjust the unit’s position and/or your
speech direction accordingly.
Battery status indicator
Illuminates yellow when
the battery is low and in
need of recharging. Flashes
yellow when the unit is
recharging. See page 4.
Charger socket
For connection of the PL1’s
plugtop battery charger.
Note that the amplifier
will
still operate when its
battery is charging. See
page 4 for further details.
= OK
=
too
loud
Charging indicator
Lit green when the battery
is being charged. See page
4 for further details.
Figure 1 :
Typical counter / ticket booth application
Figure 2 :
Typical tabletop / meeting room application
In order to view people in wheelchairs, etc., it is important you do not position the amplifier directly in front of you. Always position the amplifier so its front is angled towards the hearing aid
user without blocking their view. The microphone on the rear of the amplifier has a wide pick up
range and will continue to respond to your speech if positioned as shown in the above diagrams.
If multiple portable loop systems are to be used in close proximity, it is possible that the ‘field’
generated by one system may be picked up by a hearing aid user stood at another. To guard
against this, try to ensure there is a gap of at least two metres between each system.
It can be seen from figure 1 that as well as covering tall people, the field of coverage of the AFILS
system also extends down to cover small children, people confined to wheelchairs, etc.
Changing the amplifier’s default on time
The amplifier’s default on time can be changed from the factory default setting of 10 minutes to
30 or 60 minutes as required.
To do this, make sure the amplifier is powered down and then press and hold down the On/Off
button and watch the ‘AFILS working’ indicators step between 1, 2 and 3.
Let go of the button when indicator 1 is lit to set the on time to 10 mins.
Let go of the button when indicator 2 is lit to set the on time to 30 mins.
Let go of the button when indicator 3 is lit to set the on time to 60 mins.
For partially sighted users, the PL1 also sounds a stepped frequency beep
to aid selection (low = 10 mins; medium = 30 mins; high = 60 mins).
The amplifier’s on time commences the moment the On/Off button is
released. 10 seconds before the end of the session, a beeper will sound to
indicate shut off is imminent. To extend the session by a further period,
simply press the On/Off button again before the 10 seconds elapse.
If the amplifier is switched off at any time, the default on time will return to its previous set rate
when it is switched back on. Please note, if the On/Off button is pressed whilst the unit is on and
NOT in the last 10 seconds of its session time, it will immediately turn off.
= 10 mins
= 30 mins
= 60 mins
On/Off button
To turn the amplifier on,
momentarily press the
On/Off button (to turn
it off press the On/Off button again).
Provided the battery has enough
charge, the PL1’s AFILS On
indicator light will be lit green.
The system is now ready to use
(refer to the typical application
diagrams on page 3 for guidance
on the amplifier’s position).
To prevent the system being left on
for extended periods of time and
flattening the battery, the
amplifier is set to operate for a
default on time of 10 minutes.
10 seconds before the 10 minutes
expires, a beeper will sound to
indicate that shut off is imminent.
To extend the amplifier’s on time,
simply press the On/Off button
again before the 10 seconds elapse.
If required, the system’s default on
time can be extended to 30 or 60
minutes. See page 3 for details.
 Loading...