


FIELD CONTROL SYSTEMS
™
GALAXY
OPERATION MANUAL
GALAXY™ Field Controller
Quick Start Guide
Firmware Version 5.50
Document Title GALAXY FIELD CONTROLLER QUICK START GUIDE
– FIRMWARE VERSION 5.50
Document Number DOCGOMQS550
Revision Number B
Release Date FEBRUARY 26, 2009
Pages 16

GALAXY™ Field Control Systems
Quick Start Guide
- v
5.50
Signature Control Systems, Inc. shall not be liable for technical or editorial errors or omissions contained
herein; nor for incidental or consequential damages resulting from furnishing this material, or the
performance or use of this product.
Signature Control Systems reserves the right to change product specifications without notice. Information
in this document may change without notice.
No part of this document may be copied, reproduced, or transmitted by any means, for any purpose
without prior written permission from Signature Control Systems, Inc.
Page 2 of 16 DOCGOMQS550 (Rev B)

GALAXY™ Field Control Systems
Quick Start Guide
- v5.50
Contents
Safety Symbols .............................................................................................................................. 4
Personal Injury Warning ................................................................................................................ 4
Section A ...................................................................................................................................5
Control Panel Overview ............................................................................................................5
a) Control Panel Description .............................................................................................5
Keypad Descriptions ..................................................................................................................... 5
b) Screen Display ...............................................................................................................7
System Status / Current Activity ................................................................................................... 7
Message Dialogs ............................................................................................................................ 7
c) Galaxy Menu Navigation ...............................................................................................8
Section B ...................................................................................................................................9
Turning Stations ON and OFF ..................................................................................................9
a) Using Manual Modes Menu ...........................................................................................9
Using the Main Menu to Activate Stations.................................................................................... 9
b) Using Smart Switch Activation.......................................................................................11
Using the Smart Switch to Activate Stations .............................................................................. 11
Procedure to Manually Start/Stop a Station Using Smart Switch .............................................. 11
Set Default Time for the Smart Switch ........................................................................................ 11
Section C .................................................................................................................................13
Controller Setup ......................................................................................................................13
a) Set Date/Time...................................................................................................................13
Setup Current Time and Date .................................................................................................... 13
b) Select the Display Language ..........................................................................................14
Notes ........................................................................................................................................15
Figures
Figure 1 Galaxy Field Controller Menu Tree .......................................................................................... 8
DOCGOMQS550 (Rev B) Page 3 of 16
GALAXY™ Field Control Systems
Quick Start Guide
- v
5.50
Safety Symbols
Become familiar with the safety symbols presented in this section. These symbols will alert you to
safety hazards and conditions that may result in personal injury, death, or property and equipment
damage. The following symbols are used in this document:
WARNING: Failure to observe this warning may result in personal injury or death.
CAUTION: Failure to observe this caution may result in property and equipment damage.
Note: Highlights important information or details.
Idea: Indicates a suggestion that helps you make better use of your system.
Personal Injury Warning
TO PREVENT PERSONAL INJURY - DO NOT STAND DIRECTLY OVER ANY LARGE
TURF SPRINKLERS WHEN FILLING SYSTEM OR WHEN ACTIVATING MANUALLY
WARNING!
AT THE SPRINKLER.
Page 4 of 16 DOCGOMQS550 (Rev B)
GALAXY™ Field Control Systems
Quick Start Guide
- v5.50
Section A
Control Panel
Overview
Operating a Field Controller
Section A describes the basic control panel overview and procedures for operation. Detailed
Descriptions can be found in the “GALAXY Field Controller Programming Guide, DOCGOM550.”
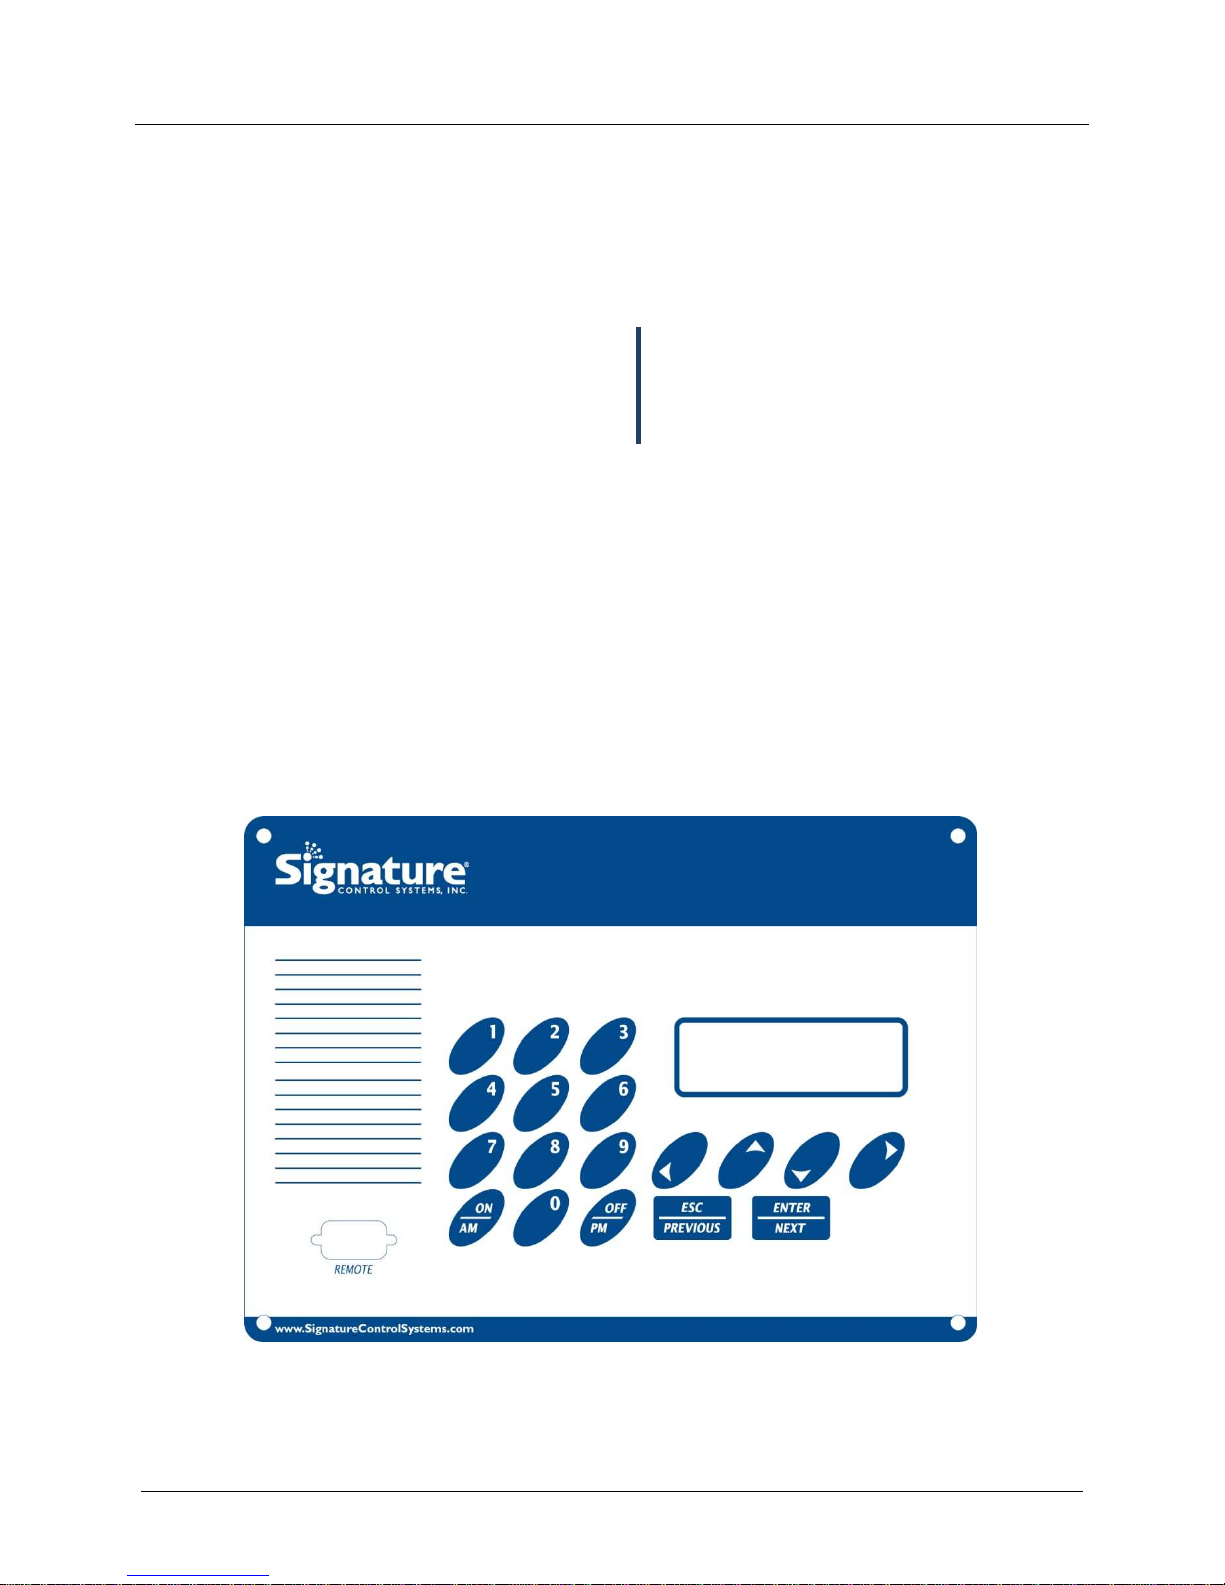
a) Control Panel Description
Keypad Descriptions
DOCGOMQS550 (Rev B) Page 5 of 16

GALAXY™ Field Control Systems
Quick Start Guide
- v
5.50
ON/AM Activates watering days and/or pump stations. Sets the clock to AM when using
the 12-hour format, and turns stations on with the smart switch.
OFF/PM Deactivates watering days and/or pump stations. Sets the clock to PM when
using the 12-hour format, and turns stations off with the smart switch.
ESC/PREVIOUS Exits the current menu or data entry position without saving entries.
ENTER/NEXT From the Startup screen, this button activates the Main menu for programming
the controller. From the Main menu, this button saves the current information in
the highlighted menu option.
UP, DOWN, RIGHT and LEFT ARROWS
Moves the cursor in the direction indicated. The right and left arrows are also
used to scroll through predefined options when setting up sensors, watering
schedules or changing languages.
0 thru 9 Data entry keypad buttons.
Page 6 of 16 DOCGOMQS550 (Rev B)

Quick Start Guide
- v5.50
b) Screen Display
(The display figures are in gray tone for clarity.)
The Startup Screen shows the following information:
GALAXY™ Field Control Systems
03:54:53
ID#:001
*A*
This icon is only an indication that an alarm occurred in the controller.
Stations: 08
Current Time /
Displays the unique 3-digit number that identifies the Field Controller on the Field
Controller network (i.e. address). If the unit is also used as a repeater, REP appears in
the ID# field.
Displays the total number of stations configured for the Field Controller. If the
unit also controls decoders, then the number of stations and decoders appears.
For example, STNS: 08 + 274 would indicate that 8 stations and 274 decoders
are configured for the Field Controller.
12/25/2008
Current Date.
System Status / Current Activity
Displays the current status and activity of the Field Controller as one of the following:
OFF appears if the Field Controller is off or in the rain shut
down mode meaning no automatic programs will run. When
the word OFF is not there the controller is ON and will run an
automatic program if it is triggered by one of its cycle starts.
REP appears in the ID# field if the unit is used as a repeater.
Message Dialogs
Important message dialogs will appear during normal
programming functions. This line means that a message
came in from controller 990 on port 2; there is no need to
acknowledge anything it is only a message that tells you
the controller got a message from another controller or the
software. To get rid of the message just hit ESC.
DOCGOMQS550 (Rev B) Page 7 of 16
GALAXY™ Field Control Systems
Quick Start Guide
- v
5.50
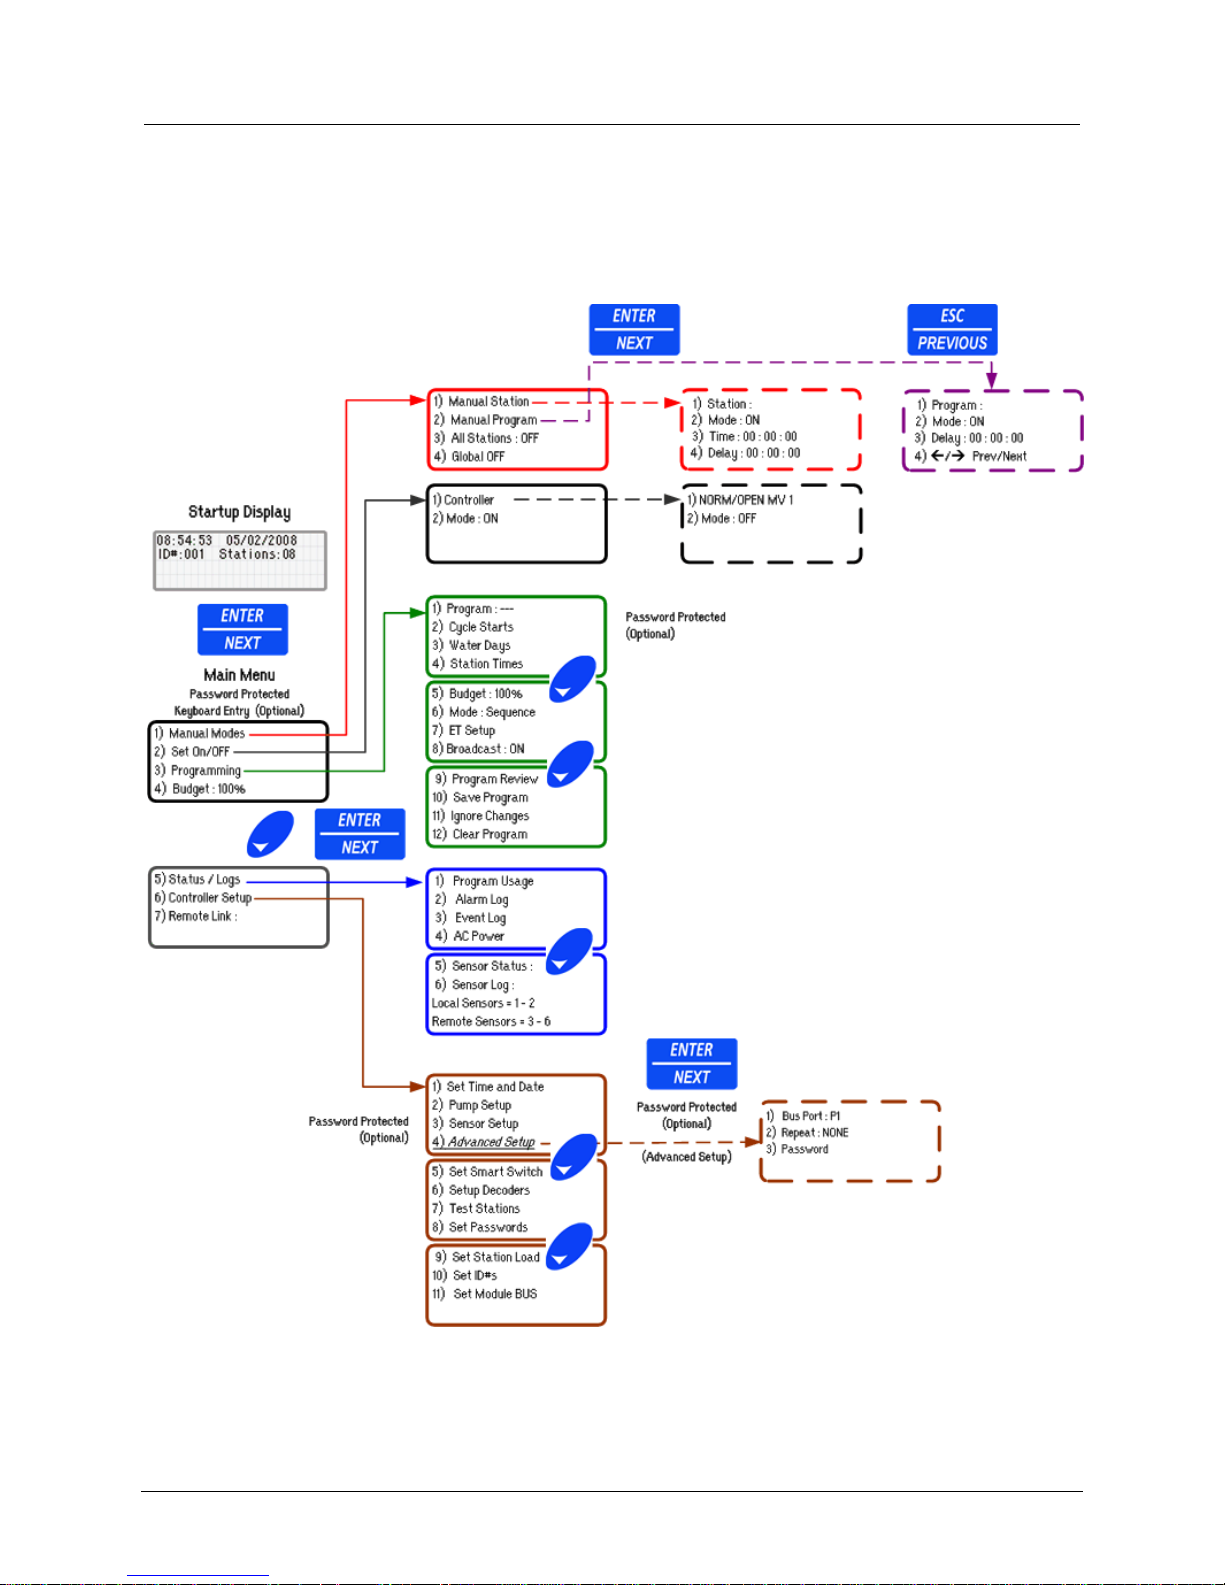
c) Galaxy Menu Navigation
Page 8 of 16 DOCGOMQS550 (Rev B)
Figure 1 Galaxy Field Controller Menu Tree

GALAXY™ Field Control Systems
Quick Start Guide
- v5.50
Section B
Turning Stations ON
and OFF
Manually Starting and Stopping
of Stations
Section B describes the procedures to start and stop stations manually. Detailed Descriptions can
be found in the “GALAXY Field Controller Programming Guide, DOCGALPG550.”
There are 2 ways to start or stop stations, either thru using (a) Manual Modes Menu or (b) Smart
Switch Activation.
a) Using Manual Modes Menu
Using the Main Menu to Activate Stations
1) Manual Modes
1) Manual Modes
1) Manual Modes 1) Manual Modes
2) Set ON/OFF
3) Programming
4) Budget: 100%
1)
1) Manual Station
Manual Station
1) 1)
Manual Station Manual Station
2) Manual Program
3) All Stations OFF
4) Global OFF
The above “Manual Modes” sub-menu options perform these tasks:
• Manually starting or stopping a station.
• Manually starting or stopping a program.
• Stop all active stations on the Field Controller.
• Stop all active stations on the site. In order to use this option, there must be a means of
communication between the Field Controllers on the site.
There are optional parameters to set specific DELAY durations.
The Delay Time duration, HHMMSS, is an optional parameter.
• If the Delay Time duration is omitted in an ON operation, no DELAY is used and the
station starts immediately. If used, it defines the DELAY duration, after expiration of this
duration the Station will start.
The Run Time duration may be used by itself without specifying the Delay Time duration, but if using
the Delay Time duration the Run Time duration must be specified.
Neither of the parameters is required for OFF operations.
DOCGOMQS550 (Rev B) Page 9 of 16
GALAXY™ Field Control Systems
Quick Start Guide
- v
5.50
1)
Station
: 001
1) Station: 001
1)
Station
: 001
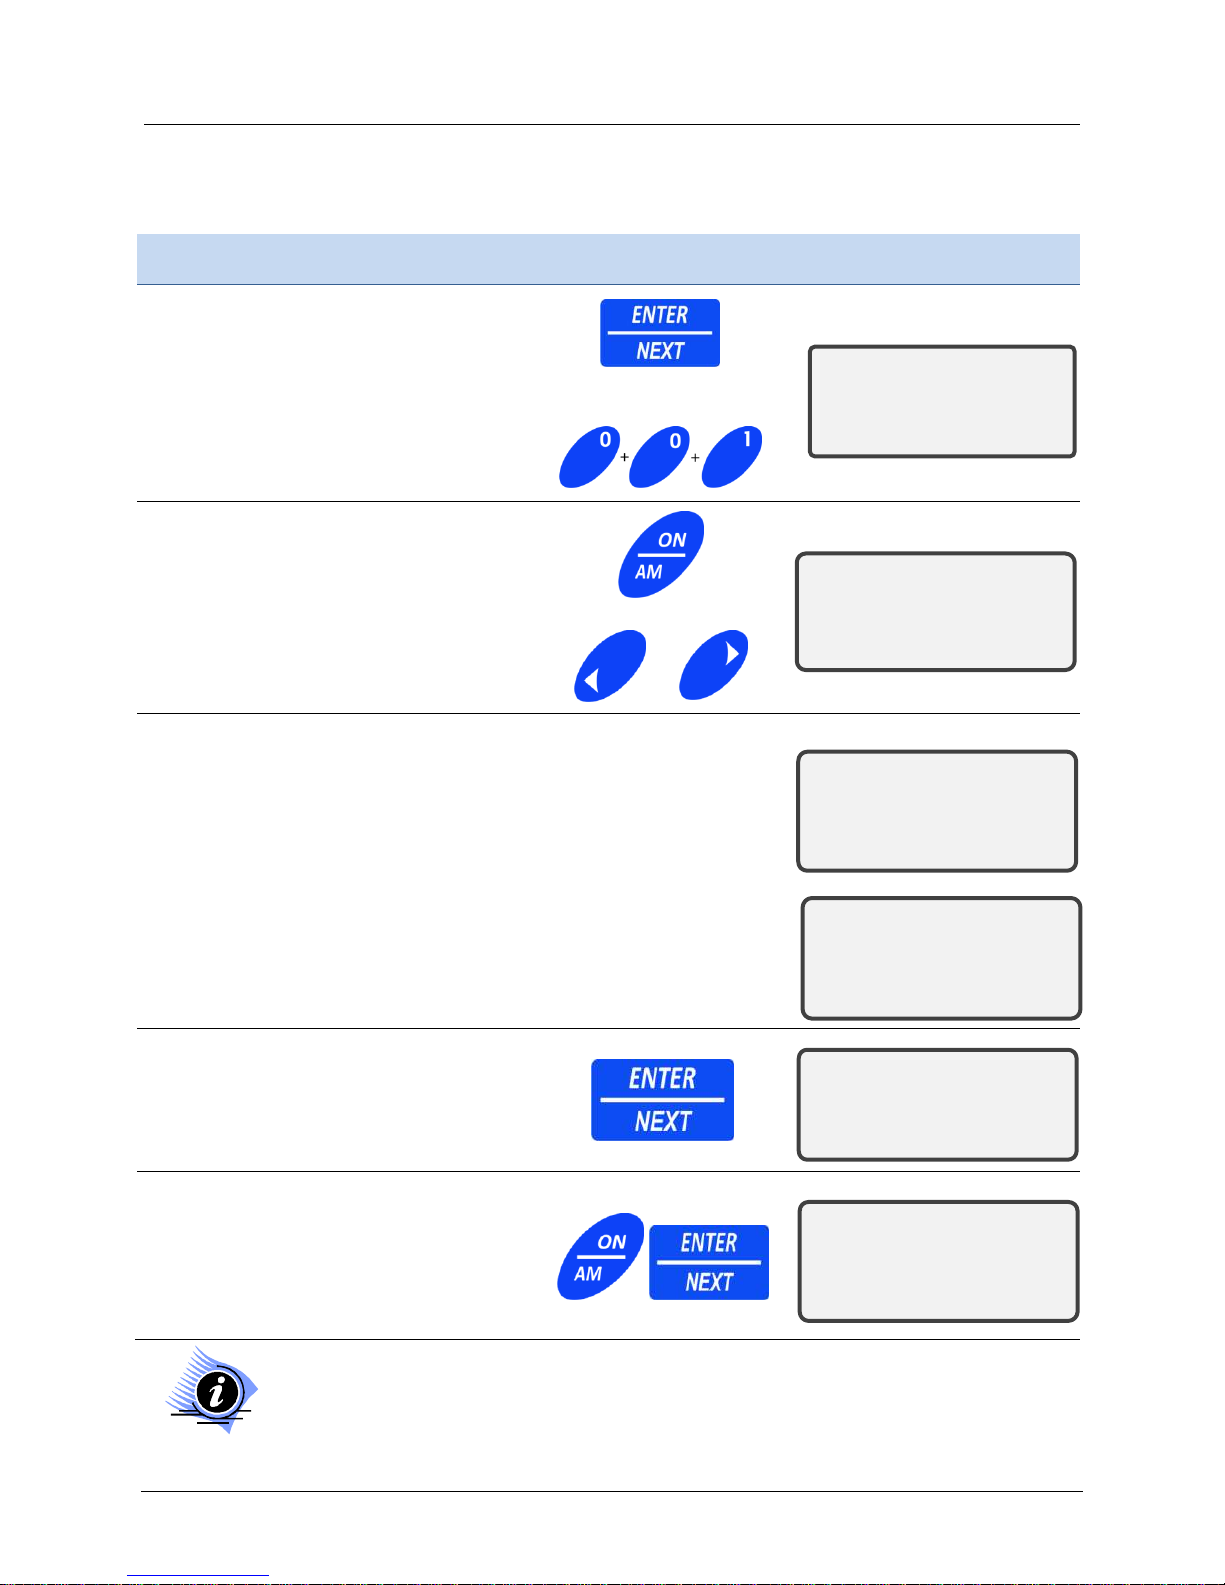
Procedure Keypad Display
1. From the Startup screen press Enter.
Then select option 1) Manual Modes.
Then select option 1) Manual Station.
2. Press ENTER/NEXT button again.
3. At menu option 1) Station, press keys
to enter a three-digit number to identify
the station number; for example, press
keys 001 for Station 1.
Press keys:
1)
1) Station:
Station: ------
1) 1)
Station: Station:
2) Mode:
3) Time: 00:00:00
4) Delay: 00:00:00
--
----
4. Press the ON/AM button or press left or
right arrows until ON is the Mode.
5. Press down arrow to option 3) Time,
enter the Water Time for the station in
hours: minutes: second’s format. For
example, to enter a Water Time of 10
minutes, press right arrow twice, press
key 1.
6. Press down arrow to option 4) Delay,
enter the Delay Time for the station in
hours: minutes: second’s format. For
example, to enter a delay time of 10
seconds, you would press keys
000010.
7. To start the station, press the
ENTER/NEXT button.
The station starts or if you entered a
delay time, the delay countdown
begins.
or
Arrow twice and
Press key: 1
Press keys: 000010
2)
2) Mode: On
Mode: On
2) 2)
Mode: OnMode: On
3) Time: 00:00:00
4) Delay: 00:00:00
2) Mode: ON
3)
3) Time
Time: 00:10:00
: 00:10:00
3) 3)
TimeTime
: 00:10:00: 00:10:00
4) Delay: 00:10:00
2) Mode: ON
3) Time: 00:10:00
4) Delay: 00:00:10
4) Delay: 00:00:10
4) Delay: 00:00:104) Delay: 00:00:10
1)
1) Station
Station: 001
StationStation
: 001
: 001: 001
1) 1)
2) Mode:
3) Time: 00:10:00
4) Delay: 00:00:10
8. To add another station with the same
Water Time and Delay Time, enter a
station number and press the ON/AM
button; and then press the
ENTER/NEXT button to activate the
station(s).
A Delay time is not required to activate a station.
Page 10 of 16 DOCGOMQS550 (Rev B)
1)
1) Station
Station:
1) 1)
StationStation
2) Mode:
3) Time: 00:10:00
4) Delay: 00:00:10
: ---
---
: :
------

GALAXY™ Field Control Systems
Quick Start Guide
- v5.50
Set Smart Switch
b) Using Smart Switch Activation
Using the Smart Switch to Activate Stations
The Smart Switch is a short cut to turn stations on manually for a preset time directly from the main
screen without having to go to the Manual Operations menu.
Procedure to Manually Start/Stop a Station Using Smart Switch
Procedure Keypad
Press keys:
1. On the Startup screen, enter the three-digit station number for
the station you want to operate.
2. Press the ENTER/NEXT button.
3. Press the ON/AM button. The station that was entered will
manually operate the amount of time specified in the Set Smart
Switch feature.
4. To turn the station off before the time expires repeat the steps
above except press the OFF/PM button instead of the ON/AM
button.
Alternately;
Set Default Time for the Smart Switch
The default time for the Smart Switch is set at ten minutes.
Procedure Keypad Display
5. Press the down arrow button to option
6) Controller Setup.
6. Press the ENTER/NEXT button, and
then press the down arrow button to
option 5) Set Smart Switch.
7. Press the ENTER/NEXT button and
enter the amount of time you want the
station running in hours: minutes: and
seconds format.
8. Press the ENTER/NEXT button to
return to the menu.
5) Set Smart
5) Set Smart Switch
5) Set Smart 5) Set Smart
6) Setup Decoders
7) Test Stations
8) Set Passwords
Run Time:
00 hr 19 min 00 sec
00 hr 19 min 00 sec
00 hr 19 min 00 sec00 hr 19 min 00 sec
5)
5) Set Smart Switch
5) 5)
6) Setup Decoders
7) Test Stations
8) Set Passwords
Switch
SwitchSwitch
Set Smart Switch
Set Smart SwitchSet Smart Switch
DOCGOMQS550 (Rev B) Page 11 of 16

GALAXY™ Field Control Systems
Quick Start Guide
- v
5.50
This page intentionally left blank
Page 12 of 16 DOCGOMQS550 (Rev B)

GALAXY™ Field Control Systems
Quick Start Guide
- v5.50
1) Time : 06 : 00 : 00
P
1) Time : 07 : 45 : 00 P
Section C
Controller Setup
Setup a Field Controller
Chapter C describes the basics of how to setup the field controller. Detailed Descriptions can be
found in the “GALAXY Field Controller Programming Guide, DOCGALPG550.”
a) Set Date/Time
Setup Current Time and Date
First set the Mode for time to a 12-hour or 24-hour clock then continue through to set time, date, week
preferences.
Procedure Keypad Display
1. Press down arrow to menu option
6) Controller Setup, and press the
ENTER/NEXT button.
2. At menu option 1) Set Date / Time
press the ENTER/NEXT button.
3. Press down arrow to option 4) Mode;
use right or left arrow buttons to toggle
between a 12-hour and a 24-hour time
mode.
4. After you select the Mode, press the up
arrow to menu option 1) Time to set
time, date and week preferences.
or
Toggle 12 or 24 hour
2) Date : 04/15/2008
3) Week (1-4) : 1
4) Mode
4) Mode : 12 hour
4) Mode 4) Mode
: 12 hour
: 12 hour: 12 hour
5. At menu option 1) Time, enter the
current time of day; set in hours:
minutes: seconds: format. Press keys:
060000.
6. Press down arrow to option 2) Date
enter the current date set mm/dd/yyyy
format. Enter date, press keys:
04152008.
DOCGOMQS550 (Rev B) Page 13 of 16
Enter Time of Day
Press keys: 060000
Enter Date
Press keys: 04152008
1) Time
1) Time : 06 : 00 :
: 06 : 00 : 00
1) Time1) Time
2) Date : 01/01/1999
3) Week (1-4) : 1
4) Mode : 12 hour
2) Date :
3) Week (1-4) : 1
4) Mode : 12 hour
: 06 : 00 : : 06 : 00 :
2) Date : 04
2) Date : 2) Date :
04/15
0404
/15/200
/15/15
00
0000
/2008888
/200/200

GALAXY™ Field Control Systems
Quick Start Guide
- v
5.50
1) Time : 07 : 45 : 00 P
SCS Inc. V5.
5
0.00G2
CAUTION!
Make sure to verify the AM/PM status before leaving option 1) Time. If it is 7:45 PM in the
afternoon (and this is the first time the controller is setup), and then settings are changed
from a 12 to a24 hour mode, the controller will be set at 7:45 AM not PM. You would be
required to set the time to 19:45:00.
3) Week option applies only to programs
that are using the Weekday schedule
option.
7. Press down arrow to 3) Week option;
use the keypad to enter the current
week, based on the 4-week period used
by the watering programs.
Enter 1 = week 1 of 4
This only applies to
programs that are using
the WEEK day schedule
option.
2) Date : 04/15/2008
3) Week (1
3) Week (1----4) :
3) Week (13) Week (1
4) : 1111
4) : 4) :
4) Mode : 12 hour
b) Select the Display Language
Your controller is equipped with two languages at a time; the default is English/Spanish. Also
available is English/German, English/French, English/Dutch, English/Italian and others.
Procedure Keypad Display
1. Press any arrow button at the Startup
screen.
2. Press the right arrow button to toggle the
Language field between English and
Espanol.
3. After making a language selection, press
the ENTER/NEXT button. The Main screen
(and all menus) will appear in the selected
language.
AUR SITE: 00000000
1)
1) Lang
Lang : English
: English
1) 1)
LangLang
: English: English
2) LOCK : --------
Page 14 of 16 DOCGOMQS550 (Rev B)

GALAXY™ Field Control Systems
Quick Start Guide
- v5.50
Notes
DOCGOMQS550 (Rev B) Page 15 of 16

Signature Control Systems, Inc.
World Headquarters
1 Mason ▪ Irvine ▪ California ▪ 92618 ▪ USA
Tel: 949.580.3640 ▪ Fax: 949.580.3645
www.SignatureControlSystems.com
® Signature and the Signature logo, Constellation and the Constellation logo, Galaxy and the Galaxy logo are trademarks and/or
registered trademarks of Signature Control Systems, Inc.
© 2009 Signature Control Systems, Inc. All Rights Reserved.
 Loading...