

Page 1

Natural Draft Diesel Heater
Operating and Installation
Instruction Manual
*KEEP THIS MANUAL FOR FUTURE REFERENCE*
Sig100, 120, 170, 180
** Please read from beginning to end before installing and operating.
Heater’s Serial #: __________________
Form#7.2-256 Issue#2 Sept 5th, 2012
Quality Controlled by- Doug & Don
Page 2

2
WARNINGS
- Do not operate this heater unattended.
- Turn off the heater when refueling.
- Do not burn gasoline.
- When operating the heater there MUST be an open fresh air vent.
- Do not light a warm burner or it can result in an explosion.
- Do not use a pressurized fuel tank.
- Do not plug the overflow fitting.
- Install a CO alarm.
- Follow ALL installation and operation procedures.
1. About a Natural Draft Diesel Heater
A Sig Marine diesel heater has many advantages to other heating appliances.
They can be run on no power but has a 12v draft assist fan to provide draft
assistance. Our heaters are equipped with simple but reliable internal
components including a gravity feed oil metering valve to a vaporizing oil
burner where the fuel vaporizes by natural draft to burn a beautiful clean fire
in the viewing combustion chamber. A vaporizing oil burner is designed to
transform oil to a vapor state and then burn the vapor. Vaporizing is
achieved by the oil reaching 465 F. Once the oil is vaporized, it becomes
flammable and an efficient and clean combustion is the result.
To obtain a clean and efficient combustion, 3 factors must be in a balanced
proportion.
1. Draft- the volume of air rising through the exhaust chimney.
2. Oxygen- replacement supply of fresh air.
3. Fuel- Input in proportion to the supply of draft and oxygen.
Sig Marine diesel heaters can also be calibrated to run kerosene (K) and
stove oil (S). See “Fuel Variations” on Pg. 23. This code will be indicated on
the side of the valve.
A hot water coil can be factory installed or added later to also enjoy water
heating from your Sig Marine diesel heater only on the Sig180 models. Hot
Page 3

3
water coils are available in a 1 turn coil to heat approx. 5-10 gallons of
water. Hot water coils are also available in 2 turn coils to heat approx. 15-20
gallons of water.
2. Important Notes
Here are some important notes to remember when installing a Sig Marine
diesel heater:
• Mounting & location, 12v power hook-up, minimum 4ft and a
maximum 10ft of chimney, the location of hole for the chimney & the
fuel supply.
• VERY IMPORTANT: Unrestricted permanent fresh air inlet
required to draw in outside air needed for correct operation.
• Fuel must be filtered and not exceed a pressure of 4 psi or a fuel
pressure regulator must be used to avoid dangerous flooding.
• A barometric damper must be installed to help regulate the draft. A
barometric gives you more control in the “fuel to air” mixture needed
for correct operation. The valve controls the fuel whereas the fan
increases the air and the barometric decreases the air (See Pg. 7/8).
• Install a CO alarm.
3. Ventilation
Do NOT operate this heater in an enclosed area without a permanent fresh air
inlet designated for your heater. This is required to draw in outside air for
correct operation. To guarantee that fresh air is available for your heater, good
ventilation is essential. You MUST replace the air inside your boat at the same
rate that the heater is removing it. The higher the heater’s burning rate, the more
air the heater will require. If the air flow is blocked or restricted, the heater will
burn inefficiently, create soot, blow out and can even be a very dangerous health
hazard.
A permanently open fresh air inlet MUST be installed or dedicated to the heater.
This inlet must be at least 3" in diameter. Ducting to the heater is also an option.
Page 4

4
It is important to create and maintain a positive pressure inside the boat. High
winds can draw air out from the boat and thus create a negative pressure. This
condition can result in down drafts. Ensure that when you do have windows
open that they do not create a suction effect in the cabin due to the window’s
position and the wind direction. In a similar way, it is possible for the air intake
on your engine to suck the air out of a cabin if it is not properly vented.
Your heater is a natural draft appliance and it creates its draft pressure like a
chimney in a wood stove. The rising, heated air in the chimney pulls fresh
air into the heater as it rises up the chimney and exits the flue cap. The
greater the draft pressure, the more able the heater will be to resist strong
winds, overcome flue elbows that inhibit draft and the hotter you will be
able to get your heater without sooting. A CO alarm should be installed in
the boat. We also recommend the high heat shut-off kits available through
us.
4. How Does the Chimney affect the Heater?
The heater does not create the draft for a natural draft appliance to operate; it
is the chimney that creates the draft for operation. The purpose of a chimney
is to take the combustion products (smoke and gasses) from the appliance to
the atmosphere outside your boat, and at the same time, to draw air in for
combustion into the appliance. This movement of combustion air and
exhaust is called draft.
In essence, it is the difference in pressure between the air inside the chimney
flue and the outside air that creates this movement. Warmer, lighter gases in
the flue will move upward.
To keep the pressure conditions favorable, we need a tall column of warm
air inside the chimney, and cooler air outside. The warm air will tend to rise,
drawing the exhaust from the appliance out. As air exits the chimney, fresh
air for combustion is drawn into the appliance. The stronger the upward draft
in the chimney the more likely you won’t experience downdraft.
Important Factors of the Chimney
Since draft is a measure of pressure, chimney draft is affected by pressure
conditions in the boat. Several factors come into play:
1. Adequate air. First, there must be adequate air movement into the
boat to make up for the air exiting through the chimney. If the boat is
very tightly insulated, the volume of air drawn up the flue will exceed
Page 5

the volume of air entering the boat, and the boat will gradually
become depressurized. With lower pressure in the boat than outside,
there will be a tendency for air to be drawn back into the boat from all
available openings including down the chimney.
2. Air movement in the boat. Second, air movement in the boat must
not interfere with the chimney. As air flows out through the one
window, air is drawn from another to replace it. This is called the
stack effect, since the boat acts like a stack, or chimney. If the stack
effect is powerful enough, it will overcome the chimney's upward
draft and pull replacement air (and smoke) into the boat through the
chimney.
3. Competition for available air. Third, there must not be too much
competition from other devices in the boat, such as exhaust fans, a
large engine or air-exchange systems. If something else is sucking the
air out of the boat, the chimney might not be powerful enough to
overcome it, and exhaust might be drawn into the boat from the
chimney.
4. Proper chimney design. And finally, a chimney must be designed to
accommodate the volume and type of exhaust being emitted by the
appliances it serves. This involves correct sizing, adequate height, and
proper construction. See the “Chimney Pipe” section on pg. 9.
5
Since the chimney draft is affected by so many factors, draft problems
can be complicated to find.
Testing the Draft
To find where the air is being drawn, twist a paper towel into a wick, light it
and blow it out to create smoke. Placing the smoking wick near the open
hatches, windows or vents will lead you to the location. Installing or opening
opposing vents will allow the air to come in from a path of least resistance
and not disturb the draft in the chimney.
Downdraft
A common reason for downdraft is burning the heater too low (too much air
in the burner and not enough fuel). If the flames are burning below the top
burner ring and inside the burner pot then it is burning inefficiently causing
the draft to be too weak going up the chimney allowing downdraft down the
chimney. When the flames are burning above the top ring then the natural
draft is at its strongest so it can fight against downdraft.
Page 6
6
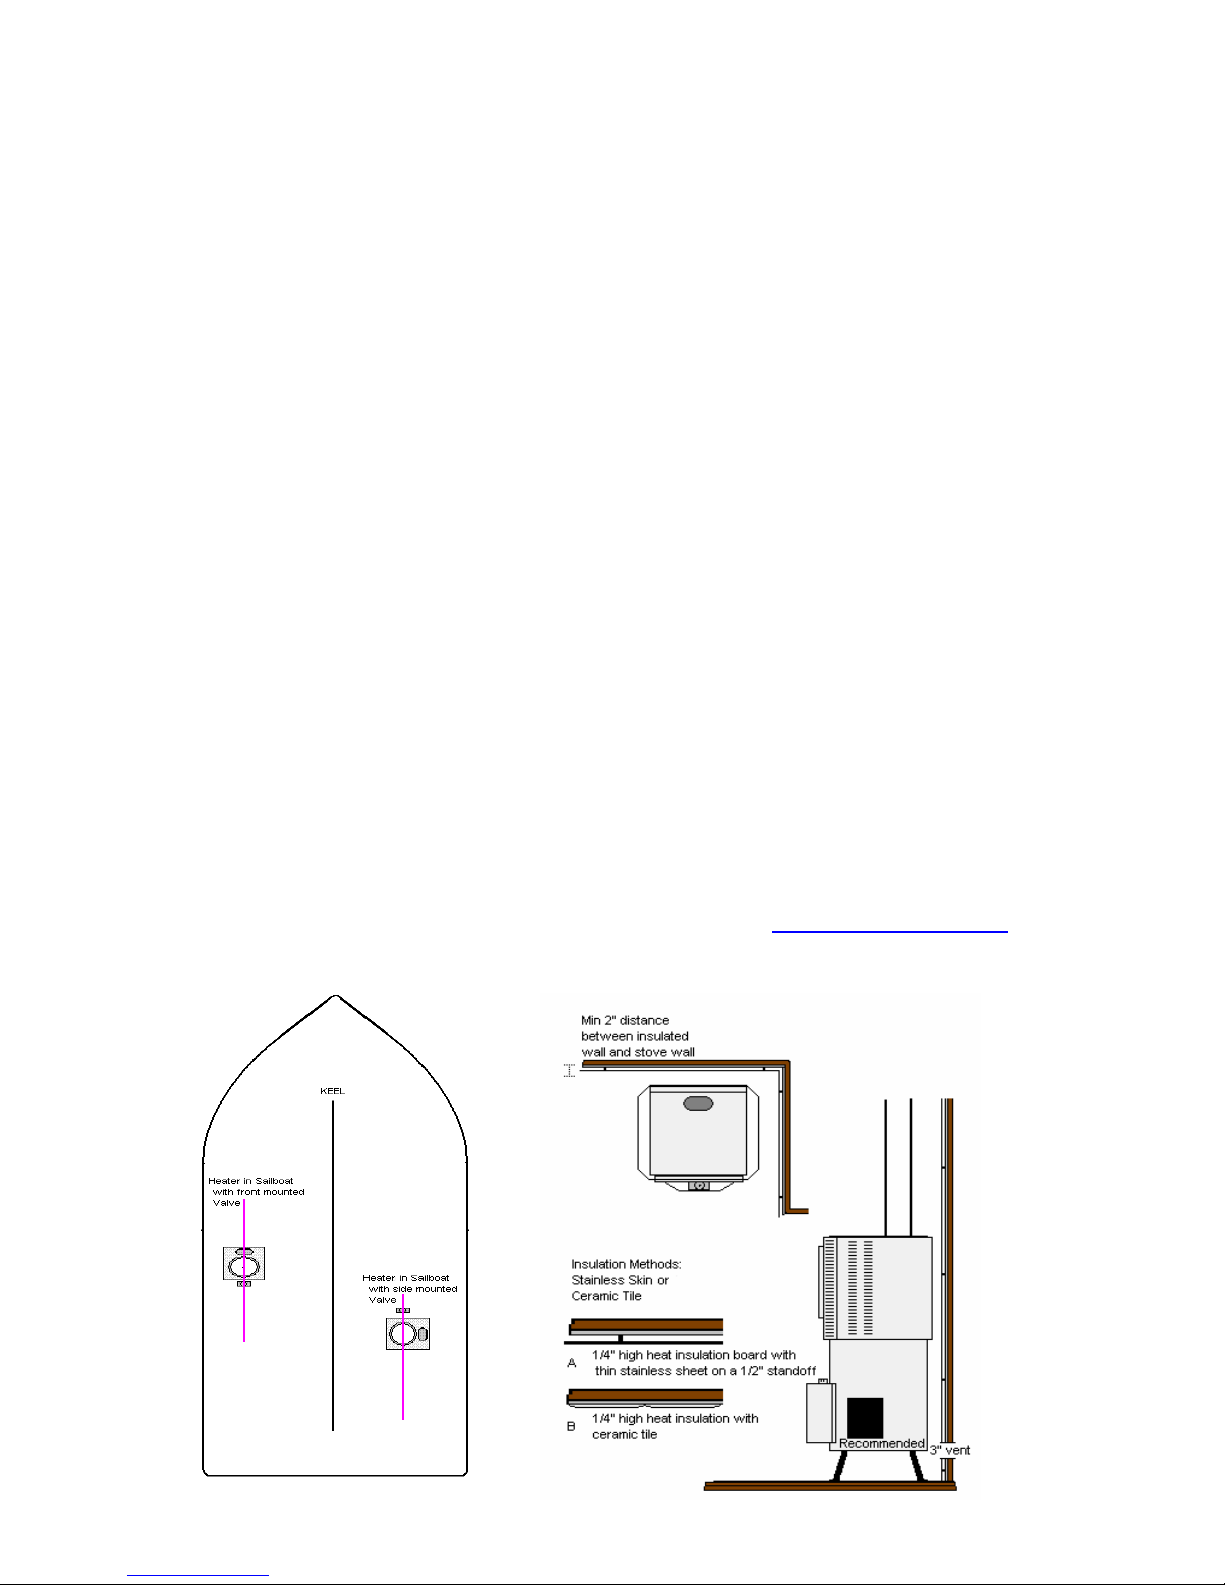
5. Installing your Heater
Location
Plan your heaters location prior to installing to ensure the location chosen
will fit the specifications and safety clearances. Combustible material closer
to the heater then the specified safety clearances must be lined with
insulation or millboard and a metal liner with a .5” standoff for air
movement behind. Another alternative is using insulation or millboard and
ceramic tile. The wall behind the heater and the first length of chimney pipe
should also be lined with such material. See diagram below.
Safety Clearances
Above- 30”, In front- 18”, Sides- 12”, Below- 6”
Facing Direction
The heater ideally should face the bow or stern of the boat, particularly on a
sailboat. Fuel is gravity fed from the oil metering valve into the burner so if
the valve should drop below the level of the burner, the fuel would not flow
uphill into the burner, which will put out the fire. In a beam-facing
installation, the oil metering valve may have to be relocated to the side of the
heater. See diagram below. This will allow the heater to operate up to 15
degrees. If you need the valve mounted on the side, the heater would need to
be special ordered from the factory, please email us. info@sigmarine.com
Note: the heaters valve & burner should be in line with the boats keel.
Page 7

7
Mounting
The Sig heaters have the appropriate brackets to secure the heater to the
bulkhead. The drip tray will then fit under the bottom of the heater.
**REMEMEBER: remove all protective plastic on ALL parts of the heater.
Chimney Pipe
The location and configuration of the chimney stack is very important to the
operation of the heater. A long, straight chimney stack will ensure a strong
draft for correct operation. The diameter of the chimney must be what is
specified. We recommend that the length of your chimney is a straight 5-6ft
run with a minimum of 4ft long and a maximum of 10ft. Avoid using elbows
and if necessary, use 45 degree elbows and allow for as much straight pipe
as possible with a minimum of 12” (28 cm) from the top of the heater. There
is no connector to connect the chimney pipe to the heater. There is a flue
collar already attached to the top of the heater and the pipe can attach by
squeezing the pipe into an oval shape and fitting it over the flue collar.
Chimney Pipe Diameters
All Sig Heaters- 3” diameter chimney (7.5cm)
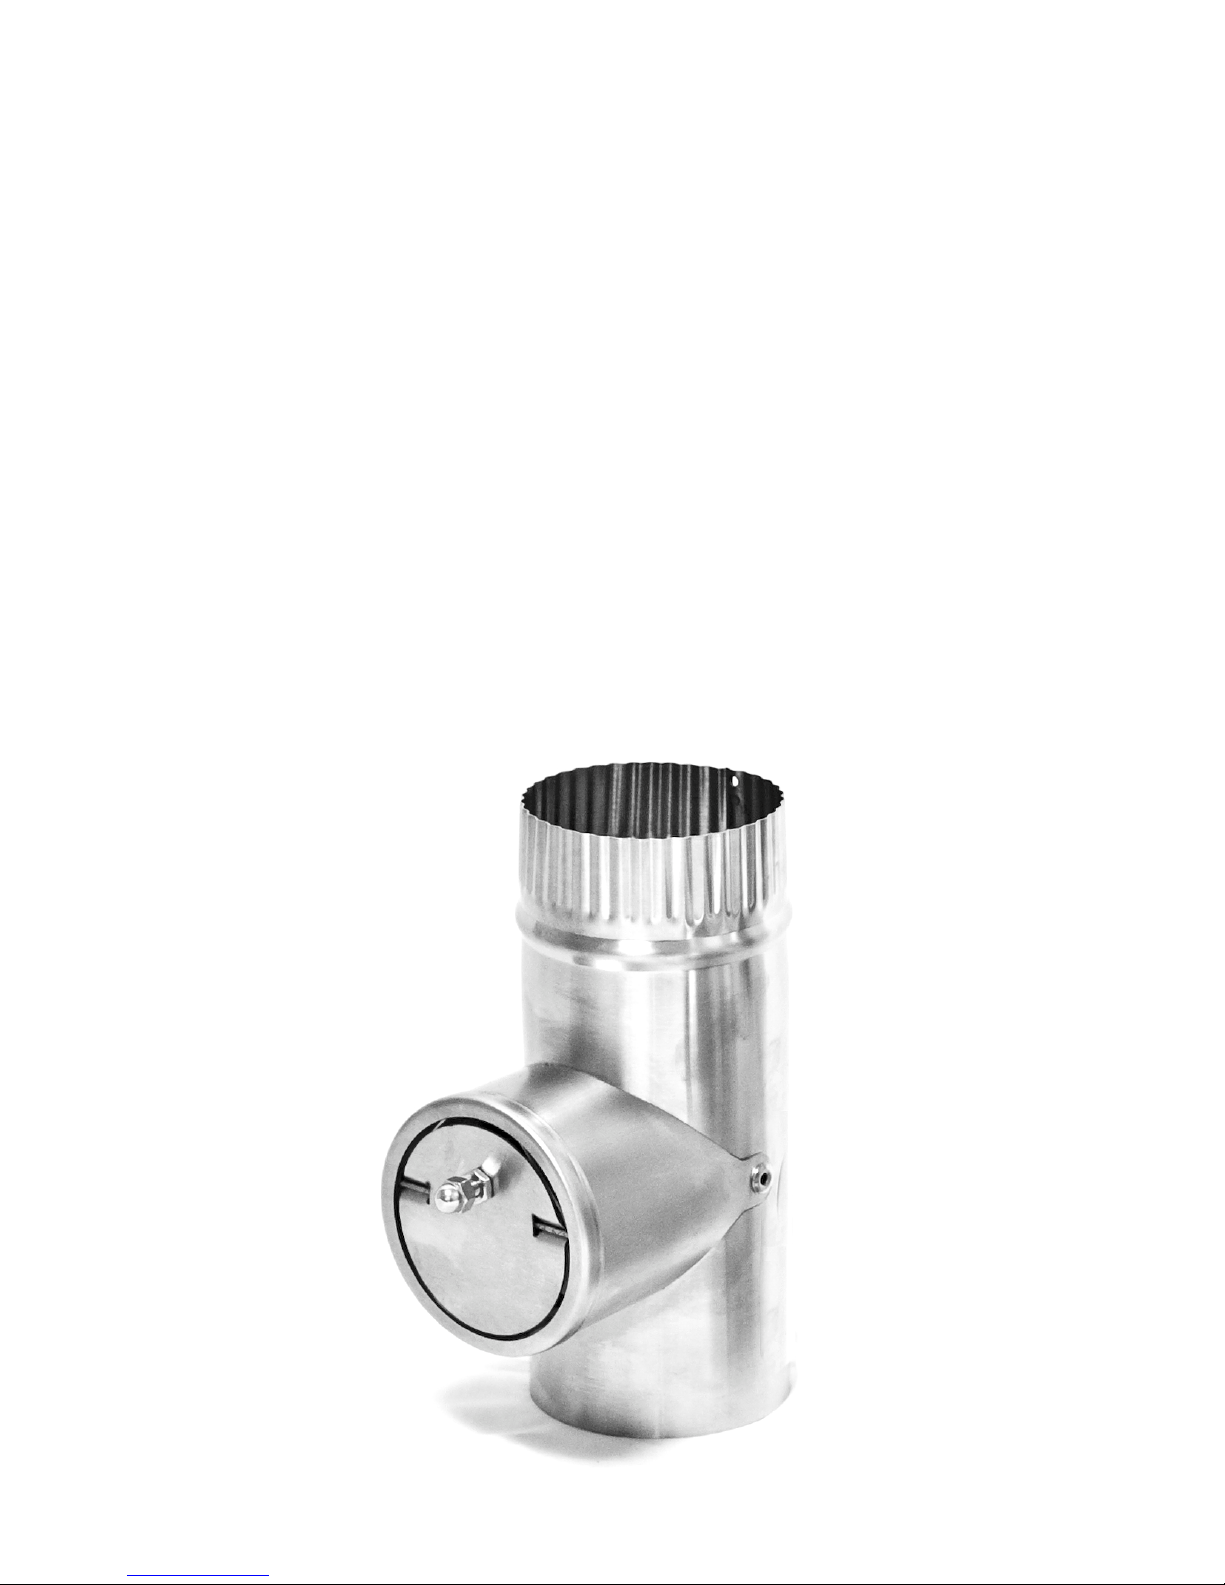
Barometric Damper
We have 2 options for installing the barometric damper into your chimney.
You can either have the barometric attached to a 22” stainless pipe to be the
first piece of pipe of your chimney off the top of the heater or a 7” piece of
pipe that you can fit into your chimney 12” to 24” from the top of the heater.
All model heaters:
Part# S16-001: 3” x 22” stainless pipe with barometric
Part# 900287: 3” x 7” stainless pipe with barometric
The barometric damper should be installed in oil and solid fuel heaters. The
purpose is to maintain a strong draft without causing too much air to the
“fuel to air” mixture. When the damper is adjusted, the draft is altered by
allowing air to be pulled into the chimney by the air inlet on the damper and
not pulled into the burner. This gives you more control. Having a barometric
allows you to burn your heater at lower temperatures giving you the control
to adjust the draft once the fuel is adjusted to ensure a clean burn.
Page 8
8
Install the barometric tee pipe with the front flap facing fore and aft. In order
for the barometric to work efficiently it must be installed between 12” and
24” from the top of the heater. If using a flue guard, turn the barometric tee
to the back as it does not have to be seen to work
To adjust the flap on the barometric, back off the jam nut and turn the
counterweight so the flap is standing closed. Once the heater has been
burning for some time and the room temperature is starting to rise, it is a
good time to do the adjustment. Adjust the counterweight so the flap starts to
open (aprox 6mm or ¼”). This will allow air to enter the barometric tee and
reduce the air entering the burner. This will help the flame to burn above the
top burner ring. If the flame is still burning below the ring, adjust the flap
open another 3mm or 1/8”. At this time, if there is flames burning below the
top burner ring and the barometric flap is open aprox 9mm or 3/8”, do not
adjust the flap open any further and increase the valve setting until the flame
is burning above the top ring.
Page 9
9
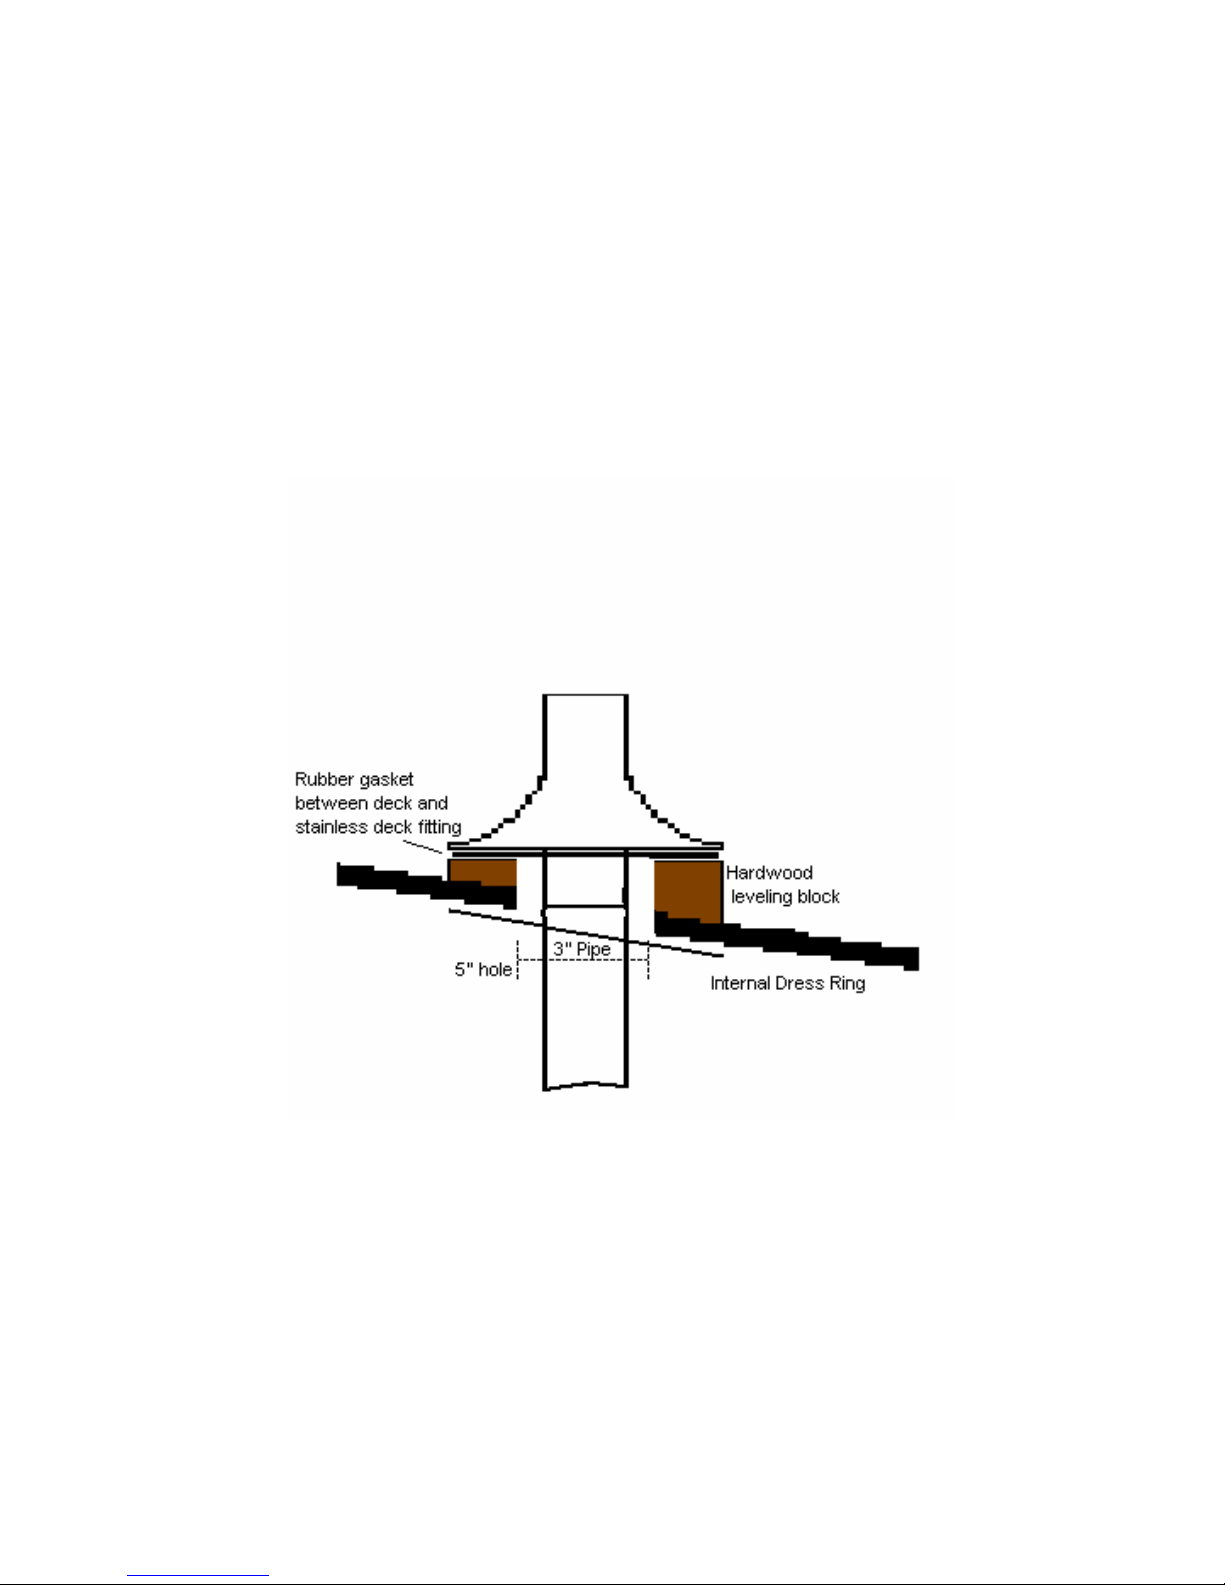
Deck Fitting
To install the thru deck fitting, a hole must be cut in your deck. Depending on
the diameter of the chimney stack will depend on the size hole that needs to be
cut. There should be a 1” clearance all around the chimney pipe. For example, a
3” diameter exhaust pipe would require a 5” hole drilled in the deck. Once a
hole is cut, you can line the raw hole with epoxy, caulking or a metal liner to
finish it off. Just ensure there is a 1” air gap between the side of the hole and the
chimney pipe.
The thru-deck fitting includes a stainless steel dress ring for the interior of
the cabin and a neoprene rubber gasket to better seal the fitting on the deck
side. Depending on the contour or the angle of the cabin top, you may need
to make a hardwood spacer block. One surface of the block would be a level
plane to mate to the deck cap. The other would match the angle or contour of
the cabin top. A hole through the center of the block would also be 2 inches
greater then the diameter of the flue pipe.
Exhaust Cap
The DP round or H style exhaust caps are most recommended. The exhaust
cap will fit over the crimp on the deck fitting or flue pipe. The location of
the exhaust cap above deck must be clear of any immediate obstruction that
may cause unusual air movement or turbulence. CAUTION: The Exhaust
Cap gets hot when the stove is operating.
Page 10

10
Heater Installation Diagram
Page 11

11
6. Fuel System Installation
For efficient and safe operation of the heater, follow all recommendations
for properly installing the fuel system.
DANGER: Never use gasoline in a heater. Use only #2 diesel, #1 stove oil
or kerosene. The valves are factory calibrated to #2 diesel; if #1stove oil or
kerosene is preferred, the valves can be re-calibrated to suit those viscosities.
*** If in colder temperatures it may be wise to burn kerosene or add fuel
additives to your fuel to keep the fuel viscosity thin for correct operation. In
some cases, a valve with a higher flow rate may be needed.
Fuel Supply & Overflow Feature
The fuel supply fitting on the oil metering valve is a 1/8” NPT fitting and
the overflow is also a 1/8” NPT fitting. Copper tubing should be used for the
first 3 feet of fuel line from the heater. Approved hose can be used for the
remainder of the installation. Run the fuel lines as straight as possible to
avoid air locks. Check all connections for any leaks.
The overflow safety feature is designed to allow the controlled escape of
fuel from the heater in case of over pressurization. If dirt, debris, or too
much pressure gets into the needle and seat inside the valve, the fuel will rise
and overflow out of the valve and away from the heater. It is common to get
a few drips now and then from the movement in rough waters, however,
more then a few drops of fuel from the overflow indicates the need to
service and clean the valve.
Under NO circumstances plug the overflow fitting!! A fuel line must be
taken from the overflow fitting back to the main tank if the fuel is supplied
from the main tank. If the fuel is supplied from a day tank, then run the
overflow line to a container away from the heat source. The fuel overflow is
a gravity escape. Do not install the overflow line so that is goes up or in
loops as this will cause an air lock and block the fuel from escaping. Plastic,
rubber or copper tubing may be used for the overflow line.
Note: If the your fuel tank vent or fill tube is higher than the valve of the
heater, and the overflow of the heater goes back to the main tank, there may
be a chance when re-filling that the fuel will back flow up the overflow and
out of the valve. For this reason a manual shut-off will need to be teed in the
overflow line and closed when refilling tanks. CAUTION: After refilling,
Page 12

12
you will need to burn off the fuel in the line before re-opening the shut-off
valve. Do not use a check valve. Remember to re-open the shut-off valve on
the overflow line.
Fuel Filter & Manual Shut-off’s
The fuel must be filtered before the fuel pump and before the oil metering
valve to prevent dirt and debris from plugging up the check valves in the
pump and the needle and seat in the valve. There also must be a manual
shut-off by the tank and also close to the heater as the pressure on the needle
in the valve will wear it out faster. We can supply a ¼” NPT fuel filter with
a shut-off for close to your heater for this purpose. (Part# 15076) The 15
micron stone element in the filter (part#15077) should be replaced every 1-2
years.
Fuel Supply
The fuel can be supplied to your heater by either your main tank or a day
tank and fed with either a fuel pump or gravity depending on your install.
Gravity Feed
When using a gravity tank, there should be a minimum head of 12" (30.48
cm) above the fuel level marked on the side of the oil-metering valve to
operate correctly. The gravity feed tank must be vented and all fuel lines
must be as straight as possible to avoid air locks. Do NOT use a pressurized
tank.
The oil metering valve is rated to an incoming fuel pressure of 3 psi. If the
pressure exceeds 4 psi, a pressure regulator will be needed in the supply line. If
installing a gravity tank larger then 30gal or higher than 8 feet above the
valve of the heater, you will also need a pressure regulator.
Fuel Pump
When a low pressure fuel pump is used, a fuel line must be tee’d in as close
to the fuel tank as possible, not from the engine supply line or engine filter.
Use a check valve in the heater fuel line to stop the engine from pulling back
the fuel and starving the heater.
Page 13

13
7. Walbro Fuel Pump Installation
When installing a Walbro fuel pump you must ensure it is mounted
approximately at the level of the valve on the heater. These pumps can
“pull” fuel but have trouble “pushing” fuel so it must be gravity fed from the
pump to the heater. The lift and the climate will then indicate if you need the
standard pump (part#15078) or the heavy duty pump (part#15078-1). We
highly recommend the heavy duty pump for all installs so you have the
option of adjusting the pressure if needed.
The standard pump Walbro’s FRD-2 part# 15078 is a 12v DC pump with a
pressure of 3psi. It is for a standard installation where the climate is fair and
fuel run from the fuel supply to the pump is less then approx. 4ft vertical and
15ft horizontal.
The heavy duty pump part# 15078-1 is Walbro’s FRD-2 12v DC pump with
a factory retrofitted pressure spring and an adjustable pressure regulator
installed for a higher pressure pump for a heater installation in a colder
climate and where the fuel run from the fuel supply to the pump is higher
then approx. 4ft vertical and 15ft horizontal. This pressure regulator will
adjust the pressure higher or lower to the oil metering valve.
*If using the heavy duty fuel pump part# 15078-1, the adjustable pressure
regulator attached has a thread size of 1/8” NPT. It is soft die cast aluminum
so use caution when connecting the fittings. The numbered settings are only
for reference because depending on the fuel supply installation and the
climate will depend on the pressure of each setting. Disconnect the fuel line
at the valve and allow the pump to push the air out of the fuel line to see a
constant flow of fuel going into a bucket. Set the regulator to the lowest
setting. Watch the flow of fuel. Adjust the regulator setting until there is a
constant flow of fuel pouring into the bucket. If you have adjusted the
regulator to the highest setting with still no constant flow of fuel, the
regulator can be adjusted. Pierce a hole in the sticker on the center of the
knob with a 5/64th Allen wrench and turn the adjusting screw clockwise ½ a
turn.
To prime the pump, pump fuel into a container to remove all the air in the
fuel lines. After a cup of fuel has been pumped, reconnect fuel line to the
valve. If there is no fuel getting to the pump or there’s air in the fuel line the
pump can make a chattering noise.
Page 14

14
Once the valve is full of fuel and the pressure has been reached the fuel
pump will still continue to tick, but less frequent. Once the pressure drops in
the valve the pump will then begin to tick more frequent depending on the
demand of fuel from the valve. To lessen the noise of the pump pulsing, a
rubber backing can be installed.
The pump should be included in a control circuit with a 2 amp fuse so it can
be turned off when the heater is not in use. NOTE: If the power to the pump
is shut off, the fuel could still flow through to the pump by way of siphon.
The flow of fuel should be turned off using the shut-off valve near the heater
as well as the oil metering valve.
The pumps can be installed with fuel inlets and outlets up or down, however
mounting the pump with the fuel inlet (spout looking side) on top will give
the pump extra pressure and is easier to clean. The pump will need to be
primed the first time only to remove air in the fuel line. There are 3 check
valves in the pump to prevent the back flow of fuel, so the pump should stay
primed. If the pump does not stay primed then 1 of the check valves in the
pump needs to be cleaned
The pump should be installed in a ventilated area and not near a hot exhaust.
Connect the ground to a negative battery. This pump is not recommended for
gasoline.
Walbro FRD-2 Fuel Pump Upgrade
To upgrade a Walbro FRD-2 (part#15078) to a Heavty Duty pump
(part#15078-1) a factory spring & regulator must be installed. If you find
you are not getting fuel to the valve with the FRD-2 standard pump you may
need the stronger pump with the stronger pressure. Please contact Sig
Marine to order a stronger spring & regulator. info@sigmarine.com
Once you have received a stronger spring and regulator from Sig Marine,
you can upgrade your pump to a stronger pressure. Unscrew the 3 torx
screws (t-20) and with twisting the lid back and forth, pull it straight back
off. Note the pump plunger, spring, check valve, and a very small amount of
fuel will drop out if installed as per diagram. Place the check valve as
shown in the diagram on top of the heavier replacement spring, and the
spring on top of the pump plunger and push it back into the pump body
holding it in with a finger. Note the magnetic part of the plunger is on the
Page 15

15
opposite end of the spring. Replace the lid with the gasket on by lowering
your finger on to the red O ring sleeve without the plunger falling out (the
plunger is about 2” long so you have room to lower your finger out of the
way). The red O ring sleeve will fit inside the pump tube and the black O
ring will fit over the outside of the pump tube and will require twisting and
pushing the lid straight back in. This is a little tight but that is what makes
the seal. Rotate the gasket and replace the screws.
Now that your standard pump is upgraded to a heavy duty pump it must be
primed. When priming the heavy duty pump hold down the knob of the
pressure regulator to prime the fuel lines to take out the air. Then turn the
dial to the lowest setting on the regulator and increase the pressure one
increment at a time until the pump is just delivering a constant flow at the
heater.
Page 16

16
8. Draft Assist Fan Installation
The 12v draft assist is not needed for operation but highly recommended as
it will help to vaporize the fuel and give more control in burning the heater
as clean as possible. The fan is a 12v DC fan that the draw is .17amp. The
fan is 12v and if 24v or 32v is needed, resistors are available. This fan is
rated for 8000 hours and is only for start up and for higher temperature
settings as using the fan all the time will burn it out prematurely and make
hard carbon deposits inside your burner pot clogging up the air holes causing
the heater to not operate correctly.
When turning the fan on, turn it up to a faster speed first, then you can adjust
it back down to a slower speed as this gets the fan blade going.
Whenever possible, ensure a weatherproof connection between wires with
solder or the appropriate connectors with 18awg wire. The motor mount
‘bushing’ washers should be placed in between the mount bracket and the
main housing NOT between the mount bracket and the head of the fastener.
.
During start up, operating at higher settings or during windy conditions, you
want to use the combustion assist fan on your heater to artificially boost the
draft. Your heater should operate without the use of the fan on lower
temperature settings. Some heater installations with only the minimum flue
heights or with flue elbows that inhibit the draft may need the use of the fan
more often.
Page 17

17
9. Operation
The first time the oil-metering valve is turned on it will take 5-10 minutes
for the fuel lines to fill and oil to appear in the bottom of the burner.
Lighting Procedure
1. Turn on the fuel pump or open the gravity feed valve to allow fuel to
flow into the oil metering valve on the heater.
2. Open the door or open the lid and twist the superheater so the bottom
makes a good contact with the bottom of the burner.
3. Lift and turn the oil metering valve knob on to setting #5 for 2
minutes to accumulate 2 tablespoons of oil in the bottom of the burner
pot.
4. Then turn the oil metering valve OFF.
5. Twist a piece of tissue, light it and throw it into the pool of oil in the
burner pot. Use a poking tool to push the lit paper into the pool of oil.
6. Once the oil has ignited, replace the lid or close the door.
7. Turn the draft assist fan on to the medium speed then turn it back
down to the slowest speed.
8. After a few minutes, watch the flames grow above the top burner ring
where they should burn at all times.
9. It will take approx. 5-10 minutes for the priming fuel to burn. Once
the flames drop back down into the burner pot it’s time to turn the oil
metering valve back on.
10. Lift and turn the oil metering valve knob to setting #5 and turn the fan
OFF and watch the flames grow back to above the top burner ring.
11. Wait 20 minutes for the heater and chimney pipe to warm up before
you adjust the valve further.
*NOTE: The flames must ALWAYS burn above the top burner ring
regardless of the valve setting.
***DANGER: If the flames go out at any point at this stage, turn the
valve off and wait 5-10 minutes for the burner to cool. Re-lighting warm
diesel or a flooded burner can result in an explosion. *Do not use
gasoline or any other flammable materials to light the burner. Do not
operate this heater unattended.
Page 18

18
11. Approximate Valve & Fan Settings
Heater Temperature Fan Knob Position
Cold Start Off
Warm Low Off
Warm Low (cold or windy) 4 to 5 o’clock
Medium 5 to 6 o’clock
Medium (cold or windy) 6 to 7 o’clock
High 7 o’clock
* Operating the fan can deliver too much air and cause the burner to run too
lean (too much air in the fuel to air mixture). If you find that the flames start
to burn below the top burner ring, turn the fan down slightly or increase the
fuel slightly.
* The fan has a low amperage motor and will need to have the speed control
turned up to a faster speed to get the fan blade spinning, then turn it down to
the appropriate setting. This also applies, should the fan blade rattle.
* The best low speed setting is at the 4 to 5 o’clock position on the speed
control knob. The best medium setting is at the 5 to 6 o’clock position and
the best high setting is at the 6 to 7 o’clock position.
* When turning up the valve wait a minute and watch the flames react before
adding air.
Page 19

19
12. Operation Tips
When operating on the lower temperature settings the burner needs less air.
To reduce the air, adjust the barometric damper open wider, turn off the fan,
and add more fuel even if you do not want the heat. It is better to make too
much heat and dissipate it than to run the burner too lean with flames inside
the burner pot as this will result in hard carbon build up and soot. The burner
is designed to burn a certain amount of fuel on low and if less fuel is burned,
it causes the flames to end up below the ring, inside the burner pot causing
an unclean burn.
Turning up the valve in small increments will help the draft to catch up with
the fuel increases, keeping a good fuel to air mixture, which helps in
reducing soot.
When on medium to higher settings, the flames start to look orange with
black tips, turn the fan on using the lowest fan speeds, increase air slowly
until the flames start to turn yellow and more vibrant.
If you turn the fan on too high the air will burn off all the fuel leaving
the flames below the burner ring resulting in carbon soot.
***Remember, the key to burning this heater correctly is to find the right
fuel to air mixture. When adjusting the fuel, you must adjust the air to find
the correct balance so you have the cleanest burn.
After the heater is well heated and cabin temperature is reaching comfortable
temperature, the valve body and the fuel in it will start to warm up and the
fuel will become thinner, flowing faster causing the heater to burn hotter. An
adjustment will have to be made to turn down the fuel to a lower setting or
add more air for a higher setting.
Please visit our sister website and view the Operation Video
www.dickinsonmarine.com/video.html
Page 20

20
Page 21

21
13. Flooding the Burner
A vaporizing oil burner of this type can be flooded if care is not taken to prevent
excess oil entering the burner when lighting. By following the lighting
instructions flooding will be avoided. A flooded burner that is still burning
should be turned off and the heater monitored until the oil has burned off. Use
the combustion assist fan to add air to fully combust the excess fuel.
Reasons that will flood your burner.
Increasing the fuel supply too quickly without use of the combustion
assist fan.
Poor draft and/or ventilation.
The suggested method to fix a flooded burner is to sacrifice a toilet paper
roll as a perfectly fitted sponge and then dispose of the oil soaked roll. For
this reason, always monitor the heater closely when lighting.
DANGER: This oil must be removed from the pot before the heater is lit
again or the heater will dangerously overheat.
If the flame has extinguished, the oil metering will continue to deliver fuel to
the burner causing it to accumulate fuel to a level of 9/16” (model 100/120)
and 5/8” (model 170/180) from the bottom of the burner and no more. Never
relight this amount of fuel.
Page 22

22
14. The Oil Metering Valve & Fuel Flow
Safety Fuse
A high temperature fuse is incorporated into the oil metering valve. The
adjusting screw on the top of the knob of the oil metering valve is fitted with
a fusible sleeve. This fuse will melt if the valve knob reaches a temperature
of 165 degrees F. This will shut-off the flow of oil into the burner. Under
normal conditions, the valve is at room temperature. If the high fire sleeve
melts it indicates too much heat is by the valve compartment. Overheating of
this kind is due to burning the heater too lean with the flames burning down
in the burner pot and should be rectified before the heater overheats again.
In case of the release of the high temperature fuse, remove the brass nut and
do not move the adjusting screw. Apply heat from a lighter to re-solder the
link back into its original position which was flat on the top. Once back in
place the adjusting screw will not need re-adjusting. Make sure to now burn
the heater correctly with ALL flames above the top of the burner. See the
Operating Tips section of this Manual.
Fuel Adjustment
The height of the valve-adjusting knob will determine the quantity of oil
exiting from the valve outlet. The height is determined by the length of the
metering screw against the fuel ramp on the main casting of the valve.
Remove the anti-vibration set screw (5/64 or 2.5mm Allen key) located in
the center of the brass nut on top of the knob (turn counterclockwise). The
adjusting screw may be (5/64 Allen) or a very small flat head. Adjust 1/8
turn at a time. After finishing the adjustments, return the set screw using
needle nose pliers to hold the adjuster from turning when locking set screw
in place
Page 23

23
Fuel Flow Measurements
If your heater is burning rich (making soot or smoking) or burning lean
(flames not burning above the top burner ring), adjust the valve fuel flow as
follows regardless of what type of fuel:
1) Unscrew the compression nut from the bottom of the valve with 2
wrenches and bend away the copper fuel line. Allow the oil to drip into a
cup or container.
2) Lift and turn the valve knob to the #1 setting. Measure the quantity
of oil dripping slowly from the fuel outlet.
Model 100 & 120 1 teaspoon in 90 seconds (2.5
c.c.'s / minute)
Model 170 & 180 1 teaspoon in 75 seconds (3 c.c.'s /
minute)
Fuel Variations
It is unlikely that the fuel you are using is the same viscosity as the fuel used
to calibrate the oil-metering valve. Diesel is one of the few fuels you can
reliably get all around the world but the quality and viscosity of that fuel is
variable. Fuel differs on a routine basis even though you buy the same oil
from the same supplier. Factors influencing oil viscosity include: the
temperature; the age and quality of the fuel; the regional differences due to
local refineries; and the particular mix of certain brands of fuel.
The oil metering valve is calibrated for #2 diesel, unless otherwise
requested. Burning diesel #1 (stove oil) will allow 25% more fuel and
burning kerosene will allow 50% more fuel to flow through the oil-metering
valve. Because of this, it is important to burn the fuel for which the heater
has been calibrated. Metering valves are available for diesel (D stamped on
the side of the valve), kerosene (K) or stove oil (SO).
It is important to know that although you can re-calibrate your valve to each
variation of fuel, you can also adjust the way you operate the heater to
compensate for these variations. If the oil is thicker than usual, open the
valve more or use less of the fan. If the fuel is thin, run the fan more to burn
off the fuel to keep a clean burn.
Page 24

24
Oil Metering Valve Repair Kit
Part# 905005 *For valves made from 2007-Present
All Valves made prior to 2007 are discontinued and no parts are
available.
1. Float (black)
2. High Temp Fuse c/w metering set & adjustment screw
3. Replacement fuel screen
4. Viton ‘O’ ring
5. Neoprene tipped needle & s/s seat & copper/brass washer assembly
Oil Metering Valve Repair
Detach copper fuel lines from the valve inlet and outlet and overflow, then
remove the valve from the mounting bracket (do not remove the overflow
fitting from the valve). Unscrew the 4 retaining screws holding the valve top
to the body. Note that the valve top and the valve knob are attached.
The valve rebuild kit #905005 (after 2007 only) has been packed with all the
parts to rebuild your valve.
• Remove the float from the bottom casting
• Remove the needle from the seat fitting.
• Using a 5/16ths socket, remove the seat fitting from the valve bottom
casting, and remove the copper or brass washer.
• Remove the fuel inlet fitting only and remove the stainless screen
behind the inlet fitting.
• Clean the threaded aperture in the bottom casting to remove any dirt
or buildup. Perhaps use a pipe cleaner to clean the path from the inlet
hole to the seat fitting aperture.
• Remove and replace with viton ‘o’ ring on the valve stem, and clean
the stem groove.
• Clean out the stem guide in the bottom of the valve housing and the
overflow tube.
• Clean the inside of the valve housing castings, top and bottom.
• Replace oil inlet screen with new and replace the inlet fitting into the
bottom casting (use teflon tape and do not over tighten).
Page 25

• Place the new copper/brass washer in, then screw in the new seat into
the bottom casting until tight but not so tight as to damage the
aluminum threads of the casting (35 inch pounds).
• Place the new needle in the groove of the float and insert the float pin
through the bracket and float, then snug up the float screw.
• Loosen the float screw so the bracket will move up and down and
adjust the bracket so when pushing on the needle the top of the float
will be parallel with the top of the casting. It is very important to keep
the float from binding on the stem guide as it moves up and down.
• Replace the top casting into the bottom casting so the metering stem
slides in to the metering guide.
• Replace the 4 top screws snugly, and move the control knob up and
down while tightening the 4 screws. Once tight the control knob
should move up and down freely in any position.
25
• Meter the valve to the specifications above and check the overflow
fuel line ( if the float is operating correctly and adjusted parallel to the
casting the oil level in the valve will be correct.
The metering screw/high fire screw can also be replaced from the valve
rebuild kit, or kept as a spare.
Page 26

26
Oil Metering Valve Diagram
Page 27

27
15. Burner Assembly
Your diesel heater has been equipped with a Airflow burner. There are two
components in the burner that must be correctly placed for the heater to
operate properly. The burner ring must be placed at the top of the pot so the
outside edge of the ring fits into the groove in the top of the pot. Ensure that
the ring fits in evenly and snugly all the way around the pot and that all of
the oval shaped slots are clearly visible.
The second component is the superheater. The superheater is placed through
the burner ring and will sit on the bottom of the burner with the round 2”
disc sitting 2” up from the bottom of the burner. The bottom of the
superheater should sit flat on the bottom of the burner to radiate heat to the
fuel coming in through the center of the superheater washer. This will need
to be kept clean to allow fuel to flow through it. The ring of the superheater
will sit up above the burner ring where the flames are and radiate heat down
to the vaporizing fuel. The 2” round disc sitting 2” above the bottom of the
burner deflects the hot rising vapor up the sides of the burner pulling in the
primary air needed to mix with the fuel.
Page 28

28
16. Maintenance
Fuel Maintenance Checklist (CHECK ONCE A YEAR)
1) Disconnect the fuel inlet line from the valve and place into a
bucket. Turn on your pump or open your gravity feed valve to
ensure there is a constant flow of fuel. This will indicate your fuel
filter and fuel pump are operating correctly.
2) Remove the fuel inlet fitting from the valve and clean the screen
behind.
3) Replace fuel inlet line to the fuel inlet fitting. Disconnect the fuel
outlet line and place a cup or small container underneath the valve.
4) Turn the valve on to setting #1 and measure the fuel drip from the
fuel outlet of the valve. See page 23 for fuel measurements. This
will indicate that the valve is working correctly.
5) Before re-connecting the fuel line, put some paper towel inside the
burner pot and blow into the fuel line so if any dirt is in there, it
will blow into the burner onto the paper towel.
6) Re-connect the fuel line to the fuel outlet on the valve and wipe the
inside of the burner clean with the paper towel.
Cleaning the Burner
Carbon accumulates in the burner over a period of time and it must be
cleaned out or the air cannot get into the burner and the heater will not
operate correctly. It is especially important to ensure the air holes are clear.
If you are burning good quality fuel and the heater is burning efficiently
above the top burner ring this cleaning procedure will only be required once
a year. If there is rapid carbon build up in the burner pot, it indicates the
heater is not being operated correctly or the need for a barometric damper
adjustment. If you do not have a barometric you should install one to reduce
the air in the burner that is causing the carbon build up. This must be
rectified for satisfactory operation of the heater.
1) Open the door and remove the burner ring and the superheater
2) Insert the reamer tool provided into the fuel inlet hole. This will
prevent loose carbon from falling into the fuel inlet during cleaning.
3) With a wire brush, scrape any loose carbon from the sides of the
burner.
Page 29

29
4) Using a paperclip, poke out the four rows of twelve air intake holes on
the sides of the burner to ensure they are clear of any soot.
5) Remove any loose carbon from the base of the burner.
6) Remove the reamer tool and replace burner ring and the superheater.
Cleaning the Fuel Line
Any blockage in the fuel line from the oil-metering valve to the burner can
be cleaned by removing the clean-out plug situated directly under the burner.
The fuel lines themselves can be cleaned with compressed air or a pipe
cleaner or even blowing air through to remove any blockages. The plug then
must be replaced with tape sealant and checked for leaks. Tap the fuel line
once re-connected to clear any air locks.
Exterior Surface
Little maintenance is needed for stainless steel. There are many stainless
steel cleaners available and these may be applies as needed. An abrasive
scotch bright pad can be used to remove burn discoloration or surface
scratches by rubbing parallel to the grain of the brushed metal.
*For replacement parts not shown here please e-mail us for more
information. info@sigmarine.com
17. Trouble Shooting
*Flames are burning incorrectly inside the burner pot- The flames are
burning too lean, this is to say too much air and/or not enough fuel. Reduce
the air intake first by adjusting the barometric damper flap open to 3/8”. This
will keep the draft in the chimney strong but reduce the amount of air being
drawn into the burner. Turn the fan off. If flames still below the top burner
ring then start adding more fuel until ALL the flames are above the ring.
*There is hard carbon build-up inside the burner- This is also caused by
burning the flames in the burner below the top ring. The burner needs a little
more fuel and a little less air.
Page 30

30
*Flames are orange and dirty creating soot on the window & deck- The
flames are burning too rich, this to say too much fuel and / or not enough air.
Add air first by turning the fan on. Just add enough air to turn the flames
vibrant yellow and not lazy orange with black tips, however adding too
much air will burn off the fuel and the flames will end up below the top
burner ring. After a short time you will get to know what positions to set the
fuel and air to maintain the most heat with the cleanest flames.
*Burner flooded with fuel- Is caused by fuel entering the burner faster than
it is burning and is caused by increasing the fuel supply too quickly without
the use of the combustion assist fan. Poor draft and/or ventilation.
*Fuel is leaking out the overflow or the top of the valve- The overflow
line may have an air lock causing the excess fuel to back up into the valve,
or excessive pressure going into the valve.
*Fuel isn’t getting to the burner- The fuel line may be plugged from the
valve to the burner. Disconnect the fuel outlet from the bottom of the valve
and let the valve drip fuel into a small container or cup. Next blow hard
through the fuel line so any debris will end up in the burner, then reconnect.
If the valve was dripping fuel and the fuel line is not plugged tap the copper
line to remove any air lock.
*I am getting downdraft down my chimney pipe- The smell of diesel or
smoke coming into the boat may be caused by negative ventilation. The
chimney may not be getting hot enough to create a strong draft. Turn the fan
on to a very slow speed but balance the fuel to keep flames above the ring
Pg 18. Adjust the barometric flap so it is open between ¼ to 3/8.
*There was an explosion inside my heater-This is caused by a downdraft
however the air is sucked in by a negative draft that actually blows out the
flames but is hot enough to re-ignite the hot vapor. Follow instructions for
downdraft.
*My valve is turned to the OFF position and oil is still going to the
burner- This is a broken O ring in the valve. See diagram.
Page 31

31
18. Warranty Policy
We at Sig Marine and Dickinson Marine wish to maintain a reasonable and
easy system for returns, warranty, returns and exchanges. To accomplish
this, we would like to inform you of some helpful guidelines and procedures
to use and follow when sending back product to the Sig Marine. All
correspondence regarding returns, warranties and exchanges will go through
the factory of Sig Marine in Surrey, BC, Canada and the product MUST be
returned to this location.
Warranty
Sig Marine warranties all of its products for a period of one year dated from
the purchase of the product by the end user with proof of purchase or a
registered warranty. We warrant our barbeque burners for a period of 3 years
dated from the purchase of the product by the end user with a registered
warranty. The warranty card should be copied for your records and returned
to Sig Marine to activate your warranty within 90 days of your purchase.
A copy of the warranty card must have been received or a proof of purchase
must be presented to receive the warranty.
1. The customer can contact us directly to settle any warranty issues. We
are pleased to help. Call us toll free 1-800-659-9768 or email:
info@sigmarine.com
2. If the customer is returning a complete product they see as defective,
be sure the product has been assembled correctly and is being used
correctly. If you are not sure please call our Technical Help
Department @ 1-800-659-9768. Sig Marine will not provide credit for
used products that are not defective. In these cases, it is best to call the
factory to determine if the product is being used correctly, has been
assembled correctly or is in fact defective.
3. All products being sent back to Sig Marine must have a Return
Authorization Number. Contact us at Sig Marine toll free 1-800-6599768 or e-mail info@sigmarine.com to obtain a Return Authorization
Number. This allows us to track and process your return. Once you
have received an RA# from us, include your proof of purchase and
ship to the address below. We recommend you ship using the mail
Page 32

32
service insured and retain a tracking number. Customers are
responsible for the shipping costs for all returns and exchanges.
Sig Marine Returns
Unit #101-17728 66 Avenue
Surrey, BC
V3S 7X1, Canada
4. Products that are demonstrably older than the warranty period or those
that have obviously been misused will not be returned, exchanged, or
repaired.
Non-defective Returns & Exchanges
Sig Marine reserves the right to apply a 20% restocking fee for returned
product sent back. An RA # will be needed from the factory to facilitate any
return. Credits will be made at the last purchased price for that part number.
Limited Warranty
WARRANTY PROVISIONS: Sig Marine warrants this product to be free of defects in
workmanship and materials for a period of one year. This warranty is limited to claims
submitted in writing within a one-year period following the date of purchase. If any part
of your new product fails because of a manufacturing defect within the warranty period
Sig Marine offers to replace said parts free of charge, provided, however, that such parts
have not been improperly repaired, altered or tampered with or subjected to misuse,
abuse or exposed to corrosive conditions. This warranty, however, is limited by certain
exclusions, time limits and exceptions as listed below. Read these limitations and
exclusions carefully.
TIME LIMIT: This warranty is given too and covers only the original purchaser.
Coverage terminates one year from the date of purchase for parts replacement.
EXCLUSIONS : This warranty does not cover or include : (a) Any normal deterioration
of the product and appearance of items, due to wear and/or exposure; (b) any guarantees,
promises, representations, warranties or service agreements given or made by an
authorized distributor or other person selling this product, other than those specifically
stated herein; (c) any damage or defect due to accident, improper repair, alteration,
unreasonable use including failure to provide reasonable and necessary maintenance,
misuse or abuse of the equipment, or exposure to corrosive conditions. This warranty is
conditioned upon normal use, reasonable and necessary maintenance and service of your
product, and written notice being given promptly upon Buyer's discovery of a warranty
claim, pursuant to paragraph 6 below. Reasonable and necessary maintenance is
maintenance which you are expected to do yourself or have done for you. It is
Page 33

maintenance, which is necessary to keep your product performing its intended function
and operating at a reasonable level of performance.
DAMAGE LIMITATION WARNING : IN NO EVENT SHALL Sig Marine BE
LIABLE FOR ANY INCIDENTAL OR CONSEQUENTIAL DAMAGES, INCLUDING
(BUT NOT LIMITED TO) LOSS OF USE OF THE PRODUCT, LOSS OF TIME,
INCONVENIENCE, EXPENSES FOR TRAVEL, LODGING TRANSPORTATION
CHARGES, LOSS BY DAMAGE TO PERSONAL PROPERTY OR LOSS OF
INCOME, PROFITS OR REVENUE.
ORAL OR IMPLIED WARRANTY LIMITATIONS: The foregoing warranty is
exclusive and in lieu of all other warranties, written or oral, expressed or implied,
including but not limited to any warranty or merchantability or fitness for a particular
purpose.
TRANSFER LIMITATIONS: This warranty is not assignable or transferable. It covers
only the original purchaser.
CLAIM PROCEDURE: In the event of a defect, problem or that a breach of this
warranty is discovered, in order to protect any warranty rights you must promptly notify
Sig Marine. Give name, address, and model name, location of unit, description of
problem and where you can be reached during business hours.
RESERVED RIGHT TO CHANGE: Sig Marine reserves the right to make changes or
improvements to products it produces in the future without imposing on itself any
obligations to install the same improvements in the products it has previously
manufactured.
SECOND OR SUBSEQUENT OWNER: Sig Marine does not give any warranty to
secondary or subsequent purchasers, and it disclaims all implied warranties to such
owners.
INSPECTION: To assist you in avoiding problems with your product and to validate this
warranty you are required to do the following: (a) read the warranty; (b) inspect the
product. Do not accept delivery until you have examined the product with your supplier;
(c) ask questions about anything you do not understand concerning the product.
OWNER REGISTRATION: Fill out the WARRANTY CARD within 30 days from the
date of delivery. WARRANTY: RETURN OF THE CARD IS CONDITION
PRECEDENT TO WARRANTY COVERAGE AND PERFORMANCE. IF YOU DO
NOT FILL OUT AND MAIL THE CARD AS DIRECTED, YOU WILL NOT HAVE A
WARRANTY.
33
Page 34

34
19. Register your Warranty…..
Please register your warranty with Sig Marine Marine. Fill out and send
back the warranty registration below. Make sure to include the serial # for
our records.
No warranty will be extended for improper installations. Use of any
unapproved materials, equipment, or installation procedures will result in a
voided warranty. Do not use any substitutes of the heaters valve, burner or
fan other then the ones supplied by Sig Marine. Sig Marine accepts no
liability for any damage or loss of service resulting from unapproved
modifications.
Warranty Form
I have read and understand the Limited Warranty and the entire Instruction
Manual and agree to the terms and conditions. (PLEASE PRINT)
Name: ______________________________________________________
Address: ____________________________________________________
Phone: ______________________________________________________
Heater Model Name: ___________________________________________
Heater Serial #:_______________________________________________
Date of Purchase: _____________________________________________
Seller’s Name: _______________________________________________
Seller’s Location: _____________________________________________
Signature: ___________________________________________________
Page 35

Sig Marine
#101-17728 66 Avenue, Surrey, B.C.,
V3S 7X1 Canada
Tel: 604-574-8641
Fax: 604-574-8659
E-mail: info@sigmarine.com
Website: www.sigmarine.com
All rights reserved. No part of this manual may be reproduced without permission
in writing from Sig Marine. Sig Marine also reserves the right to modify or change
without notice, any materials, applications, equipment, accessories, and/or prices.
All measurements and weights are approximate.
35
 Loading...