

Page 1

597EN0861 E ENGLISH
APO 200-500mm F2.8/400-1000
INSTRUCTIONS
(fig.1)
Thank you very much for purchasing a Sigma Lens. In order to get the
maximum performance and enjoyment out of your Sigma lens, please
read this instruction booklet thoroughly before you start to use the lens.
PACKAGE CONTENTS / ACCESSORIES
Please make sure that the following standard accessories are included
with your lens. If any of them is missing, contact the retailer from whom
you purchased your lens immediately.
1. Lens body
(Lens Hood, Filter Holder, DG UV Filter and Rear Cap supplied)
2. 400-1000mm F5.6 Attachment
(Front Cap and Rear Cap supplied)
3. Safety Strap
4. Dedicated Circular Polarizing (C-PL) Filter
5. Li-ion Battery BP-21(Battery Cover is included)
6. Battery Charger BC-21
7. Battery Charger Cable
8. Carrying Case
9. Instruction Manual
10. Warranty Card
11. SIGMA Limited Warranty & Service Network
DESCRIPTION OF THE PARTS (fig.1)
Lens body
1. Lens Hood
2. Safety Strap Cringle
3. Carrying Handle
4. Tripod Socket
5. Focus Mode Switch
6. m/ft Switch Button
7. LCD Panel
8. Rear Barrel Fixing Knob
9. Filter Holder
10. Filter Holder Fixing Knob
11. Focus Limiter
12. Battery Compartment Cover
13. Battery Compartment Cover Fixing Knob
14. Zoom Ring
15. Filter Rotator Ring
16. Focus Ring
17. Mount
400-1000mm F5.6 Attachment
18. Mount (For attaching to the lens body )
19. Lens Detachment Lever
20. Mount (For attaching to the camera body)
APO LENS
APO lenses use high reflective index and low dispersion glass in some
lens elements. This special glass normally has some tiny air bubbles
but it does not affect the optical performance of your lens.
NIKON AF TYPE CAMERAS
This lens functions in the same way as a G Type auto-focus Nikon
lens (without an aperture ring). Functions may be restricted
depending on the lens/camera combination. For more details, please
refer to the camera’s instruction manual.
The AF function of this lens can be used with cameras that support
built-in lens motors.
mm F5.6 EX DG
SAFETY PRECAUTIONS
Warning !!
Using the product and disregarding this warning sign may cause serious
injury or other dangerous results.
Caution !!
Using the product disregarding this caution sign may cause injury or
damage.
Warning !! (Lens and Attachment)
After attaching a lens, do not look directly at the sun, through the
viewfinder. Doing so can cause damage to the eye or loss of
eyesight.
Do not look at the sun with the lens of your camera; otherwise you
can lose your eyesight.
The weight of this lens is very heavy. When using the safety strap,
please avoid causing any injury to your body.
Caution !! (Lens and Attachment)
Do not aim your lens or camera & lens combinations toward the
sun; light entering through the lens could cause damage to eyes or
fire.
The mount part of the lens is complicated. Improper usage may
cause injury.
Please select a sturdy tripod that is capable of supporting this lens.
If the tripod is not sturdy enough, it may cause the lens to fall.
When carrying the lens body while the camera body is attached,
please grip the lens from its carrying handle. If you carry the lens
by holding the camera body only, the mount part of the lens or the
camera body may brake.
Warning !! (Battery and Battery Charger)
Keep batteries in a safe place out of children’s reach. If a battery is
swallowed, call for emergency medical aid immediately.
Do not use any battery other than the designated battery types.
Doing so may cause battery explosion, battery leakage, lems
damage, injury or fire.
Do not use any battery other than that specified in this booklet.
Otherwise, it might cause battery explosion, battery leakage, lens
damage, injury or fire.
Avoid any shock, shake and drop. Ignoring this warning may cause
battery explosion, or battery leakage, resulting in injury or fire.
Never disassemble, short circuit, heat, batteries or put batteries
into fire. Ignoring this warning may cause battery explosion, battery
leakage, injury or fire.
Please only use charger with dedicated battery. Charging other
battery types causes battery explosion, battery leakage, lens
damage, injury or fire.
If for some reason, the camera, lens or batteries emit smoke, or if
overheating or the smell of burning is detected, remove the
batteries, taking care to avoid being burned, Take the camera and
the lens to the retailer where you bought it, or to an authorized
Sigma service station.
Please follow all guidelines, rules and regulations of your
community regarding the disposal of batteries.
If you do not use the lens for a long period of time, remove the
battery.
Do not attempt to modify or disassemble this product. Doing so can
cause fire or electric shock.
If water or a foreign object gets into the battery charger, unplug
from the AC outlet immediately. It could cause fire or electric shock.
Do not place any heavy objects on the power cord, or pull it, bend it
unduly, or heat it. It could damage the cord, and could cause fire or
electric shock.
Do not use this product with AC voltage other than the specified
power supply voltage (AC100V - 240V). Doing so could cause fire
or electric shock.
Use a safety approved AC power cord as is specified by each
country.
Caution !! (Battery and Battery Charger)
Do not pull the AC power cord, when disconnecting the battery
charger from the AC outlet. It could cause fire or electric shock due
to damaged cord. Always take hold of the molded AC plug, when
unplugging it from the outlet.
Do not cover the Battery Charger with cloth, cushions, etc. It could
cause excessive heat, deform the case, and cause fire.
When Battery Charger is not used unplug it from the AC outlet.
TO CHARGE THE BATTERY
A lithium ion battery BP-21 is provided with this lens. Charge the
battery, before using the camera first time. Please charge the battery
by the supplied battery charger BC-21, when no charge remains.
1. Connect the power cable to the
charger and insert the plug into
the wall outlet.
2. Attach the battery, by sliding it in
the direction of the arrow, as
shown in the diagram.
Charge lamp will be on during
charging.
It takes about 150 minutes to
recharge the battery.
Required time for recharging the
battery depends on the ambient
temperature and status of
recharge level.
When the charge lamp goes out,
charging is completed.
Remove the battery from the charger and remove the power cable
plug from the wall outlet.
We recommend charging the battery before using the camera again.
If it is not used for several days, battery performance decreases.
In the case that the number of possible shots will decrease
extremely after charging, it may indicate the end of battery life.
Please purchase a new battery.
LOADING THE BATTERY
1. To open the battery compartment cover, turn the battery
compartment cover fixing knob counter-clockwise, as shown in the
instruction.
2. Insert the battery until it reaches the contact points of the lens as
shown in the illustration.
3. Insert the battery until it locks into place.
4. Close the battery compartment cover and then turn the battery
compartment cover fixing knob clockwise to fix the battery
compartment cover in place.
If the battery compartment cover is turned in its improper position, the
battery compartment cover may brake.
Inserting the battery will “reset” the lens. Resetting the lens will set
the zoom position to the wide focal length and set the focusing to the
infinity, automatically. In addition, all icons in the LCD panel will blink
and shooting will not be possible. It will be possible to take a picture
once the lens is reset.
TO REMOVE THE BATTERY
Eject the battery by sliding the battery
compartment cover latch in the direction of
the arrow, as shown in the illustration.
Page 2
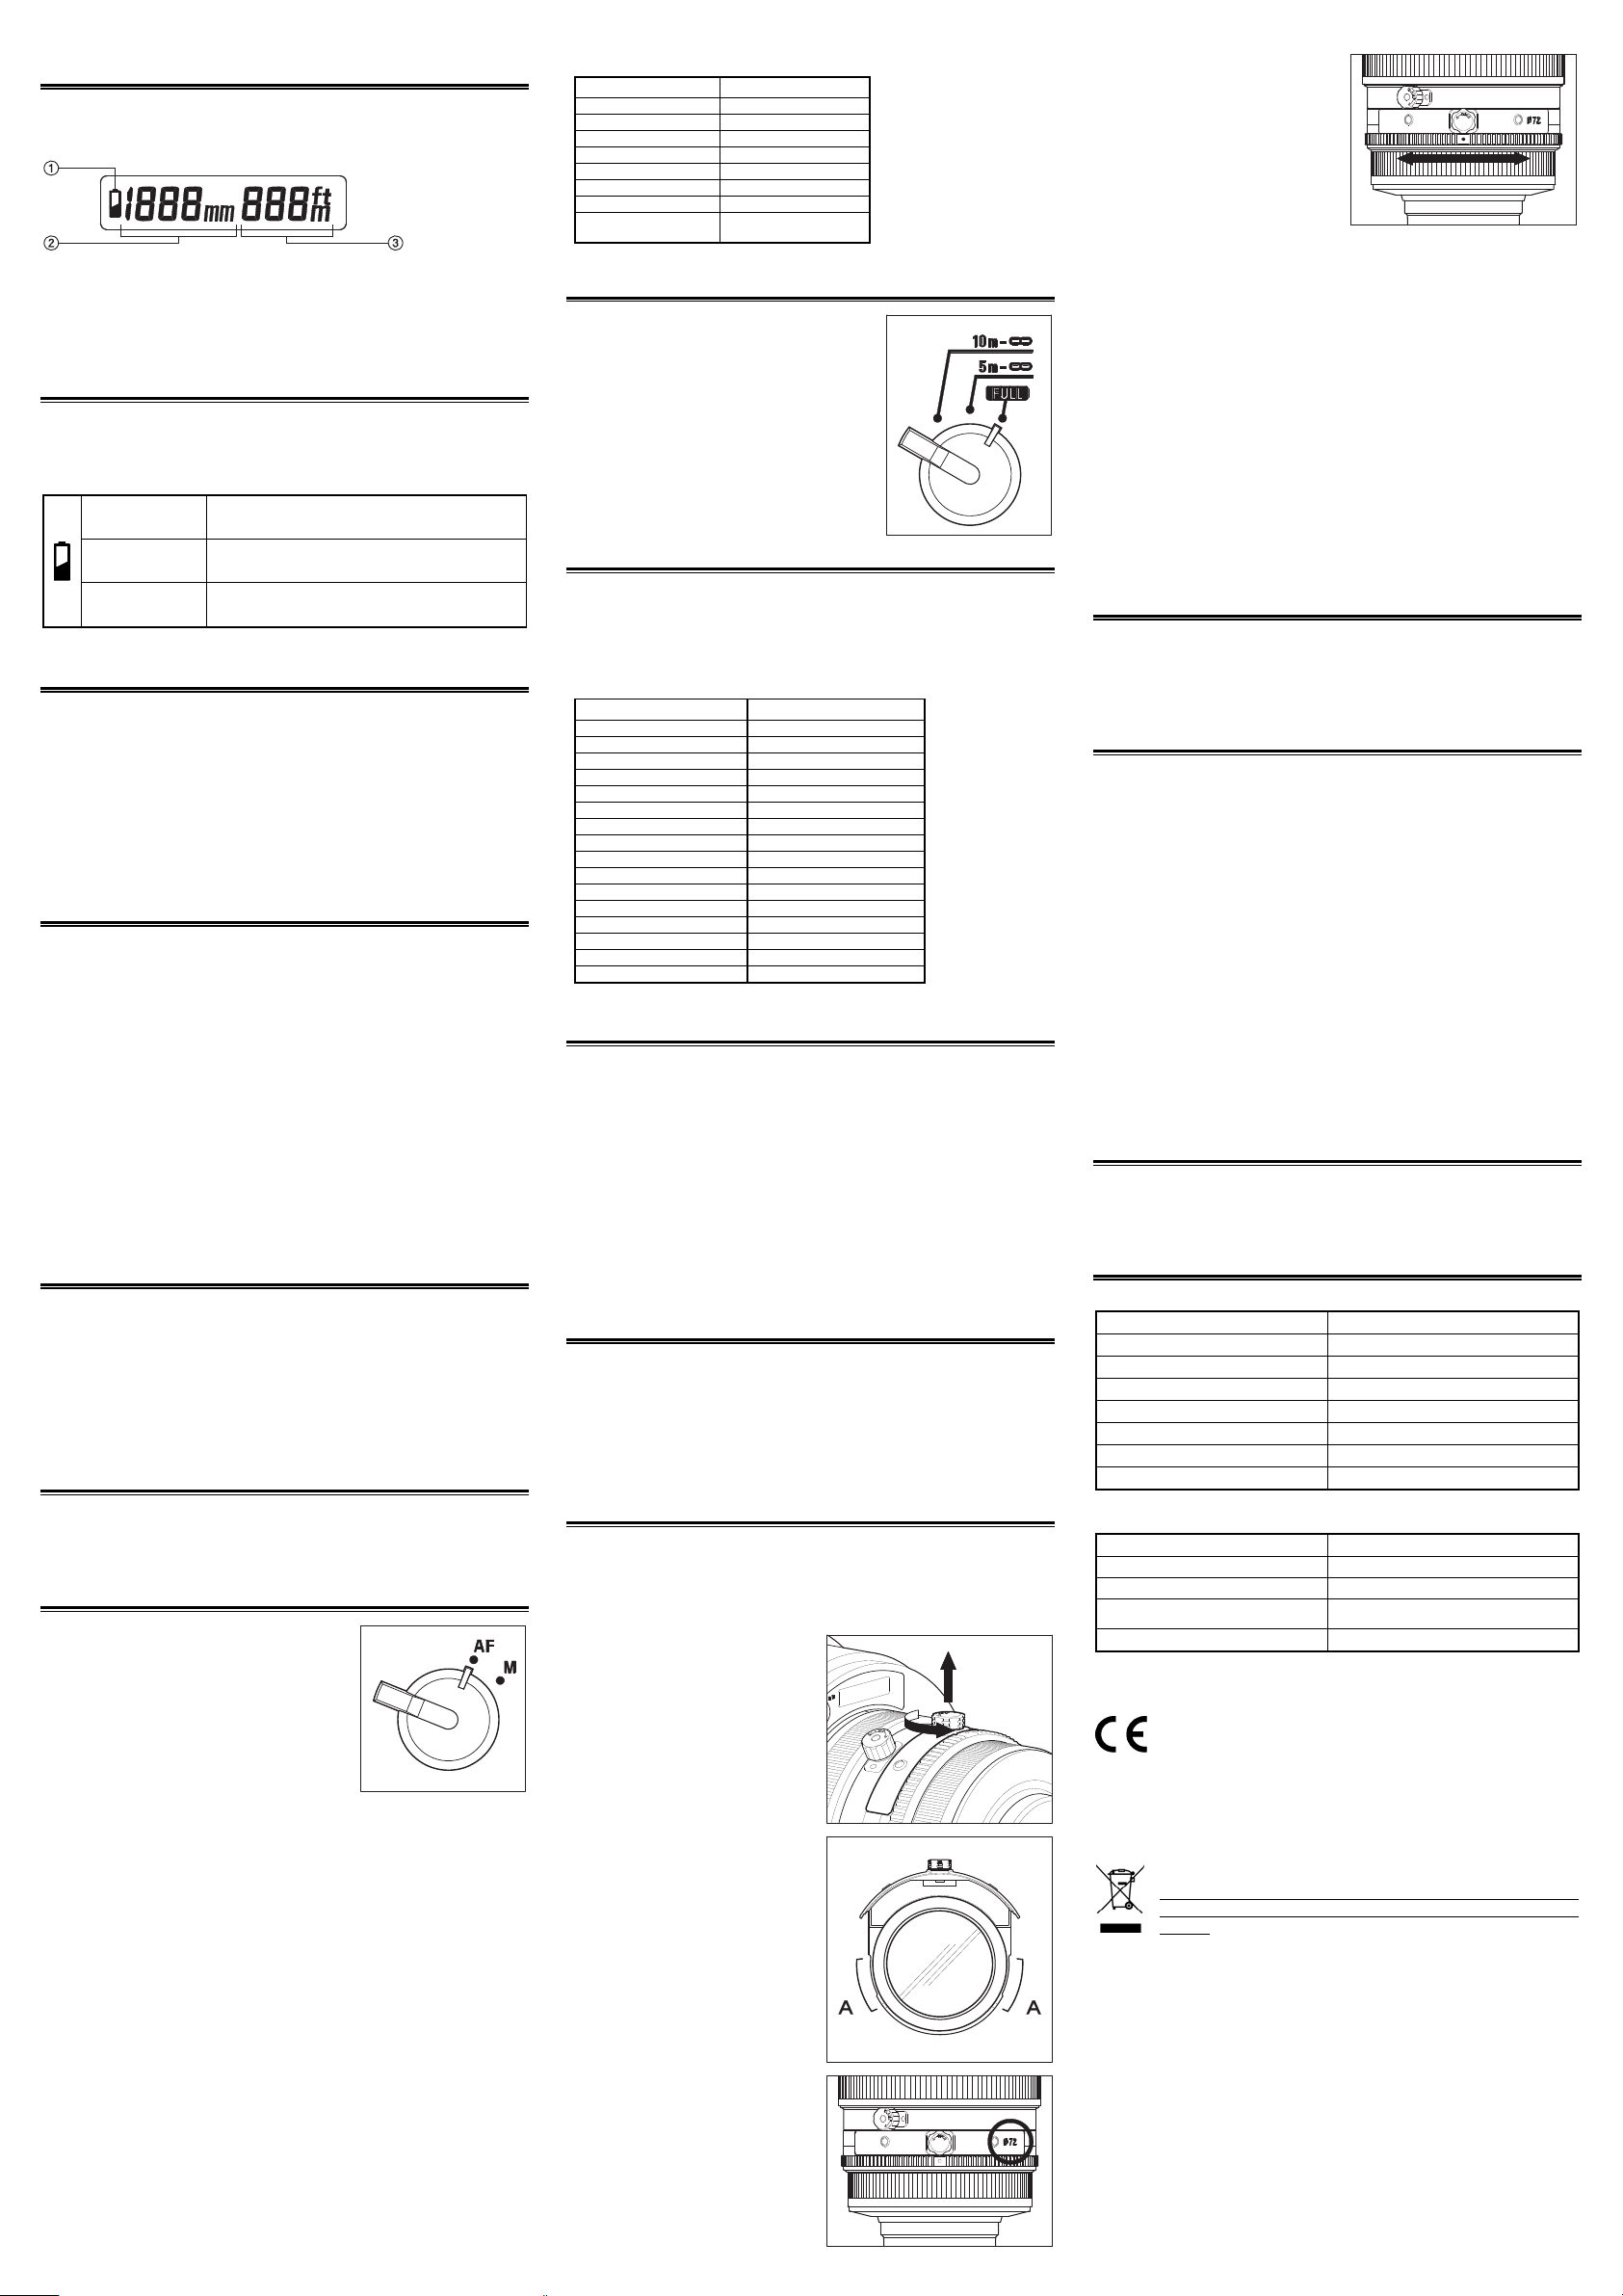
LCD PANEL
(
)
(
)
This lens is equipped with the LCD panel. The meaning of functions
displayed from the LCD panel explained below.
① Battery Indicator
② Focal length Indicator
③ Shooting range Indicator
CHECKING THE BATTERY STATUS
When the power of the camera body is on, the battery icon, which
shows the capacity of the battery, is shown on the LCD panel.
Explanations of the symbols are given as follows.
No Icon The battery strength is sufficient.
Display Icon
Blinking Icon
The battery level is low and the battery will
need to be changed soon.
The power of the battery is insufficient,
replace the battery immediately.
SAFETY STRAP
The supplied safety strap is used to prevent the lens dropping when
being attached to a tripod. Please attach the safety strap to the
safety strap cringle.
When carrying the lens body, please hold the carrying handle. Do
not use safety strap for carrying the lens.
The weight of this lens is very heavy. When using the safety strap,
please avoid causing any injury to your body.
FIXING THE LENS BODY TO THE TRIPOD
The weight of this lens is very heavy. Please select a sturdy tripod
for this lens that will be capable of supporting it.
To avoid dropping it, please attach or remove the lens to the tripod
with more than two people.
The tripod socket of this lens has three screw holes. Both sides are
used for popular 1/4 inch screw and the center hole is used for 3/8
inch screw.
The mount can be rotated counter-clockwise by loosening the rear
barrel fixing knob. It is possible to change the attaching camera to
vertical or horizontal, easily.
The Carrying Handle has two holes, which can be used as a sighting
device when you first target the subject. Please aim the lens at
your subject while looking through these holes.
ATTACHING TO CAMERA BODY
When this lens is attached to the camera body it will automatically
function in the same way as the camera manufacturer’s lens. Please
refer to the instruction booklet for your camera body.
On the lens mount surface, there are a number of couplers and
electrical contacts. Please keep them clean to ensure proper
connection.
SETTING THE EXPOSURE MODE
The Sigma lens functions automatically once attached to the camera.
Please refer to the camera instruction book.
FOCUSING
For autofocus operation, set the focus
mode switch on the lens to “AF” position.
(Select the autofocus mode on your camera
body for Nikon AF.) If you wish to focus
manually, set the focus mode switch on the
lens to the “MF” position. Manual focus
can be achieved by turning the focus ring.
This lens also permits manual focusing even in the autofocus mode.
With the camera set to the One-Shot AF (AF-S) mode, it is possible
to manually override the autofocus while the shutter release button
is pressed halfway.
The viewfinders of some Nikon AF cameras have indicators to
display the focus status. The “● ” symbol indicates that correct
focus has been set, “
subject, and “
When this AF lens is used with Nikon AF cameras in MF mode,
please adjust the lens’ focus until the “● ” symbol is visible.
The shooting range value is displayed in the LCD panel. It is
possible to change the indication to m (meter) or ft (feet). To change
it, press the m/ft switch button.
The value of shooting range in the LCD panel is showed is 23 steps
with m (meter) or 59 steps with ft (feet) (Please refer the table 1).
The nearest value in the following table will be displayed depending
on the actual shooting range.
► ” indicates that focus is set in front of the
◄” indicates that focus is set behind the subject.
Table 1
mft
∞∞
120 m 390 ft
60 m 190 ft
40 m 130 ft
30 m 100 ft
24 m 80 ft
20 m 60 ft
17 m ~ 2 m
Display per 1m
59 ft ~ 8 ft
Display per 1ft
FOCUS LIMITER SWITCH
This lens is equipped with the focus limiter
switch, which enables a limit of the AF
range.
It is possible to switch to the following three
modes.
FULL(Tele side 5m/Wide side 2m ~ ∞)
5m ~ ∞
10m ~ ∞
ZOOMING
Rotate the Rubber grip on the zoom ring to the desired position.
The focal length value in the LCD panel is shown is 16 steps (Please
refer the table 2). The nearest value from table 2 will be displayed
depending on the position of the zoom ring.
Table 2
Without Attachment With Attachment
200 mm 400 mm
210 mm 420 mm
220 mm 440 mm
230 mm 460 mm
240 mm 480 mm
250 mm 500 mm
260 mm 530 mm
280 mm 560 mm
290 mm 590 mm
310 mm 620 mm
330 mm 660 mm
350 mm 710 mm
380 mm 760 mm
410 mm 820 mm
450 mm 900 mm
500 mm 1000 mm
400-1000MM F5.6 ATTACHMENT
The addition of the supplied 400-1000mm F5.6 Attachment produces
twice focal length (400-1000mm F5.6) zoom lens.
HOW TO ATTACH OR REMOVE
Firstly, attach the Attachment unit to the lens body, and then attach the
camera body.
To remove the Attachment from the lens body, turn the Attachment in
the opposite direction, whilst sliding the lens’ removable lever.
It is not possible to use any other tele converter except the supplied
Attachment with this lens.
The supplied Attachment cannot be used with any other lenses.
LENS HOOD
This lens hood helps to prevent flare and ghosted images caused by
extraneous light. It is attached to the lens body before shipment from
the factory
After using the lens, please store the lens in the carrying case after
attaching the lens hood.
FILTER
It is not possible to attach the lens filter at the front of lens body. To
attach a filter to the lens assembly, please use the filter holder that is
inserted into the lens barrel near the rear of the lens assembly. This
unit has a removable filter holder that fits a 72mm filter.
HOW TO USE FILTER HOLDER
The DG UV filter is set in the filter
holder in advance.
Turn the filter holder fixing knob
counter-clockwise and then pull
the filter holder out.
REMOVING THE FILTER
To remove the filter from the filter
holder, rotate the filter counterclockwise holding part A to avoid
rotating the filter holder.
ATTACHING THE FILTER
To avoid rotating the filter holder,
rotate the filter clockwise holding
A
. To fix the filter, please rotate
part
the filter until it stops the rotating.
To re-install the filter holder into the
lens barrel, the notation (
ø72
be on the right side of the holder
while the lens faces away from you.
Please insert the filter holder as far
as it can go into the slot. Rotate the
filter holder fixing knob clockwise to
fix the Filter Holder.
) must
Gray colored Circular Polarizing
(C-PL) Filter is supplied with your
lens as one of its accessories.
Please turn your filter rotator
ring while looking through the
viewfinder to set the desired
picture taking position.
This lens has been designed to deliver optimum performance with a
filter installed in the lens assembly. The quality of the picture
decreases if the filter is not installed inside the lens. Please, always
use a filter inside the lens assembly. Stray light and dust entering
from the insertion slot of the filter holder can affect exposure and
cause poor pictures if the filter holder is not in the lens assembly.
The position of the white dot on the rotator ring is important for filters
that use rotation movement as a filtering process, such as Circular
Polarizing (C-PL) Filters.
It is possible to use any other 72mm filters. However, if the filters
have the thickness of more than 5mm (screw thread excluded) or
diameter of more than 75mm, they cannot be attached.
Please do not attach a PL filter except the dedicated filter supplied with
this lens. If any other filter is attached, it may be impossible to remove.
Supplied circular PL filter cannot be used with any other lenses.
FLASHGUNS AND AF AUXILIARY LIGHT
Vignetting will occur if the lens is used with the cameras built-in flash
and AF auxiliary light. In addition, when an external flashgun is
attached to the camera’s hot shoe and fired, it will cause vignetting.
BASIC CARE AND STORAGE
Avoid any shocks or exposure to extreme high or low temperatures
or to humidity.
For extended storage, choose a cool and dry place, preferably with
good ventilation. To avoid damage to the lens coating, keep away
from mothballs or naphthalene gas.
Do not use thinner, benzine or other organic cleaning agents to
remove dirt or finger prints from the lens elements. Clean by using a
soft, moistened lens cloth or lens tissue.
Prevent water, sand, dust and other foreign getting into the lens
body. This can result in critical damage which can not be repaired.
When rain or drops of water fall on the lens body, please wipe away
them by clean towel.
Sudden temperature changes may cause condensation or fog to
appear on the surface of the lens. When entering a warm room
from the cold outdoors, it is advisable to keep the lens in the case
until the temperature of the lens approaches room temperature.
QUALITY ASSURANCE AND AFTER SERVICE
Warranty terms and warranty card are on a separate sheet, attached.
Please refer to these materials for details.
TECHNICAL SPECIFICATIONS
Lens body
Lens construction 13 - 17
Angle of View 12.3 - 5°
Minimum Aperture 22
Minimum Focusing Distance 2m (Wide side) - 5m (Tele side)
Magnification 1:3.5
Filter Size 72mm (Drop in - rear)
Dimensions Dia.×Length 236.5×726mm (9.31×28.6in)
Weight 15,700g (554oz)
Dimensions and weight include the SIGMA mount.
400-1000mm F5.6 Attachment
Lens construction 6 - 7
Focal length 2x that of a master lens
Magnification 2x that of a master lens
Dimensions Dia.×Length
Weight
Dimensions and weight include the SIGMA mount.
The CE Mark is a Directive conformity mark of the European Community (EC).
SIGMA (Deutschland) GmbH
Carl-Zeiss-Str. 10/2, D-63322 Roedermark, Germany
Verkauf:
01805-90 90 85-0
This symbol indicates that this product shall not be treated as household waste.
Instead it shall be collected separately for the recycling of electrical and electronic
equipment.
If the new products are purchased, this product might be handed over to the distributor
or the collection system of waste electrical and electronic equipment eventually.
By ensuring this product is disposed of correctly, you will help prevent potential
negative consequences for the environment and human health, which could otherwise
be caused by inappropriate waste handling of this product or components of this
product.
If this product is disposed illegally, it might cause a possibility of penalties.
For more detailed information about recycling of this product, please contact your local
city office, your household waste disposal service or the shop where you have
purchased the product.
Disposal of Electric and Electronic Equipment in Private Households
Disposal of used Electrical & Electronic Equipment (Applicable in the
European Union and other European countries with separate collection
systems)
Service:
01805-90 90 85-85
SIGMA CORPORATION
2-4-16 Kuriki, Asao-ku, Kawasaki-shi, Kanagawa 215-8530 Japan
Phone : 044 - 989 - 7430 Fax : 044 - 989 – 7451
71×52.8mm (2.8×2.08in)
288g (10.2oz)
Fax (Service):
01805-90 90 85-35
 Loading...