

SIGLENT TECHNOLOGIES CO.,LTD SSA3000X Series User Manual

User Manual
SSA3000X Series Spectrum Analyzer
UM0703X-E02B
2016 SIGLENT TECHNOLOGIES CO., LTD.


SIGLENT
SSA3000X User Manual 1
Copyright Information
SIGLENT TECHNOLOGIES CO., LTD. All Rights Reserved.
Information in this publication replaces all previously corresponding material.
SIGLENT reserves the right to modify or change parts of or all the specifications or pricing
policies at company’s sole decision.
Any way of copying, extracting or translating the contents of this manual is not allowed
without the permission of SIGLENT.
Note: SIGLENT is the registered trademark of SIGLENT TECHNOLOGIES CO., LTD.

SIGLENT
SSA3000X User Manual 2
General Safety Summary
Carefully read the following safety precautions to avoid any personal injury or damage to
the instrument and any products connected to it. To avoid potential hazards, please use the
instrument as specified.
Use Proper AC Power Line
Only the power cord designed for the instrument and authorized by local country should be
used.
Ground the Instrument
The instrument is grounded through the protective earth conductor of the power line. To
avoid electric shock, please make sure the instrument is grounded correctly before
connecting its input or output terminals.
Connect the Probe Correctly.
If a probe is used, do not connect the ground lead to high voltage since it has isobaric
electric potential as the ground.
Look Over All Terminals’ Ratings
To avoid fire or electric shock, please look over all ratings and sign instruction of the
instrument. Before connecting the instrument, please read the manual carefully to gain
more information about the ratings.
Use Proper Overvoltage Protection
Make sure that no overvoltage (such as that caused by a thunderstorm) can reach the
product, or else the operator might be exposed to danger of electrical shock.
Electrostatic Prevention
Operate the instrument in an electrostatic discharge protective area environment to avoid
damages induced by static discharge. Always ground both the internal and external
conductors of the cable to release static before connecting.
Maintain Proper Ventilation
Inadequate ventilation may cause increasing of the instrument’s temperature, which will
eventually damage the instrument. So keep well ventilated and inspect the intake and fan
regularly.
Avoid Exposed Circuit or Components
Do not touch exposed contacts or components when the power is on.
Do Not Operate Without Covers
Do not operate the instrument with covers or panels removed.
Use Only the Specified Fuse.
Keep Product Surfaces Clean and Dry.
To avoid the influence of dust and/or moisture in the air, please keep the surface of the
device clean and dry.
Do Not Operate in Wet Conditions.
In order to avoid short circuiting to the interior of the device or electric shock, please do not
operate the instrument in a humid environment.
Do Not Operate in an Explosive Atmosphere.
In order to avoid damage to the device or personal injury, it is important to operate the
device away from an explosive atmosphere.
SIGLENT
SSA3000X User Manual 3
Safety Terms and Symbols
Terms on the product. These terms may appear on the product:
DANGER Indicates direct injuries or hazards that may happen.
WARNING Indicates potential injuries or hazards that may happen.
CAUTION Indicates potential damages to the instrument or other property that may
happen.
Symbols on the product. These symbols may appear on the product:
Hazardous Protective Warning Earth Chassis
Voltage Ground Ground

SIGLENT
SSA3000X User Manual 4
SSA3000X Series Spectrum Analyzer Overview
SSA3000X series spectrum analyzer has a frequency range from 9 kHz up to 2.1GHz/3.2GHz;
it is light weight and small size, with a user friendly interface, concise style of display,
reliable measurement precision and plenty of RF measurement functions. Applicable to
research and development, education, production, maintenance and other related fields
that meets a wider range of application requirements.
Features and Benefits
All-Digital IF Technology
Frequency Range from 9 kHz up to 3.2 GHz
-161 dBm/Hz Displayed Average Noise Level (Typ.)
-98 dBc/Hz @10 kHz Offset Phase Noise (1 GHz, Typ.)
Total Amplitude Accuracy < 0.7 dB
10 Hz Minimum Resolution Bandwidth(RBW)
Standard Preamplifier
Up to 3.2 GHz Tracking Generator Kit (Opt.)
Reflection Measurement Kit (Opt.)
Advanced Measurement Kit (Opt.)
EMI Pre-compliance Measurements Kit (Opt.)
10.1 inch WVGA(1024x600)Display

SIGLENT
SSA3000X User Manual 5
Contents
Chapter 1 Quick Start ......................................................................................................... 1
1.1 Appearance and Dimension .................................................................................. 2
1.2 Preparing for Use .................................................................................................. 3
1.2.1 Adjust the Supporting Legs ........................................................................ 3
1.2.2 Connect to AC Power Supply ..................................................................... 3
1.3 The Front Panel .................................................................................................... 4
1.3.1 Front Panel Function Keys ......................................................................... 5
1.3.2 Front Panel Key Backlight .......................................................................... 6
1.3.3 Using the Numeric Keyboard ...................................................................... 6
1.3.4 Front Panel Connectors .............................................................................. 8
1.4 Rear Panel .......................................................................................................... 10
1.5 User Interface ...................................................................................................... 12
1.6 Menu Operation .................................................................................................. 14
1.7 Parameter Setting ............................................................................................... 15
1.8 Using Built-in Help ............................................................................................... 16
1.9 Using the Security Lock ....................................................................................... 17
Chapter 2 Front Panel Operation ..................................................................................... 18
2.1 Basic Settings ..................................................................................................... 19
2.1.1 Frequency ................................................................................................ 19
2.1.2 Span ......................................................................................................... 22
2.1.3 Amplitude ................................................................................................. 24
2.1.4 Auto Tune ................................................................................................. 28
2.2 Sweep and Function Settings .............................................................................. 30
2.2.1 BW ............................................................................................................ 30
2.2.2 Trace ........................................................................................................ 32
2.2.3 Detect ....................................................................................................... 34
2.2.4 Sweep ...................................................................................................... 35
2.2.5 Trigger ...................................................................................................... 38
2.2.6 Limit .......................................................................................................... 38
2.2.7 TG ............................................................................................................ 40
2.2.8 Demod ...................................................................................................... 42
2.3 Marker Setting ..................................................................................................... 44
2.3.1 Marker ...................................................................................................... 44
2.3.2 Marker -> .................................................................................................. 47
2.3.3 Marker Fn ................................................................................................. 49
2.3.4 Peak ......................................................................................................... 51
2.4 Measurement ...................................................................................................... 54
2.4.1 Meas ......................................................................................................... 54
2.4.2 Meas setup ............................................................................................... 55
2.5 System ................................................................................................................ 63
2.5.1 System ..................................................................................................... 63
2.5.2 Display ...................................................................................................... 65

SIGLENT
SSA3000X User Manual 6
2.5.3 File ............................................................................................................ 66
2.6 Shortcut Key ........................................................................................................ 68
2.6.1 Preset ....................................................................................................... 68
2.6.2 Couple ...................................................................................................... 71
2.6.3 Help .......................................................................................................... 71
2.6.4 Save ......................................................................................................... 71
Chapter 3 General Inspection and Troubleshooting ......................................................... 72
3.1 General Inspection .............................................................................................. 72
3.2 Troubleshooting ................................................................................................... 73
Chapter 4 Service and Support ........................................................................................ 75
4.1 Maintain Summary .............................................................................................. 75
4.2 Contact Us .......................................................................................................... 75

SIGLENT
SSA3000X User Manual 1
Chapter 1 Quick Start
This chapter guides users to quickly get familiar with the appearance, dimensions, front/ rear panel
and the user interface, as well as announcements during first use of SSA3000X series spectrum
analyzer.
Subjects in this chapter:
Appearance and Dimension
Preparing for Use
The Front Panel
Rear Panel
User Interface
Menu Operation
Parameter Setting
Using Built-in Help
Using the Security Lock
SIGLENT
SSA3000X User Manual 2
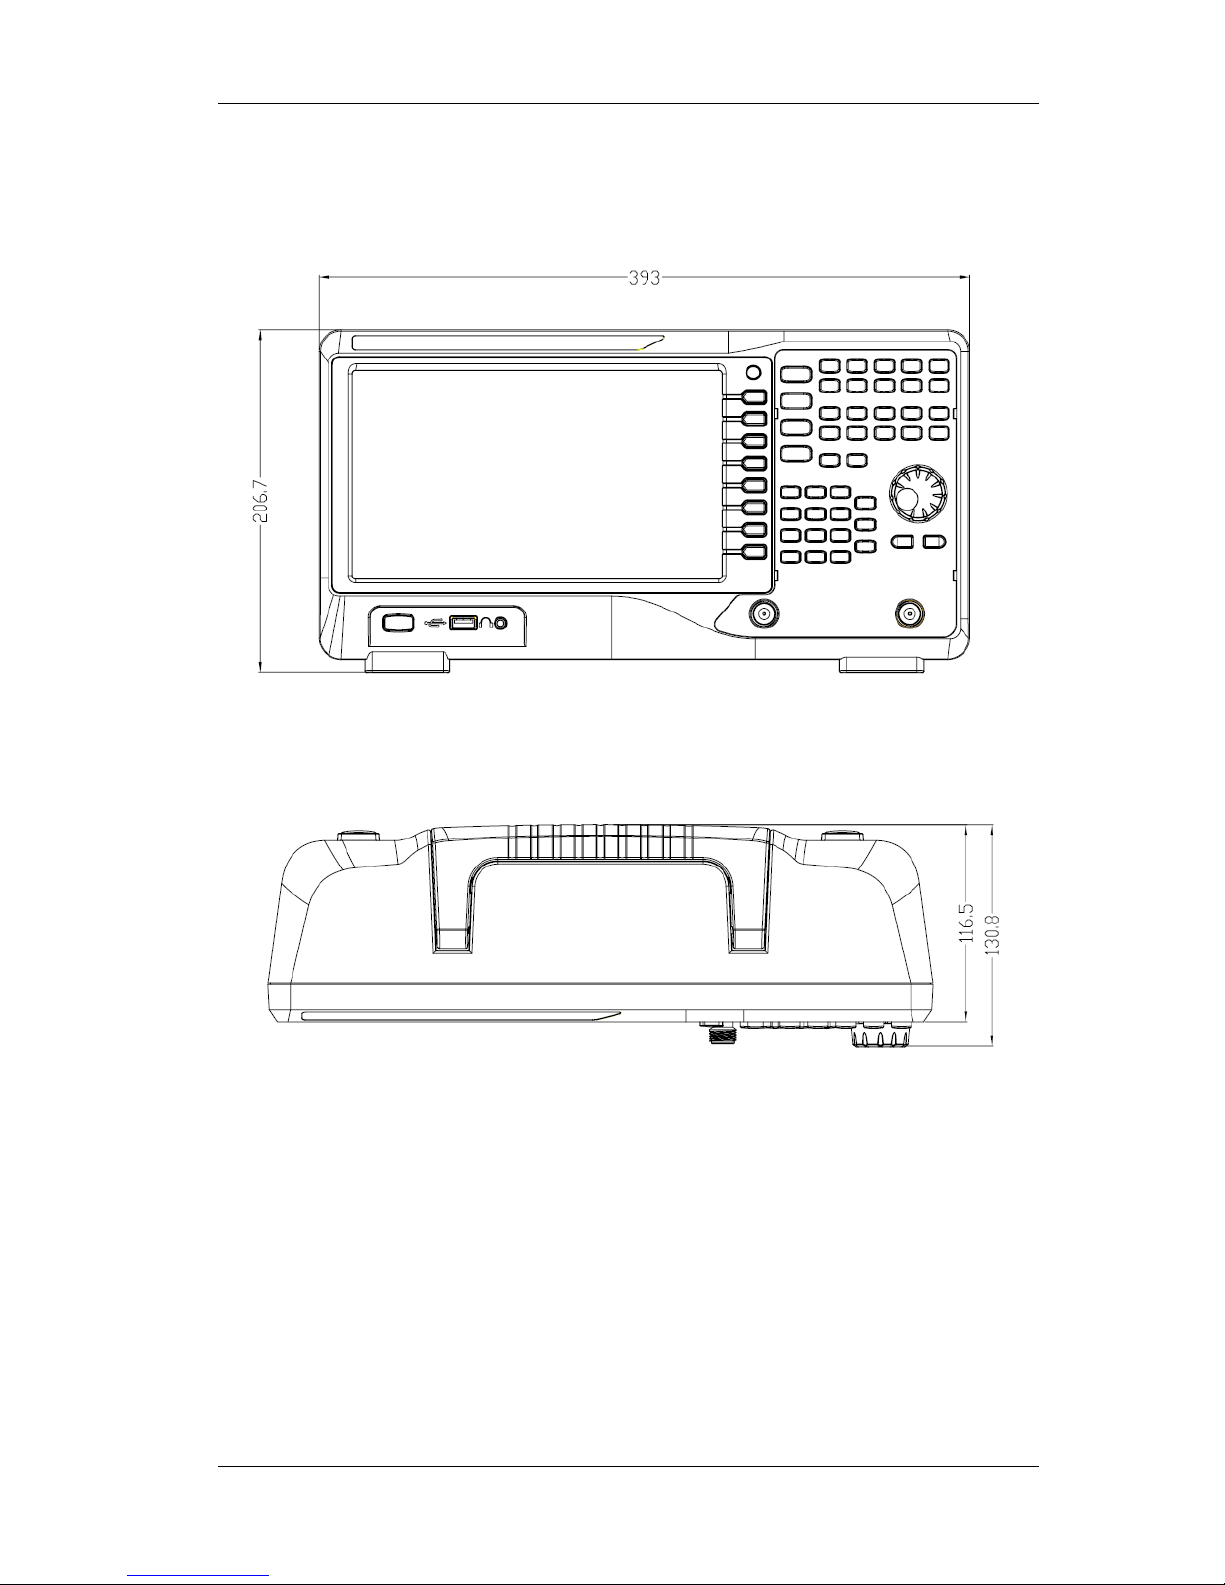
1.1 Appearance and Dimension
Figure 1-1 Front View
Figure 1-2 Top View

SIGLENT
SSA3000X User Manual 3
1.2 Preparing for Use
1.2.1 Adjust the Supporting Legs
Adjust the supporting legs properly to use them as stands to tilt the Spectrum Analyzer upwards for
stable placement as well as easier operation and observation of the instrument.
Figure 1-3 Before adjusting Figure1-4 After adjusting
1.2.2 Connect to AC Power Supply
The Spectrum Analyzer accepts 100-240V, 50/60/440Hz AC power supply. Please use the power
cord provided as accessories to connect the instrument to the power source as shown in the figure
below.
Figure 1-5 Power Cord Connection
SIGLENT
SSA3000X User Manual 4
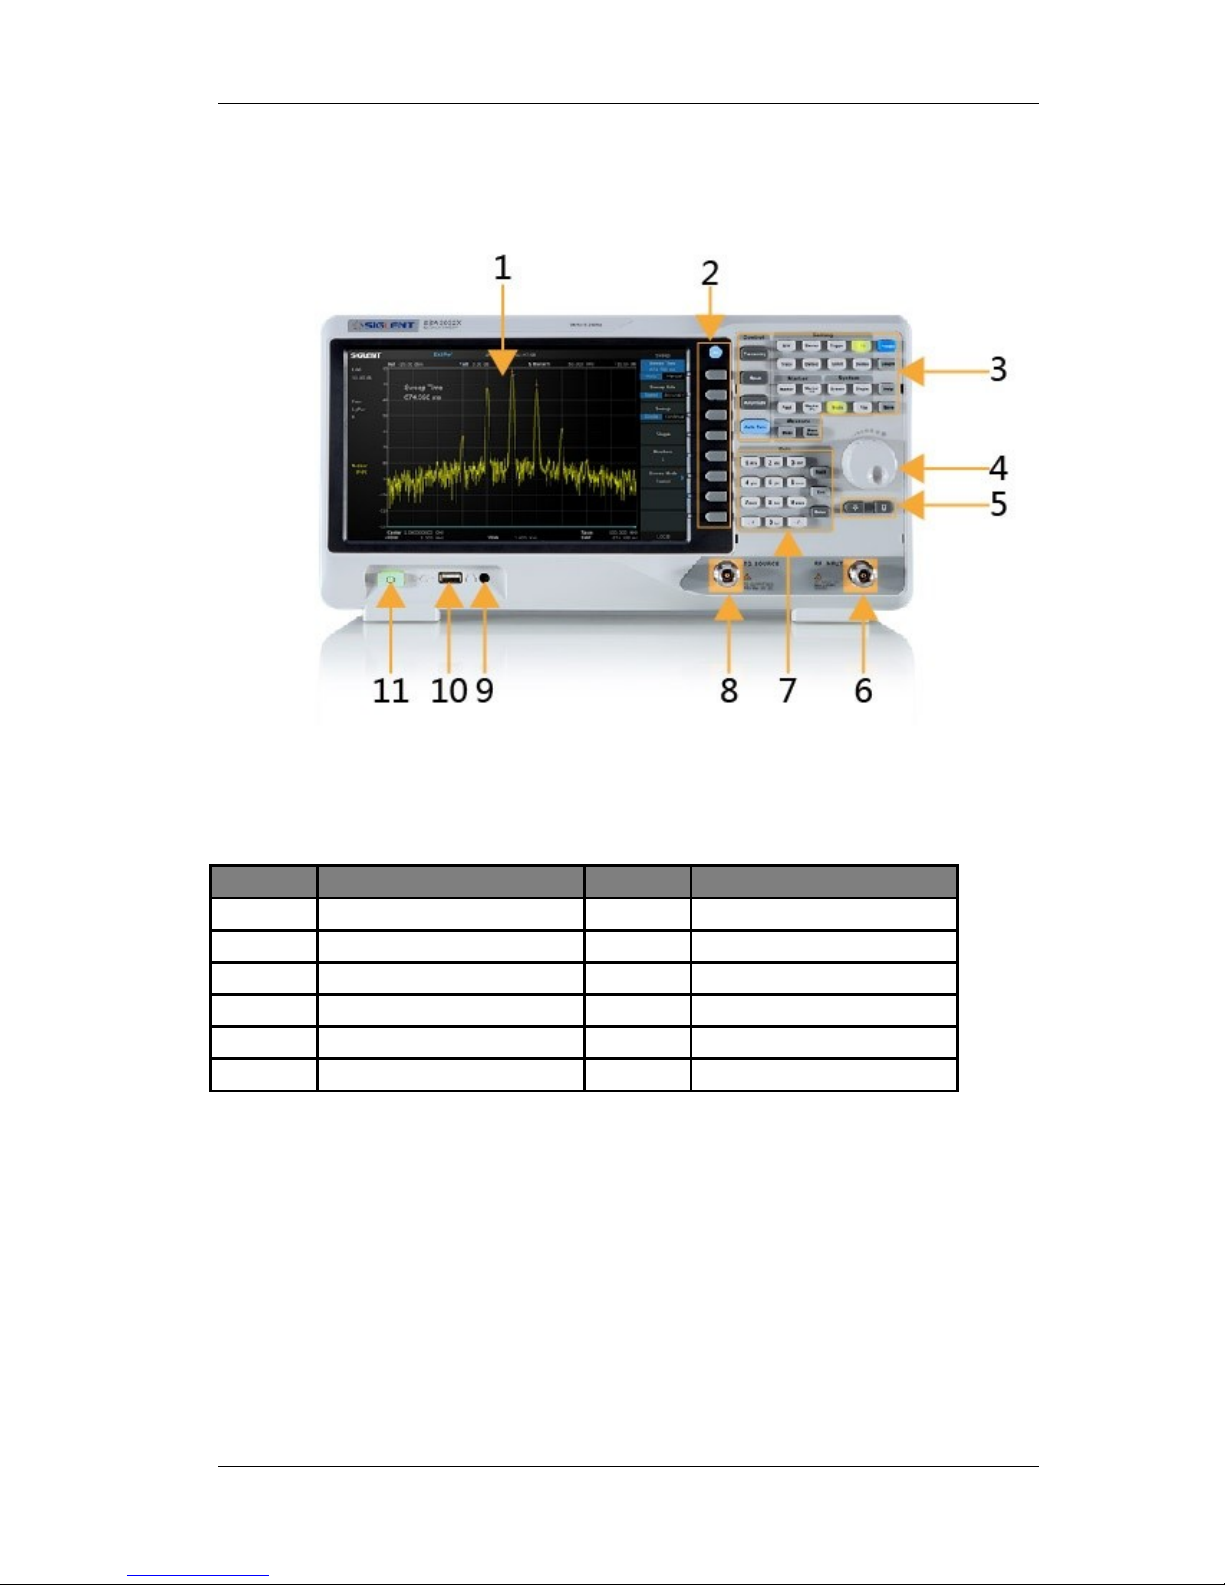
1.3 The Front Panel
Figure 1-6 The Front Panel
Table 1-1 Front Panel Description
NO.
Description
NO.
Description
1
User Graphical Interface
2
Menu Control Keys
3
Function Keys
4
Knob
5
Arrow Keys
6
RF Input
7
Numeric Keyboard
8
TG Output
9
Earphone interface
10
USB Host
11
Power Switch
SIGLENT
SSA3000X User Manual 5
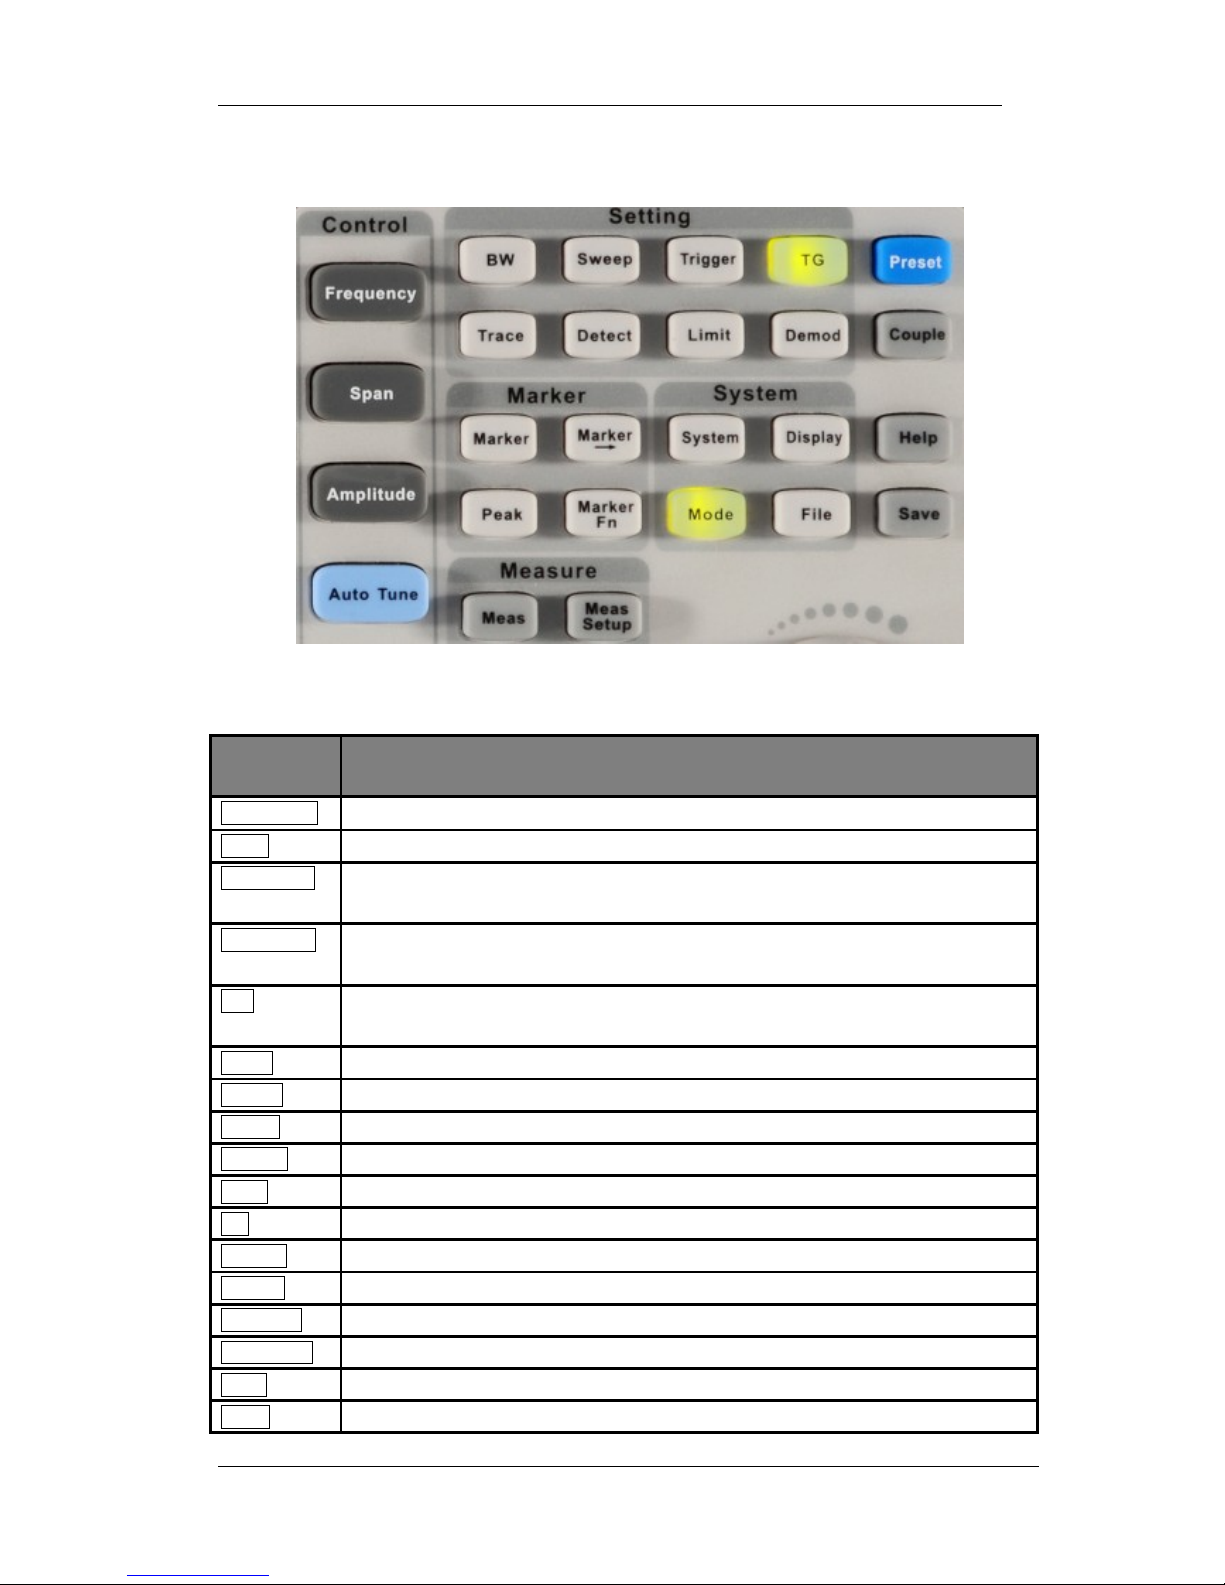
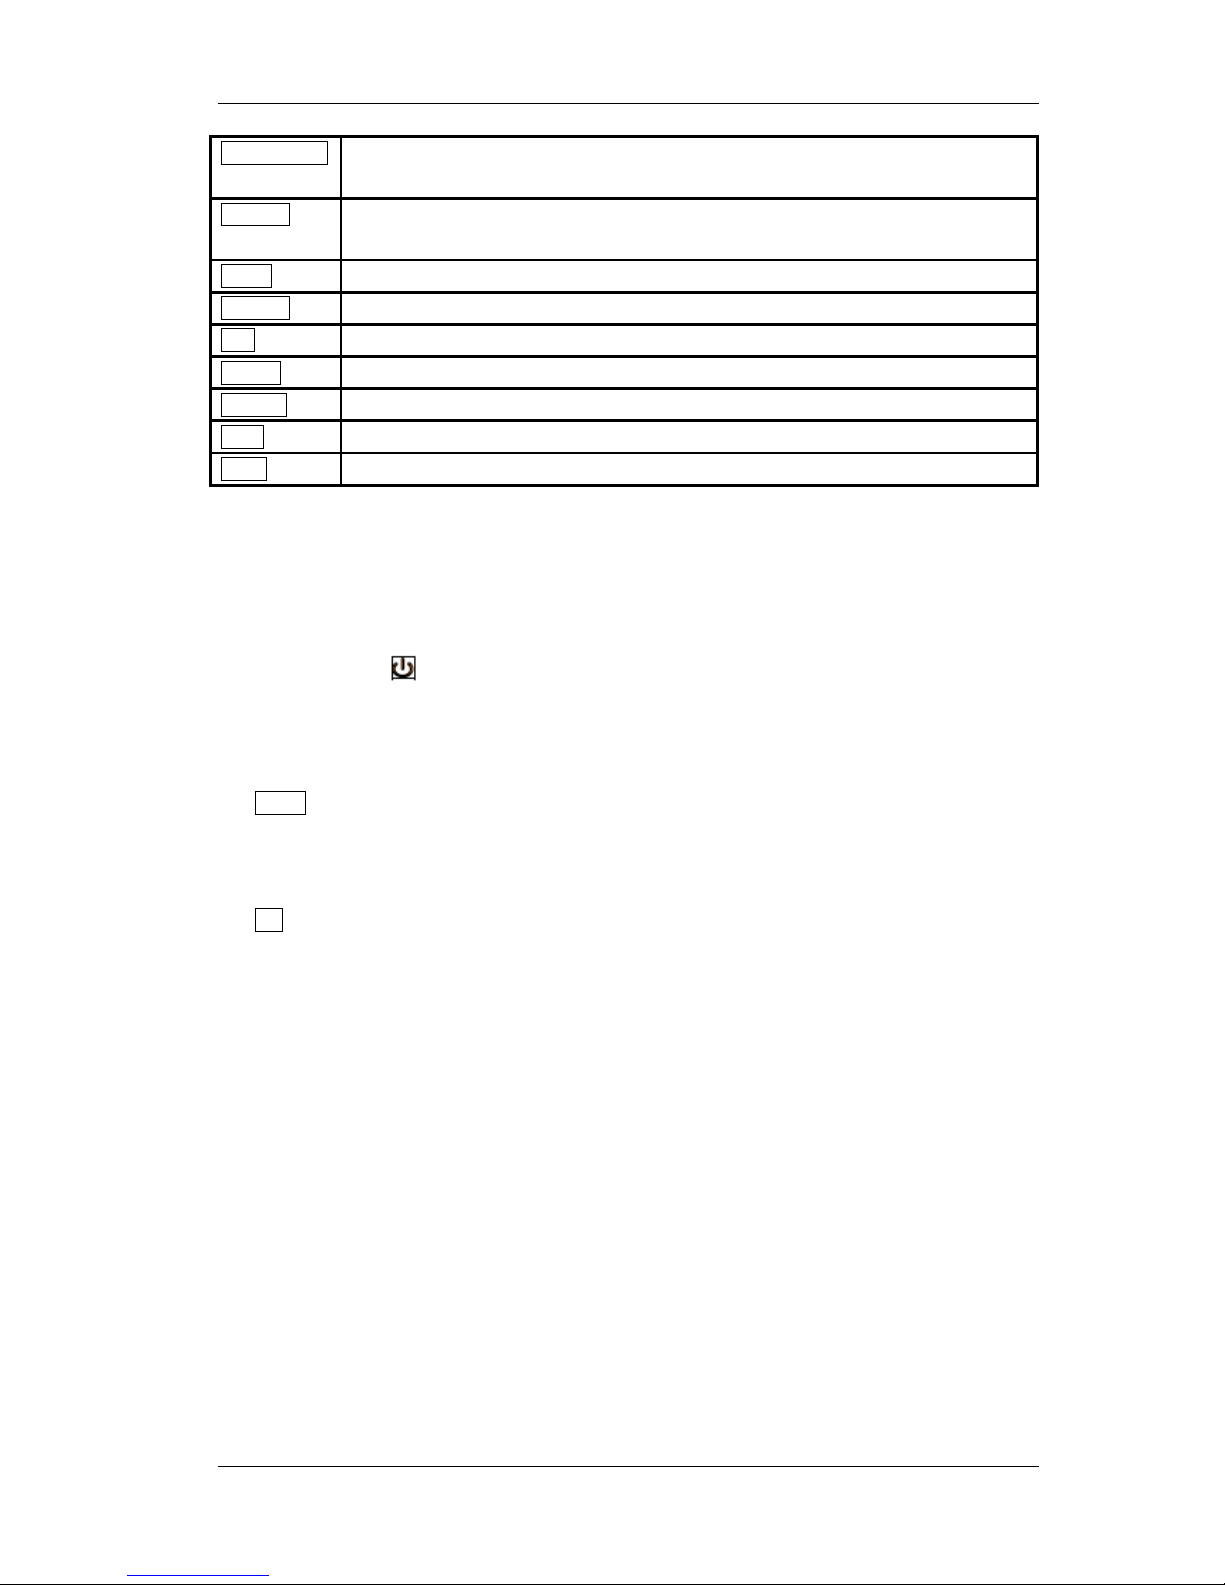
1.3.1 Front Panel Function Keys
Figure 1-7 Function Keys area
Table 1-2 Function keys description
Function
keys
Description
Frequency
Sets the Center Freq\Start Freq\Stop Freq\Freq Step\Peak→CF\CF→Step
Span
Sets the Span\Full Span\Zero Span\Zoom In\Zoom Out\Last Span\X-scale
Amplitude
Used to Set the REF Level\Attenuator\Preamp\Units\Scale/Div\Scale Type\REF
Offset\Corrections
Auto Tune
Automatically sets the optimal parameters according to the characteristics of the
signal
BW
Used to adjust the RBW\VBW\VBW/RBW Rate\Average Type (Log power\Power\
Voltage)\Filter
Trace
Selects Trace\Trace setup\Trace math
Sweep
Selects the Sweep time\Sweep Rule\Sweep Mode\QPD Dwell Time
Detect
Selects the Detector type
Trigger
Used in Selecting the Free Trigger\Video Trigger/ External Trigger
Limit
Sets the Pass\Fail Limit
TG
Sets the TG Level\TG Level offset\Normalize
Demod
Used to set the Parameters of the AM and FM
Marker
Used to Select the Mark Trace and Marker math
Marker->
Sets all types of Markers to Freq
Marker Fn
Selects the Noise Marker\N dB BW\Freq Counter\Read out of Freq
Peak
Searches for the Peak Signal and Counts the Peak Frequency
Meas
Selects the Channel Power\ACPR\Occupied BW\T-Power\TOI\Spectrum Monitor
SIGLENT
SSA3000X User Manual 6
Meas Setup
Used to Choose the Parameters Details of Channel Power\ACPR\Occupied
BW\T-Power\Spectrum Monitor
System
Selects the Language\Power on/Preset\Interface\Calibration\System Information
\Data&Time\Self Test
Mode
Selects the Spec Analyzer\Reflection Meas
Display
Used to Adjust the Grid Brightness\Display Line\Screen Text\Screenshot
File
Use to Select the File system
Preset
Sets the system to default status
Couple
Used to Select the RBW\VBW\Attenuator\Freq Step\Sweep time mode
Help
Help Information Switch
Save
Save Shortcut Key
1.3.2 Front Panel Key Backlight
The on/off state and the color of the backlights of some keys at the front panel indicate the working
state of the spectrum analyzer. The states are as listed below.
1. Power Switch
Flash on and off alternatively, in breathing state: indicate the unit is in stand-by state.
Constant on: indicate the instrument is in normal operating state.
2. Mode
When the Reflection Meas function and EMI is enabled, the backlight of Mode turns on.
When the function is Spec Analyzer, the backlight is turn off.
3. TG
When the TG function is enabled, the backlight of TG turns on and turns off when the function is
disabled.
1.3.3 Using the Numeric Keyboard
SSA3000X provides a numeric keyboard at the front panel (as shown in the figure below). The
numeric keyboard which supports English uppercase/lowercase characters, numbers and
common symbols (including decimal point, #, space and +/-) are mainly used to edit file or folder
name and set parameters (refer to ―Parameter Setting‖).

SIGLENT
SSA3000X User Manual 7
Figure 1-8 Numeric Keyboards
1. +/-
Press this key can switch in number and letter during file editing.
2. 1 A/a
Press this key to enter 1 in number input and switch between uppercase and lowercase letter
in English input.
3. . #
Press this key to input a decimal point in number input.
Press this key to input special character in English input.
4. Back
During the process of parameter editing, press this key to delete the character on the left of
the cursor.
5. Esc
During parameter editing process, press this key to clear the inputs in the active function area
and exit parameter input.
When the instrument is in remote mode, use this key to return to local mode.
6. Enter
When pressed during parameter editing process, the system will complete the input and insert
a default unit for the parameter automatically.
SIGLENT
SSA3000X User Manual 8
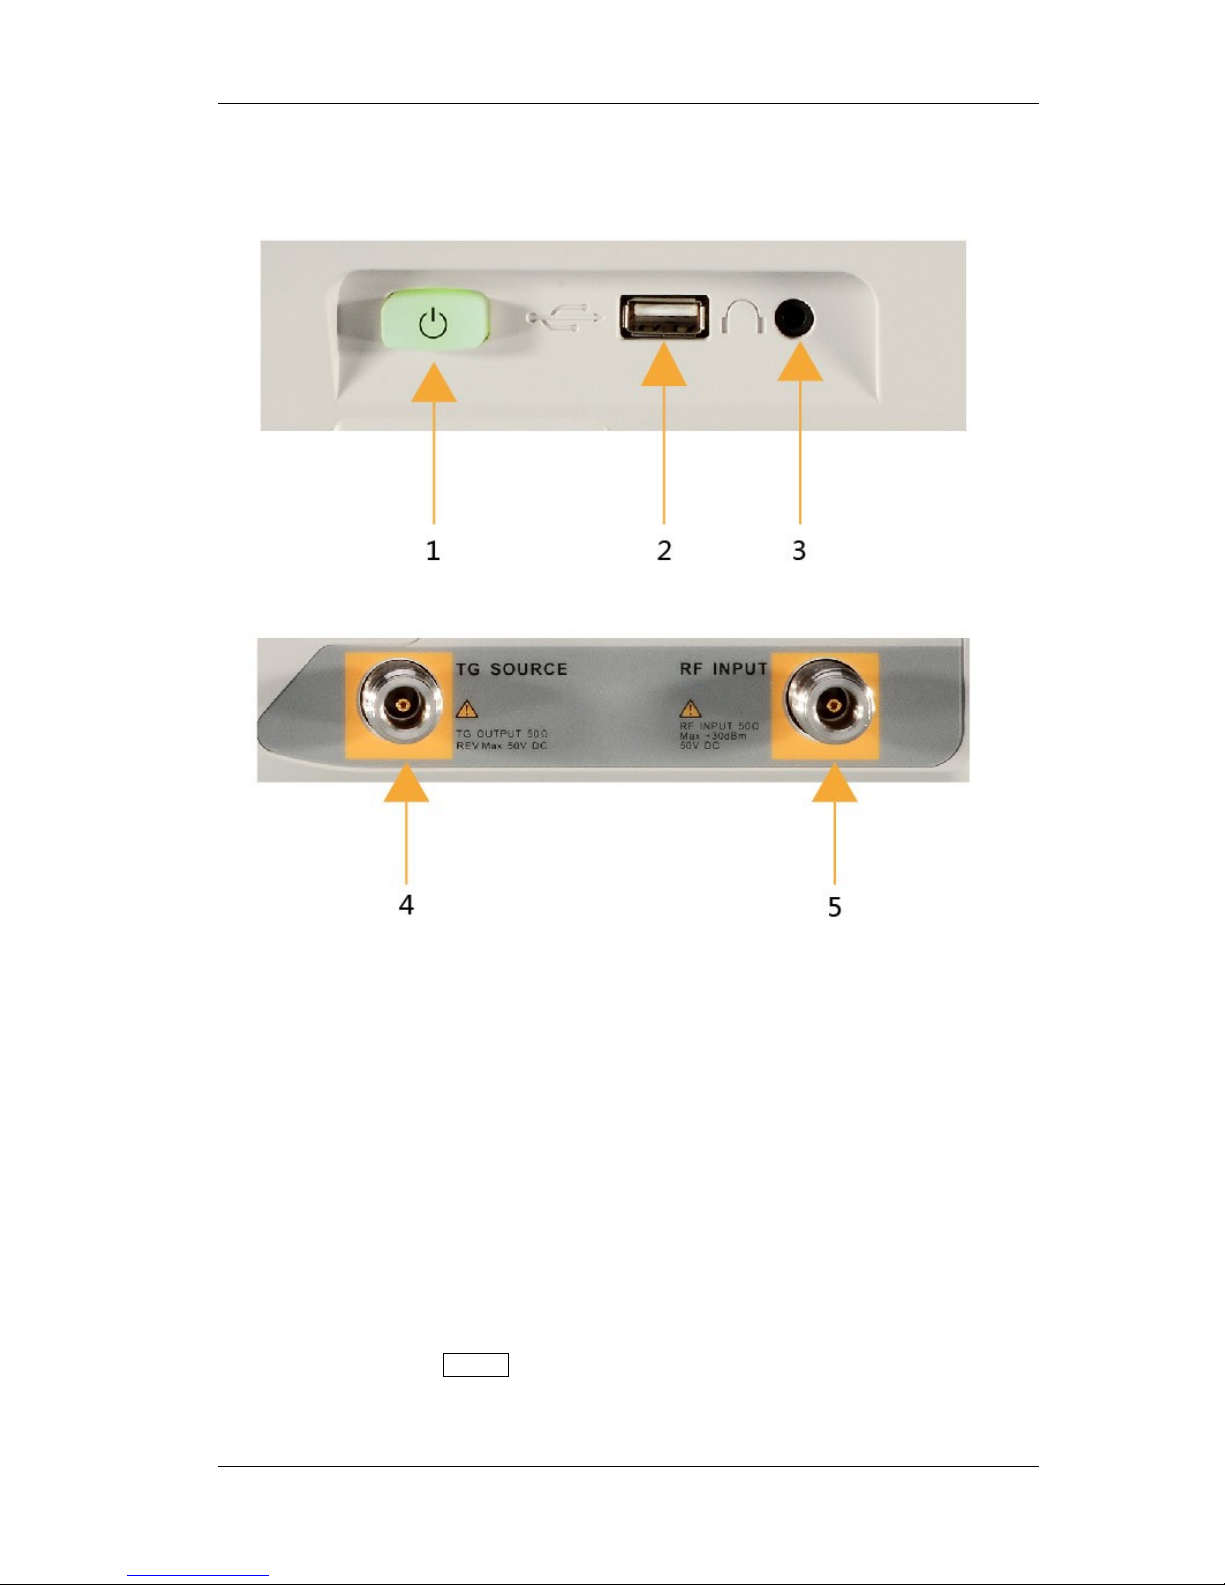
1.3.4 Front Panel Connectors
Figure 1-9 Front Panel Connectors
1. Power Switch
Power up/Power down the instrument
2. USB Host
The analyzer can serve as a ―host‖ device to connect external USB devices. This interface is
available for USB storage devices.
Read and store the current instrument state or trace in the USB storage device or store the
contents currently displayed on the screen in the USB storage device in ―.bmp‖ or ―.jpg‖
format.
3. Earphone Jack
The analyzer provides AM and FM demodulations. Insert the earphone to the jack to acquire
the audio output of the demodulated signal. You can turn on or off the earphone output and
adjust the volume via Demod ->Volume.
SIGLENT
SSA3000X User Manual 9
CAUTION
For fear of damaging your hearing, please turn the volume down to zero and
gradually turn the volume up after putting on the earphone.
4. TG OUTPUT
The output of the tracking generator can be connected to a receiver through a cable with an N
male connector.
CAUTION
To avoid damage to the tracking generator, the reverse DC voltage cannot
exceed 50 V
5. RF INPUT
CAUTION
To avoid damage to the instrument, for the signal input from the RF input
terminal, the DC voltage component and the maximum continuous power of
the AC (RF) signal component can not exceed 50 V and +30 dBm
respectively.
SIGLENT
SSA3000X User Manual 10
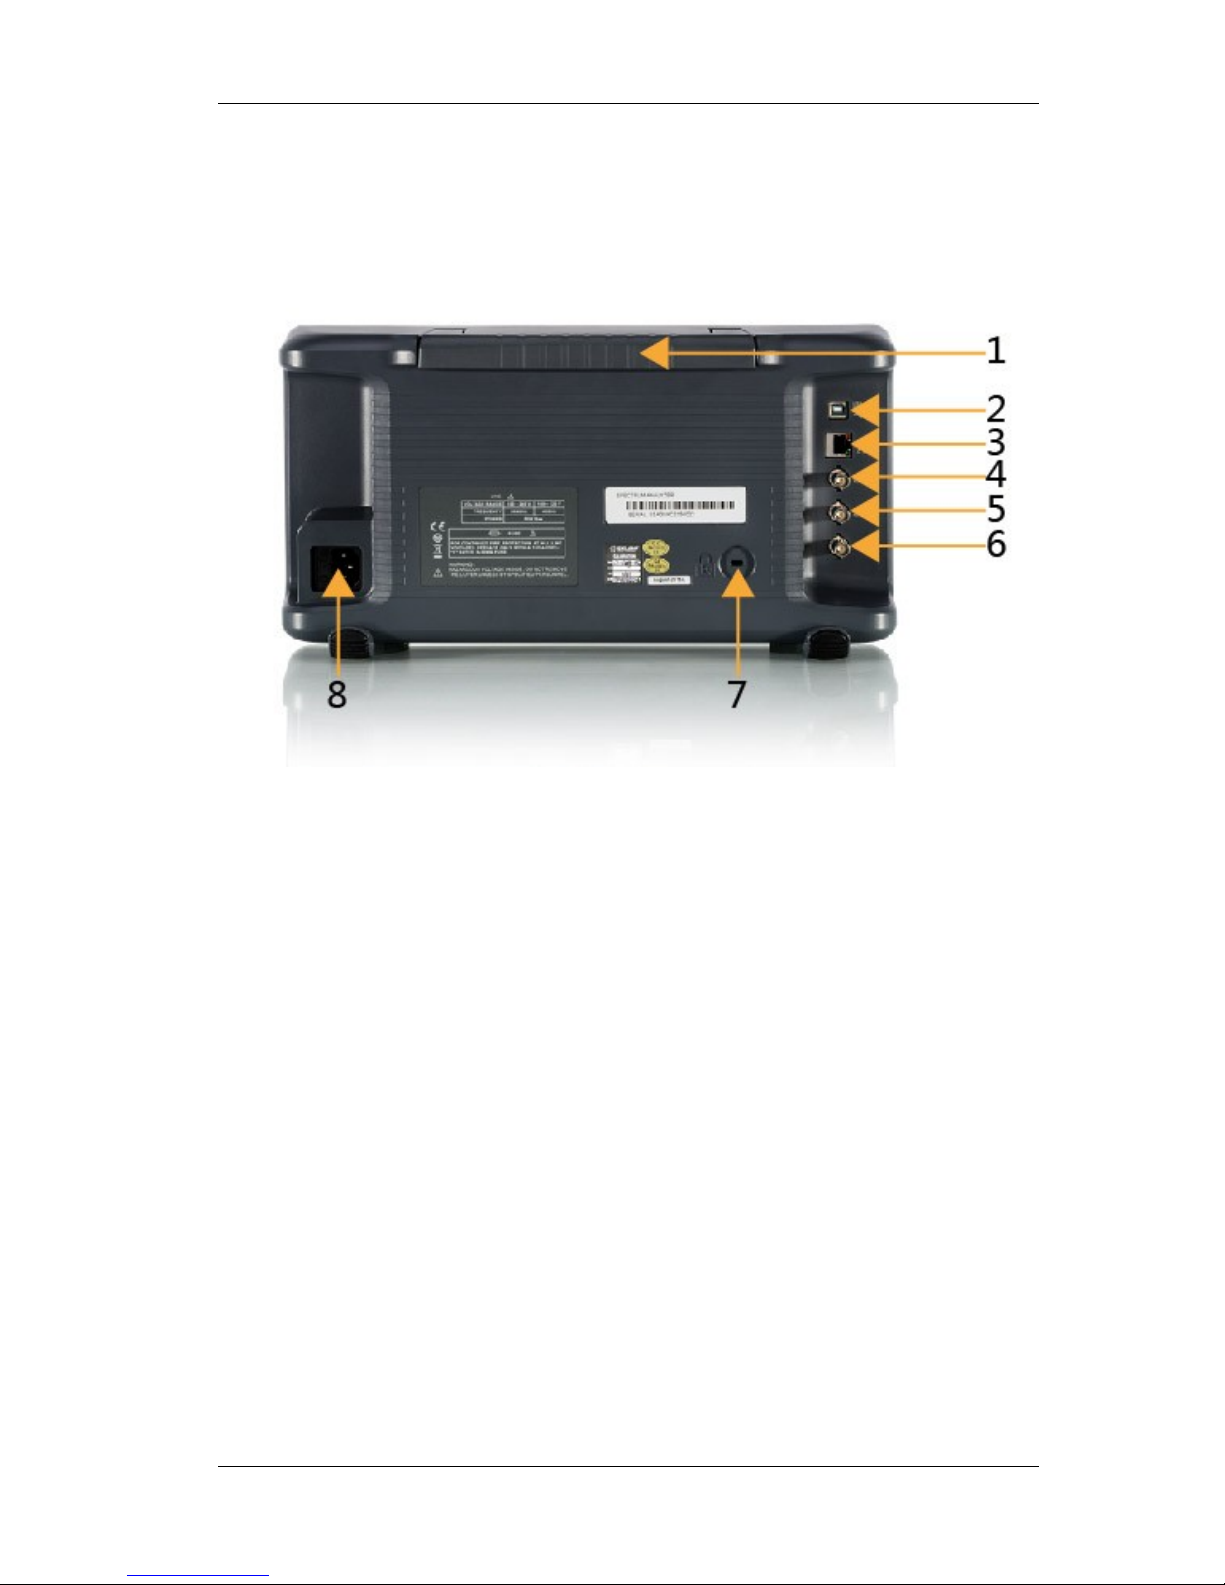
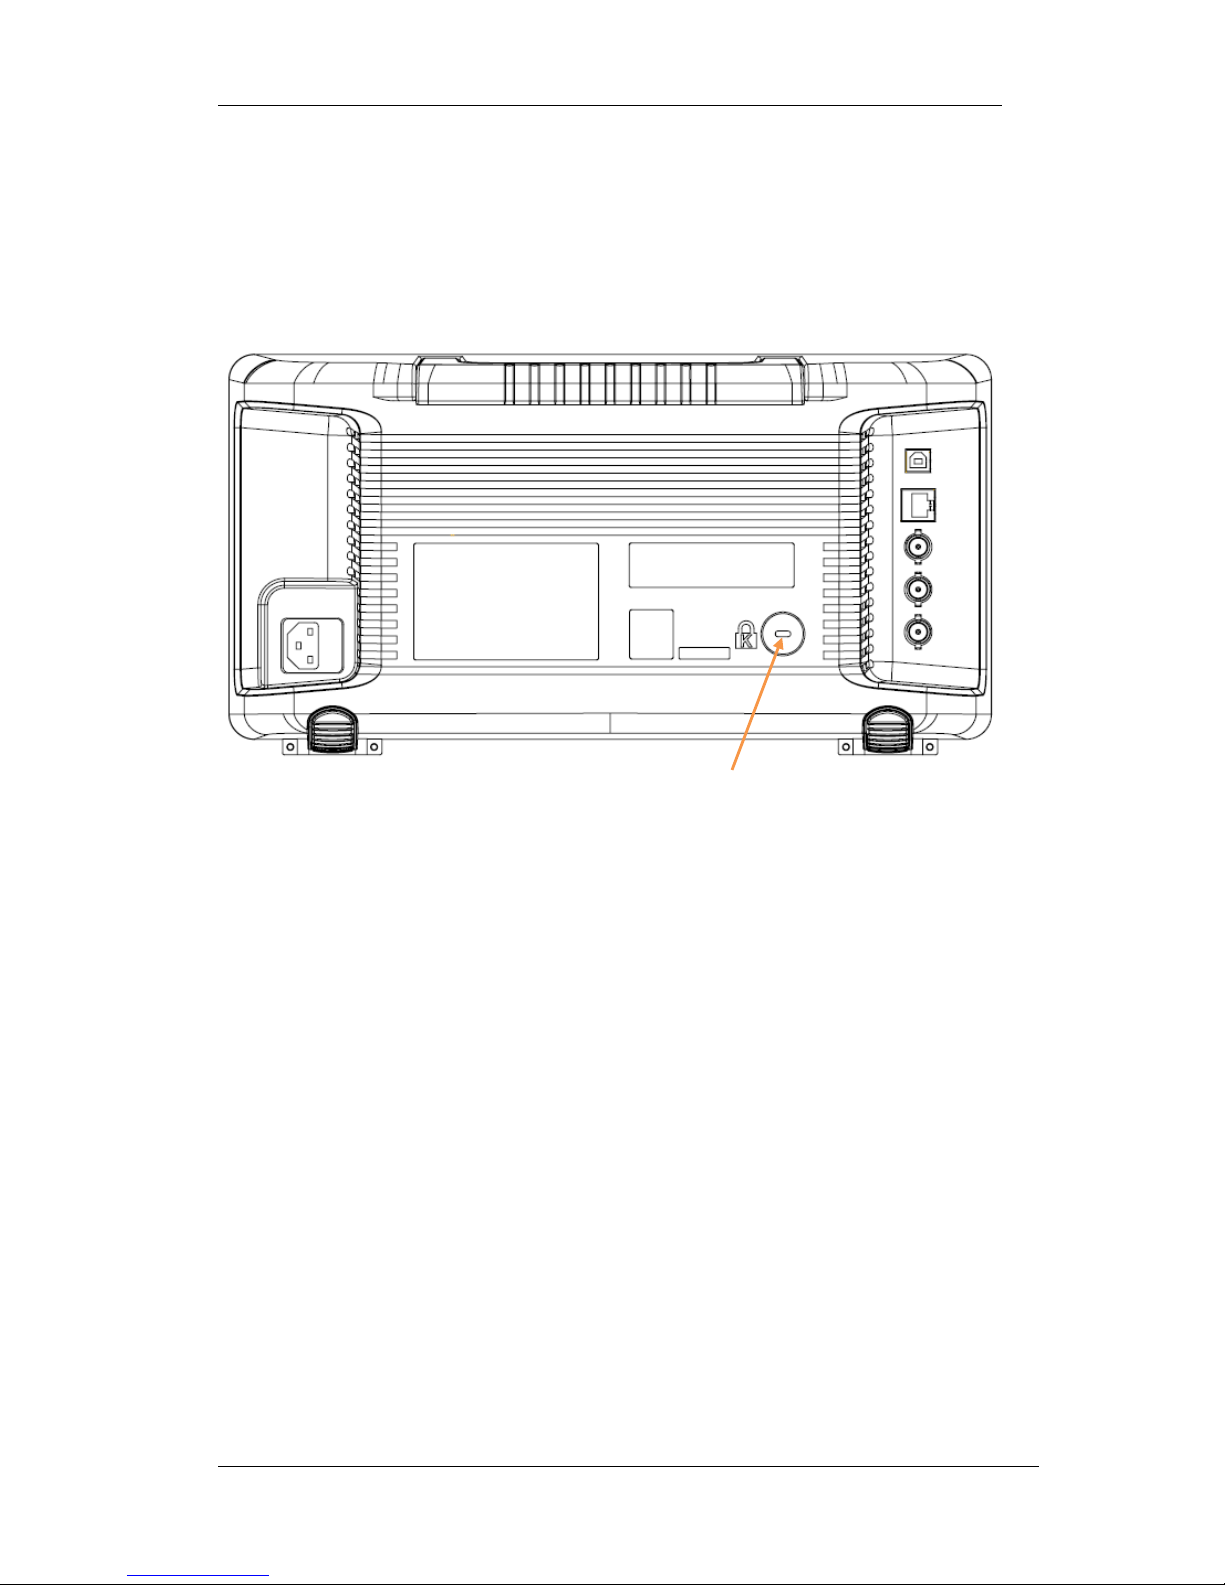
1.4 Rear Panel
Figure 1-10 Rear Panel
1. Handle
Pull up the handle vertically for easy carrying of the instrument. When you do not need the handle,
press it down.
2. USB Device interface
The analyzer can serve as a ―slave‖ device to connect external USB devices. Through this
interface, a PC can be connected to control SSA3000X remotely through programming or PC
software.
3. LAN interface
Through this interface, the analyzer can be connected to your local network for remote control.
4. REF IN 10MHz
SSA3000X can use internal or external reference source.
When a 10 MHz external clock signal is received through the [10MHz IN] connector, this
signal is used as the external reference source and ―Ext Ref‖ is displayed in the status bar of
the user interface. When the external reference is lost, transfinite or not connected, the
instrument switches to its internal reference source automatically and ―Ext Ref‖ on the screen
disappears.
The [10MHz IN] and [10MHz OUT] connectors are usually used to build synchronization
among multiple instruments.

SIGLENT
SSA3000X User Manual 11
5. REF OUT 10MHz
SSA3000X can use internal or external reference source.
When internal reference source is used, the [10MHz OUT] connector can output a 10 MHz
clock signal generated by the analyzer. This signal can be used to synchronize other
instruments.
The [10MHz OUT] and [10MHz IN] connectors are usually used to build synchronization
among multiple instruments.
6. Trigger in
In external trigger mode, the connector receives an external trigger signal through a BNC cable.
7. Security Lock Hole
If needed, you can use a security lock (buy it yourself) to lock the analyzer to a desired location.
8. Connect to AC Power Supply
The Spectrum Analyzer accept 100-240V, 50/60/440Hz AC power supply. Please use the power
cord provided as accessories to connect the instrument
SIGLENT
SSA3000X User Manual 12
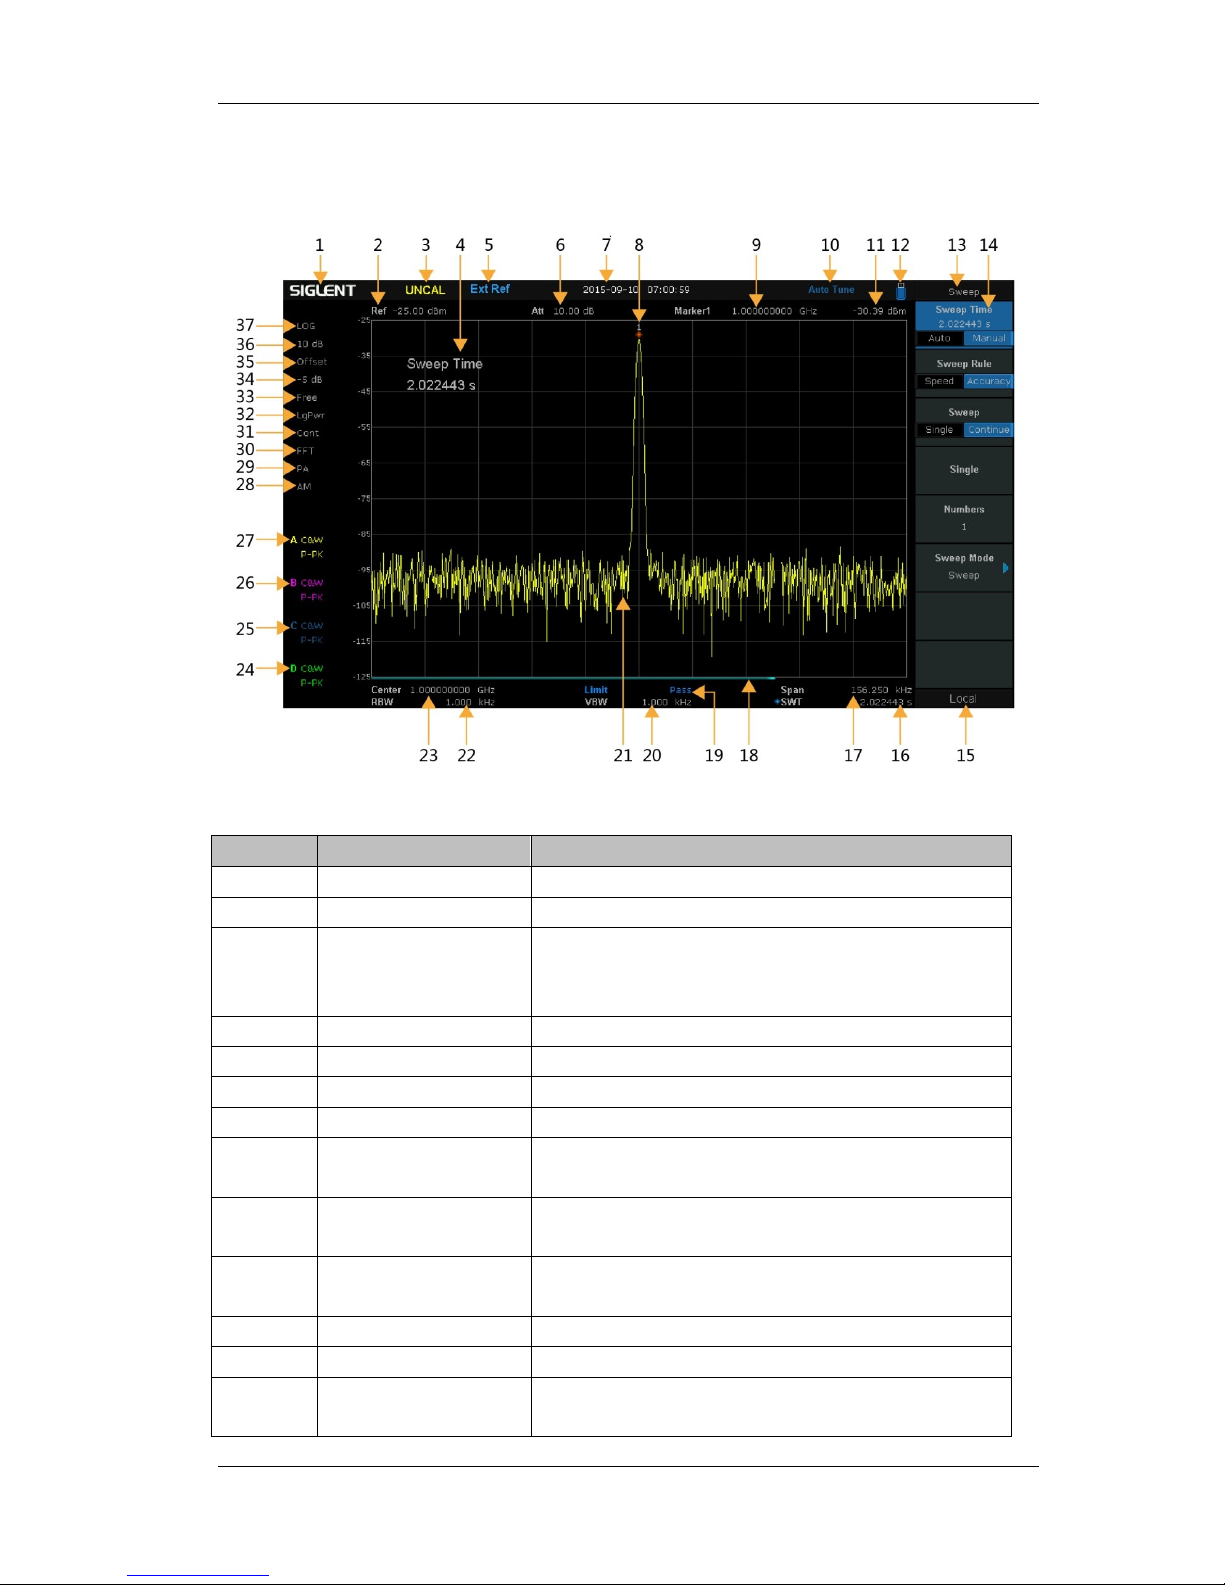
1.5 User Interface
Figure 1-11 User Interface
Table 1-3 User Interface labels
NO.
Name
Description
1
SIGLENT
Logo of SIGLENT
2
Ref
Reference level
3
UNCAL
When the sweep time less than the auto couple time,
the measure result may be inaccuracy, at the same
time appear the ―UNCAL‖
4
Active function area
Current parameter and its value
5
EXT REF
Ext Ref
6
Att
Attenuator Value
7
Day and time
System time
8, 9, 11
Cursor parameter
8:Current active cursor; 9:current cursor frequency
value 11:current cursor amplitude value;
10
Auto Tune
Automatically sets the optimal parameters according to
the characteristics of the signal
12
USB storage device
identification
The identification is displayed when a USB flash drive
is inserted
13
Menu title
Function of the current menu.
14
Menu items
Menu items of the current function
15
Operation status
Local is local mode, Remote is remote mode, Upgrade
means the instrument is upgrading

SIGLENT
SSA3000X User Manual 13
16
Sweep time
Sweep time
17
Span or stop
Frequency
The frequency range of the current sweep channel can
be expressed by the combination of center frequency
and span or the combination of start frequency and
stop frequency
18
Sweep progress bar
Sweep progress bar
19
Pass/Fail status
Pass/Fail status
20
VBW
Video bandwidth
21
Spectrum trace
Spectrum trace
22
RBW
Resolution bandwidth
23
Center or start
frequency
The frequency range of the current sweep channel can
be expressed by the combination of center frequency
or the combination of start frequency
24, 25,
26, 27
Trace status
Can set the trace A\B\C\D is Clear Write\Max Hold\Min
Hold\Freeze\Average times\Math
28
AM or FM
AM or FM identification
29
PA
Enable or disable Preamplifier
30
FFT
Sweep mode is FFT
31
Single or Continue
Sweep mode single or continue
32
Average type
Log power\Power\Voltage power
33
Trigger type
Free\Video\External trigger
34, 35
Ref offset
34:Ref offset identification;35:Ref offset value
36
Scale/Div
Scale value
37
Scale type
Logarithm or linearity
SIGLENT
SSA3000X User Manual 14
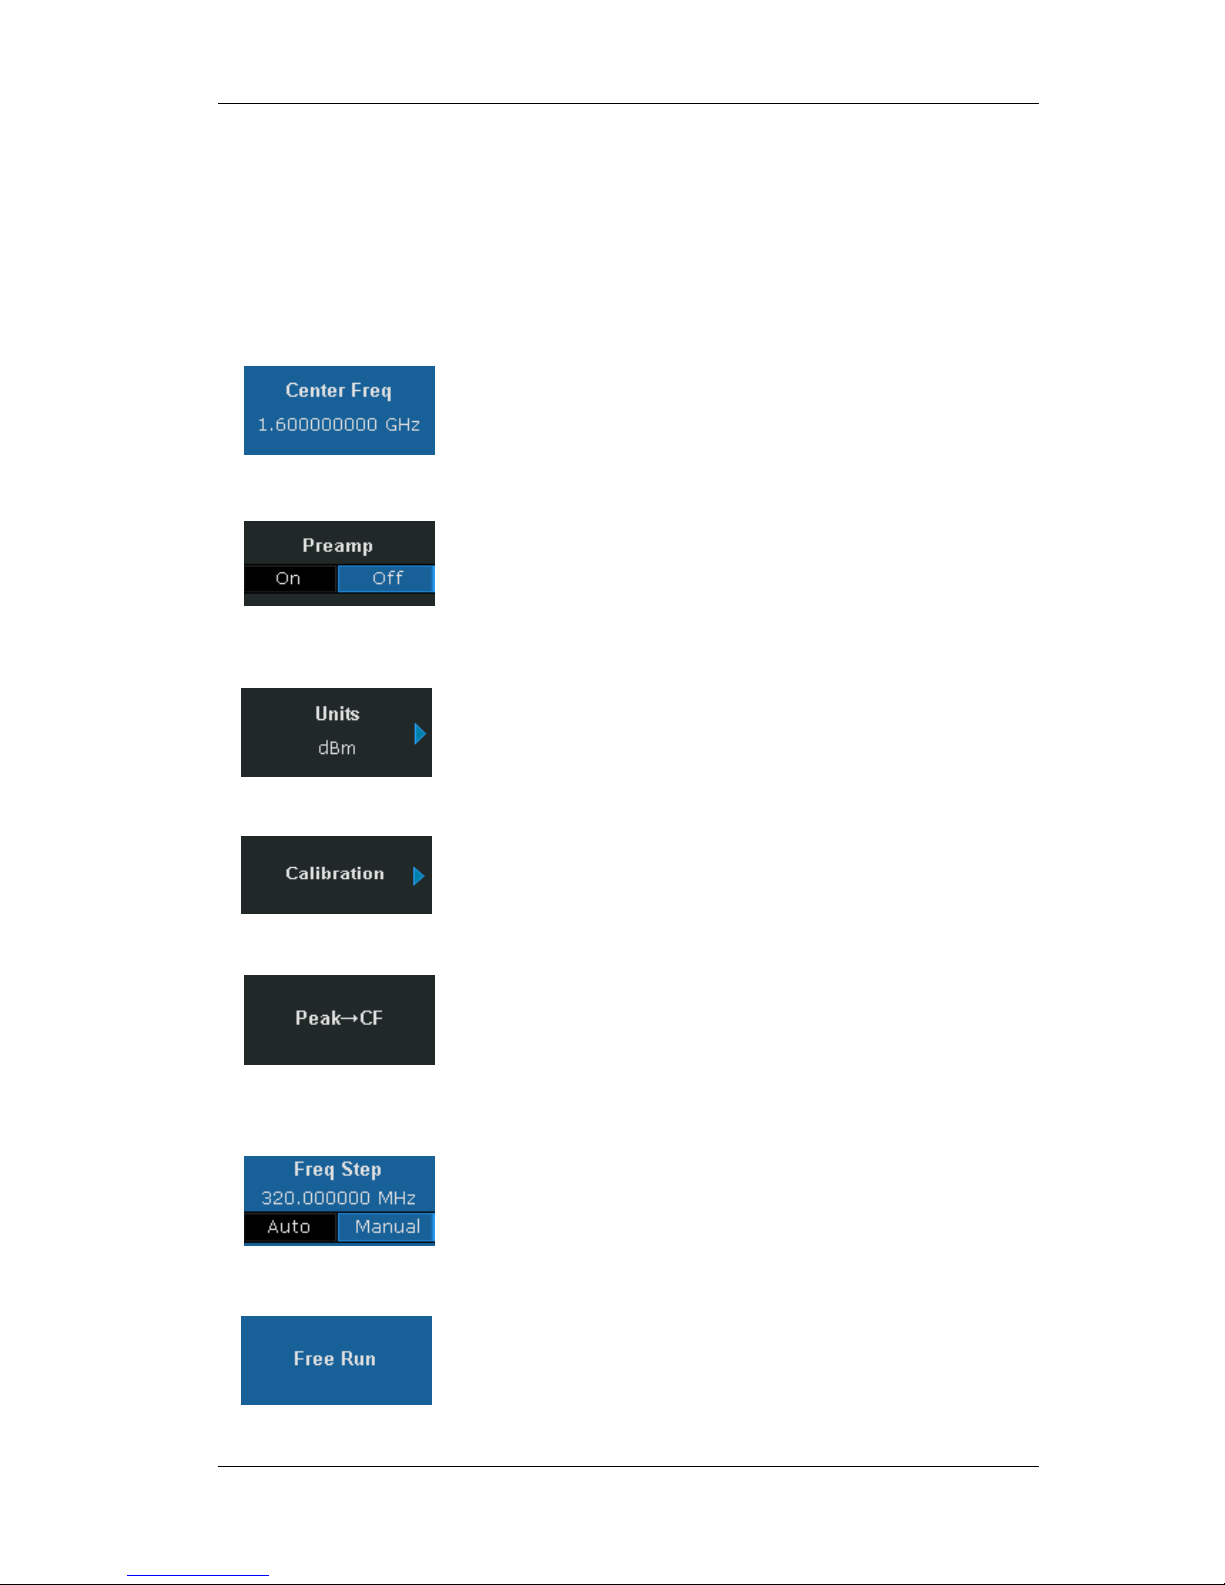
1.6 Menu Operation
There are 7 types of menus according to their operation modes. Each type of menu and its
operation method are introduced below.
1. Parameter Input
When selected, use the numeric keys to modify the parameters
directly.
For example, select Center Freq, input the desired figure and press
Enter to change the center frequency.
2. State switching
Press the corresponding menu key to switch between the
sub-options.
For example, press Preamp to enable or disable the amplifier.
3. Enter Lower Menu(with parameter)
Press the corresponding menu key to enter the lower menu and
change the option currently selected. The parameter in the upper menu
will change when you return to the upper menu.
For example, press Units to enter the lower menu. Select dBm and
return to the previous menu. The unit of Y-axis changes to dBm.
4. Enter Lower Menu (without parameter)
Press the corresponding menu key to enter the lower menu.
For example, press Calibration to enter the lower menu directly.
5. Direct Execution
Press the key to execute the corresponding function.
For example, press Peak->CF to execute a peak search and set the
center frequency of the analyzer to the frequency of the current peak
signal.
6. Function Switch + Parameter Input
Press the corresponding menu key to switch between functions;
change the parameter directly using the numeric keys.
For example, press Freq Step to switch between Auto and Manual; if
Manual is selected, you can directly input the desired number to
change the Freq Step.
7. State Selection
Press the corresponding menu key to modify the parameter and
return to the menu one level up.
For example, press Trig Type ->Free Run to select free trigger and
the analyzer is in Free Run state at present.

SIGLENT
SSA3000X User Manual 15
1.7 Parameter Setting
Users can enter the desired parameter values using the numeric keys, knob or Arrow keys. This
section describes the three methods of parameter setting through an example (to set the center
frequency to 100 MHz).
1. Use the numeric keyboard
1) Press Frequency->―Center Freq‖
2) Input 100 using the numeric keys;
3) Select the desired unit (MHz) from the popup menu.
2. Use the knob
When the parameter is editable (namely when the parameter is selected), turn the knob clockwise
to increase or counterclockwise to decrease the parameter value at the specified step.
1) Press Frequency->―Center Freq‖
2) Rotate the knob until the parameter is set to the desired value (100 MHz).
Figure 1-12 Knob
Note: In the storage function, the knob can also be used to select the current path or file.
3. Use the arrow keys
When the parameter is editable (namely when the parameter is selected), you can increase or
decrease the parameter value at the specific step using the direction keys.
1) press Frequency -> ―Center Freq‖
2) Press the up/down Arrow key until the parameter is set to the desired value (100 MHz).
SIGLENT
SSA3000X User Manual 16
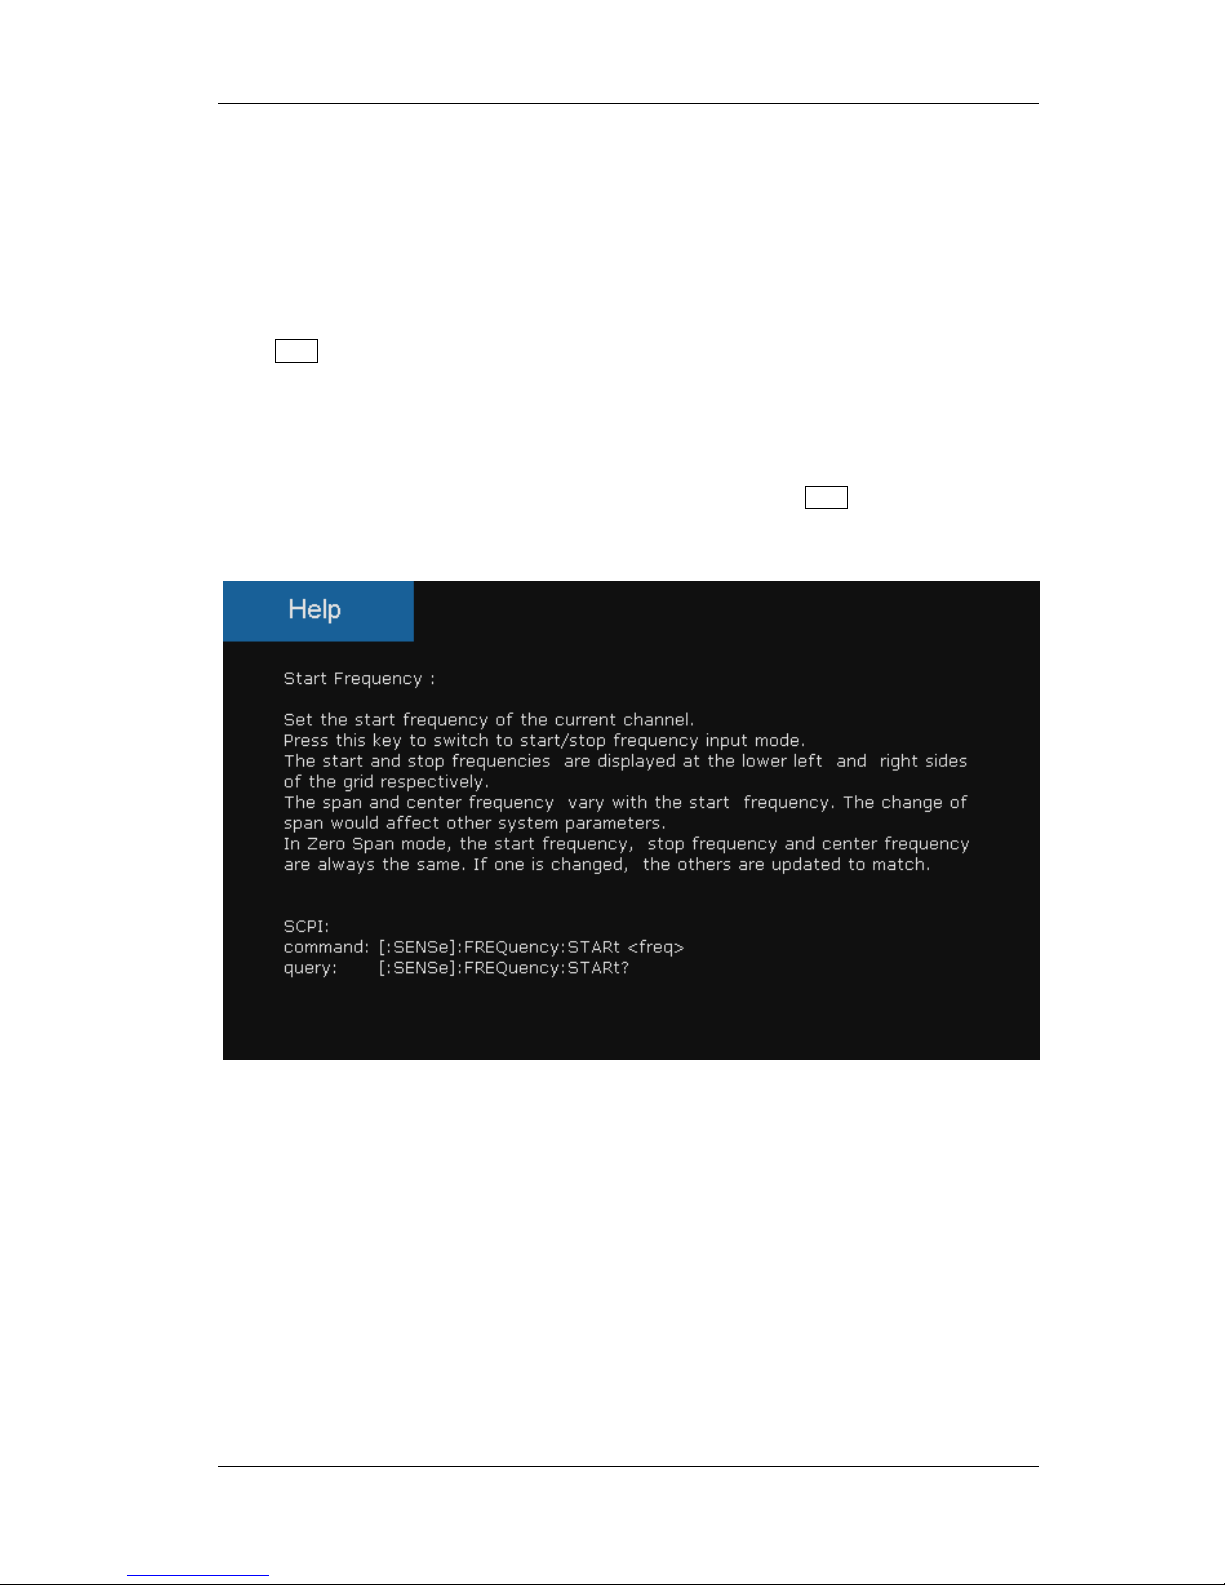
1.8 Using Built-in Help
The built-in help system provides information about every function key at the front panel and every
menu soft key.
1. How to acquire built-in help
Press Help and a prompt about how to obtain help information will be shown at the center of the
screen. Then, press the key that you want to get help of and the relevant help information will be
shown at the center of the screen.
2. Close the current help information
When the help information show at the center of the screen. Press the Help button, It will close the
help information.
Figure 1-13 help information
SIGLENT
SSA3000X User Manual 17
1.9 Using the Security Lock
If needed, you can use the security lock (please buy it yourself) to lock the Spectrum Analyzer to a
fixed location. The method is as follows, align the lock with the lock hole and plug it into the lock
hole vertically, turn the key clockwise to lock the Spectrum Analyzer and then pull the key out.
Figure 1-14 Security Lock
 Loading...