

Page 1
USER MANUALUSER MANUAL
SIGNAL N320RT
4.5x30 DIGITAL NIGHT VISION
MONOCULAR
SIGNAL N340RT
4.5x30 DIGITAL NIGHT VISION
MONOCULAR
(SM18024) (SM18025)
Page 2

While Sightmark’s MAKE YOUR MARK tagline perfectly illustrates our mission to provide uncompromising accuracy
in virtually any environment, to us, those three words mean quite a bit more.
MAKE YOUR MARK represents our commitment; rst, to those who serve; second, to our Constitutional right to bear
arms, the right ensuring all others remain intact; and nally, every single professional and recreational shooting
enthusiast embracing and sharing our Pro-2nd Amendment lifestyle.
MAKE YOUR MARK also symbolizes our desire to build more than a brand people know they can trust. It represents
our higher calling to build an honorable, unapologetic legacy, truly appreciative of the fabric of a free society to
pass on to future generations. Only accomplishing the latter truly embodies the gravity of what MAKE YOUR MARK
means to us.
In the spirit of gratitude for those who preserve freedom as we know it to be, MAKE YOUR MARK is a call to action.
One we take seriously when it comes to developing products worthy of our brand… and our lifetime warranty. The
same brand countless professionals rely upon for performance in the best… and most assuredly, worst of times.
ABOUT SIGHTMARK
®
FEATURES:
• Wi-Fi remote view via Pulsar Stream Vision
• Built-in video/sound recording
• 2x digital zoom
• Power input
• High resolution sensor
• Built-in 850nm LED IR illuminator
• Resistant to bright light exposure
• Intuitive easy-to-use interface
• Front focus objective lens
• Additional weaver rail for accessories
SIGNAL RT SERIES
Extend your reach far past sundown with the Sightmark Signal RT Digital Night Vision Monocular. This hand held
unit is easy to operate and features a matching high resolution (640x480) imaging sensor and display for a crisp
picture. The Signal RT boasts 8Gb of built in memory for audio/video recording and photos. Featuring a high
powered LED IR illuminator, this digital unit can be used day or night with adjustable display brightness settings to
stay on target in any condition.
INCLUDED:
• Carrying case
• USB cable
• Neck strap
• Lens cloth
• Manual
1
Page 3
2
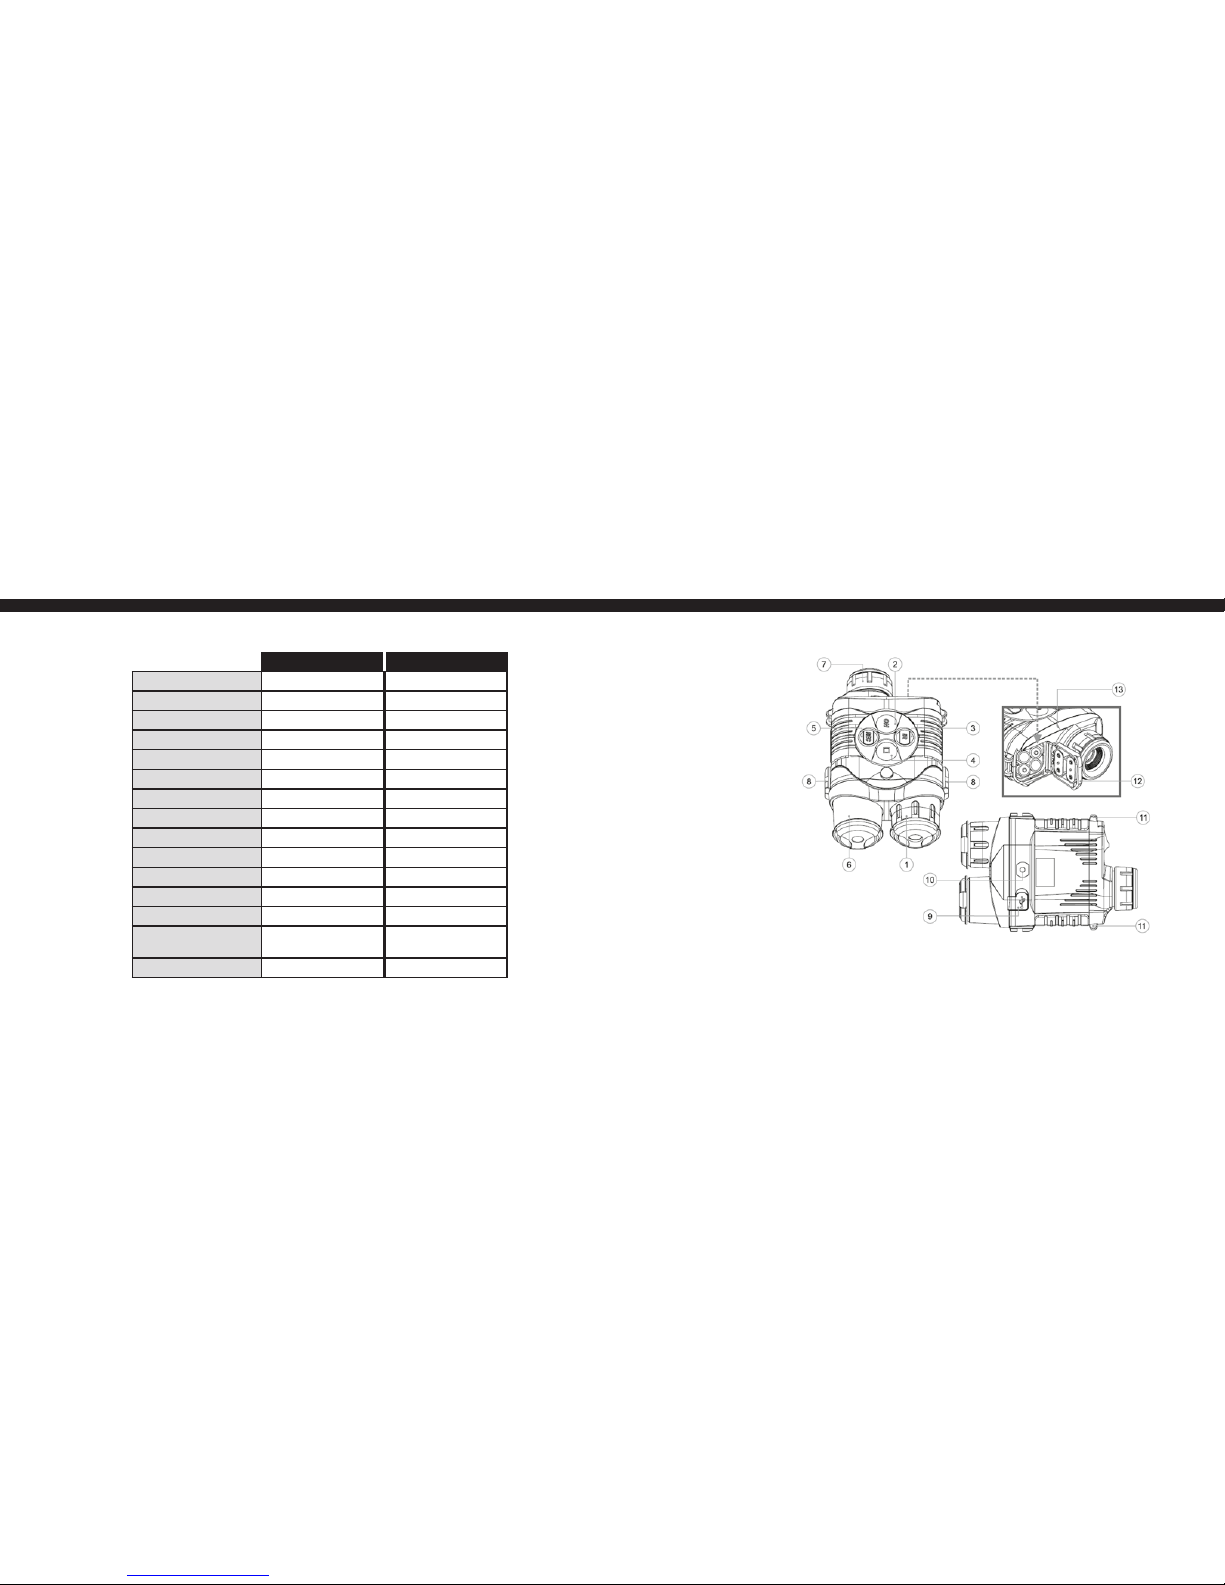
TECHNICAL SPECIFICATIONS
Sensor Resolution, pixels 640x480
Display Type LCD
Display Resolution, pixels 640x480
Magnication 4.5/9
Lens Diameter, mm 30
Digital Zoom 2x
Field of View, ft@100yd 40.2
Eye Relief, in/mm .5/14
IR Emitter LED
IR Wavelength, nm 850
Range of Detection, yd/m 380/350
Battery Type 4xAA
Battery Life (with IR), hour 3
Dimensions, in/mm 6.61x4.37x 2.2 /
168x111x 56
Weight (with batteries), oz 12.3
640x480
LCD
640x480
4.5/9
30
2x
22.5
2.76/70
LED
940
300/330
4xAA
3
6.61x4.37x 2.2 /
168x111x 56
12.3
1. Objective lens
2. On/o button
3. IR button
4. Zoom button
5. Record button
6. IR illuminator
7. Eyepiece
8. Weaver rail
9. Micro USB port
10. Tripod mount
11. Neck strap eyelets
12. Battery cover
13. Microphone
DIAGRAM
3
N320 (SM18024) N340 (SM18025)
Page 4
4
INSTALLING THE BAT TERY
The Sightmark Signal RT uses four AA batteries. It is recommended to use batteries of the same type and same charge for
best performance. It is safe to use rechargeable batteries with the Signal RT.
To install a new battery:
1. Slide forward and open the battery cover (12).
2. Insert the batteries into the battery container. Make note that the battery polarity matches the positive and negative
symbol marked on the battery cover.
3. Slide back the battery cover to its original position.
Note: the battery charge icon on the display will show current charge level of the batteries. When the batteries are near depletion
the battery indicator light will turn red and ash.
EXTERNAL POWER SUPPLY
The Sightmark Signal RT can be powered by an external power supply such as a 5V power bank or even your
personal computer.
To connect the Signal RT to external power:
1. Connect the provided micro USB cable to the USB port (9).
2. Connect the other end of the USB cable to a power bank or PC.
3. On the unit’s display two icons will appear, plug icon (power) and computer icon (storage device). Using the
navigation buttons (3,5) select the plug icon and conrm selection by pressing the zoom button (4).
4. The batter y icon on the display will switch to the plug icon. The unit is now operating using the external power only.
Note: When AA batteries are in the unit and an external power source is used, the unit operates on the external power source only.
When the unit is disconnected from a power bank or external power supply, the Signal RT will automatically switch to internal
batteries. When using rechargeable AA batteries in the Signal RT, plugging the Signal RT into an external power source DOES NOT
recharge the batteries in the unit.
5
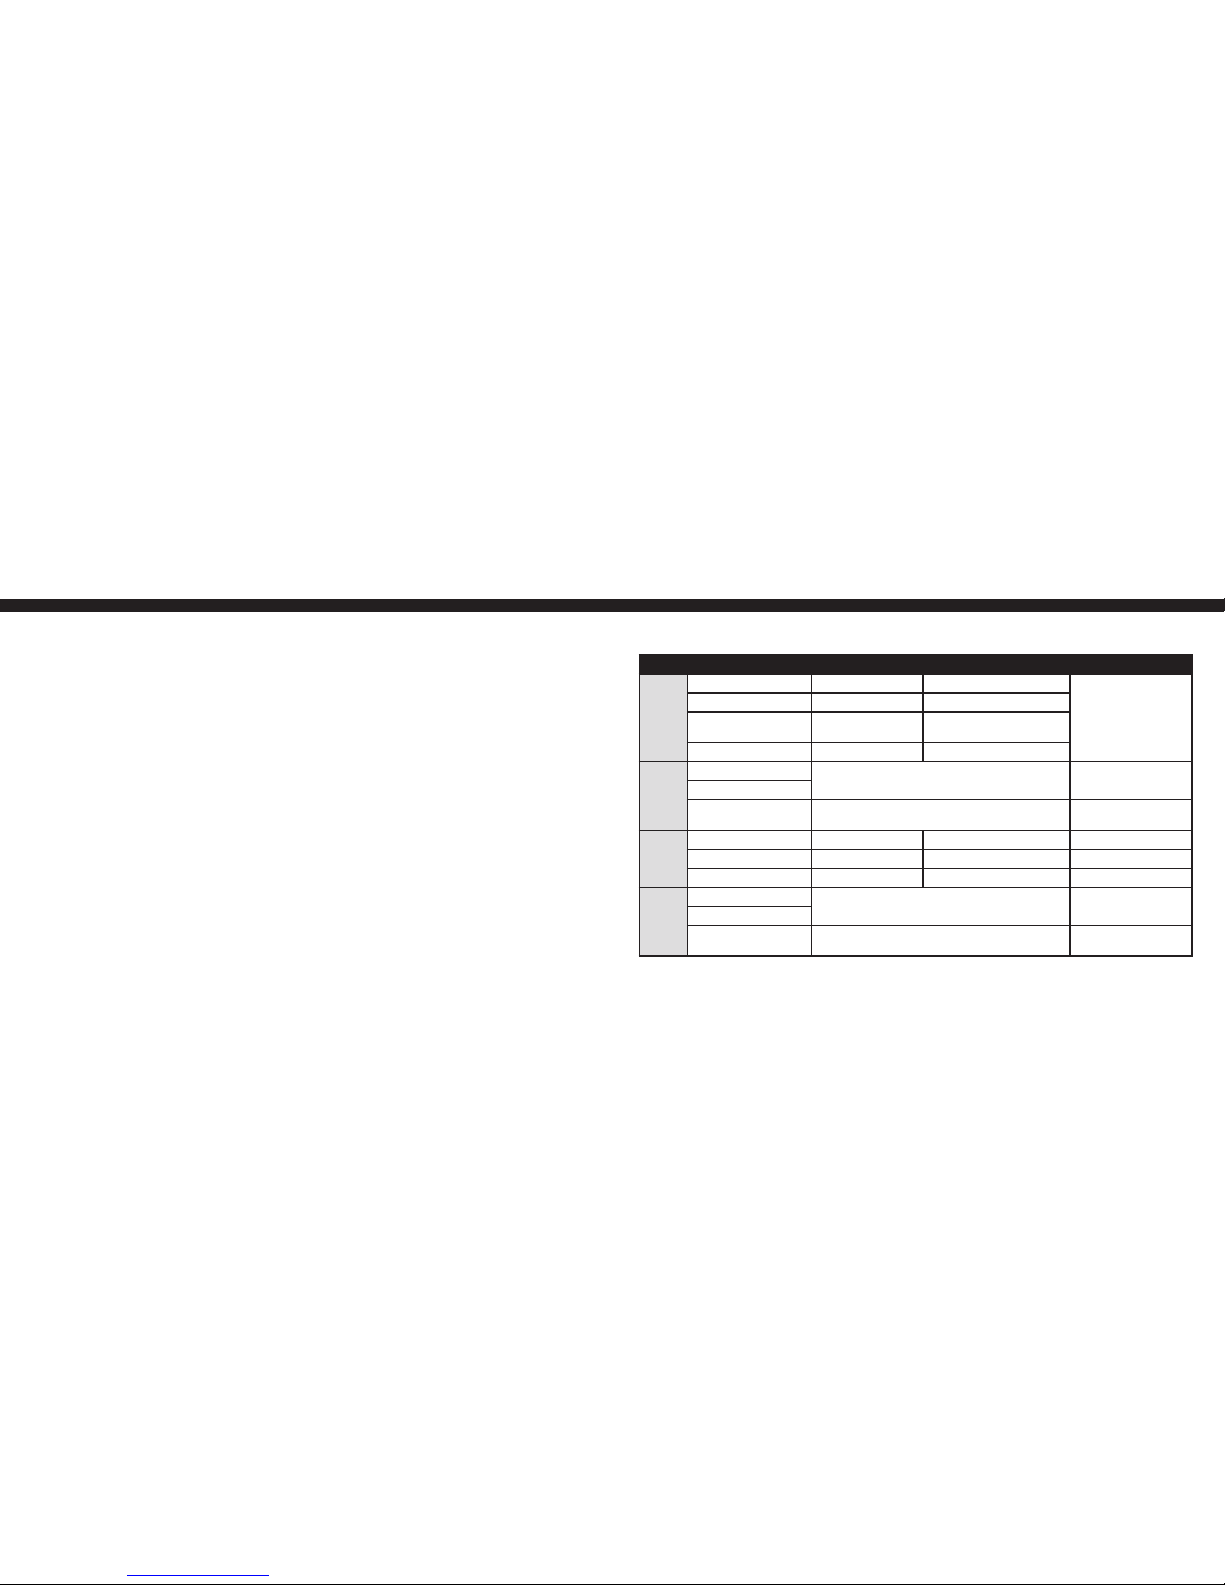
DESCRIPTION OF CONTROLS
Button Operating Mode 1st Short Press 2nd Short Press Long Press
ON The unit is o Turns the unit on Turns the Wi-Fi on
Turns the display o
(hold longer than 1 sec)
Turns the unit o
(hold longer than 3 sec)
Display o mode Turns the display on Turns the Wi-Fi on/o
The unit is in Video/Photo
mode
Turns the Wi-Fi on Turns the Wi-Fi o
The unit is in Review mode File deletion prompt See description of Review mode
Zoom Video
Digital zoom activation Enter/Exit the menu
Photo
Review Switch between les–rightwards navigation
Return to the beginning of le under review
–
REC Video Start video recording Stop video recording Switch to Photo mode
Photo Image capture Image capture Switch to Review mode
Review Recorded video review Pause video review Switch to Video Mode
IR Video
Switch between IR Illuminator modes Turns the IR illuminator o
Photo
Review Switch between les - leftwards navigation.
Return to le currently viewed
–
Page 5

76
FOCUSING USINGTHE IR ILLUMINATOR
ADJUSTING DISPLAY BRIGHTNESS
The Sightmark Signal RT’s objective lens (1) can be
rotated to allow the unit to deliver a clear, sharp image.
Anytime the viewing distance of a target is changed,
generally the image must be refocused.
To focus the image:
1. Turn the objective lens (1) until the image is
focused. Make sure the image is always well
focused as this will prevent eye fatigue.
The Sightmark Signal RT is equipped with builtin IR illuminator (6) for use in low light conditions
or in complete darkness. The IR illuminator will
automatically turn on when the unit is activated.
To activate the IR illuminator:
1. Turn on the Signal RT. The IR illuminator will
automatically turn on to the lowest power, IR1
2. Press the IR button (3) consecutively to change
the power level (3 levels are available).
3. To turn the IR illuminator o, press and hold
down the IR button for two seconds. Next a cross
out icon, , will appear on the display.
The Sightmark Signal RT’s display is equipped with adjustable
brightness. This allows the brightness to be customized to
the user’s preference.
To adjust the display brightness:
1. Hold down the zoom button (4) to enter the menu.
2. Use the IR and Record button (3,5) to select the
brightness icon.
3. Press the zoom button to select the icon and enter the
submenu.
4. Adjust the image brightness with the IR and record
button. The adjustment range will show 0 to 20 on the
display.
ON/OFF ACTIVATION
DIOPTER ADJUSTMENT
The Sightmark Signal RT controls are located on top of the unit for easy access.
To power the unit on:
1. Remove the lens cover from the objective lens (1).
2. Locate the on/o button (2) on top of the unit.
3. To turn the unit on, press the on/o button once. The display will turn on after several seconds.
4. To turn the display o, press the on/o button again for one second.
5. The message “Display o” will appear on the screen. This mode saves battery life when the unit is not being used in
the eld, but operation could be started again quickly by briey pressing the on/o button again.
6. To turn the unit o, press and hold the on/o button for 3 seconds. The display shows the message “Switch o” and
a countdown from 3 to 1 seconds.
The Sightmark Signal RT’s eyepiece (7) is designed to rotate to adjust for diopter. The diopter is the measurement of
the eye’s curvature. People’s eyes are all curved dierently. If the display does not appear clear, crisp, nor sharp, rotate
the eyepiece until the reticle becomes clear and sharp. This adjustment should stay the same unless the unit’s operator
changes.
To adjust the eyepiece:
1. Locate the eyepiece (7) on the back of the unit.
2. While looking through the eyepiece, rotate the eyepiece until the display and its icons are clear and crisp.
9x
IR Power
999
04:23pm
Page 6
USING DIGITAL ZOOM
DISPLAY OFF FUNCTION
8 9
USB CONNECTION
The Signal RT can be connected to a PC via the USB port (8). The PC will detect
the Signal automatically, no driver installation is necessary. With the Signal turned
on and connected to a PC, the display will show two icons: plug icon (power)
and computer icon (storage device). Use the navigation buttons (3,5) to change
between the two modes. press the zoom button (4) to select the desired mode.
USB Mass Storage Device
If this option is selected, the unit is detected by the PC as a storage device. The unit
switches to USB power and will not use up the AA batteries. This mode allows the
transfer of recording videos and photos from the Signal RT’s memory to the PC. In
this mode the unit’s functions are deactivated.
Power
When this option is selected, the PC is used to power the unit. The external power icon appears on the display in place of
the battery charge icon. Typically, this mode is used with a power bank for longer operating times out in the eld.
Connection in various operating modes
The digital zoom function allows you to control the Signal’s magnication. Each Signal
RT model is equipped with 2x digital zoom. When digital zoom is activated, the full
magnication value is shown on the display.
To activate the zoom function:
1. Press the digital zoom button (4).
2. Each consecutive press of the controller will cycle between the optical
magnication and the 2x zoom. For example, the 4.5x Signal will change to 9x
when the 2x digital zoom is applied.
Note: digital zoom is not saved in the unit’s memory. Each time the unit is turned o and
This function deactivates the display, which eliminates light exposure caused by the glowing display, but also saves battery
life when the unit is not being used for viewing.
To turn o the display:
1. Press and hold down the on/o button (4) for more than one second.
2. The display will turn o and will show the message “Display O”.
3. To turn the display on, briey press the on/o button again.
Note: when the display o function is activated, all controls are inactive except for the on/o button. Remote viewing through
Wi-Fi feature will continue to function. Video recording also will continue if recording was activated before the display o
function was activated. Finally, the display o function will deactivate if the unit is connected to a PC via the USB port or to an
external power supply.
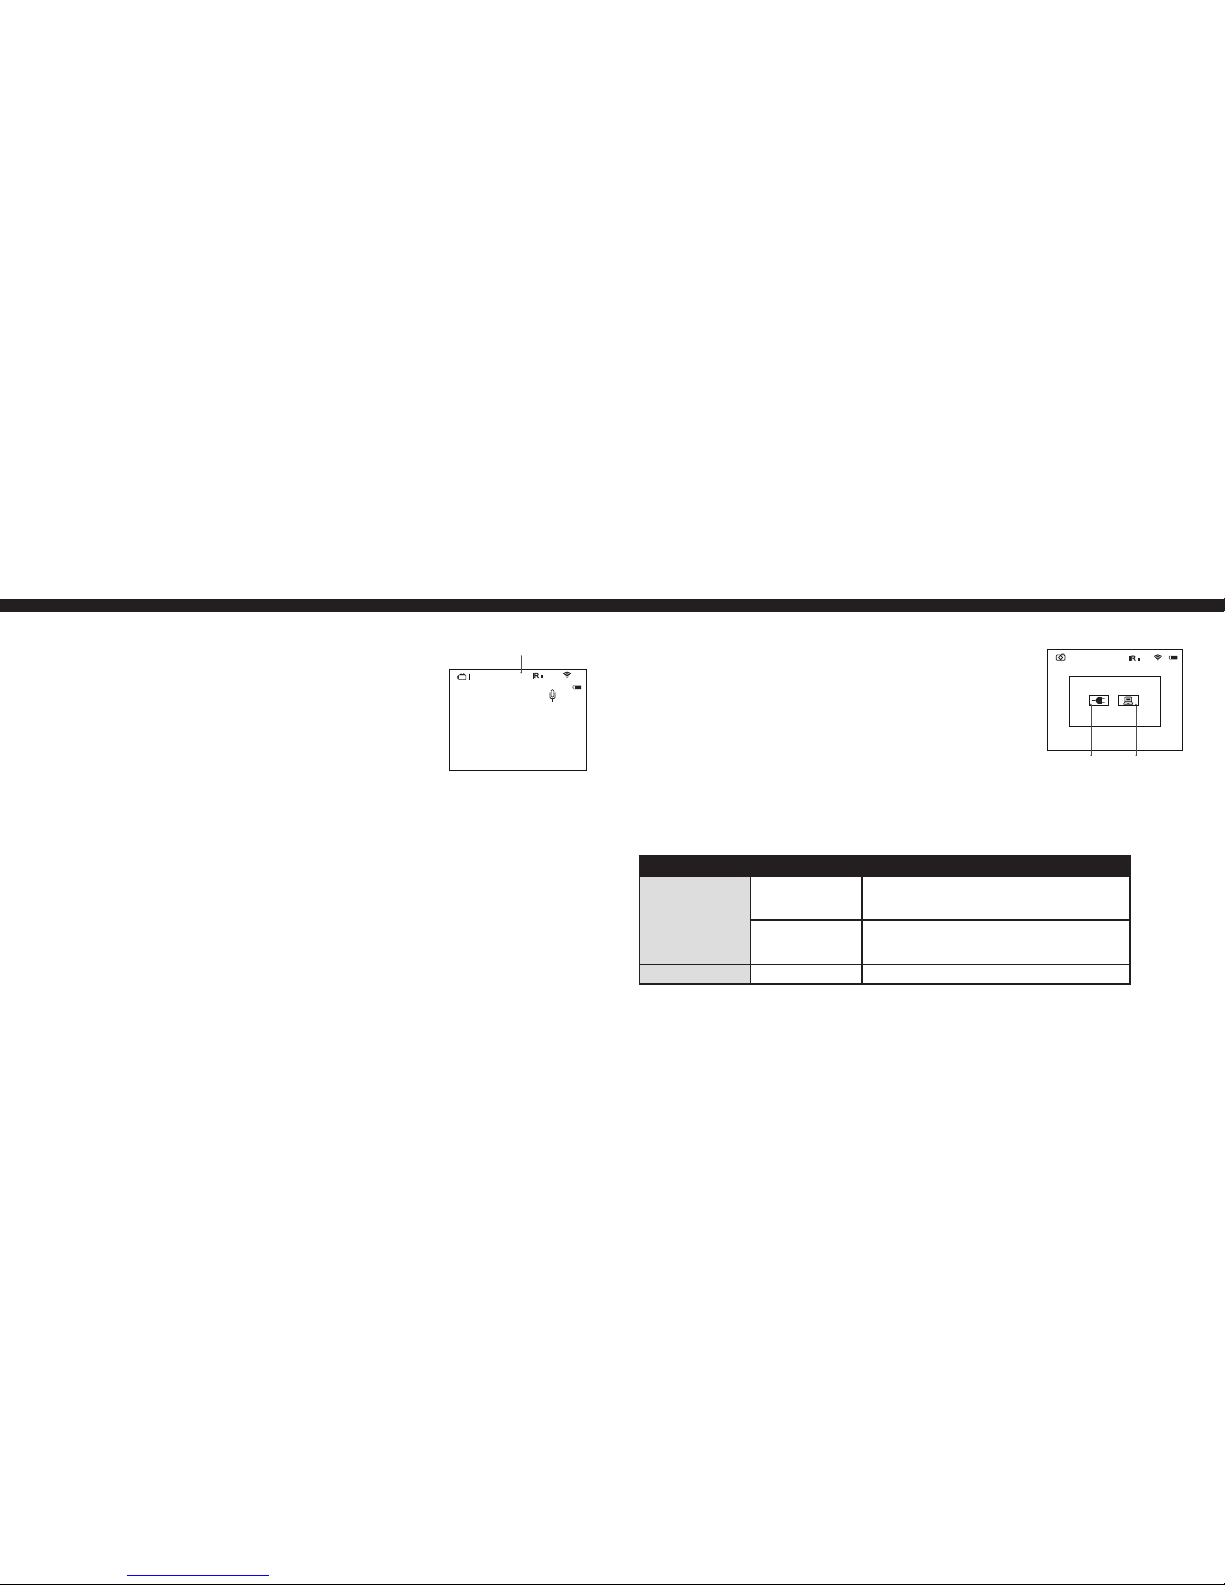
Connection Option Operating Mode Status of the Unit
USB Video/Photo The unit is “o.”
If the video recording is on when the connection is
made, the recording is stopped and saved automatically.
Review The unit is “o.”
If a video is being reviewed when the connection is
made, review stops.
Power Video/Photo/Review The unit continues to function
960p 04:23pm
Active connection
option
Inactive connection
option
9x
04:23pm
ZOOM
01:42
back on, digital zoom is turned o and the magnication will be set to the optical magnication (i.e. 4.5x or 6x).
Page 7
USB CONNECTION continued
OPERATING MODES
10 11
USB Mass Storage Device
When the Signal is selected as a USB mass storage device and the USB cable is disconnected from the PC, the unit will
remain turned o. The Signal must be powered on to continue operation.
When the Signal is in power mode and the USB cable is disconnected from the PC, the unit will turn o. The unit must be
turned back on in order to be detected by the PC.
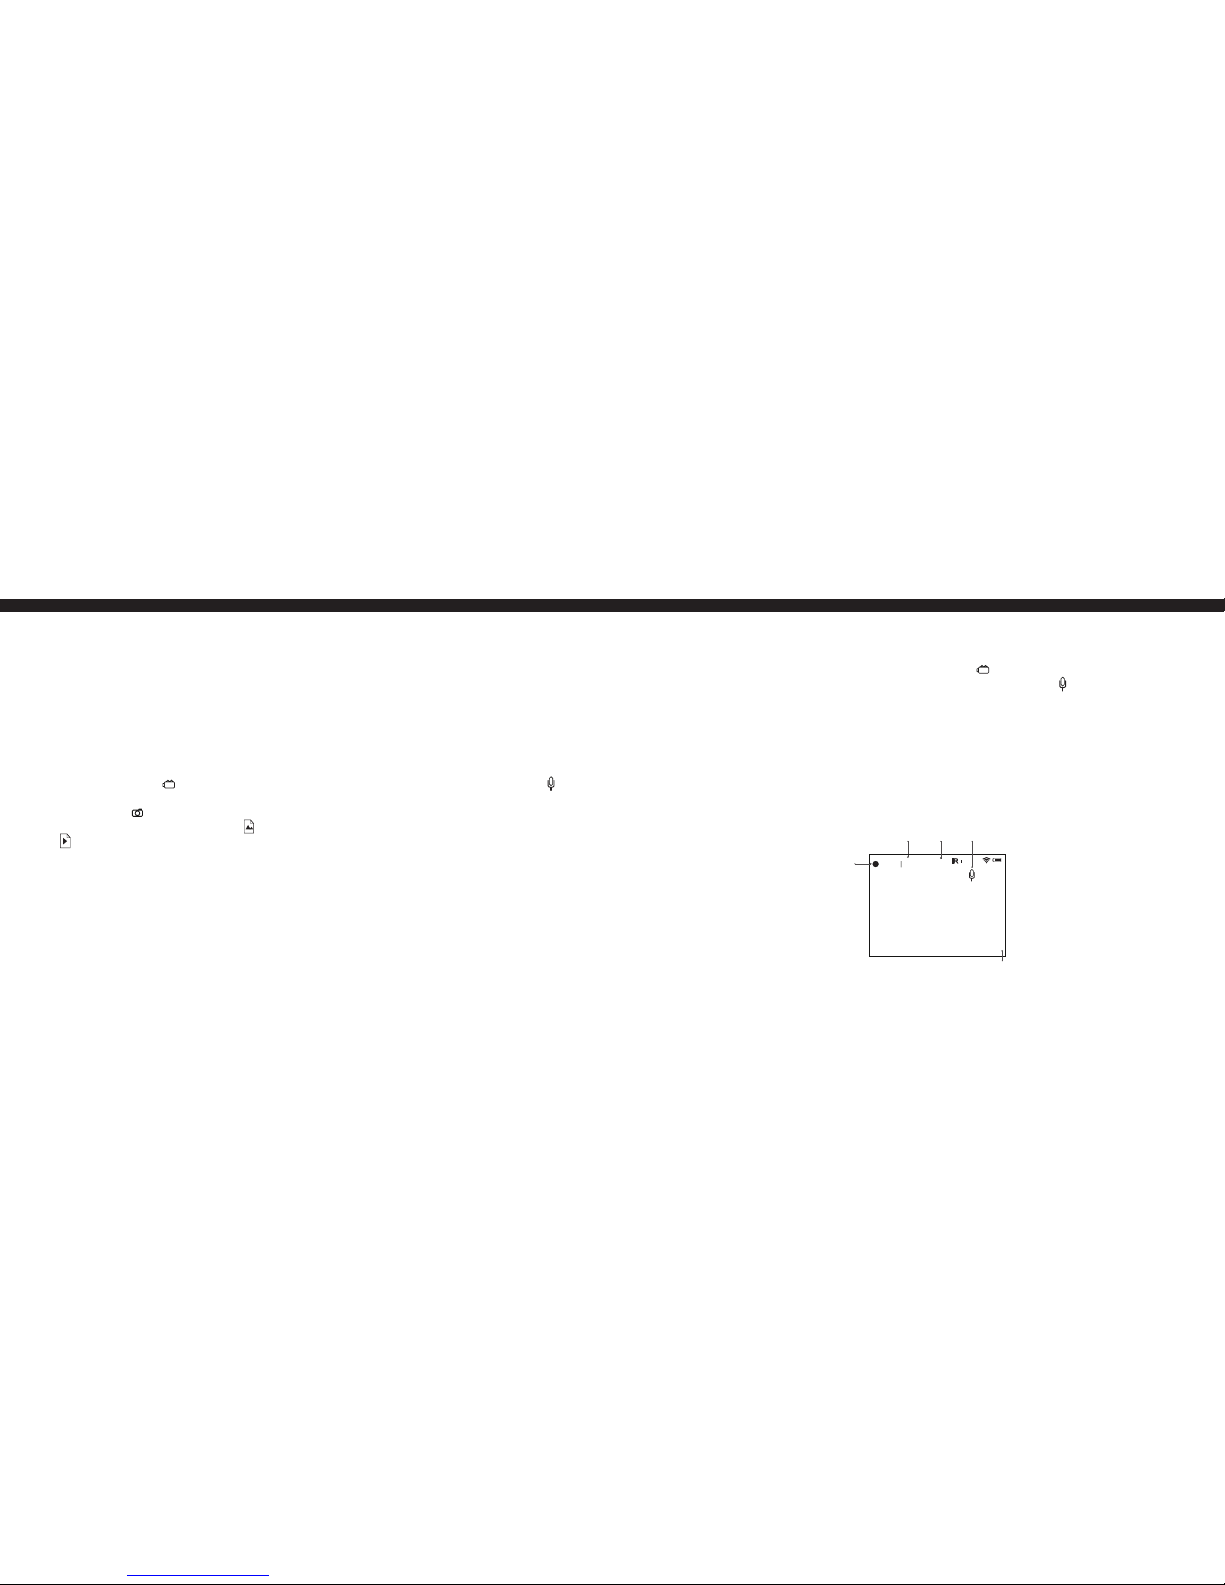
The Signal RT is equipped with 3 operation modes: video, photo, and review. Video mode allows for video recording of
what is seen on the display. Video mode is the default mode and will be active each time the unit is turned on. When the
Signal is in video mode, the (camcorder) icon is shown on the display. If sound recording is activated, the (mic)
icon is also shown on the display. Photo mode allows for image capture of what is seen on the display. When the Signal
is in photo mode, the (camera) icon is shown on the display. Review mode allows the user to see previously recorded
videos or pictures. When in Review mode the (picture) icon will be shown on the display if a photo is being displayed
or the (video) icon will be shown if a video is being display.
In order to switch between modes:
1. Press and hold the record button (5) to cycle between modes.
2. Switch between modes by a long press of the record button.
3. The modes will cycle between Video, Photo, and Review.
Video Mode
Video mode is the default mode each time the Signal is turned on. The (camcorder) icon is shown on the display to
notify the user it is in video mode and will record video. If sound recording is activated the (mic) icon is also shown on
the display. Users can still enter and navigate menu during recording. You can only stop recording after exiting the menu.
Display icons are not recorded.
To start recording:
1. Briey press the record button (5).
2. The Signal will start recording. “REC” will be displayed at the top left corner of the display. The record timer will also
start.
3. To stop recording, press the record button again. The record timer will stop.
Note: the maximum duration of a recorded le is seven minutes. After this time, a video is recorded in a new le. The number of
recorded les is limited by the capacity of the unit’s internal memory. Approximately 5 hours of video only can be saved on the
internal memory.
9x
Record timer SOUNDZOOM
Video
recording
REC
00:42
00:02
Elapsed
recording
time
Page 8
OPERATING MODES continued
12
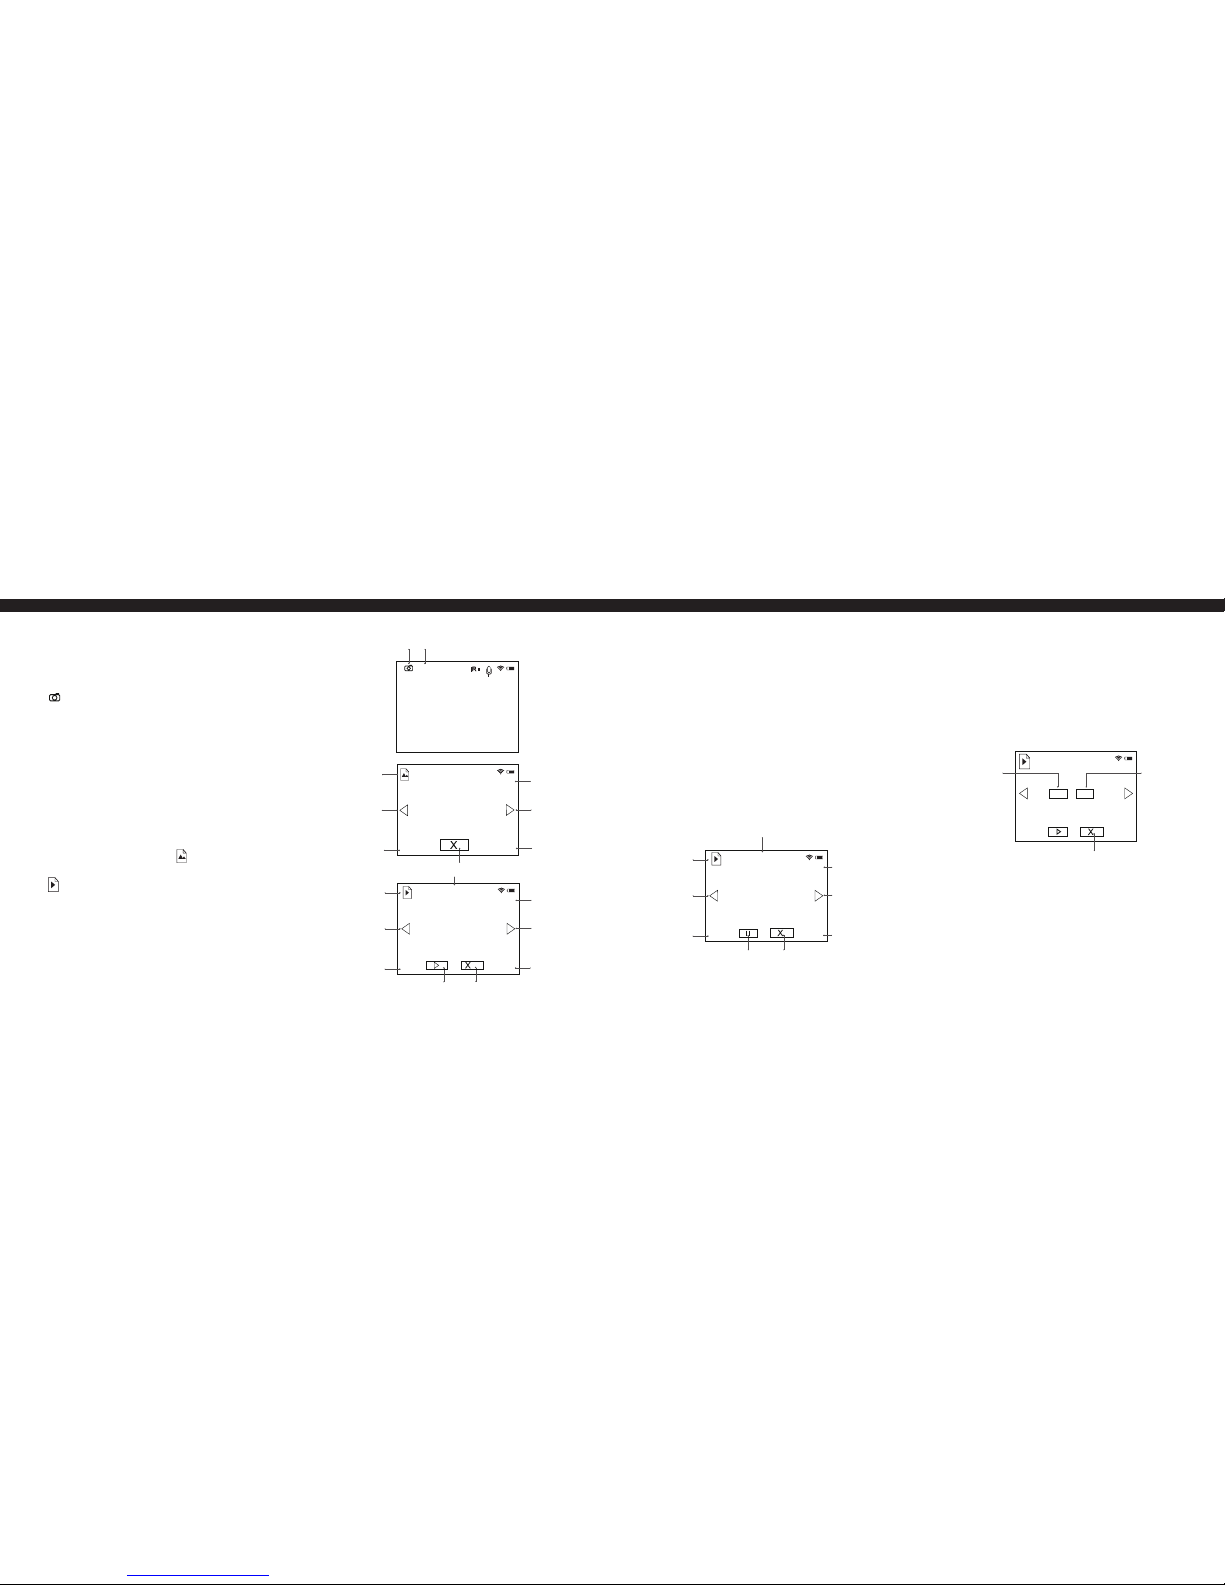
Photo Mode
Photo mode allows for image capture of what is
seen on the display. When the Signal is photo mode,
the (camera) icon is shown on the display.
To take a photo:
1. Briey press the record button (5).
2. The Signal will save a jpeg image of the current view
on the display.
Note: Sound is not recorded in photos.
Review Mode
Review mode is designed to playback photo and video
les saved on the internal memory. When the Signal is in
review mode, the display always shows the last recorded
le. When in Review mode the (picture) icon will be
shown on the display if a photo is being displayed and
the (video) icon will be shown if a video is being
displayed.
To navigate les:
1. To navigate to the next le to the left, press the IR
button (3).
2. To navigate to the next le to the right, press the
zoom button (4).
13
To play a video le:
1. When the desired video le is on the display, press the
record button (5) to start playing. The video length
countdown timer will start.
2. To pause the video, press the record button again. The
pause indicator will appear at the bottom in place of
the play indicator. Also the video length countdown
timer will stop.
3. To resume play, press the record button again.
4. To return to the start of the current video le, press the
IR button (3).
5. To review the next le, press the record button.
File deletion:
1. When the desired video le is on the display, press
the on/o button (4).
2. The display will show a yes and no option.
3. To select yes, press the zoom button (4).
4. To select no, press the on/o button (2).
Note: During le review some control functions are not
available such as menu, zoom control, and IR illuminator
control. If the IR was on, it will turn o when entering
review mode. The IR illuminator power level is saved and
will return to the same power upon exiting review mode.
Image
counter*
9x
VIDEO mode
999
04:23pm
960p
Delete current file
Photo resolution
File navigation
arrow (left)
Mode
REVIEW-PHOTO
2/123
Time and date
of photo file
File counter
File navigation
arrow (right)
22:18
2016.08.05
480p
Play current file
Delete current file
File navigation
arrow (left)
00:05
Video duration
Video review mode
Photo resolution
2/123
File navigation
arrow (right)
Time and date
of video file
File counter
22:18
2016.08.05
File
counter
Time and
date of video
file
File
navigation
arrow (right)
5/123
480p
Pause the
current file
00:05
Video countdown timer
Video
review
mode
Video
resolution
Delete
current file
File
navigation
arrow (left)
22:18
2016.08.05
Cancel
file
deletion
5/123
Confirm
deletion
00:05
Delete current file
480p
YES NO
22:18
2016.08.05
Page 9

MENU
The Signal RT menu system allows access to further features, functions, and customization options.
The menu system consists of the following:
Menu contents
• Brightness setup
• Wi-Fi setup
• Video/photo resolution selection
• Date and time setup
• Sound record activation
• About device
To open the main menu system:
1. Press the zoom button (4) for 3 seconds. The menu icons will appear on the left of the display.
2. Use the navigation buttons (3,5) to move menu selection down or up.
3. To enter the submenu function, briey press the zoom button (4).
4. To exit the menu, press the zoom button (4) for two seconds or wait 10 seconds to exit automatically.
14 15
Wi-Fi Setup
Wi-Fi function allows for external devices such as smartphones to connect to the Signal via the Pulsar Stream Vision App.
By using the Pulsar Stream Vision App the Signal RT’s features can be controlled through your smart device. Your smar t
device can also display live video from your Signal RT. Pulsar Stream Vision app must be downloaded rst through the
Apple® Store or Google® Play Store. Further guidelines on the Stream Vision app are provided in the individual booklet or
on www.pulsarnv.com/streamvision.
To turn on Wi-Fi:
1. Press the on/o button and the wi icon will appear in the top right corner of the display.
2. The Wi-Fi icon will glow meaning Wi-Fi is on.
3. Once a Wi-Fi connection is established with a smart device, the icon will blink.
Wi-Fi setup allows you to set a password for the access point. This password is used to connect an external device
(smartphone for example) to our Signal RT.
To setup Wi password:
1. Enter the submenu by selecting the lock icon, .
2. A password will appear on the display, default password is 12345.
3. Use the navigation buttons (3,5) to set your desired password. To move to the next digit, press the zoom button (4).
4. To save the password and exit password submenu, press and hold the zoom button (4) for longer than one second.
Wi-Fi setup also allows users to set access levels. This feature allows users to restrict access to others to only see video
streaming from the device and not have the ability to access the device’s func tions.
To set access levels:
1. Enter the submenu by selecting the access icon,
2. Select access level Owner, or the house icon, . This gives Stream Vision users connected to your device complete
access to all the device’s functions.
3. Select access level Guest, or the door icon, . This gives Stream Vision users connected to your device access only
to the video stream for remote viewing.
i
Page 10

16 17
MENU continued
Recording Resolution
The recording resolution of the Signal RT can be changed for video and photos. Lower resolution video and photos
require less memory and will provide longer video record times, or storage of more photos.
Video mode available resolution Photo mode available resolutions
Date and Time Setup
This menu options allows the user to set the current date and time and the time format. The current time setting is shown
on the display. The date will only be shown as a date/time stamp for recorded photos and videos.
To change date and time:
1. Enter the submenu by select the clock icon,
2. The date format is displayed as :yyyy/mm/dd (2017/02/12).
3. Use the navigation buttons to select the desired value of year, month, and date. To move to the next between year,
month, date press the zoom button.
4. To save the date, press and hold down the zoom button for more than one second. The display will next show
time setup.
• 320x240
• 640x480
• 320x240
• 640x480
• 1280x960
To change resolution:
1. Enter the submenu by selecting the resolution icon,
2. The options: 240 (320x240) and 480p (640x480) will be shown on the display.
3. Use the navigation buttons (3,5) to the desired resolution and press the zoom button to conrm the selection.
Note: The resolution is displayed in the REVIEW mode. The resolution selected is also saved. Next time the Signal RT is
turned on, the same resolution is used for recording.
5. The time format is display as “format mm/hh” (24 06:51).
6. Use the navigation buttons to select the required time format – 24/AM/PM. Press the zoom button to select the
desired time format.
7. To set the hour value, use the navigation buttons.
8. To set the minute value, press the zoom button. Use the navigation buttons to select the minute value.
9. Press and hold down the zoom button for more than one second to save the time settings and exit the menu.
Sound Record Activation
This menu option allows you to activate/deactivate sound recording. Sound recording is only used in video record mode.
To turn sound recording on and o:
1. Enter the submenu by selecting the microphone icon,
2. Use the navigation buttons to select yes to turn on sound recording. Select no to turn o sound recording.
3. Press the zoom button to conrm the selection.
Note: When sound recording is activated, the microphone icon, , will appear on the display. When sound recording is turned
o, the crossed out microphone icon, , will appear on the display. The selection is saved. Next time the unit is turned on, the
display will show the last saved setting.
About Device
This menu option shows the following service information about your Signal RT unit such as the serial number and
software version.
1. Enter the submenu by selecting the reticle color icon,
Name: Signal RT (name of unit)
Serial: 20119307 (serial number)
FW: 12.34.567 (software version)
HW: MNV001 (hardware version)
i
Page 11

18 19
MAINTENANCE
WARNING
Proper maintenance of the Sightmark Signal RT is recommended to ensure longevity. Attempts to disassemble or repair
the unit will void the warranty. It is recommended that when the unit becomes dirty that it is wiped down with a dry or
slightly damp cloth. Blow dirt and debris o all optics and then clean lenses with a lens cleaning cloth. To remove oils or
dried water spots, apply a small amount of denatured alcohol to a lens cloth or cotton swab. Clean the surface of the lens
and let dry. Finally use your breath to clean the lens once more. No further maintenance is required.
The Signal RT is a digital night vision unit, this allows the unit to also be used during the daytime without damaging the
unit. However, it is not recommended to point the Signal RT at bright light sources such as the sun. Using the unit from
cold to warm conditions will cause condensation to form on the lenses. It is recommended to keep the unit in its carry case
for 2 to 3 hours when transitioning from cold to warm temperatures.
WARNING!
• DO NOT submerge the unit into water.
• DO NOT leave the unit in direct sunlight or rain.
• DO NOT expose the unit to high heat as this may damage the unit.
• DO NOT cover the IR heat sink (5). Keep it clean to insure proper performance of the long range IR illuminator.
• DO NOT connect inappropriate equipment (i.e. headphones) to the video output. This may disable the unit.
• DO NOT attempt to focus the long range IR illuminator. This is a xed focus beam.
• Up to seven light or darks spots on the LCD display is acceptable and not considered defective.
STORAGE
TROUBLESHOOTING
Proper authorization is required before shipping any product back to Sightmark. Failure to obtain authorization could
result in your product being returned to the wrong address, lost, or damaged. Sightmark is not liable for products returned
without authorization.
Never ship back a product without getting proper authorization beforehand. Doing so could result in losing the
product due to a multitude of reasons, i.e. sending it to the wrong address and other problems associated with
unexpected packages.
The unit will not turn on:
1. Check the polarity of the batteries. Reinstall the batteries if necessary.
2. Clean the battery compar tment contacts with denatured alcohol and a cotton swab.
3. Install fresh batteries.
The IR illuminator will not turn on:
1. Adjust the brightness of the IR, noting brightness indication on the display. Adjust the display brightness. If no IR light
is being detected the unit may need to be returned for service.
The image is dark:
1. Make sure the lens caps on the objective lens is opened and the IR illuminator is on. Adjust the display brightness and
the IR illuminator brightness accordingly to obtain a bright, clear image.
There are light or black dots on the display:
1. The presence of dots on the display is caused by sensor production technology and is not a defect. No action
is required.
Page 12

20 21
TROUBLESHOOTING continued
The unit does not operate on external power:
1. Make sure the power supply is providing output voltage.
2. Check that the power bank is charged. Charge if necessary.
3. Check that the USB cable is plugged in to both the Signal or power supply.
The image is ickering:
1. This is common if the unit is viewing or pointing in the direction of a bright light source. Cease viewing the bright
light source immediately. If ickering in normal dark conditions the unit may need to be returned for service.
The image is not in focus:
1. Make sure there is no dust or condensation covering the objective lens or eyepiece.
2. Adjust the focus ring near the objective lens to adjust focus for dierent viewing distances.
3. Make sure to adjust the diopter setting on the eyepiece for your specic vision.
No Wi-Fi signal or erratic signal:
1. The Signal is beyond reliable Wi-Fi range or there are obstacles between the unit and the signal receiver. Place the
Signal in line of sight of the Wi-Fi signal.
2. There may be too many Wi-Fi networks in the area. Move the unit to an area with few or no other Wi-Fi networks.
The unit is not operating properly due to rmware update:
1. Restore the original rmware version using the following procedure:
a. Connect an external power supply or insert batteries into the unit.
b. Hold down simultaneously the IR and Zoom buttons.
c. Start the unit with a brief press of the ON button. Display will blink two times.
d. Release the Record button and the controller. The original rmware is now being installed which may take up to 1
minute. After successful install the display will steadily glow.
e. Disconnect the Signal from the power supply or remove the batteries as the Signal will not turn o using the
on/o button.
f. After the Signal is shutdown it is ready to operate.
SIGHTMARK WARRANTY
Please visit www.sightmark.com for warranty details and information.
Page 13

23
NOTESNOTES
22
Page 14

www.sightmark.com
 Loading...