

SightLife Surgical EndoSerter User Manual
English Français Deutsch
Instrument de mise en place d’endothélium cornéen Instrument zum Ablegen von KorneatransplantatCorneal Endothelium Delivery Instrument
CAUTION: Federal (USA) Law restricts this device to sale by, or on the
order of, a physician.
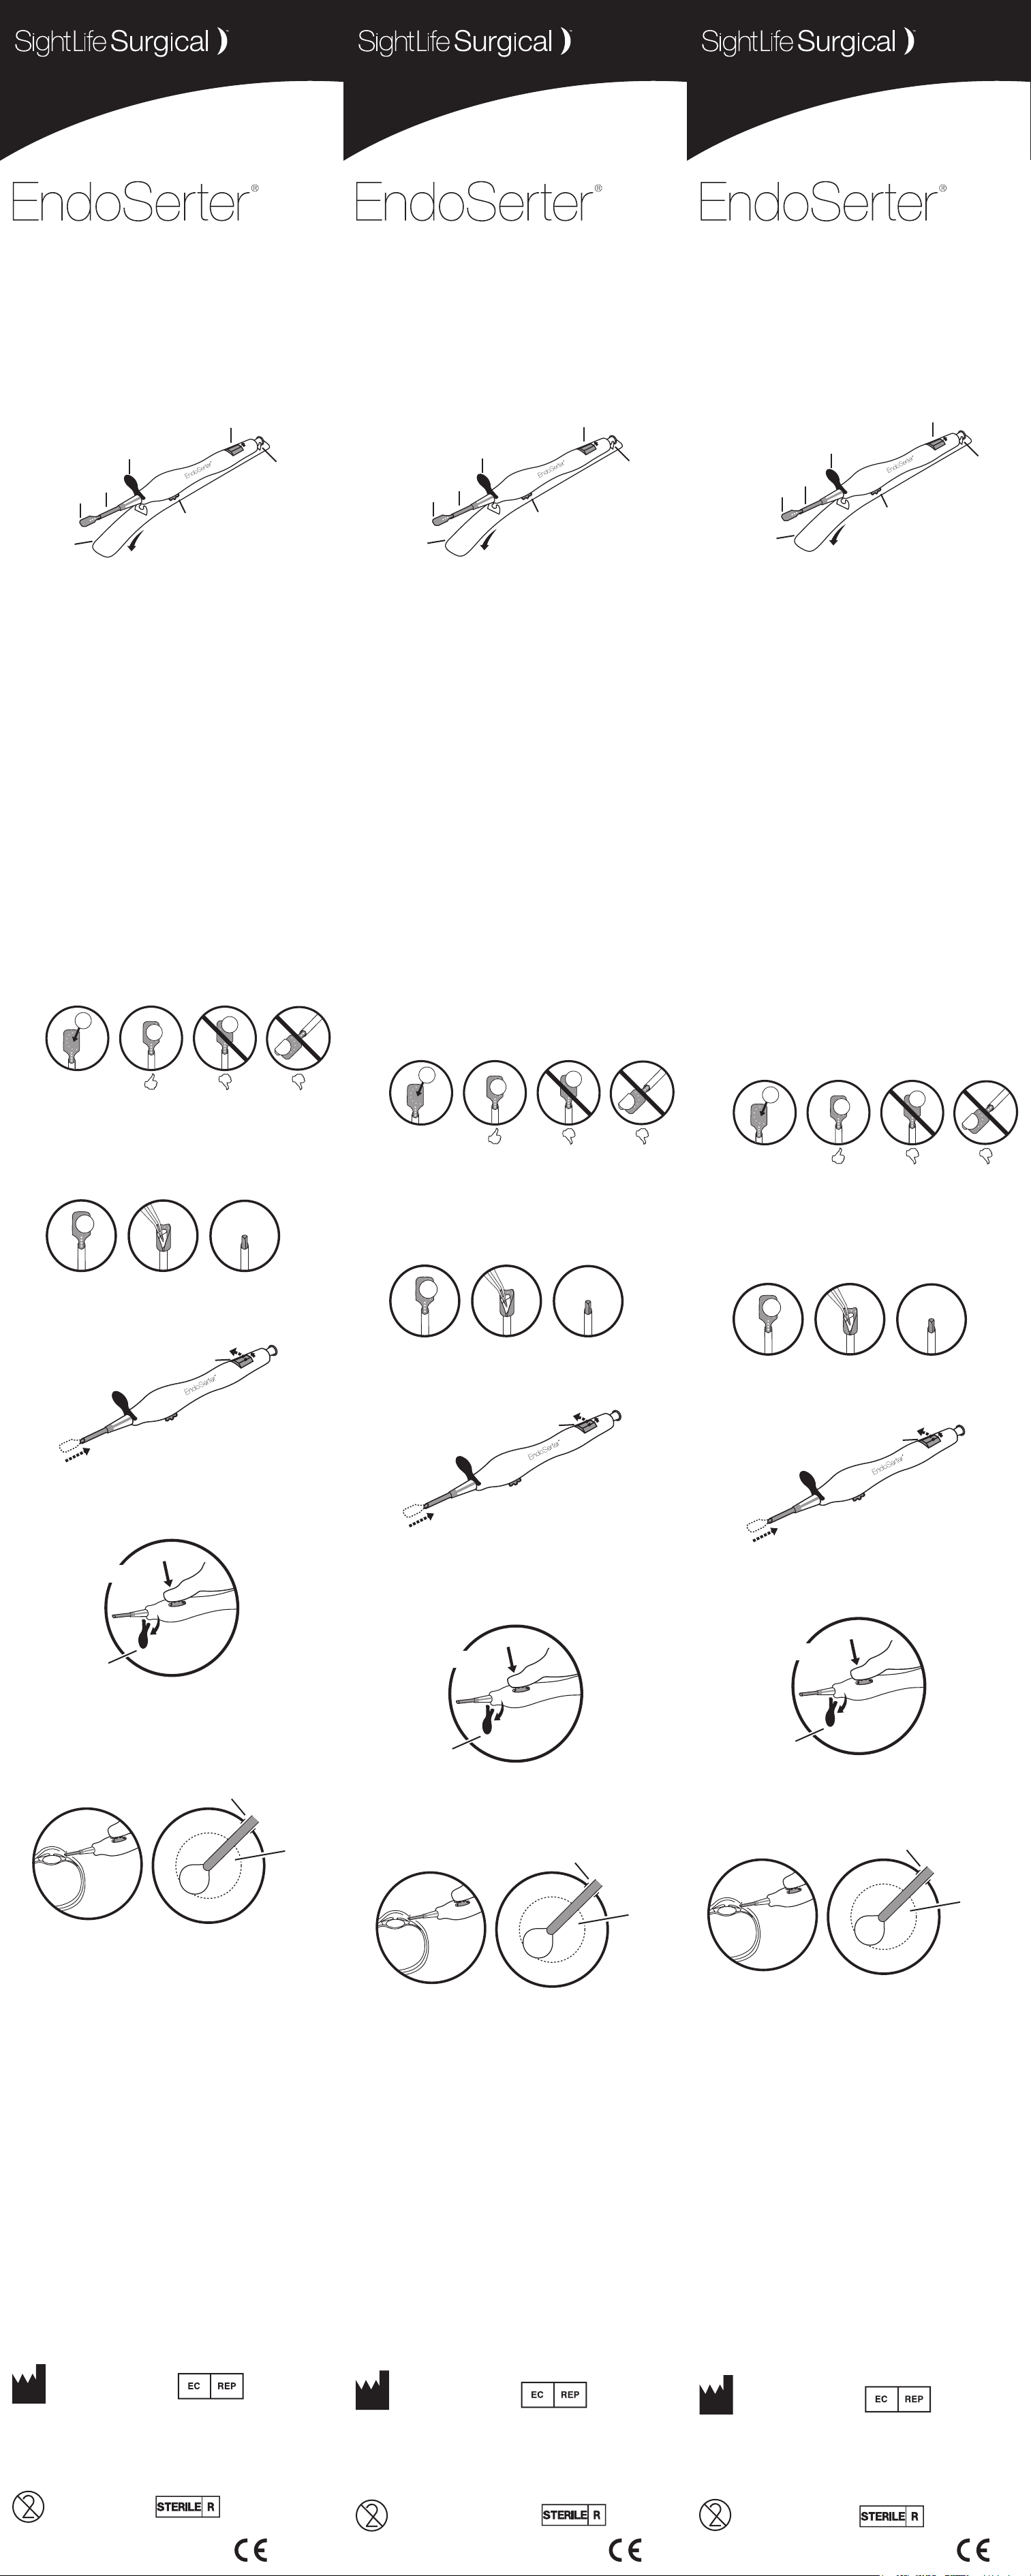
Description
The EndoSerter® Corneal Endothelium Delivery Instrument is a device used for
delivering a corneal endothelial allograft into the eye. The EndoSerter® consists
of the instrument’s body and its internal mechanism and carrier shown in Fig. 1.
The EndoSerter® is a sterile, disposable, single use only device. When loaded with
allograft tissue, rotated, and inserted into the eye the allograft can be deployed in
the anterior chamber.
Wheels
Thumbscrew
Luer
Connection
Fig. 1
Platform
Card
Carrier
Sheath
Locking
Guard
Deployment
Indications
The EndoSerter® is used to insert corneal endothelial allograft tissue measuring less
than or equal to 8.5mm in diameter and 175 micron in central thickness into the anterior
chamber through a minimum 4mm incision during endothelial keratoplasty procedures.
WARNINGS: DO NOT remove black locking guard from the EndoSerter®
until ready to insert tissue into anterior chamber. Loading tissue should be
performed immediately prior to insertion and deployment. Once loaded, do
not ush the device unless the sheath is inserted in the anterior chamber.
Failure to follow the Instructions for Use may result in patient injury or
damage to donor tissue.
Instructions for Use
1. Refer to Fig. 1 to acquaint yourself with the device.
2. Open the package and handle the device using standard sterile procedures.
Hold the device by the body and remove the white plastic platform card by gently
pulling it down and away from the carrier-end of the device.
3. DO NOT remove the black locking guard until ready to insert tissue into
anterior chamber.
4. The device is delivered with the allograft carrier already extended in the
loading position.
5. Hold the device so the side printed with “EndoSerter®” faces up. Fig. 1.
6. Flush the device at the Luer connection with balanced salt solution and
remove excess moisture from the carrier with an absorbent sponge (do not
shake). Stop irrigation and DO NOT restart until the tip of the EndoSerter® is
in the anterior chamber.
7. Allograft tissue is trephined by the surgeon to a preferred diameter.
8. Load the endothelial allograft onto the carrier, endothelium-side up. Place
the donor tissue within the boundary of the alignment holes. Remove excess
moisture from around the allograft with an absorbent sponge to enhance
adherence of the allograft to the carrier during loading and deployment. Larger
diameter allografts will overhang the carrier on the open side of the alignment
holes. WARNING: Do not allow the donor tissue to extend past the front
end of the carrier or drape below the edge of the carrier. Fig. 2.
Fig. 2
AVERTISSEMENT : la loi fédérale des États-Unis exige que cet instrument soit
vendu par un médecin ou sur l’ordre d’un médecin.
Description
L’instrument de mise en place d’endothélium cornéen EndoSerter® est un appareil
qui permet de placer un allogreon endothélial cornéen dans l’œil. L’EndoSerter®
se compose du corps de l’instrument, d’un mécanisme interne et d’un support
(voir Fig. 1). L’EndoSerter® est un appareil stérile, jetable et à usage unique. Après
le chargement du tissu à greer, le retournement de l’instrument et son insertion
dans l’œil, l’allogreon peut être déployé dans la chambre antérieure.
Fig. 1
Plate-forme
Support
Élément de
blocage
Gaine
Roulettes de
déploiement
Molette
Raccord
Luer
Indications
L’EndoSerter® permet d’insérer un allogreon endothélial cornéen mesurant au
maximum 8,5 mm de diamètre et 175 microns d’épaisseur centrale dans la chambre
antérieure via une incision de 4 mm minimum au cours de procédures de kératoplastie
endothéliale.
AVERTISSEMENTS : NE retirez PAS l’élément de blocage noir de
l’EndoSerter® avant d’être prêt à insérer le tissu dans la chambre antérieure.
Le chargement du tissu doit avoir lieu immédiatement avant l’insertion et le
déploiement. Une fois le chargement eectué, ne rincez pas l’instrument tant
que la gaine n’est pas insérée dans la chambre antérieure. Le non-respect
des instructions d’utilisation peut entraîner des blessures chez le patient ou
endommager le tissu du donneur.
Instructions d’utilisation
1. Consultez la Fig. 1 pour vous familiariser avec l’instrument.
2. Ouvrez l’emballage et manipulez l’instrument en respectant les procédures de
stérilité standard. Tenez l’instrument par le corps et retirez la plate-forme en
plastique blanche en l’écartant doucement à partir de l’extrémité du support.
3. NE retirez PAS l’élément de blocage noir avant d’être prêt à insérer le tissu dans
la chambre antérieure.
4. L’instrument est fourni avec le support d’allogreon déjà déplié en position de
chargement.
5. Tenez l’instrument de façon à ce que le côté portant la mention « EndoSerter® »
soit orienté vers le haut. Fig. 1.
6. Rincez l’instrument par le raccord Luer avec une solution saline équilibrée et
retirez l’excès d’humidité du support à l’aide d’une éponge absorbante. (Ne
secouez pas l’instrument.) Arrêtez l’irrigation et NE la recommencez PAS avant
que la pointe de l’EndoSerter® soit dans la chambre antérieure.
7. Le chirurgien découpe le tissu à greer au diamètre adéquat.
8. Chargez l’allogreon endothélial sur le support en plaçant l’endothélium vers
le haut. Placez le tissu du donneur dans la zone délimitée par les trous. Retirez
l’excès d’humidité autour de l’allogreon à l’aide d’une éponge absorbante pour
renforcer son adhérence sur le support durant le chargement et le déploiement.
Les allogreons de diamètre supérieur débordent du support du côté opposé
aux trous d’alignement. AVERTISSEMENT : le tissu du donneur ne doit pas
dépasser de l’extrémité avant du support, ni s’enrouler sous le bord du
support. Fig. 2.
VORSICHT: Nach US-amerikanischem Bundesrecht darf dieses Gerät nur von
einem Arzt oder in dessen Auftrag verkauft werden.
Beschreibung
Das EndoSerter® Instrument zum Ablegen von Korneatransplantat ist ein Instrument,
um ein allogenes Hornhauttransplantat in das Auge einzubringen. Der EndoSerter®
besteht aus dem Gri, dem inneren Mechanismus und dem Träger, wie in Abb. 1
dargestellt. Der EndoSerter® ist ein steriles Einweg-Instrument für die einmalige
Verwendung. Wenn das Instrument mit eingelegtem Transplantat gedreht und
in das Auge eingeführt ist, kann das Transplantat in der vorderen Augenkammer
abgelegt werden.
Abb. 1
Kunststoffschutz
Trägerhülle
Träger
Sperrschutz
Rädchen
Rändelrad
Luer-Anschluss
Ablage-
Indikationen
Der EndoSerter® dient zum Einsetzen eines allogenen Hornhauttransplantats mit
einem Durchmesser von höchstens 8,5 mm und einer zentralen Stärke von 175
Mikrometer durch eine Inzision von mindestens 4 mm während einer EndothelKeratoplastik.
WARNUNGEN: NICHT den schwarzen Sperrschutz vom EndoSerter®
entfernen, solange keine Bereitschaft zum Einlegen des Gewebes in die
Augenkammer besteht. Das Einlegen des Gewebes in das Instrument
sollte unmittelbar vor dem Einführen und Einsetzen vorgenommen werden.
Nachdem das Implantat aufgelegt ist, darf das Instrument nicht gespült
werden, es sei denn, die Trägerhülle ist bereits in die vordere Augenkammer
eingeführt. Die Nichtbeachtung der Gebrauchsanweisung kann zur Verletzung
des Patienten oder Schädigung des Spendergewebes führen.
Gebrauchsanweisungen
1. In Abb. 1 sehen Sie eine Übersicht des Instruments.
2. Verwenden Sie sterile Standardverfahren zum Önen der Verpackung und
Handhabung des Instruments. Halten Sie das Gerät am Gri und entfernen Sie
den weißen Kunststoschutz, indem Sie ihn vorsichtig nach unten, vom Ende
des Trägers weg, abziehen.
3. NICHT den schwarzen Sperrschutz entfernen, solange keine Bereitschaft zum
Einlegen des Gewebes in die Augenkammer besteht.
4. Das Instrument wird in ausgefahrener Position geliefert, sodass das Implantat
direkt aufgelegt werden kann.
5. Halten Sie das Gerät mit der mit „EndoSerter®“ bedruckten Seite nach oben.
Abb. 1.
6. Spülen Sie das Instrument mit einer ausgewogenen Salzlösung über den LuerAnschluss und nehmen Sie übermäßige Flüssigkeit auf dem Träger mit einem
Schwamm auf (nicht schütteln). Unterbrechen Sie das Spülen und setzen Sie es
NICHT fort, bis sich die Spitze des EndoSerter® in der Augenkammer bendet.
7. Das allogene Transplantat wird vom Chirurgen mittels Trepanation auf den
gewünschten Durchmesser gebracht.
8. Legen Sie das Hornhauttransplantat auf den Träger mit der Hornhautseite nach
oben. Positionieren Sie das Spendergewebe innerhalb der Ausrichtungslöcher.
Entfernen Sie mit einem Schwamm übermäßige Flüssigkeit um das Implantat
herum, um während des Ladens und Einlegens die Haftung des Transplantats
auf dem Träger zu verbessern. Transplantate mit größerem Durchmesser
überlappen den Träger auf der Seite ohne Ausrichtungslöcher. WARNUNG: Das
Spendergewebe nicht über das vordere Ende des Trägers hängen lassen
oder unter die Kante des Trägers drapieren. Abb. 2.
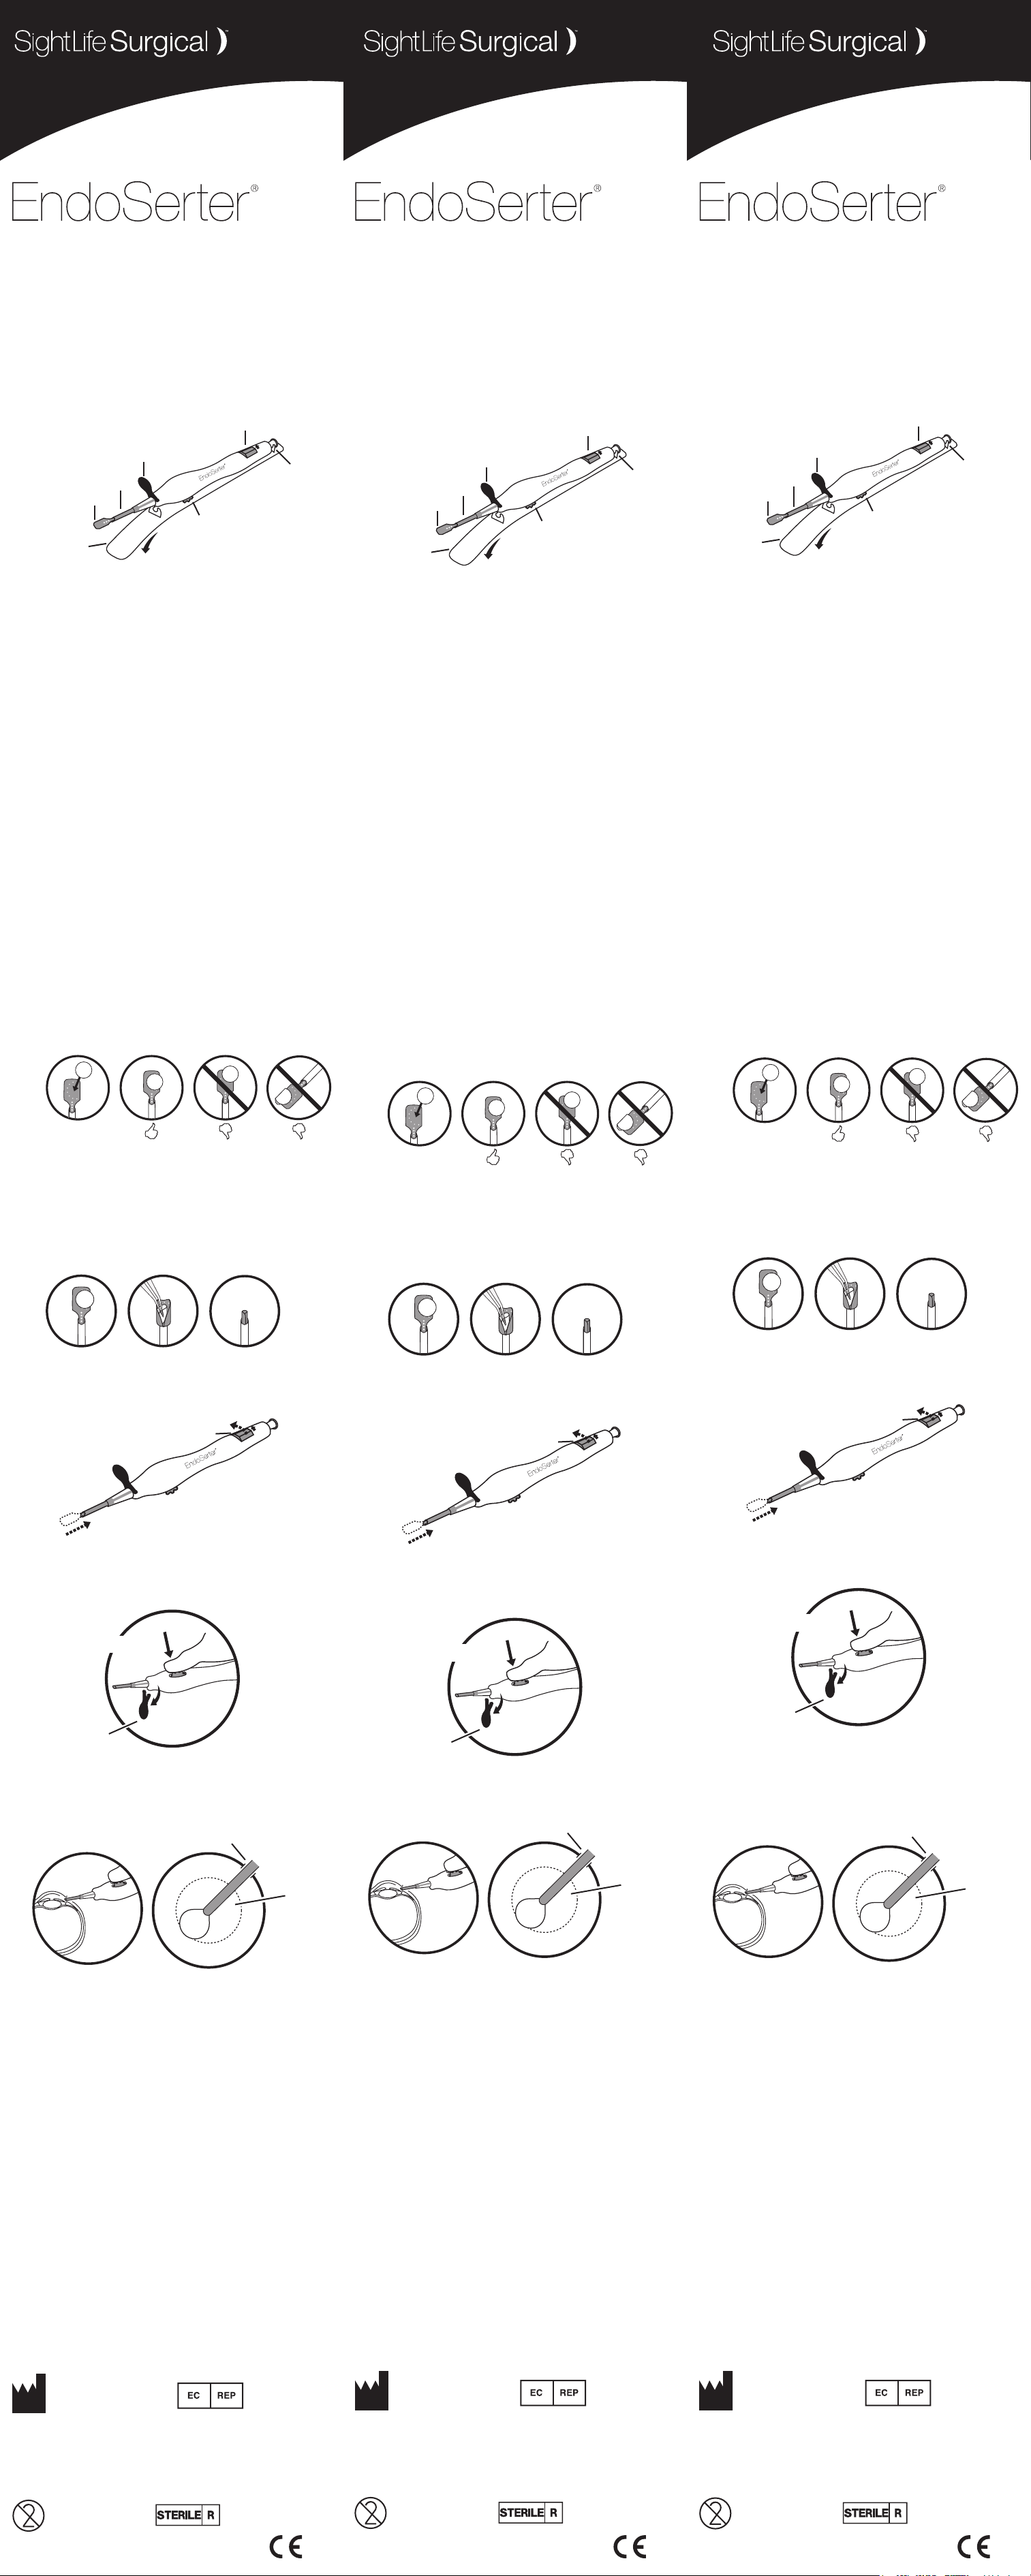
9. Apply a small amount of cohesive viscoelastic to the endothelium.
10. Rotate the blue thumbscrew in the direction of the arrow to load the tissue into
the insertion sheath. As the tissue retracts and begins to roll, gently tuck the
overhanging tissue edge under the opposite edge. Visualize the tissue loading
until complete and, if necessary, repeat tucking on exposed edge(s). Allografts
that do not overhang the carrier will not require tucking. Fig. 3.
Fig. 3
11. Rotate the blue thumbscrew only in the direction indicated by the printed arrow
until all action stops. Then rotate 3 full revolutions past the point where tissue is
observed to be fully retracted. Fig. 4.
Fig. 4
Thumbscrew
Fig. 2
9. Appliquez une petite quantité de produit viscoélastique cohésif sur
l’endothélium.
10. Tournez la molette bleue dans le sens de la èche pour charger le tissu dans la
gaine d’insertion. Quand le tissu se rétracte et commence à s’enrouler, rentrez
avec précaution l’extrémité de tissu qui dépasse sous le côté opposé. Contrôlez
visuellement le chargement du tissu jusqu’à la n et, si nécessaire, répétez l’opération
précédente pour rentrer les bords exposés restants. Il n’est pas nécessaire de rentrer
les allogreons qui ne débordent pas du support. Fig. 3.
Fig. 3
11. Tournez la molette bleue uniquement dans le sens de la èche jusqu’à ce que
toute action s’arrête. Tournez ensuite de 3 tours complets après rétractation
complète du tissu. Fig. 4.
Fig. 4
Molette
Abb. 2
9. Geben Sie eine kleine Menge kohäsives Viskoelastikum auf die Hornhaut.
10. Drehen Sie das blaue Rändelrad in Pfeilrichtung, um das Transplantat in die
Trägerhülle zu ziehen. Schieben Sie die überhängende Seite des Transplantats
vorsichtig unter die gegenüberliegende Kante, während das Implantat
eingezogen wird und sich dabei aufrollt. Beobachten Sie das Einziehen des
Transplantats bis zum Schluss und wiederholen Sie gegebenenfalls das
Unterschieben der überhängenden Seite. Transplantate, die nicht über den
Träger hinausragen, erfordern kein Unterschieben einer Seite. Abb. 3.
Abb. 3
11. Drehen Sie das blaue Rändelrad nur in die durch den Pfeil angegebene
Richtung, bis der Träger vollständig eingezogen ist. Drehen Sie, nachdem
das Implantat vollständig eingezogen ist, das Daumenrädchen um 3 ganze
Umdrehungen weiter. Abb. 4.
Abb. 4
Rändelrad
12. Roll the device 180 degrees so that the black deployment wheels are up.
13. Firmly hold the black deployment wheels in existing position. Gently remove and
discard the locking guard. Fig. 5.
Fig. 5
Hold in position
Locking
Guard
14. Continue to hold the black deployment wheels while inserting the beveled tip of
the insertion sheath into at least the center of the anterior chamber. WARNING:
Deployment wheels must be held securely to avoid damage to donor
tissue during insertion. Fig. 6A.
Fig. 6
Incision
Host
Bed
12. Rouler le dispositif de 180 degrés an que les roues de déploiement noir sont orientés
vers le haut.
13. Maintenez fermement les roulettes de déploiement noires dans leur position
actuelle. Retirez l’élément de blocage avec précaution et jetez-le. Fig. 5.
Fig. 5
Position de maintien
Élément de
blocage
14. Tout en continuant à maintenir les roulettes de déploiement noires, insérez la
pointe biseautée de la gaine d’insertion au moins jusqu’au centre de la chambre
antérieure. AVERTISSEMENT : les roulettes de déploiement doivent être
maintenues fermement en place pour éviter d’endommager le tissu du
donneur lors de l’insertion. Fig. 6A.
Fig. 6
Incision
12. Rollen Sie das Gerät um 180 Grad, so dass die schwarzen Einsatz Räder nach
oben zeigen.
13. Halten Sie die schwarzen Ablage-Rädchen in ihrer Position. Entfernen Sie
vorsichtig den Sperrschutz. Abb. 5.
Abb. 5
In Position halten
Sperrschutz
14. Halten Sie weiter die schwarzen Ablage-Rädchen in ihrer Position, während
Sie die abgeschrägte Spitze der Trägerhülle bis mindestens in die Mitte
der vorderen Augenkammer einführen. WARNUNG: Die Ablage-Rädchen
müssen unbedingt in ihrer Position bleiben, um eine Beschädigung des
Spendergewebes während des Einführens zu vermeiden. Abb. 6A.
Abb. 6
Inzision
A B
15. Once the beveled tip of the insertion sheath is inserted into the anterior
chamber, deepen the anterior chamber using gentle irrigation (e.g. bottleheight
at 40 cm) through the device. Continue irrigation as the device is moved across
the anterior chamber past the far edge of the stromal bed.
16. Deploy the allograft by rotating the black deployment wheels forward towards
the patient. Move the black deployment wheels until the allograft is completely
uncovered. WARNING: The EndoSerter® uncovers the tissue allograft and
the sheath will retract toward the incision during deployment. Fig. 6B.
17. When the allograft has deployed, hold the black deployment wheels in their
position, and remove the device from the anterior chamber.
18. Discard the EndoSerter® after use.
Precautions
The device must be ushed with balanced salt solution prior to loading tissue. The tissue
allograft must be placed within the boundary of the graft alignment holes on the carrier.
Store the EndoSerter® in its sterile sealed package at room temperature. Contents are
sterile unless package is opened or damaged. Do not resterilize.
Surgical Procedure
Proper surgical technique and donor tissue handling is the responsibility of the individual
surgeon. Surgeons must determine the suitability of any particular procedure based upon
their medical training and experience.
Warranty and Limitations of Liability
SightLife Surgical warrants that the EndoSerter®, when delivered, will conform to the
device’s current specications and shall be free from defects in material workmanship
for a period equal to the expiration date.
Lit
receveur
A B
15. Une fois la pointe biseautée de la gaine d’insertion insérée dans la chambre
antérieure, approfondissez la chambre antérieure en procédant à une irrigation
douce (par ex. hauteur de acon de 40 cm) via l’instrument. Poursuivez
l’irrigation en insérant l’instrument dans la chambre inférieure au-delà de
l’extrémité du lit stromal.
16. Déployez l’allogreon en faisant tourner les roulettes de déploiement noires
vers le patient. Actionnez les roulettes de déploiement noires jusqu’à ce que
l’allogreon soit complètement découvert. AVERTISSEMENT : l’EndoSerter®
découvre le tissu à greer et la gaine se rétracte vers l’incision lors du
déploiement. Fig. 6B.
17. Une fois l’allogreon déployé, maintenez les roulettes de déploiement noires en
place et retirez l’instrument de la chambre antérieure.
18. Jetez l’EndoSerter® après son utilisation.
Précautions
L’instrument doit être rincé avec une solution saline équilibrée avant le chargement du tissu.
L’allogreon doit être placé dans la zone délimitée par les trous du support. Conservez
l’EndoSerter® dans son emballage stérile fermé à température ambiante. Le contenu est
stérile tant que l’emballage n’est ni ouvert ni endommagé. Ne restérilisez pas l’instrument.
Procédure chirurgicale
La technique chirurgicale adéquate et la manipulation du tissu sont la responsabilité du
chirurgien. Les chirurgiens doivent évaluer l’adéquation de toute procédure particulière en
s’appuyant sur leur formation et leur expérience médicales.
Garantie et limitations de responsabilité
SightLife Surgical garantit que l’EndoSerter® fourni est conforme aux spécications
actuelles de l’instrument et dépourvu de défauts matériels pour une période allant jusqu’à
la date d’expiration.
Transplantationsbett
A B
15. Sobald die abgeschrägte Seite der Trägerhülle in die Augenkammer eingeführt
wurde, vertiefen Sie die Augenkammer durch vorsichtiges Spülen (z. B.
Flaschenfüllhöhe bei 40 cm) mithilfe des Instruments. Fahren Sie mit dem
Spülen fort, während das Instrument durch die Augenkammer bis zur Rückseite
des Stromas bewegt wird.
16. Setzen Sie das Implantat ein, indem Sie die schwarzen Ablage-Rädchen
vorwärts in Richtung des Patienten drehen. Drehen Sie die schwarzen
Ablage-Rädchen bis das Transplantat vollständig oen liegt. WARNUNG: Der
EndoSerter® legt das Implantat frei und während des Ablegens zieht sich
die Trägerhülle in Richtung der Inzision zurück. Abb. 6B.
17. Wenn das Transplantat abgelegt ist, halten Sie die schwarzen AblageRädchen in ihrer Position und entfernen Sie das Instrument aus der vorderen
Augenkammer.
18. Entsorgen Sie den EndoSerter® nach Gebrauch.
Vorsichtsmaßnahmen
Vor dem Einlegen des Transplantats muss das Instrument mit ausgewogener Salzlösung
gespült werden. Das Transplantat muss innerhalb der Ausrichtungslöcher auf dem Träger
liegen. Lagern Sie den EndoSerter® in seiner sterilen Verpackung bei Raumtemperatur.
Solange die Verpackung ungeönet oder nicht beschädigt ist,
ist der Inhalt steril. Nicht erneut sterilisieren.
Operationsverfahren
Die richtige Operationstechnik und korrekte Handhabung des Spendergewebes liegen in
der Verantwortlichkeit des einzelnen Chirurgen. Der Chirurg muss aufgrund seiner Fähigkeit
und Erfahrung über die Eignung des jeweiligen Verfahrens entscheiden.
Gewährleistung und Haftungsbeschränkungen
SightLife Surgical garantiert, dass der EndoSerter® bei Lieferung den
aktuellen Gerätespezikationen entspricht und bis zum Verfallsdatum keinerlei
Materialverarbeitungsfehler aufweist.
SightLife Surgical
101 North Chestnut Street, Ste 303
Winston-Salem, NC 27101
www.sightlifesurgical.com
Tél. : +1 (844) 526 7632
Single Use Only
®
denotes trademark of SightLife Surgical.
© 2016 SightLife Surgical. All rights reserved.
ES-899-JUL17
EMERGO EUROPE
Prinsessegracht 20
2514 AP, The Hague
The Netherlands
0086
SightLife Surgical
101 North Chestnut Street, Ste 303
Winston-Salem, NC 27101
www.sightlifesurgical.com
Tél. : +1 (844) 526 7632
EMERGO EUROPE
Prinsessegracht 20
2514 AP, La Haye
Pays-Bas
À usage unique seulement
® indique une marque déposée d’SightLife Surgical.
© 2016 SightLife Surgical. Tous droits réservés.
0086
SightLife Surgical
101 North Chestnut Street, Ste 303
Winston-Salem, NC 27101
www.sightlifesurgical.com
Tél. : +1 (844) 526 7632
EMERGO EUROPE
Prinsessegracht 20
2514 AP, The Hague
The Netherlands
Nur zur einmaligen
Verwendung
® bezeichnet die Marke SightLife Surgical.
© 2016 SightLife Surgical. Alle Rechte vorbehalten.
0086
Italiano Español Nederlands
Strumento per l’inserimento di endotelio corneale Instrumento de colocación de endotelio corneal Instrument voor plaatsing van hoornvliesendotheel
ATTENZIONE: la legge federale statunitense limita la vendita di questo dispositivo ai
soli medici o dietro prescrizione medica.
Descrizione
EndoSerter®, strumento per l’inserimento di endotelio corneale, è un dispositivo
utilizzato per l’alloinnesto di endotelio corneale nell’occhio. EndoSerter® si compone
del corpo dello strumento, di un supporto e del relativo meccanismo interno
mostrato alla Fig. 1. EndoSerter® è un dispositivo monouso, sterile, usa e getta.
Quando lo strumento viene caricato con il tessuto per alloinnesto, ruotato e inserito
nell’occhio, permette di posizionare l’alloinnesto nella camera anteriore.
Rotelle di
Vite zigrinata
Connessione
Luer
Fig. 1
Placchetta di
supporto
Supporto
Protezione di
blocco
Guaina
posizionamento
Indicazioni
EndoSerter® è utilizzato nelle procedure di cheratoplastica endoteliale per l’inserimento
in camera anteriore, attraverso un’incisione di almeno 4 mm, di tessuto per alloinnesto
di endotelio corneale, con diametro inferiore o pari a 8,5 mm e 175 micron di spessore
centrale.
AVVERTENZE: NON rimuovere la protezione di blocco nera da EndoSerter® no
al momento dell’inserimento del tessuto nella camera anteriore. Il tessuto deve
essere caricato immediatamente prima dell’inserimento e del posizionamento.
Una volta caricato il tessuto, non irrigare il dispositivo nché la guaina non è
inserita nella camera anteriore. La mancata osservanza delle istruzioni d’uso
può provocare lesioni al paziente o danni al tessuto del donatore.
Istruzioni per l’uso
1. Fare riferimento alla Fig. 1 per la visione d’insieme del dispositivo.
2. Aprire il contenitore e prelevare il dispositivo utilizzando le consuete procedure
sterili. Impugnare il corpo del dispositivo e rimuovere la placchetta bianca in
plastica di supporto, estraendola dolcemente verso il basso e sganciandola dal
terminale del dispositivo.
3. NON rimuovere la protezione nera di blocco no al momento dell’inserimento
del tessuto nella camera anteriore.
4. Il dispositivo è fornito con il supporto per alloinnesto già estratto, in posizione
di carico.
5. Impugnare il dispositivo con la scritta “EndoSerter®” rivolta verso l’alto. Fig. 1.
6. Irrigare il dispositivo, tramite la connessione Luer, con soluzione salina
bilanciata e rimuovere l’eccesso di umidità dal supporto con una spugnetta
assorbente (non agitare). Interrompere l’irrigazione e NON riavviare no
a quando la punta di EndoSerter® si trova nella camera anteriore.
7. La sezione circolare di tessuto per alloinnesto deve essere preparata dal
chirurgo nel diametro prestabilito.
8. Caricare l’alloinnesto di endotelio sul supporto, con il lato endoteliale in alto.
Posizionare il tessuto del donatore entro i limiti dati dai fori di allineamento.
Rimuovere l’eccesso di umidità intorno all’allotrapianto con una spugna
assorbente per migliorare l’adesione dell’allotrapianto al supporto durante il
caricamento e il posizionamento. Alloinnesti di diametro superiore deborderanno
dal supporto sul lato aperto del fori di allineamento. AVVERTENZA: non
permettere che il tessuto del donatore debordi dall’estremità anteriore del
supporto o scenda al di sotto del bordo del supporto. Fig. 2.
Fig. 2
ATENCIÓN: Las Leyes Federales (Estados Unidos de América) estipulan que la
venta de este dispositivo debe ser realizada por un médico o por prescripción
médica.
Descripción
El instrumento de colocación de endotelio corneal EndoSerter® es un dispositivo
utilizado para colocar un aloinjerto de endotelio corneal dentro del ojo. El EndoSerter
se compone del cuerpo del instrumento, su mecanismo y el cargador que se
muestra en la Fig. 1. El EndoSerter® es un dispositivo estéril desechable de un solo
uso. Una vez cargado con el tejido para el aloinjerto, girado e insertado en el ojo, el
aloinjerto se puede colocar en la cámara anterior.
Fig. 1
Soporte
Cargador
Vaina
Tope de
seguridad
Ruedas de
colocación
Tornillo de
apriete manual
Conexión
Luer
Indicaciones
El EndoSerter® se utiliza para insertar tejido para un aloinjerto endotelial corneal en la
cámara anterior con un tamaño igual o menor a 8,5 mm de diámetro y 175 micras de
grosor en su centro, a través de una incisión mínima de 4 mm durante procedimientos
de queratoplastia endotelial.
ADVERTENCIAS: NO retire el tope de seguridad negro del EndoSerter® hasta
que esté listo para insertar tejido en la cámara anterior. La carga de tejido
debe realizarse inmediatamente antes de su inserción y colocación. Una vez
cargado, no lavar el dispositivo hasta que la vaina se haya insertado en la
cámara anterior. Si no se siguen estas instrucciones de uso, podrían causarse
lesiones al paciente o daños al tejido del donante.
Instrucciones de uso
1. Consulte la Fig. 1, para familiarizarse con el dispositivo.
2. Abra el envase y manipule el dispositivo utilizando los procedimientos
estándar para instrumentos estériles. Sostenga el dispositivo tomando el
cuerpo del mismo en la mano y retire el soporte blanco de plástico, estirando
cuidadosamente de él hacia abajo y retirándolo del extremo del cargador del
dispositivo.
3. NO retire el tope de seguridad negro hasta que esté listo para insertar tejido en
la cámara anterior.
4. El dispositivo se entrega con el cargador del aloinjerto ya extendido en la
posición de carga.
5. Sostenga el dispositivo de forma que el lado con la inscripción “EndoSerter®”
esté hacia arriba. Fig. 1.
6. Lave el dispositivo en la conexión Luer con una solución salina equilibrada y
retire el exceso de humedad del cargador con una esponja absorbente (no lo
agite). Detenga la irrigación y NO reinicie hasta que la punta del EndoSerter®
esté en la cámara anterior.
7. El tejido para el aloinjerto es trepanado por el cirujano hasta que tenga el
diámetro deseado.
8. Cargue el injerto endotelial en el cargador, con el endotelio hacia arriba.
Coloque el tejido del donante dentro del espacio delimitado por los oricios
de alineamiento. Elimine el exceso de humedad de la zona alrededor del
aloinjerto con una esponja absorbente para mejorar la adherencia del aloinjerto
al cargador durante la carga y la colocación. Los aloinjertos con un diámetro
mayor sobresaldrán del cargador por el lado abierto de los oricios de
alineamiento. ADVERTENCIA: No debe permitirse que el tejido del donante se
extienda más allá del extremo frontal del cargador. Fig. 2.
LET OP: Krachtens de federale wetgeving van de Verenigde Staten mag dit
instrument uitsluitend door of op voorschrift van een arts worden verkocht.
Beschrijving
Het EndoSerter® -instrument voor plaatsing van hoornvliesendotheel is een
instrument dat wordt gebruikt om een allograft van hoornvliesendotheel in het oog
®
te plaatsen. De EndoSerter® omvat de behuizing van het instrument alsmede het
inwendige mechanisme en de houder zoals afgebeeld in Fig. 1. De EndoSerter® is
een steriel wegwerpinstrument voor eenmalig gebruik. Nadat het allograftweefsel in het
instrument is geplaatst en dit gedraaid en in het oog is ingebracht, kan de allograft in
de voorste oogkamer worden aangebracht.
Fig. 1
Borgklemmetje
Sheath
Drager
Plaatsingswieltjes
Platformkaart
Draaiknop
Luerlock
Indicaties
De EndoSerter® wordt gebruikt om allograftweefsel van hoornvliesendotheel met een
diameter van ten hoogste 8,5 mm en een dikte in het midden van ten hoogste 175
micrometer in de voorste oogkamer in te brengen door een incisie van ten minste 4 mm
tijdens corneatransplantatie-ingrepen.
WAARSCHUWINGEN: Verwijder het zwarte borgklemmetje van de EndoSerter®
NIET tot het weefsel in de voorste oogkamer ingebracht kan worden. Het
weefsel dient direct vóór het inbrengen en plaatsen te worden geladen. Nadat
het weefsel is geladen mag het instrument niet meer worden gespoeld, tenzij
de sheath in de voorste oogkamer is ingebracht. Als de aanwijzingen voor
gebruik niet in acht worden genomen, kan dit resulteren in letsel bij de patiënt
en schade aan het donorweefsel veroorzaken.
Aanwijzingen voor gebruik
1. Bestudeer Fig. 1 om vertrouwd te raken met het instrument.
2. Open de verpakking en hanteer het instrument gebruikmakend van de
standaard aseptische technieken. Houd het instrument bij de behuizing vast
en verwijder de witte kunststof platformkaart door deze voorzichtig uit het
houderuiteinde van het instrument omlaag te trekken.
3. Verwijder het zwarte borgklemmetje NIET tot het moment waarop het weefsel in
de voorste oogkamer ingebracht kan worden.
4. Bij levering is de allografthouder van het instrument reeds in de laadpositie naar
voren gebracht.
5. Houd het instrument zo vast dat de kant met de aanduiding “EndoSerter®” omhoog
wijst. Fig. 1.
6. Spoel het instrument via de Luer-Lock met een gebalanceerde zoutoplossing
en verwijder al het overtollige vocht van de houder met een absorberend
sponsje (niet schudden). Stop met irrigeren en begin NIET opnieuw totdat de
EndoSerter® zich in de voorste oogkamer bevindt.
7. Het allograftweefsel wordt door de chirurg bijgesneden tot de gewenste diameter.
8. Laad de endotheel-allograft op de houder, met de endotheelkant omhoog.
Plaats het donorweefsel binnen de grenzen van de uitlijngaatjes. Verwijder al
het overtollige vocht rondom de allograft met een absorberend sponsje, zodat
de allograft tijdens het laden en plaatsen beter op de lader blijft zitten. Allografts
met een grote diameter zullen aan de open kant van de uitlijngaatjes tot over de
rand van de houder uitsteken WAARSCHUWING: het donorweefsel mag niet
uitsteken voorbij de voorkant van de houder en mag ook niet over de hoek
van de drager hangen. Fig. 2.
Fig. 2
9. Applicare una modesta quantità di viscoelastico coesivo all’endotelio.
10. Ruotare la vite zigrinata blu nella direzione indicata dalla freccia per caricare
il tessuto all’interno della guaina d’inserimento. Quando il tessuto arretra e
inizia ad arrotolarsi, spingere delicatamente il bordo sporgente di tessuto sotto
il bordo opposto. Controllare visivamente il caricamento del tessuto no a
completamento e, se necessario, ripetere l’operazione di accompagnamento
dei bordi sporgenti. Gli alloinnesti che non debordano dal supporto non
necessitano di spinta di accompagnamento. Fig. 3.
Fig. 3
11. Ruotare la vite zigrinata blu solo nella direzione indicata dalla freccia nché il
movimento si arresta. Quindi eseguire 3 giri completi oltre il punto di completo
arretramento del tessuto. Fig. 4.
Fig. 4
Vite zigrinata
Fig. 2
9. Aplique una pequeña cantidad de viscoelástico cohesivo en el endotelio.
10. Gire el tornillo de apriete manual azul en la dirección de la echa para cargar
el tejido en la vaina de inserción. Cuando el tejido se repliegue y comience
a enrollarse, introduzca con cuidado la parte que sobresale del tejido bajo
el borde opuesto. Visualice la carga del tejido hasta que esté terminada y, si
fuera necesario, vuelva a introducir el borde o los bordes que sobresalgan. Los
aloinjertos que no sobresalgan del cargador no necesitarán ser introducidos.
Fig. 3.
Fig. 3
11. Gire el tornillo de apriete manual azul únicamente en la dirección indicada por
la echa impresa, hasta que deje de producir efecto alguno. Después, gire 3
vueltas completas más allá del punto en el que se observe que el tejido se haya
replegado totalmente. Fig. 4.
Fig. 4
Tornillo de apriete manual
9. Breng een klein beetje cohesief viscoelastisch materiaal aan op het endotheel.
10. Draai de blauwe draaiknop in de richting van de pijl om het weefsel in de
inbrengsheath te laden. Wanneer het weefsel naar binnen wordt getrokken
en zich begint op te rollen, vouwt u de uitstekende weefselrand onder de
tegenoverliggende rand. Volg het laden van het weefsel op het oog totdat
dit is voltooid en vouw zo nodig de blootliggende buitenrand(en) verder weg.
Allografts die niet over de rand van de houder uitsteken, hoeven niet te worden
weggestopt. Fig. 3.
Fig. 3
11. Draai de blauwe draaiknop uitsluitend in de door de pijl aangegeven richting
totdat alle beweging stopt. Draai hem vervolgens nog eens 3 volle slagen
voorbij het punt waarop u kon zien dat het weefsel helemaal was ingetrokken.
Fig. 4.
Fig. 4
Draaiknop
12. Arrotolare il dispositivo di 180 gradi in modo che le ruote distribuzione neri sono
rivolti verso l’alto.
13. Tenere saldamente le rotelle nere di posizionamento in questa posizione.
Rimuovere delicatamente e buttare via la protezione di blocco. Fig. 5.
Fig. 5
Tenere in posizione
Protezione di
blocco
14. Continuare a tenere le rotelle nere di posizionamento mentre si inserisce la
punta smussata della guaina di inserimento almeno no al centro della camera
anteriore. AVVERTENZA: le rotelle di posizionamento devono essere
tenute saldamente per evitare danni al tessuto del donatore durante
l’inserimento. Fig. 6A.
Fig. 6
Incisione
Letto
ospite
12. Rodar el dispositivo 180 grados para que las ruedas de despliegue negros queden
mirando hacia arriba.
13. Sujete rmemente las ruedas negras de colocación en la posición actual. Retire
con cuidado y deseche el tope de seguridad. Fig. 5.
Fig. 5
Mantener en su posición
Tope de
seguridad
14. Siga sujetando las ruedas negras de colocación mientras inserta la punta
biselada de la vaina de inserción al menos hasta el centro de la cámara anterior.
ADVERTENCIA: Las ruedas de colocación deben sujetarse rmemente
para evitar daños al tejido del donante durante la inserción. Fig. 6A.
Fig. 6
Incisión
Lecho
hospedante
12. Rol het apparaat 180 graden, zodat de zwarte inzet wielen naar boven.
13. Houd de zwarte plaatsingswieltjes stevig in de huidige stand. Verwijder het
borgklemmetje en werp het weg. Fig. 5.
Fig. 5
Op positie houden
Borgklemmetje
14. Blijf de zwarte plaatsingswieltjes tegenhouden en breng de afgeschuinde
tip van de inbrengsheath ten minste in tot het middelpunt van de voorste
oogkamer. WAARSCHUWING: De plaatsingswieltjes moeten goed worden
tegengehouden om beschadiging van het donorweefsel tijdens het
inbrengen te voorkomen. Fig. 6A.
Fig. 6
Incisie
Plaatsingslocatie
recipiënt
A B
15. Una volta inserita la punta smussata della guaina di inserimento nella camera
anteriore, aumentare la profondità della camera anteriore tramite lieve
irrigazione (ad es. altezza della bottiglia a 40 cm) dal dispositivo. Continuare
l’irrigazione mentre il dispositivo viene spostato all’interno della camera anteriore
oltre il bordo del letto stromale.
16. Posizionare l’alloinnesto ruotando le rotelle nere di posizionamento in avanti
verso il paziente. Muovere le rotelle di posizionamento nere nché l’alloinnesto
risulta completamente esposto. AVVERTENZA: durante il posizionamento,
EndoSerter® scopre l’alloinnesto di tessuto e la guaina si ritrae verso
l’incisione. Fig. 6B.
17. Quando l’alloinnesto è posizionato, mantenere le rotelle nere di posizionamento
in posizione e rimuovere il dispositivo dalla camera anteriore.
18. Gettare EndoSerter® dopo l’uso.
Precauzioni
Il dispositivo deve essere irrigato con soluzione salina bilanciata prima del
caricamento del tessuto. L’alloinnesto di tessuto deve essere posizionato all’interno
dei limiti dati dai fori di allineamento dell’innesto sul supporto. Conservare
EndoSerter® nella sua confezione sterile a temperatura ambiente. Il contenuto è
sterile salvo che il contenitore sia stato aperto o danneggiato. Non sottoporre a
successiva sterilizzazione.
Procedura chirurgica
La tecnica chirurgica idonea e la manipolazione del tessuto del donatore sono
responsabilità individuale del chirurgo. I chirurghi devono stabilire l’idoneità di una
particolare procedura secondo la loro preparazione ed esperienza medica.
Garanzia e limitazioni di responsabilità
SightLife Surgical garantisce che EndoSerter®, al momento della consegna, è
conforme alle speciche correnti del dispositivo e che esso è privo di difetti di
materiali e di fabbricazione per un periodo coincidente con la data di scadenza.
A B
15. Una vez que la punta biselada de la vaina de inserción esté insertada en la
cámara anterior, agrande la cámara anterior utilizando una leve irrigación (por
ejemplo, hasta una altura de la botella de 40 cm) a través del dispositivo.
Continúe la irrigación mientras el dispositivo se mueve a través de la cámara
anterior hasta sobrepasar el borde más alejado del lecho estromal.
16. Coloque el aloinjerto girando las ruedas negras de colocación hacia adelante
y hacia el paciente. Mueva las ruedas negras de colocación hasta que el
aloinjerto quede totalmente descubierto. ADVERTENCIA: El EndoSerter®
retira el recubrimiento del aloinjerto de tejido y la vaina retrocederá hacia
la incisión durante la colocación. Fig. 6B.
17. Una vez que se haya colocado el aloinjerto, sujete las ruedas negras de
colocación en su posición y retire el dispositivo de la cámara anterior.
18. Deseche el EndoSerter® después de utilizarlo.
Precauciones
El dispositivo debe lavarse con una solución salina equilibrada antes de cargar el tejido.
El aloinjerto de tejido debe colocarse dentro del espacio delimitado por los oricios de
alineamiento del injerto del cargador. Almacene el EndoSerter® en su envase estéril
sellado a temperatura ambiente. El contenido es estéril, a no ser que el paquete haya
sido abierto o esté dañado. No debe volver a esterilizarse.
Procedimiento quirúrgico
El uso de la técnica quirúrgica adecuada y la manipulación apropiada del tejido
del donante son responsabilidad del cirujano. Los cirujanos deben determinar si un
procedimiento concreto es adecuado, basándose en su formación médica y en su
experiencia.
Garantía y limitaciones de responsabilidad
SightLife Surgical garantiza que el EndoSerter®, al ser entregado, se adecuará a las
especicaciones actuales del dispositivo y estará libre de defectos de fabricación,
hasta la fecha de caducidad.
A B
15. Als de afgeschuinde tip van de inbrengsheath zich in de voorste oogkamer
bevindt, diept u de voorste oogkamer uit door middel van milde irrigatie (bijv.
eshoogte op 40 cm) via het instrument. Blijf irrigeren terwijl u het instrument
door de voorste oogkamer beweegt tot voorbij het stromale weefsel.
16. Plaats de allograft door de zwarte plaatsingswieltjes in de richting van de
patiënt vooruit te draaien. Draai aan de zwarte plaatsingswieltjes totdat de
allograft geheel is vrijgekomen. WAARSCHUWING: De EndoSerter® legt de
weefselallograft bloot en de sheath wordt tijdens de plaatsing naar de
incisie toe teruggetrokken. Fig. 6B.
17. Nadat de allograft is geplaatst, verwijdert u het instrument uit de voorste
oogkamer, terwijl u de zwarte plaatsingswieltjes op hun plaats houdt.
18. Werp de EndoSerter® na gebruik weg.
Voorzorgsmaatregelen
Het instrument dient met een gebalanceerde zoutoplossing te worden gespoeld
voordat het weefsel wordt geladen. De weefselallograft dient binnen de grenzen
van de uitlijngaatjes op de houder te worden geplaatst. Bewaar de EndoSerter® in
de steriele, verzegelde verpakking op kamertemperatuur. De inhoud is steriel tenzij de
verpakking is geopend of beschadigd. Niet opnieuw steriliseren.
Operatieve procedure
Het gebruik van de juiste operatietechnieken en het correct hanteren van het
donorweefsel is de verantwoordelijkheid van de individuele chirurg. De chirurg dient de
gepastheid van de gekozen procedure te baseren op de eigen medische opleiding en
ervaring.
Garantie en aansprakelijkheidsbeperking
SightLife Surgical garandeert dat de EndoSerter® bij levering zal voldoen aan de
huidige specicaties van het instrument en vrij zal zijn van tekortkomingen in materiaal en
fabricage gedurende de periode tot aan de uiterste gebruiksdatum.
SightLife Surgical
101 North Chestnut Street, Ste 303
Winston-Salem, NC 27101
www.sightlifesurgical.com
Tél. : +1 (844) 526 7632
Monouso
® indica il marchio di SightLife Surgical.
© 2016 SightLife Surgical. Tutti i diritti riservati.
EMERGO EUROPE
Prinsessegracht 20
2514 AP, L’Aia
Paesi Bassi
SightLife Surgical
101 North Chestnut Street, Ste 303
Winston-Salem, NC 27101
www.sightlifesurgical.com
Tél. : +1 (844) 526 7632
Para un único uso
® signica una marca registrada de SightLife Surgical.
0086 0086 0086
© 2016 SightLife Surgical. Todos los derechos reservados.
EMERGO EUROPE
Prinsessegracht 20
2514 AP, La Haya
Países Bajos
SightLife Surgical
101 North Chestnut Street, Ste 303
Winston-Salem, NC 27101
www.sightlifesurgical.com
Tél. : +1 (844) 526 7632
Uitsluitend voor
eenmalig gebruik
® geeft aan dat dit een handelsmerk van SightLife Surgical is.
© 2016 SightLife Surgical. Alle rechten voorbehouden.
EMERGO EUROPE
Prinsessegracht 20
2514 AP, Den Haag
Nederland
 Loading...