

Page 1

User Manual
SGC 49B
Page 2

Contents
z Intr
oduction
z Warning
z Caution
z Main Unit Description
z Remote Control
z OSD Basic Adjustment
z Specifications
roubleshooting
T
z
2
Page 3

oduction
Intr
Thank you for purchasing SIGCUS FHD LED Television. To get the most out of your
new purchase, it is highly recommended that you read this manual before starting the
operation.
ALLATION
INST
Locate
Total darkness or a reflection on the picture screen can cause eyestrain.
Soft and indirect lighting is recommended for comfortable viewing.
Allow
A
premature component failure.
This
Do
direct sunlight, or in closed compartments and closed areas.
Do not cover the ventilation openings when using the TV.
The indicator light will last for about 30 seconds after the power has been turned
off.
Wait until the indicator light goes out before repowering the TV.
the receiver in the room where direct light does not strike the screen.
enough space between the receiver and the wall to permit ventilation.
void excessively warm locations to prevent possible damage to the cabinet or
TV can be connected to AC 100-240V~ 50/60HZ.
not install the TV in a location near heat sources such as radiators, air ducts,
3
Page 4
arning
W
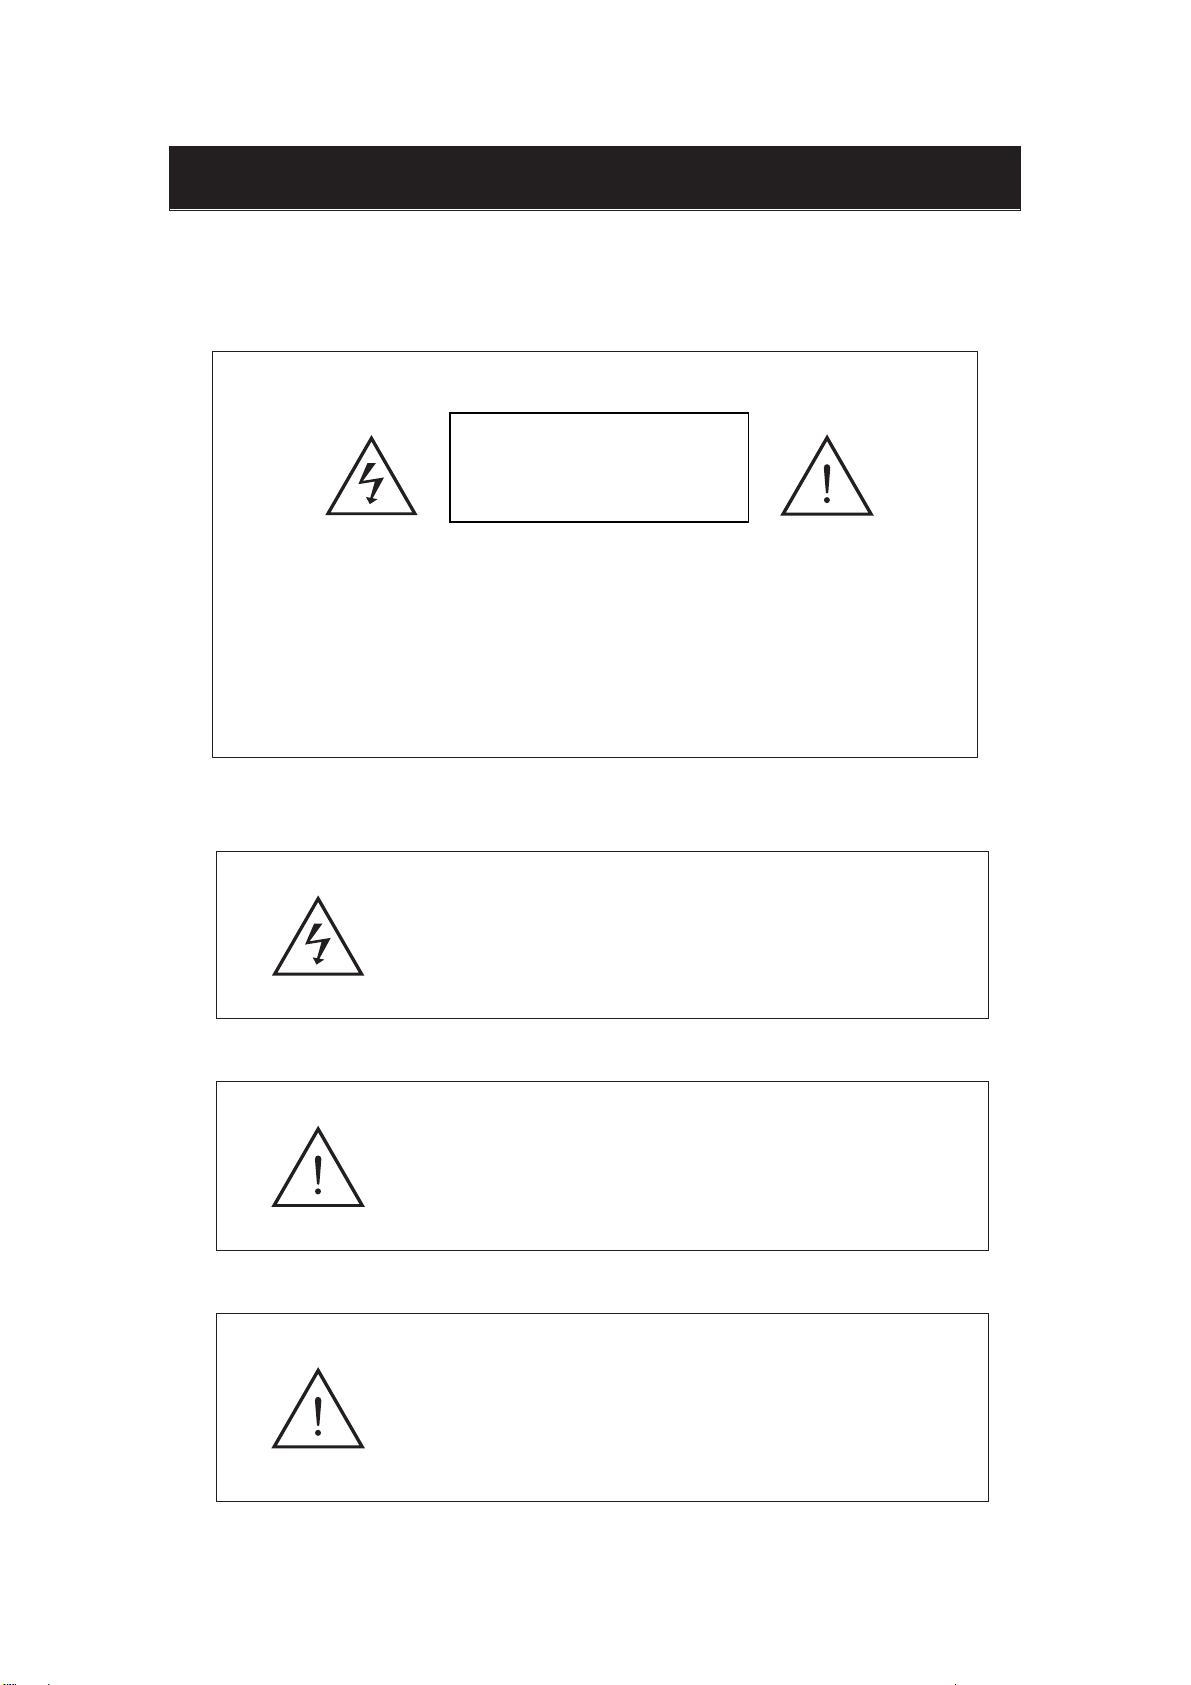
CAUTION:
RISK OF EL
TO AVOID THE RISK OF ELECTRIC SHOCK.
CAUTION
ECTRIC SHOCK
DO NOT OPEN
DO NOT REMOVE COVER (OR BACK).
NO USER- SERVICEABLE PARTS INSIDE.
REFER SERVICING TO QUALIFIED SERVICE PERSONNEL
This sy
mbol is intended to alert the user to avoid the risk
.
of electric shock. This equipment may only be disassembled
by qualified service personnel.
This sy
mbol is intended to alert the user to the presence
of important operation and maintenance instructions in
the literature accompanying the equipment.
Class I structures of equipment sh
power output with a protective earth connection on the socket.
Power plug as a broken applianceˈ
be easy
to operate.
ould be connected to the grid
broken installations should
4
Page 5
Caution
Caution
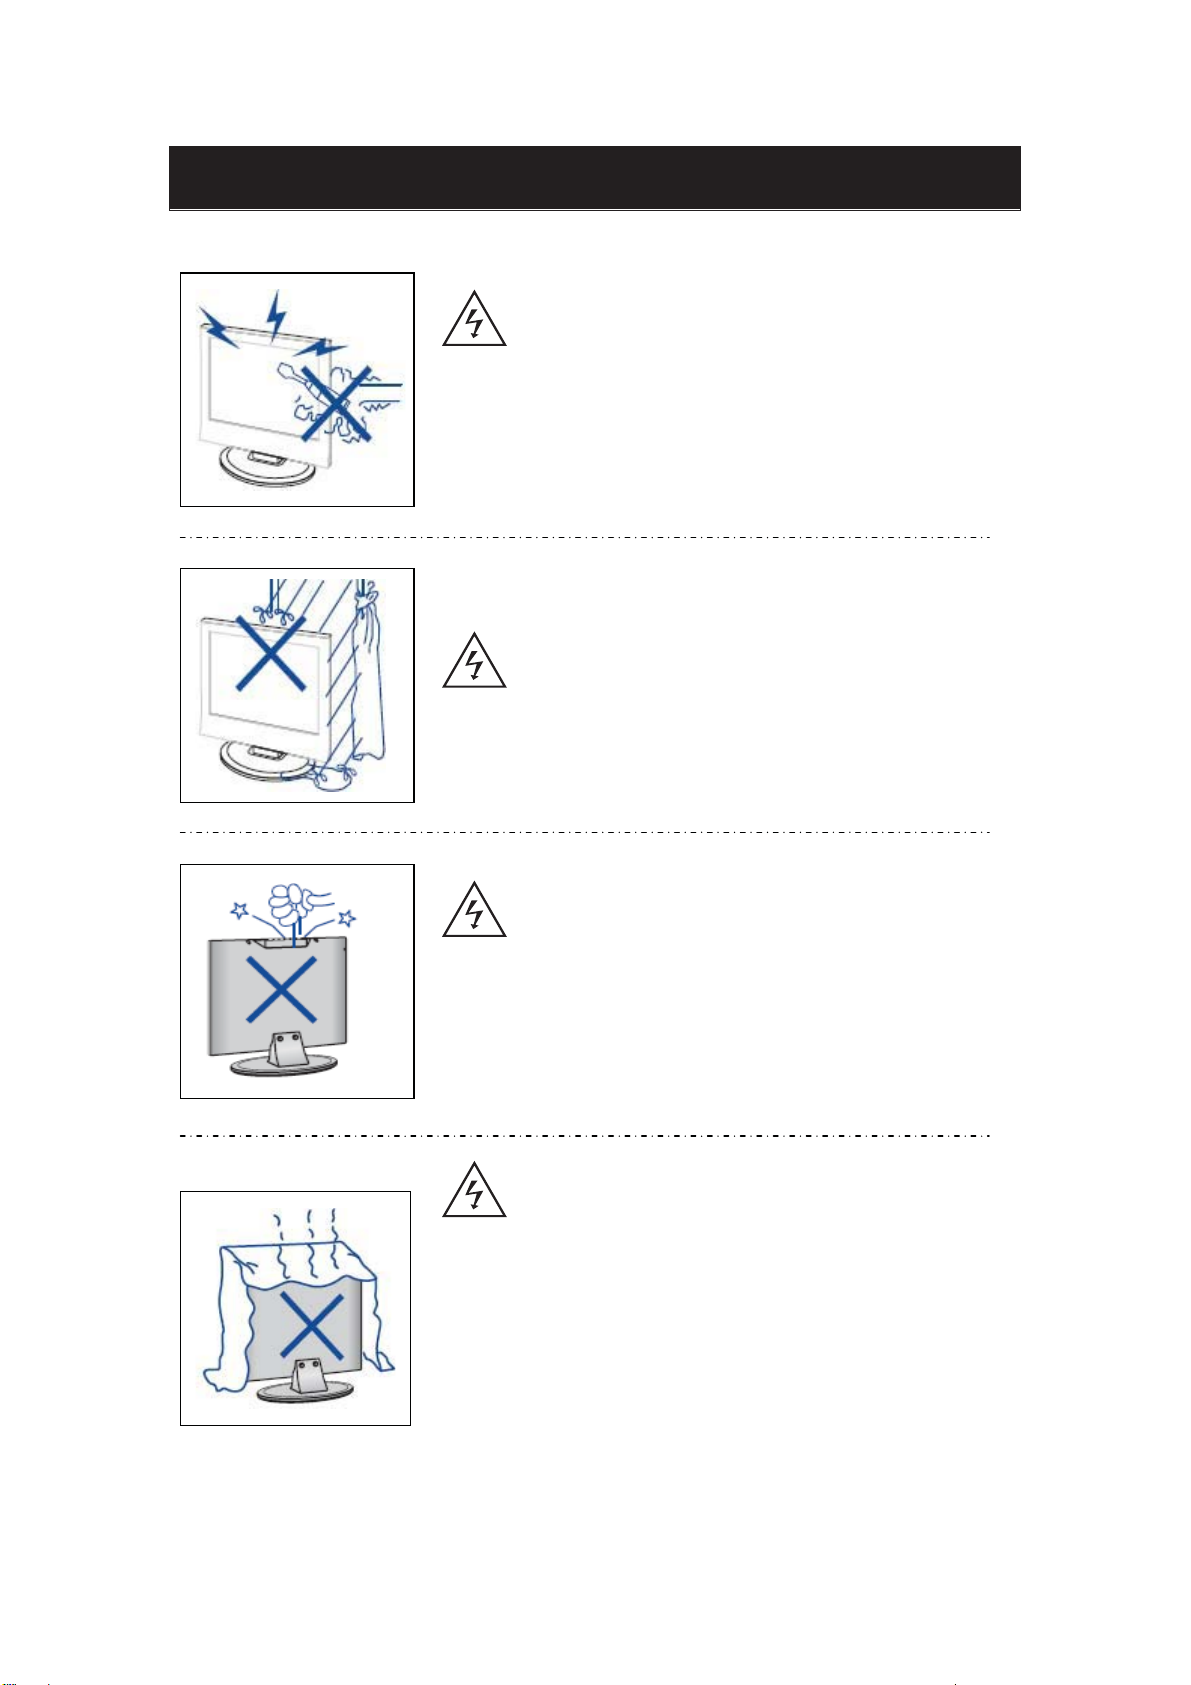
High voltages
Do not open the product's casing. Refer servicing to qualified
service personnel .
T
o prevent fire or electrical shock hazard, do not expose the main
unit to rain or moistureˈdo not place objects filled with liquids,
such as vases, on the apparatus.
are used in the operation of this product.
Caution
Caution
Do not drop or push objects into the television cabinet slots or
openings. Never spill any kind of liquid on the television
receiver.
Caution
A
void exposing the main unit to direct sunlight and other sources
of heat. Do not stand the television receiver irectly on other
products which give off heat: e. g. video cassette players and
audio amplifiers. Do not block the ventilation holes in the back
cover. Ventilation is essential to prevent failure of electrical
components. Do not squash the power supply cord under the
main unit or other heavy objects.
5
Page 6
Caution
Caution
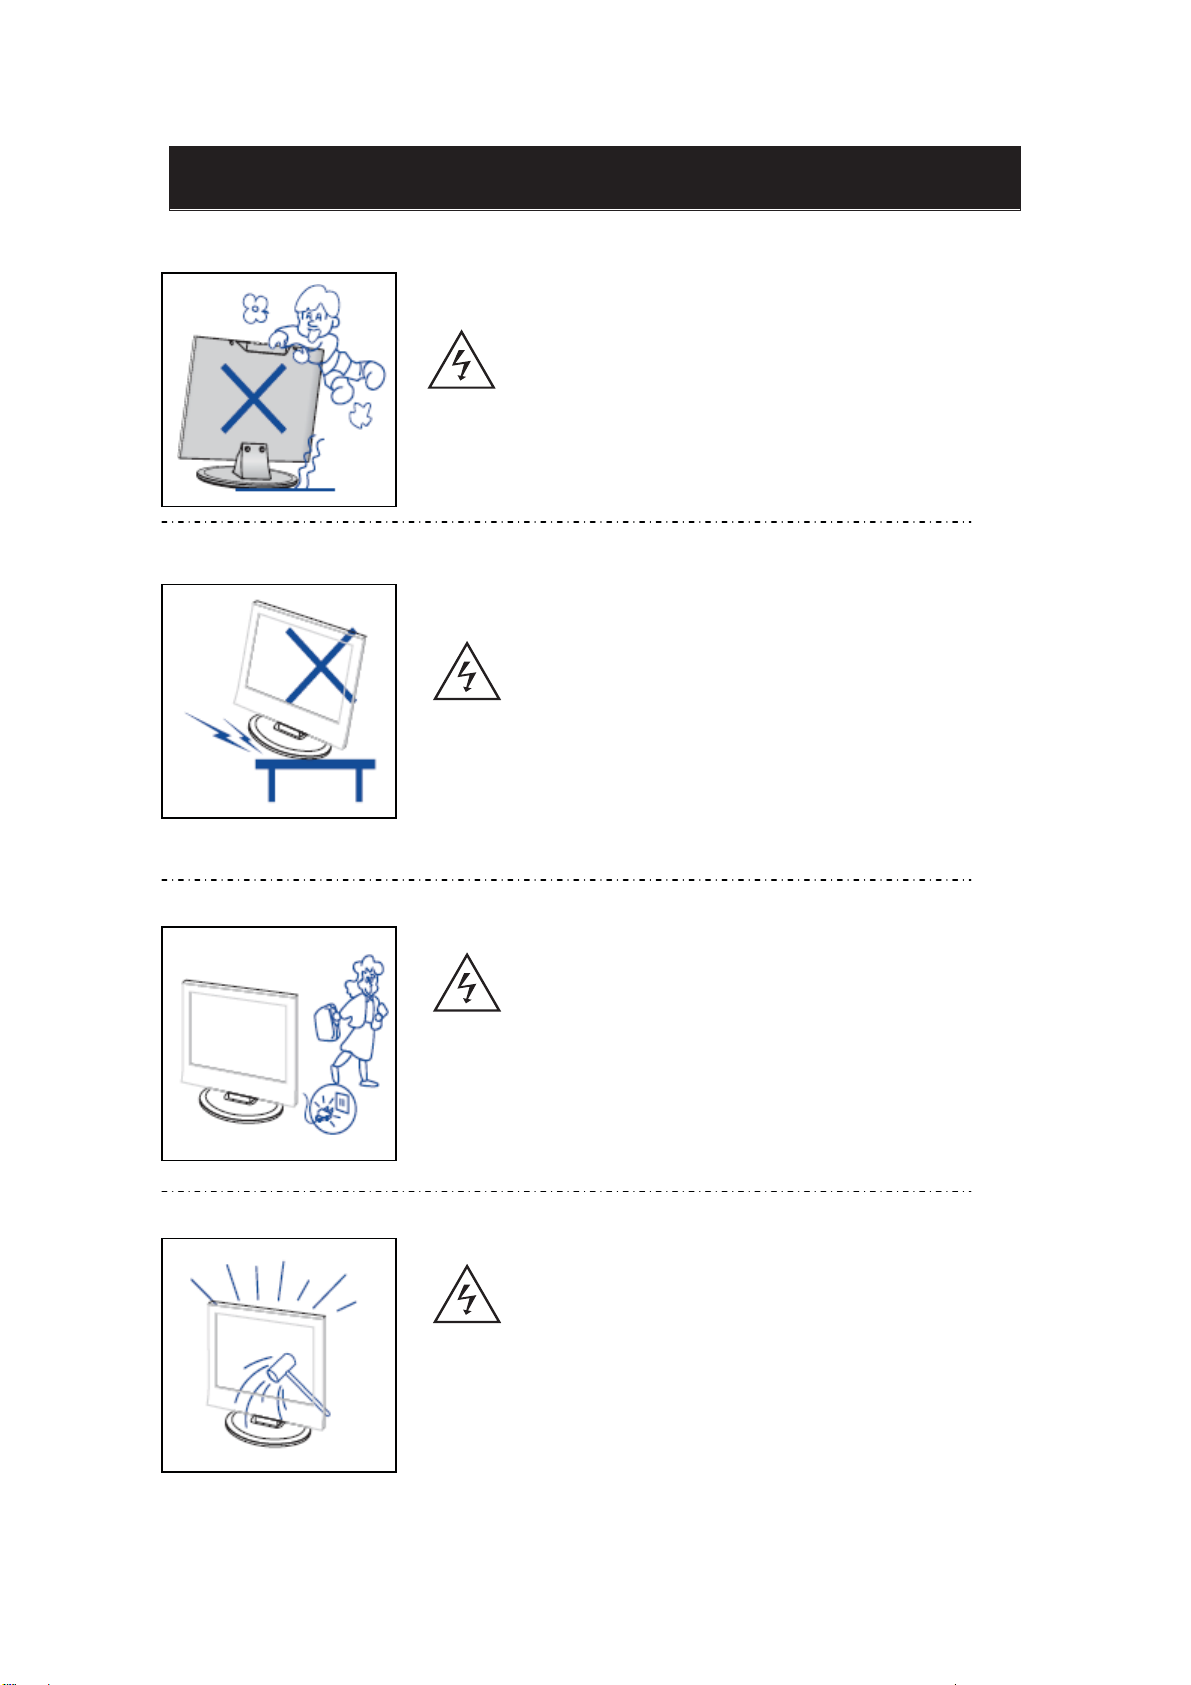
Never stand on, lean on
You should pay special attention to children.
or suddenly push the product or its stand.
Caution
Do not pla
ce the main unit on an unstable cart stand,
shelf or table. Serious injury to an individual and
damage to the television may result if it should fall.
Caution
When the product is not used for an extended period of time, it is
advisable to disconnect the
AC power from the AC outlet.
Caution
The LED panel used in this
breakable. This product must not be dropped or banged. If the LED
Panel breaks be careful of being injured by broken glass.
6
product is made of glass and is therefore
Page 7
Main unit description
Control Panel Button Function
VOL+ : Volume up.
VOL- : Volume down.
CH+ : TV channel up.
CH- : TV channel down.
MENU : Press to select the main menu.
SOURCE : Select the input sources.
POWER : Switching Power On/Standby.
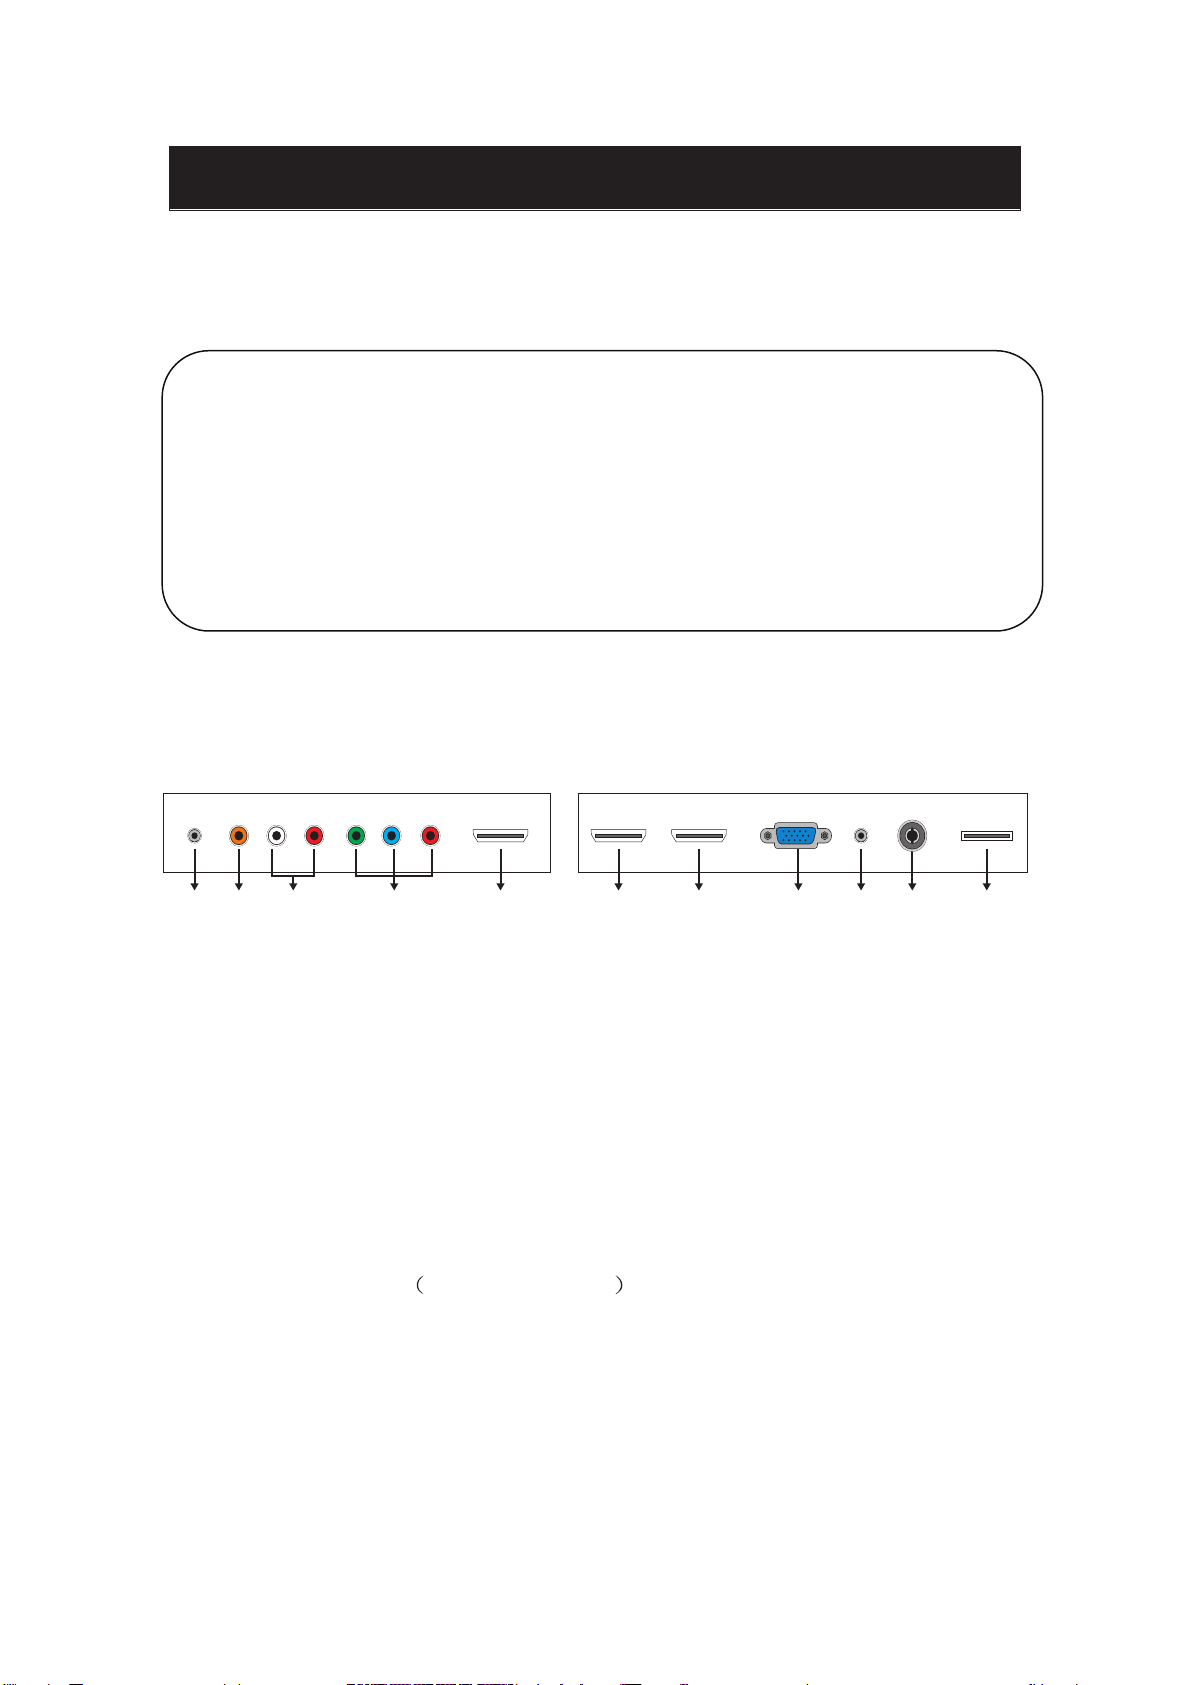
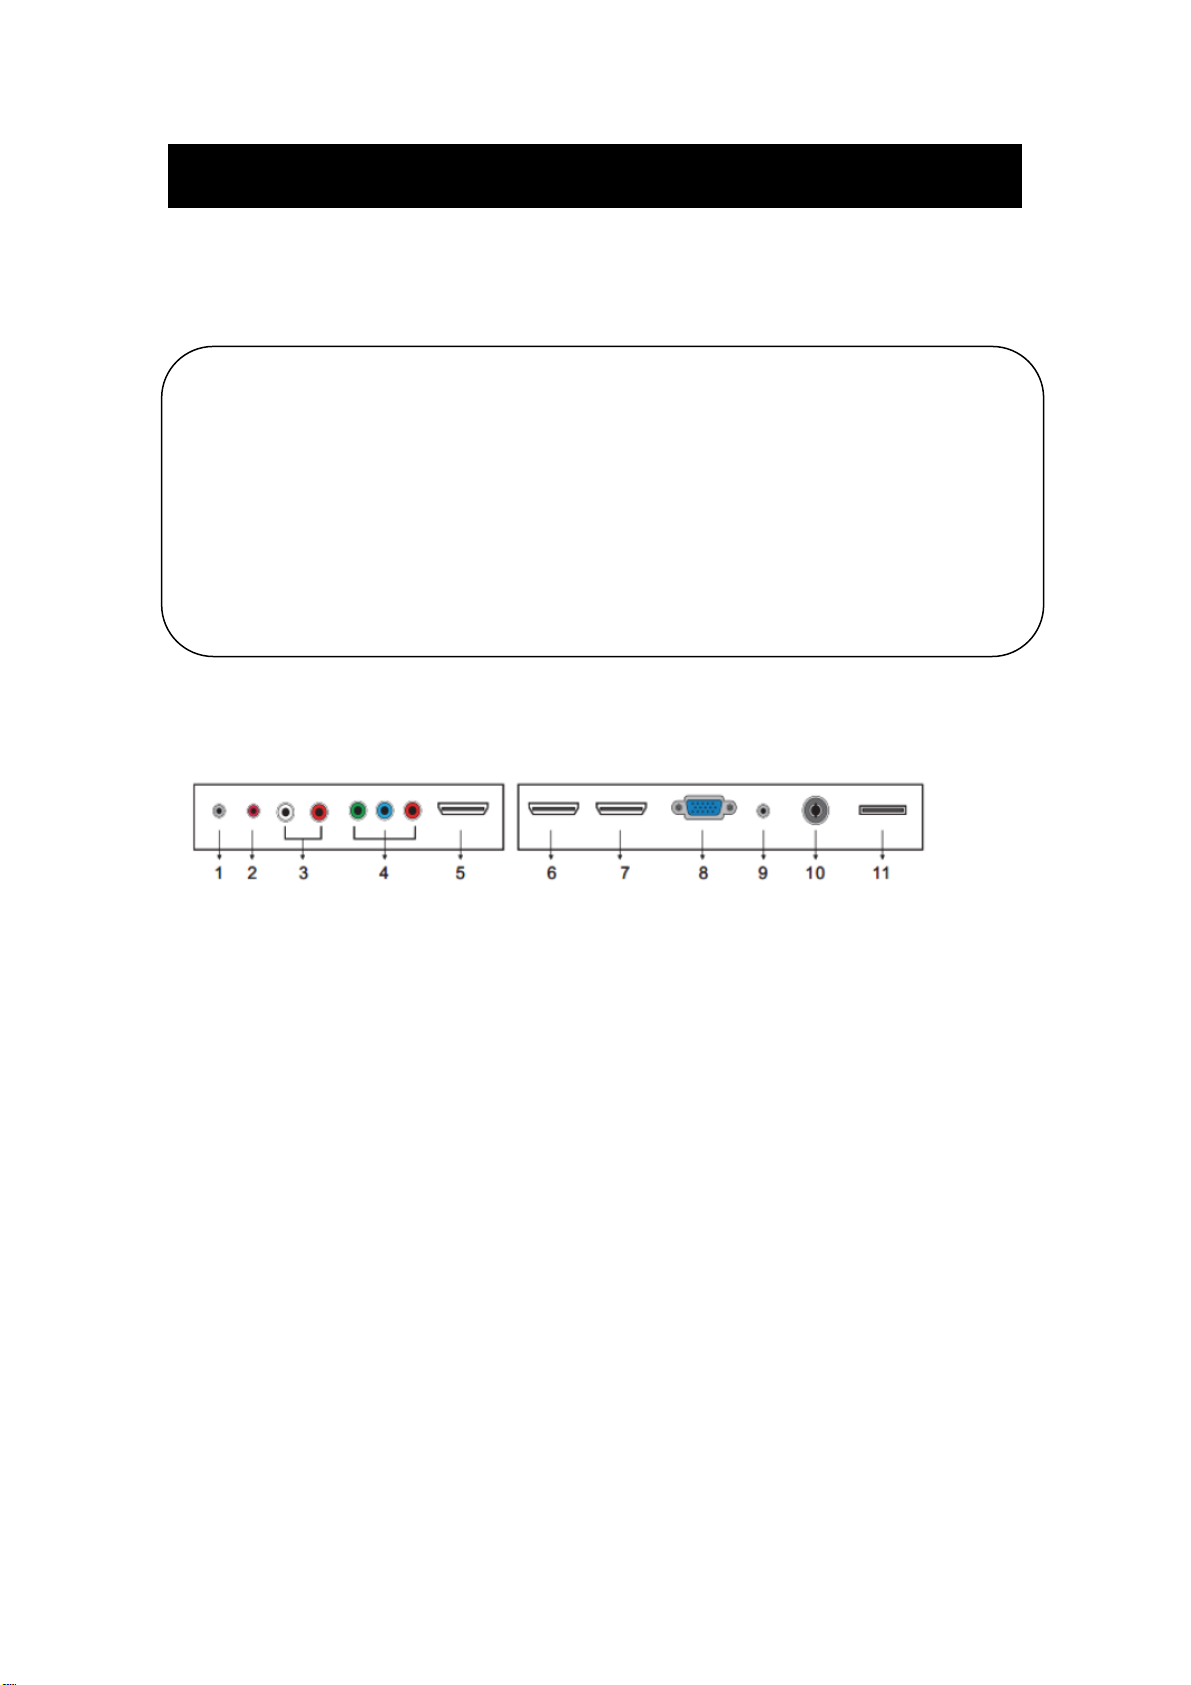
TV Terminal Connections
1 2 3 4 5 6 7 8 9 10 11
1. HEADPHONE out terminal.
2. Coaxial out terminal.
3. Audio input terminal for component video/composite video.
4. Component video/composite video input terminal.
5. HDMI1 input terminal.
6. HDMI2/MHL input terminal.
7. HDMI3 input terminal
8. VGA input terminal of simulation signal of PC.
9. PC AUDIO input terminal.
10. RF antenna.
11. USB input terminal Playing JPEG files.
7
Page 8
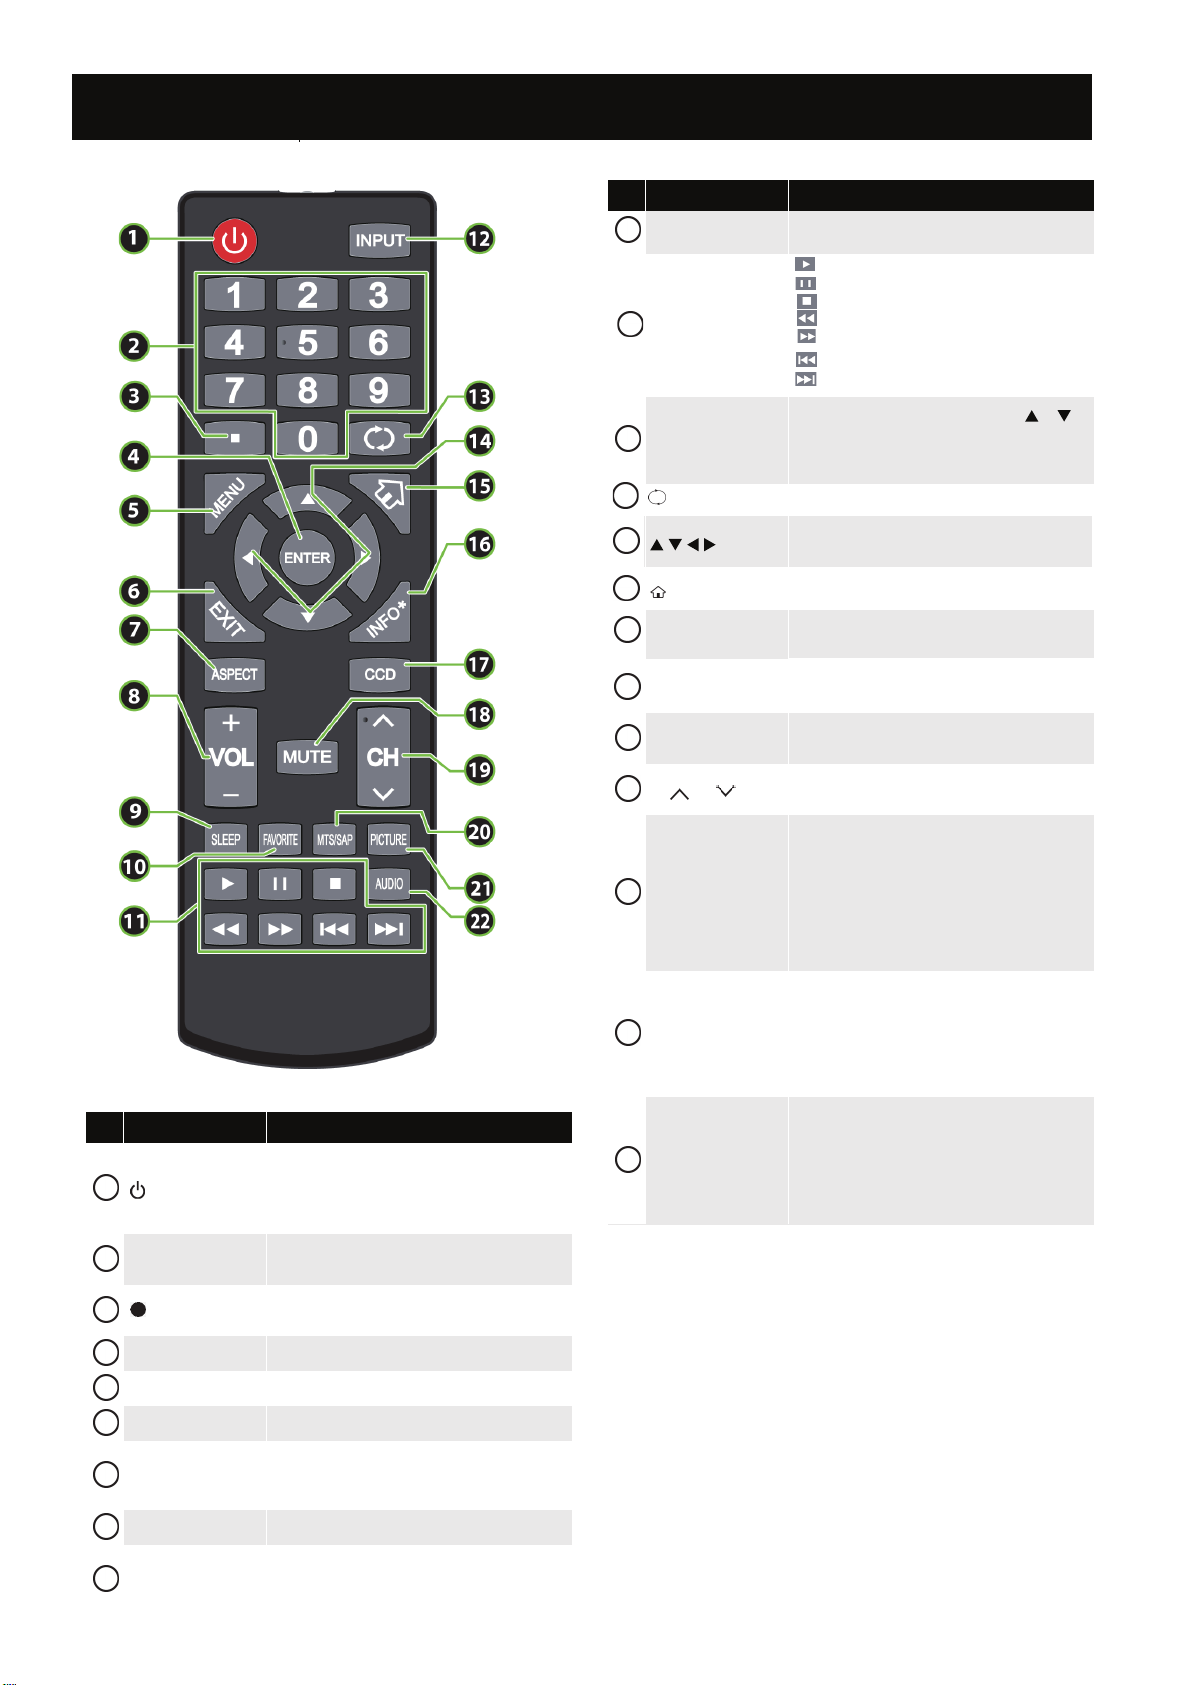
Remote Control
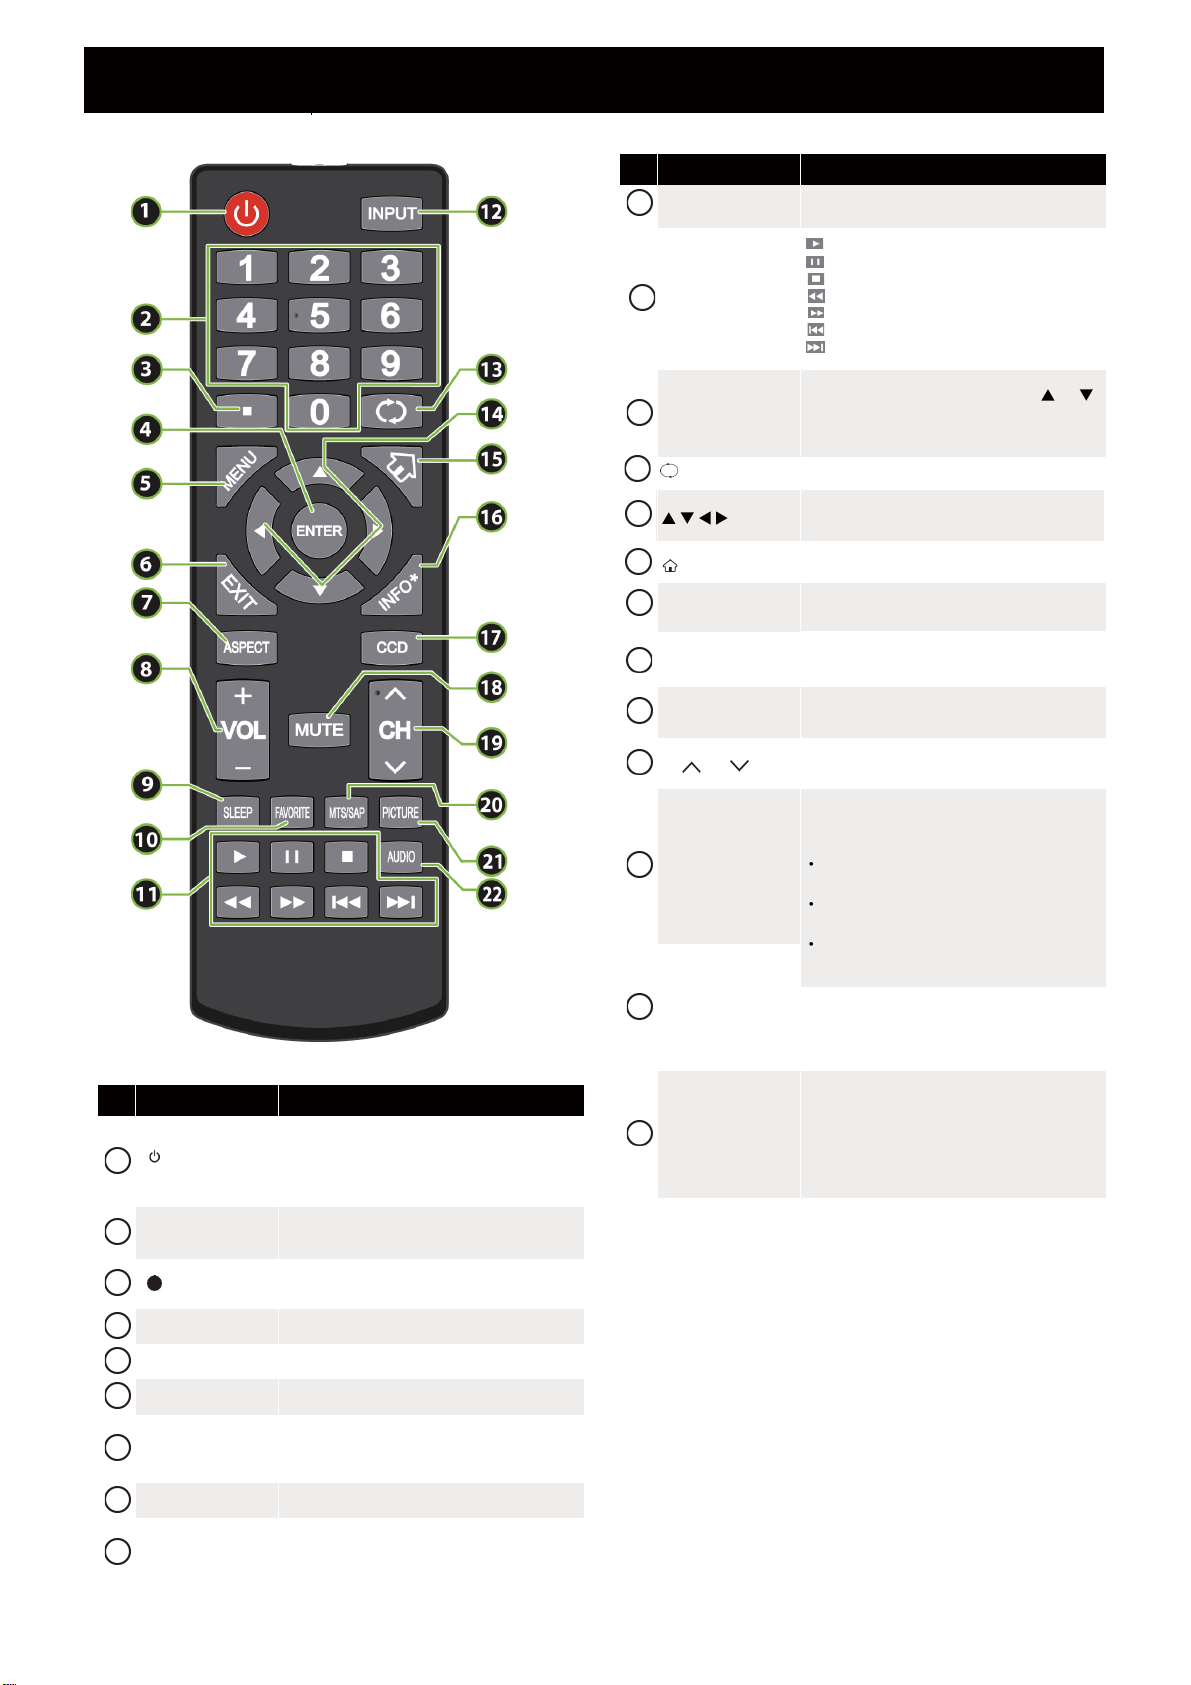
# Button Description
10
FAVORITE
11
USB Operation
12
INPUT
13
(return) In TV mode, press to return to the previous channel.
Press to open the
Press to start the photo playback.
Press to pause the photo playback.
Press to stop the photo playback.
Press to stop the photo playback.Press to stop the photo playback.
.
Press to play backward faster.
Press to play forward faster.
Press to view the previous photo.
Press to view the next photo.
Press to open the INPUT SOURCE list, press or on
the remote control to select the video input source,
then press ENTER
Favorite
14
15
(home) Press to open the ROKU menu. (Not available)
16
INFO*
17
CCD
18
MUTE
19
CH /CH
20
MTS/SAP
21
PICTURE
Press to navigate in on-screen menus and to adjust
settings.
Press to display TV status information, such as the
source.
channel number, channel name (if available), or signal
Press to turn closed captioning on or o. You can select
CC O, CC On, or CC On When Mute
Press to mute the sound. Press again to restore the
sound.
Press to change TV channels.
Press to select the audio mode for an analog program.
You can select:
• Mono—Select this option if there is noise or
static on weak stereo broadcasts.
• Stereo—Select this option for programs
broadcast in stereo.
• SAP—Select this option to listen to a
secondary audio program, if available.
Press to select the picture mode.
Press to select the picture mode.
# Button Description
1
(power)
2
Numbers
3
4
ENTER Press to conrm selections or changes.
5
MENU Press to open the on-screen menu.
6
EXIT Press to close the on-screen menu.
7
ASPECT
8
VOL+/– Press to increase or decrease the volume.
9
SLEEP
Press to turn your TV on or o (standby mode).
Press to enter channel numbers and the parental
control password.
Press to enter a digital sub-channel number.
Press to change how the picture looks on the screen
(aspect ratio).
Press to set the sleep timer.
22
AUDIO
8
Press to select the sound mode.
Page 9
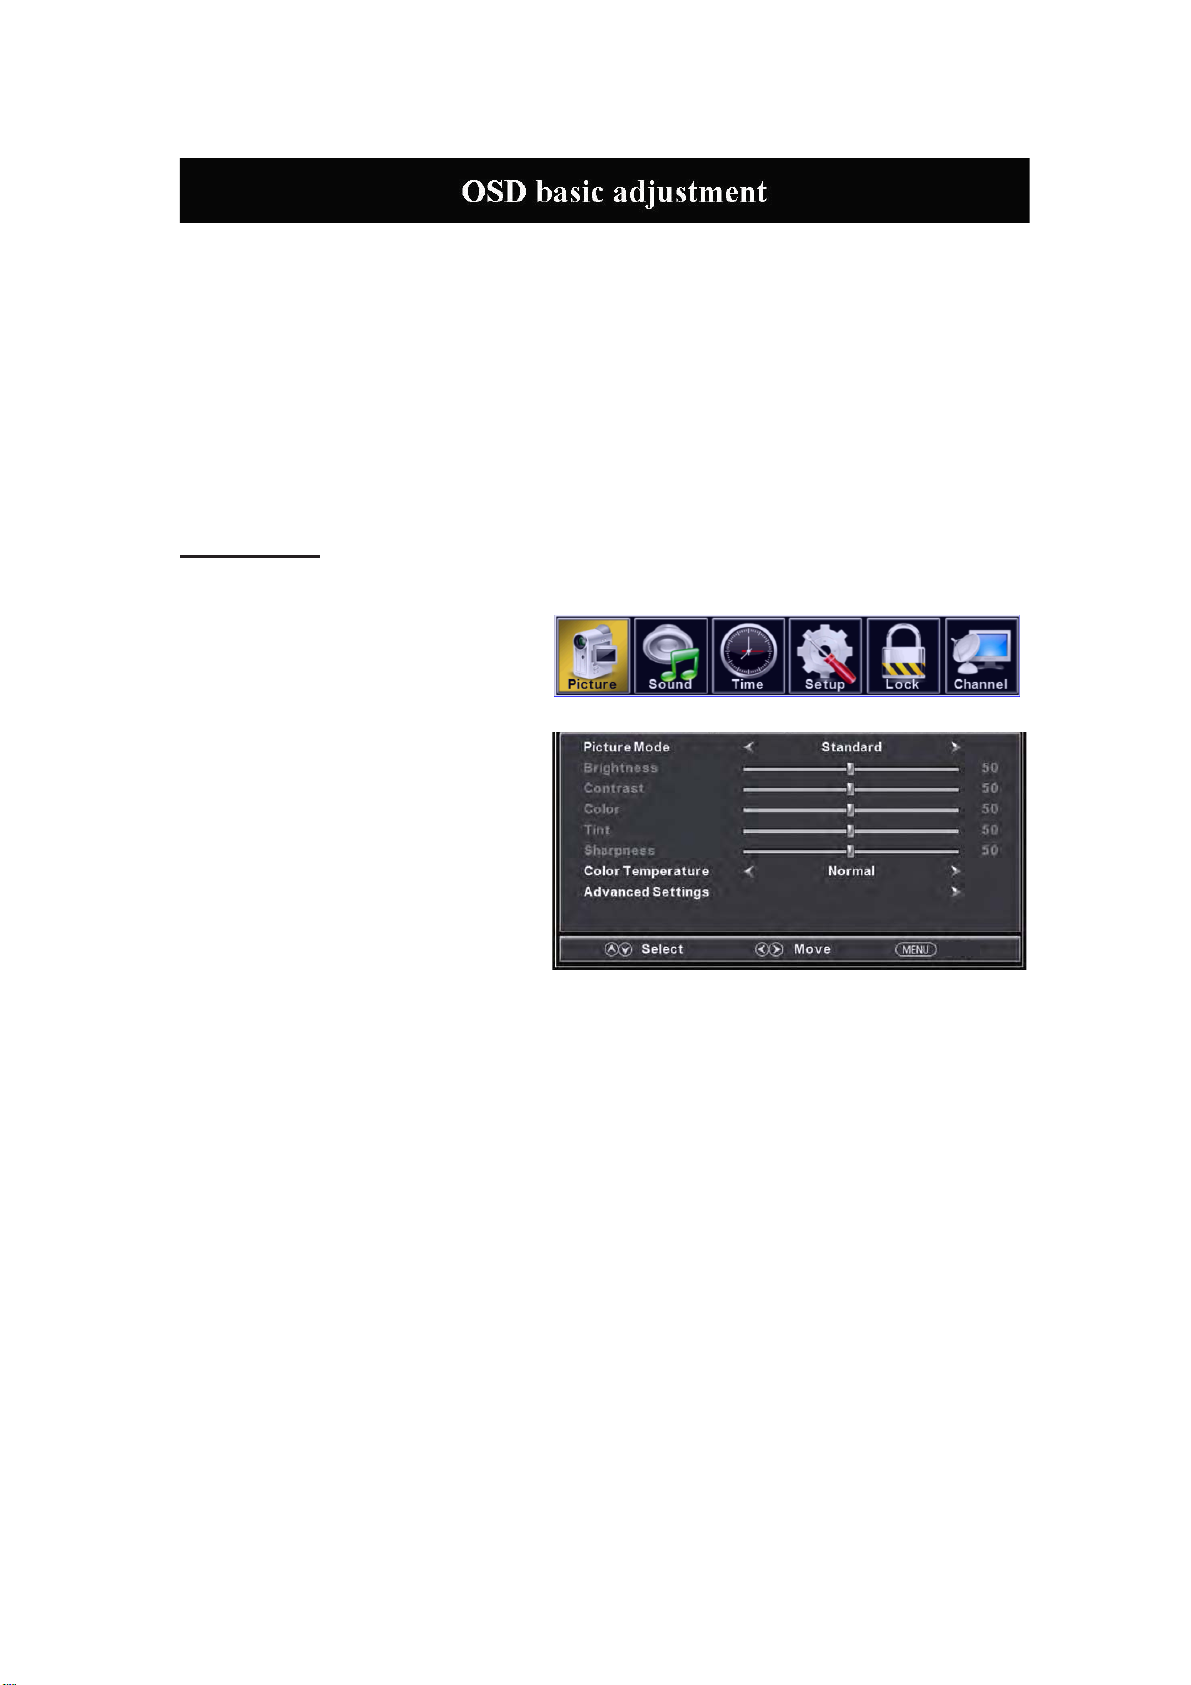
Installation Guide
Press MENU button to
MENU you want; Press ENTER button to enter the sub menu; Press / button to select the
option and then press / to adjust the value in the sub menu; You can press MENU button to
go back to the upper menu or EXIT button to close the OSD.
display the MAIN OSD MENU; Press / button to select the
PICTURE
You can s
button to enter the OSD menu .Then
press “e/f” button to select the
“PICTURE” m
to enter the sub-menu.
1. Press “d” button to select “Picture
Mode”, press “
2. Press “c/d” button to select
“Brightness” and press the “e/f”
button to enter brightness adjustment
menu to adjust brightness.
3. Press “c/d” button to select
“Contrast” and press the “e/f” button
to enter contrast adjustment menu to
adjust contrast.
4. Press “c/d” button to select “Color” and press the “e/f” button to enter color adjustment
5. Press “c/d” button to select “Tint” and press the “e/f” button to enter hue adjustment menu
6.
7. Press “c/d” button to select “Color Temperature” and press the “e/f” button to select.
8. Press “c/d” button to select “Advanced Setting” and press the “ENTER/f” button to enter
elect the type of picture, which best corresponds to your viewing. Press the “MENU”
enu. And press the "ENTER"button
button to select.
”
e/f
menu to adjust color.
to adjust tint.
The 'Tint' item is used in
Note:
Press “c/d” button to select “Sharpness” and press the “e/f” button to enter sharpness
adjustment menu to adjust sharpness.
sub-menu.
NTSC mode only.
Return
9
Page 10
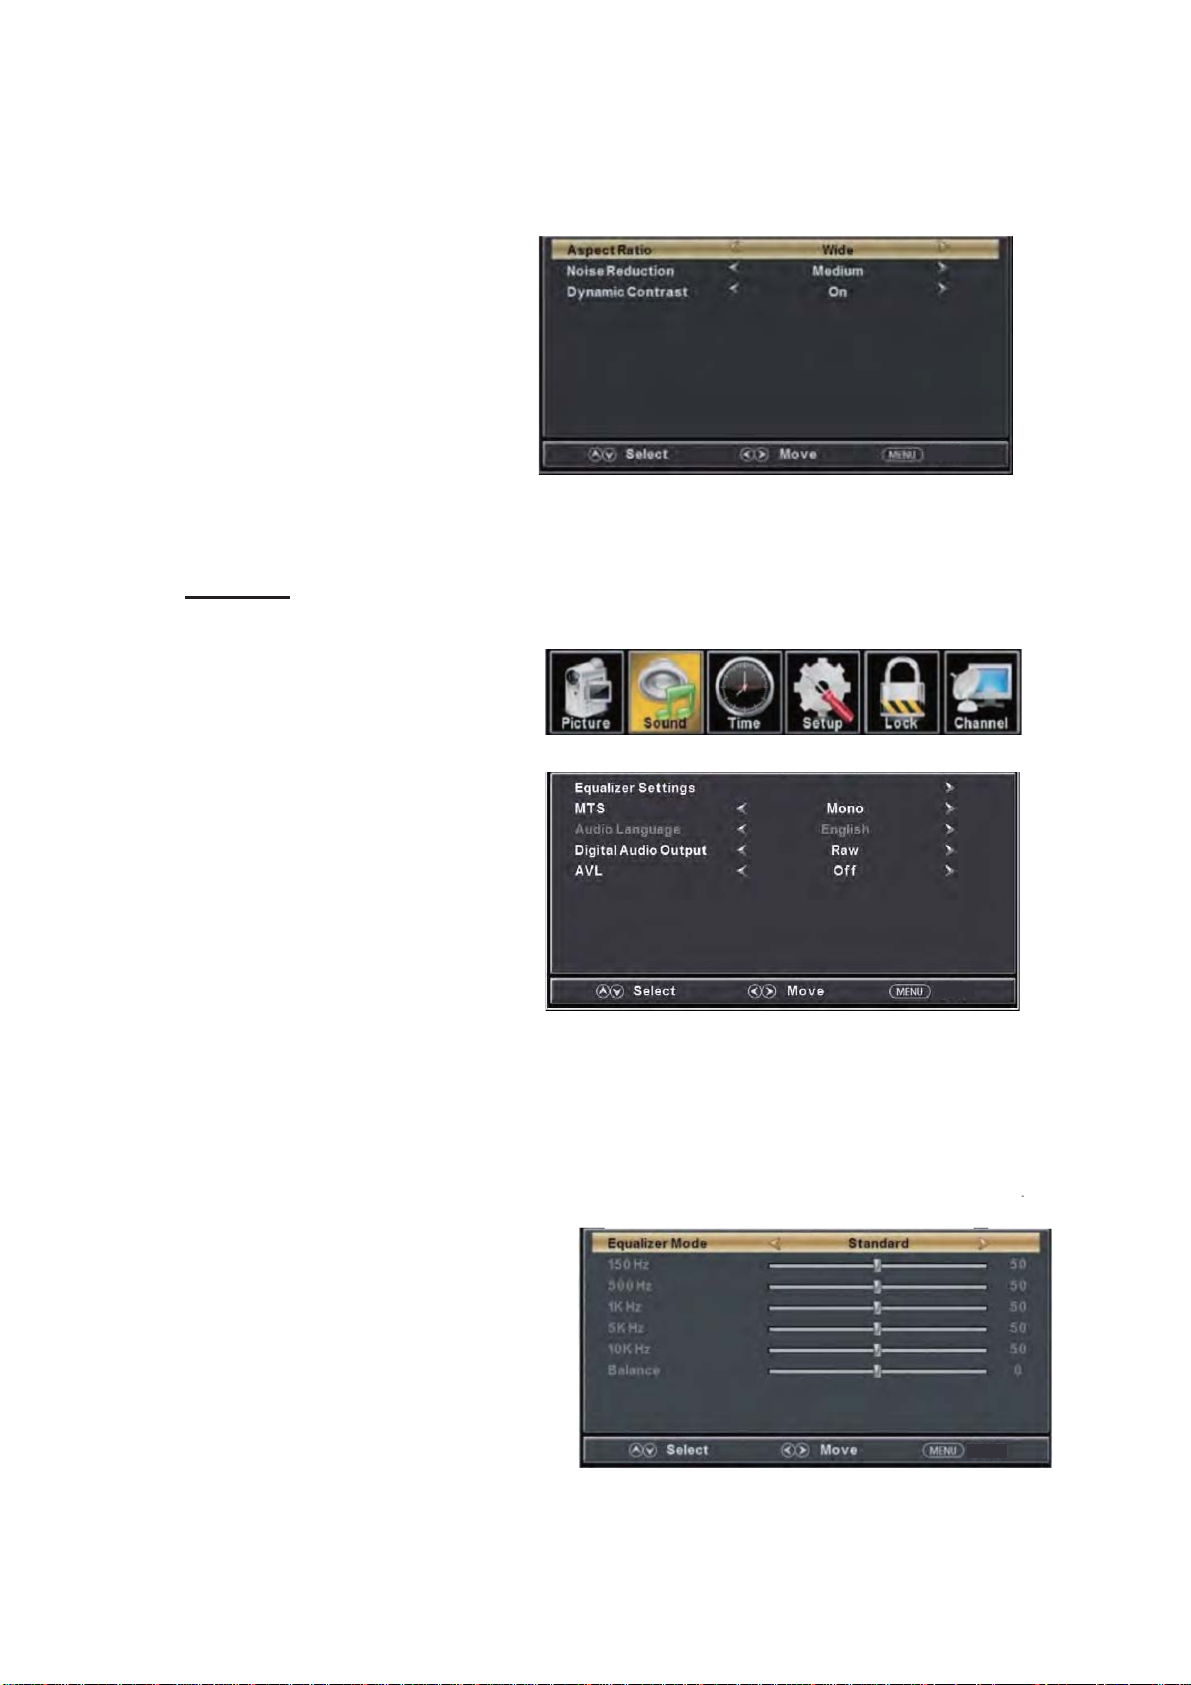
a. Press “c/d” button to
“Aspec
t Ratio” and
“ e/f” button to
press the
select.
b. Press “c/d” button to
“Noise Reduction”
“e/f”
button to select.
and press the
select
select
c. Press “c/d” button to
“Dynamic Contrast”
“ e/f”
button to select “On” or
select
and press the
“Off”.
SOUND
You can select the type of sound, which best corresponds to your listening.
Press the
to enter the OSD
press “e/f”
the “SOUND”
1. Press “d”
“Equalizer
“ENTER/f” button to enter sub-menu.
“MENU” button
enu .Then
m
button to select
menu.
button to
Settings”
And press the "ENTER" button to enter the sub-menu.
select
and press
the
Return
Return
a. Press “c/d” button to select “Equalizer Mode”. Press “e/f” button to select.
b. Press “c/d” button to select “150Hz”. Press “e/f” button to select.
c. Press “c/d” button to select “500 Hz”. Press “e/f” button to select.
d. Press “c/d” button to select “1K Hz”. Press
“e/f” button to select.
e. Press “c/d” button to select “5K Hz”.
Press“e/f” button to select.
f. Press “c/d” button to select “10K Hz”.
Press “e/f” button to select
g. Press “c/d” button to select “Balance”.
Press “e/f” button to select
Return
10
Page 11

Note: The
2. Press “c/d” button to select “MTS” and press the “e/f” button to adjust.
Note: It is only available in ATV.
3. Press “c/d” button to select “Audio Language” and press the “e/f” button to adjust.
Note: It is only available in DTV.
4. Press “c/d” button to select “Digital Audio Output” and press the “e/f” button to adjust.
5. Press “c/d” button to select “AVL” and press the “e/f” button to select “On” or “Off”.
ǃcǃdǃeǃ
b
fǃg function it is
only available in USER m
ode.
TIME
Pr
ess the “MENU” button to enter the OSD menu .Then press “ee/f” button to
select the “TIME” menu. And press “ ENTER” to enter the sub-menu.
1.
Press “d
and press the “
sleep timer
sleep timer.
” button to select “Sleep Timer”
” button to enter
f
e/
ustment menu to adjust
adj
Return
Press “c/d” button to select “Time Zone” and press the “e/f” button to enter time zone
2.
adjustment menu to select the local time zone.
3. Press “c/d” button to select “Daylight Saving Time” and press the “e/f” button to select
“On” or “Off”.
4. Press “c/d” button to select “Time Format” and press the “e/f” button to select “12-hour”
or “24-hour”.
5. Press “c/d” button to select “Auto Clock” and press the “e/f” button to select “On” or
“Off”.
6. Press “c/d” button to select “Clock” and press the “ENTER/f” button to adjust.
11
Page 12
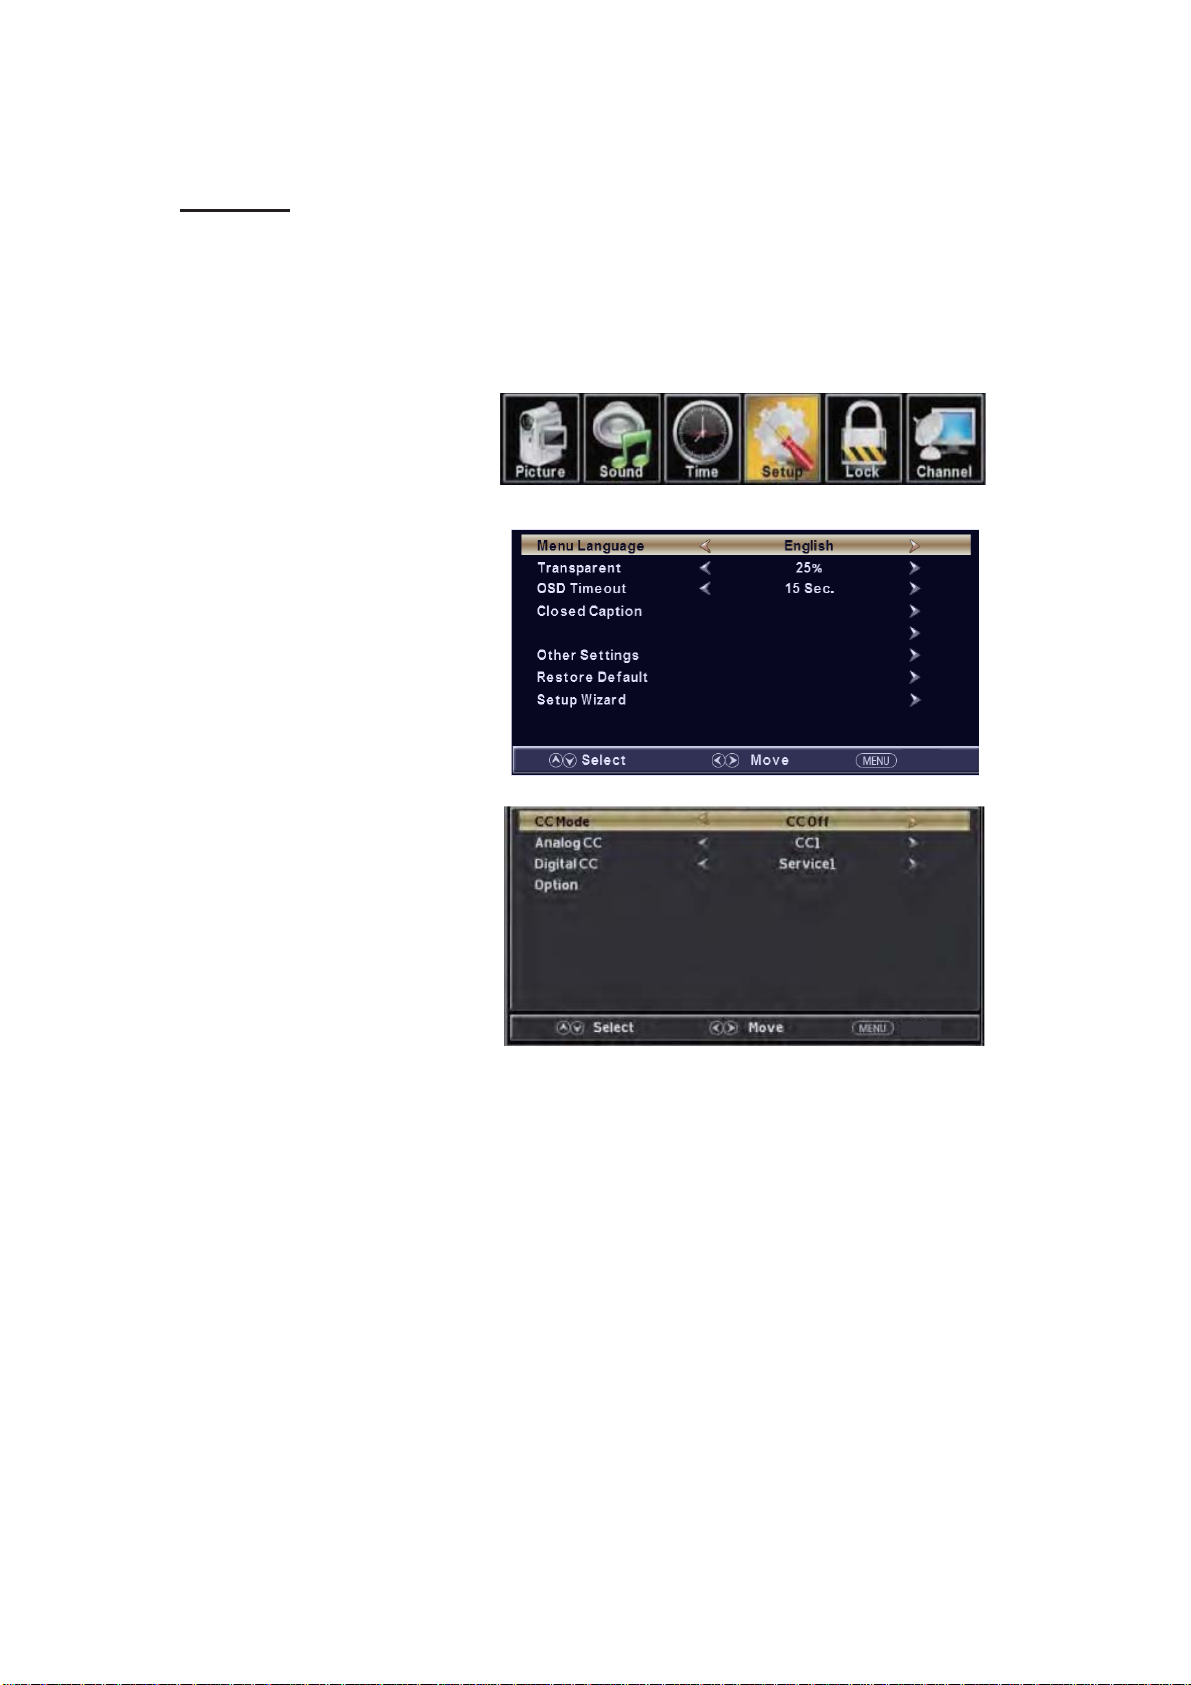
SETUP
Press the “MENU” button to enter the OSD m
the “Setup” m
1.
Press “d” button to select “MENU Language” and press the “e/f” button to select the MEUN
language which you
enu. And press the "ENTER" button to enter the sub-menu.
desire.
enu .Then press “e/f” button to select
2. Press “c/d” button to elect
“Transparency” and press
the “ e/f”
button to select.
3. Press “c/d” button to select
“OSD Timeout” the
button to
adjust OSD timeout.
“e/f”
4. Press “c/d” button to select
“Closed
Caption” and press the
Input Label
“ENTER/f” button to enter
sub-m
e
nu.
Return
Press “c/d” button to select “CC Mode” the “e/f” button to adjust.
a.
b. Press “c/d” button to select “Analog CC ” the “e/f” button to adjust.
c. Press “c/d” button to select “Digital CC” the “e/f” button to adjust.
d. Press “c/d” button to select “Option” the “ENTER/f” button to enter sub-menu.
Note: The cǃd function it is only available in DTV.
Note: The option is adjust the digital closed captioning setting.
Return
12
Page 13
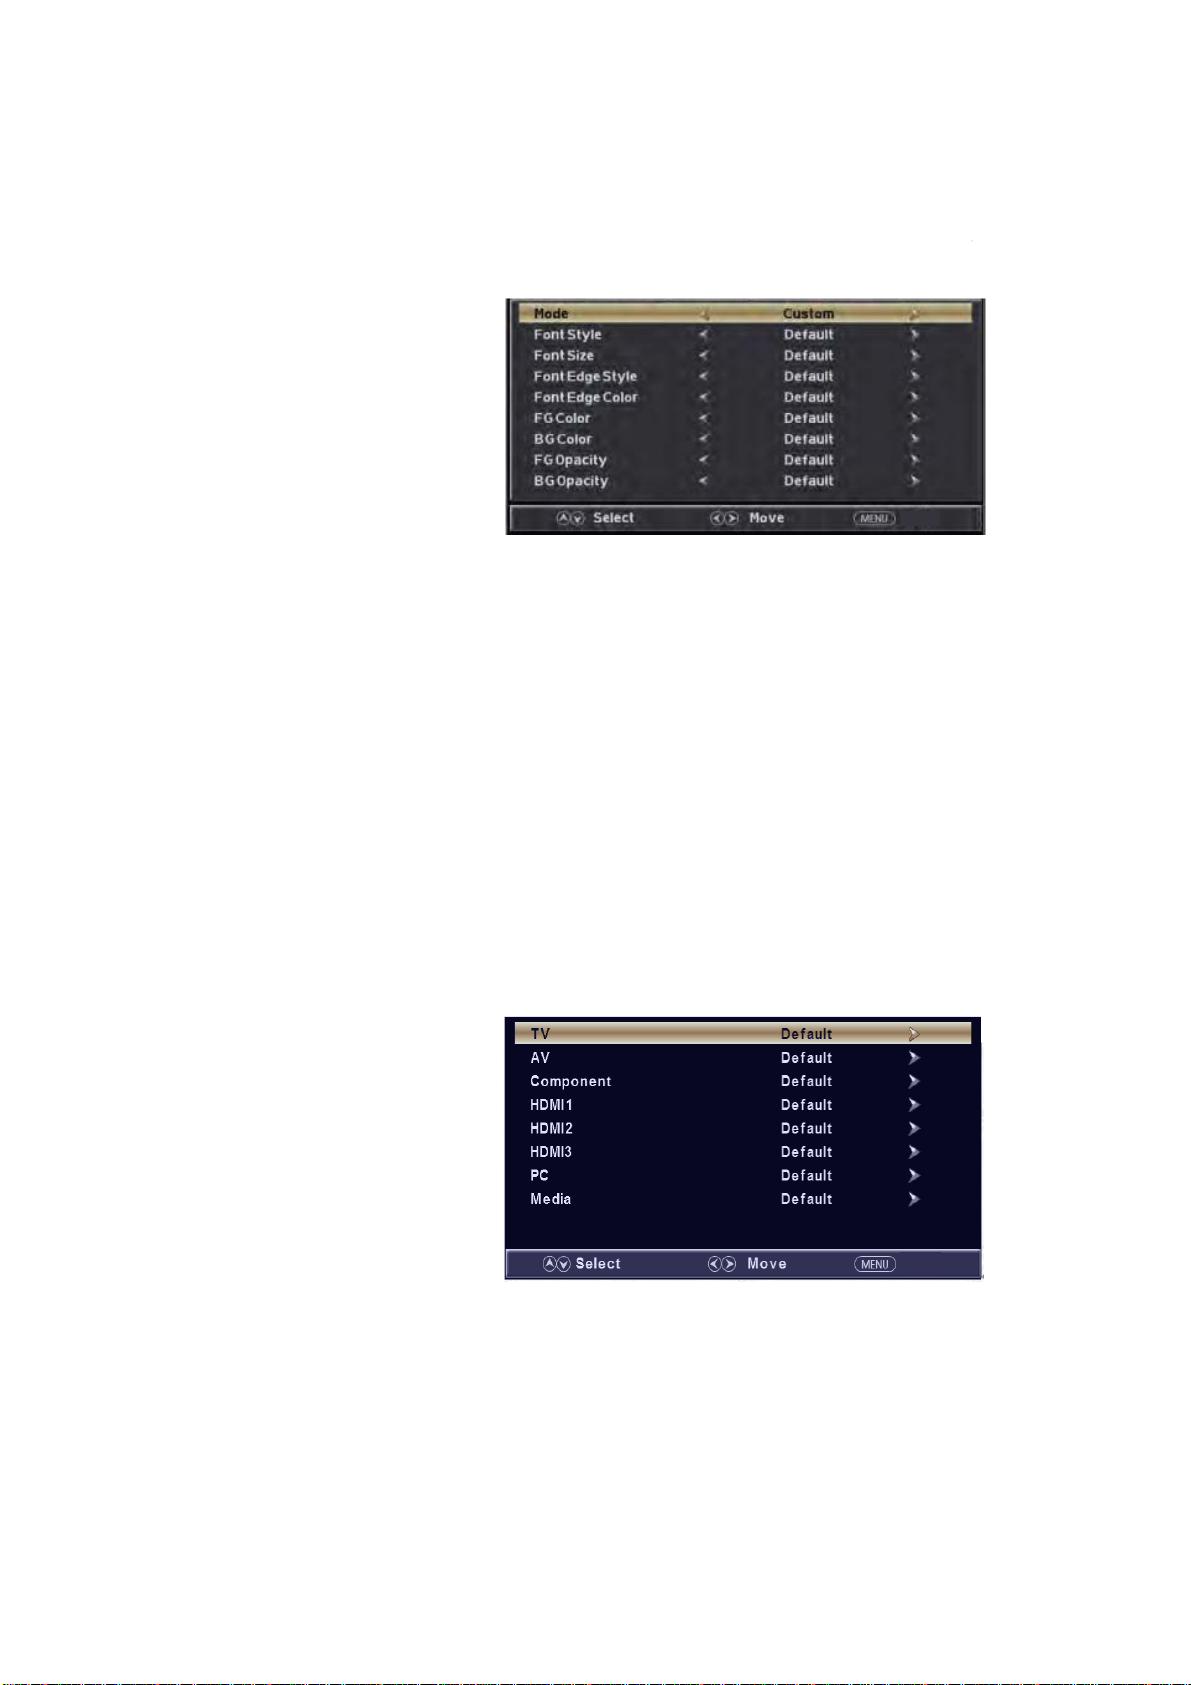
Return
(a). Press “c/d” button to s
elect “Mode” the “e/f” button to adjust.
(b). Press “c/d” button to select “Font Style” the “e/f” button to adjust.
(c). Press “c/d” button to select “Font Size” the “e/f” button to adjust.
(d). Press “c/d” button to select “Font Edge Style” the “e/f” button to adjust.
(e). Press “c/d” button to select “Font Edge Color” the “e/f” button to adjust.
(f). Press “c/d” button to select “FG Color” the “e/f” button to adjust.
(g). Press “c/d” button to select “BG Color” the “e/f” button to adjust.
(h). Press “c/d” button to select “FG Opacity” the “e/f” button to adjust.
(i). Press “c/d” button to select “BG Opacity” the “e/f” button to adjust.
Note: All the option it is not available in Custom.
5. Press “cc/d” button to select “Input Label” and press the “ENTER/f” button to enter
sub-menu.
Note: The
Create labels
connected to
6. Press
“c/d”
“Other
source label is
for the
devices
your TV.
button to select
Settings”
and press
/MHL
the “ENTER/f” button to enter
sub-menu.
Return
Return
13
Page 14

Return
Return
a. Press “c/d” button to select “A
udio Only” the “e/f” button to select “On” or “Off”.
b. Press “c/d” button to select “Blue Screen” the “e/f” button to select “On” or “Off”.
When select “On”, only listen sound and the screen is black; When select “Off”ˈwatch
TV normally.
ess “cc/d” button to select “Restore Default” and press the “ENTER/f”, Press “e/f”
7. Pr
button selecting “Yes” to restore all setting to default setting.
8. Press “c/d” button to select “Setup wizard” and press the
“ENTER” button to enter sub-menu.
ess “c/d” button to select “Menu Language” and press the “e/f” button to select
a. Pr
language.
b. Press “c/d” button to select “Go to next step” and press the “ENTER/f” button to enter
next step.
14
Page 15
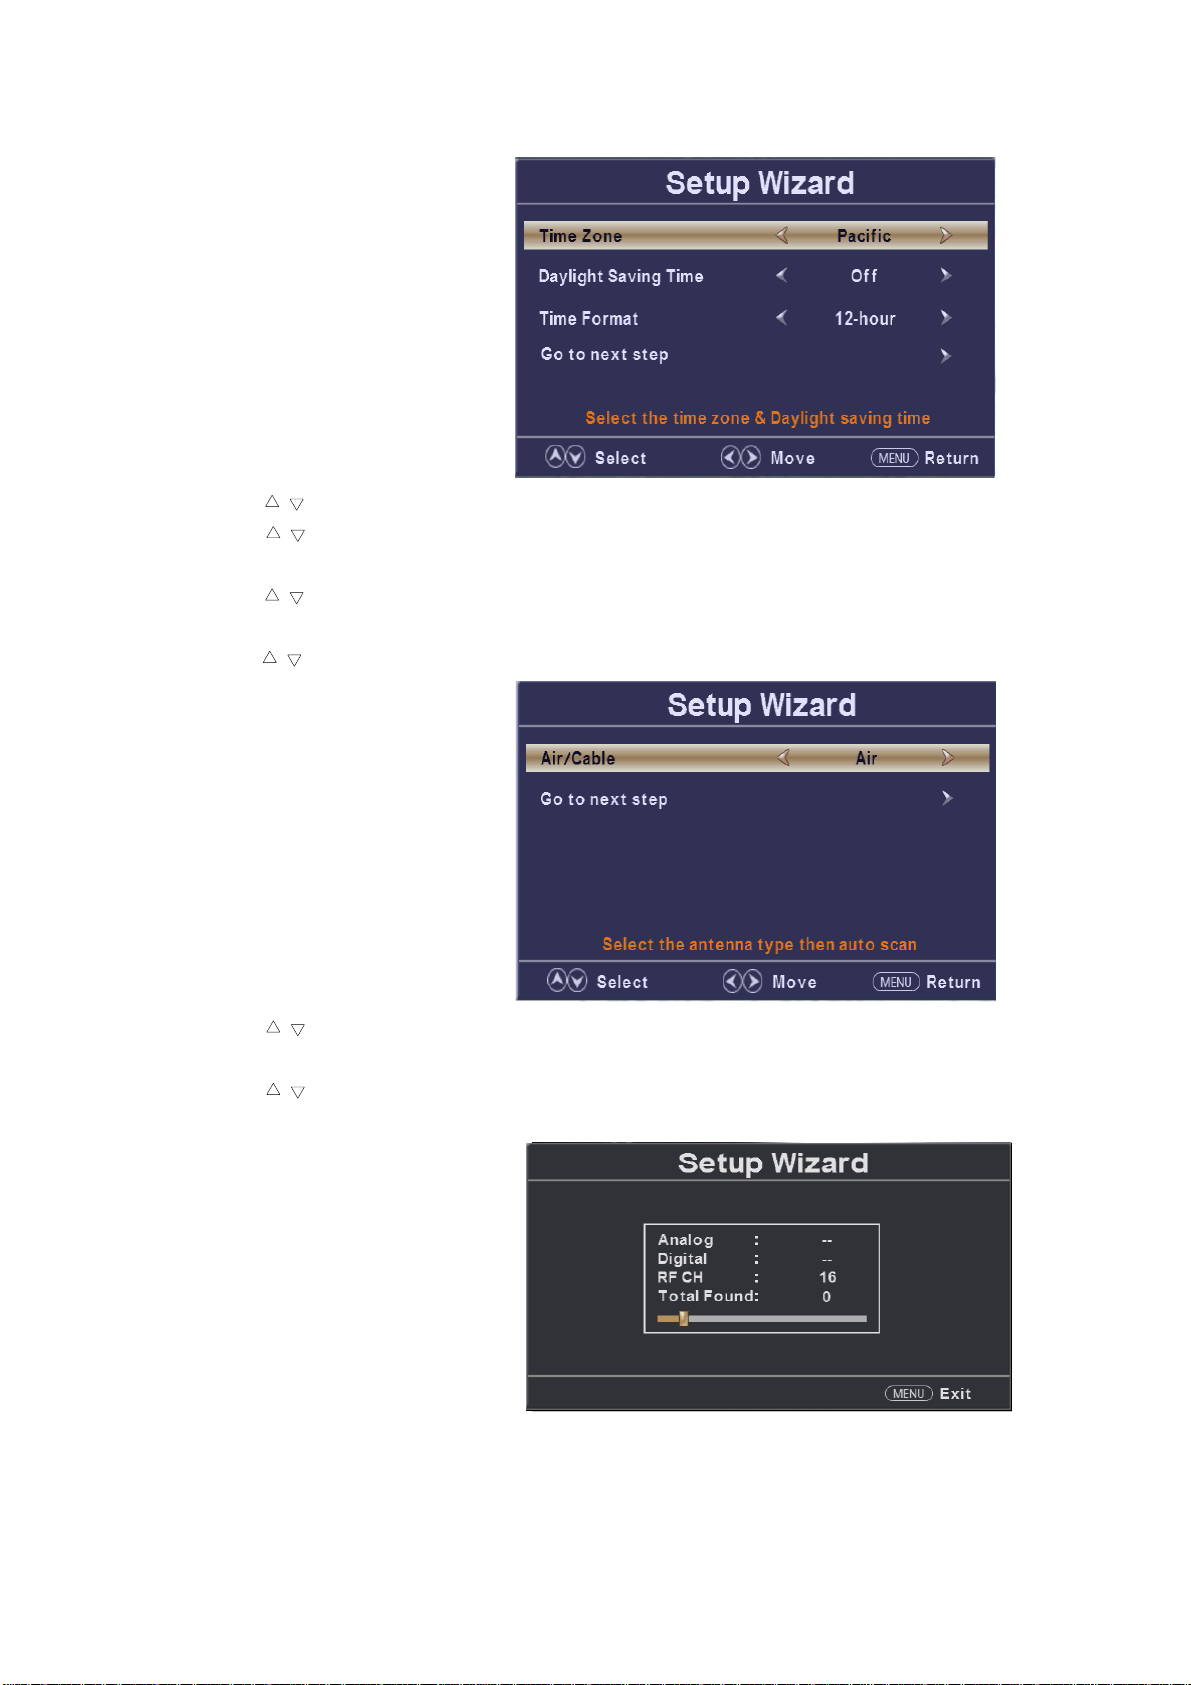
. Press “
c
button to select “Time Zone” and press the “/” button to select time zone.
/”
d. Press “/” button to select “Daylight Saving Time” and press the “/” button to select
“On” or “Off”.
e. Press “/” button to select “Time Format” and press the “/” button to select “12-hour”
or “24-hour”.
f. Press “/” button to select “Go to next step” and press the “ENTER/” button to enter next
step.
g
. Pr
ess “
“Cable”.
h. Press “
scan.
Note: Searc
/”
button to select
“Air/C
able”
and
press the “/” button to select “Air” or
/” button to select “Go to next step” and press the “ENTER/” button to start auto
hing platform will take a long time. Please be patient!
15
Page 16
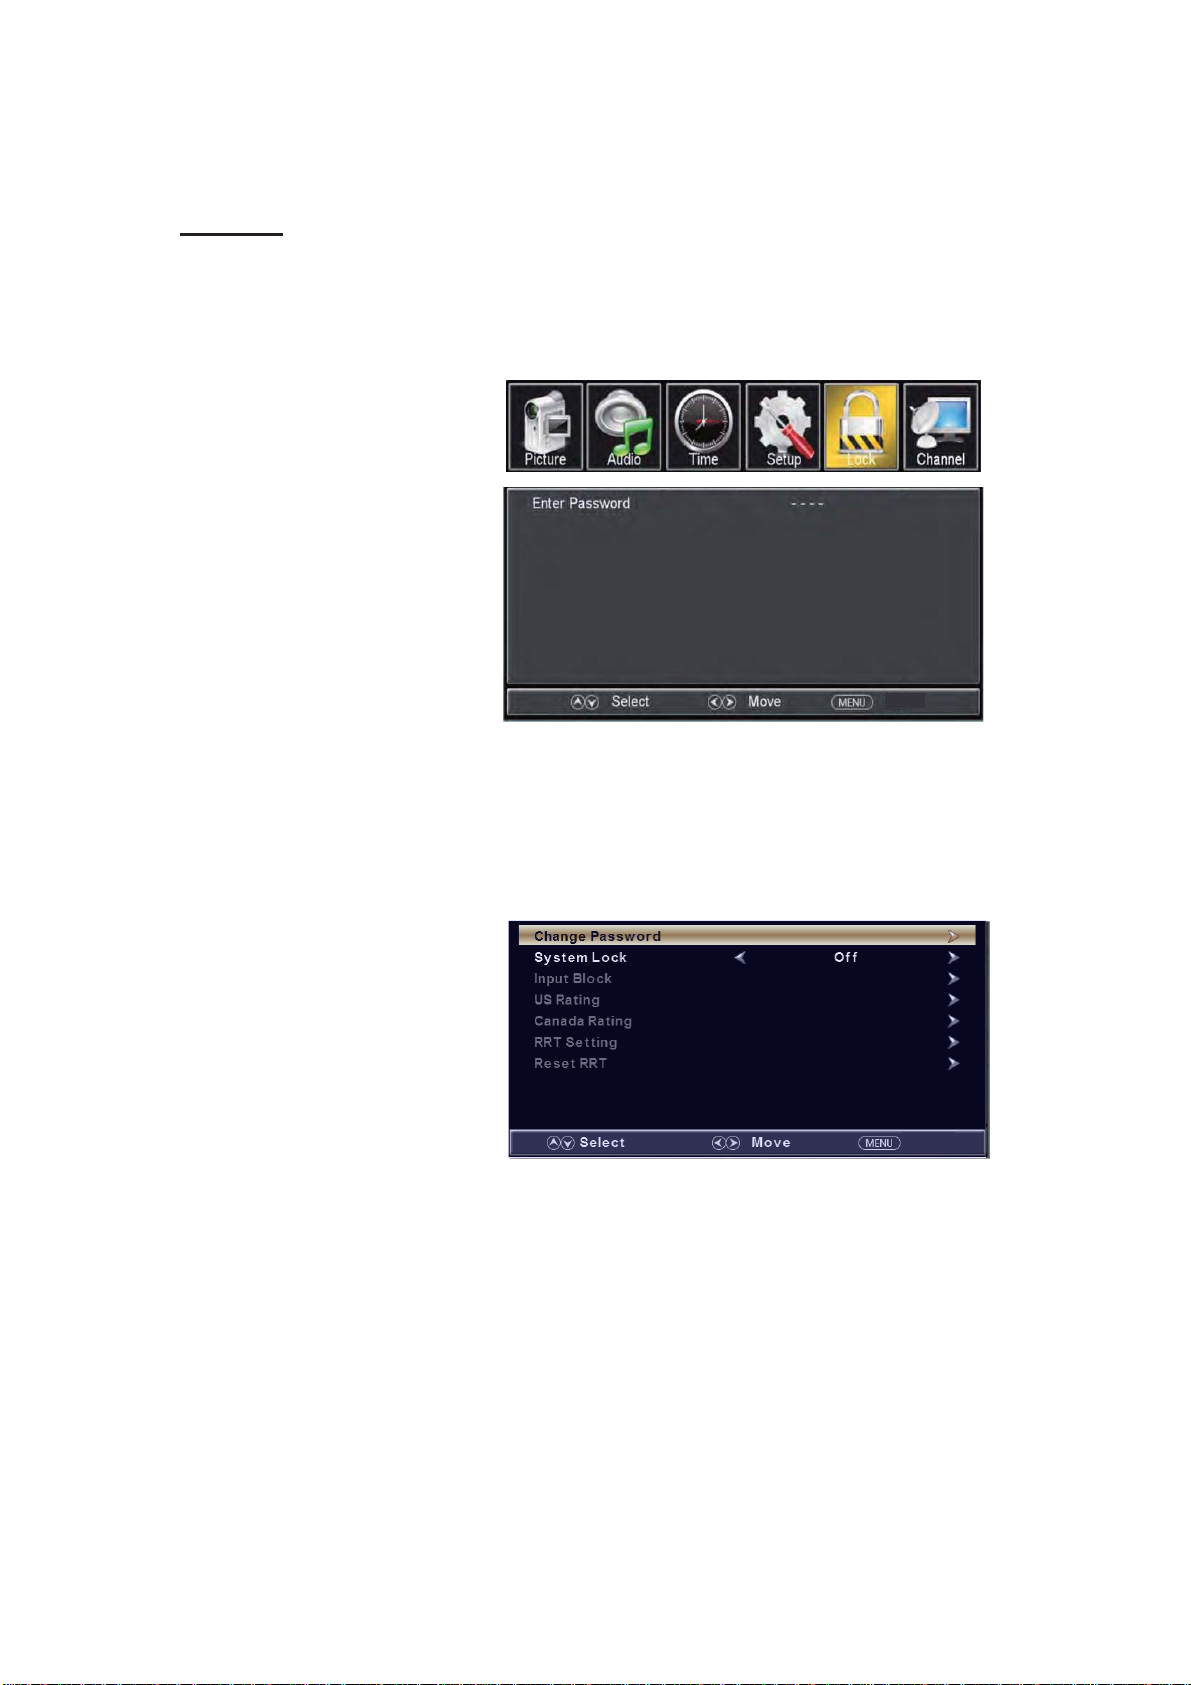
LOCK
Pr
ess the “MENU” button to enter the OSD menu .Then press “ee/f” button
to select the “Lock” menu. And press “ ENTER” to enter the sub-menu.
1. Press “d” button to select “Enter Passwor
Note: The default password is “0000”
selec
o
Press / button t
2.
the va
lue.
t “Change Password”, then press
d” and press select digital button to enter.
Return
Return
Return
Return
“ENTER/f”
button
to
ad
jus
t
the password is changed, all of the passwords in the menu will be changed at the same time.
If
Note
: If you f
password, you can use “1470”
to enter any menu locked.
3.
Press
orget your
“c/d” button
to select “System Lock”
and press the “e/f”
button to select “On” or
“Off”.
4. Press / bu
select “Input Block”, then press
Press “c/d” button to select “TV” and press the “e/f” button to select “Block”
a.
or “Unblock”.
b.
Press “c/d” button to select “A
or “Unblock”.
tton to
“ENTER/f”
V” and press the “e/f” button to select “Block”
button to enter
sub-m
enu.
Return
Return
16
Page 17
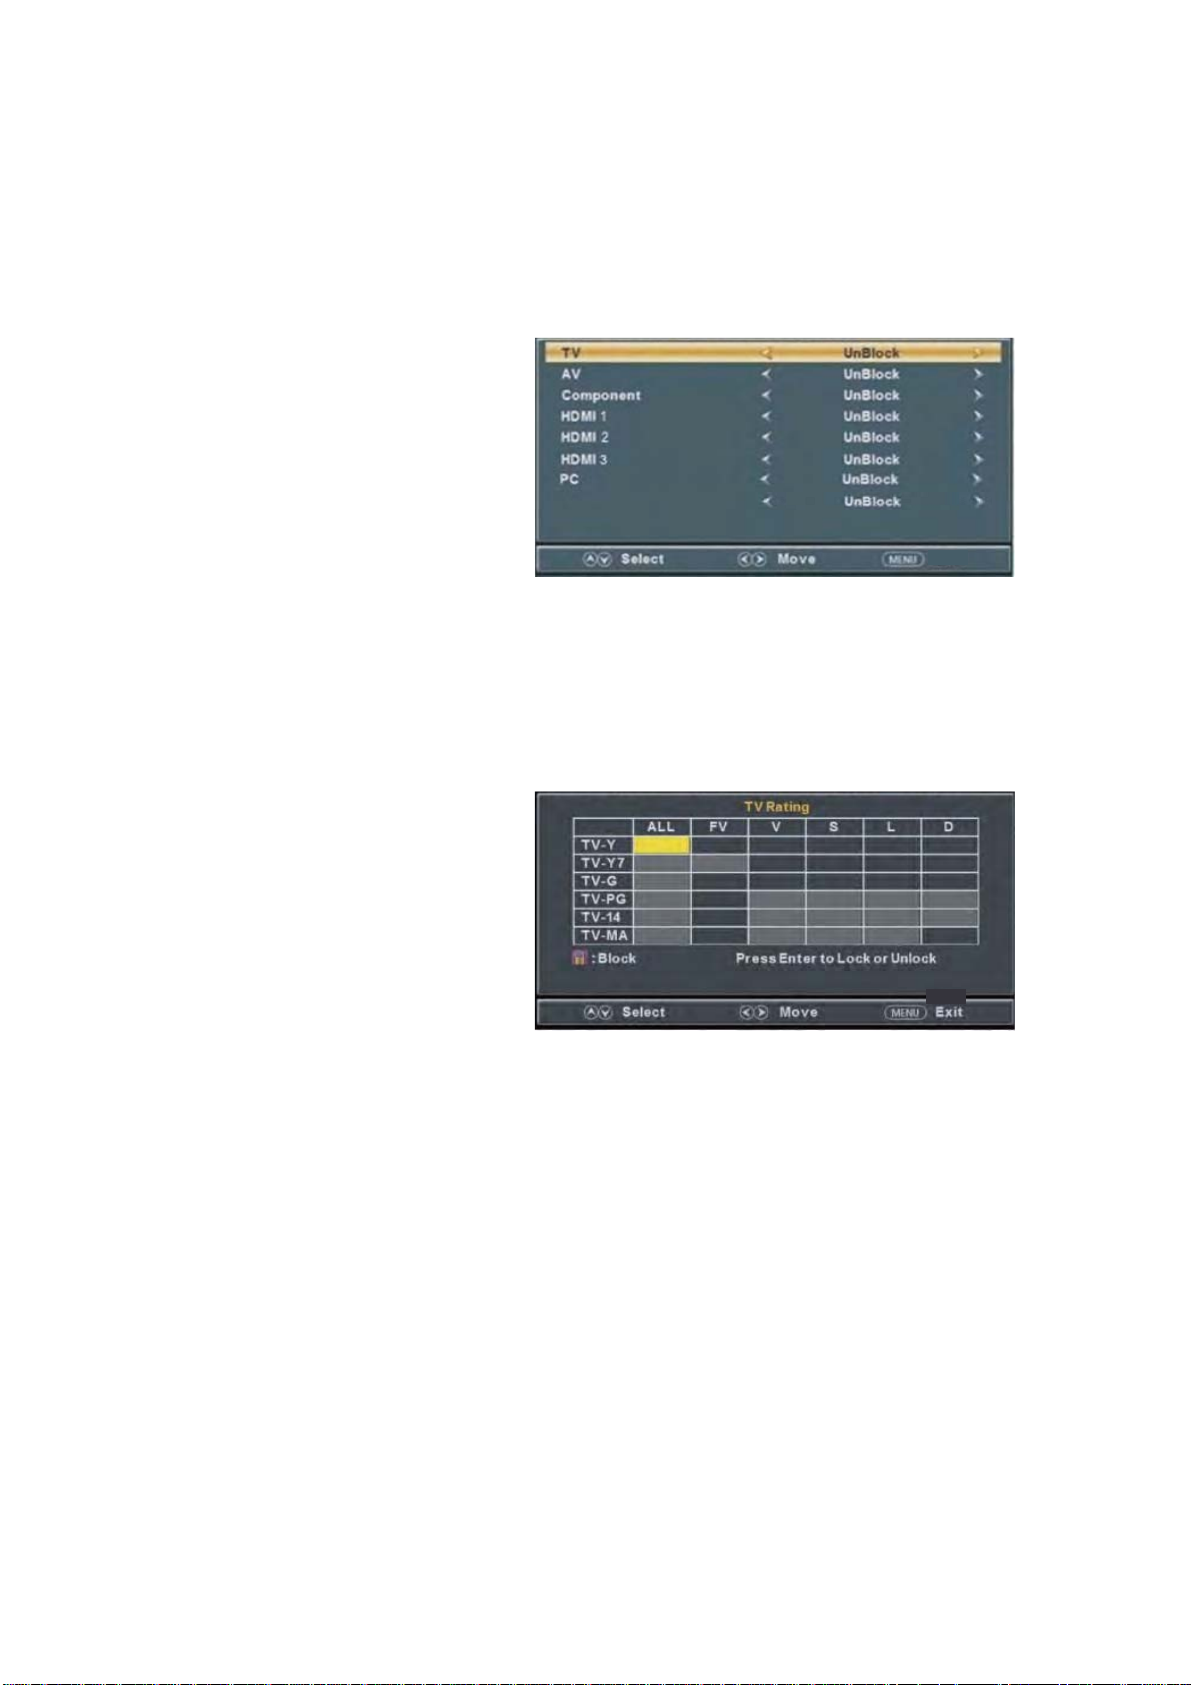
c. Press “cc/d” button to select “Component” and press the “e/f” button to select
“Block” or “Unblock”.
Press “c/d” button to select
d.
“HDMI” and press the “e/f”
button to select “Block” or
“Unblock”.
Press “c/d” button to select
e.
/MHL
“PC” and press the “e/f”
button to select “Block” or
Media
“Unblock”.
f.
Press “c/d” button to select
“Media” a
nd press the “e/f”
button to select “Block” or
“Unblock”.
5.
Press “c/d” button to s
a. Press “c/d” button to select “TV” and press “ENTER/f” button to enter sub-menu.
elect “US Rating” and press “ENTER/f” button to enter sub-menu.
Return
Return
Press “c/d”
b. Press “c/d” button to select “MP
“Off/G/PG/PG-13/R/NC-17/X”.
6. Press “c/d” button to select “Canada Rating” and press “ENTER/f” button to enter sub-menu.
a. Press “
“Off/C/C8+/G/PG/14+/18+”.
b. Press “c/d” button to select “Canada French” and press the “e/f” button to select
“Off/G/8ans+/13ans+/16ans+/18ans+”.
7. Press “c/d” button to select “RRT Setting” and press “ENTER/f” button to enter sub-menu.
button to select and pr
c/d” button to select “Canada English” and press the “e/f” button to select
ess ĀENTERāto block or unblock.
AA” and press the “e/f” button to select
17
Page 18
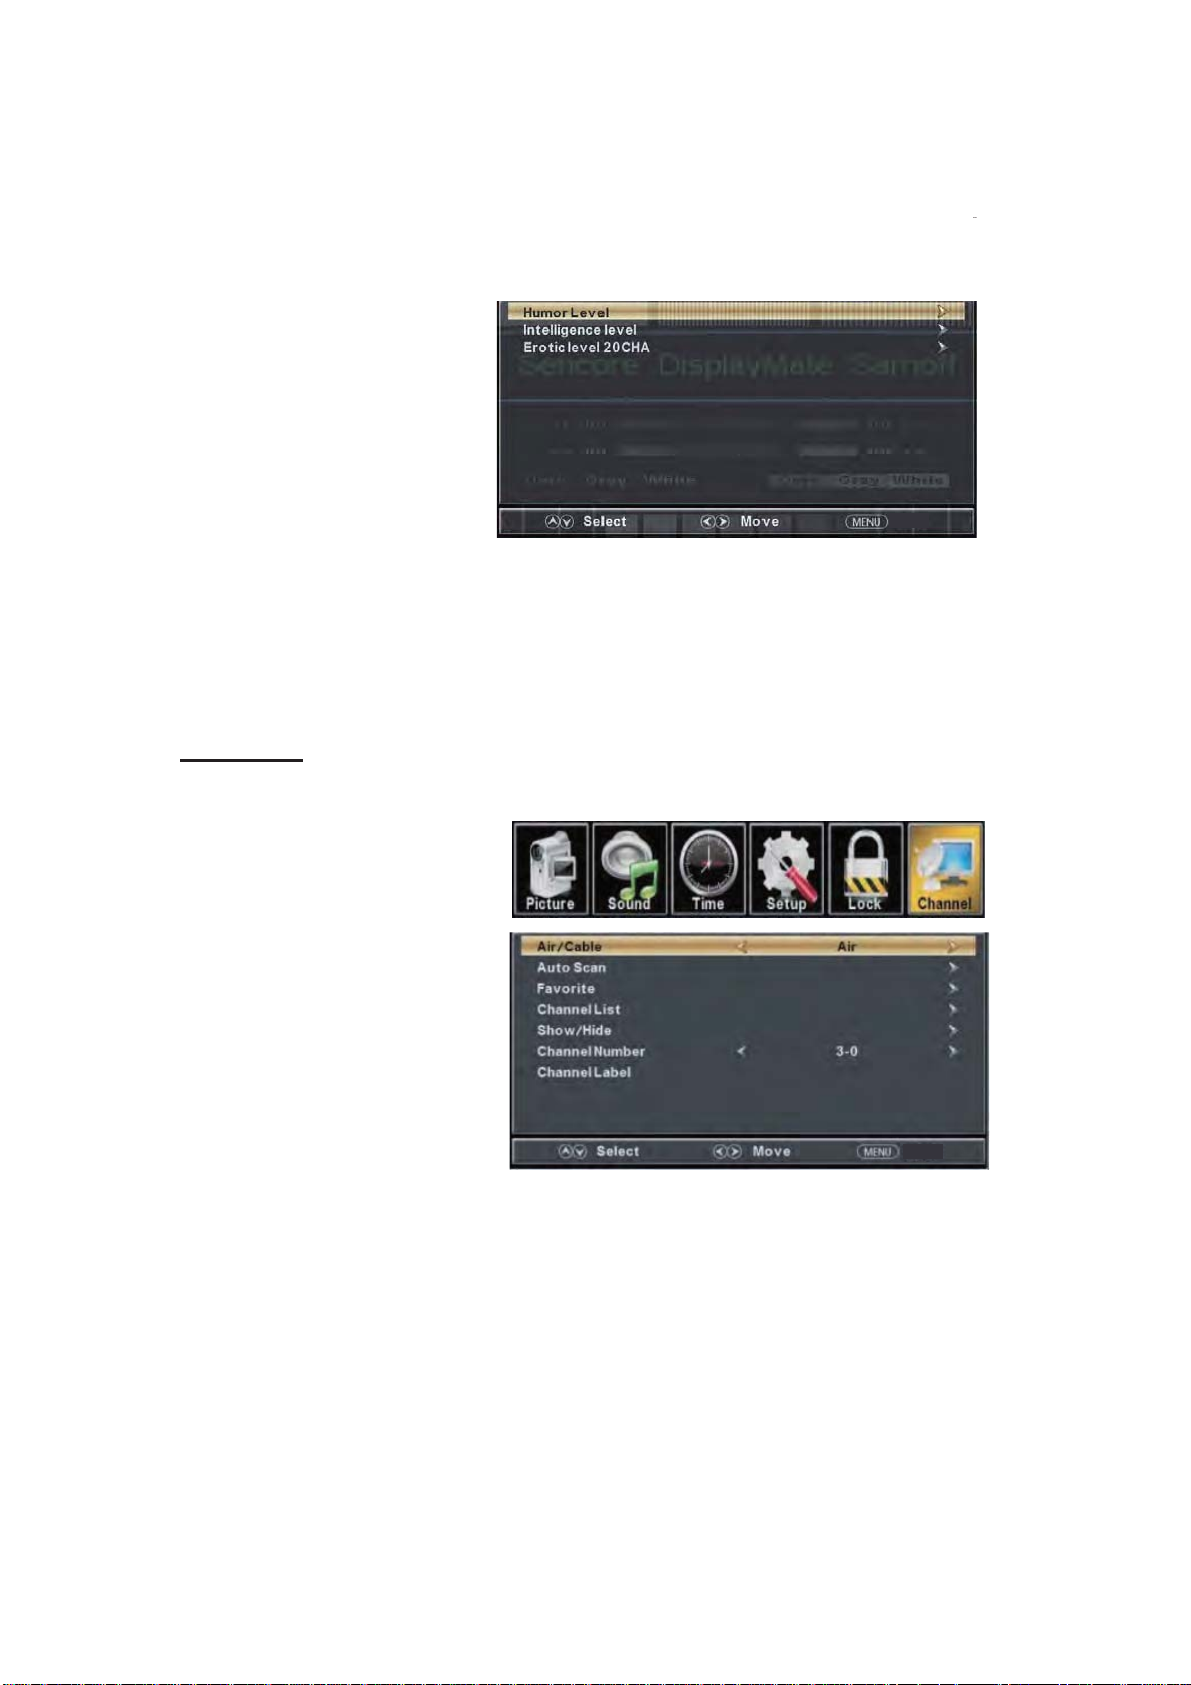
The item is available only when current stream has downloadable rating data.
Note:
8. Press “c/d” button to select “Reset RRT” and press “ENTER/f” button to reset.
Channel
Return
Press the “MENU” but
ton to enter the OSD menu .Then press “e/f” button to
select the “Channel” menu.
And press the "ENTER" button to
to enter the sub-menu
1.
Pre
ss “d” button to select
“AIR/CLABLE”
and press the
“e/f”button to select
Cable or AIR.
2. Press “c/d” button to
select “Auto
the “
enter then press" " button
button to select "YES" and press
ENTER” to do auto scan.
“
3.
Press “c/d” button to
4. Press “c/d” button to select “Channel list” and press the “
5. Press “c/d” button to select “Show/Hide” and press the “
6. Press “c/d” button to select “Channel Number” and press the “
7. Press “c/d” button to select “Channel Label” and press the “
Scan” and press
ENTER/f” button
e/f
select “Favorite” and press
ENTER/f
the “
ENTER/f
ENTER/f
” button to enter
” button
” button to enter.
e
/f” but
ENTER/f
Return
to enter.
ton to adjust.
button to enter.
”
.
18
Page 19
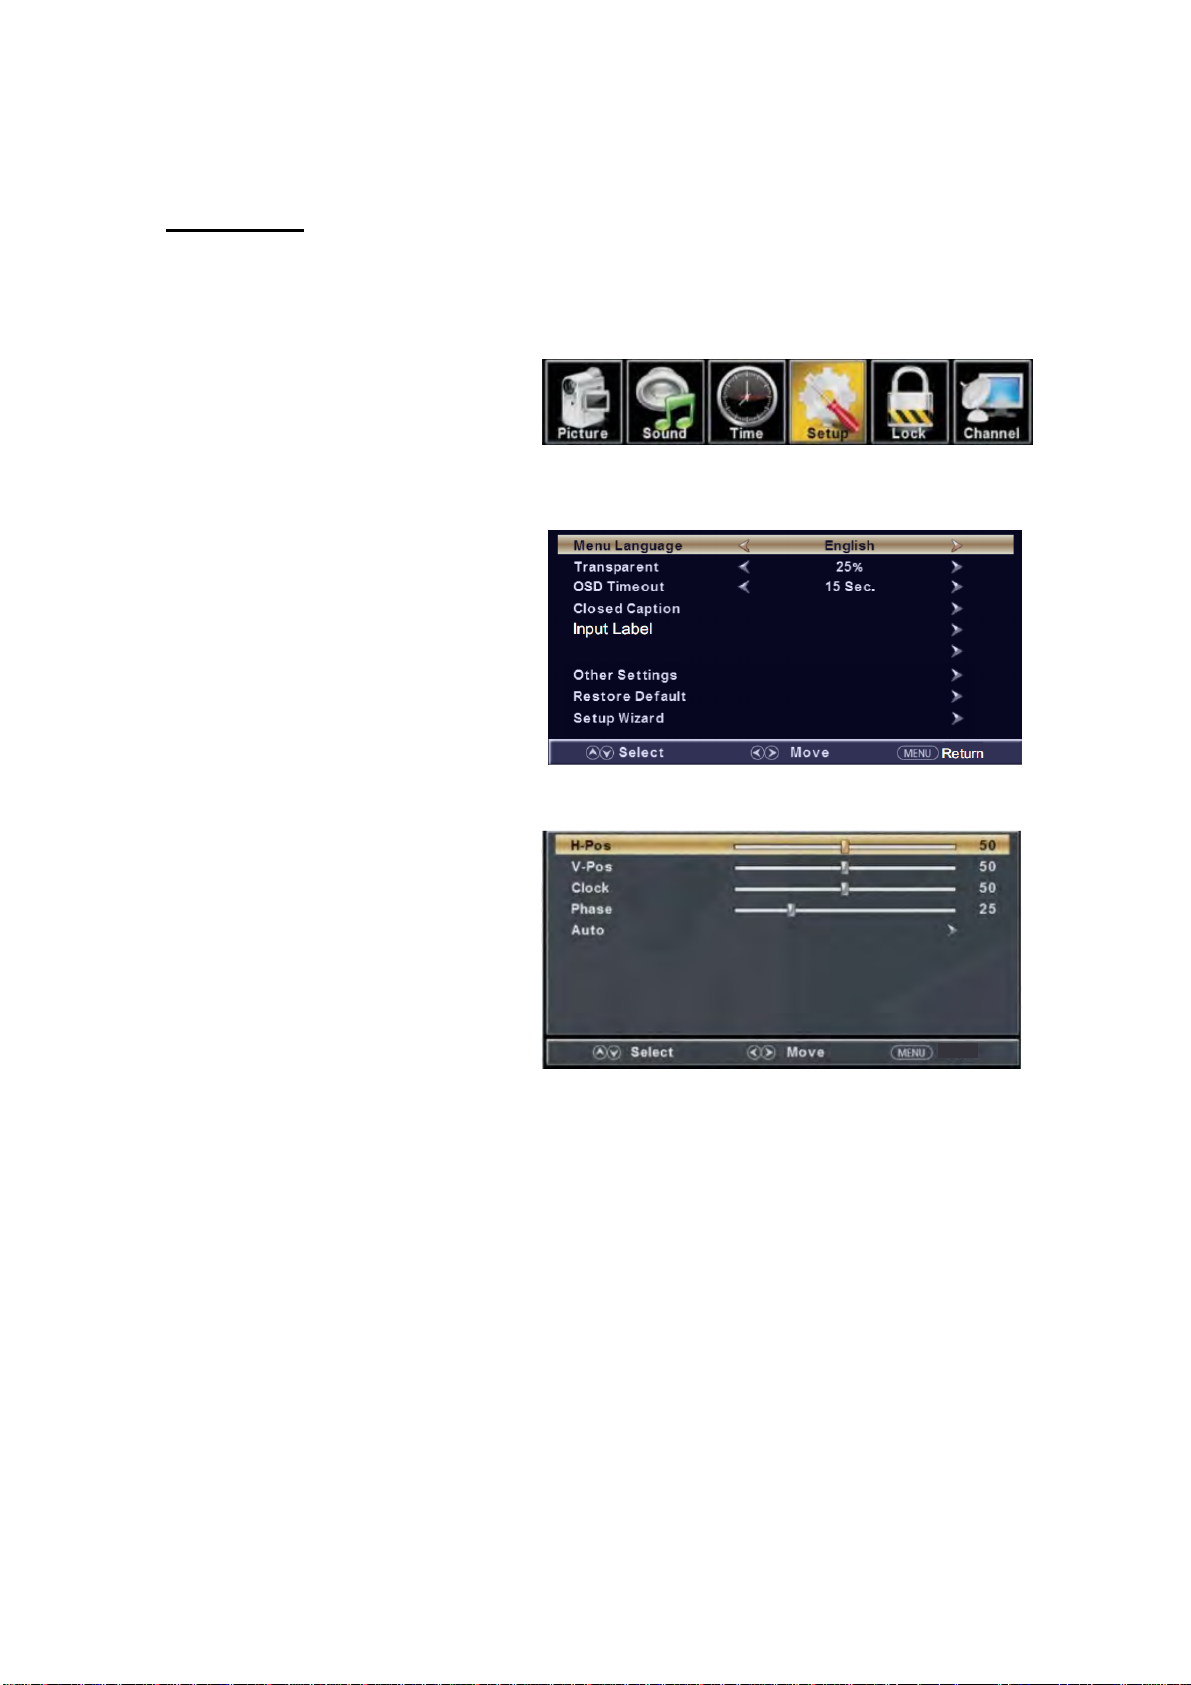
PC
Setting
the “MENU” button to enter the OSD menu .Then press “
Press
“” b
the “Setup” menu. And then press
ENTER/
“
” b
utton to enter sub-menu.
utton to select “PC Settin press the
PC Settings
/”
and ” gs
button to select
1
. Press “/” button to select “H-Pos” and press the “
2. Press “/” button to select “V-Pos” and press the “
3. Press “/” button to select “Clock” and press the “
4. Press “/” button to select “Phase” and press the “
5. Press “/” button to select “Auto” and press the “
Note: The pictures in regard to function are provided for reference purposes only.
19
/
/
/
/”
ENTER/
tton to adjust.
” bu
” button to adjust.
”
button to adjust.
button to adjust.
button to do auto adjust.
”
Return
Page 20
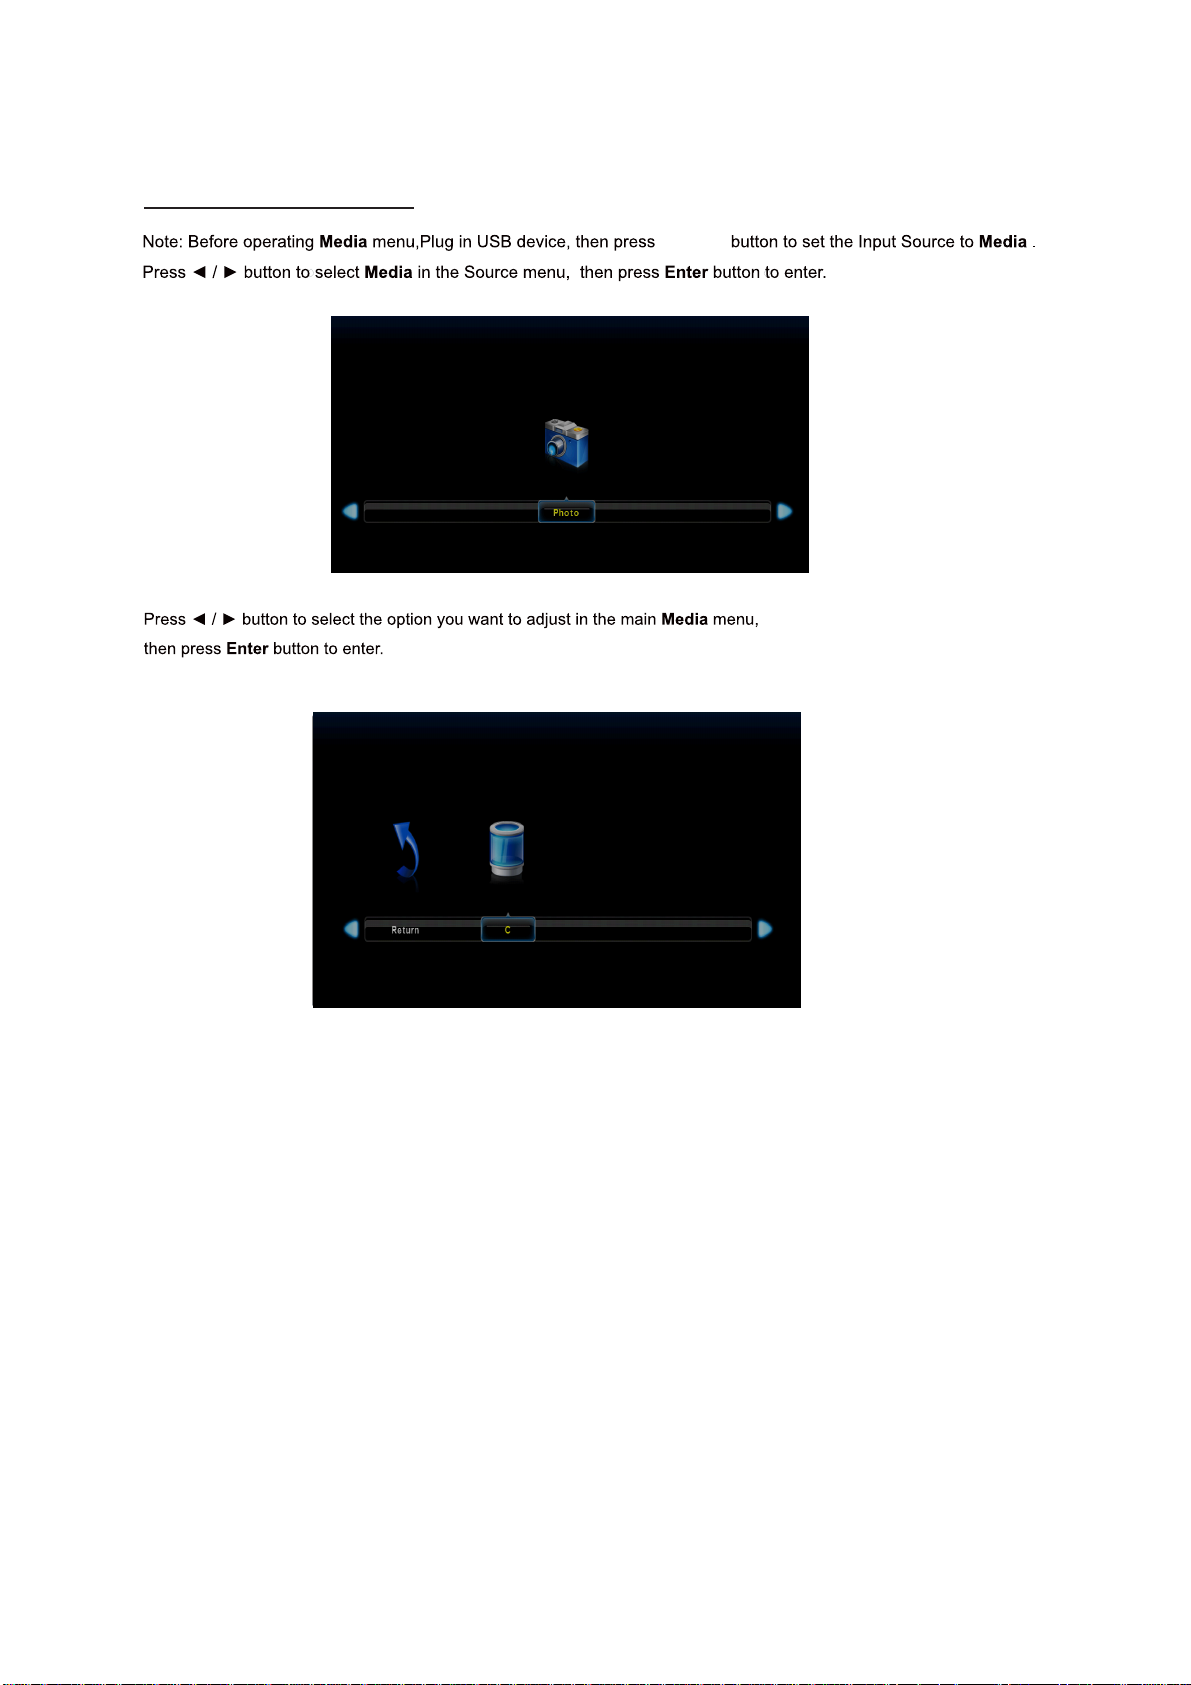
Media OPERATION
SOURCE
20
Page 21
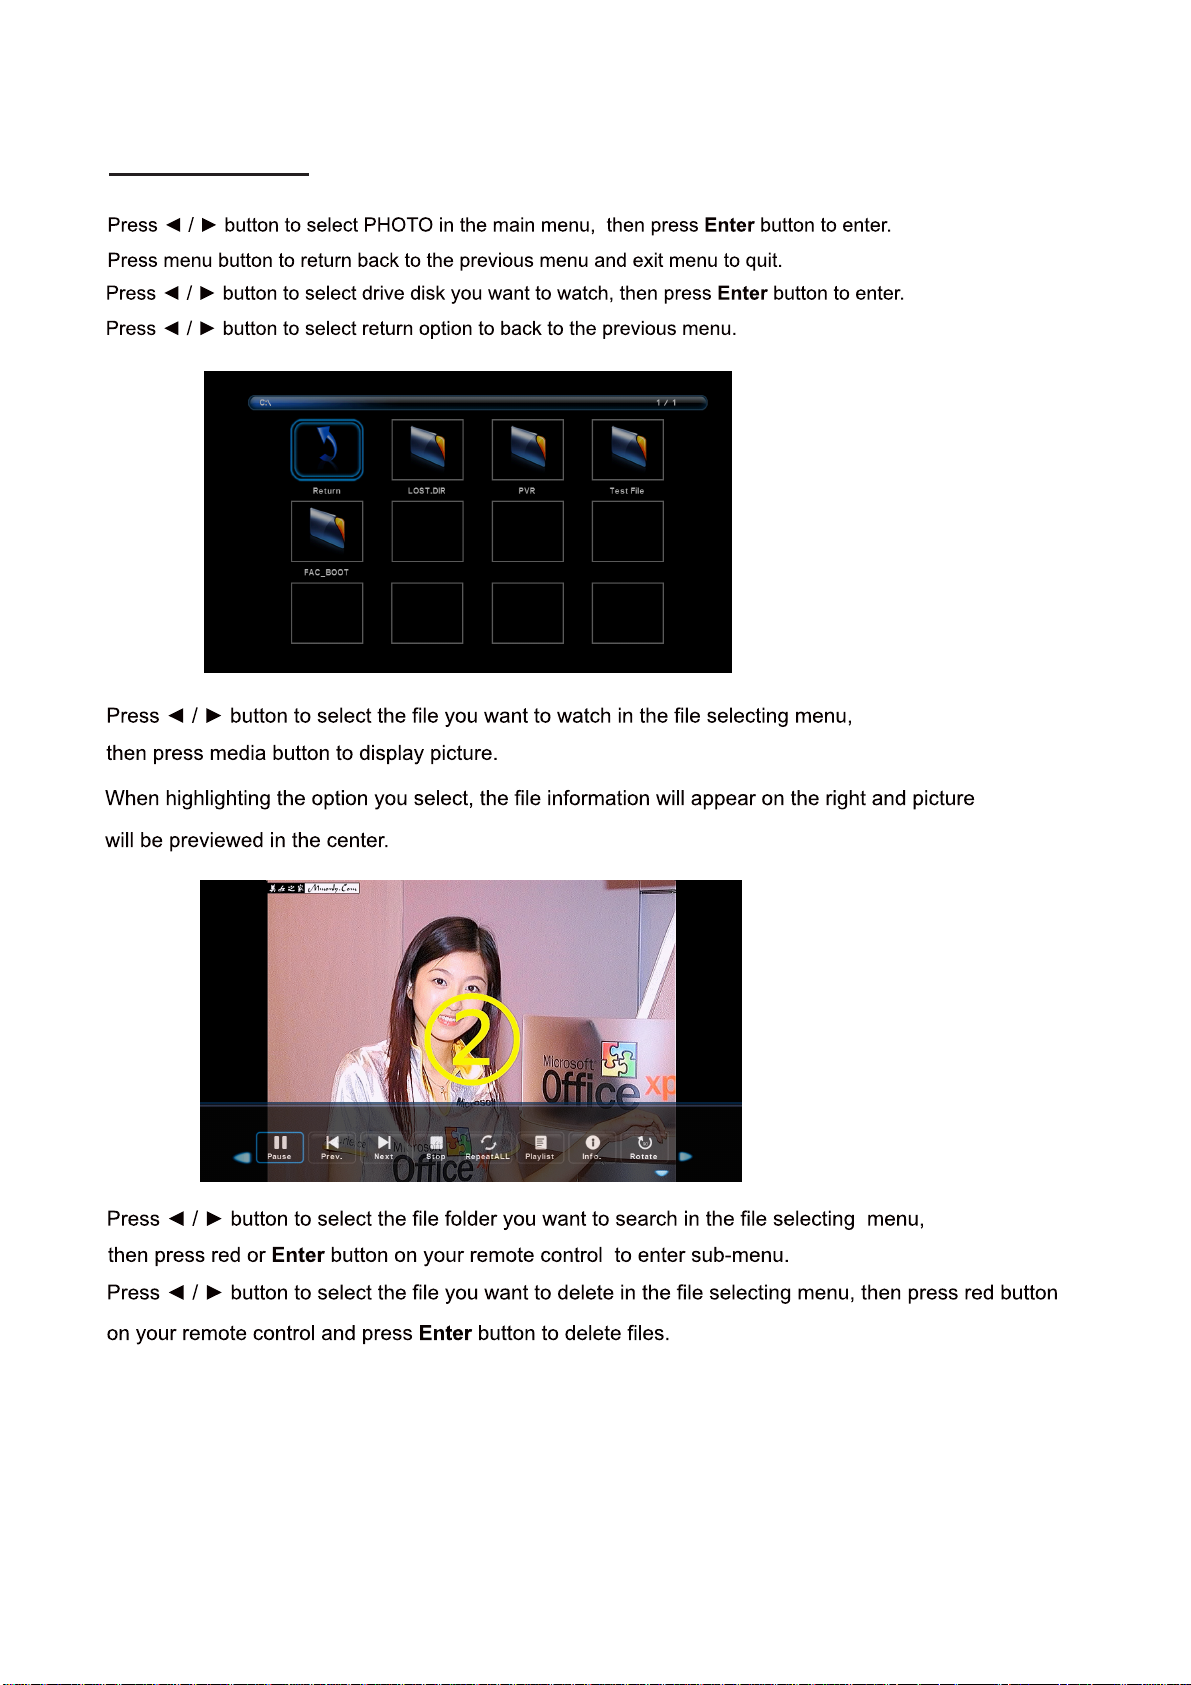
Photo Menu
21
Page 22
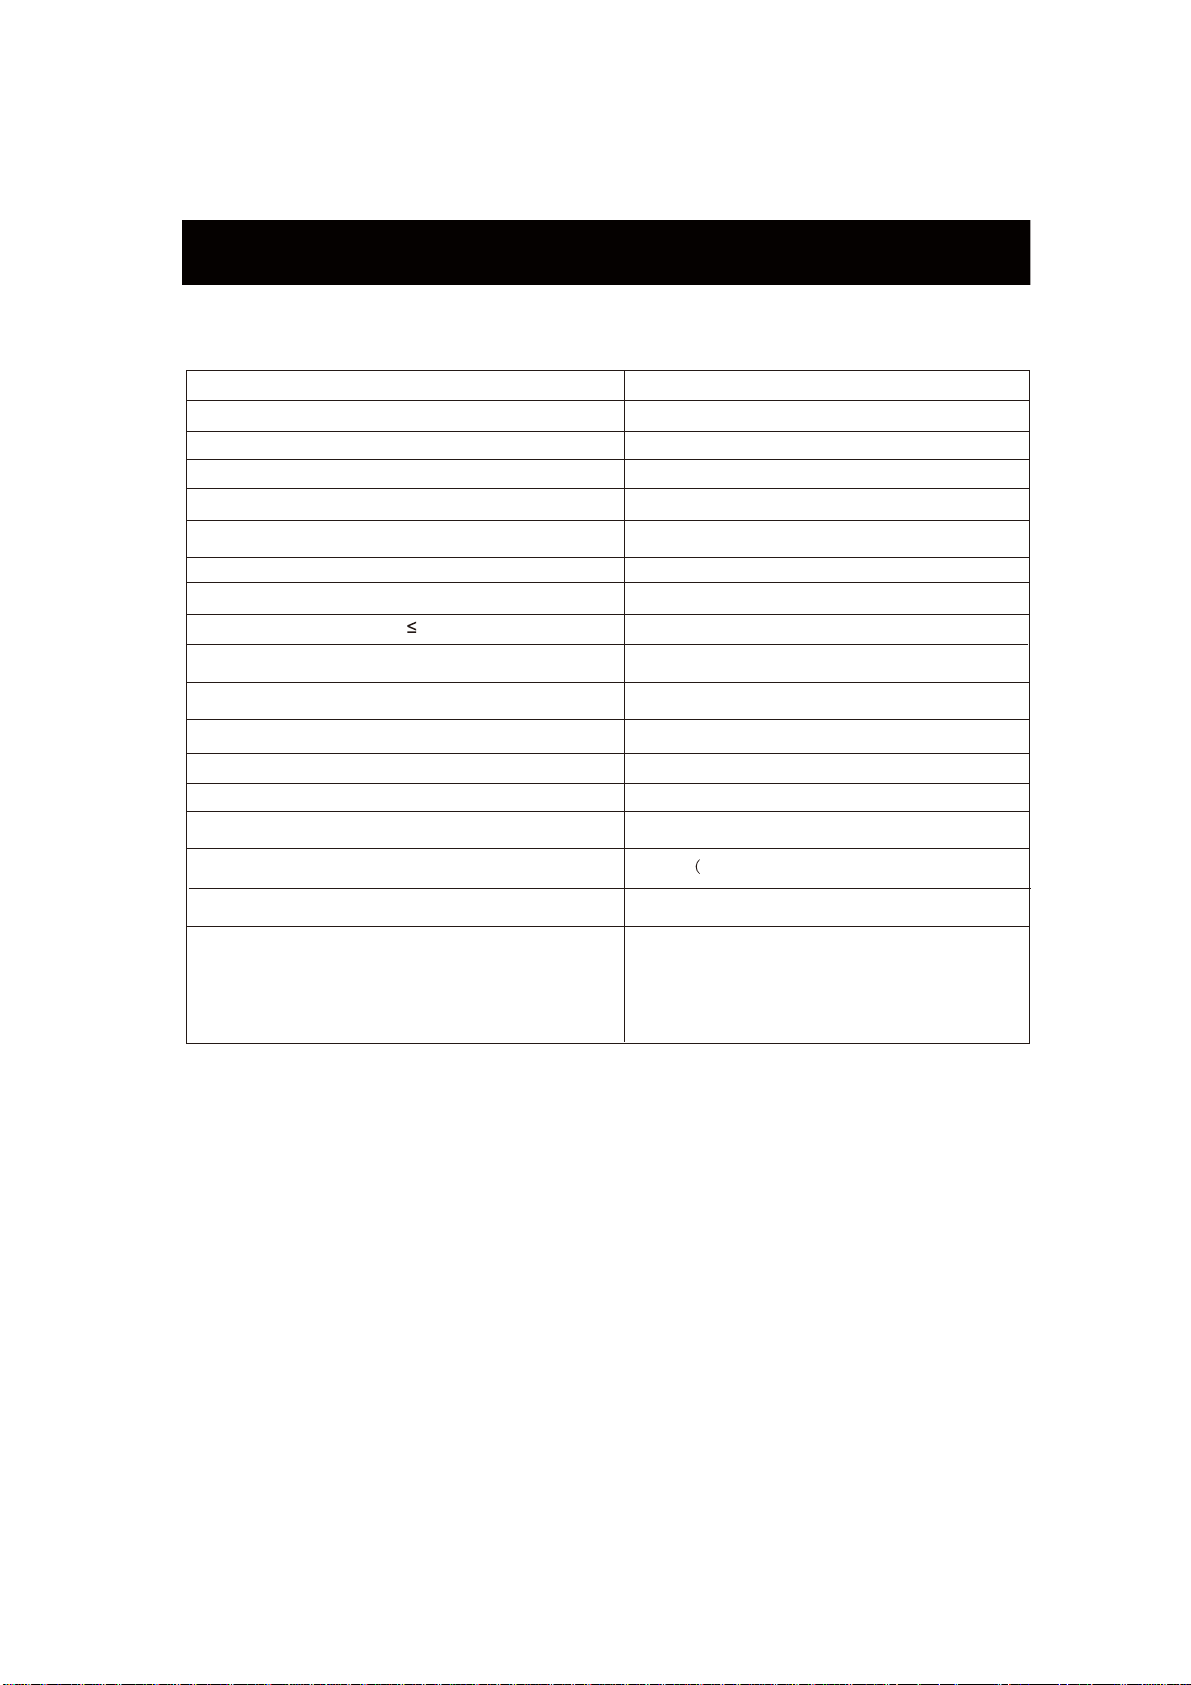
SPECIFICATIONS
Viewing Picture Size(diagonal)
Resolution
Aspect Ratio:
TV System:
Video Signal System:
Receiving Channel:
Maximum Power Consumption:
Input Power Voltage:
Audio Output Power(THD 7%)
RF Input
Audio Input x 2
Headphone
USB In
Coaxial Output
Horizontal definition(TV line)
Output
put
:
49 inches
1920x1080
16:9
ATSC Digital system and NTSC Analog system
NTSC
Cable :1-135/ Air: 2-69(ATV&DTV)
74W
AC 100-240V
2 x 6W
x tupnI )IMDH(ecafretnI aidemitluM noitinifeD-hgiH ediS
x 1
tupnI )AGV(BGR golanA
x 1
x 1
Composite Video Input >=350
Video Input >=
3
1 x tupnI oediV etisopmoC raeR
1 x
for software upgrading/JPG/Slide/Slowly show)
1 x
35
0
22
Page 23
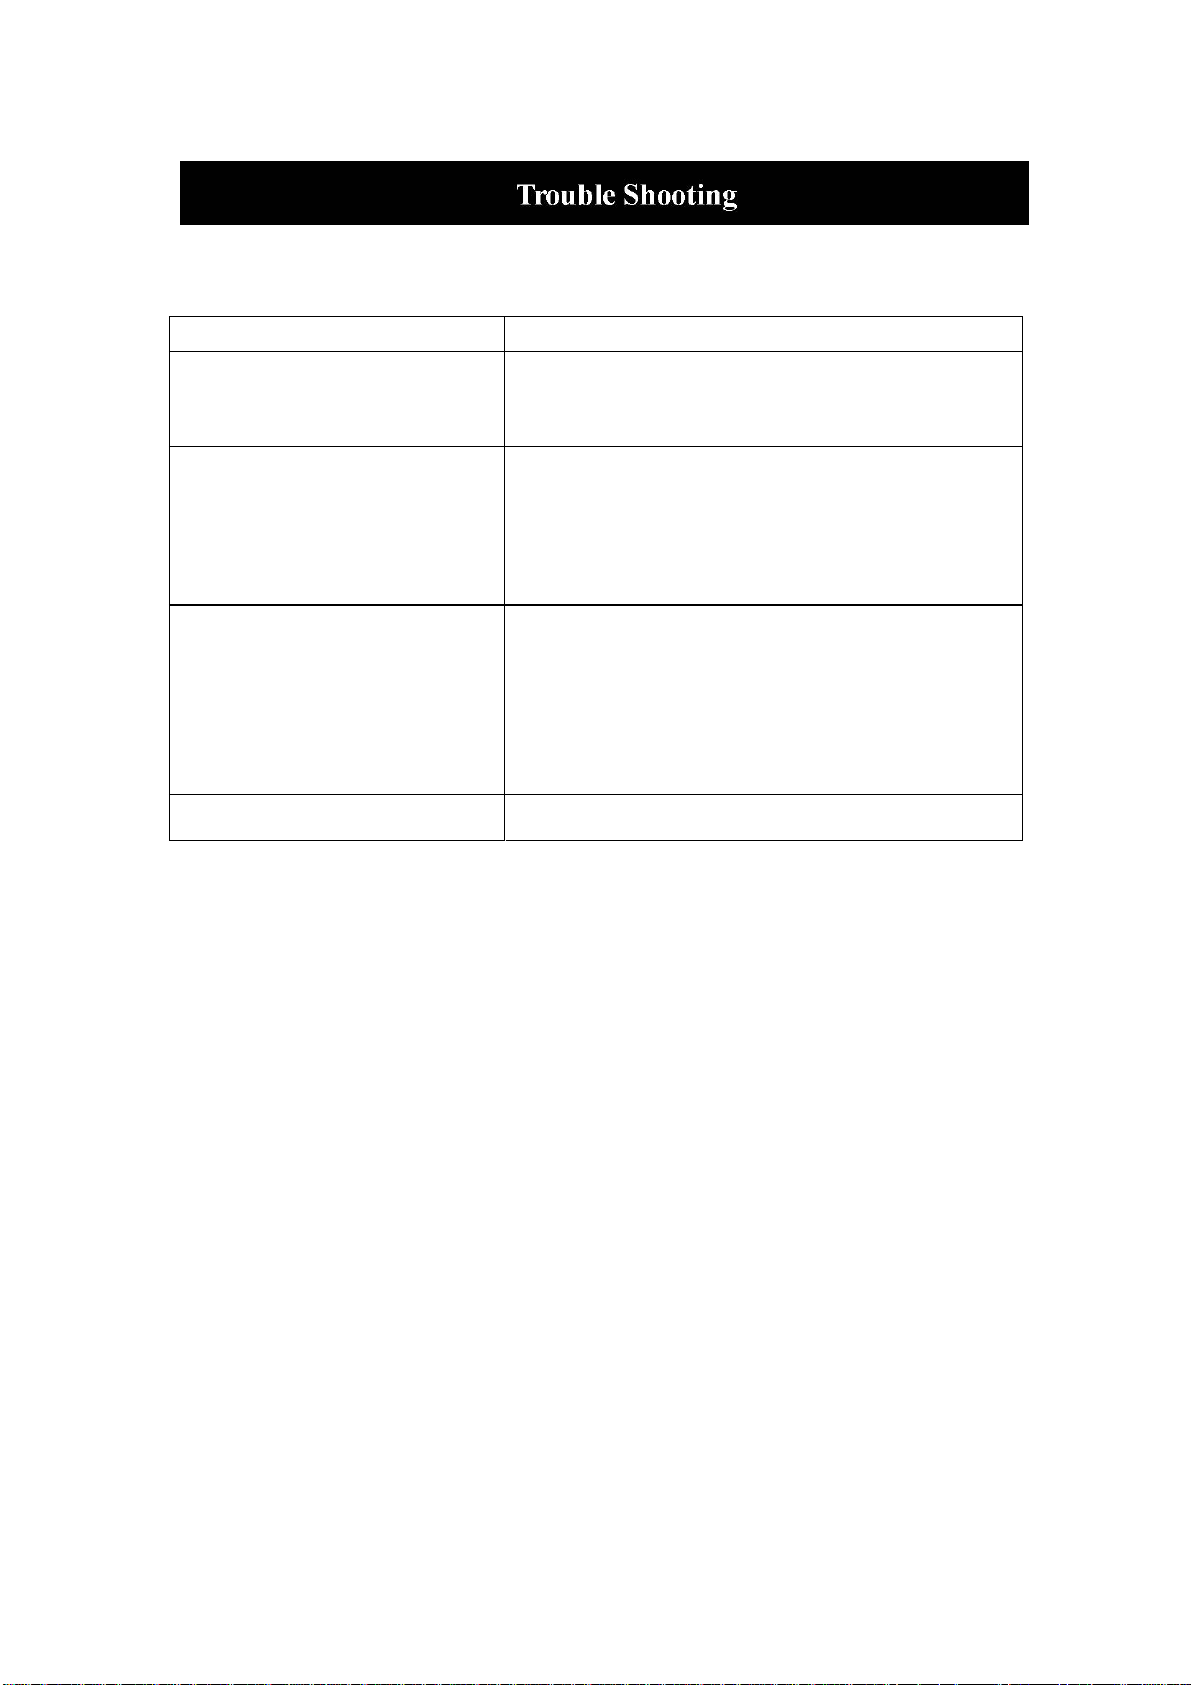
Before consulting service personne
l, check the following chart for
possible solutions.
PROBLEM
SOLUTION
ƔMake sure the power cord is plugged in. ƔThe batteries
TV will not turn on
in the remote control may be
batteries
.
usted; replace
Exha
ƔCheck the cable between TV and antenna/
ƔPress the power button on the remote. ƔPress the
the remote, then press the “Ÿ/ź”button
cture, no sound
No pi
device.
SOURCE button
repeatedly to select the TV source.
ƔCheck the cable between TV and antenna/
device.
nother channel, the station may have
ƔTry a
broadcast difficulties. ƔAdjust the brightness/contrast in
Poor picture, s
Audi
The TFT LED panel uses a panel consisting of
technology to produce. However, there may be
ound OK
the Video menu.
Check t
hat the unit is set to NTSC
o noise ƔMove any infrared equipment away from the TV.
sub pixels which requires sophisticated
all number of
a sm
bright or
screen. These pixels will have no impact on the performance of the product.
the
external AV
rnal AV
exte
dark pixels on the
23
Page 24
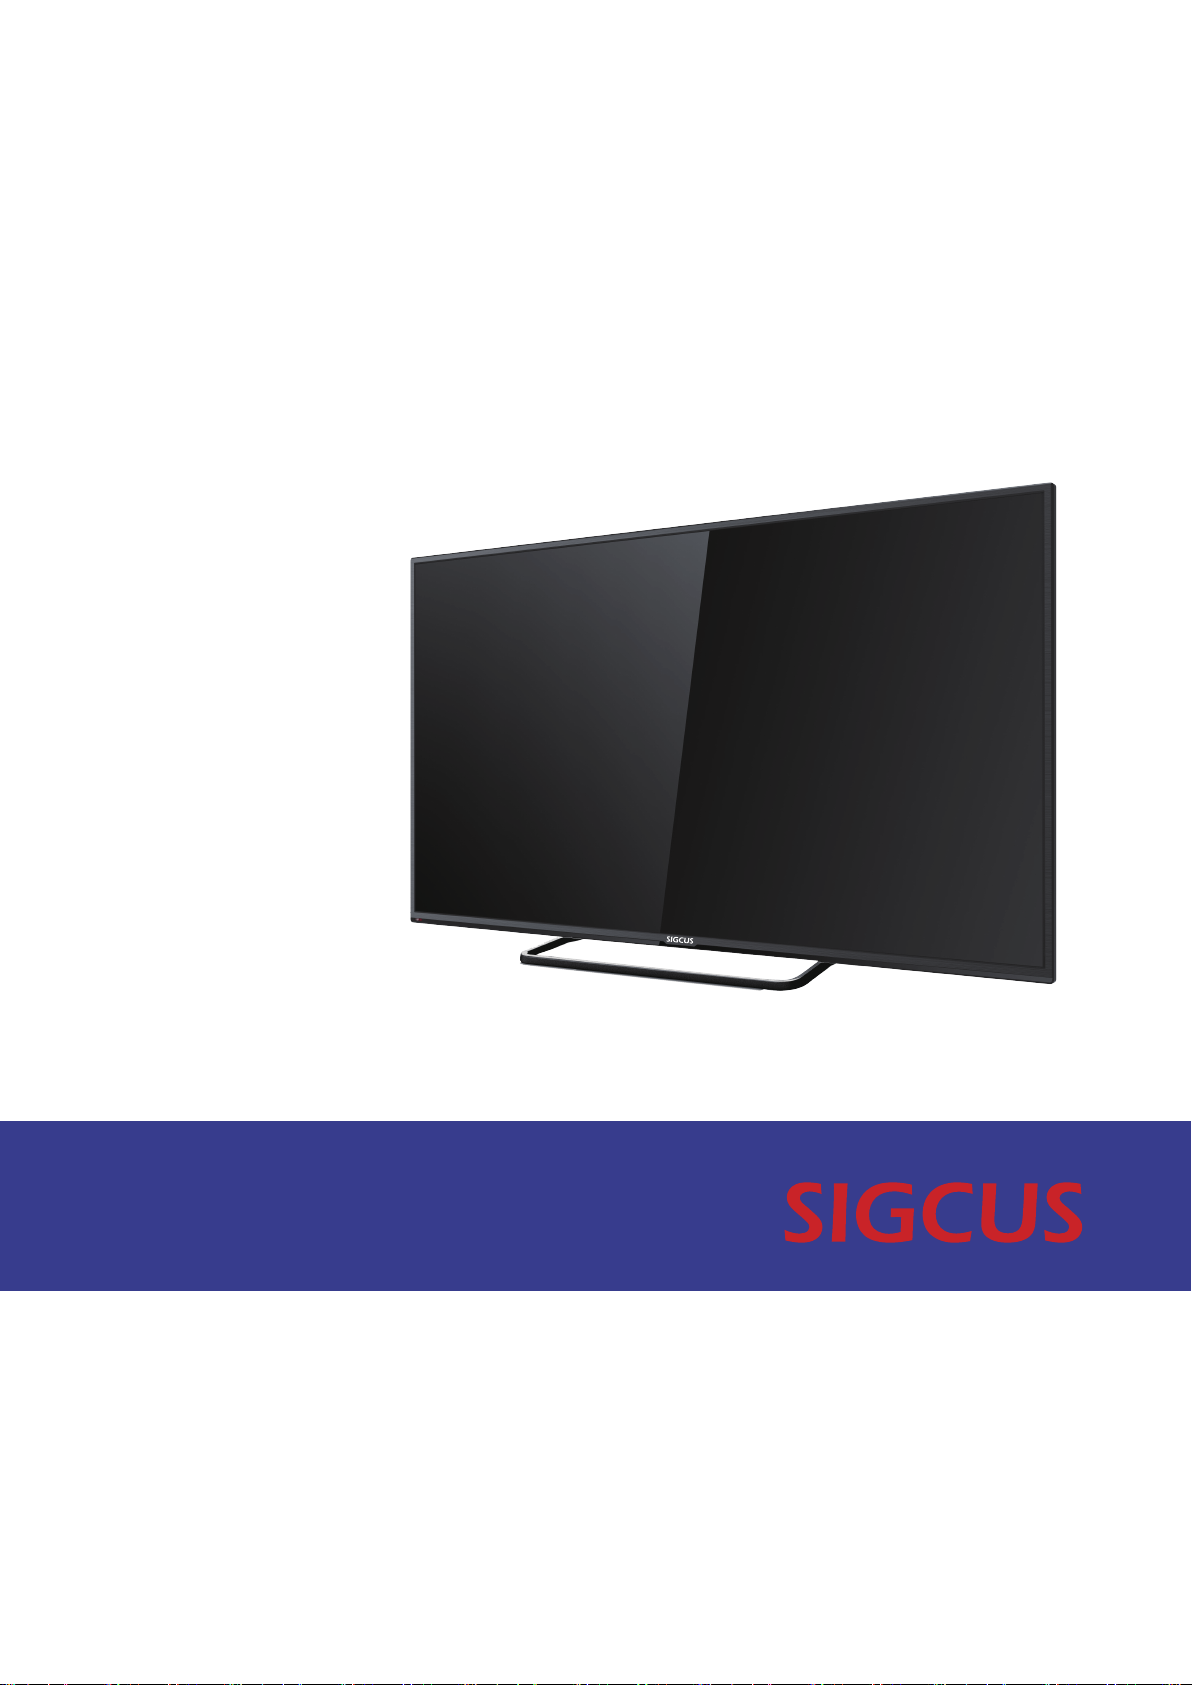
Manual del usuario
SGC 49B
Page 25

Contenido
z Intr
oducción
z Advertencia
z Precaución
z Descripción de la unidad principal
z Control Remoto
z Ajuste básico OSD
z Especificaciones
Solución de pr
z
oblemas
2
Page 26

Intr
oducción
Gracias por
se recomienda enfáticamente que lea este manual antes de comenzar su funcionamiento.
adquirir el televisor SIGCUS FHD LED. Para aprovechar al máximo su equip o,
ALACIÓN
INST
Coloque el receptor en la habitación en donde la luz no llegue directamente a la ①
pantalla. La oscuridad total o un reflejo en la pantalla de imágenes puede provocar
agotamiento de ojos. Se recomienda una luz indirecta y suave para ver de manera
cómoda.
② Perm
fallos prematuros de componentes.
ita suficiente espacio entre el receptor y la pared para permitir ventilación.
Evite lugares excesivam
TV se puede conectar a CA 100④ -240V~ 50/60HZ.
Esta
No i⑤ nstale la TV
en un lugar cerca de fuentes de calor como radiadores, ductos de
ente calientes para prevenir daños futuros al mueble o ③
aire, luz de sol directa o en compartimentos cerrados y áreas cerradas. No cubra las
aperturas de ventilación al usar la TV.
La luz del indicador durará cerca de 30 segundos después de que se haya
6
○
apagado el aparato.
Espere que la luz del indicador se apague antes de volver a encender la TV.
3
Page 27
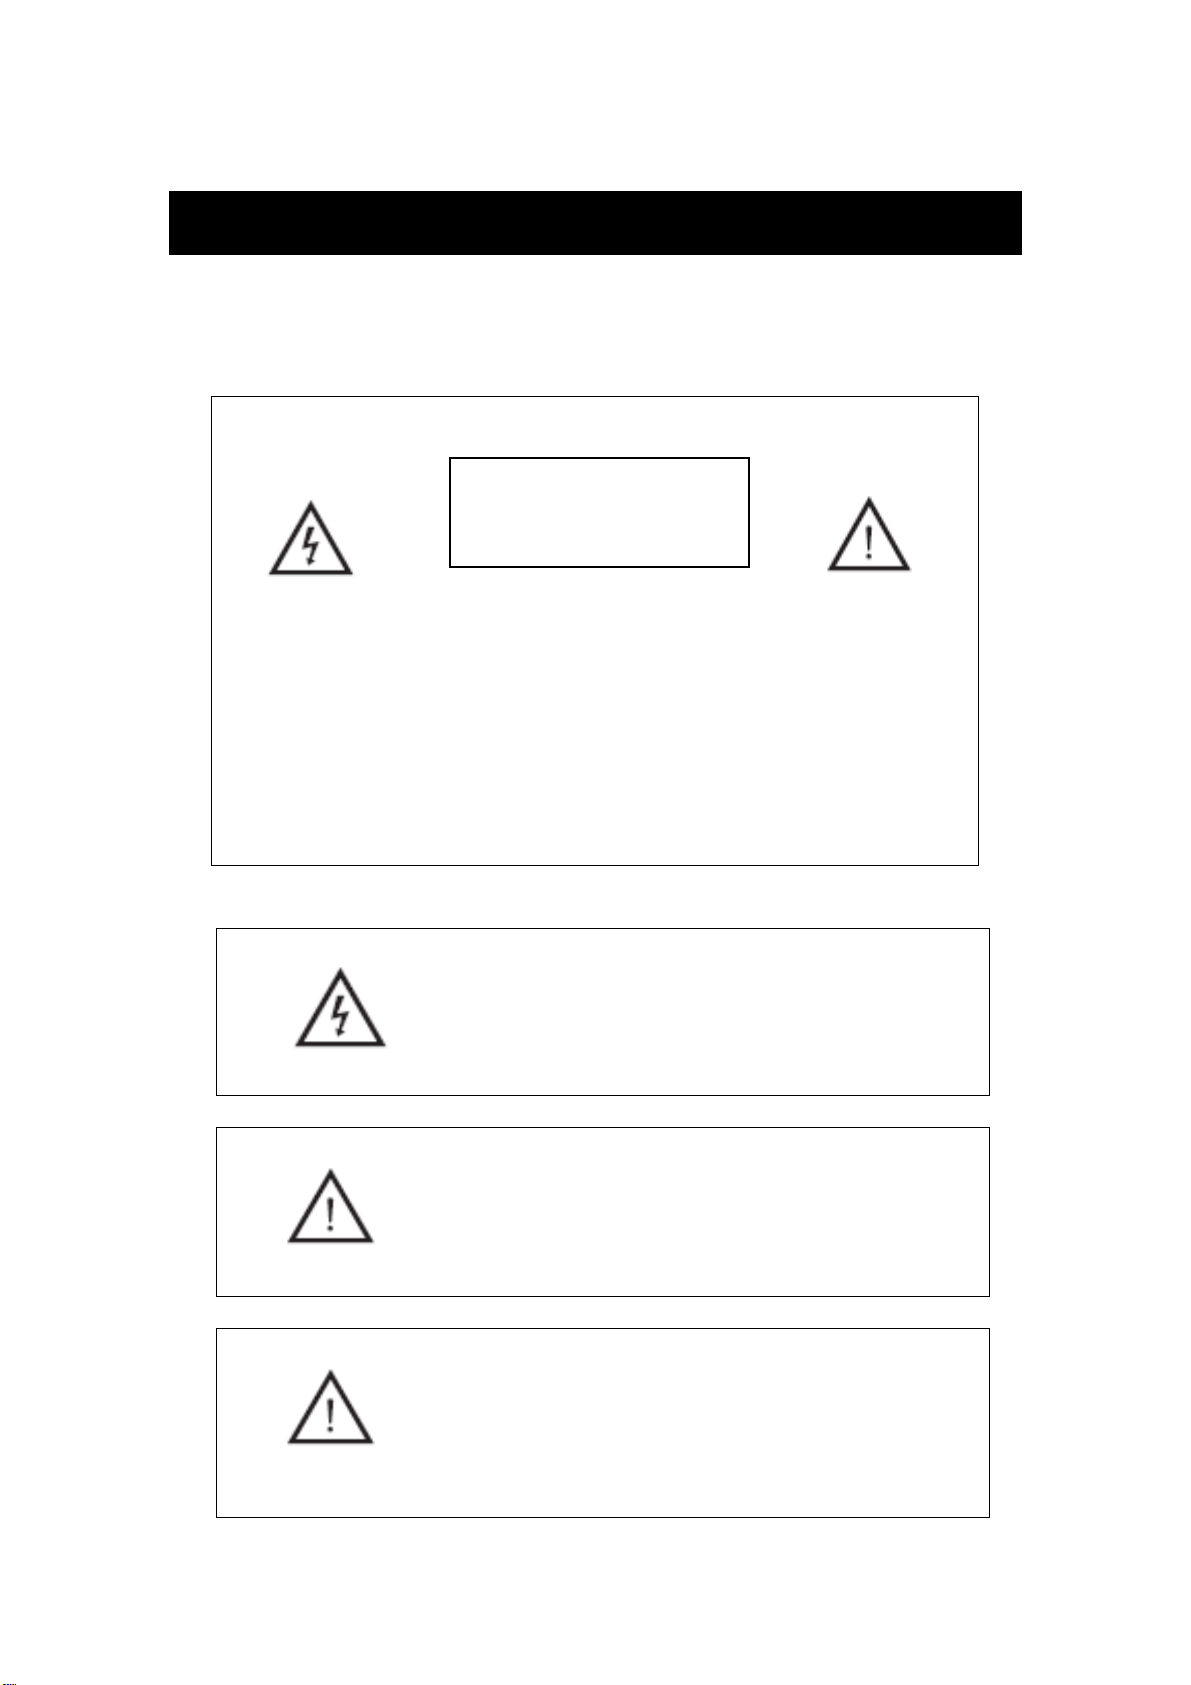
Advert
encia
PRECAU
CIÓN: PARA EVITAR EL RIESGO DE UN CHOQUE
PRECAUCIÓ
RIESGO DE CHOQUE
ELÉCTRICO
ELÉCTRICO.
NO QUITE LA CUBIERTA (O PARTE TRASERA).
NO HAY PARTES QUE EL USUARIO PUEDA REPARAR DENTRO.
SI NECESIT
SERVICIO CALIFICADO.
A SERVICIO CONTACTE A UN REPRESENTANTE DE
N
Este sím
bolo es para alertar al usuario de evitar el riesgo
de un choque eléctrico. Este equipo puede solo ser
desensamblado por personal de servicio calificado.
Este sí
mbolo es para alertar al usuario de la presencia
de instructivos importantes de operación y mantenimiento
en los documentos que acompañan al equipo.
Las estruct
tipo rejilla con una conexión protectora a tierra en el enchufe.
Conecte el enchufe como un electrónico roto, las instalaciones
rotas deben ser fáciles de operar.
uras del equipo Clase I deben conectarse al enchufe
4
Page 28
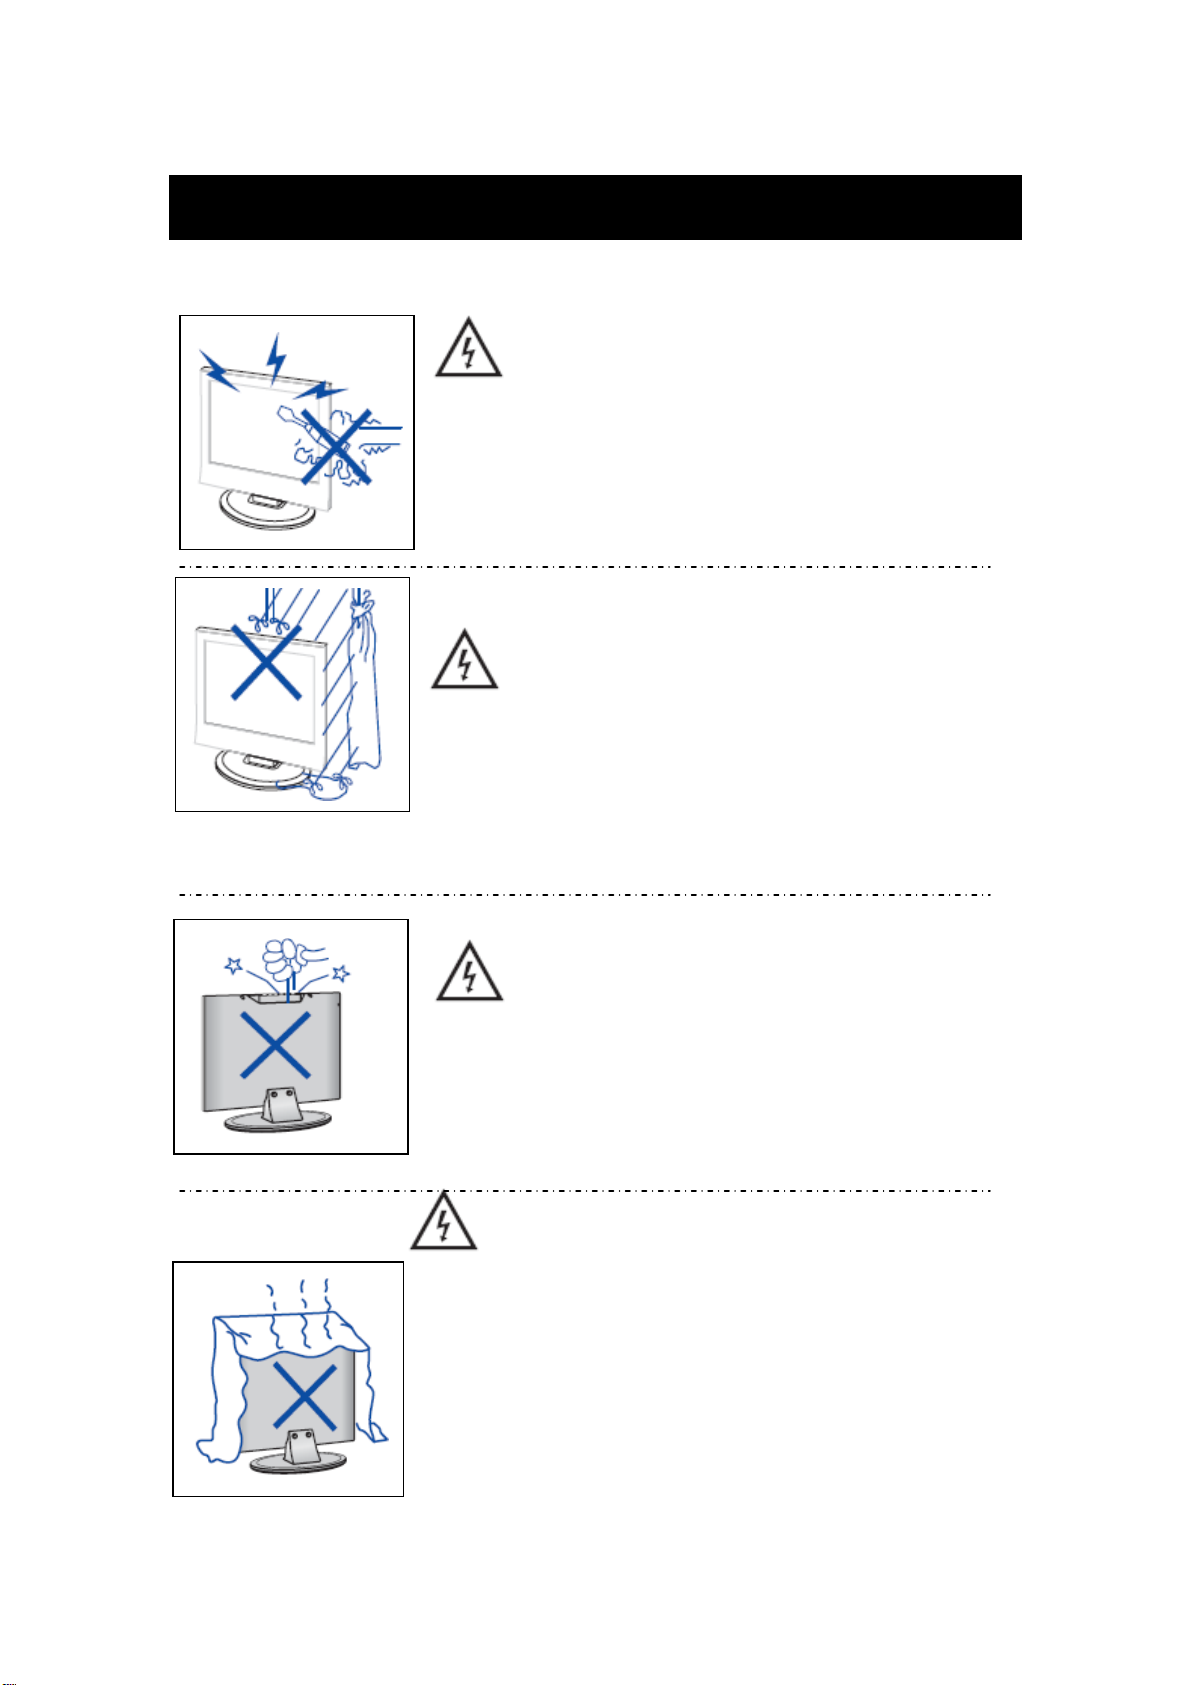
ecaución
Pr
ecaución
Pr
Se usan altos voltajes en la operación de
No abra el estuche del producto. Si necesita servicio
contacte a un representante de servicio calificado.
este producto.
ecaución
Pr
Para prevenir fuego o r
exponga la unidad principal a la lluvia o humedad,no
coloque objetos llenos de líquidos como jarrones sobre el
aparato.
iesgo de choque eléctrico no
ecaución
Pr
No deje caer
gabinete de televisión o aperturas. Nunca derrame ningun
tipo de líquido sobre el receptor de la televisión.
ecaución
Pr
Evite expo
otras fuentes de calor. No apoye el receptor de televisión
directamente sobre otros productos que emiten calor: como
reproductores de videocintas y amplificadores de audio.
No bloquee los orificios de ventilación en la cubierta
trasera. La ventilación es esencial para prevenir la falla de
componentes eléctricos. No aplaste el cable de suministro
de energía bajo la unidad principal u otros objetos pesados.
o empuje objetos dentro de las ranuras del
ner la unidad principal a la luz directa del sol o a
5
Page 29
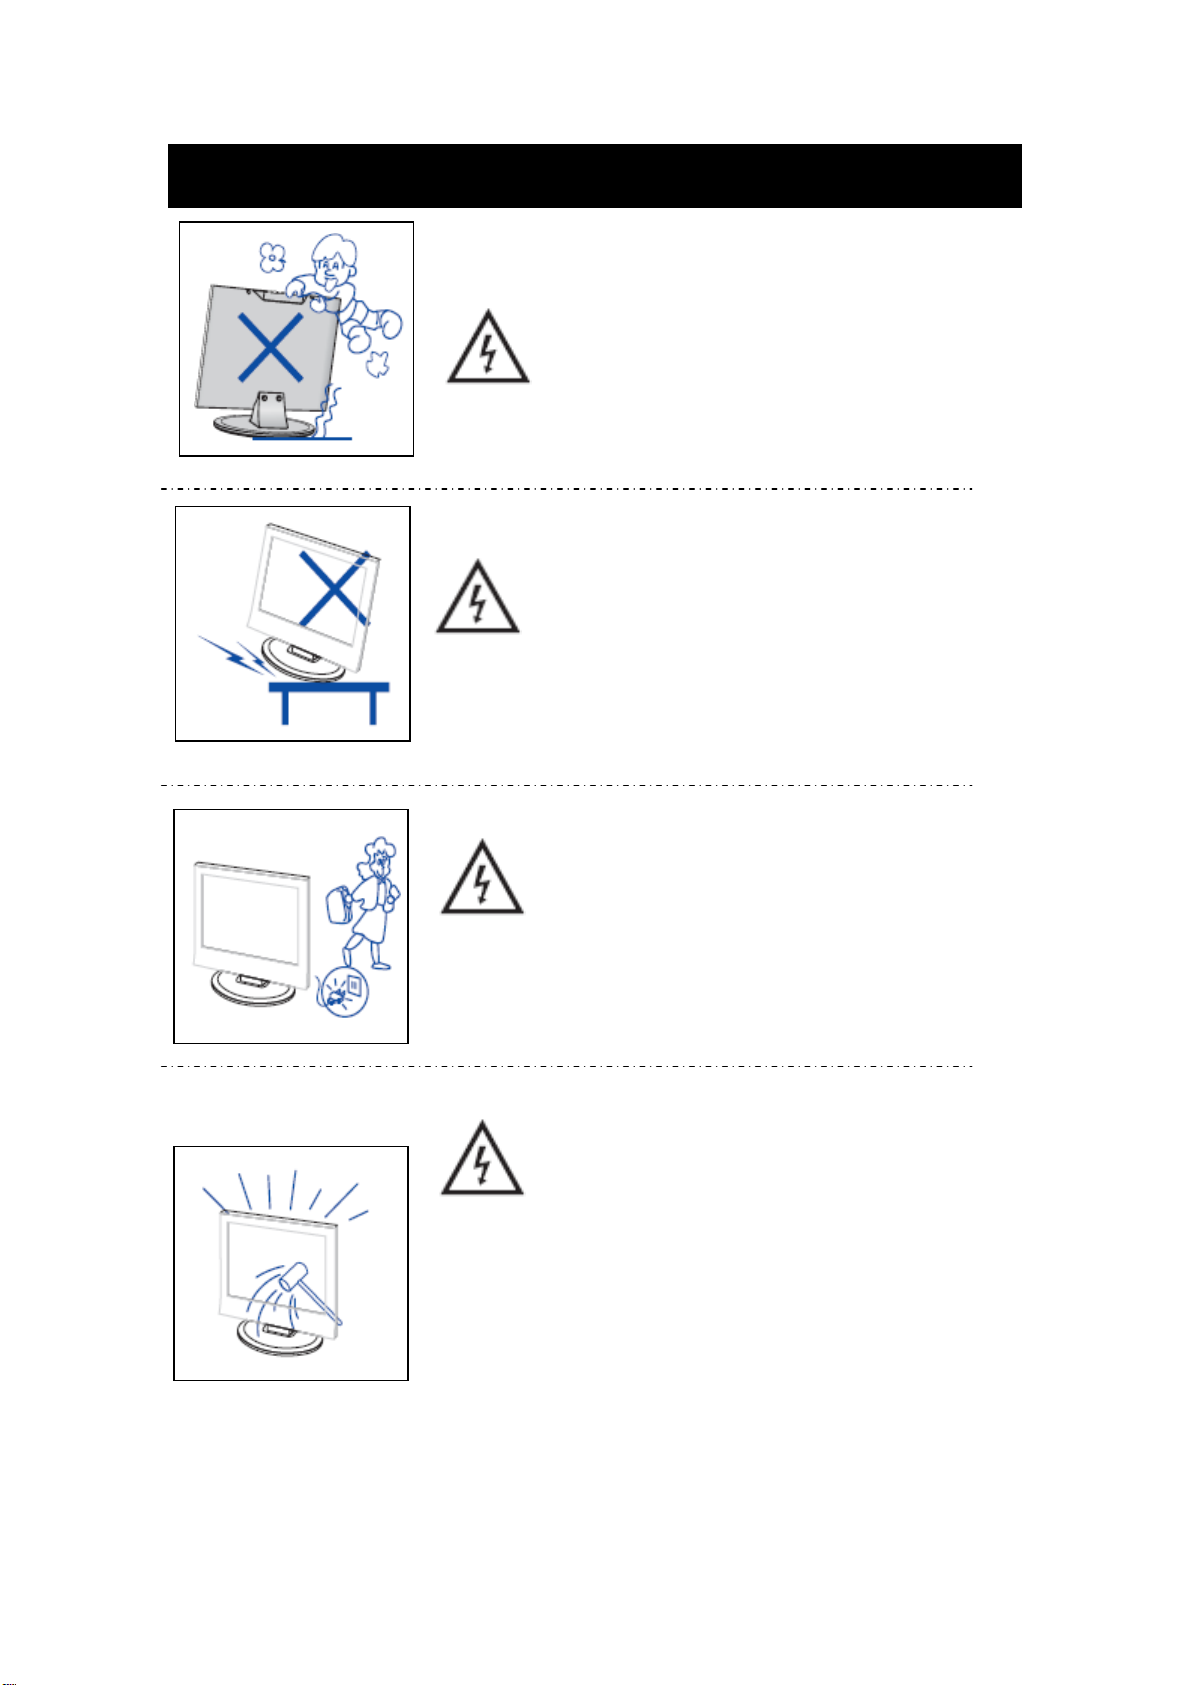
Pr
ecaución
ecaución
Pr
Nunca se pare sobre, se recar
su soporte. Debe prestar atención especial a los niños.
ecaución
Pr
No coloque l
inestable con llantas, estante o mesa. Puede resultar en
heridas serias a individuos o daños al televisor si esto
a unidad principal sobre un soporte de
gue o empuje el producto o
falla.
ecaución
Pr
Cuando el producto no se utiliza durante un periodo
extendido de
corriente alterna del enchufe AC.
ecaución
Pr
El panel LED usado en
vidrio y por lo tanto es frágil. Este producto no debe
dejarse caer o golpearse. Si el Panel LED se rompe
tenga cuidado de no lastimarse con el vidrio roto.
tiempo, se recomienda desconectar la
este producto está hecho de
6
Page 30
Descripción de la unidad principal
Función del botón del panel de contr
VOL+ :
Incrementar volumen.
ol
VOL- : Disminuir volumen.
CH+ : Siguiente canal de la TV.
CH- : Anterior canal de la TV.
MENU : Presione para seleccionar el menú principal.
FUENTE: Seleccione las fuentes de entrada
ENCENDIDO: Presionando el interruptor de encendido/modo inactivo.
Conexiones de terminales de la
TV
erminal de salida de AURICULAR
1. T
2. Terminal de salida coaxial.
3. Terminal de entrada de audio para componente video/video
4. Terminal de entrada de video/componente video.
5. Terminal de entrada HDMI1
6. Terminal de entrada HDMI2/MHL
7. Terminal de entrada HDMI3
8. Señal de simulación de terminal de entrada VGA de la PC.
9. Terminal de entrada del audio PC
10. Antena RF
11. Terminal de entrada USB (Archivos JPEG).
7
Page 31
Control remoto
# Botón Descripción
10
FAVORITE
Operación USB
11
Presione para abrir los Favoritos.
Presione para iniciar la reproducción de fotografías.
Presione para pausar la reproducción de fotografías.
Presione para detener la reproducción de fotografías.
Presione para rebobinar rápido.
Presione para avanzar rápido.
Presione para ver fotografías anteriores.
Presione para ver fotografías siguientes.
Presione para abrir la lista de FUENTE DE
INPUT
12
En modo TV, presione para regresar al canal
(return)
13
anterior.
14
15
(home)
16
17
18
19
20
Presione
INFO*
Presione para activar o des
CCD
Presione para silenciarel sonido.
MUTE
Presionenuevamente para restablecerlo.
CH /CH
Presione para seleccionar el modo de audio para
MTS/SAP
ENTRADA, presione en el control remoto para
seleccionar la fuente
pr
esione ENTER (Intro)
Presione para navegar los menús en pantalla y
ajustar las configuraciones.
Presione para abrir el menu ROKU. (No
disponible)
para mostrar la información de estado
del TV, tal como el número de canal, nom bre del
canal (si está disponible), o la señal.
Puede seleccionar CC O_, CC On, o CC Onen
modo Silencio.
Presione para cambiar los canales de TV.
un programa analógico. Puede seleccionar los
siguientes modos:
Mono—Seleccione esta opción si hay ruido o
estática en fuentes estéreo de poca intensidad.
Stereo—Seleccione esta opción para
programas que se emiten en estéreo.
SAP—Seleccione esta opción para escuchar
un programa de audio secundario, si está
disponible.
de entrada de video, luego
activar los subtítulos.
# Botón Descripción
(power)
1
Números Presiónelos para ingresar los números de canal y
2
3
4
ENTER Presione para confirmar selecciones o cambios.
MENU Presione para abrir el menú en pantalla.
5
EXIT Presione para cerrar el menú en pantalla.
6
ASPECT Presione para cambiar el modo de
7
VOL+/– Presione para aumentar o disminuir el volumen.
8
SLEEP Presione para definir el temporizador de modo
9
inactivo
Presione este botón para encender o apagar su
TV (modo inactivo).
la contraseña de control parental.
Presione para ingresar un número de subcanal
digital.
presentación en la pantalla (relación de
aspecto).
21
22
PICTURE
AUDIO
Presione para seleccionar el modo de imagen.
Presione para seleccionar el modo de sonido.
8
Page 32
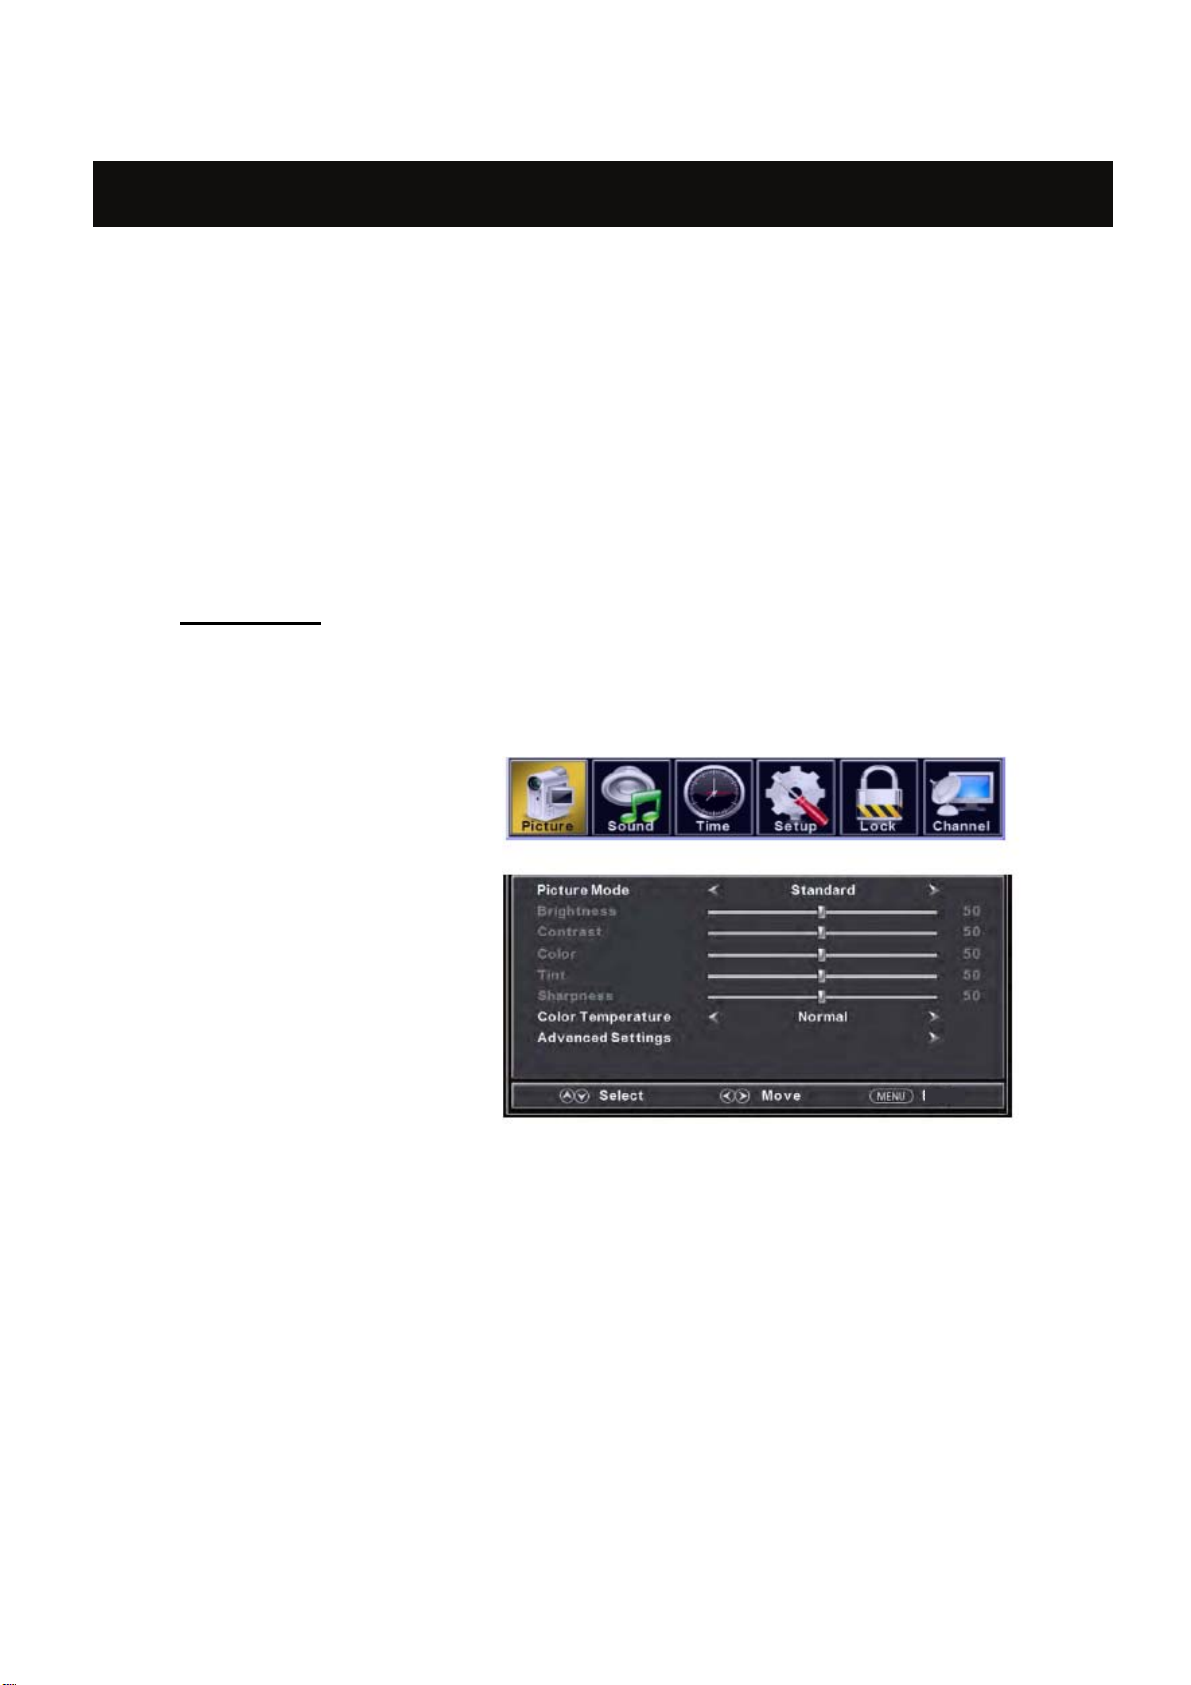
Ajuste básico de OSD
Guía de instalació
Presione
/ ►para seleccionar el MENU que quiera; Presione el botón ENTER para ingresar el sub menú;
Presione el botón ▼ / ▲ para seleccionar la opción y después presione ◄ / ► para ajustar el
valor en el sub menú; Puede presionar el botón MENU para regresar al menú superior o el botón
EXIT para cerrar el OSD.
el botón MENU para mostrar el MENÚ PRINCIPAL OSD; Presione el botón ◄
n
IMAGEN:
seleccionar el tipo de imagen que mejor corresponde a lo que está viendo. Presione el botón
Puede
“MENU” para ingresar al menú OSD. Después presione el botón “e/f” para seleccionar el botón
“PICTURE”. Y presione el botón “Enter” (Intro) para ingresar al submenú.
1. Presione el botón “d” para
seleccionar “Picture Mode (Modo
de imagen)”, presione el botón
” para
e/f
“
2. Presione el botón “c/d” para
seleccionar el "Brillo" y presione
el botón “e/f” para ingresar al
menú de ajuste de brillo para
ajustar el brillo.
3. Presione el botón “c/d” para
seleccionar el " Contrast
(Contraste)" y presione el botón
“e/f” para ingresar al menú de ajuste de contraste para ajustar el contraste.
4. Presione el botón “c/d” para seleccionar el " Color (Color)" y presione el botón “e/f” para
ingresar al menú de ajuste de color para ajustar el color.
5. Presione el botón “c/d” para seleccionar el " Tint (Tinte)" y presione el botón “e/f” para
ingresar al menú de ajuste de tinte para ajustar el tinte.
Nota:
6. Presione
para ingresar al menú de ajuste de nitidez para ajustar la nitidez.
7. Presione el botón “c/d” para seleccionar la " Color Temperature (Temperatura de color)" y
presione el botón “e/f” para seleccionar.
8. Presione el botón “c/d” para seleccionar la " Advanced Setting (Configuración avanzada)" y
presione el botón “ENTER/f” para ingresar al sub menú.
seleccionar.
Return
El elemento "
el botón “c/d” para seleccionar la " Sharpness (Nitidez)" y presione el botón “e/f”
Tint (
T
inta)" se usa solo en el modo NTSC.
9
Page 33
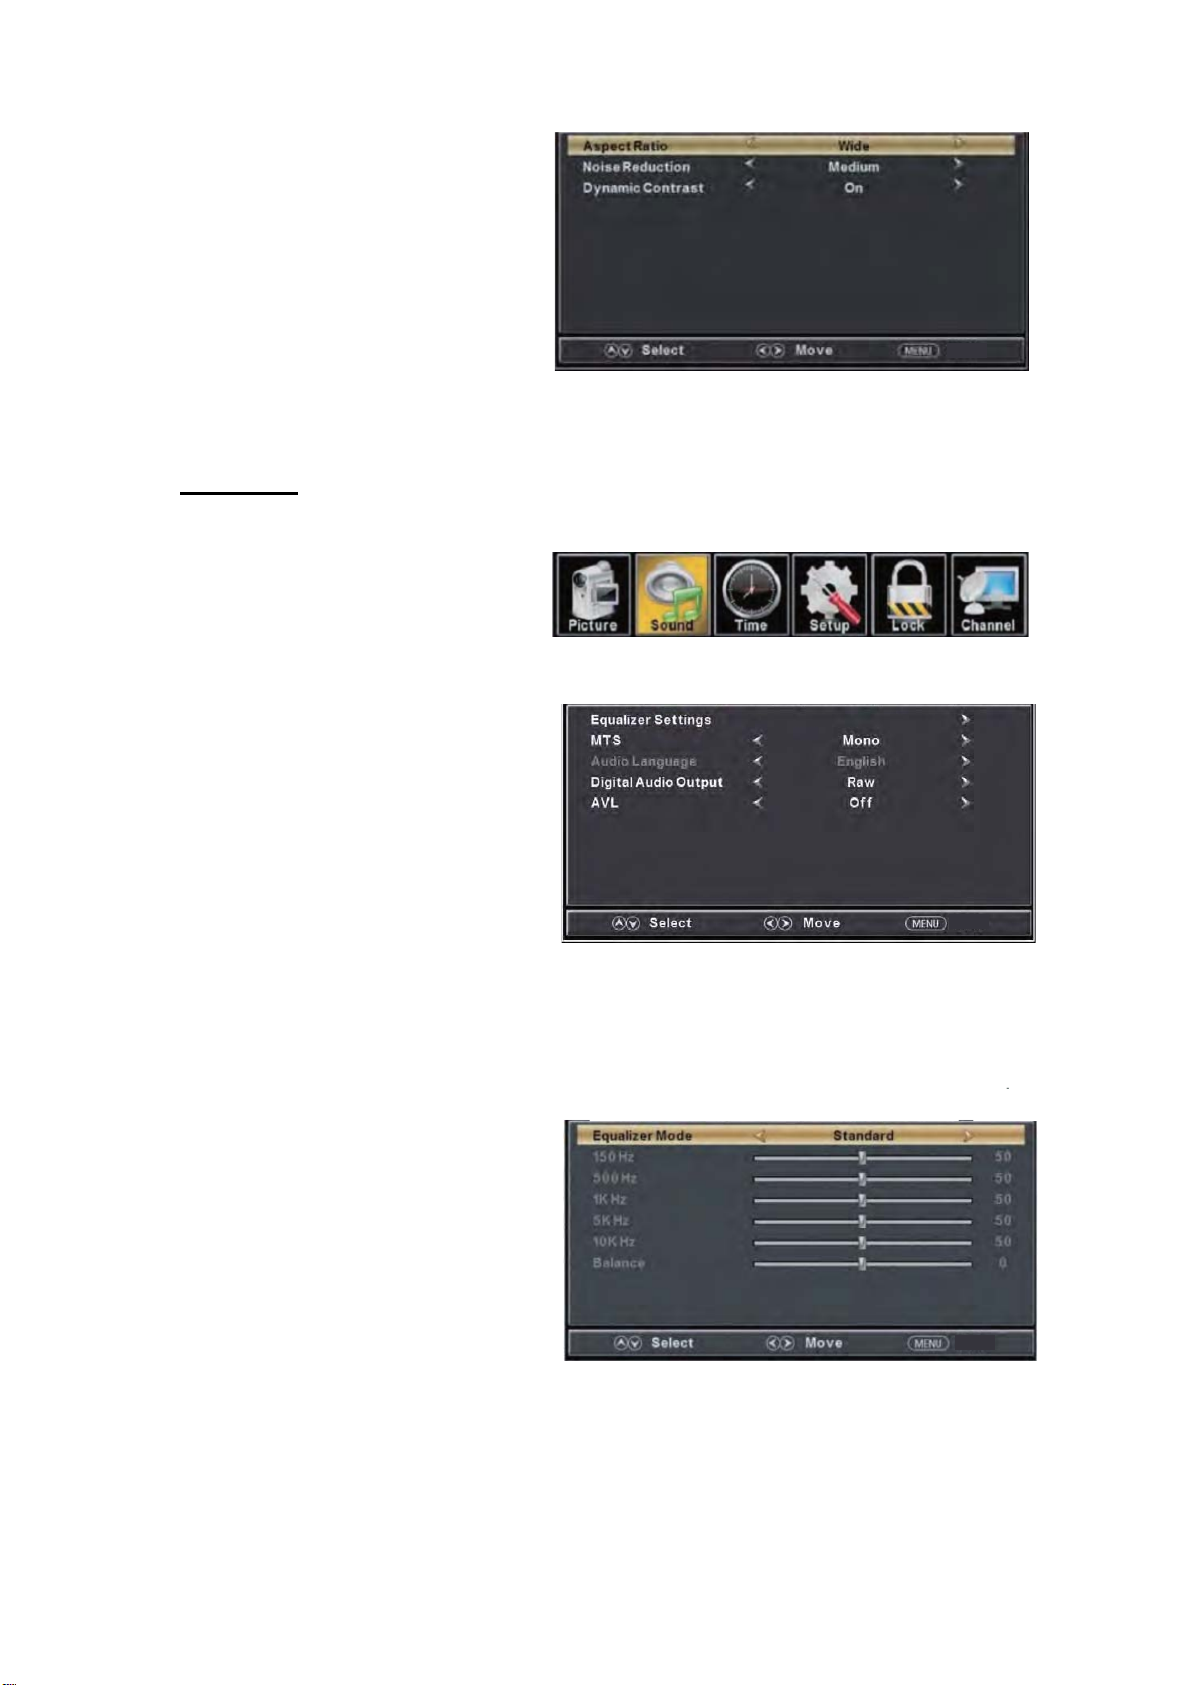
a. Presio
ne el botón “c/d” para
seleccionar " Aspect Ratio (Radio de
aspecto)" y presione el botón “e/f” para
seleccionar.
b. Presione el botón “c/d” para
seleccionar " Noise Reduction (Reducción
de ruido)" y presione el botón “e/f”
para seleccionar.
Return
c. Presione el botón “c/d” para
seleccionar " Dynamic Contrast (Contraste dinámico)" y presione el botón “e/f” para seleccionar
" On (Encender)" o " Off (Apagar)".
SONIDO
Puede seleccionar
el tipo de sonido que mejor corresponde a lo que está
escuchando.
Presione
seleccionar el menú "SOUND" (SONIDO). Y presione el botón “Enter” (Intro) para ingresar al
submenú.
1. Presi
“Ajustes del ecualizador” y presione el
botón “Enter” (Intro) para ingresar al
submenú.
a. Presione el botón “c/d” para seleccionar
el “Modo de ecualizador”. Presione el botón
“e/f” para seleccionar entre el menú.
b. Presione el botón “c/d” para seleccionar “150Hz”. Presione el botón “e/f” para seleccionar
entre el menú.
c. Presione el botón “c/d” para seleccionar “500 Hz”. Presione el botón “e/f” para seleccionar
entre el menú.
d. Presione el botón “c/d” para seleccionar “1K Hz”. Presione el botón “e/f” para seleccionar
entre el menú.
e. Presione el botón “c/d” para seleccionar
“
para seleccionar
el botón “MENU” para ingresar al menú OSD. Después presione el botón “e/f” para
one el botón “d” para seleccionar
5K Hz”. Presione el botón “
e/f” para
entre el menú.
Return
f. Presione el botón “c/d” para seleccionar
“10K Hz”. Presione el botón “
para seleccionar
entre el menú.
e/f” para
g. Press “c/d” button to select “Balance”.
Presione el botón “
” para seleccionar entre el
e/f
menú.
Nota: Las funciones b, c, d, e, f, g solo están disponibles en modo USER (Usuario).
10
Return
Page 34
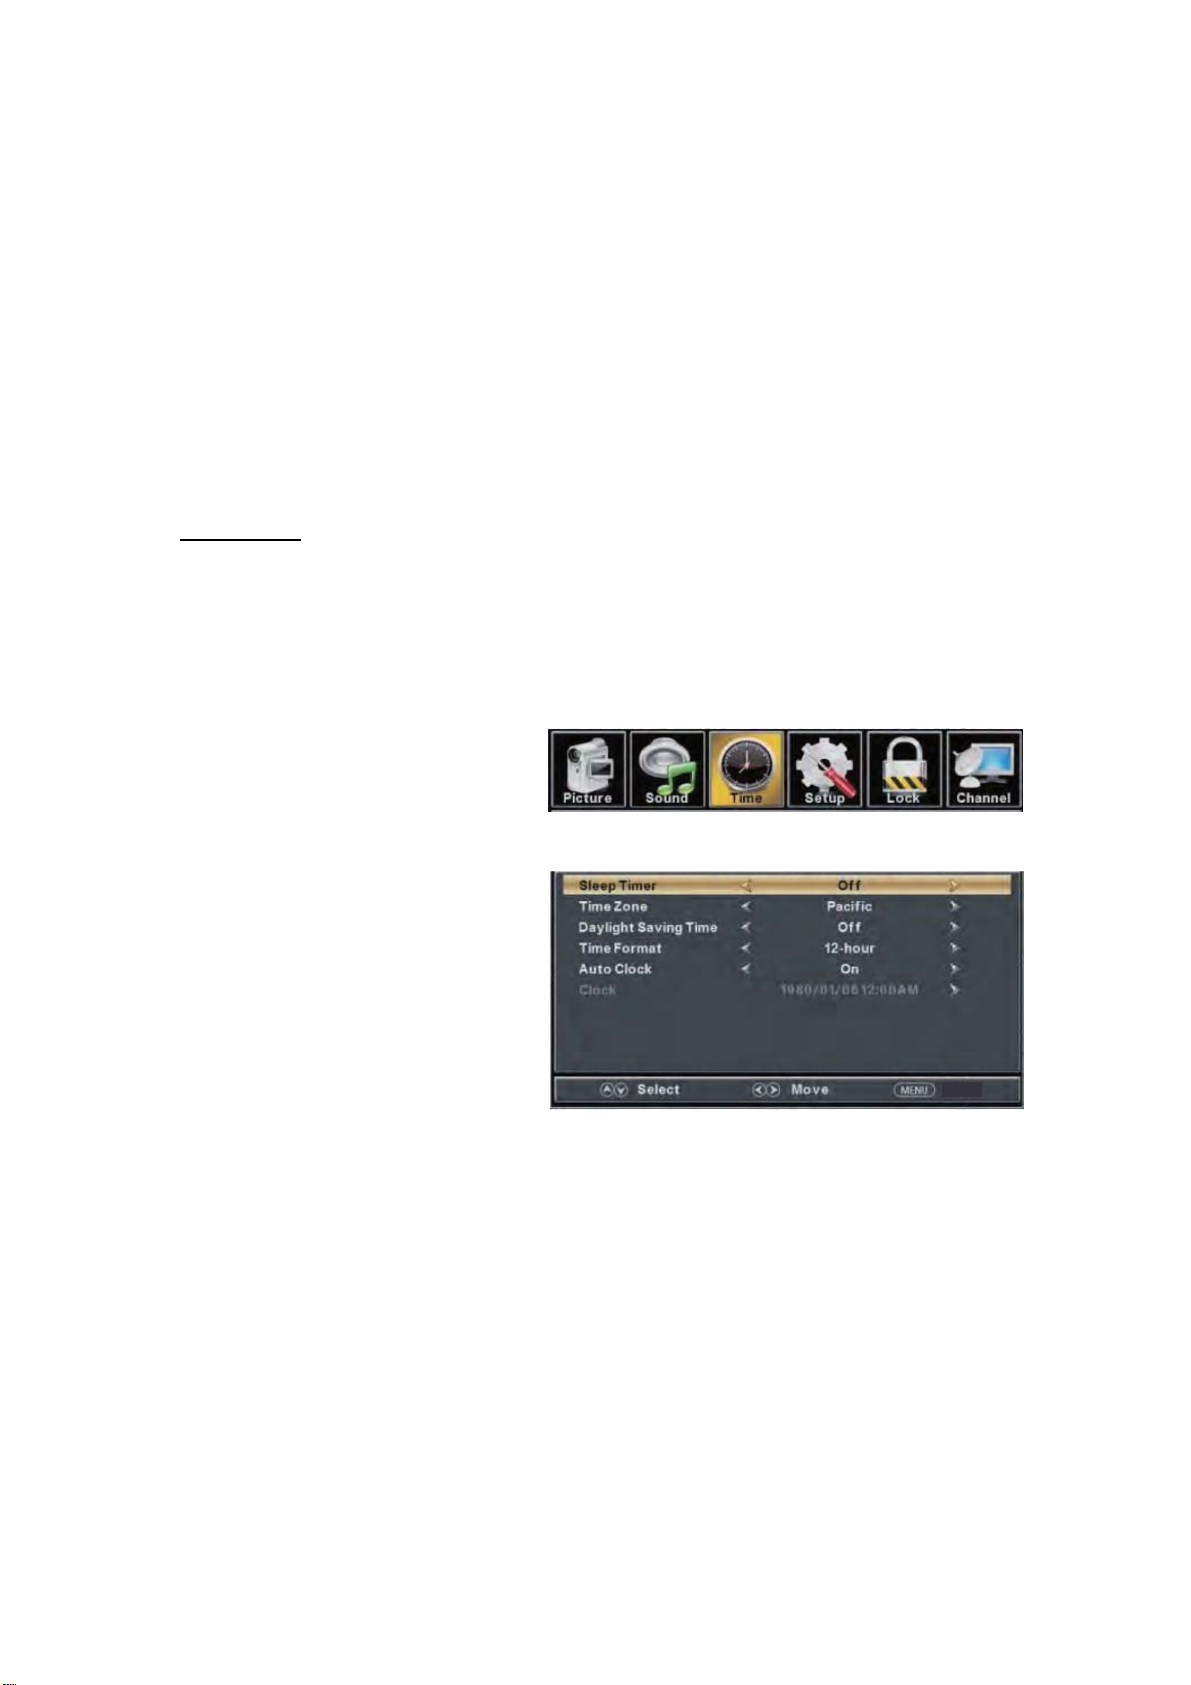
2. Presione el botón “c/d” para seleccionar “MTS” y presione el botón “e/f” para ajustar los
valores.
Nota: Solo disponible en ATV.
3. Presione el botón “c/d” para seleccionar “Idioma de audio” y presione el botón “e/f” para
ajustar los valores.
Nota: S
4. Presione el botón “c/d” para seleccionar “Salida de audio digital” y presione el botón “e/f”
para ajustar los valores.
5. Presione el botón “c/d” para seleccionar “AVL” y presione el botón “e/f” para seleccionar
“On” (Encendido) u “Off” (Apagado).
TIEMPO
olo disponible en DTV.
Pr
esione el botón “MENU” para ingresar al menú OSD. Después presione el
botón “e/f” para seleccionar el menú “TIME” (TIEMPO). Y presione el botón
“Enter” (Intro) para ingresar al submenú.
Presione
botón “e/f” para ingresar al menú de ajuste de cronómetro para dormir para ajustar el cronómetro
para dormir.
1. Presione el botón “c/d” para
sel
horaria)" y presione el botón
para ingresar al menú de ajuste de
el botón “d” para seleccionar el " Sleep Timer (Cronómetro para dormir)" y presione el
eccionar la " Time Zone (Zona
“e/f
”
zona horaria para seleccionar la zona
zona de tiempo
2. Presione el botón “c/d” para seleccionar " Daylight Saving Time (Horario de ahorro de
energía)" y presione el botón “e/f” para seleccionar " On (Encender)" o " Off (Apagar)".
3. Presione el botón “c/d” para seleccionar " Time Format (Formato de tiempo)" y presione el
botón “e/f” para seleccionar "12-hour (12 horas)" o "24-hour (24 horas)".
4. Presione el botón “c/d” para seleccionar " Auto Clock (Reloj automático)" y presione el
botón “e/f” para seleccionar " On (Encender)" o " Off (Apagar)".
5. Presione el botón “c/d” para seleccionar " Clock (Reloj)" y presione el botón “ENTER/f”
para ajustar.
local.
Return
11
Page 35
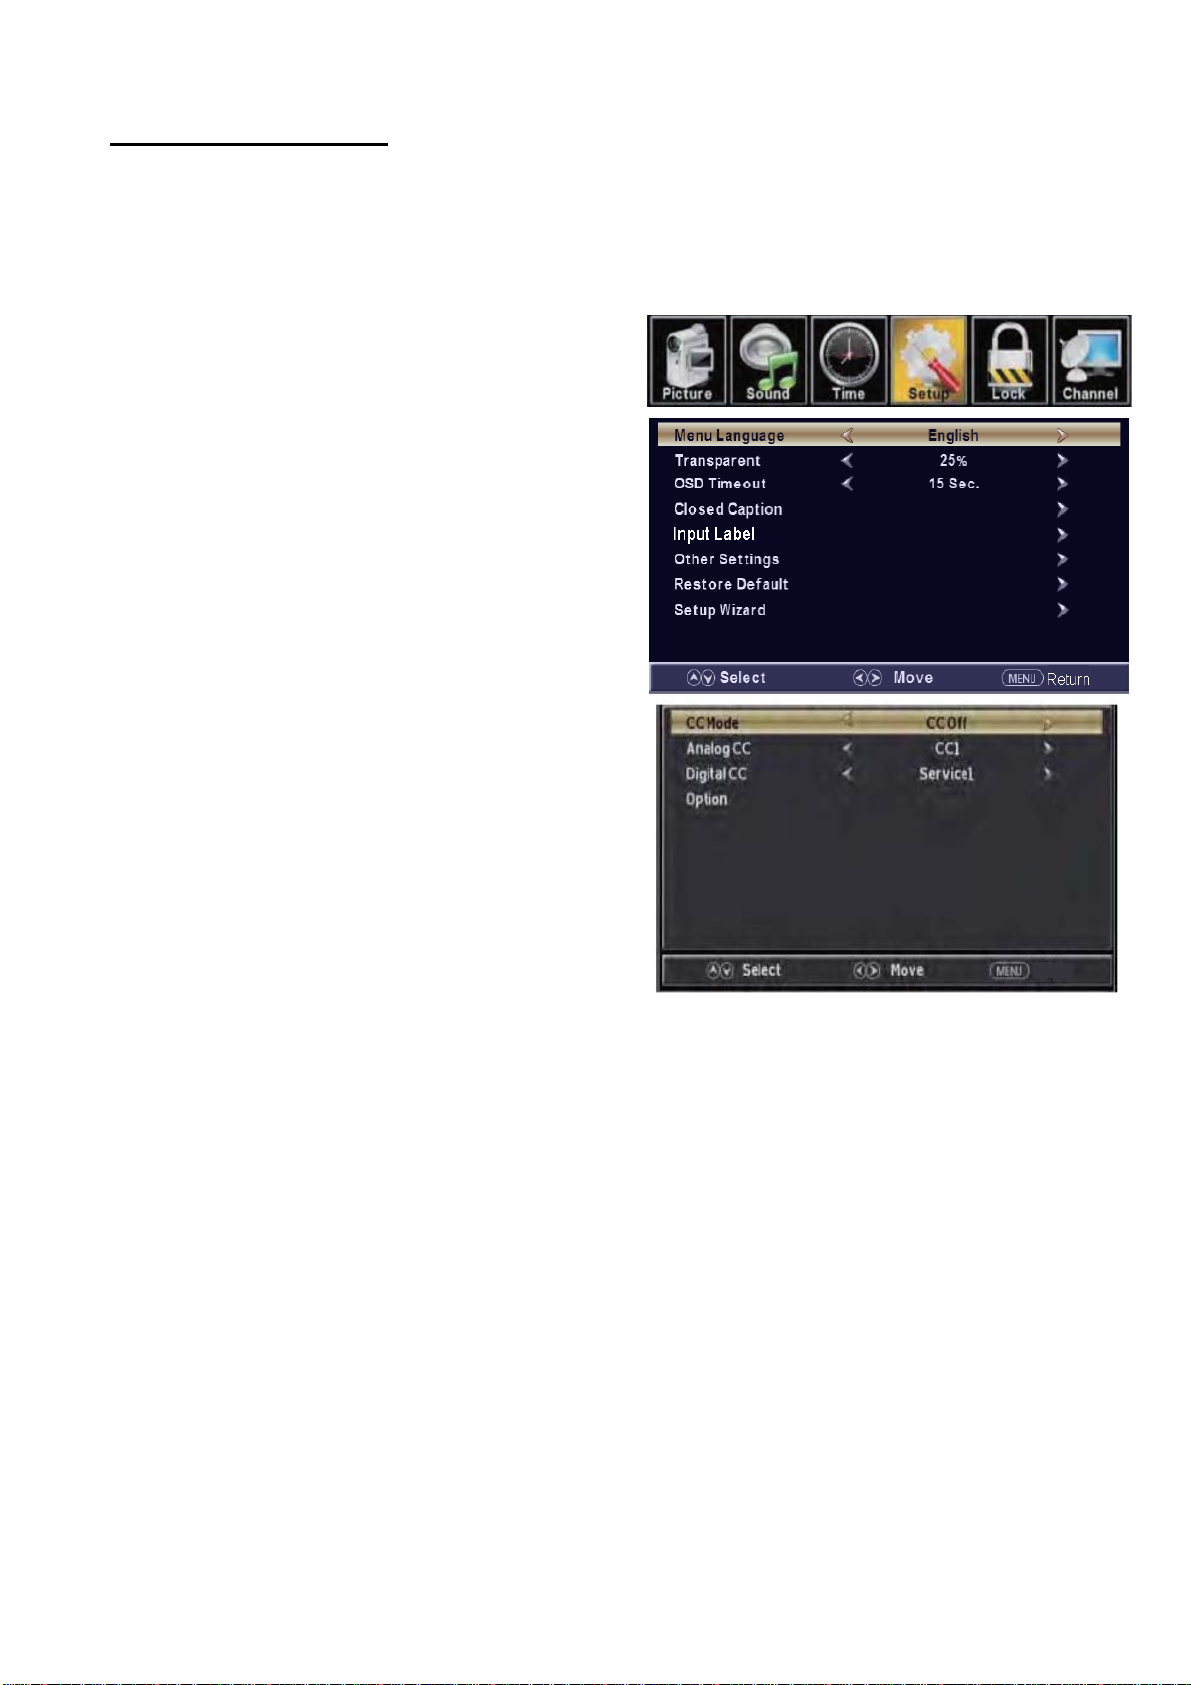
CONFIGURACIÓN
Presione el botón “ME
seleccionar el menú “Setup (Configuración)”. Y
NU” para ingresar al menú
OSD. Después presione el botón “e/f” para
presione el botón “Enter” (Intro) para ingresar al
submenú.
1. Presione el botón “d” para seleccionar “Idioma MENU” y presione el botón “e/f” para
seleccionar el idioma MENU según sus preferencias.
2. Presione el botón “c/d” para seleccionar la " Transparent
(T
ransparencia)" y presione el
seleccionar.
3. Presione el botón “c/d” para seleccionar " OSD
Timeout (Tiempo fuera de OSD)” el botón
“e/f” para ajustar el tiempo fuera de OSD.
4. Presione el botón “c/d” para seleccionar los " Closed
Closed Caption (Subtitulos)" y presione el
“ENTER/ f” para ingresar al sub menú.
botón “e/f” para
botón
a. Presione
botón “e/f” para ajustar.
b. Presione el botón “c/d” para seleccionar " Analog CC (Subtítulos análogos)" y presione el
botón “e/f” para ajustar.
c. Presione el botón “c/d” para seleccionar " Digital CC (Subtítulos digitales)" y presione el
botón “e/f” para ajustar.
d. Presione el botón “c/d” para seleccionar " Option (Opción)" y presione el botón
“ENTER/f” para ingresar al sub menú.
Nota: Las funciones c y d solo están disponibles en DTV.
Nota: La opción ajusta la configuración de subtitulos digitales.
el botón “c/d” para seleccionar el " CC Mode (Modo de subtítulos)" y presione el
Return
12
Page 36
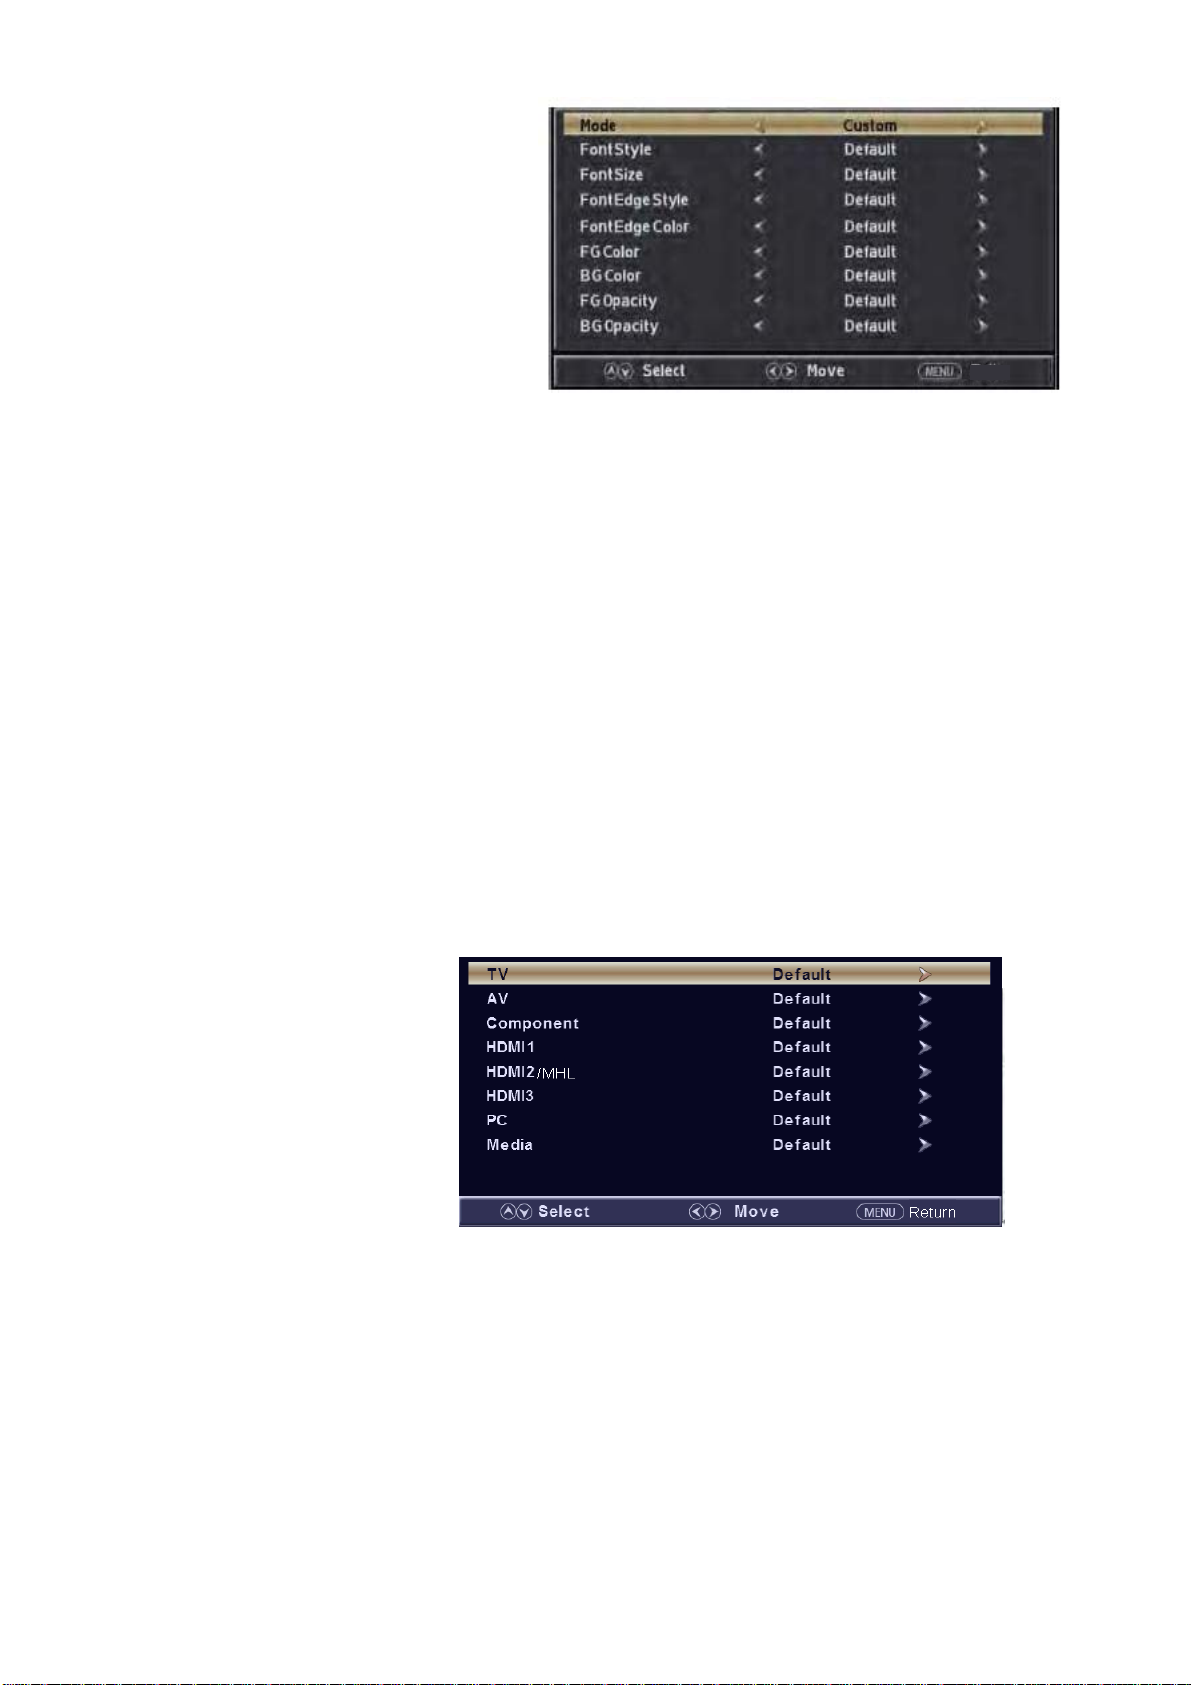
(a). Presione el botón “c/d” para
seleccionar el " Mode (Modo)" y
presione el botón “e/f” para ajustar.
(b). Presione el botón “c/d” para
seleccionar " Font Style (Estilo de
letra)" y presione el botón “e/f” para
ajustar.
(c). Presione el botón “c/d” para
seleccionar " Font Size (Tamaño de
Return
letra)" y presione el botón “e/f” para
ajustar.
(d). Presione el botón “c/d” para seleccionar " Font Edge Style (Estilo de bordes de letras)" y
presione el botón “e/f” para ajustar.
(e). Presione el botón “c/d” para seleccionar " Font Edge Color (Color de bordes de letras)" y
presione el botón “e/f” para ajustar.
(f). Presione
el botón “c/d” para seleccionar " FG Color (Color FG)" y presione el botón
“e/f” para ajustar.
(g). Presione el botón “c/d” para seleccionar " BG Color (Color BG)" y presione el botón
“e/f” para ajustar.
(h). Presione el botón “c/d” para seleccionar " FG Opacity (Opacidad FG)" y presione el botón
“e/f” para ajustar.
(i). Presione el botón “c/d” para seleccionar " BG Opacity (Opacidad BG)" y presione el botón
“e/f” para ajustar.
Nota: Todas las opciones no están disponibles en Personalizado.
5. Presione el botón “c/d” para seleccionar “Etiqueta de entrada” y presione el botón
“ENTER/f” para ingresar al submenú.
Return
Nota: La etiqueta de fuente es Crear etiquetas para los dispositivos conectados a su TV.
6. Presione el botón “c/d” para seleccionar " Other Settings (Otras configuraciones)" y presione
el botón “ENTER/f” para ingresar al sub menú.
13
Page 37
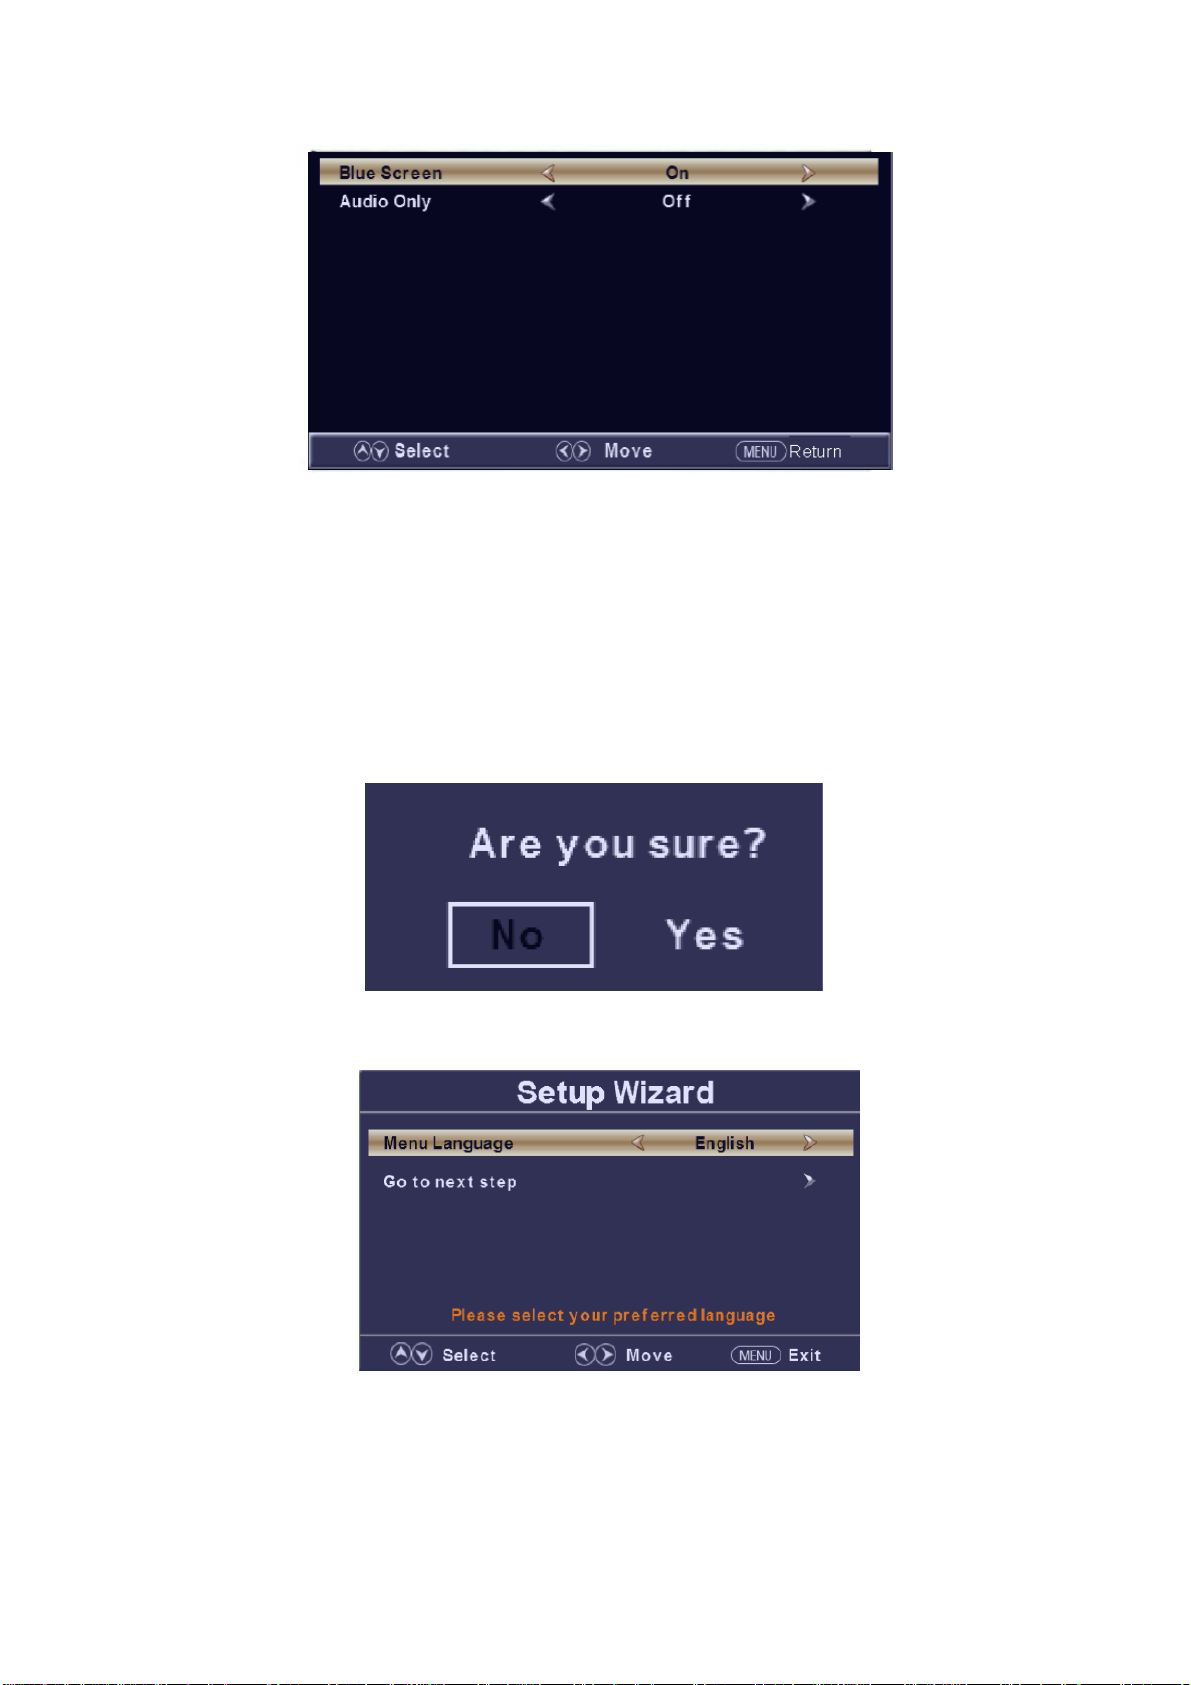
Return
a. Presione
el botón “c/d” para seleccionar " Audio Only (Solo audio)" y presione el botón
“e/f” para seleccionar " On (Encender)" o " Off (Apagar)".
b. Presione el botón “c/d” para seleccionar " Blue Screen (Pantalla azul)" y presione el botón
“e/f” para seleccionar " On (Encender)" o " Off (Apagar)".
Al seleccionar “On” (Encendido), solo se escucha el sonido y la pantalla aparece oscura; al
seleccionar “Off” (Apagado), el TV funciona normalmente.
7. Presione el botón “c/d” para seleccionar " Restore Default (Restaurar a
predeterminado)” y presione “ENTER/f”, Presione el botón “e/f” seleccionando " Yes
(Sí)" para restaurar todas las configuraciones a las configuraciones predeterminadas.
esione el botón “c/d” para seleccionar " Setup wizard (Asistente de configuración)” y
8. Pr
presione el botón “ENTER” para ingresar al sub menú.
esione el botón “c/d” para seleccionar el " Menu Language (Menú del idioma)” y
a. Pr
presione el botón “e/f” para seleccionar idioma.
b. Presione el botón “c/d” para seleccionar " Go to next step (Ir al siguiente paso)" y
presione el botón “ENTER/f” para ingresar al siguiente paso.
14
Page 38
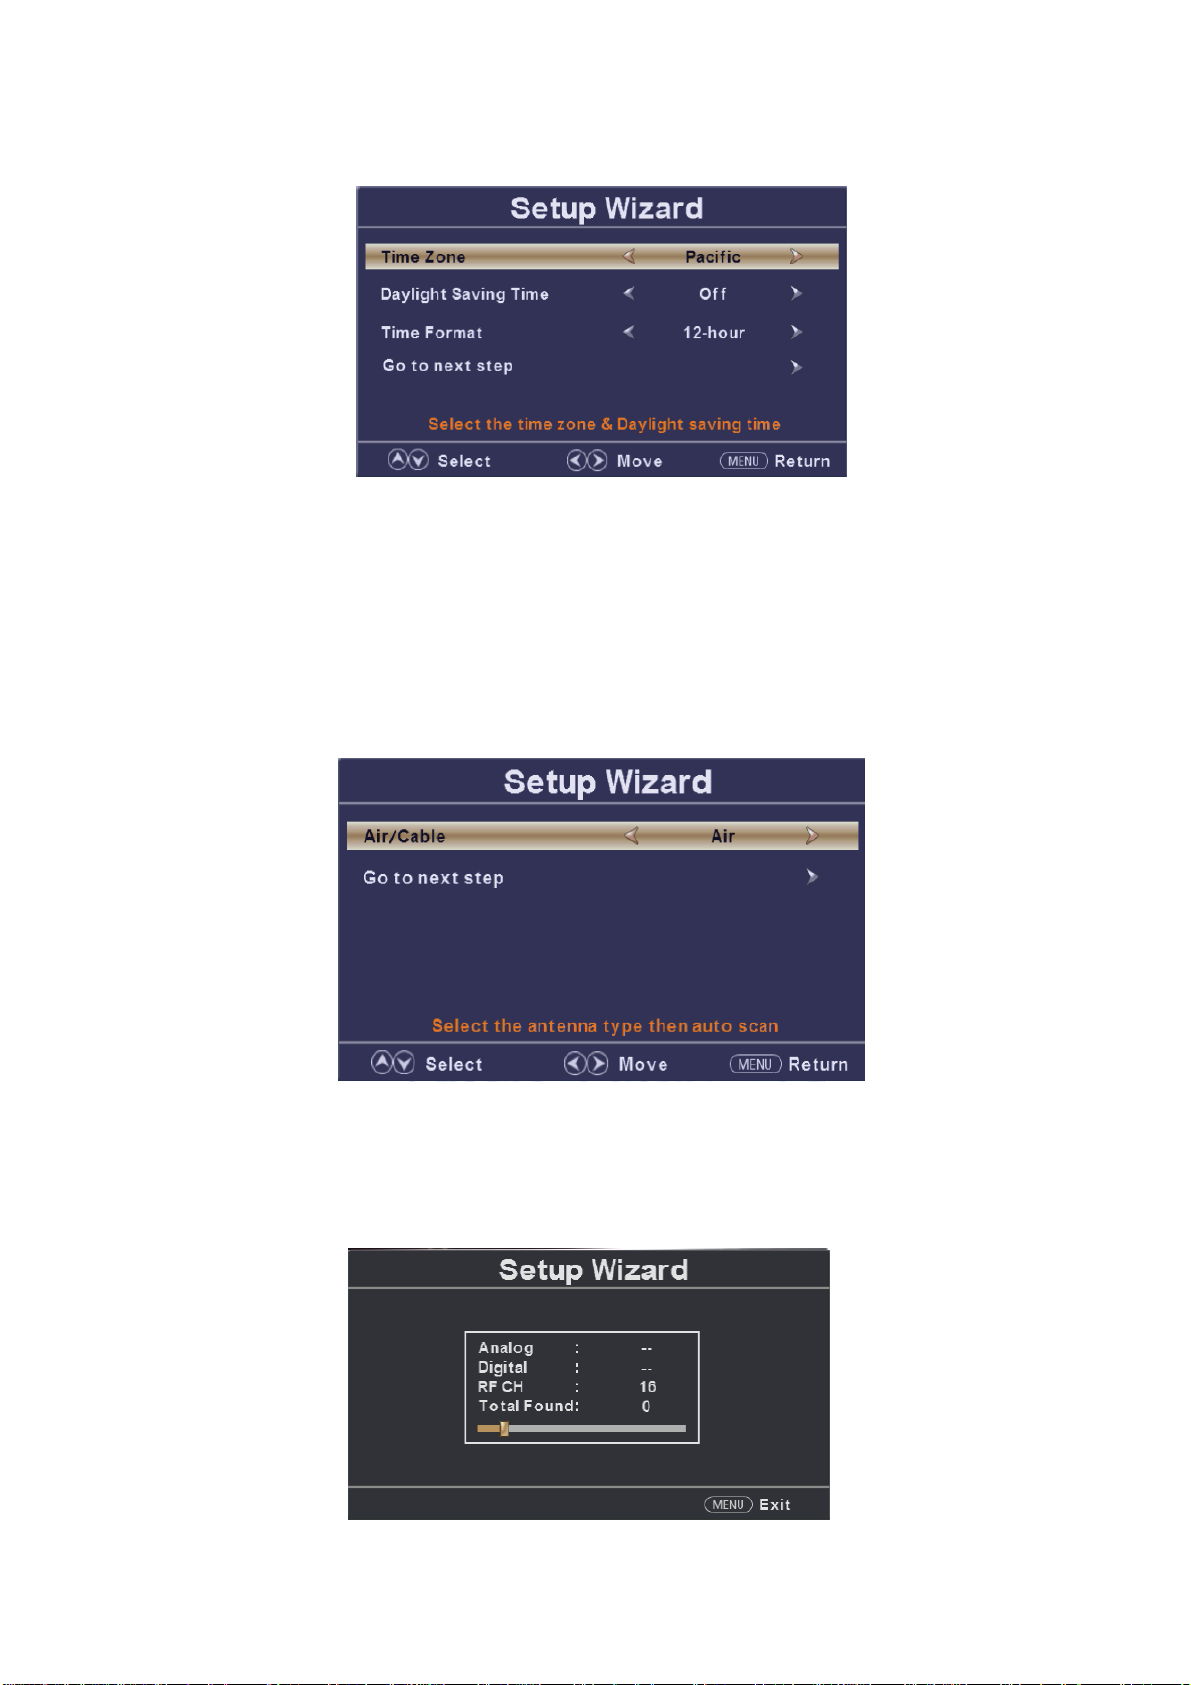
c. Pr
esione el botón “c/d” para seleccionar la " Time Zone (Zona horaria)” y presione el
botón “e/f” para seleccionar la zona horaria.
d. Presione el botón “c/d” para seleccionar " Daylight Saving Time (Horario de ahorro de
energía)” y presione le botón “e/f” para seleccionar " On (Encender)" o " Off (Apagar)”.
e. Presione el botón “c/d” para seleccionar " Time Format (Formato de hora)” y presione el
botón “e/f” para seleccionar "12-hour (12 horas)" o "24-hour (24 horas)”.
f. Presione el botón “c/d” para seleccionar " Go to next step (Ir al siguiente paso)" y
presione el botón “ENTER/f” para ingresar al siguiente paso.
g. Pr
esione el botón “c/d” para seleccionar " Air/Cable (Aire/cable)” y presione le botón
“e/f” para seleccionar " Air (Aire)" o " Cable (Cable)”.
h. Presione el botón “c/d” para seleccionar " Go to next step (Ir al siguiente paso)" y
presione el botón “ENTER/f” para ingresar al siguiente paso.
Nota: Buscar
plataforma tomará mucho tiempo. ¡Por favor sea paciente!
15
Page 39
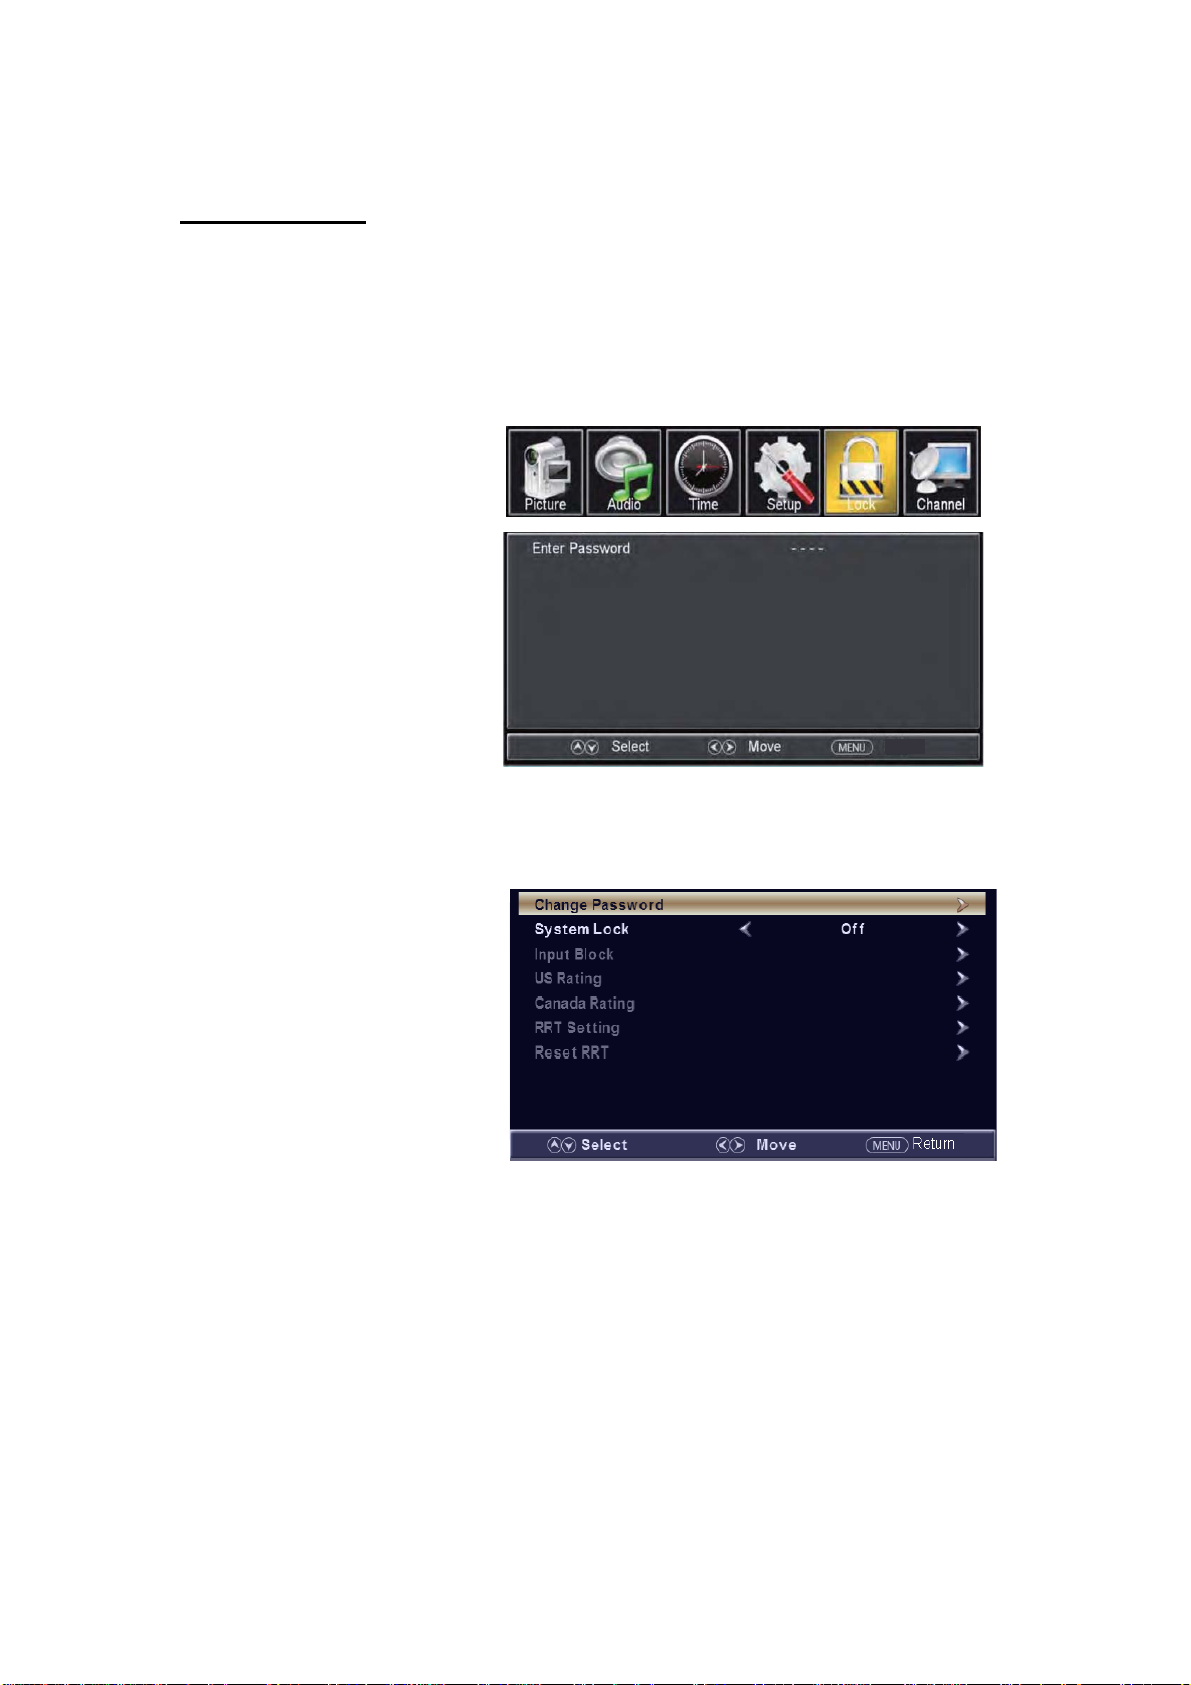
BLOQUEAR
esione el botón “MENU” para ingresar al menú OSD. Después presione el
Pr
botón “e/f” para seleccionar el menú “Lock (Bloquear)”. Y presione el botón
“Enter” (Intro) para ingresar al submenú.
1. Presione
seleccionar el botón digital para ingresar.
Nota: La contraseña predeterminada es "0000"
el botón “d” para seleccionar " Enter Password (Ingresar contraseña)" y presione
Return
Return
Return
Return
Presione
2.
presione el botón
Si la contraseña se cambia, todas las contraseñas en el menú se cambiarán al mismo tiempo.
el botón ▼ / ▲ para seleccionar " Change Password (Cambiar contraseña)", después
“ENTER/f” para ajustar el valor.
Return
Nota: Si o
Presione el botón “c/d” para seleccionar " System Lock (Bloqueo del
3.
lvida su contraseña puede usar "1470” para ingresar a cualquier menú bloqueado.
sistema)” y presione le botón “e/f” para seleccionar " On (Encender)" o " Off
(Apagar)”.
4. Presi
botón
one el botón ▼ / ▲ para seleccionar " Input Lock (Ingresar bloqueo)", después presione el
“ENTER/f”
para
ajustar el valor.
a. Presione el botón “c/d” para s
eleccionar "TV” y presione le botón “e/f” para
seleccionar " Block (Bloquear)" o " Unblock (Desbloquear)”.
b. Presione el botón “c/d” para s
eleccionar "AV” y presione le botón “e/f” para
seleccionar " Block (Bloquear)" o " Unblock (Desbloquear)”.
16
Page 40
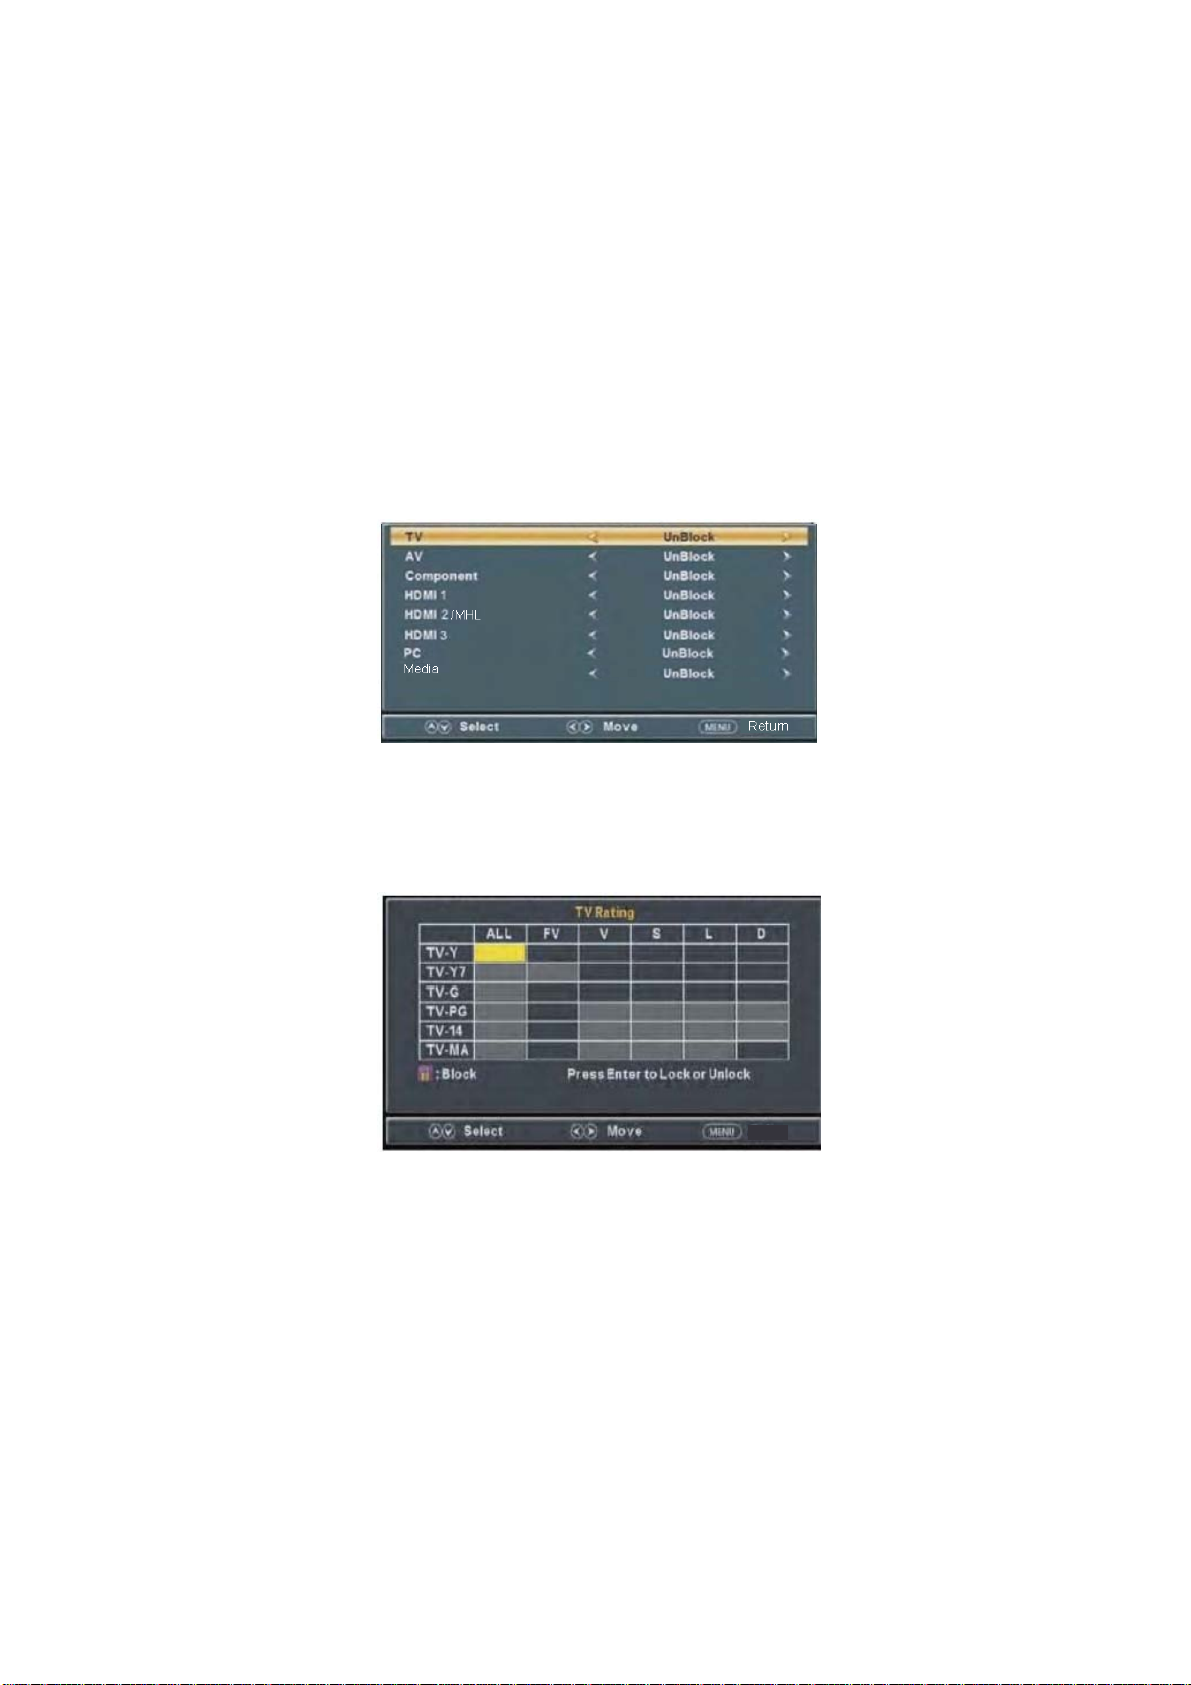
c. Presione el botón “c/d” para seleccionar “Component (Componente)” y
presione el botón “e/f” para seleccionar " Block (Bloquear)" o " Unblock
(Desbloquear)".
d. Presione el botón “c/d” para se
leccionar "HDMI” y presione el botón “e/f”
para seleccionar " Block (Bloquear)" o " Unblock (Desbloquear)”.
e. Presione el botón “c/d” para seleccionar "PC” y presione el botón “e/f”
para seleccionar " Block (Bloquear)" o " Unblock (Desbloquear)”.
f. Presione el botón “c/d” para seleccionar "Media” y presione el botón “e/f”
para seleccionar " Block (Bloquear)" o " Unblock (Desbloquear)”.
5. Presione el botón “c/d” para seleccionar los " US Rating (Clasificación EUA)" y presione el
botón “ENTER/f” para ingresar al sub menú.
a. Presione el botón “c/d” para seleccionar los "TV" y presione el botón “ENTER/f” para
ingresar al sub menú.
Return
Presione el
b. Presione el botón “c/d” para seleccionar “MPAA” y presione el botón “e/f” para
seleccionar “Off/G/PG/PG-13/R/NC-17/X”.
6. Presione el botón “c/d” para seleccionar los " Canada Rating (Clasificación Canadá)" y
presione el botón “ENTER/f” para ingresar al sub menú.
a. Presione el botón “c/d” para seleccionar “Canada English (Inglés de Canadá)” y presione
el botón “e/f” para seleccionar “Off/C/C8+/G/PG/14+/18+”.
b. Presione el botón “c/d” para seleccionar “Canada French (Francés de Canadá)” y
presione el botón “e/f” para seleccionar “Off/G/8ans+/13ans+/16ans+/18ans+”.
7. Presione el botón “c/d” para seleccionar “RRT Setting (Configuración RRT)” y presione el
botón “ENTER/f” para ingresar el sub menú.
botón “c/d” para seleccionar y oprima “ENTER”para blooquear o desbloquear.
17
Return
Page 41
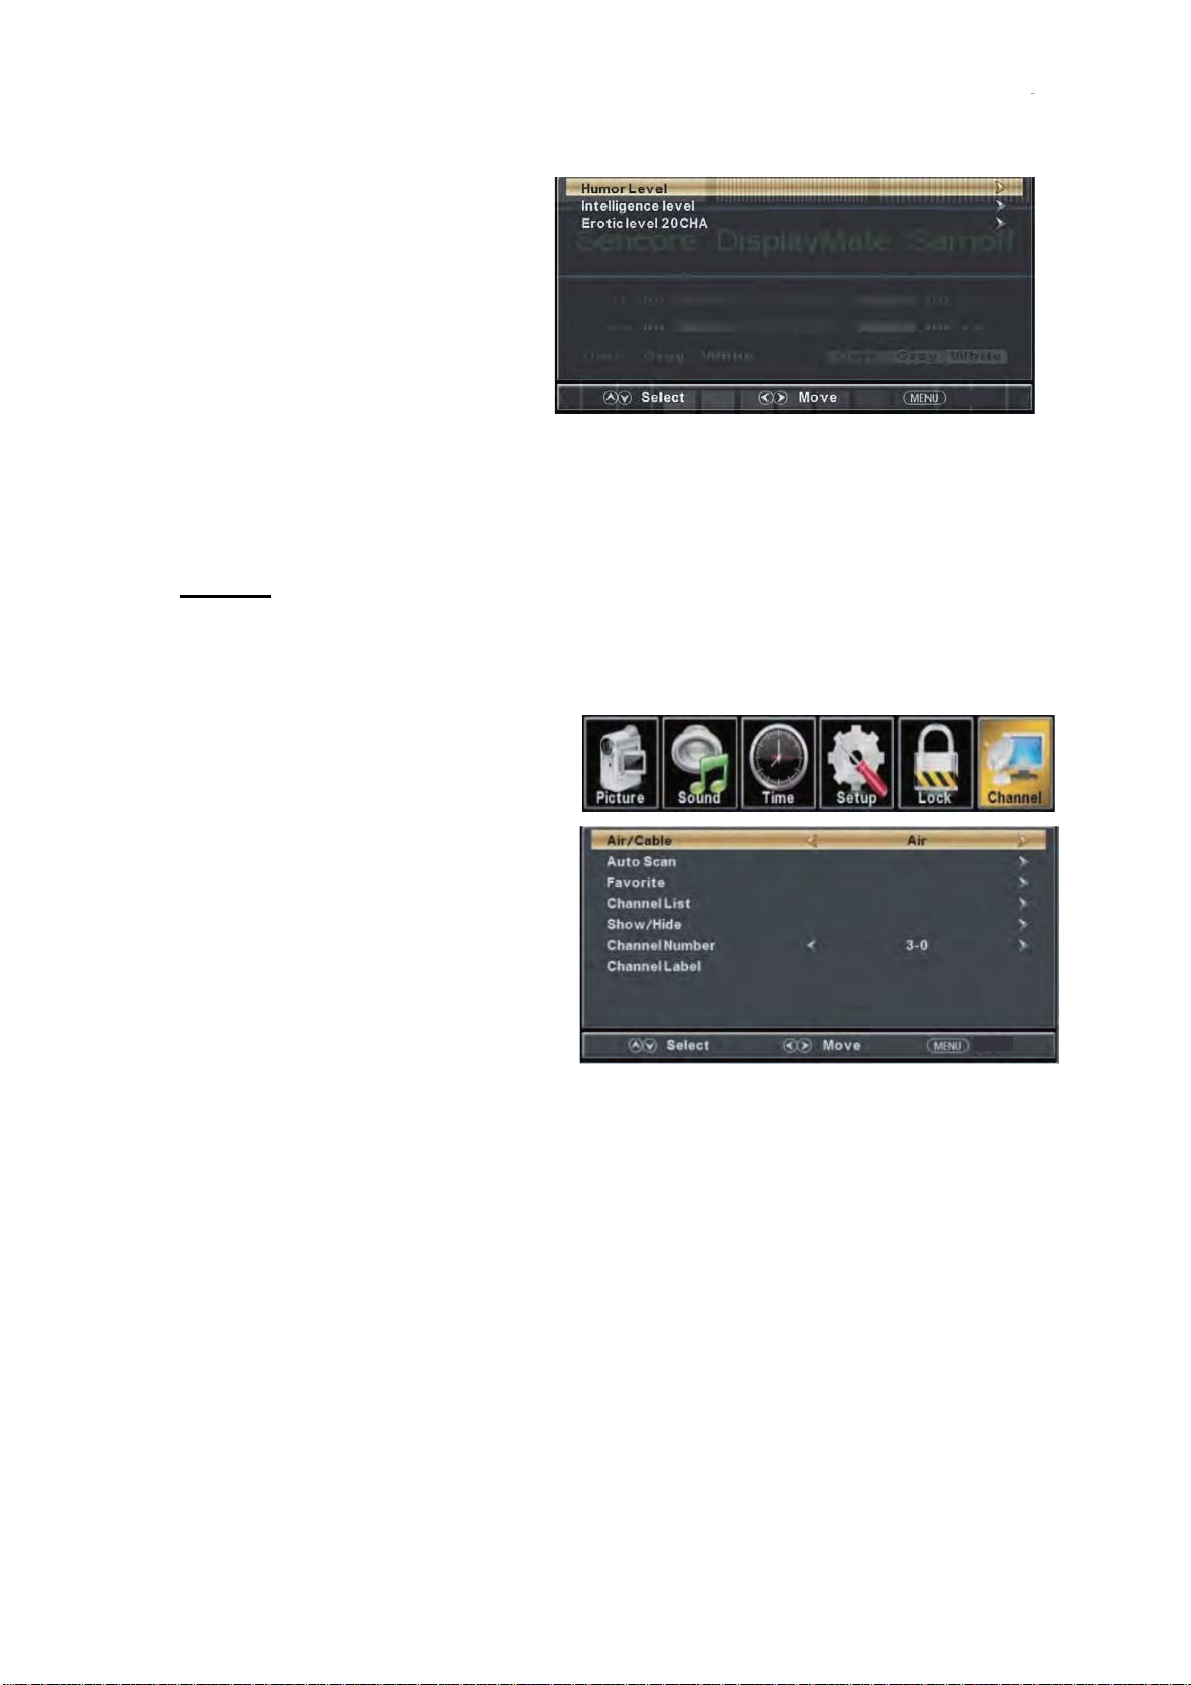
Nota:
Este elemento está disponible solamente cuando la descarga actual tiene datos de rangos para
descargar.
8. Presione el botón “c/d” para seleccionar los " Reset RRT (Restablecer RRT)" y presione el
botón “ENTER/f” para restablecer.
Return
Canal
Presione el botón “MENU” para ingresar al m
“e/f” para seleccionar el menú “Channel (Canal)”. Y presione el botón “Enter” (Intro)
para ingresar al submenú.
1.
sione el botón “d” para
Pre
seleccionar “AIR/CLABLE
(AIRE/CABLE)” y presione el botón
“e/f” para seleccionar Cable o
AIRE.
2. Presio
" Auto Scan (Auto Escaneo)" y presione el
botón “
botón
ne el botón “c/d” para seleccionar
ENTER/f
“e/f” para selec
” des
pués presione el
cionar " YES
(SI)" y presione "ENTER" para hacer un
escaneo automático.
3.
Presione el botón “c/d” para seleccionar " Favorite (Favorito)" y presione el botón
“
ENTER/f
4. Presione el botón “c/d” para seleccionar " Channel list (Lista de canales)" y presione el botón
“
ENTER/f
5. Presione el botón “c/d” para seleccionar " Show/Hide (Mostrar/Esconder)" y presione el botón
“
ENTER/f” para
6. Presione el botón “c/d” para seleccionar " Channel Number (Número de canal)" y presione el
botón “
7. Presione el botón “c/d” para seleccionar " Channel Label (Etiqueta de canales)" y presione el
botón “
e
/f
ENTER/f
ingresar.
” para
” para
ingresar.
ingresar.
”
para ajustar.
” para
ingresar.
enú OSD. Después presione el botón
Return
18
Page 42
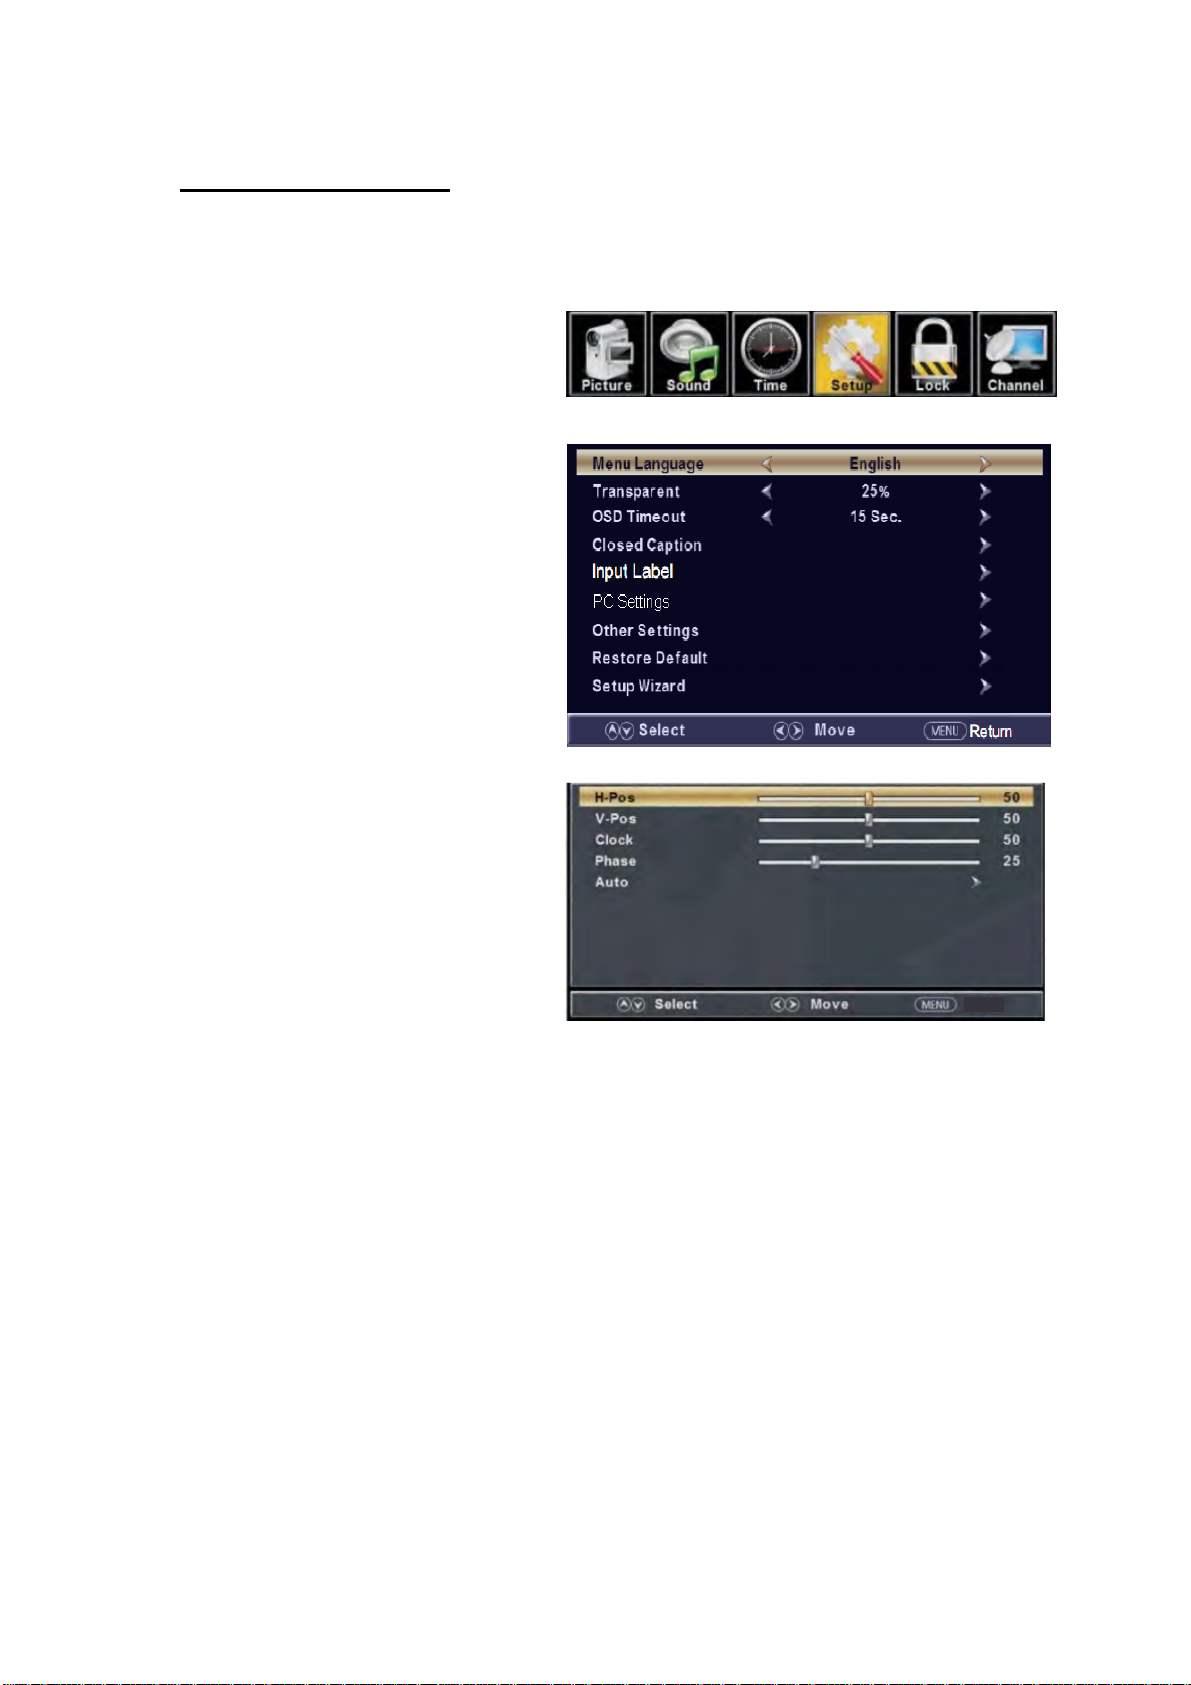
Configuración de PC
Presione el botón “ME
NU” para ingresar al menú OSD. Después presione el botón
“e/f” para seleccionar el menú “Setup (Configuración)”. Y después presione el
botón
ENTER/f
“
ara seleccionar " PC Setting (Configuración de PC)" y presione el botón
“d” p
” para
ingresar al sub menú.
1. Presione el botón “c/d” para seleccionar "H-Pos" y presione el botón “
2. Presione el botón “c/d” para seleccionar "V-Pos" y presione el botón “
3. Presione el botón “c/d” para seleccionar " Clock (Reloj)" y presione el botón “
ajustar.
4. Presione el botón “c/d” para seleccionar " Phase (Fase)" y presione el botón “
ajust
ar.
5. Presione el botón “c/d” para seleccionar "Auto" y presione el botón “
el ajuste automático.
Nota: Las imágenes relacionadas con la función se proporcionan solo con propósitos de
referencia.
” pa
e/f
” pa
e/f
e/f
e/f
ENTER/f
ra ajustar.
ra ajustar.
” para
” para
” para
Return
hacer
19
Page 43
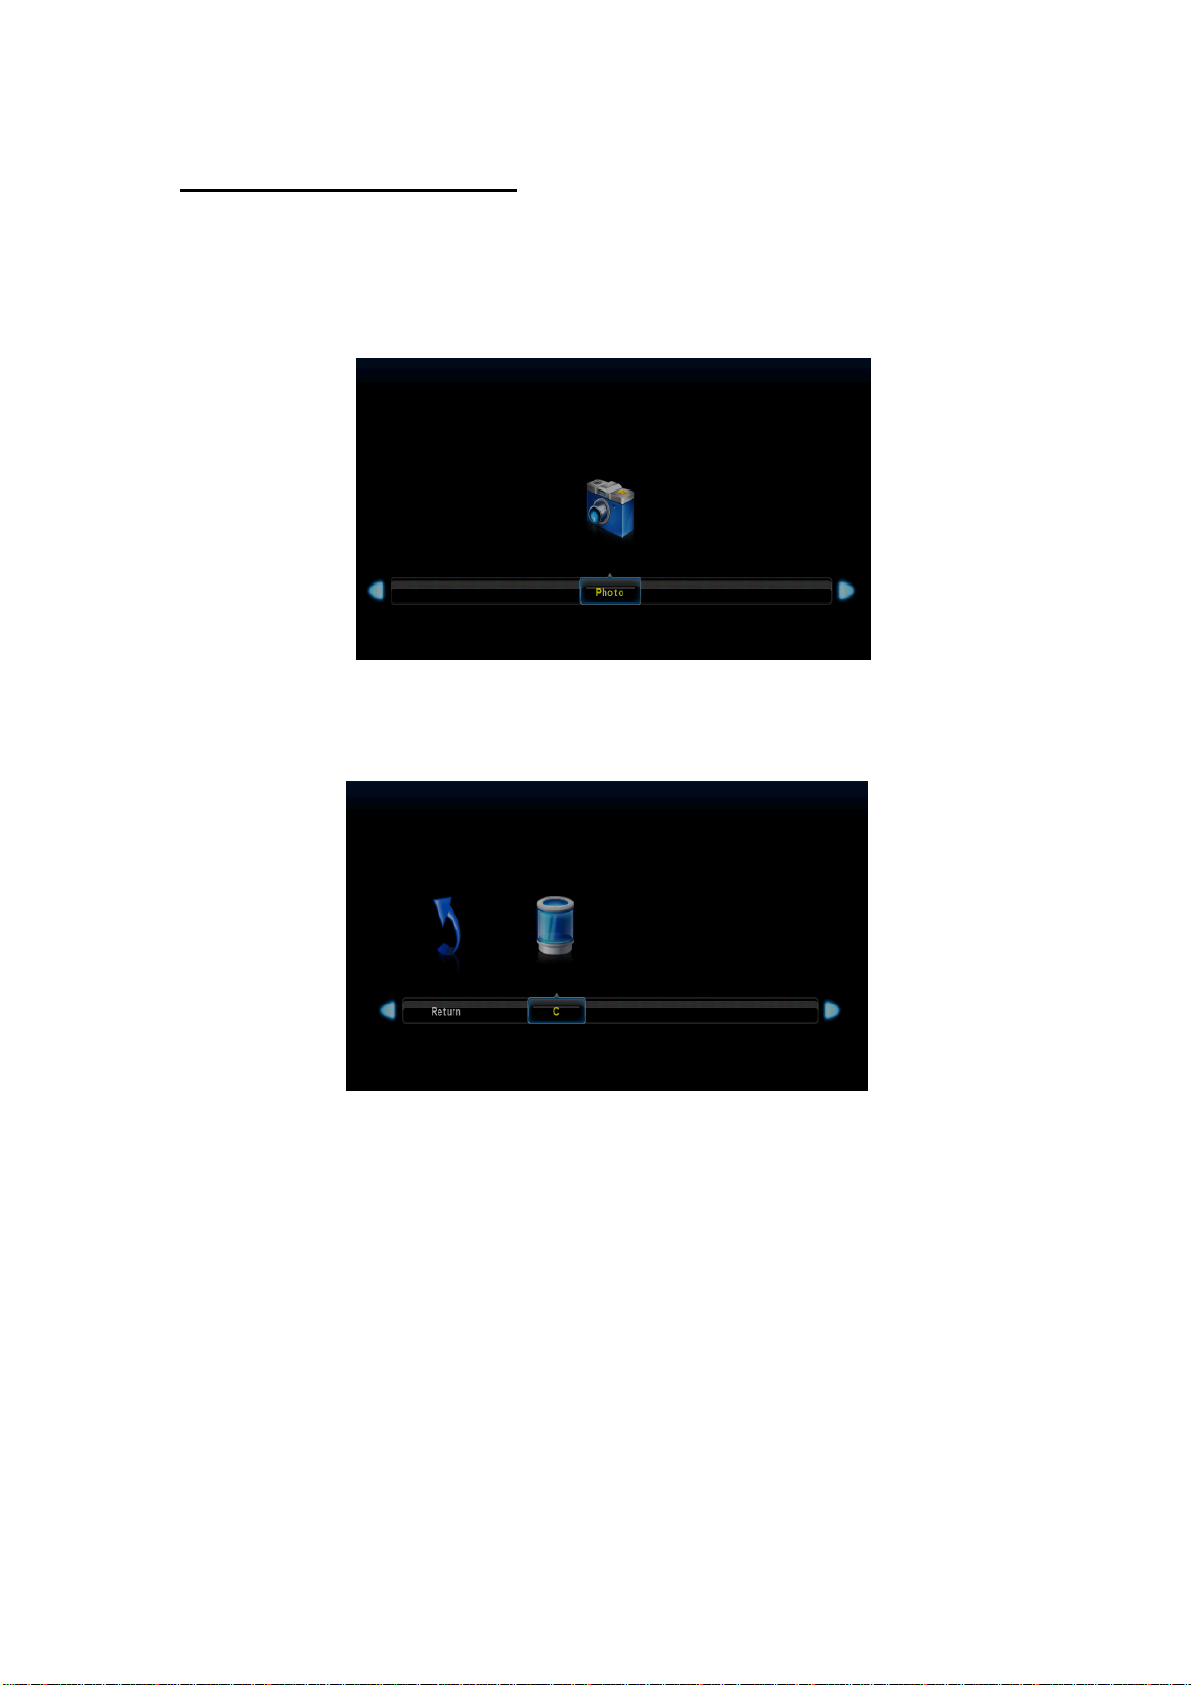
OPERACIÓN multimedia
Nota: antes de opera
r el menú Multimedia, conecte el dispositivo USB, luego presione
el botón SOURCE (Fuente) para definir la Fuente de entrada en Multimedia. Presione
el botón e/f para seleccione Multimedia en el menú Fuente, luego presione el botón
Enter para ingresar.
Presione el botón e/f para seleccionar la opción que desea ajustar en el m
Multimedia, luego presione Enter para ingresar.
enú
20
Page 44
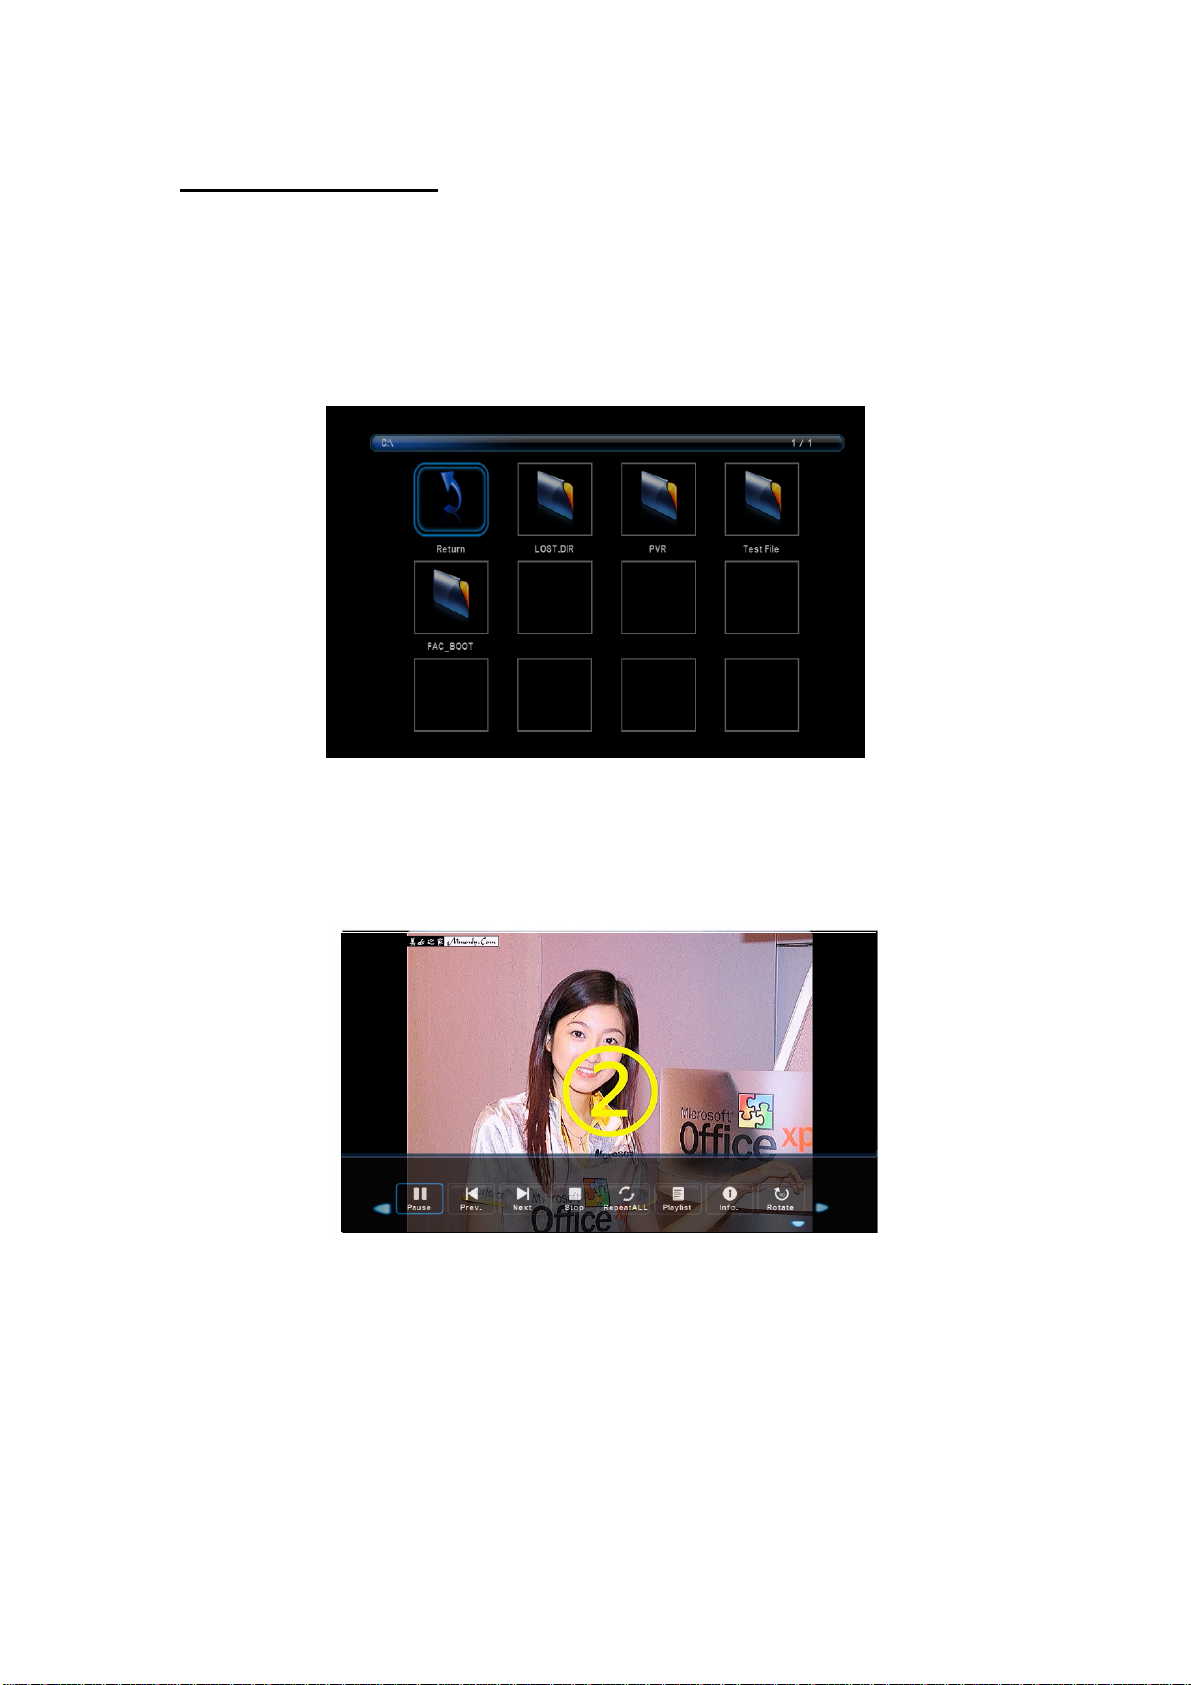
Menú de fotografías
Presione el botón e/f para seleccionar FOTOGRAFÍ
AS en el menú principal, luego
presione el botón Enter para acceder. Presione el botón de menú para regresar al menú
anterior y presione Salir para cerrar la función.
Presione el botón e/f para seleccionar la unidad de disco que desea ver, luego
presione el botón Enter para acceder. Presione el botón e/f para seleccionar la opción
de regreso al menú anterior.
Presione el botón e/f para seleccionar el archivo que desea ver en el m
enú de
selección de archivos, luego presione el botón Multimedia para mostrar las imágenes.
Al resaltar la opción seleccionada, aparecerá información del archivo al lado derecho y
la imagen será presentada en el centro.
Presione el botón e/f para seleccionar la carpeta de archivos que desea buscar en el
enú de selección de archivos, luego presione el botón rojo o Enter en su control
m
remoto para ingresar al submenú.
Presione el botón e/f para seleccionar el archivo que desea eliminar en el menú de
selección de archivos, luego presione el botón rojo en su control remoto y presione el
botón Enter para eliminar archivos.
21
Page 45
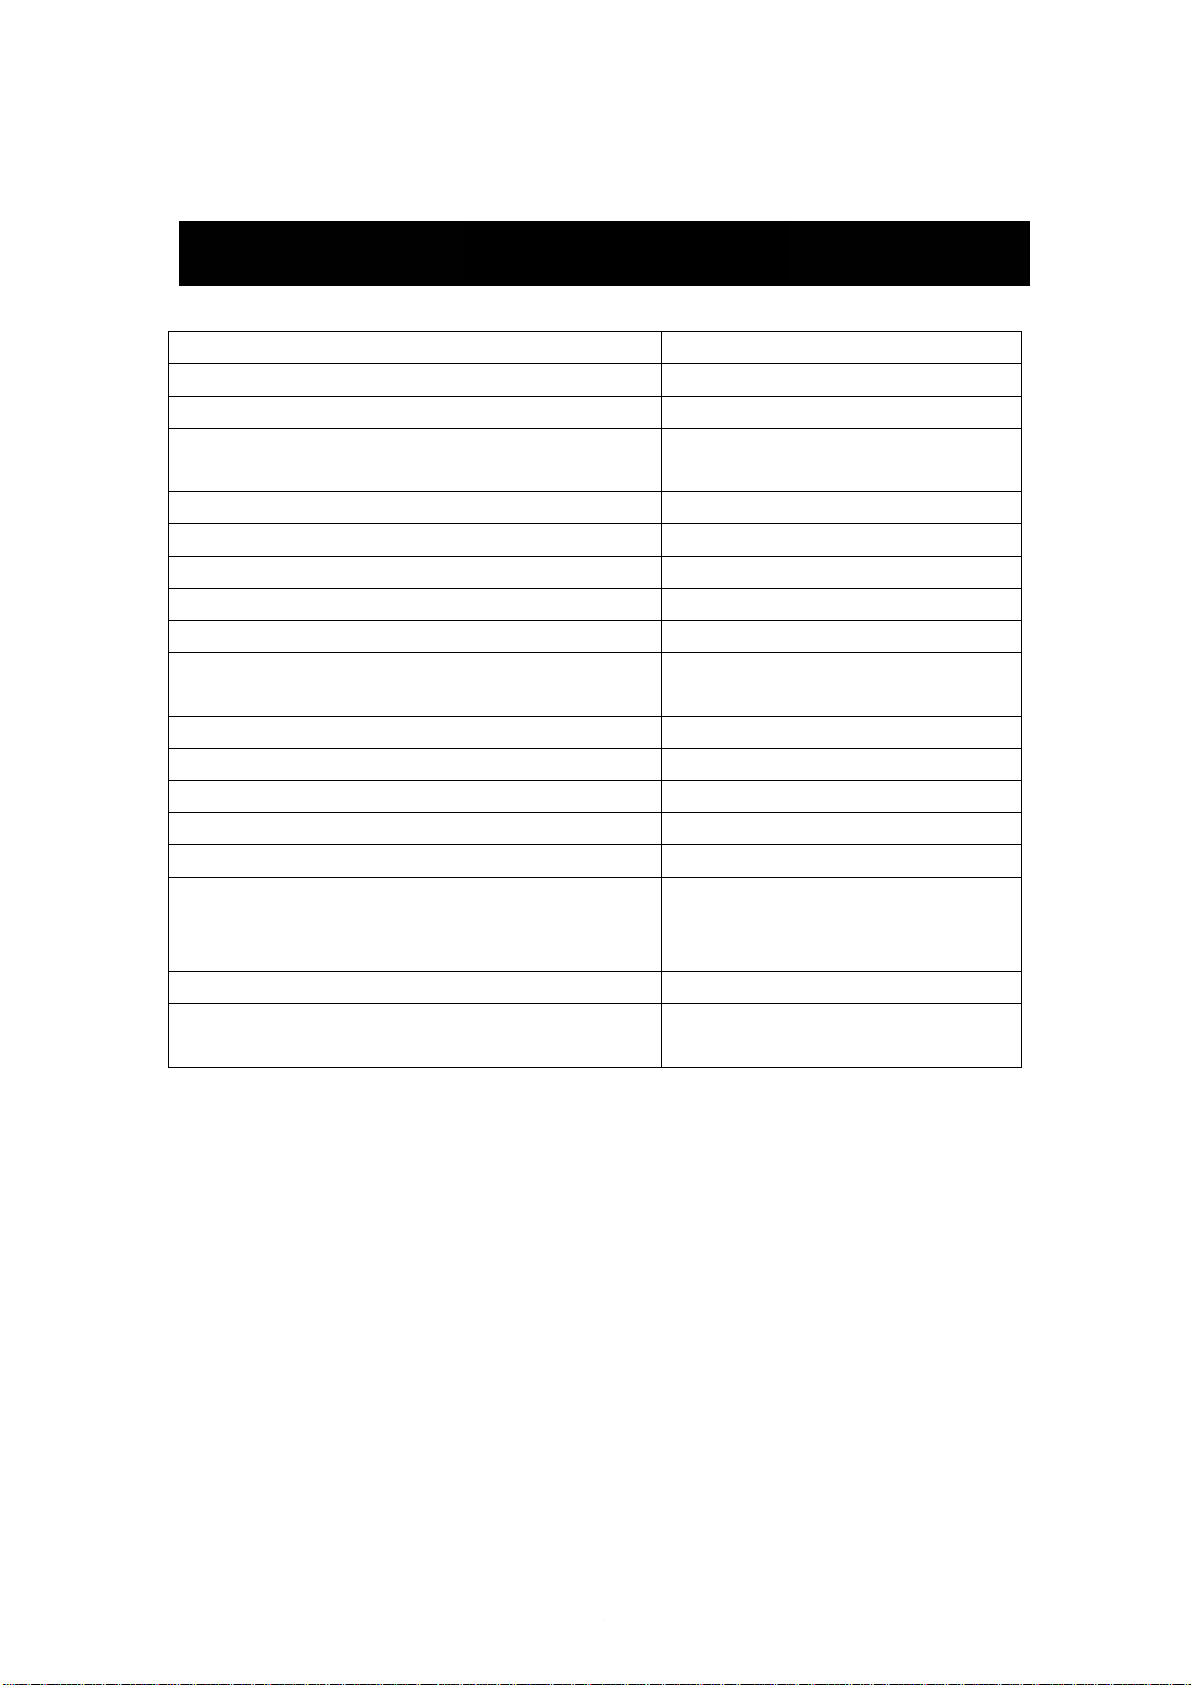
••••
ESPECIFICACIONES
Tamaño de visualización de imágenes (diagonal) 49 pulgadas
Resol 0 801x0291 nóicu
Relación de aspecto: 16:9
Sistema de TV: Sistema digital ATSC y Sistema
analógico NTSC
Sistema de señal de video: NTSC
Canal de recepción Cable: 1-135/ Aire: 2-69(ATV&DTV)
umo máximo de energía: 74W
Cons
Voltaje de entrada de energía: AC 100-240V
Energía de salida de audio (THD≤ 7%): 2 x 6W
Entra
da de interfaz multimedia de alta definición
(HDMI)
Entrada RF x 1
Entrada de componente video posterior x 1
Entrada analógica RGB (VGA) x 1
Entrada de audio x 2
Salida para auricular x 1
Entrada USB x 1 (para actualización de
Salida coaxial x 1
Definición horizontal (línea de TV) Entrada de video componente>=350
x 3
software/JPG/Diapositivas/Presentación
lenta)
Entrada de video>=350
Page 46
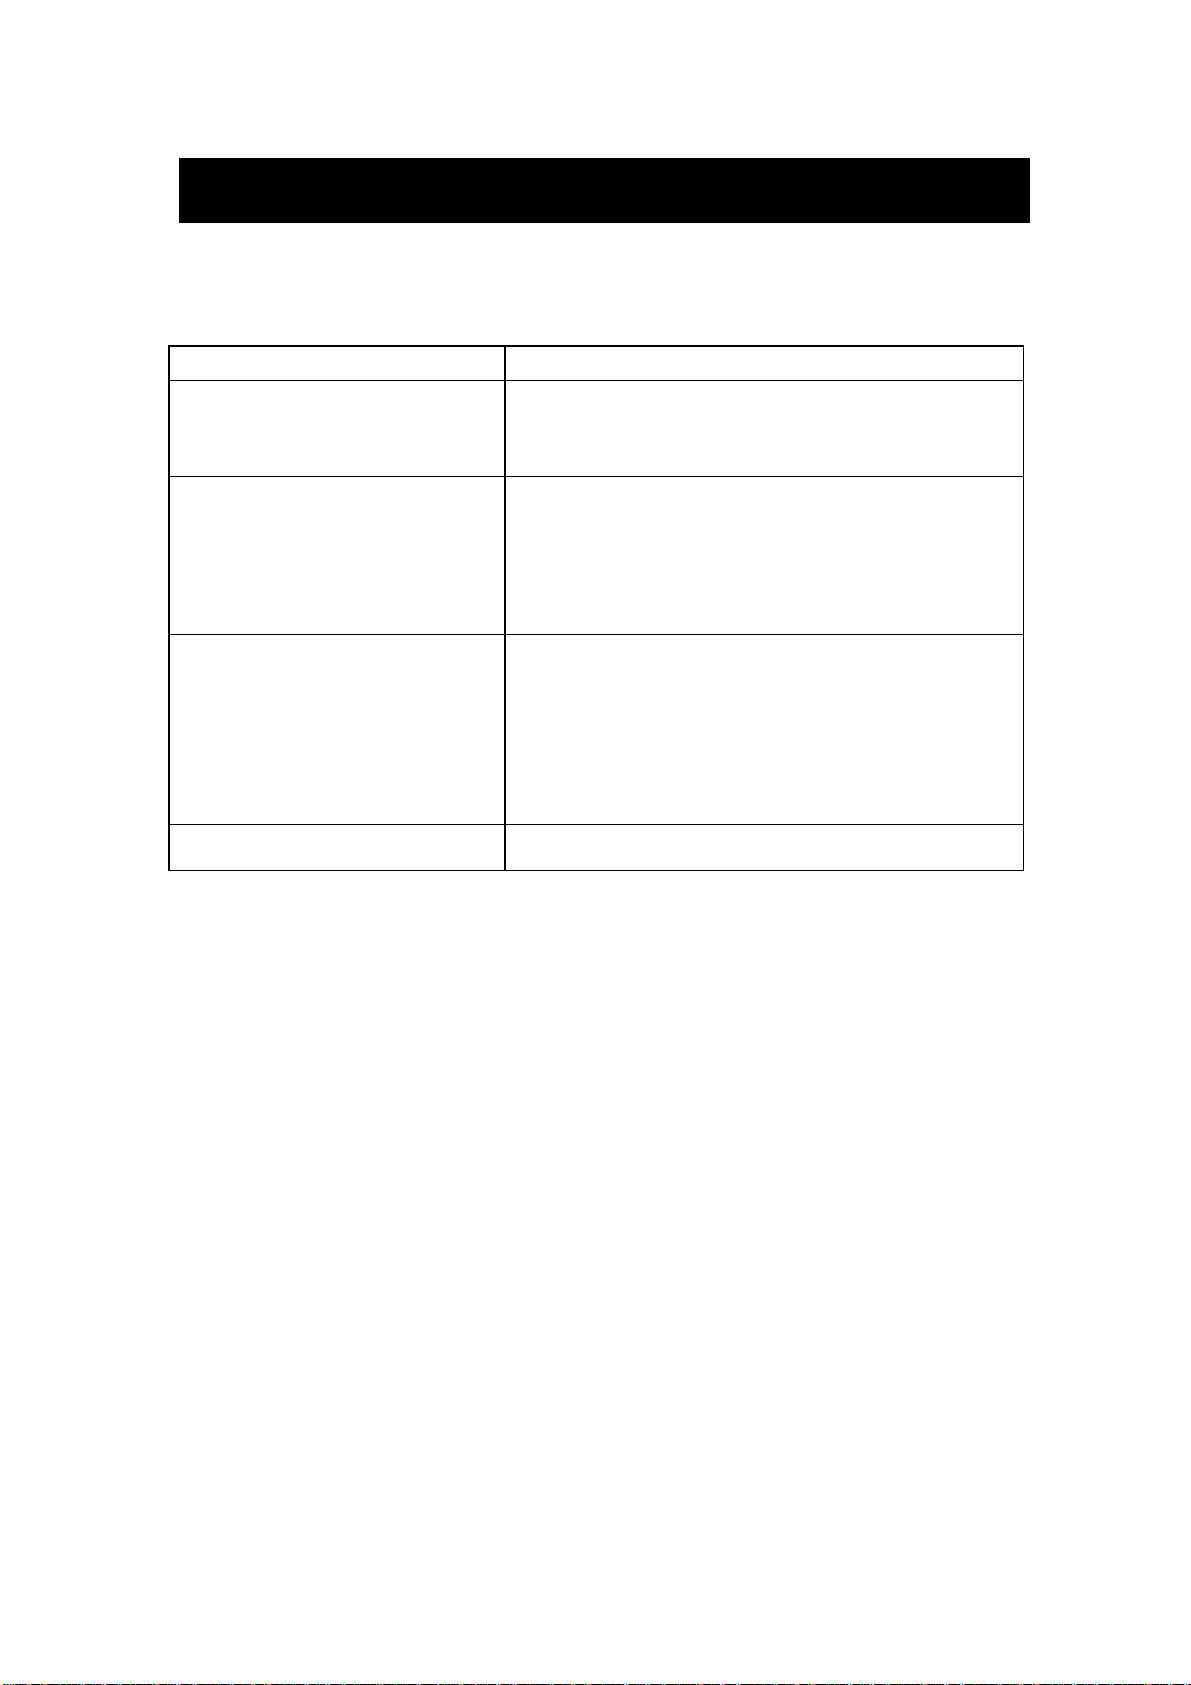
Solución de pr
oblemas
Antes de consultar al personal de servicio revise la siguiente gráfica para posibles
solucion
es.
PROBLEMA
La TV no enciende
N
o hay imagen, no hay sonido
Mala
imagen, sonido OK.
SOLUCIÓN
●Asegúrese de que el cable de alimentación está
conectado. ●Las baterías en el control remoto pueden estar
agotadas; reemplace las baterías.
●Revise el cable entre la TV y el dispositivo AV
.
externo/antena
control remoto. ●Presione el botón SOURCE en el control
remoto, después presione el botón “▲/▼” de manera
repetida para seleccionar la fuente de TV.
●Revise el cable entre la TV y el dispositivo AV
externo/antena
podría tener problemas de transmisión. ●Ajuste el
brillo/contraste en el menú de Video.
unidad está programada en NTSC.
●Presi
one el botón de encendido en el
.
●I
nténtelo con otro canal, la estación
Com
pruebe que la
Rui
do en el audio ●Aleje cualquier equipo infrarrojo de la TV.
El panel TF
T LED usa un panel compuesto por sub pixeles que requiere sofisticada
tecnología para ser producido. Sin embargo, puede haber un pequeño número de
pixeles brillantes u oscuros en la pantalla.
del producto.
Est
os pixeles no tendrán impacto en el desempeño
23
 Loading...