

Page 1
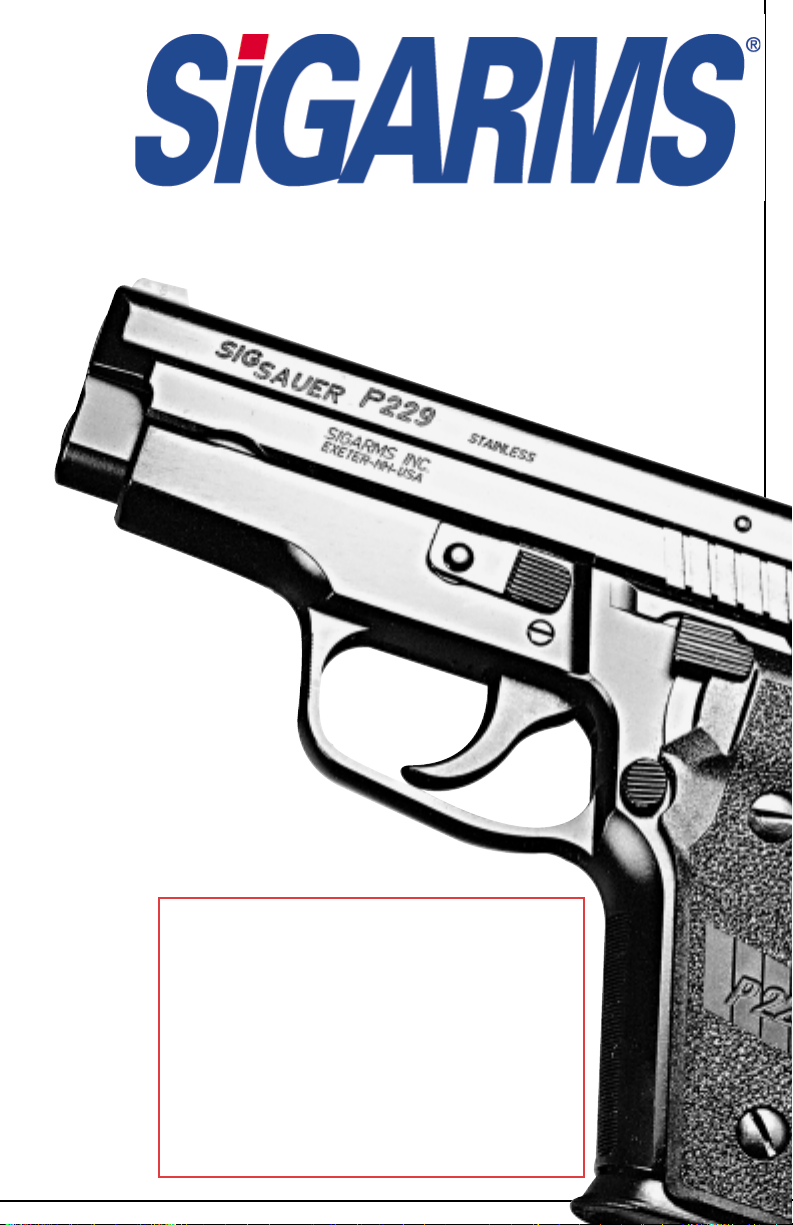
SIG SAUER PISTOL
Owners Manual
Models
P220
P225
P226
P228
P229
P239
P245
WARNING
Please read and understand this owner’s manual
before taking your new SIGARMS pistol out of
the box. It is vital to your safety and to the
safety of others that you accurately follow
th e information contained in this m anual, as
w e l l a s t h e information supplied by the
ammunition manufacturer. If you h av e any
questions, please call or write:
SIGARMS Inc.
18 Industrial Drive, Exeter, NH 03833
(603) 772-2302
Page 2

Contents Page
Introduction 3
Safety Information 4
General Description 4
Safety and Safety Mechanism 5
Principal Features 6
Ammunition 7
Firearms Handling 8
Troubleshooting 9
Troubleshooting Guide 10
Field Stripping 11 & 12
Assembly 13
Care of the Pistol 14
Transportation, Storage and Returns 15
Sight Adjustment s and Options 16
Ordering Parts, Inspection and Maintenance 17
Warranty Statement and Service Policy 18
Specifications:
P220 & P245 19
P225 20
P226 21
P228 22
P229 23
P239 24
Parts Diagram - P220 & P245 26
Parts List - P220 & P245 27
Parts Diagram - P225 28
Parts List - P225 29
Parts Diagram - P228 and P226 (sheet metal slide) 30
Parts List - P228 and P226 (sheet metal slide) 31
Parts Diagram - P229 and P226 (SS Slide) 32
Parts List - P229 and P226 (SS Slide) 33
Parts Diagram - P239 34
Parts List - P239 35
Page 3

3
Congratulations
You are now the owner of one of the world's finest and most superbly engineered firearms. The SIG SAUER
®
Semiautomatic Pistol has been designed
and crafted to meet the stringent requirements of law enforcement agencies
and the military. Used with the proper ammunition and given reasonable
maintenance, it will serve you dependably and well for many years.
To make sure you get the best performance and reliability from your pistol,
please read and follow the procedures outlined in this manual. You'll
notice that we place a heavy emphasis on safe firearms handling. Like any
other mechanical devices, such as automobiles or power tools, high quality
firearms are inherently safe unless they are handled in a careless or irresponsible manner. Always remember that you, the owner, are the ultimate firearms
safety device.
You should become familiar with your pistol and its operation before
using any live ammunition or actual shooting.
Study the instructions carefully and make sure you understand
the pistol’s operating guidelines.
This manual includes information you need to know in order to use your pistol
safely and effectively. If you have any questions or comments about this pistol
and its use and maintenance, or need more information about other SIGARMS
products and accessories, please write or call:
SIGARMS Inc.
Customer Service Department
18 Industrial Drive
Exeter, NH 03833
Phone: 603-772-2302 Fax: 603-772-9082
California Proposition 65 Warning
“Discharging firearms in poorly ventilated areas, cleaning firearms, or
handling ammunition may result in exposure to lead and other substances
known to cause birth defects, reproductive harm, and other serious
physical injury. Have adequate ventilation at all times. Wash hands
thoroughly after exposure.”
Page 4

4
Firearms safety is your responsibility
PISTOLS are classified as FIREARMS and are sold by us with the specific
understanding that we are not responsible in any manner whatsoever for
their safe handling or resale under local laws and regulations. SIGARMS
Inc. shall not be responsible in any manner whatsoever for malfunctioning of
the firearm, for physical injury or for property damage resulting in whole or in
part from (1) criminal or negligent discharge, (2) improper or careless handling,
(3) unauthorized modifications, (4) defective, improper, hand-loaded, or reloaded ammunition, (5) corrosion, (6) neglect, or (7) other influences beyond
our direct and immediate control. This limitation applies regardless of whether
liability is asserted on the basis of contract, negligence or strict liability
(including any failure to warn). Under no circumstances shall SIGARMS Inc.
be liable for incidental or consequential damages, such as loss of use of property,
commercial loss and loss of earnings or profits.
Safety Information
Before you take your new SIG SAUER pistol out of the box,
please read the following information.
It is vital to your safety and the safety of others.
General Description
The SIG SAUER Semiautomatic Pistol has been designed specifically to meet
the stringent requirements of military and law enforcement agencies. Manufactured by advanced state-of-the-art production processes, the SIG SAUER is a
mechanically locked, short recoil operated pistol featuring an automatic firing
pin safety lock, double-action/single-action trigger, decocking lever and external slide catch lever. Firing takes place with each pull of the trigger until the
magazine is empty. The slide stays open after you've fired the last shot.
IMPORTANT
THE SAFEST PISTOL IS ONE THAT IS FULLY
UNLOADED.
Page 5

5
The Ten Commandments of Firearms Safety
1. ALWAYS treat every gun as if it were loaded.
2. ALWAYS keep the gun pointed in a safe direction.
3. ALWAYS keep your finger off the trigger until ready to shoot.
4. ALWAYS keep the gun unloaded until ready to use.
5. ALWAYS be sure the gun is safe to operate and the barrel is clear
of any obstruction.
6. ALWAYS use the proper, factory-made ammunition for your
particular gun.
7. ALWAYS know your target and what is beyond it.
8. ALWAYS wear ear and eye protection when shooting.
9. NEVER use alcohol or drugs before or during handling a gun.
10. ALWAYS store guns and ammunition in separate locked containers,
so they are secure and not accessible to unauthorized persons.
What you should know about all safety mechanisms
NEVER completely trust any safety mechanism. Your pistol is equipped
with an effective, well designed safety mechanism.
NO SAFETY MECHANISM, HOWEVER, IS A SUBSTITUTE
FOR PROPER GUN HANDLING. Any safety mechanism can break
down or malfunction. YOU, AND YOU ALONE, ARE THE
ULTIMATE SAFETY MECHANISM.
Remember, there is no such thing as a "childproof” safety or one
which can completely prevent accidental discharge from careless or
irresponsible use. The best safety is proper and applied training in
safe gun handling.
BECOME FAMILIAR WITH YOUR PISTOL, UNDERSTAND THE
INSTRUCTIONS FULLY BEFORE USING IT.
Page 6

6
Principal Features
We've designed the automatic firing pin lock to provide additional safety with
the hammer in either the cocked or decocked position. You can fire the pistol
only by pulling the trigger. The double-action feature and the absence of manual safeties make it easier for you to get off a quick first shot. A decocking
lever* allows you to lower the cocked hammer safely into the safety intercept
notch without your touching the trigger. While you're doing this, the firing pin
remains automatically locked. High-contrast sights help you line up on the target rapidly, even under poor light conditions. Ergonomically designed grip
plates, ideal grip angle and comfortable grip dimensions facilitate rapid and
accurate shooting. The closed design helps keep dirt, sand and other debris out
of the action.
* does not apply to the Double Action Only pistols. See page 7 of this manual.
What you should know about the decocking lever
The decocking lever on the SIG SAUER pistol is designed for the express purpose of decocking the firearm. The reason it is there is because it is not safe
practice to decock a pistol by pulling the trigger and attempting to ease the
hammer forward manually. To decock your pistol, push down the decocking
lever (keep your finger OFF the trigger while you do this).
WARNING
Always use the decocking lever to decock your SIG SAUER pistol. This is
the only way to safely lower the hammer from the cocked position and prevent an accidental discharge. This warning applies to all pistols with
decocking levers.
The positive way to safely lower the hammer is by use of the decocking
lever. Never lower the hammer by pulling the trigger and attempting to ease
the hammer forward manually. Manually lowering the hammer is dangerous and prevents full application of the pistol's safety features.
The decocking lever is the only proper means of lowering the hammer and
assuring that the hammer rests in the intercept notch.
Again, DO NOT THUMB THE HAMMER DOWN: the consequence can
be serious injury or death - only and ALWAYS use the decocking lever!
Page 7

7
Ammunition
Your SIG SAUER pistol will function effectively and safely with a wide variety
of commercial and military-standard ammunition. Here are some suggestions
that will help you keep your pistol free from ammunition-related problems:
WARNING
Always know your target, and the maximum range of
the ammunition that you are using.
IMPORTANT:
Read this if you own a SIG SAUER DAO Pistol
(Double-Action Only):
The DAO differs from the standard pistol in several ways.
FIRST, there's no single-action position for the hammer. It returns to a
decocked position after each trigger pull, so it can be fired only in doubleaction mode. SECOND, because it's double-action only, there's only one
trigger pull to learn. THIRD, because the hammer returns to a decocked
position after each shot, there's no need for a decocking lever. In all other
respects, the DAO is identical in design and function. In this manual,
whenever there's an instruction or information that doesn't apply to the
DAO, we'll note it.
WARNING
Using the wrong ammunition could result in serious
injury or death. Catastrophic damage could occur.
1. Use only ammunition of the caliber for which your pistol is chambered. The
right caliber is permanently engraved on your pistol.
2. Use only clean, dry, undamaged new factory-manufactured ammunition.
Always use ammunition that complies with the performance standards established
by the Sporting Arms and Ammunition Manufacturers' Institute, Inc. of the United
States (SAAMI).
3. Always inspect your ammunition before use to be certain all cartridges are the
correct caliber.
READ ANY WARNINGS OR INSTRUCTIONS THAT COME WITH
YOUR AMMUNITION.
4. Keep your cartridges free of oil. Wipe the chamber clean of any oil or
preservative before you shoot. Oil in the chamber creates dangerous stresses.
Page 8

8
Firearms Handling
You have the pistol and the ammo, and you've read and understood all the safety
instructions. You know about decocking the pistol by using the decocking lever
(which doesn't apply if you have the DAO). Now, you're ready to use the pistol.
Removing the magazine
Remove the magazine by pressing the magazine catch.
Retracting the slide
Draw back the slide, and engage it by pushing up the slide catch lever.
Loading the magazine
1. Press down on the magazine follower with the cartridge case rim.
2. Push the cartridge to the rear and under the magazine lips.
3. Continue until the magazine holds the desired number of cartridges.
Loading the pistol
1. Insert a loaded magazine and make sure it has engaged the magazine catch.
2. Push down the slide catch lever with your thumb, or draw back the slide as far
as it will go and allow it to snap forward into battery. This cocks the hammer (on
the DAO, the hammer will be in the down position) and chambers a round.
3. Push down the decocking lever with your thumb. The pistol is now loaded,
safe and ready to fire in double-action mode. Keep your finger off the trigger
while you do this.
Reloading during shooting
When the magazine is empty, the slide catch lever holds the slide open. Press the
magazine catch to remove the empty magazine and insert a loaded one. Push
down the slide catch lever with the thumb of the shooting hand, or draw back the
slide and allow it to snap forward. The pistol is again loaded and ready to fire in
the single-action mode*.
Unloading the pistol
Pointing the pistol in a safe direction, keep your finger off the trigger and remove
the magazine. Pull back the slide and lock it with the slide catch lever. Make sure
the last round in the chamber has been extracted and ejected. Visually and physically check the chamber and the magazine well to make sure pistol has been unloaded.
Now release the slide on an empty chamber. Depress the decocking lever*.
The pistol is now unloaded, decocked and safe.
* Not valid for the DAO. See page 7 of this manual.
Page 9

9
Troubleshooting
Firearms work reliably if properly maintained. If there is a malfunction during
firing, here's what to do:
1. Keep the pistol pointed in a safe direction with your finger off the trigger.
2. Remove and secure the magazine.
3. Move the slide rearward and forward to clear any cartridge case in or near
the chamber.
4. If you suspect that a bullet is lodged in the bore, field strip your pistol and
check to see if the barrel is blocked. If there is a bullet lodged in the bore,
return the pistol to SIGARMS Inc. See instructions on page 15.
Follow the above procedures if:
● You notice that a cartridge is difficult to chamber, or
● A cartridge does not go off, or
● The mechanism fails to extract a fired cartridge case, or
● You discover unburned grains of propellant powder spilled in the mechanism
● A shot sounds or feels weak or abnormal.
WARNING
IF A BULLET IS IN THE BORE, DO NOT ATTEMPT TO SHOOT IT
OUT BY USING ANOTHER CARTRIDGE, OR BY BLOWING IT OUT
WITH A BLANK OR A CARTRIDGE FROM WHICH THE BULLET
HAS BEEN REMOVED. THIS CAN GENERATE EXCESSIVE PRES-
SURE, DAMAGE THE FIREARM AND CAUSE SERIOUS
PERSONAL INJURY.
Page 10

10
Malfunction
Feed:
No round fed into the
chamber
Slide does not close
easily or completely
Extraction/Ejection:
After firing, the case
stays in the chamber or
is jammed in the ejection port
Ignition:
Hammer drops but
round does not fire
Cause
Magazine not properly
inserted or magazine is
deformed or dirty
Pistol or cartridge is
fouled (dirty) or pistol
is too heavily lubricated
Pistol requires service
Insufficient recoil due
to dirt
Light hold or limp wrist
Low powered ammunition
Pistol requires service
Firing pin obstructed
Faulty ammunition
Pistol requires service
Troubleshooting Guide
Correction
Insert magazine properly or change magazine
Clean and lubricate pistol and /or replace the
ammunition
Return to SIGARMS
Clean and lubricate the
pistol
Solid grip, rigid hold
Change ammunition
Return to SIGARMS
Inspect, clean and lubricate the pistol
Manually cycle in next
round
Return to SIGARMS
Page 11
11
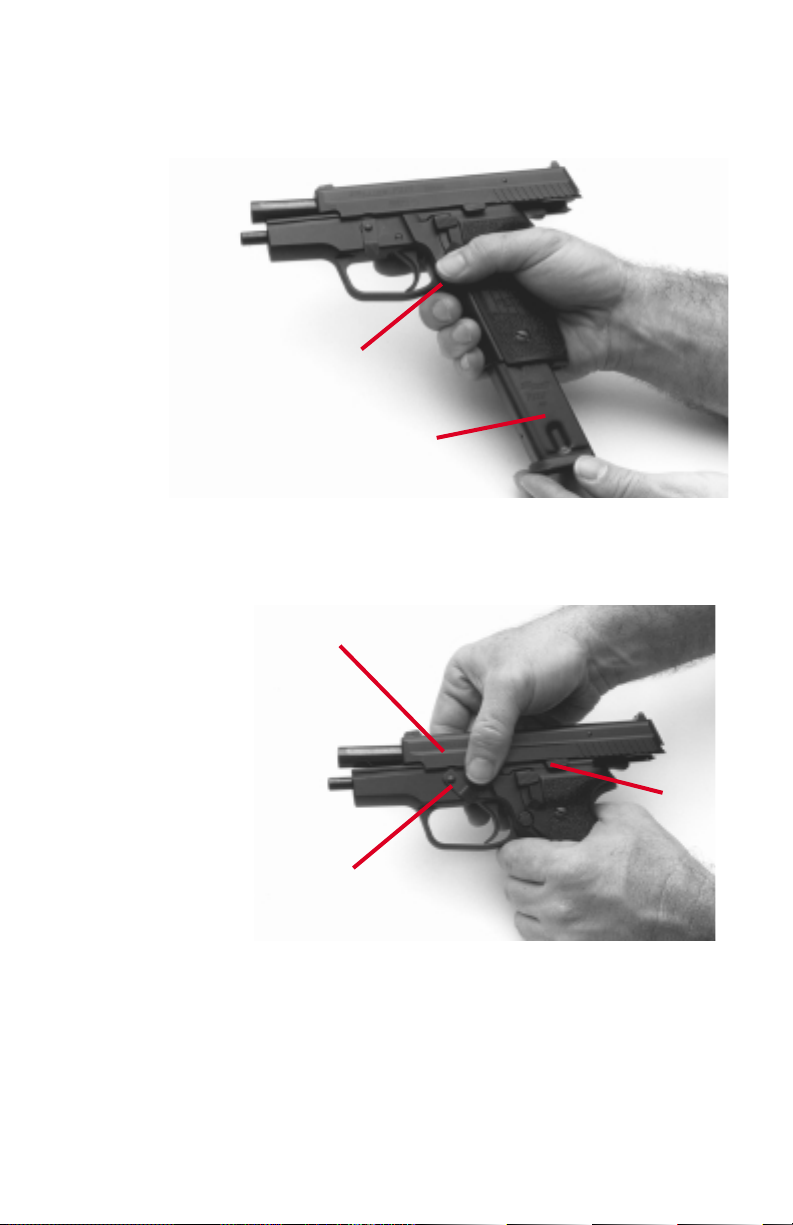
Field Stripping
Before you take the pistol apart, make sure it's unloaded. This is essential
for your safety and the safety of others.
Field strip the pistol as follows:
Figure A
● Press the magazine catch (43). Remove the magazine (51).
4
16
18
43
51
Figure B
● Pull back the slide (4) as far as it will go and hold it in the open
position by pushing up the slide catch lever (18) with your thumb.
● Check carefully to ensure that the chamber is empty and the magazine well
is clear.
● Turn the take-down lever (16) to a vertical (6 o'clock) position.
Page 12
12
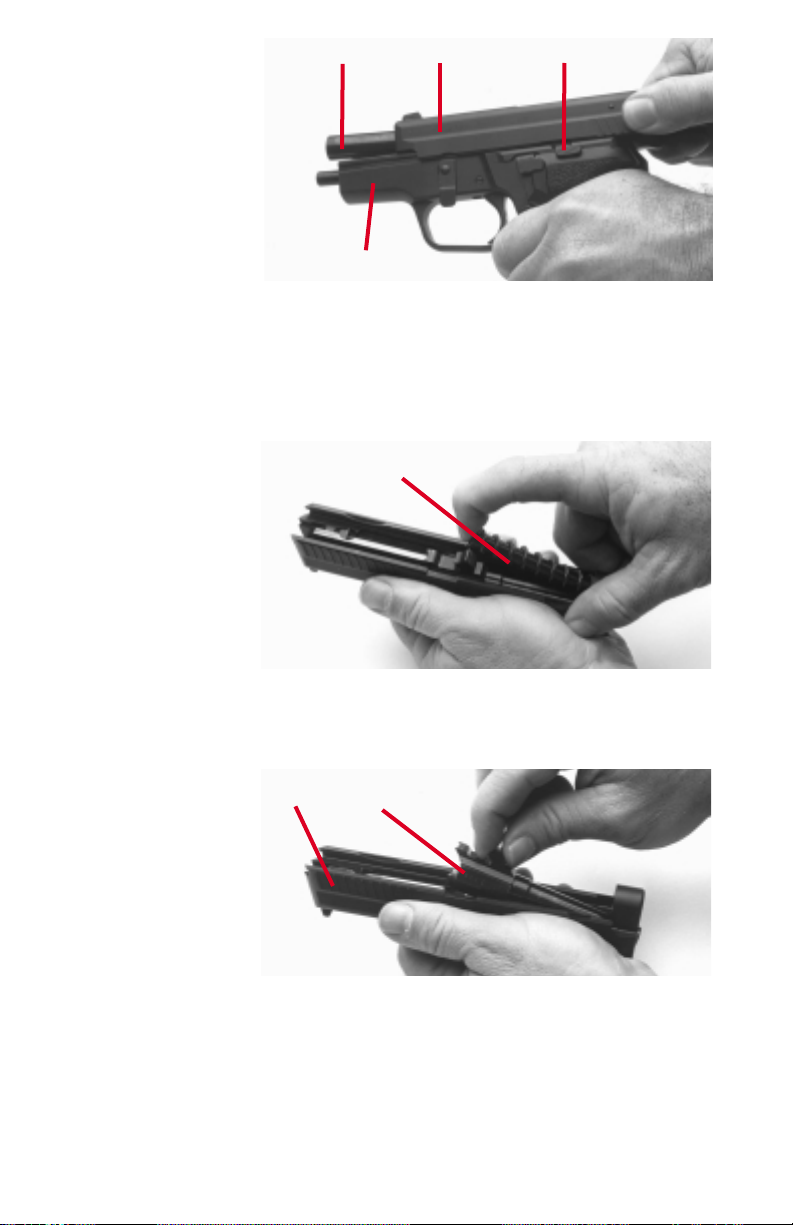
Figure C
● Pull back the slide (4) slightly to disengage the slide catch lever (18). Hold
the slide firmly and allow it to glide forward gently. Now slip the complete
assembly, comprising slide (4), barrel (1), recoil spring and guide, forward
and off the frame (15).
Figure D
● Remove the recoil spring (3) and guide (2), taking care to control the release
of spring tension while pointing the assembly away from your body and in a
safe direction.
Figure E
● Remove the barrel (1) from the slide (4).
● The field stripped pistol is shown in Figure F. Field stripping is quite
sufficient to allow cleaning after shooting. Further dismantling is a job for
qualified gunsmiths and armorers only.
1841
15
2 & 3
4
1
Page 13
13
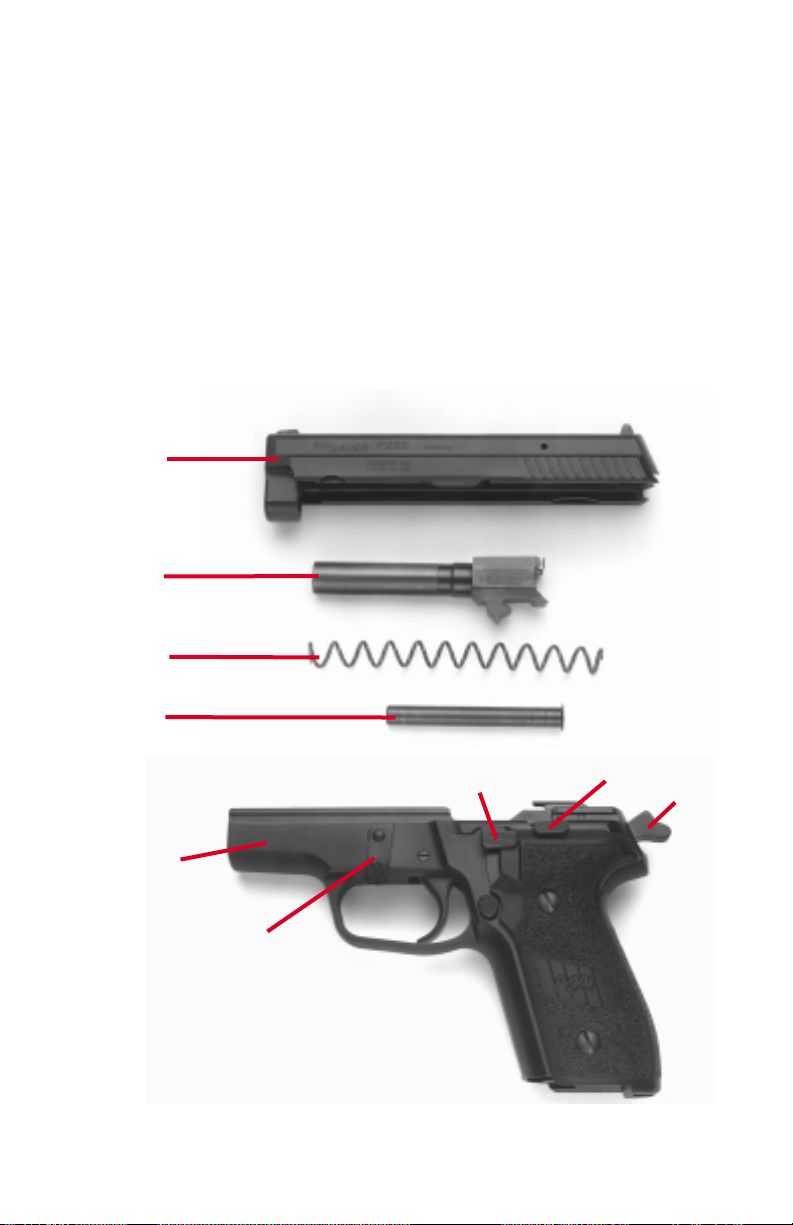
Assemble the pistol as follows:
Insert the barrel (1) into the slide (4); fit the recoil spring (3) and guide (2) into
place. If the recoil spring and guide were separated during stripping, ensure
that the narrower end of the spring is slipped over the guide first. During
spring compression, point the assembly away from your body. Slip the assembled slide system onto the frame (15) until it contacts the end stop, and hold it
in place with the slide catch lever (18). Now, push up the take-down lever (16).
To close the slide, thumb down the slide catch lever (18). Decock the hammer
(29) with decocking lever (40)*. Insert the magazine.
* There's no decocking lever on the DAO. See page 7 of this manual.
4
1
2
3
15
16
40
18
29
Figure F
Page 14

14
Caring for your Pistol
WARNING
BEFORE PERFORMING ANY CLEANING OR MAINTENANCE,
MAKE SURE THE PISTOL IS COMPLETELY UNLOADED.
THIS INCLUDES THE MAGAZINE AND CHAMBER.
Follow these instructions and your SIG SAUER pistol will remain in excellent
condition even after years of hard service.
NOTE: Your SIG SAUER pistol comes from the factory with a light coating of
protective grease and oils. Before you fire the pistol, you should disassemble,
clean and lubricate it as recommended on this page.
WARNING
BEFORE PERFORMING ANY DISASSEMBLY, MAKE SURE YOU
ARE WEARING EYE PROTECTION
Barrel and chamber:
Clean the barrel and the chamber from the rear with a quality cleaning solvent,
using a cleaning rod and brush of the correct caliber. Never clean the barrel
from the muzzle end. Wipe the interior and exterior of the barrel free of all
residue. Lightly lubricate the barrel, inside and out, with a quality lubricant
designed for firearms.
Breech face and locking insert:
Use a small nylon bristle brush to thoroughly clean these areas.
External metal surfaces:
After each use, wipe all metal surfaces with a cloth lightly soaked with a lubricant preservative. This will remove any foreign material and preserve the finish of the pistol. Lightly lubricate the recoil spring (3), recoil spring guide (2)
and frame rails before reassembling the pistol.
NOTE: Some cleaning solvents may be harmful to the finish of your pistol.
Read the solvent manufacturer's product use instructions and warning labels
before using.
IMPORTANT
It is your responsibility to maintain your pistol, if rust appears in the bore,
the barrel should be replaced.
PRIOR TO SHOOTING MAKE SURE THE BORE IS DRY.
Page 15

15
Transport and Storage
When transporting your pistol, keep it unloaded for your safety and for the
safety of others. Know and comply with all laws governing the transport of
firearms in your locality. When storing your pistol, keep it separated from
ammunition, under lock and key and out of the reach of children and other
inexperienced or unauthorized persons.
Returning your Firearm
When you return a pistol to the SIGARMS Inc. Service Department, here's
what to do:
1. Make sure that the chamber and magazine(s) are unloaded and that no
ammunition is included.
2. Package the firearm securely to prevent damage. Enclose a letter which
includes your name, street address, daytime phone number, pistol model
and serial number, and a detailed description of the problem you have experienced or the work you want performed. With the exception of extra magazines, do not include cases, scopes, mounts or other accessories.
If repairs are to be done under warranty, enclose copy of sales receipt.
3. Generally, an individual may ship firearms to the manufacturer for repair or
service. Some states and localities, however, prohibit this. If you live in
such an area, the firearms must be shipped by and returned to a Federally
Licensed Firearms Dealer.
4. Individuals must ship handguns via UPS. Federal law prohibits persons
who do not possess a Federal Firearms License from shipping a handgun
via the U.S. Postal Service. (Note: Any shipment of firearms outside of the
USA borders is subject to the valid law of the specific country, which you
must strictly follow.)
5. Ship your firearms insured and prepaid (we don't accept collect
shipments) to:
SIGARMS Inc.
Attention: Service Department Corporate Park
18 Industrial Drive
Exeter, NH 03833
USA
Page 16

16
Sights
The SIG SAUER pistol is equipped with drift adjustable fixed sights which
have proven their worth under severe conditions. The sights consist of a rear
sight and a front sight blade, designed and dimensioned to ensure rapid target
acquisition even when visibility is poor. You can adjust the sights as follows:
Windage: Change windage by moving the rear sight either to the left or right
in its dovetail. When you do this, follow the rear sight rule: Move the rear
sight in the direction you want the group to go. Moving the rear sight 0.020"
in the dovetail changes the point of impact by approximately 3" at 25 yards.
(Note: SIGARMS has available a Combination Sight Pusher tool which makes
it easier to adjust and change sights.)
Elevation: There are different height combinations available for the front and
rear sights. The sights are numbered according to their height. You can change
elevation by changing either the rear or front sight. It's easier if you change the
rear sight first. Each rear sight change will move the impact of the bullet
approximately 2" at 25 yards. Each front sight change will move the impact of
the bullet approximately 1" at 25 yards.
Remember, a higher rear sight will raise the impact of the bullet; a higher front
sight will lower the impact of the bullet.
Sight Options
Front Sight Rear Sight
Number Height Number Height
05 6.01 mm 05 5.52 mm
06 5.88 mm 06 5.80 mm
07 5.74 mm 07 6.07 mm
08 5.60 mm 08 6.35 mm
09 5.46 mm 09 6.62 mm
10 6.90 mm
Page 17

17
Parts
Before you order any parts, please be advised that: while most gunsmiths and
armorers are perfectly capable of repairing your firearm, we can't vouch for any
individual's skill or workmanship. Remember, unauthorized adjustments or
parts replacement can void your service policy. Your SIG SAUER pistol is a
precision instrument and some replacement parts may require a trained gunsmith
or armorer to ensure proper operation. Don't take chances; if your firearm ever
needs service, simply return it to SIGARMS Inc. Remember, always specify
MODEL, CALIBER and SERIAL NUMBER of your pistol when ordering
parts.
If you order a part without returning the pistol to SIGARMS Inc., you're responsible for ensuring that the part supplied is correct for your particular pistol and
that it is properly installed and fitted by a qualified gunsmith or armorer.
Inspection and Maintenance
Even the best of pistols, like fine automobiles, require periodic maintenance
and inspection. This may reveal a need for adjustment or repair. Even if your
pistol seems to be working well, don't take chances... have it checked annually
by a qualified gunsmith or armorer.
If you notice any mechanical malfunction, STOP using the firearm. UNLOAD
it and take it to a qualified gunsmith or armorer immediately for a thorough
examination. Similarly, if water, sand, or other debris enters the mechanism,
field strip the pistol immediately and thoroughly clean it. Failure to keep your
pistol cleaned, lubricated and in proper working order could lead to serious bodily injury or property damage.
SIGARMS Inc. CANNOT BE RESPONSIBLE FOR THE
FUNCTIONING OF ANY FIREARM WHICH HAS BEEN
ALTERED FROM FACTORY SPECIFICATIONS
WARNING
DO NOT ATTEMPT TO DISASSEMBLE YOUR PISTOL BEYOND THE
POINT EXPLAINED IN THIS MANUAL. THIS SHOULD BE DONE
ONLY AT THE FACTORY.
Some of the components are installed under great spring pressure
requiring special tools and fixtures for disassembly.
Page 18

18
This instruction manual should always accompany this pistol and be
transferred with it upon change of ownership.
Service Policy
If you have questions concerning the performance or servicing of your pistol,
please write or call: SIGARMS Inc.
Attention: Service Department
18 Industrial Drive
Exeter, NH 03833 USA
Phone: 603 772-2302 Fax: 603 772-9082
IF YOU DO NOT UNDERSTAND THE INSTRUCTIONS
FOR OPERATING YOUR PISTOL, IT IS YOUR RESPONSIBILITY
TO CALL OUR SERVICE DEPARTMENT: Phone # 603 772-2302
BEFORE USING YOUR FIREARM.
Warranty Statement
Based on Magnuson-Moss Warranty Act, SIGARMS Inc. offers no express
warranty on their product line. However, SIGARMS Inc. recognizes its
obligations concerning service to owners of SIGARMS products.
SIGARMS Inc. stands behind its products and will continue to provide service to their product line as they have over the years. SIGARMS Inc. products will be serviced for a period of one year from date of retail purchase,
for defects in materials or workmanship, at no charge to the purchaser. Be
sure to retain your sales slip as proof of purchase date when making a claim.
WARNING
Always use the decocking lever to decock your SIG SAUER pistol.
This is the only way to safely lower the hammer from the cocked position
and prevent an accidental discharge.
This warning applies to all pistols with decocking levers. The positive
way to safely lower the hammer is by use of the decocking lever.
Never lower the hammer by pulling the trigger and attempting to ease
the hammer forward manually. Manually lowering the hammer is dangerous and prevents full application of the pistol's safety features.
The decocking lever is the only proper means of lowering the hammer
and assuring that the hammer rests in the intercept notch.
Again, DO NOT THUMB THE HAMMER DOWN: the consequence
can be serious injury or death - only and ALWAYS use the
decocking lever!
Page 19

19
Specifications SIG SAUER P220 & P245
Mechanically-Locked, Recoil-Operated, Semiautomatic Pistol
Trigger: Double-Action/Single-Action or Double-Action Only
4 Point Safety System: 1. Patented automatic firing-pin lock
2. Decocking Lever (DA/SA Only)
3. Safety Intercept Notch
4. Disconnector
P220 P245
Caliber .45 ACP .45 APC
Length, overall 7.8" 7.28˝
Height, overall 5.6" 5.0˝
Width, overall 1.4" 1.34˝
Barrel length 4.4" 3.9˝
Rifling twist 1 in 16" 1 in 16˝
Rifling grooves 6 6
Sight radius 6.3" 5.7˝
Weight, w/o magazine 27.8 oz. 27.5 oz.
Weight, empty magazine 2.6 oz. 2.5 oz.
Trigger pull weight DA 10 Ibs., DA 10 lbs.
SA 4.5 Ibs. SA 4.5 lbs.
Magazine capacity 7 rounds 6 rounds
8 rounds
(optional)
All weights and dimensions are approximate
Specifications subject to change without notice
Page 20

20
Specifications - SIG SAUER P225
Mechanically Locked, Recoil-Operated, Semiautomatic Pistol
Trigger: Double-Action/Single-Action or Double-Action Only
4 Point Safety System: 1. Patented automatic firing-pin lock
2. Decocking Lever (DA/SA Only)
3. Safety Intercept Notch
4. Disconnector
Caliber 9mm Luger (Parabellum)
Length, overall 7.1"
Height, overall 5.2"
Width, overall 1.3"
Barrel length 3.9"
Rifling twist 1 in 10"
Rifling grooves 6
Sight radius 5.7"
Weight, w/o magazine 25.9 oz.
Weight, empty magazine 2.7 oz.
Trigger pull weight DA 10 Ibs.,
SA 4.5 Ibs.
Magazine capacity 8 rounds
All weights and dimensions are approximate
Specifications subject to change without notice
Page 21

21
Specifications- SIG SAUER P226
Mechanically-Locked, Recoil-Operated, Semiautomatic Pistol
Trigger: Double-Action/Single-Action or Double-Action Only
4 Point Safety System: 1. Patented automatic firing-pin lock
2. Decocking Lever (DA/SA Only)
3. Safety Intercept Notch
4. Disconnector
Caliber 9mm Luger .357 SIG .40 S&W
Length, overall 7.7" 7.7" 7.7"
Height, overall 5.5" 5.5" 5.5"
Width,overall 1.5" 1.5" 1.5"
Barrel length 4.4" 4.4" 4.4"
Rifling twist 1 in 10" 1 in 16" 1 in 15"
Rifling grooves 6 6 6
Sight radius 6.3" 6.3" 6.3"
Weight,w/o magazine 28.3 oz. 30.6 oz. 30.6 oz.
Weight, empty magazine 3.4 oz. 3.4 oz. 3.4 oz.
Trigger pull weight DA 10 Ibs., DA 10 lbs., DA 10 lbs.,
SA 4.5 lbs. SA 4.5 lbs. SA 4.5 lbs.
Magazine capacity 10 rounds* 10 rounds** 10 rounds**
All weights and dimensions are approximate
Specifications subject to change without notice
The .357 SIG and the .40 S&W barrels can be interchanged on the P226
and the same magazine can be used for .357 SIG or .40 S&W cartridges.
The 9mm barrel and magazine are not interchangeable with the .357 SIG
or .40 S&W
*15-round magazines available for law enforcement personnel only.
**12-round magazines available for law enforcement personnel only.
Page 22

22
Specifications - SIG SAUER P228
Mechanically-Locked, Recoil-Operated, Semiautomatic Pistol
Trigger: Double-Action/Single-Action or Double-Action Only
4 Point Safety System: 1. Patented automatic firing-pin lock
2. Decocking Lever (DA/SA Only)
3. Safety Intercept Notch
4. Disconnector
Caliber 9mm Luger (Parabellum)
Length, overall 7.1"
Height, overall 5.4"
Width, overall 1.5"
Barrel length 3.9"
Rifling twist 1 in 10"
Rifling grooves 6
Sight radius 5.7"
Weight w/o magazine 26.2 oz.
Weight, empty magazine 3.0 oz.
Trigger pull weight DA 10 lbs.,
SA 4.5 Ibs.
Magazine capacity 10 rounds*
All weights and dimensions are approximate
Specifications subject to change without notice
*13-round magazines available for law enforcement personnel only.
Page 23

23
Specifications - SIG SAUER P229
Mechanically-Locked, Recoil-Operated, Semiautomatic Pistol
Trigger: Double-Action/Single-Action or Double-Action Only
4 Point Safety System: 1. Patented automatic firing-pin lock
2. Decocking Lever (DA/SA Only)
3. Safety Intercept Notch
4. Disconnector
Caliber 9mm Luger .357 SIG .40 S&W
Length, overall 7.1" 7.1" 7.1"
Height, overalI 5.4" 5.4" 5.4"
Width, overall 1.5" 1.5" 1.5"
Barrel length 3.9" 3.9" 3.9"
Rifling twist 1 in 10" 1 in 16" 1 in 15"
Rifling grooves 6 6 6
Sight radius 5.7" 5.7" 5.7"
Weight, w/o magazine 28.1 oz. 29.5 oz. 29.3 oz.
Weight, empty magazine 3.0 oz. 2.9 oz. 2.9 oz.
Trigger pull weight DA 10 lbs., DA 10 Ibs., DA 10 Ibs.,
SA 4.5 Ibs. SA 4.5 Ibs. SA 4.5 Ibs.
Magazine capacity 10 rounds* 10 rounds** 10 rounds**
All weights and dimensions are approximate
Specifications subject to change without notice
The .357 SIG or .40 S&W barrels can be interchanged on the P229 and the
same magazine can be used for .357 SIG or .40 S&W cartridges.
The 9mm barrel and magazine are not interchangeable with the .357 SIG or
.40 S&W.
* 13-round magazines available for law enforcement personnel only
** 12-round magazines available for law enforcement personnel only
Page 24

24
Specifications - SIG SAUER P239
Mechanically-Locked, Recoil-Operated, Semiautomatic Pistol
Trigger: Double-Action/Single-Action or Double-Action Only
4 Point Safety System: 1. Patented automatic firing-pin lock
2. Decocking Lever (DA/SA Only)
3. Safety Intercept Notch
4. Disconnector
Caliber 9mm Luger .357 SIG .40 S&W
Length, overall 6.6" 6.6" 6.6"
Height, overall 5.1" 5.2" 5.2"
Width, overall 1.2" 1.2" 1.2"
Barrel length 3.6" 3.6" 3.6"
Rifling twist 1 in 10" 1 in 16" 1 in 15"
Rifling grooves 6 6 6
Sight radius 5.2" 5.3" 5.3"
Weight, w/o magazine 25.2 oz. 27.4 oz. 27.4 oz.
Weight, empty magazine 2.3 oz. 2.4 oz. 2.4 oz.
Trigger pull weight DA 9.5 Ibs., DA 9.5 Ibs., DA 9.5 lbs.
SA 4 lbs. SA 4 lbs. SA 4 lbs.
Magazine capacity 8 rounds 7 rounds 7 rounds
All weights and dimensions are approximate
Specifications subject to change without notice
The .357 SIG and .40 S&W barrels can be interchanged in the P239.
Each caliber will require a caliber specific magazine.
Magazines are not interchangeable between calibers.
The 9mm barrel and magazine are not interchangeable with the
.357 SIG or .40 S&W
Page 25

25
SIG Sauer Pistol
Exploded Diagrams
&
Parts Lists
Page 26
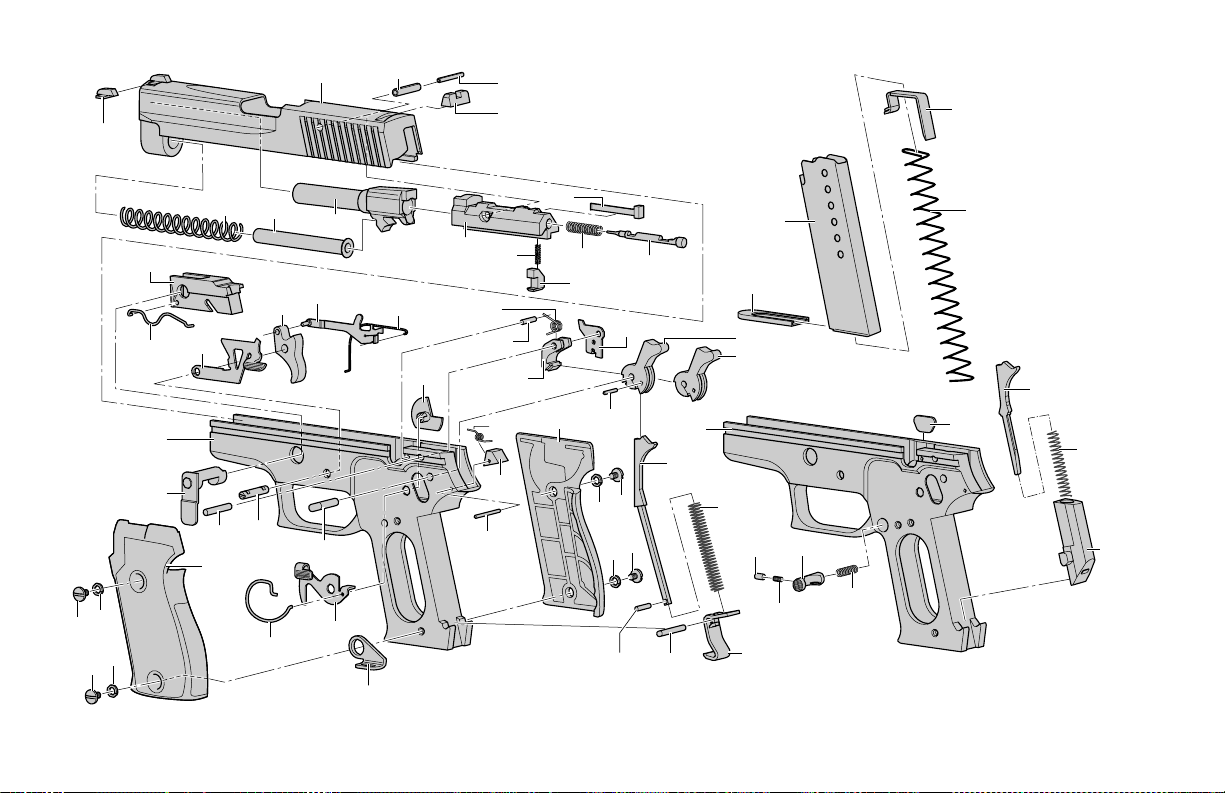
26
5
1
12
11
9
45
43
30
37
39
40
21
26
31
42
56
50
56
50
19
3
22
2
41
46
47
57 A35 A
54
23
48, 48 A
20
18
8
4
7
6
17
13
29 C
33 A
15
53
52
43 A
58
44
29
14
51, 51 A
25
27
24
16
15 A
10
28
38
49, 49 A
50
56
50
56
34 A
36
33
34
P220 Exploded View
Page 27

27
Item Designation
19 Slide catch lever
spring
20 Trigger
21 Trigger pivot
22 Trigger bar
23 Trigger bar spring
24 Sear
25 Sear spring
26 Pivot, sear and safety
lever
27 Roll pin, heavy
28 Safety lever
29, 29 C Hammer
30 Hammer strut pin
31 Hammer pivot pin
33, 33 A Hammer strut
34, 34 A Mainspring
35 A Hammer strut roll pin
36 Mainspring seat
37 Hammer stop
38 Reset spring
39 Hammer stop pin
Item Designation
40 * Decocking lever
41 * Decocking lever
bearing
42 * Decocking lever
spring
43, 43 A Magazine catch
44 Support plate
45 Magazine catch spring
46 Magazine catch stop
47 Catch stop spring
48, 48 A Grip plate, right
49, 49 A Grip plate, left
50 Grip plate screw
51, 51 A Magazine tube
52 Magazine spring
53 Feeder
54 Magazine floorplate
56 Serrated washer
57 A Magazine catch pin
58 Lanyard loop
왖 For the accompanying
figure to the list,
see page 26.
Essential information when
ordering spare parts
– Pistol model (calibre,
designation)
– Pistol serial number
– Item number and index
– Part designation
Index explanation
– A = P 220 (European)
– B = P 220-1(American)
– C = P 220-1 DAO
– * = not for P 220-1 DAO
왖 Never install a standard
hammer 29 in a DAO
pistol.
Item Designation
1 Barrel
2 Recoil spring guide
3 Recoil spring
4 Slide
5 Front sight
05/06/07/08/09/10
6 Rear sight
04/05/06/07/08/09/10
7 Roll pin, heavy
8 Roll pin, heavy
9 Breechblock
10 Extractor
11 Firing pin
12 Firing pin spring
13 Safety lock
14 Safety lock spring
15, 15 A Frame
16 Takedown lever
17 Locking insert
18 Slide catch lever
P220 Parts List
Page 28
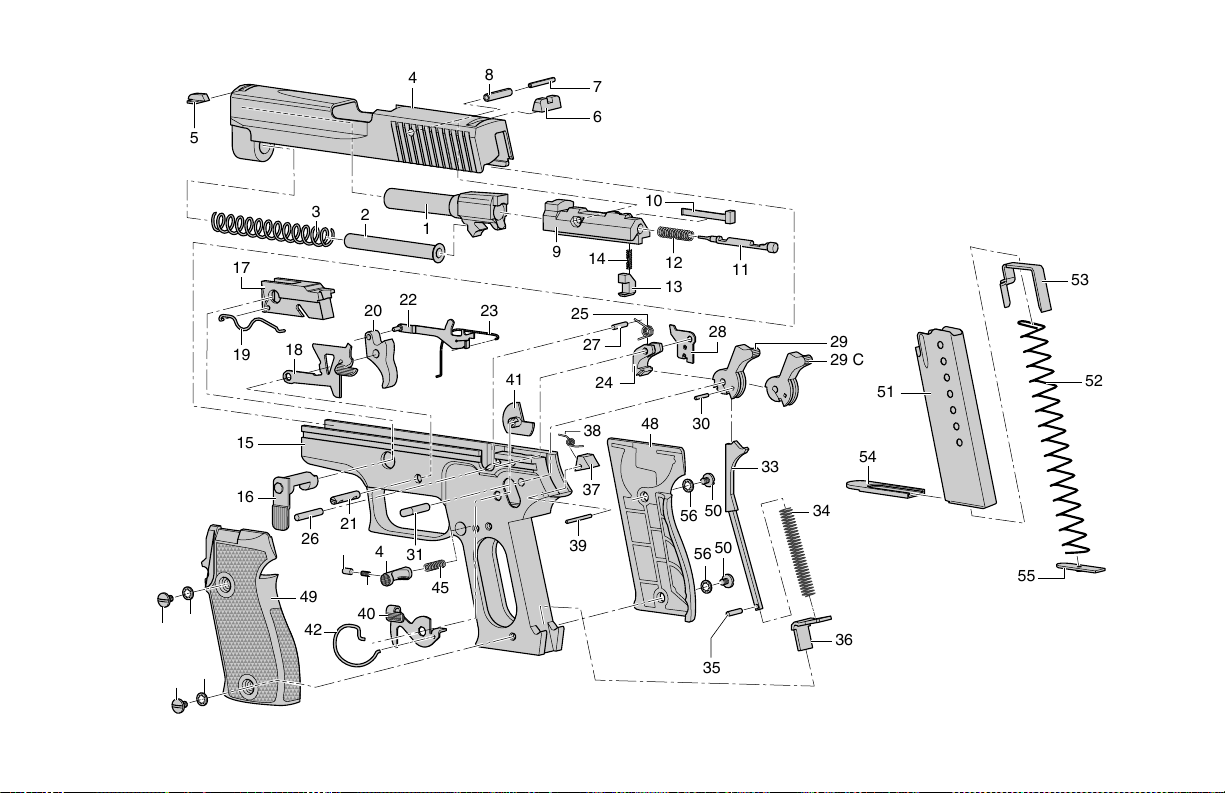
28
5
1
12
11
9
30
37
39
21
26
31
56
50
56
50
19
3
22
2
41
35
54
23
48
20
18
8
4
7
6
17
13
49
29 C
33
53
52
36
29
14
51
25
27
24
16
42
40
15
10
28
55
38
34
45
43
46
47
56
56
50
50
P225 Exploded View
Page 29

29
Item Designation
19 Slide catch lever
spring
20 Trigger
21 Trigger pivot
22 Trigger bar
23 Trigger bar spring
24 Sear
25 Sear spring
26 Pivot, sear and safety
lever
27 Roll pin, heavy
28 Safety lever
29, 29 C Hammer
30 Hammer strut pin
31 Hammer pivot pin
33 Hammer strut
34 Mainspring
35 Hammer strut roll pin
36 Mainspring seat
37 Hammer stop
Item Designation
38 Reset spring
39 Hammer stop pin
40 * Decocking lever
41 * Decocking lever
bearing
42 * Decocking lever
spring
43 Magazine catch
45 Magazine catch
spring
46 Magazine catch stop
47 Catch stop spring
48 Grip plate, right
49 Grip plate, left
50 Grip plate screw
51 Magazine tube
52 Magazine spring
53 Feeder
54 Magazine floorplate
55 Floorplate insert
56 Serrated washer
왖 For the accompanying
figure to the list,
see page 28.
Essential information when
ordering spare parts
– Pistol model (calibre,
designation)
– Pistol serial number
– Item number and index
– Part designation
Index explanation
– C = P 225 DAO
– * = not for P 225 DAO
왖 Never install a standard
hammer 29 in a DAO
pistol.
Item Designation
1 Barrel
2 Recoil spring guide
3 Recoil spring
4 Slide
5 Front sight
05/06/07/08/09/10
6 Rear sight
04/05/06/07/08/09/10
7 Roll pin, heavy
8 Roll pin, heavy
9 Breechblock
10 Extractor
11 Firing pin
12 Firing pin spring
13 Safety lock
14 Safety lock spring
15 Frame
16 Takedown lever
17 Locking insert
18 Slide catch lever
P225 Parts List
Page 30
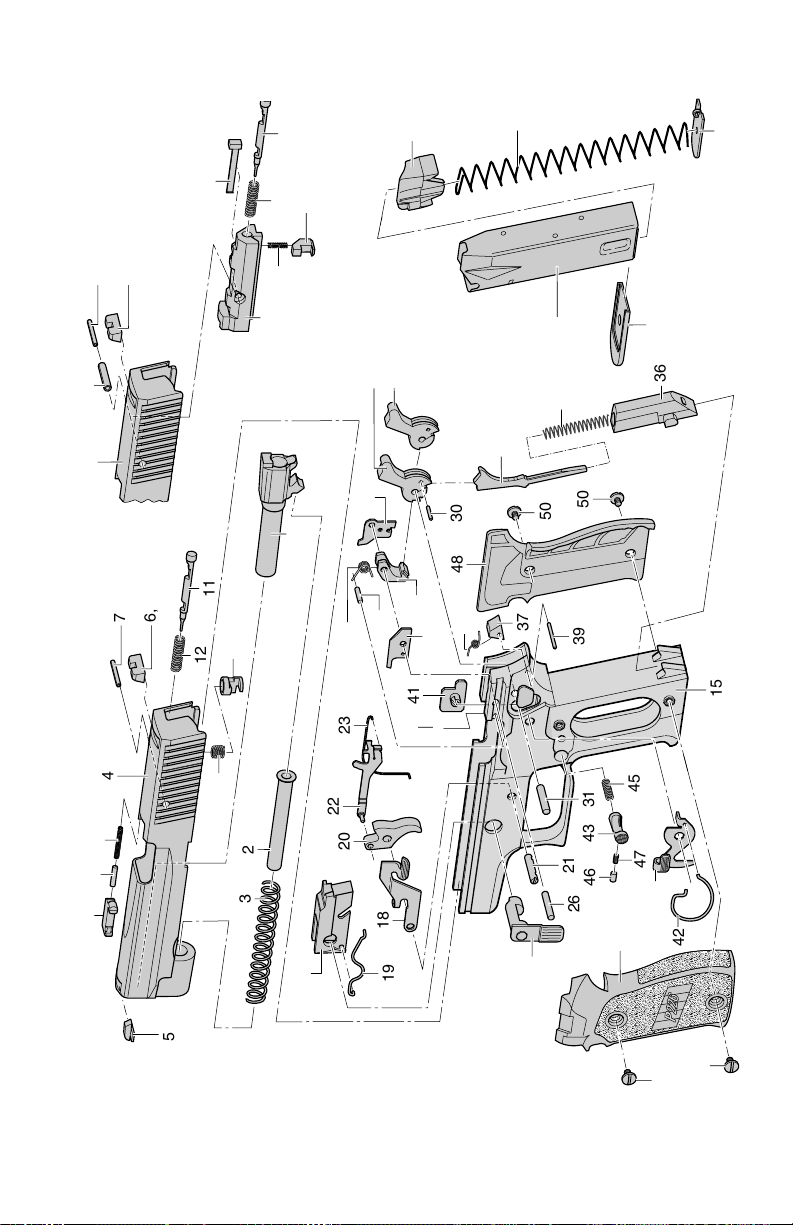
30
36
5
12
11
45
15
43
30
37
39
42
21
26
31
50
50
19
3
22
2
41
46
47
23
48
20
18
4
7
6, 6 B
1
17
49
40
29 C
33
29
44
25
27
24
16
28
38
50
50
34
32
14
13
10
9
8
12
11
9 °
8 °
4, 4 B
7 °
6, 6 B
13 °
14 °
10 °
55
54
53
52
51
P226 Exploded View
Page 31

31
Item Designation
16 Takedown lever
17 Locking insert
18 Slide catch lever
19 Slide catch lever
spring
20 Trigger
21 Trigger pivot
22 Trigger bar
23 Trigger bar spring
24 Sear
25 Sear spring
26 Pivot, sear and safety
lever
27 Roll pin, heavy
28 Safety lever
29, 29 C Hammer
30 Hammer strut pin
31 Hammer pivot pin
32 Ejector
33 Hammer strut
34 Mainspring
36 Mainspring seat
Item Designation
37 Hammer stop
38 Reset spring
39 Hammer stop pin
40 * Decocking lever
41 * Decocking lever
bearing
42 * Decocking lever
spring
43 Magazine catch
44 Support plate
45 Magazine catch spring
46 Magazine catch stop
47 Catch stop spring
48 Grip plate, right
49 Grip plate, left
50 Grip plate screw
51 Magazine tube
52 Magazine spring
53 Feeder
54 Magazine floorplate
55 Floorplate insert
왖 For the accom
panying
figure to the list,
see page 30.
Essential inform
ation w
hen
ordering spare parts
– Pistol m
odel (calibre,
designation)
– Pistol serial num
ber
– Item
num
ber and index
– Part designation
Index explanation
– B = P 226 Sport
– C = P 226 DAO
– * = not for P 226 DAO
– ° = sheet m
etal slide
왖 Never install a standard
ham
m
er
29 in a DAO
pistol.
Item Designation
1 Barrel
2 Recoil spring guide
3 Recoil spring
4, 4 B Slide
5 Front sight
05/06/07/08/09/10
6 Rear sight
04/05/06/07/08/09/10
6 B Micrometre
rear sight
7
°
Roll pin, heavy
7 Firing pin bolt
8
°
Roll pin, heavy
8 Extractor spring
9
°
Breechblock
9 Extractor bolt
10, 10 ° Extractor
11 Firing pin
12 Firing pin spring
13, 13 ° Safety lock
14, 14 ° Safety lock spring
15 Frame
P226 Parts List
Page 32
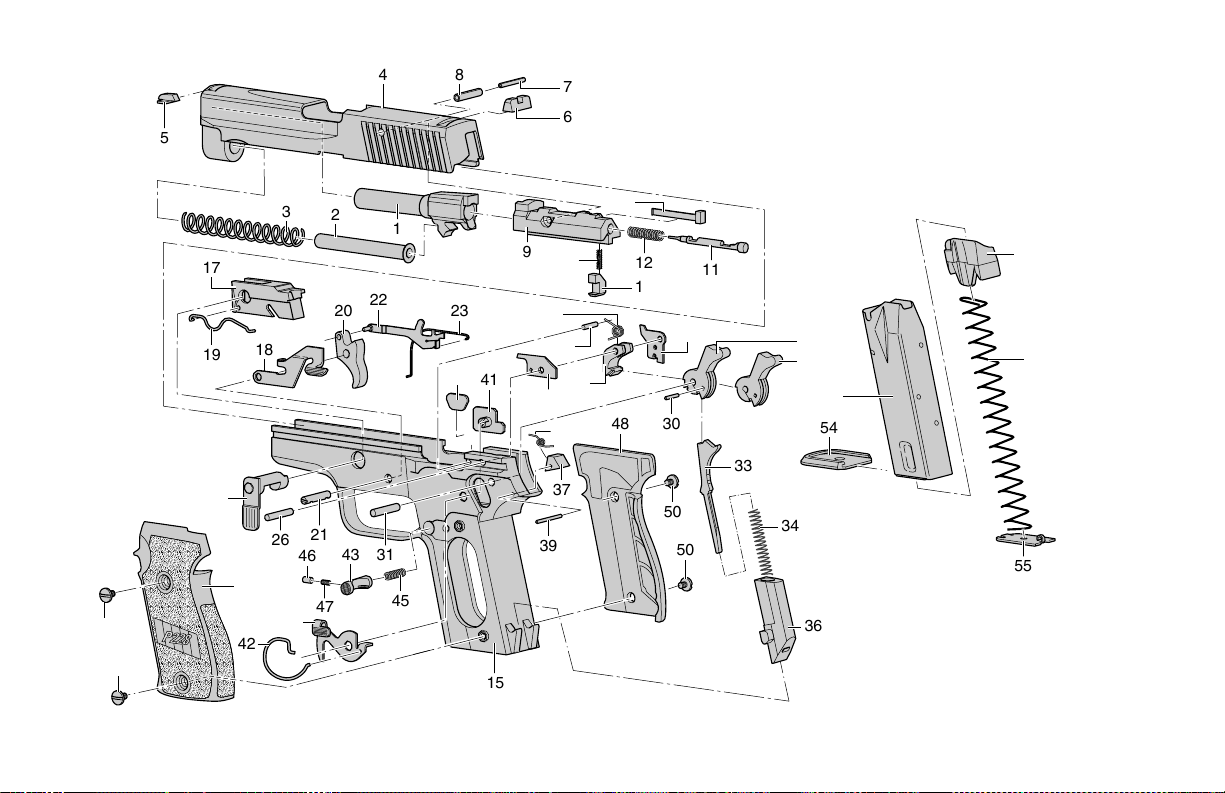
32
33
34
36
5
1
12
11
55
9
45
15
43
30
37
39
42
21
26
31
50
50
19
3
22
2
41
46
47
54
23
48
20
18
8
4
7
6
17
13
49
40
29 C
29
53
52
44
14
51
25
27
24
16
10
28
38
50
50
32
P228 Exploded View
Page 33

33
Item Designation
20 Trigger
21 Trigger pivot
22 Trigger bar
23 Trigger bar spring
24 Sear
25 Sear spring
26 Pivot, sear and safety
lever
27 Roll pin, heavy
28 Safety lever
29, 29 C Hammer
30 Hammer strut pin
31 Hammer pivot pin
32 Ejector
33 Hammer strut
34 Mainspring
35 Hammer strut roll pin
36 Mainspring seat
37 Hammer stop
38 Reset spring
39 Hammer stop pin
Item Designation
40 * Decocking lever
41 * Decocking lever
bearing
42 * Decocking lever
spring
43 Magazine catch
44 Support plate
45 Magazine catch spring
46 Magazine catch stop
47 Catch stop spring
48 Grip plate, right
49 Grip plate, left
50 Grip plate screw
51 Magazine tube
52 Magazine spring
53 Feeder
54 Magazine floorplate
55 Floorplate insert
왖 For the accompanying
figure to the list,
see page 32.
Essential information when
ordering spare parts
– Pistol model (calibre,
designation)
– Pistol serial number
– Item number and index
– Part designation
Index explanation
– C = P 228 DAO
– * = not for P 228 DAO
왖 Never install a standard
hammer 29 in a DAO
pistol.
Item Designation
1 Barrel
2 Recoil spring guide
3 Recoil spring
4 Slide
5 Front sight
05/06/07/08/09/10
6 Rear sight
04/05/06/07/08/09/10
7 Roll pin, heavy
8 Roll pin, heavy
9 Breechblock
10 Extractor
11 Firing pin
12 Firing pin spring
13 Safety lock
14 Safety lock spring
15 Frame
16 Takedown lever
17 Locking insert
18 Slide catch lever
19 Slide catch lever
spring
P228 Parts List
Page 34
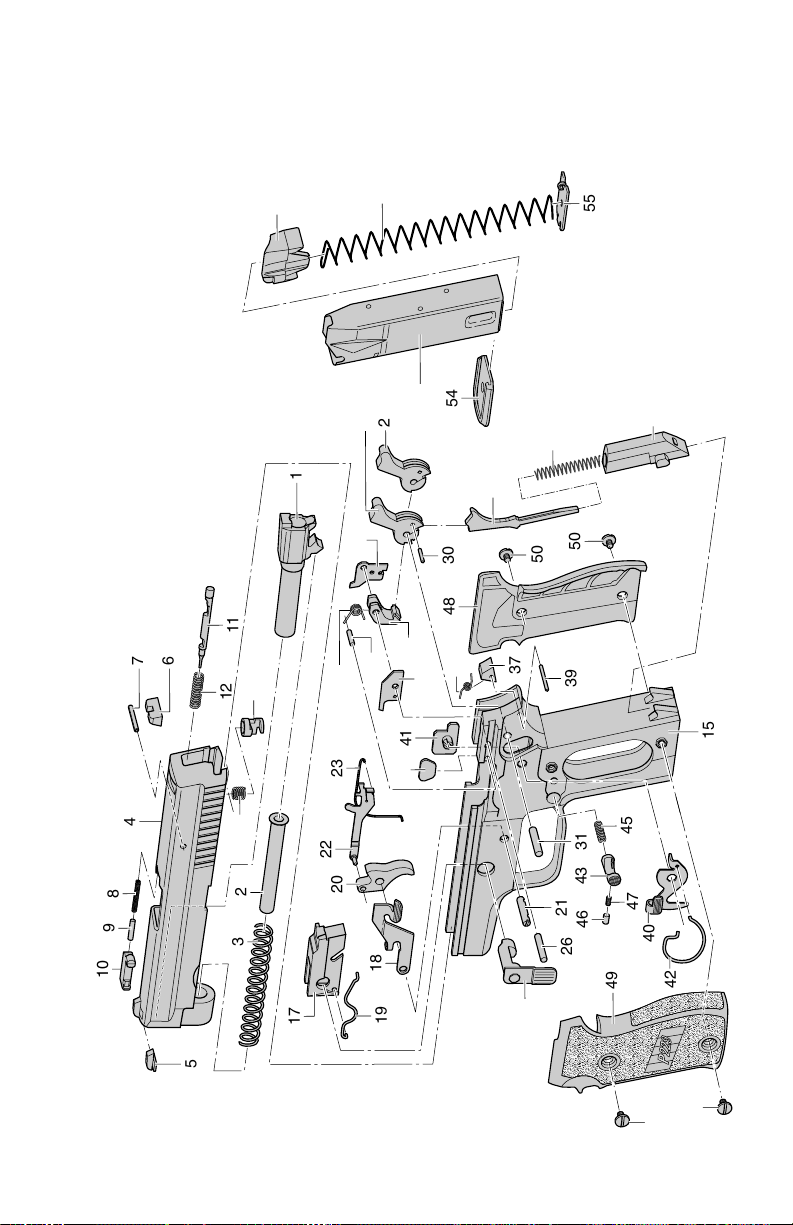
34
5
1
12
11
55
45
15
43
30
37
39
42
21
26
31
50
50
19
3
22
2
10
9
8
41
46
47
54
23
48
20
18
4
7
6
17
49
40
29 C
29
53
52
44
14
13
51
25
27
24
16
28
38
50
50
32
36
33
34
P229 Exploded View
Page 35

35
Item Designation
20 Trigger
21 Trigger pivot
22 Trigger bar
23 Trigger bar spring
24 Sear
25 Sear spring
26 Pivot, sear and safety
lever
27 Roll pin, heavy
28 Safety lever
29, 29 C Hammer
30 Hammer strut pin
31 Hammer pivot pin
32 Ejector
33 Hammer strut
34 Mainspring
36 Mainspring seat
37 Hammer stop
38 Reset spring
39 Hammer stop pin
Item Designation
40 * Decocking lever
41 * Decocking lever
bearing
42 * Decocking lever
spring
43 Magazine catch
44 Support plate
45 Magazine catch spring
46 Magazine catch stop
47 Catch stop spring
48 Grip plate, right
49 Grip plate, left
50 Grip plate screw
51 Magazine tube
52 Magazine spring
53 Feeder
54 Magazine floorplate
55 Floorplate insert
왖 For the accompanying
figure to the list,
see page 34.
Essential information when
ordering spare parts
– Pistol model (calibre,
designation)
– Pistol serial number
– Item number and index
– Part designation
Index explanation
– C = P 229 DAO
– * = not for P 229 DAO
왖 Never install a standard
hammer 29 in a DAO
pistol.
Item Designation
1 Barrel
2 Recoil spring guide
3 Recoil spring
4 Slide
5 Front sight
05/06/07/08/09/10
6 Rear sight
04/05/06/07/08/09/10
7 Firing pin bolt
8 Extractor spring
9 Extractor bolt
10 Extractor
11 Firing pin
12 Firing pin spring
13 Safety lock
14 Safety lock spring
15 Frame
16 Takedown lever
17 Locking insert
18 Slide catch lever
19 Slide catch lever
spring
P229 Parts List
Page 36
36
5
1
12
11
11 M
55
45
15
43
30
42
21
26
31
50
3
22
2
10
9
8
41
35
54
23
48
20
18
4
4 M
56 M
7
6
17
49
46
47
40
29 C
33
29
53
52
36
44
14
13
51
25
27
24
28
38
50
34
13 M
57 M
58 M
14 M
59 M
60 M
9 M
32
19
10 M
8 M
16
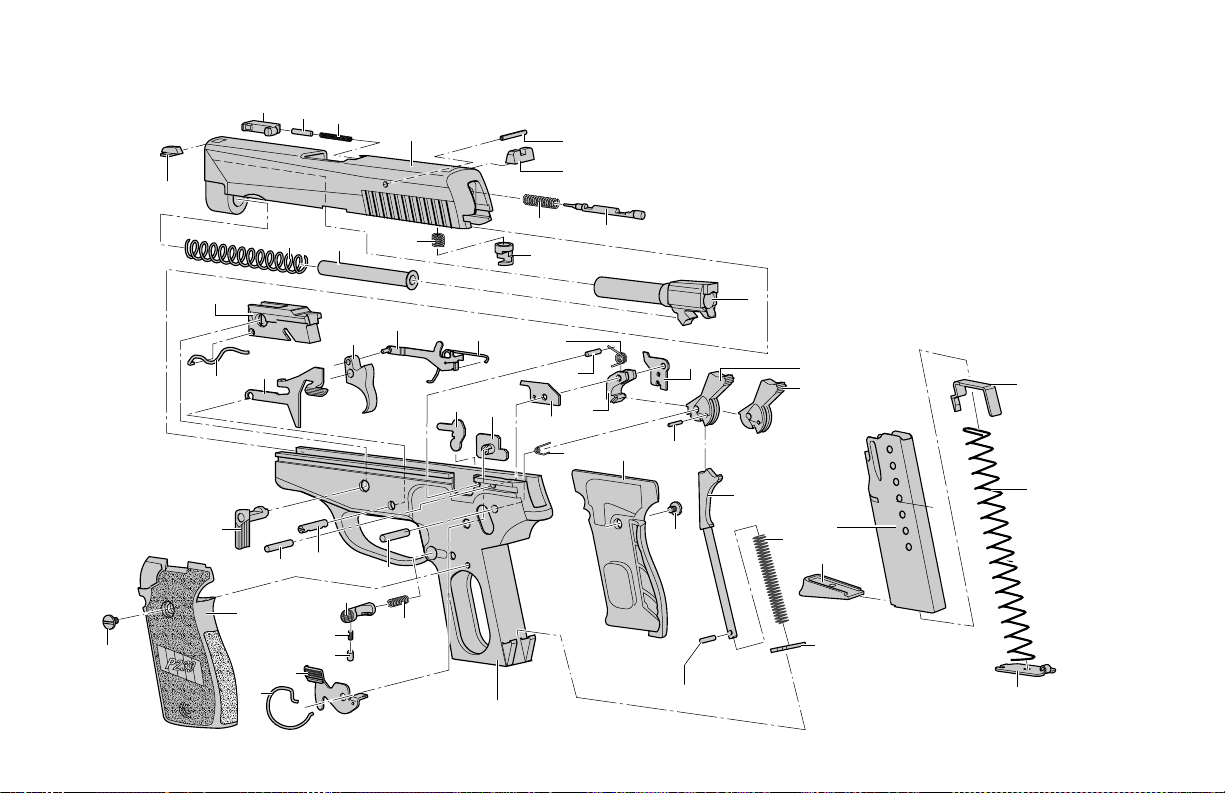
P239 Exploded View
Page 37

37
Item Designation
20 Trigger
21 Trigger pivot
22 Trigger bar
23 Trigger bar spring
24 Sear
25 Sear spring
26 Pivot, sear and safety
lever
27 Roll pin, heavy
28 Safety lever
29, 29 C Hammer
30 Hammer strut pin
31 Hammer pivot pin
32 Ejector
33 Hammer strut
34 Mainspring
35 Hammer strut roll pin
36 Mainspring seat
38 Reset spring
40 * Decocking lever
41 * Decocking lever
bearing
Item Designation
42 * Decocking lever
spring
43 Magazine catch
44 Support plate
45 Magazine catch spring
46 Magazine catch stop
47 Catch stop spring
48 Grip plate, right
49 Grip plate, left
50 Grip plate screw
51 Magazine tube
52 Magazine spring
53 Feeder
54 Magazine floorplate
55 Floorplate insert
왖 For the accompanying
figure to the list,
see page 36.
Essential information when
ordering spare parts
– Pistol model (calibre,
designation)
– Pistol serial number
– Item number and index
– Part designation
Index explanation
– C = P 239 DAO
– * = not for P 239 DAO
왖 Never install a standard
hammer 29 in a DAO
pistol.
Item Designation
1 Barrel
2 Recoil spring guide
3 Recoil spring
4 Slide
5 Front sight
05/06/07/08/09/10
6 Rear sight
04/05/06/07/08/09/10
7 Firing pin bolt
8 Extractor spring
9 Extractor bolt
10 Extractor
11 Firing pin
12 Firing pin spring
13 Safety lock
14 Safety lock spring
15 Frame
16 Takedown lever
17 Locking insert
18 Slide catch lever
19 Slide catch lever
spring
P239 Parts List
Page 38
38
44
36
33
34
45
43
46
47
5
1
12
11
9
30
37
39
40
21
26
31
56
50
19
3
22
2
54
23
48
20
18
8
4
7
6
17
13
29 C
53
52
29
14
51
25
27
24
16
15
10
28
41
55
38
56
50
49
50
56
50
56
42
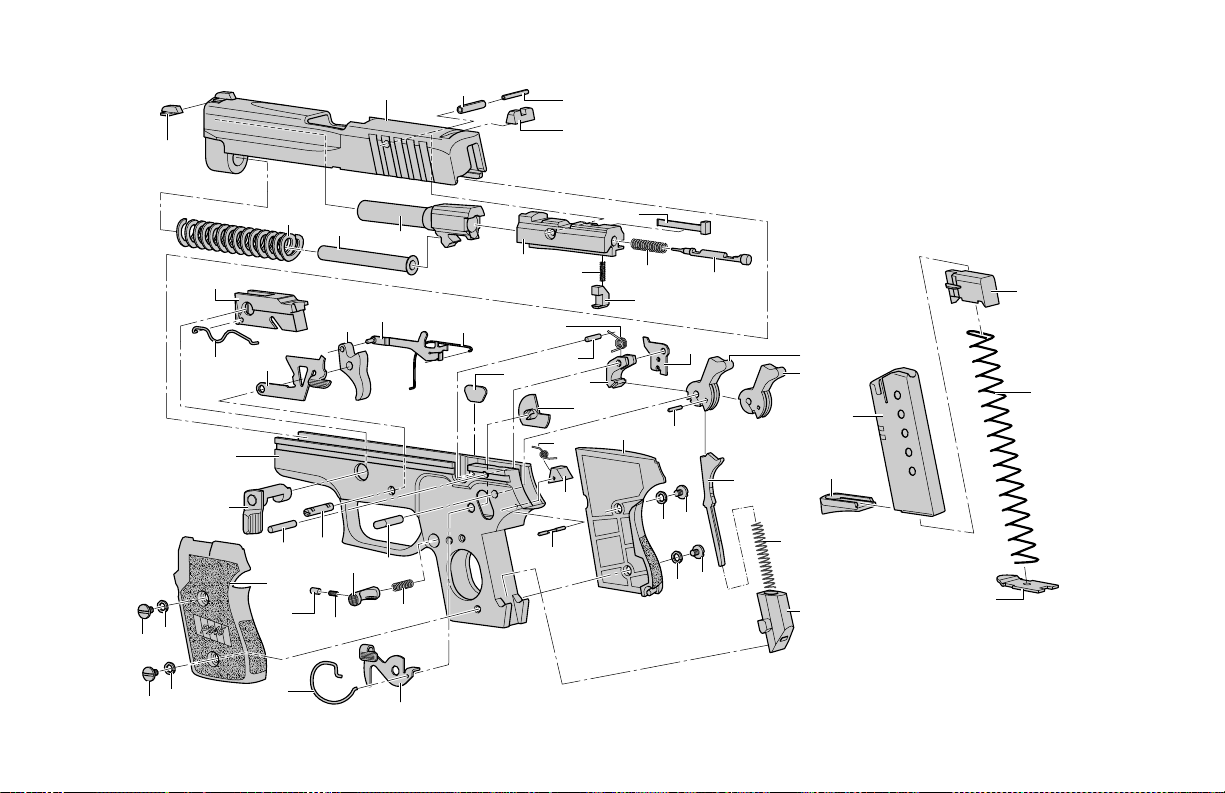
P245 Exploded View
Page 39

39
Item Designation
19 Slide catch lever
spring
20 Trigger
21 Trigger pivot
22 Trigger bar
23 Trigger bar spring
24 Sear
25 Sear spring
26 Pivot, sear and safety
lever
27 Roll pin, heavy
28 Safety lever
29, 29 C Hammer
30 Hammer strut pin
31 Hammer pivot pin
33 Hammer strut
34 Mainspring
35 Hammer strut roll pin
36 Mainspring seat
37 Hammer stop
38 Reset spring
39 Hammer stop pin
Item Designation
40 * Decocking lever
41 * Decocking lever
bearing
42 * Decocking lever
spring
43 Magazine catch
44 Support plate
45 Magazine catch spring
46 Magazine catch stop
47 Catch stop spring
48 Grip plate, right
49 Grip plate, left
50 Grip plate screw
51 Magazine tube
52 Magazine spring
53 Feeder
54 Magazine floorplate
55 Floorplate insert
56 Serrated washer
왖 For the accompanying
figure to the list,
see page 38.
Essential information when
ordering spare parts
– Pistol model (calibre,
designation)
– Pistol serial number
– Item number and index
– Part designation
Index explanation
– C = P 245 DAO
– * = not for P 245 DAO
왖 Never install a standard
hammer 29 in a DAO
pistol.
Item Designation
1 Barrel
2 Recoil spring guide
3 Recoil spring
4 Slide
5 Front sight
05/06/07/08/09/10
6 Rear sight
04/05/06/07/08/09/10
7 Roll pin, heavy
8 Roll pin, heavy
9 Breechblock
10 Extractor
11 Firing pin
12 Firing pin spring
13 Safety lock
14 Safety lock spring
15 Frame
16 Takedown lever
17 Locking insert
18 Slide catch lever
P245 Parts List
Page 40
IMPORTANT:
Do not discard. Keep this manual with your firearm.
Upon change of ownership, transfer this manual
with the firearm.
SIGARMS Inc.
Corporate Park
Exeter, NH 03833
(603) 772-2302
www.sigarms.com
SIG SAUER
®,
SIG ®,and SIGLITE
®
are registered trademarks of SIGARMS Inc.
All specifications are subject to change without notice.
P/N OM-P245-USA 6/1/01 Printed in U.S.A.
Be aware of those around you.
If their actions are not in keeping with
safe gun handling procedures,
TELL THEM.
 Loading...