

Page 1
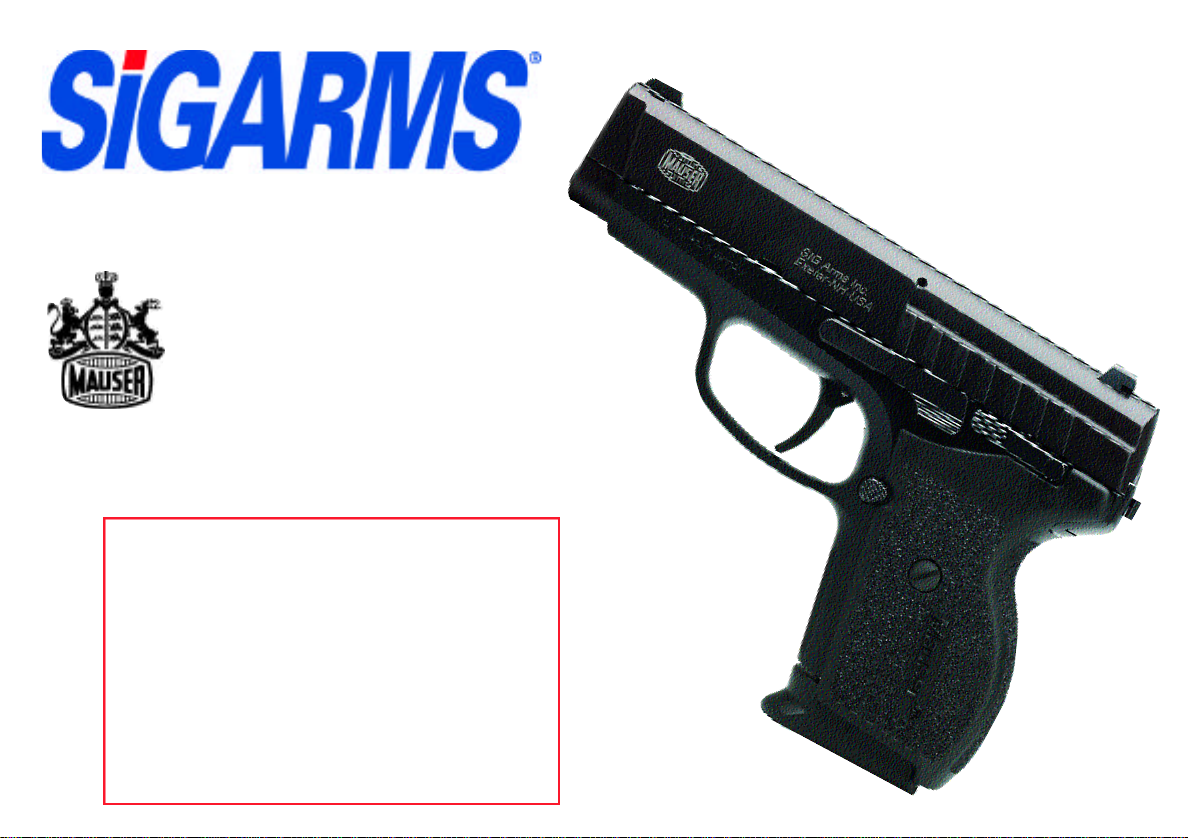
Mauser M2
Handling and Safety Instructions
WARNING
Please read and understand this owner’s manual before
taking your new Mauser pistol out of the box. It is
vital to your safety and to the safety of others that
you accurately follow the i n f o rmation contained in
this man u a l, as wel l a s the i n f o rmation supplied
by the ammunition manufacture r. If you have any
q u e s t i o n s , please call or write:
SIGARMS Inc.
Corporate Park
Exeter, NH 03833
(603) 772-2302
Page 2

Handling and Safety Instructions
US 1 – US 28
Congratulations
You are now the owner of one of the world's finest and most superbly engineered firearms. The Mauser M2
Semiautomatic Pistol has been designed and crafted to meet the unique requirements of concealed carry and
self defense. Used with the proper ammunition and given reasonable maintenance, it will serve you dependably
and well for many years.
To make sure you get the best performance and reliability from your pistol, please read and follow the
procedures outlined in this manual. You'll notice that we place a heavy emphasis on safe firearms handling.
Like any other mechanical devices, such as automobiles or power tools, high quality firearms are inherently safe
unless they are handled in a careless or irresponsible manner. Always remember that you, the owner, are the
ultimate firearms safety device.
You should become familiar with your pistol and its operation before
using any live ammunition or actual shooting.
Study the instructions carefully and make sure you understand
the pistol’s operating guidelines.
®
Page 3

Table of Contents
1 General Instructions US 2
2 Safety Regulations US 3
3 Product Description US 5
3.1 Main parts US 5
3.2 Main features US 6
3.3 Scope of supply US 6
4 Transporting the Pistol US 7
5 Handling the Pistol US 8
5.1 General remarks US 8
5.2 Initial preparation US 8
5.3 Ammunition US 8
5.4 Loading the magazine US 8
5.5 Loading the pistol (ready to fire) US 9
5.6 Discharging a shot US 10
5.7 Reloading during shooting US 11
5.8 Unloading the pistol US 11
5.8.1 Unloading the pistol,
magazine not empty US 11
5.8.2 Unloading the pistol,
magazine empty, slide open US 12
6 Sight Correction US 13
6.1 Sight correction for windage US 13
6.2 Sight correction for elevation US 13
6.3 Front sight variants US 14
6.4 Front sight keys US 14
7 Maintenance of the Pistol US 15
7.1 Stripping the pistol US 15
7.2 Cleaning the pistol US 18
7.3 Assembling the pistol US 19
7.4 Verification of functions US 20
7.5 Care of the pistol US 22
8 Pistol Service and Repairs US 22
8.1 Cause and correction of malfunctions US 22
8.2 Safekeeping and storage of the pistol US 24
8.3 Shipping the pistol US 24
9 Disposal US 25
10 Technical Specifications / Types / Accessories US 26
11 Spare Parts List US 27
This manual includes information you need to know in
order to use your pistol safely and effectively. If you have
any questions or comments about this pistol and its use
and maintenance, or need more information about other
SIG Arms products and accessories, please write or call:
SIGARMS Inc.
Customer Service Department
18 Industrial Drive
Exeter, NH 03833
Phone: 603-772-2302
Fax: 603-772-9082
www.sigarms.com
Specifications subject to change without notice.
06.01
– US1 –
Mauser M2
Page 4

Instructions
1 General Instructions
Be sure to read through these instructions carefully before
any manipulation on this Mauser M2 pistol.
Understanding these instructions and the technically correct
implementation of the information contained therein are
imperative to correct preparation and safety during handling,
care and maintenance of this Mauser M2 pistol. Do not use
the pistol until you have fully understood all safety instructions
and its handling procedures. Should you require further
information, do not hesitate to contact your dealer, importer or
the manufacturer.
Please observe all Federal, State & local laws and regulations
governing the ownership, carrying and use of firearms.
Be aware that these pistols, like all firearms, are dangerous.
Consequently, the pistol accompanying these Handling and
Safety Instructions has been sold under the express
understanding that the manufacturer and the importer of the
pistol decline any responsibility for consequences of
manipulations with or on the pistol. This applies in particular to
liability for bodily harm or damage to property resulting in
whole or in part from:
– discharge with criminal intent or through negligence,
– improper or careless handling,
– defective, incorrect, hand-loaded or reloaded ammunition,
– inadequate care of the pistol (e.g. corrosion, damage),
– disregard of malfunctions,
– resale in contradiction of regional legislation,
– other circumstances beyond our direct and immediate
control.
These limitations apply regardless of whether liability is
asserted on the basis of contract, negligence or strict liability
(including any failure to warn).
The manufacturer and the importers are not liable for
incidental or consequential damages such as loss of use of
property, commercial loss or loss of earnings and profits.
California Proposition 65 Warning
“Discharging firearms in poorly ventilated areas, cleaning
firearms, or handling ammunition may result in exposure to
lead and other substances known to cause birth defects,
reproductive harm, and other serious
physical injury. Have adequate ventilation at all times.
Wash hands thoroughly after exposure.”
Mauser M2
06.01– US2 –
Page 5
Safety Regulations
2 Safety Regulations
Never use the pistol when under the influence of alcohol or
drugs, during illness or other complaints; they can influence
your judgement and reflexes.
Always consider the pistol as loaded and unsafe until you
have verified that it is not through the unloading procedure
(see Sect. 5.8).
During all manipulations, keep the muzzle of the pistol
pointed in a safe direction. Safe directions are defined as
areas where there are no people, other living creatures or
other people’s property.
Never point the pistol at doors, window panes, walls,
concrete, stones or other flat surfaces (including water).
Shots can penetrate such surfaces, or be deflected into
unsafe directions by them.
Never aim at yourself or other living creatures.
Never rely on safety mechanisms. They are never a substitute for careful and correct handling of the pistol.
Always handle your pistol as if the safety mechanisms were
defective. The best safety device is correct, well-exercised
and secure handling of the pistol.
Never shoot a pistol into which there has been ingress of
water, sand, dirt or other foreign bodies.
Never let a loaded pistol out of your hands.
Always unload the pistol immediately after shooting,
before putting it down, holstering it or handing it to another
authorized person.
Never hand over the pistol to any person who has not
thoroughly familiarized himself or herself with the safety
regulations and handling of the pistol by reading the accompanying instructions.
Never leave the pistol unattended. Unauthorized persons
could cause damage with it, threaten or kill other people,
for which you could be held liable.
Never store the pistol loaded, but remove the magazine
and verify that there is no round in the barrel chamber by
following the unloading procedure (see Sect. 5.8).
Always keep the pistol and the ammunition in different
places and ensure that neither can fall into the hands of unauthorized persons or children.
In the individual sections of these instructions, the
following safety indications alert you to various risks:
Information on risks which, if not scrupulously
observed, can directly lead to severe bodily harm
or death.
Information on risks which, if not scrupulously
observed, can lead to bodily harm, damage to
property and damage to the pistol.
Information on technical requirements which, if
not scrupulously observed, can lead to damage
to the pistol.
IMPORTANT
THE SAFEST PISTOL IS ONE THAT IS
FULLY UNLOADED.
06.01 – US3 –
– US3 –
Mauser M2
Page 6

Safety Regulations
The Ten Commandments of Firearms Safety
1. ALWAYS treat every gun as if it were loaded.
2. ALWAYS keep the gun pointed in a safe direction.
3. ALWAYS keep your finger off the trigger until ready to shoot.
4. ALWAYS keep the gun unloaded until ready to use.
5. ALWAYS be sure the gun is safe to operate and the barrel is clear of any obstruction.
6. ALWAYS use the proper, factory-made ammunition for your particular gun.
7. ALWAYS know your target and what is beyond it.
8. ALWAYS wear ear and eye protection when shooting.
9. NEVER use alcohol or drugs before or during handling a gun.
10. ALWAYS store guns and ammunition in separate locked containers, so they are secure and not accessible
to unauthorized persons.
BECOME FAMILIAR WITH YOUR PISTOL, UNDERSTAND THE INSTRUCTIONS FULLY BEFORE USING IT.
What you should know about all safety mechanisms
NEVER completely trust any safety mechanism. Your pistol is equipped with an effective, well designed safety
mechanism. NO SAFETY MECHANISM, HOWEVER, IS A SUBSTITUTE FOR PROPER GUN HANDLING.
Any safety mechanism can break down or malfunction.
YOU, AND YOU ALONE, ARE THE ULTIMATE SAFETY MECHANISM.
Remember, there is no such thing as a "childproof” safety or one which can completely prevent accidental
discharge from careless or irresponsible use.
The best safety is proper and applied training in safe gun handling.
Mauser M2
06.01– US4 –
Page 7
Product Description
3 Product Description
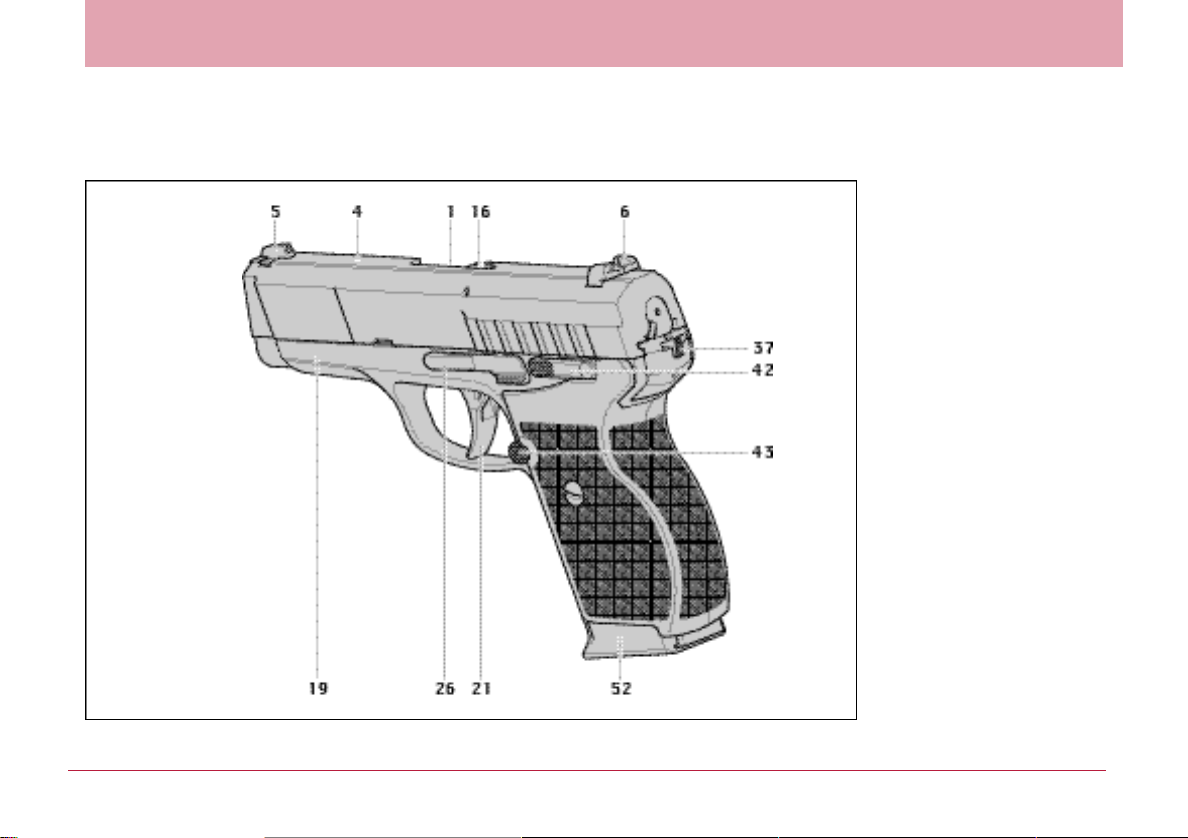
3.1 Main parts
1 Barrel
4 Slide
5 Front sight
6 Rear sight
16 Loaded chamber
indicator
19 Frame
21 Trigger
26 Slide catch lever
37 Safety lock
42 Control lever
43 Magazine catch
52 Magazine
Fig. 1
06.01 – US5 –
Mauser M2
Page 8

Product Description
3.2 Main features
Mauser M2 pistols are modern semi-automatic pistols
complying with the latest technical advances in firearms
design. They operate on the principle of mechanically halfcocked recoil loading with semiautomatic reloading. The
pistols utilize a striker system (no hammer) and incorporate a
double action only trigger mechanism. The Mauser M2
incorporates several safety features, including a loaded
chamber indicator, magazine safety disconnect (pre v e n t s
activation of the firing mechanism when the magazine is
removed), trigger bar disconnector (prevents out of battery
firing), automatic firing pin safety, and optional extern a l
manual safety. After each shot the firing pin re t u rns to the
half-cocked position. The distinctive contrast sights in
conjunction with the ergonomic grip design permit rapid,
precision target acquisition and engagement. The enclosed
design prevents the penetration of dirt inside the pistol.
3.3 Scope of supply
Included:
– 1 Pistol
– 2 Magazines
- 1 Trigger Lock
– 1 Handling and Safety Instructions (Owners Manual)
- 1 Hard Carry Case
Not included:
– Accessories (see Sect. 10)
– Spare parts (see Sect. 11)
Mauser M2
06.01– US6 –
Page 9

Transporting
4 Transporting the Pistol
For your own safety and for the safety of others, always
transport the pistol in the unloaded condition, decocked
and under lock (see Sect. 5.8).
Always carry the pistol in such a manner that, should you
fall or otherwise slip, you are able to control the direction of
the muzzle.
Transport the pistol separate from the ammunition.
Ensure that you comply with all Federal, State & local laws
and regulations relating to the transport of firearms.
06.01 – US7 –
–
Mauser M2
Page 10
Handling
5 Handling the Pistol
5.1 General remarks
For preservation, the pistol is normally delivered with a light
coating of protective grease and oils. Before first use, the
pistol must be stripped, the protective coatings removed
and then relubricated.
5.2 Initial preparation
Procedure
1. Strip the pistol (see Sect. 7.1)
2. Clean and relubricate the pistol (see Sect. 7.2)
3. Assemble the pistol (see Sect. 7.3)
5.3 Ammunition
Use only ammunition of the caliber for which your pistol is
chambered. The right caliber is permanently engraved on
your pistol. Always use ammunition that complies with the
performance standards established by the Sporting Arms
and Ammunition Manufacturers’ Institute, Inc. of the
United States (SAAMI).
Never use reloaded, “refurbished”, hand-loaded, nonstandard ammunition, or ammunition of a different caliber.
Never use dirty, wet, corroded, bent, damaged or oiled
ammunition.
Never leave ammunition unattended.
Always use clean ammunition and comply with the warnings
and instructions that come with your ammunition.
5.4 Loading the magazine
Procedure
1. Place round on feeder 55, close to the magazine lips.
2. Press the round down and push it to the rear of the
magazine.
3. Load the number of rounds that you intend to shoot.
Number of inserted rounds can be checked through the holes
of the magazine.
WARNING
USING IMPROPER AMMUNITION OR
MISUSE OF THE CORRECT
AMMUNITION CAN CAUSE SERIOUS
INJURY OR DEATH
Mauser M2
06.01– US8 –
Page 11

Handling the Pistol
5.5 Loading the pistol (ready to fire)
Never load or unload the pistol inside a vehicle, inside
a building or other confined space (except in a designated
firing range or a safe area).
Before loading, always wipe off any excess grease and oil
and check that there is no obstruction in the bore of the
barrel 1.
Always keep the muzzle of the pistol pointed in a safe
direction.
Do not place your finger on trigger 21, but outside of the
trigger guard.
Do not load the pistol until immediately before shooting.
Never rely on safety mechanisms. They are never a
substitute for careful and correct handling of the pistol.
Never let a loaded pistol out of your hands.
Procedure
1. Point the pistol in a safe direction.
2. Insert full magazine 52 and check that it engages.
3. Release pistol safety (external safety models only).
4. Draw back slide 4 to the stop and allow it to fly forward.
– The pistol is loaded and ready for firing with half-cocked
(double action only) trigger.
– See also loaded chamber indicator.
06.01 – US9 –
Mauser M2
Page 12
Handling the Pistol
5.6 Discharging a shot
Ensure that the target and the environment allow shots to
be fired without danger.
When discharging shots, ensure that neither your fingers,
hands or any other part of the body are located in front of,
adjacent to, or over the barrel muzzle or the ejector port.
Never allow other persons to stand beside you where they
might be struck by ejected cartridge cases.
Always wear ear protection and safety glasses when
shooting. Alert bystanders to the importance of wearing ear
protection.
Immediately before firing set the safety catch 37 to position
F (external safety models only).
Immediately stop shooting and unload the pistol (see
Sect. 8.1) if you suspect that a round has not been chambered properly, a case is jammed, a bullet is lodged in the
bore, or a discharge sounded or felt weak or abnormal.
Never attempt to dislodge a blockage by firing another
round.
Always comply with the warnings and instructions that
come with your ammunition.
Procedure
1. Aim the pistol at a safe target.
2. Release pistol safety (external safety models only).
3. Place finger on trigger 21 and pull back trigger 21 to
discharge the shot.
4. Keep the pistol aimed at the target and fire further shots as
required.
5. Remove magazine and unload the pistol (see Sect. 5.8).
If the pistol has been fired until the magazine is empty,
slide 4 will be caught in the open position. If firing is to
continue, reload the pistol (see Sect. 5.7).
After every shot the pistol is in the half-cocked state. Refer
to section 5.8 when you are finished firing the pistol.
Ensure you fully understand and adhere to the procedures
in section 5.8 before performing any maintenance on the
pistol (Chapter 7).
IMPORTANT
THE SAFEST PISTOL IS ONE THAT IS
FULLY UNLOADED.
Mauser M2
06.01– US10 –
Page 13
Handling the Pistol
5.7 Reloading during shooting
The slide is caught in the open position.
Never let the pistol out of your hands.
Keep the pistol pointed in a safe direction.
Procedure
1. Remove the empty magazine.
2. Insert full magazine and ensure that it engages.
3. Thumb down slide catch lever 26 or draw back slide 4 to
the stop and allow it to fly forward (see Sect. 5.5).
– The pistol is loaded and ready to fire.
5.8 Unloading the pistol
5.8.1 Unloading the pistol, magazine not empty
Never let the pistol out of your hands before it is unloaded
and set on safe.
The pistol is loaded, a round is located in the chamber of
the barrel.
Perform the unloading cycle from the rear of the pistol.
Keep your finger away from the trigger.
Never place your hand over the ejection port of the slide.
Procedure
1. Keep the muzzle of the pistol pointed in a safe direction.
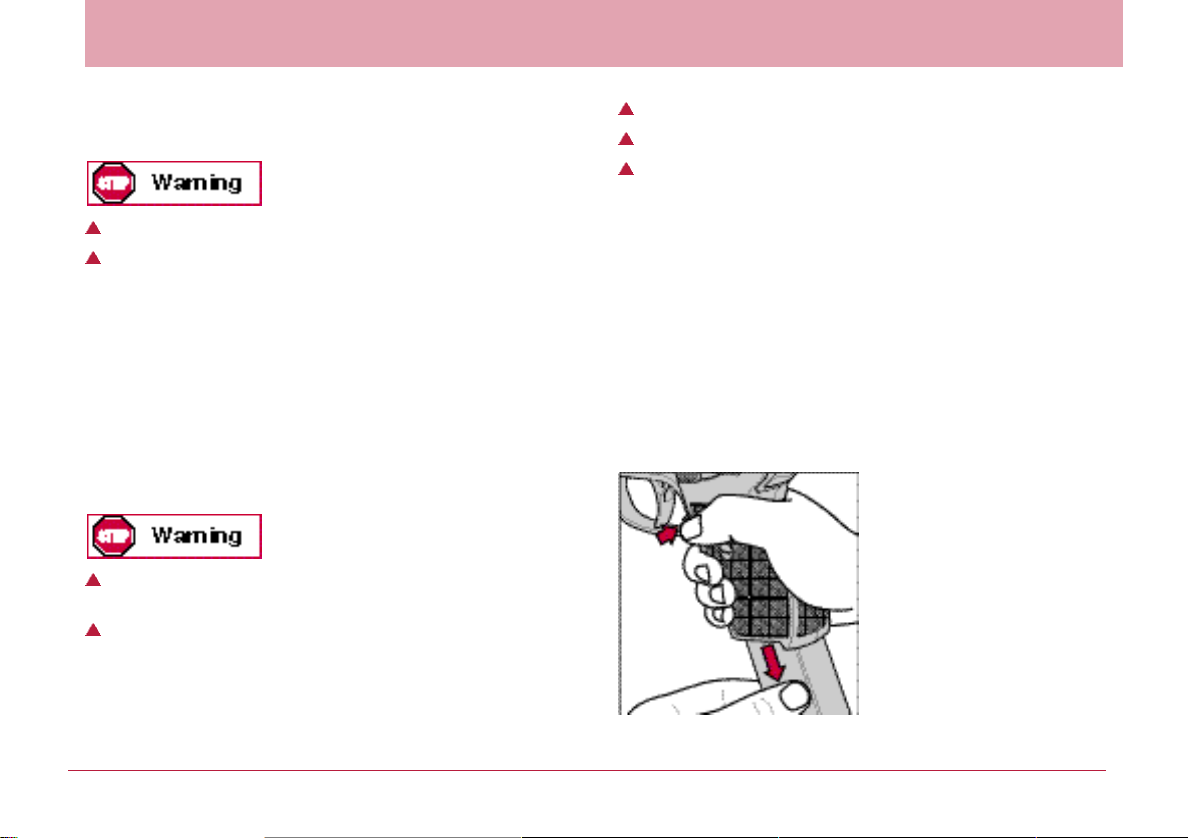
2. Depress magazine catch 43 and remove the magazine
(Fig. 2).
3. Release pistol safety (external safety models only).
4. Draw back slide 4 to the stop and thumb up slide catch
lever 26. The round will be ejected and the slide 4 will lock
in the open position, exposing the chamber.
06.01 – US11 –
Fig. 2
Mauser M2
Page 14
Handling the Pistol
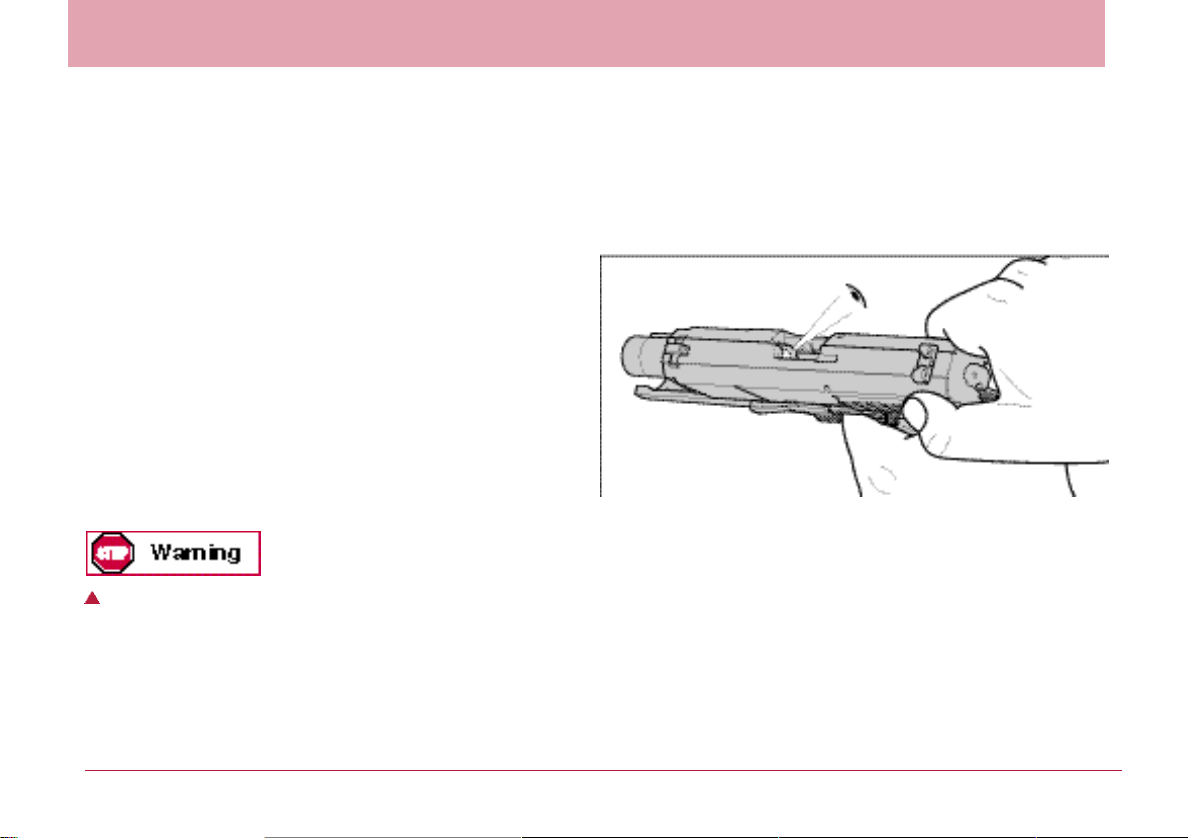
5. Check visually and physically that the round was ejected
and that no other round is chambered (Fig. 3).
6. Depress slide catch lever 26. Slide 4 will be released
forward.
7. The loaded chamber indicator 16 shows there is no cartridge in the chamber.
8. Pull the trigger 21 to fully decock the pistol.
9. Move the safety 37 to position S (external safety models
only).
10.Empty magazine.
11.Pick up and clean ejected round.
The pistol is unloaded and decocked. It must be cleaned
after every shooting session (see Sect. 7).
5.8.2 Unloading the pistol, magazine empty, slide open
The pistol must not be put down and out of your hand
until the magazine is removed and the pistol is unloaded
and, for external safety models, set on safe.
Procedure
1. Keep the muzzle of the pistol pointed in a safe direction.
2. Depress magazine catch 43 and remove the magazine
(see Fig. 2, page 11).
3. Check visually and physically that no round is chambered
(Fig. 3).
Fig. 3
4. D e p ress slide catch lever 2 6. Slide 4 will be re l e a s e d
f o rw a rd .
5. The loaded chamber indicator shows that there is no
cartridge in the cartridge chamber.
6. Pull trigger 21 to fully decock the pistol.
7. Move the safety 37 to position S (external safety models
only).
The pistol is unloaded, decocked and set on safe.
Mauser M2
06.01– US12 –
Page 15
Sights
6 Sight Correction
Any adjustment to sights should only be done on an
unloaded pistol, by an armorer, gunsmith or other qualified
person. Special tools (see Sect. 6.4) are required for this
task.
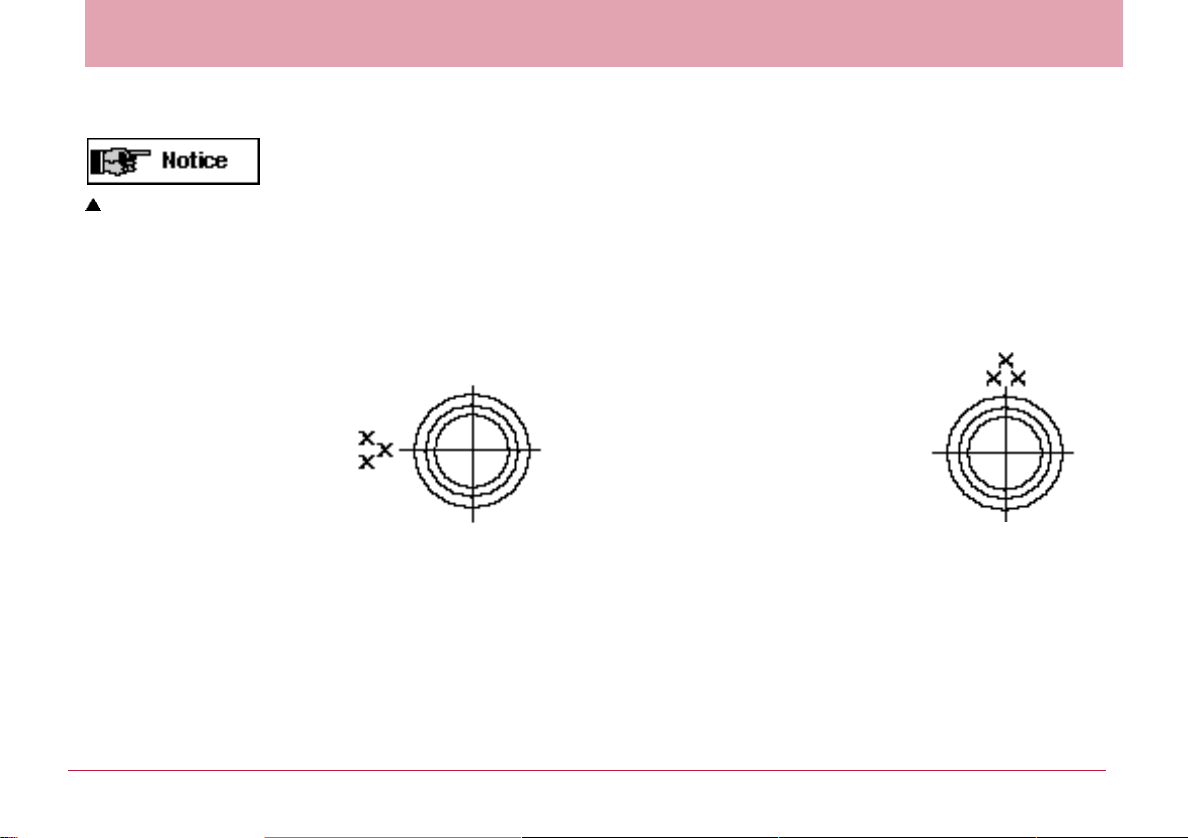
6.1 Sight correction for windage
Shifting the rear sight 6
Shifting the rear sight 6 by
0.02” to the right moves the
point of impact by 3” to the
right at 25 yard range.
Shifting the front sight 5
Shifting the front sight 5 by
0.02” to the left moves the
point of impact by 3” to the
right at 25 yard range.
06.01 – US13 –
Fig. 4,
point of impact left
6.2 Sight correction for elevation
Changing the front sight 5
Changing the front sight 5 for
a higher one (one front sight
increment) alters the point of
impact by 1” lower at
25 yard range.
Fig. 5,
point of impact high
Mauser M2
Page 16
Sight Correction
6.3 Front sight variants
Front sight variants
Number 05 06 07 08 09
Height 6.01 mm 5.88 mm 5.74 mm 5.60 mm 5.46 mm
.235” .230” .225” .220” .215”
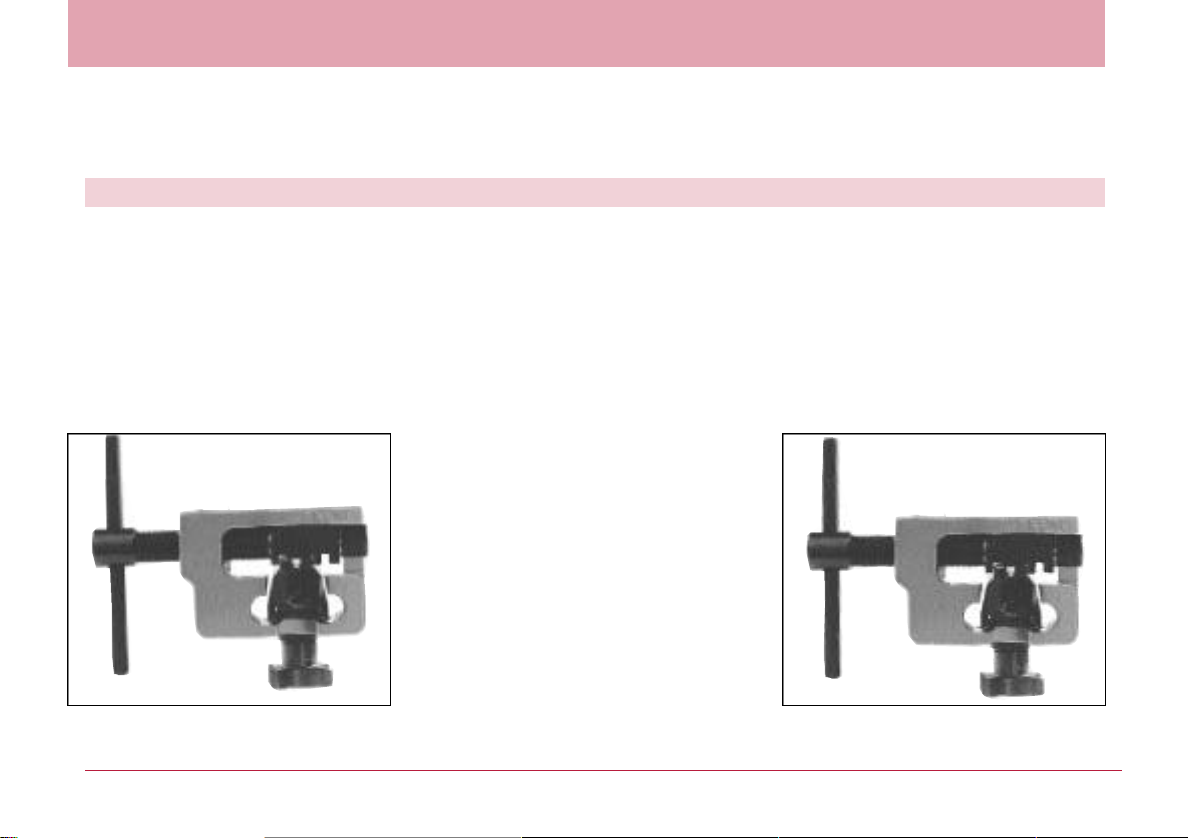
6.4 Front and rear sight adjustment tool.
Fig. 6, Combined front & rear sight
adjustment tool, from front.
Mauser M2
Fig. 7, Combined front & rear sight
adjustment tool, from rear
06.01– US14 –
Page 17
Maintenance
7 Maintenance of the Pistol
The magazine must be removed from the pistol.
Before stripping your pistol for cleaning, ensure once again
that it is unloaded (see Sect. 5.8).
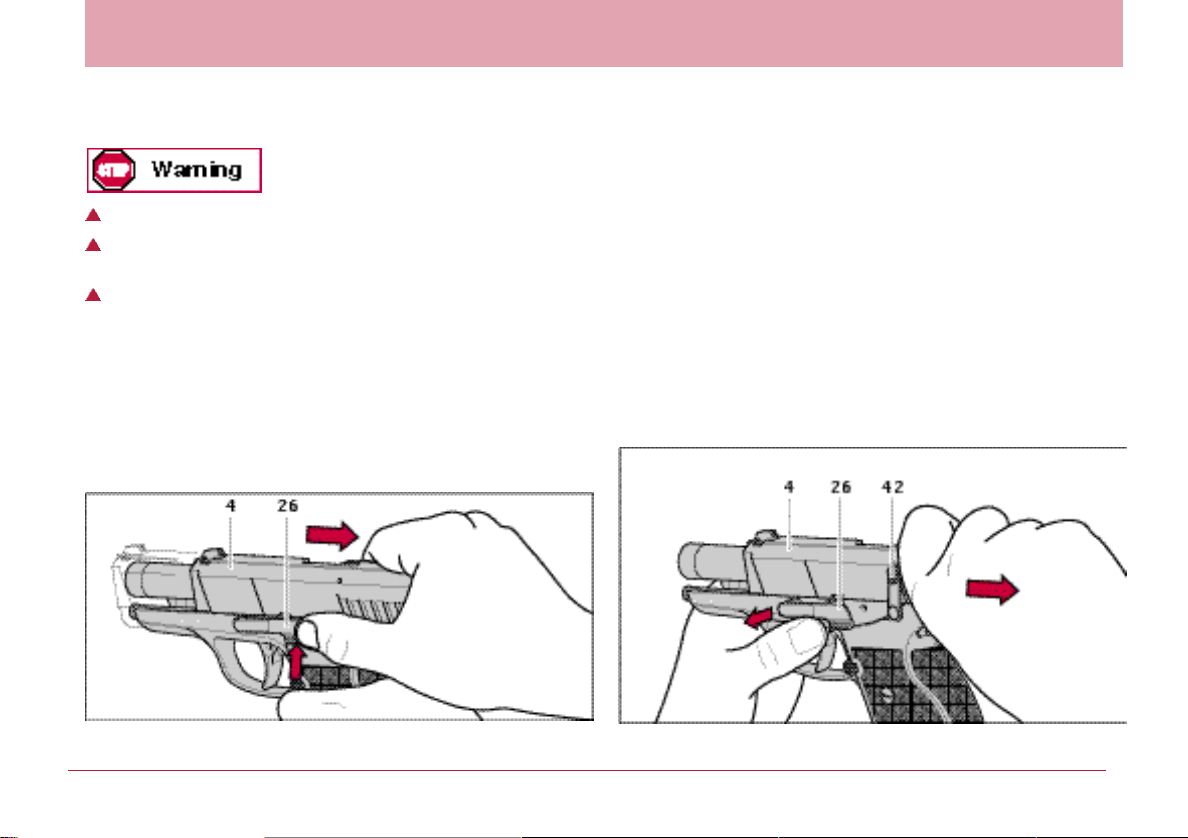
Grasp slide 4 with your hand (fig. 8) not your fingers.
7.1 Stripping the pistol
1. Unload the pistol (see Sect. 5.8).
2. Release pistol safety (external safety models only).
3. Draw back the slide 4 to stop and hold it in the opened
position by pressing up the slide catch lever 26 (Fig. 8).
4. Check that no round is chambered (see Fig. 3, page 12).
5. Rotate control level 42 clockwise into its vertical position.
6. With the right hand grasp the grip and slide. Press in the
slide catch lever 26 from the right and pull it out from the
left (Fig. 9).
Fig. 8 Fig. 9
06.01 – US15 –
Mauser M2
Page 18
Maintenance
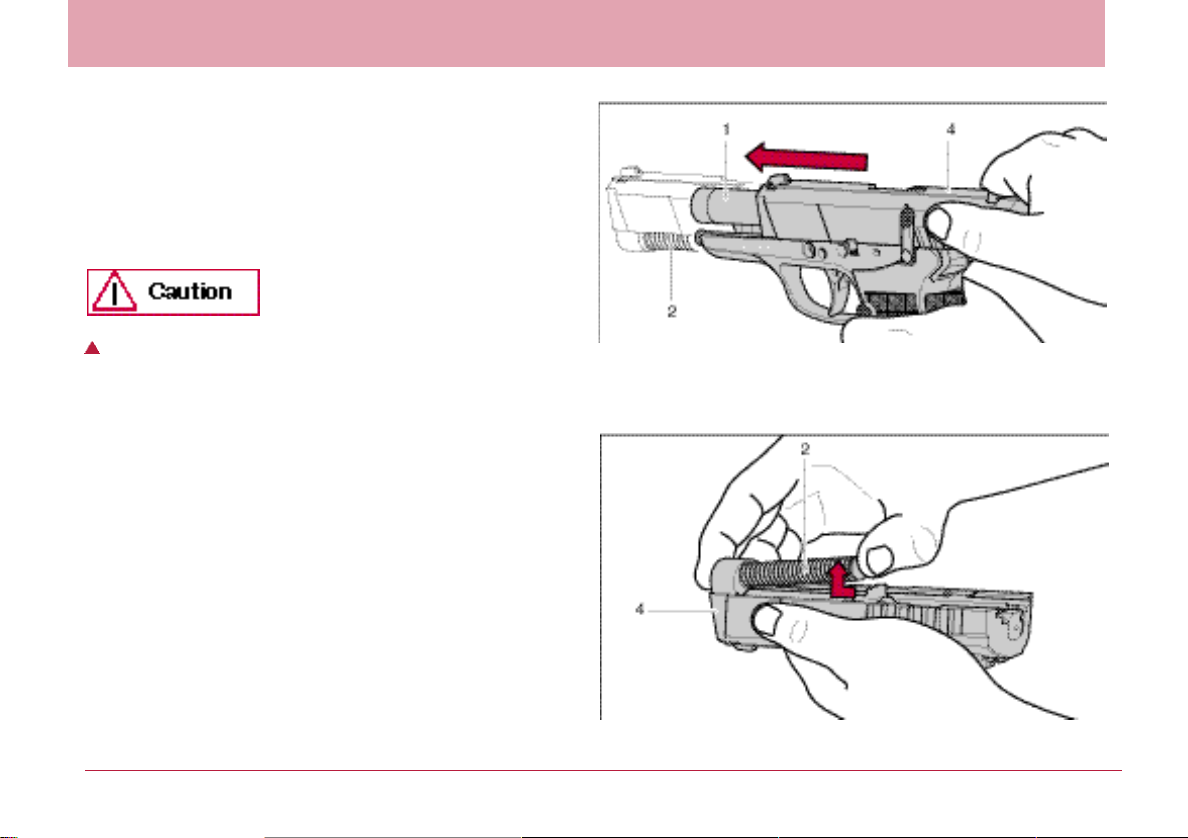
7. Slowly ease the slide 4 forwards with your hand until the
recoil spring unit 2 is released (Fig. 10).
8. Now slip the complete assembly (slide 4, barrel 1, recoil
spring unit 2) forward.
9. Press the recoil spring unit 2 forward, carefully lift it and
remove it from the slide 4 (Fig. 11).
Recoil spring unit 2 is compressed. Uncontrolled removal
of recoil spring unit 2 can cause it to jump away. When
stripping, control decompression of the preloaded recoil
spring unit 2 with your hand.
Mauser M2
Fig. 10
Fig. 11
06.01– US16 –
Page 19
Maintenance
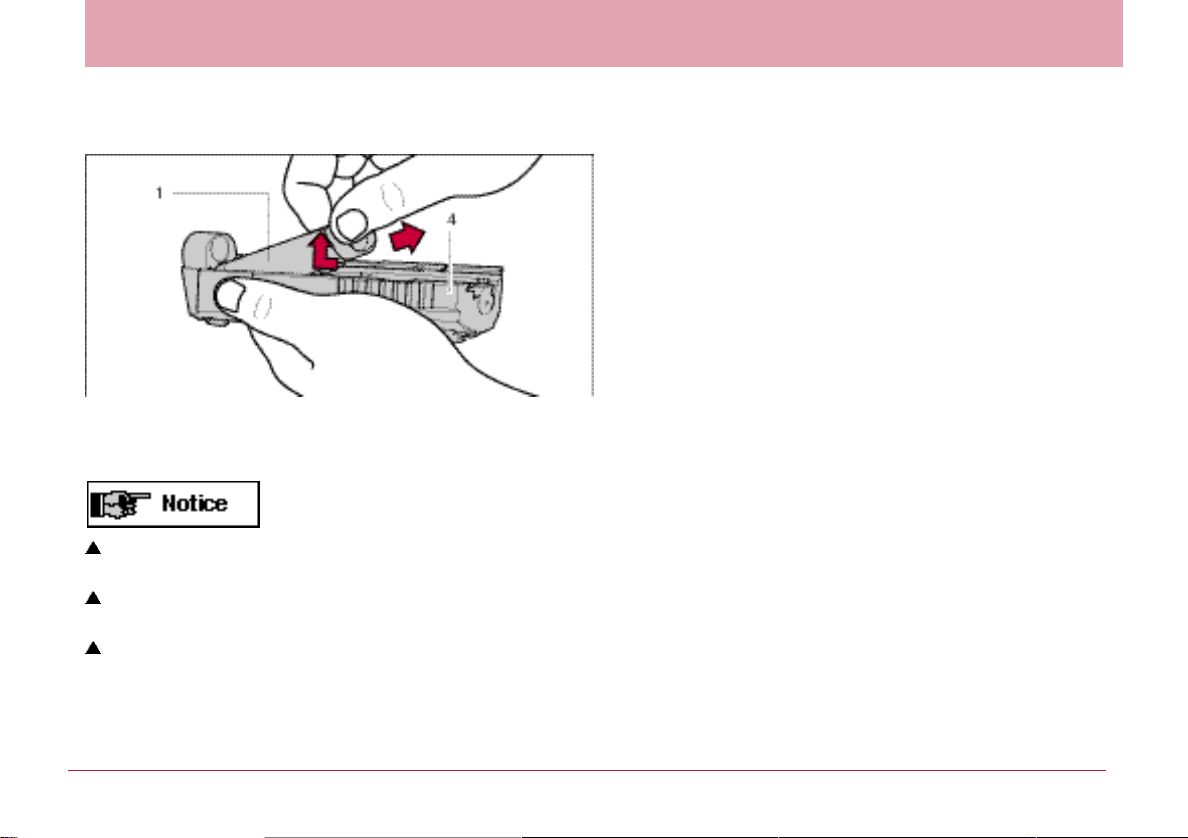
10.Remove barrel 1 from slide 4 (Fig. 12).
Fig. 12
This level of stripping is sufficient to allow a thorough
cleaning after shooting.
Further dismantling of the pistol may only be carried out by
qualified armorers and gunsmiths.
Further disassembly may result in the loss of components
and the voiding of the factory warranty.
06.01 – US17 –
Mauser M2
Page 20

Maintenance
7.2 Cleaning the pistol
Never clean barrel 1 from the muzzle end and do not use
steel wire brush as it can destroy the smooth surface of
the bore. Use a suitable cleaning rod and brush of
matching caliber (see Sect. 10).
Solvents can be harmful to the surface finish of the pistol.
Read the manufacturer’s warnings and instructions before
using solvents or cleaners.
Use only solvents, cleaners and lubricants specifically
designed for firearms.
Procedure
1. Treat the cleaning brush with gun solvent and insert it into
barrel 1 via the chamber. Use brush to carefully remove all
powder residues and dirt in the barrel 1 and chamber.
2. Wipe powder residues and solvent from the barrel bore and
chamber with cleaning patches.
3. Clean external surfaces of barrel 1 with a brush dipped in
gun solvent.
4. Clean the metal guide in the frame 19, the inside and outside surfaces of the slide 4, the locking insert 20 and recoil
spring unit 2 with a brush or rag. Then lightly lubricate with
a treated cloth.
5. Lightly lubricate the inside and outside of the barrel.
Mauser M2
06.01– US18 –
Page 21
Maintenance
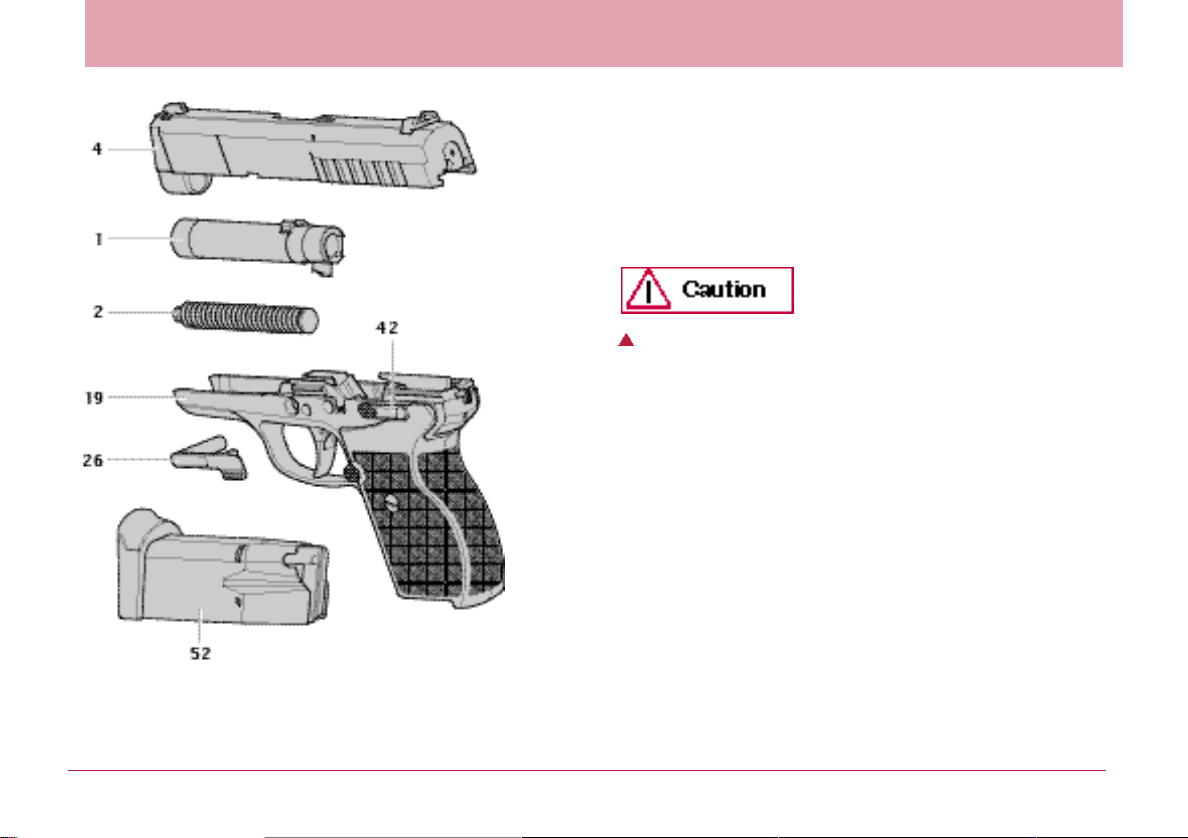
7.3 Assembling the pistol
Procedure
1. Check that there is no foreign matter inside the pistol.
2. I n s e rt barrel 1 into the slide 4 with the control lug facing down.
3. Insert recoil spring unit 2 into the slide 4 and b a rrel lug
When recoil spring unit 2 is inserted into slide 4, it becomes
preloaded. If the recoil spring unit 2 is not carefully installed
in slide 4, it can fly out and injure you or someone in your
vicinity.
4. Turn control lever 42 into its horizontal position.
5. Push the entire assembly onto the grip frame 19 from the
front, pull back to the rear position and then ease forwards
again till the recoil spring unit 2 is uncompressed.
6. Push in slide catch lever 26 horizontally from the left until it
is up against the grip frame 19.
Fig. 14, Pistol dismantled for cleaning
06.01 – US19 –
Mauser M2
Page 22
Maintenance
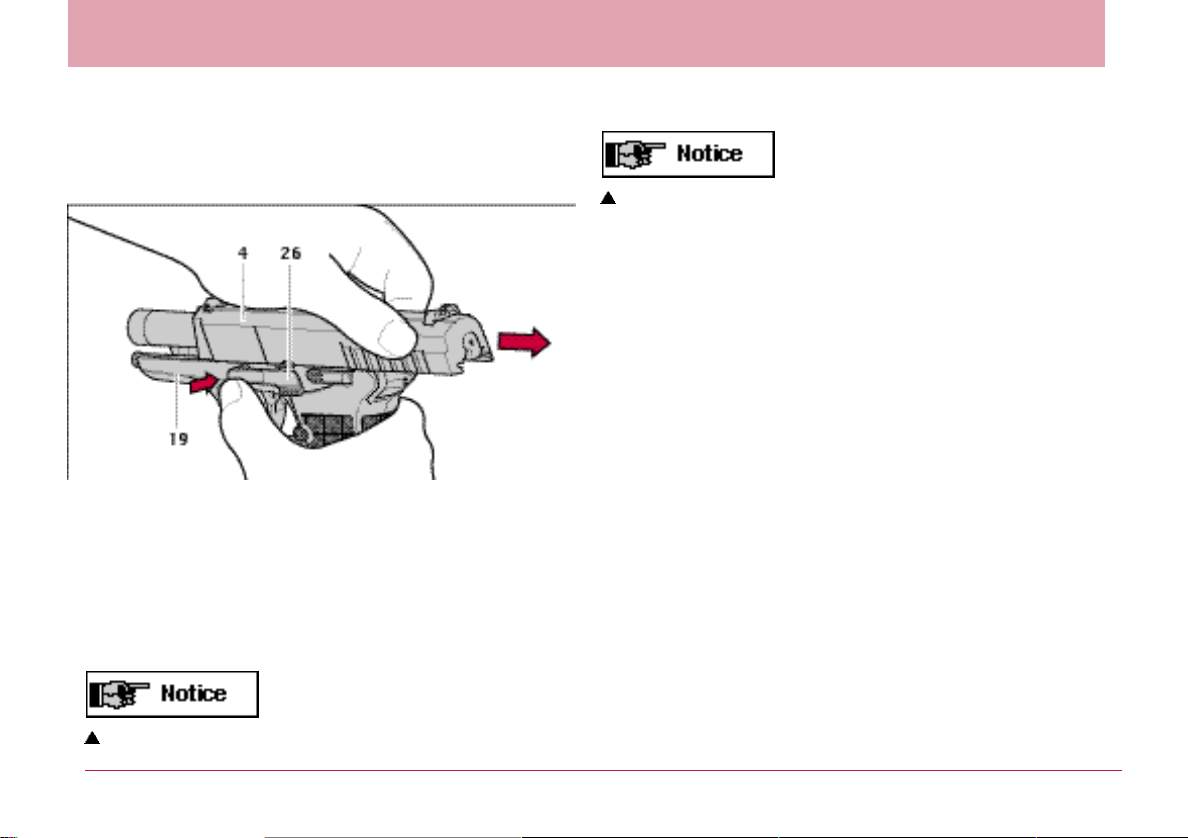
7. Hold the grip frame 19 with the right hand, pull back the
slide 4 to its rear position with the left hand. Press slide
catch lever 26 up and in till it “clicks” into place (Fig. 15).
Fig. 15
8. Follow the slide 4 forwards with the hand.
9. Pull back trigger 21 so that the pistol is in its fully
decocked position.
10.Pistol set on safe (external safety models only).
7.4 Verification of functions
Verification of functions must be conducted on the assembled pistol:
– to identify causes of malfunction,
– after completion of repairs
– and after each cleaning and assembly of the pistol.
Procedure
1. Remove the magazine, unload and clear the pistol (see
Sect. 5.8) and, for external safety models, remove safety.
2. Check the strength of recoil spring unit 2 and the smoothness of the slide 4 action.
– Draw back slide 4 to the stop and release it to fly forward.
– Check that slide 4 moves forward with sufficient energy
and that it locks up.
– Repeat the verification test.
The pistol is unloaded, decocked and set on safe.
Mauser M2
06.01– US20 –
Page 23

Maintenance
3. Check manual safety and trigger (external safety models).
– Insert empty magazine.
– Move safety lock 37 to position S. Pull trigger 21 fully.
– Check whether trigger 21 is locked.
– Move safety lock 37 to position F and pull trigger 21 fully.
– Check whether firing pin 9 is cocked and trips audibly
after about .6” trigger movement.
4. Check trigger interruption.
– Remove magazine.
– With trigger 21 pulled fully back, pull back slide 4 to stop
and release. Do not release trigger 21.
– Insert empty magazine and release trigger 21.
– Check whether trigger bar 22 is reengaged and whether
the firing pin 9 is released when the trigger is pulled
again.
5. Check magazine catch and magazine safety disconnect.
– Remove magazine.
– Pull back slide 4 as far as it will go and release it. Pull
trigger 21 fully.
– Make sure that the firing pin 9 has not tripped.
– Insert empty magazine and pull trigger 21 fully.
– Check whether firing pin 9 has tripped.
6. Check slide catch lever 26.
– Draw back slide 4 to the stop and release it.
– Check that slide 4 remains caught in its rearmost
position.
– Depress slide catch lever 26.
– Check that slide 4 is released and moves forward with
sufficient energy.
– Remove magazine.
7. Inspect magazine.
– Check condition of magazine tube 5 2 for signs of
damage or dirt (lips and floorplate).
– Check that magazine floorplate 56 is properly secured.
– Check free movement and spring action of feeder 55.
– Check smooth insertion of magazine into frame 19.
– Check magazine catch 43 for clean engagement and
release.
8. Inspect external appearance of the pistol.
– Check front sight 5, rear sight 6, grip plates 4 9 / 5 0 f o r
damage and dirt .
– Check that front sight 6, rear sight 5 and grip plates
4 9 / 5 0 are firmly secured.
06.01 – US21 –
Mauser M2
Page 24
Maintenance Service and Repairs
7.5 Care of the pistol
Always keep your pistol in immaculate condition and in
good working order.
Always clean your pistol after use.
Never modify or repair parts of your pistol yourself.
Have your pistol checked once every 12 months by a
qualified gunsmith or armorer because defects, wear,
corrosion, etc. are not always visible from the outside.
For repairs or service work, however, we recommend that
you return your pistol to the manufacturer who always
holds a full range of replacement parts in stock.
If you order spare parts without returning the pistol, you
are responsible for ordering the correct part and its
correct fitting by a qualified gunsmith or armorer.
The manufacturer and importer cannot be held liable for
faults in the pistol or malfunctions if the pistol has been
modified or non-original parts have been fitted by third
parties.
8 Pistol Service and Repairs
8.1 Cause and correction of malfunctions
Pistol maintenance (cleaning and inspection) according to the
instructions can prevent malfunctions. Should, nevertheless, a
malfunction occur during shooting, proceed as follows:
Hold pistol pointed in the firing direction (safe direction)
and keep your finger off trigger 21 while you carry out the
operations described in the following.
1. Remove and safeguard the magazine.
2. Release pistol safety (external safety models).
3. Draw back slide 4 and lock it in the open position by
thumbing up slide catch lever 26.
4. Verify (visually or with a tool) that there is no bullet, round,
case or foreign body in the barrel bore or chamber (see
Fig. 3, page US 12). If a projectile is lodged in the bore, strip
the pistol (see Sect. 7.1) and have the blockage removed
with a suitable tool by a qualified gunsmith.
5. Remove all rounds, cases or foreign bodies. Clean, lubricate
and assemble the pistol (see Sect. 7.2/7.3).
6. Have the pistol inspected by an armorer or gunsmith.
Mauser M2
06.01– US22 –
Page 25

Service and Repairs
Assembly/Malfunction
Ammunition feed:
No round chambered.
Slide:
Slide does not close properly.
Case ejection:
Spent case sticks in chamber or jams
in ejection port.
Misfire:
The trigger 21 was pulled,
no discharge.
Potential Cause
Magazine not properly inserted,
deformed or dirty.
Pistol or rounds dirty or too
heavily greased.
Pistol defective.
Recoil insufficient because
of fouling.
Underloaded ammunition.
Pistol defective.
Firing pin sticking in its guide.
Defective ammunition.
Pistol defective.
Potential Remedy
Insert magazine properly
or replace it.
Strip, clean and lubricate pistol
(see Sect. 7.1–7.3); clean or re p l a c e
a m m u n i t i o n .
Repair by manufacturer.
Strip, clean and lubricate pistol (see
Sect. 7.1–7.3)
Replace ammunition.
Repair by manufacturer.
Strip, clean and lubricate pistol (see
Sect. 7.1–7.3). Have pistol checked by
a rm o u re r.
Manually cycle slide to chamber new
round.
Repair by manufacturer.
06.01 – US23 –
Mauser M2
Page 26

Service and Repairs
8.2 Safekeeping and storage of the pistol
Always store your pistol unloaded and in cleaned
condition.
Store your pistol separate from its ammunition and
under lock and key. The pistol and ammunition must not
be accessible to children and other inexperienced or
unauthorized persons.
8.3 Shipping the pistol
Familiarize yourself fully with Federal, State & local laws
governing the shipping and transportation of firearms.
When you return a pistol to the SIGARMS Inc. Service
Department, here's what to do:
1. Make sure that the chamber and magazine(s) are
unloaded and that no ammunition is included.
2. Package the firearm securely to prevent damage. Enclose
a letter which includes your name, street address, daytime
phone number, pistol model and serial number, and a
detailed description of the problem you have experienced or
the work you want performed. With the exception of extra
magazines, do not include cases, scopes, mounts or other
accessories.
If repairs are to be done under warranty, enclose copy of sales
receipt.
3. Generally, an individual may ship firearms to the
manufacturer for repair or service. Some states and localities,
however, prohibit this. If you live in such an area, the firearms
must be shipped by and returned to a Federally Licensed
Firearms Dealer.
4. Individuals must ship handguns via UPS. Federal law
prohibits persons who do not possess a Federal Firearms
License from shipping a handgun via the U.S. Postal Service.
(Note: Any shipment of firearms outside of the USA borders is
subject to the valid law of the specific country, which you must
strictly follow.)
5. Ship your firearms insured and prepaid (we don't
accept collect shipments) to:
SIGARMS Inc.
Attention: Service Department
18 Industrial Drive
Exeter, NH 03833
USA
Mauser M2
06.01– US24 –
Page 27

Disposal
9 Disposal
– Strictly observe any current Federal, State & local legislation
governing the disposal of handguns.
– Provided this is not contrary to the abovel legislation, we
recommend shipping the pistol to the address listed under
Sect. 8.3 for disposal.
– When shipping the pistol, strictly observe the instructions
listed under Sect. 8.3.
06.01 – US25 –
Mauser M2
Page 28

Technical Specifications / Types / Accessories
Technical Specifications Caliber .45 ACP .40 S&W
Length, overall 6.85” 6.85”
Height, overall 5.04” 5.04”
Width, overall 1.34” 1.34”
Barrel length 3.54” 3.54”
Rifling lead 1 in 16” 1 in 15”
No. of grooves 6 6
Sight base 5.7” 5.7”
Weight, excl. magazine 28.9 oz 29.3 oz
Magazine weight, empty 3.4 oz 3.4 oz
Trigger pull DAO 8.8 lbs 8.8 lbs
Magazine capacity/Rounds 8 10
Accessories
– Spare magazines
– Cleaning kit
– Front sight
– Rear & Front Sight Adjustment Tool
Mauser M2
06.01– US26 –
Page 29

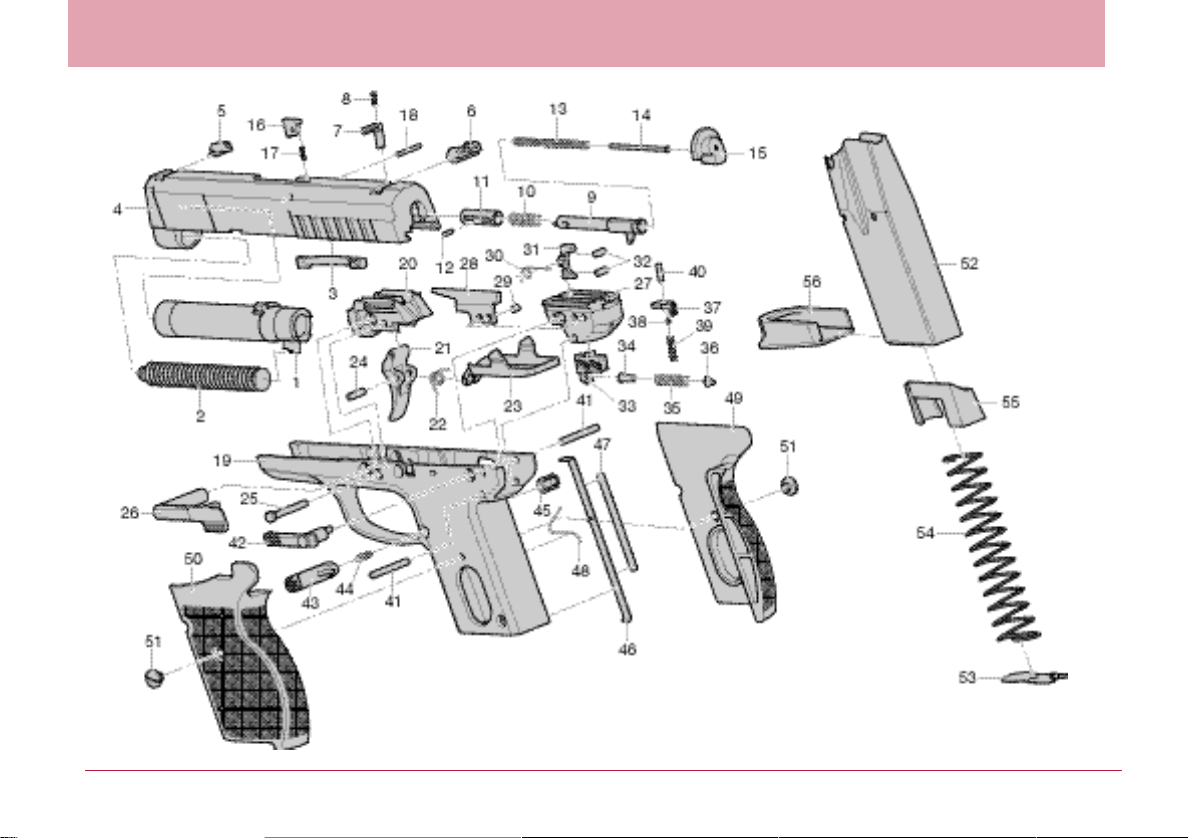
Spare Parts List
For the accompanying
figure to the list, see page
US 28.
Essential information when
ordering spare parts
– Pistol model (caliber,
designation)
– Pistol serial number
– Item number
– Part designation
Item Designation
1 Barrel
2 Recoil spring unit
3 Extractor
4 Slide
5 Front sight
05/06/07/08/09
6 Rear sight
7 Safety lock
8 Safety lock spring
9 Firing pin
10 Firing pin reset spring
11 Bushing
12 Pin
13 Firing pin spring
14 Firing pin spring guide
15 End cover
16 Loaded chamber
indicator
17 Loaded chamber
indicator spring
18 Loaded chamber
indicator pin
Item Designation
19 Frame
20 Locking insert
21 Trigger
22 Trigger spring
23 Trigger bar
24 Trigger bolt
25 Locking insert bolt
26 Slide catch lever
27 Rear insert
28 Ejector
29 Ejector bolt
30 Safety lever spring
31 Safety lever
32 Safety lever bolt
33 Catch
34 Long spring bolt
35 Catch reset spring
36 Short spring bolt
37 Safety lock
38 Stop ball
39 Stop ball spring
Item Designation
40 Safety lock bolt
41 Rear insert bolt
42 Control lever
43 Magazine catch
44 Magazine catch
spring
45 Magazine catch lock
46 Magazine safety
47 Spring plate to
magazine safety
48 Magazine safety
spring
49 Grip plate, right
50 Grip plate, left
51 Grip plate screw
52 Magazine tube
53 Floorplate insert
54 Magazine spring
55 Feeder
56 Magazine floorplate
06.01 – US27 –
Mauser M2
Page 30
Spare Parts List
Mauser M2
06.01– US28 –
Page 31

Warranty Statement
Based on Magnuson-Moss Warranty Act, SIGARMS Inc. offers no express warranty on their product
line. However, SIGARMS Inc. recognizes its obligations concerning service to owners of SIGARMS
products. SIGARMS Inc. stands behind its products and will continue to provide service to their
product line as they have over the years. SIGARMS Inc. products will be serviced for a period of one
year from date of retail purchase for defects in materials or workmanship, at no charge to the
purchaser. Be sure to retain your sales slip as proof of purchase date when making a claim.
This instruction manual should always accompany this pistol and be transferred with it upon change of ownership.
Service Policy
If you have questions concerning the performance or servicing of your pistol,
please write or call: SIGARMS Inc.
Attention: Service Department
18 Industrial Drive
Exeter, NH 03833 USA
Phone: 603 772-2302 Fax: 603 772-9082
IF YOU DO NOT UNDERSTAND THE INSTRUCTIONS FOR OPERATING YOUR PISTOL, IT IS YOUR
RESPONSIBILITY TO CALL OUR SERVICE DEPARTMENT: Phone # 603 772-2302
BEFORE USING YOUR FIREARM.
Page 32
Be aware of those around you.
If their actions are not in keeping with
safe gun handling procedures,
TELL THEM.
IMPORTANT:
Do not discard. Keep this manual with your firearm.
Upon change of ownership, transfer this manual
with the firearm.
/SIGARMS Inc.
Corporate Park
18 Industrial Drive
Exeter NH 03833
USA
Telefon +1 603 772 23 02
Telefax +1 603 772 90 82
Internet www.sigarms.com
 Loading...