

Page 1
User Operating Manual
USER OPERATING MANUAL
RADIO
Manufactured by,
Senao Neworks.
Sify Technologies LTD Page 1
Page 2

User Operating Manual
MANUFACTURER
SENAO NETWORKS
MANUFACTURER’S ADDRESS
NO. 528 Fushing 3rd, Hwa-Ya tech. Park
Kueishan, Tao Yuan 333, Taiwan
FACTORY NAME
SENAO NETWORKS
FACTORY ADDRESS
NO. 528 Fushing 3rd, Hwa-Ya tech. Park
Kueishan, Tao Yuan 333, Taiwan
VERSION
2.0
Sify Technologies LTD Page 2
Page 3

User Operating Manual
Federal Communication Commission Interference Statement
This equipment has been tested and found to comply with the limits for a Class B digital
device, pursuant to Part 15 of the FCC Rules. These limits are designed to provide
reasonable protection against harmful interference in a residential installation. This
equipment generates, uses and can radiate radio frequency energy and, if not installed and
used in accordance with the instructions, may cause harmful interference to radio
communications. However, there is no guarantee that interference will not occur in a
particular installation. If this equipment does cause harmful interference to radio or television
reception, which can be determined by turning the equipment off and on, the user is
encouraged to try to correct the interference by one of the following measures:
- Reorient or relocate the receiving antenna.
- Increase the separation between the equipment and receiver.
- Connect the equipment into an outlet on a circuit different from that
to which the receiver is connected.
- Consult the dealer or an experienced radio/TV technician for help.
FCC Caution: Any changes or modifications not expressly approved by the party responsible
for compliance could void the user's authority to operate this equipment.
This device complies with Part 15 of the FCC Rules. Operation is subject to the following two
conditions: (1) This device may not cause harmful interference, and (2) this device must
accept any interference received, including interference that may cause undesired operation.
This transmitter must not be co-located or operating in conjunction with any other antenna or
transmitter.
IMPORTANT NOTE:
FCC Radiation Exposure Statement:
This equipment complies with FCC radiation exposure limits set forth for an uncontrolled
environment. This equipment should be installed and operated with minimum distance 20cm
between the radiator & your body.
Sify Technologies LTD Page 3
Page 4

Professional installation instruction
1. Installation personal
This product is designed for specific application and needs to be installed by a
qualified personal who has RF and related rule knowledge. The general user shall
not attempt to install or change the setting.
2. Installation location
The product shall be installed at a location where the radiating antenna can be
kept 20cm from nearby person in normal operation condition to meet regulatory RF
exposure requirement.
User Operating Manual
3. External antenna
Use only the antennas which have been approved by the applicant. The nonapproved antenna(s) may produce unwanted spurious or excessive RF transmitting
power which may lead to the violation of FCC limit and is prohibited.
4. Installation procedure
Please refer to user’s manual for the detail.
5. Warning
Please carefully select the installation position and make sure that the final output
power does not exceed the limit set force in relevant rules. The violation of the
rule could lead to serious federal penalty.
Sify Technologies LTD Page 4
Page 5

User Operating Manual
Table of Contents
Safety precautions: ............................................................................................................................. 7
1.1 ODU ................................................................................................................................................... 8
Description .............................................................................................................................................. 8
Technical Specification ............................................................................................................................ 9
1.0 ODU (Radio) .................................................................................................................................... 11
1.1 System Requirement ............................................................................................................... 11
1.2 Hardware Overview ................................................................................................................ 11
1.3 Computer Configuration Instruction ........................................................................................... 11
1.3.1 Assign a Static IP................................................................................................................... 12
1.3.2 Logging Method ................................................................................................................... 12
1.4 Status .......................................................................................................................................... 13
1.4.1 Save/Load ............................................................................................................................. 13
1.4.2 Main ..................................................................................................................................... 14
1.4.3 Wireless Client List ............................................................................................................... 14
1.4.4 System Log ........................................................................................................................... 15
1.4.5 Connection Status ................................................................................................................ 15
1.5 System ......................................................................................................................................... 16
1.5.1 Switching Operation Mode .................................................................................................. 16
1.5.2 IP Settings: ............................................................................................................................ 16
1.5.3 Ethernet Settings.................................................................................................................. 17
1.5.4 Location ................................................................................................................................ 18
1.5.5 Spanning Tree Settings ......................................................................................................... 18
1.5.6 Service Settings .................................................................................................................... 19
1.6 Wireless Configuration ................................................................................................................ 19
1.6.1 Wireless Network ................................................................................................................. 19
1.6.2 Wireless Security Settings .................................................................................................... 21
1.6.3 Wireless MAC Filter .............................................................................................................. 23
1.6.4 Wireless Advanced Settings ................................................................................................. 24
1.7 Management Settings ................................................................................................................. 25
Sify Technologies LTD Page 5
Page 6

User Operating Manual
1.7.1 Administration ..................................................................................................................... 25
1.7.2 SNMP Settings ...................................................................................................................... 26
1.7.3 Backup/Restore Settings ...................................................................................................... 27
1.7.4 Auto reboot settings ............................................................................................................ 28
1.7.5 Firmware Upgrade ............................................................................................................... 28
1.7.6 Firmware Upgrade Settings ................................................................................................. 29
1.7.7 Time Settings ........................................................................................................................ 29
1.7.8 Log ........................................................................................................................................ 30
1.7.9 Diagnostics ........................................................................................................................... 31
1.8 Device Discovery ......................................................................................................................... 31
1.8.1 Reset ........................................................................................................................................ 32
1.9 LED Indication ............................................................................................................................. 32
Sify Technologies LTD Page 6
Page 7

User Operating Manual
Safety precautions:
Prior to connecting cables to the ODU, the protective earth terminal (screw) of the ODU must
be connected to an external protective ground conductor or to a grounded mast.
Only a qualified person using the proper safety equipment should climb the antenna mast.
Only trained professional installers should be used when installing or dismantling ODUs and
masts.
Do not use product near water (i.e. wet basement, bathtub, sink or near a swimming pool,
etc.), to avoid risk of electrocution
Avoid using and/or connecting the equipment during an electrical storm, to avoid risk of
electrocution.
Sify Technologies LTD Page 7
Page 8
1.1 ODU
Description
User Operating Manual
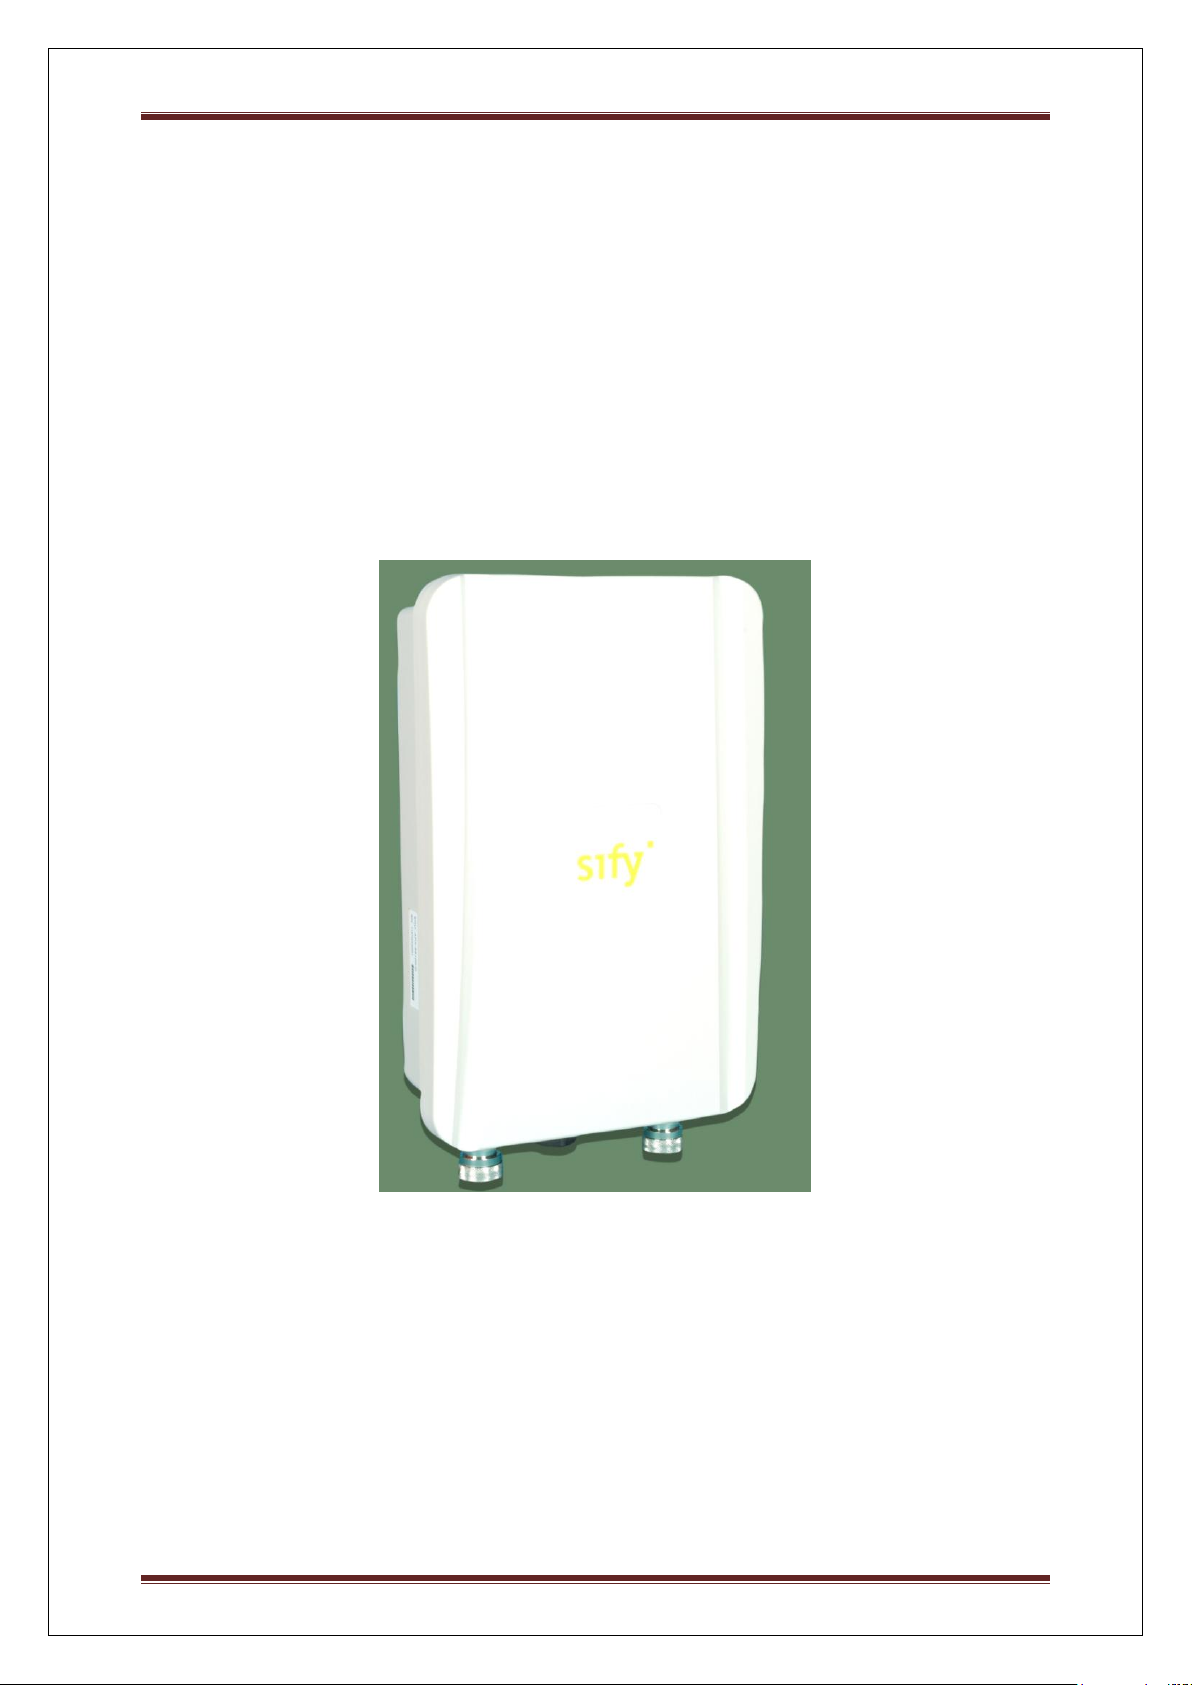
Figure 1: Radio (SMAC5700)
Thank you for using SMAC5700. It is a powerful, enhanced, enterprise scale product with
functions Outdoor Base and Outdoor Subscriber.
SMAC5700 uses the latest wireless technology 802.11n standard. It has faster
transmit/receive wireless speed. SMAC5700 gives you a great advantage to save your time
and cost to expend your network. It is also compatible with 802.11a.
Sify Technologies LTD Page 8
Page 9

User Operating Manual
PRODUCT MODELS
SMAC5700
SKU : APX-57200D
SMAC 5700 Base station unit, 200 Mbps, 5.8 GHz, 2 x N-Type
connectors
INTERFACES
WIRED
ETHERNET
Single auto MDI-X RJ45 10/100/1000 Mbps with POE & Data
WIRELESS
INTERFACE
802.11 a/n
RADIO SPECS
RANGE
Upto 20 Km / 12 miles
MIMO
2x2 MIMO
MODULATION
OFDM
FREQUENCY
BAND
5.725 GHz- 5.850 GHz
CHANNEL
BANDWIDTH
Configurable : 20 MHz, 40 MHz
DUPLEX
TECHNOLOGY
TDD
DATA RATE
MCS 0 to 15 for max throughput (6.5 – 300 Mbps) with DDRS
BPSK, QPSK, 16-QAM and 64-QAM for (6 Mbps – 54 Mbps) –
legacy mode
ADAPTIVE
MODULATION &
CODING
Supported
TX POWER
Up to 24dBm
TX POWER
CONTROL
Transmit power control and distance control (ACK timeout)
RX SENSITIVITY
(BER=10-6)
(in dBm)
Channel Size
20 MHz
MCS0 / MCS8
-90 MCS1 / MCS9
-87 MCS2 / MCS10
-85 MCS3 / MCS11
-80 MCS4 / MCS12
-77 MCS5 / MCS13
-73
SMAC5700 is easily to install almost anywhere with Power over Ethernet for quick indoor
installation and regular Power by Adapter. SMAC5700 can manage power level control,
Narrow bandwidth selection, Traffic shaping and Real-time RSSI indicator. SMAC5700 is
fully support of security encryption including Wi-Fi Protected Access (WPA2-PSK), 128 bit
- AES Encryption and IEEE 802.1x with RADIUS.
Technical Specification
Sify Technologies LTD Page 9
Page 10

User Operating Manual
MCS6 / MCS14
-71
MCS7 / MCS15
-70
LED INDICATION
Ethernet status and wireless signal strength indication
LATENCY
< 10 m.sec (typical)
ANTENNA
APX-57200-D
TYPE
External
CONNECTOR
2 x N-Type connector with built in Surge
Protection
MANAGEMENT
LOCAL
Serial interface RS-232 available in PCBA
REMOTE
Telnet and SSH, Web/GUI, TFTP, SNMP V2
SNMP
SNMP V1,V2c, V3, Traps, Private MIB
OTHER
Syslog
BACKUP
User can backup all settings to a file via WEB & CLI
PING &
TRACEROUTE
Built in functionality from Web GUI
FIRMWARE
UPGRADE
Upgrading firmware via web browser & CLI, settings are reserved
after upgrade
SECURITY
ENCRYPTION
AES-128 bit
AUTHENTICATION
802.1X, MAC address, Radius based Authentication
NETWORK
BRIDGING
Transparent Bridging (802.1d)
ROUTING
Static and Dynamic Routing, RIP v1/v2
IP
Ipv4 Static and Dynamic address,IPV6
GATEWAY
FEATURES
DHCP Server, DHCP Client, Filter
VLAN
802.1Q – Access VLAN, Trunk and Q-in-Q
FEATURES
FILTERING
IP source / destination address , TCP/UDP Port Numbers, MAC
address Source or Destination, Multicast traffic, Broadcast
BANDWIDTH
CONTROL
Flexible uplink and downlink bandwidth control
POWER
POE (Power Over
Ethernet )
Power adapter Input – 100-240V/ 0.6A ,50 to 60Hz
Power adapter Output – 48VDC /0.5A
Sify Technologies LTD Page 10
Page 11

User Operating Manual
POWER CHORD
6A 250V, 50 Hz
3 Pin Indian type IS:1293
POE Fuse Rating
2 Amp (2A, 250V), which is used in the location F, and F1.
SURGE PROTECTION
Inbuilt Ethernet Surge Protection
ENVIRONMENTAL SPECS
OPERATING,
STORAGE
TEMPERATURE
HUMIDITY, IP RATING
POWER CONSUMPTION
-15oC to 60oC
-15oC to 80oC
0% - 90%, (non-condensing)
IP 67
10W (max)
MECHANICAL SPECS
DIMENSIONS
(PACKED)
DIMENSIONS
(UNPACKED)
WEIGHT
(PACKED)
WEIGHT
(UNPACKED)
14.6 x 9.25 x 8.07 in
(370 x 235 x 205
mm)
6.7x 10.2 x 3.1 in
(170 x 260 x 80 mm)
2 Kg (4.41 lbs)
1 Kg (2.2 lbs)
Physical Interface
- 1 x LAN Port with PoE support
- 2 x RF port
1.0 ODU (Radio)
1.1 System Requirement
The following conditions are the minimum system requirement.
A computer with an Ethernet interface and operating under Windows XP, Vista, 7 or
Linux.
Internet Browser that supports HTTP and JavaScript.
1.2 Hardware Overview
1.3 Computer Configuration Instruction
Sify Technologies LTD Page 11
Page 12
User Operating Manual
The default operating mode is Outdoor Base for AP hardware and Outdoor Subscriber for SU
hardware. Device will not assign an IP address to the
computer/notebook. Therefore, follow the steps to assign an
IP address to your Ethernet card.
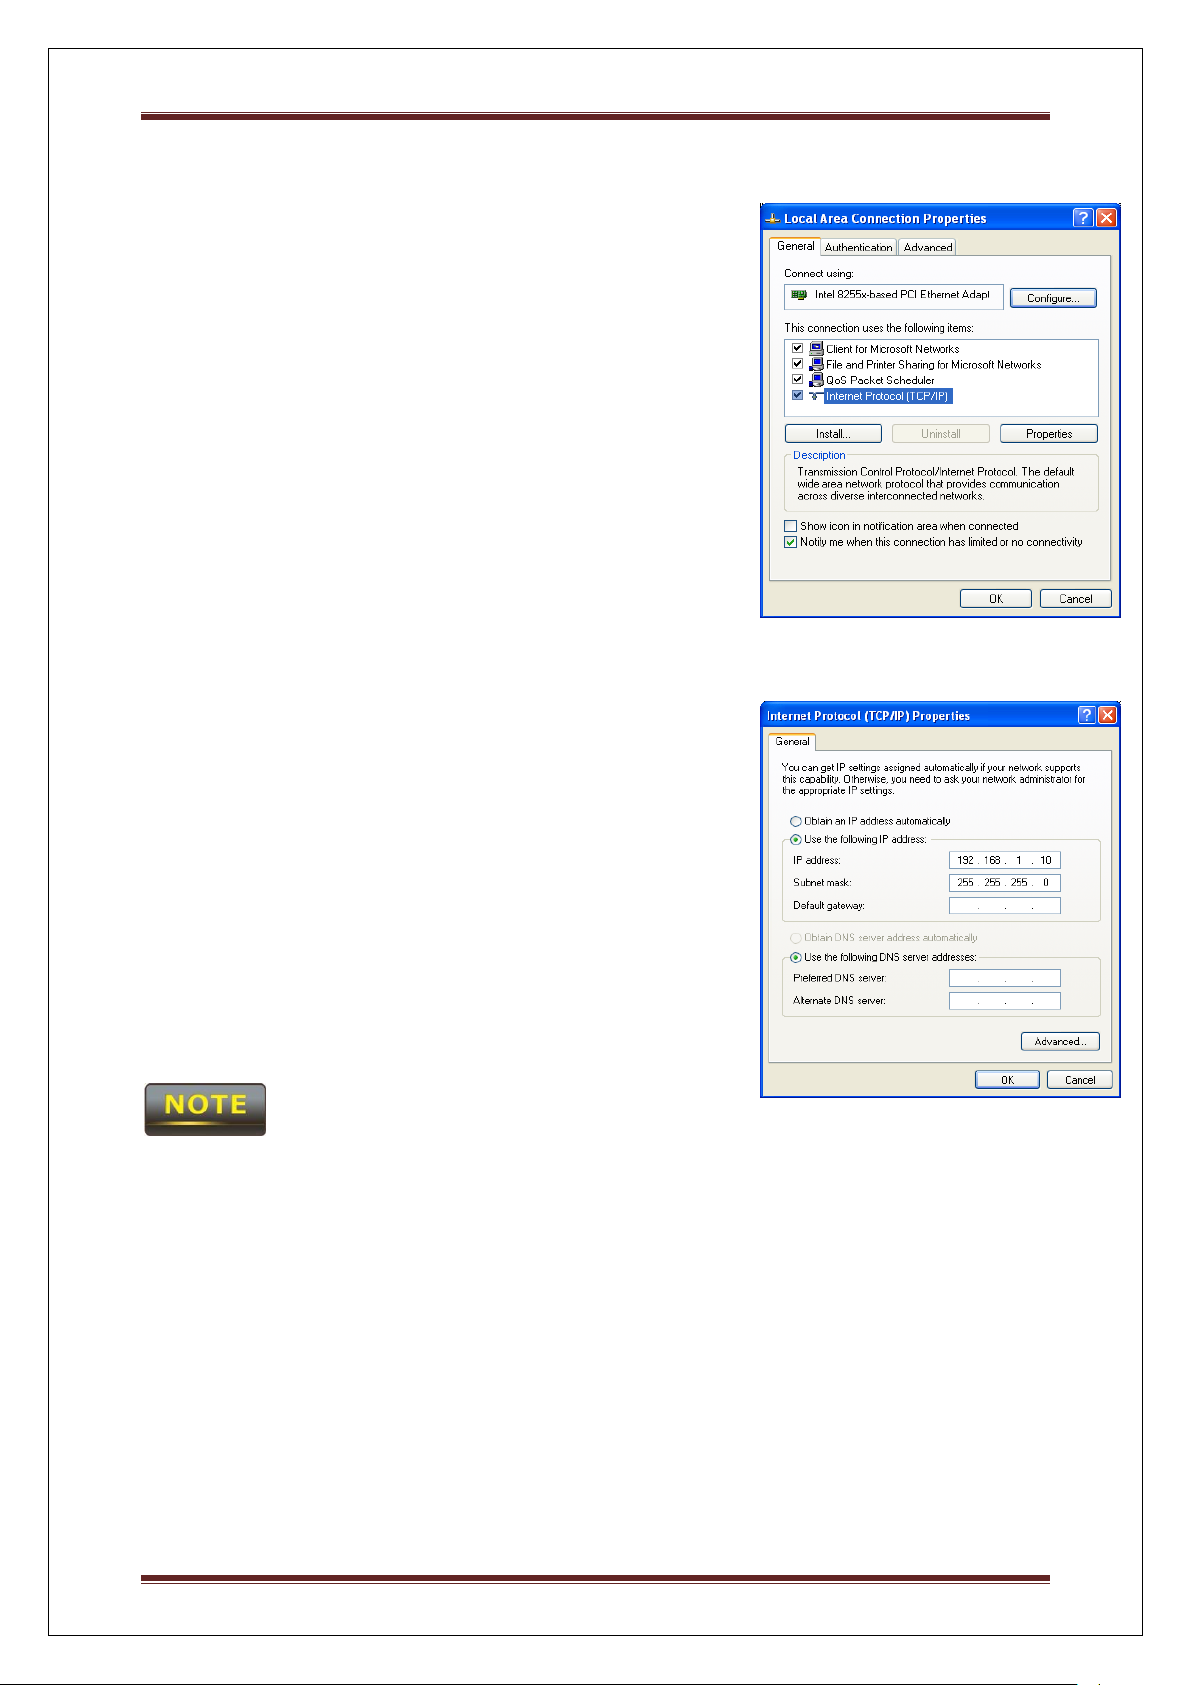
1.3.1 Assign a Static IP
In order to configure SMAC5700, please follow the
instruction below:
1. In the Control Panel, double click Network Connections
and then double click on the connection of your Network
Interface Card (NIC). You will then see the following
screen.
2. Select Internet Protocol (TCP/IP) and then click on the
Properties button. This will allow you to configure the TCP/IP settings of your PC/Notebook
3. Select Use the following IP address radio button and then
enter the IP address and subnet mask. Ensure that the IP
address and subnet mask are on the same subnet as the
device.
4. Click on the OK button to close this window, and then
close LAN properties window.
IP Address entered in the TCP/IP Properties needs to be at the same subnet of the
SMAC5700 IP Address. For example: SMAC5700’s default IP Address is 192.168.1.1 so the
IP Address in the TCP/IP settings could be 192.168.1.10.
1.3.2 Logging Method
After complete the IP settings from last section, you can now access the web-based
configuration menu.
1. Open web browser.
Sify Technologies LTD Page 12
Page 13
User Operating Manual
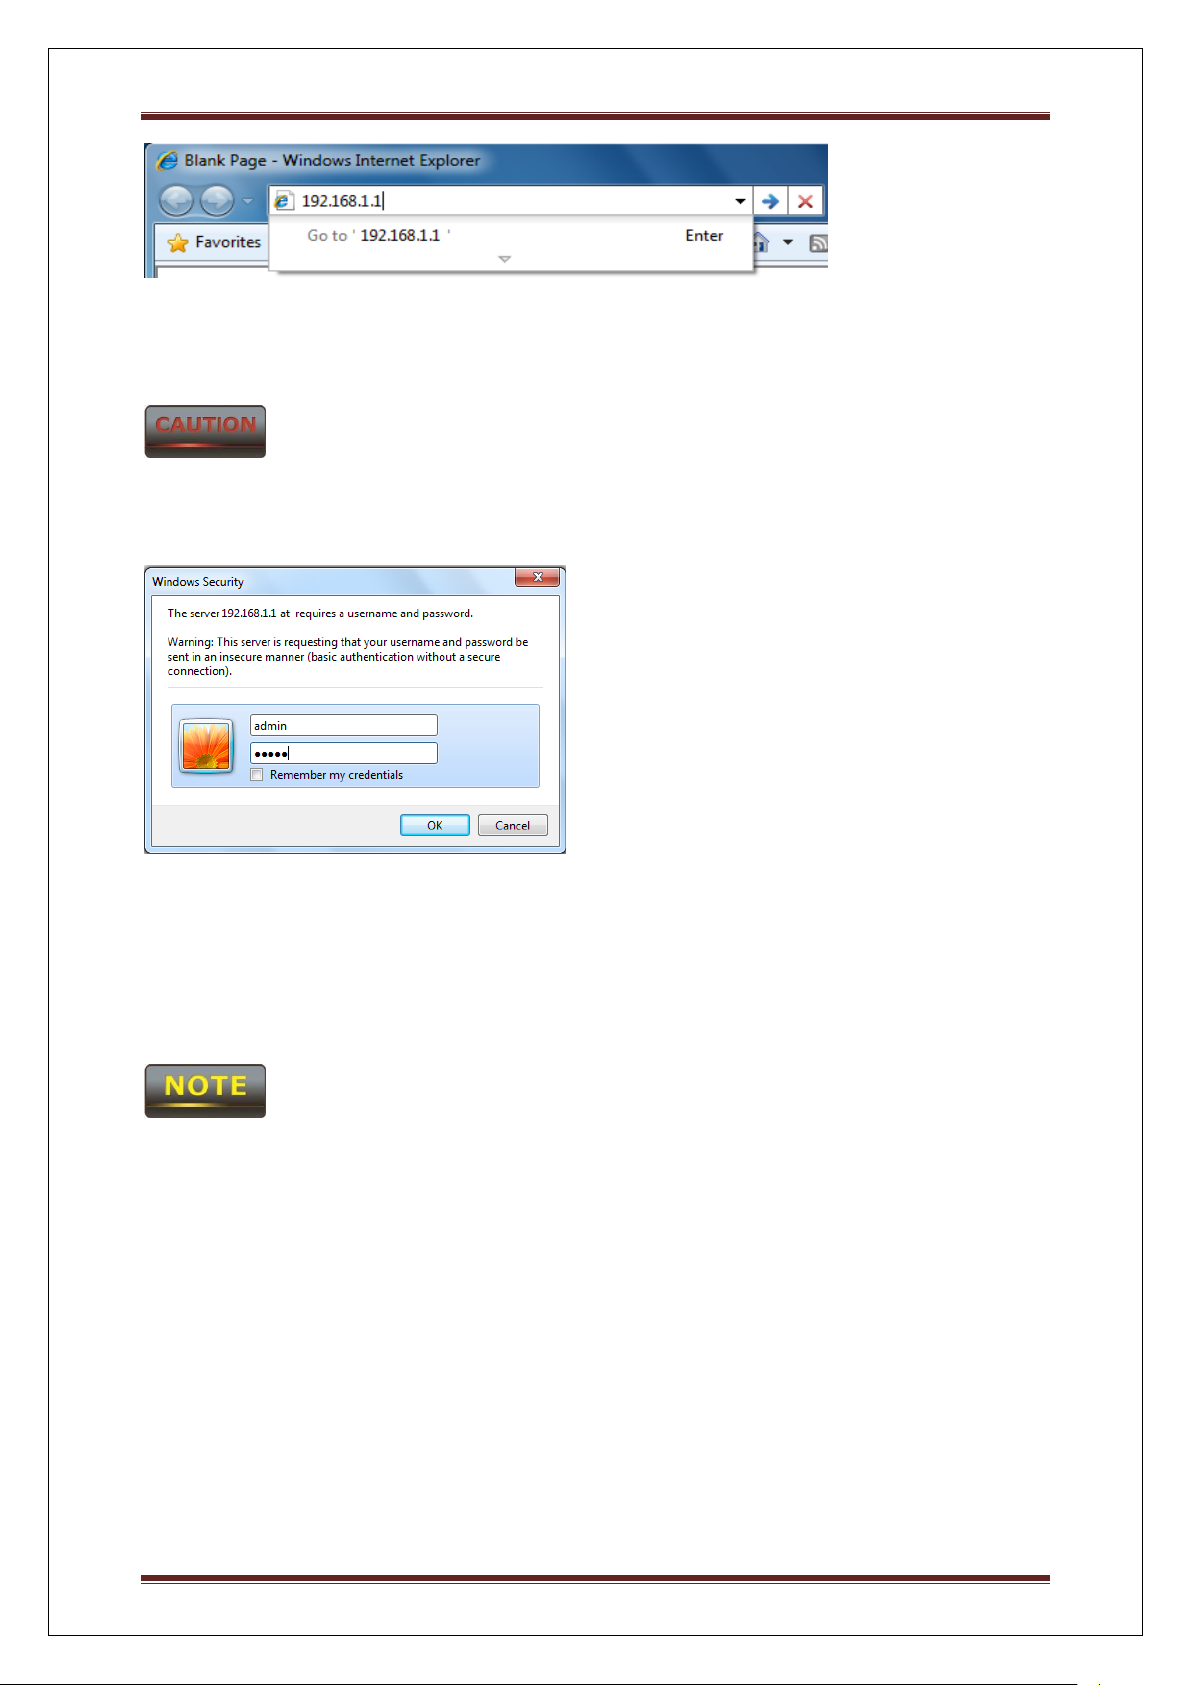
2. Enter IP 192.168.1.1 into you address filter.
If you have changed the SMAC5700 LAN IP address, make sure you enter the correct IP
Address.
3. After connected to the SMAC5700 successfully, browser will pop out a Windows Security
window. Please enter the correct Username and Password.
4. The default Username and Password are both admin.
If you have changed the Username and Password, please enter your own Username and
Password. Password length should be minimum 8 and maximum 16.
1.4 Status
Status section is on the navigation drop-down menu. You will then see the options: Main,
Statistics, Wireless Client List, System Log and Connection Status. Each option is described
in detail below.
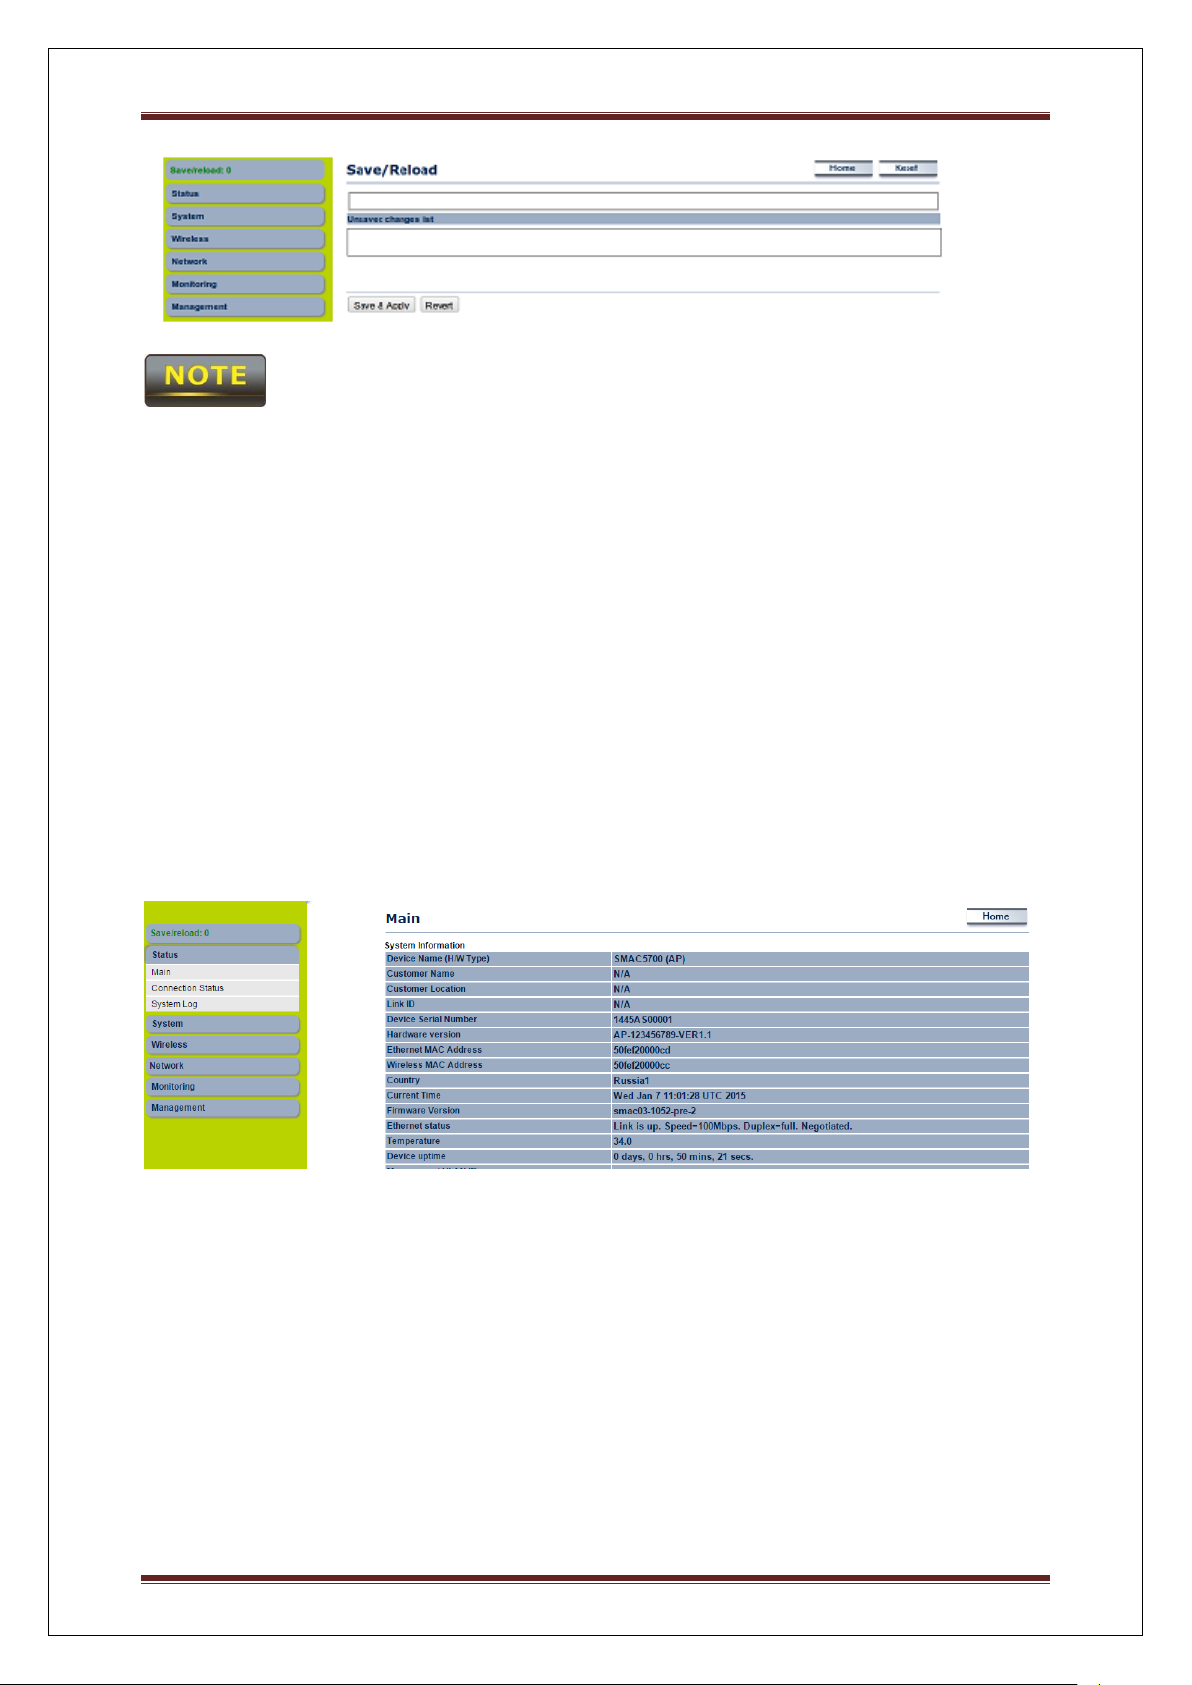
1.4.1 Save/Load
This page allows viewing the modified changes. The changes show in the unsaved changes
list table. You can decide to cancel all the changes or to compile to the new setting.
Sify Technologies LTD Page 13
Page 14
User Operating Manual
If any configuration changes has been made by the user the Save/Reload button will appear in
Red color unless clicking the Save& Apply button.
You cannot cancel the specific settings. You can only compile all the settings or revert to the
previous settings.
1.4.2 Main
Click on the Main link under the Status drop-down menu or click Home from the top-right
of the webpage. The status that is displayed corresponds with the operating mode that is
selected. Information such as operating mode, system up time, firmware version, serial
number are displayed in the ‘System’ section. LAN IP address, subnet mask, and MAC
address are displayed in the ‘LAN’ section. In the ‘Wireless section, the frequency, channel is
displayed. The details of each SSID and its security settings are displayed.
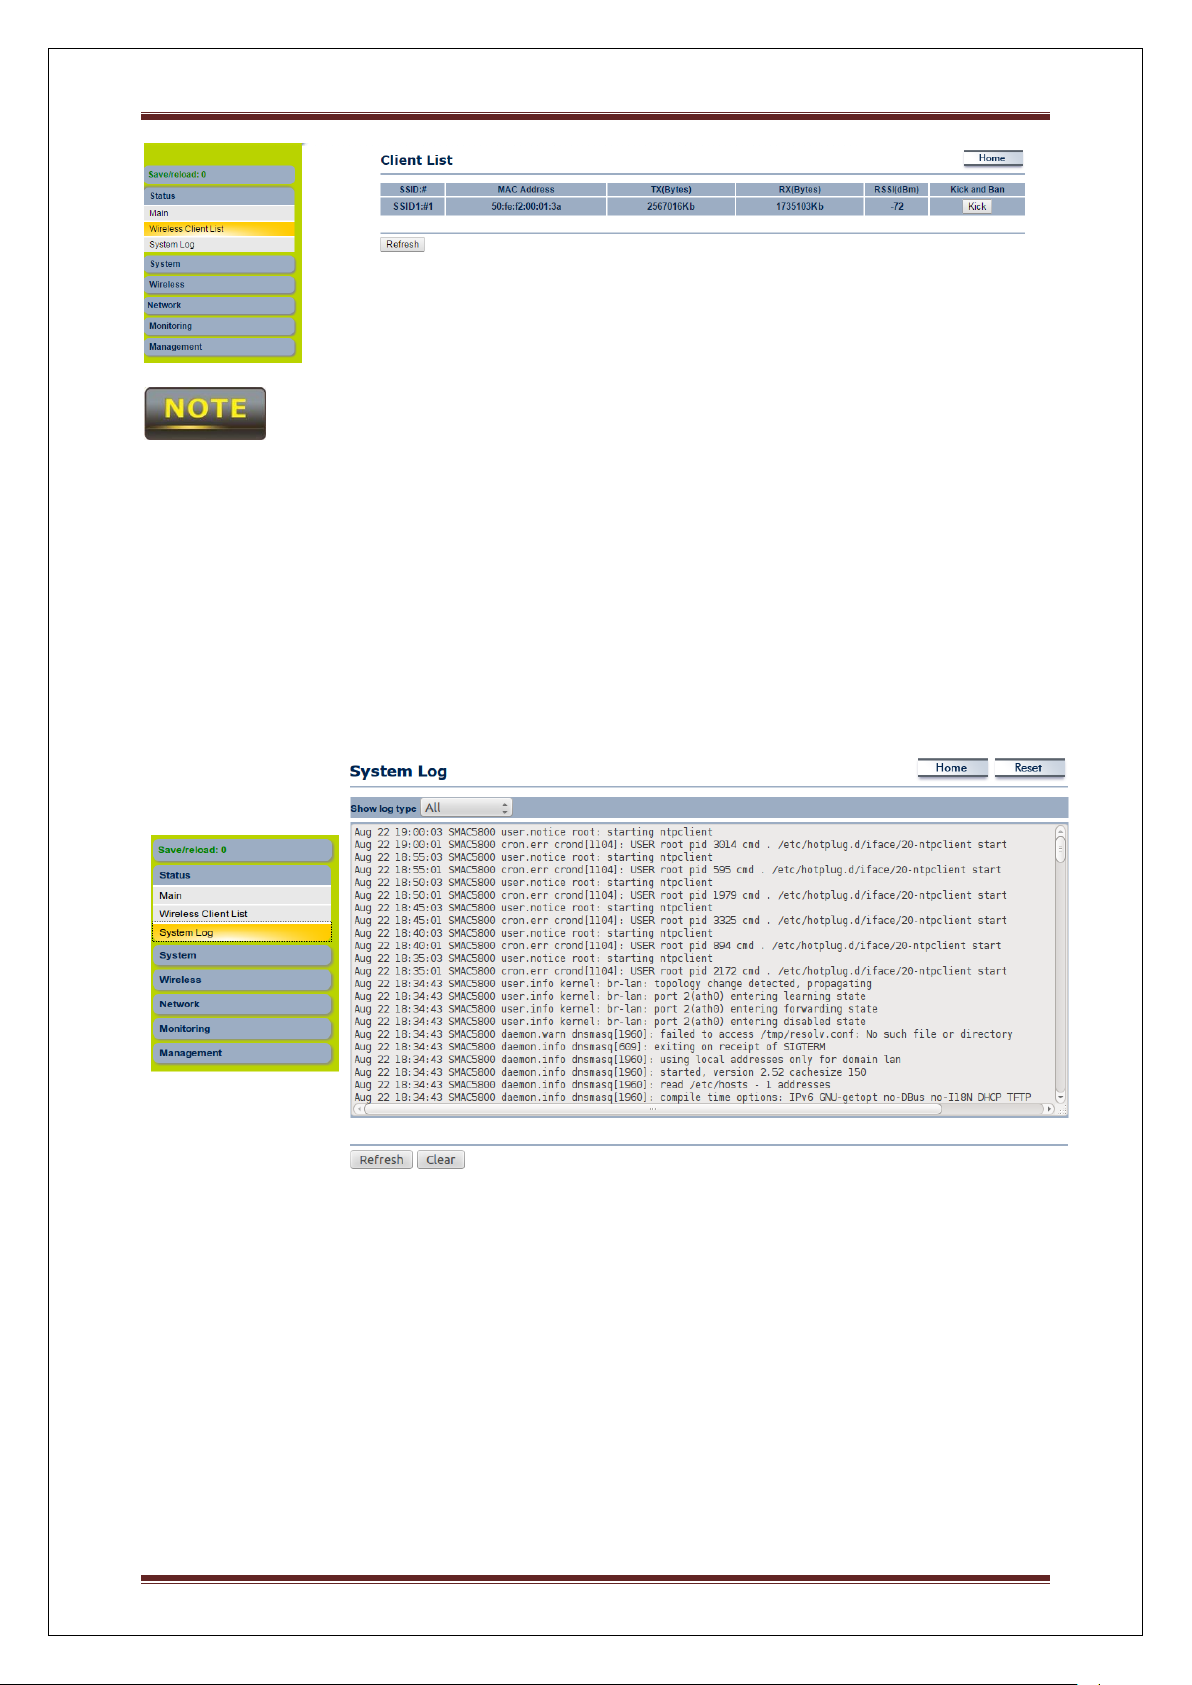
1.4.3 Wireless Client List
Click on the Wireless Client List link under the Status drop-down menu. This page displays
the list of Clients that are associated to the SMAC5700.
The MAC addresses and signal strength for each client is displayed. Click on the Refresh
button to refresh the client list. Default refresh time will be 10 seconds.
Sify Technologies LTD Page 14
Page 15
User Operating Manual
This will be shown in Outdoor Base only
1.4.4 System Log
Click on the System Log link under the Status drop-down menu. The device automatically
logs (records) events of possible interest in its internal memory. If there is not enough internal
memory for all events, logs of older events are deleted, but logs of the latest events are
retained.
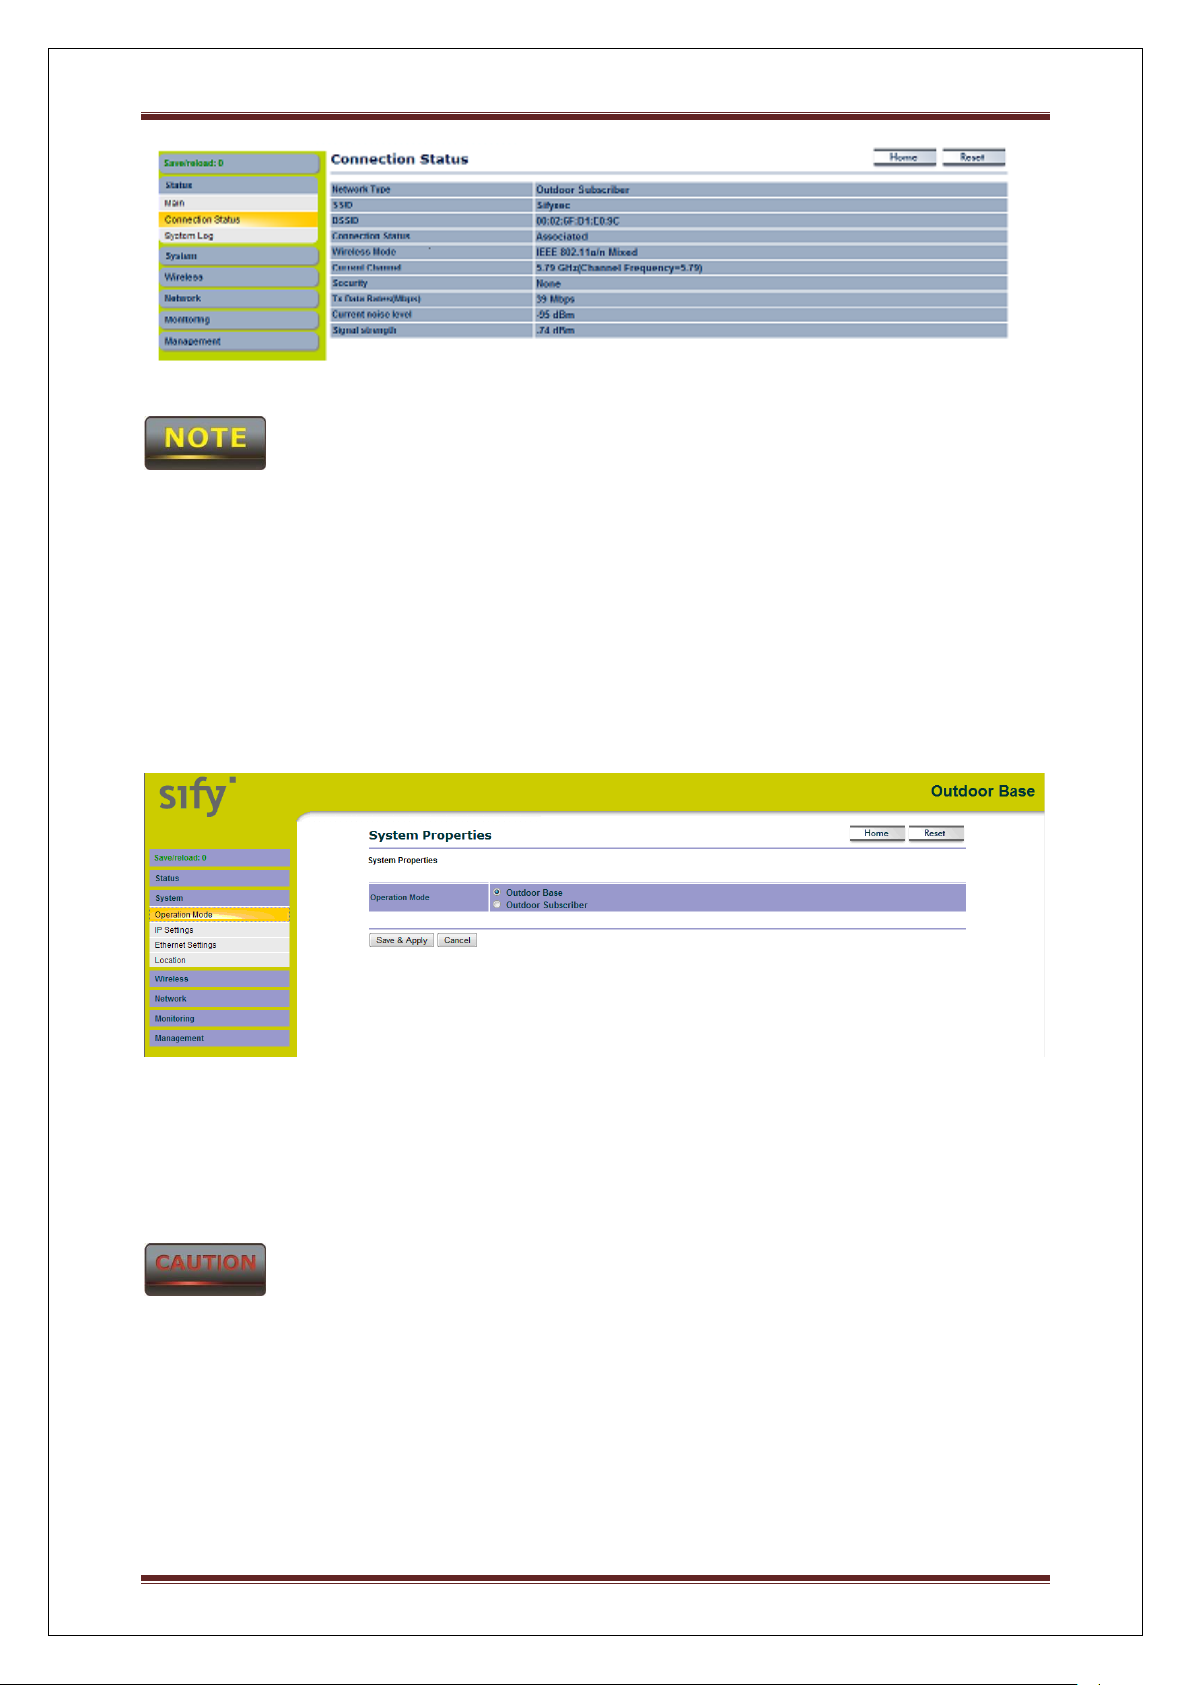
1.4.5 Connection Status
Click on the Connection Status link under the Status drop-down menu. This page displays
the current status of the network, including network type, SSID, BSSID, connection status,
wireless mode, current channel, security, data rate, noise level and signal strength.
Sify Technologies LTD Page 15
Page 16
User Operating Manual
This will be shown in Outdoor Subscriber mode only.
1.5 System
1.5.1 Switching Operation Mode
The SMAC5700 supports operation modes: Outdoor Base, Outdoor Subscriber. In order to
switching between the operating modes, please go to System -> click Operation mode.
Operation Mode: Select an operation mode via Radio Button.
Click Save & Apply to confirm the changes.
Accept does not compile the changes, you must go to Status -> Save/Load to apply the new
settings.
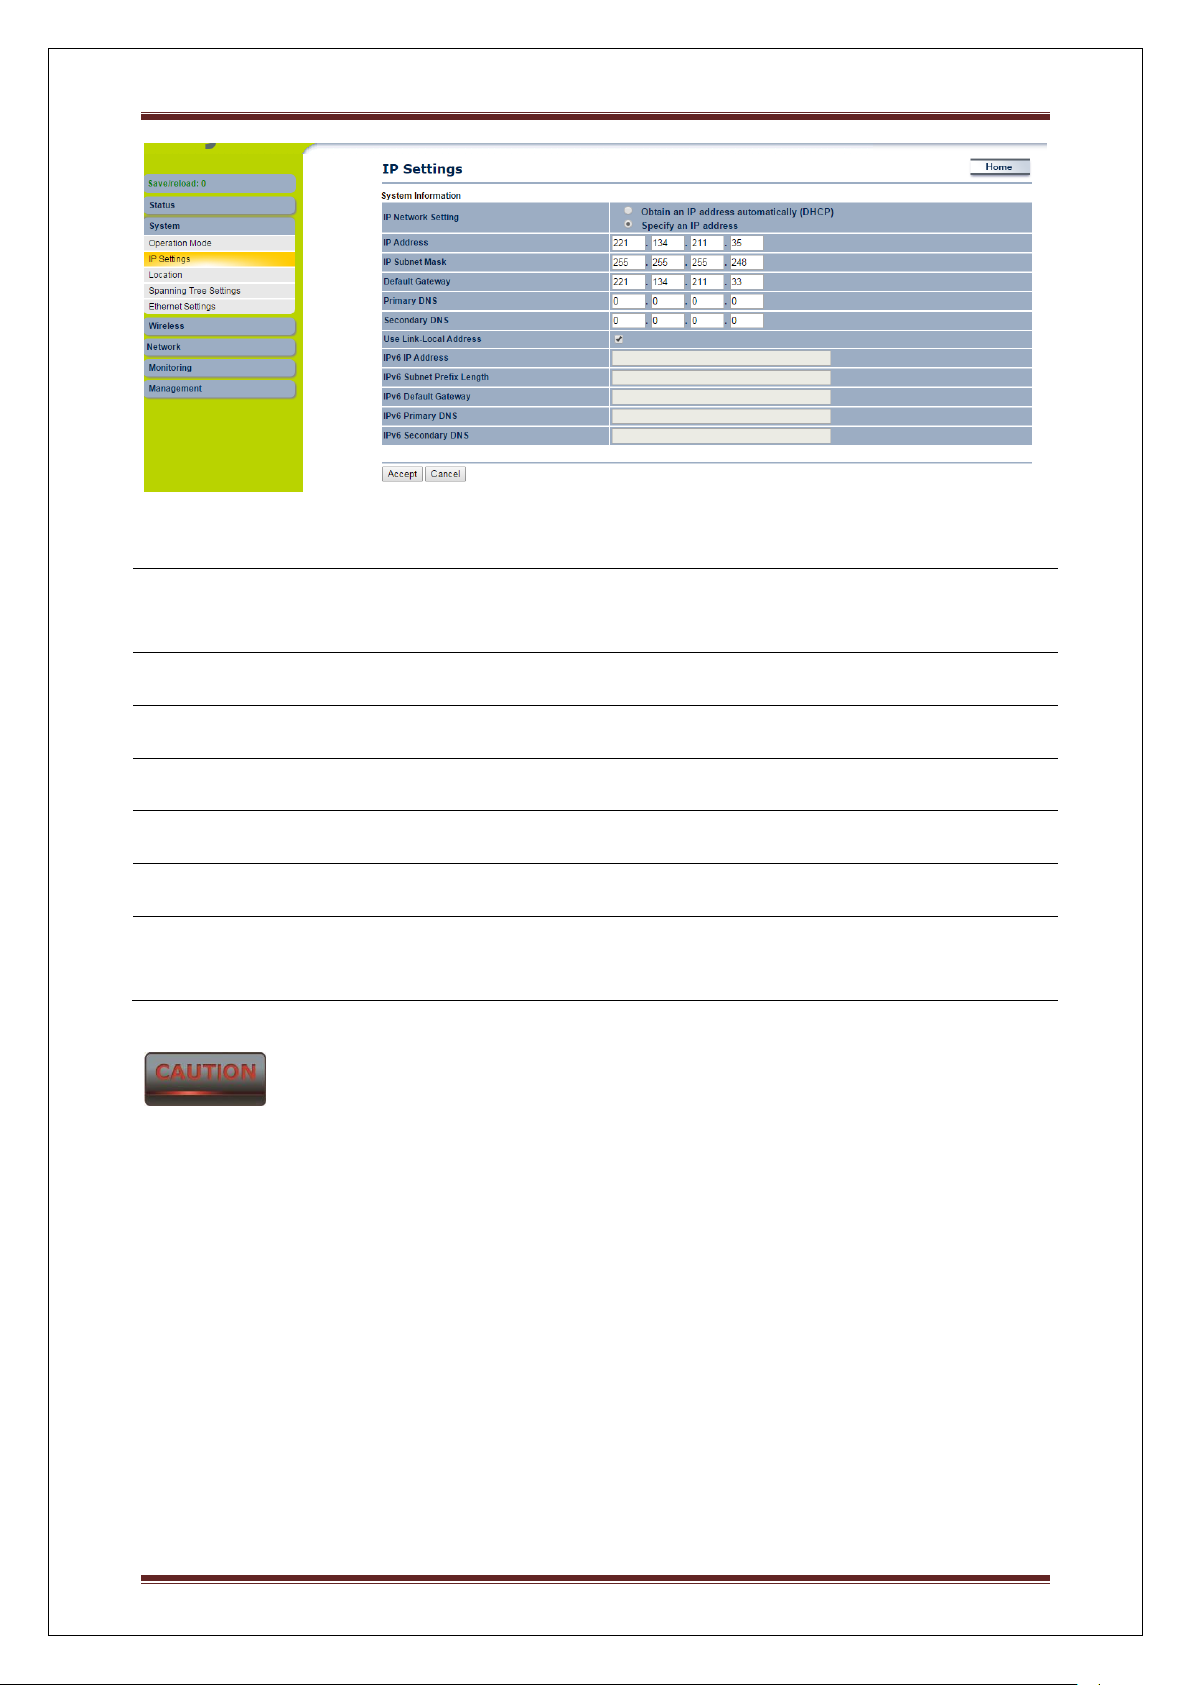
1.5.2 IP Settings:
Go to System -> Click IP settings
Sify Technologies LTD Page 16
Page 17
User Operating Manual
IP Network Setting
Select Radio button for Obtain an IP address automatically or
Specify an IP address.
IP Address
Specify LAN port IP address.
IP Subnet Mask
Specify Subnet Mask.
Default Gateway
Specify Default Gateway
Primary DNS
Specify Primary DNS
Secondary DNS
Specify Secondary DNS
Accept / Cancel
Press Accept to confirm the changes or Cancel to return previous
settings.
Accept does not compile the changes, you must go to Status -> Save/Load to apply the new
settings. IPV6 feature also included in this device.
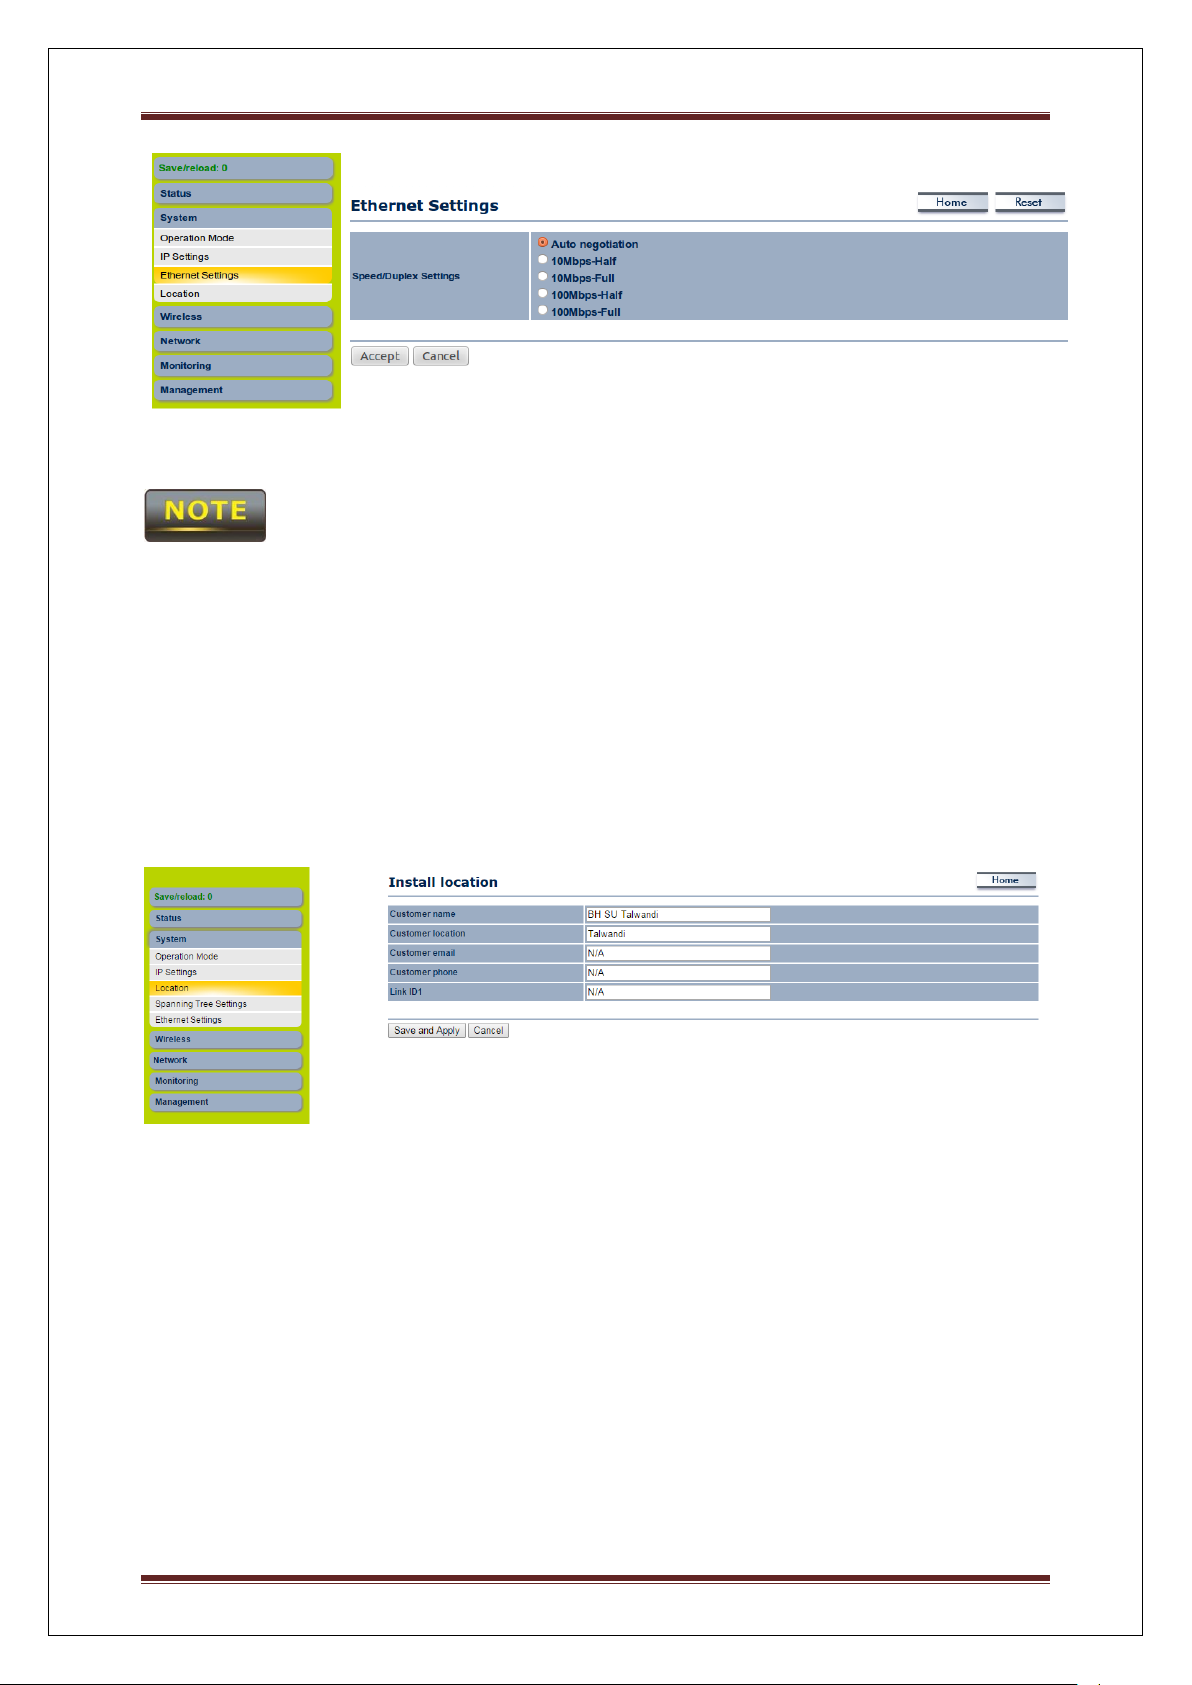
1.5.3 Ethernet Settings
Go to System -> Ethernet settings to change the speed and duplex of the device
SMAC5700.
Sify Technologies LTD Page 17
Page 18
User Operating Manual
The moment you click “Accept “the changes will take effect immediately, there is no need to
save/reload.
1.5.4 Location
Go to System -> Location to configure the customer name, customer location, customer
email ID, customer mobile number & Link ID.
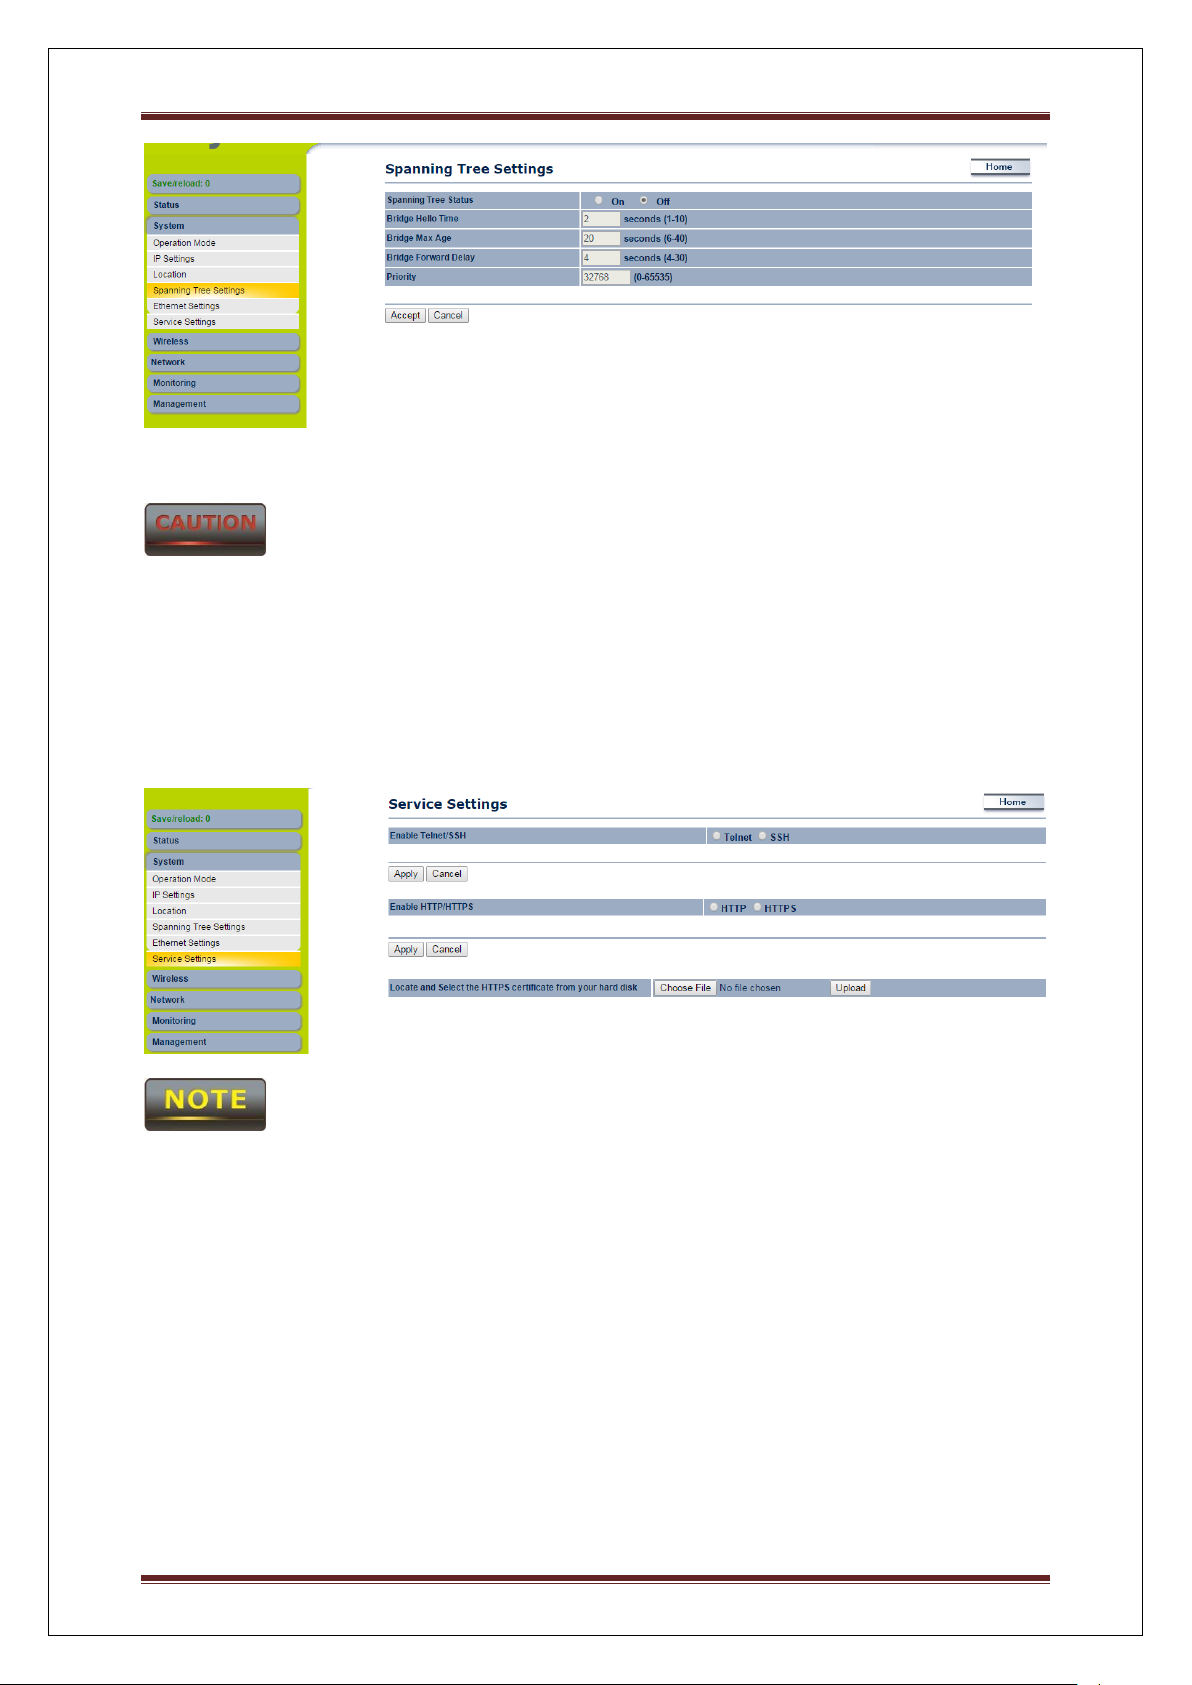
1.5.5 Spanning Tree Settings
Go to System -> Spanning Tree settings to enable the spanning tree option and configure
the STP parameters like hello time, Max Age, Forward Delay & Priority.
Sify Technologies LTD Page 18
Page 19
User Operating Manual
Accept does not compile the changes, you must go to Status -> Save/Load to apply the new
settings.
1.5.6 Service Settings
Go to System -> Service settings to enable/disable the HTTPS/HTTP,SSH/TELNET
options. Also upload the certificate for safety login through HTTPS.
The moment you click “Accept “the changes will take effect immediately, there is no need to
save/reload
1.6 Wireless Configuration
This section will guide you through all the wireless settings. Please read the instruction
carefully. Inappropriate setting could lower the performance or affect the network structure.
Before you continue, please make sure you have chosen the correct operating mode.
1.6.1 Wireless Network
This section is the basic wireless settings. Please read the description carefully and check the
steps on chapter 10 in case you need more detail information.
For Outdoor Base Mode
Sify Technologies LTD Page 19
Page 20
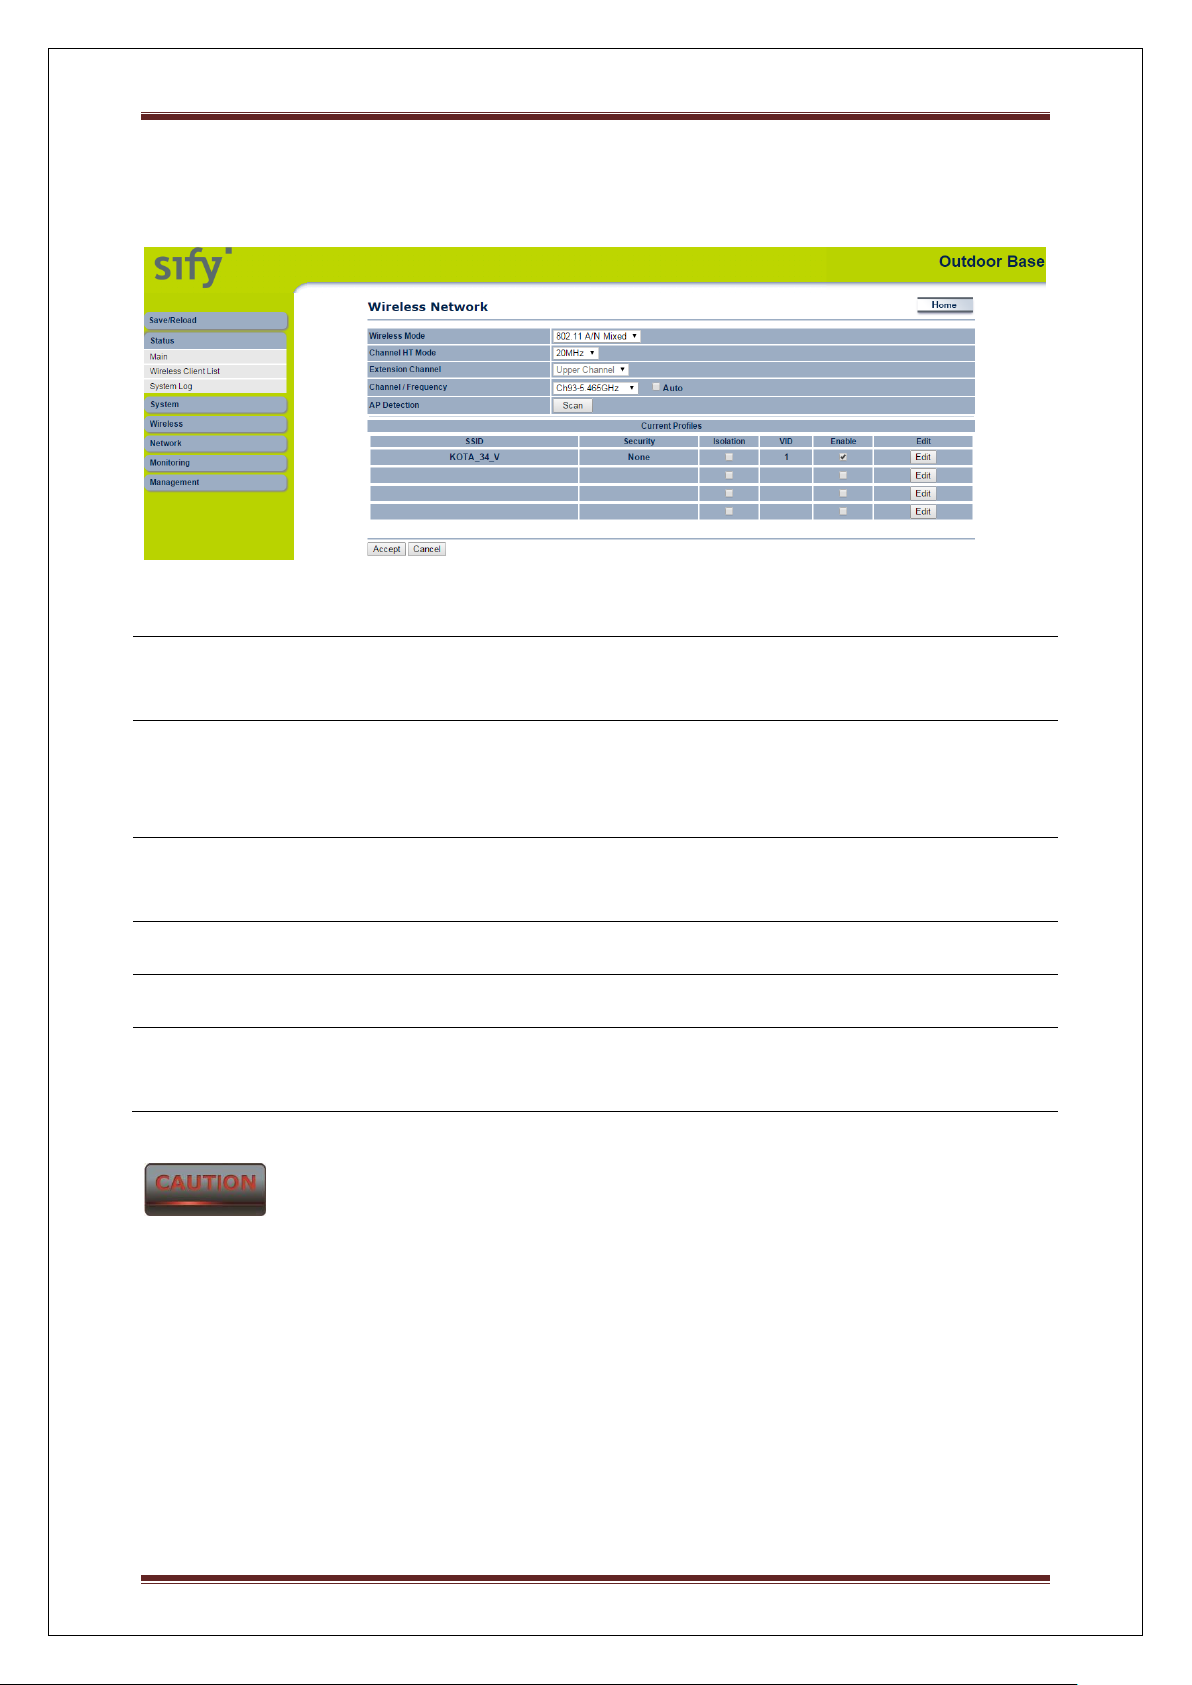
Under Wireless Click wireless Network
Wireless Mode
The wireless mode supports 802.11a/n mixed modes. It is
compatible with the most common known wireless band.
Channel HT Mode
The default channel bandwidth is 20 MHz. The larger channel
can provide better transmit quality and speed. 40 MHz options
also available
Extension Channel
Specify the upper channel or lower channel selection. It may
influence the Auto channel function
Channel / Frequency
Specify the channel/frequency.
Auto
Place a Check mark to enable Auto channel selection.
Current Profile
Configure the SSID, it can help to divide group of clients to
access the network. Just Edit to configure the profile.
User Operating Manual
Accept does not compile the changes, you must go to Status -> Save/Load to apply the new
settings.
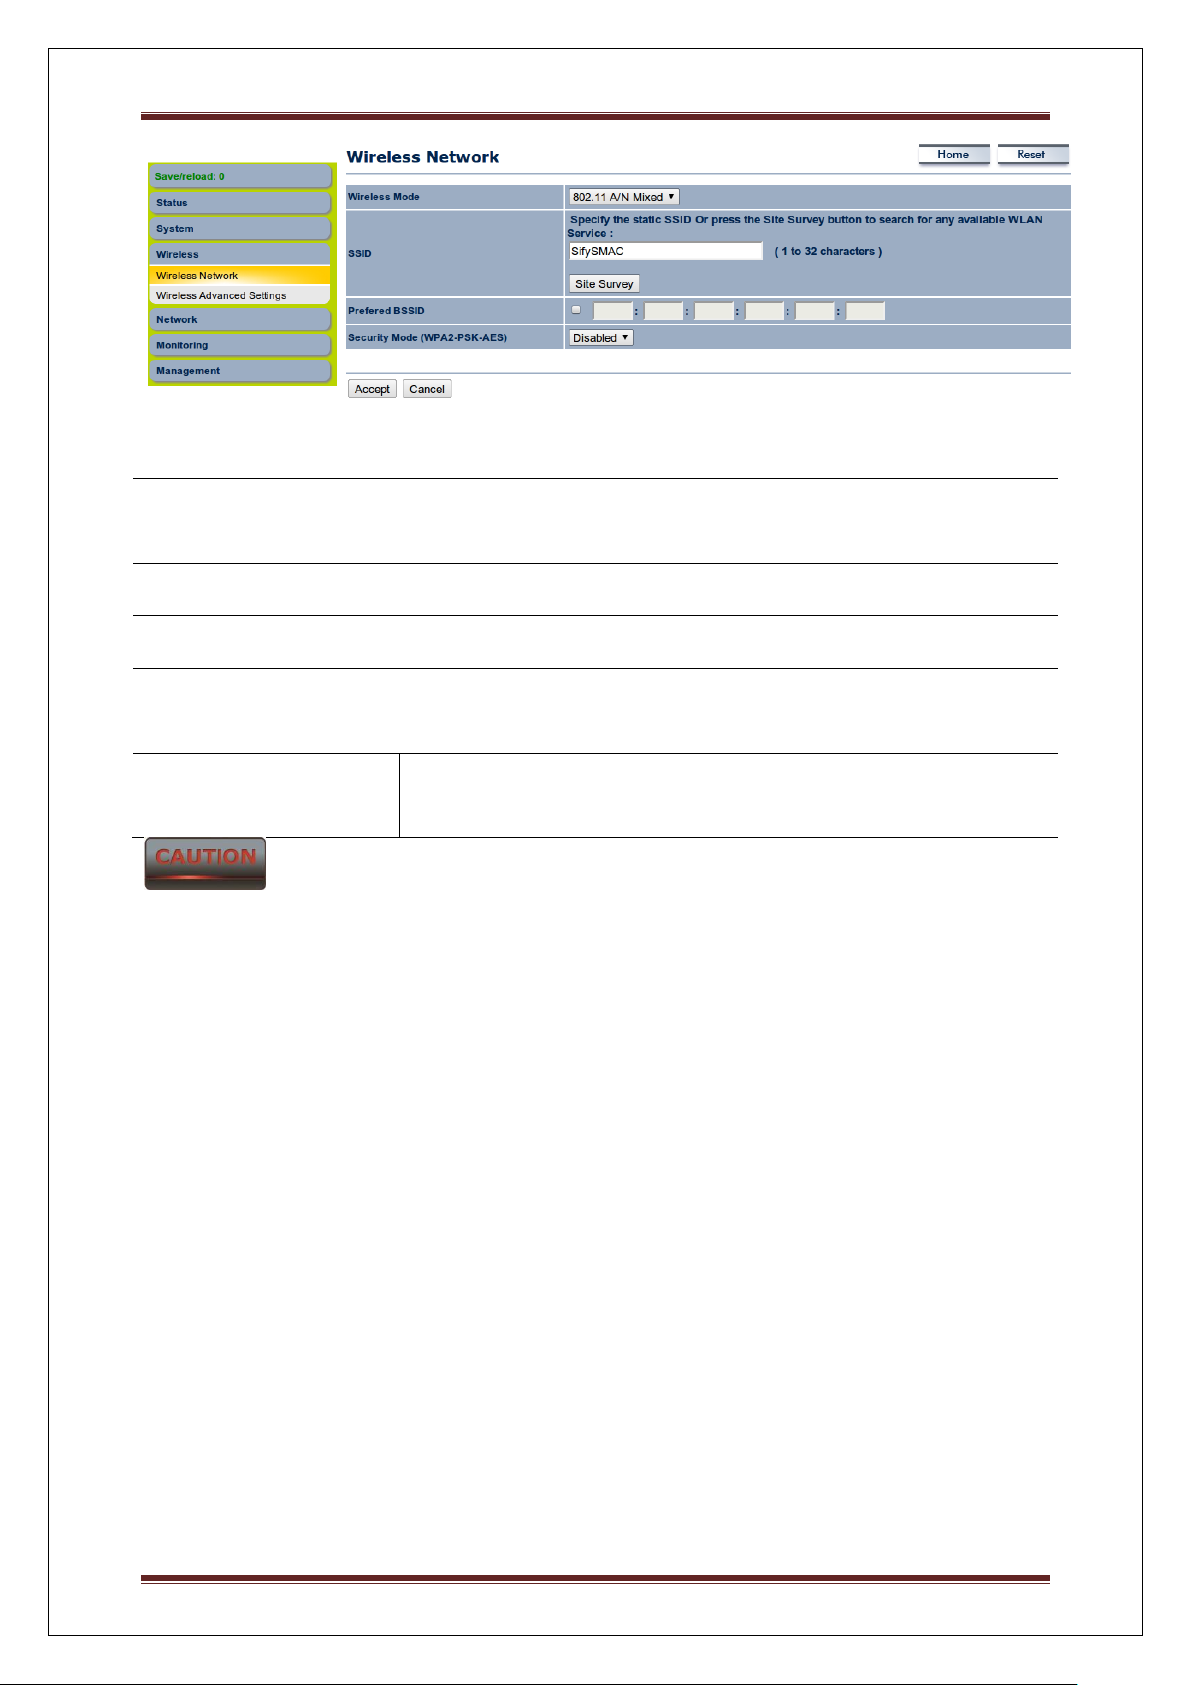
For Outdoor Subscriber
Under Wireless Click wireless Network
Sify Technologies LTD Page 20
Page 21
User Operating Manual
Wireless Mode
The wireless mode supports 802.11a/n mixed modes. It is
compatible with the most common known wireless band.
Channel HT Mode
Automatically detect the change when changed on Outdoor base
Channel / Frequency
Automatically detect the change when changed on Outdoor base
Accept / Cancel
Press Accept to confirm the changes or Cancel to return previous
settings.
Current Profile
Configure the SSID, it can help to divide group of clients to
access the network .Just Edit to configure the profile.
Accept does not compile the changes, you must go to Status -> Save/Load to apply the new
settings. Please refer to the chapter 4.4.1 for more detail.
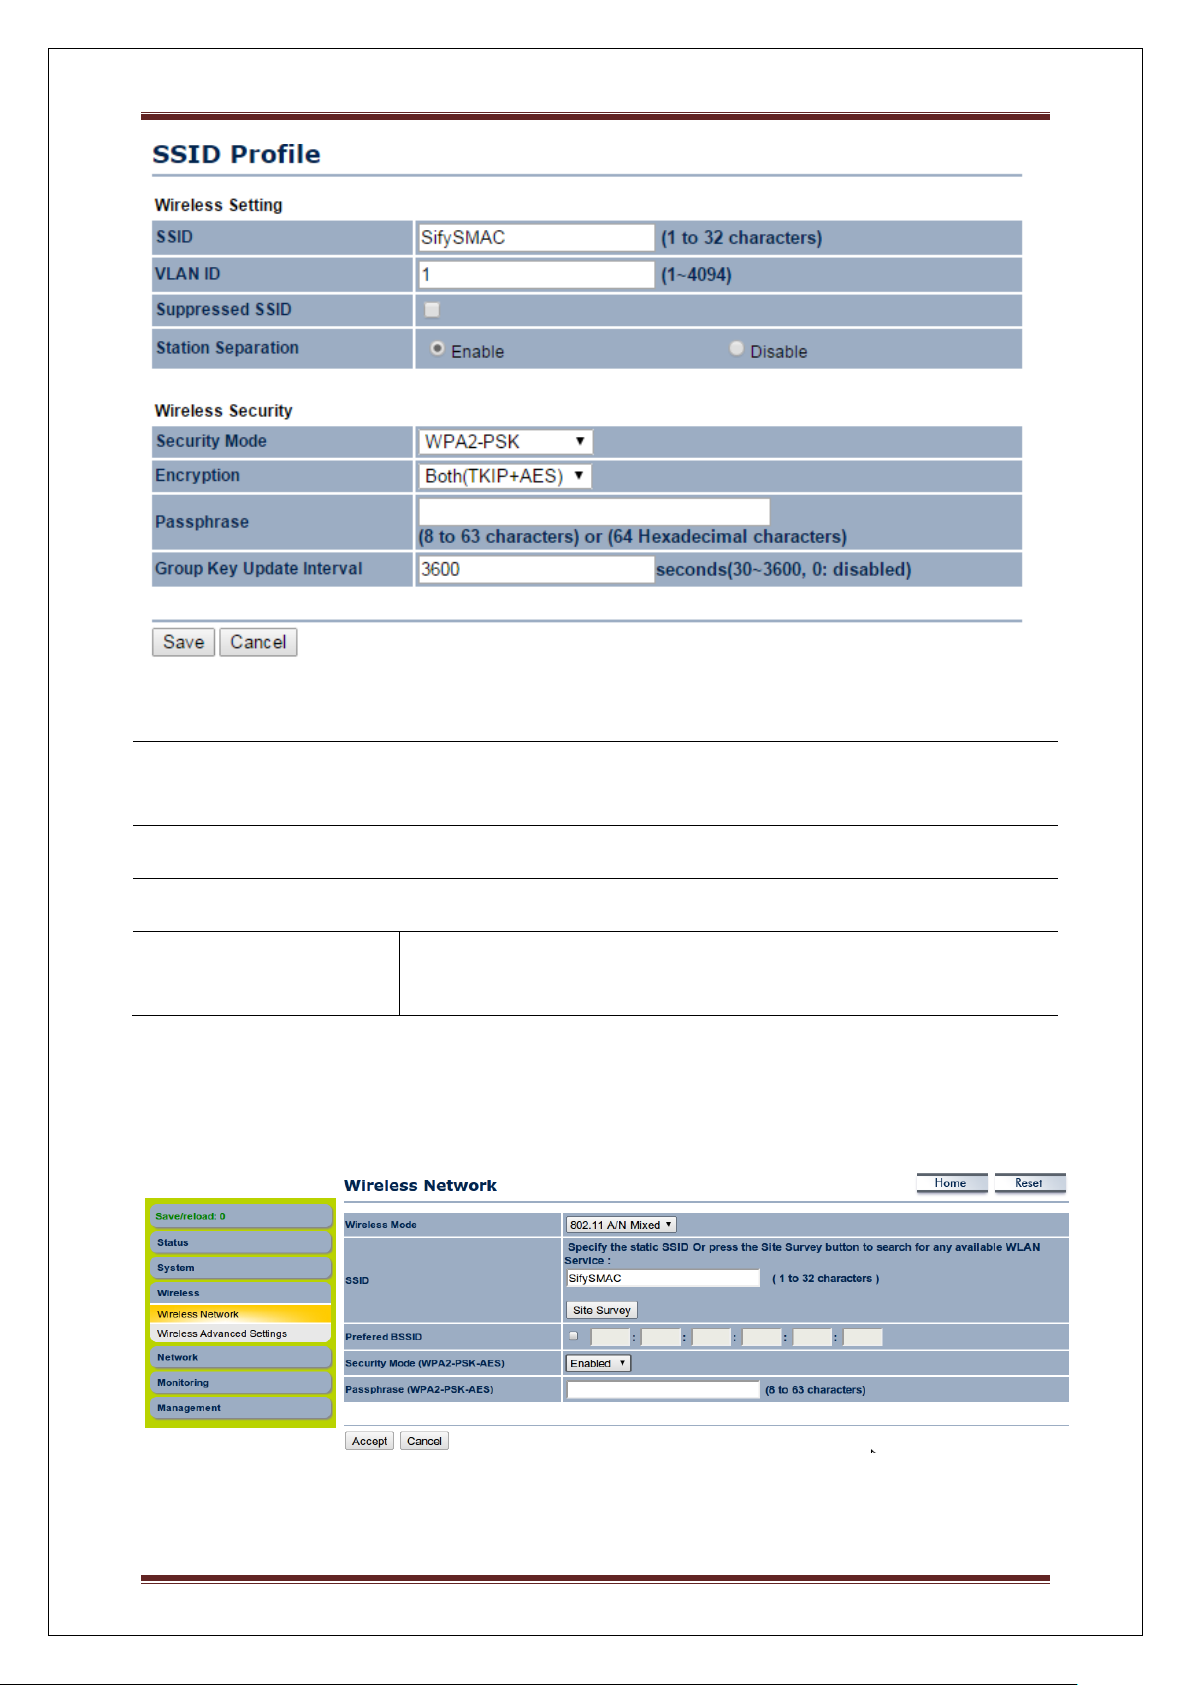
1.6.2 Wireless Security Settings
Wireless Security Settings section will guide you to the entire Security mode configuration:
We strongly recommend that WPA2-PSK as your security settings.
For Outdoor Base:
Under Wireless Click wireless Network
Sify Technologies LTD Page 21
Page 22
User Operating Manual
Security Mode
Select Enabled from the drop down list to begin the
configuration.
Encryption
Advanced Encryption System.
Passphrase
Specify the security password.
Passphrase Length
64 Hexadecimal characters password length.(minimum 8
characters)
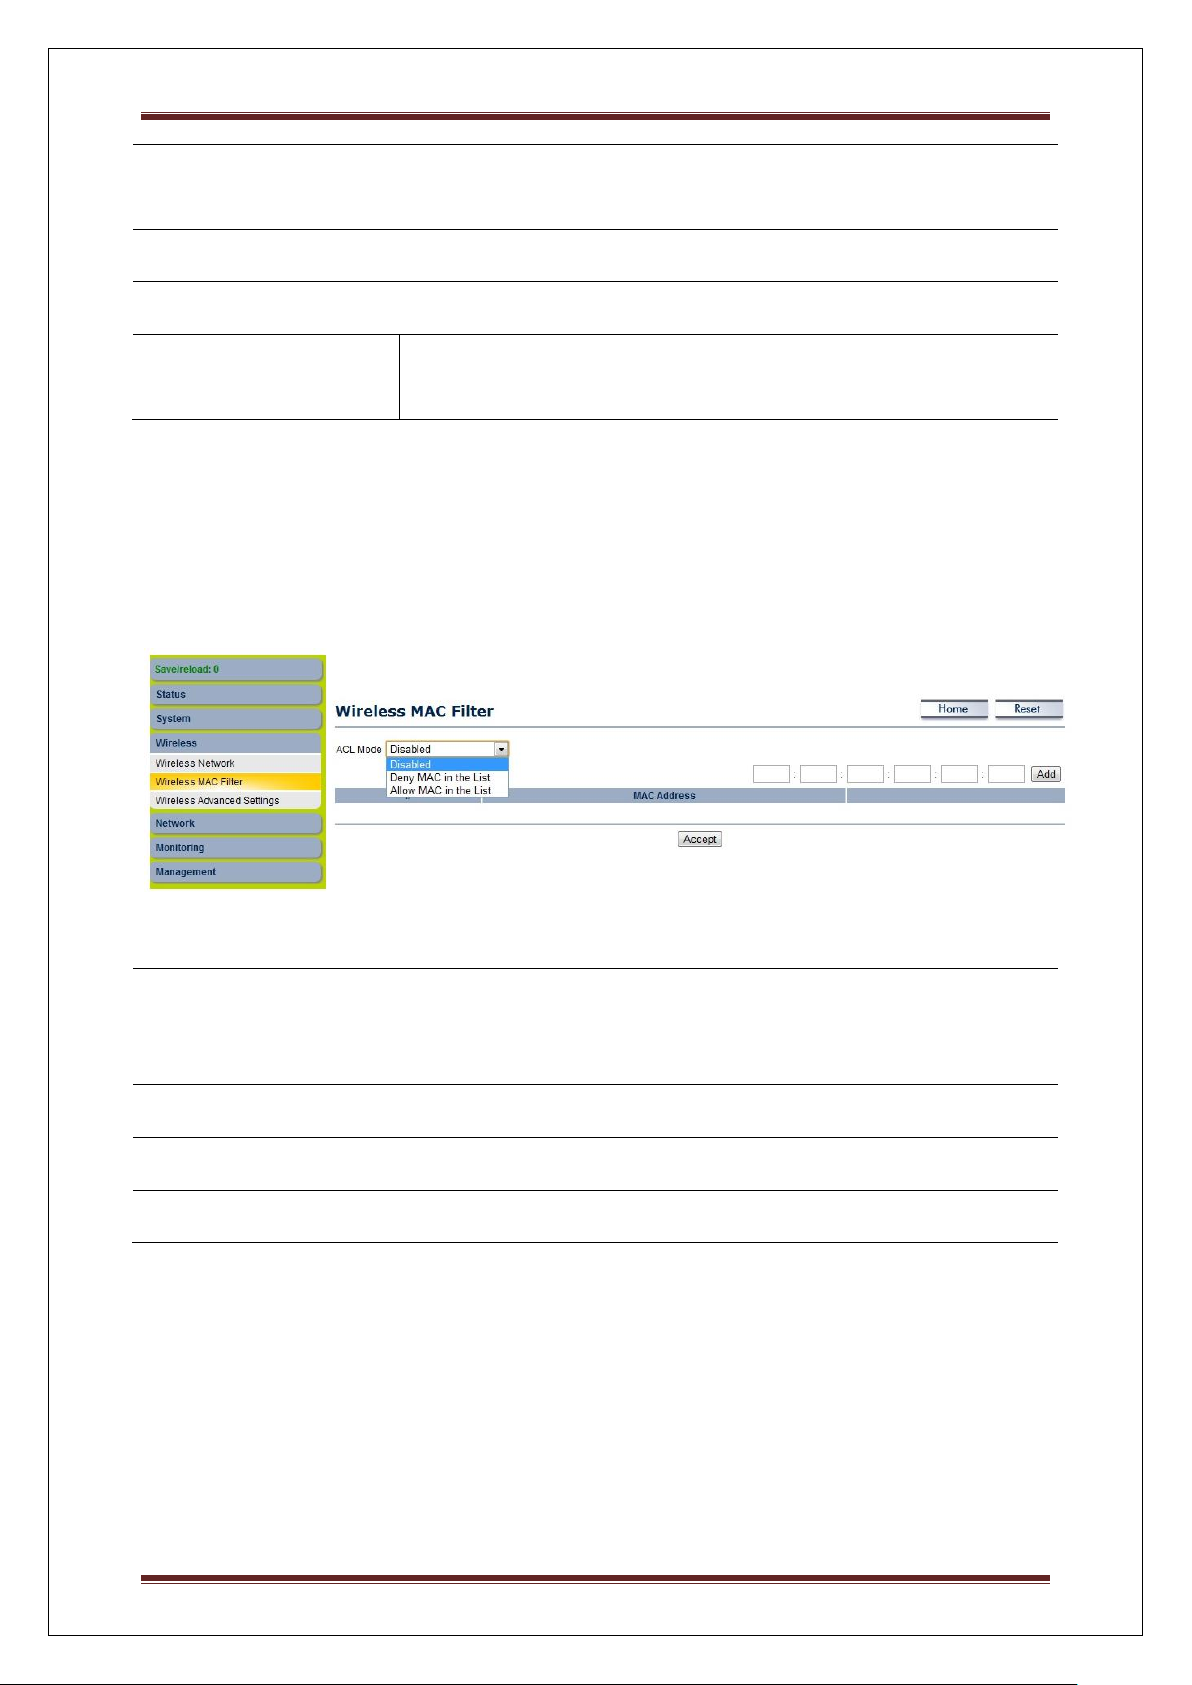
For Outdoor Subscriber:
Under Wireless Click wireless Network
Sify Technologies LTD Page 22
Page 23
User Operating Manual
Security Mode
Select WPA2-PSK from the drop down list to begin the
configuration.
Encryption
Select AES for Encryption type.
Passphrase
Specify the security password.
Passphrase Length
64 Hexadecimal characters password length.(minimum 8
characters)
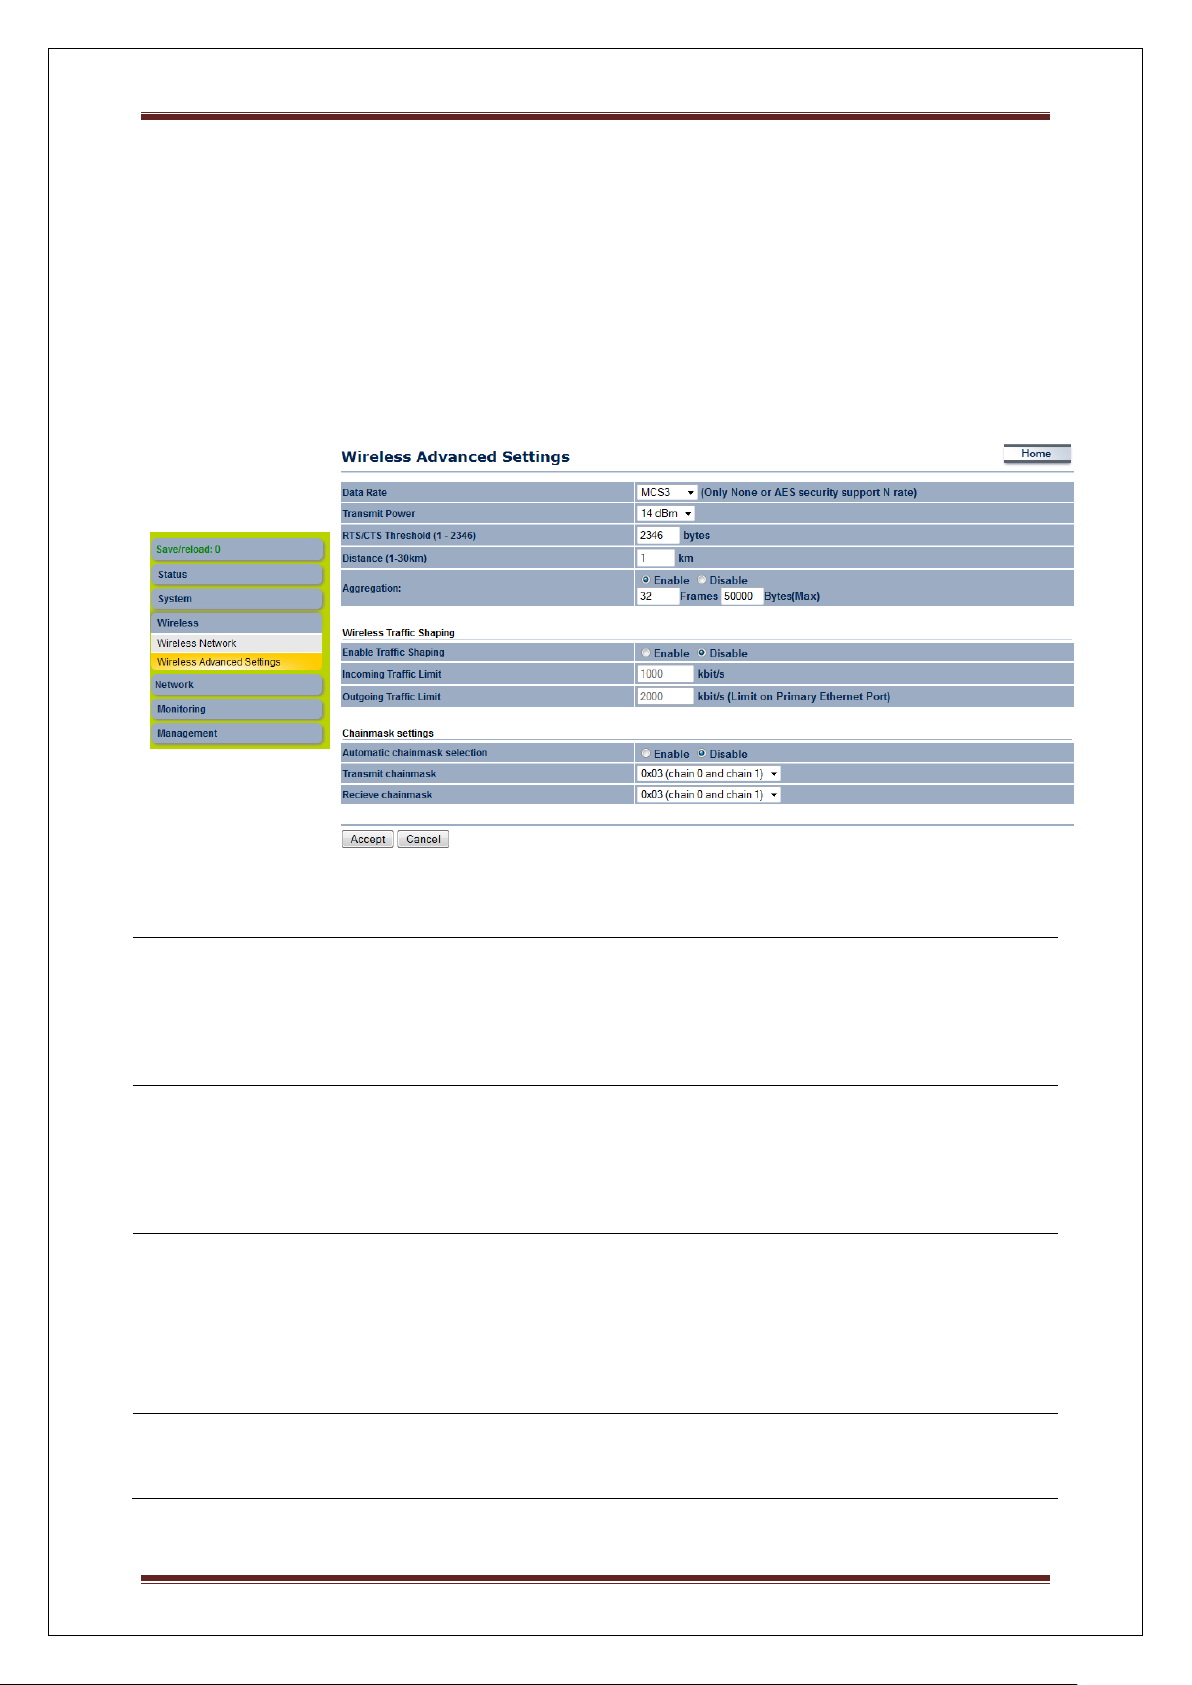
ACL Mode
ACL Mode can help to deny or allow certain Client to access the
network. Select Disable Deny MAC in the list or Allow MAC in
the list from the drop down list.
MAC Address Filter
Specify the Wireless MAC address manually.
Add
Press Add to add the Wireless MAC address in the table.
Apply
Press Apply to apply the changes.
1.6.3 Wireless MAC Filter
Wireless MAC Filters is used to Allow or Deny wireless clients, by their MAC addresses,
accessing the Network. You can manually add a MAC address to restrict the permission to
access SMAC5700. The default setting is Disable Wireless MAC Filters.
Sify Technologies LTD Page 23
Page 24
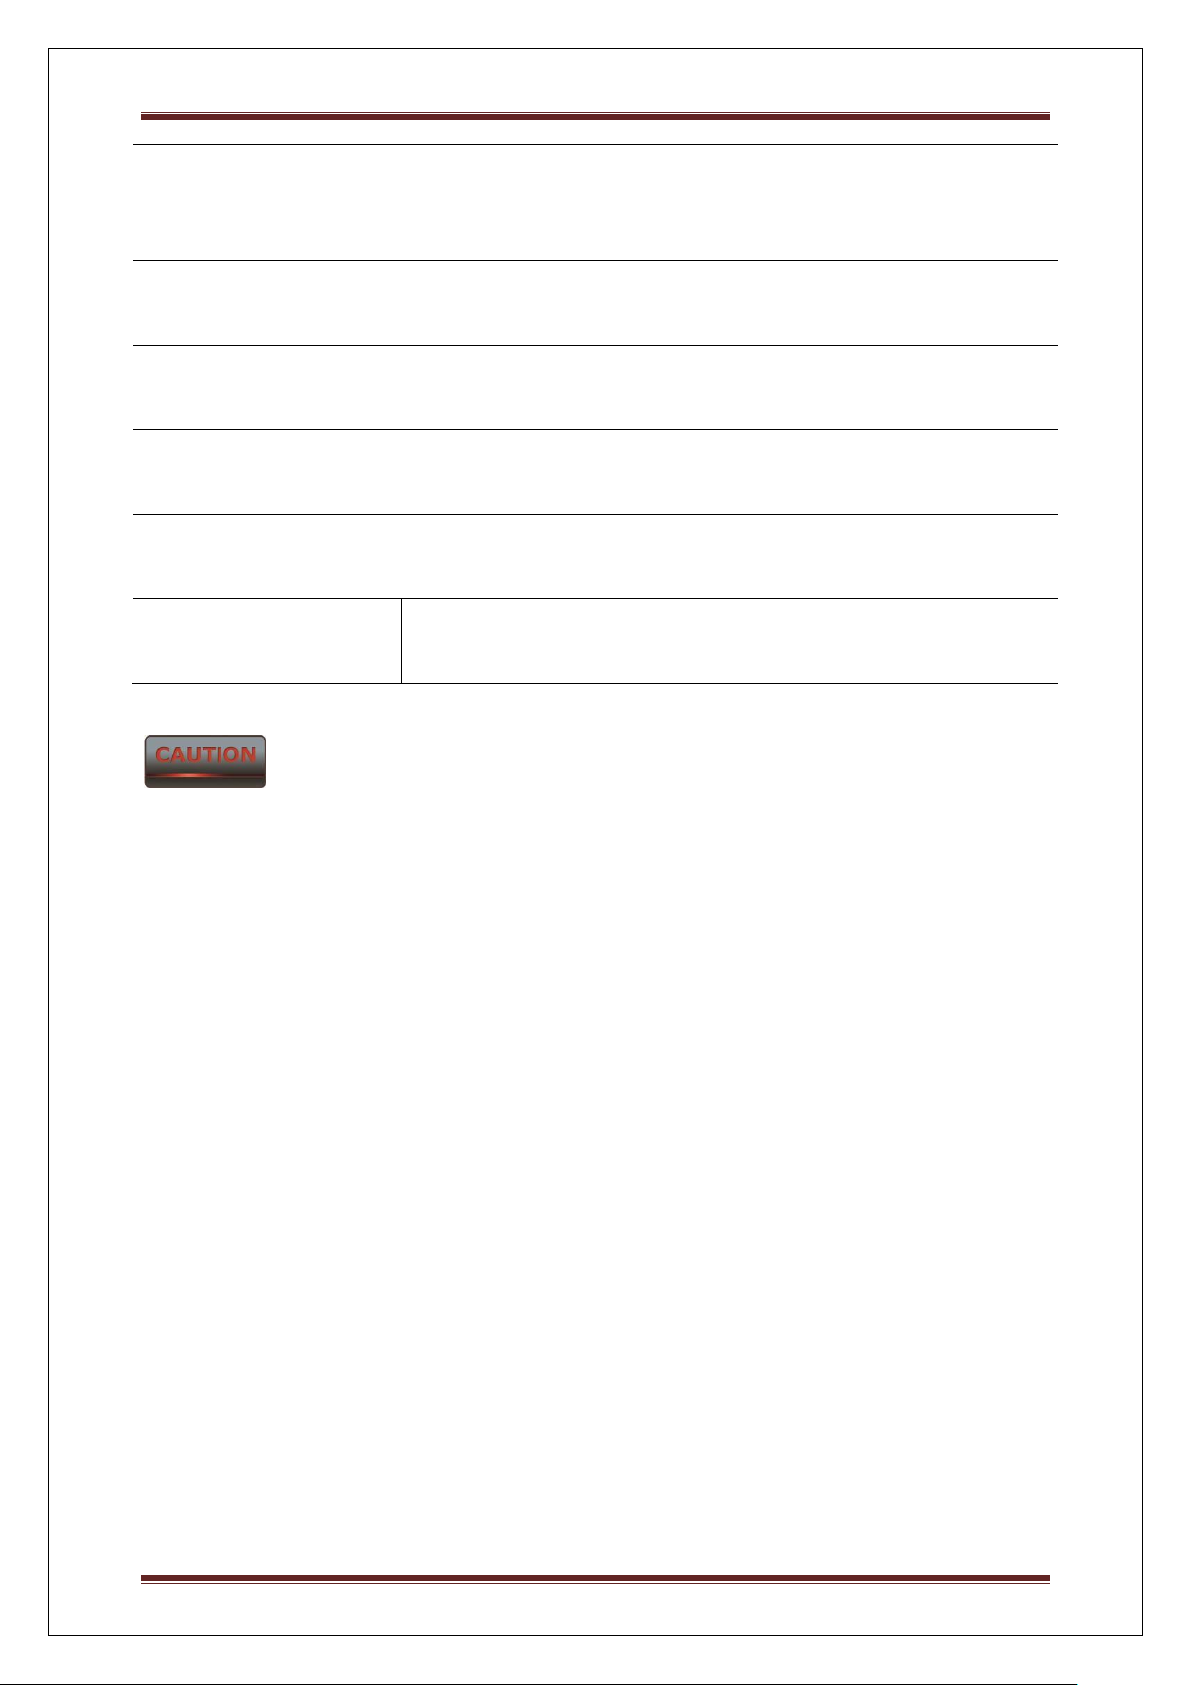
Data Rate
Select Data Rate from the drop down list. Data rate will affect the
efficiency of the throughput. If the data rate is set to a small
number, the lower through will get but it can transmit to longer
distance.
Transmit Power
Select Transmit Power to increase or decrease Transmit Power.
Higher transmit power will sometimes cause unable to connect to
the network. On the other hand, the lower transmit power will
cause client unable to connect to the device.
RTS/CTS Threshold
Specify Threshold package size for RTC/CTS. Using small
number of the threshold will cause RTS/CTS packets to be sent
more often to consuming more of the available bandwidth. In
addition, if the heavy load traffic occurs, the wireless network can
be recovered easily from interferences or collisions.
Distance
Specify distance rage between AP and Clients. Longer distance
may lose high connection speed.
1.6.4 Wireless Advanced Settings
Under Wireless Click Wireless Advanced Settings
User Operating Manual
Sify Technologies LTD Page 24
Page 25
User Operating Manual
Short GI
Short GI is improved of 802.11n and 802.11a/g. It can increase
10% of the internet speed during the data transmission. For
example, the 802.11a/g’s GI is 800us; the short GI will be 400us.
Aggregation
Aggregation is to merge the typical size of data’s header to one
data. It is useful for the small size but larger amount packets.
Wireless Traffic
Shaping
Place a Check to enable Wireless Traffic Shaping function.
Incoming Traffic Limit
Specify the wireless transmission speed for downloading in
Kbits/seconds
Outgoing Traffic Limit
Specify the wireless transmission speed for uploading in
kbits/seconds
Accept / Cancel
Press Accept to confirm the changes or Cancel to return previous
settings.
1. Changing Wireless Advanced Settings may cause insufficient wireless connection quality.
2. Accept does not compile the changes; you must go to Status -> Save/Load to apply the new
settings.
1.7 Management Settings
Management section is on the navigation drop-down menu. You will then see seven options:
administration, management VLAN, SNMP settings, backup/restore settings, firmware
upgrade, time settings, and log. Each option is described below.
1.7.1 Administration
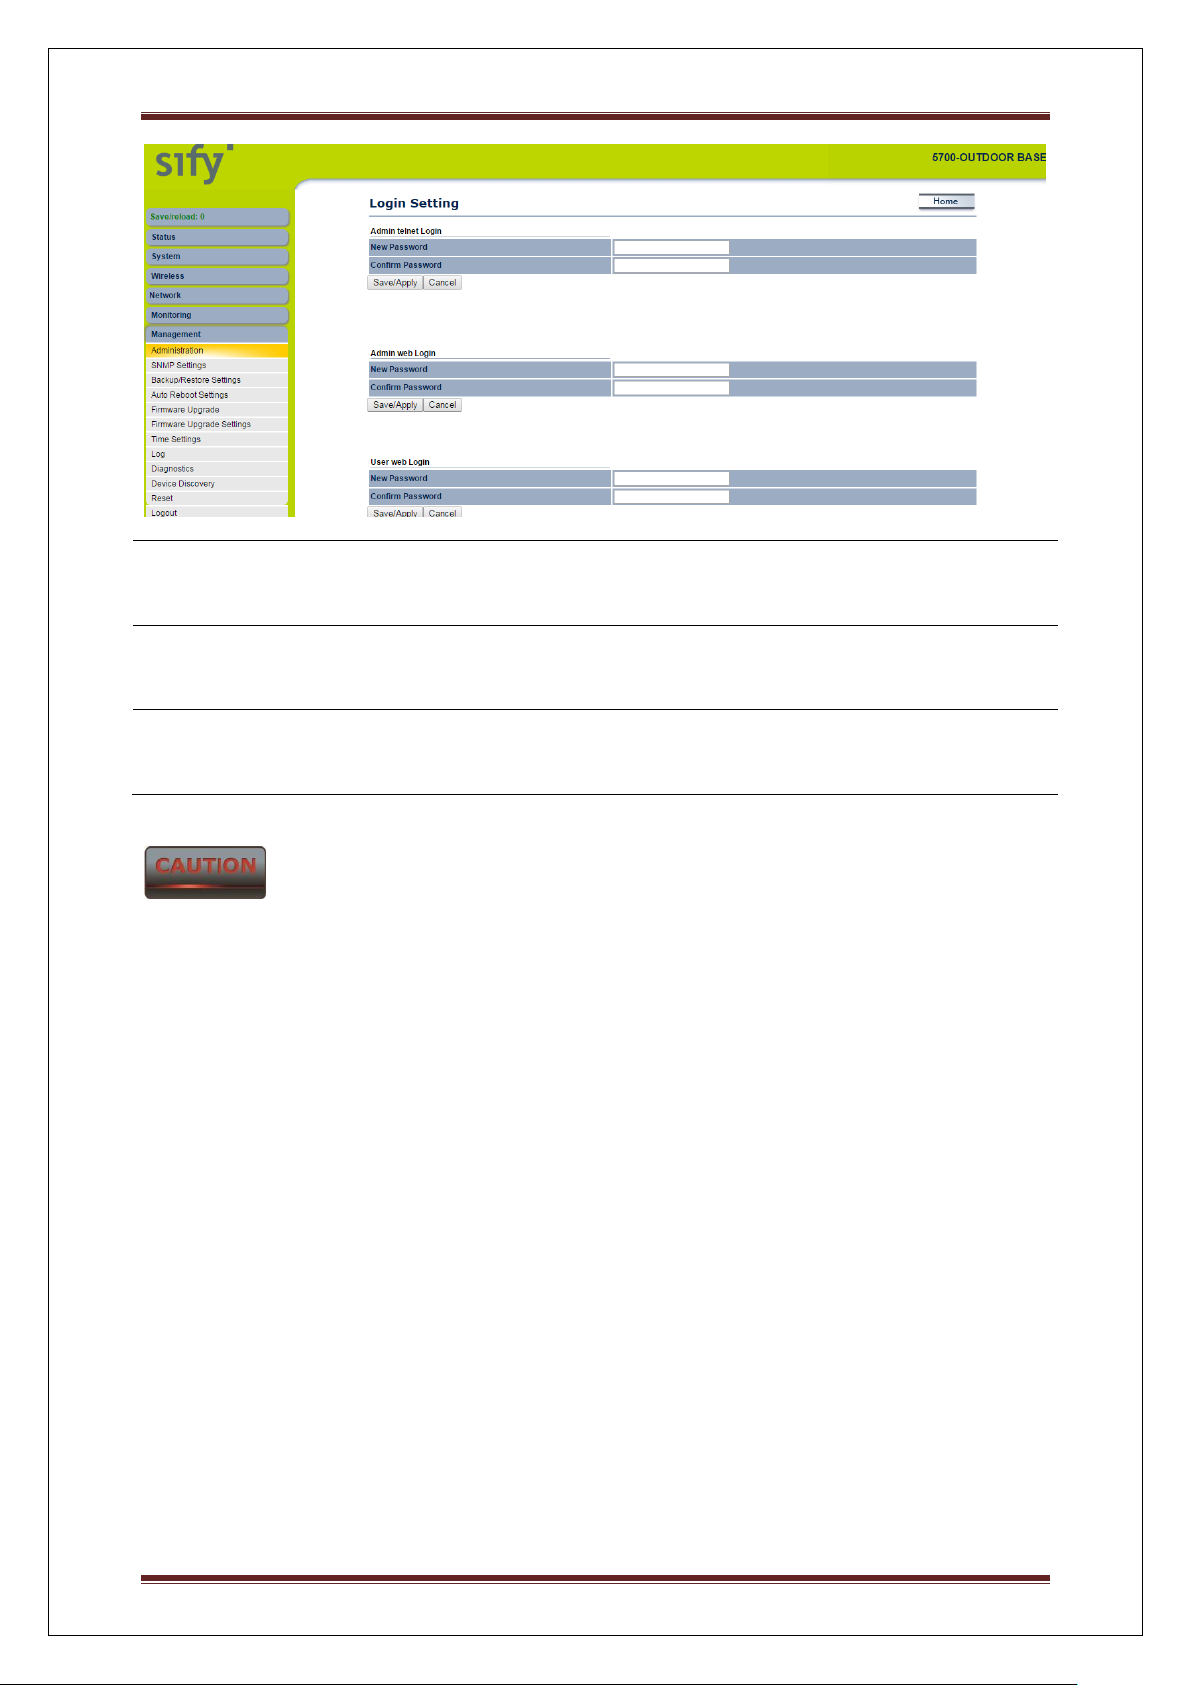
Click on the Administration link under the Management menu. This option allows you to
create a user name and password for the device. Also we can provide Admin / User access &
telnet by creating separate passwords. By default, this device is configured with a user name
and password admin. For security reasons it is highly recommended that you create a new
user name and password.
Sify Technologies LTD Page 25
Page 26
User Operating Manual
Password
Specify a Password for logging in Admin telnet / WEB as well as
User
Confirm Password
Re-enter the Password for confirmation. Password length should
be minimum 8 and maximum 16.
Save/Apply / Cancel
Press Save/Apply to apply the changes or Cancel to return
previous settings.
Press Save/Apply will change the setting immediately. It will not be able to undo the action.
1.7.2 SNMP Settings
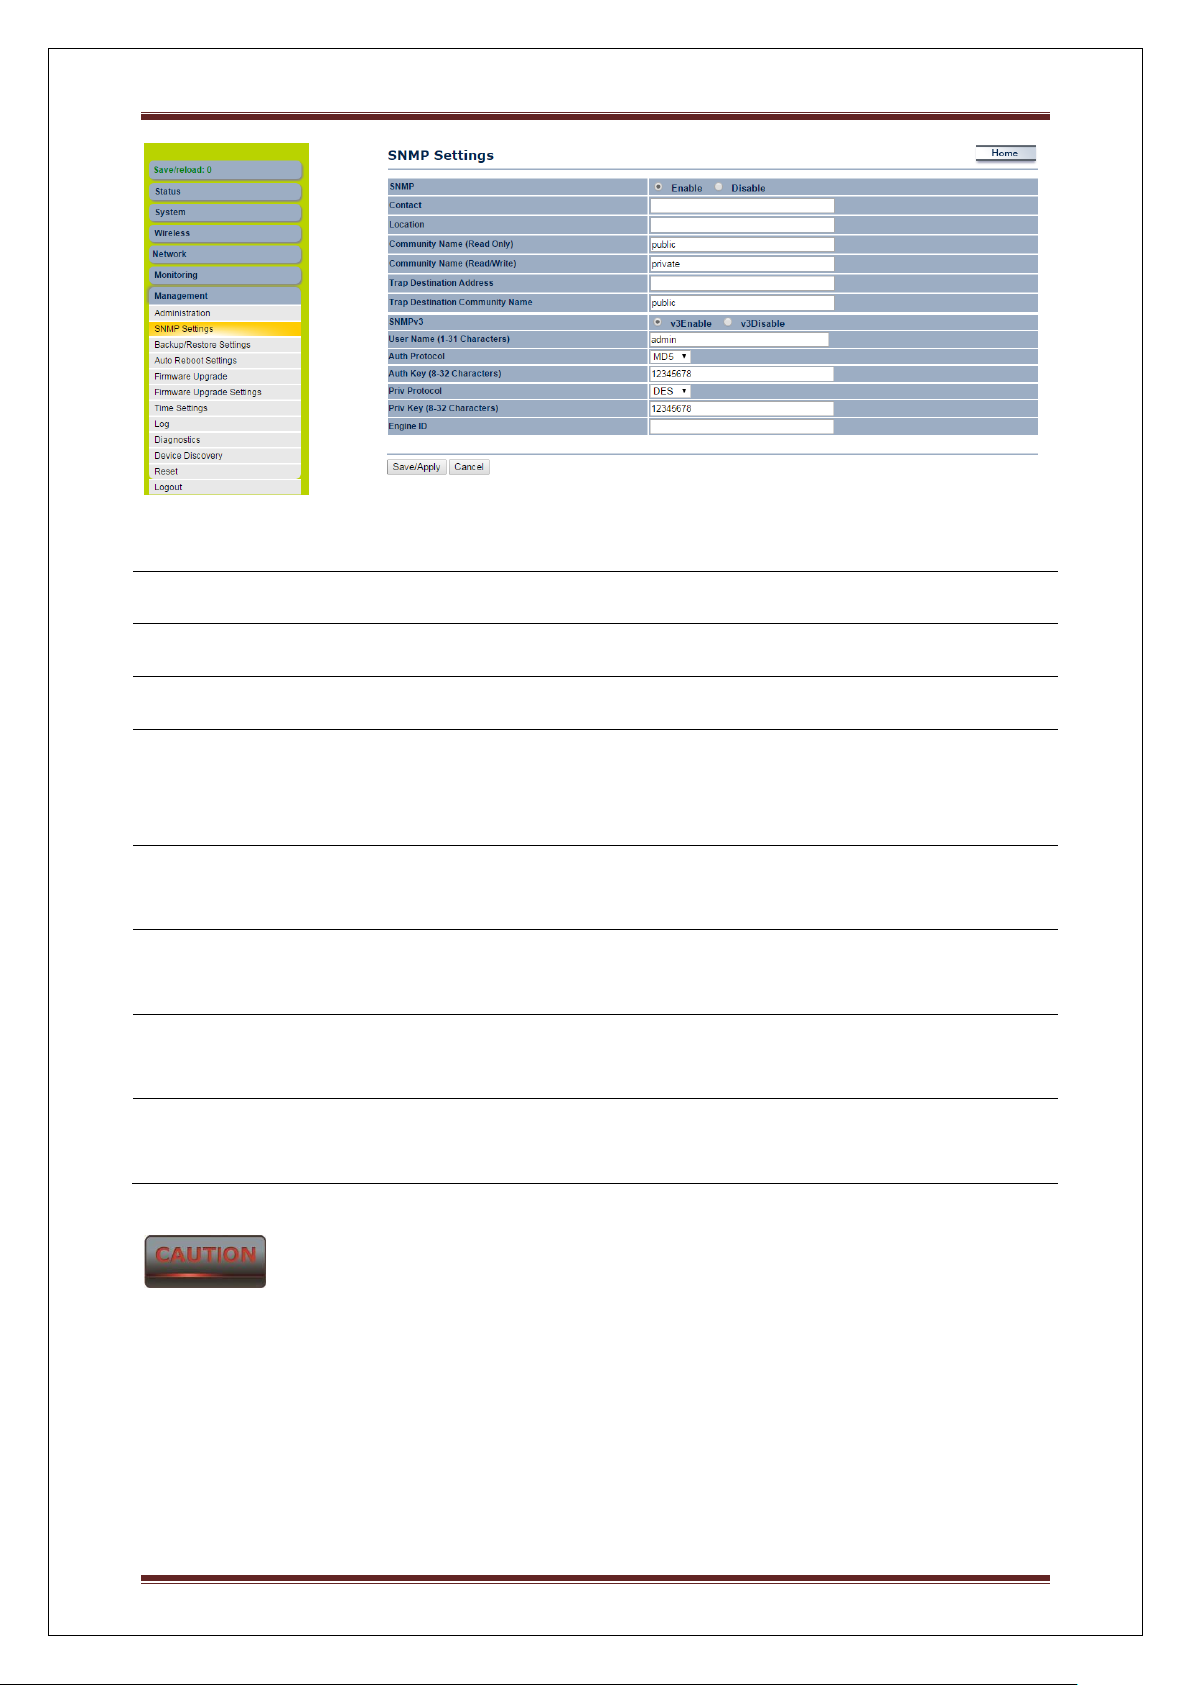
Click on the SNMP Settings link under the Management menu. This is a networking
management protocol used to monitor network-attached devices. SNMP allows messages
(called protocol data units) to be sent to various parts of a network. Upon receiving these
messages, SNMP-compatible devices (called agents) return data stored in their Management
Information Bases. It can support SNMP V3 feature also.
Sify Technologies LTD Page 26
Page 27
User Operating Manual
Enable/Disable
Select the Radio button to Enable or Disable SNMP function.
Contact
Specify the contact details of the device.
Location
Specify the location of the device.
Community Name(Read
only)
Specify the password for access the SNMP community for read
only access. By default its public; better keep it in default
password.
Community
Name(Read/Write)
User cant able to change the default SNMP Read/Write
password.
Trap Destination IP
Address
Specify the IP address that will receive the SNMP trap.
Trap Destination
Community Name
Specify the Destination Community name.
Save/Apply / Cancel
Press Save/Apply to apply the changes or Cancel to return
previous settings.
Press Save/Apply will change the setting immediately. It will not be able to undo the action.
1.7.3 Backup/Restore Settings
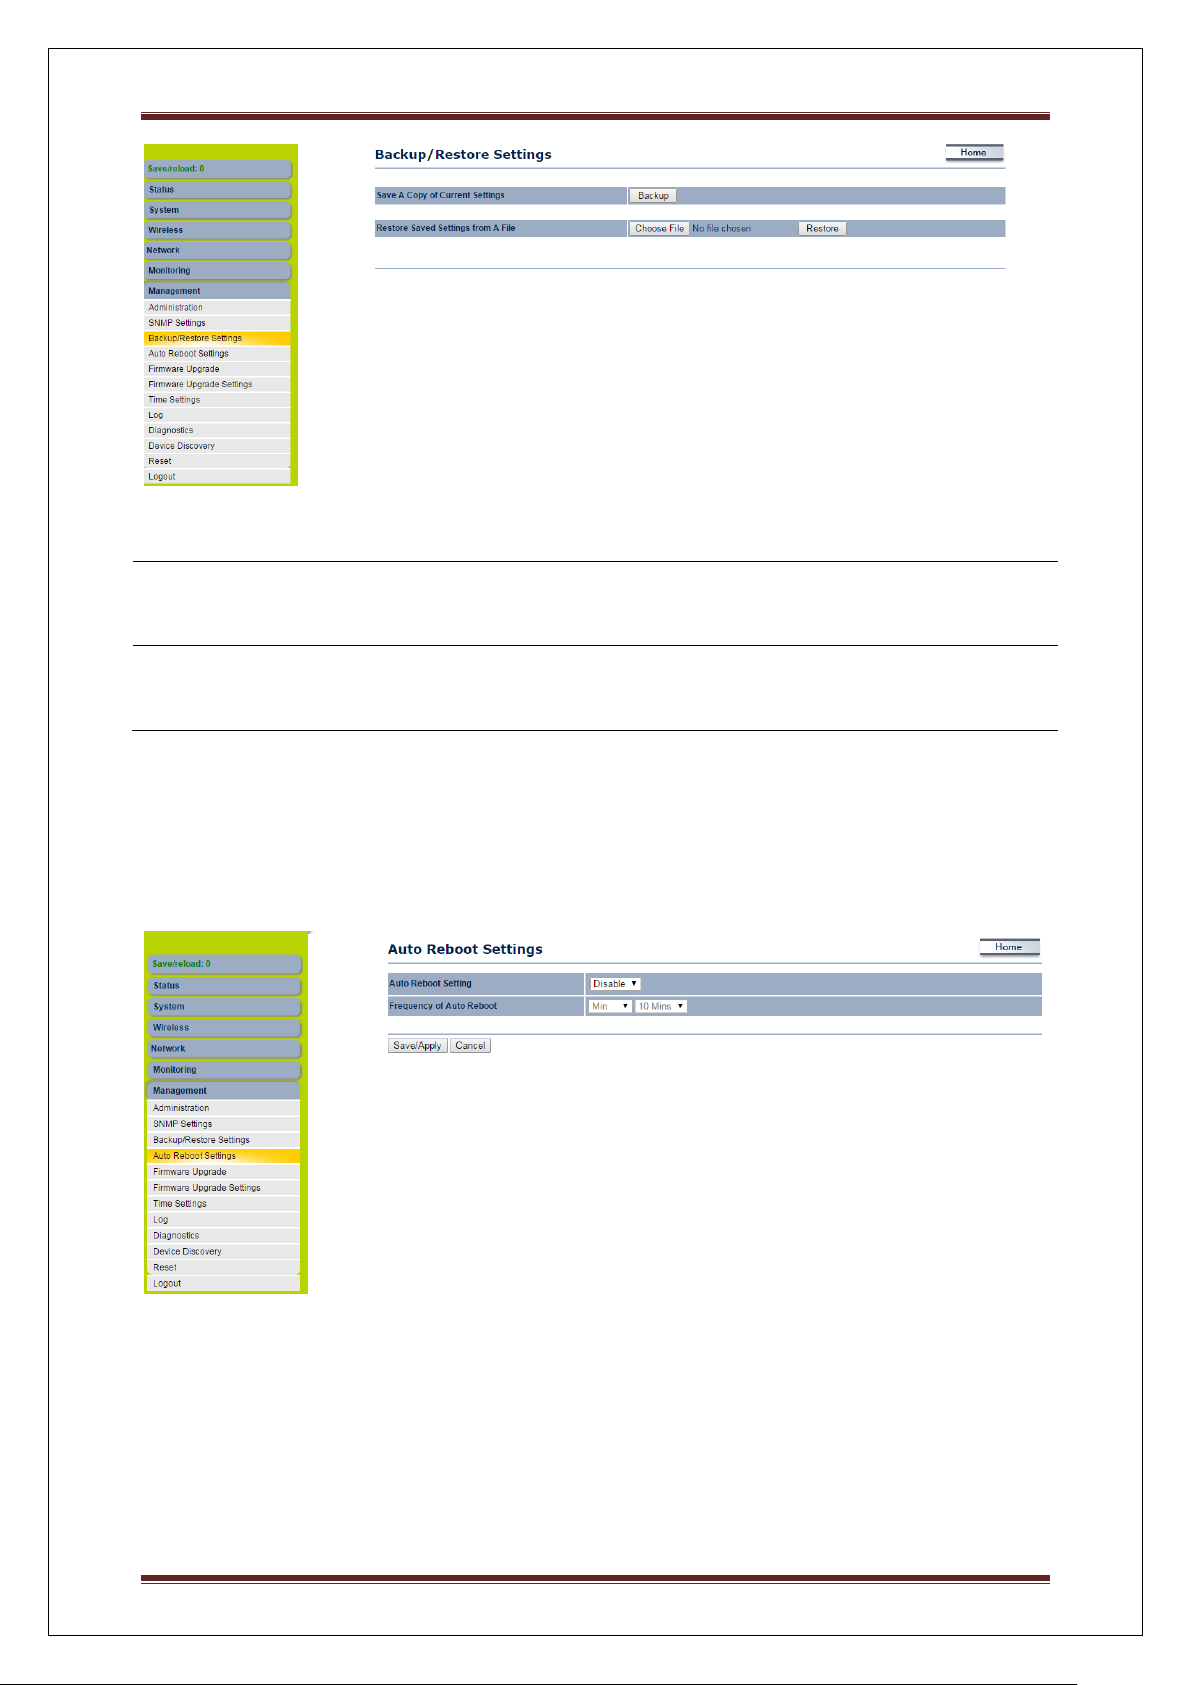
Click on the Backup/Restore Setting link under the Management menu. This option is used
to save the current settings of the device in a file on your local disk or load settings on to the
device from a local disk. This feature is very handy for administrators who have several
devices that need to be configured with the same settings.
Sify Technologies LTD Page 27
Page 28
User Operating Manual
Save A Copy of
Current Settings
Click on Backup to save current configured settings.
Restore Saved Settings
from a File
SMAC5700 can restore a previous setting that has been saved.
Click on Browse to select the file and Restore.
1.7.4 Auto reboot settings
Click on the Auto reboot setting link under the Management menu for auto rebooting the
radio.
1.7.5 Firmware Upgrade
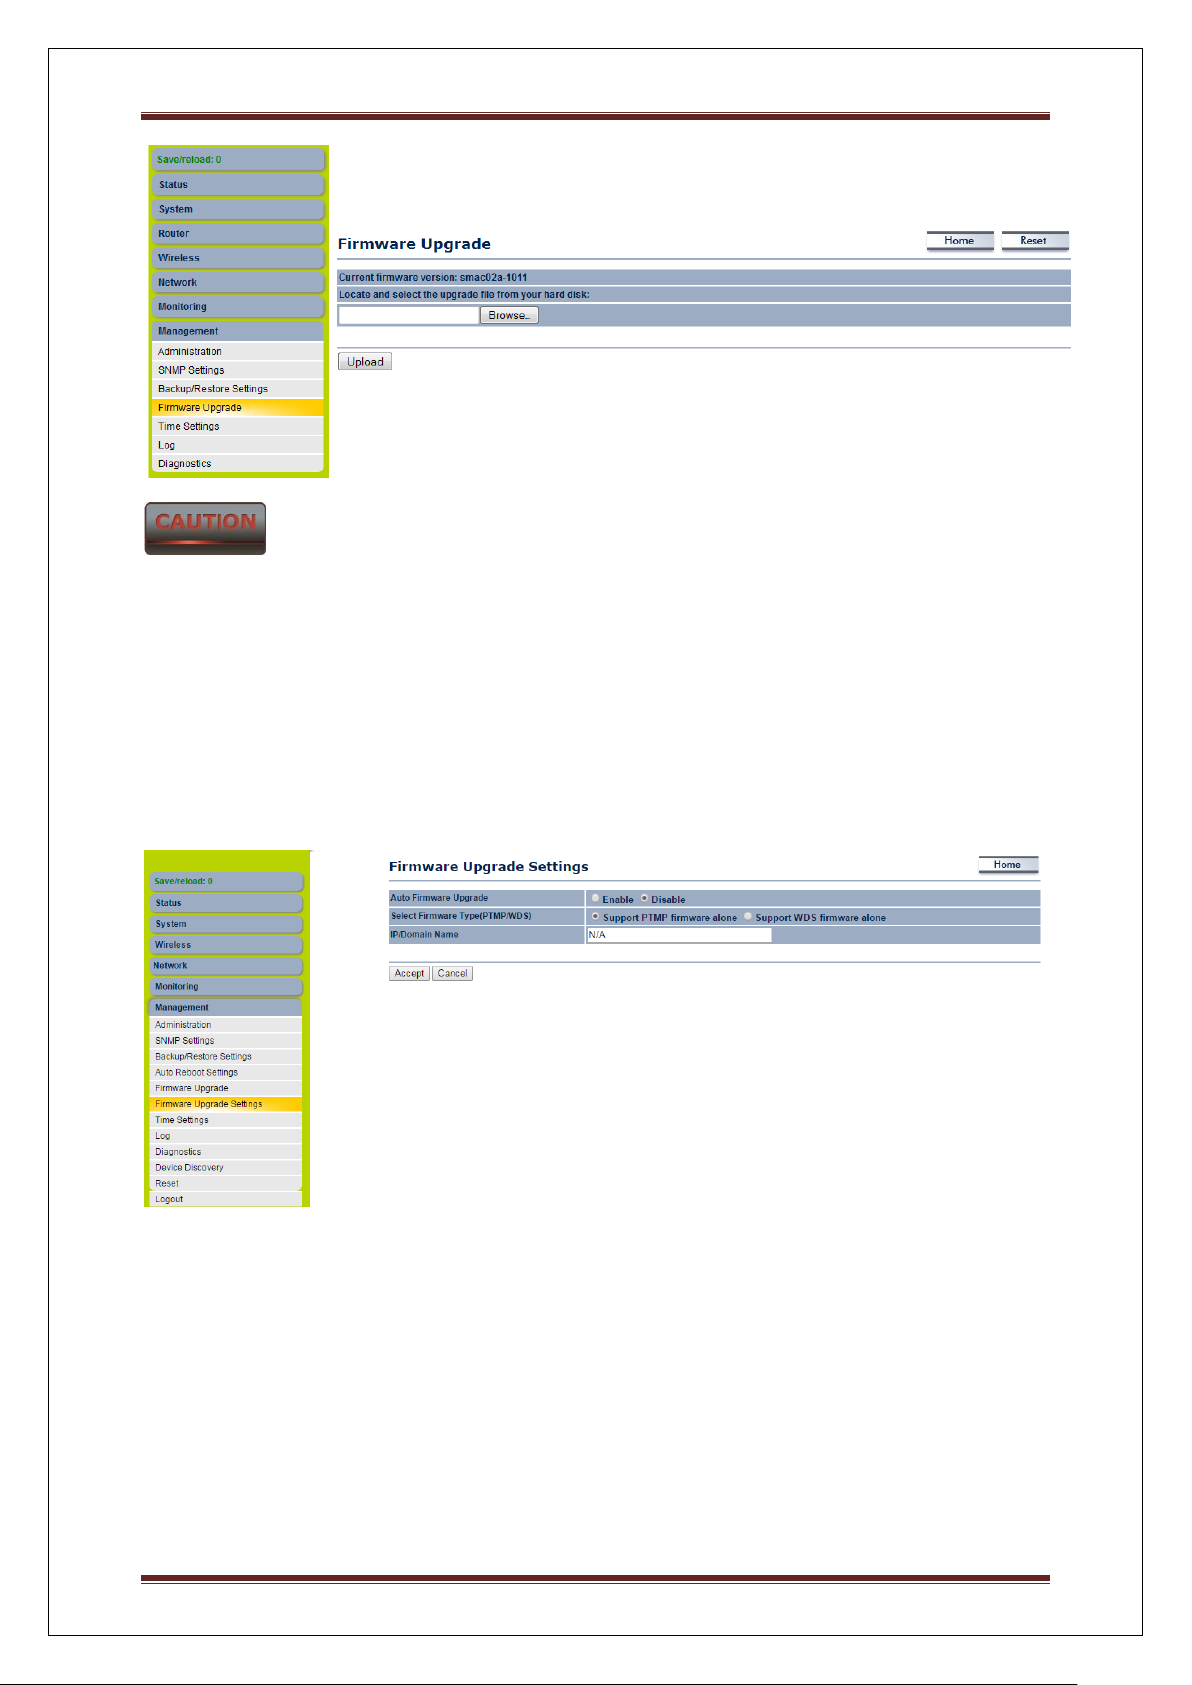
Click on the Firmware Upgrade link under the Management menu. This page is used to
upgrade the firmware of the device. Make sure that downloaded the appropriate firmware
from your vendor.
Sify Technologies LTD Page 28
Page 29
User Operating Manual
Upgrade process may take few minutes (approximate 3 minutes); please do not power off the
device and it may cause the device crashed or unusable. SMAC5700 will restart
automatically once the upgrade is completed.
1.7.6 Firmware Upgrade Settings
Click on the Firmware Upgrade Settings link under the Management menu. This page is
used to upgrade the firmware from remote. Latest firmware can be uploaded in server and
connected devices can upgrade automatically when reboots.
1.7.7 Time Settings
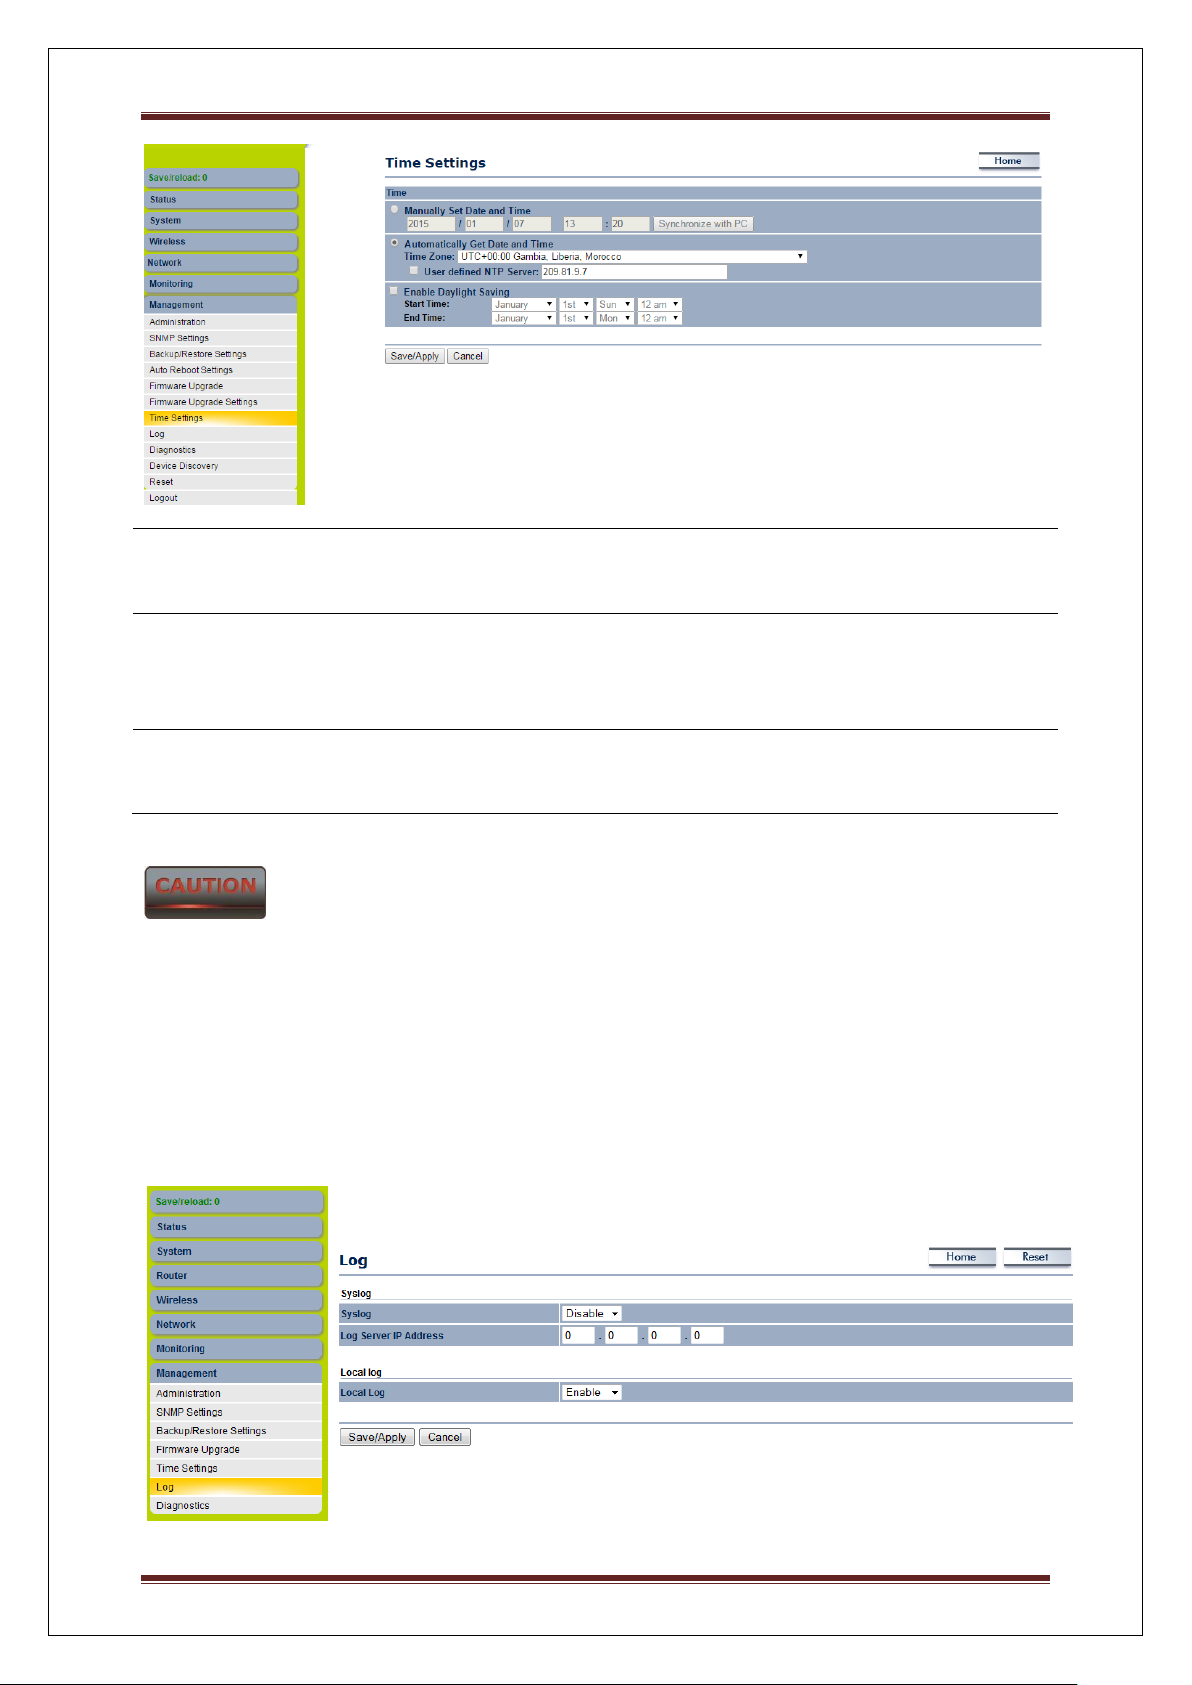
Click on the Time Settings link under the Management menu. This page allows you to
configure the time on the device. You may do this manually or by connecting to a NTP
server.
Sify Technologies LTD Page 29
Page 30
User Operating Manual
Manually Set Date and
Time
Manually setup the date and time.
Automatically Get Date
and Time
Specify the Time Zone from the drop down list and Place a
Check to specify the IP address of the NTP Server manually or
uses default NTP Server.
Save/Apply / Cancel
Press Save/Apply to apply the changes or Cancel to return
previous settings.
Press Save/Apply will change the setting immediately. It will not be able to undo the action.
1.7.8 Log
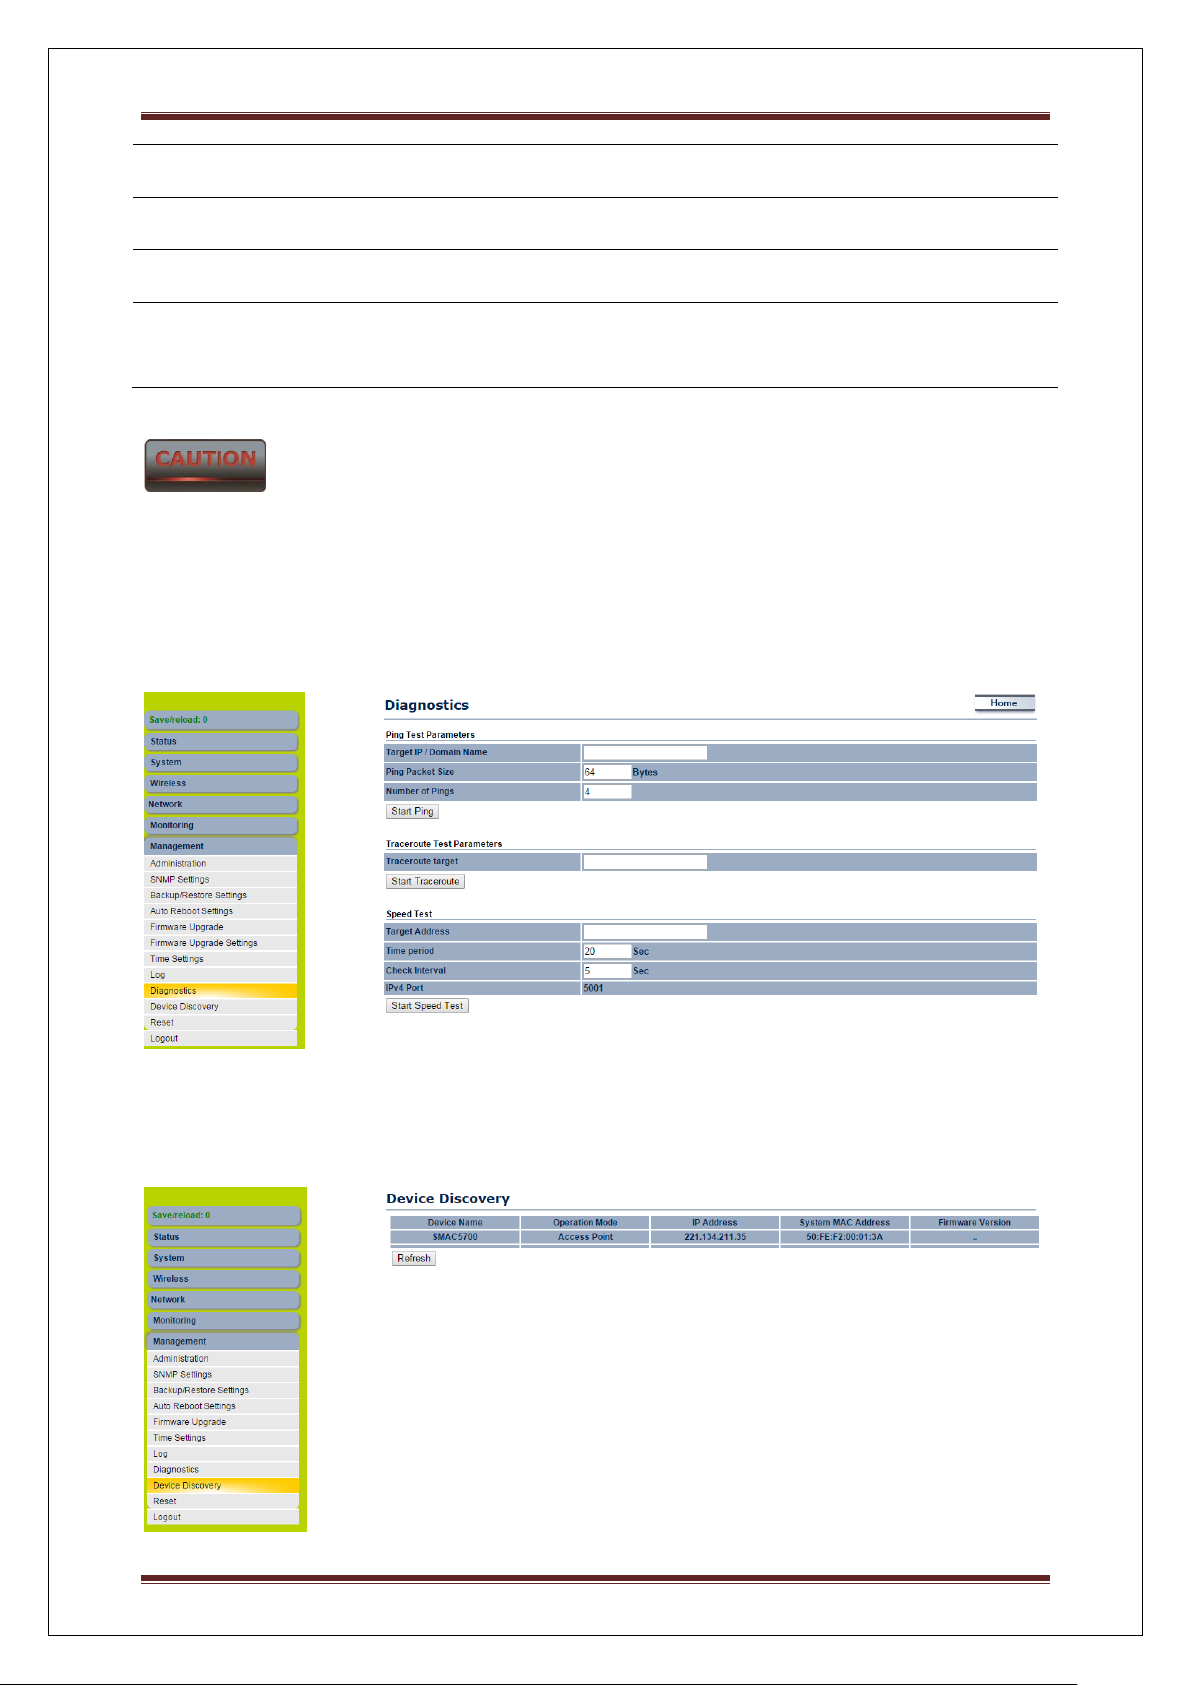
Click on the Log link under the Management menu. The Log page displays a list of events
that are triggered on the Ethernet and Wireless interface. This log can be referred when an
unknown error occurs on the system or when a report needs to be sent to the technical support
department for debugging purposes.
Sify Technologies LTD Page 30
Page 31
User Operating Manual
Syslog
Select Enable or Disable Syslog function from the drop down list.
Log Server IP Address
Specify the Log Server IP address.
Local Log
Select Enable or Disable Local Log service.
Save/Apply / Cancel
Press Save/Apply to apply the changes or Cancel to return
previous settings.
Press Save/Apply will change the setting immediately. It will not be able to undo the action.
1.7.9 Diagnostics
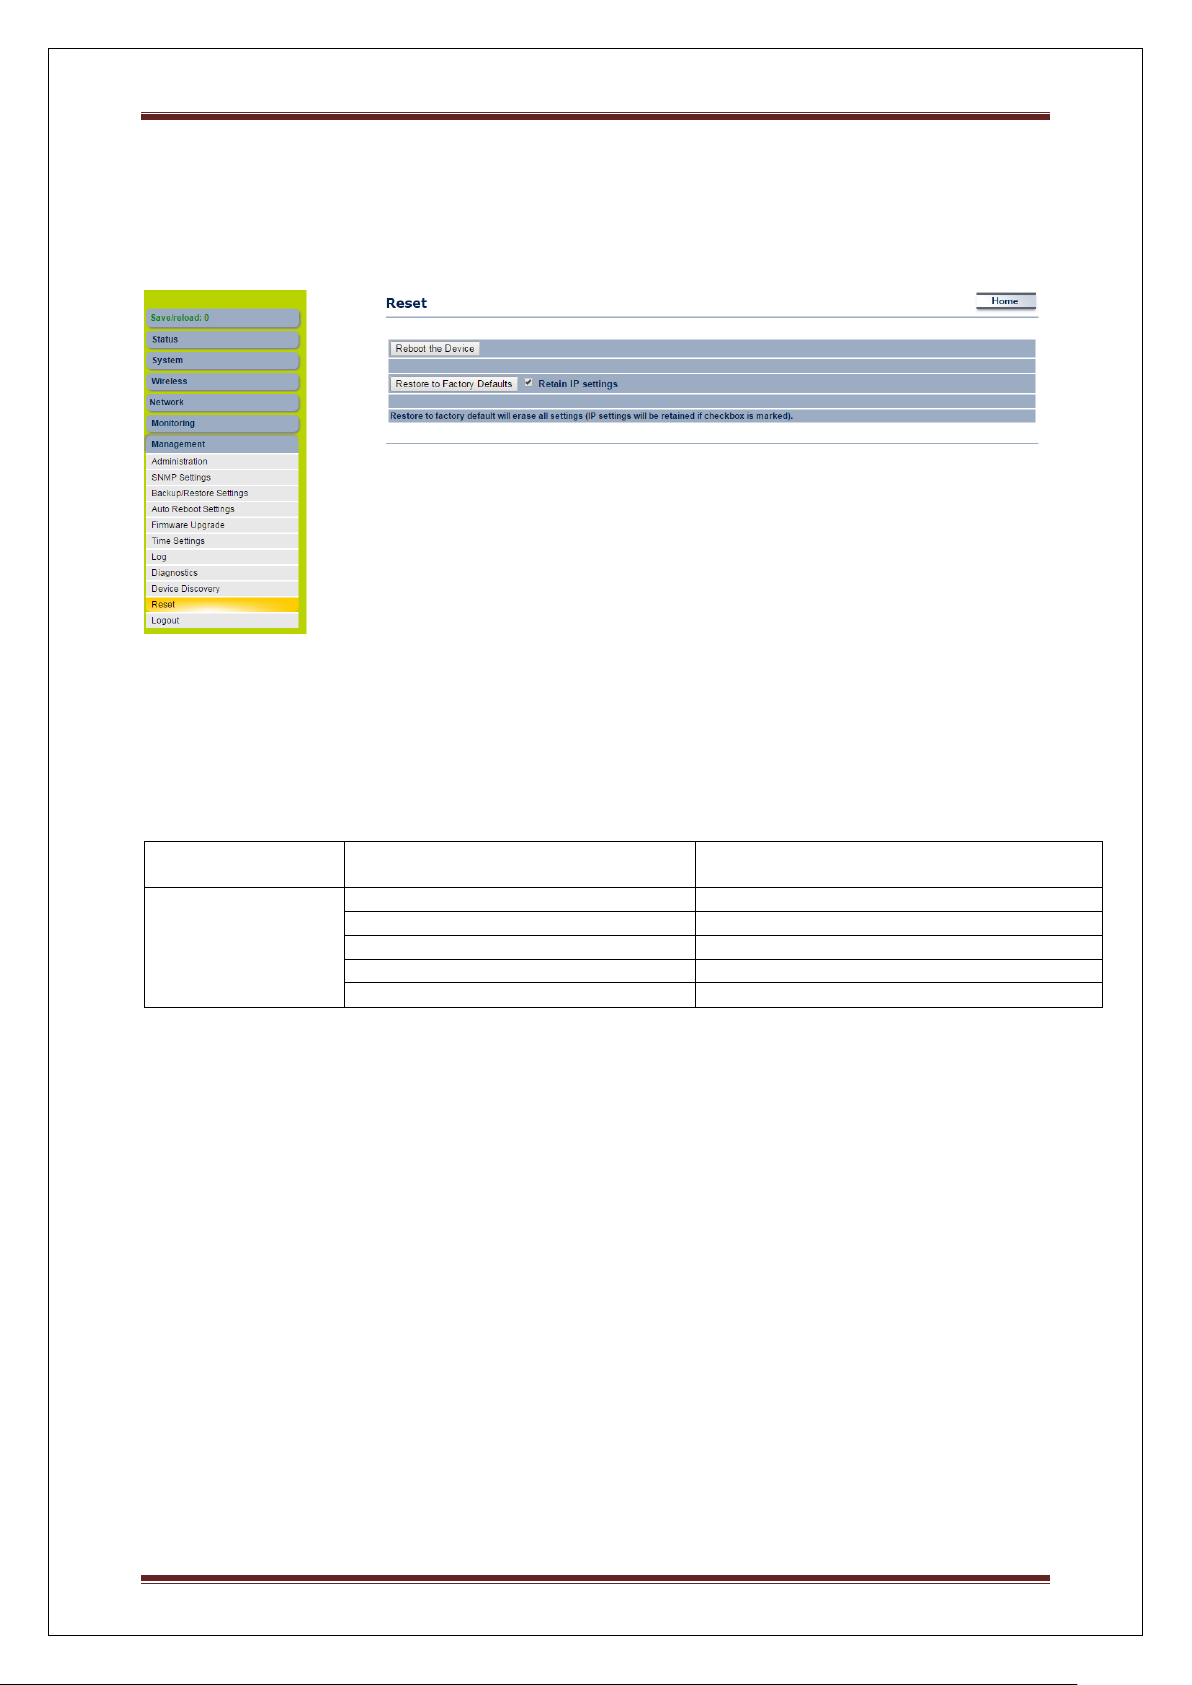
Click on the Diagnostics link under the Management menu. This function allows you to
detect connection quality and trace the routing table to the target.
1.8 Device Discovery
. Click on the Device discovery link under the Management menu. This function displays
the device information as well as associated SU information.
Sify Technologies LTD Page 31
Page 32
User Operating Manual
NAME
Condition
Signal Strength
GREEN blinking fast
Excellent (less than -63)
GREEN blinking slow
Good (-64 to -74 dBm)
Alternate GREEN and AMBER
Average (-75 to -80 dBm)
AMBER blinking
Poor (above -81 dBm)
WLAN_LED
OFF
Wireless Link DOWN
1.8.1 Reset
Click on the Reset link under the Management menu. This page is used to reboot & reset
the device to factory default. We can restore the factory setting with retain the IP setting,
hence IP reachability will be available & all other parameters will go to factory settings.
1.9 LED Indication
LED indication in Outdoor Subscriber (SU) mode and LED blinking format is given below.
Sify Technologies LTD Page 32
 Loading...