

INSTALLATION
MANUAL
IM-5CKYER-0411(0)-SIESTA
Part No.: R08019036183
Models
ACQ 71 AV1
ACQ 100 AV1
ACQ 125 AV1
Installation Manual
Split Type Unit
English

1-1
English
Indoor Unit ACQ 71 / 100 / 125 AV1
A
B
C
D
E
F
H
K
J
I
G
Original Instruction
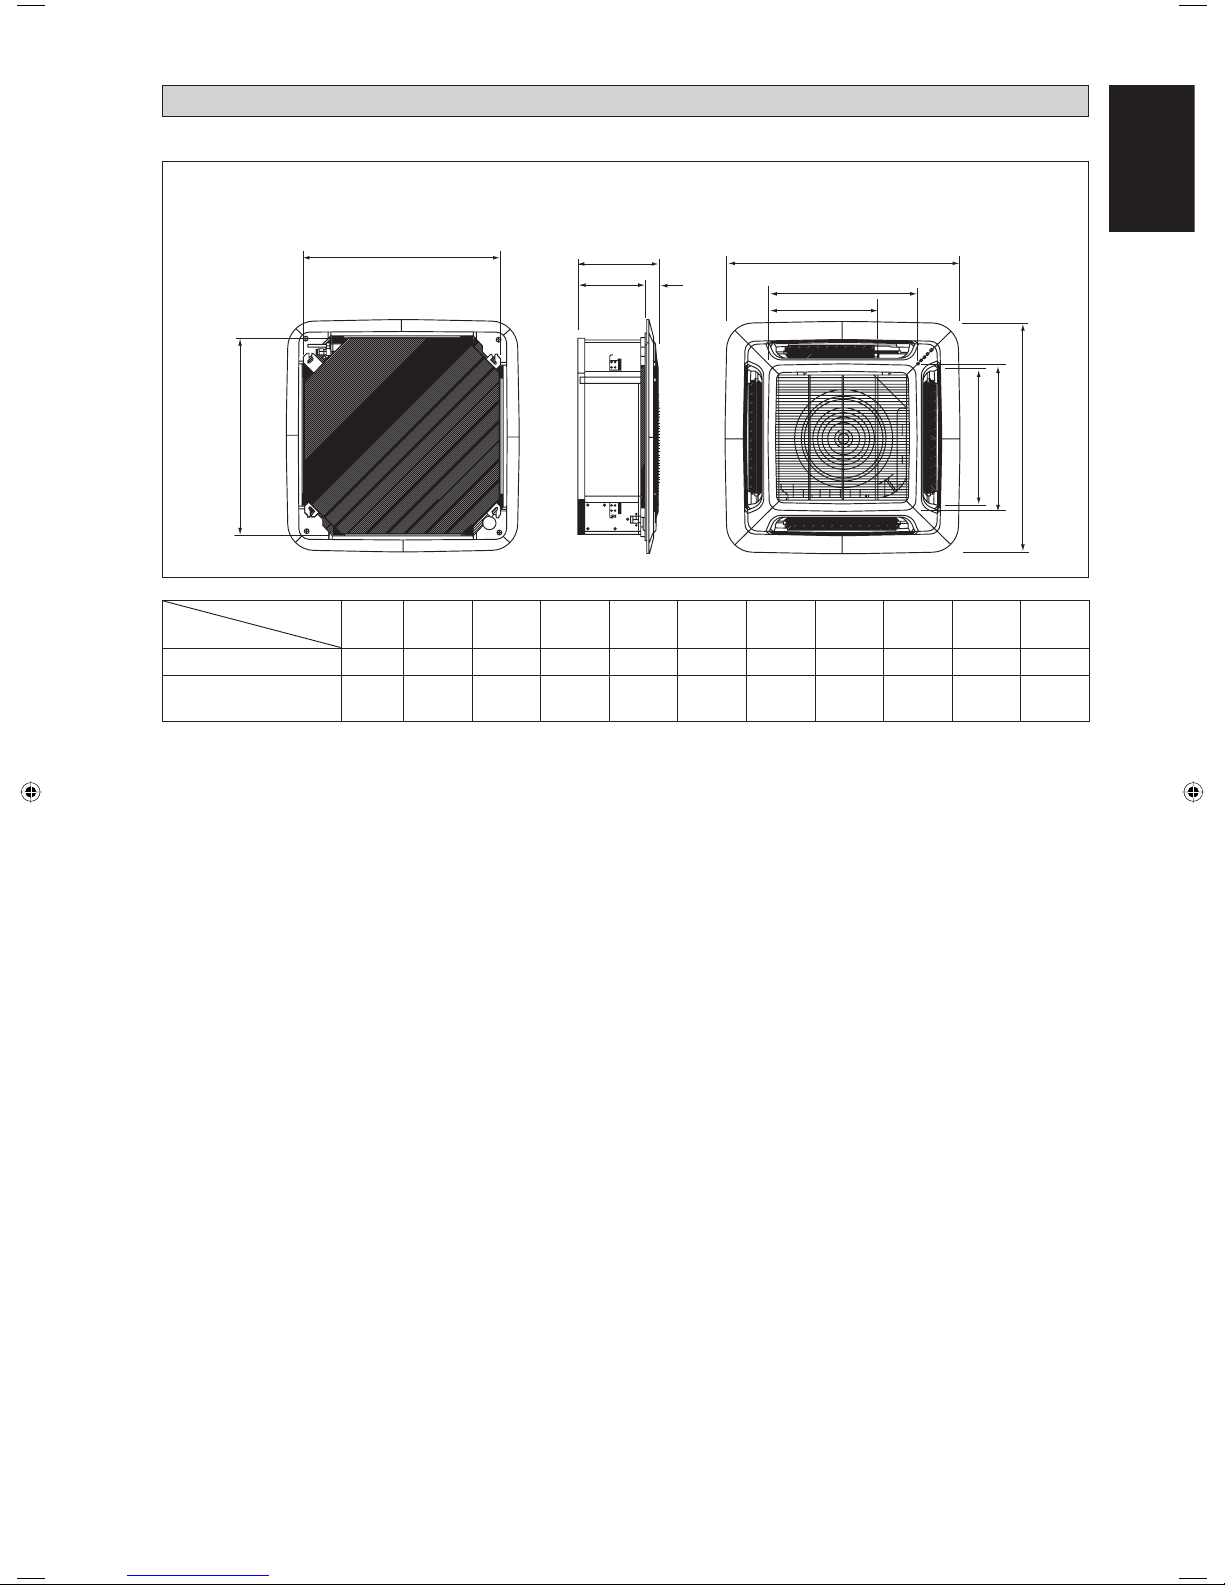
All dimensions are in mm
OUTLINE AND DIMENSIONS
Dimension
Model
AB C D E F GH I J K
ACQ 71 AV1 820 820 340 300 40 990 990 627 627 607 430
ACQ 100 AV1 /
ACQ 125 AV1
820 820 375 335 40 990 990 627 627 607 430
1-2
SAFETY PRECAUTIONS
! WARNING ! CAUTION
•
Installation and maintenance should be performed by qualifi ed
persons who are familiar with local code and regulation, and
experienced with this type of appliance.
•
All fi eld wiring must be installed in accordance with the national
wiring regulation.
•
Ensure that the rated voltage of the unit corresponds to that of
the name plate before commencing wiring work according to
the wiring diagram.
•
The unit must be GROUNDED to prevent possible hazard due
to insulation failure.
•
All electrical wiring must not touch the refrigerant piping, or
any moving parts of the fan motors.
•
Confi rm that the unit has been switched OFF before installing
or servicing the unit.
•
Disconnect from the main power supply before servicing the
air conditioner unit.
•
DO NOT pull out the power cord when the power is ON. This
may cause serious electrical shocks which may result in fi re
hazards.
•
Keep the indoor and outdoor units, power cable and transmission
wiring, at least 1m from TVs and radios, to prevent distorted
pictures and static. {Depending on the type and source of the
electrical waves, static may be heard even when more than 1m
away}.
Please take note of the following important points when
installing.
•
Do not install the unit where leakage of fl ammable gas may
occur.
If gas leaks and accumulates around the unit, it may cause
fi re ignition.
•
Ensure that drainage piping is connected properly.
If the drainage piping is not connected properly, it may
cause water leakage which will dampen the furniture.
•
Do not overcharge the unit.
This unit is factory pre-charged.
Overcharge will cause over-current or damage to the
compressor.
•
Ensure that the unitʼs panel is closed after service or
installation.
Unsecured panels will cause the unit to operate noisily.
•
Sharp edges and coil surfaces are potential locations which
may cause injury hazards.
Avoid from being in contact with these places.
•
Before turning off the power supply, set the remote
controllerʼs ON/OFF switch to the “OFF” position to
prevent the nuisance tripping of the unit. If this is not done,
the unitʼs fans will start turning automatically when power
resumes, posing a hazard to service personnel or the user.
•
Do not operate any heating apparatus too close to the air
conditioner unit. This may cause the plastic panel to melt or
deform as a result of the excessive heat.
•
Do not install the units at or near doorway.
•
Do not operate any heating apparatus too close to the air
conditioner unit or use in room where mineral oil, oil vapour
or oil steam exist, this may cause plastic part to melt or
deform as a result of excessive heat or chemical reaction.
•
When the unit is used in kitchen, keep fl our away from going
into suction of the unit.
•
This unit is not suitable for factory used where cutting oil
mist or iron powder exist or voltage fl uctuates greatly.
•
Do not install the units at area like hot spring or oil refi nery
plant where sulphide gas exists.
•
Ensure the color of wires of the outdoor unit and the
terminal markings are same to the indoors
respectively.
•
IMPORTANT: DO NOT INSTALL OR USE THE AIR
CONDITIONER UNIT IN A LAUNDRY ROOM.
•
Donʼt use joined and twisted wires for incoming power
supply.
•
Avoid direct contact of any coil treatment cleaners on plastic
part. This may cause plastic part to deform as a result of
chemical reaction.
•
For any enquiries on spare parts please contact your
authorized dealer.
•
The equipment is not intended for use in a potentially
explosive atmosphere.
This manual provides the procedures of installation to ensure a safe and good standard of operation for the air conditioner unit.
Special adjustment may be necessary to suit local requirements.
Before using your air conditioner, please read this instruction manual carefully and keep it for future reference.
This appliance is intended to be used by expert or trained users in shops, in light industry and on farms, or for commercial use by lay persons.
INSTALLATION MANUAL
NOTICE
Disposal requirements
Your air conditioning product is marked with this symbol. This means that electrical and electronic products shall not be mixed with unsorted
household waste.
Do not try to dismantle the system yourself: the dismantling of the air conditioning system, treatment of the refrigerant, of oil and of other parts
must be done by a qualifi ed installer in accordance with relevant local and national legislation.
Air conditioners must be treated at a specialized treatment facility for re-use, recycling and recovery. By ensuring this product is disposed of
correctly, you will help to prevent potential negative consequences for the environment and human health. Please contact the installer or local
authority for more information.
Batteries must be removed from the remote controller and disposed of separately in accordance with relevant local and national legislation.
1-3
English
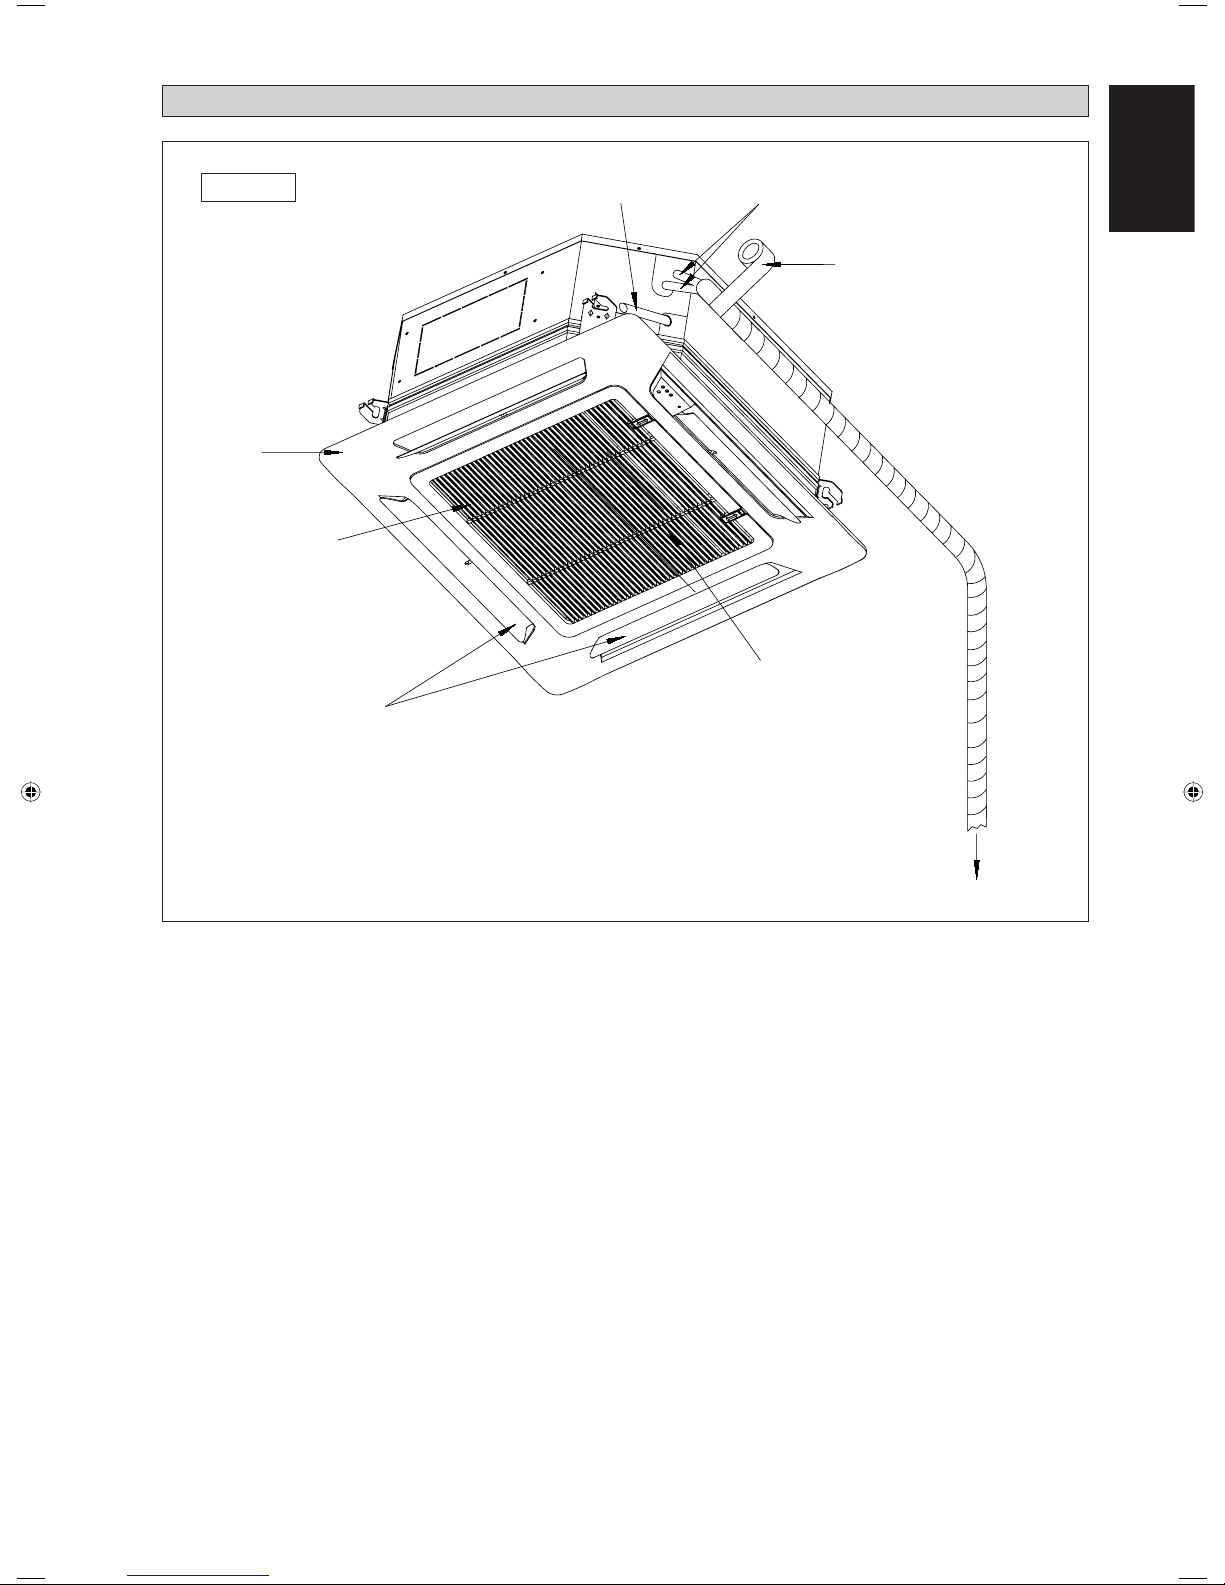
INSTALLATION DIAGRAM
Drain Piping
Thermal Insulation
Wrap the insulated pipe with the
fi nishing tape from bottom to top
Air Intake Grille
Front Panel
Air Filter
(behind the grille)
Air Discharge Louver
To Outdoor Unit
Indoor Unit

1-4
Obstacle
1m or more
3m or more
Floor
0.5m or more 0.5m or more 0.5m or more
0.3m or less
Beam
990.0mm
30 mm
Indoor Unit
Ceiling
Board
NOTE
Be sure to discuss the ceiling drilling work with the installers
concerned.
• Measure and mark the position for the hanging rod. Drill
the hole for the angle nut on the ceiling and fi x the hanging
rod.
• The installation template is extended according to
temperature and humidity. Check on dimensions in use.
• The dimensions of the installation template are the same as
those of the ceiling opening dimensions.
• Before ceiling laminating work is completed, be sure to fi t
the installation template to the indoor unit.
• Confi rm the pitch of the hanging rod is 770mm 622mm
sharp.
• Hold the unit and hang it on the hanging rod with the nut
and washer.
• Adjust the unit height to 30 mm between the indoor unit
bottom surface and the ceiling surface.
• Confirm with a level gauge that the unit is installed
horizontally and tighten the nut and bolt to prevent unit
falling and vibration.
• Open the ceiling board along the outer edge of the paper
installation template.
Unit Hanging
Unit Installation
INSTALLATION OF THE INDOOR UNIT
Preliminary Site Survey
Be sure to read this manual before installing the air-conditioner indoor unit.
• Voltage supply fl uctuation must not exceed ±10% of rated voltage. Electricity supply lines must be independent of welding
transformers which can cause high supply fl uctuation.
• Ensure that the location is convenient for wiring, piping and drainage.
• Do not exert pressure on the resin parts when opening the unit or when moving it after opening.
• Do not move the unit from packaging while moving, until it reaches the installation site. Use safe material or protection
plates when unpacking it or lifting it to avoid damage or scratches to the unit.
880.0~990.0mm (Ceiling Opening Site = 890mm)
770.0mm (Hanging Rod)
880.0~990.0mm (Ceiling Opening Site)
Piping Direction
622.0mm (Hanging Rod)
• Ensure a location where:
a) Drainage can be done easily.
b) Convenient for wiring and piping.
c) Which have enough space for installation and service work.
d) Where no risk of fl ammable gas leakage.
e) When free from any obstacles in path of cool air discharge and warm air return and must allow spreading of air throughout
the room (near the center of the room).
f) Must be provided clearance for indoor unit from the wall and obstacles as shown in fi gure below.
g) The installation place must be strong enough to support a load 4 times the indoor unit weight to avoid amplifying noise
and vibration.
h) The installation place (hanging ceiling surface) must be assuring levelness and the height in the ceiling is 350mm or
more.
i) The indoor unit must be away from heat and steam sources (avoid installing it near an entrance).
990.0mm

1-5
English
Open
Screw
From
Unit
Control
Box
From
Front
Panel
LED Wire
Air Swing Wire
•
The front panel can only be fi tted in one direction, follow the piping direction. (Follow piping arrow sticker on front panel)
• Be sure to remove the installation template before installing the front panel.
Panel Installation
• Open the air intake grille by pulling back the catchers and removing it together with fi lter from panel.
• Install the front frame panel onto the indoor unit by 4 screws and tighten it completely to prevent cool air leakage.
• Connect the LED wire and air swing wire to the indoor unit.
• The air swing connector must put inside the control box after connected.
NOTE
This Indoor Unit uses a drain pump for condensed water drainage. Install the unit horizontally to prevent water leakage
or condensation around the air outlet.
Indoor Unit
Pipe Clamp
Feed Water
Flexible Drain Hose
Main Drain Pipe
•
Drain pipe must be in downward gradient for smooth
drainage.
•
Avoid installing the drain pipe in up and down slope to
prevent reversed water fl ow.
•
During the drain pipe connection, be careful not to exert
extra force on the drain connector at indoor unit.
•
The outside diameter of the drain connection at the
fl exible drain hose is 20 mm.
•
Be sure to execute heat insulation (polyethylene foam
with thickness more than 8.0 mm) on the drain piping to
avoid the condensed water dripping inside the room.
• Connect the main drain pipe to the fl exible drain.
• Feed water from fl exible drain hose to check the piping
for leakage.
• When the test is completed, connect the fl exible drain
hose to the drain connector on the indoor unit.
Drain Pump Work
Drain Test

1-6
Frame
Intake Grille
Cover Lock Grille
(2pcs)
Screw M4 x 6
(2pcs)
Cover Lock Grille (The moving part protection for user direct touching)
Cover lock grill must be installed as the fi gure below.
If the unit need to be service, steps below shall be followed:
1. Confi rm that the unit had been switched off before servicing the unit.
2. Use screwdriver to unlock the screw on the cover lock grille.
3. Remove the cover lock grille and open the intake grille for the service purpose.
4. Install the intake grille and screw the cover lock grille after service and make sure the unit is proper install.

1-7
English
Figure 2 Figure 3
Figure 4 Figure 5
Wires Installation
Figure 1 and Figure 2 shows the location of cover wire in Indoor unit.
Steps to install power supply wires and wires from outdoor unit.
1. Remove wire cover by removing 2 screws as shown in Figure 3.
2. Wires will go through the hole as shown in Figure 4 and 5 respectively without crossing the height of the hole.
3. After that, wire cover will be assembled back to close the wire.
Figure 1
! CAUTION
Do not install the unit at altitude over 2000m for both indoor and outdoor.
Power supply
terminal block
Shape wires so
that the stop valve
cover fi t securely.
A
1-3
B
A<B

1-8
D
A
Piping Works And Flaring Technique
• Do not use contaminated or damaged copper tubing. If any pipings, evaporator or condenser had been exposed or had been
opened for 15 seconds or more, the system must be vacuumed. Generally, do not remove plastic, rubber plugs and brass
nuts from the valves, fi ttings, tubings and coils until it is ready to connect suction or liquid line into valves or fi ttings.
• If any brazing work is required, ensure that the nitrogen gas is passed through coil and joints while the brazing work is
being done. This will eliminate soot formation on the inside walls of the copper tubings.
• Cut the pipe stage by stage, advancing the blade of the pipe cutter slowly. Extra force and deep cut will cause more distortion
on the pipe and thus extra burr. See Figure A.
Cutting Copper Tube
Figure B
Figure A
Remove Burr
Figure C
Copper Tube
Swaging Block
• Remove burrs from cut edges of the pipes with remover
as shown in Figure B. This will avoid unevenness on the
fl are faces which will cause gas leak. Hold the pipe on
top position and burr remover at lower position to prevent
metal chips from entering the pipe.
• Insert the fl are nuts, mounted on the connection parts of
both the indoor unit and outdoor unit, into the copper
pipes.
• The exact length of pipe protruding from the top surface of
the swaging block is determined by the fl aring tool. Refer
Figure C.
• Fix the pipe fi rmly on the swaging block. Match the centers
of both the fl are die and the fl aring punch, and then tighten
the fl aring punch fully.
Piping Connection To The Units
• Align the center of the piping and tighten the fl are nut
suffi ciently with fi ngers. Refer Figure D.
• Finally, tighten the fl are nut with the torque wrench until
the wrench clicks.
• When tightening the fl are nut with the torque wrench,
ensure that the tightening direction follows the arrow
indicated on the wrench.
• The refrigerant pipe connection are insulated by closed
cell polyurethane.
Spanar
Torque Wrench
Indoor Piping
Flare Nut
Flared Tube
Flare Joint
Figure D
Ø Tube, D A (mm)
Inch mm Imperial
(Wing-nut Type)
Rigid
(Clutch Type)
1/4" 6.35 1.3 0.7
3/8" 9.52 1.6 1.0
1/2" 12.70 1.9 1.3
5/8" 15.88 2.2 1.7
3/4" 19.05 2.5 2.0
Pipe Size (mm/in) Torque (Nm/ft-lb)
6.35 (1/4") 18 (13.3")
9.52 (3/8") 42 (31.0")
12.70 (1/2") 55 (40.6")
15.88 (5/8") 65 (48.0")
19.05 (3/4") 78 (57.6")
1/4t

1-9
English
Attach insulation sleeve
Round crimp-style terminal
Electric wire
Connect wires of the
same gauge to both side.
Do not connect wires of the
same gauge to one side.
Do not connect wires
of different gauges.
• All wires must be fi rmly connected.
• Make sure all the wire do not touch the refrigerant pipings, compressor or any moving parts.
• The connecting wire between the indoor unit and the outdoor unit must be clamped by using provided cord anchorage.
• The power supply cord must be equivalent to H07RN-F which is the minimum requirement.
• Make sure no external pressure is applied to the terminal connectors and wires.
• Make sure all the covers are properly fi xed to avoid any gap.
• Use round crimp-style terminal for connecting wires to the power supply terminal block. Connect the wires by matching
to the indication on terminal block. (Refer to the wiring diagram attached on the unit).
• Use the correct screwdriver for terminal screws tightening. Unsuitable screwdrivers can damage the screw head.
• Over tightening can damage the terminal screw.
• Do not connect wire of different gauge to same terminal.
• Keep wiring in an orderly manner. Prevent the wiring from obstructing other parts and the terminal box cover.
R410A is a new HFC refrigerant which does not damage the
ozone layer. The working pressure of this new refrigerant is 1.6
times higher than conventional refrigerant (R22), thus proper
installation / servicing is essential.
•
Never use refrigerant other than R410A in an air conditioner
which designed to operate with R410A.
•
POE or PVE oil is used as lubricant for R410A
compressor, which is different from the mineral oil used
for R22 compressor. During installation or servicing, extra
precaution must be taken not to expose the R410A system
too long to moist air. Residual POE or PVE oil in the piping
and components can absorb moisture from the air.
•
To prevent mischarging, the diameter of the service port
on the fl are valve is different from that of R22.
•
Use tools and materials exclusively for refrigerant R410A.
Tools exclusively for R410A are manifold valve, charging
hose, pressure gauge, gas leak detector, fl are tools, torque
wrench, vacuum pump and refrigerant cylinder.
•
As an R410A air conditioner incurs higher pressure
than R22 units, it is essential to choose the copper pipes
correctly. Never use copper pipes thinner than 0.8mm even
though they are available in the market.
•
If the refrigerant gas leakage occurs during installation /
servicing, be sure to ventilate fully. If the refrigerant gas
comes into contact with fi re, a poisonous gas may occur.
•
When installing or removing an air conditioner, do not
allow air or moisture to remain in the refrigerant cycle.
SPECIAL PRECAUTIONS WHEN DEALING WITH R410A UNIT
Vacuuming is necessary to eliminate all moisture and air from the system.
Vacuuming The Piping And The Indoor Unit
The indoor unit and the refrigerant connection pipes must
be air-purged because the air containing moisture that
remains in the refrigerant cycle may cause malfunction of
the compressor.
• Remove the caps from the valve and the service port.
• Connect the center of the charging gauge to the vacuum
pump.
• Connect the charging gauge to the service port of the 3-way
valve.
• Start the vacuum pump. Evacuate for approximately 30
minutes. The evacuation time varies with different vacuum
pump capacity. Confi rm that the charging gauge needle has
moved towards -760mmHg.
VACUUMING AND CHARGING
Caution
• If the gauge needle does not move to -760mmHg, be sure to
check for gas leaks (using the refrigerant detector) at fl are
type connection of the indoor and outdoor unit and repair
the leak before proceeding to the next step.
• Close the valve of the changing gauge and stop the vacuum
pump.

1-10
Sealing Material
• It is possible to seal one of the four air discharge outlet. (sealing two or more air discharge outlet could cause a
malfunction)
• Remove the front panel and insert the sealing material into the air discharge outlet on the indoor unit to seal the air
outlet.
• The sealing material is the same length as the longer air discharge outlet. If it is desired to seal the shorter air discharge
outlet, cut the sealing material to shorten it.
• Push the sealing material in about 10 mm beyond the bottom surface of the indoor unit so that it does not touch the air
louver. Be sure not to push the sealing material in any farther than about 10mm.
Short Duct Specifi cation
• The indoor unit is provided with air discharge and air intake “knock-out” hole for duct connection. However the connection
of the short duct for air discharge is possible on only one side.
• The use of short duct for air discharge will improve airfl ow distribution if there is an obstruction (such as a lighting fi xture)
or in a long, narrow room or an L-shaped room. It also use for air conditioning of two rooms simultaneously.
Possible Opening Dimension For Duct Connection
Air Discharge Knock Out Hole
Air Intake Knock
Out Hole
Possible Direction For Air Discharge And Air Intake
Air Intake
Air DischargeAir Discharge
Air Discharge Air Discharge
10
50 50 50 50 50 10
207020
90
Ø100
PCD Ø140
115 20 115
ACCESSORY PARTS
NOTE
• Avoid using the short duct on which the air discharge grille can be completely closed, to prevent evaporator
freezing.
• In order to prevent condensation forming, be sure that there is suffi cient thermal insulation and no leakage of cool
air when installing the short duct.
• Keep the introduction of fresh air intake within 20% of total air fl ow. Also provide chamber and use booster fan.

MEMO / LE MÉMO / MITTEILUNG / MEMO / EL MEMORÁNDUM /
ПАМЯТКА / NOT / ΣΗΜΕΙΩΜΑ / MEMO

Daikin Europe N.V.
CE - DECLARATION-OF-CONFORMITY
CE - KONFORMITÄTSERKLÄRUNG
CE - DECLARATION-DE-CONFORMITE
CE - CONFORMITEITSVERKLARING
CE - DECLARACION-DE-CONFORMIDAD
CE - DICHIARAZIONE-DI-CONFORMITA
CE - ¢H§ø™H ™YMMOPºø™H™
CE - DECLARAÇÃO-DE-CONFORMIDADE
СЕ - ЗАЯВЛЕНИЕ-О-СООТВЕТСТВИИ
CE - OPFYLDELSESERKLÆRING
CE - FÖRSÄKRAN-OM-ÖVERENSTÄMMELSE
CE - ERKLÆRING OM-SAMSVAR
CE - ILMOITUS-YHDENMUKAISUUDESTA
CE - PROHLÁŠENÍ-O-SHODĚ
CE - IZJAVA-O-USKLAĐENOSTI
CE - MEGFELELŐSÉGI-NYILATKOZAT
CE - DEKLARACJA-ZGODNOŚCI
CE - DECLARAŢIE-DE-CONFORMITATE
CE - IZJAVA O SKLADNOSTI
CE - VASTAVUSDEKLARATSIOON
CE - ДЕКЛАРАЦИЯ-ЗА-СЪОТВЕТСТВИЕ
CE - ATITIKTIES-DEKLARACIJA
CE - ATBILSTĪBAS-DEKLARĀCIJA
CE - VYHLÁSENIE-ZHODY
CE - UYUMLULUK-BİLDİRİSİ
3PW54723-19J
Shigeki Morita
Vice President
Ostend, 26th of April 2011
01 are in conformity with the following standard(s) or other normative document(s), provided that these are used in accordance wit
h our
instructions:
02 der/den folgenden Norm(en) oder einem anderen Nor
mdokument oder -dokumenten entspricht/entsprechen, unter der V
oraussetzung,
daß sie gemäß unseren Anweisungen eingesetzt werden:
03 sont conformes à la/aux norme(s) ou autre(s) document(s) nor
matif(s), pour autant qu'ils soient utilisés conformément à nos instructions:
04 conform de volgende norm(en) of één of meer andere bindende documenten zijn, op voorwaarde dat ze worden gebruikt overeenkomstig
onze instructies:
05 están en conformidad con la(s) siguiente(s) norma(s) u otro(s) documento(s) nor mativo(s), siempre que sean utilizados de acuerdo con
nuestras instrucciones:
06 sono conformi al(i) seguente(i) standard(s) o altro(i) documento(i) a car
attere normativo, a patto che vengano usati in conformità alle
nostre istruzioni:
07 В›У·И Ы‡МКˆУ· МВ ЩФ(·) ·ОfiПФ˘ıФ(·) ЪfiЩ˘Ф(·) ‹ ¿ППФ ¤ББЪ·КФ(·) О·УФУИЫМТУ, ˘fi ЩЛУ ЪФ¸fiıВЫЛ fiЩИ ¯ЪЛЫИМФФИФ‡УЩ·И
Û‡Ìʈӷ Ì ÙȘ Ô‰ËÁ›Â˜ Ì·˜:
08 estão em conformidade com a(s) seguinte(s) norma(s) ou outro(s) documento(s) nor mativo(s), desde que estes sejam utilizados de
acordo com as nossas instruções:
09 соответствуют следующим стандартам или другим нормативным документам, при условии их испо
льзования согласно нашим
инструкциям:
10 overholder følgende standard(er) eller andet/andre retningsgivende dokument(er), forudsat at disse anvendes i henhold til vore
instrukser:
11 respektive utrustning är utförd i överensstämmelse med och följer följande standard(er) eller andr
a normgivande dokument, under
förutsättning att användning sker i överensstämmelse med vår
a instruktioner:
12 respektive utstyr er i overensstemmelse med fø
lgende standard(er) eller andre normgivende dokument(er), under forutssetning av at
disse brukes i henhold til våre instrukser:
13 vastaavat seuraavien standardien ja muiden ohjeellisten dokumenttien vaatimuksia edellyttäen, että niitä käytetään ohjeidemme
mukaisesti:
14 za předpokladu, že jsou využívány v souladu s našimi pokyny
, odpovídají následujícím normám nebo normativním dokumentům:
15 u skladu sa slijedećim standardom(ima) ili drugim normativnim dokumentom(ima), uz uvjet da se oni koriste u skladu s našim uput
ama:
16 megfelelnek az alábbi szabvány(ok)nak vagy egyéb irányadó dokumentum(ok)nak, ha azokat előírás szerint használják:
17 spełniają wymogi następujących norm i innych dokumentów normalizacyjnych, pod warunkiem że używane są zgodnie z naszymi
instrukcjami:
18 sunt în conformitate cu următorul (următoarele) standard(e) sau alt(e) document(e) normativ(e), cu condiţia ca acestea să fie u
tilizate în
conformitate cu instrucţiunile noastre
19 skladni z naslednjimi standardi in drugimi normativi, pod pogojem, da se uporabljajo v skladu z našimi navodili:
20 on vastavuses järgmis(t)e standardi(te)ga või teiste normatiivsete dokumentidega, kui neid kasutatakse vastavalt meie juhendite
le:
21 съответстват на следните стандарти или други нормативни документи, при условие, че се използват съгласно нашите
инструкции:
22 atitinka žemiau nurodytus standartus ir (arba) kitus norminius dokumentus su sąlyga, kad yra naudojami pagal mūsų nurodymus:
23 tad, ja lietoti atbilstoši ražotāja norādījumiem, atbilst sekojošiem standartiem un citiem normatīviem dokumentiem:
24 sú v zhode s nasledovnou(ými) normou(ami) alebo iným(i) normatívnym(i) dokumentom(ami), za predpokladu, že sa používajú v súlad
e
s našim návodom:
25 ürünün, talimatlarımıza göre kullanılması koşuluyla aşağıdaki standartlar ve norm belirten belgelerle uyumludur:
01 Directives, as amended.
02 Direktiven, gemäß Änderung.
03 Directives, telles que modifiées.
04 Richtlijnen, zoals geamendeerd.
05 Directivas, según lo enmendado.
06 Direttive, come da modifica.
07 √‰ËÁÈÒv, fiˆ˜ ¤¯Ô˘Ó ÙÚÔÔÔÈËı›.
08 Directivas, conforme alteração em.
09 Директив со всеми поправками.
10
Direktiver, med senere ændringer.
11 Direktiv, med företagna ändringar.
12 Direktiver, med foretatte endringer.
13
Direktiivejä, sellaisina kuin ne ovat muutettuina.
14 v platném znění.
15 Smjernice, kako je izmijenjeno.
16
irányelv(ek) és módosításaik rendelkezéseit.
17 z późniejszymi poprawkami.
18 Directivelor, cu amendamentele respective.
19 Direktive z vsemi spremembami.
20 Direktiivid koos muudatustega.
21 Директиви, с техните изменения.
22 Direktyvose su papildymais.
23 Direktīvās un to papildinājumos.
24 Smernice, v platnom znení.
25 Değiştirilmiş halleriyle Yönetmelikler.
01 following the provisions of:
02 gemäß den Vorschriften der :
03 conformément aux stipulations des:
04 overeenkomstig de bepalingen van:
05 siguiendo las disposiciones de:
06 secondo le prescrizioni per:
07 Ì ًÚËÛË Ùˆv ‰È·Ù¿Íˆv Ùˆv:
08 de acordo com o previsto em:
09 в соответствии с положениями:
10 under iagttagelse af bestemmelserne i:
11 enligt villkoren i:
12 gitt i henhold til bestemmelsene i:
13 noudattaen määräyksiä:
14 za dodržení ustanovení předpisu:
15 prema odredbama:
16 követi a(z):
17 zgodnie z postanowieniami Dyrektyw:
18 în urma prevederilor:
19 ob upoštevanju določb:
20 vastavalt nõuetele:
21 следвайки клаузите на:
22 laikantis nuostatų, pateikiamų:
23 ievērojot prasības, kas noteiktas:
24 održiavajúc ustanovenia:
25 bunun koşullarına uygun olarak:
01 Note * as set out in <A> and judged positively by <B>
according to the Certificate <C>.
02 Hinweis * wie in der <A> aufgeführt und von <B> positiv
beurteilt gemäß Zertifikat <C>.
03 Remarque * tel que défini dans <A> et évalué positivement par
<B> conformément au Certificat <C>.
04 Bemerk * zoals vermeld in <A> en positief beoordeeld door
<B> overeenkomstig Certificaat <C>.
05 Nota * como se establece en <A> y es valorado
positivamente por <B> de acuerdo con el
Certificado <C>.
06 Nota * delineato nel <A> e giudicato positivamente
da <B> secondo il Certificato <C>.
07 ™ËÌ›ˆÛË * fiˆ˜ ηıÔÚ›˙ÂÙ·È ÛÙÔ <A> Î·È ÎÚ›ÓÂÙ·È ıÂÙÈο
·fi ÙÔ <B> Û‡Ìʈӷ Ì ÙÔ ¶ИЫЩФФИЛЩИОfi <C>.
08 Nota * tal como estabelecido em <A> e com o parecer
positivo de <B> de acordo com o Certificado <C>.
09 Примечание * как указано в <A> и в соответствии с
положительным решением <B> согласно
Свидетельству <C>.
10 Bemærk * som anført i <A> og positivt vurderet af <B> i
henhold til Certifikat <C>.
11 Information * enligt <A> och godkänts av <B> enligt
Certifikatet <C>.
12 Merk * som det fremkommer i <A> og gjennom positiv
bedømmelse av
<B> ifølge Sertifikat <C>.
13 Huom * jotka on esitetty asiakirjassa <A> ja jotka <B> on
hyväksynyt Sertifikaatin <C> mukaisesti.
14 Poznámka * jak bylo uvedeno v <A> a pozitivně zjištěno <B> v
souladu s osvědčením <C>.
15 Napomena * kako je izloženo u <A> i pozitivno ocijenjeno od
strane <B> prema Certifikatu <C>.
16 Megjegyzés * a(z) <A> alapján, a(z) <B> igazolta a megfelelést,
a(z) <C> tanúsítvány szerint.
17 Uwaga * zgodnie z dokumentacją <A>, pozytywną opinią
<B> i Świadectwem <C>.
18 Notă * aşa cum este stabilit în <A> şi apreciat pozitiv
de <B> în conformitate cu Certificatul <C>.
19 Opomba * kot je določeno v <A> in odobreno s strani <B> v
skladu s certifikatom <C>.
20 Märkus * nagu on näidatud dokumendis <A> ja heaks
kiidetud <B> järgi vastavalt sertifikaadile <C>.
21 Забележка * както е изложено в <A> и оценено
положително от <B> съгласно
Cертификата <C>.
22 Pastaba * kaip nustatyta <A> ir kaip teigiamai nuspręsta <B>
pagal Sertifikatą <C>.
23 Piezīmes * kā norādīts <A> un atbilstoši <B>
pozitīvajam
vērtējumam saskaņā ar sertifikātu <C>.
24 Poznámka * ako bolo uvedené v <A> a pozitívne zistené <B> v
súlade s osvedčením <C>.
25
Not
*
<A>‘da belirtildiği gibi ve <C> Sertifikasına
göre <B> tarafından olumlu olarak
değerlendirildiği gibi.
<A> DAIKIN.TCF.512/26-04-2011
<B> Intertek Semko AB (NB0413)
<C> 915845T1
01
a
declares under its sole responsibility that the air conditioning models to which this declaration relates:
02
d
erklärt auf seine alleinige Verantwortung daß die Modelle der Klimageräte für die diese Erklärung bestimmt ist:
03
f
déclare sous sa seule responsabilité que les appareils d'air conditionné visés par la présente déclar
ation:
04
l
verklaart hierbij op eigen exclusieve verantwoordelijkheid dat de airconditioning units w
aarop deze verklaring betrekking heeft:
05
e
declara baja su única responsabilidad que los modelos de aire acondicionado a los cuales hace
referencia la
declaración:
06
i
dichiara sotto sua responsabilità che i condizionator
i modello a cui è riferita questa dichiarazione:
07
g
‰ЛПТУВИ МВ ·ФОПВИЫЩИО‹ ЩЛ˜ В˘ı‡УЛ fiЩИ Щ· МФУЩ¤П· ЩˆУ ОПИМ·ЩИЫЩИОТУ Ы˘ЫОВ˘ТУ ЫЩ· ФФ›· ·У·К¤ЪВЩ·И Л ·ЪФ‡Ы· ‰‹ПˆЫЛ:
08
p
declara sob sua exclusiva responsabilidade que os modelos de ar condicionado a que esta declar
ação se refere:
09
u
заявляет, исключительно под свою ответственность, что модели кондиционеров воздуха, к которым относится настоящее заявление:
10
q
erklærer under eneansvar, at klimaanlægmodellerne, som denne deklaration vedrører:
11
s
deklarerar i egenskap av huvudansvarig, att luftkonditioner
ingsmodellerna som berörs av denna deklaration innebär att:
12
n
erklærer et fullstendig ansvar for at de luftkondisjoner
ingsmodeller som berøres av denne deklarasjon innebærer at:
13
j
ilmoittaa yksinomaan omalla vastuullaan, että tämän ilmoituksen tar
koittamat ilmastointilaitteiden mallit:
14
c
prohlašuje ve své plné odpovědnosti, že modely klimatizace, k nimž se toto prohlášení vztahuje:
15
y
izjavljuje pod isključivo vlastitom odgovornošću da su modeli klima uređaja na koje se ova izjava odnosi:
16
h
teljes felelőssége tudatában kijelenti, hogy a klímaberendezés modellek, melyekre e nyilatkozat vonatkozik:
17
m
deklaruje na własną i wyłączną odpowiedzialność, że modele klimatyzatorów, których dotyczy niniejsza deklaracja:
18
r
declară pe proprie răspundere că aparatele de aer condiţionat la care se referă această declaraţie:
19
o
z vso odgovornostjo izjavlja, da so modeli klimatskih naprav
, na katere se izjava nanaša:
20
x
kinnitab oma täielikul vastutusel, et käesoleva deklaratsiooni alla kuuluvad kliimaseadmete mudelid:
21
b
декларира на своя отговорност, че моделите климатична инсталация, за които се отнася т
ази декларация:
22
t
visiška savo atsakomybe skelbia, kad oro kondicionavimo prietaisų modeliai, kuriems yra taikoma ši deklaracija:
23
v
ar pilnu atbildību apliecina, ka tālāk uzskaitīto modeĮu gaisa kondicionētāji, uz kuriem attiecas šī deklarācija:
24
k
vyhlasuje na vlastnú zodpovednosť, že tieto klimatizačné modely
, na ktoré sa vzťahuje toto vyhlásenie:
25
w
tamamen kendi sorumluluğunda olmak üzere bu bildirinin ilgili olduğu klima modellerinin aşağıdaki gibi olduğunu beyan eder:
01
**
Daikin Europe N.V. is authorised to compile the Technical Construction File.
02
**
Daikin Europe N.V. hat die Berechtigung die Technische Konstruktionsakte zusammenzustellen.
03
**
Daikin Europe N.V. est autorisé à compiler le Dossier de Constr
uction Technique.
04
**
Daikin Europe N.V. is bevoegd om het Technisch Constr
uctiedossier samen te stellen.
05
**
Daikin Europe N.V. está autorizado a compilar el Archiv
o de Construcción Técnica.
06
**
Daikin Europe N.V. è autorizzata a redigere il File
Tecnico di Costruzione.
07
**
∏ Daikin Europe N.V. Â›Ó·È ÂÍÔ˘ÛÈÔ‰ÔÙË̤ÓË Ó· Û˘ÓÙ¿ÍÂÈ ÙÔÓ Δ¯ÓÈÎfi Ê¿ÎÂÏÔ Î·Ù·Û΢‹˜.
08
**
A Daikin Europe N.V. está autorizada a compilar a documentação técnica de f
abrico.
09
**
Компания Daikin Europe N.V. уполномочена составить Комплект технической документации.
10
**
Daikin Europe N.V. er autoriseret til at udarbejde de teknisk
e konstruktionsdata.
11
**
Daikin Europe N.V. är bemyndigade att sammanställa den tekniska k
onstruktionsfilen.
12
**
Daikin Europe N.V. har tillatelse til å kompilere den
Tekniske konstruksjonsfilen.
13
**
Daikin Europe N.V. on valtuutettu laatimaan Teknisen asiakirjan.
14
**
Společnost Daikin Europe N.V. má oprávnění ke kompilaci souboru technické konstrukce.
15
**
Daikin Europe N.V. je ovlašten za izradu Datoteke o tehničkoj konstrukciji.
16
**
A Daikin Europe N.V. jogosult a műszaki konstrukciós dokumentáció összeállítására.
17
**
Daikin Europe N.V. ma upoważnienie do zbierania i opracowywania dokumentacji konstrukcyjnej.
18
**
Daikin Europe N.V. este autorizat să compileze Dosarul tehnic de construcţie.
19
**
Daikin Europe N.V. je pooblaščen za sestavo datoteke s tehnično mapo.
20
**
Daikin Europe N.V. on volitatud koostama tehnilist dokumentatsiooni.
21
**
Daikin Europe N.V. е оторизирана да състави Акта за техническа конструкция.
22
**
Daikin Europe N.V. yra įgaliota sudaryti šį techninės konstrukcijos failą.
23
**
Daikin Europe N.V. ir autorizēts sastādīt tehnisko dokumentāciju.
24
**
Spoločnosť Daikin Europe N.V. je oprávnená vytvoriť súbor technickej konštrukcie.
25
**
Daikin Europe N.V. Teknik Yapı Dosyasını derlemeye yetkilidir
.
Machinery 2006/42/EC
Electromagnetic Compatibility 2004/108/EC
**
*
EN60335-2-40,
ACQ71AV1, ACQ100AV1, ACQ125AV1,


Zandvoordestraat 300, B-8400 Oostende, Belgium
In the event that there is any confl ict in the interpretation of this manual and any translation of the same in any language,
the English version of this manual shall prevail.
The manufacturer reserves the right to revise any of the specifi cation and design contain herein at any time without prior
notifi cation.
En cas de désaccord sur l’interprétation de ce manuel ou une de ses traductions, la version anglaise fera autorité.
Le fabriquant se réserve le droit de modifi er à tout moment et sans préavis la conception et les caractéristiques techniques
des appareils présentés dans ce manuel.
Im Falle einer widersprüchlichen Auslegung der vorliegenden Anleitung bzw. einer ihrer Übersetzungen gilt die Ausführung
in Englisch.
Änderungen von Design und technischen Merkmalen der in dieser Anleitung beschriebenen Geräte bleiben dem Hersteller
jederzeit vorbehalten.
In het geval dat een versie van deze handleiding in vertaling anders kan worden geïnterpreteerd dan de Engelse versie,
geldt de Engelse versie.
De fabrikant behoudt zich het recht voor specifi caties en ontwerpkenmerken die in dezes worden vermeld, te allen tijde te
herzien zonder voorafgaande kennisgeving.
En caso de confl icto en la interpretación de este manual, y en su traducción a cualquier idioma, prevalecerá la versión
inglesa.
El fabricante se reserva el derecho a modifi car cualquiera de las especifi caciones y diseños contenidos en el presente
manual en cualquier momento y sin notifi cación previa.
В случае противоречия перевода данного руководства с другими переводами одного и того же текста, английский
вариант рассматривается как приоритетный.
Завод-изготовитель оставляет за собой право изменять характеристики и конструкцию в любое время без
предварительного уведомления.
Bu k›lavuzun anlafl›lmas›nda bir çat›flma oldu¤unda ve farkl› dillerdeki tercümeler farkl›l›k gösterdi¤inde, bu k›lavuzun
‹ngilizce sürümü üstün tutulacakt›r.
Üretici burada bulunan herhangi teknik özellikleri ve tasar›mlar› herhangi bir zamanda ve önceden haber vermeden de¤ifltirme
hakk›n› sakl› tutar.
Σε περίπτωση διαφορών μεταξύ του εγχειριδίου αυτού και τυχόν μετάφρασής του σε οποιαδήποτε γλώσσα, υπερισχύει η Αγγλική
Σε περίπτωση διαφορών μεταξύ του εγχειριδίου αυτού και τυχόν μετάφρασής του σε οποιαδήποτε γλώσσα, υπερισχύει η Αγγλική
έκδοση αυτού του εγχειριδίου.
έκδοση αυτού του εγχειριδίου.
Ο κατασκευαστής διατηρεί το δικαίωμα αναθεώρησης των προδιαγραφών και σχεδίων που περιέχονται στο παρόν οποιαδήποτε
Ο κατασκευαστής διατηρεί το δικαίωμα αναθεώρησης των προδιαγραφών και σχεδίων που περιέχονται στο παρόν οποιαδήποτε
στιγμή χωρίς προηγούμενη ειδοποίηση.
στιγμή χωρίς προηγούμενη ειδοποίηση.
A versão em inglês do Manual prevalecerá na eventualidade de qualquer confl ito na interpretação deste Manual e de
qualquer tradução do mesmo.
O fabricante reserva-se o direito de rever qualquer uma das especifi cações e concepção/design aqui contido a qualquer
altura sem aviso prévio.
•
•
•
•
•
•
•
•
•
•
•
•
•
•
•
•
•
•
 Loading...