

Page 1

Quick Reference
Quick Reference
This Quick Reference section is a duplication of the
Voq Pocket Reference Guide
that you received with your Voq
phone and is included here for your convenience.
To... Follow these instructions...
Change input modes Press * (asterisk key). This applies to text
fields only. Press and hold for menu.
Type a space Press # (pound key).
Type punctuation Press the
1 key repeatedly.
To... Follow these instructions...
Turn On/Off the phone Press and hold the Power button.
Lock the keypad
Press and hold .
Unlock the keypad
Unlock > #. Enter password if
Keypad text input
On and Off
To... Follow these instructions...
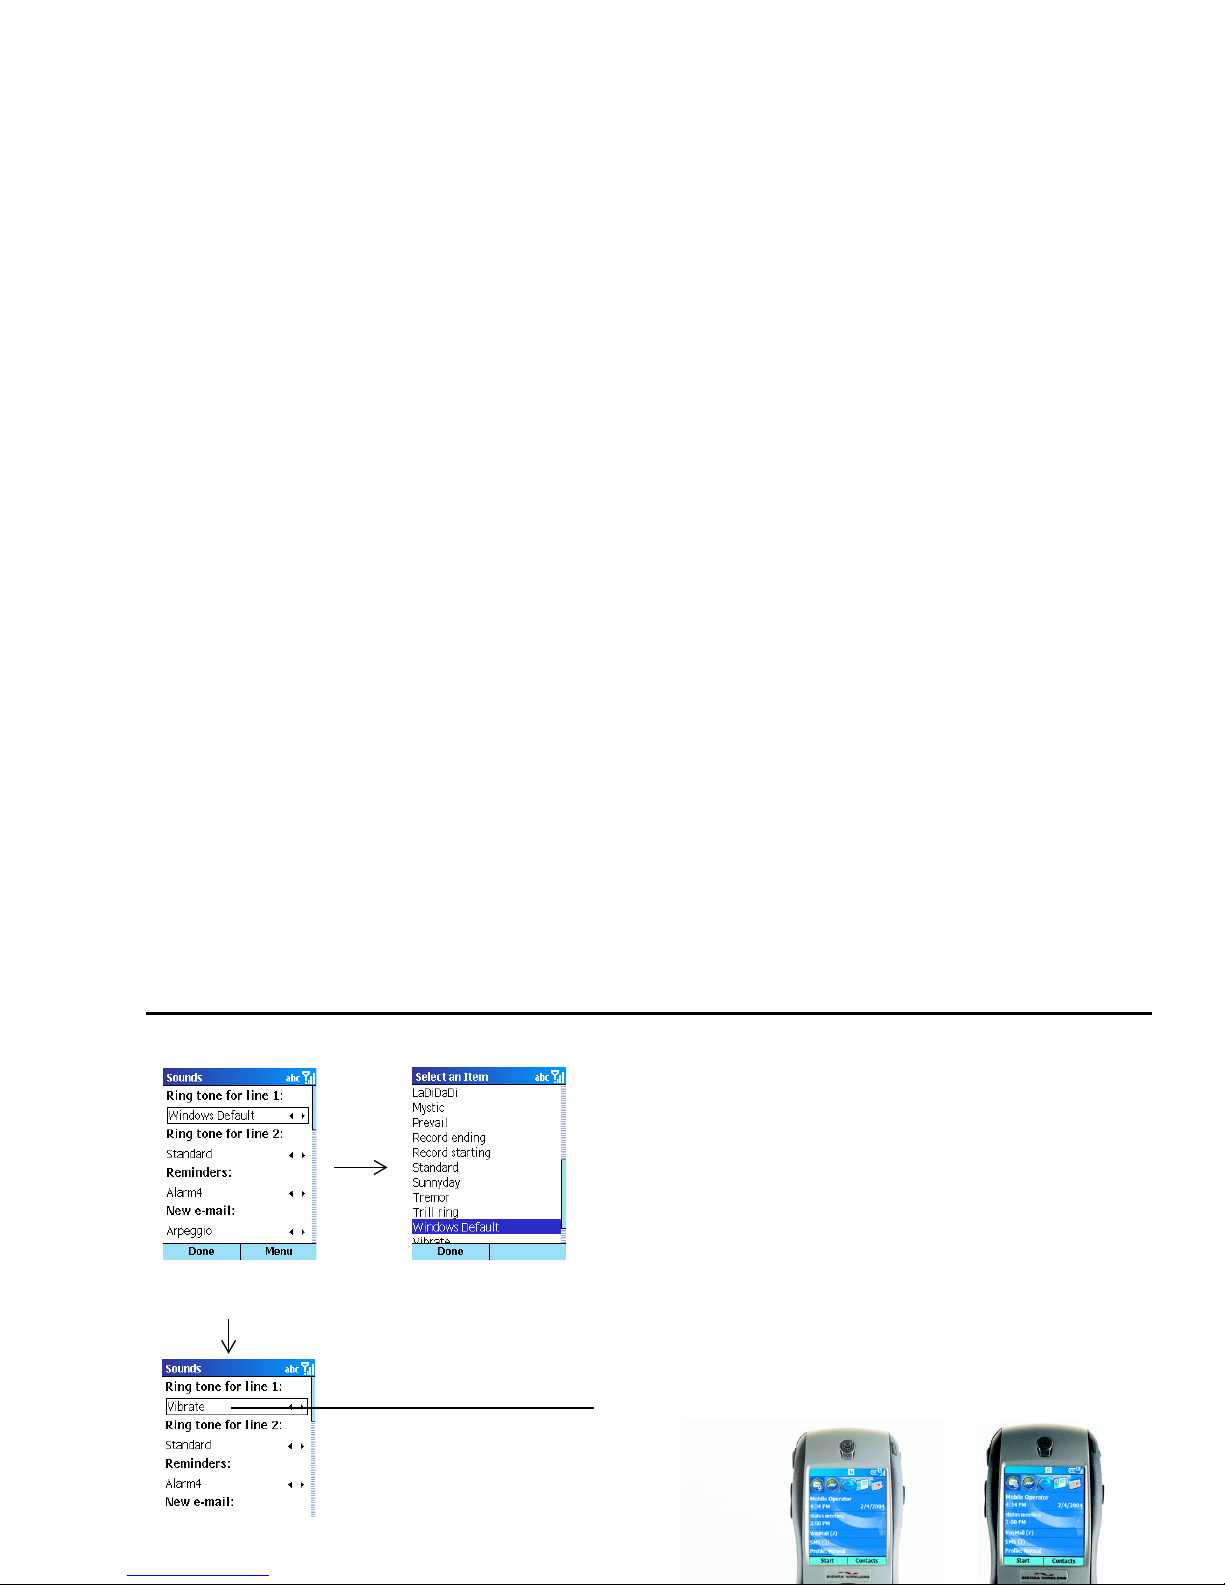
Change the ring sound
Start > Settings > Sounds >
Ring tone.
Change to vibration alert Start > Settings > Sounds >
Ring tone > Vibrate.
Choose/edit an alert
profile
Start > Settings > Profiles.
Set the time and date
Start > Settings > More > Date and
Time.
Set the alarm clock
Start > Settings > More > Date and
Time > Alarm > Alarm Time.
Change the Home
screen
Start > Settings > Home Screen.
Change backlight time
out
Start > Settings > More > Power
Management > Backlight battery
time out.
Page 2

Voq User Guide
To... Follow these instructions...
Display month view Start > Calendar > Menu > Month
View.
To... Follow these instructions...
Make a call
• Dial number > Press . Or...
• Open thumbpad or press
> Start typing name > Select contact
> Press . Or...
•
Contacts > Select contact > Press
.
Redial
Press twice.
Receive a call
Press or
Accept.
End a call
Press .
Call voice mail Press and hold the
1 key.
Call speed dial number Press and hold the speed dial key for the
contact.
Add a speed dial
(Add person to Contacts list first.)
V
oice Calls
To... Follow these instructions...
Change default
number for a contact
Contacts > Select contact >
Move joystick left or right.
Assign special ring to a
contact
Contacts > Select contact> Press joystick
>
Edit > Scroll down to Custom Ring
Tone > Done.
Put a caller on Hold
Menu > Hold.
Activate call on Hold
Menu > Unhold.
View previous calls
Start > Call History.
Make a conference call 1 Call the first person. Press Hold.
2 Call the second person while first is
on hold.
3 When the second person answers,
the screen displays Conference.
Press the joystick.
4 Repeat steps to add more people.
Forward calls
Start > Settings > Phone > Call
Forwarding > Choose when to forward
calls > Check
Enable call forwarding
when... > Enter number > Done.
Turn On speakerphone
Press and hold for two seconds during a
call.
Page 3

Quick Reference
The instructions below assume that the myVoq screen is displayed. To
display the myVoq screen, flip open the thumbpad when you are in the
Home screen or press .
To... Follow these instructions...
Configure your e-mail
(VoqMail Personal and
VoqMail Professional)
Start > More > VoqMail Settings >
Setup & Test Wizard > Follow wizard
instructions > Press
Next or Previous
to move from screen to screen >
Finish.
Read your messages
Start > Inbox > Move joystick to
select inbox.
Configure how often Voq
checks server for e-mail
Start > More > VoqMail Settings >
Schedule Settings > Basic.
Manually check for
messages
Start > Inbox > Menu > Send/
Receive.
To... Follow these instructions...
Make a call Type phone number > Send.
E-mail
myVoqTM (incl. sending e-mail and SMS)
To... Follow these instructions...
Send an SMS message • Type phone number > Send
SMS. Or...
• Type Contact name >
Send
SMS. Or...
• Type GAL recipient’s name >
Send SMS. Or...
• Type message > Send SMS >
select Contact >
Send.
Write a note
Type note >
Note l [Save As...] >
Save.
Add text to a note Type text > Highlight
Notes > Menu >
Append Note.
Edit a note Type name of note > Highlight note >
Edit.
Send a note
Type name of note > Highlight note >
Menu > Send Email or Send SMS >
Enter address/number
> Send.
Edit Contact notes Type contact name >
Menu > Notes.
View a file or hear a sound Type file name > Highlight file > Press
joystick.
Repeat the last action Press the joystick to open History. Press
Page 4

Voq User Guide
VoqMail Pro is an optional upgrade to the VoqMail Personal e-mail
application that lets you seamlessly connect to your work e-mail via a
secure VPN, and includes other advanced features.
To... Follow these instructions...
Change custom alert
settings
Start > More > VoqMail Settings >
Alert Settings > Select alert level to
change >
Edit.
Add a custom alert to a
contact
(Person must be in Contacts list with email address.)
Start > More > VoqMail Settings >
Contact Alerts > Add > Select a
contact >
Add.
Add a custom alert to a
keyword in message title
Start > More > VoqMail Settings >
Keyword Alerts > New > Enter
keyword and priority >
Done.
V
oqMailTM Professional Edition
To... Follow these instructions...
Play a song from the
playlist
Start > More > Windows Media >
Scroll to the file to play >
Play.
Skip to:
Beginning of current file
Beginning of previous file
Next file on playlist
Move joystick to the left
Move joystick to the left twice
Move joystick to the right
Change playback settings
Start > More > Windows Media >
Menu > Settings > Set volume or
other settings >
Done.
Play a streaming media
file
Open the thumbpad or press
> Begin typing URL > Select URL >
Go.
Play a game
Start > More > Games > Select
game.
Music and Games
Page 5

Contents
1 Quick Reference
Getting Started
8 What’s in the box?
8 Getting up and running
Knowing Your Phone
14 The Voq Professional Phone
TM
15 Flip-open QWERTY thumbpad
16 Home screen
16 myVoq
TM
screen
16 Keypad
17 Joystick
17 Keys and buttons
19 Programs
Making and Answering Calls
34 Making calls
36 Voice dialing
40 Answering calls
42 Reviewing calls
Managing Your Personal Information
46 Managing your contacts
50 Using the calendar
51 Using tasks
52 Writing notes
E-mail and Messaging
56 Choosing your e-mail
58 VoqMail
TM
software
Page 6

Voq User Guide
81 Getting started
84 Synchronizing remotely
Configuring Your Phone
88 Phone
90 Sounds
91 Profiles
91 Home screen
92 About
92 Accessibility
93 Beam
93 Certificates
93 Data connections
98 Date and time
99 Owner information
99 Power management
Browsing the Internet
106 Browsing the Internet
108 Customizing Internet Explorer
Playing Music, Games, and More
110 Playing audio or video files
112 Playing Java applications
114 About myVoqTag indexes
114 Playing Solitaire
114 Playing Mount Voq
115 Using the calculator
116 Recording voice notes or memos
117 Adding programs
118 Removing programs
Voq Accessories
Page 7

1
Getting Started
What’s in the box?
Getting up and running
Page 8

Voq User Guide
What’s in the box?
Your box contains the following:
• Voq
TM
handset
• Battery
• AC adapter/charger
• Mono headset
• Synchronization cable
• Companion CD
• Documentation:
· Voq Pocket Reference
· Voq User Guide (this guide)
· Getting Started/Accessories fold-out
· Warranty and End-user License booklet
If any items are missing, please contact your Voq
dealer.
Getting up and running
1 Insert your SIM card
Your service provider will provide you with a SIM
(Subscriber Information Module) card that contains all
your account information. Your phone cannot function
without this card.
Note: To browse the Internet and
use e-mail on your Voq phone, your SIM card must be
GPRS enabled. To use VoqMail
TM
Professional Edition,
your SIM card must be VPN enabled.
To install your SIM card:
1 Remove the SIM card from its packaging.
2 Lay the phone face down with the battery
removed.
3 Position the SIM card with the gold contacts
down and line it up with the SIM card outline on
the phone. The cut corner of the card should
point towards the center of the phone.
Page 9

Getting Started
2 Install the battery
You cannot operate the phone without the battery even
if the phone is attached to the AC adapter.
1 Insert the battery, bottom end first, into the
opening on the back of the phone.
2 Lower the battery to the phone. Press the top of
the battery until it clicks into place.
3 Charge the battery
Charge the battery for a minimum of 12 hours the first
time. You can use the phone while the battery is
charging. If the battery is totally discharged when you
plug in the AC adapter, it takes several minutes for the
phone to start up. This is normal and ensures that the
phone has sufficient power for reliable operation.
1 Plug the lead from the AC adapter into the bottom
of the phone.
2 Insert the AC adapter plug into a power outlet. If
Page 10

Voq User Guide
5 Make a call
Try out your new phone by making a phone call or by
calling your voicemail box, if you have one.
6 Send an SMS
1 Flip open the QWERTY thumbpad. When you do,
the phone displays the myVoq screen.
1) Turn on
the phone.
2) Dial the
number.
4) To end,
press the red
button.
3) Press the
green
button.
Page 11

Getting Started
7 Set up synchronization
You can synchronize your E-mail, Contacts, Calendar,
and Tasks so that the information on your phone and
your desktop PC is the same and up to date. To do this
you must install Microsoft
®
ActiveSync® and VoqTM
Desktop Tools onto your desktop PC.
To install the software, insert the Voq companion CD
into the CD-ROM drive of your PC. On the Getting
Started window, click
Start Here and follow the
instructions.
8 Top ten things to do next!
The Voq phone is an exciting new device that combines
a phone, a PDA, and a messaging device in one. Try
out these other key Voq features:
• Set up your e-mail. See Choosing your e-mail,
page 56.
• Add contacts and make a call from your contacts
list. See Managing your contacts, page 46.
• Learn about myVoq. See About myVoq, page 27.
• Browse the Web. See Browsing the Internet,
page 106.
• Wirelessly sync your calendar to Microsoft
Exchange 2003. See Synchronize your calendar
wirelessly, page 85.
• Play a song from an SD card. See Play a media
file from an SD card, page 31.
Page 12

Voq User Guide
Page 13

2
Knowing Your
Phone
The VoqTM Professional Phone
Flip-open QWERTY thumbpad
Home screen
myVoqTM screen
Joystick
Keys and buttons
Programs
Status icons
Page 14

Voq User Guide
The Voq Professional PhoneTM
Congratulations! Your new Voq phone will change the
way you communicate. This innovative phone puts the
best of wireless technology in the palm of your hand—
make calls, send e-mail and SMS messages, browse
the Internet, and manage your calendar. For a person
on the go, it’s everything you need and more.
Handset speaker
Color display
Soft key
End button (red)
On/Off button
Joystick
Soft key
Talk button (green)
Volume control
Infrared port
SD card slot
Record/voice dial button
Headset connector
LED indicator
Page 15

Knowing Your Phone
Flip-open QWERTY thumbpad
The Voq phone has a remarkable flip-open QWERTY
thumbpad that lets you create text messages and
e-mails using a full-featured keyboard. To use the
thumbpad, just flip it open and start typing. It’s that
simple. When in the Home screen or on a call, opening
the thumbpad launches the myVoq screen.
Shift key
Backspace key
Number keys
Shift key
Number keys
Return key
Letter keys
Press the Shift key twice to invoke shift lock. The next
key you press will be in uppercase.
You can cut, copy and paste just like on a PC keyboard.
To select text, press and hold the Shift key, then move
the joystick left or right. To cut, copy, or paste, press
the function key, then
x (cut), c (copy), or v (paste).
Page 16
Voq User Guide
Home screen
The Home screen is what you see when you first turn
on your phone. You can change the background
images and colors of your Home screen to suit you.
You can even download your own images. For more
information on customizing your display, see “Home
screen” on page 91.
The Home screen is the starting point for many tasks.
Scroll to any area on the Home screen and press the
joystick to start the application.
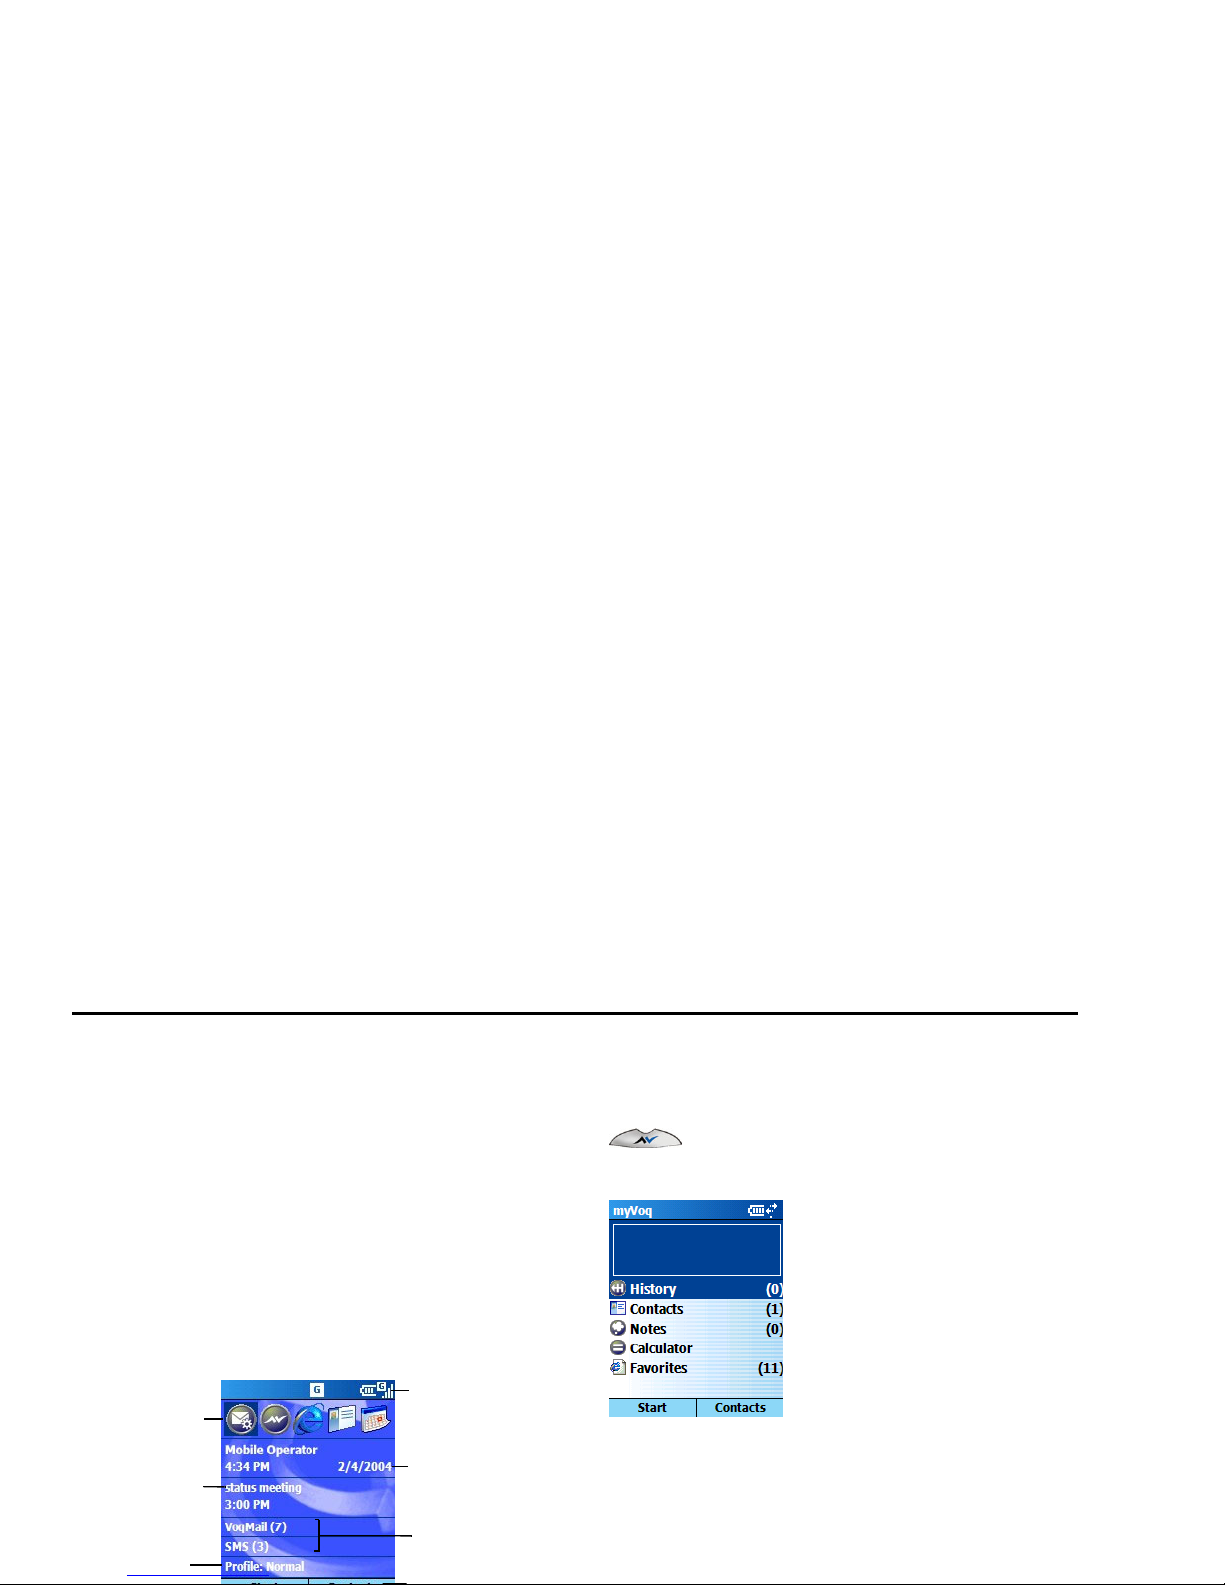
myVoqTM screen
The myVoq screen is what you see when you press
or flip open the thumbpad from the Home
screen or during a call.
The myVoq program powers the thumbpad and
activates the phone’s advanced search, store, and
send capabilities. Use myVoq to:
• Easily send an SMS or e-mail
• Quickly find information stored on your phone
Recently used
programs
Time and date
Next
Appointment
Messages
Current soft
Status icons
Ring profile
Page 17

Knowing Your Phone
Joystick
In the center of the phone is the joystick. You use it to
move around the screens and select the items you
want. The joystick moves in five directions: left, right,
up, down, and in.
When you press the joystick in, it works like the Enter
key on a keyboard, or like a left mouse click. It
confirms your selection and starts an action.
Keys and buttons
Talk button
End button
• Ends voice or data calls.
• Ends the active call when you are on a
conference call, or when you have another call on
hold.
• Locks the keypad when you press and hold the
button.
Home button
• Displays the Home screen leaving other
applications open.
myVoq button
• Launches myVoq with the thumbpad closed.
• Activates the phone’s advanced search, store,
and send capabilities.
• Clears any text and returns you to the myVoq
Page 18

Voq User Guide
Soft keys
The phone has two keys located directly below the
display. Each key performs the command displayed
above the key. The command changes depending on
the screen.
On many screens, the right soft key is called
Menu.
The Menu soft key lists options that are relevant to
what your are doing. It is a good idea to press
Menu to
check out the many options available to you.
Power button
• Turns the phone on and off when you press and
hold.
To change the ringer volume, press
Start > Settings
> Profiles
, then change the settings for the profile you
are using.
Record/Voice Dial button
• Turns voice dialing on when when you press and
hold. See “Voice dialing” on page 36.
• Turns the voice memo recording function on
when you press once. See “Recording voice
notes or memos” on page 116.
LED indicator
• When the phone is cradled or connected to the
AC adapter, red indicates the battery is charging.
• When the phone is cradled or connected to the
AC adapter, green indicates the battery is fully
charged.
• When the screen saver turns off the display,
blinking green indicates the phone is on.
Soft key
Command
Command
Soft key
Page 19

Knowing Your Phone
• Displays a character map when you press and
hold the key in a text field.
Programs
Your phone comes with a number of installed
applications as shown below. To access these
applications, press
Start.
Inbox/SMS
Read, write, and send e-mail and SMS messages.
VoqMail
Set customized alerts for incoming mail. Configure rapid, low-bandwidth, battery-saving
mail reception and delivery.
Contacts
Quickly find who you are looking for.
myVoq
Activate the thumbpad and the phone’s powerful search, store, and save capabilities.
MSN Messenger
Send and receive instant messages to and from
your friends and colleagues.
Pocket MSN
Sign up for Microsoft’s offering of online services.
Settings
Change the way the phone looks and behaves
to suit you.
ActiveSync
Keep the information on your phone and your
PC up to date.
Speed Dial
View and set up numeric shortcuts for impor-
Page 20

Voq User Guide
Status icons
The phone displays a row of small icons across the top
of the Home screen that provide information about the
status of the phone, incoming calls, and messages.
Windows Media
Play music/video clips. Listen to Internet radio.
myVoq Calculator
A calculator that keeps a running tab of what
you type. Use it to quickly divide up the restaurant bill, including tip and taxes.
Infrared
Beam information to/from other phones and
laptops using infrared (Accessories folder).
Mount Voq
Climb Mount Voq with this challenging thumbpad typing game (Games folder).
Solitaire
Pass the time playing this well-known card
game (Games folder).
Jawbreaker
Pass the time playing this challenging new
New e-mail or SMS Call forwarding
New voicemail. Press
1 to retrieve.
Call on hold
Ringer off Missed call
Battery charging New instant message
Voice call in progress Battery level
Data call in progress Low battery
Signal strength No battery
No signal Sync error
Page 21

3
The Basics
Turning your phone on and off Using the Quick List
Locking/unlocking the keypad About text input modes
Setting the time and date Entering text and numbers
Setting the backlight timer Navigating menus with
numbers
Setting the screensaver timer About myVoq
Setting your voicemail number Using Secure Digital (SD) cards
Setting number, time, and
currency formats
Managing Memory
Page 22

Voq User Guide
Turning your phone on and off
To turn your phone On, press and hold the Power
button on the top right side of the phone.
To turn your phone Off, momentarily press the power
button to display the Quick List, then select Power Off.
If you remove the battery without turning off the phone,
you will not lose personal data such as contacts,
calendar, tasks, and saved notes. You will lose any
unsaved data in forms or notes as well as the state of
suspended games.
Locking/unlocking the keypad
You can also set up a password for your phone. For
more information, see “Phone lock” on page 102.
Setting the time and date
Note: Your phone needs the correct date and time to
ensure that your calendar and inbox work properly. For
example, alarms will not occur at the expected times,
and messages may not load correctly into your
mailbox. Some service provider networks automatically
set the date and time. If not, set them manually.
To set the date and time.
1 Press
Start > Settings > More > Date and
Time
.
2 Set your time zone, date and time, and the alarm
clock if you wish.
3 Press
Done when you have finished.
To change from AM to PM or vice versa, highlight
AM
or
PM in the Time or the Alarm field, then press any
Caution: if you press and hold the power button to
turn off the phone, you could lose important
settings. Always turn the phone off using the Quick
List.
Page 23

The Basics
Setting the backlight timer
The Home screen goes dark after a period of inactivity
to save battery life. As soon as you press a key, the
backlight comes back on. The simplest way to turn the
light on again without entering a number or a letter is
to press .
To set how long the backlight timer stays on, press
Start > Settings > More > Power Management.
You can also set the timeout when the phone is
plugged into the AC adapter.
Setting the screensaver timer
You can set up a screensaver or have the Home screen
display turn off to save battery life. When the screen
saver turns off the display, the
LED indicator on the
top right-hand side of the phone blinks green
periodically to indicate that the phone is on.
Setting your voicemail number
The number 1 on your keypad is reserved as a speed
dial shortcut to your voicemail.
To change or set your voicemail number:
1 Press
Start > Settings > Phone >
Call Options
.
2 Scroll to
Voice Mail number. Enter the number.
3 Press
Done. The phone dials this number when
you press and hold the
1 key.
Setting number, time, and currency
formats
Number, time, and currency formats can vary
depending on where you live. To change how numbers
and dates appear on the screen:
1 Press
Start > Settings > More > Regional
Settings
.
Page 24

Voq User Guide
Using the Quick List
Use the Quick List to perform common actions quickly.
To display the Quick List:
1 When the phone is on, momentarily press the
Power button.
2 Scroll to a command and press the joystick. The
list items are:
Note: When the battery is very low, your phone may
automatically revert to
Flight Mode to conserve
battery power. Once you charge the battery, use the
Quick List to turn flight mode off (momentarily press
the power button, then select
Flight mode off).
Entering text and numbers
The simplest way to enter text and numbers is using
the flip-open thumbpad. For a list of keystrokes to
display special characters, see “QWERTY thumbpad
key strokes” on page 130.
About text input modes
You can choose from several different input modes
when you enter text or numbers.
Power off Turn off the phone safely.
Flight mode Turn the radio on or off (e.g. to play
a game on an airplane). You cannot
make or receive calls and messages
but you can use other features.
Key lock Lock the keypad.
Device lock Turn on password protection after a
period of inactivity.
Profile
Choose a set of ring tone and
Input Mode Icon Press Get
Page 25

The Basics
Note: When entering text in an SMS or e-mail field, the
phone automatically capitalizes the first word of a
sentence and after a period. Pressing shift or * again
enables Caps lock.
To choose an input mode (in a text field):
1 On the
keypad–press the * key repeatedly or
press and hold the
* key until the menu appears.
If you display a menu, select the input mode from
the list.
Predictive text (eZiTap mode)
When you type using the keypad, the phone can predict
and displays word before all letters are pressed.
To enable predictive text or eZi mode, press and hold
the
* key, then choose eZiTap English.
Use the following keys on the keypad when in eZi
mode.
Multipress. All
lowercase.
abc 2
22
222
a
b
c
Numeric. All numbers. 123 222 222
Predictive text. See
below. (Keypad only.)
Ezi
eZi
EZI
2
22
222
A
b
C
Select word.
Delete.
Select caps mode.
Space.
P&H: Display
characters.
P&H = Press
and Hold
Page 26
Voq User Guide
continue typing. You can also press the 0 key to see
other word candidates.
In
Multiple Candidates mode, the phone displays
several word candidates at the bottom of the display.
To select a word, press the number “
0” key to
highlight the word in yellow, then press the joystick in.
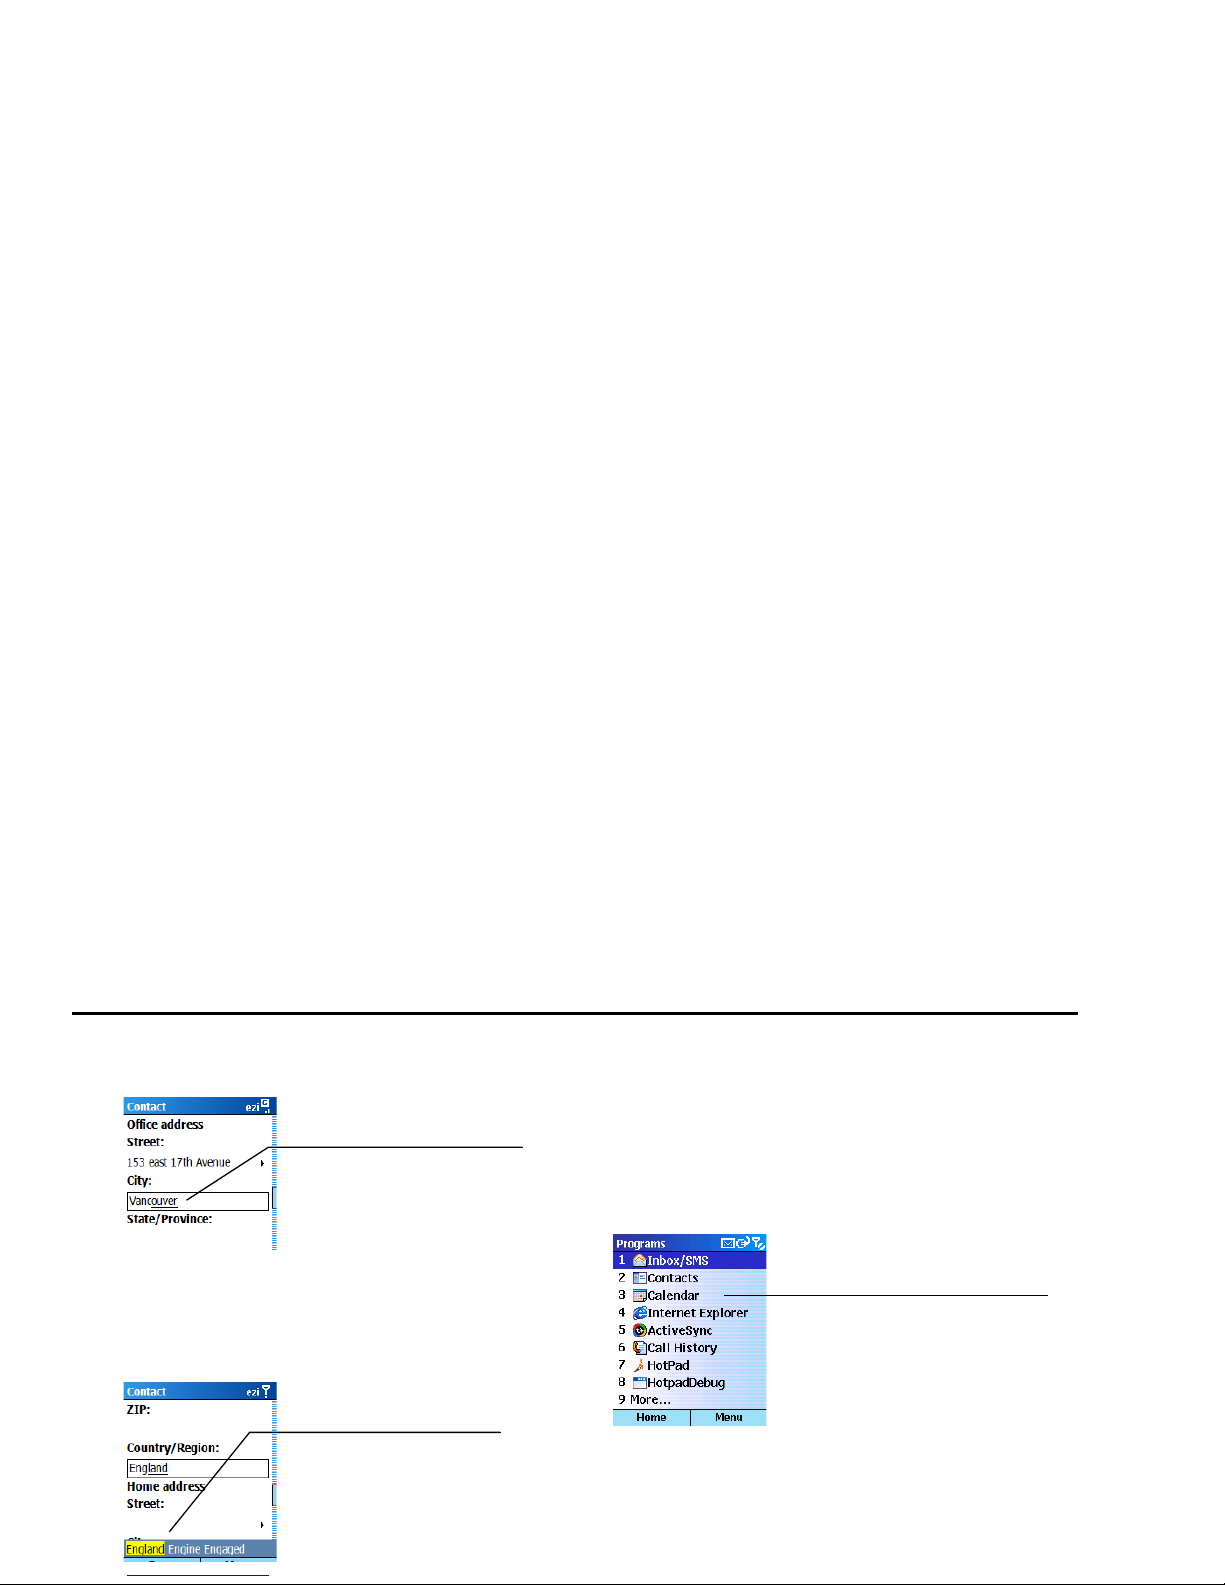
Navigating menus with numbers
Many menus provide numeric shortcuts to save
scrolling and keystrokes. When you see a number
beside an item in a list, press the corresponding
number on the keypad or the thumbpad to select the
item.
Navigating with the joystick
The joystick can help you navigate and select
information quickly. For example, if you are changing
the ring tone for your phone (
Start > Settings >
To select the underlined
word in “inline” mode,
simple press the joystick in.
To select one of the words
shown, press the
0 key,
then press the joystick in.
To open your Calendar, press 3
on the keypad or the thumbpad.
Page 27
The Basics
thumbpad, the phone immediately returns a list
of entries where the letters appear.
• Reduces the frustration of text entry dramatically.
In addition to powering a full keyboard, the
"Send" capability further reduces the number of
keystrokes you need to send messages.
For a quick overview of what you can do with myVoq,
see the Quick Reference “myVoqTM (incl. sending e-
mail and SMS)” on page 3.
Starting myVoq
myVoq starts when you flip open the thumbpad or
press the myVoq button just below the joystick.
Joystick
left or right
In
Joystick
As you move the joystick left
or right, you change the
information in the field.
Page 28

Voq User Guide
The default myVoq home screen looks like this.
The myVoq screen displays a list of the default
categories shipped with the phone. These are:
•
History–a record of each of the actions you
have previously taken. This allows for the easy
"recall" of a commonly executed task.
•
Contacts–your address book, synchronized
with your PC. You can search for the first name,
last name, and company name fields.
•
Notes–a note pad program that allows you to
Searching
The myVoq program provides powerful search
capabilities that check applications and categories at
the same time.
Note: When the thumbpad is closed, myVoq uses 0-9
to find alphabetic names. When the thumbpad is open,
myVoq uses the actual keyboard letters.
To search, start typing. As you type, the program
compares the letters, numbers, or characters you type
with data in many of the applications listed on the
phone, not just the Contacts list.
For example, myVoq automatically checks your notes
or stock lists if you have any. To narrow the search you
can type two letters separated by a space. myVoq will
find entries that have at least two words that start with
the letters.
Matches appear below the text area in two columns.
Text input
area.
Categories
Count of items in
each category.
Page 29

The Basics
• To view all matches for a category, highlight the
category in the left-hand column, then press the
joystick or press
View.
• To view an item, highlight it in the right-hand
column, then press the joystick, or press
View.
• To clear the myVoq text input area, press and
hold the myVoq button.
Search contact fields
You can search for first name, last name, company
name, and default phone number in a contact record.
myVoq searches for default phone numbers only.
For example, here is a search using a person’s
company name.
Storing and sending
The myVoq program allows you to type text and save it
as a Note, or even as a Contact record.
You can also decide to send the note as an SMS or an
e-mail message by pressing
Menu and selecting Send
as E-mail
or Send as SMS.
Service Messages
A service message is normal and provides information
about the status of your phone or the wireless network.
If you receive a service message on the home screen,
scroll to the message and press the joystick to find out
more information.
Page 30

Voq User Guide
Using Secure Digital (SD) cards
An SD storage card is a stamp-sized flash memory
card that comes in a variety of storage capacities. The
Voq phone can access information such as music or
contacts or e-mail attachments stored on an SD card.
Note: The Voq phone ships with a dummy SD card to
protect the phone from dust and debris. You must
remove this card before inserting your own SD card.
To insert an SD card:
1 Position the card with the contacts facing down
and the cut corner of the card facing the phone.
Copying files to an SD card
You can copy files such as MP3 and other media files
to an SD card and play them on your phone.
To copy a file to an SD card:
1 Insert an SD card into your phone.
2 Connect the phone to your desktop PC using the
sync cable or the cradle.
3 On your PC, copy the file you want. The file
format must be .wav, .mp3, or .wma.
4 From your desktop PC, start ActiveSync.
5 On the ActiveSync main window:
a Click the
Explore button.
b Double-click
My Smartphone
c Double-click Storage Card.
Note: The Storage Card folder appears only if
you inserted an SD card into the phone.
Page 31

The Basics
6 Paste the sound file into the Storage card folder
or create a new folder under Storage card if you
wish.
Play a media file from an SD card
You cannot use myVoq to search for a song or a media
file. To play a media file, simply start Windows Media
Player by pressing
Start > More > Window Media.
The media file appears automatically in the PlayList.
Copying files to your phone
You can copy various media files, such as a new
background or a new ring tone, to your phone. Store
large files such as .mp3 files on an SD card rather than
directly on your phone. See “Copying files to an SD
card” on page 30.
To copy a file to your phone:
5 Paste the file into the appropriate folder:
· Store background pictures in
\Home.
· Store ring tones in
\Sounds.
· Store small photos or documents in
\My Documents.
Managing Memory
Your Voq Professional Phone has ample memory for
Page 32

Voq User Guide
Page 33

4
Making and
Answering Calls
Making calls
Voice dialing
Answering calls
Reviewing calls
Page 34

Voq User Guide
Making calls
There are many ways to make a call. The simplest is to
dial the number and press . To end a call, press .
When you press , a call progress tone indicates that
the phone is actively setting up your voice connection.
What you see when you dial
When you dial a number using the keypad, the phone
matches what you type with the information stored in
your Contacts list. For example, if you type 3, you
might see a list of contacts that start with the letter
E.
This is because the number 3 also corresponds to the
letter E. The fields included in the basic contact search
are first name and last name.
Make a call from the Contacts list
To make a call from the Contacts list, you can:
• Use the thumbpad
• Use the keypad
• Use the joystick
Find a contact/make a call using the
thumbpad
The easiest way to find a contact, particularly in a long
list, is to use the thumbpad.
1 Open the thumbpad.
2 Type the contact’s first name, last name, or
company name as listed in the contact record.
As you type, myVoq displays all possible matches
for the letter or number combinations. The more
you type, the more the search narrows.
3 If you see the contact name displayed, select the
name using the joystick, then press . The
On the keypad, the number 3
also corresponds to the letters
Page 35

Making and Answering Calls
3 When you see the name you want, highlight it,
then Press to dial the default number for this
contact. To call a different number for this
contact, move the joystick left or right, then press
, or press the joystick in.
Find a contact/make a call using the joystick
1 Press Contacts.
2 Use the joystick to scroll to the person you want
to call.
3 Press . The phone dials the default number for
the contact.
Assign a different default phone number to a
contact
To change the default number for a contact:
1 Press
Contacts to display the Contacts list.
2 Scroll to the contact.
Make a call using recently dialed numbers
1 On the Home screen, press . The phone
displays a list of recently dialed numbers.
2 Select the name or number to call, then press the
joystick.
Redial the last number called
Press twice with no numbers entered.
Make a call from Call History
The Call History list displays the last 25 calls you made,
received, and missed.
1 Press
Start > Call History.
2 Select a name or number to call, then press .
Make a call from an e-mail or SMS hyperlink
If you receive a text message with an underlined
Page 36

Voq User Guide
Make a conference call
Up to 10 people can participate in the same conference
call but your service provider may limit this number.
To make a conference call:
1 Call the first person.
2 Press
Hold.
3 Call the second person, while the first is on hold.
4 When the second person answers, the screen
displays
Conference. Press the joystick.
5 To add more people, repeat steps 2 to 4.
Speed dialing
Speed dial shortcuts allow you to press and hold a
single key or two keys on the keypad to make a call.
To make a call using a speed dial shortcut:
• If the speed dial number has a single digit (0-9),
press and hold the key.
from 2 to 99. The number 1 is reserved for your
voicemail.
To add a person or number to your Contacts list first.
See “Adding Contacts” on page 46.
To create a speed dial shortcut:
1 Press
Contacts, then select a name on the list.
2 On the Contact screen, highlight a phone
number, e-mail address, or web page, then press
Menu > Add Speed Dial.
3 On the Add Speed Dial screen, enter the keypad
assignment, then press
Done.
To view your speed dial shortcuts.
Press Start > More > Speed Dial.
Voice dialing
You can program your phone to dial numbers or call a
Page 37

Making and Answering Calls
You cannot manage your voice tags by pressing
Contacts on the Home screen.
Voice dialing modes
Voice dialing has three modes, voice, digits, and main.
As a general rule, you can leave the default setting as
Main.
•
Names. Recognizes the voice tags you record for
contact numbers, for example, “Bob.”
•
Digits. Recognizes any phone number said in the
selected language (English US or English UK). You
do not need to record the digits. However, if the
phone has trouble recognizing your speech, you
can record the digits to train or personalize the
phone.
•
Main. The default mode, which combines both
Digits and Names modes. This mode also recognizes commands.
are in Main mode, you say a preset command to
activate or start a function on your phone.
Note: If you press and release the Record button
quickly, you start the Memo record function.
To use a command:
1 Press and hold the Record button.
2 Wait for the “Say Command” prompt. Speak the
command when the display shows
Speak now.
3 If you are calling a name or a number, listen for
the “Say Name” or “Say Number” prompt. Speak
the name or number when you see the
Speak
Now indicator.
Don’t start speaking until
you see the “Speak now”
indicator!
Page 38

Voq User Guide
Set up Voice Dialing
Choose the language for your area. In this case, either
English US or English UK.
1 Press
Start > More > SmARTspeak NG>
Options > Settings
.
2 In the Language field, make your selection, then
press
Done.
Record a voice tag
A voice tag is essentially a spoken, verbal shortcut to a
person’s phone number. The number must already be
To record a voice tag:
1 Press
Start > More > SmARTspeak NG >
Options > Voice Tags
. .
2 When your list of contacts appears, scroll to the
contact for whom to create a voice tag. Press
Select or press the joystick.
3 The phone displays the numbers listed in the
Page 39

Making and Answering Calls
4 Wait for the phone to display “Speak Now”, then
say the contact name or a word of your choice.
5 When prompted, wait for the “Speak Now”
display, then repeat the voice tag. The phone
plays back the voice tag.
6 Press
Exit when you have finished, or press
Options again to record a voice tag for someone
else.
When you add a voice tag, a + sign appears
beside numbers with voice tags assigned to
them.
In the Contacts list (
Options > Voice Tags), a
check mark appears beside contacts with one or
more voice tags.
1 Press and hold the Record button on the right
side of the phone.
2 Wait for the prompt.
· If you are in
Voice mode, say the voice tag
associated with the contact. The phone plays
back the voice tag and then dials the phone
number, opens a new e-mail message, or
displays the Web page.
· If you are in
Main mode, say the command
“Call” then say the voice tag.
3 If the phone misinterprets the word, press
No
and start over.
Make a call by speaking the number
To verbally dial a number:
1 Press and hold the Record button on the right
side of the phone.
2 Wait for the “Speak Now” prompt
· If you are in
Digits mode, say the number you
Page 40

Voq User Guide
Advanced dialing options
You can add pauses to dialing sequences that may be
required for international calls.
To add a pause to a dialing sequence:
1 Press
Contacts, then select the person in whose
phone number you want to insert a pause.
2 Scroll to the phone number, then press
Edit.
3 Place the cursor in the number where you want
to insert a pause.
· To insert a 3-second pause, press
Menu >
Insert Pause
. The letter “p” appears where
the pause will occur during dialing.
· To insert a manual pause, press
Menu >
Insert Wait
. The letter “w” appears where
the pause will occur during dialing. To resume
dialing after a manual pause, press .
4 Select
Done.
Reject means the call is redirected to your voice mail
box if you have one. If you don’t have a mail box, the
call is terminated.
Turn the ringer off for all calls
1 Press the Power button to display the Quick List.
2 Choose
Silent.
Turn the speakerphone On and Off
• To turn the speakerphone On, press and hold
for two seconds during an active call.
• To turn the speakerphone Off, press again.
Tip: If you are dialing your voicemail or another service
that requires a password or a menu selection with the
speakerphone on, press the
Mute soft key while
dialing to help reduce audio interference and improve
the system’s abililty to recognize your key presses.
Page 41

Making and Answering Calls
Taking notes while on a call or
3 Assign a category to each piece of information by
selecting the item, and pressing the joystick left
or right. For example, change the field for “Doe”
to
Last name rather than First name.
4 When you have finished, press
Save.
5 On the Contact screen, fill in other fields as
necessary, then press
Save.
End
Disconnect the call
Hold
Put the active call on hold
Unhold
Activate the call on hold
Swap
Switch between two calls
Save Contact
Create a contact record for the caller
Conference
Join calls together
Private
Put all conference calls on hold
except one
Mute
Mute the microphone (you hear the
caller but the caller can’t hear you)
Unmute
Turn the microphone back on
Page 42

Voq User Guide
Answering a second call
To be able to answer a second call while already on a
call, your phone service package must include call
waiting.
• To end the first call and answer the second call,
press , then press
Accept.
• To put the first call on hold and answer the
second call, press or press
Accept. To switch
between calls, press .
• To create a conference call, put the first caller on
hold, answer the second call, then press
Menu >
Conference
.
• To postpone answering the call, press
Wait. The
call will continue ringing until one of the following
occurs: you answer the call by pressing , the
call is placed in voice mail after the requisite
number of rings, or the caller disconnects.
Reviewing calls
You can view information about calls you have made
and received. For example, you can see who has called
you recently and see the duration of the call.
Call history
Call History displays the last calls that you have made,
received, and missed. Each entry for a call contains the
start time, duration, caller’s name, if available, and
caller’s number. The oldest calls are automatically
deleted from the list to make room for new ones.
Note: The phone does not record the duration of calls
when you use Call Waiting.
View call history
1 Press Start > Call History.
2 To separately view missed calls, incoming calls,
Page 43

Making and Answering Calls
Retrieve voicemail messages
The speed dial “1” shortcut is reserved for your
voicemail. On the Home screen, press and hold 1 to
call your voice mailbox. Follow the prompts to retrieve
your messages. To change your speed dial shortcut,
see “Speed dialing” on page 36.
Call timers
Call timers record the length of your last call and other
call statistics. This information is useful for keeping
track of your calling patterns. It can also help you
estimate your monthly billing.
View Call Timers
Press Start > Call History > Menu > View Timers.
Note: The length of calls is not recorded when you are
using Call Waiting.
Page 44

Voq User Guide
Page 45

5
Managing Your
Personal
Information
Managing your contacts
Using the calendar
Writing notes
Page 46

Voq User Guide
Managing your contacts
The Contacts list is similar to an address book where
you store information about the people and businesses
you deal with. You can:
• Synchronize contacts with your desktop
computer (Microsoft Exchange only)
• Dial phone numbers, compose e- mails and SMS
messages directly from a contact record
• Specify a special ring when a contact calls
• Assign the contact to a category, such as
business or personal, so you can filter and view
contacts in a category
• Use infrared to beam contact information to
another device, such as your PC if it has an
infrared sensor
• Save contacts to a SIM card, and view SIM
contact information
Change the default number or address
1 Press Contacts.
2 Select a contact.
3 On the Contact screen, scroll to the person’s
number or address.
4 Press
Menu > Set as Default > Edit > Done.
Note: You can also press the joystick left or right.
w
work phone
w2
second work phone
h
home phone
h2
second home phone
m
mobile phone
e
e-mail
pgr
pager
e2
second e-mail address
web
web address
e3
third e-mail address
car
car phone
sms
text message address
Page 47

Managing Your Personal Information
The contact information screens you see differ slightly
depending on the method of adding contacts you
choose.
Add a contact using the thumbpad
The easiest way to add a contact is using the
thumbpad.
1 Open the thumbpad and start typing the name.
2 Select
Save As beside Cont, then press the
joystick. The phone displays the information you
typed in a list.
3 Assign a category to each piece of information by
selecting the item, and pressing the joystick left
or right. For example, change the field for “Doe”
to Last name rather than First name.
5 On the Contact screen, fill in other fields as
necessary, then press
Save.
Enter information in the appropriate field. For
example, the phone uses the number in the
Mobile field to send an SMS; it does not check
other phone number fields.
Add a contact using the keypad
1 Press Contacts > New. The Contact screen is
displayed.
Page 48

Voq User Guide
3 When you have finished entering information,
press
Done.
Add notes to a contact
You can add additional information about a contact
using notes. Notes is the very last field in the contact
record.
To add a note:
1 Open the thumbpad or press .
2 Start typing the contact name or select Contacts.
3 Highlight the contact, then press
Menu > Notes.
4 Write the note, then press
Done.
3 Scroll to the field you want to change, then press
Edit.
4 Change the information, then press
Done.
Add a contact from an incoming call
1 On the Call Progress screen, press Menu > Save
to Contacts
.
2 Fill in the contact fields, the press
Done.
Download contacts from your PC
You can download and synchronize the contacts on
Page 49

Managing Your Personal Information
phone. Unlike regular contacts, you can store only one
phone number for each SIM contact.
A SIM contact has a special icon that appears to the
right of the name in your Contacts list.
Create a regular contact from a SIM contact
You can copy a SIM phone number to your regular
contact list.
1 Press
Contacts.
2 Scroll to the SIM contact from which to copy a
phone number and press the joystick.
Create a SIM contact from a regular contact
You can save the contact name and one phone number
from a contact record to a SIM card.
1 Press
Contacts.
2 Select a contact and scroll to the phone number
you want to save to the SIM card.
3 Press
Menu > Save to SIM > Done.
Create a new SIM contact
1 Press Contacts > Menu > New SIM Contact.
2 Enter the contact's name and phone number.
3 Press
Done.
The new SIM contact appears in your contact list.
Edit a SIM contact
1 Press Contacts.
2 Select the SIM contact to edit.
3 Press
Edit.
SIM contact icon
Page 50

Voq User Guide
Using the calendar
Use the Calendar to keep track of your appointments,
and view your schedule by day, week, or month. When
you synchronize your phone with your PC, changes to
your phone calendar are added to your desktop Outlook
calendar and vice versa.
Answer meeting requests
When you receive a meeting request in your VoqMail
inbox, you can choose to accept or decline the
invitation. Your phone sends your response as an email. The phone updates your calendar differently
depending on the software and software version
running on the e-mail server. For more information,
see “Meeting requests” on page 72.
Add a new appointment
Edit an appointment
1 Press Start > Calendar.
2 Select the appointment to edit, then press
Edit.
3 Make your changes, then press Done.
Delete an appointment
1 Press Start > Calendar.
2 Select the appointment, press
Menu > Delete.
View your schedule
You can view your schedule in three different ways:
Agenda, Week, and Month.
For more information on configuring meeting requests,
see “Meeting requests” on page 72.
Agenda view
The Agenda view displays meetings and appointments
Page 51

Managing Your Personal Information
View today’s agenda:
1 Press Start > Calendar. The phone displays
today’s appointments.
If you are already in Week or Month view, press
Menu > Agenda View.
Tip: To look at your agenda for previous or
approaching days, scroll left or right with the joystick.
View the agenda for a specific date:
1 Press Start > Calendar > Menu > Go to Date.
2 Type the date to view, then press
Done.
Week view
Week view displays your schedule one week at a time,
with one-hour increments from 9:00 to 5:00 down the
side of the screen.
Month view
Month view provides an overview of your schedule one
month at a time. The symbols on the calendar indicate
when you have appointments
Using tasks
A task is a project, assignment, or errand that you don’t
want to forget. A task can occur once, or it can recur.
The task list
morning (a.m.)
afternoon (p.m.)
all-day event
both a.m and p.m.
a.m., p.m., and all day
Page 52

Voq User Guide
Create a new task
1 Press Start > More > Tasks.
2 In
Enter new task here, begin typing.
3 When you have finished typing your task, press
Complete.
Mark a task as complete
1 Press Start > More > Tasks.
2 Select the task, then press
Complete.
Mark a task as incomplete
1 Press Start > More > Tasks.
2 Select the task, then press
Activate.
Delete a task from the Tasks list
1 Press Start > More > Tasks.
2 Select the task, then press
Delete.
2 Select
Save As beside Note and press the
joystick.
3 When you have finished typing, you can save the
note or send it:
· To save the note, press
Save.
· To send the note as an SMS, press
Menu >
Send as SMS
.
· To send the note as an e-mail, press
Menu >
Send as E-Mail
.
4 If you are sending a message, type the address
or phone number, then press
Send.
Page 53

Managing Your Personal Information
· Select Notes from the myVoq screen, then
select the note to edit.
2 Once you find and display the note, edit it, then
press
Save.
Tip: you can use myVoq notes as a contact manager.
Simply use the contact name (e.g. person or company)
Page 54

Voq User Guide
Page 55

6
E-mail and
Messaging
Choosing your e-mail
VoqMail
TM
Software
Creating messages
Viewing and responding to messages
Multimedia Messaging Service (MMS)
Instant messaging
Page 56

Voq User Guide
The Voq phone supports a full range of e-mail and
messaging programs including e-mail Inbox, Text
Messaging, Multimedia Messaging Service, and Instant
Messaging.
Choosing your e-mail
Your phone arrives with a general messaging program
called Inbox already installed. Within Inbox, you can set
up several different accounts:
• VoqMail Personal Edition
• VoqMail Professional Edition
• ActiveSync
• IMAP4
• POP3
You must choose one of these methods to handle your
mail and then configure the account. Your choice will
depend on the type of e-mail server your service
• If your e-mail server supports only the POP3
protocol, you must use Inbox POP3. See “Setting
up a POP3 account” on page 61.
Working with multiple accounts
You can configure and use up to eight different
messaging accounts. All accounts are stored in the
Inbox program. For example, you can have a separate
account for:
• Home e-mail (e.g. myname@myprovider.com)
• Work e-mail (e.g. myname@mywork.com)
• Internet e-mail (e.g. myname@hotmail.com)
• SMS (e.g. myname@myprovider.com)
Each account has its own separate set of message
folders: Drafts, Inbox, Outbox, Sent.
About “Inbox”
The word “inbox” can mean different things depending
Page 57

E-mail and Messaging
About “ActiveSync”
The word “ActiveSync” can mean different things
depending on where it appears on your phone:
• ActiveSync is the name of the program that you
use to synchronize information with your desktop
PC.
• ActiveSync can also be used wirelessly to
synchronize to Microsoft Exchange 2003.
• ActiveSync is also the account name for your
Microsoft Exchange mailbox.
Switch between accounts
When you open your Inbox, by clicking Start > Inbox,
the phone displays the last account you used.
To switch to a different account:
1 Press
Start > Inbox.
2 Push the joystick right or left to switch from one
account to another.
View the complete list of accounts
To see a list of all your accounts:
1 Press
Start > Inbox > Menu > Accounts/
Always check the title bar
for the account name. To
change it, push the
joystick left or right.
Page 58

Voq User Guide
To change VoqMail account options:
1 Press
Start > More > VoqMail settings.
To change other e-mail account options:
1 Press
Start > Inbox. Scroll right or left to switch
to the account you want.
2 Press
Menu > Options. Select and change
options you want. Press
Done.
Delete an account
1 Press Start > Inbox > Menu > Options >
Account Setup
.
2 Scroll to the account to delete.
3 Press
Menu > Delete.
VoqMail
TM
software
Your phone comes with VoqMail software already
installed. VoqMail is a powerful e-mail program that
VoqMail Personal Edition features
VoqMail Personal allow you to:
• Connect to mail servers hosted by Internet or
telephone service providers
• Enjoy full e-mail functionality–send, receive,
forward and delete messages
• Define your e-mail delivery settings
• Send messages immediately
• Send e-mails using the Contacts list
• Reply to e-mails with a phone call
• Synchronize with your server–messages read on
the phone are shown as read on your desktop PC
Battery, bandwidth, and memory
management features
VoqMail includes many features that minimize airtime
use and maximize battery life. For example, the
program pauses mail delivery when memory and
Page 59

E-mail and Messaging
your company network. Messages sent to your
company e-mail address are forwarded to your phone.
Messages sent from your phone leave a copy in the
Sent folder of your desktop PC.
VoqMail Pro also includes these enhanced features:
• “Always there” business e-mail–no need to
manually check for mail
• Direct communication with the e-mail server–you
do not need to leave your work PC running
• Custom alerts–assign different alerts to e-mails
from different people
• Download settings–choose how much of a
message body to download
• Smart polling–automatically check for responses
to e-mails you send
• Accept Outlook meeting invitations, which
automatically updates your Voq calendar, and
preserves meeting attachments
• Secure VPN access
• Microsoft Exchange 5.5, 2000 and 2003
• Lotus Notes 5.0.12 or later
• Novell GroupWise
• Other IMAP4 servers
VoqMail Pro is not compatible with:
• POP3 servers
The Voq phone provides POP3 support through a
standard account that you can set up using ActiveSync.
See “Setting up a POP3 account” on page 61.
Setting up a VoqMail account
You set up your VoqMail e-mail account using the
VoqMail Setup Wizard.
If you are using VoqMail Professional Edition, the
wizard allows you to send a pre-composed e-mail
message from your phone to your IT manager from the
setup wizard, and he or she can configure your work
Page 60

Voq User Guide
• Your password
• Incoming and outgoing mail server names (e.g.
mail.myprovider.com)
• A data connection for connecting to the Internet.
See “Data connections” on page 93.
Note: Your
data connection is normally already set up when
you receive your phone.
VoqMail Pro
• E-mail display name (e.g. John Smith)
• E-mail address (e.g. jsmith@mywork.com)
• VPN protocol (e.g. Microsoft PPTP, Cisco IPsec)
• VPN server name (e.g. server.mywork.com)
• VPN user name (e.g. jsmith)
• Incoming and outgoing mail server names (e.g.
mail.mywork.com)
• Work domain name (e.g. mywork)
Start the VoqMail setup wizard
Use the setup wizard to configure both VoqMail
2 Follow the instructions on the display. Press
Next to move to the next screen or Previous to
move to a previous screen.
If you are setting up your work e-mail with
VoqMail Pro, you can send an e-mail to have your
IT manager remotely configure the phone. This is
probably your simplest option.
For more information about setting up VoqMail, visit
www.voq.com/site/support/default.voq.
Start the VoqMail Setup
Wizard.
Page 61

E-mail and Messaging
Create an ActiveSync e-mail account
To create an ActiveSync e-mail account, use the
ActiveSync setup wizard:
1 Press
Start > Inbox > Menu > Options >
Account Setup > Menu > New
.
2 Fill in the fields on each page of the wizard. Press
Next or Previous to move from page to page.
3 Press
Finish, when you have completed all
screens.
Setting up a POP3 account
To set up a POP3 account
1 Press
Start > Inbox > Menu > Options >
Account Setup > Menu > New
.
2 Check
Attempt to obtain e-mail settings
from the Internet
, then press Next.
3 If the phone cannot detect the settings
automatically, press
Next to enter settings
Scheduling e-mail polling with
VoqMail
The Voq phone periodically contacts your mail server
and checks for mail. This is called polling. Polling
means your e-mail is “always there” similar to your
desktop PC.
Although polling uses very little bandwidth, you can
control how often your phone checks for mail to
maximize battery life and minimize airtime charges.
For example, you can check less frequently after
business hours when receiving mail is generally less
urgent. You can also check manually whenever you
wish.
Using the schedule wizard, you can define the polling
frequency for three different periods throughout the
day: Work, Sleep, and All Other Times. The default
settings are: Work (every 15 minutes), Sleep (manually,
Page 62

Voq User Guide
3 When you have finished, press Done.
Automatic increase in polling frequency
When you send an e-mail, the phone automatically
increases its polling frequency to once every minute for
five minutes to check for replies. After five minutes the
polling frequency returns to the previous setting.
Also, if you begin using the phone after it has been idle
for a period of time, it automatically polls for e-mail.
Turn off e-mail polling
When you define the polling frequency, you can choose
to check for e-mails manually. In other words, the
phone will not automatically check for mail.
1 Press
Start > More > VoqMail Settings >
Schedule Settings > Basic
.
2 Press
Next.
In the
Check Messages field, set the polling
Check for messages manually
To check for new messages immediately without
waiting for the next scheduled polling, or if the polling
schedule is set to
Manually:
1 Press
Start > Inbox.
2 If necessary, scroll right or left to switch to your
e-mail account.
3 Press
Menu > Send/Receive. The phone
connects to your mail server and sends and
receives your messages.
Note: The phone checks and download messages in
the background so you can continue to use your Inbox.
E-mail sound alerts
Note: VoqMail Personal and VoqMail Pro sound alert
settings override standard settings in
Start >
Settings > Sounds
.
Page 63

E-mail and Messaging
2 In New e-mail, scroll left or right to select a new
sound, or press the joystick to see the complete
list of sounds.
3 Select the sound you want. You can also select
Vibrate or None from the bottom of the list.
·
VoqMail Personal–This is the alert used for
all incoming e-mail messages.
·
VoqMail Pro–This is the alert used for
contacts that do not have an alert level
assigned to them, or for contacts that have
been assigned the alert level “Normal”.
4 Press
Done.
Custom e-mail sound alerts (Pro only)
With VoqMail, you can define custom alerts for the
e-mail messages you receive depending on the sender.
For example, you could assign a special sound alert to
an important customer.
VoqMail Pro also has a unique reply alert feature. If you
Alert level settings have two parts: the ring tone and
how much of the message body is downloaded. The
default alert level settings are:
Note: If you assign an alert level with an “All text”
setting to a contact, the phone downloads the full text
of all previous messages on your desktop PC. This
could result in higher charges.
Assign an alert to a contact (Pro only)
Level Ring tone Message body
download
Critical
Voq Message Alert 2 All text
High
Voq Message Alert 6 All text
Normal
Use Default E-mail Alert 2 screens
Low
None 2 screens
Page 64

Voq User Guide
4 To change the alert level, press Menu, then
select the alert level.
Add an alert to a keyword (Pro only)
To assign a special alert to a keyword in a message
header:
1 Press
Start > More > More > VoqMail
Settings
> Keyword Alerts > New.
2 Fill in the fields:
·
Keyword–Type a word that will trigger an
alert.
·
Priority–move the joystick left or right to
change the alert level for the word.
3 Press
Done.
Delete a custom alert (Pro only)
1 Press Start > More > More > VoqMail
Settings > Contact Alerts
.
2 Select the contact from whom you want to
1 Press
Start > More > More > VoqMail
Settings
> Alert Settings.
2 Select the alert level you want to change, then
press
Edit.
3 Choose the sound and download options for the
alert, then press
Done twice.
VoqMail message limits
You can set the following limits on messages and data
traffic:
• Maximum number of messages saved
• Maximum number of megabytes downloaded in a
month
To change VoqMail limits:
1 Press
Start > More > More > VoqMail
Settings
> VoqMail Limits.
2 Set the parameters as necessary.
3 Press
Done.
Page 65

E-mail and Messaging
The phone takes measurements above the security
layers, and cannot identify packets in an encrypted
e-mail message. Accuracy is affected because some
security layers increase the amount of traffic, while
others use compression to reduce it.
To see traffic statistics, press
Start > More >
VoqMail Settings
> Traffic.
Creating messages
E-mail and SMS are different messaging systems but
they share many common features. With myVoq, you
create both types of messages the same way.
Consequently, SMS and e-mail are described together
in many of the instructions that follow.
Note: Depending on your network, sending or
receiving e-mail may block voice calls or send them to
your voicemail.
after you have typed a few words, press Menu >
Send E-mail
.
2 On the Insert Contact screen, type an e-mail
address or start typing the recipient’s name to
search for a contact in your contacts list. If you
find the name you want, highlight the name with
the joystick, then press
Select.
Tip
: If the Send E-mail option is not available
when you press
Menu, try typing more of your
message before you choose
Menu.
3 On the E-mail Message screen, enter a subject
and edit the body of your e-mail message, if
Page 66

Voq User Guide
Create a quick SMS message with
myVoq
You can send and receive SMS messages up to 160
characters in size. The phone splits up and sends
longer messages as several small messages.
1 Open the thumbpad and start typing.
2 Press
Send SMS.
3 Enter a phone number or select a contact with a
mobile phone number.
Create a message in Inbox
Note: If you start an e-mail message from the Home
screen, you cannot use myVoq to search your contacts.
To take advantage of myVoq’s advanced search
features, start your message from the myVoq screen.
To create a message from the Inbox.
1 From the Home screen, press
Start > Inbox >
New.
2 Move the joystick left or right to choose the mail
account you want to use, then press
Select.
3 Complete the message fields:
·
To–enter recipient e-mail addresses or SMS
numbers. Press the joystick to see a list of
recipients. Insert a semicolon (;) between
multiple addresses or SMS numbers.
·
Cc–enter the e-mail addresses of persons to
receive a copy. This field does not appear for
SMS messages.
Page 67

E-mail and Messaging
Cancel a message
To cancel a message you are creating, press Menu >
Cancel
Compose.
Create a message from a contact
If you have included an e-mail address or SMS number
in a contact record, you can create a new message
from the contact.
1 Press
Start > Contacts.
2 Select a contact from the list.
3 Select the e-mail address or SMS number to use.
If you selected an e-mail address, select the
e-mail account to use.
4 In
Subj, enter a subject. This field does not
appear for SMS messages.
5 Type a message and press
Send.
Tips: When using the keypad in Multipress mode, you
can insert punctuation such as the “at” sign (@), a
2 Scroll to the sender’s name in the
From field,
then press the joystick. A screen appears with all
known phone numbers for the contact.
3 Scroll to the desired number and press the
joystick to make the call.
Other e-mail options
Inserting predefined text into messages
To save time entering text, you can insert predefined
text into messages. The phone includes a list of
standard predefined text, which you can edit to create
words or phrases that you frequently use.
Insert predefined text into a message
1 Press Start > Inbox > New.
2 Select the account to use.
3 In
Subj or the message area, press Menu >
Insert Text.
Page 68

Voq User Guide
Insert a voice recording into a message
You can easily insert a voice recording into an e-mail
message. Inserting a voice recording is useful when
you want to verbally explain information that is
contained in the message.
1 In the message area of an e-mail message, press
Menu > Insert Recording > Record.
2 Start speaking into the phone microphone.
3 When you finish speaking, press
Stop > Done.
Note: You can send only one voice recording in a
message. If you insert a second recording, it replaces
the first.
Insert a signature
You can specify a signature that is automatically
inserted into messages you send.
Note: If you use myVoq to compose an e-mail
5 Replace the text with in the Signature box with a
signature to insert, and press
Done. The
signature is inserted into messages that you send
from this account.
To remove a signature, repeat steps 1 and 2 above,
then uncheck
Use signature with this account. A
signature is no longer inserted in messages that you
send from this account.
Save a draft of a message
You can save a draft of a message that you are
composing to finish and send later.
1 Press
Start > Inbox > New.
2 Select the account to use.
3 Enter information in the message.
4 Press
Menu > Postpone Message. The phone
saves a draft of the message in the Drafts folder.
Note: To edit and send a draft message, you must
Page 69

E-mail and Messaging
Request a delivery receipt for an SMS
message
1 Before sending an SMS message, press Menu >
Message Options.
2 Select
Request SMS text message delivery
notification
.
3 Press
Done. When your message is delivered,
you receive a receipt on the phone.
Working with message folders
Each messaging account has a set of folders in which
the phone stores messages for that account. The
default folders are:
•
Deleted Items–Contains messages that you
delete until you empty this folder.
•
Drafts–Contains messages that you save before
sending.
•
Sent Items–Contains copies of messages that
you send.
You can move a message to a different folder within
the same account.
View message folder contents
1 Press Start > Inbox > Menu > Accounts/
Folders
.
2 Scroll to the account for which to view the
contents of a message folder.
3 Press
Folders and then the folder to view.
4 To view all ActiveSync folders, even those not
marked to synchronize, press
Menu > Show All
Folders
.
5 To return to Inbox, Press
Menu > Accounts/
Folders
.
6 Press
Folders > Inbox.
Move a message to a different folder
Page 70

Voq User Guide
Empty the Deleted Items folder
1 Press Start > Inbox > Menu > Accounts/
Folders
.
2 If necessary, scroll right or left to switch to the
inbox for which to empty the Deleted Items
folder.
3 Press
Folders > Deleted Items > Menu >
Empty Folder
.
Viewing and responding to
messages
When you receive an e-mail message, the phone plays
a sound and displays an envelope icon at the top of the
screen.To quickly view new messages, select the
message notification area on the Home screen.
The phone stores received messages in the Inbox
messages are displayed and show the date and
time that messages were sent.
Change message list display options
1 Press Start > Inbox > Menu > Options >
Display
.
2 Change the display options, then press
Done.
You can change the status of a message by marking it
as Read or Unread.
Mark a message as Read or Unread
1 Press Start > Inbox.
2 Scroll to the message to mark.
3 Press
Menu > Select Mark as Read or Mark
as Unread
.
The message display is changed to reflect its
new status: normal text for read messages and
bold text for unread messages.
Page 71

E-mail and Messaging
2 If necessary, scroll right or left to switch to the
account you want.
3 Select the message to open.
4 To return to the message list, press the Back
button.
Tips: To open the next message in the list from within
an open message, scroll right; to open the previous
message in the list, scroll left.
To add the sender to your contact list, press
Menu >
Save Sender to Contacts
.
Choose the character set for messages
1 From an open message, press Menu > Options.
2 In
E-mail message language, scroll to the
language.
3 Press
Done. The message is displayed using the
appropriate characters for the selected language.
3 In
To, enter recipient e-mail addresses or SMS
numbers. Insert a semicolon (;) between multiple
addresses or SMS numbers.
Note: You cannot
forward to an SMS number and an email address
at the same time. You must forward separate
messages.
Optionally, you can enter an introductory message by scrolling to the message area, pressing
the joystick to insert a blank line, and entering
your text.
4 Press
Send.
Delete a message
1 Press Start > Inbox.
2 If necessary, scroll right or left to switch to the
inbox in which to delete a message.
3 Scroll to the message to delete.
4 Press
Menu > Delete. For the ActiveSync
account, the message is also deleted from
Page 72

Voq User Guide
Messages with an attachment have an envelope icon
with a paperclip in the message list. The attachment
icon has the following three states:
• Not downloaded
• Marked for download
• Downloaded
Open messages display their attachments as a list of
hyperlinks at the bottom of the message.
Download a complete e-mail message
1 Press Start > Inbox.
2 Scroll to the message to download, then open it.
3 Press
Mark for Download. The phone begins
downloading the full e-mail message, except for
attachments.
Download an attachment
1 Open the message with an attachment to
View an attachment
In an open message containing a downloaded
attachment, select the attachment.
Note: To view attachments, you must have the
appropriate viewer or reader installed. If an attachment
will not open, your phone likely does not have the
application that supports the file type. Many
attachments cannot be viewed on the phone.
Delete an attachment
1 In an open message containing a downloaded
attachment, scroll to the attachment.
2 Press
Menu > Delete.
Caution: This deletes all of the attachments to this
message, not only the selected attachment. This
deletes attachments on the device only.
Meeting requests
Page 73

E-mail and Messaging
· Updates the free/busy indicators on your
calendar the next time you sync your phone at
your desktop
• When you decline a meeting:
· The organizer is notified immediately
Respond to a meeting request
To respond to a meeting request:
1 Press
Start > Inbox.
2 Select the meeting request, then respond to it:
· To accept, press
Menu > Accept.
· To decline, press
Menu > Decline.
· To tentatively accept, press
Menu >
Tentative
.
Appointing a delegate
If you accept an invitation, you update the calendar on
the mail server the next time you sync your phone. This
means that the calendar at your office may not
Configure an automatic e-mail to send to a
delegate
1 Press Start > More > VoqMail Settings >
Calendar Settings
.
2 Check
Notify my delegate of meeting
requests and updates
, then fill in the
delegate’s name and e-mail address.
3 Press
Done.
Import SMS messages from a SIM
card
In addition to receiving SMS messages wirelessly, you
can import them from your Subscriber Identity Module
(SIM) card.
Note: You cannot export SMS messages
from your phone to a SIM card.
Press
Start > Inbox > Menu > Options > Import
SIM Messages>
Done.
Page 74

Voq User Guide
Multimedia Messaging Service
(MMS)
Multimedia Messaging Services (MMS) let you send
short messages containing pictures, audio, and text
from your phone to other MMS customers. (Your
wireless network service provider must enable MMS
services on your account).
The jMMS program allows viewing, selecting, and
sending of valid image and audio files stored in the
Storage\My Documents folder.
To view an MMS message:
1 Press
Start > More > jMMS Messaging.
2 Select
Inbox to view your received MMS
messages. MMS Messages may have multiple
pages to view.
To send an MMS message:
· Select
Compose to send a message that
contains a combination of pictures, sounds
and text. Compose allows you to create
messages with multiple pages.
2 When your MMS is complete, press
Send to
address your message. Insert the phone number
of a person whose phone accepts MMS
messages.
To change MMS settings:
1 Press
Start > More > jMMS Messaging.
2 Press
Settings.
3 Select or change the settings you want, then
press
Save.
Instant messaging
MSN Messenger may be available on your Voq phone.
If it is available, MSN Messenger on your phone
Page 75

E-mail and Messaging
Create a connection on your phone, such as a modem
or wireless connection that allows you to connect to
the Internet. For more information about creating
connections, see “Data connections” on page 93.
Using MSN Messenger
You can sign in to MSN Messenger using your Hotmail
or your .NET Passport credentials. Once you sign in,
you can exchange instant messages with others. This
is called “chatting.” Contacts must have a Hotmail or
.NET Passport account.
Sign in to MSN Messenger
Note: When you sign in to MSN Messenger, your
phone communicates periodically with the MSN
Messenger server to check for messages. This
consumes airtime. To avoid extra charges, be sure to
sign out when finished using MSN Messenger.
When you sign in, MSN Messenger retains your sign-in
name, and your password if you opted to save it, so
that you don’t need to enter this information again.
Sign out of MSN Messenger
Press Menu > Sign out.
Add an MSN Messenger contact
In the MSN Messenger contacts list, Press Menu >
Add Contact
.
Add the Hotmail or .NET Passport sign-in name of a
person with whom you want to chat. Their sign-in
name is added to the contacts list.
Delete an MSN Messenger contact
In the MSN Messenger contacts list, select the contact,
then press
Menu > Delete Contact.
Page 76

Voq User Guide
To edit this text, press Menu > Options > Edit My
Text
. Select the text, make any edits, then press
Done.
Reply to an instant message
1 Press Menu > Chats.
2 Select the name of the person sending the instant
message. The message displays, along with a
box for your reply.
3 Enter your reply and press
Send.
Tips: By default, your phone plays a sound when you
receive an instant message. For instructions on
changing the sound, see “Sounds” on page 90.
If you want to be able to receive instant messages at
any time your phone is connected to a network, press
Options > Passport Account > Run this program
when connection is available
> Done.
Return to the contacts list
From a chat, press Menu > My Contacts.
End a chat
Press Menu > End Chat.
See who is already chatting
Press Menu > Chats.
Block or unblock an MSN Messenger contact
1 In the MSN Messenger contacts list, select the
contact's name.
2 Press
Menu > Block. The contact will no longer
be able to see your status or send you messages.
3 To unblock the contact, Press
Menu >
Unblock
.Change your MSN status
4 In the contacts list, select your name.
5 Select a status description, such as
Away. This
Page 77

E-mail and Messaging
Features according to e-mail program
The table below lists the features available depending on the type of e-mail account you use on the phone.
VoqMail
Personal
VoqMail
Pro
Wireless
ActiveSync
POP3
E-mail Features
Continuous delivery
✔✔
Work E-mail
✔✔
Personal E-mail
✔✔ ✔
Optimized Polling
✔✔
Battery Saver
✔✔
Bandwidth Saver
✔✔
Contact/Subject/Reply Alerts
✔
Auto Download Rules
✔
Auto Suspend Rules
✔✔ ✔
Page 78

Voq User Guide
E-mail Features
C
alendar:
Accept/Decline Meeting Requests
✔✔ ✔
✔
Save attachments to invitations
✔✔ ✔
Microsoft Exchange 5.5
✔✔
✔
Microsoft Exchange 2000
✔✔
✔
Microsoft Exchange 2003
✔✔ ✔
✔
Lotus Notes
✔✔
Novell GroupWise
✔✔
E-mail response to originator
✔✔ ✔
E-mail request to delegate
✔✔
Device Calendar Updated
✔✔ ✔
✔
Server Calendar Updated
✔
Page 79

7
Synchronizing
Your Phone
Synchronizing your Voq phone
Getting started
Page 80

Voq User Guide
Synchronizing your Voq phone
Synchronization ensures that the information on your
phone and your PC is the same and up to date. You can
synchronize your Inbox, Contacts, Calendar, and Tasks.
Microsoft
®
ActiveSync® 3.7.1 or later and Voq Desktop
Tools are the programs you use to synchronize. They
are already installed on your Voq phone but you must
install them on your desktop PC. If your company has
Microsoft Exchange 2003 installed as a messaging and
collaboration server, you may be able to synchronize
About “ActiveSync”
The word “ActiveSync” can mean different things
depending on where it appears on your phone:
• ActiveSync is the name of the program you use to
synchronize information with your desktop PC.
• ActiveSync is also the account name on the
phone for your Microsoft Exchange mailbox.
This section deals with ActiveSync, the application you
use to synchronize information with your desktop PC.
Voq Desktop Tools
Page 81

Synchronizing Your Phone
Getting started
Before you begin synchronizing your Voq phone with
your desktop PC, complete the following steps:
1 Install ActiveSync and Voq Desktop tools on your
desktop PC.
2 Connect the phone and the PC.
3 Create a partnership.
4 Synchronize your phone.
1Install ActiveSync and Voq Desktop
Tools
Even if you use VoqMail only, you must first install
ActiveSync and then Voq Desktop Tools on your
desktop PC.
Note: To install Outlook 2002 from the Voq Companion
4 Once you have finished installing ActiveSync, go
back to the Overview screen, and click
Install
Voq Desktop Tools.
Note: If you intend to synchronize your Calendar
wirelessly using Wireless ActiveSync, you will not
need VoqDesktop Tools Voq Calendar Sync. Be
sure to uncheck VoqCalendar when you create a
partnership in Step 3 below.
2 Connect the phone and the PC
After you install ActiveSync and the Voq Desktop Tools,
connect your phone and the PC.
1 Plug the sync cable into the handset connector at
the bottom of the phone. The Voq logo on the top
of the connector should face up.
2 Insert the other end of the sync cable into a USB
Page 82

Voq User Guide
1 Open ActiveSync if you have not already done so.
This starts the New Partnership Wizard, which
steps you through the set-up procedure.
2 There are two types of partnership, standard and
guest. Choose a standard partnership to
synchronize with your own computer.
3 The wizard asks you to choose a device to which
to connect. If you are synchronizing to your own
PC, choose
Synchronize with this desktop.
4 If you wish to synchronize your phone to
Microsoft Exchange 2003 using Wireless
ActiveSync, follow the instructions carefully to
configure your connection, and choose the
folders you wish to synchronize (Inbox, Calendar,
Contacts). If you are using VoqMail Pro, do not
select "Inbox" . See “Synchronizing remotely” on
page 84.
5 When asked, choose the folders you wish to
synchronize when connected via a cable or
The settings below are for a VoqMail account using an
Exchange server.
VoqMail account
Exchange server
ActiveSync
account
Exchange
2003 server
Calendar ✔
Contacts ✔ ✔
Inbox ✔
Tasks ✔ ✔
VoqCalendar ✔
VoqGlobal
Address List
✔ ✔
VoqNotes ✔ ✔
Page 83

Synchronizing Your Phone
If you are using other mail servers, see
www.voq.com/support for more information on
1 Click
Start > Programs >Microsoft
ActiveSync
.
2 In ActiveSync, choose
File > Synchronize.
Change what to synchronize when
connected via cable or cradle
You can change the folders and information types you
want to synchronize when the phone and the PC are
connected by changing your desktop PC settings.
1 Start ActiveSync.
On your desktop PC, click
Start > Programs >
Microsoft ActiveSync
.
2 On the ActiveSync window, choose
Tools >
Options
.
3 Check the items to synchronize, then click
OK.
The next synchronization uses the new settings.
Synchronizing your e-mail inbox
Lotus Notes/Lotus
Domino server
Calendar
Contacts
Inbox
Tasks
VoqCalendar ✔
VoqGlobal Address List
VoqNotes ✔
VoqContacts ✔
VoqTasks ✔
Page 84

Voq User Guide
• Copies messages from the Outlook Inbox folder
on your desktop computer, or from your mail
server, to the Inbox folder on your phone.
• Copies messages to your phone from the last
three days only, and the first 500 bytes of each
new message.
• Links messages on your phone and your PC.
When you delete a message on your phone,
ActiveSync deletes the message from your PC the
next time you synchronize, and vice versa.
• Synchronizes messages in subfolders of other
e-mail folders only if you selected the folders for
synchronization on your phone.
Note: SMS messages are not sychronized.
Synchronizing remotely
You can synchronize remotely with your desktop
minimal amount of bandwidth. See “Set VoqMail Sync
Settings” on page 86. You can still use ActiveSync to
synchronize your Calendar and Contacts.
Create a synchronization schedule
Create a schedule so that your phone and server
synchronize at the intervals you specify.
1 Press
Start > ActiveSync > Menu >
Options > Mobile Schedule
.
2 Select how often you want the synchronization to
take place, then Press
Done.
Select the PC for wireless synchronization
How you configure wireless synchronization depends
on your network. For example, you may need to set up
a virtual private network (VPN) connection to the
network.
1 Press
Start > ActiveSync > Menu >
Page 85

Synchronizing Your Phone
Choose what to sync wirelessly
Note: if you are using VoqMail, do not set any server
parameters for
Inbox.
To choose what to synchronize over the air:
1 Press
Start > ActiveSync > Menu >
Options >
Server Settings.
2 Select the information type that you wish to
synchronize. For example, Contacts.
3 Check
Sync <...> with a server, then press
Done.
Tip: The most efficient use of bandwidth for remote
synchronization is:
• VoqMail for e-mail
• ActiveSync for Calendar - once a day
• No wireless sync for Contacts - you would do this
at home or at the office via your sync cable.
Synchronize your calendar wirelessly
Configure an Exchange Server connection
To configure or edit the server connection:
1 Press
Start > ActiveSync > Menu >
Options > Server Settings > Connection
.
2 Fill in the fields:
·
User name–enter your Microsoft Exchange
User name.
·
Password–enter your Microsoft Exchange
password.
·
Domain–enter the name of the domain for
your Microsoft Exchange Server (if required).
·
Save password–select this to have the
phone save your password so that you don’t
need to type it again.
·
Server name–enter the name of the
Microsoft Mobile Information Server you
connect to.
3 Press
Done > Sync.
Page 86

Voq User Guide
1 Press Start > Inbox > Menu > Accounts/
Folders
2 Highlight ActiveSync, then press Folders >
Menu > Manage Folders.
3 Scroll to a folder to synchronize.
4 Press
Show > Done. The next time you
synchronize, the folder(s) that you marked on
your phone are synchronized with the
corresponding folders in Outlook on your desktop
PC.
Set VoqMail Sync Settings
You can control the VoqMail synchronization between
the phone and your desktop PC.
To set synchronization parameters:
1 Press
Start > VoqMail Settings > Schedule
Settings > Advanced
.
2 Choose how you want the phone to synchronize
·
Sync Full Messages–Choose how often you
want the phone to complete a full
synchronization of messages. This means
downloading the full bodies of all messages in
your VoqMail Inbox.
·
Sync When Roaming–enable or disable
automatic polling when the phone is in
roaming mode.
ActiveSync errors
If ActiveSync cannot synchronize your information, it
displays an error on your phone. When the message
appears, press the joystick to display more information
about the error.
Note: Some types of errors can interfere with
automatic synchronization. If you suspect that a
scheduled automatic synchronization has not occurred,
try to manually synchronize your information. A
Page 87

8
Configuring Your
Phone
Phone Certificates
Sounds Data connections
Profiles Date and time
Home screen Owner information
About Power management
Accessibility Regional settings
Beam Voq software updates
Page 88

Voq User Guide
The Settings screen lets you change the way your Voq
phone looks and behaves to match the way you use it.
For example, you can change the Home screen
background or the sounds your phone makes.
To view the main Settings menu:
1 Press
Start > Settings.
2 Select an option from the list. These options are
described below.
Phone
You use Phone settings to set options including call
forwarding, call waiting, and caller ID.
Call Barring
Block incoming or outgoing calls. For example, you can
block all outgoing international calls. See also Fixed
Dialing as a different way to restrict outgoing calls.
Call Forwarding
Its easy to forward your unanswered Voq calls to
another number (your corporate voice mail, for
example).
1 Press
Start > Settings > Phone >
Call Forwarding
.
2 Choose when to forward a call:
·
Unconditional–forward all calls immediately
·
No Reply–forward calls when you do not
answer
·
Busy–forward calls when your line is busy
·
Unavailable–forward calls when your phone
is off or out of service range
3 Select
Enable call forwarding.
4 Enter the phone number to which calls are to be
forwarded.
5 Select
Done.
Call Options
Page 89

Configuring Your Phone
• SMS Service Center—Enter or change the
service provider number used to process SMS
calls. Contact your wireless network operator to
obtain this number.
•
Country code—Specify your country code.
•
Area code—Specify your area code.
Call Waiting
You can choose to be notifiied if you receive a call
while you are already on a call.
1 Press
Start > Settings > Phone >
Call Waiting
.
2 Select or clear
Provide call waiting
notifications
.
Caller ID
Caller ID lets you decide if you want people to see your
name and number on their phones when you call them.
Channels
You can configure phone channel settings.
1 Press
Start > Settings > Phone > Channels.
2 Select the options you want, then press
Done.
Fixed Dialing
Fixed dialing lets you restrict outgoing calls to the area
codes and phone numbers you specify.
1 Press
Start > Settings > Phone > Fixed
Dialing
.
2 Check
Enable fixed dialing, then press
Menu > Edit Numbers > Menu > Add.
3 Enter the phone number or area code to which to
restrict calling and press
Done.
4 Repeat these steps to add more numbers as
necessary.
You will be able to make and receive calls only to and
from the numbers or area codes specified.
Page 90

Voq User Guide
2 In Network selection, scroll to the option you
want, either Manual or Automatic.
·
Manual–press Menu > Select a Network.
Select the network, then press
Done. The
phone uses the selected network.
·
Automatic–press Menu > Preferred
Networks
. Select the networks to use, then
press
Done. The phone automatically uses the
preferred networks.
Sounds
You can choose the sounds for ring tones, notifications,
reminders, and other events. You can also turn off the
tones you hear when pressing number keys. Your
phone can also remain silent or vibrate.
To set alert sounds for incoming e-mail messages, see
“E-mail sound alerts” on page 62.
Copy a sound from your PC
1 Connect the phone to the USB port on your
desktop PC using the sync cable or the cradle.
2 On your PC, copy the sound file you want. The file
format must be .wav, .mp3, or .wma.
3 From your desktop PC, start ActiveSync.
4 On the main window, click
Explore, double-click
My Smartphone, double-click Storage, double-
click
Application Data, double-click Sounds,
and then paste the sound file into the Sounds
folder.
Delete a sound
You can only delete sounds that you have added, not
sounds that come with the phone.
1 Press
Start > Settings > Sounds > Menu >
Delete Sounds
.
2 Select the sound to delete.
Page 91

Configuring Your Phone
To turn keypad tones on or off
1 Press Start > Settings > Sounds > Keypad
control
.
2 Select
Tone, Click, or None, then press Done.
Profiles
A profile is a group of settings that determines how
your phone notifies you of incoming calls, messages,
or appointments. For example, if you are going into a
meeting, you may want all visual notifications only.
The default profile is called Normal. The table below
compares the default Normal and Silent settings:
Select a profile
The quickest way to select a profile is to scroll to the
profile displayed at the bottom of the Home screen and
press the joystick. Scroll to a new profile and press the
joystick. Or:
1 Press
Start > Settings > Profiles.
2 Scroll to a new profile, press
Menu > Select >
Done.
Tip: You can also change your profile using the Quick
List. Press the Power button and then select the profile.
Edit a profile
1 Press Start > Settings > Profiles.
2 Scroll to the profile to edit.
3 Press
Menu > Edit.
4 Modify the settings and press
Done.
To revert to the default profile settings, press
Menu >
Profile Normal Silent
Auto-answer
n/a n/a
Ring type
ring vibrate
Page 92

Voq User Guide
Change the Home screen
1 Press Start > Settings > Home Screen.
2 In
Home screen layout, Color scheme, and
Background image, select the option you want.
3 Press
Done. The image appears behind the text
on the Home screen.
Copy a background from your PC
You can copy an image from your PC to your phone.
The image must be in .gif, .jpg, or .bmp format. For
best results, use images with a 176 x 200 screen
resolution.
1 Connect the phone to your desktop PC with a USB
cable or place the phone in the desktop cradle.
2 On the desktop PC, start ActiveSync.
3 On the main ActiveSync window:
· Click
File > Explore
· Double-click My Smartphone under Mobile
Specify the idle time before the Home screen
appears
1 Press Start > Settings > Home Screen.
2 In
Time out, scroll to the amount of time for the
phone to be idle before the Home screen
automatically appears.
3 Press
Done.
About
The About screen displays information about the phone
operating system, including the version number and
copyright information.
View operating system information
Press Start > Settings >About.
Page 93

Configuring Your Phone
do not respond, the time it takes for the dialog
box to disappear on its own.
•
In-call alert volume–the volume level for
sounds that play when you are on a call.
Change Accessibility settings
1 Press Start > Settings > Accessibility.
2 Select the options you want, then press
Done.
Beam
If you want to receive infrared beams from other
devices, you must turn on the option to receive
incoming beams.
Receive incoming beams
Press Start > Settings > Beam > Receive
incoming beams
. The phone receives all incoming
which you connect. This helps prevent unauthorized
users from accessing your device. You can store two
types of certificates on your phone:
•
Personal certificates–Establish your identity.
•
Root certificates–Establish the identity of serv-
ers to which you connect.
View and delete certificates
Press Start > Settings > More > Certificates.
· To view the list of personal certificates, press
Personal.
· To view the list of root certificates, press
Root.
· To delete a certificate, scroll to it, then press
Menu > Delete.
· To view details about a certificate, select it in
the list.
Page 94

Voq User Guide
Press Start > Settings > More > Data
Connections
Dial-up connections
You can create a dial-up connection to connect
remotely to the Internet, a Wireless Application Protocol
(WAP) network, or your company network.
When you open a program that is configured to use this
connection, your phone connects automatically. For
example, you can create a connection to the Internet
and then configure Internet Explorer to use it.
Create a dial-up connection
1 Press Start > Settings > More > Data
Connections
> Menu > Edit Connections >
Dial-up Connections > Menu > Add.
2 Enter the requested information as follows and
then press
Done:
·
Description–enter a name for the
connection.
·
Connects to–scroll to the network.
Caution: If you set the Internet connection field
to a specific GPRS connection (rather than to
Automatic), the phone uses this GPRS connection
even when it is connected to your desktop PC
through the cradle or a sync cable. In other words,
data always travels over the air. This could result in
higher charges from your service provider.
As a general rule, leave the
Internet connection field set
to
Automatic.
Page 95

Configuring Your Phone
your company network or the Internet, which is faster
than a dial-up connection. For instructions, see “GPRS
connections” on page 97.
Edit a dial-up connection
1 Press Start > Settings > More > Data
Connections > Menu > Edit Connections >
Dial-up Connections
.
2 Scroll to the connection to edit.
3 Press
Menu > Edit.
4 Change any information, then press
Done.
Delete a dial-up connection
1 Press Start > Settings > Data Connections >
Menu > Edit Connections > Dial-up
Connections
.
2 Scroll to the connection to delete.
3 Press
Menu > Delete.
Create a VPN connection
1 Press Start > Settings > Data Connections >
Menu > Edit Connections > VPN
Connections > Menu > Add
.
2 Enter the requested information as follows, then
press
Done:
·
Description–enter a name for the
connection.
·
VPN type–scroll to the type of VPN.
·
Server–enter the VPN server name.
·
Connects from–scroll to the type of network
from which you will connect to the VPN
(typically The Internet).
·
Connects to–scroll to the type of network to
which you will connect (typically My company
Network).
·
User name–enter your user name for the
VPN.
·
Password–enter your password.
Page 96

Voq User Guide
Edit a VPN connection
1 Press Start > Settings > Data Connections >
Menu > Edit Connections
> VPN
Connections.
2 Scroll to the connection to edit.
3 Press
Menu > Edit.
4 Change any information and press
Done.
Delete a VPN connection
1 Press Start > Settings > Data Connections >
Menu > Edit Connections
> VPN
Connections.
2 Scroll to the connection to delete.
3 Press
Menu > Delete.
Proxy connections
Proxy connections provide access to the Internet over
an existing connection to your company network.
·
Connects from–Scroll to the type of network
from which you will connect.
·
Connects to–Scroll to the type of network to
which you will connect.
·
Proxy (name:port)–Enter the proxy server
name and port number in the form: server
name:port number.
·
Type–Scroll to the type of proxy connection to
create.
·
User name–Enter your user name for the
network to which you will connect.
·
Password–Enter your password.
Note: If you are not sure about the information to
enter, ask your network administrator.
Edit a proxy connection
1 Press Start > Settings > Data Connections >
Menu > Edit Connections
> Proxy
Connections
.
Page 97

Configuring Your Phone
3 Press Menu > Delete.
GPRS connections
If you subscribe to General Packet Radio Services
(GPRS), you can set up a GPRS connection to gain
access to your company network or the Internet. When
you open a program that connects to the Internet, the
phone uses this connection.
As a general rule, if you buy a Voq phone from a
service provider, the GPRS connection is already set.
Create a GPRS connection
If you change your service provider and insert a new
SIM
card into the phone, you must create a new GPRS
connection. Contact your service provider for the GPRS
connection settings.
2 Enter the requested information as follows and
press
Done:
·
Description–enter a name for the
connection.
·
Connects to–scroll to the type of network to
which you will connect.
·
Access point–enter the information provided
by your system administrator.
·
User name–enter the user name for the GPRS
network.
·
Password, enter the password.
·
Primary DNS–enter the primary domain
naming system (DNS) address, as provided by
your network administrator.
·
Secondary DNS–enter the secondary DNS
address, as provided by your system
administrator.
·
IP address–enter the IP address provided by
your system administrator.
Caution: Always delete your old GPRS connection.
Page 98

Voq User Guide
Delete a GPRS connection
Press Start > Settings > Data Connections >
Menu > Edit Connections
> GPRS Connections >
Menu > Delete
.
Adding a URL exception
Some URLs for Web pages on your company intranet
may use periods, for example:
intranet.companyname.com. To view these pages in
Internet Explorer, you must create an URL exception,
otherwise, the pages do not display.
Note: You do not need to create URL exceptions for
Internet URLs.
Add a URL exception
1 Press Start > Settings > Data Connections >
Menu > Work URL Exceptions > Menu >
Add
.
Delete a URL exception
1 Press Start > Settings > Data Connections >
Menu > Work URL Exceptions
.
2 Scroll to the URL to delete.
3 Press
Menu > Delete.
Date and time
Use Date and Time settings to change the local time
zone, the current date and time, and to set the alarm.
Set the date and time
1 Press Start > Settings > Date and Time.
·
Time Zone–scroll to your time zone.
·
Date–scroll to the month, day, or year and
edit the information.
·
Time–scroll to a number and edit it.
2 Press
Done.
Page 99

Configuring Your Phone
Owner information
Owner Information settings allow you to record
personal information such as your name, phone
number, and e-mail address. If, for example, you lose
your phone, the person finding it can contact you.
Configure owner information
1 Press Start > Settings > Owner Information.
2 Enter your information, then press
Done.
Power management
Power Management settings provide ways to conserve
battery power, such as a timeout for the display and
backlight when the phone is idle.
Configure power management settings
Regional settings
Regional settings change the language, date, and time
style, as well as number and currency formatting
options.
Configure Regional Settings
1 Press Start > Settings > Regional Settings.
·
Language–scroll to the language to use when
entering information.
·
Locale–scroll to your locale. This changes the
remaining settings appropriately.
2 Configure other settings in the same manner.
3 Press
Done.
Note: After changing the language, you must turn the
phone off and on again for the change to take effect.
Voq software updates
Page 100

Voq User Guide
installation of the update file. Press Install to update
your phone. If you cancel the VoqUpdate screen, the
phone displays it again on a periodic basis. You should
install all updates at your earliest convenience to
ensure the smooth operation of your phone.
In the event of a major upgrade, you may need to use
your PC to download the software or firmware and
install it on your phone using ActiveSync. The phone
will notify you of any action you need to take.
Change VoqUpdate settings
You can choose how often your phone checks for
updates.
1 Press
Start > More > VoqUpdate > Menu >
Settings
.
2 Choose
Daily or Weekly.
Manually check for updates
 Loading...