

Page 1

DART 200 CDPD Modem
For CDPD Versions 1.0 and 1.1
User’s Guide
Firmware Version 3.0.10
Revision 1.0
Part Number: 1197-00
January 1998
Page 2

DART 200 CDPD Modem User's Guide
?
NOTE:
This guide provides the information necessary to program the Data Access Radio Transceiver
(DART) 200 for operation on Cellular Digital Packet Data (CDPD) 1.0 or 1.1 networks. The factory
default is for 1.1 mode. If you need to operate in CDPD 1.0 mode, refer to Selecting CDPD 1.0 or 1.1
mode of operation, p. 2-8, for detailed instructions.
The guide provides information for use with the current released version of the DART 200 software
(3.0.10). See the ATI command in Appendix F, DART AT Commands, to determine the firmware
version your DART 200 is currently using. If you need a prior or newer version of the software please
contact Sierra Wireless for the desired download package.
Sierra Wireless, Inc. ii
Page 3

DART 200 CDPD Modem User’s Guide
Important Notice
The Data Access Radio Transceiver (DART) can only be exported from the US, or re-exported to another country with the
issuance of an export license from the US Government. Contact Sierra Wireless for more information.
Because of the nature of wireless communications, transmission and reception of data can never be guaranteed. Data can be
delayed, corrupted, or be totally lost. Although significant delays or losses of data are rare when wireless devices such as DART
are used in a normal manner with a well-constructed network. DART should not be used in situations where failure to transmit or
receive data could result in damage of any kind to the user or any other party, including but not limited to personal injury, death,
or loss of property. Sierra Wireless, Inc., accepts no responsibility for damages of any kind resulting from delays or errors in data
transmitted or received using DART, or for failure of DART to transmit or receive such data.
Contact Information
Sierra Wireless, Inc.
260 - 13151 Vanier Place, Richmond, BC, Canada V2V 2J2
Tel. 604.231.1100 or 313.528.5880
Fax. 604.231.1109
Email: support@sierrawireless.com
Web site: www.sierrawireless.com
Part Number: 1197-00, Revision 1.0
© 1997 Sierra Wireless, Inc. All rights reserved.
Printed in Canada.
First Printing: January, 1998.
No part of this publication may be reproduced, stored in a retrieval system, or transmitted in any form or by any means, without
the prior permission of the publisher.
AT is a trademark of Hayes Microcomputer Products, Inc.
Hayes is a registered trademark of Hayes Microcomputer Products, Inc.
All other trademarks are owned by their respective companies.
The information in this guide is subject to change without notice and does not represent a commitment on the part of Sierra
Wireless, Inc. Sierra Wireless, Inc. shall not be liable for incidental or consequential damages resulting from the furnishing,
performance, or use of this manual
Safety and Hazards
Do not operate the Sierra Wireless modem in areas where blasting is in progress, where explosive atmospheres may be present,
near medical equipment, near life support equipment, or any equipment which may be susceptible to any form of radio
interference. In such areas, the Sierra Wireless modem MUST BE TURNED OFF. The Sierra Wireless modem can transmit
signals which could interfere with this equipment.
Do not operate the Sierra Wireless modem in any aircraft, whether the aircraft is on the ground or in flight. In aircraft, the Sierra
Wireless modem MUST BE TURNED OFF. The reason for this is that when operating in the CDPD or cellular circuit switched
mode, the Sierra Wireless modem can transmit signals which could interfere with various onboard equipment systems.
The driver or operator of any vehicle should not operate the Sierra Wireless modem while in control of a vehicle. Doing so will
detract from the driver or operator’s control and operation of that vehicle. In some states and provinces, operating such
communications devices while in control of a vehicle is an offence.
PN1197-00 Revision 1.0 iii
Page 4

DART 200 CDPD Modem User's Guide
Sierra Wireless, Inc. iv
Page 5

DART 200 CDPD Modem User’s Guide
Contents
Figures xi
Tables xii
About This Guide xiii
Who should read this guide xiii
Skills required to use this guide xiii
What is in this guide xiii
Changes and additions to this guide xiv
Related reading xv
Compliances xvi
FCC xvi
Canadian xvi
Safety information xvii
Conventions used in this guide xvii
1 Introduction 1-1
Description 1-1
New for this version 1-2
DART 200 accessories and services 1-2
RF accessories 1-2
Power accessories 1-2
Hardware options 1-2
Software options 1-2
Services 1-2
Migration considerations 1-2
Contacting your cellular carrier 1-3
CDPD network overview 1-3
AT command set summary 1-4
PN1197-00 Revision 1.0 v
Page 6

DART 200 CDPD Modem User's Guide
2 Installation and Setup 2-1
Field installation 2-1
Physical installation considerations 2-1
Antenna considerations 2-2
Troubleshooting 2-4
Getting started 2-5
Modem setup 2-5
Basic modem personalization 2-6
Selecting CDPD 1.0 or 1.1 mode of operation 2-8
Initial testing 2-8
Setup verification 2-8
Register representation 2-9
Channel acquisition 2-10
Problem determination 2-12
Registration 2-15
Troubleshooting registration failure 2-17
Basic communications 2-21
3 CDPD Security Features 3-1
Airlink security 3-1
Authentication services 3-1
Modem security management 3-2
4 Broadcast and Multicast Operation 4-1
Overview 4-1
Broadcast 4-2
Multicast 4-2
Multicast setup 4-3
5 DART Supported Protocols 5-1
UDP 5-1
Basic UDP characteristics 5-2
Basic UDP communication 5-2
Basic UDP setup options 5-4
UDP server characteristics 5-5
UDP server setup options 5-6
Sample UDP server setups 11
Remote UDP setup 5-11
Host UDP setup 5-12
TCP 5-14
Sierra Wireless, Inc. vi
Page 7

DART 200 CDPD Modem User’s Guide
DART TCP capabilities 5-14
Friends Only mode operation 5-14
TCP communication 5-15
Setup options 5-17
Sample TCP setups 5-19
Remote TCP setup 5-19
Host TCP setup 5-21
SLIP 5-22
Modem setup for SLIP 5-22
SLIP IP Address overview 5-24
SLIP operation 5-26
SLIP initial testing 5-27
Telnet 5-28
Setup options 5-28
Telnet escape commands 5-30
New for this version 5-31
Binary mode considerations 5-31
Telnet operation 5-31
6 Device Attachment 6-1
RS-232 connection 6-1
Null modem function 6-1
7 Vehicle Installation Considerations 7-1
Electrical transients 7-1
Application considerations 7-1
Proximity to other antennas 7-2
8 Application Programming 8-1
AT Command Set Support 8-1
Device drivers 8-2
Application program structure 8-2
DART setup 8-2
Network connection 8-2
Data transfer 8-3
Modes of operation 8-3
Error recovery 8-4
Automatic registration 8-6
Registration timer 8-7
Manual registration 8-7
Auto-Registration at power-on 8-7
Auto-Registration when not registered 8-8
PN1197-00 Revision 1.0 vii
Page 8

DART 200 CDPD Modem User's Guide
Auto-Registration/De-Registration at connection/disconnection 8-8
Deregistration 8-8
Data forwarding 8-8
Manual transmit control 8-9
Automatic transmit control 8-9
Maximum packet size transmit control 8-10
Escape transmit control 8-11
Usage considerations (for TCP and UDP) 8-11
Auto answer setup 8-11
Flow control considerations 8-12
Flow control and the new end-user 8-13
Flow control in application (online) mode 8-13
Hardware flow control operation 8-14
PAD operating mode 8-14
Data and control interface 8-15
CDPD status sensing 8-15
Escaping through the control interface 8-16
Binary data transfer 8-16
Flow control considerations 8-17
Data forwarding considerations 8-17
Parity considerations 8-17
PAD keep-alive considerations 8-18
Timer expiry in transmit mode 8-19
Timer expiry in receive mode 8-19
Timer expiry for keep-alives 8-19
Escape sequence considerations 8-20
Command response options 8-20
Echo option selection 8-21
Channel acquisition restrictions 8-22
Baud considerations 8-22
Maximum block size considerations 8-23
Modem dial directory 8-24
Messages and response codes 8-25
Messages 8-25
Sierra Wireless, Inc. viii
Page 9

DART 200 CDPD Modem User’s Guide
A Limited Warranty and Service A-1
Limited warranty A-1
Service A-1
B Product Specifications B-1
Power requirements B-1
Mobile B-1
Stationary B-1
Peak B-1
Power cable B-1
Size B-1
Weight B-1
Operating environment B-1
RF power output B-1
Frequency range B-1
Data rates B-1
Antenna B-1
Antenna cable B-1
Data connection B-1
Data cable B-2
Protocols B-2
C Charts and Diagrams C-1
D SLIP Setup Examples D-1
Trumpet
D-1
Installation and startup D-1
Windows 95 D-3
E S-Registers E-1
Register display formats E-1
Registers 0 through 99 formats E-2
Register 100 through 126 formats E-2
Register definitions E-3
F DART AT Command Set F-1
AT command set usage F-1
Basic AT commands F-1
Service Provider commands F-24
Clearing BLOCKED status F-25
PN1197-00 Revision 1.0 ix
Page 10

DART 200 CDPD Modem User's Guide
G Loading DART 200 Firmware G-1
Firmware download procedure G-1
H Problem Sheet H-1
Glossary Glossary-1
Acronyms Glossary -1
Terms Glossary-8
Index Index-1
Notes Notes-1
Sierra Wireless, Inc. x
Page 11

DART 200 CDPD Modem User’s Guide
Figures
Figure 1-1. DART 200 front view 1-1
Figure 2-1. Installing DART 200 with mounting bracket 2-2
Figure 2-2. S-Register bit positions 2-9
Figure 2-3. Viewing the network S-Register (S57) 2-13
Figure 2-4. Monitoring the CDPD channel 2-13
Figure 2-5. Viewing registration status with ATS57? 2-15
Figure 4-1. Checking NEI status with AT\S? 4-3
Figure 5-1 Terminal connection to a CDPD network using SLIP 5-25
Figure 6-1. Standard RS-232 connection 6-1
Figure 6-2. Stand-alone RS-232 6-2
Figure 6-3. Null modem location 6-2
Figure 8-1. Viewing the IP Address directory 8-24
Figure C-1. Mounting bracket template C-1
Figure C-2. Modem connector pinout C-1
Figure E-1. S-Register bit positions E-3
PN1197-00 Revision 1.0 xi
Page 12

DART 200 CDPD Modem User’s Guide
Tables
Table 1-1. Basic AT command set 1-5
Table 1-2. Service Provider AT command set 1-6
Table 2-1. S-Registers above 100 2-14
Table 2-2. Registration failure troubleshooting 2-17
Table 3-1. Key types 3-2
Table 5-1. Remote UDP setup 5-11
Table 5-2. Host UDP setup 5-13
Table 5-3. Remote TCP setup 5-20
Table 5-4. Host TCP setup 5-21
Table 6-1. Typical null modem pinout 6-2
Table 8-1. Telemetry options for PAD Mode 8-15
Table C-1. Pin functions C-2
Table C-2. RS-232 signal interface C-2
Table E-1. S-Register digits E-2
Table E-2. Register summary E-3
Table F-1. Commands beginning with letters F-2
Table F-2. Commands beginning with ampersand (&) F-9
Table F-3. Commands beginning with backslash (\) F-13
Table F-4. Commands beginning with asterisk (*) F-18
Table F-5. Enable/Disable Service Provider mode F-24
Table F-6. Service Provider commands beginning with caret (^) F-25
Table F-7 Service Provider commands beginning with dash (-) F-29
Sierra Wireless, Inc. xii
Page 13

About This Guide
Who should read this guide
This User’s Guide is designed to assist application software developers
with setup, installation, testing, and design of applications for the Data
Access Radio Transceiver (DART) 200.
Skills required to use this guide
The reader requires a basic working knowledge of Transmission Control
Protocol/Internet Protocol (TCP/IP) and the use of the Attention (AT)
command set to use this guide.
What is in this guide
This guide provides information and assistance for both physical
installation and programming of the DART.
This guide is composed of eight chapters, eight appendixes, a glossary
and an index.
Chapter 1, Introduction, describes new features for version 3.0.10, how
to migrate from previous versions, and Cellular Digital Packet Data
(CDPD) network information. Also, the AT command set is summarized
in this chapter.
Chapter 2, Installation and Setup, provides the basic information needed
to install, setup, and test the modem on the CDPD network.
Chapter 3, CDPD Security Features, discusses security features such as
airlink security, authentication services, and modem security
management.
Chapter 4, Broadcast and Multicast Operation, discusses the CDPD
broadcast and multicast functions.
Chapter 5, DART Supported Protocols, discusses and gives set up
instructions for the communication protocols supported by the DART,
including User Datagram Protocol (UDP), Transmission Control
Protocol (TCP), Serial Line Interface Protocol (SLIP), and telnet. The
TCP and UDP sections include sample setups for each of the protocols.
PN1197-00 Revision 1.0
Page 14

DART 200 CDPD Modem User’s Guide About This Guide
Chapter 6, Device Attachment, describes the RS-232 interface to the
DART, what a null modem is, and how to determine if one is required.
Chapter 7, Vehicle Installation, discusses the items to consider when
installing the DART 200 in a vehicle.
Chapter 8, Application Programming, describes the AT command set to
use with the DART in detail, presents command usage considerations,
and provides additional information for planning and designing CDPD
applications for the TCP and UDP environments.
Appendix A, Limited Warranty and Service, gives important warranty
information and instructions for getting service.
Appendix B, Product Specifications, summarizes the physical, electrical,
and environmental specifications for the DART 200.
Appendix C, Charts and Diagrams, provides the DART mounting
bracket template and the modem connector pinout figure.
Appendix D, SLIP Setup Examples, gives a setup example for the
Trumpet Winsock and directions for getting Windows 95 support.
Appendix E, S-Registers, lists the Status (S)-Registers supported by the
DART 200 and describes their function and usage.
Appendix F, DART AT Command Set, lists all the DART AT commands
and provides detailed descriptions of their function and usage.
Appendix G, Loading DART Firmware, describes how to update DART
200 firmware.
Appendix H, Problem Sheet, provides a Sierra Wireless form for
submitting problems to be resolved.
Glossary
Index
Changes and additions to this guide
For those readers familiar with the DART 200 User's Guide, the
following items have been added or enhanced:
• Migration considerations, p. 1-2
• Anntena grounding caution, p. 2-3
• Registration progress status in Registration, p. 2-15 and p. 8-6
• Improved description of Modem security management, p. 3-1
• Sample UDP setups, p. 5-11
• Ability to get client's IP Address and port in bullet point UDP server
communication, p.5-8 and in TCP communication, p. 5-15
• Friends Only mode operation, p. 5-14
Sierra Wireless, Inc. xiv
Page 15

DART 200 CDPD Modem User’s Guide About This Guide
• Sample TCP setups, p. 5-19
• Automatic SLIP restart bullet point, p. 5-24
• Telnet operation, p. 5-31
• Maximum packet size transmit control, p. 8-9
• Escape transmit control, p. 8-10
• Hardware flow control operation, p. 8-13
• PAD operating mode, p. 8-14
• RS-232 signal levels and states, in Table C-2, RS-232 signal
interface, p. C-2
• Channel acquisition restrictions, p. 8-21
• Modem dial directory, p. 8-24
• Message and response codes, p. 8-25
• Windows 95, p. D-3
• Clearing BLOCKED status, F-25
• Index, p. I-1
Related reading
Additional information regarding the CDPD network and communication
information can be found in the following references:
• Cellular Digital Packet Data System Specification, CDPD Forum,
401 N. Michigan Ave., Chicago, IL 60611, (tel.) 800.335.CDPD
• TCP/IP, Running a Successful Network, K. Washburn and J.T.
Evans, NY, Addison-Wesley, 1993
• Internetworking with TCP/IP, D.E. Comer, N.J., Prentice Hall, 1991
• The Whole Internet, E. Krol, Sabastopol, CA, 1992,
(tel.) 800.998.9938
• Computer Networks, A.S. Tannenbaum, N.J., Prentice Hall, 1989
PN1197-00 Revision 1.0 xv
Page 16

DART 200 CDPD Modem User’s Guide About This Guide
??
??
Compliances
FCC
This equipment has been tested and found to comply with the limits for a
Class B digital device, pursuant to Part 15 of the FCC rules. These limits
NOTE:
This unit was tested
with shielded cables on
the peripheral devices.
Shielded cables must be
used with the unit to
insure compliance.
provide reasonable protection against harmful interference in residential
installations. This equipment generates, uses and can radiate radio
frequency energy and, if not installed and used in accordance with the
instructions, can cause harmful interference to radio communications.
However, there is no guarantee that interference will not occur in a
particular installation. If this equipment does cause harmful interference
to radio or television reception, determined by turning the equipment off
and on, try to correct the interference by one or more of the following
measures:
• Reorient or relocate the receiving antenna
NOTE:
The manufacturer is
not responsible for any
radio or TV
interference caused by
unauthorized
modifications to this
equipment. Such
modification could void
the user’s authority to
operate the equipment.
• Increase the separation between the equipment and receiver
• Connect the equipment to an outlet on a circuit different from the
circuit the receiver is connected to
• Consult the dealer or an experienced radio/TV technician for help
Changes or modifications not expressly approved by the manufacturer
can void the user’s authority to operate the equipment.
Canadian
“This digital apparatus does not exceed the Class B limits for radio noise
emissions from digital apparatus as set out in the interference causing
equipment standard entitled ‘Digital Apparatus’, ICES-003 of the
Department of Communications.”
“Cet appareil numerique respecte les limites de bruits radioelectriques
applicables aux appareils numeriques de Classe B prescrites dans la
norme sur le materiel brouilleur: ‘Appareils Numeriques’, NHB-003
edictee par le ministre des Communications.”
Sierra Wireless, Inc. xvi
Page 17
DART 200 CDPD Modem User’s Guide About This Guide
!!
injury.
Safety information
A caution in the margin, as shown at the left or in the body of the text,
denotes a procedure or practice if not performed correctly could result in
CAUTION:
A caution calls
attention to a procedure
or practice if not
performed correctly
could result in loss of
data or damage to
equipment.
WARNING:
Denotes a hazard. A
warning calls attention
to a procedure or
practice if not
performed correctly
could result in personal
loss of data, or damage to equipment.
A warning in the margin, as shown at the left or included within the body
of the text denotes a hazard. A caution calls attention to a procedure or
practice if not performed correctly could result in personal injury.
Conventions used in this guide
The following conventions are used in this guide to help readers locate
and interpret information easily.
Italics Italicized text is used for book titles, and for
cross-referencing chapter titles, and subsections
within chapters. In cross-references the most
specific item, usually, the last item, is italicized, for
example:
• Chapter 1, Introduction
• Chapter 1, Introduction, Description
Courier
Courier text is used to show on-screen text, for
example:
at\s?
* NEI 0 = IP ADDRESS 198.225.189.032
GMID 00000
OK
SMALL CAPS
Small capitals are used for key names, key
combinations, and key sequences, for example:
Press ENTER.
ALL CAPS All capitals are used to show the connection states
of the DART, for example, CONNECT.
Bold
Bold text is used to emphasize the AT commands,
for example, AT\N.
PN1197-00 Revision 1.0 xvii
Page 18

DART 200 CDPD Modem User’s Guide About This Guide
Sierra Wireless, Inc. xviii
Page 19
1 Introduction
Power
Chapter
Description
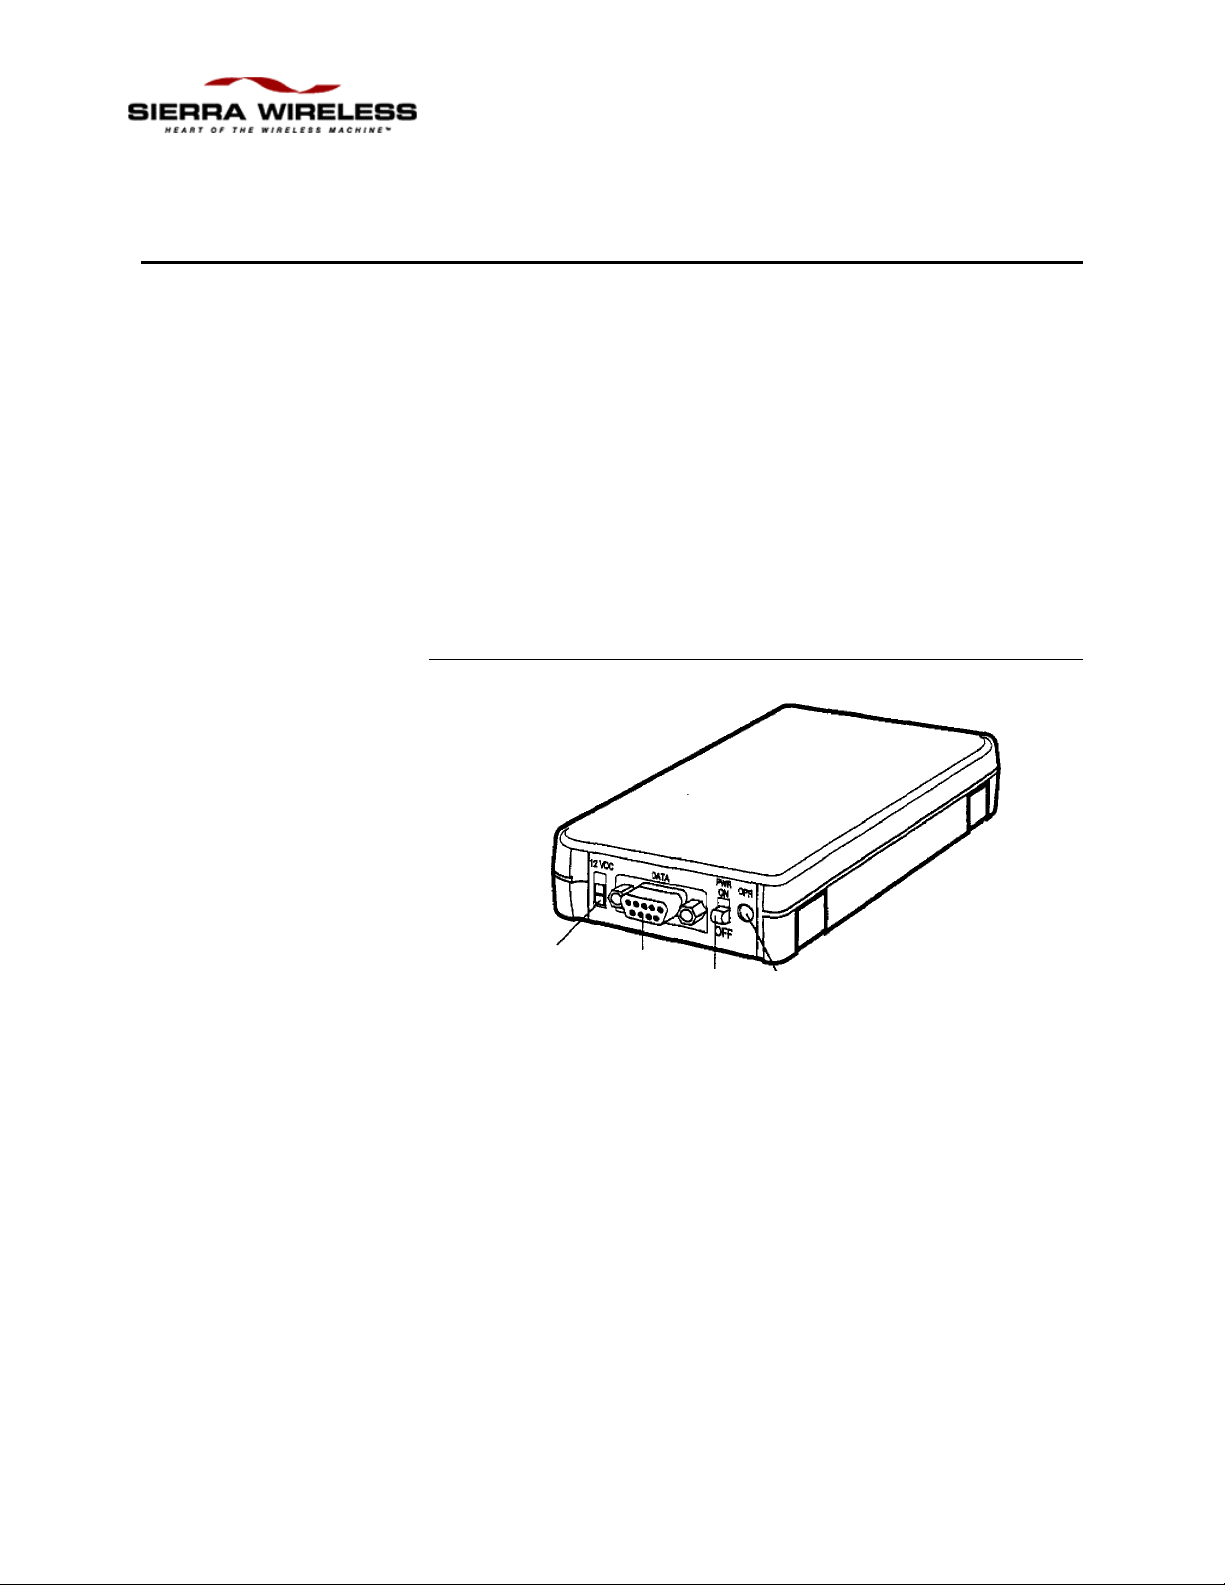
The Data Access Radio Transceiver (DART) 200, as shown in Figure
1-1, is a wireless, multipurpose, programmable modem that provides
reliable, cost effective mobile and fixed communications over the
Cellular Digital Packet Data (CDPD) network. It is a 3-watt, half-duplex
device operating on a regulated 12 volts @ 2.5 amps, and contains flash
memory to allow software upgrades to be made in the field. The DART
200 differs from its predecessor, the DART 100, in that it has the flash
memory to enable field download of software upgrades.
Figure 1-1. DART 200 front view
PN1197-00 Revision 1.0
Power
connection
12VDC*
Data input
RS-232 DB-9
Connector
Switch
Power On
indicator
and RSSI
*Molex Micro-Fit 3.0 4305-0200 - Mates with Molex 43025-0200 on
cable.
The modem is lightweight (only 12 ounces), with a small form factor
(6.3” x 3.4” x 1.0”). Its rugged construction makes it well suited for
industrial and commercial applications of all kinds.
The DART 200 firmware supports either CDPD V1.0 or CDPD V1.1.
The present version of the modem comes pre-selected for CDPD V1.1.
This selection can be altered by modifying an Status (S)-Register. Refer
to Selecting CDPD 1.0 or 1.1 mode of operation, p. 2-8, for details.
Page 20

DART 200 CDPD Modem User’s Guide 1 Introduction
From a networking perspective, the modem has complete built-in
Transmission Control Protocol (TCP), User Datagram Protocol (UDP),
Serial Line Internet Protocol (SLIP), and telnet protocols. Network
communications can be achieved without the attached end-user device
having to provide an integrated TCP or UDP capability. Select the
desired built-in protocol included in the DART 200 by using the
appropriate AT dial command and begin your data transfer. The end-user
can put the DART 200 in SLIP mode, providing an external software
stack, if desired.
A power cord with connector is supplied with each DART 200, and one
copy of this User’s Guide is included with each order. A power supply
and cellular antennas are available as options at additional cost.
New for this version
If you have prior experience with the DART 200, major differences and
enhancements between the old modem software (3.0.9 dated 7/2/96 and
earlier) and the current version are:
• Provides the “friends only” feature for TCP in addition to UDP
• The automatic SLIP restart feature is now available
DART 200 accessories and services
RF accessories
Power accessories
Hardware options
Software options
Services
• 3 dB cellular magnetic mount antenna
• 110 VAC to 12 VDC @2.5 amps power
supply
• Mounting bracket
• V.42 bis data compression
• Developers package
• DART technical training
Migration considerations
If you are migrating applications from prior versions of the DART 200
software to the current version, there are no changes in this version that
alter existing application operation to be aware of. However, to use TCP
Friends Only mode or Auto SLIP restart, some alteration can be required.
Sierra Wireless, Inc. 1-2
Page 21
DART 200 CDPD Modem User’s Guide 1 Introduction
??
Contacting your cellular carrier
There are currently two cellular carriers in each market area: the A side
carrier and the B side carrier. Each carrier can potentially install and
enable CDPD on their cellular network. The CDPD network allows
end-users to visit the regions of other carriers, as well as move within
their home cellular system.
Contact your cellular provider to get an IP Address for your modem.
This IP address lets you operate the modem on the CDPD network.
Although the modem can perform some basic functions without an IP
NOTE:
The EID is found on
the label on the bottom
of your DART 200.
Address, it cannot register, ping, or run end-user applications. Your
carrier requires the Equipment Identifier (EID) of the DART 200 to give
you an IP Address.
Ask your carrier for the following information:
• Side of their operation (A or B)
• IP Address
• IP Address of a router or server to ping when you are testing
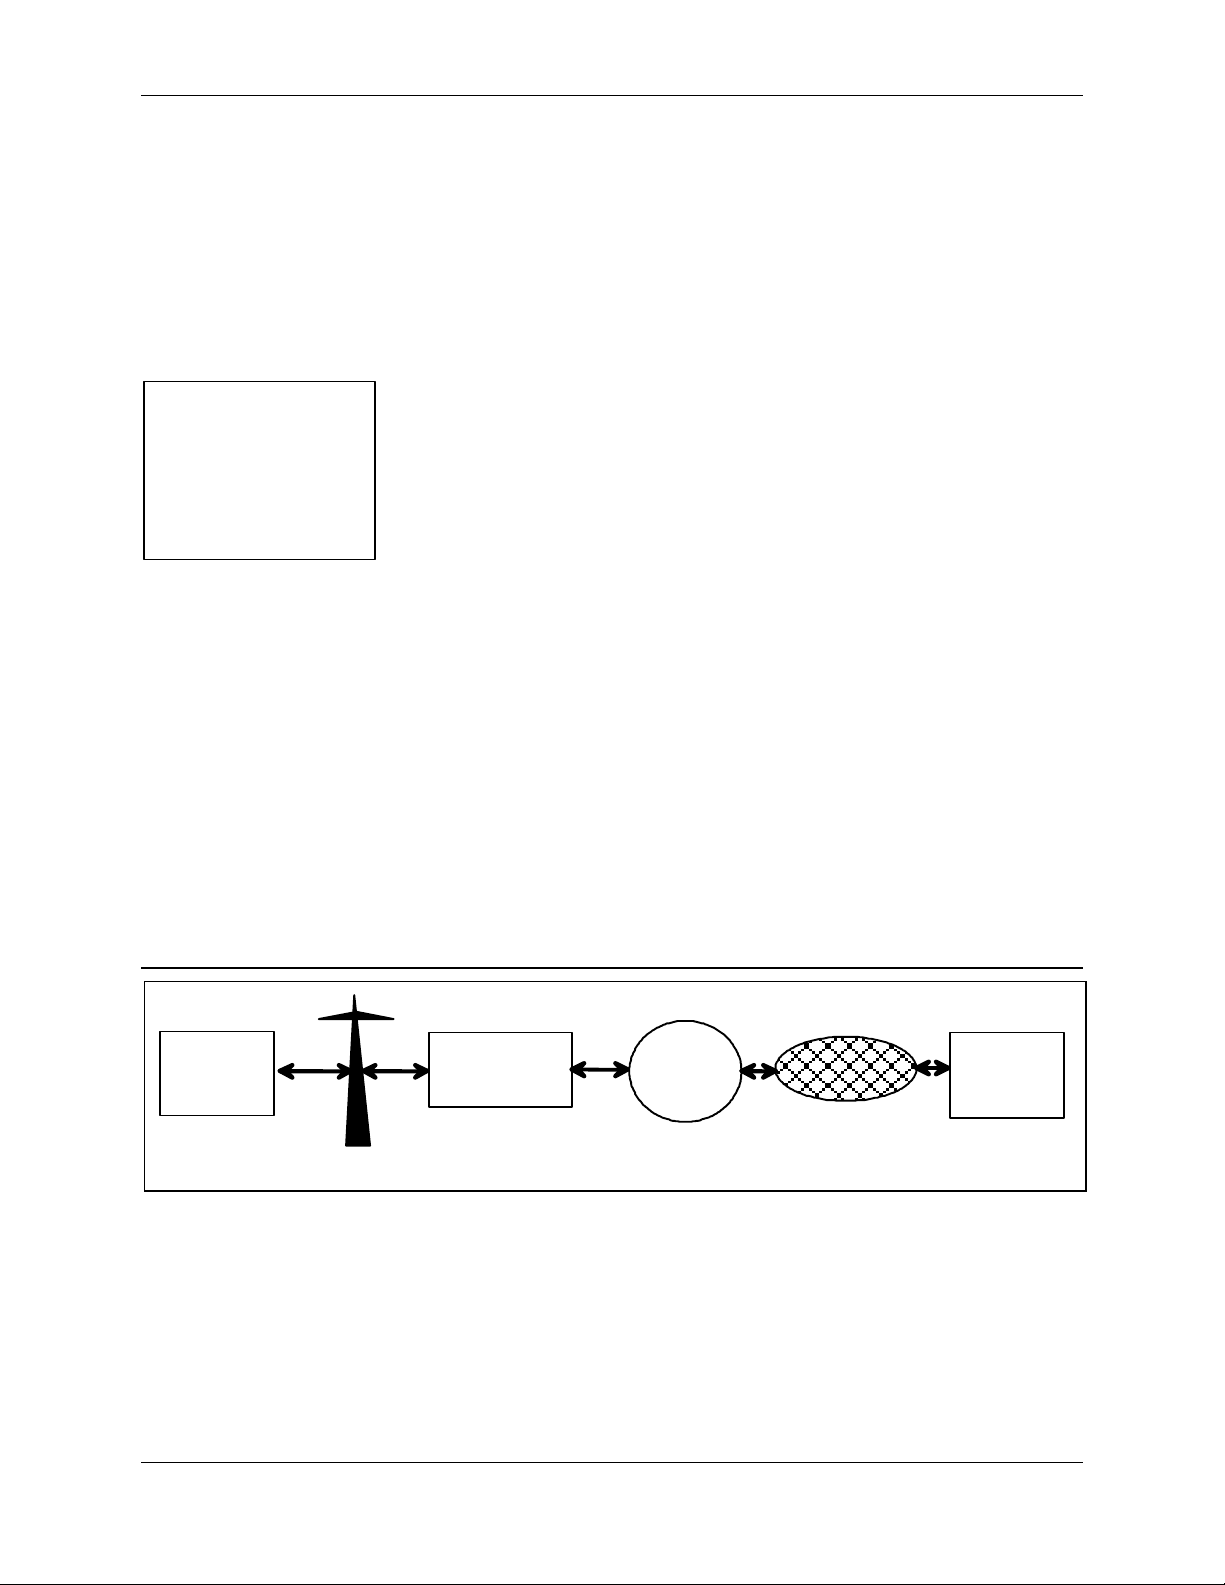
Figure 1-2. CDPD network
M-ES
MAS/
CDPD
Modem
Cellular Tower
CDPD network overview
The CDPD system is an extensive communications system overlaying
the existing cellular voice network, as shown in Figure 1-2. It takes
advantage of the investments already made by cellular providers. By
adding CDPD to the network, packet data can be interspersed with voice
communications at an advantageous cost to the end-user.
F-ES
MDBS MDIS
Public or Private
Packet Data Networks
The communication flow sequence includes:
1. Data packets transmitted from the Mobile End Station (M-ES) are
received at the cellular towers by Mobile Data Base Stations
(MDBSs)
Host
System
2. Data packets are passed by the MDBS to the controlling Mobile Data
Intermediate System (MDIS)
PN1197-00 Revision 1.0 1-3
Page 22

DART 200 CDPD Modem User’s Guide 1 Introduction
??
3. Data packets are routed by the MDIS through the appropriate
network to the Fixed End System (F-ES), usually a host computer
over a public or private data network.
NOTE:
Either the M-ES or
F-ES can initiate
CDPD communication.
4. If a response is required from the F-ES, the process is reversed.
The role of the DART 200 in the CDPD network is to:
1. Accept commands and digital data from the end-user application
equipment through the RS-232 port.
2. Assemble the data into packets.
3. Encrypt the packets.
4. Transmit the encrypted data packet to the network.
The DART 200 also:
1. Receives packet data from the network.
2. Decrypts the packets.
3. Disassembles the packets to extract the application data.
4. Passes the serial data to the end-user’s application equipment
through the RS-232 port.
Airlink security, to prevent eavesdropping, is provided by encrypting the
data packets between the DART 200 and the MDIS. If end-to-end data
security is desired it must be implemented or otherwise provided by the
end-user.
The major cellular carriers and equipment manufacturers created a trade
group called the Wireless Data Forum (formerly the CDPD Forum), that
develops and publishes the governing technical specifications for, and
promotes the use of CDPD technology.
AT command set summary
The Basic and Service Provider AT command sets are listed in Tables
1-1 and 1-2 (pp. 1-5 and 1-6). The AT commands can be concatenated
(end-to-end or with a blank between commands) for up to a length of 80
characters including blanks, for example:
• Normal command concatenation
• ATE1V1&D0&S1\F3\N2
• AT\S?S57?&V+
• White space concatenation (for readability)
• AT E1 V1 &D0 &S1 \F3 \N2
Sierra Wireless, Inc. 1-4
Page 23

DART 200 CDPD Modem User’s Guide 1 Introduction
??
unexpected results.
Do not enter an AT command that requires a parameter without using
one, as the missing parameter defaults to zero. For example, if you
entered AT\N without a value in the range of 1 to 4, the command
defaults to AT\N0. The \N0 setting also forces \J1, causing channel
acquisition problems.
Similarly, the same thing can happen with concatenation. If you enter an
invalid command, such as AT\N?, the DART 200 assumes a
concatenation of AT\N and AT? The result is a display of the last
register referenced (due to the AT?) and to set \Nn to \N0.
Use caution when entering commands. If you get unexpected results,
display the register settings and modem profile with an AT&V command
to check there is no entry error.
NOTE:
Entering invalid AT
commands can cause
incorrect and
Table 1-1. Basic AT command set
A/ Repeat
A Answer Online
D Dial (connection setup)
E Command Mode Echo
F Online Mode Echo
H Hang-up (close connection)
I Identify
O Enter Online Mode
Q Quiet Mode
S Select Register
V Verbose Result Codes
X Extended Result Codes
Z Soft Reset
? Read Selected Register
= Write Selected Register
&C Set DCD Operation
&D Set DTR Operation
&E Escape Code Recognition On or Off
&F Restore Factory Defaults
&L Set DART Line Speed and Format
&S Set DSR Operation
&V View Active Profile
&V+ View Radio Resource status
&W Save Active Profile
&Z Set or Display Dial Directory Entries
\F Set Data Forwarding Operation
\J Restrict Channel Selection
\M Manual Transmit Control
\N Set Side Preference
\O Select PAD or Telnet Operating Mode
\P Set, Enable or Disable PIN
\Q Set Flow Control Operation
\R Network Registration Control
\S Set Subscriber Identity
\T Automatic Transmit Control
*A Select Server Type
*B Enable/Disable Reception of Broadcast Messages
PN1197-00 Revision 1.0 1-5
Page 24

DART 200 CDPD Modem User’s Guide 1 Introduction
Table 1-1. Basic AT command set (cont.)
*C Enable/Disable SLIP TCP Header Compression
*E Enable Network Connection with PIN
*G SLIP Multicast Address Selection
*K TCP PAD Keep Alive
*L Set Listen Port Number
*M Set MAS IP Address for SLIP
*P Ping Remote Host
*R Automatic SLIP Restart
*S Start SLIP (Serial Line IP) Mode
*T Telnet Keep Alive
*U Unblock Modem - Pin Access
Table 1-2. Service Provider AT command set
^A Set the IP Address of modem
^C Clear Blocked Status
^F Force PIN Usage
^G Set Multicast Group ID
^H Set Service Provider ID
^I Set Service Provider network ID
^L Set the Local Service Area ID
^P Enable/disable Supervisor Mode
^S Set the Modem SLIP Address
-L Set Channel Lock
-R Software Reboot
-V View Radio Resource Management Data
-Z View Modem Credentials
Sierra Wireless, Inc. 1-6
Page 25

2 Installation and Setup
Chapter
PP
Field installation
Physical installation considerations
The Data Access Radio Transceiver (DART) 200 is designed for both
stationary and mobile applications. The guidelines for modem
TIP:
Use the optional
mounting bracket to
simplify the physical
installation, refer to
Figure C-1 for the
mounting bracket
template.
installation are:
• Environment - The standalone DART 200 is ruggedly constructed.
However, it is not waterproof, so do not locate the modem where it
can get wet. Also, refer to the humidity specification in Appendix B,
Product Specifications. If installing the DART 200 in a wet
environment, enclose it in a proper National Electrical
Manufacturer’s Association (NEMA) enclosure. Also, install the unit
where there is adequate ventilation to prevent possible overheating
• Location - Installation with clear access to the unit is recommended
for viewing the LED, that indicates power and RF status, and for
accessing the RS-232 port for required personalization or
troubleshooting. Locate the DART 200, if possible, at least 2 feet
from personnel
• Power Source - The DART 200 requires a nominal 13.8 V DC
regulated power source capable of supplying 2.5 amps maximum.
Refer to Appendix B, Product Specifications, for more details. Wire
the supplied power cord (Red positive, Black negative) with a Molex
connector to the power source using a 3.0 amp fuse
• Refer to Figure 2-1 for instructions for installing the DART 200 with
the mounting bracket
PN1197-00 Revision 1.0
Page 26
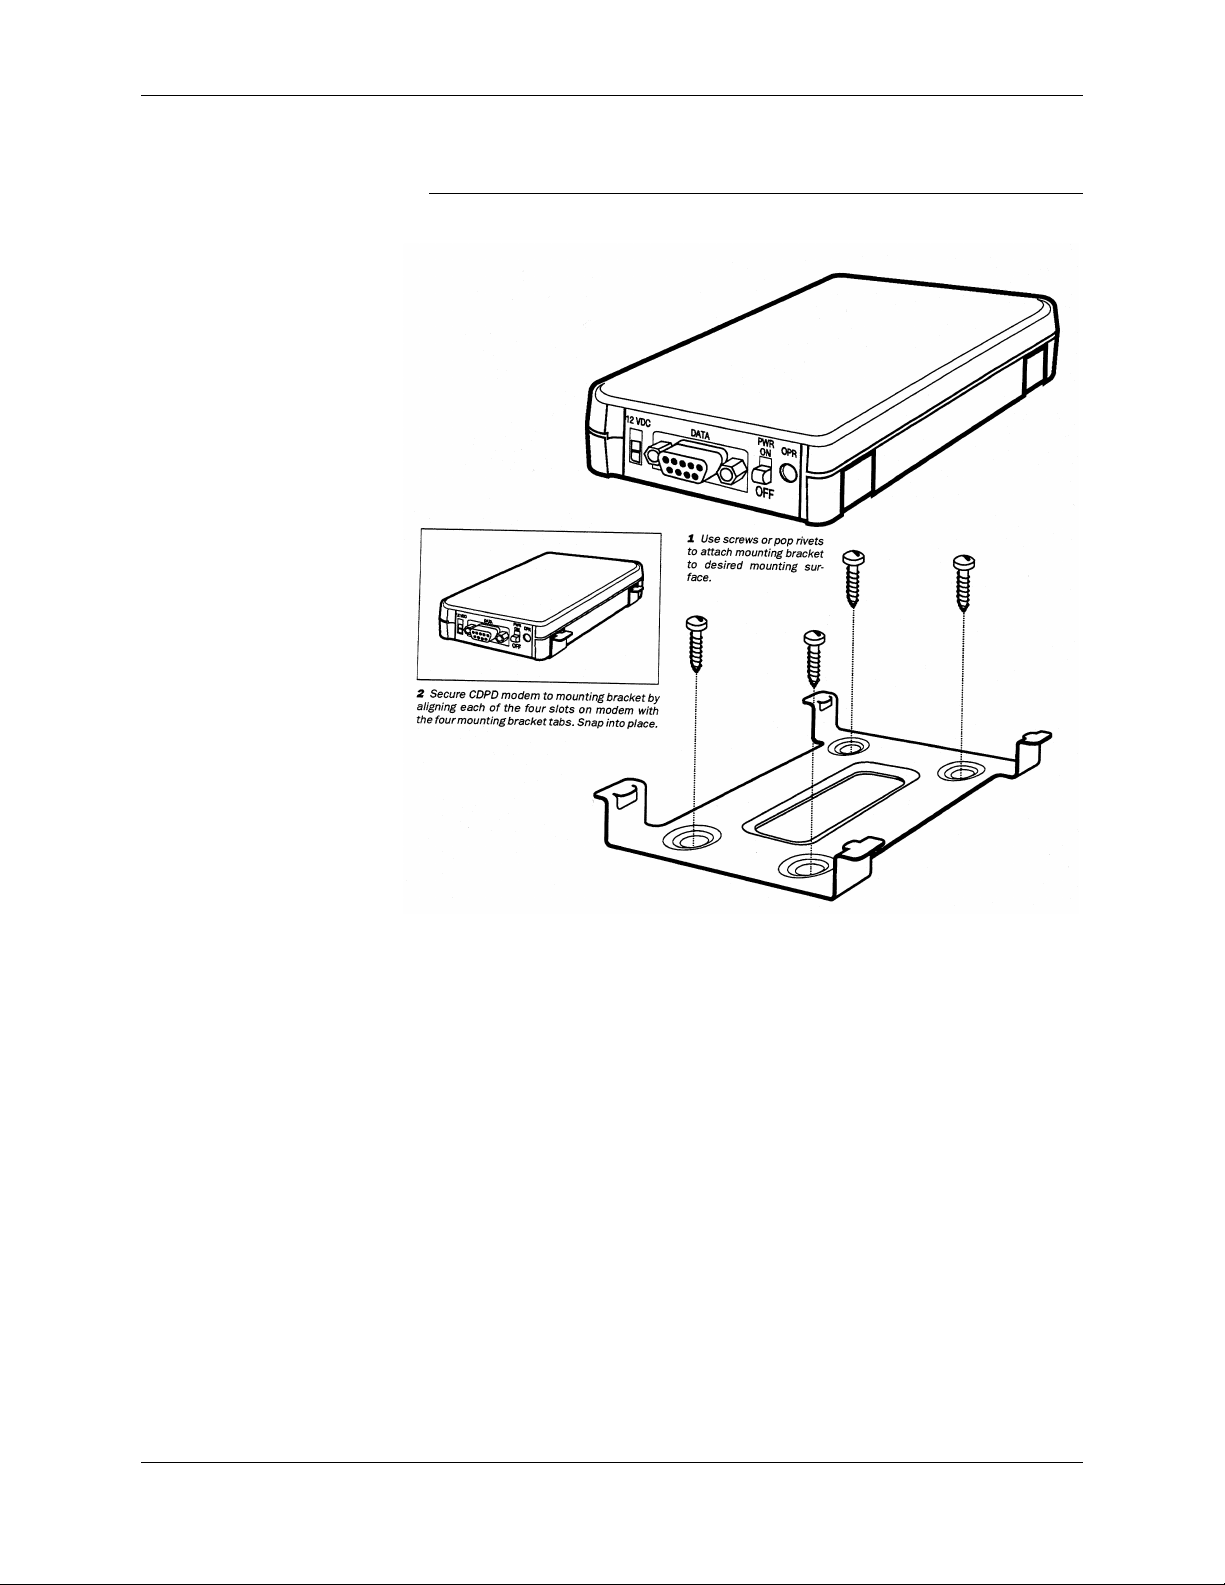
DART 200 CDPD Modem User’s Guide 2 Installation and Setup
Figure 2-1. Installing DART 200 with mounting bracket
Sierra Wireless, Inc. 2-2
Page 27
DART 200 CDPD Modem User’s Guide 2 Installation and Setup
??
Antenna considerations
The DART 200 uses standard mobile cellular radio signals and any
standard cellular antenna of good quality with a maximum gain of 3 dB
NOTE:
Snub-nosed (rubber
duck) antennas,
although they may work
in some areas, are NOT
recommended.
(FCC requirement) will function properly subject to the following
guidelines:
• Location
Locate the antenna as far away from personnel as possible to
minimize signal blocking. For optimum reception, in fixed location
applications position the antenna above the height of personnel and
Operating the unit
without an antenna
does not damage the
modem but can cause
unpredictable results.
nearby equipment or structures. If used inside locate the antenna as
close to a window as possible. In mobile applications, locate the
antenna outside and away from or above any portion of the vehicle
body that can block the RF signals. To determine the actual signal
strength, attach a PC with an ASCII terminal emulator, such as
Procomm, or Kermit, to view the Receive Signal Strength Indication
(RSSI) value in S-Register 102.
• Antenna cable
Select an antenna cable with a low loss, high quality, 50 ohm,
coaxial cable with the appropriate connectors. The cable can be any
length, but lengths greater than 12 feet increase cable loss and offset
CAUTION:
For outdoor fixed
installations ground the
antenna cable using an
antenna discharge unit
to prevent damage to
the modem and the
attached equipment.
the antenna’s nominal gain. If longer length cables are required, use
a heavier wire gauge to reduce the dB loss/ft and to minimize the
effect of the cable loss on antenna gain.
• Ground plane
For installations where a good antenna ground plane (metal surface)
is not available, use a non-ground plane type of antenna to help
maximize signal reception
• Proximity to other antennas
In general, do not locate the DART 200 and its antenna closer than
five feet to another antenna; in certain cases, even more separation is
required. In many vehicular applications, there are high-power
two-way voice transmitters used and usually the antenna mounting
locations are not five feet apart. The effect of the interference from
the two-way transmitters varies from slowing down response times
to blocking modem transmission.
In this situation, separate the antennas as far as possible and then do
a test with the voice system also being used. If the DART 200 works
satisfactorily you do not have an interference problem. If it does not
work properly, then use filtering on the two-way output, the DART
200 input, or both. The calculation to determine the required filtering
is not trivial and usually requires an RF engineer. However, if you do
not have the option to do a test first, this analytical approach is your
only option.
PN1197-00 Revision 1.0 2-3
Page 28

DART 200 CDPD Modem User’s Guide 2 Installation and Setup
??
Troubleshooting
The DART 200 is thoroughly inspected during manufacturing. There are
no end-user access items within the case of the modem. If problems
NOTE:
To aid in
troubleshooting use an
IBM-compatible PC
with an ASCII terminal
emulator, such as
Procomm, Terminal,
Kermit, Hyperterminal,
or a Mac with White
Knight.
occur, check the following:
• Power supply
If the Power On/Registration Indicator is not flashing or glowing
solid red, check the power source for adequate voltage. The modem
requires regulated 12 V DC at 2.5 A. If the power is marginal it can
be the problem. Check the fuse (if any) in the power source, and as a
final test use a voltmeter to check for an open cable.
The DART 200 draws up to 2.5 amps under maximum power output.
The power output is a function of the modem’s distance from the
Mobile Data Base Station (MDBS). It is possible for the modem to
work well with a particular power supply in a location requiring low
power output (low current draw), and yet to fail using the same
power supply in a location requiring a high power output. Check the
amperage rating of the power supply to verify that it is adequate for
all situations.
• Channel acquisition
If the modem does not acquire a CDPD channel (fast blinking or
solid red light), refer to Channel acquisition, p. 2-10, for guidelines
on how to proceed.
• Registration
If the modem does not register refer to Registration, p. 2-15, for
guidelines on how to proceed.
• Unsuccessful data transfer
If the unit registered, but application data transfer is unsuccessful,
check that the RS-232 cable is properly attached. If that does not
correct the problem, substitute a good RS-232 cable (known to
work). If that does not work, you may have a flow control problem.
Refer to Flow control, p. 8-12, for guidelines. Also, review the Dial
command (ATD) in Appendix F, DART AT Command Set, Auto
Answer setup, p. 8-11, and Setup options, p. 5-17 or Basic UDP
setup options, p. 5-4, setup options as appropriate.
Sierra Wireless, Inc. 2-4
Page 29

DART 200 CDPD Modem User’s Guide 2 Installation and Setup
Getting started
Before opening the DART 200 box, but preferably before it arrives,
check that the following equipment is available:
• A 12.0 V DC regulated power source with 2.5 amp capability. You
can either provide your own, or order the power source as an option
with the DART 200
• A standard cellular antenna of good quality with a maximum gain of
3 dB. Cable attached magnetic mount antennas are preferred because
the antenna can be positioned easily for optimum signal reception
• A PC with a communications program capable of operating in ASCII
terminal emulation mode. For IBM PC-compatibles this can be
Procomm, Windows Terminal, Hyperterminal, Kermit or something
similar
This makes the PC function as a terminal attached to the modem and
permits the entering of AT commands required for both modem
setup and diagnostics. It is recommended that the program chosen is
capable of logging terminal communications activity to a file for
later analysis or printout in the event that technical support is
required
• A PC communications cable with a male DB9 connector. If your PC
has a DB25 communications port, get a DB25 to DB9 adapter
(available from electronics stores)
Modem setup
To setup the DART 200:
1. Connect the antenna, PC, and power supply to the DART 200 using
appropriate cables and connectors. The red light on the end of the
modem turns on and start blinking at a rate of approximately once
per second (slow blink). If the light does not turn on, check the
power source and connections.
The red OPR light doubles as a signal strength indicator. When the
DART 200 finds a usable CDPD channel the rate of blinking
increases in proportion to the strength of the received signal. This is
discussed in more detail in Channel acquisition, p. 2-10.
PN1197-00 Revision 1.0 2-5
Page 30

DART 200 CDPD Modem User’s Guide 2 Installation and Setup
2. To proceed, your PC must have the ASCII terminal emulation
program installed and active, and be attached to the CDPD modem
by the PC communications cable. To verify the setup, enter AT and
press ENTER: an OK response should return. To verify that the
connection is with the DART 200 and not with an internal modem,
enter ATI1 and press ENTER. If the response is the modem software
version and date, proceed to Basic modem personalization. If you
fail to get that response, verify that your cable is working and that
the correct COM port is specified for the terminal emulation program
and repeat this step.
3. If you still fail to get the AT echo and/or the OK, enter an AT&V
command to display the modems communications setup, profile,
S-Registers and EID. The first three fields below the baud should be
E1, V1 and Q0. If the values are anything else, change to the correct
values and save the new values by entering ATE1V1Q0&W.
If the AT&V command fails, contact your DART 200 supplier for
technical assistance.
Basic modem personalization
The DART 200 requires an IP Address to be set internally before it can
be registered on the CDPD network. In addition, the side preference (A
or B) for your carrier needs to be specified. This information can be
preloaded by the carrier, but generally the carrier gives it to you upon
request. To determine if the IP Address was preloaded, refer to step 1
(below). If the IP Address was not preloaded contact your carrier to
obtain one along with the side preference (A or B), and a Domain Name
Server (DNS) IP Address.
In addition to the side preference, the DART 200 has 23 additional
operational parameters and several Status (S-)Registers to review. The
default values for these parameters and S-Registers can require changes
if they are not appropriate for your application. However, for initial setup
the default parameters (except for side preference) are adequate.
To set up the DART 200 for operation:
1. Load the IP Address supplied by the carrier. To check if it was
preloaded, use the AT\S? command, as shown in this example:
at\s?
* NEI 0 = IP ADDRESS 198.225.189.032 GMID 00000
OK
* - Means the Network Entity Identifier (NEI) is active
The DART 200 in the sample has the IP Addresses already entered.
Ignore the Group Multicast Identifier (GMID) field for now.
If your modem has no IP Address, the response to the AT\S?
command is OK. Enter the IP Address now, by:
• Putting the modem into Service Provider mode with an
AT^P+51348954 command
Sierra Wireless, Inc. 2-6
Page 31

DART 200 CDPD Modem User’s Guide 2 Installation and Setup
Current active profile
• Entering the IP Address with an AT^An.n.n.n. It defaults to
being put into the first entry in the IP Address table (NEI 0). For
more information, refer to the AT^A command in Appendix F,
DART AT Command Set
• Verify that the IP Address was entered correctly using AT\S?
2. Examine the Modem Operational Parameters (Modem Profile). To
view these parameters, the communication port status and settings,
and the DART 200’s S-Registers use the AT&V command, for
example:
at&v
DART 200
Communication Port Settings:
Auto Baud: 9600 Baud, 8 Data Bits, No Parity, 1 Stop Bit(s)
E1 V1 Q0 F1 X1 &C1 &D0 &E1 &S0
\F3 \J0 \M0 \N3 \O1 \Q2 \T1 *A0 *B0 *C1 *G1 *K0 *R0 *T0
S00:000 S01:001 S02:043 S03:013 S04:010 S05:008 S06:127 S07:020 S08:250
S09:005 S10:080 S11:175 S12:050 S13:060 S14:074 S15:010 S16:050 S17:010
S18:010 S19:151 S20:000 S21:098 S22:016 S23:091 S24:140 S25:000 S26:003
S27:140 S28:140 S29:090 S30:010 S31:010 S32:005 S33:002 S34:001 S35:065
S36:041 S37:007 S38:003 S39:010 S40:090 S41:140 S42:080 S43:100 S44:023
S45:050 S46:005 S47:050 S48:050 S49:040 S50:020 S51:013 S52:026 S53:000
S54:000 S55:000 S56:000 S57:000 S58:058 S59:000 S60:001 S61:143 S62:000
S63:000 S64:022 S65:003 S66:002 S67:020 S68:020 S69:108 S70:010 S71:006
S72:005 S73:005 S74:006 S75:008 S76:240 S77:030 S78:000 S79:001 S80:250
S81:017 S82:002 S83:030 S84:000 S85:000 S86:120 S87:000 S88:020 S89:010
S90:008 S91:003 S92:000 S93:000 S94:000 S95:011 S96:000 S97:002 S98:090
S99:008
EID: 0020EB000B71
(factory defaults)
Most S-Registers are used by the DART control program. The
S-Registers of interest to the end-user are discussed in the following
sections.
3. Set Side Preference with AT\Nn. This command specifies which
service provider side (A or B) to search for a usable CDPD channel.
In each geographical area, there is a maximum of two service
providers (an A side carrier and a B side carrier). Your carrier sets up
this value or provides you with their preference. The default is \N3
(A side preferred), but is not appropriate for most end-users. If you
have an A side carrier, enter AT\N1; if the carrier is B side enter
AT\N2.
4. Verify that there are no channel restrictions in place. These
restrictions are controlled by the \Jn parameter. The default value is
\J0, no restrictions, and is the desired setting. If this parameter has a
non-zero value from prior use, set it to zero with AT\J0 before
proceeding.
5. Save your changes into permanent memory with the AT&W
command. Issue this command after making the above changes to
ensure that new values replace the default values.
6. Display the modem profile using the AT&V command to check that
your change to the \N parameter was successful.
PN1197-00 Revision 1.0 2-7
The basic setup for your CDPD modem is now complete.
Page 32

DART 200 CDPD Modem User’s Guide 2 Installation and Setup
Selecting CDPD 1.0 or 1.1 mode of operation
DART firmware Version 3.0.1 and above can operate in either CDPD 1.0
or 1.1 mode; prior firmware versions support only CDPD 1.0. The
firmware version can be determined by the ATI1 command.
The default is to operate in CDPD 1.1 mode, but in areas where CDPD
1.1 is not yet active, the operating mode can be changed to CDPD 1.0.
To set CDPD 1.0 mode, set S-Register 95 to 8 (default is 11) as follows:
1. Enter Service Provider mode with AT^P+51348954.
2. Set S-Register 95 for CDPD 1.0 mode with ATS95=8.
3. Save change with AT&W.
4. Restart to activate the change with AT-R.
To change back to CDPD 1.1 mode, repeat steps 1 to 4, but set
S-Register 95 to 11 instead of 8.
Initial testing
Setup verification
The first step to make the DART 200 operational is to verify the setup by
doing the following:
1. Use AT\S? to view and verify the IP Addresses, for example:
at\s?
* NEI 0 = IP ADDRESS 198.225.189.032 GMID 00000
OK
* Means the NEI is active
If you are just starting, there should be no problem here, because the
IP Address was just entered. However, if the address needs
correction, put the modem into Service Provider mode with an
AT^P+51348954 command, then enter the IP Address with an
AT^An.n.n.n.
The GMID is used with multicast operation, the value now should be
zero.
Sierra Wireless, Inc. 2-8
Page 33

DART 200 CDPD Modem User’s Guide 2 Installation and Setup
??
wide use.
2. If the NEI information is correct, use AT&V to verify the side
setting (\Nn) and channel restrictions (\Jn), for example:
ar&v
DART 200
Communication Port Settings:
Auto Baud: 9600 Baud, 8 Data Bits, No Parity, 1 Stop Bit(s)
E1 V1 Q0 F1 X1 &C1 &D0 &E1 &S0
\F3 \J0 \M0 \N3 \O0 \Q2 \T1 *A0 *B0 *C0 *G1 *K0 *R0 *T0
S00:000 S01:001 S02:043 S03:013 S04:010 S05:008 S06:127 S07:020 S08:250
S09:005 S10:080 S11:175 S12:050 S13:060 S14:074 S15:010 S16:050 S17:010
S18:010 S19:151 S20:000 S21:098 S22:016 S23:091 S24:140 S25:000 S26:003
S27:140 S28:140 S29:090 S30:010 S31:010 S32:005 S33:002 S34:001 S35:065
S36:041 S37:007 S38:003 S39:010 S40:090 S41:140 S42:080 S43:100 S44:023
S45:050 S46:005 S47:050 S48:050 S49:040 S50:020 S51:013 S52:026 S53:000
S54:000 S55:000 S56:000 S57:000 S58:058 S59:000 S60:001 S61:143 S62:000
S63:000 S64:022 S65:003 S66:002 S67:020 S68:020 S69:108 S70:010 S71:006
S72:005 S73:005 S74:006 S75:008 S76:240 S77:030 S78:000 S79:001 S80:250
S81:017 S82:002 S83:030 S84:000 S85:000 S86:120 S87:000 S88:020 S89:010
S90:008 S91:003 S92:000 S93:000 S94:000 S95:011 S96:000 S97:002 S98:090
S99:008
EID: 0020EB000B71
NOTE:
The bits are numbered
in high to low order
from left to right that is
the reverse of some
notation systems in
If this is the initial setup, the only parameter that changed from the
default value is the side preference specification (\N). Verify that it is
set to match your carrier before proceeding. Refer to Basic modem
personalization, p. 2-6, for details.
3. If the modem has been used previously, then some of the profile
parameters and S-Registers might be altered. Check that the profile is
correct before proceeding to step 4.
4. If you made changes, save the new configuration with the AT&W
command before continuing.
Register representation
The DART 200 keeps its status and control information in S-Registers.
Many of its functions are controlled by bits within a register, and are
displayed as a numerical value. Figure 2-2 shows the register notation
used.
Figure 2-2. S-Register bit positions
S-Register
Bit Position 7 6 5 4 3 2 1 0
PN1197-00 Revision 1.0 2-9
Page 34

DART 200 CDPD Modem User’s Guide 2 Installation and Setup
The values associated with the bit positions are listed below.
Bit Position Value
0 1
1 2
2 4
3 8
4 16
5 32
6 64
7 128
For example, if register bits 0,3, and 5 are on, the register value would be
1+8+32=41.
Channel acquisition
For the DART 200 to acquire a channel for operation it must have a good
antenna and an MDBS near enough to deliver a signal that is strong
enough to be received by the modem. CDPD systems are currently
defined as being either forced hopping or dedicated.
In a forced hopping (often called sniff-and-hop) system, an MDBS has
multiple channels (from 1 to 21, but usually 7) shared by voice calls or
CDPD. CDPD uses any available channel when it is not in use for voice.
If a voice call wants a channel already in use for CDPD, the MDBS notes
that occurrence (sniffs) and moves CDPD to another available channel
(hops).
The modem detects the fact that the current channel no longer supports
CDPD (loss of sync), and searches for an alternate CDPD channel using
the MDBS’s adjacent channel list. In such a system, CDPD operates in
the time between voice calls. During busy periods there is little time
available. Applications requiring quick response times are adversely
affected by the hopping.
In a dedicated system, each MDBS has one or possibly two channels
assigned for CDPD use only. In such a system, contention with voice
calls is not an issue and application response times are much more
predictable.
• CDPD Version 1.0 Mode Operation
In the above system types, the channel acquisition process is:
1. The DART 200 powers up and immediately begins searching for
a CDPD channel to use. It searches sequentially, from the lowest
numbered channel to the highest, on the side (A or B) it is
configured to use, starting at a relatively strong signal level (-60
dBm).
2. Each time the DART finds an active channel, the modem checks
to determine if it is in use for voice or available for CDPD.
Sierra Wireless, Inc. 2-10
Page 35

DART 200 CDPD Modem User’s Guide 2 Installation and Setup
3. If the channel is not available for CDPD use, the DART
continues searching, dropping the allowable signal level by 10
dB after each pass through all the cellular channels on the side it
is searching, until it finds a usable channel or reaches the
weakest allowable signal level (-110 dBm).
4. If an available CDPD channel was not found, the search starts
over again at -60 dBm and the modem repeats the spiral search
process indefinitely until an available CDPD channel is found.
5. When a CDPD channel is found the modem checks that the
block error rate (BLER) is acceptable.
6. If the BLER is adequate, the DART extracts the network
operating parameters (continuously being broadcast by the
MDBS) from the data stream, then stays on the channel as long
as possible awaiting commands from the Mobile Application
Subsystem (MAS); the attached device. If the BLER is not
acceptable the search continues.
7. While on the CDPD channel, the modem accepts operating
parameters (called XID parameters) broadcast by the base
station, including thresholds, threshold time limits, and adjacent
channel lists. The modem continually monitors its radio
environment and compares the current signal quality to the
thresholds and time limits; if any of the thresholds are exceeded
for longer than their permissible time limit, the modem must go
find a better channel. To speed up this search the modem makes
use of the adjacent channel lists picked up from the base station
along with the operating parameters.
This process allows a modem to stay on an acquired channel, until
the signal strength or BLER fails the threshold test. In a situation
where the M-ES is mobile, the modem can continue to use a channel
far from its original acquisition point (a phenomenon known as cell
dragging). In many cases this causes interference with voice
channels on intervening base stations. One of CDPD Version 1.1’s
main objectives is to avoid cell dragging.
• CDPD Version 1.1 mode operation
In the system types already described the channel acquisition process
is:
1. The DART 200 powers up and immediately searches for a
CDPD channel to use. It searches sequentially, from the lowest
number channel to the highest, on the side (A or B) it is
configured to use recording the signal strength (RSSI) of every
active cellular channel encountered.
2. The DART then sorts the channels in descending order of
strength and evaluates them to find the best available (strongest
signal) CDPD channel (in a dedicated system many in the list are
voice only channels).
PN1197-00 Revision 1.0 2-11
Page 36

DART 200 CDPD Modem User’s Guide 2 Installation and Setup
3. If the CDPD channel’s BLER is acceptable, the DART acquires
the power product, current CDPD operating parameters, and
adjacent channel lists from the MDBS. If the channel BLER is
not satisfactory, the modem goes to the next best CDPD channel
in the list and repeats this step using the next best channel.
4. Once a channel is acquired, there is no guarantee that the modem
stays there very long. In a sniff-and-hop system it is forced to
continuously hop from one channel to another because voice
traffic has priority. Even in a dedicated system, if the modem is
mobile, it is forced to frequently change channels as it travels
from one cell coverage area to another.
5. The XID parameters broadcast by the base station, in addition to
the thresholds, threshold time limits, and adjacent channel lists
used with CDPD 1.0, include an evaluation frequency (scan
time), and a signal strength change (scan delta) value. As in
CDPD 1.0 mode, the modem continually monitors its radio
environment and compares the current BLER value to the XID
threshold and time limit; if the threshold is exceeded for longer
than the permissible time limit, the modem finds a better
channel. To speed up this search, the modem makes use of the
adjacent channel lists picked up from the base station along with
the operating parameters.
CDPD Version 1.1 requires that the DART periodically evaluates
alternative channels to ensure that it is still operating on the best
available channel. Also, CDPD Version 1.1 requires that if the DART
detects an RSSI changes of more than a predetermined amount, from the
initial acquisition value, it must check that it is still using the strongest
channel in the area. These features, scan time (usually 90 seconds), and
scan delta (usually +/- 8 dB), help to keep the M-ES on the best available
channel, and avoids the cell dragging phenomenon common to mobile
M-ESs operating in CDPD 1.0 mode.
Whenever the RSSI threshold or scan delta is exceeded, or the scan timer
expires the modem must locate a better channel if possible. To speed up
this search, the modem makes use of the adjacent channel lists picked up
from the base station along with the operating parameters.
Problem determination
There are three ways to determine if a channel was acquired:
• By observing the OPR light (simplest way). At power on this light
flashes at the rate of about once per second. When the DART 200
acquires a channel the rate of flashing speeds up to at least twice per
second and flashes faster as the signal strength increases. A very
strong signal causes the light to glow steadily
• By viewing S-Register 101 with the ATS101? command. A value of
1 indicates that a channel has been acquired
Sierra Wireless, Inc. 2-12
Page 37

DART 200 CDPD Modem User’s Guide 2 Installation and Setup
• By viewing the Network Status Register (S-Register 57) with the
AT&V command or the ATS57? command. This is the
recommended method, because viewing S-Register 57 shows other
useful information, as shown in Figure 2-3
Figure 2-3. Viewing the network S-Register (S57)
ATS57?
160
OK
A value of 128 (bit 7 on) or higher indicates that the modem acquired
a channel. If auto-registration at power on (AT\R4) is specified, then
the value is 160 (bits 5 and 7 on) or 161 (bit 0 also on) indicating that
it completed registration.
If the DART cannot acquire a channel, move the antenna to a better
location. To determine the best location for the antenna you need some
indication of received signal strength. This is given by the RSSI; one of
the radio resource values. View RSSI with the ATS102? or the AT&V+
command.
Figure 2-4 is a snapshot of the CDPD channel at a specific point in time.
View this data several times to see if the modem is staying on a single
channel (S-Register 100) or continues to search. If the value in
S-Register 101 is a zero, then the search is continuing.
Figure 2-4. Monitoring the CDPD channel
at&v+
DART 200
S100:00799 S101:00001 S102:-0073 S103:00002 S104:00040 S105:00000
S106:00001 S107:00000 S108:00022 S109:00010 S110:00079 S111:00001
S112:00000 S113:00000 S114:00000 S115:00000 S116:00000 S117:00000
S118:00018 S119:0FFFF S120:00000 S121:00002 S122:00000 S123:00002
S124:00030 S125:14400 S126:00005
If the modem cannot acquire a usable channel (S-Register 101 = 1) after
a few minutes there are several possible causes:
• The signal strength is too weak
• The cell is not currently CDPD capable (check with your cellular
carrier)
• The modem has an incorrect channel restriction configuration. Use
the AT&V command to check the \Jn setting
• The side setting is wrong. Use the AT&V command to check the
\Nn setting
• There is an interference problem
• The modem is faulty
PN1197-00 Revision 1.0 2-13
Page 38

DART 200 CDPD Modem User’s Guide 2 Installation and Setup
If the problem persists after checking the above possibilities, try power
cycling the modem. If that fails to help, contact your modem supplier for
assistance.
To determine if you have a channel restriction problem check the setting
of the \J parameter with an AT&V. If it is \J0 then the DART 200 has no
channel restrictions, so this can be eliminated as a possible source of the
problem. If \J has any other value then bypass the problem by entering
the AT\J0 command followed by an AT&W.
The S-Registers of interest in the AT&V+ output are summarized in
Table 2-1. The remainder of S-Registers are described in Appendix E,
S-Registers.
Table 2-1. S-Registers above 100
S100 The channel currently being reported (may not be acquired)
S101 Will be 1 if a channel has been acquired
S102 RSSI for the channel being reported
S103 Output power (0 to 7 with 0 being highest and 7 lowest)
S104 MDBS power product (a request for a specific power output)
S105 Current BLER (receive block error rate - %)
S106 Current SER (symbol error rate - %)
S107 Current LSAI (CDPD V1.0), or WASI (CDPD V1.1)
S108 Current SPNI (service provider network identifier)
S109 Current CSI (channel stream identifier)
S110 Current LCI (local cell identifier)
S111 Current Area/Cell color code
S112 Current TX BLER (transmit block error rate - %)
S113 Current SIE (symbols in error)
S114 Current SPI (Service Provider ID) (CDPD V1.1)
XID RSSI threshold, time (CDPD V1.0)
* threshold is dBw above -143 (in this case -125);
* time (in 1/10 sec) is how long RSSI can be below threshold before a
channel hop must be taken (5 seconds in this case)
S115 Not Used (CDPD V1.1)
XID BLER threshold, time (CDPD V1.0)
* Block error rate threshold (1/n) in % (10% in this case)
* time (in 1/10 sec) is how long BLER can be above threshold before
a channel hop must be taken (1 second in this case)
S116 Not Used (CDPD V1.1)
XID SER threshold, time (CDPD V1.0)
* Symbol error rate threshold (1/n) in % (10% in this case)
* time (in 1/10 sec) is how long RSSI can be below threshold before a
channel hop must be taken (5 seconds in this case)
S117 Reserved
S118 Reserved
~ ~ ~ ~ ~ ~
S126 Registration progress counter
Sierra Wireless, Inc. 2-14
Page 39
DART 200 CDPD Modem User’s Guide 2 Installation and Setup
If the modem stabilizes for short periods before restarting the search, the
AT&V+ output shown in Table 2-1 can be useful.
S-Register 102 contains the RSSI value in dBm. The less negative the
number the stronger the signal, for example, for CDPD 1.1:
• Strong signals are in the range of -45 to -59
• Good signals are in the range of -60 to -74
• Acceptable signals are in the range of -75 to -89
• Weak signals are in the range of -90 to -104
• Signals below -100 are usually not dependable and can prevent the
modem from acquiring the channel
Sometimes local radio interference prevents channel acquisition. If the
BLER in S-Register 105 is above 10%, this could be the problem. Try
moving the antenna as far as possible from its current location or, if
possible, move to another location to determine if the problem can be
lessened.
CAUTION:
With auto-registration
active the DART can
lock up, requiring a
power cycle to clear it,
if manual registration
(AT\R1) is attempted
and the registration
fails to complete
successfully.
Before deciding that the location is unsuitable, execute the AT&V
command and examine S-Register 60. If the 2 bit is on (usually a 5), then
the modem was set up to suppress channel searching, probably for use at
a trade show. Reset S-Register 60 to the default value of 1 with an
ATS60=1 command, and save it with an AT&W command. If this was
not the problem, contact your carrier to discuss the lack of CDPD
coverage.
Registration
Once the DART 200 acquires a channel the next step in the initial
operation process is registration; performed by the AT\R command.
The first few times you register the modem use manual registration
(AT\R1), to get a feel for timing, and from the timing an indication of
potential problems. When registration becomes routine use continuous
auto-registration (an AT\R4 command) combined with an ATS13=0
command. Save these changes with an AT&W command, and activate
the changes by power cycling or restarting (AT-R) the modem.
This setup causes the modem to attempt to register at power on and
whenever the modem loses registration, for example, when driving out of
coverage. Registration status can be viewed by using the ATS57?
command, as shown in Figure 2-5.
Figure 2-5. Viewing registration status with ATS57?
ATS57?
161 (bits 7, 5, and 1 are on)
OK
PN1197-00 Revision 1.0 2-15
Page 40

DART 200 CDPD Modem User’s Guide 2 Installation and Setup
??
The bit definitions in Figure 2-5 are as follows:
• Channel acquired indicator (bit 7)
• Automatic registration switch (bit 5)
• Registration indicator (bit 0)
An odd value in S-Register 57 indicates a registered modem.
If the DART has problems registering, begin problem determination by
checking the contents of S-Register 56 with the ATS56? command. The
NOTE:
Most carriers and
equipment
manufacturers follow
these guidelines making
problem determination
easier. If these
guidelines are not
followed, more
ingenuity is required.
possible return codes are listed below:
• S-Register 56 Return Codes
Return codes 0 through 7 are suggested by the CDPD specification.
0 Reset condition - Also, registration is incomplete but did
not time out. Refer to the description of S-Register 126 in
the next bullet point for details
1 Registration denied - Usually means IP Address is being
used by another device. On some systems it could also be
an invalid NEI or a credentials mismatch
2 Service currently unavailable
3 Invalid NEI (IP Address)
4 Insufficient authentication credentials
5 Unsupported authentication credentials
6 NEI has exceeded usage limitations
7 Service denied on this subnetwork - service can be obtained
on an alternate Service Provider network
250 Timer expired waiting for the home MDIS Intermediate
System Confirmation (ISC) registration response - Usually
caused by router problems between the home and serving
MDISs
251 MDLP parameters unsupported
252 MDLP version unsupported
254 Could not access the CDPD network
255 Could not de-register because M-ES was not registered
• S-Register 126 - Registration Progress Indicator
CDPD registration is a four-step process that can, if there are
problems anywhere in the system, be delayed or halted at any of the
steps. If your registration attempt is unsuccessful, use ATS126? to
view S-Register 126 to determine at what step in the registration
process progress halted.
0 Protocol not active
1 Waiting for Temporary Equipment Identifier (TEI) assignment
from MDIS
2 Link connection establishment pending - waiting for the
Unnumbered Acknowledgement (UA) from MDIS
3 Encryption key exchange pending - waiting for MDIS Key
Exchange (IKE) from MDIS
4 Registration pending - End System Hello (ESH) sent, waiting for
Intermediate System Confirmation (ISC) from MDIS
Sierra Wireless, Inc. 2-16
Page 41

DART 200 CDPD Modem User’s Guide 2 Installation and Setup
5 NEI successfully registered
The descriptions of S-Registers 56 and 126 usually give a good idea
of what the problem is. The following section describes some of the
most common conditions leading to registration failures.
Troubleshooting registration failure
The most common conditions leading to registration failures and possible
solutions are listed in Table 2-2. If your problem does not appear in
Table 2-2, or if after checking the conditions you cannot find the
problem, contact your carrier for assistance. If your carrier cannot find
the problem, then contact the modem supplier for guidance
Table 2-2. Registration failure troubleshooting
Condition Result
Code
Weak signal
strength
Wrong side
specified
0 or 254 1. Verify that the RSSI is adequate. Refer
3 (invalid
NEI)
Solution
to Channel acquisition, p. 2- 10, for
instructions.
2. If you are mobile, the signal could be
temporarily out of range. If you are
stationary, you could be in a marginal
reception area. If you are stationary
and have a magnetic mount antenna,
relocate the antenna while observing
S-Register 102. The objective is to get
a less negative value.
3. If this does not improve the signal, or
if you are mobile use a better (higher
gain) antenna. Do not use an antenna
with gain greater than the FCC
allowed maximum of 3 dB.
Check that you are operating on the same
side (channel range) as your carrier,
because if there are two CDPD carriers in
your area you may have acquired a channel
on the wrong system.
1. Use the AT&V command to view the
\Nn parameter, where n specifies
which side (1 = A side, 2 = B side)
you are operating on.
2. Correct the side setting, if necessary.
PN1197-00 Revision 1.0 2-17
Page 42

DART 200 CDPD Modem User’s Guide 2 Installation and Setup
Table 2-2. Registration failure troubleshooting (cont.)
Condition Result
Code
Invalid IP
Address
3 or 1 (on
some
systems)
Expired IP
6 As CDPD networks grow, some carriers
Address
Solution
1. If the side setting is OK, verify that the
modem’s IP Address is correct, by
using the AT\S? command to view the
IP Address. If the modem has more
than one IP Address in the table,
verify that the active NEI, the one with
the asterisk (*) to the left, is correct.
This condition could also mean that
the carrier did not activate this IP
Address.
2. Contact the carrier to ensure that the
IP Address is valid and active
are concerned about unauthorized use of
unused IP Addresses to gain access to the
network. To minimize this likelihood an
expiration time is used, usually a few hours
long, on each new IP Address. If you are
slow in registering a modem with a
recently assigned IP Address, the
expiration time period can be exceeded.
Find out from your carrier if they employ
this strategy, and if so register new IP
Addresses promptly.
Authentication
(credentials)
problem
4 or 5 Each IP Address has two credential values
associated with it: a sequential number and
a random number. These numbers are
initially set to zero at the MDIS when the
IP Address is assigned to an end-user.
When the end-user puts the IP Address into
the modem these values are also set to
zero.
When the IP Address is registered, these
values are compared at the MDIS to ensure
that they match. If they do, a new random
number is generated at the MDIS and
returned to the modem, and both ends
update their sequential numbers. On each
subsequent registration these values are
compared by the MDIS (before updating)
to see that they match. The modem keeps
these credentials separately for each slot in
the NEI (IP Address) list.
Problems can arise if the IP Address is
reloaded after it was registered, or is being
reused or shared among modems. Any of
these activities will cause the modem
Sierra Wireless, Inc. 2-18
Page 43

DART 200 CDPD Modem User’s Guide 2 Installation and Setup
Table 2-2. Registration failure troubleshooting (cont.)
Condition Result
Code
Authentication
(credentials)
problem (cont.)
Flow control
problem
Not
applicable
Solution
credentials to be reset. Trying to register a
modem after doing this will cause a
credentials error because the reset values in
the modem do not match the values the
MDIS has for that IP Address from prior
usage.
This problem is not likely when you are
initially registering a new modem, unless
the IP Address was previously used in your
organization. If a credentials problem is
indicated, contact the carrier to have the
credentials for the IP Address reset.
If you suspect that this occurred, use the
AT-Z command (in service provider
mode) to view the actual credentials. If the
displayed credentials are zero, call the
carrier to get the IP Address reset.
This condition is only possible if you are
using manual registration (AT\R1) instead
of automatic registration. If, after you key
AT\R1 and press ENTER, the cursor returns
to the A of the AT and the modem does not
return an OK or an ERROR within the
time-out period (S-Register 13) you likely
have this problem.
Flow control is only applied when the
modem is in online mode or is interacting
with the network in command mode (as it
is when trying to register). Even if the flow
control is set improperly, or has a cable
problem that impacts flow control, you will
not notice it until you try to register. The
flow control setting defaults to hardware
flow control, indicated by \Q2 in the
modem profile, and this should match the
COM port setting on your PC’s terminal
emulator program. If the settings match try
changing them both to no flow control
(\Q0) on the DART. If registration now
works then a broken or missing pin, faulty
connection, or broken or missing RTS or
CTS wire is the likely source of the
problem.
PN1197-00 Revision 1.0 2-19
Page 44

DART 200 CDPD Modem User’s Guide 2 Installation and Setup
Table 2-2. Registration failure troubleshooting (cont.)
Condition Result
Code
Power supply
problem
MDIS or
network
Not
applicable
251, or 252 in
S-Register 56
problem
Solution
The DART operates on a voltage of 11 to
16 VDC with a current rating of 2.5 amps.
Voltage level fluctuations caused by using
an unregulated power supply, or a supply
with too low a current rating will cause the
modem to experience a power reset. This
forces the modem to reset itself before it
can complete the multi-step registration
request.
The most frequent problem is too low a
current rating. The MDBS controls the
output power of the DART. The DART
may work well with a particular power
supply in a location where low power
output is required, and yet fail using the
same power supply in a different location
if the power output demands are higher.
Use a power supply with an amperage
rating of at least 2.5 amps to avoid this
problem.
Registration problems can be caused by the
MDIS, or by the network beyond. If you
are operating in an area where CDPD
service is new or has recently had software
changes then this is a possibility.
OR
250 in
S-Register 56
If your serving MDIS is different than your
home MDIS (usually occurs if the F-ES is
in one carrier’s territory and the DART is
registered on a different carrier’s MDIS) a
network router or link problem could cause
the registration attempt to time out.
1. View S-Register 126 to determine how
far through the registration process the
modem had progressed. Home MDIS
delay problems show up as 4 in this
register.
2. Contact your local carrier for
assistance
Sierra Wireless, Inc. 2-20
Page 45

DART 200 CDPD Modem User’s Guide 2 Installation and Setup
Basic communications
The final step in the initial setup process is to confirm that the DART
200 can communicate with the network by performing a ping. The
DART 200 sends a fixed length character string to another device that is
registered on the network, and requests that it be echoed back. However,
to do a ping you need the address of another registered device.
Get two addresses to ping: a network server or Domain Name Server
(DNS), and a second DART adjacent to the first. Get the IP Address of a
network server or DNS from your carrier at the same time you get your
IP Address assigned. If you can ping the server or DNS, basic
connectivity is functional. If you can ping a device, such as a second
DART, on the other side of the MDIS, then network connectivity is
established.
Ping is executed by the AT*P command, as shown in this example:
at*p198.225.191.25
Press <ENTER> to stop
PING Host (198.225.191.25): 60 data bytes & 8 header bytes
68 bytes from 198.225.191.25: icmp_sn=0. time=1380. ms TSR=7631.250S
68 bytes from 198.225.191.25: icmp_sn=1. time=920. ms TSR=7632.280S
68 bytes from 198.225.191.25: icmp_sn=2. time=790. ms TSR=7633.180S
68 bytes from 198.225.191.25: icmp_sn=3. time=1340. ms TSR=7634.620S
68 bytes from 198.225.191.25: icmp_sn=4. time=1440. ms TSR=7639.660S
68 bytes from 198.225.191.25: icmp_sn=8. time=860. ms TSR=7636.180S
68 bytes from 198.225.191.25: icmp_sn=5. time=1450. ms TSR=7637.730S
68 bytes from 198.225.191.25: icmp_sn=6. time=900. ms TSR=7638.740S
68 bytes from 198.225.191.25: icmp_sn=7. time=820. ms TSR=7640.620S
----198.225.191.25 PING Statistics---10 packets transmitted, 10 packets received, 0% packet loss
0 sequence errors round-trip (ms) min/avg/max = 790/1127/1450
The ping executes continuously until the <CR> key is pushed. The ping
command is covered in detail in Appendix F, DART AT Command Set.
If the network server and another device were successfully pinged, the
initial operation is complete and you are ready to begin application
testing.
The time since reset (TSR) field represents the time in seconds since the
modem was last reset (through an AT-R command or a power cycle).
Problems with the ping are usually seen as time-outs. Most devices
respond in less than 2 seconds using the default ping packet size. Both
packet size (60 bytes plus an 8 byte header) and the time-out period
(default is 10 seconds) are in S-Registers 71 and 70 and can be changed.
If you increase the size of the packet, consider increasing the time-out
period to allow for the longer transit time of the larger packet.
PN1197-00 Revision 1.0 2-21
Page 46

DART 200 CDPD Modem User’s Guide 2 Installation and Setup
If increasing the time-out period does not correct the time-out failures,
the problem could be that the other device is not registered, or that the
path to it is not operational. Check with those responsible for the other
device to see that it is operational and registered. Next, check S-Register
57 to see if you have a channel and are still registered. If you are, then
verify that the IP Address of the ping target is correct. If S-Register 57
status is fine and the IP Address is also fine, contact your carrier to check
for network connectivity between the local modem and remote device.
Sierra Wireless, Inc. 2-22
Page 47

3 CDPD Security Features
Chapter
Airlink security
The Cellular Digital Packet Data (CDPD) network is a public wireless
data communications service vulnerable to casual eavesdropping. To
minimize this possibility, a data encryption mechanism is provided for
all non-broadcast communications between the Mobile Data Intermediate
System (MDIS) and the Mobile End System (M-ES).
If activated by the carrier, encryption services are implemented by the
MDIS. At registration time the Data Access Radio Transmitter (DART)
200 is told, during session negotiation, whether or not encryption is
being used. The M-ES has no choice and follows the lead of the MDIS in
using or not using encryption
Authentication services
M-ES authentication is provided within the CDPD network to prevent
fraudulent use of the network. This mechanism is implemented by the
MDIS, as follows:
1. The MDIS validates the Authentication Data (credentials) presented
by the M-ES at registration time by comparing them against
information stored in the MDIS authentication table.
2. If the credentials are acceptable to the MDIS they are updated, stored
back into the MDIS authentication table, and also sent back to the
M-ES for use when it next registers. Registration is denied if the
M-ES presented credentials do not match those stored for its
Network Entity Identifier (NEI) by the MDIS.
When an IP Address is first authorized for use by the carrier, or an IP
Address is loaded into a modem, the associated credentials are set to
zero. On each subsequent registration the credentials are for the IP
Address are updated as described in steps 1 and 2 above.
PN1197-00 Revision 1.0
Page 48

DART 200 CDPD Modem User’s Guide 3 CPDP Security Features
Modem security management
Two types of modem security are provided for the DART 200:
• Personal Identification Number (PIN) - Protects against unauthorized
use of the CDPD network. A PIN can be required before the modem
can gain access to the CDPD network
• Service Provider Key (SPK) - Protects against modem operating
parameters being altered. An SPK is mandatory before making
changes
The use of the PIN can be required by the service provider, although
currently none do. If not required by the carrier, you have the option of
requiring it, or leaving it disabled (this is the modem default). However,
the use of the SPK is mandatory and cannot be disabled.
The intent of the security management feature is to provide a layer of
control at the end-user level, in addition to CDPD network authentication
services, to aid in the prevention of unauthorized access to the network.
Table 3-1 summarizes the DART 200’s PIN management system. There
are four keys and six AT commands, three of which will only function
when in service provider mode, involved in the total process.
Table 3-1. Key types
Key Description
PIN Prevents unauthorized access to the CDPD network by
blocking commands that access the network, including the
registration command (AT\R) and the dial command (ATD).
To use these commands an authorized PIN and the AT*E
command are required. If the PIN is entered incorrectly three
times in a row it becomes BLOCKED. The default is PIN not
required.
PIN
Unblocking
Key
The AT*U command temporarily enables the PIN when it
becomes BLOCKED, allowing it to reset or change to a new
value. BLOCKED status is permanently cleared by the AT^C
command, and PIN values are reset or changed by the AT\P
command. If the PIN unblocking key is entered incorrectly 10
times in a row, it also becomes BLOCKED. The BLOCK of
the PIN Unblocking Key is also cleared by the AT^C
command.
Sierra Wireless, Inc. 3-2
Page 49

DART 200 CDPD Modem User’s Guide 3 CDPD Security Features
Table 3-1. Key types (cont.)
SPK Prevents unauthorized changes to the modems operating
parameters. These include selected S-Registers as well as
modem IP Addresses. In addition, the use of selected AT
commands, including several of the security management
commands, is also controlled by this key. This key is enabled
by the AT^P command. If entered incorrectly three times in a
row, it will become BLOCKED.
When the SPK is in the BLOCKED state, entering any SPK
through the AT^P command causes a 30-second delay before
the BLOCKED response is returned. This delay imposes a
barrier to computer-generated attempts at finding the Master
Key value by unauthorized users.
Master Key Temporarily enables the SPK when it becomes BLOCKED
allowing the BLOCKED status to be cleared. Temporary
unblocking is performed by the AT^P command, and the
BLOCKED status is permanently cleared by the AT^C
command. The Master Key cannot become BLOCKED.
AT
Commands
The AT commands used to implement the security
management feature (*E, \P, ^F, *U, ^P, ^C) and the default
keys are described in detail in Appendix F, DART AT
Command Set.
PN1197-00 Revision 1.0 01/23/98 3-3
Page 50

DART 200 CDPD Modem User’s Guide 3 CPDP Security Features
Sierra Wireless, Inc. 3-4
Page 51

4 Broadcast and Multicast
Operation
Overview
Broadcast and multicast are Cellular Digital Packet Data (CDPD)
functions that support sending the same data to a large group of IP
Addresses with a single transmission to the CDPD network. This
capability is implemented through Mobile Data Intermediate System
(MDIS) software.
The facility was originally defined for Fixed End System (F-ES) (host) to
Mobile End System (M-ES) (terminal) transmissions. However, some
MDIS manufacturers have implemented multicast to also support M-ES
to M-ES transmissions. Protocol restrictions prevent broadcast or
multicast messages from being encrypted. Check with your carrier to
determine if these capabilities are offered before planning to use it as part
of your application.
Broadcast and multicast transmissions are point-to-multi-point and
provide a one-way connectionless service. The protocol used is User
Datagram Protocol (UDP) or another unacknowledged protocol that
operates over IP, for example, ICMP PING. The operational
considerations are:
PN1197-00 Revision 1.0
1. Broadcast or multicast data packets will not be received by a DART
200 with an active telnet or Transmission Control Protocol (TCP)
PAD session.
2. If a User Datagram Protocol (UDP) PAD session is active the
broadcast and multicast messages will be interspersed with the
application data packets and must be separated by the application.
3. In the case of Serial Line Internet Protocol (SLIP), the disposition of
the broadcast and multicast messages is a function of the support
provided by the software stack and end-user applications (one must
be UDP) operating on the Mobile Application Subsystem (MAS). If
a UDP session is not active, the messages will be lost.
Page 52

DART 200 CDPD Modem User’s Guide 4 Broadcast and Multicast Operation
Broadcast
The Broadcast function is used on a geographic coverage basis. To
support this function the MDIS is set up with a Broadcast Network Entity
Identifier (NEI) that includes a list of the Mobile Data Base Stations
(MDBSs) in the desired broadcast area in its definition. There can be
multiple broadcast areas within the coverage area of a single MDIS. The
message is sent (by the F-ES or an M-ES) to a Broadcast NEI at the
MDIS that replicates the message, puts a special broadcast header on it,
and sends it to the cells indicated by the broadcast list.
Any Data Access Radio Transmitter (DART) wishing to receive
broadcast messages indicates its readiness by having specified the *B1
profile parameter and by being ready to receive UDP datagrams. The
latter can be accomplished by having the UDP Server function active or,
if in SLIP mode, by having a Winsock UDP application active, and by
being ready to process any incoming broadcast datagrams.
For most applications broadcast is not appropriate, because broadcast
messages are sent to all the CDPD modems in the covered geography. It
is more useful to be able to specify that messages only go to all, or a
subset of the IP Addresses associated with a specific customer; a
capability offered by multicast.
Multicast
Multicast is set up similarly to broadcast, except that the MDIS is set up
with a Multicast NEI and a list of the M-ESs that belong to that specific
group rather than a list of cells, as is done by the broadcast function. The
message to be multicast is sent (by the F-ES or an M-ES) to the Multicast
NEI at the MDIS, that replicates the message and sends individual
messages to the M-ESs indicated in its multicast group list.
An M-ES can be a member of any number of multicast groups, however
it can only be active in one at any given time. An M-ES wishing to
receive multicast messages indicates its readiness by registering a
Multicast NEI and by being ready to receive UDP datagrams. The latter
can be accomplished by having the UDP Server function active, or if in
SLIP mode, by having a UDP application ready. In all of the preceding
cases the MAS is assumed to be ready to process any incoming multicast
datagrams.
Contact your service provider for information on the availability and use
of multicast service in your area.
Sierra Wireless, Inc. 4-2
Page 53

DART 200 CDPD Modem User’s Guide 4 Broadcast and Multicast Operation
Multicast setup
For multicast set up the DART 200 with a multicast IP Address and an
associated Group Multicast Identifier (GMID), in addition to the normal
IP Address, as follows:
1. Enter the Multicast NEI (like any other IP Address) by using the
AT^A command.
2. Select the NEI for multicast use with the AT\S+n command, where
n is the slot number in the DART 200’s IP Address list.
3. Define the GMID, use the AT^G command that assigns a multicast
group ID to the slot containing the Multicast NEI, for example:
• AT^P+51348954 Must be in Service Provider mode
• AT^A198.225.189.35/1 Enter multicast IP Address in slot 1
• AT^G12/1 Set GMID for slot 1 to 12
• AT\S+1 Select IP Address in slot 1 for
multicast use
4. Verify the set up of your Multicast NEI with an AT\S? command; it
shows the CDPD modem’s NEI status. The screen appears as shown
in Figure 4-1:
Figure 4-1. Checking NEI status with AT\S?
AT\S?
SLIP = IP ADDRESS 001.001.001.002
MAS = IP ADDRESS 198.225.189.031
* NEI 0 = IP ADDRESS 198.225.189.031 GMID 0000C
+ NEI 1 = IP ADRESS 198.225.189.035 GMID 00012
SPI 0 = 00012
SPNI 0 = 00035
WASI 0 = 00001
OK
* - Indicates which slot contains the active point-to-point NEI (IP Address)
+ - Indicates the multicast NEI selected.
Both NEIs must be registered concurrently; there is no command to
register a multicast NEI by itself. Define and select the multicast NEI
before registering the point-to-point NEI. The GMID field in Figure
4-1 is only applicable to the multicast NEIs.
The DART 200 can have multiple Multicast NEIs defined, but can only
have one active at a time. The multicast designation for a particular slot
in the NEI table can be deactivated by an AT\S-n command, (where n is
the slot number), and a different one activated by an AT\S+n command.
PN1197-00 Revision 1.0 4-3
Page 54

DART 200 CDPD Modem User’s Guide 4 Broadcast and Multicast Operation
Some software stacks, used when the DART 200 operates in Serial Line
Internet Protocol (SLIP) mode, only receive broadcast messages
(including multicast) on a specific IP destination address, specifically the
point-to-point NEI. To provide for this limitation, the DART 200 permits
specifying whether or not the received destination IP Address (multicast
address) is replaced with the active point-to-point NEI before the
received packet is passed across the SLIP interface to the software stack.
This feature is implemented by using the AT*G command. AT*G1
(default) causes the received destination address to be replaced as
described above. AT*G0 passes the received packet across the SLIP
interface to the TCP stack unmodified, with the destination address being
that of the Multicast NEI.
Sierra Wireless, Inc. 4-4
Page 55

5 DART Supported Protocols
UDP
User Datagram Protocol (UDP) is the most basic transmission protocol
provided by the Data Access Radio Transceiver (DART) 200. It is a thin
protocol, adding only a port specification to the underlying Internet
Protocol (IP). It has the same features as IP, that is a best effort,
connectionless delivery service with the chief benefit being minimum
overhead.
UDP is not considered reliable because packet delivery is not guaranteed.
Packets can be lost, duplicated, delayed, or delivered out of sequence.
These conditions are not detected, and the sender or receiver is not
informed.
UDP is connectionless because sender and receiver are never logically
connected. If the intended receiver is not active the message is lost. It is a
best effort delivery, because the IP software makes an earnest attempt to
deliver the packets, failing only if system resources are overloaded or the
underlying networks fail.
Application programs using UDP must accept full responsibility for
handling the problems of reliability, including message loss, duplication,
delay, out-of-order delivery, and loss of connectivity.
These problems are often treated casually be programmers. Testing done
when using highly reliable, low delay local networks may not expose
potential failures. This explains why many applications that use UDP
work well in a local environment but often fail in dramatic ways on a
more global network.
Despite these warnings, UDP is still the most efficient and widely used
protocol. Take care in analyzing the application being implemented, the
network being used, and the Mobile Application Subsystem (MAS)
device involved to determine if an application implementation using
UDP is feasible.
• How likely is it that the network being used can cause these
problems?
Small, non-Internet networks are not likely to cause problems.
• How much compute power and programming capability does the
MAS device have?
Lack of available memory or programming capability can preclude
adding the needed reliability features into the application.
PN1197-00 Revision 1.0
Page 56

DART 200 CDPD Modem User’s Guide 5 DART Supported Protocols
??
While UDP offers the possibility of using fewer data packets and less
total bytes to implement an application than TCP, adding the features
already described can consume some of these savings, and requires a
major programming effort.
The DART 200 provides basic UDP, available since the DART was first
commercially available, and the UDP server, which become available
with firmware version 3.0.4 for the DART in April, 1996. These are
described separately in the following subsections to delineate the setup
options and functions available with each.
Basic UDP characteristics
Basic UDP was originally offered on the DART 100 and early versions
of the DART 200. It provides a simple UDP communications capability
characterized by no server (auto answer) capability, and the need for both
sides of the communications session to use a common port number.
Without server capability the DART 200 issues a UDP dial (ATDP)
command to get into an online state so that it can receive incoming
datagrams.
NOTE:
The DART
implementation of basic
UDP requires that both
the host and MAS dial
commands use the same
port number.
Basic UDP communication
Before initiating UDP communication register the DART 200 on the
Cellular Digital Packet Data (CDPD) system. Refer to Channel
acquisition, p. 2-10, and Registration, p. 2-15, for instructions on
registering the DART 200.
To initiate UDP communication:
1. Basic UDP has no auto answer capability, so the modem must be in
online mode before communications can be started. Use the ATD
command with the P (for UDP) modifier followed by the IP Address
and port number of the destination system (host or another MCDART) to put the DART 200 into online mode. If the DART will be
used by a remote device that cannot issue a UDP dial command, then
basic UDP is not a viable option; the UDP server option must be
used.
2. If no port is specified the default port number (23) is used. Since the
DART listens by default if another DART is the target. If a port
number is required, specify it now. Unless the application operates
on a closed system, port numbers should be in the range between
1025 to 4999 to comply with industry standards.
Alternatively, the dial could reference an IP Address/port stored in
the DART 200 dial list by the ATDPSn command: where n is the
number of the desired IP Address in the dial list. Refer to Modem
dial directory, p. 8-24, or the &Z command in Appendix F, DART
AT Command Set, for more information.
Sierra Wireless, Inc. 5-2
Page 57

DART 200 CDPD Modem User’s Guide 5 DART Supported Protocols
??
??
Even though a successful ATDP command receives a CONNECT
response a connection was not established. The ATDP merely passes
NOTE:
Even though a
successful ATDP
command receives a
CONNECT response a
connection was not
established.
the IP Address and port number of the destination system to the
DART 200, where they are stored for use in constructing UDP
headers for the data packets that follow. If the communication
session is being set up between two DARTs, both have to execute a
UDP dial command to go into online mode so that communications
can begin.
If data transmission is initiated by the MAS:
1. The MAS writes application data blocks to the DART 200.
2. Data blocks are assembled until a data forwarding condition, as
described in Data forwarding, p. 8-8, occurs.
3. The DART 200 attaches the UDP header and checksum and sends
the packet to the network.
4. The datagram (packet) is directed by the network routers to the
appropriate port on the designated host. If the host or host port is
inactive the data is lost and the local application is not informed.
Good UDP application design includes packet sequence checking, and
acknowledgments to ensure that both the sender and receiver can
determine if all application data arrived successfully.
NOTE:
A good error-checking
and acknowledgment
scheme is essential to
successful UDP
operation.
If the MAS is on the receiving end:
1. When expecting a message following the initial CONNECT message
or in response to an output message, the MAS reads continuously
until all expected data is received.
2. When the data block is received it should be checked against
preceding blocks for sequence errors before proceeding.
3. The DART 200 passes the data portion of the incoming datagram on
to the MAS after removing the source IP Address and port number
from the header for use as the destination address in the response (if
required). This address data is available to the MAS through
S-Register 53 with an ATS53? command; it cannot be viewed with
an AT&V.
The handling of network connectivity issues (such as loss of carrier), as
well as data delivery and sequencing, is the responsibility of the MAS.
Refer to Modes of operation, p. 8-3, for guidelines on handling network
errors.
Session termination may or may not be necessary. If the MAS originates
sessions, it must terminate the first session before starting a second.
Terminate sessions by the escape function followed by a hang-up
command (H), as described in Appendix F, DART AT Command Set. If
the MAS only receives calls (performs a server function), it can remain
in online mode waiting for a datagram (service request) from another
client.
PN1197-00 Revision 1.0 5-3
Page 58

DART 200 CDPD Modem User’s Guide 5 DART Supported Protocols
??
Because UDP is a connectionless protocol, a single M-ES can
communicate with multiple M-ESs at the same time as long as timing
considerations are closely followed.
When a DART 200 receives a datagram from another M-ES:
1. The DART 200 removes the source address information (IP Address
and port number) and saves it to use as the destination address for its
response message.
2. After the DART 200 responds to client #1, it is free to receive and
respond to requests from client #2, #3, and so on. The requests and
responses from clients can be interspersed, as long as no request
comes in from a client before a response is given to the previous
client. If that occurred, the response intended for #1 would go to #2,
followed by the normal response to #2.
Unless the timing of requests can be scheduled or controlled to prevent
this from happening, avoid this type of operation with basic UDP. The
UDP server is designed to handle this, as described in UDP server, p.
5-5.
NOTE:
The DART default is
basic UDP active. It is
strongly recommended
that this feature be
disabled so that the
UDP server function
will be active.
The DART 200 with UDP server capability uses a bit in Status
(S)-Register 82 to enable and disable basic UDP operation; basic UDP
operation is enabled. If you do not have an older DART compatibility
requirement, it is strongly recommended that basic UDP not be used.
Refer to the bullet point on backward compatibility on p. 5-7, for
information on enabling and disabling the basic UDP mode of operation.
Basic UDP setup options
The following items must be set so the DART 200 can operate on the
CDPD network:
• IP Address (^A)
• Side Preference (\N in the modem profile)
• Channel restrictions ( \J in the modem profile)
Refer to Basic modem personalization, p. 2-6, for a review of using the
AT commands, ^A, \N, and \J.
In addition, the following items are required for basic UDP operation:
• Automatic registration - as described in Automatic registration,
p. 8-6
• PAD mode - \O0 in the profile. Refer to \O command in Appendix F,
DART AT Command Set for details on using this command.
• S-Register 82 set to 2 (default). Refer to the bullet point on backward
compatibility, p. 5-7, for details on setting this S-Register
Many of the following profile parameters may apply and need to be
evaluated. Some need to be set to provide the proper application
operating environment, others can be allowed to default.
Sierra Wireless, Inc. 5-4
Page 59

DART 200 CDPD Modem User’s Guide 5 DART Supported Protocols
??
??
To set up the options, first, review Chapter 8, Application Programming,
and the command descriptions in Appendix F, DART AT Command Set
before setting the following parameters, then proceed to step 1.
• Command mode echo (En)
• Data set ready (DSR) operation (&Sn)
• Verbose Mode (Vn)
• Data Forwarding operation (\Fn)
• Quiet mode (Qn)
• Manual transmit control (\Mn)
• Online mode echo (Fn)
• Flow control (\Qn)
• Extended result codes (Xn)
• Automatic transmit control (\Tn)
• Data carrier detect (DCD) operation (&Cn)
• Reception of IP broadcasts (*Bn)
• Data terminal ready (DTR) operation (&Dn)
• Listening Port (*Ln)
• Escape code recognition (&En)
1. Set the key parameter, PAD operating mode (\On), to \O0 for UDP
operation. The default value is \O1, so it must be changed.
NOTE:
At present no carrier is
offering a broadcast
capability.
NOTE:
UDP is also the only
protocol that can
receive multicast
messages.
2. UDP is the only CDPD protocol that can receive broadcast messages.
Use the AT*Bn command to allow (B1) or to suppress (B0)
reception of broadcast traffic.
3. Check with your carrier to determine if multicast is available in your
area before proceeding to step 4.
4. Direct multicast messages to the modem’s listening port (refer to *L
command in Appendix F, DART AT Command Set). Multicast
messages can appear at any time; possibly interspersed with the
application data. The end-user’s application must handle the
multicast messages interspersed with the application data. For
applications with the modem set up to use multicast, be aware that it
cannot be suppressed by AT commands.
UDP server characteristics
The DART UDP server is a backward compatible extension to the
DART 200 basic UDP implementation with the following additional
features:
• Auto-answer capability to permit Remote Terminal Units (RTUs)
with limited capability to use UDP. The RTU is not required to issue
a UDP dial (ATDP) command in order to receive messages when the
UDP server is active
• Friends Only mode to restrict communications to a specific list
(maximum of 10) of source addresses (IP Address only). This helps
prevent unauthorized access to the MAS application
PN1197-00 Revision 1.0 5-5
Page 60

DART 200 CDPD Modem User’s Guide 5 DART Supported Protocols
??
• Receive locking capability to allow the DART 200 to function as a
UDP server by holding off incoming messages until the preceding
message is answered
• Eliminates the need for the M-ES and Host modems to use a
common port number. The server uses the source address contained
in the incoming packet as the destination address for outgoing packet
• Backward compatibility with the basic UDP function in earlier
DART modems by an S-Register setting. When there are DART
modems involved in the UDP application that use non-server
software, activate this feature
These added features make the DART UDP server compatible with
industry standard client-server models where the client originates
communications and the server waits for incoming communications
requests.
UDP server setup options
In addition to the new options discussed here, the same setup options
used with basic UDP, as described on p. 5-4, also must be considered
before proceeding to step 1.
NOTE:
When the listening port
is changed it is not
active until the server is
stopped and restarted,
or the modem is reset
with an AT-R or a
power cycle.
1. Set the defining setup parameter for the UDP server function ( *An -
select server type) to 2 with an AT*A2 command. Selecting this
option enables the UDP server function. The default value for this
parameter is *A0 (no server active). This is appropriate if the MAS
application always operates in client mode; always originates the
connection request with an ATDP command.
2. With the UDP server option enabled, choose the method used to
answer incoming calls. The preferred method is to set S-Register 0 =
1 with an ATS0=1 command, which puts the modem into permanent
auto answer mode. The alternative is for the MAS to use the answer
command, ATA. This command could be used in response to a
RING message, or in anticipation of an incoming call. However, in
the latter case, since the command is only active for 20 seconds it has
to be used in a programming loop to receive a call.
3. (Optional) Select the port to listen for incoming messages on. For
basic UDP the listening port is fixed at 2100. However, with the
UDP server the listening port can be set using the *L command. The
command format is AT*Ln where n is the desired listening port; a
decimal number in the range of 1025 to 4999 for compliance with
industry standards.
4. If the listening port is changed, save it with an AT&W. The default
value for the listening port is still 2100 for backward compatibility
with basic UDP.
The remaining setup options for the UDP server are controlled by the
contents of S-Register 82, including:
• Friends Only mode
Sierra Wireless, Inc. 5-6
Page 61

DART 200 CDPD Modem User’s Guide 5 DART Supported Protocols
• Receive locking
• Backwards compatibility
The details of these options follow.
• Friends Only Mode - Restricts communication with the modem (for
security reasons) to a predefined group of addresses (friends)
This feature is controlled by S-Register 82 which enables and
disables the comparison of datagram source addresses against a list
stored in the DART 200’s destination dial directory. Refer to the
AT&Z command in Modem dial directory, p. 8-24, or Appendix F,
DART AT Command Set for details. Only the IP Address portion of
the addresses in the dial directory is used with this feature. Bit 0 of
S-Register 82 controls this mode. The default is to accept all
incoming datagrams (bit 0 = 0).
This bit is significant only when the UDP connection is established
passively (server mode). When the connection is established actively
(by an ATDP command), incoming datagrams are accepted from the
destination address specified in the dial command regardless of the
address being in the friends list; this is consistent with basic UDP
operation.
In both of the above cases, the source address (IP Address and port
number) of the last accepted datagram is saved in a temporary
variable for use as the current destination address for all datagrams
being sent by the MAS during the current session. This source
address information is also saved in S-Register 53 where it can be
obtained with an ATS53? command. However, if the application
design allows the M-ES to receive messages from multiple clients,
outbound datagrams can only be sent to the last source of input data.
If this is a potential problem due to timing considerations, refer to the
next bullet point on receive locking.
• Receive Locking - A UDP server feature that allows time for the
MAS to respond to a datagram without concern that another
datagram from a different source will overlay the current destination
address
This feature is controlled by bit 2 of S-Register 82. The default is
receive locking disabled (bit 2 = 0). The lock time out period is
specified in S-Register 83 in tenths of seconds (default is 3 seconds).
If receive locking is enabled, all datagrams arriving after the first
one, regardless of their source address, are held in a First-In-FirstOut (FIFO) queue until a data transmission occurs, or the time out
period expires, releasing the first datagram in the queue.
• Backward Compatibility - Permits the UDP server to operate in a
mode compatible with the basic UDP provided in earlier versions of
the software (prior to version 2.0)
PN1197-00 Revision 1.0 5-7
Page 62

DART 200 CDPD Modem User’s Guide 5 DART Supported Protocols
??
??
This feature is controlled by bit 1 of S-Register 82. The default is
backward compatibility enabled (bit 1 = 1). When this bit is on the
UDP server does not generate a random port number as the source
NOTE:
This bit should be set to
0 if there are no DARTs
using basic UDP
participating in the
network.
NOTE:
The UDP server is
compliant with industry
standard client-server
models where client
systems originate calls
and server systems
answer calls. Another
aspect of these
standards is the
distinction between
active (client) and
passive (server)
operation.
port when the MAS issues an ATDP, but instead uses the port
number specified in the destination address of the dial command. In
backward compatibility client mode, the destination port cannot be
the same as the modem’s listening port if the UDP server is active.
• UDP server communication - UDP communications with the UDP
server active are similar to those for basic UDP, with the exception
of the call establishment operation discussed in Basic UDP
communication, p. 5-2. A discussion of call establishment operation
with the UDP server active follows.
In active operation (client mode):
1. The MAS (or DTE) issues an ATDP command using the dial
string (ATDPn.n.n.n/x) or the dial list entry (ATDPSn) form to
put the M-ES into online mode. If no destination port is
specified the port number defaults to the standard telnet port
(23); this should be avoided.
2. Unless the application operates on a closed system, use port
numbers in the range of 1025 to 4999 to comply with industry
standards. The modem’s protocol stack generates a random
number for use as the source port for active mode sessions.
However, if the backward compatibility option is active the
source port number is forced to be the same as the destination
port address specified in the dial string.
As is the case with basic UDP, the CONNECT message received
when going into online mode does not imply that a logical
connection was established as it does with TCP. Instead, it
indicates to the MAS that the modem is in online mode, ready to
communicate, and that the destination address is saved for use in
constructing packet headers for data that follows.
3. In addition to putting the modem into online mode, the ATDP
generates a random port number for use in the packet source
address, which is also used as the active session listening port.
4. If the modem functions only as a client (*A0), the listening port
defined by the *L command is not active. The modem receives
datagrams on the active session listening port instead, and only
from the destination address (IP Address and port) specified in
the dial command.
If the modem functions in a dual role, both as client and server
(*A2), there are some additional items to be aware of, including:
Sierra Wireless, Inc. 5-8
Page 63

DART 200 CDPD Modem User’s Guide 5 DART Supported Protocols
??
• The modem’s server listening port is disabled for the
duration of any active client session. Incoming datagrams are
received on the active session listening port and only from
the destination address specified on the dial command until
an escape is performed and an ATH is issued; reactivating
the server’s normal listening port
• If operating in backward compatibility mode, the destination
port number on the ATDP command must be different from
the modem’s server listening port
5. Following receipt of the connect message, application data
written to the DART 200 through the RS-232 port using device
specific commands.
6. This data is assembled until a data forwarding condition, as
described on p. 8-8, occurs.
7. The DART 200 then attaches the UDP header and sends the
datagram onto the network.
8. The datagram is directed by the network routers to the
appropriate port on the designated server. If the server is not
active when the datagram arrives it is lost, and the client is not
informed.
NOTE:
How the UDP behaves
is dependent on the
auto answer mode in
use.
In passive operation (server mode):
1. The UDP server listens on the configured port (2100 or *L
specified) for an incoming datagram, then determines if the
datagram is to be passed to the MAS and the M-ES put into
online mode.
2. With auto answer disabled when a datagram is received by the
UDP server, it first validates the source address (if the Friends
Only option is specified), and if it is acceptable issues a RING
result code. Refer for Auto Answer setup, p. 8-11, for more
details.
3. If an ATA command is not currently active, or is not issued
within 60 seconds, the arriving datagram is discarded and the
source address of the arriving datagram is not saved. No
indication of this event is presented to the MAS. If the ATA
command is, or becomes, active within the time-out period:
• A CONNECT result code is issued
• The modem enters online mode
• The source address is saved
• The datagram is passed to the MAS
4. With auto answer enabled, as described in Auto Answer setup,
p. 4-11, when a UDP datagram is received by the UDP server,
the modem first validates the source address (if the friends only
option was specified).
5. If the source address is acceptable then a CONNECT result code
is issued.
PN1197-00 Revision 1.0 5-9
Page 64

DART 200 CDPD Modem User’s Guide 5 DART Supported Protocols
??
• The modem enters the online mode
• The source address is saved
• The datagram is passed to the MAS
In the answering modes already discussed:
1. The modem accepts incoming UDP datagrams.
2. The modem strips off the UDP header, and passes the packets
on to the attached device for processing.
3. Responses are assembled and transmitted as described in steps 1
and 2 for UDP clients.
4. The modem continues in this mode, accepting and transmitting
data until the MAS explicitly moves the modem to command
mode by issuing an escape sequence (+++), or by dropping DTR
with a non-zero &D option specified.
5. Now, the MAS can return to online mode with the ATO
command, or drop out of the CONNECTED state with the ATH
command. Issuing a hang up command (ATHn) causes the
current source (S-Register 53) and destination address to be
reset, and the UDP server to automatically listen for the next
datagram. At this point, both passive and active connection
requests will be honored.
NOTE:
The DART 200 has
approximately 6K of
buffer space available
for storing queued
datagrams.
A MAS functioning as a server receives calls from any client device.
However, it can only save one source address, the one that was
extracted from the last datagram received, for sending any required
response. For this reason, if multiple clients are expected server
modems must use receive locking to delay accepting subsequent
datagrams until a response is sent to the source of the prior datagram.
Datagrams subsequent to the first are placed in a FIFO queue for
later processing.
In both client or server modes, the modem extracts the source
address (IP Address and port number) from the first packet received
and stores it in S-Register 53. This information can be retrieved by
the end-user application, if needed, with an ATS53?, for example:
ats54?
198.225.189.21,4000
This address data cannot be viewed with the AT&V command. The
data remains in S-Register 53 until the session is ended by an ATH
command (client mode), or a datagram is received from a different
source (server mode).
Sierra Wireless, Inc. 5-10
Page 65

DART 200 CDPD Modem User’s Guide 5 DART Supported Protocols
Sample UDP server setups
These settings give a general sense of the AT commands required to set
up a DART 200 for a UDP application. All relevant AT commands are
listed, including the defaults. All devices function differently, so the
setups that follow are general. These setups show specific items to
examine, but it is good practice to examine all of the setup values.
Two UDP setup examples are given:
• Remote UDP setup - A remote telemetry application and a central
client application, that shows the setup for a server modem at an
RTU being polled by a host computer
• Host UDP setup - shows the setup for a client modem at the host
computer that does the polling. This modem at the host arrangement
is suitable for bench-testing and limited use pilot implementations.
Production systems normally are direct connected through a leased
line or frame relay to a router at the customer’s host system (F-ES)
Remote UDP setup
The remote modem is set up as a server at the remote telemetry unit
where it responds to polls from a host computer. The sample RTU does
not use flow control and the data being sent is binary, not character, data.
This requires the UDP server to be set up with auto answer to respond to
polling, no flow control, and timed data forwarding because of the binary
data.
In Table 5-1, line items marked with an R (required) or an O (optional)
were changed from the default (D). After the changes are made save
them with an AT&W.
Table 5-1. Remote UDP setup
AT Command Req Opt Def Description
AT^Annn.nnn.nnn.nnn
AT\N[1,2]
AT\J0
AT\R4
ATS13=0
AT\O0
AT*A2
AT*L2100
ATS0=1
ATS82=0
R
R
D Use default - No channel access
R
R
R
R
D Use default - Listen on port 2100
O
R
Input IP Address (if not already done)
Side Preference (get from carrier)
restrictions
Auto Registration at Power On
With AT\R4 sets Continuous
Automatic Registration
PAD mode required for UDP.
Set UDP Server mode
Activate auto answer for server
Turn off backward compatibility.
Consider friends only mode if
unauthorized access is a concern.
PN1197-00 Revision 1.0 5-11
Page 66

DART 200 CDPD Modem User’s Guide 5 DART Supported Protocols
Table 5-1. Remote UDP setup (cont.)
AT Command Req Opt Def Description
ATE0
ATV0
ATQ0
O
O
D Use default - Result codes are sent to
No command mode character echo
Use terse result codes
the RTU
ATF1
D Use default - Do not echo transmitted
data to the RTU
ATX1
AT&C1
D Use default - Extended result codes
D Use default - DCD follows state of
the connection
AT&D0
D Use default - You may want to
consider using DTR to escape if RTU
supports it
AT&E2
AT&S0
AT\F3
O
D Use default - DSR is always active
D Use default - Applies only if \M1
Filter escape sequence from output
specified
AT\M0
D Use default - Do not recognize data
forwarding characters
AT\Q0
AT\T1
O
D Timed data forwarding - Always use
Most RTUs do not use flow control
with binary data
AT*B0
D Use default - Many CDPD Carriers
have not implemented Broadcast.
AT*C1
AT*G1
AT*K0
AT*R0
AT*T0
D Use default - Does not apply to UDP
D Use default - Does not apply to UDP
D Use default - Does not apply to UDP
D Use default - Does not apply to UDP
D Use default - Does not apply to UDP
Host UDP setup
The host (client) modem is set up to support polling of remote devices by
the host computer. The specific host uses flow control and the data being
sent is binary, not character, data. The polling function does not require
the UDP server, but requires flow control, and timed data forwarding
because of the binary data.
Use this setup only for bench testing or a limited use trial. A production
application uses a leased line, frame relay, or Internet connection
between the host and the MDIS instead of a modem. In the latter
scenario, the production host application needs to interface with a
software stack (replacing the modem stack to operate with the CDPD
network).
In Table 5-2, only the line items marked with an R or an O are changed
from the default (D). After making changes, save them with an AT&W.
Sierra Wireless, Inc. 5-12
Page 67

DART 200 CDPD Modem User’s Guide 5 DART Supported Protocols
AT^Annn.nnn.nnn.nnn
Table 5-2. Host UDP setup
AT Command Req Opt Def Description
Input IP Address (if not already done)
Side Preference - (get from carrier)
AT\N[1,2]
AT\J0
R
R
D Use default - No channel access
restrictions
AT\R4
ATS13=0
R
R
Auto Registration at Power On
With AT\R4 sets Continuous
Automatic Registration
AT\O0
AT*A0
R
D Use default - No server function
PAD mode required for UDP.
required
AT*L2100
ATS82=0
ATE0
ATV0
ATQ0
D Use default - Listen on port 2100
R
O
O
Turn off backward compatibility.
No command mode character echo
Use terse result codes
D Use default - Result codes are sent to
the host
ATF1
D Use default - Do not echo transmitted
data to the host
ATX1
AT&C1
D Use default - Extended result codes
D Use default - DCD follows state of
the connection
AT&D0
D Use default - You may want to
consider using DTR to escape
AT&E2
AT&S0
AT\F3
O
D Use default - DSR is always active
D Use default - Applies only if \M1
Filter escape sequence from output
specified
AT\M0
D Use default - Do not recognize data
forwarding characters
AT\Q2
D Use default - Most PC’s use flow
control
AT\T1
D Timed data forwarding - Always use
with binary data
AT*B0
D Use default - Many CDPD Carriers
have not implemented Broadcast.
AT*C1
AT*G1
AT*K0
AT*R0
AT*T0
D Use default - Does not apply to UDP
D Use default - Does not apply to UDP
D Use default - Does not apply to UDP
D Use default - Does not apply to UDP
D Use default - Does not apply to UDP
PN1197-00 Revision 1.0 5-13
Page 68

DART 200 CDPD Modem User’s Guide 5 DART Supported Protocols
TCP
Transmission Control Protocol (TCP) is an advanced transmission
protocol that adds substantial functionality to the underlying Internet
Protocol it is built on. Because of this structure it is often referred to as
TCP/IP. The advantage of TCP is reliability of data transmission;
achieved by using positive acknowledgments with retransmission if
required. The main disadvantage is the overhead needed to provide this
reliability under any and all conditions.
Unlike UDP, TCP offers both reliable and connected data transmission
service. Lost, delayed, duplicated, or out of sequence packets are
detected and automatically corrected. A logical point-to-point connection
is established and maintained throughout the communications session.
TCP is ideally suited for applications where speed of development is
critical, or for applications where the MAS is low on compute power,
available memory, or both. It requires very little other than session
establishment, sending data over the serial port, and session termination
to get a basic application operational.
The price for this reliability is the number of extra data packets used and
the time required to process them. Both need to be considered when
selecting an application protocol.
DART TCP capabilities
The DART software stack offers industry standard client-server
capability where the client originates communications and the server
waits for incoming requests. In server mode it includes auto answer
capability and an optional Friends Only mode. Friends Only mode
restricts the devices the server can receive calls from to help prevent
unauthorized access to applications or devices.
Friends Only mode operation
Friends Only mode permits communication with the modem to be
restricted (for security reasons) to a predefined group of addresses
(friends). Friends Only mode is controlled by S-Register 82, that enables
and disables the comparison of packet source addresses against a list
stored in the DART 200’s destination dial directory. Refer to the Modem
dial directory, p. 8-24 AT&Z command in Appendix F, DART AT
Command Set, for details. Only the IP Address portion of the addresses
in the dial directory is used with this feature. Bit 0 of S-Register 82
controls this mode. The default is to accept all incoming datagrams (bit 0
= 0).
Sierra Wireless, Inc. 5-14
Page 69

DART 200 CDPD Modem User’s Guide 5 DART Supported Protocols
This bit is significant only when the TCP connection is established
passively (server mode). When the connection is established actively (by
an ATDT command), incoming packets are accepted from the
destination address specified in the dial command regardless of whether
or not it is contained in the friends list.
In both modes of operations, the source address (IP Address and port
number) of the last accepted packet is saved in a temporary variable for
use as the current destination address for all packets being sent by the
MAS during the current session. This source address information is also
saved in S-Register 53 where it can be obtained with an ATS53?
command.
TCP communication
To participate in a TCP session the DART 200 must be registered on the
CDPD system. Refer to Channel acquisition, p. 2-10, and Registration,
p. 2-15 for details on registering the DART 200 on the CDPD network.
A TCP session can be started by the central site system (host or F-ES) or
remote system (MAS); it is application dependent. If the MAS is the
client it starts a session with the ATD command and the T (for TCP)
modifier followed by the host IP Address and port number (Ex.
ATDT198.225.176.43/2100). If no port is specified the port number
defaults to the standard telnet port (23); this should be avoided.
Unless the application is being run on a closed system, use port numbers
between 1025 and 4999 for compliance with industry standards.
Alternatively, the dial could reference an IP Address/port stored in the
DART 200 dial list by the ATDTSn command where n is the position
number of the desired IP Address in the dial list. Refer to the &Z
command in Modem dial directory, p. 8-24, Appendix F, DART AT
Command Set, for more details.
When a connection with the server is established:
1. The modem enters online mode and presents a CONNECT response
to the MAS. It is customary (but not required) for the client to do the
first data transmission.
2. The MAS begins data transfer by writing application data to the
DART 200 through the RS-232 port using device specific
commands.
3. This data is assembled until a data forwarding condition occurs, as
described in Data forwarding, p. 8-8.
4. The DART 200 attaches the TCP header and sends the packet onto
the network.
PN1197-00 Revision 1.0 5-15
Page 70

DART 200 CDPD Modem User’s Guide 5 DART Supported Protocols
??
??
5. The data packet is directed by the network routers to the appropriate
port on the designated server. If the server or the data path becomes
inactive between the time the connection is established and the time
data transmission starts, the MAS is informed by an error message
being returned.
If the central site is the client establishing the TCP session, the modem at
the remote site must be set up in TCP sever mode. The MAS can wait for
NOTE:
Time-outs are not a
consideration if auto
answer is enabled.
a RING message and respond with an ATA command, or its modem can
have auto answer active. Refer to Auto Answer setup, p. 8-11, for details
on activating this option.
Unlike UDP, with TCP a session is established by a three-way handshake
between the client and the server, not by the initial datagram. The client
IP Address is part of the incoming session establishment packet. When
the TCP handshake is received by the TCP server, the modem first
validates the source address (if the Friends Only option was specified).
If the source address is acceptable or if Friends Only is not active then a
RING result code is issued.
• If auto answer is active the CONNECT message is issued. If not,
then an ATA must be issued by the MAS within 60 seconds or the
tentative connection will be dropped.
NOTE:
The address remains in
S-Register 53 until the
session is ended by an
ATHn command.
• The modem extracts the source address (IP Address and port
number) from the handshake packet for use in constructing the
response data packets and also stores it in S-Register 53. This data
can be retrieved by the end-user application, if needed, with an
ATS53? The address data cannot be viewed with the AT&V
command:
ats53?
198.225.189.21.4000
• The modem enters online mode.
If the source address is not acceptable, the connection is refused.
In either client or server mode:
1. When the connection is established a CONNECT message is
received.
2. The MAS continues to read from (server) or write to (client) the
serial port to exchanges data packets with its session partner.
3. If data is being sent, it accumulates until a data forwarding condition,
as described in Data forwarding, p. 8-8 occurs:
• The DART 200 then attaches the TCP header and sends the
packet onto the network
• The packet is directed by the network routers to the appropriate
port on the designated server
Sierra Wireless, Inc. 5-16
Page 71

DART 200 CDPD Modem User’s Guide 5 DART Supported Protocols
4. Once the data block is received it is ready for processing. Any
necessary error-checking, resequencing, and so on, is handled by the
TCP software and is not the responsibility of the MAS. The handling
of network connectivity issues (such as loss of carrier), as opposed to
data delivery and sequencing (provided by TCP), is the responsibility
of the MAS. Refer to Error recovery, p. 8-4, for guidelines on error
handling.
5. Once the first data block has been received, the server system (MAS
or central site depending on application design) could reply to the
client system with data of its own, or it could wait for additional data
from the client. The variations at this point are numerous and entirely
dependent on application design.
6. When data transfer is complete the session terminates. As with the
initial communication step, either end could terminate; it is another
application design decision, but usually, the client terminates.
7. If the MAS is the server, it receives a NO CARRIER message and
returns to command mode when the client terminates the session. If
the MAS is the client, it performs an escape function to return to
command mode followed by a hang-up command (H). Refer to
Appendix F, DART AT Command Set, for a description of H.
Setup options
The following items must be set to enable the DART 200 to operate on
the CDPD network:
• IP Address (^A)
• Side Preference - \N in the modem profile
• Channel restrictions - \J in the modem profile
Refer to Basic modem personalization, p. 2-6, for a review of the details
on the AT commands ^A, \N, and \J.
In addition the following items are required for basic TCP operation:
• Automatic registration. Refer to p. 8-6 for details
• PAD mode - \O0 in the profile. Refer to \O command in Appendix F,
DART AT Command Set
If application design dictates that the MAS accepts connection requests,
activate the TCP server by setting the *A (select server type) AT
command to 1 with an AT*A1. Selecting this option enables the TCP
server function. The default value for this parameter is *A0 (no server
active). The default option is appropriate if the MAS application always
operates in client mode; always originates the connection request with an
ATDT command.
PN1197-00 Revision 1.0 5-17
Page 72

DART 200 CDPD Modem User’s Guide 5 DART Supported Protocols
Many of the following profile parameters apply and need to be evaluated
before proceeding to step 1. Some need to be set to provide the proper
application operating environment, and others can be allowed to default.
Review application programming in Chapter 8, Application
Programming, and the command descriptions in Appendix F, DART AT
Command Set.
• Command mode echo (En)
• Data set ready (DSR) operation (&Sn)
• Verbose mode (Vn)
• Data forwarding operation (\Fn)
• Quiet mode (Qn)
• Manual transmit control (\Mn)
• Online mode echo (Fn)
• Flow control (\Qn)
• Extended result codes (Xn)
• Automatic transmit control (\Tn)
• Data carrier detect (DCD) operation (&Cn)
• TCP PAD Keep-alives (*Kn)
• Data terminal ready (DTR) operation (&Dn)
• Set Listen Port (*Ln)
• Escape code recognition (&En)
1. Set the key parameter, PAD Operating mode (\On), to \O0 for TCP
operation.
2. If the modem is to be set up as a server to answer incoming calls
(connection requests), select the method to be used. There are two
options available: setting S-Register 0 = 1 with an ATS0=1
command is the preferred method. This option puts the modem into
permanent auto answer mode. The alternative is for the MAS to wait
for the RING message, indicating an incoming connection request,
and then use the answer command, ATA, to establish the connection.
3. Select the port for the DART 200 to listen on for incoming messages
with *L command by using an AT*Ln, where n is the desired
listening port. Unless you are operating on a closed network, use a
decimal number in the range of 1025 to 4999 for compliance with
industry standards. The default value for the listening port is 2100
for backward compatibility with earlier versions of the modem.
Sierra Wireless, Inc. 5-18
Page 73

DART 200 CDPD Modem User’s Guide 5 DART Supported Protocols
4. In any TCP application where the remote system only operates in
server mode, consider the use of the TCP keep-alive option (*K). It
is possible for the central client system to fail after establishing a
session with a remote server. If the client fails its end of the TCP
session closes, but the server end remains open.
Attempts to re-establish the connection with the server after the
client recovers get a BUSY response because the prior session was
not properly closed. The receive keep-alive option (*K2) enables a
remote server to close its side of a session if data or a keep-alive
character is not received within an end-user specified timeout period.
The time out period is contained in S-Register 86 (default 120
minutes). A reasonable timeout value is on the order of 3 to 5
minutes.
The remaining parameters are application dependent and are covered in
detail in Chapter 8, Application Programming.
Sample TCP setups
These settings give a general sense of the AT commands required to set
up a DART 200 for a TCP application. All relevant AT commands are
listed, even the defaults. All devices function differently, therefore, the
setups listed in this section of the manual are general. These setups show
specific items to examine, but it is a good idea to examine all of the setup
values.
Two TCP setup examples are shown below: a remote telemetry
application and a central client application. Remote TCP setup, p. 5-19
shows the setup for a server modem at a remote telemetry unit (an RTU)
being polled by a host computer.
Host TCP setup, p. 5-21, shows the setup for a client modem at the host
computer that does the polling. This modem at the host arrangement is
suitable for bench testing and limited use pilot implementations.
Production systems normally are direct connected through a leased line
or frame relay to a router at the customer’s host system (F-ES).
Remote TCP setup
The remote modem is set up as a server at the remote telemetry unit
where it responds to polls from a host computer. The specific RTU does
not use flow control and the data being sent is binary, not character, data.
This requires the TCP server with auto answer to respond to polling, no
flow control, and timed data forwarding because of the binary data.
In Table 5-3, the line items marked with an R (required) or an O
(optional) are changed from the default (D).
PN1197-00 Revision 1.0 5-19
Page 74

DART 200 CDPD Modem User’s Guide 5 DART Supported Protocols
Table 5-3. Remote TCP setup
AT Command Req Opt Def Description
AT^Annn.nnn.nnn.nn
n
AT\N[1,2]
AT\J0
R
R
D Use default - No channel access
Input IP Address (if not already
done)
Side Preference (get from carrier)
restrictions
AT\R4
ATS13=0
R
R
Auto Registration at Power On
With AT\R4 sets Continuous
Automatic Registration
AT\O0
AT*A1
ATS0 =1
AT*L2100
ATE0
ATV0
ATQ0
R
R
O
D Use default - Listen on port 2100
O
O
D Use default - Result codes are sent to
PAD mode is required for TCP
Sets TCP Server mode
Set modem to Auto Answer
No command mode character echo
Use terse result codes
the RTU
ATF1
D Use default - Do not echo
transmitted data to the RTU
ATX1
AT&C1
D Use default - Extended result codes
D Use default - DCD follows state of
the connection
AT&D0
D Use default - You may want to
consider using DTR to escape if
RTU supports it
AT&E2
AT&S0
AT\F3
O
D Use default - DSR is always active
D Use default - Applies only if \M1
Filter escape sequence from output
specified
AT\M0
D Use default - Do not recognize data
forwarding characters
AT\Q0
AT\T1
O
D Use default - Timed data forwarding
Most RTUs do not use flow control
should always be used with binary
data
AT*B0
AT*C1
AT*G1
AT*K2
ATS86 = 3
AT*R0
AT*T0
D Use default - Does not apply to TCP
D Use default - Does not apply to TCP
D Use default - Does not apply to TCP
O
O
Set TCP receive keep-alives
Use 3 minute keep-alive timeout
D Use default - Does not apply to TCP
D Use default - Does not apply to TCP
Sierra Wireless, Inc. 5-20
Page 75

DART 200 CDPD Modem User’s Guide 5 DART Supported Protocols
Host TCP setup
The host (client) modem is set up to support polling of remote devices by
the host computer. The host uses flow control and the data being sent is
binary, not character data. The polling function does not require the TCP
server, but requires flow control, and timed data forwarding because of
the binary data.
Use this setup only for bench testing or a limited use trial. A production
application uses a leased line, frame relay, or Internet connection
between the host and the MDIS instead of a modem. In the latter
scenario, the production host application needs to include a software
stack (replacing the modem stack) to operate with the CDPD network.
In Table 5-4, only the line items marked with an R (required) or an O
(optional) are changed from the default (D).
Table 5-4. Host TCP setup
AT Command Req Opt Def Description
AT^Annn.nnn.nnn.
nnn
AT\N[1,2]
AT\J0
AT\R4
ATS13=0
AT\O0
AT*A0
AT*L2100
ATE0
ATV0
ATQ0
ATF1
ATX1
AT&C1
AT&D0
AT&E2
AT&S0
AT\F3
AT\M0
AT\Q2
AT\T1
AT*B0
AT*C1
AT*G1
R
R
D Use default - No channel access
R
R
R
D Use default - No server required
D Use default - Listen on port 2100
O
O
D Use default - Result codes are sent to the
D Use default - Do not echo transmitted
D Use default - Extended result codes
D Use default - DCD follows state of the
D Use default - You may want to consider
O
D Use default - DSR is always active
D Use default - Applies only if \M1
D Use default - Do not recognize data
D Use default - Most PC’s use flow
D Timed data forwarding - Always use
D Use default - Does not apply to TCP
D Use default - Does not apply to TCP
D Use default - Does not apply to TCP
Input IP Address (if not already done)
Side Preference (get from carrier)
restrictions
Auto Registration at Power On
With AT\R4 sets Continuous Automatic
Registration
PAD mode is required for TCP.
No command mode character echo
Use terse result codes
host
data to the host
connection
using DTR to escape
Filter escape sequence from output
specified
forwarding characters
control
with binary data
PN1197-00 Revision 1.0 5-21
Page 76

DART 200 CDPD Modem User’s Guide 5 DART Supported Protocols
Table 5-4. Host TCP setup (cont.)
AT Command Req Opt Def Description
AT*K0
AT*R0
AT*T0
D Use default - Keep-alives not needed at
central site
D Use default - Does not apply to TCP
D Use default - Does not apply to TCP
SLIP
Serial Line Interface Protocol (SLIP) is the defacto standard for
encapsulating TCP/IP protocol over dedicated and/or switched serial
lines. It is a useful and reliable way to allow mixes of hosts and routers to
communicate with one another in various combinations.
Most casual end-users do not encounter SLIP in the above form. Instead,
they find SLIP being used with TCP/IP stacks (usually referred to simply
as stacks) in a variety of PC programs designed to provide support for
multiple TCP or UDP applications over networks of various types (X.25,
LANs, satellite, and so on) including the Internet. CDPD is another such
network.
These stacks frequently include additional functions such as electronic
mail, various forms of telnet, ping, Internet browsers, and file
downloading using File Transfer Protocol (FTP). In addition, most of
these programs provide a multitasking end-user application programming
interface (API) to the stack (usually, Winsock), for developing custom
communications applications. These programs are also used with PCs
attached to the CDPD network.
The DART 200 provides SLIP capability. When operating in SLIP mode,
the modem’s internal TCP/IP stack is bypassed (but not its CDPD stack)
and, the modem acts as a router passing data between the software
package’s stack, and the network, such as the Internet or a private
network using Internet Protocol, attached server applications.
Using such a package allows the design of applications that need
multiple communications sessions active concurrently. For example, a
public safety application where a police car has active sessions
simultaneously with the NCIC in Washington, the State Bureau of Motor
Vehicles, and the local police system.
Modem setup for SLIP
In SLIP mode, the following profile parameters are not operational and
can be ignored. Their function is provided by the PC-based software
package.
• Data forwarding operation (\Fn)
• Select Server Mode (*An)
• Manual Transmit Control (\Mn)
Sierra Wireless, Inc. 5-22
Page 77

DART 200 CDPD Modem User’s Guide 5 DART Supported Protocols
• TCP/IP keep-alives (*Kn)
• TCP PAD operating mode (\On)
• Telnet keep-alives (*Tn)
• Automatic transmit control (\Tn)
The following profile parameters are operational in command or SLIP
modes and need to be evaluated to determine their proper settings:
• Command mode echo (En)
• Data set ready (DSR) operation (&Sn)
• Online mode echo (Fn)
• Restrict Channel Selection (\Jn)
• Quiet mode (Qn)
• Side preference (\Nn)
• Verbose mode (Vn)
• Flow control (\Qn)
• Extended result codes (Xn)
• Reception of IP broadcasts (*Bn)
• Data carrier detect (DCD) operation (&Cn)
• SLIP TCP header compression (*Cn)
• Data terminal ready (DTR) operation (&Dn)
• SLIP Multicast address selection (*Gn)
• Escape code recognition (&En)
• Automatic SLIP Restart (*Rn)
SLIP Header Compression (*C) and Flow Control (\Q) are the key
parameters. They must match the stack settings for SLIP to operate.
1. Setting SLIP header compression on saves a small amount of time
(recommended) in data transfer. In most commercial software stacks
this feature, if offered, is identified as CSLIP. The default setting for
this parameter is *C1 (enabled). If this setting and that of the stack
do not match SLIP cannot operate successfully. If your stack does
not support compression, you must deactivate it on the DART. To do
this execute an AT&C0, and save it with an AT&W.
2. Use hardware flow control (\Q2 - default). If this setting and that on
the stack do not match SLIP cannot operate successfully. Software
flow control or no flow control are inappropriate.
3. Set Channel Restrictions (\J), and Side Preference (\N)
appropriately, as described in Basic modem personalization, p. 2-6,
but these settings are CDPD, not SLIP related.
4. Set the COM port for 8 data bits and NO parity (8N1). Since SLIP
operates in binary mode, a data byte could be any 8-bit
configuration, so parity must be disabled to permit proper operation.
5. Set the DART 200 COM port speed to match that of the stack: 19.2
Kbps is recommended. This can be accomplished by an AT&L &W
command.
PN1197-00 Revision 1.0 5-23
Page 78

DART 200 CDPD Modem User’s Guide 5 DART Supported Protocols
Automatic SLIP restart specifies that the DART 200 always enters SLIP
mode following power on or modem reset. It lets Winsock applications
rely on the modem always being in SLIP mode, particularly following a
power off/on cycle.
When this feature is active the modem is not in command mode
following power on. This can sometimes be inconvenient. Any time that
it is necessary to send AT commands to the modem, at initial application
startup or when querying modem status an escape function must be
performed (refer to &E or &D commands) before the modem responds
to AT commands. If using the manual escape function, check that both
the terminal emulation program and the modem are set to the same baud
or the escape will not work.
1. This capability is activated with an AT*R1 command (deactivate it
with an AT*R0). Bit 6 of S-Register 57 (value of 64) indicates that
auto slip mode is active. A modem that acquired a CDPD channel
(128), and used the auto registration feature (32) to get registered (1)
shows a value of 225 in S-Register 57 with Auto SLIP Mode Startup
(64) active.
2. Save the setting with the &W command to become a permanent
setting.
3. To make the command active, power cycle or reset the modem with
the AT-R command.
SLIP IP Address overview
• Internet Address Classes
CDPD Internet addresses are 32-bit fields consisting of a network ID
followed by a device ID (netid, devid). For readability, these 32-bit
addresses are broken down into four 8-bit fields (called octets or
bytes) that are then converted to their decimal equivalents and
separated by a period. For example, the address 11000000 00001110
10100111 00010101 (hardly readable) is represented as
192.14.167.21
Internet standards further define five classes of addresses, the first
three (A,B, and C) of which are used for network addresses.
• Class A addresses have a first octet between 1 and 127, and
consist of a one octet network address followed by a three octet
device address
• Class B addresses have a first octet between 128 and 191, and
consist of a two octet network address followed by a two octet
device address
• Class C addresses have a first octet between 192 and 255, and
consist of a three octet network address followed by a one octet
device address. Most CDPD addresses are class B or class C
Sierra Wireless, Inc. 5-24
Page 79

DART 200 CDPD Modem User’s Guide 5 DART Supported Protocols
(Terminal)
Link
A simplified block diagram of a terminal connection to a CDPD
network using the SLIP interface is shown in Figure 5-1.
Figure 5-1 Terminal connection to a CDPD network using SLIP
AirLinkRS-232
#1 #2 #3
MAS
M-ES
MC-DART
CDPD
Network
#1 - Local Terminal (MAS) IP Address
#2 - DART SLIP Interface IP Address
#3 - DART (registered NEI) IP Address
The three IP Addresses are:
1. Local Terminal (MAS) IP Address is set using by AT*Mn.n.n.n
This MAS address is not known to the CDPD network, so it is set by
convention to the same value as the one used for #3, as described in
item 3 on p. 5-25, to improve performance of the DART 200’s
routing mechanism and to ensure that FTP protocol works properly.
2. The DART SLIP Interface IP Address is set using the service
provider command AT^Sm.m.m.m
The SLIP IP Address is an arbitrary value, usually 1.1.1.2, because it
is only used by the MAS and DART 200 and is not known to the
network. In the definitions for commercially available stacks used
with SLIP this IP Address is referred to as the router, gateway, or
server address. This address must be present in SLIP definitions for
your stack or you cannot run SLIP with the DART 200.
There are two issues involving this address to consider:
• Some TCP/IP software stacks do a validity check on all of these
addresses and require them to be of the same class as the NEI
• The SLIP IP Address must be on a different subnetwork than the
NEI. If it is not, the DART cannot route packets (pings included)
to the CDPD network
The suggested resolution to these constraints (if 1.1.1.2 does not
work) is to set the network (class) portion of the DART SLIP address
to be off by one from the NEI’s network address, and to set the
device address to all ones, for example:
Class NEI SLIP Address
Class A 111.155.189.21 110.1.1.1
Class B 155.160.147.17 155.161.1.1
Class C 196.37.111.165 196.37.110.1
PN1197-00 Revision 1.0 5-25
Page 80

DART 200 CDPD Modem User’s Guide 5 DART Supported Protocols
??
3. The DART (registered NEI) IP Address is known to the network and
is obtained from your service provider. This IP Address is set using
the following service provider command: AT^An.n.n.n/x, where: x
defines which slot (0-9) in the address table to use. If not entered, x
defaults to 0.
If there is more than one NEI stored in the modem’s NEI list the
desired one is selected by using the following command: AT\Sn,
where: n = 0 to 9
The IP Address selected for use as the NEI remains fixed until
specifically changed by using the AT\S command.
NOTE:
• All three IP
Addresses cannot
be the same
• For FTP, #1 and
#3 (in Figure 5-1)
must be the same
• All three can be
different for
non-FTP
communications,
but performance is
somewhat better if
#1 and #3 are the
same
To view the list of IP Addresses as well as the MAS and SLIP IP
Addresses use the AT\S? command: the active NEI has an * to its
left, for example:
at\s?
SLIP = IP ADDRESS 001.001.001.002
MAS = IP ADDRESS 155.174.048.173
NEI 0 = IP ADDRESS 155.174.036.087
*NEI 1 = IP ADDRESS 155.174.048.173 SPNI 00000 LSA
00000
OK
SLIP operation
The SLIP operation process is as follows:
1. SLIP starts with the AT*S command.
2. This command puts the modem into SLIP mode and gives an OK
response.
3. When in SLIP mode the DART 200 passes all IP and higher layer
protocols (TCP, UDP, telnet) to the TCP/IP stack in the MAS for
processing, but continues to handle the lower CDPD protocol layers
including the data encryption function. Data forwarding defaults to a
transparent, symbol-based method where the symbol is the SLIP
end-of-packet character.
4. The modem stays in SLIP mode until an escape function is
performed by the end-user application; by either sending the escape
sequence, or by dropping DTR.
5. To return to SLIP mode another AT*S must be issued.
An example of SLIP setup for Trumpet, a commonly available shareware
Winsock, is shown in Appendix D, SLIP Setup Examples.
Sierra Wireless, Inc. 5-26
Page 81

DART 200 CDPD Modem User’s Guide 5 DART Supported Protocols
PP
SLIP initial testing
After the IP Addresses are set, the SLIP setup is completed, and the
modem has been put into SLIP mode, determine if your setup is correct
and that you have network connectivity by pinging the network.
The ping command format can vary slightly depending on the program
you are using. However, the following discussion provides basic
guidance regardless of the TCP/IP stack used. The general format of the
ping command is: PING nnn.nnn.nnn.nnn
The ping sends a fixed length of data (L) with an echo request to IP
Address nnn.nnn.nnn.nnn and waits for a time out period (T) for a
response. L and T can be quite different from one program to another, as
well as from the DART 200 ping values used with the AT*P command.
Consider the differences in these values between your program and the
DART 200’s AT*P when comparing results.
The DART 200 default ping values are L= 68 bytes, and T=10 seconds,
that result in ping times in the range of 600 to 1600 ms. Most SLIP
packages use a larger L and a smaller T than the DART 200, because
they were originally designed for land lines or Local Area Networks
(LANs) where ping times are much faster than with CDPD. Executing a
SLIP ping with its own default parameters over CDPD frequently causes
time-outs. If this occurs shorten the SLIP ping data length or increase the
timeout period to get successful pings.
TIP:
It's helpful when testing
to have two DARTs to
ping between. This
gives you control over
both ends of the link,
and can be done using
a single PC. Register
the first DART using
your PC, then switch
the PC to the second
DART, bring up SLIP,
and ping back to the
first modem. A
registered modem does
not need an attached
PC to respond to a
ping provided it is not
in SLIP mode.
To validate that you have set up the SLIP session between the DART
200 and the stack correctly:
1. Ping the modem. Make the modem’s SLIP address (1.1.1.2) the
target. If this ping operation is successful it demonstrates that your
setup is correct. This test can be done without being registered or
without CDPD being active.
2. Ping the DNS or a server at the local carrier. This Server IP Address,
like the DNS, is available from the carrier. If this ping operation is
successful, the SLIP system can communicate with the carrier.
If the ping fails and you are using a modem SLIP address other than
1.1.1.2 , you may have a routing problem. Refer to item 2 on p.5-25,
for guidance.
3. Ping an IP Address on the other side of the MDIS; usually, this is a
server, or a test terminal near you.
If this is successful, your SLIP system has network connectivity and
is now fully operational. If this ping attempt fails for reasons other
than time-out, suspect a bad IP Address, an unregistered IP Address,
or a router failure at the MDIS.
PN1197-00 Revision 1.0 5-27
Page 82

DART 200 CDPD Modem User’s Guide 5 DART Supported Protocols
Telnet
The telnet capability within TCP/IP is designed to provide support for
ASCII terminals to communicate with text-oriented server applications
on host systems. As implemented in the DART 200, the telnet support
mode provides the capability for the modem to emulate such a terminal;
the default is the DEC VT100 but the actual type is negotiated with
(dictated by) the server.
A device (usually a PC, but potentially an ASCII terminal) attached to
the DART 200 and using telnet mode has its data stream translated to
that of the VT100 or whatever other terminal type was negotiated. This
usually involves not only translating a few control characters, but also
turning off the high order bit of each data character. This translation can
make it very awkward to use telnet mode for a typical telemetry
application. It is strongly recommended that telnet not be used for other
than the intended use; providing access to ASCII terminal application
servers.
Setup options
With the exception of the side preference, the DART 200 factory defaults
permit a telnet session to be established. However, certain profile
parameters need to be checked to ensure they work appropriately with
the remote host at minimum cost, as follows:
• Online Mode Echo (ATFn) - Controls the echoing of characters
when in online mode. The default for telnet mode is F1 (host echo)
When a telnet session starts, one of the items that the DART 200
negotiates with the host is whether the host or modem provides the
echo for characters entered at the modem end of the connection.
Most processes connected on the well-known telnet port (23) provide
the echo. However, in a CDPD telnet session where charges are
based on packet and data flow rather than on connect time, there is a
big incentive to minimize the flow of extraneous information; use the
F0 option (modem echo) to do this.
The tradeoff is one of cost versus the confirmation that the characters
arrived correctly, which is presumed if they echo back correctly from
the host. Also, the client has no knowledge of how certain characters,
such as a backspace (BS), should be handled locally since the remote
process is what determines if a BS is destructive or harmless.
Sierra Wireless, Inc. 5-28
Page 83

DART 200 CDPD Modem User’s Guide 5 DART Supported Protocols
• Data Forwarding Operation
• Manual Transmit Control (AT\Mn) - Controls the use of the
characters (specified in S-Registers 51 and 52) for data
forwarding while in online mode. The default for this parameter
is \M0 (disabled). The default for S-Register 51 is <CR>, that
takes effect only if manual transmit control is enabled.
• Automatic Transmit Control (AT\Tn) - Controls the use of the
inter-character time-out period (specified in S-Register 50) for
data forwarding when in online mode. The default for this
parameter is \T1 (enabled)
With the defaults listed above in effect, characters are
transmitted to the telnet host process (remote login or gopher)
and echoed back from the remote system for display as they are
entered. This generates a lot more packets, but ensures an
accurate display of the data as seen by the host application.
If your telnet host process operates correctly with, or requires
block mode data transfers (a string of characters followed by a
<CR>), then set local echo (F0), manual transmit mode enabled
(\M1, and disable inter character data forwarding (\T0). A local
echo is recommended, in this case, so you can view keys as you
enter them without pressing the <CR> key.
• Telnet Keep-Alive - Allows the DART 200 to keep a telnet
session alive (not time out) if the terminal user has excessive
think time between entries. Without this capability the telnet
session could be terminated prematurely by the server
This facility can work in transmit mode, receive mode, or both. It
uses a non-intrusive telnet NOP command packet and a
keep-alive time-out value (S-Register 86) to implement the
function. The keep-alive timer restarts when data is sent or
received regardless of the mode selected (transmit, receive, or
both).
If the timer expires with the transmit option specified, pending
data or the telnet NOP command is forwarded. If the NOP
(keep-alive) is sent the telnet server protocol ignores it, but the
session is not allowed to time out. This is the normal use of the
function.
If the timer expires with the receive option specified, an ATH
command is issued to close the connection.
The default for this function is *T0 (not enabled). Refer to the
*T command in Appendix F, DART AT Command Set, for details
on how to use this command.
• Linefeed after <CR> - S-Register 1 controls whether or not a linefeed
(<LF>) is sent with a carriage return (<CR>), for telnet mode only.
The default is 1 (send <LF> with <CR>). When not enabled, a NULL
character follows the <CR> as specified by telnet protocol
PN1197-00 Revision 1.0 5-29
Page 84

DART 200 CDPD Modem User’s Guide 5 DART Supported Protocols
• Terminal Emulation Negotiation - S-Register 78 determines the
terminal emulation type to offer first when negotiating with the telnet
host system. The current list is:
• 0 = DEC-VT100 (default)
• 1 = DEC-VT52
• 2 = UNKNOWN
Default is for most specific first, such as 0. When the telnet session is
established and negotiation is complete, the actual terminal type chosen
is determined by using the telnet escape mode status command, or by an
appropriate command for the remote server. If UNKNOWN was
selected, the backspace and delete keys may not work correctly. If this is
the case you have two options:
1. Use the erase character definition on the remote server. UNIX
usually uses the tset, stty, or printen commands to access terminal
parameters. Refer to a UNIX manual or ask the serving system
administrator.
OR
2. Use the telnet virtual terminal erase character command to send the
erase character.
Telnet escape commands
When in a telnet session, entering a Ctrl ^ means that telnet interprets the
next keystroke as a command. The commands include:
e Send Telnet Virtual Terminal erase character command.
i Send Telnet IP command (Interrupt Process).
l Tell server you are going to local echo mode
r Request server to perform remote echo usually responds [YES] if
there
a Send a telnet AYT Are You There (AYT) command; Server
usually responds YES if there
b Request Binary Mode. This is not normal, use with caution
o Request to turn Binary Mode off
s Print current status of telnet session. (Local parameters)
^ Send the local telnet escape character.
Any other key that follows the ^^ sequence displays a list of allowed
commands. S-Register 77 contains the telnet escape character (default is
^^ or decimal 30.
Some of the DART 200 profile parameters (\Mn, \Tn, and so on) can be
changed after logging in to the telnet host by using the DART 200’s
escape to command mode sequence (+++). However, do not change
S-Register values and modem profile parameters that were negotiated
with the remote host when in the connected state, since changing their
values at this point could impact client/remote host communication.
After completing your changes, return to the telnet session with the ATO
command.
Sierra Wireless, Inc. 5-30
Page 85

DART 200 CDPD Modem User’s Guide 5 DART Supported Protocols
??
New for this version
The telnet binary mode (\Bn) was removed from the AT command set,
because a telnet remote login session should not be started with this
function enabled.
Binary mode considerations
Binary operation is available for telnet but only as a telnet escape
command. Requesting binary mode does not guarantee that it can be
established because the option is negotiated with the remote host. Query
telnet status after requesting binary mode to determine this, but do so
with caution.
Software flow control cannot be used since XON/OFF characters in the
data stream can not be distinguished from data with the same bit format.
Also, escape data streams containing the telnet escape command
character should be escaped by doubling the character. For example, if
the escape character is ^^ (decimal 30) and it appears in the binary data
stream, then modify the data by inserting a second escape character
adjacent to the first, for example:
NOTE:
Telnet servers are usually
quite slow, so be patient
when waiting for the
CONNECT message, and
again for the login
screen. Usually, after the
LOGIN session
operations speed up.
Follow the instructions
from the server to run
and terminate your
session. Usually, when
you quit the telnet session
the server breaks the
connection and a NO
CARRIER message
appears. If this does not
happen, escape from
online mode with the +++
escape sequence and
hang up with an ATH0.
1. Original data stream
• Data to modem [...69,123,24,30,49,....]
• Data from modem [...69,123,24,49,....]
2. Modified data
• Data to modem [...69,123,24,30,30,49,....]
• Data from modem [...69,123,24,30,49,....]
If binary data transfer is needed, the telnet mode of operation is probably
not the appropriate mechanism to use. The need to negotiate the option,
and the need for doubling the telnet escape character tend to make the
function awkward. Non-telnet modes such as UDP or TCP are much
better suited to binary data transfer.
Telnet operation
When the setup options are complete (\O1, \F0, \M1, \T0 are
recommended) establish a telnet session by dialing a telnet server, for
example, a bulletin board with an ATDTn.n.n.n/p command; where
n.n.n.n is the IP Address of the telnet server. The port number (p) is not
required because it defaults to the standard telnet port number (23).
PN1197-00 Revision 1.0 5-31
Page 86

DART 200 CDPD Modem User’s Guide 5 DART Supported Protocols
Sierra Wireless, Inc. 5-32
Page 87

6 Device Attachment
DTE
RS-232 connection
The DART 200 has an RS-232 DB9 interface. If the remote device has a
similar interface, then any standard PC communications cable functions
as a connector between the two. Otherwise, refer to Data and control
interface, p. 8-14, for a discussion of the RS-232 leads and the minimum
number required for operation.
Standard RS-232 communications cables function properly for distances
up to 50 feet. If longer lengths are required, low loss RS-232 cable or
electronic cable extenders can be used; both are available from local
cable distributors or electronic catalogs.
Null modem function
The RS-232 interface specification was defined before the invention of
microcomputers. The original intent was to standardize the method that
computers and terminals used to communicate remotely over telephone
lines. The standard specification is generalized in Figure 6-1.
PN1197-00 Revision 1.0
Figure 6-1. Standard RS-232 connection
DTE
Terminal
Computer
RS-232
DCE DCE
Modem
Phone
Line
Modem
RS-232
The RS-232 standard specified the label Data Terminal Equipment or
Data Terminating Equipment (DTE) for terminals and computers, and
the label Data Communications Equipment (DCE) for modems. The
popularization of RS-232 serial communications resulted in many
different types of equipment, besides modems, that employ the standard.
Many manufacturers expect devices to connect directly to DTE
equipment (usually, PCs). Consequently, devices are designed with a
DCE interface, so a standard RS-232 cable meets the cabling
requirements. Common usage of RS-232 is shown in Figure 6-2.
Page 88

DART 200 CDPD Modem User’s Guide 6 Device Attachment
DTE
DCE
Figure 6-2. Stand-alone RS-232
Computer
RS-232
Terminal
The problem with this occurs when modems are inserted between the
DTE and a remote device with a DCE interface. The modem expects to
communicate with a DTE interface. Since this is not the case at the
remote end, where the DCE modem is trying to talk to a DCE device, a
communications failure results. The solution for this situation is a null
modem connector. A typical null modem pin out is shown in Table 6-1.
Table 6-1. Typical null modem pinout
Female
DB9
1 DCD 4
2 RXD 3
3 TXD 2
4 DTR 6 and 1
5 SGD 5
6 DSR 4
7 RTS 8
8 CTS 7
9 --- Open
Male
DB9
The null modem adapter corrects the mismatch between the modem and
a terminating device having a DCE interface. The proper location for the
null modem is shown in Figure 6-3.
Figure 6-3. Null modem location
DTE
Computer
RS-232
DCE DCE
Modem
Phone
Modem
Line
RS-232
Null modem
needed here
DCE
Terminal
Sierra Wireless, Inc. 6-2
Page 89

DART 200 CDPD Modem User’s Guide 6 Device Attachment
To identify this problem connect a PC directly to the device and establish
communication. If communication is established, the device uses a DCE
interface and requires a null modem to communicate with the DART
200.
Null modem adapters are available as stand-alones; that look like an
RS-232 gender-changer, or as null modem cables. Null modem adapters
are available from electronics stores and are well suited for application
development. Null modem cables can be ordered from cable suppliers,
and are better suited for field deployment, because the cables eliminate
the extra part and failure prone connections required for a stand-alone
null modem.
PN1197-00 Revision 1.0 6-3
Page 90

DART 200 CDPD Modem User’s Guide 6 Device Attachment
Sierra Wireless, Inc. 6-4
Page 91

7 Vehicle Installation
Considerations
Electrical transients
When a Data Access Radio Transceiver (DART) 200 is installed in a
vehicle it is usually powered from the vehicle’s electrical system.
Transients or temporary outages that can occur during starts or other
vehicle operations, can cause the DART 200 to reset the power. These
transients can also impact the attached Mobile Application Subsystem
(MAS).
There are several options available to minimize or eliminate vehicle
power disturbances, including filters, cut off switches, and universal
power supplies. The best solution; however, is to compare the needs of
the application and equipment to the cost of the proposed solution. Try
alternatives during testing to avoid problems during application roll out.
The simplest power backup system is a 12-volt battery; large enough to
supply the modem’s maximum transmit current, with a blocking diode to
prevent discharging the battery into the vehicle’s electrical system. The
battery floats on the vehicle’s 12 volt DC power system, constantly being
recharged, and used only during periods of transient voltage drop. The
diode prevents the vehicle’s electrical system from drawing power from
the backup battery during these voltage drops.
PN1197-00 Revision 1.0
The diode needs to allow at least 2.5 amps of current in the forward
direction, and withstand a reverse voltage of at least 20 volts. Higher
rated diodes, available at a nominal cost from electronic stores, dealers,
and catalogs, provide a better safety factor.
Application considerations
Resets can occur during or between communications with the remote
system. The most serious situation occurs if the reset happens during
communications, because the modem switches from online to command
mode. If the reset occurs between communications, the impact can be
less critical because many applications take the modem out of online
mode during this time period anyway.
Page 92

DART 200 CDPD Modem User’s Guide 7 Vehicle Installation Considerations
The application program in the MAS has no way of knowing before
attempting a send or receive operation if the modem is still in online
mode. The application can be designed to assume that the modem is
always online, or to always check that it is online before performing the
send or receive operation. In the former case, a send operation failure is
indicated by an error return code (in command mode the modem expects
to see all messages start with an AT), while a receive failure is indicated
by a timeout.
If the MAS can sense the RS-232 interface, as described in CDPD status
sensing, p. 8-15, perform this operation to verify that the modem is still
connected before attempting a send/receive operation. For Transmission
Control Protocol (TCP) or User Datagram Protocol (UDP) the connected
state implies that the modem is online. If the MAS cannot sense the
interface leads, it tries the send/receive operation first, and only proceeds
to error-checking if an error or timeout occurs.
For applications using Serial Line Internet Protocol (SLIP), use the
Automatic SLIP restart feature on the modem, to automatically put the
modem back into SLIP mode following a power reset.
If the modem is not online, the next step is to check registration state
through the RS-232 leads or with ATS57? If it is not registered, the
program waits and periodically checks registration status, eventually
proceeding when the modem reregisters. It is assumed that the modem is
set up to register automatically, as described in Auto-Registration when
not registered, p. 8-7.
When the modem becomes registered, the next step depends on whether
or not the MAS is a server or a client. If it is a client, the recovery
procedure for both TCP and UDP is to issue the appropriate dial
command. If it is a server, the recovery procedure for both TCP and UDP
is to wait for a call from a client.
Proximity to other antennas
In general, do not locate the DART 200 antenna closer than 5 feet to
other antennas (specifically, two-way radio antennas) and in certain cases
more separation is required. In many vehicular applications, there are
two-way radio transmitters in use and usually the antenna mountings are
not 5 feet apart. Interference from the radio transmitter can slow down
response times or block modem transmission.
Sierra Wireless, Inc. 7-2
Page 93

DART 200 CDPD Modem User’s Guide 7 Vehicle Installation Considerations
In this situation, separate the antennas as far as possible and then run a
field test when the two-way radio is also being used. If the DART 200
works satisfactorily you do not have a problem, but if it does not filtering
is required. A bandpass filter on the two-way radio’s transmitter output
eliminates harmonics that can interfere with the cellular frequencies. A
band reject filter on the DART 200’s input, centered on the two-way
radio’s base frequency, provides signal attenuation at that frequency to
help prevent de-sensing the DART 200’s Radio Frequency (RF)
circuitry: either, or both can be required. The calculation to determine the
filtering usually requires an RF engineer.
If you do not have the option to field test, then the theoretical calculation
approach is your only option.
PN1197-00 Revision 1.0 7-3
Page 94

DART 200 CDPD Modem User’s Guide 7 Vehicle Installation Considerations
Sierra Wireless, Inc. 7-4
Page 95

8 Application Programming
Chapter
The Data Access Radio Transceiver (DART) 200 offers built-in
Transmission Control Protocol (TCP), User Datagram Protocol (UDP),
Serial Line Internet Protocol (SLIP), and telnet support, but most
end-user application programming that interacts with the modem uses
TCP, UDP, or SLIP.
Telnet is used primarily as a path to applications on remote hosts with
the local device being an ASCII terminal or, more likely, a PC emulating
an ASCII terminal. Outside of setting up the modem initially to meet
telnet’s needs, there is no programming to do. Error handling is provided
by the ASCII terminal emulator and is usually minimal.
This chapter is directed at TCP and UDP applications, and DART 200
solutions, particularly for DART 200 error handling. SLIP mode
applications function similarly, but the specifics are a function of the
capabilities of the software stack being used. If you plan on using SLIP,
refer to the application programming guide for your specific package.
AT Command Set Support
The terminal device, (Mobile Application Subsystem), does not have to
support the Attention (AT) command set directly to operate with the
DART 200. Even in cases where the device does support the basic AT
command set, there are some extensions to the command set that are not
supported. Usually, a programmable device can create a constant string
that represents the desired AT command. Sending such a character string
to the DART 200 works the same as sending the AT command.
If the remote device is of limited intelligence it does not need to support
the AT command set at all. The modem can be pre-initialized to work
with the remote device, including being in auto answer mode. In auto
answer mode, when the modem receives a connection request (TCP
mode), or a datagram (UDP mode), it goes online and passes data to the
attached device, just like a wire-line modem. In this situation, the fact
that CDPD is the communications medium is transparent to the remote
device.
PN1197-00 Revision 1.0
Page 96

DART 200 CDPD Modem User’s Guide 8 Application Programming
Device drivers
The DART 200 requires no special device drivers. Serial
communications port support provided by the PC Operating System is all
that is needed. For modem setup any ASCII terminal emulator, such as
Terminal, Hyperterminal, Procomm, Kermit, and so on, is appropriate.
For applications use the normal communications port I/O commands
supported by the programming language you use.
Application program structure
A CDPD application is similar in general structure to most network
based applications. It consists of the following major sections:
DART setup
This is usually done before the DART 200 is put into use, or as a special,
first time only function of the application. The needs of the application
and the terminal are evaluated based on the protocol being used (TCP,
UDP, or SLIP mode) and the appropriate options are chosen. Refer to
Chapter 5, DART Supported Protocols, for modem setup samples.
Network connection
Establishing a network connection involves, enabling the Personal
Identification Number (PIN) (if used), registering the modem with the
network (if not set up to register automatically), then establishing the
communication session with a peer device, as follows:
1. If PINs are used, issue the PIN enabling command (AT*E) before
attempting to access the network.
2. For application use (as opposed to testing), set up the modem
registration as fully automatic, by setting the Registration time-out
S-Register to 0 (ATS13=0), then issue an AT\R4 command, as
described in Automatic registration, p. 8-6. Save your changes with
an AT&W.
This causes the DART 200 to automatically register at power up, and
when registration is dropped, for example, due to a power failure or
driving out of the coverage area.
3. A session is established for a client by dialing (ATDn command) to
establish a logical connection with another device (TCP), or to set up
the target device’s IP Address and port for insertion into the data
packets to follow (UDP). Refer to the D command in Appendix F,
DART AT Command Set, for more information.
Sierra Wireless, Inc. 8-2
Page 97

DART 200 CDPD Modem User’s Guide 8 Application Programming
4. For a modem functioning as a server, (answering calls or being
polled) activate the appropriate server, TCP (with AT*A1) or UDP
(with AT*A2). The connection can be established automatically by
having auto answer active (S-Register 0 =1), or manually by issuing
an ATA command when the RING message occurs, as described in
Auto Answer setup, p. 8-11.
For both client and server systems, successful completion of the Dial
command (ATD) is indicated by a CONNECT message (verbose mode)
or a 1 (terse mode). This puts the modem in online mode. In this state,
AT commands are ignored, the autobaud function is suppressed, and
flow control (if specified) is enabled.
Data transfer
To accomplish data transfer, the DART 200 must be in online mode.
Data transfer is performed by the Mobile Application Subsystem (MAS)
by sending data to or reading data from the DART 200’s RS-232 serial
port. Unlike the previous activities, data transfer uses device-specific
rather than AT commands. For a PC the I/O commands are directed to
the serial port and use the serial port I/O driver supplied by the operating
system being used.
Outgoing data accumulates in the DART 200 until a data forwarding
condition is reached. The DART 200 then attaches the appropriate
header information, and sends the data onto the CDPD network for
forwarding through the appropriate routers to the target IP Address and
port. Refer to Data forwarding, p. 8-8, for more details.
The incoming packet is received by the DART 200, and the header is
removed, and the data passed, subject to flow control considerations, as
described on p. 8-12, to the attached device.
Modes of operation
A major difference between a Cellular Digital Packet Data (CDPD)
Hayes-compatible network session and a typical synchronous
communications session is the two modes of operation: command mode
and online (data) mode.
AT commands are issued and responded to by the DART 200 when in
command mode. Once a remote station is dialed, or SLIP mode is
started, the modem enters online mode and only transmits or receives
data; it no longer responds to AT commands.
To return to command mode, to process AT commands for error
recovery purposes or to hang up at the end of a session, the DART 200
issues an escape sequence, or drops Data Terminal Ready (DTR) (if
possible) with an &Dn set up option specified. Refer to Escaping
through the control interface, p. 8-16 for details.
PN1197-00 Revision 1.0 8-3
Page 98

DART 200 CDPD Modem User’s Guide 8 Application Programming
Error recovery
Good application design includes provisions for handling errors. Insert
code to perform the error-handling function after every operation where
an error might occur, such as after every AT command, where the most
likely failure is modem power loss, and after every communications
operation where these five distinct errors are possible:
1. Loss of modem power.
2. Loss of radio signal.
3. Loss of network registration.
4. Loss of host connection (does not apply to UDP).
5. Loss of online mode (a power reset has occurred).
Failure of a communications operation (usually send or receive) is
indicated by:
• Send - A time out or an error response
• Receive - A time out
If the MAS is capable of sensing signal status over the RS-232 interface
then testing for loss of signal, registration, or connection can be done (if
desired) before attempting the send/receive operation. If it is not (or the
application designer chooses not to sense prior to I/O operations), then
testing follows failures only.
There is no specific test for loss of modem power. If the modem is in
online mode, and the application does not get an OK or 0 response to the
escape sequence, then power loss can be assumed. Similarly, if the
modem is in command mode and the application fails to get the expected
response to an AT command, then power loss can be assumed.
Status information and error codes, to be analyzed to determine
appropriate error recovery actions, can be obtained from the Data Set
Ready (DSR) and Data Carrier Detect (DCD) signals, or from Status
(S-)Registers 56, 57, 62, 63, 101, 102 and 126. The use of DSR and DCD
for basic status sensing is recommended (if the MAS supports it) for both
speed and simplicity. The available information, by source, is
summarized below.
• DCD - This signal can be set up at modem initialization time to
follow the state of the connection established condition (&C1), the
state of the RF in range condition (&C3), or the modem’s
registration state (&C4). The default is &C1
• DSR - This signal can be set up at modem initialization time to
follow the state of the connection established condition (&S1), the
state of the RF in range condition (&S2), or the modem’s registration
state (&S3). The default is &S0 (always active)
Sierra Wireless, Inc. 8-4
Page 99

DART 200 CDPD Modem User’s Guide 8 Application Programming
With three variables and only two signal lines, decide which two of
the three items are most crucial to the application. Usually, RF in
range and registration state are tracked. If both of these statuses are
present, then a Dial command (ATD) can be issued. To determine
more than two items of status the MAS escapes to command mode
and reads the network status register (S-Register 57).
• DTR (Data Terminal Ready) - Transitioning this signal lets the
application enter command mode without having to use the escape
sequence. To do this, the &D1 (escape) or &D2 (escape and
hang-up) option must be selected at initialization time. If this option
is used DTR must be held in the down state for a minimum of 15 ms.
Refer to Escaping through the control interface, p. 8-16, for more
information. The default is &D0 (ignore DTR)
• S-Register 56 (extended network error codes) - Indicates reasons for
a registration failure. Codes 1-7 are suggested in the CDPD
specifications but may not be followed by all carriers or
infrastructure providers.
1 Registration denied - Network Entity Identifier (NEI) may
be in use by another device
2 Service currently not available
3 Invalid NEI (IP Address)
4 Insufficient authentication credentials
5 Authentication credentials not supported
6 NEI has exceeded usage limitations
7 Service denied on this subnetwork; try an alternate Provider
250 Timed out waiting for home Mobile Data Intermediate
Station (MDIS) registration response
251 Mobile Data Link Protocol (MDLP) parameters unsupported
252 MDLP version unsupported
254 Could not access the CDPD network
255 Could not de-register the NEI because it was not registered
• S-Register 57 (network status) - A bit-mapped register showing
several items of interest. For error-handling the values of interest are:
• RF in range - value of 128 or greater (bit 7)
• Registered - odd value (bit 0)
• Connected - value of 133, 165, 197 or 229 (bit 2 and not bit 3)
• S-Register 62 (connection failure) - This register indicates at what
point in the operation the connection failed
1 During the connection process
2 During the transmission of a packet
3 During the reception of a packet
• S-Register 63 (connection failure) - This register indicates the most
probable cause for the connection failure or loss of connection
24 No socket available
67 Address already in use
69 Network is down
PN1197-00 Revision 1.0 8-5
Page 100

DART 200 CDPD Modem User’s Guide 8 Application Programming
70 Network is unreachable
71 Network dropped connection or reset
72 Software caused connection abort
73 Connection reset by peer
75 Socket is already connected
76 Socket is not connected
78 Connection timed out
79 Connection refused (for DART to DART the server function is
not active or is of the wrong type)
81 Host is down
82 Host is unreachable
• S-Register 101 (CDPD available flag) - Indicates not only if the
modem acquired a channel, but also whether it established (or
reestablished) CDPD communications with the MDIS. This is a
better indicator than the RF in range bit found in S-Register 57
0 CDPD not available
1 CDPD available
• S-Register 102 (mean Receive Signal Strength Indication for
acquired channel) - Indicates the RF signal strength in dBm for the
active channel. If CDPD is not currently available (S-Register 101 =
0), this value has no meaning
A negative value usually in the range of -50 to -113dBm. Values
below -100 are unreliable, and below -110 cannot be used.
• S-Register 126 (Registration progress status) - Indicates how far
through the registration process the modem proceeded
0 Protocol not active
1 Temporary Equipment Identifier (TEI) assignment pending
2 Link connection establishment pending - waiting for
Unnumbered Acknowledgement (UA)
3 Encryption key exchange pending - waiting for MDIS Key
Exchange (IKE)
4 Registration pending - waiting for Intermediate System
Confirmation (ISC)
5 Registration complete
Use the ATSn? command to read the S-Registers with the modem in
command mode
After sensing the appropriate registers, if the MAS determines it
needs to go back to online mode, it issues an ATO command (TCP
or UDP), or AT*S command (SLIP) to do so.
Automatic registration
Before the DART 200 can operate on the CDPD network it must be
registered. Registration is controlled by the AT\Rn command; the
following options are available:
Sierra Wireless, Inc. 8-6
 Loading...