

Page 1

AirPrime XA1110/XM1110
AirPrime XA1110/XM1110
41111116
Rev 1
Page 2

AirPrime XA1110/XM1110 Hardware Design Guide
Important
Notice
Safety and
Hazards
Due to the nature of wireless communications, transmission and reception of data
can never be guaranteed. Data may be delayed, corrupted (i.e., have errors) or be
totally lost. Although significant delays or losses of data are rare when wireless
devices such as the Sierra Wireless modem are used in a normal manner with a
well-constructed network, the Sierra Wireless modem should not be used in
situations where failure to transmit or receive data could result in damage of any
kind to the user or any other party, including but not limited to personal injury,
death, or loss of property. Sierra Wireless accepts no responsibility for damages
of any kind resulting from delays or errors in data transmitted or received using
the Sierra Wireless modem, or for failure of the Sierra Wireless modem to
transmit or receive such data.
Do not operate the Sierra Wireless modem in areas where blasting is in progress,
where explosive atmospheres may be present, near medical equipment, near life
support equipment, or any equipment which may be susceptible to any form of
radio interference. In such areas, the Sierra Wireless modem MUST BE
POWERED OFF. The Sierra Wireless modem can transmit signals that could
interfere with this equipment.
Do not operate the Sierra Wireless modem in any aircraft, whether the aircraft is
on the ground or in flight. In aircraft, the Sierra Wireless modem MUST BE
POWERED OFF. When operating, the Sierra Wireless modem can transmit
signals that could interfere with various onboard systems.
Limitation of
Liability
Note: Some airlines may permit the use of cellular phones while the aircraft is on the
ground and the door is open. Sierra Wireless modems may be used at this time.
The driver or operator of any vehicle should not operate the Sierra Wireless
modem while in control of a vehicle. Doing so will detract from the driver or
operator's control and operation of that vehicle. In some states and provinces,
operating such communications devices while in control of a vehicle is an offence.
The information in this manual is subject to change without notice and does not
represent a commitment on the part of Sierra Wireless. SIERRA WIRELESS AND
ITS AFFILIATES SPECIFICALLY DISCLAIM LIABILITY FOR ANY AND ALL
DIRECT, INDIRECT, SPECIAL, GENERAL, INCIDENTAL, CONSEQUENTIAL,
PUNITIVE OR EXEMPLARY DAMAGES INCLUDING, BUT NOT LIMITED TO,
LOSS OF PROFITS OR REVENUE OR ANTICIPATED PROFITS OR REVENUE
ARISING OUT OF THE USE OR INABILITY TO USE ANY SIERRA WIRELESS
PRODUCT, EVEN IF SIERRA WIRELESS AND/OR ITS AFFILIATES HAS BEEN
ADVISED OF THE POSSIBILITY OF SUCH DAMAGES OR THEY ARE
FORESEEABLE OR FOR CLAIMS BY ANY THIRD PARTY.
Notwithstanding the foregoing, in no event shall Sierra Wireless and/or its
affiliates aggregate liability arising under or in connection with the Sierra Wireless
product, regardless of the number of events, occurrences, or claims giving rise to
liability, be in excess of the price paid by the purchaser for the Sierra Wireless
product.
Rev 1 Jun.17 2 41111116
Page 3
Preface
Patents This product may contain technology developed by or for Sierra Wireless Inc. This
product includes technology licensed from QUALCOMM
manufactured or sold by Sierra Wireless Inc. or its affiliates under one or more
patents licensed from InterDigital Group and MMP Portfolio Licensing.
®
. This product is
Copyright © 2017 Sierra Wireless. All rights reserved.
Trademarks Sierra Wireless
are registered trademarks of Sierra Wireless.
Windows
Corporation.
Macintosh
the U.S. and other countries.
QUALCOMM
under license.
Other trademarks are the property of their respective owners.
®
, AirPrime®, AirLink®, AirVantage® and the Sierra Wireless logo
®
and Windows Vista® are registered trademarks of Microsoft
®
and Mac OS X® are registered trademarks of Apple Inc., registered in
®
is a registered trademark of QUALCOMM Incorporated. Used
Contact
Information
Sales information and technical
support, including warranty and returns
Web: sierrawireless.com/company/contact-us/
Global toll-free number: 1-877-687-7795
6:00 am to 6:00 pm PST
Corporate and product information Web: sierrawireless.com
Revision
History
Revision
number
1 June 23, 2017 Initial draft in SWI template.
Release date Changes
Rev 1 Jun.17 3 41111116
Page 4

Contents
Introduction . . . . . . . . . . . . . . . . . . . . . . . . . . . . . . . . . . . . . . . . . . . . . . . . . . . . .6
Precautions. . . . . . . . . . . . . . . . . . . . . . . . . . . . . . . . . . . . . . . . . . . . . . . . . . . 7
Technical Support. . . . . . . . . . . . . . . . . . . . . . . . . . . . . . . . . . . . . . . . . . . . . . 8
General Rules for Design . . . . . . . . . . . . . . . . . . . . . . . . . . . . . . . . . . . . . . . . . .9
Circuit Design . . . . . . . . . . . . . . . . . . . . . . . . . . . . . . . . . . . . . . . . . . . . . . . . . 9
Power Supply - Compatible Models: Gmm-g3, Gmm-g3(B), Gms-g6a, Gms-
g9, Gms-g6, Gms-b6,PA6E-CAM, XM1110, XA1110 . . . . . . . . . . . . . . . .9
VBACKUP backup battery - Compatible Models: Gmm-g3, Gmm-g3(B),
Gms-g6a, Gms-g9, Gms-g6, Gms-b6, PA6E-CAM, XM1110, XA1110 . .10
UART / I2C/ SPI Serial Interface . . . . . . . . . . . . . . . . . . . . . . . . . . . . . . .10
GND-Ground - Compatible Models: Compatible Models: Gmm-g3, Gmmg3(B), Gms-g6a, Gms-g9, Gms-g6, Gms-b6, PA6E-CAM, XM1110, XA1110 12
Antenna Compliance Design - Compatible Models: Gmm-g3, Gmm-g3(B),
XM1110, XA1110 . . . . . . . . . . . . . . . . . . . . . . . . . . . . . . . . . . . . . . . . . . .12
1PPS - Compatible Models: Gmm-g3, Gmm-g3(B), Gms-g6a, Gms-g9, Gms-
g6, Gms-b6,PA6E-CAM, XM1110, XA1110 . . . . . . . . . . . . . . . . . . . . . . .17
3D_Fix - Compatible Models: Gmm-g3, Gmm-g3(B), Gms-g6a, Gms-g9,
Gms-g6, Gms-b6 . . . . . . . . . . . . . . . . . . . . . . . . . . . . . . . . . . . . . . . . . . .19
1.8V Boost to 3.3V Application. . . . . . . . . . . . . . . . . . . . . . . . . . . . . . . . . . . 21
Layout Guidelines. . . . . . . . . . . . . . . . . . . . . . . . . . . . . . . . . . . . . . . . . . . . . 22
Layout Underneath the GNSS Module - Compatible Models: Gmm-g3,
Gmm-g3(B), Gms-g6a, Gms-g9, Gms-g6, Gms-b6,PA6E-CAM, XM1110,
XA1110 . . . . . . . . . . . . . . . . . . . . . . . . . . . . . . . . . . . . . . . . . . . . . . . . . .22
Keep Far Away from High Profile or Metal-Canned Components - Compatible Models: Gms-g6a, Gms-g9, Gms-g6, Gms-b6,PA6E-CAM, XA1110 25
Placement - Compatible Models: Gmm-g3, Gmm-g3(B), Gms-g6a, Gms-g9,
Gms-g6, Gms-b6, PA6E-CAM, XM1110, XA1110 . . . . . . . . . . . . . . . . . .26
Trace - Compatible Models: Gmm-g3, Gmm-g3(B), Gms-g6a, Gms-g9, Gms-
g6, Gms-b6,PA6E-CAM, XM1110, XA1110 . . . . . . . . . . . . . . . . . . . . . . .26
Ground Segmentation - Compatible Models: Gmm-g3, Gmm-g3(B), Gms-g6a,
Gms-g9, Gms-g6, Gms-b6, PA6E-CAM, XM1110, XA1110 . . . . . . . . . .27
Ground Plane - Compatible Models: Gms-g9,PA6E-CAM, Gms-g6, Gms-b6,
XA1110 . . . . . . . . . . . . . . . . . . . . . . . . . . . . . . . . . . . . . . . . . . . . . . . . . .27
Metal Effect on the GNSS Module Compatible Model: Gms-g6a. . . . . . . . . 29
Rev 1 Jun.17 4 41111116
Page 5

Thermal Profile for SMD Modules . . . . . . . . . . . . . . . . . . . . . . . . . . . . . . . . . . 30
SMT Reflow Soldering Temperature Profile . . . . . . . . . . . . . . . . . . . . . . . . 30
SMT Solder Mask . . . . . . . . . . . . . . . . . . . . . . . . . . . . . . . . . . . . . . . . . . . . 30
Manual Soldering. . . . . . . . . . . . . . . . . . . . . . . . . . . . . . . . . . . . . . . . . . . . . 30
Troubleshooting . . . . . . . . . . . . . . . . . . . . . . . . . . . . . . . . . . . . . . . . . . . . . . . . 31
How to Check the Working Status of the GPS Module . . . . . . . . . . . . . . . . 31
Super Capacitor Design . . . . . . . . . . . . . . . . . . . . . . . . . . . . . . . . . . . . . . . . . 33
About Super Capacitors. . . . . . . . . . . . . . . . . . . . . . . . . . . . . . . . . . . . . . . . 33
How to Calculate the Backup Time . . . . . . . . . . . . . . . . . . . . . . . . . . . . . . . 33
. . . . . . . . . . . . . . . . . . . . . . . . . . . . . . . . . . . . . . . . . . . . . . . . . . . . . . . . . 33
Contents
50 Ω Antenna Matching . . . . . . . . . . . . . . . . . . . . . . . . . . . . . . . . . . . . . . . . . 34
UART to RS232 Interface . . . . . . . . . . . . . . . . . . . . . . . . . . . . . . . . . . . . . . . . 35
UART to USB Interface . . . . . . . . . . . . . . . . . . . . . . . . . . . . . . . . . . . . . . . . . . 36
How to Efficiently Transfer 1PPS Through Extended Distances . . . . . . . . 37
1pps Delay Time . . . . . . . . . . . . . . . . . . . . . . . . . . . . . . . . . . . . . . . . . . . . . 38
The Delay Time Caused by the Cable . . . . . . . . . . . . . . . . . . . . . . . . . . . . . 39
Calculating the Delay Time in Respect to the Communication Cable Length 39
Waveform Rising Time Caused by OP-amp . . . . . . . . . . . . . . . . . . . . . . . . 40
Recommended OP-amp . . . . . . . . . . . . . . . . . . . . . . . . . . . . . . . . . . . . . . . 40
Voltage degradation of Communication cable . . . . . . . . . . . . . . . . . . . . . . . 40
Reflow Soldering Precautions . . . . . . . . . . . . . . . . . . . . . . . . . . . . . . . . . . . . 41
Other Cautionary Notes on the Reflow-Soldering Process . . . . . . . . . . . . . 43
Manual Soldering. . . . . . . . . . . . . . . . . . . . . . . . . . . . . . . . . . . . . . . . . . . . . 44
Soldering Iron . . . . . . . . . . . . . . . . . . . . . . . . . . . . . . . . . . . . . . . . . . . . . 44
Rev 1 Jun.17 5 41111116
Page 6
1: Introduction
The purpose of this application note is to assist the system developer and integrator
with the MT3333 chip-based Sierra Wireless receiver modules during the process of
implementation. This document covers the following receiver modules:
Standard Modules
• XM1110
• Firefly 1 (Gmm-g3)
• Firefly 1b (Gmm-g3b)
Antenna Modules
• XA1110
• Titan 1 (PA6E-CAM)
• Titan 2 (Gms-g6)
• Titan 2B (Gms-b6)
• Titan 3 (Gms-g6)
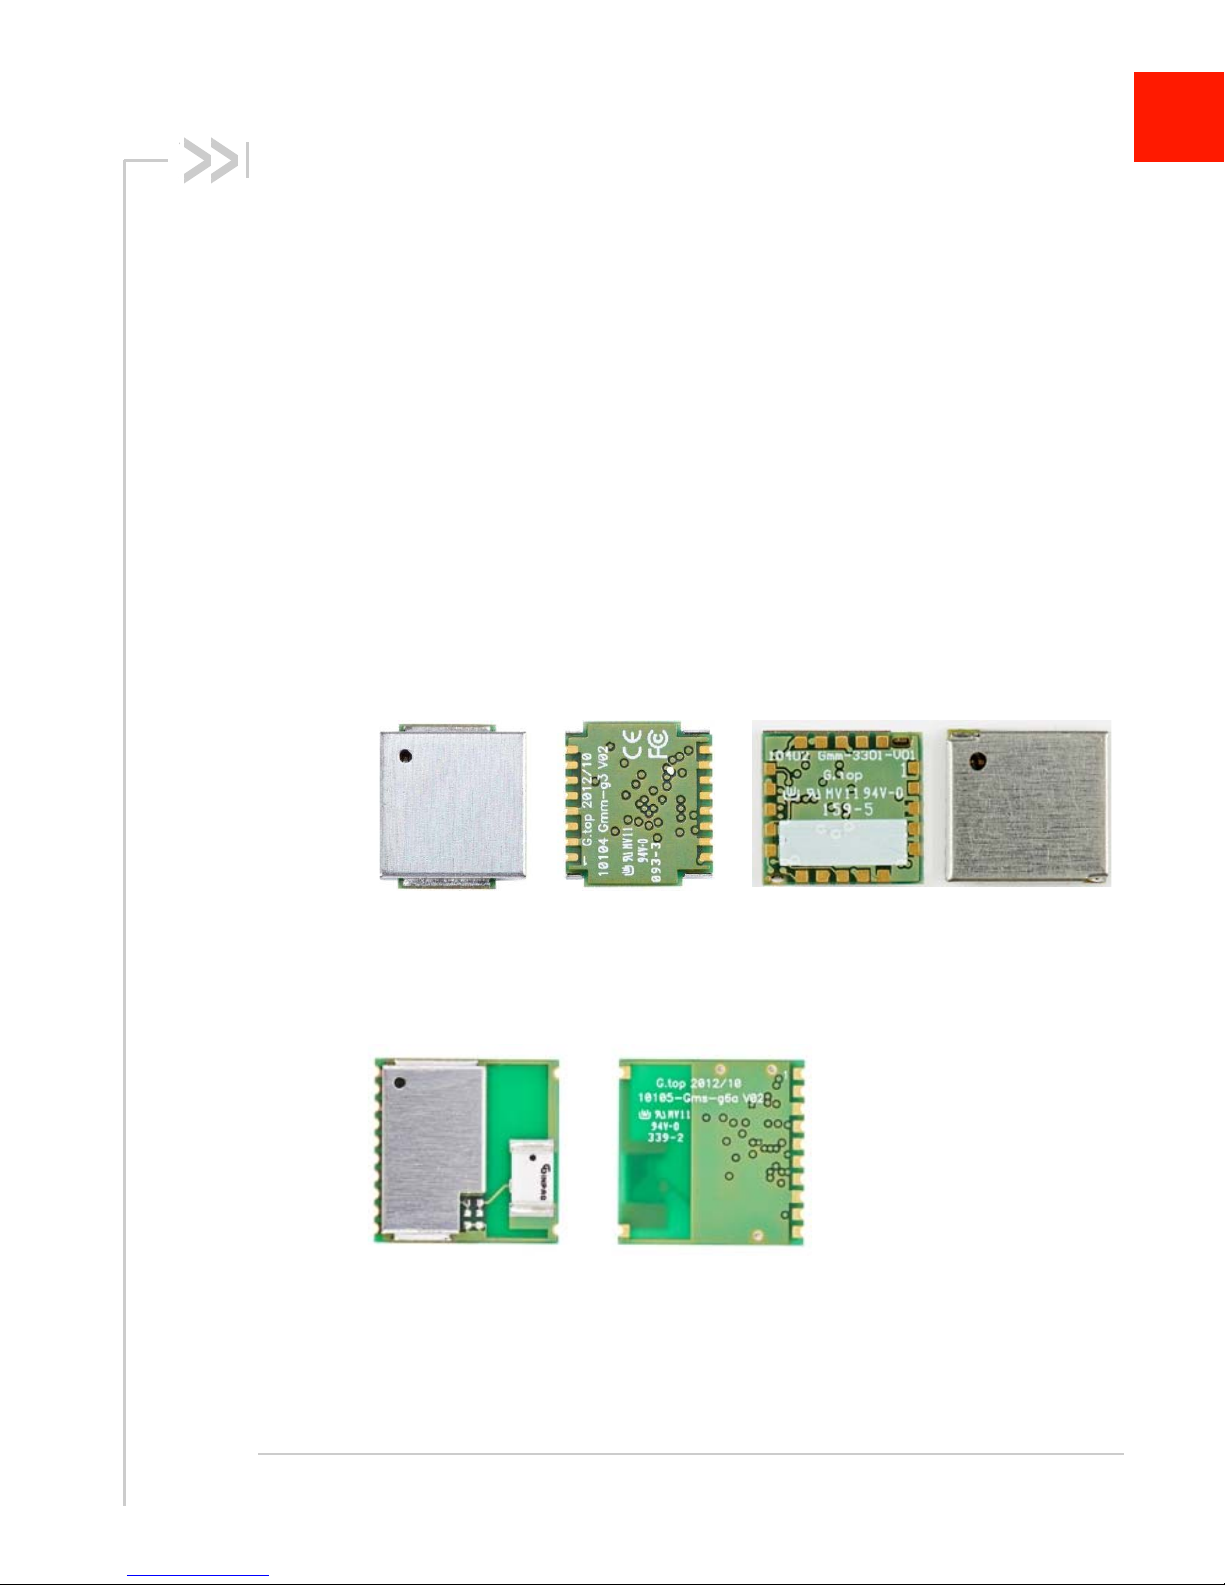
• Stand Alone GPS module: FireFly 1 & FireFly 1b (Gmm-g3, Gmm-g3(B)) and
XM1110
1
Figure 1-1: Stand Alone GPS modules. Left: FireFly 1 & FireFly 1b (Gmm-g3, Gmm-g3(B)). Right: XM1110
• Built-in Chip Antenna Module: Carrion 2 (Gms-g6a)
Figure 1-2: Built-in Chip Antenna Module: Carrion 2 (Gms-g6a)
• Built-in Patch Antenna Modules: Titan 2 (Gms-g6) and Titan 2B (Gms-b6), Titan 3
(Gms-g9) and Titan1 (PA6E-CAM), and XA1110.
Rev 1 Jun.17 6
41111116
Page 7
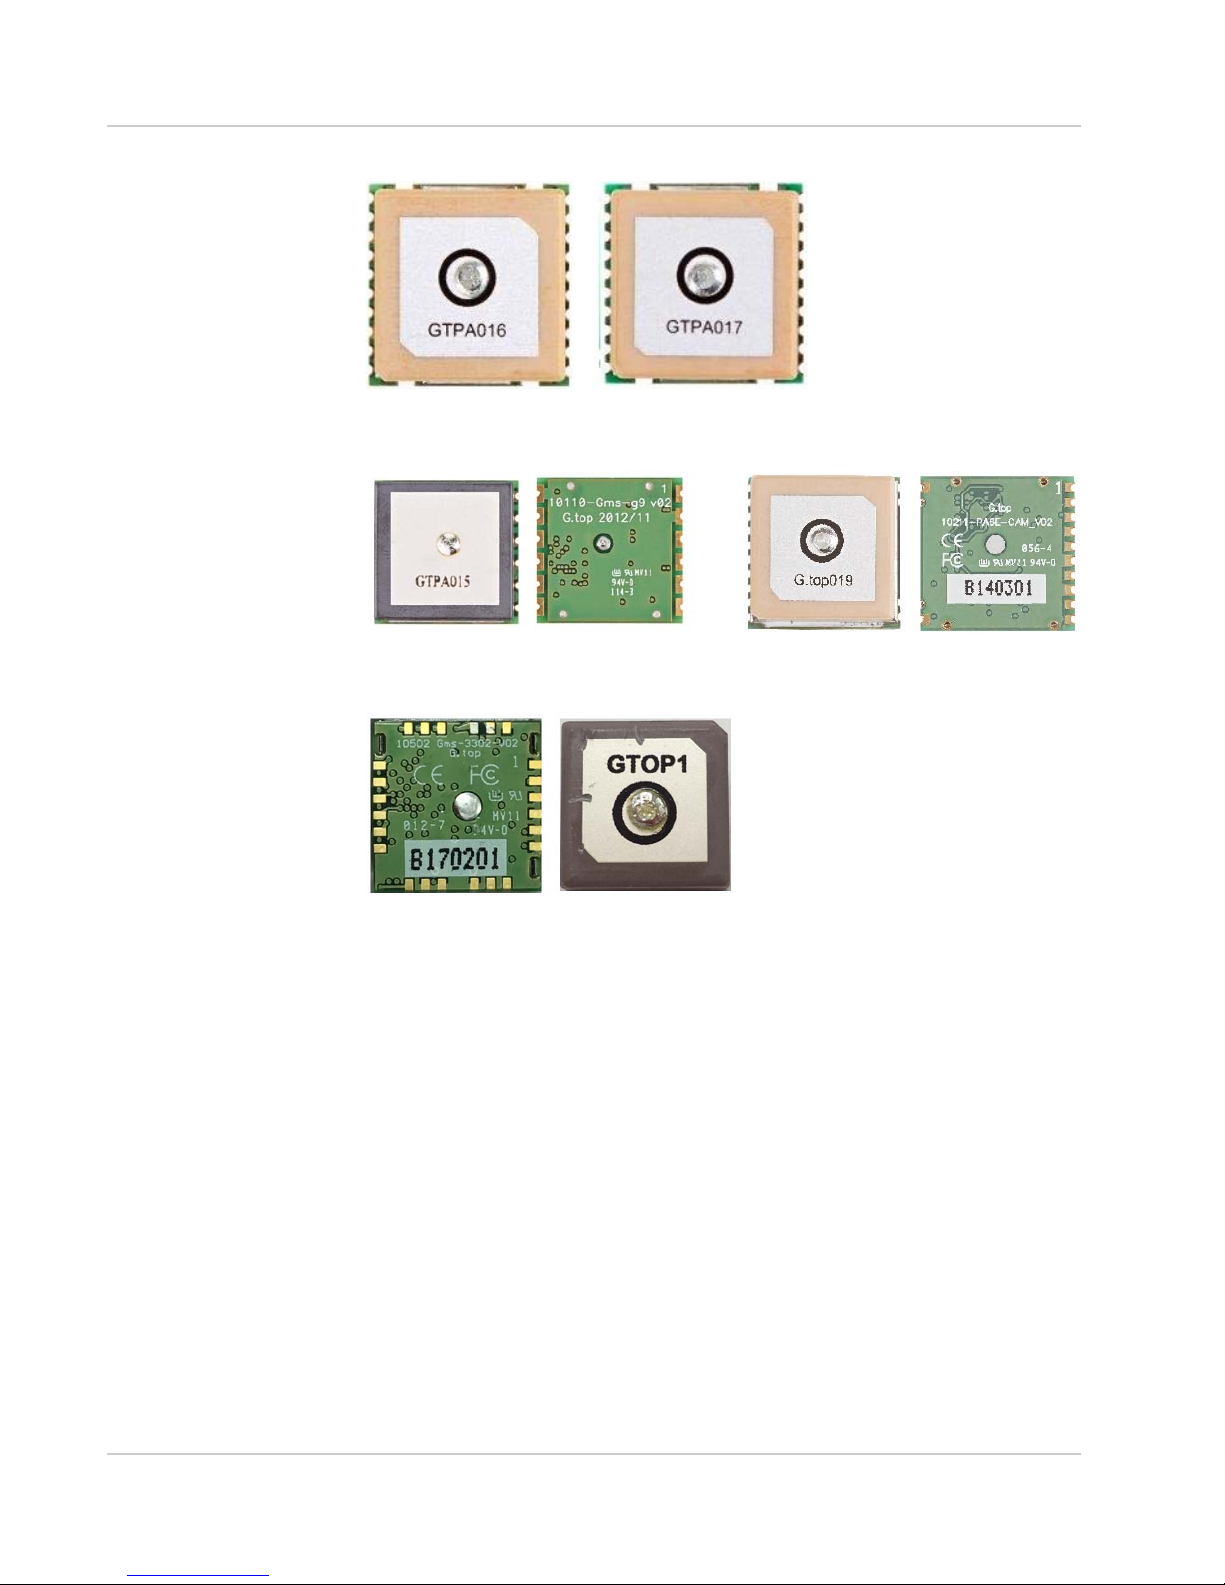
Figure 1-3: Titan 2 (Gms-g6) and Titan 2B (Gms-b6)
Figure 1-4: Titan 3 (Gms-g9) and Titan1 (PA6E-CAM)
Introduction
Figure 1-5: XA1110
Precautions
Please read carefully before you start
If you use the GNSS receiver inside buildings, tunnels, or beside any huge
objects, the GNSS signals might be cut-off or weakened. Please do not assume
the receiver has malfunctioned.
This application note provides the necessary guidelines for a successful system
design using GNSS modules. For detailed module specifications, please refer to
the corresponding datasheet of the GNSS module.
The GNSS module is an electrostatic sensitive device, please DO NOT touch the
GPS module directly. Follow ESD safety rules when handling.
When using the device for the first time, it is strongly recommended to test the
device outdoors with open sky for at least 10 to 15 minutes to ensure that full
ephemeris data received.
Rev 1 Jun.17 7 41111116
Page 8

AirPrime XA1110/XM1110 Hardware Design Guide
Technical Support
If you have any technical problems or cannot find the required information in our
documents, please feel free to contact us for technical support. Below is a list of
information which you can provide to us to help us in determining the source of
the problem and the necessary solution:
1. Your company name and website.
2. Description about application and system.
3. GNSS module type.
4. GNSS firmware version.
5. Description of the question or problems encountered, together with figures,
pictures or videos files.
a. Test setup.
b. The problem or issue shown in figures.
Rev 1 Jun.17 8 41111116
Page 9
2: General Rules for Design
This section provides some rules when using the GNSS module to obtain good GNSS
performance.
Circuit Design
Power Supply - Compatible Models: Gmm-g3,
Gmm-g3(B), Gms-g6a, Gms-g9, Gms-g6, Gmsb6,PA6E-CAM, XM1110, XA1110
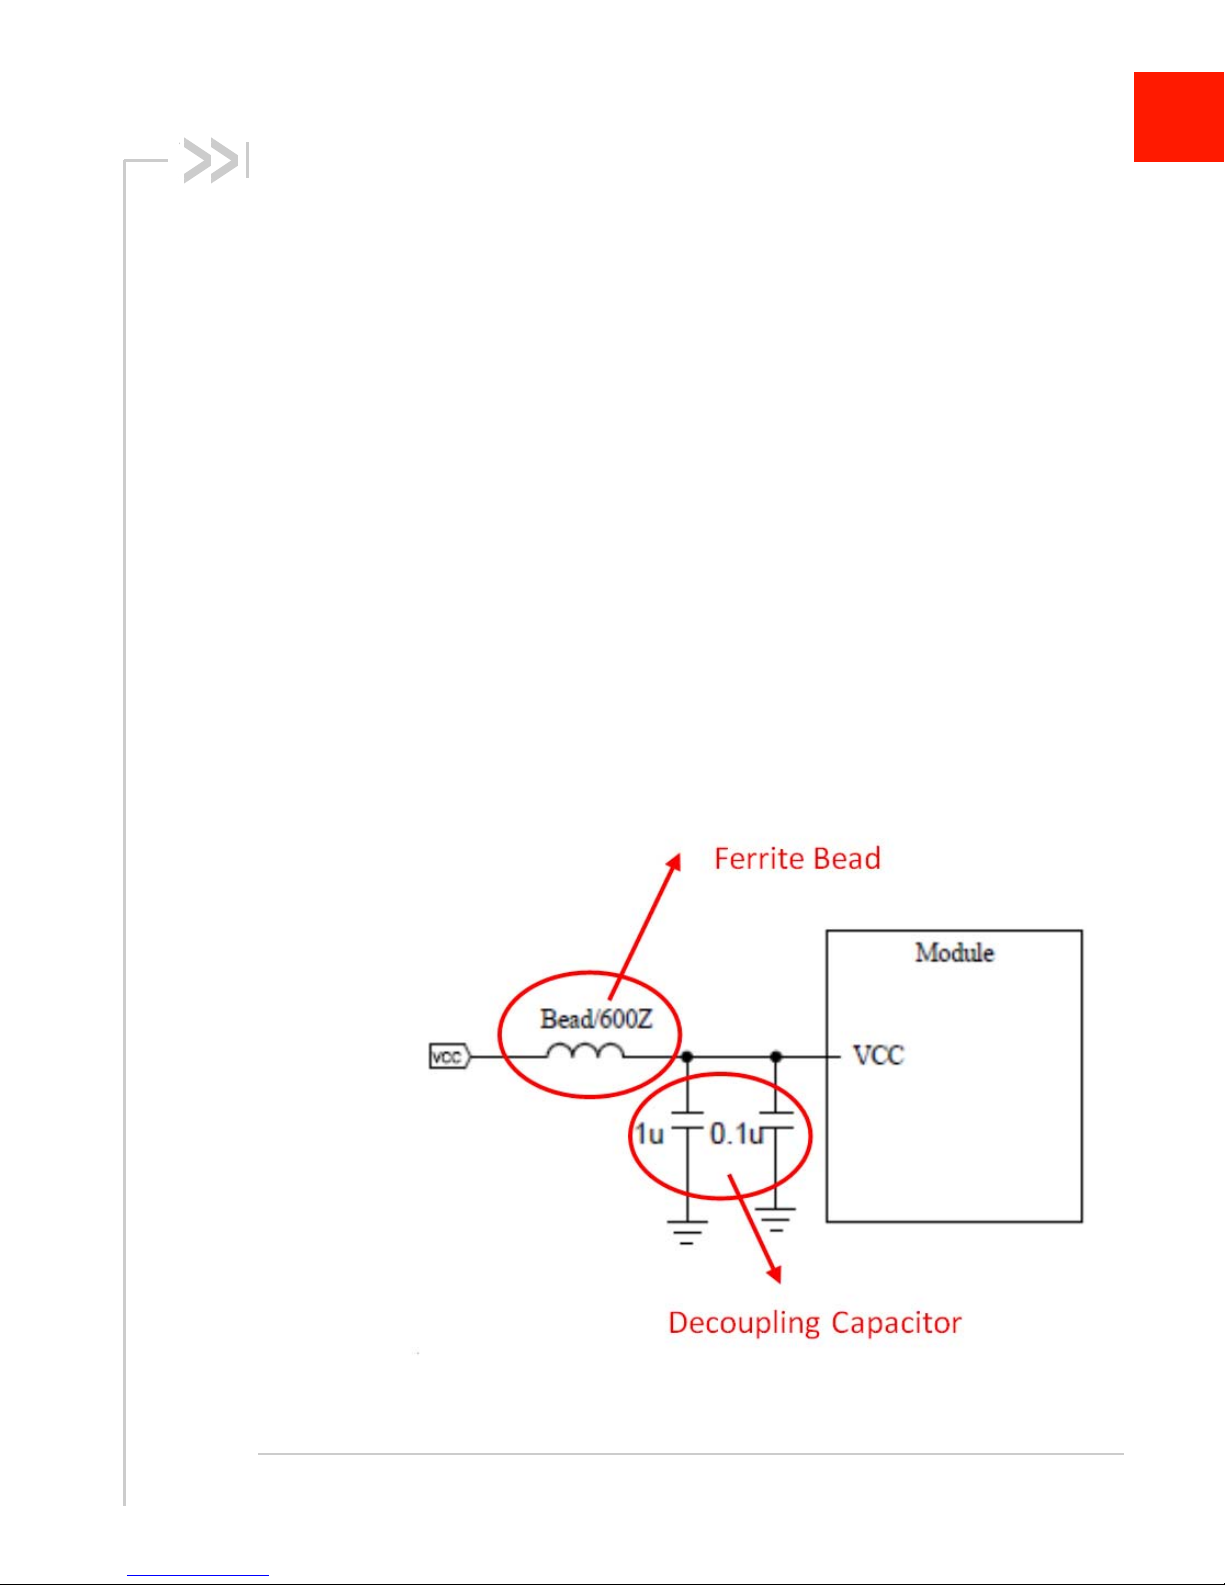
It is necessary to provide a clean and stable power supply for our GNSS module in
order to obtain good performance. An unstable power source will have a significant
negative impact on the performance. To achieve high-quality performance, the VCC
ripple must be controlled under 50mVpp. In addition, there are also some important
suggestions for main power circuit design:
1. Add a ferrite bead, power choke, or low pass filter for power noise reduction.
2. A linear regulator (LDO) is better than a switch DC/DC power supplier in the
ripple.
3. Use enough decoupling capacitors beside the VCC for stable voltage.
2
Figure 2-1: Power Design for the GNSS Module
Rev 1 Jun.17 9
41111116
Page 10
AirPrime XA1110/XM1110 Hardware Design Guide
VBACKUP backup battery - Compatible
Models: Gmm-g3, Gmm-g3(B), Gms-g6a, Gmsg9, Gms-g6, Gms-b6, PA6E-CAM, XM1110,
XA1110
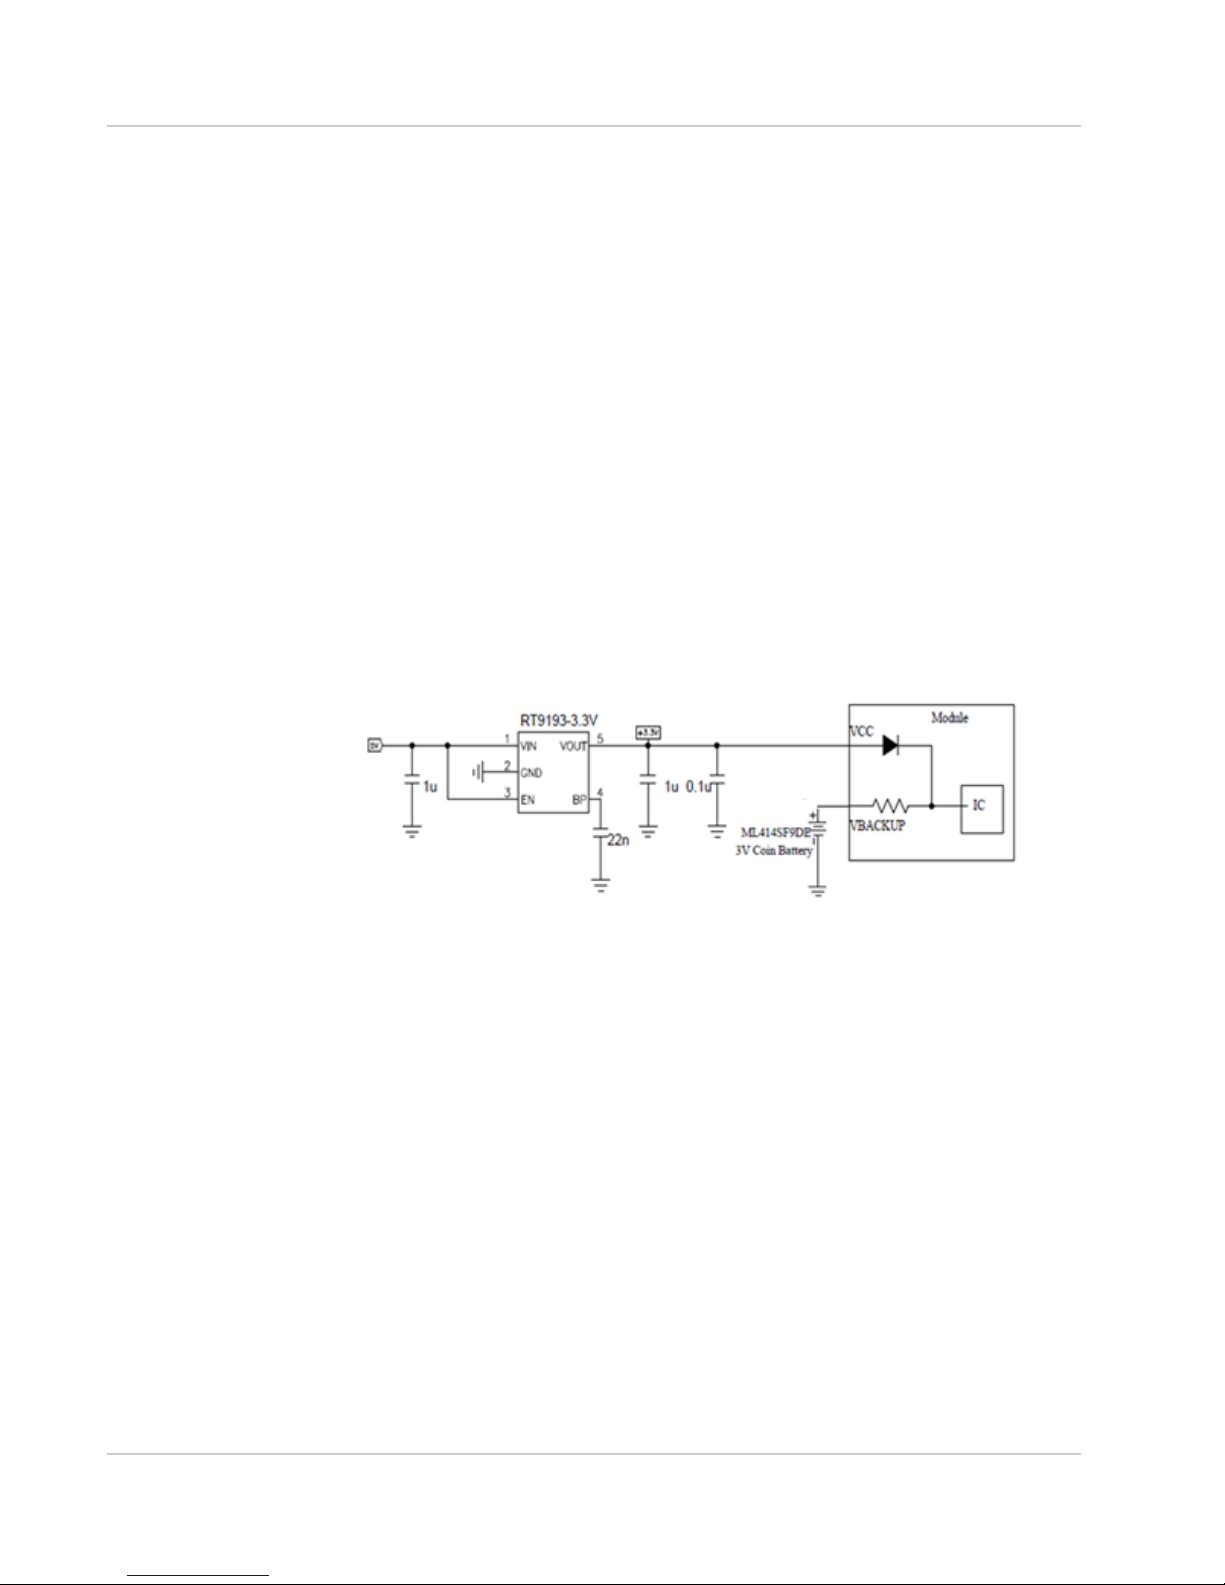
The GNSS module has a built-in charging circuit which charges the rechargeable
coin battery.
For most systems, it is recommended to provide the module with backup power
(e.g. Li-Ion rechargeable coin battery, super capacitor). See Figure 2-2 for a
reference design.
For information on the super capacitor reference design, please refer to Super
Capacitor Design.
Backup power is useful in order to maintain RTC operation and retain Ephemeris
data in flash memory which can get a faster TTFF and acquire PVT (Position,
Velocity, Time) information.
If VBACKUP isn’t connected to any coin battery, the GNSS module will execute a
cold start whenever the system is restarted.
Figure 2-2: Built-in a charging circuit for GNSS module
UART / I2C/ SPI Serial Interface
UART 0 (RX/TX) Compatible Models: Gmm-g3, Gmmg3(B), Gms-g6a, Gms-g9, Gms-g6, Gms-b6,PA6ECAM, XM1110, XA1110
1. UART is the TTL level interface that carries the baud rate ranging from 4800
bps to 115200 bps.
2. Placing a damping resistor on the RX and TX of the GNSS module could limit
the interference from the host MCU or high speed digital logics. Fine tuning
the damping resistor is required to efficiently suppress interference. The
damping resistor is a wire wound component and may function as a choke
coil.
Rev 1 Jun.17 10 41111116
Page 11
General Rules for Design
3. Please don’t connect diode(s) to RX/TX as it will decrease the signal driving
capability which might adversely affect the RX/TX signal level. In some cases
no data output will occur.
4. If RS232 logic-level is needed for any particular application, the level shifter
will be necessary. For more information please refer to UART to RS232
Interface.
5. If USB logic-level is needed for any particular application please refer to
UART to USB Interface.
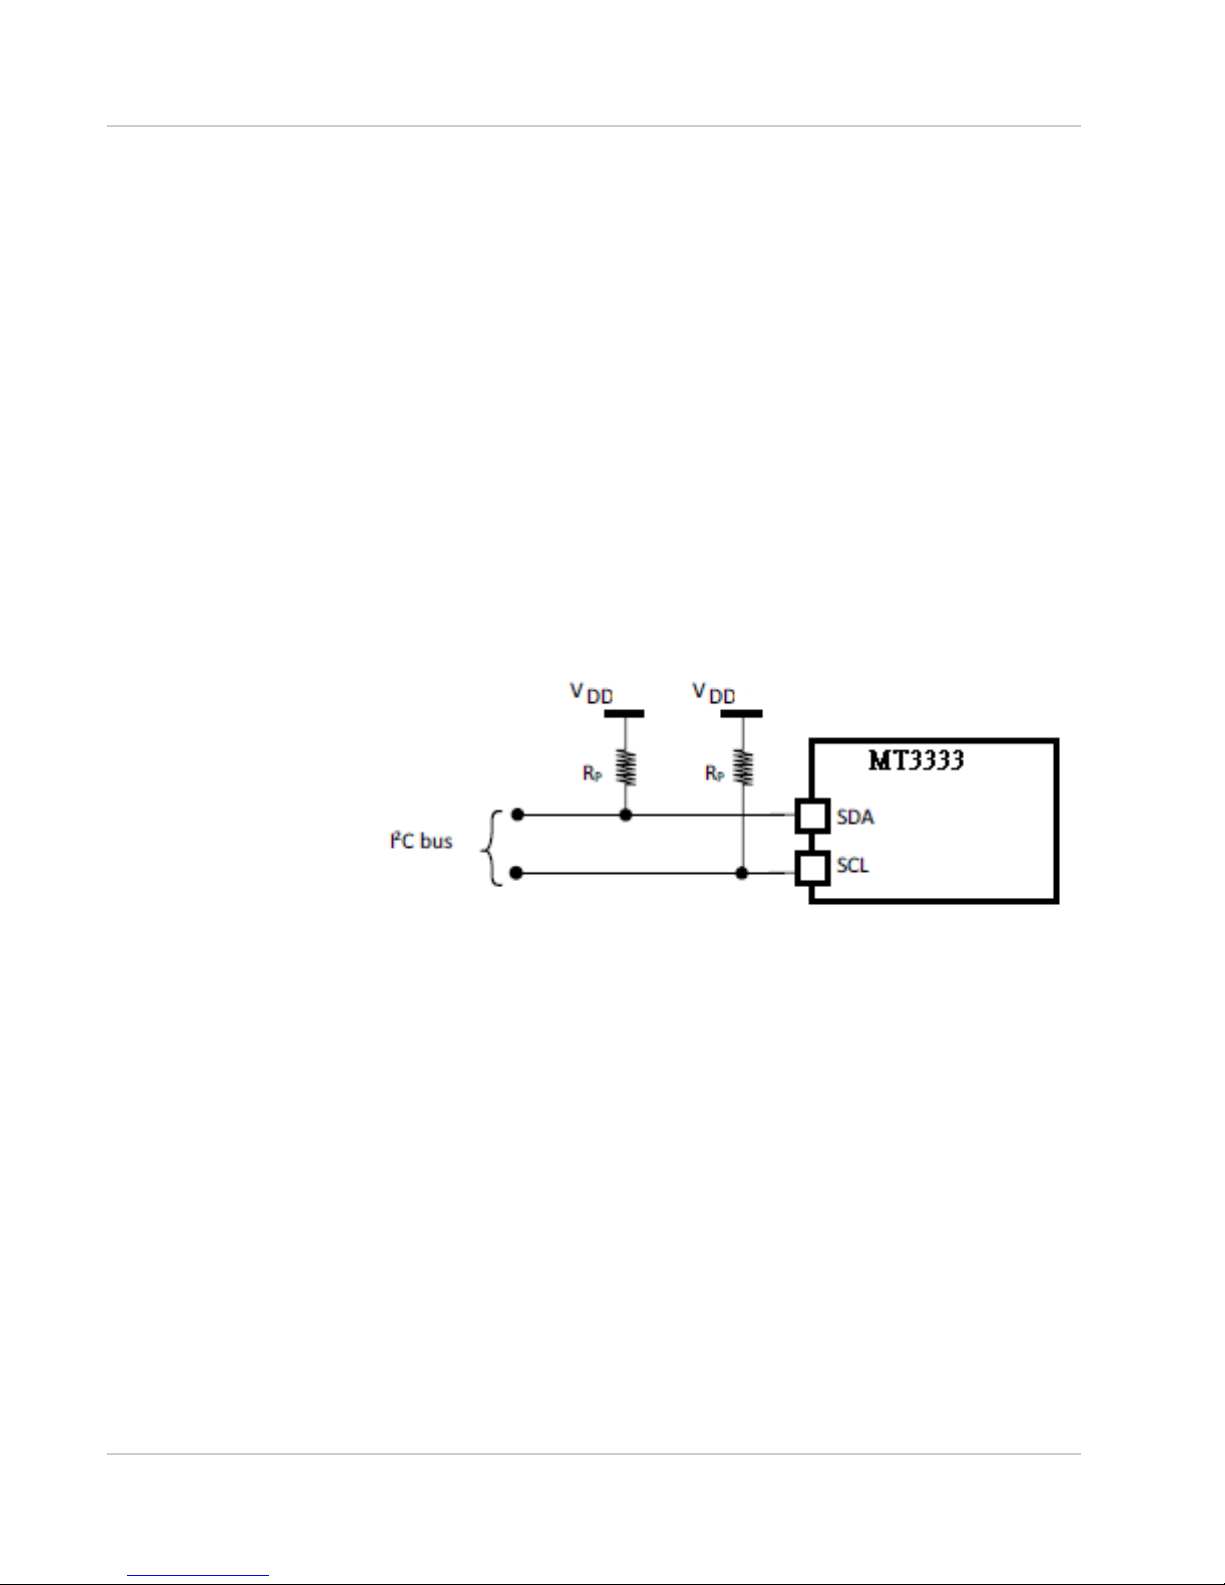
I2C (SCL/SDA) - Compatible Models: XM1110, XA1110
1. The I2C interface is mainly connected to external devices. MT3333 supports
only slave mode (default slave address is 0x10). MT3333 has 256 bytes
URAM mode and 8-byte FIFO mode for transmitting and receiving data. The
bit rate is up to 400 kb/s for fast mode. In addition, MT3333 supports manual
or automatic indicator for data transfer in the slave mode. Device addresses
in the slave mode are programmable.
2. Pull-up resistor must be added for I
2
C bus:
Figure 2-3: Addition of Pull-up Resistor
SPI (CS/CLK/MISO/MOSI) - Compatible Model: Gmm3301, XA1110
1. The serial peripheral interface port manages the communication between the
digital BB and external devices. The MT3333 supports only slave mode. The
slave has a 4 byte-register mode or URAM mode. In URAM mode, the transmitted and received data size is 256 bytes. The clock phase and clock polarity
are selectable. The MT3333 supports a manual or automatic indicator for
data transfer in slave mode. The bit rate is up to 700kb/s.
Rev 1 Jun.17 11 41111116
Page 12

AirPrime XA1110/XM1110 Hardware Design Guide
GND-Ground - Compatible Models: Compatible
Models: Gmm-g3, Gmm-g3(B), Gms-g6a, Gmsg9, Gms-g6, Gms-b6, PA6E-CAM, XM1110,
XA1110
Make sure all GND pins of the module are connected to a completed ground
plane.
The separation of ground between the GNSS module and the rest of the system
are recommended to avoid interference. If this setup is not possible, it is best to
follow these rules: divide the segmentation of the ground between the digital and
analogue system, high current and low current system, and different radiation
systems in general (such as GNSS and GPRS).
One method to segment the ground is to place digital and noise components at
one corner of the board, while placing analog and quiet components at the
opposite corner of the board. Make sure there is no crossing of microstrip or
current between the two component sets with the ground of each set to be
connected to one point only.
Another method is to place the two different sets at different layers of the board
while the ground of each layer is connected to one point only which is preferably
located at the border of the board practically.
Antenna Compliance Design - Compatible
Models: Gmm-g3, Gmm-g3(B), XM1110, XA1110
The GNSS antenna is a receiving part of the device to acquire weak GNSS
signals from the sky. A common solution would be to use a ceramic patch
antenna because of its small form factor and low cost. There are two types of
antennas: passive and active.
A passive antenna, like a patch antenna and chip antenna, is solely by itself
without signal amplifier such as LNA. It must be fine tuned for the specific module
model to obtain the best signal receiving performance.
An external antenna is a standalone device, which integrates an LNA and patch
antenna with an RF cable for higher gain. This performs better than a passive
antenna.
The antenna can be chosen according to the radiation efficiency, radiation
pattern, gain, bandwidth, form factor, and cost. Make sure the ground plane is
sufficient for the antenna to ensure better performance.
Design Patch Antenna with GNSS module.
1. In general, a 50Ω patch antenna will work well with the GNSS module. The
antenna can be connected to the Antenna IN pin with a 50Ω impedance
trace.
2. Please keep the patch antenna far away from noise sources such as the
switching power supply and high speed digital logic and radar wave guide.
Rev 1 Jun.17 12 41111116
Page 13
General Rules for Design
3. The 50Ω trace should be kept as short as possible to reduce the chance of
picking up noise from the air and PCB. A simple direct-line trace is recommended.
4. If needed, a matching circuit could be placed between the patch antenna and
the GNSS module. The matching circuit design should be discussed with the
module and patch antenna manufacturer.
5. For 50Ω matching, please refer to 50 Ω Antenna Matching.
Figure 2-4: PCB trace design for antenna impedance matching
Selecting an External Antennal Architecture for the
GNSS Module
An external antenna requires DC power in order to work properly. A typical
method is to feed DC into the RF trace. The external antenna then extracts the
DC from the RF trace. Thus the RF trace transports both the RF signal and DC
power. An RF chock coil couples the DC power to the RF trace to perform this
method.
The Sierra Wireless modules provide a circuit for connecting an external antenna
and power feeding method as depicted in Figure 2-5, Figure 2-6, and Figure 2-7
below. Please select the module prudently while applying the design with an
external antenna.
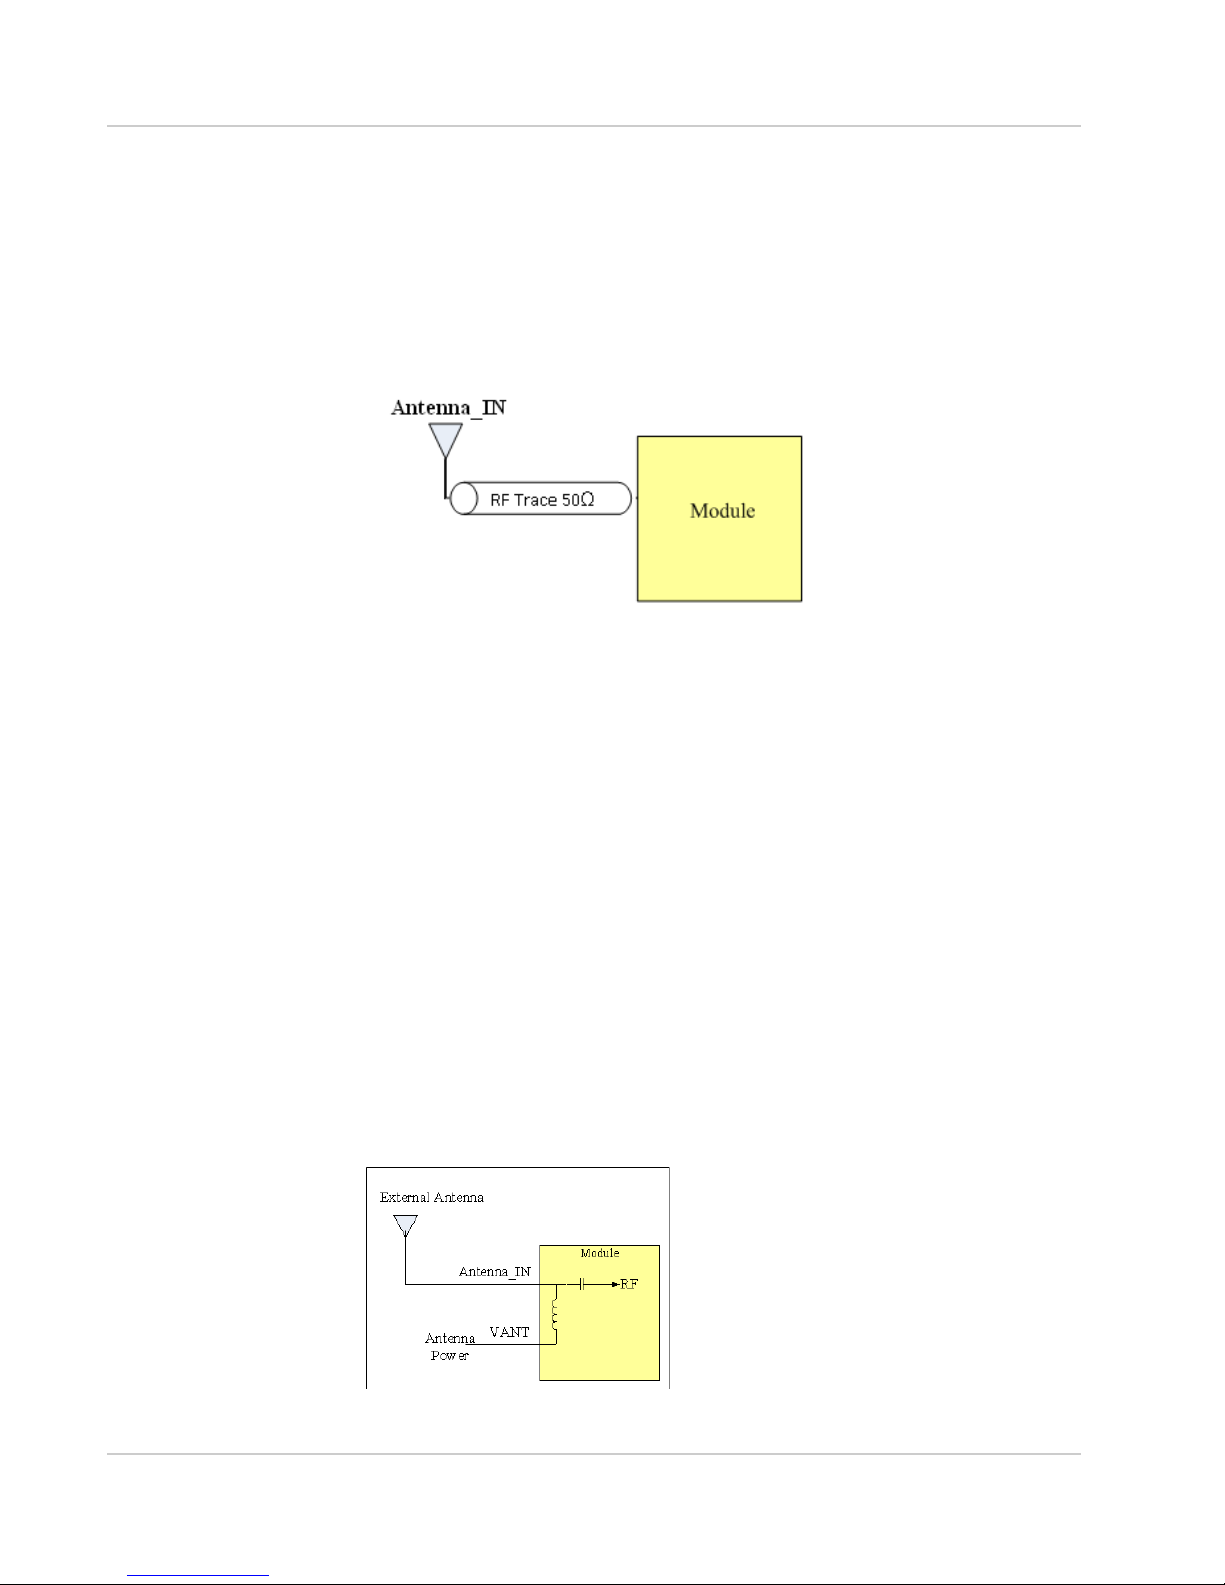
• Mode1 (i.e. Gmm-g3, Gmm-g3(B)): the power supply for the external
antenna needs to be externally fed into the module via the VANT pin and the
antenna connected to the Antenna IN pin:
Figure 2-5: Mode 1: (Internal chock coil)
Rev 1 Jun.17 13 41111116
Page 14
AirPrime XA1110/XM1110 Hardware Design Guide
• Mode2 (i.e. XM1110): The power supply needs to be externally provided and
is connected directly to the external antenna via a chock coil.
Note: Chock Coil for reference: LQG15HS33NJ02D (Murata)
Figure 2-6: Mode 2: (External chock coil)
Note: Chock Coil for reference: LQG15HS33NJ02D (Murata)
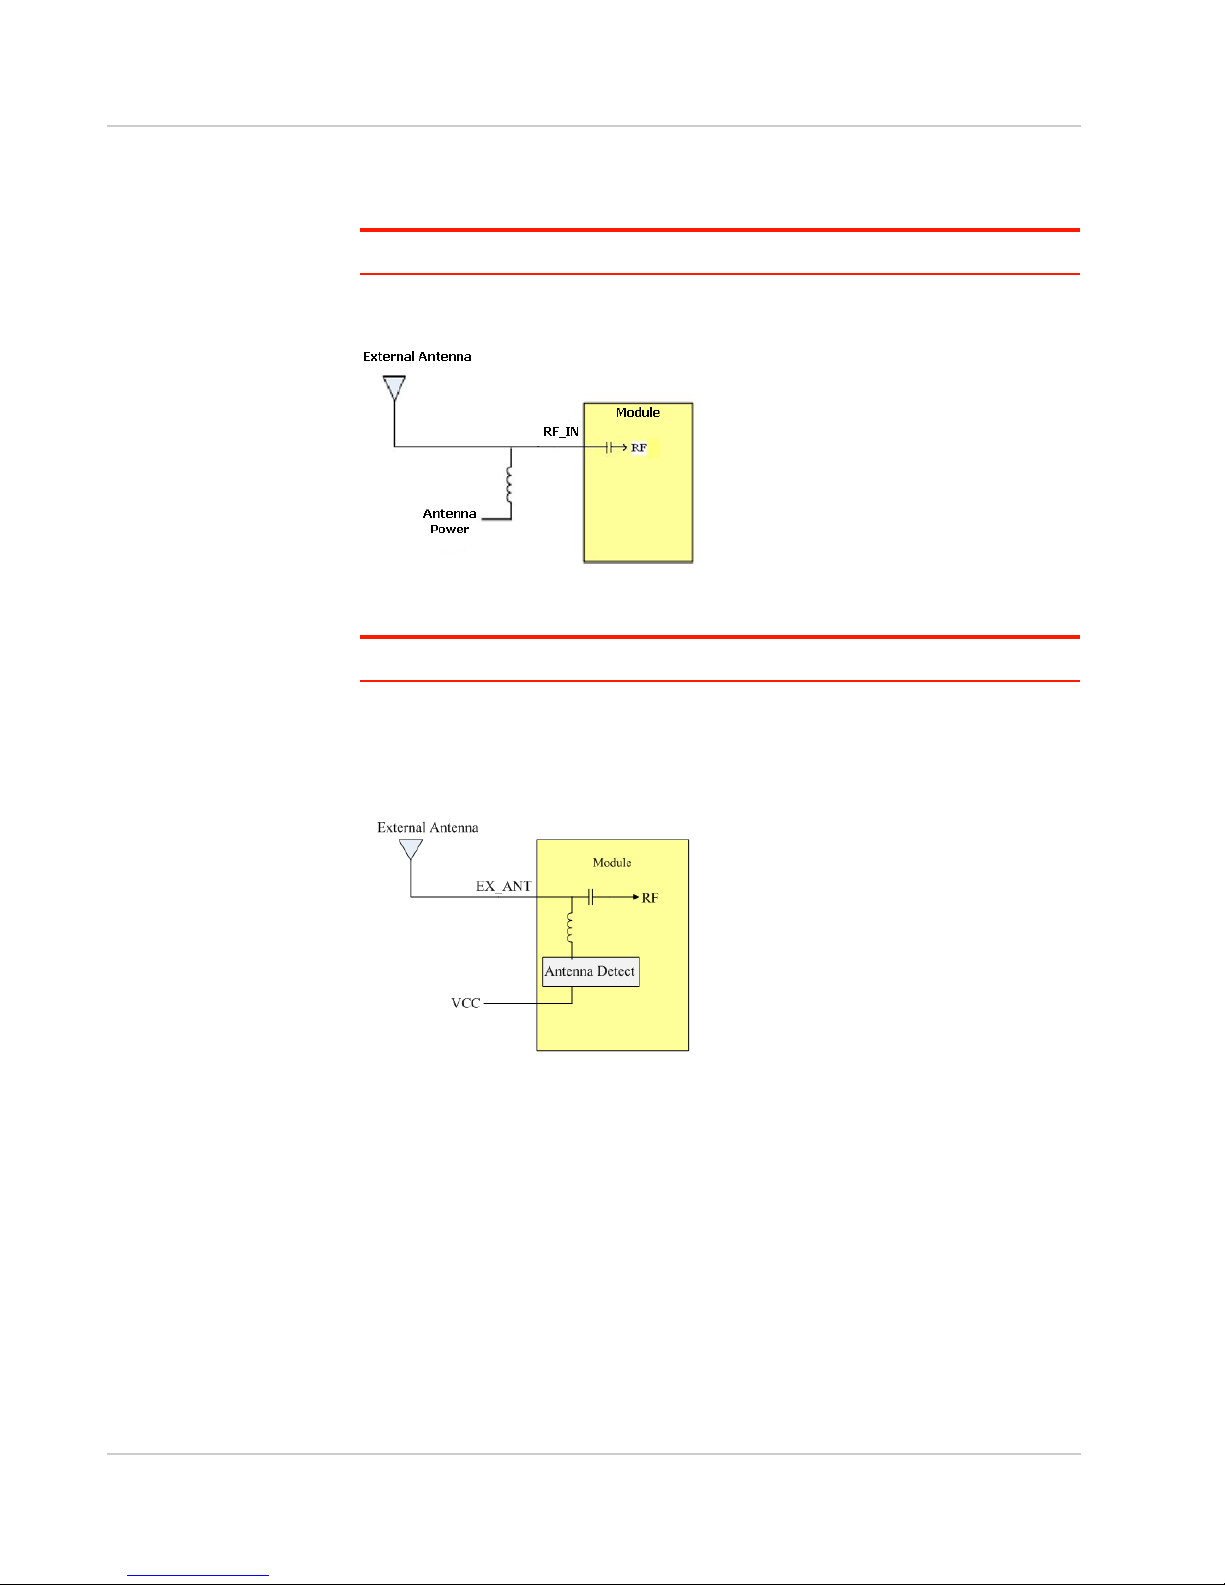
• Mode3 (i.e. PA6E-CAM, XA1110): The power supply for the external antenna
needs to be externally fed into the module from the VCC pin directly and
connect antenna to EX_ANT pin.
Figure 2-7: Mode 3: (Internal chock coil)
Rev 1 Jun.17 14 41111116
Page 15

General Rules for Design
Figure 2-8: Modes
Design chip antenna with GNSS module
Different vendors have different reference designs, so we list two chip antenna
sources: Pulse and Unictron.
1. Antenna source: Pulse
Figure 2-9: Pulse Schematic Design
Figure 2-10: Pulse PCB Layout
When selecting the Antenna source, check its datasheet first before tuning an RF
match component’s footprint (such as: C27, C28). You can base this on its PCB
size and housing to tune for an optimal value and meet the GNSS’s frequency in
order to get a good reception effect.
Rev 1 Jun.17 15 41111116
Page 16

AirPrime XA1110/XM1110 Hardware Design Guide
Pulse web site:
www.pulseeng.com/antennas
Note: C27, C28’s value are still based on your actual trace to tune it.
2. Antenna source: Unictron
Figure 2-11: Unictron Schematic
Figure 2-12: Unictron PCB
When you select this source, check its datasheet first before tuning the RF match
component’s footprint (such as: C26, C27, C28, C29, C30). You can tune based
on the PCB size and housing to tune for an optimal value in order to meet the
GNSS’s frequency and obtain good reception.
Unictron web site:
http://www.unictron.com/index/
Note: C26,C27,C28,C29,C30’s value are still based on your actual trace to tune it.
Rev 1 Jun.17 16 41111116
Page 17

General Rules for Design
External Antenna of Specification
When select your external antenna, refer to the specification shown in Table 2-1
and Table 2-2 below.
The Gmm-g3 module uses the GPS/GLONASS External Antenna:
Table 2-1: GPS/GLONASS External Antenna
Characteristic Specification
Polarization Right-hand circular polarized
Frequency Received 1.575GHz~1.615GHz
Power Supply 3.3V
DC Current 5mA<IDC<11mA at 3.3V
Total Gain 27±3dB
Output VSWR 2.0
Impendence 50Ω
Noise Figure 2dB
The Gmm-g3(B) module uses the Beidou/GPS External Antenna:
Table 2-2: Beidou/GPS External Antenna
Characteristic Specification
Polarization Right-hand circular polarized
Frequency Received 1.561GHz~1.575GHz
Power Supply 3.3V
DC Current 3mA<IDC<30mA at 3.3V
Total Gain 27±1dB
Output VSWR 2.0
Impendence 50Ω
Noise Figure 1.5dB
1PPS - Compatible Models: Gmm-g3, Gmmg3(B), Gms-g6a, Gms-g9, Gms-g6, Gmsb6,PA6E-CAM, XM1110, XA1110
1PPS signal is an output pulse signal used for timing applications. Its electrical
characteristics are:
• Low Voltage level: 0~0.4V
• High Voltage level: 2.8~3.1V
Rev 1 Jun.17 17 41111116
Page 18

AirPrime XA1110/XM1110 Hardware Design Guide
• Period: 1s
• Accuracy (jitter):±20ns
• 100ms pulse width duration (firmware customization for pulse width duration
is available)
Figure 2-13: 1PPS signal and its pulse width with 100ms duration
Free run 1PPS Output Before 3D_FIX
The Sierra Wireless standard GNSS module outputs 1PPS signal after the
module obtains a 3D_FIX. This is a factory default setting.
Cable Delay Compensation
In some cases a long distance connection (~300m) may be needed. For a timing
application, the cable length is critical. For more information on 1PPS signal
transmission delay please refer to How to Efficiently Transfer 1PPS Through
Extended Distances.
LED Indicator for 1PPS Signal
For 1PPS LED indication, you may connect an LED indicator with a 330ohm
resistor in series.
Rev 1 Jun.17 18 41111116
Page 19

General Rules for Design
Figure 2-14: 1PPS Signal Design for IO
3D_Fix - Compatible Models: Gmm-g3, Gmmg3(B), Gms-g6a, Gms-g9, Gms-g6, Gms-b6
3D_Fix signal is an output pulse signal used for GPS fix applications. Its electrical
characteristics are:
• Low Voltage level: 0~0.4V
• High Voltage level: 2.8~3.1V
• Source current (Max.): 14mA, sink current 14mA
Signal Output Before 2D Fix:
Duration: 1 second high and 1 second low.
Period: 2s
(Firmware customizable)
Figure 2-15: Signal Output Before 2D Fix
Rev 1 Jun.17 19 41111116
Page 20

AirPrime XA1110/XM1110 Hardware Design Guide
Signal Output After 2D or 3D Fix
Duration: Constant low level output
(Firmware customizable)
Figure 2-16: Signal output after 2D or 3D Fix
For 3D_Fix indication, you may connect an LED with a 330ohm resister in series
in two ways as shown in Figure 2-17 and Figure 2-18.
Figure 2-17: 3D_F ix signal design for IO (LED ON when high, LED OFF when low)
Figure 2-18: 3D_F ix signal design for IO (LED ON when low, LED OFF when high)
Rev 1 Jun.17 20 41111116
Page 21

General Rules for Design
1.8V Boost to 3.3V Application
If you want to use the 3.3V’s GNSS module in the 1.8V system there are two
considerations: power supply translation and signal level shift. For power supply
translation, you can use a boost circuit which can boost 1.8V to 3.3V (refer to
Figure 2-19 below).
TPS61097A-33 is the Ti’s boost IC which can support boost functionality. In its
application C1 and C2 need to use 10uF and L1 is 10uH. It can support
approximately 100mA of output. For information about the capacitor and
inductor’s placement, refer to the application note on the Ti web site:
http://www.ti.com/lit/ds/symlink/tps61097a-33.pdf
Figure 2-19: Application Schematic
Figure 2-20: Output Voltage vs Output Current
Rev 1 Jun.17 21 41111116
Page 22

AirPrime XA1110/XM1110 Hardware Design Guide
For signal level shift, when your host system is 1.8V and the Sierra Wireless
module is 3.3V, the host system can control the Sierra Wireless module by using
a signal level shift circuit (refer to theFigure 2-21 below). R1 to R4’s values are
default values. In actual design, you can adjust their values to achieve control.
The 2N7002L can select low RDS(On) to reduce power consumption through a
voltage drop.
Figure 2-21: Signal Level Shift Circuit
Layout Guidelines
Please follow the layout guideline for the right GPS module during the design
process.
Layout Underneath the GNSS Module Compatible Models: Gmm-g3, Gmm-g3(B),
Gms-g6a, Gms-g9, Gms-g6, Gms-b6,PA6ECAM, XM1110, XA1110
In general, GNSS modules have high receiving sensitivity at around -165dBm.
During hardware integration, try to avoid noise or harmonics in the following
bands to prevent unnecessary reception degradation:
• Beidou 1561.098MHz ±2.046MHz and GPS 1572.42MHz±2MHz
• GLONASS 1598.0625~1605.375MHz
Modern GNSS positioning products include many components such as an LCD
screen, MCU, high speed digital signal (access memory card), and an RF system
(i.e. Cellular module, BT, Wi-Fi, DVB-T). Keep these components away from the
GNSS module in order to avoid the noise interference, otherwise poor GNSS RF
reception may result.
For modules Gmm-g3, Gmm-g3(B) and XM1110
Don’t leave any trace or mark underneath the GNSS module as indicated by the
circled area in figure Figure 2-22 below. In other words, provide the GNSS
module with a clean GND plane.
Rev 1 Jun.17 22 41111116
Page 23

Figure 2-22: GPS Module on a clean GND Plane
General Rules for Design
Don’t place any trace such as I2C (SCL/SDA), SPI (CLK/MISO/MOSI), UART (TX/
RX) underneath the GNSS module, otherwise it will cause a sensitivity decrease.
For Modules Gms-g9, Gms-g6, Gms-b6 and PA6ECAM
Place a hole according to the location of the RF feeding pin of the module. The
hole will provide an area to fit the RF feeding pin on your system PCB and provide
the appropriate hole size.
Don’t place any high speed trace such as I
UART (TX/RX) underneath the GNSS module, otherwise it will cause a sensitivity
decrease.
2
C (SCL/SDA), SPI (CLK/MISO/MOSI),
Figure 2-23: Hole Placement
Rev 1 Jun.17 23 41111116
Page 24

AirPrime XA1110/XM1110 Hardware Design Guide
Figure 2-24: GPS on a clean GND plane and antenna hole
For Module XA1110
In order to avoid the interference, place many vias on the two sides of the RF
trace which is from the module to the SMA/RF connector on your system PCB as
illustrated in xxx below.
Don’t place any high speed trace such as I
UART (TX/RX) underneath the GNSS module, otherwise it will cause a sensitivity
decrease.
2
C (SCL/SDA), SPI (CLK/MISO/MOSI),
Figure 2-25: Avoiding Interference
Rev 1 Jun.17 24 41111116
Page 25

General Rules for Design
Keep Far Away from High Profile or MetalCanned Components - Compatible Models:
Gms-g6a, Gms-g9, Gms-g6, Gms-b6,PA6ECAM, XA1110
It is good practice to place the GNSS module far away from any high-profile
components especially with metal case enclosed components such as the E-CAP,
coin battery, and Pin Header. The antenna field pattern can be affected and
pattern distortion can occur. At worst, this will decrease the GNSS signal up to
~10dB.
Figure 2-26: First Example of bad and good GNSS module placements
Figure 2-27: Second Example of bad and good GNSS module placements
Figure 2-28: Third Example of bad and good GNSS module placements
Rev 1 Jun.17 25 41111116
Page 26

AirPrime XA1110/XM1110 Hardware Design Guide
Placement - Compatible Models: Gmm-g3,
Gmm-g3(B), Gms-g6a, Gms-g9, Gms-g6, Gmsb6, PA6E-CAM, XM1110, XA1110
• Place the decoupling capacitors for the VCC close to the GNSS module.
• Place the damping resistors for TX/RX close to GNSS module.
Do not place:
• the GNSS module in proximity to high-speed digital processing circuitry
• the GNSS module in proximity to high-current switching power circuitry
• the GNSS module in proximity to clock sources circuitry
Trace - Compatible Models: Gmm-g3, Gmmg3(B), Gms-g6a, Gms-g9, Gms-g6, Gmsb6,PA6E-CAM, XM1110, XA1110
1. The USB differential signals should be traced closely and of equal length for
better noise immunity and minimum radiation.
2. Apply a 50 ohm impedance RF trace for correct impedance matching.
3. Any right angle turn in trace routing should be done with two 135 degree
turns or an arc turn.
Figure 2-29: Examples of turns in trace routing
It is better to have an independent trace of the power source for any device:
Figure 2-30: Examples of Independent Trace
Rev 1 Jun.17 26 41111116
Page 27

General Rules for Design
Ground Segmentation - Compatible Models:
Gmm-g3, Gmm-g3(B), Gms-g6a, Gms-g9, Gmsg6, Gms-b6, PA6E-CAM, XM1110, XA1110
In general, the separation of ground between the GNSS module and the rest of
the system is recommended to avoid interference. If this is not possible, it is best
to follow these typical rules: segmentation of ground between digital and
analogue system, high current and low current system, and different radiation
systems such as GNSS and GPRS. One way to segment the ground is to place
digital and noise components at one corner of the board, while placing analog
and quiet components at the opposite corner of the board. Make sure there is no
crossing of microstrip or current between the two component sets with ground of
each sets to be contacted to one point only.
Another method is to place the two different sets at different layers of the board,
while the ground of each layer is contacted at one point only which is practically
located at the border of the board.
Ground Plane - Compatible Models: Gmsg9,PA6E-CAM, Gms-g6, Gms-b6, XA1110
For Gms-g9, PA6E-CAM, Gms-g6, Gms-b6, XA1110
A large GND plane directly underneath the module could enhance the magneticfield line of the antenna for better GNSS signal reception. Typically it will improve
~2dB maximum. It is strongly recommended to have a ground plane designed
underneath the GNSS module as big as possible.
The recommended thickness for the ground layer is 0.5 to 1 OZ (0.0175 to 0.035
mm). It is best to place the ground plane on the top layer of the PCB, directly
underneath the GNSS module as shown in Figure 2-31:
Figure 2-31: Ground Plane for FR4 Design
Rev 1 Jun.17 27 41111116
Page 28

AirPrime XA1110/XM1110 Hardware Design Guide
C o m p a t i b l e M o d e l : G m s - g 6 a
For the Gms-g6a with a built-in chip antenna module, a special ground plane is
required to improve chip antenna reception performance.
As shown in the circled area of figure Figure 2-32 where the chip antenna area is
when placed on the PCB, no ground plane should be placed on this chip antenna
area or all other layers underneath:
Figure 2-32: Area where no ground plane should be placed
Note: The clearance area size at least 15x6.3mm.
To enhance the antenna efficiency for better GNSS signal reception, it is
recommended to cover the rest of the PCB top layer with ground plane except
where the chip antenna seats as shown in Figure 2-33:
Figure 2-33: Variation in reception sensitivity according to the different size of the GND plane
Rev 1 Jun.17 28 41111116
Page 29

General Rules for Design
Metal Effect on the GNSS Module
Compatible Model: Gms-g6a
The Gms-g6a chip antenna is a sensitive component with the environment.
Care consideration should be taken regarding the housing and the environment
where it is placed:
1. The housing (case) of the host device should not be made of or include any
conductive material for the basic antenna reception.
2. The host device should not be placed underneath conductive material such
as a metal case, metal film, or plastic housing coated in conductive material,
which blocks the GNSS signal from reaching the antenna. If there is metal
material placed underneath the chip antenna, this will also decrease the
antenna reception performance.
As shown in the figure, the distance (d) between metal and module should be
kept as far as possible.
Figure 2-34: Distance between metal and module should be as large as possible
Table 2-3 shows how reception performance can be negatively affected in regard
to the distance between metal and the mounted module.
Table 2-3: Decrease in Sensitivity due to Distance
Distance (MM) Sensitivity Decrease in dB
0mm -14 dB ~ -18dB
1mm -7dB~ -9dB
3mm -6dB ~ -7dB
5mm -3dB~ -5dB
7mm -2dB~ -4dB
10mm 0dB
Rev 1 Jun.17 29 41111116
Page 30

3: Thermal Profile for SMD Modules
The following information is Pb-Free compliant. The details are for reference only.
SMT Reflow Soldering Temperature Profile
• Average ramp-up rate (25 ~ 150°C): 3°C/sec. max.
• Average ramp-up rate (270°C to peak): 3°C/sec. max.
• Preheat: 175 ± 25°C, 60 ~ 120 seconds
• Temperature maintained above 217°C: 60~150 seconds
• Peak temperature: 250 +0/-5°C, 20~40 seconds
• Ramp-down rate: 6°C/sec. max.
• Time 25°C to peak temperature: 8 minutes max.
3
Figure 3-1: SMT Reflow Soldering Temperature Profile
SMT Solder Mask
Please use the dimension of PCB pad as reference and shrink the size by 0.1 to 0.2
mm and use that as layout for paste mask (for PCB pad layout, please see
“Recommended PCB pad layout” on the individual GPS module data sheet).
Manual Soldering
• Soldering iron: Bit Temperature: under 380°C | Time: under 3 second.
Rev 1 Jun.17 30
41111116
Page 31

4: Troubleshooting
How to Check the Working Status of the
GPS Module
The first thing to check for is the NMEA sentence output through TX using various
application tools. For example: you may use the Windows tool: Hyperterminal or you
may use another GPS application program.
If there is no NMEA output at the TX pin, this indicates that the module is currently not
working. Please double check your schematic design. The following is a list of
possible items to check:
Item 1: VCC
The voltage should be kept between 3V to 4.3V (typical: 3.3V).
Item 2: VBACKUP
The voltage should be kept between 2.0V~4.3V (typical: 3.0V). If a backup battery is
not installed for the VBACKUP pin, the pin could still be measured as the voltage
comes from the built-in battery recharging circuit. It is recommended to provide power
to the VBACUP pin as it is used to keep RTC time running and preserve stored
navigation data.
4
Item 3: 3D-FIX
If all the measurements are within the specifications, please also measure the 3D-FIX
signal. Before 2D Fix, the pin should output one second high followed by a one
second low signal.
Note: this is not applicable to those with a customized 1PPS which always has a 1PPS signal
configuration as described in 1PPS - Compatible Models: Gmm-g3, Gmm-g3(B), Gms-g6a,
Gms-g9, Gms-g6, Gms-b6,PA6E-CAM, XM1110, XA1110.
Figure 4-1: 3D-Fix
Rev 1 Jun.17 31
41111116
Page 32

AirPrime XA1110/XM1110 Hardware Design Guide
Item 4: TX0
The UART transmitter of the module outputs the GPS NMEA information for the
application.
Figure 4-2: TX0
Rev 1 Jun.17 32 41111116
Page 33

Appendix A:Super Capacitor Design
About Super Capacitors
Super capacitors have a lifetime similar to that of aluminum electrolytic capacitors.
The service life of a super capacitor is greatly dependent on the operating
temperature, humidity, applied voltage, current, and backup time. Therefore, the
service life is determined based on the backup time set by the customer.
How to Calculate the Backup Time
The example below shows how to calculate the backup time:
A
Figure A-1: Calculating backup time
Rev 1 Jun.17 33
41111116
Page 34

Appendix B:50 Ω Antenna Matching
We used the AppCAD tool to simulate 50Ω impedance for the RF PCB layout.
Table B-1: Antenna Matching
B
RF Line Width (W) PCB FR4
Thickness
1.8mm 1mm 4.6 0.035mm
Dielectric
Parameters
Copper Thickness
per ounce
Figure B-1: Dimensions
Notice:
For multi-layer layouts, you could place a ground layer in the second layer to minimize
the trace width in a specific PCB (such as FR4) and impedance.
For impedance calculation, there is free software available to calculate the trace width
or impedance. Once such software package is:
http://www.awrcorp.com/products/additional-products/tx-line-transmission-linecalculator
Rev 1 Jun.17 34
41111116
Page 35

Appendix C:UART to RS232 Interface
Typically an RS232 or USB interface is required to connect the PC to the Sierra
Wireless GNSS module for communication. The majority of Sierra Wireless modules
use a set of communication ports in TTL-logic. Some newer ones support direct USB
connection. A bridge IC is needed for RS232 signal conversion.
The supported baud-rates are 4800, 9600, 14400, 19200, 38400, 57600, and 115200
bps.
Please refer to the reference circuit in Figure C-1 below for RS232 signal conversion.
An SP3320 IC is used here as an example.
C
Figure C-1: RS232 Signal Conversion Example
Rev 1 Jun.17 35
41111116
Page 36

Appendix D:UART to USB Interface
If the Sierra Wireless module you have purchased does not come with a USB
interface, it is possible to connect the module to an external USB IC. To further
enhance the transferring speed, use one that is capable of USB version 2.0. Once the
driver for the chosen USB Bridge IC is successfully installed onto Windows or another
operating system, the USB Bridge IC will automatically be recognized as a COM port.
Note: a proper driver must be installed or else the operating system will not be able to
recognize the device!
Please refer to the reference circuits in Figure D-1 below for the conversion. A
CP2102 IC is used here as an example.
D
Figure D-1: UART to USB
Pin29 and Pin30 are the bottom ground pads which are not documented in the IC
datasheet. You may ignore these two pins in the drawing.
Rev 1 Jun.17 36
41111116
Page 37

Appendix E:How to Efficiently Transfer
1PPS Through Extended Distances
There are several aspects to note when transferring a 1PPS signal through a long
cable which will result in a 1PPS signal degradation, an increase in noise, and an
increase in signal delay. As the 1PPS signal is traveling through the communication
cable, impedance matching must be implemented to prevent waveform distortion.
Depending on your application, an OP-amp can be added to effectively control the
accuracy of the voltage level for the 1PPS signal.
When using a 1PPS signal for time synchronization, the OP-amp chosen should have
a high slew rate property to prevent a large delay in the 1PPS. The accuracy level of
1PPS for Sierra Wireless GNSS modules is within 100ns. This applies to most of
Sierra Wireless’ MTK GNSS modules. The reference design in Figure E-1 below can
be used to improve accuracy to within 80ns.
E
Figure E-1: Design to improve accuracy to within 80ns
Rev 1 Jun.17 37
41111116
Page 38

AirPrime XA1110/XM1110 Hardware Design Guide
1pps Delay Time
When using coaxial cable for long distance communication using an OP-amp for
amplification, pay close attention to the coaxial cable time delay and the rising
time of the wave form due to the OP-amp’s Slew Rate. A brief explanation for this
is given below.
Figure 5-2 shows the specification of the coaxial cable with the model number
RG6U.
Figure E-2: RG60 Specifications
Figure E-3: RG6U Design and Characteristics
Rev 1 Jun.17 38 41111116
Page 39

The Delay Time Caused by the Cable
Figure E-4: The delay time caused by the cable
Calculating the Delay Time in Respect to
the Communication Cable Length
The simplest method to calculate this is to have a good grasp of the relationship
of the three parameters:
1. The speed of the traveling waveform.
2. The distance of the wave form traveled.
3. The delay time.
= Distance of the wave form traveled (m)
= Speed of the waveform (m/s)
= Delay Time (ns)
If the speed of the waveform (in the coaxial cable) is unknown, it is possible to use
a known coaxial cable length to test. For example, the signal travel in one meter
of coaxial cable may have a delay time measured by an oscilloscope as 5ns and
consequently the will be 2 * 10
If the value of capacitance and inductance for the coaxial cable is known, then
(m/s) can also be calculated.
Rev 1 Jun.17 39 41111116
8
(m/s).
Page 40

AirPrime XA1110/XM1110 Hardware Design Guide
Other coaxial cable electromagnetic fundamental parameters along with the inner
and outer diameter of the physical cable can be used in combination to perform
theoretical calculations.
Waveform Rising Time Caused by OPamp
Figure E-5 shows Slew Rate which is the time needed for a rising waveform.
When the SR (V/
sec) of OPA is higher, the rising time will be shortened as well.
Figure E-5: Slew Rate
Recommended OP-amp
If an inadequate OP-amp is chosen (i.e. with a low slew rate), the delay at the
rising time introduced to the waveform can be significantly larger than that of the
coaxial wire.
We recommend using OP-amp 301 to decrease the waveform rising time.
Specification of OP-amp 301:
• Low Power: 9.5mA (Typ) on 5.5V
• Single Power: 2.7V ~ 5.5V
• High Slew Rate: 80 V/?sec
• Tiny Packages: MSOP and SOT23
Voltage degradation of Communication
cable
We tested a 10m long coaxial cable and observed that only insignificant amount
of voltage degradation occurred. Users should not be concerned with this issue.
Rev 1 Jun.17 40 41111116
Page 41

Appendix F:Reflow Soldering Precautions
Table F-1: Precautions
Details Suggestions Notes
F
1 Before proceeding with
the reflow-soldering
process, the GPS
module must be prebaked.
2 Because PCBA (along
with the patch antenna)
is highly endothermic
during the reflowsoldering process, extra
care must be paid to the
GPS module's solder
joint for any signs of cold
welding or false welding.
3 Special attention is
needed for the PCBA
board during reflowsoldering to see if there
are any symptoms of
bending or deformation
to the PCBA board,
possibly due to the
weight of the module. If
so, this will cause
concerns at the latter half
of the production
process.
Pre-bake Time:
6 Hours @ 60°±5°C or
4 Hours @ 70°±5°C
The parameters of the
reflow temperature must be
set accordingly to module’s
reflow-soldering
temperature profile.
A loading carrier fixture must
be used with PCBA if the
reflow soldering process is
using rail conveyors for the
production.
The maximum tolerated temperature for
the tray is 100°C.
After the pre-baking process, please make
sure the temperature is sufficiently cooled
down to 35°C or below in order to prevent
any tape and reel deformation.
Double check to see if the surrounding
components around the GPS module are
displaying symptoms of cold welding or
false welding.
If there is any bending or deformation to
the PCBA board, this might cause the
PCBA to collide into one another during the
unloading process.
4 Before the PCBA
undergoes a reflowsoldering process, the
production operators
must check with their
own eyes to see if there
are positional offsets to
the module, because it
will be difficult to readjust
after the module has
gone through the reflowsoldering process.
Rev 1 Jun.17 41
41111116
The operators must check
with their own eyes and
readjust the position before
the reflow-soldering
process.
If the operator is planning to readjust the
module position, please do not touch the
patch antenna while the module is hot in
order to prevent a rotational offset between
the patch antenna and module.
Page 42

AirPrime XA1110/XM1110 Hardware Design Guide
Table F-1: Precautions
Details Suggestions Notes
5 Before handling the
PCBA, they must be
cooled to 35°C or below
after they have
undergone a reflowsoldering process, in
order to prevent a
positional shift which
may occur when the
module is still hot.
6 1. When separating the
PCBA panel into
individual pieces using
the V-Cut process,
special attention is
needed to ensure that
there are sufficient gaps
between patch antennas.
2. If the V-Cut process is
not available and the
pieces must be
separated manually,
please make sure the
operators are not using
excess force which may
cause a rotational offset
to the patch antennas.
1. One may use an electric
fan behind the reflow
machine to cool them down.
2. Cooling the PCBA can
prevent the module from
shifting due to fluid effect.
1. The blade and the patch
antenna must have a gap
greater than 0.6mm.
2. Do not use the patch
antenna as the leverage
point when separating the
panels by hand.
It is very easy to cause a positional offset
to the module and its patch antenna when
handling the PCBA under high
temperatures.
1. Tests must first be performed to
determine if the V-Cut process is going to
be used. Ensure that there is enough
space between the blade and patch
antenna so that they do not touch one
another.
2. An uneven amount of manual force
applied to the separation will likely to cause
a positional shift in the patch antenna and
module.
7 When separating the
panel into individual
pieces during latter half
of the production
process, special
attention is needed to
ensure the patch
antennas do not come in
contact with one another
in order to prevent
chipped corners or
positional shifts.
Use a tray to separate the
individual pieces.
Note: for patch antenna users: patch antenna refers to the patch-on-top antenna which is
built on the GPS module (i.e. PA/Gmm Module Series) and may not be applicable to all
GPS modules.
It is possible to chip a corner and/or cause
a shift in position if the patch antennas
come into contact with each other.
Rev 1 Jun.17 42 41111116
Page 43

Other Cautionary Notes on the ReflowSoldering Process
1. Module must be pre-baked before going through the SMT solder reflow
process.
2. The usage of solder paste should follow the “First-in-First-out” principle.
Opened solder paste needs to be monitored and recorded in a timely manner
(refer to IPQC standards for related documentation and examples).
3. Temperature and humidity must be controlled within an SMT production line
and storage area. A temperature of 23°C, 60±5% RH humidity is recommended (please refer to IPQC standards for related documentation and
examples).
4. When performing solder paste printing, check if the amount of solder paste is
in excess or insufficient, as both conditions may lead to defects such as
electrical shortage, empty solder, and etc.
5. Make sure the vacuum mouthpiece is able to bear the weight of the GPS
module in order to prevent a positional shift during the loading process.
6. Before the PCBA goes through the reflow-soldering process, the operators
should check by his/her own eyes to see if there is a positional offset to the
module.
7. The reflow temperature and its profile data must be measured before the
SMT process and match the levels and guidelines set by IPQC.
8. If an SMT protection line is running a double-sided process for PCBA, please
process the GPS module during the second pass only to avoid repeated
reflow exposures of the GPS module. Please contact Sierra Wireless
beforehand if you must process the GPS module during the first pass of
double-side process.
Figure F-1: Placing the GPS module right-side up when running the reflow-solder process; do not
invert.
Rev 1 Jun.17 43 41111116
Page 44

AirPrime XA1110/XM1110 Hardware Design Guide
Manual Soldering
Soldering Iron
Heat Temperature: Under 380°C | Time: Under 3 sec.
Notes:
1. To prevent further oxidation, do not directly touch the soldering pads on the
surface of the PCB board.
2. The solder paste must be defrosted to room temperature before use so that it
can return to its optimal working temperature. The time required for this
procedure is unique and dependent on the properties of the solder paste
used.
3. The steel plate must be properly assessed before and after use, so its
measurement stays strictly within the specification set by SOP.
4. Watch out for the spacing between the soldering joints, as excess solder may
cause electrical shortages.
5. Exercise caution and do not use an extensive amount of flux due to possible
siphon effects on neighboring components, which may lead to electrical
shortages.
6. Please do not use a heat gun for long periods of time when removing the
shielding or inner components of the GPS module, as it is very likely to cause
a shift to the inner components which will lead to electrical shortages.
Rev 1 Jun.17 44 41111116
 Loading...