

Page 1

User Guide
Overdrive 3G/4G Mobile Hotspot
by Sierra Wireless
AirCard
®
W801
www.sprint.com
©2009 Sprint. SPRINT and the logo are trademarks of Sprint.
Other marks are the property of their respective owners.
12/18/09
Page 2

Table of Contents
Section 1: Getting Started . . . . . . . . . . . . . . . . . . . . . . . . . . . . . . . . . . . . . . . . . . . . 1
1A. Device Basics . . . . . . . . . . . . . . . . . . . . . . . . . . . . . . . . . . . . . . . . . . . . . . . . . . . . . . . . . 2
Your Device . . . . . . . . . . . . . . . . . . . . . . . . . . . . . . . . . . . . . . . . . . . . . . . . . . . . . . . . . 3
Components of Your Device. . . . . . . . . . . . . . . . . . . . . . . . . . . . . . . . . . . . . . . . . . . 3
3G and 4G Networks . . . . . . . . . . . . . . . . . . . . . . . . . . . . . . . . . . . . . . . . . . . . . . . . . 4
Package Contents . . . . . . . . . . . . . . . . . . . . . . . . . . . . . . . . . . . . . . . . . . . . . . . . . . . 4
Care and Maintenance . . . . . . . . . . . . . . . . . . . . . . . . . . . . . . . . . . . . . . . . . . . . . . . 5
About This Guide . . . . . . . . . . . . . . . . . . . . . . . . . . . . . . . . . . . . . . . . . . . . . . . . . . . . 5
1B. Getting Started . . . . . . . . . . . . . . . . . . . . . . . . . . . . . . . . . . . . . . . . . . . . . . . . . . . . . . . . 6
System Requirements . . . . . . . . . . . . . . . . . . . . . . . . . . . . . . . . . . . . . . . . . . . . . . . . 6
Section 2: Setting up the Device . . . . . . . . . . . . . . . . . . . . . . . . . . . . . . . . . . . . . . 7
2A. Setting Up Your Device on Your Account . . . . . . . . . . . . . . . . . . . . . . . . . . . . . . . . 8
2B. Setting Up the Device . . . . . . . . . . . . . . . . . . . . . . . . . . . . . . . . . . . . . . . . . . . . . . . . . . 9
Installing the Battery . . . . . . . . . . . . . . . . . . . . . . . . . . . . . . . . . . . . . . . . . . . . . . . . . . 9
Connecting the Device . . . . . . . . . . . . . . . . . . . . . . . . . . . . . . . . . . . . . . . . . . . . . . 10
Connecting to the Network . . . . . . . . . . . . . . . . . . . . . . . . . . . . . . . . . . . . . . . . . . . 10
Change Password/Settings. . . . . . . . . . . . . . . . . . . . . . . . . . . . . . . . . . . . . . . . . . . 11
Activating and Using Your Network Service. . . . . . . . . . . . . . . . . . . . . . . . . . . . . 14
Section 3: Using Your Device . . . . . . . . . . . . . . . . . . . . . . . . . . . . . . . . . . . . . . . .15
3A. Power Button. . . . . . . . . . . . . . . . . . . . . . . . . . . . . . . . . . . . . . . . . . . . . . . . . . . . . . . . .16
Turning Your Device On and Off . . . . . . . . . . . . . . . . . . . . . . . . . . . . . . . . . . . . . . 16
Using the Power Button to Determine the Device State . . . . . . . . . . . . . . . . . . . 18
Pressing the Power Button . . . . . . . . . . . . . . . . . . . . . . . . . . . . . . . . . . . . . . . . . . . 19
3B. LCD . . . . . . . . . . . . . . . . . . . . . . . . . . . . . . . . . . . . . . . . . . . . . . . . . . . . . . . . . . . . . . . . . 20
Interpreting the LCD . . . . . . . . . . . . . . . . . . . . . . . . . . . . . . . . . . . . . . . . . . . . . . . . . 20
3C. Charging the Device . . . . . . . . . . . . . . . . . . . . . . . . . . . . . . . . . . . . . . . . . . . . . . . . . . 21
Using the AC Charger with USB Port . . . . . . . . . . . . . . . . . . . . . . . . . . . . . . . . . . 22
Charging Through a Computer . . . . . . . . . . . . . . . . . . . . . . . . . . . . . . . . . . . . . . . 23
3D. Connecting Through USB . . . . . . . . . . . . . . . . . . . . . . . . . . . . . . . . . . . . . . . . . . . . .24
TRU-Install . . . . . . . . . . . . . . . . . . . . . . . . . . . . . . . . . . . . . . . . . . . . . . . . . . . . . . . . . 24
Requirements for a USB Tethered Connection . . . . . . . . . . . . . . . . . . . . . . . . . . 25
Making a Tethered Connection . . . . . . . . . . . . . . . . . . . . . . . . . . . . . . . . . . . . . . . 25
3E. Browser Interface Home Page . . . . . . . . . . . . . . . . . . . . . . . . . . . . . . . . . . . . . . . . . 27
Displaying the Home Page of the Device . . . . . . . . . . . . . . . . . . . . . . . . . . . . . . . 28
Logging On as an Administrator . . . . . . . . . . . . . . . . . . . . . . . . . . . . . . . . . . . . . . 29
Virtual Device. . . . . . . . . . . . . . . . . . . . . . . . . . . . . . . . . . . . . . . . . . . . . . . . . . . . . . . 29
Mini Window . . . . . . . . . . . . . . . . . . . . . . . . . . . . . . . . . . . . . . . . . . . . . . . . . . . . . . . 30
3F. Alerts . . . . . . . . . . . . . . . . . . . . . . . . . . . . . . . . . . . . . . . . . . . . . . . . . . . . . . . . . . . . . . . . 31
3G Activation Required . . . . . . . . . . . . . . . . . . . . . . . . . . . . . . . . . . . . . . . . . . . . . . 31
3G Network Update Available. . . . . . . . . . . . . . . . . . . . . . . . . . . . . . . . . . . . . . . . . 32
Page 3

GPS Privacy Agreement . . . . . . . . . . . . . . . . . . . . . . . . . . . . . . . . . . . . . . . . . . . . . 32
SD Card Error . . . . . . . . . . . . . . . . . . . . . . . . . . . . . . . . . . . . . . . . . . . . . . . . . . . . . . 33
Software Update Available . . . . . . . . . . . . . . . . . . . . . . . . . . . . . . . . . . . . . . . . . . . 33
3G. Your Network Connection. . . . . . . . . . . . . . . . . . . . . . . . . . . . . . . . . . . . . . . . . . . . . 35
Launching Your Network Connection . . . . . . . . . . . . . . . . . . . . . . . . . . . . . . . . . . 35
Sharing Your Connection . . . . . . . . . . . . . . . . . . . . . . . . . . . . . . . . . . . . . . . . . . . . 35
Ending Your Network Connection . . . . . . . . . . . . . . . . . . . . . . . . . . . . . . . . . . . . . 36
3H. Vertical row (of icons and text). . . . . . . . . . . . . . . . . . . . . . . . . . . . . . . . . . . . . . . . . 37
Signal Information. . . . . . . . . . . . . . . . . . . . . . . . . . . . . . . . . . . . . . . . . . . . . . . . . . . 38
Mobile Broadband Information and Settings . . . . . . . . . . . . . . . . . . . . . . . . . . . . 39
3G Roaming Information and Settings . . . . . . . . . . . . . . . . . . . . . . . . . . . . . . . . . 40
Alert Information . . . . . . . . . . . . . . . . . . . . . . . . . . . . . . . . . . . . . . . . . . . . . . . . . . . . 40
GPS Information and Settings. . . . . . . . . . . . . . . . . . . . . . . . . . . . . . . . . . . . . . . . . 41
Wi-Fi Users Information and Settings . . . . . . . . . . . . . . . . . . . . . . . . . . . . . . . . . . 42
Battery Information and Settings . . . . . . . . . . . . . . . . . . . . . . . . . . . . . . . . . . . . . . 43
Internet Connection Information . . . . . . . . . . . . . . . . . . . . . . . . . . . . . . . . . . . . . . . 44
microSD Card Information and Settings . . . . . . . . . . . . . . . . . . . . . . . . . . . . . . . . 45
Sounds Information and Settings . . . . . . . . . . . . . . . . . . . . . . . . . . . . . . . . . . . . . . 45
3I. Buttons On the Home Page. . . . . . . . . . . . . . . . . . . . . . . . . . . . . . . . . . . . . . . . . . . . 47
Buttons Along the Top of the Home Page . . . . . . . . . . . . . . . . . . . . . . . . . . . . . . 47
Buttons Below the Virtual Device . . . . . . . . . . . . . . . . . . . . . . . . . . . . . . . . . . . . . . 49
3J. Using the microSD Card . . . . . . . . . . . . . . . . . . . . . . . . . . . . . . . . . . . . . . . . . . . . . . 50
microSD Card Slot . . . . . . . . . . . . . . . . . . . . . . . . . . . . . . . . . . . . . . . . . . . . . . . . . . 50
Before Using the microSD Card Slot. . . . . . . . . . . . . . . . . . . . . . . . . . . . . . . . . . . 50
Inserting a microSD Card . . . . . . . . . . . . . . . . . . . . . . . . . . . . . . . . . . . . . . . . . . . . 52
Removing a microSD Card. . . . . . . . . . . . . . . . . . . . . . . . . . . . . . . . . . . . . . . . . . . 52
Accessing the microSD Card . . . . . . . . . . . . . . . . . . . . . . . . . . . . . . . . . . . . . . . . . 53
3K. Sprint Location Services . . . . . . . . . . . . . . . . . . . . . . . . . . . . . . . . . . . . . . . . . . . . . . 55
Requirements for GPS Service. . . . . . . . . . . . . . . . . . . . . . . . . . . . . . . . . . . . . . . . 55
Enabling GPS . . . . . . . . . . . . . . . . . . . . . . . . . . . . . . . . . . . . . . . . . . . . . . . . . . . . . . 55
Displaying Your Location Information . . . . . . . . . . . . . . . . . . . . . . . . . . . . . . . . . . 56
Viewing Your Current Location. . . . . . . . . . . . . . . . . . . . . . . . . . . . . . . . . . . . . . . . 56
Performing a Location Search . . . . . . . . . . . . . . . . . . . . . . . . . . . . . . . . . . . . . . . . 56
GPS Fix in Progress . . . . . . . . . . . . . . . . . . . . . . . . . . . . . . . . . . . . . . . . . . . . . . . . . 57
3L. Updates . . . . . . . . . . . . . . . . . . . . . . . . . . . . . . . . . . . . . . . . . . . . . . . . . . . . . . . . . . . . . 58
Automatically Check for Updates . . . . . . . . . . . . . . . . . . . . . . . . . . . . . . . . . . . . . . 58
Manually Check for Updates. . . . . . . . . . . . . . . . . . . . . . . . . . . . . . . . . . . . . . . . . . 59
Upgrade Firmware From a File . . . . . . . . . . . . . . . . . . . . . . . . . . . . . . . . . . . . . . . 60
3M. Viewing Device Information. . . . . . . . . . . . . . . . . . . . . . . . . . . . . . . . . . . . . . . . . . . . 62
3N. Connecting to a VPN . . . . . . . . . . . . . . . . . . . . . . . . . . . . . . . . . . . . . . . . . . . . . . . . . . 64
3O. Battery. . . . . . . . . . . . . . . . . . . . . . . . . . . . . . . . . . . . . . . . . . . . . . . . . . . . . . . . . . . . . . . 65
Replacing the Battery. . . . . . . . . . . . . . . . . . . . . . . . . . . . . . . . . . . . . . . . . . . . . . . . 65
3P. Reset Button . . . . . . . . . . . . . . . . . . . . . . . . . . . . . . . . . . . . . . . . . . . . . . . . . . . . . . . . .67
Restarting the Device . . . . . . . . . . . . . . . . . . . . . . . . . . . . . . . . . . . . . . . . . . . . . . . . 67
3Q. Mute Switch. . . . . . . . . . . . . . . . . . . . . . . . . . . . . . . . . . . . . . . . . . . . . . . . . . . . . . . . . .70
Page 4

3R. Safety Information . . . . . . . . . . . . . . . . . . . . . . . . . . . . . . . . . . . . . . . . . . . . . . . . . . . . 71
Important Notice . . . . . . . . . . . . . . . . . . . . . . . . . . . . . . . . . . . . . . . . . . . . . . . . . . . . 71
Safety and Hazards . . . . . . . . . . . . . . . . . . . . . . . . . . . . . . . . . . . . . . . . . . . . . . . . . 71
Section 4: Settings . . . . . . . . . . . . . . . . . . . . . . . . . . . . . . . . . . . . . . . . . . . . . . . . . .73
4A. Power Settings . . . . . . . . . . . . . . . . . . . . . . . . . . . . . . . . . . . . . . . . . . . . . . . . . . . . . . . 74
Battery and USB Power Settings . . . . . . . . . . . . . . . . . . . . . . . . . . . . . . . . . . . . . . 74
AC Power Settings . . . . . . . . . . . . . . . . . . . . . . . . . . . . . . . . . . . . . . . . . . . . . . . . . . 74
4B. Configuring the LCD . . . . . . . . . . . . . . . . . . . . . . . . . . . . . . . . . . . . . . . . . . . . . . . . . . 75
Turning the LCD On or Off . . . . . . . . . . . . . . . . . . . . . . . . . . . . . . . . . . . . . . . . . . . 75
Setting the LCD Timeout . . . . . . . . . . . . . . . . . . . . . . . . . . . . . . . . . . . . . . . . . . . . . 75
Setting the LCD Brightness . . . . . . . . . . . . . . . . . . . . . . . . . . . . . . . . . . . . . . . . . . . 76
4C. Enabling and Disabling the LED . . . . . . . . . . . . . . . . . . . . . . . . . . . . . . . . . . . . . . . 77
4D. Enabling and Disabling Sounds . . . . . . . . . . . . . . . . . . . . . . . . . . . . . . . . . . . . . . . 78
Enabling and Disabling Sounds for Specific Events . . . . . . . . . . . . . . . . . . . . . . 78
Low Battery Alert . . . . . . . . . . . . . . . . . . . . . . . . . . . . . . . . . . . . . . . . . . . . . . . . . . . . 79
Critical Battery Level Alert . . . . . . . . . . . . . . . . . . . . . . . . . . . . . . . . . . . . . . . . . . . . 79
4E. Login Settings . . . . . . . . . . . . . . . . . . . . . . . . . . . . . . . . . . . . . . . . . . . . . . . . . . . . . . . .80
Changing the Administrator Password . . . . . . . . . . . . . . . . . . . . . . . . . . . . . . . . . 80
Automatic Login (“Remember Me”). . . . . . . . . . . . . . . . . . . . . . . . . . . . . . . . . . . . 80
4F. Advanced Settings . . . . . . . . . . . . . . . . . . . . . . . . . . . . . . . . . . . . . . . . . . . . . . . . . . . 82
Accessing the Advanced Settings Window . . . . . . . . . . . . . . . . . . . . . . . . . . . . . 82
Device Tab. . . . . . . . . . . . . . . . . . . . . . . . . . . . . . . . . . . . . . . . . . . . . . . . . . . . . . . . . 82
WAN Tab . . . . . . . . . . . . . . . . . . . . . . . . . . . . . . . . . . . . . . . . . . . . . . . . . . . . . . . . . . 86
Wi-Fi Tab . . . . . . . . . . . . . . . . . . . . . . . . . . . . . . . . . . . . . . . . . . . . . . . . . . . . . . . . . . 88
4G. Configuring the Wi-Fi Network. . . . . . . . . . . . . . . . . . . . . . . . . . . . . . . . . . . . . . . . . 91
SSID (Wi-Fi Network Name) . . . . . . . . . . . . . . . . . . . . . . . . . . . . . . . . . . . . . . . . . . 91
Wi-Fi Security . . . . . . . . . . . . . . . . . . . . . . . . . . . . . . . . . . . . . . . . . . . . . . . . . . . . . . 93
Host Name (Device Name) . . . . . . . . . . . . . . . . . . . . . . . . . . . . . . . . . . . . . . . . . . . 97
Setting the Maximum Number of Wi-Fi Users . . . . . . . . . . . . . . . . . . . . . . . . . . . 97
Wi-Fi Channel . . . . . . . . . . . . . . . . . . . . . . . . . . . . . . . . . . . . . . . . . . . . . . . . . . . . . . 98
Disabling Wi-Fi When Connected Through USB. . . . . . . . . . . . . . . . . . . . . . . . . 98
4H. Configuring 3G/4G . . . . . . . . . . . . . . . . . . . . . . . . . . . . . . . . . . . . . . . . . . . . . . . . . . . 99
Viewing 3G Activation Information . . . . . . . . . . . . . . . . . . . . . . . . . . . . . . . . . . . . . 99
3G Section of the WAN Tab . . . . . . . . . . . . . . . . . . . . . . . . . . . . . . . . . . . . . . . . . . 99
Resetting the 3G/4G Configuration to Default Settings . . . . . . . . . . . . . . . . . . 100
4I. GPS Settings . . . . . . . . . . . . . . . . . . . . . . . . . . . . . . . . . . . . . . . . . . . . . . . . . . . . . . . .101
Setting the GPS Mode . . . . . . . . . . . . . . . . . . . . . . . . . . . . . . . . . . . . . . . . . . . . . . 101
Setting the GPS Fix Rate . . . . . . . . . . . . . . . . . . . . . . . . . . . . . . . . . . . . . . . . . . . . 101
Using Metric Units. . . . . . . . . . . . . . . . . . . . . . . . . . . . . . . . . . . . . . . . . . . . . . . . . . 102
Changing Your Mapping Service. . . . . . . . . . . . . . . . . . . . . . . . . . . . . . . . . . . . . 102
Performance Setting (GPS) . . . . . . . . . . . . . . . . . . . . . . . . . . . . . . . . . . . . . . . . . . 102
Accuracy . . . . . . . . . . . . . . . . . . . . . . . . . . . . . . . . . . . . . . . . . . . . . . . . . . . . . . . . . 103
4J. Configuring the Router . . . . . . . . . . . . . . . . . . . . . . . . . . . . . . . . . . . . . . . . . . . . . . .104
Basic Section of the Router tab . . . . . . . . . . . . . . . . . . . . . . . . . . . . . . . . . . . . . .104
Page 5

LAN Section of the Router Tab . . . . . . . . . . . . . . . . . . . . . . . . . . . . . . . . . . . . . . . 105
Port Forwarding Section of the Router Tab . . . . . . . . . . . . . . . . . . . . . . . . . . . . 109
Port Triggering Section of the Router Tab . . . . . . . . . . . . . . . . . . . . . . . . . . . . .111
DMZ Section of the Router Tab . . . . . . . . . . . . . . . . . . . . . . . . . . . . . . . . . . . . . . 112
Resetting the Software to Default Settings . . . . . . . . . . . . . . . . . . . . . . . . . . . . .114
4K. Exporting and Importing Settings . . . . . . . . . . . . . . . . . . . . . . . . . . . . . . . . . . . . .117
Exporting Settings. . . . . . . . . . . . . . . . . . . . . . . . . . . . . . . . . . . . . . . . . . . . . . . . . . 117
Importing Settings. . . . . . . . . . . . . . . . . . . . . . . . . . . . . . . . . . . . . . . . . . . . . . . . . . 117
4L. Logs. . . . . . . . . . . . . . . . . . . . . . . . . . . . . . . . . . . . . . . . . . . . . . . . . . . . . . . . . . . . . . . .118
Logs Available. . . . . . . . . . . . . . . . . . . . . . . . . . . . . . . . . . . . . . . . . . . . . . . . . . . . . 118
Connection History . . . . . . . . . . . . . . . . . . . . . . . . . . . . . . . . . . . . . . . . . . . . . . . . . 118
System Events. . . . . . . . . . . . . . . . . . . . . . . . . . . . . . . . . . . . . . . . . . . . . . . . . . . . . 119
Setting the Method Used for Time Acquisition. . . . . . . . . . . . . . . . . . . . . . . . . . 120
4M. Setup Pages . . . . . . . . . . . . . . . . . . . . . . . . . . . . . . . . . . . . . . . . . . . . . . . . . . . . . . . .121
Welcome to Your Device Window - Select an Option . . . . . . . . . . . . . . . . . . . 121
Section 5: Resources . . . . . . . . . . . . . . . . . . . . . . . . . . . . . . . . . . . . . . . . . . . . . 123
5A. More Information . . . . . . . . . . . . . . . . . . . . . . . . . . . . . . . . . . . . . . . . . . . . . . . . . . . .124
Visiting the Sprint Web Site. . . . . . . . . . . . . . . . . . . . . . . . . . . . . . . . . . . . . . . . . . 124
Contacting Customer Service. . . . . . . . . . . . . . . . . . . . . . . . . . . . . . . . . . . . . . . . 124
Online Help . . . . . . . . . . . . . . . . . . . . . . . . . . . . . . . . . . . . . . . . . . . . . . . . . . . . . . . 124
5B. Frequently Asked Questions . . . . . . . . . . . . . . . . . . . . . . . . . . . . . . . . . . . . . . . . .126
How Can I Tell I’m Connected to 3G/4G? . . . . . . . . . . . . . . . . . . . . . . . . . . . . . 126
How do I Connect to Wi-Fi? . . . . . . . . . . . . . . . . . . . . . . . . . . . . . . . . . . . . . . . . .126
Is Roaming on 4G Supported? . . . . . . . . . . . . . . . . . . . . . . . . . . . . . . . . . . . . . . 127
What Do I Do if I Forgot the Wi-Fi Password? . . . . . . . . . . . . . . . . . . . . . . . . . . 127
What Do I Do if I Forgot the Administrator Password? . . . . . . . . . . . . . . . . . . . 127
If the Connection is “Always On,” am I Always Being Billed? . . . . . . . . . . . . . 127
Questions About GPS and Sprint Location Services . . . . . . . . . . . . . . . . . . . .127
How do I Access My Corporate Network Through a VPN? . . . . . . . . . . . . . . . 128
Are Terminal Sessions Supported? . . . . . . . . . . . . . . . . . . . . . . . . . . . . . . . . . . . 128
5C. Tips . . . . . . . . . . . . . . . . . . . . . . . . . . . . . . . . . . . . . . . . . . . . . . . . . . . . . . . . . . . . . . . .129
Extending Battery Life. . . . . . . . . . . . . . . . . . . . . . . . . . . . . . . . . . . . . . . . . . . . . . . 129
Device Location. . . . . . . . . . . . . . . . . . . . . . . . . . . . . . . . . . . . . . . . . . . . . . . . . . . . 130
Improving Signal Strength. . . . . . . . . . . . . . . . . . . . . . . . . . . . . . . . . . . . . . . . . . . 130
Improving 3G Network Service. . . . . . . . . . . . . . . . . . . . . . . . . . . . . . . . . . . . . . .130
Improving Wi-Fi Performance . . . . . . . . . . . . . . . . . . . . . . . . . . . . . . . . . . . . . . . . 131
Security Tips . . . . . . . . . . . . . . . . . . . . . . . . . . . . . . . . . . . . . . . . . . . . . . . . . . . . . . 131
Finding the MAC Address . . . . . . . . . . . . . . . . . . . . . . . . . . . . . . . . . . . . . . . . . . . 131
Finding the IP Address. . . . . . . . . . . . . . . . . . . . . . . . . . . . . . . . . . . . . . . . . . . . . . 132
5D. Troubleshooting Tips . . . . . . . . . . . . . . . . . . . . . . . . . . . . . . . . . . . . . . . . . . . . . . . .134
General tips . . . . . . . . . . . . . . . . . . . . . . . . . . . . . . . . . . . . . . . . . . . . . . . . . . . . . . . 134
LCD Is Dark . . . . . . . . . . . . . . . . . . . . . . . . . . . . . . . . . . . . . . . . . . . . . . . . . . . . . . . 134
Insufficient Signal Strength . . . . . . . . . . . . . . . . . . . . . . . . . . . . . . . . . . . . . . . . . .135
Messages Displayed on the Device LCD . . . . . . . . . . . . . . . . . . . . . . . . . . . . . . 135
Cannot Connect to Wi-Fi . . . . . . . . . . . . . . . . . . . . . . . . . . . . . . . . . . . . . . . . . . . . 137
Page 6

Cannot Display the Home Page . . . . . . . . . . . . . . . . . . . . . . . . . . . . . . . . . . . . . . 137
Cannot Connect to the 3G/4G Network . . . . . . . . . . . . . . . . . . . . . . . . . . . . . . . 139
Sprint Location Services Aren’t Working or Don’t Seem to Be Available. . . . 139
GPS Fix Not Available . . . . . . . . . . . . . . . . . . . . . . . . . . . . . . . . . . . . . . . . . . . . . . 139
Cannot Check for Updates . . . . . . . . . . . . . . . . . . . . . . . . . . . . . . . . . . . . . . . . . . 139
Sounds Are Enabled, but the Device Doesn’t Generate Any Sounds . . . . . . 139
Section 6: Technical Specifications and Regulatory Information . . . . . 141
6A. Technical Specifications . . . . . . . . . . . . . . . . . . . . . . . . . . . . . . . . . . . . . . . . . . . . .142
LED Operation. . . . . . . . . . . . . . . . . . . . . . . . . . . . . . . . . . . . . . . . . . . . . . . . . . . . . 142
Radio Frequency and Electrical Specifications . . . . . . . . . . . . . . . . . . . . . . . . . 143
Software Specifications . . . . . . . . . . . . . . . . . . . . . . . . . . . . . . . . . . . . . . . . . . . . . 144
Environmental Specifications . . . . . . . . . . . . . . . . . . . . . . . . . . . . . . . . . . . . . . . . 145
Mechanical Specifications. . . . . . . . . . . . . . . . . . . . . . . . . . . . . . . . . . . . . . . . . . . 145
6B. Regulatory Notices . . . . . . . . . . . . . . . . . . . . . . . . . . . . . . . . . . . . . . . . . . . . . . . . . .146
6C. Legal . . . . . . . . . . . . . . . . . . . . . . . . . . . . . . . . . . . . . . . . . . . . . . . . . . . . . . . . . . . . . . .147
Patents . . . . . . . . . . . . . . . . . . . . . . . . . . . . . . . . . . . . . . . . . . . . . . . . . . . . . . . . . . . 147
Trademarks . . . . . . . . . . . . . . . . . . . . . . . . . . . . . . . . . . . . . . . . . . . . . . . . . . . . . . . 147
Copyright . . . . . . . . . . . . . . . . . . . . . . . . . . . . . . . . . . . . . . . . . . . . . . . . . . . . . . . . . 148
Limitation of Liability . . . . . . . . . . . . . . . . . . . . . . . . . . . . . . . . . . . . . . . . . . . . . . . . 148
Additional Information and Updates . . . . . . . . . . . . . . . . . . . . . . . . . . . . . . . . . . 148
Index. . . . . . . . . . . . . . . . . . . . . . . . . . . . . . . . . . . . . . . . . . . . . . . . . . . . . . . . . . . . . 149
Page 7

Section 1
Getting Started
Page 8

Section 1A
Device Basics
⽧ Your Device (page 3)
⽧ Components of Your Device (page 3)
⽧ 3G and 4G Networks (page 4)
⽧ Package Contents (page 4)
⽧ Care and Maintenance (page 5)
⽧ About This Guide (page 5)
Your Overdrive 3G/4G Mobile Hotspot allows you to easily connect to the Internet and to share your
3G/4G connection with others.
This user guide describes how to set up your device and use the browser interface to:
● View the status of your device.
● View and change the settings of your device and the browser interface.
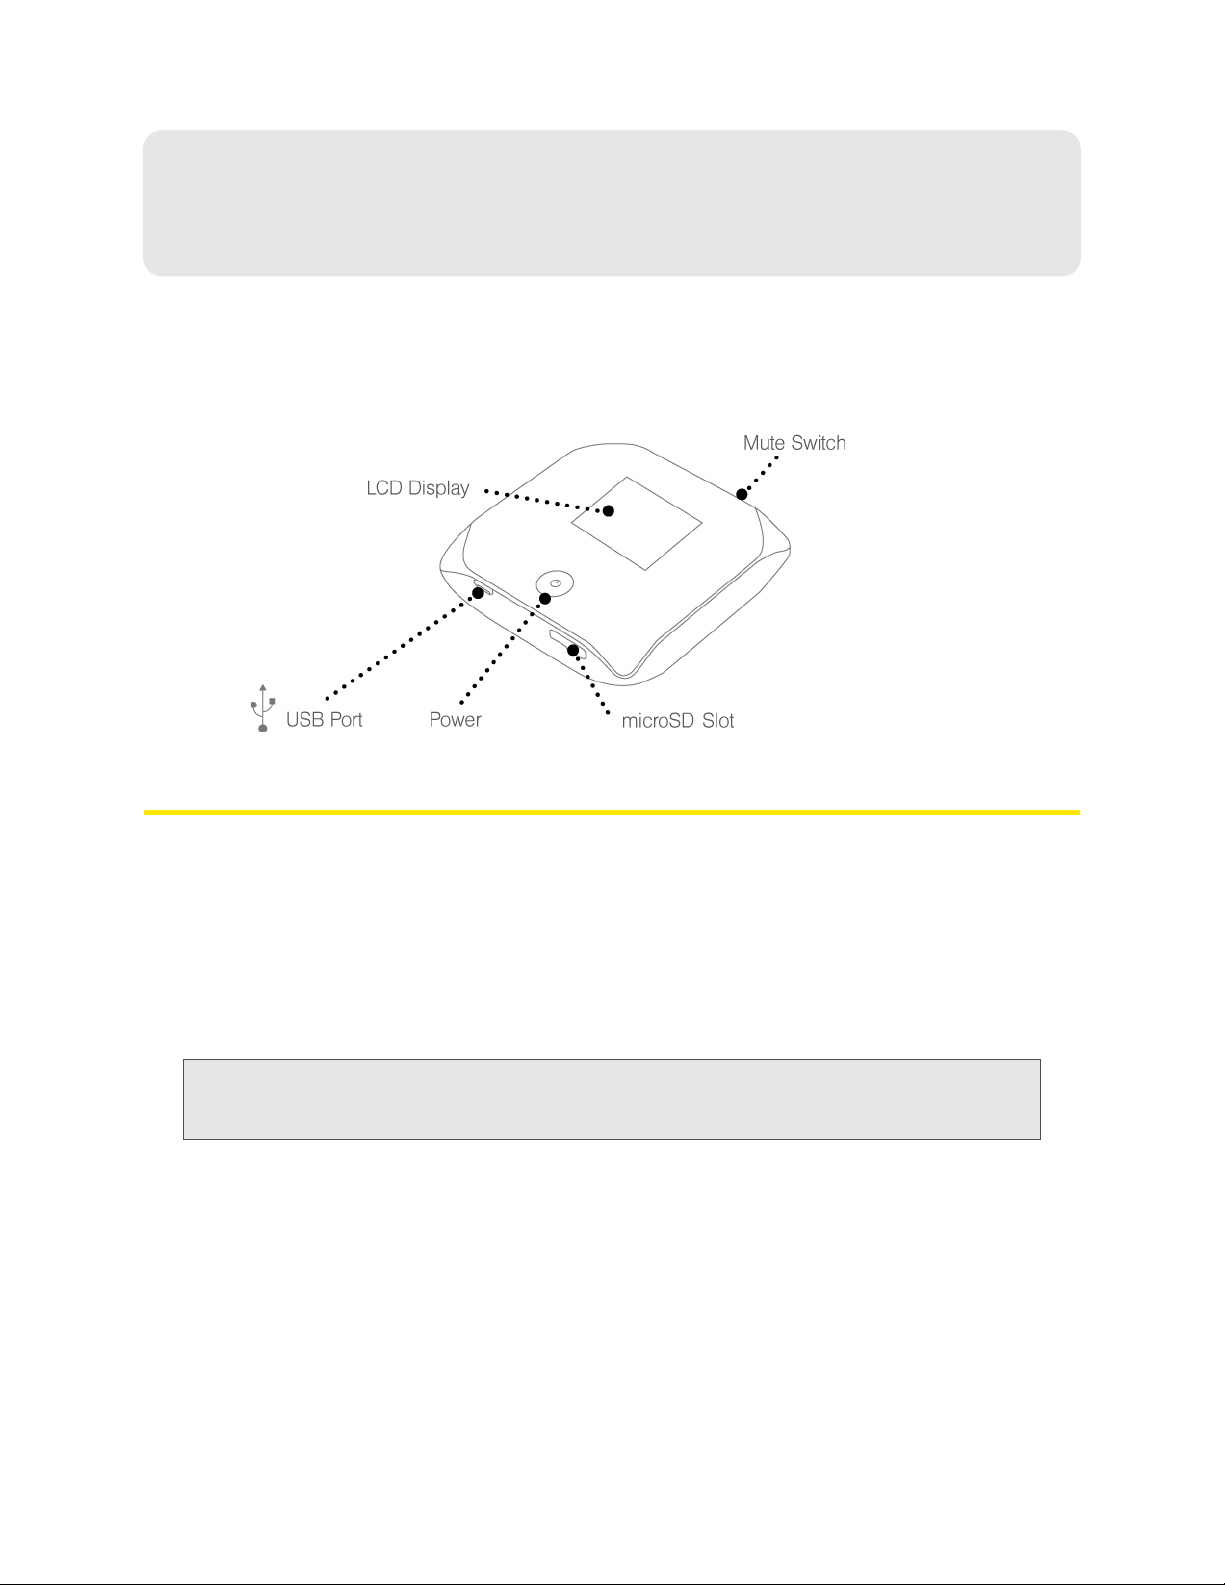
It also describes your device (its various connectors and buttons).
2 Device Basics
Page 9

Your Device
The Overdrive 3G/4G Mobile Hotspot provides a simple way to use your 3G/4G Internet
connection with any Wi-Fi-enabled device, and to share your Internet connection with friends and
family.
Device Basics
Components of Your Device
Your device consists of these main components:
● Wi-Fi access point
The Wi-Fi access point connects your computers and o
Overdrive 3G/4G Mobile Hotspot.
● 3G modem
The 3G modem connects your Overdrive 3G/4G Mobi
(CDMA 1X/EVDO) network (more widely available, compared to 4G).
● 4G modem
The 4G modem connects your Overdrive 3G/4G Mobi
(WiMAX) network (newer technology and faster speeds, compared to 3G).
ther Wi-Fi-enabled devices to your
le Hotspot to the Internet via the 3G
le Hotspot to the Internet via the 4G
Device Basics 3
Page 10

● Ro
uter
The router handles traffic between the 3G/4G modems, y
our Overdrive 3G/4G Mobile Hotspot, and
the Wi-Fi network.
3G and 4G Networks
These wireless networks connect you to the Internet. Depending on your coverage area, you may
have:
● Bo
th 3G and 4G coverage
● Only 3G coverage
● Only 4G coverage.
Your device automatically connects to the fastest network that is a
and 4G coverage and your connection happens to get disrupted, your device can automatically
switch to the other network. For more information, see “Configuring the 3G/4G Connection
Preferences” on page 39.
Download speeds
Actual speeds depend on several factors, including network conditions
Theoretical maximum downlink speeds Typical maximum downlink speeds
3G (CDMA 1xEV-DO Rev. 0)
2.4 Mbps 400–700 kbps
vailable to you. If you have both 3G
.
3G (CDMA 1xEV-DO Rev. A)
4G
Package Contents
Your package includes:
● Ov
erdrive 3G/4G Mobile Hotspot by Sierra Wireless
● Ba
ttery compartment cover
chargeable battery
● Re
● A
C charger with USB port
● USB to Micr
● Get Started guide
o B cable
3 Mbps 0.6–1.4 Mbps
10 Mbps 3–6 Mbps
4 Device Basics
Page 11

Care and Maintenance
As with any electronic device, you should handle this device with care to ensure reliable operation.
Follow these guidelines in using and storing the device:
● Pr
otect the device from liquids, dust, and excessive heat.
● Do
not handle or operate the device while driving or operating a vehicle. Doing so may distract
you from properly operating the vehicle. In some jurisdictions, operating communication
devices while in control of a vehicle is a criminal offense.
Device Basics
● Do not
alter the antenna’s performance.
apply adhesive labels to the device. They may cause the device to overheat and may
About This Guide
This user guide is designed to provide you with all the information you need to install and use
your Overdrive 3G/4G Mobile Hotspot by Sierra Wireless (AirCard W801).
Note: The printed Get Started guide that comes with the Overdrive 3G/4G Mobile Hotspot should be
sufficient for most installations.
● Chapter 1 (which you are reading) gives you an overview of the device.
● Chapter 2 p
Device” on page 7).
● Chapter 3 d
on page 15).
● Chapte
“Settings” on page 73).
● Chapter 5 con
help. (See “Resources” on page 123).
rovides step-by-step instructions for setting up the device. (See “Setting up the
escribes more-common tasks when using your device. (See “Using Your Device”
r 4 describes advanced configuration of the device and the browser interface. (See
tains frequently asked questions, troubleshooting tips, and resources for getting
● Chapter
require technical information, as well as regulatory information and legal information. (See
“Technical Specifications and Regulatory Information” on
6 lists the electrical, radio frequency, and other parameters of the device for those who
page 141).
Device Basics 5
Page 12

Section 1B
Getting Started
⽧ System Requirements (page 6)
System Requirements
● One or more computing devices that support Wi-Fi (802.11b/g)
● Web browser (required if you’ll be using the browser interface to view status and to configure
settings). The following browsers are supported:
䡲 Internet Explorer (version 6.0 or higher)
䡲 Mozilla Firefox (version 2.0 or higher)
䡲 Google Chrome (version 2.0.172.28 or higher)
䡲 Apple Safari (version 2.0 or higher)
䡲 Opera version 9.64
● If you’ll be connecting the Overdrive 3G/4G Mobile Hotspot through USB:
䡲 Computing device running Windows Vista, Windows XP, or Mac (OS X 10.4.x or higher)
䡲 USB 2.0 slot
6 Getting Started
Page 13

Section 2
Setting up the Device
Page 14

Section 2A
Setting Up Your Device on Your Account
Normally your device will be set up on your Sprint account at the time of purchase.
To verify that your device is set up on your Sprint account:
1. Log in to your account at sprint.com by entering your username and password.
2. Confirm that the Overdrive 3G/4G Mobile Hotspot is on your account with a Mobile Broadband
connection plan.
If you don’t see your device listed, you will need to contact Sprint Customer Service to complete
setting up the device on your account (see
following available before calling:
● Your Sprint account information.
● The ESN number of your device (displayed on the packaging, on the device [under the battery],
and at
Advanced Settings > Device > About).
“Contacting Customer Service” on page 124). Have the
8 Setting Up Your Device on Your Account
Page 15
Section 2B
Setting Up the Device
⽧ Installing the Battery (page 9)
⽧ Connecting the Device (page 10)
⽧ Connecting to the Network (page 10)
⽧ Change Password/Settings (page 11)
⽧ Activating and Using Your Network Service (page 14)
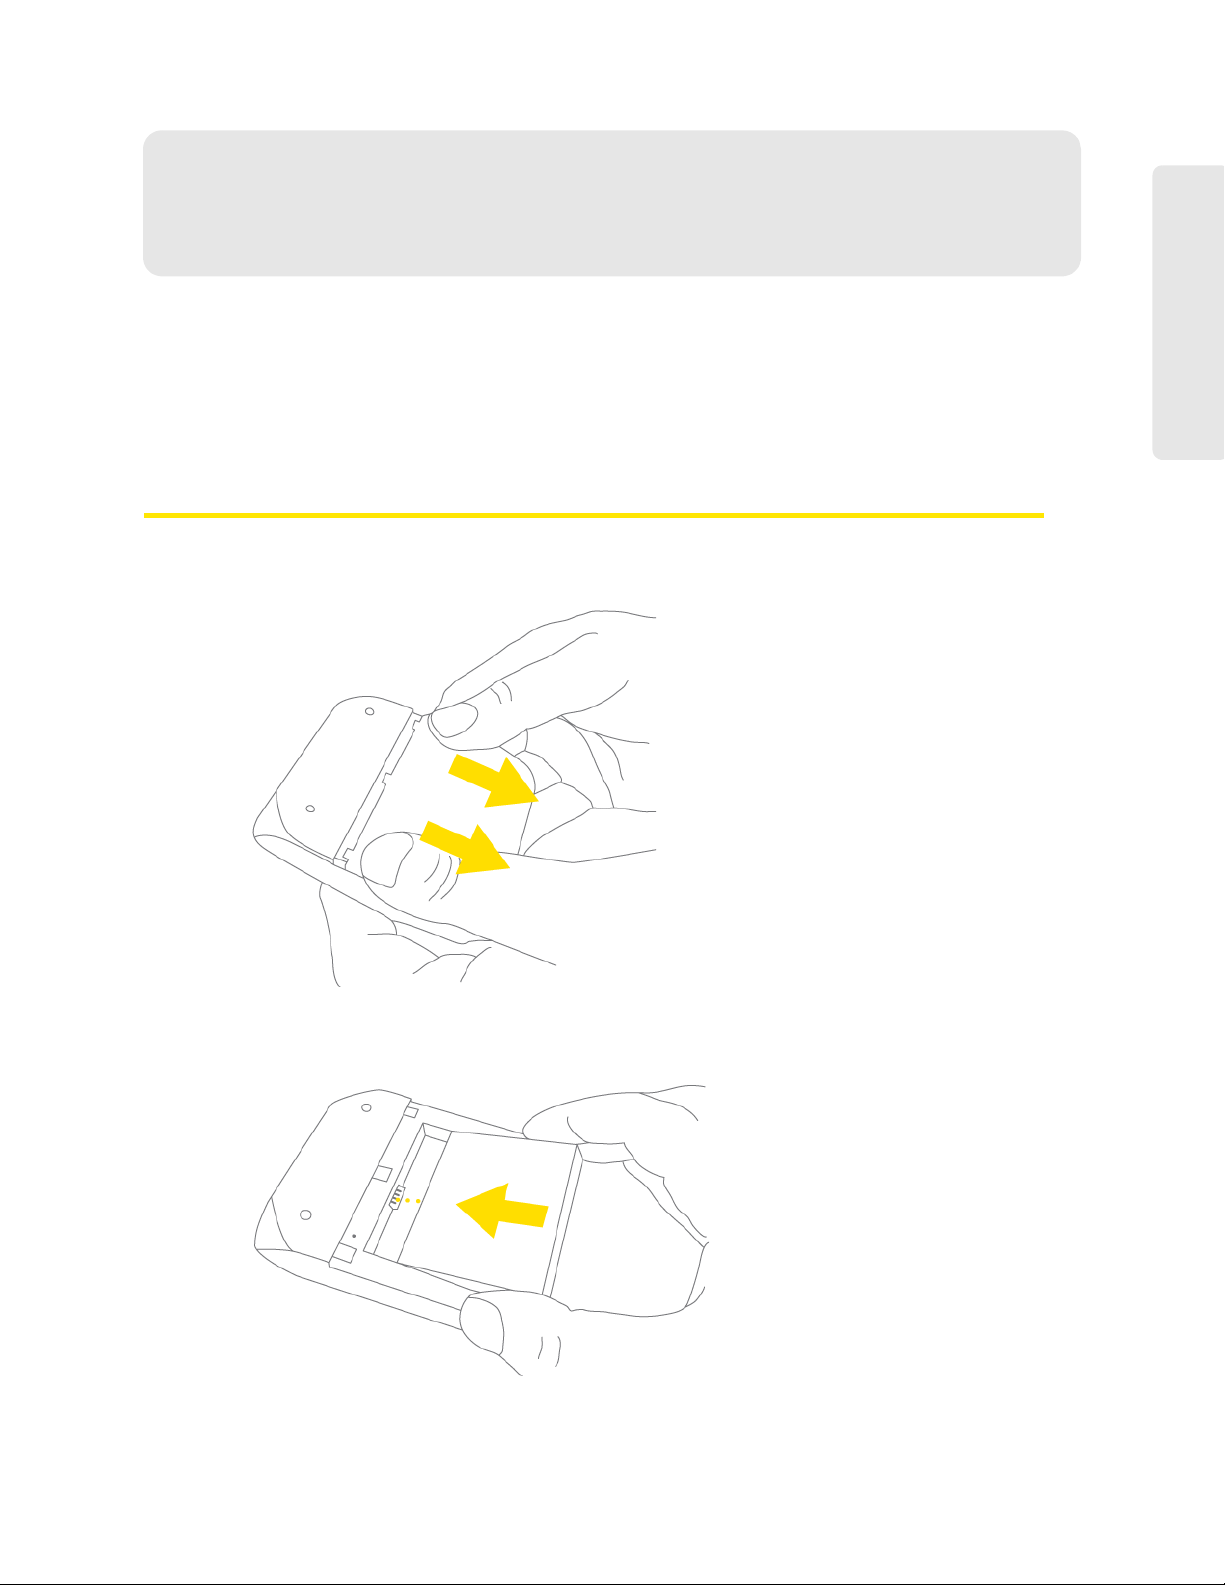
Installing the Battery
1. Remove the battery compartment cover.
Setting Up the Device
2. Insert the battery into the Overdrive 3G/4G Mobile Hotspot (Sierra Wireless logo facing up).
Setting Up the Device 9
Page 16
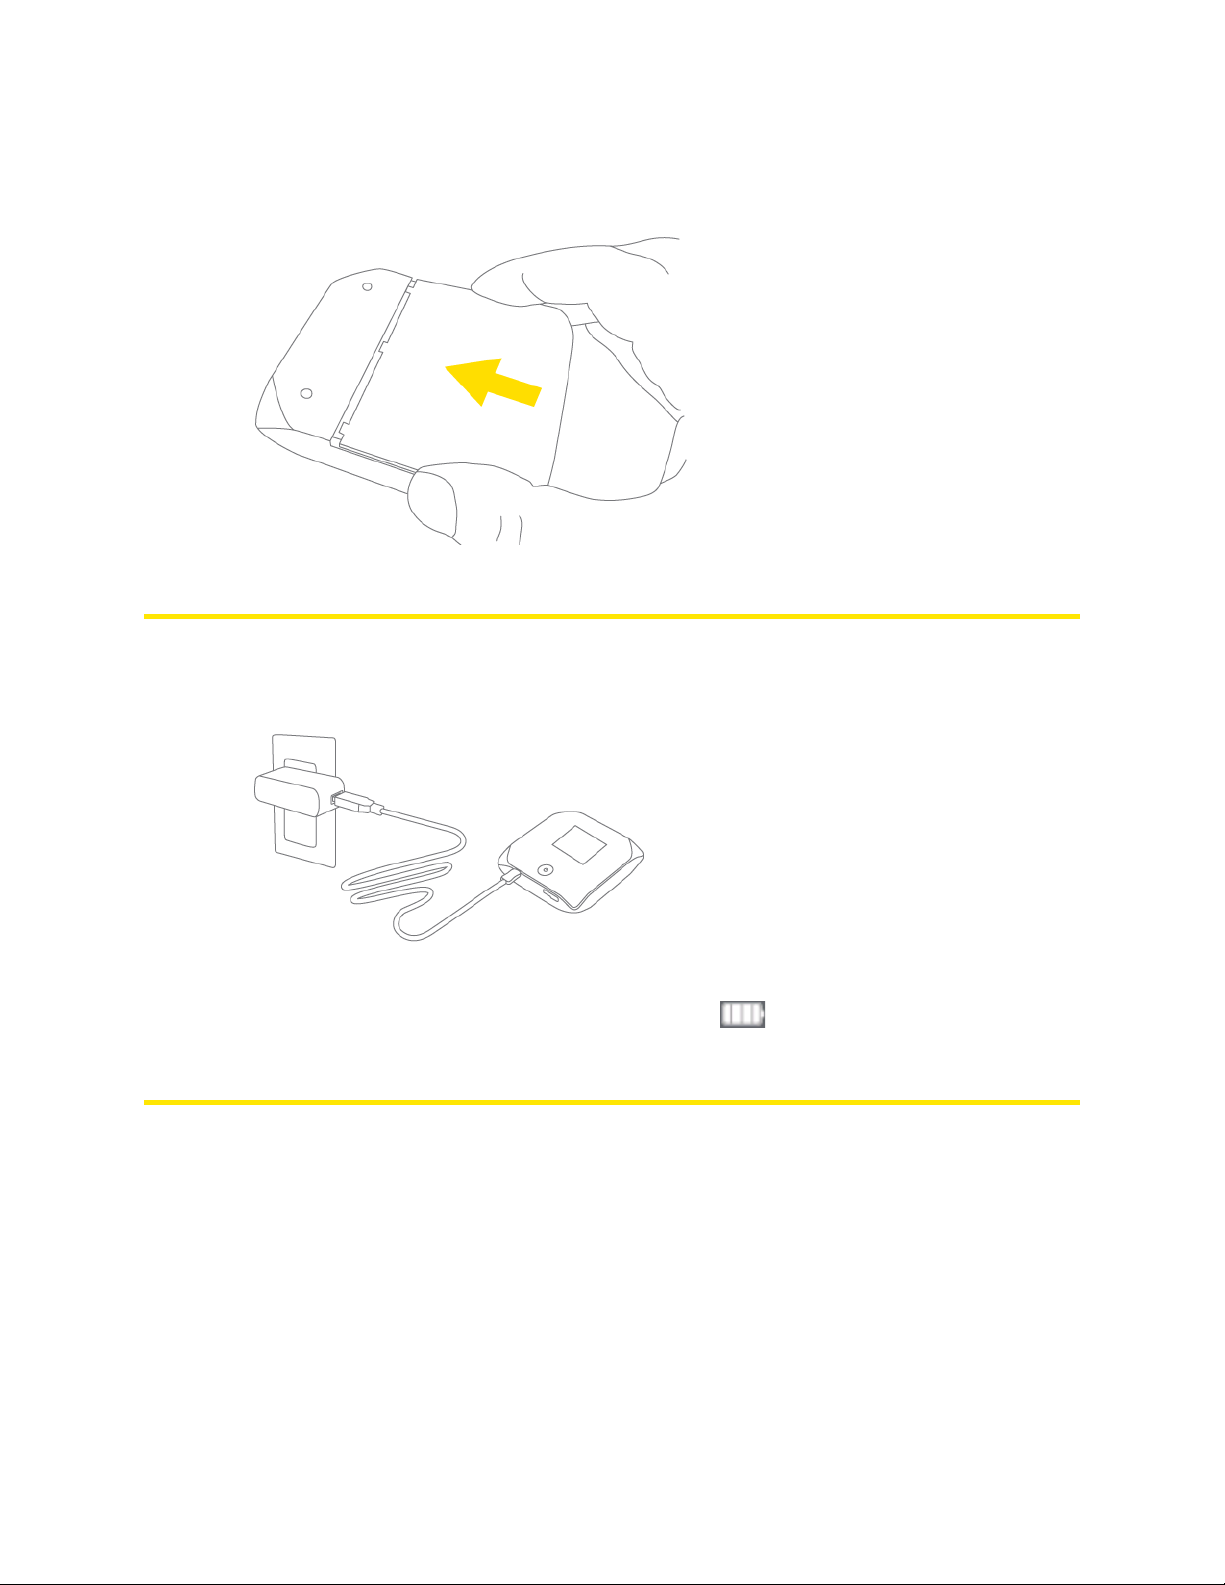
3. Put the battery compartment cover onto the device.
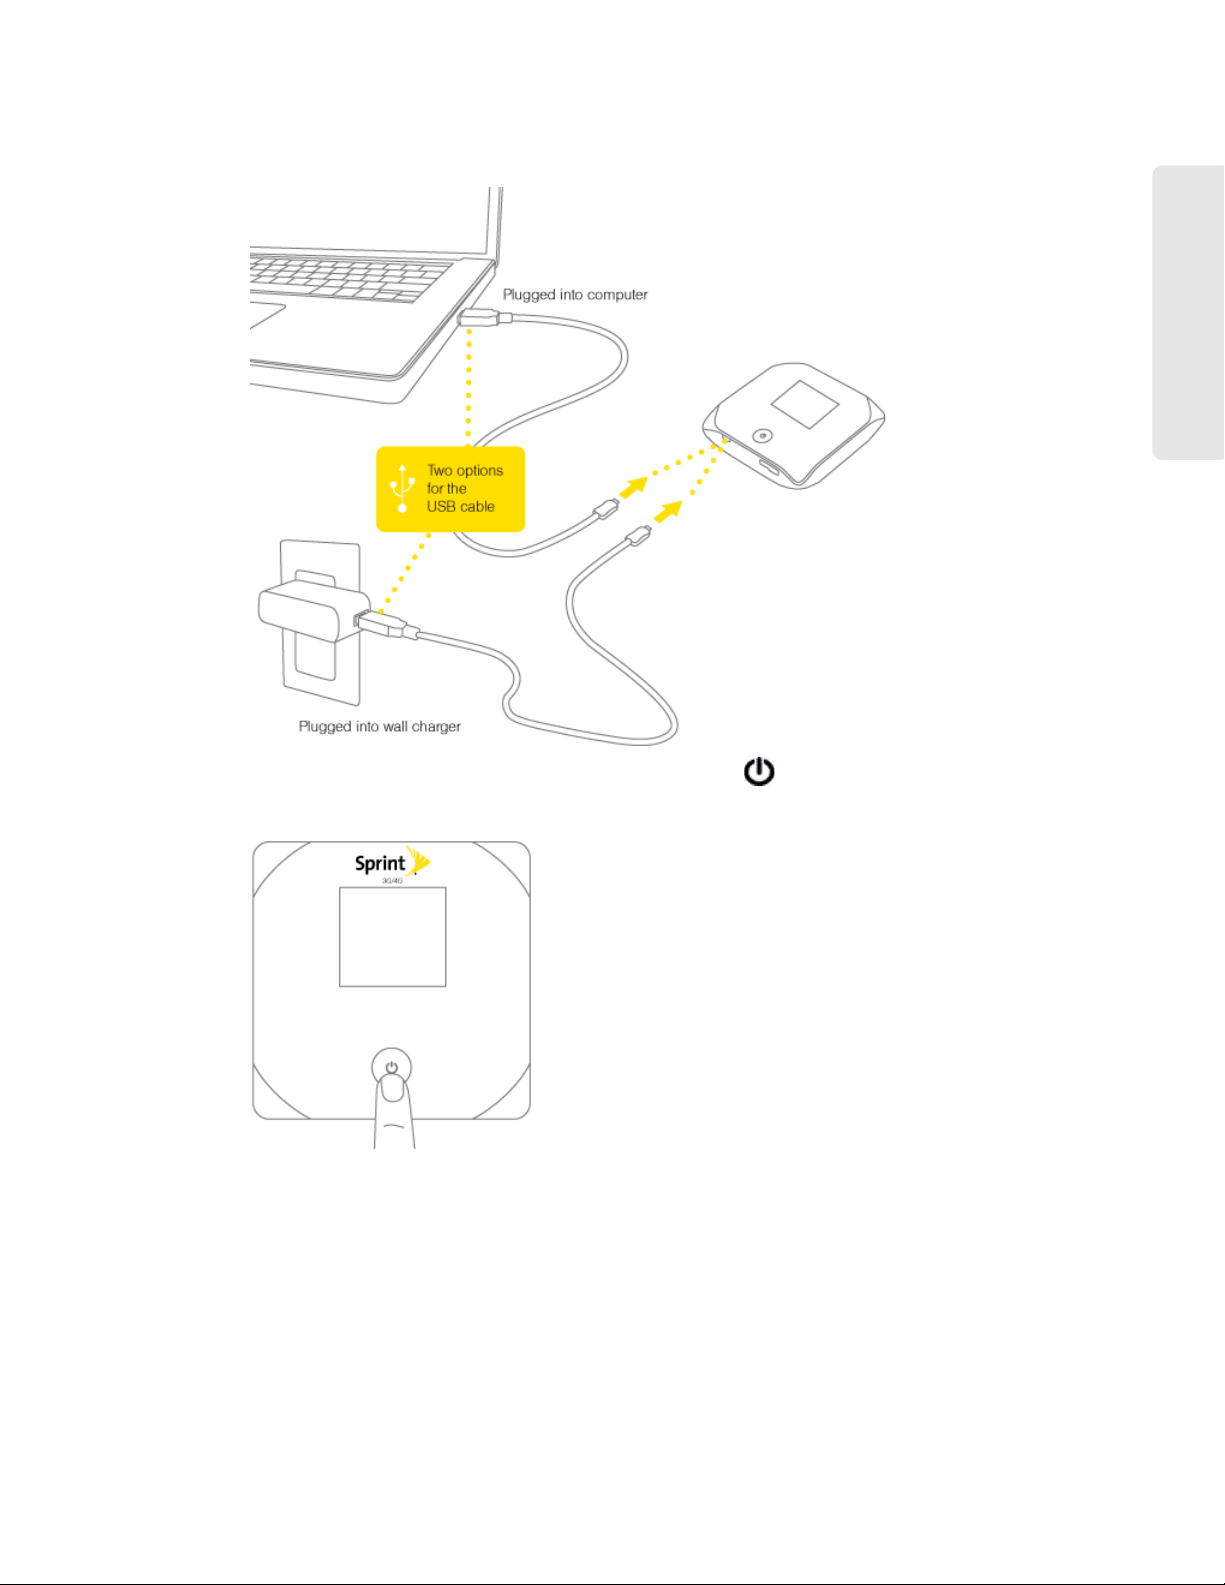
Connecting the Device
1. Connect the smaller end of the USB to Micro B cable to the device, and connect the other end to
the AC charger.
2. Plug the AC charger into an electrical outlet.
3. Important: Charge the device until the battery icon is full ( ).
Connecting to the Network
1. Ensure you are in the Sprint 3G or 4G coverage area (not roaming).
2. If you have a LAN connection, disconnect it.
3. Ensure your computer’s Wi-Fi is turned on.
10 Setting Up the Device
Page 17
4. If the device LCD displays “Charging”, “Charged”, or “Powered off,” press and hold the power
button
for two seconds.
5. Wait until the device LCD displays “Connect your computer to Wi-Fi network,” followed by the
network name (SSID) and password. This may take several seconds.
6. On your computer, connect to the Wi-Fi network listed on the device LCD. If you don’t know
how to do this, see “How do I Connect to Wi-Fi?” on page 126.
Setting Up the Device
After you’ve connected to the Wi-Fi network, the de
continue setup.”
vice LCD displays “Open any web page to
7. Open your Web browser. The “Welcome to your Overdrive” window is displayed.
Note: This window displays the administrator password and the address of the device home page. Please
remember this information or write it down in a safe place.
This window provides several options.
● T
o keep the default settings of the device, select one of the following:
䡲
The Internet (to start surfing)
䡲
My Overdrive’s home page (to view the device status, customize settings). Proceed to
“Activating and Using Your Network Service” on page 14.
o change security settings, select Set up my Overdrive.
● T
Change Password/Settings
During the device setup, you can select Set up my Overdrive to change the settings for the:
●
Administrator password — This password is used to log in to the home page, where you can
view and customize your device settings. The default password is “password.” Choose
something easy-to-remember (yet not easily guessed by others). If you forget this password,
you’ll need to reset the device to its default settings and go through the device setup (as
described in “Setting Up the Device” on page 9).
Your administrator password must be 1–20 characters long.
●
Wi-Fi network name (SSID) — This name is visible to other Wi-Fi-enabled devices, and is used
to identify your Wi-Fi network. The length of the Wi-Fi network name (SSID) depends on other
Setting Up the Device 11
Page 18

settings of the browser interface. (See the Help bubble that’s displayed when you move the cursor
to the SSID input field.)
Wi-Fi security — The default setting is WPA. To select another option, click the More options button.
●
See “Wi-Fi Security Options” on page 12.
●
Wi-Fi password — The maximum length of this field is determined by the Wi-Fi security option (the
previous item). (See the Help bubble that’s displayed when you move the cursor to the Wi-Fi
password field.)
If you’ll be sharing your Internet connection with others, y
ou’ll have to give the Wi-Fi password to
others; don’t use your banking or other important passwords. Also, don’t use a password that’s
easily guessed by others.
From this window you can also enable the Password Reminder featur
e, which is useful if you forget
the Wi-Fi password. See “Wi-Fi Password Reminder” on page 94.
Tip: Help information on each field is displayed (in a bubble) when you move the cursor into the field.
You can display this window an
y time, by clicking the Admin Setup button in the browser interface.
After you change the settings and click Submit, the device restarts and displays updated information
on its LCD. Follow the instructions on the LCD, and proceed to “Your Device is Now Restarting” on
page 14.
Wi-Fi Security Options
If you select More options (after having selected Set up my Overdrive, during the device setup), a
window with four Wi-Fi security options is displayed.
Note: All the devices used with the Overdrive 3G/4G Mobile Hotspot must support the selected security
type.
Going from no security to stronger security, the options are:
None — No security (no password is required to access the Wi-Fi network); not recommended.
●
Anyone may access your device and use your Internet connection (you are responsible for
payment for data usage).
WEP-64 bit — Lower security. Works with older and newer Wi-Fi devices. Recommended only if any
●
of your devices don’t support WPA or WPA2.
●
WPA-personal — A strong security standard, supported by most Wi-Fi devices.
WPA2-Personal — A stronger, newer security standard. Limited to newer Wi-Fi devices.
●
If the above options don’t meet your requirements, click
I don’t see what I want....
12 Setting Up the Device
Page 19

Expanded Wi-Fi Security Options
If you display the Security section of the Wi-Fi tab of the Advanced Settings window or if you
I don’t see what I want... (from the Wi-Fi Security Options window during the device setup), a
select
window with an expanded list of Wi-Fi security options is displayed.
Note: All the devices used with the Overdrive 3G/4G Mobile Hotspot must support the selected security
type.
The options are:
●
None — No security (no password is required to access the Wi-Fi network); not recommended.
Anyone may access your device and use your Internet connection (you are responsible for
payment for data usage).
●
WEP-64 bit - Shared — Lower security. Works with older and newer Wi-Fi devices.
Recommended only if any of your devices don’t support WPA or WPA2.
Shared WEP uses the same key for encryption and authentication; some consider shared WEP
be less secure than open WEP.
to
●
WEP-128 bit - Shared — Lower security. Works with older and newer Wi-Fi devices.
Recommended only if any of your devices don’t support WPA or WPA2.
Shared WEP uses the same key for encryption and authentication; some consider shared WEP
be less secure than open WEP.
to
Setting Up the Device
●
WEP-64 bit - Open — Lower security. Works with older and newer Wi-Fi devices. Recommended
only if any of your devices don’t support WPA or WPA2.
Open WEP uses the key for encryption,
●
WEP-128 bit - Open — Lower security. Works with older and newer Wi-Fi devices.
but not for authentication.
Recommended only if any of your devices don’t support WPA or WPA2.
Open WEP uses the key for encryption,
●
WPA-Personal - TKIP — A strong security standard, supported by most Wi-Fi devices.
●
WPA-Personal - TKIP/AES — A strong security standard, supported by most Wi-Fi devices.
WPA2-Personal - AES — A stronger, newer security standard. Limited to newer Wi-Fi devices.
●
●
WPA2-Personal - TKIP/AES — A stronger, newer security standard. Limited to newer Wi-Fi
but not for authentication.
devices.
WPA/WPA2 Personal (recommended setting) — Wi-Fi devices that use either WPA or WPA2 can
●
connect to the Overdrive 3G/4G Mobile Hotspot. Supported by most Wi-Fi devices.
Setting Up the Device 13
Page 20

Your Device is Now Restarting
The “Your device is now restarting” window is displayed if you’ve selected the Set up my Overdrive
option and then clicked
Submit.
The changes take effect after the de
It’s recommended you write down the following information that’
● Wi-F
● Wi-Fi passwor
As described in the window,
i network name
d
vice restarts automatically.
s displayed in the window:
1. Wait until the device LCD displays “Connect your computer to Wi-Fi Network.”
2. Connect your computer to the Wi-Fi network, using the information you’ve written down. If you
don’t know how to do this, see “How do I Connect to Wi-Fi?” on page 126 .
3. After the Wi-Fi connection was successfully established, click the Click here text in the window.
Activating and Using Your Network Service
Note: If you’re able to connect to 3G, you are already set up to use Sprint service on the 3G network; no
further action is needed. Proceed to “Using Your Device” on page 15.
Before using your device, you must have a Sprint wireless network account set up. The process of
setting up an account is called
has been configured with an account (“preactivated”). If it has not, the activation process starts
automatically.
activation. When the device starts up, it will detect whether the device
In most cases, the activation process will be seamless, not
some cases, you won’t even see any activation-related messages displayed on the device LCD.
requiring any action from your part; in
Initiating Activation of Your Device for 3G
In rare cases, the device LCD and the home page may indicate that activation is required:
● The
● T
To activate your device for 3G:
LCD displays “3G Activation failed.”
he home page displays the alert “3G Activation Required.”
Note: You will still be able to connect to the Internet, when you have 4G coverage.
1. Log in to the home page. See “Logging On as an Administrator” on page 29.
2. Display the “3G Activation Required” alert. See “3G Activation Required” on page 31.
3. In the alert, click Activate now.
If the activation fails, contact Sprint. See “Contacting Customer Service” on page 124.
14 Setting Up the Device
Page 21

Section 3
Using Your Device
Page 22
Section 3A
Power Button
⽧ Turning Your Device On and Off (page 16)
⽧ Using the Power Button to Determine the Device State (page 18)
⽧ Pressing the Power Button (page 19)
Turning Your Device On and Off
Turning Your Device On
1. Ensure that:
䡲 The
device has a charged battery inserted.
— or —
䡲 The de
as shown in the drawing on the next page.
Note: If you’ll be using USB for data transfer (and not just for charging the device), you must install the
vice is connected to the AC charger or a computer (through the USB to Micro B cable),
device driver when you connect through USB for the first time. See “Making a Tethered Connection”
on page 25.
16 Power Button
Page 23
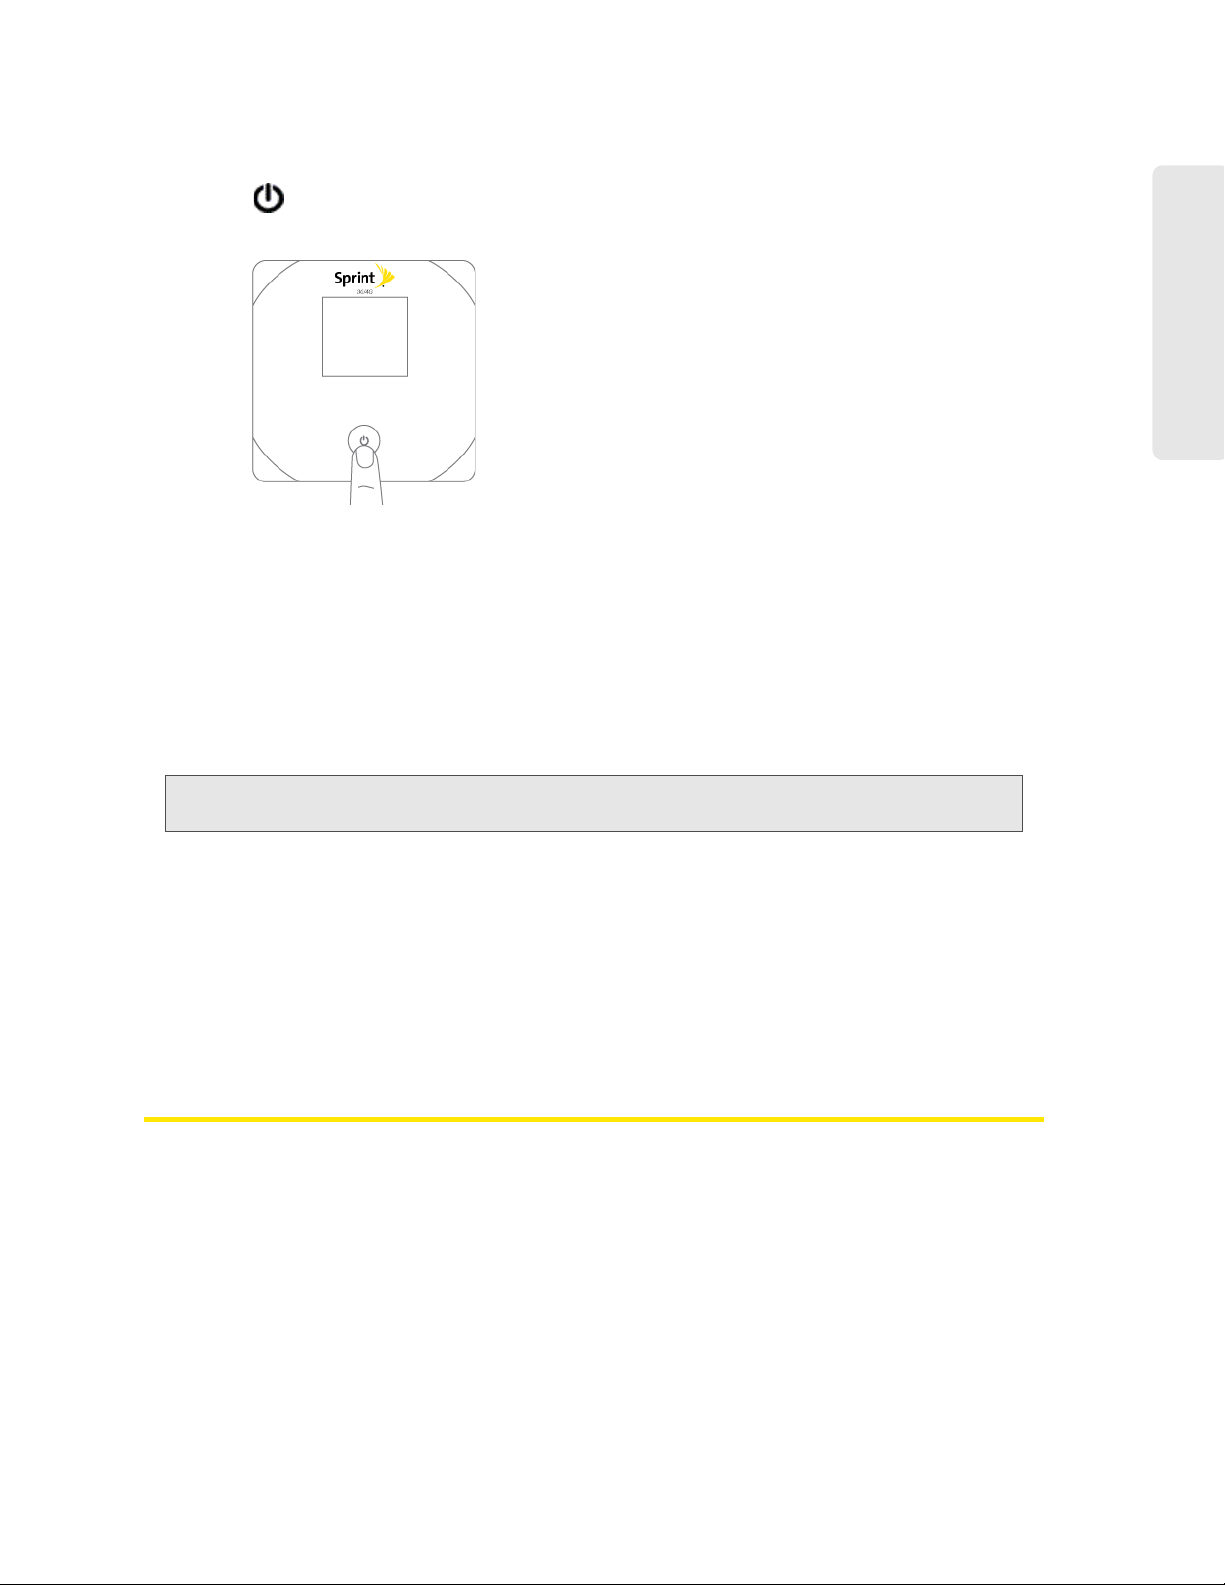
2. If the device LCD is blank, press and hold the power button for two seconds.
Power Button
Power Button 17
Page 24
Turning Your Device Off
● From the home page:
1. Ensure you’re logged in to the home page.
2. Click the Power Off button (below the Virtual Device).
rom the Mini Window:
● F
1. Ensure you’re logged in to the home page.
2. Click the Power Off button.
m the device:
● Fro
䡲 Pr
ess and hold the power button for 2 seconds.
Note: You can turn the device on only from the device itself.
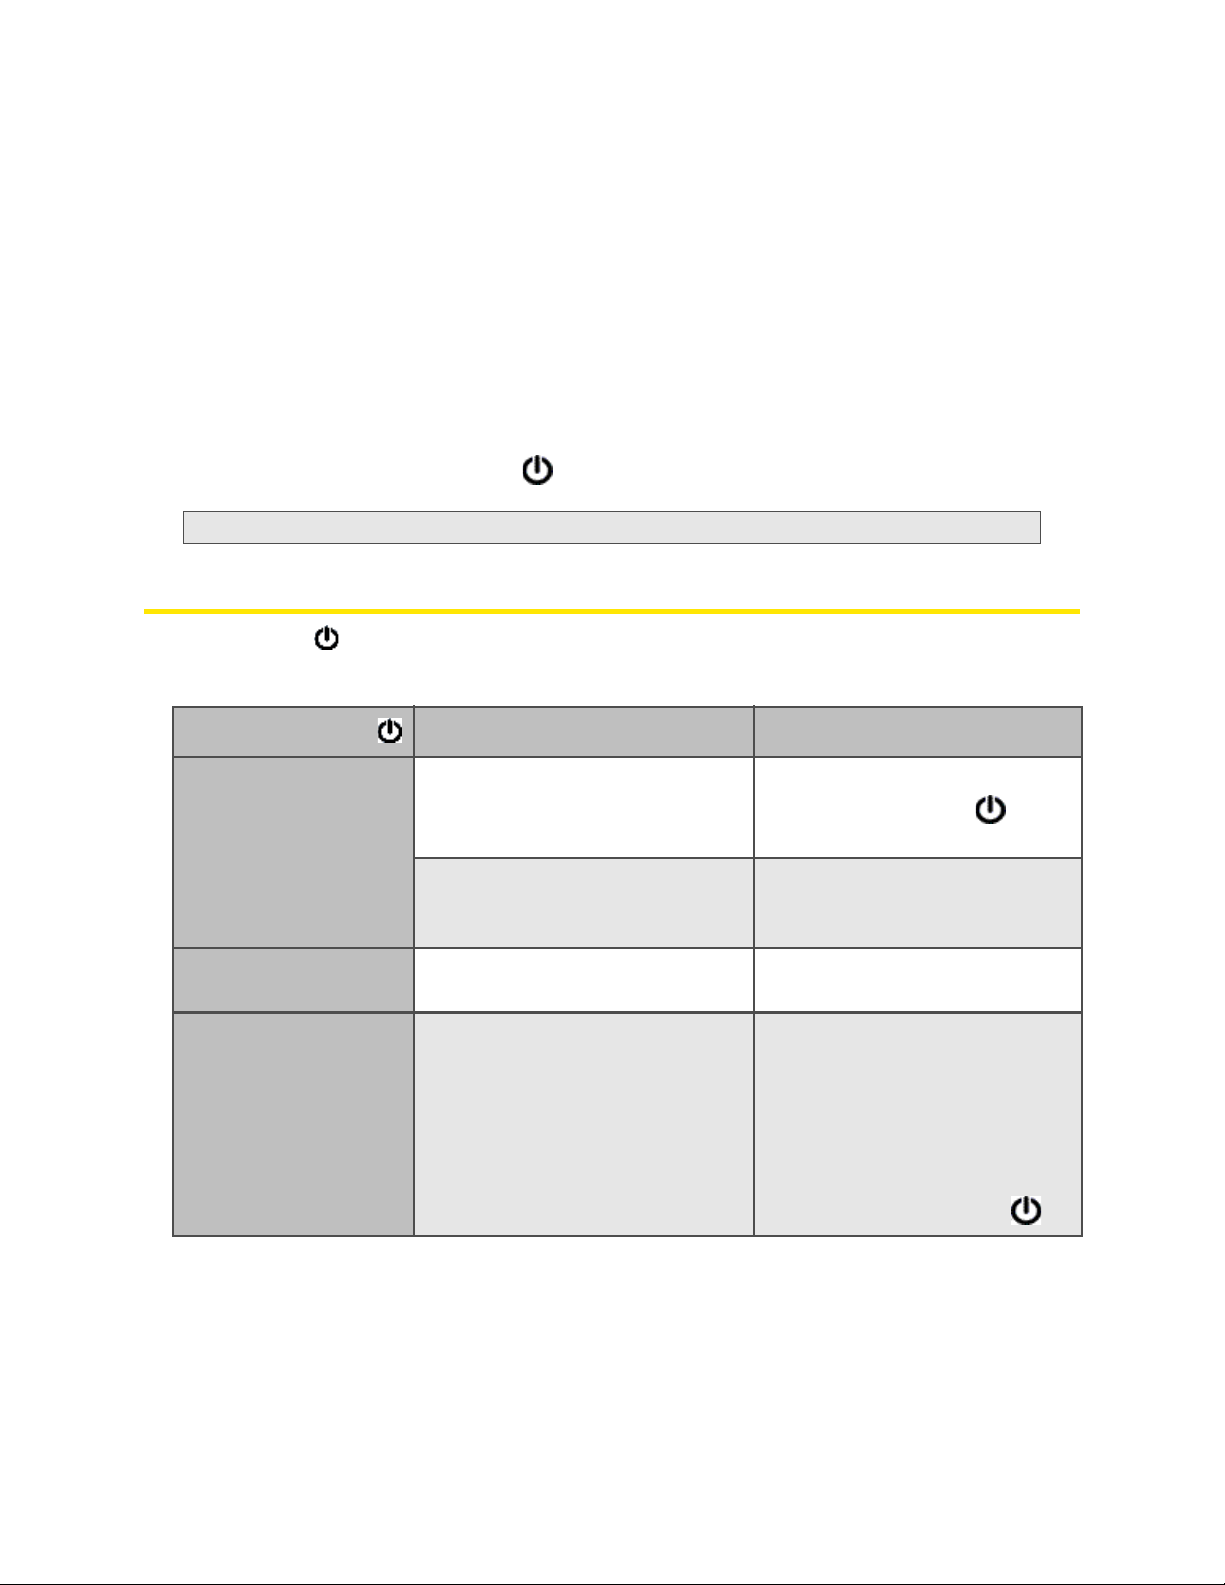
Using the Power Button to Determine the Device State
The power button on the device also acts as an LED/status indicator, and may or may not be lit;
this indicates the power state
of the device, as shown in the following table.
Power button
Not lit
Lit, flashing (approximately
every 4 seconds)
Lit, flashing (approximately
every 30
seconds)
Description You r a ction
● The device is turned off, and may
or may not be charging.
● The device is turned on, but you
have turned off the LED.
The device is turned on, and the LED
is enabled.
The device is in standby (low power)
mode.
The following are off: LCD, Wi-Fi
adio, 3G/4G radios.
r
For more information, see “Standby
(Low Power) Mode” on page 43
.
● To turn the device on, press and
hold the power button
seconds.
for two
● Optionally, turn on the LED. See
“Enabling and Disabling the LED”
on page 77
No action required.
To exit standby mode:
.
䡵 Connect the Overdrive 3G/4G
Mobile Hotspot to the AC
charger or computer, through
the USB to Micro B cable.
— or —
P
ress the power button .
18 Power Button
Page 25
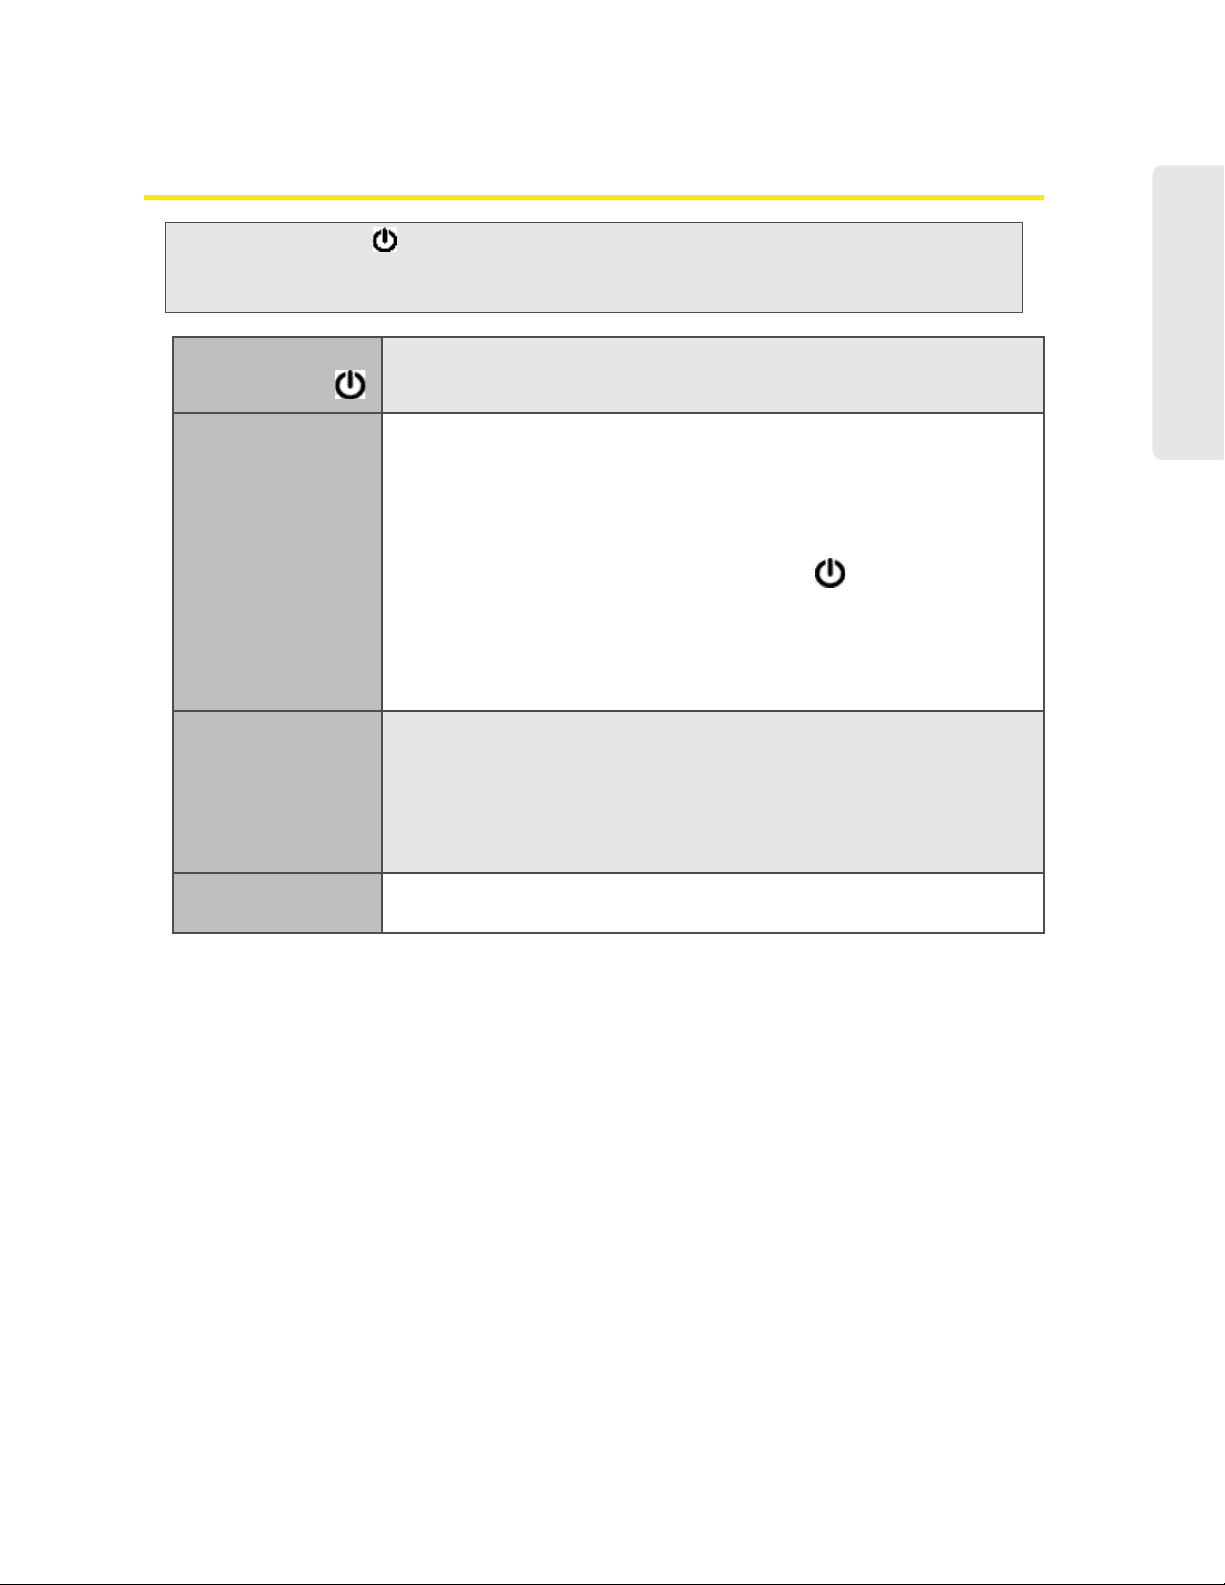
Pressing the Power Button
Note: The power button on the device also acts as an LED/status indicator, and may or may not be lit;
this indicates the power state of the de
Determine the Device State” on page 18.
vice. For more information, see “Using the Power Button to
If you do this to the
power button :
Quick press
Quick double-press
Press and hold for
two seconds
The result is:
If the device is on:
● If the device is in standby (low power) mode, the device exits standby
mode and becomes fully powered.
● If the LCD is enabled but dormant
a
, the LCD becomes lit.
● If the LCD displays a message (such as “Press to ...”), the
corresponding action is co
nfirmed or acknowledged.
● If the Wi-Fi network name (SSID) and password were displayed on the
LCD, they are no longer displayed.
If the device is on:
● If the LCD is enabled but dormant, the LCD becomes lit.
● The Wi-Fi network name (SSID) and password are briefly displayed on
the device LCD; if the Wi-Fi Password Reminder is not enabled, the
password is shown as ****. See “Wi-Fi Password Reminder” on page 94
The device turns on (if it was off) or off (if it was on).
Power Button
.
a. The LCD turns dark, after a configurable time of inactivity.
Power Button 19
Page 26

Section 3B
ABCDF
I
H
GE
LCD
⽧ Interpreting the LCD (page 20)
If the LCD is not lit, see “Turning Your Device On” on page 16.
Interpreting the LCD
The LCD shows icons and text that reflect the status of the device and your connection.
A
Signal strength
B
3G/4G status
C
Roaming indicator
D
Alerts
E
GPS
F
Number of Wi-Fi users
G
Battery status
Device name.
H
Message area.
Amount of data transferred; connection duration.
I
Message area.
Tip: Most of the LCD icons and messages are also shown on the Virtual Device and Mini Window. See
“Virtual Device” on page 29 and “Mini Window” on page 30. Also see “Messages Displayed on the
Device LCD” on page 135 .
20 LCD
Page 27
Section 3C
Charging the Device
⽧ Using the AC Charger with USB Port (page 22)
⽧ Charging Through a Computer (page 23)
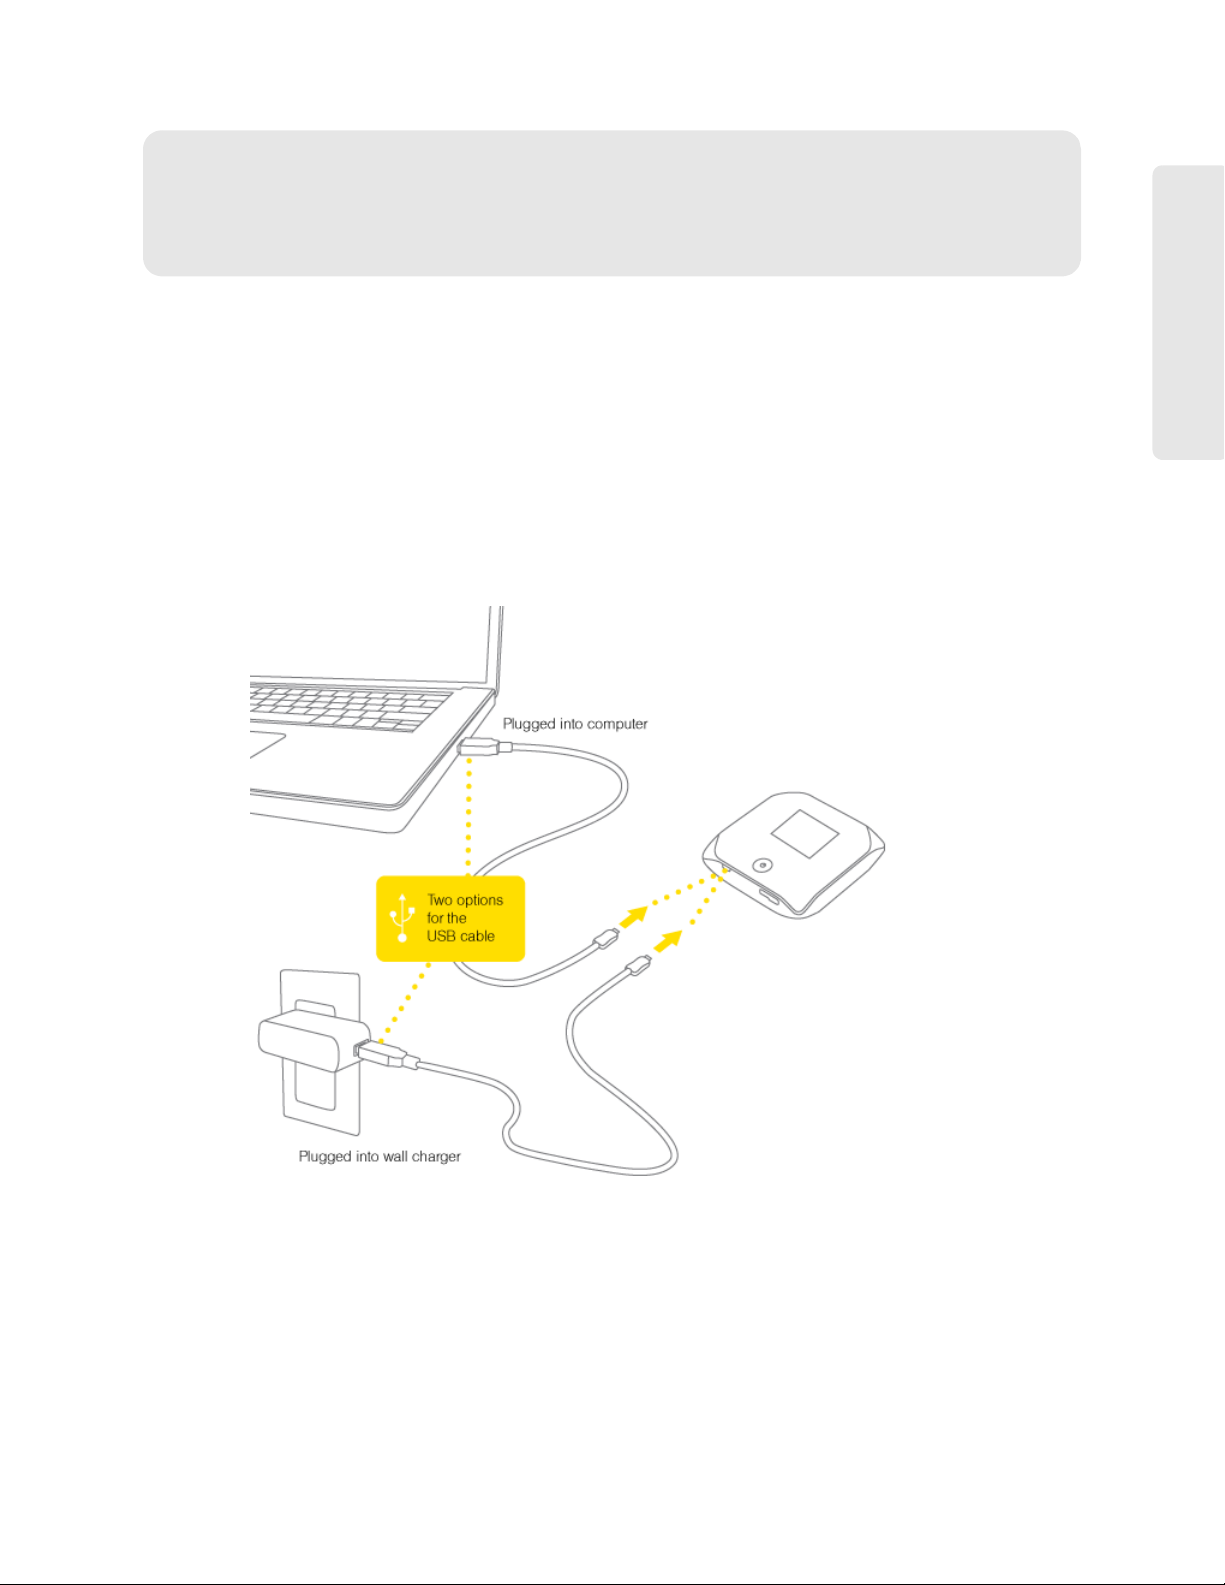
The Overdrive 3G/4G Mobile Hotspot has a battery, which you must periodically charge. You can
continue using y
To charge the battery, you have two options, as shown in the drawing below — you can connect
the de
vice to a:
● A
C charger (faster way to charge). See “Using the AC Charger with USB Port” on page 22.
our device while it is charging.
Charging the Device
● Computer (slower wa
y to charge). See “Charging Through a Computer” on page 23.
Charging the Device 21
Page 28
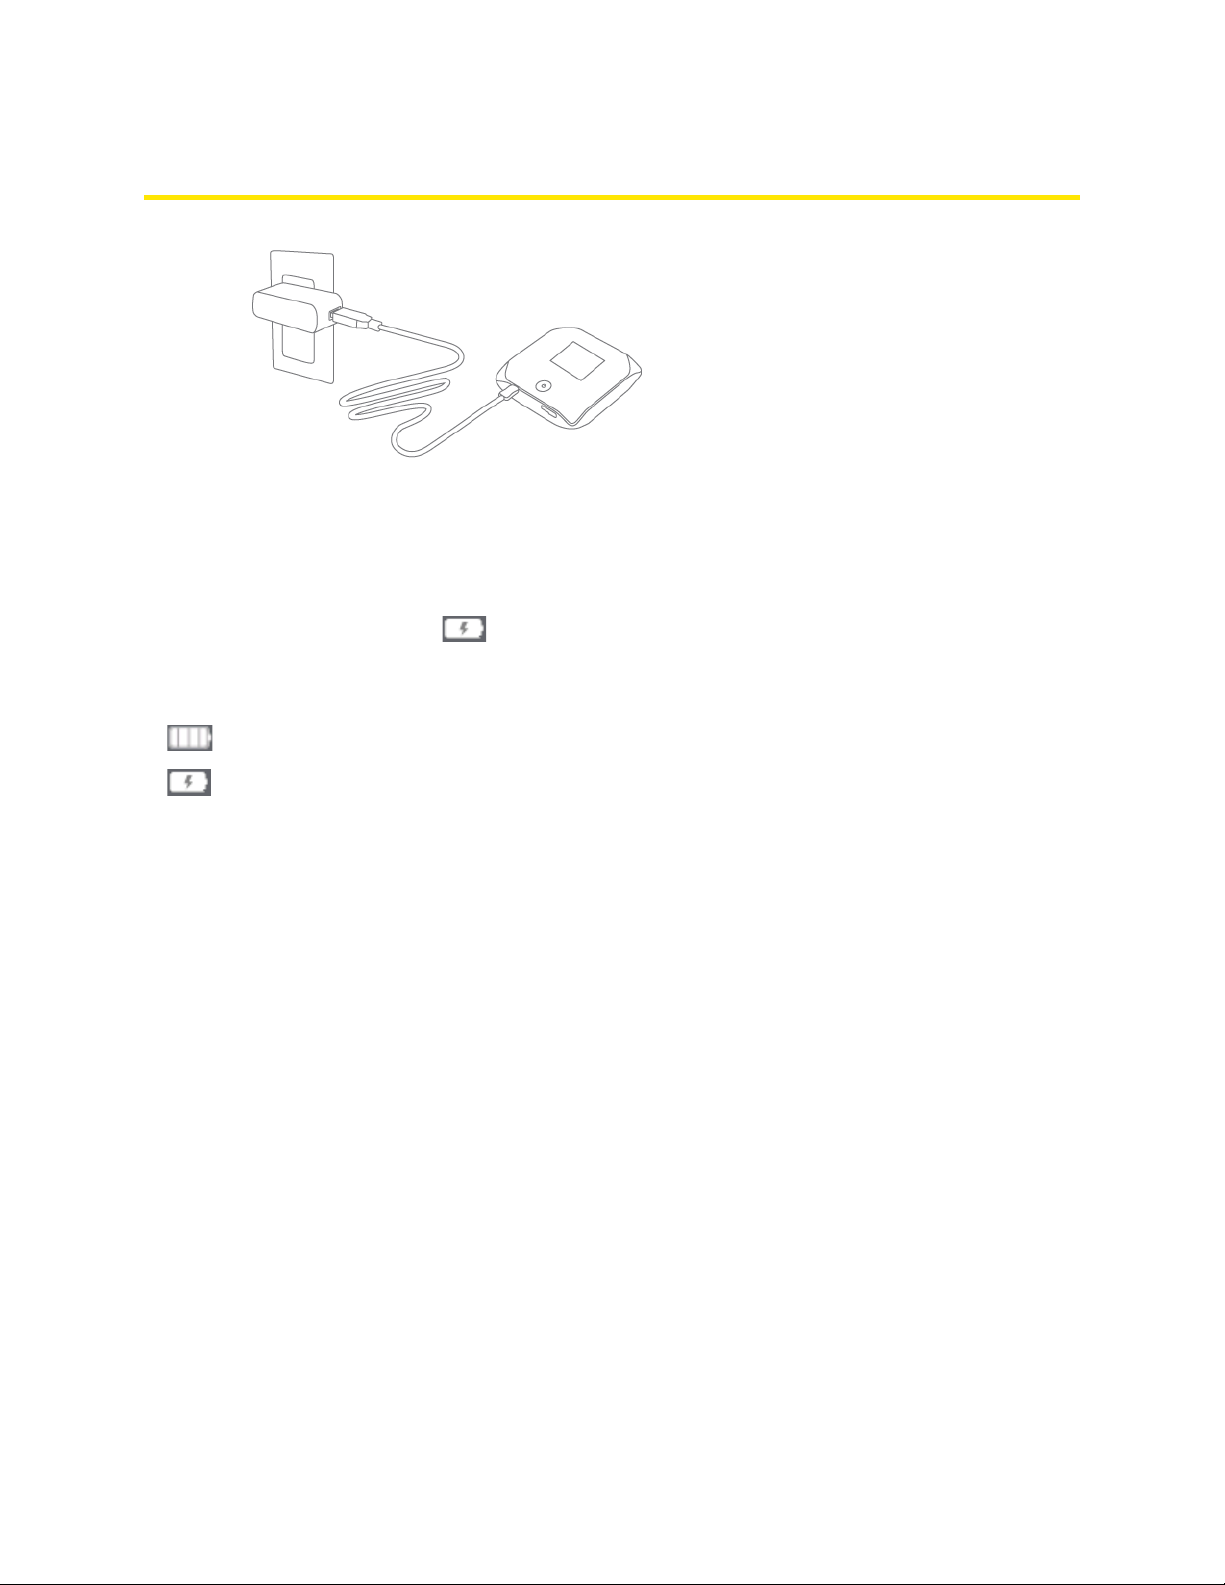
Using the AC Charger with USB Port
1. Insert the smaller end of the USB to Micro B cable into the USB connector on the side of the
device.
2. Insert the other end of the USB to Micro B cable into the AC charger.
3. Insert the AC charger into an electrical outlet.
When charging, the LCD shows
xx% complete.”
When the device is charged, the LCD shows:
●
●
(if the device is on)
and the message “Fully charged” (if the device is off).
and, if the device is off, displays a message “Charging...
22 Charging the Device
Page 29
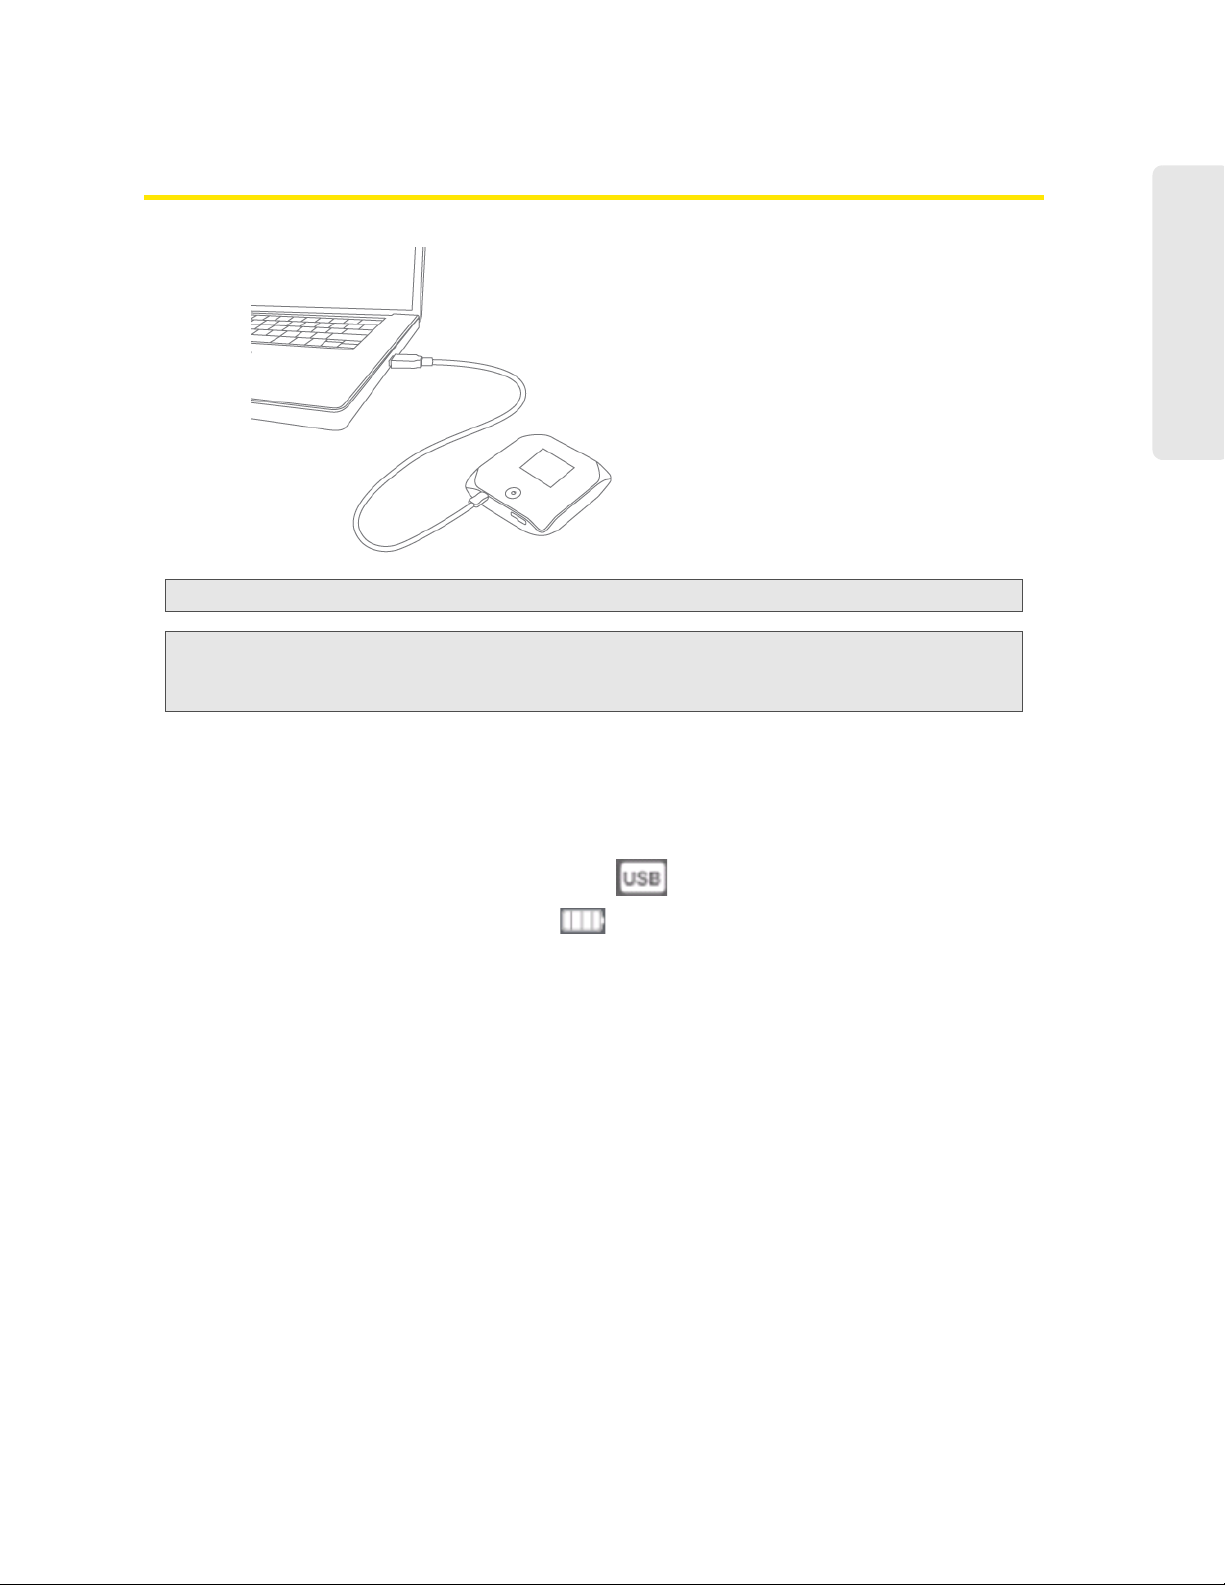
Charging Through a Computer
Note: Charging through a computer usually takes longer than charging through the AC charger.
Note: If you’ll be using USB for data transfer (and not just for charging the device), you must install the
device driver when you connect through USB for the first time. See “Making a Tethered Connection”
on page 25.
1. Ensure the computer is turned on.
Charging the Device
2. Insert the wider end of the USB to Micro B cable into the computer.
3. Insert the other end of the USB to Micro B cable into the USB connector on the side of the
device.
When charging, the LCD shows the animated icon
When the device is charged, the LCD shows
.
.
Charging the Device 23
Page 30
Section 3D
Connecting Through USB
⽧ TRU-Install (page 24)
⽧ Requirements for a USB Tethered Connection (page 25)
⽧ Making a Tethered Connection (page 25)
Note: If you’ll be using USB for data transfer (and not just for charging the device), you must install the
device driver when you connect through USB for the first time. See “Making a Tethered Connection”
on page 25.
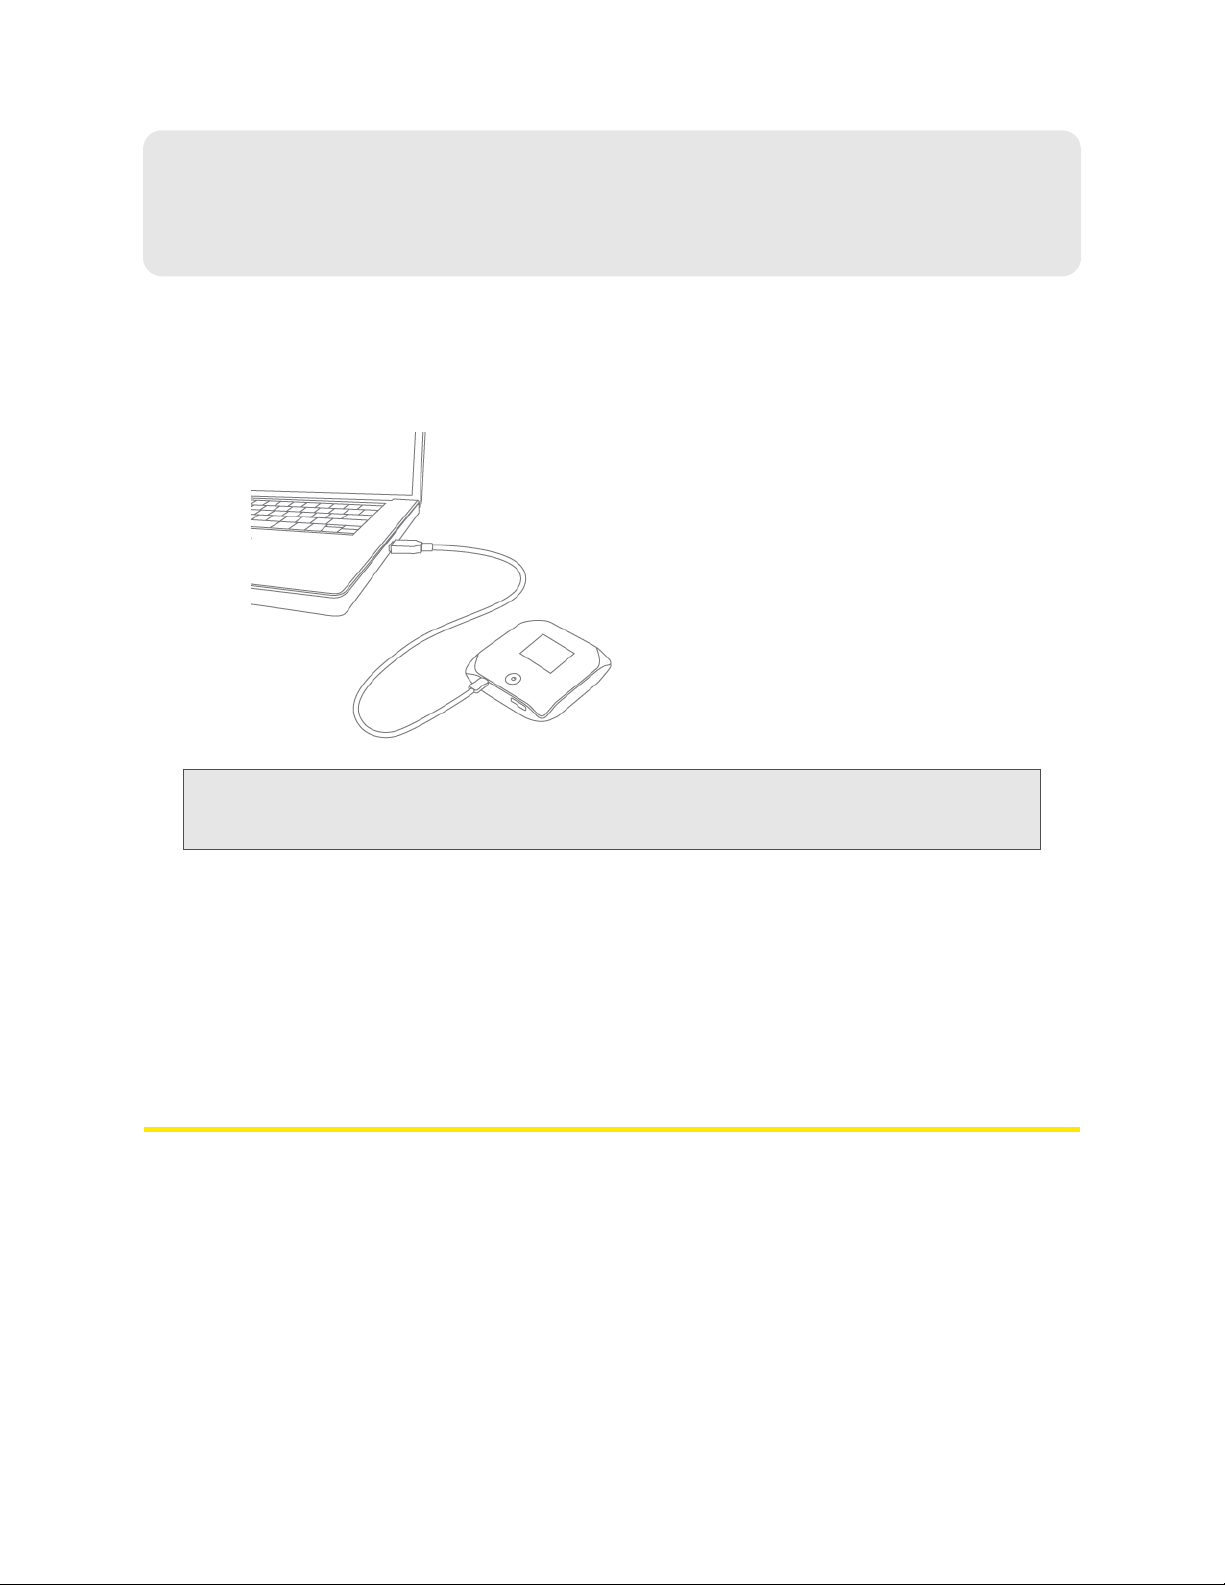
Use the USB to Micro B cable to connect the device to your computer when:
● Y
ou want to charge the device, but you don’t want to use the AC charger, or the AC charger is not
available.
our computer does not have Wi-Fi.
● Y
● Y
ou want to block others from using the device. (See “Disabling Wi-Fi When Connected Through
USB” on page 98.)
TRU-Install
TRU-Install™ is a Sierra Wireless feature that installs the necessary drivers the first time you connect
the Overdrive 3G/4G Mobile Hotspot to your Windows or Mac computer through the USB to Micro B
cable (for details, see “Making a Tethered Connection” on page 25). An installation CD is not required.
By default, TRU-Install is enabled.
To change the setting:
1. Ensure you’re logged in to the home page.
2. Click Advanced settings > Device > Basic.
3. Select a value for TRU-Install.
24 Connecting Through USB
Page 31

Requirements for a USB Tethered Connection
Your device supports a direct connection through a USB cable to a Windows or Mac computer.
(This is commonly referred to as a “tethered” connection.)
Making a Tethered Connection
Note: If you’ll be using USB for data transfer (and not just for charging the device), you must install the
device driver when you connect through USB for the first time (see below). No installation CD is
required — the Overdrive 3G/4G Mobile Hotspot supports the Sierra Wireless TRU-Install feature.
Connecting Through USB
Windows
To install the device driver on Windows, you have two options.
Option 1.
1. Ensure the device is turned on.
2. Connect the device to your computer through the USB to Micro B cable.
3. If the TRU-Install window is not displayed, in Windows Explorer browse to the
entry (under My Computer), then browse to the Win folder and run
Alternatively, if you’re running Windows Vista and the AutoPlay window is displayed, click
Run setup.exe.
Setup.exe.
4. In the TRU-Install window, click OK.
5. Go through the installation of the Sierra Wireless USB driver (follow the instructions on the
screen).
Option 2.
1. Using Wi-Fi, connect to the device. See “How do I Connect to Wi-Fi?” on page 126.
2. Ensure you’re logged in to the home page.
3. Click Advanced Settings > Device > Basic.
Connecting Through USB 25
Page 32

4. In the TRU-Install section, click Windows, to download the .exe file to your computer.
5. Run the .exe file, and go through the installation of the Sierra Wireless USB driver (follow the
instructions on the screen).
Mac
To install the device driver on Mac, you have two options.
Option 1.
1. Ensure the device is turned on.
2. Connect the device to your computer through the USB to Micro B cable.
3. In the window that appears, double-click the .pkg file.
4. Go through the installation of the Sierra Wireless USB driver (follow the instructions on the
screen).
When prompted for your password, enter your Mac password.
Option 2.
1. Using Wi-Fi, connect to the device. See “How do I Connect to Wi-Fi?” on page 126.
2. Ensure you’re logged in to the home page.
3. Click Advanced Settings > Device > Basic.
4. In the TRU-Install section, click Mac OS X, to download the file to your computer.
5. If the “Welcome to the Sierra Wireless Driver Installer” window isn’t automatically displayed,
double-click the file that you’ve downloaded.
6. In the “Welcome to the Sierra Wireless Driver Installer” window, click Continue.
7. Follow the instructions on the screen.
To connect the device to your computer through the USB to Micro B cable:
1. Insert the wider end of the USB to Micro B cable into your computer.
2. Insert the other end of the USB to Micro B cable into the USB connector on the side of the
device.
26
Page 33

Section 3E
AB
D
C
F
E
Browser Interface Home Page
⽧ Displaying the Home Page of the Device (page 28)
⽧ Logging On as an Administrator (page 29)
⽧ Virtual Device (page 29)
⽧ Mini Window (page 30)
The home page is the entry page of the browser interface that lets you:
● Displa
● Lau
● Change
● Access additional r
y status information for your device and your data connection.
nch and end a network connection.
the settings for your device and your data connections (if you’re logged in).
esources (the user guide and the Important Information document).
Browser Interface Home Page
Browser Interface Home Page 27
Page 34

When you click an icon or the text next to it, a window is displayed to the right (see the screenshot
on page 38). The window contains additional status inform
A
commonly-used configurable settings.
See “Vertical row (of icons and text)” on page 37
Use this area to enter the administrator password and log in. When you’re logged in, you can
B
change settings.
See “Logging On as an Administrator” on page 29
Clicking one of these buttons displays a window or a menu. See “Buttons On the Home Page”
C
on page 47
This is the Virtual Device; it reflects the status of your Overdrive 3G/4G Mobile Hotspot. If you click
D
the image, a movable Mini Window is opened.
See “Virtual Device” on page 29 and “Mini Window” on page 30
A handy way to turn the device off, especially if, for example, you’re in an airplane before takeoff,
E
and the device is in your overhead bag.
Available only if you’re logged in.
Disconnects a connection, or connects (if currently there’s no connection).
F
Available only if you’re logged in.
.
Displaying the Home Page of the Device
ation and, if you’re logged in,
.
.
.
Note: You can display the home page only when your Overdrive 3G/4G Mobile Hotspot is turned on and
you have established a connection to it (through Wi-Fi or through the USB to Micro B cable).
To display the home page, type one of the following in the address bar of your Web browser:
●
http://Overdrive
● SSID value (field in Advanced Settings > Wi-Fi > Network and also in Advanced Settings > Router
)
> LAN
Note: If you're using the Google Chrome Web browser, after typing in the address bar, press the Down
Arrow key and then the Enter key. (If you press only the Enter key, a Google search is started, using
the information you typed in.)
If your Web browser displays an error message, see “Cannot Display the Home Page” on page 137.
28 Browser Interface Home Page
Page 35

Logging On as an Administrator
To access and use the home page, you do not need to log in. However, when you’re logged in:
● Addi
● Y
● Y
● Y
To log i n:
tional information is displayed in the window that appears when you click an item on the
left side of the home page. See “Vertical row (of icons and text)” on page 37.
ou can access the Advanced Settings window, where you can modify additional settings.
ou can rerun the device setup, if required. (Admin Setup button)
ou can install updates.
1. Ensure that nobody else is already logged in — other people can use the home page at the
same time, but only one user can be logged in.
2. In the Admin Login section (in the upper left area of the home page), enter the administrator
password (1–20 characters/numbers).
The default password is "password". (It’s recommended y
haven’t already.)
ou change the password, if you
3. Click OK.
After a certain time, you will be automatically lo
Remember me (below the password field). For more information, see “Automatic Login
select
(“Remember Me”)” on page 80.
gged off (timeout security feature), unless you
Virtual Device
Browser Interface Home Page
The right half of the home page contains an image of your Overdrive 3G/4G Mobile Hotspot.
This is a “virtual device;” it reflects most of the icons and text displayed on the real device.
Browser Interface Home Page 29
Page 36

Mini Window
If you click the virtual device in the home page, the Mini Window is displayed — an image of the
device in a separate Web browser window.
Similar to the virtual device, the Mini Window reflects most of the icons and text displayed on the real
device.
To save space on your monitor, you can close the home page and move the Mini Window to the side
our monitor. Then you can use the window to keep an eye on the status of your device and
of y
connection. (To reopen the home page, click the
If you’re logged in, the window has a
Connect/Disconnect and a Power Off button.
Home link.)
30 Browser Interface Home Page
Page 37

Section 3F
Alerts
⽧ 3G Activation Required (page 31)
⽧ 3G Network Update Available (page 32)
⽧ GPS Privacy Agreement (page 32)
⽧ SD Card Error (page 33)
⽧ Software Update Available (page 33)
Alerts
The alerts icon
The icon is on the left side of the home page.
Click the icon to display the Alert window. If more than one alert is available:
● The higher
● W
hen you close an alert, the next alert is displayed.
● Y
ou can use the “<” and “>” buttons (at the top of the alert window) to view other alerts.
The options and instructions shown in the alert window depend on the alert event. Please read the
instructions
update is installed.
indicates whether there are any alerts (messages that require your attention).
priority alert is displayed.
carefully. They may state, for example, that you have to reconnect to Wi-Fi after an
3G Activation Required
If only 3G coverage is available, you won’t be able to connect to the Internet until 3G activation
has been completed.
To activate 3G on your device:
1. Ensure you have 3G coverage.
2. Ensure you’re logged in to the home page.
3. Click the alerts icon . to display the alert window.
4. If more than one alert is available, use the “<” and “>” buttons (at the top of the alert window)
to browse to the alert.
5. In the 3G Activation Required alert window, click Activate now.
Activation is then performed over the network; no user
● If activ
ation is successful, “Activation complete!” is displayed. You can now connect to the 3G
network. If the connection is not established automatically, click the
page or Mini Window.
interaction is required.
Connect button in the home
Alerts 31
Page 38

● If activ
ation was not successful, “Activation failed” is displayed. Retry the activation. If it is not
successful, prepare the following, and contact Sprint:
䡲 Y
our billing information.
䡲 ES
N of the Overdrive 3G/4G Mobile Hotspot (displayed on the packaging, on the device
[under the battery], and at
Advanced Settings > Device > About).
3G Network Update Available
The 3G Network Update Available alert is displayed if a PRL update or 3G profile update is available
for your device. The update may improve your 3G network service.
Note: During installation of the update:
• DO NOT turn off or unplug the device.
• Your 3G connection won’t be available. (Your 4G connection won’t be affected.)
To install the update:
1. Ensure you have 3G coverage.
2. Ensure you’re logged in to the home page.
3. Click the alerts icon . to display the alert window.
4. If more than one alert is available, use the “<” and “>” buttons (at the top of the alert window) to
browse to the alert.
5. In the 3G Network Update Available alert window, click Update now.
GPS Privacy Agreement
The GPS Privacy Agreement alert is displayed if you haven’t accepted the GPS privacy agreement.
(You cannot use GPS until you accept the GPS privacy agreement and then enable GPS.)
To accept the GPS privacy agreement:
1. Ensure you’re logged in to the home page.
2. In the vertical row of icons (down the left side of the home page), click the GPS icon ( ) and, in
the window that’s displayed, click
— or —
Display the GPS Privacy Agreement alert window. See “Alert Information” on page 40.
3. Read the agreement, and select I accept.
View privacy agreement.
32 Alerts
Page 39

SD Card Error
If you’re having problems reading from the microSD card, or if the SD Card Error alert window is
displayed or the device LCD displays “SD Card error,” try the following:
1. Remove and reinsert the microSD card.
2. If the card is still not working, try it in the microSD slot of another computing device.
If it works in the other device, the card slot on y
have a problem.
If the card doesn’t work in the other computin
䡲 Us
e a different microSD card.
— or —
䡲 R
eformat your card.
Note: The formatting procedure erases all the data on the microSD card, after which the files CANNOT be
retrieved. To prevent the loss of important data, please check the contents before you format the
microSD card.
our Overdrive 3G/4G Mobile Hotspot may
g device, try one of the following:
Software Update Available
The update may improve performance and functionality.
Note: During installation of the update, your Internet and Wi-Fi connections won’t be available.
When the installation is complete, y
To install the update:
ou will need to reconnect to Wi-Fi.
Alerts
1. Ensure your Overdrive 3G/4G Mobile Hotspot is connected to the AC charger or computer,
through the USB to Micro B cable.
Note: If you’ll be using USB for data transfer (and not just for charging the device), you must install the
device driver when you connect through USB for the first time. See “Making a Tethered Connection”
on page 25.
2. Ensure you’re logged in to the home page.
3. Click the alerts icon . to display the alert window.
4. If more than one alert is available, use the “<” and “>” buttons (at the top of the alert window)
to browse to the alert.
5. In the Software Update Available alert window, click Update Options.
6. Read the information in the Software Installation Options window.
Alerts 33
Page 40

7. To install the update, click Download and install now.
— or —
If your network conditions are not currently optimal, remember or write down the URL displayed
in the window and click
update to your computer, and then follow the steps in
page 60.
When the installation is complete, reconnect to Wi-Fi. See “How do I Connect to Wi-Fi?” on page 126.
I’ll get the update later. At a later time, access the URL to download the
“Upgrade Firmware From a File” on
34 Alerts
Page 41

Section 3G
Your Network Connection
⽧ Launching Your Network Connection (page 35)
⽧ Sharing Your Connection (page 35)
⽧ Ending Your Network Connection (page 36)
Launching Your Network Connection
After the Overdrive 3G/4G Mobile Hotspot powers on and boots up, a connection to the 3G/4G
network is launched automatically, unless you’ve disabled
You will need to manually launch
● The co
● Y
● Y
To launch a connection:
䡵 Click the
See also:
nnection was not successful.
ou’ve disabled auto-connect.
ou’ve manually ended a connection (by clicking the Disconnect button).
Connect button on the Virtual Device on the home page (you must be logged in).
— or —
Click the
— or —
If the device LCD displays “Disconnected from 3G/4G network.
power button
Connect button in the Mini Window (you must be logged in).
on the device.
a connection if:
Connect Automatically.
Connect now?”, press the
Your Network Connection
● “Internet Connection Information” on page 44.
● “Mobile Broadband Information and Settings” on page 39.
● “3G Roaming Information and Set
● “Signal Information” on page 38.
tings” on page 40.
Sharing Your Connection
For others to share your network connection:
1. Provide the Wi-Fi network name and password to them.
2. On their computer, users must connect to the Wi-Fi network of the Overdrive 3G/4G Mobile
Hotspot. See “How do I Connect to Wi-Fi?” on page 126.
Your Network Connection 35
Page 42

Ending Your Network Connection
1. Ensure you’re logged in to the home page.
2. Click the Disconnect button on the Virtual Device or in the Mini Window. See “Virtual Device” on
page 29 and “Mini Window” on page 30.
Note: The Wi-Fi connection is still available, so users can, for example, share files by using a microSD card.
36 Your Network Connection
Page 43

Section 3H
Vertical row (of icons and text)
⽧ Signal Information (page 38)
⽧ Mobile Broadband Information and Settings (page 39)
⽧ 3G Roaming Information and Settings (page 40)
⽧ Alert Information (page 40)
⽧ GPS Information and Settings (page 41)
⽧ Wi-Fi Users Information and Settings (page 42)
⽧ Battery Information and Settings (page 43)
⽧ Internet Connection Information (page 44)
⽧ microSD Card Information and Settings (page 45)
⽧ Sounds Information and Settings (page 45)
Vertical row (of icons and text)
The left part of the home page has a vertical row of icons and te
indicator
Most of these icons are also shown on the physical device and Virtual Device (page 29). Hover
the mouse over an icon; the corresponding icon on the Vi
.
xt, starting with the signal strength
rtual Device is highlighted.
Vertical row (of icons and text) 37
Page 44

If you click an icon or the text, a window is displayed with additional information, as shown in the
following scr
eenshot.
If you’re logged in, the window may also display configurable settings.
Note: A more complete set of configurable settings is available in the Advanced Settings window. See
“Advanced Settings” on page 48.
Signal Information
No signal
... The number of bars reflects the signal strength: the more bars, the stronger the signal.
Click the signal strength icon to display the Signal Quality window. The window displays:
● The activ
“3G (EVDO Rev A).”
● 3
G or 4G status:
䡲 Con
䡲 Brief description of
䡲 T
ables that show the coverage type, RSSI, and Ec/Io (for 3G) or CINR (for 4G).
RSSI reflects the signal strength of the network.
E
c/Io is a dimensionless ratio of the average power of a channel, typically the pilot channel, to
the total signal power.
Very weak signal
Excellent signal
e network: the network that is currently being used for your data connection. For example:
nection status. For example: “Connected.”
the signal strength. For example: “Good signal (60%).”
38 Vertical row (of icons and text)
Page 45

CINR stands for Carrier to Interference-plus-Noise Ratio, and is a measurement of signal
effectiveness.
The first table also shows the type(s) of 3G service you have: 1X, 1xEV-DO, or both. (To
determine whether you have 1xEV-DO Rev. 0 or Rev. A service, use the text near the 3G
icon; see “Mobile Broadband Information and Settings” on page 39.)
See also “Improving Signal Strength” on page 130.
Mobile Broadband Information and Settings
The 3G or 4G icon indicates the service and connection state. Note that only one icon is shown
(the active network).
or
or
or
You have no service. Try the suggestions in “Cannot Connect to the 3G/4G
Network” on page 139.
You have service but are not connected.
You have service and are connected.
The text next to the icon displays the connection status, for example: “No service”, or
“3G (EVDO Rev A).”
Click the icon to display the Mobile Broadban
● The activ
e network: the network that is currently being used for your data connection. For
d Information window. The window displays:
example: “4G” or “3G (EVDO Rev A).”
● 3G and 4G
䡲 Con
䡲 Brief description of
● Con
nection Preferences (if you’re logged in).
status:
nection status. For example: “Connected.”
the signal strength. For example: “Good signal (60%).”
Configuring the 3G/4G Connection Preferences
Vertical row (of icons and text)
The value determines which network(s) to connect to, and in what order:
4G Preferred — Connection can be established to either 3G or 4G; if both are available, 4G is
●
used. This setting is recommended if your service provider has no data limit for 4G, but does
for 3G, or you want to take advantage of the faster data transfer speeds of 4G.
3G Preferred — Connection can be established to either 3G or 4G; if both are available, 3G is
●
used.
●
4G Only — Connection can be established only to 4G.
3G Only — Connection can be established only to 3G.
●
If you don’t have 4G coverage, you can save power by selecting “3G Only.”
To automatically connect to the network upon loss of
select
Connect Automatically.
connection or when the device powers on,
Vertical row (of icons and text) 39
Page 46

3G Roaming Information and Settings
The roaming indicator shows whether you are roaming. The text near the icon may indicate additional
details.
Not roaming
Roaming
[flashing]
Note: Roaming on 4G is not supported.
Enhanced roaming indicator
Click the roaming indicator to display the 3G Roaming Information window. The window displays:
● Ro
aming status.
●
Allow 3G roaming field (if you’re logged in).
䡲 If
you select this field, you can roam and connect when outside of Sprint coverage, but
additional charges may occur. (To roam outside of North America, you must also select
international access
䡲 If y
ou do not select this field, you can connect only when you're inside the Sprint coverage
.)
Allow
area.
●
Allow international access field (if you’re logged in, and subject to feature availability) — allows
roaming outside of North America.
If this field is displayed but not available, select
Allow 3G roaming.
Alert Information
The alerts icon indicates whether there are any alerts (situations that require your attention).
Note: To view alert information, you must be logged in. New alerts are checked upon device power-up.
That is, if an event occurs, you won’t be notified until the device is restarted.
No alerts are available.
One or more alert is available.
The text next to the icon indicates the number of alerts.
Click the icon to display the Alert window.
For more information, see “Alerts” on page 31.
40 Vertical row (of icons and text)
Page 47

GPS Information and Settings
GPS is off (not enabled).
Before you can use GPS, you must accept
enable GPS. See “GPS Privacy Agreement” on page 32 and “Enabling
GPS” on page 55.
GPS is on and available. (The GPS privacy agreement has been accepted,
and GPS is enabled.)
(flashing) GPS is active (acquiring a location fix).
The text next to the icon displays the GPS status, for example: “GPS not enabled” or
“GPS searching for satellites.”
the GPS privacy agreement and
Vertical row (of icons and text)
Click the icon to display the GPS Information and Set
tings window. The window shows the
GPS status and, if available, location information, including:
Timestamp — indicates the time of the last fix.
●
●
HEPE — Horizontal Estimated Position Error; it reflects accuracy (horizontal/vertical precision).
Note: To use GPS, you must have a clear line of sight to the GPS satellites.
Configuring the Settings
When you’re logged in, the following items are available.
View privacy agreement (link displayed if you haven’t yet accepted the GPS privacy agreement).
You cannot enable and use GPS until you accept this agreement. Click th
accept the agreement.
Enable GPS — To use GPS and to configure other GPS settings, this check box must be selected.
GPS Mode — How often the device should obtain a fix.
●
One-time — Use a single fix. Use this option if you’ll be using your device at the same location.
●
Continuous — Obtain fixes on a regular basis. Also known as auto-tracking. Useful for
navigation or turn-by-turn (TBT) applications (for example, driving directions).
Get fix now — This button starts a one-time fix. Not displayed if GPS Mode (above) is Continuous or
a GPS session is already in progress. If you change the value from
must click
Save before your changes take effect and the fix becomes possible.
e link to view and then
Continuous to One-time, you
Mapping Service — The mapping service (for example, Google Maps or MapQuest) that displays
the GPS results (in a separate browser window).
Metric units — Specifies whether to use metric when displaying the GPS results (for example, the
altitude, speed, HEPE).
Note: Additional settings are available at Advanced Settings > WAN > GPS. See “GPS Settings” on
page 101.
Vertical row (of icons and text) 41
Page 48

Wi-Fi Users Information and Settings
The Wi-Fi users icon shows how many Wi-Fi users are connected to the device.
No Wi-Fi users are connected. (One user is connected via USB).
One user is connected via Wi-Fi.
The number indicates how many Wi-Fi users are connected.
Click the icon to display the Wi-Fi Users window.
Connected Users Information
When you’re logged in, the Wi-Fi Users window shows a table with information on computers
currently connected to the device.
A row may optionally show one or both of these icons:
●
●
MAC Address — Each wireless device has a unique MAC address (assigned by its manufacturer). On
— The user of this computer is logged in as administrator.
— This computer is connected to the device through the USB to Micro B cable.
Windows PCs, the MAC address is called the “physical address;” on a Mac computer, it is called the
“Ethernet ID.” See “Finding the MAC Address” on page 131.
Block — Used to block the computer’s access to the device. You might want to do this if:
ou don’t recognize a listed computer.
● Y
● Y
ou have lots of data to transfer (you want to be the sole user of the bandwidth).
● Y
ou’re approaching the data limit on your account.
Note: You cannot block the administrator. (The row for the administrator has the icon).
Max Wi-Fi users — Limits the number of Wi-Fi users that can connect to the device. A smaller number
improves performance and security.
Disable Wi-Fi when connected via USB — Turns off the Wi-Fi of the Overdrive 3G/4G Mobile Hotspot
when the device is connected to a computer through the USB to Micro B cable. Only this computer
will be able to use the Overdrive 3G/4G Mobile Hotspot.
42 Vertical row (of icons and text)
Page 49

Battery Information and Settings
The battery icon indicates the state of the battery of the device.
The text next to the icon displays additional infor
mation, for example, the charging status
(% remaining or % complete).
Tip: You can also check the battery icon from the Home page, Mini Window, and device LCD.
Battery level is critical. Charge the device immediately. See “Charging the Device” on
page 21.
No battery; connected to an electrical outlet (through the AC charger).
Connected to USB. Battery is either charging, or is not inserted.
Charging through the AC charger.
Battery is low. Charge the device. See “Charging the Device” on page 21.
... The more bars are shown, the more the battery is charged.
Battery is charged.
Click the icon to display the Battery Information and Settings window.
When you’re logged in, you can set the beha
●
Battery or USB powered. Choose one of the following:
vior for when the device is:
Vertical row (of icons and text)
䡲
Better battery life — At the cost of shorter Wi-Fi range.
䡲
Longer Wi-Fi range — At the cost of shorter battery life.
AC powered. Choose one of the following:
●
䡲
Longer Wi-Fi range
䡲 Shorter Wi-Fi range — You have a designated wireless area and you need to minimize the
effect of your network on other networks in the vicinity
Standby (Low Power) Mode
When the device is in standby (low power) mode, the 3G/4G modem radios, the Wi-Fi radio, and
the LCD are off, and the power button
When you’re logged in, you can set how soon the device goes into standby mode when no Wi-Fi
users are connected to it (Standby Timer).
You can specify settings for when bat
Note: This setting has no effect when the device is connected to a computer through the USB to Micro B
cable.
is flashing.
tery powered and AC powered.
Vertical row (of icons and text) 43
Page 50

To exit standby mode:
䡵 Connect the Ov
Micro B cable.
— or —
Press the power button
See also “Extending Battery Life” on page 129.
erdrive 3G/4G Mobile Hotspot to the AC charger or computer, through the USB to
.
Internet Connection Information
Note: Data usage amounts are approximate and should not be used for billing purposes. For accurate
data usage amounts, check with Sprint.
Click the data icon to display the Internet Connection Information window. The window displays:
● Data statistics f
䡲 Data sent
䡲 Data r
䡲 T
otal transferred
䡲 Session
WWAN IP address of the device — the external IP address of the modem [3G or 4G] (that is, the
● The
IP address of the modem as seen from the Internet).
or the current connection session:
eceived
duration
Viewing and Configuring Detailed Internet Connection Information
When you’re logged in, the Internet Connection Information window displays a table showing data
use:
● In the curr
Starts on day drop-down list.
ver the lifetime of the device.
● O
● By network
From this window you can:
● Reset the data usage
● Change the start da
ently billing cycle. These numbers get automatically reset to 0 on the day specified by the
[3G/4G], and by sent/received/total.
figures for the current billing cycle (click the Reset button).
y of the billing cycle (Starts on day drop-down list).
44 Vertical row (of icons and text)
Page 51

microSD Card Information and Settings
The text next to the microSD icon ( ) indicates whether the card is:
● Enabled
● Detected
● Accessible
● Accessible with or without a passwor
Click the icon to display the SD Card Information and Settings window. The window displays:
● T
he card status (see the above list)
● Stor
age capacity of the card, and space available
When you’re logged in, you can:
● Enable or disable the micr
● Set
up access to the card. See “Setting Up Access to the microSD Card” on page 51.
by all (“shared”) or only the administrator
d (security)
oSD card slot. See “Enabling the microSD Card Slot” on page 50.
Sounds Information and Settings
The sounds icon ( ) shows whether the device speaker is on.
The device speaker is on.
The device speaker is off.
Click the sounds icon to display the Sounds window. The window displays:
Vertical row (of icons and text)
● Status
● If y
of the device speaker (on or off).
ou’re logged in: check boxes to enable or disable sounds for the following events:
䡲
Internet connected
䡲 Internet disconnected
䡲 Wi-Fi user has joined — Useful, for example, to detect an unwelcome Wi-Fi user if you’re the
only one using the device.
䡲
Wi-Fi user has left
䡲 Last user has left — When you hear the device beep, you can turn off the device, if nobody
will be using it for awhile.
䡲
Low battery — Useful as a reminder to charge the device.
Vertical row (of icons and text) 45
Page 52

䡲
System alerts — When you hear the device beep, you can then use the device LCD or the
Alerts window to get information about the alert. See “Alert Information” on page 40.
Note: System alerts include several types of events, for example:
• Critical battery
• Critical temperature
• Software update available
• Network update available
• Router settings reset
• Device startup failure
Tip: You can also disable all sounds through the mute switch on the device. See “Mute Switch” on page 70.
If you’ve enabled the sounds through the home page, but there are no sounds when an event occurs,
check the po
sition of the Mute switch.
46 Vertical row (of icons and text)
Page 53

Section 3I
Buttons On the Home Page
⽧ Buttons Along the Top of the Home Page (page 47)
⽧ Buttons Below the Virtual Device (page 49)
Buttons Along the Top of the Home Page
The top horizontal part of the home page has the following areas/buttons:
● Admin Login. See “Logging On as an Administrator” on page 29.
● Admin Setup — Rerun the device setup, for example, after you’ve reset the software to default
settings. See
● Advanced settings. See “Advanced Settings” on page 48.
● Map me — GPS/Location Based Services.
䡲 Open a Web browser window that shows your current location. See “Viewing Your Current
Location” on page 56.
䡲 Search for the closest gas station, restaurant, and so on, or do a custom search. See
“Performing a Location Search” on page 56.
“Welcome to Your Device Window - Select an Option” on page 121.
Buttons On the Home Page
● Support. See “Support Button” on page 48.
● Feedback — Send your comments on the device. See “Feedback” on page 48.
● Help — Open the online Help, display the important information booklet, or download the user
guide.
Admin Setup Button
This button displays a window where you can change the:
● Administrator password
● Wi-Fi network name (SSID)
● Wi-Fi security type
● Wi-Fi password
For more information, see “Welcome to Your Device Window - Select an Option” on page 121.
Buttons On the Home Page 47
Page 54

Advanced Settings
From the Advanced Settings window you can configure all the settings of the Overdrive 3G/4G Mobile
Hotspot and the browser interface.
The Advanced Settings window has the following
vice tab. See “Device Tab” on page 82.
● De
● W
AN tab. See “WAN Tab” on page 86.
● Wi-F
● Ro
For most fields, field-level Help is displayed to the right of the window, when you select a field. For
mo
Accessing the Advanced Settings Window
To access the Advanced Settings window:
i tab. See “Wi-Fi Tab” on page 88.
uter tab. See “Configuring the Router” on page 104.
re information, see “Field-level Help in the Advanced Settings Window” on page 125.
tabs; each tab has several sections.
1. Ensure you’re logged in to the home page.
2. Click the Advanced Settings button.
Map me Button
The Map me button is used for GPS/Location Based Services: you can, for example, search for the
closest gas station, restaurant, and so on, or do a custom search.
See “Sprint Location Services” on page 55.
Support Button
The Support button opens, in a new Web browser window (or tab), the online support site for the
Overdrive 3G/4G Mobile Hotspot.
Note: This button is available only when you’re connected to the Internet.
Feedback
The Feedback button opens, in a new Web browser window (or tab), the online feedback site for the
Overdrive 3G/4G Mobile Hotspot.
Note: This button is available only when you’re connected to the Internet.
Help Button
This button displays a menu with options to:
● Displa
● Download
● View the imp
y the online Help.
the user guide.
ortant information booklet.
This booklet contains regulatory notices, warranty, and other information.
48 Buttons On the Home Page
Page 55

Buttons Below the Virtual Device
⽧ Connect/Disconnect Button (page 49)
⽧ Power Off Button (page 49)
Note: The buttons appear only when you’re logged in.
Connect/Disconnect Button
This button disconnects a connection, or connects (if currently there’s no connection).
Power Off Button
This button turns the device off.
Note: You can turn the device on only from the device itself.
Buttons On the Home Page
Buttons On the Home Page 49
Page 56

Section 3J
Using the microSD Card
⽧ microSD Card Slot (page 50)
⽧ Before Using the microSD Card Slot (page 50)
⽧ Inserting a microSD Card (page 52)
⽧ Removing a microSD Card (page 52)
⽧ Accessing the microSD Card (page 53)
microSD Card Slot
The Overdrive 3G/4G Mobile Hotspot has a microSD™ slot that can be used with a microSD card
(sold separately) for file sharing/transfer or storage.
The microSD slot is located on the same side of the device as the USB connector.
Your computer recognizes the microSD card as a removable storage device.
The device supports microSD cards up to 16 GB.
Note: Using microSD cards larger than 16 GB can cause data loss and damage your device.
See also:
● “microSD Card Information and Settings” on page 45.
Before Using the microSD Card Slot
1. Enable the slot. See “Enabling the microSD Card Slot” below.
2. Set up access to the slot. See “Setting Up Access to the microSD Card” on page 51.
3. Optionally, rename the microSD Shared Folder Name. See “microSD Shared Folder Name” on
page 51.
4. Inform others how they can access the card. See “Accessing the microSD Card” on page 53.
Enabling the microSD Card Slot
Before computers can recognize the microSD card, you must enable the microSD slot on the
Overdrive 3G/4G Mobile Hotspot.
1. Ensure you’re logged in to the home page.
2. In the SD Card Information and Settings window or from Advanced Settings > Device >
microSD card
page 45.)
, select Enable SD Card. (See “microSD Card Information and Settings” on
50 Using the microSD Card
Page 57

Setting Up Access to the microSD Card
If you’ve enabled access to the microSD card, you must also specify whether a username and
password are required to access the card.
1. Ensure you’re logged in to the home page.
2. In the SD Card Information and Settings window or from Advanced Settings > Device >
microSD card, under “Username and Password Security,” select one of the values:
䡲 To have no security, select None.
Anyone can access the card; no username or password is required.
䡲 To allow only the administrator to access the card, select Administrator Only.
When prompted for the username (when you try to access the card), enter “admin”. For the
password, enter the home page login password.
䡲 To allow non-administrator users to access the card, select Administrator + Guest.
3. If you’ve selected Administrator + Guest:
a. Optionally, change the Set Guest Username and Set Guest Password fields (up to
characters each; spaces are allowed).
20
b. Give the guest username and password to people whom you want to allow access to the
card.
microSD Shared Folder Name
You can optionally change the name of the folder that the microSD card shows up as (in the file
browser program); the default folder name is “shared.”
To change the shared folder name:
1. Ensure you’re logged in to the home page.
2. Click Advanced settings > Device > MicroSD card.
3. In the MicroSD shared folder name field, type the new name.
Using the microSD Card
Up to 32 characters (letters, numbers, and spaces) are allowed.
For information on how this folder name is used, see “Accessing the microSD Card” on page 53.
Using the microSD Card 51
Page 58

Inserting a microSD Card
1. Gently flip open the tab labelled “microSD” on the side of the device.
2. Gently insert the microSD card (label facing up) into the slot on the side of the device, until the
microSD card clicks into place.
Note: If your microSD card has not been formatted, or is in a format that your computer does not recognize,
you may be prompted to format the microSD card. The formatting procedure erases all the data on
the microSD card, after which the files CANNOT be retrieved. To prevent the loss of important data,
please check the contents before you format the microSD card.
3. Check the status of the microSD card. See “microSD Card Information and Settings” on page 45.
Removing a microSD Card
1. Ensure you and other users have completed any file transfers.
2. Gently flip open the tab labelled “microSD” on the side of the device.
3. Using your fingernail or a thin blunt object, gently press the microSD card in and then release; it
should partially pop out of its slot, as shown in the drawing above.
4. Remove the microSD card and store it in a safe place.
5. Close the tab over the microSD slot of the device.
52 Using the microSD Card
Page 59

Accessing the microSD Card
If the microSD slot is enabled, an inserted card appears in your file browser as a shared network
drive.
The way to access the card varies, depending on your operating system.
Note: In the information that follows, <Hostname> is the value of the Hostname field (in Advanced
Settings > Wi-Fi > Network
and also in Advanced Settings > Router > LAN).
Windows
1. In Windows Explorer or Internet Explorer, type one of the following:
䡲
\\Overdrive\
䡲 \\<Router IP address>\ (field in Advanced Settings > Router > LAN)
For example: \\192.168.0.1\
䡲
\\<Hostname>\
For example: \\MyDeviceName\
— or —
From the Windows
䡲
\\Overdrive\
䡲 \\<Hostname>\
start menu, select start > Run, and then type one of the following:
2. Double-click the shared folder.
Mac
1. In Finder, select Go > Connect to Server.
2. Type one of the following:
䡲
smb://Overdrive/
䡲 smb://<Router IP address>/
䡲 smb://<Hostname>
Using the microSD Card
3. When prompted, select the shared drive as the folder to mount.
Linux
1. Open the run menu (Alt+F2) or a file browser, and type one of the following:
䡲
smb://Overdrive/
䡲 smb://<Router IP address>/
䡲 smb://<Hostname>/
2. Double-click the shared folder.
Using the microSD Card 53
Page 60

Other operating systems
Please see the user documentation for your operating system or computer.
If security has been enabled for the microSD card, you will be prompted to enter the username and
password for the microSD
card. (See “Setting Up Access to the microSD Card” on page 51.
54 Using the microSD Card
Page 61

Section 3K
Sprint Location Services
⽧ Requirements for GPS Service (page 55)
⽧ Enabling GPS (page 55)
⽧ Displaying Your Location Information (page 56)
⽧ Viewing Your Current Location (page 56)
⽧ Performing a Location Search (page 56)
⽧ GPS Fix in Progress (page 57)
See also:
● “GPS Information and Settings” on page 41.
● “GPS Settings” on page 101
● “GPS Privacy Agreement” on page 32.
● “GPS Fix Not Available” on page 139.
Requirements for GPS Service
Sprint Location Services
To access GPS services:
● Y
ou must accept the GPS privacy agreement.
● GPS must be enab
GPS services are not available if you are indoors.
global positioning satellites to accurately determine position. The number of obstructions present
indoors often makes accurate position determination impossible.
led.
GPS receivers must be able to lock onto the
Enabling GPS
1. Ensure you’re logged in to the home page.
2. Click the GPS icon (on the left side of the home page) and select Enable GPS.
— or —
Click
Advanced settings > WAN > GPS and select Enable GPS.
Note: If Enable GPS is not available, you must accept the GPS privacy agreement. See “GPS Privacy
Agreement” on page 32.
3. If the GPS privacy agreement is displayed, you must read and accept it.
Sprint Location Services 55
Page 62

Displaying Your Location Information
To display your location information:
1. Ensure you’re logged in to the home page.
2. Ensure GPS is enabled.
3. Ensure you have a clear line of sight to the GPS satellites.
4. Click the GPS icon (on the left side of the home page).
5. In the GPS Information and Settings window, set GPS Mode to One-time, and click Get fix now.
Your location information is displayed in the top part of the window.
Tip: You can also display location information from Advanced Settings > WAN > GPS — click the Get
fix now
Alternatively, you can view your current location in a Web browser. See “Viewing Your Current Location”
on page 56.
button.
Viewing Your Current Location
To open a Web browser that shows your current location:
1. Ensure GPS is enabled.
2. Ensure you have a clear line of sight to the GPS satellites.
3. In the horizontal row of buttons (across the top of the home page), click the Map me ( )
button.
See also “Changing Your Mapping Service” on page 102.
Performing a Location Search
To perform a search for establishments near your current location:
1. Ensure GPS is enabled.
2. In the horizontal row of buttons (across the top of the home page), move the mouse over the Map
( ) button to display a row of icons:
me
56 Sprint Location Services
Page 63

3. Click one of these icons to search for:
Text (search string) that you enter.
Sprint stores
Restaurants
Local hotels
Local banks (ATM machines)
Local gas stations
Local coffee shops
The results of the search are displayed in a new browser window or tab.
See also “Changing Your Mapping Service” on page 102.
GPS Fix in Progress
If a window displays this message, please wait while your device obtains a GPS location fix.
When a location fix has been acquired, your Web browser will display the mapping results.
Sprint Location Services
Sprint Location Services 57
Page 64

Section 3L
Updates
⽧ Automatically Check for Updates (page 58)
⽧ Manually Check for Updates (page 59)
⽧
Upgrade Firmware From a File (page 60)
Note: If a software update, 3G network update, or 3G profile update is available, the device LCD displays a
message, and an alert is available from the home page. See “Software Update Available” on
page 33 and “3G Network Update Available” on page 32.
The updates may improve performance and functionality. The updates may include the following:
● De
vice firmware
● 3G network
he browser interface
● T
● Help files
● Other files
You can:
● Set the br
● Manually check for
update
owser interface to automatically check for updates (see below).
updates. See “Manually Check for Updates” on page 59.
Automatically Check for Updates
To specify how often the browser interface checks for updates:
1. Log in to the home page.
2. Click the Advanced Settings button.
3. Select Device > Basic.
4. From the Check for updates drop-down list, select the desired value.
Tip: When updates are available, an alert is shown in the browser interface. See “Alert Information” on
page 40.
58 Updates
Page 65

Manually Check for Updates
Note: During installation of the update:
• DO NOT turn off or unplug the device.
• Your Wi-Fi and Internet connections won’t be available.
When the installation is complete, you will need to r
Fi?” on page 126).
1. Log in to the home page.
2. Ensure you’re connected to 3G/4G.
3. Click the Advanced Settings button.
4. Select Device > Basic.
5. Click the Check for updates now button.
Text next to the button indicates whether updates are available.
6. If updates are available:
a. Ensure your Overdrive 3G/4G Mobile Hotspot is connected to the AC charger or
computer
Note: If you’ll be using USB for data transfer (and not just for charging the device), you must install the
device driver when you connect through USB for the first time. See “Making a Tethered Connection”
on page 25.
, through the USB to Micro B cable.
econnect to Wi-Fi. (See “How do I Connect to Wi-
Updates
b. Click Update options.
c. Read the information in the Software Installation Options window.
d. To install the update, click
— or —
If your network conditions are not currently
displayed in the window and click
to download the update to your computer, and then follow the steps in ““Upgrade
Firmware From a File” on page 60.
e. When the installation is complete, r
on page 126 .
Download and install now.
optimal, remember or write down the URL
I’ll get the update later. At a later time, access the URL
econnect to Wi-Fi. See “How do I Connect to Wi-Fi?”
Updates 59
Page 66

Upgrade Firmware From a File
Use this option when you have an updated firmware file that you’ve, for example, downloaded from
the Sprint or Sierra Wireless Web site.
Note: During installation of the update:
• DO NOT turn off or unplug the device.
• Your Wi-Fi and Internet connections won’t be available.
When the installation is complete, you will need to r
Fi?” on page 126).
To upgrade the device firmware from a file:
1. Log in to the home page.
2. Ensure Disable Wi-Fi when connected via USB is set to Enabled. See “Disabling Wi-Fi When
Connected Through USB” on page 98.
3. Ensure your Overdrive 3G/4G Mobile Hotspot is connected to the AC charger or computer,
through the USB to Micro B cable.
4. Click the Advanced Settings button.
5. If you want to later confirm that the upgrade was successful, write down the current version
information (shown in
䡲 Sof
tware version
Device > About):
econnect to Wi-Fi. (See “How do I Connect to Wi-
䡲 F
irmware version (in the 3G section)
䡲 F
irmware version (in the 4G section)
6. Select Device > Basic.
7. Optional, but recommended: save the current configuration:
a. Click the
b. Save the file. Note the filename and path.
Export button.
8. Next to the Update firmware from file field, click the Browse button and select the firmware file to
upload to the device.
9. Click Update.
Please wait while the upgrade occurs; this may tak
upgrade status. The device will restart (possibly several times).
Once the upgrade is complete, the LCD device shows the usual icons and text (for example, the
de
vice name).
e several minutes. The device LCD shows the
10. If you want to confirm that the upgrade was successful, compare the current version information
Device > About) to the values you wrote down in step 5.
(in
60 Updates
Page 67

11 . If you’ve saved the current configuration, reload it.
a. Next to the Import Router Settings field, click the Browse button and select the file you’ve
saved.
b. Click Import.
12. Reconnect to Wi-Fi. See “How do I Connect to Wi-Fi?” on page 126.
Updates
Updates 61
Page 68

Section 3M
Viewing Device Information
To view information about your device:
1. Log in to the home page.
2. Click the Advanced Settings button.
3. Select Device > About.
Note: 4G information is not available if WAN mode is “3G only”.
WAN mode is in Advanced Settings > WAN > Setup.)
(
The following information is displayed:
●
Manufacturer
● Model
●
Software Version — Firmware version of the router component of the device.
●
Router PRI version — PRI version of the router component of the device. The PRI (Product Release
Instructions) is a file that contains the settings used to configure wireless products for a particular
service provider, customer, or purpose.
●
ESN/MEID (3G).
The ESN(Electronic Serial Number) is the unique first-gener
component of the device.
The MEID (Mobile Equipment Identifier) is the unique second-generation serial number assigned to
the 3
G component of the device.
●
PRL version — The PRL (Preferred Roaming List) is an account configuration item set by your
service provider. It controls the radio channels/network carrier used by the 3G modem. An updated
PRL may improve your 3G network service.
●
Firmware version — Firmware version of the 3G component of the device.
●
PRI version — PRI version of the 3G component of the device.
MAC address — MAC address of the 4G module. Each wireless device has a unique MAC address
●
(assigned by its manufacturer).
●
Firmware version — Firmware version of the 4G component of the device.
Activation status — 3G activated, or not activated.
●
●
Activation date — Date that the 3G modem/account were first activated.
●
Network operator — The operator (carrier) that your device and account were activated for.
ation serial number assigned to the 3G
62 Viewing Device Information
Page 69

The window also has buttons to:
● Save the information to a text file.
● Reset the 3G/4G configuration of the device to default settings. See “Resetting the 3G/4G
Configuration to Default Settings” on page 100.
Viewing Device Information
Viewing Device Information 63
Page 70

Section 3N
Connecting to a VPN
Sprint Data LinkSM is a network feature that allows you to directly connect to your corporate VPN.
With Data Link, you and your mobile workforce can maintain a secure, seamless VPN connection
between your enterprise network and the advanced Sprint Mobile Broadband Network.
To learn more about Data Link, to arrange a connectivity solution that works for you, or to configure
Data Link, please contact Sprint.
64 Connecting to a VPN
Page 71

Section 3O
Battery
⽧ Replacing the Battery (page 65)
The Overdrive 3G/4G Mobile Hotspot contains a replaceable battery, located under the battery
compartment co
ver.
Battery
If you need a new battery, see the Sierra Wireless online store (
eStore/). The battery’s part number is 1201883.
https://www.sierrawireless.com/
Replacing the Battery
1. Turn the device off. (See “Turning Your Device Off” on page 18.)
2. Remove the battery compartment cover.
3. Remove the old battery.
Battery 65
Page 72

4. Insert the battery into the Overdrive 3G/4G Mobile Hotspot (Sierra Wireless logo facing up).
5. Put the battery compartment cover onto the device.
66 Battery
Page 73

Section 3P
Reset button
Reset Button
⽧ Restarting the Device (page 67)
The reset button is located on the back of the device.
The reset button is recessed, and is inside the hole locat
compartment.
For information on using this button, see “Restarting the Device” (below) and “Resetting the
Software to Default Settings” on page 114 .
ed below and to the right of the battery
Restarting the Device
Tip: Alternatively, you may be able to restart the device by pressing and holding the power button on
the device for three to four seconds.
Reset Button
If the device or the home page seems to stop responding, you can reset (restart) the device:
Reset Button 67
Page 74

1. Remove the battery compartment cover from the device.
Reset button
2. Find the small hole below and to the right of the battery compartment. The reset button is inside
this hole.
3. Insert a thin object (for example, the end of a paper clip) into the hole, and lightly press on the
bottom of the hole for about a second.
68 Reset Button
Page 75

4. Put the battery compartment cover onto the device.
Reset Button
Reset Button 69
Page 76

Section 3Q
Mute Switch
The mute switch is located on the side of the device:
Tip: You can also disable sounds through the home page. See “Sounds Information and Settings” on
page 45.
70 Mute Switch
Page 77

Section 3R
Safety Information
⽧ Important Notice (page 71)
⽧ Safety and Hazards (page 71)
Important Notice
Due to the nature of wireless communications, transmission and reception of data can never be
guaranteed. Data may be delayed, corrupted (i.e., have errors) or be totally lost. Although
significant delays or losses of data are rare when wireless devices such as the Sierra Wireless
modem are used in a normal manner with a well-constructed network, the Sierra Wireless
modem should not be used in situations where failure to transmit or receive data could result in
damage of any kind to the user or any other party, including but not limited to personal injury,
death, or loss of property. Sierra Wireless accepts no responsibility for damages of any kind
resulting from delays or errors in data transmitted or received using the Sierra Wireless modem, or
for failure of the Sierra Wireless modem to transmit or receive such data.
Safety and Hazards
Do not operate the Sierra Wireless modem:
● In
areas where blasting is in progress
● Wher
● Near medical
● Ne
e explosive atmospheres may be present
equipment
ar life support equipment, or any equipment that may be susceptible to any form of radio
interference.
Safety Information
In such areas, the Sierra Wireless modem MUST BE POWERED OFF. The Sierra Wireless modem
n transmit signals that could interfere with this equipment.
ca
Do not operate the Sierra Wireless modem in any aircraft, whether the aircraft is on the ground or
in flight. In
Sierra Wireless modem can transmit signals that could interfere with various onboard systems.
Note: Some airlines may permit the use of cellular phones while the aircraft is on the ground and the door
The driver or operator of any vehicle should not operate the Sierra Wireless modem while in
control of a vehicle. Doing so will detract from the driver or operator’s control and operation of that
vehicle. In some states and provinces, operating such communications devices while in control of
a vehicle is an offence.
aircraft, the Sierra Wireless modem MUST BE POWERED OFF. When operating, the
is open. The Sierra Wireless modem may be used at this time.
Safety Information 71
Page 78

Proper Battery Use and Disposal
Note: Improper battery use may result in a fire, explosion, or other hazard.
To ensure safe and responsible battery use:
● Do
not open, disassemble, puncture, crush, bend, or shred.
● Do n
● Use the bat
● If using with a char
● Do
● W
● F
● A
ot expose to water or other liquids, fire, explosion, or other hazards.
tery only in the Overdrive 3G/4G Mobile Hotspot.
ger, use only the AC charger supplied with the Overdrive 3G/4G Mobile Hotspot.
not short circuit the battery.
hen replacing a battery, use the same model of battery that was supplied with the Overdrive 3G/
4G Mobile Hotspot.
ollow local regulations when disposing of a used battery.
void dropping the Overdrive 3G/4G Mobile Hotspot or the battery. If dropped and you suspect
damage, take it to a service center for inspection.
72 Safety Information
Page 79

Section 4
Settings
Page 80

Section 4A
Power Settings
⽧ Battery and USB Power Settings (page 74)
⽧ AC Power Settings (page 74)
Battery and USB Power Settings
You can set the power settings for when the device is battery or USB powered:
●
Better battery life — At the cost of a shorter Wi-Fi range.
Longer Wi-Fi range — At the cost of a shorter battery life.
●
To choose an option:
1. Ensure you’re logged in to the home page.
2. Click the battery icon . The Battery Information and Settings window is displayed.
— or —
Select
Advanced Settings > Wi-Fi > Network.
3. Select an option in the Battery or USB powered section.
AC Power Settings
You can set the power settings for when the device is connected to an AC electrical outlet:
● Longer Wi-Fi r
● Shorter Wi-Fi
To choose an option:
1. Ensure you’re logged in to the home page.
2. Click the battery icon . The Battery Information and Settings window is displayed.
— or —
Select
3. Select an option in the AC powered section.
ange
range
Advanced Settings > Wi-Fi > Network.
74 Power Settings
Page 81

Section 4B
Configuring the LCD
⽧ Turning the LCD On or Off (page 75)
⽧ Setting the LCD Timeout (page 75)
⽧ Setting the LCD Brightness (page 76)
Turning the LCD On or Off
1. Log in to the home page.
2. Click the Advanced Settings button.
3. Select Device > Display.
4. Set the LCD Backlight field to On or Off.
“Off” helps prolong the battery life, but you can’t check the LCD for status icons and
messages
See also “Standby (Low Power) Mode” on page 43.
.
Configuring the LCD
Setting the LCD Timeout
Tip: Alternatively, you can permanently turn off the LCD, in which case it will never become lit and will not
display text and icons. See “Turning the LCD On or Off” on page 75.
To set the amount of time, after which the LCD of the device temporarily turns off:
1. Ensure you’re logged in to the home page.
2. Select Advanced settings > Device > Display.
3. Ensure LCD Backlight is set to On.
4. Select a value from the Turn Backlight Off drop-down list.
A smaller value helps prolong the battery life.
Note: The LCD turns on if an important system event occurs.
See also “Standby (Low Power) Mode” on page 43.
Configuring the LCD 75
Page 82

Setting the LCD Brightness
1. Ensure you’re logged in to the home page.
2. Select Advanced settings > Device > Display.
3. Ensure LCD Backlight is set to On.
4. Select a value for On Battery/USB Power.
A lower brightness prolongs the battery life.
5. Select a value for On AC Power.
76 Configuring the LCD
Page 83

Section 4C
Enabling and Disabling the LED
The power button on the device acts as an LED/status indicator, and may or may not be lit.
For more information, see “Using the Power Button to Deter
mine the Device State” on page 18.
To enable or disable the lighting of the power button
1. Log in to the home page.
2. Click the Advanced Settings button.
3. Select Device > Display.
4. Set the LED field to On or Off.
:
Enabling and Disabling the
Enabling and Disabling the LED 77
Page 84

Section 4D
Enabling and Disabling Sounds
⽧ Enabling and Disabling Sounds for Specific Events (page 78)
⽧ Low Battery Alert (page 79)
⽧ Critical Battery Level Alert (page 79)
You can enable or disable sounds of the device through:
● The mu
● T
page 45 and “Enabling and Disabling Sounds for Specific Events” on page 78.
te switch on the device (disables all sounds). See “Mute Switch” on page 70.
he browser interface (selectively disables sounds). See “Sounds Information and Settings” on
Enabling and Disabling Sounds for Specific Events
1. Log in to the home page.
2. Click the Advanced Settings button.
3. Select Device > Sounds.
4. Next to each of the event types, select Enable or Disable.
Sounds for the following events
● Low bat
Useful as a reminder to charge the device. From the
battery level at which an alert sounds.
● Syst
When you hear the device beep, use the device LCD or
the alert. See “Alert Information” on page 40.
tery alert
em alerts
Note: System alerts include several types of events, for example:
• Critical battery
• Critical temperature
• Software update available
• Network update available
• Router settings reset
• Device startup failure
can be individually enabled or disabled:
Alert when drop-down list, you can set the
the Alerts window to get information about
● Connect to Internet
● Connection lost
● Wi-Fi user has joined — Useful, for example, if you’re the only one using the device, to detect an
intruder.
●
Wi-Fi user has left
● Last user has left — You can turn off the device if nobody will be using it for a while.
78 Enabling and Disabling Sounds
Page 85

Low Battery Alert
You can set an alert to sound when the battery level is low.
Setting the Alert From the Home Page
1. Ensure you’re logged in to the home page.
2. Click the Sounds icon ( ).
3. In the Sounds window, select Low battery.
Setting the Alert From the Advanced Settings Window
1. Log in to the home page.
2. Click the Advanced Settings button.
3. Select Device > Sounds.
4. For the Low battery alerts field, select Enable.
5. From the Alert when drop-down list, select the battery level at which the alert is to sound.
Critical Battery Level Alert
You can enable an alert to sound when the battery level is critical (that is, dangerously low).
Enabling and Disabling
1. Log in to the home page.
2. Click the Advanced Settings button.
3. Select Device > Sounds.
4. For the System alerts field, select Enable.
Note: System alerts include several types of events, for example:
• Critical battery
• Critical temperature
• Software update available
• Network update available
• Router settings reset
• Device startup failure
Enabling and Disabling Sounds 79
Page 86

Section 4E
Login Settings
⽧ Changing the Administrator Password (page 80)
⽧ Automatic Login (“Remember Me”) (page 80)
Changing the Administrator Password
Note: If you forget this password, you’ll need to reset the device to its default settings and go through the
device setup. See "What Do I Do if I Forgot the Administr
1. Log in to the home page.
2. Click the Advanced Settings button.
3. Select Device > Basic.
4. In the Admin password field, type the new password (1–20 characters/numbers).
Automatic Login (“Remember Me”)
ator Password?" on page 127.
If you enable automatic login:
● An
yone who uses the computer will automatically be logged in to the home page (as long as no
one else has already logged in from another computer); entering the administrator password is not
required.
● T
he timeout security feature is disabled — you will never be automatically logged off.
To enable automatic login:
1. From the computer that you want to enable automatic login, log in to the home page.
2. In the login area, select Remember me.
You can repeat the above steps on other computers; however, since only one administrator can be
logged in at
a time, only the first person to display the home page will be logged in.
Viewing Computers That Are Set to Automatically Log In as Administrator
1.
Log in to the home page.
2. Click the Advanced Settings button.
3. Select Device > Basic.
4. Next to Remember me clients list, click Show list.
80 Login Settings
Page 87

Disabling Automatic Login For a Specific Computer
1. Log in to the home page.
2. Click the Advanced Settings button.
3. Select Device > Basic.
4. Next to Remember me clients list, click Show list.
5. In the row for the computer that you want to disable automatic login, click Delete.
Login Settings
Login Settings 81
Page 88

Section 4F
Advanced Settings
⽧ Accessing the Advanced Settings Window (page 82)
⽧ Device Tab (page 82)
⽧ WAN Tab (page 86)
⽧ Wi-Fi Tab (page 88)
From the Advanced Settings window you can configure all the settings of the Overdrive 3G/4G Mobile
Hotspot and the browser interface.
The Advanced Settings window has the following tabs; each tab has several sections.
● Device tab. See “Device Tab” on page 82.
● WAN tab. See “WAN Tab” on page 86.
● Wi-Fi tab. See “Wi-Fi Tab” on page 88.
● Router tab. See “Configuring the Router” on page 104.
For most fields, field-level Help is displayed to the right of the window, when you select a field. For
more information, see
“Field-level Help in the Advanced Settings Window” on page 125.
Accessing the Advanced Settings Window
1. Ensure you’re logged in to the home page.
2. Click the Advanced Settings button.
Device Tab
Basic Section of the Device Tab
1. Log in to the home page.
2. Click the Advanced Settings button.
3. Select Device > Basic.
From this window, you can view/set these parameters, or perform these actions:
● Login password. See “Changing the Administrator Password” on page 80.
● Computers that are set to automatically log in. See “Automatic Login (“Remember Me”)” on
page 80.
● Enable or disable field-level Help in the Advanced Settings window. (Help for Advanced Settings)
See
“Field-level Help in the Advanced Settings Window” on page 125.
● Import configuration settings. See “Importing Settings” on page 117 .
● Export configuration settings. See “Exporting Settings” on page 117 .
82 Advanced Settings
Page 89

● Update firmware from a file. See “Upgrade Firmware From a File” on page 60.
● Enable
page 43.
● Enable
● Download
Tethered Connection” on page 25.
● Check for updates. See “Automatically Check for Updates” on page 58 and “Manually Check
for Updates” on page 59.
● Reset 3G/4
Default Settings” on page 100.
standby (low power) mode (Standby Timer...). See “Standby (Low Power) Mode” on
TRU-Install. For information on this feature, see “TRU-Install” on page 24.
the Windows or Mac driver (if you’re using USB for data transfer). See “Making a
G configuration to default settings. See “Resetting the 3G/4G Configuration to
Display Section of the Device Tab
From the Display section of the Device tab, you can configure settings for the LCD of the Overdrive
3G/4G Mobile Hotspot.
To access this tab:
1. Log in to the home page.
2. Click the Advanced Settings button.
3. Select Device > Display.
From this window, you can view/set these parameters:
Advanced Settings
● Lighting of
Disabling the LED” on page 77.
● T
urn the LCD on or off (LCD Backlight). See “Turning the LCD On or Off” on page 75.
● LC
D timeout — how soon the LCD goes dormant (Turn Backlight Off). See “Setting the LCD
Timeout” on page 75.
● Brightness of
the power button on the device (Power Button LED). See “Enabling and
the LCD (Backlight Settings). See “Setting the LCD Brightness” on page 76.
microSD Card Section of the Device Tab
Log in to the home page.
1.
2. Click the Advanced Settings button.
3. Select Device > microSD Card.
From this window, you can view/set these parameters, or perform these actions:
● Status
● Enable the micr
● F
● Set up access to
of the microSD slot/card.
oSD card slot. See “Enabling the microSD Card Slot” on page 50.
older name for the shared micro SD card. See “microSD Shared Folder Name” on page 51.
the microSD Card. See “Setting Up Access to the microSD Card” on page 51.
Advanced Settings 83
Page 90

Sounds Section of the Device Tab
From the Sounds section of the Device tab, you can enable or disable sounds for specific types of
events.
1. Log in to the home page.
2. Click the Advanced Settings button.
3. Select Device > Sounds.
4. Next to each of the event types, select Enable or Disable.
Sounds for the following events
●
Low battery — Useful as a reminder to charge the device. From the Alert when drop-down list, you
can be individually enabled or disabled:
can set the battery level at which an alert sounds.
System alerts — When you hear the device beep, use the device LCD or the Alerts window to get
●
information about the alert. See “Alert Information” on page 40.
Note: System alerts include several types of events, for example:
• Critical battery
• Critical temperature
• Software update available
• Network update available
• Router settings reset
• Device startup failure
● Connect to Internet
● Connection lost
●
Wi-Fi user has joined — Useful, for example, if you’re the only one using the device, to detect an
intruder.
●
Wi-Fi user has left
● Last user has left — You can turn the device off if nobody will be using it for a while.
About Section of the Device Tab
To view information about your device:
1. Log in to the home page.
2. Click the Advanced Settings button.
3. Select Device > About.
Note: 4G information is not available if WAN mode is “3G only”.
WAN mode is in Advanced Settings > WAN > Setup.)
(
84 Advanced Settings
Page 91

The following information is displayed:
● Manufacturer
● Model
● Software Version — Firmware version of the router component of the device.
● Router PRI version — PRI version of the router component of the device. The PRI (Product
Release Instructions) is a file that contains the settings used to configure wireless products for a
particular service provider, customer, or purpose.
● ESN/MEID (3G).
The ESN(Electronic Serial Number) is the unique first-generation serial number assigned to the
3G component of the device.
The MEID (Mobile Equipment Identifier) is the unique second-generation serial number
assigned to the 3G component of the device.
● PRL version — The PRL (Preferred Roaming List) is an account configuration item set by your
service provider. It controls the radio channels/network carrier used by the 3G modem. An
updated PRL may improve your 3G network service.
● Firmware version — Firmware version of the 3G component of the device.
● PRI version — PRI version of the 3G component of the device.
● MAC address — MAC address of the 4G module. Each wireless device has a unique MAC
address (assigned by its manufacturer).
Advanced Settings
● Firmware version — Firmware version of the 4G component of the device.
● Activation status — 3G activated, or not activated.
● Original activation date — Date that the 3G modem/account were first activated.
● Network operator — The operator (carrier) that your device and account were activated for.
The window also has buttons to:
● Save the information to a text file.
● Reset the 3G/4G configuration of the device to default settings. See “Resetting the 3G/4G
Configuration to Default Settings” on page 100.
Log Section of the Device Tab
1. Log in to the home page.
2. Click the Advanced Settings button.
3. Select Device > Log.
From this window, you can:
● Enable logging of system events. See “Enabling and Disabling Logging of System Events” on
page 119 .
● Enable logging of connects/disconnects. See “Enabling and Disabling Logging of Connect/
Disconnects” on page 118 .
Advanced Settings 85
Page 92

● Export logs. See “Exporting System Events” on page 120 and “Exporting the Connection History”
on page 118 .
● Clear logs. See “Clearing the System Events Log” on page 120 and “Clearing the Connection
History” on page 119 .
● Set the method used for time acquisition. See “Setting the Method Used for Time Acquisition” on
page 120.
WAN Tab
See also “3G Section of the WAN Tab” on page 99.
Setup Section of the WAN Tab
1. Log in to the home page.
2. Click the Advanced Settings button.
3. Select WAN > Setup.
From this window, you can view/set these parameters, or perform these actions:
● Active network — Network that is currently being used for your data connection: 3G, 4G, or none.
● Network operator — The operator (carrier) that your device and account were activated for.
● Session duration — How long you’ve been connected to the network.
● Total data — Amount of data transferred over the lifetime of the device (by network type) and in the
current session.
● WAN mode — Network(s) to connect to, and in what order.
䡲 4G Preferred — Connection can be established to either 3G or 4G; if both are available, 4G is
used. This setting is recommended if your service provider has no data limit for 4G, but does
for 3G, or you want to take advantage of the faster data transfer speeds of 4G.
䡲 3G Preferred — Connection can be established to either 3G or 4G; if both are available, 3G is
used.
䡲 4G Only — Connection can be established only to 4G.
䡲 3G Only — Connection can be established only to 3G.
If you don’t have 4G coverage, you can save power by selecting “3G Only.”
● Connect automatically to the network when the Overdrive 3G/4G Mobile Hotspot powers on.
● Failover wait time — How long the device should wait, after it loses the connection with the preferred
network, before it attempts to connect to the other network. Not available if
or “4G only.”
● Switchback wait time — How long the device should wait, when the less-preferred network is
connected and the preferred network becomes available, before switching to the preferred network.
Not available if
WAN mode is “3G only” or “4G only.”
WAN mode is “3G only”
● Update 3G PRL — Check whether an updated PRL is available.
86 Advanced Settings
Page 93

The PRL (Preferred Roaming List) is an account configuration item set by your service provider.
It controls the radio channels/network carrier used by the 3G modem. An updated PRL may
improve your 3G network service.
In technical terms, clicking the button
Note: A 3G connection to the Internet won’t be available until the update is complete. (The 4G connection
won’t be affected).
● Update 3G profile — Check whether an updated profile for your 3G connection is available. An
updated profile may improve your 3G network service.
In technical terms, clicking the but
● Configur
e Data Link and the Mobile IP settings. See “Connecting to a VPN” on page 64.
initiates a CI OMA-DM PRL session.
ton initiates a CI OMA-DC session.
4G Section of the WAN Tab
1. Log in to the home page.
2. Click the Advanced Settings button.
3. Click WAN > 4G.
Note: 4G information is not available if WAN mode is “3G only”.
WAN mode is in Advanced Settings > WAN > Setup.)
(
From this window, you can view these 4G parameters:
Connection status — Connected, or not connected.
●
Advanced Settings
● Service type:
● RSSI and CINR.
RSSI reflects the signal strength of the network.
CINR stands for Carrier to Interference-plus-Nois
effectiveness. For the receiver to decode the carrier signal, the latter must be in an acceptable
CINR range.
●
Tx Power — Transmitter power. A higher number is better.
●
Center frequency — Frequency of the 4G channel used for the data connection.
NSP-ID — ID of the 4G Network Service Provider.
●
●
NAP-ID — ID of the 4G Network Access Provider.
●
BSID — Base Station ID.
4G, 4G Off, or no service.
e Ratio, and is a measurement of signal
GPS Section of the WAN Tab
Log in to the home page.
1.
2. Click the Advanced Settings button.
3. Select WAN > GPS.
Advanced Settings 87
Page 94

From this window, you can view/set these parameters, or perform these actions:
● Enable GPS — To use GPS, and to configure other GPS settings, this check box must be selected. If
the GPS privacy agreement is displayed, you must accept it before you can use GPS.
● GPS Mode — How often the device should obtain a fix.
䡲 One-time — Use a single fix. Use this option if you’ll be using your device at the same location.
䡲 Continuous — Obtain fixes on a regular basis. Also known as auto-tracking. Useful for
navigation or turn-by-turn (TBT) applications (for example, driving directions).
● Mapping Service — The mapping service (for example, Google Maps or MapQuest) that displays
the GPS results (in a separate browser window).
● Performance value — Amount of time the device should wait for a satellite to be discovered.
䡲 Automatic — The device automatically determines the most appropriate setting to use.
䡲 Manual — In the input field, enter the number of seconds the device should wait for a satellite to
be discovered. If this time is exceeded, an error is reported.
● Accuracy.
Automatic — The device automatically determines the most appropriate setting to use.
Manual — In the input field, enter the number of meters to which the data must be accurate. Note: If
the value is very small (i.e. very high accuracy), the fix may fail.
● Fix rate — The smaller the number, the more up-to-date the location tracking will be, at the cost of
shorter battery life of the device. Available only if
GPS Mode is set to Continuous.
● Metric units — Specifies whether to use metric when displaying the GPS results (for example, the
altitude, speed, HEPE).
● Get fix now — This button starts a one-time fix. Not displayed if GPS Mode (above) is Continuous or
a GPS session is already in progress. If you change the value from
must click
Save before your changes take effect and the fix becomes possible.
Continuous to One-time, you
Wi-Fi Tab
Network Section of the Wi-Fi Tab
1. Log in to the home page.
2. Click the Advanced Settings button.
3. Select Wi-Fi > Network.
From this window, you can view/set these parameters, or perform these actions:
● Disable Wi-Fi when connected via USB. See “Disabling Wi-Fi When Connected Through USB” on
page 98.
● SSID — Wi-Fi network name; identifies your Wi-Fi network, and is visible to other Wi-Fi-enabled
devices. See
● Hostname — Device name. See “Host Name (Device Name)” on page 97 and “Displaying the
Home Page of the Device” on page 28.
“SSID (Wi-Fi Network Name)” on page 91.
88 Advanced Settings
Page 95

● Link SSID and Hostname. See “Linking the SSID and the Host Name” on page 92.
●
SSID broadcast — If broadcast is enabled, the wireless network is displayed in the list of Wi-Fi
networks available in the local area.
For increased security, set this field to
Disable. You will need to give the SSID to the people who
will be accessing your network.
Max number of users — Limits the number of Wi-Fi users that can connect to the device. A
●
smaller number improves performance and security.
● P
ower settings for when the device is battery or USB powered.
䡲
Better battery life — At the cost of a shorter Wi-Fi range.
䡲
Longer Wi-Fi range — At the cost of a shorter battery life.
ower settings for when the device is connected to an AC electrical outlet.
● P
䡲 Longer Wi-Fi r
䡲 Shorter Wi-Fi
●
Wi-Fi channel — The active channel of the Wi-Fi access point. If your network is having
ange
range
performance issues (possibly caused by other Wi-Fi networks in the vicinity using the same
channel), try a different Wi-Fi channel.
Basic Rate — Type of wireless devices connected to your network.
●
If you’re certain that all of the Wi-Fi devices used with your Overdrive 3G/4G Mobile Hotspot
support 802
802.11b/g compatible.
●
RTS threshold — Specifies the smallest packet size, in bytes, for which RTS/CTS (Request to
.11g, then select
802.11g only (this ensures faster Wi-Fi speeds); otherwise, select
Send/Clear to Send) handshaking is used. The recommended value is 2347.
Advanced Settings
Change this value only if you’re experiencing inconsisten
t data flow. Make only minor changes
to this value.
●
Fragmentation threshold — Specifies the largest allowable size, in bytes, for a packet. If the
packet is larger than this, it is fragmented into multiple packet before it is transmitted. To prevent
poor network performance, it’s recommended to keep this value as large as possible (up to
2345).
List of connected devices — Display a window that shows connected computers. A table row
●
may optionally show one or both of these icons:
䡲
—The user of this computer is logged in as administrator.
䡲
—This computer is connected to the device through the USB to Micro B cable.
Advanced Settings 89
Page 96

Security Section of the Wi-Fi Tab
1. Log in to the home page.
2. Click the Advanced Settings button.
3. Select Wi-Fi > Security.
From this window, you can set the:
● Wi-Fi security type. See “Wi-Fi Security” on page 93.
● Wi-Fi password. See “Wi-Fi Password” on page 94.
● Wi-Fi Password Reminder feature. See “Wi-Fi Password Reminder” on page 94.
MAC Filter Section of the Wi-Fi Tab
The MAC (Media Access Control) filter is used to grant (“whitelist”) or block (“blacklist”) wireless
devices access to the Wi-Fi, 3G, and 4G networks. Access is based on the MAC address of each
wireless device.
MAC filtering can prevent unauthorized wireless devices from connecting to your network.
MAC filtering increases security of your network. You can give access to your network, based on the
MAC address of the wireless devices. This makes it harder for a hacker to use a MAC address to
access your network.
To access this tab:
1. Log in to the home page.
2. Click the Advanced Settings button.
3. Select Wi-Fi > MAC Filter.
From this window, you can:
● Display a list of computers that are:
䡲 Allowed to access the network (MAC filter mode = “Allow all in list”)
䡲 Not allowed to access the network (MAC filter mode = “Block all in list”)
● Add or remove a computer from the lists. See “Specifying Computers That Can Access the
Network” on page 95 and “Specifying Computers That Are Not Allowed to Access the Network” on
page 96.
● Display a list of computers that are currently connected through Wi-Fi. See “Displaying a List of
Currently Connected Computers” on page 96.
90 Advanced Settings
Page 97

Section 4G
Configuring the Wi-Fi Network
⽧ SSID (Wi-Fi Network Name) (page 91)
⽧ Wi-Fi Security (page 93)
⽧ Host Name (Device Name) (page 97)
⽧ Setting the Maximum Number of Wi-Fi Users (page 97)
⽧ Wi-Fi Channel (page 98)
⽧ Disabling Wi-Fi When Connected Through USB (page 98)
You can configure basic settings of the Wi-Fi network through the setup pages.
1. Ensure you’re logged in to the home page.
2. Click the Admin Setup button.
For more information, see “Change Password/Settings” on page 11 .
You can configure basic and advanced settings of the Wi-Fi network through the Advanced
Settings window.
1. Log in to the home page.
Configuring the Wi-Fi Network
2. Click the Advanced Settings button.
3. Select Wi-Fi > Network.
For more information, see “Network Section of the Wi-Fi Tab” on page 88.
See also:
● “Disabling Wi-Fi When Connected Through USB” on page 98.
● “Battery and USB Power Settings” on page 74.
● “AC Power Settings” on page 74.
SSID (Wi-Fi Network Name)
The SSID identifies your Wi-Fi network and is visible to other Wi-Fi-enabled devices.
It is shown on your device’s LCD screen; if more than one Overdrive 3G/4G Mobile Hotspot is
available, you can use this name to tell the devices apart.
You can display the home page by typing the SSID in your Web browser (if Link SSID and
Hostname
For security, it’s recommended that you make the SSID unique and change it on a regular basis.
is selected; see “Linking the SSID and the Host Name” on page 92).
Configuring the Wi-Fi Network 91
Page 98

To change the SSID:
1. Log in to the home page.
2. Click the Advanced Settings button.
3. Select Wi-Fi > Network.
4. In the SSID field, enter the new name.
If the SSID field is not available,
Hostname (and the SSID will get the same value), or disable Link SSID and Hostname and edit
the SSID.
Link SSID and Hostname is enabled. You must either edit
5. Click Save.
6. Reconnect to Wi-Fi: follow the instructions on-screen, and see “How do I Connect to Wi-Fi?” on
page 126.
Note: If you’re sharing your connection with others, they also must reconnect to Wi-Fi; provide them the
new SSID.
For security reasons, it’s recommended you disable SSID Broadcast. See "Network Section of the
Wi-Fi Tab" on page 88.
Linking the SSID and the Host Name
If you link the SSID (Wi-Fi network name) and the Hostname (name of your Overdrive 3G/4G Mobile
Hotspot):
● The SSID
● Y
ou only need to remember one name when selecting the Wi-Fi network, accessing the browser
interface, or accessing the microSD card.
To link the SSID and the Hostname:
becomes whatever the Hostname is (you cannot change the SSID — only the Hostname).
1. Log in to the home page.
2. Click the Advanced Settings button.
3. Select Wi-Fi > Network or Router > LAN.
4. Select the Link SSID and Hostname field.
The
SSID field gets the value of Hostname and becomes unavailable (grayed out).
5. Click Save.
The device resets, after which you must reconnect to Wi-Fi. See “How do I Connect to Wi-Fi?” on
page 126.
92 Configuring the Wi-Fi Network
Page 99

Wi-Fi Security
By default, Wi-Fi security is enabled for your Overdrive 3G/4G Mobile Hotspot and the Wi-Fi
network.
Note: All the devices used with the Overdrive 3G/4G Mobile Hotspot must support the selected security
type.
To change the security used by Wi-Fi:
1. Log in to the home page.
2. Click the Advanced Settings button.
3. Select Wi-Fi > Security.
4. Select one of the options:
䡲
None — No security (no password is required to access the Wi-Fi network); not
recommended. Anyone may access your device and use your Internet connection (you are
responsible for payment for data usage).
䡲
WEP-64 bit - Shared — Lower security. Works with older and newer Wi-Fi devices.
Recommended only if any of your devices don’t support WPA or WPA2.
Configuring the Wi-Fi Network
Shared WEP uses the same key for encryption and authentic
WEP to be less secure than open WEP.
䡲
WEP-128 bit - Shared — Lower security. Works with older and newer Wi-Fi devices.
Recommended only if any of your devices don’t support WPA or WPA2.
Shared WEP uses the same key for encryption and authentic
WEP to be less secure than open WEP.
䡲
WEP-64 bit - Open — Lower security. Works with older and newer Wi-Fi devices.
Recommended only if any of your devices don’t support WPA or WPA2.
Open WEP uses the key for encryption, but not for authentication.
䡲
WEP-128 bit - Open — Lower security. Works with older and newer Wi-Fi devices.
Recommended only if any of your devices don’t support WPA or WPA2.
Open WEP uses the key for encryption, but not for authentication.
䡲
WPA-Personal - TKIP — A strong security standard, supported by most Wi-Fi devices.
䡲
WPA-Personal - TKIP/AES — A strong security standard, supported by most Wi-Fi devices.
䡲
WPA2-Personal - AES — A stronger, newer security standard. Limited to newer Wi-Fi
devices.
䡲
WPA2-Personal - TKIP/AES — A stronger, newer security standard. Limited to newer Wi-Fi
devices.
䡲
WPA/WPA2 Personal (recommended setting) — Wi-Fi devices that use either WPA or WPA2
can connect to the Overdrive 3G/4G Mobile Hotspot. Supported by most Wi-Fi devices.
ation; some consider shared
ation; some consider shared
The option you select determines the Wi-Fi security used and also the maximum length of the WiFi passwor
d.
Configuring the Wi-Fi Network 93
Page 100

Wi-Fi Password
If Wi-Fi security is enabled, a Wi-Fi password is required to connect to the Wi-Fi network.
Some general rules to make your password more secure:
● Use let
● Use
● Use both upper
To change the Wi-Fi password:
ters and numbers
special characters (for example, @)
case and lowercase letters
1. Log in to the home page.
2. Click the Advanced Settings button.
3. Select Wi-Fi > Security.
4. In the Wi-Fi password field, type the password; the maximum length depends on the Wi-Fi
security type that you’ve selected:
䡲
None — No security (no password is required to access the Wi-Fi network); not recommended.
Anyone may access your device and use your Internet connection (you are responsible for
payment for data usage).
WEP-64 bit - Shared — 5 ASCII characters.
䡲
䡲
WEP-128 bit - Shared — 13 ASCII characters.
䡲
WEP-64 bit - Open — 5 ASCII characters.
䡲
WEP-128 bit - Open — 13 ASCII characters.
䡲
WPA-Personal - TKIP — ASCII string, 8 to 63 characters.
䡲
WPA-Personal - TKIP/AES — ASCII string, 8 to 63 characters.
䡲
WPA2-Personal - AES — ASCII string, 8 to 63 characters.
䡲
WPA2-Personal - TKIP/AES — ASCII string, 8 to 63 characters.
䡲
WPA/WPA2 Personal — ASCII string, 8 to 63 characters.
Wi-Fi Password Reminder
When the Wi-Fi Password Reminder feature is enabled, y
LCD of the device:
ou can display the Wi-Fi password on the
1. If the LCD is dark (no text or icons are displayed):
a. Ensure the LCD is enabled. See “Turning the LCD On or Off” on page 75.
b. Briefly press the power button
on the device.
2. Double-click the power button on the device.
To double-click the power button
The information is displayed for approximately 20 seconds. T
press the power button
on the device.
on the device, press it twice, quickly (within 0.5 seconds).
o clear the information before that, briefly
94 Configuring the Wi-Fi Network
 Loading...