

Page 1
AirCard® 710/750 Wireless Network
Card
Installation Guide
2130135
Rev 1.2
Page 2

Page 3

Table of Contents
Important Notice Because of the nature of wireless communications, trans-
mission and reception of data can never be guaranteed. Data
may be delayed, corrupted (i.e., have errors) or be totally lost.
Although significant delays or losses of data are rare when
wireless devices such as the Sierra Wireless network card are
used in a normal manner with a well-constructed network, the
Sierra Wireless network card should not be used in situations
where failure to transmit or receive data could result in
damage of any kind to the user or any other party, including
but not limited to personal injury, death, or loss of property.
Sierra Wireless, Inc. accepts no responsibility for damages of
any kind resulting from delays or errors in data transmitted or
received using the Sierra Wireless network card, or for failure
of the Sierra Wireless network card to transmit or receive such
data.
Safety and Hazards Do not operate the Sierra Wireless AirCard
network card in areas where blasting is in progress, where
explosive atmospheres may be present, near medical
equipment, life support equipment, or any equipment which
may be susceptible to any form of radio interference. In such
areas, the Sierra Wireless network card MUST BE POWERED
OFF. The Sierra Wireless network card can transmit signals
that could interfere with this equipment.
Do not operate the Sierra Wireless network card in any aircraft,
whether the aircraft is on the ground or in flight. In aircraft, the
Sierra Wireless network card MUST BE POWERED OFF.
When operating, the Sierra Wireless network card can transmit
signals that could interfere with various onboard systems.
Note: Some airlines may permit the use of cellular phones while the
aircraft is on the ground and the door is open. Sierra Wireless network
cards may be used at this time.
The driver or operator of any vehicle should not operate the
Sierra Wireless network card while in control of a vehicle.
Doing so will detract from the driver or operator's control and
operation of that vehicle. In some states and provinces,
operating such communications devices while in control of a
vehicle is an offence.
®
710/750 wireless
FCC RF Exposure
Information
Rev. 1.2 Mar.02 iii
In August 1996 the Federal Communications Commission
(FCC) of the United States with its action in Report and Order
FCC 96-326 adopted an updated safety standard for human
exposure to radio frequency (RF) electromagnetic energy
emitted by FCC regulated transmitters. Those guidelines are
Page 4

AirCard 710/750 Wireless Network Card Installation Guide
consistent with the safety standard previously set by both U.S.
and international standards bodies. The design of this wireless
network card complies with the FCC guidelines and these
international standards.
Use only the supplied or an approved antenna. Unauthorized
antennas, modifications, or attachments could impair call
quality, damage the phone, or result in violation of FCC
regulations.
This device is approved for use in typical laptop PCs only. To
comply with FCC RF exposure requirements the AirCard
710/750 PCS GSM modem card must be operated with a
minimum separation distance of 2.5 cm (1 inch) between the
user/nearby persons and the antenna.
For more information about RF exposure, please visit the FCC
web site at www.fcc.gov
.
Limitation of
Liability
The information in this manual is subject to change without
notice and does not represent a commitment on the part of
Sierra Wireless, Inc. SIERRA WIRELESS, INC. SPECIFICALLY
DISCLAIMS LIABILITY FOR ANY AND ALL DIRECT,
INDIRECT, SPECIAL, GENERAL, INCIDENTAL, CONSEQUENTIAL, PUNITIVE OR EXEMPLARY DAMAGES
INCLUDING, BUT NOT LIMITED TO, LOSS OF PROFITS OR
REVENUE OR ANTICIPATED PROFITS OR REVENUE
ARISING OUT OF THE USE OR INABILITY TO USE ANY
SIERRA WIRELESS, INC. PRODUCT, EVEN IF SIERRA
WIRELESS, INC. HAS BEEN ADVISED OF THE POSSIBILITY OF SUCH DAMAGES OR THEY ARE FORESEEABLE
OR FOR CLAIMS BY ANY THIRD PARTY.
Patents Portions of this product are covered by some or all of the
following US patents:
6339405, D452496, D452495, 6327154, D442170, 6199168,
6191741, 6169884, D416857, 5929815, 5890057, 5878234,
5847553, 5845216, 5748449, 5682602, 5629960, 5617106,
D372701, D372248, 5515013, D367062 and other patents pend-
ing.
Copyright ©2002 Sierra Wireless, Inc. All rights reserved.
Trademarks AirCard
trademarks of Sierra Wireless, Inc.
iv 2130135
®
and Heart of the Wireless Machine® are registered
Page 5

Table of Contents
Sierra Wireless, the Sierra Wireless logo, the red wave design,
the red-tipped antenna, and Watcher are trademarks of Sierra
Wireless, Inc.
Other trademarks are the property of the respective owners.
All product specifications are subject to change without notice.
Rev. 1.2 Mar.02 v
Page 6

AirCard 710/750 Wireless Network Card Installation Guide
vi 2130135
Page 7

Table of Contents
Introducing the AirCard® 710/750 Network Card . . . . . . . . . . . . . .1
About the AirCard 710/750 wireless network card . . . . . . . . . . . . . . . . . . . . . . . 1
Supported computer platforms and wireless networks . . . . . . . . . . . . . . . . . . 1
Care and maintenance of your AirCard . . . . . . . . . . . . . . . . . . . . . . . . . . . . . . . . 2
Getting Started . . . . . . . . . . . . . . . . . . . . . . . . . . . . . . . . . . . . . . . . . . . .5
Information you must get from your service provider . . . . . . . . . . . . . . . . . . . . 5
SIM card overview. . . . . . . . . . . . . . . . . . . . . . . . . . . . . . . . . . . . . . . . . . . . . . . . . . 6
Inserting a SIM card . . . . . . . . . . . . . . . . . . . . . . . . . . . . . . . . . . . . . . . . . . . . 6
Removing a SIM card . . . . . . . . . . . . . . . . . . . . . . . . . . . . . . . . . . . . . . . . . . . 6
Installation on Notebook PCs . . . . . . . . . . . . . . . . . . . . . . . . . . . . . . .9
System requirements . . . . . . . . . . . . . . . . . . . . . . . . . . . . . . . . . . . . . . . . . . . . . . . 9
Setting your Internet connection to use the AirCard. . . . . . . . . . . . . . . . . . . . . 9
Internet Explorer version 5 and 6 . . . . . . . . . . . . . . . . . . . . . . . . . . . . . . . . . . 9
Windows 95 OSR 2, 98 SE, 2000, and Me. . . . . . . . . . . . . . . . . . . . . . . . . . . . . . 10
Windows XP. . . . . . . . . . . . . . . . . . . . . . . . . . . . . . . . . . . . . . . . . . . . . . . . . . . . . . 12
Windows NT. . . . . . . . . . . . . . . . . . . . . . . . . . . . . . . . . . . . . . . . . . . . . . . . . . . . . . 15
Inserting the AirCard . . . . . . . . . . . . . . . . . . . . . . . . . . . . . . . . . . . . . . . . . . . 15
Installing the Network Card Driver . . . . . . . . . . . . . . . . . . . . . . . . . . . . . . . 16
Installing the Modem Driver . . . . . . . . . . . . . . . . . . . . . . . . . . . . . . . . . . . . . 17
Changing the Interrupt . . . . . . . . . . . . . . . . . . . . . . . . . . . . . . . . . . . . . . . . . 18
Installation on Pocket PCs . . . . . . . . . . . . . . . . . . . . . . . . . . . . . . . . .19
System requirements . . . . . . . . . . . . . . . . . . . . . . . . . . . . . . . . . . . . . . . . . . . . . . 19
Installing the software . . . . . . . . . . . . . . . . . . . . . . . . . . . . . . . . . . . . . . . . . . . . . 19
Installing the software on the host . . . . . . . . . . . . . . . . . . . . . . . . . 20
Downloading the software to the Pocket PC . . . . . . . . . . . . . . . . . 21
Rev 1.2 Mar.02 vii
Page 8

AirCard 710/750 Wireless Network Card Installation Guide
Inserting the AirCard into a Pocket PC . . . . . . . . . . . . . . . . . . . . . . . . . . . . . . . 21
Configuring Your Account . . . . . . . . . . . . . . . . . . . . . . . . . . . . . . . . . 23
Notebooks . . . . . . . . . . . . . . . . . . . . . . . . . . . . . . . . . . . . . . . . . . . . . . . . . . . . . . . 23
Pocket PC 2002 . . . . . . . . . . . . . . . . . . . . . . . . . . . . . . . . . . . . . . . . . . . . . . . . . . . 24
Removing the AirCard . . . . . . . . . . . . . . . . . . . . . . . . . . . . . . . . . . . . 27
Windows NT. . . . . . . . . . . . . . . . . . . . . . . . . . . . . . . . . . . . . . . . . . . . . . . . . . . . . . 27
Windows 95, 98, 2000, Me, XP . . . . . . . . . . . . . . . . . . . . . . . . . . . . . . . . . . . . . . . 27
Pocket PC 2002 . . . . . . . . . . . . . . . . . . . . . . . . . . . . . . . . . . . . . . . . . . . . . . . . . . . 28
The Watcher™ Window . . . . . . . . . . . . . . . . . . . . . . . . . . . . . . . . . . . 31
Launching the Watcher program . . . . . . . . . . . . . . . . . . . . . . . . . . . . . . . . . . . . 31
Components of the Watcher window (notebooks). . . . . . . . . . . . . . . . . . . . . . 31
Components of the Watcher screen (Pocket PC) . . . . . . . . . . . . . . . . . . . 32
Getting more information . . . . . . . . . . . . . . . . . . . . . . . . . . . . . . . . . . . . . . . . . . 32
Notebooks . . . . . . . . . . . . . . . . . . . . . . . . . . . . . . . . . . . . . . . . . . . . . . . . . . . . 32
Pocket PC 2002 . . . . . . . . . . . . . . . . . . . . . . . . . . . . . . . . . . . . . . . . . . . . . . . . 33
Technical Specifications . . . . . . . . . . . . . . . . . . . . . . . . . . . . . . . . . . 35
Radio frequency and electrical specifications . . . . . . . . . . . . . . . . . . . . . . . . . 35
Environmental specifications . . . . . . . . . . . . . . . . . . . . . . . . . . . . . . . . . . . . . . . 36
Regulatory Information . . . . . . . . . . . . . . . . . . . . . . . . . . . . . . . . . . . 37
Declaration of conformity for CE Marking. . . . . . . . . . . . . . . . . . . . . . . . . . . . . 39
Index . . . . . . . . . . . . . . . . . . . . . . . . . . . . . . . . . . . . . . . . . . . . . . . . . . . . 41
viii 2130135
Page 9

1: Introducing the AirCard® 710/
710/750
750 Network Card
• About the AirCard
• Supported platforms
and networks
• Care and maintenance
About the AirCard 710/750 wireless network card
The AirCard® 710/750 wireless network card fits into a
standard Type II PC Card slot (available on most notebook
PCs) and functions as a wireless network card. This card
allows you to connect to the Internet, send and receive e-mail,
and connect to a corporate network, without the need of a
network cable or phone line. The card uses cellular telephone
radio frequencies and the GSM (Global System for Mobile
Communications) digital telephone infrastructure.
When packet mode service is available, the AirCard 710/750
network card uses the General Packet Radio Service (GPRS)
infrastructure to provide an “always-on” data connection, just
like an Ethernet card or other wired network adapter.
Supported computer platforms
Introducing the AirCard
and wireless networks
Windows computer platforms The AirCard 710/750
wireless network card works in notebook PCs running
Windows 95, 98 SE, Me, NT, XP, and 2000, and in Pocket PCs
running Windows CE 3.0, Pocket PC and Pocket PC 2002. For
more details, see "System requirements" on page 9 (notebooks)
and page 19 (Pocket PCs).
GSM wireless networks The AirCard 710/750 network card
operates over a type of wireless network called GSM (Global
System for Mobile communications), supported by a number
of wireless carriers in North America and around the world.
To use the AirCard 710/750 network card, you must have an
account that gives you access to a GSM network.
Note: Every GSM network worldwide operates on one of three radio
frequency bands. The AirCard 710 network card operates only on the
1900 MHz PCS band used in North America and in some parts of
Rev 1.2 Mar.02 1
Page 10
AirCard 710/750 Network Card Installation Guide
Central and South America. The AirCard 750 is a tri-band product that
operates on the 900, 1800, and 1900 MHz bands used in Europe and
Asia.
Like GSM mobile phones, the AirCard 710/750 network card
requires a SIM card (also known as a “smart card” or “smart
chip”), provided by your wireless service provider, in order to
function. For more information, see "SIM card overview" on
page 6.
Care and maintenance of your AirCard
Do not apply adhesive labels to the AirCard. This may cause
the AirCard to become jammed inside the card slot, or prevent
it from being inserted properly.
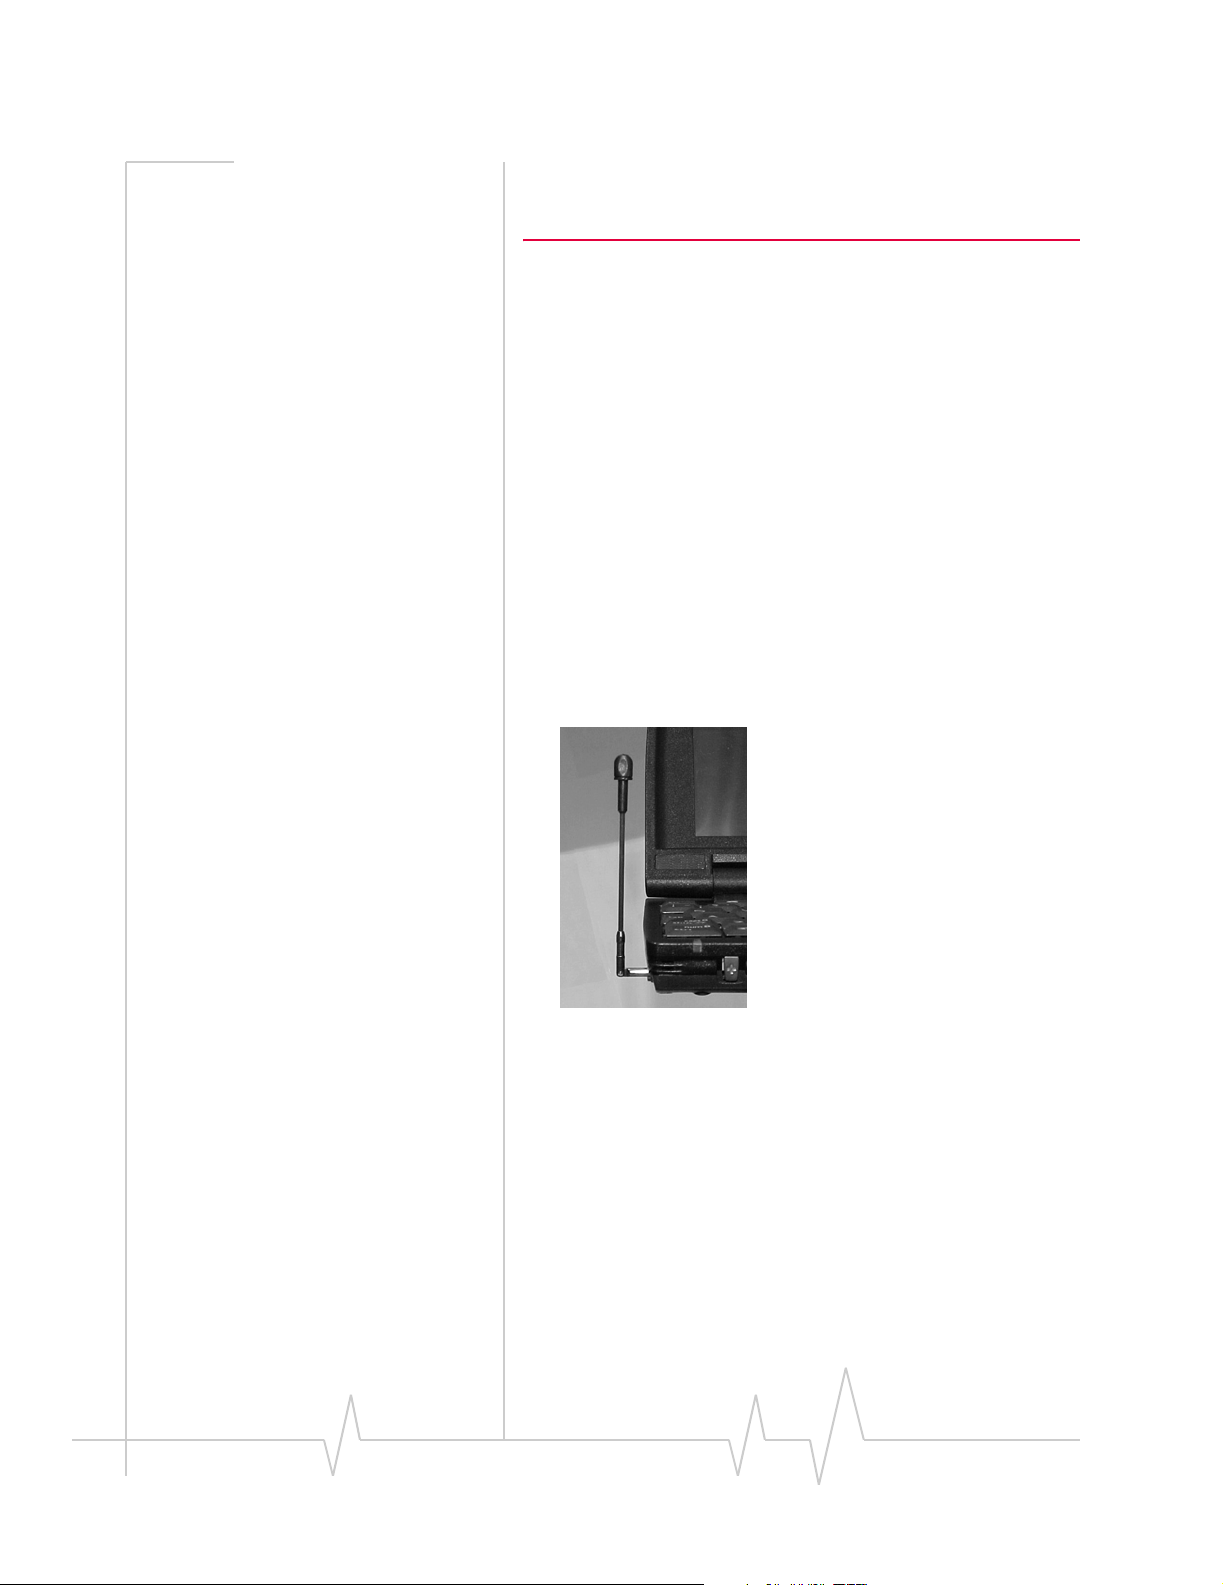
Optimal signal strength is usually obtained when the antenna
is fully extended (applies to the AirCard 710 only) and perpendicular to the card. The antenna should bend easily at the
hinge. Do not forcefully bend the antenna.
Figure 1-1: Proper positioning of the AirCard 710/750 antenna in a notebook
When storing or transporting your PC in a case (such as a
notebook case), retract the AirCard antenna (AirCard 710) or
remove the AirCard antenna (AirCard 750) and position the
computer where the antenna tip cannot be crushed or broken.
The AirCard should fit easily into your computer’s PC Card
slot. Forcing the AirCard into the slot may damage the
connector pins.
Protect the card from liquids, dust, and excessive heat (see
"Environmental specifications" on page 36 for details).
2 2130135
Page 11

Chapter 1: Introducing the AirCard 555 Network Card
When not installed in your computer, store the AirCard in a
safe place.
710/750
Introducing the AirCard
Rev 1.2 Mar.02 3
Page 12

AirCard 710/750 Network Card Installation Guide
4 2130135
Page 13

2: Getting Started
• Information you need
from your service
provider
• Inserting the SIM card
• Removing the SIM
card
Before you can begin using the AirCard 710/750 wireless
network card, you must:
1. Obtain certain information from your service provider.
2. Insert the SIM card into the slot in your AirCard PC Card
(page 6).
3. Install the AirCard 710/750 software (notebooks: page 10;
Pocket PC: page 19).
4. Insert the AirCard into your computer.
5. Configure the AirCard to use your account (page 23).
Information you must get from your service provider
When you purchase an AirCard, you should also receive a SIM
card that holds your account information. Without a valid SIM
card and a valid account, your AirCard will not work.
To activate your account, your service provider needs from
you:
• Billing information (for example, your credit card infor-
mation) used to collect payment for your network usage
• The SIM card serial number (printed on the upper surface
of the SIM card)
Getting Started
Note: Keep a written record, in a
secure place, of the account
information that your service
provider gives you. You will need
this information if you ever need
to re-enter the account information.
Rev 1.2 Mar.02 5
You require from your service provider:
• A phone number for your AirCard
• APN (Access Point Name), if required by the network
• User name and password, if required by the network
• Whether or not your provider is using header
compression and/or data compression
• IP address, if the network does not automatically assign
one
• Optionally: Primary DNS
1. DNS (Domain Name Server)—a computer that converts web
site names, such as www.sierrawireless.com, into IP
addresses, such as 64.114.87.11.
1
and Secondary DNS addresses
Page 14

AirCard 710/750 Network Card Installation Guide
SIM card overview
Note: If you change GSM
service providers (such as if you
move to a new city), you will
need a new SIM card from your
new service provider. You will
also need to enter your new
profile information into the
Watcher software (see “Configuring Your Account” on page 23).
Inserting a SIM card
To install your SIM card into the AirCard 710/750 network
card, follow these steps:
1. Hold the AirCard 710/750 network card with the label on
top and the antenna closest to you.
2. Locate the thin SIM card slot on the left side of the AirCard
PC Card’s antenna end.
3. Orient the SIM card, as shown in the diagram on the
bottom side of the AirCard.
4. Insert the end of the SIM card into the slot, and gently
push it until it clicks into place.
Figure 2-1: Inserting the SIM card Into the AirCard 710/750 SIM card slot
5. Once the SIM card is properly inserted, it should not
extend beyond the end of the card. See Figure 2-2.
Figure 2-2: A SIM card properly inserted
Removing a SIM card
To remove the SIM card, you will need a slim object, such as
the tip of a pen or a straightened paper clip, to push into the
eject hole.
6 2130135
Page 15
Chapter 1: Introducing the AirCard 555 Network Card
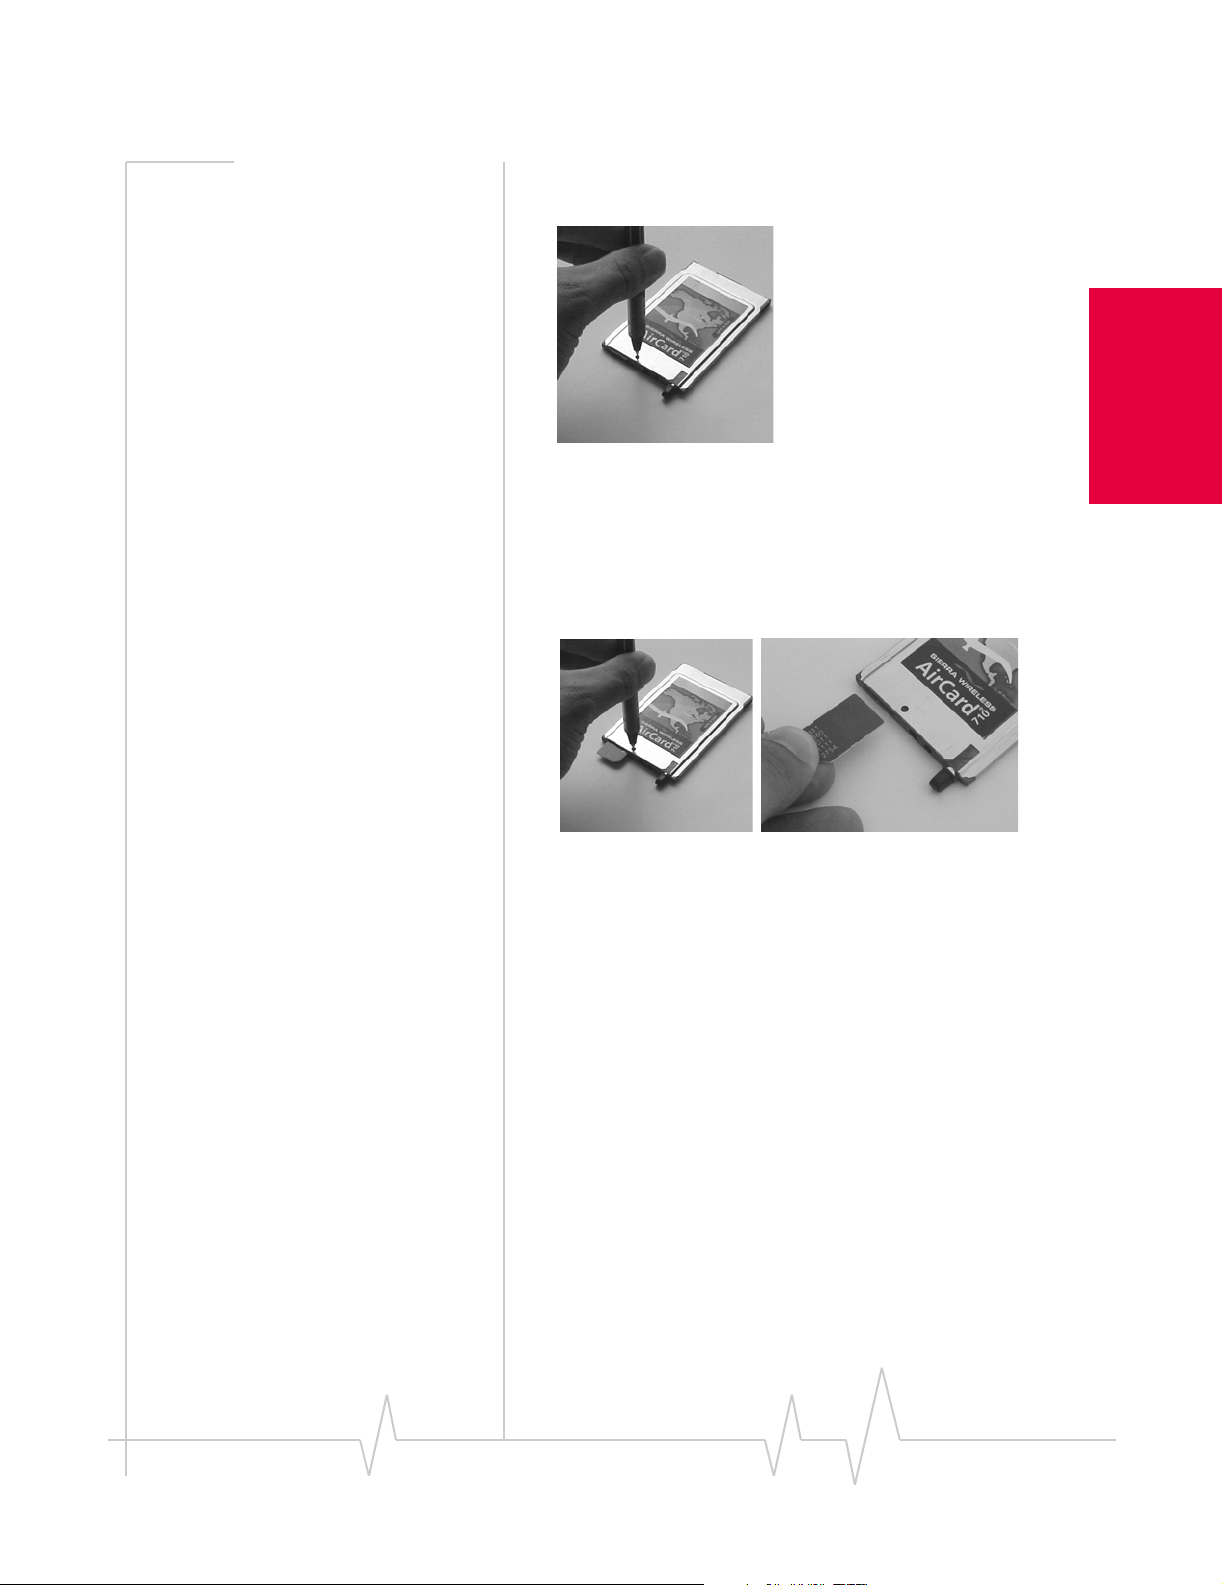
1. Place the AirCard 710/750 PC Card on a smooth, hard
surface such as a tabletop, as shown in Figure 2-3.
Figure 2-3: Positioning a pen to eject the SIM card
2. Position your pen or paperclip above the eject hole, which
is on the top surface of the AirCard housing, just to the
right of the SIM card slot (left photo in Figure 2-4).
3. Press down firmly (but without excessive force) on the
eject hole. The SIM card should pop out of its slot.
Figure 2-4: Ejecting and removing the SIM card
4. Gently pull the SIM card from the slot until it slides free.
Getting Started
Rev 1.2 Mar.02 7
Page 16

AirCard 710/750 Network Card Installation Guide
8 2130135
Page 17

3: Installation on Notebook PCs
• System requirements
• Setting up your
Internet connection
• Installing the AirCard
software
System requirements
Note: Dial-up Networking and
Winsock are components of the
Windows operating system
required by the AirCard 710/750.
The versions of these components shipped with Windows 95
OSR2 do not meet the AirCard
710/750 requirements. If you are
using Windows 95 OSR2 and
have not yet upgraded to
Winsock2 and Dial-up
Networking version 1.3 or later,
you must do so before installing
the AirCard. The required
versions can be downloaded
from the Microsoft web site,
www.microsoft.com.
The AirCard 710/750 wireless network card is supported on:
• Windows 95 OSR2 and higher with Winsock2 and Dial-up
Networking 1.3 or higher
• Windows 98 SE
• Windows 2000 with Service Pack 1
• Windows NT 4.0 with Service Pack 6a and Networking
installed
• Windows Me
• Windows XP (Home and Professional versions)
To install the AirCard, you require these system resources:
Table 3-1: System resource requirements
Card Slots 1 Type II PCMCIA (PC Card) Slot
Disk Drive CD-ROM
I/O Resources 1 IRQ, 40 bytes I/O Space
Memory 32 MB
Setting your Internet
Notebook PCs
connection to use the AirCard
Most likely, your computer will be set to use a modem to
connect to the Internet.
To use the AirCard, you must set your computer to connect to
the Internet through a LAN (local area network).
The specific steps to do this will depend on the browser you
are using.
Internet Explorer version 5 and 6
1. In Internet Explorer, select Tools > Internet Options.
2. Click the Connections tab.
Rev 1.2 Mar.02 9
Page 18

AirCard 710/750 Network Card Installation Guide
3. Click Setup to run the Internet Connection Wizard.
4. Select the option "
manually, or I want to connect through a local area network
(LAN).
5. Select "
Next.
6. In the “Local area network Internet configuration“
window, ensure no checkboxes are selected. Click
Windows 95 OSR 2, 98 SE, 2000, and Me
I want to set up my Internet connection
" Click Next.
I connect through a local area network (LAN)". Click
Next.
Note: Users of Windows 2000
must be logged in with administrative privileges.
Windows 2000 4. If the Digital Signature Not Found window appears (this may
Note: Users of Windows 95 must have Winsock2 and Dial-up
Networking version 1.3 installed. These versions of the components
were not included in Windows 95 OSR as it was originally shipped.
You can download them from the Microsoft web site.
You must also verify that your PC card slots are enabled and that
TCP/IP is installed. For instructions on installing Dial-Up Networking
and TCP/IP and enabling your PC card slots, see the Windows 95
online Help (available by selecting Start > Help).
Note: You may require your Windows CD (particularly if you are using
Windows 95). Ensure you have the CD before proceeding.
1. If the AirCard CD is not already in your CD-ROM drive,
insert it. The CD should auto-start and display a menu.
· If the CD does not auto-start, select
d:\launch.exe where d is the drive letter of your CD-ROM
Start > Run and enter
drive.
2. From the CD start-up menu, select
documentation
launch the InstallShield
3. Use the
and then notebook software installation to
®
Wizard.
Next and Back buttons to navigate through the
notebook installation and
wizard.
Using the default settings for the Destination Location and
Program Folder is recommended unless you have special
requirements and an advanced understanding of PC configuration.
happen several times), click
Yes (to continue the instal-
lation).
10 2130135
Page 19

Chapter 1: Introducing the AirCard 555 Network Card
5. When prompted to insert the AirCard:
AirCard 750 only a. Attach the antenna to the AirCard 750. (The AirCard
710 has a built-in antenna.)
Note: Do not forcefully insert the
AirCard. This may damage
connector pins.
Windows 2000 6. If the Digital Signature Not Found window appears (this may
AirCard 710 only 7. Grasp the tip of the AirCard 710 antenna and pull it to
b. With the SIM card inserted into the AirCard (page 6)
and the label of the AirCard facing up, carefully insert
the AirCard into your PC Card slot.
Figure 3-1: Inserting the AirCard 710/750 network card
c. Click OK in the window requesting you to insert the
AirCard.
Windows detects that a new device has been inserted and
launches a wizard that guides you through the driver
installation.
happen several times), click
Yes (to continue the instal-
lation).
extend the antenna fully (it should click into place).
8. Pivot the antenna hinge so that the antenna is vertical to
your keyboard.
Notebook PCs
Figure 3-2: Pivoting the antenna at the hinge
Windows 95, 98 and Me 9. If prompted to eject the card and then restart the PC:
a. Eject the AirCard.
Rev 1.2 Mar.02 11
Page 20

AirCard 710/750 Network Card Installation Guide
b. Click Yes to restart your computer.
c. Only after your computer has restarted and Windows
10. To close the CD start-up menu, use the
lower right corner of the window.
Watcher should start, and a window prompting you to
configure your account should display.
11. Click
Windows XP
has finished launching, insert the AirCard.
exit option in the
Yes. See “Configuring Your Account” on page 23.
Note: Depending on the XP
installation, you may require
administrative privileges.
AirCard 750 only a. Attach the antenna to the AirCard 750. (The AirCard
1. If the AirCard CD is not already in your CD-ROM drive,
insert it. The CD should auto-start and display a menu.
· If the CD does not auto-start, select
d:\launch.exe where d is the drive letter of your CD-ROM
Start > Run and enter
drive.
2. From the CD start-up menu, select
documentation
and then notebook software installation to
notebook installation and
launch the InstallShield Wizard.
3. Use the
Next and Back buttons to navigate through the
wizard.
Using the default settings for the Destination Location and
Program Folder is recommended unless you have special
requirements and an advanced understanding of PC configuration.
4. Each time the
Continue Anyway.
Software Installation window appears, click
5. When prompted to insert the AirCard:
710 has a built-in antenna.)
12 2130135
Page 21

Chapter 1: Introducing the AirCard 555 Network Card
Note: Do not forcefully insert the
AirCard. This may damage
connector pins.
b. With the SIM card inserted into the AirCard (page 6)
and the label of the AirCard facing up, carefully insert
the AirCard into your PC Card slot.
Figure 3-3: Inserting the AirCard 710/750 network card
c. Click OK in the window requesting you to insert the
AirCard.
Windows should detect that a new device has been
inserted and launch a wizard that guides you through the
driver installation.
6. On the first window of the Found New Hardware Wizard,
select
Install from a list or specific location (Advanced) and click
Next to proceed.
7. In the
Found New Hardware Wizard window:
a. Select the
Search for the best driver in these locations radio
button.
b. Ensure “Search removable media” is
c. Select the
then enter
Include this location in the search check box,
d:\Drivers\WinXP where d is the drive letter of
not selected.
your CD-ROM drive.
Notebook PCs
d. Click
Next to proceed to the next window.
8. If a window appears requesting you to “Please select the
best match for your hardware from the list below”, select
Rev 1.2 Mar.02 13
Page 22

AirCard 710/750 Network Card Installation Guide
the file that is located on the CD (in the \drivers\winxp
folder) and click
9. If a warning appears stating that AirCard 710/750 has not
passed Windows Logo testing, click
10. Click
AirCard 710 only 11. Grasp the tip of the antenna and pull it to extend the
antenna fully (it should click into place).
12. Pivot the antenna hinge so that the antenna is vertical to
your keyboard.
Next.
File on CD
Continue Anyway.
Finish and repeat steps 6 to 9 as prompted.
Figure 3-4: Pivoting the antenna at the hinge
13. When you see a window with the message “AirCard® 710/
750 has been successfully installed.“, click
OK.
Watcher should start, and a window prompting you to
configure your account should display.
14. Click
To close the CD start-up menu, click
then use the
Yes. See “Configuring Your Account” on page 23.
Demoshield on the Taskbar,
exit option in the lower right corner of the
window.
14 2130135
Page 23

Chapter 1: Introducing the AirCard 555 Network Card
Windows NT
Note: The AirCard driver
requires that Windows
Networking is installed. Also
the PC Card slots must be
enabled. If you are not certain
that networking is installed
and the slots enabled, see the
Windows NT user documentation for instructions.
Note: You must re-install the Windows NT Service Pack after you
install the AirCard driver. Ensure you have your Service Pack CD
before you begin. (Version 6a is supported.)
Note: Windows system files may also be required to complete the
installation. These files are located on the Windows NT CD.
1. If the AirCard CD is not already in your CD-ROM drive,
insert it. The CD should auto-start and display a menu.
· If the CD does not auto-start, select
d:\launch.exe where d is the drive letter of your CD-ROM
Start > Run and enter
drive.
2. From the CD start-up menu, select
documentation
and then notebook software installation to
notebook installation and
launch the InstallShield Wizard.
3. Use the
Next and Back buttons to navigate through the
wizard.
Using the default settings for the Destination Location and
Program Folder is recommended unless you have special
requirements and an advanced understanding of PC configuration.
On completion of the software installation, exit from the
startup menu by clicking
exit in the lower right corner.
Notebook PCs
Inserting the AirCard
Your PC must be off whenever
you insert or eject the AirCard
AirCard 750 only 2. Attach the antenna to the AirCard. (The AirCard 710 has a
Rev 1.2 Mar.02 15
1. Close all Windows programs and turn your PC off.
built-in antenna.)
Page 24

AirCard 710/750 Network Card Installation Guide
Note: Do not forcefully insert the
AirCard. This may damage
connector pins.
AirCard 710 only 4. Grasp the tip of the antenna and pull it to extend the
3. With the SIM card inserted into the AirCard (page 6) and
the label of the AirCard facing up, carefully insert the
AirCard into your PC Card slot.
Figure 3-5: Inserting the AirCard 710/750 network card
antenna fully (it should click into place).
5. Pivot the antenna hinge so that the antenna is vertical to
your keyboard.
Figure 3-6: Pivoting the antenna at the hinge
6. Turn on your PC.
7. Log on as Administrator.
Note: Depending on how
Windows NT is configured, the
prompts and windows described
here may not appear in the
precise order indicated. Use
these instructions as a guideline
to the selections you should
make.
Installing the Network Card Driver
1. Open the Control Panel by selecting Start > Settings >
Control Panel
2. Double click the Network icon to open the Network
window.
3. Click the
4. Click the
.
Adapters tab in the Network window.
Add... button to open the Select Network Adapter
window.
16 2130135
Page 25

Chapter 1: Introducing the AirCard 555 Network Card
5. Click the Have Disk... button to open the Insert Disk
window.
6. Enter
d:\Drivers\WinNT where d is the drive letter for your
CD-ROM drive and click
Option window in which
Adapter
is selected.
OK to open the Select OEM
Sierra Wireless AirCard GPRS
Note: The AirCard will not
function with the default settings
for the I/O Port , Interrupt, and
Com port if any of these
resources are allocated to
another network card or other
device. If you are familiar with
the Windows NT Diagnostics
window, you can check to see if
these resources are available.
Otherwise, leave the default
settings and if the AirCard does
not function following the driver
installation, see the instructions
on changing the interrupt on
page 18.
7. Click OK. A window opens showing the settings for the
I/O Port (0x800), interrupt (10) and COM port (4).
8. If you are aware that these resources are in use by another
device (see the note in the margin), change the settings and
click
OK. Otherwise, click OK to use the default settings.
Windows then copies the driver files.
9. Click
Close to close the Network window and open the
Microsoft TCP/IP Properties window.
10. Select
Sierra Wireless AirCard GPRS Adapter in the Adapter
field and select
Obtain an IP address from a DHCP Server
radio button.
11. Click
12. Click
13. Click
Yes to confirm that DHCP is to be used.
OK to close the TCP/IP Properties window.
No if prompted to restart your PC. (You must restart
your PC after the modem driver installation.)
On completion of this step, the network card driver is installed
and you can proceed to install the modem driver. Follow the
instructions in the next section.
Installing the Modem Driver
1. In the Control Panel, double click the Modems icon. If the
Install New Modem wizard opens, skip to step 3.
Otherwise, proceed to step 2.
2. Click the
wizard.
3. Select
Next.
4. Select the
5. Enter
CD-ROM drive and click
6. Verify that
and click
7. Select the
communications port used for the network card driver
(COM 4 unless you changed it). Click
8. Click
Add button to open the Install New Modem
Don’t detect my modem, I will select it from a list and click
Have Disk button.
d:\Drivers\WinNT\ where d is the drive letter for your
OK.
Sierra Wireless AirCard GPRS Modem is displayed
Next.
Selected Ports radio button and select the same
Next.
Finish.
Notebook PCs
Rev 1.2 Mar.02 17
Page 26

AirCard 710/750 Network Card Installation Guide
9. Click Close to close the Network Properties window.
Note: You must restart your PC
to complete the installation.
10. If you are prompted to restart your PC, click Yes.
Otherwise restart your PC from the Start menu.
11. When the PC restarts, re-install your Service Pack.
On completion of this step, the modem driver is installed and
you can proceed to configure the AirCard to use your account
(if it was not pre-activated). See the section “Account Configuration Procedures” on page 23.
Changing the Interrupt
If the message, “Communication Failed!…” occurs when you
start Watcher, a possible reason is that you have assigned an
interrupt to the AirCard that has also been assigned to another
device.
To change the interrupt assigned to the AirCard:
1. Open the Control Panel by selecting
Control Panel
.
2. Double click the Network icon.
3. Select the
4. Select
Properties… button.
Adapters tab.
Sierra Wireless AirCard GPRS Adapter and click the
5. Use the drop-down list to change the Interrupt to another
number and click
OK.
6. Close the Network window by clicking the
7. Restart your PC.
8. If the AirCard still does not function properly, repeat the
procedure, selecting a different interrupt.
Start > Settings >
Close button.
18 2130135
Page 27

4: Installation on Pocket PCs
• System requirements
• Installing the software
• Inserting the AirCard
System requirements
On Pocket PCs, your operating system must be:
• Windows CE 3.0 MS Pocket PC, or
• Windows CE 3.0 Pocket PC 2002
Note: If your device is running
Pocket PC, we strongly
recommend you upgrade to
Pocket PC 2002, if possible.
Contact your retailer or manufacturer for details.
Note: ActiveSync is made by
Microsoft and is included with all
Pocket PCs running Windows
CE 3.0. (It is also available from
the Microsoft web site.)
ActiveSync 3.1 is supported on
Windows 95/95, Windows 2000,
Windows Me, and Windows NT
4.0 with Service Pack 3 or later.
ActiveSync 3.5 is supported on
Windows 98, Windows 2000,
Windows XP, and Windows NT
4.0 with Service Pack 6 or later.
If you do not know what version of Windows CE you are
using, select
About icon. If the second line on the screen reads, “Windows
3.0.9348 (Build…)”, your operating system is Windows CE 3.0
MS Pocket PC. If the second line reads, “Windows 3.0.11171
(Build…)”, your operating system is Windows CE 3.0 Pocket
PC 2002.
Your Pocket PC must have:
• [2.6] MB of storage memory
• The PCMCIA jacket accessory (with a single PC Card slot)
• A method of connecting to a host computer, using either a
serial autosync cable, USB autosync cable, or infrared ports
You require a desktop or notebook computer to function as the
host that:
• Has the necessary port (serial, USB, or infrared) to connect
to the Pocket PC
• Has a CD-ROM drive
• Has ActiveSync version 3.1 or 3.5 installed (ActiveSync 3.5
is required if you are using Windows CE 3.0 Pocket PC
2002)
Start > Settings, tap the System tab, and tap the
Installing the software
Software cannot be installed directly to a Pocket PC. The installation process has these steps:
1. Install the software to the host (a desktop or notebook
computer to function as a host).
Pocket PCs
Rev 1.2 Mar.02 19
Page 28

AirCard 710/750 Network Card Installation Guide
Warning: Do not insert the
AirCard into the Pocket PC
before downloading the
software.
2. Connect the Pocket PC to the host and download the
software from the host to the Pocket PC. (You can connect
the Pocket PC to the host before or after you install the
software to the host.)
3. Insert the AirCard into the Pocket PC.
To install the software, you can either:
• Connect the host and the Pocket PC before you install the
software to the host. (In this case, you are prompted to
initiate the download as soon as the software installation is
complete.)
Or
• Install the software to the host and then connect the host
and the Pocket PC, as described here.
This process installs Watcher and the AirCard drivers.
Installing the software on the host
1. If the AirCard installation CD is not in your CD-ROM
drive, insert it. The CD should auto-start and display a
menu.
· If the CD does not auto-start, select
d:\launch.exe where d is the drive letter of your CD-ROM
Start > Run and enter
drive.
Note: Newer versions of the
AirCard software may be
available on the Sierra Wireless
web site,
www.sierrawireless.com.
2. From the CD start-up menu, select:
·
Pocket PC installation and documentation and then Pocket
PC software installation
(if you have a Pocket PC running
Windows CE 3.0 MS Pocket PC), or
·
Pocket PC 2002 installation and documentation and then
Pocket PC 2002 software installation (if you have a Pocket
PC running Windows CE 3.0 Pocket PC 2002)
This launches the InstallShield Wizard that installs the software to the host.
3. Use the
Next and Back buttons to navigate through the
wizard.
· Using the default settings for the Destination Location
and Program Folder is recommended unless you have
special requirements and an advanced understanding of
PC configuration.
· A dialog box displays this message, “On the next mobile
device connection, the installed applications will be
downloaded to the device.” Click
· Use the
exit option in the lower right corner of the
OK.
window to close the CD start-up menu.
20 2130135
Page 29

Chapter 1: Introducing the AirCard 555 Network Card
Downloading the software to the Pocket PC
Warning: Download the AirCard
software before inserting the
AirCard into your Pocket PC.
Note: If you are unable to
establish a connection, launch
ActiveSync from the Start menu
and use the online help in
ActiveSync.
1. Connect the Pocket PC to the host in one of these ways:
· Connect one end of the serial cable to the bottom of the
Pocket PC and the other end to a serial port on your host
PC, or
· Place your Pocket PC in its cradle and connect the USB
cable on the cradle to a USB port on your host PC, or
· Align the infrared port on your Pocket PC with an
infrared port on your host PC.
ActiveSync should launch automatically when the host
and Pocket PC are connected.
2. If you are prompted to indicate whether you want to set
up a partnership, click
purpose of downloading the AirCard software, it does not
matter whether you have a partnership.) You should then
be prompted that there is software to download.
3. In the Installing Applications window, click
download. When complete, you will be prompted to check
your mobile device screen to see if additional steps are
required.
4. Click
5. Reset your Pocket PC by inserting the stylus into the reset
OK.
button. (The reset button is usually a circular indentation
that may be on the bottom of the Pocket PC. Consult the
documentation that came with your PC if you do not know
how to reset the device. Simply turning the device off and
on is not sufficient.)
Yes or No and click Next. (For the
Yes to start the
Pocket PCs
Inserting the AirCard into a Pocket PC
To insert the AirCard into a Pocket PC:
1. If the PCMCIA jacket accessory is not already attached,
slide the Pocket PC bottom first into the jacket. It should
click into place.
2. Ensure the SIM card is inserted into the AirCard
(described on page 6).
AirCard 750 only 3. Attach the antenna to the circular copper connector on the
end of the AirCard. DO NOT FORCE. (The AirCard 710
has a built-in antenna.)
Rev 1.2 Mar.02 21
Page 30

AirCard 710/750 Network Card Installation Guide
4. With the label facing towards the front of the Pocket PC,
insert the network card into the slot at the top of the jacket,
as shown in the following photos.
Figure 4-1: Inserting the AirCard into a Pocket PC
AirCard 710 only 5. Grasp the antenna tip and pull it so that the antenna slides
out.
AirCard 710 only 6. Make sure the antenna is fully extended (it should click
into place). The metal hinge should be fully visible, and
should rotate and pivot easily.
Figure 4-2: Extending the AirCard antenna until it clicks into place (AirCard
710 only)
7. Position the antenna so that it is vertical.
22 2130135
Page 31
5: Configuring Your Account
• Notebooks
• Pocket PC 2002
Unless your AirCard was pre-configured, you must set up a
user profile before you can use the AirCard.
Notebooks
To enter your account information into Watcher:
1. If Watcher is not running, start Watcher, by selecting
Start > Programs > Sierra Wireless > AirCard 710 > AirCard 710
Watcher
If you have a valid SIM card and are in an area that has
GPRS coverage, a screen titled “Configure a profile now?”
is displayed. Click
If instead the main Watcher window displays, this means
that you don’t have a valid SIM card or you are not in an
area that has GPRS coverage or your AirCard was preconfigured. Click
of the Options window.
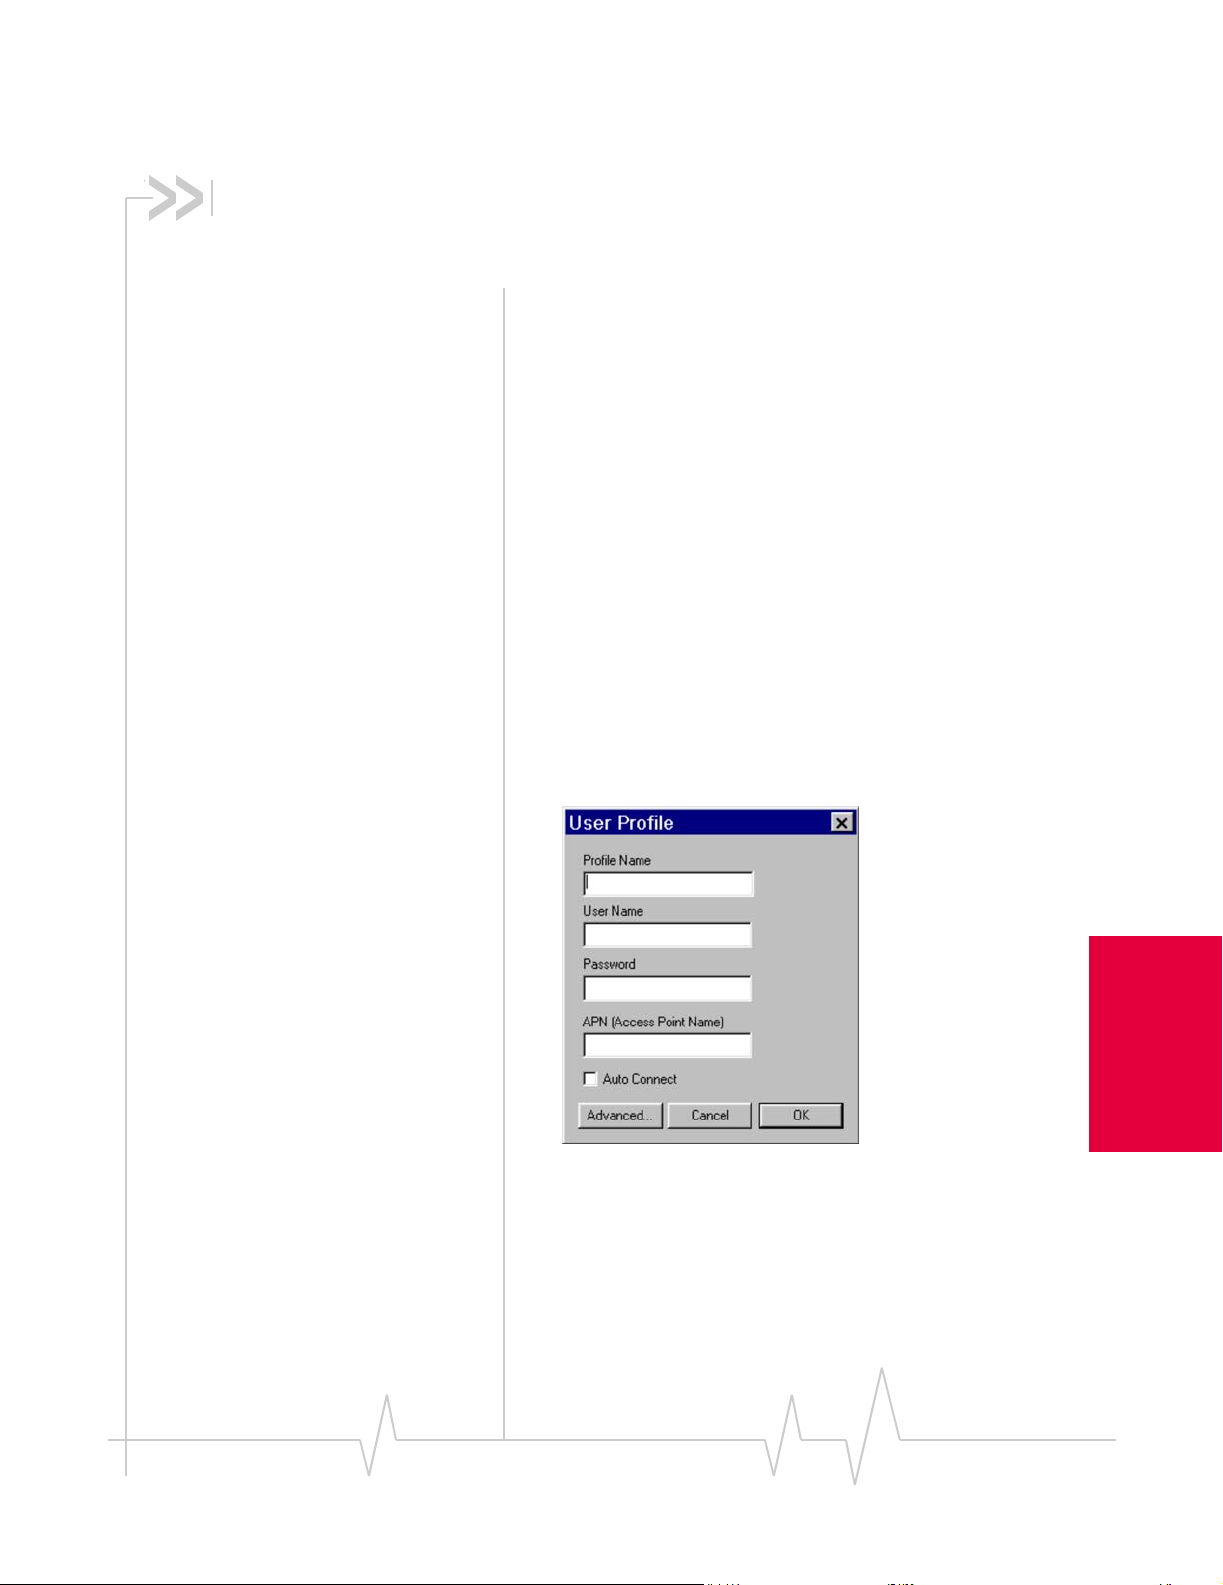
2. In the Profiles tab of the Options window, click
The User Profile window appears.
Yes.
Tools > Options to access the Profiles tab
Add.
Figure 5-1: Entering profile information (notebooks)
3. Fill in the following fields:
Profile Name—type in any name that will help you remem-
ber the purpose/use of this account. This name will be
shown in the main Watcher window and, if you later create
more profiles, you can use it to select this profile.
Rev 1.2 Mar.02 23
Account
Configuring Your
Page 32

AirCard 710/750 Network Card Installation Guide
User Name and Password—type in the user name and pass-
word that the service provider gave you, if applicable.
APN (Access Point Name)— type in the name that the service
provider gave you, if any (some service providers do not
use this, and allow a blank name). This is the name of the
system located at a base station on the GSM network that
maintains connections with other networks like the Internet.
4. If you want to have a GPRS packet data session established
whenever you are using this profile and whenever you are
in GPRS coverage, then select
Auto Connect.
Note: Depending on your
AirCard configuration, the User
Profile window may or may not
have an Advanced button. If the
button is not displayed, there is
no need to enter an IP address
or DNS address(es).
5. If your account information includes an IP address or DNS
address(es), click the
Advanced button.
6. If your service provider gave you a specific IP address for
your AirCard, then select “
the address. (Usually, you should select “
address
“.)
Use static IP address”, and type
Use dynamic IP
7. If your service provider is using data compression and/or
header compression, then select the checkbox(es) for the
feature(s) that your service provider supports.
8. If your service provider gave you values for
and
Secondary DNS , then:
Primary DNS
a. Click the DNS tab at the top of the window.
b. Enter the values into the corresponding fields.
c. Click
9. Click
OK.
OK until you return to the main Watcher screen.
The AirCard is now ready for use.
Pocket PC 2002
To enter your account information into Watcher:
1. If Watcher is not running, start Watcher, by selecting
Programs > AirCard 710 or 750 Watcher
If you have a valid SIM card and are in an area that has
GPRS coverage, a screen asking you to “Configure a profile now?” is displayed. Tap
Yes.
If instead the main Watcher screen is displayed, this means
that you don’t have a valid SIM card or you are not in an
area that has GPRS coverage or your AirCard was preconfigured. Tap
Tools > Options to access the Profiles tab of
the Options screen.
2. Tap
Add.
Start >
24 2130135
Page 33

Chapter 1: Introducing the AirCard 555 Network Card
A screen in which you enter profile information appears.
Figure 5-2: Entering profile information (Pocket PC 2002)
3. Fill in the following fields:
Profile—type in any name that will help you remember the
purpose/use of this account. This name will be shown in
the main Watcher screen and, if you later create more profiles, you can use it to select this profile.
User Name and Password—type in the user name and pass-
word that the service provider gave you, if applicable.
APN (Access Point Name)— type in the name that the service
provider gave you, if any (some service providers do not
use this, and allow a blank name). This is the name of the
gateway through which you will be connecting to the
Internet.
4. If you want to have a GPRS packet data session established
whenever you are using this profile and whenever you are
in GPRS coverage, then check
5. Tap
Advanced.
Auto Connect.
6. If your service provider gave you a specific IP address for
your AirCard, then select the radio button “
address
the radio button “
”, and type the address. (Usually, you should select
Use dynamic IP address“.)
Use static IP
7. If your service provider is using data compression and/or
header compression, then select the checkbox(es) for the
feature(s) that your service provider supports.
8. If your service provider gave you values for
and
Secondary DNS , then:
Primary DNS
a. Tap the DNS tab at the bottom of the screen.
b. Enter the values into the corresponding fields.
c. Tap
9. Tap
ok.
ok until you return to the main Watcher screen.
Account
Configuring Your
The AirCard is now ready for use.
Rev 1.2 Mar.02 25
Page 34

AirCard 710/750 Network Card Installation Guide
26 2130135
Page 35

6: Removing the AirCard
• Windows NT
• Windows 95, 98, 2000,
Me, XP
• Pocket PC 2002
Windows NT
If you are using Windows NT, your PC must be off whenever
you insert or eject the AirCard.
Windows 95, 98, 2000, Me, XP
To remove the AirCard:
1. Close Watcher if it is open.
2. Click the PC Card icon in the status area to display the
option to stop the card.
3. Click “Stop Sierra Wireless AirCard GPRS Adapter
Parent” (Windows 95, 98, 2000, or Me) or “Safely remove
Sierra Wireless AirCard GPRS Adapter Parent” (Windows
XP).
4. If a dialog box appears notifying you that it is safe to
remove the card, click
OK.
AirCard 710 only 5. Pivot the antenna so that it is once again parallel to the end
of the AirCard housing, then gently push it all the way
into its retracted position.
Figure 6-1: Retracting the antenna (AirCard 710 only)
Removin g the AirCa rd
Rev 1.2 Mar.02 27
Page 36

AirCard 710/750 Network Card Installation Guide
6. Push the PC Card eject button on your computer to eject
the card.
Figure 6-2: Ejecting the AirCard 710/750 PC Card from its slot
7. Grasp the AirCard PC Card and remove it from the slot.
Note: Anytime you eject and reinsert the AirCard, restart your
Pocket PC by turning it off and
on again.
AirCard 710 only 3. Gently push the AirCard antenna all the way into its
Figure 6-3: Removing the AirCard 710/750 PC Card from its slot
Pocket PC 2002
To remove the AirCard from your Pocket PC:
1. Stop Watcher (
Running Programs
“
AirCard 710 Watcher”, then tap Stop.)
2. Pivot the antenna so that it is parallel to the end of the
AirCard housing.
retracted position, until the tip is firmly seated against the
edge of the AirCard housing.
4. Push the PC Card eject button on the Pocket PC to eject the
card.
5. Grasp the AirCard and remove it from the slot.
Start > Settings > System tab > Memory >
> In the “Running Program List”, select
28 2130135
Page 37

Chapter 1: Introducing the AirCard 555 Network Card
Figure 6-4: Removing the AirCard from its slot (Pocket PC)
Rev 1.2 Mar.02 29
IRemoving the AirCard
Page 38

AirCard 710/750 Network Card Installation Guide
30 2130135
Page 39

7: The Watcher™ Window
C
• Launching Watcher
• The Watcher window
• Getting more
information
Notebook PCs • Selecting Start > Programs > Sierra Wireless > AirCard 710 >
Pocket PC 2002
Notebooks PCs
Wat che r Window
Watcher is the application that allows you to manage and
monitor the connection between the AirCard network card
and the network.
Launching the Watcher program
If you account profile is set to auto connect (see page 24), you
do not need to run Watcher when you use the AirCard, but it
does provide useful status information.
Depending on your settings in the Options window, Watcher
launches automatically anytime you insert the AirCard. You
can also launch Watcher by:
AirCard 710 Watcher
• Selecting Start > Programs > AirCard 710 or 750 Watcher
• Double clicking the Watcher icon on your desktop
The Watcher window
Notebook PCs
ompact View
Profile drop-down list
Packet mode
Signal strength
Indicator area
Figure 7-1: The Watcher window (AirCard 750 on notebooks)
Note: The AirCard 710 does not have a DATA or VOICE tab as it
supports data only
Roaming
DATA tab
VOICE tab
Rev 1.2 Mar.02 31
Page 40

AirCard 710/750 Network Card Installation Guide
Components of the Watcher screen (Pocket PC)
Packet mode
Signal strength
Indicator area
Profile drop-down list
VOICE tab
DATA tab
Figure 7-2: The Watcher screen (AirCard 750 on Pocket PC 2002)
Note: The AirCard 710 does not have a DATA or VOICE tab. Voice
features are not supported.
Roaming indicator
Getting more information
Detailed information on using the AirCard is included in the
online Help, which can be accessed from the
Notebooks
Note: In most windows, you can
press the Help button for help.
32 2130135
If the topic you want to view has a link on the main Help
window, click the link.
If you do not see the topic you want to display, use the
Find, or Help Topics buttons to find the topic of interest.
• In the
Index window, a list of index entries (associated to
topics) is displayed. Search for an index entry by either
typing the first few letters in the field at the top, or use the
scroll bars to scan the list of entries. When you locate an
entry of interest, click the entry and click
HELP menu.
Index,
Display.
Page 41

Chapter 1: Introducing the AirCard 555 Network Card
• In the Help Topics (Contents) window, use the scroll bar to
locate a topic of interest. Topics that have a book icon next
to them can be expanded by double-clicking the icon.
Double-click a topic to display it.
• In the
Find window, select a radio button to generate a
database (for text searching). Type the word or words you
want to find in the Help system. You can click
Options to
set word matching options.
Pocket PC 2002
Wat che r Window
To get help on a particular screen, tap Start
To view the contents of the Help:
1. Tap
Start > Help > AirCard 710.
1
> Help.
1. Start is on a menu accessed from the icon in the upper
left corner of the screen.
Rev 1.2 Mar.02 33
Page 42

AirCard 710/750 Network Card Installation Guide
34 2130135
Page 43

8: Technical Specifications
• Radio frequence and
electrical
• Environmental
Radio frequency and electrical specifications
Table 8-1: Radio frequency & electrical
specifications
Approvals FCC Parts 15, and 24
Industry Canada
[Pending] CE
Technical
Specifications
Compliance Compliant with:
Voltage +5 VDC from PCMCIA Slot
Current Typical requirement:
Multi-slot class Class 12
Transmit AirCard 710:
Receive AirCard 710:
GPRS GSM Release 97 SMG 31 Phase 2+
4 TX slots on 1.20 A peak, 0.80 A average
2 TX slots on 0.77 A peak, 0.40 A average
1 TX slots on 0.55 A peak, 0.22 A average
Standby 15 mA
PCS:
1850 to 1910 MHz
AirCard 750:
PCS:
1850 to 1910 MHz
DCS1800:
1710 to 1785 MHz
EGSM900:
880 to 915 MHz
PCS:
1930 to 1990 MHz
AirCard 750:
PCS:
1930 to 1990 MHz
DCS1800:
1805 to 1880 MHz
EGSM900:
925 to 960 MHz
Channel spacing 200 kHz
Frequency
stability
Rev 1.2 Mar.02 35
0.1 ppm
Page 44

AirCard 710/750 Network Card Installation Guide
Table 8-1: Radio frequency & electrical
specifications
RX sensitivity -102 dBm
TX modulation
quality
Antenna gain AirCard 710:
GMSK burst:
RMS phase error < 5 degrees;
Peak phase error < 20 degrees
PCS1900 band: -2.5 dB
AirCard 750:
PCS1900 and DCS1800 bands: -2.5 dB
EGSM900 band: -3.5 dB
Environmental specifications
Table 8-2: Environmental specifications
Operating
temperature
Storage
temperature
Humidity 95%, non-condensing
Vibration 15 g peak 10 to 2000 Hz (non-operating)
Drop 30” (76.2 cm) onto vinyl-covered concrete
-20 to +60 °C (ambient, outside PCMCIA
enclosure)
-30 to +85 °C
36 2130135
Page 45

9: Regulatory Information
Tested to comply with FCC standards
FOR HOME OR OFFICE USE.
This device complies with Part 15 of the FCC Rules. Operation
of this device is subject to the following two conditions: (1) this
device may not cause harmful interference, and (2) this device
must accept any interference received, including interference
that may cause undesirable operations.
CAUTION When the AirCard 710/750 is in use, users should
maintain a distance of at least 25 mm (1”) between the antenna
and any part of the body. This device has been tested for
compliance with FCC RF exposure limits in a typical laptop
computer like the IBM ThinkPad T21 laptop PC used in the
grant application. This device is only authorized to be used
in a typical laptop computer, such as the one used in the
grant application.
FCC ID: N7NAC710 (for the AirCard 710); N7NAC750 (for
the AirCard 750).
Industry Canada #: 2417332343A (for the AirCard 710);
2417C11897 (for the AirCard 750).
Where appropriate, the use of the equipment is subject to the
following conditions:
Regulatory Information
CAUTION Unauthorized modifications or changes not
expressly approved by Sierra Wireless, Inc. could void
compliance with regulatory rules, and thereby your authority
to use this equipment.
WARNING (EMI) – United States FCC Information – This
equipment has been tested and found to comply with the
limits pursuant to Part 15 of the FCC Rules. These limits are
designed to provide reasonable protection against harmful
interference in an appropriate installation. This equipment
generates, uses, and can radiate radio frequency energy and, if
not installed and used in accordance with the instructions,
may cause harmful interference to radio communication.
However, there is no guarantee that interference will not occur
in a particular installation.
If this equipment does cause harmful interference to radio or
television reception, which can be determined by turning the
equipment off and on, the user is encouraged to try to correct
the interference by one or more of the following measures:
• Reorient or relocate the receiving antenna
• Increase the separation between the equipment and
receiver
Rev 1.2 Mar.02 37
Page 46

AirCard 710/750 Network Card Installation Guide
• Connect the equipment into an outlet on a circuit different
from that to which the receiver is connected
• Consult the dealer or an experienced radio/TV technician
for help
If you have purchased this product under a United States
Government contract, it shall be subject to restrictions as set
forth in subparagraph (c)(1)(ii) of Defense Federal Acquisitions
Regulations (DFARs) Section 252.227-7013 for Department of
Defense contracts, and as set forth in Federal Acquisitions
Regulations (FARs) Section 52.227-19 for civilian agency
contracts or any successor regulations. If further government
regulations apply, it is your responsibility to ensure
compliance with such regulations.
WARNING (EMI) – Canada – This digital apparatus does not
exceed the Class B limits for radio noise emissions from digital
apparatus as set out in the interference causing equipment
standard entitled “Digital Apparatus”, ICES-003 of the
Department of Communications.
Cet appareil numérique respecte les limites de bruits radioélectriques applicables aux appareils numériques de Classe B
prescrites dans la norme sur le matériel brouilleur: “Appareils
Numériques”, NMB-003 édictée par le ministre des Communications.
[Pending] The AirCard 750 is certified to be used in the
member states of the EU.
38 2130135
Page 47

Chapter 1: Introducing the AirCard 555 Network Card
Declaration of conformity for CE Marking
[Pending]
We,
Sierra Wireless Inc.
13811 Wireless Way
Richmond, BC
Canada V6V 3A4
declare under our sole responsibility that the product
AirCard 750, to which this declaration relates, is in conformity
with the following standard(s) or other normative
document(s):
• EN 301 502; V7.0.1 (07-2000)
• ETS 300 342-1, November 1997;
• EN 301 489-07 (09-2000)
• EN 60950, 1992
• ICNIRP Guidelines - 1998
following the provisions of directive:
• R&TTE is 1999/5/EEC.
Regulatory Information
Date [Pending]
Signature
Name
Rev 1.2 Mar.02 39
Page 48

AirCard 710/750 Network Card Installation Guide
40 2130135
Page 49

Index
Numerics
1900 MHz PCS band 1
A
Access Point Name (APN) 5, 24, 25
account. See profile
aircraft, using the AirCard in
"always on" connection
antenna
care and maintenance
APN (Access Point Name)
approvals
Auto Connect
35
24, 25
iii
1
2
5, 24, 25
C
care and maintenance 2
CE
certification
declaration of conformity for CE marking
class, multi-slot
Communication Failed
configuring a profile
connection speed
copyright information
38
35
18
23–25
32
iv
D
declaration of conformity for CE marking 39
destination location
Pocket PCs
notebook PCs (Windows 98, 2000, Me)
notebook PCs (Windows XP)
DNS
primary
secondary
drop
36
20
12, 15
5, 24, 25
5, 24, 25
10
39
frequencies
receive
35
transmit
35
frequency bands
1
G
GSM wireless networks supported 1
H
hazards iii
Help, using
humidity
32
36
I
I/O space (input/output space) 9
Industry Canada #
inserting a SIM card
inserting the AirCard
Pocket PC
Windows 98, 2000, Me
Windows NT
Windows XP
installation
Pocket PCs
notebook PCs
Windows NT
Internet connection
setting to use the AirCard
Internet Explorer
setting to use the AirCard
IRQ (interrupt request)
37
6
21
11
15
13
19–22
9–18
15–18
9
9
9
L
liability, limitation of iv
Index
E
ejecting a SIM card 6
electrical specifications
EMI warning
environmental specifications
37
35
36
M
maintenance 2
memory required
multi-slot class
35
9
N
F
FCC ID 37
FCC RF exposure information
Rev 1.2 Mar.02 41
iii
networks supported 1
notebook PCs
Watcher window
notebook PCs. See also Windows
31
Page 50

AirCard 710/750 Wireless Network Card Installation Guide
O
online Help 32
operating systems supported
1
P
package contents 32
password (service provider)
patents
iv
PC Card slots required
PC Card, inserting and removing. See inserting the AirCard, removing the AirCard
PCS band
platforms supported
Pocket PC
Pocket PC 2002. See Pocket PC
primary DNS
profile
Profile Name
program folder
1
inserting the AirCard
installing the software
removing the AirCard
system requirements
Watcher screen
5, 24, 25
configuring
23–25
23, 25
Pocket PCs
notebook PCs (Windows 98, 2000, Me)
notebook PCs (Windows XP)
20
24, 25
9
1
21
19–21
28
19
32
10
12, 15
R
radio frequency bands 1
radio frequency specifications
receive frequencies
regulatory information
removing a SIM card
removing the AirCard
Pocket PC
Windows 95, 98, 2000, Me, XP
Windows NT
RF exposure information
RF specifications
35
6
28
27
35
35
37–39
27–29
27
iii
S
safety and hazards iii
secondary DNS
service provider
information you must get from
signal strength
obtaining optimal
SIM card
inserting
removing
serial number
software
5, 24, 25
5
2
6
6
5
See software installation, Watcher.
software installation
Pocket PCs
notebook PCs
specifications
electrical
environmental
radio frequency
speed of connection
starting Watcher
storage
temperature
when not using AirCard
system requirements
Pocket PCs
notebook PCs
19–21
Windows 98, 2000, Me
Windows NT
Windows XP
15–18
12–14
35–36
35
36
35
32
31
36
19
9
T
technical specifications 35–36
temperature
trademarks
transmit frequencies
Type II PC card
36
v
35
1
U
User Name 24, 25
V
vibration 36
W
warning
EMI
37
safety and hazards
Watcher
Windows
Windows 2000
Windows 95
Windows 98
31–33
screen areas
notebook PCs
Pocket PCs
starting
31
operating systems supported
as a supported operating system
inserting the AirCard
installing the software
removing the AirCard
as a supported operating system
removing the AirCard
iii
31
32
11
10–12
27
27
10–12
3
1
9
9
42 2130135
Page 51

Table of Contents
as a supported operating system 9
inserting the AirCard
installing the software
removing the AirCard
Windows CE
as a supported operating system
See also Pocket PC
Windows Me
as a supported operating system
inserting the AirCard
installing the software
removing the AirCard
11
11
10–12
27
10–12
27
19
9
Windows NT
Windows XP
wireless networks supported
15–18
as a supported operating system
changing the interrupt
inserting the AirCard
installing the software
removing the AirCard
as a supported operating system
inserting the AirCard
installing the software
removing the AirCard
15
13
9
18
15
27
9
12–14
27
1
Index
Rev 1.2 Mar.02 43
Page 52

AirCard 710/750 Wireless Network Card Installation Guide
44 2130135
Page 53

Page 54

 Loading...