

SIERRA VIDEO SYSTEMS Tahoe 2010V, Tahoe 2010VA, Tahoe 2010AA, Tahoe 2010VAA, Tahoe 2020V User Manual
...Page 1
SIERRA VIDEO SYSTEMS
Tahoe Series 20 Routing Switchers Models 2010V,
2010VA, 2010VAA, 2010A, 2010AA, 2020V, 2020VA,
2020VAA, 2020A,2020AA
User’s Manual
Page 2

Page 3

TAHOE SERIES 20 ROUTING SWITCHERS
User’s Manual
Sierra Video Systems
P.O. Box 2462 Grass Valley, CA 95945
Tel: (530) 478-1000
Fax: (530) 478-1105
Email: info@sierravideo.com
Version 2.0
Publication Date: February 2012
The information contained in this manual is subject to change by Sierra Video System
© Sierra Video Systems
Page 4

Page 5

Table of
Contents
Introduction 1
Before You Begin 1
Warnings & Safety Regulations 2
Warnings 2
Cautions 2
Cautions (continued) 3
Power Supply Cords 3
North American Power Supply Cords 3
International Power Supply Cords 3
EMC Regulatory Notices 3
Delivery Damage Inspection 3
Tahoe Family Overview 4
Introduction 4
Model Suffix Designations 5
Tahoe Series System Components 5
Frame 804030 6
Factors Affecting Quality of Results 7
Installation 9
Introduction 9
Rack Mounting 9
Dimensions 9
Connecting To Video Devices 10
Connecting To Audio Devices 10
Balanced/Unbalanced Audio Connections 11
Audio Adjustments 11
Audio Follow Video and Breakaway Audio
Configurations 12
J1 Connector 12
Connecting Peripherals 13
Sync Input 14
AC Power Connections 14
Control Processor Dip Switch Settings 14
Names 16
Salvos 16
Communication Protocol 19
Introduction 19
Generic Protocol 19
Leader and Trailer 21
Troubleshooting 37
Introduction 37
Power and Indicators 37
Video Signal 38
Audio Signal 39
Control 39
Switching Malfunctions 40
Theory of Operation 41
Introduction 41
Serial Control Module 504001 41
Video Crosspoint Module 504034 44
Audio Crosspoint Module 504035 45
Schematics 47
504001 47
504034 52
504035 54
Specifications 55
Audio Specifications 55
Video Specifications 56
Software Upgrades 57
Introduction 57
Operation 57
Operation 17
Control System Overview 17
Serial Control Ports 17
Control Panels (RS-485) 18
Power Up 18
Warranty 59
Limited Warranty Error! Bookmark not
defined.
Contents 1
Page 6

Page 7

Sierra Video Systems
Introduction
Before You Begin
There are several terms and acronyms that you should become familiar with before
reading this manual. They are shown below.
Term/Acronym Definition
Crosspoint The electronic switch that assigns one of the inputs
on the matrix crosspoint modules to an output.
Chapter
1
Destination The output of a routing switcher connected to a
device that receives signals from the output of the
switcher.
Input Connected to the source that provides the signal to
the switcher.
Matrix The crosspoint array of the switcher module that
selects which input is selected to an output.
Output Connects the signal to the destination device.
Protocol The command structure used on a serial bus to
affect a switch or multiple switches on the routing
switcher.
Routing Switcher Consists of one or more crosspoint modules that
switch together, or sometimes independently, to
connect the desired signals through the switcher.
Source The signal that is connected to the input of the
routing switcher.
Serial Port The 9-pin RS232 connector that allow you to
control the switcher using a standard personal
computer or other external device. Sends control
protocol commands in ASCII.
1
Page 8

Sierra Video Systems
Warnings & Safety Regulations
The information in the following section provides important warnings and safety
guidelines for both the operator and service personnel. Specific warnings and cautions
may be found throughout this manual. Please read and follow the important safety
precautions noting especially those instructions relating to risk of fire, electrical shock and
injury to persons.
Any instructions in this manual that require opening the equipment cover or enclosure are
intended for use by qualified service personnel only. To reduce the risk of electrical
shock, do not perform any servicing other than what is contained in the operating
instructions unless you are qualified.
Warnings
Heed all warnings on the unit and in the operating instructions.
Disconnect AC power before installing any options.
Do not use this product in or near water.
This product is grounded through the grounding conductor of the power
cord. To avoid electrical shock, plug the power cord into a properly wired
receptacle before connecting inputs and outputs.
Cautions
Route power cords and other cables so that they are not likely to be
damaged, or create a hazard.
Dangerous voltages exist at several points in this product. To avoid personal
injury, do not touch unsafe connections and com ponents when the power is
on.
To avoid fire hazard, use only the specified type, correct voltage, and
current rating of fuse. Always refer fuse replacement to qualified service
personnel.
Have qualified personnel perform safety checks after any completed service
This is an FCC class A product. In a domestic environment, this product
may cause radio interference, in which case the user may be required to take
necessary measures.
Use the proper AC voltage to supply power to the switcher. When installing
equipment, do not attach the power cord to building surfaces.
To prevent damage to equipment when replacing fuses, locate and correct
trouble that caused the fuse to blow before applying power.
Use only the recommended interconnect cables to connect the switcher to
other frames.
Follow static precautions at all times when handling the equipment.
2
Page 9

Cautions (continued)
Leave the side, top, and bottom of the frame clear for air convection cooling
and to allow room for cabling. Slot and openings in the frame are provided
for ventilation and should not be blocked.
Only an authorized Sierra Video Systems technician should service the
switchers. Any user who makes changes or modifications to the unit
without the expressed approval of the Sierra Video Systems will void the
warranty.
Pow er Supply Cords
North American Power Supply Cords
This equipment is supplied with North American power cords with molded grounded plug
(NEMA-15P) at one end and molded grounding connector (IEC 320-C13) at the other
end. Conductors are CEE color coded, light blue (neutral), brown (line), and green/yellow
(ground). Operation of the equipment at voltages exceeding 130VAC will require power
supply cords that comply with NEMA configurations.
International Power Supply Cords
Tahoe Series 20
If shipped outside North America, this equipment is supplied with molded ground
connector (IEC 320-C13) at one end and stripped connectors (50/5mm) at the other end.
Connections are CEE color coded, light blue (neutral), brown (line), and green/yellow
(ground). Other IEC 320-C13 type power cords can be used if they comply with safety
regulations of the country in which they are installed.
EMC Regulatory Notices
Federal Communications Commission (FCC) Part 15 Information: This device complies
with Part 15 of the FCC standard rules. Operation is subject to the following conditions:
This device may not cause harmful interference
This device must accept any interference received including interference that may cause
undesirable operations.
Delivery Damage Inspection
Carefully inspect the frame and exterior components to be sure that there has been no
shipping damage. Make sure all modules are seated correctly and have not detached
during shipment. Also, make sure the input buffer modules on the rear panel are secure.
3
Page 10

Sierra Video Systems
Tahoe Family Overview
Introduction
The Tahoe Family is Sierra Video Systems’ most extensive line of analog routing
switchers, setting the standard in mid-sized switchers for more than a decade. Tahoe
frames can be populated with limited modules, providing flexibility for future expansion.
Tahoe routing switchers can contain video and audio in one frame or video in one frame
and audio in a separate frame with the frames connected together by a J1 connecting
cable. Tahoe routing switchers can be video or audio only. Multiple frames can be
connected together (up to 8 levels) under the same Tahoe control system. For multiple
frames, only one Tahoe serial control module is required.
An RS-232/422 serial interface control and a RS-485 control panel network that can
accept up to 64 panels on a simple twisted pair gives the Tahoe extensive control
options. With battery backed-up RAM protection of all personality and crosspoint
information, 256 salvo registers capable of holding 800 or more crosspoints, the Tahoe
family can endure the most demanding of applications.
4
Page 11
Model Suffix Designations
Model Suffix Designations
V Analog video (50MHz bandwidth)
2020 Matrix size 20x20
A, AA… Number of analog audio channels-1 channel per “A”
R Redundant Power Supplies
T ahoe Series System Components
This User's Manual provides installation and operation information for the Tahoe Series
20x Routing Switchers. Front and Rear panel illustrations are provided in the following
subsections for each switcher model. Take time to familiarize yourself with the location of
your switcher model features.
Tahoe Series 20
Component
Frame
Accessory Kit User’s Manual
Tahoe Family Series 20x Switchers
804030 Frame
2020V, 2020VA, 2020VAA, 2020A,
2020AA, 2010V, 2010VA, 2010VAA,
2010A, 2010AA
Video and /or Audio contained in one
frame
Power Supply(ies)
Video Module(s) 504034
Audio Module(s) 504035
Processor Module 504001
Fuses
Power Cord
Software Disk
5
Page 12

Sierra Video Systems
Frame 804030
Note
The Tahoe model shown here and in the
subsequent sections are fully populated video
and / or audio matrices. In some cases, these
frames may be configured with fewer video
channels and perhaps no audio. i.e. Tahoe
models also offer redundant power supplies.
Consult the rear panel serial number and model
number to verify your order and product.
The system you receive is customized for the size
& type requested at time of purchase from Sierra
Video Systems.
6
Page 13

Factors Affecting Quality of Results
There are many factors affecting the quality of results when signals are transmitted from
a source to a destination.
Signal cables — Use only the best quality cables to avoid interference
and degraded signal quality and elevated noise levels.
Sockets and connectors of the sources and destinations — Use only the
highest quality, since "zero ohm" connection resistance is the target.
Connectors should also match the required impedance (75 ohm in
video) to minimize return loss.
Amplifying circuitry — Must have quality performance when the
desired end result is high linearity, low distortion, and low noise.
Distance between sources and destinations — Plays a major role in the
final result. For long distances (over 15 meters) between sources and
destinations, special measures should be taken to avoid high frequency
cable losses. These measures include using higher quality cables and/or
adding line cable equalizing amplifiers.
Interference from neighboring electrical appliances — These can have
an adverse affect on signal quality. Balanced audio lines are less prone
to interference, but unbalanced audio should be installed away from
any main power lines, electric motors, transmitters, etc. even when the
cables are shielded.
Tahoe Series 20
CAUTION!
Only an authorized Sierra Video Systems technician can service the switchers.
Any user who makes changes or modifications to the unit without the expressed
approval of the manufacturer will void the warranty
Use the proper AC voltage to supply power to the switcher.
Use only the recommended interconnect cables to connect the switcher to other
frames.
7
Page 14

Page 15

Sierra Video Systems
Installation
Introduction
Carefully inspect the frame to ensure that there has been no shipping damage. Make
sure all shipping material is removed from the router frame.
The routing switcher described in this manual can be rack mounted in a standard 19"
(RU) EIA rack assembly and includes rack "ears" at the ends of the front of the frame.
None of the switcher models require spacing above or below the unit for ventilation. If
ample space exists, a 1RU spacing gap is recommended.
Chapter
2
Rack Mounting
To rack mount the routing switcher, simply place the unit's rack ears against the rack rails
of the rack, and insert proper rack screws through each of the holes in the rack ears.
Always rack mount the routing switcher prior to plugging the unit into a power receptacle
or attaching any cables.
Dimensions
Frame Height Depth Width
804030
3 RU (5.25”) 16 ½” 19”
9
Page 16
Sierra Video Systems
Connecting To Video Devices
Video sources and output devices (such as monitors, or recorders) may be connected to
the routing switchers through the BNC type connectors located on the back of the unit.
Keep in mind that the output signal format will be that of the input signal format.
All signal connections that use more than one cable interconnecting between devices
should be of equal timing length (example: cables between a camera and the switcher
should have the same time delay).
Unused outputs do not need to be terminated.
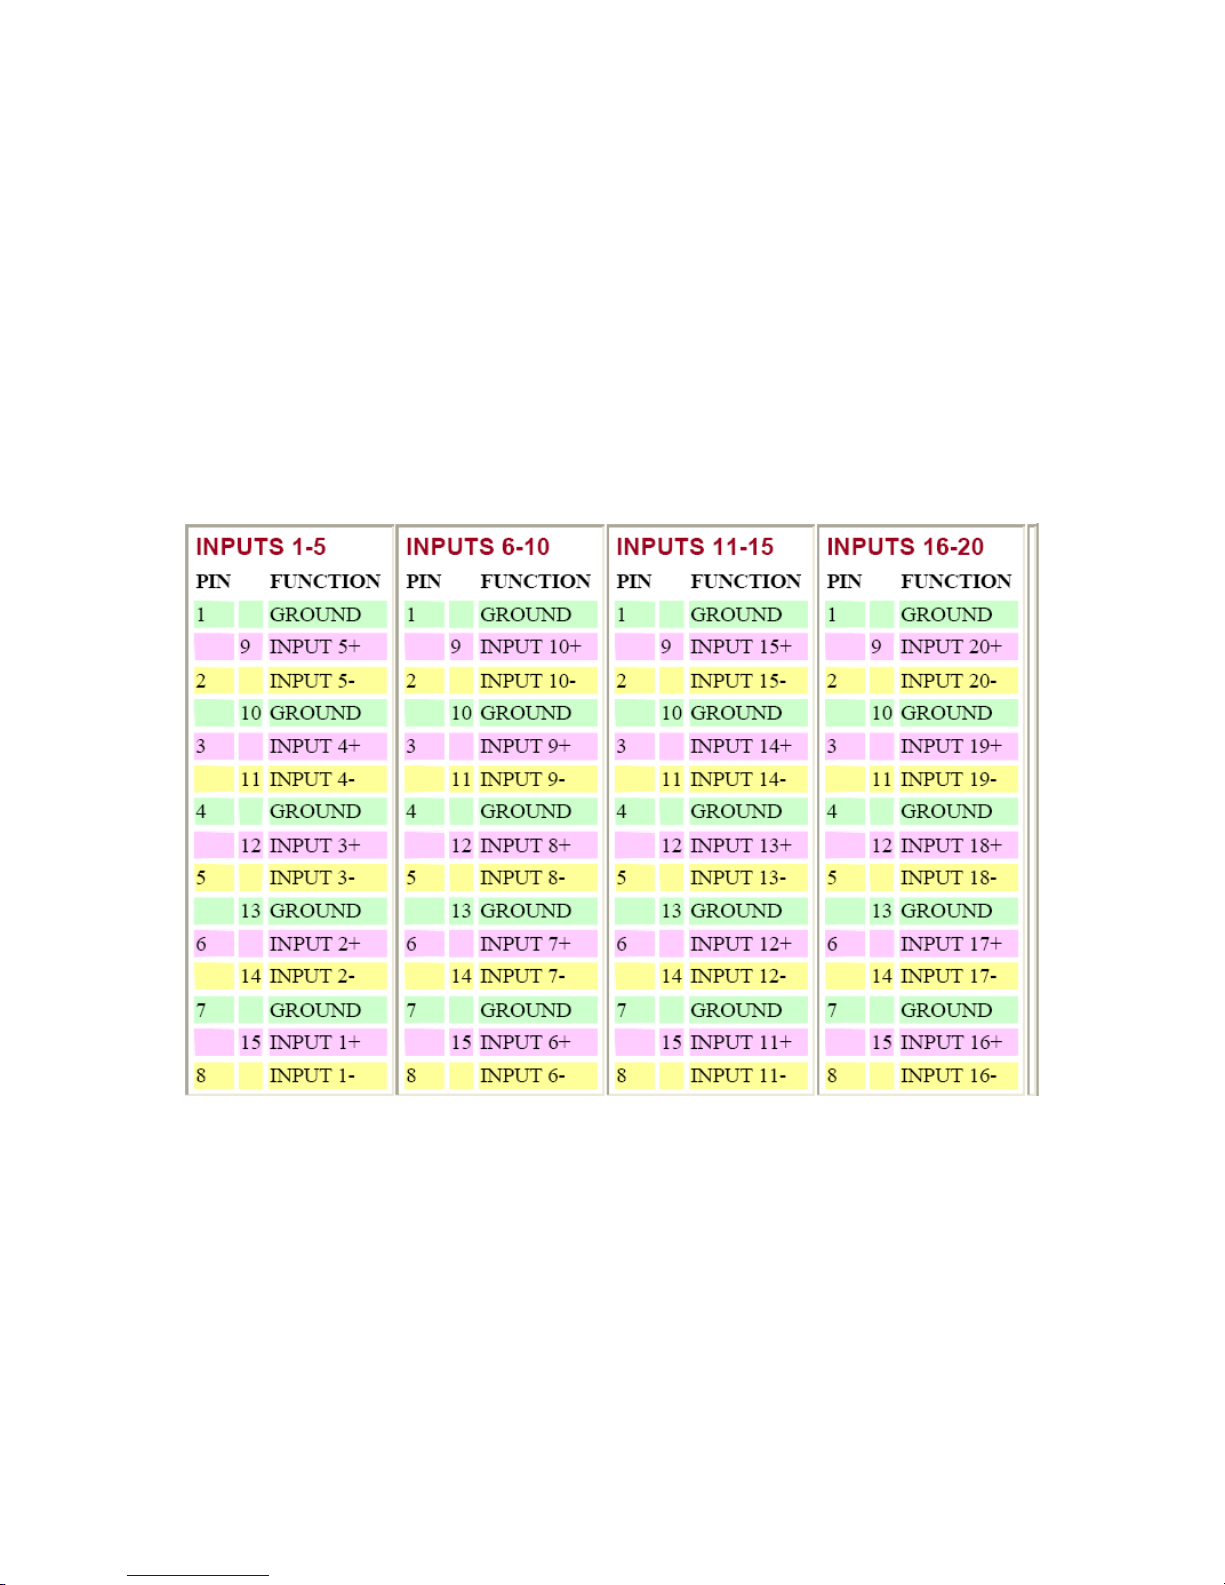
Connecting To Audio Devices
Audio sources and output devices (such as amplifiers or recorders) are connected to the
switchers through 15 pin D connectors located at, and marked, on the rear of the
switcher.
10
Page 17
Tahoe Series 20
*
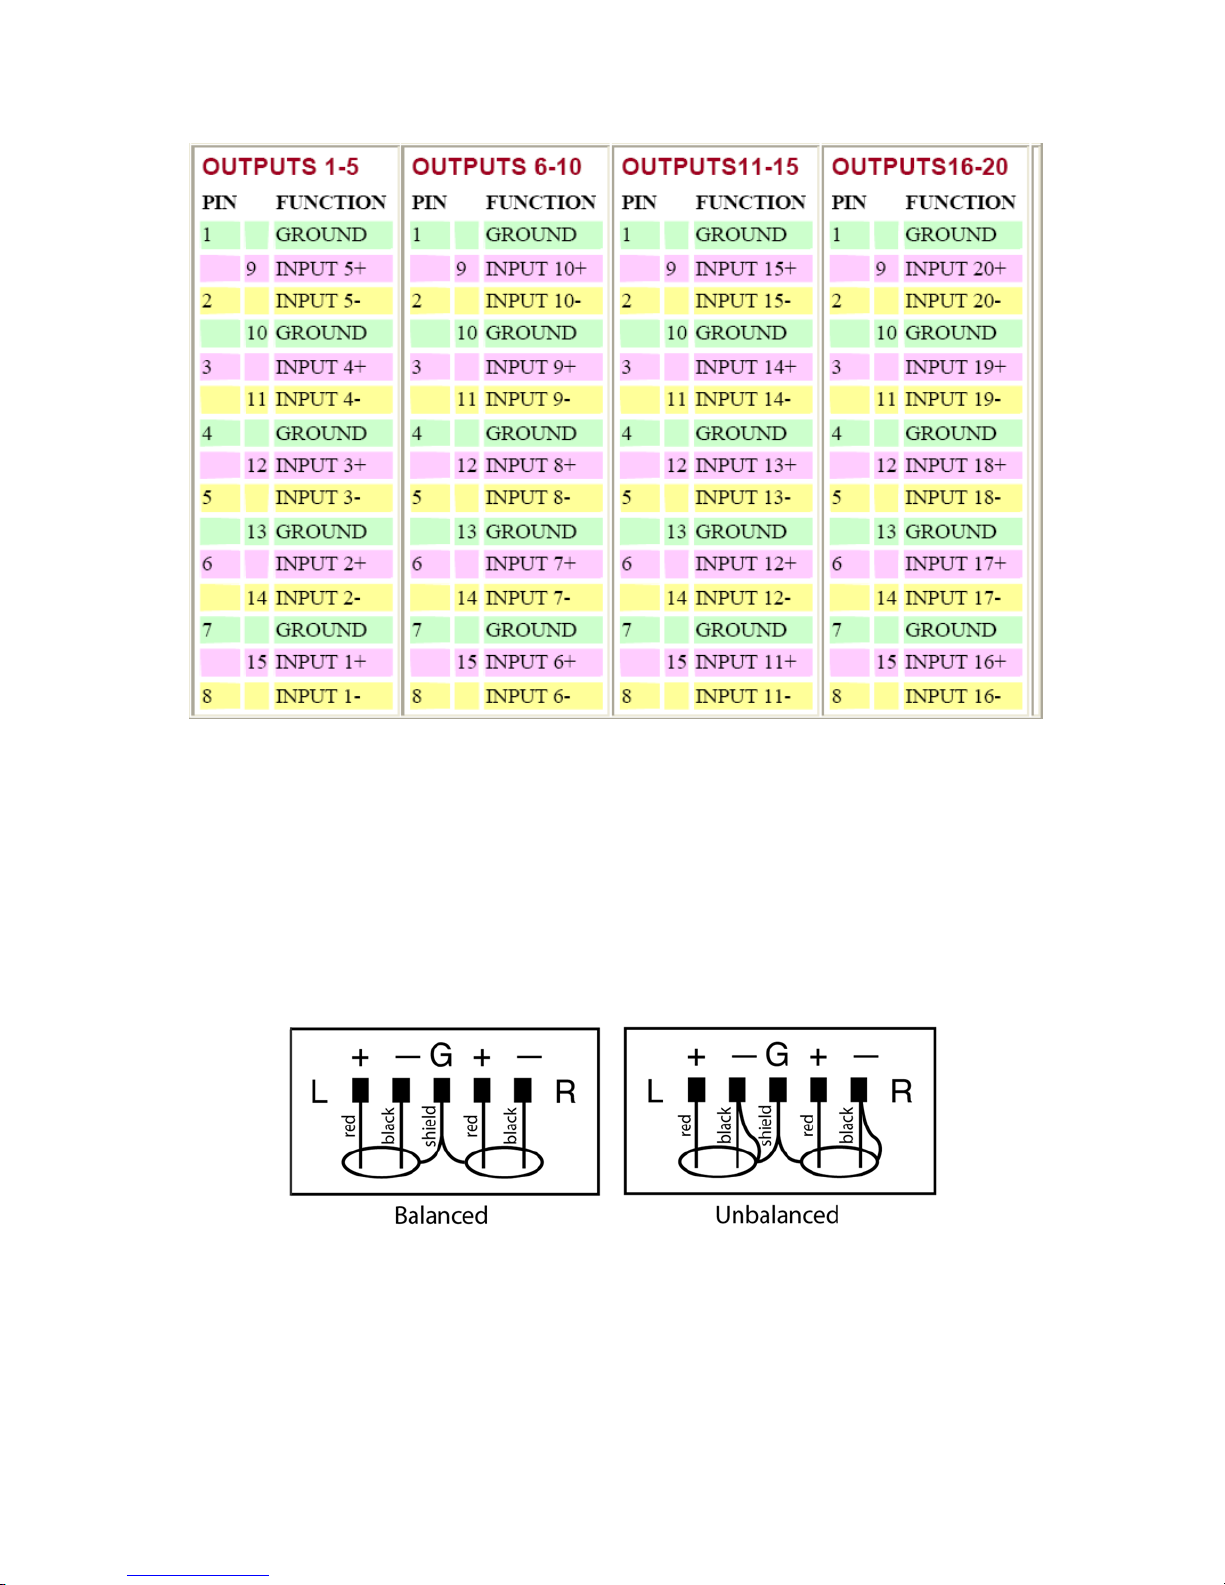
Balanced/Unbalanced Audio Connections
All audio sources from the routing switcher are balanced audio. Connect the balanced
audio to the balanced input of your destination device(s).
If this is a 2-channel system used for stereo audio, ensure that you keep the same phase
relationship. Connect the positive designated pin to the same relative pin on the
destination device of both channels.
To connect an unbalanced device to the switcher, first place a jumper between the
negative (-) and the ground on the switcher (jumper not included.) Then connect the
device positive (+) to positive (+) and shield to ground as shown in the graphic below.
For unbalanced sources, connect the unbalanced source to one side of the balanced
input and ground. The other input does not have to be grounded. Note, always use the
same side of the balanced input for stereo.
Audio Adjustments
There are no “user adjustable” audio gains. The circuit is designed for unity gain.
11
Page 18

Sierra Video Systems
Audio Follo w Video and Breakaway Audio Configurations
Video and Audio signals are switched by separate crosspoint modules. Audio can be
switched following the video or separately after the breakaway. Audio channels can be
configured to “breakaway” from each other (left and right, ect.).
J1 Connector
The connector labeled J1 on the back panel is used to connect other routing devices to
the router, such as an RS-422 machine control switcher.
Contact the factory for correct configuration before adding other devices that were not
part of your original configuration.
12
Page 19
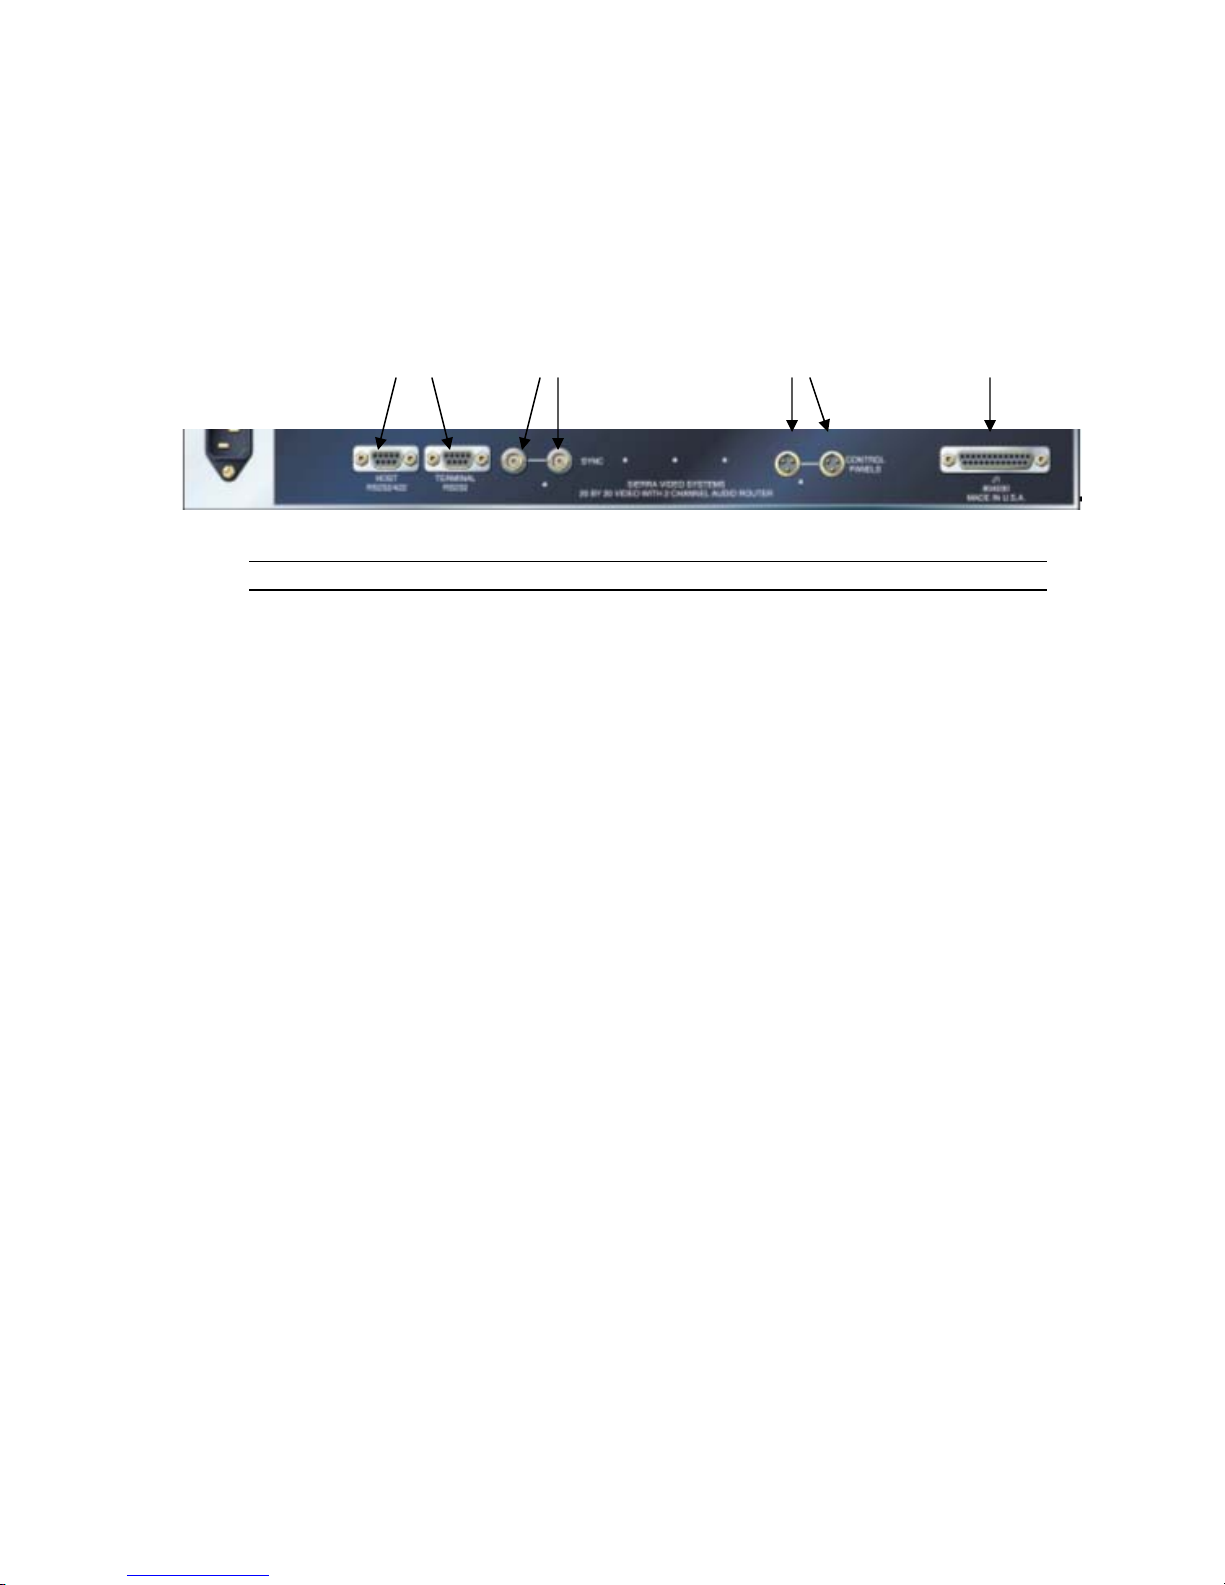
Connecting Peripherals
Control panels, sync inputs, and power are all connected to the rear of the frame. The
peripherals area may vary depending on the model size and type.
Tahoe series routing switchers offer redundant power supplies but must be specified prior
to order.
Tahoe Series 20
RS-232/422
Serial Control
SYNC RS-485 Control Panels
Note:
Rear Panels vary according to model. See back panel for precise detail.
J1 Frame
Interconnect
13
Page 20
Sierra Video Systems
Sync Input
There are two BNC connectors labeled "SYNC". This is a "looping" input for sync
referencing. Connect either composite sync or video with sync to either BNC. If desired,
use the second BNC to loop the signal to another device. If the loop is not used,
terminate the second BNC with 75 ohms. If no sync is available, the routing switcher will
switch at a random point rather than during the vertical interval of the reference signal.
AC Po wer Connections
Tahoe series routing switchers offer redundant power supplies but must be specified prior
to order. Voltage selection must be specified prior to order.
Turn on power to the frame ONLY AFTER all video and control connections have been
completed as described below.
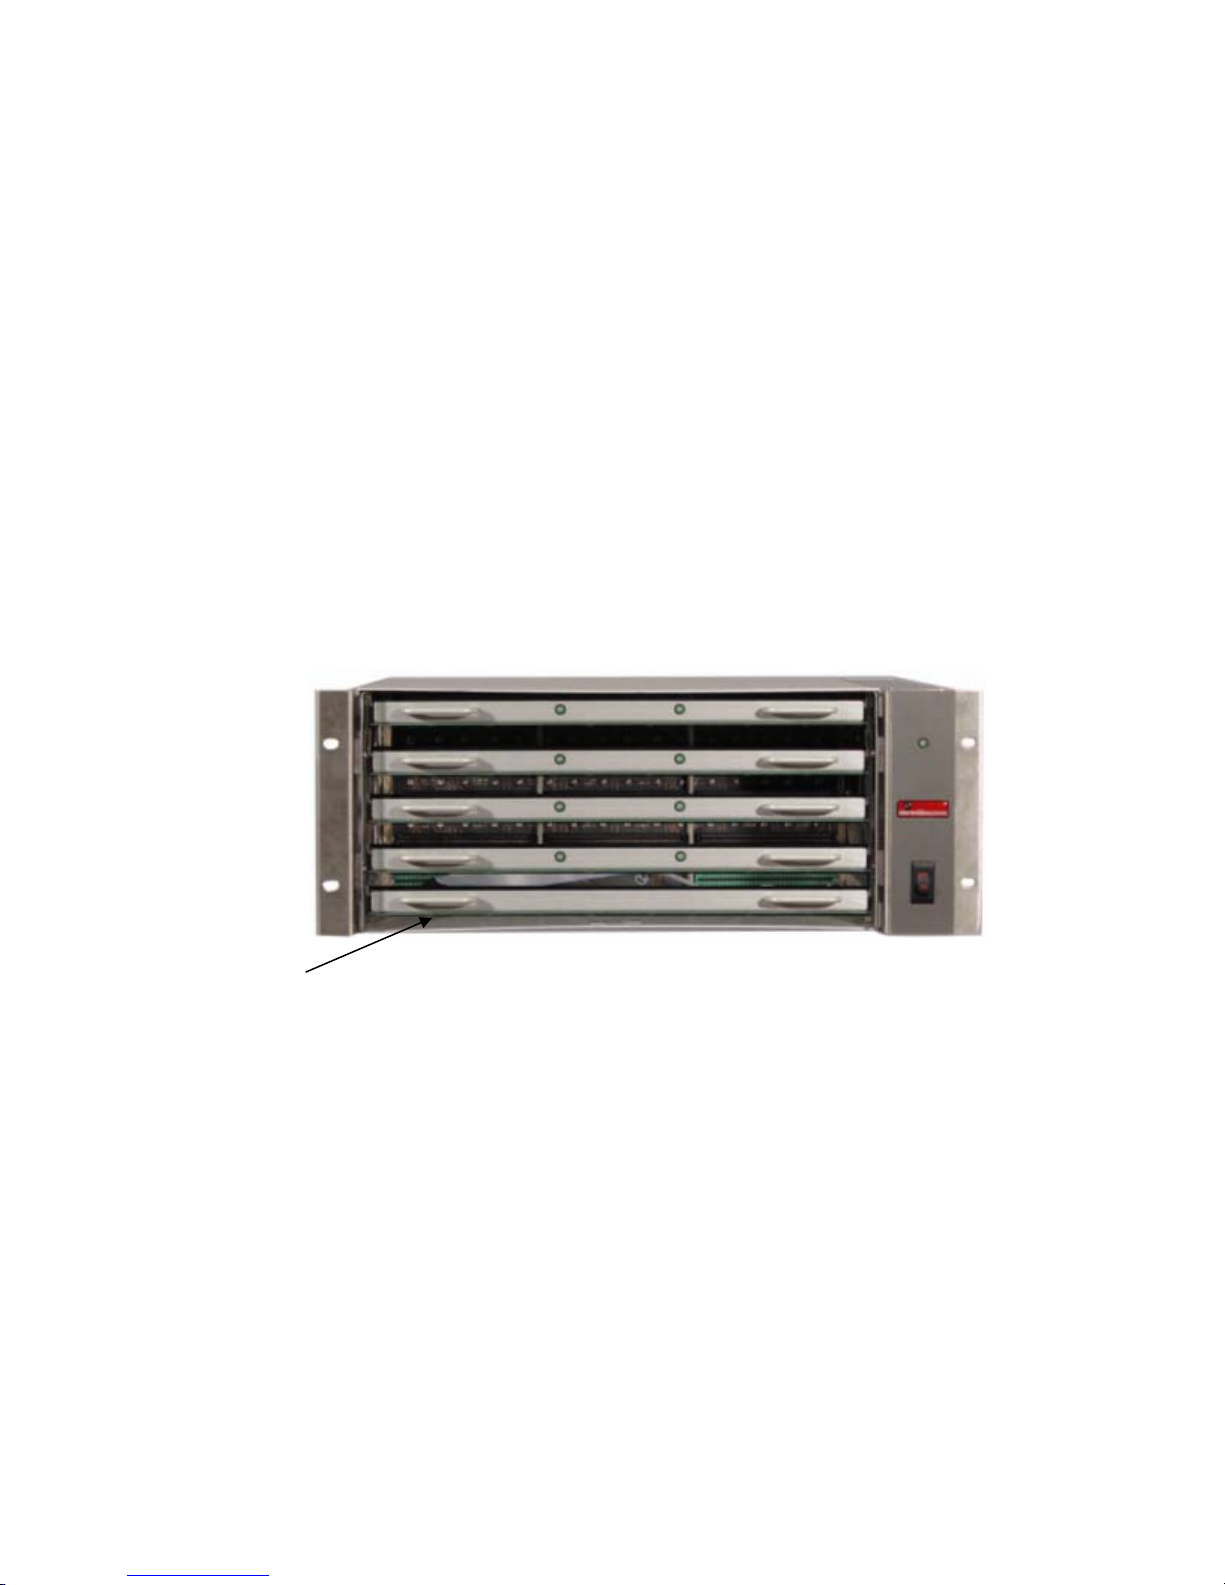
Control Processor Dip Switch Settings
In a multi-frame system, only one processor is needed to control the entire router.
The processor module, in a Tahoe series frame, is located in the bottom PC board slot as
shown;
Processor Module
14
Your switcher has been configured at the factory for the settings you are most likely to
need. However, if you want to configure the switcher differently, you can do so by setting
the switches located on the processor board (behind the front panel). Dip Switches and
their action are given in the table that follows. Dip Switches are shown in their factory
default settings.
Page 21

Tahoe Series 20
Note:
Changing any Dip Switch causes an automatic reset after a few seconds.
15
Page 22

Sierra Video Systems
Names
Source, Destination, and level names can be applied using two methods. Names can be
applied using the GRIP program (See the GRIP manual for details on naming), or names
can be applied using the serial port (See the Generic Protocol section of this manual).
Salvos
A Salvo is a group of Sources and Destinations that are stored in the routing switcher and
switched by a single “Salvo Take” command. GRIP Routing Software allows up to 40
Salvos to be named and stored in the routing switcher. The salvo name will be displayed
in the Salvo register. Salvos are made and stored in the router using the Sierra Video
Systems Software program GRIP. See the GRIP manual for details on creating and
storing salvos.
16
Page 23

Sierra Video Systems
Operation
Control System Overview
The Tahoe Family’s three port control system incorporates many powerful features, while
retaining control compatibility with many leading third party control systems and with
earlier generation SVS routing switchers. The control system uses an intuitive interface
for routing switcher control and configuration, passwording, salvo setup, multiple
input/output configuration and name configuration. Windows based, client/server software
is IP addressable and supports event timing and bitmap icons. Up to 64 control panels
can be linked at any one time, daisy-chained on a single RS-485 network. A variety of
control panel styles are available including single-bus, X-Y, simple keypad, color LCD
multi-bus, and fully programmable panels.
Chapter
3
Connectors associated with the system’s internal control computer are located on the
rear of the routing switcher frames. When systems are ordered with more than one
frame, only one frame will have a control computer module installed. The following
pertains to the frame that contains the master control CPU processor, 504001. Additional
frames will need to be installed and connected to the master processor as described in
the installation section above (J1 connector).
Serial Control Ports
The internal control CPU processor has three serial ports for Terminal, Host, and RS-485
control panel protocol. These three serial ports are used for overall routing switcher
system personalities, local or networked PC computer control, and control panel network
operation. Terminal Protocol is a human-readable protocol while Host Protocol is a
machine-friendly protocol. The three serial ports are shipped with a factory default as
described in Chapter 2.
Pin functions and wiring are described below.
RS-232 PC to Router Wiring
PC Pin # Router Pin #
2 2
3 3
5 1 or 9
17
Page 24

Sierra Video Systems
Host & Terminal Port
Installation
Pin RS-232 RS-422
1
2
3
Ground
Transmit
Receive
(Tied to pin 8)
Ground
Transmit (-)
Receive (+)
4 Not used Not used
5 Not used Not used
6 Not used Not used
7 Not used Transmit (+)
8
9
Control Panels (RS-485)
Tahoe Family video routing switcher frames have two male 3-pin connectors labeled
“Control Panels” on the rear. These connectors are “looped” together.
The maximum system cable length is 2,000 feet (310m) when the RS-485 network
operates at the higher speed of 31.25K baud. The maximum system cable length is 5,000
feet (1,524m) when operated at 9600 baud. Consult your Control Panel Manual for more
detailed information.
If you make your own interconnect cables, Pin 2 is Ground. Pin 1 and 3 connect pin for
pin.
Receive
Ground
Receive (-)
Ground
RS-485 Interconnect Cable
Pow er Up
Once all signal and control connections have been made, turn on the power switch. AC to
the router is indicated by an LED above the power switch. If you have power up problems
ensure that the AC fuse on the back of the switcher is seated properly.
On power up, the controller will restore the routing switcher to the last state it was in
before the power was turned off including all configuration settings as well as crosspoint
switcher status.
.
18
Page 25

Sierra Video Systems
Communication
Protocol
Introduction
The protocol uses the 7-bit ASCII character set, usually sent over an RS232-C or RS422
serial link — 9600 bps is recommended with 8 data bits and no parity. The protocol is
compact, with few characters required to cause switch changes to occur. It is also
human-readable and thus easy to understand and use. Several different crosspoint
switch request commands are defined, so that the one that is most compact for any given
switcher and application can be chosen.
Chapter
4
The protocol is useful with both very small and very large routing switchers. The sizes of
the numbers representing inputs, outputs, and levels are not fixed, but can be as large or
small as necessary. Special provisions allow numbers to be packed one after another
with no intervening delimiter character, in order to make the protocol compact, as long as
each number is the largest size necessary for that particular switcher.
All input, output, and level numbers begin at number 1, not 0.
Generic Protocol
Commands are sent to a routing switcher in a group called a command string. A
command string can contain zero or more commands, limited only by the size of the
receive buffer of the router, whose size depends on the particular router model.
A command string consists of a leader string of asterisk characters, zero, or more
commands, and a trailer string of exclamation marks. Larger routers require two leader
(**) and trailer (!!) characters, while small routers require only one, in order to make the
protocol compact for those routers. The remainder of this document gives examples
using doubled characters. Note that two leader/trailer characters may be sent to small
routers even when only one is required, and they will still work fine.
If a leader character (**) is encountered within the command string being processed by a
router, the command string up to that point is discarded and a new command string is
expected. This ensures that a router will always act on a complete command string sent
to it, even if the previous one was never completely received.
When a command string is received, it is not acted upon (but rather, is merely buffered
up) until the final trailer character (!) character of the command string is received. At that
time, the routing switcher begins to execute the commands within the string.
19
Page 26

Sierra Video Systems
The protocol uses only 7-bit ASCII characters. The 8th bit of received characters is
treated as if it is 0. Within the command string, certain ASCII characters may be present
and are ignored: any ASCII character whose code is less than the SPACE character
(includes all control characters and the SPACE character) and the DEL (ASCII 7F)
character. Alphabetic characters within the command string may be in either upper-case
or lower-case letters. The router always sends upper case characters, except for
character strings such as input, output, and level names, which may have lower case
characters in them.
When sending commands to the router, SPACE characters are optional, but if used may
only appear before and after each individual command and NOT embedded within an
individual command. Within command strings sent from the router, a single SPACE
character appears before and after each individual command. SPACES may also appear
in character strings, such as input, output, and level names.
Certain commands (R, Q, L, and G) have character strings that appear as arguments.
The first three, “R”, “Q”, and “L”, have character strings only in commands sent from the
router, and these character strings are always terminated with a ~ (tilde) character. No
special character marks the start of these strings, they simply begin at the appropriate
point within the command. The “G” command, on the other hand, uses the ~ (tilde)
character to mark both the start and end of a character string argument.
Just before the router begins executing a command string, it sends a leader (**) to the
host (the same number as are required in commands from the host). As it executes the
commands, some of them may generate additional output back to the host. These
command response characters are always preceded and followed by a space character,
making the response string easily human-readable.
After the command string has been executed, the routing switcher returns the string " OK
" (with a single space character before and after the word "OK"), followed by the trailer (!!)
and a CR (carriage return, ASCII 0D) character, to the host. This indicates that the
command has executed successfully. If an error occurs within any command of a
command string, the remainder of the command string is ignored and the router returns
the string " ERROR ", followed by an optional descriptive string followed by a string of
trailer characters and a CR character, to the host. An error can be caused by an unknown
command name or bad arguments to a command.
The simplest possible command string would be:**!! which consists of the leader and
trailer characters but no commands between them. This command string would generate
the response:
** OK !!<CR>
This can be useful for verifying that the serial link to the router is operational. In routers
requiring only one leader/trailer character, the simplest command string would be: *!
which would generate the response:
* OK !<CR>
(To determine whether a particular router uses one or two leader/trailer characters, send
it "!!**" and check the response to see which of the above two responses it is. It won’t hurt
to always use two even if only one is required.)
The simplest error response is one with no optional descriptive string. For example, this
command string:
** XXX !! might generate this response from the router:
** ERROR Syntax: No Number:XX !!
The descriptive string always ends with a colon and up to three characters from the
command string that caused the error. Generally, the error can be assumed to have
occurred just before these characters
20
Page 27

Leader and Trailer
The simplest possible command string would be “**!!” which consists of the leader and
trailer characters but no command between them. This command string would generate
the response “**OK!!” followed by “CR”. This can be useful for verifying that the serial link
to the switcher is operational.
The following is the set of commands available for sending to the router, a subset of
which may be implemented in any given routing switcher.
Syntax Example Description
R R Router Reset
I I Capabilities Inquiry
Q Q Model Name and Software
L L Matrix Size and Level Names
O O5 Output Status inquiry
Tahoe Series 20
Version Inquiry
Inquiry
N N5 Input Status inquiry
S S Status inquiry
C C Clear matrix
K K9999 Set Password to Change
Protected Settings
M M139 Set Remote Address
U {0 1} U0 Update request on/off
V out,in,in… V3,1,2,2 Connect levels
W lvl,in,in… W1,4,19 Connect outputs
X out,in,lvl X12,9,2 Connect crosspoint
Y out,in Y1,7 Connect AFV
Z in in… Z13,12,8 Connect AFV
D numsyncs D300 Delay vertical sync intervals
T {A-Z} TB Trigger a Salvo Connect sequence
P {A-Z} PBY1,7~ Preset a Salvo connect sequence
B B21 Output Lock inquiry or change
F F5 Field Delay for crosspoint output
HOST HOST0 Select Host or Terminal Protocol
G G1,10~
The command "G" is used to query
or modify a router configuration
parameter or parameters.
21
Page 28

Sierra Video Systems
“R”: Router R eset
Use this command to force the routing switcher to reset, by sending it the command
"RESET". If an administrator password has been set (using the “G ADMIN_PASSWORD”
command described later in this document), then the password must be sent in a “K”
message prior to sending this command, else this command will generate an error. For
example, the command:
**RESET!!
would initiate a reset (if the password has been entered, if required), and when the router
finished the reset operation, something like this would be received, just as if the router
had powered up:
** RESET Tahoe Vx.xx (C) 2000~ !!<CR>
“I”: Capabilities Inquiry
The command "I" requests that command capability information be returned to the host.
The information is sent as a string of characters. The first characters are a space
followed by "I", the next characters are the letters of the commands that are implemented
and available in this router, and the last character is "~" (tilde). Do not count on the
characters being in any specific order. Search all characters for a particular one.
All routing switchers implement the I, L, S, and X commands. The Q command will
eventually be added to all.
For example, the command:
**I!!
might return the following string:
** ILSX~ OK !!<CR>
indicating that the router supports the I, L, S, and X commands from the host.
“Q”: Model Name and Software V ersion Inquiry
The command "Q" requests that the router model name and software version number
string be returned to the host. The information is sent as a string of characters. The first
characters are a space followed by "Q", the next characters are the router model name,
terminated by a "~" (tilde). Following this are the characters of the software version
number string, again terminated by a "~" (tilde).
For example, the command:
**Q!!
might return the following string:
** QSmall~V2.1~ OK !!<CR>
indicating that the router model name is "Small" and the software version number is
"V2.1".
“L ”: Matrix Size and Le v el Names Inquiry
The command "L" requests that matrix size (Nout, Nlvl, Nin) and level name information
(lvl1, lvl2, etc.) be returned to the host. The information is sent as a string of characters.
The first characters are a space followed by "L", some optional values described below,
then the number of outputs (Nout), a comma, the number of levels (Nlvl), a comma, the
number of inputs (Nin), a comma, and then the level names, each terminated by a "~"
(tilde), and the last followed by two tildes.
For example, the command:
**L!!
22
Page 29

might return the following string:
** L64,3,32,VIDEO~AudioL~AudioR~~ OK !!<CR>
indicating that the router has 64 outputs, 3 levels, and 32 inputs, and the levels are
named "VIDEO", "AudioL", and "AudioR".
“O”: Output Status Inquiry
The command "O" requests that matrix status information for a single output be returned
to the host. The status information is sent as a “Y” command or a “V” command or as a
sequence of L “X” commands, where L=number of levels.
For example, the command:
**O5!!
to a 3-level router might have the following three commands as its response:
** X65,23,1 X5,-,2 X5,0,3 !!
Note the dash, indicating that on level 2, output 65 is not connected to an input. Also note
the 0, indicating that the connection on level 3 is either unknown or that output 65 doesn’t
exist or isn’t mapped on level 3.
Or, a 3-level router might have the following single command as its response:
** V65,23,-,0 !!
which has the same information as the three X commands in the previous example.
If the router has only one level, or if all levels are connected the same, the router might
instead use the Y command. For example:
** Y65,23 !!
Tahoe Series 20
“N”: Input Status Inquiry
The command "N" requests that matrix status information for a single input be returned to
the host. This command is only useful on those router levels that allow an input to be
connected to at most one output. The status information is sent as a “Y” command or a
sequence of L “X” commands, where L=number of levels that allow an input to be
connected to at most one output (each such level generates a single “X” command of
status). Thus, a 6-level router with three single-output-per input levels would generate 3
“X” commands of status command output. A router that has all of its levels as single-
output-per-input may return a single “Y” command instead of individual “X” commands if
all of the levels are connected to the same output. The “X” and “Y” commands are
formatted exactly as with the "O" command.
For example, the command:
**N4!!
to a router might have the following three commands as its response:
** X12,4,2 X-,4,3 X0,4,4 !!
giving the status of levels 2, 3, and 4 (level 1 presumably not being a single-output-perinput level). Note that on level 3 the ë-ë (dash) indicates that the input is disconnected,
and on level 4 the 0 indicates that the connection to the input is either unknown or that
input does not exist or is not available on that level.
If the router has only one level, or if all levels are connected the same, it might instead
use the Y command. For example:
** Y12,4 !!
“S”: Status Inquiry
Use command S to request that status information be returned to the host. The status
information is sent as a string of L x O substrings, where L = number of levels and O =
number of outputs. Each level/output combination generates a single substring of status.
23
Page 30

Sierra Video Systems
Thus, a 21-level 16 output router would generate 2x16 = 32 substrings of status
command output. The length of each substring depends on the size of the particular
switcher involved. Larger switchers use bigger numbers for inputs, outputs, and levels.
The first substring of status is for level 1 output 2, etc.; however, each substring contains
the level and output numbers, so the sequence in which the data is sent is not important).
The first characters of each substring are a space followed by “X”, then the output
number, a comma character, the input number connected to the output (or 0 if no
connection exists), another comma, and finally the level number at which the input-output
pair is connected. For example, the command:
**S!!
might have the following two substrings at the beginning of its response:
**x01, 12, 1 x02, 02, 1!!
This indicates that output 1 is connected to input 12 on level 1, and that output 2 is
connected to input 2 on level 1.
The number of digits used for each number is generally the maximum number of digits
ever required for that particular switcher. Thus, a switcher with between 10 and 99 inputs
would use two digits for the input number, and a switcher with less than 10 levels would
use one digit for the level number.
“C”: Clear Matrix
Use command C to request that the switcher matrix be cleared so that all outputs are
disconnected from inputs (in switchers where this is possible) or else all outputs at all
levels have input 1 as their source. This command can take several seconds to execute
(depending on the size of the switcher matrix). In order to help ensure that this command
isn’t accidentally executed, it requires four additional characters following the “C”
character, to spell out the word “CLEAR” in full. For example, the command:
**CLEAR!!
would clear the matrix and when finished — the following response would be generated:
**OK!!<CR>
“K”: Set Passw ord
The command "K" is followed by a password, which may be 0 to cancel the previous
password, thus causing no password to be specified, or, it may be a value between 1 and
9999 to supply a password, which remains in effect until another password (or password
0) is supplied in another “K” command. The password is stored by the router under the
remote address specified using an “M” command, or under the control portís remote
address if an “M” command was not specified before the “K” command in the same
command string as the “K” command. The password that is set remains in effect until
another “K” command is received from the same remote address.
It would be used to establish a password for a remote address, to be used for such things
as locking and unlocking outputs and modifying the router configuration. When the router
receives a protected command (one which requires use of a password) from a remote
address, it compares the current password for that remote address with the password
required to execute the protected command. Protected commands consist of many of the
“G” commands that change router configuration, as well as take and salvo trigger
commands when the output to be taken is locked. In the former case, the administrator
24
Page 31

password is the one that must be sent in the “K” command to permit the router
configuration to be changed, while in the latter case the password that was used to lock
the output is the one that must be sent in the “K” command to permit the take to occur.
Refer to the “B” command and the “G ADMIN_PASSWORD” command (in a separate
document) for more information.
For example, the command:
** M197 K1777 !!
requests that password 1777 be stored as the current password for remote address 197.
The command:
** M197 Y7,9 !!
requests that output 7 be connected to input 9, using the password stored for remote
address 197 as the output lockout override password. The take will succeed if output 9 is
either not locked or is locked with password 1777. Otherwise, the take will fail.
“M”: Set Remote Address
The command "M" is followed by a remote address value, and it sets the remote address
to be used by all remaining commands in the current command string. This command is
supported on larger routers. It would be used when a client/server software system on a
router control port permits multiple remote users to send commands to the router through
that control port. In such a system, the server software that talks to the control port can
insert an “M” command at the beginning of each command string it sends to the router on
behalf of its clients. The server would assign a different address to each of its clients. The
router uses the address to control access to and modification of protected resources. The
“M” command will typically work in conjunction with the “K” command, which allows a
password to be sent to the router. Some commands, such as those that allow
modification of router configuration settings, might require entry of an administrator
password before allowing the router configuration to be modified. The “K” command is
used to send the password, but the router must be able to record that password in
association with a particular remote user. The router would save the password as the one
established by the remote address specified in the “M” command. The examples below
show how this would work.
If the “M” command is not present in a control string received on a serial port, the address
assigned to the serial port itself is used as the address for all commands in that
command string.
The “M” command works on an honor system. There is nothing to keep a remote device
from forging a false address. This conforms with the philosophy of providing protection
mechanisms that are not designed to be totally hack-proof, but rather, are designed
under the assumption that controlling devices will honor the system. A dedicated hacker
can always hack into the system if he chooses. Note, however, that the server in a
client/server relationship can provide a great deal of added security for the system,
forcing the correct “M” command to be sent each time, and filtering out bogus “M”
commands received from clients.
When the router receives an “M” command in a command string, it echoes the same “M”
command in its response. This allows the server connected to the serial port to parse the
received response string and determine to which client it should route the response.
Normally the server will assign remote addresses to its clients. However, it should always
provide a way to send these addresses to the client, because the client needs to know its
address in order to know how to interpret some responses. By simply passing each “M”
response command received from the router back to the client, the server can let the
client know what its address is.
For example, the command:
** M139 K9664 !!
Tahoe Series 20
25
Page 32

Sierra Video Systems
establishes password 9664 as the password for remote address 139. The response to
this command string would be:
** M139 OK !!
If remote address 13 later sends the command:
** M139 Y8,27 !!
to request that output 8 be connected to input 27, the router would check to see if output
8 has been locked. If so, the router compares the password of remote address 139
(which has previously been set to 96643) to the password that was used to lock output 8.
If they match, the connection request succeeds, but if they don’t match, output 8 is left
unchanged.
“U”: Update Request on/off
The command "U" turns on or off the automatic sending of output change reports. The
command letter must be followed by either a number 0, 1, or 2 to specify the new
automatic change report state, as follows:
0: Automatic output change reporting is turned off.
1: Automatic output change reporting is turned on. Crosspoint change commands do not
immediately report changed status, but instead, the report comes up to a few seconds
after the crosspoint change command is received.
2: Automatic output change reporting is turned on, and crosspoint change commands
immediately report changed status as part of the response to the command.
Output change reports are automatic messages sent to the host whenever an output is
crosspoint status (i.e. connected source) is changed.
For example, the command:
**U1!!
turns on automatic output change reporting. When a crosspoint is changed, the following
message might be received:
** X5,17,3 !!<CR>
indicating that output 5 is now connected to input 17 on level 3. Alternatively, if the router
has only a single level or if all levels of the output are connected the same, it might send:
** Y5,17 !!<CR>
indicating that output 5 is now connected to input 17. Alternatively, newer routers might
use the “V” command instead of “X” commands to report a change:
** V5,17,12,0 !!<CR>
indicating that output 5 is now connected to input 17 on level 1, to input 12 on level 2, and
does not exist or is not available on level 3.
To turn off output change reporting, use the command:
**U0!!
The difference between an argument value of 1 versus 2 has to do with the response
generated by the router when it receives a crosspoint connect command (“V”, “W”, “X”,
“Y”, or “Z” command). For example, suppose the router sends the following crosspoint
connect commands in a single command sequence:
** Y1,18 Y8,34 !!
If U1 is in effect, the response to this command will be:
** OK !!<CR>
and then sometime later, perhaps up to several seconds later, the crosspoint change
reports will be sent as separate command sequences for each output:
** Y1,18 !!<CR>
** Y8,34 !!<CR>
On the other hand, if U2 is in effect, the response to the original crosspoint change
command sequence will be:
** Y1,18 Y8,34 OK !!<CR>
and no additional crosspoint change reports will be sent because they already HAVE
been sent. The U2 mode of operation is generally more convenient because it produces
26
Page 33

more immediate feedback to the controlling device that is sending a crosspoint change
command. The U1 mode of operation is provided for compatibility with older control
systems.
“V”: Connect Lev els
The command "V" is used to request that a connection be made. It must be followed by
an output number, a comma, and a comma-separated list of input numbers, one for each
level, up to the number of levels in the router. Fewer than the number of levels may be
specified if desired, and the remaining levels will be left unchanged.
For example, the command:
**V12,7,8,9!!
says that connections are to be made to output 12: from input 7 on level 1, input 8 on
level 2, and input 9 on level 3.
An input number of 0 means the output connection is to be left unchanged.
An input number of ë-ë (dash) means the output is to be disconnected. If the router does
not support disconnected outputs, the output connection will be left unchanged.
“W”: Connect Outputs
The command "W" is used to request that a connection be made. It must be followed by
a level number, a comma, and a comma-separated list of input numbers, one for each
output, up to the number of outputs in the router. Fewer than the number of outputs may
be specified if desired, and the remaining outputs will be left unchanged.
For example, the command:
**W1,17,3,9!!
says that connections are to be made on level 1: from input 17 to output 1, input 3 to
output 2, and input 9 to output 3.
If the level number is specified as "0", this means that the connection is to be made on all
levels (AFV).
For example, the command:
**W0,8,3,7!!
says that connections are to be made on all levels: from input 8 to output 1, input 3 to
output 2, and input 7 to output 3.
An input number of 0 means the output connection is to be left unchanged.
An input number of ë-ë (dash) means the output is to be disconnected. If the router does
not support disconnected outputs, the output connection will be left unchanged.
It is an error to request connection of an input or output that doesn’t exist on the specified
level, even if the input or output does exist on some other level. However, if the level
number is “0”, any input or output may be used as long as it exists on at least one level,
and in that case no connection will be made on any level on which the input and output
does not exist. If the requested connection has an output or input number that isn’t
mapped to a physical connector (on virtual-mapped routers) on one or more levels, those
levels are simply not changed.
If “U2” is in effect (see “U” command), the response will include one or more V, Y, or X
commands to report the new status of the outputs. The response will be the same as if
“O” commands were issued for the outputs immediately following the “W” command. No
response is generated if this command is being used to define a salvo.
Tahoe Series 20
“X”: Connect Crosspoint
Use command X to request that a connection be made. It must be followed by an output
number, a comma, an input number, a comma, and a level number. For example:
27
Page 34

Sierra Video Systems
**X8, 3, 2!!
This string says that a connection is to be made between output 8 and input 3 on level 2.
If the level number is specified as “0”, this means that the connection is to be made on all
levels (AFV). For example, the command:
**X8, 3, 0!!
This string says that a connection is to be made between output 8 and input 3 on all
levels.
“Y”: Connect AFV
Use command Y to request that a connection be made. It must be followed by an output
number, a comma, and an input number. The connection is made on all levels (AFV). For
example, the command:
**Y2, 8!!
This string says that input 8 is to be connected to output 2 on all levels.
“Z”: Connect AFV
The command "Z" is used to request that a connection be made. It must be followed by a
comma-separated list of input numbers, one for each output, up to the number of outputs
in the router. Fewer than the number of outputs may be specified if desired, and the
remaining outputs will be left unchanged. The connection is made on all levels (AFV).
For example, the command:
**Z4,18,7!!
says that input 4 is to be connected to output 1 on all levels, input 18 to output 2 on all
levels, and input 7 to output 3 on all levels.
An input number of 0 means the output connection is to be left unchanged.
An input number of ë-ë (dash) means the output is to be disconnected. If the router does
not support disconnected outputs, the output connection will be left unchanged.
Any input or (implied) output number may be specified as long as it exists on at least one
level. No connection will be made on any level on which an input or (implied) output
number does not exist. If the requested connection has an output or input number that
isn’t mapped to a physical connector (on virtual-mapped routers) on one or more levels,
those levels are simply not changed.
If “U2” is in effect (see “U” command), the response will include one or more V, Y, or X
commands to report the new status of the outputs. The response will be the same as if
“O” commands were issued for the outputs immediately following the “Z” command. No
response is generated if this command is being used to define a salvo.
“D”: Delay vertical sync intervals
The command "D" is used to delay before continuing execution of the commands that
follow. It must be followed by a number giving the number of vertical sync intervals by
which to delay. If the number is 1, the delay will be to the VERY NEXT vertical sync
interval. If the number is 0, no delay occurs. The number must be no larger than 255.
Note that this command will also delay the time at which the remaining command
responses and the trailer character are returned to the host.
For example, the command:
** Y1,5 D200 D100 Y1,6 S !!
28
Page 35

says that input 5 is to be connected to output 1 on all levels, then a delay of 300
(=200+100) sync intervals is to occur, then input 6 is to be connected to output 1 on all
levels, then a status response is to be returned.
It is generally recommended that the host computer be responsible for timing the initiation
of commands, rather than using this command to do the job. The host computer can
simply send the appropriate commands at the appropriate times. The "P" and "T"
commands described below can aid in ensuring that lengthy connect sequences aren't
delayed due to the time it takes to send them to the router.
“T”: Trigger a Salv o
The command "T" is used to trigger a previously set up salvo (set using the "P" command
above). It must be followed by a register letter from A to Z or a register number from 1 to
256 giving the register to be triggered.
For example, the command:
** TB D180 TC !!
says to trigger salvo register B (same as 2), delay 180 sync intervals, then trigger salvo
register C (same as 3). When the register is triggered, this means that the connect
commands stored in it take effect.
If a salvo is triggered and it attempts to connect a locked output or port, or a disallowed
input/output pair, or a port to itself, the salvo trigger operation is aborted, no crosspoint
changes are performed, and an error is reported: “ERROR Salvo Has Locked Xpts”.
Tahoe Series 20
“P”: Preset a Salvo
The command "P" is used to set up a salvo, which is a series of connect commands for
later execution with the "T" command. It must be followed by a register letter from A to Z
or a register number from 1 to 256 giving the register into which the connect sequence is
to be stored, followed by zero or more connect commands (V, W, X, Y, or Z), followed by
a "~" (tilde) character.
Registers A-Z are the same registers as 1-26. The letter designators are allowed to
shorten up the command sequence slightly, so that “T” commands can be sent in
compact form if one of the first 26 registers is used.
For example, the command:
** PB X2,5,0 Z7 ~ !!
says that two connect commands (output 2 to input 5 AFV, and output 1 to input 7 AFV)
are to be stored into salvo register B (i.e. register 2). Another example:
** P239 Y5,7 ~ !!
says that one connect command (output 5 to input 7 AFV) is to be stored in salvo register
239.
Only supported connect commands (those connect commands whose command letters
appear in the "I" command response) may follow the register letter up to the tilde
character. The connect commands do not take effect until the register is triggered using
the "T" command below.
The maximum allowed number of connect commands is determined by the particular
router. In all cases where this command is implemented, there is guaranteed to be space
available to store at least two complete switch matrices AT ONE LEVEL. If more connect
commands are received than there is space available to store them, the error response
string "FULL ERROR Salvo Space Full" is sent to the host, and only the first part of the
salvo is stored. For example:
** FULL ERROR Salvo Space Full !!
says that the salvo request filled memory and the salvo could not be completely stored.
29
Page 36

Sierra Video Systems
“B”: Output Lock inquiry or change
The command "B" requests that lock information for the specified output be returned to
the host, and optionally that the lock status of that output be changed. Whenever the
router receives a “B” command, it sends one back.
In routers that support the “B” command, the router reports changes to output lock status
using the “B” command, not the “G OUTPUT_LOCK” command.
When an output is locked, it cannot be routed to a new input unless the password sent
using the “K” command matches the password used to lock the output.
In virtual-mapped routers, this command applies lockouts to virtual destinations rather
than physical outputs, so the word “output” should be replaced with “destination” in this
command description.
If the “password” and “lock” arguments are both 0, this is a query for lock status of the
specified output. A “B” command is sent to report the lock status.
If the “password” argument is not 0, this is a request to change the lock status of the
specified output. After changing the lock status, a “B” command is sent to report the new
lock status, so a response occurs regardless of which form of the “B” command is sent to
the router.
When requesting that lock status be changed, if “lock” is 0, this is a request to unlock the
output, and if “lock” is 1, this is a request to lock the output. An attempt to lock an output
that is already locked, or to unlock an output that is already unlocked, fails, as does an
attempt to unlock an output using a password that is different from the password that the
output was locked with and is not the administrator password. Any use of a password
larger than 9999 also fails. In any of those cases, the output lock status remains
unchanged and an error response is generated. The “B” command response will indicate
that the output still has the same lock state as before.
In the “B” command response that is sent by the router, the “password” argument is the
current lock password for the output (1-9999), or is 0 if the output is not locked, and the
“lock” argument is 0 if the output is not locked, or 1 if it is locked.
When locking an unlocked output, the specified password is recorded by the router as the
lock password for that output. When unlocking a locked output, the specified password is
compared by the router to the lock password for the output. If they match, or if the
specified password is the administrator password, the output is unlocked, else it remains
locked. Attempting to lock an already-locked output, or unlock an already-unlocked
output, has no effect on the lock state of that output.
Whenever a take is done, the router checks to see if the specified output for the take has
been locked. If so, the current password of the control port that sent the take request (as
set with the “K” command) is compared to the output’s lock password. If they match, the
take is allowed, but if not, the take has no effect. The administrator password may NOT
be used in lieu of the output’s lock password to do a take, so if a controlling device sends
the administrator password in a “K” command, that will not permit the device to reroute
locked outputs (but it can use the administrator password to unlock locked outputs using
the “B” command).
Output lockouts apply on all levels. On virtual-mapped routers, a level may be left out of a
lockout by making sure the level is unmapped for the destination being locked.
As with all router configuration parameters, the output lockout data is stored in non-
volatile storage and thus is retained across router power-ups. When a router is first
initialized at the factory, all outputs are set to be unlocked.
This command provides the same functionality as the “G OUTPUT_LOCK” command.
This command, which was added at router software version V5.06, is preferred over that
command. Note that the output lock version number is not present in this command.
30
Page 37

Since output lock status changes frequently, it is not really useful to cache output lock
status for outputs, so the output lock version number is not really useful.
For example, to request whether or not output 21 is locked:
** B21,0,0 !!
The response might be:
** B21,0,0 OK !!
indicating that output 21 is NOT locked. Or, the response might be:
** B21,6741,1 OK !!
indicating that output 21 is locked with password 6741. To clear this lockout:
** B21,6741,0 !!
To lock output 96 using password 439:
** B96,439,1 !!
If successful, the response would be:
** B96,439,1 OK !!
If output 122 becomes locked using password 235, the following change report would be
sent by the router:
** B122,235,1 !!
“F”: Field Delay
The command "F" is used to specify the delay between the time a crosspoint change
request is received by the router and the time the crosspoint switch actually occurs. It
must be followed by a number giving the number of video fields of delay desired. If the
number is smaller than the smallest delay that the router can handle, the smallest delay
is used instead. If it is larger than the largest delay the router can handle, the largest
delay is used instead. Note that this command does not cause a delay in command
processing, as the “D” command does.
To understand this command more fully, consider the way that router software will
typically handle a crosspoint command. The last character of the command string, the
final “!” (exclamation) character, is received somewhere in a particular video field, call it
video field 7. The router parses the command string and, for each crosspoint it contains,
it puts the crosspoint in a buffer that is marked to be delivered to the crosspoint hardware
on a particular video field. Suppose that previously, an “F5” command has been received.
Then crosspoint commands whose final “!” command string character was received on
video field 7 would be placed in a buffer that is marked to be delivered to the crosspoint
hardware at video field 13 (7+5+1=13).
To understand the reason for adding 1 in the previous sum, consider an “F0” command: it
would ask for output at the very next video field, field 8 in our case. So, it is necessary to
add the “F” argument plus 1 to the field number on which the crosspoint command is
received to get the field number at which the crosspoint will be output.
A typical router will have a minimum delay that is between 1 and 2 fields. Suppose a
crosspoint command is received just before a vertical field mark. The software may be
able to prepare the crosspoint data and send it to the hardware when that vertical field
mark occurs, but the hardware itself typically has a one-field delay in it, so the soonest
that such a crosspoint would switch would be one field (plus a little) from when it was
received. If the command were received towards the beginning of a field rather than the
end of a field, the delay would be closer to two fields. Industry parlance is to call this a
one-field delay, because only full fields of delay are counted.
The delayfields argument of this command takes into account the hardware delay. So, if
a router has a minimum delay, including the hardware delay, of one full field, as
described in the previous paragraph, then a delayfields value of 1 causes this minimum
delay to be used. A delayfields value of 0 will also cause this minimum delay, because
the router uses its minimum if a smaller value is specified. A delayfields value of 2,
Tahoe Series 20
31
Page 38

Sierra Video Systems
however, will add one more field to the minimum possible delay. Thus, delayfields
specifies the number of full fields of delay between end-of-crosspoint-command-stringreceived and crosspoint-switch-occurs. Note that the actual minimum value of delayfields
depends on the particular router model.
Routers typically have a limit to the number of crosspoint commands they can process in
one field. First, there is an inherent delay in sending the command to the router, but
beyond that, the router requires time to parse the command and buffer up the crosspoint
data, plus it requires time to deliver the buffered data to the hardware when the desired
video field arrives. Each individual router has documentation to describe its limitations on
how many crosspoints it can process in a given amount of time.
Larger values for delayfields give the router more time to process commands. Although
the long-term average number of crosspoints that can be processed per unit of time is
unchanged, a larger delayfields value can improve router performance during a short
burst of many crosspoint commands. For example, suppose a large number of crosspoint
commands is sent to the router in a single large command. If delayfields is small, the
router typically wonít have time to parse and process all these crosspoint commands and
place the data in the crosspoint delivery buffer before the target video field arrives. By
making delayfields larger, the user can give the router more time to process the
crosspoint commands.
If too many crosspoint commands are received and the router is not able to process them
fast enough, it will output the crosspoint connections as soon as it can. Unexpected
delays in crosspoint output are a sign that the router is being pushed beyond its limits.
The fielddelay value applies to the entire router, not just to the control port on which the
“F” command is received. It is therefore recommended that a single value be settled on
for the fielddelay value, rather than changing the value constantly depending on needs.
Once changed, the router records the value in non-volatile memory and uses it each time
it is powered up, so it is only necessary to change it one time.
Even though a crosspoint isnít changed until the fielddelay time has elapsed, the router
records the new crosspoint state immediately upon receiving the crosspoint change
request, so a controlling device may receive a report of a crosspoint change before the
change has actually taken effect, and this is more likely to happen the larger fielddelay is.
Since routers currently make no guarantees about when they will report a crosspoint
change anyway, this behavior is usually of no concern. There is a case where this could
cause problems. If the fielddelay value were to be changed while two different devices
were changing the same output, it is possible for the router to report the incorrect input
value for that output. This would happen if the earlier device that changed the output did
so before the fielddelay value was changed, and the later device that changed the output
did so after the fielddelay value was reduced but soon enough that its input value would
be sent to the crosspoint hardware before that of the earlier device. A bit later, the earlier
deviceís input value is sent to the crosspoint hardware, but the router has recorded the
later deviceís input value as being the one in effect. To prevent this scenario, we
recommend that an appropriate
Here is an example of an “F” command:
** F5 Y1,5 X2,6,3 !!
This says that input 5 is to be connected to output 1 on all levels and input 6 is to be
connected to output 2 on level 3, after a delay of 5 fields from the beginning of the field
that follows receipt of the “!” character.
fielddelay value be chosen, set, and left alone.
32
Page 39

Basic “G” Command:
Action From Syntax
Modify Host G command_name { arguments… } ~
Query Host G command_name { arguments… } ~
Query Response Router G command_name { arguments… } ~
Modify is Protected: Yes
Report Changes: No
The command "G" is used to query or modify a router configuration parameter or
parameters.
Summary lines at the start of each command section describe, for each type of command
action (Modify, Query, or Query Response), whether the command is sent to the router or
from the router and what the syntax of the command is. They also indicate whether or not
the modify form of the command is password-protected or not (“Modify is Protected”) and
whether or not the command participates in automatic reporting of parameter changes
(“Report Changes”) as described under the “G REPORT_CHANGES” command.
Each command has three possible syntax forms:
1. Modify: this form is sent to the router to modify a parameter value
2. Query: this form is sent to the router to query for a parameter value
3. Query Response: this form is sent by the router to report the value of a parameter in
response to receiving a Query or in response to a change in the parameter value when
automatic reporting of parameter changes is turned on.
Generally, the command arguments identify the parameter that is being queried or
modified, and provide its new value if it is being modified. The first argument following the
“G” command character is a command name. Additional arguments may be required for
some command names to completely specify the parameter in question. After those, one
or more additional optional arguments may give a new value for the parameter. All
arguments are separated from one another by commas.
When the Modify form of the command is used and if the new value is a valid value, the
router will change the parameter value to this new value, providing that “Modify is
Protected” says “No” or the administrator password has been sent using the “K”
command. It will then report the new value to all router control ports that have requested
these reports, providing that “Report Changes” says “Yes”. If a new value is provided that
is an illegal value, the parameter is left unchanged and no “G” command is sent.
When the Query form of the command is used, the Query Response form of the
command is returned to the control port that sent the Query command, reporting the
current value of the parameter. The Query form of a command is normally the same as
the Modify form except that the new parameter values are not included. The Query
Response form of a command is normally the same as the Modify form (but of course the
sender and receiver are reversed in these two cases).
Some “G” commands may initiate an action or report the occurrence of an event, instead
of querying or changing a router parameter.
Commas are used to separate arguments in the “G” command.
Space characters should not appear within the “G” command arguments, except when
they appear within strings. Also, a single space character is allowed after the “G”
character itself. When a “G” command is sent by the router, it will always include this
space, but the space is optional when sending a “G” command to the router.
Character string arguments are delimited on both sides by a tilde (‘~’) character.
Generally character strings may contain any printable ASCII character except tilde,
asterisk, and
exclamation.
Tahoe Series 20
33
Page 40

Sierra Video Systems
Every “G” command must be terminated with a tilde (‘~’) character. This allows a
command parser to ignore any received “G” command that has a command_name that it
doesn’t know about.
The “G” commands available for any given router may vary, depending on the router
model. The “G SUPPORTED” command allows controllers to find out whether particular
“G” commands are supported by a given router or not.
A router may be sent “G” commands that it doesn’t understand. It will simply ignore them
and generate an ERROR response.
V AR: Modify or query system variables
Action From Syntax
Modify Host G
VAR,<varname>,<value>[,<value>…]~
Query Host G VAR,<varname>~
Query Response Router (same as Modify)
Modify is Protected: Yes
Report Changes: No
The “G VAR“ command is used to change or query system variables that control specific
features of the router. The variable being affected is specified using its name, and only
one variable at a time can be targeted by this command. The features being controlled
are typically system options that allow the user to control special hardware or software
enhancements to the router code.
The Modify command has two or more arguments, the name of the variable to be
changed and the new value of that variable. Most variables have only a single value
associated with them, but it is possible for a variable to be multi-valued, in which case the
number of <value> arguments may be two or more.
The Query command has the variable name whose value is to be queried as the only
argument.
The Query Response command has the same argument structure as the Modify
command.
Each different router may support different variables. The supported variables may grow
over time, as enhancements are added to this protocol, so command parsers should
generally ignore unknown variable names. The routers themselves will ignore any
command that is received with an unknown variable name or an invalid variable value.
Use the “G VARQRY” command to find out which variables a particular router actually
supports. Refer to documentation for each router for a description of the variables.
A variable value is typically an unsigned decimal number, but may also be a signed
decimal number. The “G VARQRY” command can be used to determine the allowed
range of values.
For example, to query for the value of a variable named “VI_DELAY”:
** G VAR,VI_DELAY~ !!
The response command might be:
** G VAR,VI_DELAY,4~ !!
To set the “HD_SLAVE” variable to 1:
** G VAR,HD_SLAVE,1~ !!
34
Page 41

Tahoe Series 20
V AR1: Modify or query single-dimensional array variables
Action From Syntax
Modify Host G
VAR1,<varname>,<index>,<value>[,<value>…]~
Query Host G VAR1,<varname>,<index>~
Query Response Router (same as Modify)
Modify is Protected: Yes
Report Changes: No
The “G VAR1“ command is used to change or query single-dimensional array variables
that control specific features of the router. The variable being affected is specified using
its name and an array index that varies from a minimum value (typically 0 or 1) to some
maximum value, and only one such variable at a time can be targeted by this command.
The features being controlled are typically options that allow the user to control special
hardware or software enhancements as a function of router level, input number, or output
number, although the array variable is general-purpose in nature and will be used
whenever a single-dimensional array is appropriate.
The Modify command has three or more arguments, the name of the array variable to be
changed, the index within the array of the variable to be changed, and the new value of
that variable. Most variables have only a single value associated with them, but it is
possible for a variable to be multi-valued, in which case the number of <value>
arguments may be two or more.
The Query command has the name and index of the array variable whose value is to be
queried as its two arguments.
The Query Response command has the same argument structure as the Modify
command.
Each different router may support different single-dimensional array variables. The
supported single-dimensional array variables may grow over time, as enhancements are
added to this protocol, so command parsers should generally ignore unknown variable
names and out-of-range index values. The routers themselves will ignore any command
that is received with an unknown variable name, an index that is out of range, or an
invalid variable value. Use the “G VAR1QRY” command to find out which singledimensional array variables a particular router actually supports, and what the valid index
range is. Refer to documentation for each router for a description of the variables.
A variable value is typically an unsigned decimal number, but may also be a signed
decimal number. The “G VAR1QRY” command can be used to determine the allowed
range of values.
For example, to query for the value of the fifth element of an array variable named
“SYNC_SOURCE”:
** G VAR1,SYNC_SOURCE,5~ !!
The response command (or a command to set the variable to this value) might be:
** G VAR1,SYNC_SOURCE,5,3~ !!
35
Page 42

Sierra Video Systems
VAR2: Modify or query two-dimensional array variables
Action From Syntax
Modify Host G
VAR2,<varname>,<index1>,<index2>,<value>[,<value>…]~
Query Host G
VAR2,<varname>,<index1>,<index2>~
Query Response Router (same as Modify)
Modify is Protected: Yes
Report Changes: No
The “G VAR2“ command is used to change or query two-dimensional array variables that
control specific features of the router. The variable being affected is specified using its
name and two array indexes that vary from minimum values (typically 0 or 1) to some
maximum values, and only one such variable at a time can be targeted by this command.
The features being controlled are typically options that allow the user to control special
hardware or software enhancements as a function of router level and either input or
output number, although the array variable is general-purpose in nature and will be used
whenever a two-dimensional array is appropriate.
The Modify command has four or more arguments, the name of the array variable to be
changed, the two indexes within the array of the variable to be changed, and the new
value of that variable. Most variables have only a single value associated with them, but it
is possible for a variable to be multi-valued, in which case the number of <value>
arguments may be two or more.
The Query command has the name and the two indexes of the array variable whose
value is to be queried as its three arguments.
The Query Response command has the same argument structure as the Modify
command.
Each different router may support different two-dimensional array variables. The
supported two-dimensional array variables may grow over time, as enhancements are
added to this protocol, so command parsers should generally ignore unknown variable
names and out-of-range index values. The routers themselves will ignore any command
that is received with an unknown variable name, with an index that is out of range, or an
invalid variable value. Use the “G VAR2QRY” command to find out which twodimensional array variables a particular router actually supports, and what the valid index
range is. Refer to documentation for each router for a description of the variables.
A variable value is typically an unsigned decimal number, but may also be a signed
decimal number. The “G VAR2QRY” command can be used to determine the allowed
range of values.
For example, to query for the value of the (3,87) the element of an array variable
named “GAIN”:
** G VAR2,GAIN,3,87~ !!
The response command (or a command to set the variable to this value) might be:
** G VAR2,GAIN,3,87,29~ !!
Details of the “G” command can be found on our website or by contacting the factory .
36
© Connor Dog Inc.
Page 43

Sierra Video Systems
Troubleshooting
Introduction
NOTES:
If the output signal is disturbed or interrupted by electromagnetic interference, the
signal should return and stabilize when the interference ends. If not, turn the
power switch off and on again to reset the switcher.
Chapter
5
If the following recommended actions still do not result in satisfactory operation,
please consult your Sierra Video Systems Dealer.
Power and Indicators
Problem Remedy
No power Confirm that the rocker switch is in the “ON” position, and that the power
lamp is illuminated.
Confirm that power connections are secured at the switcher and at the
receptacle. Make sure the receptacle is active, with the proper mains
voltage.
If there is still no power, check the fuse. Remove power cord from the AC
outlet and from the switcher and then remove the fuse holder located
above the power connector. Confirm that the fuse is good by looking at
the fuse wire connected to the ends of the fuse. If the wire is separated,
replace the fuse.
37
Page 44

Sierra Video Systems
Video Signal
Problem Remedy
No video at the
output device,
regardless of
input selected.
Video level is too
high or too dim.
Confirm that your sources and destination device are powered on and
connected properly. Video signals connected to the input of the switcher
should be of an identical signal format as the output of your source. Video
signals at the output of your switcher should be of an identical signal form
required by your video monitor or recorder.
Confirm that any other switchers in the signal path have the proper input
and/or output selected.
Use a Video Tester to test the video path leading to/from your Matrix Switcher.
Replace the video crosspoint module with one that is known to be functional.
Verify that the video line is terminated with a precision 75 ohm impedance,
otherwise it results in a video level that is too high or too low when looping is
performed and the termination is not within 1% of 75 ohms.
Confirm that the connecting cables are of high quality, properly built and
terminated with 75 ohms. Check level controls located on your source input
device or output monitor or recorder.
Replace the video crosspoint module with one that is known to be functional.
Problem Remedy
Noise bars are
"rolling" up or down in
the output image
or:
Low Frequency hum
in the audio output of
the audio
Hum bars (ground loop) are caused by a difference in the ground potential
of any two or more devices connected to your signal path. Passing that
voltage difference through any available interconnection, including your
video cables, creates hum bars in the picture and/or hum in the audio.
WARNING!
Do not disconnect the ground from any piece of video equipment in your
signal path!
Check the following to remove hum bars:
Confirm that all interconnected equipment is connected to the same phase
of power, if possible.
Remove equipment connected to that phase that may introduce noise,
such as motors, generators, etc.
Disconnect all interconnect cables and reconnect them one at a time until
the ground loop reappears. Disconnect the cable, or insert an isolation
transformer in the signal path.
38
Page 45

Audio Signal
Problem Remedy
Tahoe Series 20
No audio at the
destination
device,
regardless of
source selected
Audio level is too
low
Confirm that your sources and destination device are powered on and
connected properly. Audio signals connected to the input of your switcher
should be properly wired from the output of your source. Audio signals
connected to the output of your switcher should be properly wired to the input
of your destination device.
Confirm that any other amplifiers in the signal path have the proper source
and/or destination selected. Pay special attention to input amplifiers that may
be built into your destination device.
Replace the audio crosspoint module with one that is known to be functional.
Confirm that the connecting cables are of high quality and properly built. Take
special care in noting the wiring configuration of balanced to unbalanced
cables (if possible use a matching transformers).
Check level controls located on your source input device or output monitor or
recorder.
Replace the audio crosspoint module with one that is known to be functional.
Control
Problem Remedy
No control of
Matrix Switcher
from PC software
Confirm the correct wiring of the connecting cable. Be sure to use the serial
adaptor provided if using a standard PC serial cable.
Confirm that all Dip Switches on the control processor are set properly. See
Dip switch settings on page 14.
Confirm that the baud rate of your computer COM port is set to the same as
that of your Matrix Switcher (9600-Baud recommended). Confirm that the
proper COM port is selected in the control software.
Use a terminal emulator program to send **!! commands and check for **OK!!
response.
If the PC is controlling the switcher, the problem is with the switcher.
39
Page 46

Sierra Video Systems
Switching Malfunctions
Problem Remedy
The switcher
succeeds in
switching a
number of
sources then fails
to switch one.
The Matrix
Switcher turns ON
but will not switch
at all
Malfunction in the particular source or cable assembly.
NOTE:
The most common failure mode in transferring the signal of an audio source is a
break in the connecting wire.
Disconnect the source from a channel that is switching successfully and
connect the suspect source to it. If the channel continues to switch
successfully, then there is something wrong with the Matrix Switcher or the
suspect source was not connected properly. If it does not continue to switch
successfully, then there is something wrong with the source or cable
assembly.
Check the LEDs on the serial processor board. If they are not counting, the
control module is dead. If the control panel is not lit, check the ribbon cable
connection between the panel and the processor control module.
40
Page 47

Sierra Video Systems
Theory of
Operation
Introduction
The Tahoe 16 Series routing switchers can be configured using three different modules,
video, audio, and the processor modules. Your router includes a combination of all or
some of these modules. Schematics and circuit descriptions for each module are
described in the following section.
Module Description Part Number
Serial Control Module 504001
20x10 Video Crosspoint Module 504034
Chapter
6
20x10 Audio Crosspoint Module 504035
* Schematics are at the end of this chapter.
Serial Control Module 504001
The 504001 is a plug-in circuit module used as a controller for a variety of Sierra Video
Systems routing systems. The processor chosen for the 504001 is the Motorola
MC68302 microprocessor running at 16.5 MHz. This processor has 3 serial control
channels built in.
The 504001 controls the switching matrix by means of a parallel interface. This interface
is designed to have the proper timing characteristics required by the switching matrix.
Serial channel #1 is designed to connect to a RS-485 panel network. Up to 64 control
panels can be “daisy-chained” on this network. A variety of different panel types can be
used, and are available from Sierra Video Systems. The RS-485 network can be
operated at either 9600 baud or 31250 baud. The factory default baud rate is 31250.
Serial channel #2 is the Terminal port, and can be either RS-232 or RS-422, depending
on the board stuffing options. This port conforms to SVS Terminal Protocol and can be
addressed using the windows program “Hyper Term”.
Serial channel #3 is the Host port. The Host port can also be RS-232 or RS-485
depending on the board stuffing options. This port conforms to SVS Host Protocol as
41
Page 48

Sierra Video Systems
described in the Communication Protocol section of this manual and can be addressed
using the SVS windows program “GRIP”.
Two 8-bit dip switches allow the user to make configuration choices. See the section on
Dip Switch settings.
Power-Up Reset
The power-up reset signal is used to reset the MC68302 under certain conditions. The
primary source of reset is U24, an MC34064 low-voltage detector. This 3 terminal device
detects when the Vcc voltage is below a threshold level and pulls the output to ground.
This condition should arise only when the router is first turned on and the DC voltage
ramps up from the power supply. This signal grounds the enable of ½ of a LS244 bus
driver (12), which simultaneously drives low two outputs which are connected to HALT
and RESET on the MC68302.
The secondary source of reset is the watchdog timer output from the MC68302 itself. If
some internal mechanism of the software fails and the watchdog is not reset periodically,
the watchdog output will pulse low and cause a reset. This signal is also connected to the
enable input of the same LS244.
The software cannot distinguish one form of reset from the other.
Chip Select Decodes
The MC68302 offers 4 chip select decodes. After power-up, the base address and range
of these chip selects can be changed by writing to internal control registers in the
MC68302. Initially, the MC68302 will begin by fetching instructions from the EPROM, and
one of the first things it does is set the range and address of the other chip selects
properly.
The first three chip selects are used by the EPROM (U2), the static RAM (U3) and the
battery RAM (U4). The last chip select is treated specially and described in the next
section.
The EPROM and both RAMs are connected directly to the MC68302’s address and data
bus since it is being used in the 8-bit mode. This is one of the advantages of the
MC68302 as it does not require bus buffers or any additional logic to interface to these
memory parts.
The MC68302 offers selectable DTACK generation and wait state internal on a per-chip
select basis. The 504001 uses internal DTACK and 1 wait state for CSO, CS1, and CS2.
Chip Select 3
Chip select #3 is futher decoded to select whether the memory access is to the LEDs, the
dip switches, or the matrix interface. ½ of an LS139 (U13) is used for this purpose.
Address lines A16 and A17 evenly divide the portion of memory allocated to CS3 into 4
parts.
The two dip switch input enables and the LED latch enable are directly compatible with
the HC541 drivers and HC573 latch; so that these enabling signals go to those parts
directly.
The matrix address and data latches, U5 and U6, however, need to have an enable of
the oppsite polarity to ensure that the data is valid when it is latched. A portion of U15
inverts this signal so that data will be valid when latched.
DTACK Generator
Chip selects 0, 1, and 2 use the internal DTACK generation circuit of the MC68302 and
therefore no special circuitry is needed. (Because of this, an external DTACK signal must
not appear after any of these chip selects are asserted).
42
Page 49

Tahoe Series 20
The matrix interface has special timing requirements. These time delays are too long to
be provided by the MC68302 wait state or DTACK generator. This special timing is
generated externally using U14, U15, and U12.
The basic operation of the circuit is U14, which counts up to 32 starting from 0 whenever
a CS3 cycle is initiated. At this count it returns DTACK to the MC68302 which terminates
the memory cycle.
U14 is a 74F579 binary counter being clocked by CLKO at a 60 nanosecond rate. It is
held in permanent reset (count = 0) whenever CS3 is high.(U15 provides an inverter to
keep the counter reset). As soon as CS3 falls low, indicating an access to any of the 4
peripherals in this memory area, U14 begins counting up. U14 continues counting up until
it reaches a count of 8, at which point the output of U15-6 goes high because U15-4 is
high but U15-5 is low. U14 continues counting until it reaches a count of 16, at which
point U15-5 is high, but U15-4 is now low, so U15-6 is still high. Eventually U14 reaches
a count of 24, at which point both pin 4 and pin 5 of U15 are high, so the output falls low.
The net effect of this is to generate a strobe enable signal to the matrix which lasts for
approximately 860 nanoseconds. This strobe enable signal is fed into U7, which decodes
which of the 8 levels of strobe are desired based on the setting of address lines A6, A7,
and A8. But U14 has not yet finished counting; in fact the memory access to this region is
not terminated until DTACK has been recognized by the processor. U14 continues
counting until it reaches a count of 32, whereupon it drives U15-10 high, which becomes
inverted, and drives U12-19 low, which asserts the DTACK signal to the processor.
Within several clock periods the MC68302 recognizes the DTACK and terminates the
memory cycle. It removes CS3 assertion, which immediately returns U14 to the held-inreset-count state. U14 returns to 0, and the entire process can then repeat with another
memory cycle.
Because 8 clocks are provided at the start of each cycle before the matrix strobe is
asserted, a 480 nanosecond leading-edge delay is provided for data setup. The strobe
signal lasts almost 900 nanoseconds, and is followed by another 480 nanosecond delay
during which the data remains stable. After this 1.8 microsecond, the cycle is complete
and could begin again.
Matrix Interface
The routing switcher interface consists of three parallel groups of lines; input select, bus
select and strobe(s).
U5 latches the D0 through D7 processor lines during each matrix interface cycle. This
provides selection capability of up to 256 inputs. At the same time U6 latches address
lines A0 through A7. This provides control of up to 256 output buses.
The input select and bus select data is asserted for a total of 1800 ns. During the first 600
ns of this time the strobe lines are all low. During the second 600 ns period one strobe is
asserted high. During the final 600 ns all the strobe outputs are low again.
For each crosspoint that must be set, the above cycle is repeated. After the MC68302
receives a vertical interrupt, only those crosspoints in the matrix whose state must be
changed since the last verticle interrupt are changed. When no new changes are required
the outputs of U5, U6, and U7 remain static.
Vertical interrupt occurs at line 6 (for NTSC or line 3 for PAL). The processor can output
32 crosspoint changes per 64 microsecond TV line. A 256 output system can be entirely
reconfigured by line 14, well before the beginning of the active picture.
Vertical Interrupt Generator
Sync, video black or any composite video source can be used as a locking input to the
504001 module. The signal is AC coupled to Q2, an emitter follower. Q2 provides a low
43
Page 50

Sierra Video Systems
impedance output to sync separator Q1. The output of Q1 is inverted sync. U23E and
U23F form a low pass filter which separates vertical sync from the signal. U23D performs
several functions. When sync is present at its input, it acts as an inverter. If no sync is
present at the output of U23E, it may be in either state it is AC coupled by C1 to U23D.
U23D then functions as a free running oscillator. The oscillator is made by the resistive
feedback around U23D and the value of C1. The oscillator does not function when sync
is present because the input to U23D is driven by U23E to the full 5V input range. This
overdrives the oscillator mode which uses the much lower (about 1V) hysteresis range of
U23. U23D’s output drives the DREQ input of the MC68302.
Serial Interfaces
The RS485 control panel network is interfaced to by U16, an EIA RS485 transceiver. The
RS485 network is terminated on the 504001 by a complex network. R101 provides a
simple resistive load. R103 in conjunction with D15 and D16 provides a lower impedance
termination as the peak to peak swing across the line exceeds the forward drop of the
diodes. C26 was selected to reduce ringing. This complex termination performs much
better than the usual single 100 ohm resistor used with RS485 lines. It was optimized for
31250 rate and Belden 8451 cable. At 31250 baud, 64 panels can operate over a
combined cable length of 2000 ft. At 9600 baud, the cable total length can be up to 5000
ft.
Power Supply
Most of the circuits on the 504001 are powered by +5VDC. The RS232 interface circuits
use + and -12VDC. Low voltage AC enters the module. It is then rectified and filtered.
Three terminal fixed voltage regulators are used to provide the required ages.
Video Crosspoint Module 504034
The 504034, 20 x10 video crosspoint module is a plug-in module that is a complete video
switching module containing; input buffers, crosspoint array, output amplifiers, control
logic and power supply. It is the basic building block for the video portion of the Tahoe
Series 20 routing switcher. The 504034 is available in a standard bandwidth of 50 MHz.
Input buffers
Each of the 20 video inputs has a separate wide band video buffer (U4). R1 provides a
DC reference to the input of the buffer. R22 and C35 form a snubber network which
compensates for the phase shift loading affect the crosspoint buses have on the output of
the buffer.
Crosspoint Matrix
The crosspoints on the 504034 are configured from individual 4 by 1 IC crosspoint
chips,HA4314’s. Each switching IC has 3 control inputs. The “A” and “B” inputs select “1
of 4” inputs for that IC. The third control input is a CS (chip select). By using the chip
select input, multiple 4 by 1 IC’s can be linked to form a larger bus.
The output of each crosspoint chip passes through a PIN diode (D9) before being bussed
together. The PIN diode blocks the off capacitance of the 7 deselected chips and has an
extremely low forward impedance. The common bus of eight diodes has an FET (Q1)
configured as a constant current source connected as a load for the bus.
Output Amplifiers
The output amplifier circuit is based on a current mode feedback amplifier IC. The
standard 504034 uses an 60Mhz EL2020 (Elantec) or CLC430 (Comlinear) for this
function. R5 and C3 are a snubber network which controls peaking on the crosspoint bus.
44
Page 51

The gain of the output amplifier is adjusted by a 15 turn control (R7). R9, a 75 ohm 1%
resistor provides the required output line driving impedance.
Control Circuits
The 504034 is usually controlled by a centralized control processor module which may be
in the same frame as the 504034 or in another frame in the overall system. Each of the
data inputs to the 504034 is in series with a 4.7K resistor. This serves two functions. It
protects the logic circuits on the 504034 CMOS inputs from static over voltage or static
damage. Second, it protects the bus in the system from a failure on an individual 504034
module.
U3 is a 4 line to 16 line decoder. Its output determines which bus on the 504034 is being
addressed by the central controller. The strobe input (J1-6S) is centered timing wise in
the data time that appears on the other logic lines to the 504034.
Power Supply
Low voltage AC enters the 504034 on J3 pins 27 and 28. If dual supplies are used, low
voltage AC from the second supply enters the 504034 on J3 pins 25 and 26. The low
voltage AC is rectified (D1 through D8) and filtered (C7 and C8) to unregulated DC. U11
provides +5VDC for the logic circuits. U12 is a 7805 and provides +5VDC to the analog
circuits. U10 is a 7905 and provides -5VDC to the analog circuits.
Tahoe Series 20
Audio Crosspoint Module 504035
The 504035, 20 x 10 audio crosspoint module is a plug in module that is a complete
audio switching module containing; input buffers, crosspoint array, output amplifiers,
control logic and power supply. It is the basic building block for the audio portion of the
Tahoe series 20 routing switchers. The 504035 employs balanced audio switching. The
advantages include; higher internal levels to achieve very high dynamic range (over
100db), lower crosstalk, no audio ground current, and no switching transients. The
504035 has a bandwidth of about 500KHz. This allows it to be used for switching time
code at even the fastest machine shuttle speeds.
Input Buffers
Each one of the 20 audio inputs is buffered by a dual low noise op-amp (U1). The circuit
provides 40db of common mode rejection. The circuit gain is set by 1% resistor values.
Crosspoint Matrix
The crosspoints on the 504035 module are configured from individual 4 by 1 IC
crosspoint chips. Each switching IC has 3 control inputs. The “A” and “B” inputs select “1
of 4” inputs for that IC. The third control input is a CS (chip select). By using the chip
select input, multiple 4 by 1 IC’S can be linked to form a larger bus.
Output Amplifiers
The output amplifier circuit is based on another dual low noise op-amp. The circuit is also
configured to reject up to 40 db of common mode signal. This includes common mode
crosstalk (which is immeasurable below 15 KHz) and switching transients. The output
circuit has a gain of 10db to offset the deliberate loss introduced by the input network.
Control Circuits
The 504035 is usually controlled by a centralized control processor module which may be
in the same frame as the 504035 or in another frame in the overall system. Each of the
data inputs to the 504035 is in series with a 4.7K resistor. This serves two functions. It
protects the logic circuits on the 504035 CMOS inputs from static over voltage or static
45
Page 52

Sierra Video Systems
damage. Second, it protects the bus in the system from a failure on an individual 504035
module.
U6 is a 4 line to 16 line decoder. Its output determines which bus on the 504035 is being
addressed by the central controller. The strobe input (J1-6S) is centered timing wise in
the data time that appears on the other logic lines to the 504035.
Power Supply
Low voltage AC enters the 504035 on J3 pins 27 and 28. If dual supplies are used, low
voltage AC from the second supply enters the 504035 on J3 pins 25 and 26. The low
voltage AC is rectified (D1 through D8) and filtered (C1 and C2) to unregulated DC. U10
provides +5VDC for the logic circuits and switching array. U11 provides -5VDC for the
switching array. U12 is a 78M15 and provides +15VDC to the analog circuits. U13 is a
79M15 and provides -15VDC to the analog circuits.
46
Page 53

Schematics
504001
Tahoe Series 20
47
Page 54

Sierra Video Systems
48
Page 55

Tahoe Series 20
49
Page 56

Sierra Video Systems
50
Page 57

Tahoe Series 20
51
Page 58

Sierra Video Systems
504034
52
Page 59

Tahoe Series 20
53
Page 60

Sierra Video Systems
504035
54
Page 61

Sierra Video Systems
Specifications
Audio Specifications
Audio
Nominal Input Level +4 dbm
Chapter
7
Maximum Input Level + 24 dbm
Input Impedance 15k ohms, balanced
Common Mode Rejection ≥ 40 db @ 60 Hz
Nominal Output Level +4 dbm
Maximum Output Level +24 dbm into 150 ohms
Output Source Impedance 150 ohms, balanced
Voltage Gain Unity ± 0.1db (High Z load)
Frequency Response 20Hz to 20kHz ± 0.1 db
Bandwidth 100 kHz
S/N Ratio (20 Hz to 20 kHz) 110 db ref. To +24 dbm
Crosstalk (all inputs hostile) ≥ 80db @ 15 kHz
IM & THD (20Hz to 20 kHz) ≤0.05% to +24 dbm
55
Page 62

Sierra Video Systems
Video Specifications
Video
Nominal Input Video Level 1 V p-p
Maximum Input Video Level 1.5 V p-p
Input Impedance 75 ohms
Input Return Loss ≥ 40 db @ 5 MHz
Superimposed DC ± 5 V
External Sync Color Black to 4 V p-p
Nominal Output Video Level 1 V p-p
Maximum Output Video Level 1.5 V p-p
Output Impedance 75 ohms
Output Return Loss ≥ 35 db @ 5 MHz
DC on Signal ± 50 mV
Gain Unity (± 2 db adj.)
Response ± 0.1 db to 5 MHz; + 0/- 3 db, 5 – 50 MHz
Diff. Phase Error ± 0.1 degree @ 3.58 or 4.43 MHz
Diff. Gain Error ± 0.1 % @ 3.58 or 4.43 MHz
Crosstalk (all hostile) ≥ 60db @ 5 MHz
S/N Ratio ≥ 80db @ 5 MHz
Response, wide bandwidth option + 0/- 3 db to 200 MHz
Crosstalk (adjacent hostile)
wide bandwidth option
≥ 45db @ 50 MHz
56
Page 63

Sierra Video Systems
Software
Upgrades
Introduction
From time to time software upgrades will be available from SVS. Check our web site
(sierravideo.com) for available downloads, or contact the factory.
Tahoe series router processors can be upgraded via the 9 pin serial port on the router’s
Host port. Upgrades are accomplished using the GRIP program. For details on software
upgrades refer to the GRIP manual.
Chapter
8
Operation
Download the software upgrade to a folder on your PC. Open G.R.I.P. and click on
“Router Configuration” from the drop down list, select “Software upgrades”.
The following window will be displayed;
Place a check in the Router Upgrade box and press “Select File and Send”. Select the
upgrade file you downloaded and press OK.
A status bar will be displayed indicating file transfer.
Depending on the speed of your PC’s processor, this upgrade may take several minutes.
57
Page 64

Page 65

Sierra Video Systems
Chapter
9
Warranty
A. General
Buyer assumes all responsibility for ascertaining the suitability of Sierra Video (hereinafter "SVS")
products for Buyer's intended use. No product sold by SVS is designed or manufactured for use
in any manner or under any conditions other than those described in SVS's instruction manuals
and other printed material for each particular product. If any product is used or applied in a
manner or under conditions not specifically authorized by such written materials or if any product
is used by unqualified or improperly trained personnel, Buyer agrees that SVS shall have no
liability of any kind arising from such use, and Buyer agrees to indemnify and hold SVS harmless
from any claims of third parties arising from such use, and Buyer shall provide SVS with counsel
of SVS's choice to defend against such claims.
B. Limited Warranty
1. This limited warranty applies only to the original purchaser and is non-transferable. This limited
warranty begins on the date of purchase and will be in effect for seven (7) years for new
equipment and for three (3) years for "Factory Refurbished" equipment. Power Supplies and fans
are warranted for three (3) years from the date of purchase for new equipment and two (2) years
for “Factory Refurbished” units, from the date of purchase.
Buyer must obtain a Return Material Authorization ("RMA") number from SVS prior to returning a
product for repair. If, in SVS' sole discretion, the product is found to be defective during the term
of this warranty, SVS will at its option: (a) provide free replacement parts, and/or (b) repair the
unit at an SVS facility. During the warranty period, SVS will make every reasonable effort to
support critical emergencies by supplying no-cost loan equipment while the defective unit is being
repaired. SVS will provide replacement parts and/or factory service at no charge. Buyer bears
the cost of shipping products returned to SVS under this warranty. SVS will bear the cost of
shipping repaired products or replacement parts to the Buyer.
This limited warranty shall not apply to any of SVS's goods which have been altered or which
have been subjected to misuse, mishandling, improper storage or negligence. The
aforementioned provisions do not extend the original warranty period of any goods which have
been replaced by SVS. This limited warranty shall not apply to any goods not of SVS's
manufacture, Buyer to be entitled only to the warranty set forth in the original manufacturer's
limited warranty.
59
Page 66

Sierra Video Systems
THIS LIMITED WARRANTY IS EXPRESSED IN LIEU OF ALL OTHER
WARRANTIES, EXPRESS, IMPLIED OR STATUTORY, INCLUDING WITHOUT
LIMITATION THE IMPLIED WARRANTIES OF MERCHANTABILITY AND OF
FITNESS FOR A PARTICULAR PURPOSE, AND ALL OTHER OBLIGATIONS OR
LIABILITIES ON SVS'S PART.
SVS neither assumes nor authorizes any other person to assume for SVS any other liabilities in
connection with the sale of products of its own manufacture.
2. SVS's liability hereunder on any claim of any kind, except as set forth herein for any loss,
injury to person or property or damage, shall in no case exceed the price allocable to the goods
which give rise to such claim.
3. In no event shall SVS be liable for any damages or injuries to person or property if any
goods do not meet the above limited warranty, including, without limitation, incidental expenses or
consequential or special damages, except as set forth in such limited warranty. The foregoing
states the exclusive remedy of Buyer and the exclusive liability of SVS for any breach of the
foregoing limited warranty.
C. Cancellation
Except as provided in paragraph B immediately above, all sales are final, and Buyer may cancel
this order or return products only upon written consent of SVS.
D. General
In the event of a breach of any of the terms hereof, the non-breaching party shall be entitled to
recover all of its costs, fees, and expenses, including, without limitation, reasonable attorney's
fees, from the breach party incurred as a result of such breach, regardless of whether or not a
suit is actually filed to enforce the terms hereof.
The provision hereof shall be governed by the laws of the State of California (excluding its choice
of law provisions).
The headings are for convenience only and do not limit or amplify the terms and provisions
hereof.
In case any one or more of the provisions set forth herein shall be held to be invalid, illegal, or
unenforceable in any respect, the validity, legality, and enforceability of the remaining provisions
contained herein shall not in any way be affected or impaired thereby.
No waiver, alteration, or modification of any of the provisions hereof shall be binding unless in
writing and signed by an authorized Officer of SVS.
NOTE:
All products returned to SVS for service must have prior approval. Return authorization
requests may be obtained from your SVS dealer.
60
© Sierra Video Systems
 Loading...