

Siemens Healthcare Clinitek Status Connect System Operator's Manual
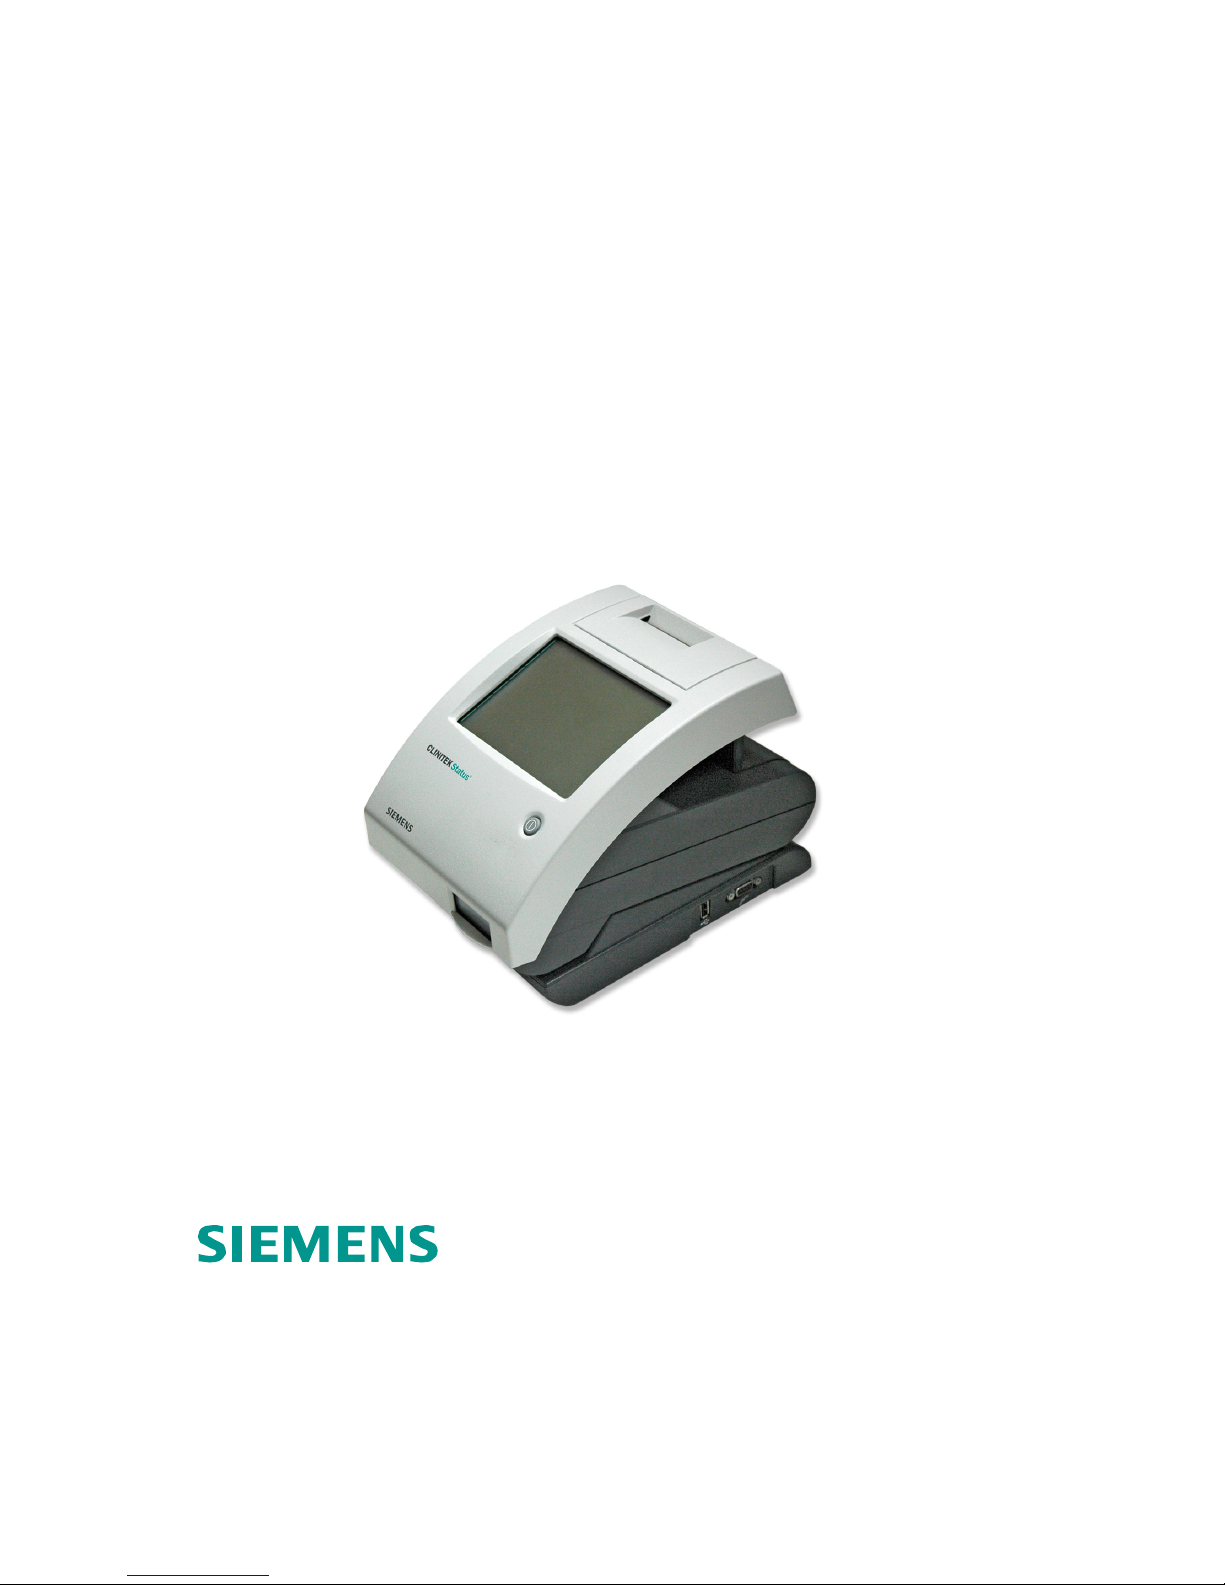
Clinitek Status® Connect System
Operator’s Guide
(For US Only)
10490852, 2009-12
(135055, Rev A)

© 2009 Siemens Healthcare Diagnostics Inc. All rights reserved.
No part of this guide or the products it describes may be reproduced by any
means or in any form without prior consent in writing from Siemens
Healthcare Diagnostics.
Clinitek, Clinitek Status, Clinitest, and Chek-Stix are trademarks of Siemens
Healthcare Diagnostics.
Origin: UK
The information in this guide was correct at the time of printing. However,
Siemens continues to improve products and reserves the right to change
specifications, equipment, and maintenance procedures at any time without
notice.
If the Clinitek Status Connect system is used in a manner differently from that
specified by Siemens, the protection provided by the equipment may be
impaired. Observe all warning and hazard statements.
Clinitek Status Connect System 2 Operator’s Guide

Clinitek Status Connect System 3 Operator’s Guide
Table of Contents
TABLE OF CONTENTS .......................................................................3
USING THIS GUIDE.............................................................................7
CONVENTIONS ....................................................................................7
1 OVERVIEW..................................................................................9
INTRODUCTION ...................................................................................9
HARDWARE OVERVIEW .......................................................................9
User Interface ..............................................................................9
Network Connectivity .................................................................10
Memory ......................................................................................10
Optional Bar Code Scanner.......................................................11
SOFTWARE OVERVIEW......................................................................12
ANALYZER OVERVIEW.......................................................................12
Navigating the Screens..............................................................12
Entering Information...................................................................12
Setting Test Mode......................................................................13
Setting the Password .................................................................13
2 OPERATING THE CONNECTOR .............................................15
OVERVIEW .......................................................................................15
GETTING STARTED ...........................................................................15
Using the Start-Up Wizard .........................................................15
Getting to the Select Ready Screen ..........................................16
Enabling the Connector .............................................................16
MANAGING OPERATORS LIST ............................................................17
Setting Operator IDs ..................................................................17
Adding Operator IDs ..................................................................18
Viewing, Editing, Printing, and Deleting Operator IDs ...............18
SCANNING PATIENT INFORMATION .....................................................19
MANAGING URINE COLORS ...............................................................20
Setting and Customizing Urine Colors.......................................20
Adding Customized Colors ........................................................21
Entering Urine Color and Clarity during Test Cycle...................21
MANAGING STRIP LOT NUMBER AND EXPIRATION DATE......................22
Setting Strip Information Prompt................................................22
Entering the Strip Lot Number and Expiration Date ..................22

Clinitek Status Connect System 4 Operator’s Guide
3 QUALITY CONTROL ................................................................25
MANAGING QC TESTS ......................................................................25
Setting Up QC Strip Tests..........................................................26
Setting Up QC for Cassette Tests..............................................29
Running a QC Strip Test............................................................31
Running a QC Cassette Test.....................................................32
MANAGING QC RESULTS ..................................................................33
QUALITY CONTROL ERRORS .............................................................34
4 TROUBLESHOOTING ..............................................................37
GENERAL INFORMATION ....................................................................37
5 DATA MANAGEMENT..............................................................39
MANAGING PATIENT AND SYSTEM INFORMATION ................................39
Recalling Patient or QC Data.....................................................39
Deleting Records .......................................................................40
6 SYSTEM CONFIGURATION.....................................................41
OVERVIEW .......................................................................................41
RECORD THE WARRANTY INFORMATION.............................................41
UNPACKING ......................................................................................41
INSTALLING ......................................................................................43
INSTALLING THE OPTIONAL BAR CODE SCANNER ...............................45
STARTING THE CONNECT SYSTEM .....................................................45
CONFIGURING THE CONNECTOR ........................................................45
COPYING CONFIGURATION SETTINGS ................................................46
MANAGING NETWORK CONNECTIVITY ................................................47
Connecting to the LAN...............................................................48
Connecting to the LAN, Wired Settings .....................................48
Connecting to the LAN, Wireless Settings.................................50
MANAGING PRINTOUT SETTINGS .......................................................52
Customizing the Printout............................................................52
APPENDIX A: WARRANTY AND SUPPORT INFORMATION ..55
LEGAL INFORMATION.........................................................................55
Siemens Authorized Representative .........................................55
WARRANTY INFORMATION .................................................................55
SUPPORT INFORMATION ....................................................................55
Addresses ..................................................................................56
PRE-SERVICE CHECKLIST..................................................................57

Clinitek Status Connect System 5 Operator’s Guide
APPENDIX B: ORDERABLE SUPPLIES....................................59
ACCESSORY ITEMS ...........................................................................59
QUALITY CONTROL SUPPLIES............................................................59
SYSTEM DOCUMENTATION ................................................................59
APPENDIX C: SYMBOLS............................................................61
SYSTEM AND PACKAGING..................................................................61
USER INTERFACE..............................................................................63
APPENDIX D: SPECIFICATIONS ...............................................65
CONNECTOR SPECIFICATIONS ...........................................................65
Dimensions ................................................................................65
ENVIRONMENTAL SPECIFICATIONS.....................................................65
Electrical Requirements .............................................................65
Regulatory Specifications ..........................................................67
Electrical Precautions ................................................................67
APPENDIX E: BAR CODE SCANNER .......................................69
GENERAL INFORMATION ....................................................................69
INSTALLING THE OPTIONAL BAR CODE SCANNER ...............................69
TESTING THE OPTIONAL BAR CODE SCANNER....................................69
TROUBLESHOOTING ..........................................................................69
SPECIFICATIONS ...............................................................................70
Bar Code Formats......................................................................70
Bar Code Symbols and Labels ..................................................70
BAR CODE SCANNER MAINTENANCE .................................................71
APPENDIX F: COMPUTER INTERFACE (LIS) ..........................73
OVERVIEW .......................................................................................73
CONNECTION SPECIFICATIONS ..........................................................73
Serial Connection.......................................................................73
Ethernet (Wired) Connection .....................................................73
Wireless Connection ..................................................................73
COMMUNICATION PROTOCOLS ..........................................................73
APPENDIX G: GLOSSARY .........................................................75
INDEX.................................................................................................79

Clinitek Status Connect System 6 Operator’s Guide
Using this Guide
The Clinitek Status Connect System Operator’s Guide® provides information
for medical professionals who use the Clinitek Status Connect system.
The following table illustrates how this guide is organized.
If you want to . . . Then refer to . . .
learn about the system functions,
hardware, and operating sequence,
Section 1,
Overview.
set up and use connector features, Section 2, Operating the Connector.
set up and process Quality Control
tests,
Section 3,
Quality Control.
investigate and correct system
problems,
Section 4,
Troubleshooting.
learn about record and data
management,
Section 5,
Data Management.
install the system or modify system
parameters,
Section 6,
System Configuration.
review additional information, such
as the glossary or the supplies list,
Appendices.
Conventions
The Clinitek Status Connect System Operator’s Guide uses text and symbol
conventions in the following table.
Convention Description
BIOHAZARD
Biohazard statements alert you to
potentially biohazardous conditions.
WARNING
Warning statements alert you to
conditions that may cause personal injury.
CAUTION
Caution statements alert you to conditions
that may cause product damage or loss of
data.
Clinitek Status Connect System 7 Operator’s Guide

Clinitek Status Connect System 8 Operator’s Guide
Convention Description
NOTE: Note statements alert you to important
information that requires your attention.
Bold
Bold type indicates text or icons on the
user interface. For example, if the word
Select appears as
Select, it refers to the
Select key on the user interface.
System icons are also indicated by words
in bold type. For example, the words
Next
Screen
refer to a system icon.
A complete list of system icons and their
equivalents is in Appendix C,
Symbols.
Italic
Italic type refers to the title of a document,
a section title in this guide, or screen
name.

Clinitek Status Connect System 9 Operator’s Guide
1 Overview
Introduction
The Clinitek Status connector is intended for use with the Clinitek Status
analyzer. It allows network connectivity and centralized control of all satellite
Point of Care (POC) Clinitek Status analyzers and the connector provides the
capability to communicate with remote Hospital and Laboratory Information
Systems (HIS/LIS) and interface with Electronic Medical Records (EMR).
The Clinitek Status connector and Clinitek Status analyzer together are the
Clinitek Status Connect system.
This Operator’s Guide provides information on setting up and using
functionality provided by the connector. For complete information on using the
analyzer, refer to the Clinitek Status Analyzer Operator’s Manual.
The connector includes the following key features:
• Centralized control
• Communication with LIS
• Bar-code scan to easily enter data
• Operator management and security
• Password protection
• Improved data management
• Quality control (QC) lockout
• QC reminder
• Communication via Ethernet or wireless medium
• Recall patient and QC records
• Copy Setup configuration using memory stick
• Customized urine colors
Hardware Overview
User Interface
The Clinitek Status connector easily connects to the Clinitek Status analyzer
by physically combining the units and connecting two short cables. The
connector includes two Universal Serial Bus (USB) 2.0 ports, one Ethernet
(RJ45) port, and three Serial (RS-232) ports.

Clinitek Status Connect System 10 Operator’s Guide
You can connect a USB memory stick, an external printer, an Ethernet device,
and a handheld bar code scanner to the system using the interface
connections.
You can use an optional handheld bar code scanner and/or external keyboard
to enter operator, patient, and cassette and strip information into the system
instead of entering information using keyboard screens.
Network Connectivity
The Clinitek Status connector supports bidirectional communication with an
external LIS and Ethernet or wireless network connectivity. The connector
supports the 802.11b and 802.11g wireless specifications by connecting a
wireless card to the rear USB port. Standard wired connectivity is available
using the supplied Ethernet cable and the RJ45 port. You can also send CSVformatted results to an LIS or PC using the serial (RS-232) port on the back of
the connector.
Memory
The analyzer operating system, software, and settings are stored in the
instrument’s onboard, non-volatile, EEPROM memory. You can insert a USB
memory stick into the USB port on the connector to copy configuration
information. You can then insert the USB memory stick into another Clinitek
Status connector and copy the configuration setup to the new system.
NOTE: You cannot import data from a spreadsheet into the system.

1
Power cord to AC outlet
2
Connections
Figure 1. Power Cord and Network Connections
Optional Bar Code Scanner
The connector also supports importing certain information using an optional
bar code scanner. When a screen prompts for patient information, operator ID
and name, or QC control and level, you can use the bar code scanner to enter
the information.
Figure 2. Bar Code of Patient Information
Clinitek Status Connect System 11 Operator’s Guide

Clinitek Status Connect System 12 Operator’s Guide
Software Overview
The Clinitek Status Connect system provides an easy-to-navigate and intuitive
user interface. For complete information on using the analyzer, refer to the
Clinitek Status Analyzer Operator’s Manual.
Analyzer Overview
This section provides a quick reference on navigating and using the analyzer
user interface screens, entering information, test modes, and setting the
password. For complete information on using the analyzer, refer to the
Clinitek Status Analyzer Operator’s Manual.
Navigating the Screens
The Clinitek Status screens display messages, instructions, and options to
which you respond by selecting or touching the appropriate area on the
screen. Each screen has an icon, title bar, and one or more touch-sensitive
active areas. To select any item, touch the appropriate area on the screen.
There are 3 types of touch-sensitive areas:
• Round buttons
• Boxed areas
• Scroll arrows
Round buttons typically appear on screens that require a selection among
several items. The button with a filled circle is the current selection. Some
screens allow more than one selection.
Boxed areas are text or symbols on the screen enclosed in boxes of varying
sizes. To activate that function, touch any area within the box.
Scroll arrows are the up and down arrows on the right side of the screen.
Touch the arrows to scroll through the list of information on the left side of the
screen. Once the information on the left side of the screen is highlighted,
select the appropriate button at the bottom of the screen. If there are double
arrows on the screen, these arrows take you to the top or bottom of the page.
For screen symbols, refer to Appendix C, Symbols, User Interface.
The icon indicates the section in which you are working: Strip Test, Cassette
Test, Instrument Set Up, Recall Results, or QC.
Entering Information
When the screen prompts you to enter information, an alphabetic or numeric
keyboard displays on the screen. To toggle between the alphabetic and

Clinitek Status Connect System 13 Operator’s Guide
numeric keyboards, select either A B C or 1 2 3 at the top left part of the
screen. When you are done entering information, select
Enter at the bottom.
Setting Test Mode
The analyzer allows you to set up patient tests in 3 modes: Quick, Full, or
Custom. When the analyzer is set to Quick Test, there are no prompts for any
patient or operator information. In Full Test, there are prompts for operator
and patient information. Custom Test allows you to set which options are
prompted and displayed in results.
Setting the Password
The analyzer default is to have the password disabled. You can set the
password through Instrument Settings. One password allows all users who
know it to modify system settings. The password differs from the Operators ID
list in that you can permit individual operators to perform patient tests, QC
tests, recall results, and/or modify system settings. If both the password and
Operator ID are enabled, the system prompts only for the Operator ID. For
more information on Operator IDs, refer to Managing Operators List.

Clinitek Status Connect System 14 Operator’s Guide

Clinitek Status Connect System 15 Operator’s Guide
2 Operating the Connector
This section describes using the Clinitek Status connector with the
Clinitek Status analyzer. For complete information on using the analyzer, refer
to the Clinitek Status Analyzer Operator’s Manual.
Overview
The connector allows the system to connect to a Local Area Network (LAN)
and supports several external devices. The connector includes two USB
ports, three serial RS-232 ports, and one Ethernet RJ45 port.
The USB ports allow for software upgrades, copying configuration setup,
wireless network connectivity, and external keyboard use. The RS-232 ports
are used to send data to Laboratory Information Systems (LIS) and support
an optional bar code scanner. The RJ45 port provides network connectivity for
communication with remote systems.
Getting Started
This section explains how to set up the Clinitek Status Connect system for the
first time using the Start-Up Wizard. For unpacking and installation
instructions, see System Configuration.
Using the Start-Up Wizard
After you connect the instrument and connector, and turn the system on, the
instrument completes self-checking and the Start-Up Wizard screen displays.
Use the Start-Up Wizard to set basic functionality including language, current
date and time, and units convention.
To set basic functionality, perform the following steps:
1. At the Select Language screen, use the arrow keys to select your
language.
2. Select
Select.
The next Start-Up Wizard screen displays.
3. Select
Next.
The Set Date & Time screen displays.
4. Use the arrow keys to set the month, day, year, and time.
5. Select
Next.
The Input Settings screen displays.
6. Select the button for
Quick Test or Full Test.
Refer to the Clinitek Status Analyzer Operator’s Manual for descriptions of
Quick and Full tests.

Clinitek Status Connect System 16 Operator’s Guide
7. Select Next.
The Select Urinalysis Test screen displays.
8. Use the arrow keys to select a Siemens reagent strip.
9. Select
Next.
The Choose Results Format screen displays.
10. Select the radio button for
Conventional, SI, or Nordic units selection.
NOTE: Nordic units are only available in English and Swedish.
If you set the language to Chinese, this screen does not display, as only SI
units are available in Chinese.
11. Select
Next.
The Confirmation screen displays.
12. Select
Next.
The Select Ready screen displays.
To enable the connector functionality, refer to Enabling the Connector below.
NOTE: If you reset system defaults, the connector resets to Enabled.
Getting to the Select Ready Screen
The Select Ready screen displays after system initialization. The Select
Ready screen is the starting point to run urine strip tests, cassette tests, QC
tests, and to recall data or modify system settings.
When you turn the power on, the system initializes and the Select Ready
screen displays. After modifying system settings or running tests, you may
need to select Done several times to return to the Select Ready screen.
Enabling the Connector
To enable the connector to communicate with the analyzer, perform the
following steps:
1. At the Select Ready screen, select
Instrument Set Up.
The Choose Settings screen displays.
2. Use the arrow keys to select
Instrument Settings.
3. Select
Select.
The Instrument Settings screen displays.
4. Use the arrow keys to select
Connectivity.
5. Select
Select.
The Connectivity screen 1 of 2 displays.
6. To enable communication between the instrument and the connector,
select
Enabled.
To prevent communication, select
Disabled.
NOTE: If there is no connector, Siemens recommends setting the connector to
Disabled setting. Setting the connector to the Enabled setting without a
connector may prevent communication with an external system.

NOTE: You can edit connectivity settings if the connector is Disabled.
7. Select
Previous.
8. Select
Done twice to return to the Select Ready screen.
Managing Operators List
This section describes how to set up use of operator IDs and add, edit, or
delete the list of operator IDs. When enabled, the system permits only allowed
operators to perform patient tests, QC tests, recall results, or modify system
settings. Operators gain access by entering their ID.
The Clinitek Status+ analyzer stores 700 operators. The Clinitek Status
analyzer stores 20 operators.
NOTE: The Operator ID is never printed or displayed with patient results. If
you wish to associate the Operator’s Name with patient results, enable
Operator Name in Custom Settings-Operator screen 1 of 5.
CAUTION
Once the Operator ID and Operator Name settings are made, do
not change the Operator ID setting. If you change the Operator
ID setting, all patient results are erased.
Setting Operator IDs
To set up operator IDs, perform the following steps:
1. At the Select Ready screen, select
Instrument Set Up.
The Choose Settings screen displays.
2. Use the arrow keys to select
Instrument Settings.
3. Select
Select.
The Instrument Settings screen displays.
4. Use the arrow keys to select
Authorized operator.
5. Select
Select.
The Authorized operator screen displays.
6. To permit access only by authorized operators, select
Enabled.
To allow all operators access to the system, select
Disabled.
7. If you selected
Enabled, see Adding Operator IDs below to add at least
one operator.
If you selected
Disabled, select Done 3 times to return to the Select
Ready screen.
Clinitek Status Connect System 17 Operator’s Guide

CAUTION
If the instrument uses the operator list sent by the LIS, do not
power down the system. If the connector loses power, the
operator names are erased.
NOTE: The operator list sent by the LIS overwrites an operator list entered via
the analyzer.
Adding Operator IDs
To add operator IDs, perform the following steps:
1. At the Authorized operator screen, select
Add operator.
2. Enter the new Operator ID.
Use the alpha keyboard to enter text.
To enter numeric text, select
123.
3. Select
Enter.
The Authorized Operator screen displays indicating the Operator ID and
which functions the operator can perform.
4. To edit this Operator ID, select
Edit.
5. To edit which functions this Operator ID can access, select
Edit.
The Authorized Operator-Operator access screen 1 of 2 displays.
6. To allow this operator to run patient tests, select
Enabled.
To prevent patient tests, select
Disabled.
7. To allow this operator to run QC tests, select
Enabled.
To prevent QC tests, select
Disabled.
8. Select
Next.
The Authorized Operator-Operator access screen 2 of 2 displays.
9. To allow this operator to recall results, select
Enabled.
To prevent recall results, select
Disabled.
10. To allow this operator to set up the instrument, select
Enabled.
To prevent instrument setup, select
Disabled.
11. Select
Done twice.
The Authorized Operator-Operators list screen displays.
12. Select
Exit.
13. Select
Done 3 times to return to the Select Ready screen.
Viewing, Editing, Printing, and Deleting Operator IDs
You can view, print, or delete the entire operator list or edit individual
operators.
NOTE: If you delete the entire operator list, ensure that authorized operators is
Disabled. See Setting Operator IDs above.
Clinitek Status Connect System 18 Operator’s Guide

Clinitek Status Connect System 19 Operator’s Guide
At the Authorized operator screen, perform the following steps:
1. To delete the entire operators list, select
Delete operators list.
The Delete operators list caution screen displays.
2. To delete, select
Yes.
To keep the operators list, select
No.
If you selected
No, the Authorized operator screen displays.
If you selected
Yes, go to Step 8.
3. To edit or view the operators list, select
View operators list.
The Authorized Operator-Operators list screen displays.
4. Use the arrow keys to select the operator you want to delete or edit.
5. To delete that operator, select
Delete entry.
To edit or delete that operator, select
Select.
The Authorized operator screen displays.
Refer to Adding Operator IDs above, Step 6.
6. To print all operators, select
Print.
NOTE: The system prints the first 100 operators listed alphabetically.
7. To return to the Authorized operator screen, select
Exit.
8. Select
Done 3 times to return to the Select Ready screen.
NOTE: Enabling the instrument password restricts access to Instrument Setup
to those who know the password. If both Operator ID and password are
enabled, the Operator ID has priority.
Scanning Patient Information
You can require operators to only enter patient information with the bar code
scanner and not allow operators to manually enter patient information.
To require patient information entry only by scanning, perform the following
steps:
1. At the Select Ready screen, select
Instrument Set Up.
The Choose Settings screen displays.
2. Use the arrow keys to select
Operator and Patient Information.
3. Select
Select.
The Input Settings screen displays.
4. Select
Custom Set Up.
5. Select
Next.
The Custom Settings-Operator screen 1 of 5 displays.
6. Select
Next.
The Custom Settings-Patient Information screen 2 of 5 displays.
7. Select
Bar code reader settings.
The Patient Information screen displays.
8. To require entry of patient information only by bar code scanner, select
Enabled.
To permit entry of patient information by either bar code scanner or
manually, select Disabled.

Clinitek Status Connect System 20 Operator’s Guide
9. Select Done.
The Custom Settings Patient Information screen 2 of 5 displays.
10. Select
Next 4 times.
11. Select
Done twice to return to the Select Ready screen.
Managing Urine Colors
The following sections describe how to customize and set urine color choices
and urine clarity for Siemens strip tests. When you print patient test results,
you can include urine color, clarity, or color and clarity in the printout. Urine
color and clarity are optional; you can choose not to print these parameters.
Urine color and clarity are available only in Full Test or Custom mode.
Setting and Customizing Urine Colors
You can choose from one of 10 instrument-provided colors and add up to 4
customized colors to patient test results.
To include instrument-provided colors, perform the following steps:
1. At the Select Ready screen, select
Instrument Set Up.
The Choose Settings screen displays.
2. Use the arrow keys to select
Operator and Patient information.
3. Select Select.
The Input Settings screen displays.
4. Select Custom Set Up.
5. Select Next.
The Custom Settings-Operator screen 1 of 5 displays.
6. Select Next 3 times.
The Custom Settings-Sample Appearance screen 4 of 5 displays.
7. Select Edit colors.
The Sample Appearance-Select colors screen 1 of 3 displays.
8. To choose colors, select the button for the color you want.
To remove a selected color, select that color button again.
9. Select Next.
The Sample Appearance-Select colors screen 2 of 3 displays.
10. To choose colors, select the button for the color you want.
11. Select Next.
The Sample Appearance-Select colors screen 3 of 3 displays.
12. Select Next 3 times.
The Input Settings-Confirmation screen displays.
13. Select Done twice to return to the Select Ready screen.

Adding Customized Colors
To enter up to 4 custom colors, perform the following steps:
1. At the Sample Appearance-Select colors screen 3 of 3, select Enter
custom color 1 (2, 3, or 4) corresponding to each custom color.
2. Enter the custom color.
Use the alpha keyboard to enter text.
To enter numeric text, select 123.
NOTE: The maximum number of characters for each color is 10.
3. Select Enter.
The Sample Appearance-Select colors screen 3 of 3 displays.
CAUTION
Do not edit a custom color that already exists because doing so
deletes all patient records stored on the system.
If a custom color exists, the Sample Appearance screen displays.
Select Yes, to edit that custom color and delete all records.
Select No, to return to the Sample Appearance Select Colors screen 3 of
3.
4. Select Next 3 times.
The Input Settings-Confirmation screen displays.
5. Select Done twice to return to the Select Ready screen.
Entering Urine Color and Clarity during Test Cycle
While a strip test is in progress, you can choose one of the instrumentprovided or custom urine colors and clarity options for a urine sample. Or you
can indicate the standard option of Yellow and Clear.
NOTE: This option is only available in Full Test or Custom mode.
During a patient test, the Select Appearance-Test in progress screen
displays.
1. To choose the standard option, select Yellow and Clear. Go to Step 8.
To choose a urine color and clarity, select Other.
If you selected Other, the Select Appearance-Test in progress screen 2 of
4 displays.
2. Select a color for the urine sample from the options displayed.
3. Select Next.
The Select Appearance-Test in progress screen 3 of 4 displays.
4. If you want a different color for the urine sample, select a color from the
options displayed.
NOTE: You can select only one color for a urine sample.
Clinitek Status Connect System 21 Operator’s Guide

Clinitek Status Connect System 22 Operator’s Guide
5. Select Next.
The Select Appearance-Test in progress screen 4 of 4 displays.
6. Select the clarity of the urine sample.
7. Select Next.
While the test is in progress, the Analyzing-In progress screen displays
followed by the Results screen.
8. Select Done to return to the Select Ready screen.
Managing Strip Lot Number and Expiration Date
You can enter the strip lot number and expiration date and associate this
information with each patient record. Once entered, the information is retained
for the next test, or you can enter a new lot number and expiration date. You
can also enter strip information using the optional bar code scanner.
You can set the instrument to prompt for new strip information or use the
information from the last strip before each patient test.
Setting Strip Information Prompt
To set the prompt for strip information, perform the following steps:
1. At the Select Ready screen, select Instrument Set Up.
The Choose Settings screen displays.
2. Use the arrow keys to select Instrument Settings.
3. Select Enter.
The Instrument Settings screen displays.
4. Use the arrow keys to select Urinalysis Test Settings.
5. Select Select.
The Urinalysis Test Settings screen displays.
6. Select Next.
The Urinalysis Test screen displays.
7. To prompt for strip information before each test, select Enabled.
To bypass a prompt to enter strip information before each test, select
Disabled.
8. Select Done 3 times to return to the Select Ready screen.
Entering the Strip Lot Number and Expiration Date
To enter strip lot information for a second strip test, perform the following
steps:
1. At the Select Ready screen, select Strip Test.
The Strip screen displays.
2. To use the last strip number and begin the test, select Use Last Lot.
To enter new strip data, select Enter new lot and expiration.
The Strip Lot screen displays.

Clinitek Status Connect System 23 Operator’s Guide
3. Enter the strip lot number.
Use the alpha keyboard to enter text.
To enter numeric text, select 123.
4. Select Enter.
The Strip Expiration screen displays.
5. Use the arrow keys to indicate the strip expiration date.
6. Select Enter.
The Prepare Test screen displays.
7. Select Start.
Refer to the Clinitek Status Operator’s Manual as needed.

Clinitek Status Connect System 24 Operator’s Guide
 Loading...