

Page 1

®
SpeedStream
Wireless DSL/Cable
Router
Model SS2624
Part No. 007-0311-002
Page 2

ii
Page 3

TABLE OF CONTENTS
CHAPTER 1 INTRODUCTION......................................................................................... 1
Features of the DSL/Cable Router...............................................................................1
Package Contents.......................................................................................................... 3
Physical Details.............................................................................................................4
CHAPTER 2 INSTALLATION........................................................................................... 7
Requirements................................................................................................................7
Procedure......................................................................................................................7
CHAPTER 3 SETUP............................................................................................................ 9
Overview.......................................................................................................................9
Configuration Program..............................................................................................11
Setup Wizard..............................................................................................................13
LAN Screen................................................................................................................. 16
Wireless Screen ..........................................................................................................18
Password Screen.........................................................................................................22
CHAPTER 4 PC CONFIGURATION............................................................................... 23
Overview..................................................................................................................... 23
Windows Clients.........................................................................................................23
Printer Setup for Windows.........................................................................................35
Macintosh Clients.......................................................................................................43
Linux Clients...............................................................................................................43
Other Unix Systems....................................................................................................44
Wireless Station Configuration..................................................................................45
CHAPTER 5 OPERATION AND STATUS...................................................................... 46
Operation....................................................................................................................46
Status Screen............................................................................................................... 47
Connection Status - PPPoE......................................................................................... 50
Connection Status - PPTP...........................................................................................52
Connection Details - Fixed/Dynamic IP Address.......................................................53
CHAPTER 6 ADVANCED FEATURES...........................................................................55
Overview..................................................................................................................... 55
Advanced Internet Screen.......................................................................................... 55
URL Filter ..................................................................................................................59
Virtual Servers............................................................................................................ 61
Dynamic DNS..............................................................................................................64
Remote Management.................................................................................................. 67
Access Control ............................................................................................................68
Firmware Upgrade.....................................................................................................73
CHAPTER 7 ADVANCED CONFIGURATION..............................................................74
Overview..................................................................................................................... 74
Network Clients Screen ..............................................................................................75
Options........................................................................................................................77
Printer Port.................................................................................................................79
MAC Address.............................................................................................................80
Routing........................................................................................................................82
Security.......................................................................................................................86
i
Page 4

APPENDIX A TROUBLESHOOTING ............................................................................88
Overview..................................................................................................................... 88
General Problems.......................................................................................................88
Internet Access ...........................................................................................................88
Printing.......................................................................................................................89
APPENDIX B SPECIFICATIONS....................................................................................92
SpeedStream Wireless DSL/Cable Router.................................................................92
APPENDIX C TECHNICAL SUPPORT ..........................................................................94
© 2002 Efficient Networks, Inc. A Siemens Company. All rights reserved. Efficient Networks, its logos and SpeedStream are registered and unregistered trademarks of Efficient
Networks, Inc. Siemens and the Siemens logo are trademarks of Siemens AG, Germany. All
other trademarks are held by their respective companies. Efficient Networks reserves the right
to make changes to product specifications at any time without notice.
All trademarks and trade names are the properties of their respective owners.
ii
Page 5

1
Chapter 1
Introduction
This Chapter provides an overview of the SpeedStream Wireless DSL/Cable
Router's features and capabilities.
Congratulations on the purchase of your new SpeedStream DSL/Cable Router; commonly
referred to as a Broadband Router. The SpeedStream Wireless DSL/Cable Router is a multifunction device providing the following services:
• Wireless LAN Access Point for equipment compliant with the IEEE802.11b (DSSS)
specifications.
• Shared Broadband Internet Access for all LAN users.
• 4-Port Switching Hub for 10BaseT or 100BaseT connections.
• Network Printer - LAN users can share the printer attached to the SpeedStream Router.
Figure 1: SpeedStream Router
Features of the DSL/Cable Router
The SpeedStream Wireless DSL/Cable Router incorporates many advanced features, carefully
designed to provide sophisticated functions while being easy to use.
Internet Access Features
• Shared Internet Access. All users on the LAN can access the Internet through the
DSL/Cable Router, using only a single external IP Address. The local (invalid) IP Addresses are hidden from external sources. This process is called NAT (Network Address
Translation).
• DSL & Cable Modem Support. The DSL/Cable Router has a 10BaseT Ethernet port
for connecting a DSL or Cable Modem. All popular DSL and Cable Modems are supported.
1
Page 6

DSL/Cable Router User Guide
• PPPoE and PPTP Support. The Internet (WAN port) connection supports PPPoE
(PPP over Ethernet) and PPTP (Peer-to-Peer Tunneling Protocol), as well as "Direct Connection" type services.
• Fixed or Dynamic IP Address. On the Internet (WAN port) connection, the
DSL/Cable Router supports both Dynamic IP Address (IP Address is allocated on connection) and Fixed IP Address.
Wireless Features
• Standards Compliant. The Wireless DSL/Cable Router complies with the
IEEE802.11b (DSSS) specifications for Wireless LANs.
• WEP support. Support for WEP (Wired Equivalent Privacy) is included. Both 64 Bit
and 128 Bit keys are supported.
• Access Control. The Access Control feature can ensure that only trusted Wireless
Stations can access your LAN.
• Simple Configuration. If the default settings are unsuitable, they can be changed
quickly and easily.
Advanced Internet Functions
• Conferencing & Telephony Applications. Internet Telephony and Conferencing
applications, which are often difficult to use when behind a Firewall, are supported.
• Special Internet Applications. Applications that use non-standard connections or port
numbers are normally blocked by the Firewall. The ability to define and allow such applications is provided, to enable such applications to be used normally.
• Virtual Servers. This feature allows Internet users to access Internet servers on your
LAN. The required setup is quick and easy.
• DMZ. One (1) PC on your local LAN can be configured to allow unrestricted 2-way
communication with Servers or individual users on the Internet. This provides the ability
to run programs that are incompatible with Firewalls.
• URL Filter. Use the URL Filter to block access to undesirable Web sites by LAN users.
• Internet Access Log. See which Internet connections have been made.
• VPN Support. VPN (Virtual Private Networking) connections using PPTP and IPSec
are transparently supported - no configuration is required.
LAN Features
• 4-Port Switching Hub. The DSL/Cable Router incorporates a 4-port 10/100BaseT-
switching hub, making it easy to create or extend your LAN.
• DHCP Server Support. Dynamic Host Configuration Protocol provides a dynamic IP
address to PCs and other devices upon request. The DSL/Cable Router can act as a
DHCP Server for devices on your local LAN and WLAN.
• Multi Segment LAN Support. LANs containing one or more segments are supported,
via the Router's RIP (Routing Information Protocol) support and built-in static routing table.
• Network Printer. The printer attached to the DSL/Cable Router becomes a "Network
Printer", available to all Windows and Linux (Unix) clients on your LAN.
2
Page 7

Introduction
Configuration & Management
• Easy Setup. Use your Web browser from anywhere on the LAN for configuration.
• Remote Management. The DSL/Cable Router can be managed from any PC on your
LAN. And, if the Internet connection exists, it can also (optionally) be configured via the
Internet.
• UPnP Support. UPnP (Universal Plug and Play) allows automatic discovery and
configuration of the DSL/Cable Router. UPnP is by supported by Windows ME, XP, or
later.
Security Features
• Password - protected Configuration. Optional password protection is provided to
prevent unauthorized users from modifying the configuration data and settings.
• NAT Protection. An intrinsic side effect of NAT (Network Address Translation)
technology is that by allowing all LAN users to share a single IP address, the location and
even the existence of each PC is hidden. From the external viewpoint, there is no network, only a single device - the DSL/Cable Router.
• Stateful Inspection Firewall. All incoming data packets are monitored and all incom-
ing server requests are filtered, thus protecting your network from malicious attacks from
external sources.
• Protection against DoS attacks. DoS (Denial of Service) attacks can flood your
Internet connection with invalid packets and connection requests, using so much bandwidth and so many resources that Internet access becomes unavailable. The DSL/Cable
Router incorporates protection against DoS attacks.
Package Contents
The following items should be included:
• SpeedStream Wireless DSL/Cable Router (SS2624)
• Wireless Antenna
• Power Adapter
• Quick Start Guide
• CD-ROM containing the on-line manual and Printer Port Driver for Windows®
• Extended Warranty/Product Registration Card
If any of the above items are damaged or missing, please contact SpeedStream Technical
Support for assistance.
3
Page 8

DSL/Cable Router User Guide
Physical Details
LEDs
The front panel contains the following LEDs.
Power On - Normal operation.
Off - No power
Status On - Error condition.
Off - Normal operation.
Blinking - This LED blinks during start up, or when the Firmware is
being upgraded.
LAN Ports
(1, 2, 3, 4)
WAN Port Flashing - data is being transmitted or received via the WAN port.
Wireless On - Wireless connection available; Wireless Access Point is ready for
Print Act On - Connection to printer established.
For each LAN port, there are 2 LEDs
• Link/Act
• On - Corresponding LAN (hub) port is active.
• Off - No active connection on the corresponding LAN (hub)
port.
• Flashing - Data is being transmitted or received via the corre-
sponding LAN (hub) port.
• 100
• On - Corresponding LAN (hub) port is using 100BaseT.
• Off - Corresponding LAN (hub) port connection is using
10BaseT, or no active connection.
Off - no data is being transferred.
use.
Off - No Wireless connection available.
Flashing - Data is being transmitted or received via the Wireless access
point. This includes "network traffic" as well as user data.
Off - No connection to printer; printer is Off or Off-line.
Flashing - Data is being transmitted to the printer.
Print Err On - Printer error detected.
Off - No printer error detected.
4
Page 9

Rear Panel
Introduction
Figure 2: Rear Panel
Printer Port
Standard parallel printer port. If you wish to share a printer, connect it
here.
Aerial Antenna
Best results are usually obtained with the antenna in a vertical position.
Reset Button
This button has three (3) functions:
• Reboot. When pressed and released, the DSL/Cable Router will
reboot (restart).
• Diagnostic print-out. If held down for 3 seconds, a diagnostic
print-out will be sent to the attached printer.
• Ensure the printer is ready.
• Both Print LEDs will flash simultaneously during the diag-
nostic printing.
• Reset to Factory Defaults. This button can also be used to clear
ALL data and restore ALL settings to the factory default values.
To Clear All Data and restore the factory default values:
1. Power Off the router
2. Hold the Reset Button down while you Power On the router.
3. Continue holding the Reset Button until the Status (Red) LED
blinks TWICE.
4. Release the Reset Button.
The factory default configuration has now been restored, and the
Router is ready for use.
WAN port
(10BaseT)
10/100BaseT
LAN connectors
Connect the DSL or Cable Modem here. If your modem came with a
cable, use the supplied cable. Otherwise, use a standard CAT5 UTP
LAN cable.
Use standard LAN cables (RJ45 connectors) to connect to your PCs.
Both 10BaseT and 100BaseT connections can be used simultaneously.
If no Uplink push-button is present, all 4 LAN ports are capable of
being connected to a hub with a straight-through cable.
If an Uplink button is present, see the "Normal/Uplink" button
function below.
5
Page 10

DSL/Cable Router User Guide
Normal/Uplink
Button- Optional
Power port
If this button is present, it allows LAN port 1 to be used as an Uplink
port for connecting directly to another hub.
When depressed (in), then the "LAN 1" port becomes an "Uplink"
port, and must be connected to a normal port on another Hub.
If this button is extended (out), then the "LAN 1" port acts as a normal
LAN port.
Connect the supplied power adapter here.
6
Page 11

2
Chapter 2
Installation
This Chapter covers the physical installation of the SpeedStream Wireless
DSL/Cable Router.
Requirements
• DSL or Cable modem, and an Internet Access account with an ISP, for shared Internet
access.
• Network cables. Use standard 10/100BaseT CAT5 network (UTP) cables with RJ45
connectors
• TCP/IP network protocol must be installed on all PCs.
• For shared access to the attached printer, the following clients are supported:
• Windows 95/98/ME
• Windows NT 4.0, 2000 or XP
• Unix (LPD printing)
Procedure
Figure 3: Installation Diagram
1. Choose an Installation Site
Select a suitable place on the network to install the DSL/Cable Router.
Ensure both the DSL/Cable Router and the DSL or Cable modem are powered OFF.
2. Connect LAN Cables
• Use standard 10/100 CAT5 network cables to connect PCs to the Switching Hub ports on
the DSL/Cable Router.
• Both 10BaseT and 100BaseT connections can be used simultaneously.
7
Page 12

DSL/Cable Router User Guide
The wired LAN connection, rather than the Wireless
interface, is preferred for first-time router setup.
Once the Wireless configuration is correct, the Wireless
interface can be used for any further configuration.
3. Connect WAN Cable
Connect the DSL or Cable modem to the WAN port on the DSL/Cable Router. Use the
cable supplied with your DSL/Cable modem. .
4. Attach Antenna
Attach the supplied wireless antenna to the connector provided on the back of the
DSL/Cable Router. Secure the antenna by turning the grooved or ridged ring on the antenna until snug (Do not over tighten).
5. Connect Printer Cable
Use a standard parallel printer cable to connect your printer to the Printer port on the
DSL/Cable Router.
6. Power Up
• Power on the Cable or DSL modem.
• Power on the Printer.
• Connect the supplied power adapter to the DSL/Cable Router and power up.
Use only the power adapter provided. Using a different one may cause hardware damage
7. Check the LEDs
• The Status LED should flash, then turn On. If it stays On, or flashing, there is a hardware
error.
• For each active LAN (PC) connection, the LAN Link/Act LED should be ON
• The WAN LED should be ON.
• The Wireless LED should be ON.
• The Print Act LED should be ON.
For more information, refer to LEDs in Chapter 1.
8
Page 13

3
Chapter 3
Setup
This Chapter provides details of the Setup process.
Overview
This chapter describes the setup procedure for:
• Internet Access
• LAN configuration
• Wireless LAN configuration.
• Assigning a Password to protect the configuration data.
PCs on your local LAN may also require configuration. For details, see Chapter 4 - PC
Configuration.
Other configuration may be required, depending on which features and functions of the
DSL/Cable Router you wish to use. Use the table below to locate detailed instructions for the
required functions.
To Do this: Refer to:
Configure PCs on your LAN. Chapter 4:
PC Configuration
Check DSL/Cable Router's operation and Status. Chapter 5:
Operation and Status
Use any of the following Internet features:
• Special Applications
• DMZ
• Virtual Servers
• Dynamic DNS
• Remote Management
Use any of the following Advanced Configuration
settings:
• Network Clients
• Options (Backup DNS, TFTP, UPnP)
• Security and Firewall settings
• Printer Port setup (for Linux/Unix only)
• Routing (RIP and static Routing)
• Firmware Upgrade
Chapter 6:
Advanced Features
Chapter 7
Advanced Configuration
9
Page 14

DSL/Cable Router User Guide
Where use of a certain feature requires that
PCs or other LAN devices be configured, this
is also explained in the relevant chapter.
10
Page 15

Setup
Configuration Program
The DSL/Cable Router contains an HTTP server. This enables you to connect to it, and
configure it, using your Web Browser. Your Browser must support JavaScript. The configuration program has been tested on the following browsers:
• Netscape V4.08 or later
• Internet Explorer V4 or later
Preparation
Before attempting to configure the DSL/Cable Router, please ensure that:
• Your PC can establish a physical connection to the Router. The PC and the DSL/Cable
Router must be directly connected (using the Hub ports on the Router) or on the same
LAN segment.
• The DSL/Cable Router must be installed and powered ON.
• If the DSL/Cable Router's default IP Address (192.168.254.254) is already used by
another device, the other device must be turned OFF until the DSL/Cable Router is allocated a new IP Address during configuration.
Connecting to the Wireless DSL/Cable Router
Using UPnP
If your Windows operating system supports UPnP, an icon for the DSL/Cable Router will
appear in the system tray, notifying you that a new network device has been found, and
offering to create a new desktop shortcut to the newly-discovered device.
• Unless you intend to change the IP Address of the Router, you can accept the desktop
shortcut.
• Whether you accept the desktop shortcut or not, you can always find UPnP devices in My
Network Places (previously called Network Neighborhood).
• Double - click the icon for the DSL/Cable Router (either on the Desktop, or in My Net-
work Places) to start the configuration. Refer to the following section Setup Wizard for
details of the initial configuration process.
Using your Web Browser
To establish a connection from your PC to the DSL/Cable Router:
1. After installing the DSL/Cable Router in your LAN, start your PC. If your PC is already
running, restart it.
2. Start your Web browser.
3. In the Address box, enter "HTTP://" and the IP Address of the DSL/Cable Router, as in
this example, which uses the DSL/Cable Router's default IP Address:
HTTP://192.168.254.254
11
Page 16

DSL/Cable Router User Guide
If you can't connect
If the Router does not respond, check the following:
• The DSL/Cable Router is properly installed, LAN connection is OK, and it is
powered ON. You can test the connection by using the "Ping" command:
• Open the MS-DOS window or command prompt window.
• Enter the command:
ping 192.168.254.254
If no response is received, either the connection is not working, or your
PC's IP address is not compatible with the DSL/Cable Router's IP Address. (See next item.)
• If your PC is using a fixed IP Address, its IP Address must be within the range
192.168.254.1 to 192.168.254.253 to be compatible with the DSL/Cable
Router's default IP Address of 192.168.254.254. Also, the Network Mask must
be set to 255.255.255.0. See Chapter 4 - PC Configuration for details on
checking your PC's TCP/IP settings.
• Ensure that your PC and the DSL/Cable Router are on the same network
segment. (If you don't have a router, this must be the case.)
12
Page 17

Setup
Setup Wizard
The first time you connect to the DSL/Cable Router, the Setup Wizard will run automatically.
(The Setup Wizard will also run if the Router's default settings are restored.)
1. Step through the Wizard until finished.
• You need to know the type of Internet connection service used by your ISP. Check
the data supplied by your ISP.
• The common connection types and associated data are explained in the tables below.
2. On the final screen of the Wizard, run the test and check that an Internet connection can
be established.
• If the connection fails, check your data, the Cable or DSL modem, and all connec-
tions.
• When you exit the Wizard, you will see the Home screen. If you wish to run the Wiz-
ard again at any time, use the "Setup Wizard" button on the main menu.
Cable Modems
Data Details Check
Hostname Some ISPs allocate a "Host-
name".
If so, you must enter this
"Hostname" instead of using
the default value.
Domain name Some ISPs allocate a "Do-
main Name".
If so, you must enter this
"Domain Name" instead of
using the default value.
MAC address Some ISPs record the MAC
(physical) address of your
PC, and will only permit
connections from that
address.
IP Address There are 2 systems used:
• Dynamic -Your IP
Address is allocated
automatically, when you
connect to you ISP.
• Static - Your ISP
allocates a permanent
IP Address to you.
Did your ISP allocate a "Hostname" to you?
If so, enter the name provided.
Otherwise, use the default value.
Did your ISP allocate a "Domain
Name" to you?
If so, enter the name provided.
Otherwise, use the default value.
Does your ISP expect a particular
MAC address?
If YES, enter the value (if
known), or use the "Clone MAC
address" button to copy your PCs
address to the DSL/Cable Router.
If NO, use the default MAC
address.
Were you allocated a specified IP
Address?
If YES, select "Fixed IP address"
in the Wizard, and enter the
details provided by your ISP.
If NO, select "Dynamic IP address" in the Wizard.
13
Page 18

DSL/Cable Router User Guide
DSL Modems
Connection
Details Data Required
Type
PPPoE You connect to the ISP only
when required. The IP
address is allocated automatically.
PPTP Mainly used in Europe.
You connect to the ISP only
when required.
Username and password.
Note that this is the Username
and password for Internet
access, not for E-mail.
• PPTP Server IP Address.
• User name and password.
• Your IP Address
Check if were you allocated
an IP Address by your ISP.
• If so, select "Fixed IP
address" in the Wizard,
and enter the details provided by your ISP.
• Otherwise, select "Dy-
namic IP address" in the
Wizard.
If your ISP currently requires using PPPoE client software
on your PC, this software is no longer required and
should be disabled or uninstalled.
Other Modems (e.g. Satellite Broadband)
Data Details Check
IP Address There are 2 systems used:
• Dynamic -Your IP
Address is allocated
automatically, when you
connect to you ISP.
• Static - Your ISP
allocates a permanent
IP Address to you.
Were you allocated a specified IP
Address?
If YES, select "Fixed IP address"
in the Wizard, and enter the
details provided by your ISP.
If NO, select "Dynamic IP address" in the Wizard.
14
Page 19

Home Screen
After finishing the Setup Wizard, you will see the Home screen. When you connect in the
future, you will see this screen when you connect. An example screen is shown below.
Setup
Figure 4: Home Screen
Navigation & Data Input
• Use the menu bar on the left of the screen, and the "Back" button on your Browser, for
navigation.
• Changing to another screen without clicking "Save" does NOT save any changes you may
have made. You must "Save" before changing screens or your data will be ignored.
• When finished, you should use the "Logout" button, rather than just close your Browser.
On each screen, clicking the "Help" button will
display help for that screen.
From any help screen, you can access the list of all
help files (help index).
15
Page 20

DSL/Cable Router User Guide
LAN Screen
Use the LAN link on the main menu to reach the LAN screen. An example screen is shown
below:
Figure 5: LAN Screen
Data - LAN Screen
TCP/IP
IP Address
Subnet Mask
DHCP Server
Buttons
IP address for the Wireless DSL/Cable Router, as seen from the local
LAN. Use the default value unless the address is already in use or your
LAN is using a different IP address range. In the latter case, enter an
unused IP Address from within the range used by your LAN.
The default value 255.255.255.0 is standard for small (class "C")
networks. For other networks, use the Subnet Mask for the LAN
segment to which the DSL/Cable Router is attached (the same value as
the PCs on that LAN segment).
• If Enabled, the DSL/Cable Router will allocate IP Addresses to
PCs (DHCP clients) on your LAN when they start up. The default
(and recommended) value is Enabled.
• If you are already using a DHCP Server, this setting must be
Disabled, and the existing DHCP server must be re-configured to
treat the DSL/Cable Router as the Gateway. See the following section for further details.
• The Start IP Address and Finish IP Address fields set the values
used by the DHCP server when allocating IP Addresses to DHCP
clients. This range also determines the number of DHCP clients
supported.
See the following section for further details on using DHCP.
Save
Cancel
Save the data on screen.
The "Cancel" button will discard any data you have entered and reload
the file from the DSL/Cable Router.
16
Page 21

Setup
DHCP
What DHCP Does
A DHCP (Dynamic Host Configuration Protocol) server allocates a valid IP address to a
DHCP client (PC or device) upon request.
• The client request is made when the client device starts up (boots).
• The DHCP Server provides the Gateway and DNS addresses to the client, as well as
allocating an IP Address.
• The DSL/Cable Router can act as a DHCP server.
• Windows 95/98/ME and other non-Server versions of Windows will act as a DHCP
client. This is the default Windows setting for the TCP/IP network protocol. However,
Windows uses the term Obtain an IP Address automatically instead of "DHCP Client".
• You must NOT have two (2) or more DHCP Servers on the same LAN segment. (If your
LAN does not have other Routers, this means there must only be one (1) DHCP Server on
your LAN.)
Using the DSL/Cable Router's DHCP Server
This is the default setting. The DHCP Server settings are on the LAN screen. On this screen,
you can:
• Enable or Disable the DSL/Cable Router's DHCP Server function.
• Set the range of IP Addresses allocated to PCs by the DHCP Server function.
You can assign Fixed IP Addresses to some devices
while using DHCP, provided that the Fixed IP Addresses are NOT within the range used by the DHCP
Server.
Using another DHCP Server
You can only use one (1) DHCP Server per LAN segment. If you wish to use another DHCP
Server, rather than the DSL/Cable Router's, the following procedure is required.
1. Disable the DHCP Server feature in the DSL/Cable Router. This setting is on the LAN
screen.
2. Configure the DHCP Server to provide the DSL/Cable Router's IP Address as the Default
Gateway.
To Configure your PCs to use DHCP
This is the default setting for TCP/IP under Windows 95/98/Me. See Chapter 4 - Client
Configuration for the procedure to check these settings.
17
Page 22

DSL/Cable Router User Guide
Wireless Screen
The Wireless Access Point settings must match the other Wireless stations. To change the
DSL/Cable Router's default settings for the Wireless Access Point feature, use the Wireless
link on the main menu to reach the Wireless screen. An example screen is shown below.
Data - Wireless Screen
Identification
Regulatory
Domain
Station name
SSID
(ESSID)
Options
Channel No.
It is illegal to use this device in any location outside of the regulatory
domain.
This is the same as the "Device Name" for the DSL/Cable Router.
On your PC, some Wireless status screens may display this name as
the name of the Access Point in use.
• If using an ESS (Extended Service Set, with multiple access
points) this ID is called an ESSID (Extended Service Set Identifier).
• To communicate, all Wireless stations should use the same
SSID/ESSID.
• Select the Channel you wish to use on your Wireless LAN.
• If you experience interference (shown by lost connections and/or
slow data transfers) you may need to experiment with different
channels to see which is the best.
• If using multiple Access Points, adjacent Access Points should use
different Channels to reduce interference.
Figure 6: Wireless Screen
18
Page 23

Setup
WEP data
encryption
Access Point
Allow LAN
access by …
Allow Internet
access by …
Buttons
Configure WEP
Select Stations
• WEP (Wired Equivalent Privacy) status will display "Enabled" or
"Disabled", depending on whether WEP is being used. If used,
data is Encrypted before being transmitted, making communication more secure.
• Click the "Configure WEP" button to access the WEP sub-screen,
and view or change the WEP settings.
• All Wireless Stations - All wireless stations can use the access
point to access your LAN.
• Selected Wireless stations only - Only selected wireless stations
can access your LAN. To select the required wireless stations,
click the "Select Stations" button.
• All Wireless Stations - All wireless stations can use the access
point to access the Internet.
• Selected Wireless stations only - Only selected wireless stations
can use the access point to access the Internet. To select the required wireless stations, click the "Select Stations" button.
Click this button to view the WEP sub-screen. See the following
section for more details.
Click this button to select the required PCs.
Save
Cancel
Save the data on screen.
The "Cancel" button will discard any data you have entered since the
last "Save" operation.
19
Page 24

DSL/Cable Router User Guide
WEP Screen
This screen is accessed by clicking the "Configure WEP" button on the Wireless screen. An
example WEP screen is shown below. Note that in IE, the "Key Table" is only displayed when
required.
Figure 7: WEP Screen
Data - WEP Screen
WEP Data Encryption
Authentication
Type
Encryption Off
Select the appropriate value - "Open System" or "Shared Key". Check
your Wireless card's documentation to see what method to use. Some
Wireless cards do not support both methods.
• If OFF (default), data is NOT encrypted before being transmitted.
64 Bit Encryption
• If selected, data is encrypted, using the default key, before being
• Default Key - select the key you wish to be the default. Transmit-
• Key Table:
transmitted. The receiving station must be set to use 64 Bit
Encryption, and have the same Key value in the same position in
its key table. Otherwise, it will not be able to decrypt the data.
ted data is ALWAYS encrypted using the Default Key; the other
Keys are for decryption only.
• This table is used when Encrypting and Decrypting data. All
stations, including this Access Point, always transmit data
encrypted using their default key. The key number (1, 2, 3, 4)
is also transmitted. The receiving station will use the key
number (1, 2, 3, 4) to determine which key value to use for
decryption. If the key value does not match the transmitting
station, decryption will fail.
• The easiest way to ensure there are no problems is to have
every Station, including the Access Point, use the same key
table (all entries identical).
20
Page 25

Setup
128 Bit Encryption
• If selected, data is encrypted using the key before being transmit-
ted. The receiving station must be set to use 128 Bit Encryption,
and have the same Key value. Otherwise, it will not be able to decrypt the data.
• Keys - Enter the key values you wish to use. Other stations must
have the same key values.
Passphrase
To generate a set of keys from a word or phrase:
1. Select the type of key required (64 Bit or 128 Bit)
2. Enter the word or phrase in the "Passphrase" field.
3. Click the "Generate Keys" button.
4. The screen will refresh with the key values inserted.
21
Page 26

DSL/Cable Router User Guide
Password Screen
The password screen allows you to assign a password to the DSL/Cable Router.
Figure 8: Password Screen
Once you have assigned a password to the DSL/Cable Router (on the Password screen above)
you will be prompted for the password when you connect, as shown below. (If no password
has been set, this dialog will not appear.)
Figure 9: Password Dialog
• Leave the "User Name" blank.
• Enter the password for the DSL/Cable Router, as set on the Password screen above.
22
Page 27

4
Chapter 4
PC Configuration
This Chapter details the PC Configuration required for each PC on the local
LAN.
Overview
For each PC, the following may need to be configured:
• TCP/IP network settings
• Wireless settings
• Internet Access configuration
• Printer configuration
Windows Clients
This section describes how to configure Windows clients for:
• Internet access via the DSL/Cable Router
• Sharing the Printer connected to the DSL/Cable Router.
The first step is to check the PC's TCP/IP settings.
The DSL/Cable Router uses the TCP/IP network protocol for all functions, so it is essential
that the TCP/IP protocol be installed and configured on each PC.
TCP/IP Settings - Overview
If using the default DSL/Cable Router settings, and the default Windows
TCP/IP settings, no changes need to be made.
• By default, the DSL/Cable Router will act as a DHCP Server, automatically providing a
suitable IP Address (and related information) to each PC when the PC boots.
• For all non-Server versions of Windows, the default TCP/IP setting is to act as a DHCP
client.
If using a Fixed (specified) IP address, the following changes are required:
• The Gateway must be set to the IP address of the DSL/Cable Router
• The DNS should be set to the address provided by your ISP.
If your LAN has a Router, the LAN Administrator must
re-configure the Router itself. Refer to Chapter 7 - Rout-
ing for details.
23
Page 28

DSL/Cable Router User Guide
Checking TCP/IP Settings - Windows 9x/ME:
1. Select Control Panel - Network. You should see a screen like the following:
Figure 10: Network Configuration
2. Select the TCP/IP protocol for your network card.
3. Click on the Properties button. You should then see a screen like the following.
Figure 11: IP Address (Win 95)
Ensure your TCP/IP settings are correct, as follows:
Using DHCP
To use DHCP, select the radio button Obtain an IP Address automatically. This is the default
Windows settings.
Restart your PC to ensure it obtains an IP Address from the DSL/Cable Router.
Using "Specify an IP Address"
• If your PC is already configured, do NOT change the settings on the IP Address tab
shown in Figure 11 above.
24
Page 29

PC Configuration
• On the Gateway tab, enter the DSL/Cable Router's IP address in the New Gateway field
and click Add. Your LAN administrator can advise you of the IP Address they assigned to
the DSL/Cable Router.
Figure 12: Gateway Tab (Win 95/98)
• On the DNS Configuration tab, ensure Enable DNS is selected. If the DNS Server Search
Order list is empty, enter the DNS address provided by your ISP in the fields beside the
Add button, then click Add.
Figure 13: DNS Tab (Win 95/98)
25
Page 30

DSL/Cable Router User Guide
Checking TCP/IP Settings - Windows NT4.0
1. Select Control Panel - Network, and, on the Protocols tab, select the TCP/IP protocol, as
shown below.
Figure 14: Windows NT4.0 - TCP/IP
2. Click the Properties button to see a screen like the one below.
26
Page 31
PC Configuration
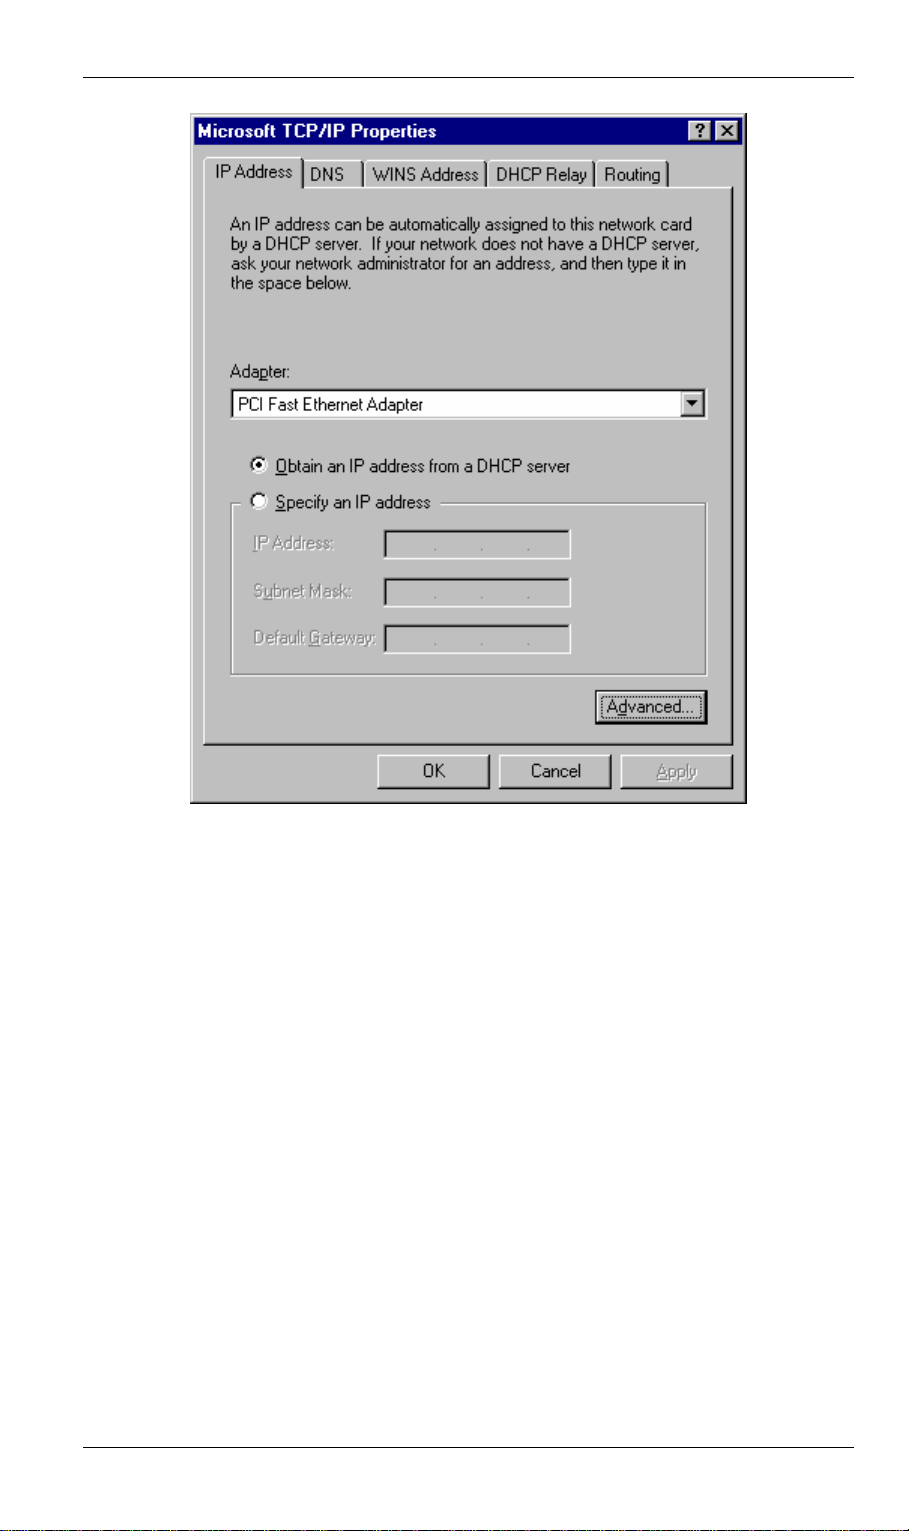
Figure 15: Windows NT4.0 - IP Address
3. Select the network card for your LAN.
4. Select the appropriate radio button - Obtain an IP address from a DHCP Server or
Specify an IP Address, as explained below.
Obtain an IP address from a DHCP Server
This is the default Windows setting. Using this method is recommended. By default, the
DSL/Cable Router will act as a DHCP Server.
Restart your PC to ensure it obtains an IP Address from the DSL/Cable Router.
Specify an IP Address
If your PC is already configured, check with your network administrator before making the
following changes.
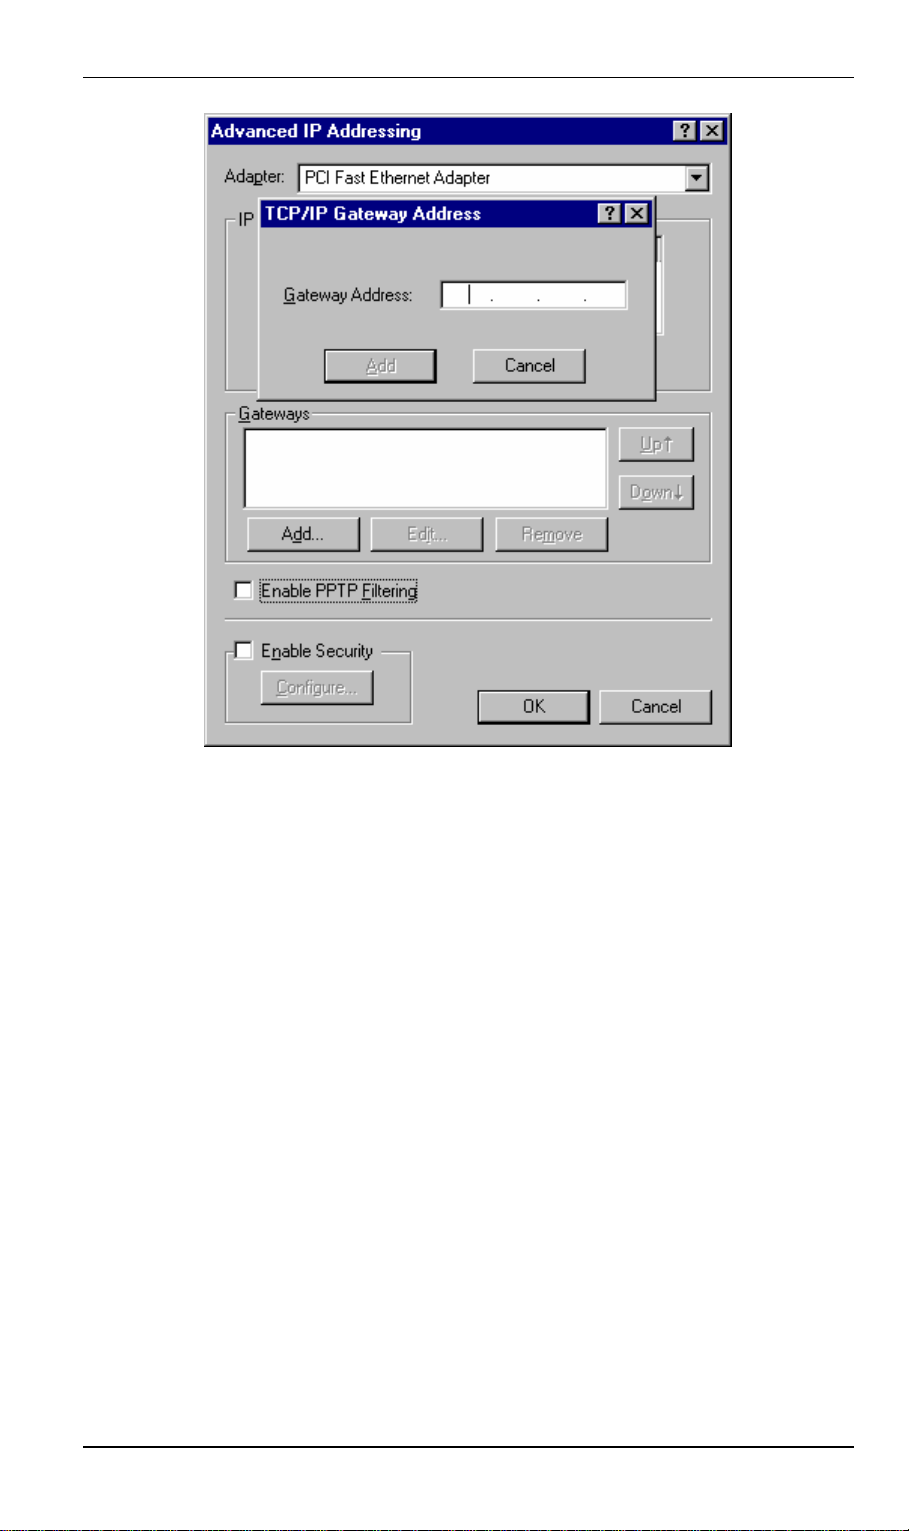
1. The Default Gateway must be set to the IP address of the DSL/Cable Router. To set this:
• Click the Advanced button on the screen above.
• On the following screen, click the Add button in the Gateways panel, and enter the
DSL/Cable Router's IP address, as shown in Figure 16 below.
• If necessary, use the Up button to make the DSL/Cable Router the first entry in the
Gateways list.
27
Page 32
DSL/Cable Router User Guide
Figure 16 - Windows NT4.0 - Add Gateway
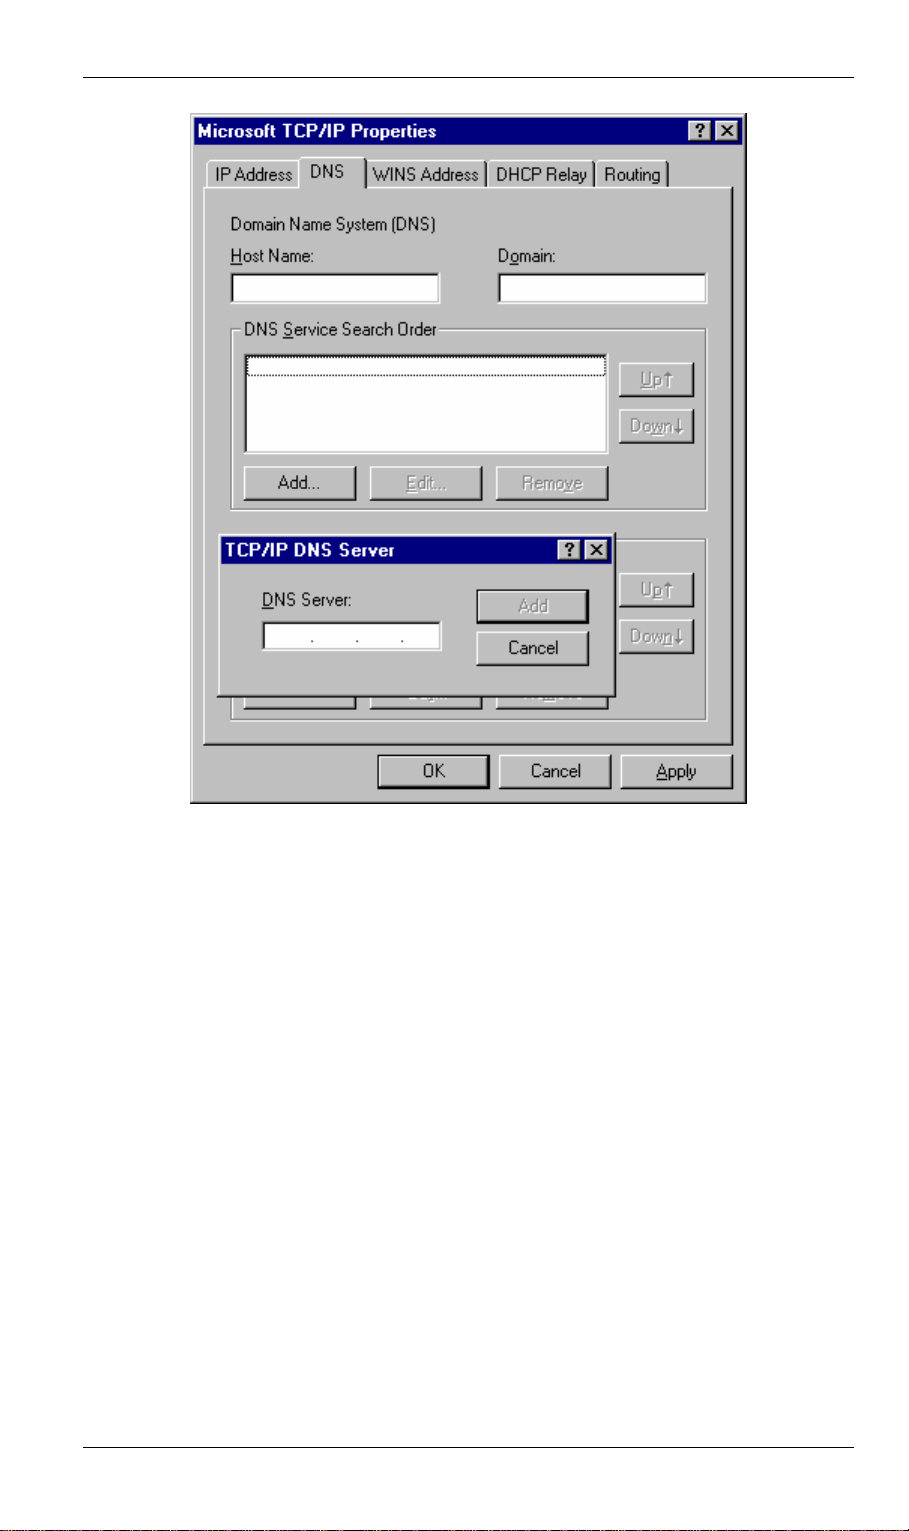
2. The DNS should be set to the address provided by your ISP, as follows:
• Click the DNS tab.
• On the DNS screen, shown below, click the Add button (under DNS Service Search
Order), and enter the DNS provided by your ISP.
28
Page 33
PC Configuration
Figure 17: Windows NT4.0 - DNS
29
Page 34
DSL/Cable Router User Guide
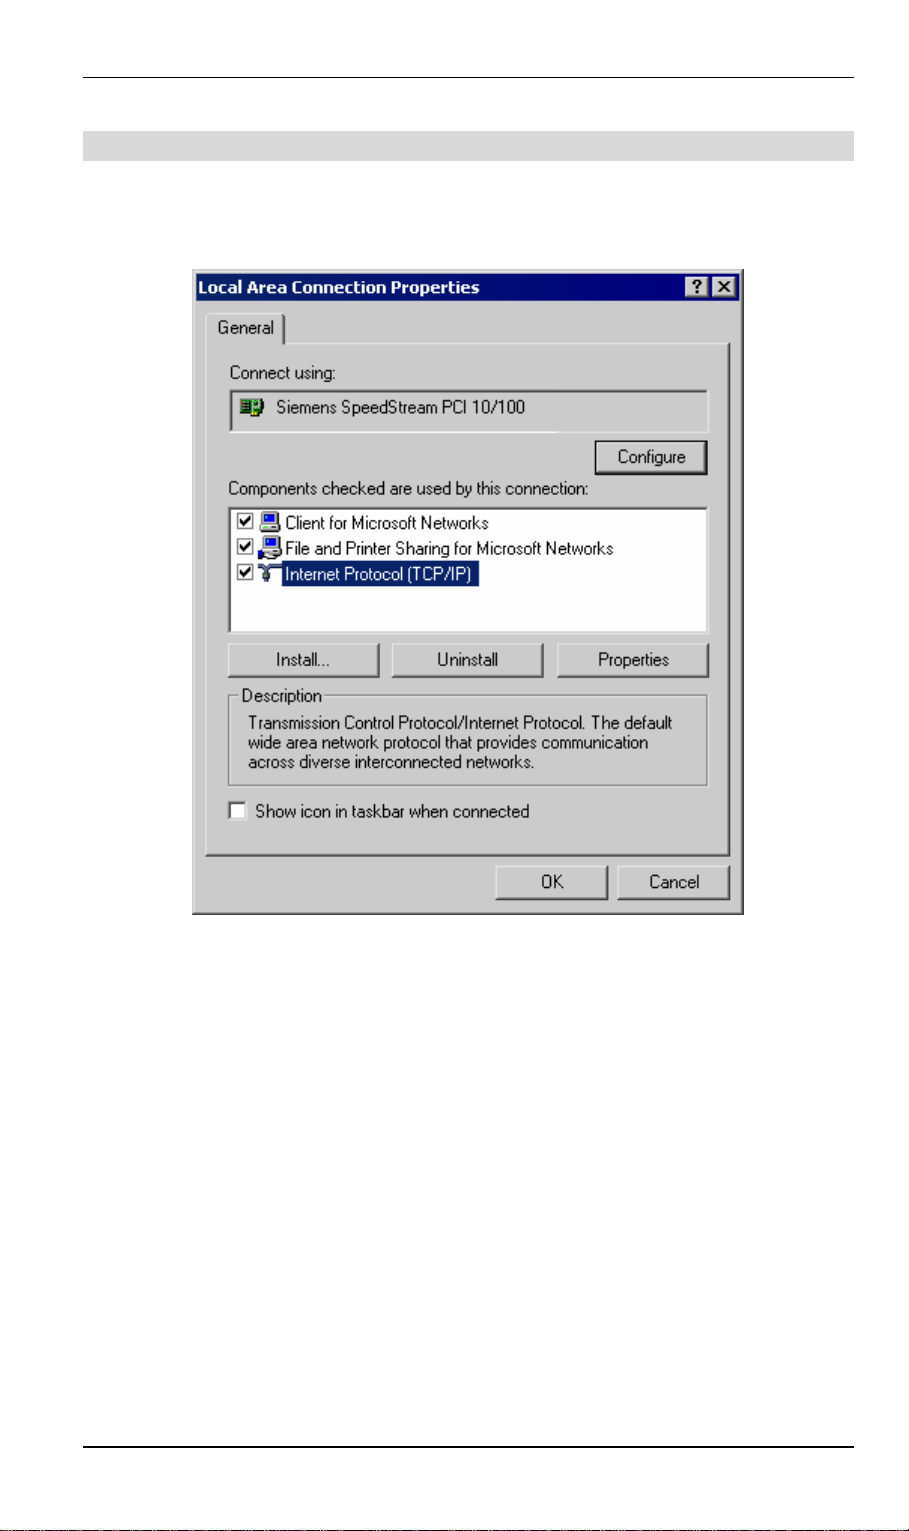
Checking TCP/IP Settings - Windows 2000:
1. Select Control Panel - Network and Dial-up Connection.
2. Right click the Local Area Connection icon and select Properties. You should see a
screen like the following:
Figure 18: Network Configuration (Win 2000)
3. Select the TCP/IP protocol for your network card.
4. Click on the Properties button. You should then see a screen like the following.
30
Page 35
PC Configuration
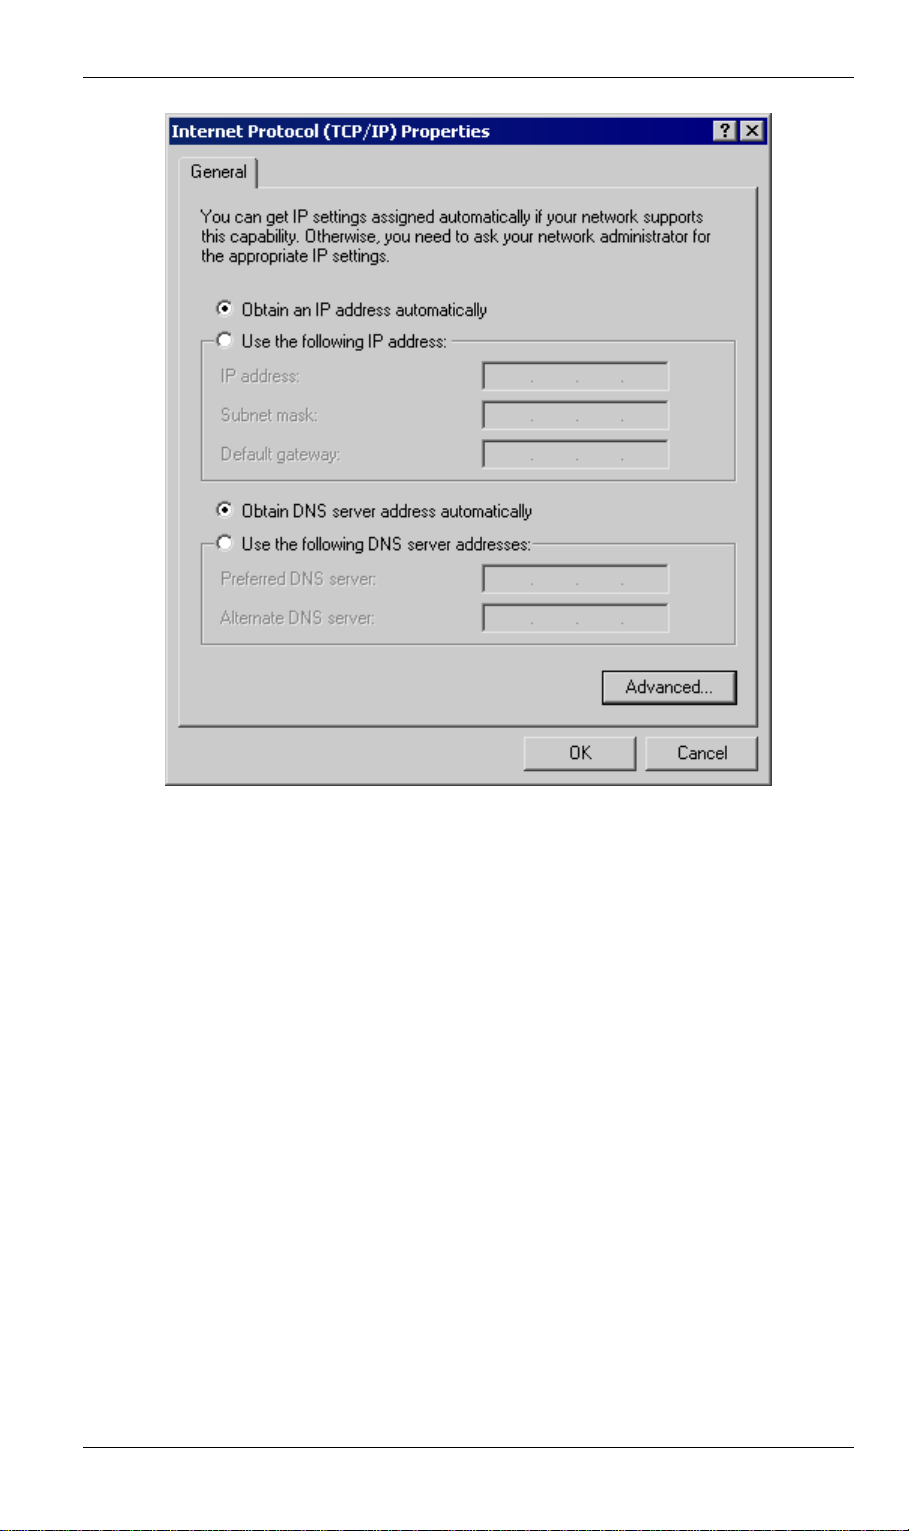
Figure 19: TCP/IP Properties (Win 2000)
5. Ensure your TCP/IP settings are correct:
Using DHCP
To use DHCP, select the radio button Obtain an IP Address automatically. This is the default
Windows settings.
Restart your PC to ensure it obtains an IP Address from the DSL/Cable Router.
Using a fixed IP Address ("Use the following IP Address")
If your PC is already configured, check your ISP's documentation before making the following
changes.
• Enter the DSL/Cable Router's IP address in the Default gateway field and click OK.
• If the DNS Server fields are empty, select Use the following DNS server addresses, and
enter the DNS address or addresses provided by your ISP, then click OK.
31
Page 36
DSL/Cable Router User Guide
Checking TCP/IP Settings - Windows XP:
1. Select Control Panel - Network Connection.
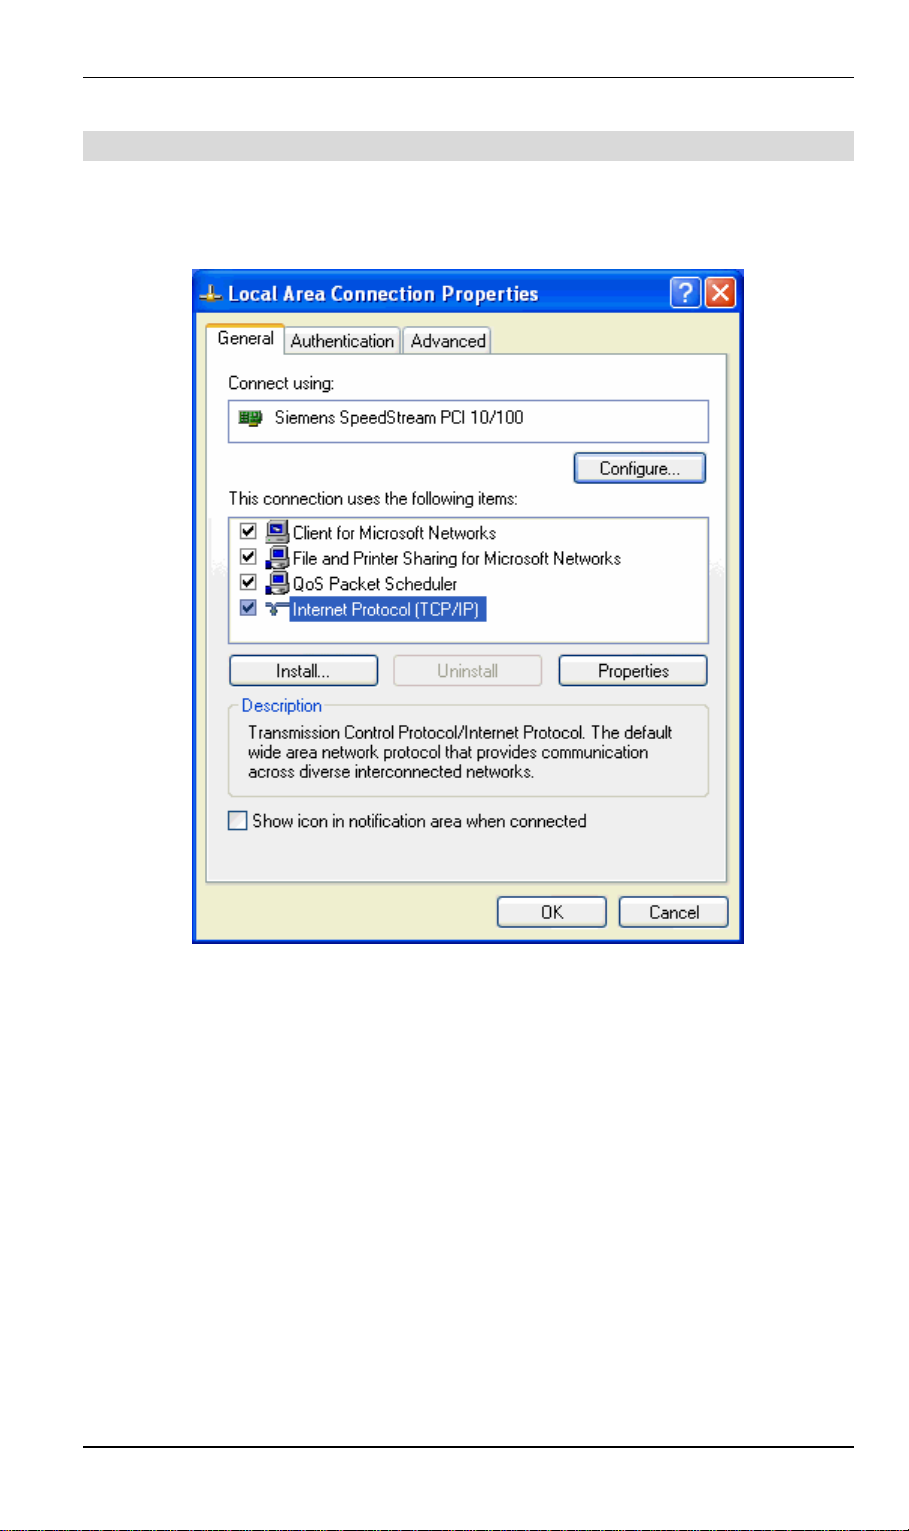
2. Right click the Local Area Connection and choose Properties. You should see a screen
like the following:
Figure 20: Network Configuration (Windows XP)
3. Select the TCP/IP protocol for your network card.
4. Click on the Properties button. You should then see a screen like the following.
32
Page 37
PC Configuration
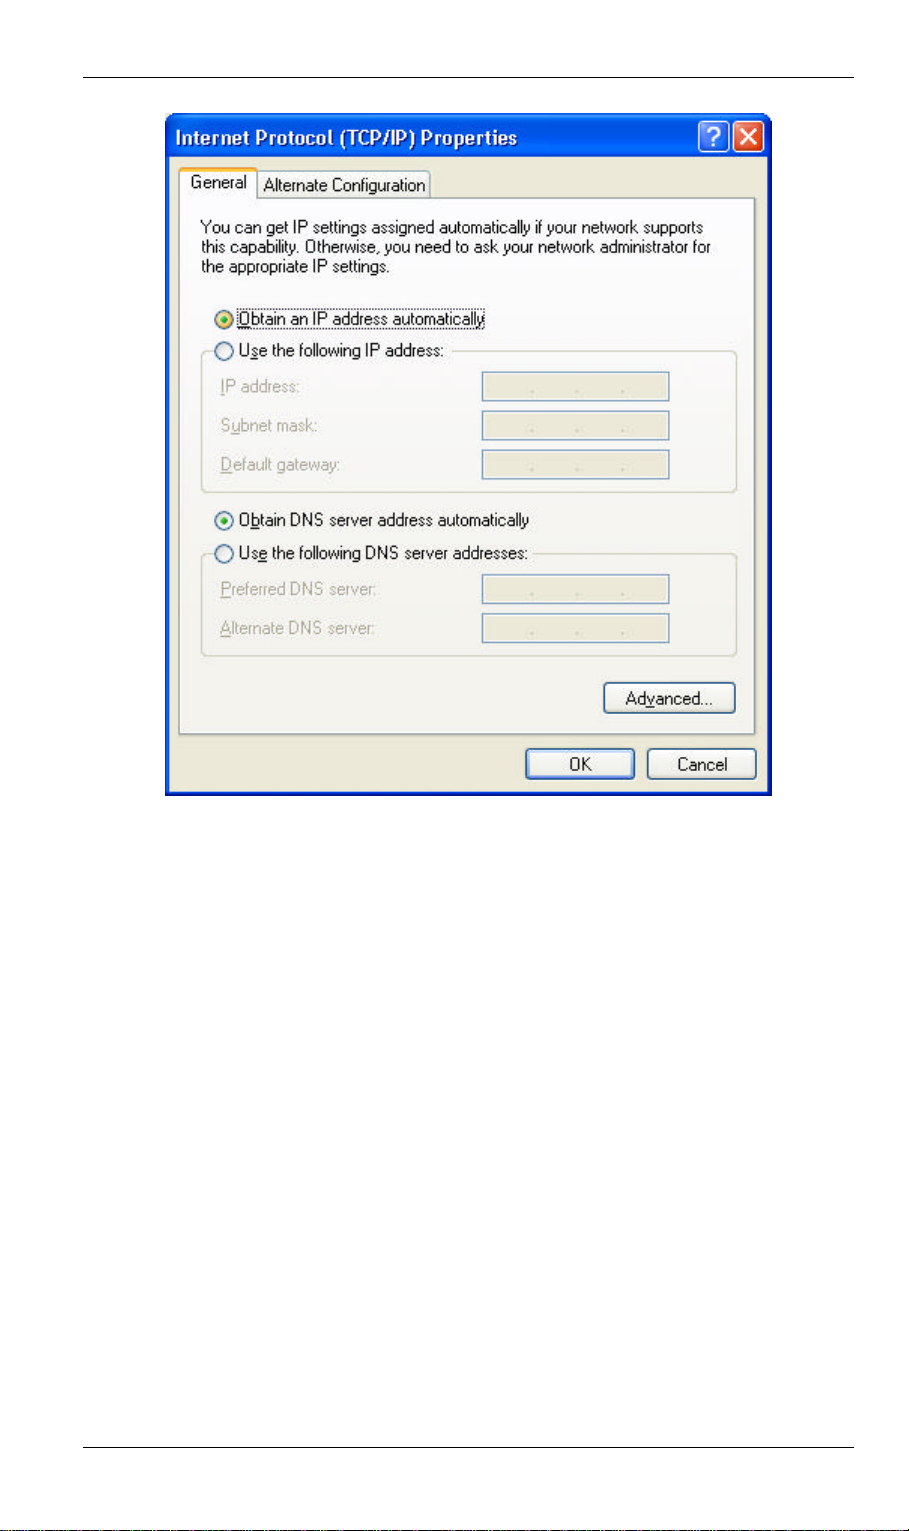
Figure 21: TCP/IP Properties (Windows XP)
5. Ensure your TCP/IP settings are correct.
Using DHCP
To use DHCP, select the radio button Obtain an IP Address automatically. This is the default
Windows settings.
Restart your PC to ensure it obtains an IP Address from the DSL/Cable Router.
Using a fixed IP Address ("Use the following IP Address")
• If your PC is already configured, do NOT change the settings on the screen shown in
Figure 21 above, unless advised to do so by your network administrator.
• You can enter the DSL/Cable Router's IP address in the Default gateway field and click
OK. Your LAN administrator can advise you of the IP Address they assigned to the
DSL/Cable Router.
• If the DNS Server fields are empty, select Use the following DNS server addresses, and
enter the DNS address or addresses provided by your ISP, then click OK.
33
Page 38

DSL/Cable Router User Guide
Internet Access
To configure your PCs to use the DSL/Cable Router for Internet access:
• Ensure that the DSL modem, Cable modem, or other permanent connection is functional.
• Use the following procedure to configure your Browser to access the Internet via the
LAN, rather than by a Dial-up connection.
For Windows 9x/2000
1. Select Start Menu - Settings - Control Panel - Internet Options.
2. Select the Connection tab, and click the Setup button.
3. Select "I want to set up my Internet connection manually, or I want to connect through a
local area network (LAN)" and click Next.
4. Select "I connect through a local area network (LAN)" and click Next.
5. Ensure all of the boxes on the following Local area network Internet Configuration
screen are unchecked.
6. Check the "No" option when prompted "Do you want to set up an Internet mail account
now?".
7. Click Finish to close the Internet Connection Wizard.
Setup is now completed.
For Windows XP
1. Select Start Menu - Control Panel - Network and Internet Connections.
2. Select Set up or change your Internet Connection.
3. Select the Connection tab, and click the Setup button.
4. Cancel the pop-up "Location Information" screen.
5. Click Next on the "New Connection Wizard" screen.
6. Select "Connect to the Internet" and click Next.
7. Select "Set up my connection manually" and click Next.
8. Check "Connect using a broadband connection that is always on" and click Next.
9. Click Finish to close the New Connection Wizard.
Setup is now completed.
Accessing AOL
To access AOL (America On Line) through the DSL/Cable Router, the AOL for Windows
software must be configured to use TCP/IP network access, rather than a dial-up connection.
The configuration process is as follows:
• Start the AOL for Windows communication software. Ensure that it is Version 2.5, 3.0 or
later. This procedure will not work with earlier versions.
• Click the Setup button.
• Select Create Location, and change the location name from "New Locality" to "Broad-
band Router".
• Click Edit Location. Select TCP/IP for the Network field. (Leave the Phone Number
blank.)
• Click Save, then OK.
Configuration is now complete.
• Before clicking "Sign On", always ensure that you are using the "Broadband Router"
location.
34
Page 39
PC Configuration
Printer Setup for Windows
The DSL/Cable Router provides printing support for 2 methods for printing from Windows:
• Print Port Driver. After installing the Print Port Driver, Windows users can print
directly to the DSL/Cable Router. Print jobs are spooled (queued) on each PC.
The supplied Print Port Driver supports Windows 95/98, Windows ME, Windows NT4.0,
Windows 2000 and Windows XP.
• LPD/LPR Printing. If using Windows NT 4.0 Server or Windows 2000 Server,
LPD/LPR printing can be used. No software needs to be installed on either the Windows
Server or each client PC. Print jobs will be spooled (queued) on the Windows Server, and
can be managed using the standard Windows Server tools.
Print Port Driver Setup
Existing Installed Printer (See next section for new printer installation)
The following procedure is for all versions of Windows (95/98/Me, NT4.0, 2000, XP). The
Windows "Add Printer" screens will vary depending on your version or Windows, but the
procedure is the same:
1. Insert the supplied CD-ROM into your drive. If the setup program does not start auto-
matically, run SETUP.EXE in the root folder.
2. At the Select Components screen, select the Print Port Driver option.
3. Follow the prompts to complete the installation.
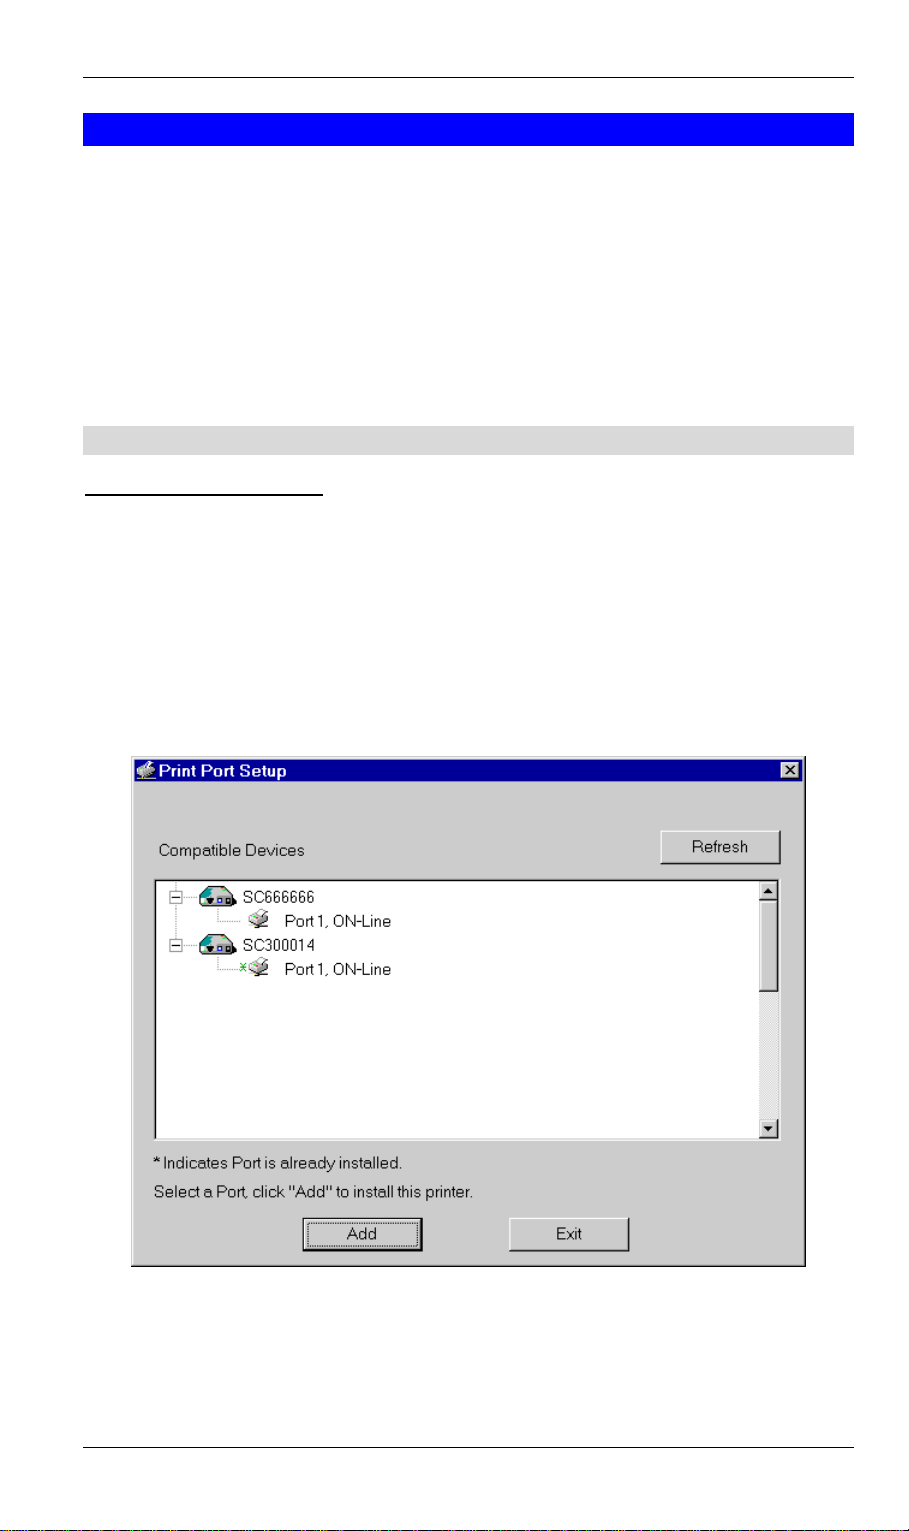
4. The Print Port Setup will then run, and the following screen will be displayed.
Figure 22: Print Port Setup
5. Select the desired device and port, and then click the "Add" button.
35
Page 40
DSL/Cable Router User Guide
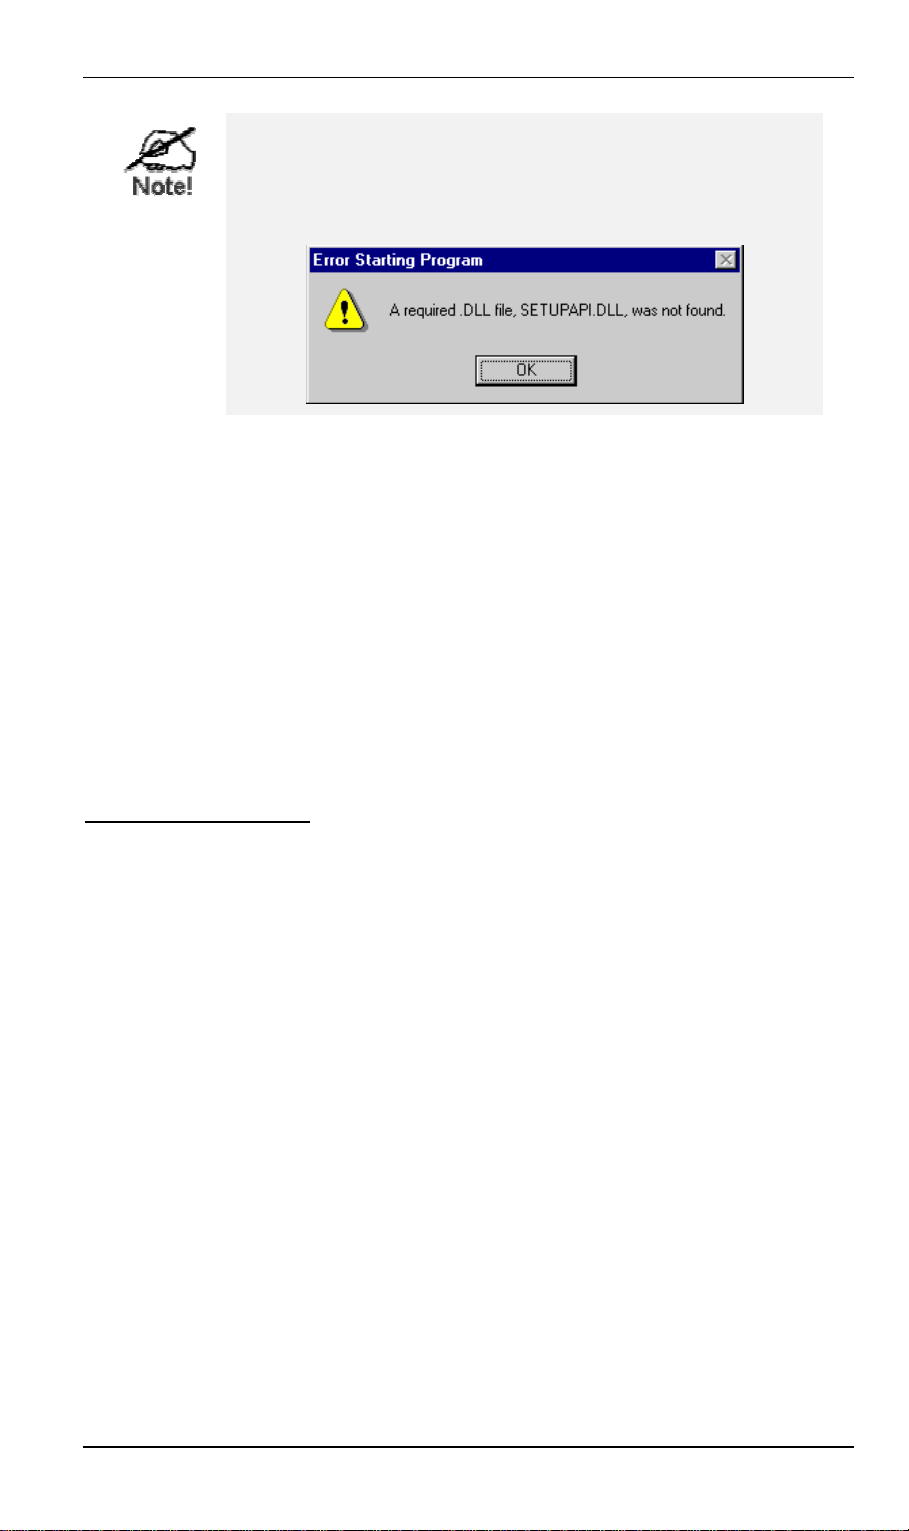
Under Windows 95, if you see the following error message,
either install Internet Explorer 4 or later, or follow the procedure in the "Trouble Shooting - Printing" section of
Appendix A.
6. A pop-up message will inform you if the port has been created successfully, and then the
Windows Add Printer wizard will start.
7. Click Cancel to close the wizard.
8. From the Start menu, select Settings -> Printers.
9. Locate your existing printer. Select/highlight the icon and Right-click.
10. Select Properties from the pop-up menu.
11. From the Properties screen, select the tab labeled Ports.
12. Select the port name starting with SC, this is the SpeedStream Com Port.
13. Click OK.
Your existing printer is now set to use the SpeedStream print server on the router.
New Printer Installation
The following procedure is for all versions of Windows (95/98/Me, NT4.0, 2000, XP). The
Windows "Add Printer" screens will vary depending on your version or Windows, but the
procedure is the same:
1. Insert the supplied CD-ROM into your drive. If the setup program does not start auto-
matically, run SETUP.EXE in the root folder.
2. At the Select Components screen, select the Print Port Driver option.
3. Follow the prompts to complete the installation.
4. The Print Port Setup will then run, and the following screen will be displayed.
36
Page 41
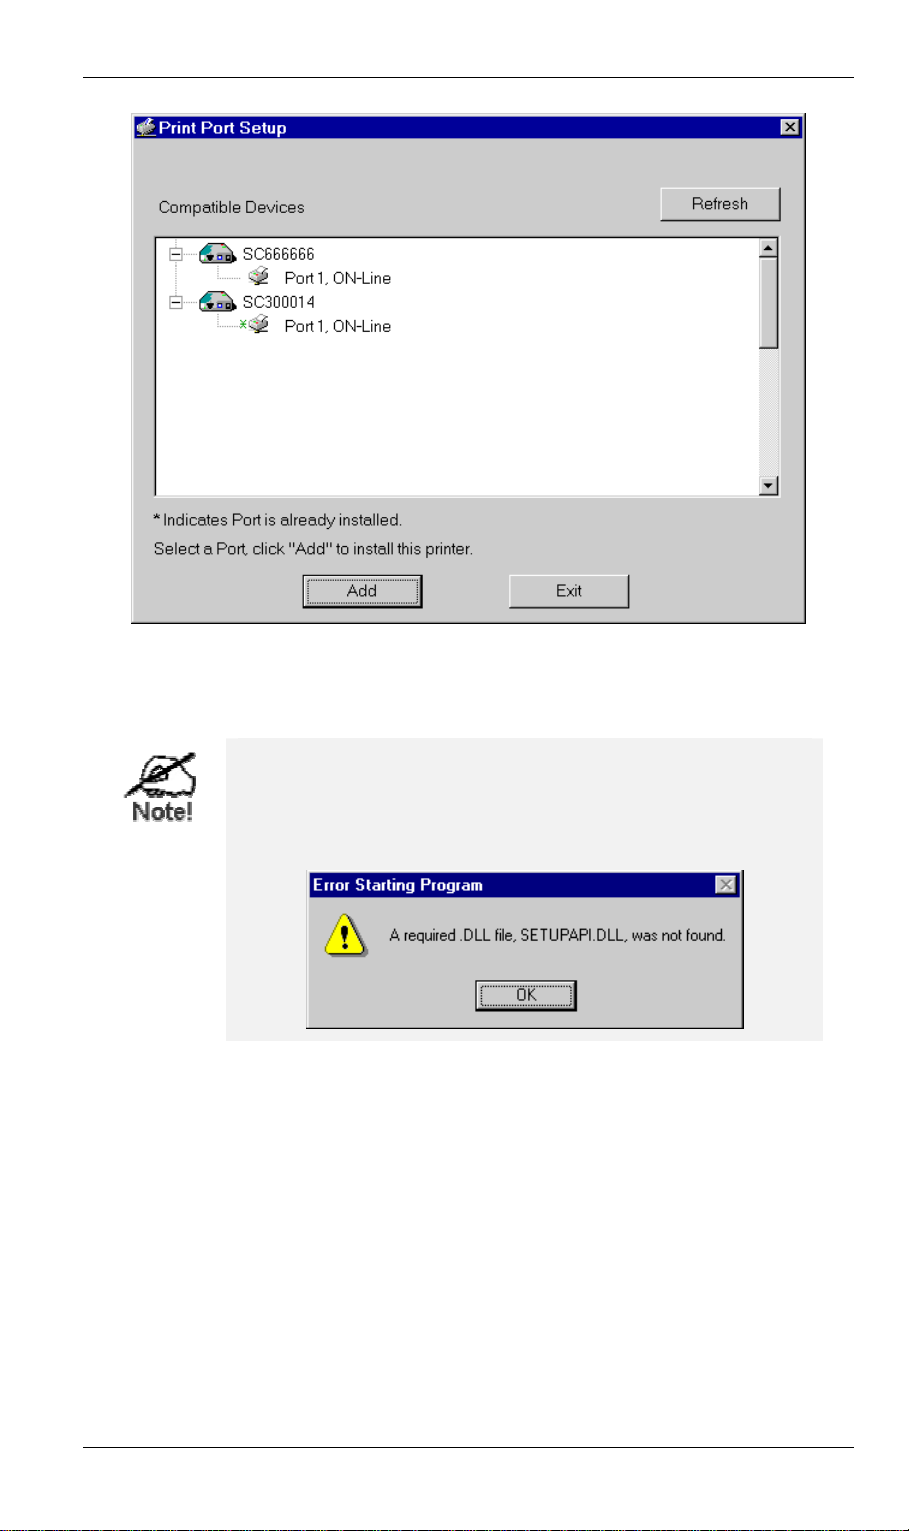
Figure 23: Print Port Setup
PC Configuration
5. Select the desired device and port, and then click the "Add" button.
Under Windows 95, if you see the following error message,
either install Internet Explorer 4 or later, or follow the procedure in the "Trouble Shooting - Printing" section of
Appendix A.
6. A pop-up message will inform you if the port has been created successfully, and then the
Windows Add Printer wizard will start.
• Select the correct Printer Manufacturer and Model, or use the "Have Disk" option if
appropriate.
• If desired, change the Printer name so it indicates the device used (e.g. HP2100 on
SCA43600)
• If prompted about Sharing, do NOT enable Printer Sharing for Windows. The router
will manage the printer sharing for your network.
7. Installation is now complete. You can now print using this printer.
• To install additional Printers (on different devices), repeat steps 6 and 7.
• Use the Start menu to run this program in future. The default installation is Start -
Programs - SpeedStream DSL/Cable Router - Add Port .
37
Page 42
DSL/Cable Router User Guide
Management
• Print jobs can be managed like any Windows printer. Open the Printers folder (Start -
Settings - Printers) and double-click any printer to see the current print jobs.
• If the printer attached to the DSL/Cable Router is changed, just run this program again,
and select the correct printer.
• To delete a port created by this setup program, use the Windows Delete Port facility:
• Right-click any printer in the Printers folder, and select Properties.
• Locate the Delete Port button. This button is on the Details or Ports tab, depending
on your version or Windows.
• If the DSL/Cable Router's IP Address is changed, and you can no longer print, delete the
port (see procedure above) and re-install it.
Port Options
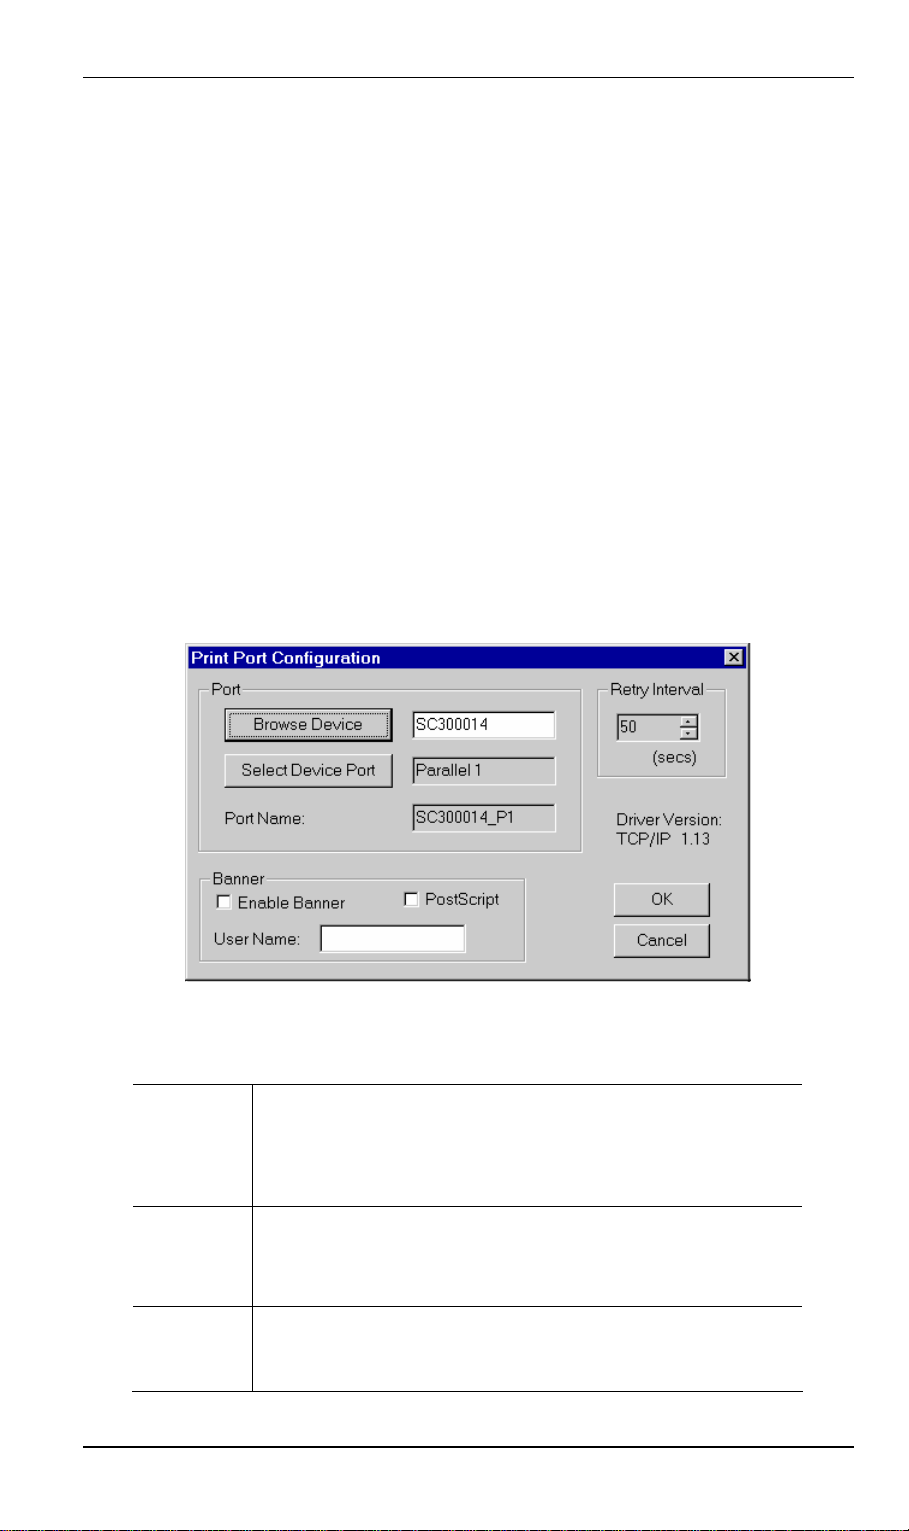
The options for the Print Port Driver are accessed via the Windows Port Settings button.
Use Start - Settings - Printers to open the Printers folder, then right-click the Printer, and
select Properties. The Port Settings button is on the Details or Port tab, depending on your
version of Windows.
An example screen is shown below:
Figure 24: Print Port Configuration
Items shown on this screen are as follows:
Port
If desired, click Browse to select a different device. (The Select
Device Port button is provided to allow this software to work
with multi-port models.)
The Port Name is shown in the Printer's Properties.
Banner
Check this option to print a banner page before each print job.
• If using a PostScript Printer, check the PostScript box.
• The User Name will be printed on the banner page.
Retry
Interval
Sets how often Windows will poll the DSL/Cable Router to
establish a connection when the printer is busy. Increase this
value if you get too many warning messages.
38
Page 43

PC Configuration
39
Page 44

DSL/Cable Router User Guide
LPD/LPR Printing
LPD/LPR printing can be used with Windows NT 4.0 Server or Windows 2000. No software
needs to be installed on client PCs.
Windows NT 4.0 Server Configuration
To use LPD printing, Microsoft TCP/IP Printing must be installed and enabled. This can be
checked using Start-Settings-Control Panel-Network - Services.
To install LPD printing using the DSL/Cable Router, follow this procedure:
1. Go to Start-Settings-Printer and invoke the Add Printer wizard.
2. When prompted with "This printer will be managed by..", select My Computer and click
Next.
3. Select Add Port, then select LPR Port and click New Port.
4. In the Dialog requesting Name of Address of server providing lpd, enter the IP address of
the DSL/Cable Router.
5. For Name of printer or print queue on that server, enter L1
6. Click OK. When returned to the Printer Ports window, simply select Close and then
install your printer driver as usual.
7. When prompted whether or not the printer will be shared, select the Sharing radio
button.
8. In the Shared dialog box, enter the shared printer name. The shared name is how other
users will see this printer. You should advise client PCs of the Server name and this
printer name.
9. Click OK to save and exit.
40
Page 45
Windows 2000 Server Configuration
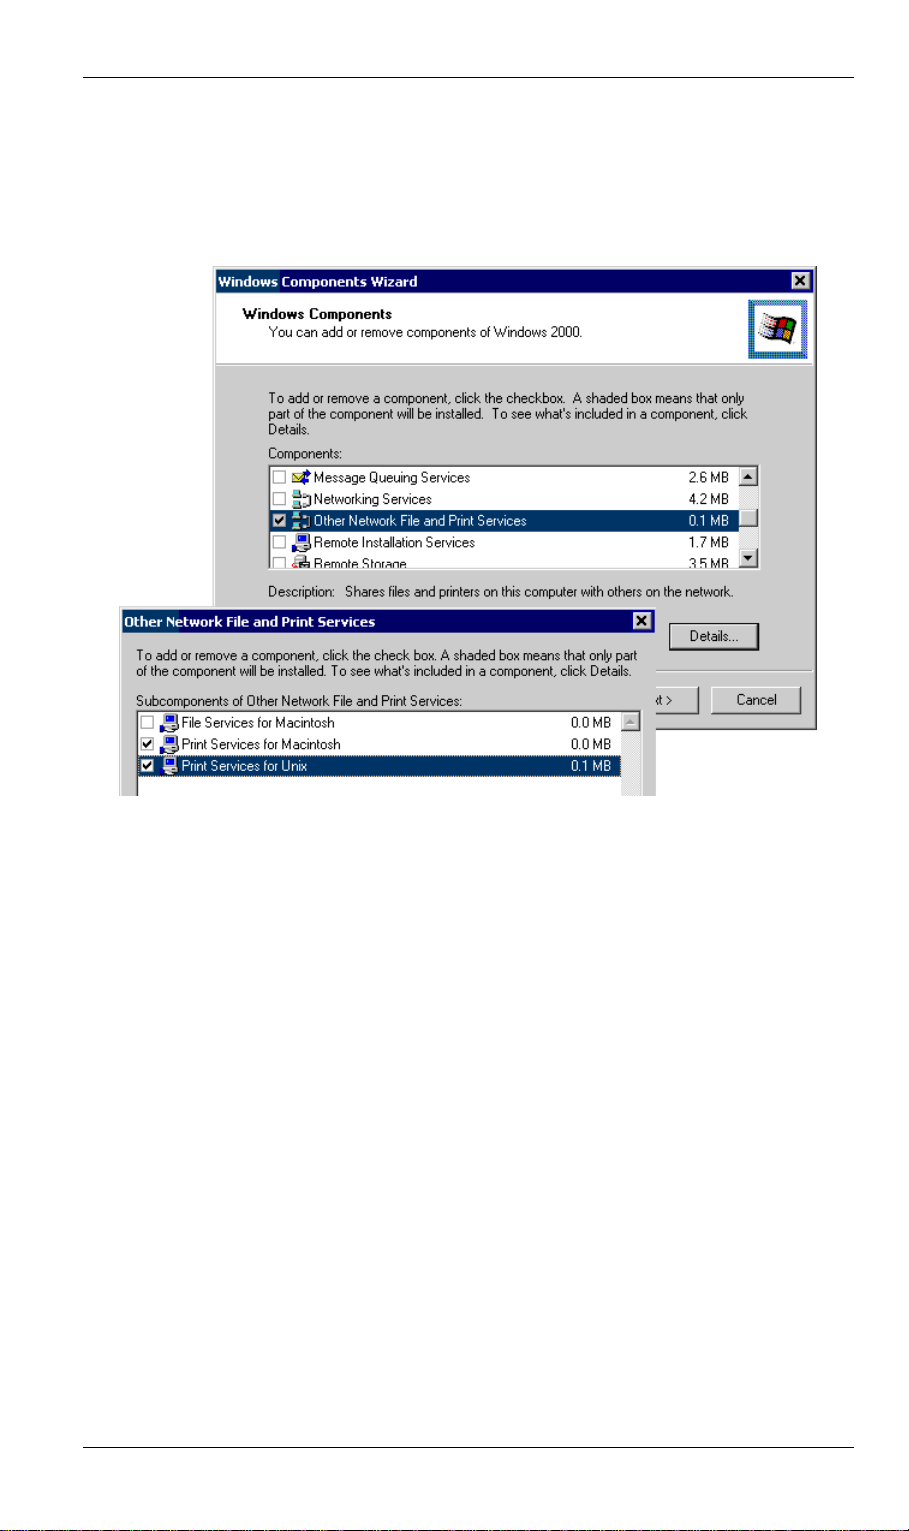
The LPD/LPR Port is not enabled by default. To enable it, use this procedure:
1. In Control Panel, select Add/Remove Programs, then Windows Components.
2. Select Other Network File and Print Services, then click the Details button.
PC Configuration
Figure 25: Adding LPD/LPR Port (Win 2000)
3. Enable Print Services for Unix, and click OK.
4. Click Next and complete the Wizard.
Adding the Printer
1. Open your Printers folder, and start the Add Printer Wizard.
2. When prompted, select Local Printer.
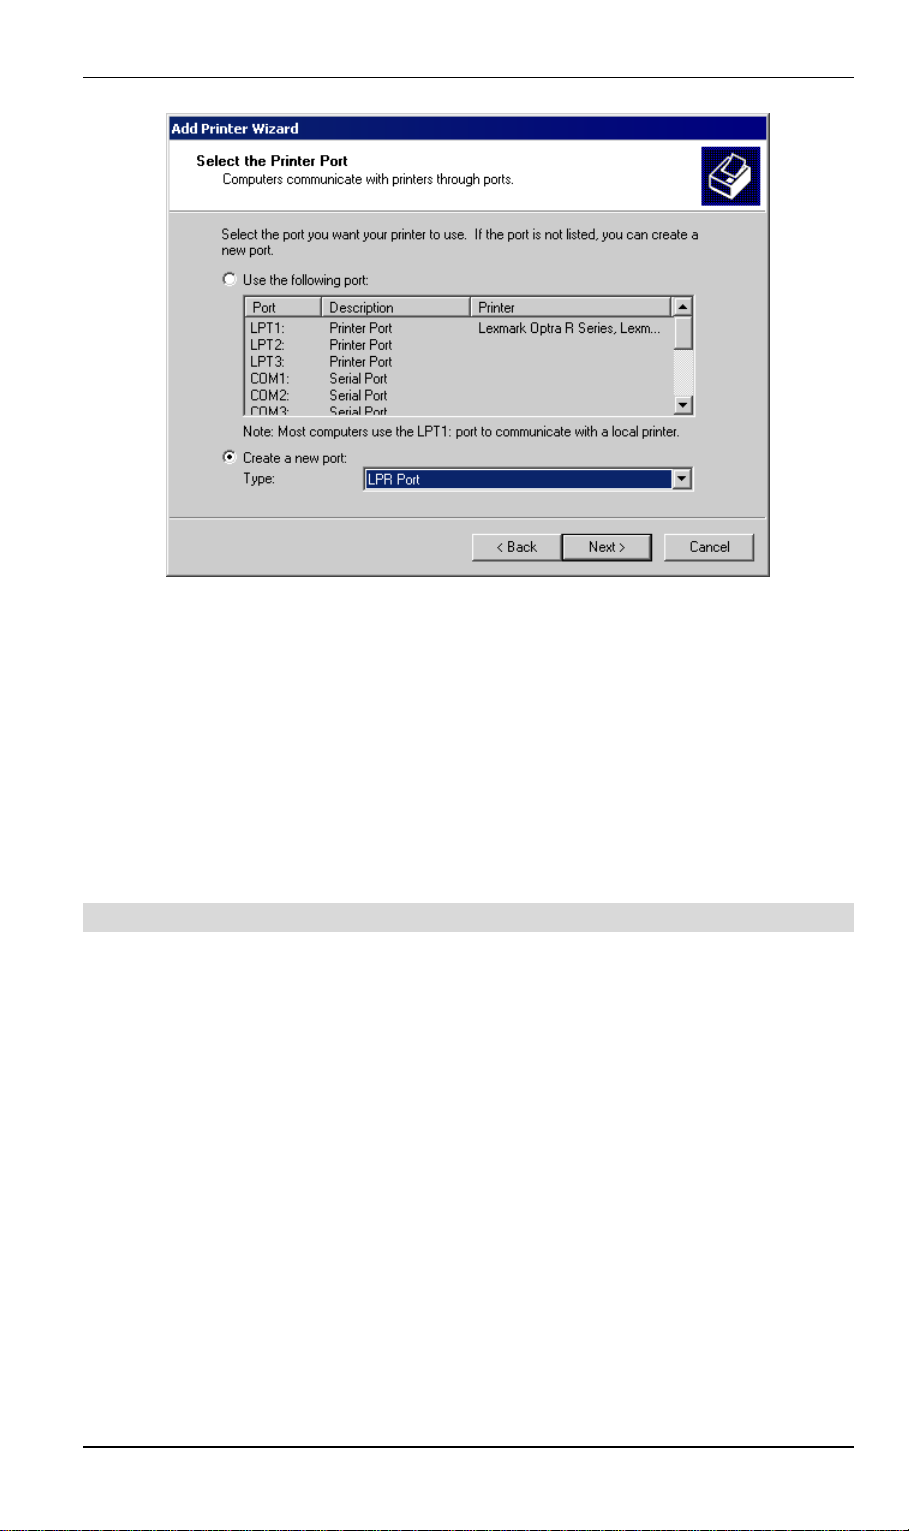
3. On the Select the Printer Port screen, select LPR Port , as shown below. Click Next to
continue.
41
Page 46
DSL/Cable Router User Guide
Figure 26: Windows 2000: Select Port
4. In the Dialog requesting Name or Address of server providing lpd, enter the IP address of
the DSL/Cable Router.
5. For Name of printer or print queue on that server, enter L1
6. Click OK, and then Next, and continue the Wizard.
7. At the Select Sharing screen, select the Radio Button for Share As, and enter the shared
printer name. The shared name is how other users will see this printer. You should advise
client PCs of the Server name and this printer name.
8. Complete the Add Printer wizard.
Client PC Setup for LPD/LPR Printing
After configuring the Windows Server, client PCs on the LAN can install the new printer.
The following procedure is for Windows 95/98/ME, Windows NT4.0, and Windows 2000
workstation.
1. Open your Printers folder, and start the Add Printer Wizard.
2. When prompted, select Network Printer
3. When prompted for Network Path or Queue Name, click the Browse button, and locate
the Server and Printer which your Network Administrator advised you to use.
4. Click OK, then Next.
5. Select the correct printer Manufacturer and Model, as advised by your Network Adminis-
trator, and click Next.
6. Follow the prompts to complete the Wizard.
7. The new printer will be listed with any other installed printers, and may be selected when
printing from any Windows application.
42
Page 47

PC Configuration
Macintosh Clients
From your Macintosh, you can access the Internet via the DSL/Cable Router. The procedure is
as follows.
1. Open the TCP/IP Control Panel.
2. Select Ethernet from the Connect via pop-up menu.
3. Select Using DHCP Server from the Configure pop-up menu. The DHCP Client ID field
can be left blank.
4. Close the TCP/IP panel, saving your settings.
Note:
If using manually assigned IP addresses instead of DHCP, the required changes are:
• Set the Router Address field to the DSL/Cable Router's IP Address.
• Ensure your DNS settings are correct.
Linux Clients
To access the Internet via the DSL/Cable Router, it is only necessary to set the DSL/Cable
Router as the "Gateway".
Ensure you are logged in as "root" before attempting any changes.
Fixed IP Address
By default, most Unix installations use a fixed IP Address. If you wish to continue using a
fixed IP Address, make the following changes to your configuration.
• Set your "Default Gateway" to the IP Address of the DSL/Cable Router.
• Ensure your DNS (Name server) settings are correct.
To act as a DHCP Client (recommended)
The procedure below may vary according to your version of Linux and X -windows shell.
1. Start your X Windows client.
2. Select Control Panel - Network
3. Select the "Interface" entry for your Network card. Normally, this will be called "eth0".
4. Click the Edit button, set the "protocol" to "DHCP", and save this data.
5. To apply your changes
• Use the "Deactivate" and "Activate" buttons, if available.
• OR, restart your system.
Printing Setup on Linux
The DSL/Cable Router supports LPD Printing on Linux.
• The DSL/Cable Router supports 3 "Logical Printers" under LPD. To configure the "Logi-
cal Printers" on the DSL/Cable Router, refer to Printer Port in Chapter 7.
• The procedure to install a LPD printer is detailed below, but may vary according to your
version of Linux and X -windows shell.
43
Page 48
DSL/Cable Router User Guide
1. In your X Windows shell, select Control Panel, then Printer Configuration.
2. Select Add. For the printer type, select Remote Unix (lpd) Queue.
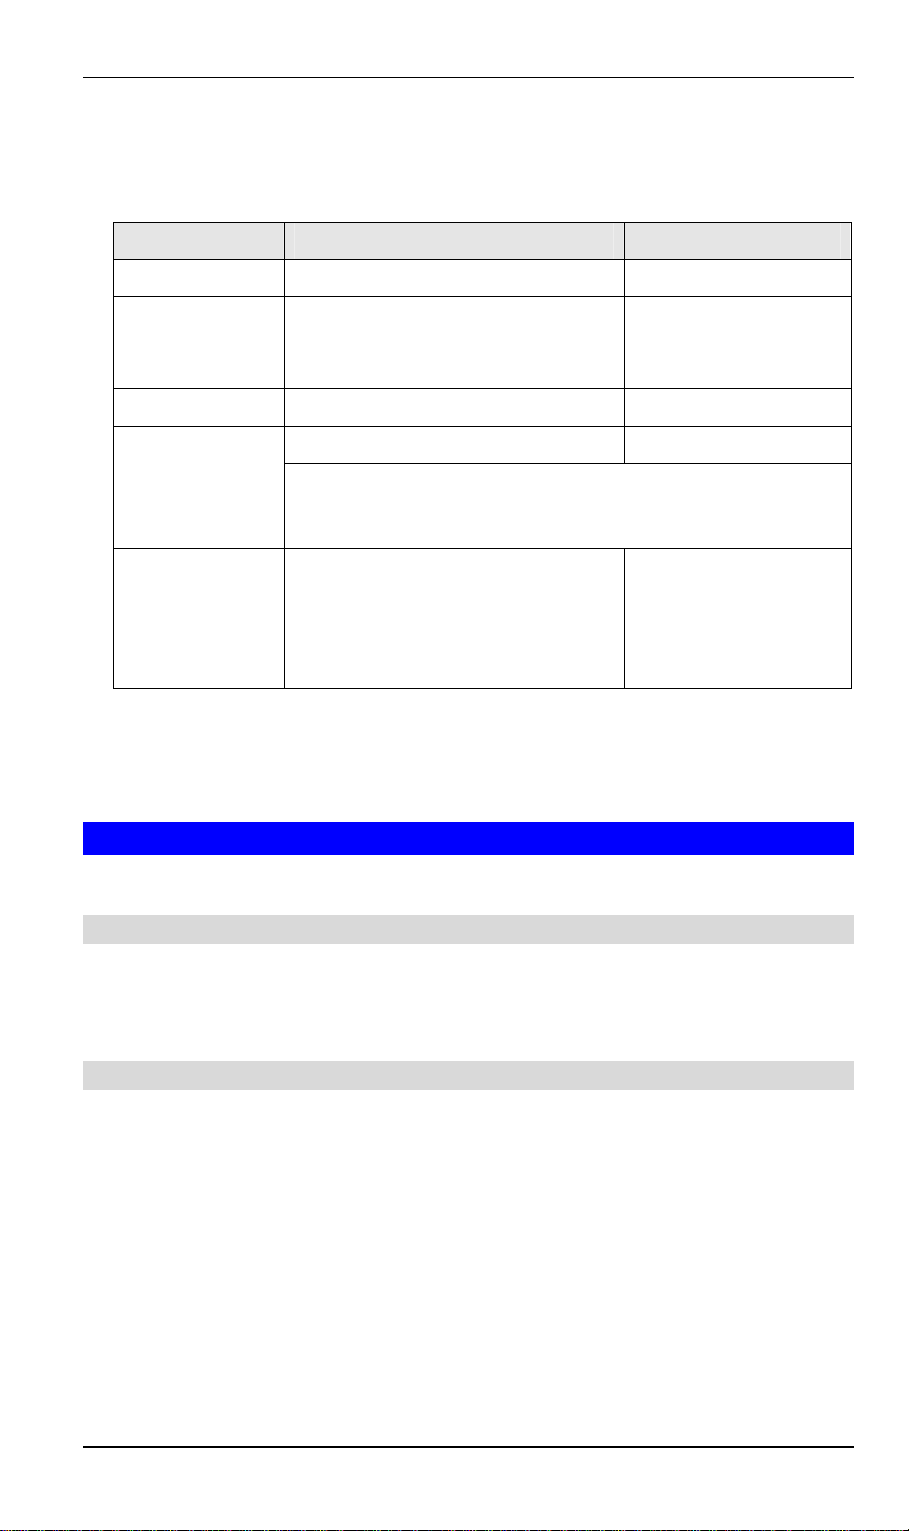
3. Use the following data to complete the resulting dialog.
Field Data Example
Name
Spool Directory
File Limit
Remote Host
Remote Queue
4. Save this data, and exit the Printer Configuration. Configuration is now completed, and
the printer is now available for use.
Enter a name for this printer gw_prn
/var/spool/lpd/printer_name
Where printer_name is the "Name"
entry above.
Enter a suitable number. 0 (no limit)
DSL/Cable Router's IP address 192.168.254.254
Note:
If you have made a host file entry, you can use the name from the
host file instead of the IP Address.
Ln
Where n is the Logical Printer number
(L1, L2, L3). Logical Printers can be
configured on the DSL/Cable Router's
Advanced - Printer Port screen.
/var/spool/lpd/gw_prn
L1
Other Unix Systems
Internet Access
• Ensure the "Gateway" field for your network card is set to the IP Address of the
DSL/Cable Router.
• Ensure your DNS (Name Server) settings are correct.
Printing Setup
To use LPD printing to the DSL/Cable Router's printer, install an LPD printer using the
standard procedure for your system.
• Use the DSL/Cable Router's IP Address as the location of the remote host
• Use L1, L2, or L3 for the name of the printer on the remote host.
On the DSL/Cable Router, the logical printers (L1, L2, and L3) can be configured on the
Advanced - Printer Port screen. See Printer Port in Chapter 7 for details.
44
Page 49

PC Configuration
Wireless Station Configuration
This section applies to all Wireless stations wishing to use the DSL/Cable Router's Access
Point, regardless of the operating system which is used on the client.
To use the Wireless Access Point in the DSL/Cable Router, each Wireless Station must have
compatible settings, as follows:
Mode
SSID (ESSID)
WEP By default, WEP on the DSL/Cable Router is disabled.
The mode must be set to Infrastructure.
This must match the value used on the DSL/Cable Router. The default
value is SpeedStream
Note! The SSID is case sensitive.
• If WEP remains disabled on the DSL/Cable Router, all stations
must have WEP disabled.
• If WEP is enabled on the DSL/Cable Router, each station must use
the same settings as the DSL/Cable Router.
45
Page 50

5
Chapter 5
Operation and Status
This Chapter details the operation of the DSL/Cable Router and the status
screens.
Operation
Once both the DSL/Cable Router and the PCs are configured, operation is automatic.
However, there are some situations where additional Internet configuration may be required:
• If using Internet-based Conferencing & Telephony applications, it may be necessary to
specify which PC receives an incoming connection. Refer to Chapter 6 - Advanced Fea-
tures for further details.
• Applications that use non-standard connections or port numbers may be blocked by the
DSL/Cable Router's built-in firewall. You can define such applications as Special Appli-
cations to allow them to function normally. Refer to Chapter 6 - Advanced Features for
further details.
• Some non-standard applications may require use of the DMZ feature. Refer to Chapter 6
- Advanced Features for further details.
46
Page 51
Status Screen
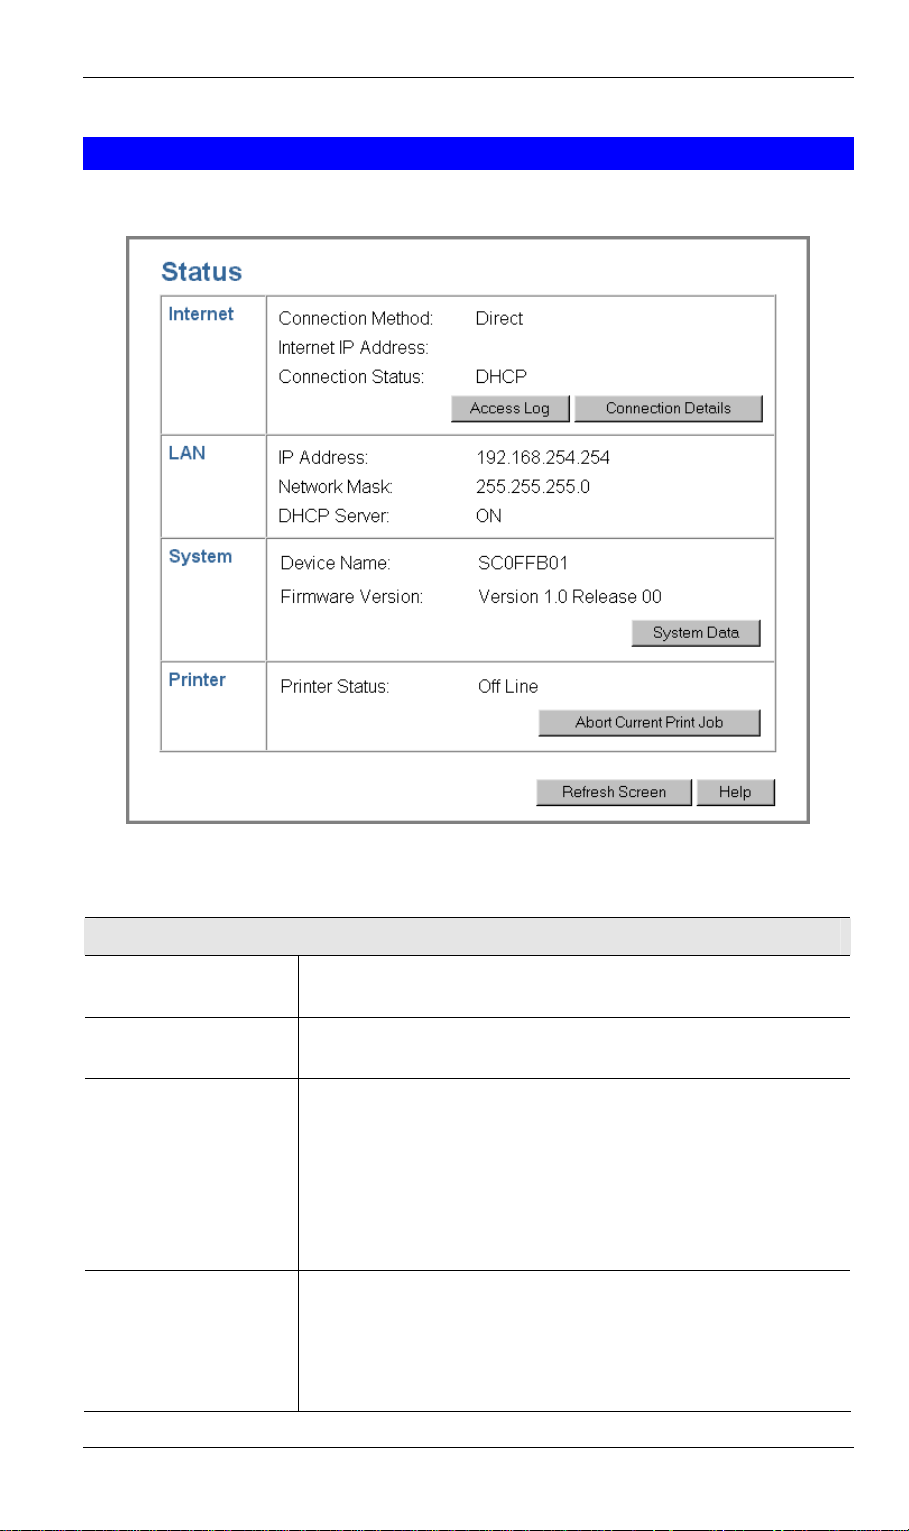
Use the Status link on the main menu to view this screen.
Operation and Status
Data - Status Screen
Internet
Connection Method
Internet IP Address
Connection Status
"Access Log"
Button
Figure 27: Status Screen
This indicates the current connection method, as set in the Setup
Wizard.
This IP Address is allocated by the ISP (Internet Service Provider).
Current connection status:
• OK
• No connection
• Error
If there is an error, you can click the "Connection Details" button
to find out more information.
Click this button to open a sub-window and view details of
outgoing connections to the Internet. The log contains the following data:
• Date/Time - When the connection was first established.
• Source IP Address - The IP Address of the local PC re-
47
Page 52
DSL/Cable Router User Guide
questing the Internet connection.
• Destination - The Internet address which was requested. If
the URL Filter is enabled, this address will be shown as a
URL. Otherwise, the IP address will be displayed.
• Blocked - If the request was blocked by the URL Filter
function, this will display "Yes". Otherwise, it will be blank.
"Connection Details"
Button
LAN
IP Address
Network Mask
DHCP Server
System
Device Name
Firmware Version
"System Data"
Button
Printer
Click this button to open a sub-window and view a detailed
description of the current connection. Depending on the type of
connection, a "log" may also be available.
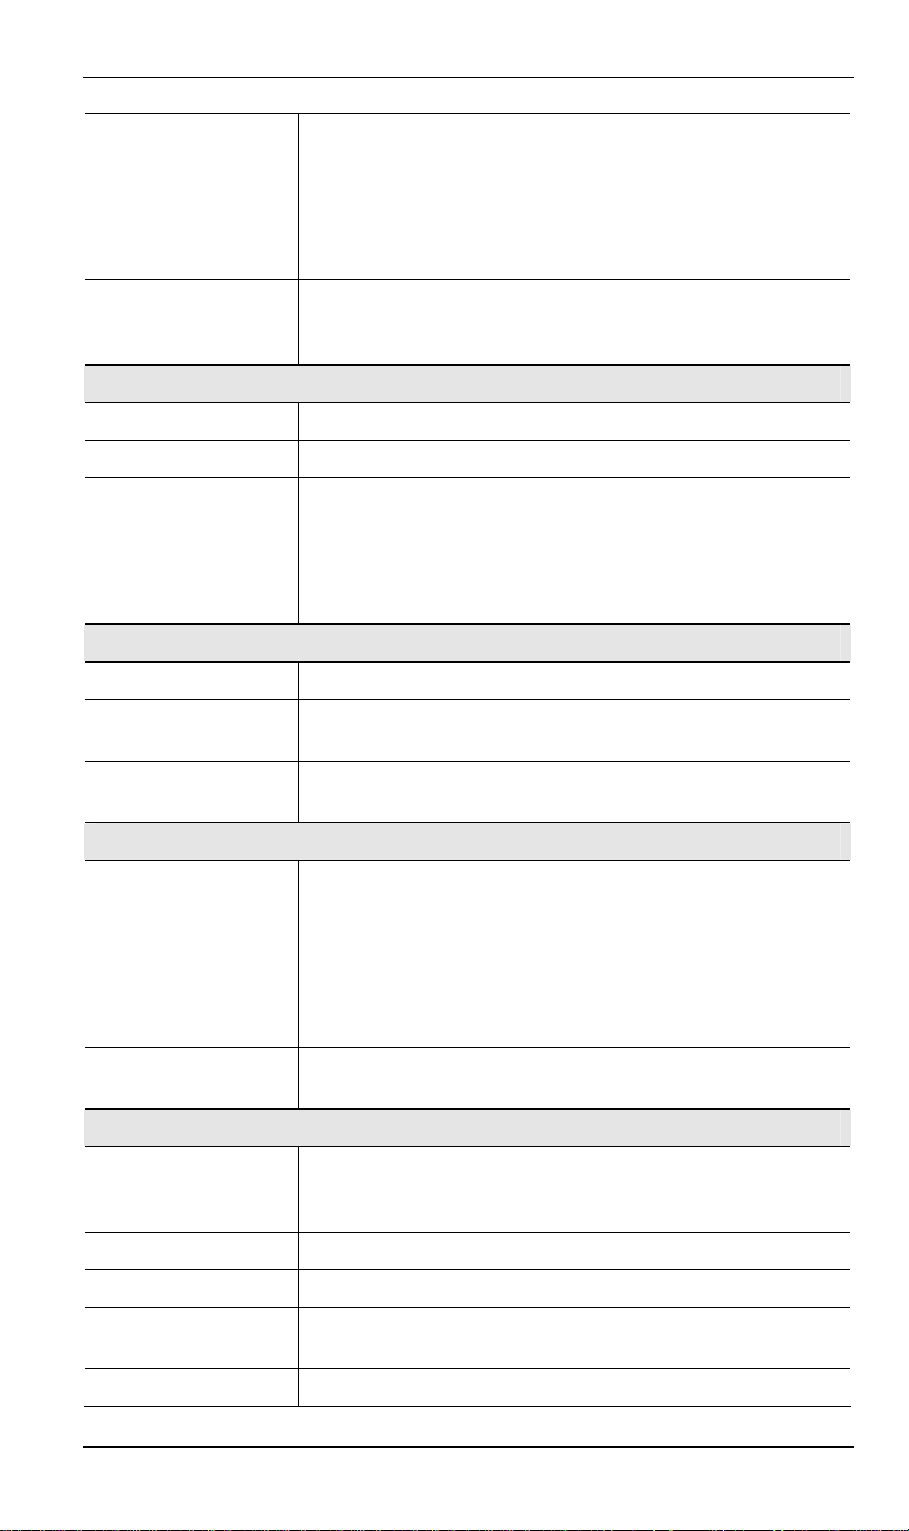
The IP Address of the DSL/Cable Router.
The Network Mask (Subnet Mask) for the IP Address above.
This shows the status of the DHCP Server function - either
"Enabled" or "Disabled".
For additional information about the PCs on your LAN, and the
IP addresses allocated to them, use the Network Clients option on
the Advanced menu.
This displays the current name of the DSL/Cable Router.
The current version of the firmware installed in the DSL/Cable
Router.
Clicking this button will open a Window which lists all system
details and settings.
Printer Status
"Abort Current Print
Job" Button
Buttons
Connection Details
Access Log
System Data
Abort Current
Print Job
Refresh Screen
This indicates the current status of the printer. Possible values
are:
• Idle
• Printing
• Off-line
• Out of paper
Click this button to terminate the current print job. This button
should be used if the current print job is not printing correctly.
View the details of the current Internet connection. The subscreen displayed will depend on the connection method used. See
the following sections for details of each sub-screen.
View details of outgoing connections to the internet.
Display all system information in a sub-window.
Use this to terminate the current print job if is not printing
correctly.
Update the data displayed on screen.
48
Page 53

Operation and Status
49
Page 54
DSL/Cable Router User Guide
Connection Status - PPPoE
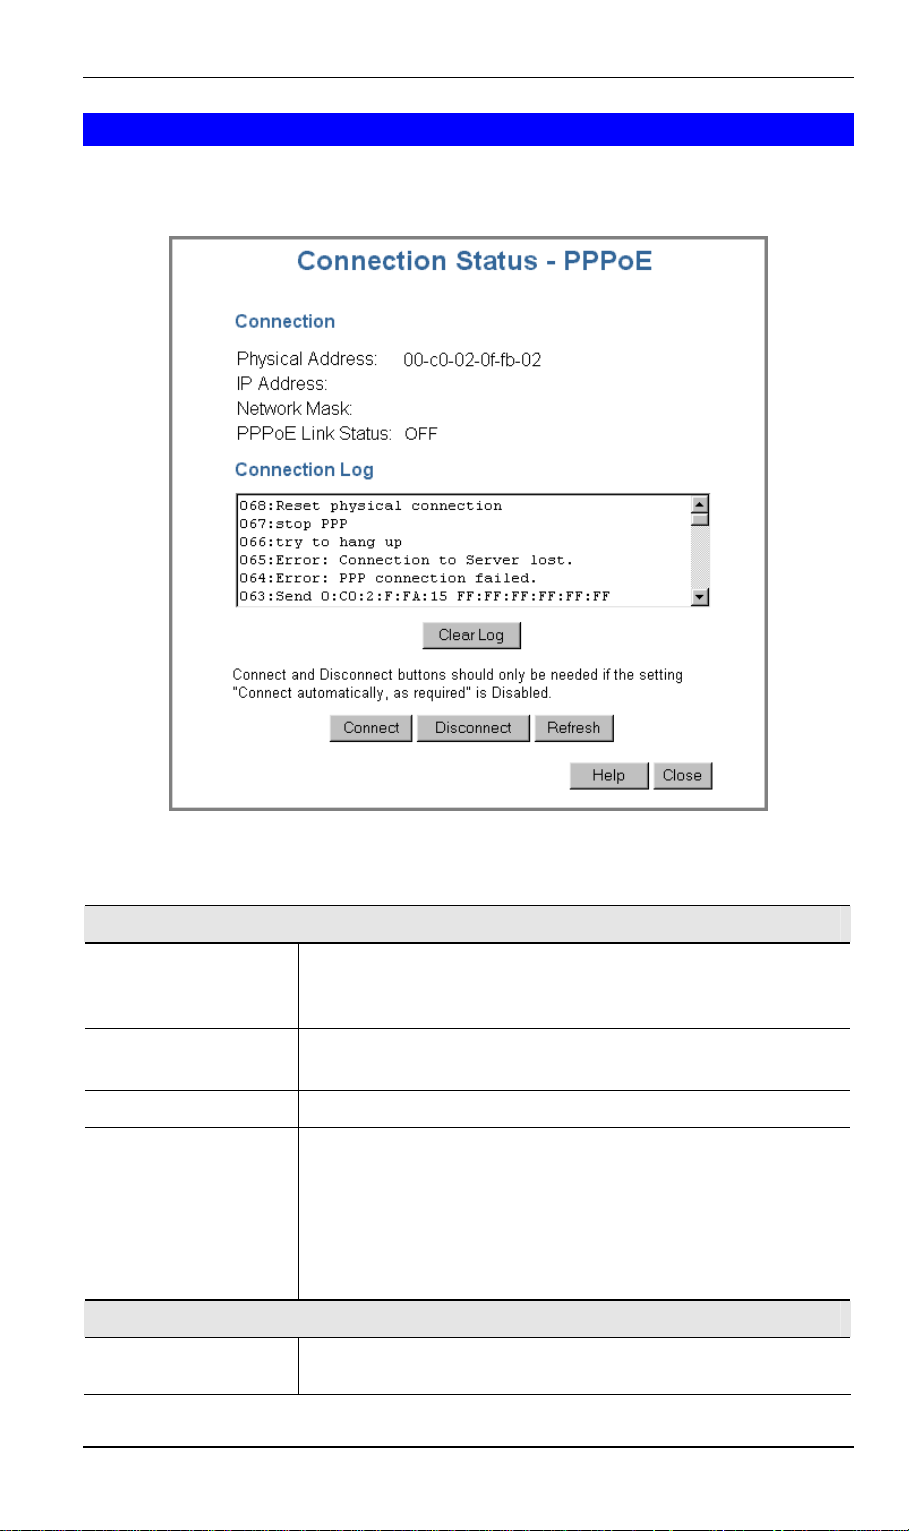
If using PPPoE (PPP over Ethernet), a screen like the following example will be displayed
when the "Connection Details" button is clicked.
Figure 28: PPPoE Status Screen
Data - PPPoE Status Screen
Connection
Physical Address
IP Address
Network Mask
PPPoE Link Status
Connection Log
Connection Log
The hardware address of this device, as seen by remote devices
on the Internet. (This is different to the hardware address seen by
devices on the local LAN.)
The IP Address of this device, as seen by Internet users. This
address is allocated by your ISP (Internet Service Provider).
The Network Mask associated with the IP Address above.
This indicates whether or not the connection is currently estab-
lished.
• If the connection does not exist, the "Connect" button can be
used to establish a connection.
• If the connection currently exists, the "Disconnect" button
can be used to break the connection.
• The Connection Log shows status messages relating to the
existing connection.
50
Page 55
Buttons
Operation and Status
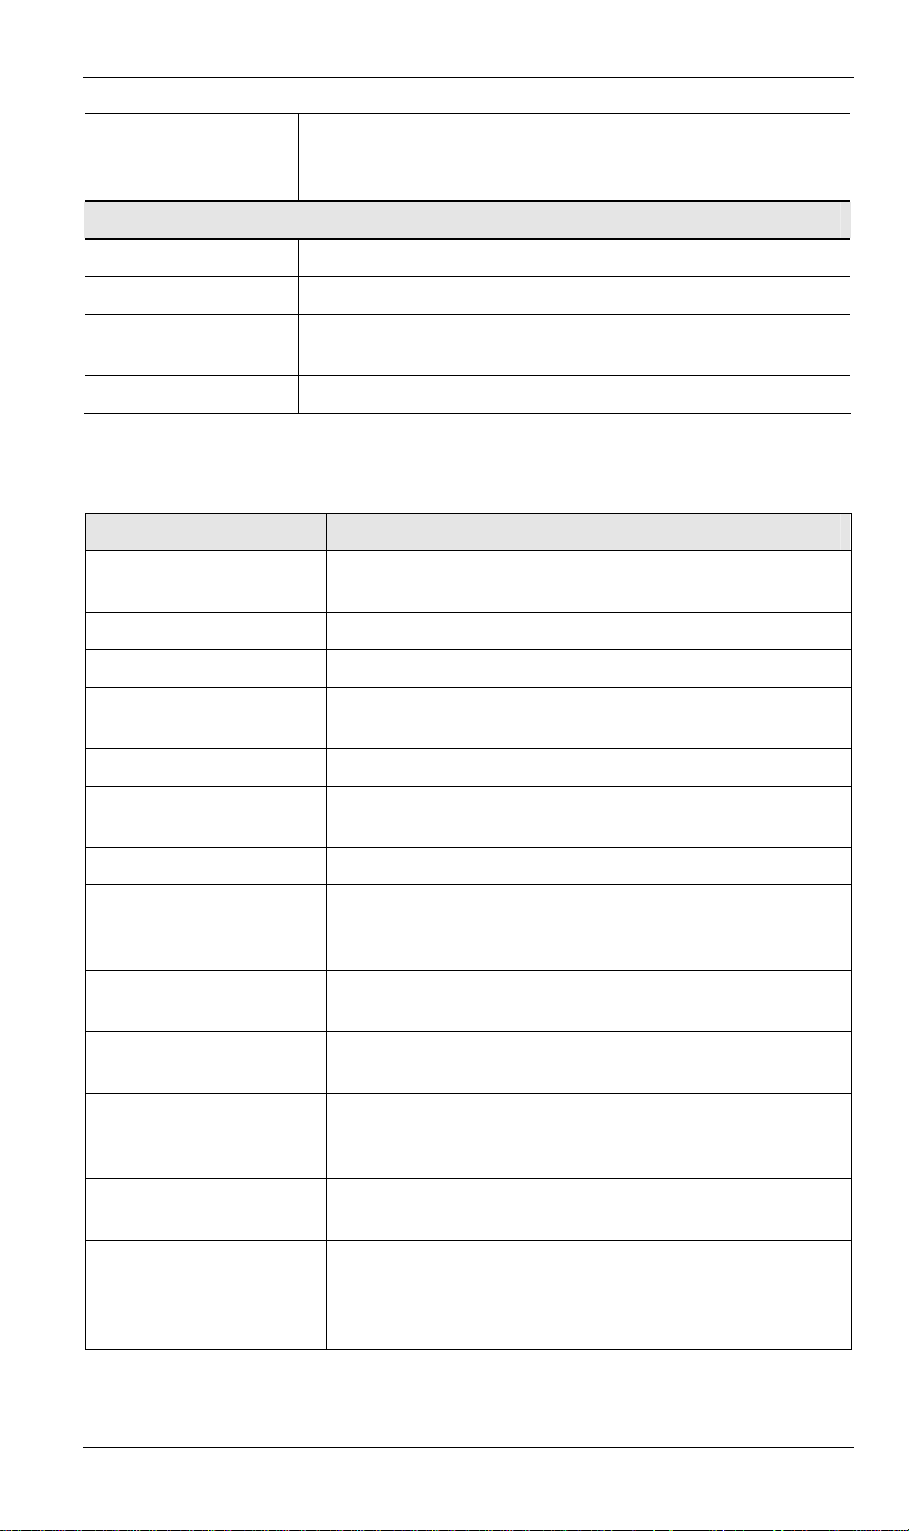
• The most common messages are listed in the table below.
• The "Clear Log" button will restart the Log, while the
Refresh button will update the messages shown on screen.
Connect
Disconnect
Clear Log
If not connected, establish a connection to your ISP.
If connected to your ISP, hang up the connection.
Delete all data currently in the Log. This will make it easier to
read new messages.
Refresh
Update the data on screen.
Connection Log Messages
Message Description
Connect on Demand Connection attempt has been triggered by the "Connect
automatically, as required" setting.
Manual connection Connection attempt started by the "Connect" button.
Reset physical connection Preparing line for connection attempt.
Connecting to remote
server
Remote Server located ISP's Server has responded to connection attempt.
Start PPP Attempting to login to ISP's Server and establish a PPP
Attempting to connect to the ISP's server.
connection.
PPP up successfully Able to login to ISP's Server and establish a PPP connection.
Idle time-out reached The connection has been idle for the time period specified in
the "Idle Time-out" field. The connection will now be termi-
nated.
Disconnecting The current connection is being terminated, due to either the
"Idle Time-out" above, or "Disconnect" button being clicked.
Error: Remote Server not
found
Error: PPP Connection
failed
ISP's Server did not respond. This could be a Server problem,
or a problem with the link to the Server.
Unable to establish a PPP connection with the ISP's Server.
This could be a login problem (name or password) or a Server
problem.
Error: Connection to
Server lost
Error: Invalid or unknown
packet type
The existing connection has been lost. This could be caused
by a power failure, a link failure, or Server failure.
The data received from the ISP's Server could not be proc-
essed. This could be caused by data corruption (from a bad
link), or the Server using a protocol which is not supported by
this device.
51
Page 56
DSL/Cable Router User Guide
Connection Status - PPTP
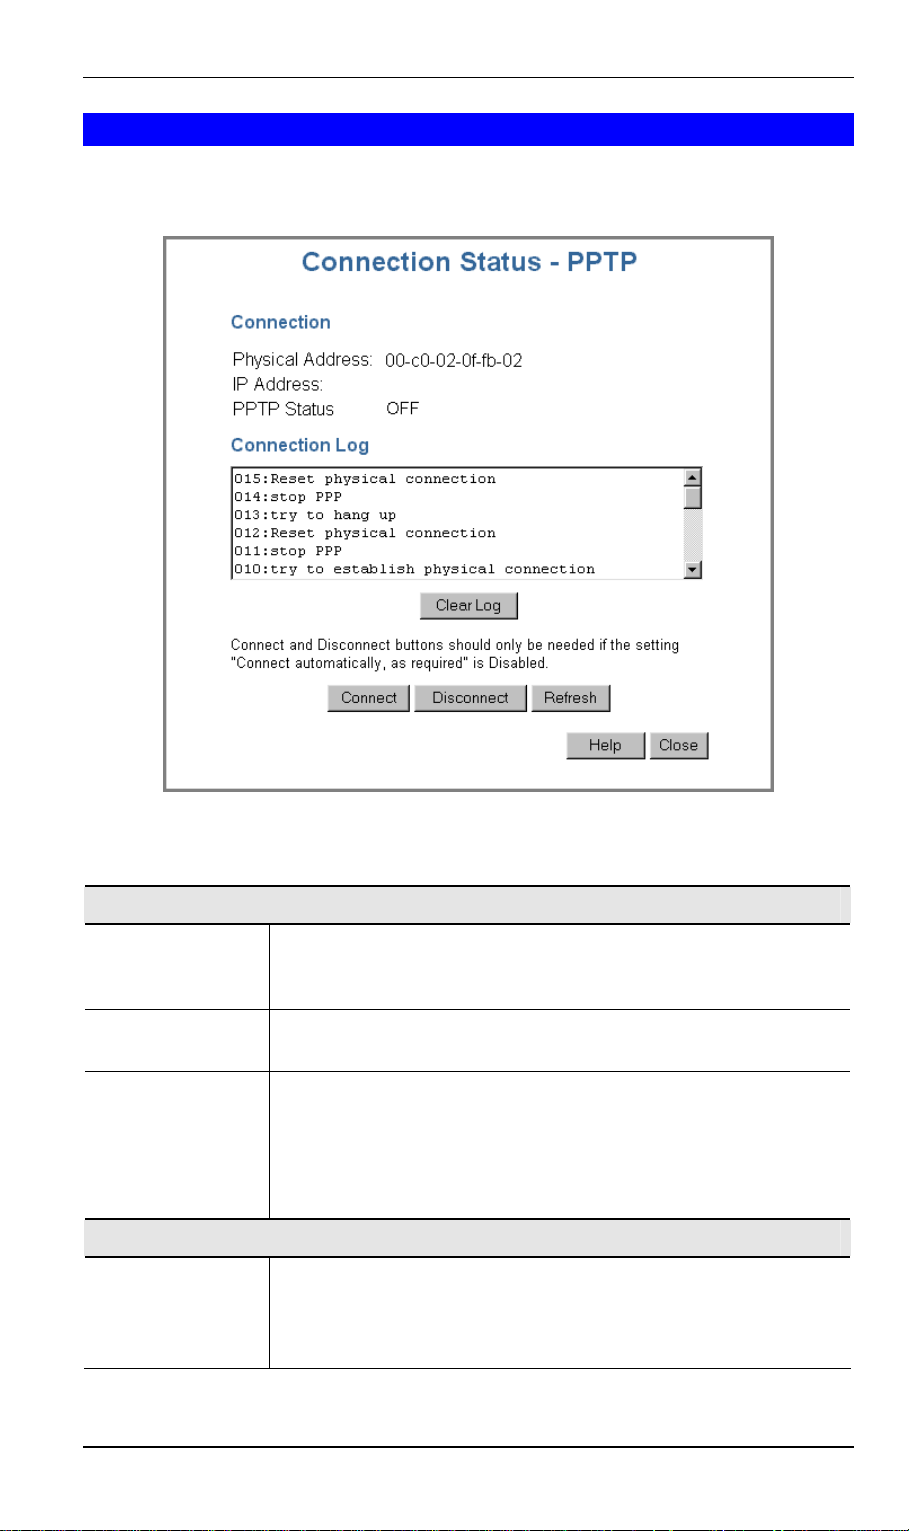
If using PPTP (Peer-to-Peer Tunneling Protocol), a screen like the following example will be
displayed when the "Connection Details" button is clicked.
Figure 29: PPTP Status Screen
Data - PPTP Status Screen
Connection
Physical Address
IP Address
PPTP Status
Connection Log
Connection Log
The hardware address of this device, as seen by remote devices on
the Internet. (This is different to the hardware address seen by
devices on the local LAN.)
The IP Address of this device, as seen by Internet users. This address
is allocated by your ISP (Internet Service Provider).
This indicates whether or not the connection is currently established.
• If the connection does not exist, the "Connect" button can be
used to establish a connection.
• If the connection currently exists, the "Disconnect" button can
be used to break the connection.
• The Connection Log shows status messages relating to the
existing connection.
• The "Clear Log" button will restart the Log, while the Refresh
button will update the messages shown on screen.
52
Page 57
Buttons
Operation and Status
Connect
Disconnect
Clear Log
Refresh
If not connected, establish a connection to your ISP.
If connected to your ISP, hang up the connection.
Delete all data currently in the Log. This will make it easier to read
new messages.
Update the data on screen.
Connection Details - Fixed/Dynamic IP Address
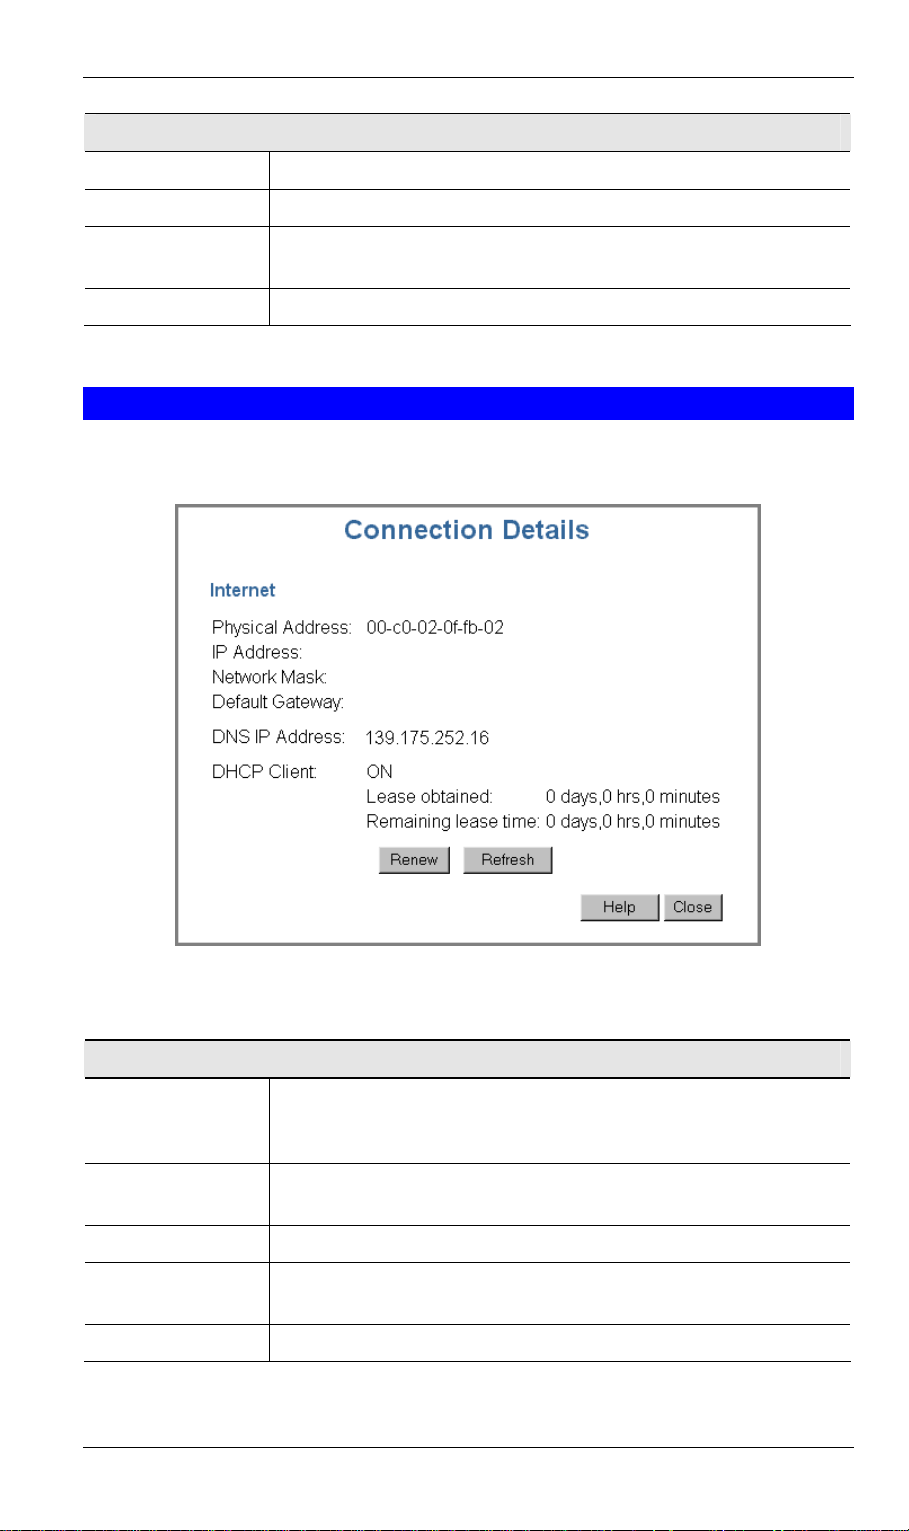
If your access method is neither PPPoE nor PPTP, a screen like the following example will be
displayed when the "Connection Details" button is clicked.
Figure 30: Connection Status Screen
Data - Connection Details Screen
Internet
Physical Address
IP Address
Network Mask
Default Gateway
DNS IP Address
The hardware address of this device, as seen by remote devices on
the Internet. (This is different to the hardware address seen by
devices on the local LAN.)
The IP Address of this device, as seen by Internet users. This address
is allocated by your ISP (Internet Service Provider).
The Network Mask associated with the IP Address above.
The IP Address of the remote Gateway or Router associated with the
IP Address above.
The IP Address of the Domain Name Server which is currently used.
53
Page 58

DSL/Cable Router User Guide
DHCP Client
Buttons
Release/Renew
Button will display
EITHER
"Release"
OR
"Renew"
Refresh
This will show "Enabled" or "Disabled", depending on whether or
not this device is functioning as a DHCP client.
If "Enabled" the "Remaining lease time" field indicates when the IP
Address allocated by the DHCP Server will expire. The lease is
automatically renewed on expiry; use the "Renew" button if you wish
to manually renew the lease immediately.
This button is only useful if the IP address shown above is allocated
automatically on connection. (Dynamic IP address). Otherwise, it
has no effect.
• If the ISP's DHCP Server has NOT allocated an IP Address for
the DSL/Cable Router, this button will say "Renew". Clicking
the "Renew" button will attempt to re-establish the connection
and obtain an IP Address from the ISP's DHCP Server.
• If an IP Address has been allocated to the DSL/Cable Router (by
the ISP's DHCP Server), this button will say "Release". Clicking
the "Release" button will break the connection and release the IP
Address.
Update the data shown on screen.
54
Page 59

6
Chapter 6
Advanced Features
This Chapter explains when and how to use the DSL/Cable Router's "Advanced" Features.
Overview
All advanced features are accessed via the Advanced menu. The following advanced features
are provided.
• Special Applications
• DMZ
• Virtual Servers
• Dynamic DNS
• Remote Management
• Access Control
• Firmware Upgrade using your Web Browser
This chapter contains details of the configuration and use of each of these features.
Note: The screens shown below are identical for all SpeedStream DSL/Cable Routers; there-
fore, some screenshots are shared between multiple user manuals.
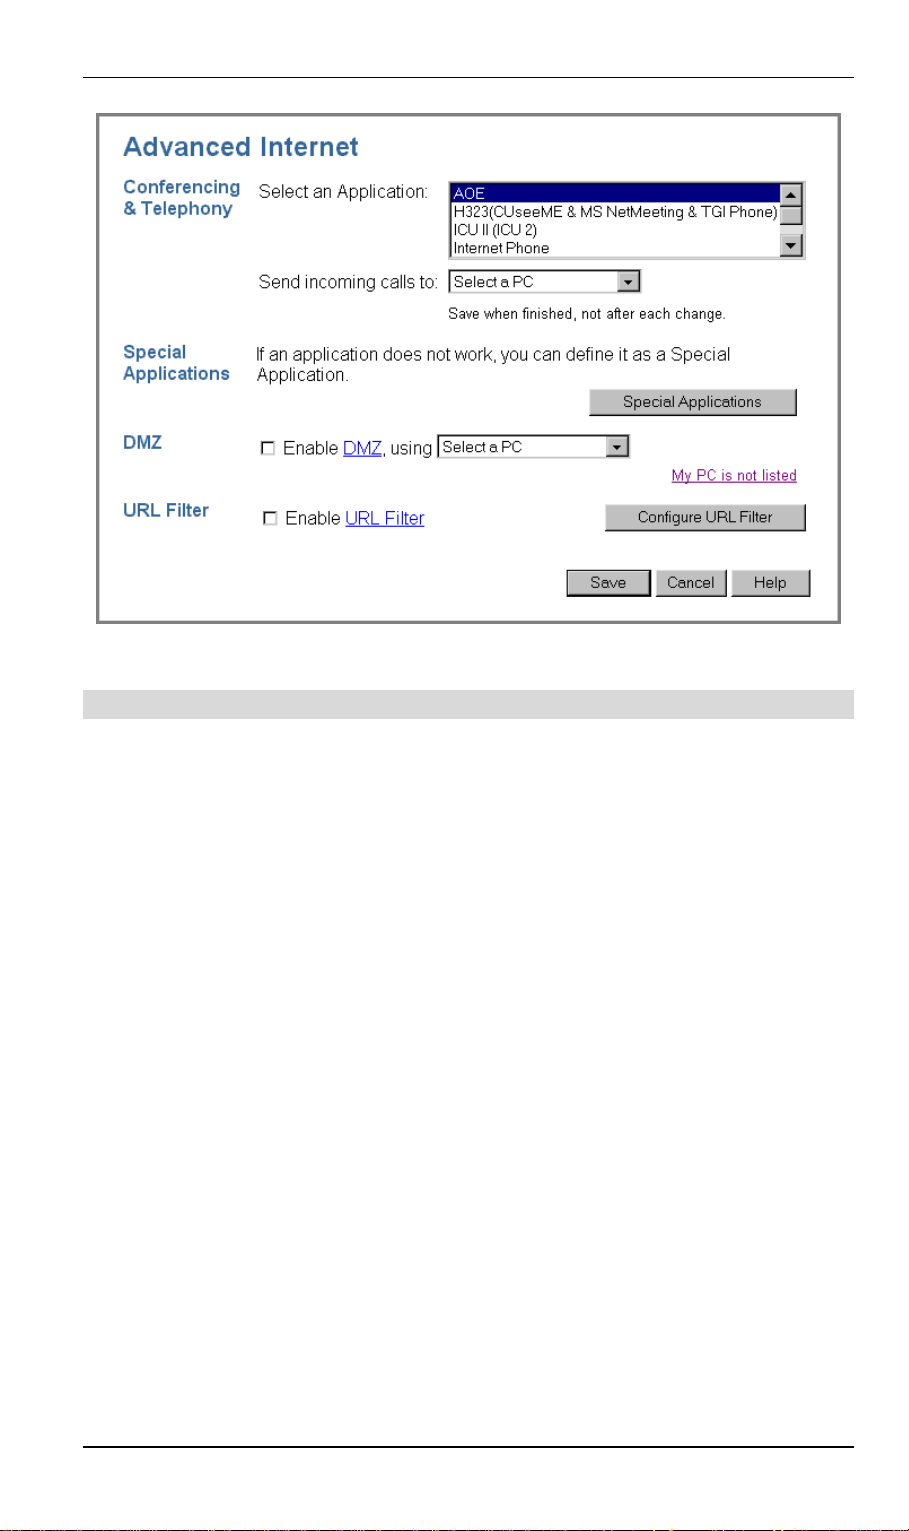
Advanced Internet Screen
This screen allows configuration of all advanced features relating to Internet access.
• Conferencing and Telephony applications
• Special Applications
• DMZ
• URL filter
An example screen is shown below.
55
Page 60
DSL/Cable Router User Guide
Figure 31: Advanced Internet Screen
Conferencing & Telephony
Most applications are supported transparently by the DSL/Cable Router. But sometimes it is
not clear which PC should receive an incoming connection. This problem could arise with the
following Conferencing & Telephony applications:
• CUseeME
• ICQ
• ICU II (ICU 2)
• Internet Phone
• mIRC
• MS NetMeeting
• Yahoo Messenger
If this problem arises, you can use this screen to set which PC should receive an incoming
connection, as described below.
56
Page 61
Conferencing & Telephony
Advanced Features
Select an Application
Send incoming calls
to
This lists applications which may generate incoming connections, where the destination (on your local LAN) is unknown.
This lists the PCs on your LAN.
• For each application listed above, you can choose a destina-
tion PC.
• If necessary, you can add PCs manually, using the Network
Clients option on the advanced menu.
• There is no need to "Save" after each change; you can set the
destination PC for each application, then click "Save".
Special Applications
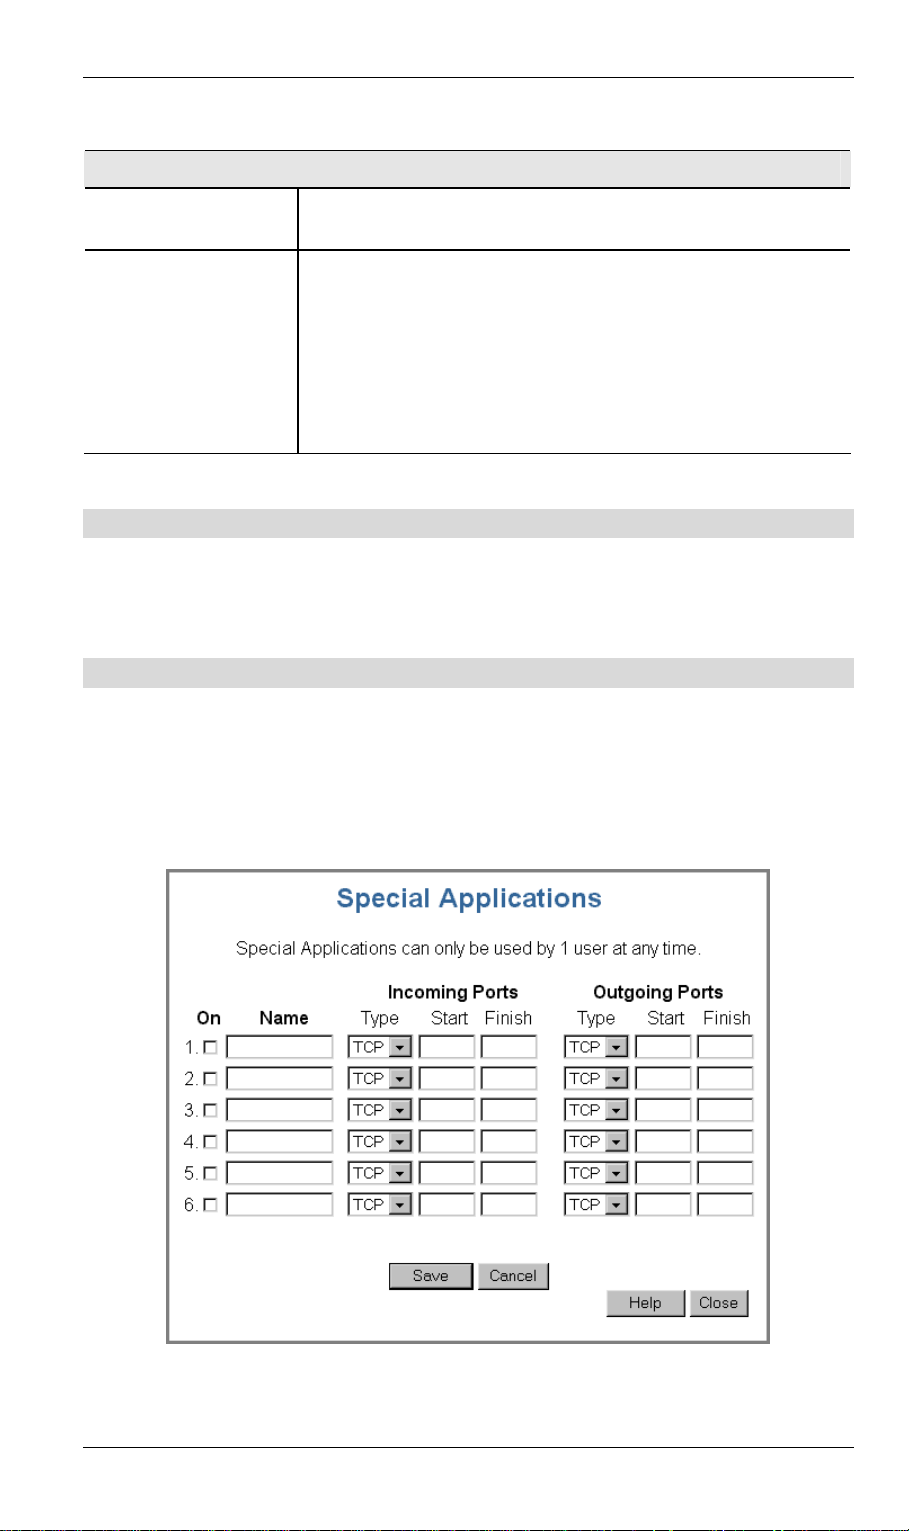
If you use Internet applications which use non-standard connections or port numbers, you may
find that they do not function correctly because they are blocked by the DSL/Cable Router's
firewall. In this case, you can define the application as a "Special Application".
Special Applications Screen
This screen can be reached by clicking the Special Applications button on the Internet screen.
You can then define your Special Applications. You will need detailed information about the
application; this is normally available from the supplier of the application.
Also, note that the terms "Incoming" and "Outgoing" on this screen refer to traffic from the
client (PC) viewpoint
Figure 32: Special Applications Screen
57
Page 62

DSL/Cable Router User Guide
Data - Special Applications Screen
Checkbox
Name
Incoming
Ports
Outgoing
Ports
Use this to Enable or Disable this Special Application as required.
Enter a descriptive name to identify this Special Application.
• Type - Select the protocol (TCP or UDP) used when you receive data
from the special application or service. (Note: Some applications use
different protocols for outgoing and incoming data).
• Start - Enter the beginning of the range of port numbers used by the
application server, for data you receive. If the application uses a single
port number, enter it in both the "Start" and "Finish" fields.
• Finish - Enter the end of the range of port numbers used by the appli-
cation server, for data you receive.
• Type - Select the protocol (TCP or UDP) used when you send data to
the remote system or service.
• Start - Enter the beginning of the range of port numbers used by the
application server, for data you send to it. If the application uses a single port number, enter it in both the "Start" and "Finish" fields.
• Finish - Enter the end of the range of port numbers used by the appli-
cation server, for data you send to it. If the application uses a single
port number, enter it in both the "Start" and "Finish" fields.
Using a Special Application
• Configure the Special Applications screen as required.
• On your PC, use the application normally. Remember that only one (1) PC can use each
Special application at any time. Also, when 1 PC is finished using a particular Special
Application, there may need to be a "Time-out" before another PC can use the same Special Application. The "Time-out" period may be up to 3 minutes.
If an application still cannot function correctly, try using the "DMZ" feature.
DMZ
This feature, if enabled, allows one (1) computer on your LAN to be exposed to all users on
the Internet, allowing unrestricted 2-way communication between the "DMZ PC" and other
Internet users or Servers.
• This allows almost any application to be used on the "DMZ PC".
• The "DMZ PC" will receive all "Unknown" connections and data.
• If the DMZ feature is enabled, you must select the PC to be used as the "DMZ PC".
• The DMZ feature can be Enabled and Disabled on the Advanced Internet screen.
58
Page 63
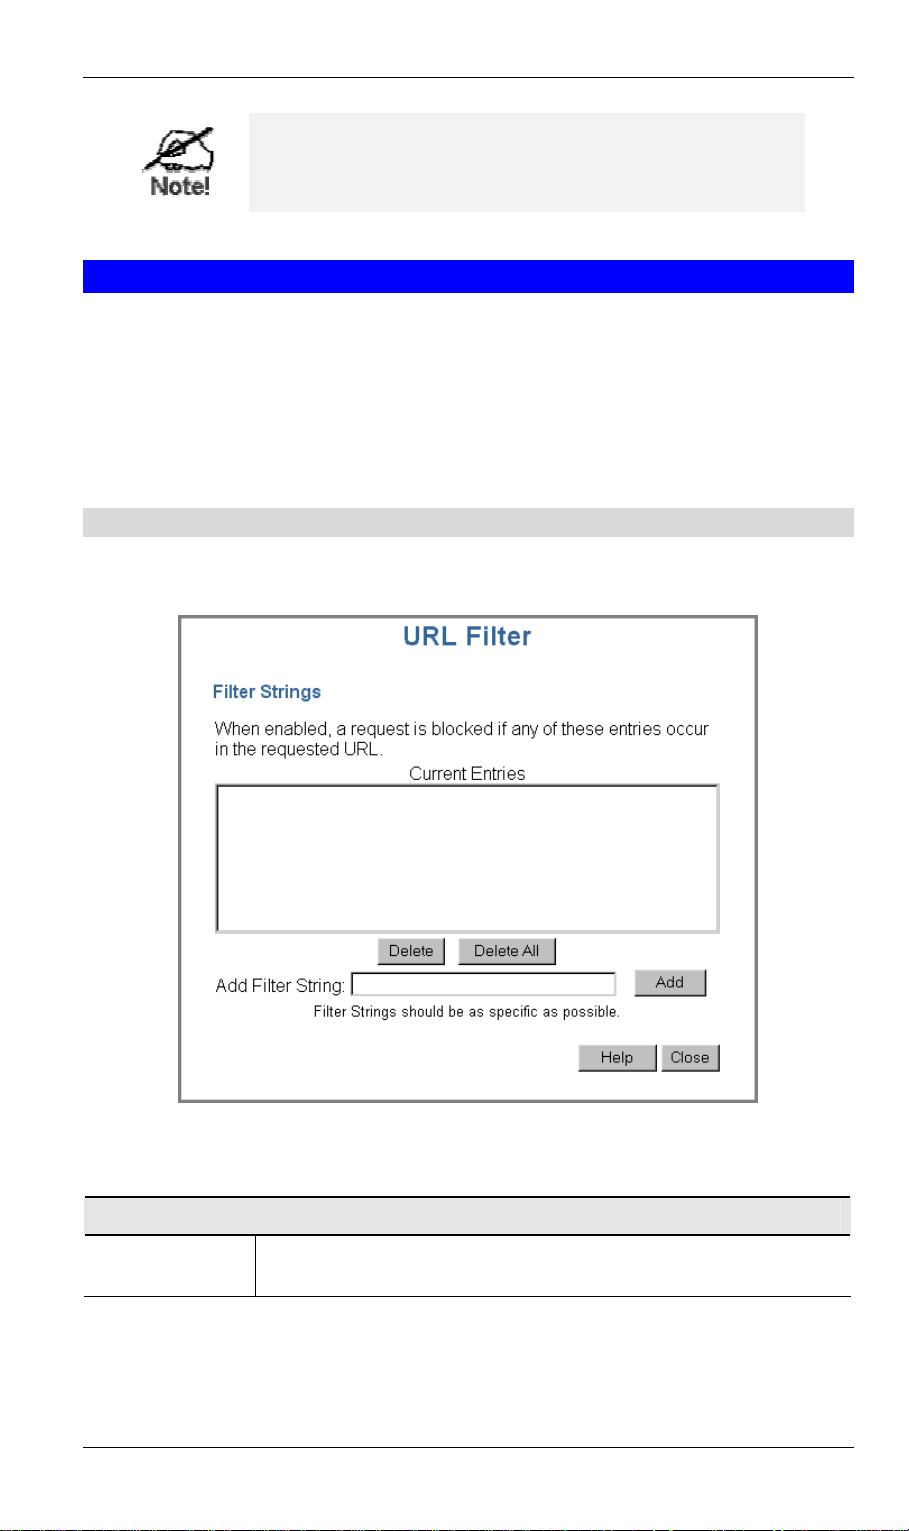
Advanced Features
The "DMZ PC" is effectively outside the Firewall, making it more vulnerable to attacks. For this reason, you
should only enable the DMZ feature when required.
URL Filter
The URL Filter allows you to block access to undesirable Web sites.
• To use this feature, you must define "filter strings". If the "filter string" appears in a
requested URL, the request is blocked.
• Enabling the URL Filter also affects the Internet Access Log. If Enabled, the "Destina-
tion" field in the log will display the URL. Otherwise, it will display the IP Address.
• The URL Filter can be Enabled or Disabled on the Advanced Internet screen.
URL Filter Screen
Click the "Configure URL Filter" button on the Internet screen to access the URL Filter
screen. An example screen is shown below.
Data - URL Filter Screen
Filter Strings
Current Entries
This lists any existing entries. If you have not entered any values, this
list will be empty.
Figure 33: URL Filter Screen
59
Page 64

DSL/Cable Router User Guide
Add Filter
String
Buttons
Delete/Delete All
Add
To add an entry to the list, enter it here, and click the "Add" button.
An entry may be a Domain name (e.g. www.trash.com) or simply a
string. (e.g. ads/ )
Any URL which contains ANY entry ANYWHERE in the URL will
be blocked.
Use these buttons to delete the selected entry or all entries, as required.
Multiple entries can be selected by holding down the CTRL key while
selecting.(On the Macintosh, hold the SHIFT key while selecting.)
Use this to add the current Filter String to the site list.
60
Page 65
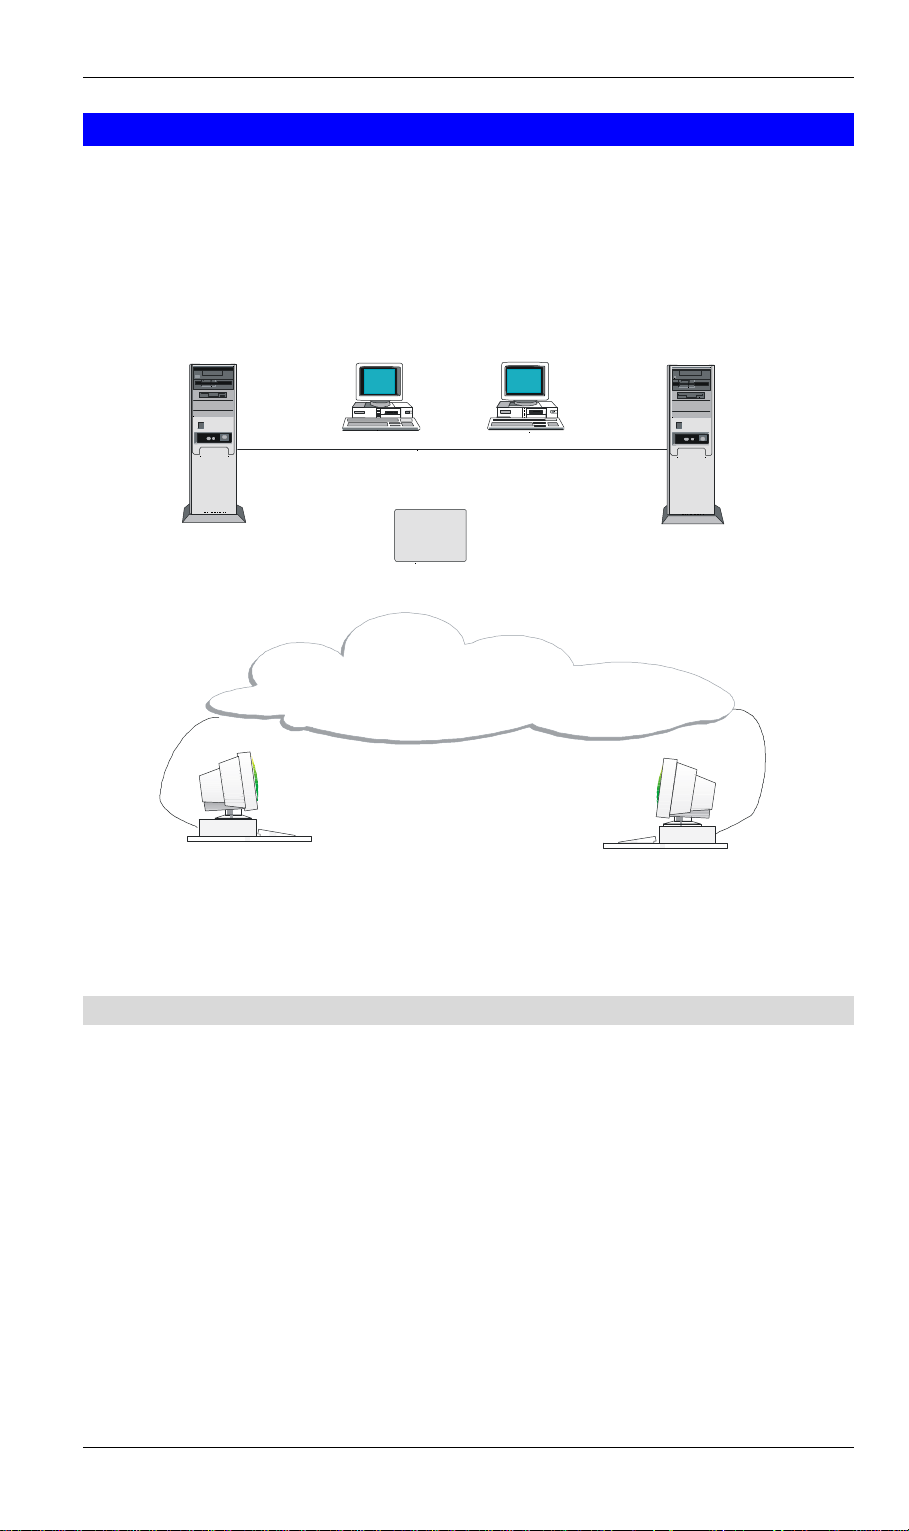
Advanced Features
DSL/Cable
FTP Server
Remote PC
Remote PC
Using Web Server
Using FTP Server
(http://203.70.212.52)
(192.168.254.20)
Virtual Servers
This feature allows you to make Servers on your LAN accessible to Internet users. Normally,
Internet users would not be able to access a server on your LAN because:
• Your Server does not have a valid external IP Address.
• Attempts to connect to devices on your LAN are blocked by the firewall in this device.
The "Virtual Server" feature solves these problems and allows Internet users to connect to
your servers, as illustrated below.
192.168.254.254
(LAN IP Address)
Web Server
(192.168.254.10)
Router
203.70.212.52
(WAN IP Address)
Internet
(ftp://203.70.212.52)
Figure 34: Virtual Servers
IP Address seen by Internet Users
Note that, in this illustration, both Internet users are connecting to the same IP Address, but
using different protocols.
To Internet users, all virtual Servers on your LAN have the same IP Address.
This IP Address is allocated by your ISP.
This address should be static, rather than dyn amic, to make it easier for Internet users to
connect to your Servers.
However, you can use the DDNS (Dynamic DNS) feature to allow users to connect to your
Virtual Servers using a URL, instead of an IP Address.
61
Page 66
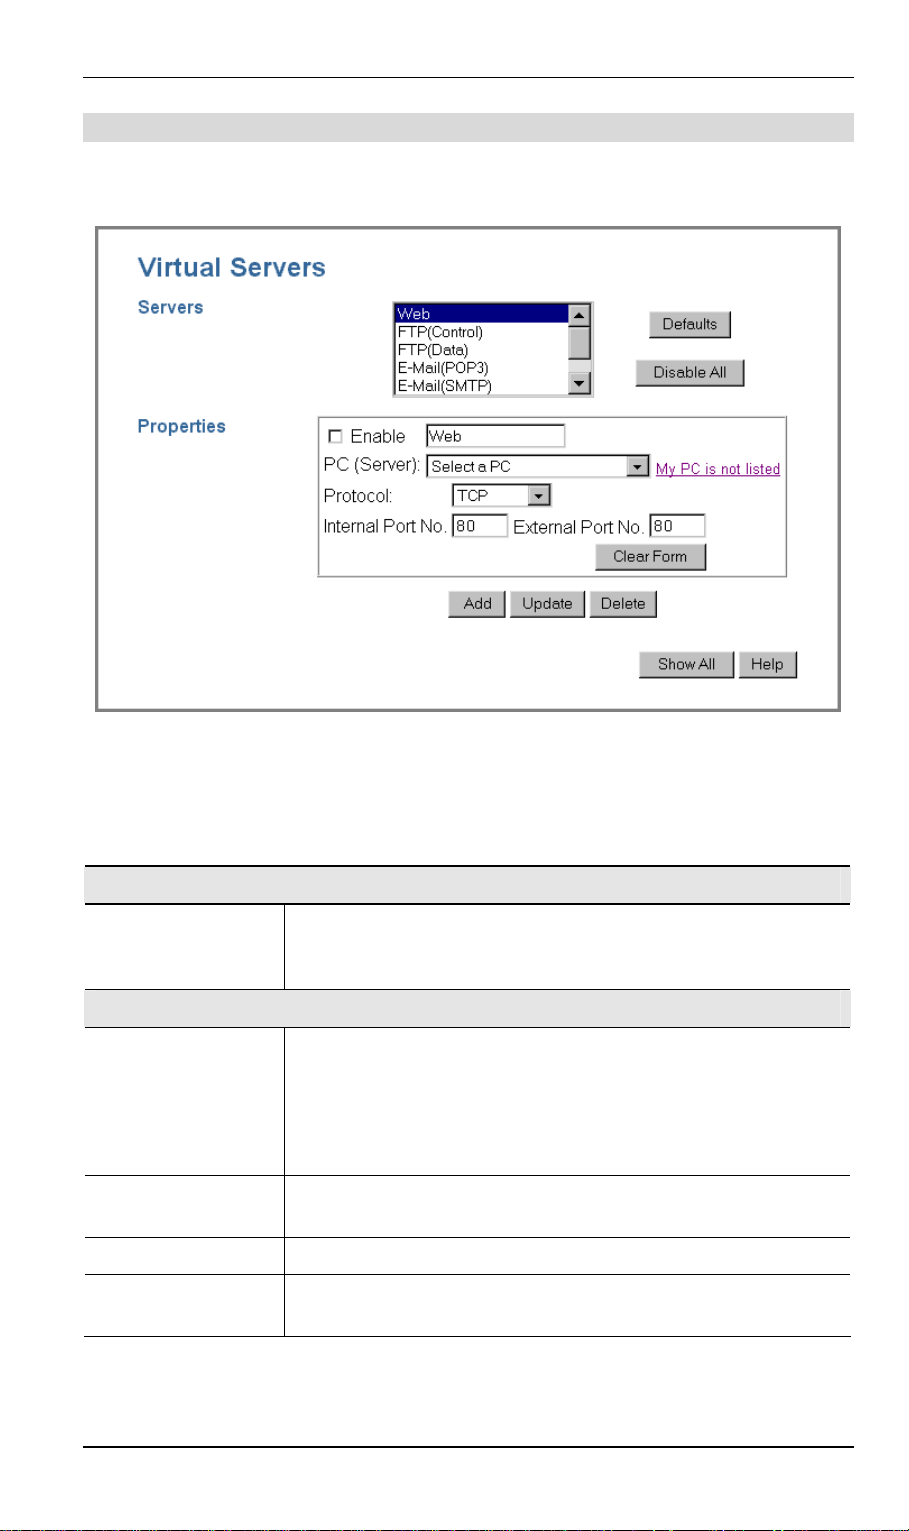
DSL/Cable Router User Guide
Virtual Servers Screen
The Virtual Servers screen is reached by the Virtual Servers link on the Advanced screen. An
example screen is shown below.
Figure 35: Virtual Servers Screen
This screen lists a number of pre-defined Servers, and allows you to define your own Servers.
Details of the selected Server are shown in the "Properties" area.
Data - Virtual Servers Screen
Servers
Servers
Properties
Enable
PC (Server)
Protocol
This lists a number of pre-defined Servers, plus any Servers you
have defined. Details of the selected Server are shown in the
"Properties" area.
Use this to Enable or Disable support for this Server, as required.
• If Enabled, any incoming connections will be forwarded to the
selected PC.
• If Disabled, any incoming connection attempts will be
blocked.
Select the PC for this Server. The PC must be running the appropriate Server software.
Select the protocol (TCP or UDP) used by the Server.
Internal Port No.
Enter the port number which the Server software is configured to
use.
62
Page 67
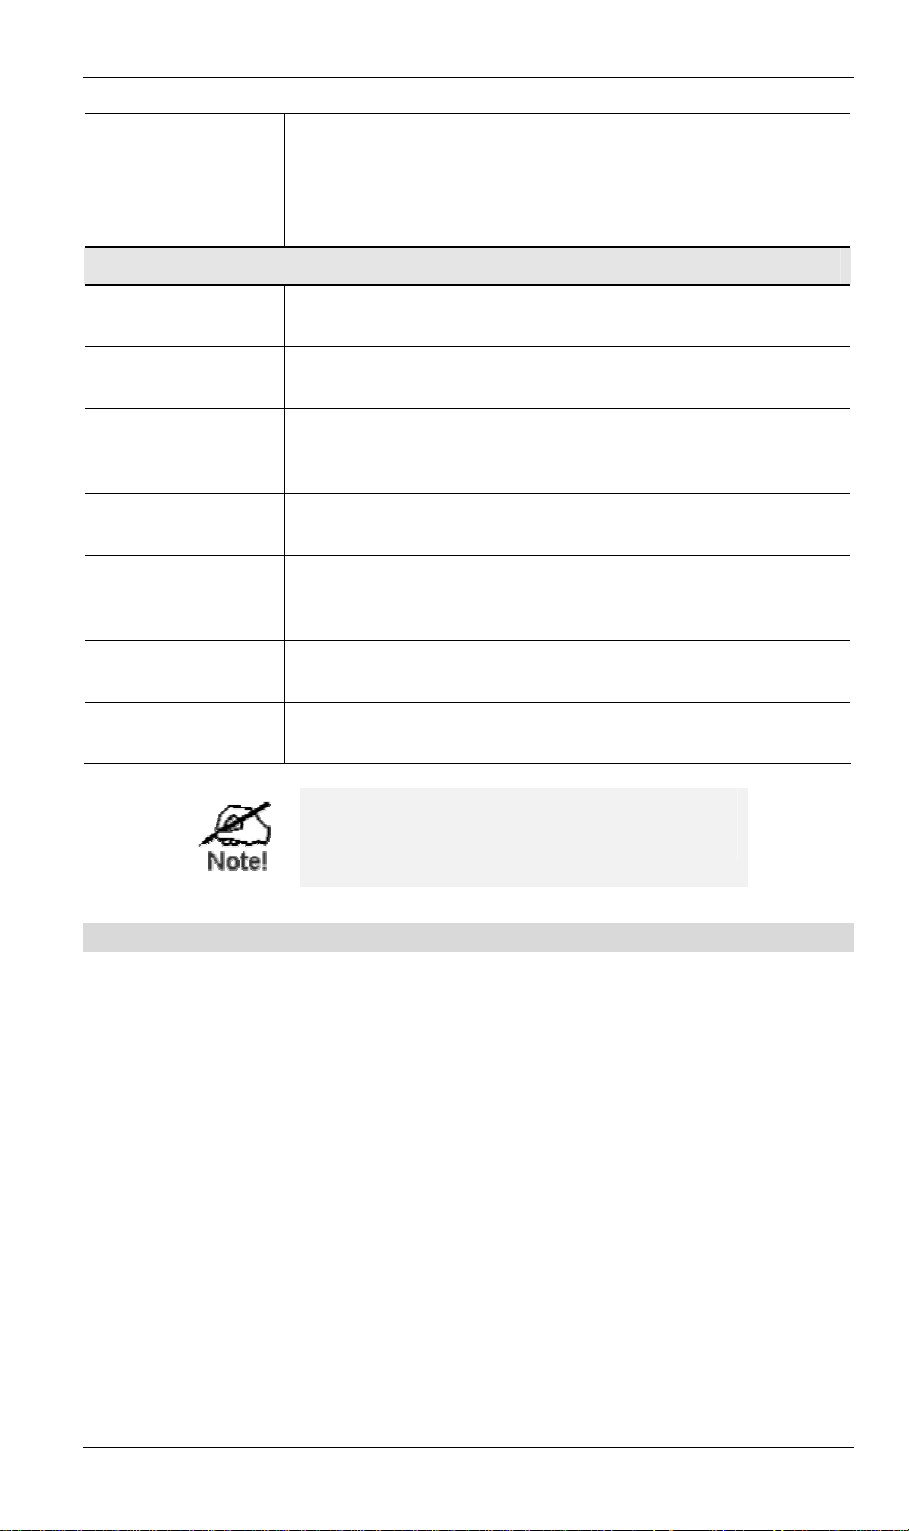
Advanced Features
External Port No.
Buttons
Defaults
Disable All
Add
Update
Delete
Clear Form
The port number used by Internet users when connecting to the
Server. This is normally the same as the Internal Port Number. If it
is different, this device will perform a "mapping" or "translation"
function, allowing the server to use one port address, while clients
use a different port address.
This will delete any Servers you have defined, and set the predefined Servers to use their default port numbers.
This will cause the "Enable" setting of all Virtual Servers to be set
OFF.
Add a new entry to the Virtual Server list, using the data shown in
the "Properties" area on screen. The entry selected in the list is
ignored, and has no effect.
Update the current Virtual Server entry, using the data shown in
the "Properties" area on screen.
Delete the current Virtual Server entry. Note that the pre-defined
Servers can not be deleted. Only Servers you have defined yourself
can be deleted.
Clear all data from the "Properties" area, ready for input of a new
Virtual Server entry.
Show All
List all entries in the Virtual Server database. The list will be in
new window, allowing saving or printing of this data.
For each entry, the PC must be running the
appropriate Server software.
Defining your own Virtual Servers
If the type of Server you wish to use is not listed on the Virtual Servers screen, you can define
and manage your own Servers:
Create a new Server:
Modify (Edit) a Server:
1. Click "Clear Form"
2. Enter the required data, as described above.
3. Click "Add".
4. The new Server will now appear in the list.
1. Select the desired Server from the list
2. Make any desired changes (for example, change the
Enable/Disable setting).
3. Click "Update" to save changes to the selected Server.
Delete a Server:
1. Select the entry from the list.
2. Click "Delete".
Note: You can only delete Servers you have defined. Pre-
63
Page 68

DSL/Cable Router User Guide
defined Server cannot be deleted.
View all Settings of all
Servers
Click the "Show All" button. This will generate a report in a
new window, where is can be printed or saved, as well as
viewed.
From the Internet, ALL Virtual Servers have the IP
Address allocated by your ISP.
Connecting to the Virtual Servers
Once configured, anyone on the Internet can connect to your Virtual Servers. They must use
the Internet IP Address (the IP Address allocated to you by your ISP).
e.g.
http://203.70.212.52
ftp://203.70.212.52
It is more convenient if you are using a Fixed IP Address from your ISP, rather than Dynamic.
However, you can use the Dynamic DNS feature, described in the following section, to allow
users to connect to your Virtual Servers using a URL, rather than an IP Address.
Dynamic DNS
This free service is very useful when combined with the Virtual Server feature. It allows
Internet users to connect to your Virtual Servers using a URL, rather than an IP Address.
This also solves the problem of having a dynamic IP address. With a dynamic IP address, your
IP address may change whenever you connect, which makes it difficult to connect to you.
The Service works as follows:
1. You must register for the service at http://www.dyndns.org (Registration is free). Your
password will be E-mailed to you.
2. After registration, use the "Create New Host" option (at www.dyndns.org) to request your
desired Domain name.
3. Enter your data from www.dyndns.org in the DSL/Cable Router's DDNS screen.
4. The DSL/Cable Router will then automatically ensure that your current IP Address is
recorded at http://www.dyndns.org
5. From the Internet, users will be able to connect to your Virtual Servers (or DMZ PC)
using your Domain name, as shown on this screen.
64
Page 69
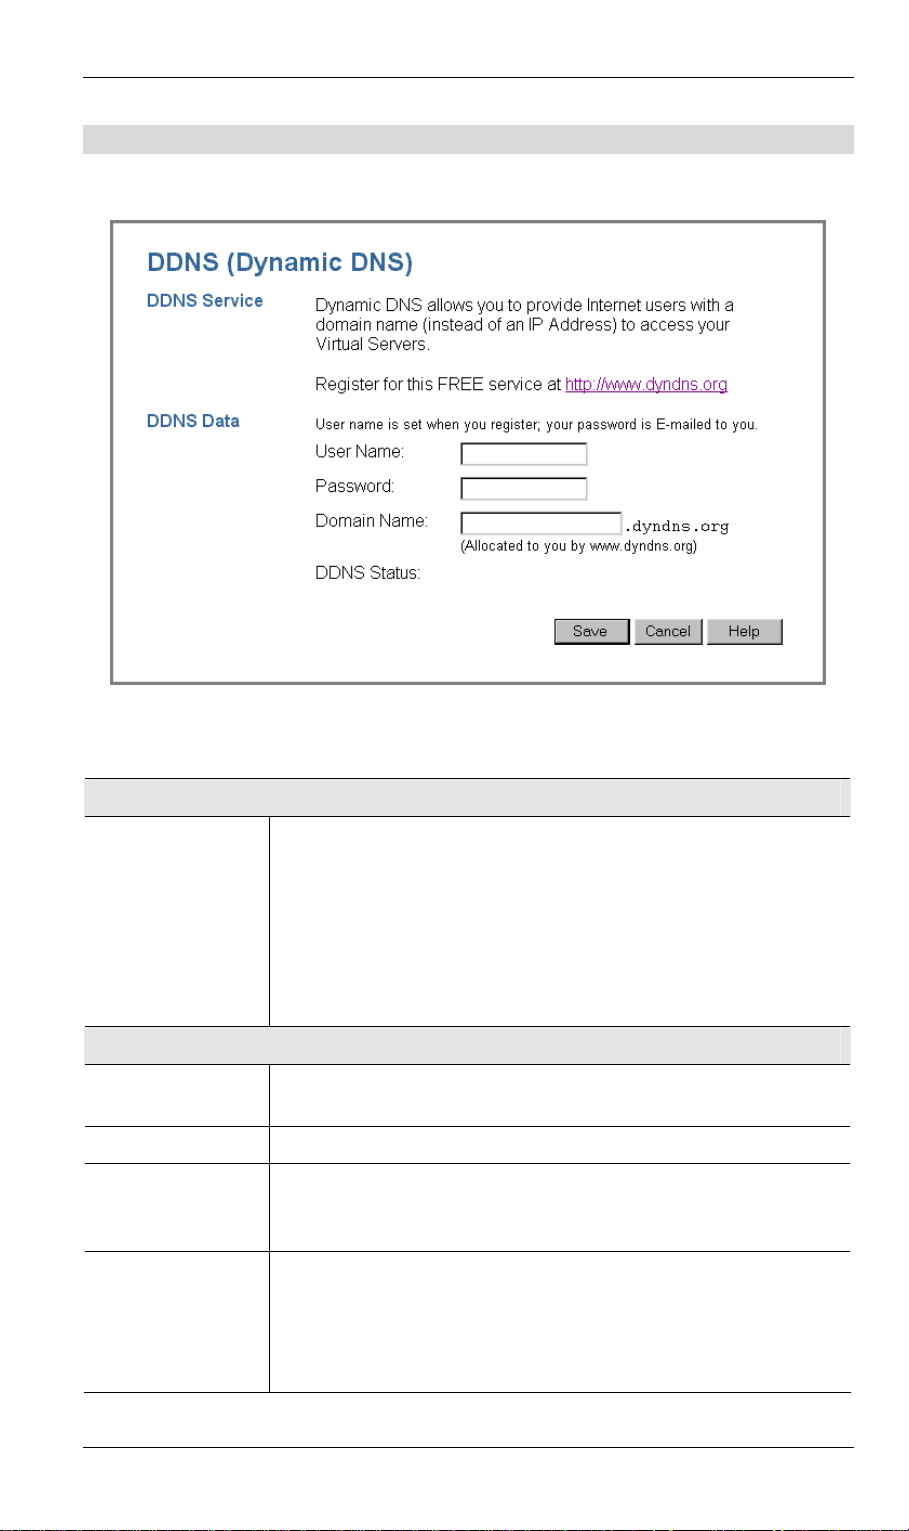
Advanced Features
Dynamic DNS Screen
Select Advanced on the main menu, then Dynamic DNS, to see a screen like the follow ing:
Figure 36: DDNS Screen
Data - Dynamic DNS Screen
DDNS Service
DDNS Service
DDNS Data
User Name
Password
Domain
• You must sign up first to create a new account before using the
service. The service is free.
• Click this link to connect to the www.dyndns.org Web site.
• Your initial password will be E-mailed to you; you can change
this later if you wish.
• After registration, use the "Create New Host" link (on the
www.dyndns.org Web site) to request a domain name.
Enter the "User name" specified at the www.dyndns.org Web site
when you registered.
Enter your current password for www.dyndns.org
• Enter your domain name, as allocated at www.dyndns.org.
• The name should consist only of letters and the hyphen (dash).
Using any other characters may cause problems..
DDNS Status
This message is returned by the DDNS Server at www.dyndns.org
• Normally, this message should be "Update successful" (current
IP address was updated on the www.dyndns.org server).
• If the message is "No host", this indicates the host name entered
was not allocated to you. You need to connect to
65
Page 70

DSL/Cable Router User Guide
www.dyndns.org and correct this problem.
66
Page 71
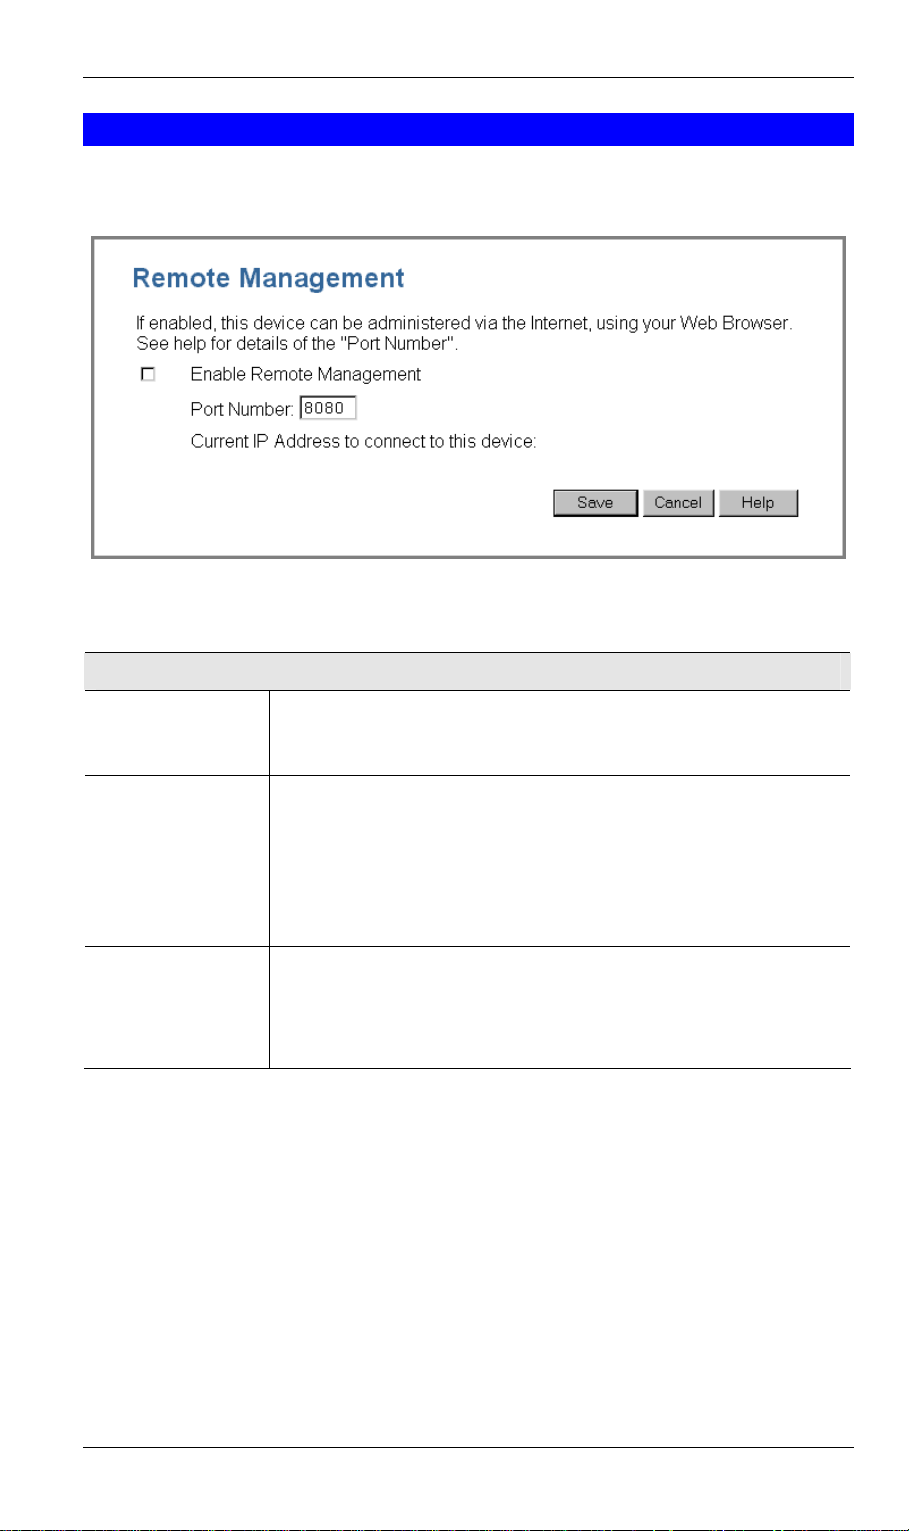
Advanced Features
Remote Management
This feature allows you to manage the DSL/Cable Router via the Internet. An example screen
is shown below.
Figure 37: Remote Management Screen
Data - Remote Management Screen
Remote Management
Enable Remote
Management
Port Number
Current IP Address
Enable to allow management via the Internet. If Disabled, this
device will ignore management connection attempts from the Internet.
Enter a port number between 1024 and 65535 (8080 is recommended). This port number must be specified when you connect (see
below).
Note: The default port number for HTTP (Web) connections is port
80, but using port 80 here will prevent the use of a Web "Virtual
Server" on your LAN. (See Advanced Internet - Virtual Servers)
You must use this IP Address to connect (see below).
This IP Address is allocated by your ISP. But if using a Dynamic IP
Address, this value can change each time you connect to your ISP.
So it is better if your ISP allocates you a Fixed IP Address.
To connect from a remote PC via the Internet
1. Ensure your Internet connection is established, and start your Web Browser.
2. In the "Address" bar, enter "HTTP://" followed by the Internet IP Address of the
DSL/Cable Router. If the port number is not 80, the port number is also required. (After
the IP Address, enter ":" followed by the port number.)
e.g.
HTTP://123.123.123.123:8080
This example assumes the WAN IP Address is 123.123.123.123, and the port number is 8080.
67
Page 72
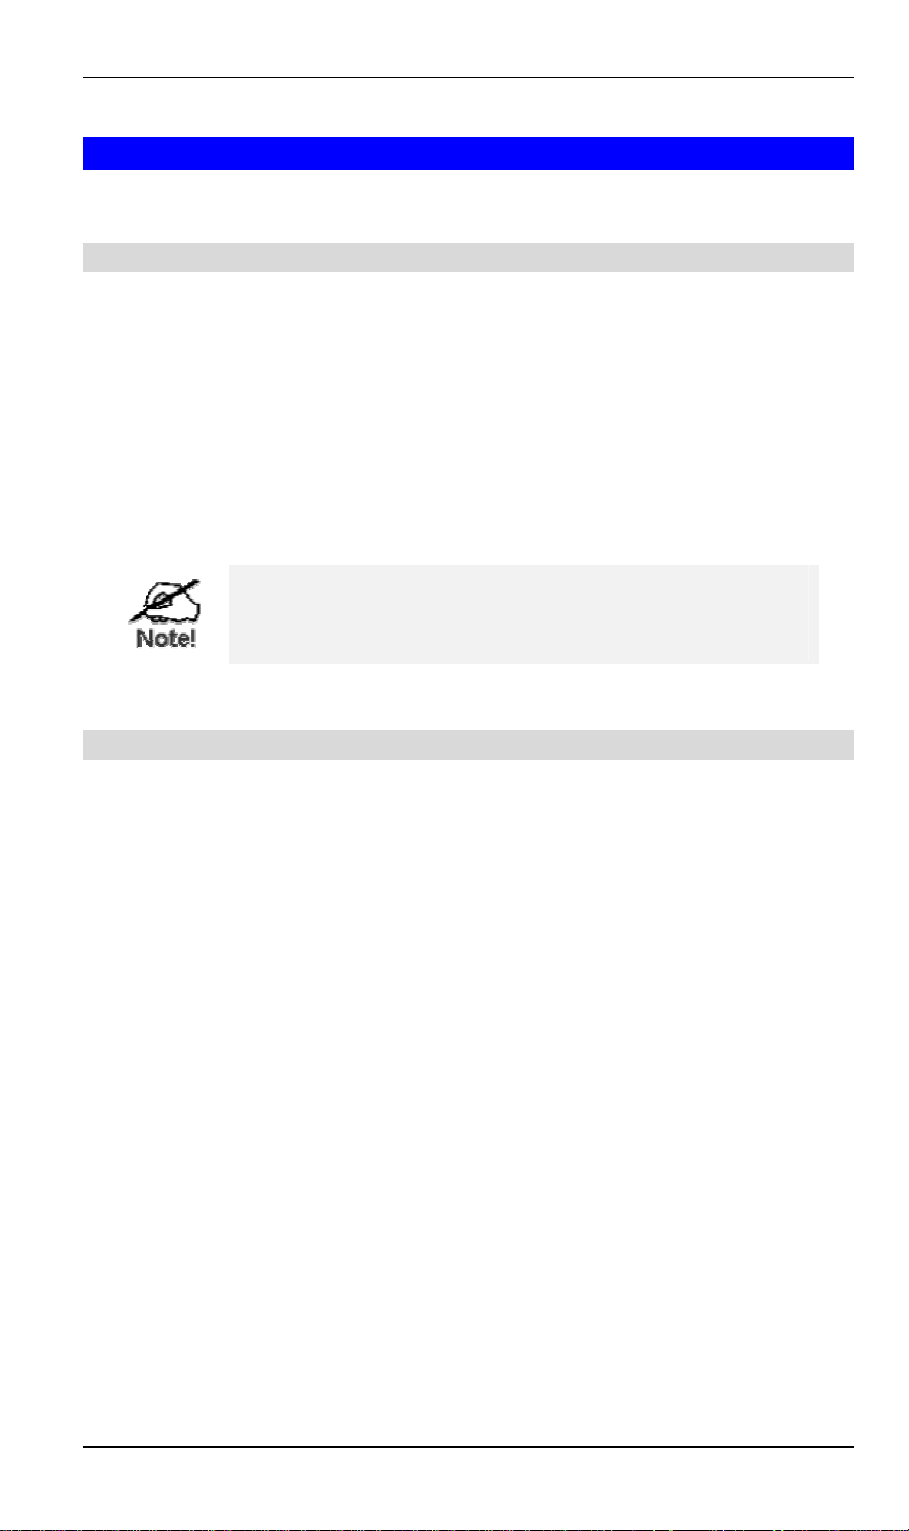
DSL/Cable Router User Guide
Access Control
This feature is accessed by the Access Control link on the Advanced menu.
Overview
The Access Control feature allows administrators to restrict Internet Access by individual
PCs. With the default settings, everyone has unrestricted Internet access.
To use this feature:
1. Set the desired restrictions on the "Default" group. All PCs are in the "Default" group
unless explicitly moved to another group.
2. Set the desired restrictions on the other groups ("Group 1", "Group 2", "Group 3" and
"Group 4") as needed.
3. Assign PCs to the groups as required.
Restrictions are imposed by blocking "Services", or types
of connections. All common Services are pre-defined.
If required, you can also define your own Services.
Access Control Log
To check the operation of the Access Control feature, an Access Control Log is provided.
Click the View Log button on the Access Control screen to view this log.
This log shows attempted Internet accesses which have been blocked by the Access Control
function.
Data shown in this log is as follows:
Date/Time
Name
Source IP address
MAC address
Destination
Date and Time of the attempted access.
If known, the name of the PC whose access was blocked. This
name is taken from the Network Clients database
The IP Address of the PC or device whose access request was
blocked
The hardware or physical address of the PC or device whose access
request was blocked
The destination URL or IP address
68
Page 73
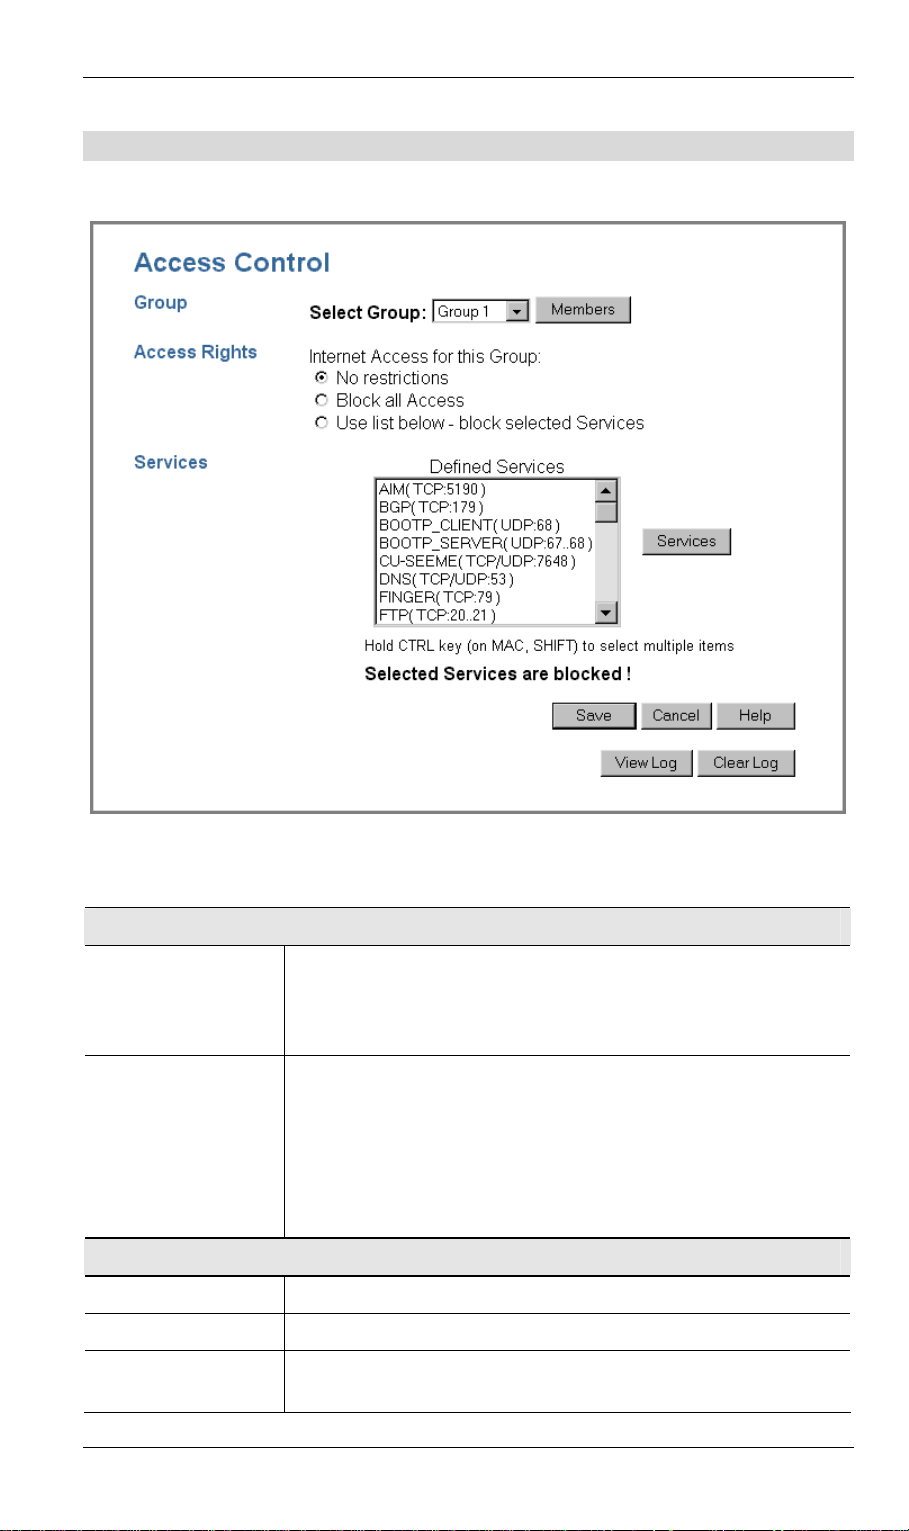
Access Control Screen
To view this screen, select the Access Control link on the Advanced menu.
Advanced Features
Figure 38: Access Control Screen
Data - Access Control Screen
Group
Select Group
"Members" Button
Access Rights
Internet Access
No Restriction
Block All Access
Select the desired Group. The screen will update to display the
settings for the selected Group. Groups are named "Default",
"Group 1", "Group 2", "Group 3" and "Group 4", and cannot be renamed.
Click this button to add or remove members from the current
Group.
If the current group is "Default", then members can not be added
or deleted. This group contains PCs not allocated to any other
group.
See the following section for details of the Group Members screen.
Select the desired options for the current group, as detailed below.
Nothing is blocked. Use this to create the least restrictive group.
All traffic via the WAN port is blocked. Use this to create the most
restrictive group.
69
Page 74

DSL/Cable Router User Guide
Use List Below block Selected
Services
Services
Defined Services
"Services" button
Buttons
Members
Service
You can select which Services are allowed, and which are blocked.
Use this to gain fine control over a group.
Select the applications you wish to block.
Multiple Services can be selected by holding the CTRL key (on the
Macintosh, the SHIFT key) while selecting.
Selected Services are blocked.
Click this to open the Services window, allowing you to define
your own Services.
See the following section for details of the Services screen.
Click this button to add or remove members from the current
Group.
If the current group is "Default", then members can not be added
or deleted. This group contains PCs not allocated to any other
group.
See the following section for details of the Group Members screen.
Click this button to add or remove services from the current list.
Save
Cancel
View Log
Clear Log
Save the data on screen.
Reverse any changes made since the last "Save".
See all the details in the Log.
Delete all data currently in the Log. This will make it easier to
read new entries.
70
Page 75
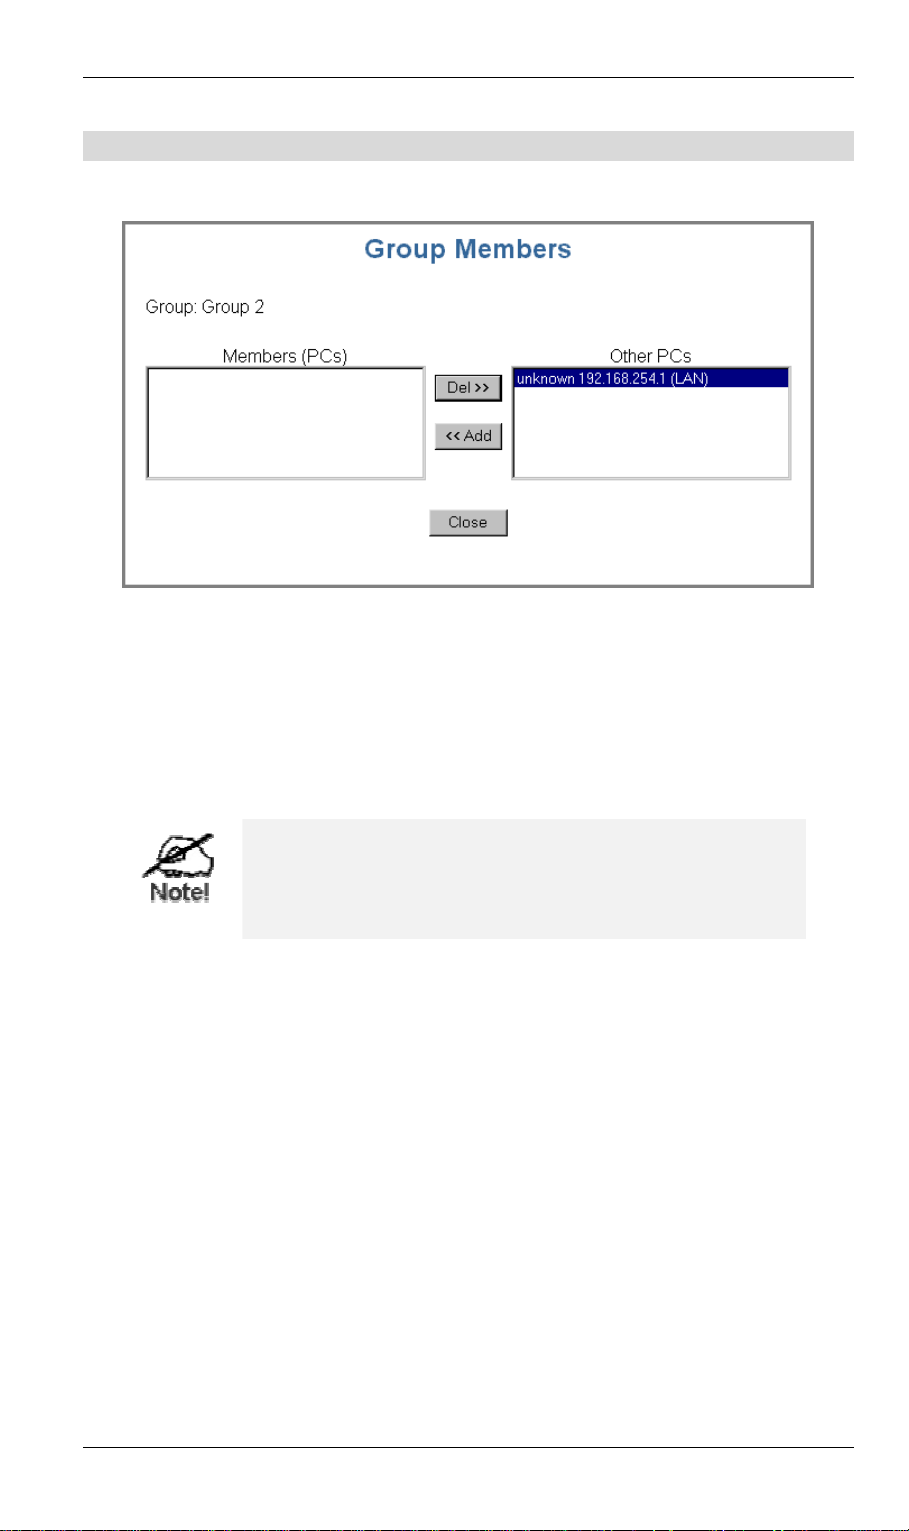
Advanced Features
Group Members Screen
This screen is displayed when the Members button on the Access Control screen is clicked.
Figure 39: Group Members
Use this screen to add or remove members (PCs) from the current group.
• The "Del >>" button will remove the selected PC (in the Members list) from the current
group.
• The "<< Add" button will add the selected PC (in the Other PCs list) to the current
group.
PCs not assigned to any group will be in the "Default"
group.
PCs deleted from any other Group will be added to the
"Default" group.
71
Page 76
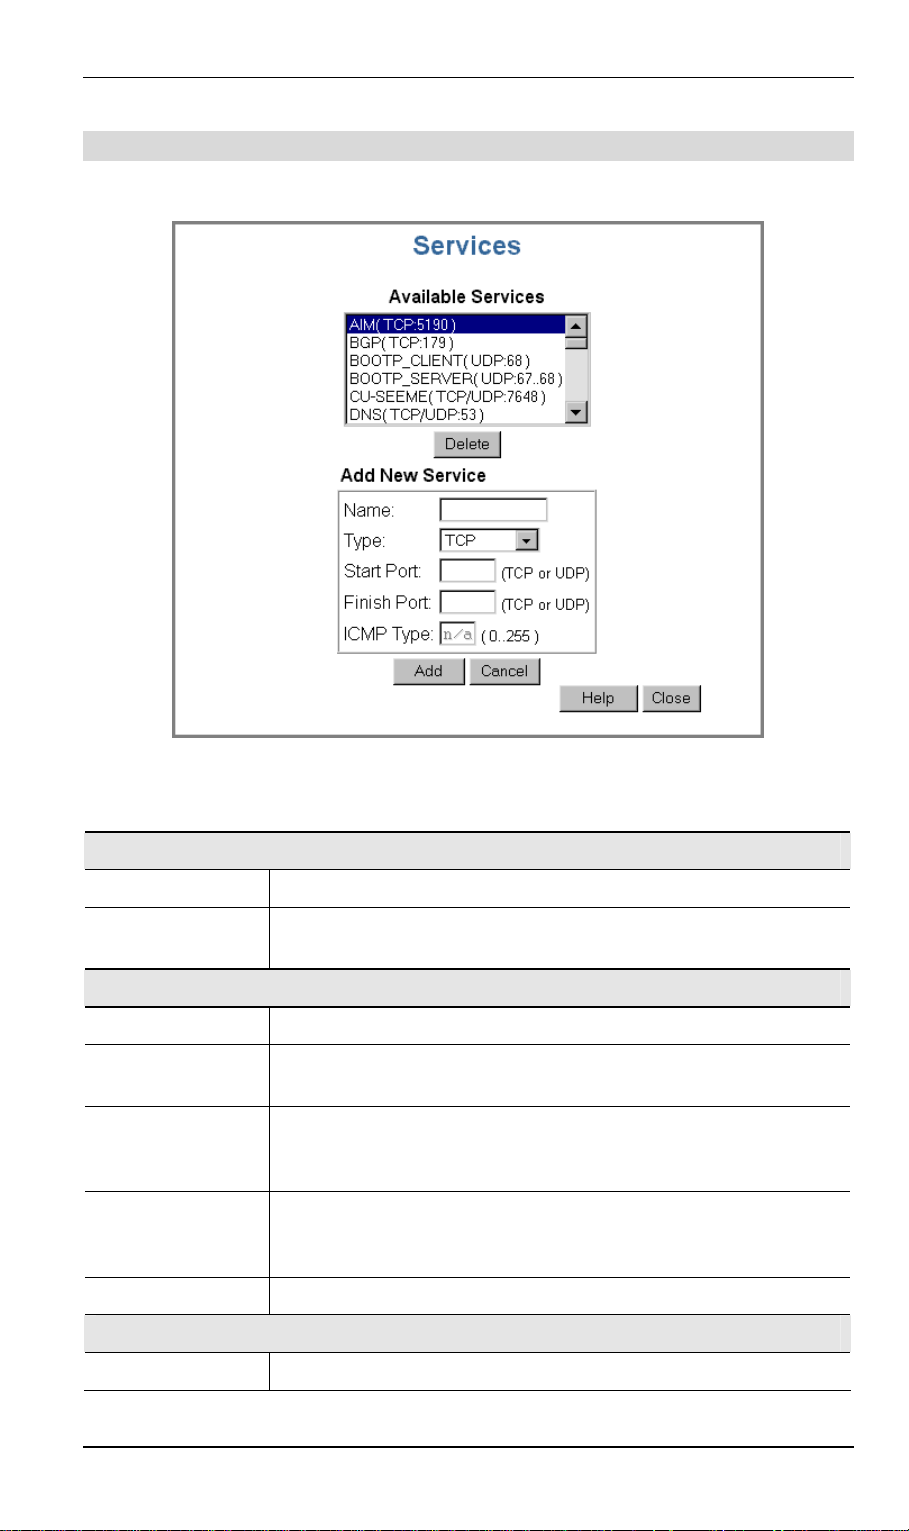
DSL/Cable Router User Guide
Services Screen
This screen is displayed when the Services button on the Access Control screen is clicked.
Data - Services Screen
Available Services
Available Services
"Delete" button
Add New Service
Name
Type
Start Port
Finish Port
ICMP Type
This lists all the available services.
Use this to delete any Service you have added. Pre-defined Services
can not be deleted.
Enter a descriptive name to identify this service.
Select the protocol (TCP, UDP, ICMP) used to the remote system or
service.
For TCP and UDP Services, enter the beginning of the range of port
numbers used by the service. If the service uses a single port number, enter it in both the "Start" and "Finish" fields.
For TCP and UDP Services, enter the end of the range of port
numbers used by the service. If the service uses a single port number, enter it in both the "Start" and "Finish" fields.
For ICMP Services, enter the type number of the required service.
Figure 40: Services
Buttons
Delete
Delete the selected service from the list.
72
Page 77
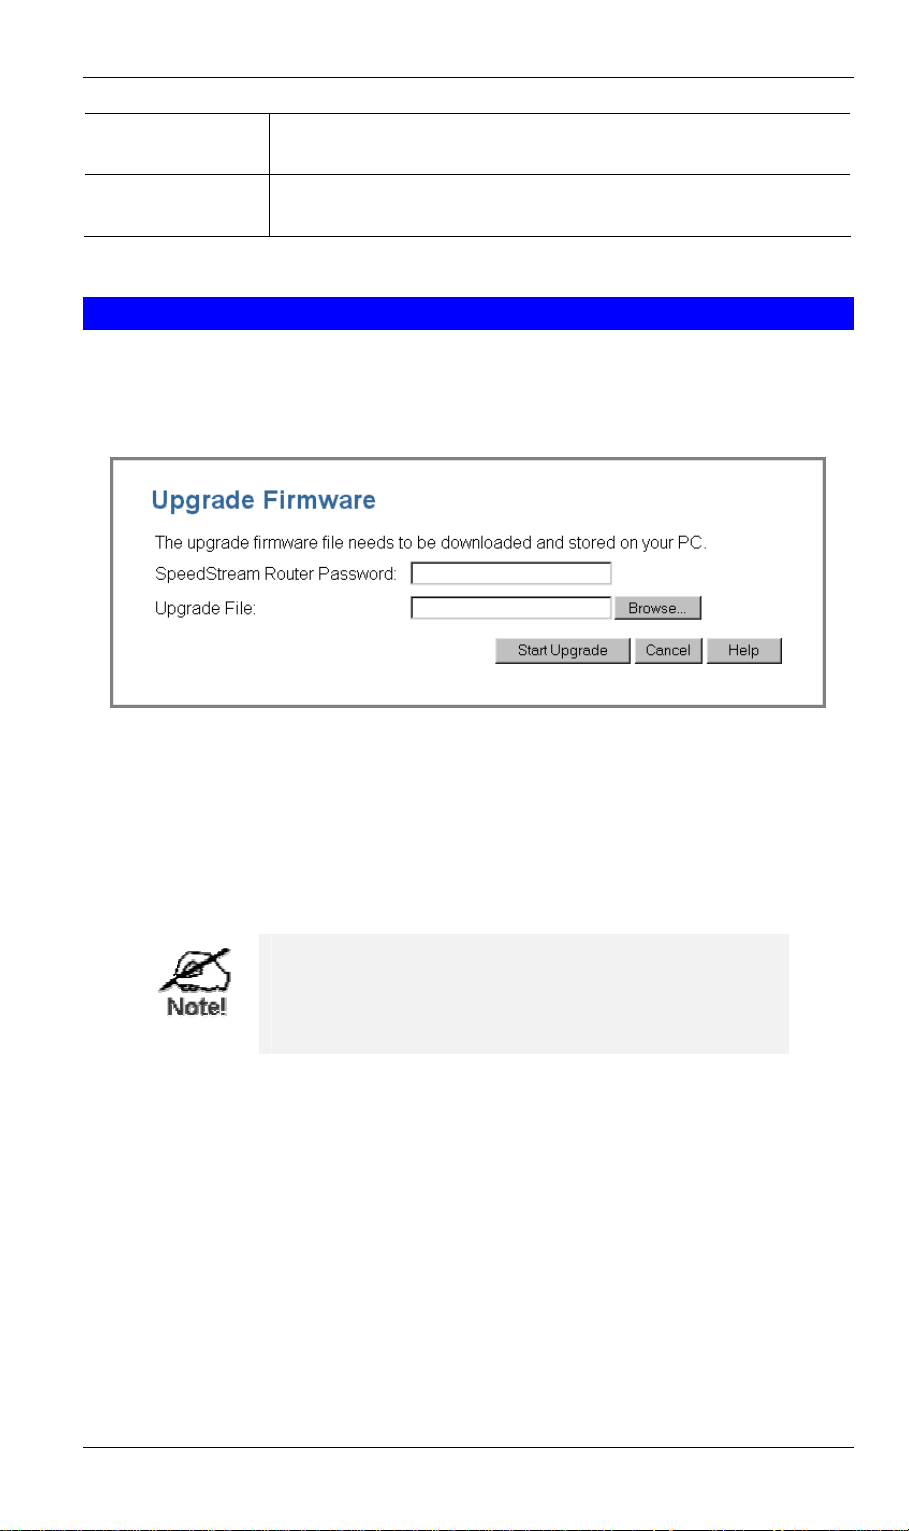
Advanced Features
Add
Cancel
Add a new entry to the Service list, using the data shown in the
"Add New Service" area on screen.
Clear the " Add New Service " area, ready for entering data for a
new Service.
Firmware Upgrade
The firmware (software) in the DSL/Cable Router can be upgraded using your Web Browser.
You must first download the upgrade file, then select Upgrade on the Advanced menu. You
will see a screen like the following.
Figure 41: Upgrade Firmware
To perform the Firmware Upgrade:
1. Click the "Browse" button and navigate to the location of the upgrade file.
2. Select the upgrade file. It's name will appear in the Upgrade File field.
3. Click the "Start Upgrade" button to commence the firmware upgrade.
The DSL/Cable Router is unavailable during the
upgrade process, and must restart when the upgrade is completed. Any connections to or through
the DSL/Cable Router will be lost.
73
Page 78

7
Chapter 7
Advanced Configuration
This Chapter explains the settings available via the Advanced configuration
section of the "Advanced" menu.
Overview
Normally, it is not necessary to use these screens, or change any settings. These screens and
settings are provided to deal with non-standard situations, or to provide additional options for
advanced users.
The settings available are:
Network Clients
Options
Printer
MAC Address
Routing
Security
Note: The screens shown below are identical for all SpeedStream DSL/Cable Routers; therefore, some screenshots are shared between multiple user manuals.
This is the list of PCs shown when you select the "DMZ PC" or a
"Virtual Server". This database is maintained automatically, but you
can add and delete entries for PCs which use a Fixed (Static) IP
Address.
Various options, including DNS and UPnP.
Configure Logical Printers for use under Unix
Set the MAC (hardware) address used on the Internet (WAN port)
interface. This is required only if your ISP has recorded the MAC
(hardware) address you should use.
Only required if your LAN has other Routers or Gateways.
Firewall settings.
74
Page 79
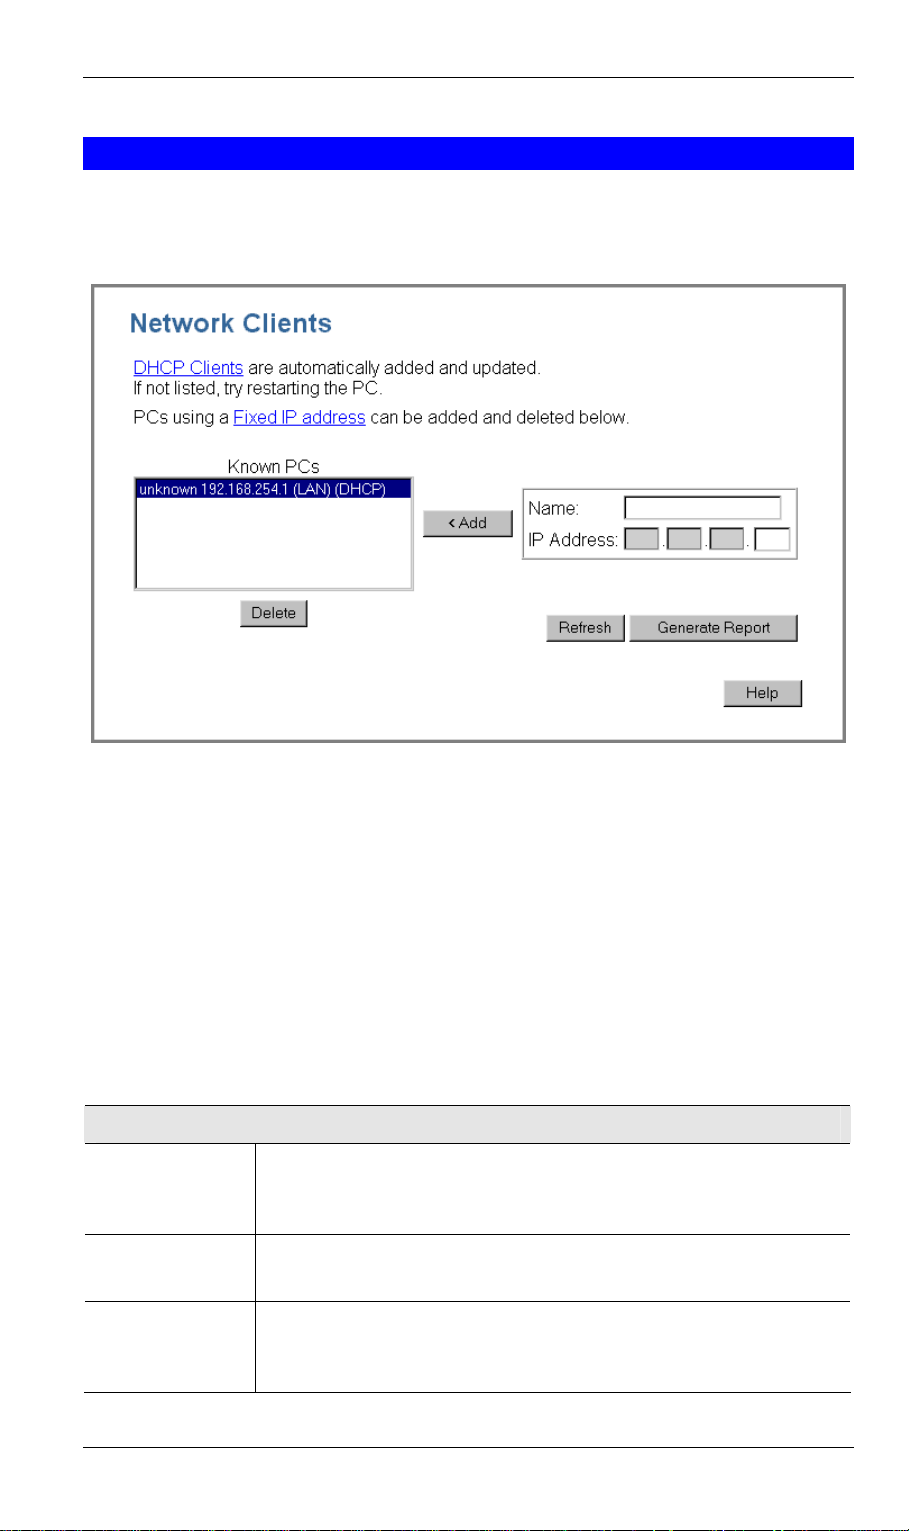
Advanced Configuration
Network Clients Screen
The Network Clients database is used whenever you need to select a PC (e.g. for the "DMZ"
PC). It eliminates the need to enter IP addresses. An example Network Clients screen is
shown below.
Figure 42: Network Clients Screen
• PCs which are "DHCP Clients" are automatically added to the database, and updated as
required.
• By default, non-Server versions of Windows act as "DHCP Clients"; this setting is called
"Obtain an IP Address automatically".
• The DSL/Cable Router uses the "Hardware Address" to identify each PC, not the name or
IP address. The "Hardware Address" can only change if you change the PC's network
card or adapter.
• This system means you do NOT need to use Fixed (static) IP addresses on your LAN.
However, you can add PCs using Fixed (static) IP Addresses to the Network Clients database if required.
Data - Network Clients Screen
Network Clients
Known PCs
Name
This lists all current entries. Data displayed is name (IP Address) type.
For this model, the "type" will either be "LAN" or "WLAN" (Wireless
LAN).
If adding a new PC to the list, enter its name here. It is best if this
matches the PC's "hostname".
IP Address
Enter the IP Address of the PC. The PC will be sent a "ping" to
determine its hardware address. If the PC is not available (not connected, or not powered On) you will not be able to add it.
75
Page 80

DSL/Cable Router User Guide
Buttons
Add
Delete
Refresh
Generate Report
This will add the new PC to the list. The PC will be sent a "ping" to
determine its hardware address. If the PC is not available (not connected, or not powered On) you will not be able to add it.
Delete the selected PC from the list. This should be done in 2 situations:
• The PC has been removed from your LAN.
• The entry is incorrect.
Update the data on screen.
Display a read-only list showing full details of all entries in the Net-
work Clients database.
76
Page 81
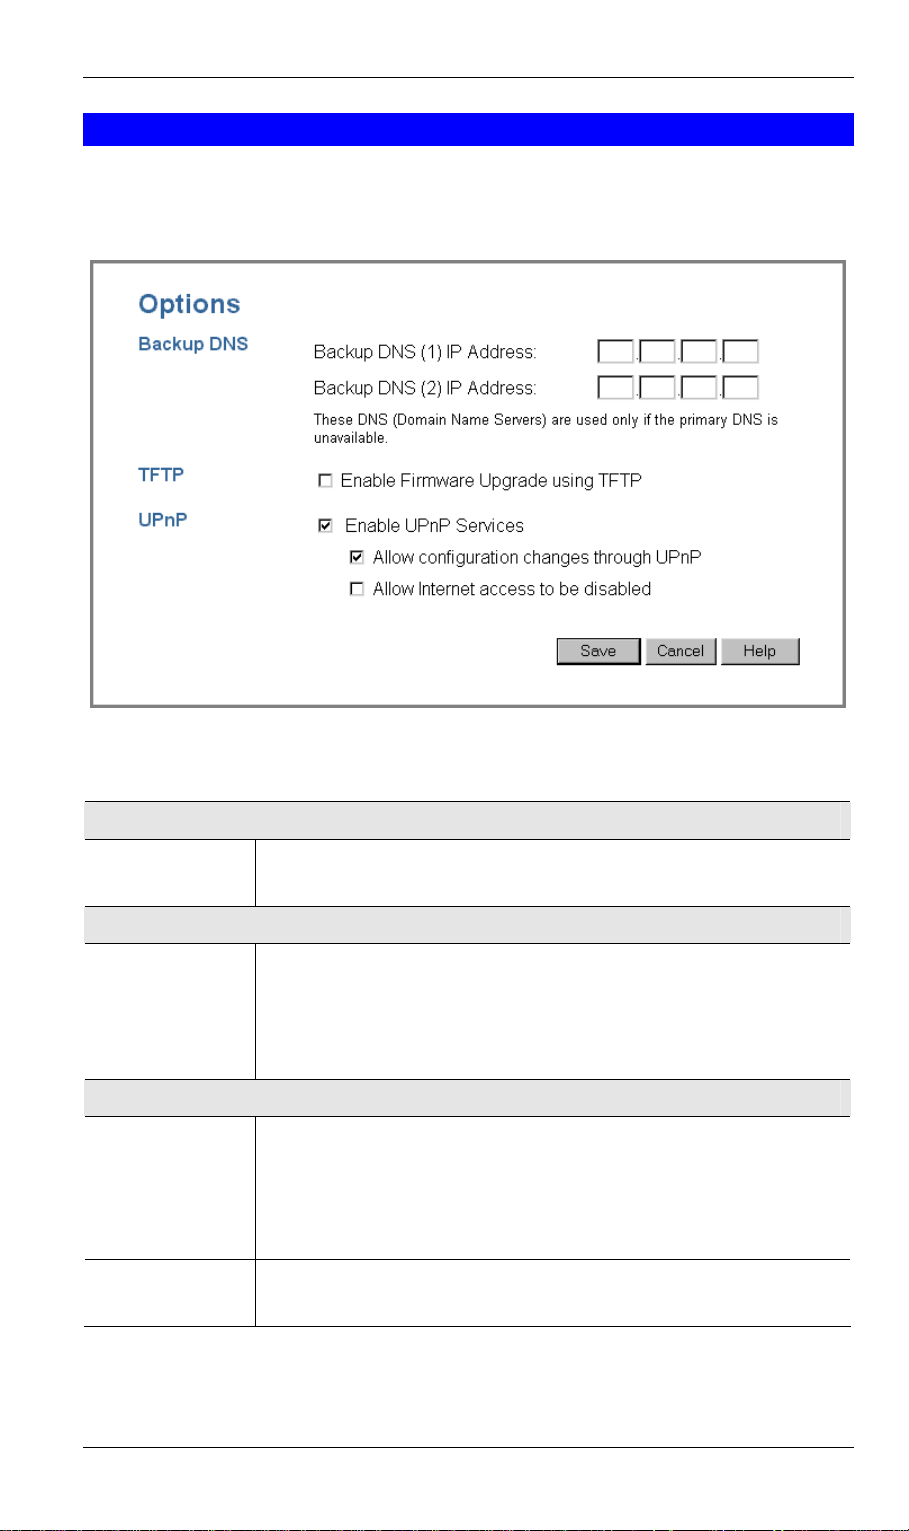
Advanced Configuration
Options
This screen allows advanced users to enter or change a number of settings. For normal operation, there is no need to use this screen or change any settings. An example Options screen is
shown below.
Data - Options Screen
Backup DNS
IP Address
TFTP
Enable Firmware Upgrade
using TFTP
UPnP
Enable UPnP
Services
Allow Configuration...
Enter the IP Address of the DNS (Domain Name Servers) here. These
DNS will be used only if the primary DNS is unavailable.
• If enabled, TFTP (Trivial FTP) can be used to upgrade the firm-
ware in this device. This is normally not required; a Windows
utility is available for this purpose.
• You must obtain the firmware upgrade file first; instructions for
using TFTP will be available with the upgrade.
• UPnP (Universal Plug and Play) allows automatic discovery and
configuration of equipment attached to your LAN. UPnP is by
supported by Windows ME, XP, or later.
• If Enabled, this device will be visible via UPnP.
• If Disabled, this device will not be visible via UPnP.
• If checked, then UPnP users can change the configuration.
• If Disabled, UPnP users can only view the configuration.
Figure 43: Options Screen
77
Page 82

DSL/Cable Router User Guide
Allow Internet
access to be
disabled
• If checked, then UPnP users can disable Internet access via this
device.
• If Disabled, UPnP users can NOT disable Internet access via this
device.
78
Page 83
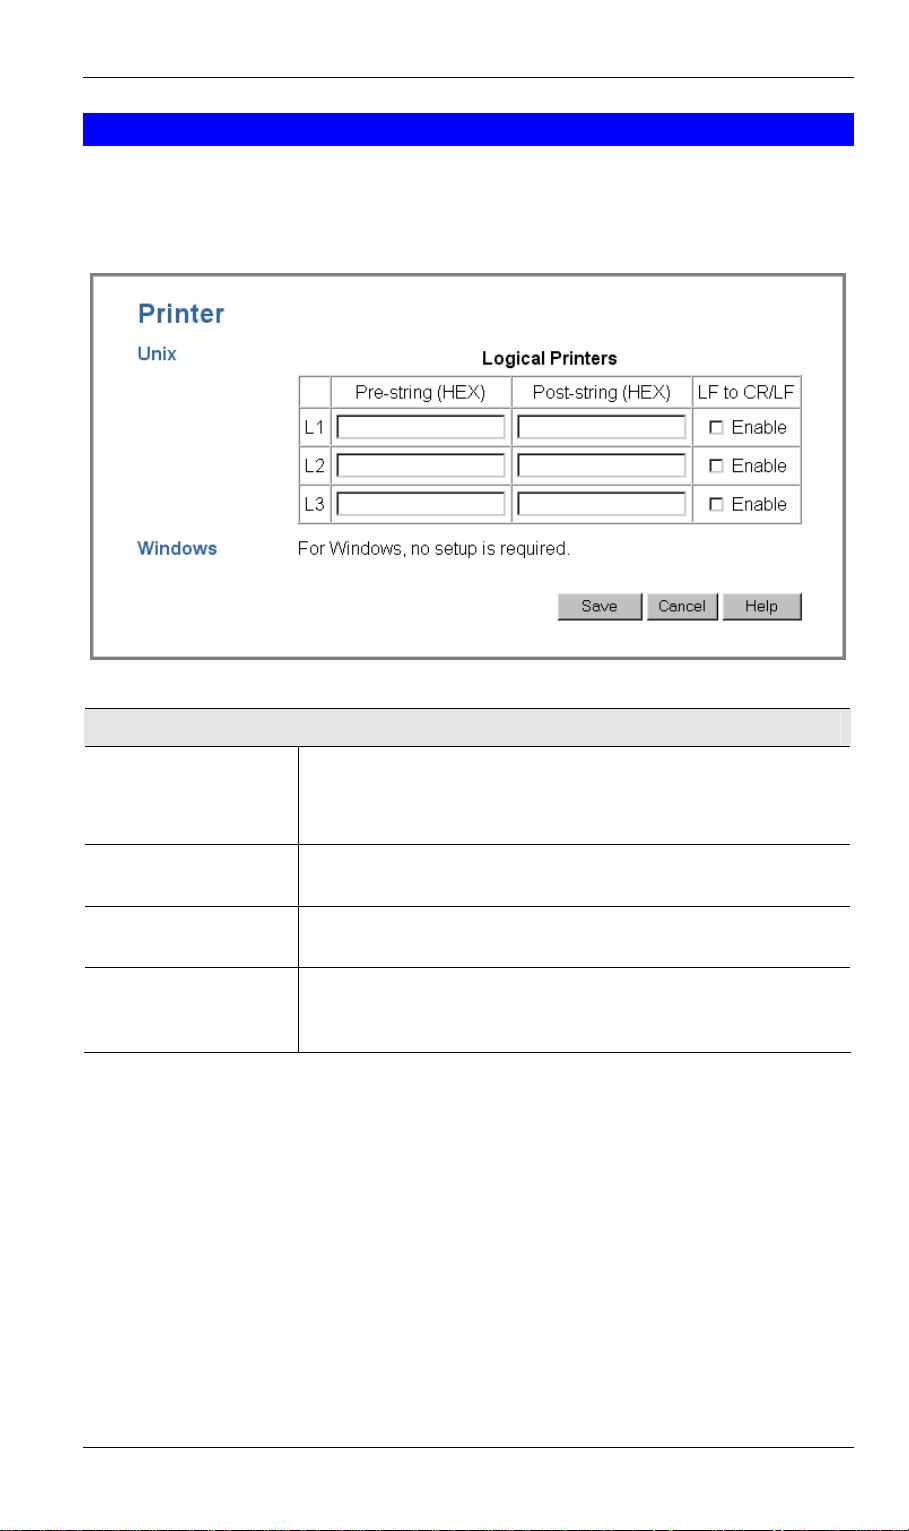
Advanced Configuration
Printer Port
Printer Port configuration is only required if using LPD printing under Linux or Unix. Ot herwise, these settings are ignored.
Under LPD, the DSL/Cable Router supports 3 "Logical Printers".
Logical Printers
No (L1, L2, L3)
Pre-string (HEX)
Post-string (HEX)
LF to CR/LF
Figure 44: Printer Port Screen
There are 3 Logical Printers (Ports), named L1, L2, and L3.
These names can not be changed, and must be used when select-
ing the logical printer from your Unix system.
Enter (in HEX) the series of printer commands to be sent to the
attached printer BEFORE each print job.
Enter (in HEX) the series of printer commands to be sent to the
attached printer AFTER each print job.
If checked, Unix-style LF (line feed) characters at the end of each
line will be converted to CR/LF (carriage return/line feed) pairs,
as used in MSDOS and Windows.
79
Page 84
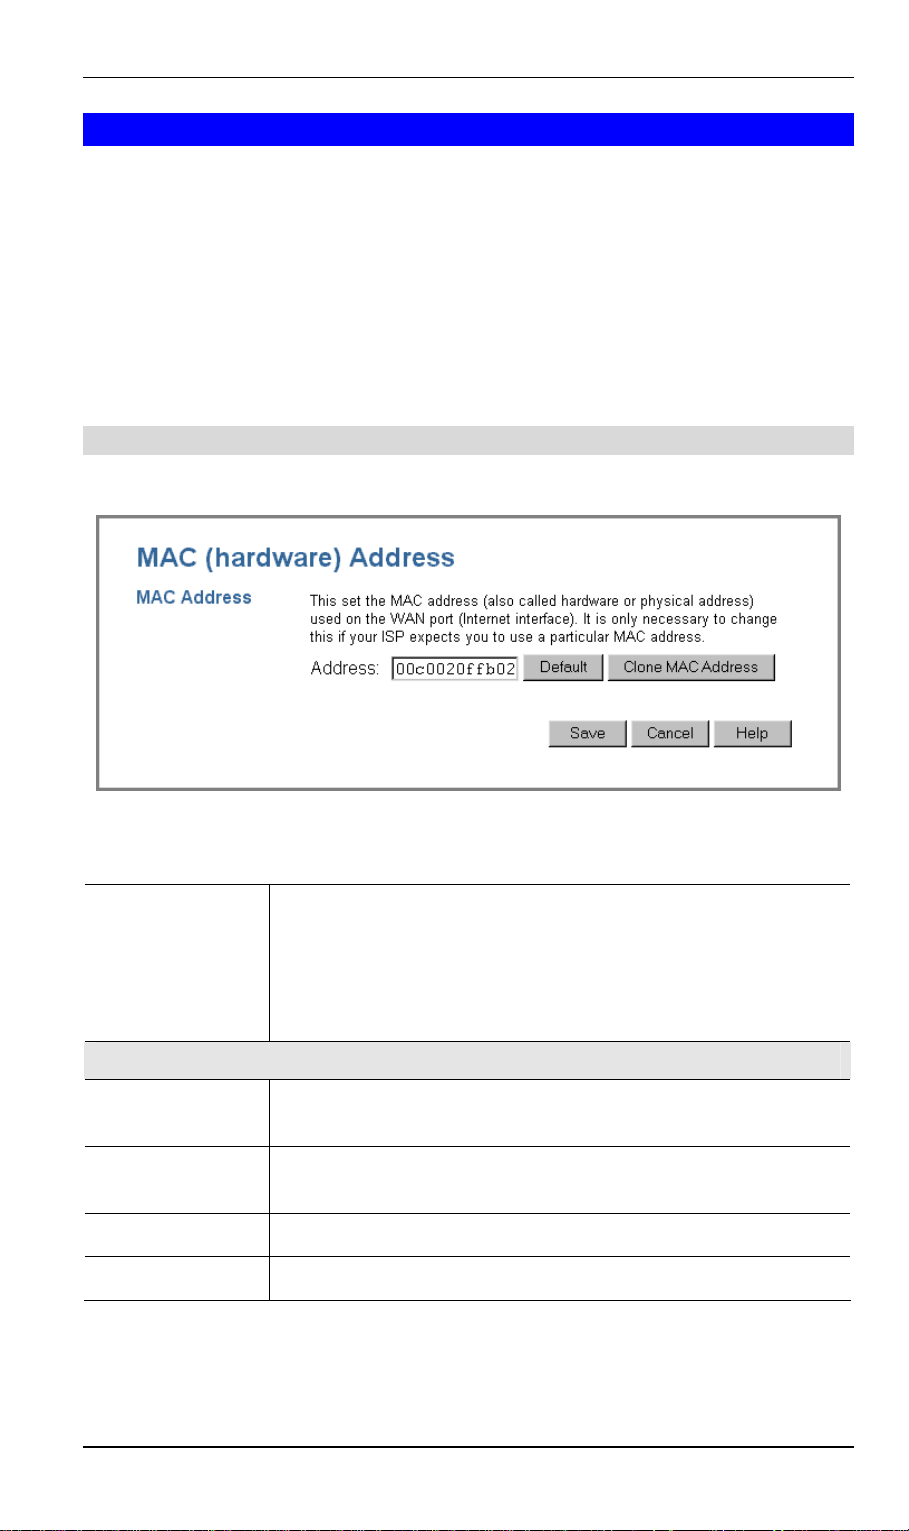
DSL/Cable Router User Guide
MAC Address
The MAC (hardware) address is a low-level network identifier. It may be called "MAC
Address", "Hardware Address", or "Physical Address". On a PC, this address is associated
with the Network card or adapter. The address on the MAC Address screen is the address on
the Internet (WAN port) interface, and has no effect on the LAN interface.
• If your ISP asks for the "Network Adapter Address", "Physical Address", "Hardware
Address", or "MAC Address" for the PC the DSL/Cable modem is connected to, provide
this value.
• If your ISP has already recorded a MAC address, you can change the address used by the
DSL/Cable Router to match the address recorded by your ISP.
MAC Address Screen
Select MAC Address from the Advanced menu to reach a screen like the example below.
Figure 45: MAC address screen
Data - MAC address Screen
MAC (hardware)
Address
Buttons
Default
Clone MAC
Address
Save
Cancel
The current MAC (hardware) address is displayed.
If your ISP has recorded a Hardware Address, you can "spoof" that
address by entering it in the address field. The hardware address
consists of 12 characters, where each character is a digit (0..9) or a
character between A and F.
Inserts the default MAC address into the MAC address field. You
must click "Save" to actually change the address used.
Inserts the MAC address from your PC into the MAC address field.
You must click "Save" to actually change the address used.
Save your changes to the DSL/Cable Router.
Reverse any changes made since the last "Save".
80
Page 85

If the MAC address is changed, the DSL/Cable
Router must be restarted.
Advanced Configuration
81
Page 86

DSL/Cable Router User Guide
Routing
Overview
• If you don't have other Routers or Gateways on your LAN, you can ignore the "Routing"
page completely.
• If the DSL/Cable Router is only acting as a Gateway for the local LAN segment, ignore
the "Routing" page even if your LAN has other Routers.
• If your LAN has a standard Router (e.g. Cisco) on your LAN, and the DSL/Cable Router
is to act as a Gateway for all LAN segments, enable RIP (Routing Information Protocol)
and ignore the Static Routing table.
• If your LAN has other Gateways and Routers, and you wish to control which LAN seg-
ments use each Gateway, do NOT enable RIP (Routing Information Protocol). Configure
the Static Routing table instead. (You also need to configure the other Routers.)
• If using Windows 2000 Data center Server as a software Router, enable RIP on the
DSL/Cable Router, and ensure the following Windows 2000 settings are correct:
• Open Routing and Remote Access
• In the console tree, select Routing and Remote Access , [server name], IP Routing,
RIP
• In the "Details" pane, right-click the interface you want to configure for RIP version
2, and then click "Properties".
• On the "General" tab, set Outgoing packet protocol to "RIP version 2 broadcast", and
Incoming packet protocol to "RIP version 1 and 2".
Routing Screen
The routing table is accessed by the Routing link on the Advanced screen.
Using this Screen
Generally, you will use either RIP (Routing Information Protocol) OR the Static Routing
Table, as explained above, although is it possible to use both methods simultaneously.
Static Routing Table
• If RIP is not used, an entry in the routing table is required for each LAN segment on your
Network, other than the segment to which this device is attached.
• The other Routers must also be configured. See Configuring Other Routers on your LAN
later in this chapter for further details and an example.
82
Page 87
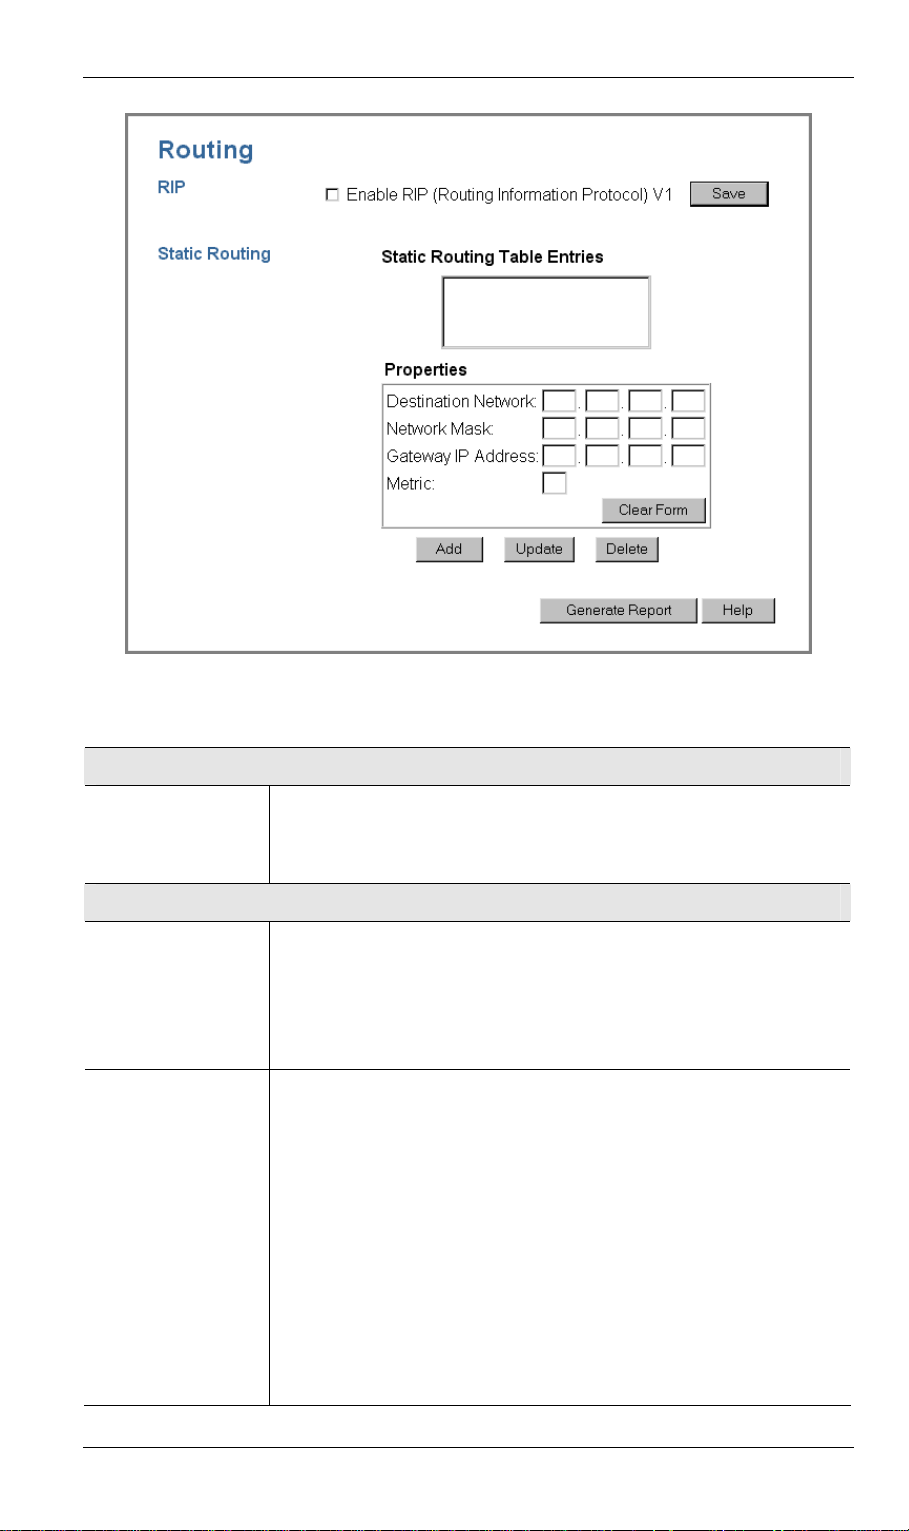
Advanced Configuration
Data - Routing Screen
RIP
Enable RIP
Static Routing
Static Routing
Table Entries
Properties
Check this to enable the RIP (Routing Information Protocol) feature
of the DSL/Cable Router.
The DSL/Cable Router supports RIP 1 only.
This list shows all entries in the Routing Table.
• The "Properties" area shows details of the selected item in the
• Change any the properties as required, then click the "Update"
• Destination Network - The network address of the remote LAN
• Network Mask - The Network Mask for the remote LAN
• Gateway IP Address - The IP Address of the Gateway or
• Metric - The number of "hops" (routers) to pass through to
Figure 46: Routing Screen
list.
button to save the changes to the selected entry.
segment. For standard class "C" LANs, the network address is
the first 3 fields of the Destination IP Address. The 4th (last)
field can be left at 0.
segment. For class "C" networks, the default mask is
255.255.255.0
Router which the DSL/Cable Router must use to communicate
with the destination above. (NOT the router attached to the remote segment.)
reach the remote LAN segment. The shortest path will be used.
83
Page 88

DSL/Cable Router User Guide
Buttons
The default value is 1.
Save
Add
Update
Delete
Clear Form
Generate Report
Save the RIP setting. This has no effect on the Static Routing Table.
Add a new entry to the Static Routing table, using the data shown in
the "Properties" area on screen. The entry selected in the list is
ignored, and has no effect.
Update the current Static Routing Table entry, using the data shown
in the "Properties" area on screen.
Delete the current Static Routing Table entry.
Clear all data from the "Properties" area, ready for input of a new
entry for the Static Routing table.
Generate a read-only list of all entries in the Static Routing table.
Configuring Other Routers on your LAN
It is essential that all IP packets for devices not on the local LAN be passed to the DSL/Cable
Router, so that they can be forwarded to the external LAN, WAN, or Internet. To achieve this,
the local LAN must be configured to use the DSL/Cable Router as the Default Route or
Default Gateway.
Local Router
The local router is the Router installed on the same LAN segment as the DSL/Cable Router.
This router requires that the Default Route is the DSL/Cable Router itself. Typically, routers
have a special entry for the Default Route. It should be configured as follows.
Destination IP Address
Network Mask
Gateway IP Address
Metric
Normally 0.0.0.0, but check your router documentation.
Normally 0.0.0.0, but check your router documentation.
The IP Address of the DSL/Cable Router.
1
Other Routers on the Local LAN
Other routers on the local LAN must use the DSL/Cable Router's Local Router as the Default
Route. The entries will be the same as the DSL/Cable Router's local router, with the exception
of the Gateway IP Address.
• For a router with a direct connection to the DSL/Cable Router's local Router, the Gateway
IP Address is the address of the DSL/Cable Router's local router.
• For routers which must forward packets to another router before reaching the DSL/Cable
Router's local router, the Gateway IP Address is the address of the intermediate router.
84
Page 89
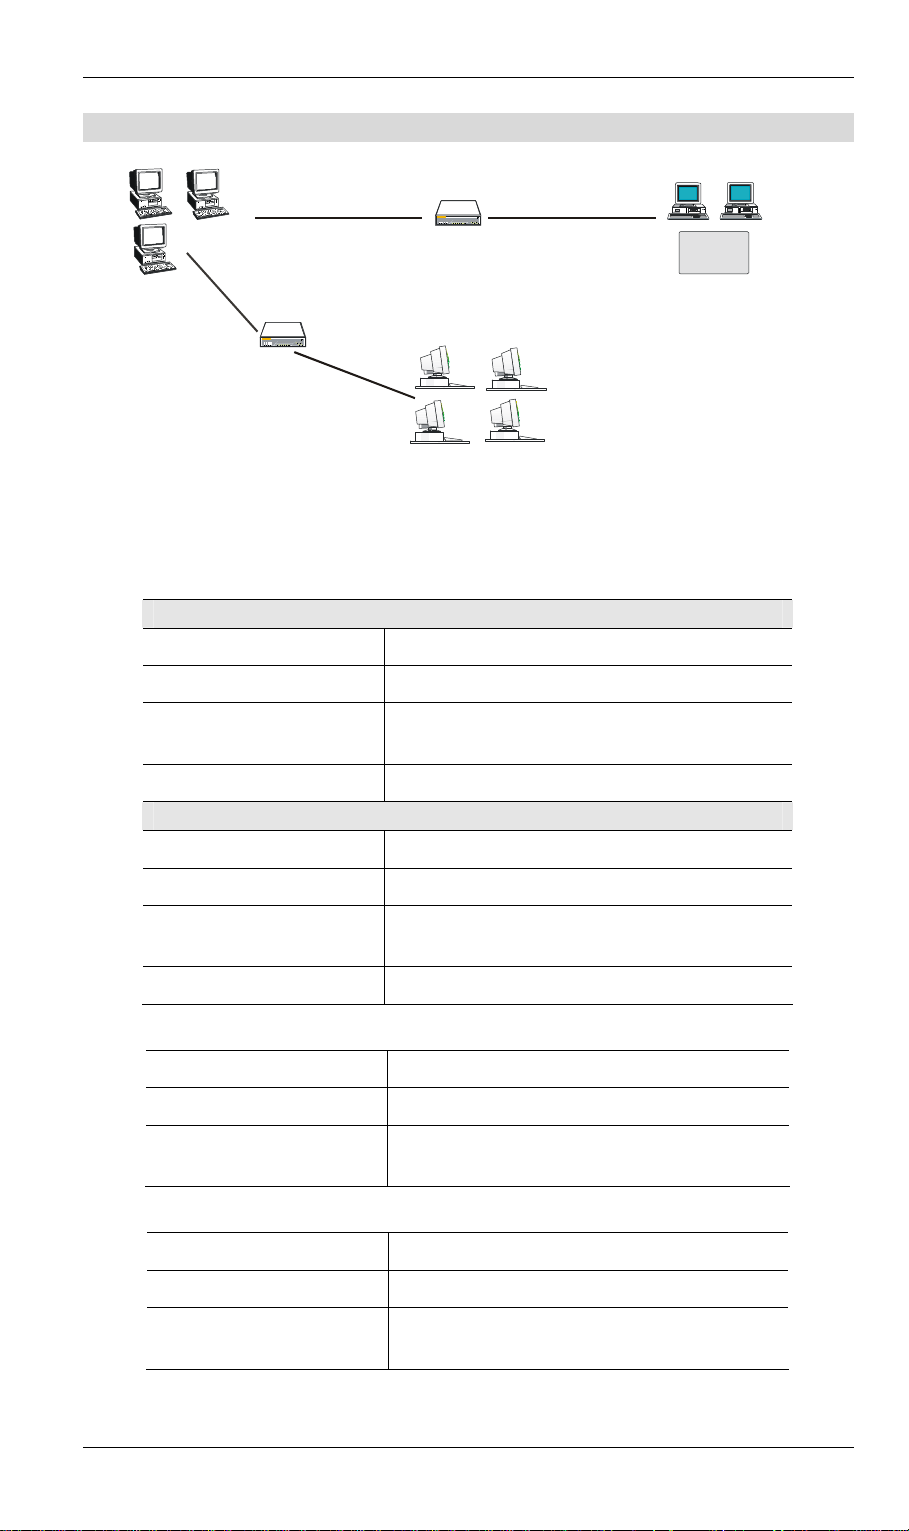
Static Routing - Example
Router A
(192.168.254.254)
Advanced Configuration
(192.168.1.80)
Segment 1
(192.168.1.xx)
(192.168.254.1)
Segment 0
(192.168.254.xx)
DSL/Cable
Router B
(192.168.1.90)
For the DSL/Cable Router's Routing Table
For the LAN shown above, with 2 routers and 3 LAN segments, the DSL/Cable Router r equires 2 entries as follows.
Entry 1 (Segment 1)
Destination IP Address 192.168.1.0
Network Mask 255.255.255.0 (Standard Class C)
Gateway IP Address 192.168.254.1 (DSL/Cable Router's local
(192.168.2.70)
Segment 2
(192.168.2.xx)
Figure 47: Routing Example
Router)
Router
Metric 1
Entry 2 (Segment 2)
Destination IP Address 192.168.2.0
Network Mask 255.255.255.0 (Standard Class C)
Gateway IP Address 192.168.254.1 (DSL/Cable Router's local
Metric 2
For Router A's Default Route
Destination IP Address 0.0.0.0
Network Mask 0.0.0.0
Gateway IP Address 192.168.254.254 (DSL/Cable Router's IP
For Router B's Default Route
Destination IP Address 0.0.0.0
Network Mask 0.0.0.0
Gateway IP Address 192.168.254.254 (DSL/Cable Router's local
Router)
Address)
router)
85
Page 90
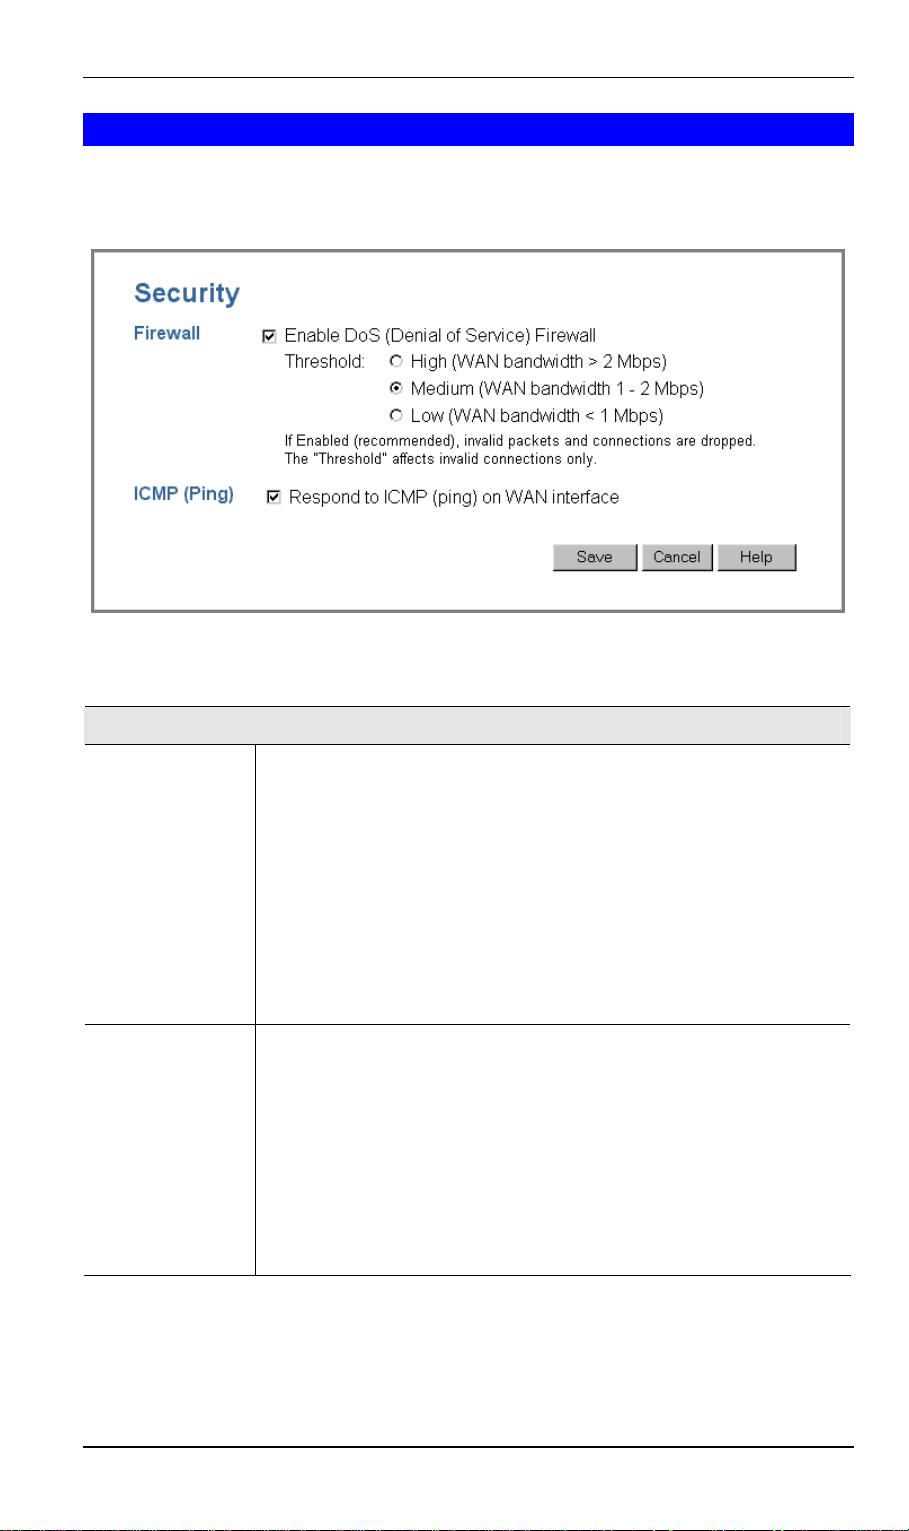
DSL/Cable Router User Guide
Security
The security screen is accessed by the Security option on the Advanced menu.
Figure 48: Security Screen
Data - Security Screen
Firewall
Enable DoS
Firewall
Threshold
If enabled, DoS (Denial of Service) attacks will be detected and
blocked. The default is enabled. It is strongly recommended that this
setting be left enabled.
Note:
• A DoS attack does not attempt to steal data or damage your PCs,
but overloads your Internet connection so you can not use it - the
service is unavailable.
• The DSL/Cable Router uses "Stateful Inspection" technology.
This system can detect situations where individual TCP/IP packets are valid, but collectively they become a DoS attack.
This setting affects the number of "half-open" connections allowed.
• A "half-open" connection arises when a remote client contacts the
Server with a connection request, but then does not reply to the
Server's response.
• While the optimum number of "half-open" connections allowed
(the "Threshold") depends on many factors, the most important
factor is the available bandwidth of your Internet connection.
• Select the setting to match the bandwidth of your Internet connec-
tion.
86
Page 91

ICMP (Ping)
Advanced Configuration
Respond to
ICMP (ping)
The ICMP protocol is used by the "ping" and "traceroute" programs,
and by network monitoring and diagnostic programs.
• If checked, the DSL/Cable Router will repond to ICMP packets
received from the Internet.
• If not checked, ICMP packets from the Internet will be ignored.
Disabling this option provides a slight increase in security.
87
Page 92

A
Appendix A
Troubleshooting
This Appendix covers the most likely problems and their solutions.
Overview
This chapter covers some common problems that may be encountered while using the
DSL/Cable Router and some possible solutions to them. If you follow the suggested steps and
the DSL/Cable Router still does not function properly, contact your dealer for further advice.
General Problems
Problem 1:
Solution 1:
Can't connect to the DSL/Cable Router to configure it.
Check the following:
• The DSL/Cable Router is properly installed, LAN connections are OK,
and it is powered ON. Check the LEDs for port status.
• Ensure that your PC and the DSL/Cable Router are on the same net-
work segment. (If you don't have a router, this must be the case.)
• If your PC is set to "Obtain an IP Address automatically" (DHCP
client), restart it.
• If your PC uses a Fixed (Static) IP address, ensure that it is using an IP
Address within the range 192.168.254.1 to 192.168.254.253 and thus
compatible with the DSL/Cable Router's default IP Address of
192.168.254.254.
Also, the Network Mask should be set to 255.255.255.0 to match the
DSL/Cable Router.
In Windows, you can check these settings by using Control Panel-
Network to check the Properties for the TCP/IP protocol.
Internet Access
Problem 1:
Solution 1:
When I enter a URL or IP address I get a time out error.
A number of things could be causing this. Try the following troubleshooting steps.
• Check if other PCs work. If they do, ensure that your PCs IP settings
are correct. If using a Fixed (Static) IP Address, check the Network
Mask, Default gateway and DNS as well as the IP Address.
• If the PCs are configured correctly, but still not working, check the
DSL/Cable Router. Ensure that it is connected and ON. Connect to it
and check its settings. (If you can't connect to it, check the LAN and
power connections.)
• If the DSL/Cable Router is configured correctly, check your Internet
connection (DSL/Cable modem etc) to see that it is working correctly.
88
Page 93

Appendix A - Troubleshooting
Problem 2:
Solution 2:
Printing
Problem 1:
Solution 1:
Some applications do not run properly when using the DSL/Cable
Router.
The DSL/Cable Router processes the data passing through it, so it is not
transparent.
Use the Special Applications feature to allow the use of Internet applications which do not function correctly.
If this does solve the problem you can use the DMZ function. This should
work with almost every application, but:
• It is a security risk, since the firewall is disabled for the DMZ PC.
• Only one (1) PC can use this feature.
When I tried to install the Printing software for Peer-to-Peer printing, I received an error message and the installation was aborted..
This may be caused by an existing installation of the printer port software. Before attempting another installation:
• Remove the existing installation
• Restart your PC
Problem 2:
Solution 2:
To remove an existing printer port installation:
1. Open Start - Settings - Control Panel - Add/Remove Programs
2. Look for an entry with a name like "Shared Port", "Shared Printer
Port", "Print Server Driver" or "Print Server Port".
3. Select this item, click "Add/Remove", and confirm the deletion.
I am using Windows 95, and the Printing software installed and ran,
but when I selected a port on a DSL/Cable Router and clicked "Add",
the printer was not installed.
Try installing the printer using the standard Windows tools, as follows:
1. Start the Add Printer Wizard.
2. Select Network Printer when prompted "How is the printer attached
to your Computer?", and click Next.
3. When prompted for the Network Path or Queue, enter a dummy value
such as \\123, as shown below. (Do NOT select Yes for "Do you print
for MS-DOS programs?")
89
Page 94
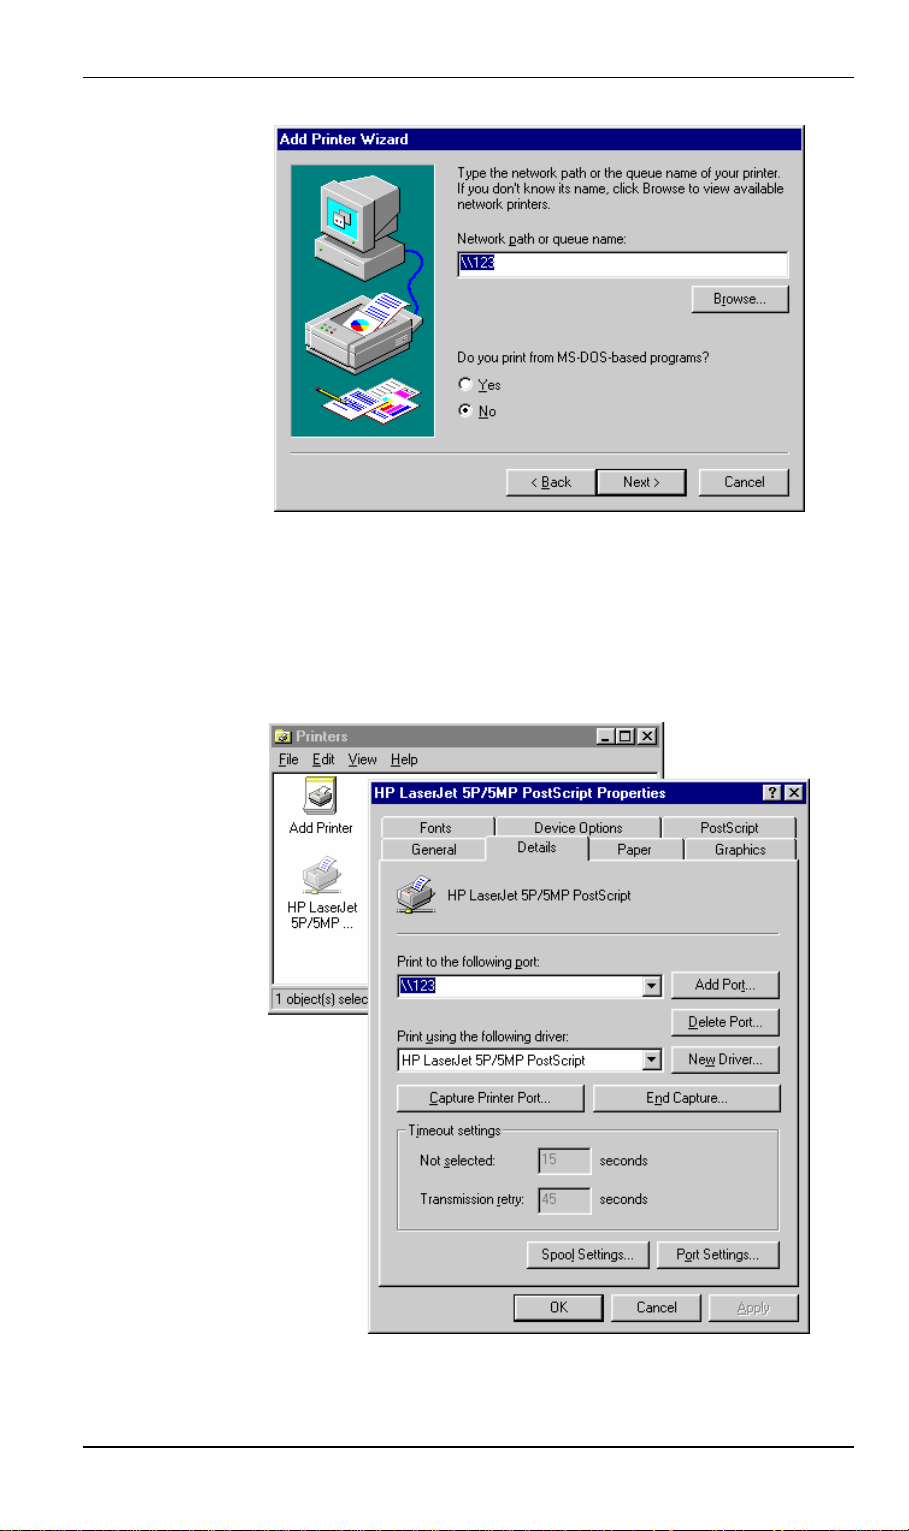
DSL/Cable Router User Guide
4. The printer wizard will display a message stating that "The Network
Printer is off-line". This is OK. Continue the Add Printer Wizard until finished.
5. When finished, go to Control Panel-Printers. The printer icon will be
grayed out indicating the printer is not ready.
6. Right-click the Printer, and select Properties. Then select the Details
tab, as shown below.
7. Click the Add Port button. On the resulting screen, select Other, then
Shared Port, as the port to add, as shown below.
90
Page 95
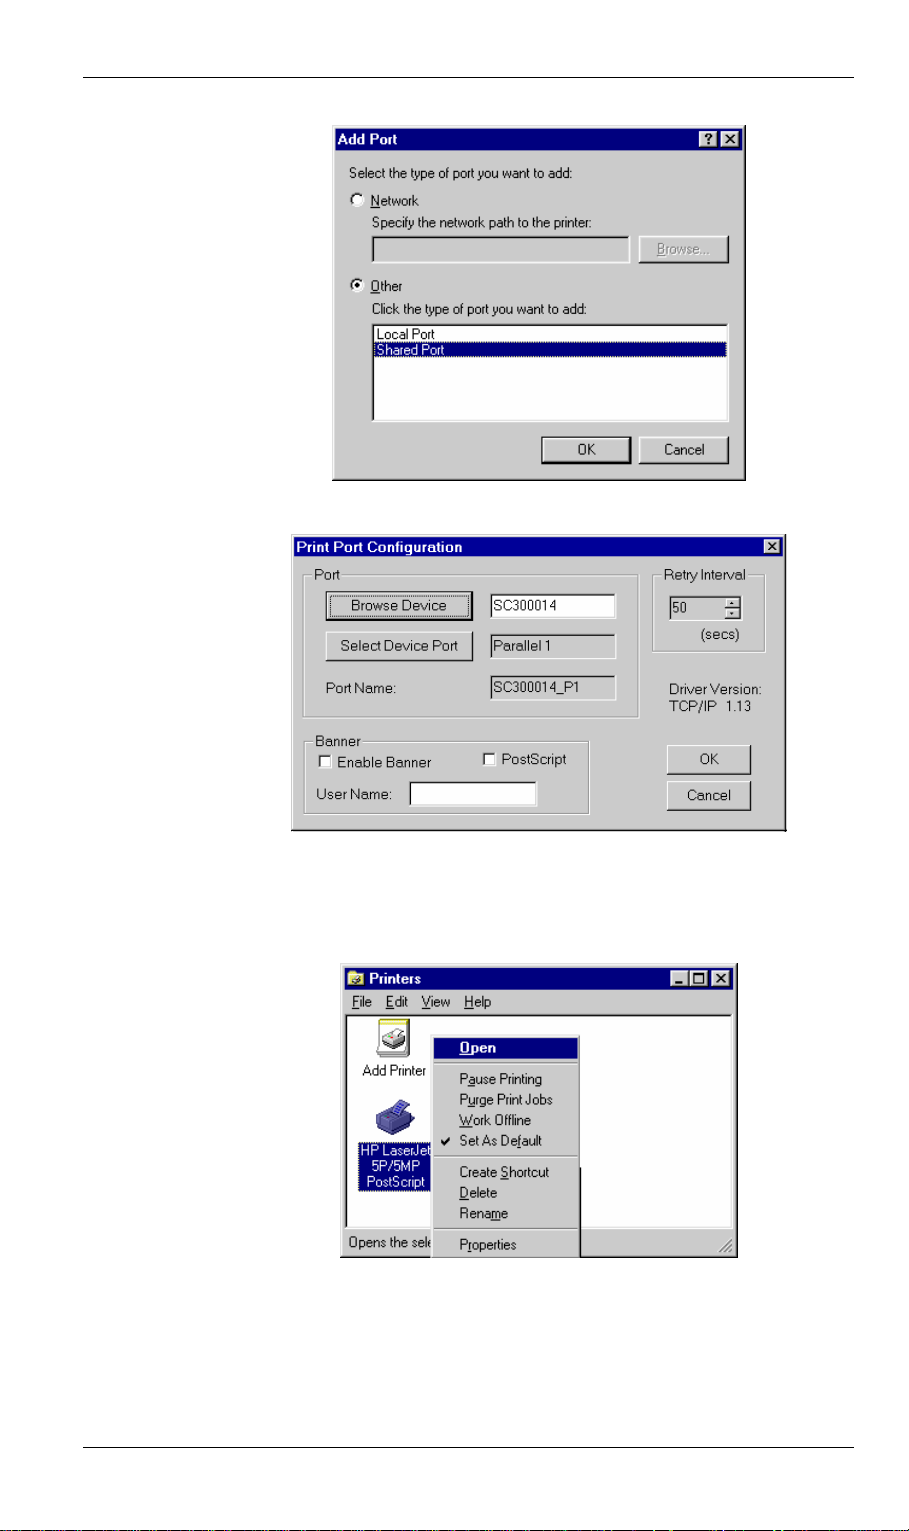
Appendix A - Troubleshooting
8. Click OK to see the Print Port Configuration screen, as shown below.
9. Click the Browse Device button, select the device name of the desired
DSL/Cable Router, and click OK.
10. Click OK to return to the Printers folders, and right-click on the
Printer. Ensure that the Work off-line option is NOT checked.
The Printer should no longer be grayed out, and is ready for use.
91
Page 96

B
Appendix B
Specifications
SpeedStream Wireless DSL/Cable Router
Model SS2624 Wireless DSL/Cable Router
Dimensions 204mm(W) * 127mm(D) * 29mm(H)
Operating Temperature
Storage Temperature
Network Protocol: NAT, PPPoE, HTTP, DHCP client/server, TCP/IP
Network Interface: 5 Ethernet:
Printer Port 1 * parallel printer port
LEDs 14
External Power Adapter 12 V DC
Wireless Interface
Standards IEEE802.11b WLAN, PCMCIA 2.1, JEIDA 4.2
Frequency 2.4 to 2.4835GHz ( Industrial Scientific Medical Band )
0° C to 40° C
-10° C to 70° C
4 * 10/100BaseT (RJ45) auto-Switching Hub ports for LAN
devices
1 * 10BaseT (RJ45) for WAN
Channels Maximum 14 Channels, depending on regulatory authorities
Data Rate 11 / 5.5 / 2 / 1 Mbps
Coverage Area Closed Space : 25m @11Mbps, 100m @5.5Mbps or lower
Power DC +3.3V / 220mA
Output Power 13dBm (typical)
Receiver Sensitivity -80dBm Min.
Operating Temperature 0o to 55oC
Storage Temperature -25o to 70oC
Relative humidity 10% to 90%
92
Page 97

Appendix C - Specifications
FCC Statement
This equipment has been tested and found to comply with the limits for a Class B digital
device, pursuant to Part 15 of the FCC Rules. These limits are designed to provide reasonable
protection against harmful interference in a residential installation.
This equipment generates, uses and can radiate radio frequency energy and, if not installed
and used in accordance with the instructions, may cause harmful interference to radio communications. However, there is no guarantee that interference will not occur in a particular
installation. If this equipment does cause harmful interference to radio or television reception,
which can be determined by turning the equipment off and on, the user is encouraged to try to
correct the interference by one of the following measures:
• Reorient or relocate the receiving antenna.
• Increase the separation between the equipment and receiver.
• Connect the equipment into an outlet on a circuit different from that to which the receiver
is connected.
• Consult the dealer or an experienced radio/TV technician for help.
To assure continued compliance, any changes or modifications not expressly approved by the
party responsible for compliance could void the user's authority to operate this equipment.
(Example - use only shielded interface cables when connecting to computer or peripheral
devices).
FCC Radiation Exposure Statement
This equipment complies with FCC RF radiation exposure limits set forth for an uncontrolled
environment. This equipment should be installed and operated with a minimum distance of 20
centimeters between the radiator and your body.
This device complies with Part 15 of the FCC Rules. Operation is subject to the following two
conditions:
(1) This device may not cause harmful interference, and
(2) this device must accept any interference received, including interference that may cause
undesired operation.
This transmitter must not be co-located or operating in conjunction with any other antenna or
transmitter.
93
Page 98

C
Appendix C
Technical Support
Before contacting technical support, please refer to the previous Troubleshooting information.
If you are still unable to resolve the problem, be prepared to provide the following information:
• Model number (SS2624)
• Date of purchase or installation
• Description of problem
SpeedStream Technical Support Services are available via the web, e-mail and telephone.
Visit our website at www.SpeedStream.com for the latest product information and support
knowledge base.
Contact SpeedStream Support via e-mail at: [email protected]
Telephone Support for North America only: 877-823-6722
94
 Loading...