


User Guide
Behind-the-Ear-Instruments
|
TRIANO S/SL |
|
TRIANO 3 |
|
TRIANO 3 P |
|
TRIANO SP |
|
|
||||||
|
|
|
TRIANO
Siemens Hearing Solutions

A friendly guide to your new Siemens hearing instruments
Congratulations!
You have decided in favour of hearing instruments from Siemens.You have taken an important step towards being able to hear and understand better once again.
Your new hearing instruments will be your constant companions from now on. With these technically perfected hearing instruments you profit from our many years’ research and experience in microelectronics. Soon it will be easy for you to hear again. Good hearing is an important requirement for your physical well being. With your new hearing instruments, which will accompany you daily, you will again enjoy taking an active part in the world of speech and music.
And as with any constant companion, you’ll need some time at first to get used to handling your hearing instruments. With a little patience, we trust that your new hearing experience will be all the more pleasant for you.
For this purpose we are providing you with this brief user guide for your hearing instruments. It should contribute to deepening your friendship with your new partners in the matter of better hearing. We want to help you to handle your hearing instruments correctly, so that they will become an important part of your life.
Wishing you much success,
Your Siemens Team
2

The best way to use your new hearing instrument
In this brief guide you will find instructions for inserting, placing and adjusting your hearing instruments. There are also tips and information on correct handling, cleaning, care and battery changing. And naturally information about how you can solve some failures yourself if you cannot visit a hearing instrument specialist immediately.
One important note:
Your hearing success depends largely on how well your instruments fit in the ears and how carefully you maintain and handle them.
This is your |
Contents: |
|
|
|
|
|
|
Instrument |
|
|
|
|
|
|
|
|
TRIANO 3 / TRIANO 3 P |
Page 5 |
3/3 P |
|
|
|
|
|
TRIANO S / TRIANO SL |
Page 13 |
S/SL |
|
|
|
|
|
TRIANO SP |
Page 23 |
SP |
Applicable to all TRIANO instruments |
|
All |
|
|
|
|
|
How to insert your ear mould |
Page 34 |
|
|
|
|
|
|
Notes for cleaning and care |
Page 36 |
|
|
|
|
||
The best way to handle your hearing instruments Page 37 |
|
||
|
|
|
|
How to solve some failures yourself |
Page 38 |
|
|
|
|
|
|
Hearing training made easy |
Page 39 |
|
|
|
|
|
|
3

4
TRIANO 3 |
|
TRIANO 3P |
||
|
|
|
|
|
|
|
|
|
|
Description of the TRIANO 3/3 P hearing instrumentPage |
7 |
|
|
||
|
|
|
|
|
|
Handling batteries |
Page |
8 |
|
|
|
3/3 P |
|||||
|
|
|
|
||
Battery changing |
Page |
9 |
|
||
|
|
|
|
||
Switching ON/OFF |
Page 10 |
|
|||
|
|
|
|
||
How to select the programs |
Page 11 |
|
|||
|
|
|
|
||
Volume control (TRIANO 3P only) |
Page 12 |
|
|||
|
|
|
|
|
|
Telephoning in combination with your |
|
|
|
|
|
hearing Instruments |
Page 12 |
|
|||
|
|
|
|
|
|
Applicable to all TRIANO instruments |
|
|
|
|
|
|
|
|
|
||
How to insert your ear mould |
Page 34 |
|
|||
|
|
|
|
||
Notes for cleaning and care |
Page 36 |
|
|||
|
|
|
|
||
The best way to handle your hearing instruments |
Page 37 |
|
|||
|
|
|
|||
How to solve some failures yourself |
Page 38 |
|
|
||
|
|
|
|
||
Hearing training made easy |
Page 39 |
|
|||
|
|
|
|
|
|
5

6
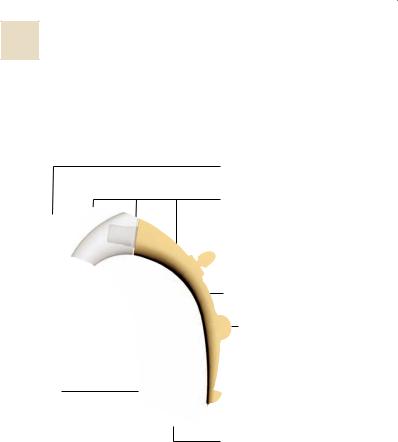
Description of the
TRIANO 3/3 P hearing instruments
Ear hook
Microphone openings
 Volume control (TRIANO 3P only)
Programming socket
Program button |
3/3 P |
|
to select the |
||
|
||
programs (1-4) |
|
|
On/Off |
|
Type red=right blue=
Battery compartment with on/off switch (Battery type 13)
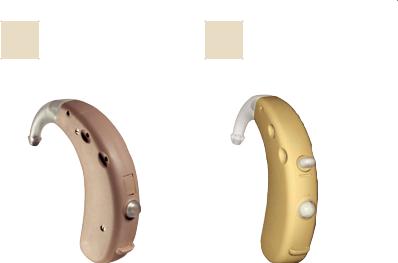
To achieve optimum fitting TRIANO 3/3 P instruments are available in a left and right version. The different coloured type labels make it easier for you to allocate the instruments especially when being fitted binaural.
7

Handling batteries
So-called zinc-air batteries are used today almost exclusively
in hearing instruments to minimize environmental damage.
These batteries require oxygen for operation, which they ab-
sorb from the air. The battery is activated as soon as the
protective foil is pulled off and is used up even if you do not use your hearing instrument.
You should always pull off the protective foil only if you actually use the battery. Also, do not leave the batteries in your hearing instruments if you do not use them over a longer period. The batteries can leak and damage the instruments. The batteries keep for from a few days up to several weeks according to the way they are used. You can recognize when a change of batteries becomes necessary, because your hearing instru-ments become noticeably quieter towards the end of the battery’s life. Then it is time for new batteries. Two warning tones sound once per minute, indicating that you must insert a new battery.
 …
…
Your hearing instrument specialist can switch off the warning tones if required.
Zinc-air batteries which are almost completely used up show the following behaviour: After switching on the instruments they function completely normally, but then rapidly become quieter. The more the battery is used up, the faster the gain falls off.You must then replace such batteries by new ones.
8
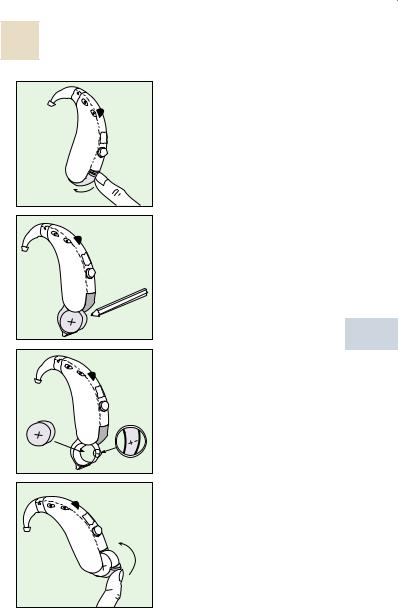
Battery changing
Removing the battery
Open the battery compartment as shown in the picture.
It has to opened completely. In order to do this you have open the compartment beyond the first stop (“OFF“– see: Switching ON/OFF).
Normally the battery drops out when the battery compartment is completely open.
Should this not be the case, you can lightly tap the instrument or push the battery out with a pencil as shown in the picture.
3/3 P
Inserting the battery
Important! Make sure to note the polarity of the battery!
If the battery is inserted incorrectly, the battery compartment can be closed only with considerable force.This will damage the instrument.
Closing the battery compartment
Close the battery compartment by pressing from below with your finger tip.
9

Useful tips:
The plus (+) side of the battery is always the smooth side.You can recognize the minus (–) side by the coloured ring.
You should always keep spare batteries at hand.
If you feel you cannot change the battery yourself, ask someone to help you: a family member, friend or your hearing instrument specialist.
Please do not throw used batteries into household refuse. Return them to your hearing instrument specialist for environmentally correct disposal.
Caution!
Please keep batteries out of the reach of children. They are damaging to health when swallowed.
Switching ON/OFF
fig. 1
fig. 2
Battery compartment
There are two ways to switch the TRIANO 3/3P ON/OFF. The first way is by using the battery compartment. When it is completely closed, the TRIANO 3/3P is “ON“(see fig.1).
Opening the battery compartment to the first stop (see fig. 2) means the instrument is turned “OFF“.
The second way to switch the instrument is by using the program button. See chapter “Program button“.
10
Program button |
|
The hearing instrument is auto- |
|
matically switched on when the |
|
battery is inserted and the battery |
|
compartment closed. The instru- |
Program |
ment then diverts to program“1“. |
|
By pressing the program button |
button |
|
|
approx. 3 seconds the hearing |
|
instrument is switched off. |
|
If the hearing instrument has already been operated and then switched off as described above, to switch it on again simply press the program button approx. 3 seconds. The instrument diverts again to program“1“.
The battery should be removed if the hearing instrument is not in use over a longer period.
3/3 P
How to select the programs
The TRIANO 3/3P instruments have 4 hearing programs which are selected with a program button. Each time the button is pressed the instrument diverts to the next program which is confirmed with a beep tone. The number of beep tones is identical with the selected program. That means when program “3“ is selected 3 beep tones are heard. The standard seizure of the programs is as follows: Program “1“ – for the most frequently hearing
situations
Program “2“ – is the automatic microphone mode Program “3“ – is telecoil mode
Program “4“ – normally not activated but can be programmed if requested
11
Volume control
(TRIANO 3 P only)
TRIANO 3 P Instruments work fully automatically. Normally it is not necessary to change the volume manually. But if the instruments wearer still desires to change the volume, TRIANO 3 P offers a volume control with a programmable volume range. If this is not wished the volume control can be switched off. Operating the volume control then does not affect the adjustment on the instrument.
Telephoning in combination with your hearing instrument
The telecoil mode (Standard setting program “3“ is intended for telephoning and using inductive loops. e.g. in churches, theatres or lecture rooms. Using program “3“ for telephoning requires that the telephone is suitable for hearing instruments and emits a corresponding magnetic field. Not all modern telephones, especially cordless telephones and mobile phones, produce a magnetic field. In such cases we recommend that you telephone preferably with the setting used for the most frequently hearing situations (for e.g. program “1”).
12

TRIANO S/SL
|
|
|
|
|
|
|
Description of the TRIANO S hearing instrument |
Page 15 |
|||||
|
|
|
|
|
||
Handling batteries |
Page 16 |
|||||
|
|
|
|
|
|
|
Battery changing |
Page 17 |
|
||||
S/SL |
||||||
|
|
|
|
|||
Program switch |
Page 18 |
|
||||
Telephoning in combination with TRIANO S |
Page 19 |
|
||||
|
|
|
|
|||
Children`s safety device |
Page 20 |
|||||
|
|
|
|
|||
Audio input |
Page 21 |
|||||
|
|
|
|
|
|
|
Applicable to all TRIANO instruments |
|
|
|
|
||
|
|
|
|
|||
How to insert your ear mould |
Page 34 |
|||||
|
|
|
|
|||
Notes for cleaning and care |
Page 36 |
|||||
|
|
|
|
|||
The best way to handle your hearing instruments |
Page 37 |
|||||
|
|
|
|
|||
How to solve some failures yourself |
Page 38 |
|||||
|
|
|
|
|||
Hearing training made easy |
Page 39 |
|||||
|
|
|
|
|
|
|
13

14
 Loading...