

Page 1
SIMATIC RF650M mobile reader
___________________
___________________
___________________
___________________
___________________
___________________
___________________
___________________
___________________
___________________
SIMATIC Ident
RFID systems
SIMATIC RF650M mobile reader
Operating Instructions
04/2015
C79000
-G8976-C404-01
Introduction
1
Safety Information
2
Description
3
Commissioning
4
Operation
5
"RF650M" software
6
Advanced functions
7
Technical data
8
Ordering data
9
Appendix
A
Page 2
Siemens AG
Division Process Industries and Drives
Postfach 48 48
90026 NÜRNBERG
GERMANY
C79000-G8976-C404-01
Ⓟ
04/2015 Subject to change
Copyright © Siemens AG 2015.
All rights reserved
Legal information
Warning notice system
This manual contains notices you have to observe in order to ensure your personal safety, as well as to prevent
damage to property. The notices referring to your personal safety are highlighted in the manual by a safety alert
symbol, notices referring only to property damage have no safety alert symbol. These notices shown below are
graded according to the degree of danger.
DANGER
indicates that death or severe personal injury will result if proper precautions are not taken.
WARNING
indicates that death or severe personal injury may result if proper precautions are not taken.
CAUTION
indicates that minor personal injury can result if proper precautions are not taken.
NOTICE
indicates that property damage can result if proper precautions are not taken.
If more than one degree of danger is present, the warning notice representing the highest degree of danger will
be used. A notice warning of injury to persons with a safety alert symbol may also include a warning relating to
property damage.
Qualified Personnel
The product/system described in this documentation may be operated only by
personnel qualified
for the specific
task in accordance with the relevant documentation, in particular its warning notices and safety instructions.
Qualified personnel are those who, based on their training and experience, are capable of identifying risks and
avoiding potential hazards when working with these products/systems.
Proper use of Siemens products
Note the following:
WARNING
Siemens products may only be used for the applications described in the catalog and in the relevant technical
documentation. If products and components from other manufacturers are used, these must be recommended
or approved by Siemens. Proper transport, storage, installation, assembly, commissioning, operation and
maintenance are required to ensure that the products operate safely and without any problems. The permissible
ambient conditions must be complied with. The information in the relevant documentation must be observed.
Trademarks
All names identified by ® are registered trademarks of Siemens AG. The remaining trademarks in this publication
may be trademarks whose use by third parties for their own purposes could violate the rights of the owner.
Disclaimer of Liability
We have reviewed the contents of this publication to ensure consistency with the hardware and software
described. Since variance cannot be precluded entirely, we cannot guarantee full consistency. However, the
information in this publication is reviewed regularly and any necessary corrections are included in subsequent
editions.
Page 3

SIMATIC RF650M mobile reader
Operating Instructions, 04/2015, C79000-G8976-C404-01
3
Table of contents
1 Introduction ............................................................................................................................................. 5
2 Safety Information ................................................................................................................................... 7
3 Description .............................................................................................................................................. 9
3.1 Field of application and features ............................................................................................... 9
3.2 Keyboard overview ................................................................................................................. 11
3.3 Antenna and antenna field ...................................................................................................... 12
4 Commissioning ..................................................................................................................................... 13
4.1 Power supply .......................................................................................................................... 13
4.1.1 Inserting the battery ................................................................................................................ 13
4.1.2 Connecting the charging/docking station ................................................................................ 14
4.1.3 Charging the device ................................................................................................................ 15
4.1.4 The backup battery ................................................................................................................. 17
4.2 Scope of supply ...................................................................................................................... 17
4.3 Switching the device On and Off ............................................................................................ 18
4.4 Basic settings in the operating system ................................................................................... 19
4.4.1 Control Panel .......................................................................................................................... 19
4.4.1.1 Accessing the Control Panel ................................................................................................... 19
4.4.1.2 Opening/closing applets ......................................................................................................... 19
4.4.1.3 Closing the Control Panel ....................................................................................................... 20
4.4.1.4 Control Panel applets.............................................................................................................. 20
4.4.1.5 Power Management (PM) ....................................................................................................... 29
5 Operation .............................................................................................................................................. 33
5.1 The keypad ............................................................................................................................. 33
5.1.1 Activator key ........................................................................................................................... 34
5.1.2 Navigation ring ........................................................................................................................ 34
5.1.3 Tab / Alt key ............................................................................................................................ 34
5.1.4 Delete key ............................................................................................................................... 35
5.1.5 Cancel / Esc key ..................................................................................................................... 35
5.1.6 Scan key ................................................................................................................................. 35
5.1.7 F / mode key ........................................................................................................................... 35
5.1.8 Alphanumeric keypad / function keys ..................................................................................... 35
5.1.9 On / Off key ............................................................................................................................. 36
5.2 The touchscreen ..................................................................................................................... 38
5.2.1 Stylus and touchscreen........................................................................................................... 38
5.2.2 Screen keypad ........................................................................................................................ 38
Page 4

Table of contents
SIMATIC RF650M mobile reader
4 Operating Instructions, 04/2015, C79000-G8976-C404-01
6 "RF650M" software ............................................................................................................................... 39
6.1 Starting "RF650M" software ................................................................................................... 39
6.2 Menu overview and functions ................................................................................................ 40
6.3 The functions in the "Inventory" menu ................................................................................... 41
6.4 The functions in the "Tag Editor" menu ................................................................................. 44
6.5 The functions in the "Tag Locator" menu ............................................................................... 49
6.6 The functions in the "Tag Info" menu ..................................................................................... 52
6.7 The functions in the "Settings" menu ..................................................................................... 53
6.8 The functions in the "Channel Scanner" menu ...................................................................... 62
6.9 The "Help" menu .................................................................................................................... 63
7 Advanced functions ............................................................................................................................... 65
7.1 Saving identified transponders ............................................................................................... 65
7.2 Data transfer between the PC and mobile reader ................................................................. 67
7.2.1 Prerequisites .......................................................................................................................... 67
7.2.2 Windows Mobile Device Center ............................................................................................. 67
8 Technical data ...................................................................................................................................... 69
9 Ordering data ........................................................................................................................................ 71
A Appendix .............................................................................................................................................. 73
A.1 Certificates and approvals ..................................................................................................... 73
A.2 Developing user applications ................................................................................................. 74
A.3 Service & support ................................................................................................................... 75
Page 5

SIMATIC RF650M mobile reader
Operating Instructions, 04/2015, C79000-G8976-C404-01
5
1
Purpose of this document
These operating instructions contain information required for commissioning and using the
SIMATIC RF650M device.
The documentation is intended for commissioning engineers and machine operators who
start up the application themselves and it describes the functions of the software.
Scope of validity of this document
This documentation is valid for the SIMATIC RF650M mobile reader and describes the
delivery status as of 03/2015.
Registered trademarks
SIMATIC ®, SIMATIC NET®, SIMATIC RF ® and MOBY ® are registered trademarks of
Siemens AG.
Naming conventions
The following terms/abbreviations are used synonymously in this document:
Mobile reader
Reader, read/write device (SLG), hand terminal,
handheld
Transponder
Tag, mobile data storage (MDS), data carrier
History
Previous editions of these operating instructions:
Edition
Note
04/2015
First edition
Page 6

Introduction
SIMATIC RF650M mobile reader
6 Operating Instructions, 04/2015, C79000-G8976-C404-01
Page 7
SIMATIC RF650M mobile reader
Operating Instructions, 04/2015, C79000-G8976-C404-01
7
2
SIMATIC RFID products comply with the salient safety specifications to VDE/DIN, IEC, EN,
UL and CSA. If you have questions about the validity of the installation in the planned
environment, please contact your service representative.
NOTICE
Forfeiture of approvals and guarantees
Alterations to the devices are not permitted.
Failure to observe this requirement shall constitute a revocation of the radio equipment
approval, CE approval and manufacturer's warranty.
Repairs
WARNING
Repairs only by authorized qualified personnel
Unauthorized opening of and improper repairs to the device may result in substantial
damage to equipment or danger. Repairs may only be carried out by authorized qualified
personnel.
Page 8

Safety Information
SIMATIC RF650M mobile reader
8 Operating Instructions, 04/2015, C79000-G8976-C404-01
Page 9

SIMATIC RF650M mobile reader
Operating Instructions, 04/2015, C79000-G8976-C404-01
9
3
SIMATIC RF650M expands the RF600 identification system with a powerful mobile reader
for applications in the areas of logistics, production and service. In addition, it is an
indispensable aid for startup and testing.
3.1
Field of application and features
Device variants for different frequency ranges
The SIMATIC RF650M device is available in the following variants:
● For the European frequency bands,
● For the US frequency bands
Implementation environment, field of application and features
●
Field of application
The SIMATIC RF650M mobile readers can be used in a harsh environment. The device
is extremely rugged and protected against spray water. The backlit display is easy to read
even under unfavorable lighting conditions.
●
RFID system
The SIMATIC RF650M mobile reader is intended specifically for the SIMATIC RF600
RFID system. The device can be used to process all RF600 transponders and
transponders compatible with it.
●
Transponder standards
The device supports the following transponder standards:
– ISO 18000-6C (EPC Class1 Gen2)
●
Software
The "RF650M" software is stored in non-volatile memory on an integrated flash disk and
permits user-friendly, distributed reading and writing of all RF600 transponders.
●
API software interface
For the RF650M mobile reader SIMATIC a software interface (API) including
documentation is available.
Page 10

Description
3.1 Field of application and features
SIMATIC RF650M mobile reader
10 Operating Instructions, 04/2015, C79000-G8976-C404-01
You can perform the following functions with the SIMATIC RF650M mobile reader:
Functions of the RF650M
● Reading the tag ID
● Writing the tag ID to a transponder
● Reading data from transponder
● Writing data to transponder
● Representing and editing the data in hexadecimal, ASCII format
● Password protection for all writing functions that can be enabled or disabled
(Write, Lock, Kill)
● Menu prompting in English and German (switchable)
For more information, refer to the section "The functions in the "Tag Editor" menu
(Page 44)".
Accessories
The charging station for recharging the batteries and the connection to PCs via a USB
interface or Ethernet must be ordered separately. This station has a charging bay for an
additional spare battery. You will find more information on this subject in the section
"Ordering data (Page 71)".
Page 11
Description
3.2 Keyboard overview
SIMATIC RF650M mobile reader
Operating Instructions, 04/2015, C79000-G8976-C404-01
11
3.2
Keyboard overview
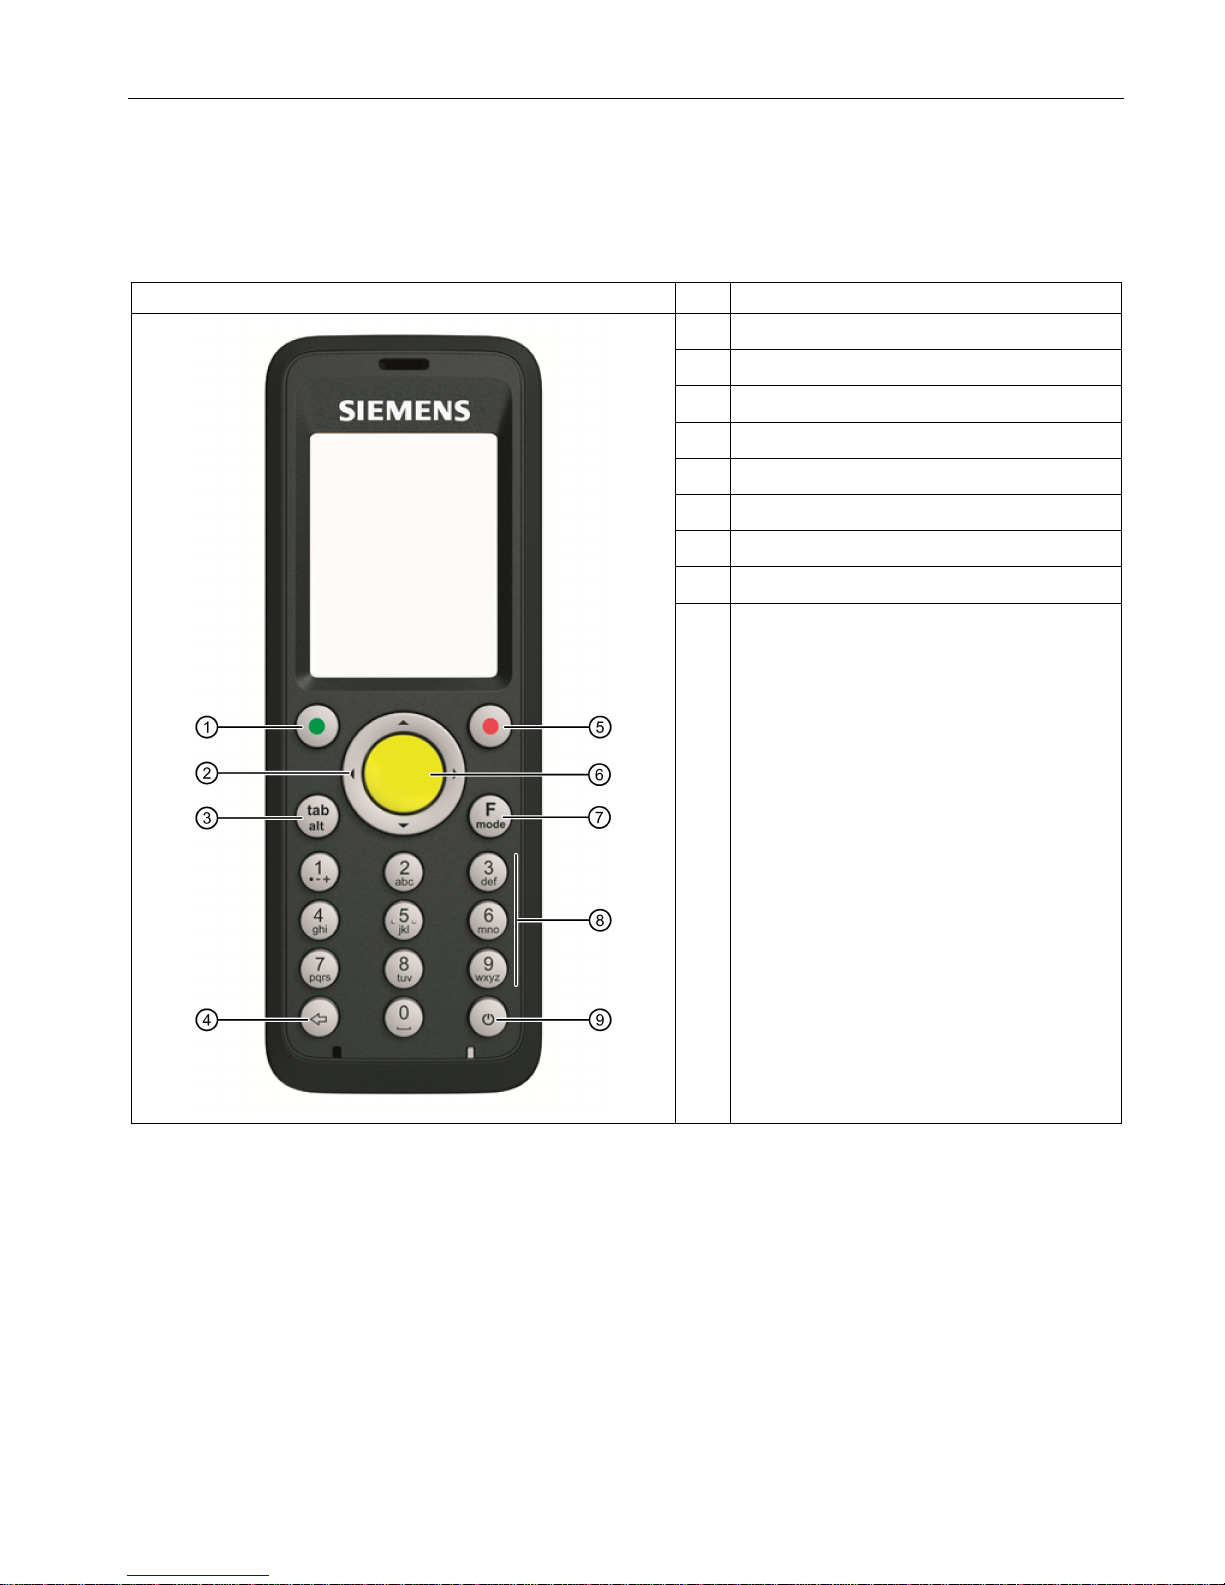
Table 3- 1 Keypad overview of the SIMATIC RF650M
SIMATIC RF650M
Pos.
Key label
①
Activator key
②
Navigation ring
③
Tab / Alt key
④
Delete key
⑤
Cancel / Esc key
⑥
Scan key
⑦
F / mode key
⑧
Alphanumeric keypad / function keys
⑨
On / Off key
Page 12
Description
3.3 Antenna and antenna field
SIMATIC RF650M mobile reader
12 Operating Instructions, 04/2015, C79000-G8976-C404-01
3.3
Antenna and antenna field
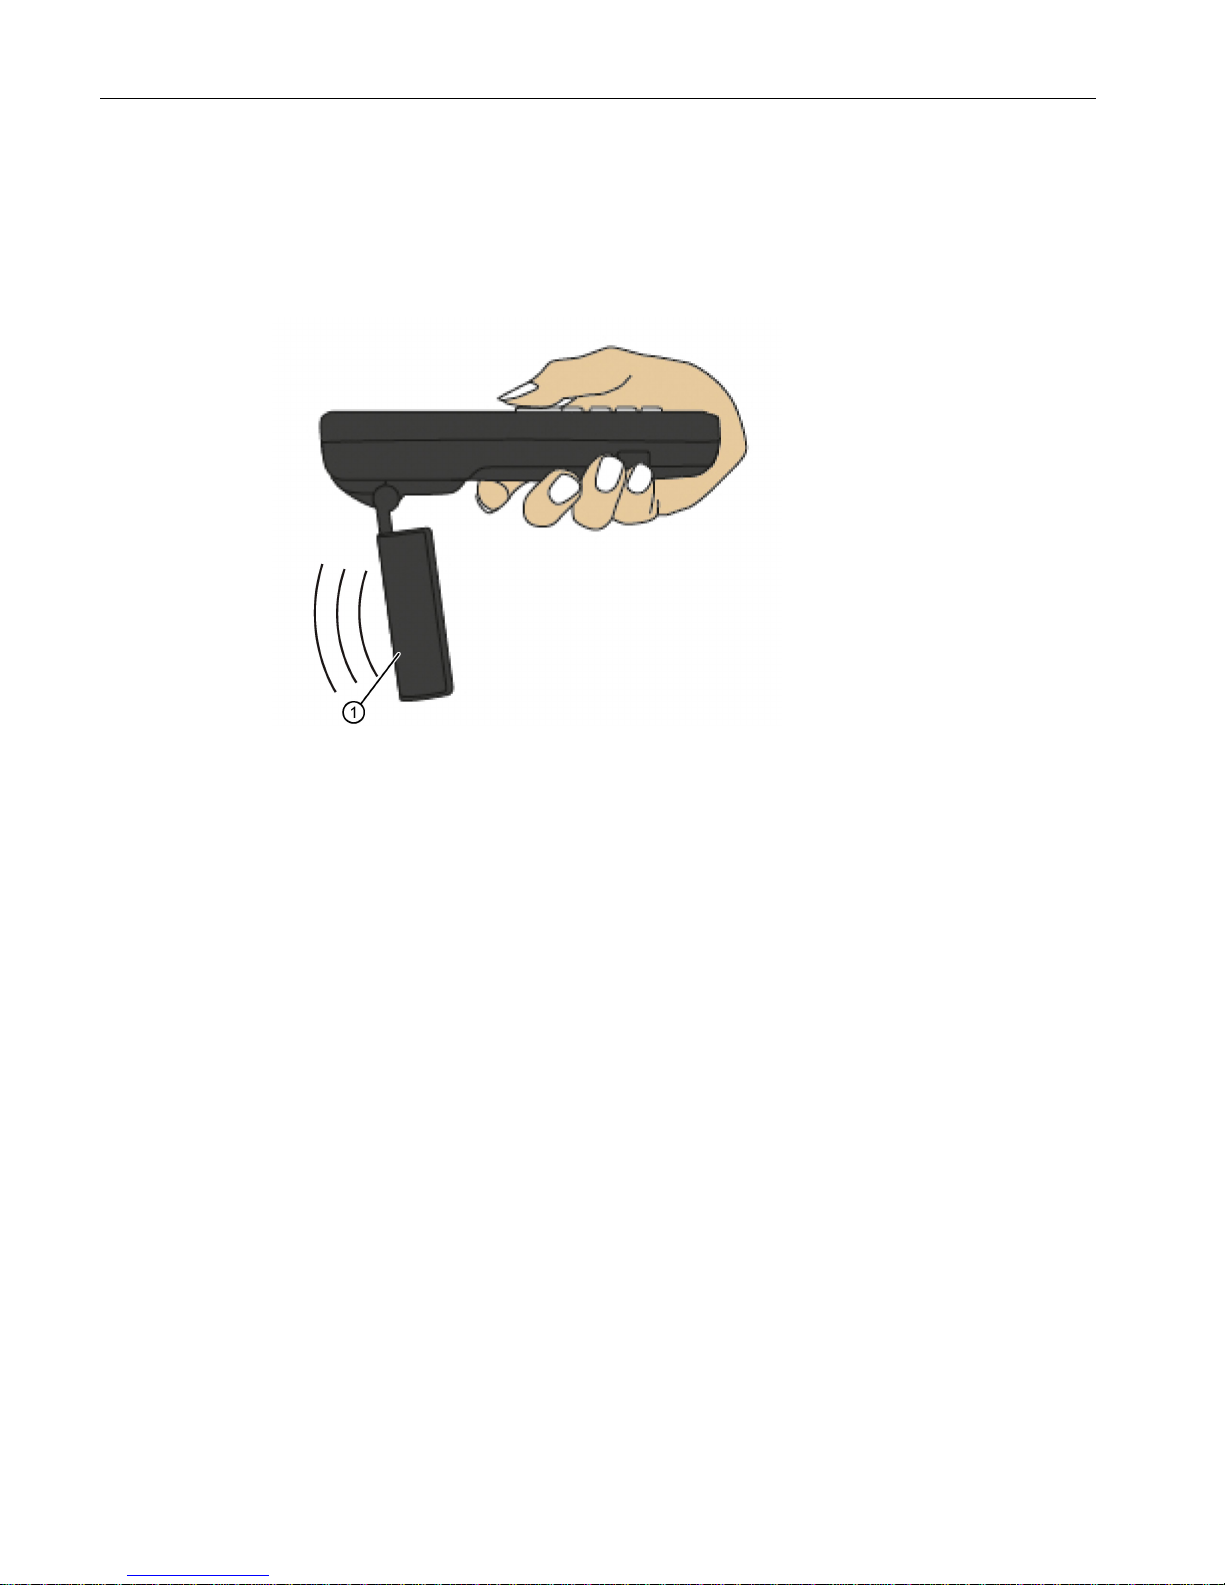
For the best possible performance when detecting or processing transponders, we
recommend that you swing out the antenna of the SIMATIC RF650. The antenna of the
RF650M has double linear polarization, horizontal and vertical.
①
Antenna
Figure 3-1 RF650M mobile reader with antenna swung out
Page 13
SIMATIC RF650M mobile reader
Operating Instructions, 04/2015, C79000-G8976-C404-01
13
4
4.1
Power supply
4.1.1
Inserting the battery
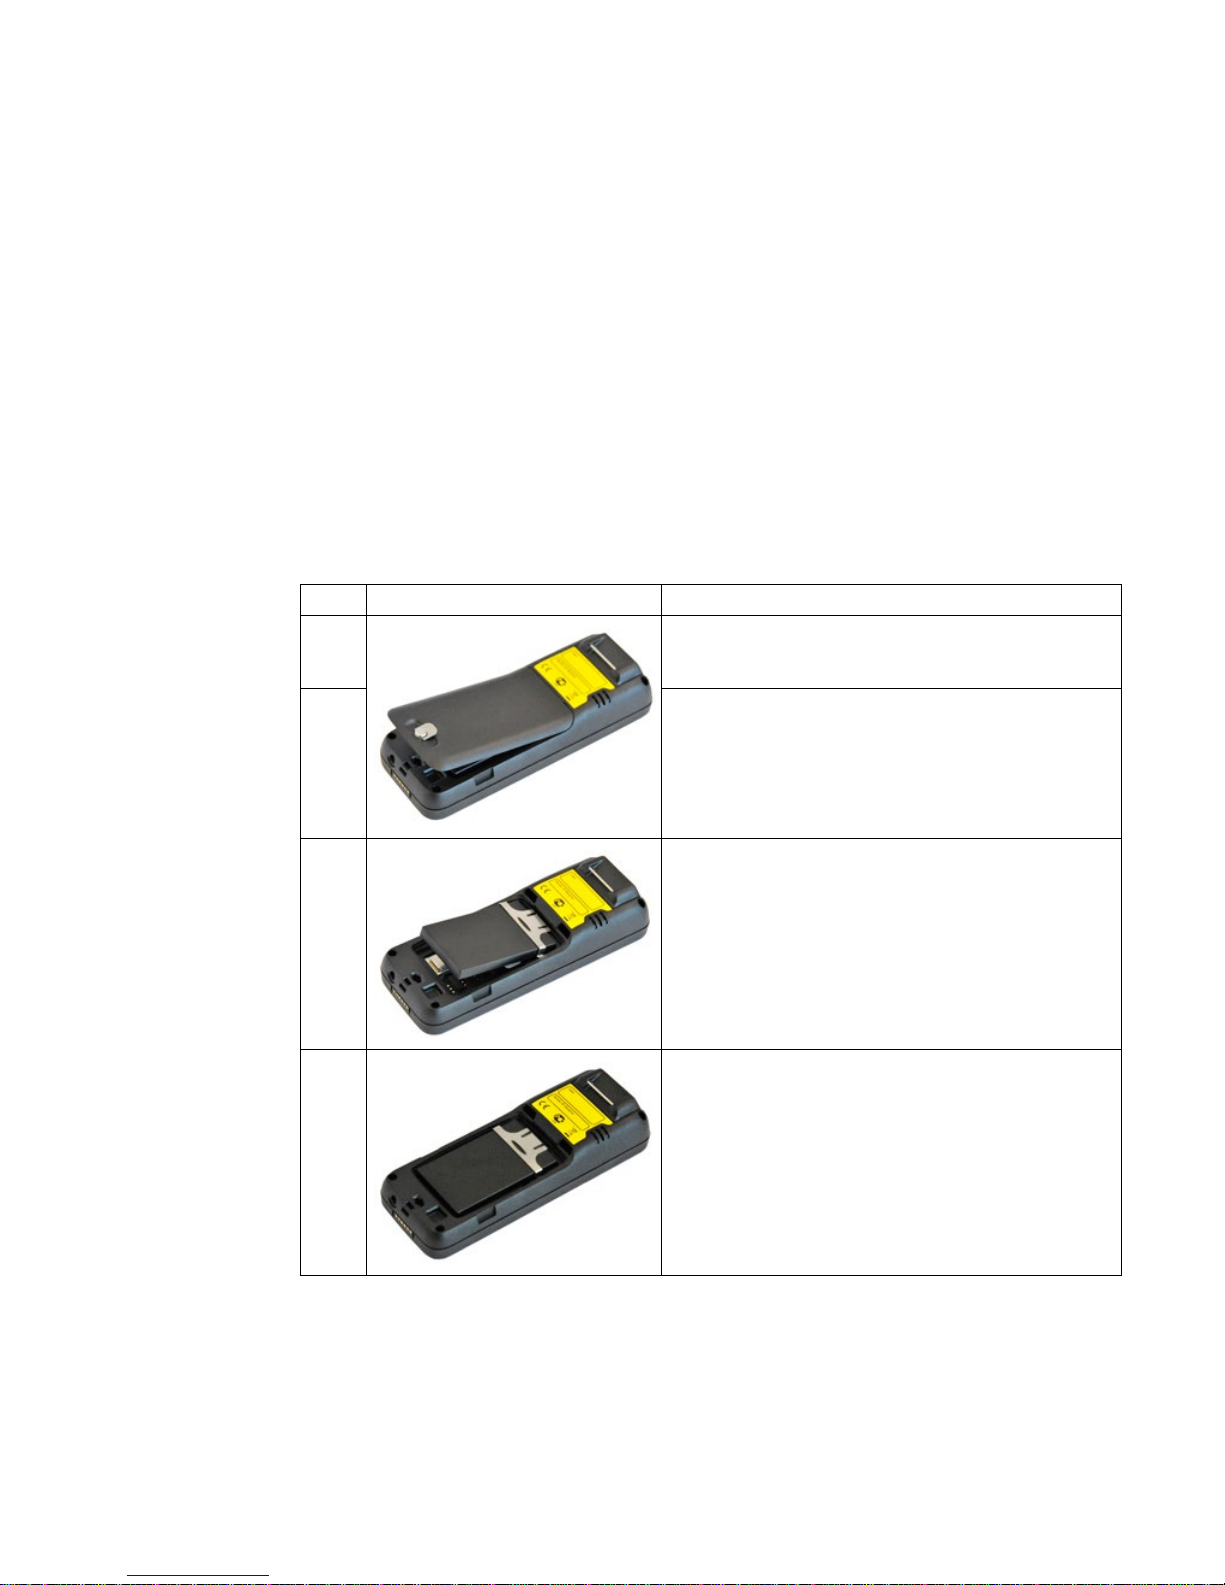
The battery of the SIMATIC RF650M is located on the rear of the device. The following
instructions describe inserting the battery in the device
Table 4- 1 Inserting the battery
Step
Picture
Description
1.
Turn the locking mechanism on the rear of the device
through 90° to the left. Raise the battery cover on the
screw side and remove the cover.
2. If necessary, release the securing bar by pushing it
forward and then lifting it.
3.
Insert the battery. Make sure that you insert the battery
at an angle so that the contact side of the battery is
inserted into the battery compartment first.
4.
Close the securing bar by pressing it down and then
pulling it back so that it locks in place on both sides.
Page 14
Commissioning
4.1 Power supply
SIMATIC RF650M mobile reader
14 Operating Instructions, 04/2015, C79000-G8976-C404-01
Step
Picture
Description
5.
Hook the battery cover and close it. Turn the locking
mechanism 90° to the right.
4.1.2
Connecting the charging/docking station
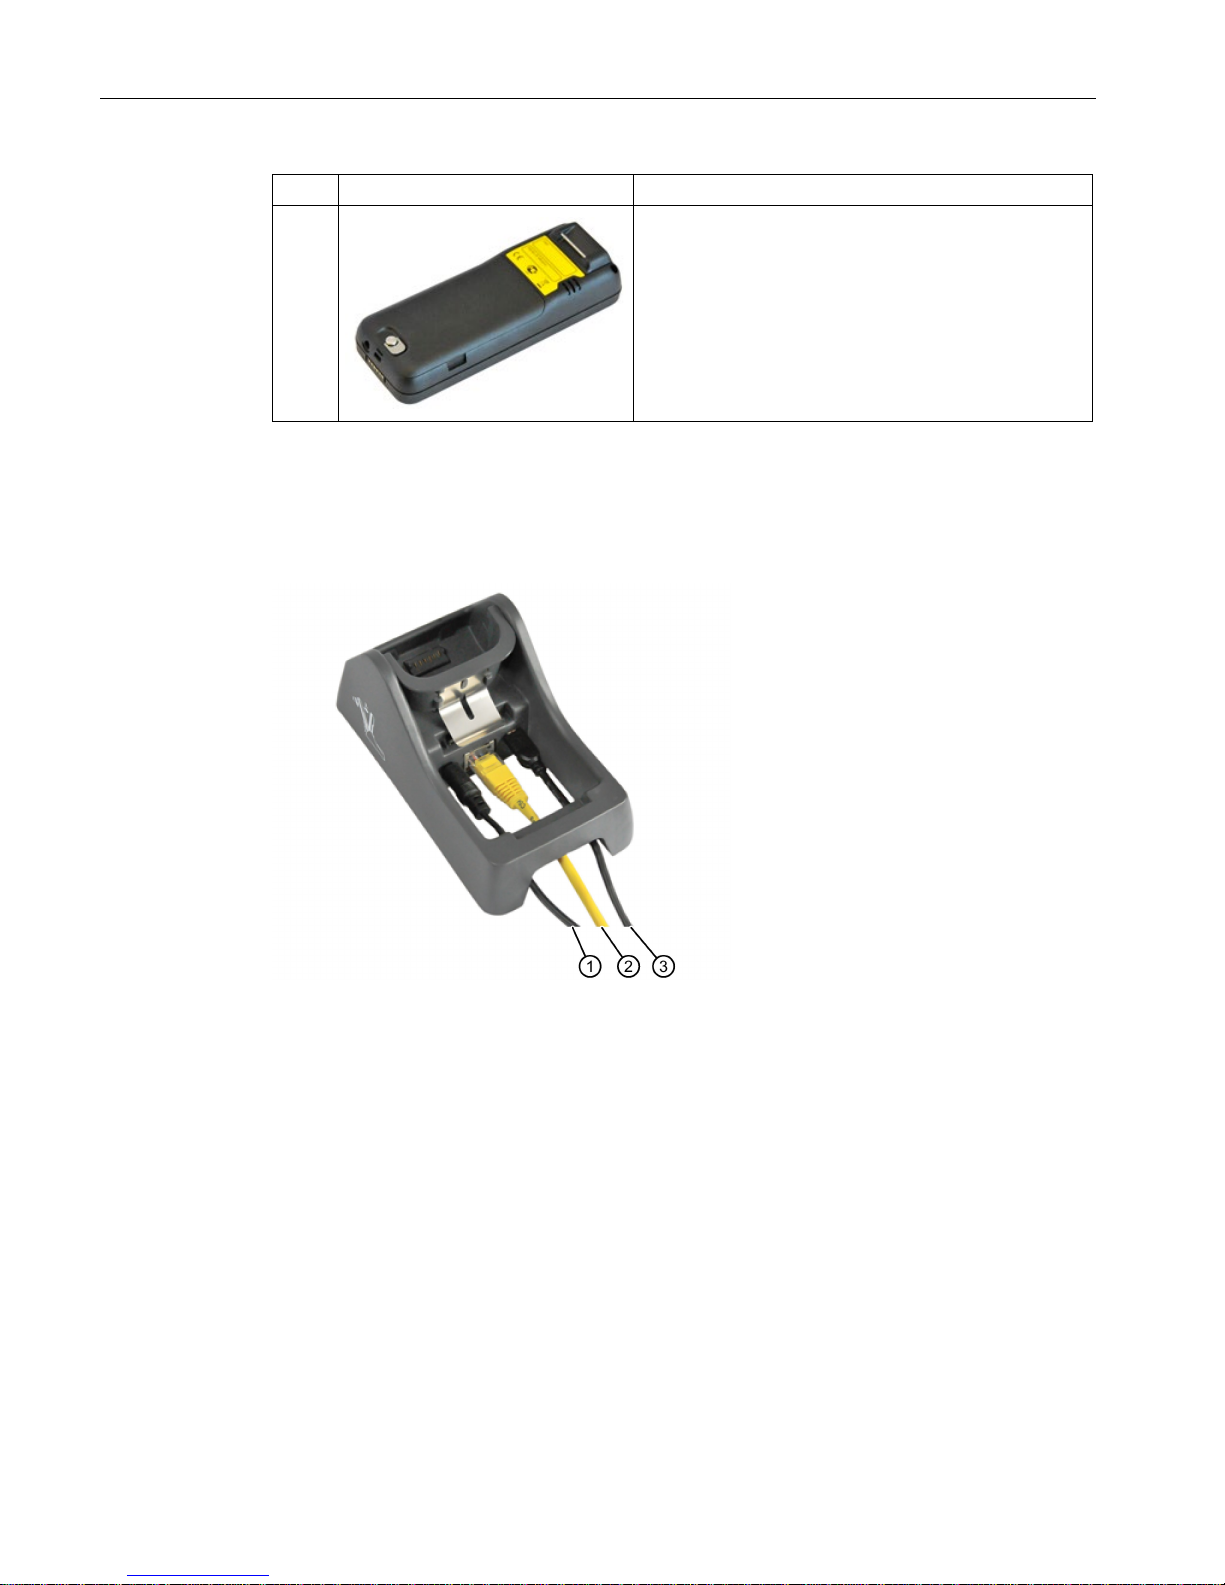
Close the charging/docking station as shown in the following figure.
①
Power supply (5 VDC)
②
Ethernet
③
Mini-USB
Figure 4-1 Connecting the charging station of the RF650M
You can use charging/docking station to:
● charge the SIMATIC RF650M mobile reader,
● charge a spare battery and
● connect the reader to the PC.
Page 15
Commissioning
4.1 Power supply
SIMATIC RF650M mobile reader
Operating Instructions, 04/2015, C79000-G8976-C404-01
15
4.1.3
Charging the device
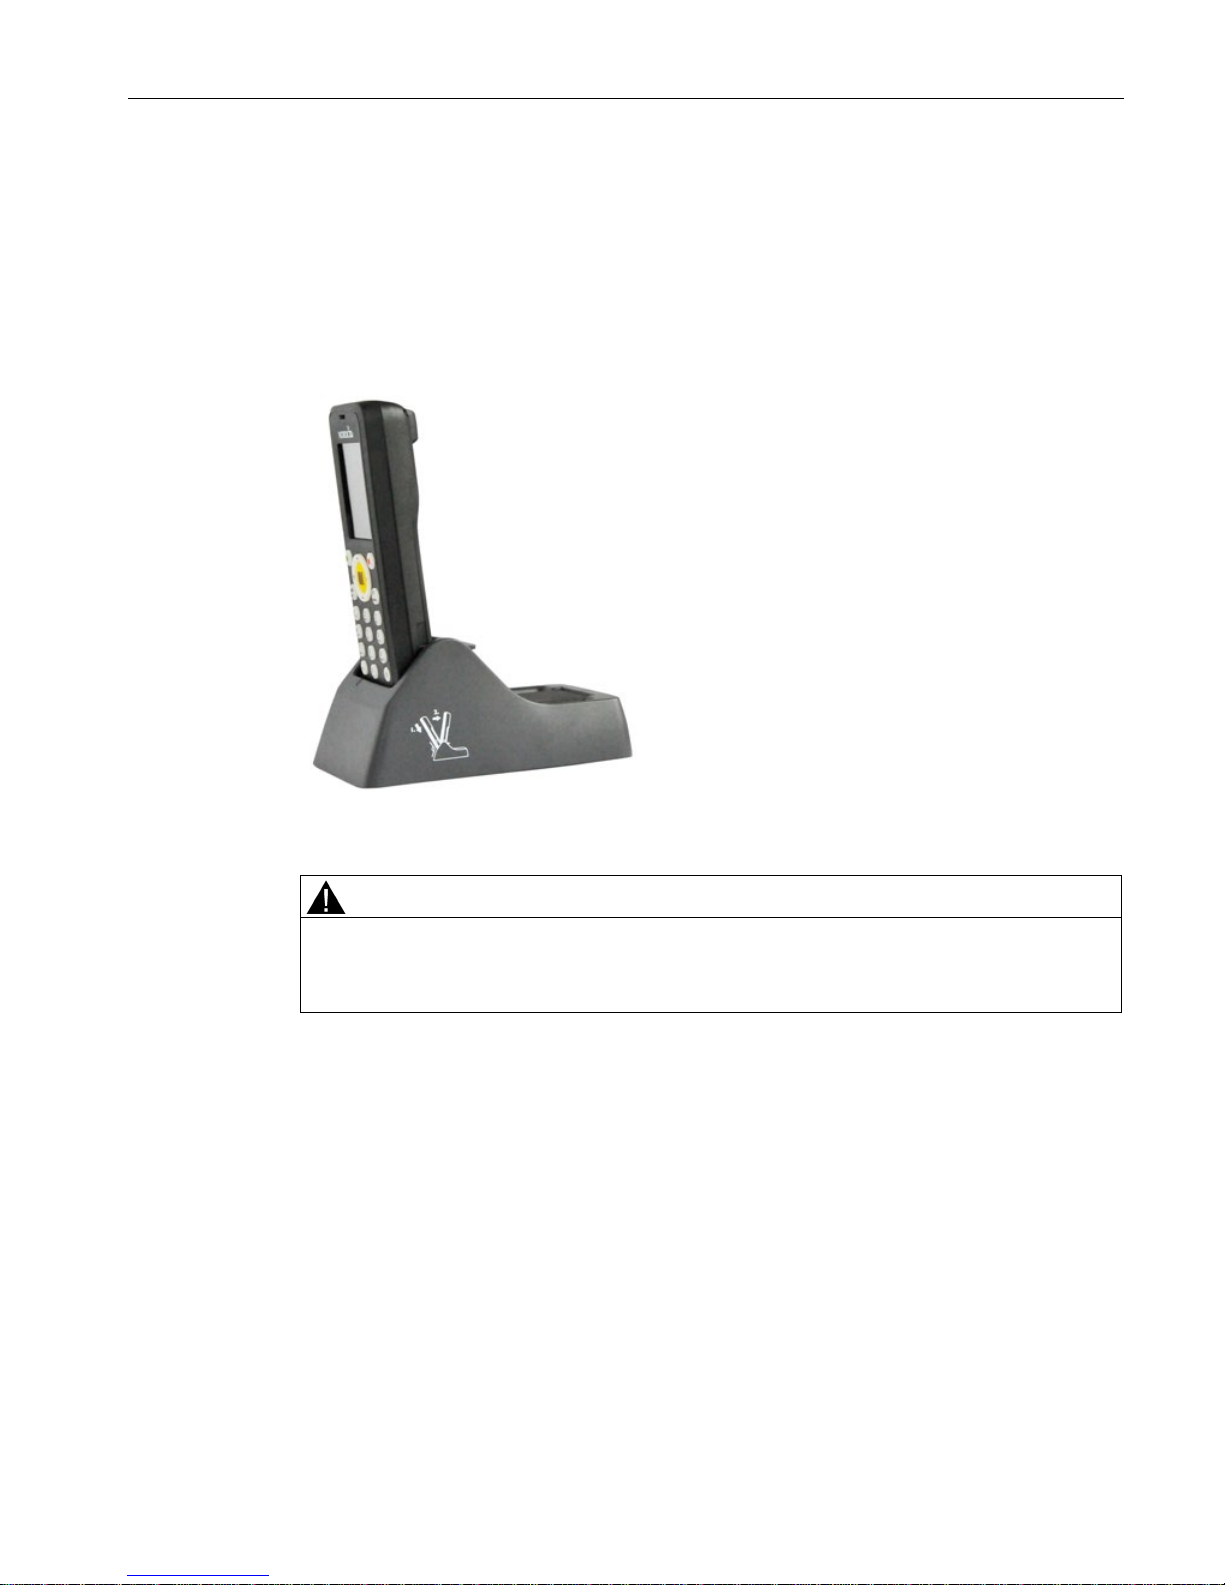
Complete charging of an empty battery takes approximately 5 hours.
Starting the charging operation
The charging operation is started as soon as you insert the mobile reader into the charging
station.
Figure 4-2 RF650M mobile reader in the charging station
WARNING
Explosion hazard when using a different charging station.
Use only the original charging station. Use of another charging station can result in
explosions and serious personal injury.
Page 16
Commissioning
4.1 Power supply
SIMATIC RF650M mobile reader
16 Operating Instructions, 04/2015, C79000-G8976-C404-01
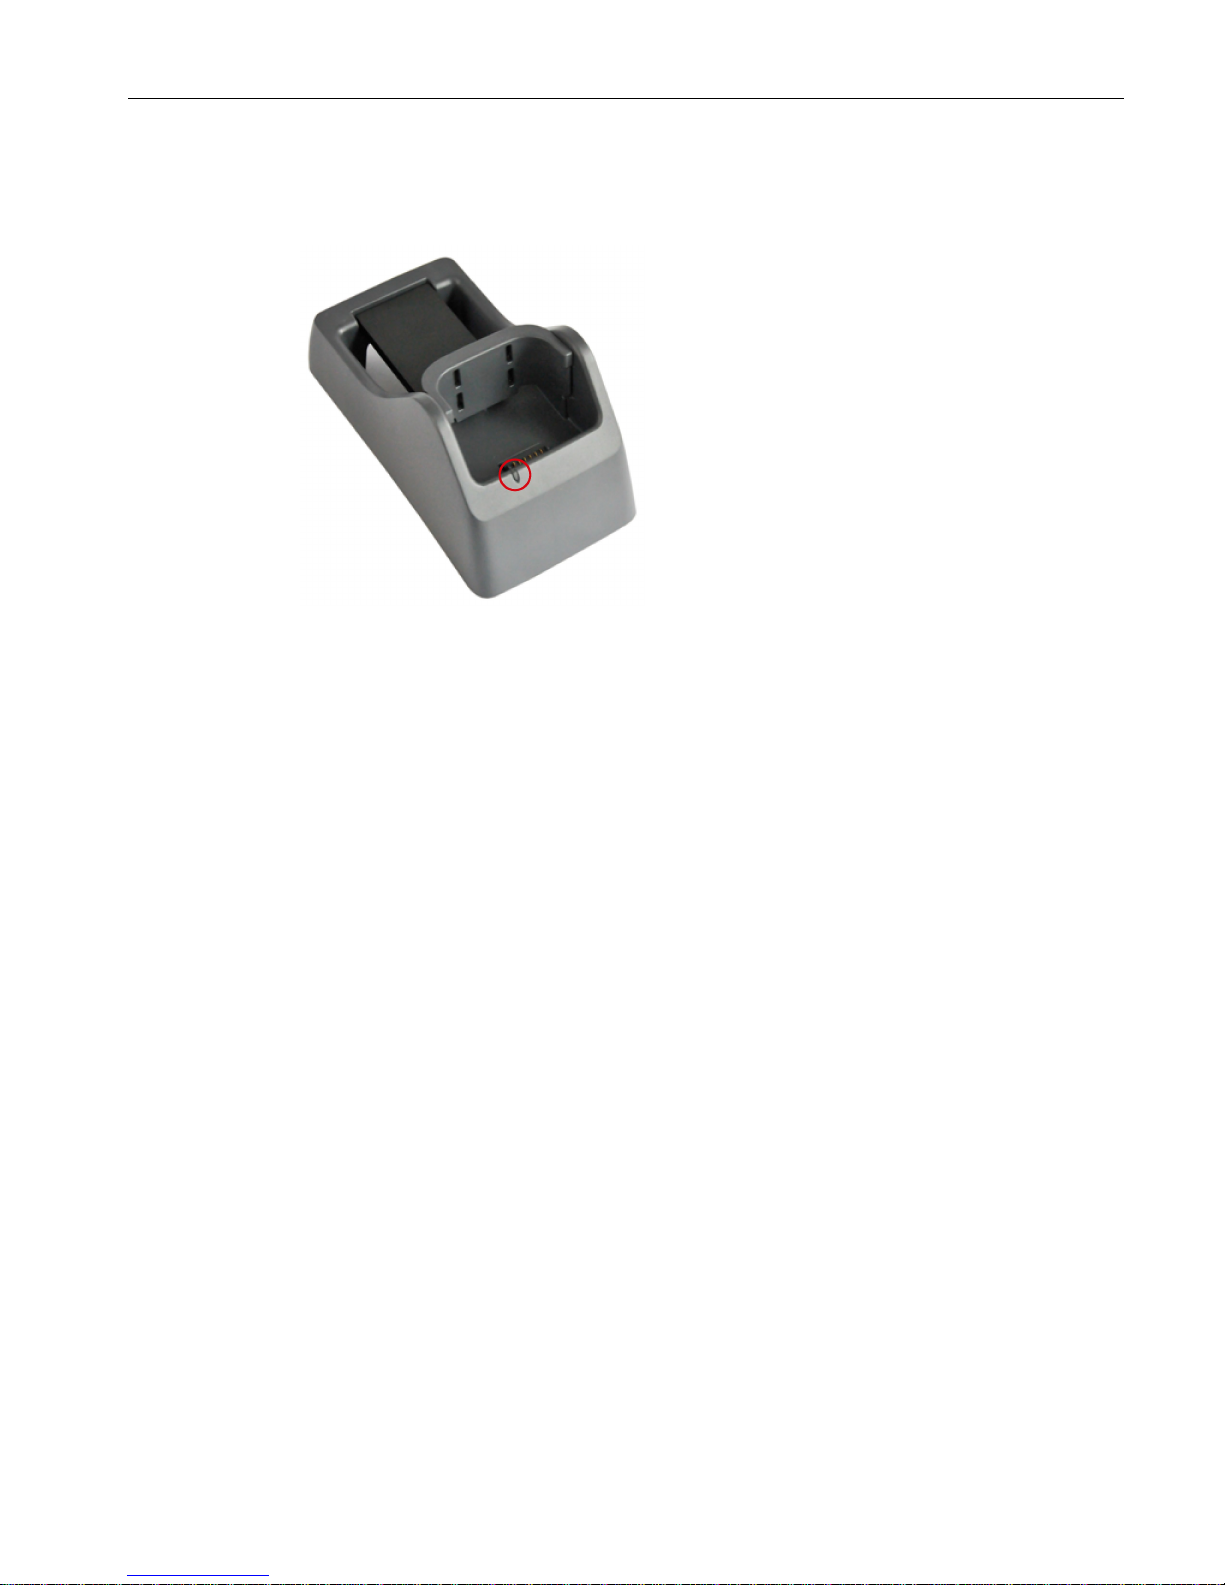
With the charging station, you can also charge the spare battery.
Figure 4-3 Charging the spare battery
Detecting the level of charge
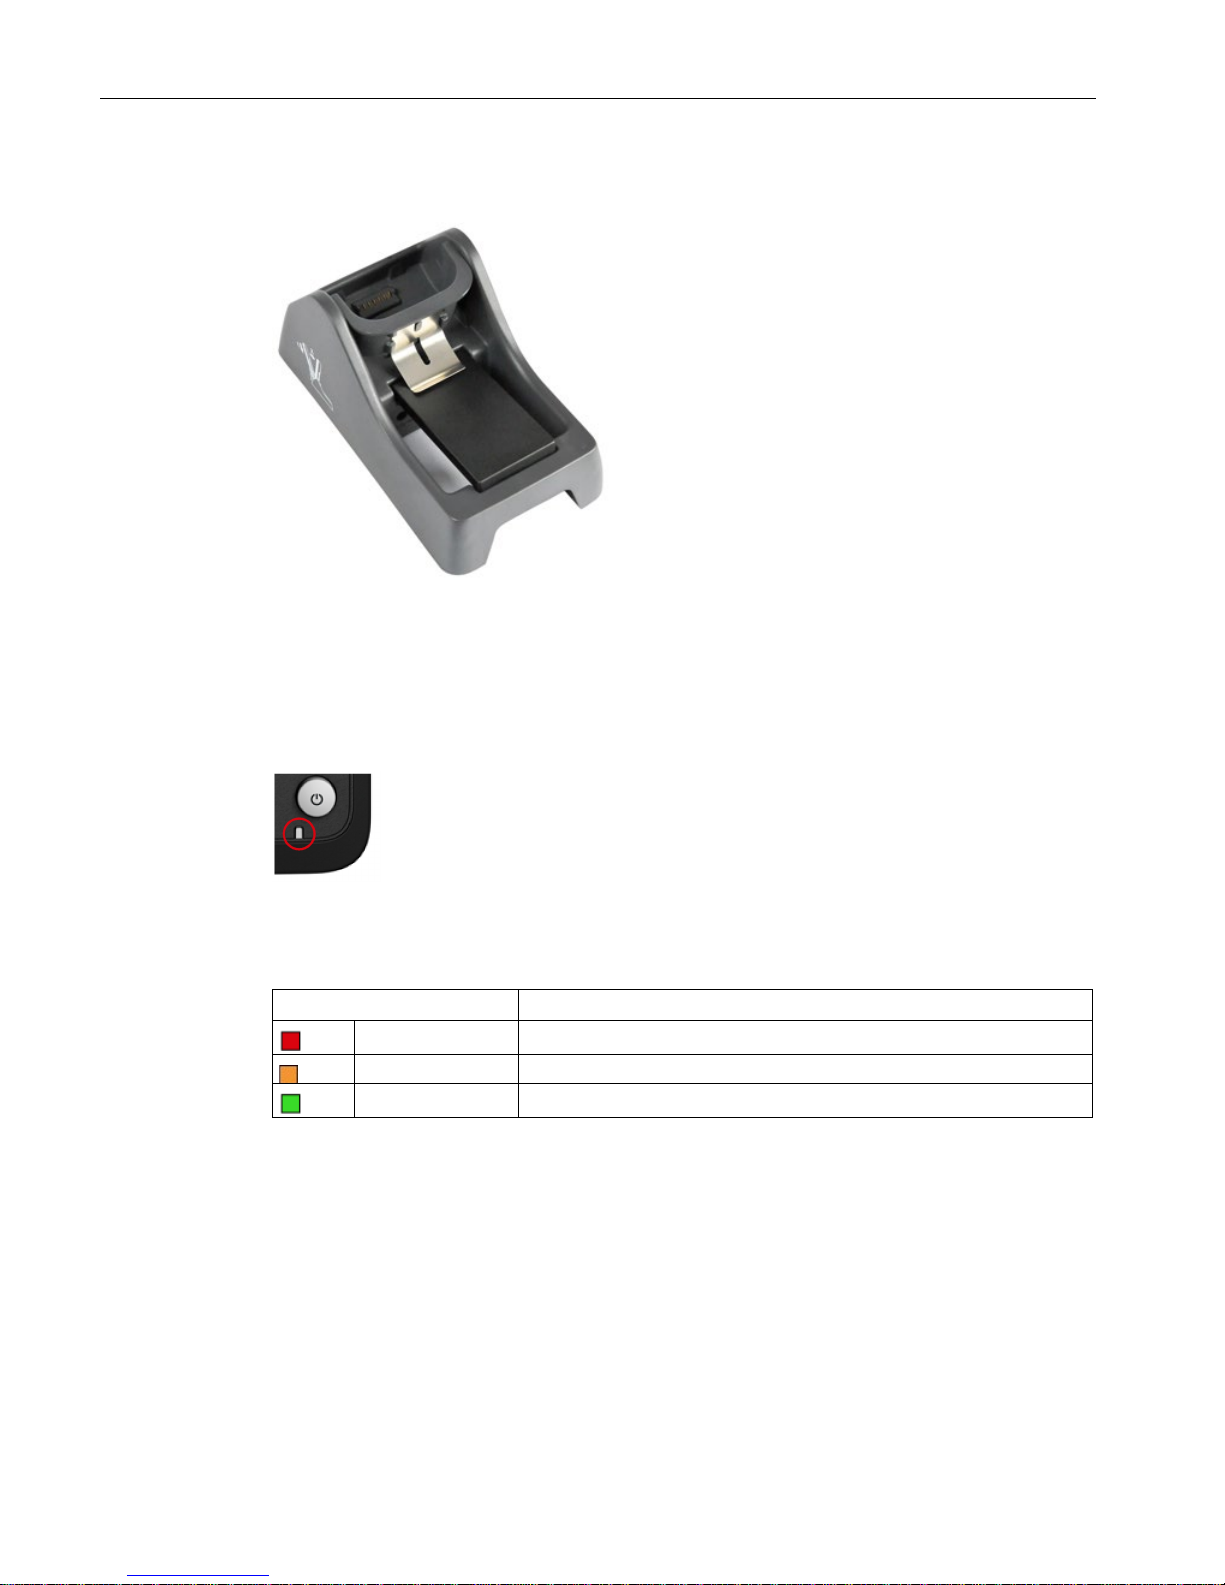
When the mobile reader is in the charging station, the charging status of the device is
indicated by the LED charging display of the reader:
Figure 4-4 LED display of the reader
Table 4- 2 LED charge indicator
LED color
Meaning
red Charge level ≤ 80%; charging active
Orange Charge level ≥ 80%; charging active
Green Charge level = 100%
Page 17
Commissioning
4.2 Scope of supply
SIMATIC RF650M mobile reader
Operating Instructions, 04/2015, C79000-G8976-C404-01
17
The LED charging display of the charging station indicates the charge status of the spare
battery.
Figure 4-5 LED display of the charging station
4.1.4
The backup battery
The backup battery in the SIMATIC RF650M is used to for retain the application data when
the main battery is empty. It is a rechargeable battery that is charged along with the main
battery.
Please note that the backup battery (in the case of an empty or removed main battery) can
only retain the data for a few minutes. It cannot be replaced because it is permanently
connected to the device.
4.2
Scope of supply
When supplied, the SIMATIC RF650M comprises the following components:
● SIMATIC RF650M mobile reader
● Power supply unit
● Battery
● Hand strap
● Input stylus as an aid to navigation on the touchscreen
Page 18
Commissioning
4.3 Switching the device On and Off
SIMATIC RF650M mobile reader
18 Operating Instructions, 04/2015, C79000-G8976-C404-01
4.3
Switching the device On and Off
Requirements for startup
The battery of the reader is charged and inserted as described in the section "Power supply
(Page 13)".
Note
Keep to the minimum charging time
Before switching the device on for the first time, you must insert the reader into the charging
unit and charge it for approximately five hours.
Switching the device on/off
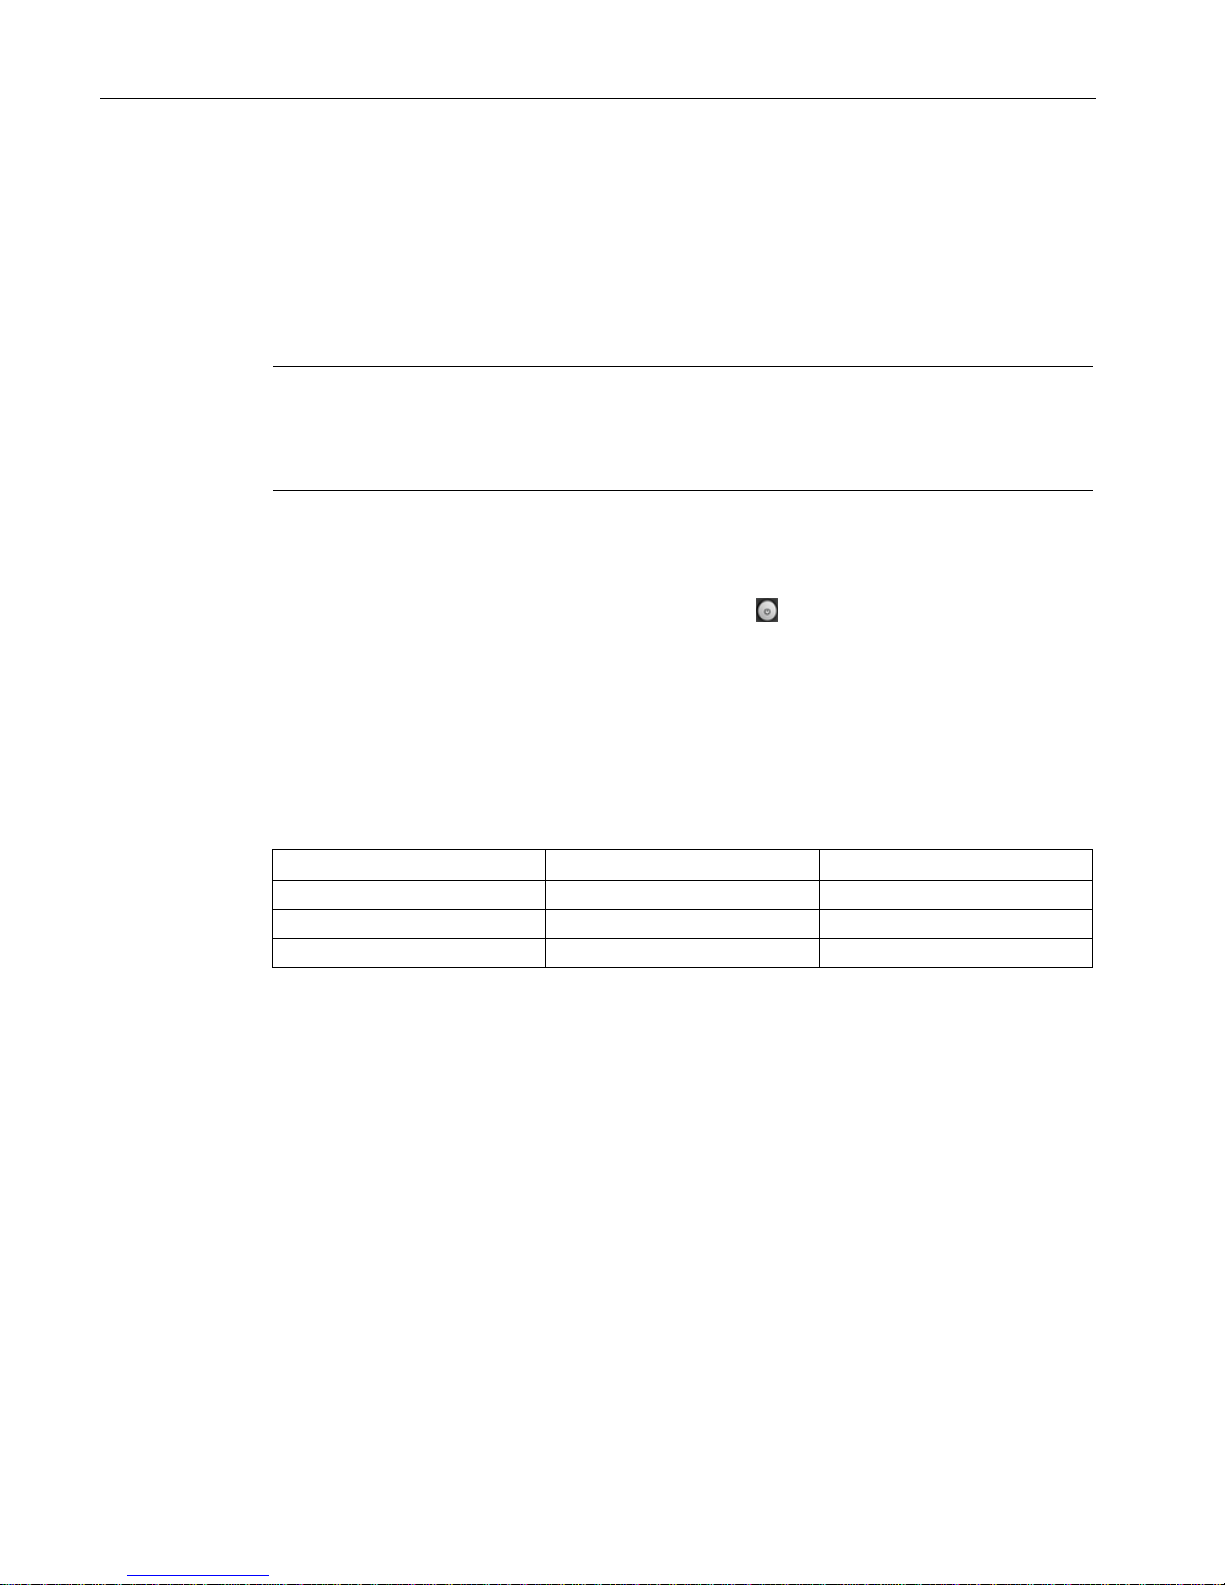
To switch the reader on or off, press the On/Off button . After switching on, the power-up
takes a few seconds.
Automatic shutdown of the device
The RF650M mobile reader has an automatic suspend mode to save energy. With this, the
reader is changed to the following power statuses step-by-step:
Table 4- 3 Factory settings: Power statuses of the reader
Power status
Power line operation
Battery operation
User Idle
1 minute
1 minute
System Idle
5 minutes
2 minutes
Suspend
--
5 minutes
After being switched on again, the reader starts in the last active menu entry.
You can manage the energy statuses with "Start > Settings > Control Panel > Power". For a
detailed description of the power statuses, refer to the section "Power Management (PM)
(Page 29)".
Page 19

Commissioning
4.4 Basic settings in the operating system
SIMATIC RF650M mobile reader
Operating Instructions, 04/2015, C79000-G8976-C404-01
19
4.4
Basic settings in the operating system
As the operating system the RF650M mobile reader uses "Microsoft Windows CE V6.0". The
following sections describe the setting options of the operating system.
4.4.1
Control Panel
The Control Panel contains a collection of applets to be able to access the settings of
various system properties, to configure these properties, to change their performance
characteristics and to enable or disable them.
4.4.1.1
Accessing the Control Panel
You can access the Control Panel either via the keyboard or using the touchscreen. The
following instructions relate to access via the keyboard. Before you begin close all
application windows on the screen.
To open the Control Panel, follow the steps below:
1. Press the Tab / Alt key so that the input focus is set on the start menu symbol to the left in
the taskbar in the lower left area of the screen.
2. Press the Activator button to open the start menu.
3. Select the menu command "Settings" with the navigation ring.
4. Press the right arrow of the navigation ring to open the "Settings" submenu.
5. Select the menu command "Settings" with the navigation ring.
6. Press the Activator key to open the Control Panel.
4.4.1.2
Opening/closing applets
Opening applets
To open applets, follow the steps below:
1. Select the required applet using the navigation ring.
2. Press the activator button to open the applet.
Closing applets
To close the applet and its window, you have two options:
● If you want to discard changes made to the configuration, press the Cancel/Esc key.
● If you want to adopt changes you have made, press the activator key.
Page 20

Commissioning
4.4 Basic settings in the operating system
SIMATIC RF650M mobile reader
20 Operating Instructions, 04/2015, C79000-G8976-C404-01
Note
Exceptions when closing applets
There are exceptions to the procedure listed above, such as the
applet for Network and Dial-
up Connections.
4.4.1.3
Closing the Control Panel
Follow the steps below to close the Control Panel:
1. Press the F / Mode key and then the Tab / Alt key. Following this, the "File" menu is
opened in the Control Panel.
2. Using the arrow at the bottom on the navigation ring, select the menu entry "Close".
3. Press the activator key to close the Control Panel.
4.4.1.4
Control Panel applets
Display
With the Display applet, you can change the representation of the window elements on the
screen and the desktop background picture.
Owner
This applet is mainly for information in conjunction with user identification. To enter user
information, the following tabs are available.
● Identification
Here you can specify general information (name, company and address) about the owner
of the device.
● Network ID
This user information is required for access to network resources.
Page 21

Commissioning
4.4 Basic settings in the operating system
SIMATIC RF650M mobile reader
Operating Instructions, 04/2015, C79000-G8976-C404-01
21
ClearType
Windows Embedded CE supports three types of text display technology. On of these is
ClearType. A ClearType applet refers to the text display technologies as "font antialiasing".
One of the font anti-aliasing methods is a ‘No Anti-Aliasing’. With the ClearType applet, from
these three text display technologies you can select the best possible look for a font on the
display. In addition, the applet gives you the option of fine-tuning the rendering method to
improve the rendering of your chosen font even further.
Note that the font rendering technology of your choice is enabled for all fonts in the system,
the look of one font may improve but the look of another on the display may not when text is
rendered using different fonts with the same text display technology.
Date/Time
In addition to the date and time settings, with the Date/Time applet you can change to time
zone of your device and enable or disable the automatic daylight saving time switchover.
Input area
With this applet you can change the appearance of the screen keyboard.
Error Reporting
Windows Embedded CE provides numerous technologies for calling up device status
information at the time of a program crash. You can enable or disable this system property
with the Error Reporting applet. You can also choose how much memory the Error Reporting
system may use for the report file.
Internet Options
This is a utility for configuration of the Internet Explorer. The Internet options can also be
called up using the "View" menu in the Internet Explorer.
Password
If you want to protect the reader from unauthorized access to the background system of the
RF650M mobile reader by third parties, you can protect the device with a password using the
Password applet. Password protection is enabled when the system is turned on or the blank
screen is reactivated. Both situations relate to the transition from a status with low power
consumption to the status with the highest possible power consumption; in other words the
"On" status. If you "enable password protection for screen saver" in the Password applet and
the blank screen (or the entire device) is turned on again due to user or system activity, you
will be prompted to enter your password to be able to use the system again.
To enter your password use the screen keypad to be sure of the characters that make up
your password. Entering the password using the keypad may prove difficult if, for example
you mix numbers, lowercase and uppercase characters. Note that you can also enter the
password when you log on using the screen keypad.
Page 22

Commissioning
4.4 Basic settings in the operating system
SIMATIC RF650M mobile reader
22 Operating Instructions, 04/2015, C79000-G8976-C404-01
Country and language settings
The "Regional Settings" applet includes the settings for supporting the national language
(NLS) in Windows Embedded CE and in particular the NLS implementation on the RF650M
mobile reader. NLS is responsible for date, time, calendar, numerical and currency formats.
The applet also provides options for selecting the user interface and input language. Support
of these functions by the mobile reader may be restricted.
Note
Saving changes permanently on the reader
To save changes to the regional settings permanently on the reader so that any changes
made are still active when you restart the device, you need to make a "Registry Backup"
("Start > Programs > Advanced settings > Registry Backup").
Volume and Sounds
Windows Embedded CE uses sound effects to make the user aware of certain events.
These events are divided into five categories: Application sounds, system events and
warnings, alarms and reminders, key clicks and touchscreen taps. The "Volume & Sounds"
applet describes system events and warnings as "events" and alarms and reminders as
"notifications". Keystrokes are referred to as "key clicks". Using the applet, you can allow or
prevent the sound effects depending on the source. The sound effects of the keystrokes and
touchscreen taps have a control for setting three volume levels. If you disable the sound
effects, you mute the sound.
The "Volume & Sounds" applet also provides the option for volume control of a loudspeaker
that affects all sounds generated by the system. In the "Sound" tab you can enable or
disable the event sources and the sound effects assigned to them. The tab also supports
you when selecting a sound effect for a particular event by allowing you to listen to the
available sounds using the relevant option. When you have selected the enabled event
sources and their corresponding sounds, you can save your selection as a scheme file.
Network and Dial-up Connections
The applet lists all communications methods that can either establish a connection or that
have already established a connection. As default, the applet shows the symbols "USB" and
"NXPWLAN1" that stand for the USB interface or for the 802.11b/c compliant wireless
receiver in the RF650M mobile reader. When you place the device in the charging station,
the symbol "AX887721" is displayed in the applet window. This stands for the Ethernet
interface of the charging station. Apart from the symbols mentioned above, the symbol
"COM6" is also displayed if the USB cable of the charging station is connected to a PC,
assuming that the PC is turned on.
Note
Display of the interface symbols
Note that the interface symbols "AX887721" and "COM6" are only displayed in the applet
window when the charging station is connected to the power line.
Page 23

Commissioning
4.4 Basic settings in the operating system
SIMATIC RF650M mobile reader
Operating Instructions, 04/2015, C79000-G8976-C404-01
23
The configuration options that provide various media symbols by tapping on them twice
apply to IP network information with the exception of the "USB" symbol. The symbol begins
either when a connection is established or allows this connection to be terminated assuming
it is connected. If you select the USB symbol and then select the menu element "Properties"
in the "Connection" menu of the applet window, you obtain access to its properties.
In practice, where you require the "Network and Dial-up Connections" applet to assign static
IP address information to the interfaces "NXPWLAN1" and "AX887721", DHCP is set as
default on the interfaces. With the "New..." option, the applet also provides the option of
establishing a new connection (e.g. VPN or a point-to-point connection).
Note
Access to the submenu
Note that you can also access this applet using the "S
ettings" submenu in the "Start" menu.
NID AutoStart Settings
Using this applet, you can enable or disable the service that controls the system when the
device is started up after being switched on. The purpose of the service is to start your
business application after the network connection has been established and to maintain
user-friendliness by both hiding unnecessary information on the screen and by preventing
the user from interfering in the connection establishment phase by pressing keys or touching
the screen. The applet has a help that informs you about the use of the applet.
NID Backlight
Using the applet for the NID Backlight, you can set the brightness of the screen and the
keyboard background lighting in different power statuses.
NID Indicators
A NID indicator provides two measuring bars on the screen. One bar shows the charge
remaining in the battery. The other bar displays the signal strength with which the mobile
reader communicates with the connected wireless LAN access point. The applet also
provides for options for arranging the bars on the display.
NID Keypad
With the NID Keypad applet, you can assign functions to certain keys:
● Changing one key to another
● Enabling/disabling the scan key
● Default mode of the alphanumeric keypad, in other words numeric mode, lowercase or
uppercase writing
● Enabling/disabling the keylock
Page 24

Commissioning
4.4 Basic settings in the operating system
SIMATIC RF650M mobile reader
24 Operating Instructions, 04/2015, C79000-G8976-C404-01
NID Link Watchdog
With this applet, you can put a service into operation for monitoring connectivity via wireless
LAN (WLAN) or by USB. This service informs the user about an interruption of the
connection by sounding a warning signal and displaying a corresponding message on the
screen. As soon as a functional communications channel is available again, the message
window disappears from the screen and a connected signal sounds.
The purpose of this service is to improve the user-friendliness of the device particularly in the
WLAN environment where an interruption of the connection can occur daily. One reason for
this may be that the device is outside the range of the WLAN coverage or there is a longer
bad signal transmission. The user therefore receives information about an interruption of the
WLAN connection that may be difficult to recognize when there are other problems. This
allows suitable measures to be taken immediately after interruption of the WLAN connection.
The Link Watchdog service can only be used when the computer can be reached via the
cable backbone network of the WLAN infrastructure. The monitoring does not require any
special software on this computer. Only its IP address and the TCP port number for sending
"polls" need to be set in the applet. Polling does, however, require an open TCP port on the
computer. In addition to this, the computer must also react to TCP connection initiations. An
alternative to the end device for monitoring connectivity is a Web server running on the
computer.
NOTICE
Blocking by firewall and NAT device
If there is a firewall, a NAT device or both between the RF650M mobile reader and the
computer sending the polls, it is possible that the service for monitoring the NAT connection
does not work if no changes to the configuration are made on the NAT device and on the
firewall.
NID Menu
The NID Menu is a support application that helps you with your work. With the NID Menu, a
number of applications can be selected and added to a menu displayed via the desktop. The
NID Menu provides the option of completely blocking access to the Windows desktop when
necessary.
In the "Settings" tab, you can specify the content of the NID Menu, add new programs and
delete programs that are not required. You can change the order in which the programs in
the NID Menu are displayed using the "Up" and "Down" buttons.
Select the "Enable Startup Menu" check box to start the NID Menu after starting up. You can
also specify an "Unlock Password" that is required by the user to exit the NID Menu. With
these settings, following startup the user only has access to the NID Menu and the programs
it contains.
You can add new programs with the "Add" button. The "New Entry" tab is opened. In this
tab, you can search for and name the exe file for starting the program. You can also assign
arguments for the program and specify a picture for the start button. The picture must exist in
png format and can have a maximum size of 48 x 48 pixels.
Page 25
Commissioning
4.4 Basic settings in the operating system
SIMATIC RF650M mobile reader
Operating Instructions, 04/2015, C79000-G8976-C404-01
25
"Search" tab
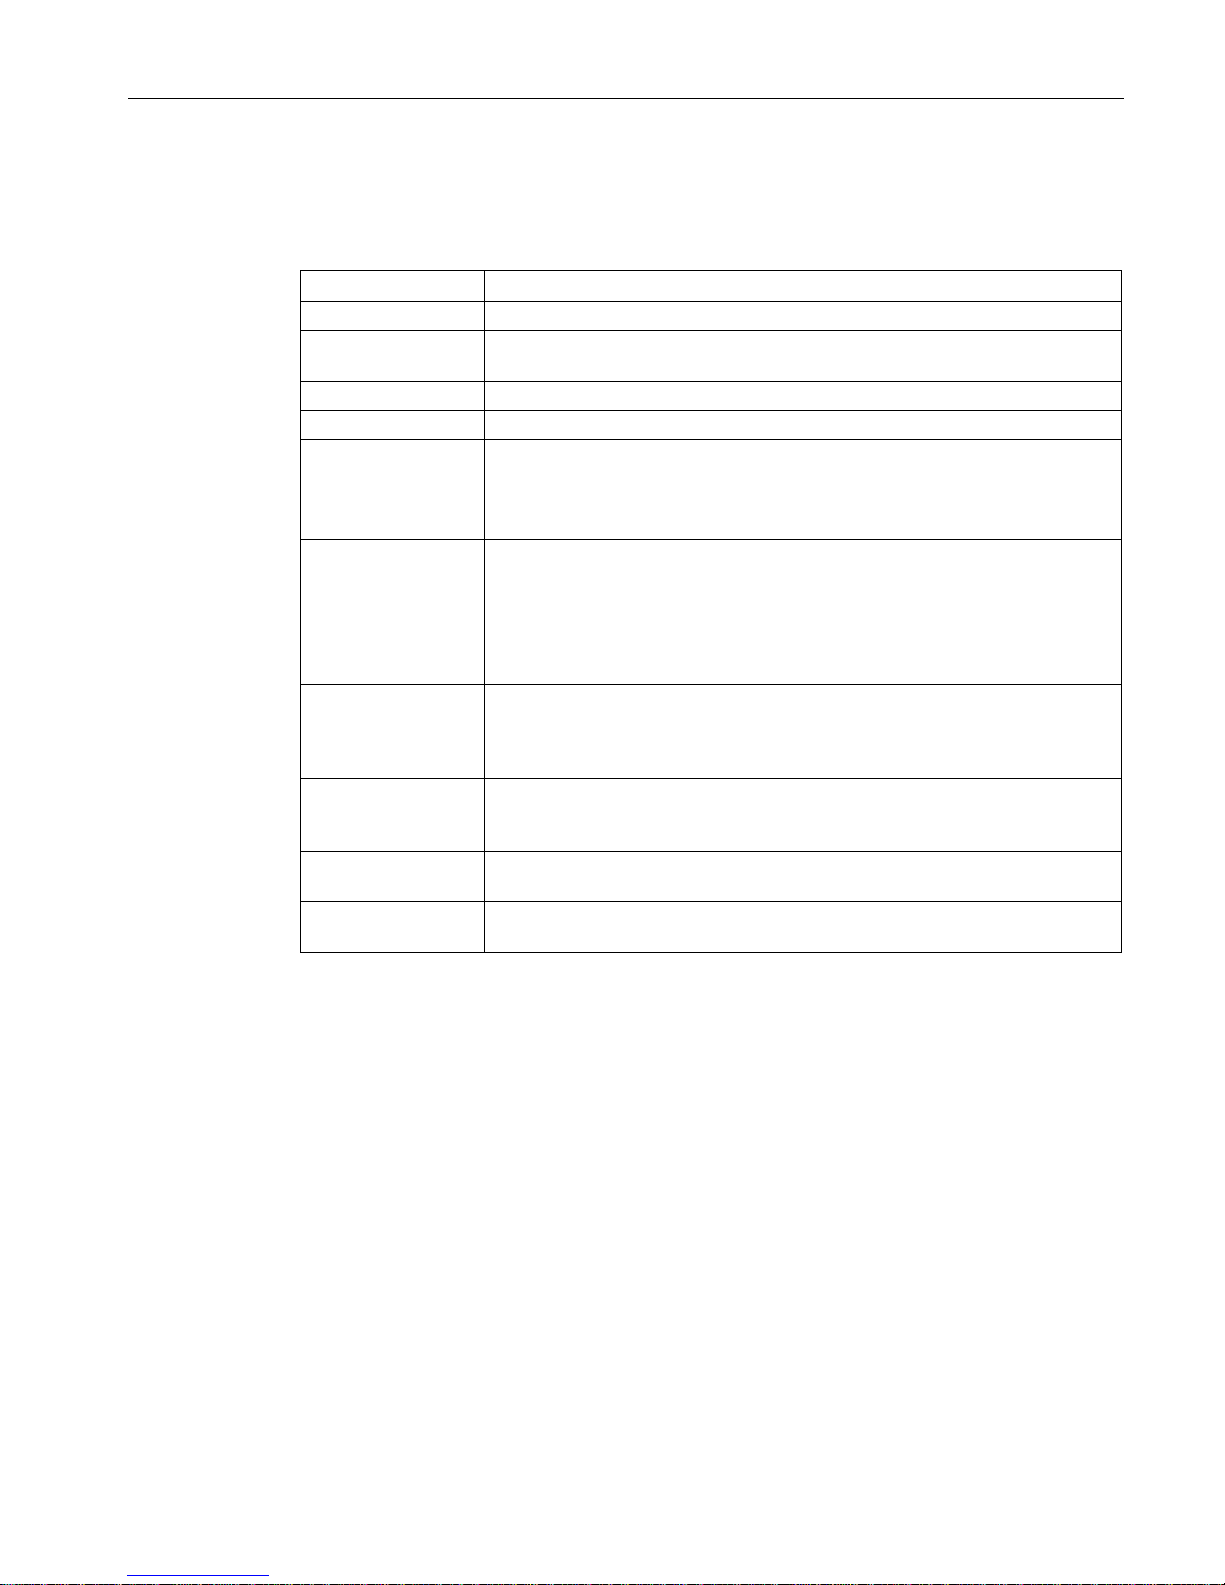
Table 4- 4 Setting options of the "Search" tab
Characteristic
Description
Programm Path
Path of the program file
Programm
Arguments
Path of the argument
Menu Title
Title of the menu
Picture Path Path of the symbol graphic
Dependent on
Network Connection
Select this check box to only allow the application to start when a network
connection exists. Select this option only when a network connection is absolutely necessary (e.g. browser-based applications).
If the application has an offline mode, this option should not be selected.
Program has Custom
Keymap
Select this check box if the keyboard is adapted for the specific user using the
MHL (Multiple Hardware Layer service / Nordic ID API) in your application.
This setting saves the current key assignment for all open applications. This
allows the correct use of the application at all times. If the program uses a
user-specific key assignment and this check box is not selected, problems will
occur in other applications.
Program Customizes
Scanner Config
Select this check box when the application sets up scanner applications for a
specific user using the MHL (Multiple Hardware Layer service / Nordic ID
API). Otherwise the scanner may not func
tion correctly for the other NID Menu
applications.
Force Fullscreen This option is only intended for applications that do not have integrated full-
screen functions. Select the check box to remove the bar of the NID Menu
from the screen when the application starts.
AutoStart Program Select this check box to start the selected program automatically after the
device starts up.
Start Topmost Select this check box to place the application window in the foreground in
front of any other open windows.
NID-OTF-Backup
The "NID-OTF-Backup" applet was developed to ensure the persistency of registry settings.
In this applet, you can specify intervals at which the device makes automatic backups of the
registry.
NID On/Off key
Using the "NID On/Off button" you can assign the various on/off functions to key of the virtual
keypad.
As default, when you press the On/Off button, the "Reboot.exe" file executes. You can save
changes to the keypad assignment in profiles.
NID RFID Reader
This applet contains the RFID settings of the "Settings (Page 53)" menu of the "RF650M"
software.
Page 26
Commissioning
4.4 Basic settings in the operating system
SIMATIC RF650M mobile reader
26 Operating Instructions, 04/2015, C79000-G8976-C404-01
NID SNTP Service
If your business application requires that the RF650M mobile reader is synchronized with the
time of day of your server, you can use the "NID SNTP Service" applet to make an SNTP
client (Simple Network Time Protocol) available on the mobile reader. The SNTP client can
obtain a time value from a source. Apart from the address of a time server, you can specify a
destination port on which the service is available when necessary.
To implement the SNTP client, polling parameters are also necessary. On the "Settings" tab
of the applet, you can adapt the following parameters:
● Update Interval
Specifies how often the client checks the time (in minutes or hours).
● Timeout
Specifies how long the client waits for a server response before sending the time check
request again.
● Retries
Specifies how often the attempt is repeated per update interval.
This applet also provides the option of adjusting the system time of the device. For time
queries, you can link the user dialog utility "AskTime" to the SNTP queries. To customize
(localize) text boxes of the user interface of AskTime, there are two tabs in the applet.
Apart from using AskTime, you are also instructed to start the SNTP client in the "Settings"
tab.
NOTICE
Saving the system time
The mobile reader is equipped with a real-time clock chip. This is supplied by the
rechargeable backup battery so that the system time is not lost during a restart.
NID Touchscreen
With this applet you can activate/deactivate the touchscreen.
PC Connection
With this applet you can enable or disable the PC connection that is based on the Microsoft
ActiveSync technology. The ActiveSync connection via USB is the standard medium on the
RF650M mobile reader.
The ActiveSync connection is only possible if you have installed Microsoft ActiveSync and
the USB driver for the ActiveSync connection provided by Siemens on your Windows PC.
The PC connection established via USB should then run in plug and play mode. Remember
that you cannot connect the USB cable directly to the device. Instead, connect the USB
cable to the charging station of the mobile reader (you will find more information on the
charging station and USB connection in the operating instructions of the charging station).
Page 27

Commissioning
4.4 Basic settings in the operating system
SIMATIC RF650M mobile reader
Operating Instructions, 04/2015, C79000-G8976-C404-01
27
Power
This applet is for the control of power status changes of the system from maximum to
minimum power consumption. The actual control is based on the adaptation of three timeout
periods. With all periods, the system must remain idle until the transition to a power status
with lower power consumption is possible. After three successive idle periods, the system
stops itself. Apart from controlling the power management of the device, the "Power" applet
provides information on the battery status and the power status of subsystems (e.g. the
wireless LAN adapter, audio system, barcode scanner).
The power statuses are described in the section "Power Management (PM) (Page 29)".
Storage Manager
This applet is used to manage the non-volatile memory ("DSK1:") on the device. The storage
space can be repartitioned using the applet. You can also format the entire volume after
dismounting it and delete all the existing partitions. Or you delete just one partition in
permanent storage.
Stylus
As the name "Stylus" implies, the applet makes the interfaces available for adapting your
interaction with the touchscreen. You can calibrate the touchscreen so that it not only
processes the double tap interaction, but also when you touch the screen with the stylus.
System
The "System" applet has two informative tabs. "General" and "Copyright". As well as these
informative tabs, the applet also has two further tabs "Memory" and "Device Name". In the
"Memory" tab, there is a trackbar slider that regulates the usage of the RAM memory
between program execution and storage capacity of the RAM-based file system on the
device. The default position of the slider is suitable in normal operation. Nevertheless,
situations may occur in which certain maintenance operations fail unexpectedly. In this case,
adjusting the use of the RAM between the storage space of the file system and the execution
storage space can help.
Windows Embedded CE supports dynamic name registration on a WINS server (Windows
Internet Naming Service). For the registration, the device needs to have a unique name in
the network. You can specify the device name in the "Device Name" tab.
Keypad
With the help of this applet, the auto-repeat property of the keys on the keyboard can be
enabled or disabled. You can also adjust the following parameters of the auto-repeat
function: Auto-repeat delay and auto-repeat rate.
Page 28

Commissioning
4.4 Basic settings in the operating system
SIMATIC RF650M mobile reader
28 Operating Instructions, 04/2015, C79000-G8976-C404-01
USB Profile
The "USB Profile" applet can be considered as a selector with which you can choose an
operating mode of the device via the USB connection. You can put the RF650M mobile
reader into operation via USB as follows:
● ActiveSync
● Mass Storage
● RNDIS
● Serial Port
● Disalbe
ActiveSync
As default, the mobile reader is operated via the USB cable in ActiveSync mode. This mode
is used to synchronize data between a local Windows desktop PC and a Windows CE device
via a USB connection. The mode also depends on the enable/disable parameter that you
can specify in the "PC Connection" applet of the Control Panel.
Note that data synchronization on computers with Windows Vista is not known as
"ActiveSync", however this data synchronization technology is part of a WMDC software
package (Windows Mobile Device Center) of Windows Vista systems.
Mass Storage
If you select the "Mass Storage" option, the mobile reader is treated as a USB mass storage
device by Windows when the reader is connected to the USB port of the computer. On the
Windows computer, the "Flash" folder of the root directory of the Windows CE file system of
the mobile reader is displayed. In this mode you can use the device or to be more precise
the flash folder of the device as a USB drive.
RNDIS
RNDIS (Remote Network Driver Interface Specification) is the protocol on which ActiveSync
communication is based since publication of version 4.0. The RNDIS mode on the device
combined with ActiveSync on the local Windows PC allow an IP connection via the serial
USB bus.
Serial Port
If you select the option "Serial Port", the computer recognizes the device as a virtual serial
port.
Disalbe
The USB function of the device is disabled.
If you require a cable IP connection to synchronize data between the application host system
and the mobile reader, the use of the Ethernet interface on the charging station of the mobile
reader is recommended instead of the USB interface and your own synchronization software
instead of the RNDIS option of the mobile reader. One reason for this is the complexity of the
ActiveSync technology and that its remote synchronization function can conceal security
risks.
Page 29

Commissioning
4.4 Basic settings in the operating system
SIMATIC RF650M mobile reader
Operating Instructions, 04/2015, C79000-G8976-C404-01
29
Dialing
Due to the current communications options of the RF650M mobile reader , the "Dialing"
applet is not necessary. The applet may be useful with future models. Currently, however, it
is not possible to set dialing properties for the communications options of the device.
Certificates
Windows Embedded CE provides a certificate store (this means three logical stores) for
keeping and managing certificates. With the aid of the store and its application programming
interface, Embedded CE applications can verify, list, call up, save and delete certificates. For
example a configuration-free wireless subsystem when acting as supplicant uses the store
when EAP-TLS is selected as the authentication method for wireless access. This means
that the Certificate applet is an instrument for the following:
● Viewing certificates and their contents in the store
● Deleting certificates from the store
● Adding certificates to the store
4.4.1.5
Power Management (PM)
In the RF650M mobile reader, settings relevant to power are controlled by the power
management. (PM). One of the tasks of the PM is to save battery power by reducing the
power consumption. The reason for reducing power consumption is the inactivity of the user
or the system. For example as default, the PM reduces the screen brightness when there is
neither input by pressing keys or using the stylus on the screen for a specified period of time.
When, however, there is user action the PM activates the system. If, for example, if the
screen is turned off, the PM instructs the system to turn on the screen with the adjusted
maximum brightness if a key is pressed or the screen is touched.
The PM is controlled by the Control Panel applet "Power (Page 27)".
Power statuses
The RF650M mobile reader has two essential power statuses; in other words it is either on
or off. It can also be operated with alternating current or with a battery. From the user's point
of view, the system has four different power statuses:
● On
● User Idle (display is darkened)
● System Idle (power saving mode)
● Suspend (standby)
NOTICE
Definition of the "Off" status
In this manual, "Suspend" and "Idle" relate to the "Off" status of the device; in other words
when the mobile reader is turned off.
Page 30

Commissioning
4.4 Basic settings in the operating system
SIMATIC RF650M mobile reader
30 Operating Instructions, 04/2015, C79000-G8976-C404-01
When the mobile reader is in the idle status for a longer period of time, as default it changes
via "User Idle" and "System Idle" to the "Suspend" status. For the transition from the "On"
status to the "Suspend" status, the PM uses three inactivity timers. As soon as all three
timers have expired, the PM stops the mobile reader. The device can therefore not only be
stopped using the "Shutdown" dialog window that is called with the On/Off button. By default,
the PM tends to change the device to the "Suspend" status to save power when it is running
on the battery. If the battery cover is removed, the mobile reader changes automatically to
the "Suspend" status. You can also turn off the Mobile reader using the "Shutdown" dialog
window regardless of the active power status; in other words, it does not matter whether the
device is in the "On" status or in a transitional status.
Power status "On"
When you use the mobile reader actively, it is in the "On" status. If the device is in a different
status from the "On" status, the PM changes the system to the "On" status as soon as you
start to use the device and, for example turn on the stopped device. You can recognize the
"On" status because the screen is turned on with the adjusted maximum brightness.
The device exits this status if you turn it off or a "User Idle" timer expires. When the timer
expires, the system changes to the power status "User Idle". If the setting "Never" is
enabled, the timer does not expire. The device remains in the "On" status until it is turned off.
Power status "User Idle"
"User Idle" is a transitional status. This status serves only to reduce power consumption. At
the same time, the device gives the impression of being still turned on. Normally the
transition to the "Idle" status can be recognized because the screen brightness is reduced.
You can return the device to the "On" status by touching the screen or pressing a key.
Otherwise, after a specified timeout the device changes to the "System Idle" status in which
the device uses less power because it switches off the screen. If, however, an application is
running on the device for which the system needs to remain in the current power status, PM
does not change the power status to "System Idle".
Power status "System Idle"
"System Idle" is a transitional status. Changing to this status is only possible when the
system idle timer has expired. The system idle timer also has the setting "Never". If this is
set, the system does not change to the "System Idle" status but remains in the "User Idle"
status until the user performs an action on the device.
Under certain circumstances, the statuses "System Idle" and "Suspend" may be difficult to
distinguish since the power statuses appear similar from the outside. If the device appears to
be turned off, the best thing is to press the On/Off button to change it to the "On" status. If
the "Shutdown" dialog window appears on the screen, press the On/Off button to close the
window. When the dialog window "Shutdown" is displayed, this indicates that the device was
in the "System Idle" power status.
The device remains in the "System Idle" power status and waits for the timeout of the
Suspend timer as long as no system or user activity occurs. As soon as the Suspend timer
expires, the device is stopped by the PM.
Page 31

Commissioning
4.4 Basic settings in the operating system
SIMATIC RF650M mobile reader
Operating Instructions, 04/2015, C79000-G8976-C404-01
31
Power status "Suspend"
When the reader is switched off, it is suspended. This is for the simple reason that the device
cannot be turned off completely. Instead, the critical parts of the system's electronics remain
powered after turning off the device. If the device changes via the "Shutdown" dialog window
to "Sleep", it is suspended.
The PM stops the device as soon as the "System Idle" status is reached and a Suspend
timer has expired. The Suspend timer has the setting "Never". If this value is set, the PM
does not suspend the mobile reader.
You can recognize the suspended status by the blank screen and that the device does not
react when a key is pressed. The exception to this is pressing the En/Off button that turns on
the screen. The device therefore only exits this status when the On/Off button is pressed.
When the device is operated with alternating current, it cannot be changed to the suspended
status.
Page 32

Commissioning
4.4 Basic settings in the operating system
SIMATIC RF650M mobile reader
32 Operating Instructions, 04/2015, C79000-G8976-C404-01
Page 33
SIMATIC RF650M mobile reader
Operating Instructions, 04/2015, C79000-G8976-C404-01
33
5
5.1
The keypad
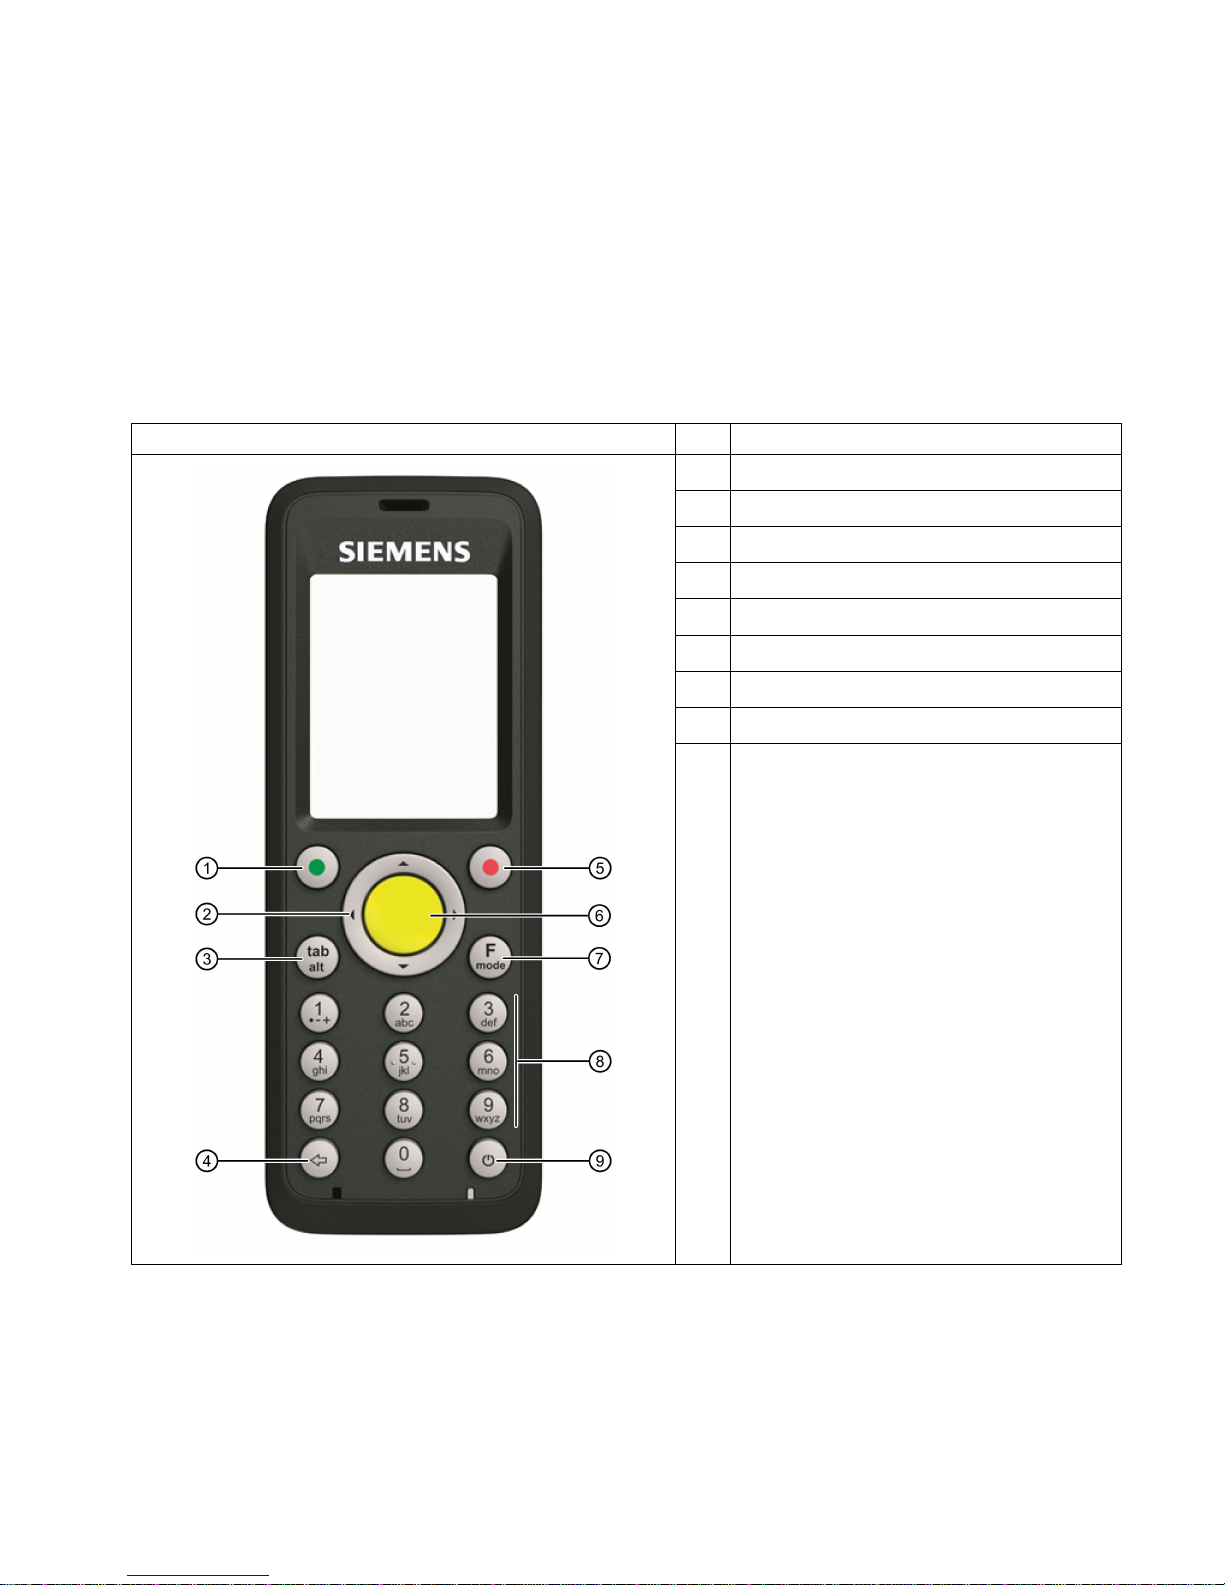
Table 5- 1 Keypad overview of the SIMATIC RF650M
SIMATIC RF650M
Pos.
Key label
①
Activator key
②
Navigation ring
③
Tab / Alt key
④
Delete key
⑤
Cancel / Esc key
⑥
Scan key
⑦
F / mode key
⑧
Alphanumeric keypad / function keys
⑨
On / Off key
Page 34

Operation
5.1 The keypad
SIMATIC RF650M mobile reader
34 Operating Instructions, 04/2015, C79000-G8976-C404-01
Basic functions when navigating with the keypad
Using the keypad or the touchscreen, you can navigate within the operating system and the
"RF650" software.
The following keys handle the most important basic functions when navigating in the user
interface:
● With the Tab / Alt key, you change between the taskbar and desktop in the operating
system.
● With the Activator key, you open the selected menu or program.
● With the navigation ring you navigate through the user interface.
● With the Cancel / Esc key you return to the higher-level menu/menu command.
The following sections describe the functions of all keys in detail.
5.1.1
Activator key
With the Activator key, an operation is accepted or activated. In the conventional sense it
provides the same function as the Enter key. For example, the key moves the cursor to the
next line when writing.
5.1.2
Navigation ring
The navigation ring controls cursor movements in editing mode and controls the selection of
entries grouped together by window elements (e.g. menus, lists or desktop icons
representing applications or utilities). The function of the ring can be compared to that of the
arrow keys on a PC keyboard.
5.1.3
Tab / Alt key
This key has two modes; in other words it is a Tab key and an Alt key. Tab is the default
function of the key. To use the Alt function the F / Mode key needs to be pressed once
before this key is pressed.
Normally, the Tab key moves the cursor a preset number of spaces or to the next tab stop in
text to be edited. The Tab key also has navigation properties by controlling the input focus
movements in window elements. Input focus means that the window element with the input
focus is enabled to receive messages from the user pressing the keys.
The Alt key is often pressed in combination with other keys (Alt + key combination) and the
action that results normally depends on the application. By pressing the Alt key various
window menus can be called up.
Page 35

Operation
5.1 The keypad
SIMATIC RF650M mobile reader
Operating Instructions, 04/2015, C79000-G8976-C404-01
35
5.1.4
Delete key
By pressing the Delete key, the previous icon closest to the cursor is deleted. The Delete key
has an automatic repeat property when the key is held pressed. Note that the key retains its
delete function regardless of the mode of the alphanumeric keypad.
5.1.5
Cancel / Esc key
In general, the Cancel / Esc key cancels the selection or the currently running operation like
an Esc key on a conventional PC keyboard.
5.1.6
Scan key
Pressing the Scan key enables the scan function of the reader. All the transponders in the
antenna field are scanned and displayed.
5.1.7
F / mode key
The key is a selection key with several modes. Using the "F / Mode" key, alphanumeric keys
can be changed to numeric or alphabetic and numeric keys. The key also serves to change
between uppercase and lowercase writing. In addition to this, the numeric keys operate as
function keys and the Tab / Alt key as an Alt key.
To use the "F" function of the key, this needs to be pressed once. To change the mode, the
key needs to be pressed twice in succession. Note that the "F" function of the key is not
coupled with the "mode" function. After pressing the key once, the numeric keys operate as
function keys regardless of the mode of the alphanumeric keypad.
The function of the key is explained in greater detail along with the particular key or keys that
can be controlled with the F / Mode key.
5.1.8
Alphanumeric keypad / function keys
Alphanumeric keypad
Modes of the alphanumeric keypad
An alphanumeric keypad can be used in three different modes:
● In numeric mode
● In lowercase mode
● In uppercase mode
Page 36

Operation
5.1 The keypad
SIMATIC RF650M mobile reader
36 Operating Instructions, 04/2015, C79000-G8976-C404-01
The mode of the alphanumeric keypad can be changed by pressing the F / Mode key twice
in succession. The mode of the alphanumeric keypad is changed in the following order:
1. From the numeric mode to the lowercase mode
2. From the lowercase world to the uppercase mode
3. From the uppercase mode back to the numeric mode
Alphanumeric keys in the numeric mode
As default, the alphanumeric keypad is in numeric mode; in other words, when a key is
pressed only numbers are entered. In this mode, holding down the key enters the number
until the key is released (automatic repeat).
Function keys
On the keypad of the RF650M mobile reader there are the function keys F1 to F10. After
pressing the F / Mode key (the "F" function of the key), every numeric key operates as the
function key with the corresponding number. If, for example, the F / Mode key and the "4"
key are pressed one after the other, this corresponds to pressing the "F4" key on a PC
keyboard. Note that F10 is activated after pressing the "F / Mode" and "0" keys one after the
other. The function keys can be accessed regardless of the mode of the alphanumeric
keypad.
5.1.9
On / Off key
Turning the device on
To turn the device on, press the On/Off button. The system is ready for operation without
rebooting. The first time the device is uses is, however, an exception to the turn on
procedure described here since the mobile reader initially runs a system start after pressing
the On/Off button.
Turning the device off
Requirements: The mobile reader is battery-operated and the operating system is running.
Follow the steps below to turn the device off:
1. Press the On/Off button.
However, do not hold the button pressed down. The "Shutdown" dialog window is then
displayed on the screen of the device.
2. Press the Activator key. The system changes to the idle mode.
Page 37

Operation
5.1 The keypad
SIMATIC RF650M mobile reader
Operating Instructions, 04/2015, C79000-G8976-C404-01
37
The "Shutdown" window provides more options than simply shutting down the device. The
default option changes the mobile reader to a status in which power consumption is at its
lowest (idle mode). The key sequence "On/Off button" and "Activator key" is adequate to turn
off the device.
Table 5- 2 Shutdown options of the reader
Options
Description
Remark
Sleep 1) The device changes to the idle
mo
de. After exiting the idle mode, the
reader starts in the last active menu
entry before the On/Off button was
pressed.
Note 1:
The power management in the Control Panel influences the depth of the
idle mode. For more information,
refer to the section "Power Management (PM) (Page 29)".
Note 2:
The device does not change to the
idle mode when it is in the docking
station.
Warm Boot 2) The content of memory and unsaved
registry contents are retained (including RAM memory). All unsaved data
in all running programs is lost.
Note 1:
The device retains all settings also
those that have not been saved.
Windows CE is simply restarted.
Note 2:
Some applications/functionalities
need to be restarted so that the new
settings are valid.
Note 3:
Do not reopen the PAK files.
Cold Boot The content of the RAM memory is
deleted and the device is reset to its
initial status. All unsaved registry
entries are lost.
Note 1:
Restart Windows CE and delete all
the settings that have not been
saved.
Note 2:
Open all PAK files.
Reload Windows CE RAM is deleted and the device is
reset to its initial status. All unsaved
registry entries are lost. The device
loads Windows CE from the flash
memory into RAM.
Note 1:
Load Windows from the flash and
then perform a "Cold Boot".
Power Off The device is completely turned off.
Select this option if you need to store
the device for a longer period of time
without loading it.
Note 1:
Mode for long-term storage to protect
the battery from total drainage.
Note 2:
Wakes up "Reload Windows CE".
1)
Default when the mobile reader is not in the charging station.
2)
Default when the mobile reader is in the charging station.
Page 38

Operation
5.2 The touchscreen
SIMATIC RF650M mobile reader
38 Operating Instructions, 04/2015, C79000-G8976-C404-01
5.2
The touchscreen
The display of the SIMATIC RF650M is designed as a touchscreen. You can easily enter
commands by touching it with the stylus.
5.2.1
Stylus and touchscreen
The simplest option for navigating through the Windows CE desktop and the window of the
auxiliary programs is to navigate using the touchscreen. To allow you to navigate using the
touchscreen, the RF650M mobile reader is equipped with a stylus.
Figure 5-1 Stylus
The stylus and touchscreen can be used in much the same way as a mouse. By pressing the
stylus on the touchscreen, the same result is achieved as when clicking with the left mouse
button on a Windows PC. Clicking with the right mouse button, on the other hand, is not as
obvious. In the Windows CE desktop window, you click with the right mouse button by
tapping and holding with the stylus. This procedure does not have the same effect with the
taskbar. To "right click" the taskbar, you need to hold down the "Alt" key and tap on the
taskbar at the same time. It therefore depends on the Windows CE application which
sequence is selected for a right click.
5.2.2
Screen keypad
Windows CE provides a control element that simulates the keypad on the touchscreen. With
the key sequence F / Mode key and the Activator key, the screen keypad is displayed (and
hidden). Characters are entered by tapping on the screen keys and appear in the input box
in just the same way as when entering using the alphanumeric keypad.
Note
Enabling/disabling the screen keypad
Note that the availability of the screen keypad is indicated by a corresponding icon in the
taskbar. By
tapping on the icon, the screen keypad is turned on or off.
Page 39

SIMATIC RF650M mobile reader
Operating Instructions, 04/2015, C79000-G8976-C404-01
39
6
6.1
Starting "RF650M" software
After you turn on the RF650M mobile reader the first time, the "RF650M" software is started
automatically. When you exit the "RF650M" software, you can call it up again via the desktop
or the Start menu.
You can access the software either using the keypad or the touchscreen. The following
instructions relate to access via the keyboard.
Starting the software using the desktop
Follow the steps below to start the "RF650M" software using the desktop:
1. Press the Tab / Alt key so that the input focus is set on one of the desktop icons.
2. Using the navigation ring, select the icon of the RF650M software.
3. Press the activator key to start the software.
Starting the software using the Start menu
Follow the steps below to start the "RF650M" software using the Start menu:
1. Press the Tab / Alt key so that the input focus is set on the start menu symbol to the left in
the taskbar in the lower left area of the screen.
2. Press the Activator button to open the start menu.
3. Select the menu entry "Programs" with the navigation ring.
4. Press the right arrow of the navigation ring to open the "Programs" submenu.
5. Select the menu entry "RFID" with the navigation ring.
6. Press the right arrow of the navigation ring to open the "RFID" submenu.
7. Press the right arrow of the navigation ring to select the menu entry "RF650M".
8. Press the activator key to start the software.
Page 40
"RF650M" software
6.2 Menu overview and functions
SIMATIC RF650M mobile reader
40 Operating Instructions, 04/2015, C79000-G8976-C404-01
6.2
Menu overview and functions
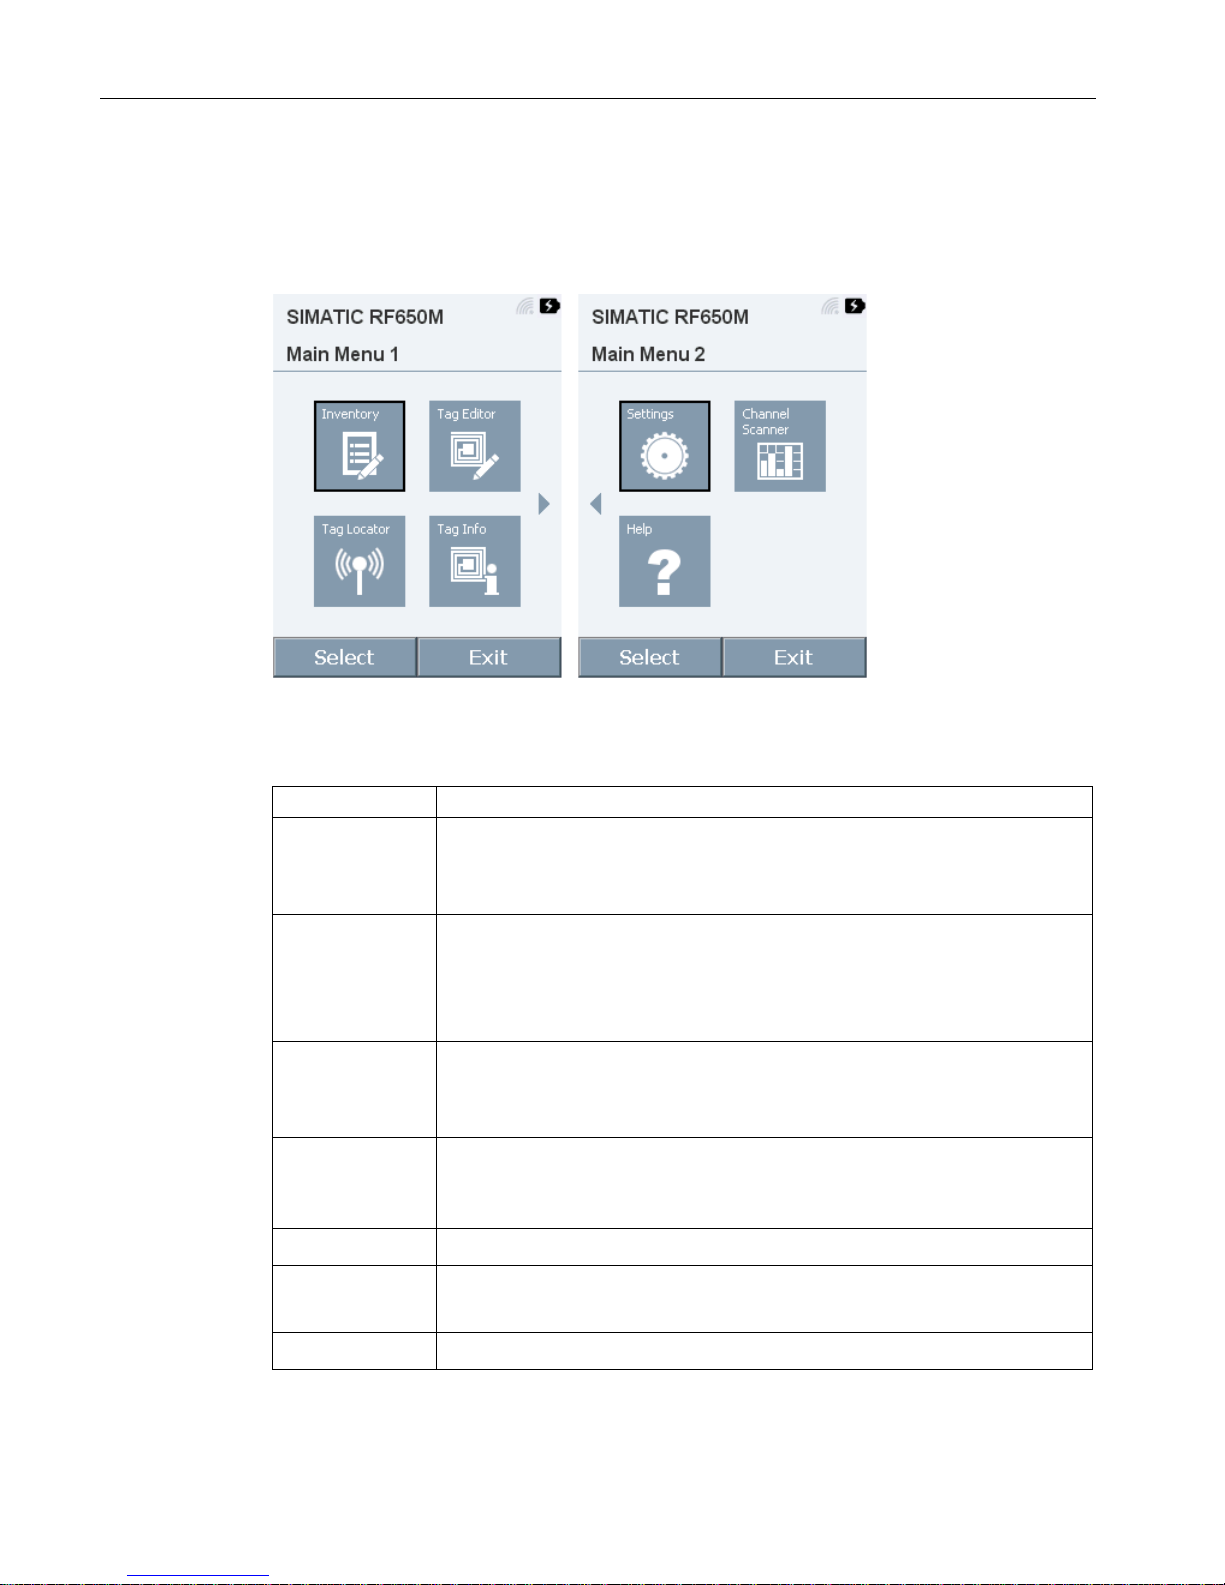
After the "RF650M" software has been started, the "Main Menu 1" is displayed. The main
menu is divided into "Main Menu 1" and "Main Menu 2".
Figure 6-1 "Main Menu 1" and "Main Menu 2"
Table 6- 1 The menus of the "RF650M" software
Menu
Description
Inventory
• Starting/stopping scanning
• Display of the recognition rate
• Overview of the identified transponders
Tag Editor
• Starting/stopping scanning
• Reading out and writing transponder data
• Locking and unlocking memory areas
• Assigning passwords
Tag Locator
• Starting/stopping scanning
• Overview of the identified transponders
• Transponder localization based on the received signal strength
Tag Info
• Starting/stopping scanning
• Information on the memory configuration and content of the transponder and
the transponder type
Settings
• Adaptations and settings for the "RF650M" software
Channel Scanner
• Starting/stopping scanning
• Display of the wireless channel occupation
Help
• Contact data for Siemens Support
Click the "Select" button to open the selected menu. Click on "Exit" to end the "RF650M"
software and to return to the operating system.
Page 41
"RF650M" software
6.3 The functions in the "Inventory" menu
SIMATIC RF650M mobile reader
Operating Instructions, 04/2015, C79000-G8976-C404-01
41
6.3
The functions in the "Inventory" menu
In the "Inventory" menu, transponders can be identified in the antenna field of the RF650M
and when necessary also saved in a file.
Statistics
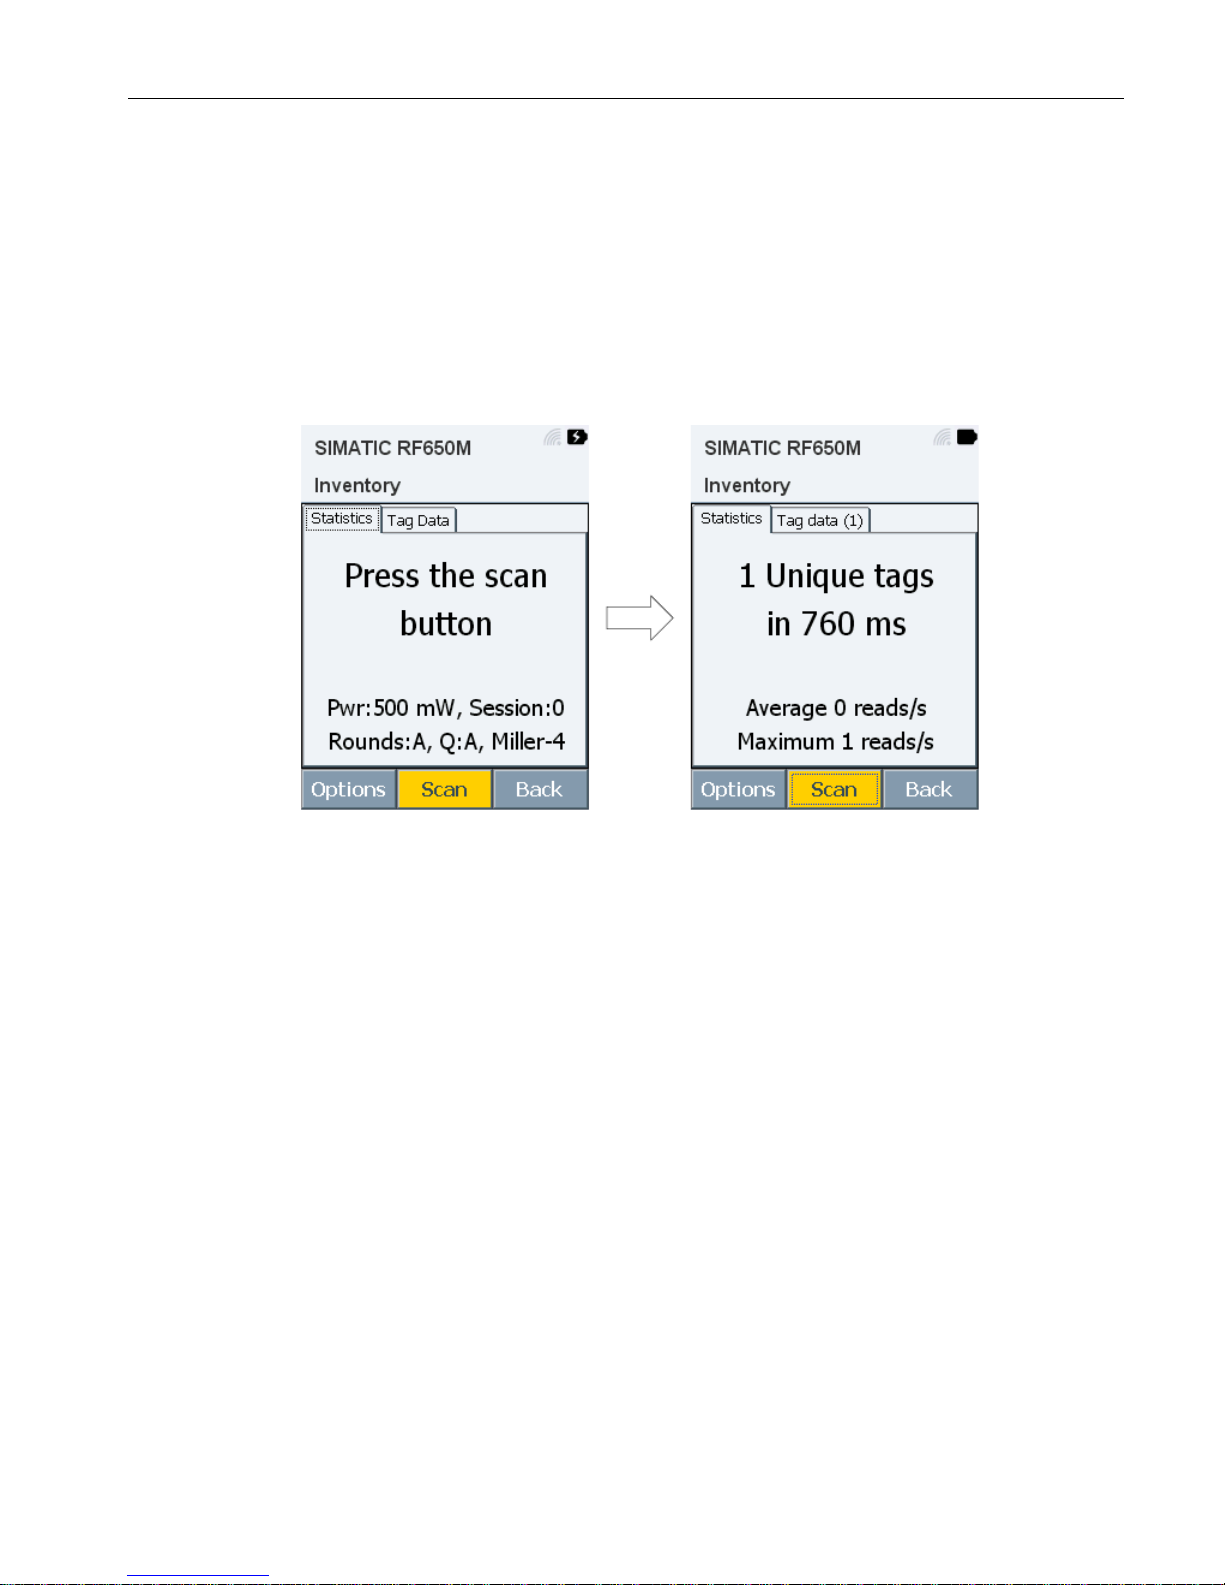
In the "Statistics" tab, the current settings for taking inventories are displayed. If you start
scanning, the number of identified transponders and the identification rate are displayed.
Figure 6-2 "Statistics" tab in the "Inventory" menu
The properties displayed in this tab are specified in the "Settings" menu.
The properties shown here "Pwr", "Session", "Rounds" and "Q" are described in the section
"The functions in the Settings menu".
Page 42
"RF650M" software
6.3 The functions in the "Inventory" menu
SIMATIC RF650M mobile reader
42 Operating Instructions, 04/2015, C79000-G8976-C404-01
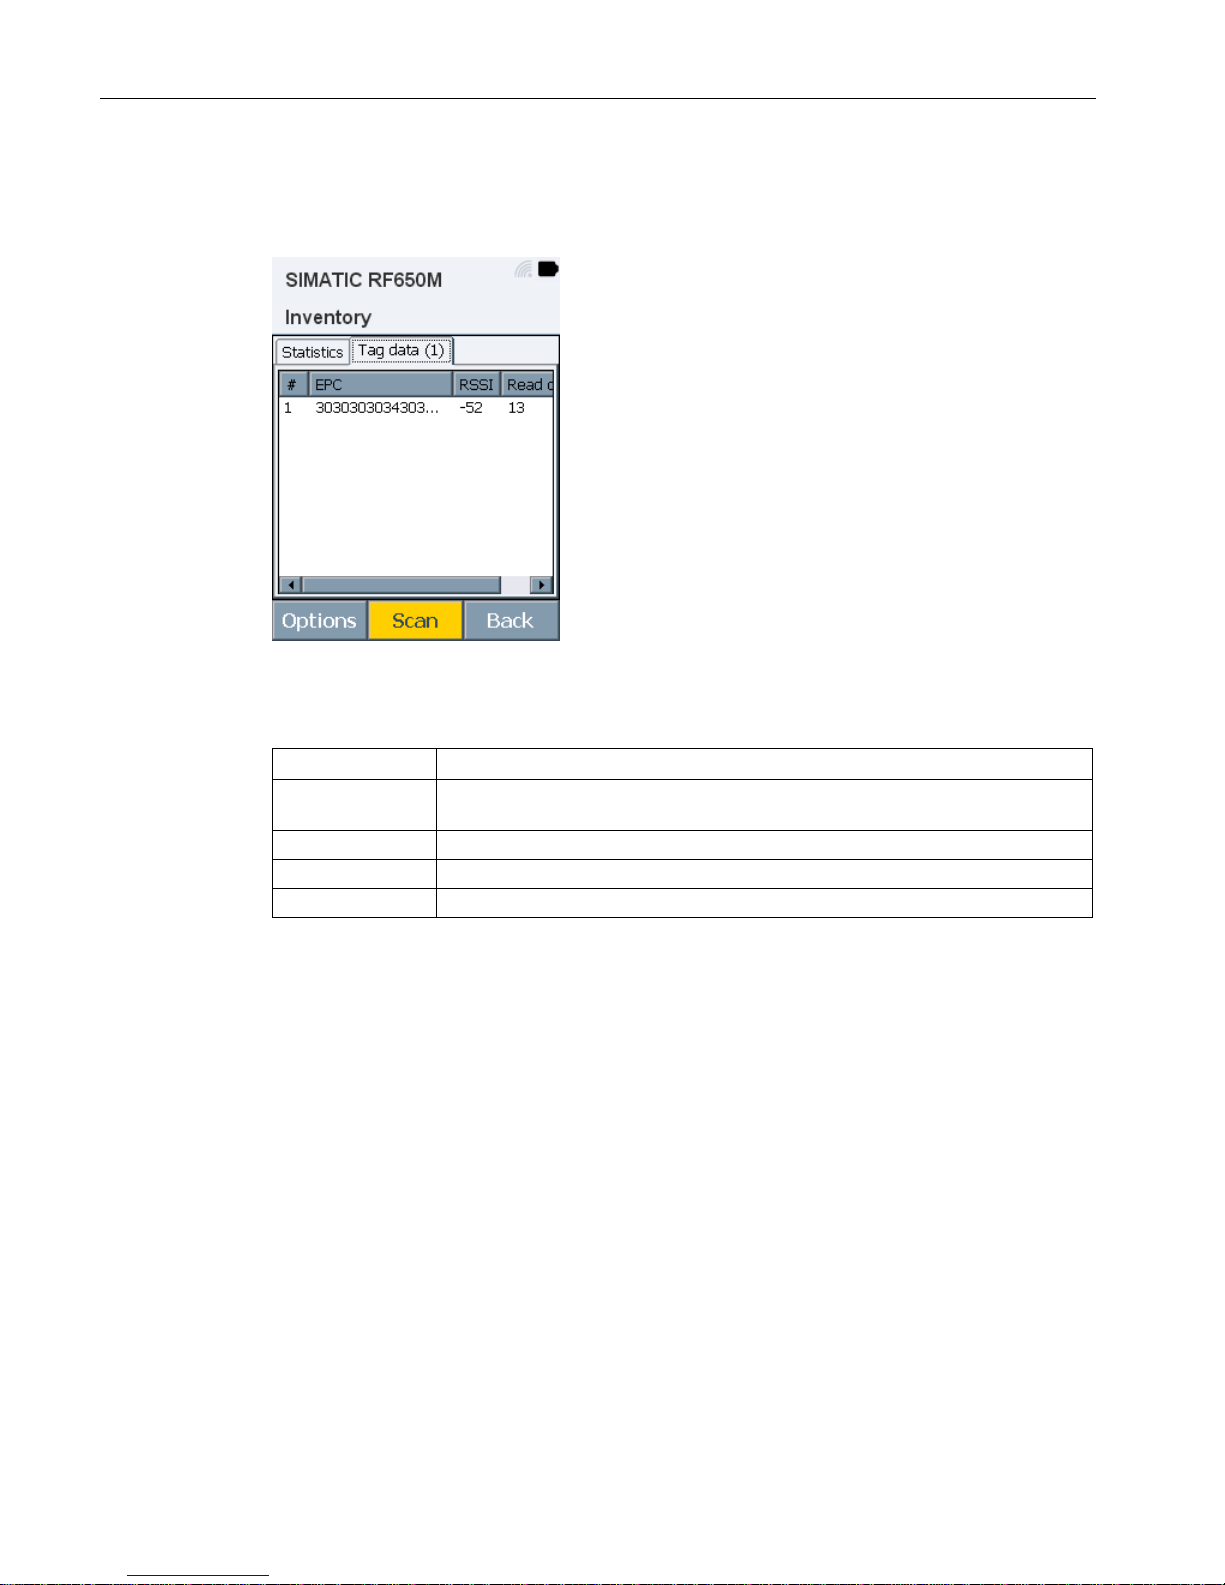
Tag Data
The "Tag Data" tab shows you the identified transponders.
Figure 6-3 "Tag Data" tab in the "Inventory" menu
Table 6- 2 Properties of the tag list
Characteristic
Description
# Numbering of the transponders in the order in which the transponders were
identified.
EPC ID
EPC ID of the identified transponder
RSSI
Last measured RSSI value of the transponder.
Read counter
Number of inventory replies (identifications) of this transponder.
Buttons of the menu
The "Inventory" menu contains the following buttons:
● Options
Opens the Options menu.
● Scan
Starts/stops scanning.
● Back
Returns to the main menu.
Page 43
"RF650M" software
6.3 The functions in the "Inventory" menu
SIMATIC RF650M mobile reader
Operating Instructions, 04/2015, C79000-G8976-C404-01
43
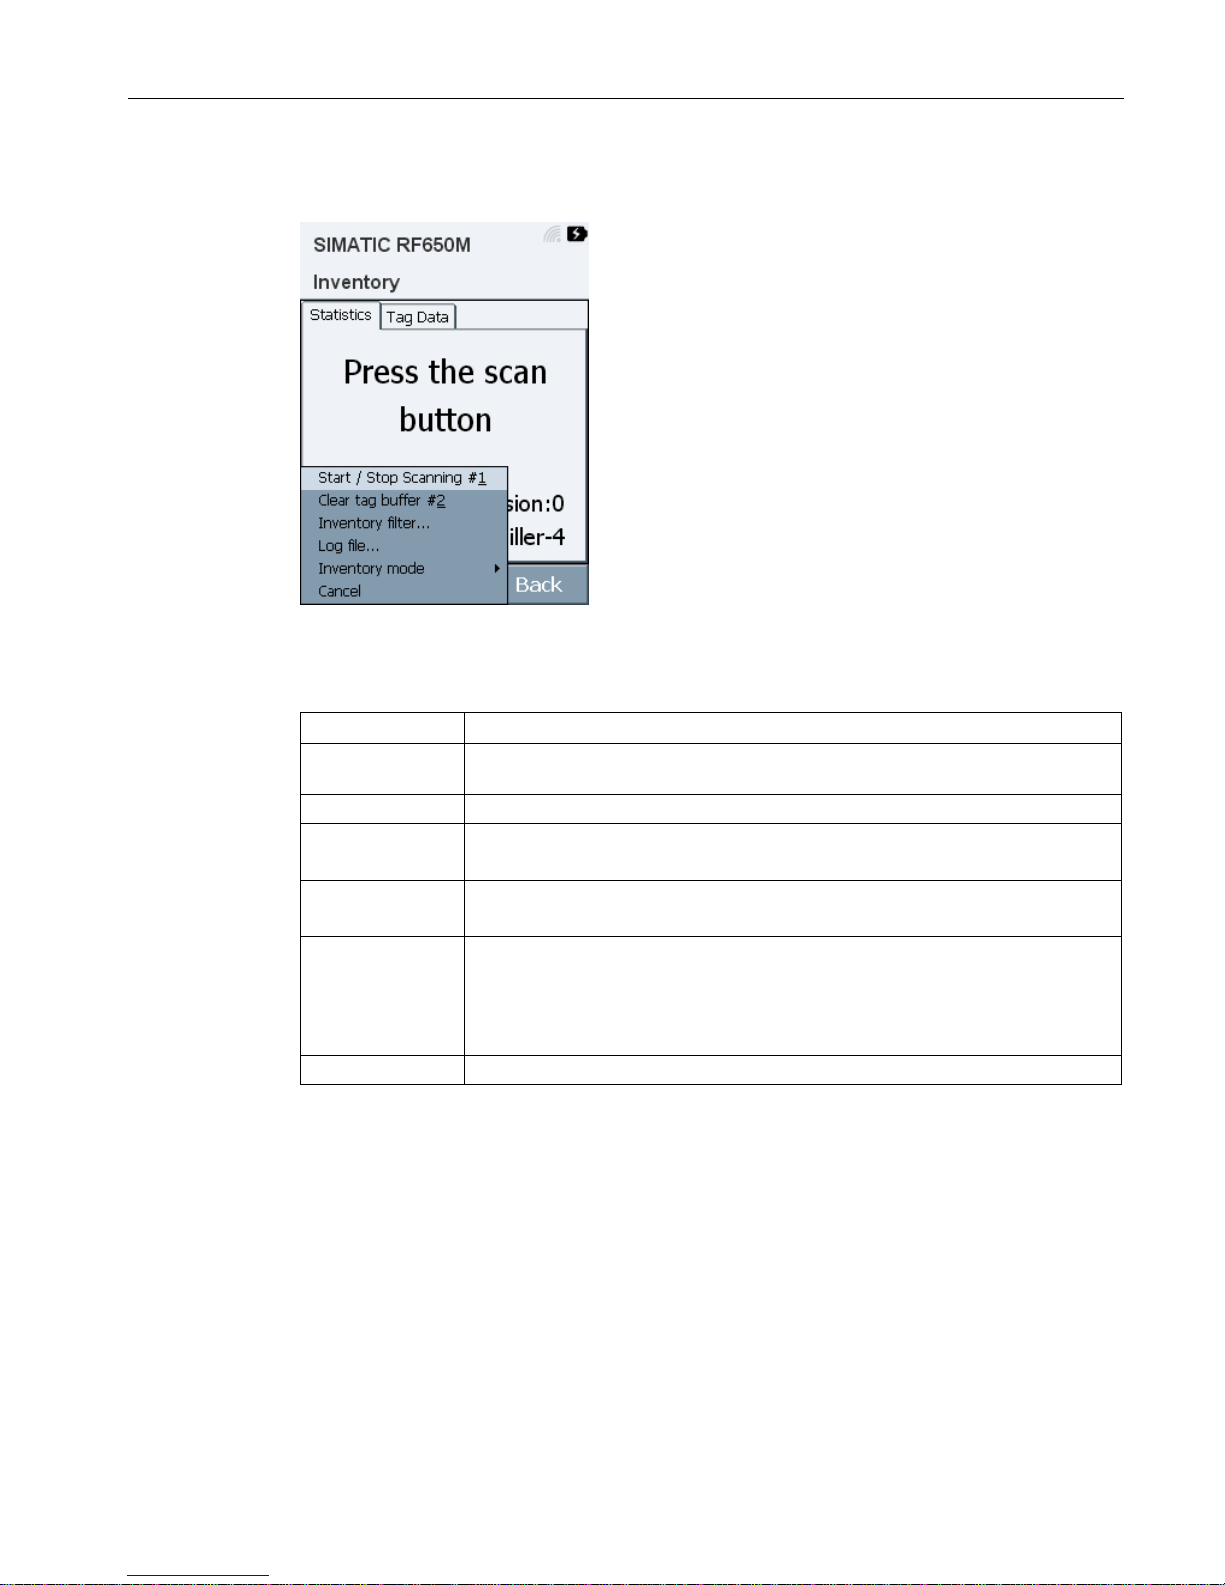
Options
Figure 6-4 Options in the "Inventory" menu
Table 6- 3 Options of the "Inventory" menu
Options
Description
Start / Stop Scan-
ning
Starts/stops scanning.
Clear the tag list
Deletes all the transponders in the transponder list.
Inventory filter Opens the "Inventory Filter" submenu.
In the submenu, you can create an inventory filter and enable/disable it.
Log file Opens the "Log file" submenu.
In the submenu, you can specify the properties for saving the log files.
Inventory mode Specifies the inventory mode.
• Normal: Counting the transponders always starts at "0".
• Incremental: Counting the transponders starts continuing from the last count
action.
Cancel
Closes the Options menu.
Page 44
"RF650M" software
6.4 The functions in the "Tag Editor" menu
SIMATIC RF650M mobile reader
44 Operating Instructions, 04/2015, C79000-G8976-C404-01
6.4
The functions in the "Tag Editor" menu
In the "Tag Editor" menu, you can read data from a target transponder, change this and write
to the target transponder. you can protect memory areas and assign access and kill
passwords.
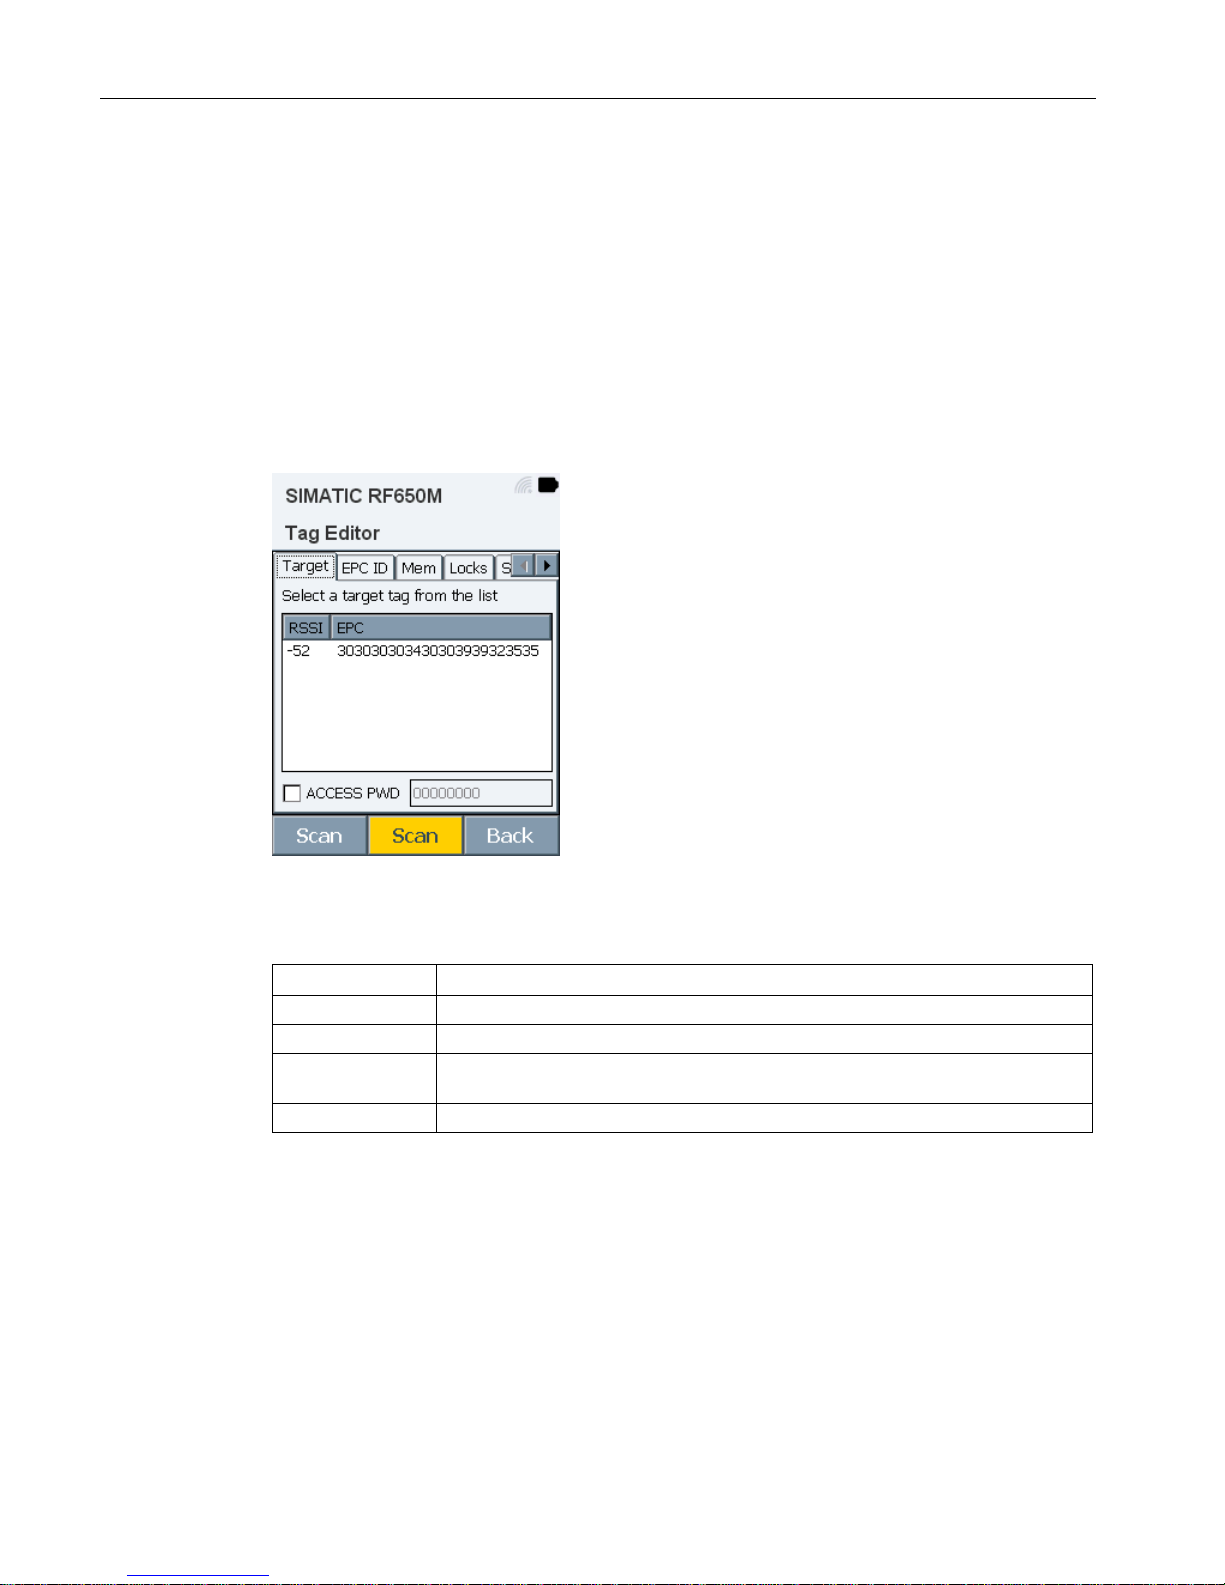
Target
In the "Target" tab, you can scan the antenna field of the RF650M for transponders and
select a target transponder from the transponder list. All the functions/setting described in
the following tabs only affect the target transponder selected here.
Figure 6-5 "Target" tab in the "Tag Editor" menu
Table 6- 4 Properties of the "Target" tab
Characteristic
Description
RSSI
Last measured RSSI value of the transponder.
EPC ID
EPC ID of the identified transponder
ACCESS PWD Check box and input box for the access password to allow access to a tran-
sponder already protected by an access password.
Scan
Runs a scan. All identified transponders are displayed in the transponder list.
Select a target transponder from the transponder list to edit this with the tabs described
below.
Page 45
"RF650M" software
6.4 The functions in the "Tag Editor" menu
SIMATIC RF650M mobile reader
Operating Instructions, 04/2015, C79000-G8976-C404-01
45
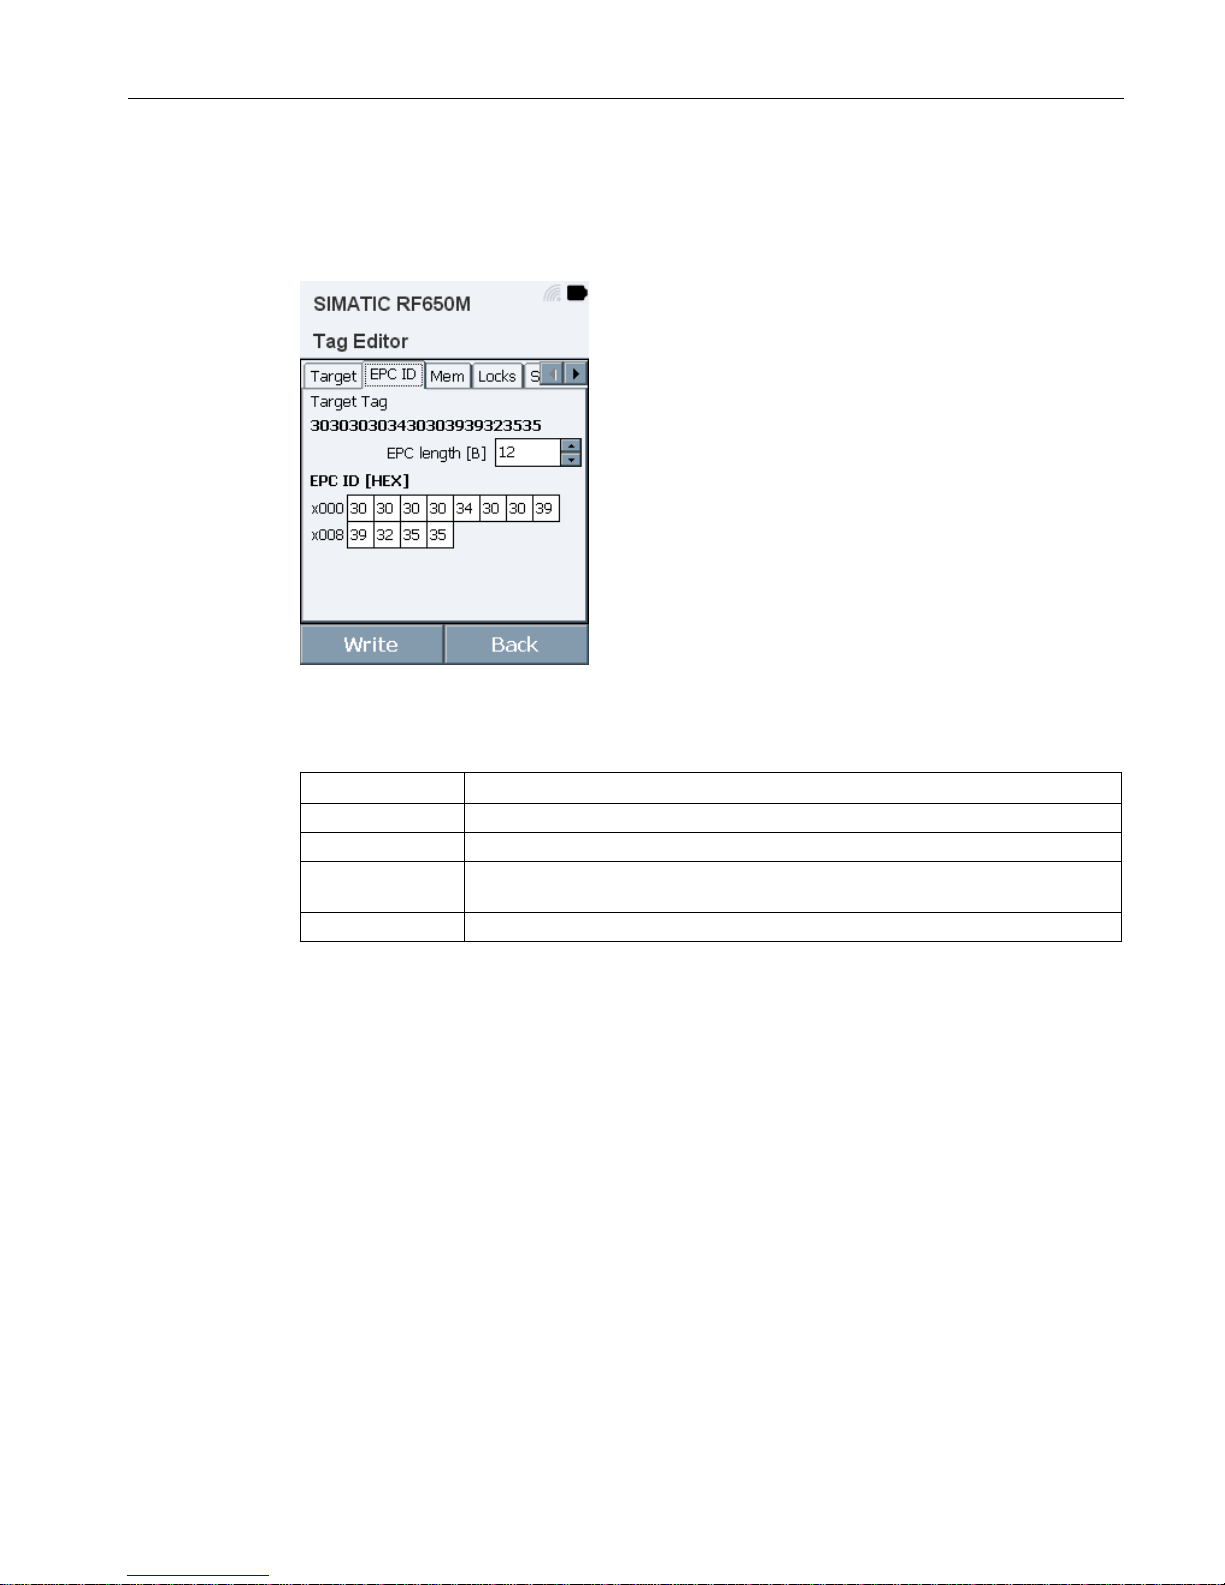
EPC ID
In the "EPC ID" tab, you can specify the EPC length of the target transponder and change
the EPC ID.
Figure 6-6 "EPC ID" tab in the "Tag Editor" menu
Table 6- 5 Parameters of the "EPC ID" tab
Parameter
Description
Target Tag
EPC ID of the selected target transponder
EPC length [B]
Length of the EPC-ID in bytes
EPC ID Representation of the EPC ID in hexadecimal or decimal format. To change the
format click on "[HEX]/[DEC]".
Write
Writes the displayed EPC ID to the selected target transponder.
Page 46
"RF650M" software
6.4 The functions in the "Tag Editor" menu
SIMATIC RF650M mobile reader
46 Operating Instructions, 04/2015, C79000-G8976-C404-01
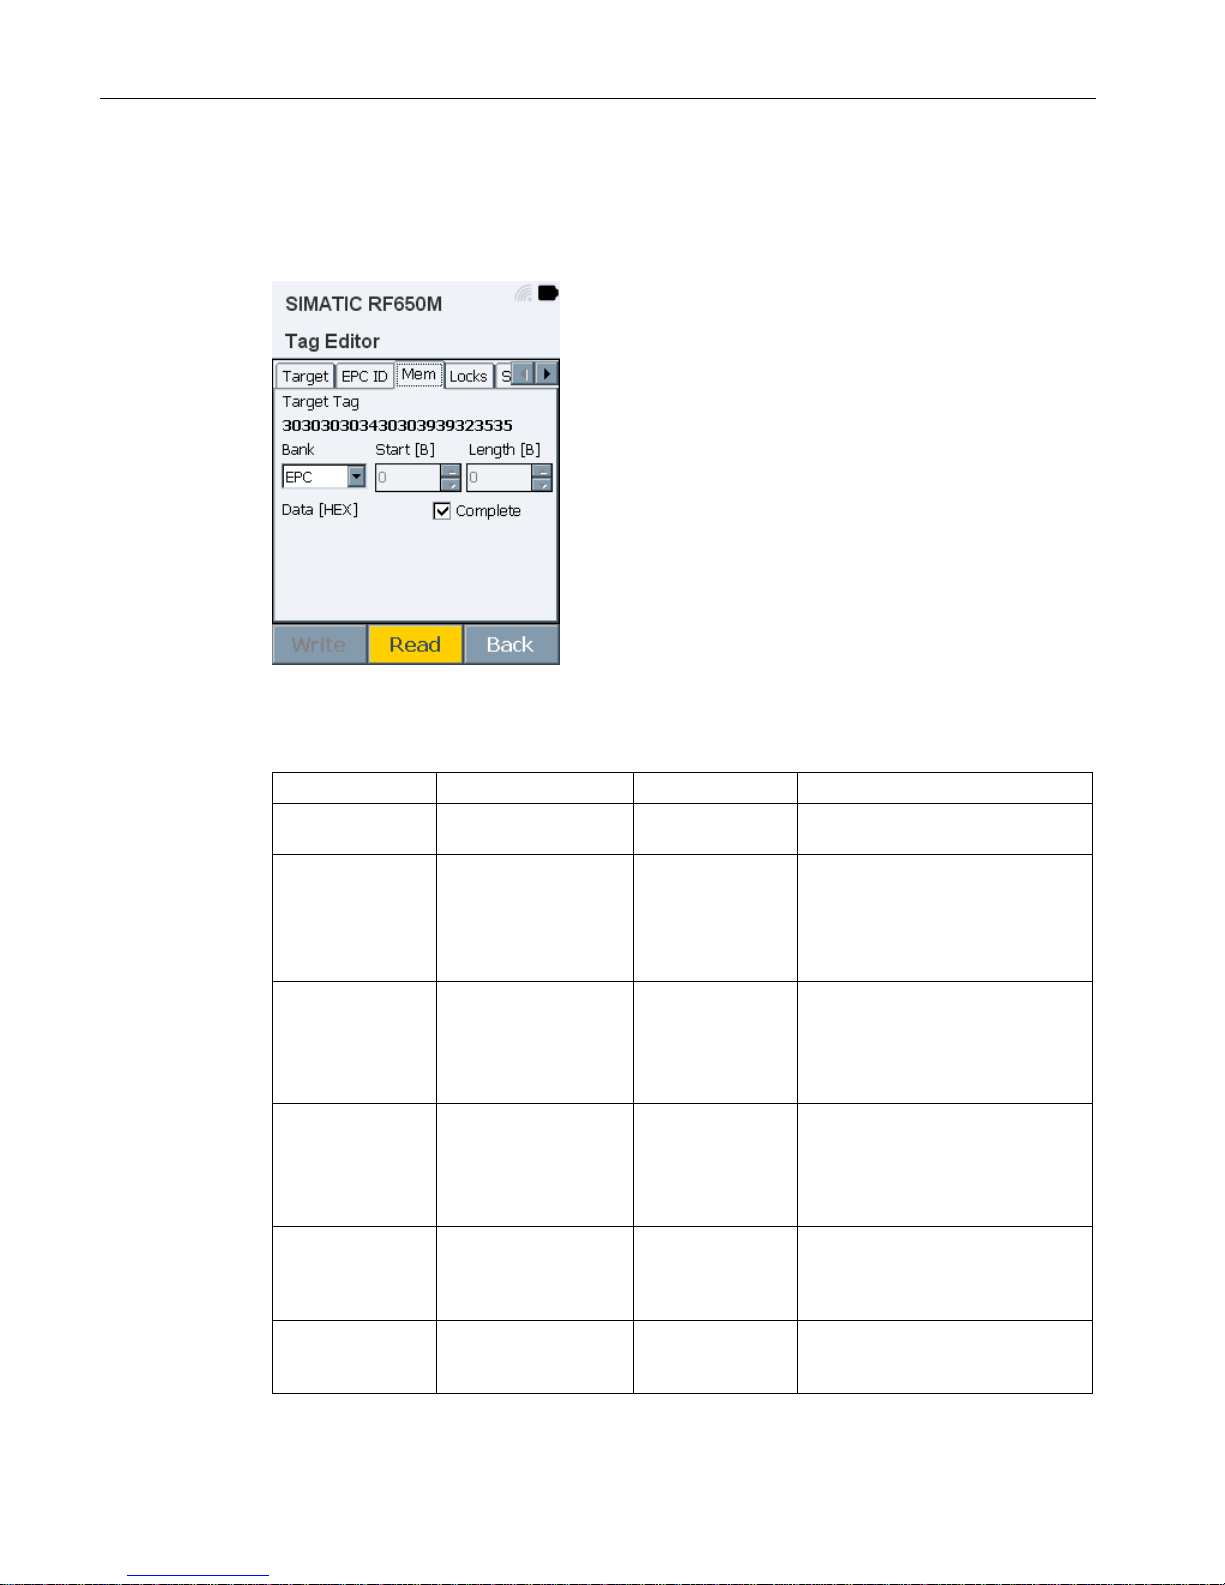
Mem
In the "Mem" tab, you can read and write all memory areas of the selected target
transponder.
Figure 6-7 "Mem" tab in the "Tag Editor" menu
Table 6- 6 Parameters of the "Mem" tab
Parameter
Setting options
Default value
Description
Target Tag -- -- EPC ID of the selected target tran-
sponder
Bank
• Reserved
• EPC
• TID
• User
EPC Selection of the memory area
(memory bank) from which data is
read out or to which data is written.
Start [B] 0 ... 65535 0 Start address in bytes from which
data is read out/written to.
The maximum value depends on
the memory size of the transpond-
er.
Length [B] 0 ... 65535 0 Number of bytes to be read out or
written starting at the start address.
The maximum value depends on
the memory size of the transpond-
er.
Data
• HEX
• DEC
HEX
Representation of the data in hexadecimal or decimal format. To
change the format click on
"[HEX]/[DEC]".
Complete ☐ / ☑ ☑ Check box to read out or to write to
the complete memory area
(memory bank).
Page 47
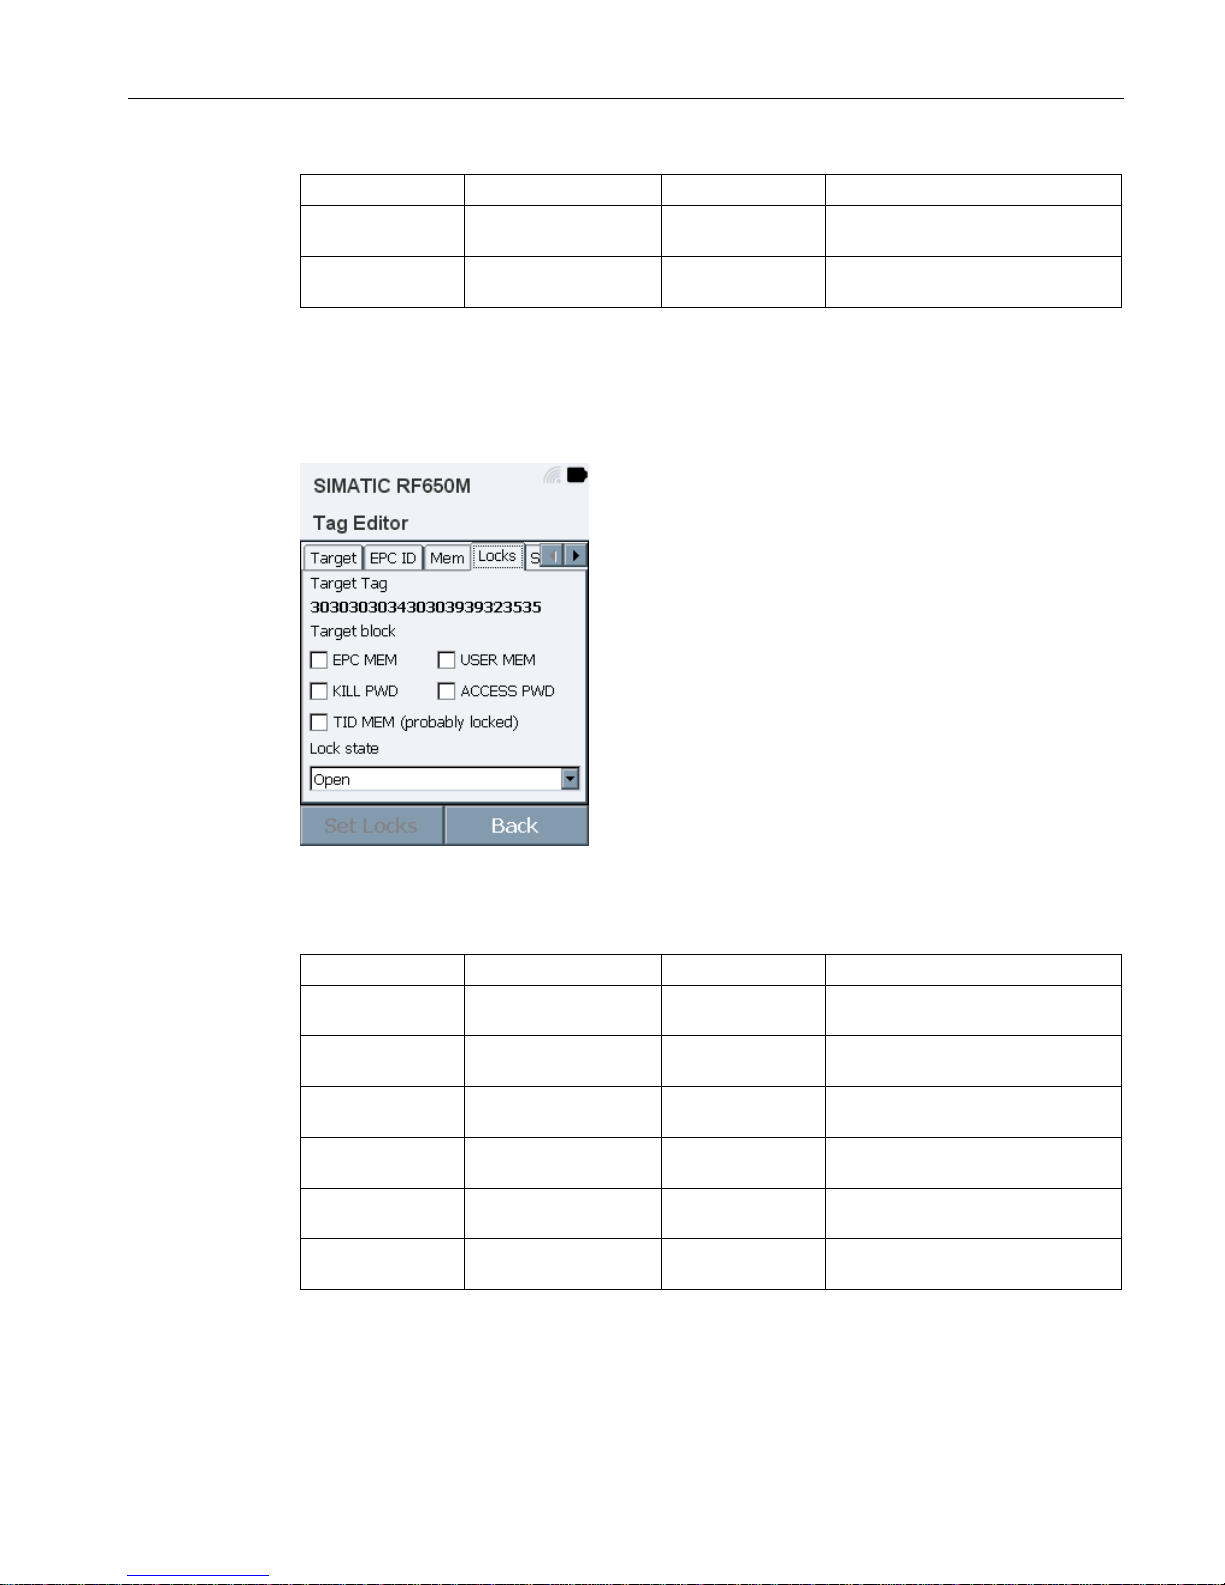
"RF650M" software
6.4 The functions in the "Tag Editor" menu
SIMATIC RF650M mobile reader
Operating Instructions, 04/2015, C79000-G8976-C404-01
47
Parameter
Setting options
Default value
Description
Write -- -- Writes the displayed data to the
selected target transponder.
Read -- -- Reads out the data from the se-
lected target transponder.
Locks
In the "Locks" tab, you can adapt the access rights for the memory or password areas
(open/secured).
Figure 6-8 "Locks" tab in the "Tag Editor" menu
Table 6- 7 Options of the "Locks" tab
Options
Setting options
Default value
Description
Target Tag -- -- EPC ID of the selected target tran-
sponder
EPC MEM ☐ / ☑ ☐ Check box to lock/unlock the
"EPC" memory area.
USER MEM ☐ / ☑ ☐ Check box to lock/unlock the
"USER" memory area.
KILL PWD ☐ / ☑ ☐ Check box to lock/unlock the kill
password.
ACCESS PWD ☐ / ☑ ☐ Check box to lock/unlock the ac-
cess password.
TID MEM ☐ / ☑ ☐ Check box to lock/unlock the "TID"
memory area.
Page 48
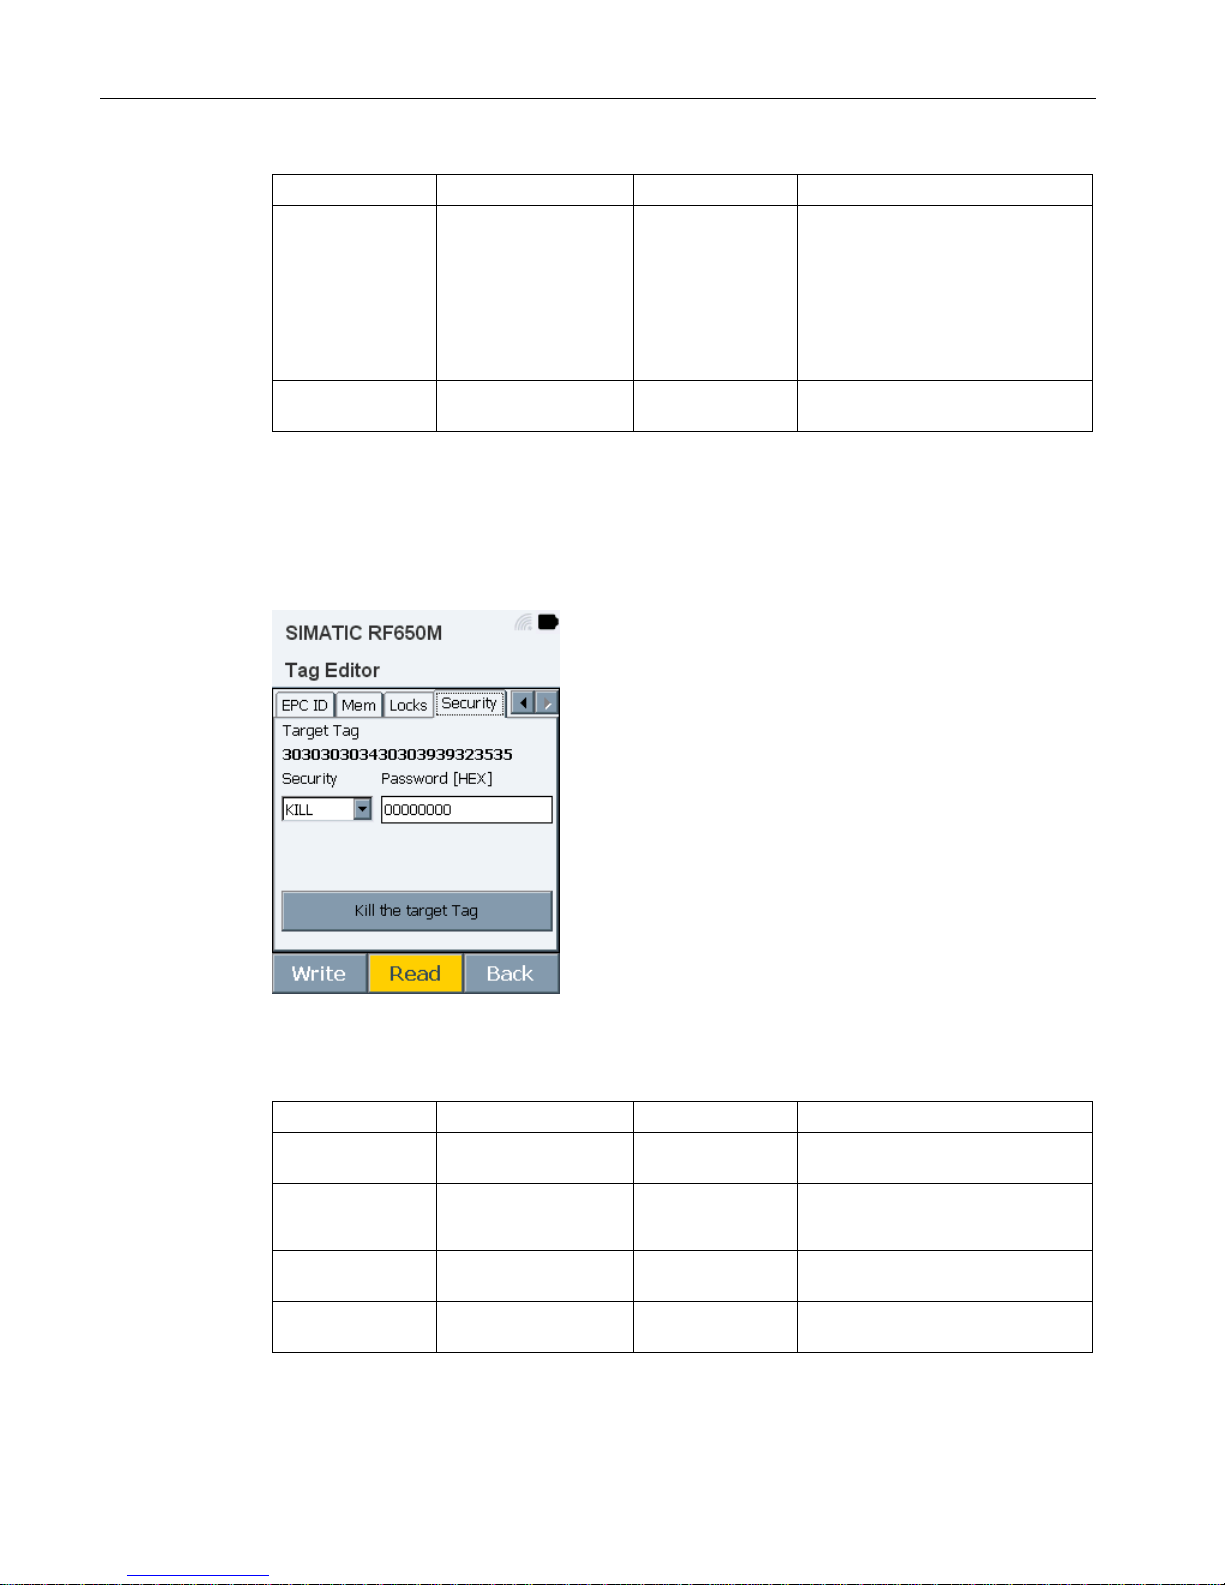
"RF650M" software
6.4 The functions in the "Tag Editor" menu
SIMATIC RF650M mobile reader
48 Operating Instructions, 04/2015, C79000-G8976-C404-01
Options
Setting options
Default value
Description
Lock status
• Open
• Permanently
Writeable
• Locked
• Permanently
Locked
Open
The "Lock state" specifies whether
the selected memory areas/passwords are open or secured.
Note that permanent changes are
irreversible.
Set Locks -- -- Transfers the locks to the selected
target transponder.
Security
In the "Security" tab, you can assign passwords for transponder access or for killing the
transponder. A "Kill" destroys the entire memory of the transponder so that the transponder
can no longer be identified by an RFID reader and is therefore no longer usable.
Figure 6-9 "Security" tab in the "Tag Editor" menu
Table 6- 8 Parameters of the "Security" tab
Parameter
Setting options
Default value
Description
Target Tag -- -- EPC ID of the selected target tran-
sponder
Security
• KILL
• ACCESS
KILL Selection of the password type that
you want to read out or change.
Password 00000000 ...
FFFFFFFF
00000000 Input box for the password
Kill the target tag -- -- Destroys the entire memory of the
selected target transponder.
Page 49

"RF650M" software
6.5 The functions in the "Tag Locator" menu
SIMATIC RF650M mobile reader
Operating Instructions, 04/2015, C79000-G8976-C404-01
49
Parameter
Setting options
Default value
Description
Write -- -- Writes the displayed password to
the selected target transponder.
Read -- -- Reads out the password from the
selected target transponder.
6.5
The functions in the "Tag Locator" menu
In the "Tag Locator" menu, you can find out the position of a transponder. The principle on
which this functions is comparable to a metal detector.
Easy
In the "Easy" tab, you can control the search.
Follow the steps below to find out the position of a transponder:
1. Press the "Scan" button to start scanning.
2. Stop the scanning as soon as the required transponder has been identified and its ID
appears in the transponder list.
3. From the transponder list, select the transponder whose position you want to locate.
4. Press the "Scan" button to start the search.
Reaction: The view of the tab changes to the locate mode.
5. Now move through the room with the RF650M moving the reader.
As soon as the reader identifies the selected transponder this is signaled both optically
and acoustically. The reader shows the received signal strength with which the target
transponder was identified. Based on the displayed signal strength, you can "work your
way" to the selected target transponder and localize it.
Page 50
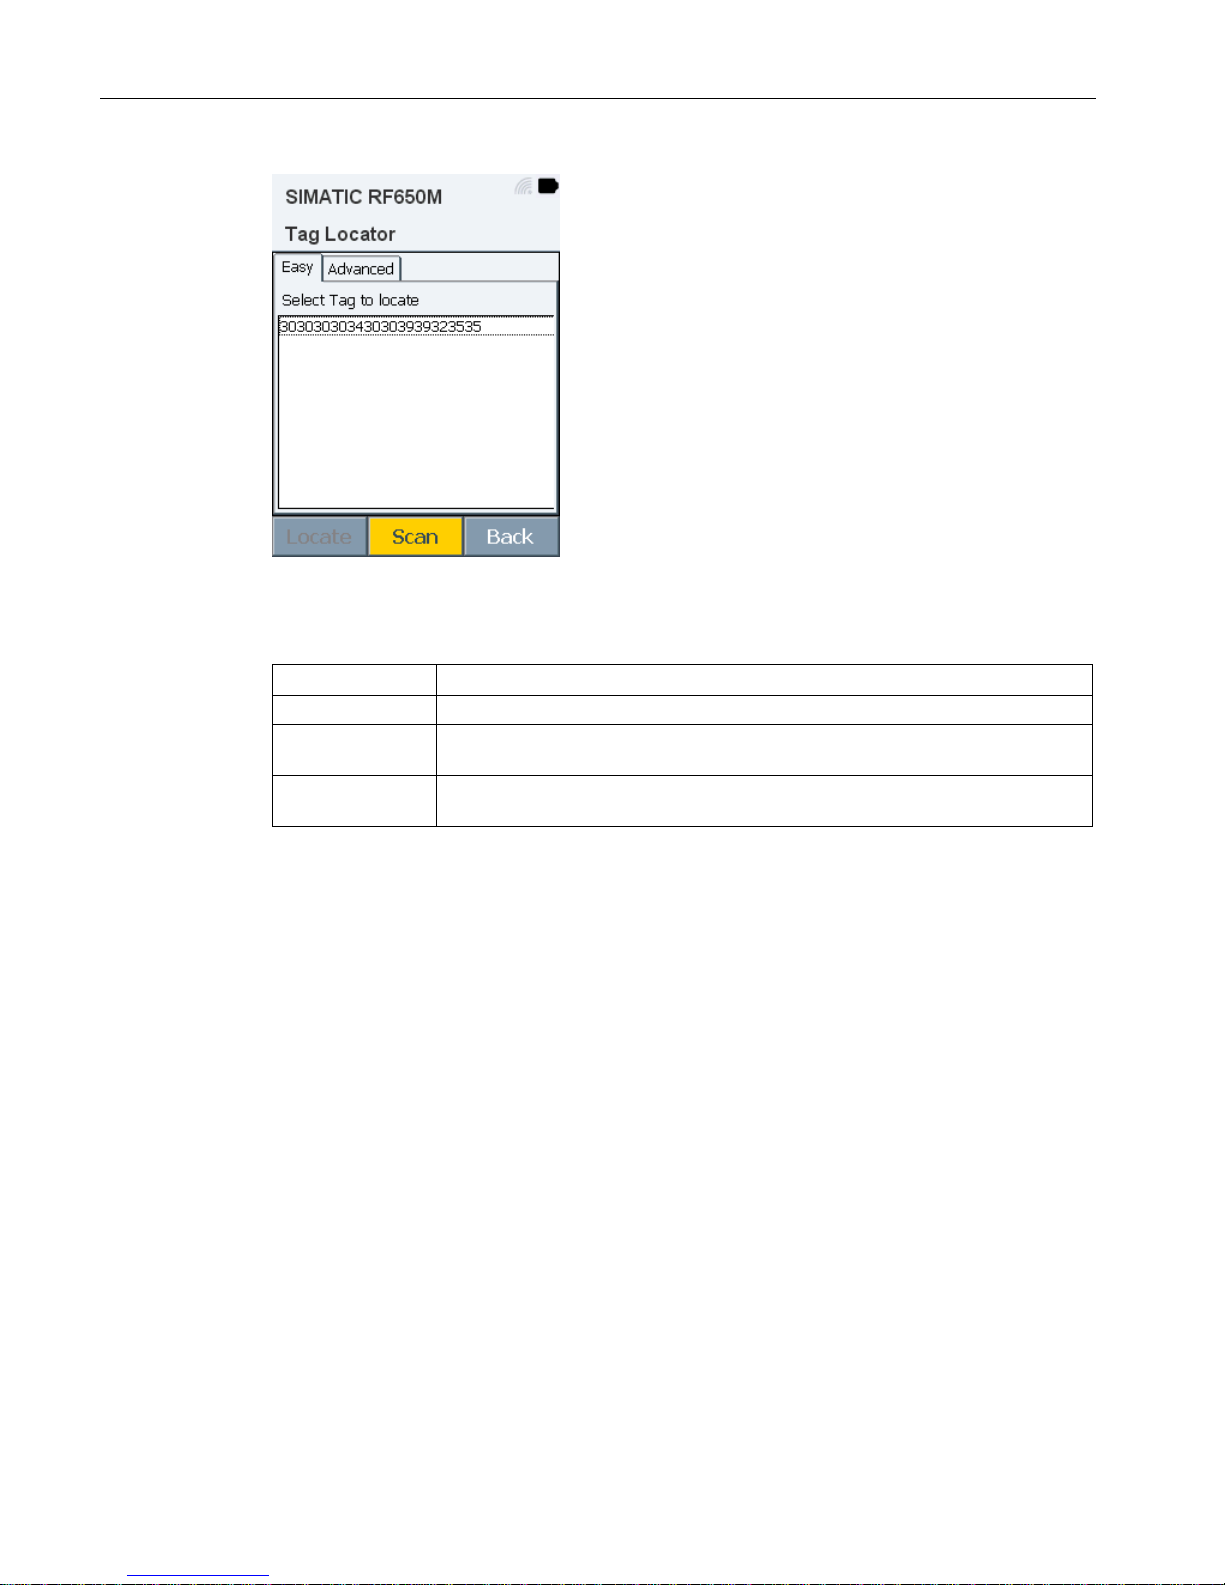
"RF650M" software
6.5 The functions in the "Tag Locator" menu
SIMATIC RF650M mobile reader
50 Operating Instructions, 04/2015, C79000-G8976-C404-01
Figure 6-10 "Easy" tab in the "Tag Locator" menu
Table 6- 9 Parameters of the "Easy" tab
Parameter
Description
Tag list
List with IDs of the identified transponders
Locate Changes to the locate mode. In the locate mode the received signal strength is
displayed with which the target transponder was identified.
Scan Starts/stops scanning. All identified transponders are displayed in the tran-
sponder list.
Page 51
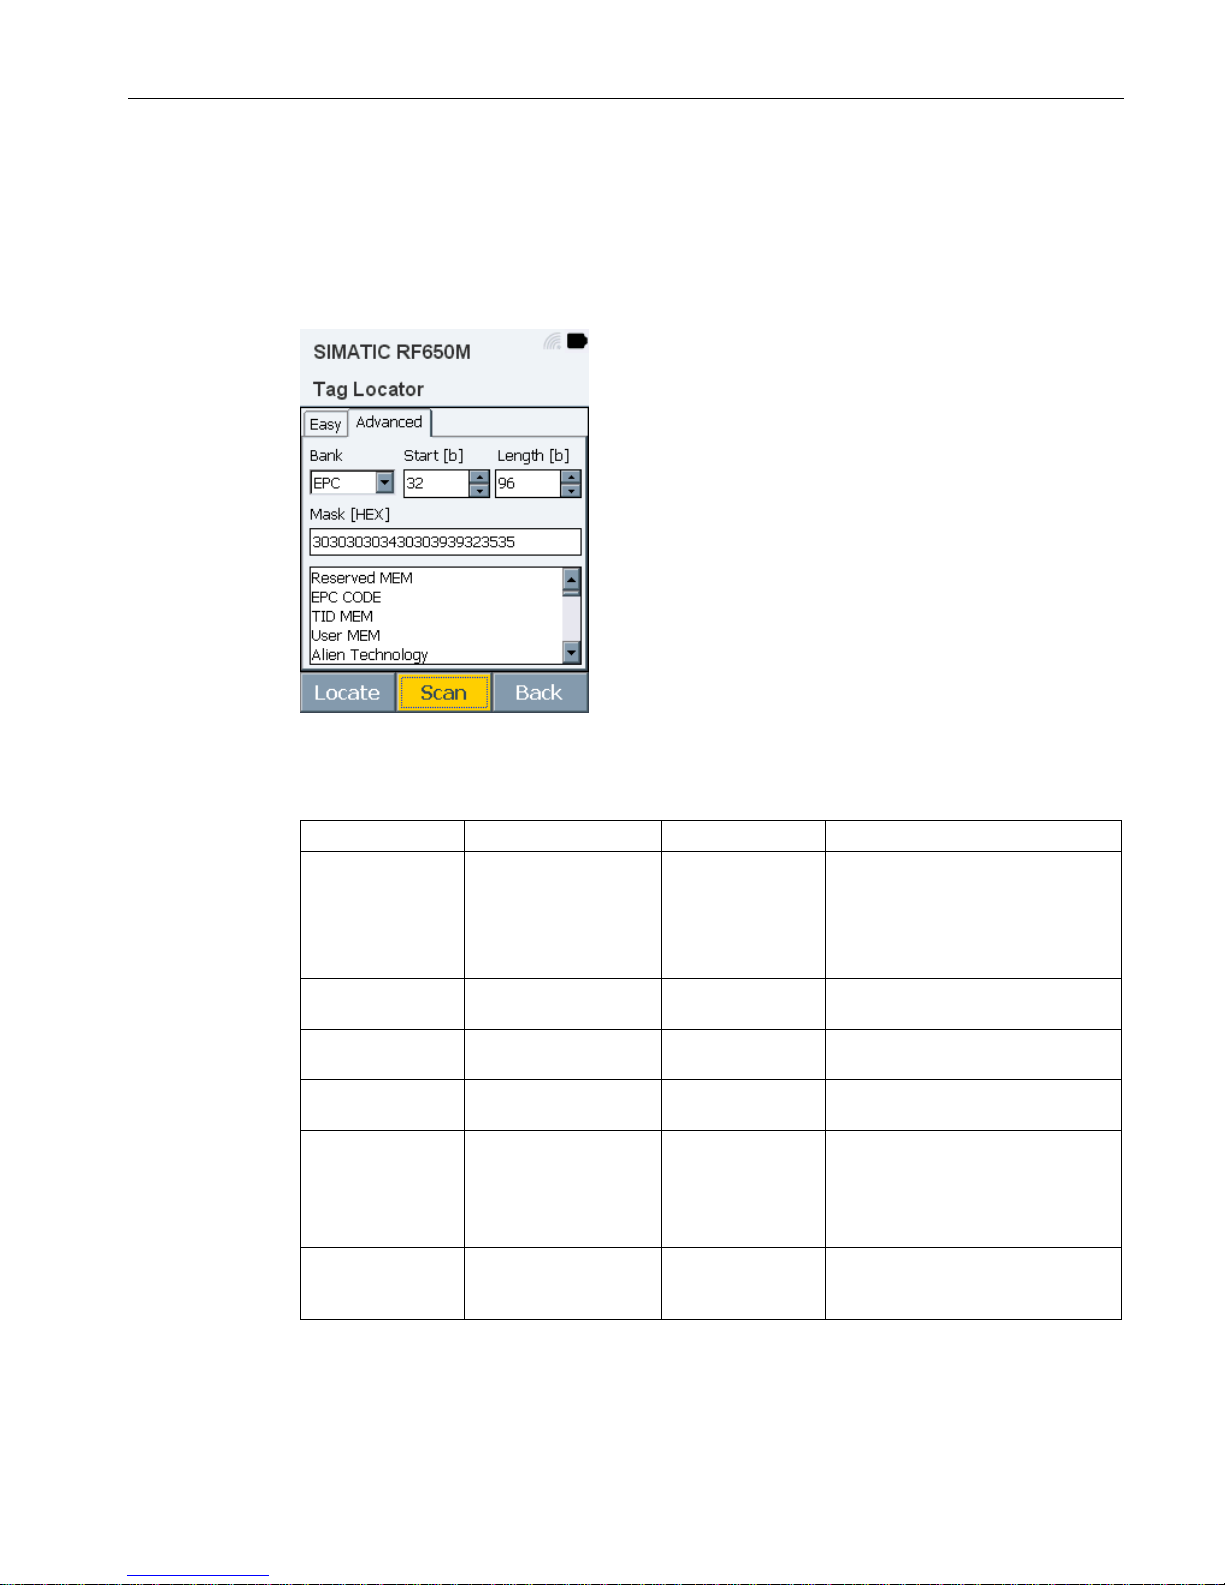
"RF650M" software
6.5 The functions in the "Tag Locator" menu
SIMATIC RF650M mobile reader
Operating Instructions, 04/2015, C79000-G8976-C404-01
51
Advanced
In the "Advanced" tab, you can specify the locate parameters. During scanning, only the
transponders identified by the reader and whose parameters match the specified locate
parameters are shown in the transponder list. You can, for example, locate transponders that
use a special chip type or transponders, for example, whose EPC starts with the value "3".
Figure 6-11 "Advanced" tab in the "Tag Locator" menu
Table 6- 10 Parameters of the "Advanced" tab
Parameter
Setting options
Default value
Description
Bank
• Reserved
• EPC
• TID
• User
EPC Selection of the memory bank in
which a locate criterion should be
met.
Start [b] 0 ... 65535 32 Start address of the locate criterion
in bits
Length [b] 0 ... 65535 0 Length of the locate criterion start-
ing from the start address
Mask 00000000 ...
FFFFFFFF
-- Desired value of the locate criteri-
on 1)
Locate -- --
Changes to the locate mode. In the
locate mode the received signal
strength is displayed with which
the target transponder was identi-
fied.
Scan -- -- Starts/stops scanning. All identified
transponders are displayed in the
transponder list.
1)
From the list in the lower area, you can select the preset transponder chip types.
Page 52
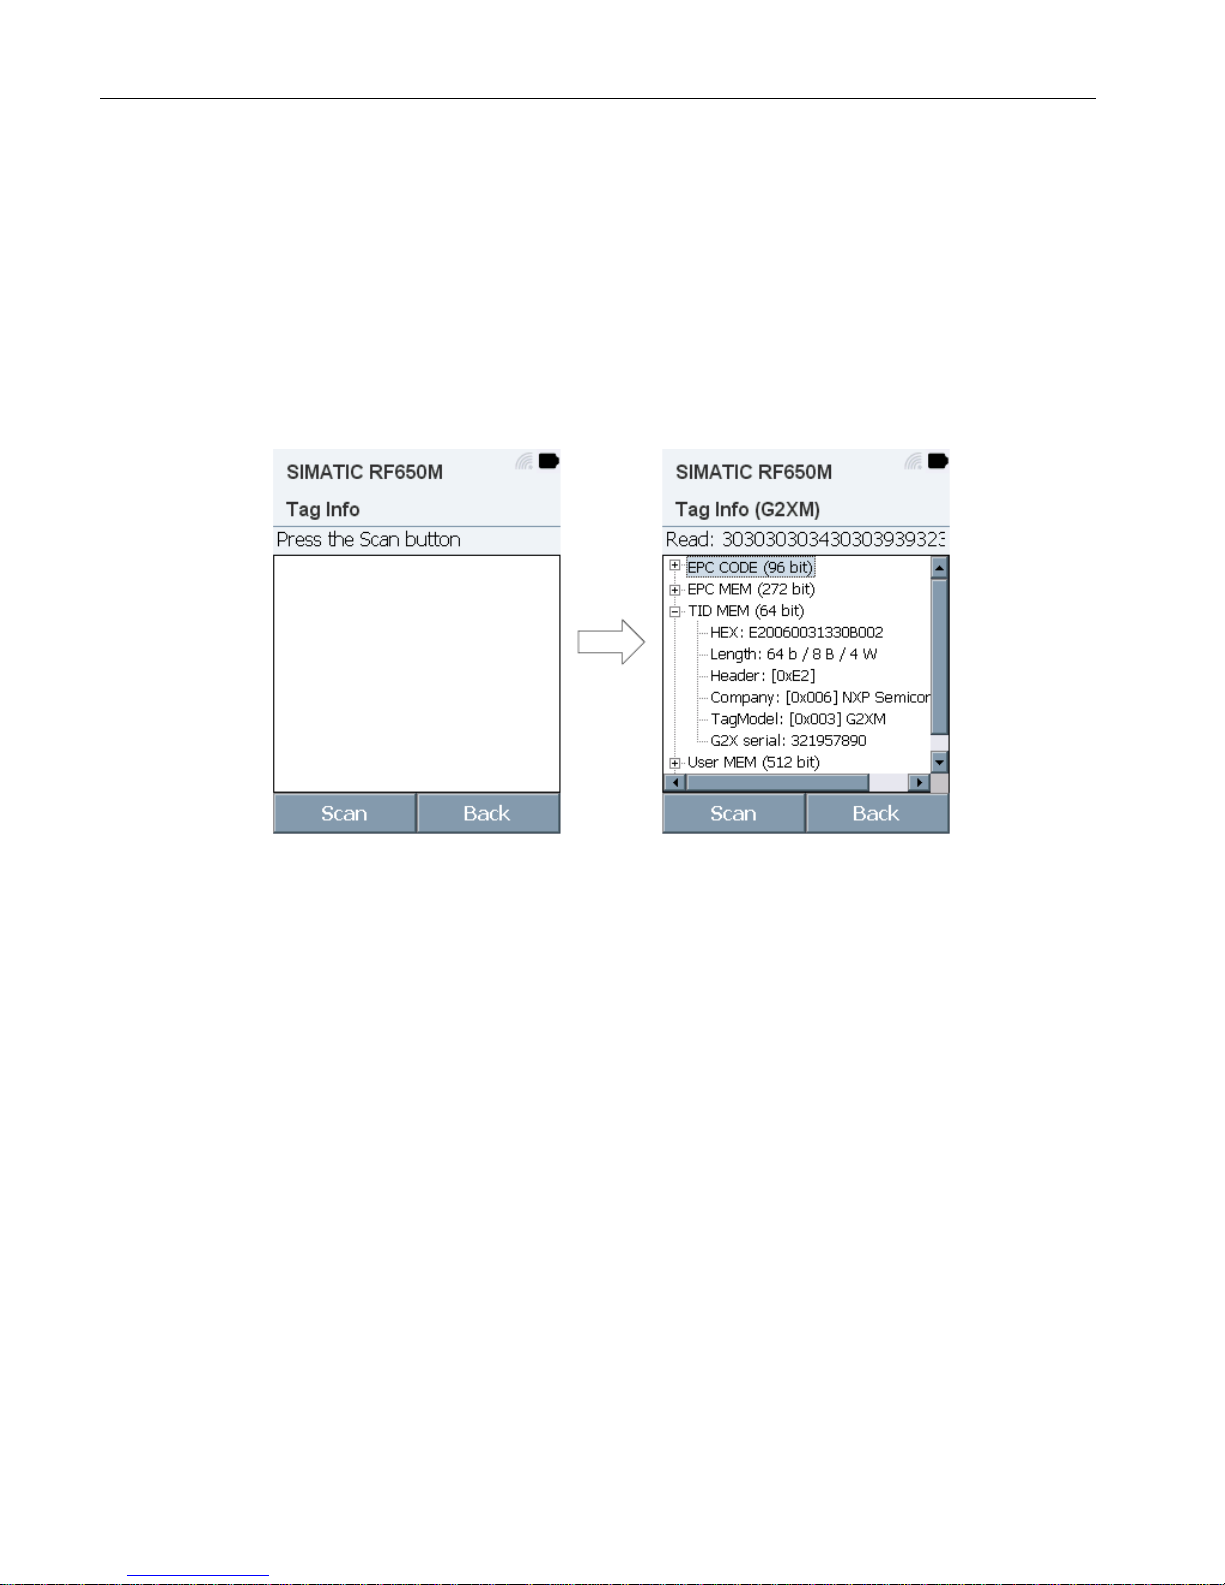
"RF650M" software
6.6 The functions in the "Tag Info" menu
SIMATIC RF650M mobile reader
52 Operating Instructions, 04/2015, C79000-G8976-C404-01
6.6
The functions in the "Tag Info" menu
The "Tag Info" menu reads out and displays information on the memory configuration and
content of the transponder and the transponder type. Since the reading out of all memory
areas can take several seconds, you must make sure that the transponder remains
permanently in the antenna field of the reader while reading. Make sure that during
scanning, only one transponder is located in the antenna field.
The data read out and its meaning, for example chip type recognition in the TID bank, the
PC Word or the EPC coding in the EPC bank or passwords in the Reserved bank are
displayed.
Figure 6-12 "Tag Info" menu
Page 53
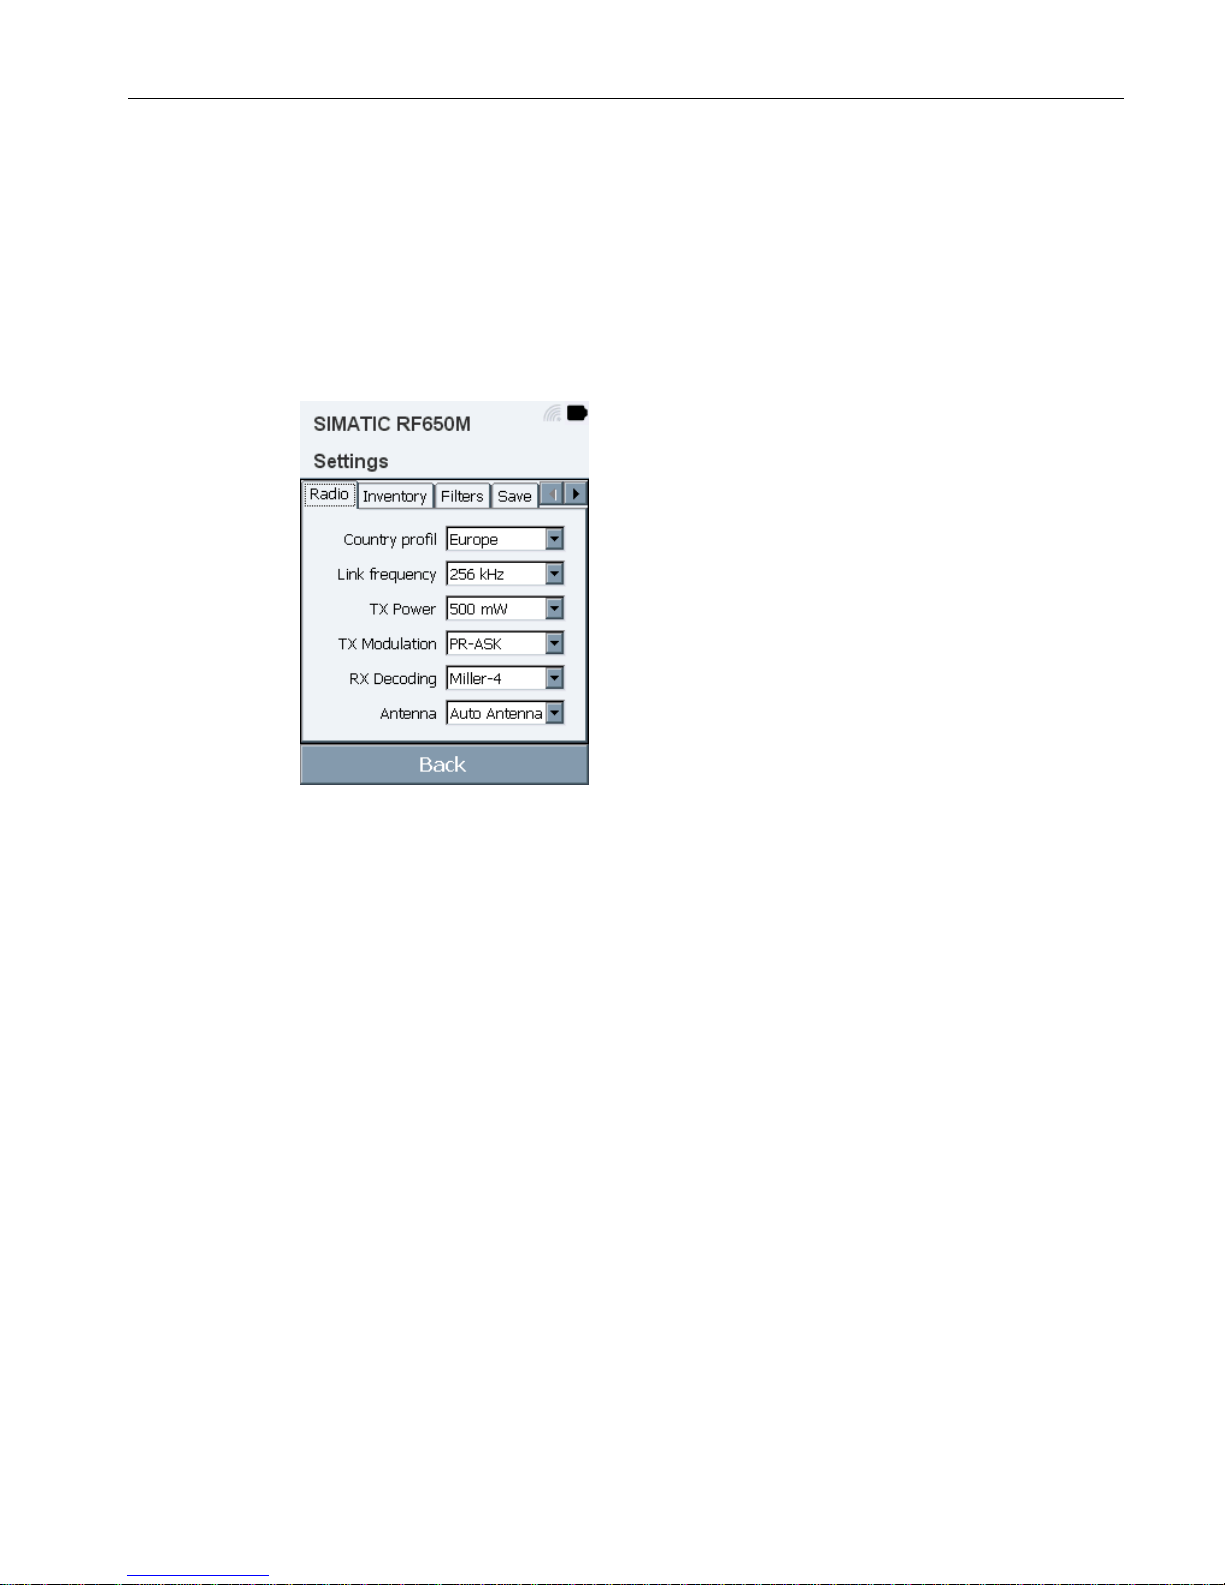
"RF650M" software
6.7 The functions in the "Settings" menu
SIMATIC RF650M mobile reader
Operating Instructions, 04/2015, C79000-G8976-C404-01
53
6.7
The functions in the "Settings" menu
In the "Settings" menu, you can adapt and make settings for the "RF650M" software.
Radio
In the "Radio" tab, you can make all the settings that influence the radio performance of the
reader (e.g. the transmit power).
Figure 6-13 "Radio" tab in the "Settings" menu
Page 54
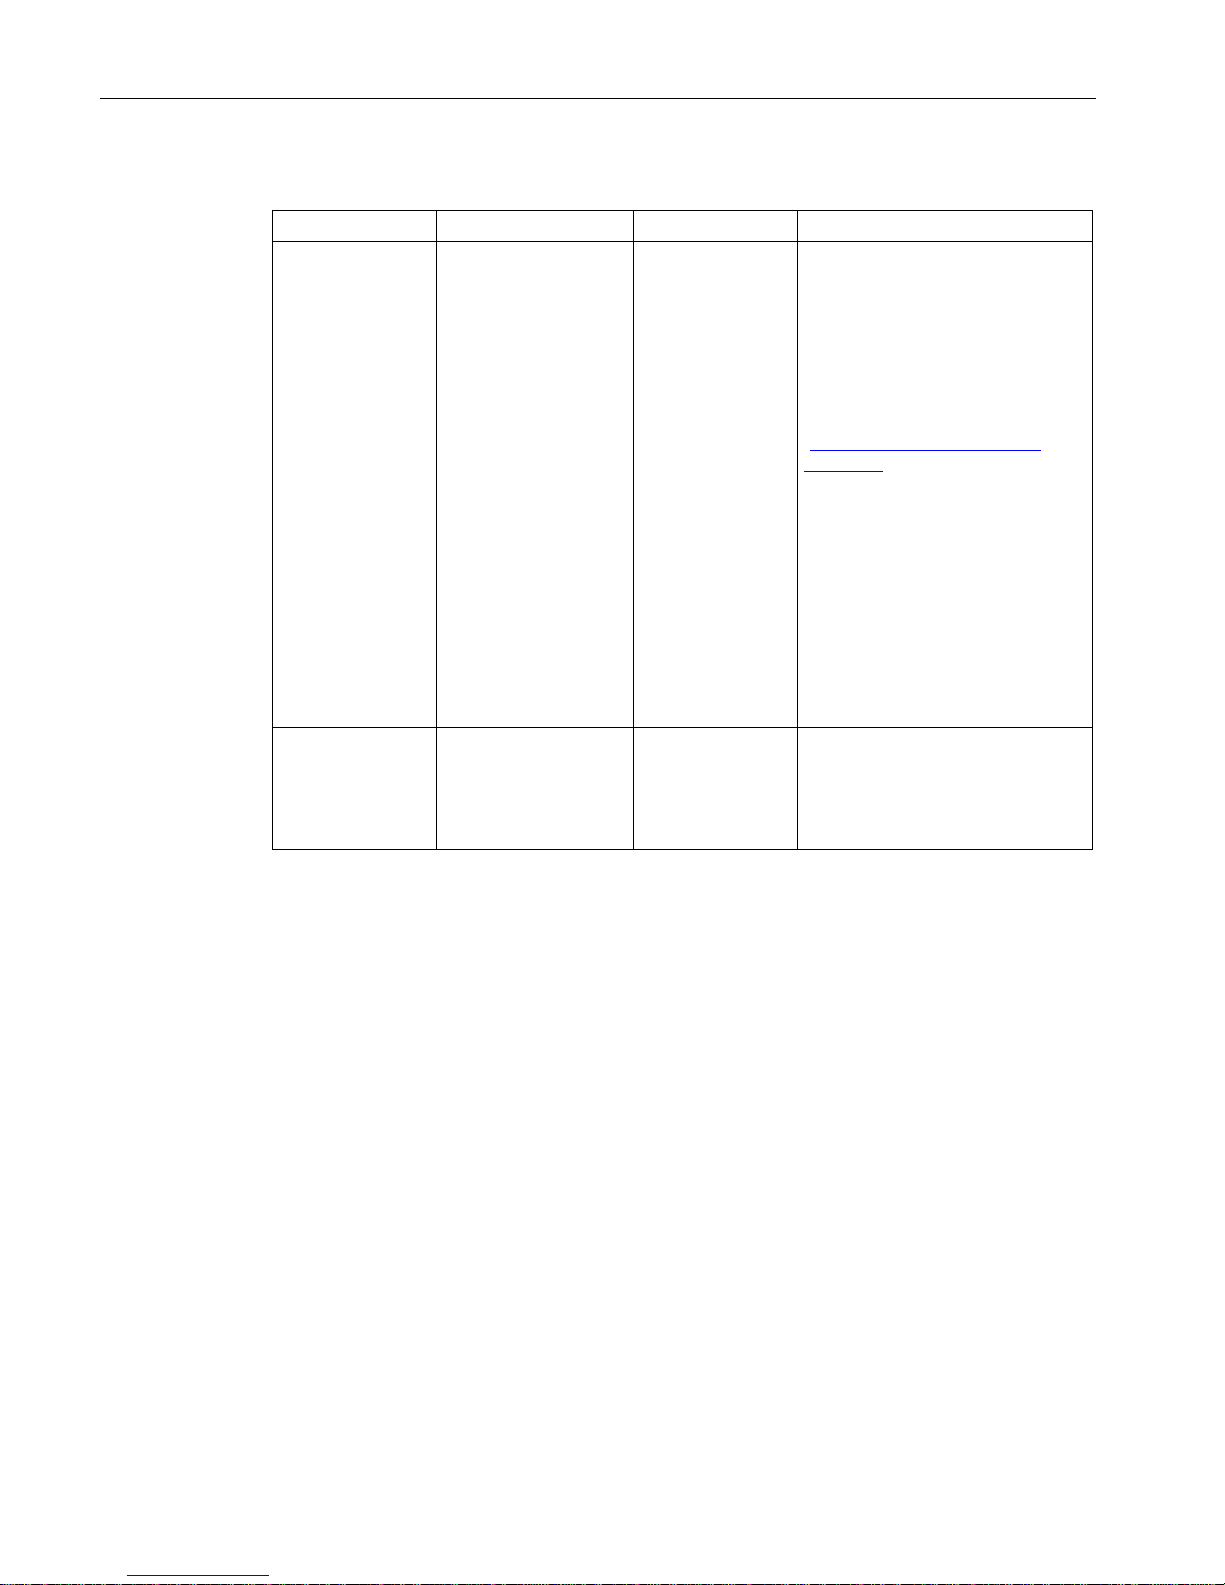
"RF650M" software
6.7 The functions in the "Settings" menu
SIMATIC RF650M mobile reader
54 Operating Instructions, 04/2015, C79000-G8976-C404-01
Table 6- 11 Parameters of the "Radio" tab
Parameter
Setting options
Default value
Description
Country profile
• Europe
• Nord-America
• China
• Malaysia
• Brazil
• Australia
• New Zealand
• Japan 250 mW
• Japan 500 mW
• Korea LBT
• India
• Russia
• Vietnam
• Singapore
• Thailand
• Philippines
Europe In this parameter you can set the
country / region in which the device
is operated. Note that there must
be a device approval for the relevant region.
You will find the current wireless
approvals for Siemens RFID devices in: "RFID radio approvals
(
http://www.siemens.com/rfid-
approvals)"
Frequency
• 160 kHz
• 256 kHz
• 320 kHz
256 kHz Link frequency between tran-
sponder and reader.
This setting should only be
changed by experienced and
trained RFID users.
Page 55

"RF650M" software
6.7 The functions in the "Settings" menu
SIMATIC RF650M mobile reader
Operating Instructions, 04/2015, C79000-G8976-C404-01
55
Parameter
Setting options
Default value
Description
TX Power
• 500 mW
• 398 mW
• 316 mW
• 251 mW
• 200 mW
• 158 mW
• 126 mW
• 100 mW
• 79 mW
• 63 mW
• 50 mW
• 40 mW
• 32 mW
• 25 mW
• 20 mW
• 16 mW
• 13 mW
• 10 mW
• 8 mW
• 6 mW
500 mW The transmit power (TX Power)
essentially decides the size of the
identification range for transponders.
TX Modulation
• ASK
• PR-ASK
PR-ASK Modulation method.
This setting should only be
changed by experienced and
trained RFID users.
RX Decoding
• FM-0
• Miller-2
• Miller-4
• Miller-8
Miller-4 This setting should only be
changed by experienced and
trained RFID users.
Antenna
• Auto
• Antenna 1
Auto
The integrated turnstile antenna
can be set to a fixed polarization. It
is recommended that you leave the
value at "Auto" since with this transponders in different positions or
dipole directions can be identified.
Page 56
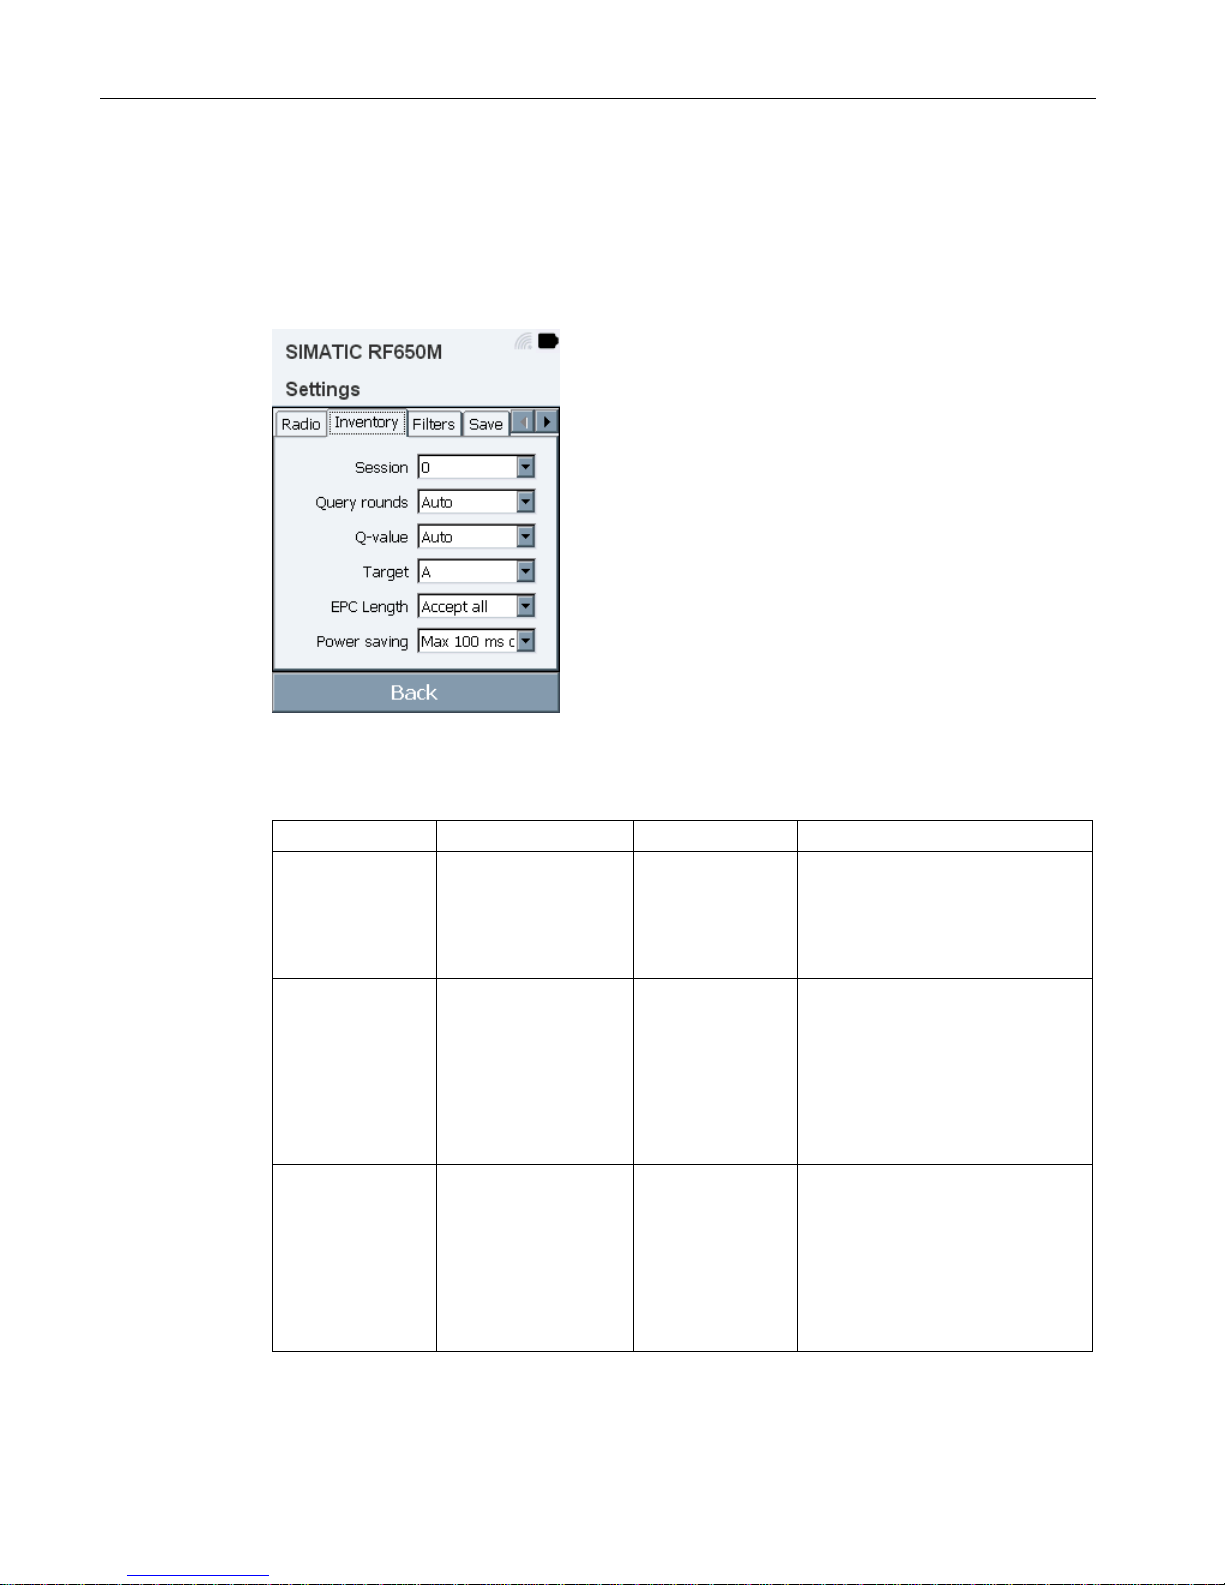
"RF650M" software
6.7 The functions in the "Settings" menu
SIMATIC RF650M mobile reader
56 Operating Instructions, 04/2015, C79000-G8976-C404-01
Inventory
In the "Inventory" tab, you can make settings for the inventory (identification) of
transponders. It is recommended that you do not change the values but leave the setting at
"Auto". You will find a detailed description of the inventory parameters in the specification
ISO 18000-6C or in the EPC Global Class 1 Gen2 standard.
Figure 6-14 "Inventory" tab in the "Settings" menu
Table 6- 12 Parameters of the "Inventory" tab
Parameter
Setting options
Default value
Description
Session
• 0
• 1
• 2
• 3
0
The description can be found in the
wireless standard ISO 18000-6C.
This setting should only be
changed by experienced and
trained RFID users.
Query rounds
• Auto
• 1
• 2
• ...
• 9
• 10
Auto
The description can be found in the
wireless standard ISO 18000-6C.
This setting should only be
changed by experienced and
trained RFID users.
Q-value
• Auto
• 1
• 2
• ...
• 14
• 15
Auto
The description can be found in the
wireless standard ISO 18000-6C.
This setting should only be
changed by experienced and
trained RFID users.
Page 57
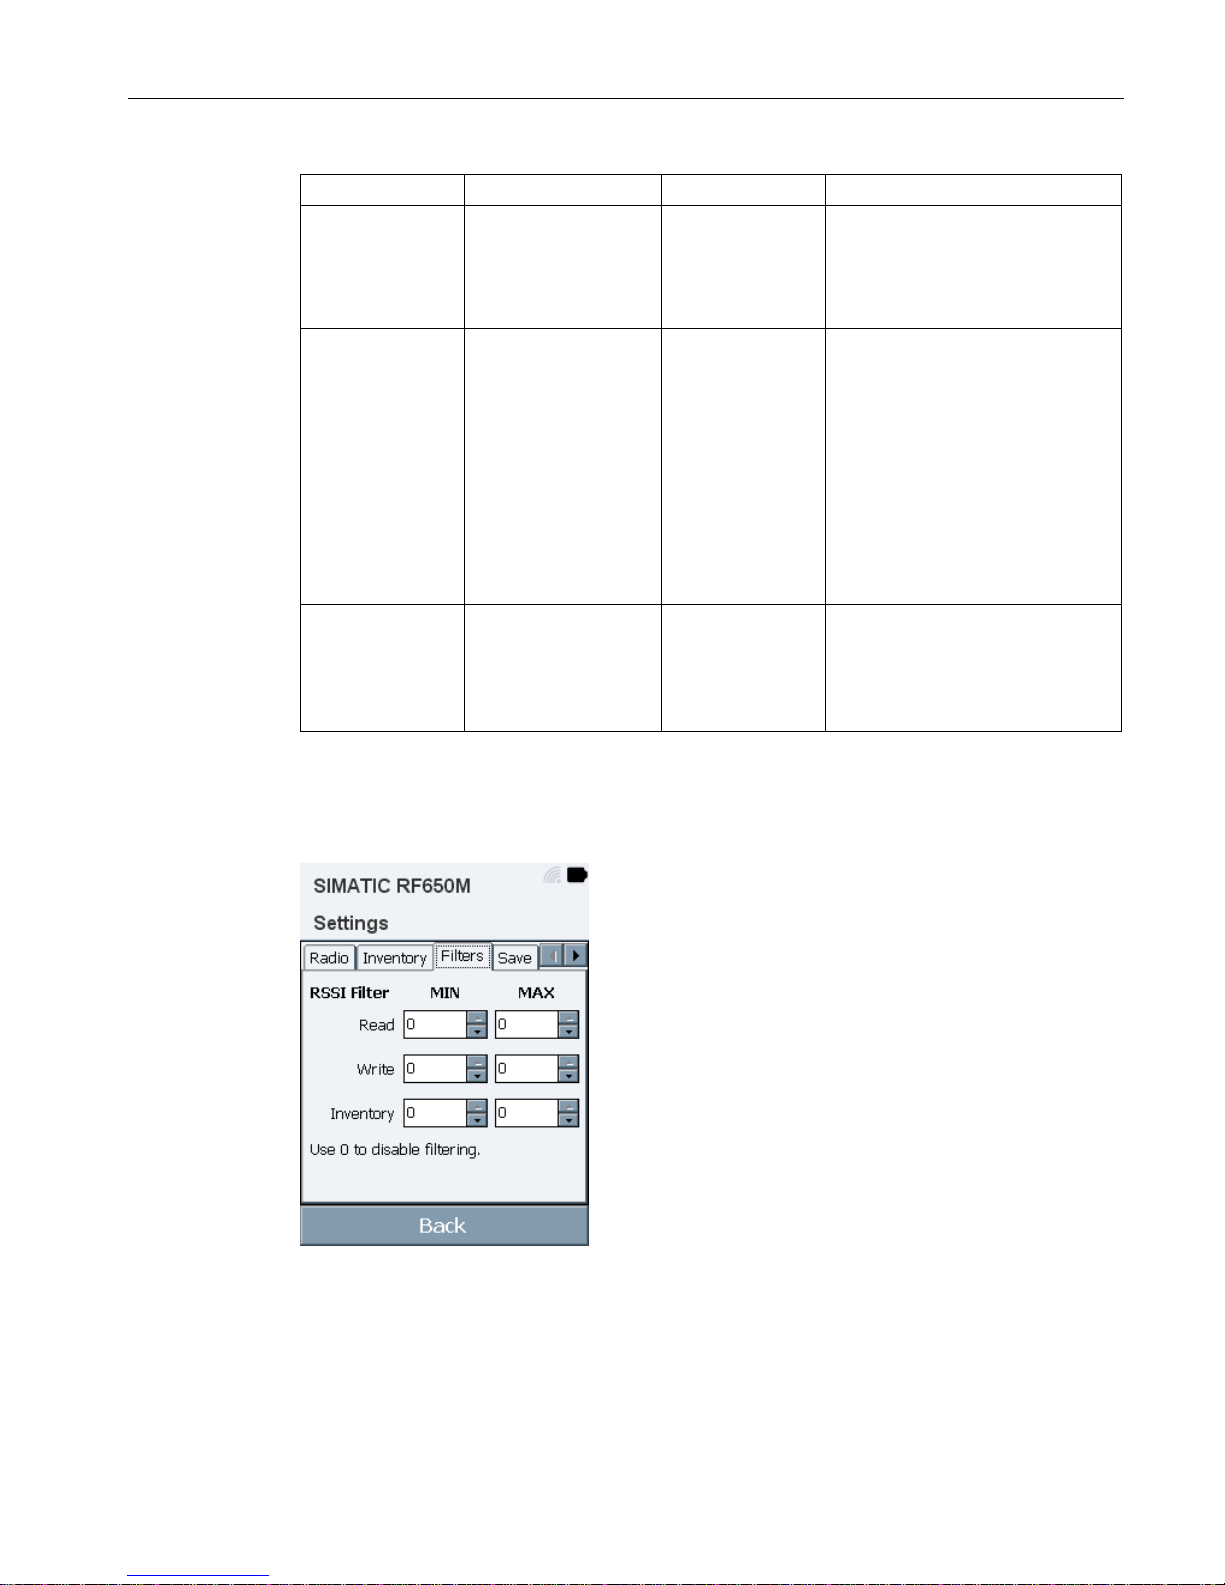
"RF650M" software
6.7 The functions in the "Settings" menu
SIMATIC RF650M mobile reader
Operating Instructions, 04/2015, C79000-G8976-C404-01
57
Parameter
Setting options
Default value
Description
Target
• A
• B
• Auto Switch
A
The description can be found in the
wireless standard ISO 18000-6C.
This setting should only be
changed by experienced and
trained RFID users.
EPC Length
• Accept all
• 16 b / 2 B
• 32 b / 4 B
• 48 b / 6 B
• 64 b / 8 B
• ...
• 464 b / 58 B
• 480 b / 60 B
• 496 b / 62 B
Accept all This setting should only be
changed by experienced and
trained RFID users.
Power saving
• Inactive
• Max. 1000 ms off
• Max. 500 ms off
• Max. 100 ms off
Max. 100 ms off Maximum pause times between
inventories.
This setting should only be
changed by experienced and
trained RFID users.
Filters
In the "Filters" tab, you can filter out transponders based on the signal strength (RSSI).
Figure 6-15 "Filters" tab in the "Settings" menu
Page 58
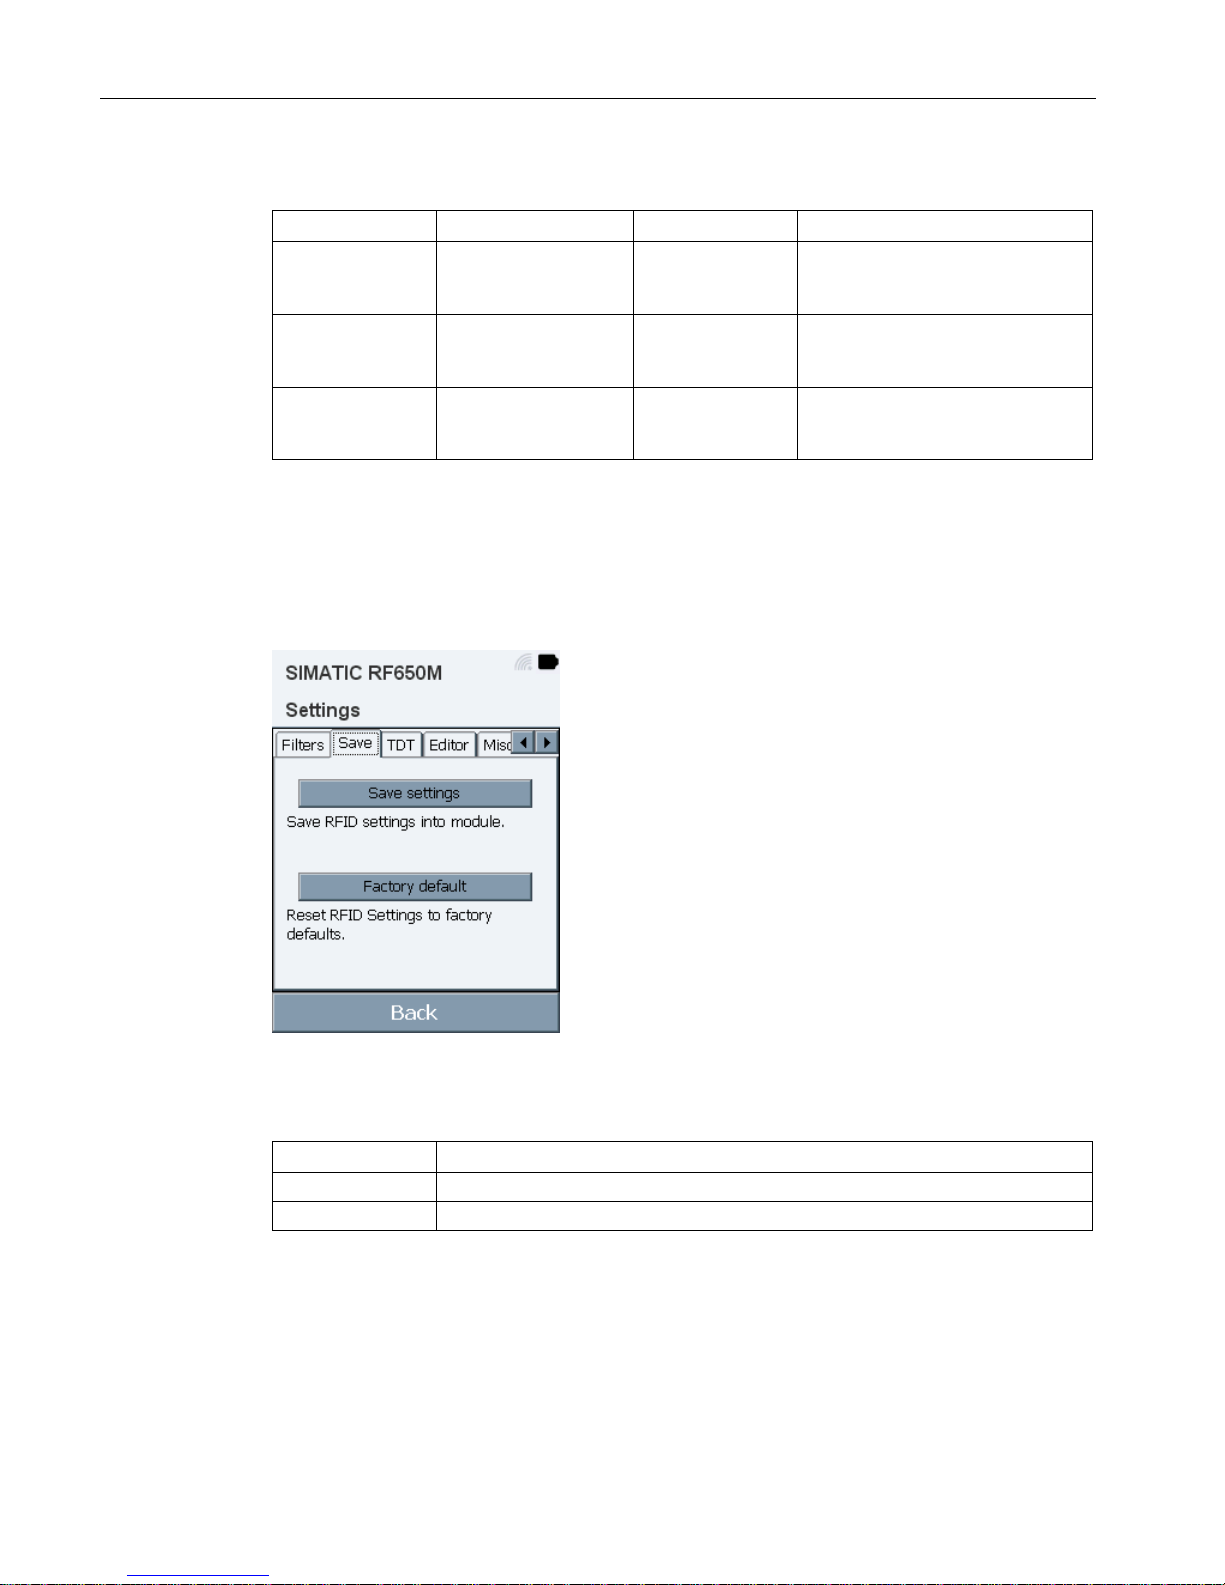
"RF650M" software
6.7 The functions in the "Settings" menu
SIMATIC RF650M mobile reader
58 Operating Instructions, 04/2015, C79000-G8976-C404-01
Table 6- 13 Parameters of the "Filters" tab
Parameter
Setting options
Default value
Description
Read 0 ... -90 0 1) Range of values of the signal
strength in bB in which data can be
read from transponders.
Write 0 ... -90 0 1) Range of values of the signal
strength in bB in which data can be
written to transponders.
Inventory 0 ... -90 0 1) Range of values of the signal
strength in bB in which transpond-
ers can be identified.
1)
With the value "0", filtering is disabled.
Save
In the "Save" tab, you can save changes to the "Radio" and "Inventory" tabs on the mobile
reader and reset the device to the factory defaults.
Figure 6-16 "Save" tab in the "Settings" menu
Table 6- 14 Options of the "Save" tab
Option
Description
Save settings Saves changes in the "Radio" and "Inventory" tabs.
Factory defaults
Restores the RFID settings to the factory defaults.
Page 59
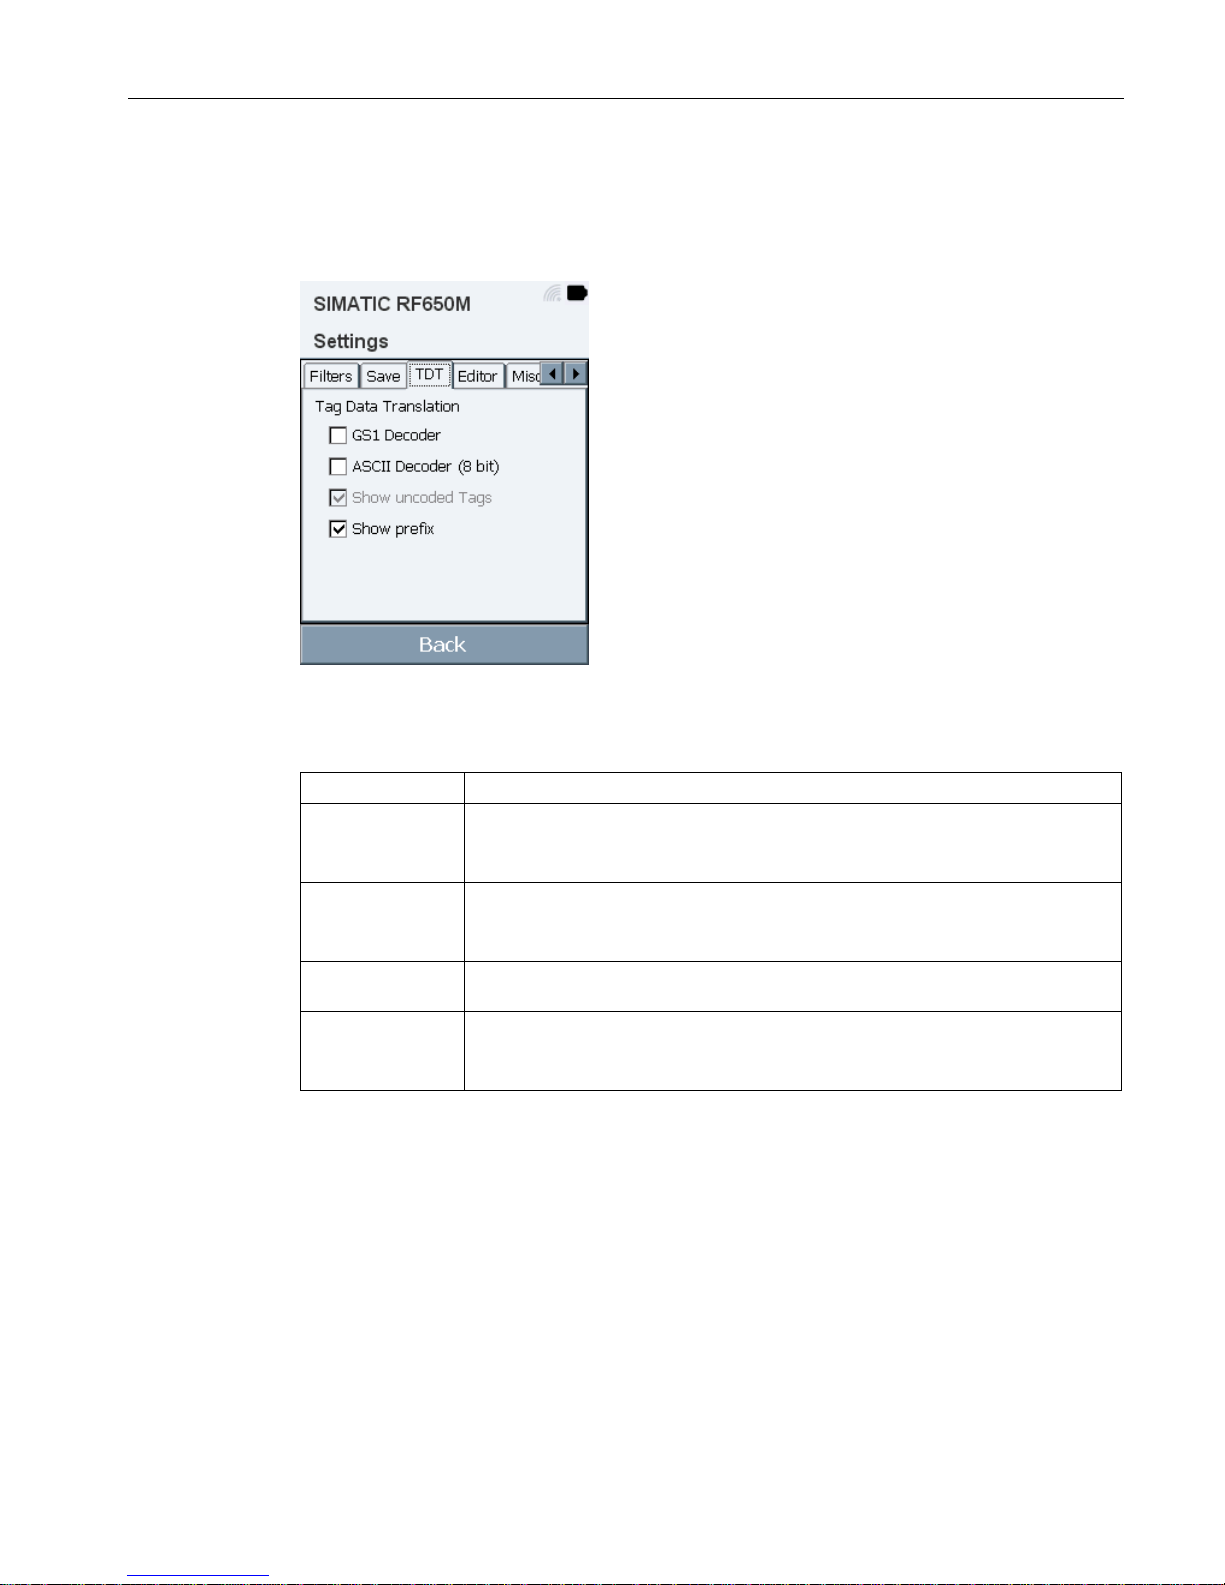
"RF650M" software
6.7 The functions in the "Settings" menu
SIMATIC RF650M mobile reader
Operating Instructions, 04/2015, C79000-G8976-C404-01
59
TDT
In the "TDT" tab you can enable data translations. With the translations, identified
transponder IDs are displayed in a GS1 or ASCII decoded view.
Figure 6-17 "TDT" tab in the "Settings" menu
Table 6- 15 Options of the "TDT" tab
Option
Description
GS1 Decoder If the check box is selected, transponder IDs are displayed in a GS1 decoded
view.
e.g. "sgtin-96:0.6810064511"
ASCII Decoder (8
bit)
If the check box is selected, transponder IDs are displayed in an ASCII decoded
view.
e.g. "ascii:Hello world"
Show uncoded
Tags
If the check box is selected, transponder IDs are also displayed when they do
not match any of the codings above (shown in hexadecimal).
Show prefix If the check box is selected, GS1 or ASCII decoded transponder IDs are dis-
played with a prefix.
e.g. "sgtin-96:" or "ascii:"
Page 60
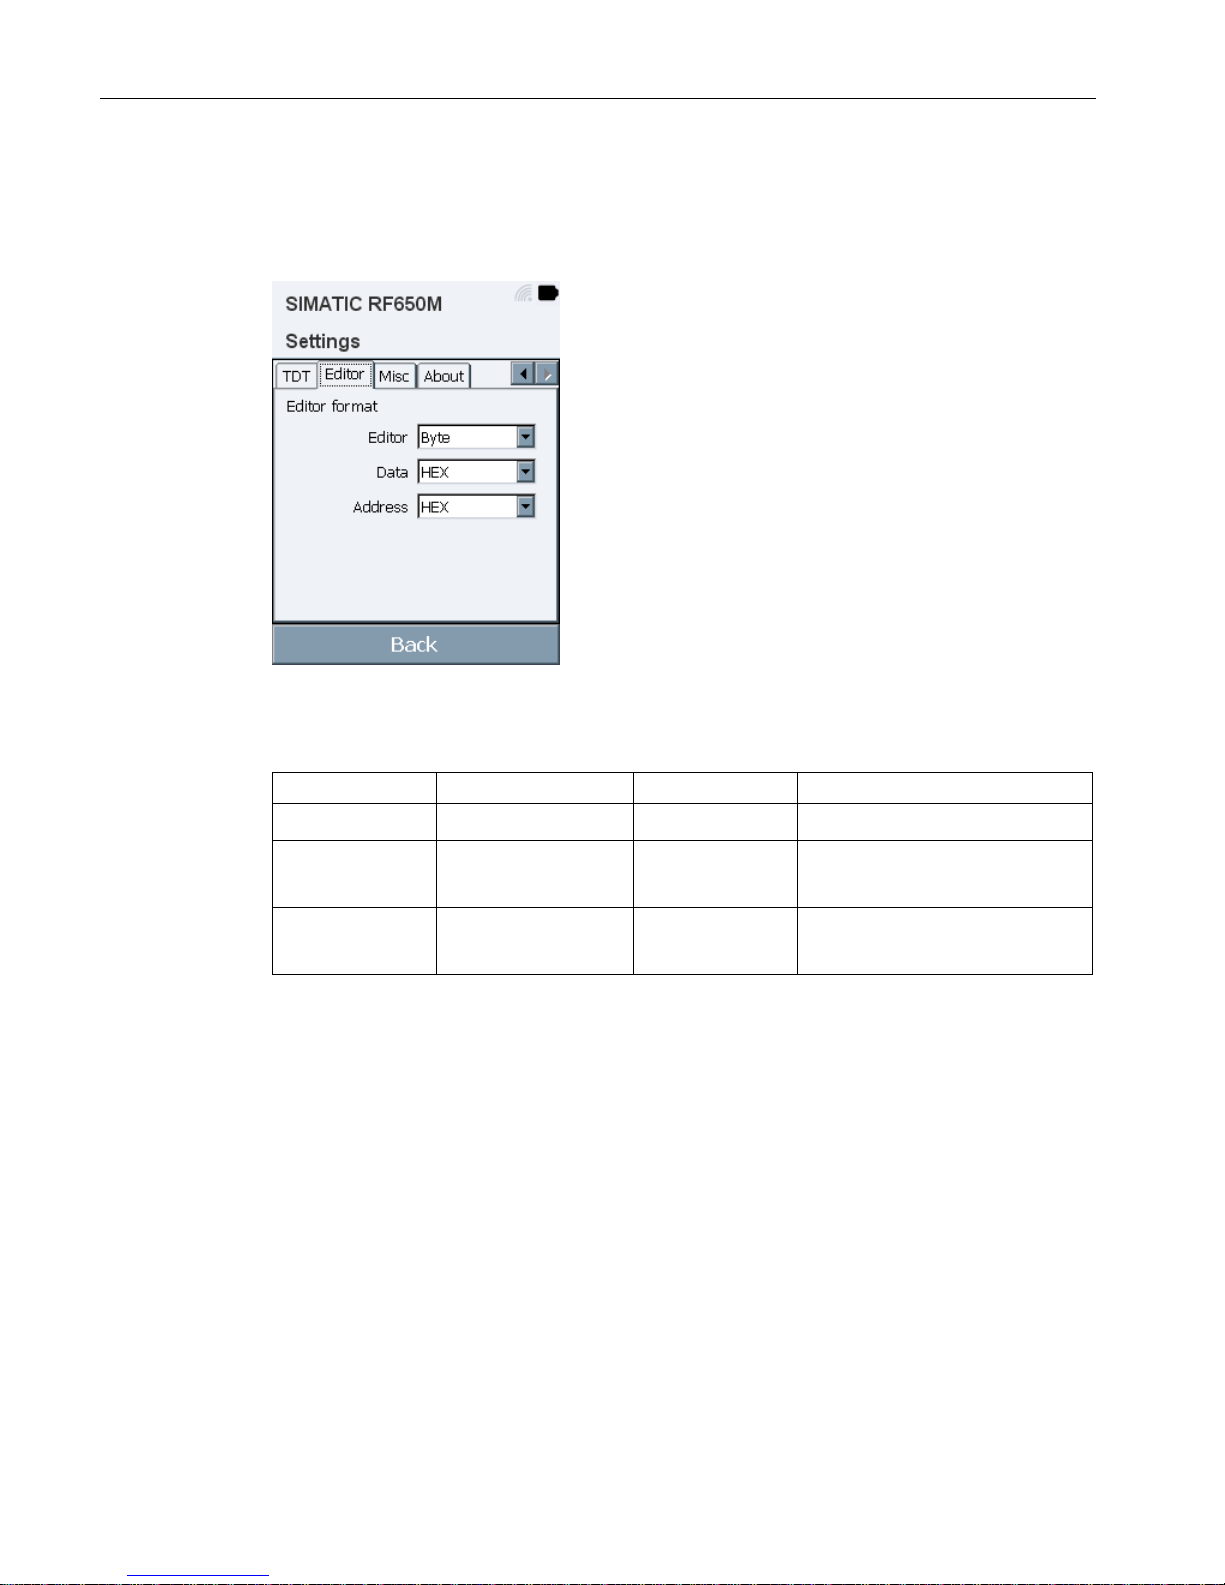
"RF650M" software
6.7 The functions in the "Settings" menu
SIMATIC RF650M mobile reader
60 Operating Instructions, 04/2015, C79000-G8976-C404-01
Editor
In the "Editor" tab you can decide whether data and addresses are displayed in hexadecimal
or decimal in the editor.
Figure 6-18 "Editor" tab in the "Settings" menu
Table 6- 16 Parameters of the "Editor" tab
Parameter
Setting options
Default value
Description
Editor
• Byte
Byte
Data
• HEX
• DEC
HEX Format for representing the tran-
sponder data
Address
• HEX
• DEC
HEX Format for representing the ad-
dress information
Page 61
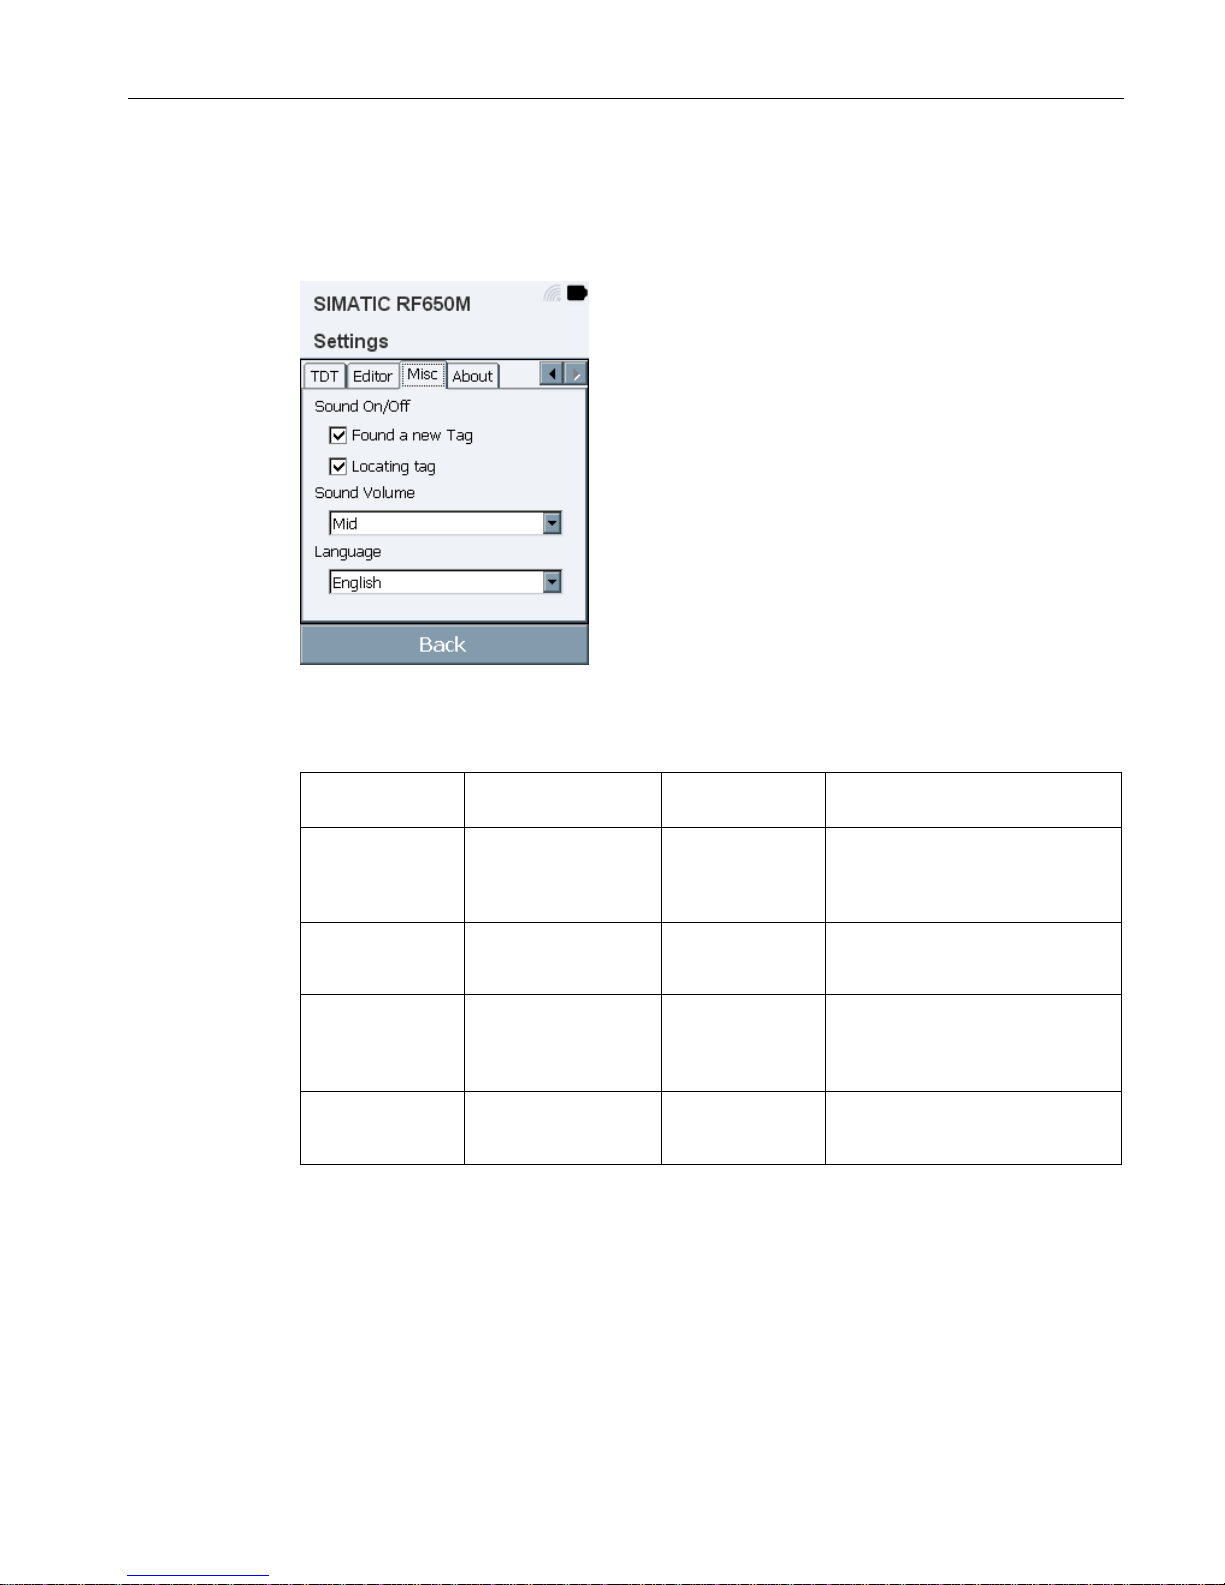
"RF650M" software
6.7 The functions in the "Settings" menu
SIMATIC RF650M mobile reader
Operating Instructions, 04/2015, C79000-G8976-C404-01
61
Misc
In the "Misc" tab, you can specify both the language of the "RF650M" software and adapt
settings for acoustic signals.
Figure 6-19 "Misc" tab in the "Settings" menu
Table 6- 17 Parameters of the "Misc" tab
Options / parameters
Setting options
Default value
Description
Found a
new tag
☐ / ☑ ☑ Check box to enable/disable an
acoustic signal that is generated
when the reader has identified a
new transponder.
Locating tag ☐ / ☑ ☑ Check box to enable/disable an
acoustic signal that is generated
when a transponder is localized.
Sound Volume
• High
• Mid
• Low
Mid Selection of the volume of the
generated acoustic signal.
Sprache/
Language
• English
• German
English
Selection of the user interface
language of the "RF650M" soft-
ware.
Page 62
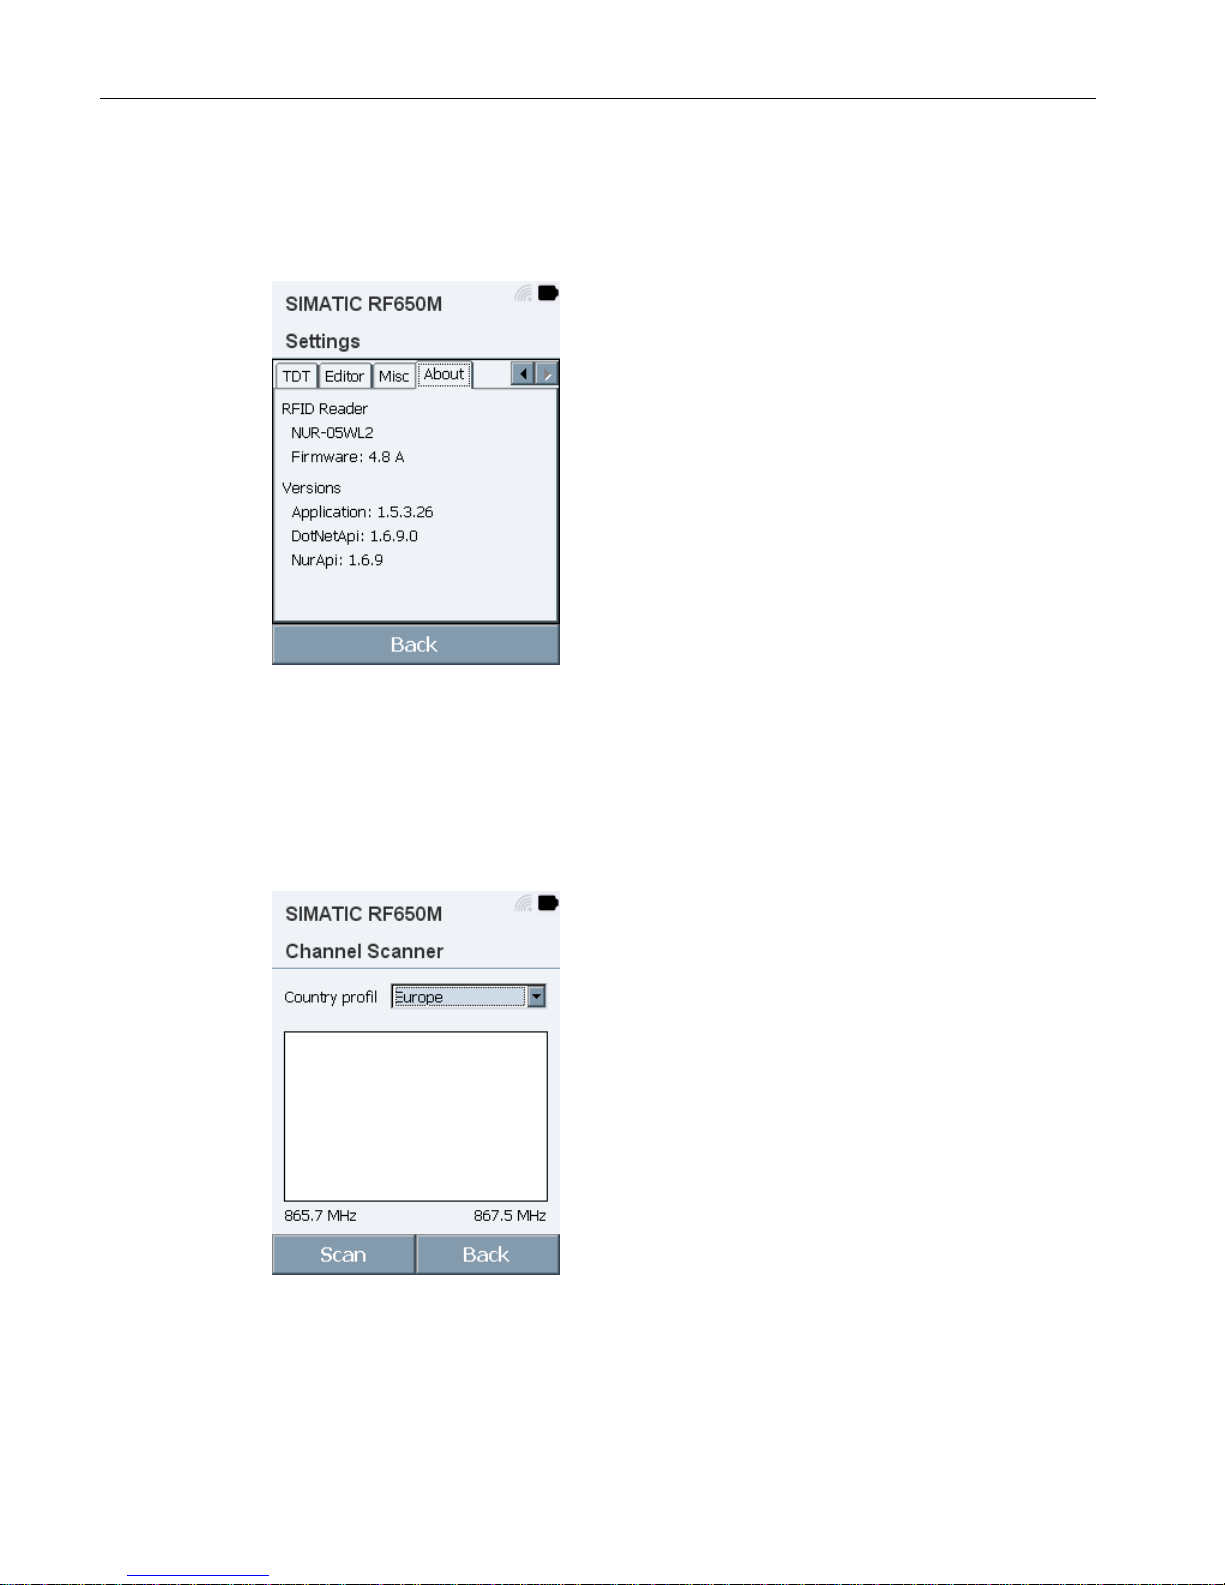
"RF650M" software
6.8 The functions in the "Channel Scanner" menu
SIMATIC RF650M mobile reader
62 Operating Instructions, 04/2015, C79000-G8976-C404-01
About
The "About" tab contains information about the versions of the "RF650M" firmware and
software.
Figure 6-20 "About" tab in the "Settings" menu
6.8
The functions in the "Channel Scanner" menu
In the "Channel Scanner" menu, you can check whether and when which channels are
occupied by other RFID devices in the relevant frequency range.
Figure 6-21 "Channel Scanner" menu
Page 63
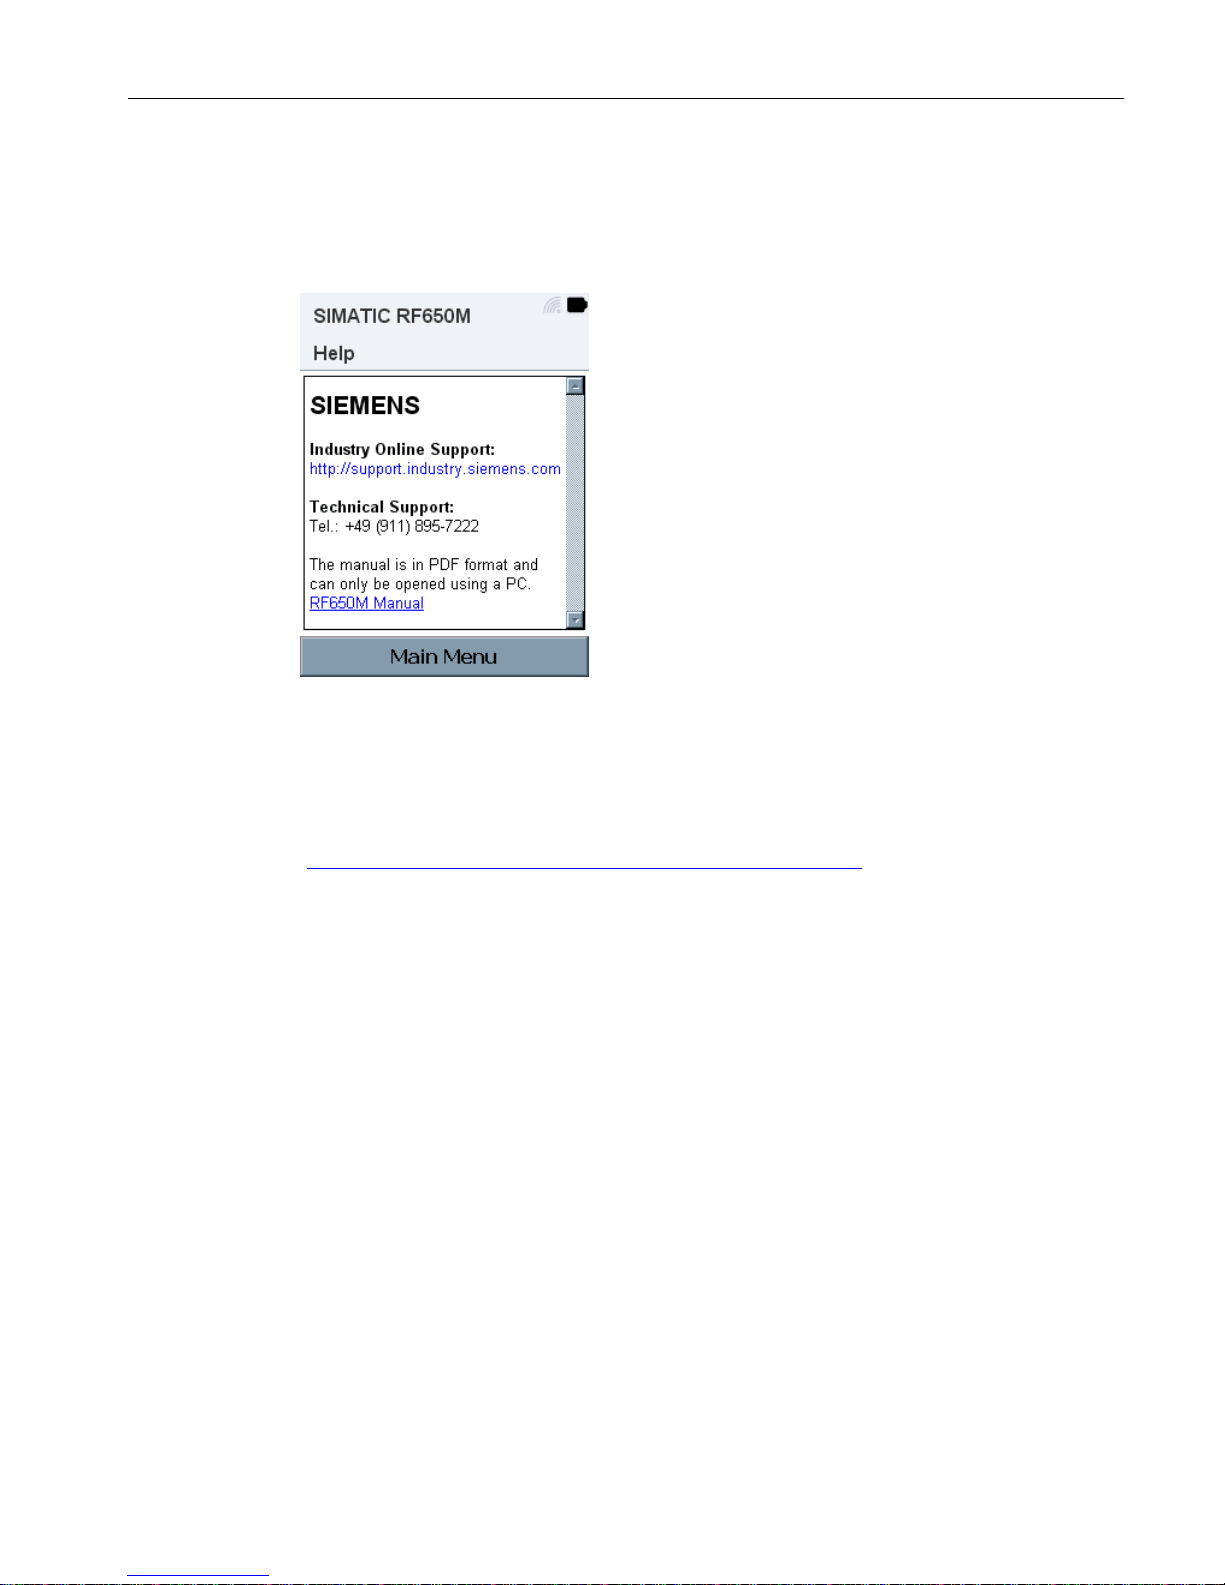
"RF650M" software
6.9 The "Help" menu
SIMATIC RF650M mobile reader
Operating Instructions, 04/2015, C79000-G8976-C404-01
63
6.9
The "Help" menu
In the "Help" menu, you will find further information about Siemens Support and the manual
of the RF650M.
Figure 6-22 "Help" menu
The operating instructions of the RF650M mobile reader are stored on the reader in PDF
format. Note that you cannot display the manual via the mobile reader.
To open the manual, you require a computer with Acrobat Reader. You can download the
manual via the "Industry Online Support - RFID Systems
(http://support.automation.siemens.com/WW/view/en/10805817
)". If the mobile reader is
connected to the computer via the docking station, you can also copy the manual to your
computer (path: "SIMATIC RF650M\Flash\Manuals").
Page 64

"RF650M" software
6.9 The "Help" menu
SIMATIC RF650M mobile reader
64 Operating Instructions, 04/2015, C79000-G8976-C404-01
Page 65
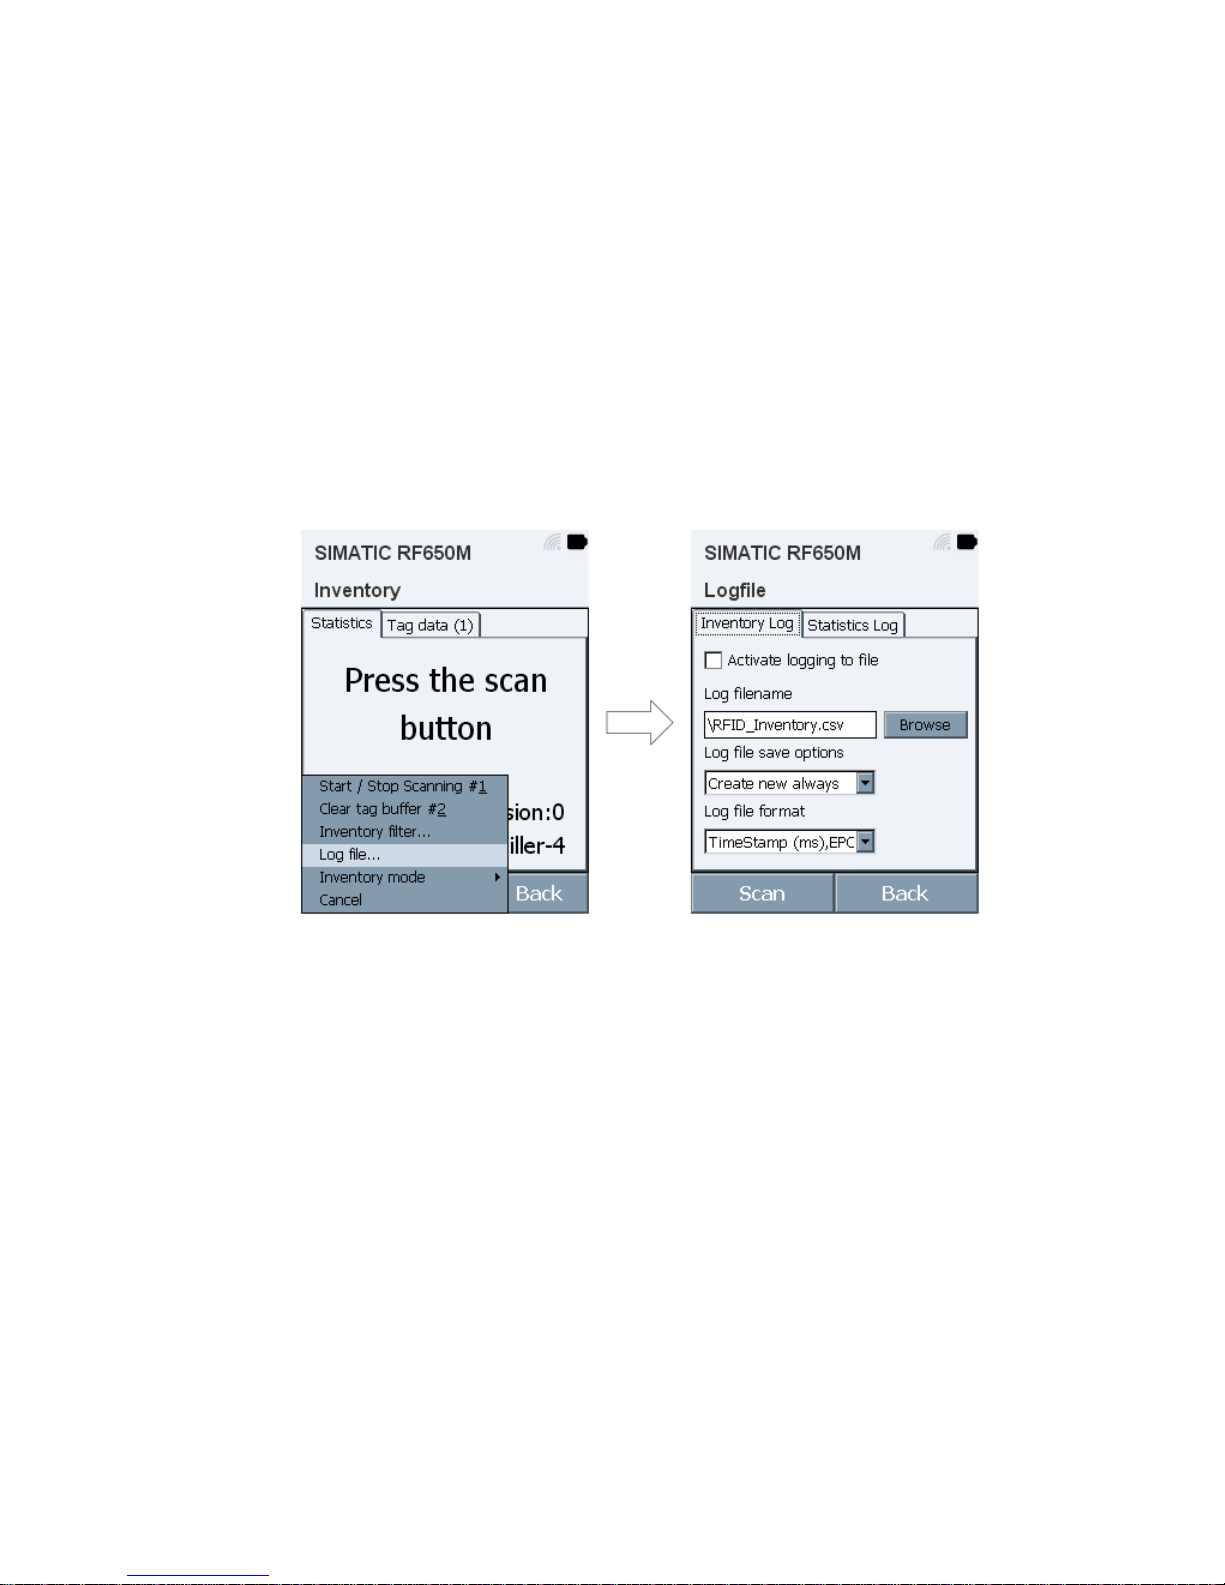
SIMATIC RF650M mobile reader
Operating Instructions, 04/2015, C79000-G8976-C404-01
65
7
7.1
Saving identified transponders
Storage of the identified transponders in the "Inventory" menu
You can save the transponders identified in the "Inventory" menu and the inventory statistics
in a file. In the options menu under "Log file", you can specify the file name and location of
the file.
Figure 7-1 "Log file" options menu
Page 66

Advanced functions
7.1 Saving identified transponders
SIMATIC RF650M mobile reader
66 Operating Instructions, 04/2015, C79000-G8976-C404-01
Representation of the transponder data in csv format
The following table shows an example of how the stored transponder data is represented in
csv format.
Table 7- 1 Example of saved transponder data in csv format
Time Stamp (ms)
Tag Count
EPC
RSSI
572 1 E2007515151800361780597E
-58
572 2 300833B2DDD9014035050010 -58
572 3 300833B2DDD9014035050011
-62
572 4 313233343132333430300002
-60
572 5 300833B2DDD9014035050000
-58
1123
6
3005FB63AC1F3681EC880014
-70
1276
7
E20020847715005418105875
-56
1470
8
E20075151518003617206224
-60
1470
9
52463630305F393939393939
-62
1634
10
AAA1
-68
1634
11
3005FB63AC1F3681EC880468
-58
Page 67
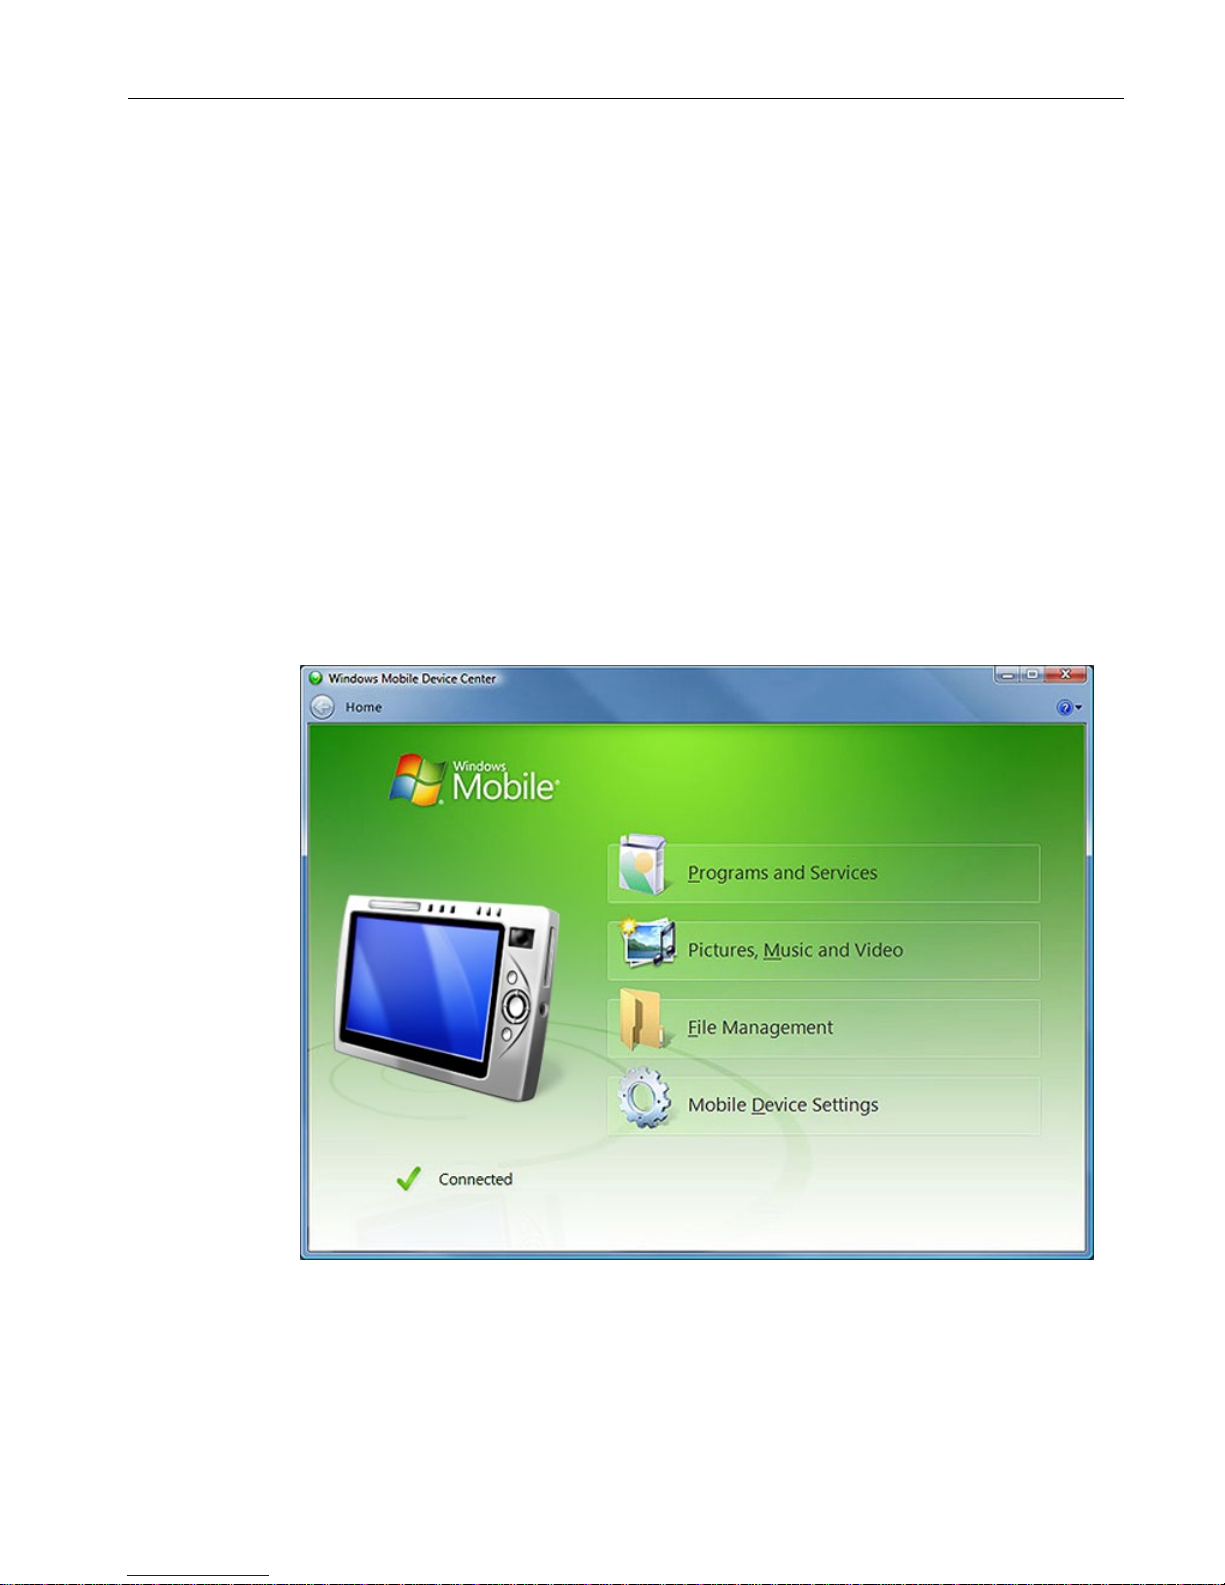
Advanced functions
7.2 Data transfer between the PC and mobile reader
SIMATIC RF650M mobile reader
Operating Instructions, 04/2015, C79000-G8976-C404-01
67
7.2
Data transfer between the PC and mobile reader
7.2.1
Prerequisites
If you want to access the supplied files and documentation, please not the following
prerequisites:
● The SIMATIC RF650M is connected to the computer in the charging/docking station and
via the USB cable. The USB cable ships with the charging/docking station.
7.2.2
Windows Mobile Device Center
In Windows 7, the Windows Mobile Device Center opens automatically when a connection
has been established via a USB cable between the RF650M and the computer. With older
operating systems up to and including Windows XP, you also require the "ActiveSync"
software.
Figure 7-2 Windows Mobile Device Center
In the "File Management" menu item, you can exchange files between the RF650M and the
computer.
Page 68

Advanced functions
7.2 Data transfer between the PC and mobile reader
SIMATIC RF650M mobile reader
68 Operating Instructions, 04/2015, C79000-G8976-C404-01
Page 69

SIMATIC RF650M mobile reader
Operating Instructions, 04/2015, C79000-G8976-C404-01
69
8
Table 8- 1 Technical specifications
6GT2813-0CAx0
Product type designation
SIMATIC RF650M
Radio frequency
Operating frequency
• EU (ETSI) • 865 ... 868 MHz
• USA (FCC) • 902 ... 928 MHz
Effective radiated power (ETSI)
10 ... 500 mW
Equivalent isotropic transmit power (FCC)
16 ... 820 mW
Electrical data
Write/read range
3 m
Protocol for wireless transmission
EPCglobal Class 1 Gen 2 / ISO 18000-6C
Product property, multitag capability
yes
Polarization
linear (horizontal / vertical / automatic)
Power supply Battery operation or line power operation via a
power supply unit or docking station (5.2 VDC)
Battery Lithium-ion battery
(3.7 V; 2260 mAh)
Charging time
• 0 ... 90 %
3 hours
• 0 ... 100 %
4.5 hours
Backup battery
• Storage time for RAM
8 hours
• Storage time for real-time clock
200 days
User program
RF650M.exe
Operating system
Microsoft Windows Embedded CE 6.0
Interfaces
Communication with PC
• USB via charging/docking station
• LAN via charging/docking station
• WLAN integrated in the device
Page 70

Technical data
SIMATIC RF650M mobile reader
70 Operating Instructions, 04/2015, C79000-G8976-C404-01
6GT2813-0CAx0
Hardware
Processor
ARM11, 532 MHz
RAM
256 MB
Flash memory
256 MB
Display
Touchscreen 2.2 ", 240 x 320 pixels
Keypad
21 keys
Sound
Loudspeaker
Mechanical specifications
Weight (incl. battery)
• Reader incl. battery
235 g
• Loading/docking station
195 g
Dimensions (L x W x H)
• Reader with retracted antenna
147 × 60 × 39 mm
• Reader with antenna swung out
147 × 60 × 115 mm
• Loading/docking station
148 × 86 × 67 mm
Degree of protection
IP54
Material
Plastic
Color
Black
MTBF
43 years
Permitted ambient conditions
Ambient temperature
• During operation
-20 ... +55 ℃
• During transportation and storage
-20 ... +60 °C (without battery)
• during charging
0 ... +40 ℃
Relative humidity
10 ... 95%, non-condensing
Maximum drop height
1.5 m
Page 71
SIMATIC RF650M mobile reader
Operating Instructions, 04/2015, C79000-G8976-C404-01
71
9
Table 9- 1 Ordering data RF650M
Article number
SIMATIC RF650M mobile reader
incl. power supply unit
EU (ETSI): 6GT2813-0CA00
USA (FCC): 6GT2813-0CA10
Table 9- 2 Ordering data for RF650M accessories
Article number
SIMATIC RF650M charging/docking station
incl. USB cable
6GT2898-0BB00
Spare battery RF650M
Lithium-ion battery (3.7 V; 2260 mAh)
6GT2898-0CB00
Page 72

Ordering data
SIMATIC RF650M mobile reader
72 Operating Instructions, 04/2015, C79000-G8976-C404-01
Page 73
SIMATIC RF650M mobile reader
Operating Instructions, 04/2015, C79000-G8976-C404-01
73
A
A.1
Certificates and approvals
Table A- 1 Certificates and approvals for SIMATIC RF650M
Certificates and approvals
Description
CE approval to R&TTE
FCC
Federal Communications Com-
mission
This hand-held device complies with part 15 of the FCC rules.
Operation is subject to the following two conditions:
(1) This device may not cause harmful interference, and
(2) this device must accept any interference received, including
interference that may cause undesired operation.
Caution
Changes or modifications not expressly approved by the party
responsible for compliance could void the user's authority to operate the hand-held equipment.
Note
This equipment has been tested and found to comply with the
limits for a Class B digital device, pursuant to part 15 of the FCC
rules. These limits are designed to provide reasonable protection
against harmful interference in a commercial environment. This
equipment generates, uses, and can radiate radio frequency energy and, if not installed and used in accordance with the instructions, may cause harmful interference to radio communications.
However, there is no guarantee that interference will not occur in a
particular installation. If this equipment does cause harmful interference to radio or television reception, which can be determined
by turning the equipment off an on, the user is encouraged to try to
correct the interference by one or more of following measures:
• Reorient or relocate the receiving antenna.
• Increase the separation between the equipment and receiver.
• Connect the equipment into an outlet on a circuit different from
that to which the receiver is connected.
• Consult the dealer or an experienced radio/TV technician for
help.
Page 74
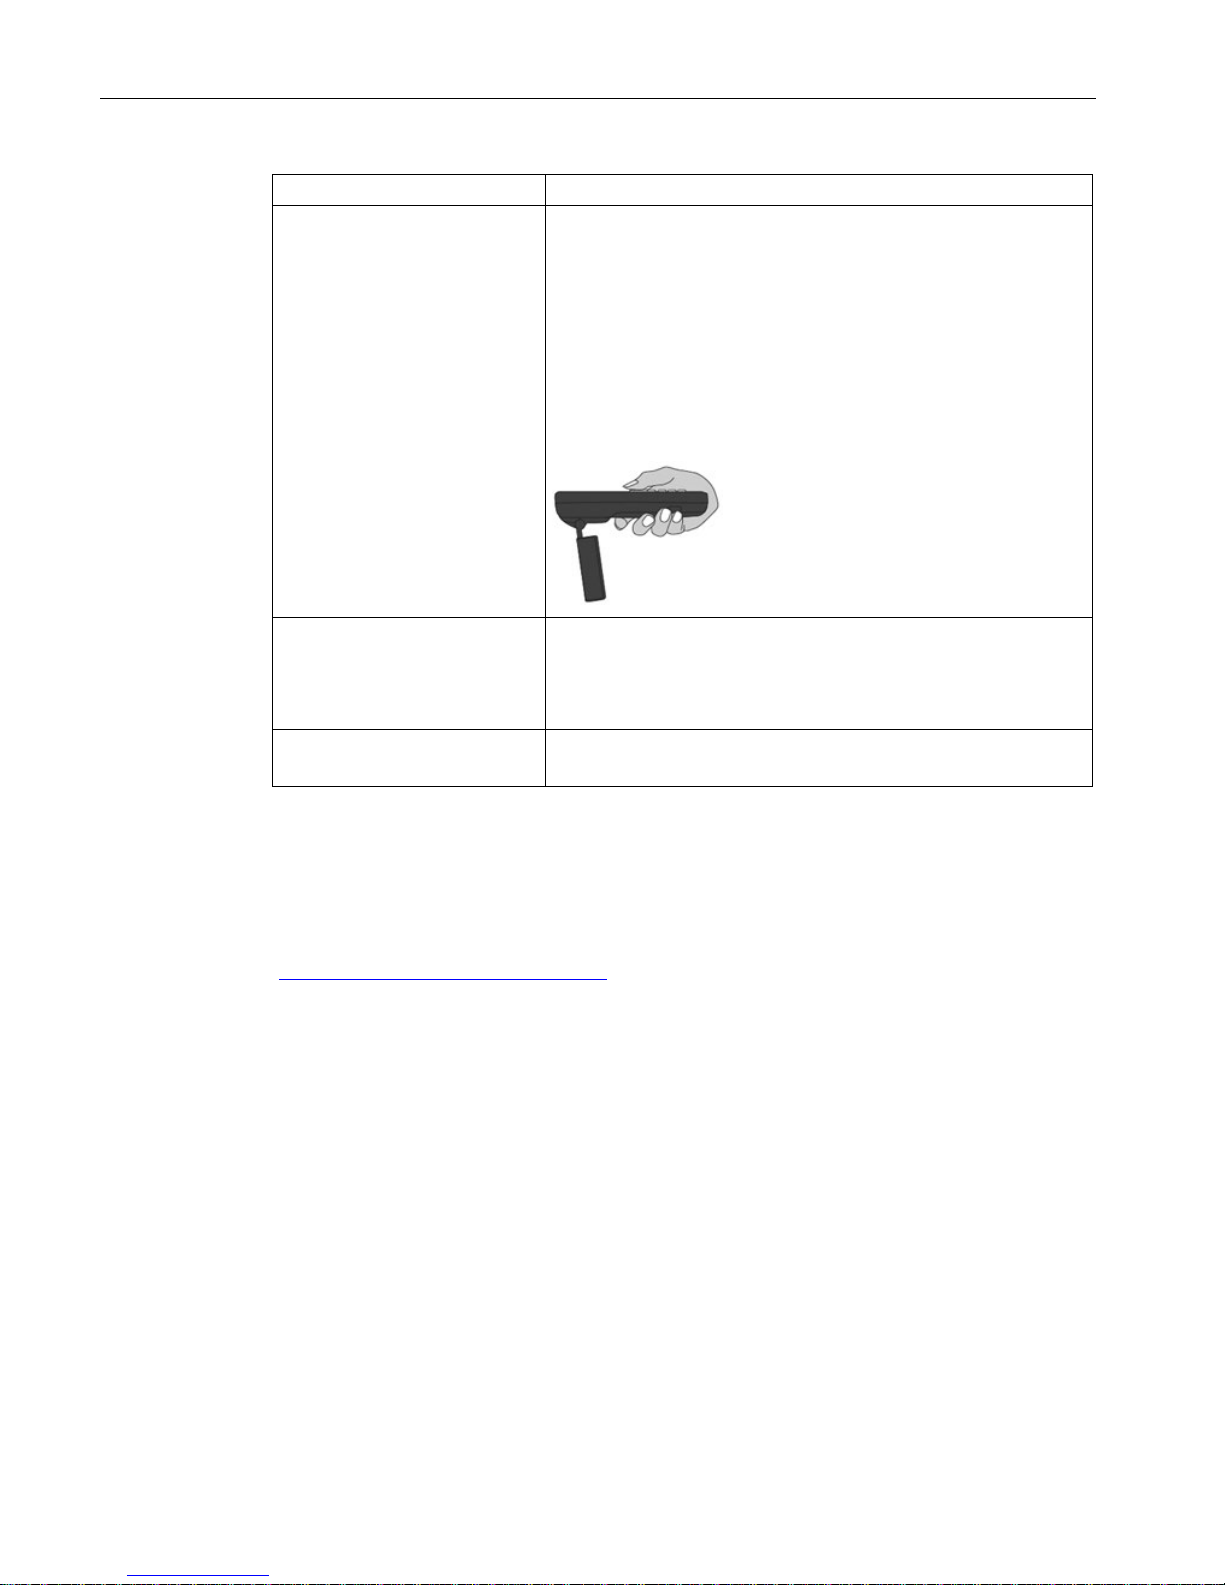
Appendix
A.2 Developing user applications
SIMATIC RF650M mobile reader
74 Operating Instructions, 04/2015, C79000-G8976-C404-01
Certificates and approvals
Description
RF
Radio frequency
This equipment complies with EU and FCC RF radiation exposure
limits set forth for an uncontrolled environment under the following
conditions:
1. This equipment should be installed and operated such that a
minimum separation distance of 20 cm is maintained between the
antenna an user`s/nearby person`s body at all times.
2. This equipment must not be co-located or operating in conjunction with any other antenna or transmitter.
THE PICTURE SHOWS THE SAFE WAY TO HANDLE THE
DEVICE.
Radio modules The device contains an approved radio module.
This module is identified below.
Module: SDC-SSD30AG
FCC ID: TWG-SDCSSD30AG
ETL
Electrical safety listing
ETL listed, Intertek 4004039
Conforms to UL STD 60950-1
A.2
Developing user applications
You will find detailed information on the user applications and development tools for the
RF650M mobile reader under "NHL" on the support pages of "Nordic ID
(http://www.nordicid.com/eng/support/
)".
Page 75

Appendix
A.3 Service & support
SIMATIC RF650M mobile reader
Operating Instructions, 04/2015, C79000-G8976-C404-01
75
A.3
Service & support
Technical Support
You can reach technical support for all PD projects as follows:
● Phone: + 49 (0) 911 895 7222
● Fax: + 49 (0) 911 895 7223
● E-mail (mailto:[email protected]
)
● Internet: Online support request form: (http://www.siemens.com/automation/support-
request)
Contacts
If you have any further questions on the use of our products, please contact one of our
representatives at your local Siemens office.
The addresses are found on the following pages:
● On the Internet (http://www.siemens.com/automation/partner
)
● In Catalog CA 01
● In the catalog ID 10 specially for Industrial Identification Systems
Service & support for industrial automation and drive technologies
On the Internet, on the Support homepage
(http://www.siemens.com/automation/service&support
) of Process Industries and Drives
(PD), you will find various services.
There you will find the following information, for example:
● Our newsletter containing up-to-date information on your products.
● Relevant documentation for your application, which you can access via the search
function in "Product Support".
● A forum for global information exchange by users and specialists.
● Your local contact for PD.
● Information about on-site service, repairs, and spare parts. Much more can be found
under "Our service offer".
RFID homepage
For general information about our identification systems, visit RFID homepage
(http://www.siemens.com/ident/rfid
).
Page 76

Appendix
A.3 Service & support
SIMATIC RF650M mobile reader
76 Operating Instructions, 04/2015, C79000-G8976-C404-01
Online catalog and ordering system
The online catalog and the online ordering system can also be found on the Industry Mall
home page (https://mall.industry.siemens.com
).
Training center
We offer appropriate courses to get you started. Please contact your local training center or
the central training center in
D-90327 Nuremberg.
Phone: +49 (0) 180 523 56 11
(€ 0.14 /min. from the German landline network, deviating mobile communications prices are
possible)
For information about courses, see the SITRAIN homepage (http://www.sitrain.com
).
 Loading...