

Page 1

RFID SYSTEMS
Mobile Reader
Function Manual · 02/2009
Valid for the following products:
SIMATIC RF310M
SIMATIC RF610M
SIMATIC Sensors
Page 2

Page 3

SIMATIC Sensors
RFID Systems
Mobile Reader
Function Manual
Introduction
RFID Reader Interface
User's Guide
RFID Reader Interface
Reference
1
2
3
Valid for the following products:
SIMATIC RF310M
SIMATIC RF610M
02/2009
J31069-D0198-U001-A1-0076
Page 4
Legal information
Warning notice system
This manual contains notices you have to observe in order to ensure your personal safety, as well as to prevent
damage to property. The notices referring to your personal safety are highlighted in the manual by a safety alert
symbol, notices referring only to property damage have no safety alert symbol. These notices shown below are
graded according to the degree of danger.
DANGER
indicates that death or severe personal injury will result if proper precautions are not taken.
WARNING
indicates that death or severe personal injury may result if proper precautions are not taken.
CAUTION
with a safety alert symbol, indicates that minor personal injury can result if proper precautions are not taken.
CAUTION
without a safety alert symbol, indicates that property damage can result if proper precautions are not taken.
NOTICE
indicates that an unintended result or situation can occur if the corresponding information is not taken into
account.
If more than one degree of danger is present, the warning notice representing the highest degree of danger will
be used. A notice warning of injury to persons with a safety alert symbol may also include a warning relating to
property damage.
Qualified Personnel
The device/system may only be set up and used in conjunction with this documentation. Commissioning and
operation of a device/system may only be performed by qualified personnel. Within the context of the safety notes
in this documentation qualified persons are defined as persons who are authorized to commission, ground and
label devices, systems and circuits in accordance with established safety practices and standards.
Proper use of Siemens products
Note the following:
WARNING
Siemens products may only be used for the applications described in the catalog and in the relevant technical
documentation. If products and components from other manufacturers are used, these must be recommended
or approved by Siemens. Proper transport, storage, installation, assembly, commissioning, operation and
maintenance are required to ensure that the products operate safely and without any problems. The permissible
ambient conditions must be adhered to. The information in the relevant documentation must be observed.
Trademarks
All names identified by ® are registered trademarks of the Siemens AG. The remaining trademarks in this
publication may be trademarks whose use by third parties for their own purposes could violate the rights of the
owner.
Disclaimer of Liability
We have reviewed the contents of this publication to ensure consistency with the hardware and software
described. Since variance cannot be precluded entirely, we cannot guarantee full consistency. However, the
information in this publication is reviewed regularly and any necessary corrections are included in subsequent
editions.
Siemens AG
Industry Sector
Postfach 48 48
90026 NÜRNBERG
GERMANY
J31069-D0198-U001-A1-0076
Ⓟ 02/2009
Copyright © Siemens AG 2007, 2009.
Technical data subject to change
Page 5

Table of contents
1 Introduction................................................................................................................................................ 7
2 RFID Reader Interface User's Guide......................................................................................................... 9
2.1 RFID Reader Interface...................................................................................................................9
2.2 How Do I Use the Reader Interface?...........................................................................................10
2.2.1 Tools Needed...............................................................................................................................10
2.2.2 Creating the Application...............................................................................................................11
2.2.3 Starting the RFID reader..............................................................................................................12
2.2.4 Compile and Run .........................................................................................................................15
2.2.5 I Want To See Tags… .................................................................................................................18
2.2.6 Know More about the Tags … .....................................................................................................19
2.2.7 Change the Tags' Data ................................................................................................................20
2.2.8 Summary......................................................................................................................................21
2.3 Extending the Reach....................................................................................................................22
2.3.1 Being Part of a Larger Family ......................................................................................................22
2.3.2 Entering the system .....................................................................................................................24
2.3.3 Wake me up before you go… ......................................................................................................25
2.3.4 We are started: What to make out of it? ......................................................................................29
2.3.5 Jerry’s tag monitoring scenario revisited .....................................................................................30
2.3.6 I’m all ears....................................................................................................................................31
2.3.7 Not without my approval ..............................................................................................................34
2.3.8 Make it fun: Working keys............................................................................................................36
2.3.9 Summary......................................................................................................................................39
3 RFID Reader Interface Reference ........................................................................................................... 41
3.1 The Interface................................................................................................................................41
3.2 RfReaderApi.Current ...................................................................................................................42
3.3 RfReaderApiException.................................................................................................................42
3.4 IRfReaderApi................................................................................................................................43
3.4.1 Version.........................................................................................................................................43
3.4.2 StartReader..................................................................................................................................44
3.4.3 StopReader..................................................................................................................................45
3.4.4 ReaderStatus ...............................................................................................................................46
3.4.5 AirProtocol....................................................................................................................................47
3.4.6 SetAirProtocol ..............................................................................................................................47
3.4.7 SetTagID......................................................................................................................................49
3.4.8 GetTagIDs....................................................................................................................................50
3.4.9 GetTagMemory ............................................................................................................................51
3.4.10 SetTagMemory.............................................................................................................................53
3.4.11 .....................................................................................................................................................55
3.4.14 LockEPCGen2Tag .......................................................................................................................59
3.4.15 LockIsoTag...................................................................................................................................62
3.4.16 SetTrigger ....................................................................................................................................63
3.4.17 SubscribeForNotifications ............................................................................................................64
3.4.18 UnsubscribeForNotifications ........................................................................................................65
Mobile Reader
Function Manual, 02/2009, J31069-D0198-U001-A1-0076
5
Page 6

Table of contents
3.4.19 SetTagEvents.............................................................................................................................. 66
3.4.20 SubscribeForAlarms.................................................................................................................... 67
3.4.21 UnsubscribeForAlarms................................................................................................................ 68
3.4.22 GetConfigParameter ................................................................................................................... 69
3.4.23 TagEventNotification ................................................................................................................... 71
3.4.24 Alarms ......................................................................................................................................... 73
3.4.25 Information .................................................................................................................................. 74
3.5 References.................................................................................................................................. 75
Mobile Reader
6 Function Manual, 02/2009, J31069-D0198-U001-A1-0076
Page 7

Introduction
This document describes the RFID Reader Interface for the SIMATIC handheld systems
RF610M and RF310M and how this interface can be utilized.
The document consists of two parts. The first part gives you an overview of how the RFID
Reader Interface can be used and the second part contains a detailed reference description
of the RFID Reader Interface.
While this document describes the usage of the RFID module within the handheld device it
neither includes nor describes how other features of the device such as barcode detection,
WLAN or updates of the operating system itself are used. You have to directly contact the
device vendor PSION in order to get software and support for these features.
With the version V1.1 of the RF610M device and the RFID Reader Interface some of the
topics above will be covered. You get an overview regarding topics such as WLAN and
barcode by consulting the RF610M device manual. Detailed developer information, however,
is still to be retrieved from the device vendor PSION directly.
This new version of RF610M will also be integrated in the SIMATIC RF-MANAGER 2008
product which allows you to configure RF610M devices to work in integrated scenarios. As
far as these scenarios deal with issues such as barcode handling, these issues will be
covered in this document either at least from a functional perspective.
This document will use the short form RF-MANAGER as an abbreviation for convenience
when speaking of SIMATIC RF-MANAGER 2008.
1
Mobile Reader
Function Manual, 02/2009, J31069-D0198-U001-A1-0076
7
Page 8

Introduction
Mobile Reader
8 Function Manual, 02/2009, J31069-D0198-U001-A1-0076
Page 9
RFID Reader Interface User's Guide
2.1 RFID Reader Interface
Simatic Handheld devices enable end users to acquire tag data from any place without the
limitations of a cable-bound system. It provides the hardware as well as a software
application to use the features of the mobile reader.
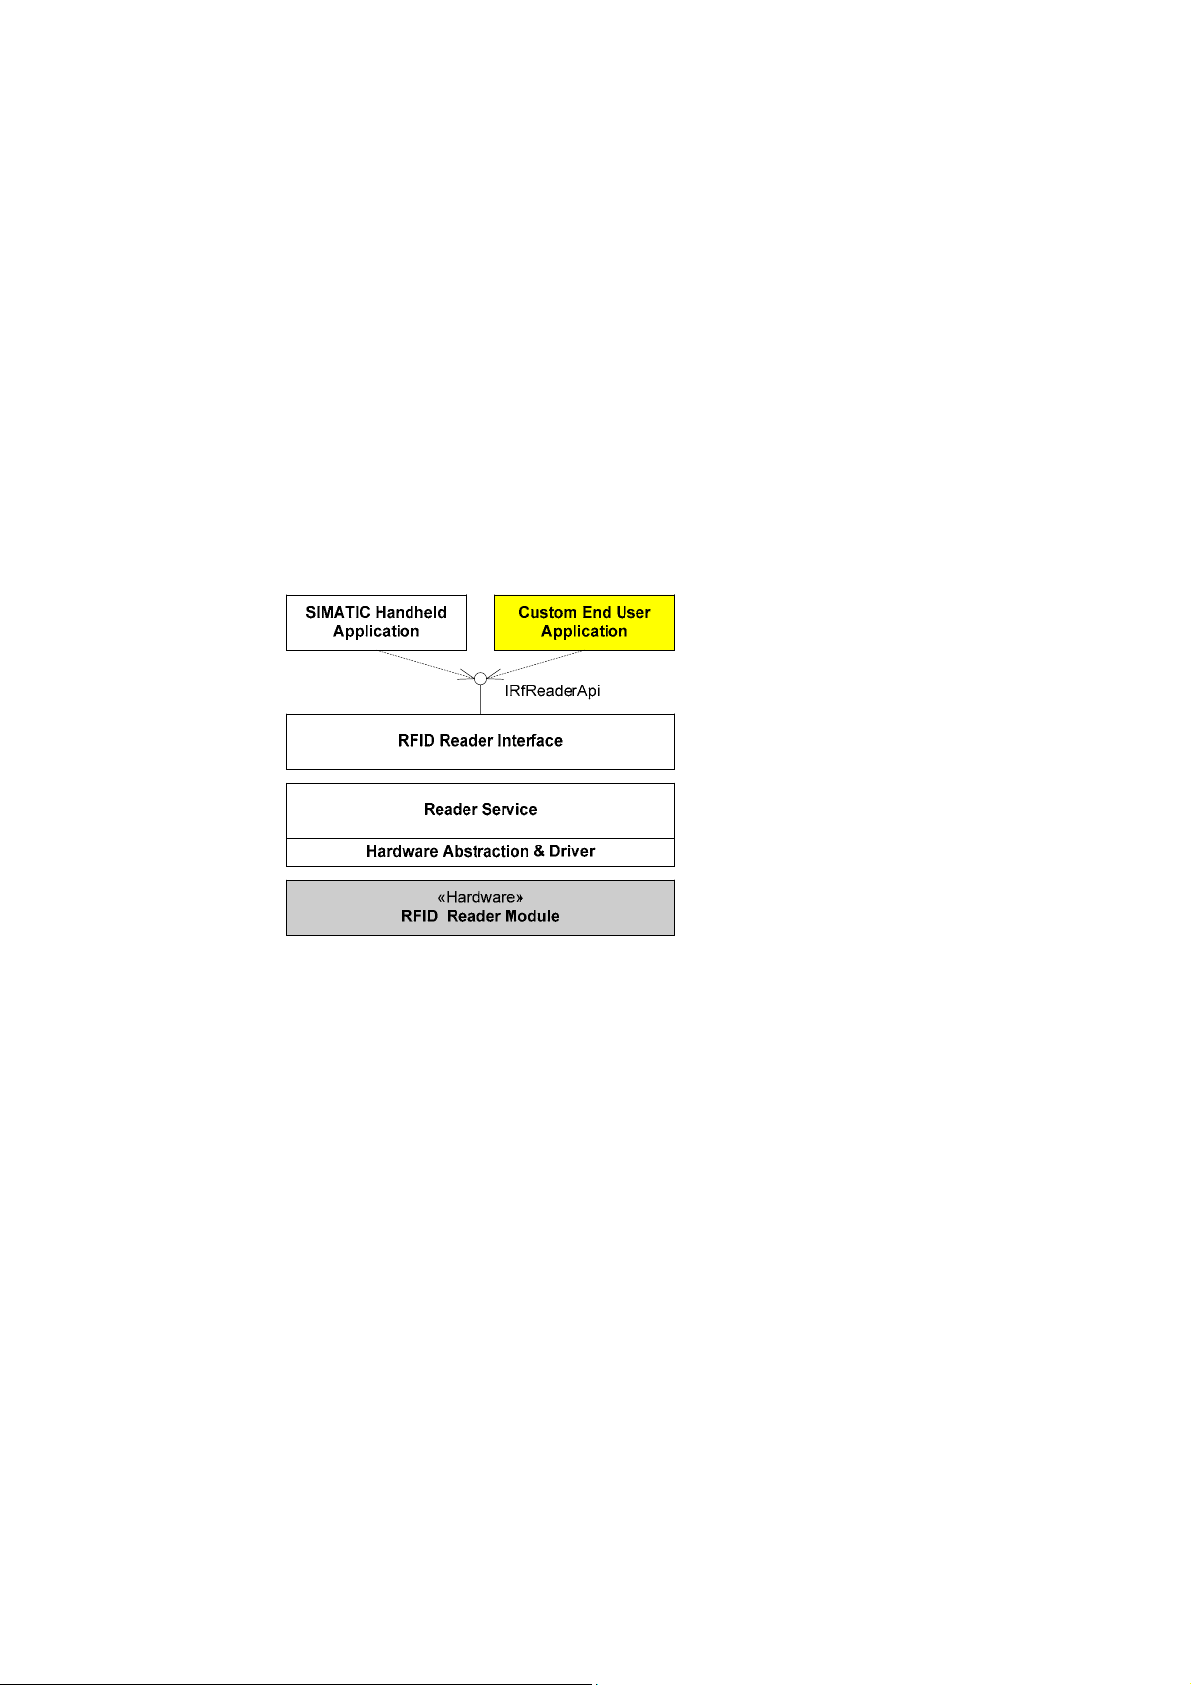
Figure 2-1 Software system structure on a SIMATIC Handheld device.
2
The Figure above shows the main components of a SIMATIC Handheld device. Obviously, a
piece of hardware is necessary – the RFID Reader Module – to acquire RFID information.
The capabilities of this hardware are accessed by a driver that is also used by the reader
service which is the software component that controls all RFID features.
The Simatic Handheld application utilizes the reader service's features and provides
customers with a user interface that can trigger all RFID features made available by the
reader service (IRfReaderApi). However, the application has no information on the special
requirements or the business processes of end customers.
Since a single application can almost never meet every need of every customer, another
approach is used. Instead of inflating the application with a large number of possible options
while still missing others, only the basic features are supported.
To facilitate the end user's needs, these basic functions are provided by an interface that
allows custom applications to fully exploit all RFID features with programming and to add the
customer's own workflows and relationships to suit his needs.
It would have been possible to directly access the reader service component via an interface
that extends the EPC standards. However, these standards are complicated and use many
internal concepts and entities. You do neither need nor probably want to know these details
if your only objective is to simply access and write data to RFID tags. That is why all this
complexity is hidden behind a simple interface - the RFID Reader Interface.
The following sections will explain how to use this interface in your work. Detailed
information about all the functions provided by this interface is given in the next chapter.
Mobile Reader
Function Manual, 02/2009, J31069-D0198-U001-A1-0076
9
Page 10

RFID Reader Interface User's Guide
2.2 How Do I Use the Reader Interface?
2.2 How Do I Use the Reader Interface?
So far, so good. We have learned that there is an easy way to access the RFID features of a
handheld device. But how do we do this?
2.2.1 Tools Needed
First, we will create a small sample application that only reads tags.
What tools will you need?
The interface is a .Net CompactFramework 2.0 SP2 assembly. Logically this requires a
derivate of the Microsoft Visual Studio 2005 as its starting point. Remember that the Express
versions will not be sufficient because they do not allow the installation of additional device
packages. You will need at least the Standard or Professional version of Visual Studio 2005.
Next comes the installation of the software development kit (SDK) from PSION Teklogix.
This software kit is available from developer resources on the PSION TEKLOGIX website
www.psionteklogix.com) after registration.
(
These are all the development tools you need to get started. Although you can now create
applications targeting a handheld device such as the RF610M, you will also need to transfer
the developed software to the handheld device. This means that Microsoft ActiveSync must
also be installed.
Moreover, in order to utilize the RFID features you will also need to reference the RFID
Reader Interface assembly within your applications. This assembly is available on your
handheld device. You can retrieve the file Siemens.Simatic.RfReaderApi.dll via
ActiveSync from the handheld device (\Flash Disk\SIMATIC
xxx\Support\RFID_AP\RFID_API.ZIP) and store it to reference the assembly.
You should now be able to create, deploy and run your custom applications.
The table below summarizes the required components.
Tool / Component Description Vendor
Microsoft Visual Studio 2005
(at least Standard edition)
(at least CompactFramework 2.0 SP2)
PSION TEKLOGIX Software Development
Kit (SDK)
Microsoft ActiveSync Enables communication between your
Siemens.Simatic.RfReaderApi.dll
rfid_power_commutation.dll
PsionTeklogixRFID.dll
PsionTeklogicNet.dll
PtxSdkCommon.dll
Siemens.Simatic.RfReaderApi.dll.config
The basic development environment Microsoft
Enables creation of applications for Windows CE
devices
development PC and a handheld device
The RFID Reader Interface assembly
Even if this assembly is enough to compile, don’t
forget to provide rfid_power_commutation.dll,
PsionTeklogixRFID.dll, PsionTeklogicNet.dll
PtxSdkCommon.dll and
Siemens.Simatic.RfReaderApi.dll.config for
executing your own application.
PSION
Microsoft
All of these components
are provided on the
device’s flash memory
within a compressed
archive.
Moreover, the sample code of the small demo application developed within the following
chapters is also available on the device’s flash disk.
Mobile Reader
10 Function Manual, 02/2009, J31069-D0198-U001-A1-0076
Page 11
RFID Reader Interface User's Guide
2.2 How Do I Use the Reader Interface?
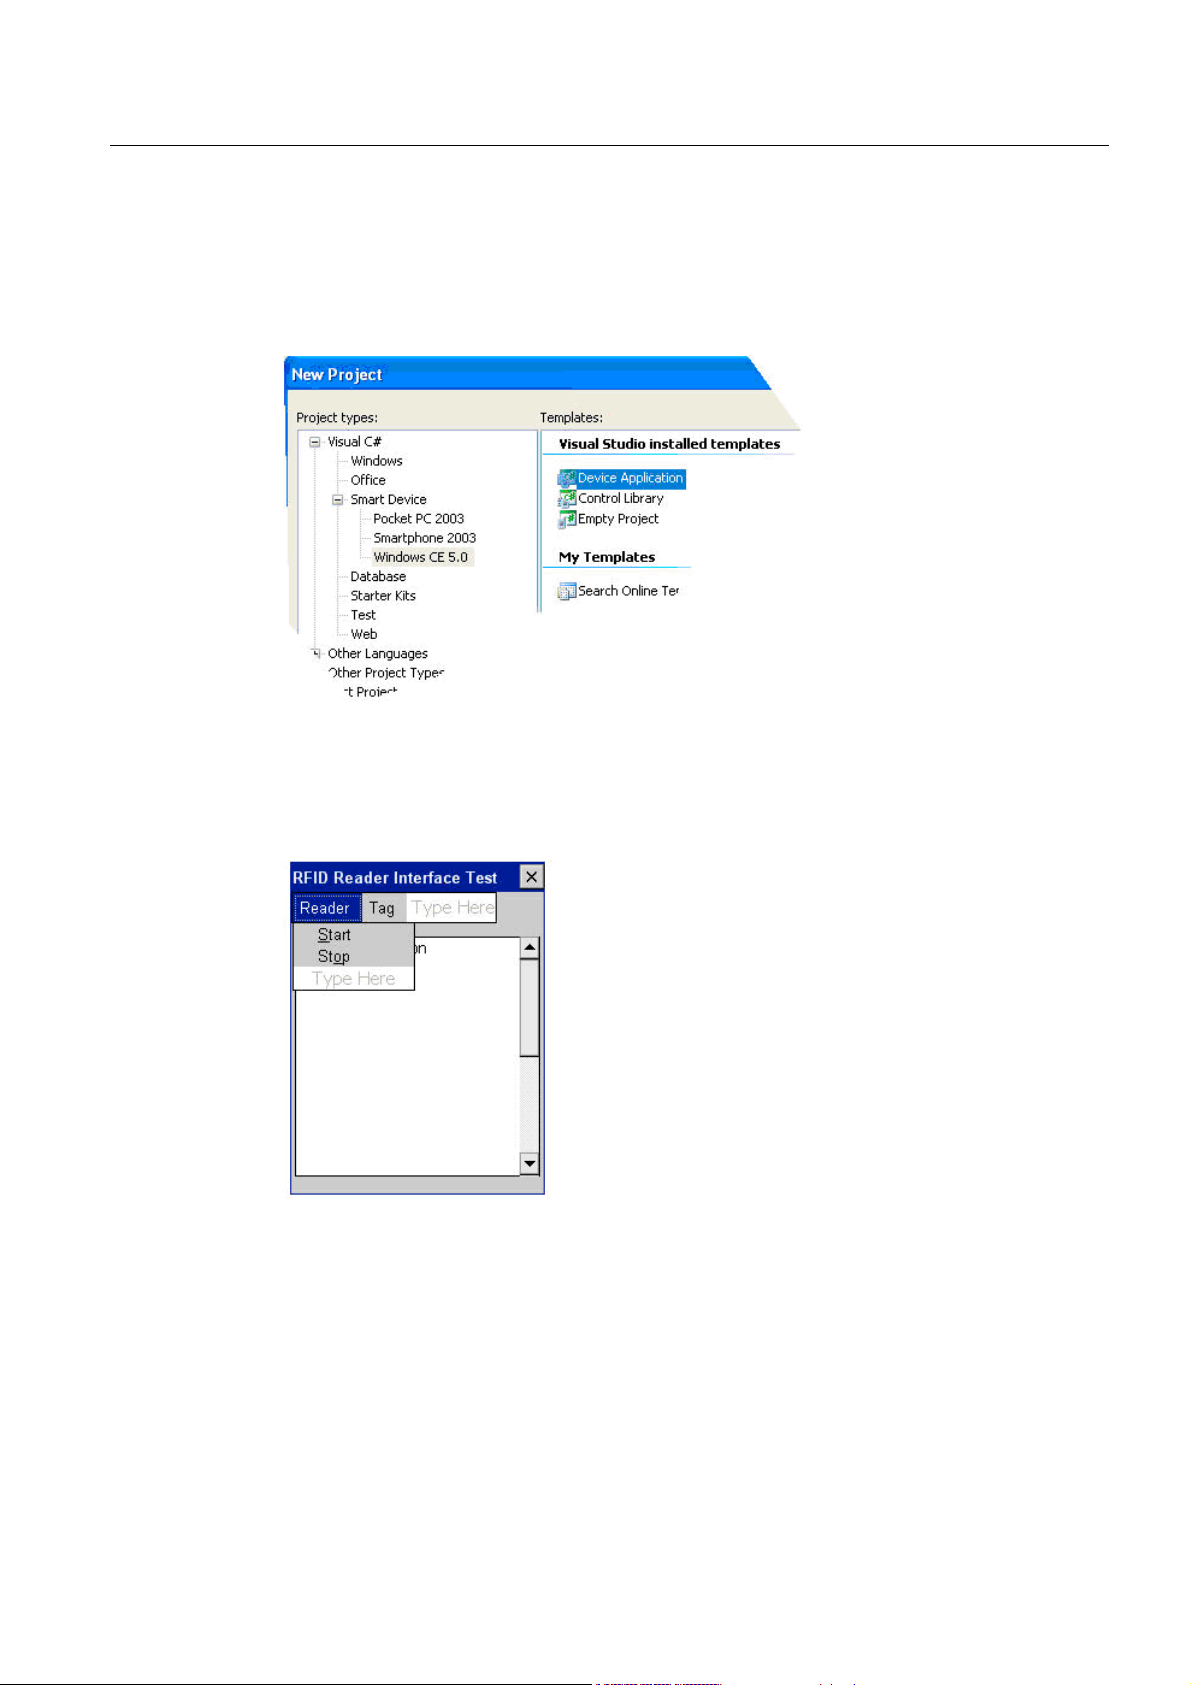
2.2.2 Creating the Application
To start a new application for a handheld device, create a new project of type 'Visual
C#\Smart Device\Windows CE 5.0\DeviceApplication' since handheld devices currently run
under Windows CE 5.0.
Figure 2-2 Type of application to create for a handheld device
You will need menu items to start and stop the reader and to trigger a read command.
Moreover, you will provide a textbox to display the results. This gives you a simple GUI as
shown in the following figure.
Figure 2-3 Our simple test application
Mobile Reader
Function Manual, 02/2009, J31069-D0198-U001-A1-0076
11
Page 12
RFID Reader Interface User's Guide
2.2 How Do I Use the Reader Interface?
2.2.3 Starting the RFID reader
So far this application has nothing unusual about it. It is not yet connected to RFID. This is
done by coding the event handler for the menu items. The code is provided below. It will be
discussed in detail.
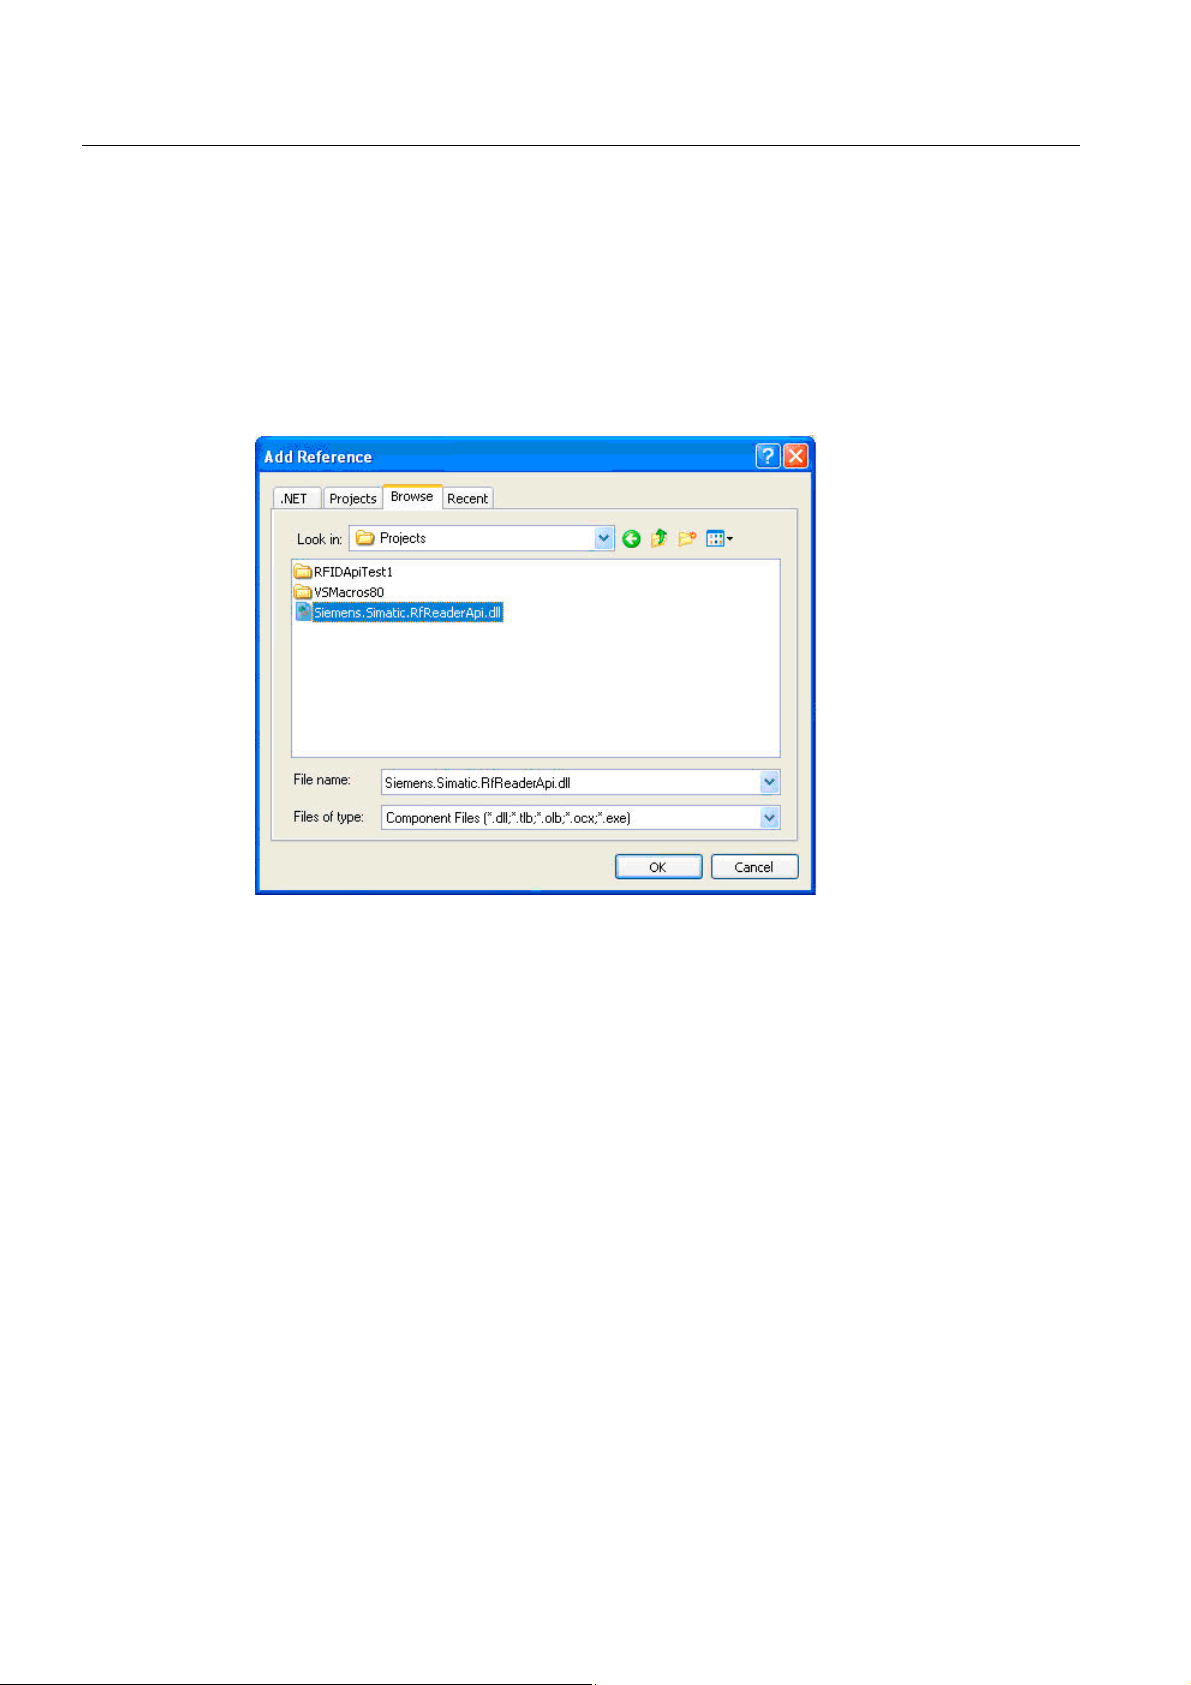
To simplify development, first add a reference to the RFID Reader Interface assembly and a
directive for the namespace Siemens.Simatic.RfReader which enables you to use 'intellisense' on the types provided by the RFID Reader Interface.
Figure 2-4 Adding a reference to the reader interface: Go to where you filed the interface assembly
which you retrieved from the handheld device.
Your first job is to start the reader service (see the RFID management component reader
service in
RFID Reader Interface (Page 9) )
The interface IRfReaderApi provides a method StartReader to accomplish that. Using the
function, however, poses two new questions:
● First, you will need a parameter to provide initialization data. This is done by creating an
object of type RfReaderInitData. The only parameters necessary is the reader type and
the reader mode, which we set to standalone for now. For all other members of
RfReaderInitData we accept the defaults.
● The StartReader function also offers other options that allow you to specify other instance
names or IP Addresses, but, for the time being, you can use the defaults.Now that you
know which function to call, the second task is – where do you obtain an object that
implements the IRfReaderApi interface.
A public static property called RfReaderApi.Current exists that always returns the current
instance of the object which implements the RFID Reader Interface.
What if you start again and no current instance is available? The Current property is
designed to return the current instance of the RFID Reader Interface if one exists or to
create a new one if none exists. If processing is correct, RfReaderApi.Current will always
return a valid instance be it a new one or an existing one. Null is only returned when
internal errors occur. Since this may cause exceptions, you must put a try catch frame
around your calls.
Mobile Reader
12 Function Manual, 02/2009, J31069-D0198-U001-A1-0076
Page 13

RFID Reader Interface User's Guide
2.2 How Do I Use the Reader Interface?
Another look at our code shows that only four lines of code are needed to start up the reader
service. The code for starting the RFID Reader Interface:
private void menuReaderStart_Click(object sender, EventArgs e)
{
try
{
// We want to create and start an instance of the RFID
// reader interface for a handheld device with a default name.
RfReaderInitData initData = new RfReaderInitData();
// Initialize the appropriate reader type (RF610M, RF310M)
// and reader mode
initData.Type = „RF610M“;
initData.Mode = RfReaderInitData.ReaderMode.Standalone;
// With RfReaderApi.Current we address the current
// RFID reader interface instance
// or initiate the creation of a new instance.
// StartReader connects to an existing reader service
// or creates a new reader service.
RfReaderApi.Current.StartReader(initData);
}
catch (RfReaderApiException rfidException)
{
// Something went wrong while starting the reader.
// More information is available by inspecting the
// RfReaderApiException's members ResultCode, Error,
// Cause and Description.
...
}
}
Stopping a running reader only requires a single call that terminates the connection to the
underlying reader service and shuts it down; The code for stopping the RFID Reader
Interface:
private void menuReaderStop_Click(object sender, EventArgs e)
{
try
{
// Use the current reader interface instance and tell
// it to shut down.
RfReaderApi.Current.StopReader();
}
catch (RfReaderApiException rfidException)
{
// Something went wrong while stopping the reader.
// More information is available by inspecting the
// RfReaderApiException's members ResultCode, Error,
// Cause and Description.
...
}
}
Mobile Reader
Function Manual, 02/2009, J31069-D0198-U001-A1-0076
13
Page 14

RFID Reader Interface User's Guide
2.2 How Do I Use the Reader Interface?
A last issue we have to consider is that the RFID reader service needs time to initialize his
internal states. The good news is that after initialization the reader service will use its Alarm
event mechanism to notify clients when it is ready to start work. In order to catch this
information, we have to implement an alarm handler.
The alarm handler function has to comply with the following prototype that defines the
special RfAlarmArgs parameters.
public void AlarmHandler(object sender, RfAlarmArgs alarmArgs)
Before starting the reader we add the alarm handler:
RfReaderApi.Current.Alarms += new RfAlarmHandler(this.AlarmHandler);
Once installed, our AlarmHandler function gives us a chance to notice a successful startup
or restart by catching the ‘Reconfiguration’ and ‘Initial’ alarms:
public void AlarmHandler(object sender, RfAlarmArgs alarmArgs)
{
if (alarmArgs.InfoItems != null)
{
// Configuration has finished
if (alarmArgs.InfoItems[0].Name == "Reconfiguration" &&
alarmArgs.InfoItems[0].Value == "Initial")
{
// This is the very first startup of the application
// Now we can access RFID reader
…
}
}
}
Mobile Reader
14 Function Manual, 02/2009, J31069-D0198-U001-A1-0076
Page 15

RFID Reader Interface User's Guide
2.2 How Do I Use the Reader Interface?
2.2.4 Compile and Run
Even if tags cannot be read yet, you can create an application to prove that it can at least
start up and shut down. You can improve the visual appearance by indicating the status of
the functions which you called in the results window of your application; The code for starting
the RFID Reader Interface:
private void menuReaderStart_Click(object sender, EventArgs e)
{
try
{
// First, we add an event handler to catch alarm notifications
RfReaderApi.Current.Alarms +=
new RfAlarmHandler(rfmIntegration.AlarmHandler);
// We want to create and start an instance of the RFID
// reader interface for a handheld device with a default name.
RfReaderInitData initData = new RfReaderInitData();
// Initialize the appropriate reader type (RF610M, RF310M)
// and reader mode
initData.Type = „RF610M“;
initData.Mode = RfReaderInitData.ReaderMode.Standalone;
// With RfReaderApi.Current we address the current
// RFID reader interface instance
// or initiate the creation of a new instance.
// StartReader connects to an existing reader service
// or creates a new reader service.
RfReaderApi.Current.StartReader(initData);
WriteInformationLine("Reader started successfully");
}
catch (RfReaderApiException rfidException)
{
// Something went wrong while starting the reader.
// More information is available by inspecting the
// RfReaderApiException's members ResultCode, Error,
// Cause and Description.
WriteInformationLine(string.Format("ERROR: {0} - {1}, cause:
{2}, desc: {3}\r\n",
rfidException.ResultCode, rfidException.Error,
rfidException.Cause, rfidException.Description));
}
}
...
Mobile Reader
Function Manual, 02/2009, J31069-D0198-U001-A1-0076
15
Page 16

RFID Reader Interface User's Guide
2.2 How Do I Use the Reader Interface?
public void AlarmHandler(object sender, RfAlarmArgs alarmArgs)
{
if (alarmArgs.InfoItems != null)
{
// Configuration has finished
if (alarmArgs.InfoItems[0].Name == "Reconfiguration" &&
alarmArgs.InfoItems[0].Value == "Initial")
{
// This is the very first startup of the application
// Now we can access RFID reader
reconfiguration");
}
}
}
...
private void WriteInformationLine(string message)
{
WriteInformation(message + "\r\n");
}
private void WriteInformation(string message)
{
// Add the information to the existing text
this.textBoxInfo.Text = this. textBoxInfo.Text + message;
this. textBoxInfo.SelectionStart = this. textBoxInfo.Text.Length;
this. textBoxInfo.ScrollToCaret();
}
WriteInformationLine("INFO: Initial
Compilation should be successful unless you forgot to add the reference to the interface
assembly and the corresponding directive using Siemens.Simatic.RfReader.
Mobile Reader
16 Function Manual, 02/2009, J31069-D0198-U001-A1-0076
Page 17

RFID Reader Interface User's Guide
2.2 How Do I Use the Reader Interface?
When you deploy your application, there are two things to consider.
● When using Visual Studio to deploy your application, make sure you selected
"PtxPxa27x: ARMV4I_Release as a target device.
● Regardless of how you deploy your application, ensure that all needed system
components are located beneath your application.
This means you must provide the RFID Reader Interface assembly
Siemens.Simatic.RfReaderApi.dll and its configuration file
Siemens.Simatic.RfReaderApi.dll.config.
You also must provide the following Psion-specific files
rfid_power_commutation.dll
PsionTeklogixRFID.dll
PsionTeklogicNet.dll
PtxSdkCommon.dll
All of these are provided on the device’s flash memory within a compressed archive.
Mobile Reader
Function Manual, 02/2009, J31069-D0198-U001-A1-0076
17
Page 18

RFID Reader Interface User's Guide
2.2 How Do I Use the Reader Interface?
2.2.5 I Want To See Tags…
You are able to start and stop the RFID reader service and would now like to see tags.
Another look at the RfReaderApi interface reveals a member called GetTagIDs. Checking
the return value’s type indicates that you will receive an array of strings containing the read
tag IDs.
You already know how to obtain an instance of an object providing the IRfReaderApi
interface. The code is shown below; The code for reading tag IDs:
private void menuItemReadIDs_Click(object sender, EventArgs e)
{
string[] tagIDs = null;
try
{
// Request all tags that are currently within reach
tagIDs = RfReaderApi.Current.GetTagIDs();
}
catch (RfReaderApiException rfidException)
{
// Something went wrong while reading tags.
// More information is available by inspecting the
// RfReaderApiException's members ResultCode, Error,
// Cause and Description.
WriteInformationLine(string.Format("ERROR: {0} - {1}, cause:
{2}, desc: {3}\r\n",
rfidException.ResultCode, rfidException.Error,
rfidException.Cause, rfidException.Description));
}
// Display read tags ...
if (null != tagIDs && tagIDs.Length > 0)
{
for (int index = 0; index < tagIDs.Length; index++)
{
WriteInformationLine(" > tagID " + index.ToString() + ": " +
tagIDs[index]);
}
}
else
{
// or a message telling us there were no tags
WriteInformationLine(" > No tags in field");
}
}
As you can see, it is easy to read tag IDs.
Mobile Reader
18 Function Manual, 02/2009, J31069-D0198-U001-A1-0076
Page 19
RFID Reader Interface User's Guide
2.2 How Do I Use the Reader Interface?
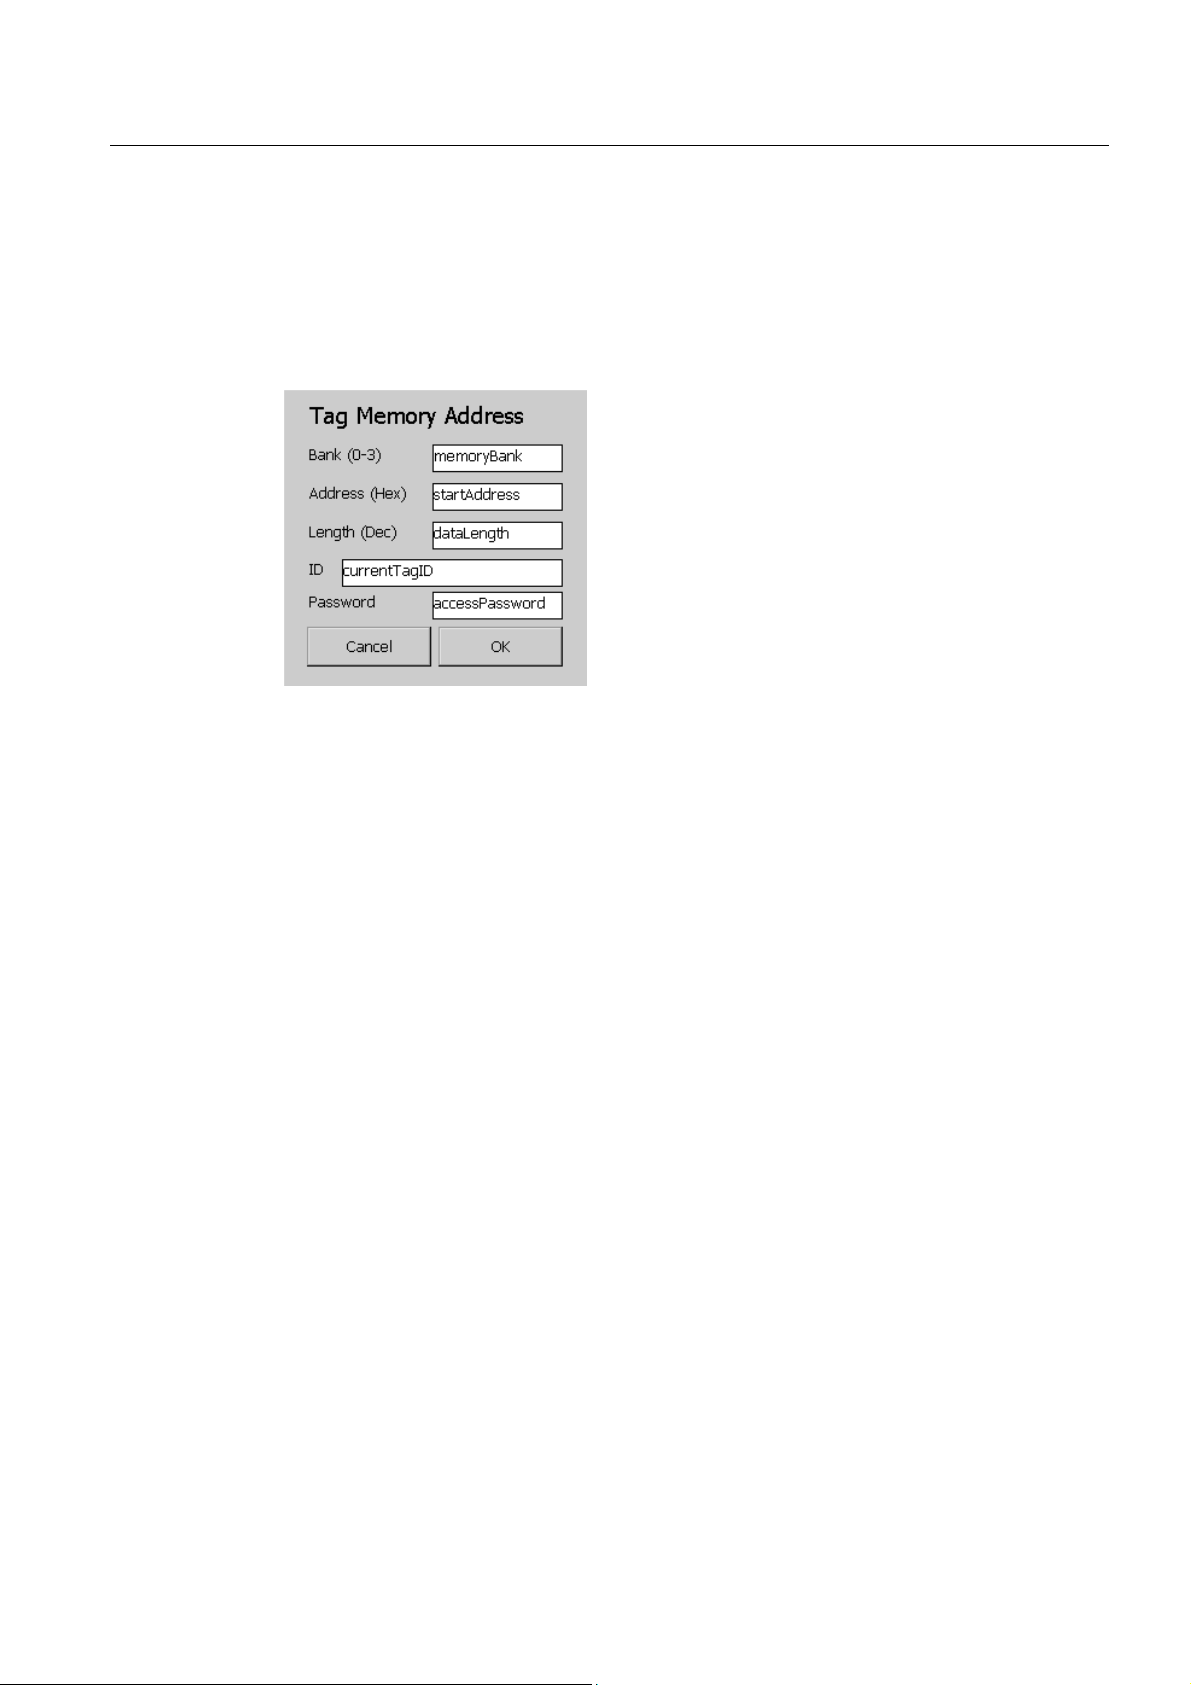
2.2.6 Know More about the Tags …
You can learn more about tags in the same way that you can access additional data on tags
or write data to tags.
Some additional data must be specified. For our test scenario the most flexible way to
provide these data is to enter them with the user interface as shown below:
Figure 2-5 A dialog for entering the address of the additional tag data to be read
Once you have acquired the address of the data, accessing the data is easy. The code for
acquiring data is given in the Figure below.
Note how the specified data is returned as an array of bytes with the requested length. Be
sure to check for a null reference which is returned if no data could be read.
When you request additional data from EPC Gen2 tags, the tag to be addressed must
always be specified by giving its tag ID. Only if a EPC Gen2 tag with a matching ID is
detected will the operation succeed.
Reading additional tag data:
byte[] buffer = null;
try
{
// Code for invoking a dialog and retrieving the data entered
left out for brevity -> check sample code for details
...
// Request all tags that are currently within reach
buffer = RfReaderApi.Current.GetTagMemory(
currentTagID, memoryBank,
startAddress, dataLength,
accessPassword);
...
// Code to show the resulting buffer left out for brevity ->
check sample code for details
}
catch (RfReaderApiException rfidException)
{
// Something went wrong while reading additional data
WriteInformationLine(string.Format("ERROR: {0} - {1}, cause:
{2}, desc: {3}\r\n",
rfidException.ResultCode, rfidException.Error,
rfidException.Cause, rfidException.Description));
}
Mobile Reader
Function Manual, 02/2009, J31069-D0198-U001-A1-0076
19
Page 20
RFID Reader Interface User's Guide
2.2 How Do I Use the Reader Interface?
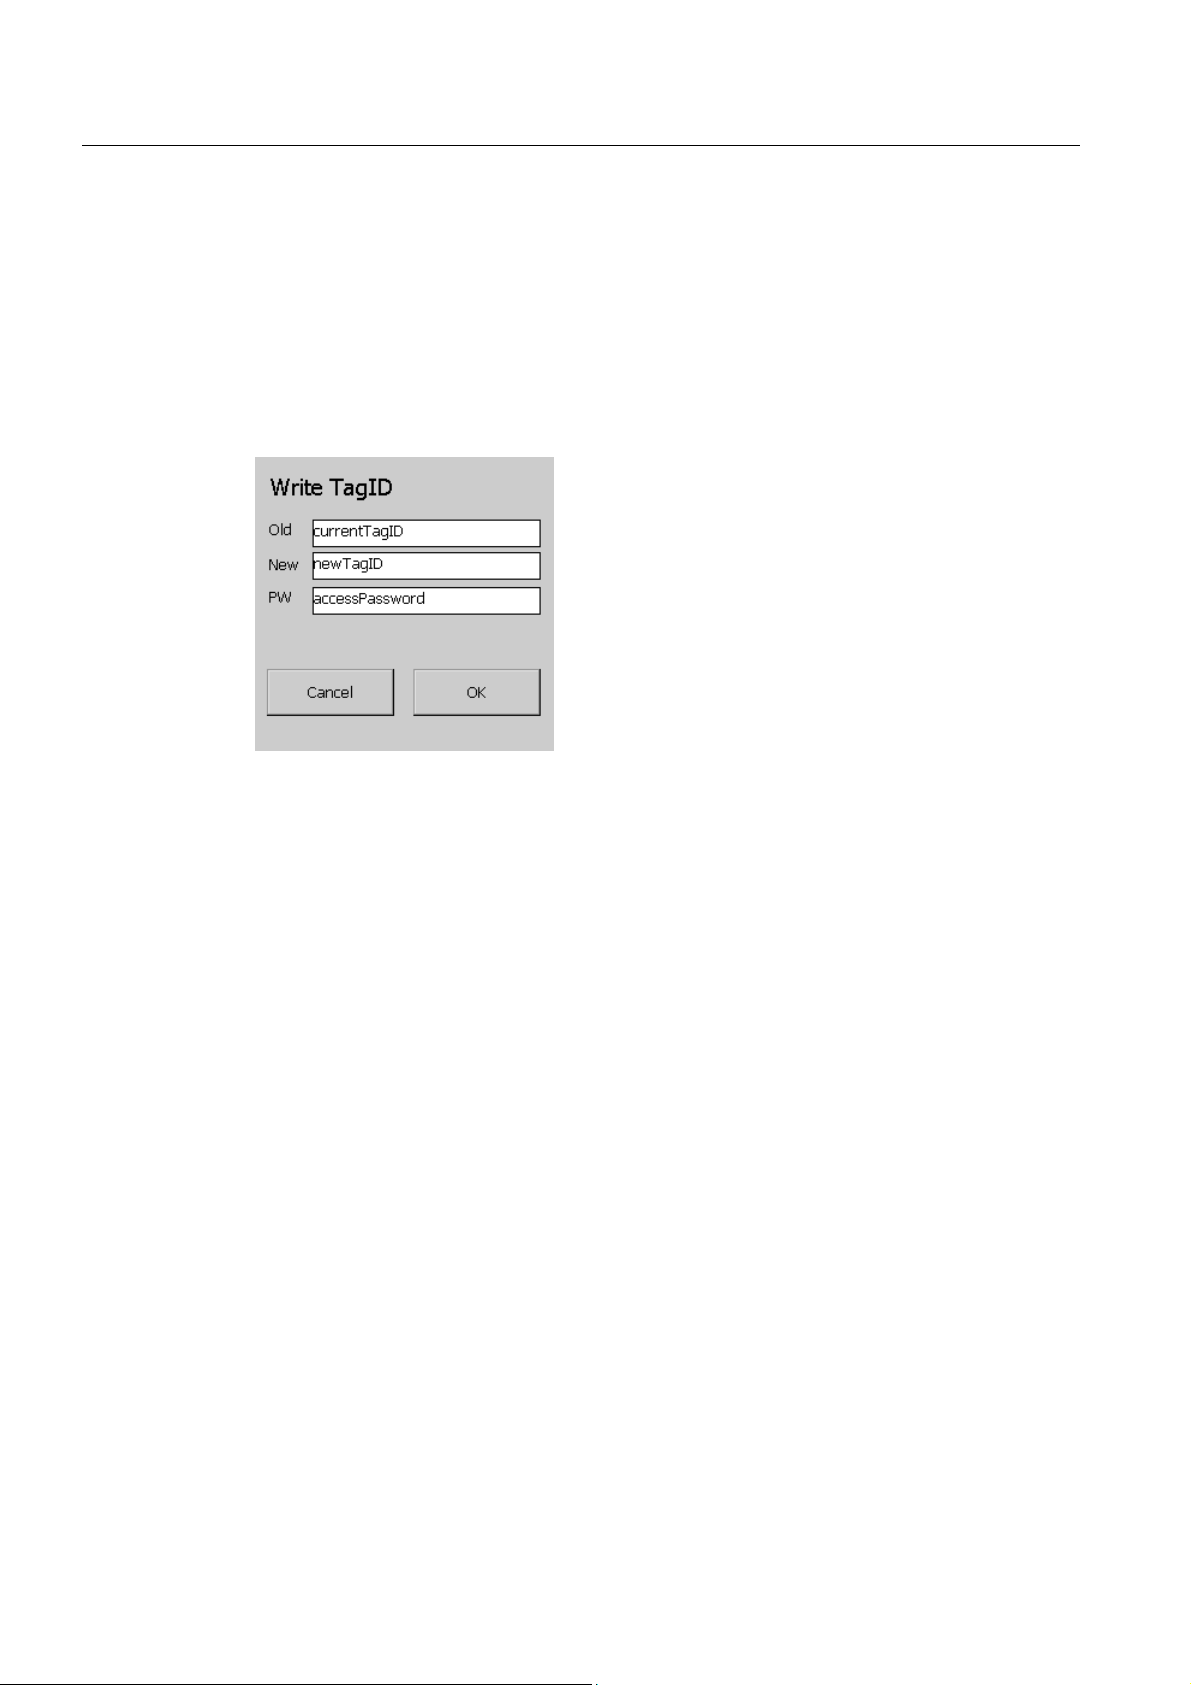
2.2.7 Change the Tags' Data
When the data on a tag must be changed, the same restriction applies on EPC Gen2 tags as
with obtaining additional data. The EPC Gen2 tag that you want to change must be specified
by supplying its ID. Only if a matching tag is detected will the operation succeed.
How to write a new ID to an existing tag for a data-change function (for EPC GEN2 only):
The tag's current ID must be supplied together with the new ID and a password (if needed)
and an instance of an object must be used that implements the IRfReaderApi which is
always available via RfReaderApi.Current.
Figure 2-6 Write TagID
Below is the code for accomplishing this; writing a new tag ID to a tag:
try
{
// Code for invoking a dialog and retrieving the data entered
left out for brevity -> check sample code for details
...
// Request all tags that are currently within reach
RfReaderApi.Current.SetTagID(
currentTagID, newTagID,
accessPassword);
}
catch (RfReaderApiException rfidException)
{
// Something went wrong while writing data
AddInformation(string.Format("ERROR: {0} - {1}, cause: {2},
desc: {3}\r\n",
rfidException.ResultCode, rfidException.Error,
rfidException.Cause, rfidException.Description));
}
Mobile Reader
20 Function Manual, 02/2009, J31069-D0198-U001-A1-0076
Page 21

RFID Reader Interface User's Guide
2.2 How Do I Use the Reader Interface?
2.2.8 Summary
Using the RFID Reader Interface is easy if you keep the few important points below in mind.
● Be sure to reference the Siemens.Simatic.RfReaderApi.dll assembly, use its namespace
and place the assembly beneath your application on the target device.
● Access the member RfReaderApi.Current whenever you want to use the RFID Reader
Interface.
● Remember that member functions which return data may also return null if no data are
found.
● Don't forget to check RfReaderApiExceptions that indicate malfunctions and errors.
● And please make sure you always place the following files beneath your application so
that it is able to run.
Siemens.Simatic.RfReaderApi.dll
Siemens.Simatic.RfReaderApi.dll.config
rfid_power_commutation.dll
PsionTeklogixRFID.dll
PsionTeklogicNet.dll
PtxSdkCommon.dll
With these simple guidelines and the description of the RFID Reader Interface's member
functions you should be able to implement your own business logic for a standalone RFID
client application without having to bother too much with the details of RFID processing.
See the sample code provided that shows the RFID Reader Interface functions in use.
If you are intending to use the barcode feature of the RF610M device within your standalone
applications, remember to consult the device vendor’s documentation about it. When
working integrated in a SIMATIC RF-MANAGER configured environment, barcode scanning
is a by-product gained automatically as you will see below.
Mobile Reader
Function Manual, 02/2009, J31069-D0198-U001-A1-0076
21
Page 22
RFID Reader Interface User's Guide
2.3 Extending the Reach
2.3 Extending the Reach
2.3.1 Being Part of a Larger Family
The last chapter discussed using the handheld RFID reader interface in a standalone
scenario. However, even RFID reader are not always alone in this world but have to interact
– or want to interact – with other components in larger systems.
Being aware of this fact, the RFID reader interface now supports ( RF610M only) integrating
into SIMATIC RF-MANAGER configured environments. Please bear in mind that both the
communication and synchronization among devices and usage of configuration data relies
on a working RF-MANAGER infrastructure. More precisely we are talking of integrating into a
SIMATIC RF-MANAGER system only.
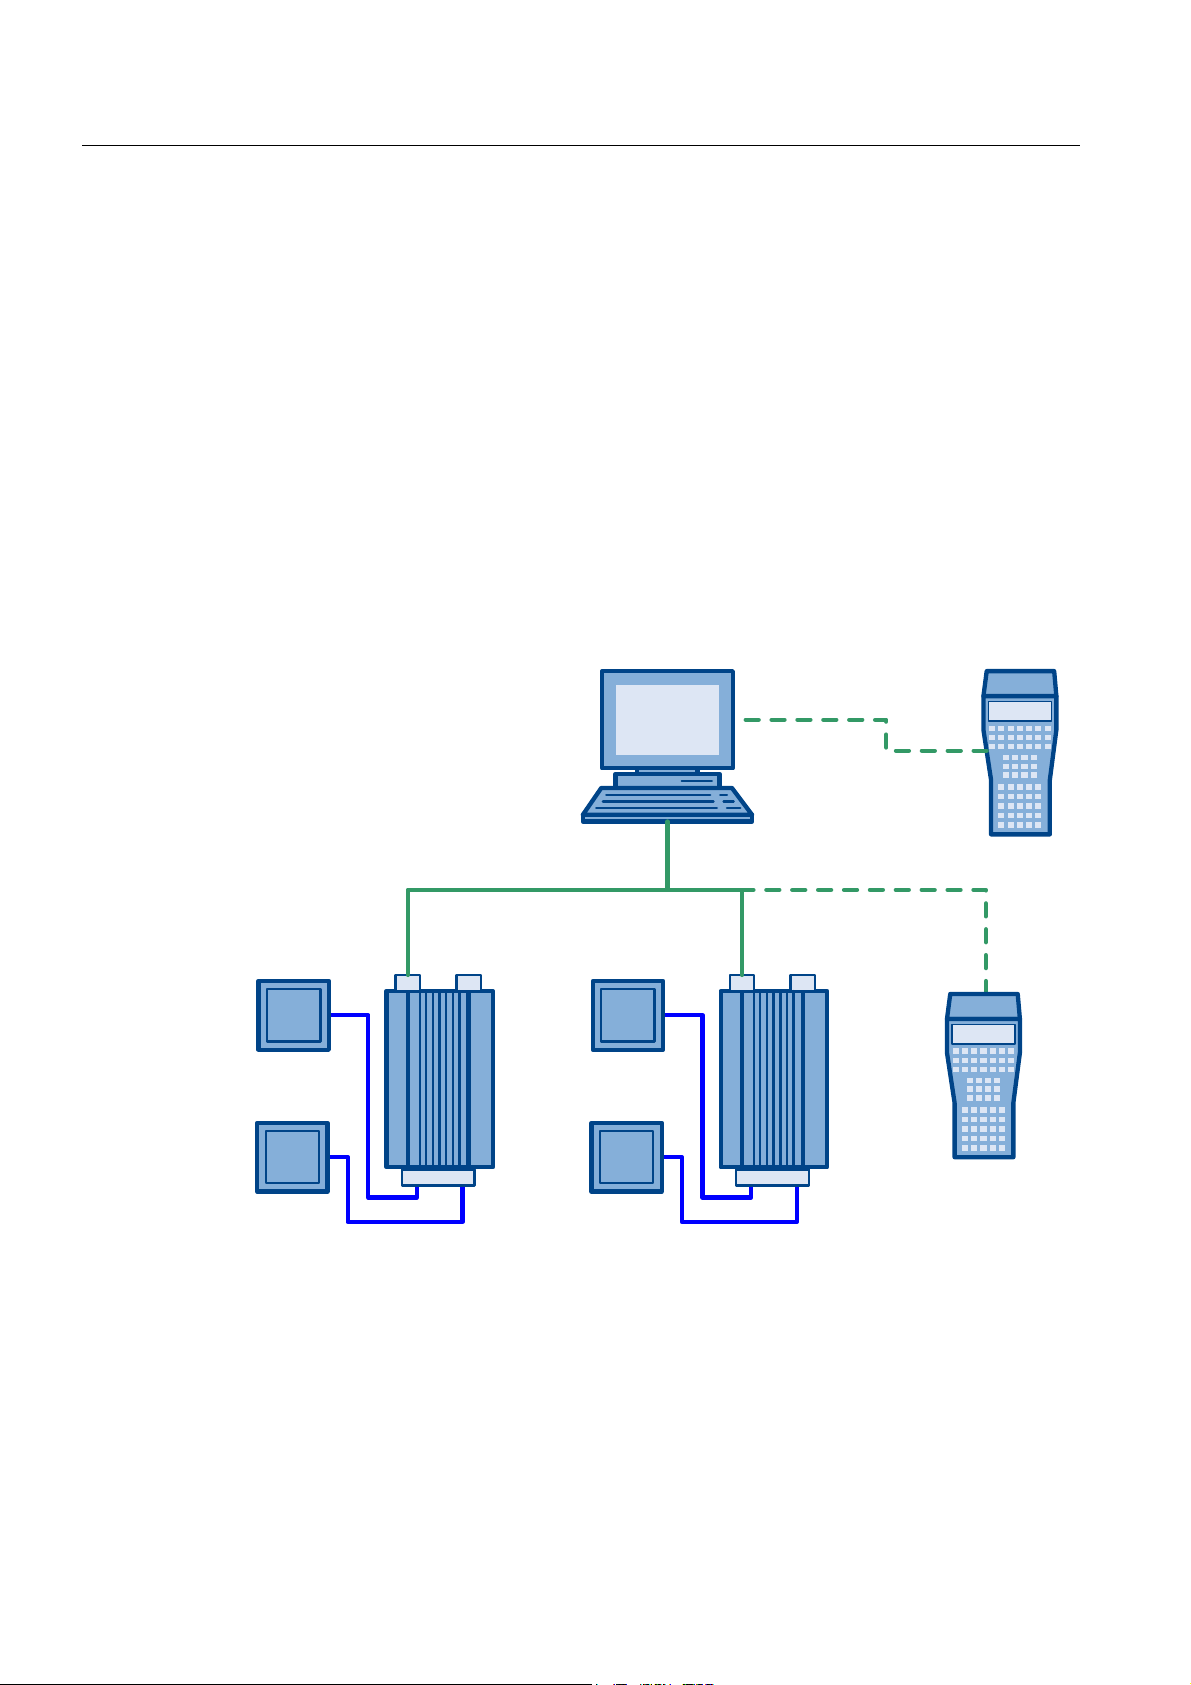
Consider an integration scenario as given in the figure below.
5)5
*DWH
Figure 2-7 Larger Infrastructures
5)0$1$*(55XQWLPH
5)5
*DWH
2IILFH
5)0
:/$1
:/$1(WKHUQHW
5)0
:DUHKRXVH
)ORRU
There are some stationary RF660R readers which are controlled by an RF-MANAGER
runtime. Let’s say, they check incoming and outgoing goods at warehouse gates. The whole
system is set up using a configuration created with RF-MANAGER.
Mobile Reader
22 Function Manual, 02/2009, J31069-D0198-U001-A1-0076
Page 23

RFID Reader Interface User's Guide
2.3 Extending the Reach
Now, Jerry – the guy working at the warehouse – wants to check if all the goods having been
unloaded at the gate are still within the package now stored in aisle three of the warehouse.
So he takes his RF610M device with him, walks up to the package in aisle three and scans
the package again just for monitoring purposes.
Since Jerry realized there were some parts missing in the package, the supplier sent the
missing parts right away in a second delivery by a parcel service. This second parcel,
however, did not pass the gates but arrived directly at the office counter. There, Molly – the
soul of the office – used another RF610M device to scan the ID of the delivered goods.
Contrary to Jerry’s scanning, the data she acquired was not only used for monitoring but as
additional input to the system just as it would be a third gate.
However, Molly’s desk is crowded as always and thus her scanning detects not only the tags
of the new parcel but some others from nearby as well. She wants to forward only the new
product IDs and skip the remaining known IDs that where scanned accidentally.
The story above shows two new use cases for the RF610M. We will go through both of them
and discuss the implications to the usage of the RFID reader interface.
Mobile Reader
Function Manual, 02/2009, J31069-D0198-U001-A1-0076
23
Page 24

RFID Reader Interface User's Guide
2.3 Extending the Reach
2.3.2 Entering the system
How do we achieve to be part of a larger system with an RF610M?
The good news is that starting with RF-MANAGER 2008 the RF610M can be configured
within a project as just another reader. All you have to do is, setting the reader type to
‘RF610M’ and setting the IP address accordingly so that the RF610M can be reached via
Ethernet. Of course you have to set up a WLAN connection to the device first.
Afterwards, you start the RFID reader using the already familiar interface member
StartReader but specifying the RF-MANAGER mode as shown in the code snippet below.
private void menuReaderStart_Click(object sender, EventArgs e)
{
try
{
// We want to create and start an instance of the RFID
// reader interface for an RF610M device that interacts with
// an RF-MANAGER runtime.
RfReaderInitData initData = new(RfReaderInitData();
initData.Type = „RF610M“;
initData.Mode = RfReaderInitData.ReaderMode.RfMananger;
// With RfReaderApi.Current we address the current
// RFID reader interface instance
// or initiate the creation of a new instance.
// StartReader connects to an existing reader service
// or creates a new reader service.
RfReaderApi.Current.StartReader(initData);
}
catch (RfReaderApiException rfidException)
{
// Something went wrong while starting the reader.
// More information is available by inspecting the
// RfReaderApiException's members ResultCode, Error,
// Cause and Description.
...
}
}
As a result, the RFID reader interface starts the underlying reader service in such a way that
it waits for a connection with an RF-MANAGER runtime. As long as no connection to an RFMANAGER runtime has happened, you will not be able to perform any operations on the
interface successfully apart from stopping, getting the version or adding an event handler.
Any try to call an API function while the connection to the RF-MANAGER is still pending will
result in an RfReaderApiInvalidModeException exception.
Hold on a second! You won’t tell me that after starting a reader the only thing that happens is
that the interface is blocked, will you? That’s crazy.
Well, actually it is not. And here is why: When working in RF-MANAGER integrated mode
the reader service needs initialization data configured with RF-MANAGER in order to know
for example if it has to scan only for RFID data or for barcodes and how the keys on the
device trigger reading and whether the device is used for monitoring or for control. As long
as this information is not available, the behavior of the RFID reader interface would be
somehow random. To prevent clients from being confused by such indiscriminate behavior,
the best way is to allow operation only, if system configuration has been finished.
Mobile Reader
24 Function Manual, 02/2009, J31069-D0198-U001-A1-0076
Page 25

RFID Reader Interface User's Guide
2.3 Extending the Reach
2.3.3 Wake me up before you go…
So far, so good – we will wait until the configuration has been finished. But how do we know
it has finished?
Luckily the RFID reader interface provides a notification mechanism which enables us as a
client of the API to know what is going on. Let’s have a closer look at what happens when a
new configuration from RF-MANAGER arrives:
ಭ5HFRQILJXUDWLRQಫ
ಭ6WDUWHGಫHYHQW
5),'UHDGHU$3,
YDOLG
LQYDOLG
5)0$1$*(5
FRQILJXUDWLRQ
QHZ
DEVHQW
NQRZQ
5HDGHU6HUYLFH
UXQQLQJ
LQDFWLYH
Figure 2-8 RFID Reader Interface
Whenever the reader service receives configuration data from a connected RF-MANAGER
runtime it sends a "Reconfiguration:Started" notification telling you that it will now start
reconfiguration (t1 , t3). At this point in time the interfaces changes to the invalid state and
disables access. For you as a client this means, you should disable functions that use the
interface until reconfiguration has finished.
&KDQJHGFRQILJ
HOHPHQWVHYHQW
W
W
ಭ5HFRQILJXUDWLRQಫ
ಭ6WDUWHGಫHYHQW
W
&KDQJHGFRQILJ
HOHPHQWVHYHQW
W
WLPHW
W
After the reconfiguration of the system has finished, the RFID reader interface changes its
state to valid and a second notification – containing either the changed configuration items
as parameters or just "Reconfiguraiton: Nochange" – is sent (t2 , t4). Now, that is the trigger
for an API client to start working with the RFID reader interface.
You can easily follow those conclusions, can’t you? But what happens if no new
configuration arrives because either a configuration is already available on the device or
there has not been a connection to an RF-MANAGER runtime yet? Do we have to wait
forever to detect these cases?
No, you don’t. The reader service and as a consequence the RFID reader interface will
always send a notification on startup as well. If there is
device the "Reconfiguration: Initial" event is sent. If a configuration is available you will either
get the changed items or the "Reconfiguration: Nochange" event.
Bear in mind, however, that in those cases no "Reconfiguration:Start" event will be issued
contrary to the arrival of new configuration data.
Mobile Reader
Function Manual, 02/2009, J31069-D0198-U001-A1-0076
no
configuration available on the
25
Page 26

RFID Reader Interface User's Guide
2.3 Extending the Reach
Nevertheless, this means, we can always rely on getting an event during startup – no matter
what.
Great, we now know when we are started. Normally, you start an underlying reader service
during startup of your client via StartReader() and you stop it again during shutdown of your
client with the StopReader() function of the RFID reader interface causing the reader service
to terminate as well.
If you shut down your client application without calling StopReader() first, the underlying
reader service keeps running. The next time you start up your client and call StartReader(),
no startup sequence of the reader service will occur because it is still running.
The downside of this behavior would be that you are again without a trigger to start working.
The good news is that the RFID reader interface knows that a reader service was already
running before and initiates a "Reconfiguration : Reconnect" notification. So, you as a client
can react and reinitialize your application.
And again, you can rely on always receiving an event during the RFID reader interface
startup.
Back to practice
So much for the theory, now back to practice. The notification means of the RFID reader
interface is its Alarms event. As a client you have to add an event handler best before you do
anything else with the interface.
The alarm handler function has to comply with the following prototype that defines the
special RfAlarmArgs parameters.
public void AlarmHandler(object sender, RfAlarmArgs alarmArgs)
Before starting the reader we add the alarm handler:
RfReaderApi.Current.Alarms += new RfAlarmHandler(this.AlarmHandler);
Now we are ready for take-off. We compile, deploy and run our test application to the
RF610M and use our new "Start RF-MANAGER" menu item.
Mobile Reader
26 Function Manual, 02/2009, J31069-D0198-U001-A1-0076
Page 27

RFID Reader Interface User's Guide
2.3 Extending the Reach
On a connected host PC we start a RF-MANAGER runtime with an RF610M device
configured as follows. Notice that the reader type and the application mode have to be set
accordingly.
Figure 2-9 RF610M Properties
As a side node, please bear in mind to set the network address for your runtime under
‘Device Settings, RFID/Network Settings’. This is needed as a ‘callback’ so that your
RF610M devices is able to pass read tag data on to the RF-MANAGER runtime.
Figure 2-10 RF610M Network Settings
When starting up our application on the RF610M and the RF-MANAGER runtime on the host
PC our AlarmHandler is called three times. Fine!
Wait: Did you say three times?
Ok, when the RF-MANAGER configuration is transmitted to the RF610M device there will be
the start reconfiguration event, which is signaled by the Boolean RfAlarmArgs member
IsConfigStart as well.
And when reconfiguration is finished there will be another event containing a list of changed
configuration items, which we deal with in a minute.
But what is the third time we are called? Just keep in mind the initial startup event that is
created in all cases telling you if it was an initial startup or a reconnect and whether there is
configuration data available.
Mobile Reader
Function Manual, 02/2009, J31069-D0198-U001-A1-0076
27
Page 28

RFID Reader Interface User's Guide
2.3 Extending the Reach
Here is a skeleton alarm handler body that shows the different events:
public void AlarmHandler(object sender, RfAlarmArgs alarmArgs)
{
if (alarmArgs.IsConfigStart)
{
// Reconfiguration has started
// => disable UI
}
else if (alarmArgs.InfoItems != null)
{
// Reconfiguration has finished
if (alarmArgs.InfoItems[0].Name == "Reconfiguration" &&
alarmArgs.InfoItems[0].Value == "Initial")
{
// This is the very first startup of the application
// where no configuration data is available
}
else if (alarmArgs.InfoItems[0].Name == "Reconfiguration"
&& alarmArgs.InfoItems[0].Value == "Reconnect")
{
// The reader service was already running and we
// only reconnected => reinitialize, e.g by rereading
// configuration data
}
else
{
// A configuration was received from RF-MANAGER and
// has been activated.
// => The list of RfInfoItems contains the changed
// configuration items
}
}
…
}
Mobile Reader
28 Function Manual, 02/2009, J31069-D0198-U001-A1-0076
Page 29

RFID Reader Interface User's Guide
2.3 Extending the Reach
2.3.4 We are started: What to make out of it?
Now the system is up and running and with the reconfiguration end event we got a list of
changed configuration items. You missed them? No problem, because there is another
possibility to query the configuration items. It’s the RFID reader interface’s
GetConfigParameter member which allows you to ask the current value for any known
parameter. In order to make it easier for you, the sample application implements a dialog for
showing you the values of the configuration parameters.
Figure 2-11 Configuration Parameter
In essence it uses a code sequence such as the following to ask for parameter values
whereas parameterName is a string giving the parameter’s id.
RfInfoItem infoItem =
RfReaderApi.Current.GetConfigParameter(parameterName);Here is a list
of parameters that you can query:
Configuration Parameter Name Possible Values / Description
MobileOperatingModeEnabled This parameter tells you if the device is working in remote
EditTagEnable This parameter could be used by your applications.
ScanBeepEnable Produce a sound on valid reads (if true).
ScanResultTime The configured time
All of the following configuration parameters give information
PistolGrip Information about the pistol grip button
Scan Key Left Information about the scan key button on the left of the device
Scan Key Right Information about the scan key button on the right of the
Mobile Reader
Function Manual, 02/2009, J31069-D0198-U001-A1-0076
mode (FALSE) or mobile mode (TRUE).
Whenever this parameter is false, you may only monitor tag
events. Only if this parameter is true, filtering is enabled and
tag events might be changed and can be fed in again with the
SetTagEvents API function.
It signals that changing of tags is allowed inside your
application.
on how certain triggers are configured. On the one hand they
specify whether a configured trigger is only valid as long as
the associated key is pressed (KEY_PRESSED) or whether
the trigger implements an ON/OFF toggling (START_STOP).
Moreover, depending on the configuration, each trigger is
associated with either RFID scanning or barcode scanning or
with both.
device
29
Page 30

RFID Reader Interface User's Guide
2.3 Extending the Reach
Configuration Parameter Name Possible Values / Description
Scan Key Top Information about the scan key button on top of the device
Application Information about the virtual software trigger
Checking the parameter values from our default RF-MANAGER configuration, we find the
following setup:
We are running in RF-MANAGER mode and we are only allowed to monitor tags but not to
change them. All keys trigger as long as pressed and trigger RFID reading except for the
pistol grip which is associated with barcode. And there is a software trigger available as well
that we can use.
Comparing this setup with our introductory scenario it looks like it suffices to fulfill Jerry’s
requirements.
2.3.5 Jerry’s tag monitoring scenario revisited
Let’s start out by making our life easy: Before we deal with key handling we first explore the
possibilities for software triggering. We now know that there is an application trigger
connected with the internal RFID data source. So we start reading tags by just telling this
trigger to work and here is how:
We add a new menu item that uses the RFID reader interface’s function SetTrigger to
change the state of the application trigger. As we learned from the configuration parameter
settings this trigger acts as a on/off button and we take that into account by toggling the
trigger’s state with every invocation of the menu item (that is what our internal Boolean flag
fAppTriggerState is for).
private void menuItemAppTrigger_Click(object sender, EventArgs e)
private void menuItemAppTrigger_Click(object sender, EventArgs e)
{
...
RfTriggerState newTriggerState = RfTriggerState.On;
if (this.fAppTriggerState)
{
newTriggerState = RfTriggerState.Off;
}
RfReaderApi.Current.SetTrigger(RfTriggerType.Application,
newTriggerState);
this.fAppTriggerState = !this.fAppTriggerState;
...
}
If we now start our test application, start the reader service in RF-MANAGER mode, wait
until we got the ‘API valid’ event and then toggle our trigger while an RFID tag is within reach
we can now see read tags.
You don’t see them? Well, to be honest, so far you won’t see any tags within our test
application but you will see them within the connected RF-MANAGER runtime if you open a
screen at runtime that shows an RFID view. This view shows the tag events we want to
monitor.
While this is great for the guys in front of the RF-MANAGER runtime PC, it won’t help our
poor plant floor guy Jerry with its RF610M device because he still does not know whether the
tags have been read or not.
So, next let’s make sure that poor Jerry sees the read tags on his device as well.
Mobile Reader
30 Function Manual, 02/2009, J31069-D0198-U001-A1-0076
Page 31

RFID Reader Interface User's Guide
2.3 Extending the Reach
2.3.6 I’m all ears
Scanning the RFID reader interface members, the most promising one for our purpose is the
TagEventNotifications event. We add a handler to this event when starting the reader
private void menuReaderStartRfm_Click(object sender, EventArgs e)
{ ...
RfReaderApi.Current.TagEventNotifications +=
new
RfNotificationHandler(rfmIntegration.NotificationHandler);
...
}
And we implement the handler after a quick look at the reference section on how to
interprete the delivered data. For a starter we look at the tag ID, the event type and the time
of occurrence.
public void NotificationHandler(object sender, RfNotificationArgs notificationArgs)
{
if (null != notificationArgs.TagEvents)
{
foreach (RfTagEvent tagEvent in notificationArgs.TagEvents)
{
this.mainFormRef.WriteInformationLine("Tag Event: " +
tagEvent.EventTimeUTC);
this.mainFormRef.WriteInformationLine(" > ID : " +
tagEvent.TagID);
this.mainFormRef.WriteInformationLine(" > Type: " +
tagEvent.EventType);
}
}
else
{
this.mainFormRef.WriteInformationLine("Tag Event: No tags");
}
}
Let’s give it a try and run the code, start the reader service and the trigger.
Did you see any tags within your test application?
No?
You might ask yourself ‘Why not? I used the very same code as with alarms and there it
worked’. What is so different here?
The difference is that contrary to alarms, notifications about tag events are only delivered if a
client subscribes at the reader service. Since such a subscription might cause heavy data
traffic, this subscription is not done automatically- Only if a client requests the data it will be
delivered.
Mobile Reader
Function Manual, 02/2009, J31069-D0198-U001-A1-0076
31
Page 32

RFID Reader Interface User's Guide
2.3 Extending the Reach
OK, we know for sure, we need the data, so we add a subscribe menu item and as we are
add it an unsubscribe item as well.
private void menuItemSubscribeMonitor_Click(
object sender, EventArgs e)
{
// Subscribe is only valid if we run in RF-MANAGER mode
if (this.fRfmIntegrated)
{
// It does not make sense to subscribe twice
if (!this.fSubscriptionActive)
{
try
{
// Subscribe for all possible data sources
bool fResult = RfReaderApi.Current.SubscribeForNotifications
(RfReaderApi.NC_ALL, false);
if (fResult)
this.fSubscriptionActive = true;
}
catch(RfReaderApiException rfidException)
...
}
}
}
private void menuItemUnsubscribeMonitor_Click(
object sender, EventArgs e)
{
...
if(this.SubscriptionActive)
{
// Subscribe for all possible data sources
RfReaderApi.Current.UnsubscribeForNotifications(
RfReaderApi.NC_ALL);
this.fSubscriptionActive = false;
}
...
}
As you can see by looking at the code snippets above, there is an SubscribeForNotifications
member within the RFID reader interface.
It needs two parameter, the first one specifying the data source and the second whether we
only want to monitor or to filter the tag event data. As we are still on the way to let Jerry
monitor the tags, the second paramter is set to false.
For the first parameter we would have to know which data sources are configured within a
project. Luckily, configurations for a RF610M do not allow too much variation on the data
sources. They normally include an RFID and/or a barcode source only. Moreover, these data
sources have fixed names which are provided via constants within the RFID reader interface.
The following table lists possible values.
RfReaderApi.NC_RFID
RfReaderApi.NC_BARCODE
RfReaderApi.NC_ALL
Mobile Reader
32 Function Manual, 02/2009, J31069-D0198-U001-A1-0076
This is the data source name if you want to target the RFID
component
This is the data source name if you want to target the barcode
component
This is a generic name that subscribes for all configured data
sources within a project.
Page 33

RFID Reader Interface User's Guide
2.3 Extending the Reach
Most interesting here is the last constant which ensures that all available data sources are
subscribed. Most often ‘NC_ALL’ is the safest option.
Running the application again now gives us what we wanted. Whenever we are not
subscribed, toggling the trigger will show tag events only at the RF-MANAGER runtime.
As soon as we subscribe, tag events are also shown within our test application directly on
the RF610M device. After unsubscribing tag events are still shown within the RF-MANAGER
runtime but no longer within our test application.
We got it! Jerry can now monitor his tags.
Mobile Reader
Function Manual, 02/2009, J31069-D0198-U001-A1-0076
33
Page 34

RFID Reader Interface User's Guide
2.3 Extending the Reach
2.3.7 Not without my approval
Now back to the office where Molly still wants to add the missing parcel to the original
delivery. Using the device with an application such as that we created above doesn’t really
help. While it would be possible to scan new IDs and to forward them to a connected RFMANAGER runtime there is no way of intercepting the data before it is delivered to the RFMANAGER.
Here is where the second parameter of the SubscribeForTagNotifications function of the
RFID reader interface comes to play. Whenever this parameter is set to true, scanned
information is delivered to the subscribed client (i.e. our application) but not yet to a
connected RF-MANAGER.
Forwarding of the data to the RF-MANAGER runtime will not occur until the RFID reader
interface member SetTagEvents is called with a list of tag events to be passed on.
Having the said facts about filtering in mind, subscribing and unsubscribing for our Molly
scenario is just a duplicate of what we already have whereas only the filtering parameter is
changed.
private void menuItemSubscribeFilter_Click(
object sender, EventArgs e)
{
...
// Subscribe for all data sources with filtering (!)
bool fResult = RfReaderApi.Current.SubscribeForNotifications(
RfReaderApi.NC_ALL, true);
...
}
In order to make it easier for us to test our code we introduce another new function that
allows us to simulate the pressing of a key where acquiring data only happens as long as the
key is pressed.
This is achieved by setting a corresponding trigger to ON, waiting for a second and setting
the trigger to OFF again. Here is the code for our new ‘simulate key’ function
private void menuItemSimulateKey_Click(
object sender, EventArgs e)
{
...
// Pretend we pressed the top key
RfReaderApi.Current.SetTrigger(RfTriggerType.ScanTop,
RfTriggerState.On);
// Hold the key for a second
Thread.Sleep(1000);
// 'Release' the key again
RfReaderApi.Current.SetTrigger(RfTriggerType.ScanTop,
RfTriggerState.Off);
...
}
Starting our application, starting the reader, subscribing as mentioned above and using our
new trigger method will result in the scanned tag data to appear within our notification
handler.
Mobile Reader
34 Function Manual, 02/2009, J31069-D0198-U001-A1-0076
Page 35

RFID Reader Interface User's Guide
2.3 Extending the Reach
We store incoming tag events in a list of tag events for later delivery
public void NotificationHandler(object sender, RfNotificationArgs
notificationArgs)
{
...
if (null != notificationArgs.TagEvents)
{
foreach (RfTagEvent tagEvent in notificationArgs.TagEvents)
{
// Remember this tag event when filtering for later
// confirmation
this.bufferedTagEvents.Add(tagEvent);
}
}
...
}
// This is our internal list to store tag events
private List<RfTagEvent> bufferedTagEvents = new List<RfTagEvent>();
Remember that as long as we are scanning, all acquired data is only stored locally on your
RF610M device. A connected RF-MANAGER runtime will not see a single one of the
scanned tags.
Now we can present the buffered tags to an end user such as Molly. If she confirms that all
shown tag events are valid, we can forward them to the RF-MANAGER runtime by calling
the SetTagEvents function as shown below:
public void ConfirmTagEvents()
{
...
if (this.bufferedTagEvents.Count > 0)
{
RfReaderApi.Current.SetTagEvents(RfReaderApi.NC_RFID,
this.bufferedTagEvents.ToArray());
}
...
}
Notice that the second parameter for the SetTagEvents function is just a list of tag events. In
the code above, simply all buffered tag event items are passed on to the function. The only
other information needed is the name of the data source within our reader service that will
receive the tag events. Again, we can safely rely on the system’s default component names
and use the given constant RfReaderApi.NC_RFID.
Contrary to subscribing for tag event notifications – where we simply used NC_ALL – we are
not allowed to use a generic name such as ‘all’ here but we have to address a specific data
source.
Running the code above now passes on the read tag events to the connected RFMANAGER runtime.
As said in our case the whole list of tag events. However, nothing prevents you from
selecting only some of the tag events, deleting events, adding your own tag events or
changing the values of a tag event before handing it over to the SetTagEvents function.
That way you can allow ‘Molly-like’ filtering for example by providing all tag events in a list
and letting the user select those events to be passed on.
And voila! We are able to make both Jerry and Molly happy again.
Mobile Reader
Function Manual, 02/2009, J31069-D0198-U001-A1-0076
35
Page 36

RFID Reader Interface User's Guide
2.3 Extending the Reach
2.3.8 Make it fun: Working keys
Finally, let’s get back to the trigger keys – remember your RF610M device has plenty of it, on
the left on the right, a big one on top and a pistol grip trigger (if you have a device equipped
with a barcode unit).
Capturing keyboard input as such is easy: We only have to add an event handler to the main
form’s keydown event. And since we want to know when the key is released again we also
add an event handler to the keyup event. The simple code is shown below.
...
// Main Form initialization code
this.KeyDown += new System.Windows.Forms.KeyEventHandler(
this.KeyDownHandler);
this.KeyUp += new System.Windows.Forms.KeyUpHandler(
this.KeyDownHandler);
...
However, this code will only work as long as the main form has the focus. Whenever a
control residing on this main form has the focus, we will not get the key events. Therefore,
our demo application uses a simply ‘intercept all controls’ mechanism starting at the main
form. The main form’s constructor invokes CaptureKeys(this).
protected void CaptureKeys(Control control)
{
for (int i = control.Controls.Count - 1; i >= 0; i--)
{
Control c = control.Controls[i] as Control;
if (c != null)
{
c.KeyDown += new System.Windows.Forms.KeyEventHandler(
this.KeyDownHandler);
c.KeyUp += new System.Windows.Forms.KeyEventHandler(
this.KeyUpHandler);
CaptureKeys(c);
}
}
}
Now, we only have to check for the right keycode and invoke the correct trigger function.
Mobile Reader
36 Function Manual, 02/2009, J31069-D0198-U001-A1-0076
Page 37

RFID Reader Interface User's Guide
2.3 Extending the Reach
Initially, all of the special keys produce the same keycode 0xEF or 239 decimal. So,
whenever such a code arrives with a key down event, we set our trigger to active. And if the
key is released again, we reset the trigger. That way we implemented a simple ‘scan as long
as key is pressed’ behavior.
protected void KeyDownHandler(object sender, KeyEventArgs e)
{
if (e.KeyValue == 0xEF)
{
...
// (Error handling code omitted for the sake of clarity
RfReaderApi.Current.SetTrigger(RfTriggerType.Application,
RfTriggerState.On);
...
}
}protected void KeyUpHandler(object sender, KeyEventArgs e)
{
if (e.KeyValue == 0xEF)
{
...
// (Error handling code omitted for the sake of clarity
RfReaderApi.Current.SetTrigger(RfTriggerType.Application,
RfTriggerState.Off);
...
}
}
That is all you need to attach keys to function. Piece of cake, isn’t it?
Let’s add some cream on top of it. What if you do want to distinguish among all of those scan
keys. It is not always desireable using the same function for all keys. But if they all send the
same keycode it is impossible.
Luckily, PSION provides a way to change this. There is an interface assembly
PsionTeklogixNet.dll that offers you a PsionTeklogix.Keyboard namespace containing a
KeyRemapper class. This class allows redefining the keycodes. So we add some
initialization code in our main form’s constructor as shown below
...
// Initialize key mapping
PsionTeklogix.Keyboard.KeyRemapper Rf610MKeyRemapper =
new KeyRemapper();
// left scan key
Rf610MKeyRemapper.Add(0x38, null,
PsionTeklogix.Keyboard.Function.SendCode,
(int)PsionTeklogix.Keyboard.VirtualKey.VK_F27);
// right scan key
Rf610MKeyRemapper.Add(0x39, null,
PsionTeklogix.Keyboard.Function.SendCode,
(int)PsionTeklogix.Keyboard.VirtualKey.VK_F25);
// Pistol Grip
Rf610MKeyRemapper.Add(0x3A, null,
PsionTeklogix.Keyboard.Function.SendCode,
(int)PsionTeklogix.Keyboard.VirtualKey.VK_F26);
// top scan key
Rf610MKeyRemapper.Add(0x01, null,
PsionTeklogix.Keyboard.Function.SendCode,
(int)PsionTeklogix.Keyboard.VirtualKey.VK_F28);
...
Mobile Reader
Function Manual, 02/2009, J31069-D0198-U001-A1-0076
37
Page 38

RFID Reader Interface User's Guide
2.3 Extending the Reach
These calls to PsionTeklogix.Keyboard.KeyRemapper select the key in question with the first
parameter and provide new keycodes wih the last parameter. After this initialization we can
rewrite our keyhandler as follows:
protected void KeyDownHandler(object sender, KeyEventArgs e)
{
switch (e.KeyValue)
{
...
case (int)PsionTeklogix.Keyboard.VirtualKey.VK_F25:
// right scan key pressed
...
break;
case (int)PsionTeklogix.Keyboard.VirtualKey.VK_F26:
// pistol grip key pressed
...
break;
case (int)PsionTeklogix.Keyboard.VirtualKey.VK_F27:
// left scan key pressed
...
break;
case (int)PsionTeklogix.Keyboard.VirtualKey.VK_F28:
// top scan key pressed
... break;
...
}
}
Now we know which key was pressed and can implement a different behavior for each of
them if wanted.
The key mapping stays active until a cold reset, a redefinition or if we manually remove the
key mapping again. As we want to leave the system as clean as we found it, we undo our
key mapping before exiting:
...
// Make our key mapping undone again
PsionTeklogix.Keyboard.KeyRemapper Rf610MKeyRemapper =
new KeyRemapper();
Rf610MKeyRemapper.Remove(0x38, null);
Rf610MKeyRemapper.Remove(0x39, null);
Rf610MKeyRemapper.Remove(0x3A, null);
Rf610MKeyRemapper.Remove(0x01, null);
...
Mobile Reader
38 Function Manual, 02/2009, J31069-D0198-U001-A1-0076
Page 39

RFID Reader Interface User's Guide
2.3 Extending the Reach
2.3.9 Summary
This chapter provided a short overview of the possibilities that the RFID reader interface
offers when working in integrated scenarios where most of the configuration is done with RFMANAGER and custom applications on a mobile device such as the RF610M need to tweak
the system behavior a little.
You are now familiar with the basics of monitoring and filtering of tag events. You know how
to eliminate unwanted data or even create data artificially.
You learned about the possibilities to find out what is configured under the hood by exploring
the configuration parameters and about the considerations necessary when starting up or
shutting down.
This manual can in no way cover all aspects and details of creating client applications. It is
intended as a jump start into the realm of tag event processing.
Additional topics such as connecting keys to triggers or something similar are left for your
own exploration.
Build on the basics you learned and adjust them to fit your needs to ‘Extend your Reach’.
Mobile Reader
Function Manual, 02/2009, J31069-D0198-U001-A1-0076
39
Page 40

RFID Reader Interface User's Guide
2.3 Extending the Reach
Mobile Reader
40 Function Manual, 02/2009, J31069-D0198-U001-A1-0076
Page 41

RFID Reader Interface Reference
The RFID Reader Interface provides a way to access the RFID features that the handheld
device provides. End users can utilize these features by using the DLL interface which is
provided as a .Net assembly within own client applications.
This chapter provides a detailed description of all available functions and their parameters.
3.1 The Interface
The programming interface is contained in a .Net assembly with the name
Siemens.Simatic.RfReaderApi.dll. Whenever clients want to use the interface, they must
reference this assembly in their applications.
This assembly contains the defining and implementing classes in a namespace
Siemens.Simatic.RfReader.
There are a few helper classes, the interface itself and a static function to instantiate an
instance of the RFID Reader Interface.
Starting with RFID Reader Interface V1.1 notifications and alarms are supported which led to
some new helper classes
Supported in RFID reader interface: since v1.0
RfReaderApiException Helper class to wrap exception information
RfReaderInitData Helper class for initialization purposes
IRfReaderApi The interface class
RfReaderApi Creation of an RFID Reader Interface instance
3
Supported in RFID reader interface: since V1.1
RfNotificationArgs Helper class that wraps arguments for notification events
RfTagEvent Helper class that contains all data of a single tag event
RfAlarmArgs Helper class that wraps argument for alarm events
RfAlarm Helper class that contains all data of a single alarm
RfInfoItem Helper class that contains information about configuration or state
RF310M device is supported with reader interface V1.2
The following chapters describe each member of the interface in detail including its
parameters and return.
Mobile Reader
Function Manual, 02/2009, J31069-D0198-U001-A1-0076
changes
41
Page 42

RFID Reader Interface Reference
3.2 RfReaderApi.Current
3.2 RfReaderApi.Current
RfReaderApi.Current : IRfReaderApi {get}
Parameters:
None (.Net Property)
Return value(s):
This function returns the current instance of an RFID Reader interface or null.
Note:
If no instance has been created before, a call for this function will create a new RFID Reader
Interface instance.
If there is already an instance of the RFID Reader Interface running, it will be returned.
Should it not be possible to create an instance of the RFID Reader Interface, null will be
returned.
3.3 RfReaderApiException
Whenever RFID reader API related exceptions occur either internally or by calling the
underlying reader service or the physical RFID reader device, these exceptions are wrapped
within an instance of the RfReaderApiException class.
However, this does not prevent general exceptions such as ‘out of memory’ or ‘out of range’
to occur either. So, be prepared to catch those kind of exceptions as well.
This class provides additional information about the source or cause of an exception via the
following members:
● ResultCode : int
The ResultCode specifies the source location of an exception.
ResultCode_System specifies error conditions which occurred internally.
ResultCode_Reader specifies error conditions arising from within an underlying reader
service.
● Error : string
Error is a short description of the error that occurred.
● Cause : string
Cause gives additional information if the cause of an error is known.
● Description : string
Additional extra description of the error. May be left blank if not applicable.
Mobile Reader
42 Function Manual, 02/2009, J31069-D0198-U001-A1-0076
Page 43

RFID Reader Interface Reference
3.4 IRfReaderApi
3.4 IRfReaderApi
3.4.1 Version
IRfReaderApiVersion : string {get}
Parameters
None (.Net Property)
Return value(s)
The current version of the interface and its implementation as a string formatted as 'V
mj.mn.sp.hf_i1.i2.i3.i4' whereby mj and mn are the major and minor version of the product,
sp specifies a service pack number and hf a hotfix number.
All of the four following numbers (i1, i2, i3, i4) are internal identifiers qualifying a special
release or build of the RFID reader interface assembly.
Note
This information can be used to determine which features are supported by a certain version
of the RFID Reader Interface. When checking for function compatibility using the major and
the minor version is sufficient.
A sample version number is "V01.01.00.00_01.12.00.01".
Version information
Supported in RFID Reader Interface: since V1.0
Mobile Reader
Function Manual, 02/2009, J31069-D0198-U001-A1-0076
43
Page 44

RFID Reader Interface Reference
3.4 IRfReaderApi
3.4.2 StartReader
StartReader( initData : RfReaderInitData ) : void
Parameters
initData
Information about how to configure the reader and how to establish the connection.
Information is given within the following RfReaderInitData structure:
RfReaderInitData Member Description
Mode Specifies whether the underlying reader service works in standalone
mode (RfReaderInitData.ReaderMode.Standalone) or integrated in an
RF-MANAGER configured environment
(RfReaderInitData.ReaderMode.RFManager)
Name Specifies a name for the reader service. This parameter is not needed
in RfManager mode and is always set to a default value.
Address Set the IP address for the device. This value defaults to 127.0.0.1
which is the local device.
Port The port which is used for communication between the API and the
underlying reader service. Defaults to 4684, which is the EPC default
port.
Type Supported Types:
- RF610M
- RF310M
Default is RF610M. Any other type will be refused
AdditionalInitData Additional initialization data for other readers. Currently always empty.
(This member is provided for future use)
1)
1) since Reader interface V1.2
Return value(s)
None
Exceptions
ArgumentOutOfRangeException Validation of the contents of initData failed. Check the values
provided.
RfReaderApiException Error while starting the communication with the reader. Check
the Error member for more information.
Note
Initiates the communication to an underlying reader service application that manages the
physical RFID reader device.
Most often you only need to specify only a single parameter when instantiating
RfReaderInitData, which is the mode that specifies whether the RFID reader interface should
be used from a standalone application or within an RF-MANAGER configured system.
Mobile Reader
44 Function Manual, 02/2009, J31069-D0198-U001-A1-0076
Page 45

RFID Reader Interface Reference
3.4 IRfReaderApi
Version information
Supported in RFID Reader Interface: since V1.0
3.4.3 StopReader
StopReader() : void
Parameters
None
Return value(s)
None
Exceptions
RfReaderApiException Error while communicating with the reader service. Check the Error
member for more information.
Note
Stops the communication with an underlying reader service application, terminates and
unloads the service.
Version information
Supported in RFID Reader Interface: since V1.0
Mobile Reader
Function Manual, 02/2009, J31069-D0198-U001-A1-0076
45
Page 46

RFID Reader Interface Reference
3.4 IRfReaderApi
3.4.4 ReaderStatus
ReaderStatus : Hashtable {get}
Property
A hash table that contains name values. The parameter names are used as keys.
Exceptions
RfReaderApiException Error while communicating with the reader service. Check the Error
member for more information.
Note
Returns information about the state of the reader as a list of name values within a hash
table. Currently supported entries are:
ReaderModel
ComPort The communication port used
ReaderFirmware The version identifier of the RFID module's firmware
ReaderServiceVersion The version of the reader service (since V1,2)
ReaderHWVersion The hardware version of the RFID modul (RF310M only)
ReaderLoaderVersion The version of the RFID modul (RF310M only)
ErrorCounter The error counter of the RFID modul (RF310M only)
AbortCounter The abort counter of the RFID modul (RF310M only)
CodeErrorCounter The code error counter of the RFID modul (RF310M only)
SignaturErrorCounter The signatur error counter of the RFID modul (RF310M only)
CRCErrorCounter The CRC error counter of the RFID modul (RF310M only)
Returns the current model
Valid values are :
'RF610 EU' for the European version of RF610M
'RF610M US' for the American version. Of RF610M
‘SIMATIC RF310M’
Version information
Supported in RFID Reader Interface:since V1.0
Mobile Reader
46 Function Manual, 02/2009, J31069-D0198-U001-A1-0076
Page 47

RFID Reader Interface Reference
3.4 IRfReaderApi
3.4.5 AirProtocol
AirProtocol : string {get, set}
Property
A string identifying the current or desired air protocol
Exceptions
RfReaderApiException Error while communicating with the reader service. Check the Error
member for more information.
Note
Sets a new air protocol type or returns the air protocol type currently in use.
Valid protocol types are:
● EPCC1G2
● ISO18000-6B
● RF300
● ISO15693
Remember that not all functions are supported for all protocol types and that there may be
restrictions on the data ranges.
KillTag and LockEPCGen2Tag are only supported for the EPCC1G2 protocol. Invoking these
functions while another protocol e.g. ISO18000-6B is set will result in an exception.
Version information
Supported in RFID Reader Interface: since V1.0
3.4.6 SetAirProtocol
SetAirProtocol( protocolName : string, initialQ : int) : void
Parameters
● protocolName
A string specifying the air protocol to be set.
● initialQ
An integer value that denotes the initialQ value used for collision detection with EPC
Class1 Gen 2 tags.
This parameter is ignored if an air protocol other than 'EPCC1G2' is specified.
Return value(s)
None
Mobile Reader
Function Manual, 02/2009, J31069-D0198-U001-A1-0076
47
Page 48

RFID Reader Interface Reference
3.4 IRfReaderApi
Exceptions
RfReaderApiException Error while communicating with the reader service. Check the Error
member for more information.
Note
This method is an alternate choice instead of the AirProtocol property described earlier. In
contrast to the property, it allows an additional parameter (initialQ) to be specified for the
EPC Class1 Gen2 protocol.
Version information
Supported in RFID Reader Interface: since V1.0
Mobile Reader
48 Function Manual, 02/2009, J31069-D0198-U001-A1-0076
Page 49

RFID Reader Interface Reference
3.4 IRfReaderApi
3.4.7 SetTagID
SetTagID(currentTagID : string, newTagID : string, password
:string) : void
Parameters
● currentTagID
The ID of a tag to be written to given as a hexadecimal encoded string (i.e., each byte is
represented by a two-letter hexadecimal number).
● newTagID
The new ID to be written given as a hexadecimal encoded string (i.e., each byte is
represented by a two-letter hexadecimal number).
● Password
An access password if needed. If none needed use an empty string. A password is a
hexadecimal encoded string of up to eight characters.
Return value(s)
None
Exceptions
RfReaderApiException Error while communicating with the reader service.
Note
This method writes a new tag ID to an existing tag.
A valid tag ID must be specified for a tag currently within the field before you can write a new
ID, or if no tag ID is specified, the first tag within the field will be written.
All tag IDs are given in a plain hexadecimal encoded string (i.e., each byte is represented by
a two-letter hexadecimal number).
When writing an EPC class1 Gen2 tag, the password is verified for access rights.
No passwords are required for writing an ISO tag. Please provide an empty string.
RF300 device does not support writing of Tag iDs at all
Version information
Supported in RFID Reader Interface: since V1.0
Check the Error member for more information.
Mobile Reader
Function Manual, 02/2009, J31069-D0198-U001-A1-0076
49
Page 50

RFID Reader Interface Reference
3.4 IRfReaderApi
3.4.8 GetTagIDs
GetTagIDs() : string[]
Parameters
None
Return value(s)
Returns an array of strings that contains the read tag IDs. The tag IDs are returned in a plain
hexadecimal encoded string (i.e., each byte is represented by a two-letter hexadecimal
number).
Exceptions
RfReaderApiException Error while communicating with the reader service.
Check the Error member for more information.
Note
This method executes a read operation on the reader and returns the IDs of all the
recognized tags as an array of strings.
Version information
Supported in RFID Reader Interface: since V1.0
Mobile Reader
50 Function Manual, 02/2009, J31069-D0198-U001-A1-0076
Page 51

RFID Reader Interface Reference
3.4 IRfReaderApi
3.4.9 GetTagMemory
GetTagMemory(tagID : string, memoryBank : uint,
startAddress : uint, dataLength : uint,
password :string) : byte[]
Parameters
● tagID
The ID of a tag whose data are to be read, given as a hexadecimal encoded string. (i. e.
each byte is represented by a two-letter hexadecimal number).
● memoryBank
The memory bank (0 - 3) from which to read data.
Valid Values for the air protocol 'ISO18000-6B,'
0 – USER MEM
Valid values for the air protocol ‘EPCC1G2’ are:
0 – Reserved
1 – EPC,
2 – TID and
3 – USER MEM.
Valid values for the air protocol ‘RF300’”are:
0 – Memory
Valid values for the air protocol ‘ISO15693’ are:
0 – Memory
Return value(s)
Exceptions
● startAddress
The base address within the memory bank from which to read data.
Base addresses are specified in bytes.
● dataLength
The length in bytes of the data to be read.
● Password
An access password if needed. The ISO18000-6B protocol e.g. does not support a
password. So just pass an empty string.
A password is a hexadecimal encoded string of up to eight characters.
An array of bytes containing the specified tag memory's contents.
In case of errors null is returned.
RfReaderApiException Error while communicating with the reader service.
Check the Error member for more information.
Mobile Reader
Function Manual, 02/2009, J31069-D0198-U001-A1-0076
51
Page 52

RFID Reader Interface Reference
3.4 IRfReaderApi
Note
Reads tag data whereby both internal and user-specific areas may be accessed.
A valid tag ID must be specified for a tag currently within the field before you can read data,
or if no tag ID is specified, the first tag within the field will be read.
Version information
Supported in RFID Reader Interface: since V1.0
Mobile Reader
52 Function Manual, 02/2009, J31069-D0198-U001-A1-0076
Page 53

RFID Reader Interface Reference
3.4 IRfReaderApi
3.4.10 SetTagMemory
SetTagMemory(tagID : string, memoryBank : uint,
startAddress : uint, dataLength : uint,
password :string, buffer : byte[]) : void
Parameters
● tagID
The ID of a tag whose data are to be modified, given as a hexadecimal encoded string.
● memoryBank
The memory bank (0 - 3) to which data are to be written.
Valid Values for the air protocol 'ISO18000-6B,'
0 – USER MEM
Valid values for the air protocol ‘EPCC1G2’ are:
0 – Reserved
1 – EPC,
2 – TID and
3 – USER MEM.
Valid values for the air protocol ‘RF300’”are:
0 – Memory
Valid values for the air protocol ‘ISO15693’ are:
0 – Memory
Return value(s)
Exceptions
● startAddress
The base address within the memory bank to which data are to be written.
Base addresses are specified in bytes.
● dataLength
The length in bytes of the data to be written.
● Password
An access password if needed. The ISO18000-6B e.g. protocol does not support a
password. So just supply an empty string.
A password is a hexadecimal encoded string of up to eight characters.
● Buffer
The data to be written as a stream of bytes.
None.
RfReaderApiException
Error while communicating with the reader service. Check the Error
member for more information.
Mobile Reader
Function Manual, 02/2009, J31069-D0198-U001-A1-0076
53
Page 54

RFID Reader Interface Reference
3.4 IRfReaderApi
Note
Writes tag data whereby both internal and user-specific areas may be accessed.
RF310 specific banks UID and CONFIG Data are not writeable, and will return with error
exception.
A valid tag ID must be specified for a tag currently within the field before you can write data,
or if no tag ID is specified, the first tag within the field will be written.
Version information
Supported in RFID Reader Interface: since V1.0
Mobile Reader
54 Function Manual, 02/2009, J31069-D0198-U001-A1-0076
Page 55

RFID Reader Interface Reference
3.4 IRfReaderApi
3.4.11 GetTagStatus
GetTagStatus(tagID: string) : Hashtable {}
Parameters
● tagID
The ID of a tag whose status is to be read as a plain hexadecimal encoded string (i.e.,
each byte is represented by a two-letter hexadecimal number)
Return value(s)
A hash table that contains named values. The parameter names are used as keys.
Exceptions
RfReaderApiException Error while communicating with the reader service. Check the Error
member for more information.
Note
A valid tag ID must be specified for a tag currently within the field before you can get the
status data, or if no tag ID is specified, the first tag within the field will be read
Returns information about the state of the tag as a list of named values within a hash table.
Currently supported entries are:
TagType Valid values for the air protocol RF300 are:
• RF300
Valid values for the air protocol ISO15693 are:
• ISO15693
MemorySize
Returns the size of memory in Byte
For RF300 Tags this is only the size of the FRAM
Mobile Reader
Function Manual, 02/2009, J31069-D0198-U001-A1-0076
55
Page 56

RFID Reader Interface Reference
3.4 IRfReaderApi
LockBit Register
Returns a Byte: the LockBit Register value.
Block:
Bit
7 6 5 4 3 2 1 0
7 6 5 4 3 2 1 0
Schreibschutz-Status:
0 = Block nicht geschützt
1 = Block geschützt
Adresszuordnung:
Block 0 : FF80…FF83
Block 1 : FF84…FF87
Block 2 : FF88…FF8B
Block 3 : FF8C…FF8F
Block 4 : FF90…FF93
Block 5..7 reserviert
ASICVersion Returns the Version string of the tag ASIC
BlockSize Returns the BlockSize of the Transponder
NumberOfBlocks Returns the number of Blocks of the Transponder
Only valid for ISO15693 Tags
TagID The ID of a tag
Limitations
This function is only valid when the protocol type is set to RF300 or ISO15693
Invoking this function while an other protocol is set e.g ISO18000-6B will result in an
exception.
Version information
Supported in RFID Reader Interface: since V1.2
Mobile Reader
56 Function Manual, 02/2009, J31069-D0198-U001-A1-0076
Page 57

RFID Reader Interface Reference
3.4 IRfReaderApi
3.4.12 InitTagMemory
InitTagMemory(TagID : string, memorBank : uint, startAddress : uint,
dataLength : uint, password : string, initData : byte) : void
Parameters
● TagID
The ID of a tag to be initialized, given as a hexadecimal encoded string (i.e., each byte is
represented by a two-letter hexadecimal number).
● memoryBank
Valid values for the air protocol ‘RF300’”are:
0 – Memory
Valid values for the air protocol ‘ISO15693’ are:
0 – Memory
● startAddress
The base address within the memory bank to which data are to be written.
Base addresses are specified in bytes.
● dataLength
The length in bytes of the data to be written.
Return value(s)
Exceptions
Note
● Password
An access password if needed. If none needed use an empty string. A password is a
hexadecimal encoded string of up to eight characters.
● initData
The data to be initialized.
None.
RfReaderApiException Error while communicating with the reader service.
Check the Error member for more information.
A valid tag ID must be specified for a tag currently within the field before you can initialize it,
or if no tag ID is specified, the first tag within the field will be initialized.
Initializes all writeable tag data with the given data.
Limitations
RF610M device does not support initializing of tags at all
Version information
Supported in RFID Reader Interface: since V1.2
Mobile Reader
Function Manual, 02/2009, J31069-D0198-U001-A1-0076
57
Page 58

RFID Reader Interface Reference
3.4 IRfReaderApi
3.4.13 KillTag
KillTag(tagID : string, password :string) : void
Parameters
● tagID
The ID of a tag which is to be killed, given as a plain hexadecimal encoded string.
● Password
An access password if needed. If none needed use an empty string.
A password is a hexadecimal encoded string of up to eight characters.
Return value(s)
None.
Exceptions
RfReaderApiException Error while communicating with the reader service.
Check the Error member for more information.
Note
Kills a tag with the given ID (i.e., the tag can no longer be used).
Limitations
This function is only valid when the protocol type is set to EPCC1GEN2.
Invoking this function while another protocol is set , e.g. ISO18000-6B, will result in an
exception.
Version information
Supported in RFID Reader Interface: since V1.0
Mobile Reader
58 Function Manual, 02/2009, J31069-D0198-U001-A1-0076
Page 59

RFID Reader Interface Reference
3.4 IRfReaderApi
3.4.14 LockEPCGen2Tag
LockEPCGen2Tag(tagID : string, epcGen2LockAction :
string epcGen2LockMask : string password :string) : void
Parameters
● tagID
The ID of a tag which is to be locked, given as a plain hexadecimal encoded string.
● epcGen2LockAction
The lock action is a binary string as defined in the EPC Radio Frequency Identity
Protocols Standard Specification.
The action is a value ranging from 000 to 11 1111 1111.
If the length of the lockAction is less than 10 characters (e.g., 111),
the value defines the MSB (i. e. it is interpreted as 11 1000 0000).
● epcGen2LockMask
The lock mask is a binary string as defined in the EPC Radio Frequency Identity
Protocols Standard Specification.
The mask is a value ranging from 000 to 11 1111 1111.
If the length of the lockMask is less than 10 characters (e.g., 11),
the value defines the MSB (i. e. it is interpreted as 11 0000 0000).
Return value(s)
Exceptions
● Password
A kill password if needed. If none needed use an empty string.
A password is a hexadecimal encoded string of up to eight characters.
None.
RfReaderApiException Error while communicating with the reader service.
Check the Error member for more information.
Mobile Reader
Function Manual, 02/2009, J31069-D0198-U001-A1-0076
59
Page 60

RFID Reader Interface Reference
3.4 IRfReaderApi
Note
Use this command to lock an EPC class1 Gen2 tag on a logical reader.
The tag is locked at the source in which the tag is currently located.
If the given ID is an empty string, all RFID tags in the field of the logical reader will be locked.
Below is a short description of the parameters epcGen2LockAction and epcGen2LockMask.
The first line of the table ('Bit') defines the bit positions of the action and the mask values.
The mask and action values are given with the MSB first.
Bank Kill PWD Access PWD EPC Memory TID Memory User Memory
Bit 9 8 7 6 5 4 3 2 1 0
Mask s/w s/w s/w s/w s/w s/w s/w s/w s/w s/w
Action r/w p r/w p w p w p w p
The mask value determines which of the action value bits should be applied as shown in the
table above as s/w (skip/write with skip=0 and write=1).
The action value determines how the bank should be locked for each memory bank.
The flag r/w defines a password lock for read/write.
The flag w defines a password lock for write (read access allowed).
The p flag defines a permanent lock.
The following tables list possible combinations of r/w and w flags with p flags and their
combined meanings for one memory bank.
The tag is in the open state if it is identified and in the secured state if its access password is
verified.
w p Description
0 0 Associated memory bank can be write-accessed from either open or secured state.
0 1 Associated memory bank can be permanently write-accessed from either open or secured
state and can never be locked.
1 0 Associated memory bank can be write-accessed from the secured state but not from the
open state.
1 1 Associated memory bank cannot be write-accessed from any state.
r/w p Description
0 0 Associated password location can be read and write-accessed from either open or
secured state.
0 1 Associated password location can be permanently read and write-accessed from either
open or secured state and can never be locked.
1 0 Associated password location can be read and write-accessed from the secured state
but not from the open state.
1 1 Associated memory bank cannot be read or write-accessed from any state.
Mobile Reader
60 Function Manual, 02/2009, J31069-D0198-U001-A1-0076
Page 61

RFID Reader Interface Reference
3.4 IRfReaderApi
Example
Bank Kill PWD Access
PWD
Mask (00)1 1 1 1 1 1 0 0 0 0 3F0
Action (00)1 0 1 0 1 0 0 0 0 0 2A0
In the above example, the lockMask is 11 1111 0000 (hexadecimal 3F0). This means that
you can only write action bits to the Kill, Access and EPC memory locations. The lockAction
fields are 10 1010 0000 (hexadecimal 2A0) which results in the following:
● Kill Password:
Can be read and write-accessed from the secured state but not from the open state.
The Access Password of the tag must be known before the kill password can be read or
changed.
● EPC Memory Bank:
Can be write-accessed from the secured state but not from the open state.
The Access Password must be known before a new ID can be written to the tag.
For detailed information about the epcGen2LockAction and epcGen2LockMask, see the
EPC Radio Frequency Identity Protocols Standard Specification.
EPC
Memory
TID Memory User
Memory
Hex String
Value
Limitations
This function is only valid when the protocol type is set to EPCC1GEN2.
Invoking this function while another protocol is set, e.g.ISO18000-6B, will result in an
exception.
Version information
Supported in RFID Reader Interface: since V1.0
Mobile Reader
Function Manual, 02/2009, J31069-D0198-U001-A1-0076
61
Page 62

RFID Reader Interface Reference
3.4 IRfReaderApi
3.4.15 LockIsoTag
LockIsoTag(tagID : string,
iso6BAddress : uint
iso6BTagDataLength : uint) : void
Parameters
● tagID
The ID of a tag which is to be locked, given as a plain hexadecimal encoded string.
● iso6BAddress
The ISO address is an offset at which to start the locking procedure. The ISO Standard
18000-6 specification defines this address as 1 byte in the range of 0 to 255.
● iso6BTagDataLength
The length in bytes of the ISO tag memory block that is to be locked.
Return value(s)
None.
Exceptions
RfReaderApiException Error while communicating with the reader service.
Note
Locks an ISO tag against further write-accesses.
For detailed information about the iso6BTagAddress and iso6BTagDataLength, see the ISO
Standard 18000-6 (see references section).
Limitations
This function is only valid when the protocol type is set to ISO18000-6B.
Invoking this function while another protocol is set (e.g. EPCC1GEN2) will result in an
exception.
Version information
Supported in RFID Reader Interface: since V1.0
Check the Error member for more information.
Mobile Reader
62 Function Manual, 02/2009, J31069-D0198-U001-A1-0076
Page 63

RFID Reader Interface Reference
3.4 IRfReaderApi
3.4.16 SetTrigger
SetTrigger(triggerType : RfTriggerType,
triggerState : RfTriggerState) : void
Parameters
● TriggerType
This is the selected trigger to be changed which is one of the following enumeration
values and is normally associated to a hardware key on your device.
Trigger Description
ScanLeft Specifies the trigger associated with the left button on the device
ScanRight Specifies the trigger associated with the right button on the device
ScanTop Specifies the trigger associated with the button on top of the device (directly
above the cursor keys)
ButtonScan Specifies the trigger associated with a button within the GUI application
PistolGrip Specifies the trigger associated with the pistol grip button on the device
Application Specifies a virtual trigger that is only available within the software (configured
with RF-MANAGER)
Return value(s)
Exceptions
Note
Limitations
● triggerState
This parameter sets the level (state) of a trigger.
None.
RfReaderApiException Error while communicating with the reader service.
Check the Error member for more information.
This function allows setting or resetting a trigger value which in turn triggers execution of
code within the reader service (e.g. triggering an RFID source to read tags).
Being able to set the state of a trigger to ON or OFF allows arbitrary behavior of the different
keys depending on their configuration. A key may work only as long as it is pressed or as an
on/off switch.
RF-MANAGER mode only.
Successfully activating a trigger depends on a valid configuration being available. Such a
configuration is normally set by a connected RF-MANAGER. If no valid trigger configuration
for a given trigger type exists, an error is returned.
Version information
Supported in RFID Reader Interface: since V1.1
Mobile Reader
Function Manual, 02/2009, J31069-D0198-U001-A1-0076
63
Page 64

RFID Reader Interface Reference
3.4 IRfReaderApi
3.4.17 SubscribeForNotifications
SubscribeForNotifications(notificationChannel : string,
isFilter : bool) : bool
Parameters
● notificationChannel
The name of a notification channel that provides tag event data whereas a notification
channel is – from the API’s perspective – the source of tag events.
The following table contains the constants for default notification channel names that are
available.
RfReaderApi.NC_RFID This is the data source name if you want to target the RFID
component
RfReaderApi.NC_BARCODE This is the data source name if you want to target the barcode
component
RfReaderApi.NC_ALL This is a generic name that subscribes for all configured data
sources within a project.
● isFilter
Determine whether a subscriber is merely monitoring data (i.e. isFilter is false) or
intercepts data before it is passed on to other clients.
Return value(s)
Exceptions
Note
Limitations
A boolean value telling whether the subscription succeeded (true) or failed (false).
RfReaderApiException Error while communicating with the reader service.
Check the Error member for more information.
This function registers for asynchronous notifications of tag events. Users have to either
specify the name of the notification channel that creates tag events (which depends on the
underlying configuration) or use an empty string or "ALL" in order to subscribe to both the
RFID and the barcode notification channel that are available in a default RF-MANAGER
project for an RF610M.
Notifications from the underlying reader service are delivered via the TagEventNotifications
event.
RF-MANAGER mode only.
If there is no configuration data available or the contained notification channels do not match
in name, calls to SubscribeForNotifications will fail.
Version information
Supported in RFID Reader Interface: since V1.1
Mobile Reader
64 Function Manual, 02/2009, J31069-D0198-U001-A1-0076
Page 65

RFID Reader Interface Reference
3.4 IRfReaderApi
3.4.18 UnsubscribeForNotifications
UnsubscribeForNotifications(notificationChannel : string) : void
Parameters
● notificationChannel
The name of a notification channel that provides tag event data whereas a notification
channel is – from the API’s perspective – the source of tag events.
The following table contains the constants for default notification channel names that are
available.
RfReaderApi.NC_RFID This is the data source name if you want to target the RFID
component
RfReaderApi.NC_BARCODE This is the data source name if you want to target the barcode
component
RfReaderApi.NC_ALL This is a generic name that subscribes for all configured data
sources within a project.
Return value(s)
Exceptions
Note
Limitations
None.
RfReaderApiException Error while communicating with the reader service.
Check the Error member for more information.
This function stops notifications about tag events via the TagEventNotification event of the
reader interface. The given notification channel name specifies which notification to
terminate. An empty string or "ALL" unsubscribes from both the RFID and the barcode
channel available in a default RF-MANAGER project for an RF610M.
Whenever a previous subscription for a given channel name succeeded,
UnsubscribeForNotifications for the same channel name will succeed even if the underlying
connection might be temporarily unavailable.
RF-MANAGER mode only.
Whenever channel names are used that do not exist within the configuration,
UnsubscribeForNotifications will fail.
Version information
Supported in RFID Reader Interface: since V1.1
Mobile Reader
Function Manual, 02/2009, J31069-D0198-U001-A1-0076
65
Page 66

RFID Reader Interface Reference
3.4 IRfReaderApi
3.4.19 SetTagEvents
SetTagEvents(tagEventTarget : string,
tagEvents : RfTagEvent[]) : void
Parameters
● tagEventTarget
The name of the component that created the tag events (i.e. the data’s source).
The following table contains the constants for default event target names.
RfReaderApi.NC_RFID This is the data source name if you want to target the RFID
component
RfReaderApi.NC_BARCODE This is the data source name if you want to target the barcode
component
RfReaderApi.NC_ALL This is a generic name that subscribes for all configured data
sources within a project.
● tagEvents
A list of all tag events that are to be created.
Return value(s)
Exceptions
Note
Limitations
None.
RfReaderApiException Error while communicating with the reader service.
Check the Error member for more information.
This function forwards a list of tag events to the underlying reader service. The function will
only succeed if clients previously subscribed as a filtering client (isFilter = true). Unless
filtering is active the function will not accept any tag events.
The system is designed in such a way that the list of tag events received via the
TagEventNotifications event can safely be used as an input to SetTagEvents without any
changes.
RF-MANAGER mode only.
Each tag event must specify a valid notification channel name which it targets. Invalid
notification channel names will cause the function to fail.
Version information
Supported in RFID Reader Interface: since V1.1
Mobile Reader
66 Function Manual, 02/2009, J31069-D0198-U001-A1-0076
Page 67

RFID Reader Interface Reference
3.4 IRfReaderApi
3.4.20 SubscribeForAlarms
SubscribeForAlarms(alarmChannel : string,
isFilter : bool) : bool
Parameters
● alarmChannel
The name of an alarm channel that asynchronously provides alarms.
RfReaderApi.AC_ALL This is a shortcut for all possible alarm channels. The current
version of the API does only support the default alarm channel
RfReaderApi.AC_DEFAULT This is the name of the default alarm channel available in every
configuration.
● isFilter
Reserved for future use. Must be false in this version of the API. A value of true leads to a
not implemented exception.
Return value(s)
Exceptions
Note
Limitations
A boolean value telling whether the subscription succeeded (true) or failed (false).
RfReaderApiException Error while communicating with the reader service.
Check the Error member for more information.
This function registers for asynchronous notifications of RFID alarms. Users have to either
specify the name of the alarm channel (which depends on the underlying configuration) or
use an empty string or "ALL" in order to subscribe to all available alarm channels.
Notifications from the underlying reader service are delivered via the Alarms event.
Users should always subscribe for alarms both when working RF-MANAGER integrated or
standalone. The ReaderService uses the alarm channel to notify clients about the end of its
startup or restart phase by sending a “Reconfiguration” alarm. Only after receiving this alarm,
the RFID interface is fully initialized and able to support all features.
RF-MANAGER mode only.
If there is no configuration data available or the contained alarm channels do not match in
name, calls to SubscribeForAlarms will fail.
Version information
Supported in RFID Reader Interface: since V1.1
Mobile Reader
Function Manual, 02/2009, J31069-D0198-U001-A1-0076
67
Page 68

RFID Reader Interface Reference
3.4 IRfReaderApi
3.4.21 UnsubscribeForAlarms
UnsubscribeForAlarms(alarmChannel : string) : void
Parameters
● alarmChannel
The name of an alarms channel that you want to unsubscribe
Return value(s)
None.
Exceptions
RfReaderApiException Error while communicating with the reader service.
Check the Error member for more information.
Note
This function unregisters for asynchronous notifications of RFID alarms. Users have to either
specify the name of the alarm channel (which depends on the underlying configuration) or
use an empty string or "ALL" in order to subscribe to all available alarm.
Limitations
RF-MANAGER mode only.
If there is no configuration data available or the contained alarm channels do not match in
name, calls to UnsubscribeForAlarms will fail.
Version information
Supported in RFID Reader Interface: since V1.1
Mobile Reader
68 Function Manual, 02/2009, J31069-D0198-U001-A1-0076
Page 69

RFID Reader Interface Reference
3.4 IRfReaderApi
3.4.22 GetConfigParameter
GetConfigParameter(parameterName : string) : RfInfoItem
Parameters
● parameterName
The name of the configuration parameter whose value should be retrieved
Return value(s)
The value for the configuration parameter in an RfInfoItem structure.
Exceptions
RfReaderApiException
Error while communicating with the reader service.
Check the Error member for more information.
Note
This function retrieves information about a given configuration parameter.
The RfInfoItem structure contains both the name and the value for a parameter. Moreover, it
provides information to which feature set the configuration parameter applies. Each
parameter might apply to either RFID, barcode or global configuration. A parameter can
apply to both RFID and barcode as well.
If a parameter with a given name is not available, null is returned. For known parameters
their current value is returned. Following is a list of the currently available parameters.
Some configuration parameters are for your information only. They do not prevent you from
using a special feature but give information on how a client or user interface should behave
to comply with what has been configured in RF-MANAGER. Those parameters are flagged
with Info in the last column of the table below.
Mobile Reader
Function Manual, 02/2009, J31069-D0198-U001-A1-0076
69
Page 70

RFID Reader Interface Reference
3.4 IRfReaderApi
Other configuration parameters have an effect on how certain functions behave or whether a
feature can be activated or not. Mostly this applies to the trigger configuration.
Configuration Parameter
Name
MobileOperatingMode
Enabled
EditTagEnable This parameter could be used by your applications.
ScanBeepEnable Produce a sound on valid reads (if true). Info
ScanResultTime The configured scan time Info
All of the following configuration parameters give information on how certain triggers are configured.
On the one hand they specify whether a configured trigger is only valid as long as the associated key
is pressed (KEY_PRESSED) or whether the trigger implements an ON/OFF toggling
(START_STOP).
This information is for information only.
Moreover, depending on the configuration, each trigger is associated with either RFID scanning or
barcode scanning or with both. This defines which function will be triggered and is thus relevant for
your client.
PistolGrip Information about the pistol grip button Config
Scan Key Left Information about the scan key button on the left of
Scan Key Right Information about the scan key button on the right of
Scan Key Top Information about the scan key button on top of the
Application Information about the virtual software trigger Config
Possible Values / Description Info vs. Config
This parameter tells you if the device is working in
remote mode (FALSE) or mobile mode (TRUE).
Whenever this parameter is false, you may only
monitor tag events. Only if this parameter is true,
filtering is enabled and tag events might be changed
and can be fed in again with the SetTagEvents API
function.
It signals that changing of tags is allowed inside your
application.
the device
the device
device
Info
Info
Config
Config
Config
Limitations
RF-MANAGER mode only.
There has to be valid RF-MANAGER configuration data available in order to successfully
retrieve values.
Version information
Supported in RFID Reader Interface: since V1.1
Mobile Reader
70 Function Manual, 02/2009, J31069-D0198-U001-A1-0076
Page 71

RFID Reader Interface Reference
3.4 IRfReaderApi
3.4.23 TagEventNotification
TagEventNotifications
Event
RfNotificationHandler(sender : object, args : RfNotificationArgs)
Exceptions
RfReaderApiException Error while communicating with the reader service.
Check the Error member for more information.
Note
This event provides notifications about tag events that the underlying reader service
produced.
Both RFID and barcode events will be delivered depending on the configured data sources.
As a prerequisite clients have to subscribe for tag events. As long as no subscription
occurred, the TagEventNotifications event will not provide any data.
Whenever tag event data is available, the notification arguments will contain an array of
RfTagEvent objects.
Each RfTagEvent object provides information about the tag id, the tag type (i.e. barcode or
RFID), the event type (e.g. glimpsed or observed), the time an event occurred as well as
information about the source of the data, the notification channel which sends the events and
the trigger which led to the event.
When working in filtering mode, the RfTagEvent list can be passed on to the SetTagEvents
function.
Each tag event contains a bunch of members giving information about the event itself and
about the reader and environment that created the event.
Whenever existing events are modified or own events are created some of these members
are required to have reasonable values. Those are marked with "mandatory" in the last
column of the table below.
Mobile Reader
Function Manual, 02/2009, J31069-D0198-U001-A1-0076
71
Page 72

RFID Reader Interface Reference
3.4 IRfReaderApi
Take special care in providing correct event times and types as well as tag type, source and
notification names because these values are heavily used in ordering, sorting and filtering
events.
RfTagEvent Member Possible Values / Description Mandatory
TagID The read tag ID as a hexadecimal encoded string. x
TagType The tags type (EPC or barcode) x
EventType The event type (GLIMPSED, OBSERVED, LOST,
UNKNOWN, NEW)
EventAntenna The antenna number that sent when reading the tag
EventTimeUTC The time when the event occurred in UTC format x
EventTimeTick The time when the event occurent in time ticks (must
correspond with EventTimeUTC)
EventTrigger The name of the trigger which caused the event
SourceName The name of the data source at which the tag event was
created
NotifyTriggerName The notification channel trigger that caused the event to be
sent.
NotifyChannelName The name of the notification channel which sends the
event
ReaderNowUTC The reader’s current time in UTC format
ReaderNowTick The reader’s current time in time ticks
ReaderName The name of the reader
ReaderHandle An internal handle value of the reader
ReaderEPC The reader’s EPC identifier
NotificationID A unique ID per tag event x
x
x
x
x
Limitations
RF-MANAGER mode only.
There has to be valid RF-MANAGER configuration data available in order to successfully
retrieve values.
Version information
Supported in RFID Reader Interface: since V1.1
Mobile Reader
72 Function Manual, 02/2009, J31069-D0198-U001-A1-0076
Page 73

RFID Reader Interface Reference
3.4 IRfReaderApi
3.4.24 Alarms
Alarms
Event
RfAlarmHandler(sender : object, args : RfAlarmArgs)
Exceptions
RfReaderApiException Error while communicating with the reader
service.
Check the Error member for more information.
Note
This event provides notifications about alarms whereas an alarm is considered not only as a
warning or error condition but also as a means of notification about changed system states.
Contrary to the TagEventNotifications event the Alarms event provides information even
without an explicit subscription (i.e. a call to SubscribeForAlarms in this case).
In order to distinguish errors from notifications the RfAlarmArgs may contain either an array
of RfAlarm objects or an array of RfInfoItem objects. Following is a list of the public members
of the alarm arguments.
Member Type Description
Alarms RfAlarm[ Whenever a system error or warning isissued, it is contained
in one or more RfAlarm structures in this member.
If the alarm is a notification only this member is null.
InfoItems RfInfoItem[ This member contains information about configuration
changes or the current system state packed in RFInfoItem
structures.
If the alarm signals an error or warning, this member is null.
AlarmMessage string If an alarm occurs that does not apply to one of the two
options above, it is delivered as a simple string in this
member. The default value is null.
IsDataBuffering bool This member is a shortcut for a configuration notification that
signal the begin or end of local data buffering with true.
In all other cases this member is false.
IsConfigStart bool This member is a shortcut for a configuration notification that
signal the begin of a reconfiguration due to new configuration
data received from a connected RF_MANAGER.
In all other cases this member is false.
IsScanning bool This member is a shortcut for a configuration notification that
signals the begin or end of a current progressing scan with
true.
In all other cases this member is false.
Mobile Reader
Function Manual, 02/2009, J31069-D0198-U001-A1-0076
73
Page 74

RFID Reader Interface Reference
3.4 IRfReaderApi
Version Information
Supported in RFID Reader Interface: since V1.1
3.4.25 Information
Information
Event
InformationHandler(sender : object, args : InformationArgs)
Exceptions
RfReaderApiException Error while communicating with the reader service.
Check the Error member for more information.
Note
Provides categorized information about internal actions and status changes.
The arguments InformationArgs consist of:
● Type : InformationType
● Message : string
Version information
Supported in RFID Reader Interface: since V1.0
Categorizes the information given. Valid categories are: Debug, Info, Notice, Warning,
Error, Critical, Alert, Emergency
The message to be delivered.
Mobile Reader
74 Function Manual, 02/2009, J31069-D0198-U001-A1-0076
Page 75

RFID Reader Interface Reference
3.5 References
3.5 References
EPCglobal Tag Data Standards Version 1.3
Ratified Specification
March 8, 2006
EPCglobal Tag Data Translation (TDT) 1.0
Ratified Standard Specification
January 21, 2006
EPCglobal. EPC Radio Frequency Identity Protocols:
Class-1 Generation-2 UHF RFID Protocol for Communications at 860 MHz - 960 MHz,
Version 1.0.9
EPC Standard Specification
December 2005
ISO. Information Technology -
Radio Frequency Identification (RFID) for Item Management -
Part 6: Parameters for Air Interface Communications at 860-930 MHz.
ISO Standard 18000-6
May 2005
Mobile Reader
Function Manual, 02/2009, J31069-D0198-U001-A1-0076
75
Page 76

Get more Information
www.siemens.com/simatic-sensors
Siemens AG
Industry Automation
Factory Automation Sensors
Postfach 4848
90327 NÜRNBERG
DEUTSCHLAND
www.siemens.com/automation
subject to change
J31069-D0198-U001-A1-0076
© Siemens AG 2008
 Loading...