

Siemens SED2-IP21 Series, SED2-IP21-A, SED2-IP21-B, SED2-IP21-C Mounting Instructions
s
Y
A
M5194
Montageanleitung
Montageanleitung
de
de
Mounting instructions
Mounting instructions
en
en
Instructions de montage
Instructions de montage
fr
fr
Monteringsinstruktion
Monteringsinstruktion
sv
sv
Montage-aanwijzing
Montage-aanwijzing
nl
nl
Istruzioni di montaggio
Istruzioni di montaggio
it
it
Asennusohje
Asennusohje
fi
fi
Instrucciones de montaje
es
Instrucciones de montaje
es
Monteringsvejledning
da
de
Deutsch
Drehantrieb
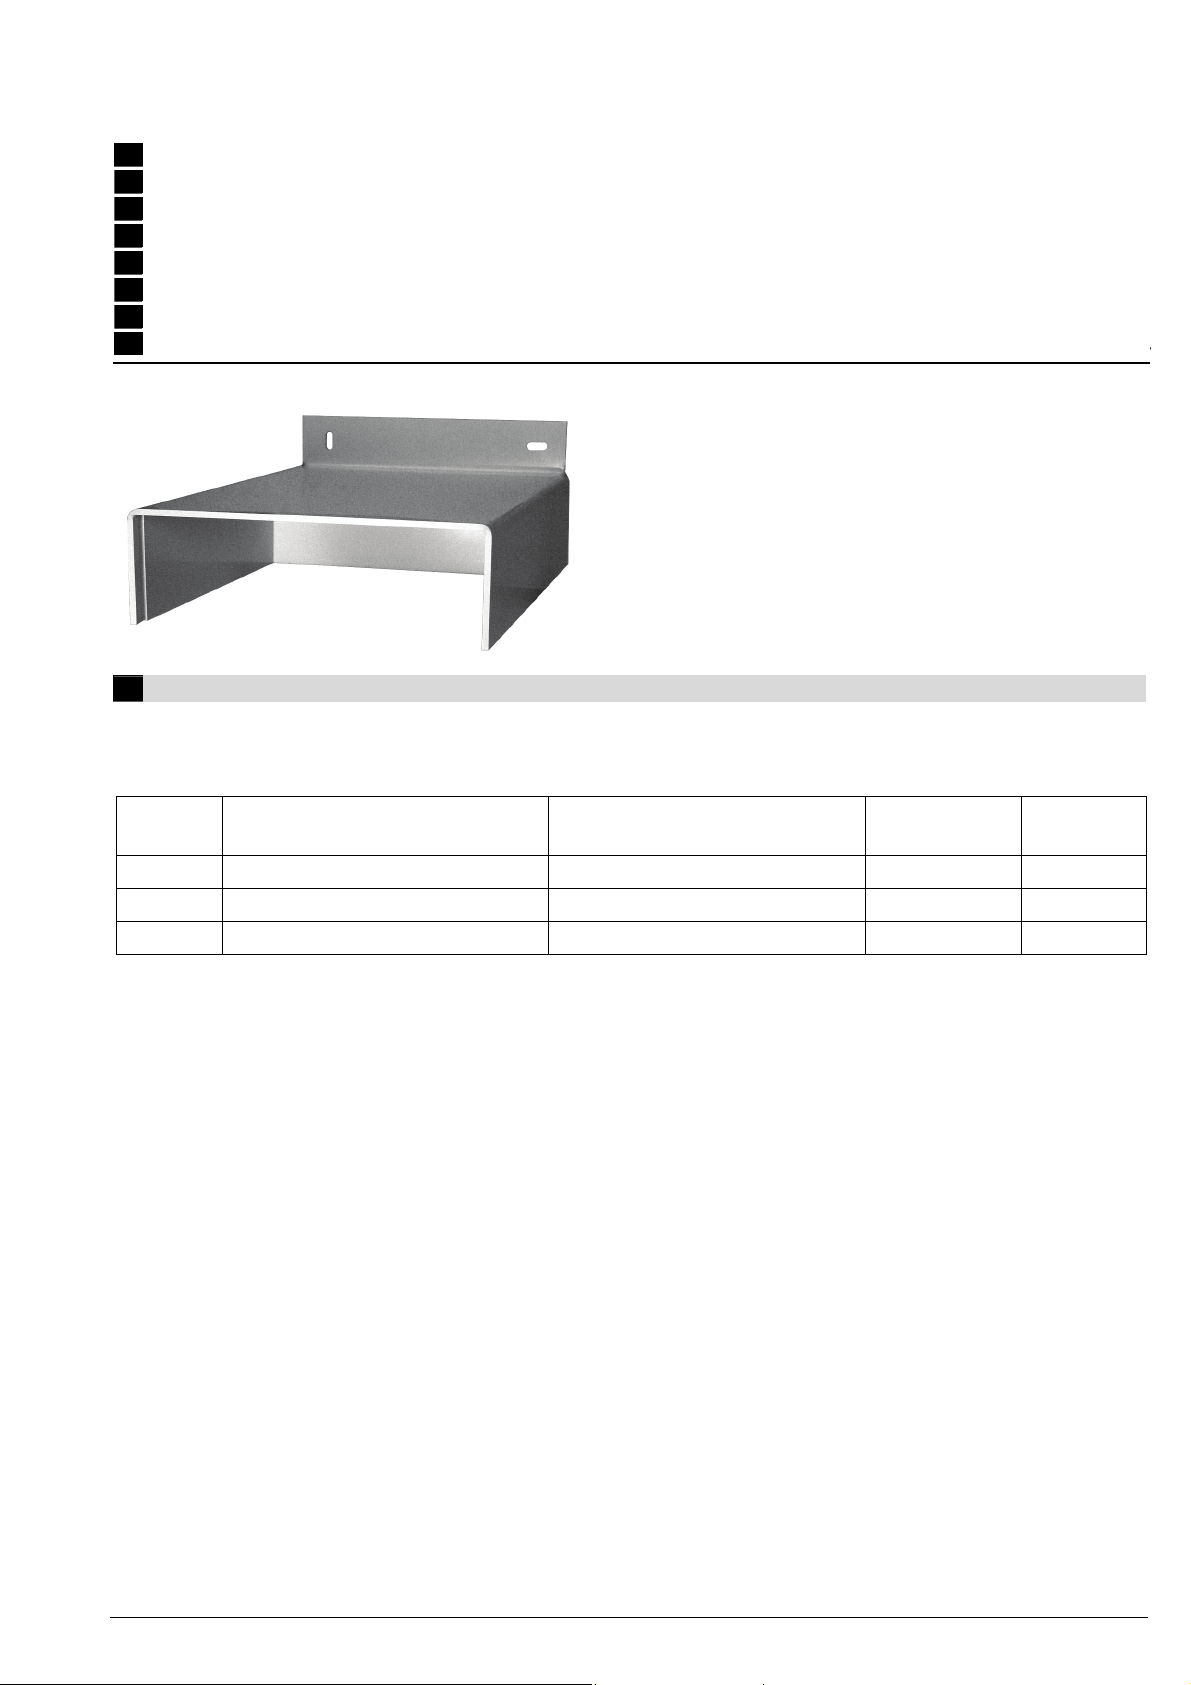
SED2-IP21 Abdeckung für Baugrössen A…C
Rotary-type actuator
SED2-IP21 cover for frame sizes A…C
Servo-moteur à action angulaire
SED2-IP21-Couvercle pour grandeurs A…C
Spjällställdon med vridande rörelse
SED2-IP21-täckplatta för kapslingsstorlek A…C
Luchtklepservomotor voor rot. aandrijving
SED2-IP21 afdekkap voor bouwgrootte A…C
Servocomando rotativo per serrande
SED2-IP21 coperchio per contenitori A…C
Kiertoliikkeinen ilmapeltien toimimoottori
SED2-IP21-suoja laitekokoihin A…C
SED2-IP21 Cubierta para los tamaños de bastidor A…C
Actuador de acción rotativa
Motor for drejebevægelse
SED2-IP21SED2-IP21-B
SED2-IP21-C
Voraussetzungen
Für eine vollständige SED2 IP21-Installation sind je nach Baugrösse folgende Komponenten erforderlich:
Type X
Baugrösse SED2 AC 200…240 V
3 Phasen / IP20
A
B
C
SED2-0.37/22(B/X)…SED2-0.75/22(B/X) SED2-0.37/32(B/X)…SED2-1.5/32(B/X) SED2-GLA
SED2-1.1/22(B/X)…SED2-2.2/22(B/X) SED2-2.2/32(B/X)…SED2-4/32(B/X) SED2-GLB
SED2-3/22(B/X)…SED2-7.5/22(B/X) SED2-5.5/32(B/X)…SED2-15/32(B/X) SED2-GLC
SED2 AC 380…480 V
3 Phasen / IP20
Schirm-
Anschlussplatte
SED2-IP21
Abdeckung
SED2-IP21-A
SED2-IP21-B
SED2-IP21-C
Montagehinweise
• Um eine fachgerechte Montage von SED2 und IP21 Abdeckung sicherzustellen, ist es wichtig, dass Sie diese Anleitung
lesen, bevor Sie mit der Installation beginnen.
• Die SED2-IP21 Abdeckung wird ausschliesslich verwendet bei Wandmontage von SED2 Frequenzumrichtern zur Erhö-
hung der Gehäuseschutzart von IP20 auf IP21.
• Die Montage darf nur in einem sauberen, trockenen und abgeschlossenen Raum erfolgen.
• Ein SED2 mit IP21 Abdeckung darf auf keinen Fall an öffentlich zugänglichen Stellen installiert werden.
• Der SED2 und vor allem die IP21 Abdeckung darüber sollten auf einer möglichst ebenen Oberfläche montiert werden.
• Die Montage der SED2-IP21 Abdeckung ist strikt gemäss dieser Anleitung und den darin enthaltenen Bohrplänen für die
Baugrössen A…C auszuführen, damit die Norm für Schutzart IP21 und Berührungsschutz (EN 60529) erfüllt ist, und ein
sicherer Betrieb des Frequenzumrichters gewährleistet ist.
Montage und Netzanschluss
1. Die Bohrlöcher für Frequenzumrichter und IP21 Abdeckung gemäss den unten abgebildeten Bohrplänen an einer möglichst ebenen Wandfläche anzeichnen.
2. Angezeichnete Löcher entsprechend den vorgesehenen, nachfolgend aufgelisteten Befestigungsschrauben bohren
und den Frequenzumrichter inklusive EMV-Unterbaufilter an der Wand anschrauben.
Building Technologies/HVAC Products CE1M5194xx 06.10.2009 1/18
Dazu empfehlen wir folgendes Montagematerial:
Baugrösse
SED2 mit EMV - Unterbaufilter /
Montagematerial
IP 21 Abdeckung
SED2
A
SED2-IP21-A
SED2
B
SED2-IP21-B
SED2
C
SED2-IP21-C
4 Holzschrauben ∅ 4 mm
4 Unterlagsscheiben M4
2 Holzschrauben ∅ 4 mm
2 Unterlagsscheiben M4
4 Holzschrauben ∅ 4 mm
4 Unterlagsscheiben M4
2 Holzschrauben ∅ 4 mm
2 Unterlagsscheiben M4
4 Holzschrauben ∅ 5 mm
4 Unterlagsscheiben M5
2 Holzschrauben ∅ 5 mm
2 Unterlagsscheiben M5
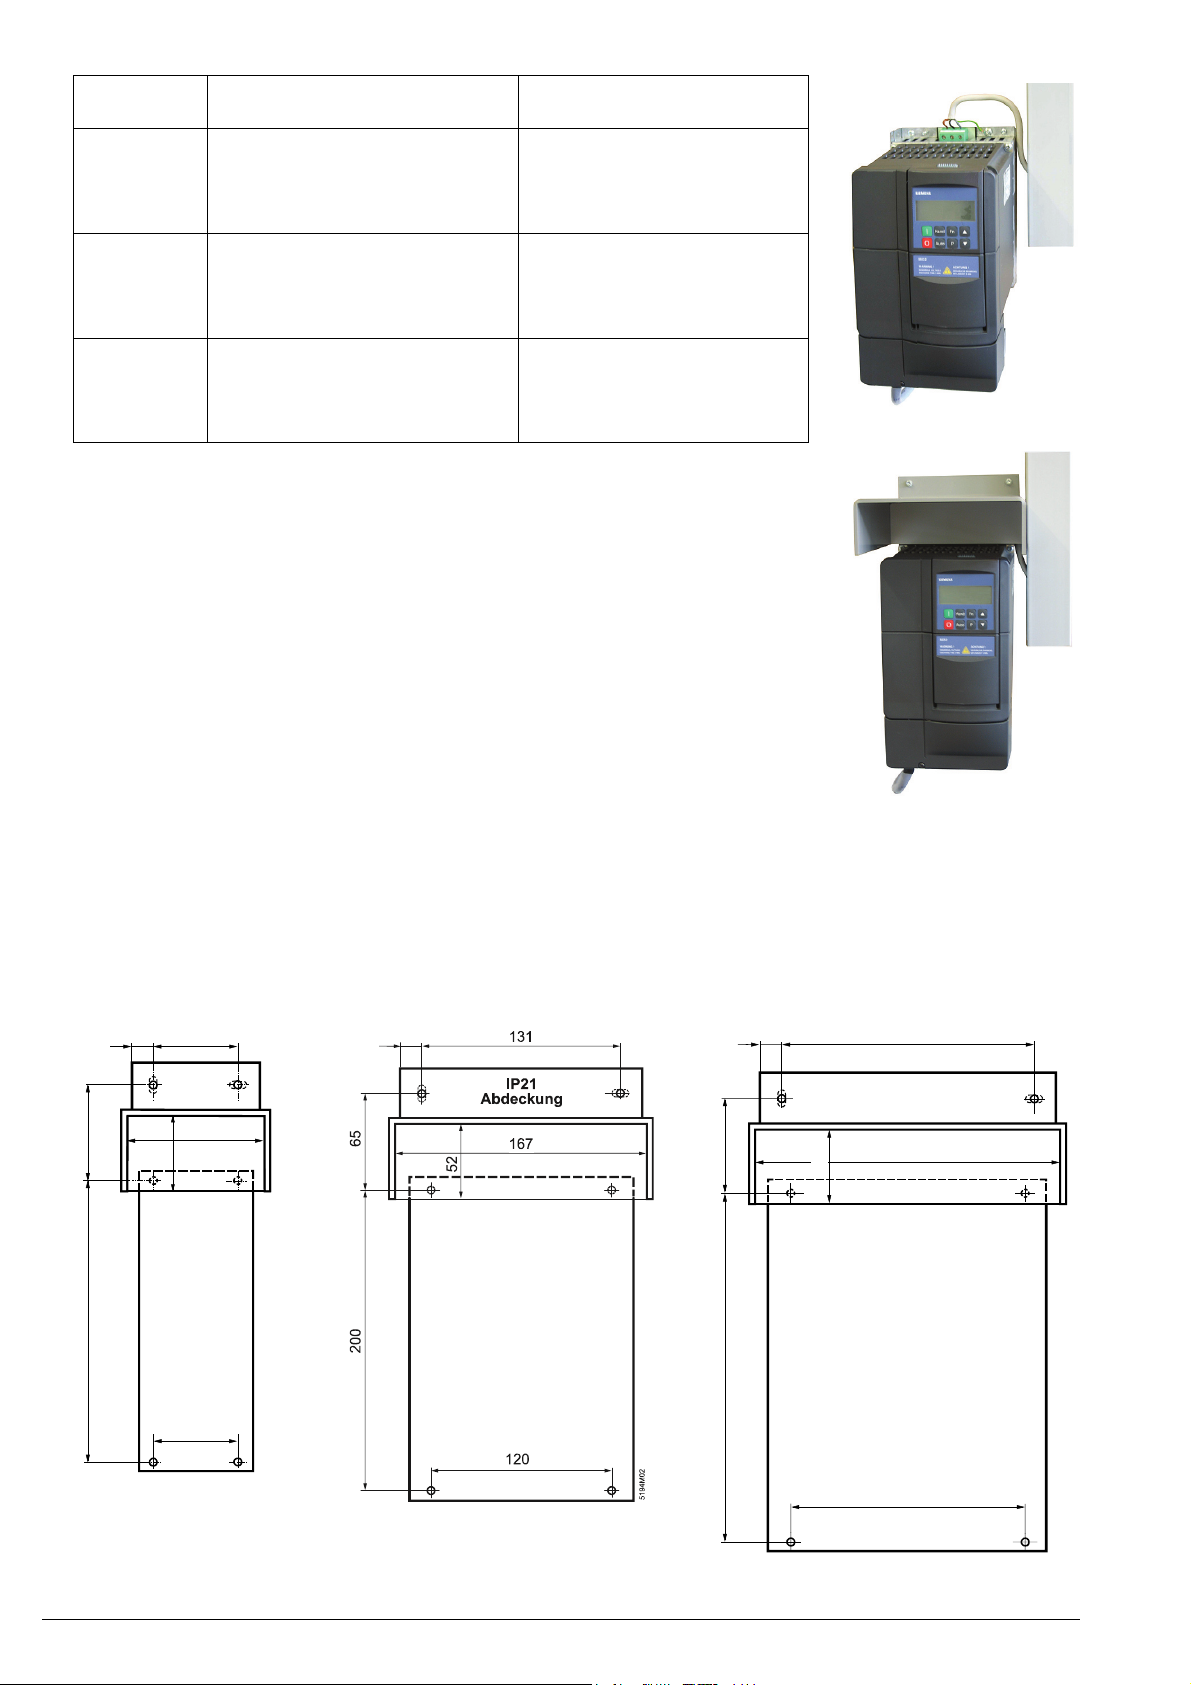
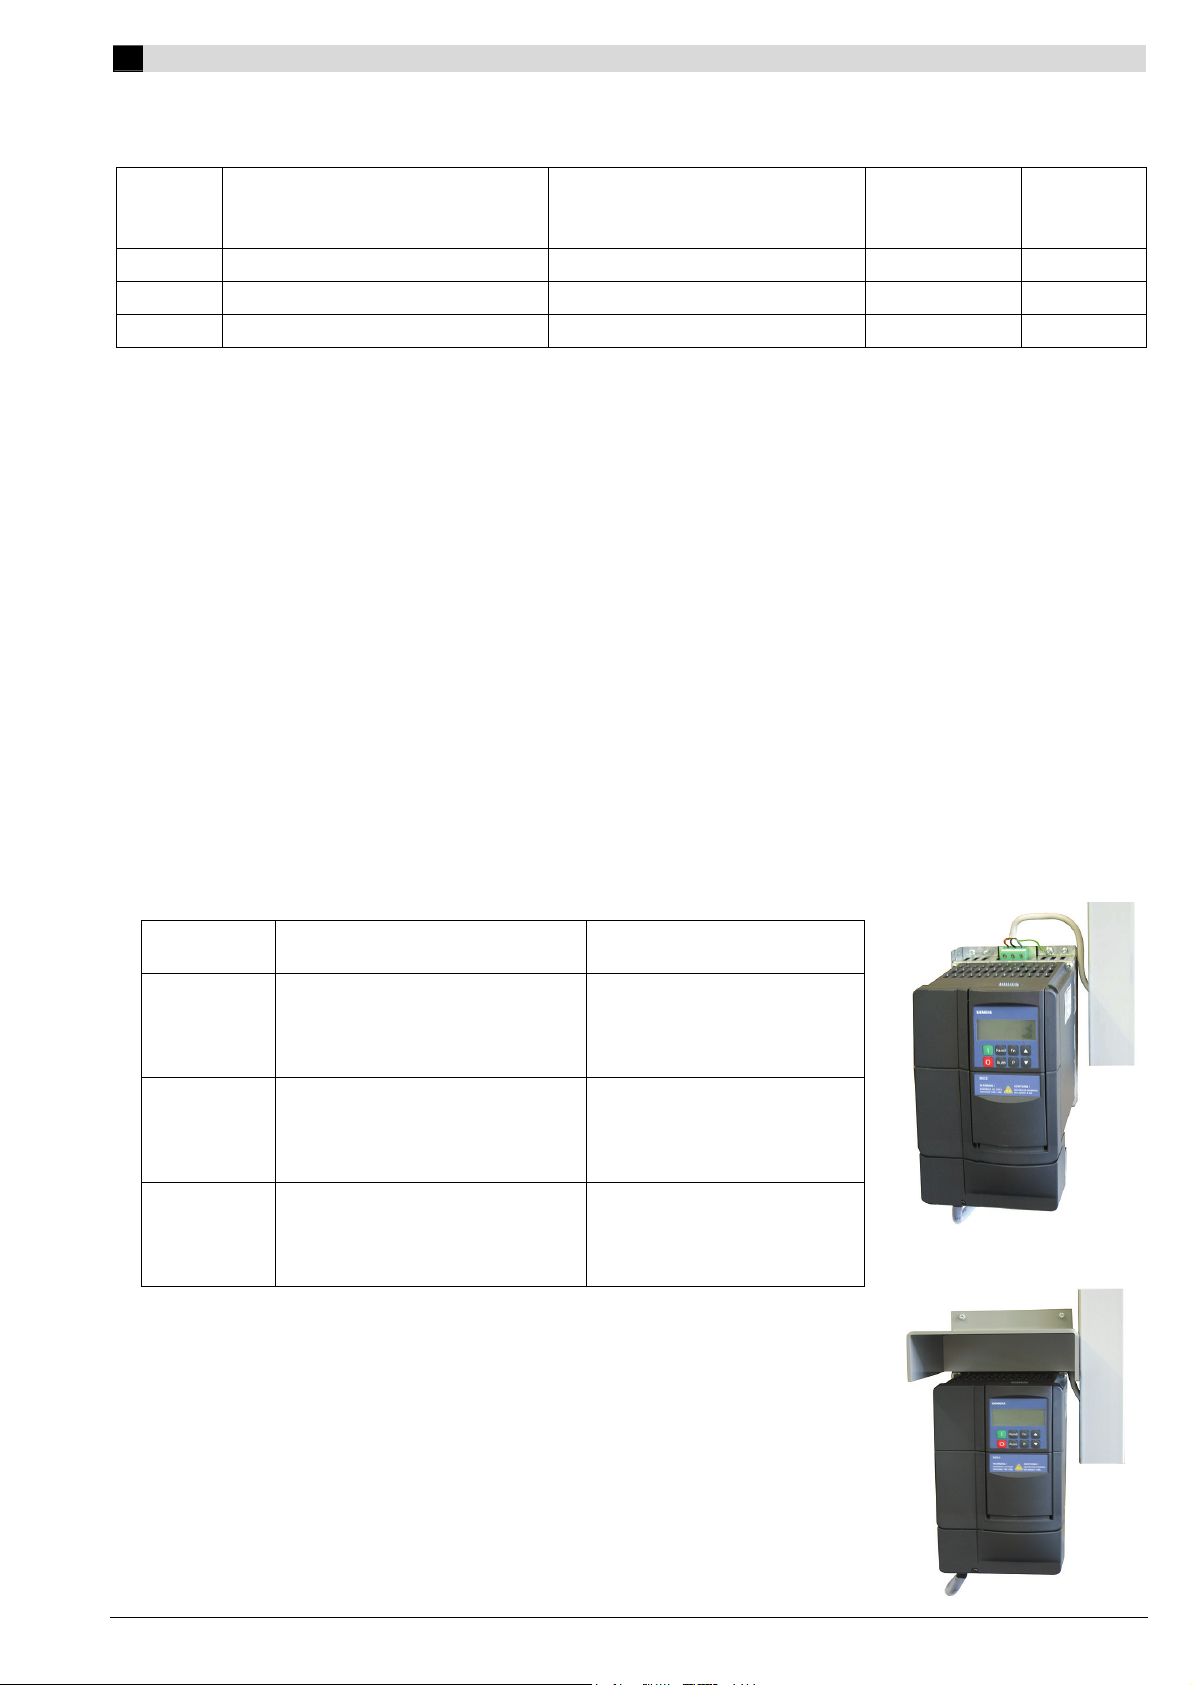
3. Danach das Netzspeisungskabel am Frequenzumrichter, bzw. dem darunter liegenden
EMV-Unterbaufilter anschliessen. Der Mantel des Zuleitungskabels muss möglichst
nahe bei den Anschlussklemmen des SED2 abisoliert werden. Siehe Abbildung rechts
oben. Die einfache Isolation darf nach der Montage der IP21 Abdeckung auf keinen
Fall berührt werden können. Die Zugentlastung des Zuleitungskabels hat bauseitig zu
erfolgen.
Hinweise: Bohren Sie möglichst keine zusätzlichen Löcher in die IP21 Abdeckung. Ist
für die Zuleitung eine Kabeldurchführung durch die IP21 Abdeckung unumgänglich, muss eine entsprechende Kabelverschraubungen mit Gummidichtung verwendet werden, die mindestens der Schutzart IP21 entspricht.
Bitte beachten Sie auch die SED2 Inbetriebnahmeanleitung
(CM1G5192de) Kap. 4 EMV-gerechte Installation von SED2 und darin
insbesondere Kap. 4.4.1 Potentialausgleich und Erdung.
4. IP21 Abdeckung montieren
Hinweis: Ist die Montage auf einer unebenen Wandoberfläche nicht zu vermeiden,
muss zwischen der Wand und der IP21 Abdeckung ein Dichtungsband
verwendet werden, damit allenfalls vorhandenes Kondenswasser nicht
hinter der Abdeckung in den Frequenzumrichter laufen kann.
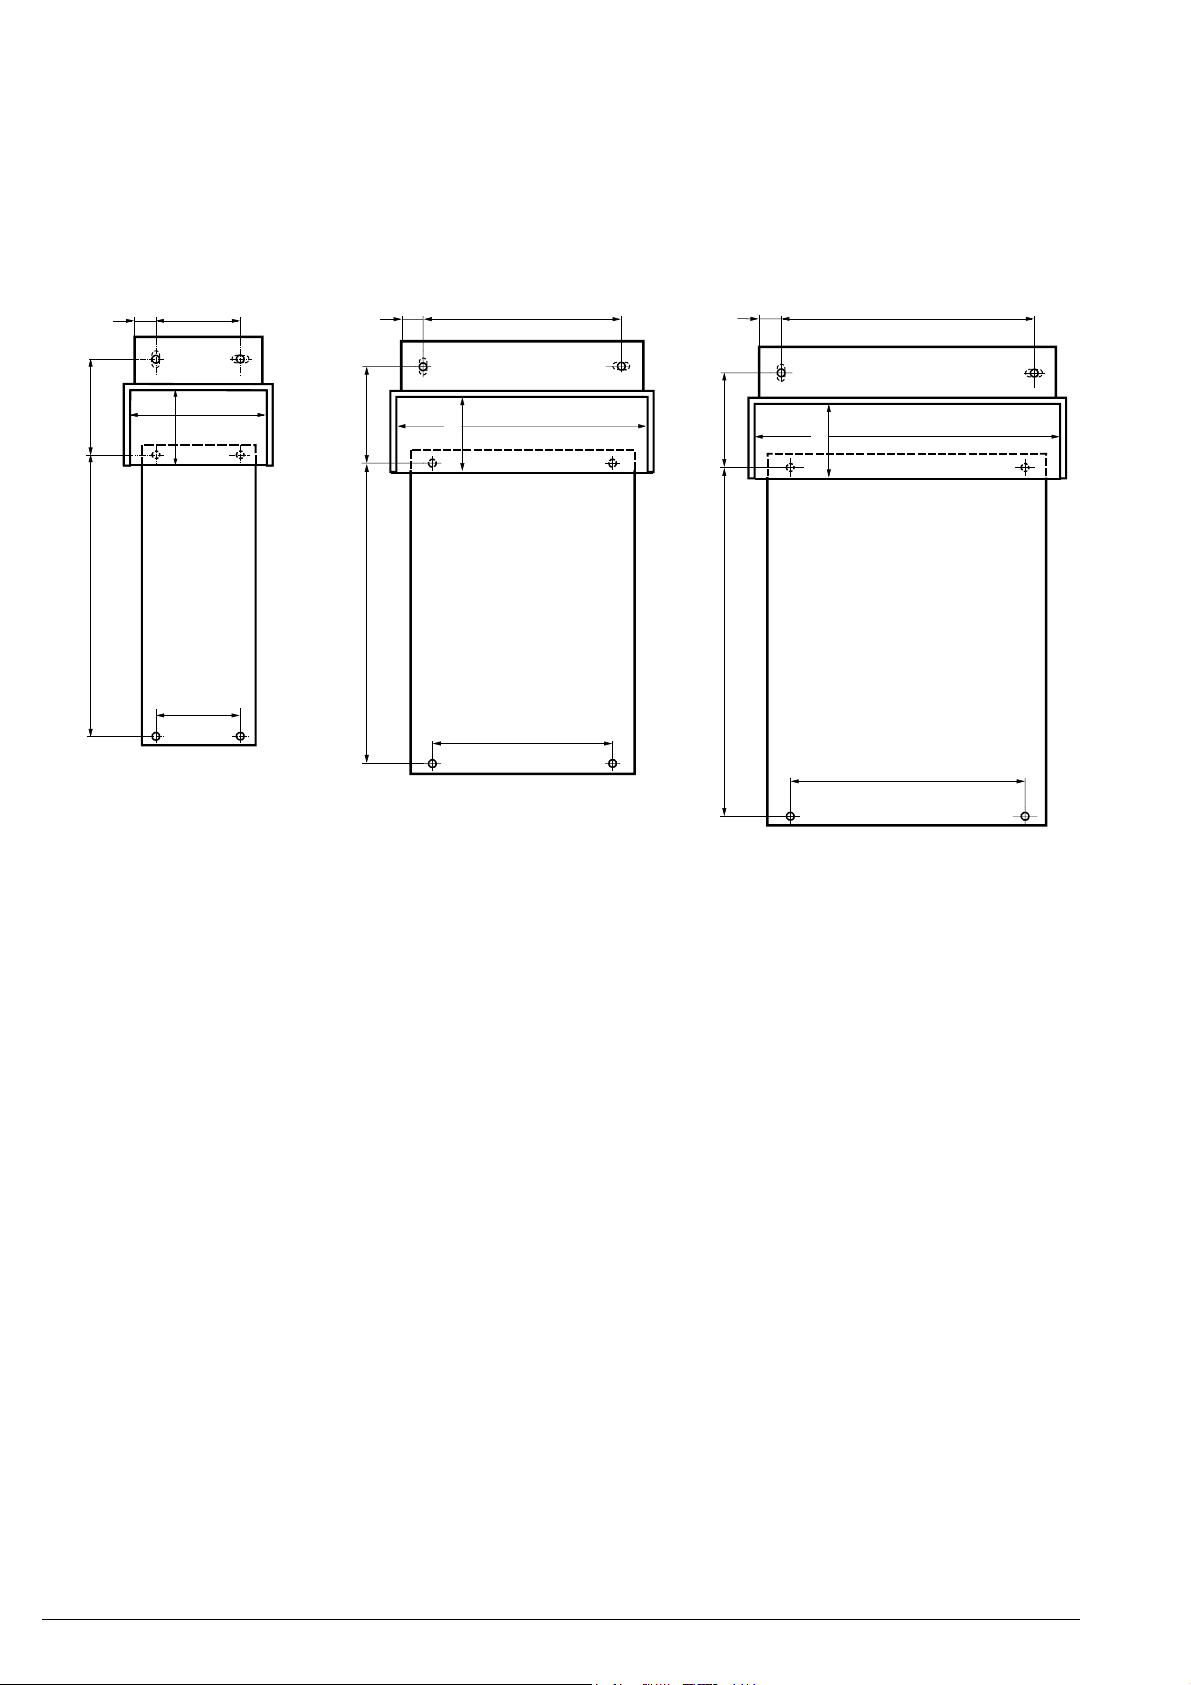
Bohrplan für SED2 IP20 Baugrössen A…C
Masse in mm
Baugrösse A Baugrösse B Baugrösse C
18
59
187
18
55
IP21
Abdeckung
91
52
SED 2
IP20 FSA
56
5194M01
SED2
IP20 FSB
18
85232
72
179
IP21
Abdeckung
215
SED2
IP20 FSC
156
5194M03
2/18 06.10.2009 CE1M5194xx Building Technologies/HVAC Products
en
English
Prerequisites
For a complete SED2 IP21 installation, the following items are required, depending on frame size:
Frame size SED2 AC 200…240 V
3 phases / IP20
A
B
C
SED2-0.37/22(B/X)…SED2-0.75/22(B/X) SED2-0.37/32(B/X)…SED2-1.5/32(B/X) SED2-GLA
SED2-1.1/22(B/X)…SED2-2.2/22(B/X) SED2-2.2/32(B/X)…SED2-4/32(B/X) SED2-GLB
SED2-3/22(B/X)…SED2-7.5/22(B/X) SED2-5.5/32(B/X)…SED2-15/32(B/X) SED2-GLC
SED2 AC 380…480 V
3 phases / IP20
Gland plate SED2-IP21
cover
SED2-IP21-A
SED2-IP21-B
SED2-IP21-C
Mounting notes
• To ensure correct mounting of the SED2 variable speed drive and the IP21 cover, read these instructions carefully
before starting the installation
• Use the SED2-IP21 cover only when mounting the SED2 on a wall, to increase the degree of protection of the
equipment from IP20 to IP21
• Mount the equipment in a clean, dry and lockable room
• Do not install the SED2 with IP21 cover in a space open to the public
• Mount the SED2, and especially the IP21 cover above it, on a flat wall
• Mount the SED2-IP21 cover strictly according to these instructions and the drilling plans shown for frame sizes A…C,
thus ensuring that the standards for degree of protection IP21 and protection against electric shock (EN 60529) will be
met and that the SED2 will safely operate
Mounting and mains connection
1. Mark the boreholes for the SED2 and the IP21 cover on a flat wall according to the drilling plans shown below.
2. Drill the holes according to the fixing screws listed below and fit the SED2 including the EMC footprint filter to the wall.
We recommend to use the following mounting material:
Frame size
A
B
C
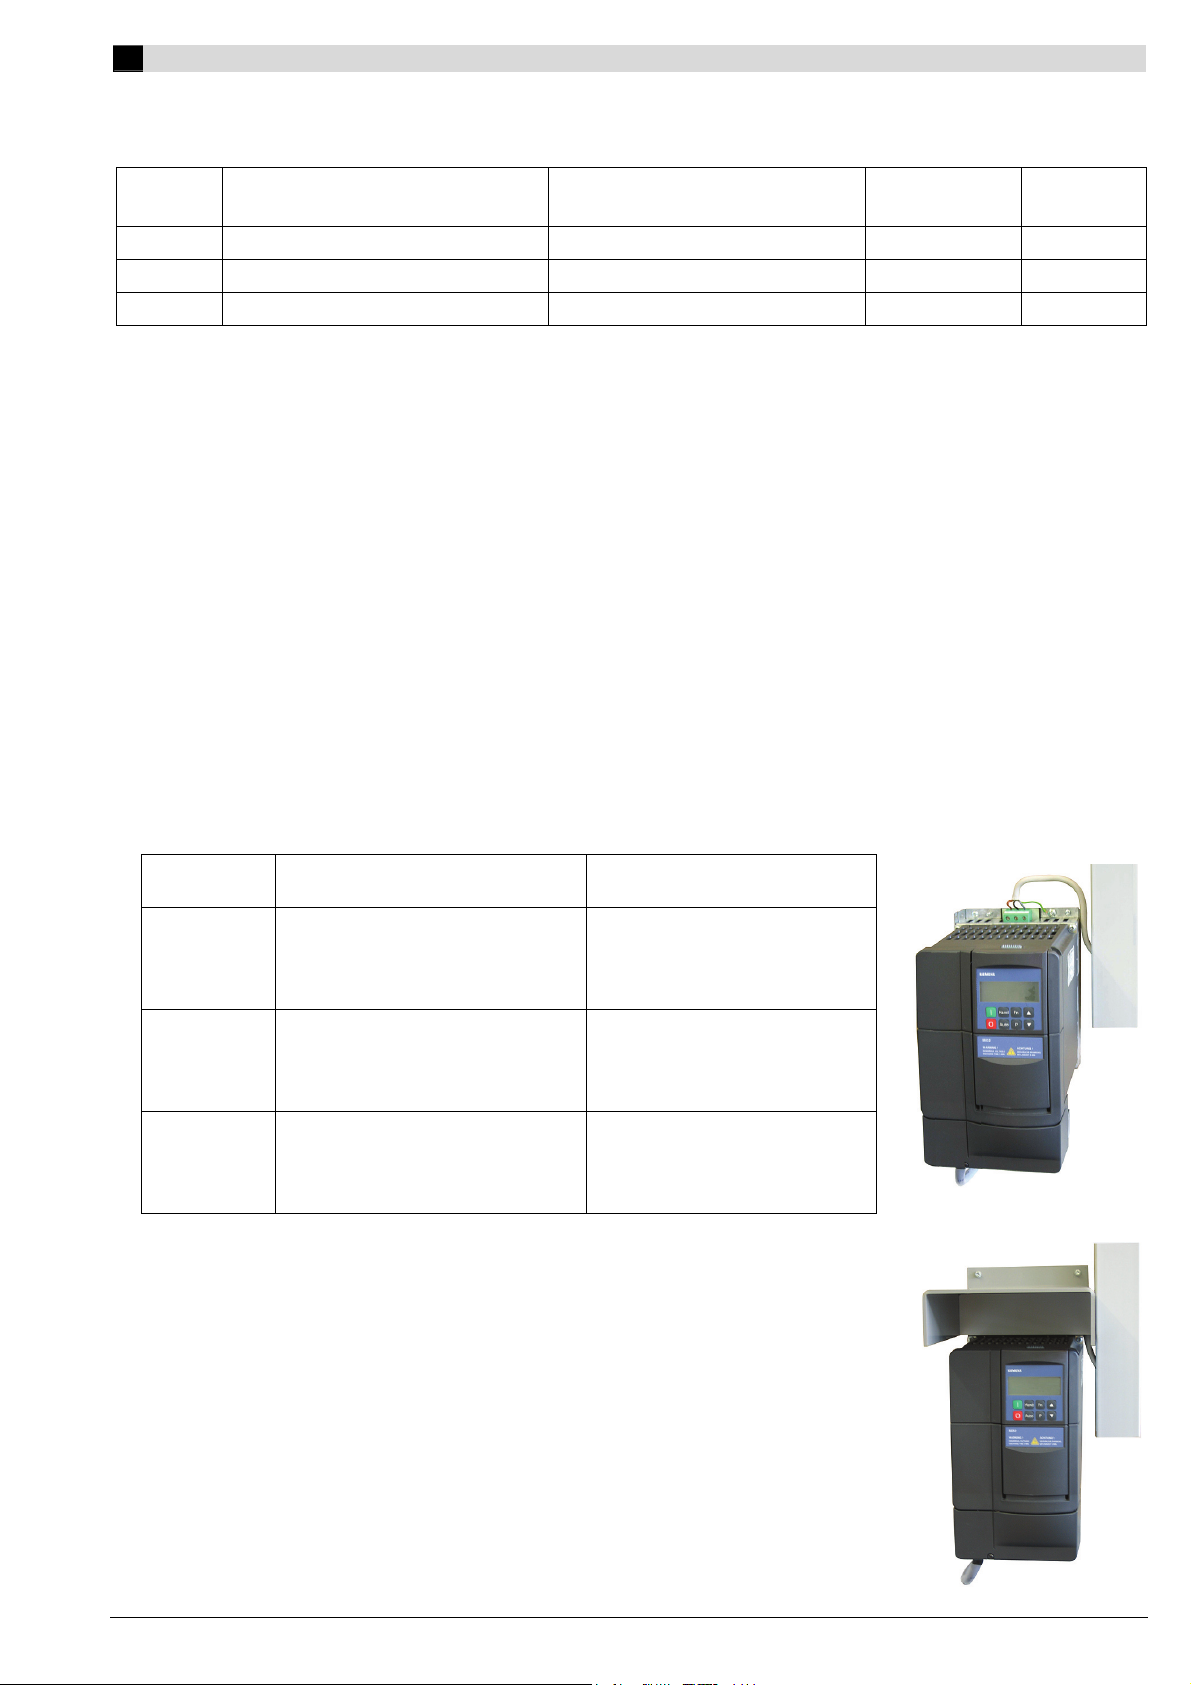
3. Connect the power supply cable to the SED2 or the EMC footprint filter underneath.
Strip the jacket of the power supply cable as close as possible to the connection
terminals of the SED2 (refer to the illustration at top right). After mounting the IP21
cover, it must under no circumstances be possible to touch the basic insulation. Tension
relief of the power supply cable must be provided on site.
Note: If possible, do not drill any additional holes in the IP21 cover. If there is a
Also observe the SED2 Commissioning Guide (CM1G5192en), chapter 4
4. Fit the IP21 cover
Note: If a flat wall is not available for fitting the IP21 cover, use a sealing band
SED2 complete with EMC
footprint filter / IP21 cover
SED2
SED2-IP21-A
SED2
SED2-IP21-B
SED2
SED2-IP21-C
need to introduce the power supply cable through the IP21 cover, use a
cable entry gland with rubber seal, ensuring degree of protection IP21 as a
minimum requirement.
EMC-compatible installation of SED2 and, especially subsection 4.4.1
Potential equalization and earthing.
between the wall and the cover to ensure that condensation, if any, cannot
penetrate the SED2.
Mounting material
4 wood screws 4 mm dia.
4 washers M4
2 wood screws 4 mm dia.
2 washers M4
4 wood screws 4 mm dia.
4 washers M4
2 wood screws 4 mm dia.
2 washers M4
4 wood screws 5 mm dia.
4 washers M5
2 wood screws 5 mm dia.
2 washers M5
Building Technologies/HVAC Products CE1M5194xx 06.10.2009 3/18
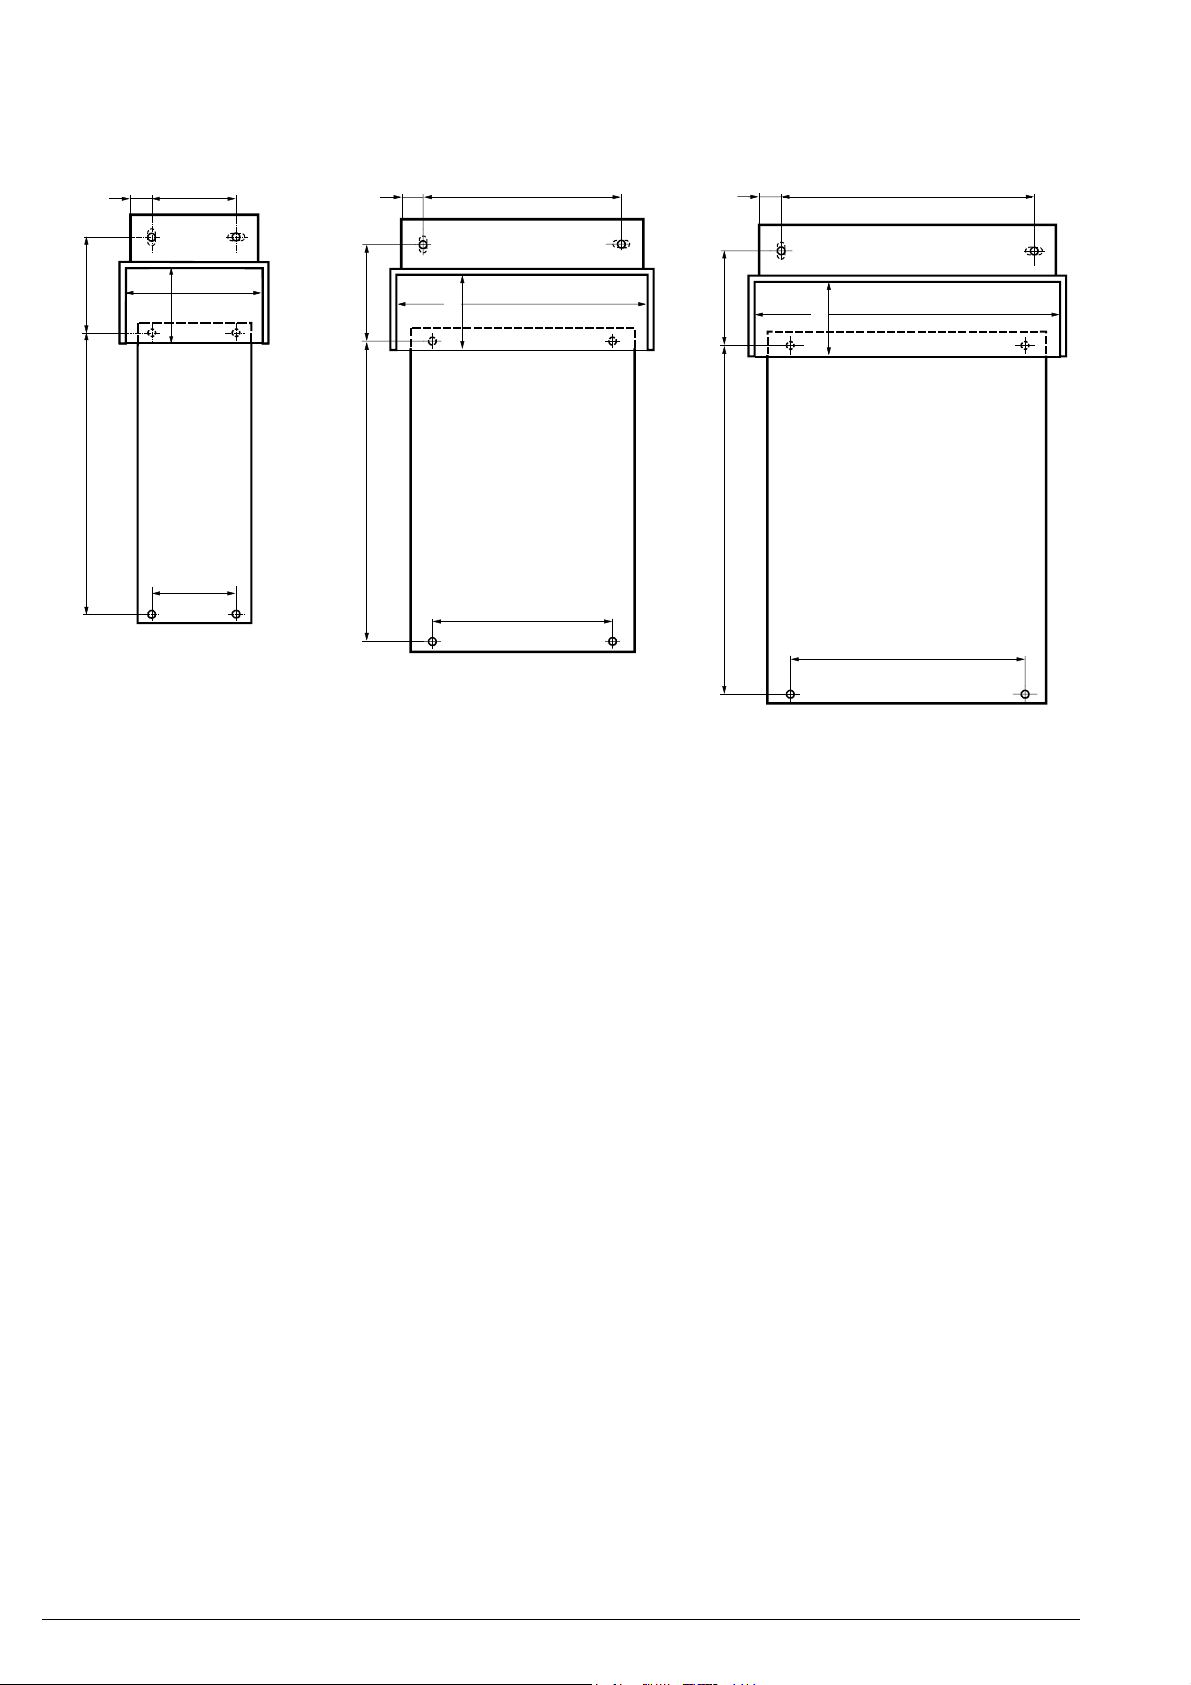
Drilling plan for SED2 IP20 frame sizes A…C
Dimensions in mm
Frame size A Frame size B Frame size C
59
187
18
55
IP21
Cover
91
52
SED 2
IP20 FSA
56
18
65200
5194M01
52
131
IP21
Cover
167
SED2
IP20 FSB
120
M5194M02
18
85232
72
179
IP21
Cover
215
SED2
IP20 FSC
156
5194M03
4/18 06.10.2009 CE1M5194xx Building Technologies/HVAC Products
fr
Français
Conditions
Une installation SED2 IP21 complète nécessite, en fonction de la grandeur, les composants suivants:
Grandeur SED2 AC 200…240 V
3 phases / IP20
A
B
C
SED2-0.37/22(B/X)…SED2-0.75/22(B/X) SED2-0.37/32(B/X)…SED2-1.5/32(B/X) SED2-GLA
SED2-1.1/22(B/X)…SED2-2.2/22(B/X) SED2-2.2/32(B/X)…SED2-4/32(B/X) SED2-GLB
SED2-3/22(B/X)…SED2-7.5/22(B/X) SED2-5.5/32(B/X)…SED2-15/32(B/X) SED2-GLC
SED2 AC 380…480 V
3 phases / IP20
Plaque de
raccordement
de l'écran
SED2-IP21
Couvercle
SED2-IP21-A
SED2-IP21-B
SED2-IP21-C
Instructions de montage
• Pour assurer un montage dans les règles de l'art du variateur de fréquences SED2 avec le couvercle IP21, il est
primordial que vous lisiez cette instruction avant de commencer l'installation
• Le couvercle SED2-IP21 n'est utilisé exclusivement pour un montage mural du SED2 pour l'augmentation de la classe
de protection de IP20 à IP21
• L'installation n'est seulement admise dans un local propre, sec et fermé
• Un SED2 avec couvercle IP21 ne doit en aucun cas être installé dans des endroits accessible au public
• Le SED2 et surtout le couvercle IP21 doivent être montés sur une surface plane
• Le montage du couvercle SED2-IP21 doit se faire rigoureusement selon les prescriptions de cette instruction et les
schémas de perçage pour les grandeurs A…C qui y figurent, afin de respecter les normes de la classe de protection
IP21 et la protection contre le contact (EN 60529) et de garantir un fonctionnement sûr du variateur de fréquence
Montage et raccordement au courant électrique
1. Marquer les trous de perçage pour le variateur de fréquence et le couvercle IP21 selon les schémas de perçage cidessous sur une surface murale plane.
2. Percer les trous correspondants aux vis de fixation prévues indiquées dans la tabelle suivante et visser le variateur de
fréquence avec le filtre en saillie CEM contre la paroi
Nous recommandons le matériel de montage suivant:
Grandeur
A
B
C
3. Ensuite raccorder le câble d'alimentation de courant au variateur de fréquence, resp.
le filtre en saillie CEM. Le manteau du câble d'alimentation doit être dénudé le plus
près possible des bornes de raccordement du SED2 (voir illustration en haut à
droite). Il ne doit en aucun cas être possible d'entrer en contact avec l'isolation
simple après le montage du couvercle IP21. Le collier du câble d'alimentation doit
être fixé par l'installateur.
Remarque: Evitez de percer des trous supplémentaires dans le couvercle IP21. Si
SED2 avec filtre en saillie CEM /
couvercle IP21
SED2
SED2-IP21-A
SED2
SED2-IP21-B
SED2
SED2-IP21-C
un passage pour le câble d'alimentation à travers le couvercle IP21 est
inévitable, il faut utiliser un passe-câble à vis avec joint en caoutchouc
qui correspond au moins à la classe de protection IP21.
Consultez également le manuel d'installation et de mise en service
SED2 (CM1G5192fr), chap. 4 Installation assurant la compatibilité CEM
et en particulier le chapitre 4.5.1 Egalisation du potentiel et mise à terre
Matériel de montage
4 vis à bois ∅ 4 mm
4 rondelles M4
2 vis à bois ∅ 4 mm
2 rondelles M4
4 vis à bois ∅ 4 mm
4 rondelles M4
2 vis à bois ∅ 4 mm
2 rondelles M4
4 vis à bois ∅ 5 mm
4 rondelles M5
2 vis à bois ∅ 5 mm
2 rondelles M5
Building Technologies/HVAC Products CE1M5194xx 06.10.2009 5/18
4. Montage du couvercle IP21
Remarque: Si un montage sur une surface murale inégale ne peut pas être évité, il faut utiliser un ruban d'étanchéité
entre la paroi et le couvercle IP21 afin d'empêcher qu'une condensation éventuelle ne puisse couler dans
le variateur de fréquence.
Schéma de perçage pour SED2 IP20 grandeurs A…C
Encombrements en mm
Grandeur A Grandeur B Grandeur C
59
187
18
55
Couvercle
IP21
91
52
SED 2
IP20 FSA
56
18
65200
5194M01
Couvercle
52
131
IP21
167
SED2
IP20 FSB
120
M5194M02
18
85232
72
179
Couvercle
IP21
215
SED2
IP20 FSC
156
5194M03
6/18 06.10.2009 CE1M5194xx Building Technologies/HVAC Products
 Loading...