

Page 1
s
Be inspired
Page 2

Contents
Contents
Safety precautions . . . . . . . . . . . . . . . . . . . . . . . . . . . 4
The Gigaset Router . . . . . . . . . . . . . . . . . . . . . . . . . . . 5
Features and Application . . . . . . . . . . . . . . . . . . . . . . . . . . . . . . . . . . . . . . . . . . . . . . . . 6
Procedure for installation and configuration . . . . . . . . . . . . . . . . . . . . . . . . . . . . . . . . 8
First Steps . . . . . . . . . . . . . . . . . . . . . . . . . . . . . . . . . . 9
System Requirements . . . . . . . . . . . . . . . . . . . . . . . . . . . . . . . . . . . . . . . . . . . . . . . . . . 9
Package Contents . . . . . . . . . . . . . . . . . . . . . . . . . . . . . . . . . . . . . . . . . . . . . . . . . . . . . 9
Operating displays and connections . . . . . . . . . . . . . . . . . . . . . . . . . . . . . . . . . . . . . . 10
Front panel . . . . . . . . . . . . . . . . . . . . . . . . . . . . . . . . . . . . . . . . . . . . . . . . . . . . . . 10
Back panel . . . . . . . . . . . . . . . . . . . . . . . . . . . . . . . . . . . . . . . . . . . . . . . . . . . . . . . 11
Setting up the Gigaset Router . . . . . . . . . . . . . . . . . . . . . . . . . . . . . . . . . . . . . . . . . . . 12
Connecting the Gigaset Router . . . . . . . . . . . . . . . . . . . . . . . . . . . . . . . . . . . . . . . . . . 13
Connecting a DSL or cable modem to the router . . . . . . . . . . . . . . . . . . . . . . . . . 13
Creating a LAN connection . . . . . . . . . . . . . . . . . . . . . . . . . . . . . . . . . . . . . . . . . . 14
Activation . . . . . . . . . . . . . . . . . . . . . . . . . . . . . . . . . . . . . . . . . . . . . . . . . . . . . . . . 16
Configuring the local network . . . . . . . . . . . . . . . 17
Network configuration for Windows 98, 98 SE, ME . . . . . . . . . . . . . . . . . . . . . . . . . . 18
Setting up a PC as Client for Microsoft Networks . . . . . . . . . . . . . . . . . . . . . . . . . 18
Selecting computer names and workgroup . . . . . . . . . . . . . . . . . . . . . . . . . . . . . 19
Installing the TCP/IP protocol. . . . . . . . . . . . . . . . . . . . . . . . . . . . . . . . . . . . . . . . . 20
TCP/IP protocol settings . . . . . . . . . . . . . . . . . . . . . . . . . . . . . . . . . . . . . . . . . . . . . 21
Deactivating the http proxy . . . . . . . . . . . . . . . . . . . . . . . . . . . . . . . . . . . . . . . . . . 25
Synchronising the TCP/IP settings with the Gigaset Router . . . . . . . . . . . . . . . . . 26
Network configuration with Windows XP . . . . . . . . . . . . . . . . . . . . . . . . . . . . . . . . . . 27
Configuring the network . . . . . . . . . . . . . . . . . . . . . . . . . . . . . . . . . . . . . . . . . . . . 27
Selecting computer names and workgroup . . . . . . . . . . . . . . . . . . . . . . . . . . . . . 29
Checking the network settings and completing the installation procedure . . . . . 29
TCP/IP protocol settings . . . . . . . . . . . . . . . . . . . . . . . . . . . . . . . . . . . . . . . . . . . . . 30
Deactivating the http proxy . . . . . . . . . . . . . . . . . . . . . . . . . . . . . . . . . . . . . . . . . . 33
Synchronising the TCP/IP settings with the Gigaset Router . . . . . . . . . . . . . . . . . 34
Network configuration with Windows 2000 . . . . . . . . . . . . . . . . . . . . . . . . . . . . . . . . 35
Installing network services . . . . . . . . . . . . . . . . . . . . . . . . . . . . . . . . . . . . . . . . . . 35
Selecting computer names and workgroup . . . . . . . . . . . . . . . . . . . . . . . . . . . . . 36
Installing the TCP/IP protocol. . . . . . . . . . . . . . . . . . . . . . . . . . . . . . . . . . . . . . . . . 37
TCP/IP protocol settings . . . . . . . . . . . . . . . . . . . . . . . . . . . . . . . . . . . . . . . . . . . . . 39
Deactivating the http proxy . . . . . . . . . . . . . . . . . . . . . . . . . . . . . . . . . . . . . . . . . . 41
Synchronising the TCP/IP settings with the Gigaset Router . . . . . . . . . . . . . . . . . 42
Checking the connection to the Gigaset Router . . . . . . . . . . . . . . . . . . . . . . . . . . . . . 43
1
Page 3

Contents
Gigaset Router User Interface . . . . . . . . . . . . . . . . 44
Launching the User Interface . . . . . . . . . . . . . . . . . . . . . . . . . . . . . . . . . . . . . . . . . . . . 44
Language Selection . . . . . . . . . . . . . . . . . . . . . . . . . . . . . . . . . . . . . . . . . . . . . . . . . . . 46
UI elements . . . . . . . . . . . . . . . . . . . . . . . . . . . . . . . . . . . . . . . . . . . . . . . . . . . . . . . . . 47
General configuration with Basic Setup . . . . . . . . 49
Select Country . . . . . . . . . . . . . . . . . . . . . . . . . . . . . . . . . . . . . . . . . . . . . . . . . . . . . . . 49
Wireless Settings . . . . . . . . . . . . . . . . . . . . . . . . . . . . . . . . . . . . . . . . . . . . . . . . . . . . . 50
Configuring the WAN connection . . . . . . . . . . . . . . . . . . . . . . . . . . . . . . . . . . . . . . . . 51
T-online . . . . . . . . . . . . . . . . . . . . . . . . . . . . . . . . . . . . . . . . . . . . . . . . . . . . . . . . . . 51
Other Internet Service Provider . . . . . . . . . . . . . . . . . . . . . . . . . . . . . . . . . . . . . . . 53
Configuration with Advanced Setup . . . . . . . . . . . 59
System Configuration . . . . . . . . . . . . . . . . . . . . . . . . . . . . . . . . . . . . . . . . . . . . . . . . . 60
Setting the Country . . . . . . . . . . . . . . . . . . . . . . . . . . . . . . . . . . . . . . . . . . . . . . . . 60
Setting the Time Zone . . . . . . . . . . . . . . . . . . . . . . . . . . . . . . . . . . . . . . . . . . . . . . 60
Assigning passwords . . . . . . . . . . . . . . . . . . . . . . . . . . . . . . . . . . . . . . . . . . . . . . . 62
Remote Management . . . . . . . . . . . . . . . . . . . . . . . . . . . . . . . . . . . . . . . . . . . . . . . 63
WAN Configuration . . . . . . . . . . . . . . . . . . . . . . . . . . . . . . . . . . . . . . . . . . . . . . . . . . . 64
Defining a DNS Server . . . . . . . . . . . . . . . . . . . . . . . . . . . . . . . . . . . . . . . . . . . . . . 66
Configuring as a bridge . . . . . . . . . . . . . . . . . . . . . . . . . . . . . . . . . . . . . . . . . . . . . 67
LAN Configuration . . . . . . . . . . . . . . . . . . . . . . . . . . . . . . . . . . . . . . . . . . . . . . . . . . . . 68
Configuring Wireless Connections . . . . . . . . . . . . . . . . . . . . . . . . . . . . . . . . . . . . . . . . 70
Activating the wireless module . . . . . . . . . . . . . . . . . . . . . . . . . . . . . . . . . . . . . . . 70
Setting the Channel and SSID . . . . . . . . . . . . . . . . . . . . . . . . . . . . . . . . . . . . . . . . 70
Setting the Encryption . . . . . . . . . . . . . . . . . . . . . . . . . . . . . . . . . . . . . . . . . . . . . . 72
NAT Configuration . . . . . . . . . . . . . . . . . . . . . . . . . . . . . . . . . . . . . . . . . . . . . . . . . . . . 73
Defining Address mapping . . . . . . . . . . . . . . . . . . . . . . . . . . . . . . . . . . . . . . . . . . . 74
Setting up the router as a virtual server . . . . . . . . . . . . . . . . . . . . . . . . . . . . . . . . 75
Configuring Special Applications . . . . . . . . . . . . . . . . . . . . . . . . . . . . . . . . . . . . . . 76
Firewall Configuration . . . . . . . . . . . . . . . . . . . . . . . . . . . . . . . . . . . . . . . . . . . . . . . . . 77
Activating the firewall . . . . . . . . . . . . . . . . . . . . . . . . . . . . . . . . . . . . . . . . . . . . . . 77
Protection against hacker attacks . . . . . . . . . . . . . . . . . . . . . . . . . . . . . . . . . . . . . 78
Enabling only selected PCs to access your local network . . . . . . . . . . . . . . . . . . . 80
Restricting access of local PCs to the Internet . . . . . . . . . . . . . . . . . . . . . . . . . . . . 81
Opening the firewall for particular PCs (DMZ) . . . . . . . . . . . . . . . . . . . . . . . . . . . . 82
Activating dynamic DNS . . . . . . . . . . . . . . . . . . . . . . . . . . . . . . . . . . . . . . . . . . . . . . . . 83
Using the universal plug and play function . . . . . . . . . . . . . . . . . . . . . . . . . . . . . . . . . 85
Gigaset Router Administration . . . . . . . . . . . . . . . 86
Opening or closing an Internet connection manually . . . . . . . . . . . . . . . . . . . . . . . . . 86
Saving and restoring a configuration . . . . . . . . . . . . . . . . . . . . . . . . . . . . . . . . . . . . . 87
Firmware Upgrade . . . . . . . . . . . . . . . . . . . . . . . . . . . . . . . . . . . . . . . . . . . . . . . . . . . . 88
Resetting the router . . . . . . . . . . . . . . . . . . . . . . . . . . . . . . . . . . . . . . . . . . . . . . . . . . . 89
Displaying the router's Status . . . . . . . . . . . . . . . . . . . . . . . . . . . . . . . . . . . . . . . . . . . 90
Router information . . . . . . . . . . . . . . . . . . . . . . . . . . . . . . . . . . . . . . . . . . . . . . . . . 90
Working with the security log . . . . . . . . . . . . . . . . . . . . . . . . . . . . . . . . . . . . . . . . 91
2
Page 4

Contents
Appendix . . . . . . . . . . . . . . . . . . . . . . . . . . . . . . . . . 92
Fault tracing . . . . . . . . . . . . . . . . . . . . . . . . . . . . . . . . . . . . . . . . . . . . . . . . . . . . . . . . . 92
Specifications . . . . . . . . . . . . . . . . . . . . . . . . . . . . . . . . . . . . . . . . . . . . . . . . . . . . . . . 95
Service (Customer Care) . . . . . . . . . . . . . . . . . . . . . . . . . . . . . . . . . . . . . . . . . . . . . . . 97
Guarantee certificate (United Kingdom) . . . . . . . . . . . . . . . . . . . . . . . . . . . . . . . . . . . 97
Guarantee certificate (Ireland) . . . . . . . . . . . . . . . . . . . . . . . . . . . . . . . . . . . . . . . . . . 98
Glossary . . . . . . . . . . . . . . . . . . . . . . . . . . . . . . . . . 100
Index . . . . . . . . . . . . . . . . . . . . . . . . . . . . . . . . . . . 109
3
Page 5

Safety precautions
Safety precautions
◆ Only use the power supply unit provided with the Gigaset Router
(9V-1A). Note the connection values and ratings when connecting the device to the
mains.
◆ Protect the router from dampness.
◆ Never open the device. For electrical safety reasons it may only be opened by
authorised service technicians.
◆ The device may affect the operation of medical equipment. Take account of the
technical conditions in the relevant environment.
◆ Be sure to include the operating instructions if you pass your Gigaset Router on to
someone else.
◆ Dispose of the Gigaset Router in an environmentally safe manner.
Tra demar ks
Microsoft, Windows 98, Windows ME, Windows 2000, Windows XP and Internet
Explorer are registered trademarks of the Microsoft Corporation.
Netscape, Netscape Navigator and Netscape Communicator are registered trademarks
of the Netscape Communications Corporation.
4
Page 6
The Gigaset Router
The Gigaset Router
The Siemens Gigaset Router (Gigaset SE105 dsl/cable) a powerful but simple
communications device for connecting your PC or local network (LAN) to the Internet
(WAN). If you want to surf the Internet at the lowest possible cost, the Gigaset Router is
a comfortable and effective solution.
The Gigaset Router permits Internet access for several users. A single user account can
be shared, if your Internet Service Provider permits this. You can connect either a DSL or
cable modem to your Gigaset Router's WAN socket.
The Gigaset Router is programmed with numerous functions and is simple to handle. It
can be configured and operational within a few minutes.
5
Page 7

The Gigaset Router
Features and Application
The Gigaset Router's wide range of features makes it ideal for a large number of
applications, such as:
◆ setting up a local network
The Gigaset Router can accommodate
– four devices via Ethernet ports with a transmission speed of 10 or 100 Mbps.
– for up to 253 mobile end devices via a wireless interface with a transmission
speed of 11 Mbps. Here it complies with Standard IEEE 802.11b– i.e. the router
can be used together with products of several other manufacturers.
Using a Gigaset Router makes it easy to set up a network at home or small offices.
For example, users can exchange data or share resources on the network, such as a
file server or printer.
With the Gigaset devices for wireless networks you can operate a local network–as
envisaged in Standard IEEE 802.11 –in Ad-hoc mode and in Infrastructure mode.
The Gigaset Router supports DHCP for dynamic IP configuration of the local network
and DNS for Domain name mapping.
◆ Internet access
TheGigaset Router permits Internet access via a WAN socket with a transmission
speed of 10 or 100 Mbps. You can connect a DSL or cable modem to this socket.
– Since many DSL providers permit communication with end users via the PPPoE
protocol, the Gigaset Router has an integrated Client for this protocol, that means
you no longer have to install this service on your computer.
– Shared IP address
If your Internet Service Provider permits this, the Gigaset Router can use a single
IP address jointly for up to 253 users. Several users on your network can then surf
the Internet at the same time using only one Internet Service Provider account.
◆ Virtual Private Network (VPN)
The Gigaset Router supports three of the most common Protocols for setting up a
Virtual Private Network: PPTP, L2TP and IPSec. This allows you to connect devices at
different locations via the Internet securely, if your Internet Service Provider offers
this service.
6
Page 8

The Gigaset Router
◆ Protection against unauthorised access from the Internet
The Gigaset Router offers comprehensive security measures such as:
– Firewall with prevention of hacker attacks (e. g. SPI, DoS attacks)
Emails will be sent to notify you about any attacks on your network.
– NAT firewall
If Network Address Translation (NAT) has been activated, all the PCs on the local
network connect to the Internet using the router's Public IP address and as such
are not visible on the Internet themselves. The router permits access from the
Internet only if it has been requested from the local network.
– If you want to offer your own services on the Internet, you can configure the
router as a virtual server without permitting further access to the local network.
–DMZ
This allows you to release a PC on your local network for unrestricted access from
the Internet without undermining the security of the other PCs.
◆ Protection for the users of the local network, e. g. parental control
You can configure the Gigaset Router so that Internet access is blocked or limited for
various users. You can set time-based rules or specify that certain services or
Internet pages cannot be requested.
Important Information:
i
On the supplied CD you will find the file "Practical Tips and Configuration
Examples" describing many of the uses of the Gigaset Routerin full detail.
7
Page 9

The Gigaset Router
Procedure for installation and configuration
1. First install an Ethernet network card or a wireless Network adapter such as the
Gigaset USB Adapter 11 or Gigaset PC Card 11 in the PCs you want to connect with
the Gigaset Router. The installation procedure can be found in the product's User
Guide.
When installing wireless network adapters you should note the
i
2. Then install the router (see page 13).
3. Before the PCs can communicate with the router and with each other in a local
network, you have to change their network settings. Configure these network
settings on one PC first so that it can establish a connection to the router. You can
then use that PC to configure the router (see page 17).
4. In a wireless connection you establish the link from the PC's wireless network
adapter to the router. This is described in the network adapter's operating
instructions.
5. Configure the router so that the router's WAN socket can be used (see page 44).
This will require the access data from your Internet Service Provider.
6. If you want to connect more PCs to the router, configure their network settings and
set up the local network (see page 17).
7. If you want to use the router's other functions, , e. g. the comprehensive security
functions, use the router's Advanced Setup (see page 59).
following:
The factory-set SSID of the Gigaset SE105 dsl/cable is
ConnectionPoint.
8
Page 10

First Steps
First Steps
System Requirements
To operate your Gigaset Router you will need
◆ a PC with
–a Ethernet network card
or
– a Gigaset USB Adapter 11, a Gigaset PC Card 11 or an 802.11b compatible
wireless Network adapter.
◆ a Web browser, such as Microsoft Internet Explorer 5.5 or higher, Netscape
Communicator 6.0 or higher for configuring your router.
◆ for Internet access: a DSL or cable modem and the access data of your Internet
Service Provider.
Package Contents
The package contains the following items:
◆ the Gigaset Router
◆ a power supply unit
◆ an Ethernet cable (CAT-5)
◆ the Installation CD including these operating instructions
◆ a quick guide
9
Page 11
First Steps
Operating displays and connections
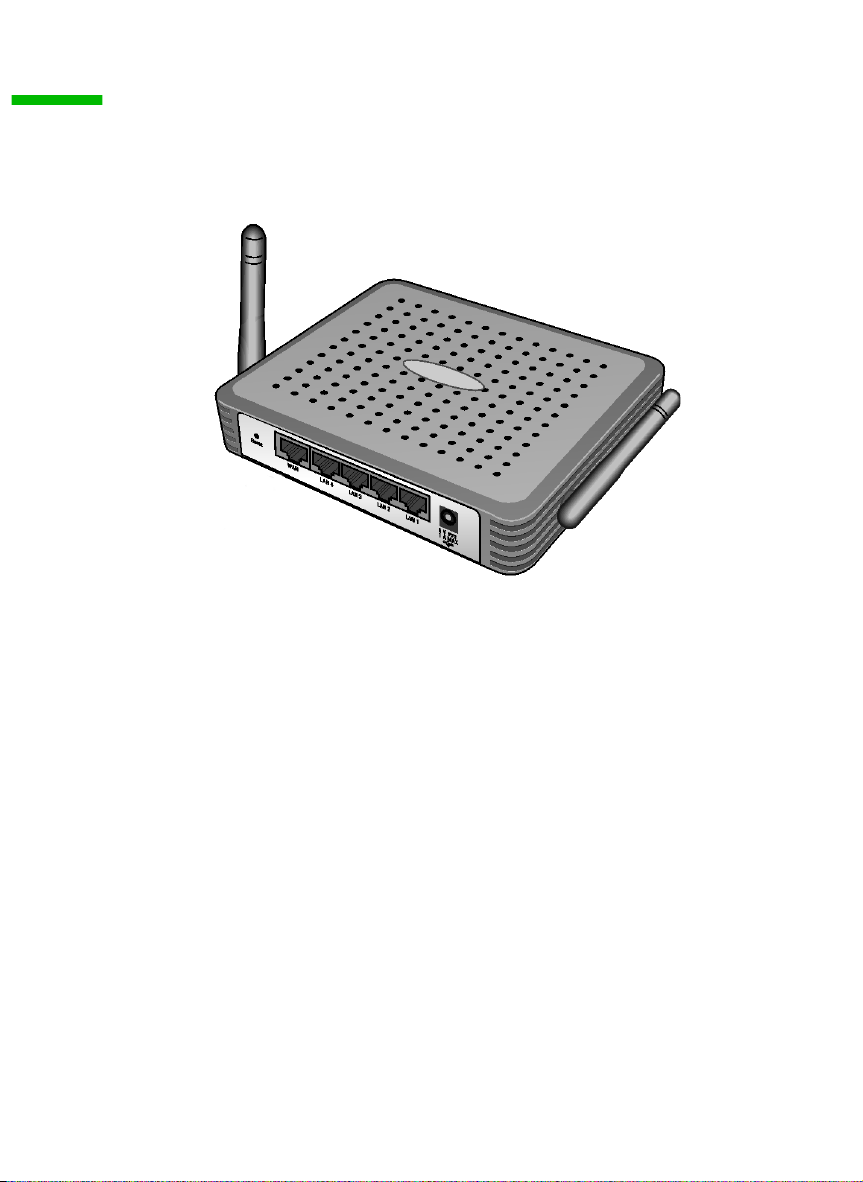
Front panel
LED displays
The front panel of the Gigaset Router contains LED displays that show the operating
state and simplify installation and fault finding in the network.
The LEDs show the following:
LED State Status
PWR On The Gigaset Router has been switched on.
WLAN On The Gigaset Router is ready to open wireless connections.
WAN On The WAN connection has established a valid network
connection.
Flashing The WAN connection is sending or receiving data (traffic).
Link/ACT On The LAN connection has established a valid network
connection.
Flashing The LAN connection is sending or receiving data (traffic).
Speed On The LAN connection is running at 100 Mbps.
Off The LAN connection is running at 10 Mbps.
10
Page 12

First Steps
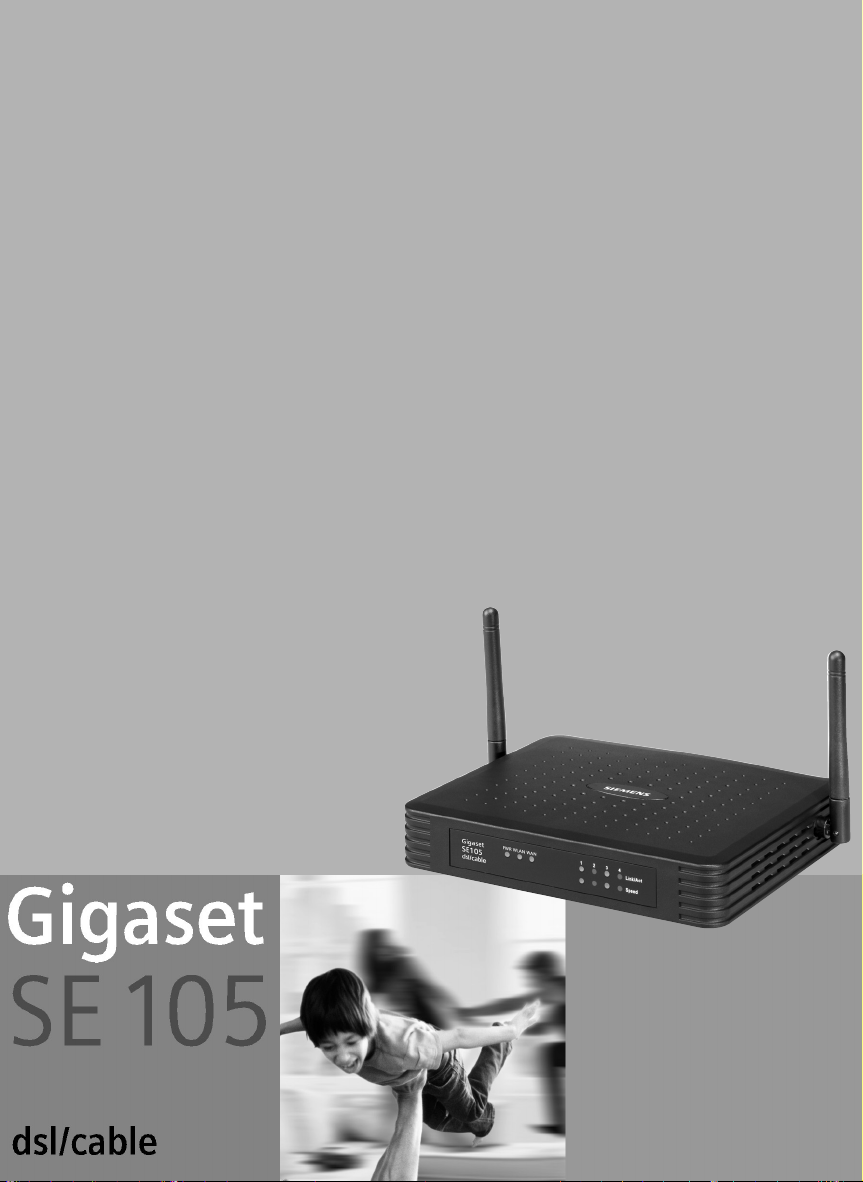
Back panel
The back panel of the Gigaset Router houses the various sockets.
Element Description
DC IN 9V-1A
MAX
Reset Reset function. Use this button to
WAN WAN socket (RJ-45) for a DSL or cable modem.
LAN1-LAN4 Four 10/100 Mbps switch sockets with automatic recognition (RJ-45).
Socket for the supplied power unit.
Warning: Using the wrong power supply unit may damage the router.
◆ boot the router.
Hold the button down for one second.
◆ reset all the settings to the factory defaults.
Hold the button down for five seconds.
Warning: This will clear all the configuration settings you have
made.
Updated firmware will not be affected.
You can connect up to four Ethernet devices (such as PCs, a Hub or
Switch).
11
Page 13

First Steps
Setting up the Gigaset Router
The Gigaset Router can be set up in any suitable location in the home or office. You do
not need any special wiring. However you should comply with the following guidelines:
◆ Operate the Gigaset Router only indoors within a temperature range of +5 to +40 °C.
Do not position the Gigaset Router near a heat source. Do not cover the ventilation
slots.
◆ A mains socket for 220/230V~ and a connection socket for the DSL modem, cable
modem or LAN must be available where you set up the Gigaset Router.
◆ Do not place the router in the immediate vicinity of stereo equipment, TV sets or
microwave ovens. Otherwise this may cause interference.
◆ Position the Gigaset Router so that it is in the centre of your wireless network. In
general: The higher you place the antenna, the better the performance. Make sure
that where you position the Gigaset Router has optimum reception in the whole
house or office.
◆ Position the Gigaset Router on a non-slip surface.
The router feet do not normally leave any traces on the surface they are on.
However, some furniture surfaces may contain substances that attack and soften
the router's plastic feet. Then the feet may well mark the furniture surface.
◆ Position the Gigaset Router so that it cannot fall down and damage the antenna.
◆ Lay the cables so that nobody can trip over them. You should not cover the cables
with anything.
◆ Protect the Gigaset Router from dampness.
12
Page 14
First Steps
Connecting the Gigaset Router
◆ Only use the (9V 1A) power supply unit supplied with the router.
◆ Do not plug any phone jack connectors into the router WAN and LAN
!
Before you start connecting PCs to your Gigaset Router make sure that
◆ a wired or wireless Network adapter is connected to the PC. Please read the
operating instructions that came with the adapter.
◆ ConnectionPoint has been entered as SSID on the network adapter.
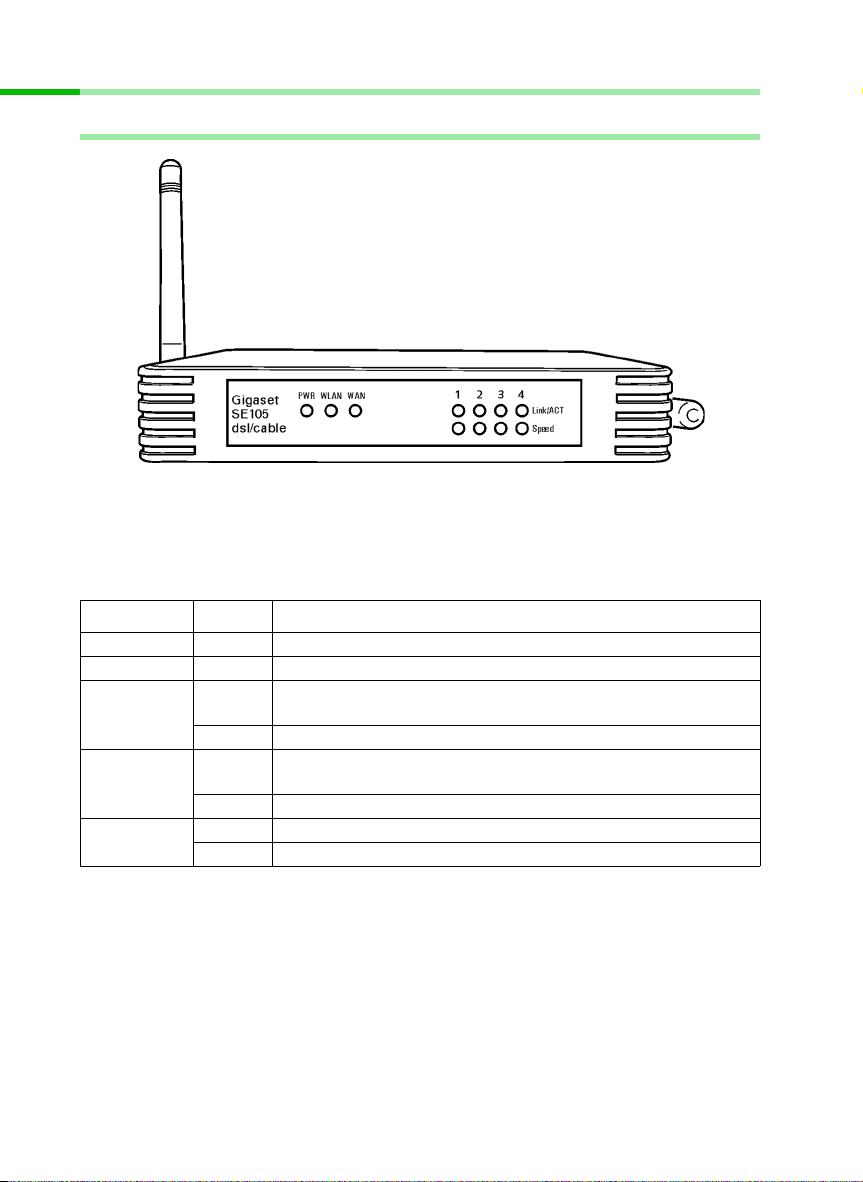
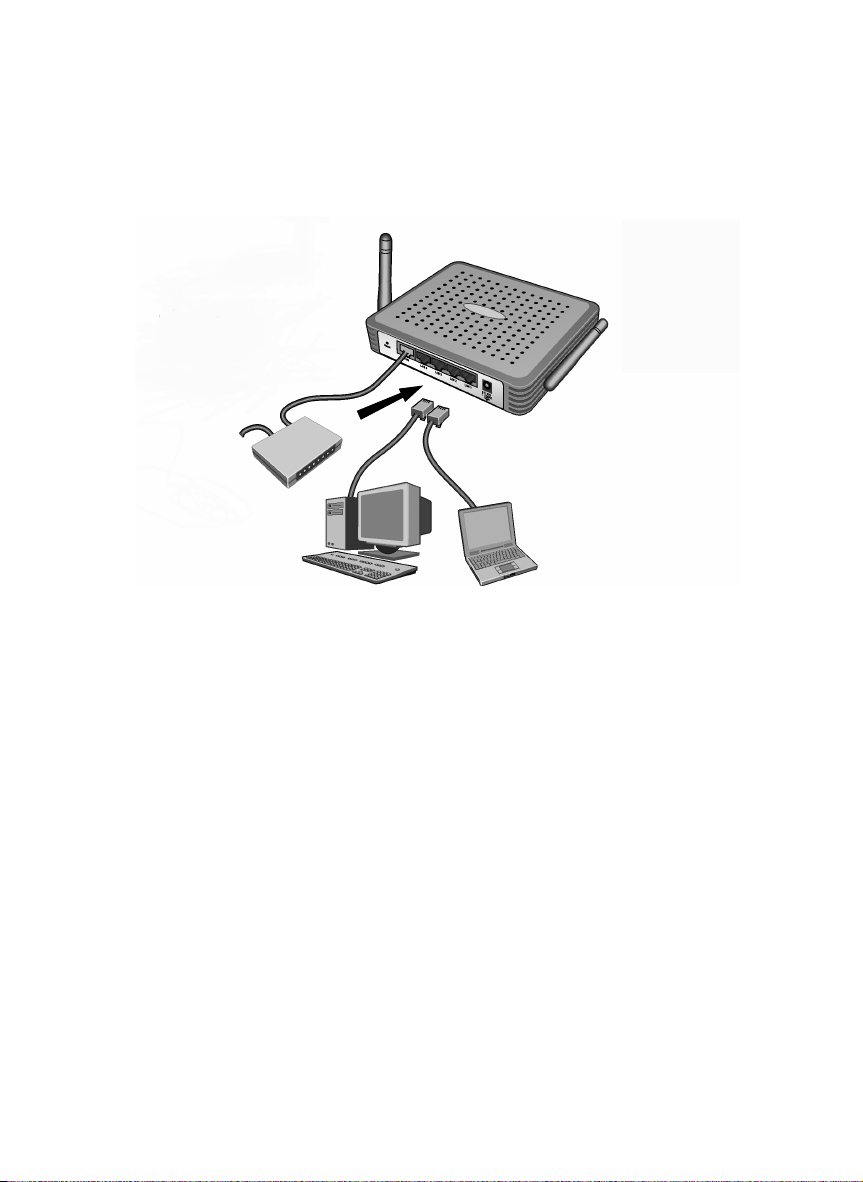
Connecting a DSL or cable modem to the router
Connect the socket on the back of the router marked WAN and your DSL or cable
modem with an Ethernet cable.
sockets.
◆ Use standard network cables for all connections (CAT-5) for the WAN
and LAN connections.
◆ An Ethernet cable must not be longer than 100 meters (328 feet).
Gigaset SE 105 dsl/cable
DSL or cable modem
Use a 100-Ohm shielded or unshielded 3, 4 or 5 category Ethernet cable
with RJ-45 jacks on both ends for all connections.
i
Please bear in mind that the cable you use must be the right one for the
modem (straight or crossed wiring). Please consult your modem
operating instructions. The Ethernet cable supplied has straight wiring.
13
Page 15

First Steps
h
Creating a LAN connection
You can connect PCs to your router in wireless or wired mode and so set up a local
network (LAN).
Wireless
A wireless connection is established via a wireless network adapter installed in your PC.
This could be for example a Gigaset USB Adapter 11, a Gigaset PC Card 11 or an 802.11b
compatible wireless network adapter.
You d efine a Wireless network by assigning all the devices an identical SSID. Assign the
network adapters the router's SSID. The factory setting for the router's SSID is
ConnectionPoint.
If the correct SSID has been entered in your PC's wireless network adapter, the wireless
link will be established automatically once you connect your router to the mains power
supply (see page 16).
PC with
Gigaset USB
Adapter 11
Arrange the Gigaset Router's two antennas in an optimum position for
i
reception from the network adapters. Coverage is more effective if you
position one antenna vertically and the other horizontally.
Notebook wit
Gigaset PC
Card 11
14
Page 16
First Steps
Wired
Insert one end of the supplied Ethernet cable in one of the LAN sockets (LAN1 - LAN4)
on the back of the router and the other end in the PC's Ethernet network card, Hub or
Switch. The four LAN ports can automatically set transmission speed to 10 Mbps
Ethernet or 100 Mbps Fast Ethernet and the transmission mode to Half duplex or Full
duplex.
wired
PC with
Ethernet
card
Notebook with
Ethernet card
15
Page 17
First Steps
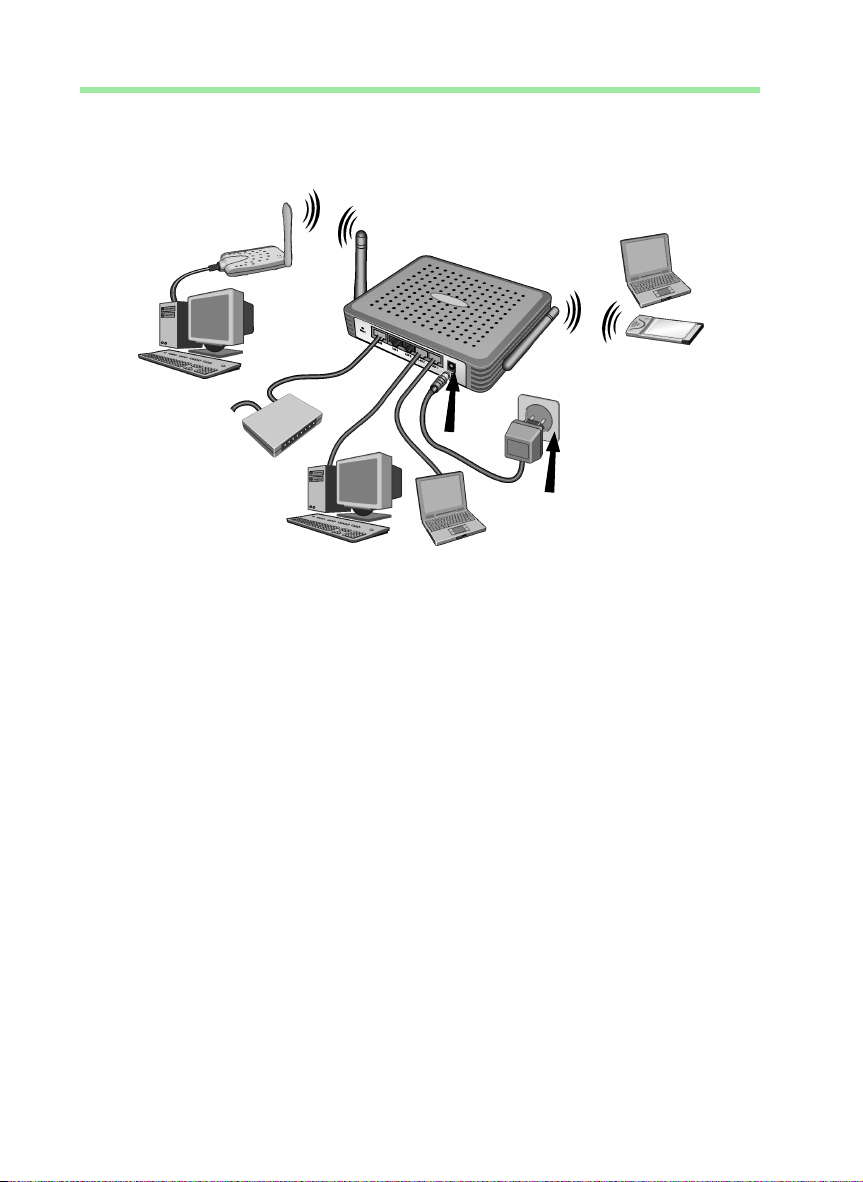
Activation
Plug the power unit cable into the 9V 1A socket on the router. Plug the other end of the
power unit cable into a power outlet.
This will activate the router. Check whether the LED display for the mains (PWR) on the
front panel is lit up. If this is not the case, please turn to "Fault tracing" on page 92.
The wireless link to the PCs connected via a wireless network adapter will be established
automatically if their network adapters have been configured with the same SSID as the
router (see page 14). It can take a few seconds for the wireless connection to be
established.
16
Page 18

Configuring the local network
Configuring the local network
Once you have set up the hardware and connected all the devices, you have to configure
the network settings of all the PCs that will communicate with each other via the Gigaset
Router.
The local network is set up as a TCP/IP network. You will have to make various choices
during the configuration procedure. The most important decision is whether you want
to use the router's DHCP service or not. The router uses DHCP (Dynamic Host
Configuration Protocol) to assign Dynamic IP addresses for the network components,
i.e. it automatically assigns a PC that logs in an IP address from a defined address block.
The next time the PC logs on it may well be assigned a different IP address. How to
configure the router's dynamic address assignment is described on page 68 of the
section "LAN Configuration".
In this chapter we assume that you will use the router's DHCP service. This is also the
router's default setting.
In some cases however it is better to assign Static IP addresses, e. g. when you want to
use certain firewall functions. How to assign fixed IP addresses is described in "Practical
Tips and Configuration Examples" on the supplied CD.
If your network has already been set up you can read on from page 44 in the chapter
"Gigaset Router User Interface".
Network configuration differs depending on the Windows operating system you are
using. Below you will find the procedure for Windows 98 from page 18, for Windows XP
from page 27 and for Windows 2000 from page 35.
Have your Windows Installation CD to hand. You may be prompted to insert it.
The Windows user interfaces depicted in this guide may differ from those
i
on your screen because of the settings you have made. The illustrations
always reflect the state after immediate installation.
17
Page 19
Configuring the local network
Network configuration for Windows 98, 98 SE, ME
To integrate a PC with Windows 98, 98 SE or ME in a local network via a Gigaset Router:
1. Set up the PC as Client for Microsoft Networks (see below).
2. Select computer names and workgroup (see page 19).
3. Install the TCP/IP protocol (see page 20).
4. Make TCP/IP protocol settings (see page 21).
5. Deactivate the http proxy (see page 25).
6. Synchronise the TCP/IP settings with the Gigaset Router (see page 26).
Setting up a PC as Client for Microsoft Networks
Before the PCs on your network can work together, you have to configure them as
Microsoft Network Clients. This can be done as follows:
◆ Click on Start – Settings – Control Panel.
◆ Double click on the Network icon and then open the Network tab in the
Configuration window.
◆ Check whether the list of components contains the entry Client for Microsoft
Networks.
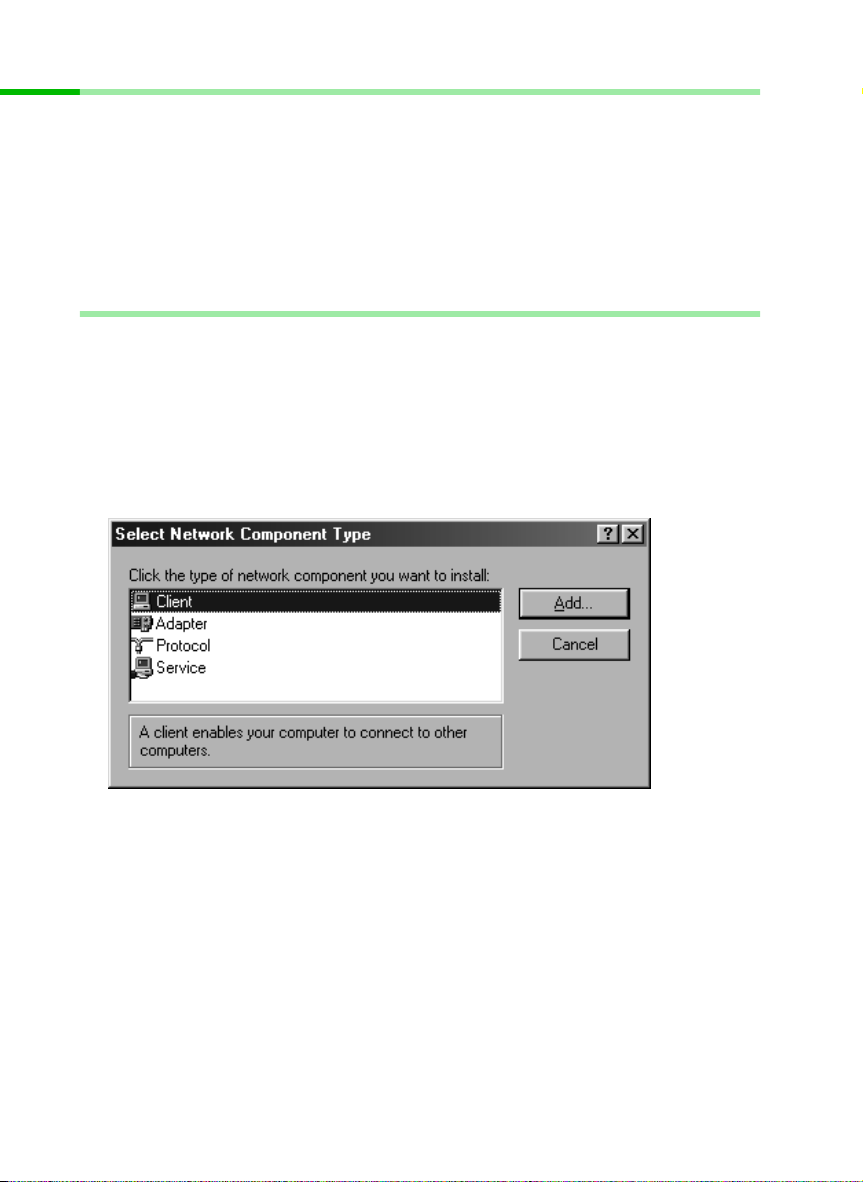
◆ If it is not there click on Add.
◆ Select as network component type Client and click on Add.
18
Page 20
Configuring the local network
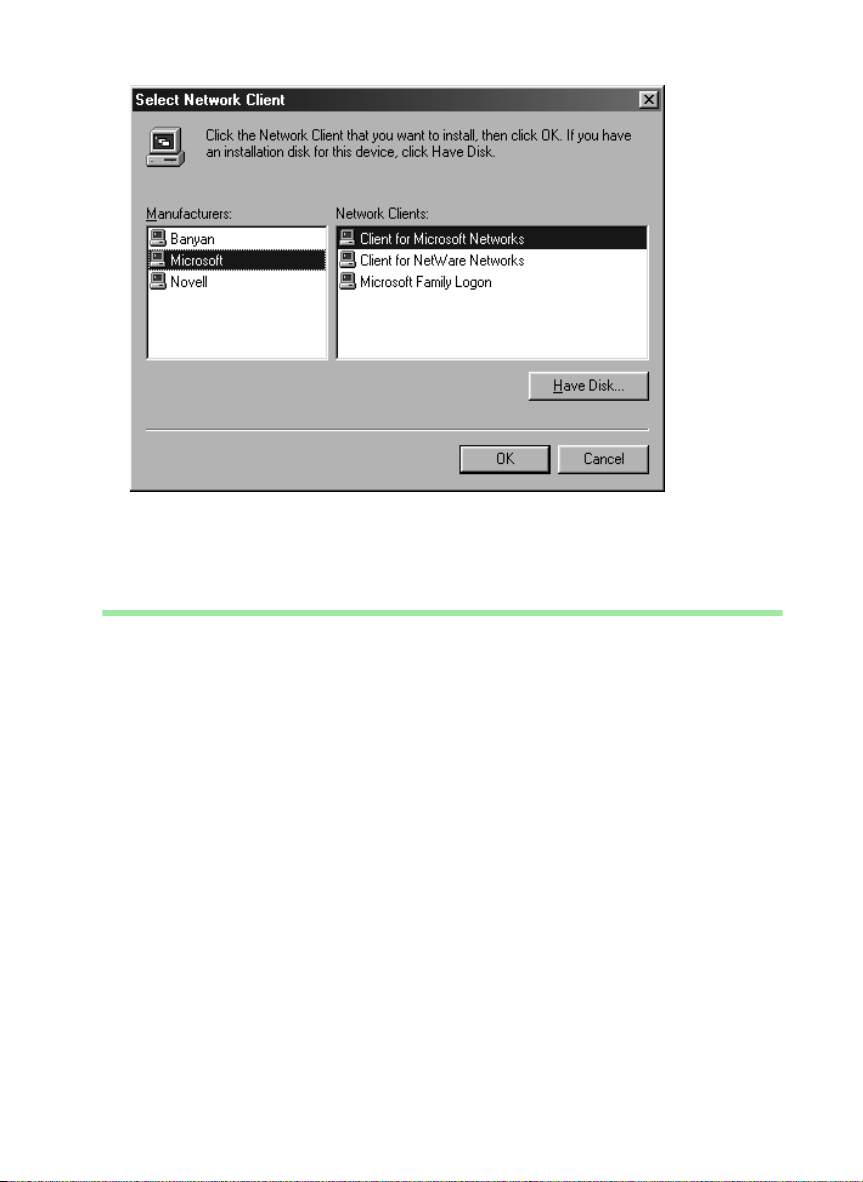
◆ Select in Manufacturer the entry Microsoft and in Network clients the entry
Client for Microsoft Networks.
◆ Confirm this with OK.
Selecting computer names and workgroup
Now you have to specify a name for the PC and assign it to a workgroup.
◆ In the Network window move from the Configuration to the Identification tab.
◆ In the Computer name box, enter the name the PC is to appear under in the
network. This name must be unique within the network.
◆ In the Workgroup box, enter a name for the workgroup. This name must be the
same for all the PCs in the network.
◆ The Description box can be left empty.
19
Page 21
Configuring the local network
Installing the TCP/IP protocol.
The TCP/IP protocol ensures that the PCs in the network can communicate with each
other. You first have to install this Protocol for the network adapter that establishes the
connection to the Gigaset Router.
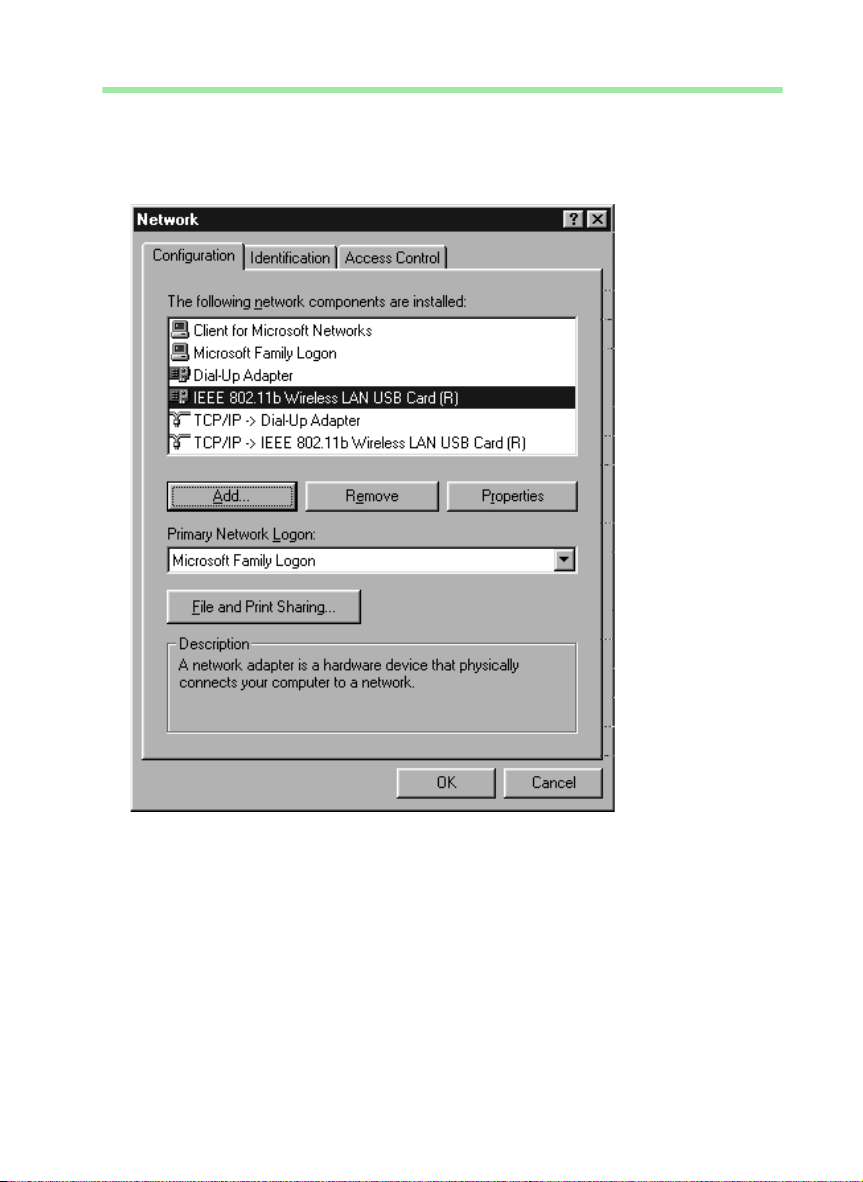
◆ In the Network window move from the Identification to the Configuration tab.
◆ In the Network window, check that there is a
TCP/IP > entry for your network card or network adapter in the list of components. If
for example you are using a Gigaset USB Adapter 11 as the wireless network adapter,
the list must contain the entry TCP/IP > Siemens Gigaset USB-Adapter 11.
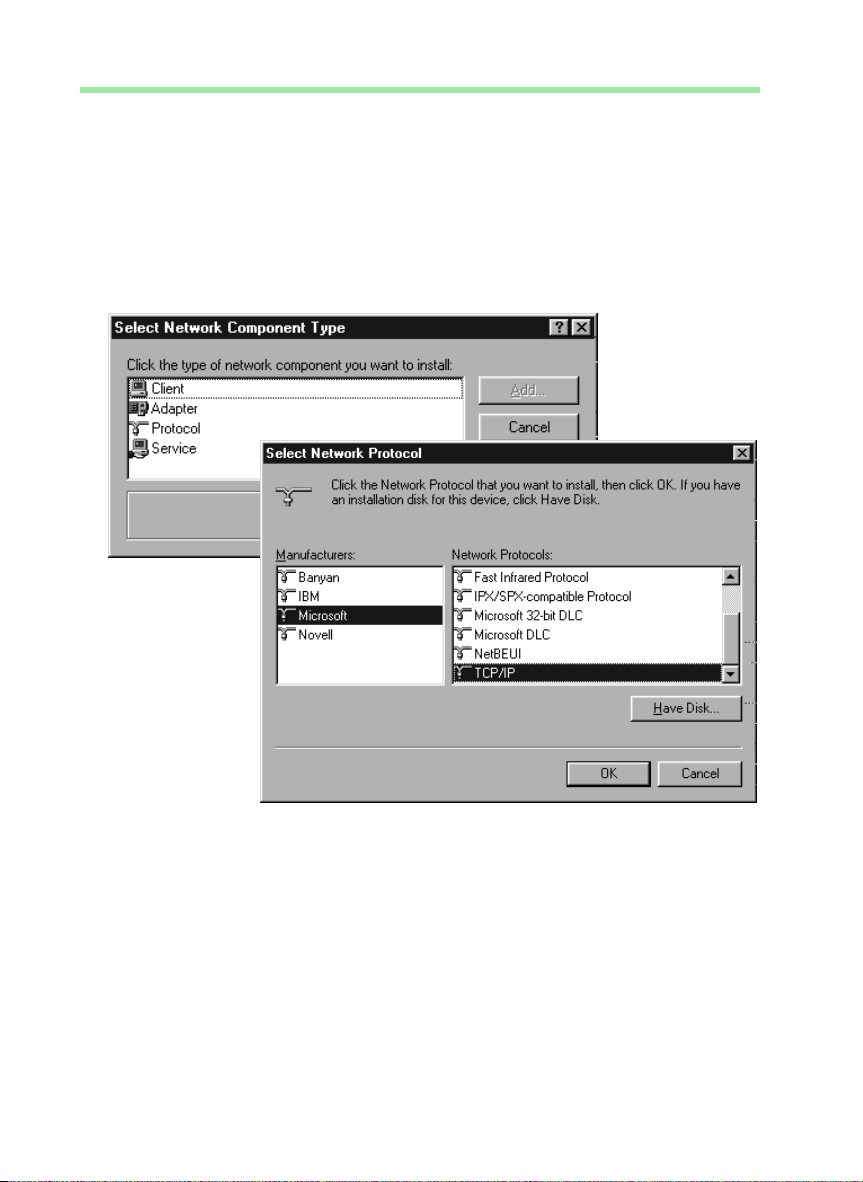
◆ If the entry does not exist, click on Add.
◆ Select as network component type Protocol and click on Add.
◆ Select in Manufacturer the entry Microsoft and in Network protocol the entry
TCP/IP before confirming with OK.
20
Page 22
Configuring the local network
TCP/IP protocol settings
The TCP/IP protocol requires certain settings which you will now make so that it can
function smoothly.
◆ To do this, in the Network window, switch to the Configuration tab.
◆ Select the TCP/IP > entry for your network card.
◆ Click on Properties.
21
Page 23
Configuring the local network
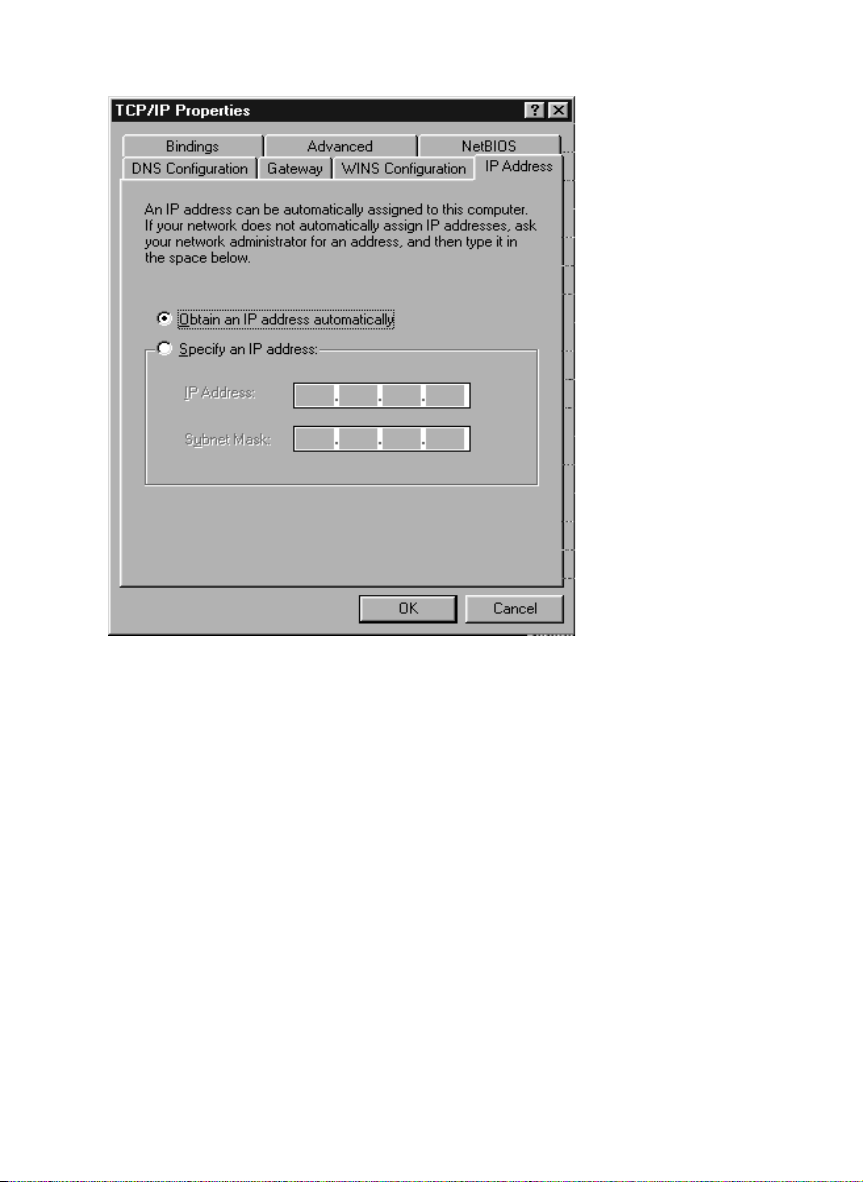
◆ Open the IP address.tab.
◆ If Obtain an IP address automatically has already been activated, your PC is
already configured for DHCP. Click on Cancel and close the next windows with OK
to run network configuration.
You may be prompted to insert your Windows Installation CD. Follow the
instructions in the installation procedure.
Once the copying procedure is completed, you will be prompted to reboot your
system. Click on Yes. The computer will then be rebooted.
Then read on from page 25.
◆ If Obtain an IP address automatically has not been activated, activate this option
now.
22
Page 24
Configuring the local network
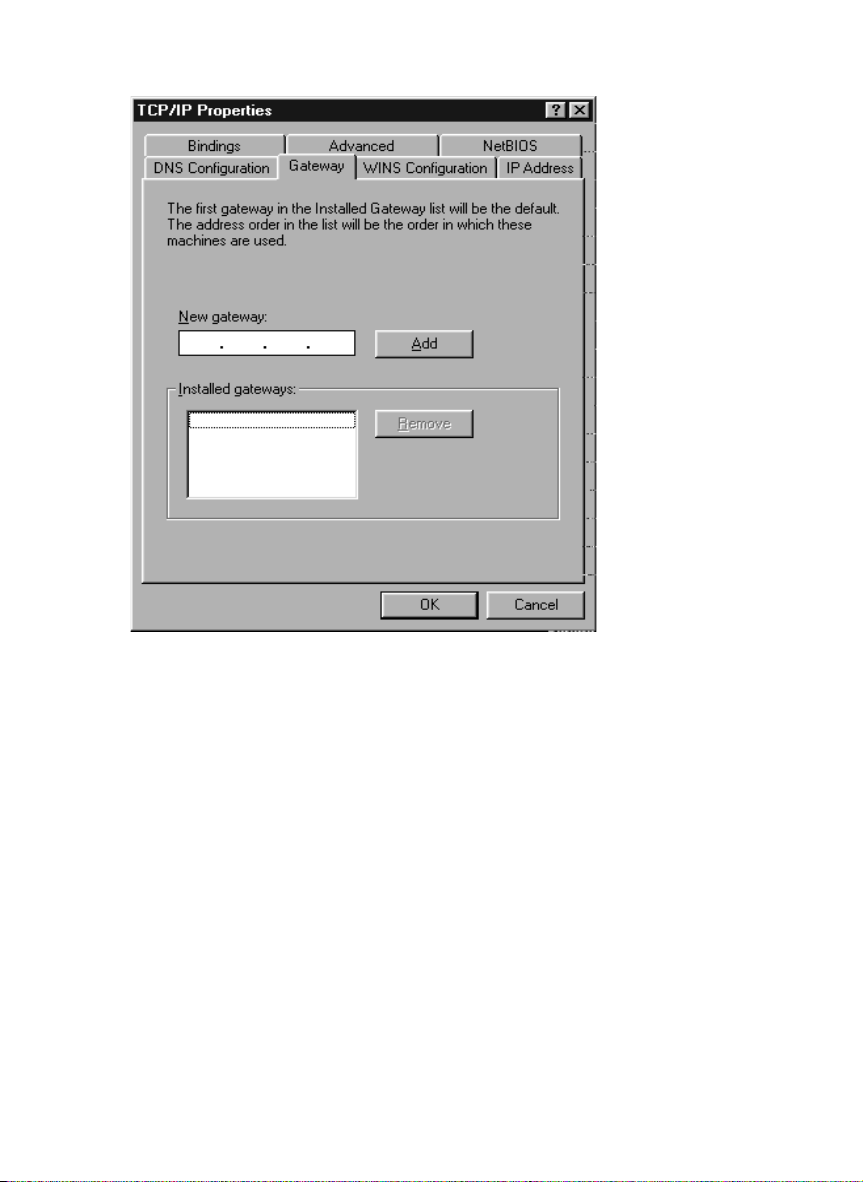
◆ Open the Gateway tab and remove any entries from the Installed gateways list.
23
Page 25
Configuring the local network
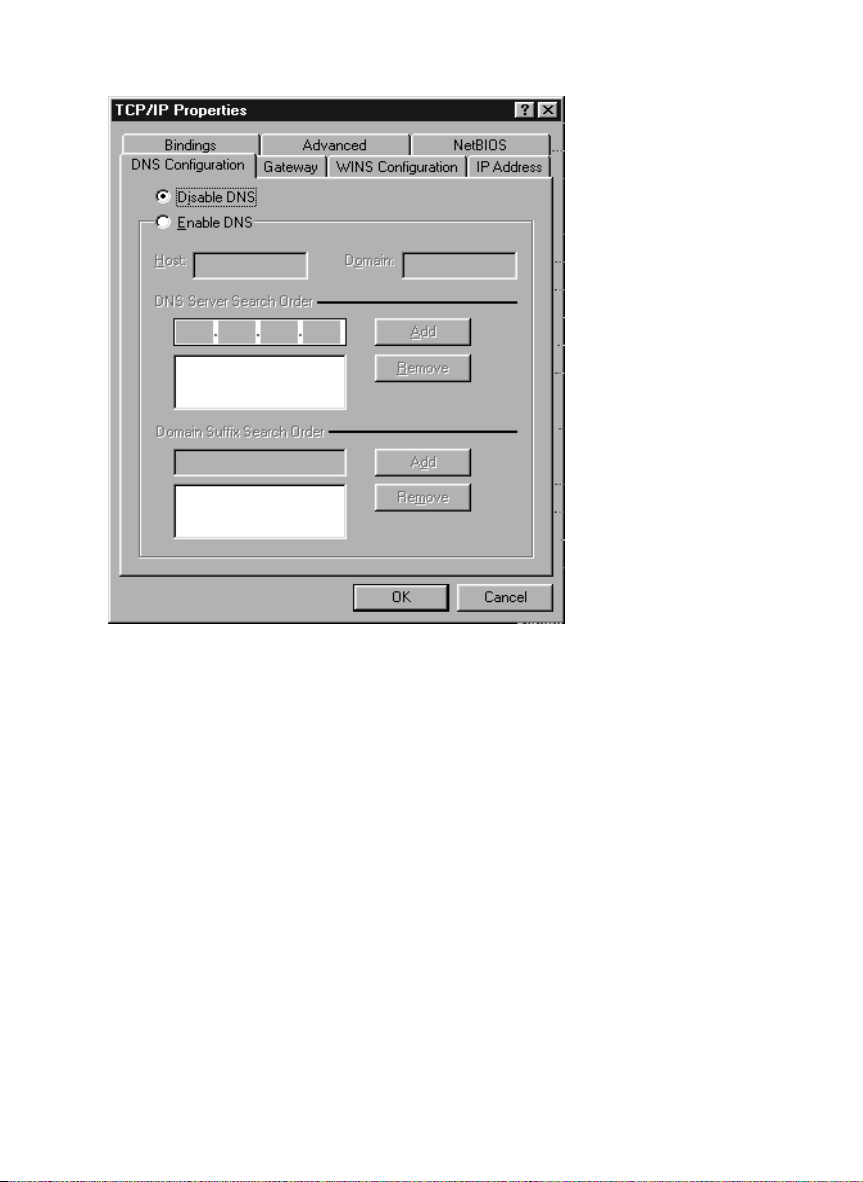
◆ Open the DNS configuration tab. Select Disable DNS.
◆ Click on OK.
◆ Complete network configuration with OK.
You may be prompted to insert your Windows Installation CD. Follow the
instructions in the installation procedure.
Once the copying procedure is completed, you will be prompted to reboot your
system. Click on Yes. The computer will then be rebooted.
24
Page 26

Configuring the local network
Deactivating the http proxy
Make sure that the http proxy in your Web browser is deactivated. This function must be
deactivated so that your Web browser can access your Gigaset Router's configuration
pages.
The following section describes the procedure for Internet Explorer and Netscape. Read
the appropriate steps for the browser you are using.
Internet Explorer
◆ Open Internet Explorer. Click on Extras – Internet options.
◆ In the Internet options window click on the Connections tab.
◆ Click on LAN settings.
◆ Deactivate all the check boxes in the Settings for local network (LAN) window and
click on OK.
◆ Click on OK again to close the Internet options window.
Netscape
◆ Open Netscape. Click on Edit and then Settings.
◆ Double click on Advanced Category in the Settings windows and then click on
Proxies.
◆ Select Direct connection to the Internet.
◆ Close the window with OK.
25
Page 27
Configuring the local network
Synchronising the TCP/IP settings with the Gigaset Router
You have now configured your PC so that it is ready to be connected to the Gigaset
Router. You now have to release the old TCP/IP settings and update them with the
settings of your Gigaset Router.
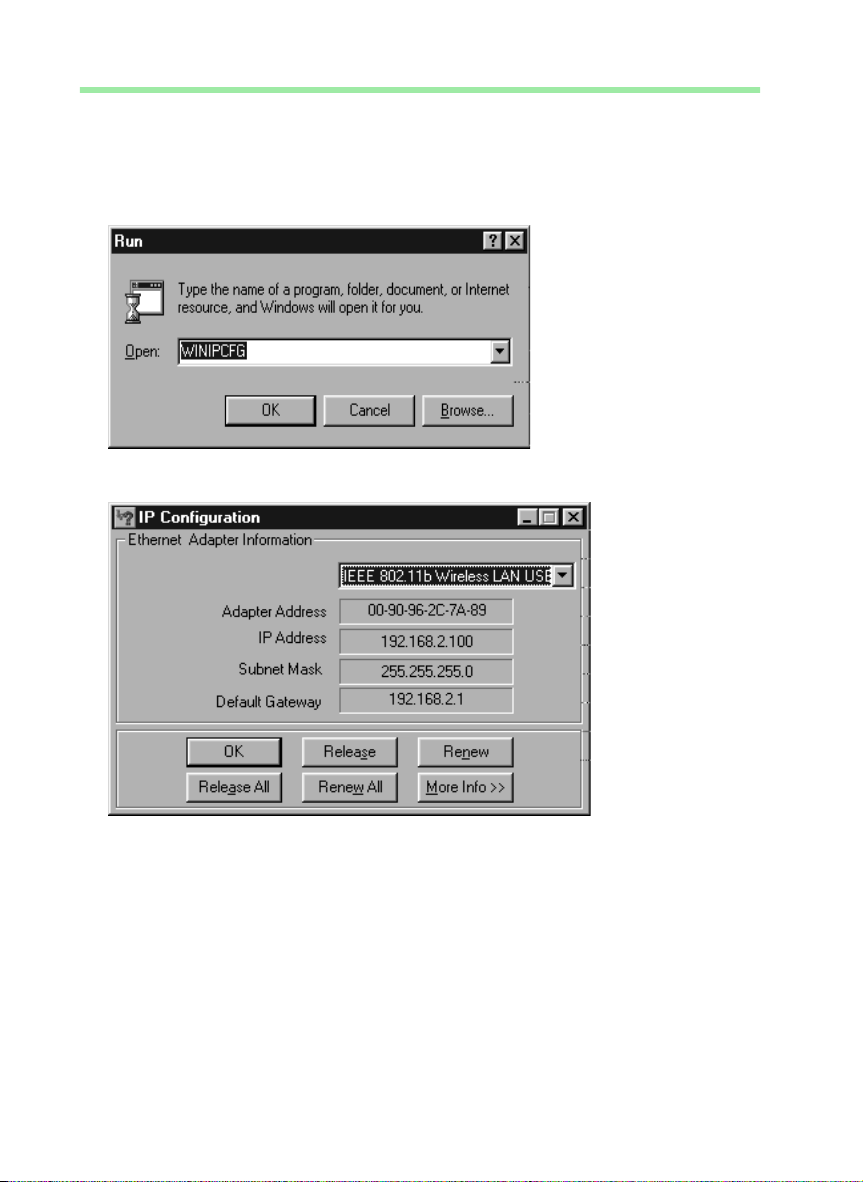
◆ Click on Start – Run.
◆ Enter WINIPCFG and click on OK.
There may be a slight delay before the IP configuration appears.
◆ Select your network adapter from the selection list.
◆ Click on Release and then Renew.
If the router's default IP address (192.168.2.1) was not changed, the IP address
should now read 192.168.2.x (with x being a number between 2 and 254). The
Subnet mask must always be 255.255.255.0 and the Default Gateway must have
the router's IP address (192.168. 2.1). These values confirm that your Gigaset Router
is working.
◆ Click on OK to close the IP configuration window.
26
Page 28
Configuring the local network
Network configuration with Windows XP
To integrate a PC in a network with Windows XP via a Gigaset Router:
1. Configure the network (see below).
2. Select computer names and workgroup (see page 29).
3. Check the network settings and complete the installation procedure (see page 29).
4. Make TCP/IP protocol settings (see page 30).
5. Deactivate the http proxy (see page 33).
Configuring the network
Configuring the network in this case means selecting Internet connection as the
connection method. You can do this with the network wizard.
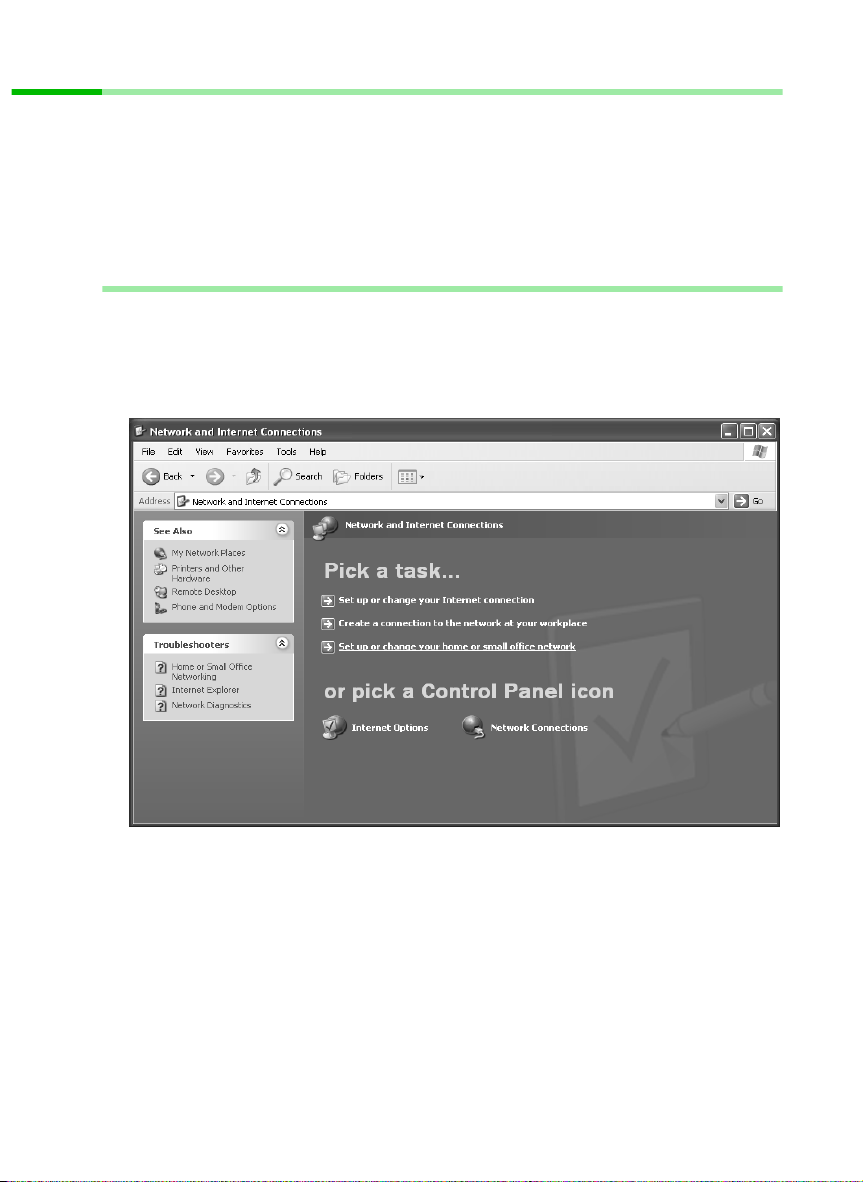
◆ Select Start – Control Panel.
◆ Select Network and Internet Connections.
◆ Now select Set up or change your home network or small office network.
This launches the network wizard.
◆ Skip the welcome screen and the checklist by clicking on next each time.
27
Page 29
Configuring the local network
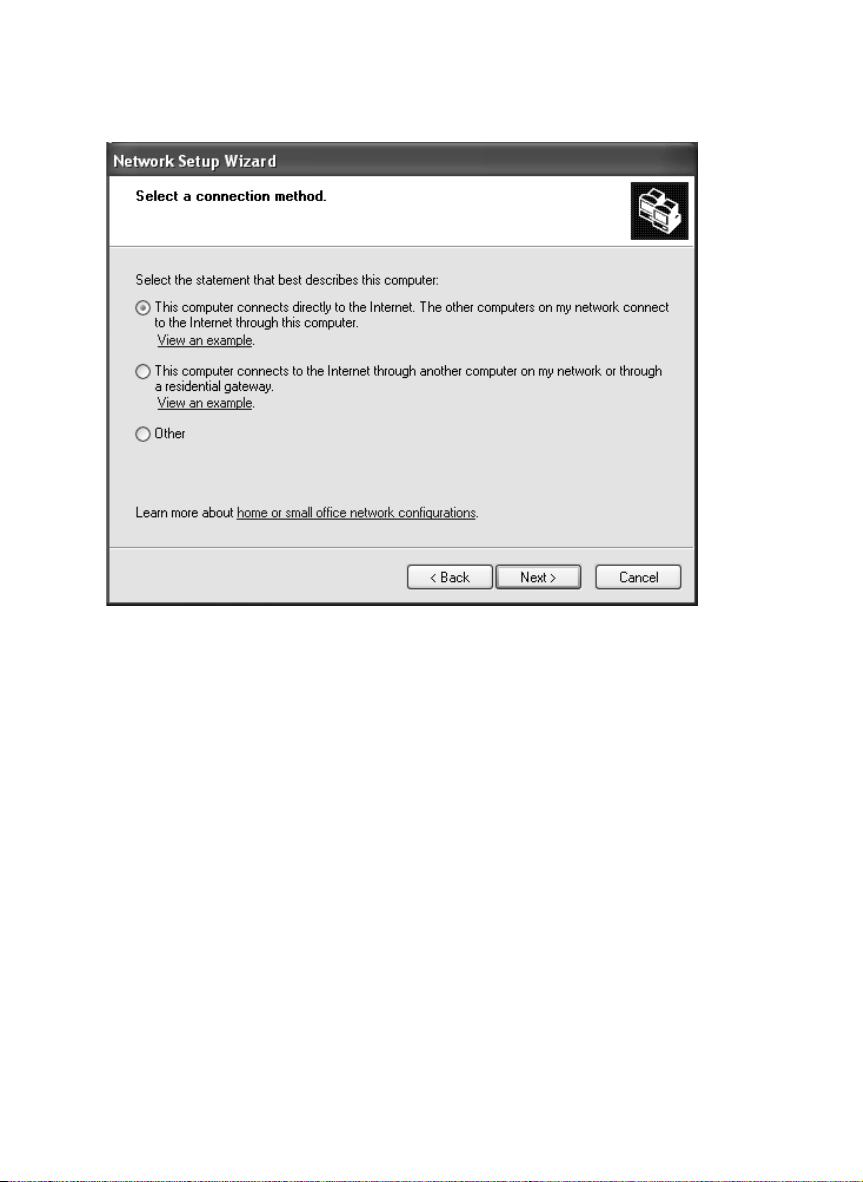
You will be prompted to select a connection method.
◆ Select Other method and confirm with next.
You will now see a screen listing various connection methods.
◆ Select This computer connects directly to the Internet. The other computers on
my network connect to the Internet through this computer. and click on next.
◆ In the next window select your network adapter and click on next.
◆ Skip the message "This network configuration is not advisable" with next.
28
Page 30

Configuring the local network
Selecting computer names and workgroup
Now you have to specify a name for the PC and assign it to a workgroup.
◆ Enter the name the PC is to appear under in the network. This name must be unique
within the network. You can complete the Computer description box or leave it
empty. Then click on next.
◆ Enter a name for the workgroup the computer is to belong to. This name must be
identical for all the PCs in the network. Continue with next.
Checking the network settings and completing the installation procedure
You will now see a screen in which you can check the settings you have made and make
any changes you want.
◆ Click on Back if you want to make any changes or click on next, if you want to leave
them unchanged.
If you do not want to install any more PCs:
◆ Select Only finish the wizard, as it is not run on other computers and confirm
twice with next.
◆ Answer the prompt Do you want to restart your computer now? with Ye s.
If you want to set up a network on other PCs with Windows XP, you can now create a
network installation disk.
◆ Select Create a network installation disk and click on next.
◆ Follow the screen instructions and insert a disk. The necessary data will now be
copied. Now label the disk as Network installation.
◆ Confirm the next two screens with next and complete the installation procedure by
rebooting the PC.
After this your "home network" will have been installed.
To set up the network on the other PCs with the same settings, insert the disk in the
drive and run Netsetup with a double click.
29
Page 31

Configuring the local network
TCP/IP protocol settings
The requires TCP/IP-Protocol certain settings which you will now make or check so that
it can function smoothly.
◆ Click on Start and select Control Panel.
◆ Select Network and Internet Connections and then click on the Network
Connections icon.
◆ Double click on the LAN connection with which you are connected to the router.
30
Page 32

Configuring the local network
◆ Click on Properties.
◆ Select Internet Protocol (TCP/IP) and click on Properties.
31
Page 33

Configuring the local network
.
◆ If the Obtain an IP address automatically und Obtain DNS server address
automatically options have already been activated, your PC is already configured
for DHCP. Click on Cancel and close the next windows with OK to save your network
configuration.
◆ If the Obtain an IP address automatically and Obtain DNS server address
automatically options have not been activated, activate them now and click on OK.
Close the following screens.
32
Page 34

Configuring the local network
Deactivating the http proxy
Make sure that the http proxy in your Web browser is deactivated. This function must be
deactivated so that your Web browser can access your Gigaset Router's configuration
pages.
The following section describes the procedure for Internet Explorer and Netscape. Read
the appropriate steps for the browser you are using.
Internet Explorer
◆ Open Internet Explorer and click on Stop. Click on Extras and then Internet options.
◆ In the Internet options window click on the Connections tab.
◆ Click on Settings.
◆ Deactivate all the check boxes in the Settings for local network (LAN) window.
◆ Click on OK and then OK again to close the Internet options window.
Netscape
◆ Open Netscape. Click on Edit and then Settings.
◆ Double click on Advanced Category in the Settings windows and then click on
Proxies.
◆ Select Direct connection to the Internet.
◆ Close the window with OK.
33
Page 35

Configuring the local network
Synchronising the TCP/IP settings with the Gigaset Router
You have now configured your computer so that it is ready to be connected to the
Gigaset Router. You now have to release the old TCP/IP settings and update them with
the settings of your Gigaset Router.
◆ Click on Start in Windows Desktop and then Programs, followed by Accessoires
and finally command prompt.
◆ In the command prompt window enter the
ipconfig /release command and press the ENTER KEY.
◆ Then enter the
IPCONFIG /RENEW command and press the ENTER KEY.
If the router's default IP address (192.168.2.1) was not changed, the IP address
should now read 192.168.2.x (with x being a number between 2 and 254. The
Subnet mask must always be 255.255.255.0 and the Default Gateway must have
the router's IP address (192.168. 2.1). These values confirm that your Gigaset Router
is working.
◆ Enter EXIT and press the Enter Key to close the command prompt window.
34
Page 36

Configuring the local network
Network configuration with Windows 2000
To integrate a PC in a network with Windows 2000 via a Gigaset Router:
1. Install the network services (see below).
2. Select computer names and workgroup (see page 36).
3. Install the TCP/IP protocol (see page 37).
4. Make TCP/IP protocol settings (see page 39).
5. Deactivate the http proxy (see page 41).
6. Synchronise the TCP/IP settings with the Gigaset Router (see page 42).
Installing network services
You have to install the network services before the PCs in your network can access
shared resources. This can be done as follows:
1. Click on Start – Settings – Control Panel.
◆ Double click on the Network and Dial-up Connections icon.
◆ In the left-hand pane click on Add network components.
35
Page 37

Configuring the local network
◆ Select Networking services and click on next.
◆ You will now be prompted for the Windows installation CD. Insert the WIN2000 CD
and click on the OK button to install all the required components.
Selecting computer names and workgroup
Now you have to specify a name for the PC and assign it to a workgroup.
◆ In the left-hand pane click on Network identification and then Properties.
◆ In the Computer name box, enter the name the PC is to appear under in the
network. This name must be unique within the network.
◆ In the Workgroup box, enter a name for the workgroup. This name must be the
same for all the PCs in the network.
◆ Confirm this with OK.
36
Page 38

Configuring the local network
Installing the TCP/IP protocol.
The TCP/IP protocol ensures that the PCs in the network can communicate with each
other. You now have to install this Protocol.
◆ Right click to open Local Area Connection.
◆ In the next window click on Properties.
◆ Click on Install.
37
Page 39

Configuring the local network
◆ Select Protocol and click on Add.
◆ In the Network protocol list, select the entry Internet Protocol (TCP/IP).
◆ Click on OK.
You will now see the TCP/IP protocol in the Local Area Connection Properties
window.
38
Page 40

Configuring the local network
TCP/IP protocol settings
The TCP/IP protocol requires certain settings which you will now make or check so that
it can function smoothly.
◆ Select Internet Protocol (TCP/IP) and click on Properties
39
Page 41

Configuring the local network
◆ If the Obtain an IP address automatically und Obtain DNS server address
automatically options have already been activated, your PC is already configured
for DHCP. Click on Cancel and close the next windows with OK to save your network
configuration.
◆ If the Obtain an IP address automatically and Obtain DNS server address
automatically options have not been activated, activate them now and click on OK.
Close the following screens.
40
Page 42

Configuring the local network
Deactivating the http proxy
Make sure that the http proxy in your Web browser is deactivated. This function must be
deactivated so that your Web browser can read your Gigaset Router's configuration
pages.
The following section describes the procedure for Internet Explorer and Netscape. Read
the appropriate steps for the browser you are using.
Internet Explorer
◆ Open Internet Explorer. Click on Extras – Internet options.
◆ In the Internet options window click on the Connections tab.
◆ Click on LAN settings.
◆ Deactivate all the check boxes in the Settings for local network (LAN) window.
◆ Click on OK and then OK again to close the Internet options window.
Netscape
◆ Open Netscape. Click on Edit and then Settings.
◆ Double click on Advanced Category in the Settings windows and then click on
Proxies.
◆ Select Direct connection to the Internet.
◆ Close the window with OK.
41
Page 43

Configuring the local network
Synchronising the TCP/IP settings with the Gigaset Router
You have now configured your computer so that it is ready to be connected to the
Gigaset Router. You now have to release the old TCP/IP settings and update them with
the settings of your Gigaset Router.
◆ Click on Start – Programs – Accessoires – command prompt in Windows Desktop.
◆ In the command prompt window enter the
ipconfig /release command and press the ENTER KEY.
◆ Then enter the ipconfig /renew command and press the ENTER KEY.
If the router's default IP address (192.168.2.1) was not changed, the IP address
should now read 192.168.2.x (with x being a number between 2 and 254. The
Subnet mask must always be 255.255.255.0 and the Default Gateway must have
the router's IP address (192.168. 2.1). These values confirm that your Gigaset Router
is working.
◆ Enter exit and press the ENTER KEY.
42
Page 44

Configuring the local network
Checking the connection to the Gigaset Router
Once the network has been set up on a PC, you can check whether the PC has been
successfully connected to the Gigaset Router. This can be done as follows:
◆ Open command prompt. This can be done by clicking on Start – Programs –
command prompt.
◆ Enter the command ping 192.168.2.1.
i
The ping command sends data packets to the router with the specified IP address and
checks whether the router responds. If this is the case, the command presents statistics
about the connection, e. g. how many data packets were sent, how many received, how
long the transfer took, etc. If you can see this information then the connection to the
router is functioning properly.
If the command does not return any statistics, but ends with a time-out, then this means
that the components cannot communicate with each other. Check the following points:
1. Has the Ethernet cable between the Gigaset Router and the PC been inserted
properly or is there a wireless connection via a wireless network adapter?
The LED display for the LAN connections on the Gigaset Router and link display for
the network card in your PC must be illuminated. For wireless connections the
Gigaset WLAN Adapter Monitor must display connection information.
2. Has TCP/IP been properly configured on your computer?
If the Gigaset Router has IP address 192.168.2.1, your PC's IP-address must be
between 192.168.2.2 and 192.168.2.254, the default gateway must have the
address 192.168.2.1.
If you can reach the Gigaset Router with the ping command, then the PC has been
configured properly.
If the router's IP address was changed, enter the new IP address.
43
Page 45

Gigaset Router User Interface
Gigaset Router User Interface
Once you have configured the network settings on a PC in your local network, you can
then use that PC to configure the Gigaset Router with the user interface. The Gigaset
Router can be configured using any browser that supports Java, e.g. Microsoft Internet
Explorer 5.5 or higher, Netscape Communicator 6.0 or higher.
The Gigaset Router user interface includes Basic Setup and Advanced Setup.
Basic Setup Use Basic Setup for the settings required for connecting to the
Internet via a DSL or cable modem. This is described from
page 49 on.
Advanced Setup Advanced Setup provides additional functions. Here, for example,
you can assign a password, configure and activate firewall
functions, back up and restore the configuration data and much
more besides. These configuration steps are optional and can be
carried out at a later stage. This is described from page 59 on.
Launching the User Interface
To access the Gigaset Router's user interface:
◆ Launch your Web browser.
◆ Enter the router IP address in the Web browser address bar.
http://192.168.2.1
You will then see a login window:
44
Page 46

◆ Click on LOGIN (the default is no password).
Gigaset Router User Interface
i
The opening screen is displayed.
For security reasons you should assign a password at a later stage (see
page 62).
45
Page 47

Gigaset Router User Interface
Language Selection
The first time you launch the user interface it will appear in English. If you do not want
to change the language, you can skip this section.
◆ If you want to work with the German, French, Italian or Spanish user interface, click
on the flag of the respective country.
A new window is displayed where you can select the language.
◆ Insert the installation CD into your CD ROM drive.
◆ Click on Browse and select your language file. You will find the file in the CD-ROM
directory of the country in question; it has the file extension .dlf. For example you
will find the language file for the English user interface under
\English\Gigaset_English.dlf.
◆ Then click on and in the following window click on OK to accept your selection.
◆ Now refresh the web page. This can be done by clicking on Refresh (Internet
Explorer) or Reload (Netscape) the browser toolbar.
The user interface will now be displayed in the desired language.
46
Page 48

UI elements
The UI pages have the following elements:
Gigaset Router User Interface
Navigation bar
Menu bar
Working area
Buttons
Navigation bar
Home Takes you to the opening screen.
Status Displays router status information. You can find detailed
information about this page on page 90. You can also open
and close an Internet connection manually here (see
page 86).
Basic Setup Launches Basic Setup.
Advanced Setup Launches Advanced Setup.
Logout Closes the current user's session and displays the login screen.
Menu bar
The menu bar contains the functions that you can run.
◆ In Basic Setup you will see the steps you have to go through for configuration. You
cannot make any selections. Configuration runs automatically.
◆ In Advanced Setup you will see a list of configuration options for the Gigaset Router.
Clicking on an entry opens a menu in which you can select the function you want.
47
Page 49

Gigaset Router User Interface
Working area
Use the working area for configuration.
With configurable parameters you will see a dialogue box or selection list with default
settings. There may be some limitations on the possible entries, e. g. entering special
characters or certain value ranges. If your entry does not meet the rules for the box in
question, you will see an error message. You can then repeat the input.
Once you have made any configuration changes on a page, you can activate the new
setting by clicking on APPLY or NEXT at the bottom of the page.
Please read the following information if you are using
Internet Explorer 5.0.
Once you have entered the command, the page will be properly updated
i
Buttons
Basic Setup NEXT Opens the page for the next configuration step.
Advanced
Setup:
Other buttons may be visible depending on the function in question. These are
described in the relevant sections.
if you have configured Internet Explorer as follows:
In Extras – Internet options – General – Temporary Internet files –
Settings the setting for Check for newer versions of the saved pages
should be set to For every visit to the page.
BACK Returns to the previous configuration step.
CANCEL Deletes all the entries on page since the last time it was
opened.
FINISH Transfers the settings you have made to the router
configuration.
HELP Displays help information about the current page.
APPLY Transfers the settings you have made to the router
configuration.
CANCEL Deletes all the entries on page since the last time APPLY
was run.
HELP Displays help information about the current page.
48
Page 50

General configuration with Basic Setup
General configuration with Basic Setup
Use Basic Setup for the general configuration of the Gigaset Router. This includes the
settings for the WAN interface and wireless communication.
The router's WAN interface is used to provide a connection to the Internet for all the PCs
connected to the router. You will need the access data you received from your Internet
Service Provider. Please have it to hand.
Remember that configuration saves the access data in the router. Before
passing your router on to somebody else or having your dealer replace it,
i
The router user interface guides you through configuration step by step. Once you have
filled in a page, click on NEXT. If you want to make any changes or check your entries,
click on BACK.
Click on Basic Setup in the opening screen or the navigation bar to start configuration.
Select Country
you should first restore the factory settings. Otherwise unauthorised
persons may use your Internet access data at your expense. To reset the
router, press the reset button on the back for at least 5 seconds.
Select
◆ Check the box next to the appropriate country.
◆ Click on NEXT.
In the first step of Basic Setup configuration choose your Country.
Selecting the country automatically selects the time zone as well. If
i
necessary, you can set the time zone separately using Advanced Setup
(see page 60).
49
Page 51

General configuration with Basic Setup
Wireless Settings
Use Wireless Settings to configure the router as an Access point of a wireless network
(WEP). PCs that have a wireless network adapter can connect to the router. Accept the
default settings. You can change them later on with Advanced Setup (see page 70).
◆ Click on NEXT.
50
Page 52

General configuration with Basic Setup
Configuring the WAN connection
In the next step you have to enter the access data for your WAN connection. You will
have received the necessary information from your Internet Service Provider (ISP).
If you have chosen Germany as your country, please read the next section. If you have
chosen a different country, please turn to page 53.
T-online
If you have chosen Germany as your country and use Internet services provided by
T-online, enter the access data you have received from T-online in this page.
If you want to use the services from a different provider, select Other Provider from the
list. Then read on from page 53.
51
Page 53

General configuration with Basic Setup
◆ Enter the required data.
◆ Maximum idle time (Default setting: 0 minutes)
This is the period of time after which the Internet connection is
closed down automatically if no data is transmitted. Entering "0"
deactivates the function. This means that the connection will
remain open even if no data is transmitted. This can lead to high
charges if you are using a time-based pricing system! In this case,
!
◆ Once you have entered the data, click on FINISH to complete setup.
Once you have completed configuration, the router will try to open an Internet
connection. The router's Status page will appear with information about the
connection.
you should enter a value other than "0".
◆ Auto-reconnect (Default setting: deactivated)
Auto-reconnect means that applications such as Web browser,
Messenger and Email can automatically open an Internet
connection when they are launched. If you do not have Flat rate,
this can lead to high charges being incurred. Therefore the default
setting is deactivated. Please refer to page 86 for manually
opening a connection.
52
!
◆ You can change your settings later on with Advanced Setup. To do this
open WAN – PPPoE.
Page 54

General configuration with Basic Setup
Other Internet Service Provider
First select the access type for your Internet connection. The options are:
◆ DSL modem (see page 54)
◆ Cable modem (see page 56)
◆ DSL modem (alternative: PPTP) (see page 57)
You will find information about the connection type and the access data you need for
further configuration in the paperwork you received from your Internet Service
Provider.
◆ Click on the connection type you are using.
Depending on the connection type, you will see another page for entering the
connection data.
53
Page 55

General configuration with Basic Setup
Configuring connection via DSL modem
Complete this page if you connect to the Internet via a DSL modem.
54
Page 56

General configuration with Basic Setup
◆ Select the connection type:
– PPPoE for DSL
Enter the PPPoE user name and password assigned by your Internet Service
Provider.
The Service Name is optional but may be required by some Internet Service
Providers.
◆ Maximum idle time (Default setting: 0 minutes)
This is the period of time after which the Internet connection is
closed down automatically if no data is transmitted. Entering
"0" deactivates the function. This means that the connection
will remain open even if no data is transmitted. This can lead to
high charges if you are using a time-based pricing system! In
!
– Fixed IP address Special case for DSL access
Some Internet Service Providers assign the router a Static IP address. If this is the
case with your router, enter the assigned parameters in the dialog boxes,
IP address is the address of the Gigaset Router and Router’s IP address the
router address of the Internet Service Provider.
DNS IP address is the address of the Internet Service Provider's DNS Server.
◆ Click on FINISH to complete the setup.
Your WAN connection has now been configured.
Once you have completed configuration, the router will try to open an Internet
connection. The router's Status page will appear with information about the
connection.
this case, you should enter a value other than "0".
◆ Auto-reconnect (Default setting: deactivated)
Auto-reconnect means that applications such as Web browser,
Messenger and Email can automatically open an Internet
connection when they are launched. If you do not have Flat
rate, this can lead to high charges being incurred. Therefore the
default setting is deactivated. Please refer to page 86 for
manually opening a connection.
55
Page 57

General configuration with Basic Setup
Configuring Connection via Cable modem
Complete this page if you connect to the Internet via a cable modem.
◆ You may have been given a host name by your Internet Service Provider. If so, enter
it in the box Host name.
◆ The MAC address is set by default to the router's physical WAN interface. Do not
change this unless required to do so by your Internet Service Provider.
If your Internet Service Provider has used the MAC address of one of
your PCs for registration when setting up your broadband account,
connect only the PC with the registered MAC address to the router
i
and click on Clone MAC address. Then the router's current MAC
address will be replaced by the already registered MAC address of the
PC. If you are not sure which PC was used as the identifier, have your
Internet Service Provider register a new MAC address for your
account. Then use this MAC address for the router.
◆ Click on FINISH to complete the setup.
Your WAN connection has now been configured.
Once you have completed configuration, the router will try to open an Internet
connection. If your configuration has been successful, a connection to your Internet
Service Provider's home page will be opened.
In this connection type your router is assigned a Dynamic IP address by
the Internet Service Provider.
◆ If you want to use a particular DNS Server, you will have to configure
i
this in Advanced Setup. To do this, select DNS in the WAN menu (see
page 66).
◆ If you want to use a PC in your network as a server, you can use the
router's DynDNS service (see page 83).
56
Page 58

General configuration with Basic Setup
Configuring connection via DSL modem (alternative: PPTP)
Complete this page if you connect to the Internet via the Point-to-Point Tunneling
Protocol (PPTP).
◆ Enter the parameters assigned by your Internet Service Provider.
◆ Maximum idle time (Default setting: 10 minutes)
This is the period of time after which the Internet connection is
closed down automatically if no data is transmitted. Entering "0"
deactivates the function. This means that the connection will
remain open even if no data is transmitted. This can lead to high
charges if you are using a time-based pricing system! In this case,
you should leave the default setting or enter a value other than
!
"0".
◆ Auto-reconnect (Default setting: deactivated)
Auto-reconnect means that applications such as Web browser,
Messenger and Email can automatically open an Internet
connection when they are launched. If you do not have Flat rate,
this can lead to high charges being incurred. Therefore the default
setting is deactivated. Please refer to page 86 for manually
opening a connection.
57
Page 59

General configuration with Basic Setup
◆ Click on FINISH to complete the setup.
Your WAN connection has now been configured.
Once you have completed configuration, the router will try to open an Internet
connection. The router's Status page will appear with information about the
connection.
58
Page 60

Configuration with Advanced Setup
Configuration with Advanced Setup
In Advanced Setup you can configure all the Gigaset Router options. If you want, you
can also make changes to the settings you made in Basic Setup. The following table
shows the possibilities available in Advanced Setup.
Menu Description
System Here you can set the country and local time zone, assign a password for
administrator access and define a PC that is permitted to carry out
remote management of the Gigaset Router (see page 60).
WAN Here you can check and change the configuration of your router's WAN
connection (see page 64).
LAN Here you can change the router's Private IP address and configure
dynamic address assignment (see page 68).
Wireless Here you can configure the options for wireless communication
(channel, SSID and encryption) (see page 70).
NAT Here you can configure the address mapping for using several public IP
addresses, set up the router as a virtual server and configure special
applications (see page 73).
Firewall Here you can configure a number of security and special functions, e. g.
access control for local PCs to the Internet or preventing hacker attacks
(see page 77).
DDNS Here you can carry out the DynDNS configuration (dynamic DNS) for the
router (see page 83).
UPnP Here you can activate and deactivate the router's universal plug and play
function (UPnP) (see page 85).
Tools Here you can back up and restore the current configuration for example,
or restore the factory settings and update the system firmware (see
page 87).
59
Page 61

Configuration with Advanced Setup
System Configuration
You can use the Gigaset Router's system configuration
◆ to set or change the country (see below),
◆ to set or change the time zone (see page 60),
◆ to assign a password for accessing the router's user interface (see page 62),
◆ to enable access to the router user interface via a PC that is not on the local network
(remote management) (see page 63).
Setting the Country
You can use this page to set the country for the router. The country setting automatically
sets the channel normally used for wireless connections in that country. You can change
the channel on Channel and SSID (see page 70).
If you have configured your router with Basic Setup, this setting has already been made
and can be changed here.
◆ In the System menu, select Country.
◆ If you want to change the setting, select the new country and click on APPLY.
Setting the Time Zone
Information on the time zone is important for various time-dependent operations on
the Internet. For example, the data packets sent in a particular country have to be sorted
in the correct chronological order in the receiver's country. Access control to particular
services can also be defined using time-based rules.
If you have configured your router with Basic Setup, the time zone was automatically
defined appropriately for your setting for the Country. You can change the setting here.
◆ In the System menu, select Time Zone.
60
Page 62

Configuration with Advanced Setup
◆ Select your time zone from the selection list.
◆ If your time zone has summer and winter time, select Daylight Saving and use the
selection list to specify the start and end of summer time.
◆ To apply the settings click on APPLY.
61
Page 63

Configuration with Advanced Setup
Assigning passwords
After installation, your router configuration is not yet protected with a password. To
prevent unauthorised changes to the configuration, you should assign a password and
change this password from time to time.
◆ In the System menu, select Password settings.
◆ Enter a password in the New password box and repeat it in the box underneath.
The password must be between 3 and 12 characters long. It is not case sensitive.
Avoid names and all too obvious words. Use a combination of letters, numbers and
special characters.
If you ever forget the password you will have to reset your router. To
do this, hold down the reset button on the back of the router for at
i
least five seconds. Please bear in mind that this will restore all the
settings to the factory configuration. No password will be active
either.
◆ Check the value in Idle time out.
Use the box to define when the configuration session should be automatically
terminated if no more entries are made. The default entry is 10 minutes.
For security reasons you should enter a smaller value.
! If you enter 0 the session will never be cut automatically.
◆ To apply the settings click on APPLY.
62
Page 64

Configuration with Advanced Setup
Remote Management
Remote management enables a PC that is not on your local network to be used to
configure the Gigaset Router with a standard Web browser.
◆ In the System menu, select Remote Management.
◆ In Host address enter the IP address of the PC that is to have access to the router's
user interface from outside your local network.
◆ Remember that the Internet Service Provider may assign a
dynamic IP address to the PC and so that it will change. Make sure
i
◆ Check the Enabled box.
◆ To apply the settings click on APPLY.
that the PC always has the same IP address.
◆ If you use the IP address 0.0.0.0, any PC can be used to manage
the Gigaset Router.
63
Page 65

Configuration with Advanced Setup
WAN Configuration
If you have configured your router with Basic Setup, you have already configured your
router's WAN connection. Use the WAN configuration option in Advanced Setup to
check and change these settings.
You can use your Gigaset Router as a Router or Bridge. With the Bridge option, the WAN
connection is configured as a link to other local networks.
The WAN menu offers the following entries:
◆ Select Dynamic IP, if the router's WAN connection is assigned a Dynamic IP address
by your Internet Service Provider. Configuration is similar to Basic Setup, as
described on page 56.
◆ Select PPPoE, if you use PPP over Ethernet (PPPoE) for your WAN connection (e. g.
for T-DSL (T-Online)). Configuration is similar to Basic Setup, as described on
page 55.
◆ Select PPTP , if you use the Point-to-Point Tunneling Protocol (PPTP) for your WAN
connection. Configuration is similar to Basic Setup, as described on page 57.
◆ Select Static IP address, if the router's WAN connection is assigned a Static IP
address by your Internet Service Provider. Configuration is similar to Basic Setup, as
described on page 55.
◆ Select DNS, if you want to use a particular DNS Server (see page 66).
◆ Select Bridge, if you want to use your router as a bridge (see page 67).
Remember that configuration saves the access data for your WAN
connection in the router. Before passing your router on to somebody else
i
or having your dealer replace it, you should first restore the factory
settings. Otherwise unauthorised persons may use your Internet access
data at your expense. To reset the router, press the reset button on the
back for at least 5 seconds.
64
Page 66

Configuration with Advanced Setup
You can also open the page for WAN configuration via the WAN Settings window.
◆ Select WAN in the menu bar.
◆ Select the WAN connection type you use for your Internet connection.
◆ Click on More configuration to enter the configuration parameters for the selected
connection type.
65
Page 67

Configuration with Advanced Setup
Defining a DNS Server
The DNS service handles the mapping of domain names (Web addresses) to IP
addresses. Most Internet Service Provider offer a DNS Server. In this case you do not
need to enter anything here. If however you want to use a particular DNS server, you
will have to enter the IP address of the DNS server on this page. You can enter a second
DNS server in case the first one cannot be reached.
◆ In the WAN menu, select DNS.
◆ Enter the IP address of the DNS server(s) and click on APPLY.
66
Page 68

Configuration with Advanced Setup
Configuring as a bridge
If you select Bridge for the router, it can be used as a link between its local network
(LAN) and other LAN segments. In Bridge mode the router's WAN connection acts as a
connection to another LAN.
i
◆ In the WAN menu, select Bridge.
◆ Select Bridge mode.
◆ Enter the router's local IP address and click on APPLY.
The router's WAN connection can no longer be used for Internet access
however.
67
Page 69

Configuration with Advanced Setup
LAN Configuration
You can use LAN configuration to
◆ define an IP address for the router and
◆ define whether the router should automatically assign the IP addresses for the PCs
in your local network or not.
The default IP address for the router is 192.186.2.1. This is the router's Private IP
address. This is the address under which the router can be reached on the local network.
It can be freely assigned from the block of available addresses. The IP address under
which the router can be reached from outside is assigned by the Internet Service
Provider.
The router has a DHCP Server, whose factory setting is active. Thus the PCs' IP addresses
are automatically assigned by the router. If you want to assign static IP addresses for the
PCs, you will have to deactivate the DHCP server.
◆ If the router's DHCP server is active, configure the PCs' network
settings so that the Obtain an IP address automatically option is
checked. To find out how to do this, please turn to page 17 in
i
◆ Select LAN in the menu bar.
"Configuring the local network".
◆ If you deactivate the router's DHCP server, you will have to assign a
static IP address for the PCs using the network settings. This is
described in Practical Tips and Configuration Examples on the
supplied CD.
68
Page 70

Configuration with Advanced Setup
LAN IP
◆ If you want to assign the router a different IP address, enter it in IP address.
i
◆ If the DHCP server is active, you will have to specify a Lease time. Lease Time defines
the period of time in which the PCs retain the IP address assigned to them without
changing them. For small networks you can set Lease time to Forever. This means
that an IP address is assigned for an unlimited period of time.
IP address pool
In IP address pool enter the range of IP addresses that the router is to use for
automatically assigning IP addresses to the PCs.
◆ Enter the first and last addresses.
◆ To apply the settings click on APPLY.
We recommend using an address from the block that is reserved for
private use. This is the address block 192.168.0.0 - 192.168.255.254.
The first three fields of the beginning and end IP address always have
as their default setting the first three fields of the router's IP address
i
because the subnet mask is always 255.255.255.0. This means that
the first three address segments for all network components must be
identical.
69
Page 71

Configuration with Advanced Setup
Configuring Wireless Connections
If you want to connect PCs in wireless mode via the Gigaset SE105 dsl/cable, you will
have to configure the router as an Access point. Use Wireless Settings for this
configuration. Here you can
◆ activate the router's wireless module (see below),
◆ change the wireless channel and the Service Set ID (SSID) of the router (see below)
and
◆ set Encryption for wireless transmissions (see page 72).
Activating the wireless module
Wireless devices can register with your router only if its wireless module has been
activated.
◆ Open the Wireless menu.
◆ Activate the wireless module on Wireless Settings.
◆ Click on APPLY.
Setting the Channel and SSID
Before wireless network components can communicate with each other, you have to
use a shared wireless channel and the same SSID (Service Set Identifier).
The Gigaset SE105 dsl/cable comes supplied with the SSID configured
asConnectionPoint. For security reasons, it is advisable to change this SSID and
deactivate the broadcast function (SSID visible).
◆ In the Wireless menu, select Channel and SSID.
70
Page 72

Configuration with Advanced Setup
◆ SSID
Enter a string of your choice. The SSID is case sensitive. It can be up to 32
alphanumerical characters long.
◆ Remember that the connection to the wireless network adapters
i
◆ Channel
Wireless channel used by the Gigaset Router to communicate with other wireless
network components.
i
◆ SSID visible
If the option has been activated, the Gigaset Router includes the SSID in all data
transmissions. In this case eavesdroppers could use the SSID to gain access to your
network.
If the option is deactivated, wireless network components that want to connect to
the local network must know the SSID. This offers a certain degree of protection
against unauthorised access.
◆ To apply the settings click on APPLY.
will be interrupted until you enter the new SSID on them as well.
◆ You will find a detailed example of how to change the SSID in
"Practical Tips and Configuration Examples" on the supplied CD.
The available channel settings are governed by your country's
regulations. They define the number of available channels. The
default setting is determined by the country setting (see page 49).
You should not change this setting unless you have a good reason to
do so.
71
Page 73

Configuration with Advanced Setup
Setting the Encryption
If you are sending sensitive data over wireless channels, we recommend that you
activate WEP-Encryption on your wireless network components.
Wired Equivalent Privacy (WEP) protects data transmitted between
i
To activate WEP encryption on your wireless network components:
1. Activate Web encryption on your Gigaset SE105 dsl/cable and generate a
64- or 128-bit key Make a note of the generated key.
2. Activate Web encryption on wireless network adapters and enter the generated
64- or 128-bit key.
You can choose either the standard 64-bit key or the more robust 128-bit key for
encryption. The keys are generated in hexadecimal format. You have to use the same
keys for encryption and decryption for the Gigaset Router and all your wireless network
adapters.
Keys can be generated automatically. You can also enter them manually. For automatic
64-bit encryption, you enter a passphrase that is used to generate four keys. For
automatic 128-bit encryption, a single key is generated from the passphrase.
wireless nodes. However WEP does not protect transmission on your
wired network or over the Internet.
72
i
You will find a detailed example of how to set WEP encryption in "Practical
Tips and Configuration Examples" on the supplied CD.
Page 74

Configuration with Advanced Setup
NAT Configuration
Your Gigaset Router comes supplied with the NAT function (Network Address
Translation). The NAT function acts as a firewall against unauthorised access from the
Internet.
◆ All the local IP addresses of the PCs in the local network are mapped to the router's
Public IP address. This means that each PC on the local network communicates with
the Internet via the router's IP address. One advantage of this is that only one
Internet access has to be bought from the Internet Service Provider even if you use
several PCs. A further advantage is that the PCs' local IP addresses remain
anonymous thus preventing any direct external access to the PCs on the local
network. The router knows which PC has launched which Internet application and
ensures that each local user receives the right data.
◆ No data from the Internet is allowed into your local network unless it has been
explicitly requested by one of the PCs on that network.
◆ The router opens only one Port for each Internet application, e. g. for email, FTP or
HTTP.
You can use the router's NAT settings to
◆ configure address mapping.
If you have several public IP addresses, your PCs can use them as well as the router's
IP address to connect to the Internet. This can be done by configuring the address
mapping appropriately (see page 74).
◆ set up the router as a virtual server.
If you want to offer files or Web services that are on a PC in your local network to
other Internet users, you will have set the router up as a virtual server (see page 75).
◆ configure Special Applications
Some applications, such as games, network conferences and voice over Internet,
will not work if Network Address Translation (NAT) has been activated. If you want
to use such applications nevertheless, then you will have to configure them as
"Special Applications" (see page 76).
73
Page 75

Configuration with Advanced Setup
Defining Address mapping
In the default setting, all the local PC IP address are mapped to your router's public IP
address. If you have a large number of users on your local network, it may be advisable
to order several IP addresses from your Internet Service Provider. Then use address
mapping to define which local IP addresses will connect to the Internet via which public
IP address.
Remember that connections via several IP addresses through the WAN
i
◆ In the NAT menu, select Address mapping.
port can lead to bottlenecks because all the connections have one
hardware interface.
◆ Enter the public IP addresses you want to share in the Global IP boxes.
◆ Enter in the line underneath the range of local IP addresses that are to share this
public IP address.
◆ To apply the settings click on APPLY.
74
Page 76

Configuration with Advanced Setup
Setting up the router as a virtual server
If you want to offer files or Web services that are on a PC in your local network to other
Internet users, set the PC up as a server (e. g. as FTP or HTTP server). However the
router's NAT function does not normally allow "external" access to PCs on the local
network. To make services available on the Internet from local PCs, you have to set up
the router as a virtual server.
Externally the router takes on the role of the server. It receives the requests of remote
users under its public IP address and automatically redirects them to the local PCs. The
private IP addresses of the servers on the local network remain protected.
Internet services are addressed via defined port numbers. The router needs a mapping
table of the port numbers to redirect the service requests to the server that actually
makes the service available.
You have to set up this mapping table.
i
You will find a detailed example of how to set up the router as a virtual
server in "Practical Tips and Configuration Examples" on the supplied CD.
75
Page 77

Configuration with Advanced Setup
Configuring Special Applications
One property of NAT is that data from the Internet is not allowed into your local network
unless it has been explicitly requested by one of the PCs on that network. Most Internet
applications run behind the NAT Firewall without any problems. If you request Internet
pages, for example, or send and receive emails, the request for data from the Internet
comes from a PC on the local network and so the router allows the data through. The
router opens exactly one Port for the application. If an external application tries to send
a call to a PC within the local network, the router will block it. There is no open port via
which the data could enter the local network.
Some applications, such as games, network conferences and voice over the Internet,
require several links, i.e. several ports, so that the users can communicate with each
other. In addition, these applications must also be permitted to send requests from
other users on the Internet to the user on the local network. These applications cannot
work if Network Address Translation (NAT) has been activated. If you want to use such
applications nevertheless, then you will have to configure them as Special
Applications. This means:
◆ You define a so-called trigger port for the application and assign it the public ports
that have to be opened for the application.
◆ The router checks all outgoing data for the port number. If it recognises a match
with a defined Trigger Port, then it will open the assigned public ports and notes the
IP address of the PC that sent the data. If data comes back from the Internet via one
of these public ports, it allows the data through and directs it to the right PC. A
trigger event always comes from a PC within the local network. If a Trigger Port is
addressed from outside, it is simply ignored by the router.
76
i
You will find a detailed example of how to configure special applications
in "Practical Tips and Configuration Examples" on the supplied CD.
Page 78

Configuration with Advanced Setup
Firewall Configuration
The router's Firewall functions include various security functions for the local network.
You can
◆ protect your network against hacker attacks (see page 78),
◆ enable only selected PCs to access your network (see page 80),
◆ restrict or totally block local users' access to the Internet (see page 81),
◆ exclude certain PCs from the firewall (see page 82).
i
Since the firewall has little impact on system performance, we
recommend that you activate it.
Activating the firewall
◆ Select the Firewall menu.
◆ Activate the firewall functions in the working area.
◆ Click on APPLY.
The firewall functions are now activated.
77
Page 79

Configuration with Advanced Setup
Protection against hacker attacks
If you have activated your router's firewall functions, it will monitor and restrict the
access of data arriving via the WAN connection with a function called Stateful Packet
Inspection (SPI). This allows the router to identify and prevent certain types of attacks
from the Internet, such as Denial-of-Service (DoS). DoS attacks are aimed at devices and
networks with Internet connections. The aim is not so much to steal data but to paralyse
the computer or network to such an extent that the network resources are no longer
available. A typical hacker attack involves making a remote computer announce that it
is acting for the paralysed machine for example and receive the data meant for you.
The router prevents the following DoS attacks: Ping of Death (Ping Flood),
i
You can use the Intrusion detection page to change the standard firewall settings and
arrange to be notified by email about any attempted hacker attacks.
◆ In the Firewall menu, select Intrusion detection.
SYN Flood, IP Fragment (Teardrop), Brute-Force, Land, IP Spoofing, IP
with Zero Length, TCP Null Scan (Port Scan), UDP Port Loopback, Snork
etc.
78
Page 80

Configuration with Advanced Setup
Changing the standard firewall settings
You can activate or deactivate the following functions:
◆
SPI and anti-DoS firewall protection
The router monitors incoming data traffic. If this option has been activated, the
router will only let those data packets through that have requested by applications
run by users on your local network. All other data packets will be rejected.
You can release applications for incoming traffic using Stateful Packet Inspection.
If for example you activate only FTP service, all incoming traffic will be blocked
apart from the data for FTP connections that have been initiated on the local
network.
◆
RIP error
RIP is a protocol used by routers to exchange information about their networks.
Faulty RIP packets slow down the data flow and can be provoked to paralyse a
network. If this option has been activated, the firewall will identify and reject RIP
errors.
◆
Reject Ping from WAN side
A ping command can be used to tell whether a PC can be reached via the network.
If you activate this option, all attempts to contact a computer on the local network
with a ping will be blocked.
Notification of attempted hacker attacks
You can choose to be informed by email about a possible hacker attack.
◆ Enter in the dialog boxes in When hackers attempt to enter your network, we can
alert you by e-mail.
– the email address to be used for notification about hacker attacks.
– the address of the SMTP server (email server) of your Internet Service Provider,
e. g. mailto.t-online.de.
◆ To apply the settings click on APPLY.
79
Page 81

Configuration with Advanced Setup
Enabling only selected PCs to access your local network
In the MAC filtering table you can enter up to 32 PCs that are allowed to access your
local network. All other computers will be denied access. Access control is based on the
PCs' MAC address.
◆ In the Firewall menu, select MAC filtering table.
◆ Activate the Ye s option next to MAC Address Control so that the MAC addresses of
accessing PCs are checked.
There are two ways of making entries in the MAC filtering table:
◆ Enter the MAC addresses of those PCs you want to have access manually in Client
PC MAC address.
◆ If you have activated DHCP, all the PCs that are currently logged in will appear in the
DHCP Client list at the bottom of the page. Select a PC, decide in which row of the
table the entry is to appear and click on Copy to. The MAC address of the selected
PC will be transferred to the table.
◆ Once you have entered all the PCs you want, click on APPLY.
If you have activated the MAC address filter, you should enter at least one
PC from which you can configure the router. Otherwise you will not have
!
any access to the router's user interface. If you have accidentally denied
router access for all the PCs, you will have to completely reset the router.
To do this, hold down the reset button on the back of the router for at
least five seconds.
80
Page 82

Configuration with Advanced Setup
Restricting access of local PCs to the Internet
Under the general heading Firewall the Gigaset Router offers the following protection
functions:
◆ Complete isolation of a PC
This allows you to prevent any access at all to Web pages from a given PC. To do this
use the functions on the Firewall – Access control page.
◆ Blocking certain URLs
– Keyword filtering
This allows you to prevent the opening of Web pages whose URL contains certain
keywords that you have defined.
Example: Keyword abcd
This would block a website with the URL http://www.abcd.com
– URL filtering
This allows you to prevent the displaying of a website with a particular URL
address.
Example: URL http://www.abcd.com/products
This would block precisely the Web page http://www.abcd.com/products.
– Domain blocking
This allows you to block a particular URL address and all the subsequent addresses
that begin with the same sequence of characters.
Example: Domain http://www.abcd.com
All Web pages beginning with http://www.abcd.com would be blocked, e.g.
http://www.abcd.com and also http://www.abcd.com/products,
http://www.abcd.com/service, http://www.abcd.com/products/
product_graphics1.htm etc.
To do this use the functions on the Firewall – URL blocking page.
◆ Time limits for blocks
You can define a particular block period or a schedule during which certain blocks
become active. You can include the four block strategies described above in this
schedule.
To do this use the functions on the Firewall – Schedule Rule page.
i
You will find a detailed example of how to set Internet blocks in "Practical
Tips and Configuration Examples" on the supplied CD.
81
Page 83

Configuration with Advanced Setup
Opening the firewall for particular PCs (DMZ)
Some applications do not work properly behind a firewall because they require
unrestricted data flow in both directions. In this case you can define a so-called
demilitarised zone (DMZ) for PCs running such applications.
When setting up DMZ PCs make sure that the PCs always have the same
IP address. This means:
i
◆ In the Firewall menu, select DMZ.
◆ the IP addresses must be static (see "Practical Tips and Configuration
Examples") or
◆ the Lease time for dynamic address assignment must be set to
Forever (see page 69).
◆ The Public IP address has as the first entry the router's Public IP address. If you have
other public IP addresses, enter them under the router address.
◆ In Client PC IP address enter the IP addresses of the PCs you want to exclude from
the firewall functions.
Please bear in mind that these PCs are no longer protected against
!
◆ To apply the settings click on APPLY.
unauthorised access from the Internet and as such could be a security
risk for your network. You should use this option only in emergency
situations.
82
Page 84

Configuration with Advanced Setup
Activating dynamic DNS
A service you want to make available on the Internet is accessible via a Domain name.
Your router's Public IP address is assigned to this Domain name. If your Internet Service
Provider for your local network's WAN connection assigns the IP address dynamically,
the IP address of the router can change. Then the assignment to the Domain name is no
longer valid and your service will no longer be available.
In this case you must ensure that the assignment of the IP address to the Domain name
is regularly updated. This is handled by the dynamic DNS Service (DynDNS). You can use
the DynDNS service to assign your Gigaset Router an individual static Domain name on
the Internet even if it does not have a static IP address.
There are various providers on the Internet offering free DynDNS Service. The Gigaset
Router uses the DynDNS Service from DynDNS.org
(http://www.DynDNS.org)
service can be reached on the Internet as a subdomain of one of the DynDNS.org
domains.
If you have activated the router's DynDNS function, it will monitor its public IP address.
When this changes, it will open a connection to DynDNS.org and update its IP address
there.
You have to open an account with DynDNS.org before you can use the router's DynDNS
function. Follow the instructions on the DynDNS.org website. Then enter the account
user data when configuring the router.
. If you use the service of this DynDNS provider, then your
83
Page 85

Configuration with Advanced Setup
◆ Select the DDNS menu.
◆ You have to activate the Dynamic DNS option on DDNS (Dynamic DNS) settings so
that the DynDNS service can be used.
i
◆ To apply the settings click on APPLY.
The other entries have to match the entries you made when opening
the account with DynDNS.org.
84
Page 86

Configuration with Advanced Setup
Using the universal plug and play function
PCs with UPnP (Universal Plug & Play) can run their network configuration themselves
and automatically use services offered on the network.
The PC must have Windows ME or Windows XP as its operating system.
Check whether the UPnP function has been installed in your PC's
i
If you have installed UPnP on your PC's operating system and activated it on the router,
an icon for your Gigaset Router will appear in the PC task bar. Windows XP systems will
also include the icon under network connections. Clicking on this icon opens the
Gigaset Router's configuration page.
To activate the router's UPnP function:
◆ Select UPnP in the menu bar.
operating system. It may be necessary to retrospectively install the UPnP
components even on Windows XP or Windows ME systems. Please
consult your PC's operating instructions.
◆ Activate UPnP.
◆ Click on APPLY.
85
Page 87

Gigaset Router Administration
Gigaset Router Administration
The Gigaset Router user interface includes several helpful functions for administering
your router. You can
◆ set up and close an Internet connection manually (see below),
◆ save and restore the router configuration data and, if required, reset the factory
settings (see page 87),
◆ upgrade the router firmware (see page 88),
◆ re-boot the router (see page 89),
◆ view information about the router configuration and status (see page 90),
◆ check, save and clear the security log (see page 91).
Opening or closing an Internet connection manually
You can open and close an Internet connection manually. If for example you deactivated
Auto-reconnect when you configured the WAN interface, Internet applications (such as
your browser or email application) will not automatically open a connection when they
are launched. In this case, you will have to open the connection manually when it is
required and also close it again when you are finished with it.
Opening and closing an Internet connection manually:
◆ Click on Status in the navigation bar.
Below the status information for the INTERNET you will see two buttons.
For PPPoE or PPTP connections:
Disconnect Cuts an open connection to the Internet.
Connect Opens a connection to the Internet.
For connections with a dynamic router IP address:
Release Cuts an open connection to the Internet and releases the IP
address.
Renew Opens a connection to the Internet and forces the DHCP server to
assign a new IP address.
86
Page 88

Gigaset Router Administration
Saving and restoring a configuration
Once you have configured your router, it is advisable to back up the settings. Then you
can restore them at any time, should they be accidentally deleted or overwritten.
◆ In the Tools menu, select Configuration tools.
Saving the configuration data
◆ Select the option Backup.
◆ Click on APPLY.
◆ Your browser opens a window in which you can run the backup routine for the
router configuration file. Confirm this with OK. Then select a directory on your local
PC to which the configuration file is to be backed up and give it a name (default
name: config.bin). Confirm this once again with OK.
Once the procedure has been completed, the current configuration data of your router
will have been backed up in the specified file.
Restoring the back-up
◆ Select the option Restore.
◆ Click on Browse and select the configuration file (config.bin) you want to restore.
◆ Click on APPLY.
Restoring Factory Defaults
◆ You can restore the original factory settings by activating Restore to factory
defaults and clicking on APPLY.
You can also restore the factory settings by pressing the reset button on
i
the back of the Gigaset Router for at least 5 seconds (see page 11). This
option is always available even if you cannot access the router's user
interface.
87
Page 89

Gigaset Router Administration
Firmware Upgrade
You can load the latest firmware for the router. First you will have to obtain the latest
firmware version. This is available on the Siemens website
www.my-siemens.com/se105
◆ Download the new firmware from the Siemens website and save it on your PC.
◆ Close down all network activities on your local network.
◆ In the Tools menu, select Firmware Upgrade.
◆ Click on Browse and select the file you downloaded from the Internet.
◆ Click on APPLY.
◆ A window will appear prompting you to confirm that you want to update the
firmware. Click on OK.
◆ The next window will warn you that the router will not be available for about a
minute during the upgrade procedure. Acknowledge this message promptly with
OK.
. Then carry out the following steps:
!
The firmware will now be updated.
Some browsers abort the upgrade process if you do not click on OK
immediately.
! Do not switch the router off during the upgrade procedure.
After successful upgrading, the router is automatically rebooted. All the LEDs will go
out. Once the process has been completed, the PWR LED will light up again. The
browser will show the router login screen.
Use the Status tab in INFORMATION to check whether the upgrade
i
88
process was in fact successful (see page 90). Here you should see the
latest firmware version for your router.
Page 90

Gigaset Router Administration
Resetting the router
You can reset the router if it no longer functions properly. The router will be rebooted
and should then work properly.
◆ In the Tools menu, select Reset.
◆ Click on APPLY. You will see a dialog window prompting you for further
confirmation.
The reboot procedure takes a few moments. Then you have to log on again before you
can make any changes to the configuration.
i
You can also reboot the router by briefly pressing the reset button on the
back or switching the router off and on again (see page 11).
89
Page 91

Gigaset Router Administration
Displaying the router's Status
The Status tab shows information about the router's configuration and connection
status. In addition, you can open and close an Internet connection manually, and also
check, save and clear the security log.
◆ Click on Status in the navigation bar.
Router information
The following information is displayed:
Current time Shows the current time.
INTERNET Shows the connection type of the WAN connection and
whether it is active or not. If it is, you will see further
information about the connection.
ROUTER Shows the private IP address of the router and the subnet
mask of the local network.
Shows whether the DHCP server of the router and the
firewall are active.
90
Page 92

Gigaset Router Administration
INFORMATION Provides the following information:
◆ The number of connected PCs,
◆ The firmware versions,
◆ The MAC address of the LAN side of the router,
◆ The MAC address of the WAN connection,
◆ The hardware version number,
◆ The product serial number,
DHCP Client Protocol Displays information about all the DHCP clients in your
network.
Working with the security log
The Security log lists all the accesses and attempted accesses to your network. It
contains the following information:
◆ Date and time of access
◆ IP address of the accessing PC
◆ Nature of the access
You can do the following:
Save Saves a security log. You will see a dialog window asking you
where you want to save the log file.
Clear Clears the content of the security log.
Refresh Updates the security log.
91
Page 93

Appendix
Appendix
Fault tracing
This chapter describes common problems and their solution. The Gigaset Router is easy
to monitor thanks to its LED displays. Problems can be quickly identified. If you cannot
solve the connection problem after checking the LED displays, please consult the other
sections of the following table.
Symptom Possible cause and solutions
PWR lamp does not light up. No power supply.
◆ Check whether the mains unit is connected to the
Gigaset Router and a power outlet.
◆ Check whether the power outlet and the mains unit
are working properly. If the mains unit is not
working properly, please get in touch with our
customer service unit (see page 97).
(LINK/ACT) display of a
connected device does not
light up.
WLAN display does not light
up.
No LAN connection
◆ Make sure that the connected device is switched on.
◆ Check whether the Ethernet cable is plugged in.
◆ Check that you are using the right cable type (CAT 3,
4 or 5) and that the cable is not too long (100 m).
◆ Check that the network card on the connected
device and the cables are not defective. If necessary,
replace a defective network card or cable.
◆ Use the Windows device manager (My Computer -
Properties) to check whether the network card is
functioning. If you see a red cross or a question
mark, then the driver may not have been installed or
there is a resource conflict. Follow the Windows
instructions to remedy the problem.
◆ Activate the router's wireless module (menu
Wireless).
92
Page 94

Symptom Possible cause and solutions
You cannot connect to the
Internet.
◆ Check that you are using the right cable to connect
to the modem. Depending on the modem you are
using, the cable must have either straight or cross
wiring. Please consult your modem operating
instructions. The Ethernet cable supplied has
straight wiring.
◆ Check whether the Auto-reconnect option has
been deactivated (for PPPoE or PPTP connections).
In this case, connections cannot be opened
automatically.
Select Auto-reconnect. Remember that this setting
may lead to higher costs if you are billed on the time
used.
◆ If the Auto-reconnect option has been activated,
perhaps the connection was terminated manually
on the Status tab using the Disconnect button.
– Open the connection manually using the Connect
button again or
– restart your router.
In both cases, the Auto-reconnect setting will be
active again.
You cannot open a
connection from a wireless
device to the Gigaset Router.
The wireless network adapter is not using the correct
SSID.
◆ Change the SSID on the network adapter.
WEP encryption has been activated on the Gigaset
Router but not on the wireless network adapter or it is
using the wrong WEP key.
◆ Activate WEP encryption on the network adapter
with the correct key.
If you do not know the key, you will have to reset
your router. To do this, hold down the reset button
on the back of the router for at least five seconds.
Warning: Please bear in mind that this will restore all
configuration settings to the factory settings.
Appendix
93
Page 95

Appendix
Symptom Possible cause and solutions
The Gigaset Router or other
PCs cannot be reached by a
PC in the connected LAN
with a ping command.
No connection to the router's
configuration interface
Password forgotten or lost
You cannot access a resource
(drive or printer) on a
different PC
◆ Make sure that TCP/IP has been installed and
configured on all the PCs on the local network.
◆ Check that the IP addresses have been properly
configured. In most cases, you can use the Gigaset
Router's DHCP function to assign dynamic addresses
to the PCs in the LAN. In this case, you have to
configure the TCP/IP settings of all the PCs so that
they obtain the IP address automatically.
If you configure the IP addresses in the LAN
manually, remember to use the subnet mask
255.255.255.0. This means that the first three parts
of the IP address on each PC and the router have to
be identical. The router also has to be configured as
DNS server and as default router.
◆ Use the ping command to check whether you can
establish a network connection to the Gigaset
Router.
◆ Check the network cable between the PC you want
to use to administer the router and the Gigaset
Router.
◆ If the PC you want to use is on the router's local
network, make sure that you are using the correct IP
address administration (see above).
◆ If the PC you want to use is not on the router's local
network it must be authorised via Remote
Management.
◆ Hold down the reset button on the back of the
router for at least five seconds to restore the factory
settings.
Warning: Please bear in mind that this will restore all
configuration settings to the factory settings.
◆ Make sure that TCP/IP has been installed and
configured on all the PCs on the local network and
that the PCs all belong to the same workgroup.
◆ Check whether the resource has been released on
the PC in question and whether you have the
necessary access rights.
◆ Printing: Check whether the printer has been set up
as a network printer.
94
Page 96

Appendix
Specifications
Standards IEEE 802.3 10Base-T Ethernet
IEEE 802.3u 100Base-TX FastEthernet
802.11b
WAN interface 10Base-T/100Base-TX
LAN interface 10Base-T/100Base-TX
4 RJ-45 Ports
LAN data transmission rate up to 10/20Mbps (10Base-
T half/full duplex) or
100/200Mbps (100Base-TX with half/full duplex)
Management Browser-based management
Both DHCP server and also client available
Advanced performance features Dynamic configuration of IP addresses – DHCP, DNS
Firewall – Client privileges, protection against hacker
attacks, log file
Virtual server via NAT & NAPT
Virtual Private Network – PPTP, L2TP, IPSec Pass-
Through
Identification of intruders, email warnings, parental
control
LED displays LAN (Connection/Link, Activity/ACT), WAN
(Connection/Link, Activity/ACT), power (PWR)
Dimensions 156 mm x 129 mm x 30 mm
Weight 470 g
Input power 9 V 1A
Maximum current 0.04A RMS max. at 110V/240V
Power consumption 5 Watt max. with 100-240 V AC
Internet Standards RFC 826 ARP, RFC 791 IP, RFC 792 ICMP, RFC 768 UDP,
RFC 793 TCP, RFC 854-859 TELNET, RFC 1321 MD5, RFC
1497 BOOTP Extension, RFC 1570 PPP LCP Extension,
RFC 1631 NAT, RFC1661 PPP, RFC 1700 Assigned
Numbers, RFC 1866 HTML, RFC 1945 HTTP, RFC 1994
CHAP, RFC 2131 DHCP, RFC 2637 PPTP
Temperature Operating temperature from 5 to 40° C
Storage temperature from -40 to 70 °C
Humidity 5 % to 95 % (non condensing)
Safety EN60950
IEC60950
as per Immunity: EN 61000-3-2/3, EN 61000-4-02.03.04/
05.06.08/11
95
Page 97

Appendix
Special conditions prevailing in your country have been taken into consideration.
The router complies with the R&TTE Guidelines, as shown by the CE mark.
96
Page 98

Service (Customer Care)
You have access to straightforward support concerning with technical aspects of your
device and how to operate it through our Online Support on the Internet:
www.my-siemens.com/customercare
or you can refer to the section "Fault tracing" on page 92.
If you have any trouble with the equipment, please contact the Siemens telephone
service:
United Kingdom 0 87 05 33 44 11
Ireland 18 50 77 72 77
The Siemens Service is only available to deal with device faults only. Your specialist
dealer will be able to help you with any questions about operating your device.
Please address any questions about the DSL or cable connection to your network
provider.
Guarantee certificate (United Kingdom)
Without prejudice to any claim the user (customer) may have in relation to the dealer or
retailer, the customer shall be granted a manufacturer's Guarantee under the conditions
set out below:
◆ In the case of new devices and their components exhibiting defects resulting from
manufacturing and/or material faults within 24 months of purchase, Siemens shall,
at its own option and free of charge, either replace the device with another device
reflecting the current state of the art, or repair the said device. In respect of parts
subject to wear and tear (including but not limited to, batteries, keypads, casing),
this warranty shall be valid for six months from the date of purchase.
◆ This Guarantee shall be invalid if the device defect is attributable to improper
treatment and/or failure to comply with information contained in the user manuals.
◆ This Guarantee shall not apply to or extend to services performed by the authorised
dealer or the customer themselves (e.g. installation, configuration, software
downloads). User manuals and any software supplied on a separate data medium
shall be excluded from the Guarantee.
◆ The purchase receipt, together with the date of purchase, shall be required as
evidence for invoking the Guarantee. Claims under the Guarantee must be
submitted within two months of the Guarantee default becoming evident.
97
Page 99

◆ Ownership of devices or components replaced by and returned to Siemens shall vest
in Siemens.
◆ This Guarantee shall apply to new devices purchased in the European Union. The
Guarantee is issued by Siemens plc, Siemens House, Oldbury, Bracknell, Berkshire,
RG12 8FZ.
◆ Any other claims resulting out of or in connection with the device shall be excluded
from this Guarantee. Nothing in this Guarantee shall attempt to limit or exclude a
Customers Statutory Rights, nor the manufacturer's liability for death or personal
injury resulting from its negligence.
◆ The duration of the Guarantee shall not be extended by services rendered under the
terms of the Guarantee.
◆ Insofar as no Guarantee default exists, Siemens reserves the right to charge the
customer for replacement or repair.
◆ The above provisions does not imply a change in the burden of proof to the
detriment of the customer.
To invoke this Guarantee, please contact the Siemens telephone service. The relevant
number is to be found in the accompanying user guide.
Guarantee certificate (Ireland)
Scope
◆ This equipment guarantee applies to end users ("customers"). This guarantee does
not in any way affect the customer's statutory rights.
◆ The guarantee applies to the supplied devices and all their components but not to
their installation or configuration or to the services provided by the dealer. Manuals
and any software supplied on a separate data medium are excluded from the
guarantee. This guarantee does not apply to decorative covers or any other
personalised parts or software not included in the scope of supply. The guarantee
also does not apply to decorative top or bottom shells for special editions.
◆ The guarantee provides for devices or components that, despite proper care and
use, have demonstrably developed defects due to faulty workmanship and/or faulty
materials to be replaced or repaired at our discretion free of charge. The guarantee
does not cover normal wear and tear. Alternatively, we reserve the right to replace
the defective device with a successor model or reimburse the original purchase price
on return of the defective device. Our decision is final. Any legal claims are excluded.
98
Page 100

◆ Claims under the guarantee cannot be made if the defect or damage was caused by
improper care or use. Improper care or use includes the following:
– Opening the device (this is classed as third-party intervention)
– Manipulating components on the printed circuit board
–Manipulating the software
– Defects or damage caused by dropping, breaking, lightning or ingress of
moisture. This also applies if defects or damage were caused by mechanical,
chemical, radio interference or thermal factors (e.g. microwave, sauna, etc.).
– Repairs or other work done by persons not authorised by us.
– Devices fitted with accessories not authorised by Siemens.
◆ Any further claims due to damage are excluded, such as damage arising outside the
device, provided this was not due to gross negligence and/or intent on our part.
◆ Claims under the guarantee must be made as soon as the defect is noticed.
◆ A till receipt showing the date of purchase must be presented as proof. Each claim
under the guarantee is accepted with the express reservation that subsequent
investigations confirm the validity of the claim.
◆ Any devices or components that are replaced become our property.
◆ The costs of materials and labour will be borne by us, but not the costs of transport,
postage or freight.
◆ We are entitled, at our discretion, to make technical changes (such as firmware
updates) beyond repair or replacement in order to upgrade the device to the latest
state of the art. There is no additional charge to the customer for this work. Our
decision is final. Any legal claims are excluded.
◆ The guarantee is valid in the country of purchase. It applies only if the device is
operated in the relevant geographical area in accordance with the information on
the packaging and in the operating instructions.
◆ Any further claims are excluded. Siemens is not liable in any circumstances for
downtime, loss of profits, loss of data or loss of any other information. The customer
alone is responsible for safeguarding such data and information.
◆ Changes to this guarantee require prior approval by Siemens in writing.
Guarantee period
◆ The guarantee applies in countries in the EU from 1 January 2002 for a period of 24
months.
◆ In all other countries the guarantee period shall be the relevant minimum statutory
guarantee period, but no longer than 24 months.
◆ The guarantee period starts on the day of purchase by the customer.
◆ A successful claim under the guarantee does not extend the guarantee period.
◆ Work under the guarantee is handled by our Customer Care Centres.
99
 Loading...