

Page 1

User Guide
ROLMphone 120/240/400 Series
for 9751 CBX and Hicom 300 E CS
Page 2

WARNING: Hackers who unlawfully gain ac ces s to customer telecommunications systems
to make long distance telephone calls that are then billed to the system owner are criminals.
Curren tly, we do not kn ow of any teleco mmunications system that is immune to this type of
criminal activity. Siemens will not accept li ability fo r any damages, including long dist ance
charges, w hich result from unaut hor ized use. Although Siemens has des igned security features into its products, it is your sole responsibility to use the security features and to establish
securi ty prac tice s with in yo ur co mpan y, i nclud ing t rai ning , se curit y awa reness , an d ca ll a udit ing. Si emens s ales and servi ce perso nnel, as w ell as Siemens’ business partners, are avai lable
to work with you to help you pr event this type of unau thorized use of your tel ecommunica tions system.
NOTE: This equipment has been tested and found to comply with the limits for a Class A digital devi ce, pu rsua nt to Par t 15 o f the FCC R ules. Thes e limit s are desi gn ed to prov id e reason able protectio n against harmful interference when the equi pment is operated in a commercial
environment. Thi s equipment generates, uses, and can ra diate rad io frequency energy and if
not ins talled and used i n accordance with the instruction manual, may cause har m f ul interf e r ence to radio communication. Operation of this equipment in a residential area is likely to
cause ha rmful interfer e nce, in w hich case the us er wi ll be req uired t o take wha te ver measu res
may be required to correct the interference at his or her own expense.
WARNING: Changes or modifications to the equipment that are not expressly approved by
the resp onsibl e part y for comp lian ce cou ld void th e user’ s author it y ot operat e the equ ipment .
This equip ment does no t exceed Class A limits per radi o noise emiss ions for di gital appar atus,
set out in the Radio Interference Regulation of the Canadian Department of Communications.
Operat ion in a r eside nt ial area ma y c ause unac ceptab le i nter fere nce t o radio a nd TV rec ept ion
requir ing the owne r or operator to take whatever steps are necessary to correct the inte r ference. See inst r uction manual.
Cet équipement ne dépas s e pas les li mit es de Classe A d’ émission de bruits radioélectriques
pour les appareils numériques, telles qu e prescrite s par le Règlement s ur le brouillage radioélectrique établi par le ministère de s Comm unications du Canada. L ’ exploitat ion faite en
milieu résidentiel peut entraîner le brouillage des réceptions radio et tél é, ce qui obligerait le
propri étaire ou l’ opérateur à prendre les dispositions nécess aires pour en éliminer les caus e s .
November 1998
Form No. GU30-1612-01 Part No. 06E0105 EC No. A93070
No part o f this pub lication may be reproduced, stored i n a retrieval system, or tr ans m itted, in
any form or by any means, mechani cal, elect ronic, photocopyi ng, record ing, or other w ise,
without prior written permission of Siemens Business Communications Systems Inc.
Request Siemens publications from your Siemens representative or the Siemens branch
serving you. Pub lications are not stocked at the address below.
Siemens Business Communication Systems, Inc.
4900 Old Ironsides Dr ive
P.O. Box 58075
Santa Clara, CA 95052-8075
(408) 492-2000
TWX: 9103387350 ROLM SNTA B Telex: 278156 ROLM UR
ROLMphone and PhoneMail are regist er ed trademark s and ROLMfax is a trademark of
Siemens Business Communication Systems, Inc.
Siemens and Hi com ar e registered trademar ks of Si emens Aktienges ellsch af t.
Copyright Siemens B us iness Commu nication Systems, Inc. 1995, 1996, 199 7, 1998.
All rights reserved.
Page 3

Contents
Chapter 1. Introduction
The ROLMphone 120, 240, an d 400 Series . . . . . . . . . . . . . . . . .1-1
The ROLMphone 120 Seri es . . . . . . . . . . . . . . . . . . . . . . . . . .1-3
The ROLMphone 240 Seri es . . . . . . . . . . . . . . . . . . . . . . . . . .1-4
The ROLMphone 400 Seri es . . . . . . . . . . . . . . . . . . . . . . . . . .1-6
ROLMphone Basics . . . . . . . . . . . . . . . . . . . . . . . . . . . . . . . . . . .1-8
Faceplate . . . . . . . . . . . . . . . . . . . . . . . . . . . . . . . . . . . . . . . . . .1-8
Line Keys . . . . . . . . . . . . . . . . . . . . . . . . . . . . . . . . . . . . . . . . .1-8
Multiple Line Appearances. . . . . . . . . . . . . . . . . . . . . . . . . . . .1-8
Key Pad. . . . . . . . . . . . . . . . . . . . . . . . . . . . . . . . . . . . . . . . . . .1-8
Display . . . . . . . . . . . . . . . . . . . . . . . . . . . . . . . . . . . . . . . . . . .1-9
System Features . . . . . . . . . . . . . . . . . . . . . . . . . . . . . . . . . . . .1-9
Feature Keys . . . . . . . . . . . . . . . . . . . . . . . . . . . . . . . . . . . . . . .1-9
Class of Service . . . . . . . . . . . . . . . . . . . . . . . . . . . . . . . . . . .1-10
Personal Identification Number (PIN) . . . . . . . . . . . . . . . . . .1-10
Hold, Transfer, Connect . . . . . . . . . . . . . . . . . . . . . . . . . . . . .1-10
Other Frequently Used Keys. . . . . . . . . . . . . . . . . . . . . . . . . .1-11
Feature Access Codes . . . . . . . . . . . . . . . . . . . . . . . . . . . . . . .1-12
Status Lights . . . . . . . . . . . . . . . . . . . . . . . . . . . . . . . . . . . . . .1-13
Speaker . . . . . . . . . . . . . . . . . . . . . . . . . . . . . . . . . . . . . . . . . .1-14
Speakerpho ne (RP240, RP240E, and RP400) . . . . . . . . . . . .1-14
Voice Volume Keys . . . . . . . . . . . . . . . . . . . . . . . . . . . . . . . .1-14
Sounds. . . . . . . . . . . . . . . . . . . . . . . . . . . . . . . . . . . . . . . . . . .1-15
Ring Volume. . . . . . . . . . . . . . . . . . . . . . . . . . . . . . . . . . . . . .1-17
Ring Tone . . . . . . . . . . . . . . . . . . . . . . . . . . . . . . . . . . . . . . . .1-17
Optional Headset Adapter. . . . . . . . . . . . . . . . . . . . . . . . . . . .1-17
Where to Go for Assistance . . . . . . . . . . . . . . . . . . . . . . . . . . . .1-19
Getting Started . . . . . . . . . . . . . . . . . . . . . . . . . . . . . . . . . . . . . .1-20
. . . . . . . . . . . . . . . . . . . . . . . . . . . . . .
1-1
Chapter 2. Using Your Phone
Quick and Easy . . . . . . . . . . . . . . . . . . . . . . . . . . . . . . . . . . . . . . .2-1
Making a Call . . . . . . . . . . . . . . . . . . . . . . . . . . . . . . . . . . . . . . . .2-2
Answering a Call . . . . . . . . . . . . . . . . . . . . . . . . . . . . . . . . . . . . .2-3
Hanging Up . . . . . . . . . . . . . . . . . . . . . . . . . . . . . . . . . . . . . . . . . .2-4
Internal Calls . . . . . . . . . . . . . . . . . . . . . . . . . . . . . . . . . . . . . . . . .2-5
Calling an Extension in Your Te lephone System. . . . . . . . . . .2-5
Features Used with Internal Calls. . . . . . . . . . . . . . . . . . . . . . .2-5
External Calls . . . . . . . . . . . . . . . . . . . . . . . . . . . . . . . . . . . . . . . .2-8
. . . . . . . . . . . . . . . . . . . . . . . . . .
2-1
iii
Page 4

Calling an Outside Number . . . . . . . . . . . . . . . . . . . . . . . . . . .2-8
Features Used with External Calls . . . . . . . . . . . . . . . . . . . . . . 2-9
Using Your Speaker . . . . . . . . . . . . . . . . . . . . . . . . . . . . . . . . . . 2-11
Using Your Speakerphone (RP240, RP240E, and RP40 0) . . . .2-12
Voice Transmission . . . . . . . . . . . . . . . . . . . . . . . . . . . . . . . .2-13
Muting the Speakerphone. . . . . . . . . . . . . . . . . . . . . . . . . . . . 2-13
Hold . . . . . . . . . . . . . . . . . . . . . . . . . . . . . . . . . . . . . . . . . . . . . . 2-14
Putting a Call on Hold . . . . . . . . . . . . . . . . . . . . . . . . . . . . . . 2-14
When Your Party Puts You on Hold . . . . . . . . . . . . . . . . . . . 2-15
Hold on Hold . . . . . . . . . . . . . . . . . . . . . . . . . . . . . . . . . . . . . 2-15
Private Hold . . . . . . . . . . . . . . . . . . . . . . . . . . . . . . . . . . . . . . 2-16
Preview . . . . . . . . . . . . . . . . . . . . . . . . . . . . . . . . . . . . . . . . . . . .2-17
Transfer . . . . . . . . . . . . . . . . . . . . . . . . . . . . . . . . . . . . . . . . . . .2-19
Connect . . . . . . . . . . . . . . . . . . . . . . . . . . . . . . . . . . . . . . . . . . . .2-21
Using Your Mailbox . . . . . . . . . . . . . . . . . . . . . . . . . . . . . . . . . . 2-22
Changing Your Ring Tone . . . . . . . . . . . . . . . . . . . . . . . . . . . . .2-23
Chapter 3. Making Calls
. . . . . . . . . . . . . . . . . . . . . . . . . . . . . .
3-1
Bridged Call . . . . . . . . . . . . . . . . . . . . . . . . . . . . . . . . . . . . . . . . .3-1
Busy Override . . . . . . . . . . . . . . . . . . . . . . . . . . . . . . . . . . . . . . .3-3
Busy Standby Queuing . . . . . . . . . . . . . . . . . . . . . . . . . . . . . . . . .3-4
Callback Request . . . . . . . . . . . . . . . . . . . . . . . . . . . . . . . . . . . . . 3-5
Conference . . . . . . . . . . . . . . . . . . . . . . . . . . . . . . . . . . . . . . . . . .3-7
Picking Up Calls to Add to Conferences . . . . . . . . . . . . . . . . 3-10
Consultation . . . . . . . . . . . . . . . . . . . . . . . . . . . . . . . . . . . . . . . .3-12
Direct Station Select (DSS) . . . . . . . . . . . . . . . . . . . . . . . . . . . .3-13
Direct Trunk Select . . . . . . . . . . . . . . . . . . . . . . . . . . . . . . . . . .3-16
Intercom Features . . . . . . . . . . . . . . . . . . . . . . . . . . . . . . . . . . . .3-17
Buzz . . . . . . . . . . . . . . . . . . . . . . . . . . . . . . . . . . . . . . . . . . . . 3-17
Community (Com) Group Call. . . . . . . . . . . . . . . . . . . . . . . .3-18
Community (Com) Group Speaker Call. . . . . . . . . . . . . . . . . 3-19
Dedicated Intercom Call. . . . . . . . . . . . . . . . . . . . . . . . . . . . .3-20
Last Number Redial . . . . . . . . . . . . . . . . . . . . . . . . . . . . . . . . . .3-21
Mailbox Reminder Message . . . . . . . . . . . . . . . . . . . . . . . . . . . . 3-22
Paging . . . . . . . . . . . . . . . . . . . . . . . . . . . . . . . . . . . . . . . . . . . . .3-23
Repertory Dialing (Repdial) . . . . . . . . . . . . . . . . . . . . . . . . . . . . 3-24
Saved Number Redial . . . . . . . . . . . . . . . . . . . . . . . . . . . . . . . . .3-27
Speaker Calls . . . . . . . . . . . . . . . . . . . . . . . . . . . . . . . . . . . . . . . 3-29
Fixed One-Way Speaker Call. . . . . . . . . . . . . . . . . . . . . . . . .3-29
One-Way Speaker Call. . . . . . . . . . . . . . . . . . . . . . . . . . . . . .3-30
One-Way Broadcast Speaker Call . . . . . . . . . . . . . . . . . . . . . 3-31
Two-Way Speaker Call . . . . . . . . . . . . . . . . . . . . . . . . . . . . . 3-32
iv ROLMphone 120/240/400 Series User Guide
Page 5

Speaker Call Rejection . . . . . . . . . . . . . . . . . . . . . . . . . . . . . .3-33
Station Speed Dialing . . . . . . . . . . . . . . . . . . . . . . . . . . . . . . . . .3-34
System Speed Dialing . . . . . . . . . . . . . . . . . . . . . . . . . . . . . . . . .3-38
Trunk Queuing . . . . . . . . . . . . . . . . . . . . . . . . . . . . . . . . . . . . . .3-39
Trunk Call bac k Queuing. . . . . . . . . . . . . . . . . . . . . . . . . . . . .3-39
Trunk Standby Queuing . . . . . . . . . . . . . . . . . . . . . . . . . . . . .3-40
Chapter 4. Answering Calls
. . . . . . . . . . . . . . . . . . . . . . . . . . .
4-1
Reminder Mess ages and Notifications
(Displaying and Answering) . . . . . . . . . . . . . . . . . . . . . . . . . . . . .4-1
Reminder Mess ages and Notifications on Display Phones . . .4-2
Displaying Specific Kinds of Messages and Notifications. . . .4-4
Display Number s for Versions 6.1 and 6. 2 . . . . . . . . . . . . .4-4
Display Numbers for 6.3 and Higher . . . . . . . . . . . . . . . . .4-5
Reminder Mess ages and Notifications on
Non-Displa y P hones . . . . . . . . . . . . . . . . . . . . . . . . . . . . .4-6
Pickup . . . . . . . . . . . . . . . . . . . . . . . . . . . . . . . . . . . . . . . . . . . . . .4-8
Group Pickup . . . . . . . . . . . . . . . . . . . . . . . . . . . . . . . . . . . . . .4-8
Preview . . . . . . . . . . . . . . . . . . . . . . . . . . . . . . . . . . . . . . . . . . . . .4-9
Station Pickup . . . . . . . . . . . . . . . . . . . . . . . . . . . . . . . . . . . . .4-11
Universal Night Answer . . . . . . . . . . . . . . . . . . . . . . . . . . . . .4-12
Chapter 5. Moving Calls
. . . . . . . . . . . . . . . . . . . . . . . . . . . . . .
5-1
Forwarding . . . . . . . . . . . . . . . . . . . . . . . . . . . . . . . . . . . . . . . . . .5-1
Fixed Forwarding . . . . . . . . . . . . . . . . . . . . . . . . . . . . . . . . . . .5-1
Variable Forwarding. . . . . . . . . . . . . . . . . . . . . . . . . . . . . . . . .5-2
Other Forwarding Options . . . . . . . . . . . . . . . . . . . . . . . . . . . .5-8
Follow-Me Forwarding . . . . . . . . . . . . . . . . . . . . . . . . . . . .5-8
Forced Forwarding . . . . . . . . . . . . . . . . . . . . . . . . . . . . . . .5-8
Relay Forwarding . . . . . . . . . . . . . . . . . . . . . . . . . . . . . . . .5-8
Forwarding Return . . . . . . . . . . . . . . . . . . . . . . . . . . . . . . .5-8
Delayed Call Forwarding on Busy . . . . . . . . . . . . . . . . . . .5-9
Park . . . . . . . . . . . . . . . . . . . . . . . . . . . . . . . . . . . . . . . . . . . . . . .5-10
System Hold . . . . . . . . . . . . . . . . . . . . . . . . . . . . . . . . . . . . . . . .5-13
Chapter 6. Blocking Call s
Do Not Disturb . . . . . . . . . . . . . . . . . . . . . . . . . . . . . . . . . . . . . . .6-1
Privacy . . . . . . . . . . . . . . . . . . . . . . . . . . . . . . . . . . . . . . . . . . . . .6-2
Automatic Privacy . . . . . . . . . . . . . . . . . . . . . . . . . . . . . . . . . .6-4
Chapter 7. Managerial Features
Account Number . . . . . . . . . . . . . . . . . . . . . . . . . . . . . . . . . . . . . .7-1
. . . . . . . . . . . . . . . . . . . . . . . . . . . . .
. . . . . . . . . . . . . . . . . . . . . . .
6-1
7-1
v
Page 6

Bad Line Reporting . . . . . . . . . . . . . . . . . . . . . . . . . . . . . . . . . . . 7-4
Hunt Groups . . . . . . . . . . . . . . . . . . . . . . . . . . . . . . . . . . . . . . . . .7-5
Pilot Hunt Group . . . . . . . . . . . . . . . . . . . . . . . . . . . . . . . . . . . 7-5
Station Hunt Group. . . . . . . . . . . . . . . . . . . . . . . . . . . . . . . . . .7-5
Hunting Patterns . . . . . . . . . . . . . . . . . . . . . . . . . . . . . . . . . . . .7-6
Circular Pattern . . . . . . . . . . . . . . . . . . . . . . . . . . . . . . . . . . 7-6
Linear Pattern . . . . . . . . . . . . . . . . . . . . . . . . . . . . . . . . . . . 7-6
Removing Yourself from a Hunt Group. . . . . . . . . . . . . . . . . . 7-7
Setup. . . . . . . . . . . . . . . . . . . . . . . . . . . . . . . . . . . . . . . . . . . . . 7-8
PIN Authorization Features . . . . . . . . . . . . . . . . . . . . . . . . . . . . 7-11
Follow-Me Forwarding . . . . . . . . . . . . . . . . . . . . . . . . . . . . . 7-11
Forced Authorization . . . . . . . . . . . . . . . . . . . . . . . . . . . . . . .7-14
Remote Authorization . . . . . . . . . . . . . . . . . . . . . . . . . . . . . .7-15
Class of Service Changeover . . . . . . . . . . . . . . . . . . . . . . . . . . . 7-17
Trace Call . . . . . . . . . . . . . . . . . . . . . . . . . . . . . . . . . . . . . . . . . . 7-18
Appendix A. Feature Access Codes
. . . . . . . . . . . . . . . . . . . .
A-1
Feature Access Codes . . . . . . . . . . . . . . . . . . . . . . . . . . . . . . . . . A-1
Appendix B. Help!
. . . . . . . . . . . . . . . . . . . . . . . . . . . . . . . . . .
B-1
Introduction . . . . . . . . . . . . . . . . . . . . . . . . . . . . . . . . . . . . . . . . B-1
Self Test . . . . . . . . . . . . . . . . . . . . . . . . . . . . . . . . . . . . . . . . . . . B-2
Begin the Self Test . . . . . . . . . . . . . . . . . . . . . . . . . . . . . . . . . B-2
Evaluate the Self Test Results . . . . . . . . . . . . . . . . . . . . . . . . B-2
Other Problems. . . . . . . . . . . . . . . . . . . . . . . . . . . . . . . . . . . . B-2
vi ROLMphone 120/240/400 Series User Guide
Page 7

Figures
Figure 1-1. The ROLMphone 120, 240, 400 Series . . . . . . . . .1-2
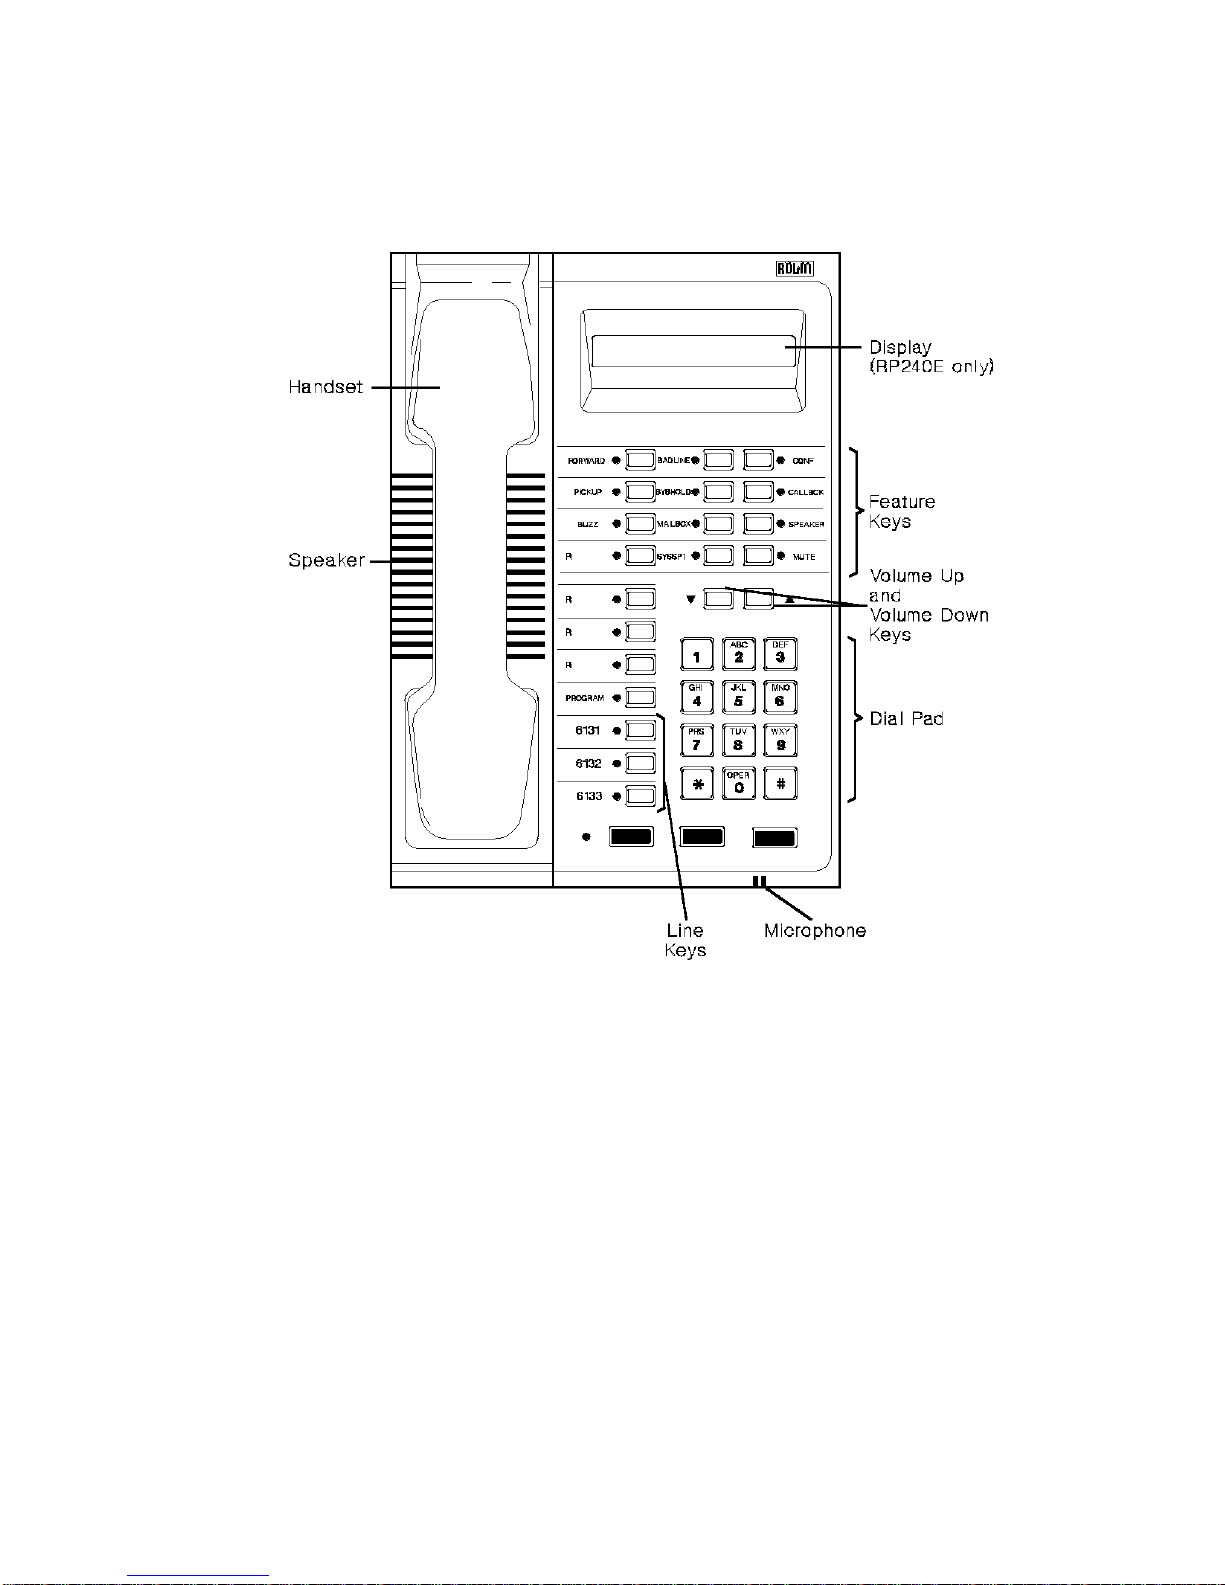
Figure 1-2. The ROLMphone 120 Telephone . . . . . . . . . . . . . .1-3
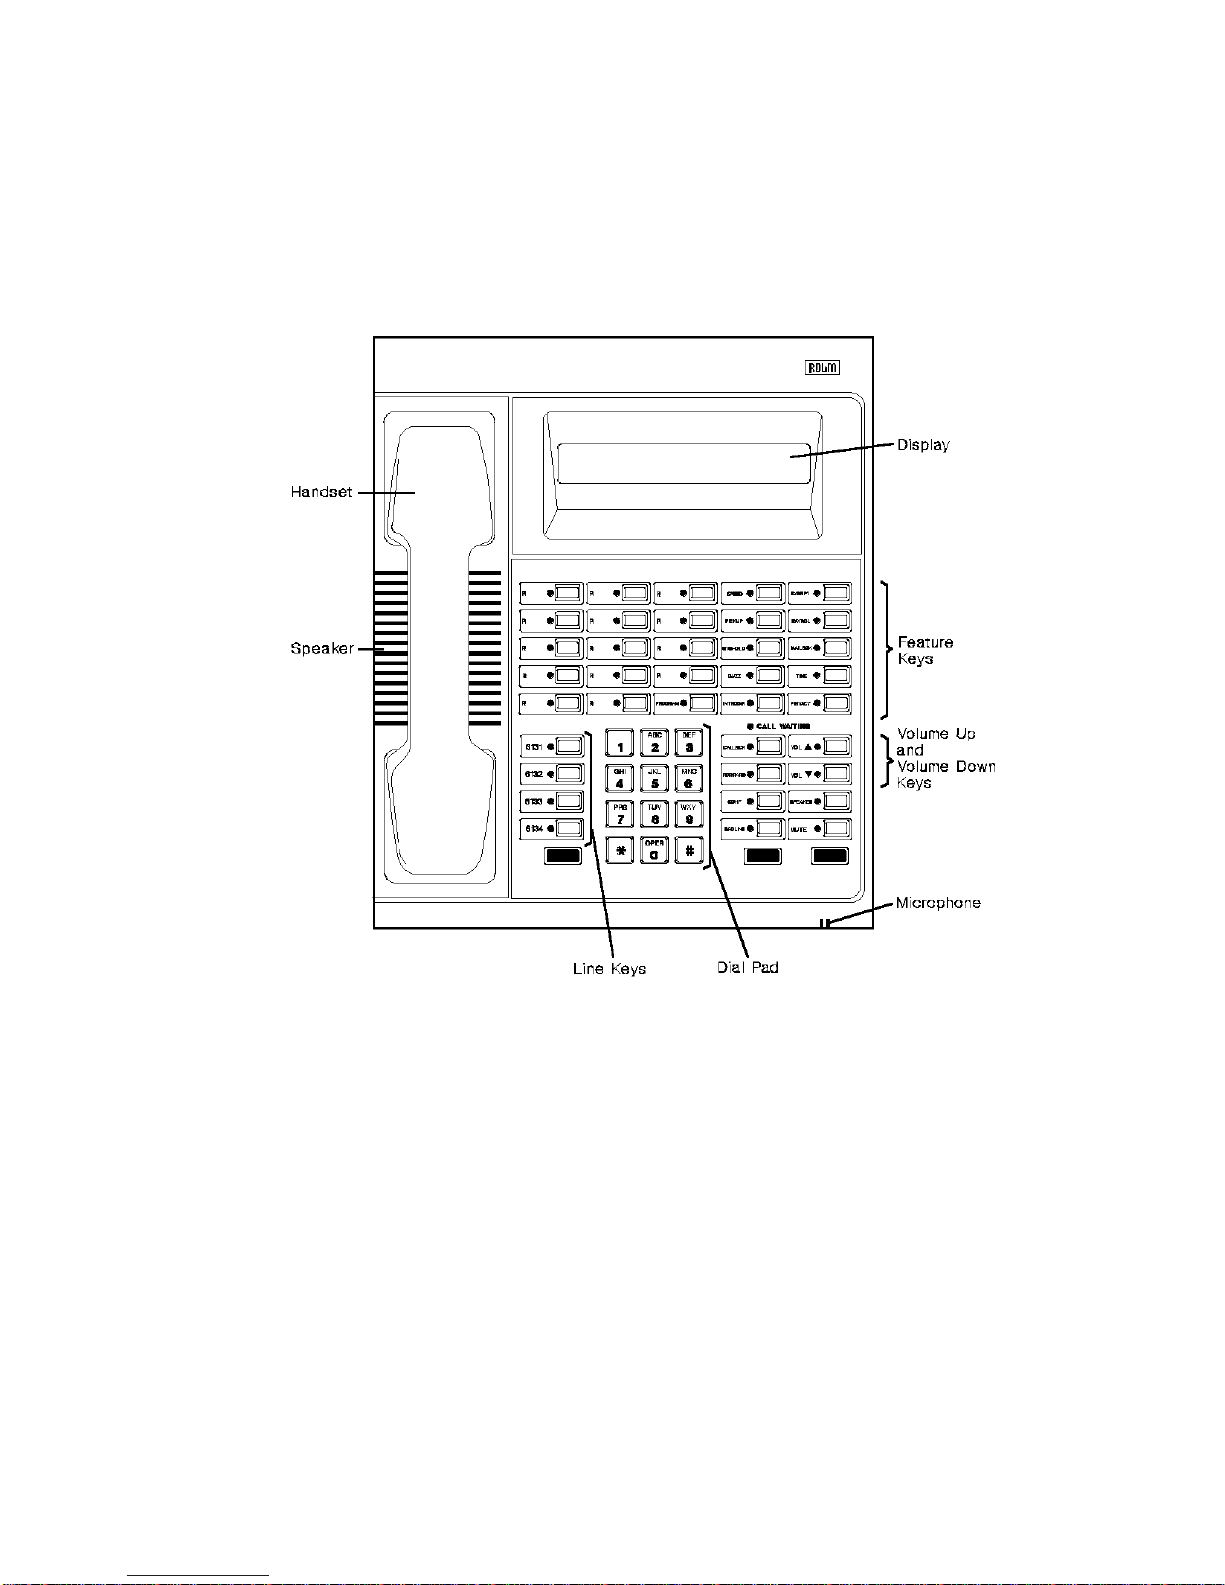
Figure 1-3. The ROLMphone 240E Telephone . . . . . . . . . . . . .1-4
Figure 1-4. The ROLMphone 400 Telephone . . . . . . . . . . . . . .1-6
Figure 1-5. RP120, RP240, RP400 Hea dset Adapters . . . . . . .1-18
vii
Page 8

viii ROLM phone 120/240/400 Series User G uide
Page 9

Tables
Table 1-1. Line Key Status Light Flash Rates . . . . . . . . . . . . .1-13
ix
Page 10

x ROLMphone 120/240/400 Series Use r G uide
Page 11

How to Use This Gu ide
This guide ex plains how to use the many features of your
ROLMphone
Chapter 1, “Introduction” and Chapter 2, “Using Your Phone” which
explain the ba sic fe at ures of your phon e. Then look th rough the rest of
the book and read about the additional features you want to us e. You
don’t have to know all about your phone in order to use any given
feature.
120/240/400 series te lephone. Be sure to read
Chapter 1
Chapter 2 Using Your Phone
Chapter 3 Making Calls
Chapter 4 Answering Calls
The
Introduction
helpful be fore you begin using your phone. It
explain s the phone models and options available in
the ROLMphone 120/240/400 series, the basic
features of your phone, where to go for assistanc e,
and how to get started using this guide.
answer calls and describes the difference between
inter nal and external ca lls and briefly explains the
features t hat can be us ed with the m. It also des cribes
how to use a speaker, a speakerphone, the Hold,
Transfer, Connect, and Mailbox keys and how to
change your phone’s ring tone.
describes the many features you can
use to in itiat e calls .
descr ib e s th e fe at u res av a il ab l e
for receiving calls.
presents info rmation tha t may be
explains how to make and
Chapter 5 Moving Calls
forwarding ca lls to other extensions and placing
calls on system hold .
Chapter 6 Blocking Calls
prevent calls from reaching your phone.
Chapter 7 Managerial F eatures
assign calls to an account, report bad lines, receive
calls through hunt groups, use PIN authorization,
and trace calls.
explains th e feat u res av ailab le for
explains the features you ca n use to
describe s features th at let you
How to Use This Guide xi
Page 12

Appendix A Feature Access Codes
dialed to use system features.
lists the codes that can be
Appendix B Help!
to correct problems with your phone.
Glossary
The
terminology and concepts used in this guide.
Index
The
information.
presents some sim ple pr ocedure s you can u se
Glossary
Index
explains so me of the te ch nical
is useful for tracking down specific
xii ROLM phone 120/240/400 Se ries User Guide
Page 13

Related Publications
The following list presents the titles and brief descriptions of other
useful Siemens publications. Please refer to the book’s order number
when requesti ng a publication from your Siemens representative.
Order No. Title and Description
GU30-1611
GU30-1539
GU30-1533
ROLMphone 120/240/400 Series Quick
Reference Guide for 9751 CBX and Hicom 300
provides a brief tour of the different p hone
E CS
models and quick access to information on the
most-used features. This is the basic manual for
all ROLMphone 120/240/400 seri es user s.
Customer P articip ation Inf ormatio n Guide
basic manual for the Customer Participation
program. This program allows custom ers to
troubleshoot, repair, and replace their own
phones. The
Guide
parts and shipping broken phones back to the
factory for repair or replacement.
Customer Setup Installation Instructions
basic manual for the Customer Setup progra m.
The Customer Setup program allows customers
to install their own phones. T his manual conta ins
detail ed insta ll ation inst ruct ions for all pres ently
shippin g Siemens telepho ne products and related
options .
provides information on maint aining spare
Customer Par ticipati on Infor mation
is the
is the
GU30-1557
Problem Determination P rocedures for
ROLMphone, Analog, Optiset E, Optiset NI1200, and DCT1900 Cordless Telephones
troubleshooting manual for the Customer
Particip ation and Cus tomer Setup programs . This
guide contains detailed troubleshooting
instructions for all presently shipping Siemens
telepho ne products and relat ed options..
Related Publications xiii
is the
Page 14

xiv ROL Mp hone 120/240/400 Ser ies User Gui de
Page 15

Chapter 1 Introduction
The ROLMphone 120, 240, and 400
Series
The ROLMphone 120, 240, an d 400 se ries of multi-featured phones
have many op tions that enha nce their functio nality. Your ROLMphone
model may have a displ ay, a speake rphone, from 12 to 40 fea ture keys,
and multiple extensions.
These digi tal telephone s work with your company’s Siemens
Communications Server to give you advanced, easy-to-use telephone
features. The communications server is your facility’s
telecommunications system.
1. Introduction
The RP240 and RP400 are multi- line tele phones; the RP 120 is a
single -line telephone. The RP240E an d RP4 00 eac h have a display.
Intro du c tio n 1-1
Page 16
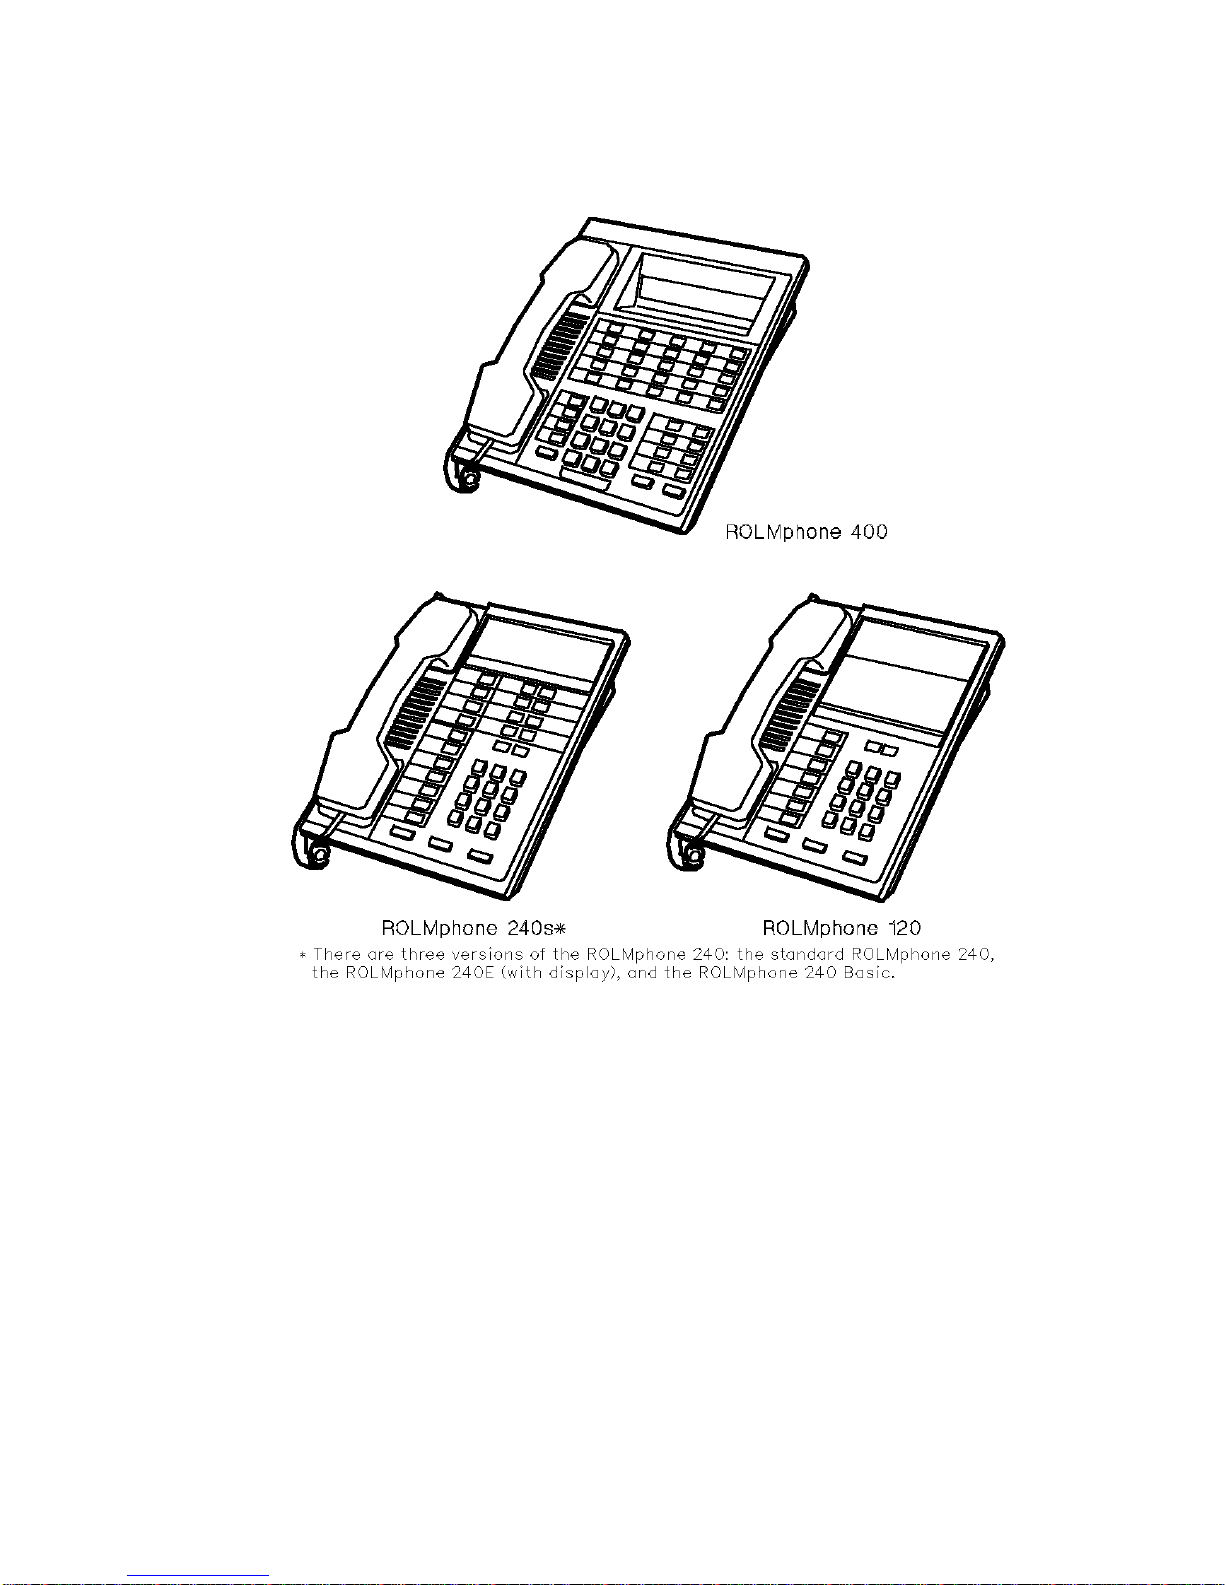
Figure 1-1. The ROLMphone 120, 240, 400 Series
1-2 ROLMphone 120/240/400 Series User G uide
Page 17

The ROLMphone 120 Series
1. Introduction
CALL
WTG
CONNECTHOLD
TRANSFER
Figure 1-2. Th e ROLMphone 120 Telephone
The ROLMphone 120 series offers three models.
• The RP120 (like the RP120H and RP120D) has 12 feature keys
and one extension.
• The RP120H has a dual headset connection.
• The RP120D has a data communi ca tions module (DCM) for
attaching your phone to a terminal or personal computer with an
RS-232C cable.
Intro du c tio n 1-3
Page 18
The ROLMphone 240 Series
CALL
WTG
HOLD
CONNECT
TRANSFER
Figure 1-3. The ROLMphone 240E Telephone
The ROLMphone 240 series offers seven models.
• The RP240 Basic has 24 feature keys and may have multiple
extens ions.
• The RP240 (like the RP240H and RP240D) has 24 feature keys
and a speakerphone, and may have multiple extensions.
• The RP240H has a dual headset connection.
• The RP240D has a data communications module (DCM) f or
attaching your phone to a terminal or personal comput er with an
RS-232C cable.
1-4 ROLMphone 120/240/400 Series User G uide
Page 19

• The RP240E (like the RP240EH and RP240ED) has 24 feature
keys, a speaker phone, a two-line dis play with up to 24 characters
per line, and may have multiple extensions.
• The RP240EH has a headset connection.
• The RP240ED has a data communications module (DCM) for
attaching your phone to a terminal or personal computer with an
RS-232C cable.
1. Introduction
Intro du c tio n 1-5
Page 20
The ROLMphone 400 Series
HOLD
TRANSFERCONNECT
Figure 1-4. The ROLMphone 400 Telephone
The ROLMphone 400 series offers four mod els.
• The RP400 (like the RP400HR, RP400D, and RP400HD) has 40
feature keys, a speakerphone, a two-line display with up to 30
characters per line, and may have multiple extensions.
• The RP400HR has connections for two headsets and a recorder.
1-6 ROLMphone 120/240/400 Series User G uide
Page 21

• The RP400D has a data communi ca tions module (DCM) for
attaching your phone to a terminal or personal computer with an
RS-232C cable.
• The RP400HD has a dual headset connection and a data
communications module (DCM) for atta ching your phone to a
terminal or personal computer with an RS-232C cable.
1. Introduction
Intro du c tio n 1-7
Page 22

ROLMphone Basics
Faceplate
The faceplate is a paper template th at identifies fea tures that you
access by pressi ng sp ecific keys on your telephone. It shows which
system featur es have been assigned to your phone keys.
Line Keys
Your ROLMphone telephone ha s a sep ara te line key for every
extension t hat ap pears on your phon e. You use the li ne keys t o a nswer
and place calls.
Multiple Line Appearances
Your phone may have multiple extensions, each of which is assigned
a separate li ne key. Thes e line keys can be of diffe re nt types. You wil l
have at least one li ne key, called the pri ma ry line key, which
correspon ds to y our exte nsion . The stat us li ght that t urns on when you
pick up your handset is next to your primary line key.
You may also have other lines on your phone. You can use both the
primary line and these other li nes to make calls.
Your lines may also appear as li nes (call ed mult iple li ne appear ances)
on other people’ s phones. Each pers on with an appeara nce of the line
on his or her phone has equal acc ess to the line. Also, a ca ll can be
placed on hold at one phone and then retriev ed at another phone on
which that same line appears. (See “Hold” on page 2-14.)
If you have a multiple line appearance on your phon e, you will need to
know how to tell if that line is in use. Your phone tells you about the
status of a line th rough the l ine key ’s st atus light. (See “Status L igh ts”
on page 1-13.)
Key Pad
Use the key pad on your phone just as you would any standard
telephone key pad for dialing telephone numbers. You can also use
your key pad to acc ess syst em feature s ava ilabl e to your te lephon e for
which you do not have feature keys. (See “Feature Access Codes” on
page 1-12.)
1-8 ROLMphone 120/240/400 Series User G uide
Page 23

Display
The display at the top of the RP240E and RP 400 provides cal l
information such as the extension calling you and, if your system is
configure d to do so , the caller’s name. I t also lets you scroll through
messages and notifications waiting in your mailbox and provides
information you’ll find us eful as you set up and use Siemens feature s.
Some features work differentl y on dis play phones from th e way they
do on non-display phones. The feature descriptions in Chapters 2
through 7 expla in these differ ences.
The RP400 has a two- line display with up to 30 characte rs per line. The
RP240E has a two-line display with up to 24 characters per li ne and
displays the same informat ion as the RP400. However, because the
RP240E’s di spl ay is smaller, it may truncate or rear range some
messages.
On Version 6.3 and higher, the elaps ed time of an incoming or
outgoing external call is displayed.
1. Introduction
System Features
Each phone in your s ystem is set up ind ividually at the
communicati ons server t o have speci fic tele phony feature s. Therefor e,
you may find that some fea tures included in thi s guide are not availabl e
on your phone.
Feature Keys
Feature keys give you access to system features such as Hold,
Transfer, Mailbox, Preview, and Program. Press the key labeled with
the fea ture name to gain access t o the feature . You can al so dial feat ure
access codes to gain access to features. (See “Feature Access Codes”
on page 1-12.)
Note:
The labels us ed in this guide to indic ate feature names on keys
are the defaults that come with your system. However, your
system ad minis trator can conf igure them diff erent ly to suit
your company’s requirements.
Intro du c tio n 1-9
Page 24

Class of Service
Some of the phones in your system may be set up to use one class of
service (the primary) during normal business hou rs and then
automatically change to a more limited one (the secondary) during
non-business hours. If so, the features you can use may vary,
depending on the cla ss of service in eff ect at the time.
Personal Identification Number (PIN)
A personal identification number (PIN) enables you to use another
phone within your comp any to ga in acc ess to the featur es of yo ur own
phone. You may al so need a PIN to be able to dial an outside number.
Ask your system admini strator whether you have be en assigned a PIN.
Also see “External Calls” on page 2-8, “PIN Authorization Features”
on page 7-11, and “Forced Authorizati on” on page 7-14.
Hold, Transfer, Connect
All ROLMphone 120/ 240/ 400 se ries phones have Hol d, Tra nsfer , and
Connect keys at the bottom of the facepla te.
The
disconnecting the other party. (See “Hold” on page 2-14.)
The
your company’s operator. (See “Transfer” on page 2-19.)
The Transfer key also places any call you have in progress on
tempor ary h ol d
second party. (See “Feature Access Codes” on pag e 1-12. )
Finally, you can press the Transfer key to establish a conference call
including yourself, a party you ha ve placed on consultation hold, and
a party you have dialed subsequently. (See “Consul tation” on page
3-12.)
key lets you temporarily hang up a line without
Hold
Transfer
key lets you transfer a call to anot her e xtension or to
1
and can be used to dial a feature access code or a
1
This temporary hold las ts only un til you hang up or reconnect to th e call, or
for a predetermined length of ti me. If you press the Transfer key while on a
call and then hang up, the call immediately rings back on your telep hone.
1-10 ROLMphone 120/240/400 Series User Gui de
Page 25

1. Introduction
The
Connect
key lets you
• reconnect with a call placed on consultation hold
• reconnect with a trans ferred call before the transfer is complete
• alternate be tween two parties, when you have one of them on
consult ation hold
(See “Connect ” on page 2-21.)
Other Frequently Used Keys
Callback (CALLBCK) Key:
complete calls to extensions that are busy, ringing, or in Do Not
Disturb mode. (See “Callback Request” on page 3-5 for more
information.) It also lets you return calls to parties tha t have left you
reminder mes sages and to the Ph oneMail
Mailbox” on page 2-22.)
Clear Key:
The Clear key can be used to remove or cancel infor mation
shown on a phone ’s dis play wh en it i s in pro gram mode . It can a lso be
used to dro p th e las t part y from a co nferenc e call an d the se con d part y
from a consult ation call.
The Callback key can help you
system. (See “Using Your
Mailbox Key:
The Mailbox key lets you receive several kinds of
messages: reminder messages , PhoneMail notifications , an d
ROLMfax
notifica tions.
You can display a reminder message, PhoneMail notific ation, or
ROLMfax notifi ca tion by pre ssing t he Mail box k ey. T he Mail box key
also let s you leave reminder messages at other exte nsions. (Se e “Using
Your Mailbox” on page 2-22 for more information.)
Previ ew Key :
The Preview key displays information associated with
any line configured on the phone. (See “Preview” on page 2-17 for
more information.)
Progra m Ke y:
The Program key is used to set up se veral features,
such as Repertory Dialing, Station Speed Dialing, and Variable
Forwarding.
Repertory D ialing ( R - ) Ke y s :
You can set up repdial keys for onetouch dialing of an extension, an outside telephone number, or a
feature access code, which makes the key act like a feature key.
You use the Program key to set up these keys for dialing. (See
“Repertory Dialing (Repdial)” on page 3-24 for further instructions.)
Introduction 1-11
Page 26

Time Key:
On a display phone, pressing th e Ti me k ey dis plays the
current day, date, and time.
Feature Access Codes
Since a set of features has already been assigned to your phone’s
feature keys , you may fin d tha t your phone does n ot have fe ature keys
for some of the feature s described in thi s guide. However , you can still
use any of t hese featu res that is avail able on you r system and permitted
by your class of servi ce by dialing that feat ure’s access code , if it has
one.
Throughout the r emainder of this guide, the steps des cribed for using
each o f the s yste m fe at ure s i ncl ude the f eatu r e ke y you pr ess to ac cess
a feature and the feature co de you c an dia l if you do not have that
feature key. If you need to know a particular feature a ccess code in a
hurry, see Appendix A, “Feature Access Codes” which lists these
codes alphabetically.
Note:
You must have a dial tone before entering a feature access
code. If you do not have a dial tone, press the Tra nsfer key to
get one.
The fea tu re access co d es li s t ed in th is guide ar e th e de f au l ts
that come with your syst em . Howe ver, your system
administ rator can configure them differently to suit your
company’s requirements.
1-12 ROLMphone 120/240/400 Series User Gui de
Page 27

Status Lights
The red status lights next to line keys tell you what is happ ening on
those lines .
A line key status li ght may turn on ste adily, blin k, or flash at diffe rent
rates to signal the status of that line.
Table 1-1. Line Key Status Light Flash Rates
Flash Rate Line Status
Off Available
On steady In use
Blinking Ringing
Flashing (faster) On hold
1. Introduction
Flickering (fastest) Forwarded
Introduction 1-13
Page 28

Spea ker
All ROLMphone 120/240/400 series phones have a speaker that you
can use for receiving calls or listening to the PhoneMail system. On
ROLMphone models that only have a speaker and not a microphone
(the RP120 and RP240 Basic models), you must pick up your ha ndset
to speak to the othe r party. For more information about using your
speaker, see “Usi ng Your S peaker” on page 2-11.
Speakerphone (RP240, RP240E, and RP400)
The RP240, RP240 E, and RP400 mo dels (excep t for the RP24 0 Basic)
have a two-way speakerp hone, consisting of a speaker and a
microphone. You can use either the hands et or the speakerphone to
make or receive calls.
During a con versation, you can us e your s peaker phon e instead of your
handset by press ing the Speaker key and hang ing up the handset. If you
want to switch back to using your handset, pick it up. For more
information, see “Using Your Speakerphone (RP240, RP240E, and
RP400)” on page 2-12.
Voice Volume Keys
Use the Volume Up (▲) and Volume Down (▼) keys to adjust the
voice volume of your phone. While on a call, press ▲ to raise the
volume of the voice you are hearing, or press ▼ to lower the volume
of the voice you are hear ing. Press either key until you reac h the
desired voice level. When you hang up or switch to another call, the
voice volume returns to the defaul t level.
1-14 ROLMphone 120/240/400 Series User Gui de
Page 29

Soun ds
Your phone makes different s ounds to let you know what’s going on.
Rings occur on a l ine tha t you are not using and i ndic ate t hat you h ave
an incoming call. Tones occur while you are using your phone and
provide information about calls and features.
Sound Meaning
Rings Singl e (repeated) Inte rnal call
Double ( repeated) External call
1. Introduction
Triple (repeated)
Note: This ring
cadence is compo sed of
3 short rings.
Long (repeated)
Note: For release 6.4
and above, this ring
cadence is made up of 2
short rings, followed by
1 long ring (repeated).
Single beep Used in co nnection with
Triple beep DSS call
Continuous Emergency call
Callback
Intercom call or hunt group
call
DSS extensions and intercom features.
Tone s Broken dial tone, inter-
Roll ove r (m u t e d or in
bursts )
rupted every 1/2 sec .
Broken dial tone, interrupted every 1 1/2 sec.
An incoming call i s pending
while th e pho ne i s alr ea dy i n
use.
Your phone is in Do Not
Disturb or Forwarding
mode.
A reminder message or PhoneM ail or ROL M fa x no tification is waiting.
Introduction 1-15
Page 30

Sound
Meaning
Busy tone The party you called is on
the phone.
Busy tone that cha nges
to a very fas t bus y ton e
Dial tone You can make a call or
Fast busy tone Invalid call
Tones (cont.) Intrusion t one followed
by a ringing-beep tone
Long tone, followed by
an intrusion t one
repeated every 8 se cs.
1-sec. tone after di aling There is a short queue for an
Ringing (ringback)
tone
You cannot queue for the
party you calle d.
invoke a feature.
The party you called is on
the pho ne, b ut ha s r ec eiv e d a
call w aiting indication. Stay
on the phone until the par ty
answers.
Busy override and speaker
call intrusion reminder
outgoing trunk.
The pho ne you called is
ringing.
Short tone ever y 20 sec. Internal call waiting
Single (conference)
tone
A ne w party has been added
to a conference.
Steady high tone A technician is testing your
phone.
3 short tones (conf irma-
tion tone)
3 short tones followed
by dial tone
30-sec. tone after dial-
ing
2 short tones every 20
A feature has been success-
fully activated .
Addit ional input, s uch as a
PIN, is required.
There is a long queue for an
outgoing trunk.
External call waiting
secs.
1-16 ROLMphone 120/240/400 Series User Gui de
Page 31

1. Introduction
Sound
Very short tone after
dialing
Wav ering (error ) tone Invalid feature req uest
Meaning
You have been routed to the
next outgoing trunk or to a
more expensive route.
Ring Volume
Use the slide control to adjus t the ringing volume of your phone. The
slide control is located underneath the RP240, RP240E, and RP400
and either underneath or on the side of the RP120 and RP240 Basic.
The volume remains at the level you set it until you adjust it a gain.
Ring Tone
When first installed, your phone will have a predet erm ined ring. You
can change your phone’s ring tone to any one of eight tones. For
information about how to do this , see “Ch anging Your Ri ng Tone” on
page 2-23.
Optional Headse t Adapter
Your phone can b e ordered with a headset adapter that provides for two
headsets — one for a user and one for a supervisor. Th e adapter’s two
pairs of jacks appear on the left side of the RP400 and on the back of
the RP120, RP240, and RP240E. (See Figure 1-5.) The PJ327 type
connector fits into a pair of jack s. When the headset is plugged in, the
speakerphone or speaker does not function.
Note:
The ROLMphone 400 HR lets you at tach a recorder. In
addition t o re cording t he convers atio n of a connec ted c all , the
recorder may also record user’s comments between calls via
the handset or heads et.
Introduction 1-17
Page 32

Figure 1-5. RP120, RP240, RP400 Headset Adapters
1-18 ROLMphone 120/240/400 Series User Gui de
Page 33

Where to Go for Assistance
See Appendix B, “Help!” for some procedures that may hel p you
correct problems with your phone.
Although eve r y company has its own way of handli ng support for
ROLMphone telephones, most have a person responsible for m aking
configura tion changes and answering questions about the telephone
system. This person, the system administrator, can provide you with
information on the features you need to use and can hel p troubleshoot
problems with your phone when necessa ry.
1. Introduction
Introduction 1-19
Page 34

Getting Started
This has been a genera l introduc ti on to the ROLMph one 120/240 /400
series telephones. To get started using your phone, read Chapter 2,
“U sing Y our Phone.”
If you have any problems, Appendix B, “Help!” ha s suggestions to
help you get things working right.
1-20 ROLMphone 120/240/400 Series User Gui de
Page 35

Chapter 2 Using Your
Phone
Quick and Easy
You can begin using your ROLMphone 120/240/400 series phone as
soon as it is properly installed and configured at the communications
server.
To make a call
from yo ur pr imary line
To make a call
from secondary
line
To answer a call
on your primary
line
➩
➩
➩
➩
Pick up the handset and use th e key pad to
dial.
Pick up the handset.
Press the line key and use the key pad to
dial.
Pick up the handset.
2. Using Your Phone
To answer a call
on another line
➩
Press the line key next to the blinking
status light and pick up the handset.
Using You r Phone 2-1
Page 36

Making a Call
Before dialing a num ber or using a feature ac ce ss code, you must get
a dial tone. The dial tone is an indication that the system is ready to
accept your reque st.
You can get a dial tone in one of the following ways:
• by picking up the handset
• by pressing a line key
• by pressing the Speaker key
• by pressing the Transf er key during a call
Note:
This guide ass um es that your phone has been set up at the
communications server to get a dial tone in the same ways as
ROLMphone telephones have on previous communications
server releases. If your phone has been set up differently, the
ways to get a dial tone may be different.
2-2 ROLMphone 120/240/400 Series User G uide
Page 37

Answering a Call
You can answer a call in three ways:
• by picking up your hand set (for a call ringing on you r primary li ne)
• by pressing the line key with the blinking status light
• by pressing the Speaker key
Note:
Once you have answered a call, do not press the li ne
key — doing so disconnects the call.
2. Using Your Phone
Using You r Phone 2-3
Page 38

Hanging Up
You can hang up in three ways:
• by hanging up your handset when you are on a handset call
• by pressing the line key when you are on a speakerphone call
• by pressing the Speaker key when you are on a speakerphone call
2-4 ROLMphone 120/240/400 Series User G uide
Page 39

Internal Calls
Calling an Extension in Your Tele phone
System
Every phone in your company’s telephone system has an extension.
2. Using Your Phone
To call another
extension
If you are a me mber of a commun ity (com) group, yo u can d ial a short
code inste ad of an ex tension to cal l another member in your grou p.
(See “Community (Com ) Group Call” on page 3–18. )
➩
➩
Get a dial tone.
Dial the extension.
Features Used with Internal Calls
The following fea tures can be used wit h internal call s:
•
Bridged C all
multiple line appear ance. (See “Brid ged Call” on page 3–1. )
•
Busy Ov erri de
(See “Busy Override” on page 3–3.)
- lets you join an existing phone call on a busy
- lets you ente r a conver sation o n a busy e xtensio n.
•
Busy Standby Queuing
extension you have dialed becomes free. The communications
server then dials the extension. (See “Busy Standby Queuing” on
page 3–4.)
•
•
- lets you signal the phone of another person, such as a
Buzz
secretary, with a special tone. (See “Buzz” on page 3–17.)
Callback Request
complete calls to busy extensions while you wait. It lets you hang
up and have the communications server call you back when the
extension becomes free. After you answer , the communications
serve r dials th e number for y ou. (See “Callback Request” on p age
3–5.)
- lets you stay on the line until the busy
- directs the co mmunications server to
Using You r Phone 2-5
Page 40

•
Community (Com) Group Speaker Call
- lets you place a twoway speakerphone call to a member of your com group. (See
“Community (Com) Group Speaker Call” on page 3–19.)
•
Conference
- lets you have up t o eight pa rties , inc luding yo urs elf,
in a telephone conversation. (See “Confere nce ” on page 3–7.)
•
Consultation
- let s you t alk priva tely wit h a second part y while the
first party is waiting on consul tation hol d. (See “Cons ultation” on
page 3–12.)
•
Direct Station Select
- lets you mon itor the s tatus of, an d autodial,
an extensi on that you specify . (See “Direct Stat ion S elect (DSS)”
on page 3–13.)
•
Fixed One-Way Speaker Call
- lets you make a one-way call to
the speaker of an extensi on that is set up at the co mmunications
serve r as yo ur sp ea ke r cal l target . (See “F ix ed O n e-W a y Sp ea k er
Call” on page 3–29.)
•
Last Number Redial
- lets you qui ckl y redi al the la st n umber y ou
have dialed. (See “Last Number Redial” on page 3–21.)
•
Paging
- lets you dial an acces s code so that you can de liver a
message over your company’s paging system. (See “Paging” on
page 3–23.)
•
Pickup
- lets you pick up c alls ringing on ot her extensio ns . Group
Pickup le ts you pic k up a call to an exte nsion in yo ur pickup group.
Station P ickup lets you answer any ringing e xtension. Universal
Night Answer lets you answer a call to your company’s operato r ,
when the operator is off duty. (See “Pickup” on page 4–8.)
•
Preview
- lets the user preview information about a line, such as
the identity of the caller, t h e identity of the user on the acti ve line,
the ide ntity of a party o r a c amped-on pa rty on the c urrently ac tive
line, and the information about a line on hold.
(See “Preview” on page 2–17 for more information.)
•
Repertory D ialing ( repdial)
- lets you set up keys for one-touch
dialing of phone numbers and feature access codes. (See
“Repertory Dialing (Repdial)” on page 3–24.)
•
Saved Number Redial
- lets you s ave the c al led pa rty’s extensi on
during a c all and dial i t later. (See “Saved Numbe r Redial” on page
3–27.)
2-6 ROLMphone 120/240/400 Series User G uide
Page 41

•
Station Speed Dialing
- lets you set up single -digit codes for
frequently dialed extensions or feature access codes, so that you
can dial the code instead of the whole extension or feature access
code. (See “Station Speed Diali ng” on page 3–34.)
•
Two-Way Speaker Call
- lets you make a two-way call to the
speaker of another phon e. (See “Two-Way Speaker Call” on page
3–32.)
2. Using Your Phone
Using You r Phone 2-7
Page 42

External Calls
Calling an Outside Number
To call ou tside yo ur communic ations server syste m, you mus t first dial
your trunk (outsi de line) access code before dialing the number you
want to reach.
If all trunks are busy when you make your call, you wil l hea r a fast
busy tone. If your system has queuing, you will receive the queuing
tone and can then us e Trunk Callback Queuing or Trunk Standby
Queuing to wait for th e next available trunk. See “Trunk Callback
Queuing” on page 3–39 and “Trunk Standby Queuing” on page 3–40.
In this guide, 9 is used as the access code for a trunk. Your system
administrator can tell you your trunk access code.
Your system’s trunk access code ____.
Your system may also prompt you to enter a personal ide ntification
number (PIN) to make an external call. See “PIN Authorization
Features” on page 7–11 and “Forced Authoriz ation” on page 7–14.
To call a n outside
number
➩
➩
➩
➩
➩
Get a dial tone.
Dial 9.
Listen for the external dial tone.
Dial the outside number.
If your system prompts you for a PIN, enter
your PIN.
2-8 ROLMphone 120/240/400 Series User G uide
Page 43

Features Used with External Calls
The following fea tures can be used wit h exte rnal calls:
•
Conference
- lets you have up to eigh t pa rties , incl uding yours elf,
in a telephone conversation. The other parties ca n be on trunks
(outside lines). (See “Conference” on page 3–7.)
•
Consultation
- lets you talk with a seco nd party while the firs t
party is wai ti ng on con sulta ti on hold. (Se e “Consul ta tion” on pa ge
3–12.)
•
Direct Trunk Select
- lets you access a particular trunk (outside
line) for plac ing a call. (See “Direc t Trunk Select” on pa ge 3–16.)
•
Last Number Redial
- lets you quic kly redia l the last numbe r you
have dialed. (See “Last Number Redial” on page 3–21.)
•
Pickup
- lets you pick up call s ringin g on othe r exten sions . Group
Pickup let s you pick up a c all to an extension i n your pickup gr oup.
Station Pickup lets you answer any ringing extension. Universal
Night Answer lets you answer a call to your company’s operator,
when the operator is off duty. (See “Pickup” on page 4–8.)
•
Preview
- lets the user preview information about a line, such as
the identity of the calle r , the identity of the user on the active line,
the identity of a p arty or a camped-on party on t he curre ntly a ctive
line, and the information about a line on hold.
(See “Preview” on page 2–17 for more information.)
2. Using Your Phone
•
Repertory Dialing (Repdial)
- lets you set up keys for one-touch
dialing of extens ions, outs ide numbers, and feature access codes.
(See “Repertory Dialing (Repdial)” on page 3–24.)
•
Saved Number Redial
- lets you save the called party’s phone
number during a call and dial it later. (See “Saved Number Redial”
on page 3–27.)
•
Station Speed Dialing
- lets you set up single -digit codes for
frequently dialed phone numbers or feature acce ss codes, so that
you can d ial the co de instead of the who le number or feature access
code. (See “Station Speed Diali ng” on page 3–34.)
•
System Speed Dialing
- lets you dial short codes, set up at the
communications server, for frequently called outside numbers.
(See “System Speed Dialing” on page 3–38. )
Using You r Phone 2-9
Page 44

•
Trunk Queuing
- directs the communications server to help you
complete your call when you are trying to re ach an outside number
and all trun ks (outside lin es ) in your company’s system are busy.
Trunk Callback Queuing le ts you hang up and have the
communic ations server call you back when a trunk becomes free.
After you answer, the communications server dials the number.
Trunk Standby Queuing lets you stay on the line until a trunk
becomes free. The communications server then dials the number.
(See “Trunk Queuing” on page 3–39.)
2-10 ROLMphone 120/240/400 Series User Gui de
Page 45

Using Your Speaker
Your phone has a speaker that you can use for receivin g cal ls or
liste ning to the Pho neMail sy stem. On RO LMphone mod els that only
have a speaker and not a microphone (the RP120 and RP240 Basic
models), you must pick up the handset to speak to the other
party.
2. Using Your Phone
To answer a call
on your primary
line
To answer a call
on another line
To hang up when
using the handset
To hang up when
listening to the
speaker
When someone puts you on hold, you do not need to hold the handset
while waiting. If you have a Speaker key, press it and re place the
handset. The speaker lets you hear your party reconnect to the call. If
you do not have a Speaker ke y, press the Hold key, replace the handset,
and press the line key.
➩
➩
➩
➩
Pick up the handset. The blinking s tatus
light next to the line key turns on steadily.
Press the line key next to the blinking
status li ght. The status light then turns on
steadily.
Hang up the handse t.
Press the line key or the Speaker key.
Using Your Phone 2-11
Page 46

Using You r Spea ke r phone (R P240,
RP240E , and RP400)
The RP240, RP240E, and RP400 models (exc ept the RP240 Basic )
have a two-way speakerp hone, consisting of a speaker and a
microphone. You can use either the hands et or the speakerphone to
make or answer call s.
To make a call
from your primary line
To make a call
from another line
To sw itch fro m
speakerphone to
handset
To sw itch fro m
handset to spea kerphone
➩
➩
➩
➩
➩
➩
Press the primary line key or the Speaker
key to get a dial tone.
Use the key pad to dial the number.
Press the line key to get a dial ton e.
Use the key pad to dial the number.
Pick up the handset.
Press the Speaker key and hang up the
handset.
To answer a call ➩
To hang up ➩
2-12 ROLMphone 120/240/400 Series User Gui de
Press the line key next to the blinking
status light.
Press the line key or the Speaker key.
Page 47

Voice Transmission
A ROLMphone speakerphone only allows voice transmission in one
direction at a time. Therefore, you and the other party cannot tal k
simulta neously. Also, if you are speaking you may not hea r voice
interrupt ions or ba ckground nois e, but th is does not mean your c all has
been disconnected.
If the noise level in your room is high, or the other party is spea king
too s oftly, you can i ncrea se the o the r part y’s v oic e vol ume by pressi ng
the Volume Up key. If the other party’s voice is too loud, you can
increa se your ability to int errupt by pressin g the Volume Down key. If
the volume adj ustment cannot compensa te for the high noise leve l, you
can use the handset to continue the conversation.
Since the speakerphone’s microphone is loca ted on the bottom right
front side of the phone, object s need to be kept away from that are a to
ensure c lear tra nsmission. Also, if your p hone i s near a large o bject a nd
you are farther away from the phone than the object is, your voice
volume ma y be re duced and you r vo ice m ay s ound hol low t o t he ot her
party. However, the party should st ill be able to understand you.
Muting the Speakerphone
If you have a Mute k ey, you can pre ss i t to t urn off the mi crophone , so
that you c an c arry on a con vers ation in your room that the other party
on your line cannot hear.
2. Using Your Phone
Mute is also helpful when someone put s you on hol d, since i t lets you
hear your party reconnect even if there is a high noise level in your
room.
To mute the
speakerphone
To cancel ➩
➩
During your conversation, press the Mute
key.
The stat us light n ext to the Mu te key bli nks
to remind you that Mute is active.
Press the Mute key or pick up the handset.
Using Your Phone 2-13
Page 48

Hold
Putting a Call on Hold
The Hold key lets you temporarily hang up a line without
disconnecting the other party. If you do not retrieve the call after a
certain period of time (determined by th e communications server),
your phone will rin g. If it is an exter nal call and you do not a nswer, the
call is transferred to the operator.
If you want to make another call a fter pla cing a call on hold, you must
use another line. If your telephone ha s only one line, use the
consultati on feature to pl ace another ca ll. (See “Consul tation” on page
3–12.)
Note:
To put a call on
hold
To reconnect to
the ca ll
On Version 6.3 and higher, you can put conf erence calls an d
consultation calls on hold.
➩
➩
➩
Pre ss th e H o ld key .
If you were using the handset, you can
ha ng up .
The status light beside the line key flashes
to remind you that the cal l is on hold, and
the communic ations server will call you
back after a certain period of ti me. You can
put only one call on hold per line.
Press the line ke y next t o the flashing status
light, or pick up the handset and press the
line key.
2-14 ROLMphone 120/240/400 Series User Gui de
Page 49

To pick up a call
on hold at
another
extension
➩
➩
Press the Pick up key, or get a dia l tone and
dial * 3.
Dial the number of the extension at which
the call was placed on hold.
When Your Party Puts You on Hold
If you are us ing your ha ndset and so meone puts you on hold , you may
want to switch to your speakerphone to leave your hands free .
If you have a Speaker key, press it and hang up. Your hands are free,
and you can hear when your party reconnects to the call. Note that a
high nois e level near you r phone may p revent your spe akerphone from
allowing voice transmission from the other party. (See “Voice
Transmission” on page 2–13.)
If you do not have a Speaker key, press the Hold key, replace the
handset, and press the line key. The speaker lets you hear your party
reconnect to the call.
To allow you to hear your party reconnect when there is a high nois e
level in you r room, us e the Mute feature. (See “Muting the
Speakerphone” on page 2–13.)
Hold on Hold
2. Using Your Phone
When a calle r has put you o n hold, you ca n use the Hold ke y to put that
caller on hold, and then answer or make a call on another line. This is
called a “hold on hold.”
If you are unable to execute a hold on hold, it may be that the caller
who put you on hold did not use the Hold key on a ROLMphone
telephone.
Using Your Phone 2-15
Page 50

Private Hold
Private Hold is another way to place a call in a temporary waiting
position . But with Private Hold, the call can only be re trieved from
your phone. Another part y cannot pick up the call from his or her
phone, even if your line appears on their phone.
To put a call on
private hold
To connect to the
call again
➩
➩
Press the Private Hold (HOLDPVT) key.
The status l ight fla shes ne xt t o th e line you
have put on hold.
Press the line ke y next t o the flashing status
light, or pick up the handset and press the
line key.
2-16 ROLMphone 120/240/400 Series User Gui de
Page 51

Preview
The Preview feature lets the user view information associated with any
line configure d on th e phone. The user ca n preview i nformation whe n
the phone is active on a call or when the phone is idle.
The user ca n se e th e fo llowin g :
• the identity of the caller on a line configured to ring on the
user’s phone (including recalling line s from hold, park, system
hold, and transfer.)
• the identity of the current user on the user’s active line.
• the identity of a p arty or a camped-on party on t he user’s curren tly
active line.
• the information about a line on hold.
To turn the Preview fe at u r e o n
➩
➩
Press the Preview key. The Preview status
light turns on.
Press a line key to view informatio n.
Line information is displayed for 8
seconds. If you tak e no further action, the
displa y reverts to the pr evious c ontent. T he
Preview key remains active so that yo u can
continue to display inform ation about ot her
lines.
2. Using Your Phone
To turn the Preview fe at u r e o ff
➩
Press the Preview key. The status light
turns off.
OR
Press any key exc ept the following d ial pad
keys: Mute , Vol ume, T ime, 0 t hrough 9, *,
or #.
OR
Using Your Phone 2-17
Page 52

Initiate a hands-free speakerphone
operation. Refer to “Us ing Your
Speakerphone (RP240, RP240E, and
RP400)” on page 2–12 for information on
how to make a call on the speak erphone.
OR
Place the handset on-hook if it is off-hook.
OR
Place the handset off-hook if it is on-hook.
To answer a call
on a Preview line
➩
If your phone is idle, go off-hook and begin
speaking while the preview information is
displayed.
If you a re ac tiv e o n a ca ll , turn th e Pr evie w
key off before answering the call.
2-18 ROLMphone 120/240/400 Series User Gui de
Page 53

Transfer
Transf er lets you move a call to another party and then hang up. The
other party can be , for ex am ple, an extension, your company’ s
operator, or an outside nu mber if your co mmunications server is s et up
to do this. Your system administrator can tell you how to dial your
company’s opera tor. In thi s guide , we assum e you dia l 0 to re ach you r
operator.
To reach your company’s operator, dial ____.
If you transfer a call to an ext ens ion and the li ne is busy, the call will
be auto ma tically queued for the extens ion and you can ha ng up. If the
transfe rred call is then not answered within a pr edetermine d period, it
will be returned to you.
If you transfe r a call to an extension that rings but does not answer
within a predetermined peri od, the call will also be re turned to you.
If the party to which you are transferring the call does not want to
accept the call, use the Connect key to reconnect to the original party.
2. Using Your Phone
To tran sfer a call
to ano ther exte nsion
Note:
If you have a display phone, the display will notif y you if the
extension to which you are trans f erring the call is in Do Not
Disturb. If you do not have a displa y phone a nd the extension
is in Do Not Dis turb , the co mmuni ca tions serve r will ca ll you
back after you hang up. When you answer, you will be
connected with the original party.
➩
➩
➩
➩
Ask the other party to hold.
Press the Transfer (TRANSFR) key.
This makes the Call W aiting (CALL
WTG) status light flash.
Dial the extension, or dial 9 and the out side
number.
If you want, announce the caller when the
party you have dialed answers.
Hang up.
Using Your Phone 2-19
Page 54

To reconnect to
the original call
➩
Before hangin g up, press the Connect key
to rejoin the original call.
2-20 ROLMphone 120/240/400 Series User Gui de
Page 55

Connect
The Connect key lets you
• reconnect with a call placed on consultation hold
• reconnect with a trans ferred call before the transfer is complete
• alternate be tween two parties, when you have one of them on
consult ation hold
To reconnect wit h
a call
➩
Press the Connect key.
2. Using Your Phone
Using Your Phone 2-21
Page 56

Using Your Mailbox
The Mailbox feat ure le ts you leave remind er messages at internal
extensions t o alert them to call you b ack. It also lets you receive and
answer reminder messages and PhoneMail and ROLMfax
notifications.
A reminder message that you leave on an internal call turns on the
Mailbox status light on the other phone. It also leaves a reminder
message if the other phone has a display.
Messages and notifications that you receive from an internal call will
turn on the status light beside your Mailbox key. On displa y phones,
they also provide informatio n about the call and on the number of
messages and noti fications tha t you have.
If you have a non-dis play phone with a Phone Mail (PHMAIL) ke y, the
status ligh t for that key, instead of the one for the Mailbox key, will
turn on when you have a PhoneMail messa ge. This applies als o for
display phones with a PhoneMail key on Version 6.4 and higher.
For information on how to leave reminder messages, see “Mailbox
Reminder Message” on page 3–22.
For information on displaying and answering reminder messages and
notifications, see “Reminder Messages and Notifications on Display
Phones” on page 4–2.
2-22 ROLMphone 120/240/400 Series User Gui de
Page 57

Changing Your Ring Tone
To change your
ring tone
➩
➩
➩
Get a dial tone.
Dial * 5 7 2.
Dial single digits (1 through 8) to hear
various tone pitches. If you have a display
phone (RP24 0E or RP400), it will display
the selected tone’s number. The last tone
you hear before you hang up will become
the ring tone of your telephone.
2. Using Your Phone
Using Your Phone 2-23
Page 58

2-24 ROLMphone 120/240/400 Series User Gui de
Page 59

Chapter 3 Making Calls
Bridged Call
The Brid ged Cal l feat ure le ts you joi n a ca ll if on e of the ot her p artie s’
extensions also appear s on your phone (a multiple line appearance).
Although the same extens ion may appea r on several phone s, onl y one
of the parties with the same mul tiple line appearance can us e the
Bridged Call feature to join a call. Onc e a call has been bridge d,
another pa rty with the same mult iple line appearance can not then
bridge into the call. Bridging also cannot take place if either of the
other original two parties are on hold or have turned on the Privacy
feature.
During a call that has been bridged, none of the parties can use their
key pads to enter fe at u re access co de s .
3. Making Calls
To join a conversation on a
mult iple li ne
appearance
Note:
If you press t he Transfer key during a bri dged call , your phone
will be removed from the call.
You cannot bridge a conv ers ation on an extension set up for
Privacy. Also, once yo u have br idged into a conversation, th e
party at that e xtension can exc lude you by pressing the Pr ivacy
key. (See “Privacy” on page 6-2.)
➩
➩
Press the line key whose status light is on.
You will hear the conference tone. Both
parties on the other end will also hear the
tone, and you wil l be joined in a thre e-way
conversation. With displ ay phones,
CONFERENCE is displayed on your
phone and C ONFERRING 1-2 is displa yed
on the bridged party’s phone.
Begin speaking. If you do not have a
speakerphone, you must pick up your
handset to s pea k to the other parties.
Making Calls 3-1
Page 60

Bridging overrides Do Not Disturb mode. (See “Do Not
Disturb” on page 6-1.)
3-2 ROLMphone 120/240/400 Series User G uide
Page 61

Busy Override
Busy Override lets you join a conversation on a busy extension. It is
intende d for high priority and emergency internal calls and require s a
special cla ss of s ervice. Ask your system administrator whether your
phone has been a ssigned this class of service.
To break through
to a busy ex te nsion
Note:
Busy Override does not interrupt a phone in Do Not Disturb
mode or a pr ivacy ca ll. (See “Do Not Dis turb” on page 6-1 a nd
“Privacy” on page 6-2.)
➩
➩
➩
Listen for the busy tone.
Press the Busy Ove rride (OVERIDE) key,
or dial # # 7.
You will hear the conference tone. Both
parties on the other end will also hear the
tone, and you wil l be joined in a thre e-way
conversat ion.
Begin speaki ng. A single beep will s ound
periodic ally until t he overriding party
hangs up.
3. Making Calls
Making Calls 3-3
Page 62

Busy St andby Queuing
With Busy Standby Queuing, you can stay on a line until a busy
extension tha t you are trying to call becomes free. The bus y tone
changes to music (or a ringing-beep tone), indicating that you are
queued. As soon as the extension becomes fr ee, your call will be put
through automatically.
To standby qu eue
for an extension
To cancel busy
standby queuing
➩
➩
➩
Listen for a busy tone.
Stay on the line until you hear music (or a
ringing-beep tone). When the other party
hangs up, the communications server will
complete your call.
Hang up.
3-4 ROLMphone 120/240/400 Series User G uide
Page 63

Callback Request
Callback Request can help you complete calls to extens ions that are
busy, ringing, or in Do Not Disturb mode, once those extensions
become available. It lets you hang up and have the communications
server cal l you back with triple rings under the following conditions:
• when a busy extension you are trying to reach becomes free
• when a ringing extensi on you ar e trying to re ach is used again and
then becomes free
When you t hen ans wer, the communicati ons server automat ically dia ls
the number.
While you are queued for a callback, the status light beside your
Callba ck (CAL LBC K) key is on.
To make a callback request
To accept the
callback
➩
➩
➩
➩
➩
Listen for the other pa rty’s phone to ring o r
for the busy tone.
Press the Cal lback (CALLBCK) key, or
dial # 1.
You will he ar t he confi rmati on ton e. I f y ou
have a display phone, WILL CALL BACK
is displayed.
Hang up.
Listen f or the triple rings.
If you have a displa y phone, FREE is
displa yed, along with the extension a nd
name of the party cal ling you back.
Answer the phone. The communications
server will automatically place your call.
3. Making Calls
➩
Listen for the called extension to ring.
Making Calls 3-5
Page 64

To cancel a
callback request
from a display
phone
➩
Press the Callback (CALLBCK) key until
the au to - c al lback m essage y ou w is h to
cancel is displ ayed. The stat us light next to
the
Program key turns on, indicating that your
phone is in program mode.
To cancel a
callback request
from a nondisplay phone
➩
➩
➩
➩
➩
Press the C le ar ke y . DELE TED is
displaye d to confirm the cancella tion.
Press the Program key to end the display.
Get a dial tone.
Dial # # 1.
You will hear the confirmation tone.
Hang up.
3-6 ROLMphone 120/240/400 Series User G uide
Page 65

Conferen ce
The Conference feature lets you have up to eight parties, including
yourself, in a telephone conversation. The other parties besides
yourself ca n be on trunks (outside lines) or extens ions. Any party can
leave th e conference by hanging up.
To set up a conference
➩
➩
➩
During a conversation, press the Transfer
(TRANSFR) key to put the party on
consultation hold.
You will hear the confirmation tone,
followed by the dial tone.
Dial the extension you want to add, or dial
9 and the outside number.
After the new party answe rs, press the
Conference (CONF) key to join all the
parties. All parties will hear a conference
tone to signal that another party has joined
the ca ll.
Or, to return to the conferen ce without
adding the new part y to it, press the
Connect ke y. Pr essing Connect again
returns you to the new party.
3. Making Calls
Note:
If you do not have a Confer ence key on your phone, press the
Transfer (TRANSFR) key to join all parties.
➩
To add an other part y, press TRANSFR and
dial the next party, then press CONF to joi n
all the parties. Everyone in the call will
hear a conferenc e tone to signa l that a new
party has joined the call.
Making Calls 3-7
Page 66

To remove the
last party from
the co n fe ren c e
➩
Press the Clear key.
OR
To determine
your position in
the co n fe ren c e
(with a displa y
phone)
➩
➩
➩
➩
➩
Press the Transfer (TRANSFR) key. The
status li ght besi de t he Confe re nce (CONF)
key blinks.
Dial * * * 4.
You will hear the confirmation tone.
Pre ss th e Conference key to re j oi n th e
conference. The number of parties and
your position in the conference is
displayed.
Press the Transfer (TRANSFR) key. The
status li ght besi de t he Confe re nce (CONF)
key blinks.
Pre ss th e Conference key to re j oi n th e
conference.
You will hear the conference tone. The
number of parties and your position in the
conference is displa y ed.
To remove a
party from the
conference
➩
➩
Press TRANSFR and dia l * * 4. T he statu s
light beside the Conference (CONF) key
blinks.
Dial the number f or the positi on in the
conference of the party you want to drop
(1-8).
You will hear the confirmation tone.
3-8 ROLMphone 120/240/400 Series User G uide
Page 67

➩
Press the Conference key to rejoin the
conference.
You will hear the conference tone. Th e
number of parties and your position in the
conference is displayed.
3. Making Calls
Making Calls 3-9
Page 68

Picking Up Calls to Add to Conferences
On Version 6.4 and highe r, you can use the Station Pickup feature to
creat e a confere nce call or to add a pic ked up party to a confere nce call .
(See “Statio n Pi ckup” on page 4-11.)
You can pick up the following kinds of ca lls for conferences:
• a call alerting or ringing on another extension, on your phone or
other phones
• a call on hold on another line on your phone or another phone
• a call parked on another extension
• a call on busy standby queuing for another extension
• a call on busy standby queuing for the line you are us ing
To pi ck up a ca ll
and add it to a
conference
➩
➩
➩
Press the Pickup key during a two-party
call or a conference call. Or get a dial tone
and dial * 3.
The other call is placed on consul tation
hold.
Dial th e ex t en si o n w h er e th e cal l to be
picked up is located.
If the call you are pic king up is on busy
standby queuing for your line, you will
already be conn ected t o i t n ow. You do not
have to dial an extension for it.
After the picked up party answers, press
the Confer ence (CONF) key to join all t h e
parties . All parties wil l hear a conference
tone to signal t hat another party has joined
the ca ll.
3-10 ROLMphone 120/240/400 Series User Gui de
If the pic ked up pa rty does not want to join
the conference, press the Clear key. This
disconnect s the pi cked up p arty and r eturns
you to the original call.
Page 69

To go back and forth (toggle) between the
picked up party and the original cal l, press
the Connec t key.
Note:
You can also transf er, place on hold, place on consultatio n
hold, or park a call you have pi cke d up. (See “Transfer” on
page 2-19, “ Hold” o n page 2-1 4, “Consult ation” o n page 3-12 ,
an d “P ark ” on page 5-1 0.)
To screen an
incoming call prior to picking it up
and adding it to a
conf er en ce
➩
➩
➩
➩
Press the Hold key to place the conference
on hold.
Press the line key for the incoming call.
Find ou t who is on the lin e .
3. Making Calls
If you do not want to add the call to the
conference, hang up that line.
If you want to add the cal l to the
confe rence, p ress th e Hold ke y to place t hat
line on hold.
Note:
➩
➩
Press the line key for the con ference.
Follow t he steps g iven in “T o pick up a call
and add it to a confere nce” on page 3-10.
You must be connected with the conference before you can
pick up a call and add it to the conferen ce.
Making Calls 3-11
Page 70

Consultation
Consulta tion l ets you p ut t he oth er party i n a call on con sulta tion h old,
so that you can call and talk privately with a second party. You can
then alternate between the two parties or join them in a conference call.
(See “Conference” on pa ge 3-7. )
To consult with a
second party during a call
To reconnect with
the first party
➩
➩
➩
➩
Press the Transfer (TRANSFR) key to put
the first party (or a conference) on
consulta tion hold.
You will hear the confirmation tone,
followed by the dial t one. The Call Waiting
(CALL WTG) status light flashes to show
that you have a party on consultation hold.
Dial the extension or 9 and an outside
number.
Talk with the second party.
Press the Connec t key. You can continue to
use the Connect key to al ternate betwe en
the two parties.
If you want to drop the s econd party an d recon nect with th e firs t par ty,
press the Clear key while you are connected with the second party.
If you hang up before reconne cting to the party on co nsultation hold,
the communic ations server will call you back with triple rings to
remind you th at you have a cal l waiting . Answer t he call to re-esta blish
the connection.
Note:
3-12 ROLMphone 120/240/400 Series User Gui de
You cannot dial a fe ature access code during a consultation
call, sin ce pressing the Trans f er key joins all parties into a
conference. Feature access codes are also not allowed during
conference calls. (See “Conference” on page 3-7.)
Page 71

Direct St ation Se lect (DSS)
Direct Stati on Se lect (DSS) let s you m onitor a nd aut omati cally dia l or
answer an e xtens ion. The s tat us l ight next t o the DSS (D-) ke y on your
phone indicates whether that extens ion is idle, ringing, or busy.
Whenever som eone is callin g that ex tension, the st atus li ght next t o the
DSS key on your phone bl ink s. Your phone may al so aler t yo u to such
a call with a si ngle beep, if it has been set up at the communications
server to do this. Wh en a cal l is in progres s on the DSS extension, the
status light turns on steadi ly.
When the DSS key status light is off, you can dial the DSS extension
by pressing the DSS key. When the DSS key status light is blinking,
you can answer a call ringing at the DSS exte nsion by pressing the
DSS key. When the DSS key status light is on, pres sing the DSS key
will place a call to the busy extension. This call will automatically
queue until the party becomes available. (See “Busy Standby
Queuing” on page 3-4.) Before you can use thi s feature, you must set
up an extension to be associated with your DSS key.
3. Making Calls
To set up a DSS
key
➩
➩
➩
➩
Press the Prog ram key. The Prog ram status
light tur ns on. If you ha ve a di splay phon e,
PRESS FEATURE KEY OR DIAL CODE
is displayed.
Press the DSS (D-) ke y you want to se t up.
If you have a display phone, DIRECT
STATION SELECT is dis played, followed
by either the stored extension or
NOTHING STORED. NEW NUMBER? is
then displayed.
Enter the extension you wish to assign to
this DSS key.
If you make an error while ent ering the
dialing sequence, press the Clear key to
cancel your changes, then enter the
extension again.
Making Calls 3-13
Page 72

➩
If you want to set up another DSS key,
press the Store key. If you have a display
phone, STORED is disp layed. Repe at the
two previous steps.
To clea r a D S S
key on a display
phone
➩
➩
➩
➩
➩
To end setup, press the Program key. The
Program status light turns off, and
STORED is displ ayed if you have a displ ay
phone.
On your faceplate, use a pencil to label
each DSS key you changed with the name
or extension of the person it dials.
Press the Pr ogram key. The Pr ogram status
light turns on, and PRESS FEATURE
KEY OR DIAL CODE is displayed.
Press the DSS (D-) key you want to clear.
DIRECT STATION SELECT is di splayed,
followed by the stored extension.
Before NEW NUMBER? is displayed,
press the Clear key. DELETED is
displayed.
Note:
You cannot clear a DSS key on a non-display phone or any
phone without a Clear key, though you can set it up to dial a
different extension.
3-14 ROLMphone 120/240/400 Series User Gui de
➩
➩
➩
If you want to clear another D-ke y, re peat
the previous two st eps.
To end setup, press the Program key. The
Program status light turns off.
On your faceplate, erase the label ne xt to
each D-key you have cleared.
Page 73

To dial a DSS
extension
➩
Press the DSS (D-) key for that extension.
The other party will hear a triple bee p.
If you press a DSS key while you are on a
call, the communications server will place
the first party on consultation hold before
dialing the DSS extension. To reconn ect to
the first party, press the Connect key. (See
“Consultation” on page 3-12.)
Note:
A DSS call overrides Forwarding and both Station and Pilot
Hunting. (See “Forwarding” on page 5-1 and “Station Hunt
Group” on page 7-5.)
To answer a DSS
extension
To answer a DSS
extensi on during
a call
➩
➩
➩
Press the DSS (D-) key for that extension.
3. Making Calls
To answe r another extens ion for which y ou
do not have a DSS key, you can use the
Station Pic kup fea ture. (See “Pickup” on
page 4-8.)
Ask the first pa rty to hold.
Press the DSS (D-) key for that extension.
Making Calls 3-15
Page 74

Direct Trunk Select
Direct Trunk S elect le ts you cho ose a parti cular trunk (outside line) for
placing a call.
To choose a trunk ➩
➩
➩
➩
Get a dial tone.
Press the Direct Trunk Select (DTS) key,
or dial # # 8.
Dial the number assigned at th e
communications server for the sp ec ific
trunk you want.
Dial the outside number.
3-16 ROLMphone 120/240/400 Series User Gui de
Page 75

Intercom Features
Intercom features let you
• send signals to another phone’s speaker
• make calls to members of your communit y (com) group by using a
short code
• make calls t o another phon e’s speake r instead of ri nging that p hone
Buzz
Buzz lets you signal another phon e’s speaker with a special tone. For
example, you might use Buzz to signal a secretary. You can use this
feature only if your phone has been assigned a buzz target at the
communications server. A buzz target is another digital phone.
To buzz your
target
➩
➩
➩
Press the Buzz key. If you have a display
phone, the extension and name of your
buzz target are displayed, along with
BUZZED. The phone that is your buzz
target makes a special tone. If your buzz
target has a dis play, your extens ion and
name are displa yed, along with BUZ ZING.
OR
Get a dial tone.
Dial # * 2.
You will he ar t he confi rmati on ton e. I f y ou
have a displa y phone, the extension and
name of your buzz target are displayed,
along with BUZZED . The phone that is
your buzz target makes a special tone. If
your buzz target has a display, your
extension and name are displayed, alon g
with BUZZING.
3. Making Calls
Making Calls 3-17
Page 76

➩
Hang up.
Note:
If you are talki ng on the phone, you can press the Buzz key
without interrupting your call.
Buzz overrides Do Not Distur b mode. (See “Do Not Dist urb”
on page 6-1.)
Comm unity (Com) Group Call
Community (c om) groups can be set up a t the communications server
so that the members of a group can call each other by dialing a short
com code inste ad of an extensi on. A call fr om a com group is signa lled
by a long ring.
On Version 6.1, you can only be a member of one group at a time.
On Version 6.2 and higher, you can be a member of more than one
group at a time and can be list ed in a group more than once. You can
also be assigned access to groups of which you are not a member.
To call a member of a com group to which you have acc es s , you dial
the com g roup acces s c ode fol lowed by the com c ode for t hat m ember.
Your system adminis trator can tell you the com group access codes.
Com groups are se t up at the communications server. Groups of up to
ten members have one-digit codes. Groups of more than ten member s
have two-digit code s. Ask your system administrator for a list of the
com group members to whom you have ac ce ss.
If the party being called is busy, you will receive a busy tone.
To call someone
➩
Get a dial tone.
in a com group to
which you have
➩
Dial the com group acce ss code.
access
➩
Dial the p ar ty ’s co m co d e .
3-18 ROLMphone 120/240/400 Series User Gui de
Page 77

Note:
A com group call overrides Forwarding and (on Version 6.2
and higher) Do Not Distu rb mode. ( See “Forwardin g” on page
5-1 and “Do Not Disturb” on pag e 6-1. )
Comm unity (C om) Gro up Spe a ke r Cal l
Community (Com) Group Speake r Call lets you make a two-way call
to the speaker of another phone in your community (com) group by
dialing a short code inst ead of an exte nsion. If the party you are c alling
does not have a speakerphone, they must pick up the handset to
answer.
If the par ty be ing ca ll ed pick s up the hands et, t he ca ll i s con vert ed to a
regular call. If the party being called is busy, you will receive a busy
tone.
This feature is much like the Two-Way Speaker Call feature, except
that the party you are calling must be a member of your community
(com) group. (See “Two-Way Speaker Call” on page 3-32.)
For more information about com groups, see “Commun ity (Com)
Group Call” on page 3-18.
3. Making Calls
To make a com
group speaker
➩
Press the Intercom (INTRCOM) key, or get
a dial tone and dial * * 6.
call
➩
Dial the mem b er’s com code.
You will hear the confirmation tone. The
other party ’ s phone will beep twice .
➩
Begin speaking. If the other party does not
have a speakerph one, they must pick up the
handset t o answe r. You a nd t he othe r party
will hear r epeated int rusion tones until they
pick up the handset.
If you are a member of a com group and want to make intercom calls
to the same member oft en, you c an set up an aut o intercom re pdial ke y.
To do this, set up a repdial key with the Intercom feature access code
(* * 6) followed by the com code of another member in your group.
(See “Repertory Dialing (Repdi al)” on page 3-24.)
Making Calls 3-19
Page 78

Note:
A com group speaker call wil l override Forwarding, Do Not
Disturb mode, and both Station and Pilot Hunting. (Se e
“Forwarding” on page 5- 1, “Do Not Dist urb” on page 6-1, and
“Station Hunt Group” on page 7-5.)
You cannot transfer a com group speaker call or place it on
consult ation hold. In addition, you cannot dial an account
number during a com group spea ker call.
If the m ember you are calling is busy on another line, the call
is converte d to a regular call.
Dedicated Intercom Call
Dedicated Intercom Call lets you dial a single digit (0 through 9) to
make a call to another phone. It uses one line on your phone set up as
a dedicated i ntercom call line . The called part y must also be set up as
a member of your dedicat ed intercom group.
If the called party’s phone is bus y, it will receive an alerting tone and
the status light next to its Dedicated Intercom (INT) key will flas h. The
called party can then hang up, and the call will be answered
automatically.
To call a member
of your dedicated
intercom group
➩
➩
➩
Press the Dedicated Intercom (INT) key.
Dial the dedica ted intercom group
member’s number (0 through 9).
After the called party answers, begin
speaking.
3-20 ROLMphone 120/240/400 Series User Gui de
Page 79

Last Number Redial
Last Number Redial lets you quickly redial the las t num ber you have
dialed.
Each time you dial a valid internal or external telephone number it is
automatically stored so that you can redial it late r. Num bers dialed
during consultation calls and transfers are also stored. (S ee
“Consultation” on page 3-12 and “Trans fer” on page 2-19.)
Only one number is stored at a time, and once you dial a new number
it replaces the number stored previously.
Note:
To redial the last
number dialed
Note:
Last Number Redial is only availab le on Version 6.4 and
higher.
If you dial a Least Cost Routing access code followed by a
number, the code and the number a r e stored for Last Number
Redial.
➩
➩
➩
Press the Last Number Redial (LNR) key.
OR
Get a dial tone.
Dial # # 4.
3. Making Calls
Feature access codes, and feature access codes followed by a
telephone number, as with the Forwarding feature for
example, are not stored.
If you use La st Number Redial to dial a number during a twoparty call or a conference call, the original call you were on
will be placed on consultation hold. (See “Consultation” on
page 3-12.)
Making Calls 3-21
Page 80

Mailbox Remi n der Mess ag e
When you call an extension that is busy or does not answer, the
Mailbox Reminder Message feature lets you leave a reminder
message, to have the other party ca ll you back. T he extensi on you are
calling mus t have a mailbox. (See “Using Your Mailbox” on page
2-22.)
For information on h ow to di spla y and respon d to rem inder mes sages,
see “Reminder Messages and Notifications on Non-Display Phones”
on page 4-6.
To leave a reminder message
To delete a reminder message
you have left on
another phone
➩
➩
➩
➩
After receiving a busy tone or getting no
answer, press the Mail box key or dial # * 1.
You will hear the con firmation tone. If you
have a disp lay phone, WILL CALL BACK
is displayed.
Hang up. The other party’s Mailbox status
light turns on. If the other party has a
display phone, the system will also leave a
reminder message providing your name
and the date and time of your call.
Get a dial tone.
Dial # * 8.
You will hear the confirmation tone,
followed by the dial tone.
3-22 ROLMphone 120/240/400 Series User Gui de
➩
➩
Dial the extension at which you le ft the
reminder message.
You will hear the confirmation tone.
Hang up.
Page 81

Paging
Paging conne cts your phone to yo ur company’s loud speaker or paging
system so th at you can ma ke an announce ment . If your pagi ng system
is divided int o zones, you may be ab le to make an announcem ent to all
zones or to only one of them. Your system adminis trator can tell you
your system’s paging access code or codes.
Your system’s paging access code ____ for all zon es .
To make an
announceme nt
➩
➩
➩
➩
➩
Get a dial tone.
Dial the pag ing access co de for all zone s or
for the one you want.
Listen for a confirmation tone.
State your message .
Press the line key to hang up.
If you hang up the handset, the noise of the
handset bei ng put down is heard over the
paging system.
3. Making Calls
Making Calls 3-23
Page 82

Repertory Diali ng (Rep di al)
The Repertory Dia ling fe ature l ets you set up eac h repdia l (R-) key on
your faceplate for one-touch dialing of an extension, an outside
number, a featur e access code, or a combination of numbers and
feature access codes.
For example, you can set up a repdial key to dial a freq uently called
phone number toget her with the accoun t number to which you always
want to charge such calls. You might set up another repdial key to
forward incoming ca lls to the same number every time.
The dialing sequence saved in a repdial key may include up to 22
characters. You can also press a feature key, which counts as three
characters, as part o f the seq uence. For e xampl e, you might enter y our
PhoneMail extens ion and then press the Mute key as the next part of
the sequence. T his would prevent office noise from interrupting your
PhoneMail messages .
On Version 6.2 and hi gher, you can pres s the Ho ld key onc e to ente r a
time delay int o a repdial sequence. For example, a dela y may be
neede d to pr oc ess a call p lace d t hrou gh a spec ia li ze d com mon ca r rie r.
On display phones, a delay appears as a “D. ” The delay is normally
configur ed as two seconds, but check with your communications
server s yste m adm in istra tor to det ermin e t he l en gth of ti me i t i s se t f or
in your system. You ca n ente r mul tiple delays in a repdial sequence,
but each delay takes up 3 characters of the 22 allowed.
Note:
3-24 ROLMphone 120/240/400 Series User Gui de
Version 6.2 and hi gher require you to press the Transf er key
(which operate s li ke Flash in previous releases) as the first
element to of some repdial feature access codes when you are
setting them up. This is necessary with features where you
start out with a call on your line, such as Automatic Privacy
(to turn it off), Bad L ine Report ing, Park, a nd Privacy. It alerts
the communications server that a command is to b e issued
from the key pad. Earlier releases do not require this use of
Transfer w i th repd ials.
If unsure of what to do, set up your repdial without Transfer,
and if that doesn’t work , re do it with Transfer. See Appendix
A, “Feature Ac cess Co d es” for a l ist of feature access codes.
Page 83

If you press a repdial key whi le you are on a call, Versions 6.0
and 6.1 will place the first party on consultation hold before
dialing. To return to the first party, press the CONNECT key.
To set up a
repdia l key
➩
➩
➩
➩
Press the Prog ram key. The Prog ram status
light tur ns on. If you ha ve a di splay phon e,
PRESS FEATURE KEY OR DIAL CODE
is displayed.
Press the repdial (R-) key you want to set
up. If you hav e a display phon e, REPDIAL
is displa yed, fo llo wed by eit her the dialin g
sequence or NOTHING STORED. NEW
NUMBER? is then displayed.
Enter the dialing sequence you want to
assign to the R- key. If you make an error
while entering the dialing sequence, press
the Clear key t o cancel your cha nges. Then
enter th e seq u ence again.
If you want to set up another R- key, press
the Store ke y. If you have a display ph one,
STORED is displayed. Repeat the two
previous steps.
3. Making Calls
➩
➩
To end setup, press the Program key. The
Program status light turns off. If you have
a display phone, STORED is displayed.
On your faceplate, use a pencil to label
each R- key you cha nged with the name of
the feature o r person it dia l s.
Making Calls 3-25
Page 84

To clea r a
repdial key on a
display phone
➩
Press the Pr ogram key. The Pr ogram status
light turns on. PRESS FEATURE KEY OR
DIAL CODE is displayed.
Note:
➩
Press the repdial (R-) key you want to
clear. REPDIAL is dis played, fol lowed by
the dialing sequence.
➩
Before NEW NUMBER? is displayed,
press the Clear key. DELETED is then
displayed.
➩
To clear anoth e r R- ke y, press th e S tore
key. STORED is displ ayed. Repeat the two
previous ste ps .
➩
To end setup, press the Program key. The
Program status light turns off.
➩
On your faceplate, erase the label ne xt to
each R- key you have clear ed.
You canno t clear a repdial key on a non-display ph one or any
phone without a Clear key, though you can set it up to dial a
different sequence.
To dial using a
repdial key
3-26 ROLMphone 120/240/400 Series User Gui de
➩
Press the repdial (R-) key.
Page 85

Saved Number Redial
Saved Number Redial lets you save a num ber that you have dialed.
Later, you can redial your saved number by pressing the Saved
Number Redial (SAV/R DL) ke y. You ca n save only one number at a
time; each tim e you save a number, you erase the number you had
saved previously.
To save a number
you have
dialed
To dial your
saved number
➩
➩
➩
➩
Press the Saved Number Redial (SAV/
RDL) key. If you have a display phone,
STORED is displayed.
OR
While the cal l is still ri nging or busy, dial #
4. If you ha ve a display phone, STORED i s
displayed. Note that certain trunk
connections (loopsta rt) do not support use
of this acce ss code.
Press the Saved Number Redial (SAV/
RDL) key.
OR
Get a dial tone.
3. Making Calls
To change your
saved number
manually
➩
➩
Dial # 4.
Press the Prog ram key. The Prog ram status
light tur ns on. If you ha ve a di splay phon e,
PRESS FEATURE KEY OR DIAL CODE
is displayed.
Making Calls 3-27
Page 86

➩
Press the Saved Number Redial (SAV/
RDL) key, or dial # 4. If you have a displ ay
phone, SAVED NUMBER REDIAL is
displayed followed by either the saved
number or NOTHING STORED. NEW
NUMBER? is then displayed.
Note:
➩
Enter the number you want to save. If you
make an error while entering the number,
press the Clear key to cancel your ch anges
and then enter the number again.
➩
Press the Pr ogram key. The Pr ogram status
light turns off. If you have a dis play phone,
STORED is displayed.
You can als o assign a fre quently used number to a re pdial key.
(See “Repertory Dialing (Repdi al)” on page 3-24.)
3-28 ROLMphone 120/240/400 Series User Gui de
Page 87

Speaker Calls
Speaker call s let you make calls to anoth er phone’s speaker i nstead of
ringing that phone.
Note:
Speaker calls (except Two-Way Speaker Call) will override
Do Not Disturb, Forwa rdi ng, and Hunt Gro ups. (See “ Do Not
Disturb” on page 6-1, “Forwardin g” on page 5-1, and “Statio n
Hunt Group” on page 7-5.) A speake r call to a line tha t is busy
receives a busy to ne.
Speaker calls can be blocked with the S peaker Call Rejection
feature. (See “Speaker Call Rejection” on page 3-33.)
Fixed One-Way Speaker Call
The Fixed One-Way Speak er Call feature lets you make a one-way call
to the speaker of a phone that is set up at the communications server
(fixed) as your speaker call target. Th e other party can hear you but
must pick up the hands et to answer. You may want to write the name
of the person who is your speaker call target next to the Fixed OneWay Speaker Call (SPK1WYF) key on your phone ’s faceplate.
To make a oneway sp ea ker call
to your target
➩
Press the One-Way Speaker Call
(SPK1WYF) key. Or get a dial tone an d
dial # * 4.
3. Making Calls
➩
➩
Listen for th e c onfirm ation t one. The ot her
party will he ar a double beep.
Begin speaking. T he othe r party mus t pick
up the handset to answer.
Making Calls 3-29
Page 88

One-Way Speaker Call
The One-Way Spea ker Call f eature l ets you mak e a one-way ca ll to the
speaker of another phone. If the other party does not have a
speakerphone, they must pick up the handset to answer.
Note:
One-Way Speaker Call is only available on Version 6.3 and
higher.
To make a oneway sp ea k er ca l l
➩
➩
➩
➩
Pre ss th e O n e- W ay Spe ak e r Call
SPK1WAY key.
Dial the extension.
You will hear the confirmation tone. The
other party wil l hea r a double beep.
OR
Get a dial tone.
Dial # 8 1.
You will hear the confirmation tone,
followed by a dial tone.
➩
Dial the extension.
You will hear a confirmation tone. The
other party wil l hea r a double beep.
➩
Begin speakin g. The oth er party must pick
up the handset to answer.
3-30 ROLMphone 120/240/400 Series User Gui de
Page 89

One-Way Broadcast Speaker Call
The One-Way Broadcast Speaker Call feature lets you make a oneway call to the s p eakers of up to 40 phones that are multiple line
appearance s of the same extensi on. To us e this fea ture, you must be s et
up for it on your communi cations server.
Note:
One-Way Broadcast Speak er Call is only available on Version
6.3 and higher.
Any multipl e lin e a ppeara nces that are busy a re dropp ed f rom
the ca ll.
If the exte nsio n calle d is busy, th e ca ll er wil l hea r a busy ton e
and the call will not be com p leted to the ext ension or the
multiple line appear ances.
If another line o n th e phone wit h the e xtens ion i s bus y and t he
extension itself is free, a one-wa y broadcast spea ker call will
be completed to the multipl e line extensi ons. It will not be
completed to the extension.
To make a oneway broadcast
speaker call
➩
3. Making Calls
Press the One-Way Broadcast Speaker Call
(SPKBCST) key.
You will hear the confirmation tone,
followed by a dial tone.
➩
➩
OR
Get a dial ton e and dial # 8 0.
You will hear the confirmation tone,
followed by a dial tone.
Dial the extension.
You will hear the confirmation tone. The
other parti es will hear a special tone.
Begin speaking.
Making Calls 3-31
Page 90

If one of the part ies yo u have cal led lift s his
handset, a two-way (not speakerphon e)
connection will be es tablis hed with that
party. The other parties will be
disconnected.
A party you have called can disc onnect by
pressing the line ke y or the Spe aker key . If
this pa rty is the las t one in th e multi ple l ine
appearance, the call is disconnected.
Two-Way Speaker Call
The Two-Way Speaker Call fe ature lets you make a two-way call to
the speaker of another phone. If the other party does not have a
speakerphone, they must pick up the handset to answer.
To make a twoway sp ea k er ca l l
➩
➩
Press the Two-Way Speaker Call
(SPK2WAY) key.
Dial the extension.
You wi l l hear a sin g l e beep . The othe r
party will hear a double beep.
➩
Begin speakin g. If the othe r party does not
have a speakerphone , they must pick up the
handset to a nswer. You and the other part y
will hear s ingle beeps pe riodic ally u ntil th e
other party picks up the handset.
To make a two-way call to the speaker of a phone within your com
group, use the Intercom Call feature. (See “Community (Com) Group
Speaker Call” on page 3-19.)
You can make a two-way s peaker call to a DS S extension by pressing
the Two-Way Speaker Call (SPK2WAY) key and th en pre ssing the
DSS key. (See “Direct St ation Select (DSS )” on page 3-13.)
3-32 ROLMphone 120/240/400 Series User Gui de
Page 91

Speaker Call Rejection
Speaker Cal l Rejection lets you tempor arily block in com ing speaker
calls. If another party attempts to make a speaker call to your phone,
they will receive a busy tone. If they have a display phone, PLEASE
TRY LATER is also displayed.
To block incoming speaker calls
To allow incoming speaker calls
Note:
Whether your phone in itially allows or blocks spea ker c alls
depends on how your phone has been set up at the
communication s server.
➩
➩
Pres s the Speaker Call Rejection (SP K REJ) key. The SPK-RE J status light turns
on.
Pres s the Speaker Call Rejection (SP K REJ) key. The SPK-RE J status light turns
off.
3. Making Calls
Making Calls 3-33
Page 92

Station Speed Dialing
The Station Speed Dialing feature lets you assign frequently used
dialing sequences to codes for easy dialing.
You can assign diali ng sequences to each of ten single-di git codes (0
through 9). You c an then dial a si ngle -digit code inst ead of di aling t he
entire sequence.
On Version 6.3 and highe r, you can also be set up at the
communication s server for up to 30 code s, in groups of 10. If you are
set up for more than ten , they follow a double-dig it scheme (00 through
29).
A dialing sequence can be an extension, an outside number, a feature
access code (or feature key that you press as part of the sequence), or
a combinatio n of numbers and feature access codes. It ca n include up
to 22 char acter s.
Station s peed code s a re not l ine d epe ndent; yo u ca n se t them up or di al
them from any line on your phone.
To set up a station
speed key on a
display phone
➩
➩
➩
➩
Press the Pr ogram key. The Pr ogram status
light turns on. PRESS FEATURE KEY OR
DIAL CODE is displayed.
Press the Station Speed (SPEED) key, or
dial # # 3. SPEED DIAL is displayed.
Enter the Station Speed code you want to
set up (0 through 9, or 00 through 29 if you
are set up for more than 10 codes).
Either the dial ing sequence or NOTHING
STORED is displayed. (You can view the
contents of other codes by entering those
co de s no w.)
Wait until NEW NUMBER? is displayed.
3-34 ROLMphone 120/240/400 Series User Gui de
Page 93

➩
Enter the dialing sequence you want to
assign to the code . If you make an error
while entering the dialing sequence, press
the Clear key to cancel your changes and
then en t er th e s e qu e n ce ag ain.
To set u p a station
speed key on a
non-display
phone
➩
➩
➩
➩
If you want to set up another station speed
code, press the Store key. STORED is
displayed. B efore PRESS FEATURE KEY
OR DIAL CODE is displayed, repeat the
three previous s teps.
To end setup, press the Program key. The
Program status light turns off, and
STORED is displayed.
Press the Station Speed (SPEED) key
twice.
You will hear the confirmation tone,
followed by the dial tone.
Enter the Station Speed code you want to
set up (0 th rough 9, or 00 thr ough 29 if you
are set up for more than 10 codes).
3. Making Calls
➩
➩
➩
➩
You will hear the confirmation tone.
Enter the dialing sequence you want to
assign to the code.
Hang up.
OR
Get a dial tone.
Dial # # 3.
Making Calls 3-35
Page 94

➩
Enter the stati on speed code you want t o set
up (0 through 9, or 00 through 29 i f you are
set up for more than 10 codes).
You will hear the confirmation tone.
Note:
You can also assign a dialing sequence to a repdi al ke y. (See
“Repertory Dialing (Repdial)” on page 3-24.)
To dial using a
station speed
code
➩
➩
➩
➩
➩
Enter the dialing sequence you want to
assign to the code.
Hang up.
Press the Station Speed (SPEED) key.
You will hear the confirmation tone,
followed by the dial tone.
Dial the station speed code.
OR
Get a dial tone.
Dial # 3.
Dial the station speed code.
Press the Pr ogram key. The Pr ogram status
light turns on. PRESS FEATURE KEY OR
DIAL CODE is displayed.
Press the Station Speed (SPEED) key you
To clear a s ta tio n
speed code on a
display phone
➩
➩
➩
➩
want to clear, or dial # # 3. SPEED DIAL
is displayed.
3-36 ROLMphone 120/240/400 Series User Gui de
Page 95

➩
Enter the st ation speed code you want to
clear (0 through 9, or 00 through 29 if you
are set up for more than 10 codes). The
dialing sequence is displayed. ( You can
view the contents of other codes by
entering their codes now.)
Note:
➩
Before NEW NUMBER? is displayed,
press the Clear key. DELETED is
displayed.
➩
If you want to clear another station speed
code, press the Store key. STORED is
displayed. Repeat the three previous steps.
➩
To end setup, press the Program key. The
Program status l ight turns off. STORED is
displa yed.
You cannot clear a station speed key on a non-dis play phone
or any phone with out a Clear key, though you can set it up to
dial a different sequen ce .
3. Making Calls
Making Calls 3-37
Page 96

System Speed Dialing
If you have the System Speed Dialing featur e s et up on your
communications server, you can dial frequently ca lled extens ions or
outside numbers (local, long distance, and international) by dialing a
code number. A number se t up for a syst em spe ed code can co ntain a n
init ial PI N , if on e is ne cessa ry to m ak e outside calls.
Usually system speed code numb ers are published for an entire
company in a special system speed dire ctory. Consult your sy st em
administrator if you do not know your system speed numbers.
Your company may have up to sixte en system speed lists. You may
have access to up to two of these lists. For release 6.4 and ab ove, you
may have access to two of these lists or to the firs t ten lists plus one
additiona l list. They will be identified on your faceplate by keys
labeled SYS-SP1 and SYS-SP2.
To make a system
speed ca ll
➩
➩
Press the correct System Speed key (SYSSP1 for the first System Speed list or SYSSP2 for the second).
Or, get a dial tone and dial
— # 6 1 for the first list
— or # 6 2 for the second
You will hear the confirmation tone,
followed by the dial tone.
Dial the s y st em s p ee d cod e .
3-38 ROLMphone 120/240/400 Series User Gui de
Page 97

Trunk Queuing
The Trunk Que uing feature s complet e calls for you to out side number s
when all available trunks (outside lines) have been busy.
Trunk Callback Queuing
Trunk Callback Queuing le ts you hang up and have the
communications server cal l you back with triple rings when a trunk
becomes free for an outside call. When you then answer, th e
communications server automatically dials the number.
To queue for a
trunk callb a ck
Note:
To accept the
trunk callb a ck
If you receive a busy tone instead of a queuing to ne, Trunk
Callback Queui ng is n ot av ai lable .
You can only queue for one ca ll at a time.
➩
➩
➩
➩
Listen for the queuing tone.
Hang up. The Callback status light turns
on.
3. Making Calls
Listen f or the triple rings.
If you have a displa y phone, FREE is
displa yed.
Answer the phone. The communications
server will automatically place your call.
You will hear the ext ernal number that you
called begin to ring.
Making Calls 3-39
Page 98

To cancel trunk
callback queuing
from a display
phone
➩
Press the Callback (CALLBCK) key until
the auto-callback request you wish to
cancel is displ ayed. The stat us light next to
the Program key turns on, indicating that
your phone is in progr am mode.
➩
Press the C le ar ke y . DELE TED is
displaye d to confirm the cancella tion.
Press the Program key to end the display.
Get a dial tone.
To cancel trunk
➩
➩
callback queuing
from a non-dis-
➩
Dial # # 1.
play phone
You will hear the confirmation tone.
➩
Hang up.
Trunk St andby Queuing
With Trunk Standby Que uing, you can stay on a line until a trunk
becomes free. As soon a s the trunk be comes fr ee, your call wil l be put
through automatically.
To standby qu eue
for a trunk
➩
After dialin g an outs ide number, sta y on
the line.
You may hear a queuing tone. When a
trunk becomes free, the communications
server will complete your call.
Note:
If you hear a long (30 sec.) queuing tone, your class of service
only has Trunk Callback Queuin g and you cannot use Trunk
Standby Queuing. Hang up and Trunk Callback Queuing will
be initiated. See “Trunk Callback Queuing” on page 3-39.
To cancel trunk
➩
Hang up.
standby queuing
3-40 ROLMphone 120/240/400 Series User Gui de
Page 99

Chapter 4 Answering
Calls
Reminder Messag es and Notifications
(Displ aying and Answering)
Your communications server can be set up to signal you when you
have reminder messages, PhoneMail notifications, or ROLMfax
notifications.
A reminder m essag e indi cate s tha t someo ne has trie d to reach you and
wants you to call them back. A PhoneMail notific ation indicates that
you have received one or more new PhoneMail messages. A
ROLMfax notification signals you when you have one or more new
facsimile s waiting. T he PhoneMail and ROLMfax syste ms are opti ons
that may or may not be a part of your system. Version 6.4 does not
support ROLMfax.
If your phone has a Mailbo x key but not a PhoneMai l ( PHMAIL) key,
the Mailbox key will light up when you have any of these reminder
messages and notificati ons.
You can scroll through your messages and notificati ons (on a display
phone) an d t hen call ba ck th e p arty or sys tem by p ress ing a sing le key.
(See “Using Your Mailbox” on page 2-22.)
If your phone has a PhoneMail (PHMAIL) key, it will light up when
you have PhoneMail messages. On Versions 6.4, only non-display
phones could have a PhoneMail key. Version 6.4 and higher al so
supports a PhoneMail key for display phones.
If you have a Phon eMail k ey and a Mailbo x key, t he Mail box k ey will
light up wh en you have reminder messa ges or ROLMfax no tificati ons.
You can have both the se keys on non-display phones, and on displa y
phones on Version 6.4 a nd higher.
You can also gain access to spec ific messages a nd notificat ions by
dialing designated numbers.
For infor mation a bout how to us e the Mai lbox ke y to leave a remi nder
message, see “Mailbox Reminder Message” on page 3-22.
4. Answering Calls
Answering Calls 4-1
Page 100

Reminder Messages and Notifications on
Display Phones
To display mailbox reminder
messages and notifications
To an s w er a di s played reminder
message or PhoneMail notification
➩
➩
➩
Press the Ma ilbox k ey. The Prog ram st atus
light turns on. MAILBOX is displayed,
followed by the first message or
notification in your mailbox.
Continue press ing MAILBOX to scroll
through your messages and notifications.
When the message or PhoneMail
notification that you want to answer is
displayed, press the Callback (CALLBCK)
key.
Or, on Version 6.4 and higher, you can
press #.
The Program status light turns off, and the
communi cation s server ca lls bac k the party
that left the message or the PhoneMail
system. If the party or system answers, the
message or notification is deleted
automatically.
To an s w er a di s played ROLMfax
notification
4-2 ROLMphone 120/240/400 Series User G uide
➩
When the ROLMfax notif ication that you
want to answer is disp layed, press the
Callback (CALLBCK) key.
The Program status light turns off, and the
communi cations server calls back the
ROLMfax system. If the system answers,
the message or notification is deleted
automatically.
 Loading...