

Page 1
s
Operating Instructions en RDG100T
RDG160T
RDG160TU
RDG100T / RDG160T / RDG160T U – the electronic room thermostat that allows you to set the ideal
room temperature you want. The thermostat provides Comfort, Economy and Protection mode and,
in addition, an Auto Timer mode with 8 programmable timers. The fan operates either in Automatic
mode or at the selected speed when using Manual mode. You can either rely on the factory settings
or make adjustments that suit your individual needs.
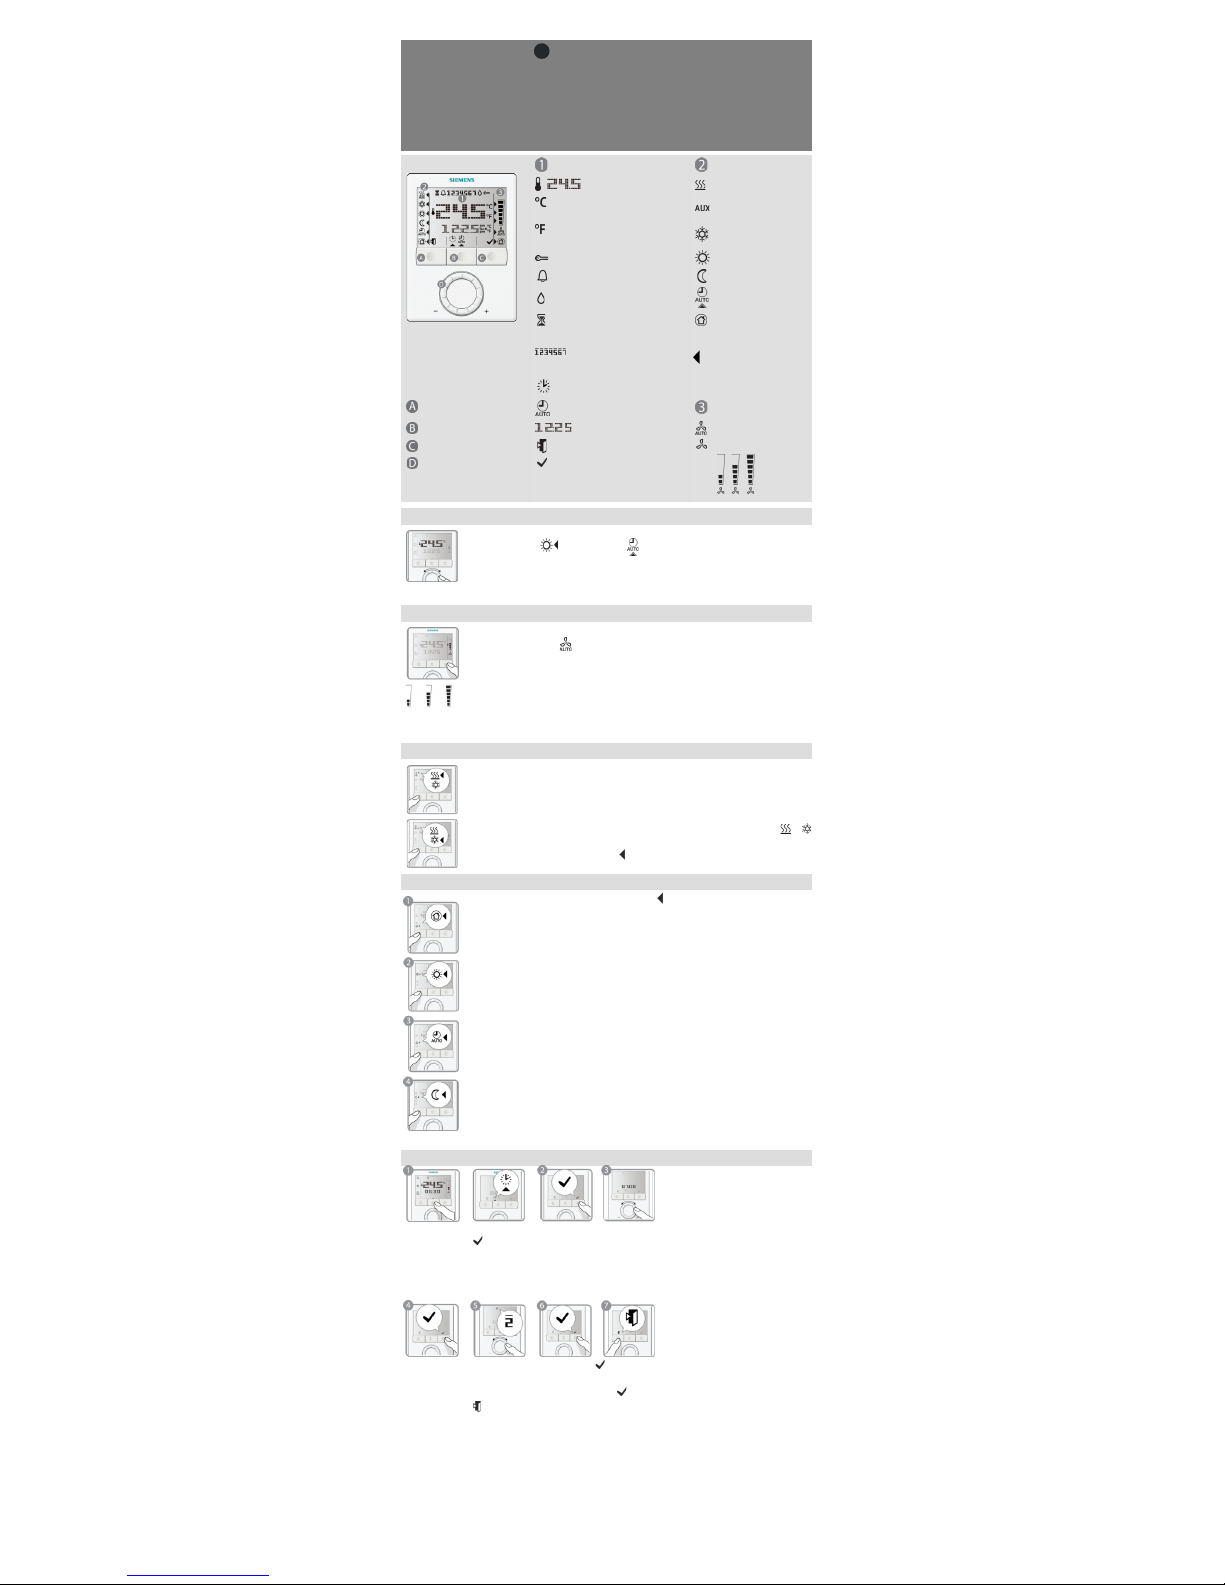
Main display Operating mode
Room temperature
Heating mode
Room temperature in degrees
Celsius
Electric heater on
Room temperature in degrees
Fahrenheit
Cooling
Button lock active
Comfort mode
Alert indicator
Economy mode
Condensation in the room
Auto timer
Temporary timer function
active
Protection mode:
Protection against
frost
Indicator for selecting
mode
Weekday 1 = Monday
7 = Sunday
Operating mode button
Setting time and weekday
Setting the auto timers
Fan mode
Pro gram mode button
Current time of day
Automat ic
T Fan mode button
Escape (Cancel)
Manual
Low Medium High
Rotary knob
Confirmation (OK)
Changing the room temperature
•
The room temperature setpo int
can be adjusted with the rotary knob when
Comfort mode is active or with
•
Turn the rotary knob clockwise (+) to increase, or counterclockwise (-
) to decrease
the current room temperature setpoint for Comfort mode
The setting range is from 5...40 °C (41 … 104 °F), unless limited by parameters P09 and P10 (for
parameter
settings, see reverse side).
Adjusting the fan speed
Low Medium High
•
Press the fan mode button until the desired fan mode is reached
•
In Automatic mode
, the fan speed is automatically selected by the thermostat
depending on the setpoint and the actual room temperature.
When the room temperature reaches the setpoint, the fan stops (factory setting) or
keeps running at low speed (P15).
•
In Manual mode, th
e fan operates independently and always runs at the same
speed: Low / medium / high
Notes:
If desired, you can change the fan mode selector option via P03: Manually only, or manually
including Protection mode. Use P15 to set the fan speed in dead zone.
Changing from heating to cooling mode
• Depending on the type of plant, the changeover from heating to cooling (or vice
versa) is made either automatically by a changeover sensor or a remote changeover
switch, or manually by pressing the operating mode button (see parameter P01)
•
To select cooling or heating manually (P01=2), press the operating mode
button
until the desired mode appears
•
With automatic changeover or continuous heating / cooling, symbols
/
indicate that the system currently operates in heating or cooling mode
•
With manual changeover, symbol
appears, indicating that the system currently
operates in heating or cooling mode
Changing the operating mode
Press the operating mode button until symbol
appears, indicating that Protection /
Comfort / Auto Timer / Economy mode is selected.
1. Protection mode
• In protection mode, the plant stops operating. If the room temperature falls below
8 °C (46 °F), heating is switched on however to protect the room against frost
The setpoints for Protection mode can be changed by your HVAC installer if desired:
Changes made by installer: Frost protection: _________ °C / °F Heat protection: __________ °C /
°F
2. Comfort mode
• In Comfort mode, the thermostat maintains the setpoint which can be readjusted
with the rotary knob
3. Auto Timer mode
• In Auto Timer mode, the controller automatically switches over between Comfort
and Economy according to the 8 preprogrammed timers
4. Economy mode
•
When selecting Economy mode, make s ure that parameter P02 is set to 2
•
In Economy mode, the room temperature is
maintained at a lower or higher
setpoint, thus saving energy and money! You can change the preselected
setpoint
by adjusting parameters P11 and P12 (for parameter settings, see reverse side)
Important: The setpoint for Economy can be set to OFF. This means that the thermostat is
deactivated! Risk of frost, i.e. no protective heating or cooli ng function is provided!
Setting the time of day and the weekday
1. Press the program mode button for programming.
2. Press button (OK) to enter the setting mode for the time of day.
3. The time digits start blinking. Turn
the rotary knob clockwise or counterclockwise to set the time
of day.
If the current time of day is in 24-hour format and you wish to change it to the 12-
hour format, turn
the knob clockwise passed 23:59 or co unterclockwise passed 00 :00. Vice versa back to the 24-
hour
format.
4. Confirm the time of day by pressing button and the weekday indicator starts blinking.
5. Turn the rotary knob clockwise or counterclockwise to set the current weekday.
6. Confirm the current weekday by pressing button (OK).
7. Press button (Esc) to leave the program mode.
Notes:
After a power failure, the time of day starts blinking to indicate power was lost. H owever, the a
uto timer continues to
run with the time before the power failure occurred. Select the setting mode to readjust the time if needed.
Page 2
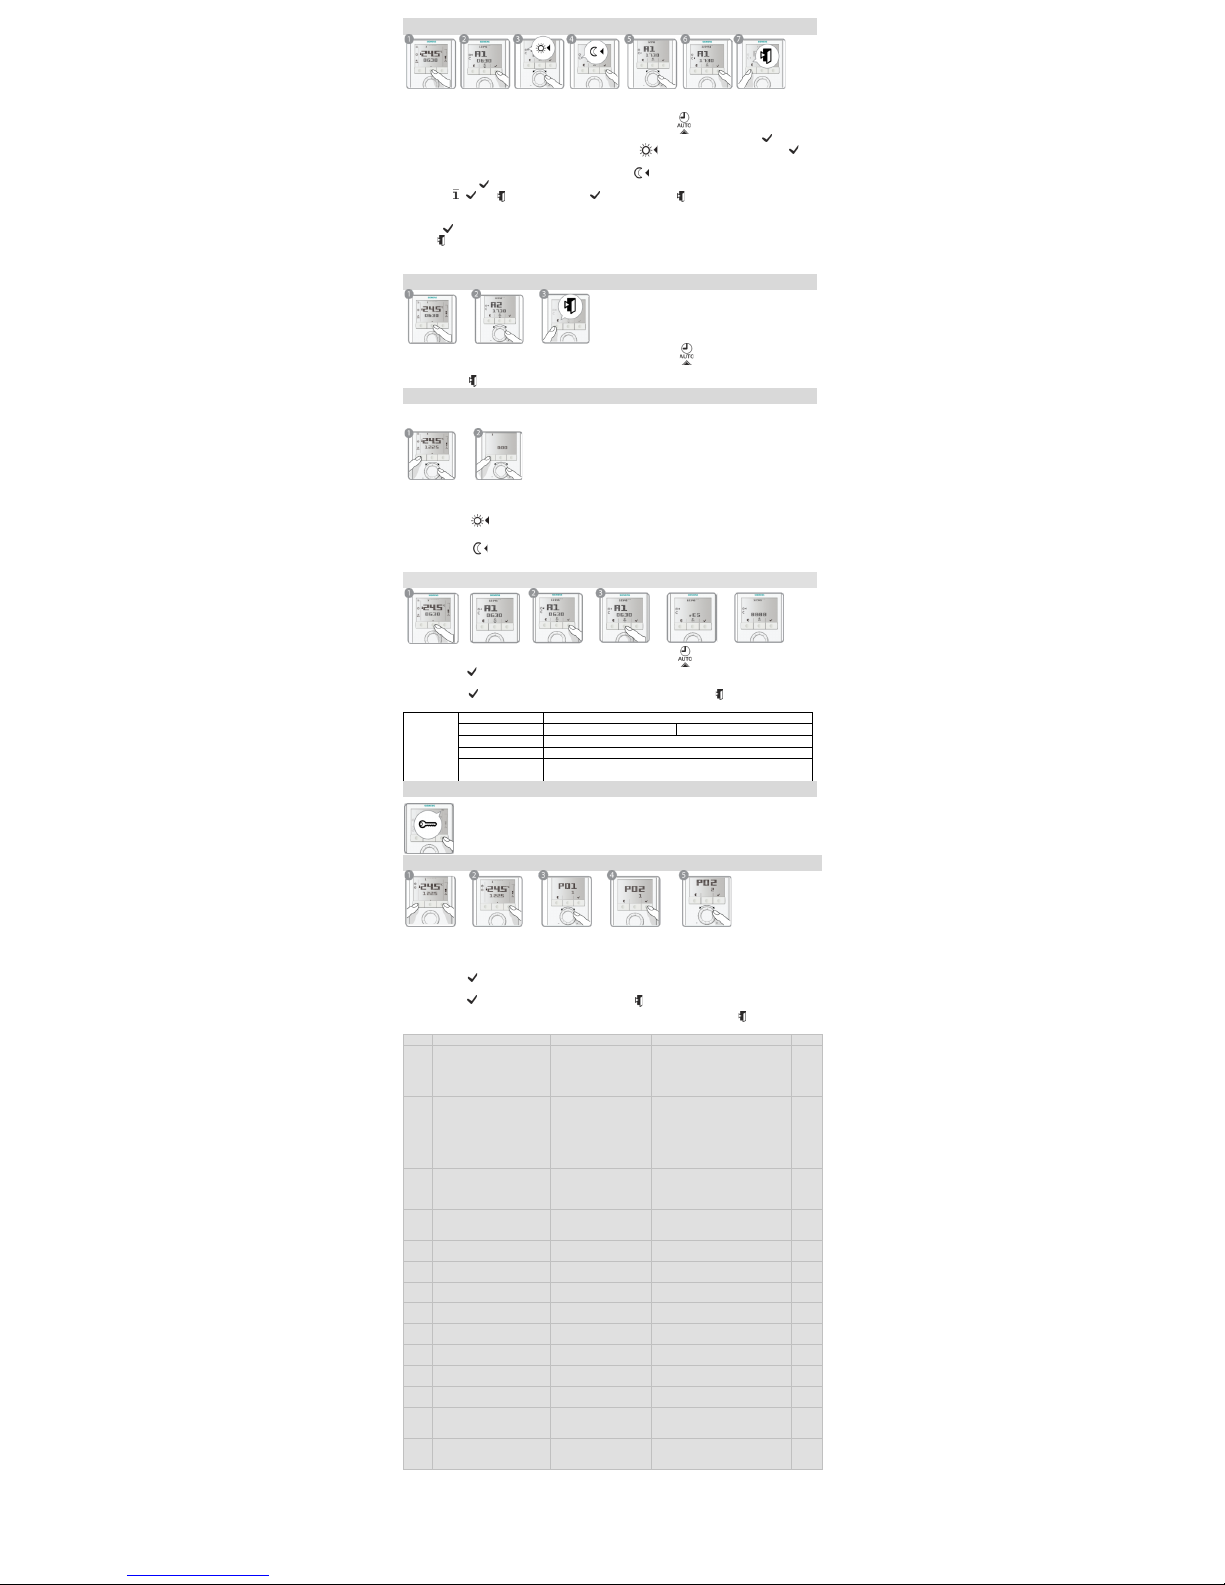
Setting the programmable timers
The
RDG100T / RDG160T / RDG160TU provides
8 programmable timers A1…A8 each of which can be
assigned to one or several days. To set an auto timer, proceed as follows:
1.
Press the program mode button twice to select auto timer setting .
2.
Turn the rotary knob to the desired timer A1…A8 that you wish to set and press button (OK).
3.
Turn the rotary knob to set the Comfort mode start time and confirm by pressing button
(OK).
4.
Turn the rotary knob to set the Comfort end time
or Economy start time and confirm by
pressing button (OK).
5.
Weekday , and blink. Press button (OK) to select or
(Esc) to deselect each day and
advance to the next day.
6. After the 7th day is set, all selected weekdays blink. Confirm setting for actual timer by pressing
button (OK) and advance to the ne
xt timer. To set the next timer, repeat steps 3 through 6, or
press (Esc) to leave the setting mode.
Notes:
- To save your settings, remember to press OK in step 6 above before pressing Esc to leave the setting mode.
- The timer function can be disabled by setting P02 = 3 or P02 = 4 (RDG160T / RDG160TU only)
Viewing the settings
1.
Press the program mode button twic e to select auto timer setting .
2.
Turn the rotary knob to review the 8 auto timers.
3.
Press button (Esc) to return to normal operation.
Temporary timer for extended presence or absence
The
Comfort and Economy modes can be temporarily extended from 0.5 to 9.5 hours using
the
temporary timer.
1.
To set the temporary timer, press and hold the operating mode button for maximum 3 seconds.
While holding the button, turn the rotary knob clockwise or counterclockwise as required.
a) Turn the rotary knob clockwise to extend Comfort mode.
Display:
0....+9:30
b) Turn the rotary knob countercloc kwise to extend Economy mode.
Display: 0....-9:30
After the temporary timer has e
lapsed, the thermostat will resume operation in Auto Timer mode.
Reloading the default timer settings
1.
Press the program mode button twice to select auto timer setting .
2
. Press button (OK) to enter the timer setting mode.
3.
Press the program mode button for at least 3 seconds; then “rES” is displayed.
4.
Press button (OK) to confirm reloading the default timer settings, or
(Esc) to leave without
change.
Default
settings
Weekdays
Time of day when thermostat is in Comfort mode
Mon (1) – Fri (5)
06:30 – 08:30 (A1)
17:30 – 22:30 (A2)
Sat (6)
08:00 – 23:00 (A3)
Sun (7)
08:00 – 22:30 (A4)
For the remaining time, the thermostat is in Economy mode.
Timers A5 - A8 are free with no default settings.
Button lock
•
To lock or unlock the buttons manually,
press and hold the fan mode button for 3
seconds. The buttons are locked or unlocked in this manner if P14 is set to 2
•
If P14 is set to 1, the thermostat automatically loc ks the button 10 seconds
after the
last adjustment
Control parameters
If you want to change control parameters, proceed as follows:
1.
Press left and right buttons simultaneously for at least 4 seconds.
2.
Release them and, within 2 seconds, press the right button again until “P01” is displayed.
3.
Select the required parameter by turning the rotary knob.
4.
Press button (OK). The current value of the selected parameter starts blinking and
can be changed
by turning the rotary knob.
5.
P ress button (OK) to confirm the adjusted value, or (Esc) to cancel the change.
If you wish to adjust additional parameters, repeat ste
ps 3 through 5, or press
(Esc) to leave the
parameter setting mode.
No.
Parameter name
Default value*
Setting range*
Adj.
P01
Control sequence
2-pipe / 2-stage: 1
4-pipe: 4
0 = heating only
1 = cooling only
2 = H/C changeover, manually
3 = H/C changeover, auto
4 = heating and cooling
P02 Mode selection via o perating
mode button
1 1 = Auto / Comfort /
Protection mode
2 = Auto / Comfort / Economy /
Protection mode
3 = Comfort / Protection mode
4 = Comfort / Economy /
Protection mode
P03 Mode selection v ia fan mode
button
0 0 = Auto / Manually
1 = Manually
2 = Auto / Manually / Protection
mode
P04 Selection of °C or °F RDG100T/160T: 0
RDG160TU: depends on
wizard setting
0 = °C
1 = °F
P05 Sensor calibration 0.0 K
(0.0 °F)
–3...3 K
(–6...6 °F)
P06 Standard temperature display 0 0 = Room temperature
1 = Setpoint
P08 Comfort basic setpoint 21 °C
(70 °F)
5...40 °C
(41 °F…104 °F)
P09 Minimum setpoint limitation
in Comfort mode
5 °C
(41 °F)
5 ... 40 °C
(41…104 °F)
P10 Maximum setpoint limitation
in Comfort mode
35 °C
(95 °F)
5...40 °C
(41 °F…104 °F)
P11
Setpoint for heating in
Economy mode (WheatEco)
15 °C
(59 °F)
OFF, 5 °C…WcoolEco
(OFF, 41 °F …WcoolEconomy)
P12
Setpoint for cooling in
Economy mode (WcoolEco)
30 °C
(86 °F)
OFF, WheatEco…40 °C
(OFF, WheatEconomy…104 °F)
P13
Electric heater in cooling
mode
ON
OFF = Disabled
ON = Enabled
P14
Button lock
0
0 = Disabled
1 = Automatically
2 = Manually
P15
Fan speed in dead zone
(Comfort mode)
0
0 = Disabled
1 = Stage 1 (H or C)
2 = Stage 1 (Cooling only)
* Degree Fahrenheit parameter selections are only applicable to RDG160TU version
The control parameters displayed depend on the DIP switch settings made
Siemens Switzerland Ltd
Subject to change
B3181.5en
2014-08-13
 Loading...