

Page 1
Operating Instructions
RDE10.1DHW
RDE10.1DHW is a temperature controller that allows you to set the ideal room temperature at the time you want. In addition, it
offers independent control of DHW. There are 2 different switching patterns available: 1 for controlling the heating output and 1
for controlling DHW. Both can be set independently to meet your specific needs. You can either rely on the factory settings or
make your own settings that suit your personal needs.
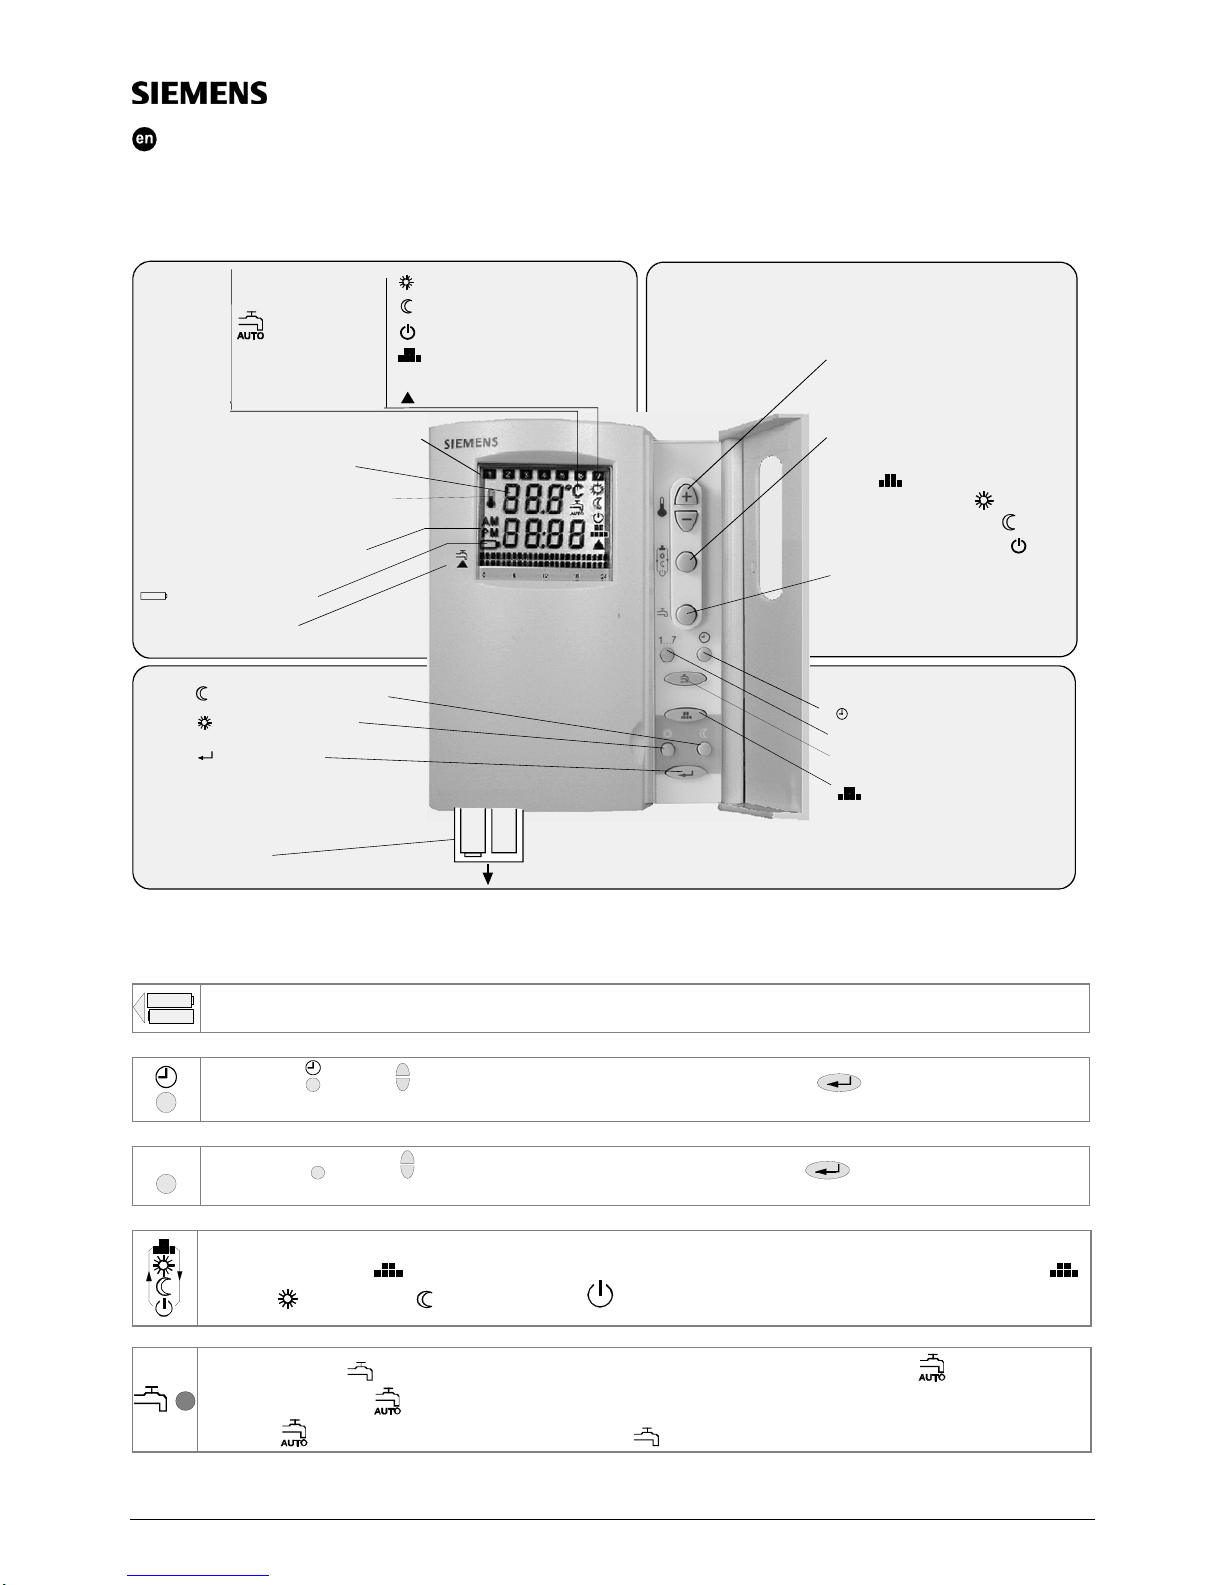
Operation
Replac e batteries
Warmer / colder
setting the
temperature setpoints
and the time of day
Button for operating
mode selectio n:
Auto ( )
,
Normal operation ( )
,
Energy saving mode ( )
,
Frost protection mode ( )
Batteries
3038Z02en
Display
Normal operation
Energy saving mode
DHW control
Weekday (1 = Monday / 7 = Sunday)
Measured room tempe ratu re,
setpoints and parameters
Real time from 00:00 to 23:59
AM / PM (for 12-hour mode)
Switching pattern
for DHW and heating
Confirmation
Settings
Time of day
Heating program
1...7
Weekday
1.5V
'AA'
1.5V
'AA'
+-
Auto DHW program
Normal operation
Energy saving mode
Heating ON
Automatic mode /
switching pattern settings
Frost protection mode
Actual room temperature symbol
°C
Temperature
Auto DHW
activated
Commissioning with quick startup
The controller is supplied with factory-set switching patterns, switching times and temperatures. To commission it,
proceed as follows:
1.5V 'AA'
1.5V 'AA'
Remove the black transit tab from the 2 included batteries. Check to see if the battery holder is in its correct position.
The controller switches itself on.
Press button and then
+
-
to set the current time of day and confirm by pressing .
1...7
Press button
1...7
and then
+
-
to set the current weekday and confirm by pressing
(1 = Monday through 7 = Sunday).
Press button for the operating mode to select the required operating mode (default mode is automatic mode).
The display shows the
symbol when powered up. The sequence of operating mode is started from automatic ,
to normal
, energy saving and frost protection , or vice versa.
Press DHW button to select the required DHW operating mode (default mode is Auto DHW ).
The display shows the
symbol when powered up. The sequence of DHW operating mode is started from
automatic
, to permanently OFF and permanently ON , or vice versa.
1/4 Operating Instructions CE1B3038en / 19.10.2005 Building Technologies / HVAC Products
Page 2
Energy saving tips without sacrificing comfort
• Never allow room temperatures to exceed
21 °C.
• Select energy saving mode, even if you
are absent for short periods of time only.
• Air out the rooms for short periods of time
only, but properly, with the windows wide
open.
Are your rooms too warm / too cold?
+
-
By pressing these buttons, you increase or
decrease the room temperature setpoint in
increments of 0.5 °C. The display first shows the
newly selected temperature and then the
measured actual value again.
These changes are only valid up to the next
switching point.
If, as a result of the factory settings, you always
feel either too warm or too cold, you should readjust the temperature setpoint of normal operation
or energy saving mode to suit your needs.
Do you want to select automatic operating mode?
If that is the case, press
until the display
shows the
symbol.
The controller will switch the heating output
according to the automatic switching pattern.
Do you require continuous normal operating
mode?
Press until the display shows the symbol
to indicate that normal operating mode is
selected. In normal operation, this ensures
continuous heating to the normal temperature.
Do you require continuous energy saving mode?
Press until the display shows the symbol
to indicate that energy saving mode is selected.
In energy saving mode, this ensures continuous
heating to the energy saving temperature.
Note:
The setpoint in energy saving mode can be set to
0 °C. This means OFF or, in other words, the
controller is not active in energy saving mode
and symbol
will not appear on the display.
Risk of frost!
Do you want to set the controller to frost protection
mode?
Press
until the display shows the symbol
to indicate that frost protection mode is selected.
In frost protection mode, the default setpoint is
5 °C. If the room temperature falls below the
preset frost protection level, it will automatically
activate the heating output.
Do you want to change the temperature set-points
of normal operation or energy saving mode?
or
+
-
Proceed as follows:
• Press
or if you want to change the
setpoint of normal operation or of energy
saving mode.
• The setpoint display starts flashing.
• Press the buttons to change the
temperature setpoints in increments
of 0.5 °C.
• By pressing
, the setting will be saved
and the entry mode quit.
Important:
In energy saving mode, the unit can be set to
OFF. Proceed as follows:
• Change the temperature setpoints to 5 °C
• Press and hold
-
for 4 seconds
Symbol
will not appear on the display.
Risk of frost!
If you want to have frost protection, press the
button for operating mode selection until the
display shows the
symbol.
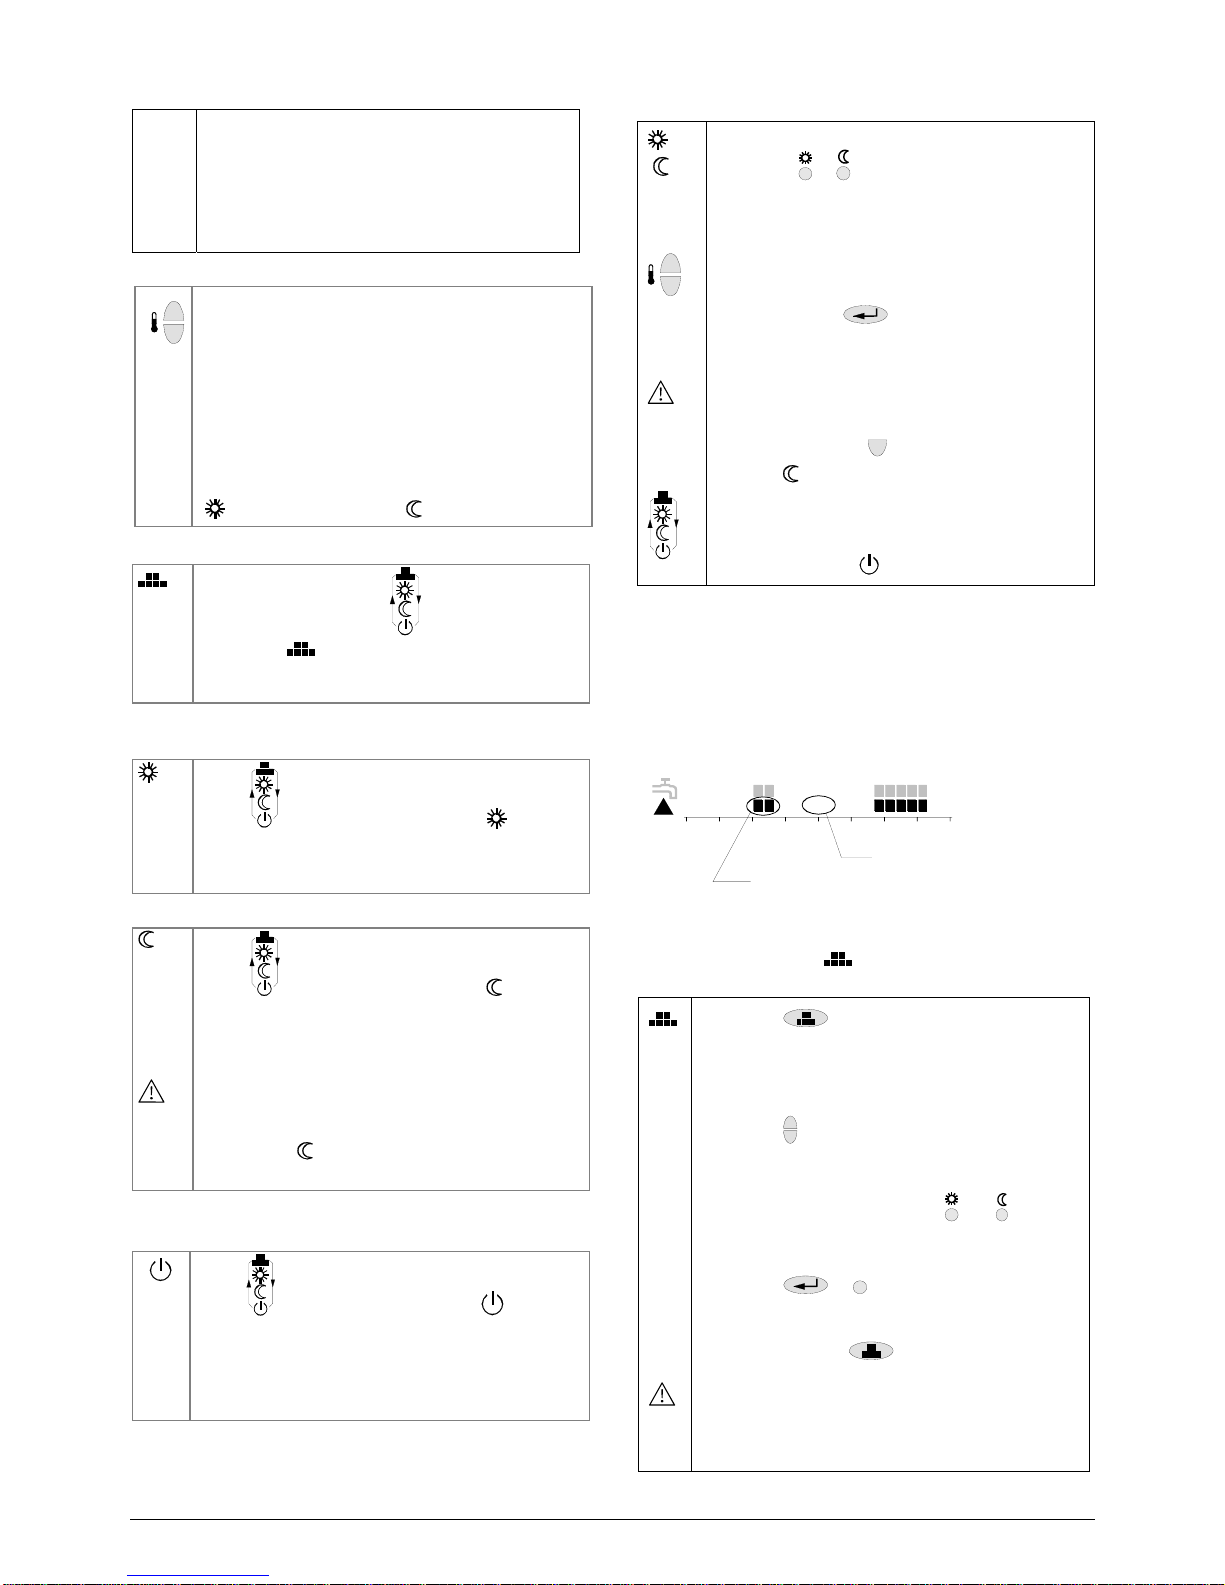
Do you want to enter your own 7-day switching
pattern for heating?
A switching pattern consisting of 24 segments in the lower
row can be entered for every weekday. Each segment
represents a period of 1 hour. This means that a switching
action can occur every 60 minutes.
Example:
0
Switching pattern for heating with factory setting Mo - Fr
1261824
Non-visible segments:
Controlling to economy temperature
Visibl e segments:
Control ling to nor mal temperature
Automatic operating mode changeover takes place
according to such a switching pattern, provided the
operating mode is set to
.
Proceed as follows:
• Press
once to reach the entry mode.
The current switching pattern for day 1
(Monday) will be displayed. The segment at
the lower left will start flashing and the time
of day 00:00 is displayed.
• Press
+
-
to set the point in time where you
want to assign the operating mode.
• Assignment of the operating mode to a point
in time is made by pressing
and
(point in time will be incremented by one
automatically).
• Press
or
1...7
to save the setting and to
change to the next day.
• When entry of the 7-day switching pattern is
finished, press
and the entry will be
saved.
Caution: 30 seconds after the last entry is made,
the controller will leave the entry mode. In that
case, the last switching pattern changes made will
not be saved!
2/4 Operating Instructions CE1B3038en / 19.10.2005 Building Technologies / HVAC Products
Page 3

Do you want to activate DHW control?
• Press
button to activate DHW control.
• The sequence for DHW control mode is
Auto , OFF and then ON . The
displays will show the symbol according to the
operating mode.
• The default operating mode is
when
the controller is first powered up.
• In Auto mode, the display shows
, and
the DHW heating equipment will
automatically switch ON / OFF according to
the switching pattern. In ON mode, the
display shows
, and no symbol
when DHW heating is deactivated.
Do you want to enter your own 7-day switching
pattern for DHW control?
A switching pattern consisting of 24 segments in the upper
row can be entered for every weekday. Each segment
represents a period of 1 hour. This means that a switching
action can occur every 60 minutes.
Example:
0
Switching pattern for DHW control with factory setting Mo - Fr
1261824
Non visible segments:
DHW contr o l i s switched OFF
Visible segments:
DHW contr o l i s switched ON
Automatic operating mode changeover takes place
according to such a switching pattern, provided the
operating mode selector is set to position
.
Proceed as follows:
• Press the
button once to reach the
entry mode. The current switching pattern
for day 1 will be displayed and the segment
at the upper left hand side is flashing and
the time of the day 00:00 is displayed.
• Press
+
-
to set the point in time you want to
have DHW control switched ON/OFF.
Then press
button to set the DHW
control ON/OFF at this point in time. When
you confirm the setting for day 1, press
or
1...7
to save the setting and go to the
next day.
Repeat the procedure for the next day until
you have completed entry for the 7 days.
Caution:
• 30 seconds after the last entry is made, the
controller will leave the entry mode. In this case,
the last switching pattern changes made will not
be saved!
Does the symbol appear on the display?
When this symbol appears, you need to replace
the batteries as soon as possible. The system
starts to count down for 2 weeks. After this time,
the controller will shunt down immediately and
all outputs will be switched OFF.
Once the batteries are completely exhausted,
there will be blank displays (only battery low
symbol
will appear).After replacing the
batteries, the controller will remember the last
operation value and setting, including operating
mode, setpoint and automatic switching pattern
both for heating and DHW control. However, you
have to reset the real time clock value. For
adjusting the time of day, please refer to the
setting.
Do you want to change the batteries?
• Get 2 new alkaline batteries type AA, 1.5 V
• Remove the battery holder, then the
batteries, insert the new batteries and
replace the battery holder.
• Make certain the old batteries are disposed
of properly, in compliance with
environmental requirements.
Recalibrating the sensor
+
+
-
If the room temperature displayed by the
controller does not agree with the temperature
effectively measured, the temperature sensor
can be recalibrated.
In all operation modes press and hold ”+” and
buttons simultaneously for more than
3 seconds. The system will switch to calibration
mode, the temperature digits flashing at 1Hz as
follows.
C
3033Z01
The room temperature displayed can now be
matched to the temperature effectively
measured. Each push of the ”+” or “-“ button
changes the temperature by ”+” or “-“ 0.5 °C up
to a maximum of +/- 3 °C
If no button is pressed within 5 seconds, the
system will resume the initial operating mode.
The new adjusted temperature value is being
saved and displayed.
3/4 Operating Instructions CE1B3038en / 19.10.2005 Building Technologies / HVAC Products
Page 4

Do you wish to reset the 7-day switching patterns
for heating and DHW control (to the factory
settings)?
+
-
Set unit to frost protection
Press and hold simultaneously “+“ and “-“ for
4 seconds, then release.
Press timer program button twice within
2 seconds
Day/s Normal operation
and DHW control
auto ON mode
Energy saving
mode and DHW
control auto OFF
mode
Mo (1) – Fr (5) 06:00 – 08:00 h
17:00 – 22:00 h
22:00 – 06:00 h
08:00 – 17:00 h
Default
values
Sa (6) – Su(7) 07:00 – 22:00 h 22:00 – 07:00 h
Do you wish to reset all settings to the factory
settings?
+
-
To reset, first press and hold the button
,
then press the 2 buttons
+
and -
simultaneously for 3 seconds.
This means that all switching times and all
setpoints will be reset to their default values (the
time clock will reset to 00:00).
Caution: All individual settings will be lost!
Temperature setpoint in normal operation: 20 °C
Temperature setpoint in energy saving mode: 8 °C
Day/s Normal
operation and
DHW control
auto ON mode
Energy saving
mode and DHW
control auto
OFF mode
Mo (1) – Fr (5) 06:00 – 08:00 h
17:00 – 22:00 h
22:00 – 06:00 h
08:00 – 17:00 h
Default
values
Sa (6) – Su(7) 07:00 – 22:00 h 22:00 – 07:00 h
4/4 Operating Instructions CE1B3038en / 19.10.2005 Building Technologies / HVAC Products
 Loading...