

Siemens Optiset E Standard, Advance Plus, Memory, Optiset E Advance Plus, Optiset E Memory Quick Reference Manual
Page 1

Quick Reference Guide
Opti set E S t andard , Ad vance P lu s, and
Memory
for Hicom 150 E, OfficePoint,
OfficeCom, and OfficePro
Version 1.0
G281-0462-01
Page 2

WARNING!
Hackers who unlawfully gain access to customer telecommunication systems
are criminals. Currently, we do not know of any telecommunications system
that is immune to this type of criminal activity. Siemens Business
Communication Systems, Inc. will not accept liability for any damages,
including long distance charges, which result fr om unauthorized use. Although
Siemens Business Communications has designed security features into its
products, it is your sole responsibility to use the security features and to
establish security practices within your company, including training, security
awareness, and call auditing.
Siemens Business Communications sales and service personnel, as well as
Siemens Business Communications business partners, are available to work
with you to help you prevent this type of unauthorized use of your
telecommunications system.
NOTE: The Siemens Optiset telephones for Hicom 150 E systems are hearingaid compatible and comply with the applicable FCC Rules, Part 68, and
Industry Canada CS-034 standard.
This equipment has been tested and found to comply with the limits for a Class
B digital device, pursua nt to Part 15 of the FC C Rules. These limits are designed
to provide reasonable protection against harmful interference in a residential
installation. This equipment generates, uses and can radiate radio frequency
energy and, if not installed and used in accordance with the instructions, may
cause harmful interference to radio communications. However, there is no
guarantee that interference will not occur in a particular installation. If this
equipment does cause harmful interference to radio or television reception,
which can be determined by turning the equipment off and on, the user is
encouraged to try to correct the interference by one or more of the following
measures:
- Reorient or relocate the receiving antenna.
- Increase the separation between the equipment and receiver.
- Connect the equipment into an outlet on a circuit different from that to
which the receiver is connected.
- Consult the dealer or an experienced radio/TV technician for help.
WARNING: Changes or modifications to the equipment that are not expressly
approved by the responsible party for compliance could void the user’s
authority to operate the equipment.
This equipment does not exceed Class B limits per radio noise emissions for
digital apparatus, set out in the Radio Interference Regulation of the Canadian
Department of Communications. Operation in a residential area may cause
unacceptable interference to radio and TV reception requiring the owner or
operator to take whatever steps are necessary to correct the interference.
Cet équipement ne dépasse pas les limites de Classe B d'émission de bruits
radioélectriques por les appareils numériques, telles que prescrites par le
Règlement sur le brouillage radioélectrique établi par le ministère des
Communications du Canada. L'exploitation faite en milieu résidentiel peut
entraîner le brouillage des réceptions radio et télé, ce qui obligerait le
propriétaire ou l'opérateur à prendre les dispositions nécessaires pour en
éliminer les causes.
September 1998
Form No. G281-0462-01 Part No. 06E0352ECNo. A93049
Job No. 4597
Page 3

No part of this publication may be reproduced, stored in a retrieval system, or
transmitted, in any form or by any means, mechanical, electronic,
photocopying, recording, or otherwise, without prior written permission of
Siemens Business Communication Systems, Inc.
Request Siemens publications from your Siemens representative or the Siemens
branch serving you. Publications are not stocked at the address below.
Siemens Business Communication Systems, Inc.
4900 Old Ironsides Drive
P.O. Box 58075
Santa Clara, CA 95052-8075
(408) 492-2000
Siemens, Optiset, and PhoneMail are registered trademarks and Hicom is a
trademark of Siemens Aktiengesellschaft.
Copyright Siemens Business Communication Systems, Inc. 1998. All rights
reserved.
Page 4

Page 5

Contents
Welcome to Your Optiset E Standard, Advance Plus, and
Memory Telephones . . . . . . . . . . . . . . . . . . . . . . . . . . . . . . . . 1
Optiset E Standard Telephone . . . . . . . . . . . . . . . . . . . . . . . . 2
Optiset E Advance Plus Telephone . . . . . . . . . . . . . . . . . . . . 3
Optiset E Memory Telephone . . . . . . . . . . . . . . . . . . . . . . . . . 4
Bay Option Modules . . . . . . . . . . . . . . . . . . . . . . . . . . . . . . . . 6
Optiset E Local Power Supply . . . . . . . . . . . . . . . . . . . . . . . 10
Where to Go for Assistance . . . . . . . . . . . . . . . . . . . . . . . . . 11
Your Class of Service . . . . . . . . . . . . . . . . . . . . . . . . . . . . . . 11
Status Lights . . . . . . . . . . . . . . . . . . . . . . . . . . . . . . . . . . . . . 11
The OptiGuide Display . . . . . . . . . . . . . . . . . . . . . . . . . . . . . 12
Feature Keys and Access Codes . . . . . . . . . . . . . . . . . . . . . . 14
Setting up Your Telephone . . . . . . . . . . . . . . . . . . . . . . . . . . 14
Volume Keys . . . . . . . . . . . . . . . . . . . . . . . . . . . . . . . . . . . . 15
Sounds . . . . . . . . . . . . . . . . . . . . . . . . . . . . . . . . . . . . . . . . . . 16
Changing Your Audio Settings . . . . . . . . . . . . . . . . . . . . . . . 17
Callback Request . . . . . . . . . . . . . . . . . . . . . . . . . . . . . . . . . 18
Caller List . . . . . . . . . . . . . . . . . . . . . . . . . . . . . . . . . . . . . . . 19
Conference . . . . . . . . . . . . . . . . . . . . . . . . . . . . . . . . . . . . . . 20
Consultation . . . . . . . . . . . . . . . . . . . . . . . . . . . . . . . . . . . . . 23
Directed Call Pickup . . . . . . . . . . . . . . . . . . . . . . . . . . . . . . . 24
Forwarding . . . . . . . . . . . . . . . . . . . . . . . . . . . . . . . . . . . . . . 25
Hold . . . . . . . . . . . . . . . . . . . . . . . . . . . . . . . . . . . . . . . . . . . 26
Hold—Internal Consultation . . . . . . . . . . . . . . . . . . . . . . . . 27
Last Number Redial—Expanded . . . . . . . . . . . . . . . . . . . . . 28
Mailbox / Text Messages . . . . . . . . . . . . . . . . . . . . . . . . . . . 29
Park . . . . . . . . . . . . . . . . . . . . . . . . . . . . . . . . . . . . . . . . . . . . 31
Pickup . . . . . . . . . . . . . . . . . . . . . . . . . . . . . . . . . . . . . . . . . . 32
Repertory Dialing (Repdial) Keys . . . . . . . . . . . . . . . . . . . . 33
Saved Number Redial . . . . . . . . . . . . . . . . . . . . . . . . . . . . . . 34
Speakerphone . . . . . . . . . . . . . . . . . . . . . . . . . . . . . . . . . . . . 35
Station / Individual Speed Dialing . . . . . . . . . . . . . . . . . . . . 36
System Speed Dialing . . . . . . . . . . . . . . . . . . . . . . . . . . . . . . 37
Transfer . . . . . . . . . . . . . . . . . . . . . . . . . . . . . . . . . . . . . . . . . 38
Feature Access Codes . . . . . . . . . . . . . . . . . . . . . . . . . . . . . . 39
Index . . . . . . . . . . . . . . . . . . . . . . . . . . . . . . . . . . . . . . . . . . .I-1
Quick Reference Guide to Optiset Phones . . . . . . . . . . . . . A-1
v
Page 6

vi Optiset E QRG
Page 7
Welcome to Your Optiset E
Standard, Advance Plus, and
Memory Telephones
The Optiset E Standard, Advance Plus, and Memory digital
telephones work with your company’s Siemens Hicom 150
E Communications Server to give you advanced, easy-to-use
telephone features. (The communications server is your
company’s internal telecommunications system.)
2)
3)
4)
5)
1)
+
–
1 2 3
123
4 5 6
456
PQRST UV WXYZ
7 8 9
789
ABC DEF
MNOJKLGHI
0
0
8)
6)
7)
9)
10)
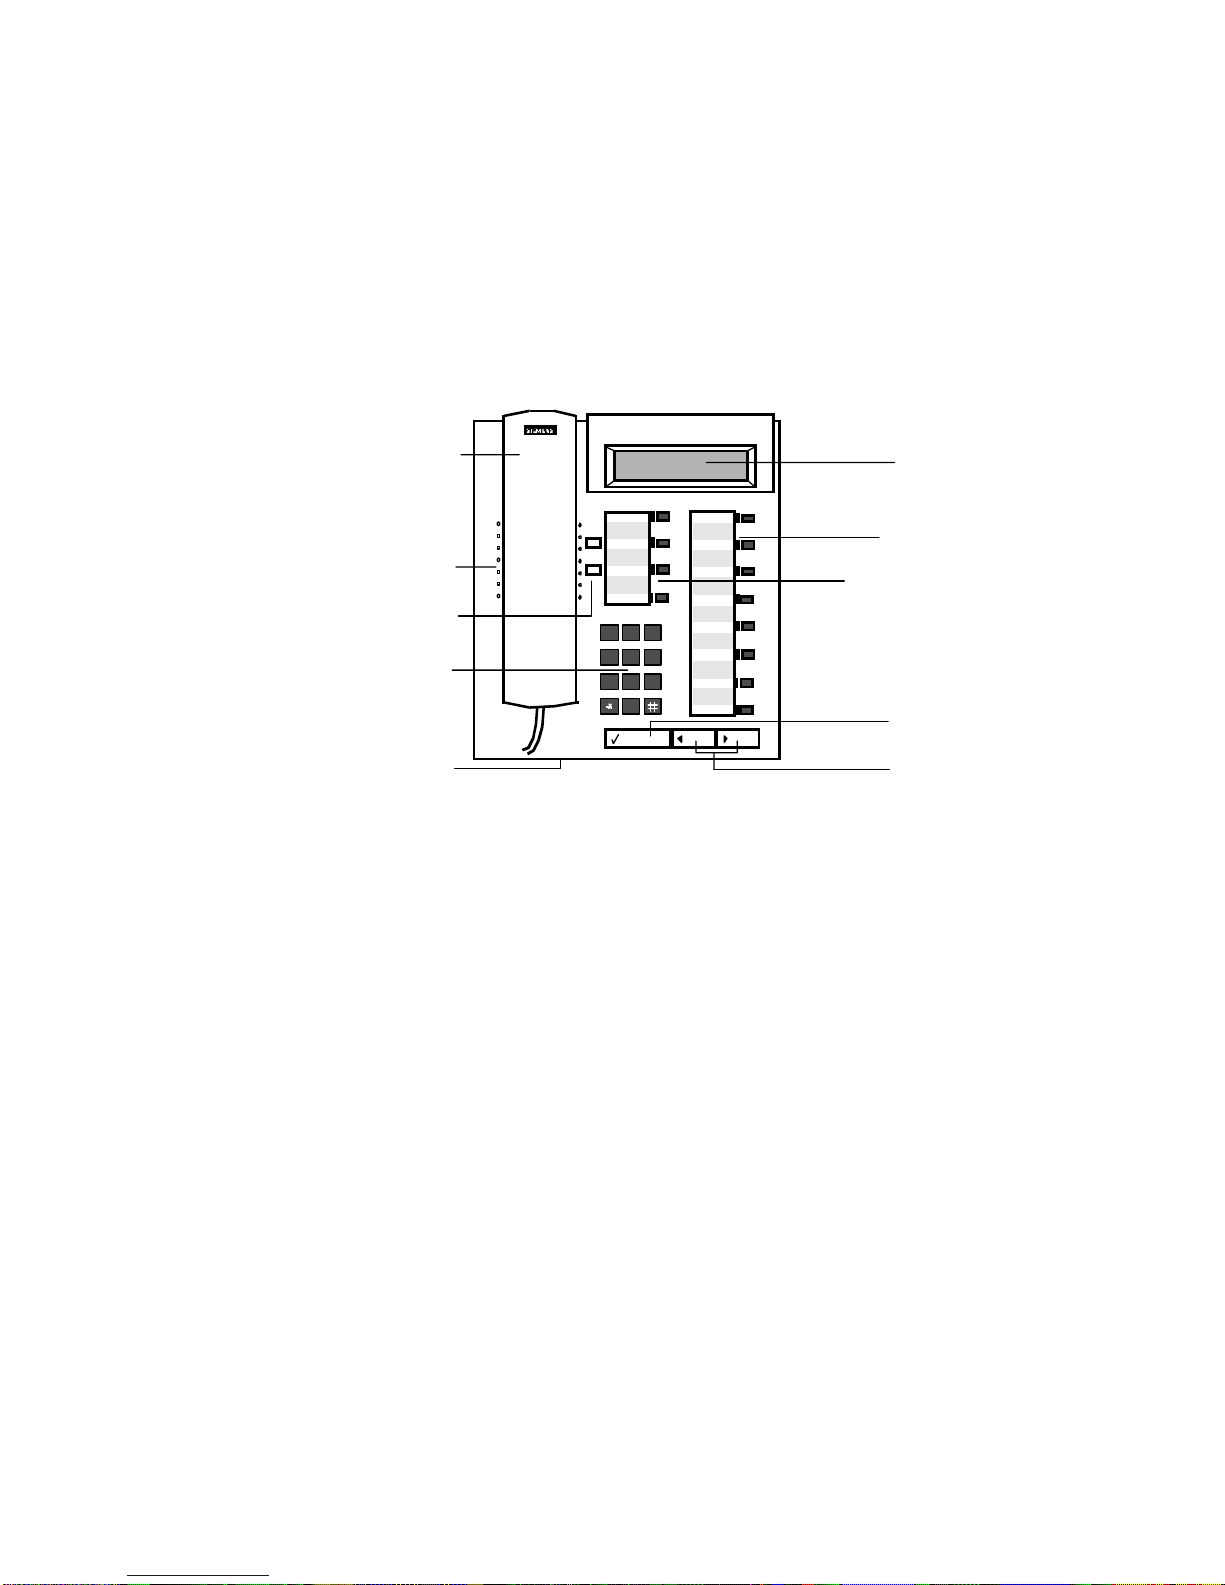
Figure 1. Optiset E Standard and Advance Plus Telephones
Handset
1)
Speaker (ringing tone/open listening)
2)
Volume keys for telephone settings
3)
Key pad
4)
Microphone for handsfree talking
5)
Display with 2 lines, 24 characters each
6)
Programmable feature keys
7)
Default feature keys
8)
Select OptiGuide key (confirms selection)
9)
Scrol l Forward an d Scroll Back Opti Guide
10)
keys (for browsing)
Welcome to Your Optiset E 1
Page 8

Optiset E Standard Telephone
The Optiset E Standard telephone has a microphone for a twoway speakerphone and does not support user-installable option
modules. The Standard and Advance Pl us telephones have four
default feature keys for the Program/Service, Redial, Mute, and
Speakerphone features. In addition, the eight programmable
feature keys can be used as either Repdial keys or userprefer red, comm only acce ssed fea ture keys . There is a two-l ine
tiltable display for viewing user prompts and the current
telephone settings.
microphone
Standard
Standard
microphone
Figure 2. Optiset E Standard Telephone
2 Optiset E QRG
Page 9

Optiset E Advance Plus Telephone
The Optiset E Advance Plus telephone ha s two bays underneath
the base of the telephone for any of the following userinstallable option modules:
• Optiset E Analog Adapter
• Optiset E Data Adapter
• Optiset E Headset Adapter
• Optiset E Headset Plus Adapter
• Optiset E ISDN Adapter
• Optiset E Phone Adapter
• Optiset E Control Adapter
The Optiset E Advance Plus telephones also support up to four,
side-mounted Optiset E Key Module options, for a total of 64
additional feature keys a nd up to 29 line ext ensions. The Optiset
E Advance Plus telephone also has a microphone for a two-way
speakerphone.
microphone
Figure 3. Optiset E Advance Plus Telephone
Advance
Optiset E Advance Plus Telephone 3
Page 10

Optiset E Memory Telephone
The Memory telephone has a microphone for a two-way
speaker telephone. T wo bays for opt ional adapters are under the
telephone. This telephone has an eight-l ine, tiltable display with
up to 24 characters per line.
The Memory telephone has four default feature keys for the
Program/Service, Redial, Mute, and Speakerphone features.
There are eight programmable feature keys that can be used as
either Repdial keys or user-preferred, commonly accessed
feature keys, and there are three OptiGuide keys for working
with the Siemens OptiGuide display.
The Memory telephone has an alphanumeric keyboar d used for
entering text in situations like programming names on stations,
sending custom text messages, and for entering names and
extensions in the Electronic Notebook included with the
telephone. The Electronic Notebook feature is used to store a
directory of data such as names, telephone numbers, and
telephone system features.
4 Optiset E QRG
Page 11
3)
1)
2)
+
PQRS TUV
–
ABC DEF
MNOGHI
0
ABC DE F
123
MNOJKLGHI
456
PQRS T UV WXYZ
789
0
Program/Ser-
Redial
Mute
Speaker
6)
4)
8)
F1
F2
F3
F4
F5
7)
QW E R
ASZD
CTRL
9)
5)
F
XCV
ALTEDIT MENÜ E ND DIAL
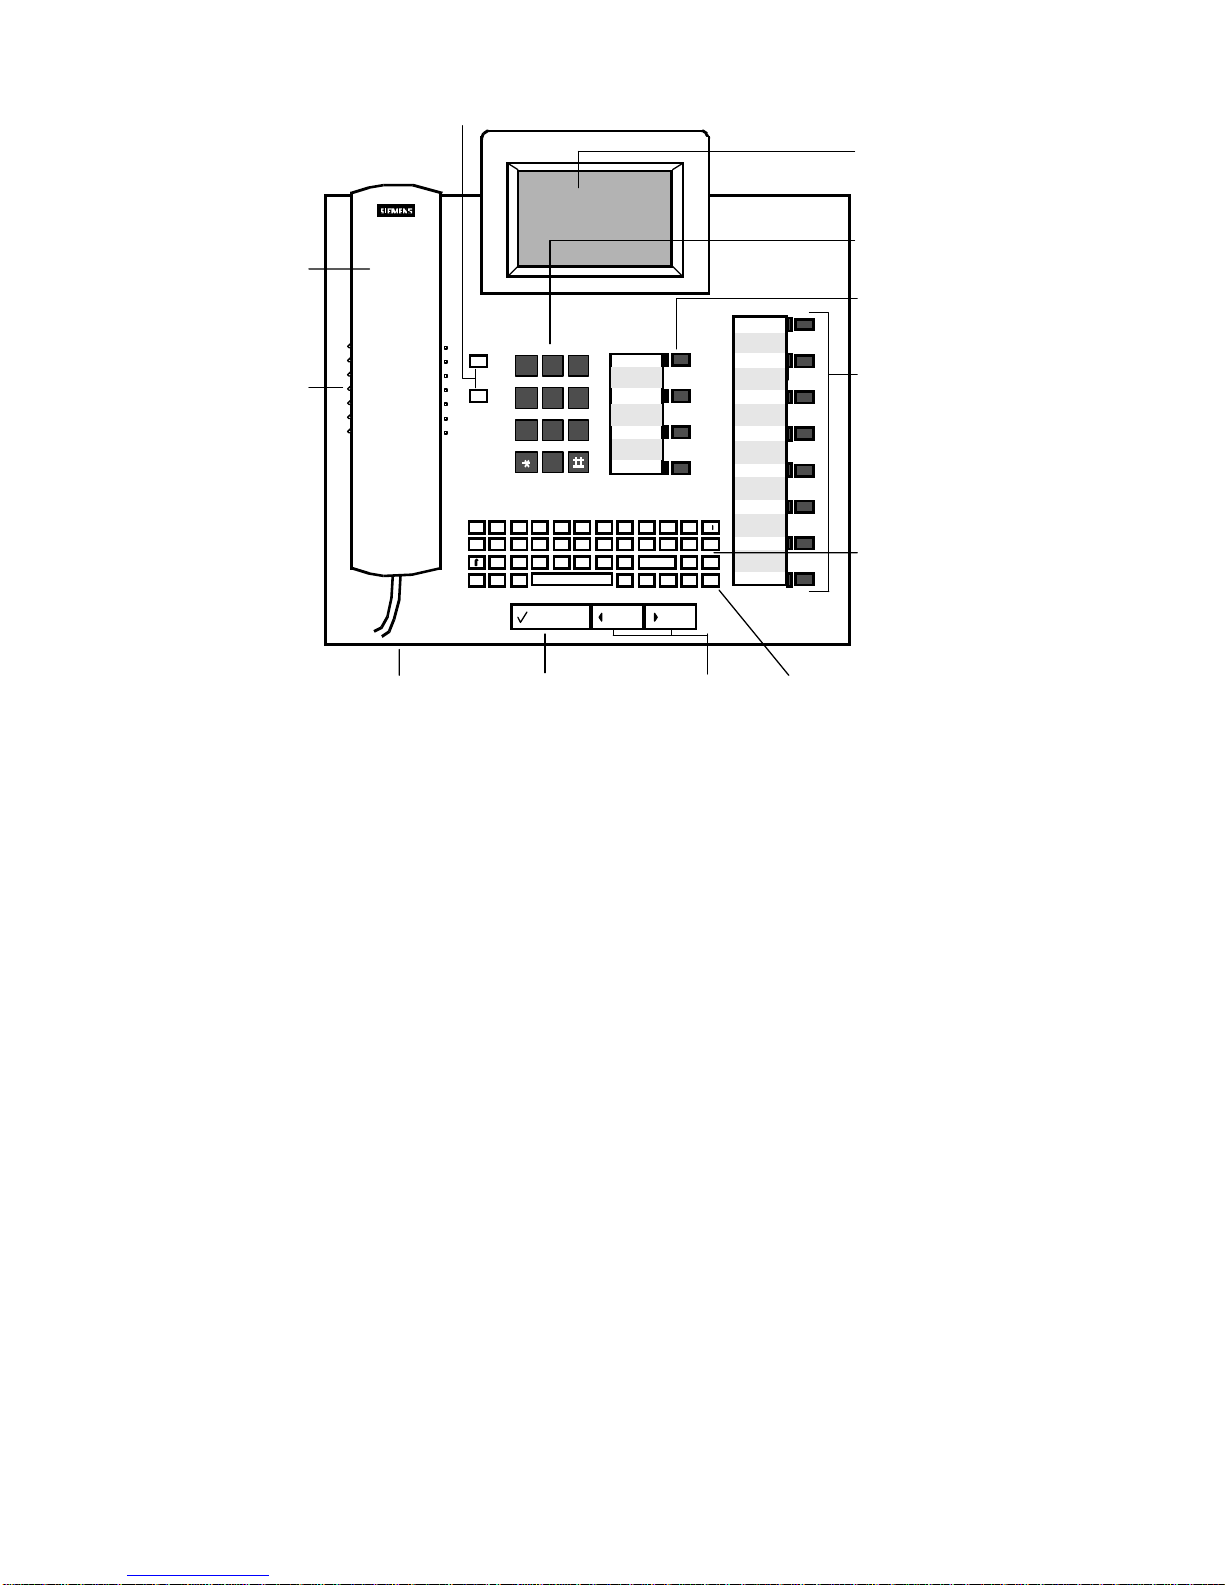
Figure 4. Optiset E Memory telephone
Features on the Memory Telephone
Handset
1)
Speaker under handset (ringing tone/open
2)
listening)
Volume keys for telephone settings
3)
Key pad
4)
Microphone for handsfree talking
5)
Tiltable display with 8 lines, 24 characters
6)
each
Programmable feature keys
7)
Default feature keys
8)
Select OptiGuide key (confirms selection)
9)
Scrol l Forward an d Scroll Back Opti Guide
10)
keys (for browsing)
Keyboard for message texts
11)
Cursor keys (for additional functions)
12)
TYUI PÜ
BNM
O
ÄÖLKJHG
↵←→
↑↓
F6
←
Delete
F7
F8
10) 12)
11)
Optiset E Memory Telephone 5
Page 12

Bay Option Modules
The bay option modules sn ap into place in the bays underneath
the Advance Plus and Memory telephones. They are the same
size and shape, but labels clearly identify their type.
Figure 5. Bay Option Modules
Optiset E Analog Adapter
The Analog Adapter lets you attach a standard analog device,
such as a telephone, facsimile machine, modem, or answering
machine, to your telephone via an RJ11 connector on the back
of the adapter. The attached device is configured at your
communications server to be completely independent, with its
own telephone number. It can be attached to a standard
telephone cable up to 300 ft. long. This adapter requires the
Optiset E Local Power Supply for operation. (See “Optiset E
Local Power Supply” on page 10.)
Optiset E Data Adapter
The Data Adapter lets you connect your telephone to a
computer or terminal via a 25-pin connector for an EIA-232-E
cable. You can make asynchronous data calls by issuing AT
commands from your attached PC or terminal to your
telephone, much as you would to an attached modem. This
adapter supports baud rates of up to 38.4 kilobytes per second
(autobaud detection), simultaneous voice and data
communication, hardware flow control (RTS/CTS), and full
duplex operation. It also supports the Siemens Application
Programming Interface (API), data loopback for customer
service tests, and V.120 and DMI mode 2-Bit Rate Adaptation.
Optiset E Headset Adapter
The Headset Adapter lets you plug one or two electret
microphone-type headsets into your telephone. You can then
make and answer calls using a headset instead of the handset or
the telephone’s built-in microphone and speaker. This type of
6 Optiset E QRG
Page 13

headset does not require an amplifier. Connection is made
through two RJ8 connectors. Only the Optiset E Advance Plus
and Memory telephones support this option. When a headset is
plugged into the adapter, the speakerphone does not function.
Optiset E Headset Plus Adapter
The Optiset E Headset Plus Adapter lets you plug one or two
carbon microphone-type headsets and a recorder into your
telephone. You can then make and answer calls handsfree by
using a headset instead of the handset or the telephone’s builtin microphone and speaker.
This type of headset requires an amplifier. You can also record
your conversations. The headsets attach to two RJ8 connectors.
The recor der attaches to an RJ11 connector. Only the Optiset E
Advance Plus and Memory telephones support this option.
When a headset is plugged into the adapter, the speakerphone
does not function. The recorder works without a headset being
plugged in.
Optiset E ISDN Adapter
The ISDN Adapter lets you connect ISDN S0 bus devices such
as telephones, PC cards, LAN Bridges, G4 fax machines, and
video equipment to your telephone via an RJ45 connector. It
supports up to 64 kilobytes per second simultaneously on each
bearer channel. It will only work properly in a primary
telephone, not in a t elephone attached to anot her telephone with
the Phone Adapter. You can only connect two ISDN devices to
the adapter.
Optiset E Phone Adapter
The Phone Adapter lets you attach another Optiset E telephone
to your Basic telephone. It provides an RJ11 connector; you can
attach the second t elephone via a standard telephone c able up to
300 feet long. You can then place the second telephone in an
area not wired for a telephone. The attached telephone is
configured at your communications server to be a completely
independent telephone with its own telephone number.
Optiset E Control Adapter
The Optiset E Control Adapter (TA Control) lets you connect a
PC and a headset to an Optiset E telephone (except Optiset E
Entry and Optiset E Basic). The Optiset E Control Adapter
operates in both API1 mode and API2 mode.
Bay Option Modules 7
Page 14
2
1
3
4
5
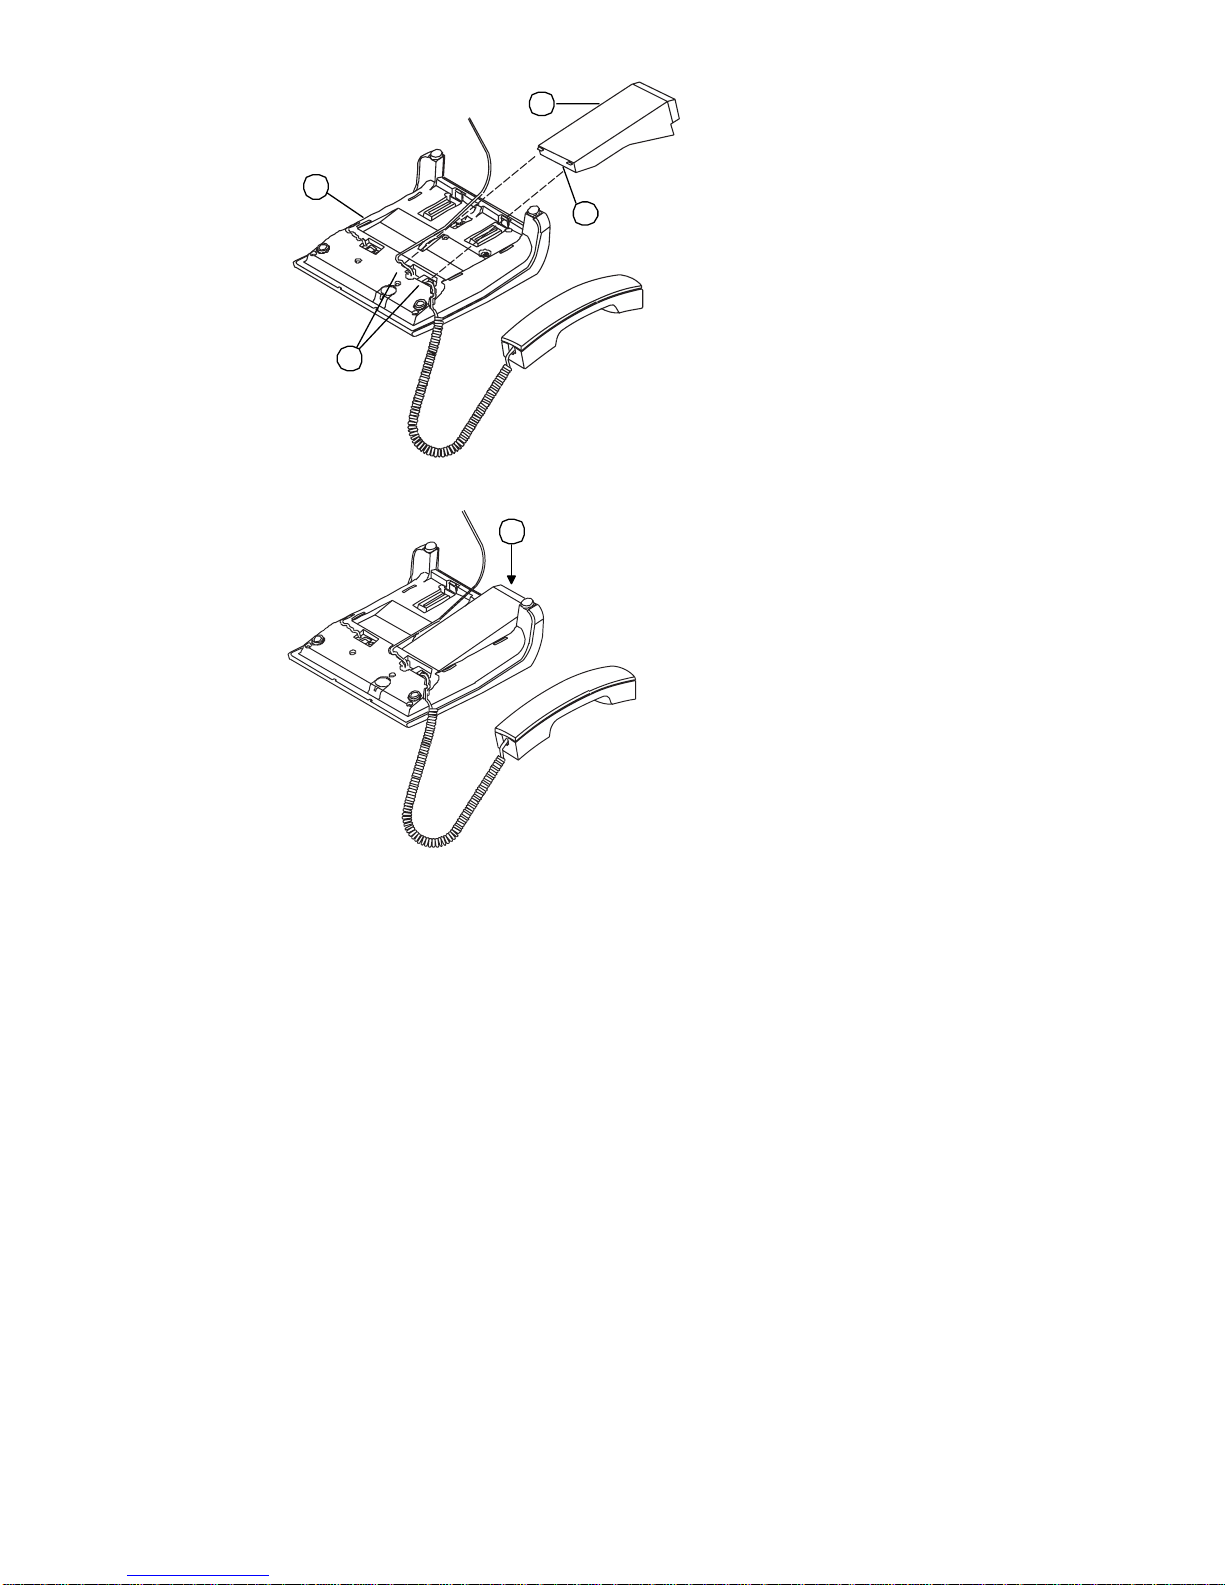
Figure 6. Installation of Bay Option Modules
To install a bay option module
1. Disconnect the telephone line from the wall j ack or telephone
and place the telephone ➀ on a soft surface with the keypad
facing down.
2. Hold t he adapt er ➁ with t he plug connec tor strip facing dow n
and mount it in one of the two mounting locations on the
bottom of the telephone, sliding the two tabs ➂ into the two
slots ➃.
3. Gently press down on the adapter until the plug connector
strip is inserted all the way into the socket connector strip ➄.
For the
Analog Adapter
RJ11 port on the back of the Analog Adapter (connecting tip/
ring to pins 3 and 4). Reconnect the telephone line to the
telephone. Note, t he analog ada pter requires the Optiset E Local
Power Supply for operation.
, connect an analog device to the 6-pin
8 Optiset E QRG
Page 15

For the
Da ta Ada pter
, connect the data terminal equipment to
the 25-pin (EIA-232) connector on the back of the Data
Adapter. Reconnect the telephone line to the telephone.
For the
Headset Adapter,
connect the headset to the headset
(RJ8) connector on the adapter. Reconnect the telephone line to
the telephone.
For the
Headset Plus Adapter
, connect the headset to the
hea dset (RJ 8) connecto r on the ad apter. C onnect the recorder to
the recorder (RJ11) connector. Reconnect the telephone line to
the telephone.
For the
ISDN Adapter
, connect the ISDN termi nal to the RJ45
adapter. Reconnect the telephone line to the telephone.
For the
Phone Adapter
, connect the secondary Optiset E
telephone into the RJ11 connector on the adapter. Re connect the
telephone line to the telephone.
For the
Control Adapter
, connect the headset to the headset
(RJ8) connector on the adapter. Connect the PC from the serial
port on the PC to the (RS232) connector on the adapter.
Reconnect the telephone line to the telephone.
Optiset E Key Module
The side-mounted Optiset E Key Module adds 16 keys for
features and line appearances. Up to four Optiset E Key
Modules can be linked together on one telephone for a total of
64 additional feature keys and up to 29 line appearances. Only
the Optiset E Advance Plus and Memory telephones support
this option. Wall mount kits do not support telephones with an
Optiset E Key Module attached.
Figure 7. Optiset E Key Module
Bay Option Modules 9
Page 16

Optiset E Local Power Supply
u
The Local Power Supply is required for the Analog Adapter. It
may also be required in other situations, depending on the
Optiset E telephone’s configuration, the type of telephone cable
used, the length of the telephone cable from the
communications server, and the type of communications server
used. Only one Optiset E Local Power Supply can be used at a
time on an Optiset E telephone. However, one Local Power
Supply can be used on a primary telephone and a second Local
Power Supply can be use d on a secondary telephone attached to
the primary telephone through a Phone Adapter.
Installation of Local Power Supply
To install a local power supply:
1. Disconnect the telephone line from the wall jack and the
telephone. New telephones should have a line cord attached
to the telephone, but may not be plugged into the wall jack.
Plug the line cord (PN 51A4871) ➀ that comes with the
power supply int o the jack on t he telephone and into the jack
on the power supply labeled .
Digital
2. Plug one end ➁ of the line cord that you disconnected from
the telephone into the jack on the power supply labeled .
3. Plug the other end ➂ of this line cord into the wall jack. Note,
you could also plug it into an Optiset E Phone Adapter
installed in another properly installed telephone.
4. Plug the power supply ➃ into a properly grounded 120 Vac
electrical outlet.
Digital
1
Advance Pl
4
2
3
10 Optiset E QRG
Page 17

Wh ere to Go f or Assist ance
Although every company has its own way of handling support
for Optiset E telephones, most have a person responsible for
making configuration changes and answering questions about
the telephone system. This person, the system administrator,
can provide you with information on the features you need to
use and can help troubleshoot problems with your telephone
when necessary. For more detailed information about your
telephone’s features and operation, refer to the
Telephones for Hicom 150 E, Administrator Guide (
0460-00).
Optiset E
G281-
Your Class of S ervice
Each telephone in your Siemens telephone system has a class of
service (COS) specifying the features available to it. Therefore,
you may find that some features included in this guide are not
available on your telephone. Ask your system administrator
about the features assigned to your telephone.
Status Lights
The red status lights next to the feature keys tell you the idle,
busy, or in-transit status of calls on those keys. A feature key
status light may t urn on steadily, blink, or flash at diff erent rates
to signal the status of the line. Lights next to the feature keys
may indicate the on/off status of that feature.
When the light is... the line is...
Off Available
On steady In use
Blinking On hold
Flashing (faster) Ringing
Where to Go for Assistance 11
Page 18

The OptiGuide Display
The OptiGuide
display provides information to help you use
your telephone. The top line shows the time and date and callrelated information such as the extension calling you.
The second line indicates some of the features available to your
telephone in its current state and provides prompts on how to
use them. For example, when you are on a call, the prompt
Consult?
consultation call if you want. When the symbol appears at
appears; this option lets you begin a private
>
the right of the display, more features are available for your
telephone’s current state. The second line also presents callrelated information such as the duration of the current call. You
can configure your telephone to display this line automatically
or manually.
7337 Chris Jones
Consult?
>
You can also use the OptiGuide display to show features you
have activated, scroll through messages sent to your telephone,
and change the audio settings on your telephone.
OptiGuide Keys
✓
▲
▲
The three large keys at the bottom of the telephone are used to
scroll through prompts and to select features.
▲
• The key (Scroll Forward) is used to scroll to the
next option.
• The key (Scroll Back) is used to scroll to the
▲
previous option.
• The key (Select) is used to select or start the
✓
displayed feature or function.
After you have selected a feature, new prompts appear to help
you complete the feature’s operation.
Main Menu
To go to the main menu, press the Program/Service key. If your
telephone is idle, you can also press or . Next,
use or to scroll to and select from the optional
▲
▲
▲
prompts. The prompts will vary in some cases, depending on
whether your telephone is idle or active (when you have a dial
tone or are on a call). If you know the code for the feature you
want to acces s, you can enter it, r ather t han s crolling through t he
▲
12 Optiset E QRG
Page 19

list s of features . F or a full list of f eatur es and codes se e “F eature
Access Codes” on page 39.
How to use this guide to access features
Since this is a quick reference guide, this manual does not
attempt to describe every possible way to activate and
dea ctivate every f eature. I n descr ibi ng each feature, t his manua l
uses the following criteria:
• If you can access the feature through the OptiGuide keys,
the other methods for accessing the feature are not included.
• If you cannot access the feature through the OptiGuide keys
(without using the Program/Service key), the other methods
for accessing the feature are shown.
• For each feature section, there is a reference to the list of
feature access codes on page 39. Once you are familiar with
the system and aware of the access codes, you can easily
activate features with the method you prefer best.
• The term
• The term
select
scroll
means to press the Select key.
means to press one of the Scroll keys.
Generally speaking, for all features with an on/off position, the
* (star key) will turn the feature on and # (pound key) will turn
it off.
This quick reference guide discusses how to use the most
popular Optiset E Standard, Advance Plus, and Memory
telephone features; for complete instructions on all of the
features, please see the
Administrator Guide
Optiset E Telephones for Hicom 150 E
(G281-0460-00).
The OptiGuide Display 13
Page 20

Feature Key s and Access C od es
You can press feature keys to gain access to Siemens telephone
system features such as Hold, Transfer, Mailbox, and Program/
Service. By programming a feature key or dialing a feature
access code, you can easily use any accessible feature without
scrolling through the OptiGuide display.
This guide explains the basic steps for using many features. For
accessing features through quick access codes refer to “Feature
Access Codes” on page 39. Your system administrator may
have configured both the acronyms for feature keys and the
access codes differently from how they appear here.
Setting up Your Telephone
The first thing you will want to do is locate the default Program/
Service key on your Optiset E telephone. The Program/Service
key accesses many of the feat ures on your Optiset E tele phone.
This key is the top default feature key (refer to “Welcome to
Your Optiset E Standard, Advance Plus, and Memory
Telephones” on page 1 for more information).
To program a feature key
1. From the Program/Service menu, scroll to and select
Program feature key?
or dial * 91.
2. Press the feature key you want to change and select
from the options menu.
key?
Other options include:
Clear Key?
Another Key?
Exit?
3. Use the Select key to choose an option.
4. Exit. Don’t for get to wr ite the name o f the f eatur e on the face
plate next to the key.
Change
Refer to “Feature Access Codes” on pa ge 39 for information on
accessing features through special access codes.
14 Optiset E QRG
Page 21

Volume Keys
+
-
Use the Volume Up and Volume Down keys to adjust
the voice volume of your telephone. While on a call, press
to raise the volume, or press
desired volume level.
When you hang up or switch to another call, t he volume returns
to the original level. To retain your new settings, press the
✓
hanging up or switching to another call.
(Select) key or the and
+
-
to lower it until you reach the
+
-
keys together before
Volume Keys 15
Page 22

Sounds
Your telephone makes different sounds to indicate what is
going on. Ring s occur on f ree lines, i ndicating an incoming call.
Tones occur while you are using your telephone and provide
information about calls and features.
Table 1: Rings
Sound Meaning
Single (repeated) Internal call
Double (repeated) External call
Triple (repeated) Callback
Table 2: Tones
Sound Meaning
Busy tone The party you dialed is on the
telephone.
Dial tone You can make a call or invoke a
feature.
Fast busy tone Invalid call.
Short tone every 20 sec. Internal call waiting.
3 short tones (confirmation
tone)
3 short tones followed by dial
tone
2 short tones every 20 secs. External call waiting.
Wavering (error) tone Invalid feature request.
A feature has been successfully
activated.
Additional input, such as a PIN,
is required.
16 Optiset E QRG
Page 23

Changing Your Audio Settings
To change the audio settings on your telephone:
1. Press the key to display the
+
Configure Telephone
option.
2. Scroll through and select from the following options:
Ring volume?
Ring tone?
Speakerphone mode?
▲
3. Use the keys to select the option that you
▲
want to adjust.
4. Use the and keys to raise or lower the volume, tone,
+
-
or microphone sensitivity.
5. Press the (select) key to save and exit.
✓
Changing Your Audio Settings 17
Page 24

Callback Request
Callback Request has the communications server help you
complete calls to busy, ringing, or Do Not Disturb extensions.
It lets you hang up and ha ve the communica tions server call you
back with triple rings when the extension is available. When
you then answer, the communications server automatically
dials the number.
You can only make two callback requests from your
Note:
telephone and only o ne callback request to the same destination.
To request a callback
1. Make a call and listen for the telephone to ring or for a busy
signal.
2. Press the Select key to choose
3. Hang up.
4. When the communicat ions server calls back with triple ring s,
answer the telephone. The communications server will then
callback the party that you called earlier.
Callback?
.
To cancel a callback
If you initiate a callback request and then want to cancel it,
1. With the telephone idle, scroll to and select
2. Select
3. If you have more callback requests to cancel, scoll to and
select
4. Select
callbacks that you want cancelled are removed.
Delete?.
Next?.
Delete?
. Keep repeating these steps until all of the
Vie w callbacks?.
Refer to “Feature Access Codes” on pa ge 39 for information on
accessing features through special access codes.
18 Optiset E QRG
Page 25

Caller List
Caller list keeps track of your unanswered incoming calls in
addition to saving any other calls that you add to the list. Using
the list, you can quickly redial any internal/external caller that
has called you, or you can redial numbers that you have added
to your list.
Your caller list tracks all the unanswered calls to your
extension, but if you a nswer the ca ll, you must manually add t he
caller to the list.
To make calls with caller list
1. Use the scroll keys to find and select
display shows the name, extension number or telephone
number (if available), and the number of calls from each
caller.
2. Select a caller from the list.
Note:
caller list; however, with the Memory tele phone, use the Up and
Down
3. Scroll to
4. The communications server will automatically dial the
With a two-l ine display, select
cursor keys.
and select.
Call?
extension.
Caller List?
Next?
to s croll through the
. The
To add callers to your caller list
While listening to ringing or during a call, scroll to
Number?
will be automatically added to your caller list.
on your OptiGuide display. Select it, and the number
Save
When the symbols OX are displayed, it means that the
Note:
call was added to the list manually.
Refer to “Feature Access Codes” on pa ge 39 for information on
accessing features through special access codes.
Caller List 19
Page 26

Con f erence
The Conference feature lets you have up to five internal or
external parties, including yourself, in a telephone
conversation.
Once a conference has begun, only the pe rson who set it up may
add or remove parties. That person is the conference master. If
the conference master has left the conference, then the internal
caller whom has been participating i n t he conference t he longest
will be the new conference master.
To set up a conference
1. During a call, scroll through the prompts on your OptiGuide
display and select
party on consultation hold.
2. Listen for dial tone, dial the extension you want to add, or
dial 9 and the outside number.
Start conference?
. This places the other
3. After the party answers, scroll to and select
from your OptiGuide display to join all the parties.
Conference?
Types of parties you can add to a conference
You can add the following kinds of calls to conference calls:
• calls that you dial
• calls on busy standby queuing for the extension you are
using (call waiting)
• calls parked in numbered system slots
• calls on hold on your telephone
To add an additional party to a conference
1. During a conference, select
2. Listen for dial tone, dial the extension you want to add, or
dial 9 and the outside number.
Add party?
3. After the party answers, scroll to and select
from your OptiGuide display to join all the parties.
To add a waiting call to a conference
If you are engaged in a conference and you receive a signal that
a call is waiting, you can receive the call and add it to the
conference.
20 Optiset E QRG
Conference?
Page 27

1. When you here the call waiting tone, accept the waiting call
by selecting
hold and connects you with the caller.
Call waiting?
. This places the conference on
2. Scroll to and select
display to join all the parties.
Conference?
from your OptiGuide
To add a call in park to a conference
You can easily park and retrieve parked calls by
Note:
programming a Park key. Refer to “To program a feature key”
on page 14 for more information on programming a feature key.
1. During a conference, scroll to and select
the conference on consultation hold.
2. Press the Park key (if present).
or dial * 56.
3. Dial the system slot (0-9) where the parked call is located.
4. The parked party answers and consents to join the
conference. Scroll to and select
Conference?.
Add party?
to place
5. All parties hear a conference tone, signaling that another
party has joined the conference.
To set up a conference call with a call on hold
1. After placing a caller on hold with a Hold key, dial the
number of the conference party that you want add.
2. After the party answers, scroll to and select
from your OptiGuide display to join all the parties.
Note:
conference. Normally, you would place a caller on consultation
hold to begin a conference. This procedure is only documented
because it is available to users as an option.
It is not necessary to place a caller on hold to start a
Conference?
To reco nnec t to th e co nfe re nc e whe n a cal led p ar ty
does not want to join
Scroll to and select
Quit and return?
.
Conference 21
Page 28

To drop a party
1. Scroll to
View conference parties?
and select it. Only the
person who set up the conference may do this.
2. From this menu you use the cursor or scroll keys to select the
option,
Remove party?.
3. Select the party to be removed.
Refer to “Feature Access Codes” on pa ge 39 for information on
accessing features through special access codes.
22 Optiset E QRG
Page 29

Cons ult a t ion
Consultation lets you put a ca ll on consultation hold, so you can
call and talk privately with a different party. You can then use
the Toggle/Connect feature to alternate be tween the two parties.
To consult with a second party during a call
1. During a call, scroll through the prompts on your OptiGuide
display and select
2. Dial the other party’s extension or 9 and the outside number.
3. Talk with the new party.
Consult?
To reconnect with the first party
1. Scroll through the prompts on your OptiGuide display and
select
Toggle/Connect?
.
.
2. You can continue to use the Toggle/Connect feature to
alternate between the two parties.
To release a consulting party
1. While connected with the party, scroll through the prompts
on your OptiGuide display and select
2. The party will be released, and you will be connected to the
first party.
Refer to “Feature Access Codes” on pa ge 39 for information on
accessing features through special access codes.
Quit and return?
.
Consultation 23
Page 30

Directed Ca ll P ickup
This feature lets you pickup calls from any extension.
For the procedure described here, you must program a
Note:
Pickup - directed key (refer to “To program a feature key” on
page 14).
To pickup a call at an extension not in your pickup
group
1. When you hear a call ringing at an extension, press the
Pickup - directed key. Your display shows the name of the
called station.
2. Select
Refer to “Feature Access Codes” on pa ge 39 for information on
accessing features through special access codes.
Accept call?.
24 Optiset E QRG
Page 31

Forwa r ding
Forwarding automatically redirects your incoming calls to
another extension or an outside number. For warding lets you set
up an extension or outside number for forwarding under
conditions you specify.
To automatically forward calls
1. With your telephone idle, scroll to and select
.
On?
2. You can then scroll to and select from the following options:
•
1=All calls?
Forwards both internal and external calls
•
2=External calls only?
Forwards all external calls
•
3=Internal calls only?
Forwards all internal calls
• Exit?
3. Dial the extension or external number where you want your
calls forwarded.
4. Select
Save?.
Forwarding
To cancel Forwarding
When your telephone is idle, the display will show one of the
following:
• all to: [the number or extension]
• int. to: [the number or extension]
• ext. to: [the number or extension]
With the telephone remaining idle, scroll to and select
Forwarding off?.
Refer to “Feature Access Codes” on pa ge 39 for information on
accessing features through special access codes.
Forwarding 25
Page 32

Hold
The Hold feature lets you place an active external call on hold
without disconnecting the caller.
For this feature, you must set up one of your programmable
feature keys as a Hold key (refer to “To program a feature key”
on page 14).
To put a call on hold
After receiving or placing an external telephone call, press the
Hold key to place the caller on hold.
To reconnect to a held call
After placing a call on Hold, you can r eturn to the ca ller without
replacing the handset by scrolling to and selecting
held call?
the call.
or by pressing the flashing line key associated with
Return to
Notes:
(determined by the communications server), the call will return
to your telephone with t riple rings. If you do not answer , the call
may be transferred to the operator, if so configured on the
communications server.
To place a caller on hold, the call must be associated with an
outside call.
Refer to “Feature Access Codes” on pa ge 39 for information on
accessing features through special access codes.
If you do not retrieve the call after a certain time
26 Optiset E QRG
Page 33

Hold—Internal Consultation
This feature lets you place an intercom or internal/external call
on exclusive hold. Up on activating this feature, you are limit ed
in the following ways:
• you cannot replace the handset on the cradle
• you cannot place or receive additional calls
• you can only retrieve the call from your telephone
For this feature, you must set up one of your programmable
feature keys as an Internal Consult key (refer to “To program a
feature key” on page 14).
To put a call on hold
After receiving or placing an internal/external call, press the
Internal Consult key to place the caller on hold.
To reconnect to a held call
If you want to retrieve the held caller, you press the Select key
to choose the
Refer to “Feature Access Codes” on pa ge 39 for information on
accessing features through special access codes.
Return to held call?
option.
Hold—Internal Consultation 27
Page 34

Last Number Redial—Expanded
Last Number Redial lets you quickly redial the last three
external number you dialed. Each time you di al a valid exte rnal
telephone number, it is automatically stored.
To redial numbers
1. Press the Redial key (the s econd default feature key from the
top). The display shows the last number dialed. The system
dials the number automatically if you do not proceed to step
two.
2. If you want to dial the last number called, scroll to and select
Call?
the next two numbers.
To quickly redial internal numbers you can use the Caller List
feature. (Refer to “Caller List” on page 19.)
Refer to “Feature Access Codes” on pa ge 39 for information on
accessing features through special access codes.
or use the
option to scoll to and select either of
Next?
28 Optiset E QRG
Page 35

Ma il box / Text M essages
This fea ture lets you r ecei ve and answer reminder me ssages lef t
on your telephone by internal callers and voicemail systems.
Messages turn on the status light beside your Mailbox key (if
programmed) and provide information about the call.
To display messages
1. The idle display will inform you of messages waiting, or your
Mailbox key (if present) will be lit.
Messages received [#]
View messages?
>
2. Press the Select key to choose the
3. Select
4. The next screen shows the first caller’s message along with
Time/date sent?
5. Select
available by scrolling:
• Call sender?
• Delete?
•Next?
• Prev ious?
• Exit?
Note:
different reminder messages, one return telephone call will
del e te all t h ree me ss ag es. A ll m essa ges will r ema i n in the q ue ue
until they are deleted through the display or the sender is
successfully called.
Message sent?.
.
Time/date sent?
(if applicable)
(if applicable)
If the same person has called three times and left three
to choose from the following options,
View messages?
option.
Simply pressing the Mailbox key also displays the
Note:
Mailbox prompts.
6. After displaying a message, scroll to
you want to see other messages.
7. To delete a message, scroll to
8. When finished, scroll to
Exit?
Next?
Delete?
and select it.
Mailbox / Text Messages 29
and select it if
and select it.
Page 36

To answer a displayed message
1. When the me ssage you want to answer is displayed, scroll to
Call sender?
and select it.
2. The communications server calls back the party that left you
the message. If the party answers, the message is deleted
automatically.
To leave a reminder message
1. When receiving a busy tone, getting no answer, or from an
idle state, scroll to
Send message?
2. You can choose from the following default messages or with
a Memory telephone you can create your own:
0 = Please call back?
1 = Someone is waiting?
2 = Appointment?
3 = Urgent call?
4 = Do not disturb?
5 = Fax waiting?
6 = Please come - dictation?
7 = Please come see me?
8 = Please make copies?
9 = Leaving office?
Type personal message?
(Memory telephone)
Previous Menu?
Exit?
and select it.
Your system admin is trator can change thes e message s, so
Note:
yours may differ.
3. Scroll to
Send?
request, scrolling is not necessary.)
4. Hang up. The other party’s Mailbox status light (if present)
turns on. If the other party has a display telephone , the system
will also le ave a reminder message providing your name and
the date and time of your call.
If you leave a message while calling an unanswered
Note:
telephone, you will also be added to the
extension.
Refer to “Feature Access Codes” on pa ge 39 for information on
accessing features through special access codes.
30 Optiset E QRG
and select it. (If you have made a callback
Caller List?
for the
Page 37

Park
Park le ts you m ove a call t o a temporary holding place ( a s ystem
slot). Any internal party can then retrieve the call by selecting
the parked slot and retrieving the call. If you do not retrieve the
parked call, the system calls you back after a designated time.
The amount of time a caller can remain in call park can be
changed by the system administrator.
Note:
key (refer to “To program a feature key” on page 14).
For the feature described here, this procedure uses a Park
To park a call
1. During a call, press the Park key
2. Dial the slot number (0-9) where you want to park the call.
You will need this number to retrieve the parked call.
If you pick a system slot that already contains a call in
Note:
park, you hear a tone and the display r emains unchanged. If this
happens, you can try another slot.
To retrieve a parked call from any telephone
1. Press the Park key
or dial # 56.
2. Enter the slot number where the call is parked.
Note:
a call, the call will return after a system-programmed
timeout
Refer to “Feature Access Codes” on pa ge 39 for information on
accessing features through special access codes.
If you have forgotten the slot number where you parked
Park
expires.
Park 31
Page 38

Pickup
Pickup features let you answer calls ringing or queued at other
extensions.
Group Pickup lets you answer a call to an extension in your
pickup group (se t up at the communications server) even when
you do not know the number for the extension. Pickup groups
are set up at the communications server by a system
administrator.
Station Pickup lets you answer a call at any extension.
To answer a call in your pickup group
When a call in your pickup group is received by the system,
your display will read:
Call for: [Name and extension]
Pickup - group?
You can answer the fir st group call in the queue in the following
ways:
>
• press the Select key
• press the button associated with the pickup group, next to
the flashing LED (if present)
To answer a group call while on another call
1. Press the Select key for pickup
or press the button associated with the pickup group, n ext to
the flashing LED (if present).
2. To go back and forth between parties, scroll to and select
Toggle?/Connect?
Note:
transf er, pl ace on hold, place on con sultat ion hol d, or park a cal l
you have picked up. (Refer to “Directed Call Pickup” on
page 24, “Transfer” on page 38, “Hold” on page 26,
“Consultation” on page 23, and “Park” on page 31.)
You can also pickup a call at any extension, or you can
.
Refer to “Feature Access Codes” on pa ge 39 for information on
accessing features through special access codes.
32 Optiset E QRG
Page 39

Repertory Dialing (Repdial) Keys
This feature lets you set up Repdial keys for one-touch dialing
of an internal extension or an outside number. To set up a
Repdial key, refer to “To program a feature key” on page 14.
After setting up the Repdial key, just press the Repdial key to
automatically connect to the programmed number or extension.
Notes:
must also enter an external access code (for example, 9). I f you
assign a Repdial key to an internal number, the key has the
following functions in relationship to the corresponding station:
• Direct Station Select key
• off hook indicator
• ring indicator
• call hold indicator
Refer to “Feature Access Codes” on pa ge 39 for information on
accessing features through special access codes.
If you assign a Repdial key for an external number, you
Repertory Dialing (Repdial) Keys 33
Page 40

Sa ved Number Redial
This feature lets you save up to ten internal or external
previously dialed numbe rs. After saving a number, you can then
select it from the caller list, and the system dials the number.
To save a number you have dialed
After calling a number, select
OptiGuide display before hanging up.
Save number?
from your
To dial your saved number
1. When the telephone is idle, scroll to and select
2. Select the number that you want to call from the list.
Note:
caller list; however, with the Memory tele phone, use the Up and
Down
3. Scroll to and select
Refer to “Feature Access Codes” on pa ge 39 for information on
accessing features through special access codes.
With a two-l ine display, select
cursor keys.
.
Call?
Next?
to s croll through the
Caller List?
.
34 Optiset E QRG
Page 41

Speakerphone
The Optiset E Standard, Advance Plus, and Memory t elephones
have a two-way speakerphone, consisting of a speaker and a
microphone. You can use either the handset or the
speakerphone to make or receive calls. During a conversation,
you can use your speakerphone instead of your handset by
pressing the Speakerphone key (the bottom default feature key)
and hanging up the handset. If you want to swi tch back to using
your handset, pick it up.
To make a call
To make a call using the Speakerphone feature, do one of the
following procedures:
• dial without lifting the handset to automatically activate the
speakerphone and place the call.
• press a Repdial key to automatically dial its programed
extension
• press the Speakerphone key to get a dial tone, then dial
To answer a call
Press the Speakerphone key and begin talking, or press the
Repdial key (if present) next to the blinking status light.
To hang up
To disconnect a spea kerphone call, press the Speakerphone key.
To switch during a call
If you are using the handset and want to use the speakerphone,
press the Speakerphone key and hang up the handset. If you are
using the speakerphone and w ant to use the handset, pick up the
handset.
Speakerphone 35
Page 42

Station / Individual Speed Dialing
This feature lets you assign frequently called external numbers
to a code (*0 through *9). You can then dial this digit code
instead of the entire telephone number. The Hicom 150 E CS
allows a dialing sequence of up to 25 characters to be assigned
to each digit code.
For the feature described here, this procedure uses a
Note:
Speed Dial key that is programmed by your system
administrator.
To set up a station speed dial code
1. Dial * 92.
2. Dial a speed dial index code (*0 through *9) and select
Change?
3. Enter the dialing sequence that the code will represent. You
may be required to include an access code for an external
line.
.
4. Select
to
5. When you are finished, scroll to and select
Save?
Next?
or to program a different speed dial code, scroll
and select it.
Exit?.
To dial using a station speed dial code
To use t he st ation speed dial f eatur e, use th e OptiGuide D isp lay
to follow these steps:
1. When your telephone is idle, press the Speed Dial key
or dial * 7.
2. Dial the station speed dialing index code.
Refer to “Feature Access Codes” on pa ge 39 for information on
accessing features through special access codes.
36 Optiset E QRG
Page 43

System Speed Dialing
If the System Speed Dialing feature is set up on your
communications server, you can dial frequently called outside
numbers (local, long distance, and international) by dialing a
code number. Usually these codes are published for an entire
company in a special system speed directory. Consult your
system administrator if you do not know your system speed
numbers.
For the feature described here, this procedure uses a
Note:
Speed Dial key that is programmed by your system
administrator.
To make a system speed call
1. When your telephone is idle, press the Speed Dial key
or dial * 7.
2. Dial the system speed dialing code (000-299 or 000-999,
depending on your system).
Refer to “Feature Access Codes” on pa ge 39 for information on
accessing features through special access codes.
System Speed Dialing 37
Page 44

Transfer
Transfer lets you send a call to another extension or to an
outside number if your communications server is set up to do
this.
To transfer a call
1. During a call, scroll to and select
2. When you have di al tone, dial the extension, or dial 9 and t he
outside number. If you want, announce the caller when the
party answers.
3. Hang up.
Start transfer?.
To reconnect
If the person you ar e trying t o transfer the call to refuses to take
the call, you can reconnect to the caller in the following two
ways:
• You will automatically be reconnected to the initial caller
when the refusing transfer party hangs up.
• Scroll to
the caller and releases the non-consenting party.
Quit and return?
and select it. This rejoins you to
To toggle between parties
If the person you are trying to transfer the call to wants more
information before accepting the call, you can toggle between
the two calls.
1. Scroll to and sel ect
caller.
2. Select
Refer to “Feature Access Codes” on pa ge 39 for information on
accessing features through special access codes.
Toggle/Connect?
Toggle/Connect?
again to return to the second party.
. This rejoins you to the
38
Page 45

Feature Acc ess Cod es
The table below lists the features that can be activated (*) and
deactivated (#) by dialing feature access codes.
Feature Activate Deactivate
Account code (max. 11 digits) *60+ACCT
Busy override * 62
Call forwarding - all calls *11+Stn. no. # 1
Call forwarding - external *12+Stn. no. # 1
Call forwarding - internal *13+Stn. no. # 1
Call pickup , di r ec ted * 59+St n. no.
Call pickup in PU group * 57
Call b ac k , in iti ate/view, c an c el * 58 # 58
Caller list, display/write to,
save station number
Change pin code * 93
Confe r ence * 3 # 3
Cons ultation hold, exit
(return to held call)
Do not disturb * 97 # 97
Group r inging * 81+St n. no. # 81
Hands free answerback * 96 # 96
Hunt group on/o ff
Group c all on/off
Key programming * 91
Microphone mute * 52 # 52
Night answer *44+Stn. no.
Park * 56+P ark slot
Releas e tr unk s * 43+ Trunk
Reset all services # 0
Retrieve ex ternal call placed on hold by
means of ho ld key
Ringer cutoff * 98 # 98
Room mo nitor * 88
Send message/ call sender # 683
Send message/ delet e all messages sent # 682
Send message/ delet e all messages sent or
received
Send message/ delet e message # 68
Send message/ display message * 68
Silent camp-on * 87 # 87
Silent monitoring (USA only) *944+Stn. no.
Spea k er c all * 80+Stn. no .
Station number, assign for MUSAP * 41+DID no.
Station number s uppressi on * 86 # 86
Station speed-dialing num ber, save/chan ge * 92+ ISD n o.
System administration * 95
System speed-dialing (SSD )/station sp eed-di-
aling (ISD), dial
Telephone lock, individual * 66+Code # 66+Code
Telepho ne test * 940
Toggle * 2
Tone dialing * 53
Trunk flash on analog trunk * 51
* 82 # 82
+Old c ode
+New code
+New code
* 0
* 85 # 85
or *4 4*
(0-9)
* 63+ Trunk
(*0 - *9)
* 7+IS D no.
(000-999)
(0 00-2 99 wit h
Of ficeP oint )
# 44
# 56+ P ark
slot (0-9)
# 680
Feature Access Codes 39
Page 46

40
Page 47

Index
A
access codes 14
Analog Adapter 6
power supply 10
assistance. See system administrator
B
Bay option modules 6
installation 8
Optiset E Analog Adapter 6
power supply 10
Optiset E Control Adapter 7
Optiset E Data Adapter 6
Optiset E Headset Adapter 6
Optiset E Headset Plus Adapter 7
Optiset E ISDN Adapter 7
Optiset E Phone Adapter 7
busy tone 16
C
callback request 18
Caller 19
caller list 19
changing audio settings 17
class of service 11
company speed dialing. See system speed dialing
conference 20
adding calls 20
dropping a party 22
setting up 20
confirmation tone 16
consultation hold 23
toggle 23
Control Adapter 7
COS. See class of service
D
Data Adapter 6
direct station select key 33
directed call pickup 24
DSS key See direct station select key
E
error tone 16
I-1
Page 48

F
feature access codes - list 39
feature keys 14
programming 14
forwarding 25
all calls 25
external calls 25
internal calls 25
to external number 25
to internal extension 25
H
Headset Adapter 6
Headset Plus Adapter 7
hold 26
hold See also consultation hold
hold—internal consultation 27
I
individual speed dialing. See station speed dialing
internal consultation 27
ISDN Adapter 7
K
Key Module 9
L
last number redial 28
list - feature access codes 39
LNR. See last number redial
M
mailbox 29
main menu 12
O
OptiGuide display 12
OptiGuide keys 12
OptiGuide keys 12
Optiset E Advance Plus telephone 3
option module bays 3, 6
installation 8
Optiset E Analog Adapter 6
Optiset E Control Adapter 7
Optiset E Data Adapter 6
Optiset E Headset Adapter 6
Optiset E Headset Plus Adapter 7
Optiset E ISDN Adapter 7
I-2 Optiset E QRG
Page 49

Optiset E Phone Adapter 7
Optiset E Key Module 9
Optiset E Key Module options 3
Optiset E Memory telephone 4
alphanumeric board (Qwerty) 4
Electronic Notebook 4
Optiset E Standard telephone 2
P
park 31
retrieve 31
Phone Adapter 7
pickup
group 32
station 32
program/service key 14
R
reminder messages 29
answering 30
leaving 30
viewing 29
repdial keys 33
setting up 33
repertory dialing. See repdial keys
ringing 16
S
saved number redial 34
Service/Program Key 12
sounds
ringing 16
tones 16
speakerphone 35
station speed dialing 36
setting up 36
status lights 11
flash rates 11
system administrator 11
system speed dialing 37
PIN 37
T
tones 16
transfer 38
toggle 38
V
voice volume keys 15
I-3
Page 50

volume keys 15
changing audio settings 17
I-4 Optiset E QRG
Page 51

Quick Reference Guide to Opt iset Ph on es
Important Note: Depending on the active/inactive state of your
telephone you may need to Select Consult? to get dial tone before
dialing a code.
Important Note: If you have an analog telephone, you may need to
dial 7 5 instead of * or 7 6 instead of #.
Transfer a call: Select Consult?. Dial the number. Announce the call
and hang up.
Consultation calls (short hold): Select Consult?. First call goes on
hold. Dial the new party. Speak. Hang up (or toggle) to return to first
call. To put a call on hold, select Consult?.
Toggle/Connect: To reconnect to a call on consultation hold, select
Toggle/Connect?.
Callback: To place a callback, while the telephone you called is
ringing or busy, dial * 5 8.
To delete all callbacks, dial # 5 8.
Conference: Begin with an ordinary call. Make a consultation call,
then dial * 3 to join all in a conference. Repeat for up to five members.
To end a conference dial # 3.
Do Not Disturb: Dial * 9 7. You can still make outgoing calls and set
callbacks.
Allow incoming calls: Dial # 9 7.
OptiPage: Dial * 8 0 and the zone code __________. Speak then hang
up gently.
Forwarding: To forward all your calls to another extension dial * 1 1
(extension number).
To cancel forwarding: dial # 1.
Park (long hold): To park a call, tell the caller to hold. Dial * 5 6. Dial
a system slot number(0-9). Hang up. The call will recall to you if not
retrieved.
Retrieve a parked call: Dial # 5 6 and the system slot number
(0-9).
Call Pickup: Dial * 5 9 and the extension of the ringing telephone.
Group Pickup: Dial * 5 7 to be connected to a ringing telephone in
your group.
Call Waiting: When you hear the tone, hang up and answer the new
call. Or, press the select key to accept the call without hanging up.
Individual Speed dial: Dial * 7, then enter the speed dial code.
Individual speed dial codes are single digits preceded by * (*0-*9).
To set up individual speed dial numbers: dial * 9 2, then a code
(*0-*9), and an external telephone number.
Optiset E QRG
Page 52

*0
*1
*2
*3
*4
*5
*6
*7
*8
*9
Station Speed Dial Numbers
System Speed dial: Dial * 7, then enter the speed dial code.
Company speed dial codes are three digits (000-299 for OfficePoint or
000-999 for OfficeCom and OfficePro).
Important Note: If you have a display telephone, your OptiGuide
display will guide you through most of these functions. Use the scroll
and select keys to choose features.
For details on all of these functions, please refer to the
Telephones for Hicom 150 E Administrator Guide
Optiset E
(G281-0460-
00).
Optiset E QRG
 Loading...