

Page 1

Contents
1 Important points and preparation before use
1.1 Characteristics
1.2 Safety precautions and regulations
1.3 Installation, placement and altering the direction that the door opens
1.4 Preparation before use
2
Usage and operation
2.1 Name of parts and introduction of the temperature control panel
2.2 Switching on the refrigerator and selecting the temperature
2.3 Use of the cooler
2.4 Use of the freezer
3 Maintenance
3.1 Cleaning and energy saving tips
3.2 Servicing and troubleshooting
Parameters list / Packing list
2
3
5
7
7
9
10
11
13
14
16
1
5140003721_Siemens_出口香港 2006.7.18, 6:14 PMPage 1 Adobe PageMaker 6.5C/PPC
Page 2
GB
1.1
Characteristics illustration
1
234 5678
1
2
2
5140003721_Siemens_出口香港 2006.7.18, 6:14 PMPage 2 Adobe PageMaker 6.5C/PPC
Page 3

1.2
Safety precautions and regulations
GB
Safety precautions
Before using the refrigerator, read the manual
carefully. The instructions provided must be
strictly observed when setting up, operating
and servicing the refrigerator. The
manufacturer is not responsible for any
accidents or damage caused by disregard of the
following rules:
1 Attention: when you switch on the
refrigerator, you would hear alarming signal,
please press the“ ” button to eliminate
the alarm. This procedure (pressing the“ ”
button) should also be done if there is alarm,
when you re-start the refrigerator in case of
power faulty, repairing or cleaning. Figure
)
3
3
2 Installation and connection of the refrigerator
must be carried out exactly according to the
instructions provided by the manual.
Connection parts must be in accordance with
the specifications stated on the identification
plaque.
the cable. Do not connect the machine to
electrical outlets while your hands are wet or
damp.
6 Repairs must be carried out by qualified
technicians. Repair faults caused by an
unqualified person may result in major
damage and could make using the
refrigerator dangerous.
7 High-proof alcohol must be stored in
tightly sealed bottles or other containers
and should always be placed in an upright
)
position.Never store explosive substances
in the refrigerator.
8 Do not cover the ventilation inlet or outlet
grills.
9 Do not step on or lean against the cooler
or freezer door, or the base cover of the
refrigerator.
10 To prevent frost bite, do not touch with
bare skin or eat anything that has been
directly removed from the freezer.
11 Do not store full, sealed, glass bottles in the
freezer as they will burst upon freezing.
12 Do not handle frozen food, nor take them
directly from the freezer with wet hands, as
wet hands adhere to frozen food.
3 Electrical safety is only guaranteed when
the refrigerator is connected to a properly
wired, earthed electricity supply, in
accordance with the supply mentioned in
section 1.3 below.
4 The refrigerator must be disconnected from
the electricity in the case of breakdown or
when cleaning and repairing.
5 To remove the plug from the socket, grasp
the plug firmly and pull it out. Do not pull at
5140003721_Siemens_出口香港 2006.7.18, 6:14 PMPage 3 Adobe PageMaker 6.5C/PPC
13 Do not place or use anything flammable,
such as oil paint, gas containers or other
such substances near the refrigerator due
to fire risk.
14 If a gas leak is discovered in the same
room as the refrigerator, turn off the gas
supply. Do not open the refrigerator door
and do not remove the plug from the main
electricity supply. A small spark resulting
from such actions could cause a gas
3
Page 4

GB
1.2
Safety precautions and regulations
explosion. Open all of the doors and
windows in the room to disperse the gas.
15 Do not locate the refrigerator in a damp or
wet environment. Or in a position where it is
likely to get splashed. Such an environment
would weaken the electrical insulation or expose
live wires while live wires are dangerous and
may cause an electric shock or fire.
16 Children should not be left unsupervised with
the refrigerator.
Regulations
This refrigerator is solely for the purpose of
refrigerating, freezing and storing food and for
making ice and must not be used for any other
purpose.
The refrigerating characteristics of this refrigerator
are in accordance with GB/ T8059 4 - 93, the safety
index is in accordance with GB4706 1- 92 and
GB4706 13 - 98.
4
5140003721_Siemens_出口香港 2006.7.18, 6:14 PMPage 4 Adobe PageMaker 6.5C/PPC
Page 5
Installation, placement and altering the direction that the door opens
1.3
GB
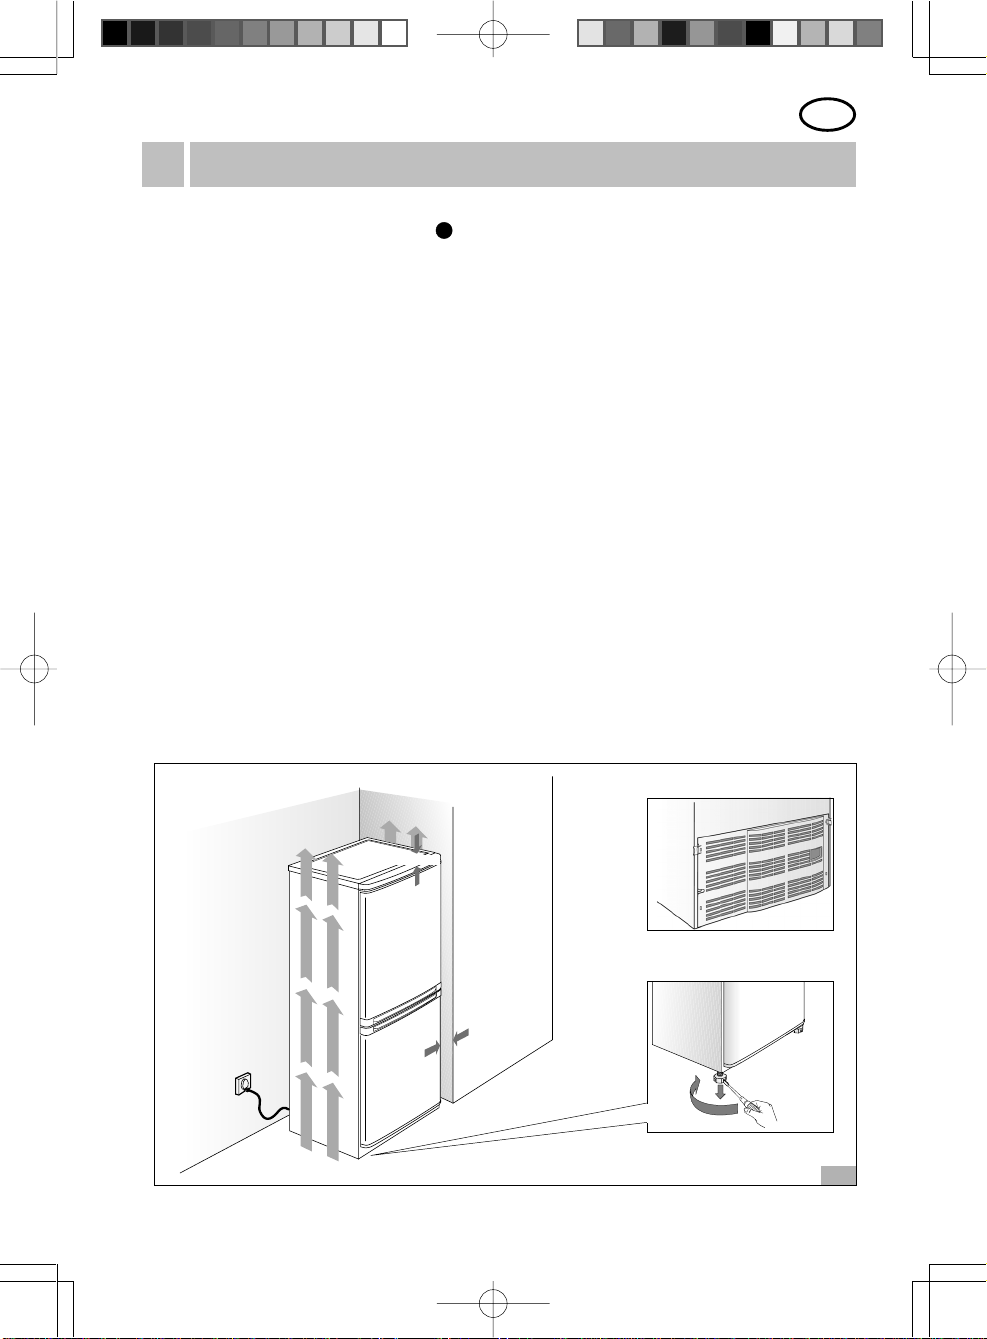
Installation and placement Figure
1 The refrigerator should be placed on firm,flat floor.
and make sure to adjut the two height-adjustable
feet according to figure 2 to make the refrigerator
vertical and stable, otherwise , the refrigerator will
lean a little toward the front and this will affect
normal running of the refrigerator.
2 Do not place the refrigerator near a heat
source or expose it to direct sunlight.
If the refrigerator is placed near a heat source
an insulation plate must be used and the
following minimum distances between the
refrigerator and the source of heat must be
observed:
- 3cm from another electrical appliance not used
for cooking
- 30cm from a stove or other cooking facility
3 Electrical connection
The refrigerator must only be plugged into a
properly installed and earthed socket. The
electricity supply should be; AC 220V (165 -242V)
/ 50 Hz, to ensure that a current of 10A mps or
above can be used.
4
It must be ensured that the plug and socket
match, that the conductor cross-section is
sufficient and that the earthing system has been
installed in compliance with regulations.
Multiple plug connectors and extension cables
must not be used.
Note: normally a voltage stabilizer is not
needed because the refrigerator can start with
a low voltage. A voltage stabilizer of
500 Watts or above should be installed if the
voltage of the power supply fluctuates
considerably.
4 Ventilation
The refrigerator should be placed in a dry and
well ventilated room. A distance of over 30cm
from the top and 30cm from both sides of the
refrigerator should be kept for proper air
circulation. The ventilation inlet and outlet grills
and other airways must never be covered.
30 cm
10cm
30 cm
4
5
5140003721_Siemens_出口香港 2006.7.18, 6:14 PMPage 5 Adobe PageMaker 6.5C/PPC
Page 6
GB
Installation, placement and altering the direction that the door opens
1.3
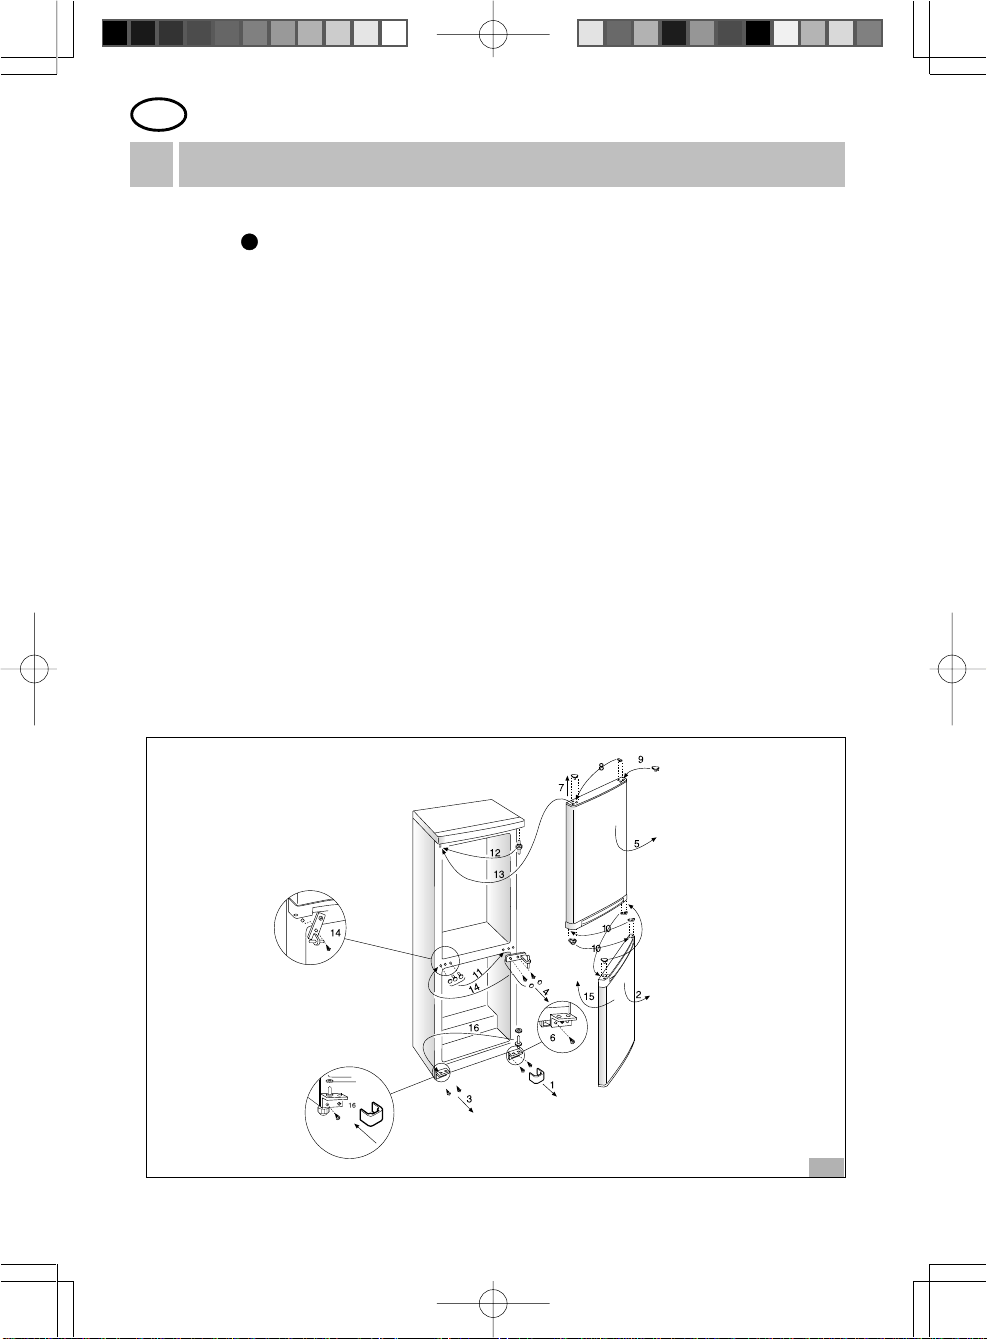
Altering the direction that the door
opens Figure
The direction that the cooler and freezer doors
open may need to be altered due to the layout
of the room that the refrigerator is located in. To
alter the door from opening from the left side to
opening from the right side:
1 Remove the screw and then remove the right
lower supporting plate (1) and the freezer door(2).
Remove the screw and then remove the left
supporting plate (3).
3 Remove the screw and then remove the middle
supporting plate (4) and the cooler door (5). Then
fix the right lower supporting plate back onto the
right of the refrigerator (6).
4 Remove the left plastic cover from upper cool
door, and keep it as spare part (7), move the right
plastic cover from the right side of the cool door
to left-side (8), then put the right plastic cover
into the right hole (9).
5 Take down the four plastic covers on bottom
edge of cooler door and top edge of freezer door
and crisscross lay them in the corresponding
holes (10). (e.g. Put the plastic cover on left
bottom edge of cooler door into the hole on right
5
top edge of freezer door, then put the plastic
cover on right top edge of freezer door into the
hole on left bottom edge of cooler door.)
6 Remove the plastic plugs from the middle left of
the refrigerator and then insert them into the
holes on the middle right of the refrigerator (11).
7 Remove the upper axes bolt from the upper right
side of the refrigerator and then screw it tightly
into position on the upper left side (12).
8 Insert the upper axes bolt into the hole on the
top left of the cooler door and then shut the
cooler door (13). Insert the middle supporting
plate into the bottom left cooler door bolt hole
and then fix it firmly onto the refrigerator with two
screws (14).
9 Insert the bolt of the middle supporting plate
into the top left hole of the freezer door and then
close the freezer door (15). remove the axes bolt
from right lower supporting plate and screw it
tightly into the left lower supporting plate. then
insert the bolt of left lower supporting plate into
the bottom left hole of freezer door and then fix
left lower supporting plate firmly onto the
refrigerator with two screws (16).
5
6
5140003721_Siemens_出口香港 2006.7.18, 6:14 PMPage 6 Adobe PageMaker 6.5C/PPC
Page 7

GB
1.2 1.2
1.4
Preparation before use
1 Unpack all of the components from the packing
material. Make sure that all of the foam packing
is removed. Unremoved foam packing is a fire
hazard.
2 Check that all of the components and
documents are present according to the packing
list.
3 Remove all adhesive tape from the inside of the
refrigerator and then clean with luke warm water
and dry and replace all attachments.
4 The refrigerator will take three hours to reach
the required temperature for storing food after it
has been switched on.
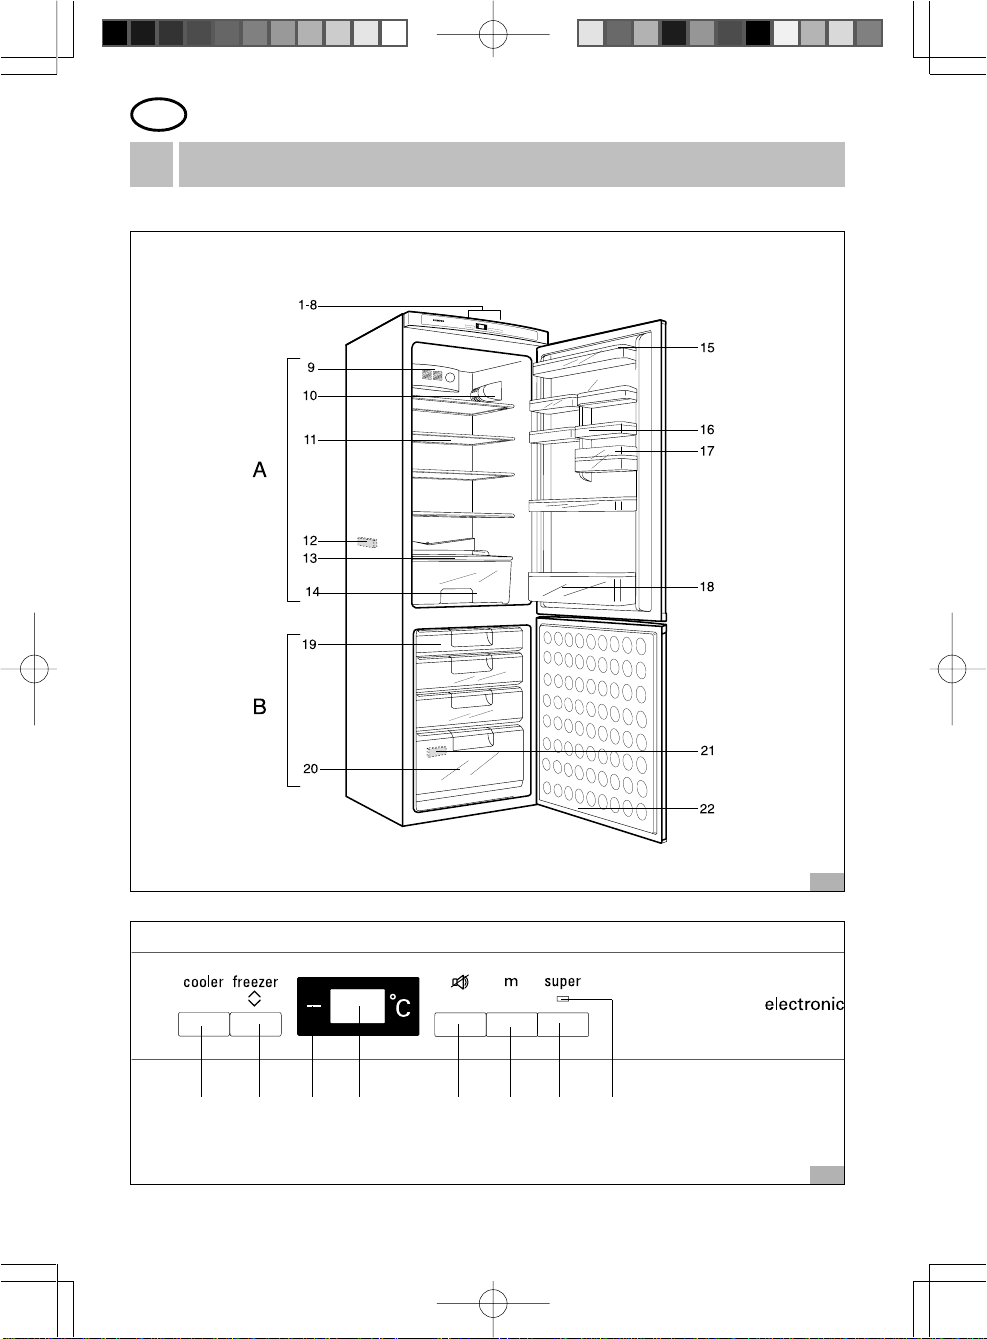
2.1
Before reading on, please check the
characteristics illustration. This
manual applies to various models.
Some of the illustrated details may
deviate from those present in your
model. Please check the packing
list for details. Figure
1 - 8 Control panel
12/21 Temperature sensor
A Refrigerator compartment
B Freezer compartment
Name of parts and introduction
of the temperature control panel
1
9 Damper thermostat
10 Lamp
11 Glass shelf
13 Glass cover
14 Vegetable basket
15 Shallow tray
16 Short shallow tray (Egg tray)
17 Cover of short shallow tray
18 Deep tray
19 Berry basket
20 Freezer drawer
22 Freezer door
Introduction of the temperature
control panel Figure
Cooler temperature display button (1)
Normally the screen displays the temperature of
freezer. When this button is pressed, display will be
shifted to the current temperature of cooler. The
display switches again automatically to the
temperature of freezer after it is released more than
5 seconds.
Temperature selecting button of freezer (2)
This button is used to select the setting of the
freezer temperature between -18 °C and -26°C.
5140003721_Siemens_出口香港 2006.7.18, 6:14 PMPage 7 Adobe PageMaker 6.5C/PPC
2
7
Page 8

GB
Name of parts and introduction of the temperature control panel
2.1
The indicator will display the current temperature
setting when the button is pressed. When the
button is pressed continuously, the temperature
will drop 1°C per time. If it is kept being pressed on,
the temperature will drop 1°C per time till -26°C,
then turn back to -18°C and drop again.
When the button is released for 5 seconds, the
indicator will display the current instantaneous
temperature of the freezer and the latest setting of
freezer temperature will be saved.
This saved value will not be erased even in the case
of power-cut and requires no resetting when power
is restored.
Minus indicator (3)
The green indicator will indicate “-” , means below
zero.
Screen (4)
It displays the temperature in the cooler or freezer
and blinks for alarm.
Button for alarm ( ) (5)
When the temperature of the freezer is above or
equals to the alarm temperature which is -11°C
( -5°C in the case of “super ” mode), the refrigerator
will be in alarm mode. The indicator will flash,
displays alarm signal. The temperature displayed at
this point is the highest temperature that has been
reached in the freezer. At the same time the alarm
will ring. If the button for alarm 5 is pressed, then
the alarm will be switched off. Figure
)
3
Button for memory (6)
If power cut occurs while the user is long
away from home, the memory will automatically
register the highest temperature that has been
reached in the freezer (it has to be above -11°C,
above -5°C in the case of “super” mode) and will
keep flashing when power is restored to remind the
user there was a power cut. Press memory button
6. The indicator will display in flashing the current
instantaneous temperature and the highest
temperature which was saved would be cleared.
When the temperature of the freezer is below
-17°C, the indicator will stop flashing and restore its
regular state.
Button of quick freezing (7)
This refrigerator has the function of quick freezing.
When the “super” button is pressed, the indicating
light for quick freezing goes on and the refrigerator
starts operating in quick freezing mode.
If this button is pressed again, the quick freezing
operation is then cancelled and the refrigerator will
restore its previous state of operation.
Otherwise the “super” mode will be automatically
cancelled in 51 hours and the refrigerator will
restore its regular mode.
Note: Cooler keeps previous set temperature in
quick freezing mode. The damper thermostate
should be set to a low position( e.g.
position ) otherwise the temperature in
cooler would be too low.
Indicator for quick freezing (8)
When the red light is on, the refrigerator is in quick
freezing mode. The light goes on only when the
“super” button is pressed, otherwise the light
would remain off.
8
5140003721_Siemens_出口香港 2006.7.18, 6:14 PMPage 8 Adobe PageMaker 6.5C/PPC
Page 9

Switch on and selecting the temperature
2.2
GB
How it works
The fully automatic NO FROST system
ensures that ice dose from inside the
freezer section. There is no longer any
need for defrosting
1 The food is cooled down by a flow of cold air.
2 The evaporator in the NO FROST system
cools the air inside the appliance. The cold air
is circulated by a fan. The moisture in the air
condenses on the evaporator which is
defrosted fully automatically whenever
necessary.
The thawed water is directed to the
refrigerating unit where it evaporates. The
freezer section and the frozen food inside are
kept free from ice.
How to operate when initially
switch on the refrigerator Figure
1 When switch on the refrigerator for the first
time at room temperature (25°C for
instance), the indicator will display the
temperature (this temperature should be the
same as the current room temperature at this
time) of freezer in flash and alarm mode will
initialize.
2 Then press “alarm” button 5 and switch off
the alarm. Press “memory” button 6 then the
indicated temperature could drop as the
freezer temperature drops. If you do not press
“memory” button 6 the indicator will always
display in flashing the initial temperature
( 25°C ), regardless of any change of
temperature in the refrigerator.
3 When the temperature of the freezer drops
to -17°C (it takes about 3 hours and the
compressor may still be working), the
indicator will stop flashing and now the
display is in normal state.
4 Setting freezer temperature
1)Normally the screen displays the temperature of
freezer.
2) When the button 2 is pressed continuously, the
temperature will drop 1°C per time till -26°C, then
2
turn back to -18°C and drop again to reach the
temperature you need.
3)It is suggested that the freezer temperature
be set around -18°C to -20°C.
5 Setting cooler temperature Figure
1)Press cooler temperature display button 1
and the screen displays a cooler temperature
which can last only 5 seconds.
2) The cooler temperature is adjusted by the
turning knob of the damper thermostate on
the rear panel. The temperature in the
compartment drops from position to .
The turning knob of the damper thermostate
can be set at any position according to the
needs of the customer.
1
Temperature adjustment during
operation
1 The temperature of the freezer may
sometimes appear too high as indicated and
even alarm occurs. This is either because a
large amount of food is stored in the
refrigerator or freezer door is opened
frequently. Normally it will go back to natural
status within 24 hours.
2 In order to keep food fresh and to save cost,
the setting of temperature in freezer should
be from -18°C to -20°C under a normal room
temperature. Frequent changes should be
avoided once the setting is done.
3 In summer when there is a higher room
temperature the damper thermostate of
cooler could be turned to position . In
winter when there is a lower room
temperature the damper thermostate of
cooler could be turned to position .
4 Please make sure the temperature sensor is
not covered by or has contact with other
objects. It’s better to keep a distance
between 5cm to 8cm to avoid any influence
to the temperature display in cooler.
9
5140003721_Siemens_出口香港 2006.7.18, 6:14 PMPage 9 Adobe PageMaker 6.5C/PPC
Page 10

GB
2.3
Use of the cooler
The temperature of the cooler can only
slow down the growth rate of bacteria
to a certain degree and therefore it is
only suitable for short-term storage of
food.
The following foods are suitable for
storage in the cooler:
eggs, butter, cheese, milk, bottled drinks, tinned
food, glazed fruit, fresh sauce, bread, cooked food,
meat, fish, fruit and vegetables, etc.
When storing food in the refrigerator,
the following instructions are to be
observed:
1 Seal or well cover food before placing it in
the refrigerator. This will prevent it from
drying out and will keep it fresh for longer
time, help it retain it’s color, nutrition and
flavors. Sealing or well covering all of the
food in the refrigerator will prevent cross tasting and being air-dried.
6 Keep a space between all of the foods to
allow for good ventilation and an even
temperature.
7 Avoid butter and cooking oil contacting with
the plastic parts inside the cooler and with the
inner liner.
8 Drinks should be tightly sealed and bottle
placed upright.
9 Only open the cooler door for a minimum
amount of time to prevent cold air leakage.
Use of bottle rack Figure
Tins, bottles or beers can be laid reposefully in
the groove of intelli-plate. The bottle plate can
be moved smoothly on the glass plate
according to your needs. If you don’t need to
use it, it can be demounted.
7
2 Wash and dry vegetables and fruit, etc. before
storage.
3 Allow food to cool before placing it in the
refrigerator.
7
4 The top of cooler has lowest temperature and it
is the area where food is cooled down most fast.
5 Fruit and vegetables should be placed in the
vegetable basket.
10
5140003721_Siemens_出口香港 2006.7.18, 6:14 PMPage 10 Adobe PageMaker 6.5C/PPC
Page 11

Use of the freezer
2.4
GB
When buying ready-frozen food, the
following precautions should be
observed:
1 Check that the packaging is intact.
2 Make sure that the products have not exceeded
their expiry date.
3 Check that the thermometer of the freezer
where the food is being bought is indicating a
temperature at or below -18°C.
4 Once bought frozen foods should be exposed
to as little heat as possible and should be
placed in the home freezer as quickly as
possible.
Freezing food at home
1 When freezing food at home, use only fresh food.
2 The following foods are suitable for freezing
meat, fish, vegetables, fruit, bread, cake, cooked
rice and cooked, left-over foods.
3 The following foods are not suitable for
freezing
raw eggs, yogurt, mayonnaise, lettuce, radish,
pepper and onion.
Packing food
1 Before freezing pack the food in tightly
sealed containers or bags so that it does not
lose its taste, color or nutritional value and so
that it does not dry out.
2 The following are suitable packing materials;
polyethylene bags, aluminium foil and
freezing-proof containers. All of these materials
are available at department stores or stores
which specialize in this line of business.
3 The following are unsuitable packing materials;
wrapping paper, vellum paper, cellophane,
rubbish bags and used shopping bags.
4 If possible, eliminate the air from the packing
container.
5 Before placing wrapped food in the freezer mark
the date that the food is being placed in the
freezer and also mark the contents. For all types
of food there is a limited amount of time that the
food can be stored frozen, before it starts to
deteriorate.
Maximum freezing capacity
The freezing capacity (kg/24h) indicated on the
electric label which is sticked on back of the
refrigerator shows the amount of food that can
be frozen at one time within 24 hours.
Quick freezing Figure
1 If a large amount of food should be frozen at
one time, the “super” function should run for
several hours before the food is stored.
Usually 4-6 hours of quick freezing in advance
is enough. If you would like to fully use the
maximum freezing capacity, the “super”
function could run 24 hours in advance (Note:
at the same time the thermostate of cooler
should be set to a low position, e.g.
position ).
2 The “super” function is unnecessary if food
less than 4kg need to be frozen.
3 Press down “super” button 7 ( the quick
freezing indicating light 8 will shine ) and
the refrigerator will run in quick freezing.
Remember that after the freezing process is
finished the “super” button 7 should be
pressed again to cancel quick freezing (light 8
will extinct ) for energy saving. If you
forget to press button 7 , after 51 hours the
“super” function would be cancelled
automatically and the original control state
would be restored.
Notice: When the maximum freezing
capacity is applied, the top two baskets of
freezer are only used for storage of
thoroughly-frozen food ( one of the
baskets is berry-basket ). If possible it
should be avoided to use the top two
baskets for freezing fresh food. The fresh
2
11
5140003721_Siemens_出口香港 2006.7.18, 6:14 PMPage 11 Adobe PageMaker 6.5C/PPC
Page 12

GB
2.4
Use of the freezer
food should be stored in the bottom two
baskets and laid evenly. Don’t put unfrozen
food directly on the ready-frozen food.
Thawing of food
1 Depending on the type of food and how it is to
be cooked, choose from the following thawing
methods:
— at room temperature
— in the cooler
— in an electric oven
— in a microwave oven
2 Uncooked, thawed food should not be
refrozen. When re-freezing defrosted and
then cooked food, the following should be
noted:
a) Fish, meat, dairy products and other fast
perishing food, must not be left exposed to
temperatures above 3°C for more than 12
hours. Other types of food, such as
vegetables, should not be exposed to
temperatures above 3°C for more than 12 hours.
The food should always be checked for any
change in smell or color.
b) The food should be thoroughly cooked and
then placed in a container before being refrozen.
c) The safe freezer storage time for defrosted and
then cooked food is shorter than for fresh food.
Storage time for frozen food
Figure
The icons on the freezer drawers show the storage
time for various types of food, also the expiry date
of wrapped purchased food is shown on the
packaging. The expiry date should always be
calculated or noted. Never eat food that has
exceeded it’s expiry date.
8
Making ice Figure
Fill the ice-tray three quarters full of water
and place it in the freezer. Ice cubes can be
easily removed from the ice-tray by slightly
twisting it.
Notice: Use cool boiled water to make ice
cubes.
9
8
9
12
5140003721_Siemens_出口香港 2006.7.18, 6:14 PMPage 12 Adobe PageMaker 6.5C/PPC
Page 13

3.1
Cleaning and energy saving tips
GB
Cleaning
The refrigerator should be cleaned once a
month.
1 Before cleaning, disconnect the refrigerator from
the power supply.
2 Whilst cleaning do not allow water to get into
the control panel or the inside light.
3 Lukewarm water with a little detergent or mild
disinfectant is suitable for cleaning the whole
refrigerator except for the door sealing. Clean
the door sealing with clean water only and
then rub it dry thoroughly.
4 Cleaning agents containing abrasives or acids
must not be used. Chemical solvents must not
be used either.
Energy saving tips
1 Install the refrigerator in a cool, well-ventilated
room, making sure that it is protected from direct
sunshine and is away from any heat sources.
2 Allow warm food and drinks to cool down
to room temperature before putting them into
the refrigerator.
3 Put frozen food into the refrigerator
compartment to thaw-out so that the low
temperature can be used to assist the cooling
of other food in the refrigerator.
4 Only open the doors for the minimum amount
of time required when removing or adding
food.
5 Freezer door should be open as less as possible.
13
5140003721_Siemens_出口香港 2006.7.18, 6:14 PMPage 13 Adobe PageMaker 6.5C/PPC
Page 14

GB
3.2
Servicing and troubleshooting
Power cut
1 When a power cut occurs, the doors of the
refrigerator should be open as less as possible.
Avoid putting new food into the cooler or freezer
as this will cause the temperature to rise at a
faster rate.
2 If the power cut is known in advance, the quick
freezing function should be activated ( press
down “ super” button) to reach a lower
temperature in the refrigerator. You can
also prepare some ice cubes and store them in
the upper section of the cooler during power cut
to keep the temperature in the cooler on a low
level.
Stop using
1 Switch off the refrigerator by directly
disconnecting the plug from the electrical supply.
2 If you have decided to cease using the
refrigerator for some time , please do as follows:
First switch off the refigerator, then clean inside
and leave the door open slightly to ventilate.
Note: Stopping use often will decrease the life
of the refrigerator.
10
Normal phenomena
1 Dew may appear on the exterior of the
refrigerator if the external humidity is high. This
can be wiped dry.
2 The area where the door seal sticks to the
refrigerator may be warm. This is caused by the
heating device to avoid dew and frost.
3 A bubbling / rattling noise sometimes could be
heard. This is due to refrigerant flowing in the
cooling pipe or because the refrigerator is in
start-up or closing mode.
4 The temperature of the compressor can reach
80°C.
Changing the lamps Figure
1 Disconnect the plug from the electrical supply.
2 Remove lamp shade (A), and unscrew the lamp
by turning in an anti-clockwise direction.
3 Replace with a new 25W / 220V /E14 lamp
and re-attach the lamp shade.
Note: Make sure that the correct lamp
output power is used.
14
5140003721_Siemens_出口香港 2006.7.18, 6:14 PMPage 14 Adobe PageMaker 6.5C/PPC
10
Page 15

3.2
Servicing and troubleshooting
GB
Fixing minor problems
Not every problem is serious enough to
warrant calling sales service staff.
Before calling for help, please check if
the problem can be solved with the aid
of the following tips:
Unusual noises:
Check if the refrigerator is standing firmly on level
ground, and if the fixtures are all secure. Also, the
pipes at the lower back of the refrigerator should
not be touching each other, and the compressor
should not be in contact with other objects.
No cooling:
Check the power supply for power cut; burnt-
out fuse: plug not fitting in the socket or wrong
voltage (under 165V).
Lamp not working:
The lamp may have burnt out. If this happened
replace it with a 25W / 220V /E14 lamp (see above
“Changing the lamp” ).
Deterioration of cooling performance:
Check that the setting on the thermostat knob is
not too warm, that the door is closed properly, that
thick layers of ice have not built up in the freezer,
that the door isn’t being opened too frequently, that
too much food hasn’t been placed in the refrigerator
or that food which is too warm is not being placed
in the refrigerator.
If a problem can not be solved after
following the above tips, please contact
our after-sales service department.
The contact details can be found in the
attached instruction document. We
provide a quick and satisfying service.
15
5140003721_Siemens_出口香港 2006.7.18, 6:14 PMPage 15 Adobe PageMaker 6.5C/PPC
Page 16

GB
Parameters list / Packing list
PARAMETERS
MODEL
Climatic type
Star mark
Total effective volume (L)
Effective volume of freezer (L)
Freezer temperature (°C)
Power supply
Freezing capacity (kg/24h)
Energy consumption (kW h/24h)
Refrigerant type
Filling amount of refrigerant (g)
External dimensions (mm)
Input power (W)
Net weight (kg)
Model name electrical safety classification
MODEL
PARAMETERS
Climatic type
Star mark
Total effective volume (L)
Effective volume of freezer (L)
Freezer temperature (°C)
Power supply
Freezing capacity (kg/24h)
Energy consumption (kW h/24h)
Refrigerant type
Filling amount of refrigerant (g)
External dimensions (mm)
Input power (W)
Net weight (kg)
Model name electrical safety classification
KK24U00HK KK27U00HK KK24U00HKL
SN / ST
233
64
-18
220V 50Hz
10
1.32
R600a
40
595x630x1700
110
71
I
SN / ST
265
64
-18
220V 50Hz
10
1.40
R600a
40
595x630x1850
120
75
I
SN / ST
233
64
-18
220V 50Hz
10
1.32
R600a
40
595x630x1700
110
71
I
KK24U00HKR KK27U00HKL KK27U00HKR
SN / ST
233
64
-18
220V 50Hz
10
1.32
R600a
40
595x630x1700
110
71
I
SN / ST
265
64
-18
220V 50Hz
10
1.40
R600a
43
595x630x1850
120
75
I
SN / ST
265
64
-18
220V 50Hz
10
1.40
R600a
43
595x630x1850
120
75
I
16
5140003721_Siemens_出口香港 2006.7.18, 6:14 PMPage 16 Adobe PageMaker 6.5C/PPC
Page 17

Parameters list / Packing list
GB
PARAMETERS
In-case
accessories
In-door
accessories
Spare part
Printed
documentation
PARAMETERS
In-case
accessories
MODEL
Safety glass shelf
Safety glass cover
Bottle rack
Vegetable basket
Ice bowl
Berry basket
freezer drawer
Shallow tray
Short shallow tray
Cover of short shallow tray
Egg tray
Deep tray
Dairy box
Right plastic cover
Operating instructions
MODEL
Safety glass shelf
Safety glass cover
Bottle rack
Vegetable basket
Ice bowl
Berry basket
freezer drawer
KK24U00HK KK27U00HK
3
1
1
1
1
1
3
1
5
1
2
1
1
4
1
1
1
1
1
3
2
5
1
2
1
1
KK24U00HKR KK27U00HKL
3
1
1
1
1
1
3
4
1
1
1
1
1
3
KK24U00HKL
3
1
1
1
1
1
3
1
5
1
2
1
1
KK27U00HKR
4
1
1
1
1
1
3
In-door
accessories
Spare part
Printed
Shallow tray
Short shallow tray
Cover of short shallow tray
Egg tray
Deep tray
Dairy box
Right plastic cover
Operating instructions
1
5
1
2
1
1
2
5
1
2
1
1
2
5
1
2
1
1
documentation
17
5140003721_Siemens_出口香港 2006.7.18, 6:14 PMPage 17 Adobe PageMaker 6.5C/PPC
Page 18

5140 003721
PD 86 07 29
18
5140003721_Siemens_出口香港 2006.7.18, 6:14 PMPage 18 Adobe PageMaker 6.5C/PPC
Page 19

(86 07 29)
5140 003721
19
5140003721_Siemens_出口香港 2006.7.18, 6:14 PMPage 19 Adobe PageMaker 6.5C/PPC
 Loading...