

Page 1

ET1..YD..
[en] Instruction manual .............................................................. 2
*9000283730* 9000283730
Page 2
Ú Table of contents
(7<'
Safety information ...................................................................... 2
Safety information for this appliance...............................................2
Causes of damage .............................................................................3
Environmental protection ..........................................................3
Environmental protection...................................................................3
Tips for saving energy .......................................................................3
Getting to know your appliance ................................................ 4
The control panel ................................................................................4
The hotplates .......................................................................................4
Residual heat indicator...................................................................... 4
Setting the hob ...........................................................................4
Switching the hob on and off ...........................................................4
Setting a hotplate................................................................................ 5
Table of cooking times ......................................................................5
Electronic boil start control....................................................... 6
Setting the electronic boil start control...........................................6
Table of cooking times for electronic boil start control...............7
Tips for the electronic boil start control..........................................7
Childproof lock ........................................................................... 7
Switching the childproof lock on and off........................................ 7
Automatic childproof lock ................................................................. 7
Timer ........................................................................................... 8
Automatic hotplate switch-off ........................................................... 8
Automatic timer ...................................................................................8
Kitchen timer........................................................................................ 8
Automatic time limit ................................................................... 8
Wipe protection .......................................................................... 8
Basic settings............................................................................. 9
Changing the basic settings ............................................................. 9
Cleaning and care .................................................................... 10
Ceramic ............................................................................................. 10
Hob surround ................................................................................... 10
Rectifying faults ....................................................................... 10
After-sales service ................................................................... 10
Produktinfo
Additional information on products, accessories, replacement
parts and services can be found at www.siemens-home.com
and in the online shop www.siemens-eshop.com
ã=Safety information
Please read this instruction manual carefully. This will enable
you to operate your hob safely and correctly.
Please keep the instruction manual, installation instructions and
the appliance certificate in a safe place. If the appliance
changes owners, this documentation should always be
included.
Check the appliance for damage after unpacking it. Do not
switch on the appliance if it is damaged.
Safety information for this appliance
This appliance is intended for domestic use only. This
appliance must only be used for food preparation. Do not leave
the appliance unattended during operation.
Safe operation
Adults and children must not operate the appliance without
supervision if:
2 Ø = cm
■ they do not have the physical or mental ability,
■ or they lack the knowledge and experience required
to operate the appliance correctly.
Overheated oil and fat
Risk of fire!
Overheated oil or fat can ignite very quickly. Never leave hot oil
or fat unattended. Never attempt to extinguish burning fat or oil
with water. Extinguish the flames with a lid or a plate. Switch the
hotplate off.
Hot hotplates
Risk of burning!
Never touch hot hotplates. Small children must be kept at a
safe distance from the hob.
Page 3

Risk of fire!
■ Never place combustible items on the hob.
■ Do not keep combustible objects or aerosol cans in drawers
directly underneath the hob.
Wet saucepan bases and hotplates
Risk of injury!
Steam pressure may build up if there is liquid between the
saucepan base and the hotplate. This may cause the pan to
jump suddenly. Always keep the hotplate and saucepan bases
dry.
Cracks in the ceramic
Risk of electric shock.!
Switch off the circuit breaker in the fuse box if the ceramic has
fractures, flaws or cracks. Call the after-sales service.
The hotplate heats up but the display does not work
Risk of burning!
Switch off the hotplate if the display is not working. Call the
after-sales service.
The hob switches off automatically
Risk of fire!
If the hob switches itself off and can then no longer be used, it
may unexpectedly switch itself on later. In order to prevent this,
disconnect the hob from the power supply. To do so, switch off
the circuit breaker in the fuse box. Call the after-sales service.
Incorrect repairs
Risk of electric shock.!
Incorrect repairs are dangerous. Switch off the circuit breaker in
the fuse box, if the appliance is faulty. Call the after-sales
service. Repairs may only be carried out by one of our qualified
after-sales engineers.
Causes of damage
Caution!
■ Rough pot and pan bases scratch the ceramic.
■ Avoid boiling pots dry. This may cause damage.
■ Never place hot pots or pans on the control panel, the
display area or the surround. This may cause damage.
■ Damage can occur if hard or pointed objects fall on the hob.
■ Aluminium foil and plastic containers melt on hot hotplates.
Oven protective foil is not suitable for your hob.
Overview
The following table provides an overview of the most frequent
kinds of damage:
Damage Cause Action
Stains Food spills Remove spills immediately with a glass scraper.
Unsuitable cleaning agents Only use cleaning agents which are suitable for ceramic
Scratches Salt, sugar and sand Do not use the hob as a work surface or storage space.
Rough pot and pan bases scratch the
Check your cookware.
ceramic.
Discolouration Unsuitable cleaning agents Only use cleaning agents which are suitable for ceramic
Pan abrasion (e.g. aluminium) Lift the pots and pans when moving them.
Blisters Sugar, food with a high sugar content Remove spills immediately with a glass scraper.
Environmental protection
Unpack the appliance and dispose of the packaging in an
environmentally-responsible manner.
Environmental protection
This appliance is labelled in accordance with the
European Directive 2002/96/EU concerning used
electrical and electronic appliances (WEEE –
waste electrical and electronic equipment). The
guideline determines the framework for the return
and recycling of used appliances as applicable.
Tips for saving energy
■ Always use the right lid for the pan in question. Cooking
without the lid requires four times as much energy.
■ Use pots and pans with even bases. Using cookware with
uneven bases increases energy consumption.
■ The diameter of the base of your pot or pan should match the
size of the hotplate. In particular, if pots that are too small are
placed on the hotplate, energy is wasted. Please note:
Cookware manufacturers often specify the diameter of the
top of the pan. This is usually bigger than the diameter of the
base of the pan.
■ Use a small pan for small quantities of food. A larger, less full
saucepan requires more energy.
■ Use only a little water when cooking. This saves energy. It
also preserves vitamins and minerals in vegetables.
■ Switch to a lower heat setting as soon as possible.
■ Use the residual heat of the hob. For longer cooking times,
you can switch the hotplate off 5 - 10 minutes before the end
of the cooking time.
3
Page 4
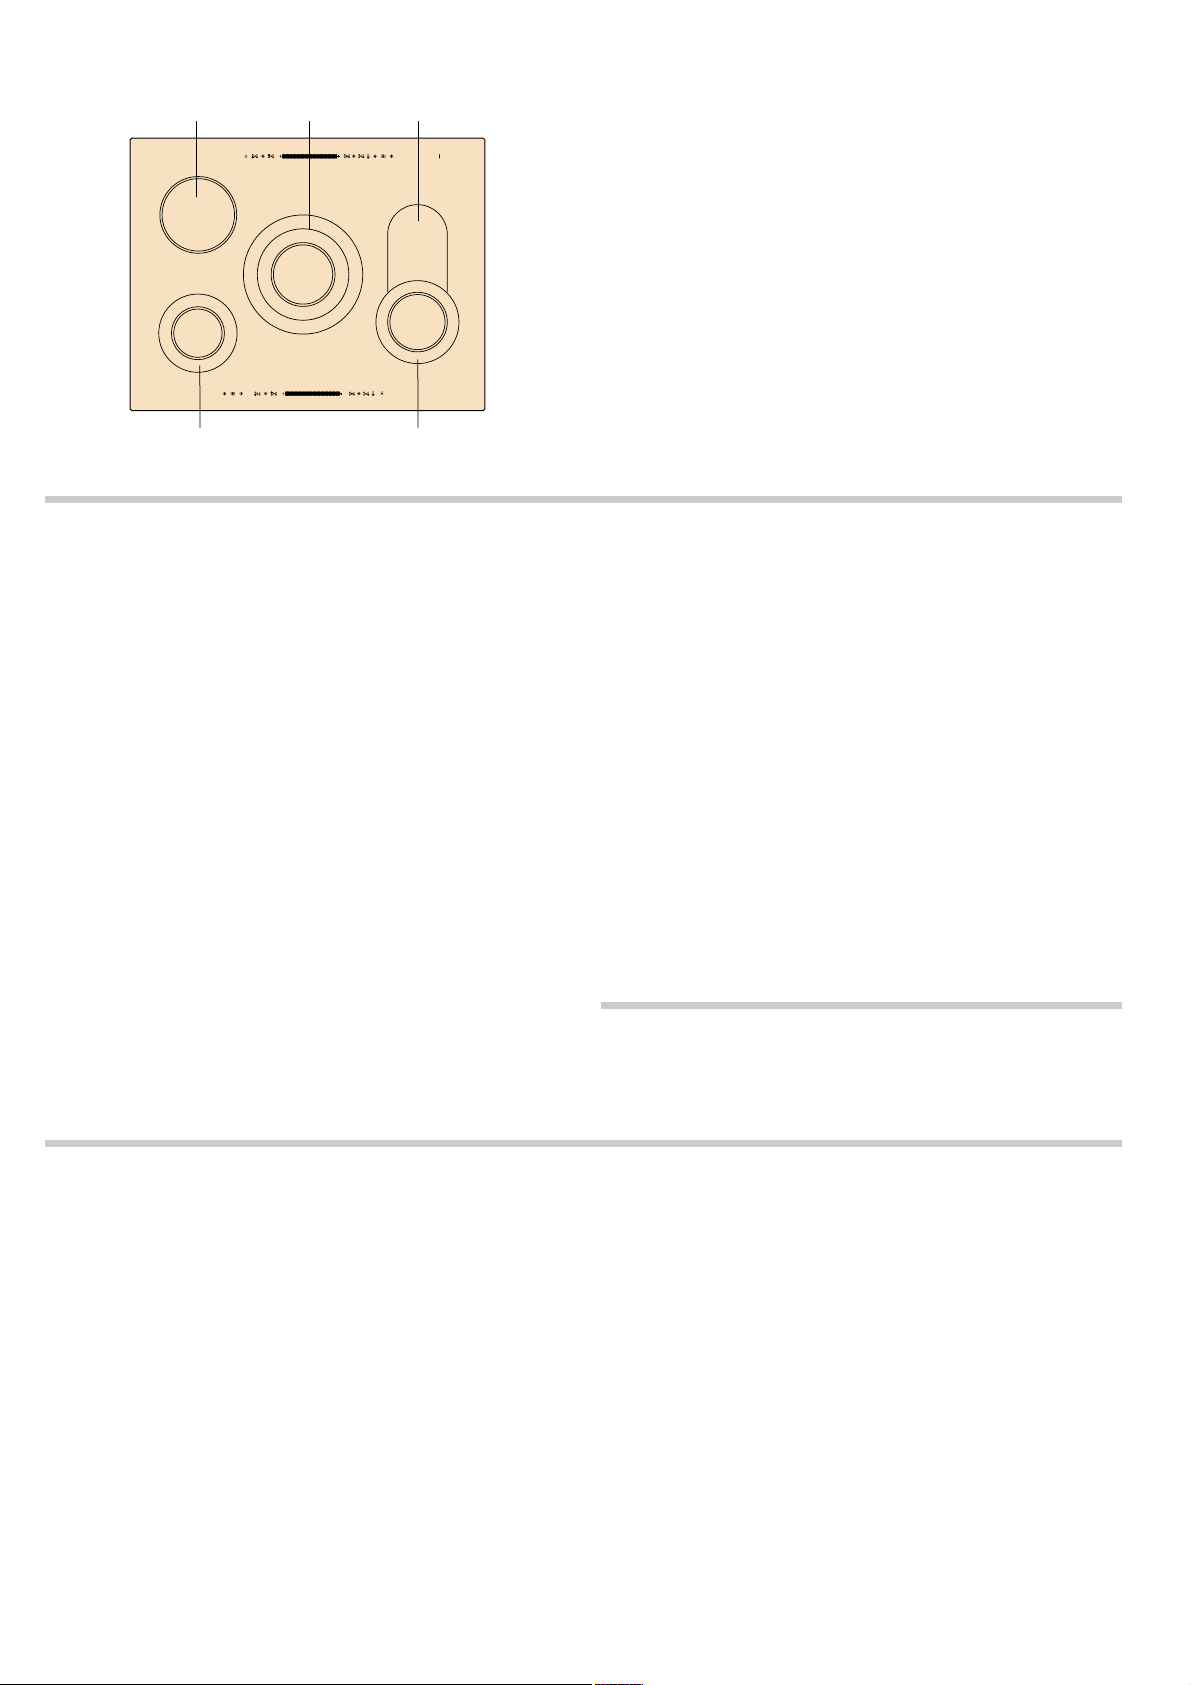
Getting to know your appliance
'LVSOD\VIRU
KHDWVHWWLQJ³É
UHVLGXDOKHDW¤
'LVSOD\IRU
WLPHU
&RQWUROVIRU
PDLQVZLWFK
FRQWUROSDQHOSDXVH
WLPHU
ÍGXDOFLUFXLWKRWSODWH
6HWWLQJVUDQJH
IRUVHWWLQJWKH
KHDWVHWWLQJ
IRUVHWWLQJWKHWLPHU
&RQWUROVIRU
KRWSODWH
«WULFLUFXLWKRWSODWH
kGXDOFLUFXLWKRWSODWH
ZLWKH[WHQGHG
FRRNLQJ]RQH
©HOHFWURQLFERLO
VWDUWFRQWURO
An overview of the models with their dimensions is given on
page 2.
The control panel
Your hob is equipped with 2 control panels. The displays and
the controls are the same. You can operate the hob from
2sides.
Controls
When you touch a symbol, the respective function is activated.
Note: Always keep the controls dry. Moisture reduces their
effectiveness.
The hotplates
Hotplate Activating and deactivating
$
ð
÷
â
When the hotplate is activated: the corresponding indicator lights up.
When the hotplate is switched on: the last selected size is automatically selected again
Residual heat indicator
The hob has a two-stage residual heat indicator for each
hotplate.
If
for example, to keep a small meal warm or to melt cooking
Single-circuit hotplate
Dual-circuit hotplate
Tri-circuit hotplate
Dual-circuit hotplate, hotplate
with extended cooking zone
• appears in the display the hob is still hot. It may be used,
Touch the
Touch the
Touch the
Touch the
Touch the
ð symbol
÷ symbol; the 2nd filament circuit is activated.
÷ symbol again, 3rd filament circuit is activated.
â symbol; the 2nd filament circuit is activated.
â symbol; the extended cooking zone is activated.
chocolate. As the hotplate cools down further, the display
changes to
cooled sufficiently.
œ. The display remains lit until the hotplate has
Setting the hob
This section informs you how to set the hotplates. The table
shows heat settings and cooking times for various meals.
Switching the hob on and off
The main switch is used to switch the hob on and off.
To switch on: touch the
main switch lights up. The hob is ready for use.
4
# symbol. The indicator above the
To switch off: touch the
main switch goes out. All hotplates are switched off. The
residual heat indicator remains on until the hotplates have
cooled down sufficiently.
Note: The hob switches off automatically if all hotplates have
been switched off for more than 20 seconds.
# symbol until the display above the
Page 5

Setting a hotplate
Set the required heat setting in the settings range.
Heat setting 1 = lowest setting
Heat setting 9 = highest setting
There is an intermediate setting between each heat setting. This
is identified by a dot.
Setting the heat setting
The hob must be switched on.
1.Touch the ¥ symbol to select the hotplate
‹ and the N symbol for hotplate selection light up in the heat
setting display.
2.Slide your finger along the settings range until the desired
heat setting appears on the hotplate display.
Table of cooking times
The following table provides some examples.
Cooking times and heat settings may vary depending on the
type of food, its weight and quality. Deviations are therefore
possible.
To change the heat setting:
Select the hotplate and set the desired ongoing cooking setting
in the settings range.
To switch off the hotplate:
Select the hotplate and set to 0 in the settings range.
Notes
■ When the hotplate is selected, the N symbol lights up. You
can adjust the settings immediately.
■ Hotplate temperature is regulated by the heat switching on
and off. The heat may also switch on and off at the highest
setting.
When heating thick liquids, stir regularly.
For bringing liquids to the boil, use heat setting 9.
Melting
Chocolate, cooking chocolate, butter, honey
Gelatine
Heating and keeping warm
Stew (e.g. lentil stew)
Milk**
Heating sausages in water**
Defrosting and heating
Frozen spinach
Frozen goulash
Poaching, simmering
Dumplings
Fish
White sauces, e.g. béchamel sauce
Emulsified sauces, e.g. béarnaise sauce, hollandaise sauce
Boiling, steaming, stewing
Rice (with double the quantity of water)
Rice pudding
Unpeeled boiled potatoes
Boiled potatoes
Pasta, noodles
Stew, soups
Vegetables
Vegetables, frozen
Cooking in a pressure cooker
* Continue cooking without a lid
** Without lid
Ongoing cooking
setting
1-2
1-2
1-2
1.-2.
3-4
2.-3.
2.-3.
4.-5.
4-5*
1-2
3-4
2-3
1.-2.
4-5
4-5
6-7*
3.-4.
2.-3.
3.-4.
4-5
Ongoing cooking
time in minutes
-
-
-
-
-
20-30 mins
10-15 mins
20-30 mins
10-15 mins
3-6 mins
8-12 mins
15-30 mins
25-35 mins
25-30 mins
15-25 mins
6-10 mins
15-60 mins
10-20 mins
10-20 mins
-
5
Page 6

Braising
Roulades
Pot roasts
Goulash
Frying**
Escalope, plain or breaded
Escalope, frozen
Cutlet, plain or breaded
Steak (3 cm thick)
Poultry breast (2 cm thick)
Chicken breast, frozen
Fish and fish fillet, plain
Fish and fish fillet, breaded
Fish and fish fillet, breaded and frozen, e.g. fish fingers
Scampi and prawns
Stir fry, frozen
Pancakes
Omelette
Fried eggs
Deep-fat frying (fry 150-200g per portion continuously in 1-2 litres oil**)
Frozen products, e.g. chips, chicken nuggets
Croquettes
Meat balls
Meat, e.g. chicken portions
Fish, breaded or battered
Vegetables, mushrooms, breaded or battered
Small items, e.g. doughnuts, fruit in batter
* Continue cooking without a lid
** Without lid
Ongoing cooking
setting
4-5
4-5
2.-3.
6-7
6-7
6-7
7-8
5-6
5-6
5-6
6-7
6-7
7-8
6-7
6-7
3.-4.
5-6
8-9
7-8
7-8
6-7
5-6
5-6
4-5
Ongoing cooking
time in minutes
50-60 mins
60-100 mins
50-60 mins
6-10 mins
8-12 mins
8-12 mins
8-12 mins
10-20 mins
10-30 mins
8-20 mins
8-20 mins
8-12 mins
4-10 mins
6-10 mins
continuous
continuous
3-6 mins
-
-
-
-
-
-
-
Electronic boil start control
The electronic boil start control heats the hotplate using the
highest heat setting and then switches down to the simmer
setting you have selected.
The time taken for the hotplate to heat up depends on the
simmer setting selected.
Setting the electronic boil start control
The electronic boil start control can only be activated in the first
30 seconds after you have switched on the hotplate:
1. Set the desired simmer setting for the hotplate.
2. Touch the ‘ symbol.
The electronic boil start control is activated.
cooking setting flash alternately.
After the food has been brought to the boil, only the simmer
setting remains lit in the display.
‘ and the ongoing
6
Page 7

Table of cooking times for electronic boil start control
The table below shows which dishes electronic boil start control
can be used for.
Dish with electronic boil start control Quantity Heat setting Total cooking time
Heating
Stock
Thick soups
Milk**
Heating and keeping warm
Stew (e.g. lentil stew) 400-800 g A 1-2 -
Defrosting and heating
Frozen spinach
Frozen goulash
Poaching
Fish 300-600 g A 4-5* 20-25 mins
Boiling
Rice (with double the quantity of water)
Unpeeled boiled potatoes with 1-3 cups of water
Boiled potatoes with 1-3 cups of water
Vegetables with 1-3 cups of water
Frozen vegetables with 1-3 cups of water
Braising
Roulades
Pot roasts
Frying**
Escalope, plain or breaded
Cutlet, plain or breaded
Steak (3 cm thick)
Fish and fish fillet, breaded
Fish and fish fillet, breaded and frozen, e.g. fish fingers
Pancakes
* Continue cooking without a lid
** Without lid
The smaller quantities specified are for the smaller hotplates
and the larger quantities are for the larger hotplates. The values
given are guidelines.
in minutes
500 ml-1 litre
500 ml-1 litre
200-400 ml
300-600 g
500g-1 kg
125-250 g
750 g-1.5 kg
750 g-1.5 kg
500g-1 kg
500g-1 kg
4 pieces
1 kg
1-2
1-2
1-2
1-2
200-300 g
A 7-8
A 2-3
A 1-2
A 2.-3.
A 2.-3.
A 2-3
A 4-5
A 4-5
A 2.-3.
A 4.-5.
A 4-5
A 4-5
A 6-7
A 6-7
A 7-8
A 6-7
A 6-7
A 6-7
4-7 mins
3-6 mins
4-7 mins
10-20 mins
20-30 mins
20-25 mins
30-40 mins
20-30 mins
15-20 mins
15-20 mins
50-60 mins
80-100 mins
8-12 mins
8-12 mins
8-12 mins
8-12 mins
8-12 mins
continuous frying
Tips for the electronic boil start control
Electronic boil start control is designed to conserve food's
nutritional value while using little water for cooking.
Childproof lock
You can use the childproof lock to prevent children from
switching on the hotplates.
Switching the childproof lock on and off
The hob must be switched off.
To switch on: touch the
@ symbol lights up for 10 seconds. The hob is locked.
To switch off: touch the
hob is unlocked.
# symbol for approx. 4 seconds. The
# symbol for approx. 4 seconds. The
■ Add only approximately 3 cups of water to the food for large
hotplates and approximately 2 cups of water for small
hotplates.
■ Place a lid on the saucepan.
■ Electronic boil start control is not suitable for food that is
cooked in a large volume of water (e.g. pasta).
Automatic childproof lock
This function automatically activates the childproof lock every
time you switch the hob off.
Switching on and off
You can find out how to switch the automatic childproof lock on
and off in the Basic settings section.
7
Page 8

Timer
The timer can be used in two different ways:
■ To switch a hotplate off automatically
■ As a kitchen timer
Automatic hotplate switch-off
Enter a cooking time for the relevant hotplate. When the
cooking time has elapsed, the hotplate switches off
automatically.
Setting a cooking time
1. Setting the heat setting
2. Touch the 0 symbol. The x display for the desired hotplate
lights up.
different hotplate, touch the
display for the desired hotplate lights up.
3. Touch the desired preset in the range of settings. The
possible presets from left to right are 1, 2, 3..... to 10 minutes.
Slide your finger along the settings range repeatedly, within
10 seconds, until the desired cooking time is reached.
‹‹ lights up on the timer display. To select a
0 symbol repeatedly until the x
When the cooking time has elapsed
When the cooking time has elapsed, the hotplate switches off.
You will hear a signal and
seconds. The
symbol. The displays go out and the audible signal ceases.
Changing or cancelling the cooking time
Touch the
lights up brightly. Change the cooking time or set to
settings area.
Note: You can set a cooking time of up to 99 minutes.
x indicator lights up brightly. Touch the 0
0 symbol repeatedly until the desired x indicator
‹‹ lights up in the display for 10
‹‹ in the
Automatic timer
You can use this function to preselect a cooking time for all
hotplates. Each time a hotplate is switched on, the preselected
cooking then counts down. When the cooking time has
elapsed, the hotplate switches off automatically.
You can find out how to switch on the automatic timer in the
Basic settings section.
Note: You can change the cooking time for a hotplate or switch
off the automatic timer for the hotplates.
Touch the
lights up brightly. Change the cooking time or set to
settings area.
0 symbol repeatedly until the desired x indicator
‹‹ in the
Kitchen timer
You can use the kitchen timer to set a time of up to 99 minutes.
It runs independently of all the other settings.
The cooking time counts down. If you have set a cooking time
for several hotplates, you can display each cooking time. To do
this, touch the
up brightly for the desired hotplate.
Automatic setting
If you touch settings range presets 1 to 5 for a longer time, the
cooking time automatically counts back down to one minute.
If you touch settings range presets 6 to 10 for a longer time,
the cooking time automatically counts up to 99 minutes.
0 symbol repeatedly until the x display lights
Automatic time limit
If a hotplate is in use for a long time without the setting being
changed, the automatic time limit is activated.
The hotplate stops heating.
hotplate indicator.
” and ‰ flash alternately in the
Setting procedure
1. Touch the 0 symbol repeatedly until the U indicator for the
kitchen timer lights up.
2. Set the desired time in the settings range.
The timer starts counting down after a few seconds.
When the cooking time has elapsed
A signal sounds once the time has elapsed.
the timer display. The
brightly. After 10 seconds, the indicator switches off.
Changing the time
Touch the
kitchen timer lights up brightly. Make your new settings.
The display goes out when you touch any control. You can
make new settings.
When the time limit is activated depends on the heat setting
selected (1 to 10 hours).
0 symbol repeatedly until the U indicator for the
‹‹ lights up on the timer display.
‹‹ lights up on
U indicator for the kitchen timer lights up
Wipe protection
If you wipe over the control panel while the hob is switched on,
settings may be altered.
To prevent this from happening, your hob has a wipe protection
function. Touch the
panel is locked for 30 seconds. You can now wipe over the
control panel without altering any settings.
8
# symbol. A signal sounds. The control
Note: The main switch is excluded from the wipe protection
function. You can switch off the hob at any time.
Page 9

Basic settings
Your appliance has various basic settings. You can adapt these
settings to your needs.
Indicator Function
™‚
™ƒ
™†
™‡
™ˆ
™Š
™‹
*Basic setting
Automatic childproof lock
‹ Switched off.*
‚ Switched on.
Audible signal
‹ Confirmation signal and operation error signal switched off.
‚ Only operation error signal switched on.
ƒ Confirmation signal and operation error signal switched on.*
Automatic timer
‹ Switched off.
‚-ŠŠ Duration after which the hotplates switch off
Duration of the timer end signal
‚ 10 seconds.*
ƒ n30 seconds
„ 1 minute.
Activation of the filament circuits
‹ Switched off.
‚ Switched on.
ƒ Last setting before the hotplate was switched off.*
Time for selecting the hotplate
‹ Unlimited: The last selected hotplate can always be adjusted without having to select it again.
‚ Once you select a hotplate, you have 10 seconds to adjust it, after which you will have to select it again in order to
be able to adjust it.
Reset to basic setting
‹ Switched off.
‚ Switched on.
Changing the basic settings
The hob must be switched off.
1.Switch on the hob.
2.Within the next 10 seconds, touch the 0 symbol for
4seconds.
™‚ appears on the left-hand display and ‹ on the right-hand
display.
3.Touch the 0 symbol repeatedly until the desired symbol
appears on the left-hand display.
4.Set the desired value on the range of settings.
5.Touch the 0 symbol for 4 seconds.
The setting is activated.
Switching off
To exit the basic setting, switch off the hob with the main switch
and make new settings.
9
Page 10

Cleaning and care
The information in this section provides help on how best to
care for your hob.
Suitable maintenance and cleaning products can be purchased
from the after-sales service or in our e-Shop.
Ceramic
Clean the hob after each use. This will prevent spills from
burning onto the ceramic.
Only clean the hob when it has cooled down sufficiently.
Use only cleaning agents which are suitable for ceramic. Follow
the cleaning instructions on the packaging.
Never use:
■ Undiluted washing-up liquid
■ Detergent intended for dishwashers
■ Scouring agents
■ Harsh cleaning agents such as oven spray or stain remover
■ Abrasive sponges
■ High-pressure cleaners or steam jet cleaners
Ground-in dirt can be best removed with a glass scraper,
available from retailers. Please note the manufacturer's
instructions.
You can also obtain a suitable glass scraper from our aftersales service or from the e-Shop.
Hob surround
To prevent damage to the hob surround, please observe the
following instructions:
■ Use only warm, soapy water.
■ Do not use harsh or abrasive agents.
■ Do not use the glass scraper.
Rectifying faults
Malfunctions often have simple explanations. Please read the
following notes before calling the after-sales service.
Indicator Fault Action
Blank There is no power supply. Check the household fuse for the appliance. Check whether there is a power
“ is
flashing
Ҥ +
number
”ƒ
”…
”‰
* Do not place hot pans close to or on the control panel
The controls are damp or an object is
resting on them.
Electronic fault. Switch the appliance off and back on again after about 30 seconds using
The electronics have overheated and
have switched off the corresponding
hotplate.
The electronics have overheated and
have switched off all hotplates.
The hotplate was in operation for too
long and has switched itself off.
cut by trying other electronic appliances.
Dry the controls or remove the object.
either the household fuse or the circuit breaker in the fuse box. Contact the
after-sales service if this appears in the display again.
Wait until the electronics have cooled down sufficiently. Then touch a control
for the hotplate.*
Wait until the electronics have cooled down sufficiently. Then touch any
control.*
You can switch the hotplate back on again immediately.
After-sales service
Our after-sales service is there for you if your appliance should
need to be repaired. We are committed fo find the best solution
also in order to avoid an unnecessary call-out.
E number and FD number:
Please quote the E number (product number) and the FD
number (production number) of your appliance when
contacting the after-sales service. The rating plate bearing
these numbers can be found on the appliance certificate.
Please note that a visit from an after-sales service engineer is
not free of charge, even during the warranty period.
Please find the contact data of all countries in the enclosed
customer service list.
10
To book an engineer visit and product advice
GB 0844 8928999
Calls from a BT landline will be charged at up to
3 pence per minute. A call set-up fee of up to 6 pence
may apply.
IE 01450 2655
Trust the expertise of the manufacturer, and rest assured that
the repair will be carried out by trained service technicians
using original spare parts for your domestic appliance.
Page 11

Page 12

Siemens-Electrogeräte GmbH
Carl-Wery-Straße 34
81739 München
DEUTSCHLAND
(900920)
 Loading...