

Page 1
Codoor CD3500
Codoor CD4000
Installation & User Manual
Fire Safety & Security Products
Siemens Building Technologies
Page 2

Book contents
English ............................................... 3
Svenska ............................................ 23
Deutsch .............................................43
Français ............................................ 63
Page 3

CD3500 & CD4000 Installation and User manual 3
ENG
English
Data and design subject to change without notice. / Supply subject to availability.
© 2006 Copyright by Bewator AB, a Siemens Company
We reserve all rights in this document and in the subject thereof. By acceptance of the document
the recipient acknowledges these rights and undertakes not to publish the document nor the
subject thereof in full or in part, nor to make them available to any third party without our prior
express written authorization, nor to use it for any purpose other than for which it was delivered
to him.
Page 4

4 CD3500 & CD4000 Installation and User manual
ENG
Contents
About this manual ...............................................................5
Codoor - General .................................................................5
Setting the programming code ........................................... 6
How to change an existing programming code................ 7
Codoor Installation kit ........................................................ 8
Fitting CD3500 to door ................................................... 9
Fitting CD4000 to door ................................................. 10
Setting codes .................................................................... 11
Delete code ................................................................... 11
Deactivation function ........................................................12
Return to locked position ...............................................12
Disconnect the deactivation function .............................13
Buzzer .............................................................................. 13
Using Codoor ....................................................................14
Access...........................................................................14
Leaving the premises ....................................................14
Automatic resetting .......................................................14
Access blocking .............................................................14
Testing .............................................................................. 15
Test Mode .....................................................................15
Entering test mode ........................................................15
Test modes ....................................................................15
Backup power supply ........................................................ 17
Changing the batteries ...................................................... 17
Erase memory ...................................................................18
Troubleshooting ................................................................19
Where can Codoor be fitted? ............................................. 20
CD3500 ........................................................................ 20
CD4000 ........................................................................21
Technical specifications ....................................................22
Page 5

CD3500 & CD4000 Installation and User manual 5
ENG
About this manual
This manual covers both the Scandinavian style (CD3500) and the
International style (CD4000) of the Codoor. In the scope of this manual
we will use the name Codoor (unless notified.)
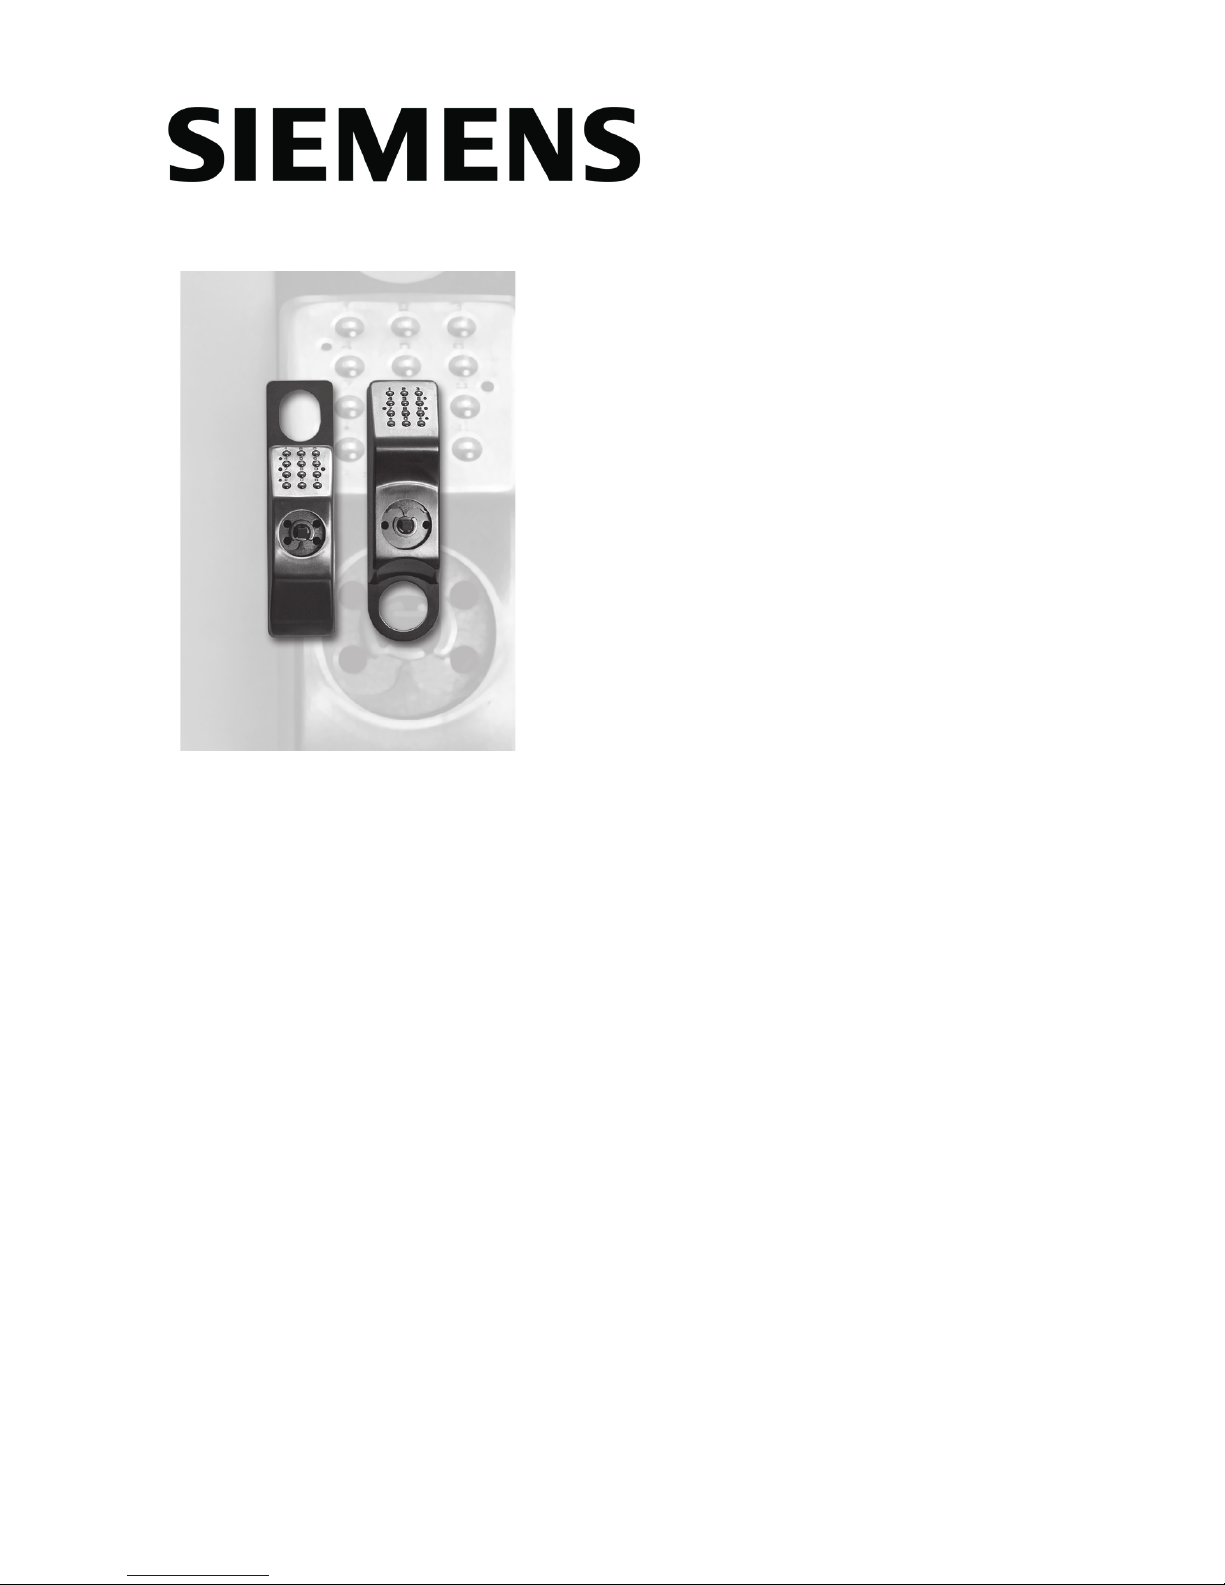
Codoor - General
The Codoor, a complete code lock suitable for fitting to a single door,
incorporates an electronic code lock, a mechanical locking device and
a power unit in the same housing. Codoor may be fitted on most doors
with handle operated locks. See page 20-21 for more information. When
Codoor is fitted; the outside door handle is disengaged and may be
pressed down without opening the door. To open the door, a 4-digit
code has to be entered. The handle on the inside of the door is not
affected by Codoor, and works normally for people leaving the premises.
All programming, except for setting of the programming code, is
entered via the keypad (see figure). Besides the keys, the keypad
includes two LEDs, one green and one red.
GREEN - In programming mode, the green LED indicates that codes
etc. have been entered correctly. It also confirms each key
press in programming mode.
RED - In operating mode, the red LED confirms each key press.
In programming mode, the LED flashes slowly until a
command is entered. Then the LED flashes quickly.
321
654
#0
987
1
2
Page 6

6 CD3500 & CD4000 Installation and User manual
ENG
Codoor also incorporates a buzzer, both to confirm each key press (if
required) and to indicate “battery low” by sounding a low tone (see
section Backup Power Supply). Otherwise, the buzzer sounds to confirm
successful programming.
The programming code must be set before the unit is fitted to the door
Setting the programming code
When Codoor is delivered, the memory is completely empty. The first
thing you have to do is to set a programming code, before you fit Codoor
to a door. To set the programming code for the first time, connect the
batteries and proceed as follows:
Press the reset button on the rear of Codoor and hold it
down as you press the # button for at least 2 seconds.
The red LED will flash quickly, accompanied by simultaneous
sounding of the buzzer
While buzzer sound - press , then
enter the desired 6-digit programming
code. Finish by pressing .
The green LED is lit for 2 seconds. A rising tone from the buzzer
confirms that the programming code has been set.
NOTE! Programming must be done while the red LED flashes and the
buzzer sounds. Do not forget to write to down the chosen digits.
Programming Code
Note! The first 4 digits
in the programming
code must never be
used for any of the 9
access codes.
Code 1: Code 4: Code 7:
Code 2: Code 5: Code 8:
Code 3: Code 6: Code 9:
1.
2.
3.
4.
R
+
#
R
+
#
Page 7
CD3500 & CD4000 Installation and User manual 7
ENG
How to change an existing programming code
Proceed like this:
Press , then enter the existing
programming code (6 digits). Finish by
pressing .
The red LED will flash slowly, accompanied by simultaneous
sounding of the buzzer.
Enter 99 . The red LED will flash quickly.
Press then enter the new
programming code (6 digits). Finish by
pressing . The green LED is lit for 2
seconds.
Finish programming by entering 00 . As a
confirmation, a rising tone sounds from the buzzer.
Having set the programming code, Codoor can be fitted to the door in
accordance with the accompanying installation instructions. Do not
forget to make a note of the programming code.
1.
2.
3.
4.
5.
0 0
0 0
9 9
9 9
Page 8

8 CD3500 & CD4000 Installation and User manual
ENG
Codoor Installation kit
Make sure you have the following tools handy:
Cross-head screwdriver for door handle and cylinder ring screws.
Hack saw for trimming lever handle spindle.
The following parts are supplied:
1 Codoor (batteries excluded).
Extension sleeves for handle nipples (use only one pair).
1 Reinforcing spring.
1 Reinforcing spring holder.
•
•
•
•
•
•
CD4000CD4000CD3500CD3500
Page 9

CD3500 & CD4000 Installation and User manual 9
ENG
Fitting CD3500 to door
Remove the cylinder ring
and the door handle from
the door by loosening the
four screws.
The lever handle spindle
should project no more
than 20 mm on the outside
of the door. If the spindle
is too long, push it through
into the handle on the
inside. If this cannot be
done, cut the spindle to
the right length.
Screw the supplied
extension sleeves to the nipples for the handle.
Use the appropriate size sleeve to suite the bolts
supplied with the handles.
Place
Codoor
on the outside of the door with the
handle attached, and
pass the lever handle
spindle through the
square hole. Note! The
red mark on the follower
should always point
downwards.
Tighten, not too hard,
the four
previously
loosened
screws (the
screws for the handle first).
1.
2.
3.
4.
5.
REDRED
55
44
33
11
22
Page 10

10 CD3500 & CD4000 Installation and User manual
ENG
Fitting CD4000 to door
Remove the cylinder ring
and the door handle from
the door by loosening
the four screws.
The lever
handle spindle should
project no more than 20
mm on the outside of the
door. If the spindle is too
long, push it through into
the handle on the inside.
If this cannot be done, cut
the spindle to the right
length.
Screw the supplied extension sleeves to the nipples
for the handle. Use the appropriate size sleeve to
suite the bolts supplied with the handles.
Place
Codoor
on the outside of the door with
the handle attached, and pass the lever handle
spindle through the
square hole. Note: The
red mark on the follower
should always point
upwards.
Tighten, not too hard, the
four previously loosened
screws (the screws for
the handle first).
1.
2.
3.
4.
REDRED
55
44
33
11
22
Page 11

CD3500 & CD4000 Installation and User manual 11
ENG
Setting codes
With Codoor you can program up to 9 different codes (codes 01-09). Follow
these steps:
Press then enter the 6-digit
programming code. Finish by pressing
. The red LED will flash slowly,
accompanied by simultaneous sounding of the buzzer.
Press then enter the code number (01-09) you
want to program. Finish by pressing . The red LED
will flash faster.
Press then enter the desired 4-digit code.
Finish by pressing . The green LED will come
on for 2 seconds. To enter any additional
codes, repeat steps 3 and 4.
Exit programming mode by entering 00 . The
buzzer sounds a rising tone to confirm.
NOTE! The unit automatically switches out of programming mode
into operating mode if no key is pressed within 10 seconds.
Programming must be done while the red LED flashes and the
buzzer sounds.
Delete code
Proceed like this:
Press then enter the 6-digit
programming code. Finish by pressing
. The red LED will flash slowly,
accompanied by simultaneous sounding
of the buzzer.
Press #, then enter the code (01 - 09) you wish to
delete. Finish by pressing #. The green LED will come
on. If you wish to delete more than one code, repeat step 3 for each
code.
Exit programming mode by entering 00 . The
buzzer sounds a rising tone to confirm.
1.
2.
3.
4.
1.
2.
3.
0 0
0 0
# ## #
0 0
0 0
Page 12

12 CD3500 & CD4000 Installation and User manual
ENG
Deactivation function
The ninth code may be used as a “deactivation” code, by which
Codoor may be set manually in the unlocked
position. Follow these steps:
Press then enter code 9 (4 digits). Finish
by pressing .
The red LED will flash slowly, accompanied by simultaneous
sounding of the buzzer.
Press 1 . The green LED will come on. The buzzer
sounds a rising tone to confirm the code has been
entered.
After 4 seconds the lock will open. It will then open automatically
each time the door handle is used. Codoor will remain unlocked
until reset to the locked position.
NOTE! If the Codoor fails to open the lock (i.e. the handle is held own),
it will attempt to open the lock 10 times. It will try a further 10
times if a button is pressed at least 10 seconds after Codoor has
tried unsuccessfully to unlock the door.
Return to locked position
Proceed like this:
Press then enter code 9 (4 digits). Finish
by pressing .
Enter 0 . The green LED will come on. The buzzer
sounds a rising tone to confirm the code has been
entered.
Press the door handle down once to re-lock the door.
Of course, code 9 works as a normal code if is not entered before and
after the code.
1.
2.
3.
4.
1.
2.
3.
1
1
0
0
Page 13

CD3500 & CD4000 Installation and User manual 13
ENG
Disconnect the deactivation function
Proceed like this:
Press , and then enter the 6-digit
programming code. Finish by pressing
.
The red LED will flash slowly, accompanied by
simultaneous sounding of the buzzer.
Enter 68 . The red LED will flash faster.
Enter 0 . The green LED will come on.
Exit programming mode by entering 00 . The
buzzer sounds a rising tone to confirm.
If you want to reconnect the deactivation function, repeat steps 1 to 5,
but enter 1 instead of 0 in step 4.
Buzzer
In operating mode, Codoor’s buzzer may be programmed to sound as
each key is pressed, or to remain silent. At delivery, the buzzer is
programmed to sound. However, if silent
operation is required, proceed as follows:
Press , then enter the 6-digit
programming code. Finish by pressing
.
The red LED will flash slowly, accompanied by simultaneous
sounding of the buzzer.
Enter 65 . The red LED will flash faster.
Enter 0 . The green LED will come on.
Exit programming mode by entering 00 . The
buzzer sounds a rising tone to confirm.
If you wish to reactivate the buzzer, follow steps 1 to 5,
but press 1 instead of 0 in step 4.
1.
2.
3.
4.
5.
1.
2.
3.
4.
5.
0 0
0 0
6 8
6 8
0
0
0
0
0 0
0 0
6 5
6 5
Page 14

14 CD3500 & CD4000 Installation and User manual
ENG
Using Codoor
Access
Enter any of the programmed codes (without pressing ) and
without touching the door handle. At each key press, an audible
signal is sounded (if the buzzer is enabled) and the red LED on the
keypad flashes once.
A click sound confirms that the code has been correctly entered.
The door must be opened within 4 seconds.
Leaving the premises
Codoor’s mechanical locking device only affects the outside door handle.
The door can always be opened from the inside as usual.
Automatic resetting
Codoor has two separate resetting systems to return the lock to the
locked position after a code has been entered.
Mechanical: the lock is reset each time the door handle is used
during access.
Electronically: the lock is reset if the handle is not used within 4
seconds of a code being entered.
This provides security against unauthorised access, since Codoor
can never be left in the unlocked position. However, it is important to
remember that Codoor should not be left in the deactivated mode (see
section Deactivation function).
Access blocking
To thwart attempts to obtain an access code by trial and error, Codoor
incorporates a blocking function to disable the unit after 16 false key
presses (four successive incorrect 4-digit codes). The unit remains
blocked until 2 correct codes are entered successively. This means that
further instructions to users are not required.
1.
2.
3.
•
•
Page 15
CD3500 & CD4000 Installation and User manual 15
ENG
Testing
It must always be possible to open the door from the inside.
The handle on the outside should not be disengaged, and should
not open the door until the correct code is entered.
When the correct code is entered, the handle on the outside should
activate the lock, but only once. As the handle is released, it should
again disengage.
The handle on the outside must not be jammed in any position, and
should spring back up completely after being pressed down.
If the code is entered, Codoor should automatically reset to the
disengaged position after about 4 seconds.
Test Mode
A test mode is implemented primarily to test and set up the unit,
and also for field service. The unit will remain in test mode until the
appropriate command is given to leave it. It is not necessary to put the
processor into SLEEP mode other than by specific function.
Entering test mode
Test mode is entered by holding the button in at the rear of the unit
and pressing * for at least 2 seconds. The buzzer will give a short beep
and the green LED will be lit continuously, unless otherwise stated, to
indicate test mode. Each time a key is pressed the buzzer should be
sounded and the red LED lit as per normal operation.
Pressing one of the keys as follows then enters each test.
Test modes
Button 1 Flashes the green and red LEDs simultaneously with the
sounding of the buzzer. This will continue until another key
is pressed.
Button 2 Checks the RAM of the processor. If successful a confirm
tone is given or if unsuccessful an error tone is given. The
unit returns to test mode with the green LED continuously
lit.
•
•
•
•
•
Page 16
16 CD3500 & CD4000 Installation and User manual
ENG
Button 3 Checks the non-volatile memory (non destructively). If suc-
cessful a confirm tone is given or if unsuccessful an error
tone is given. The unit returns to test mode with the green
LED continuously lit.
Button 4 Fires the solenoid in and out every 4 seconds, the status
of reed switch sensor is given on the LEDs, with contact
locked given by the green LED and unlocked given by the
red LED.
Button 5 Puts the unit into sleep mode to enable the current con-
sumption of the unit to be measured. The unit will come
out of this function when any key is pressed.
Button 6 Only shows the status of the position sensor. Red LED
– unit locked (solenoid un-engaged), green LED - unit
unlocked (solenoid engaged).
Button 7 Puts the unit into an unlocked state with the status of the
position sensor shown on the LEDs as previously stated.
Button 8 Shows the status of the low battery input. Low battery
detected the red LED will show. If the battery voltage is OK
the green LED will show.
Button 9 Does nothing except beep and light the red LED.
Button * Does nothing except beep and light the red LED.
Button 0 Does nothing except beep and light the red LED.
Button # Exits test mode with a confirm tone, leaving all the data
intact in the non-volatile memory.
Reset button
on rear
By pressing and holding the reset for 2 seconds the Co-
door’s memory is cleared back to factory settings:
No programming code set.
No access codes set.
Buzzer enabled.
Deactivation function enabled.
•
•
•
•
NOTE! The reset function can only be used when in test mode!
Page 17

CD3500 & CD4000 Installation and User manual 17
ENG
Backup power supply
When the batteries are running low, Codoor will operate with the buzzer
sounding a low tone. The lock has a backup power supply sufficient for a
limited number of openings once the batteries have run down.
In order not to jeopardise security, the backup power supply is
restricted to 50 openings, after which the backup function is terminated
to conserve the remaining battery power. However, to allow battery
replacement to be carried out by the person in charge, the programming
code is not disabled, to allow the door to be opened.
Changing the batteries
When the unit’s batteries run out, Codoor will stop working. The lock has
a backup power supply that will allow the door to be opened a limited
number of times, but the batteries should be replaced as soon as they
fail. Follow these steps:
Remove Codoor from the door.
Remove the batteries from the rectangular shaped holes on the
lower part of the back of the unit.
Always change both batteries. Changing only one battery will
dramatically reduce the life of the new battery. The batteries should
be lithium type (2 batteries type U9VL). See Technical Specifications.
Re-fix the housing.
1.
2.
3.
4.
Page 18
18 CD3500 & CD4000 Installation and User manual
ENG
Erase memory
In cases where the Codoor is moved to another door (with new users),
you should be sure that no old codes remains. The best way is to erase
the memory. Proceed as follows:
Remove Codoor from the door.
Press and hold the reset button on the rear of Codoor
and -button simultaneously - until the green LED lit.
Release both buttons simultaneously.
Press the reset button once again for 2 seconds.
As a confirmation, a rising tone sounds from the buzzer.
1.
2.
3.
4.
5.
RR
R
+
R
+
Page 19

CD3500 & CD4000 Installation and User manual 19
ENG
Troubleshooting
Symptom Remedy
Lock does not open when
code us entered.
• Check that the right code has been entered.•
Make sure the handle is not pressed down as the
code is entered.
•
Check that the handle is not sagging.•
Check that the time limit for automatic reset has
elapsed.
•
Check that Codoor is fitted exactly vertical.•
Check that the lock is not fitted too tightly to the
door, in which case the handle could be jammed.
•
Check that the red mark on the follower for the
lever handle spindle is pointing downwards.
•
Codoor is in unlocked
position.
• Set Codoor to locked position (if required)
according to the instructions in section
Deactivation function.
•
Codoor does not sound
following key presses.
• Activate the buzzer (see section Buzzer)
Frequent use requires frequent change of
batteries. The batteries last up to 150,000
openings (lithium-type) and 50.000 openings with
alkaline-type.
•
•
Batteries are rapidly
discharged.
• Check the batteries and change any discharged
batteries.
•
Lock does not open even
though backup power.
• The blocking counter is activated. See section
Access blocking. Enter the programming code
(skip before and after the code).
The batteries may be bad and should be changed
immediately.
The batteries are completely discharged and
should be changed immediately.
•
•
•
Page 20

20 CD3500 & CD4000 Installation and User manual
ENG
Where can Codoor be fitted?
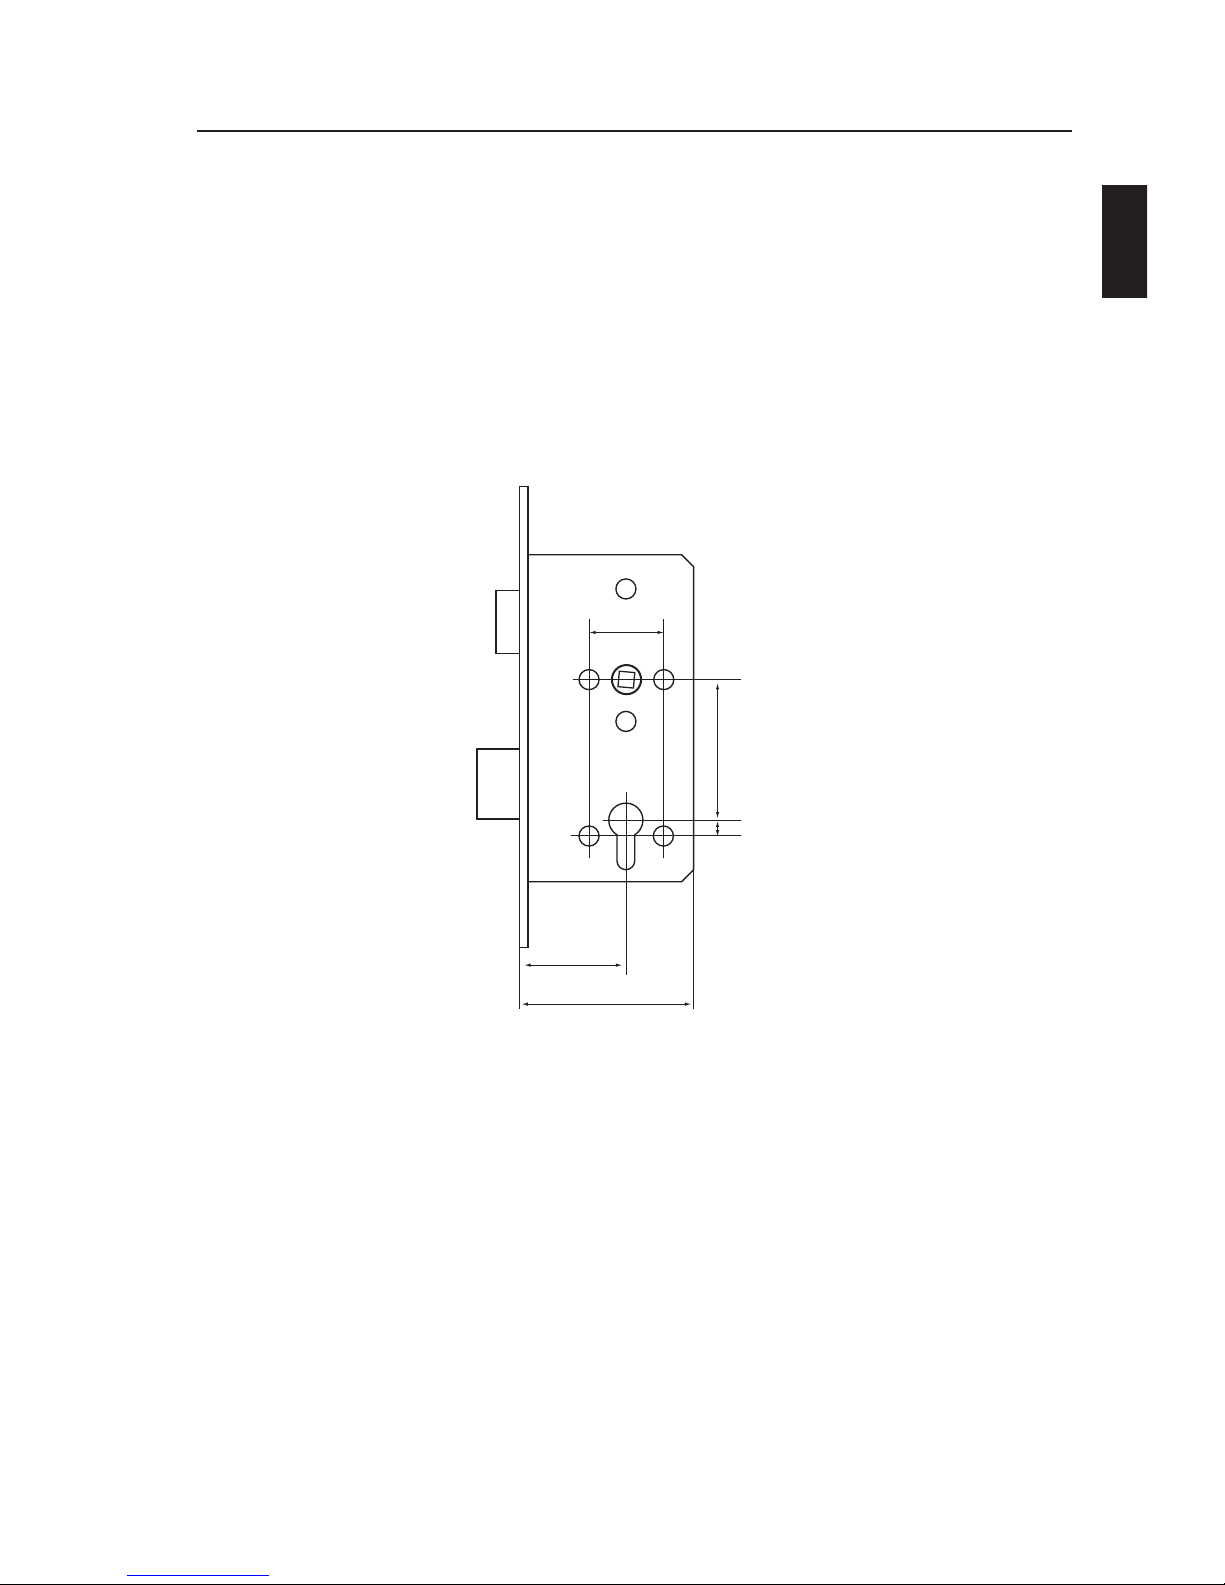
Codoor is suitable for most doors with handle-operated mortice locks.
Check suitability by simply measuring your the distance between the
center of the handle follower and the center of the cylinder.
NOTE! Codoor is only for internal fitting and operation and should not
be specified for back to back installation.
CD3500
CD3500 is suitable for most doors with ASSA Modular locks. Check
suitability by simply measuring your own lock. The backset should
normally be 70 mm.
The CD3500 can be used with many types of locks, like e g ASSA 8761 or
765 etc. If in doubt please check with your local locksmith.
5 -
116 mm
01
8x8 mm
8
3
-
0
3
"ACKSETMM
Basic needs are the following:
The distance between the centre of the handle and the centre of the
cylinder should be between 105 – 116 mm.
Latchbolt function.
The handle must have an 8 mm square spindle.
The handles fixing holes 30-38 mm (diagonal).
•
•
•
•
Page 21
CD3500 & CD4000 Installation and User manual 21
ENG
CD4000
CD4000 is suitable for most doors with e g ASSA Euro locks. Check
suitability by simply measuring your own lock. The distance between the
centre of the handle and the centre of the cylinder should be 72 mm and
the handle fixing holes 38 mm. The backset should normally be 55 or 60
mm (but are normally not critical for CD4000).
The CD4000 can be used with many types of locks, like e g ASSA 8720
If in doubt please check with your local locksmith.
55/60 mm
72 mm
8 mm
38 mm
88/93 mm
Basic needs are the following:
The distance between the centre of the handle and the centre of the
cylinder should be 72 mm.
The handle must have an 8 mm square spindle.
The handles fixing holes 38 mm
•
•
•
Page 22

22 CD3500 & CD4000 Installation and User manual
ENG
Technical specifications
Number of codes: 9.
Handle: Spindle, 8 mm square.
Environment: Indoors, dry.
Ambient temperature: 0 to +50°C.
Power: Two batteries, 9V type 6LR61
(NOT included).
Battery types Codoor can use both alkaline or lithium batter-
ies.
Note that lithium have some advantages:
The voltage level is more constant the
whole life time.
The batteries will recover faster at
frequent use of the Codoor.
Saves environment, due to longer
lifetime cycle (and less batteries in
use).
Storage time can be up to ten years.
•
•
•
•
Operating life: Up to 150,000 openings (lithium batteries) or
50 000 openings (alkaline batteries) - or one
year, which ever comes first.
Dimensions (H x W x D): CD3500: 245 x 64 x 47 mm, excluding handle
CD4000: 255 x 70 x 54 mm excluding handle
Page 23

CD3500 & CD4000 Installations- och Användarhandbok 23
SVE
Svenska
Data and design subject to change without notice. Supply subject to availability.
© 2006 Copyright by Bewator AB, a Siemens Company
Bewator AB utvecklar och marknadsför ett komplett utbud av säkerhetsprodukter, vilket
inkluderar passerkontroll och larm. Försäljning, installation och service sköts via ett rikstäckande
nät av återförsäljare.
Åtgärder (såsom olovlig manipulering, olovlig kopiering m m) får inte vidtas med i produkterna
och systemen ingående programvara. Sådana åtgärder utgör upphovsrättsintrång som kan
bestraffas med böter eller fängelse och resultera i skyldighet att betala skadestånd och vederlag
för utnyttjandet av programvaran.
Page 24

24 CD3500 & CD4000 Installations- och Användarhandbok
SVE
Innehåll
Om denna handbok ..........................................................25
Codoor - General ...............................................................25
Inställning av programmeringskod ....................................26
Ändra programmeringskod ...........................................27
Codoor monteringssats .................................................... 28
Montera CD3500 på dörren .......................................... 29
Montera CD4000 på dörren .......................................... 30
Programmering av koder ...................................................31
Radera kod....................................................................31
Uppställningsfunktion.......................................................32
Återgå till låst läge ....................................................... 32
Spärra uppställningsfunktionen ................................... 33
Summer ............................................................................33
Använda Codoor ................................................................34
Inpassering .................................................................. 34
Utpassering ................................................................. 34
Automatisk återställning .............................................. 34
Blockering.................................................................... 34
Avprovning .......................................................................35
Testläge ........................................................................35
Starta testläget .............................................................35
Olika testlägen ............................................................. 36
Reservkraft .......................................................................37
Batteribyte ........................................................................37
Radera minnet ................................................................. 38
Felsökning ........................................................................39
Var passar Codoor? .......................................................... 40
CD3500 ........................................................................ 40
CD4000 ........................................................................41
Tekniska specifikationer ....................................................42
Page 25

CD3500 & CD4000 Installations- och Användarhandbok 25
SVE
Om denna handbok
Denna handbok beskriver både den skandinaviska modellen (CD3500)
och internationella modellen (CD4000) av Codoor. I denna handbok
använder vi namnet Codoor (om inte annat anges).
Codoor - Allmänt
Codoor är ett komplett kodlås för en dörr och innehåller elektronisk
kodlås, mekanisk låskoppling och strömförsörjning i samma kapsling.
Codoor passar för montering till de flesta lås med tryckesöppning.
Se mera på sidan 40-41. När Codoor är monterat frigörs det yttre
dörrhandtaget och det kan tryckas ned utan att dörren öppnas.
För passering används en 4-siffrig kod. Vid utpassering fungerar det
inre handtaget som vanligt, eftersom detta inte påverkas av Codoor. All
programmering, förutom inställning av programmeringskod, sker från
knappsatsen (se fig.). Förutom knapparna finns det två lysdioder på
knappsatsen, en grön och en röd.
GRÖN - Lysdiod visar i programmeringsläge att inmatning av koder
etc skett korrekt. Lysdioden indikerar också varje knappnedtryckning i programmeringsläge
RÖD - Lysdiod indikerar i driftläge varje knappnedtryckning.
I programmeringsläge blinkar röd långsamt och då
kommando givits visats detta med snabb blinkning.
321
654
#0
987
1
2
Page 26

26 CD3500 & CD4000 Installations- och Användarhandbok
SVE
Dessutom är Codoor utrustad med en summer som indikerar
knappnedtryckning (om så önskas) samt ljuder med en låg ton om
batterireserv erfordras (se avsnitt Reservkraft). I övrigt ljuder summern
under programmeringen.
Innan montering sker på dörr måste programmeringskoden väljas.
Inställning av programmeringskod
Då din Codoor levereras är minnet helt raderat och det första som måste
göras är att montera batterier (kopplas in på baksidan av låset). Därefter
måste en programmeringskod bestämmas innan Codoor monteras på
dörr. Gör så här då du ska programmera programmeringskoden första
gången:
Tryck in resetknappen som sitter på baksidan av Codoor
och håll den intryckt samtidigt som du trycker in # - knappen i minst
2 sekunder.
Röd lysdiod blinkar snabbt och
summer pulsar med samma takt
Under tiden summer ljuder – slå
samt önskad programmeringskod (6 siffror). Avsluta med .
Grön lysdiod tänds i 2 sekunder och summer kvitterar med en
stigande ton – programmeringskod är inställd.
OBS! Programmering av måste ske medan under tiden röd lysdiod
blinkar och summer pulsar med samma takt.
Programmeringkod
Obs!
Programmeringskoden
fyra första siffror får
aldrig vara lika med
någon av de nio
koderna.
Kod 1: Kod 4: Kod 7:
Kod 2: Kod 5: Kod 8:
Kod 3: Kod 6: Kod 9:
1.
2.
3.
4.
R
+
#
R
+
#
Page 27

CD3500 & CD4000 Installations- och Användarhandbok 27
SVE
Ändra programmeringskod
Gör så här:
Slå samt programmeringskod (6
siffror). Avsluta med .
Röd lysdiod blinkar långsamt och
summer pulsar med samma takt.
Slå 99 . Röd lysdiod blinkar snabbare.
Slå samt ny programmeringskod (6
siffror). Avsluta med . Grön lysdiod
tänds.
Avsluta programmeringen med att slå
00 . Summer kvitterar med en stigande ton
Efter att programmeringen är inställd kan Codoor
monteras på dörr enligt följande installationsanvisning.
Var noga med att notera vald programmeringskod.
1.
2.
3.
4.
5.
0 0
0 0
9 9
9 9
Page 28

28 CD3500 & CD4000 Installations- och Användarhandbok
SVE
Codoor monteringssats
Följande verktyg kan behövas vid montering:
Stjärnskruvmejsel – för dörrens tryckes- och cylinderskruvar
Bågfil – för kapning av tryckespinne.
Följande delar medföljer:
1 st Codoor (exklusive batterier).
Förlängningshylsor till tryckesskruv (endast ett par används).
1 st Hjälpfjäder.
1 st Hjälpfjäderfäste.
•
•
CD4000CD4000CD3500CD3500
Page 29

CD3500 & CD4000 Installations- och Användarhandbok 29
SVE
Montera CD3500 på dörren
Lossa de fyra skruvarna
som håller handtaget och
cylinderringen.
Tryckespinnen får sticka
ut max 20 mm på dörrens
utsida. Om pinnen är för
lång, försök trycka in den i
det inre trycket. Om detta
inte är möjligt, kapa den
till rätt längd.
Skruva dit de medföljande
förlängningshylsorna
på tryckets mutterhylsor
Används de passande
hylsorna som passar skruvarna som följde med
trycket
.
Lägg Codoor mot dörrens utsida med trycket
påsatt och passa in tryckespinnen i det
fyrkantiga hålet. OBS!
Markeringen vid det
fyrkantiga hålet skall
vara nedåt
Drag åt de fyra skruvarna
som tidigare lossats
(skruvarna för handtaget
först). OBS drag inte för
hårt, se till att låset och
trycket inte spänner.
1.
2.
3.
4.
5.
RÖDRÖD
55
44
33
11
22
Page 30

30 CD3500 & CD4000 Installations- och Användarhandbok
SVE
Montera CD4000 på dörren
Lossa de fyra skruvarna
som håller handtaget och
cylinderringen.
Tryckespinnen får sticka
ut max 20 mm på dörrens
utsida. Om pinnen är för
lång, försök trycka in den i
det inre trycket. Om detta
inte är möjligt, kapa den
till rätt längd.
Skruva dit de medföljande
förlängningshylsorna
på tryckets mutterhylsor
Används de hylsor som passar skruvarna som
följde med trycket
.
Lägg Codoor mot dörrens utsida med trycket
påsatt och passa in tryckespinnen i det
fyrkantiga hålet. OBS! Markeringen vid det
fyrkantiga hålet skall vara
uppåt.
Drag åt de fyra skruvarna
som tidigare lossats
(skruvarna för handtaget
först). OBS drag inte för
hårt, se till att låset och
trycket inte spänner.
1.
2.
3.
4.
5.
RÖDRÖD
55
44
33
11
22
Page 31

CD3500 & CD4000 Installations- och Användarhandbok 31
SVE
Programmering av koder
I Codoor finns möjlighet att programmera upp till 9 olika koder
(kodnummer 01 – 09). Gör så här:
Slå samt programmeringskod (6
siffror). Avsluta med .
Röd lysdiod blinkar långsamt och
summer pulsar med samma takt.
Slå samt det kodnummer du vill programmera
(01-09). Avsluta med . Röd lysdiod blinkar
snabbare.
Slå samt önskad kod (4 siffror). Avsluta
med . Grön lysdiod tänds i 2 sek.
Upprepa steg 3 och 4 om fler koder skall
programmeras.
Avsluta programmeringen med att slå 00 .
Summer kvitterar med en stigande ton
OBS! Vid programmering återgår elektroniken automatiskt till driftläge
efter 10 sekunder om ingen knapp nedtrycks. Programmering
måste ske medan röd lysdiod blinkar och summer pulsar med
samma takt.
Radera kod
Gör så här:
Slå samt programmeringskod (6
siffror). Avsluta med .
Röd lysdiod blinkar långsamt och
summer pulsar med samma takt.
Slå # samt det kodnummer. Du vill radera (01-09)
Avsluta med #. Grön lysdiod tänds. Upprepa steg 3
och 4 om fler koder skall raderas.
Avsluta programmeringen med att slå 00 .
Summer kvitterar med en stigande ton
1.
2.
3.
4.
5.
1.
2.
3.
4.
0 0
0 0
# ## #
0 0
0 0
Page 32

32 CD3500 & CD4000 Installations- och Användarhandbok
SVE
Uppställningsfunktion
Den 9:e koden kan användas som ”uppställningskod”, vilket innebär att
man med denna kod kan manuellt ställa Codoor
i olåst läge. Gör så här:
Slå in samt kod 9 (fyra siffror). Avsluta
med .
Röd lysdiod blinkar långsamt och summer pulsar med samma takt.
Slå in 1 . Grön lysdiod tänds i 2 sek. Summer
kvitterar med en stigande ton.
Efter ca 4 sekunder öppnar låset. Låset öppnar sedan
automatiskt efter varje nedtryckning av handtaget och Codoor förblir
därmed olåst.
OBS! Om Codoor misslyckas med att öppna (t ex om trycket hålls ner)
kommer Codoor att göra 9 försök till. Codoor kommer därefter
( om den har misslyckats med att öppna) att göra ytterligare 10
försök till om någon knapp har tryckts ned
Återgå till låst läge
Gör så här:
Slå in samt kod 9 (fyra siffror). Avsluta
med .
Röd lysdiod blinkar långsamt och summer
pulsar med samma takt.
Slå in 0 . Grön lysdiod tänds i 2 sek. Summer
kvitterar med en stigande ton.
Tryck ned handtaget på dörren en gång och Codoor är låst igen.
Kod 9 fungerar givetvis som en vanlig kod om man ej slår in före och
efter koden. Du har möjlighet att frånkoppla uppställningsfunktionen
– se nästa sida.
1.
2.
3.
4.
1.
2.
3.
4.
1
1
0
0
Page 33

CD3500 & CD4000 Installations- och Användarhandbok 33
SVE
Spärra uppställningsfunktionen
Gör så här:
Slå samt programmeringskod (6
siffror). Avsluta med .
Röd lysdiod blinkar långsamt och
summer pulsar med samma tak.
Slå in 68 . Röd lysdiod blinkar snabbare.
Slå 0 . Grön lysdiod tänds i 2 sek.
Avsluta programmeringen med att slå 00 .
Summer kvitterar med en stigande ton.
Om uppställningsfunktionen önskas tillkopplad igen, repetera steg 1 till
5 men ersätt 0 med 1 i steg 4
Summer
Summerton vid nedtryckning av tangent i normalt driftläge kan väljas till
eller från. Vid leverans är alltid summer inkopplad men om tyst funktion
önskas, gör enligt följande:
Slå samt programmeringskod (6
siffror). Avsluta med .
Röd lysdiod blinkar långsamt och
summer pulsar med samma takt.
Slå in 65 . Röd lysdiod blinkar snabbare.
Slå 0 . Grön lysdiod tänds i 2 sek.
Avsluta programmeringen med att slå 00 .
Summer kvitterar med en stigande ton.
Om summerton önskas inkopplad igen, repetera steg 1
till 5 men ersätt 0 med 1 i steg 4.
1.
2.
3.
4.
5.
1.
2.
3.
4.
5.
0 0
0 0
6 8
6 8
0
0
0
0
0 0
0 0
6 5
6 5
Page 34

34 CD3500 & CD4000 Installations- och Användarhandbok
SVE
Använda Codoor
Inpassering
Slå in någon av de inprogrammerade koderna (utan ) och utan
att vidröra trycket/handtaget. Vid varje knappnedtryckning hörs en
ljudsignal (om summern är tillkopplad) och den röda lampan vid
knappsatsen blinkar till.
Ett ”klick” bekräftar att rätt kod har slagits in.
Öppna dörren inom 4 sekunder.
Utpassering
Den mekaniska låskopplingen i Codoor påverkar endast det yttre trycket.
Från insidan kan dörren alltid öppnas som vanligt.
Automatisk återställning
Codoor har två separata återställningssystem som återställer låset till
spärrat läge efter inslagen kod.
Återställning sker mekaniskt när yttre trycket/handtaget trycks ned
vid passering.
Elektronisk återställning efter ca 4 sekunder om inte trycket/
handtaget trycks ned efter inslagen kod.
Detta ger säkerhet mot obehörig passage eftersom Codoor aldrig kan
förbli i öppet läge. Notera dock viktigheten i att ej lämna Codoor i
uppställt läge (se avsnitt Uppställningsfunktion).
Blockering
För att förhindra försök till att prova sig fram till rätt kod finns en inbyggd
spärrkrets som blockerar Codoor efter 12 st feltryckningar (3 felaktiga
koder efter varandra). Spärrtiden är oändlig och för att häva denna
blockering skall giltig kod anges 2 gånger efter varandra. Detta innebär
att vidare instruktioner till användare ej är nödvändig.
1.
2.
3.
•
•
Page 35

CD3500 & CD4000 Installations- och Användarhandbok 35
SVE
Avprovning
Dörren skall alltid gå att öppna inifrån.
Det yttre trycket skall vara frikopplat och inte öppna låset innan rätt
kod har angetts.
Vid rätt inslagen kod skall det yttre trycket öppna låset endast en
gång. Då handtaget släpps upp skall det frikopplas igen.
Yttre trycket får inte spänna på något vis och måste fjädra helt upp
efter att ha varit nedtryckt.
Om koden knappas in skall Codoor automatiskt återställas till
frikopplat läge efter ca 4 sekunder
Testläge
Ett testläge är inbyggd för att kunna testa och ställa in enheten, och
för serviceändamål. Den kommer att kvarstå i testläget tills dess att
ett kommando för att avsluta utförs. Det är inte nödvändigt att ställa
processorn i sparläge utom vid speciella funktioner.
Starta testläget
Testläget startas genom att hålla inne knappen på baksidan och * i minst
2 sekunder. Summern piper till den gröna lysdioden lyser konstant, om
inget annat anges, för att indikera testläget. Varje gång en knapp trycks
in skall summern ljuda och lysdioden lysa som vid normal användning.
Tryck på följande knappar startar varje test.
•
•
•
•
•
Page 36

36 CD3500 & CD4000 Installations- och Användarhandbok
SVE
Olika testlägen
Knapp 1 Den gröna lysdioden blinkar och den röda lyser konstant
samt summer ljuder. Detta pågår tills dessa att någon annan knapp trycks in.
Knapp 2 Kontrollerar processorns minne. Vid felfritt ljuder bekräf-
telseton och vid fel ljuder felton. Återgår sedan till testläget och den gröna lysdioden lyser.
Knapp 3 Kontrollerar det icke-flyktiga minnet. Vid felfritt ljuder
bekräftelseton och vid fel ljuder felton. Återgår sedan till
testläget och den gröna lysdioden lyser.
Knapp 4 Aktiverar solenoiden in och ut var 4:e sekund och status
för lägessensor visas på lysdioderna. Grön visar sluten och
röd visar bruten.
Knapp 5 Ställer enheten i sparläge för att kunna mäta strömförbruk-
ningen. Återgår så snart någon knapp trycks in.
Knapp 6 Visar endast status för lägessensor. Röd lysdiod (solenoid
inte aktiverad) och grön lydsdiod LED (solenoid aktiverad).
Knapp 7 Ställer enheten i olåst läge och visar status på lägessensor
enligt ovan.
Knapp 8 Visar status på ingången för lågt batteri. Låg nivå visas
med röd lysdiod och om nivån är OK visas grön lysdiod.
Knapp 9 Gör ingenting utom piper och tänder röd lysdiod.
Knapp * Gör ingenting utom piper och tänder röd lysdiod
Knapp 0 Gör ingenting utom piper och tänder röd lysdiod
Knapp # Lämnar testläget och en bekräftelseton hörs, och sparar
alla data i det icke-flyktiga minnet.
Reset knapp
på baksidan
Genom att hålla inne knappen i 2 sekunder återställs
Codoor’s minne till fabriksinställningar:
Ingen programmeringkod vald.
Inga koder programmerade.
Summer på.
Uppställningsfunktion tillåten.
•
•
•
•
OBS! Återställningsfunktionen kan endast utföras i testläget!
Page 37

CD3500 & CD4000 Installations- och Användarhandbok 37
SVE
Reservkraft
Då Codoor öppnar och batterierna börjar ta slut, hörs en låg tonsignal.
Låset har en funktion för reservkraft som medger ett begränsat antal
öppningar då batterierna är dåliga.
För att inte äventyra säkerheten fungerar detta endast 50 gånger,
sedan blockeras denna reservfunktion så att den sista kraften i
batterierna sparas. Programmeringskoden blockeras dock inte, så att
ansvarig kan komma in och byta batterierna.
Batteribyte
När batterierna är uttömda kommer Codoor att sluta fungera. Låset har
en funktion för reservkraft som medger ett begränsat antal öppningar,
men batterierna bör bytas ut omgående.
Gör så här
Montera bort Codoor från dörren.
Batterierna sitter åtkomliga via de två rektangulära hålen (på
baksidan) i låsets nederkant (2 batterier typ U9VL).
Byt alltid båda batterierna. Om bara ett batteri byts, försämras
livslängden för det nya batteriet dramatiskt. Batterierna ska vara av
litium typ (2 batterier typ U9VL). Se Tekniska specifikationer.
Montera tillbaka Codoor.
1.
2.
3.
4.
Page 38

38 CD3500 & CD4000 Installations- och Användarhandbok
SVE
Radera minnet
Vid tillfällen då man vill flytta Codoor till annan dörr (med nya
användare) så kan man först säkerställa att inga gamla koder finns kvar.
För att radera och återställa all programmering - gör så här
Montera bort Codoor från dörren.
Håll inne resetknappen på baksidan och -knappen
samtidigt - tills gröna lysdioden tänds.
Släpp båda knapparna samtidigt.
Tryck en gång på den resetknappen.
Summer kvitterar med en stigande ton.
1.
2.
3.
4.
5.
R
+
R
+
RR
Page 39

CD3500 & CD4000 Installations- och Användarhandbok 39
SVE
Felsökning
Symptom Åtgärd
Låset öppnar inte vid
inslagen kod.
• Kontrollera att rätt kod har intryckts•
Tryck inte handtaget under kodinslagningen•
Kontrollera att trycket inte hänger•
Kontrollera att spärrtiden för automatisk
återställning inte har gått ut
•
Kontrollera att Codoor står lodrätt.•
Kontrollera att inte låset är för hårt åtdraget så att
trycket kärvar
•
Kontrollera att märkningen vid det fyrkantiga hålet
för tryckespinnen är neråt.
•
Codoor står i olåst läge.• Ställ Codoor i låst läge (om så önskas) enligt
instruktionen avsnitt Uppställningsfunktion.
•
Codoor ljuder inte för varje
tangenttryck.
• Programmera till summern (se avsnitt Summer).•
Kontrollera batterierna och byt eventuellt
urladdade batterier
•
Batterierna laddas ur i
snabb takt.
• Frekvent användande av Codoor medför täta
batteribyten. Batteriernas livslängd är upp till
150.000 öppningar med litiumbatterier och
50.000 öppningar med alkaliska
•
Låset öppnar inte trots
reservkraften.
• Blockeringsräknaren har trätt i funktion (se avsnitt
Blockering) .
•
Slå programmeringskoden (utan före och efter
koden)
•
Batterierna kan vara dåliga och bör bytas
omgående.
•
Batterierna är helt urladdade och bör bytas
omgående.
•
Page 40

40 CD3500 & CD4000 Installations- och Användarhandbok
SVE
Var passar Codoor?
Codoor passar på de flesta dörrar med trycke-/handtagsöppning. Du kan
själv enkelt kontrollera detta genom att mäta avståndet mellan centrum
på tryckespinnen och centrum på låscylindern.
OBS! Codoor är endast avsedd för inomhusbruk och bör heller inte
monteras på båda sidor om samma dörr.
CD3500
CD3500 passar de flesta dörrar med t ex ASSA modullås. Kontrollera
genom att mäta låset. Dorndjupet (backset) bör normalt vara 70 mm.
CD3500 kan användas med många typer av lås som t ex ASSA 8761 eller
765 etc. Om du är osäker kontakta din lokala låssmed.
5 -
116 mm
01
8x8 mm
8
3
-
0
3
"ACKSETMM
Grundläggande krav är följande:
Avståndet mellan centrum på tryckespinnen och centrum på
låsscylindern skall vara mellan 105 – 116 mm.
Tryckesfallfunktion.
Dörrtrycket (handtaget) måste ha 8 mm tryckespinne.
Dörrtryckets monteringshål 30-38 mm (diagonalt).
•
•
•
•
Page 41

CD3500 & CD4000 Installations- och Användarhandbok 41
SVE
CD4000
CD4000 passar de flesta dörr med t ex ASSA Eurolås. Prova enkelt
genom att mäta avståndet på ditt lås. Avståndet mellan centrum
på tryckespinnen och centrum på låsscylindern skall vara 72 mm
dörrtryckets monteringshål 38 mm. Dorndjupet (backset) bör vara 55
eller 60 mm (men är normalt inte kritiskt för CD4000).
CD4000 kan användas med många typer av lås som t ex ASSA 8720.
Om du är osäker kontakta din lokala låssmed.
55/60 mm
72 mm
8 mm
38 mm
88/93 mm
Grundläggande krav är följande:
Avståndet mellan centrum på tryckespinnen och centrum på
låsscylindern skall vara.
Dörrtrycket (handtaget) måste ha 8 mm tryckespinne
Dörrtryckets monteringshål 38 mm
•
•
•
Page 42

42 CD3500 & CD4000 Installations- och Användarhandbok
SVE
Tekniska specifikationer
Antal koder: 9 st.
Trycke: Dorn 8 mm fyrkant.
Omgivningskrav: Inomhusbruk, torr miljö.
Temperaturområde: 0 till +50°C.
Strömförsörjning: Två batterier, 9V typ 6LR61 (ingår INTE i leve-
rans).
Batterityper: Codoor kan använda både alkaliska och litium-
batterier.
Observera dock att litium ger ett antal fördelar:
Spänningsnivån är konstantare
batteriets hela livscykel.
Batteriet återhämtar sig snabbare vid
frekvent användning av Codoor.
Spar miljö eftersom drifttiden är längre
(och totalt färre batterier behövs).
Lagringstiden kan vara upp till tio år.
•
•
•
•
Drifttid: 150 000 öppningar (litiumbatterier),
Ca 50 000 öppningar (alkaliska batterier), eller
max 1 år beroende vad som först sker.
Mått (H x B x D) mm: CD3500: 245 x 64 x 47 mm, exklusive trycke.
CD4000: 255 x 70 x 54 mm exklusive trycke
Page 43

CD3500 & CD4000 Installations- und Benutzerhandbuch 43
DEU
Deutsch
Liefermöglichkeiten und technische Änderungen vorbehalten.
© 2006 Copyright by Bewator AB, a Siemens Company
Wir behalten uns alle Rechte an diesem Dokument und an dem in ihm dargestellten Gegenstand
vor. Der Empfänger erkennt diese Rechte an und wird dieses Dokument nicht ohne unsere
vorgängige schriftliche Ermächtigung ganz oder teilweise Dritten zugänglich machen oder
außerhalb des Zweckes verwenden, zu dem es ihm übergeben worden ist.
Page 44

44 CD3500 & CD4000 Installations- und Benutzerhandbuch
Inhaltsverzeichnis
Hinweise zu diesem Handbuch ..........................................45
Codoor - Allgemeines ........................................................45
Einstellen des Programmiercodes ......................................46
Ändern eines bestehenden Programmiercodes ..............47
Codoor Montage-Kit ......................................................... 48
Montage des CD3500 an einer Tür ................................ 49
Montage des CD4000 an einer Tür ............................... 50
Einstellen der Codes .......................................................... 51
Löschen eines Codes .....................................................51
Deaktivierungsfunktion .....................................................52
Zurücksetzen in die verriegelte Stellung .........................52
Außerkraftsetzen der Deaktivierungsfunktion .................53
Summer ............................................................................53
Benutzung des Codoor ......................................................54
Zutritt ........................................................................... 54
Verlassen des Gebäudes .............................................. 54
Automatische Zurücksetzung ........................................ 54
Zutrittssperre ............................................................... 54
Testen ...............................................................................55
Testmodus ....................................................................55
Aufrufen des Testmodus ................................................55
Testmodi .......................................................................55
Notstromversorgung ......................................................... 57
Auswechseln der Batterien ................................................ 57
Löschen des Speichers......................................................58
Störungsbeseitigung.........................................................59
Montageoptionen für das Codoor ..................................... 60
CD3500 ........................................................................ 60
CD4000 ........................................................................61
Technische Daten ............................................................. 62
Page 45

CD3500 & CD4000 Installations- und Benutzerhandbuch 45
DEU
Hinweise zu diesem Handbuch
Dieses Handbuch behandelt sowohl die skandinavische (CD3500) als auch die
internationale Ausführung (CD4000) des Codoor. Im Rahmen dieses Handbuchs
wird die Bezeichnung Codoor verwendet (sofern nicht anders angegeben.)
Codoor - Allgemeines
Das Codoor, ein komplettes Code-Schloss für die Montage an einer
Einzeltür, umfasst eine elektronische Code-Verriegelung, eine mechanische
Sperrvorrichtung und eine Versorgungseinheit im selben Gehäuse. Codoor
kann an den meisten Türen mit drückerbetätigten Schlössern montiert werden
(weitergehende Informationen auf Seite 20-21). Nach dem Montieren von Codoor
ist der äußere Türdrücker wirkungslos und kann betätigt werden, ohne dass
sich die Tür öffnet. Um die Tür zu öffnen, muss ein 4-stelliger Code eingegeben
werden. Der Drücker auf der Innenseite der Tür bleibt vom Codoor unberührt und
lässt sich von Personen, die das Gebäude verlassen wollen, normal betätigen.
Mit Ausnahme der Einstellung des Programmiercodes erfolgt die gesamte
Programmierung über das Tastenfeld (siehe Abbildung). Abgesehen von den
Tasten sind zwei LEDs, eine grüne und eine rote, vorhanden.
GRÜN - Im Programmiermodus deutet die grüne LED an, dass Codes
usw. korrekt eingegeben wurden. Außerdem bestätigt sie jede
Tastenbetätigung im Programmiermodus.
ROT - Im Betriebsmodus bestätigt die LED jeden Tastendruck. Im
Programmiermodus blinkt die LED langsam, bis ein Befehl
eingegeben wurde. Anschließend blinkt sie schnell.
321
654
#0
987
1
2
Page 46

46 CD3500 & CD4000 Installations- und Benutzerhandbuch
Ferner verfügt das Codoor über einen Summer, sowohl als Bestätigung für jede
Tastenbetätigung (sofern erforderlich) als auch als Hinweis auf eine schwache
Batterie durch Abgabe eines tiefen Tons (siehe Abschnitt "Notstromversorgung").
Andernfalls bestätigt der Summer eine erfolgreiche Programmierung.
Der Programmiercode muss eingestellt werden, bevor das System an der Tür
angebracht wird.
Einstellen des Programmiercodes
Bei Auslieferung des Codoor ist der Speicher vollständig leer. Bevor Sie das
Codoor an einer Tür anbringen, müssen Sie zunächst einen Programmiercode
einstellen. Um den Programmiercode das erste Mal einzustellen, setzen Sie die
Batterien ein und verfahren wie folgt:
Drücken Sie und halten die Reset-Taste (Rückseite) am Codoor
und drücken Sie dann zusätzlich die Taste # für mindestens zwei
Sekunden.
Die rote LED blinkt nun schnell, während
gleichzeitig der Summer ertönt.
Drücken Sie, während der Summer
ertönt, auf , und geben Sie dann den
gewünschten 6-stelligen Programmiercode ein. Drücken Sie abschließend
auf .
Daraufhin leuchtet die grüne LED für zwei Sekunden. Ein ansteigender Ton
des Summers bestätigt, dass der Programmiercode eingestellt wurde.
HINWEIS!
Die Programmierung muss erfolgen, solange die rote LED blinkt
und der Summer ertönt. Vergessen Sie nicht, sich die ausgewählten
Ziffern zu notieren.
Programmiercode
Hinweis! Die ersten
vier Ziffern des
Programmiercodes dürfen
für keinen der neun
Zugriffscodes verwendet
werden.
Code 1: Code 4: Code 7:
Code 2: Code 5: Code 8:
Code 3: Code 6: Code 9:
1.
2.
3.
4.
R
+
#
R
+
#
Page 47

CD3500 & CD4000 Installations- und Benutzerhandbuch 47
DEU
Ändern eines bestehenden Programmiercodes
Verfahren Sie wie folgt:
Drücken Sie auf und geben Sie den
bestehenden Programmiercode (6 Ziffern)
ein. Drücken Sie abschließend auf .
Die rote LED blinkt nun langsam, während gleichzeitig der
Summer ertönt.
Geben Sie 99 ein. Die rote LED blinkt nun schnell.
Drücken Sie auf und geben Sie dann den
neuen Programmiercode (6 Ziffern) ein.
Drücken Sie abschließend auf . Die grüne
LED leuchtet nun für zwei Sekunden.
Beenden Sie die Programmierung, indem Sie 00
eingeben. Zur Bestätigung ertönt ein ansteigender Ton
des Summers.
Nachdem Sie den Programmiercode eingestellt haben, können Sie das Codoor
gemäß den beiliegenden Montageanweisungen an der Tür anbringen. Vergessen
Sie nicht, sich den Programmiercode zu notieren.
1.
2.
3.
4.
5.
0 0
0 0
9
9
9
9
Page 48

48 CD3500 & CD4000 Installations- und Benutzerhandbuch
Codoor Montage-Kit
Achten Sie darauf, folgende Werkzeuge zur Hand zu haben:
Kreuzschlitzschraubendreher für den Türdrücker und die Zylinderschrauben.
Bügelsäge zum Anpassen des Vierkantstifts.
Folgende Teile gehören zum Lieferumfang:
1 Codoor (ohne Batterien)
Verlängerungshülsen für Drückerstutzen (nur ein Paar verwenden)
1 Verstärkungsfeder
1 Verstärkungsfederhalter
•
•
•
•
•
•
CD3500 CD4000
Page 49

CD3500 & CD4000 Installations- und Benutzerhandbuch 49
DEU
Montage des CD3500 an einer Tür
Entfernen Sie den Zylinderring
und den Türdrücker, indem Sie
die vier Schrauben lösen.
Der Vierkantstift darf nicht mehr
als 20 mm auf der Außenseite
der Tür hervorstehen. Sollte
der Stift zu lang sein, drücken
Sie ihn in den Türdrücker auf
der Innenseite. Falls dies nicht
möglich ist, müssen Sie den
Stift auf die richtige Länge
kürzen.
Schrauben Sie die beiliegenden Verlängerungshülsen
an die Stutzen für den Türdrücker. Verwenden Sie
die richtige Hülsengröße für die mit den Türdrückern
gelieferten Bolzen.
Setzen Sie das
Codoor
mit daran angebrachtem
Türdrücker an der Außenseite der Tür an und schieben
Sie den Vierkantstift in das Loch.
Hinweis! Die rote Markierung an der Nuss muss immer
nach unten weisen.
Ziehen Sie die vier zuvor
gelösten Schrauben – nicht
zu fest – an (die Schrauben
für den Türdrücker zuerst).
1.
2.
3.
4.
5.
ROTROT
55
44
33
11
22
Page 50

50 CD3500 & CD4000 Installations- und Benutzerhandbuch
Montage des CD4000 an einer Tür
Entfernen Sie den Zylinderring
und den Türdrücker, indem Sie
die vier Schrauben lösen.
Der
Vierkantstift darf nicht mehr
als 20 mm auf der Außenseite
der Tür hervorstehen. Sollte
der Stift zu lang sein, drücken
Sie ihn in den Türdrücker auf
der Innenseite. Falls dies nicht
möglich ist, müssen Sie den
Stift auf die richtige Länge
kürzen.
Schrauben Sie die beiliegenden Verlängerungshülsen
an die Stutzen für den Türdrücker. Verwenden Sie
die richtige Hülsengröße für die mit den Türdrückern
gelieferten Bolzen.
Setzen Sie das
Codoor
mit daran angebrachtem
Türdrücker an der Außenseite der Tür an und schieben
Sie den Vierkantstift in das Loch. Hinweis: Die rote
Markierung an der Nuss muss immer nach oben
weisen.
Ziehen Sie die vier zuvor
gelösten Schrauben – nicht zu
fest – an (die Schrauben für
den Türdrücker zuerst).
1.
2.
3.
4.
ROTROT
55
44
33
11
22
Page 51

CD3500 & CD4000 Installations- und Benutzerhandbuch 51
DEU
Einstellen der Codes
Beim Codoor können Sie bis zu neun verschiedene Codes einstellen (Codes 01-
09). Führen Sie dazu folgende Schritte aus:
Drücken Sie auf und geben Sie dann
den 6-stelligen Programmiercode ein.
Drücken Sie abschließend auf .
Die rote LED blinkt nun langsam, während gleichzeitig der Summer ertönt.
Drücken Sie auf und geben Sie dann die Code-Nummer
(01-09) ein, die Sie programmieren wollen. Drücken Sie
abschließend auf . Die rote LED blinkt nun schneller.
Drücken Sie auf und geben Sie dann den gewünschten
4-stelligen Code ein. Drücken Sie abschließend auf
. Die grüne LED leuchtet nun für zwei Sekunden.
Um weitere Codes einzugeben, wiederholen Sie die
Schritte 3 und 4.
Beenden Sie den Programmiermodus, indem Sie 00
eingeben. Der Summer gibt zur Bestätigung einen
ansteigenden Ton ab.
HINWEIS!
Falls innerhalb von 10 Sekunden keine Taste betätigt wird, wechselt das
System automatisch vom Programmiermodus in den Betriebsmodus.
Die Programmierung muss erfolgen, solange die rote LED blinkt und der
Summer ertönt.
Löschen eines Codes
Verfahren Sie wie folgt:
Drücken Sie auf und geben Sie dann den
6-stelligen Programmiercode ein. Drücken
Sie abschließend auf .
Die rote LED blinkt nun langsam, während gleichzeitig der
Summer ertönt.
Drücken Sie auf #; daraufhin müssen Sie den Code
eingeben (01 - 09), den Sie löschen wollen. Drücken Sie
abschließend auf #. Daraufhin leuchtet die grüne LED auf.
Um mehr als einen Code zu löschen, wiederholen Sie für
jeden Code Schritt 3.
Beenden Sie den Programmiermodus, indem Sie 00
eingeben. Der Summer gibt zur Bestätigung einen
ansteigenden Ton ab.
1.
2.
3.
4.
5.
1.
2.
3.
4.
0 0
0 0
# ## #
0 0
0 0
Page 52

52 CD3500 & CD4000 Installations- und Benutzerhandbuch
Deaktivierungsfunktion
Der neunte Code kann als ein "Deaktivierungscode" benutzt werden, mit dem
sich das Codoor manuell entriegeln lässt. Führen Sie
dazu folgende Schritte aus:
Drücken Sie auf ; daraufhin müssen Sie Code
9 eingeben (4-stellig). Drücken Sie abschließend
auf .
Die rote LED blinkt nun langsam, während gleichzeitig der
Summer ertönt.
Drücken Sie auf 1 . Daraufhin leuchtet die grüne LED auf.
Der Summer bestätigt mit einem ansteigenden Ton, dass der
Code eingegeben wurde.
Nach vier Sekunden öffnet sich das Schloss. Es öffnet sich anschließend
jedes Mal automatisch, wenn der Türdrücker benutzt wird. Das Codoor
bleibt so lange geöffnet, bis es wieder verriegelt wird.
HINWEIS!
Falls das Codoor das Schloss nicht öffnet (d.h. der Drücker wird nach
unten gedrückt), versucht es zehnmal, die Tür zu entriegeln. Sollte die
Tür weiterhin verriegelt bleiben, unternimmt das Codoor anschließend
weitere zehn Entriegelungsversuche, indem man mindestens zehn
Sekunden lang eine Taste drückt.
Zurücksetzen in die verriegelte Stellung
Verfahren Sie wie folgt:
Drücken Sie auf ; daraufhin müssen Sie Code 9
eingeben (4-stellig). Drücken Sie abschließend
auf .
Geben Sie 0 ein. Daraufhin leuchtet die grüne LED auf.
Der Summer bestätigt mit einem ansteigenden Ton, dass der
Code eingegeben wurde.
Drücken Sie den Türdrücker einmal nach unten, um die Tür wieder zu
verriegeln.
Falls vor und nach dem Code nicht eingegeben wird, verhält sich der Code 9
selbstverständlich wie ein ganz normaler Code.
1.
2.
3.
4.
1.
2.
3.
1
1
0
0
Page 53

CD3500 & CD4000 Installations- und Benutzerhandbuch 53
DEU
Außerkraftsetzen der Deaktivierungsfunktion
Verfahren Sie wie folgt:
Drücken Sie auf und geben Sie dann den
6-stelligen Programmiercode ein. Drücken
Sie abschließend auf .
Die rote LED blinkt nun langsam, während gleichzeitig der
Summer ertönt.
Geben Sie 68 ein. Die rote LED blinkt nun schneller.
Geben Sie 0 ein. Daraufhin leuchtet die grüne LED auf.
Beenden Sie den Programmiermodus, indem Sie 00
eingeben. Der Summer gibt zur Bestätigung einen
ansteigenden Ton ab.
Um die Deaktivierungsfunktion wieder in Kraft zu setzen, wiederholen Sie die
Schritte 1 bis 5 und geben in Schritt 4 "1" statt "0" ein.
Summer
Im Betriebsmodus kann der Summer des Codoor so programmiert werden, dass
er bei jeder Tastenbetätigung ertönt oder stumm bleibt. Standardmäßig ist der
Summer aktiviert. Sollte ein stiller Betrieb erforderlich sein, verfahren Sie wie
folgt:
Drücken Sie auf und geben Sie dann den
6-stelligen Programmiercode ein. Drücken
Sie abschließend auf .
Die rote LED blinkt nun langsam, während gleichzeitig der
Summer ertönt.
Geben Sie 65 ein. Die rote LED blinkt nun schneller.
Geben Sie 0 ein. Daraufhin leuchtet die grüne LED auf.
Beenden Sie den Programmiermodus, indem Sie 00
eingeben. Der Summer gibt zur Bestätigung einen ansteigenden Ton ab.
Um den Summer zu reaktivieren, führen Sie die Schritte 1 bis 5 aus, drücken in
Schritt 4 aber auf "1" statt auf "0".
1.
2.
3.
4.
5.
1.
2.
3.
4.
5.
0 0
0 0
6 8
6 8
0
0
0
0
0 0
0 0
6 5
6 5
Page 54

54 CD3500 & CD4000 Installations- und Benutzerhandbuch
Benutzung des Codoor
Zutritt
Geben Sie einen der programmierten Codes (ohne zu drücken) ein,
ohne den Türdrücker zu betätigen. Bei jeder Tastenbetätigung ertönt ein
akustisches Signal (sofern der Summer aktiviert ist) und die rote LED auf
dem Tastenfeld blinkt einmal auf.
Ein Klickton bestätigt, dass der Code korrekt eingegeben wurde.
Die Tür muss innerhalb von 4 Sekunden geöffnet werden.
Verlassen des Gebäudes
Die mechanische Verriegelungsvorrichtung des Codoor betrifft nur den äußeren
Türdrücker. Von innen lässt sich die Tür weiterhin wie gewohnt öffnen.
Automatische Zurücksetzung
Das Codoor hat zwei separate Rücksetzsysteme, um das Schloss nach Eingabe
eines Codes in den verriegelten Zustand zurückzuversetzen.
Mechanisch: Das Schloss wird jedes Mal zurückgesetzt, wenn der Türdrücker
beim Eintreten betätigt wird.
Elektronisch: Das Schloss wird zurückgesetzt, wenn der Türdrücker nicht
innerhalb von 4 Sekunden nach Eingabe eines Codes betätigt wird.
Dies verhindert einen unbefugten Zutritt, weil das Codoor nie im unverriegelten
Zustand verbleibt. Es ist jedoch wichtig daran zu denken, das Codoor nie im
deaktivierten Betriebzustand zu lassen (siehe Abschnitt Deaktivierungsfunktion).
Zutrittssperre
Um Versuche zu unterbinden, sich durch Probieren Zutritt zu verschaffen,
verfügt das Codoor über eine Sperrfunktion, die das System nach 16 falschen
Tastenbetätigungen (vier aufeinanderfolgender 4-stellige Codes) blockiert.
Das System bleibt so lange blockiert, bis nacheinander zwei korrekte Codes
eingegeben werden. Das bedeutet, dass keine weiteren Anweisungen für
Benutzer erforderlich sind.
1.
2.
3.
•
•
Page 55

CD3500 & CD4000 Installations- und Benutzerhandbuch 55
DEU
Testen
Es muss immer möglich, sein die Tür von innen zu öffnen.
Der Türdrücker an der Außenseite darf nicht benutzbar sein und die Tür erst
öffnen, wenn der korrekte Code eingegeben wird.
Nachdem der richtige Code eingegeben wurde, darf der Türdrücker auf der
Außenseite das Schloss betätigen, jedoch nur einmal. Nach dem Loslassen
muss der Türdrücker wieder funktionslos sein.
Der Türdrücker auf der Außenseite darf in keiner Stellung klemmen
und muss nach dem Herunterdrücken vollständig wieder in seine
Ausgangsstellung zurückfedern.
Nachdem der Code eingegeben wurde, muss das Codoor nach 4 Sekunden
automatisch wieder in den deaktivierten Zustand zurückkehren.
Testmodus
Der Testmodus dient zum Überprüfen und Einstellen des Systems sowie
für Servicearbeiten. Das System bleibt so lange im Testmodus, bis ein
entsprechender Befehl eingegeben wird. Es ist nicht erforderlich, den Prozessor
anders als durch eine bestimmte Funktion in den SLEEP-Modus zu versetzen.
Aufrufen des Testmodus
Um den Testmodus aufzurufen, hält man die Taste auf der Systemrückseite + die
* Taste mindestens 2 Sekunden lang gedrückt. Sofern nicht anders angegeben,
gibt der Summer als Hinweis auf den Testmodus einen kurzen Piepton ab und
die grüne LED leuchtet anhaltend auf. Bei jeder Tastenbetätigung sollte der
Summer ertönen und die rote LED wie im Normalbetrieb aufleuchten.
Wenn man eine der Tasten wie folgt drückt, erfolgt der jeweilige Test.
Testmodi
Taste 1 Die grüne und rote LED blinken gleichzeitig und der Summer
ertönt. Dies dauert an, bis eine andere Taste betätigt wird.
Taste 2 Überprüft den RAM des Prozessors. Bei einem erfolgreichen Test
ertönt ein Bestätigungssignal, andernfalls ein Fehlerton. Das
System kehrt in den Testmodus zurück, wobei die grüne LED
dauerhaft leuchtet.
•
•
•
•
•
Page 56

56 CD3500 & CD4000 Installations- und Benutzerhandbuch
Taste 3 Überprüft den nichtflüchtigen Speicher (Speicherinhalt wird nicht
gelösch). Bei einem erfolgreichen Test ertönt ein Bestätigungssignal, andernfalls ein Fehlerton. Das System kehrt in den Testmodus zurück, wobei die grüne LED dauerhaft leuchtet.
Taste 4 Schaltet die Zylinderspule alle 4 Sekunden ein und aus, wobei
der Status des Reed-Schaltersensors durch die LEDs angegeben
wird; Kontakt verriegelt: grüne LED, unverriegelt: rote LED.
Taste 5
Versetzt das System in den Sleep-Modus, um die aktuelle
Leistungsaufnahme messen zu können. Durch Betätigen einer
beliebigen Taste wird das System reaktiviert.
Taste 6 Zeigt nur den Status des Positionssensors. Rote LED – System
verriegelt (Zylinderspule deaktiviert), grüne LED - System entriegelt (Zylinderspule aktiviert).
Taste 7 Versetzt das System in einen entriegelten Zustand, wobei die
LEDs wie zuvor erläutert den Status des Positionssensors andeuten.
Taste 8 Gibt den Batteriestatus an. Bei schwacher Batterie leuchtet die
rote LED. Wenn die Batteriespannung in Ordnung ist, leuchtet die
grüne LED.
Taste 9 Hat keine Funktion, außer dass ein Signalton abgegeben wird
und die rote LED aufleuchtet.
Taste * Hat keine Funktion, außer dass ein Signalton abgegeben wird
und die rote LED aufleuchtet.
Taste 0 Hat keine Funktion, außer dass ein Signalton abgegeben wird
und die rote LED aufleuchtet.
Taste # Beendet den Testmodus mit einem Bestätigungston; alle Daten
im nichtflüchtigen Speicher bleiben erhalten.
Reset-Taste
auf der Rückseite
Wenn man die Reset-Taste 2 Sekunden lang gedrückt hält, wird
der Speicher des Codoor gelöscht und auf die Standardvorgaben
zurückgesetzt:
Kein Programmiercode eingestellt.
Keine Zutrittscodes eingestellt.
Summer aktiviert.
Deaktivierungsfunktion aktiviert.
•
•
•
•
HINWEIS!
Die Reset-Funktion kann nur im Testmodus benutzt werden!
Page 57

CD3500 & CD4000 Installations- und Benutzerhandbuch 57
DEU
Notstromversorgung
Wenn die Batterien schwach werden, gibt das Codoor einen tiefen Summerton
ab. Das Schloss hat eine Notstromversorgung, die eine begrenzte Anzahl von
Öffnungen ermöglicht, nachdem die Batterien leer sind.
Um die Sicherheit nicht zu gefährden, ist die Notstromversorgung auf 50
Öffnungen begrenzt. Anschließend wird diese Sicherungsfunktion beendet, um
die verbleibende Batterieenergie zu erhalten. Damit die Batterien ausgewechselt
werden können, wird der Programmiercode nicht deaktiviert, so dass sich die Tür
öffnen lässt.
Auswechseln der Batterien
Wenn die Batterien des Systems leer sind, hört das Codoor auf zu funktionieren.
Das Schloss hat zwar eine Notstromversorgung, die noch eine begrenzte Anzahl
von Türöffnungen zulässt, aber die Batterien sollten möglichst bald ersetzt
werden. Führen Sie dazu folgende Schritte aus:
Entfernen Sie das Codoor von der Tür.
Nehmen Sie die Batterien aus ihrem Fach im unteren Teil des Systems.
Wechseln Sie immer beide Batterien aus. Falls nur eine ausgewechselt
wird, verringert sich die Lebensdauer der neuen Batterie drastisch. Es sind
stets Lithium-Batterien (2 Batterien des Typs U9VL) zu verwenden. Siehe
Technische Daten.
Bringen Sie das Gehäuse wieder an.
1.
2.
3.
4.
Page 58

58 CD3500 & CD4000 Installations- und Benutzerhandbuch
Löschen des Speichers
Falls das Codoor an einer anderen Tür (mit neuen Benutzern) angebracht wird, ist
sicherzustellen, dass die alten Codes entfernt werden. Hierzu löscht man am
besten den Speicher. Verfahren Sie dazu wie folgt:
Entfernen Sie das Codoor von der Tür.
Drücken und halten Sie die Reset-Taste auf der Rückseite des
Codoor und drücken Sie gleichzeitig die Taste , bis die grüne
LED aufleuchtet.
Lassen Sie beide Tasten gleichzeitig wieder los.
Drücken Sie die Reset-Taste erneut für 2 Sekunden.
Zur Bestätigung ertönt ein ansteigender Ton des Summers.
1.
2.
3.
4.
5.
R
+
R
+
R
+
Page 59

CD3500 & CD4000 Installations- und Benutzerhandbuch 59
DEU
Störungsbeseitigung
Symptom Behebung
Das Schloss öffnet sich nicht,
wenn der Code eingegeben wird.
• Überprüfen Sie, ob der richtige Code eingegeben wurde.•
Achten Sie darauf, dass der Türdrücker nicht während
der Eingabe des Codes gedrückt wird.
•
Überprüfen Sie, ob der Türdrücker herunterhängt.•
Überprüfen Sie, ob die Frist für die automatische
Zurücksetzung verstrichen ist.
•
Überprüfen Sie, ob dass Codoor genau vertikal montiert
ist.
•
Überprüfen Sie, ob das Schloss zu fest an der Tür
montiert ist, so dass der Türdrücker unter Umständen
klemmt.
•
Überprüfen Sie, ob die rote Markierung an der Nuss für
den Vierkantstift nach unten (nach oben/CD4000) weist.
•
Das Codoor befindet sich im
unverriegelten Zustand.
• Bringen Sie (falls erforderlich) das Codoor gemäß den
Anweisungen im Abschnitt Deaktivierungsfunktion in
den verriegelten Zustand.
•
Das Codoor gibt bei
Tastenbetätigung keinen Ton ab.
• Aktivieren Sie den Summer (siehe Abschnitt Summer)
Bei häufiger Benutzung müssen die Batterien
öfter ausgewechselt werden. Die Lithium-Batterien
ermöglichen bis zu 150.000 Öffnungen, AlkalineBatterien bis zu 50.000 Öffnungen.
•
•
Die Batterien entladen sich sehr
schnell.
• Überprüfen Sie die Batterien und wechseln sie
schwache Batterien aus.
•
Das Schloss öffnet sich auch mit
Notstromversorgung nicht mehr.
• Der Sperrzähler ist aktiviert. Siehe Abschnitt
Zutrittssperre. Geben Sie den Programmiercode ein
(lassen Sie vor und nach dem Code weg).
Eventuell sind die Batterien schlecht und sollten
unverzüglich ausgetauscht werden.
Die Batterien sind vollständig entladen und sollten
unverzüglich ausgetauscht werden.
•
•
•
Page 60

60 CD3500 & CD4000 Installations- und Benutzerhandbuch
Montageoptionen für das Codoor
Das Codoor kann an den meisten Türen angebracht werden, deren Schloss mit
einem Türdrücker betätigt wird. Um festzustellen, ob eine Montage möglich ist,
messen Sie einfach den Abstand zwischen der Mitte des Vierkantlochs und dem
Zylinder.
HINWEIS!
Das Codoor ist nur für den Inneneinbau- und -betrieb
vorgesehen, nicht jedoch für eine beidseitige Installation.
CD3500
Das CD3500 ist für die meisten Türen mit ASSA-Modularschlössern geeignet. Um
festzustellen, ob eine Montage möglich ist, messen Sie einfach Ihr Schloss. Das
Dornmaß sollte normalerweise 70 mm betragen.
Das CD3500 kann bei zahlreichen Schlössern verwendet werden, wie
beispielsweise ASSA 8761 oder 765 usw. Wenden Sie sich im Zweifel an
einen Fachmann.
5 -
116 mm
01
8x8 mm
8
3
-
0
3
"ACKSETMM
Folgende Grundvoraussetzungen gelten:
Der Abstand zwischen der Mitte des Vierkantlochs und der des Zylinders
muss 105–116 mm betragen.
Wechsel-Funktion.
Der Türdrücker muss einen Vierkantstift von mindestens 8 mm haben.
Die Befestigungslöcher der Türdrücker müssen 30-38 mm (diagonal)
auseinander sein.
•
•
•
•
Page 61

CD3500 & CD4000 Installations- und Benutzerhandbuch 61
DEU
CD4000
Das CD4000 ist für die meisten Türen mit ASSA-Euro-Schlössern geeignet. Um
festzustellen, ob eine Montage möglich ist, messen Sie einfach Ihr Schloss. Der
Abstand zwischen der Mitte des Vierkantlochs und der des Zylinders muss 72
mm betragen und der Abstand der Befestigungslöcher 38 mm. Das Dornmaß
sollte normalerweise 55 oder 60 mm betragen (im Allgemeinen unkritisch beim
CD4000).
Das CD4000 kann bei zahlreichen Schließarten benutzt werden (z.B. ASSA
8720).
Wenden Sie sich im Zweifel an einen Fachmann.
55/60 mm
72 mm
8 mm
38 mm
88/93 mm
Folgende Grundvoraussetzungen gelten:
Der Abstand zwischen der Mitte des Vierkantlochs und der des Zylinders
muss 72 mm betragen.
Der Türdrücker muss einen Vierkantstift von mindestens 8 mm haben.
Die Befestigungslöcher für die Türdrücker müssen 38 mm auseinander sein.
•
•
•
Page 62

62 CD3500 & CD4000 Installations- und Benutzerhandbuch
Technische Daten
Anzahl der Codes: 9.
Türdrücker: Vierkantstift, 8 mm quadr.
Umgebung: Innentüren, trocken
Umgebungstemperatur: 0 bis +50°C
Versorgung: 2 Batterien, 9V Typ 6LR61
(NICHT enthalten)
Batterietyp Das Codoor kann sowohl mit Alkaline- als auch
Lithium-Batterien benutzt werden.
Beachten Sie, dass Lithium-Batterien einige Vorteile
aufweisen:
über die Lebensdauer konstantere
Spannungsversorgung
bessere Reaktivierung bei häufiger
Benutzung des Codoor
umweltschonend dank längerer
Lebensdauer (geringerer
Batterienverbrauch)
bis zu 10 Jahre lagerfähig
•
•
•
•
Betriebsdauer: bis zu 150.000 Öffnungen (Lithium-Batterien) oder
50.000 Öffnungen (Alkaline-Batterien) bzw. 1 Jahr, je
nachdem, was zuerst eintritt
Abmessungen (H x B x T): CD3500: 245 x 64 x 47 mm, ohne Türdrücker
CD4000: 255 x 70 x 54 mm, ohne Türdrücker
Page 63

Manuel d'installation et de l'utilisateur du CD3500 & du CD4000 63
FRA
Français
Les données et la conception peuvent être modifiées sans préavis.
© 2006 Copyright by Bewator AB, a Siemens Company
Nous nous réservons tous les droits sur ce document et le sujet traité dans ce dernier. En
acceptant le document, l’utilisateur reconnaît ces droits et accepte de ne pas publier le
document ni de divulguer le sujet dont il traite en tout ou partie, de ne pas le remettre à une
tierce partie quelle qu’elle soit sans notre accord préalable écrit et de ne pas l’utiliser à d’autres
fins que celles pour lesquelles il lui a été fourni.
Page 64

64 Manuel d'installation et de l'utilisateur du CD3500 & du CD4000
FRA
Sommaire
À propos de ce manuel ......................................................65
Codoor - Généralités .........................................................65
Définition du code de programmation .............................. 66
Comment changer un code de programmation existant ..67
Kit d'installation Codoor ................................................... 68
Installation du CD3500 sur la porte .............................. 69
Installation du CD4000 sur la porte .............................. 70
Définition des codes ......................................................... 71
Suppression du code ....................................................71
Fonction de désactivation ..................................................72
Retour en position verrouillée ....................................... 72
Déconnexion de la fonction de désactivation .................73
Buzzeur .............................................................................73
Utilisation du Codoor ........................................................74
Accès ............................................................................74
Sortie des locaux ...........................................................74
Réinitialisation automatique .........................................74
Blocage de l'accès.........................................................74
Tests .................................................................................75
Mode test ......................................................................75
Accès au mode test .......................................................75
Modes test ....................................................................75
Alimentation de secours ....................................................77
Remplacement des piles ................................................... 77
Effacement de la mémoire .................................................78
Dépannage .......................................................................79
Où peut-on poser le Codoor ? ........................................... 80
CD3500 ........................................................................ 80
CD4000 ........................................................................81
Spécifications techniques ................................................ 82
Page 65

Manuel d'installation et de l'utilisateur du CD3500 & du CD4000 65
FRA
À propos de ce manuel
Ce manuel couvre le style scandinave (CD3500) et le style international
(CD4000) du Codoor. Pour ce manuel, nous utiliserons le nom Codoor
(sauf mention contraire).
Codoor - Généralités
Le Codoor, un verrou à code complet adaptable sur porte unique,
incorpore un verrou à code électronique, un dispositif de verrouillage
mécanique et une alimentation dans le même boîtier. Le Codoor peut
être installé sur la plupart des portes à verrou actionné par poignée.
Pour de plus amples informations, consultez les pages 20-21. Lorsque
le Codoor est installé, la poignée de porte extérieure est désenclenchée
et peut être tournée vers le bas sans que la porte s'ouvre. Pour ouvrir
la porte, il faut entrer un code à 4 chiffres. La poignée de porte côté
intérieur n'est pas affectée par le Codoor et fonctionne normalement
pour les personnes qui quittent les locaux.
Toute la programmation, sauf le paramétrage du code de
programmation, est effectuée via le clavier (voir figure). Deux DEL, une
verte et une rouge, figurent sur le clavier, à côté des touches.
VERTE - En mode programmation, la DEL verte indique que les
codes, etc., ont été entrés correctement. Elle confirme
également chaque pression de touche en mode
programmation.
ROUGE - En fonctionnement, la DEL rouge confirme chaque
pression de touche. En mode programmation, la DEL
clignote lentement jusqu'à ce qu'une commande soit
saisie. La DEL clignote alors rapidement.
321
654
#0
987
1
2
Page 66

66 Manuel d'installation et de l'utilisateur du CD3500 & du CD4000
FRA
Le Codoor intègre également un buzzeur qui émet un signal sonore
sourd pour confirmer chaque pression de touche (le cas échéant) et
indiquer que la 'pile est faible' (consultez la section Alimentation de
secours). Sinon, le budzzeur émet un signal sonore pour confirmer la
réussite de la programmation.
Le code de programmation doit être défini avant d'installer l'unité sur la
porte.
Définition du code de programmation
À la livraison du Codoor, la mémoire est entièrement vide. Vous devez
commencer par définir un code de programmation avant d'installer le
Codoor sur la porte. Pour définir le code de programmation pour la
première fois, branchez les piles et procédez comme suit :
Appuyez sur le bouton de réinitialisation à l'arrière du Codoor et
maintenez-le enfoncé tandis que vous appuyez sur le
bouton # pendant au moins 2 secondes.
La DEL rouge clignote rapidement, accompagnée par un signal
sonore simultané du buzzeur
Tandis que le buzzeur émet un signal
sonore, appuyez sur puis entrez le
code de programmation à 6 chiffres souhaité. Terminez en appuyant
sur .
La DEL verte s'allume pendant 2 secondes. Un signal sonore
croissant émis par le buzzeur confirme le paramétrage du code de
programmation.
REMARQUE ! La programmation doit s'effectuer tandis que la DEL rouge
clignote et que le buzzeur émet un signal sonore. N'oubliez pas
de noter par écrit les chiffres choisis.
Code de
programmation
Remarque ! Les 4 premiers
chiffres du code de programmation ne doivent
jamais être utilisés pour
l'un quelconque des 9
codes d"accès.
Code 1 : Code 4 : Code 7 :
Code 2 : Code 5 : Code 8 :
Code 3 : Code 6 : Code 9 :
1.
2.
3.
4.
R
+
#
R
+
#
Page 67

Manuel d'installation et de l'utilisateur du CD3500 & du CD4000 67
FRA
Comment changer un code de programmation existant
Procédez comme suit :
Appuyez sur puis entrez le code de
programmation existant (6 chiffres).
Terminez en appuyant sur .
La DEL rouge clignote lentement, accompagnée par un signal sonore
simultané du buzzeur.
Entrez 99 . La DEL rouge clignote rapidement.
Appuyez sur puis entrez le nouveau
code de programmation (6 chiffres).
Terminez en appuyant sur . La DEL
verte s'allume pendant 2 secondes.
Terminez la programmation en entrant 00 . Un
signal sonore croissant est émis par le buzzeur en
guise de confirmation.
Une fois le code de programmation défini, le Codoor peut être installé
sur la porte conformément aux instructions d'installation jointes.
N'oubliez pas de noter le code de programmation.
1.
2.
3.
4.
5.
0 0
0 0
9 9
9 9
Page 68

68 Manuel d'installation et de l'utilisateur du CD3500 & du CD4000
FRA
Kit d'installation Codoor
Assurez-vous d'avoir les outils suivants à portée de la main :
Tournevis cruciforme pour les vis de la poignée de porte et de la
bague de cylindre.
Scie à métaux pour rogner la tige de la béquille.
Les pièces suivantes sont fournies :
1 Codoor (piles exclues).
Gaines d'extension pour mamelons de poignée (n'utilisez qu'une
seule paire).
1 ressort de renfort.
1 support de ressort de renfort.
•
•
•
•
•
•
CD4000CD3500
Page 69

Manuel d'installation et de l'utilisateur du CD3500 & du CD4000 69
FRA
Installation du CD3500 sur la porte
Retirez la bague de cylindre
et la poignée de la porte en
dévissant les quatre vis.
La tige de la béquille ne
doit pas faire saillie de plus
de 20 mm à l'extérieur de
la porte. Si la tige est trop
longue, poussez-la dans
la poignée à l'intérieur. Si
c'est impossible, coupez la
tige à la bonne longueur.
Vissez les gaines d'extension fournies sur les
mamelons pour la poignée. Utilisez la gaine de
taille appropriée pour qu'elle s'adapte aux écrous
fournis avec la poignée.
Placez le
Codoor
à l'extérieur de la porte avec
la poignée fixée et faites passer la tige de la
béquille dans l'orifice carré. Remarque ! La
marque rouge sur le
fouillot doit toujours être
orientée vers le bas.
Serrez les quatre vis
précédemment dévissées
sans forcer (les vis pour
la poignée en premier).
1.
2.
3.
4.
5.
ROUGEROUGE
55
44
33
11
22
Page 70

70 Manuel d'installation et de l'utilisateur du CD3500 & du CD4000
FRA
Installation du CD4000 sur la porte
Retirez la bague de cylindre
et la poignée de la porte
en dévissant les quatre
vis.
La tige de la béquille
ne doit pas ressortir de la
porte de plus de 20 mm.
Si la tige est trop longue,
poussez-la dans la poignée
à l'intérieur. Si c'est
impossible, coupez la tige
à la bonne longueur.
Vissez les gaines d'extension fournies sur les
mamelons pour la poignée. Utilisez la gaine de
taille appropriée pour qu'elle s'adapte aux écrous
fournis avec la poignée.
Placez le
Codoor
à l'extérieur de la porte avec
la poignée fixée et faites passer la tige de la
béquille dans l'orifice carré. Remarque : La
marque rouge sur le fouillot doit toujours être
orientée vers le haut.
Serrez les quatre vis
précédemment dévissées
sans forcer (les vis pour la
poignée en premier).
1.
2.
3.
4.
ROUGEROUGE
55
44
33
11
22
Page 71

Manuel d'installation et de l'utilisateur du CD3500 & du CD4000 71
FRA
Définition des codes
Le Codoor vous permet de programmer jusqu'à 9 codes différents (codes
01-09). Procédez comme suit
Appuyez sur puis entrez le code de
programmation à 6 chiffres. Terminez
en appuyant sur .
La DEL rouge clignote lentement, accompagnée par
un signal sonore simultané du buzzeur.
Appuyez sur puis entrez le numéro de
code (01-09) que vous voulez programmer.
Terminez en appuyant sur . La DEL rouge
clignote plus rapidement.
Appuyez sur puis entrez le code à 4 chiffres
souhaité. Terminez en appuyant sur . La DEL verte
s'allume pendant 2 secondes. Pour entrer des codes
supplémentaires, répétez les étapes 3 et 4.
Quittez le mode de programmation en entrant
00 . Un signal sonore croissant est émis par le
buzzeur en guise de confirmation.
REMARQUE ! L'unité passe automatiquement du mode de programmation
au mode de fonctionnement si vous n'appuyez sur aucune
touche dans les dix secondes qui suivent. La programmation
doit s'effectuer tandis que la DEL rouge clignote et que le
buzzeur émet un signal sonore.
Suppression du code
Procédez comme suit :
Appuyez sur puis entrez le code de
programmation à 6 chiffres. Terminez en
appuyant sur .
La DEL rouge clignote lentement, accompagnée par un signal sonore
simultané du buzzeur.
Appuyez sur # puis entrez le code (01-09) que vous
voulez supprimer. Terminez en appuyant sur #. La DEL
verte s'allume. Si vous voulez supprimer plusieurs
codes, répétez l'étape 3 pour chaque code.
Quittez le mode de programmation en entrant
00 . Un signal sonore croissant est émis par le
buzzeur en guise de confirmation.
1.
2.
3.
4.
5.
1.
2.
3.
4.
0 0
0 0
# ## #
0 0
0 0
Page 72

72 Manuel d'installation et de l'utilisateur du CD3500 & du CD4000
FRA
Fonction de désactivation
Le neuvième code peut servir de code de 'désactivation' par lequel
le Codoor peut être défini manuellement en
position déverrouillée. Procédez comme suit
Appuyez sur puis entrez le code 9 (4
chiffres). Terminez en appuyant sur .
La DEL rouge clignote lentement, accompagnée par un signal sonore
simultané du buzzeur.
Appuyez sur 1 . La DEL verte s'allume. Un
signal sonore croissant est émis par le buzzeur pour
confirmer la saisie du code.
Le verrou s'ouvre au bout de 4 secondes. Il s'ouvre ensuite
automatiquement à chaque utilisation de la poignée de porte. Le
Codoor reste déverrouillé jusqu'à sa réinitialisation en position
verrouillée.
REMARQUE ! Si le Codoor n'arrive pas à ouvrir le verrou (soit si la
poignée est maintenue vers le bas), il réessaie 10 fois.
Il réessaie 10 fois de plus si on appuie sur un bouton 10
secondes minimum après l'échec du déverrouillage de la
porte par le Codoor.
Retour en position verrouillée
Procédez comme suit :
Appuyez sur puis entrez le code 9 (4
chiffres). Terminez en appuyant sur .
Entrez 0 . La DEL verte s'allume. Un signal sonore
croissant est émis par le buzzeur pour confirmer la
saisie du code.
Appuyez une fois sur la poignée de porte pour reverrouiller la porte.
Bien entendu, le code 9 fonctionne comme un code normal si n'est
pas entré avant et après le code.
1.
2.
3.
4.
1.
2.
3.
1
1
0
0
Page 73

Manuel d'installation et de l'utilisateur du CD3500 & du CD4000 73
FRA
Déconnexion de la fonction de désactivation
Procédez comme suit :
Appuyez sur puis entrez le code de
programmation à 6 chiffres. Terminez
en appuyant sur .
La DEL rouge clignote lentement, accompagnée par un signal sonore
simultané du buzzeur.
Entrez 68 . La DEL rouge clignote plus rapidement.
Entrez 0 . La DEL verte s'allume.
Quittez le mode de programmation en entrant 00 .
Un signal sonore croissant est émis par le buzzeur
en guise de confirmation.
Si vous voulez reconnecter la fonction de désactivation,
répétez les étapes 1-5, mais entrez 1 au lieu de 0 au cours de l'étape 4.
Buzzeur
En mode de fonctionnement, le buzzeur du Codoor peut être programmé
pour émettre un signal sonore dès que vous appuyez sur une touche ou
pour rester silencieux. À la livraison, le buzzeur est programmé pour
émettre un signal sonore. Néanmoins, si un fonctionnement silencieux
est nécessaire, procédez comme suit :
Appuyez sur puis entrez le code de
programmation à 6 chiffres. Terminez en
appuyant sur .
La DEL rouge clignote lentement, accompagnée par un signal sonore
simultané du buzzeur.
Entrez 65 . La DEL rouge clignote plus rapidement.
Entrez 0 . La DEL verte s'allume.
Quittez le mode de programmation en entrant 00 .
Un signal sonore croissant est émis par le buzzeur en
guise de confirmation.
Si vous voulez réactiver le buzzeur, répétez les étapes 15, mais appuyez sur 1 au lieu de 0 au cours de l'étape 4.
1.
2.
3.
4.
5.
1.
2.
3.
4.
5.
0 0
0 0
6 8
6 8
0
0
0
0
0 0
0 0
6 5
6 5
Page 74

74 Manuel d'installation et de l'utilisateur du CD3500 & du CD4000
FRA
Utilisation du Codoor
Accès
Entrez n'importe lequel des codes programmés (sans appuyer sur
) et sans toucher à la poignée de porte. Chaque fois que vous
appuyez sur une touche, un signal audible est émis (sous réserve
que le buzzeur soit activé) et la DEL rouge du clavier clignote une
fois.
Un déclic confirme que le code a été correctement entré.
La porte doit s'ouvrir dans les 4 secondes.
Sortie des locaux
Le dispositif de verrouillage mécanique n'affecte que la poignée de porte
extérieure. La porte peut toujours être ouverte de l'intérieur comme
d'habitude.
Réinitialisation automatique
Le Codoor dispose de deux systèmes de réinitialisation distincts pour
remettre le verrou en position verrouillée après la saisie d'un code.
Mécanique : le verrou est réinitalisé à chaque utilisation de la
poignée de porte lors de l'accès.
Électronique : le verrou est réinitalisé si la poignée n'est pas utilisée
dans les 4 secondes qui suivent l'entrée d'un code.
La sécurité contre tout accès non autorisé est ainsi assurée, le Codoor ne
pouvant jamais être laissé en position déverrouillée. Néanmoins, il faut
se rappeler que le Codoor ne doit jamais être laissé en mode désactivé
(consultez la section Fonction de désactivation).
Blocage de l'accès
Pour contrecarrer les tentatives d'obtention frauduleuses d'un code
d'accès, le Codoor intègre une fonction de blocage désactivant l'unité
après 16 pressions de touche erronées (quatre codes à 4 chiffres
incorrects successifs). L'unité reste bloquée jusqu'à l'entrée successive
de 2 codes corrects. Des instructions supplémentaires aux utilisateurs
ne sont donc pas nécessaires.
1.
2.
3.
•
•
Page 75

Manuel d'installation et de l'utilisateur du CD3500 & du CD4000 75
FRA
Tests
Il doit toujours être possible d'ouvrir la porte de l'intérieur.
La poignée à l'extérieur ne doit pas être enclenchée ni ouvrir la porte
avant la saisie du code correct.
Une fois le code approprié entré, la poignée à l'extérieur doit activer
le verrou, mais une seule fois. Dès que la poignée est relâchée, elle
doit de nouveau se désengager.
La poignée à l'extérieur ne doit jamais être coincée et doit remonter
en position initiale après avoir été tournée vers le bas.
Si le code est entré, le Codoor doit se réinitialiser automatiquement
en position de désenclenchement après environ 4 secondes.
Mode test
Un mode test est avant tout mis en œuvre pour le test et le paramétrage
de l'unité, ainsi que pour l'entretien sur site. L'unité reste en mode
test jusqu'à ce que la commande permettant de quitter ce mode soit
exécutée. Il n'est pas nécessaire de mettre le processeur en mode
SOMMEIL autrement que par une fonction spécifique.
Accès au mode test
Le mode test est activé en maintenant enfoncé le bouton à l'arrière de
l'unité et en appuyant sur * pendant au moins 2 secondes. Le buzzeur
émet un bip rapide et la DEL verte s'allume de façon permanente, sauf
mention contraire, pour indiquer l'activation du mode test. À chaque
pression sur une touche, le buzzeur doit émettre un signal sonore et la
DEL rouge s'allumer comme en fonctionnement normal.
Chaque test s'exécute en appuyant sur l'une des touches indiquées cidessous.
Modes test
Bouton 1 Fait clignoter les DEL vertes et rouges simultanément avec
le signal sonore du buzzeur. Continue jusqu'à ce que vous
appuyiez sur une autre touche.
Bouton 2 Vérifie la RAM du processeur. En cas de réussite, un signal
sonore de confirmation est émis. En cas d'échec, il s'agit
d'un signal sonore d'erreur. L'unité retourne en mode test
avec la DEL verte allumée de façon permanente.
•
•
•
•
•
Page 76

76 Manuel d'installation et de l'utilisateur du CD3500 & du CD4000
FRA
Bouton 3 Vérifie la mémoire non volatile (test non destructif). En cas
de réussite, un signal sonore de confirmation est émis. En
cas d'échec, il s'agit d'un signal sonore d'erreur. L'unité
retourne en mode test avec la DEL verte allumée de façon
permanente.
Bouton 4 Allume et éteint le solénoïde toutes les 4 secondes. Le
statut du capteur de contact en ampoule est fourni par
les DEL, le verrouillage du contact étant signalé par la DEL
verte et son déverrouillage par la DEL rouge.
Bouton 5 Met l'unité en mode veille afin de pouvoir mesurer la
consommation actuelle de l'unité. Pour que l'unité quitte
ce mode, appuyez sur n'importe quelle touche.
Bouton 6 N'indique que le statut du capteur de position. DEL rouge
– unité verrouillée (solénoïde non enclenché), DEL verte
– unité déverrouillée (solénoïde enclenché).
Bouton 7 Met l'unité en mode déverrouillé avec le statut du capteur
de position indiqué par les DEL tel que susmentionné.
Bouton 8 Indique le statut de charge de la pile. La DEL rouge s'al-
lume en cas de décharge de pile détectée. La DEL verte
s'allume si la tension de la pile est OK.
Bouton 9 Ne sert qu'à émettre un bip et allumer la DEL rouge.
Bouton * Ne sert qu'à émettre un bip et allumer la DEL rouge.
Bouton 0 Ne sert qu'à émettre un bip et allumer la DEL rouge.
Bouton # Quitte le mode test en émettant un signal sonore de
confirmation et laisse intactes toutes les données dans la
mémoire non volatile.
Bouton de
réinitialisation à
l'arrière
Appuyez sur le bouton de réinitialisation et maintenez-le
enfoncé pendant 2 secondes pour restaurer les paramè-
tres usine de la mémoire du Codoor :
Aucun code de programmation défini.
Aucun code d'accès défini.
Buzzeur activé.
Fonction de désactivation activée.
REMARQUE ! La fonction de réinitialisation ne peut être utilisée qu'en
mode test !
Page 77

Manuel d'installation et de l'utilisateur du CD3500 & du CD4000 77
FRA
Alimentation de secours
Lorsque les piles sont faibles, le Codoor fonctionne mais le buzzeur
émet un signal sonore sourd. Le verrou dispose d'une alimentation de
secours suffisante pour permettre un nombre limité d'ouvertures une
fois les piles déchargées.
Afin de ne pas compromettre la sécurité, l'alimentation de secours est
limitée à 50 ouvertures, après quoi la fonction de secours s'arrête pour
conserver la puissance des piles restante. Néanmoins, pour permettre le
remplacement des piles, le code de programmation n'est pas désactivé,
ce qui autorise l'ouverture de la porte.
Remplacement des piles
Lorsque les piles de l'unité sont déchargées, le Codoor cesse de
fonctionner. Le verrou dispose d'une alimentation de secours pour
permettre un nombre limité d'ouvertures de la porte, mais les piles
doivent être remplacées dès qu'elles sont déchargées. Procédez comme
suit
Retirez le Codoor de la porte.
Retirez les piles des orifices rectangulaires situés sur la partie
inférieure au dos de l'unité.
Remplacez toujours les deux piles. Ne remplacer qu'une seule pile
diminuerait considérablement la durée de vie de la pile neuve. Les
piles doivent être de type lithium (2 piles de type U9VL). Consultez
la section Spécifications techniques.
Replacez le boîtier.
1.
2.
3.
4.
Page 78

78 Manuel d'installation et de l'utilisateur du CD3500 & du CD4000
FRA
Effacement de la mémoire
Si le Codoor est placé sur une autre porte (avec de nouveaux
utilisateurs), vous devez avoir la certitude qu'aucun des anciens codes
ne subsiste. La meilleure solution est d'effacer la mémoire. Procédez
comme suit :
Retirez le Codoor de la porte.
Appuyez simultanément sur le bouton de réinitialisation
au dos du Codoor et sur le bouton et maintenez-les
enfoncés jusqu'à ce que la DEL verte s'allume.
Relâchez les deux boutons simultanément.
Appuyez une fois encore sur le bouton de réinitialisation
pendant 2 secondes.
Un signal sonore croissant est émis par le buzzeur en guise de
confirmation.
1.
2.
3.
4.
5.
R
+
R
+
R
Page 79

Manuel d'installation et de l'utilisateur du CD3500 & du CD4000 79
FRA
Dépannage
Symptôme Solution
Le verrou ne s'ouvre pas
une fois le code saisi.
• Vérifiez que le code approprié a été entré.•
Vérifiez que la poignée n'est pas appuyée vers le
bas lors de la saisie du code.
•
Vérifiez que la poignée ne s'affaisse pas.•
Vérifiez que le délai de réintialisation automatique
s'est écoulé.
•
Vérifiez que le Codoor est posé verticalement.•
Vérifiez que le verrou n'est pas fixé de manière
trop serrée sur la porte, ce qui pourrait coincer la
poignée.
•
Vérifiez que la marque rouge sur le fouillot pour la
tige de béquille est orientée vers le bas.
•
Le Codoor est en position
déverrouillée.
• Configurez le Codoor en position verrouillée
(si nécessaire) conformément aux instructions
fournies dans la section Fonction de désactivation.
•
Le Codoor n'émet pas de
signal sonore lorsqu'on
appuie sur les touches.
• Activez le buzzeur (consulter la section Buzzeur).
Une utilisation fréquente requiert un
remplacement fréquent des piles. Les piles
peuvent couvrir jusqu'à 150 000 ouvertures
(type lithium) et 50 000 ouvertures pour les piles
alcalines.
•
•
Les piles se déchargent
rapidement.
• Vérifiez les piles et remplacez toute pile
déchargée.
•
Le verrou ne s'ouvre pas
même avec l'alimentation
de secours.
• Le compteur de blocage est activé. Consultez
la section Blocage d'accès. Entrez le code de
programmation (sautez avant et après le code).
Les piles peuvent être en mauvais état et doivent
être remplacées immédiatement.
Les piles sont complètement déchargées et
doivent être remplacées immédiatement.
•
•
•
Page 80

80 Manuel d'installation et de l'utilisateur du CD3500 & du CD4000
FRA
Où peut-on poser le Codoor ?
Le Codoor convient à la plupart des portes à serrure à mortaise
actionnée par poignée. Pour vérifier son adéquation, il vous suffit de
mesurer la distance entre le centre du fouillot de la poignée et celui du
cylindre.
REMARQUE ! Le Codoor ne peut installé et utilisé qu'en intérieur et
n'est pas adapté aux installations dos à dos.
CD3500
Le CD3500 convient à la plupart des portes munies de serrures
ASSA Modular. Pour vérifier, il suffit de mesurer votre propre serrure.
L'écartement doit normalement être de 70 mm.
Le CD3500 peut être utilisé avec un grand nombre de serrures, comme
par exemple l'ASSA 8761 ou la 765, etc. Si vous avez des doutes, veuillez
vérifier auprès de votre serrurier.
5 -
116 mm
01
8x8 mm
8
3
-
0
3
"ACKSETMM
Les exigences de base sont les suivantes :
La distance séparant le centre de la poignée de celui du cylindre
doit être comprise entre 105 et 116 mm.
Fonction pêne à demi-tour.
La poignée doit être munie d'une tige de section carrée de 8 mm.
•
•
•
Page 81

Manuel d'installation et de l'utilisateur du CD3500 & du CD4000 81
FRA
Les orifices de fixation de poignée doivent être de 30-38 mm
(diagonale).
CD4000
Le CD4000 convient à la plupart des portes munies de serrures
ASSA Euro. Pour vérifier, il suffit de mesurer votre propre serrure. La
distance séparant le centre de la poignée de celui du cylindre doit
être de 72 mm et les orifices de fixation de poignée doivent être de
38 mm. L'écartement doit normalement être de 55 ou 60 mm (mais
normalement, ce n'est pas crucial pour le CD4000).
Le CD4000 peut être utlisé avec un grand nombre de serrures, comme
par exemple l'ASSA 8720.
Si vous avez des doutes, veuillez vérifier auprès de votre serrurier.
55/60 mm
72 mm
8 mm
38 mm
88/93 mm
Les exigences de base sont les suivantes :
La distance séparant le centre de la poignée de celui du cylindre
doit être de 72 mm.
La poignée doit être munie d'une tige de section carrée de 8 mm.
Les orifices de fixation de poignée doivent être de 38 mm.
•
•
•
•
Page 82

82 Manuel d'installation et de l'utilisateur du CD3500 & du CD4000
FRA
Spécifications techniques
Nombre de codes : 9.
Poignée : Tige, section carrée de 8 mm.
Environnement : A l'intérieur, sec.
Température ambiante : 0 à +50°C.
Alimentation : Deux piles, 9 V de type 6LR61
(NON incluses).
Types de pile Le Codoor peut utiliser les piles alcalines ou au
lithium.
Veuillez noter que les piles au lithium
présentent certains avantages :
La tension est plus constante tout au
long de la durée de vie de la pile.
Les piles se rechargent plus
rapidement en cas d'usage fréquent
du Codoor.
Elles sont plus respectueuses de
l'environnement en raison de leur
durée de vie accrue (et moins de piles
sont utilisées).
La durée de stockage peut atteindre
dix ans.
•
•
•
•
Durée de fonctionnement : Jusqu'à 150 000 ouvertures (type lithium) et
50 000 ouvertures (piles alcalines) - ou un an,
le premier des deux.
Dimensions (h x l x p) : CD3500 : 245 x 64 x 47 mm, hors poignée
CD4000 : 255 x 70 x 54 mm, hors poignée
Page 83

Page 84

Issued by
Bewator AB
SE-171 24 Solna
Sweden
www.sbt.siemens.com
© 2006 Copyright by
Bewator AB
Bewator AB , a Siemens Company
Data and design to change without notice.
Supply subject to availability.
Document no.
Edition
A24205-A335-N347
09.2006
 Loading...