

Page 1
Tecta Drain Detection
Sieger Tecta-Rohrortungssystem
Bedienungsanleitung
6
Handelsstraat 36 b
7482GW Haaksbergen
The Netherlands
Tel +31 (0)53 3031265
info@sieger-machinery.com
www.sieger-machinery.com
Sieger Tecta Drain Tracing System
User Manual
3
Sieger Tecta drainage detectiesysteem
Gebruikershandleiding
9
Page 2

Page 3
3
112202RE120_-_M
Tecta Drain Detection
GENERAL
The Tecta Drain Tracing System consists of a transmitter module, which needs to be coupled to a special Sieger
jetting head, and a receiver which is used above ground to locate and follow the transmitter below ground, at a
distance of up to 20 feet. The transmitter produces a radio pulse which is converted to an audio ‘bleep’ by the
directional receiver along with the visible LED depth display.
IMPORTANT
1. CHANGE THE TRANSMITTER BATTERIES WHEN YOU NOTICE THE OPERATING RANGE IS REDUCED AND
THE PULSE SPEED IS SLOWER.
2. ENSURE THAT THE TRANSMITTER BATTERY COMPARTMENT IS CLEAN AND DRY – AN EXTRA
PRECAUTION CAN BE TO USE INSULATING TAPE AROUND THE BATTERY COMPARTMENT.
3. CAREFULLY READ THESE INSTRUCTIONS BEFORE USE.
PREPARATION – BATTERY INSERTION
RECEIVER
The receiver is powered by a 9 volt PP3 type battery and will last approximately 30 hours. If preferred a
rechargeable PP3 battery can be used.
Fitting battery:
Remove the battery cover and insert the battery as shown on the label inside the battery compartment. Replace the
battery cover then switch the receiver on (I position) - test the receiver using a transmitter to check operation.
You should hear a short ‘bleep’ and the LED display should run from ‘1’ to ‘10’ on the ‘LOCATE’ scale and then go
out. If the battery is inserted incorrectly no harm will come to the unit but it will not work.
TRANSMITTER
The transmitter is powered by two 394 batteries. DO NOT use zinc air types. Other popular equivalents are:
SR9365W, SR936, V394, GP394, D394, SR45.
Note: Ensure that the transmitter is switched off after use (see below). It is recommended that the batteries
are replaced after 240 hours or 30 eight hour days use.
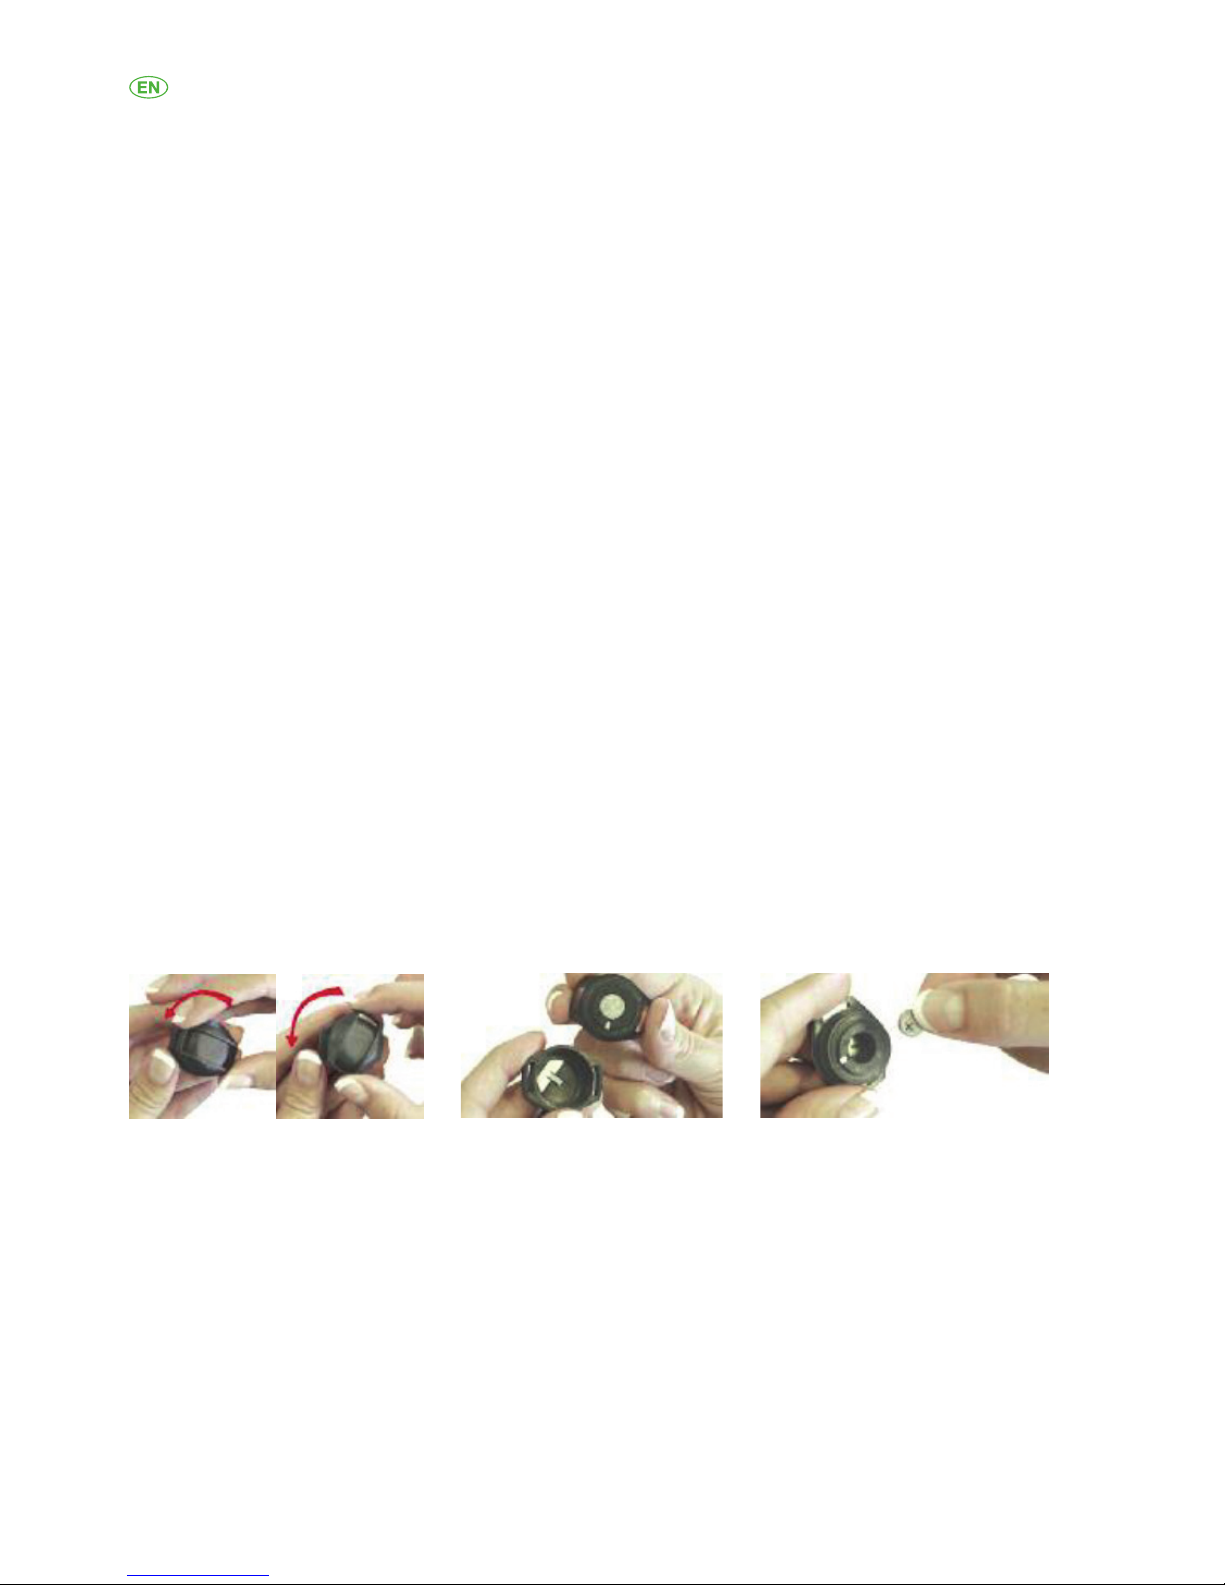
Fitting batteries:
Opening the case Removing the old batteries Inserting the new batteries
1. Unscrew the endcap from the transmitter module and remove the transmitter (Note: Bull nose pliers can be
used to aid removal of a stubborn endcap).
2. Twist the lid of the transmitter anti-clockwise to open it. Remove the old batteries.
3. Insert the two new batteries, as shown, with the “+” side of the batteries uppermost.
4. Check that the rubber O ring seal is in good condition then screw the lid back on to the transmitter base.
Tighten by hand until the two parts are lined up with each other with no gap between them.
5. Test that the transmitter is working by switching on the receiver, then using the magnet to turn on the
transmitter. If the batteries are inserted incorrectly no harm will come to the unit but it will not work.
Page 4
112202RE120_-_M
4
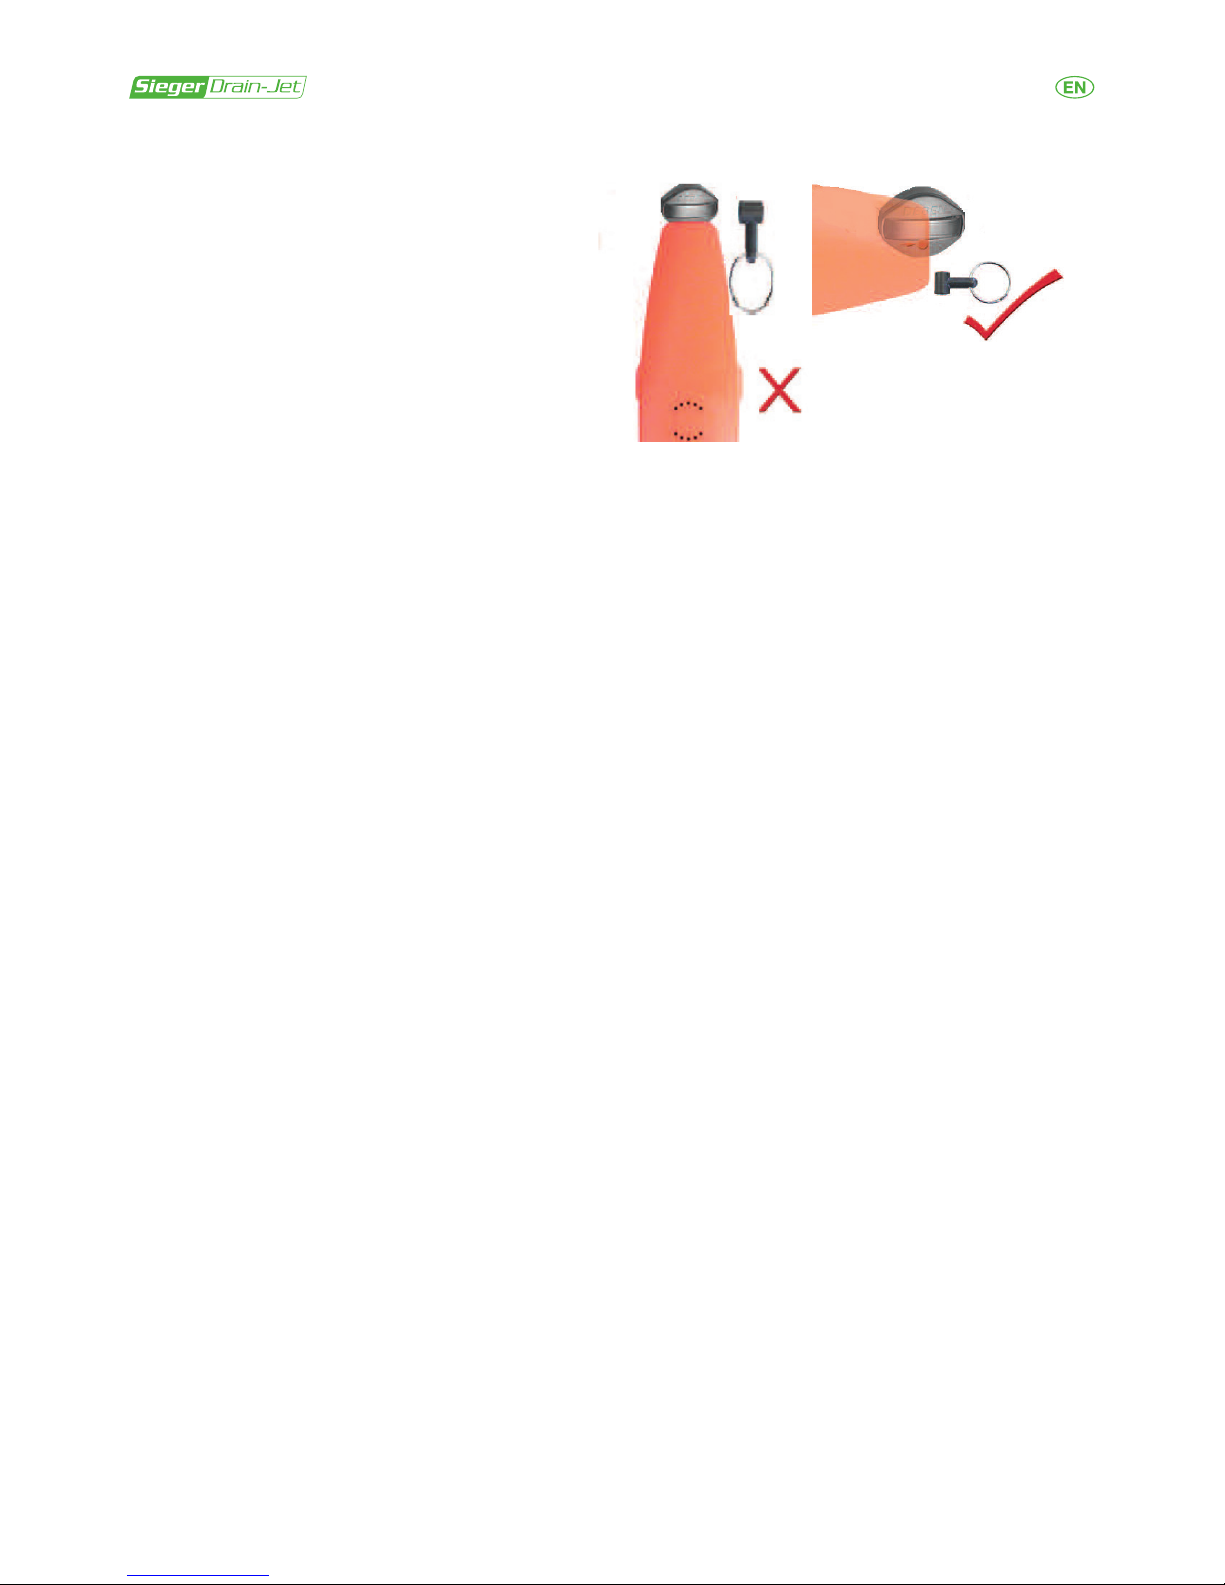
TURNING THE TRANSMITTER ON & OFF
• The transmitter is switched on and off by
using a magnet in the receiver or in the key
ring.
• Turn the PinPointer control fully clockwise,
switch the receiver on so that you can tell
when the transmitter turns on (and off).
• Line up the dot and arrow on both the
receiver and transmitter, as shown, and touch
the transmitter for about 1 second (to turn off
repeat this step).
Test that the transmitter is working by switching on the receiver and placing it within a few feet of the transmitter, if
the batteries are inserted incorrectly no harm will come to the unit but it will not work.
The transmitting module is waterproof but the battery compartment is only water resistant - extra protection from
sandy soil and waterproong can be carried out using insulating tape around the battery compartment after the
batteries have been inserted.
CLEANING THE TRANSMITTER
The battery compartment on the transmitting module should be kept clean from dirt and moisture. Remove the
batteries and clean the compartment using warm running water. Ensure that the battery terminals are clean and
bright. The battery compartment MUST be dry before using the unit.
USING THE TECTA DRAIN TRACING SYSTEM
Remove the standard cleaner nozzle from the exibel hose and replace it with the special jetting head including
transmitter. As the drain rod is pushed along the drain, the transmitter module can be followed by holding the
receiver above ground.
There are two modes of operation on the receiver - Searching and Locating,
Searching - When a signal from the transmitter is received the receiver emits ‘pips’. The pitch of these pips will
increase if you point the receiver towards the transmitter, and will go higher still as you get closer to it.
To start the search, switch to the 20 (search) range and move over the likely area until you hear the pips. If the pitch
starts to decrease rather than increase, stop where you are and move the receiver left, right, up and down until you
nd the highest pitch, then move in that direction.
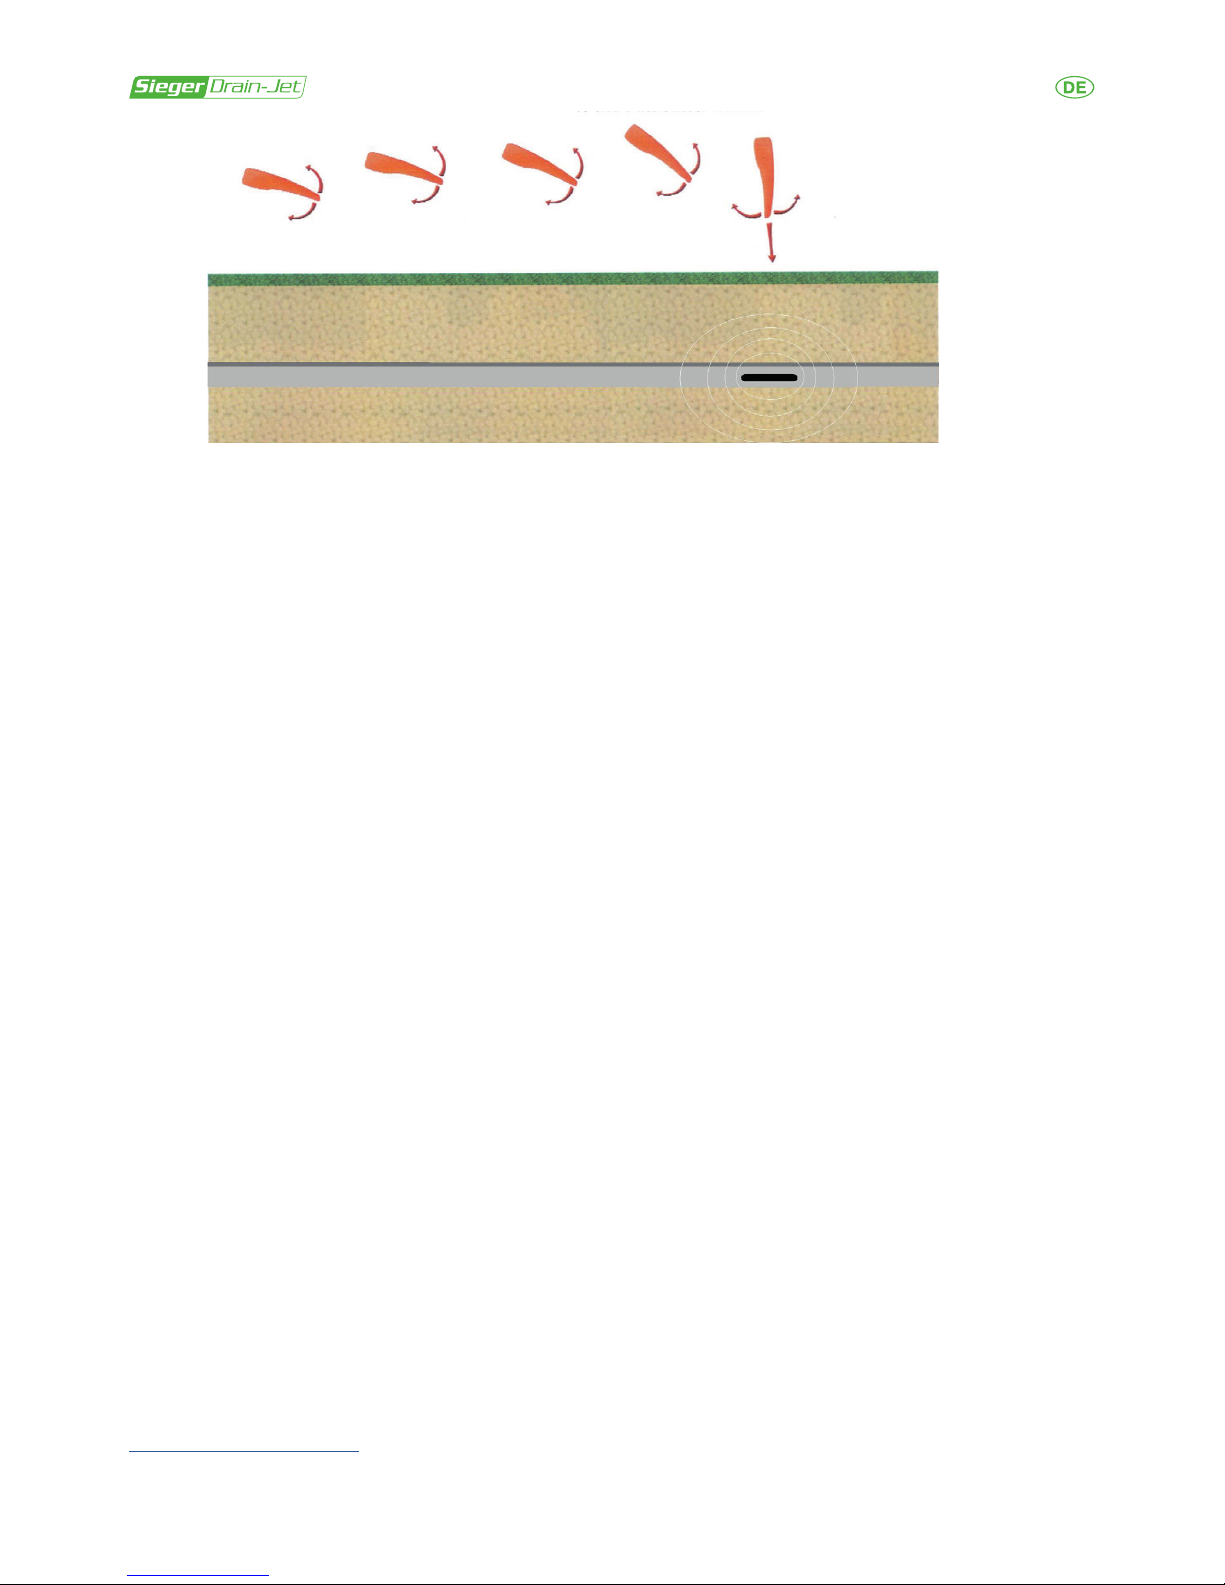
When you have found the best horizontal direction by moving it left and right, rotate the receiver to point at the
ground and move around to obtain the highest pitch. With a bit of practice you will be able to place the receiver
directly above the transmitter underground.
On the ‘20’ (search) scale the receiver will detect the transmitter up to about 20 feet away (in ideal conditions). The
LED display gives you an idea of how far away you are.
Point the receiver to where you believe the transmitter is below ground and rotate left, right, up & down to
get the highest pitch.
Adjust the PinPointer sound control to limit the sound ‘pips’ to the location area.
When the receiver is vertical you are right above it!
Page 5

5
112202RE120_-_M
Locating - When the distance drops below 10 feet, switch to the ‘10’ (locate) scale for precise location of the
transmitter.
When you are directly above the transmitter the LED display shows how far away the transmitter is. The ‘10-1’ scale
will show distance to within 1 foot of the transmitter. This reading can be affected slightly by the presence of metal,
by local interference and by the nature of the soil, so the distances indicated should be taken as a guide.
After use - Always turn OFF the receiver and transmitter (see below). Keep the inside of the transmitting module
clean and dry to ensure the transmitter rotates smoothly.
Turning on/off transmitter – This procedure should be carried out with the receiver powered to enable you to
monitor the output (the pips). The transmitter is turned on and off using the magnet (key-ring) provided: Line up the
magnetized key-ring with the side of the transmitter, hold in place for approximately one second the remove. You
should then hear the transmitters turn on or off, depending upon it’s starting state (the pips will stop when the unit
has successfully powered down, or start when it has powered up). If the unit fails to power up/down repeat this step
while slightly changing the angle of the magnet relative to the transmitter and hold it in place against it for slightly
longer.
Caution - The equipment does not function in metallic pipes. Accurate location may be difcult where electrical
cables or metallic services may deect the transmitting signal.
SPECIFICATIONS
RECEIVER
Size: 165mm Long x 72mm Width x 42mm Diameter
Weight: 186g (complete with battery)
Battery life: 30 hours (approximate)
TRANSMITTER
Size: 75.5mm Long x 38mm Diameter
Weight: 112g (complete with batteries)
Battery life: 300 hours (approximate)
Attachment: 3/8 BSP
JETTING NOZZLE
Connection: G 5/8”
CUSTOMER SERVICE
If you have questions about the Sieger Tecta Drain Tracing System that are not answered in this user manual, please
do not hesitate to contact Sieger.
For other information you can always consult our website: www.sieger-machinery.com
GROUND LEVEL
Page 6

112202RE120_-_M
6
Tecta Drainage Detektion
EINLEITUNG
Das Tecta-Rohrortungssystem besteht aus einem Sendemodul, das an eine spezieller Sieger Sprühdüse befestigt
wird. Und einem Empfänger, mit dem der Sender von außen bis zu einer Entfernung von ca. 6 m lokalisiert und
verfolgt werden kann. Der Sender erzeugt pulsförmige Funksignale, die vom richtungsempndlichen Empfänger in
Pieptöne umgewandelt und auf einer LED-Tiefenanzeige dargestellt werden.
WICHTIG
1. BITTE WECHSELN SIE DIE BATTERIEN, WENN SIE EINE REDUZIERTE EMPFINDLICHKEIT ODER EINE
GERINGERE WIEDERHOLUNGSFREQUENZ DER FUNKIMPULSE FESTSTELLEN.
2. ACHTEN SIE DARAUF, DASS DAS BATTERIEFACH DES SENDERS SAUBER UND TROCKEN IST. GGF. DAS
BATTERIEFACH FÜR ZUSÄTZLICHEN SCHUTZ MIT ISOLIERBAND ABKLEBEN.
3. BITTE LESEN SIE DIESE ANLEITUNG VOR DER VERWENDUNG DES GERÄTS SORGFÄLTIG DURCH.
VORBEREITUNG – EINSETZEN DER BATTERIEN
EMPFÄNGER
Der Empfänger benötigt eine 9-V-Blockbatterie (PP3). Eine Batterie reicht für etwa 30 Betriebsstunden. Auch
entsprechende wiederauadbare Batterien (PP3) können verwendet werden.
Einsetzen der Batterie:
Öffnen Sie den Batteriefachdeckel und setzen Sie die Batterie wie auf dem innen im Batteriefach angebrachten
Aufkleber angegeben ein. Schließen Sie den Batteriefachdeckel. Schalten Sie den Empfänger ein (Stellung „I“) ein
und führen Sie mithilfe des Senders einen Funktionstest durch.
Es muss ein kurzer Piepton zu hören sein, und die LED-Anzeige muss auf der mit „LOCATE“ bezeichneten Skale
von „1“ bis „10“ laufen und danach erlöschen. Das Gerät nimmt bei einer verkehrt herum eingesetzten Batterie
keinen Schaden und funktioniert lediglich nicht.
SENDER
Der Sender benötigt zwei Knopfzellen vom Typ 394. Zink-Luft-Batterien dürfen NICHT VERWENDET werden.
Weitere verbreitete geeignete Typen: SR9365W, SR936, V394, GP394, D394, SR45.
Anmerkung: Achten Sie darauf, den Sender nach dem Gebrauch auszuschalten (siehe unten). Es wird empfohlen,
die Batterien nach 240 Betriebsstunden bzw. 30 achtstündigen Arbeitstagen auszutauschen.
Einsetzen der Batterien:
Gehäuse öffnen. Alte Batterien entnehmen. Neue Batterien einsetzen.
1. Schrauben Sie die Verschlusskappe vom Sender (Hinweis: Wenn die Kappe sich nicht lösen lässt, verwenden
Sie eine Zange).
2. Drehen Sie den Deckel des Sendergehäuses gegen den Uhrzeigersinn, um das Gehäuse zu öffnen.
Entnehmen Sie die alten Batterien.
3. Legen Sie zwei neue Batterien wie gezeigt ein („+“ jeweils nach oben).
4. Überprüfen Sie, ob die Gummiringdichtung sich in einem einwandfreien Zustand bendet, und schrauben Sie
den Deckel wieder auf das Gehäuse des Senders. Ziehen Sie den Deckel handfest an, bis die beiden Teile
einander berühren, ohne dass ein Spalt zu sehen ist.
5. Führen Sie eine Funktionsprüfung durch, indem Sie den Empfänger einschalten und danach den Sender mit
dem Magneten aktivieren. Das Gerät nimmt bei einer verkehrt herum eingesetzten Batterie keinen Schaden
und funktioniert lediglich nicht.
Page 7

7
112202RE120_-_M
EIN- UND AUSSCHALTEN DES SENDERS
• Das Ein- und Ausschalten des Senders geschieht
mithilfe eines Magneten im Empfänger oder am
Schlüsselring.
• Drehen Sie den PinPointer Lautstärkeregler
ganz auf (im Uhrzeigersinn). Schalten Sie den
Empfänger ein, damit Sie merken, wann der
Sender ein- bzw. ausschaltet.
• Berühren Sie den Sender etwa 1 s lang so mit dem
Empfänger, dass Punkt und Pfeil übereinstimmen
(siehe Abbildung). Das Ausschalten funktioniert
auf dieselbe Weise.
Führen Sie eine Funktionsprüfung des Senders durch, indem Sie den Empfänger einschalten und ihn in die
Nähe (zum Beispiel in einer Armlänge Abstand) des Senders halten. Das Gerät nimmt bei einer verkehrt herum
eingesetzten Batterie keinen Schaden und funktioniert lediglich nicht.
Der Sender ist wasserdicht, das Batteriefach jedoch lediglich wasserbeständig. Zusätzlicher Schutz vor Sand und
Feuchtigkeit kann durch Abkleben des Batteriefachs mit Isolierband erreicht werden.
REINIGUNG DES SENDERS
Das Batteriefach des Senders ist von Schmutz und Feuchtigkeit zu befreien. Entnehmen Sie dazu die Batterien
und reinigen Sie das Batteriefach unter warmem laufendem Wasser. Die Batteriekontakte müssen stets sauber und
blank sein. Das Batteriefach MUSS vor dem Gebrauch des Geräts trocken sein.
VERWENDUNG DES TECTA-ROHRORTUNGSSYSTEMS
Entfernen Sie die Standardsprühdüse vom exiblen Schlauch und befestigen Sie anstatt die spezielle Sieger
Sprühdüse mit dem Sender. Während Sie die Spülschlauch in das Rohr schieben, können Sie die Position des
Senders mithilfe des Empfängers von außen verfolgen.
Der Empfänger hat zwei verschiedene Betriebsarten, nämlich „Suchen“ und „Lokalisieren“.
Suchen (Search) – Sobald der Empfänger ein Signal vom Sender erhält, gibt er Pieptöne aus. Diese Pieptöne
werden jeweils höher, wenn Sie den Empfänger in Richtung des Senders ausrichten und wenn Sie sich dem Sender
nähern.
Beginnen Sie die Suche im Messbereich 20 („search“) und bewegen Sie den Empfänger über den Bereich, in dem
Sie den Sender vermuten, bis Sie Pieptöne hören. Wenn die Tonhöhe nicht weiter steigt, sondern wieder zu sinken
beginnt, bleiben Sie stehen und bewegen Sie den Empfänger solange nach oben/unten und rechts/links, bis Sie die
höchste Tonhöhe gefunden haben, und bewegen Sie sich dann in die so gefundene Richtung.
Wenn Sie durch Seitwärtsbewegung die beste horizontale Richtung gefunden haben, drehen Sie den Empfänger so,
dass er Richtung Boden zeigt, und bewegen Sie ihn erneut solange, bis Sie die höchste Tonhöhe gefunden haben.
Mit etwas Übung können Sie so den Empfänger direkt über dem Sender platzieren.
Im Messbereich „Search“ erkennt der Empfänger den Sender unter idealen Bedingungen bis zu einer Entfernung
von etwa 6 m. Die LED-Anzeige gibt Ihnen Hinweise auf die Entfernung zum Sender.
Zeigen Sie mit dem Empfänger auf die vermutete Position des Senders in der Rohrleitung und drehen Sie
den Empfänger links- und rechtsherum sowie nach oben/unten, um die höchste Tonhöhe zu nden.
Stellen Sie die Lautstärke so ein, dass die Pieptöne nicht unnötig laut sind.
Wenn der Empfänger vertikal ist, bendet er sich direkt über dem Empfänger!
Page 8
112202RE120_-_M
8
Lokalisieren (Locate) - Wenn der Abstand zum Sender weniger als 3 m beträgt, schalten Sie auf den Messbereich
„Locate“ um, um die genaue Position des Senders bestimmen zu können.
Wenn sich der Empfänger direkt über dem Sender bendet, gibt die LED-Anzeige den Abstand zum Sender
in “Foot” an (10 bis 1). Ein “Foot” entspricht etwa 30 cm. Der angezeigte Wert kann durch in der Umgebung
vorhandenes Metall, elektromagnetische Strahlung oder die Beschaffenheit des Bodens geringfügig verfälscht
werden, sodass die angezeigte Entfernung lediglich einen groben Richtwert darstellt.
Nach dem Gebrauch - Schalten Sie Sender und Empfänger nach dem Gebrauch stets aus (siehe unten). Halten Sie
das Innere des Senders stets sauber und trocken, um die Rotation des Geräts nicht zu behindern.
Ein- und Ausschalten des Senders - Schalten Sie zunächst den Empfänger ein, um das Verhalten des Senders
anhand der Pieptöne überwachen zu können. Der Sender wird mithilfe des mitgelieferten Magneten (Schlüsselring)
ein- und ausgeschaltet: Halten Sie den magnetischen Schlüsselring ca. eine Sekunde lang seitlich an den Sender
und entfernen Sie ihn dann wieder. Dadurch wird der Sender ein- bzw. ausgeschaltet (nach dem Einschalten ertönen
die Piepsignale, nach dem Ausschalten verstummen sie). Falls das Ein- oder Ausschalten nicht gelingt, versuchen
Sie es erneut mit einem leicht veränderten Winkel des Magneten relativ zum Sender, und halten Sie ihn etwas länger
in Position.
Achtung - Das Gerät funktioniert nicht in Metallrohren. Das genaue Lokalisieren kann durch elektrische Leitungen
oder Metallrohre in der Umgebung erschwert werden.
TECHNISCHE DATEN
EMPFÄNGER
Abmessungen: 165 mm x 72 mm x 42 mm (Länge x Breite x Tiefe)
Gewicht: 186 g (inkl. Batterie)
Batterielebensdauer: ca. 30 h
SENDER
Abmessungen: 75 mm x 38 mm (Länge x Durchmesser)
Gewicht: 112 g (inkl. Batterien)
Batterielebensdauer: ca. 300 h
Anschluss: 3/8 BSP
SPRÜHDÜSE
Schraubanschluss: G 5/8”
KUNDENSERVICE
Haben Sie Fragen zum Sieger Tecta-Rohrortungssystem, die in der Betriebsanleitung nicht beantwortet werden?
Dann setzen Sie sich mit Sieger in Verbindung. Weitere Informationen nden Sie jederzeit auf unserer Website:
www.sieger-machinery.com
BODENNIVEAU
Page 9

9
112202RE120_-_M
Tecta Drainage Detectie
ALGEMEEN
Het Tecta drainage detectiesysteem bestaat uit een zender module die wordt bevestigd op de speciale Sieger
detectie-spuitkop en een losse ontvanger. De ontvanger wordt bovengronds gebruikt om de zender te lokaliseren
en te volgen tot een afstand van ca. 6 meter. De zender stuurt een radiosignaal uit welke door de richtingsgevoelige
ontvanger wordt omgezet in een audio ‘piep’ plus daarnaast wordt weergegeven op de LED-display met
diepteweergave.
BELANGRIJK
1. VERVANG DE BATTERIJEN VAN DE ZENDER WANNEER HET BEREIK MINDER WORDT EN HET
RADIOSIGNAAL VERMINDERT.
2. ZORG DAT HET BATTERIJCOMPARTIMENT VAN DE ZENDER SCHOON EN DROOG IS – EEN EXTRA
VOORZORGSMAATREGEL KAN ZIJN OM HET BATTERIJCOMPARTIMENT MET ISOLEERTAPE AF TE
SLUITEN.
3. LEES AANDACHTIG DE GEBRUIKSAANWIJZING VOOR GEBRUIK.
VOORBEREIDING – PLAATSEN BATTERIJ
ONTVANGER
De ontvanger wordt gevoed door een 9 volt blok batterij (PP3) en deze zorgt voor een gebruiksduur van ongeveer
30 uur. Indien gewenst kan ook een oplaadbare batterij (PP3) gebruikt worden.
Plaatsen van batterij:
Verwijder het batterijdeksel en plaats de batterij zoals aangegeven op de afbeelding in het batterijcompartiment.
Sluit vervolgens het batterijdeksel. Schakel de ontvanger in (positie I) en gebruik een zender module om de werking
van de ontvanger te testen.
Een korte ‘piep’ moet klinken en de LED-display moet op de ‘LOCATE’ schaal van ‘1’ tot en met ‘10’ lopen en
hierna moet de display doven. Indien de batterij verkeerd is geplaatst zal hierdoor geen schade ontstaan, maar de
ontvanger zal niet werken.
ZENDER
De zender wordt gevoed door twee stuks type 394 knoopcel batterij. Gebruik GEEN zinkoxide types. Bruikbare
equivalenten zijn: SR9365W, SR936, V394, GP394, D394, SR45.
Opmerking: Zorg ervoor dat de zender is uitgeschakeld na gebruik (zie hieronder). Het wordt aanbevolen
dat de batterijen worden vervangen na 240 uur of 30 dagen gebruik van acht uur.
Plaatsen van batterijen:
Open de behuizing Verwijder de oude batterijen Plaats de nieuwe batterijen
1. Schroef de sluitdop van de behuizing en verwijder de zender module (Opmerking: gebruik een tang wanneer
deze sluitdop hardnekkig vastzit).
2. Draai het deksel van de zender module tegen de klok in om deze te openen. Verwijder de oude batterijen.
3. Plaats twee nieuwe batterijen zoals op de afbeelding met de “+” zijde naar boven.
4. Controleer of de rubberen O-ring nog in goede staat is en schroef het deksel weer op de zender module. Draai
met de hand de twee delen vast totdat deze uitgelijnd zijn zonder ruimte ertussen.
5. Test of de zender werkt door de ontvanger in te schakelen en vervolgens met behulp van de magneet de
zender te activeren. Indien de batterij verkeerd is geplaatst zal hierdoor geen schade ontstaan, maar het
apparaat zal niet werken.
Page 10

112202RE120_-_M
10
IN- EN UITSCHAKELEN VAN DE ONTVANGER
• De zender schakelt in en uit met behulp
van een magneet in de ontvanger of de
sleutelhanger.
• Draai de PinPointer besturing volledig naar
rechts, zet de ontvanger aan zodat u kunt
zien wanneer de zender in- en uitschakelt.
• Lijn de ontvanger en zender uit met behulp
van de stip en pijl zoals getoond en raak de
zender ongeveer 1 seconde aan. Het uitzetten
gebeurt door dezelfde handeling te herhalen.
Test de werking van de zender door de ontvanger in te schakelen en deze binnen ongeveer één meter van de
zender te plaatsen. Indien de batterij verkeerd is geplaatst zal hierdoor geen schade ontstaan, maar het apparaat zal
niet werken.
De zender module is waterdicht, maar het batterijcompartiment is slechts waterbestendig - extra bescherming
tegen zand en vocht kan worden bereikt door, na het plaatsen van de batterijen, het batterijcompartiment met
isolatietape af te sluiten.
SCHOONMAKEN VAN DE ZENDER
Het batterijcompartiment van de zender module moet vrij van vuil en vocht worden gehouden. Verwijder de
batterijen en reinig het compartiment met warm stromend water. Zorg ervoor dat de accupolen schoon en glanzend
zijn. Het batterijcompartiment MOET voor gebruik droog zijn.
GEBRUIK VAN HET TECTA DRAINAGE DETECTIESYSTEEM
Verwijder de standaard spuitkop van het exibel slangdeel en bevestig in plaats hiervan de speciale Sieger detectiespuitkop inclusief zender module. Met het voortbewegen van de spoelslang in de drainagebuis kan de zender
gelijktijdig bovengronds worden gevolgd door de ontvanger.
De ontvanger kent twee verschillende programma’s: zoeken en lokaliseren.
Zoeken (Search) – Wanneer een signaal van de zender wordt ontvangen, geeft de ontvanger een ‘piep’ signaal. De
toonhoogte van dit audiosignaal wordt hoger wanneer de ontvanger in de richting van de zender wordt gericht. De
toonhoogte van de ‘piepjes’ zal blijven toenemen wanneer de ontvanger steeds dichter bij de zender komt.
Schakel de ontvanger naar ‘Search’ om te beginnen met zoeken. Beweeg de ontvanger over het gebied waar de
drainagebuis vermoedelijk ligt totdat u de ‘piepjes’ hoort. Als de toonhoogte afneemt in plaats van toeneemt stop
dan waar u zich bevindt. Beweeg vervolgens de ontvanger in de verschillende richtingen tot waar u het hoogste
‘piep’ hoort en volg nu deze richting.
Roteer, wanneer de beste horizontale positie is gevonden door naar links en rechts te bewegen, de ontvanger
richting bodem en verplaats deze tot de hoogste toonhoogte is gevonden. Met een beetje oefening zult u in staat
zijn om de ontvanger direct recht boven de zender te krijgen.
In de stand ‘Search’ zal de ontvanger onder ideale omstandigheden de zender tot op een afstand van ca. 6 meter
detecteren. De LED-display geeft een indicatie van de afstand tot aan de zender.
Richt de ontvanger naar de positie waar de zender zich vermoedelijk in de drainagebuis bevindt. Beweeg de
ontvanger vervolgens naar links, rechts, boven en beneden om de hoogste toonhoogte te vinden.
Stel de PinPointer zo in dat de ‘piepjes’ zich beperken het zoekgebied.
Bij een verticale stand van de ontvanger bevindt deze zich precies boven de zender!
Page 11

11
112202RE120_-_M
Lokaliseren (Locate) – Wanneer de afstand tot de zender minder dan 3 meter wordt, dan moet de ontvanger op de
stand ‘Locate’ worden gezet voor een nauwkeurige plaatsbepaling.
Wanneer u zich direct boven de zender bevindt, geeft de LED-display de afstand tot de zender weer in ‘foot’ in een
schaal van 1 tot 10. Een ‘foot’ is ongeveer 30 cm. De aangegeven waarde kan overigens beïnvloed worden door de
aanwezigheid van metalen, door elektromagnetische omgevingsstraling of door de aard van de bodemsoort. Deze
waarde moet dus altijd worden gezien als een indicatie.
Na gebruik – Schakel na gebruik altijd de ontvanger en zender uit (zie onder). Zorg ook dat de binnenkant van de
zender module droog en schoon is om een goede werking van de zender niet te belemmeren.
In- en uitschakelen zender – De ontvanger moet hiervoor ingeschakeld zijn om de werking van de zender middels
de ‘piepjes’ te kunnen controleren. De zender wordt met behulp van de meegeleverde magneet (sleutelhanger)
in- en uitgeschakeld: Houdt de magnetische sleutelhanger ongeveer één seconde aan de zijkant van de zender
en verwijder deze vervolgens weer. U moet nu de zender horen in- of uitschakelen, afhankelijk van de status (de
‘piepjes’ stoppen wanneer de module succesvol is uitgeschakeld of beginnen wanneer deze wordt ingeschakeld).
Als het in- of uitschakelen van het toestel niet lukt, wijzig dan lichtelijk de hoek van de magneet ten opzichte van de
zender en houdt de magneet net iets langer op z’n plaats.
Waarschuwing – Dit toestel werkt niet in metalen buizen (gebruik hiervoor de Sieger Altra Drainage Detectie).
Nauwkeurig lokaliseren kan worden bemoeilijkt daar waar elektrische kabels of metalen leidingen het signaal
kunnen beïnvloeden.
SPECIFICATIES
ONTVANGER
Afmeting: 165mm lengte x 72mm breedte x 42mm diameter
Gewicht: 186g (inclusief batterij)
Batterijduur: 30 uur (bij benadering)
ZENDER
Afmeting: 75.5mm lengte x 38mm diameter
Gewicht: 112g (inclusief batterijen)
Batterijduur: 300 uur (bij benadering)
Aansluiting: 3/8” BSP
DETECTIE-SPUITKOP
Schroefaansluiting: G 5/8”
Klantenservice
Heeft u vragen over het Sieger Tecta drainage detectiesysteem die niet beantwoord worden in deze
gebruikershandleiding, neem dan contact op met Sieger of bezoek de website: www.sieger-machinery.com
MAAIVELD
Page 12

 Loading...