

User´s manual
20V - Li - ion BATTERY
BRUSHLESS CORDLESS IMPACT DRILL
SBS001
Operating Instructions
Please read the operation instructions meticulously and pay particular attention to the safety instructions.

BRUSHLESS TECH series

CONTENT
BRUSHLESS TECH series
BRUSHLESS CORDLESS IMPACT DRILL
Safety instructions
Specications
Features
Operation
Maintenance
Warranty
1
7
8
9
17
18
Care for the environment!
It must not be disposed of with household waste! This product contains electrical or electronic
components that must be recycled. Take the product for recycling at the sites assigned to your
area, Ejm: the local recycling station.

BRUSHLESS TECH series
BRUSHLESS CORDLESS IMPACT DRILL
1.GENERAL SAFETY RULES
FOR ALL BATTERY OPERATED TOOLS
1.1 WARNING! READ AND UNDERSTAND ALL INSTRUCTIONS.
Failure to follow all instructions listed below, may result in electric shock, re and/or serious
personal injury.
1.2 Work Area
1.2.1 Keep your work area clean and well lit. Cluttered benches and dark areas invite accidents.
1.2.2 Flammable liquids, gases, or dust. Power tools create sparks which may ignite the dust or
fumes. Do not operate power tools in explosive atmospheres, such as in the presence of ammable liquids, gases, or dust.
1.2.3 Keep bystanders, children, and visitors away while operating a power tool. Distractions
can cause you to lose control.
1.3 Electrical Safety
1.3.1 Do not abuse the cord. Never use the cord to carry the tool. Keep cord away from heat,
oil, sharp edges, or moving parts. Replace damaged cords immediately. Damaged cords may
create a re.
Applies only to tools with a separable battery pack:
1.3.2 A battery operated tool with integral batteries or a separate battery pack must be recharged only with the specied charger for the battery. A charger that may be suitable for one type
of battery may create a risk of re when used with another battery.
1.3.3 Use battery operated tool only with specically designated battery pack. Use of any other
batteries may create a risk of re.
1

BRUSHLESS TECH series
BRUSHLESS CORDLESS IMPACT DRILL
1.4 Personal Safety
1.4.1 Stay alert, watch what you are doing, and use common sense when operating a power
tool. Do not use tool while tired or under the inuence of drugs, alcohol, or medication. A
moment of inattention while operating power tools may result in serious personal injury.
1.4.2 Dress properly. Do not wear loose clothing or jewelry. Contain long hair. Keep your hair,
clothing, and gloves away from moving parts. Loose clothes, jewelry, or long hair can be
caught in moving parts.
1.4.3 Avoid accidental starting. Be sure switch is in the locked or o position before inserting
battery pack. Carrying tools with your nger on the switch or insetting the battery pack into a
tool with the switch on invites accidents.
1.4.4 Remove adjusting keys or wrenches before turning the tool on. A wrench or a key that is
left attached to a rotating part of the tool may result in personal injury.
1.4.5 Do not overreach. Keep proper footing and balance at all times. Proper footing and balance enable better control of the tool in unexpected situations.
1.4.6 Use safety equipment. Always wear eye protection. Dust mask, non-skid safety shoes,
hard hat, or hearing protection must be used for appropriate conditions.
1.5 Tool Use and Care
1.5.1 Use clamps or other practical way to secure and support the workpiece to a stable platform. Holding the work by hand or against your body is unstable and may lead to loss of control.
1.5.2 Do not force tool. Use the correct tool for your application. The correct tool will do the
job better and safer at the rate for which it is designed.
1.5.3 Do not use tool if switch does not turn it on or o. A tool that cannot be controlled
with the switch is dangerous and must be repaired.
2

BRUSHLESS TECH series
BRUSHLESS CORDLESS IMPACT DRILL
1.5.4 Disconnect battery pack from tool or place the switch in the locked or o position before
making any adjustments, changing accessories, or storing the tool. Such preventive safety measures reduce the risk of starting the tool accidentally.
1.5.5 Store idle tools out of reach of children and other untrained persons. Tools are dangerous
in the hands of untrained users.
1.5.6 When battery pack is not in use, keep it away from other metal objects like: paper clips,
coins, keys, nails, screws, or other small metal objects that can make a connection from one
terminal to another. Shorting the battery terminals together may cause sparks, burns, or a re.
1.5.7 Maintain tools with care. Keep cutting tools sharp and clean. Properly maintained tools
with sharp cutting edge are less likely to bind and are easier to control.
1.5.8 Check for misalignment or binding of moving parts, breakage of parts, and any other condition that may aect the tool's operation. If damaged, have the tool serviced before using.
Many accidents are caused by poorly maintained tools.
1.5.9 Use only accessories that are recommended by the manufacturer for your model. Accessories that may be suitable for one tool may create a risk of injury when used on another tool.
1.6 Service
1.6.1 Tool service must be performed only by qualied repair personnel. Service or maintenance performed by unqualied personnel may result in a risk of injury.
1.6.2 When servicing a tool, use only identical replacement parts.
SAFETY INSTRUCTIONS
Warning! When using electric tools, basic safety precautions should always be followed to
reduce the risk of tire, electric shock and personal injury, including the following. Read all these
instructions before attempting to operate this product and save these instructions.
3

BRUSHLESS TECH series
BRUSHLESS CORDLESS IMPACT DRILL
For safe operations:
1. Keep work area clean
- Cluttered areas and benches invite injuries.
2. Consider work area environment
- Don't expose power tools to rain. Don't use power tools in damp or wet locations. Keep work
area well lit. Don't use power tools in presence of ammable liquids or gases.
3. Guard against electric shock
- Prevent body contact with grounded surfaces (e.g. pipes, radiators, ranges refrigerators).
4. Keep children away
- Do not let visitors contact tool or extension cord. All visitors should be kept away from work
area.
5. Store idle tools
- When not in use, tools should be stored in dry, high, or locked-up place, out of the reach of
children.
6. Don't force tool
- It will do the job better and safer at the rate for which it was intended.
7. Use right tool
- Don't force small tools or attachments to do the job of a heavy duty tool. Don't use tools for
purposes not intended; for example don't use circular saw for cutting tree limbs or logs.
8. Dress property
- Do not wear loose clothing or jewelry. They can be caught in moving parts. Rubber gloves
and non-skid food wear am recommended when working outdoors. Wear protective hair
covering to contain long hair.
9. Use safety glasses
- Also use face or dust mask if cutting operation is dusty.
4

BRUSHLESS TECH series
BRUSHLESS CORDLESS IMPACT DRILL
10. Don't abuse cord
- Never carry tool by cord or yank it to disconnect it from receptacle. Keep cord from heat, oil
and sharp edges.
11. Secure work
- Use clamps or a vise to hold work it's safer than using your hand and it trees both hands to
operate tout.
12. Don't overreach
- Keep proper footing and balance at all times.
13. Maintain tools with care
- Keep tools clean for better and safer performance. Fellow instructions for lubricating and
changing accessories,inspect tool cords periodically and if damaged, have repaired by autho
rized service facility. Inspect extension cords periodically and replace if damaged. Keep hand
les dry, clean and free from oil and grease.
14. Disconnect tools
- When not in use, before servicing, and when changing accessories such as blades, bits and
cutters.
15. Remove adjusting keys and wrenches
- Form the habit of checking to sea that keys and adjusting wrenches are removed from tool
before turning it on.
16. Avoid unintentional starting
-Don't carry plugged-in tool with nger on switch. Be sure switch is o when plugging in.
17. Outdoor use extension cords
- When tool is used outdoors, use only extension cords intended for use outdoors and sat
marked.
18. Stay alert
- Watch what you are doing. Use common sense. Do not operate fool when you are tired.
5

BRUSHLESS TECH series
BRUSHLESS CORDLESS IMPACT DRILL
19. Check damaged parts
- Before further use of the tool, a guard or other part that is damaged should be carefully checked to
determine that it will operate properly and per form its intended function. Check for alignment of
moving parts, binding of moving parts,breakage of parts, mounting, and any other conditions that may
aect its operation. A guard of other part that is damaged should be properly repaired or replaced by an
authorized service canter unless otherwise indicated elsewhere in this instruction manual. Have defective switches replaced by an authorized service center. Do not use tool if switch does not turn it on and O.
20. Warning
- The use of any other accessory or attachment other than recommended in this operating instruction or
the original catalogue may present a risk of personal injury.
21. Have your toot repaired by an expert
- This electric appliance is in accordance with the relevant salty rules. Repairing of electric appliances may
be carried out only by experts otherwise it may cause considerable danger for the user.
Important charging notes
1. Do not store in locations where the temperature may exceed 40ºC.
2. Charge only at ambient temperatures between 4ºC and 40ºC .
3. Charge only using the charger provided with the tool as other chargers might use dierent
amperages and can damage or destroy your battery and /or screwdriver
4. Unplug charger before attempting to clean.
5. Do not immerse charger in water or any other liquid.
6. Charging time around 1-2hours
Caution: Never attempt to open the battery pack for any reason. If the plastic housing of the battery pack
breaks or cracks, return it to a service center for recycling.
Warning! Do not allow liquid to enter charger. Electric shock could result. To cool the battery pack after
use, avoid placing the charger in a warm environment such as in a metal shed or a non-insulated trailer.
6

Specications
No load speed
BRUSHLESS TECH series
BRUSHLESS CORDLESS IMPACT DRILL
20VVoltaje
Brushless Tech motorMotor
2 MechanicsGears
O-500RPMSpeed 1
0-1800RPMSpeed 2
0-8.000/0-28.800BPMImpact force
Torque settings
Max. capacity
Sound pressure level
Sound power level
50 NmMax. torque
20 +
13mmSteel
13mmConcrete
30mmWood
/2" Metal without key with lock Chuck capacity
1.3 KgWeight
LPA=71.03dB (A), K=3dB (A)No load
LPA=74.6dB (A), K=3dB (A)Perforation in concrete
LWA=82.03dB (A), K=3dB (A)No load
LWA=85.6dB (A), K=3dB (A)Perforation in concrete
Vibration
Perforation In metal
Drill Screw Without hammer
AH, D=1.892m/s² <2.5m/ s², K=1.5m/ s²
AH, D=O.887m/ s² <2.5m/ s², K=1.5m/ s²
AH, ID=10.12m/s², K=1.5m/ s²Perforation in concrete
7

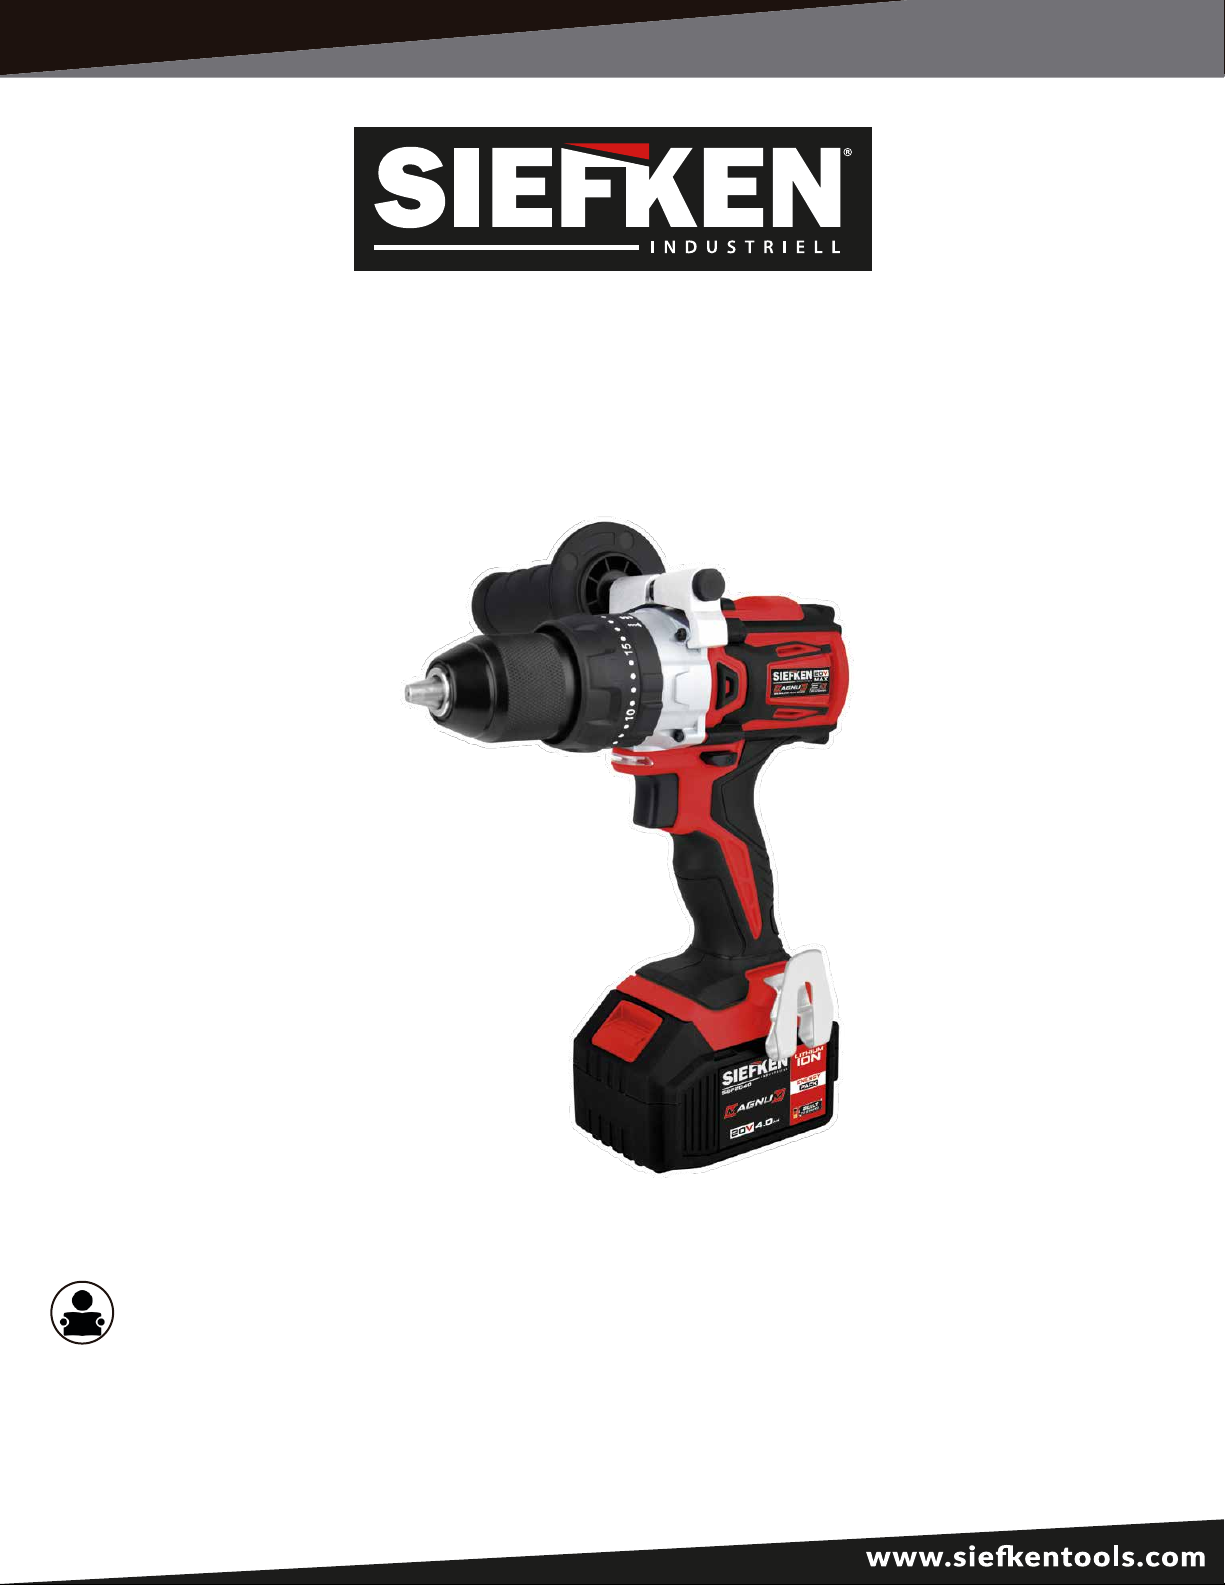
Features
1. Side handle
2. Metal chuck
3. Torque settings
4. Handle
5. Battery input
6. Belt Holder
BRUSHLESS TECH series
BRUSHLESS CORDLESS IMPACT DRILL
1
2
3
6
4
5
ADJUSTABLE TORQUE
The drill has a 20+3 position clutch.
TWO-SPEED GEAR BOX
The two-speed gear box is designed for drilling or driving at LOW or HIGH speeds. A slide
switch is located on top of your drill for selecting the appropriate speed.
VARIABLE SPEED
The variable-speed trigger switch delivers higher speed with increased pressure and lower
speed with decreased trigger pressure.
KEYLESS CHUCK
The keyless chuck allows you to hand-tighten or release the drill bit in the chuck jaws.
FORWARD/REVERSE/CENTER LOCK
The direction-of-rotation selector located above the trigger switch changes the direction of bit
rotation. Setting the trigger switch in the OFF (center lock) position helps to reduce the
possibility of accidental starting when not in use.
LED WORK LIGHT
Pressing the trigger switch illuminates the LED worklight, located on the front of the Drill Driver.
This feature provides extra light for increased visibility.
8

BRUSHLESS TECH series
BRUSHLESS CORDLESS IMPACT DRILL
OPERATION
CHARGING THE BATTERY
WARNING: The charger and battery pack are specically designed to work together so do not attempt to
use any other devices. Never insert or allow metallic objects into your charger or battery pack connections because an electrical failure and hazard will occur.
Your battery pack is UNCHARGED and you must charge once before use. The charger is designed to use
standard household 230volt 50Hz power.
1. Plug the charger adapter into a suitable power supply. The red light will on;
2. A discharged battery at normal ambient temperature will take approximately 1-2 hour to reach full
charge. When charging is complete, the red light will o and only the green light will be illuminated.
BATTERY AND CHARGER SAFETY FEATURES
OVER CHARGING PROTECTION
The over charging protection will ensure that the battery is never overcharged. When the battery has
reached its fully charge capacity, the charger will automatic shut o, protecting the internal components
of the battery from being damaged.
OVER DISCHARGE PROTECTION
An internal component of the battery pack is an over discharge protector. This feature will stop the
battery from discharging beyond the recommended lowest safety voltage.
OVER HEAT PROTECTION
The battery has an internal thermister cut o censor which will cease the charging cycle if the battery
becomes hot during the charging process. This thermister censor will also stop the battery from operating should the battery become too hot during the operation of the tool. This can happen when the tool
is overloaded or being used for extended periods of time. Up to 30 minutes in cooling time may be
required depending on ambient temperature and operation being performed.
9

BRUSHLESS TECH series
BRUSHLESS CORDLESS IMPACT DRILL
OVER CURRENT PROTECTION
Should the battery be overloaded and the maximum current draw be exceeded, the battery will
temporarily stop working to protect the internal components. The battery will resume to normal
operation once the excessive current draw has returned to normal safe level. This may take a few
seconds.
SHORT CIRCUIT PROTECTION
If the battery pack was to short circuit the short circuit protector would immediately stop the battery
pack from operating. This will ensure that no further internal components of the battery or the tool
is damaged.
INSTALLING AND REMOVING THE BATTERY PACK FROM THE TOOL
TO REMOVE BATTERY PACK:
Press the pushlock button (5) and pull the battery pack (4) out of the equipment as shown in Fig.
10

TRIGGER SWITCH & REVERSING BUTTON
BRUSHLESS TECH series
BRUSHLESS CORDLESS IMPACT DRILL
The drill is turned ON and OFF by pulling and releasing the trigger switch
(1). The farther the trigger is depressed, the higher the speed of the drill. A forward/reverse control
button determines the direction of the tool and also serves as a lock o button.
To select forward rotation, release the trigger switch and depress the forward/reverse control button to
the left. To select reverse, depress the forward/reverse control button the opposite direction.
NOTE: The center position of the control button locks the tool in the o position. When changing the
position of the control button, be sure the trigger is released.
ELECTRIC BRAKE
To stop the Drill Driver, release the trigger switch and allow the tool to come to a complete stop. The electric brake quickly stops rotating. This feature engages automatically when you release the trigger switch.
11

BRUSHLESS TECH series
BRUSHLESS CORDLESS IMPACT DRILL
Perforación en metal; Utilice un broca de acero al perforar en metal
NOTA: Asegúrese de que la broca esta siempre fría, use un líquido no inamable.
1. Sujete la pieza de trabajo. La pieza de trabajo debe quedar plana sobre el banco de trabajo.
2. Marque la posición de los agujeros con un punzón.
3. No fuerce la herramienta - no presione con demasiada fuerza el taladro. Comience a perforar a baja velocidad para que el taladro no se deslice lejos de la marca de perforación. Continuar perforando a velocidad
normal.
NOTA: El taladro puede atascarse en agujeros profundos. En tal caso, el taladro o la herramienta pueden
dañarse si el torque es demasiado alto. Suelte de forma inmediata el interruptor de alimentación si el
taladro se atasca. Cambie la rotación al sentido contrario a las agujas del reloj y opere el taladro a baja velocidad.
Perforación en plástico; Utilice una broca de acero para taladrar en plástico y siga las instrucciones para
perforar en madera.
MODO ATORNILLADOR
NOTA:
Compruebe que la punta está correctamente insertada antes de empezar a trabajar.
No apriete demasiado los tornillos – hay riesgo de dañar la cabeza del tornillo o la rosca.
Apriete de Tornillos
1. Ajuste el selector de rotación en sentido horario.
2. Coloque la punta de forma vertical sobre la cabeza del tornillo. De lo contrario, el tornillo puede dañarse.
3. Presione la broca rmemente contra el tornillo y apriete el tornillo.
4. Cuando el tornillo haya entrado, suelte el interruptor de encendido antes de dejar de presionar el tornillo, de lo contrario puede dañar el tornillo o la cabeza del tornillo. La punta o herramienta puede dañarse si
no suelta el interruptor de alimentación inmediatamente.
12

BRUSHLESS TECH series
BRUSHLESS CORDLESS IMPACT DRILL
TWO - SPEED GEAR BOX SWITCH
The drill has a two-speed gear box switch designed for drilling or driving at LOW or HIGH speeds. A slide
switch is located on the top of the drill to select either LOW or HIGH speed. When using drill in the LOW
speed range, the speed will decrease and the drill will have more power and torque.
When using drill in the HIGH speed range, the speed will increase and the drill will have less power and
torque. Use LOW speed for high power and torque applications and HIGH speed for fast drilling or driving
applications.
Use LOW speed for starting holes without a center punch, drilling metals or plastic, drilling ceramics, or in
applications requiring a higher torque. HIGH speed is better for drilling wood and wood composites and
for using abrasive and polishing accessories.
NOTE: Avoid running the drill at LOW speed for extended periods of time. Running at LOW speed under
constant usage may cause the drill to become overheated. If this occurs, cool the drill by running it without
a load at HIGH speed.
CAUTION: Never change gears while the tool is running. Failure to obey this caution could result in serious
damage to the drill.
LED WORKLIGHT
The LED worklight, located on the front of the Drill/Driver, will illuminate when the trigger switch is depressed. This provides additional light on the surface of the workpiece for operation in lower-light areas. The
LED worklight will turn o when the trigger switch is released.
TORQUE ADJUSTMENT RING
13

BRUSHLESS TECH series
BRUSHLESS CORDLESS IMPACT DRILL
This tool is tted with a torque adjustment ring to select the operating mode and to set the torque for tightening screws. Large screws and hard workpiece materials require a higher torque setting than small
screws and soft workpiece materials.
For drilling in wood, metal and plastics, set the collar to the drilling position symbol. For screwdriving, set
the ring to the desired setting. If you do not yet know the appropriate setting, proceed as follows:
1. Set the collar to the lowest torque setting.
2. Tighten the rst screw.
3. If the clutch ratchets before the desired result is achieved, increase the ring setting and continue tighte
ning the screw.
4. Repeat until you reach the correct setting. Use this setting for the remaining screws.
Function adjustment
It has Screw/Drill/Impact
14

BRUSHLESS TECH series
BRUSHLESS CORDLESS IMPACT DRILL
Select the function
Driving
Turn the selector until the arrow on the appliance points to
Turn the Torque adjustment ring from (1) to (20) until the desired result is obtained.
Drilling
Turn the selector until the arrow on the appliance points to
Drilling with Impact Function
Turn the selector until the arrow on the appliance points to
DRILLING
1. Use sharp drill bits only.
2. Check the direction of rotation selector for the correct setting (forward or reverse).
3. Support and secure work properly, as instructed in the Safety Instructions.
4. Use appropriate and required safety equipment, as instructed in the Safety Instructions.
5. Secure and maintain work area, as instructed in the Safety Instructions.
6. Run the drill very slowly, using light pressure, until the hole is started enough to keep the drill bit from
slipping out of it.
7. Apply pressure in a straight line with the bit. Use enough pressure to keep the bit biting but not so much
as to stall the motor or deect the bit.
8. Hold the drill rmly with two hands to control its twisting action.
9. DO NOT CLICK THE TRIGGER OF A STALLED DRILL OFF AND ON IN AN ATTEMPT TO START IT. DAMAGE
TO THE DRILL CAN RESULT.
10. Minimize stalling on breakthrough by reducing pressure and slowly drilling through the last part of the
hole.
11. Keep the motor running while pulling the bit out of a drilled hole. This will help reduce
jamming.
15

BRUSHLESS TECH series
BRUSHLESS CORDLESS IMPACT DRILL
DRILLING IN WOOD
For maximum performance, use high speed steel or brad point bits for wood drilling.
1. Begin drilling at a very low speed to prevent the bit from slipping o the starting point.
2. Increase speed as the drill bit bites into the material.
3. When drilling “through” holes, place a block of wood behind the workpiece to prevent
ragged or splintered edges on the back side of the hole.
DRILLING IN METAL
For maximum performance, use high speed steel bits for metal or steel drilling.
1. When drilling metals, use light oil on the drill bit to keep it from overheating. The oil will prolong the life
of the bit and increase the drilling action.
2. Begin drilling at a very low speed to prevent the bit from slipping o the starting point.
3. Maintain a speed and pressure which allows cutting without overheating the bit. Applying too much
pressure will:
• Overheat the drill
• Wear the bearings
• Bend or burn bits
• Produce o-center or irregular-shaped holes
WARNING! Always wear safety goggles or safety glasses with side shields during power tool operation or
when blowing dust. If operation is dusty, also wear a dust mask.
WARNING! To ensure safety and reliability, all repairs should be performed by a qualied service technician
at Authorized Service Center.
MAINTENANCE
Your tool requires no additional lubrication or maintenance. There are no user serviceable parts in your
power tool. Never use water or chemical cleaners to clean your power tool. Wipe clean with a dry cloth.
Always store your power tool in a dry place. Keep the motor ventilation slots clean. Keep all working controls free of dust.
16

BRUSHLESS TECH series
BRUSHLESS CORDLESS IMPACT DRILL
Occasionally you may see sparks through the ventilation slots. This is normal and will not damage your
power tool.
Avoid using solvents when cleaning plastic parts. Most plastics are susceptible to damage from various
types of commercial solvents. Use clean clothes to remove dirt, dust, oil, grease,
etc.
WARNING! To avoid serious personal injury, always remove the battery pack from the tool when cleaning
or performing any maintenance.
WARNING! When servicing, use only identical replacement parts. Use of any other parts may create a
hazard or cause product damage. To ensure safety and reliability, all repairs should be performed by a qualied service technician at an Authorized Service Center.
17

BRUSHLESS CORDLESS IMPACT DRILL
Built
to Exceed
BRUSHLESS TECH series
3
AÑOS
unbeatable
WARRANTY
Unübertrefflich Garantie
NO COST
SERVICE
Service ohne Kosten
TOTAL
SATISFACTION
Total Zufrieden
3 YEAR WARRANTY
Each tool SIEFKEN INDUSTRIELL has warranty to the original buyer from being free of defects in materials and labor.
Its subjected to certain exceptions, SIEFKEN will fix or replace any part of any power tool, after examinated, and if its determined by siefkenn like material
defective or labor by a period of (3) years*, after the date of the purchase, at least theres any other thing pointed out. The power tool must be returned to
the SIEFKEN service center location or the service center authorized by SIEFKEN, the shipment must be paid and secure. Must include a copy of the proof
of purchase with the returned product. This warranty does not apply to damages that SIEFKEN determines that are as a result of maintenance done by
someone who does not belonged to siefken service center or associates, also by incorrect use, alterations, abuse, natural usage nor accidents.
FREE SERVICE
Siefken includes in its tools 5 free preventive maintenance by year during the warranty time of the tool.
Also, any corrective service will have a 1 year warranty. (Does not apply for service done by any person that does not belong to the siefken staff, also like
damaged made by incorrect use, alterations, abuse, natural usage nor accidents)
TOTAL SATISFACTION
If the siefken tool do not satisfies the need in work, during the 30 days after your purchase you will be able to change your power tool with on of the same
reference but with more capacity just by paying the difference.
To make this warranty valid you should present the warranty policy sealed or the original invoice and return the entire product, without any damages, with
its accessories and original packaging to the distribution network or service centers.
18

 Loading...