

Page 1

IDM1xx WLAN
Hand-held Scanners
Hand-held Line
PROGRAMMING MANUAL
Page 2

IDM
WLAN
S
S
Revision History
Rev. No. Released Date Description
Rev. A1 Feb.09, 2012 First Release
SICK makes no warranty of any kind with regard to this publication, including, but not limited to, the implied warranty of
merchantability and fitness for any particular purpose. SICK shall not be liable for errors contained herein or for incidental
consequential damages in connection with the furnishing, performance, or use of this publication. This publication contains
proprietary information that is protected by copyright. All rights are reserved. No part of this publication may be photocopied,
reproduced or translated into any language, in any forms, in an electronic retrieval system or otherwise, without prior written
permission of SICK.
Reference Manual
8014567/2012-02-09
© SICK AG · Germany · All rights reserved · Subject to change without notice
2
Page 3

IDM
WLAN
S
S
Warranty
The currently released status of SICK General Terms of Delivery Factory Automation and Logistics Automation shall apply
Regulatory
FCC, CE
RohS All WLAN IDM devices are conform to RohS standards
Print out this manual
If you want to print out this manual please ensure that the original size is remained and the print out is of good quality.
Otherwise the configuration codes contained in this manual may be distorted and cannot be scanned anymore.
Deutsche Version / German version
Das Handbuch ist auch in deutscher Sprache verfügbar. Es kann unter www.sick.com heruntergeladen werden.
This manual is available in German language as well. You can download it on www.sick.com.
Reference Manual
8014567/2012-02-09
© SICK AG · Germany · All rights reserved · Subject to change without notice
3
Page 4

IDM
WLAN
S
S
Table of Contents
Getting Started
Getting Familiar with Your IDM WLAN 5
Preparation before Using 7
Install necessary software 9
Find out required information for network settings 10
Further settings 11
Connecting the IDM WLAN scanner
Ad Hoc Connection 15
Infrastructure mode (access point) 23
Batch Mode
Configuration and running batch mode 25
Appendix
Useful Tools 28
Indications 31
Symbology ID Table 33
HEX/ASCII Reference Table 34
Reference Manual
8014567/2012-02-09
© SICK AG · Germany · All rights reserved · Subject to change without notice
4
Page 5
IDM
WLAN
IDM
WLAN
S
S
Fi
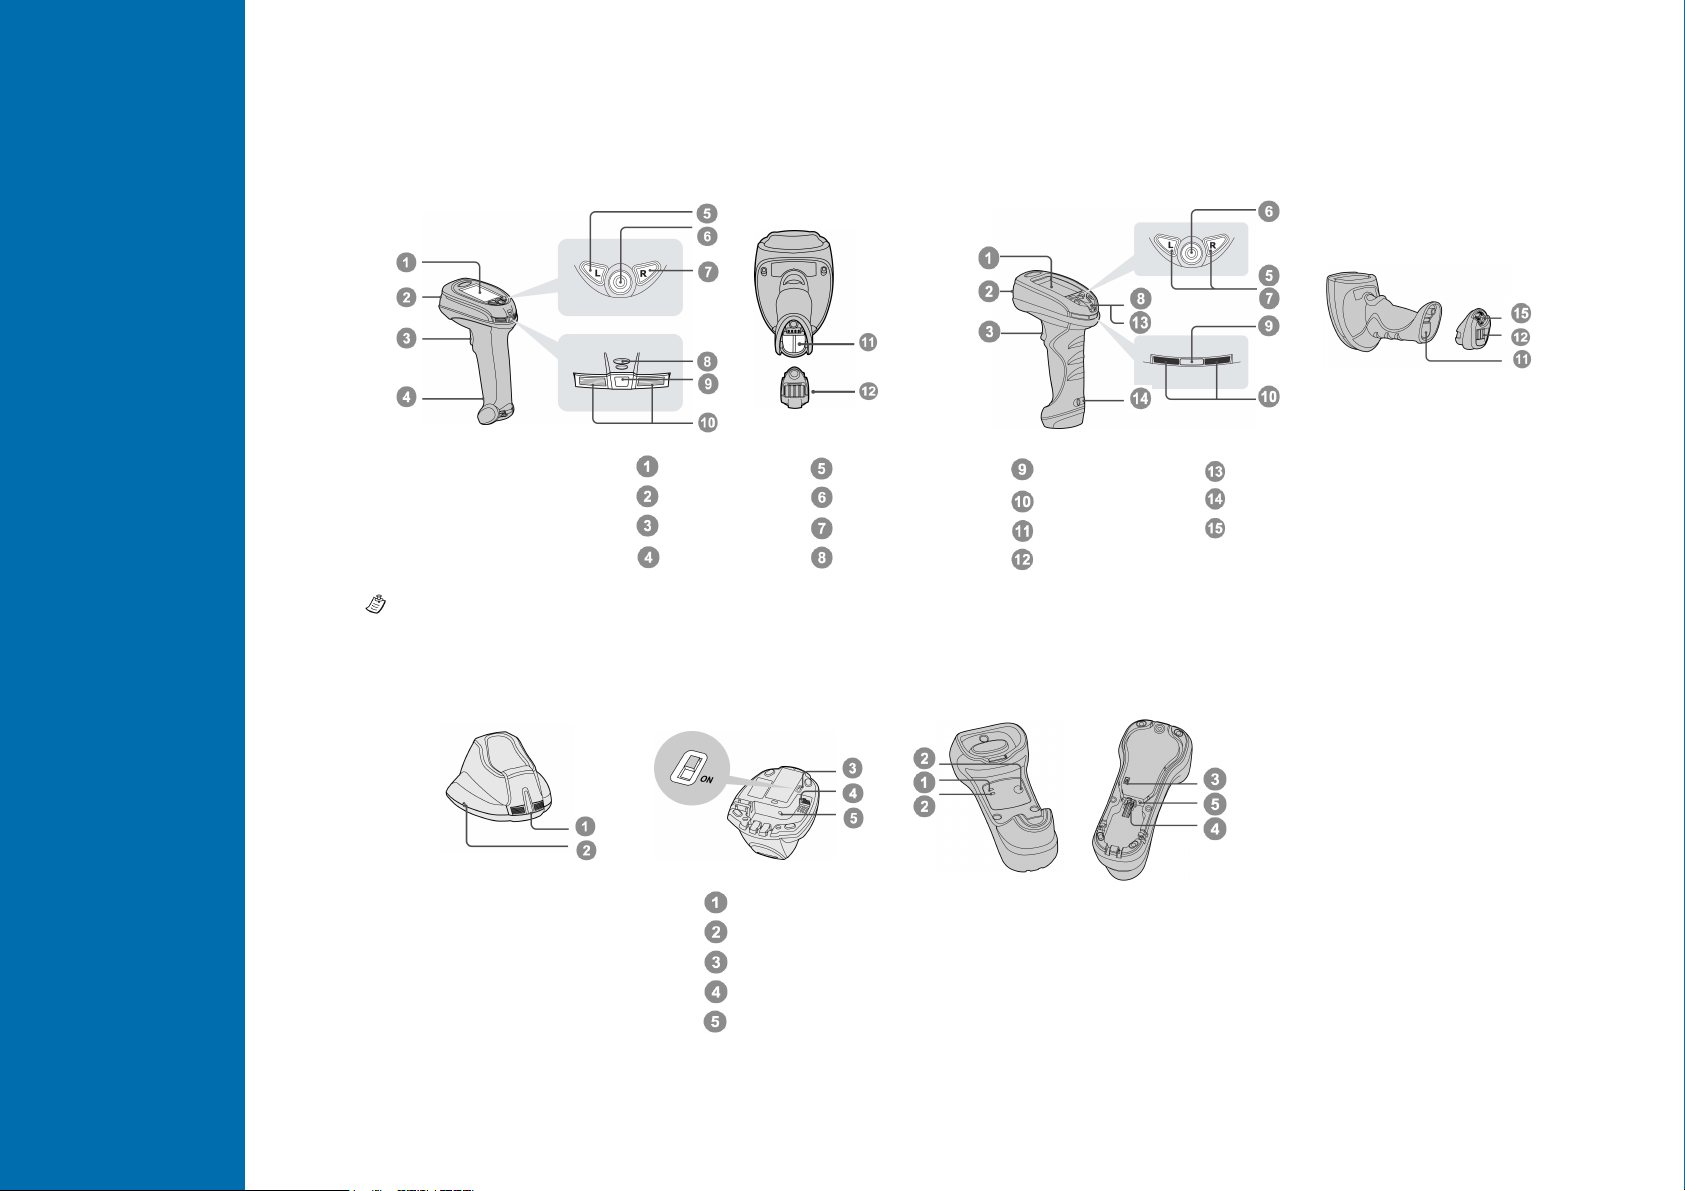
Getting Familiar with Your IDM WLAN
IDM140WLAN Series Scanner IDM160WLAN Series Scanner
The Navigation Key provides up, down, left and right 4-direction navigation. And the Center key is used to launch an
application, select an item, or activate the Virtual Keyboard.
LCD Display
Scan Window
Trigger
Reset Button
Left Function Key
Navigation Key
Right Function Key
Beeper Hole
Link Indicator
Status Indicator
Battery Cavitiy
End cap
Tether Plate
Lanyard Cat
Profile
L
No Wi-
Reference Manual
IDM140 and IDM160 charging cradle
8014567/2012-02-09
Power Indicator
Reserved
USB Bus Power Switch
USB interface port
DC Power Jack
© SICK AG · Germany · All rights reserved · Subject to change without notice
5
Page 6
IDM
WLAN
IDM
WLAN
S
S
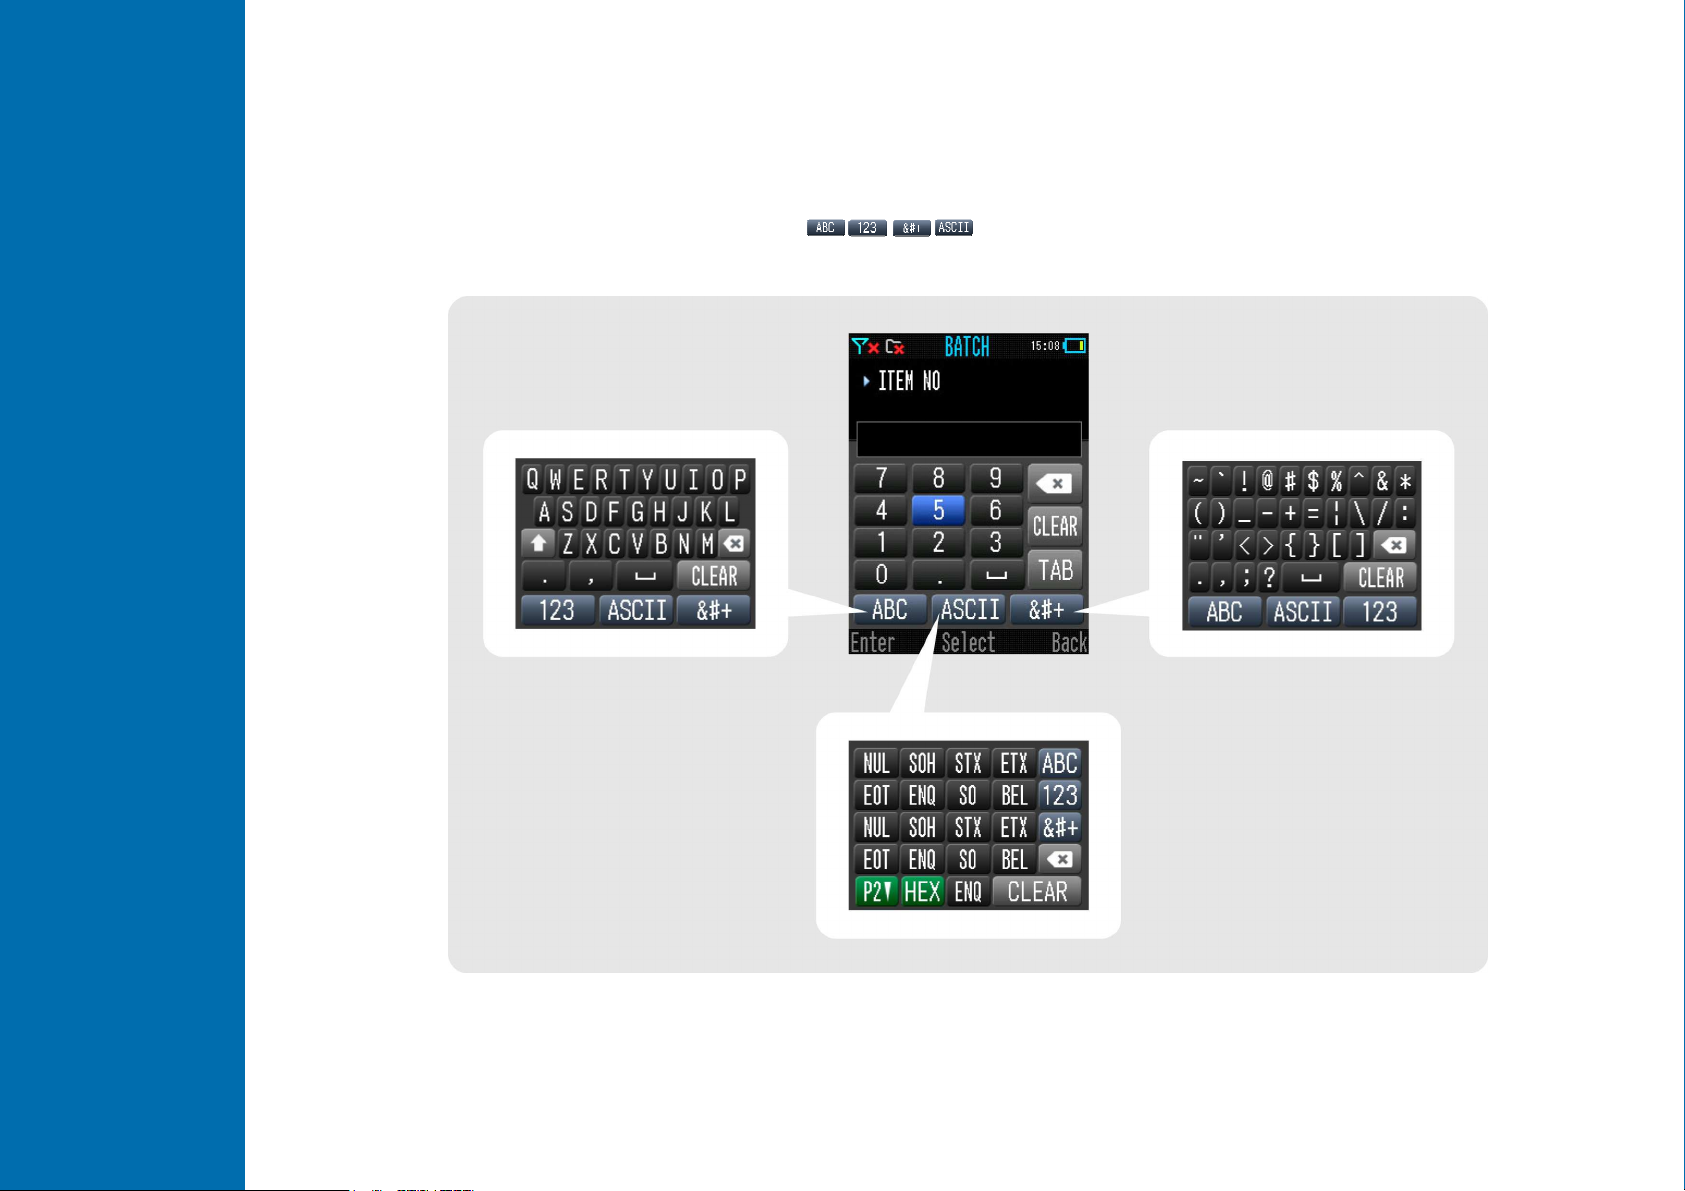
Alphabet
Keyboard
ASCII
Keyboard
Symbol Keyboard
Virtual Keyboard
A unique virtual keyboard has been provided by the Wi-Fi scanner to fulfill various inputs of alphabet, number, symbol and
ASCII value. You can use 4 toggle keys ( ) to switch into different keyboard layout before using the
navigation key to locate your desired inputs for information entering.
Reference Manual
8014567/2012-02-09
© SICK AG · Germany · All rights reserved · Subject to change without notice
6
Page 7
IDM
WLAN
IDM
WLAN
S
S
The scanner
) or via turning the integrated thumb wheel
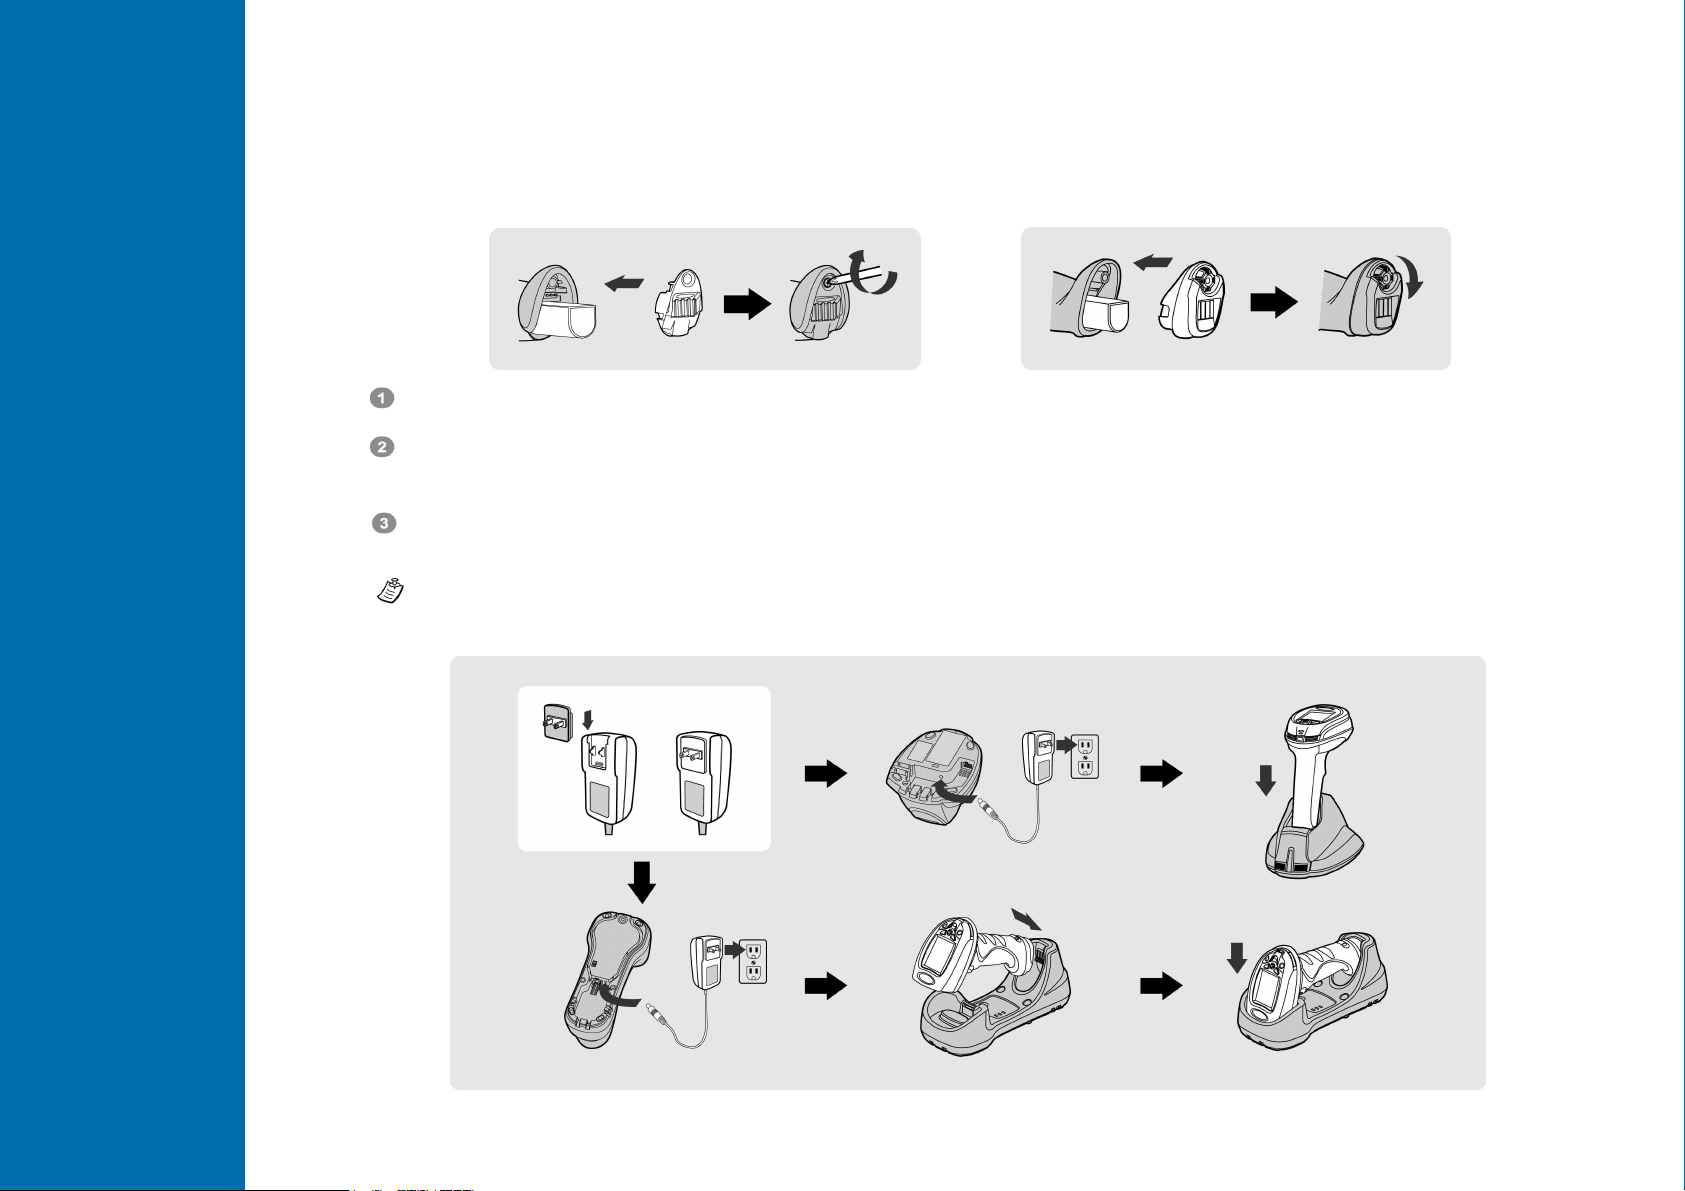
You can use the overlapping battery label to pull out the battery if needed.
Preparation before Using
Install the Battery
Ensure the battery contacts of the battery pack are facing the charging contacts inside the battery cavity.
Slide the battery pack into the battery cavity until hearing a click sound before locking it with the end cap.
will give 4 beeps when the battery pack is installed properly if the battery pack still has power.
Secure the end cap with the screw provided (IDM140-WLAN
(IDM160-WLAN).
Charge the Battery
Reference Manual
8014567/2012-02-09
© SICK AG · Germany · All rights reserved · Subject to change without notice
7
Page 8
IDM
WLAN
IDM
WLAN
S
S
Plug the DC power cord of the power supply unit into the DC power jack of the cradle. The cradle will issue the power on
) indicator of smart cradle will give one blue blink. The
ttery is not fully charged.
USB 3.0 is available in your host device, both battery charging and regular operation can be supported by the USB
cradle and host device
Plug the AC power plug into the appropriate AC wall socket.
beeps. The center (IDM140 cradle) or upper (IDM160 cradle
power indicator of charging cradle will turn steady blue.
Place the scanner on the cradle. The status indicator of scanner will turn steady red if the ba
When the battery is fully charged, the status indicator of scanner will flash green at regular interval.
Please charge the new battery pack for 8 hours prior to the first use.
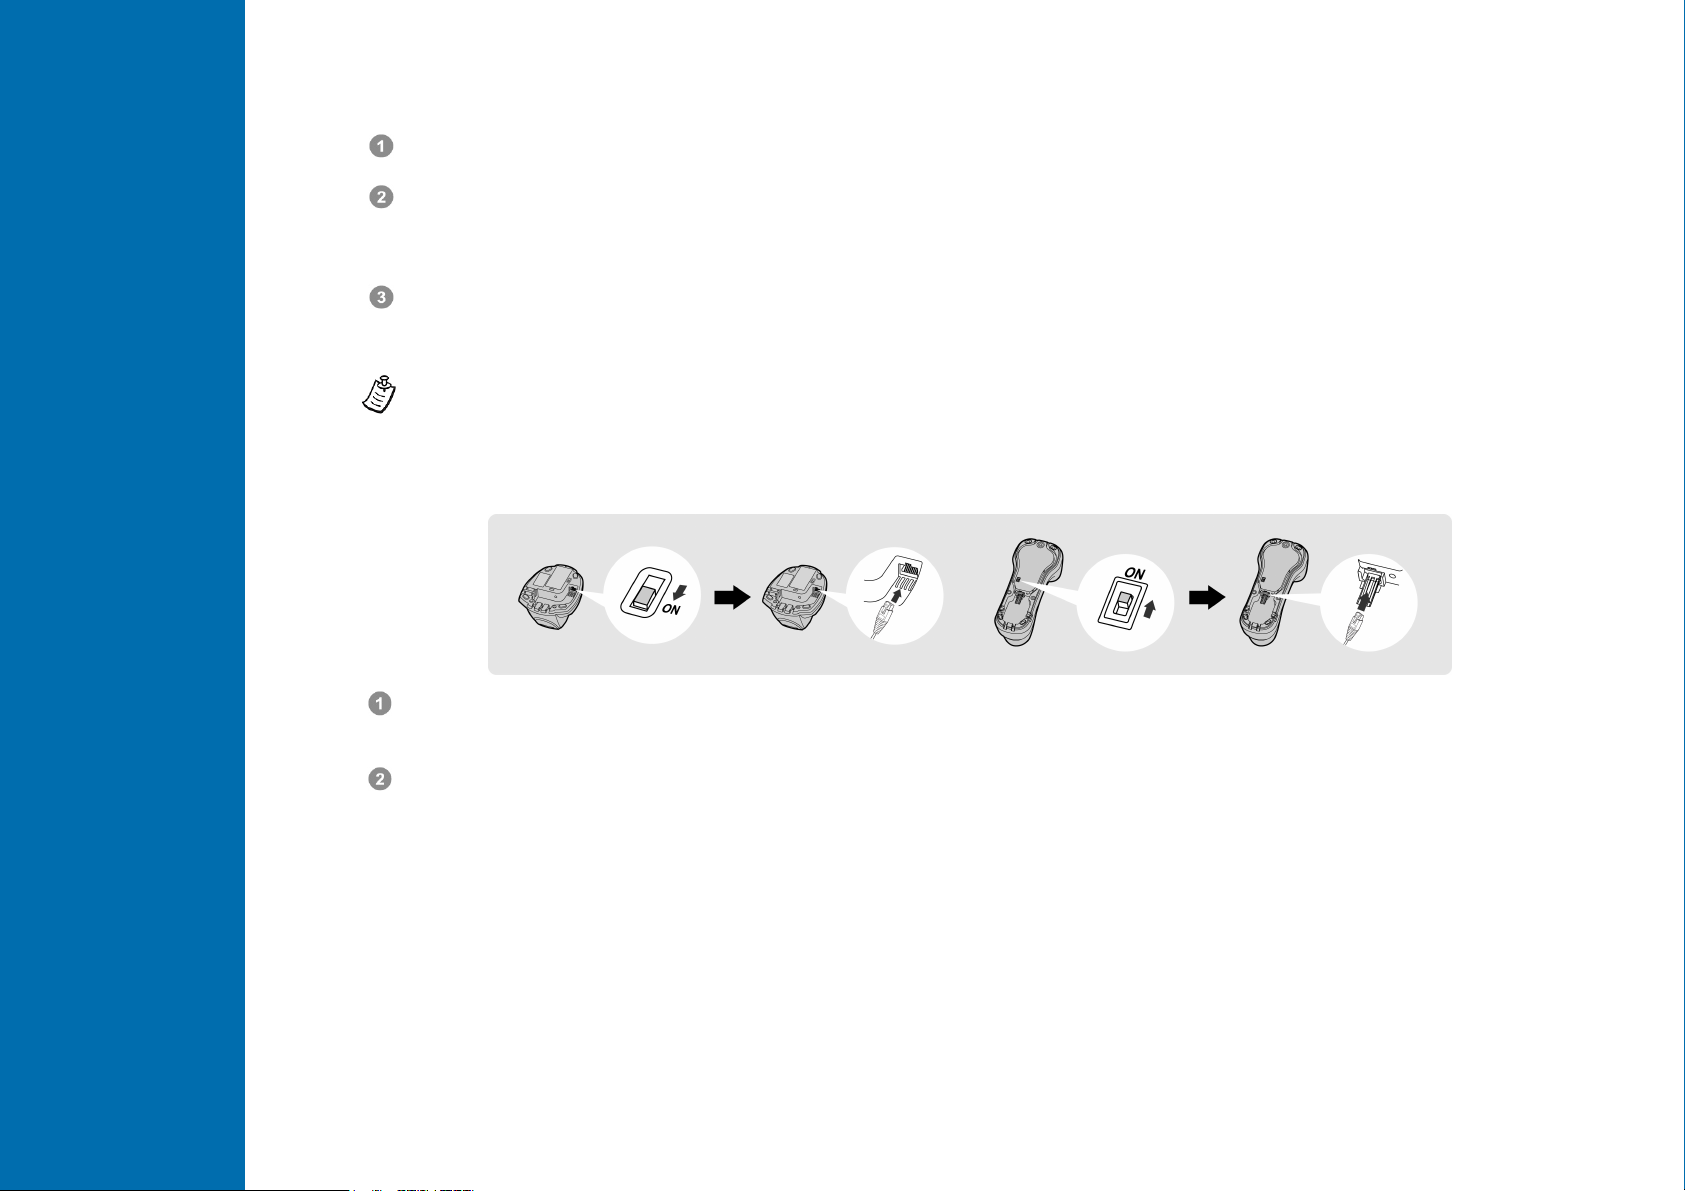
Use USB Bus Power
If
Bus Power without using external power supply.
If you want to use this feature, please slide the USB bus power switch to “ON”. Then connect the
via USB cable.
Reference Manual
8014567/2012-02-09
© SICK AG · Germany · All rights reserved · Subject to change without notice
8
Page 9

IDM
WLAN
IDM
WLAN
S
S
Install necessary software
Before you start using the Wi-Fi scanner, you are recommended to install following software into your host machine. You can
download the software for free on www.sick.com.
SICK WaveCentre
The WaveCentre is a useful Windows-based wireless management utility together with an IP virtual COM software driver.
Once you installed WaveCentre into your host machine, it can create a virtual COM port for each connected Wi-Fi scanner
corresponding to its IP address. Then the Wi-Fi scanner will work as a local serial device of the remote host.
SICK IDM Wi-Fi Set Up Tool
By using the SICK IDM Wi-Fi Set Up Tool, you can create Wi-Fi profiles, change configurations and upgrade firmware with
ease. Please note that you have to install the USB virtual COM software driver before using the Set Up Tool.
To connect the scanner to the set up tool you have to set it into host link mode. This can be done via the scanner display
under “Setup” and then “Advanced”. You then need to place the scanner on the cradle and go to section upload after
opening the set up tool software.
Reference Manual
8014567/2012-02-09
© SICK AG · Germany · All rights reserved · Subject to change without notice
9
Page 10

IDM
WLAN
IDM
WLAN
S
S
Find out required information for network settings
SSID
The SSID is an 802.11 service set identifier of Independent Wireless Host or Access Point (AP).
Operation Mode
The Wi-Fi scanner supports both “Infrastructure” and “Ad-Hoc” modes. Please note that if you select Ad-Hoc mode, you are
suggested to use the Static IP. And the Gateway and Subnet Mask have to be the same as the remote host.
Region and Channel
The region is where the Wi-Fi scanner is used, and the channel number must be the same as the channel setting of AP or
the remote host.
Security
The Encryption and Authentication will be used to communicate with the AP or the remote host, such as WEP, WPA and
WPA2.
IP Type
Both Static IP and DHCP can be used in your wireless network. But you are recommended to use Static IP for better
management purpose.
Remote IP Address and Port
The Remote IP Address is an IP address of the remote host. And the Port will be a listen port of e.g. WaveCentre used to
communicate with your Wi-Fi scanners.
Local IP Address
The Local IP Address is the IP address of the Wi-Fi scanner.
Reference Manual
8014567/2012-02-09
© SICK AG · Germany · All rights reserved · Subject to change without notice
10
Page 11
IDM
WLAN
IDM
WLAN
S
S
Further settings
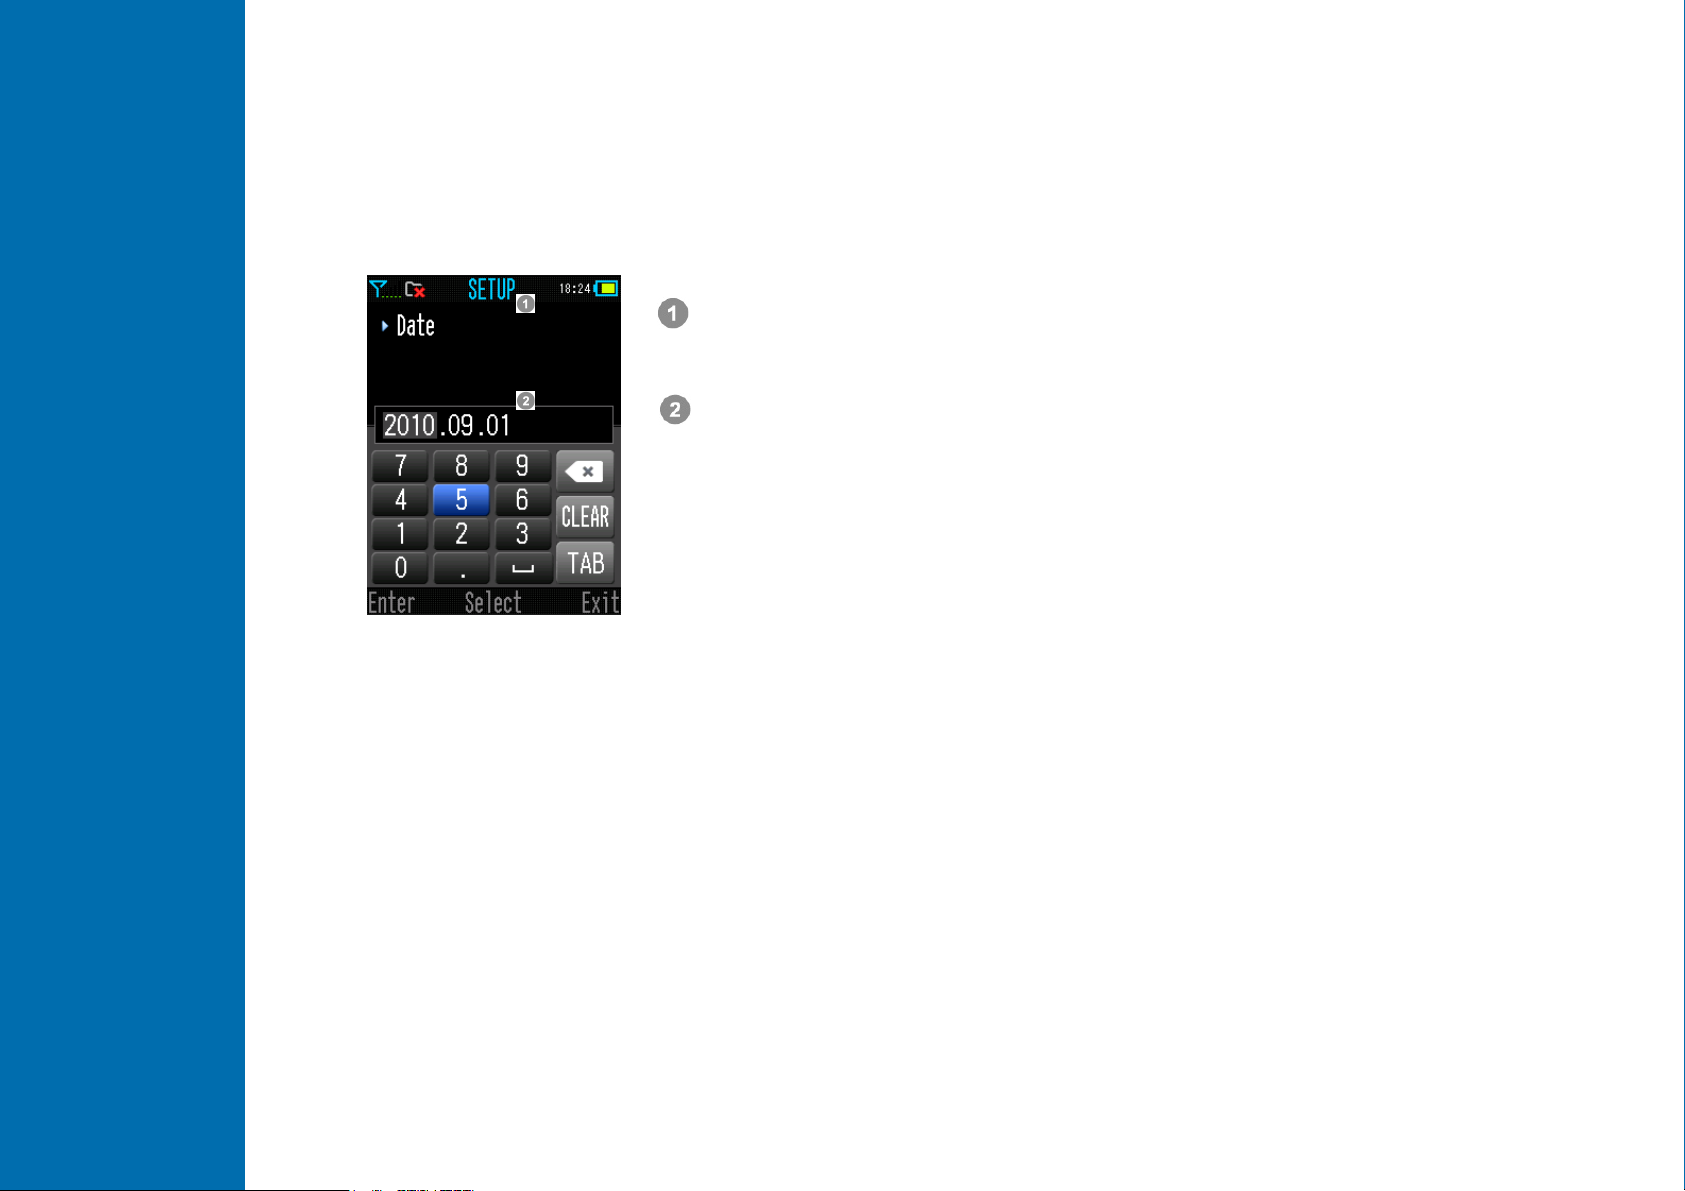
Date and Time Setup
After installing the fully charged battery pack into the battery cavity, the scanner will be powered on and booted
automatically. You will hear power on beeps and the “Date” setup screen will be displayed after the welcome message.
Once you completed the Date and Time settings, a “No Profile” message box will pop-up to remind you there is no profile
existing in your Wi-Fi scanner. Press OK to enter the Desktop (main screen) then go to “SETUP” to create a new Wi-Fi
profile.
Use the virtual keyboard to complete the date information input,
then press “Enter” (L key) to save the setting.
The “Time” setup screen will be displayed after the “Date” setup screen.
Use the virtual keyboard to complete the time information input, then press “Enter” to
save the setting.
Reference Manual
8014567/2012-02-09
© SICK AG · Germany · All rights reserved · Subject to change without notice
11
Page 12

IDM
WLAN
IDM
WLAN
S
S
Power Switch
Main Menu
Signal
Strength
Time
Battery Status
Link Status
Desktop overview
The Desktop is the main screen of Wi-Fi scanner which contains three parts, including Status Bar, Main Menu, and
Function Bar.
Status Bar
Title
Reference Manual
Signal Strength
Connecting to the server
Disconnected
Almost no signal
Very low signal
Low signal
Medium signal
Good signal
8014567/2012-02-09
Function Bar
Battery Status
Low battery
Battery is 20% full
Battery is 40% full
Battery is 60% full
Battery is 80% full
Battery is fully charged
Battery Charging
Link Status Other Icons
No Wi-Fi Profile
COM Port Close
COM Port Open
© SICK AG · Germany · All rights reserved · Subject to change without notice
Access Point
Security
Independent Wireless Device
Profile
12
Page 13

IDM
WLAN
IDM
WLAN
S
S
Configure your WLAN scanner
Once you entered the “SETUP” from the main menu of Desktop, you will find all available configuration items, including Wi-Fi
Profiles, System Settings, Scanner Settings, Interface Settings, Online Scanning, Batch Scanning and Advanced Settings.
Wi-Fi Profiles
Here, not only you can create a new Wi-Fi profile, you can also edit or delete the existing Wi-Fi profiles.
System Settings
In System Setting, you can set or change the date and time, device name, language, LCD brightness, LCD backlight
duration, key tones, administrator and user password and so on.
Scanner Settings
In Scanner Setting, you can set or change the details of each bar code symbology and all available options of Operation and
Output.
Interface Settings
In Interface Setting, you can define the detailed working behaviors of Wi-Fi, USB COM and USB HID.
Online Scanning
In this setting, you can configure all available options of Online Scanning, including barcode type indication, display font size,
record suffix, transmission format, and all detailed controls of Host ACK function.
Batch Scanning
In this setting, you can configure all available options of Batch Scanning, including desired input fields with validation,
transmission sequence, field and record delimiters, timestamp format, “Auto Save” and “Auto Delete” functions, link control,
transmission interface and so on.
Advanced
In Advanced Setting, you can enter Host Link Mode for connecting the Wi-Fi scanner to IDM Wi-Fi Set Up Tool, and perform
Factory Default, Master Default and System Reset. Moreover, you are able to turn on/off the Wi-Fi radio through the setting
of Radio Control.
Reference Manual
8014567/2012-02-09
© SICK AG · Germany · All rights reserved · Subject to change without notice
13
Page 14

IDM
WLAN
IDM
WLAN
S
S
Connecting the WLAN scanner
Before you connect the Wi-Fi scanner to a remote host, you should collect all required information for network setting, for
example SSID name, password, IP adresses available etc.
To start you have to create a correct Wi-Fi profile for the Wi-Fi connection. There are two ways to create Wi-Fi profiles. The
easy way is to use the scanner “SETUP” to create a new profile. If you want to create multiple profiles at the same time, you
may consider using SICK IDM Wi-Fi Set Up Tool.
On following pages it’s described how to set up a connection via using the scanner display and function keys. There are two
possible connection types. One is an ad hoc connection (direct connection between scanner and host), the other is called
infrastructure mode (connection via access point).
Reference Manual
8014567/2012-02-09
© SICK AG · Germany · All rights reserved · Subject to change without notice
14
Page 15

IDM
WLAN
IDM
WLAN
S
S
Ad Hoc Connection with WLAN capable PC
Go to Network settings, right click on wireless networks and open the settings window.
The settings window will open. Mark the Internet protocoll and click on settings.
Reference Manual
8014567/2012-02-09
© SICK AG · Germany · All rights reserved · Subject to change without notice
15
Page 16

IDM
WLAN
IDM
WLAN
S
S
Mark the radio button to use the following IP address and type in your desired
IP address as well as the sub net mask.
Confirm with OK. Note: Other IP addresses, different from the ones used in this
example are possible for sure. But they have to match to each other in terms of
availability and address room.
Afterwards go to wireless networks and press “Add“ under preferred networks.
Reference Manual
8014567/2012-02-09
© SICK AG · Germany · All rights reserved · Subject to change without notice
16
Page 17

IDM
WLAN
IDM
WLAN
S
S
In the following input mask you have to define a name for the network SSID (it’s
recommended to use either upper or lower case characters for easy handling).
This name will also be used within the WiFi profile of IDM scanner.
Unmark the automatic key and insert your desired network key. It has to consist
of 5 or 13 ASCII characters.
Reference Manual
8014567/2012-02-09
After pressing OK go to the advanced section and controll the the type of network
configured. It has to be set to Ad-hoc.
End your setting by clicking on Close.
© SICK AG · Germany · All rights reserved · Subject to change without notice
17
Page 18

IDM
WLAN
IDM
WLAN
S
S
Press OK and go back to network settings.
Right-click on Wireless networks and choose
“view available wireless networks”
Reference Manual
Choose your network and press Connect.
8014567/2012-02-09
© SICK AG · Germany · All rights reserved · Subject to change without notice
18
Page 19

IDM
WLAN
IDM
WLAN
S
S
You will be asked for the network key you created some
minutes before. Type it in and confirm via Connect.
After a short while the connection will be established.
Reference Manual
8014567/2012-02-09
© SICK AG · Germany · All rights reserved · Subject to change without notice
19
Page 20

IDM
WLAN
IDM
WLAN
S
S
Start the WaveCentre Software. It serves as socket
program.
Start the IDM WLAN scanner and go to the set up section.
Select Wi-Fi Profiles and confirm the question with yes.
Reference Manual
8014567/2012-02-09
© SICK AG · Germany · All rights reserved · Subject to change without notice
20
Page 21

IDM
WLAN
IDM
WLAN
S
S
You can either put in the network parameters manually or you can
perform an auto search. The parameters found after auto search
also need to be controlled and partly changed. Note: The remote
IP address is the addres of the PC, the local IP address is the
address of the scanner. The default port setting is 63000.
In both ways it’s essential that the parameters of both PC and
scanner match to each other. Otherwise a connection is not
possible.
After finishing all input press L-key to save profile data. The IDM
scanner will automatically perform a connection attempt. The
connection can take some time. When it is not successful the
scanner will automatically stop after a pre-defined time out. In this
case check the network parameters and control that radio and
WaveCenter have been started.
Reference Manual
8014567/2012-02-09
Also note that security clients, firewalls or different mechanisms
can hinder a connection between scanner and PC.
Another connection attempt can be started by going to the Online
section of the scanner desktop.
© SICK AG · Germany · All rights reserved · Subject to change without notice
21
Page 22

IDM
WLAN
IDM
WLAN
S
S
After successful connection
you can see the connection
status and the radio quality in
the scanner status bar.
Also you can see the scanner
displayed inside the
WaveCenter software. If you
mark the HID box the data
from the scanner will be
converted into keyboard input
data.
After connecting the Wi-Fi scanner to the remote host, you are able to perform the online scanning function by entering
“ONLINE” from the main menu of Desktop. Under this mode, all scanned barcodes will be displayed on the screen (and if
configured also the type of symbology) and sent to the remote host concurrently.
Reference Manual
If the scanner was unable to read very poor or invalid barcode, you can press the “Keyboard” icon to activate Virtual
Keyboard for data entering.
To press “Func” (L key), you are able to view the scan logs and configure the display option. Under Options, you can
configure “Barcode Type Indication”, “Font Size” and so on. All scan logs will be automatically recorded until the log storage
is full.
8014567/2012-02-09
© SICK AG · Germany · All rights reserved · Subject to change without notice
22
Page 23

IDM
WLAN
IDM
WLAN
S
S
Connection with WLAN in infrastructure mode (via access point)
The connection in infrastructure mode requires similar configuration of the IDM WLAN scanner. The main difference is to
configure the access point as gateway. It’s important that the scanners IP adress is in the correct range that can be handled
and is allowed by the access point. Please check access point wireless settings for this.
Example pictures for Communication via Access point:
Example access point settings:
Example PC settings:
Example scanner settings:
Reference Manual
8014567/2012-02-09
© SICK AG · Germany · All rights reserved · Subject to change without notice
23
Page 24

IDM
WLAN
IDM
WLAN
S
S
Example communication:
Port number has to match!
Reference Manual
Example communication result:
8014567/2012-02-09
© SICK AG · Germany · All rights reserved · Subject to change without notice
24
Page 25

IDM
WLAN
IDM
WLAN
S
S
Batch Mode (Offline data collection)
In batch mode is used as a data collection device. It is an ideal cost-effective solution to fulfill most inventory applications.
Before you start to use batch scanning, please enter “SETUP” then select “Batch Scanning” to configure all available
options listed below. Moreover, the “Auto Save” and “Auto Delete” functions will help you to simplify the routine operation of
data collecting.
Input Fields
Besides the field of “Item No.”, three more input fields are available for choice, including “Quantity”, “Location” and
“Timestamp”. By default, both “Item No.” and “Quantity” fields are enabled. Please note that if you changed the composition
of input fields, all stored data will be DELETED.
Validation
You can set the desired input range of each field. The scanner will do the validation automatically after the inputs of each
field are completed.
Field and Record Delimiters
Both field delimiter and record delimiter can be changed to meet your application demand.
Transmission Sequence
The transmission sequence of each field can be re-arranged to meet your needs.
Reference Manual
Transmission Interface
The scanner is preset to transmit all stored data through Wi-Fi. Alternatively, you can transmit the stored data through
physical USB interface by changing the transmission interface to USB COM or USB HID. In this case, a charging cradle has
to be used together with your scanner.
Auto Save
After completing the inputs of each record, the scanner will save the data into storage automatically then go to next record
input immediately. You do not need to press “Save” (L Key) to save data. If you still prefer to save data manually, please
disable this Auto Save function.
Auto Delete
The scanner is preset to keep all stored data after data transmission in case it needs to be retrieved later. You have to delete
all records manually. If you prefer the scanner to perform “Auto Delete” after data transmission, please enable this function.
Link Control
For power saving, the Radio can be disabled during batch scanning. When you want to transmit the data via Wi-Fi, the
scanner will activate the Radio and re-connect automatically.
8014567/2012-02-09
© SICK AG · Germany · All rights reserved · Subject to change without notice
25
Page 26

IDM
WLAN
IDM
WLAN
S
S
Run Batch Scanning
After completing all necessary settings of batch scanning, you can enter “BATCH” from the main menu of Desktop to
perform batch scanning.
Under this mode, all input data will be stored until the memory storage is full. If the “Auto
Save” is enabled, all data will be saved automatically after the inputs of each record are
completed. You can continue to the next record input immediately.
Navigation Key
For manual inputs, you can use the Navigation Key to activate virtual keyboard for manual
data entry. Moreover, you can use the navigation key to browse previous input records as
well.
Press “Func” (R key) to enter the function menu of batch scanning. Then select your desired
function to perform the data transmission or to manipulate the stored records.
Default Screen
Transmit Data
The scanner is preset to transmit the stored data through Wi-Fi. During the transmission
process, the scanner will give continuous short clicks and blue blinks. Then the scanner will
give two short beeps after data transmission is completed.
If you want to transmit the stored data through USB interface, please make sure a cradle has
been properly connected to the host with a USB cable. You have to place the scanner onto
the cradle right after you press “Transmit Data”. All stored data will be transmitted via your
specified interface (USB COM or USB HID).
Input screen with all
available input fields
Reference Manual
8014567/2012-02-09
© SICK AG · Germany · All rights reserved · Subject to change without notice
26
Page 27

IDM
WLAN
IDM
WLAN
S
S
Transmit and Save
To work with SICK WaveCentre, all transmitted data can be saved as a “TXT” or “CSV” file
into your desired destination (folder) of the remote host. Please note that this function is only
available for transmission via Wi-Fi interface.
Delete all Record(s)
If “Auto Delete” function is disabled, the scanner still keeps all stored data after transmission.
You have to manually delete all stored records by executing this function.
Function Menu
Reference Manual
8014567/2012-02-09
© SICK AG · Germany · All rights reserved · Subject to change without notice
27
Page 28

IDM
WLAN
IDM
WLAN
S
S
Useful Tools
Enter “TOOLS” from the main menu of Desktop, you can find several useful tools, including Site Survey, Link Diagnostic,
Data Validation, Scan Test, System Test, Device Information and User Settings.
Site Survey
The Site Survey is a very useful tool for finding all discoverable Access Points (AP) and
Independent Wireless Hosts within radio range. After the “Searching” process is completed, a
list will be provided for reference. You can check the detailed wireless settings of each AP or
Independent wireless host.
Link Diagnostic
The Link Diagnostic is a tool for providing detailed link report. Once you run this tool, you have
to select a desired Wi-Fi profile to perform diagnostic. After that, a detailed report of each link
process will be provided for reference (see left screen). It’s very helpful for locating link problem
if you have difficulty to make a successful link
Reference Manual
8014567/2012-02-09
© SICK AG · Germany · All rights reserved · Subject to change without notice
28
Page 29

IDM
WLAN
IDM
WLAN
S
S
Data Validation
The Data Validation is a very useful tool for you to check valid input with ease. You are able to set and store maximum 10
master data for validation. Once you completed the master data setting, you can scan the barcodes and the scanner will
compare the scanned data for you. If the scanned data is same as one of master data, a “Check” icon will be shown on
the screen. Otherwise, a “Cross” icon will be shown on the screen instead.
System Test
In System Test, you are able to perform most equipment tests, including LCD display, light source, LED indicator, buzzer,
vibrator and keypad.
User Settings
In User Setting, the user is able to configure frequently used settings, such as LCD backlight duration control, key tone and
buzzer tone settings, and vibrator control.
Device Information
You can find most detailed information of your scanner, such as model number, firmware version, MAC address, device
name and so on.
Remote Control
A complete serial command set has been implemented into the Wi-Fi scanner. You can use the Remote Control commands
to control Wi-Fi scanner(s) from the remote host. The most useful remote commands are listed below for your reference.
Remote Message
This command allows you to send message together with beeping
and vibration.
Remote Indication
This command allows you to page the scanner, or send beeping and
vibration from the remote host.
Remote Lock & Unlock
You can use this command to lock or unlock the scanner remotely.
Once you locked the scanner, the scanner can’t work till you send
unlock command.
How to use remote control
If you use SICK WaveCentre together with your Wi-Fi scanner, you can easily use all remote control functions without writing
a program. If you want to use the remote control in your application, please contact your SICK representative to obtain a
detailed documentation for development.
Reference Manual
8014567/2012-02-09
© SICK AG · Germany · All rights reserved · Subject to change without notice
29
Page 30

IDM
WLAN
IDM
WLAN
S
S
Administrator and User Password
Once you enabled the Administrator Password, the scanner will ask you to enter the administrator password before you can
enter “SETUP” to configure the scanner. If you enable the User Password, it will help to prevent any unauthorized use of the
scanner. Moreover, you can limit the available functions for all users.
When the scanner enters into sleep mode, you have to enter administrator password or user password right after the
scanner wakes up. Please note there is NO master password available. You are recommended to keep your preset
passwords in a safe condition for future use.
Reference Manual
8014567/2012-02-09
© SICK AG · Germany · All rights reserved · Subject to change without notice
30
Page 31

IDM
WLAN
IDM
WLAN
S
S
Indications
Scanner:
Descriptions Link Indicator Beeper
Radio connected 1 blue blink per 3.5 sec. Off
Radio disconnected 3 blue blinks per 3.5 sec. Off
During connection Quick blue blinks Short clicks
Radio connection built 1 blue blink per 3.5 sec. 4 beeps in ascending tone
Radio connection lost 3 blue blinks per 3.5 sec. 4 beeps in descending tone
Data Transmission Quick blue blink Short clicks
Descriptions Status Indicator Beeper
Under charging (on cradle) Steady red Off
Fully charged (on cradle) 1 green blink at regular interval Off
Out of memory 2 red blinks 2 long beeps
Reference Manual
Battery power low 1 red blink at regular interval (30sec) 1 beep at regular interval(30sec)
Battery power extremely low 8 red blinks 8 beeps
Good read 1 green blink 1 good read beep
Under Configuration Steady red Off
Upgrade state Steady red Short click
Sleep state / Battery no power Off Off
ACK Time-out Indication Off 3 long beeps
Host ACK received Off 1 beep
Error Beep Off 1 long beep
8014567/2012-02-09
© SICK AG · Germany · All rights reserved · Subject to change without notice
31
Page 32

IDM
WLAN
IDM
WLAN
S
S
Center/Upper
Indicator
Reference Manual
Cradle: Once you supplied power to the cradle via power supply or USB interface, the center/upper indicator will
be steady blue
8014567/2012-02-09
© SICK AG · Germany · All rights reserved · Subject to change without notice
32
Page 33

IDM
WLAN
IDM
WLAN
S
S
Symbology ID Table
Each AIM Code Identifier contains the three-character string ]cm where:
] = Flag Character c = Code Character m = Modifier Character
User def.
Code
Family
UPC
Code 128
Codabar Codabar/NW-7 D F m MSI/Plessey MSI/Plessey R M m
Code 25
IATA IATA O R m
UCC
Coupon
Primary Format
UPC-A m EAN/JAN-8 4
UPC-A with 2 supple.
UPC-A with 5 supple.
UPC-E m EAN/JAN-13 m
UPC-E with 2 supple.
UPC-E with 5 supple.
Example: A UPC-A bar code 012345678950 with 2 supplement 12 is
transmitted as ]E0012345678950]E112
Code 128 B m Code 93 Code 93 H G m
GS1-128 C
Standard/Industrial 2 of
5
Matrix 2 of 5 K X 0 Telepen Telepen T B m
Interleaved 2 of 5 J I m GS1 DataBar GS1 Databar
China Postal Code L X 0
German Postal Code M I 3 Code 39 Trioptic W X 0
UCC Coupon Code Z PDF417 PDF417/Micro PDF417 V L 0
Example : A UPC-A 512345678900 + GS1-128 81010123451297 bar
code is transmitted as]E0512345678900]C181010123451297
Example: A EAN-13 9923456789019 + GS1-128 81010123451297 bar
code is transmitted as ]E09923456789019]C181010123451297
ID
Code
Character
A
E
I S 0 UK/Plessey UK/Plessey S P 0
Character
Code
E
C
AIM ID
Modified
Characte
r
1
2
1
2
1 Code 11 Code 11 P H m
The listed user defined characters are default values.
User def.
ID
Code Family Primary Format
EAN/JAN-8 with 2
supple.
EAN/JAN-8 with 5
supple.
EAN/JAN
EAN/JAN-13 with 2
supple.
EAN/JAN-13 with 5
supple.
Example: A EAN/JAN-8 bar code 49123562 with 5 supplement 12345 is
transmitted as ]E449123562]E212345
Compsoite Composite Code
Code 39 G A m
Code 39
Code 32 G A 0
Codablock Codablock F Y O 0
Korea Post Korea Post Code a X 0
Remark: Above examples are given for the transmission of AIM ID.
Code
Character
N E
F E
X e 0
Code
Charact
er
AIM ID
Modified
Characte
r
1
2
1
2
Reference Manual
8014567/2012-02-09
© SICK AG · Germany · All rights reserved · Subject to change without notice
33
Page 34

IDM
WLAN
IDM
WLAN
S
S
HEX/ASCII Reference Table
H
L
0
1
2
3
4
5
6
7
8
9
A
B
C
D
E
F
0 1 2 3 4 5 6 7
NUL DLE SPACE 0 @ P ` p
SOH DC1 ! 1 A Q a q
STX DC2 " 2 B R b r
ETX DC3 # 3 C S c s
EOT DC4 $ 4 D T d t
ENQ NAK % 5 E U e u
ACK SYN & 6 F V f v
BEL ETB ' 7 G W g w
BS CAN ( 8 H X h x
HT EM ) 9 I Y i y
LF SUB * : J Z j z
VT ESC + ; K [ k {
FF FS , < L \ l |
CR GS - = M ] m }
SO RS . > N ^ n ~
SI US / ? O _ o DEL
Reference Manual
Example: ASCII “A” → HEX “41”; ASCII “a” → “61”
: High Byte of HEX Value
: Low Byte of HEX Value
8014567/2012-02-09
© SICK AG · Germany · All rights reserved · Subject to change without notice
34
Page 35

8014567/2012-02-09 ∙ 5M/ MC/TEO/BU01 ∙ A4 4c int37
Australia
Phone +61 3 9497 4100
1800 334 802 – tollfree
E-Mail sales@sick.com.au
Belgium/Luxembourg
Phone +32 (0)2 466 55 66
E-Mail info@sick.be
Brasil
Phone +55 11 3215-4900
E-Mail sac@sick.com.br
Canada
Phone +1(952) 941-6780
1 800-325-7425 – tollfree
E-Mail info@sickusa.com
Ceská Republika
Phone +420 2 57 91 18 50
E-Mail sick@sick.cz
China
Phone +852-2763 6966
E-Mail ghk@sick.com.hk
Danmark
Phone +45 45 82 64 00
E-Mail sick@sick.dk
Deutschland
Phone +49 211 5301-301
E-Mail kundenservice@sick.de
España
Phone +34 93 480 31 00
E-Mail info@sick.es
France
Phone +33 1 64 62 35 00
E-Mail info@sick.fr
Great Britain
Phone +44 (0)1727 831121
E-Mail info@sick.co.uk
India
Phone +91–22–4033 8333
E-Mail info@sick-india.com
Israel
Phone +972-4-999-0590
E-Mail info@sick-sensors.com
Italia
Phone +39 02 27 43 41
E-Mail info@sick.it
Japan
Phone +81 (0)3 3358 1341
E-Mail support@sick.jp
Magyarország
+36 1 371 2680
Phone
E-Mail office@sick.hu
Nederlands
Phone +31 (0)30 229 25 44
E-Mail info@sick.nl
Norge
Phone +47 67 81 50 00
E-Mail austefjord@sic
k.no
Österreich
Phone +43 (0)22 36 62 28 8-0
E-Mail office@sick.at
Polska
Phone +48 22 837 40 50
E-Mail info@sick.pl
România
Phone +40 356 171 120
E-Mail office@sick.ro
Russia
Phone +7 495 775 05 30
E-Mail info@sick.ru
Schweiz
Phone +41 41 619 29 39
E-Mail contact@sick.ch
Singapore
Phone +65 6744 3732
E-Mail admin@sicksgp.com.sg
South Africa
Phone +27 11 472 3733
E-Mail info@sickautomation.co.za
South Korea
Phone +82-2 786 6321/4
E-Mail info@sickkorea.net
Slovenija
Phone +386 (0)1-47 69 990
E-Mail office@sick.si
Suomi
Phone +358-9-25 15 800
E-Mail sick@sick.fi
Sverige
Phone +46 10 110 10 00
E-Mail info@sick.se
Taiwan
Phone +886 2 2375-6288
E-Mail sales@sick.com.tw
Türkiye
Phone +90 216 528 50 00
E-Mail info@sick.com.tr
United Arab Emirates
Phone +971 4 8865 878
E-Mail info@sick.ae
USA/Canada/México
Phone +1(952) 941-6780
1 800-325-7425 – tollfree
E-Mail info@sickusa.com
More representatives and agencies
at www.sick.com
SICK AG | Waldkirch | Germany | www.sick.com
 Loading...