

1. How to use this guide
This document provides a quick reference for installation and operation IDM
Bluetooth scanners. A complete user guide can be found on www.sick.com
.
The document contains a collection of codes that allow you to configure the
IDM. Factory default values are marked with a ◆ symbol. To configure the
device scan one or in some cases a sequence of codes. In some cases you
also need to scan option codes contained in the back of this quick start guide.
Eine deutsche Version der Kurzanleitung steht auf www.sick.com
zur
Verfügung – for german version of quick start, check www.sick.com.
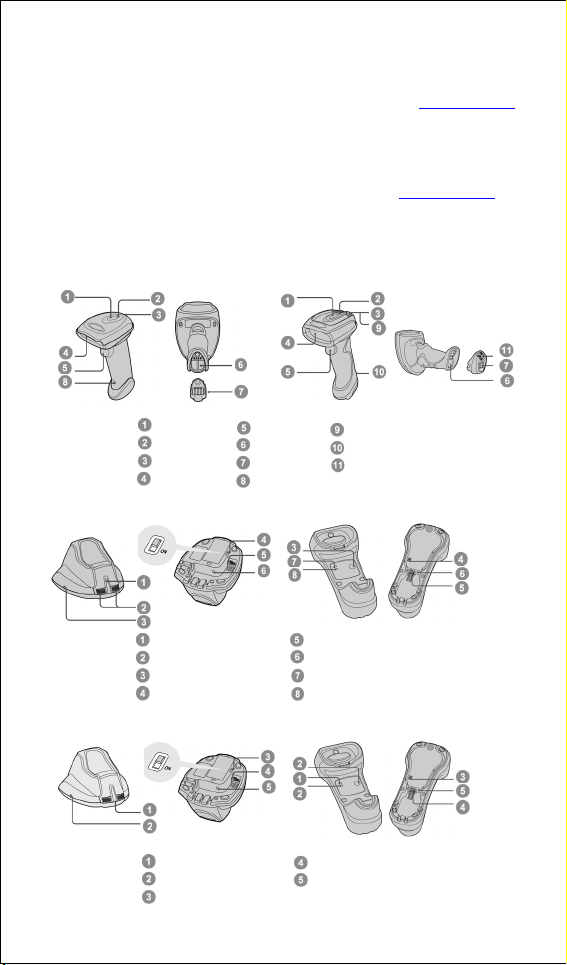
2. Getting familiar with your IDM scanner
IDM140BT Series Scanner IDM160BT Series Scanner
IDM140BT Smart Cradle IDM160-BT Smart Cradle
IDM140BT Charging Cradle IDM160-BT Charging Cradle
Status Indicator
Link Indicator
Beeper
Scan Window
Center Indicator
Side Indicators
Paging/Reset Button
USB 3.0 Bus Power Switch
Power Indicator
Reserved
USB 3.0 Bus Power Switch
Trigger
Battery Cavity
End Cap
Reset Button
Tether Plate
Lanyard Catch
Retaining Screw
Host Interface Port
DC Power Jack
Upper Indicator
Lower Indicator
Host Interface Port
DC Power Jack
2
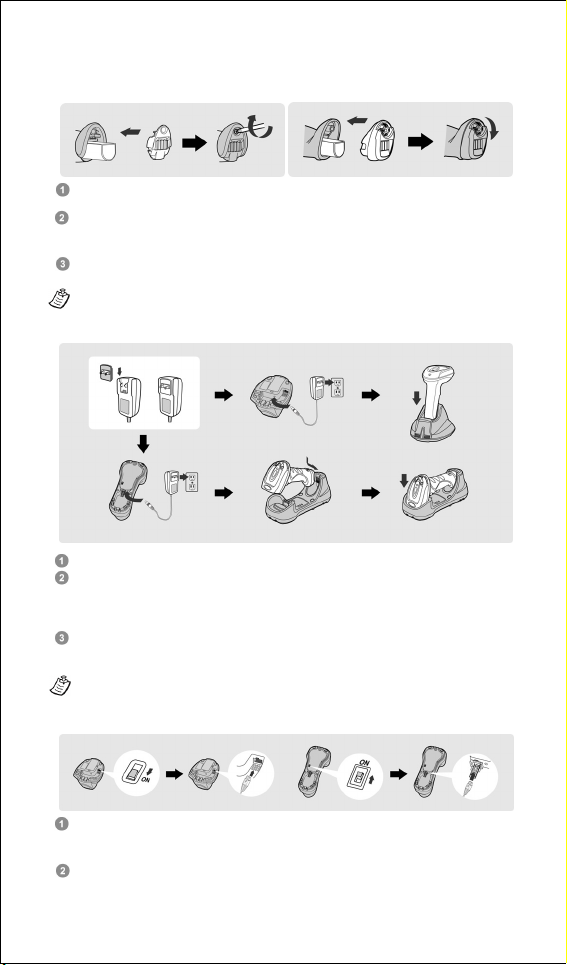
3. Preparations before Using
Y
Install the Battery
Ensure the battery contacts of the battery pack are facing the charging
contacts inside the battery cavity.
Slide the battery pack into the battery cavity until hearing a click sound
before locking it with the end cap. The scanner will give 4 beeps when the
battery pack is installed properly if the battery pack still has power.
Secure the end cap with the screw provided (IDM140BT) or via turning the
integrated thumb wheel (IDM160BT)
ou can use the overlapping battery label to pull out the battery if needed.
Charge the Battery
Plug the AC power plug into the appropriate AC wall socket.
Plug the DC power cord of the power supply unit into the DC power jack of
the cradle. The cradle will issue the power on beeps. The center (IDM140BT
cradle) or upper (IDM160BT cradle) indicator of smart cradle will give one
blue blink. The power indicator of charging cradle will turn steady blue.
Place the scanner on the cradle. The status indicator of scanner will turn
steady red if the battery is not fully charged. When the battery is fully
charged, the status indicator of scanner will flash green at regular interval.
Please charge the new battery pack for 8 hours prior to the first use.
Use USB Bus Power
If USB 3.0 is available in your host device, both battery charging and regular
operation can be supported by the USB Bus Power without using external
power supply.
If you want to use this feature, please slide the USB bus power switch to
“ON”. Then connect the cradle and host device via USB cable.
3

4. Decide Your Radio Link Mode
The IDM Bluetooth image scanners provide several radio link modes to
communicate with most host devices. When the Bluetooth-enabled host
device is not available, it can work with the smart cradle in PAIR mode (one to
one connection) or PICO mode (multiple connections) to provide a
plug-and-play cordless migration of your existing non-Bluetooth-enabled IT
assets. Moreover, you are also able to use the scanner to work with
Bluetooth-enabled host devices via SPP master/slave modes and HID mode.
After losing the radio link, the scanner is capable of resuming the radio
connection automatically when it returns to the communication coverage. But
please note that this feature is not available in SPP slave mode. If you would
like to change the radio link mode, you have to scan the “Uninstall” command
to revert the scanner to uninstall state.
PAIR Mode - 1 scanner connected to one cradle
If the Bluetooth device is not available in your existing system, this is the
simplest plug-and-play solution. In this mode, one scanner can only work with
one smart cradle. The smart cradle not only provides the Bluetooth radio link
with the scanner, but also offers the legacy cabled interfaces to the host
device, including USB HID, USB COM, PS/2(DOS/V) Keyboard Wedge and
RS232 Serial.
PICO Mode – up to 7 scanners connected to one cradle
For the requirement of multiple connections, up to 7 scanners can be
connected to one smart cradle concurrently. If you would like to un-pair all
paired scanners and smart cradle, you can simply press and hold the
paging/reset button of the smart cradle for over 5 seconds. If you just want to
un-pair part of the paired scanners, please take those paired scanners to
scan the “Uninstall” command one by one.
HID Mode - HID communication directly to Bluetooth host without cradle
Through the most helpful HID service, the scanner can work like a Bluetooth
keyboard. In this mode, the scanner is discoverable by the radio connection
request issued by a remote host device. For security purpose, you will be
requested to input the PIN Code to establish the Bluetooth connection in
most time.
SPP Master/Slave Mode - Serial communication directly to Bluetooth
host without cradle
Through the standard SPP service, the scanner can work like a serial input
device. In SPP master mode, the scanner initiates the radio connection
request to a remote slave device. In SPP slave mode, the scanner is
discoverable by the radio connection request issued by a remote master
device.
4
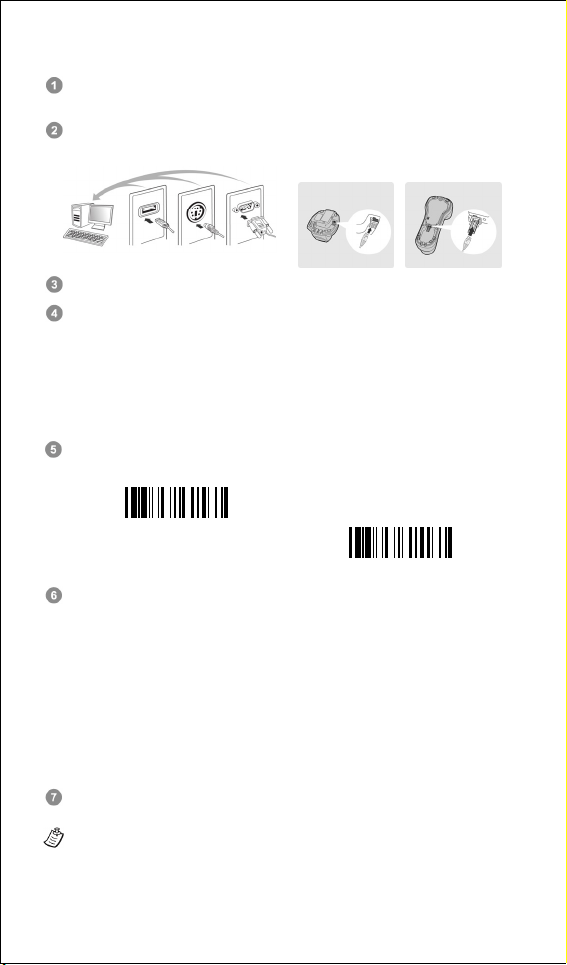
4.1 Using IDM BT in PAIR Mode
Ensure the battery is fully charged. You may refer to the section of
Preparations before Using for details.
Please choose your desired interface cable, then plug it into the host
interface port of the smart cradle and connect it to the host device.
Turn on the power of your host device.
Please note that the scanner has been pre-paired already, if the scanner
is shipped together with the smart cradle. You will see the link indicator of
scanner gives 1 blue blink per 2.5 seconds and the centre (IDM140BT
cradle) or upper indicator (IDM160BT cradle) of smart cradle turns steady
blue. If the scanner and smart cradle just give alternating red and green
blinks (in “Uninstall” state), please follow steps 5-6 to establish the
connection between the scanner and the smart cradle.
Scan “PAIR mode” command. The status indicator of scanner will turn
steady red.
USB
PS/2 RS232
Uninstall
PAIR Mode
Place the scanner on the smart cradle, then you will hear one short beep
to indicate the pairing process is activated. The scanner will give
continuous short clicks and the link indicator of scanner will flash blue
quickly during the pairing process. When you hear 4 beeps in ascending
tone, the pairing process is completed. You will see the link indicator of
scanner giving 1 blue blink per 2.5 seconds and the center/upper
indicator of the smart cradle turning steady blue.
If the scanner pairing process failed or it’s not placed on the smart cradle
within 20 seconds, you will hear 2 “Di-do Di-do” beeps to indicate pair
failure, the scanner will return to uninstall state automatically.
Scan the corresponding host interface quick set command to complete
the installation.
The default host interface of smart cradle is USB HID. If you want to set the
interface to USB COM, you have to install the USB virtual COM software driver
(available on www.sick.com) into your host device before using the scanner. All
host interface quick set codes can be found on page 13 of this guide.
5
 Loading...