

Page 1
OPERATING INSTRUCTIONS
ICR890
High-end CCD Camera System
Camera System for Reading 1-D and 2-D Codes with Superb
Image Quality suitable for OCR and Video Coding Applications
Page 2

Operating Instructions
ICR890 High-end CCD Camera System
Software Versions
Software/Tool Function Version
ICR890 System SICK Firmware From version
1.0 0000
ICR890 Device
Description
SOPAS-ET Configuration software From version
RF interference in case of use in residential areas.
¾ ICR890 High-end CCD Camera System is exclusively intended for use in an industrial
environment.
Device-specific software module for SOPAS-ET
Configuration Software
From version
1.00
2.10
Copyright
Copyright © 2006
SICK AG Waldkirch
Auto Ident, Reute Plant
Nimburger Strasse 11
79276 Reute
Germany
Trademark
Windows98
TM
, NTTM, METM, 2000TM, XPTM and Internet ExplorerTM are registered trademarks
or trademarks of the Microsoft Corporation in the USA and other countries.
Latest manual version
For the latest version of this manual (PDF), see www.sick.com.
2 © SICK AG · Division Auto Ident · Germany · All rights reserved 8011325/0000/2006-10-24
Page 3

Operating Instructions
ICR890
Quick Finder
ICR890 High-end CCD Camera System
Quick Finder …
• Included in the delivery ...
– Chapter 3.1.2 Included in delivery, page 25
• System projection
– Chapter 3.2 System requirements, page 26
• PLEASE NOTE
– Chapter 2 Safety information, page 17
• Installing the device in the reading station
– Chapter 4 Installation, page 45
• Connecting the device to the electricity supply
– Chapter 5 Electrical installation, page 53
• Familiarizing yourself with the device and its functions
– Chapter 3 Product description, page 23
– Chapter 6.3.6 Changing the device password for the user level "Authorized Client",
page 88
– Chapter 9 Technical data, page 103
• Starting up the device with the default setting
– Chapter 6.3 First startup, page 80
• Installing the SOPAS-ET Configuration Software on the PC
– Chapter 6.2.3 Installation of the Configuration Software SOPAS-ET, page 79
• Optimizing the device to the reading conditions
– Chapter 6.3.3 Configuring the ICR890 System/MSC800, page 83
• Assistance in case of problems
– Chapter 8 Troubleshooting, page 97
• Where is everything?
– Chapter Contents, page 5
8011325/0000/2006-10-24 © SICK AG · Division Auto Ident · Germany · All rights reserved 3
Page 4

Quick Finder
ICR890 High-end CCD Camera System
Operating Instructions
Overview of installation sequence
The following list summarizes the most important installation sequences for the ICR890
System as a stand-alone device in combination with the MSC800 for reading from above:
1. Check delivery for completeness.
2. Insert the ICI890 Illumination into two 180° brackets on the frame and screw tight. The front
window of the ICI890 Illumination should face downwards.
3. Remove the yellow and black protective caps from the lens protection tube and from ICD890
Camera lens.
Do not touch the lens!
4. Align the ICD890 Camera from the correct side to the illumination and carefully insert the lens
protection tube into the ICI890 Illumination opening.
5. Attach the ICD890 Camera to the ICI890 Illumination. Align the entire unit parallel to the
conveyor level and screw on the 180° brackets.
6. Connect the control line and the ICI890 Illumination power supply to the ICD890 Camera.
7. Insert and tighten the deflection mirror incl. the protective film on the opposite side to the ICI890
Illumination in two additional 180° brackets, parallel to the conveyor level.
The deflection mirror must be positioned at the same height as and exactly parallel to the
illumination.
8. Install the MSC800 close to the reading location.
9. Install the photoelectric reflex switch on the conveyor system in front of the reading location in
opposite direction of transport.
10. Install the MLG Light Grid on the conveyor system in front of the photoelectric reflex switch in
opposite direction of transport.
11. Install the incremental encoder on the conveyor system at the reading location.
12. Electrically connect the ICR890 System to the MSC800.
13. Connect the photoelectric reflex switch, MLG Light Grid, incremental encoder as well as data
processing host and PC to the MSC800 configuration.
14. Connect the MSC800 to the supply voltage (100 to 264 V AC/50 to 60 Hz).
15. Switch on the MSC800 using the main switch.
The ICR890 System and the MSC800 start up automatically.
16. Switch on the PC and install the SOPAS-ET Configuration Software (minimum requirements:
Windows 98
17. Start the SOPAS-ET Configuration Software and set up the new SOPAS-ET Project by choosing the
appropriate ICR890 and MSC800 Device Descriptions.
18. Establish communication with the MSC800.
19. Configure the ICR890 System via the register tabs in the SOPAS-ET Configuration Software
(position of the ICR890 in relation to conveyor system, focus control, code configuration, reading
pulse, etc.).
20. Trigger the ICR890 System (start reading pulse). To achieve this, move the object into the range
of the photoelectric reflex switch and keep it in this position.
The illumination switches on.
21. Remove the protective film from the deflection mirror and set up the deflection mirror ensuring
that the ICI890 Illumination light hits the stationary object (code) at a 15° angle (skew angle on
the conveyor level).
22. Carry out a test reading with the 1-D/2-D code. Move the object carrying the code several times
across the conveyor level beneath the ICR890 System and display the reading results in the
SOPAS-ET Configuration Software.
23. Repeat the test reading under real conditions and check that the data has been transferred to
the host.
24. Correct or optimize the parameter values where necessary via the SOPAS-ET Configuration
Software.
25. Save the parameter set as an “*.spr” configuration file to the SOPAS-ET Configuration Software.
The ICR890 System is ready for operation once the application-specific setting has been set.
TM
).
Note Detailed instructions can be found in Chapters 4 „Installation“, 5 „Electrical installation“
and 6 „Operation“.
4 © SICK AG · Division Auto Ident · Germany · All rights reserved 8011325/0000/2006-10-24
Page 5

Operating Instructions
ICR890
Contents
Contents
1 Notes on this document ................................................................................................. 15
1.1 Purpose............................................................................................................15
1.2 Target audience ..............................................................................................15
1.3 Information content ........................................................................................15
1.4 Symbols used ..................................................................................................16
2 Safety information ..........................................................................................................17
2.1 Authorized users .............................................................................................17
2.1.1 Installation and maintenance....................................................................17
2.1.2 Electrical installation and the replacement of system components.......17
2.1.3 Startup, operation and configuration........................................................17
2.2 Intended use ...................................................................................................18
2.3 General safety precautions and protection measures.................................19
2.3.1 Radio interferences ....................................................................................19
2.3.2 Installation work .........................................................................................19
2.3.3 Electrical installation work .........................................................................19
2.3.4 LED radiation from the ICI890 Illumination..............................................19
2.4 Quick stop and quick start..............................................................................20
2.4.1 Switch off the ICR890 System...................................................................20
2.4.2 Switch on the ICR890 System ...................................................................20
2.5 Environmental information.............................................................................21
2.5.1 Energy requirements ..................................................................................21
2.5.2 Dispose of the device after decommissioning .........................................21
3 Product description.........................................................................................................23
3.1 Design..............................................................................................................23
3.1.1 Device view .................................................................................................24
3.1.2 Included in delivery.....................................................................................25
3.1.3 Contents of the CD-ROM ............................................................................26
3.1.4 Device versions...........................................................................................26
3.2 System requirements......................................................................................26
3.2.1 General system requirements ...................................................................26
3.2.2 Installation requirements...........................................................................27
3.2.3 Electrical installation requirements ..........................................................28
3.2.4 Operation requirements.............................................................................28
3.3 Product features and functions (overview) ...................................................29
3.4 Method of operation .......................................................................................31
3.4.1 Reading configuration ................................................................................32
3.4.2 Object trigger control..................................................................................33
3.4.3 Focus control ..............................................................................................33
3.4.4 Illumination control.....................................................................................33
3.4.5 Position........................................................................................................35
3.4.6 Increment configuration.............................................................................35
3.4.7 Image requirement .....................................................................................36
3.4.8 Code configuration .....................................................................................37
3.4.9 Data processing.............................................................................................37
3.4.10 Output format .............................................................................................39
3.4.11 Network.......................................................................................................39
3.4.12 Data interfaces ...........................................................................................39
3.4.13 Digital outputs.............................................................................................40
3.4.14 Digital inputs...............................................................................................40
3.5 Indicators and control elements....................................................................41
3.5.1 User interface .............................................................................................41
3.5.2 LEDs of the ICD890 Camera......................................................................42
3.6 Impacts on the reading quality.......................................................................43
4 Installation .......................................................................................................................45
4.1 Overview of installation sequence.................................................................45
4.2 Installation preparations ................................................................................45
8011325/0000/2006-10-24 © SICK AG · Division Auto Ident · Germany · All rights reserved 5
Page 6

Contents
ICR890 High-end CCD Camera System
4.2.1 Layout the components which are to be installed................................... 45
4.2.2 Layout accessories ....................................................................................45
4.2.3 Selecting the installation location.............................................................46
4.2.4 Arrangement at the conveyor system.......................................................47
4.3 Installing and adjusting the device................................................................49
4.3.1 Installing the deflection mirror .................................................................. 50
4.3.2 Installing the ICI890 Illumination and the ICD890 Camera.................... 50
4.4 Installing external components .....................................................................51
4.4.1 External sensors for triggering .................................................................. 51
4.4.2 Installing the incremental encoder ........................................................... 52
4.4.3 Installing the MLG Light Grid..................................................................... 52
4.4.4 Installing the MSC800 Controller.............................................................. 52
4.5 Removing the device ......................................................................................52
5 Electrical installation...................................................................................................... 53
5.1 Overview of installation sequence.................................................................53
5.2 Electrical installation preparation ................................................................. 54
5.2.1 Electrical installation of the ICR890 System (without MSC800)............ 54
5.2.2 Electrical installation of the ICR890 System with MSC800
(single-side reading)................................................................................... 56
5.2.3 Electrical installation of the ICR890 System with MSC800
(multi-side reading)....................................................................................58
5.3 Electrical connections and cables.................................................................60
5.3.1 Electrical connections of the ICD890 Camera.........................................60
5.3.2 Electrical connections of the ICI890 Illumination.................................... 61
5.3.3 Electrical connections of the MSC800 (overview) ................................... 62
5.3.4 Assembled cables (overview) .................................................................... 63
5.4 Performing electrical installation...................................................................64
5.4.1 Connecting the power supply cable and the ICI890 Illumination
control line.................................................................................................. 64
5.4.2 Power supply of the ICR890 System ........................................................64
5.4.3 Data interfaces HOST/AUX........................................................................ 65
5.4.4 Data interface CAN 1-IN/OUT....................................................................66
5.4.5 Wiring the Ethernet interface HOST ETHERNET....................................... 68
5.4.6 Wiring the Ethernet interfaces GBIT 1 and GBIT 2 .................................. 69
5.4.7 Wiring the switching inputs IN 1 and IN 2 ............................................... 69
5.4.8 Wiring the switching outputs Result 1 and Result 2 (OUT connection). 70
5.5 Pin assignments and conductor colouring assignment............................... 71
5.5.1 ICD890 Camera connections .................................................................... 71
5.5.2 ICI890 Illumination connections............................................................... 75
5.5.3 Wire colours assignment of assembled cables with open end............... 75
6 Operation ......................................................................................................................... 79
6.1 Overview of the startup procedure................................................................ 79
6.2 Configuration Software SOPAS-ET................................................................. 79
6.2.1 Functions of the SOPAS-ET Configuration Software for the
ICR890 System/MSC800 (overview)........................................................ 79
6.2.2 System requirements for the SOPAS-ET Configuration Software ........... 79
6.2.3 Installation of the Configuration Software SOPAS-ET.............................. 79
6.2.4 Default setting for the SOPAS-ET Configuration Software....................... 80
6.3 First startup..................................................................................................... 80
6.3.1 Overview of the configuration procedure ................................................. 81
6.3.2 Establishing communication with the ICR890 System/MSC800........... 81
6.3.3 Configuring the ICR890 System/MSC800 ............................................... 83
6.3.4 Load changed parameter sets into the device ........................................ 87
6.3.5 Save, display and print the current parameter set.................................. 87
6.3.6 Changing the device password for the user level "Authorized Client".... 88
6.4 Default setting ................................................................................................ 88
6.4.1 Resetting the default setting in the ICR890 System ............................... 88
Operating Instructions
6 © SICK AG · Division Auto Ident · Germany · All rights reserved 8011325/0000/2006-10-24
Page 7

Operating Instructions
ICR890
Contents
6.4.2 Default setting MSC800 ............................................................................88
7 Maintenance ....................................................................................................................89
7.1 Maintenance during operation.......................................................................89
7.2 Cleaning the ICR890 System .........................................................................89
7.2.1 Cleaning the front window .........................................................................89
7.2.2 Cleaning the housing..................................................................................90
7.2.3 Cleaning the deflection mirror ...................................................................91
7.2.4 Cleaning further optical effective surfaces...............................................92
7.3 Replacing a system or a component .............................................................93
7.3.1 Replacing the ICD890 Camera or ICI890 Illumination ............................93
7.3.2 Replacing the deflection mirror .................................................................94
7.4 Disposal...........................................................................................................95
8 Troubleshooting...............................................................................................................97
8.1 Overview of errors and malfunctions which could occur..............................97
8.1.1 Installation error .........................................................................................97
8.1.2 Electrical installation error .........................................................................97
8.1.3 Configuration error .....................................................................................97
8.1.4 Malfunctions during operation ..................................................................97
8.2 Detailed malfunction analysis .......................................................................98
8.2.1 LEDs at the camera ....................................................................................98
8.2.2 System information ....................................................................................98
8.2.3 Status protocol ...........................................................................................98
8.3 ST error status in the reading result of a 1-D code (bar code) ................. 101
8.4 SICK support................................................................................................. 102
9 Technical data .............................................................................................................. 103
9.1 Data sheet for ICR890 Camera................................................................... 103
9.2 Data sheet for ICI890 Illumination ............................................................. 105
9.3 Data sheet for deflection mirror.................................................................. 105
9.4 Specification diagram.................................................................................. 106
9.4.1 Reading conditions for the diagram....................................................... 106
9.4.2 Reading areas of the ICR890 System.................................................... 106
9.4.3 Max. resolution across the direction of transport ................................. 107
9.4.4 Max. resolution in the direction of transport ......................................... 107
9.5 System dimensional drawing ICR890......................................................... 108
9.6 Deflection mirror dimensional drawing ...................................................... 110
10 Appendix........................................................................................................................ 111
10.1 Appendix overview ....................................................................................... 111
10.2 Configuring the ICR890 System with command strings............................ 111
10.3 Calculating code length of a bar code ........................................................ 112
10.4 Ordering information.................................................................................... 113
10.4.1 ICR890 High-end CCD Camera System ................................................. 113
10.4.2 Accessories: Controller and object distance detector .......................... 114
10.4.3 Accessories: Cables and connectors ..................................................... 115
10.4.4 Accessories: Incremental encoder......................................................... 116
10.4.5 Accessories: Cleaning agents for front window of the illumination ..... 116
10.5 Supplementary documentation................................................................... 117
10.6 Glossary ........................................................................................................ 118
10.7 EC Declaration of Conformity ...................................................................... 124
10.8 Code samples (decodeable)........................................................................ 127
8011325/0000/2006-10-24 © SICK AG · Division Auto Ident · Germany · All rights reserved 7
Page 8

Contents
Operating Instructions
ICR890 High-end CCD Camera System
8 © SICK AG · Division Auto Ident · Germany · All rights reserved 8011325/0000/2006-10-24
Page 9

Operating Instructions
ICR890
Figures and tables
Abbreviations
BMP
Bitmap (pixel-oriented Windows format for saving photos)
CAN Controller Area Network (field bus protocol based on the CAN bus)
CCD Charge Coupled Device
DOF Depth Of Field
dpi dots per inch ( 1 inch = 25.4 mm)
EEPROM Electrically Erasable Programmable Read Only Memory
FTP File Transfer Protocol
HTML Hyper Text Markup Language
IInput
ICD Image Capture Device
ICI Image Capture Illumination
ICR Image Code Reader (High-end CCD Camera System)
JPEG Joint Photographic Expert Group (pixel-oriented file format for saving high compression photos,
compression process for tiff formats)
LED Light Emitting Diode
lpi Lines per inch ( 1 inch = 25.4 mm)
MAC Medium Access Control
MLG Modular Light Grid
MSC Modular System Controller (MSC800)
MTBF Mean Time Between Failure
MTTR Mean Time To Repair
OOutput
RAM Random Access Memory
ROM Read Only Memory
SD Secure Digital Card
SMART SICK Modular Advanced Recognition Technology
SOPAS-ET SICK Open Portal for Application and Systems Engineering Tool (PC software for Windows for
configuration of the ICR890 System and the MSC800)
PLC ProgrammableLogic Controllers
TCP/IP Transmission Control Protocol/Internet Protocol
UDP User Datagram Protocol
VMS Volume Measuring System
8011325/0000/2006-10-24 © SICK AG · Division Auto Ident · Germany · All rights reserved 9
Page 10

Figures and tables
ICR890 High-end CCD Camera System
Note The ICR890 System components and other components in this document are referred to in
the following simplified terms:
• ICR890 High-end CCD Camera System , simplified: ICR890 System
• ICD890 Image Capture Device, simplified: ICD890 Camera
• ICI890 Image Capture Illumination, simplified: ICI890 Illumination
• MSC800 Modular System Controller, simplified: MSC800
• MLG Light Grid (Modular Light Grid), simplified: MLG Light Grid
• VMS4xx/5xx Volume Measuring System, simplified: VMS4xx/5xx
• SICK Open Portal for Application and Systems Engineering Tool, simplified:
SOPAS-ET Configuration Software
The register tabs for configuration of the ICR890 System are referred to in the SOPAS-ET
Configuration Software online help as "device pages".
Operating Instructions
10 © SICK AG · Division Auto Ident · Germany · All rights reserved 8011325/0000/2006-10-24
Page 11

Operating Instructions
ICR890
Figures and tables
Tables
Tab. 1-1: Target audience ................................................................................................15
Tab. 3-1: Included in the delivery of the ICR890 High-end CCD Camera System........ 25
Tab. 3-2: System component versions............................................................................ 26
Tab. 3-3: General system requirements (standard device) ........................................... 27
Tab. 3-4: Data interface function..................................................................................... 39
Tab. 3-5: LED indications ................................................................................................. 42
Tab. 5-1: ICR890 System (stand-alone device) without MSC800: Overview of
the ICD890 Camera connections which have to be established ..................55
Tab. 5-2: ICR890 System (stand-alone device) with MSC800: Overview of
the ICD890 Camera connections which have to be established ..................56
Tab. 5-3: ICR890 System (stand-alone device) with MSC800: Overview of
the MSC800 connections which have to be established...............................57
Tab. 5-4: ICR890 System with MSC800 (multi-side reading): Overview of
the ICD890 Camera connections which have to be established ..................58
Tab. 5-5: ICR890 System with MSC800 (multi-side reading): Overview of
the MSC800 connections which have to be established...............................59
Tab. 5-6: ICR890 System with MSC800 (multi-side reading): Overview of
the VMS4xx/5xx connections which have to be established.........................59
Tab. 5-7: ICD890 Camera: Function of the electrical connections ............................... 61
Tab. 5-8: ICI890 Illumination: Function of the electrical connections.......................... 61
Tab. 5-9: MSC800-0000 logic controller: Function of the electrical
connections (overview)..................................................................................... 62
Tab. 5-10: Cables for connecting the ICR890 System .....................................................63
Tab. 5-11: Maximum cable lengths between ICR890 and the host................................65
Tab. 5-12: CAN bus: Maximum cable lengths, depending on the data transfer rate..... 66
Tab. 5-13: CAN bus: Maximum stub cable lengths, depending on the data
transfer rate ...................................................................................................... 66
Tab. 5-14: CAN bus: Required wire cross section, depending on the data
cable length.......................................................................................................67
Tab. 5-15: Ratings of the switching inputs IN1 and IN 2 .................................................69
Tab. 5-16: Ratings of the switching outputs Result 1 and Result 2................................ 70
Tab. 5-17: ICD890 Camera: Pin assignment of the 8-pole RJ-45 sockets
“GBIT1“ and “GBIT2“........................................................................................ 71
Tab. 5-18: ICD890 Camera: Pin assignment of the 5-pole M12 sockets
“CAN 1-OUT“/“CAN 2-OUT“ ..............................................................................71
Tab. 5-19: ICD890 Camera: Pin assignment of the 5-pole M12 plugs
“CAN 1-IN“/“CAN 2-IN“.....................................................................................72
Tab. 5-20: ICD890 Camera: Pin assignment of the 8-pole M12
socket “ILLUMINATION“.................................................................................... 72
Tab. 5-21: ICD890 Camera: Pin assignment of the 8-pole M12 plug “AUX“.................. 72
Tab. 5-22: ICD890 Camera: Pin assignment of the 8-pole M12 plug “HOST“ ...............72
Tab. 5-23: ICD890 Camera: Pin assignment of the 4-pole M12 plug “OUT“.................. 73
Tab. 5-24: ICD890 Camera: Pin assignment of the 5-pole M12 socket “IN 1“.............. 73
Tab. 5-25: ICD890 Camera: Pin assignment of the 5-pole M12 socket “IN 2“.............. 73
Tab. 5-26: ICD890 Camera: Pin assignment of the 4-pole M12 socket
“HOST ETHERNET“............................................................................................ 73
Tab. 5-27: ICD890 Camera: Pin assignment of the 8-pole Harting HanQ8 plug
“POWER IN“....................................................................................................... 74
Tab. 5-28: ICD890 Camera: Pin assignment of the 8-pole Harting HanQ8 socket
“POWER OUT“.................................................................................................... 74
Tab. 5-29: ICI890 Illumination: Pin assignment of the 8-pole Harting HanQ8 plug
“POWER IN“....................................................................................................... 75
Tab. 5-30: ICI890 Illumination: Pin assignment of the 8-pole M12 plug
“ILLUMINATION“................................................................................................ 75
Tab. 5-31: Wire colours assignment: Cable no. 6028420 (HOST/AUX), standard ........ 75
Tab. 5-32: Wire colours assignment: Cables no. 6021166/no. 6021175
8011325/0000/2006-10-24 © SICK AG · Division Auto Ident · Germany · All rights reserved 11
Page 12

Figures and tables
ICR890 High-end CCD Camera System
(CAN 1-IN), PVC-free ..........................................................................................76
Tab. 5-33: Wire colours assignment: Cable no.6024861 (IN 1/IN 2), standard............76
Tab. 5-34: Wire colours assignment: Cable no. 6027559 (OUT), standard....................76
Tab. 5-35: Wire colours assignment: Cable no. 2039398 (ICD890 Camera
power supply), standard....................................................................................77
Tab. 5-36: Wire colours assignment: Cable no. 2032926 (ICD890 Camera
power supply), PVC-free ....................................................................................77
Tab. 6-1: Default setting for the SOPAS-ET Configuration Software (excerpt)..............80
Tab. 6-2: Connection between the PC with the SOPAS-ET Configuration
Software and the ICR890 System/MSC800 ...................................................81
Tab. 6-3: ICR890 System (stand-alone device) with MSC800: Overview
of parameters which have to be set.................................................................83
Tab. 6-4: ICR890 System (stand-alone device) with MSC800: Overview
of parameters which have to be set.................................................................85
Tab. 6-5: ICR890 System (stand-alone device) without MSC800: Overview
of parameters which have to be set.................................................................86
Tab. 8-1: Request “Query warnings“................................................................................99
Tab. 8-2: Answer to the request “Query warnings“.........................................................99
Tab. 8-3: Request “Query errors“.................................................................................. 100
Tab. 8-4: Answer to the request “Query errors“........................................................... 100
Tab. 8-5: Request “Query fatal errors“ ......................................................................... 100
Tab. 8-6: Answer to the request “Query fatal errors“................................................... 100
Tab. 8-7: Meaning of the ST error status in the reading result................................... 101
Tab. 9-1: Technical specifications for the ICR890 Camera......................................... 103
Tab. 9-2: Technical specifications for the ICI890 Illumination ................................... 105
Tab. 9-3: Technical specifications for deflection mirror .............................................. 105
Tab. 9-4: Reading conditions for the specification diagram ....................................... 106
Tab. 10-1: Help table for calculating code length of a bar code................................... 112
Tab. 10-2: Ordering information: ICR890 High-end CCD Camera System ................... 113
Tab. 10-3: In stock accessories: Controller and object distance detector ................... 114
Tab. 10-4: In stock accessories: Cables and connectors .............................................. 115
Tab. 10-5: In stock accessories: Incremental encoder.................................................. 116
Tab. 10-6: In stock accessories: Cleaning agents for front window of the
illumination ..................................................................................................... 116
Tab. 10-7: Supplementary documentation for the ICR890 System.............................. 117
Operating Instructions
12 © SICK AG · Division Auto Ident · Germany · All rights reserved 8011325/0000/2006-10-24
Page 13

Operating Instructions
ICR890
Figures and tables
Figures
Fig. 2-1: LED radiation outlet opening ........................................................................... 19
Fig. 3-1: ICR890 System in combination with the MSC800 (single-side reading)...... 23
Fig. 3-2: View of the ICD890 camera and the ICI890 Illumination.............................. 24
Fig. 3-3: Work area of the ICR890 System (standard device)...................................... 26
Fig. 3-4: Example of simple system installation on the installation frame.................. 27
Fig. 3-5: The ICR890 System at a conveyor system, single-side reading from above 31
Fig. 3-6: System diagram for single-side reading from above...................................... 32
Fig. 3-7: Diagram of the illumination with illuminated area ......................................... 33
Fig. 3-8: ICR890 System with deflection mirror for reading from above..................... 34
Fig. 3-9: Position of the ICR890 System and the tilt angle........................................... 35
Fig. 3-10: Example of an image recording for analysis ...................................................36
Fig. 3-11: Image analysis (blue rectangle: Regions of interest; green rectangle:
Successful decoding; green line: Decoder runtime at end of the
reading pulse) ................................................................................................... 36
Fig. 3-12: Reading operation modi of the ICR890 System in stand-alone operation... 38
Fig. 3-13: SD memory card for parameter set ................................................................. 41
Fig. 3-14: LEDs at the ICD890 Camera............................................................................42
Fig. 3-15: Pixel resolution across the direction of transport (standard device,
135 mm (5.32 in) lens) .................................................................................... 43
Fig. 3-16: Line resolution in the direction of transport (standard device,
8,192 pixels CCD sensor)................................................................................. 43
Abb. 4-1: Example of a project-specific dimensional sheet for installation.................. 46
Abb. 4-2: Free space required for connecting the camera and the illumination.......... 47
Abb. 4-3: Arrangement above the conveyor system for single-side reading
from above ........................................................................................................ 47
Abb. 4-4: Arrangement at the conveyor system for multi-side reading with
VMS4xx/5xx....................................................................................................... 48
Abb. 4-5: Arrangement at the conveyor system.............................................................. 48
Abb. 4-6: Position of the components ............................................................................. 49
Abb. 4-7: 180° bracket for the deflection mirror and the illumination.........................49
Abb. 4-8: Removeable protective camera caps.............................................................. 51
Abb. 4-9: Position of the external components...............................................................51
Abb. 5-1: Block diagram: connection principle of the ICR890 (standard system) .......54
Abb. 5-2: Block diagram: Connection principle of a ICR890 (standard system)
with MSC800.....................................................................................................56
Abb. 5-3: Block diagram: Connection principle of several ICR890
(standard systems) with MSC800 ...................................................................58
Abb. 5-4: ICD890 Camera: Position of the electrical connections
(standard system) ............................................................................................. 60
Abb. 5-5: MSC800-0000 logic controller: Position of the electrical connections ........ 62
Abb. 5-6: ICD890 Camera: Wiring of the HOST/AUX data interfaces............................66
Abb. 5-7: Block diagram: Function of the Ethernet interface.........................................68
Abb. 5-8: Wiring of the switching inputs IN 1 and IN 2................................................... 69
Abb. 5-9: Wiring of the switching outputs Result 1 and Result 2.................................. 70
Abb. 5-10: ICD890 Camera: Electrical connections (standard system).......................... 71
Abb. 6-1: Configuration with SOPAS-ET ........................................................................... 80
Abb. 7-1: Cleaning the front window................................................................................90
Abb. 7-2: Cleaning the air inlet and outlet openings at the system's
illumination ICR890.......................................................................................... 90
Abb. 7-3: Cleaning of the external optical sensors (reading pulse generator,
detector for object distance)............................................................................92
Abb. 7-4: 180° bracket: Loosening clamping screws.................................................... 93
Abb. 7-5: ICD890 Camera: Position of the battery on the internal PC card.................. 95
Abb. 9-1: Reading areas of the ICR890 System (standard).........................................106
Abb. 9-2: Pixel resolution across the direction of transport (standard device,
135 mm (5.32 in) lens) ..................................................................................107
8011325/0000/2006-10-24 © SICK AG · Division Auto Ident · Germany · All rights reserved 13
Page 14

Figures and tables
ICR890 High-end CCD Camera System
Abb. 9-3: Line resolution in the direction of transport (standard device,
8,192 pixels CCD sensor) .............................................................................. 107
Abb. 9-4: Dimensions of the ICR890 System ............................................................... 108
Abb. 9-5: Total dimensions of the ICR890 System and the free space
required for connecting.................................................................................. 109
Abb. 9-6: Dimensions of the deflection mirror ............................................................. 110
Abb. 10-1: EC Declaration of Conformity for the ICD890 Camera
(page 1, scaled down version)....................................................................... 124
Abb. 10-2: EC Declaration of Conformity for the ICI890 Illumination
(page 1, scaled down version)....................................................................... 125
Abb. 10-3: Code samples of 1-D codes of various module widths
(print ratio 2:1) and 2-D code of various cell sizes ...................................... 127
Operating Instructions
14 © SICK AG · Division Auto Ident · Germany · All rights reserved 8011325/0000/2006-10-24
Page 15

Operating Instructions Chapter 1
ICR890
Notes on this document
1 Notes on this document
1.1 Purpose
This document provides instructions for technical staff on the installation and operation of
the following ICR890 System models:
• The ICR890 System equipped with focus control, CCD sensor 8,192 pixels, standard
lens (focal distance 135 mm (5.32 in))
This document contains the following information:
• Installation and electrical installation
• Startup
• Operation and configuration
• Maintenance
• Troubleshooting
• Replacing system components
A step-by-step approach is taken for all tasks.
1.2 Target audience
The target audience of this document is persons assigned the following tasks:
Tasks Target audience
Installation, electrical installation,
maintenance, replacing system
components
Startup, operation and configuration Qualified staff, e. g. technicians and engineers
Operation of the conveyor system Qualified staff for startup and operation of the conveyor
Tab. 1-1: Target audience
Qualified staff, e. g. service technicians and factory
electricians
system
1.3 Information content
This document contains all the required information for installation, electrical installation
and operation of the ICR890 System at the installation location. The factory configuration
(default setting) of the ICR890 System as a stand-alone device is optimized to a
single-side reading (from above or from the side).
Configuration of the ICR890 System for the application-specific reading conditions and
operation is carried out via the SOPAS-ET Configuration Software at a Windows
SOPAS-ET Configuration Software contains an online help system to facilitate configuration.
Electrical installation of the MSC800 controller for a ICR890 System as stand-alone device
and its configuration is detailed in the MSC800 Operating Instructions (no. 8011540).
These instructions also described use of the MSC800 as a controller for a multi-side
reading.
Note Further information on High End CCD Camera Systems, Volume Measurement Systems and
Bar Code Scanners is available from SICK AG, Auto Ident division.
On the Internet at www.sick.com.
TM-
PC. The
8011325/0000/2006-10-24 © SICK AG · Division Auto Ident · Germany · All rights reserved 15
Page 16
Chapter 1 Operating Instructions
Notes on this document
ICR890 High-end CCD Camera System
1.4 Symbols used
Some of the information in this document is marked specially so that you can access it
quickly:
Warning!
Warnings are provided to prevent injury to operating personnel or serious damage to the
ICR890 System.
¾ Always read warnings carefully and observe them at all times.
Reference Italics are used to refer to more detailed information elsewhere.
Note Notes indicate special features or characteristics.
Explanation Explanations provide background information on technical correlations.
Recommendation Recommendations help you carry out certain procedures more effectively.
TIP Tips explain settings in the SOPAS-ET Configuration Software.
P
ROJECT This font indicates a term in the user interface of the SOPAS-ET Configuration Software.
Icons refer to buttons in the user interface of the SOPAS-ET Configuration Software.
“0x0“ This font indicates messages output by the ICR890 System.
This symbol identifies sections that describe steps carried out with the SOPAS-ET
Configuration Software.
This symbol refers to additional technical documentation.
¾ There is a procedure which needs to be carried out. This symbol indicates operational
instructions which only contain one operational step or operational steps in warning notices
which do not have to be followed in any particular order.
Operational instructions comprising several steps are denoted using consecutive numbers.
Ö This symbol indicates a glossary entry.
16 © SICK AG · Division Auto Ident · Germany · All rights reserved 8011325/0000/2006-10-24
Page 17

Operating Instructions Chapter 2
ICR890
Safety information
2 Safety information
This chapter deals with your safety and operator safety.
¾ Read this chapter carefully before using the ICR890 System.
2.1 Authorized users
For correct and safe functioning, the ICR890 System must be installed, operated and
maintained by sufficiently qualified staff.
Repairs to the ICR890 System should only be carried out by qualified and authorized SICK
AG service staff.
¾ The operating instructions should be made available to the end user.
¾ The end user should be briefed and urged to read the operating instructions by the
technicians.
The following chapters summarize the required qualifications for the various tasks.
2.1.1 Installation and maintenance
• Practical technical training
• Knowledge of current health and safety regulations at the workplace
2.1.2 Electrical installation and the replacement of system components
• Practical electrical training
• Knowledge of current electrical safety regulations
• Knowledge of startup and operation of the device in each operational area
(e. g. conveyor system)
2.1.3 Startup, operation and configuration
• Knowledge of the mechanical and electrical parameters of the conveyor system and
the characteristics of the conveyor system regarding startup and operation
• Basic knowledge of the Windows
• Basic knowledge of data transfer
• Basic knowledge of designing and setting up (addressing) Ethernet connections for
connecting the ICR890 System to the Ethernet
• Basic knowledge of working with an HTML browser (e.g. Internet Explorer) for using the
online help
• Basic knowledge of 1-D/2-D code technology
TM
operating system
8011325/0000/2006-10-24 © SICK AG · Division Auto Ident · Germany · All rights reserved 17
Page 18

Chapter 2 Operating Instructions
Safety information
ICR890 High-end CCD Camera System
2.2 Intended use
The ICR890 High-end CCD Camera System is an intelligent sensor for the automatic
recognition and decoding of 1-D/2-D codes on moving objects in a reading station.
In combination with the MSC800 modular system controller, the ICR890 System is used as
a stand-alone device for single-side reading, e.g. from above or from the side. For a similarly
possible multi-side reading on the conveyor system, the corresponding number of systems
is combined with other SICK bar code scanners and with the co-coordinating MSC800.
The intended use of the system results from the following description of the system
components and their functions:
• The system consists of the ICD890 Camera, the ICI890 Illumination and a deflection
mirror. The ICD890 Camera is installed in a frame together with the ICI890 Illumination
as a unit parallel to the deflection mirror, either above the conveyor system (reading
from above) or at the side (side reading).
• The necessary object distance information is contained in the ICR890 System either by
an MLG Light Grid (in the case of readings from above) or by a VMS4xx/5xx Volume
Measurement System for focus control during
• The ICR890 System transfers the reading data via its HOST main data interface (serial
RS 232, RS 422/485, Ethernet or CAN), with optionally selectable diagnosis data, to a
superordinate host processor for further processing.
The ICR890 System transfers its data via the CAN interface to the MSC800, in
combination with the MSC800. The data can then be accessed from the HOST data
interface.
• The processed image information of the ICD890 Camera is located on two fast GBit
Ethernet channels. The image information can be transferred to the client display at
extremely high data transfer rates on a special PC with compatible GBit Ethernet
interface cards and GigE Vision Standard licence (real time image data transfer). The
high image quality also allows use in OCR and video coding applications.
• Configuration/Operation of the ICR890 System is carried out as standard via the AUX
auxiliary data interface (serial RS 232 or Ethernet) using the SOPAS-ET Configuration
Software, which runs on a standard client PC. Alternatively, the configuration can also
be carried out via the PC connection to the MSC800 (serial RS 232 or Ethernet).
Any warranty claims against SICK AG shall be deemed invalid in the case of other system
use or system modifications, this includes modifications during installation and electrical
installation or changes to the SICK software.
Note The ICD890 Camera and ICI890 Illumination must not be opened. If the devices are
opened, the manufacturer's warranty shall not apply.
Single or multi-side reading.
18 © SICK AG · Division Auto Ident · Germany · All rights reserved 8011325/0000/2006-10-24
Page 19
Operating Instructions Chapter 2
ICR890
Safety information
2.3 General safety precautions and protection measures
¾ Read the general safety precautions thoroughly and observe them during all ICR890
System activities. Also observe the warning notices above the operational instructions
of each chapter.
2.3.1 Radio interferences
RF interference in case of use in residential areas.
¾ ICR890 High-end CCD Camera System is exclusively intended for use in an industrial
environment.
2.3.2 Installation work
Risk of injuries due to falling components!
The combined weight of the ICD890 Camera and the ICI890 Illumination is approx. 37 kg
(81.6 lb) without installation accessories.
¾ Do not carry out installation work alone.
¾ A second person should always secure components during installation.
2.3.3 Electrical installation work
Risk of injuries due to electrical current!
Connect the MSC800 Controller to the mains power supply (100 to 264 V AC/50 to 60 Hz).
¾ Observe current safety regulations when working with electrical equipment.
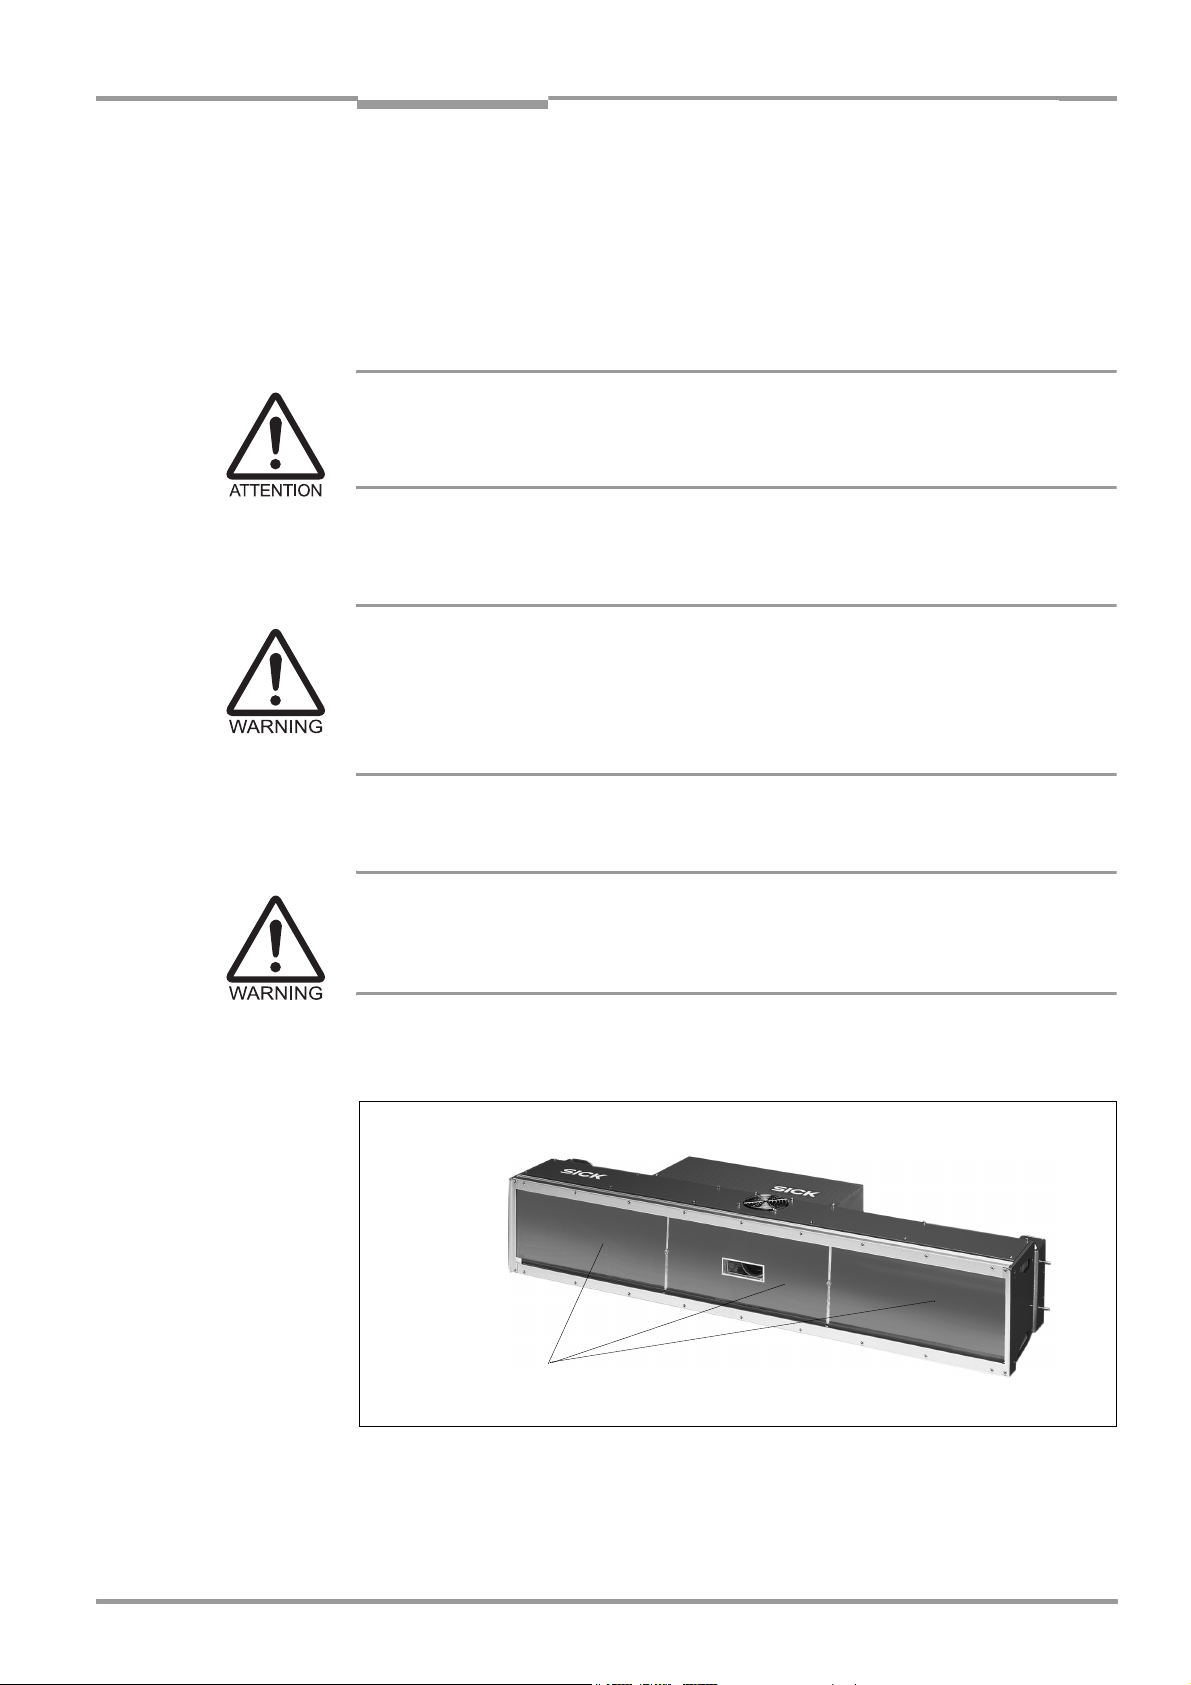
2.3.4 LED radiation from the ICI890 Illumination
Output opening
Fig. 2-1: LED radiation outlet opening
LED radiation escapes from the entire front window of the ICI890 Illumination.
8011325/0000/2006-10-24 © SICK AG · Division Auto Ident · Germany · All rights reserved 19
Page 20

Chapter 2 Operating Instructions
Note The ICI890 Illumination works with LEDs on the λ = 620 nm (red light) wavelength.
Safety information
ICR890 High-end CCD Camera System
Class 1M LED radiation (in accordance with EN/IEC 60825-1)!
Incorrect use can result in hazardous radiation exposure and the LED class being
exceeded!
The accessible radiation of the ICI890 Illumination is not hazardous under reasonably
foreseeable conditions, provided that the beam width is not reduced by optical instruments,
e.g. magnifying glass, lenses or telescopes. Visual glare, loss of colour vision and eye
injuries cannot be ruled out.
The entire window surface is the LED radiation outlet opening.
¾ Do not look directly into the radiation source with optical instruments.
¾ Do not open the housing. (The illumination is not switched off if the housing is opened).
¾ Always observe the latest valid version of laser protection regulations.
The radiation emitted is not harmful to human skin.
Regular maintenance is not required to ensure compliance with laser class 1M.
The ICI890 Illumination operates as follows:
• The reading pulse (pulse source) controls the on and off mechanism of the LED
illumination during the reading process. The LEDs are switched on in pulsed mode
during the reading operation depending on the reading gate duration.
• A time stage (illumination timeout) automatically switches off the illumination during
the reading operation after 3 seconds (default setting) following the start of a
continuous reading pulse. This, however, does not switch off the reading pulse. The
reading pulse should be stopped via a relevant pulse signal. The next reading pulse
switches the illumination back on.
• The illumination timeout can be set or switched off within a range of 3 s to 25 h. For
safety reasons, the minimum illumination power on time is 3 seconds.
2.4 Quick stop and quick start
The ICR890 System is operated via the MSC800 Controller as standard and can be
switched on and off using the controller main switch.
2.4.1 Switch off the ICR890 System
¾ Switch off the power supply of the MSC800.
When the system is switched off the following data is lost:
• Application-specific parameter sets in the ICR890 System and in the MSC800
Controller which were only temporarily saved in the devices
• The last reading result of the ICR890 System
• Daily operating hours counter of the ICR890 System
2.4.2 Switch on the ICR890 System
¾ Switch on the power supply of the MSC800 again.
The ICR890 System starts up using the most recent permanently saved configuration.
The daily operating hours counter is reset.
20 © SICK AG · Division Auto Ident · Germany · All rights reserved 8011325/0000/2006-10-24
Page 21

Operating Instructions Chapter 2
ICR890
Safety information
2.5 Environmental information
The ICR890 System has been constructed with minimum environmental pollution in mind.
Excluding the housing, the system does not contain any materials using silicone.
2.5.1 Energy requirements
The ICR890 System is electrically powered via the MSC800 Controller as standard
(functional extra-low voltage in accordance with IEC 364-4-41).
The following power consumption details apply to the system components and the
controller:
• ICD890 Camera: typically 75 W with 24 V DC ± 10 % (via MSC800 power supply)
• ICI890 Illumination: typically 350 W with 24 V DC ± 10 % (via MSC800 power supply)
• MSC800-0000 logic controller: typically 10 W with 24 V DC ± 10 %
2.5.2 Dispose of the device after decommissioning
At present SICK AG will not accept the return of any devices which can no longer be
operated or repaired.
¾ Inoperable or irreparable devices must be disposed of in an environmentally friendly
manner and in accordance with valid country-specific waste disposal guidelines.
The design of the ICR890 System allows for its separation as recyclable secondary raw
materials and hazardous waste (electronic scrap).
Please see Chapter 7.4 Disposal, page 95.
Note The battery on the internal PC card of the ICD890 Camera must be removed before the
device is scrapped.
¾ Dispose of the battery separately in accordance with ROHS regulations (Europe).
8011325/0000/2006-10-24 © SICK AG · Division Auto Ident · Germany · All rights reserved 21
Page 22

Chapter 2 Operating Instructions
Notes:
Safety information
ICR890 High-end CCD Camera System
22 © SICK AG · Division Auto Ident · Germany · All rights reserved 8011325/0000/2006-10-24
Page 23
Operating Instructions Chapter 3
ICR890
Product description
3 Product description
This chapter describes the design, the features and the functions of the ICR890 System.
¾ For installation, electrical installation and startup assistance as well as system
configuration using the SOPAS-ET Configuration Software, please read this chapter
prior to carrying out any of the tasks.
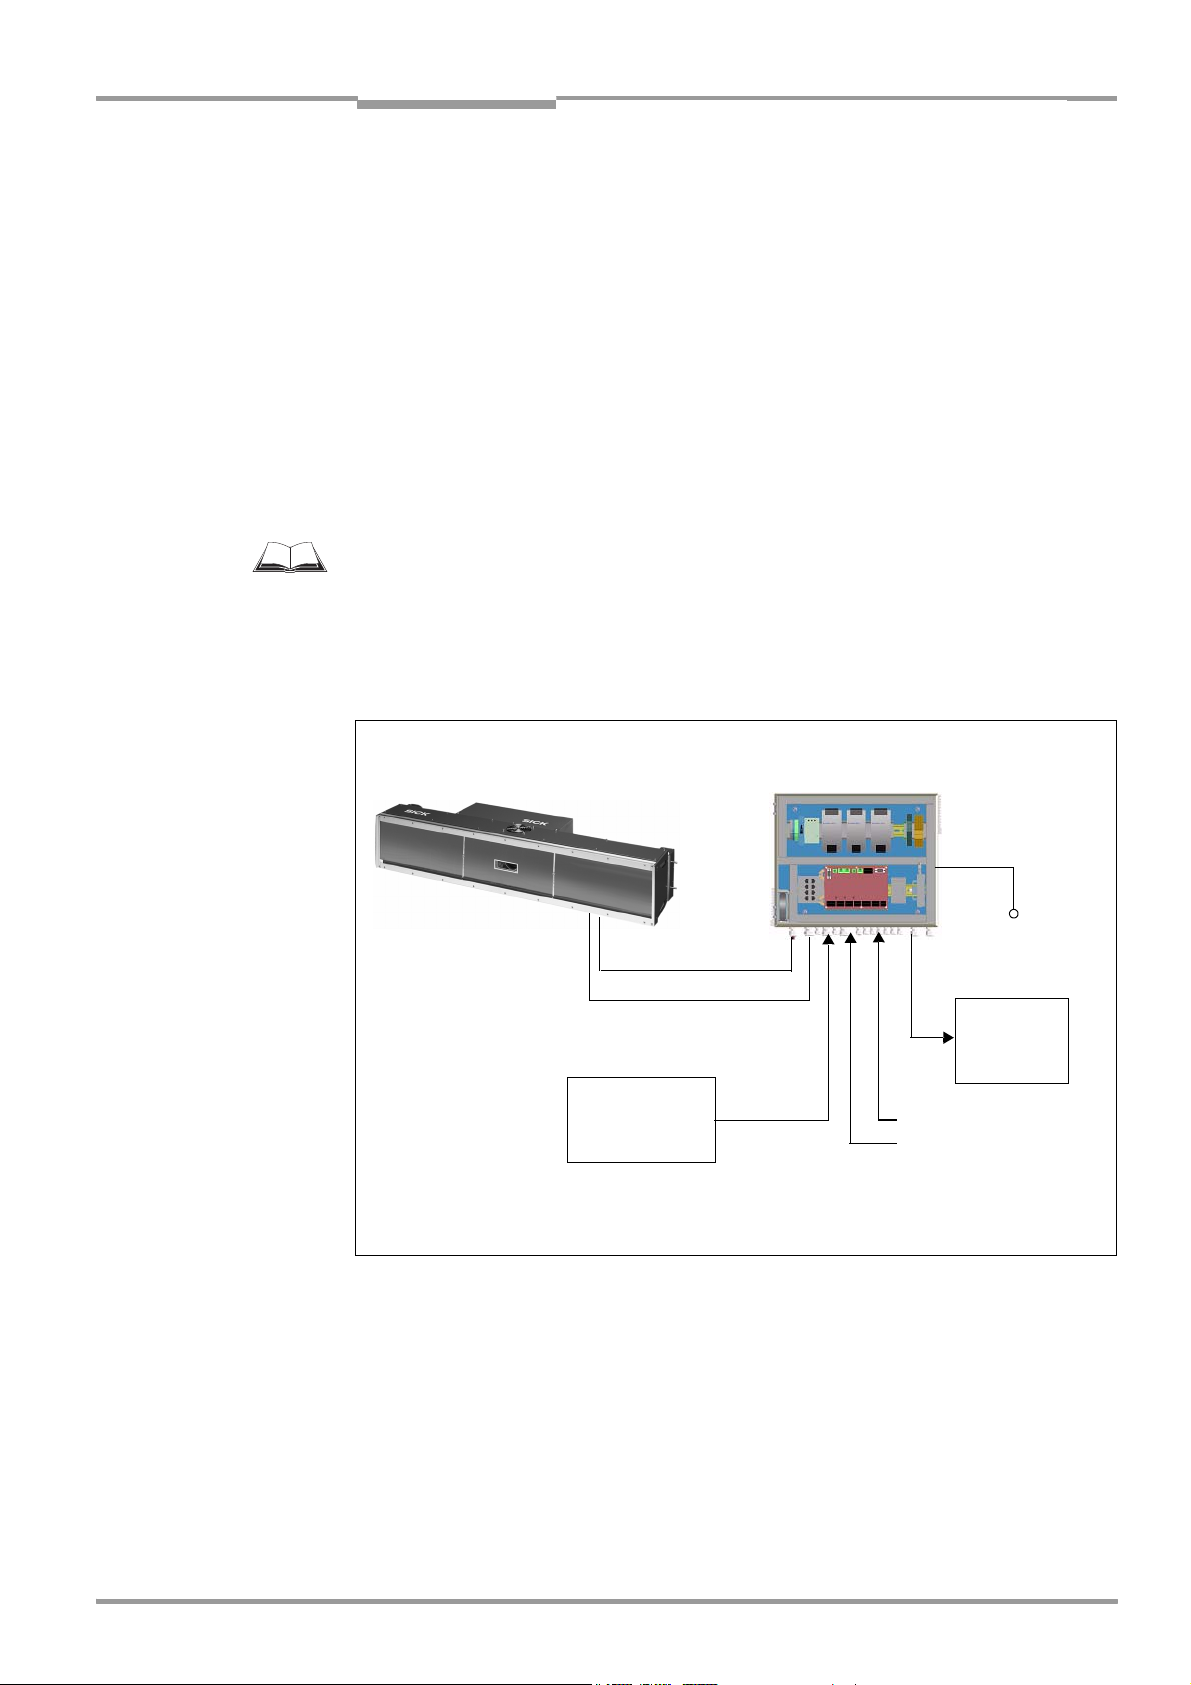
3.1 Design
The ICR890 System consists of the ICD890 Camera (Image Capture Device), the ICI890
Illumination (Image Capture Illumination) and a deflection mirror. The ICR890 System is
operated in combination with the MSC800 (Modular System Controller) via a CAN bus. The
MSC800 supplies the ICR890 System with power.
For further information on the MSC800, see the MSC800 Operating Instructions
(no. 8011540).
External sensors are required for the reading pulse, detection of the object distance and for
creation of the increment signal. These sensors and the superordinate host processor are
connected to the MSC800.
ICR890 System
Power supply
CAN bus
MLG Light Grid/
VMS4xx/5xx
Object distance/
Object geometry
Fig. 3-1: ICR890 System in combination with the MSC800 (single-side reading)
MSC800
Mains connection
HOST
Reading pulse
Conveyor speed
Alternatively, connection of the external sensors and the superordinate host processor can
be carried out directly at the ICR890 System.
8011325/0000/2006-10-24 © SICK AG · Division Auto Ident · Germany · All rights reserved 23
Page 24
Chapter 3 Operating Instructions
Product description
ICR890 High-end CCD Camera System
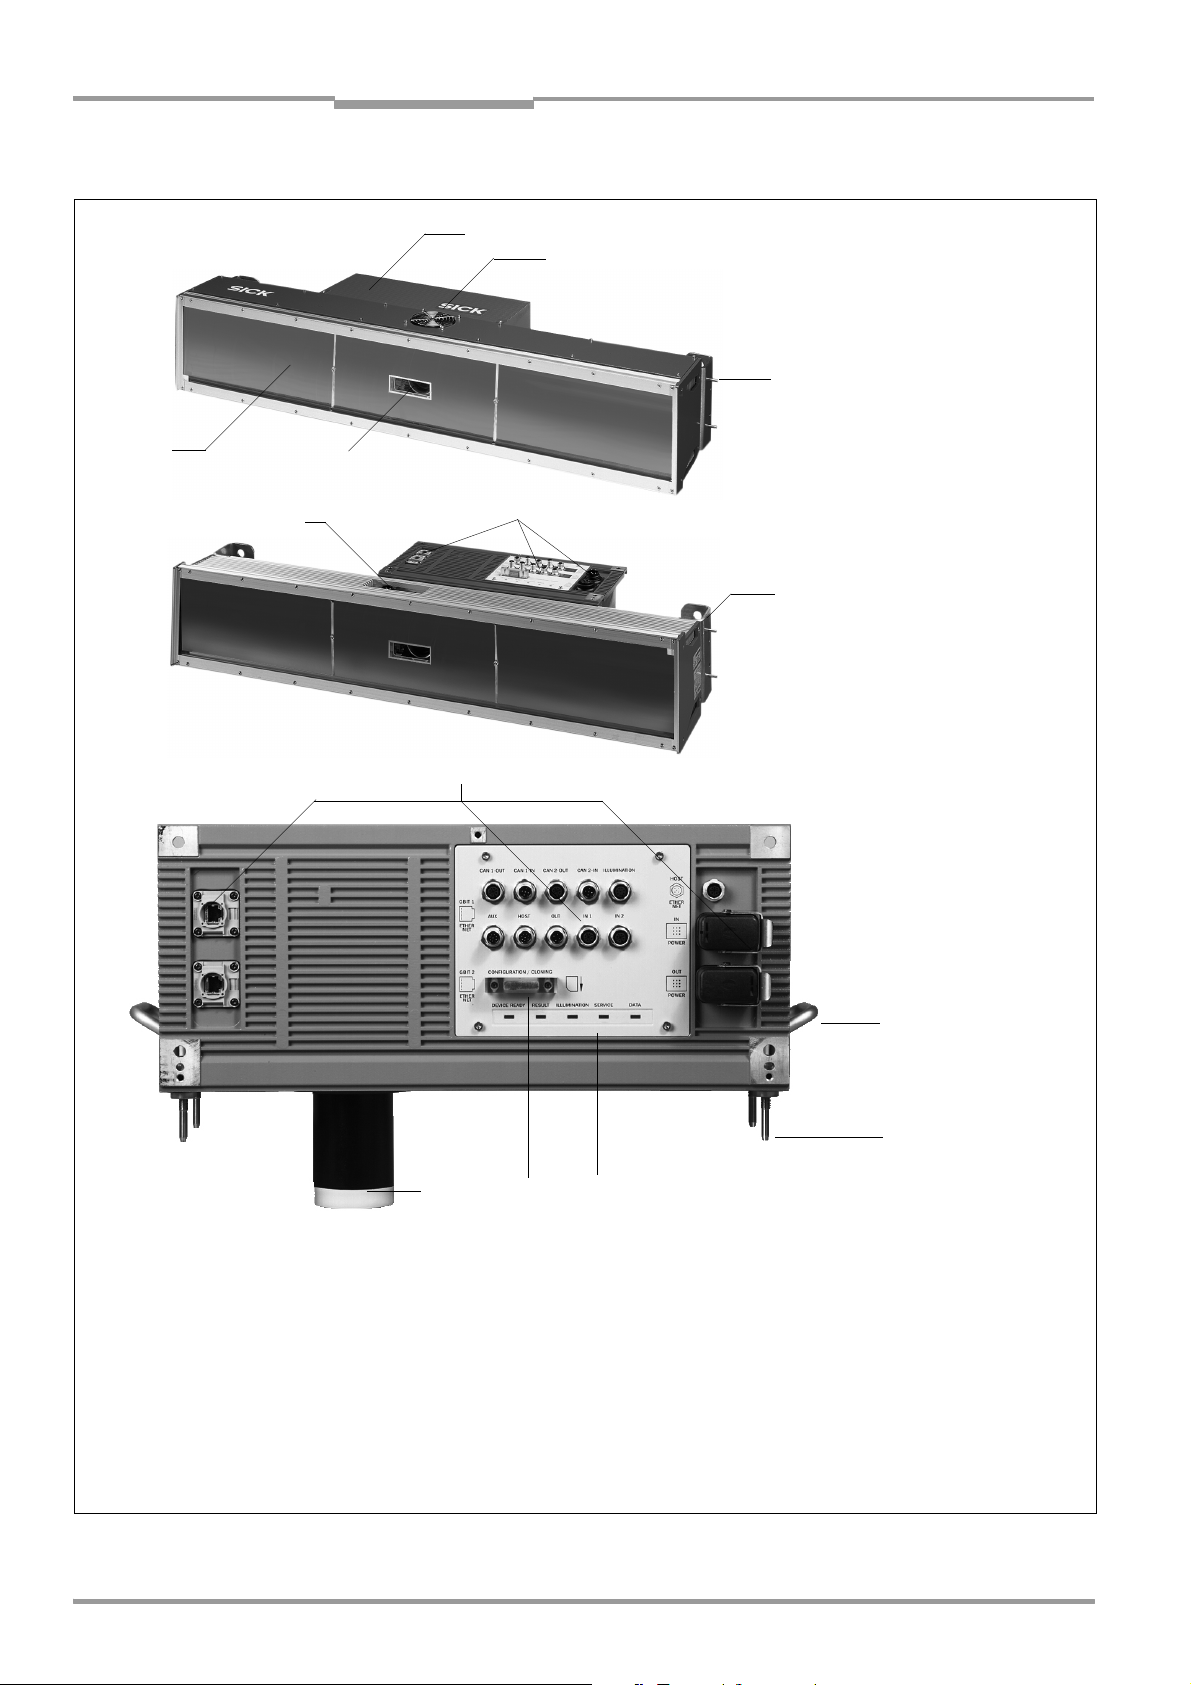
3.1.1 Device view
2
3
4
1
6
5
Complete ICR890 System, from above
7
8
Complete ICR890 System, from below
7
ICD890 Camera,
from below
Legend:
1 ICI890 Illumination
2 ICD890 Camera
3 Air inlet opening for cooling
the ICI890 Illumination
4 Guide pins (4 x) for use in
180° bracket
Fig. 3-2: View of the ICD890 camera and the ICI890 Illumination
5 ICD890 Camera reading window
6 Electrical connections for the
ICI890 Illumination
7 Electrical connections for the
ICD890 Camera
8 Fixing for bracket (2 x)
9
bl
bm bn bo
9
Handhold for camera (2 x)
bl Threaded centering pin for
fixing to the ICI890 Illumination
bm LEDs for status indicator (5 x)
bn SD memory card for parameter cloning
bo Lens protection tube
24 © SICK AG · Division Auto Ident · Germany · All rights reserved 8011325/0000/2006-10-24
Page 25

Operating Instructions Chapter 3
ICR890
Product description
3.1.2 Included in delivery
Delivery of the ICR890 System includes the following components:
Piece(s) Components Comment
1 ICD890 Camera ICR890 System
1 ICI890 Illumination
1Deflection mirror
1 MSC800 Without connection cables
1 MLG Light Grid (preconfigured) height
distance detector with connection cable and
installation kit
- or -
1 Object distance detector VMS4xx/5xx with
connection cables and installation kit
4 180° brackets with installation accessories For ICR890 System and deflection mirror
1 WL18-3 Reading Pulse Sensor (pulse
photoelectric reflex switch) with connection
cable and installation kit
1 Connection cable For the power supply of the ICR890
1 Connection cable For the power supply of the ICI890
1 Connection cable For control of the ICI890 Illumination via
1 CAN bus data link For networking the ICR890 System with
1 Terminal resistance For CAN bus termination at the ICR890
1 GigE Vision Standard licence for real time
image data transfer
1 Incremental encoder, resolution
10 mm (394 mil)/pulse
- or -
1 Incremental encoder, resolution
0.2 mm (7.9 mil)/pulse (using VMS4xx/5xx)
Installation frames Optional (application-specific)
Application-specific
Triggering the reading procedure
System
Illumination via the camera
the camera
MSC800 via the CAN bus
System
Optional (application-specific)
Optional (application-specific)
1 Notes on Device with electrical connection
diagram as primary information
min. 1 CD-ROM Depending on number of ordered devices
Operating Instructions ICR890 System in
printed form, in German and/or English
Tab. 3-1: Included in the delivery of the ICR890 High-end CCD Camera System
Included in the device packaging of the
ICR890 System
Optional, depending on the number of
issues explicitly ordered upon purchase
An overview of system components, in stock installation accessories, incremental
encoders, cables and plug connections is available in Chapter 10.4 Ordering information,
page 113.
8011325/0000/2006-10-24 © SICK AG · Division Auto Ident · Germany · All rights reserved 25
Page 26
Chapter 3 Operating Instructions
Product description
ICR890 High-end CCD Camera System
3.1.3 Contents of the CD-ROM
• “SOPAS-ET Engineering Tool“: Configuration software for Windows
TM
PCs with
integrated online help system (HTML files)
• ICR890 Operating Instructions: PDF version in German and English as well as further
publications for MSC800, VMS4xx/5xx
• “Acrobat Reader“: Freely available PC software for reading PDF files
Note The current versions of publications and programs on the CD-ROM can be downloaded at
www.sick.com.
3.1.4 Device versions
The system components are available in the following versions:
Type Order no. Description
ICD890-0000000 1027582 Camera with lens (focal distance 135 mm (5.32 in)), standard
device
ICD890-0000001 1040277 the same as 1027582, but includes GigE Vision licence
ICI890-00000 1028219 ICI890 Illumination
Tab. 3-2: System component versions
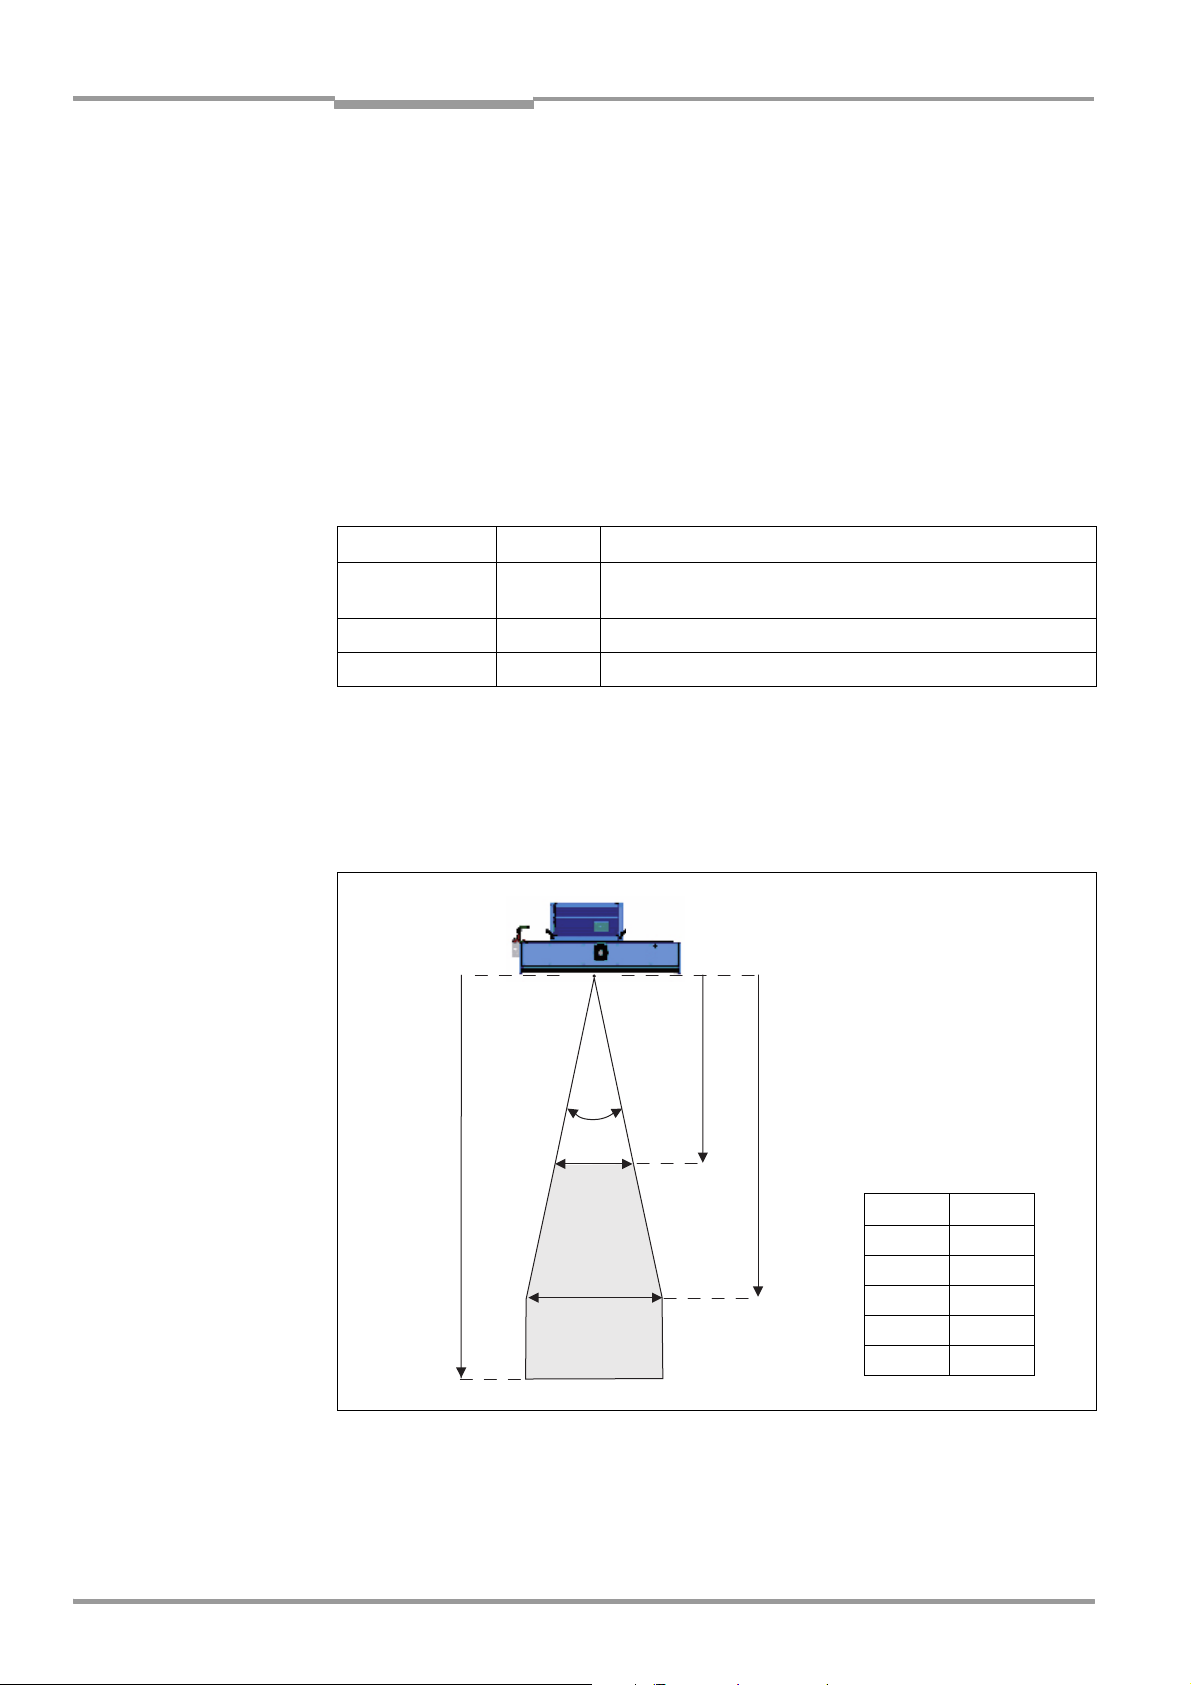
3.2 System requirements
3.2.1 General system requirements
25°
3.000 mm
600 mm
1.000 mm
1.400 mm
2.400 mm
mm inch
600 23.6
1,000 39.4
1,400 55.2
2,400 94.6
3,000 118.2
Fig. 3-3: Work area of the ICR890 System (standard device)
26 © SICK AG · Division Auto Ident · Germany · All rights reserved 8011325/0000/2006-10-24
Page 27
Operating Instructions Chapter 3
ICR890
Product description
Requirement Value Comment
Max. reading
distance
Shortest
permissible
distance to the
object
Aperture angle
Max. track width 1,000 mm (39.4 in) also see reading area diagram in Fig. 9-1,
Achievable ICD890
Camera resolution
Max. conveyor
speed
Tab. 3-3: General system requirements (standard device)
3,000 mm (118.2 in) from reading window (Fig. 3-3, page 26)
1,400 mm (55.2 in)
25
°
4.8 m/s (945 ft/min) with pixel size 0.25 mm (9.8 mil)
Work area up to 2,400 mm (94.6 in)
page 106
depends on the distance to the object and on the
conveyor speed (see Chapter 3.4.12 Data
interfaces, page 39)
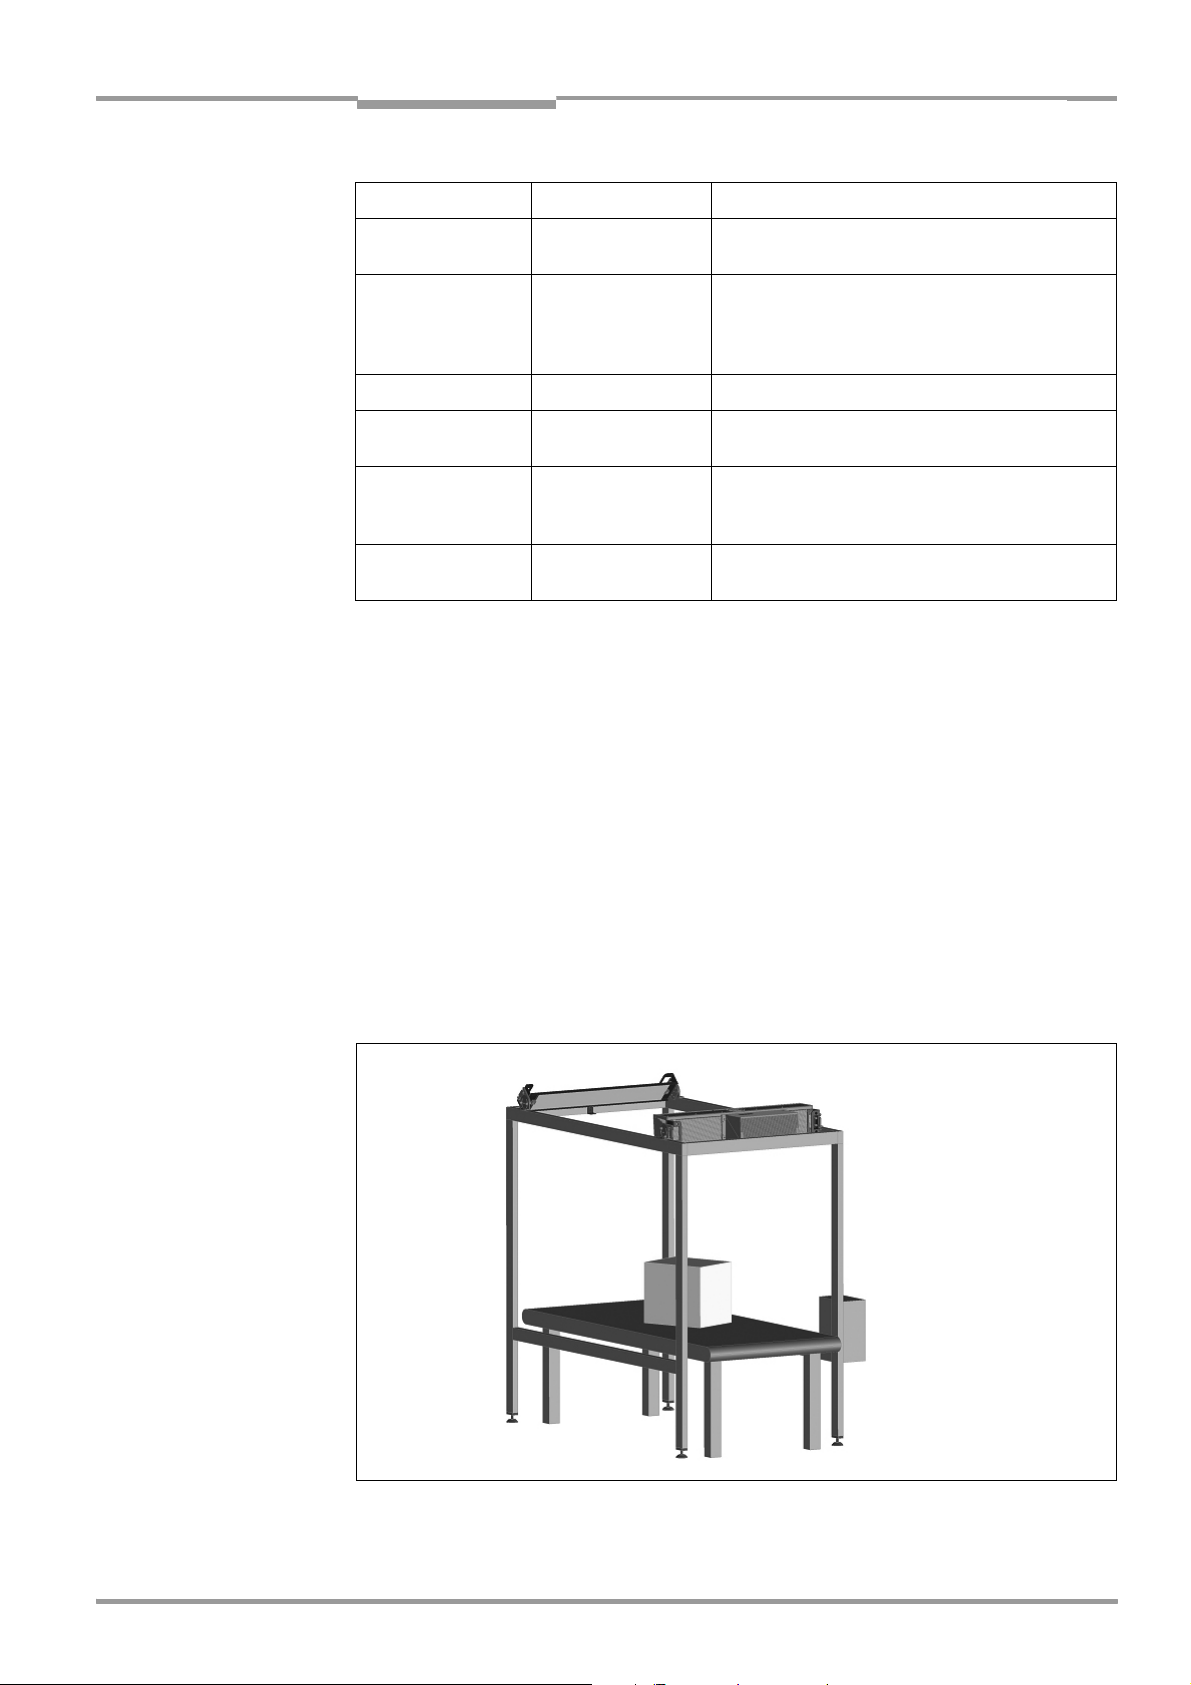
3.2.2 Installation requirements
• Typical space requirements above the highest object (for reading from above):
application-specific
• Unobstructed view of the objects for the ICR890 System
• Stable installation frames with sufficient load capacity and measurements suited to the
ICR890 System (see Chapter 9.5 System dimensional drawing ICR890, page 108)
• Four 180° brackets for the ICR890 System and the deflection mirror (included in
delivery)
• Shock absorbent and vibration free attachment
Note An installation frame made of 80 mm (3.15 in) item aluminium profiles can be used for
simple system installation (Fig. 3-4). The 180° brackets are aligned to these profiles.
Fig. 3-4: Example of simple system installation on the installation frame
8011325/0000/2006-10-24 © SICK AG · Division Auto Ident · Germany · All rights reserved 27
Page 28

Chapter 3 Operating Instructions
Product description
ICR890 High-end CCD Camera System
3.2.3 Electrical installation requirements
• Power supply (via MSC800): 100 to 264 V AC/50 to 60 Hz
• Reading pulse sensor (start/stop), e.g. photoelectric reflex switch (included in delivery):
For detecting an object with external reading pulse
• Additional appropriate reading pulse sensor (stop), e.g. photoelectric reflex switch: For
detecting the end of pulse with extended external reading pulse
• Preconfigured MLG Light Grid(included in delivery): when reading from above to detect
the object distance
• VMS4xx/5xx Volume Measurement System: when reading from the side or for multiside reading to detect the object distance
• Suitable incremental encoder, e.g. no. 2039455 (resolution 10 mm (394 mil)/pulse) or
no. 2039457 (resolution 0.2 mm (7.9 mil)/pulse) when using the VMS4xx/5xx.
Device is included in delivery depending on the system configuration
• Host processor with RS 232, RS 422/485 data interface or Ethernet: For further
processing of the reading data via MSC800 also PROFIBUS-DP
• Suitable visualization PC or PLC: To display the system status
• Connection cables: See Chapter 5.3.4 Assembled cables (overview), page 63
3.2.4 Operation requirements
• PC in the following version:
– Minimum Pentium III, 500 MHz, 128 MB RAM, CD drive, RS 232 serial data interface
or Ethernet interface card, mouse (recommended) and colour monitor
(recommended resolution 1,024 x 768 pixels)
– Operating system Windows 98
2000
TM
or Windows XP
TM
TM
, Windows NT4.0TM, Windows METM, Windows
– Free storage space on the hard drive: Approx. 100 MB for the SOPAS-ET
Configuration Software (V. 2.08) with help files and approx. 70 MB for “Acrobat
Reader“
• Connection cables see Chapter 5.3.4 Assembled cables (overview), page 63
• PC HTML browser, e.g. Internet Explorer
TM
: For online help system to the SOPAS-ET
Configuration Software
• Special PC for client display of the processed camera image information in real time
equipped with the following:
– Two 1 GBit Ethernet “IntelPro/1000 network card“ interface cards with 8254x
(x = 0, 1, 2, 4, 5, 6, 7) chip set
– GigE vision standard licence for real time image data transfer
28 © SICK AG · Division Auto Ident · Germany · All rights reserved 8011325/0000/2006-10-24
Page 29

Operating Instructions Chapter 3
ICR890
Product description
3.3 Product features and functions (overview)
High-end CCD Camera ICD890
• CCD line with 8,192 pixels (standard device)
• Dynamic focus setting
• Lens with 135 mm (5.32) focal distance (standard device)
• Reading area 1,400 to 3,000 mm (55.2 to 118.2 in) (standard device)
• Image resolution 170 to 350 dpi (standard device)
• Conveyor speed max. 4.8 m/s (945 ft/min) with 0.25 mm (9.8 mil) pixel size
• Scanning frequency max. 19.1 kHz (standard device)
• Can be adapted to the print quality of the code
• Analysis area of the CCD line can be restricted
• Real time image output (grey values: “*.bmp“ or “*.jpg“)
User safety and convenience
• Robust, compact metal housing, enclosure rating max. IP 64, CE mark
• Laser class 1M, switching off the LED ICI890 Illumination in case of prolonged active
reading gate or if the output capacity is exceeded, minimum power on-time 3 s
• Automatic self-test on system startup
• Diagnosis tools for system setup and system (distance) monitoring
• Configurable reading diagnosis data display in two reading result formats
• Operational data retrieval, error code display on request in case of errors
• Activatable test string function for signalling readiness for operation
• Password protected configuration mode
• Back up of configuration parameter values (cloning) also on SD memory card
(can be removed when replacing the camera)
• Future proof due to firmware update (flash PROM) via data interface
• Future proof SOPAS-ET Configuration Software
• Extended power supply scope
• Necessary maintenance or service task displayed via LED and system report
• The camera or illumination can be replaced within 20 mins
Convenient operation/configuration
• Configuration (online/offline) and display of image memory contents via the SOPAS-ET
Configuration Software (incl. help system)
• Status indicators via five LEDs
Operating modes
• Configuration mode
• Reading operation
Reading operation modi
• Start/Stop operation
• Object tracking (max. 10 objects per second, minimum gap 50 mm (1.97 in))
8011325/0000/2006-10-24 © SICK AG · Division Auto Ident · Germany · All rights reserved 29
Page 30

Chapter 3 Operating Instructions
Product description
ICR890 High-end CCD Camera System
1-D/2-D code detection
• Data Matrix ECC200 (PDF417 in preparation)/all conventional bar codes
• Max. number of 1-D codes: 50 per reading pulse
• Max. number of 2-D codes: 10 per reading pulse
• Separation of identical codes of the same code type using the code position
• Output sorting: Code position, FIFO, LIFO, code lengths list
• Manipulation of output strings via filter or format masks
Data communication
• Main data interface HOST: Configurable output format of the reading result,
communication redirectable to Ethernet interface
• AUX auxiliary data interface: Permanent output format with special diagnosis functions,
communication redirectable to Ethernet interface
• Two 1 GBit Ethernet interfaces for fast image output
Reading pulse
• External reading pulse via switching input(s) or data interface
Electrical interfaces
• HOST data interface: RS 232, RS 422/485 serial, Ethernet or CAN (various transfer
rate and protocol configurations possible)
• AUX data interface: RS 232, RS 422/485 serial, Ethernet or CAN (permanent transfer
rate, data format and protocol)
• CAN interface for integration into SICK CAN-SENSOR Network with the MSC800 or into
a CAN Open Network
• Ethernet interface (10/100 MBps), TCP/IP and FTP
• Two 1 GBit Ethernet interfaces, FTP and GigE Vision Standard
• Two digital switching inputs for external reading pulse sensor and incremental encoder
via optocoupler
• Two digital switching outputs for signalling definable results in the reading process
(system status)
• Connection to PROFIBUS-DP via MSC800
Connection technology (design)
• Data and function interfaces: M12 connector for industrial use
• GBit Ethernet: Phoenix VARIOSUB RJ-45 sockets, enclosure rating IP 67
• Power supply: Harting connectors
30 © SICK AG · Division Auto Ident · Germany · All rights reserved 8011325/0000/2006-10-24
Page 31

Operating Instructions Chapter 3
ICR890
Product description
3.4 Method of operation
This ICR890 System is an intelligent sensor system for automatic and non-contact detection
and decoding of 1-D/2-D codes. In principle, the codes can be detected on any side of
moving objects in a conveyor system.
For single-side readings, the codes are detected from above, below or from the side using
a camera. In order to allow easier installation and setup of the system, the camera image
is recorded using a deflection mirror.
Fig. 3-5: The ICR890 System at a conveyor system, single-side reading from above
Note Several cameras can be combined to allow detection of several sides in one passage (multi-
side reading). The method of operation is described here using the example of single-side
reading from above.
8011325/0000/2006-10-24 © SICK AG · Division Auto Ident · Germany · All rights reserved 31
Page 32

Chapter 3 Operating Instructions
Product description
ICR890 High-end CCD Camera System
The system is operated in combination with an MSC800 Controller. The reading results are
output at the data interfaces via the controller. External sensors deliver information via the
reading pulse, the object distance and the conveyor speed.
Deflection mirror
Direction
of transport
Fig. 3-6: System diagram for single-side reading from above
Object
Conveyor system
ICD890 Camera
and ICI890
Illumination
MSC800
Controller
Incremental encoder
Object distance
Direction of
transport
VMS4xx/5xx
or MLG
Light Grid
(Top view)
Reading pulse
(start/stop)
Photoelectric
reflex switch
Reading area
ICR890 System
(camera, illumination
and deflection mirror)
Object
release
point
3.4.1 Reading configuration
The ICD890 Camera detects 1-D/2-D codes line by line with the help of a CCD line. The
lines are written successively and with a high frequency into an image storage. Continuous
feeding of the object on the conveyor system produces a two-dimensional image of the
object.
Note The ICR890 System cannot recognize codes on stationary objects.
A moving 1-D/2-D code on an object is displayed as a grey level matrix in the image storage.
Contrast jumps are analyzed in order to scan the codes. The threshold value can be adapted
to the ambient conditions.
For more rapid analysis, the analysis area can be restricted to across the direction of
transport (code position).
The SOPAS-ET Configuration Software can, among other things, be used to configure
features, such as the code position and the symbol contrast:
P
ROJECT TREE, ICR890, PARAMETER, READING CONFIGURATION, register tab CODELABEL PROPERTIES
Moreover, the image resolution across the direction of transport (digital zoom in dpi) and in
the direction of transport (dynamic scanning frequency in lpi) can be configured:
P
ROJECT TREE, ICR890, PARAMETER, READING CONFIGURATION, register tab IMAGE CAPTURING
PROPERTIES
32 © SICK AG · Division Auto Ident · Germany · All rights reserved 8011325/0000/2006-10-24
Page 33

Operating Instructions Chapter 3
ICR890
Product description
3.4.2 Object trigger control
In order to initiate a reading process, the ICR890 System requires an appropriate signal
(trigger). The start signal is emitted via an external reading pulse sensor (photoelectric
reflex switch) as standard. As soon as an object has passed the reading pulse sensor, an
“internal reading gate“ opens for the reading process.
Alternatively, a command activates the reading process via a data interface or the CANSENSOR network.
The trigger source can be configured using the SOPAS-ET Configuration Software:
P
ROJECT TREE, ICR890, PARAMETER, READING CONFIGURATION, OBJECT TRIGGER CONTROL, register
tab S
TART/STOP OF OBJECT TRIGGER
3.4.3 Focus control
For dynamic focus control, the ICD890 Camera requires continuous information on the
distance to the object surface. This data is provided by a lateral MLG Light Grid for readings
from above. The object dimensions are taken from the VMS4xx/5xx Volume Measurement
System and processed via the MSC800 for readings from the side.
The SOPAS-ET Configuration Software can, among other things, be used to configure
features, such as the default position and the source of the distance measurement:
P
ROJECT TREE, ICR890, PARAMETER, READING CONFIGURATION, FOCUS CONTROL, register tabs
O
PTIONS and DISTANCE MEASUREMENT SOURCE
3.4.4 Illumination control
The area which is to be read must be illuminated with a high-performance LED illumination
when recording with the camera. The ICI890 Illumination produces a thin red illuminated
area (wavelength λ = 620 nm).
Illuminated area
Fig. 3-7: Diagram of the illumination with illuminated area
During reading from above, the light is deflected onto the conveyor system using the
deflection mirror.
8011325/0000/2006-10-24 © SICK AG · Division Auto Ident · Germany · All rights reserved 33
Page 34

Chapter 3 Operating Instructions
Product description
ICR890 High-end CCD Camera System
Fig. 3-8: ICR890 System with deflection mirror for reading from above
The illumination is controlled by the camera and can be switched on permanently or for the
duration of the internal reading gate.
If the reading gate does not run to the end due to an error (e. g. when the conveyor system
comes to a halt), the illumination automatically switches off once the settable timeout has
expired. In order to prevent epilepsy, the minimum power-on time of the illumination is 3 s.
The illumination mode and the timeout for the ICI890 Illumination can be configured using
the SOPAS-ET Configuration Software:
P
ROJECT TREE, ICR890, PARAMETER, READING CONFIGURATION, LAMP CONTROL, register tab
I
LLUMINATION MODE
34 © SICK AG · Division Auto Ident · Germany · All rights reserved 8011325/0000/2006-10-24
Page 35

Operating Instructions Chapter 3
ICR890
Product description
3.4.5 Position
To ensure correct functioning of the ICR890 System, the position and angle of the camera
and the deflection mirror have to be adjusted to the conveyor level.
Fig. 3-9: Position of the ICR890 System and the tilt angle
The position of the object trigger control (photoelectric reflex switch) on the outer right-hand
edge of the conveyor system is considered the point of reference, as viewed in the direction
of transport.
The α and γ angles must be set depending on the position of the System (e. g. on top or at
the side). In order to prevent direct reflectance, the light must be incident at an angle of
approx. 15° (β = skew) on the object surface against the direction of transport.
The position and the angle of the camera and the deflection mirror can be configured using
the SOPAS-ET Configuration Software:
P
ROJECT TREE, ICR890, PARAMETER, POSITION, register tabs OFFSET, COORDINATES and ANGLES
3.4.6 Increment configuration
In order to control the camera line frequency, the ICR890 System requires information on
the conveyor speed. An external incremental encoder delivers pulses which are used to
determine the current conveyor speed.
The conveyor speed results from the number of pulses and the resolution of the external
incremental encoder.
The increment source and resolution/speed can be configured using the SOPAS-ET
Configuration Software:
P
ROJECT TREE, ICR890, PARAMETER, INCREMENT CONFIGURATION, register tab INCREMENT
8011325/0000/2006-10-24 © SICK AG · Division Auto Ident · Germany · All rights reserved 35
Page 36

Chapter 3 Operating Instructions
Product description
ICR890 High-end CCD Camera System
3.4.7 Image requirement
The recorded image can be generated irrespective of the decoding result for further
processing via the GBit Ethernet interface. This enables, e. g., an analysis if decoding has
been unsuccessful.
Fig. 3-10: Example of an image recording for analysis
If data processing has been successful (decoding), the marking of the corresponding image
areas can also be displayed.
The image format and the scaling/quality can be configured using the SOPAS-ET
Configuration Software:
P
ROJECT TREE, ICR890, PARAMETER, IMAGE ACQUISITION, register tab REQUEST
Decoding
The recorded image is analyzed by the ICR890 System. This identifies regions of interest in
which codes are suspected.
blue rectangle
green rectangle
green line
Fig. 3-11: Image analysis (blue rectangle: Regions of interest; green rectangle: Successful
decoding; green line: Decoder runtime at end of the reading pulse)
36 © SICK AG · Division Auto Ident · Germany · All rights reserved 8011325/0000/2006-10-24
Page 37

Operating Instructions Chapter 3
ICR890
Product description
3.4.8 Code configuration
The ICR890 System can decode the following code types:
1-D codes (bar codes)
• Codabar
• Code 39
• UPC/EAN family
• 2/5 Interleaved
• Code 93
• Code 128 family
2-D codes
• Data Matrix EEC200
• PDF417 (in preparation)
The code types for 1-D and 2-D codes can be selected using the SOPAS-ET Configuration
Software:
P
ROJECT TREE, ICR890, PARAMETER, 1D CODE CONFIG., register tab SYMBOLOGIES
PROJECT TREE, ICR890, PARAMETER, 2D CODE CONFIG., register tab SYMBOLOGIES
The selected code types can be configured individually. The SOPAS-ET Configuration
Software has individual register tabs for each type.
3.4.9 Data processing
Start/Stop operation
There is only one object in the reading area during start/stop operation, i. e. all the read
codes should be unambiguously assigned to the object. The start and stop of the reading
process control two reading pulse sensors at the beginning and at the end of the reading
area as standard (Fig. 3-12, page 38). The distance between each sensor is determined by
the size of the reading area. The reading process can be alternatively controlled with
command strings via the data interface. The output of the reading results is carried out
either at the end of the reading pulse (the rear edge of the object has left the end of the
reading area) or during the reading pulse if certain parameterizable conditions have been
fulfilled.
8011325/0000/2006-10-24 © SICK AG · Division Auto Ident · Germany · All rights reserved 37
Page 38

Chapter 3 Operating Instructions
Product description
ICR890 High-end CCD Camera System
Tracking operation
During the reading process, a maximum of 10 objects can be simultaneously situated, one
behind the other, in the tracking operation, i. e. the ICR890 System must be able to
unambiguously assign the read codes to the objects (Fig. 3-12). A reading pulse sensor
controls initiation of the reading process at the start of the reading area as standard (see
Chapter 3.4.2 Object trigger control, page 33), the end is determined by the object release
point. This also defines the size of the resulting reading area.
A regular pulse is required in order to track objects in the reading area. This is generated by
the external incremental encoder, which delivers a constant pulse at least every 10 mm
(394 mil) of movement in the direction of transport (see Chapter 3.4.6 Increment
configuration, page 35). This allows the ICR890 System to generate a clear display of the
distance between the reading pulse sensor and the object release point. Any fluctuations
during startup of the conveyor technology or reductions in speed caused by heavy objects
are also detected. For clear separation of consecutive objects, a gap of at least 50 mm
(1.97 in) is required. Reading results for an object are displayed after the rear edge of the
object has passed the object release point. Alternatively, the reading process can be
initiated by a command string via the data interface.
Start/Stop operation
Data
output
Reading area
Fig. 3-12: Reading operation modi of the ICR890 System in stand-alone operation
Trigger 2:
Stop
Trigger 1:
Start
Data
output
Tracking operation
Reading area
Trigger 1:
Start
The reading operation mode and object release point can be configured using the SOPASET Configuration Software:
P
ROJECT TREE, ICR890, PARAMETER, DATA PROCESSING, register tab TRACKING
38 © SICK AG · Division Auto Ident · Germany · All rights reserved 8011325/0000/2006-10-24
Page 39

Operating Instructions Chapter 3
ICR890
Product description
3.4.10 Output format
The reading result (decoded codes) is displayed via definable data interfaces. Two different
output formats (telegrams) can be defined for this task.
Two output formats can be configured using the SOPAS-ET Configuration Software:
P
ROJECT TREE, ICR890, PARAMETER, DATA PROCESSING, OUTPUT FORMAT
3.4.11 Network
Although all important interfaces for displaying the reading results are available at the
ICR890 System, the system is operated via the MSC800 Controller as standard. The
MSC800 assumes system coordination for multi-side readings. The ICR890 System and the
MSC800 can be networked via the CAN bus.
The network parameters can be configured using the SOPAS-ET Configuration Software:
P
ROJECT TREE, ICR890, PARAMETER, NETWORK ARCHITECTURE, register tabs NETWORK OPTIONS and
M
ASTER/SLAVE
3.4.12 Data interfaces
Numerous data interfaces are available at the ICR890 System.
Data interface Connection Function
Serial host
interface
Serial host
interface
Ethernet HOST ETHERNET Preparation of the reading result for further processing by
GBit Ethernet: GBIT ETHERNET Preparation of the image data of the current reading for
CAN bus CAN 1 (Out/In),
Tab. 3-4: Data interface function
HOST Preparation of the reading result for further processing by
the host processor
AUX Reading diagnosis
the host processor
further processing
Networking one or several systems with the MSC800
CAN 2 (Out/In)
The data interfaces can be configured using the SOPAS-ET Configuration Software:
P
ROJECT TREE, ICR890, PARAMETER, INTERFACES, SERIAL
PROJECT TREE, ICR890, PARAMETER, INTERFACES, ETHERNET
PROJECT TREE, ICR890, PARAMETER, INTERFACES, GBIT ETHERNET
PROJECT TREE, ICR890, PARAMETER, INTERFACES, CAN
8011325/0000/2006-10-24 © SICK AG · Division Auto Ident · Germany · All rights reserved 39
Page 40

Chapter 3 Operating Instructions
Product description
ICR890 High-end CCD Camera System
3.4.13 Digital outputs
Under certain system conditions (e. g. for unsuccessful decoding “No Read“), two
independent switch signals can be generated at both digital outputs and can be used to
display the system status.
The digital outputs can be configured using the SOPAS-ET Configuration Software:
P
ROJECT TREE, ICR890, PARAMETER, DIGITAL OUTPUTS, register tabs OUTPUT 1 and OUTPUT 2
3.4.14 Digital inputs
The external sensor for the object trigger control (photoelectric reflex switch) and the
incremental encoder can, e. g., be connected to the two digital inputs.
The digital inputs can be configured using the SOPAS-ET Configuration Software:
P
ROJECT TREE, ICR890, PARAMETER, DIGITAL INPUTS, register tabs SENSOR 1 and SENSOR 2
40 © SICK AG · Division Auto Ident · Germany · All rights reserved 8011325/0000/2006-10-24
Page 41

Operating Instructions Chapter 3
ICR890
Product description
3.5 Indicators and control elements
3.5.1 User interface
The ICR890 System is configured application specifically using the SOPAS-ET Configuration
Software (see Chapter 6.3.1 Overview of the configuration procedure, page 81). The
software for this runs on a PC which must be connected to one of the data interfaces
(“HOST/AUX“ RS 232 or “HOST Ethernet“) of the MSC800 or the ICD890 Camera.
As an alternative to the SOPAS-ET Configuration Software, command strings are available
upon which the user interface of the SOPAS-ET Configuration Software is based (see
Chapter 10.2 Configuring the ICR890 System with command strings, page 111).
In case of an error, startup and diagnosis can only be carried out via the SOPAS-ET
Configuration Software. The system works fully automatically in normal operation. Further
operating elements are not available at the ICR890 System.
Parameter set on the SD memory card
The configured parameter values are saved as a parameter set in the internal EEPROM of
the ICR890 System and on the SD memory card of the ICD890 Camera (cloning). If the
camera needs replacing, the memory card allows convenient and rapid transfer of the
parameter set to a new device (also see Chapter 7.3 Replacing a system or a component,
page 93).
Note To prevent data loss, the SD memory card should only be removed or inserted in a new
device when the system is switched off.
The card can be accessed from the rear of the camera and is located behind a cover on the
panel with the electrical connections.
removed cover
SD memory card
Opening for insertion of
the SD memory card
Fig. 3-13: SD memory card for parameter set
8011325/0000/2006-10-24 © SICK AG · Division Auto Ident · Germany · All rights reserved 41
Page 42

Chapter 3 Operating Instructions
Product description
ICR890 High-end CCD Camera System
3.5.2 LEDs of the ICD890 Camera
There are five LEDs for the electrical connections of the ICD890 Camera. These LEDs
display the operating status, the status of the reading result, the illumination switch status,
necessary maintenance or service tasks and data transfer to the serial main data interface.
Fig. 3-14: LEDs at the ICD890 Camera
The LEDs indicate the following:
LED Colour Indication
DEVICE READY green
• Lights up after switching on and a successful self-test
• Lights up permanently during reading operation
• Goes off when the configuration mode changes
RESULT green
IllUMINATION green
SERVICE red • Flashes if system maintenance is required
• Lights up during reading operation after a successful reading (default setting: Good Read, 100 ms)
• Lights up during reading operation if the ICI890 Illumination of the camera is switched on (depends
on the reading pulse)
• Lights up permanently if the system requires servicing
DATA yellow
• Flashes during reading operation if data is being transferred between the ICR890 System and the
main data interface at the host
Tab. 3-5: LED indications
42 © SICK AG · Division Auto Ident · Germany · All rights reserved 8011325/0000/2006-10-24
Page 43

Operating Instructions Chapter 3
ICR890
Product description
3.6 Impacts on the reading quality
The image/reading quality of the ICD890 Camera is affected by the resolution across the
direction of transport (pixel resolution, dpi) and the resolution in the direction of transport
(line resolution, lpi). A quadratic resolution is selected in the default setting (dpi = lpi).
Max. pixel resolution across the direction of transport
The pixel resolution across the direction of transport depends on the reading distance to the
object. Fig. 3-15 shows the curve gradient for the standard 135 mm (5.32 in) lens and the
CCD with 8,192 pixels.
CCD line
Resolution on the object (dpi)
Reading distance (mm)
dpi = dots per inch
Fig. 3-15: Pixel resolution across the direction of transport (standard device, 135 mm (5.32 in) lens)
Max. line resolution in the direction of transport
The line resolution in the direction of transport depends on the conveyor speed. Fig. 3-16
shows the curve gradient for the standard 135 mm (5.32 in) lens and the CCD with 8,192
pixels with a max. line rate of 19.1 kHz.
CCD line
Resolution on the object (lpi)
lpi = line per inch
Fig. 3-16: Line resolution in the direction of transport (standard device, 8,192 pixels CCD sensor)
8011325/0000/2006-10-24 © SICK AG · Division Auto Ident · Germany · All rights reserved 43
Conveyor speed (m/s)
Page 44

Chapter 3 Operating Instructions
Notes:
Product description
ICR890 High-end CCD Camera System
44 © SICK AG · Division Auto Ident · Germany · All rights reserved 8011325/0000/2006-10-24
Page 45

Operating Instructions Chapter 4
ICR890
Installation
4 Installation
4.1 Overview of installation sequence
This chapter describes the installation sequence for components of the ICR890 System and
external components.
Note Prerequisite for the installation of components is a suitable installation frame at the
installation location. The installation frame has to be assembled according to the
specifications of a project-specific dimensional sheet.
The typical installation sequence is displayed below:
• Installation of the photoelectric reflex switch
• Installation and alignment of the deflection mirror
• Installation and alignment of the ICI890 Illumination and the ICD890 Camera
• Installation of the MSC800 Controller
• Installation of the MLG Light Grid or the VMS4xx/5xx
• Installation of the incremental encoder
Note Do not open the ICD890 Camera or the ICI890 Illumination. If the devices are opened,
the manufacturer's warranty shall not apply.
4.2 Installation preparations
4.2.1 Layout the components which are to be installed
The following components of the ICR890 System have to be placed ready for installation:
• Deflection mirror with protective film
• ICI890 Illumination with protective caps
• ICD890 Camera with yellow and black protective caps
For further components see Chapter 4.4 Installing external components, page 51.
4.2.2 Layout accessories
The following accessories are included and have to be placed ready for installation:
• 2 x 180° bracket for the deflection mirror incl.
– 2 clamping screws for each bracket
– 2 bolts for each bracket with 2 slot nuts for attachment to the installation frame
• 4 fastening screws for the deflection mirror
• 2 x 180° bracket for the ICI890 Illumination incl.
– 2 clamping screws for each bracket
– 2 bolts for each bracket with 2 slot nuts for attachment to the installation frame
• 4 fastening screws for the ICI890 Illumination
The following tools and resources are required for installation:
• Project-specific dimensional sheet
• Allen key (6 mm (0.24 in)) suitable for all screws
• Tape measure
• Goniometer
8011325/0000/2006-10-24 © SICK AG · Division Auto Ident · Germany · All rights reserved 45
Page 46

Chapter 4 Operating Instructions
Installation
ICR890 High-end CCD Camera System
4.2.3 Selecting the installation location
Dimensional sheet
The general installation location requirements are described in Chapter 3.2.2, page 27. The
project-specific specifications (position of the components, distances, angles, etc.) are
contained in a dimensional sheet and have to be adhered to when installing components.
Abb. 4-1: Example of a project-specific dimensional sheet for installation
46 © SICK AG · Division Auto Ident · Germany · All rights reserved 8011325/0000/2006-10-24
Page 47

Operating Instructions Chapter 4
ICR890
Installation
Free space required for connecting
Select an installation position for the illumination and for the camera which allows easy
access to the connections.
Free space
required for connecting
(L x W x H: 496 mm (19.5 in) x 250 mm (9.85 in) x 210 mm (8.3 in))
Abb. 4-2: Free space required for connecting the camera and the illumination
4.2.4 Arrangement at the conveyor system
The arrangement of the components above the conveyor system depends on the projectspecific requirements and the number of systems.
Abb. 4-3: Arrangement above the conveyor system for single-side reading from above
8011325/0000/2006-10-24 © SICK AG · Division Auto Ident · Germany · All rights reserved 47
Page 48

Chapter 4 Operating Instructions
Installation
ICR890 High-end CCD Camera System
Abb. 4-4: Arrangement at the conveyor system for multi-side reading with VMS4xx/5xx
Generally, each unit consisting of an ICI890 Illumination and a ICD890 Camera is always
installed together with a deflection mirror. The front of the illumination and the reflector
surface have to be exactly parallel to each other and aligned at a right angle to the conveyor
system.
90°
90° 90°
90°
Arrangement for reading
from above/below
(top view)
Abb. 4-5: Arrangement at the conveyor system
Arrangement for side reading
(side view)
48 © SICK AG · Division Auto Ident · Germany · All rights reserved 8011325/0000/2006-10-24
Page 49
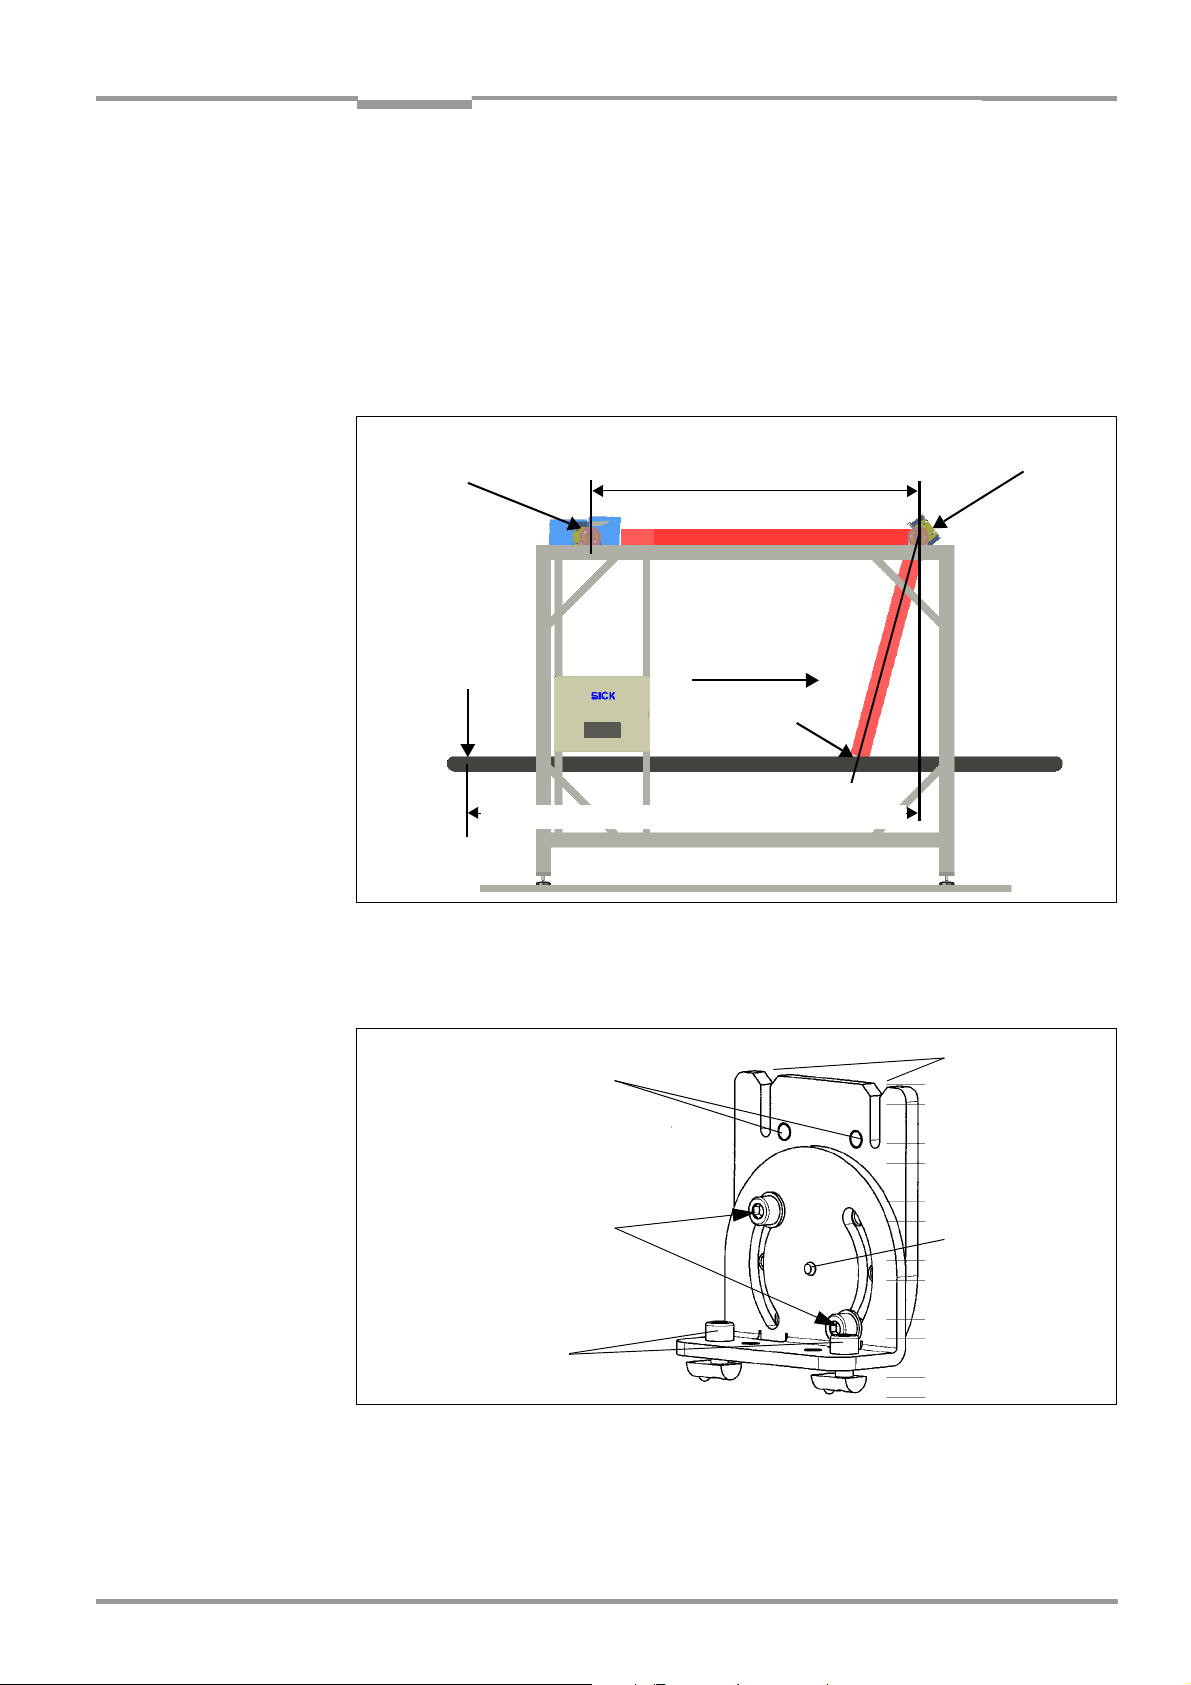
Operating Instructions Chapter 4
ICR890
Installation
4.3 Installing and adjusting the device
The position of the components on the installation frame is specified project specifically in
a dimensional sheet (Fig. 4-1, page 46). The specifications have to be adhered to as far as
possible during installation, since the values influence the configuration of the system to
some extent.
Note A final (fine) adjustment of the components can only occur during startup (see Chapter 6.3,
page 80). Prerequisite for this is the complete electrical installation of the system (Chapter
5, page 53).
ICI890 Illumination
with ICD890
Camera
Reference point
Distance of the deflection mirror to the reference point
Abb. 4-6: Position of the components
Distance of the illumination and the
camera to the deflection mirror
Direction of transport
Reading location
15°
Deflection mirror
In order to facilitate component alignment, the deflection mirror and the unit consisting of
the illumination and the camera are attached to the installation frame via 180° brackets.
Grooves for
Bore holes for
fastening screws
Clamping screws
Bolts with slot nuts
for attachment to the
installation frame
Abb. 4-7: 180° bracket for the deflection mirror and the illumination
guide pins
Pivotal point
After loosening the clamping screws, the angle of the brackets can be adjusted from 0° to
180° as required. To achieve this, the clamping screws can be screwed into the various
threaded holes.
8011325/0000/2006-10-24 © SICK AG · Division Auto Ident · Germany · All rights reserved 49
Page 50

Chapter 4 Operating Instructions
Installation
ICR890 High-end CCD Camera System
4.3.1 Installing the deflection mirror
The deflection mirror is attached to the installation frame via two 180° brackets. The
position of the deflection mirror results from the distance to the reference point in the
direction of transport (plumb line above the pivotal point of the bracket) and the angle to
the conveyor level (see Fig. 4-6, page 49). The deflection mirror has to be installed parallel
to the conveyor level.
1. Attach a 180° bracket to each side of the installation frame using two bolts and two
slot nuts on each side.
2. Place the mounting plate of the 180°bracket vertically and tighten the clamping
screws.
3. Insert the guide pins of the deflection mirror into the grooves of the 180° brackets.
The grips point upward.
4. Use two fastening screws to attach the deflection mirror to the 180° brackets.
5. Loosen the clamping screws, use the goniometer to adjust the deflection mirror to the
desired angle and retighten the clamping screws.
6. Remove the protective film from the deflection mirror.
4.3.2 Installing the ICI890 Illumination and the ICD890 Camera
The illumination is attached to the installation frame via two 180° brackets. The position of
the illumination is the result of the distance to the deflection mirror (see pivotal point of the
brackets, Fig. 4-6, page 49). The illumination has to be parallel to the deflection mirror.
Risk of injuries due to falling components!
The combined weight of the ICD890 Camera and the ICI890 Illumination is approx. 37 kg
(81.6 lb) without installation accessories.
¾ Do not carry out installation work alone.
¾ A second person should always secure components during installation.
1. Attach a 180° bracket to each side of the installation frame using two bolts and two
slot nuts on each side.
2. Place the mounting plate of the 180°bracket vertically and tighten the clamping
screws.
3. Insert the guide pins of the illumination into the grooves of the 180° brackets. Always
ensure free space for connecting (Fig. 4-2, page 47).
4. Use four fastening screws to attach the illumination to the 180° brackets.
5. Remove the protective cap from the illumination and ensure that the sealing ring on the
illumination is positioned correctly.
50 © SICK AG · Division Auto Ident · Germany · All rights reserved 8011325/0000/2006-10-24
Page 51

Operating Instructions Chapter 4
ICR890
Installation
6. Remove both protective caps from the camera.
Protective caps
Abb. 4-8: Removeable protective camera caps
7. Place the camera on the illumination and screw it to the illumination using the four
hexagon socket screws (centering pin with thread).
8. Loosen the clamping screws at the 180° brackets, horizontally rotate the illumination
and retighten the clamping screws.
4.4 Installing external components
MLG Light Grid
MSC800
Controller
Reference point
Photoelectric
reflex switch
Abb. 4-9: Position of the external components
4.4.1 External sensors for triggering
The reading pulse sensor (photoelectric reflex switch) is attached to the right-hand edge of
the conveyor system according to the specifications in the project-specific dimensional
sheet. The position of the photoelectric reflex switch is the reference point for the position
of the other components (see Fig. 4-6, page 49). The photoelectric reflex switch has to be
aligned as vertically as possible in the direction of transport.
¾ Install the photoelectric reflex switch onto the conveyor system.
Direction of transport
Incremental encoder
8011325/0000/2006-10-24 © SICK AG · Division Auto Ident · Germany · All rights reserved 51
Page 52

Chapter 4 Operating Instructions
Installation
ICR890 High-end CCD Camera System
4.4.2 Installing the incremental encoder
The incremental encoder is attached directly to the conveyor system according to the
specifications in the project-specific dimensional sheet. The position of the incremental
encoder should be as close as possible to the reading location.
¾ Install the incremental encoder to the reading location. Ensure that the friction wheel
has direct and permanent contact with the conveyor surface and does not slip.
4.4.3 Installing the MLG Light Grid
The MLG Light Grid is attached directly to the installation frame according to the
specifications in the project-specific dimensional sheet. Select a position for the light grid
which ensures that a large area above the conveyor level is detected by the sensors of the
MLG. The lower sensors should not be permanently covered by the conveyor system.
¾ Install the MLG Light Grid to the installation frame.
For further information see the MLG Modular Light Grid Operating Instructions
(no. 8009403).
4.4.4 Installing the MSC800 Controller
The MSC Controller is attached directly to the installation frame according to the
specifications in the project-specific dimensional sheet. Select a position for the MSC800
which ensures that the cables to the controller are easy to lay.
¾ Install the MSC800 close to the reading location.
For further information see the MSC800 Operating Instructions (no. 8011540).
4.5 Removing the device
Risk of injuries due to falling components!
The combined weight of the ICD890 Camera and the ICI890 Illumination is approx. 37 kg
(81.6 lb) without installation accessories.
¾ Do not carry out removal work alone.
¾ A second person should always secure components during removal.
Removal of the components is described in Chapter 7.3 Replacing a system or a
component, page 93.
Note Prior to removing the camera, always clean the cooling ribs on the illumination and on the
camera (see Chapter 7.2.3 Cleaning the deflection mirror, page 91). This prevents dirt from
entering into the illumination housing.
Carry out environmentally friendly disposal after decommissioning according to Chapter 7.4
Disposal, page 95.
52 © SICK AG · Division Auto Ident · Germany · All rights reserved 8011325/0000/2006-10-24
Page 53

Operating Instructions Chapter 5
ICR890
Electrical installation
5 Electrical installation
5.1 Overview of installation sequence
Note Complete installation of all the components is a prerequisite for electrical installation
(see Chapter 4 Installation, page 45).
The following list provides an overview of a typical installation sequence:
• Connecting the power supply of the ICI890 Illumination and the illumination control line
to the camera (system-internal connections)
• Connecting the ICD890 Camera to the external power supply (24 V DC)
• Connecting the host processor (RS 232, RS 422/485, Ethernet or CAN)
• Connecting the reading pulse sensor(s)
• Connecting the MLG Light Grid (RS 485) or the VMS4xx/5xx (CAN)
• Connecting the incremental encoder
• Connecting a PC/laptop temporarily for startup/configuration (RS 232 or Ethernet)
• Optional: Wiring the switching outputs for system status indication
• Optional: Connecting the special PC with 2 GBit Ethernet interfaces and software
(driver) for real-time image transfer/presentation
The actual installation work which has to be carried out depends on the respective system
configuration with which the ICR890 System is operated (see Chapter 5.2 Electrical
installation preparation, page 54). Once electrical installation has been completed, the
system is started up, adjusted and configured (see Chapter 6.1 Overview of the startup
procedure, page 79).
8011325/0000/2006-10-24 © SICK AG · Division Auto Ident · Germany · All rights reserved 53
Page 54

Chapter 5 Operating Instructions
Electrical installation
ICR890 High-end CCD Camera System
5.2 Electrical installation preparation
The ICR890 System can be used for single-side reading with or without the MSC800 or for
multi-side reading with the MSC800.
These three possibilities of use are described in the following chapters, each one by means
of a block diagram and a table of connections. Instructions on how to carry out the individual
installation sequences are contained in Chapter 5.4, page 64 .
5.2.1 Electrical installation of the ICR890 System (without MSC800)
Block diagram of the ICR890 System without MSC800 for single-side reading from above
Incremental encoder
Increment
Photoelectric
reflex switch
Reading pulse
IN 2
IN 1
AUX/
HOST ETHERNET
PC/laptop
Configuration/
diagnosis
(temporary)
ICR890 System
OUT (1/2)
MLG
Light Grid
Detection
object height
ILLUMINATION
POWER OUT
GBIT 1/2 ETHERNET
HOST
POWER IN
24 V DC
HOST ETHERNET
HOST
Host processor
Reading result
Special PC
Real-time
presentation of images
Abb. 5-1: Block diagram: connection principle of the ICR890 (standard system)
54 © SICK AG · Division Auto Ident · Germany · All rights reserved 8011325/0000/2006-10-24
Page 55

Operating Instructions Chapter 5
ICR890
Electrical installation
Wiring of the ICR890 System without MSC800 for single-side reading
The following connections have to be established if one ICR890 is used as a stand-alone
device without the MSC800 (e.g. reading from above):
No. ICD890 Camera
connection
1 POWER OUT Illumination power supply POWER IN connection of the ICI890 Illumination No. 2039397
2 ILLUMINATION Illumination control ILLUMINATION connection of the ICI890
3 POWER IN Power supply 24 V DC Power supply provided by the client No. 2039398
4 IN 1 Reading pulse trigger signals External reading pulse sensor Included in delivery
5 HOST or AUX Detection of object height MLG Light Grid (RS 485) Included in delivery
6 IN 2 Increment signals Incremental encoder
7 OUT (1/2) Indication of system status PLC (optional) No. 6027559
8 HOST or
HOST ETHERNET
9 GBIT 1/2
ETHERNET
10 AUX or
HOST or
HOST ETHERNET
Function Connection to ... Cable to be used
No. 6030216
Illumination
(10 m (32.8 ft))
Included in delivery
(resolution 10 mm (394 mil)/incr.)
(10 m (32.8 ft))
Data output of the reading
result
Real-time image transfer Special PC for image presentation (optional) Crossover cable
Configuration/Diagnosis Standard PC, temporarily,
Host processor (RS 232, RS 422/485 or
Ethernet)
(RS 232 or Ethernet)
– RS 232, RS 422/485:
no. 6028420
(10 m (32.8 ft))
– Ethernet:
patch cable:
no. 6030928
(3 m (9.84 ft))
no. 6029630
(5 m (16.4 ft))
no. 6029775
(10 m (32.8 ft))
or
patch cable
no. 6029776
(10 m (32.8 ft))
– RS 232:
no. 6028420
(10 m (32.8 ft))
no. 6028420
(10 m (32.8 ft))
– Ethernet:
patch cable:
no. 6030928
(3 m (9.84 ft))
no. 6029630
(5 m (16.4 ft))
Tab. 5-1: ICR890 System (stand-alone device) without MSC800: Overview of the ICD890 Camera connections which have to be
established
8011325/0000/2006-10-24 © SICK AG · Division Auto Ident · Germany · All rights reserved 55
Page 56
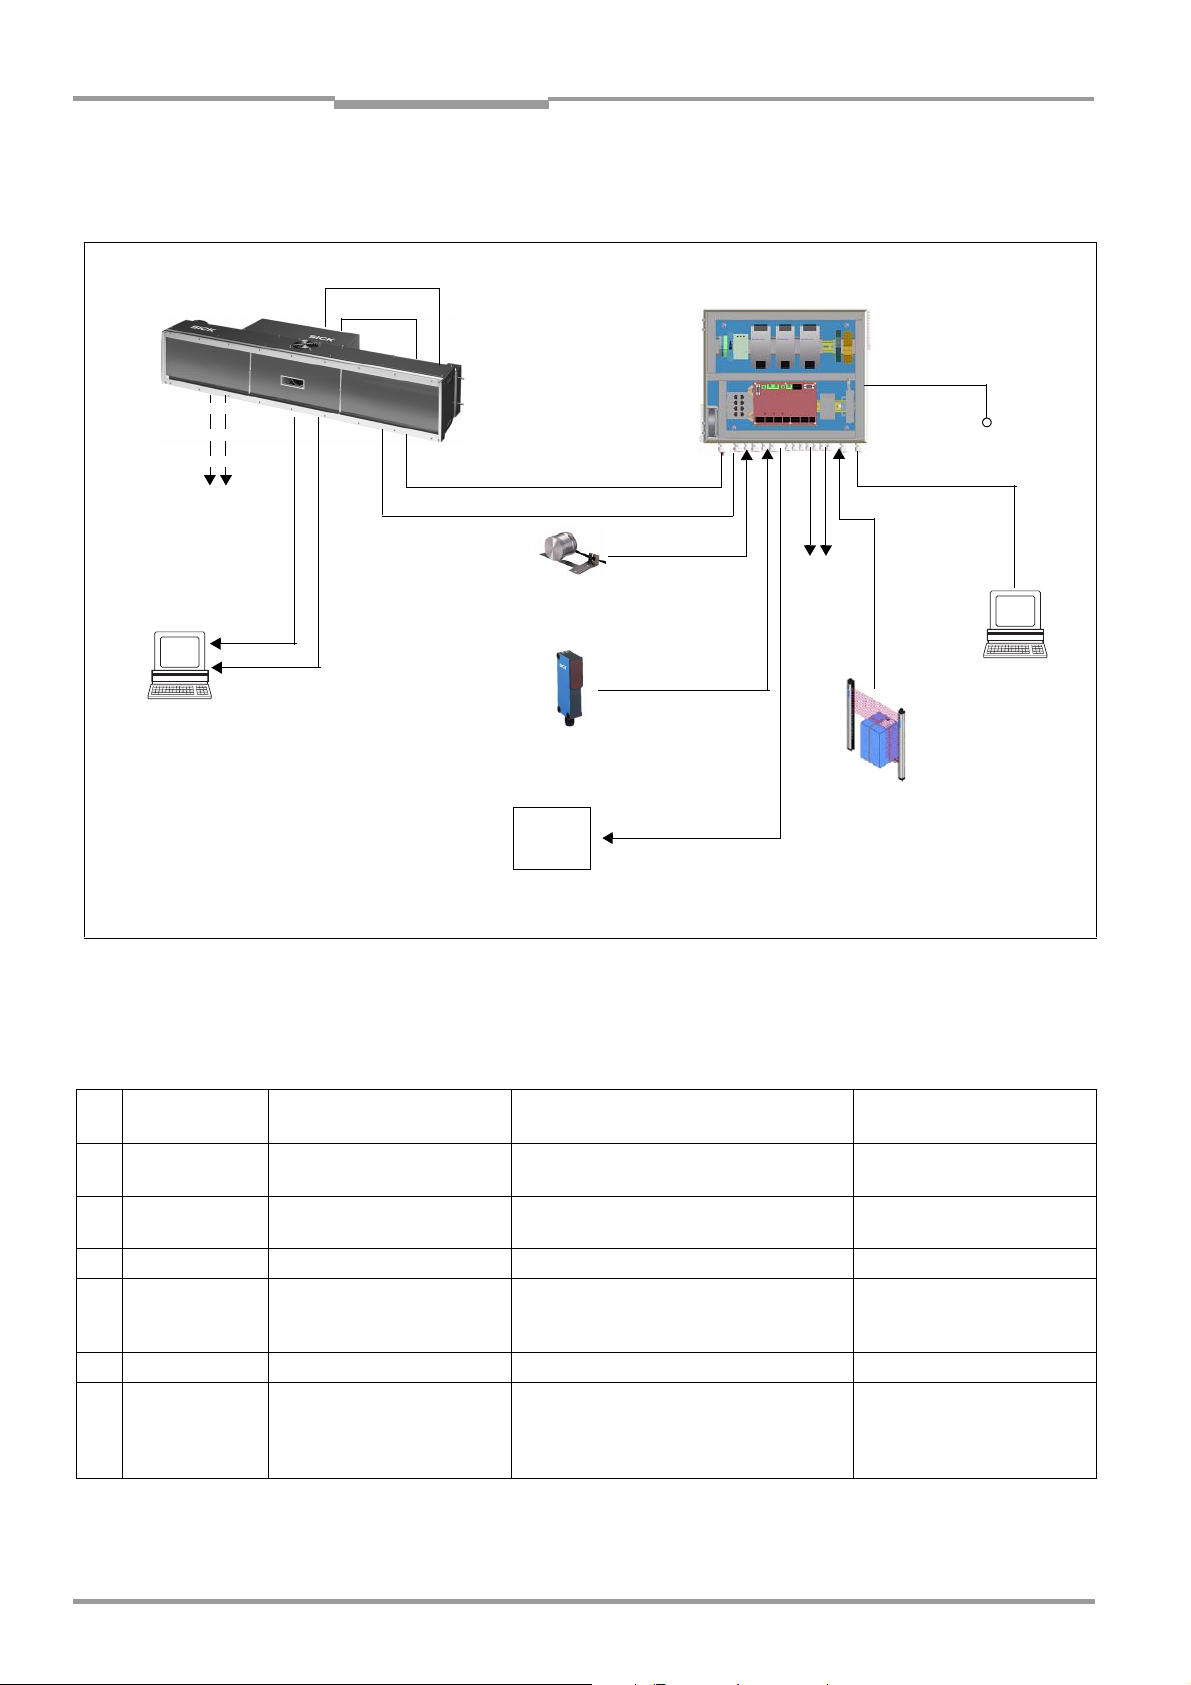
Chapter 5 Operating Instructions
Electrical installation
ICR890 High-end CCD Camera System
5.2.2 Electrical installation of the ICR890 System with MSC800 (single-side reading)
Block diagram of the ICR890 System with MSC800 for single-side reading from above
ICR890 System
OUT (1/2)
GBIT 1/2
ETHERNET
Special PC
Real-time
presentation of images
ILLUMINATION
POWER OUT
POWER IN
CAN 1-IN
Incremental encoder
Increment
Photoelectric
reflex switch
Reading pulse
HOST
Host processor
Reading result
CAN 1
INC (1)
TRIGGER
HOST/
ETHERNET/
PROFIBUS
MSC800
100 to 264 V AC/
50 to 60 Hz
AUX/ USB/
ETHERNET
OUT (1/2)
HOST/
AUX
PC/laptop
Configuration/
Diagnosis
(temporary)
MLG
Light Grid
Detection
object height
Abb. 5-2: Block diagram: Connection principle of a ICR890 (standard system) with MSC800
Wiring of the ICR890 System with MSC800 for single-side reading
The following connections have to be established if one ICR890 is used as a stand-alone
device with the MSC800 (e.g. reading from above):
No. ICD890 Camera
connection
1 POWER OUT Illumination power supply POWER IN connection of the ICI890
2 ILLUMINATION Illumination control ILLUMINATION connection of the ICI890
3 POWER IN Power supply 24 V DC Internal power supply of the MSC800 No. 2039398 (10 m (32.8 ft))
4 CAN 1-IN Communication with MSC800
5 CAN 1-OUT Terminal resistance – No. 6021167
6 GBIT 1/2
ETHERNET
Tab. 5-2: ICR890 System (stand-alone device) with MSC800: Overview of the ICD890 Camera connections which have to be
established
Function Connection to ... Cable to be used
No. 2039397
Illumination
No. 6030216
Illumination
"CAN 1" connection of the MSC800 No. 6021166 (5 m (16.4 ft))
(CAN-SENSOR network)
Real-time image transfer Special PC for image presentation
(optional)
or
No. 6021175 (10 m (32.8 ft))
Crossover cable no. 6029775
(10 m (32.8 ft)) or
patch cable no. 6029776
(10 m (32.8 ft))
56 © SICK AG · Division Auto Ident · Germany · All rights reserved 8011325/0000/2006-10-24
Page 57

Operating Instructions Chapter 5
ICR890
MSC800
No.
connection
Function Connection to ... Cable to be used
Electrical installation
1 Power supply
input terminals
2 TRIGGER Reading pulse trigger signals External reading pulse sensor Included in delivery
3 HOST or
AUX
4 INC Increment signals Incremental encoder
5 HOST or
ETHERNET or
PROFIBUS
6 OUT (1/2) Indication of system status PLC (optional) Cable provided by the
7 AUX or
USB or
ETHERNET
Tab. 5-3: ICR890 System (stand-alone device) with MSC800: Overview of the MSC800 connections which have to be established
Power supply of the MSC800 Mains voltage 100 to 264 V AC/50 to 60 Hz Cable provided by the
client
Detection of object height MLG Light Grid (RS 485) Included in delivery
Included in delivery
(resolution 0.2 mm (7.9 mil)/incr.)
Data output of the reading
result at the ICR890 System
Configuration/Diagnosis Standard PC, temporarily Cable provided by the
Host processor (RS 232, RS 422/485 or
Ethernet)
Cable provided by the
client
client
client
Note Please refer to the MSC800 Operating Instructions (no. 8011540) for connection to the
MSC800.
8011325/0000/2006-10-24 © SICK AG · Division Auto Ident · Germany · All rights reserved 57
Page 58

Chapter 5 Operating Instructions
Electrical installation
ICR890 High-end CCD Camera System
5.2.3 Electrical installation of the ICR890 System with MSC800 (multi-side reading)
Block diagram of the ICR890 System with MSC800 for multi-side reading
Power Supply
ILLUMINATION
POWER OUT
HOST
Host processor
Reading result
POWER IN
CAN 1-IN/OUT
GBIT 1/2
ETHERNET
VMS4xx/5xx
Detection
object distance
Special PC
Real-time
presentation of images
TACHO
Incremental encoder
Increment
HOST/ETHERNET/PROFIBUS
CAN 1
TRIGGER
Photoelectric
reflex switch
Reading pulse
MSC800
24 V DC
100 to 264 V AC/
50 to 60 Hz
AUX/ USB/
ETHERNET
OUT (1/2)
PC/laptop
Configuration/
Diagnosis
(temporary)
Abb. 5-3: Block diagram: Connection principle of several ICR890 (standard systems) with MSC800
Wiring of several ICR890 with MSC800 for multi-side reading.
The following connections have to be established if several ICR890 with MSC800 are used:
No. ICD890 Camera
connection
1 POWER OUT Illumination power supply POWER IN connection of the ICI890
2 ILLUMINATION Illumination control ILLUMINATION connection of the ICI890
3 POWER IN Power supply 24 V DC Internal power supply of the MSC800 No. 2039398 (10 m (32.8 ft))
4 CAN 1-IN Communication with MSC800
5 CAN 1-OUT Communication with CAN bus
6 GBIT 1/2
ETHERNET
Tab. 5-4: ICR890 System with MSC800 (multi-side reading): Overview of the ICD890 Camera connections which have to be
established
Function Connection to ... Cable to be used
No. 2039397
Illumination
No. 6030216
Illumination
“CAN 1“ connection of the MSC800 No. 6021166 (5 m (16.4 ft)) or
(CAN-SENSOR network)
“CAN 1-IN“ connection of the next ICR890
(CAN-SENSOR network)
Real-time image transfer Special PC for image presentation
System
(optional), temporary connection to every
ICR890 System, if required
No. 6021175 (10 m (32.8 ft))
No. 6021164 (1 m (3.28 ft))
No. 6021165 (3 m (9.84 ft))
No. 6021168 (5 m (16.4 ft))
Crossover cable no. 6029775
(10 m (32.8 ft)) or
patch cable no. 6029776
(10 m (32.8 ft))
58 © SICK AG · Division Auto Ident · Germany · All rights reserved 8011325/0000/2006-10-24
Page 59

Operating Instructions Chapter 5
ICR890
Electrical installation
No. MSC800
connection
1 Power supply
input terminals
2 TRIGGER Reading pulse trigger signals External reading pulse sensor Included in delivery
3 HOST or
ETHERNET or
PROFIBUS
4 OUT 1/2 Indication of system status PLC (optional) Cable provided by the
5 AUX or
USB or
ETHERNET
Tab. 5-5: ICR890 System with MSC800 (multi-side reading): Overview of the MSC800 connections which have to be established
Function Connection to ... Cable to be used
Power supply of the MSC800 Mains voltage 100 to 264 V AC/50 to 60 Hz Cable provided by the
client
Data output of the reading
result of all ICR890 Systems
via the MSC800
Configuration/Diagnosis Standard PC, temporarily Cable provided by the
Host processor (RS 232, RS 422/485 or
Ethernet)
Cable provided by the
client
client
client
Note Please refer to the MSC800 Operating Instructions (no. 8011540) for connection to the
MSC800.
VMS4xx/5xx
connector cap
No.
connection
1 Power/CAN IN Communication with CAN bus
4 Tacho Increment signals Incremental encoder (resolution 0.2 mm
Function Connection to ... Cable to be used
(CAN-SENSOR network)
“CAN 1-IN“ connection of the next ICR890
System
(7.9 mil)/incr.)
No. 6021164
(1 m (3.28 in))
No. 6021165
(3 m (9.84 ft))
No. 6021168
(5 m (16.4 ft))
Included in delivery
Tab. 5-6: ICR890 System with MSC800 (multi-side reading): Overview of the VMS4xx/5xx connections which have to be established
Note Please refer to the VMS410 Volume Measurement System Operating Instructions
(no. 8010592) for connection to the VMS410 or to the VMS 420/520 Volume
Measurement System Operating Instructions (no. 8010448) for connection to the
VMS420/520 as well as to the connector cap installation instructions for the VMS400/500
Volume Measurement Systems (no. 8010817).
8011325/0000/2006-10-24 © SICK AG · Division Auto Ident · Germany · All rights reserved 59
Page 60

Chapter 5 Operating Instructions
Electrical installation
ICR890 High-end CCD Camera System
5.3 Electrical connections and cables
Prerequisites for enclosure rating IP 64
All the electrical connections of the camera and illumination have been provided with
appropriate protective caps for delivery.
To maintain the enclosure rating IP 64, unused connections have to be provided with
protective caps during operation. The connectors attached to used connections have to be
firmly screwed or engaged.
The same applies to the EMC requirements (ESD) according to CE.
The protective caps have the following colours:
–
M12 connectors: yellow (plugs) and black (sockets)
–
RJ-45 connections: Grey, fixed to the device via a strap (cannot be lost)
–
Power supply: black
RF interference in case of use in residential areas.
¾ ICR890 High-end CCD Camera System is exclusively intended for use in an industrial
environment.
Ethernet
(GBit channels)
5.3.1 Electrical connections of the ICD890 Camera
The electrical connections of the ICR890 System comprise eleven M12 connectors
attached to the housing of the ICD890 Camera (on and next to the panel), two Harting
connectors for the power supply as well as two RJ-45 connections (enclosure rating IP 67)
for the GBit Ethernet.
Ethernet
(host)
Panel
Power supply
(IN and OUT)
Abb. 5-4: ICD890 Camera: Position of the electrical connections (standard system)
60 © SICK AG · Division Auto Ident · Germany · All rights reserved 8011325/0000/2006-10-24
Page 61

Operating Instructions Chapter 5
Electrical installation
ICR890
The following interfaces are realized via the ICD890 Camera connections:
-
Connection Design Number of
poles
GBIT 1 ETHERNET RJ-45 8, socket Image data output, channel 1
GBIT 2 ETHERNET RJ-45 8, socket Image data output, channel 2
CAN 1-OUT M-12 5, socket Output CAN-SENSOR network 1
CAN 1-IN M-12 5, plug Input CAN-SENSOR network 1
CAN 2-OUT M-12 5, socket Output CAN-SENSOR network 2 (reserved)
CAN 2-IN M-12 5, plug Input CAN-SENSOR network 2 (reserved)
ILLUMINATION M-12 8, socket Control data interface ICI890 Illumination
AUX M-12 8, plug
HOST M-12 8, plug Main data interface (RS 232, RS 422/485)
OUT M-12 4, plug Two digital switching outputs (system status)
IN 1 M-12 5, socket Digital switching input (reading pulse)
IN 2 M-12 5, socket Digital switching input (reading pulse, increment)
HOST ETHERNET M-12 5, socket Main data interface (10/100 MBps)
POWER IN Harting
8, plug Power supply input 24 V DC
HanQ8
POWER OUT Harting
8, socket Output 24 V DC, to ICI890 Illumination
HanQ8
Function
Auxiliary data interface
(RS 232, RS 422/485)
Tab. 5-7: ICD890 Camera: Function of the electrical connections
5.3.2 Electrical connections of the ICI890 Illumination
The ICI890 Illumination is equipped with a Harting connector for the power supply and an
M12 connector for the control line.
The following interfaces are realized via the ICI890 Illumination connections:
-
Design Number of
poles
M-12 8, plug Control data interface ICD890 Camera
Harting
8, plug Power supply input 24 V DC
HanQ8
Tab. 5-8: ICI890 Illumination: Function of the electrical connections
Function
8011325/0000/2006-10-24 © SICK AG · Division Auto Ident · Germany · All rights reserved 61
Page 62

Chapter 5 Operating Instructions
Electrical installation
ICR890 High-end CCD Camera System
5.3.3 Electrical connections of the MSC800 (overview)
Please refer to the MSC800 Operating Instructions (no. 8011540) for connections of the
MSC800-0000 logic controller.
Abb. 5-5: MSC800-0000 logic controller: Position of the electrical connections
The following interfaces are realized via the MSC800-0000 connections:
-
Number of
Connection Design
PROFIBUS D-Sub 9, socket Main data interface
USB 2 USB 4 Auxiliary data interface
ETHERNET 3 RJ-45 8, socket Auxiliary data interface
ETHERNET 2 RJ-45 8, socket Auxiliary data interface
USB 1 USB 4 Auxiliary data interface
ETHERNET 1 RJ-45 8, plug Main data interface
AUX 2 Block 14, terminals
AUX 1 D-Sub 9, plug
OUT Block 14, terminals Digital switching outputs (system status)
IN Block 12, terminals Digital switching inputs
TRIGGER Block 12, terminals Digital switching inputs (reading pulse)
INC Block 12, terminals Digital incremental encoder inputs
HOST (1/2) Block 14, terminals Main data interface (RS 232, RS 422/485)
CAN 2 Block 12, terminals Input/Output CAN-SENSOR network 2
CAN 1 Block 12, terminals Input/Output CAN-SENSOR network 1
POWER Block 8, terminals Power supply input 24 V DC
poles Function
Auxiliary data interface
Auxiliary data interface
(RS 232, RS 422/485)
(RS 232, RS 422/485)
Tab. 5-9: MSC800-0000 logic controller: Function of the electrical connections (overview)
62 © SICK AG · Division Auto Ident · Germany · All rights reserved 8011325/0000/2006-10-24
Page 63

Operating Instructions Chapter 5
ICR890
Electrical installation
5.3.4 Assembled cables (overview)
Cable ends Enclosure
Interface from ICD890
Camera to
HOST/AUX
(RS 232, RS 422/485)
CAN-SENSOR network 6021164 CAN data cable,
CAN-SENSOR network 6021165 CAN data cable,
CAN-SENSOR network 6021168 CAN data cable,
CAN-SENSOR network 6021166 CAN data cable to MSC800,
CAN-SENSOR network 6021175 CAN data cable to MSC800,
CAN-SENSOR network 6021167 CAN terminal resistance – 5-pole M12
Ethernet 6029776 Patch cable for GBit Ethernet,
Ethernet 6029775 Crossover cable for GBit Ethernet,
HOST Ethernet 6030928 Patch cable for HOST Ethernet,
HOST Ethernet 6029630 Patch cable for HOST Ethernet,
Reading pulse sensor
Incremental encoder
PLC 6027559 Connection cable for switching
ICI890 Illumination 6030216 Illumination control line
ICI890 Illumination 2039397 Illumination power supply
Power supply 2039398 Connection cable for power supply 10 m
ICI890 Illumination 2032922 Illumination power supply,
Power supply 2032926 Connection cable for power supply,
Cable no. Type Length
6028420 Connection cable for host processor or
PC, TPU/PUR bundle jacket
PVC-free
PVC-free
PVC-free
PVC-free
PVC-free
CAT6, PVC-free
CAT6, PVC-free
(10/100 MBps), CAT5
(10/100 MBps), CAT5
6024861 Connection cable for switching inputs,
PUR bundle jacket
outputs
(included in delivery), PUR, halogenfree
(included in delivery)
PVC-free
PVC-free
10 m
(32.8 ft)
1 m
(3.28 ft)
3 m
(9.84 ft)
5 m
(16.4 ft)
5 m
(16.4 ft)
10 m
(32.8 ft)
10 m
(32.8 ft)
10 m
(32.8 ft)
3 m
(9.84 ft)
10 m
(32.8 ft)
5 m
(16.4 ft)
10 m
(32.8 ft)
0.6 m
(23.6 in)
0.75 m
(29.6 in)
(32.8 ft)
0.75 m
(29.6 in)
10 m
(32.8 ft)
rating
ICD890 external
8-pole M12
socket
5-pole M12
socket
5-pole M12
socket
5-pole M12
socket
5-pole M12
socket
5-pole M12
socket
plug
RJ-45 plug RJ-45 plug IP 65/20
RJ-45 plug RJ-45 plug IP 65/20
4-pole M12
plug
4-pole M12
plug
5-pole M12
plug
4-pole M12
socket
8-pole M12
plug
8-pole Harting
HanQ plug
8-pole Harting
HanQ socket
8-pole Harting
HanQ plug
8-pole Harting
HanQ socket
open IP 65
5-pole M12
plug
5-pole M12
plug
5-pole M12
plug
open IP 65
open IP 65
–IP 65
RJ-45 plug IP 65/20
RJ-45 plug IP 65/20
open IP 65
open IP 65
8-pole M12
socket
8-pole
Harting
HanQ socket
open IP 65
8-pole
Harting
HanQ socket
open IP 65
IP 65
IP 65
IP 65
IP 65
IP 65
IP 65
Tab. 5-10: Cables for connecting the ICR890 System
All the cables included on the list are suitable for the temperature range 0 to +40 °C
(32 to 104 °F).
See Chapter 10.4.3 Accessories: Cables and connectors, page 115 for technical cable
data. See Chapter 5.5.3 Wire colours assignment of assembled cables with open end,
page 75 for the wire colour assignment of cables with open cable end.
8011325/0000/2006-10-24 © SICK AG · Division Auto Ident · Germany · All rights reserved 63
Page 64

Chapter 5 Operating Instructions
Electrical installation
ICR890 High-end CCD Camera System
5.4 Performing electrical installation
Risk of injuries due to electrical current!
The MSC800 Controller is connected to the power supply (mains voltage 100 to 264 V AC/
50 to 60 Hz).
¾ Observe current safety regulations when working with electrical equipment.
¾ Make sure the equipment has been deenergized before performing any installation
work.
Note To ensure secure fastening of the plugged connectors and adherence to the enclosure
rating IP 64 for the ICR890 System, the knurled nuts/coupling rings of the M12 connectors
have to be tightened and the Harting connectors for the power supply secured by means of
the fastening bows.
¾ Wire all connections provided by the client using shielded copper wires!
¾ Pay attention to the required wire cross sections:
– Switching inputs/outputs: At least 0.25 mm
– Data interfaces: At least 0.22 mm
2
(24 AWG)
¾ Lay all the cables in such a manner that persons cannot trip over them and that the
cables are protected against damage.
Recommendation Attach suitable wire end ferrules to the open wire ends of flexible cables which are fixed to
terminal screws. However, do not use wire end ferrules when fixing open wire ends to spring
terminals, since secure contact is otherwise not ensured.
2
(24 AWG)
5.4.1 Connecting the power supply cable and the ICI890 Illumination control line
The system-internal connection between the ICD890 Camera and the ICI890 Illumination is
realized via two short cables (no. 2039397 and no. 6030216) included in the delivery.
¾ Plug the power supply cable no. 2039397 into the 8-pole Harting HanQ8 socket
POWER OUT of the ICD890 Camera and fix it.
Plug the other cable end onto the corresponding 8-pole Harting HanQ8 plug of the
ICI890 Illumination and fix it.
¾ Plug the control line no. 6030216 into the 8-pole M12 socket ILLUMINATION of the
ICD890 Camera and fix it.
Plug the other cable end onto the corresponding 8-pole M12 plug of the ICI890
Illumination and fix it.
5.4.2 Power supply of the ICR890 System
Power supply requirements
A supply voltage of 24 V DC ± 10 % is required for the operation of the ICR890 System
(functional extra-low voltage according to standard IEC 364-4-41 (VDE 0100 (Part 410)).
This voltage is generated by the power supply in the MSC800 as standard. The typical power
consumption per ICD890 Camera and ICI890 Illumination amounts to a total of 425 W.
Note The wire cross section for the power supply of the ICR890 System has to be at least 3 mm
(12 AWG). To ensure protection against short circuit/overload of the supply line, the cable
has to be protected according to the wire cross sections used. The valid standards must be
observed.
2
64 © SICK AG · Division Auto Ident · Germany · All rights reserved 8011325/0000/2006-10-24
Page 65

Operating Instructions Chapter 5
ICR890
Electrical installation
Connecting the power supply of the ICR890 System via the MSC800
1. Ensure that the external power supply for the MSC800 has been switched off.
2. Plug the 8-pole Harting HanQ8 socket of the power supply cable no. 2032926 into the
8-pole Harting HanQ8 plug POWER IN of the ICD890 Camera and fix it.
3. Attach the open cable end to the terminal strip for power supply in the MSC800. (See
Tab. 5-35, page 77 for pin/wire colour assignment of cable no. 2032926.)
Note The supply voltage remains switched off during the subsequent installation work!
5.4.3 Data interfaces HOST/AUX
General conditions of the data interfaces HOST and AUX
Both the HOST data interface (main data interface) as well as the AUX data interface
(auxiliary data interface) of the ICR890 System can be operated as RS 232 version or as
RS 422/485 version or be rerouted to the Ethernet interface. Tab. 5-11 shows the
recommended maximum cablelengths, depending on the interface version and the data
transfer rate.
Interface type Data transfer rate Distance to target processor (host)
RS 232 up to 19.2 kbd
38.4 to 115.2 kbd
1)
RS 422
Ethernet 10/100 MBps max. 100 m (328 ft)
GBit Ethernet 10 Mps to 1GBps max. 100 m (328 ft)
1) with corresponding line termination according to specification
max. 38.4 kbd
max. 57.6 kbd
max. 115.2 kbd
max. 10 m (32.8 ft)
max. 3 m (9.84 ft)
max. 1,200 m (3,936 ft)
max. 500 m (1,640 ft)
max. 10 m (32.8 ft)
Tab. 5-11: Maximum cable lengths between ICR890 and the host
Recommendation ¾ Use shielded data cables (twisted pair).
¾ To prevent interference, do not lay data cables parallel to power supply cables and
motor lines over a longer distance, e. g. in cable channels.
Wiring the HOST/AUX data interface
Damage to the interface modules!
Incorrect wiring of the HOST/AUX data interfaces can damage electronic components in the
ICR890 System.
¾ Wire the data interfaces correctly according to Fig. 5-6, page 66.
¾ Check the wiring carefully before switching on the ICR890 System.
¾ Connect the data interfaces to the host/PC paying attention to the EMC and using a
shielded cable. Adhere to the maximum cable lengths (Tab. 5-11, page 65).
¾ Wire the versions RS 232 or RS 422 according to Fig. 5-6, page 66.
Use cable no. 6028420 for each of the connections.
(See Tab. 5-31, page 75 for pin/wire colour assignment.)
8011325/0000/2006-10-24 © SICK AG · Division Auto Ident · Germany · All rights reserved 65
Page 66

Chapter 5 Operating Instructions
Electrical installation
ICR890 High-end CCD Camera System
4
RS 232
ICR890
RS 422
ICR890
Abb. 5-6: ICD890 Camera: Wiring of the HOST/AUX data interfaces
6
7
3
4
5
6
7
(3)
(2)
(5)
( ) = 9-pole D-Sub
plug at PC
5.4.4 Data interface CAN 1-IN/OUT
General conditions of the CAN interface
The SICK-specific CAN-SENSOR network is based on the CAN bus, which is structured in line
topology.
Tab. 5-12 shows the maximum permissible CAN bus length, depending on the selected data
transfer rate.
Data transfer rate Maximum data cable length
10 kBps 4,976 m (16,325 ft)
20 kBps 2,476 m (8,123.3 ft)
50 kBps 976 m (3,202 ft)
100 kBps 576 m (1,889.7 ft)
125 kBps 476 m (1,561.7 ft)
250 kBps
500 kBps 76 m (249.3 ft)
1) Default setting in the ICR890 System
Tab. 5-12: CAN bus: Maximum cable lengths, depending on the data transfer rate
1)
226 m (741.5 ft)
Tab. 5-13 shows the maximum permissible overall length of all stub cables, depending on
the data transfer rate. This overall length must not be exceeded. The maximum length of
each individual stub cable must not exceed 6 m (19.7 ft).
Data transfer rate Total of all stub cable lengths
125 kBps 156 m (512 ft)
250 kBps 78 m (256 ft)
500 kBps 39 m (128 ft)
Tab. 5-13: CAN bus: Maximum stub cable lengths, depending on the data transfer rate
66 © SICK AG · Division Auto Ident · Germany · All rights reserved 8011325/0000/2006-10-24
Page 67

Operating Instructions Chapter 5
ICR890
Electrical installation
The required wire cross section of the data cable depends on the overall length of the
network. Tab. 5-14 shows an overview according to ISO 11898.
Cable length Required wire cross section (data cable)
0 to 40 m (0 to 131 ft)
40 to 300 m (131 to 984 ft)
300 to 600 m (984 to 1968 ft)
600 to 1,000 m (1968 to 3280 ft)
Tab. 5-14: CAN bus: Required wire cross section, depending on the data cable length
≥ 0.25 mm
≥ 0.34 mm
≥ 0.5 mm
≥ 0.75 mm
2
(24 AWG)
2
(22 AWG)
2
(21 AWG)
2
(20 AWG)
Wiring the data interface CAN 1-IN/OUT
The CAN interface of the ICR890 System is used in the following configurations:
• In the case of single-side reading, the peripheral equipment should be wired centrally
at the MSC800.
• In the case of multi-side reading, the ICR890 System works with the MSC800 together
with further camera systems, bar code scanners and volume measurement systems
(camera control).
¾ Connect the ICD890 Camera to the 5-pole M12 socket and the open end via the CAN
1-IN connection using the cable no. 6021166. (See Tab. 5-32, page 76 for pin/wire
colour assignment.)
¾ Attach the open cable end to the CAN 1 connection in the MSC800.
¾ Attach the terminal resistance no. 6021167 to the CAN1-OUT connection of the
ICD890 Camera.
The signals for the reading pulse and increment are transmitted to the ICR890 System via
the CAN bus. Direct connection to the ICR890 System is, thus, not required. The HOST and
AUX data interfaces as well as the signals of both switching outputs (for single-side reading)
are accessible via the CAN bus at the MSC800. The ICR890 System and the MSC800 have
to be configured accordingly as Slave or Master for this purpose (see Chapter 6.3 First
startup, page 80).
8011325/0000/2006-10-24 © SICK AG · Division Auto Ident · Germany · All rights reserved 67
Page 68
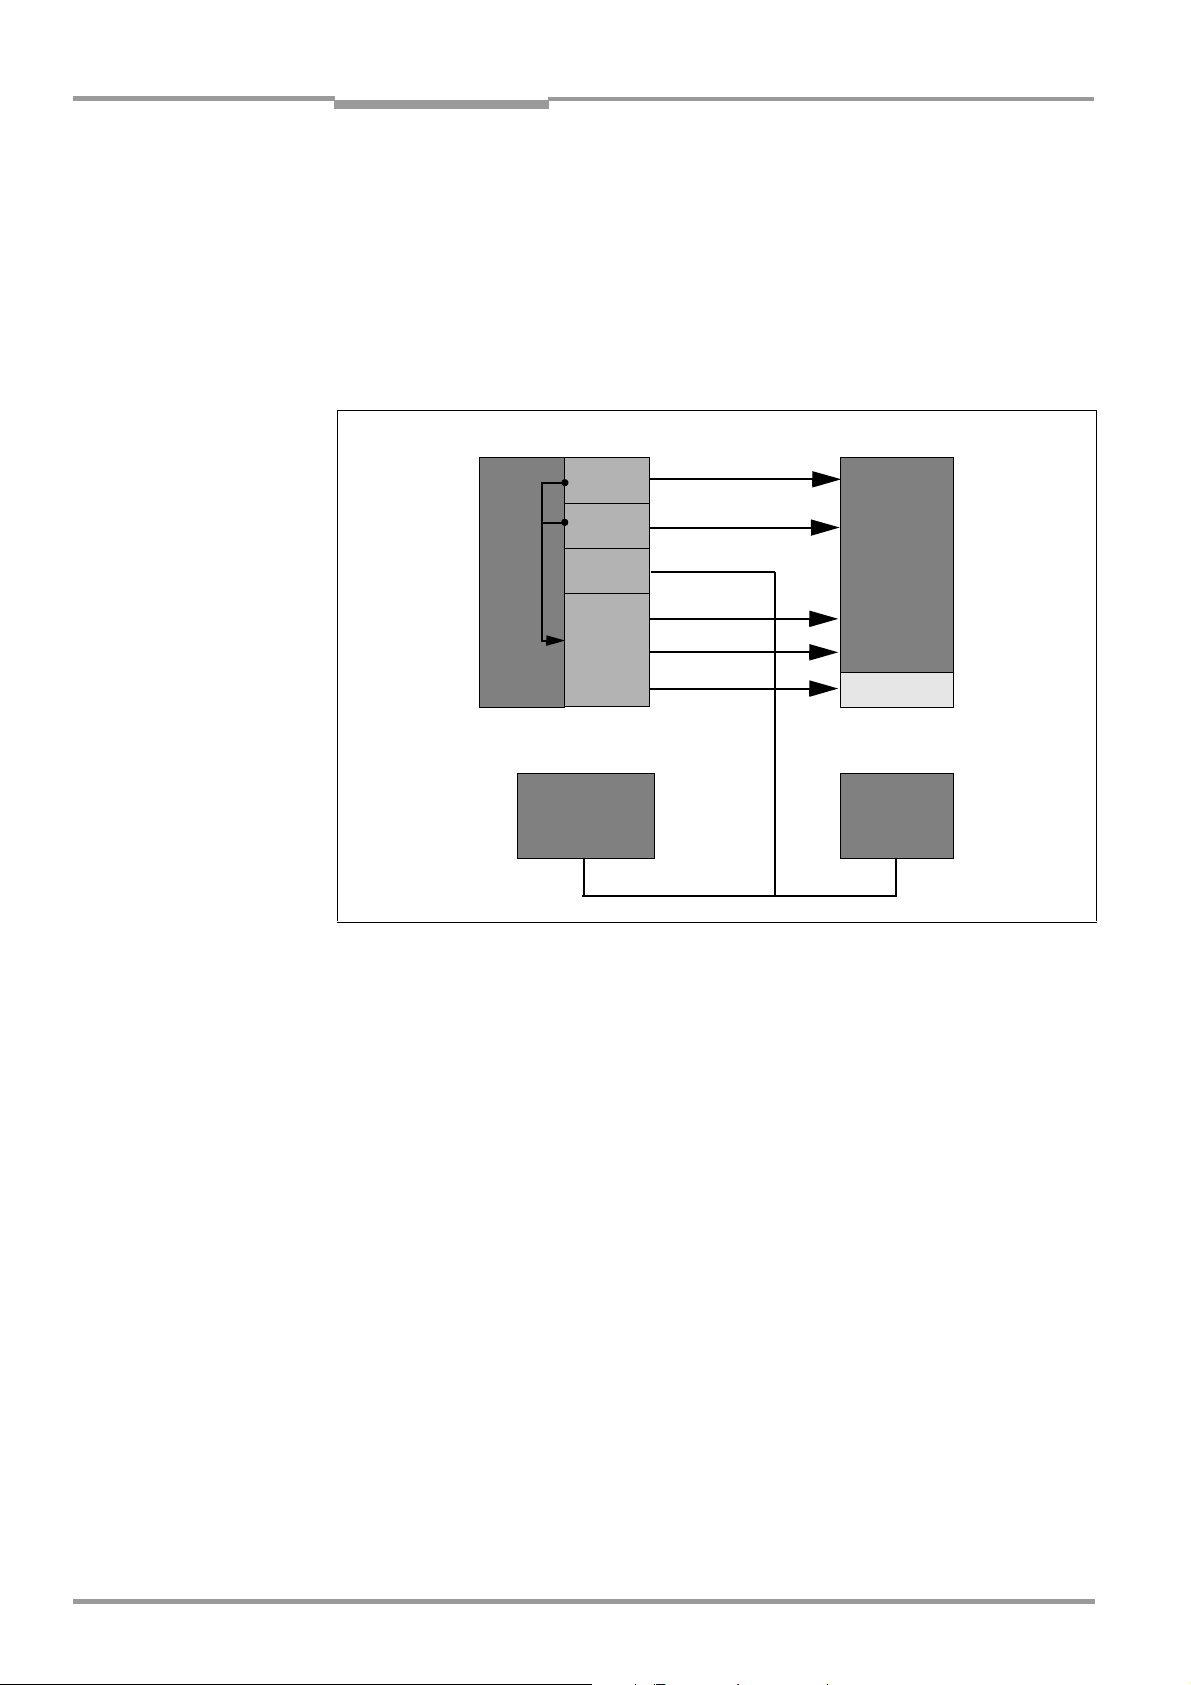
Chapter 5 Operating Instructions
Electrical installation
ICR890 High-end CCD Camera System
5.4.5 Wiring the Ethernet interface HOST ETHERNET
The Ethernetinterface HOST ETHERNET of the ICR890 System has several functions:
• Output of the reading result of the HOST data interface via TCP/IP as an alternative to
the serial interface version RS 232, RS 422/485
• Output of data of the AUX data interface (reading result + reading diagnosis data) via
TCP/IP as an alternative to the serial interface version RS 232, RS 422/485
• Access to the ICR890 System via the SOPAS-ET Configuration Software
• Connection as RDT400 Client (system distance monitoring)
ICR890
RS 232, RS 422/485
Aux
RS 232, RS 422/485
Host
CAN
Port 2111: AUX
Ethernet
VMS4xx/5xx MSC800
Abb. 5-7: Block diagram: Function of the Ethernet interface
Port 2112: Host
Port 21: FTP
PC
SOPAS-ET
FTP server
Connecting the ETHERNET HOST interface
¾ Connect the ICD890 Camera directly to the Ethernet card of the PC (point-to-point
connection) using the crossover cable (see Tab. 10-4, page 115).
- or -
Connect the ICD890 Camera to the Ethernet network using the standardized data cable
(patch
cable) no. 6029630.
See Chapter 6.3.2, page 81 for required settings at the PC and the ICR890 System.
68 © SICK AG · Division Auto Ident · Germany · All rights reserved 8011325/0000/2006-10-24
Page 69

Operating Instructions Chapter 5
Electrical installation
ICR890
5.4.6 Wiring the Ethernet interfaces GBIT 1 and GBIT 2
The two GBit Ethernet interfaces facilitate fast output of images to a special PC which is also
equipped with two GBit Ethernet interfaces.
Connecting the GBIT 1-ETHERNET and GBIT 2-ETHERNET interfaces
¾ Connect the ICD890 Camera directly to the Ethernet card of the PC (point-to-point
connection) using the crossover cables no. 6029775 (see Tab. 5-10, page 63) .
- or -
Connect the ICD890 Camera to the GBit Ethernet network using the standardized data
cables (patch cables) no. 6029776.
5.4.7 Wiring the switching inputs IN 1 and IN 2
The reading pulse sensor is connected via the digital switching input IN 1.
The incremental encoder is connected via the switching input IN 2. Fig. 5-8 shows the wiring
of switching input IN 1 as an example. Tab. 5-15 contains ratings for both inputs.
ICR890 System
Vo
V
= +24 V DC
S
*) V
imax
= 28 V!
Abb. 5-8: Wiring of the switching inputs IN 1 and IN 2
Switching
behaviour
IN 1: Power fed to the input opens the reading gate of the ICD890 Camera.
(Default setting: Not inverted (active high); debouncing: 10 ms; pulse start
delay: 0 ms, pulse end: 0 ms)
Features – Optodecoupled, reverse polarity protected
– Can be wired with the PNP output of a sensor
Electrical values Low:
–1 V ≤ V
–0.3 mA ≤ I
≤ +1 V
i
≤ +0.3 mA
i
High:
+8 V ≤ |V
+1.4 mA ≤ |I
PNP sensor Switch
| ≤ +28 V
i
| ≤ +18 mA
i
Tab. 5-15: Ratings of the switching inputs IN1 and IN 2
Connecting the switching inputs IN 1 and IN 2
1. Connect the reading pulse sensor (photoelectric reflex switch) to switching input IN 1,
as shown in Fig. 5-8.
2. Connect the incremental encoder to switching input IN 2, as shown in Fig. 5-8.
3. For power supply via the ICD890 Camera, additionally establish connections between
SGND and GND in the connector of the connection cable.
8011325/0000/2006-10-24 © SICK AG · Division Auto Ident · Germany · All rights reserved 69
Page 70

Chapter 5 Operating Instructions
Electrical installation
ICR890 High-end CCD Camera System
5.4.8 Wiring the switching outputs Result 1 and Result 2 (OUT connection)
An appropriate visualization PC or PLC for system status indication is connected via these
two digital switching outputs. Fig. 5-9 shows the wiring of switching output Result 1 as an
example. Tab. 5-16 contains ratings for both outputs.
ICR890 System
Result 1: Pin 1 and 2
Result 2: Pin 3 and 4
Abb. 5-9: Wiring of the switching outputs Result 1 and Result 2
Switching behaviour PNP-switching against the supply voltage V
Features – Optodecoupled, reverse polarity protected
– In the event of a short circuit, the current is limited to 0.7 A
– The polarity is irrelevant due to a bridge connection
Electrical values 0 V ≤ V
I
Tab. 5-16: Ratings of the switching outputs Result 1 and Result 2
≤ 30 V guaranteed: Vo ≤ VS − 1.3 V at Io ≤ 100 mA
o
≤ 100 mA
o
S
Connecting the switching outputs Result 1 and Result 2
¾ Connect the visualization PC/PLC to switching output Result 1 and/or Result 2, as
shown as an example in Fig. 5-9.
Note In the "Device Ready" function, the output supplies a static pulse if the ICR890 System is in
reading operation.
Recommendation ¾ Wire the outputs with a load resistance to test the switching functions using a high-
resistance digital voltmeter. Indication of incorrect voltages/switching statuses is
avoided this way.
70 © SICK AG · Division Auto Ident · Germany · All rights reserved 8011325/0000/2006-10-24
Page 71

Operating Instructions Chapter 5
Electrical installation
ICR890
5.5 Pin assignments and conductor colouring assignment
5.5.1 ICD890 Camera connections
Ethernet
(host)
Ethernet
(GBit channels)
Abb. 5-10: ICD890 Camera: Electrical connections (standard system)
Note All connections have been provided with protective caps for delivery.
“GBIT 1“/“GBIT 2“ connections (Ethernet, max. 1GBps)
-
Pin Ethernet signal Function
1 TD+ Transmitter+
2 TD– Transmitter–
3RD+ Receiver+
4n. c. –
5n. c. –
6RD– Receiver–
7n. c. –
8n. c. –
Tab. 5-17: ICD890 Camera: Pin assignment of the 8-pole RJ-45 sockets “GBIT1“ and “GBIT2“
“CAN 1-OUT“/“CAN 2-OUT“ connections (CAN-SENSOR networks)
-
Pin CAN signal Function
1 Shield Shielding
2 CAN_V+ Supply voltage 24 V
3CAN_GND Ground
4 CAN_H CAN bus (IN/OUT)
5 CAN_L CAN bus (IN/OUT)
Power supply
Tab. 5-18: ICD890 Camera: Pin assignment of the 5-pole M12 sockets “CAN 1-OUT“/“CAN 2-OUT“
8011325/0000/2006-10-24 © SICK AG · Division Auto Ident · Germany · All rights reserved 71
Page 72

Chapter 5 Operating Instructions
Electrical installation
ICR890 High-end CCD Camera System
“CAN 1-IN“/“CAN 2-IN“ connections (CAN-SENSOR networks)
-
Tab. 5-19: ICD890 Camera: Pin assignment of the 5-pole M12 plugs “CAN 1-IN“/“CAN 2-IN“
Pin CAN signal Function
1 Shield Shielding
2 CAN_V+ Supply voltage 24 V
3CAN_GND Ground
4 CAN_H CAN bus (IN/OUT)
5 CAN_L CAN bus (IN/OUT)
“ILLUMINATION“ connection (control data interface for illumination)
Pin Signal Function
1n. c. –
2 LAMP_ON+ Illumination ON/OFF
3n. c. –
4n. c. –
5 RD+/TD+ (RS 485) Transmitter+/Receiver+
6 RD–/TD– (RS 485) Transmitter–/Receiver–
7GND Ground
8n. c. –
Tab. 5-20: ICD890 Camera: Pin assignment of the 8-pole M12 socket “ILLUMINATION“
“AUX“ connection (auxiliary data interface)
Pin Signal Function
1n. c. –
2n. c. –
3 RD+ (RS 485) Receiver+
4 RD–/RxD (RS 485/RS 232) Receiver–/Receiver
5 TD+ (RS 485) Transmitter+
6 TD–/TxD (RS 485/RS 232) Transmitter–/Transmitter
7GND Ground
8 Shield Shielding
Tab. 5-21: ICD890 Camera: Pin assignment of the 8-pole M12 plug “AUX“
“HOST“ connection (main data interface)
Pin Signal Function
1n. c. –
2n. c. –
3 RD+ (RS 485) Receiver+
4 RD–/RxD (RS 485/RS 232) Receiver–/Receiver
5 TD+ (RS 485) Transmitter+
6 TD–/TxD (RS 485/RS 232) Transmitter–/Transmitter
7GND Ground
8 Shield Shielding
Tab. 5-22: ICD890 Camera: Pin assignment of the 8-pole M12 plug “HOST“
72 © SICK AG · Division Auto Ident · Germany · All rights reserved 8011325/0000/2006-10-24
Page 73

Operating Instructions Chapter 5
ICR890
Electrical installation
“OUT“ connection (digital switching outputs)
Pin Signal Function
1 Result 1+ Switching output 1
2 Result 1– Switching output 1
3 Result 2– Switching output 2
4 Result 2+ Switching output 2
Tab. 5-23: ICD890 Camera: Pin assignment of the 4-pole M12 plug “OUT“
“IN 1“ connection (digital switching input 1)
Pin Signal Function
1 +24 V DC Power supply for sensor
2 IN 1– Switching input 1 (optocoupler)
3GND Ground
4 IN 1+ Switching input 1 (optocoupler)
5– –
Tab. 5-24: ICD890 Camera: Pin assignment of the 5-pole M12 socket “IN 1“
“IN 2“ connection (digital switching input 2)
Pin Signal Function
1 +24 V DC Power supply for sensor
2 IN 2– Switching input 2 (optocoupler)
3GND Ground
4 IN 2+ Switching input 2 (optocoupler)
5– –
Tab. 5-25: ICD890 Camera: Pin assignment of the 5-pole M12 socket “IN 2“
“HOST ETHERNET“ connection (Ethernet 10/100 MBps)
Pin Signal Function
1 TD+ Transmitter+
2RD+ Receiver+
3 TD– Transmitter–
4RD– Receiver–
Tab. 5-26: ICD890 Camera: Pin assignment of the 4-pole M12 socket “HOST ETHERNET“
8011325/0000/2006-10-24 © SICK AG · Division Auto Ident · Germany · All rights reserved 73
Page 74

Chapter 5 Operating Instructions
Electrical installation
ICR890 High-end CCD Camera System
“POWER IN“ connection (power supply IN)
Pin Signal Function
1 +24 V DC (ICD890) Power supply IN
2 GND (ICI890_1) Ground
8
3
Tab. 5-27: ICD890 Camera: Pin assignment of the 8-pole Harting HanQ8 plug “POWER IN“
3 +24 V DC (ICI890_1) Power supply IN
6
4– n. c.
5– n. c.
1
6 GND (ICD890) Ground
7 +24 V DC (ICI890_2) Power supply IN
8 GND (ICI890_2) Ground
PE Protective ground
“POWER OUT“ connection (power supply OUT for illumination)
Pin Signal Function
1– n.c.
2 GND (ICI890_1) Ground
6
1
3 +24 V DC (ICI890_1) Power supply OUT
8
4– n.c.
5– n.c.
3
6– n.c.
7 +24 V DC (ICI890_2) Power supply OUT
8 GND (ICI890_2) Ground
PE Protective ground
Tab. 5-28: ICD890 Camera: Pin assignment of the 8-pole Harting HanQ8 socket “POWER OUT“
74 © SICK AG · Division Auto Ident · Germany · All rights reserved 8011325/0000/2006-10-24
Page 75

Operating Instructions Chapter 5
ICR890
Electrical installation
5.5.2 ICI890 Illumination connections
“POWER IN“ connection (power supply IN)
Pin Signal Function
1– n.c.
2 GND (ICI890_1) Ground
8
3
Tab. 5-29: ICI890 Illumination: Pin assignment of the 8-pole Harting HanQ8 plug “POWER IN“
3 +24 V DC (ICI890_1) Power supply IN
6
4– n. c.
5– n. c.
1
6– n. c.
7 +24 V DC (ICI890_2) Power supply IN
8 GND (ICI890_2) Ground
PE Protective ground
“ILLUMINATION“ connection (control data interface)
Pin Signal Function
1n. c. –
2 LAMP_ON+ Illumination ON/OFF
3n. c. –
4n. c. –
5 RD+/TD+ (RS 485) Transmitter+/Receiver+
6 RD–/TD– (RS 485) Transmitter–/Receiver–
7GND Ground
8n. c. –
Tab. 5-30: ICI890 Illumination: Pin assignment of the 8-pole M12 plug “ILLUMINATION“
5.5.3 Wire colours assignment of assembled cables with open end
Cable no. 6028420 for the camera (HOST/AUX connections), standard
socket
Pin Signal Wire colour
1n. c. white
2n. c. brown
3 RD+ (RS 485) green
4 RD–/RxD (RS 485/RS 232) yellow
5 TD+ (RS 485) grey
6 TD–/TxD (RS 485/RS 232) pink
7GND blue
8 Shield red
Tab. 5-31: Wire colours assignment: Cable no. 6028420 (HOST/AUX), standard
8011325/0000/2006-10-24 © SICK AG · Division Auto Ident · Germany · All rights reserved 75
Page 76

Chapter 5 Operating Instructions
Electrical installation
ICR890 High-end CCD Camera System
Cables no. 6021166/no. 6021175 for the camera (CAN 1-IN connection), PVC-free
socket
Pin Signal Wire colour
1Shield –
2CAN_V+ red
3 CAN_GND black
4 CAN_H white
5CAN_L blue
Tab. 5-32: Wire colours assignment: Cables no. 6021166/no. 6021175 (CAN 1-IN), PVC-free
Cable no. 6024861 for the camera (IN 1/IN 2 connections), standard
plug
Pin Signal Wire colour
1 +24 V DC brown
2 IN 1–/IN 2– white
3GND blue
4 IN 1+/IN 2+ black
5– grey
Tab. 5-33: Wire colours assignment: Cable no.6024861 (IN 1/IN 2), standard
Cable no. 6027559 for the camera (OUT connection), standard
socket
Pin Signal Wire colour
1Result 1+ brown
2Result 1– white
3Result 2– blue
4Result 2+ black
Tab. 5-34: Wire colours assignment: Cable no. 6027559 (OUT), standard
76 © SICK AG · Division Auto Ident · Germany · All rights reserved 8011325/0000/2006-10-24
Page 77

Operating Instructions Chapter 5
ICR890
Electrical installation
Cable no. 2039398 for the camera (POWER IN connection), standard
6
1
socket
Pin Signal Wire colour (numbers printed on wires)
1 +24 V DC (ICD890) Wire 1: black
2 GND (ICI890_1) Wire 4: black
3 +24 V DC (ICI890_1) Wire 3: black
4– n. c.
5– n. c.
6 GND (ICD890) Wire 2: black
7 +24 V DC (ICI890_2) Wire 5: black
8 GND (ICI890_2) Wire 6: black
PE green-yellow
Tab. 5-35: Wire colours assignment: Cable no. 2039398 (ICD890 Camera power supply), standard
8
3
Cable no. 2032926 for the camera (POWER IN connection), PVC-free
6
1
socket
Pin Signal Wire colour (numbers printed on wires)
1 +24 V DC (ICD890) Wire 1: black
2 GND (ICI890_1) Wire 4: black
3 +24 V DC (ICI890_1) Wire 3: black
4– n. c.
5– n. c.
6 GND (ICD890) Wire 2: black
7 +24 V DC (ICI890_2) Wire 5: black
8 GND (ICI890_2) Wire 6: black
PE green-yellow
Tab. 5-36: Wire colours assignment: Cable no. 2032926 (ICD890 Camera power supply), PVC-free
8
3
8011325/0000/2006-10-24 © SICK AG · Division Auto Ident · Germany · All rights reserved 77
Page 78

Chapter 5 Operating Instructions
Notes:
Electrical installation
ICR890 High-end CCD Camera System
78 © SICK AG · Division Auto Ident · Germany · All rights reserved 8011325/0000/2006-10-24
Page 79

Operating Instructions Chapter 6
ICR890
Operation
6 Operation
The ICR890 System does not require manual operation. Startup, adjustments and
diagnosis are carried out via the SOPAS-ET Configuration Software.
6.1 Overview of the startup procedure
• Start up the ICR890 System with the factory default settings.
• Connect the PC with the SOPAS-ET Configuration Software to the ICR890 System or the
MSC800.
• In order to optimize the functionality of the system, adjust, if necessary, the ICR890
System and optimize the configuration of the system or the MSC800.
• Check correct functioning of the system in reading operation.
6.2 Configuration Software SOPAS-ET
The SOPAS-ET Configuration Software optimizes the ICR890 System to the reading
conditions on site. The configuration data can be saved and archived as a parameter set
(project file) on the PC.
6.2.1 Functions of the SOPAS-ET Configuration Software for the ICR890 System/
MSC800 (overview)
The online help in the SOPAS-ET Configuration Software describes the general functions of
the software and their operation:
M
ENU, HELP, HELP F1
• Selecting the menu language (German, English)
• Setup communication with the ICR890 System/MSC800
• Password protected configuration for various operating levels
• Presentation of the image storage contents of the ICR890 System
• Recording of data during the current mode (recording and analyzing the data of certain
system memory areas via the data recorder)
• System monitoring
6.2.2 System requirements for the SOPAS-ET Configuration Software
PC system requirements: see Chapter 3.2.4 Operation requirements, page 28 or the
booklet in the cover of the CD-ROM “Manuals & Software ICR890“ (no. 2039442).
6.2.3 Installation of the Configuration Software SOPAS-ET
Note For installation instructions, also see the booklet in the cover of the CD-ROM “Manuals &
Software ICR890“ (no. 2039442).
1. Start the PC and insert the installation CD.
2. If installation does not start automatically, call setup.exe on the CD.
3. Follow the operating instructions to conclude installation.
8011325/0000/2006-10-24 © SICK AG · Division Auto Ident · Germany · All rights reserved 79
Page 80

Chapter 6 Operating Instructions
Operation
ICR890 High-end CCD Camera System
6.2.4 Default setting for the SOPAS-ET Configuration Software
Parameter Value
User interface language
Units of length Metric
User group (operating level) Machine operator
Download parameter for changes Immediate, temporary (RAM of the ICR890
Upload parameter after online switching Automatic
Window layout 3 (project tree, help, work area)
Serial communication COM 1: 9,600 Bd/19,200 Bd, 8 data bits, 1 stop
1) the software has to be restarted after changes
Tab. 6-1: Default setting for the SOPAS-ET Configuration Software (excerpt)
1)
English
System)
bit, no parity
6.3 First startup
The ICR890 System is optimized to the reading conditions on site via the SOPAS-ET
Configuration Software. Starting point for this is the factory default setting which can be
adjusted to optimize the system. The SOPAS-ET Configuration Software is used to create an
application-specific parameter set which can be loaded into the system and saved/archived
as a project file (spr file with configuration data) on the PC.
System ICR890
Parameter set in the
main memory of the system
RAM
Permanently saved
parameter set
EEPROM
Factory default setting of
the system
ROM
PC with Configuration
Software SOPAS-ET
Opened project file
with current
parameter set
RAM
Saved project file (*.spr)
with archived parameter
set
Database
(hard drive)
Abb. 6-1: Configuration with SOPAS-ET
Note The ICR890 System does not provide a reading result in configuration mode.
80 © SICK AG · Division Auto Ident · Germany · All rights reserved 8011325/0000/2006-10-24
Page 81

Operating Instructions Chapter 6
ICR890
Operation
6.3.1 Overview of the configuration procedure
• Connect data interfaces of the PC and the ICR890 System/MSC800
• Start the SOPAS-ET Configuration Software and create a new project file
• Configure the scan assistant (activate PC communication)
• Establish communication with the ICR890 System/MSC800
• Accept current configuration of the ICR890 System/MSC800 in the project tree
• Use the password “client“ to register at the system as an “authorized client“
• Configure the ICR890 System/MSC800 for use
• Activate the image output of the SOPAS-ET Configuration Software (“Image Viewer“) to
check the reading
• If necessary, apply the diagnosis tools “Reading Diagnosis“ and “Event Monitor“
(online presentation/recording of the switching statuses of switching inputs and
outputs as well as data transfers to the host)
• Load the optimized configuration into the ICR890 System and save permanently
• Save the project file with the configuration data of the ICR890 System/MSC800 at the
PC
6.3.2 Establishing communication with the ICR890 System/MSC800
Prerequisite The TCP-IP protocol at the PC has to be active to enable communication via TCP-IP.
Connecting data interfaces
¾ Interconnect the PC and the ICR890 System/MSC800 according to Tab. 6-2.
s
Connection via: At data interface: Comment
MSC800 ETHERNET 1
(10/100 MBps)
MSC800 (optional) AUX 1 or HOST 1
(RS 232)
ICR890 System HOST ETHERNET
(10/100 MBps)
ICR890 System (optional) AUX or HOST
(RS 232)
Connect the PC (Ethernet interface), MSC800 (ETHERNET 1
connection) and the ICR890 System (HOST ETHERNET connection) to
a joint switch using a patch cable no. 6030928 (10 m (32.8 ft)) or
no. 6029630 (3 m (9.84 ft)) for each connection.
Connect the PC via a 3-wire null modem cable no. 2014054 to the
9-pole D-Sub connector AUX 1 of the MSC800.
Directly connect the PC (Ethernet interface) to the HOST ETHERNET
connection of the ICR890 System via a crossover cable.
- or -
Use the patch cable (1:1) no. 6030928 (3 m (9.84 ft)) or no.
6029630 (10 m (32.8 ft)) when connecting via a hub.
Provide the cable no. 6028420 (open end) for connection to the PC
with a 9-pole D-Sub socket and, depending on the interface type,
configure it as a null modem cable.
(For wire colour assignment: see Tab. 5-31, page 75, transmitter and
receiver signals are crossed, see Fig. 5-6, page 66).
Connect the PC via the cable no. 6028420 to the AUX connection or
the ICR890 System HOST.
Tab. 6-2: Connection between the PC with the SOPAS-ET Configuration Software and the ICR890 System/MSC800
8011325/0000/2006-10-24 © SICK AG · Division Auto Ident · Germany · All rights reserved 81
Page 82

Chapter 6 Operating Instructions
Operation
ICR890 High-end CCD Camera System
Starting the SOPAS-ET Configuration Software and calling the scan assistant
1. Switch on the power supply to the ICR890 System/MSC800.
The ICR890 System and the MSC800 carry out a self-test and are initialized.
2. Switch on the PC and start the SOPAS-ET Configuration Software.
The SOPAS-ET Configuration Software opens the program window with an English
program interface as standard.
3. In order to change the language setting, click on C
the program interface to G
ERMAN/DEUTSCH via the menu TOOLS/OPTIONS.
ANCEL and change the language of
4. Once the language setting has been changed, shut down the SOPAS-ET Configuration
Software, restart.
5. In the dialog window select the option C
REATE A NEW PROJECT and click on OK to confirm
it.
6. In the main window under S
The dialog window S
CAN WIZARD appears.
CAN-ASSISTENT click on the CONFIGURATION button.
Configuring the serial connection
1. In the dialog window S
check box for E
2. Click on the A
3. Under B
ITS PRO SEKUNDE deactivate all the baud rates except 57.6 kbd.
NABLE SERIAL COMMUNICATION.
DVANCED... button.
4. Select the following P
CAN WIZARD under SERIAL PORT/STANDARD PROTOCOL check the
ORT SETTINGS: 8 data bits, no parity, 1 stop bit.
5. Click on OK to confirm settings.
The dialog window A
DVANCED SCAN SETTINGS closes.
Configuring the Ethernet connection
1. In the dialog window S
the check box for E
2. Click on the A
DD button.
CAN WIZARD under INTERNET PROTOCOL/INTERNET PROTOCOL IP check
NABLE IP COMMUNICATION.
3. Enter the IP address of the ICR890 System and confirm it via OK in the dialog window.
The dialog window closes. A new entry appears in the IP A
DDRESS CONFIGURATION list.
4. Click on OK to confirm settings.
The dialog window A
DVANCED SCAN SETTINGS closes.
Carrying out a scan
1. In the dialog window S
2. Select the listed devices (ICR890 and MSC800) and confirm via A
CAN WIZARD click on the SCAN button.
DD DEVICE.
Connected devices are searched for via the connection. The SOPAS-ET Configuration
Software inserts the found devices in the project tree and uploads the current
parameter set (S
YNC CHECK).
3. For configuration of the devices see Chapter 6.3.3, page 83.
82 © SICK AG · Division Auto Ident · Germany · All rights reserved 8011325/0000/2006-10-24
Page 83

Operating Instructions Chapter 6
ICR890
Operation
6.3.3 Configuring the ICR890 System/MSC800
The following tables Tab. 6-3 and Tab. 6-4 (ICR890 System with MSC800) or Tab. 6-5
(ICR890 System without MSC800) act as guidelines for the configuration.
The function of each respective parameter is explained in a context-sensitive manner in an
online help (F1 key). The valid value range and the default setting list the display window
“Parameter Info“ (right mouse button, when the cursor is positioned over the parameter).
In order to configure a device via the SOPAS-ET Configuration Software, the respective
operating level has to be selected in advance. After the start, the SOPAS-ET Configuration
Software functions at the operating level “Maintenance“.
1. In the menu bar under E
2. In the dialog window under U
and enter the word “client“ under P
XTRAS select the command LOGIN TO DEVICE.
SERLEVEL in the list box select the entry AUTHORIZED CLIENT
ASSWORD.
Click on OK to confirm the dialog window.
The previously greyed out parameters on the register tabs are now accessible.
Settings at the ICR890 System for application as a stand-alone device with MSC800
(single-side reading)
Step Entry in the project tree Register tab
1. Reading config. Codelabel properties Minimum code position
2. Reading config. Image capturing properties Digital zoom
3. Object Trigger Control Start/Stop of Object trigger Control
4. Focus Control Optionen Fokussteuerung Default Position
5. Focus Control Distance Measurement Source MLG
6. Lamp Control Illumination mode Lamp on
7. Position Offsets X-Offset
8. Position Coordinates X-Coordinate
9. Position Angles Alpha
10. Increment config. Increment Increment source
11. Image Acquisition Request Request
Parameter
Maximum code position
Symbol Contrast
Image Resolution
Start
Focus Control Mode
VMS
Lamp timeout active
Timeout
Y-Offset
Z-Offset
Y-Coordinate
Z-Coordinate
Distance to deflecting mirror
Beta
Gamma
Resolution/Speed
Image format
Bitmap scaling/JPEG Quality
Activate Diagnosis Output
Output limited by code position
Tab. 6-3: ICR890 System (stand-alone device) with MSC800: Overview of parameters which have to be set
8011325/0000/2006-10-24 © SICK AG · Division Auto Ident · Germany · All rights reserved 83
Page 84

Chapter 6 Operating Instructions
Operation
ICR890 High-end CCD Camera System
Step Entry in the project tree Register tab
12. 1D Code config. Symbologies Codabar
13. 2D Code config. Symbologies Data Matrix
14. Data processing Tracking Tracking Mode
15. Output Format Output Formating #1/#2
16. Network Architecture Master/Slave Network function
17. Serial Serial Host Interface Output format
18. Serial Serial Auxilliary Interface Mode
19. Ethernet General IP-Address
20. GBit Ethernet GBit Ethernet 1/2 IP-Address
21. CAN CAN 1/2 Mode
22. Digital Outputs Output 1/2 Output 1/2
23. Digital Inputs Sensor 1/2 Control
Parameter
Code 39
UPC/EAN Familie
2/5 Interleaved
Code 93
Code 128 Familie
PDF 417
Object release point
Baudrate
Stopbits
Databits/Parity
Hardware
Protocol
Blockcheck
IP-Mask
IP-Gate-Address
Speed
IP-Mask
IP-Gate-Address
Speed
Node-ID
Baudrate
Output format
Inverted
Control
Duration
Inverted
Debouncing
Tab. 6-3: ICR890 System (stand-alone device) with MSC800: Overview of parameters which have to be set (cont.)
84 © SICK AG · Division Auto Ident · Germany · All rights reserved 8011325/0000/2006-10-24
Page 85

Operating Instructions Chapter 6
ICR890
Operation
Settings at the MSC800 for application of the ICR890 System as stand-alone device
(single-side reading)
Step Entry in the project tree Register tab
1. Object Trigger Control Start/Stop of Object trigger Control
2. MLG settings
3. Increment config. Increment Increment source
4. 1D Code config. Symbologies Codabar
5. 2D Code config. Symbologies Data Matrix
6. Data processing Tracking Tracking mode
7. Output Format Output Formating #1/#2
8. Network Architecture Master/Slave Network function
9. Serial Serial Host Interface Output format
10. Serial Serial Auxilliary Interface Mode
11. Ethernet General IP-Address
12. CAN CAN 1/2 Mode
13. Protokoll RDT400 RDT ID
14. Digital Outputs Output 1/2 Output 1/2
15. Digital Inputs Sensor 1/2 Control
16. Realtime clock
Parameter
Start
Resolution/Speed
Code 39
UPC/EAN Familie
2/5 Interleaved
Code 93
Code 128 Familie
PDF 417
Object release point
Baudrate
Stopbits
Databits/Parity
Hardware
Protocol
Blockcheck
IP-Mask
IP-Gate-Address
Speed
Node-ID
Baudrate
Output format
Enable internal index telegram
Inverted
Control
Duration
Inverted
Debouncing
Tab. 6-4: ICR890 System (stand-alone device) with MSC800: Overview of parameters which have to be set
8011325/0000/2006-10-24 © SICK AG · Division Auto Ident · Germany · All rights reserved 85
Page 86

Chapter 6 Operating Instructions
Operation
ICR890 High-end CCD Camera System
Settings at the ICR890 System for application as stand-alone device without MSC800
Step Entry in the project tree Register tab
1. Reading config. Codelabel properties Minimum code position
2. Reading config. Image capturing properties Digital zoom
3. Object Trigger Control Start/Stop of Object trigger Control
4. Focus Control Optionen Fokussteuerung Default Position
5. Focus Control Distance Measurement Source MLG
6. Lamp Control Illumination mode Lamp on
7. Position Offsets X-Offset
8. Position Coordinates X-Coordinate
9. Position Angles Alpha
10. Increment config. Increment Increment source
11. Image Acquisition Request Request
12. 1D Code config. Symbologies Codabar
13. 2D Code config. Symbologies Data Matrix
14. Data processing Tracking Tracking Mode
15. Output Format Output Formating #1/#2
16. Network Architecture Master/Slave Network function
17. Serial Serial Host Interface Output format
18. Serial Serial Auxilliary Interface Mode
Parameter
Maximum code position
Symbol Contrast
Image Resolution
Start
Focus Control Mode
VMS
Lamp timeout active
Timeout
Y-Offset
Z-Offset
Y-Coordinate
Z-Coordinate
Distance to deflecting mirror
Beta
Gamma
Resolution/Speed
Image format
Bitmap scaling/JPEG Quality
Activate Diagnosis Output
Output limited by code position
Code 39
UPC/EAN Familie
2/5 Interleaved
Code 93
Code 128 Familie
PDF 417
Object release point
Baudrate
Stopbits
Databits/Parity
Hardware
Protocol
Blockcheck
Tab. 6-5: ICR890 System (stand-alone device) without MSC800: Overview of parameters which have to be set
86 © SICK AG · Division Auto Ident · Germany · All rights reserved 8011325/0000/2006-10-24
Page 87

Operating Instructions Chapter 6
ICR890
Operation
Step Entry in the project tree Register tab
19. Ethernet General IP-Address
20. GBit Ethernet GBit Ethernet 1/2 IP-Address
21. CAN CAN 1/2 Mode
22. Digital Outputs Output 1/2 Output 1/2
23. Digital Inputs Sensor 1/2 Control
Tab. 6-5: ICR890 System (stand-alone device) without MSC800: Overview of parameters which have to be set (cont.)
Parameter
IP-Mask
IP-Gate-Address
Speed
IP-Mask
IP-Gate-Address
Speed
Node-ID
Baudrate
Output format
Inverted
Control
Duration
Inverted
Debouncing
6.3.4 Load changed parameter sets into the device
Changed parameter values are immediately transferred to the ICR890 System depending
on the option (“Download Immediately“). To ensure that the changes remain even after a
system restart, the configuration has to be permanently saved in the system.
1. In order to load cur rent s ettin gs int o the ICR890 System, in the menu bar under ICR890
select the command P
- or -
ARAMETER/SAVE PERMANENT.
In order to load the current settings in the MSC800, select the command PARAMETER/
S
AVE PERMANENT in the menu bar under MSC800.
2. Restart the ICR890 System/MSC800.
6.3.5 Save, display and print the current parameter set
When archiving a parameter set it is recommended to not only save the project file but also
print out the contents of the file.
1. In order to save the current parameter set, select the menu item S
menu bar under P
2. Enter a file name in the dialog window and confirm it via S
ROJECT.
AVE.
AVE PROJECT AS in the
The SOPAS-ET Configuration Software saves the current settings in a configuration file
“*.SPR“.
3. In order to print out the current parameter set, select the command P
in the menu bar under P
ROJEKT.
RINT/PRINT PREVIEW
The SOPAS-ET Configuration Software displays a preview of a table with a list of all the
parameter values.
4. Click on in the tool bar at the top of the dialog window.
The dialog window P
RINT for printer configuration appears.
5. Edit setting accordingly and confirm via OK.
The current project settings are printed as a table on several pages.
8011325/0000/2006-10-24 © SICK AG · Division Auto Ident · Germany · All rights reserved 87
Page 88

Chapter 6 Operating Instructions
Operation
ICR890 High-end CCD Camera System
6.3.6 Changing the device password for the user level "Authorized Client"
The device password for the user level "A
UTHORIZED CLIENT" can be altered device specifically
by the customer. This prevents unwanted or unauthorized changes to the configuration.
1. Establish communication with the device (see Chapter 6.3.2, page 81).
2. In the menu bar under ICR890 select the command P
3. Ensure that the user level "A
R
EGISTER.
4. Enter the new password in the field N
UTHORIZED CLIENT" has been selected in the dialog window
EW PASSWORD.
ASSWORD/CHANGE PASSWORD.
The entry occurs as hidden text.
5. Re-enter the new password in the field C
ONFIRM NEW PASSWORD.
The entry occurs as hidden text.
6. Confirm entries via the L
OGIN button.
A message confirms successful device password changes.
6.4 Default setting
The values of the default setting are permanently saved in the ICR890 System (ROM) and
in the database of the SOPAS-ET Configuration Software in the device-specific jar file (see
Fig. 6-1, page 80). A PC is not required for system startup with the default setting.
6.4.1 Resetting the default setting in the ICR890 System
Prerequisite The SOPAS-ET Configuration Software is connected online to the ICR890 System.
1. In order to completely discard changes to the parameter set, in the menu bar under
ICR890 select the command P
ARAMETER/LOAD FACTORY DEFAULT.
The SOPAS-ET Configuration Software loads the default setting from the database and
displays the parameter values in the register tabs.
2. In the menu bar under E
3. In the dialog window under U
and enter the word “client“ under P
XTRAS select the command LOGIN TO DEVICE.
SERLEVEL in the list box select the entry AUTHORIZED CLIENT
ASSWORD.
Click on OK to confirm the dialog window.
4. In the menu bar under ICR890 select the command P
ARAMETER/SAVE PERMANENT.
The SOPAS-ET Configuration Software transfers the default setting to the permanent
parameter memory (EEPROM) of the ICR890 System.
6.4.2 Default setting MSC800
See MSC800 Operating Instructions (no. 8011540).
88 © SICK AG · Division Auto Ident · Germany · All rights reserved 8011325/0000/2006-10-24
Page 89

Operating Instructions Chapter 7
ICR890
Maintenance
7 Maintenance
7.1 Maintenance during operation
The ICR890 System functions maintenance free. Regular maintenance is not required to
guarantee LED class 1M of the ICR890 System.
Note Do not open the ICD890 Camera or the ICI890 Illumination.
If the devices are opened, the manufacturer's warranty shall not apply.
Checking the incremental encoder
If an incremental encoder is used, the position of the friction wheel at the drive system
should be checked at regular intervals.
¾ Ensure that the incremental encoder has contact with the drive system and that the
friction wheel rotates without slipping.
7.2 Cleaning the ICR890 System
Recommendation In order to make use of the full optical reading capacity of the ICR890 System, the front
window should be checked regularly (e. g. weekly) for soiling. This is especially
recommended when operating the device in harsh conditions (dust, abrasion, humidity,
finger prints, etc.).
If possible, do not clean the deflection mirror due to its structure.
7.2.1 Cleaning the front window
LED radiation of class 1M (according to EN/IEC 60825-1)!
Incorrect use can result in hazardous radiation exposure and the LED class being
exceeded!
The accessible radiation of the ICI890 Illumination is not hazardous under reasonably
foreseeable conditions, provided that the beam width is not reduced by optical instruments,
e.g. magnifying glass, lenses, telescopes. Visual glare, loss of colour vision and eye injuries
cannot be ruled out.
The entire window surface is the LED radiation outlet opening.
¾ Do not look directly into the radiation source with optical instruments.
¾ Do not open the housing. (The illumination is not switched off if the housing is opened!)
¾ Always observe the latest valid version of laser protection regulations.
Damage to the front window!
Reduced reading capacity due to scratches or smears on the front window!
The front window of the illumination is made of glass. The opening for the camera within the
front window is made of special glass.
¾ Do not use aggressive cleaning agents.
¾ Do not use cleaning agents which cause increased abrasion (e. g. powder).
¾ Avoid cleaning motions at the front window which could cause scratches or abrasion.
8011325/0000/2006-10-24 © SICK AG · Division Auto Ident · Germany · All rights reserved 89
Page 90

Chapter 7 Operating Instructions
Maintenance
ICR890 High-end CCD Camera System
Cleaning the front window
Note Electrostatic charges cause dust particles to stick to the front window.
This effect can be combated by using anti-static SICK synthetic cleaner (no. 5600006) in
combination with a SICK lens cloth (no. 4003353).
¾ Use a clean, soft brush to free the front window from dust.
¾ If necessary, additionally clean the front window with a clean, damp, lint-free cloth and
a mild, anti-static window cleaning fluid.
clean here
Abb. 7-1: Cleaning the front window
If the front window is scratched or damaged (cracked, broken), it must be replaced. Please
contact the SICK Service.
7.2.2 Cleaning the housing
In order to ensure sufficient cooling for the illumination, make sure that the air inlet and
outlet opening are always clean.
¾ Use a soft brush to free the openings at the ventilator on top of the housing and at the
cooling ribs of the air outlet openings on both narrow sides from dust.
clean here
Abb. 7-2: Cleaning the air inlet and outlet openings at the system's illumination ICR890
90 © SICK AG · Division Auto Ident · Germany · All rights reserved 8011325/0000/2006-10-24
Page 91

Operating Instructions Chapter 7
ICR890
Maintenance
7.2.3 Cleaning the deflection mirror
Damage to the optical effective surface of the deflection mirror!
Incorrect cleaning or aggressive cleaning agents can damage the deflection mirror, thus
impairing the reading quality of the ICR890 System.
¾ If possible, do not clean the deflection mirror.
¾ Only clean the reflector surface if absolutely necessary (e. g. heavy soiling). Never touch
the entire reflector surface.
¾ Do not use canned compressed air.
¾ To avoid irreversible scratches, never clean the mirror with a cloth.
Removing dust and loose dirt particles
¾ Carefully blow off dust and loose dirt particles using cleaned, oil-free air.
Do not use canned compressed air, since it can contain alkaline substances which
corrode the surface of the mirror.
Removing solid particles
¾ Carefully remove more solid particles with a degreased camel hair brush (previously
treated with acetone). Ensure that acetone does not come into direct contact with the
reflector surface.
Cleaning the deflection mirror intensively
1. Fill a clean plastic spray bottle with distilled water.
2. Evenly spray distilled water onto the reflector surface.
Keep the mirror tilted, allowing the distilled water to drip dry.
3. Allow the mirror to dry. Do not wipe the mirror dry!
Removing grease deposits
1. Spray affected areas with household glass cleaner.
2. Use a paper towel (recommended: “Kleenex“) to wipe the affected area. Only apply
slight pressure to the mirror. Do not scour.
3. Allow the mirror to dry. Do not wipe the mirror dry!
8011325/0000/2006-10-24 © SICK AG · Division Auto Ident · Germany · All rights reserved 91
Page 92

Chapter 7 Operating Instructions
Maintenance
ICR890 High-end CCD Camera System
7.2.4 Cleaning further optical effective surfaces
Depending on the system equipment, further sensors with optical effective surfaces can be
installed (e. g. photoelectric reflex switch for external reading pulsing or MLG Light Grid for
detecting the object distance). Soiling of these sensors can cause incorrect switching
behaviour.
¾ In order to prevent incorrect switching behaviour, remove soiling from the optical
effective surfaces of the external sensors.
: clean here
Trigger stop
(optional)
Trigger start
Abb. 7-3: Cleaning of the external optical sensors (reading pulse generator, detector for object
distance)
92 © SICK AG · Division Auto Ident · Germany · All rights reserved 8011325/0000/2006-10-24
Page 93

Operating Instructions Chapter 7
ICR890
Maintenance
7.3 Replacing a system or a component
Incorrect or damaged system components have to be removed and replaced with either
new or repaired components.
Repairs to the ICR890 System should only be carried out by qualified and authorized SICK
AG service staff.
Risk of injuries due to falling components!
The combined weight of the ICD890 Camera and the ICI890 Illumination is approx. 37 kg
(81.6 lb) without installation accessories.
¾ Do not carry out removal / installation work alone.
¾ A second person should always secure components during removal / installation.
7.3.1 Replacing the ICD890 Camera or ICI890 Illumination
Removing connection cables
1. Switch off the power supply to the ICR890 System.
2. Loosen and disconnect all external cable connectors and sockets at the camera.
3. Remove both connecting cables between the camera and the illumination.
Disconnecting system components
1. Loosen, but do not remove, the two clamping screws in the curved grooves of both
180° brackets!
Bore hole for the illumination
fastening screws
Clamping screws
Abb. 7-4: 180° bracket: Loosening clamping screws
2. Carefully swing the ICR890 System until the front window of the illumination is facing
downwards.
3. Remove the camera from the illumination.
To achieve this, loosen the four hexagon socket screws of the camera (Fig. 3-2,
page 24, centering pin with thread) and carefully extract the camera upwardly out of
the illumination.
8011325/0000/2006-10-24 © SICK AG · Division Auto Ident · Germany · All rights reserved 93
Page 94

Chapter 7 Operating Instructions
Maintenance
ICR890 High-end CCD Camera System
Replacing the illumination
1. Note the installation position of the illumination when suspended (e. g. position of the
round ventilator opening in relation to the direction of transport).
2. Remove both clamping screws for the illumination from the two 180° brackets.
3. Lift the illumination out of the bracket grooves and remove it from the frame.
4. Insert a new illumination the right way round into the two 180° brackets and
subsequently tighten the two clamping screws in each bracket.
The front window of the illumination faces downwards.
Replacing the camera
1. Remove the memory card with the saved parameter set from the defective camera
(Fig. 3-13, page 41).
2. Insert the memory card into the empty slot of the new camera accordingly.
Close the slot cover.
3. Remove the yellow and black protective caps from the lens protection tube and from
the lens of the new camera. Do not touch the lens!
4. Align the camera the right way round on the illumination and carefully insert the lens
protection tube into the illumination opening.
5. Place the camera on the illumination and attach it using four hexagon socket screws.
6. Align the complete unit parallel to the conveyor level.
7. Use the clamping screws to fix the 180° brackets.
Reconnecting cables
1. Reconnect both connecting cables between the system components.
2. Reconnect all external cables to the camera.
3. Switch on the power supply to the ICR890 System.
The ICR890 System starts up and loads the parameter set from the memory card into
its permanent parameter memory (EEPROM) after initialisation.
7.3.2 Replacing the deflection mirror
1. Mark the installation position of the deflection mirror when suspended (e. g. mark the
position of the illumination surface).
2. Loosen the clamping screws on both sides, place the mounting plate of the
180° bracket in a vertical position and retighten the clamping screws.
3. Unscrew the fastening screws and remove the deflection mirror from the
180° brackets.
4. Insert the guide pins of the new deflection mirror into the grooves of the 180° brackets.
5. Use two fastening screws to attach the deflection mirror to the 180° brackets.
6. Loosen the clamping screws, adjust the deflection mirror to the desired angle with the
illumination switched on and retighten the clamping screws.
7. Remove the protective film from the new deflection mirror.
Note The deflection mirror can also be removed without changing the angle of the 180° brackets.
The deflection mirror must, however, be held securely when removing the fastening screws.
94 © SICK AG · Division Auto Ident · Germany · All rights reserved 8011325/0000/2006-10-24
Page 95

Operating Instructions Chapter 7
ICR890
Maintenance
7.4 Disposal
Inoperable or irreparable devices must be removed and disposed of in an environmentally
friendly manner in accordance with valid country-specific waste disposal guidelines.
At present SICK AG will not accept the return of any devices which can no longer be
operated or repaired.
Removing ICR890 Systems for decommissioning
1. Switch off the power supply to the ICR890 System.
2. Disconnect all the connection cables at the ICR890 System.
3. Release the ICR890 System from the two brackets and remove it from the frame.
4. Remove both connecting cables between the camera and the illumination.
5. Loosen the four hexagon socket screws (Fig. 3-2, page 24) and carefully extract the
camera from the illumination.
Disposing of the ICI890 Illumination
1. Remove the illumination housing.
2. Remove the electronic assemblies of the illumination and dispose of them as
hazardous waste.
3. Remove the front window of the illumination and set it aside for glass recycling.
4. Set aside the fresnel lens for plastics recycling.
5. Set aside the illumination housing for the recycling of aluminium pressure die castings.
Disposing of the ICD890 Camera
1. Remove the camera housing.
2. Remove the electronic assemblies of the camera.
3. Remove the battery on the internal PC card from its holder and dispose of it as
hazardous waste according to ROHS Directives (Europe).
Battery
Abb. 7-5: ICD890 Camera: Position of the battery on the internal PC card
4. Set aside the camera lens for glass recycling.
5. Dispose of electronic assemblies as hazardous waste.
6. Set aside the housing and the cover of the camera as well as the lens assembly for the
recycling of aluminium pressure die castings.
7. Set aside the connection cables for metal recycling.
8011325/0000/2006-10-24 © SICK AG · Division Auto Ident · Germany · All rights reserved 95
Page 96

Chapter 7 Operating Instructions
Notes:
Maintenance
ICR890 High-end CCD Camera System
96 © SICK AG · Division Auto Ident · Germany · All rights reserved 8011325/0000/2006-10-24
Page 97

Operating Instructions Chapter 8
T
ICR890
roubleshooting
8 Troubleshooting
This chapter describes how errors at the ICR890 High-end CCD Camera System can be
recognised and eliminated.
8.1 Overview of errors and malfunctions which could occur
8.1.1 Installation error
• The ICR890 System has been unsuitably aligned to objects with 1-D/2-D codes (e.g.
visual glare)
• Reading pulse sensor has been incorrectly positioned (e.g. internal reading gate opens
too late or shuts too early)
• Focus switching: Sensors for detecting object heights positioned incorrectly
• Incremental encoder (optional) positioned incorrectly
8.1.2 Electrical installation error
• Interfaces of the ICR890 System wired incorrectly
8.1.3 Configuration error
• Functions have not been adjusted to the local conditions, e. g. parameters for the main
data interface set incorrectly
• Device-related limits have not been considered, e. g. reading distance, aperture angle
• Selected trigger source for reading pulse incorrect
8.1.4 Malfunctions during operation
• Start/Stop operation: External reading pulse is missing, more than one object is in the
reading area
• Tracking operation: Minimum gap of the objects in the direction of transport not
achieved
• Timeout of the ICI890 Illumination exceeded
• Device error (hardware/software)
8011325/0000/2006-10-24 © SICK AG · Division Auto Ident · Germany · All rights reserved 97
Page 98

Chapter 8 Operating Instructions
Troubleshooting
ICR890 High-end CCD Camera System
8.2 Detailed malfunction analysis
8.2.1 LEDs at the camera
The following statuses can, among other things, be read at the LEDs for the electrical
connections of the ICD890 Camera (see Chapter 3.5.2, page 42):
• Result of the self-test
• Operating status
• Status of the reading result
• Required maintenance or service work
The LEDs can display possible malfunctions or errors. Please refer to the system
information for further details.
8.2.2 System information
The ICR890 System displays errors in various ways. The error output is hierarchised and
always allows a detailed analysis:
• Communication errors can occur while transmitting telegrams to the ICR890 System.
In this case, the ICR890 System returns an error code.
• Error codes are written into a status protocol for errors which occur during a reading.
8.2.3 Status protocol
Note • The status protocol remains even after switching the device off and on again.
• The system differentiates between four error types:
–Information
– Warning
– Error
– Fatal error
The system only saves the last five entries for each of the error types.
Displaying the status protocol with the aid of the SOPAS-ET Configuration Software
In order to display the status protocol, the SOPAS-ET Configuration Software has to be
online and connected to the ICR890 System.
¾ Connect the SOPAS-ET Configuration Software to the device.
¾ Open the project tree IRC890, S
Reading the status protocol with the aid of command strings
The status protocol can also be read with the aid of command strings. There is a telegram
available for each error type.
¾ Send the telegram from the command sRN (SOPAS read by name) and the telegram
name to the ICR890 System, e. g. via the terminal in the SOPAS-ET Configuration
Software.
The ICR890 System sends an answer consisting of sRA (SOPAS write answer) the
telegram name, an error code (00000000h = no error) and information, warnings,
errors or fatal errors.
ERVICE, SYSTEM STATUS, register tab SYSTEM INFORMATION.
98 © SICK AG · Division Auto Ident · Germany · All rights reserved 8011325/0000/2006-10-24
Page 99

Operating Instructions Chapter 8
T
ICR890
roubleshooting
Query warnings
Request:
Telegram part Description Variable type Length (byte) Value range
Type of command Request (SOPAS write by name) string 3 sRN
Command Query warnings string 6 MSwarn
Tab. 8-1: Request “Query warnings“
sRN MSwarn
Answer: sRA MSwarn ParameterWARNING1 (Error code FirstTimePwrOnCnt FirstTimeOpHours
FirstTimeDailyOpHours LastTimePwrOnCnt LastTimeOpHours LastTimeDailyOpHours Number
ReservedBytes) ParameterWARNING2 ParameterWARNING3 ParameterWARNING4
ParameterWARNING5
Telegram part Description Variable type Length (byte) Value range
Type of command Answer (SOPAS answer) string 3 sRA
Command Query warnings string 6 MSwarn
Error code Hex value of the saved error code uint_32 4 00000001h
…
FFFFFFFFh
FirstTimePwrOnCnt Status of the power on counter at
the time of the first occurrence
FirstTimeOpHours Status of the total operating hours
counter at the time of the first
occurrence
FirstTimeDailyOpHours Status of the operating hours
counter at the time of the first
occurrence
LastTimePwrOnCnt Status of the power on counter at
the time of the last occurrence
LastTimeOpHours Status of the total operating hours
counter at the time of the last
occurrence
LastTimeDailyOpHours Status of the operating hours
counter at the time of the last
occurrence
Number Displays a number of the
occurrence
Parameters are repeated five times
(per memory for warnings, irrespective of whether it is full or not)
Reserved bytes Reserved uint_16 2 0000h
uint_16 2 0000h
…
FFFFh
uint_16 2 0000h
…
FFFFh
uint_16 2 0000h
…
FFFFh
uint_16 2 0000h
…
FFFFh
uint_16 2 0000h
…
FFFFh
uint_16 2 0000h
…
FFFFh
uint_16 2 0000h
…
FFFFh
Tab. 8-2: Answer to the request “Query warnings“
Example for querying warnings
Request:
sWN MSwarn
Answer: sWA MSwarn 4C0ACC0Ah 00A4h 0255h 0005h 00A4h 0256h 0006h 0256h 0000h 4C0ACC0Bh
00A4h 0255h 0005h 00A4h 0256h 0006h 0256h 0000h 4C0ACC0Ch 00A4h 0255h 0005h 00A4h
0256h 0006h 0256h 0000h 4C0ACC0Bh 00A4h 0255h 0005h 00A4h 0256h 0006h 0256h 0000h
4C0ACC0Ch 00A4h 0255h 0005h 00A4h 0256h 0006h 0256h 0000h
8011325/0000/2006-10-24 © SICK AG · Division Auto Ident · Germany · All rights reserved 99
Page 100

Chapter 8 Operating Instructions
Troubleshooting
ICR890 High-end CCD Camera System
Query errors
Request:
Telegram part Description Variable type Length (byte) Value range
Type of command Request (SOPAS write by name) string 3 sRN
Command Query errors string 5 MSerr
Tab. 8-3: Request “Query errors“
sRN MSerr
Answer: sRA MSwarn ParameterWARNING1 (Error code FirstTimePwrOnCnt FirstTimeOpHours
FirstTimeDailyOpHours LastTimePwrOnCnt LastTimeOpHours LastTimeDailyOpHours Number
ReservedBytes) ParameterWARNING2 ParameterWARNING3 ParameterWARNING4
ParameterWARNING5
Telegram part Description Variable type Length (byte) Value range
Type of command Answer (SOPAS answer) string 3 sRA
Command Query errors string 5 MSerr
Parameters see
Reserved bytes Reserved uint_16 2 0000h
Tab. 8-4: Answer to the request “Query errors“
Tab. 8-2
Example
Request:
sRN MSerr
Answer: sRA MSerr 4303C303h 00A4h 0255h 0005h 00A4h 0256h 0006h 0256h 0000h 00000000h
0000h 0000h 0000h 0000h 0000h 0000h 0000h 0000h 00000000h 0000h 0000h 0000h 0000h
0000h 0000h 0000h 0000h 00000000h 0000h 0000h 0000h 0000h 0000h 0000h 0000h 0000h
00000000h 0000h 0000h 0000h 0000h 0000h 0000h 0000h 0000h
Query fatal errors
Request:
Telegram part Description Variable type Length (byte) Value range
Type of command Request (SOPAS write by name) string 3 sRN
Command Query fatal errors string 5 MSfat
Tab. 8-5: Request “Query fatal errors“
sRN MSfat
Answer sRA MSfat ParameterFATALERROR1 (Error code FirstTimePwrOnCnt FirstTimeOpHours
FirstTimeDailyOpHours LastTimePwrOnCnt LastTimeOpHours LastTimeDailyOpHours Number
ReservedBytes) ParameterFATALERROR2 ParameterFATALERROR3 ParameterFATALERROR4
ParameterFATALERROR5
Telegram part Description Variable type Length (byte) Value range
Type of command Answer (SOPAS answer) string 3 sRA
Command Query fatal errors string 5 MSfat
Parameters see
Reserved bytes Reserved uint_16 2 0000h
Tab. 8-2
Tab. 8-6: Answer to the request “Query fatal errors“
Example
Request:
sRN MSfat
Answer: sRA MSfat 4912C912h 00A4h 0255h 0005h 00A4h 0256h 0006h 0256h 0000h 00000000h
0000h 0000h 0000h 0000h 0000h 0000h 0000h 0000h 00000000h 0000h 0000h 0000h 0000h
0000h 0000h 0000h 0000h 00000000h 0000h 0000h 0000h 0000h 0000h 0000h 0000h 0000h
00000000h 0000h 0000h 0000h 0000h 0000h 0000h 0000h 0000h
100 © SICK AG · Division Auto Ident · Germany · All rights reserved 8011325/0000/2006-10-24
 Loading...