

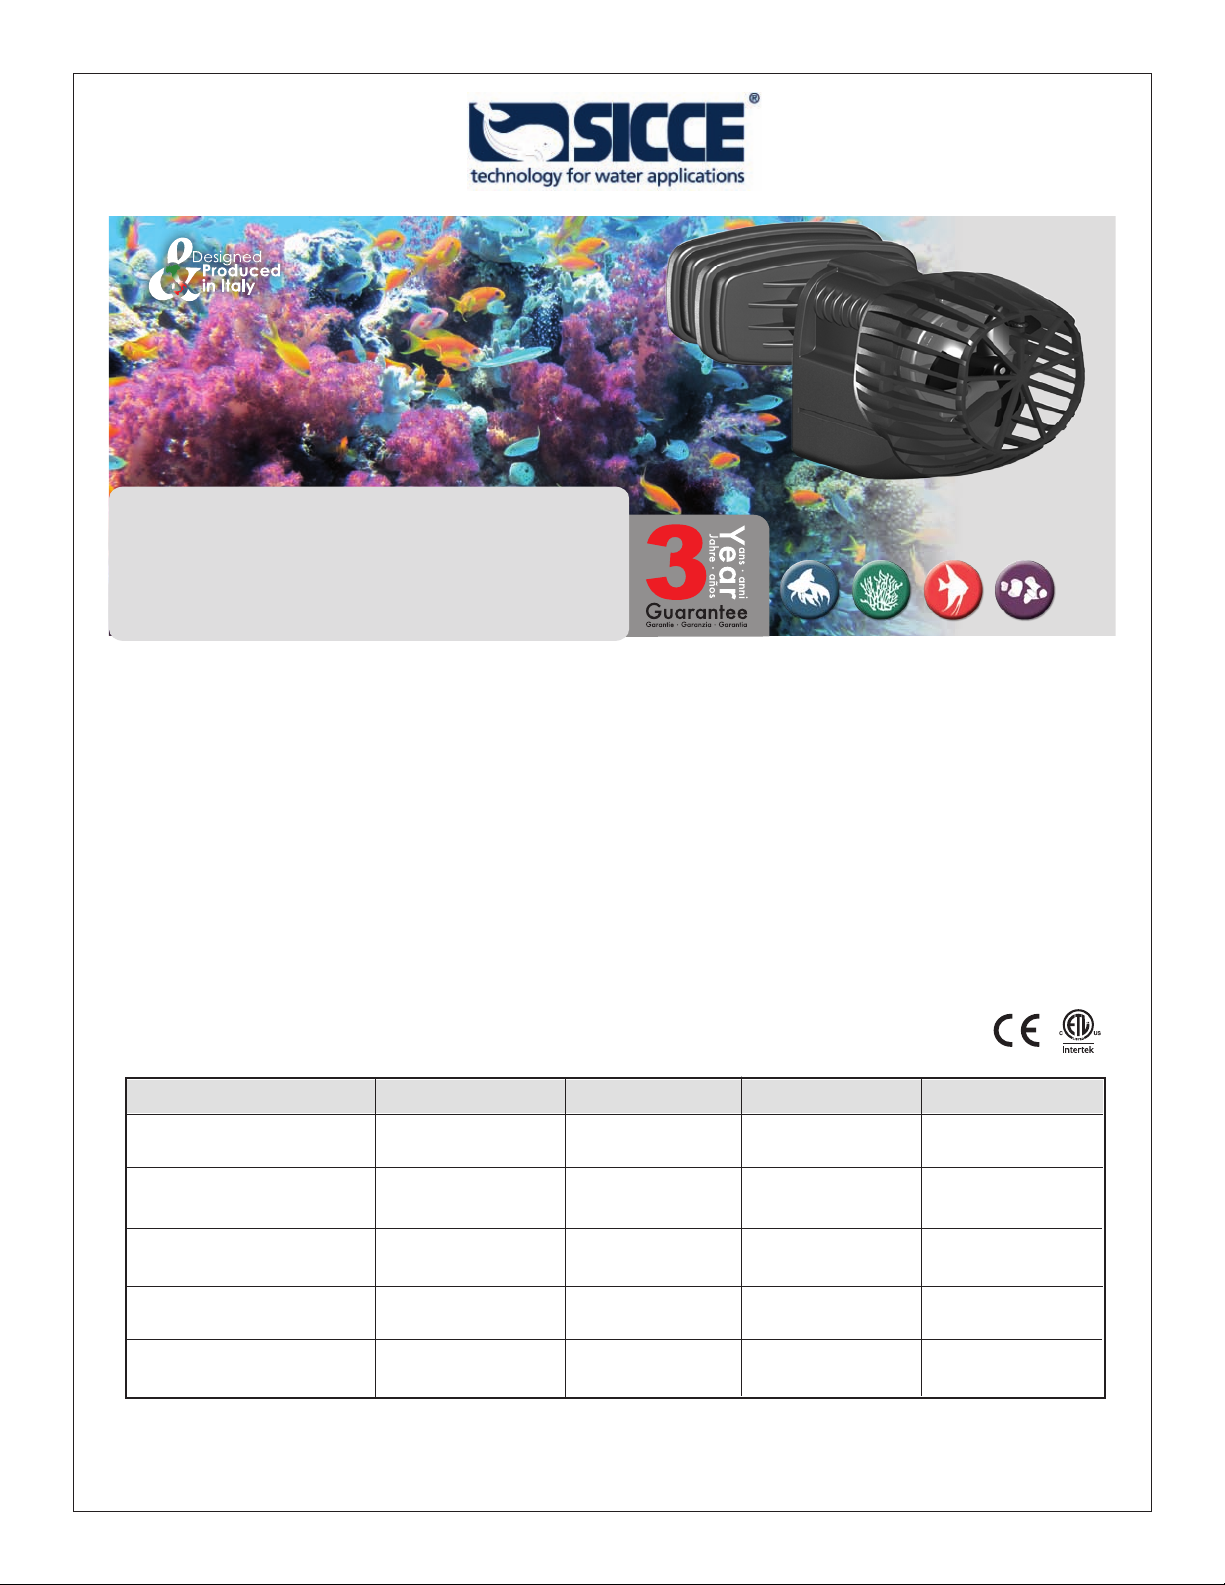
XStream
CIRCULATION AND STREAM PUMP
XStream/XStream-e
Thank you for choosing the SICCE XSTREAM series pump, the latest generation of stream pumps
for saltwater and freshwarter aquariums. XSTREAM, designed and made in Italy to rigorous quality
standards on components and production, is a technically advanced pump for high performance,
long lasting reliability, low operating costs and user-friendly maintenance. The pump’s rotating
engine allows for a wide adjustable ow up to 360˚. The strong magnet holders guarantee secure
holding even on dirty glass. The XSTREAM-e with Electronic Mini-Controller and pre-set timing
programs with ow control, will satisfy the expectations of the most demanding customer.
TECHNICAL DATA
XStream 3500 5000 6500 8000
Tank Capacity - SW
Tank Capacity - FW
Max Flow Rate
Watts
Cord Length
up to 70 gal up to 90 gal up to 120 gal up to 150 gal
up to 105 gal up to 130 gal up to 200 gal up to 250 gal
925 gph 1320 gph 1720 gph 2120 gph
4 W 6 W 9.5 W 14 W
7.2 ft 7.2 ft 7.2 ft 7.2 ft
Dimensions:
2.08” X 2.75” X 2.44”
© 2014 SICCE All Rights Reserved
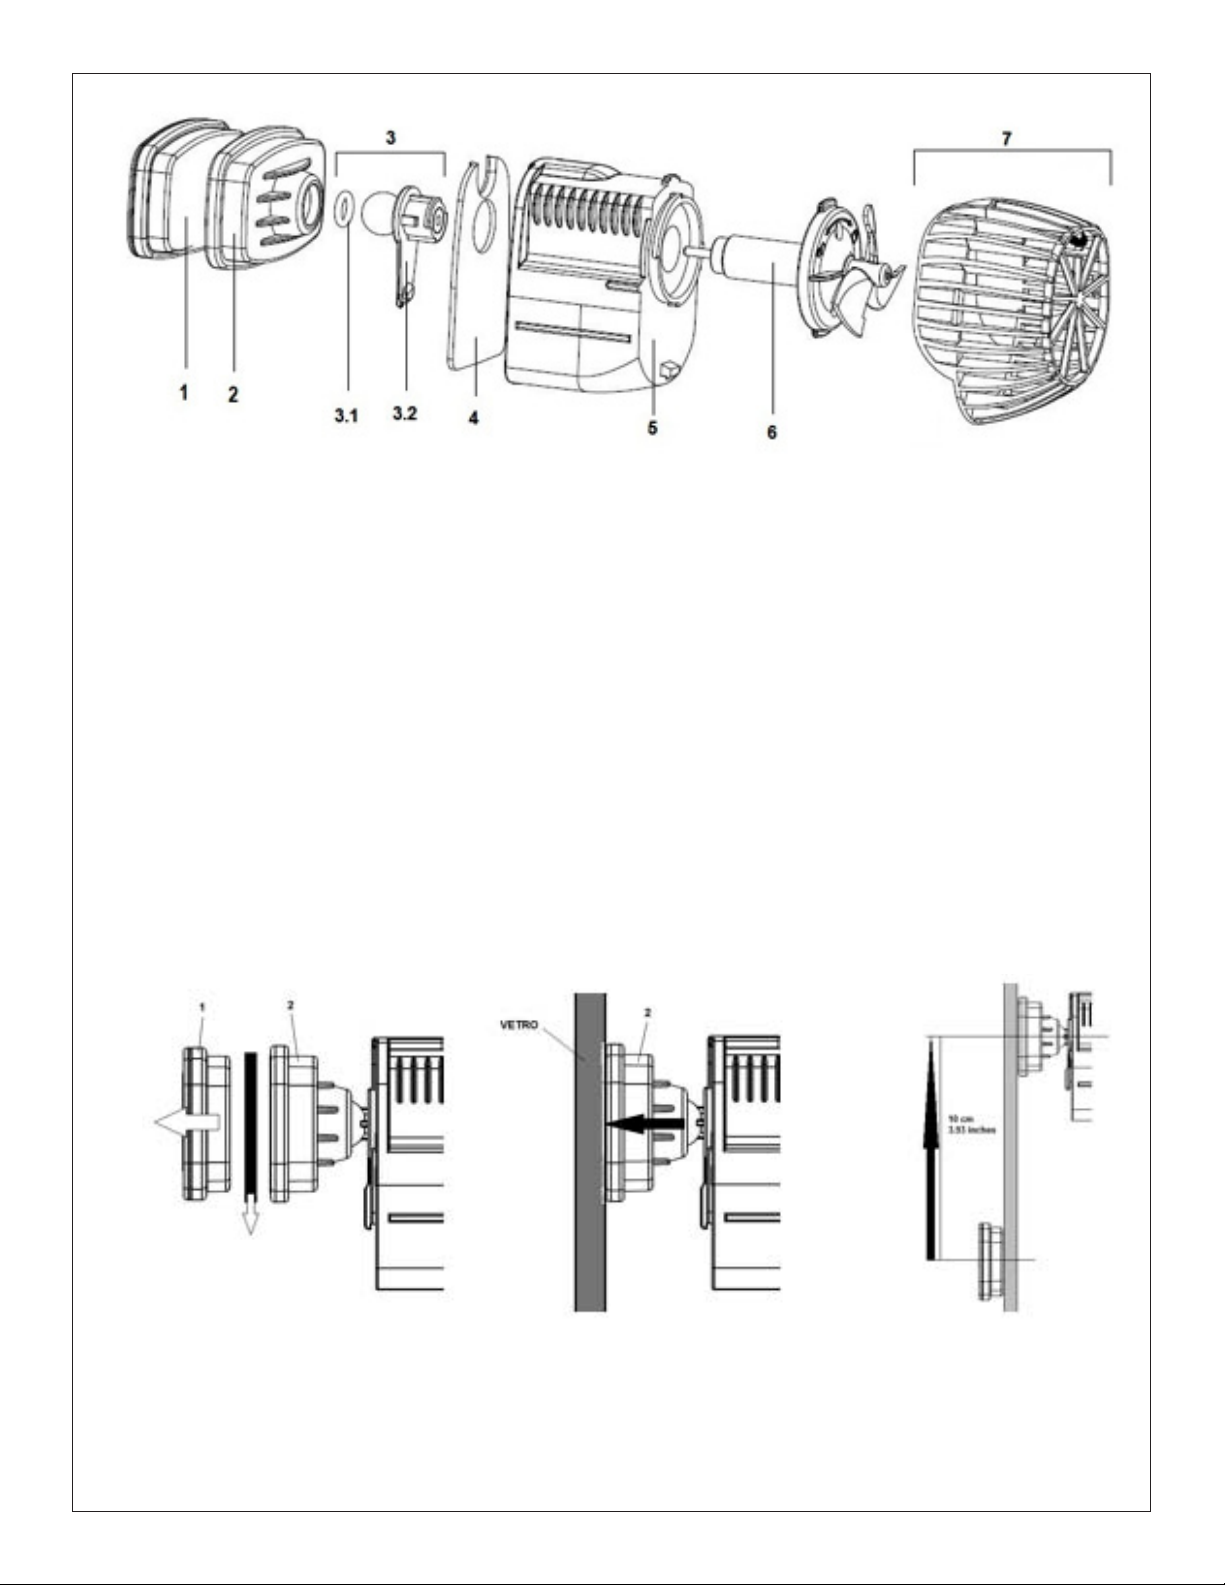
TECHNICAL DRAWING
COMPONENTS
1 External Magnet Holder
2 Internal Magnet Holder
3 Shaft holder
3.1 O ring
INSTALLATION
To install XSTREAM Pump proceed as follows:
1) Check the pump for damage.
2) Clean the aquarium glass where the pump will be attached.
3) Disconnect 1 from 2 removing the separator magnet.
4) Fully submerge the pump into the water keeping it in vertical position to release air trapped in
the rotor.
5) To avoid resonances and vibrations, do not put the pump in contact with the lateral surfaces
nearby. Do not place the pump too close to sand and gravel at the bottom of the tank.
3.2 Rotating System
4 Pump cover
5 Pump Body
6 Rotor Kit
7 Prelter grid
6) Place the pump in the desired location with holder 2 to the glass.
7) Attach the external magnetic support 1 to the tank at a 10 cm (3.93 inches) distance from the
centre of the internal support 2. Drag it until feeling the opposite magnetic force. Position the
center of the supports 1 and 2 on the same axis.

ATTENTION: Strong magnets. Use caution attaching the pump to the aqaurium. Keep hands
and ngers clear.
8) Turn the pump so that the ow is directed where desired
9) Connect it to the electric network.
REGULAR MAINTENANCE
For the periodic maintenance, unplug the pump from the electric outlet and remove the pump
from the tank.
Clean the pump and the rotor at regular intervals. Lime build up or heavy detritus in the water
may necessitate more frequent cleaning. See diagram below.
Remove the screen 7 from the pump 5 with light pressure to the sides by pulling it down. Fig. B1
Rotate the front counterclockwise and remove the rotor. (Fig. B2 and Fig. B3).
Fig. B2 Fig. B3Fig. B1
Carefully clean the pump’s components with fresh water or using a soft brush with soap or vinegar.
Rinse all parts well before returning th pump to the tank.
After cleaning, re-assemble all components making certain the small black O-ring 3 is tted into its
proper position. If the O-ring is not properly seated the rotor may mak
e noise. Replace a lost or
damaged O-ring.
SICCE products are designed for a long life andhigh, reliable service. Nevertheless, wear over time
can create a little noise even after regular maintenance. Replacement parts are available.

CIRCULATION AND STREAM PUMP
XStream-e
XStream-e is ideal for use in advanced marine tanks to create the most
natural waves Discrete design in a powerfull and versatile pump.
The mini controller cannot be submersed in water and must be placed to avoid
accidental drips and splashes. It can be attached to the glass with the suction
cup or placed on the cabinet. We suggest making a drip loop in the Mini
Controller and pump’s cord to prevent water running down and reaching the
power source. Handle the Mini Controller with dry hands. The Mini Controller can be used only with the
Sicce XSTREAM-E and can be powered only by the included transformer. Any other use could damage
this electronic device and void the warranty.
1) Connect the jack plug of the pump to the central plug b of the Mini Controller (Fig B)
2) Connect the jack d (Fig C) to the inlet on the right side c of the Mini controller (Fig B)
The pump will start from MVC Mode ( Constant Speed Mode) at 800ghp.
To disconnect the pump unplug the transformer (Fig C).
WITH ELECTRONIC CONTROL
HOW TO SET UP XSTREAM-E
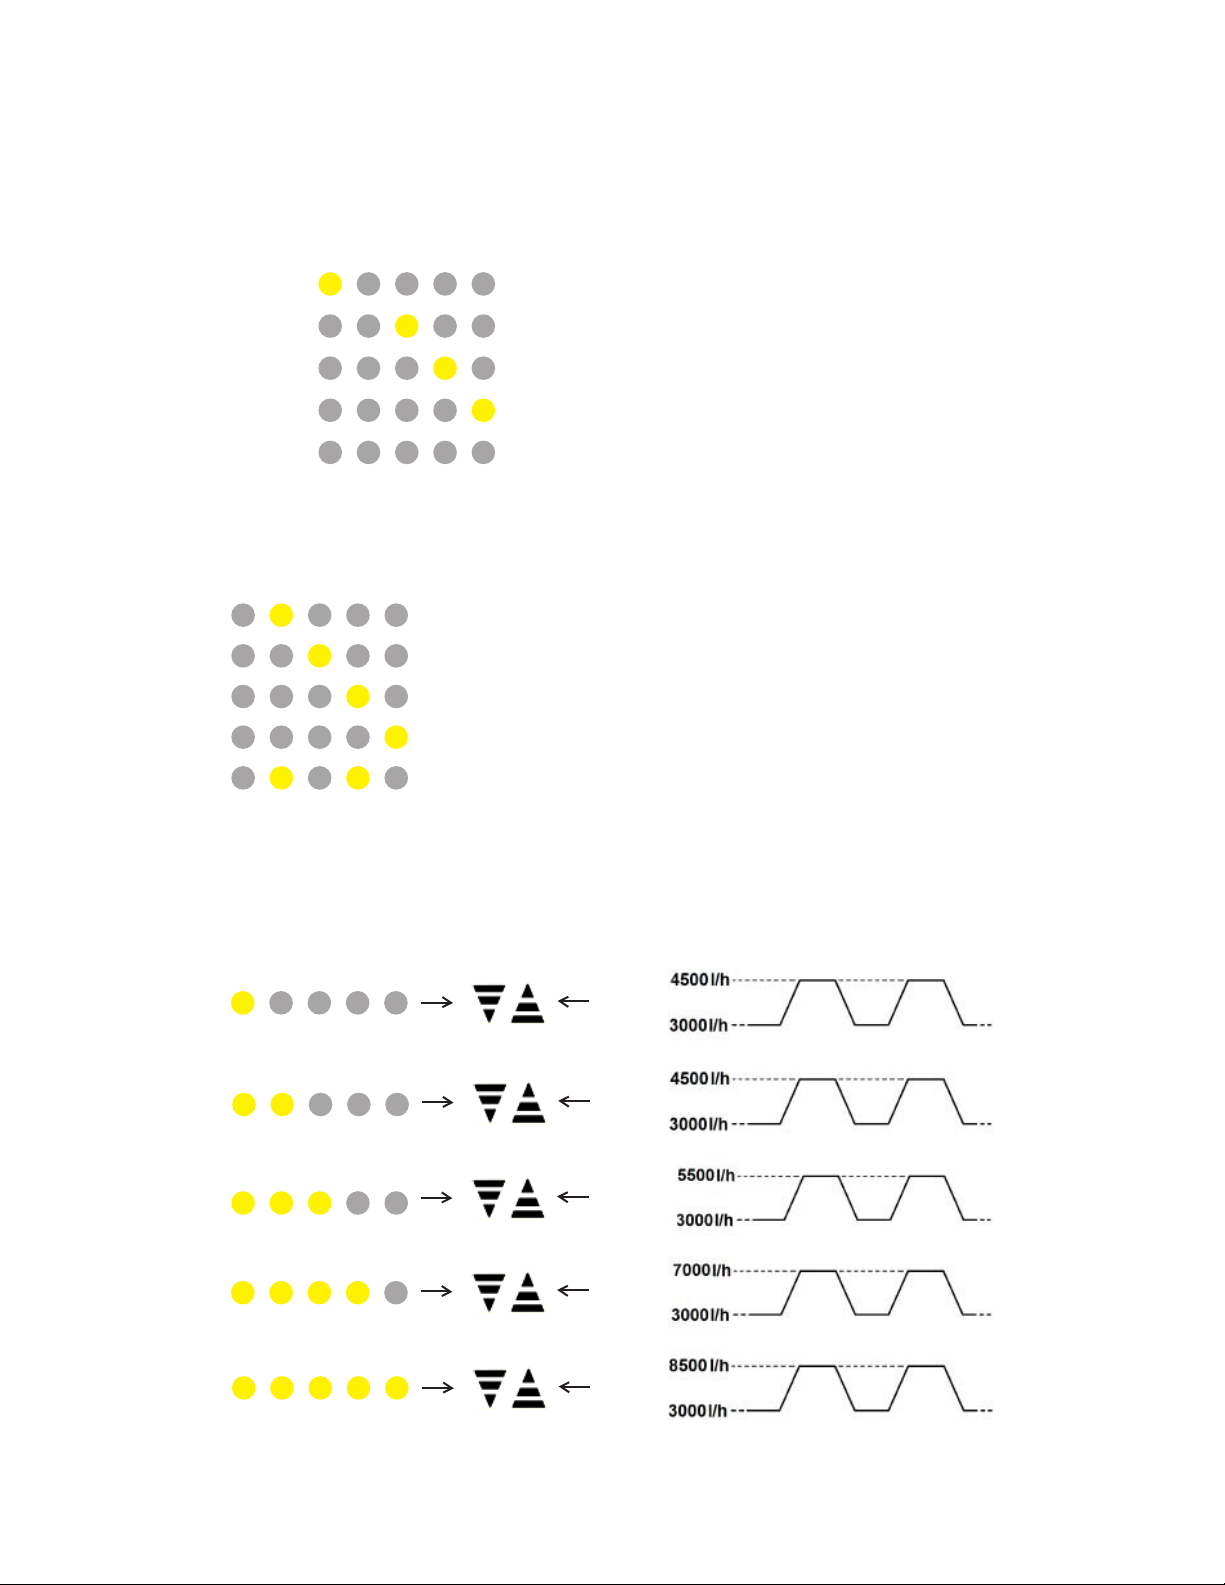
The Mini Controller works by pressing the arrows for at least 1 second. If the touch is too fast, the Mini
Controller will not sense the input given. Press the arrows to move along the desired pre-set timing
program. Touch arrow UP to increase the pump’s speed and water ow, arrow down to decrease them.
Each single touch gives a new input, indicated by the blue LED light, to the Mini Controller.
Constant Speed Mode (MVC) 800gph
Constant Speed Mode (MVC) 1190gph
Constant Speed Mode (MVC) 1450gph
Constant Speed Mode (MVC) 1850gph
Constant Speed Mode (MVC) 2250gph
To move from Constant Speed Mode (MVC) to Pre-set Timing Programs (MPP) and vice versa, press
both arrows. The blue LED lights will indicate the selected program as shown below:
SHORT PULSE: (MPP) cycle 5 seconds - Pre-set Timing
MEDIUM PULSE: (MPP) cycle 20 seconds
LONG PULSE: (MPP) cycle 60 seconds
RANDOM PULSE: (MPP) cycle 5-30 seconds
0-10V CONTROLLER IN
When you are in MMP move along the different programs by pressing arrow UP and arrow DOWN.
According to the speed you set, the MMP cycles will reach the max ow according to the following chart:
MMP
MMP
MMP
MMP
MMP

MAINTENANCE
1) Unplug the plug from the electric socket and then take the pump out of water.
2) Turn the lever counterclockwise until the end lifting it slightly to remove the magnet holders
from the pump
3) Clean the ceramic bearing with a soft brush to remove any residue or deposits of salt or
organic material being careful not to remove it from its seat.
General Safety Precautions
1. For submerged and indoor use only.
2. Strong magnets.
clear.
3. Before connecting the pump, check that the cable and the pump are not damaged.
4. ATTENTION: Disconnect all the submerged electrical products before doing any maintenance.
5. The pump can be operated at temperatures no higher than 35˚C/95˚F.
6. Avoid using this pump with corrosive and abrasive liquids.
7. Do not use the pump for applications other than those for which it is intended.
8. The pump should be operated under normal safety precautions.
9. Avoid use near blades, sharp objects or other magnets to prevent accidental injuries.
10. The magnets can cause permanent damage to electronic devices and to other objects that are
sensitive to magnetic elds. Avoid use near pacemakers, credit cards and keys.
11. The pump magnets can be damaged at temperatures higher than 50˚C/122˚F.
12. To avoid accidental drips near the plug or the socket, loop with the cord under the outlet level.
Use caution attaching the pump to the aqaurium. Keep hands and ngers
WARRANTY
This product is guaranteed against defects of materials and workmanship for a period of 3
years from the date of purchase, except the rotor. The warranty certicate must be lled
in by the dealer and must accompany the pump if it is returned for repair, along with the
cash register receipt or similar document. The warranty covers the replacement of the
defective parts. In case of improper use, tampering or negligence by the buyer or user,
the warranty is void and expires immediately. The warranty is also void in absence of the
cash register receipt or similar document. The shipping cost to and from the factory, or
the repair station, are the responisbility of the buyer.
FIND OUT HOW TO GET YOUR PRODUCT GUARANTEED FOR 5 YEARS
To improve our service and our clients’ satisfaction, SICCE offers the possibility of adding
a 2 year extension to the warranty by simply registering your product on our website
www.sicce.com in “Sicce for you/Product registration”
Fill in the form and upload the product’s purchase receipt. After having correctly inserted
all your data, complete the warranty extension request.
 Loading...