

Sicce XStream 3500, XStream 5000, XStream 6500, XStream 8000, XStream-E 24 V Instruction Manual
INSTRUCTION MANUAL
3500 · 5000 · 6500 · 8000 · XStream-E
EN · IT · DE · FR · ES · NL · PT · RU · CN
SEAL AND SIGNATURE OF RESALE DEALER
TIMBRO E FIRMA DEL RIVENDITORE
STEMPEL UND UNTERSCHRIFT DES VERKAUFERS
CACHET ET SIGNATURE DU REVENDEUR
SELLO Y FIRMA DEL REVENDEDOR
STEMPEL EN HANDTEKENING VAN DE DEALER
CARIMBO E ASSINATURA DO REVENDEDOR
ПЕЧАТЬ И ПОДПИСЬ ДИЛЕРА
邮票卖家签名
DATE OF PURCHASE
DATA DI VENDITA
VERKAUFSDATUM
DATE DE VENTE
FECHA DE VENTA
DATUM VAN AANKOOP
DATA DE VENDA
ДАТА ПРОДАЖИ
发售日
GARANTIED · GARANTIA · GARANTI · ГАРАНТИЯ · 保固書
WARRANTY · GARANZIA · GARANTIE · GARANTIA
____ / ____ / ____
day month year
230 V - 50 Hz
TECHNICAL DATA
120 V - 60 Hz
MARINE FRESH WATER FLOW WATT
XStream 8000 up to 150 US gph up to 250 US gph 2120 US gph -
XStream 6500 up to 120 US gal up to 200 US gal 1720 US gph -
XStream 5000 up to 90 US gal up to 130 US gal 1320 US gph -
XStream 3500 up to 250 l up to 400 l 3.500 l/h 3,5 W
XStream 5000 up to 350 l up to 500 l 5.000 l/h 5,5 W
XStream 6500 up to 450 l up to 750 l 6.500 l/h 8,5 W
XStream 8000 up to 550 l up to 900 l 8.000 l/h 13 W
XStream 3500 up to 70 US gal up to 105 US gal 925 US gph -
XStream-E 24 V - - 3.000 - 8.500 l/h 6 / 16,5 W
XStream-E 24 V - - 800 - 2250 US gph 6 / 16,5 W
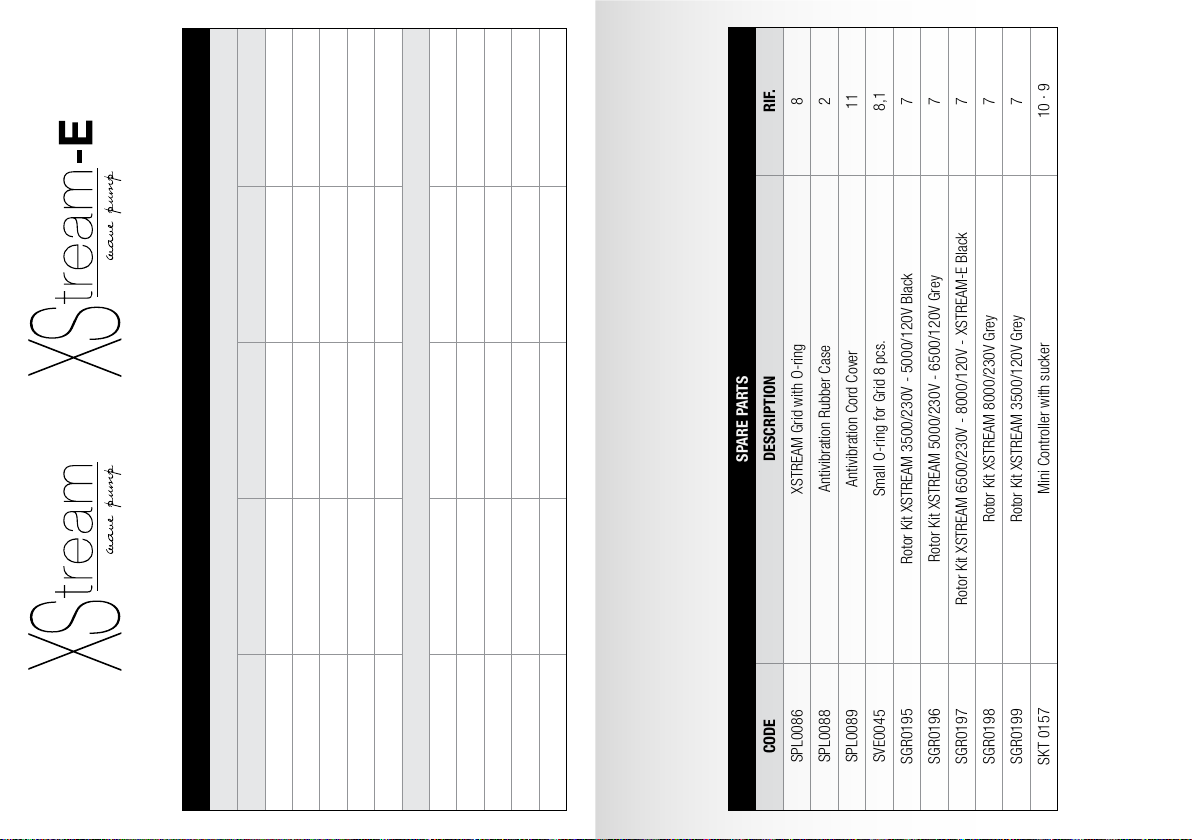
SPARE PARTS
CODE DESCRIPTION RIF.
SPL0086 XSTREAM Grid with O-ring 8
SPL0088 Antivibration Rubber Case 2
SPL0089 Antivibration Cord Cover 11
SVE0045 Small O-ring for Grid 8 pcs. 8,1
SGR0195 Rotor Kit XSTREAM 3500/230V - 5000/120V Black 7
SGR0196 Rotor Kit XSTREAM 5000/230V - 6500/120V Grey 7
SGR0197 Rotor Kit XSTREAM 6500/230V - 8000/120V - XSTREAM-E Black 7
SGR0198 Rotor Kit XSTREAM 8000/230V Grey 7
SGR0199 Rotor Kit XSTREAM 3500/120V Grey 7
SKT 0157 Mini Controller with sucker 10 · 9
8.1
8
3 + 1
2
7
10
9
6
3 + 1
5
2
4.2
4
4.1
3
1 3
A1 A2 A3
A4 A5 A6
2
2
1
11
2 3
3 + 1
1110
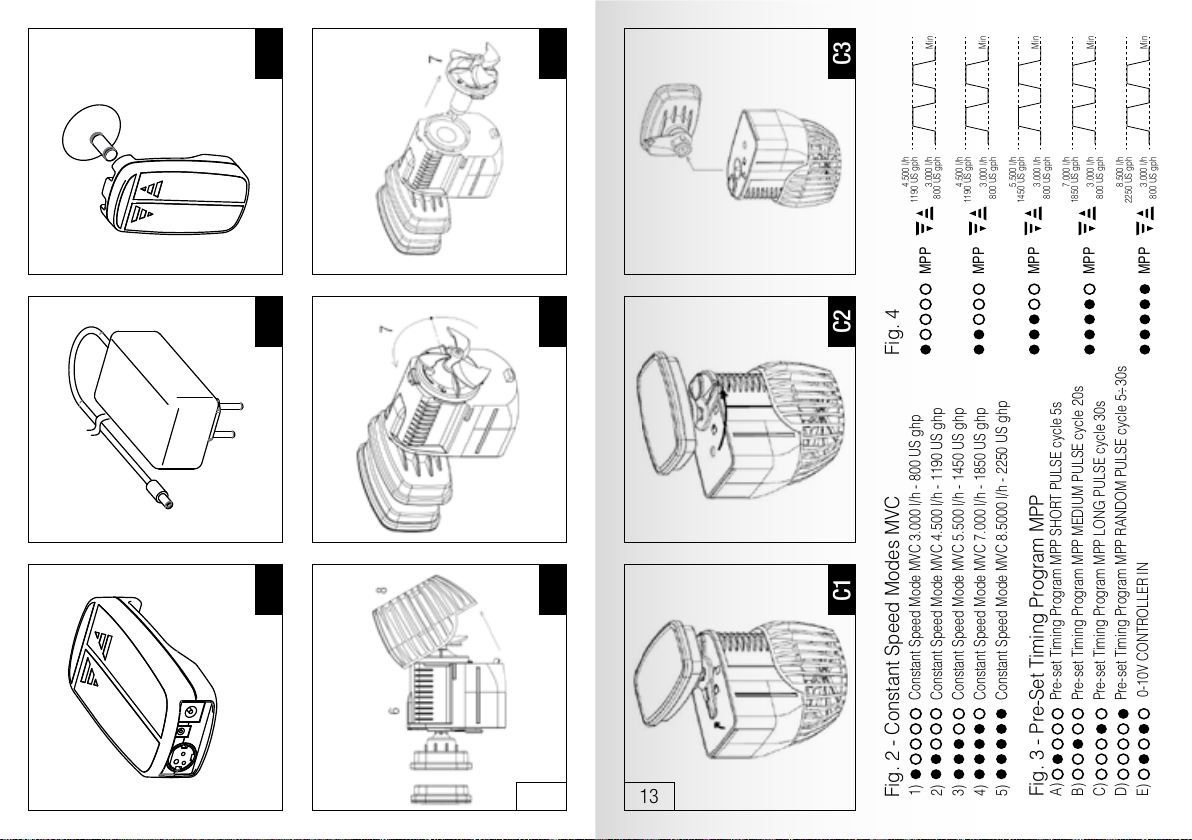
Fig. 2 - Constant Speed Modes MVC
Fig. 3 - Pre-Set Timing Program MPP
1) Constant Speed Mode MVC 3.000 l/h - 800 US ghp
2) Constant Speed Mode MVC 4.500 l/h - 1190 US ghp
3) Constant Speed Mode MVC 5.500 l/h - 1450 US ghp
4) Constant Speed Mode MVC 7.000 l/h - 1850 US ghp
5) Constant Speed Mode MVC 8.5000 l/h - 2250 US ghp
A) Pre-set Timing Program MPP SHORT PULSE cycle 5s
B) Pre-set Timing Program MPP MEDIUM PULSE cycle 20s
C) Pre-set Timing Program MPP LONG PULSE cycle 30s
D) Pre-set Timing Program MPP RANDOM PULSE cycle 5÷30s
E) 0-10V CONTROLLER IN
Fig. 4
MPP
MPP
MPP
MPP
MPP
4.500 l/h
3.000 l/h
Min
Min
Min
Min
Min
4.500 l/h
3.000 l/h
5.500 l/h
3.000 l/h
7.000 l/h
3.000 l/h
8.500 l/h
3.000 l/h
1190 US gph
1190 US gph
800 US gph
800 US gph
1450 US gph
800 US gph
1850 US gph
800 US gph
2250 US gph
800 US gph
9
UP
DOWN
d
C3C2C1
B C D
c
b
B1 B2 B3
1312

EN EN
DE DE
FR FR
ES ES
NL NL
PT PT
RU RU
CN CN
Thank you for choosing the SICCE XSTREAM series pump, the latest generation
of stream pumps for saltwater and freshwater aquariums. XSTREAM, designed
and made in Italy to rigorous quality standards on components and production,
is a technically advanced pump for high performance, long lasting reliability,
low operating costs and user-friendly maintenance. The pump’s rotating
IT
engine allows for a wide adjustable flow up to 360˚. The strong magnet holders
guarantee secure holding even on dirty glass. The XSTREAM-E with its Electronic
Mini-Controller and pre-set timing programs with flow control, will satisfy the
expectations of the most demanding customer.
IMPORTANT SAFETY INFORMATION - Please read carefully.
XSTREAM range are made in conformity with the national and international
security laws.
1) Always isolate the pump from the mains electricity before installing or carrying
out any maintenance. Power to the pump must be supplied through a Redidual
Current Device (RCD) with a rated residual operating current not exceeding
30mA.
2) This pump is designed to be used indoors and is not suitable for any outdoor
applications.
3) Before connecting the pump to the electricity supply, check there are any
damages on cord or plug.
4) The pump has a type Z cable link. The cable and the plug cannot be substituted
or repaired; in case of damage of them replace the entire pump.
5) ATTENTION: do not operate any appliance if it has a damaged cord or plug, if it
is malfunctioning, or if it has been dropped or damaged in any way.
6) Never operate the pump without water inside the impeller chamber or with
liquids at a temperature higher than 95° F/35° C.
7) Do not use the pump with corrosive and abrasive liquids.
8) Do not use the pump for uses different (i.e. in bathroom or other applications) to
those for which it has been designed.
9) The pump cannot be used by people with handicaps or by children if they are not
supervised by a person responsible for their safety.
10) Avoid closeness with blades, sharp objects or other magnets to prevent
accidental injuries as the magnets of the support attract metal objects and other
magnets with high force.
11) The magnets can provoke permanent damages to electronic devices and to
other objects that are sensitive to magnetic field such as pacemakers, credit
cards and keys: always keep them at least 30 cm (12 inches) distance.
12)
The magnets could loose partially or completely their attracting power if exposed
to temperature higher than 50° C (122° F).
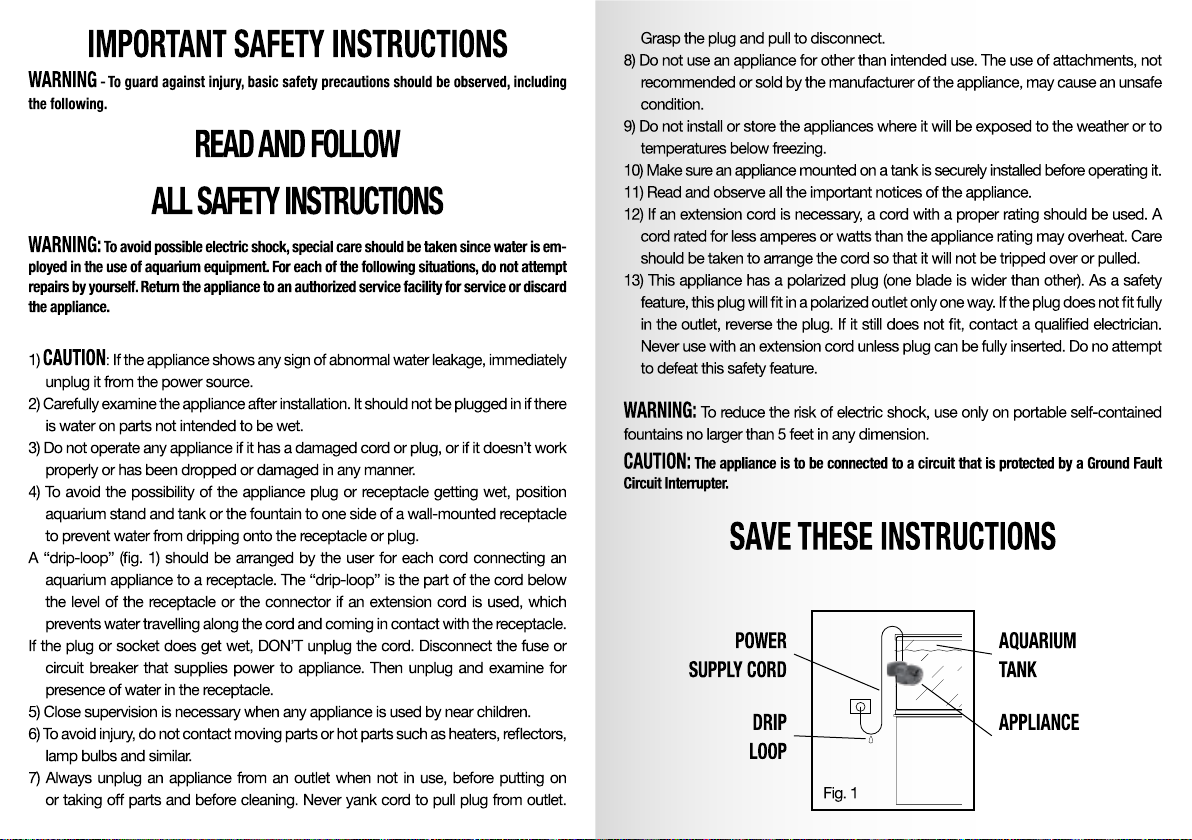
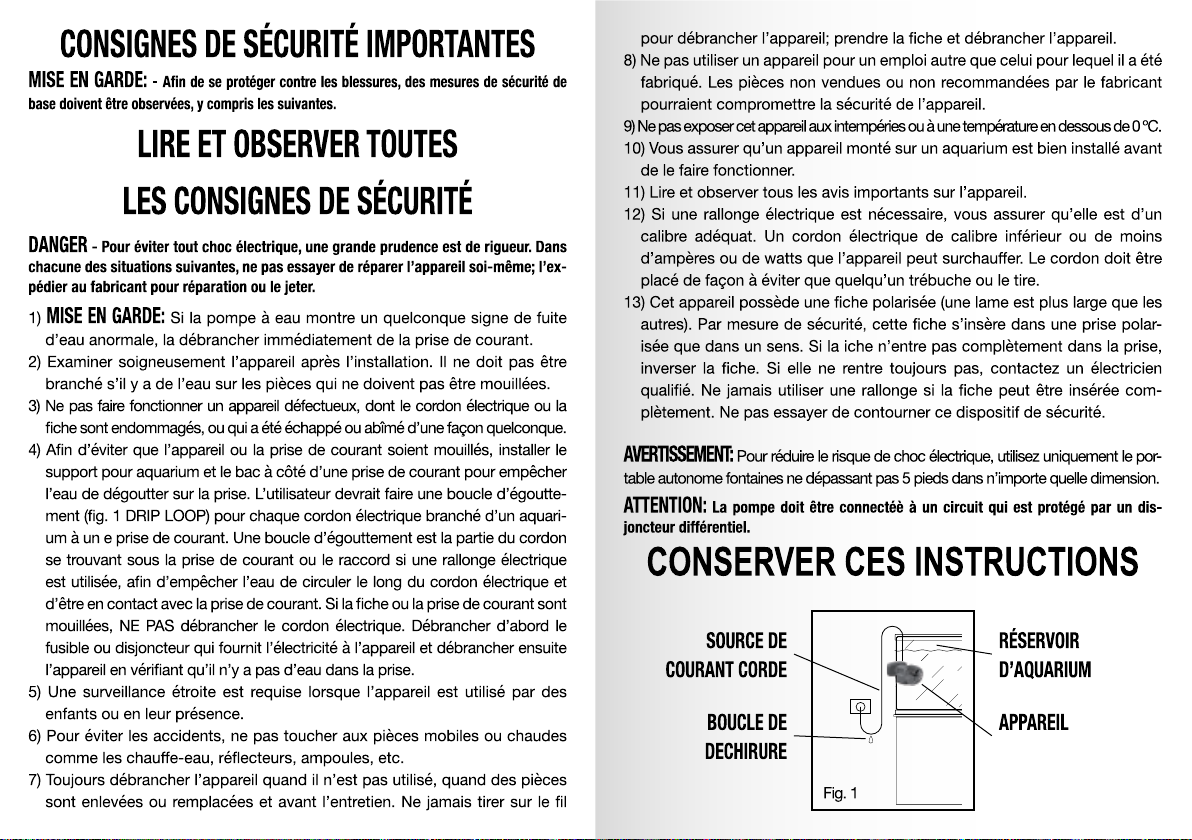
13) Always leave a drip-loop in the pump cable to prevent water running down the
cable and reaching the power source (fig. 1).
14) Avoid taking the pump by the cord during the installation or maintenance.
15) Do not try to attach directly the two magnets holder because the magnetic
attraction is very high. Hold them only on the external sides paying attention not
to put your hands or fingers in between.
14 15
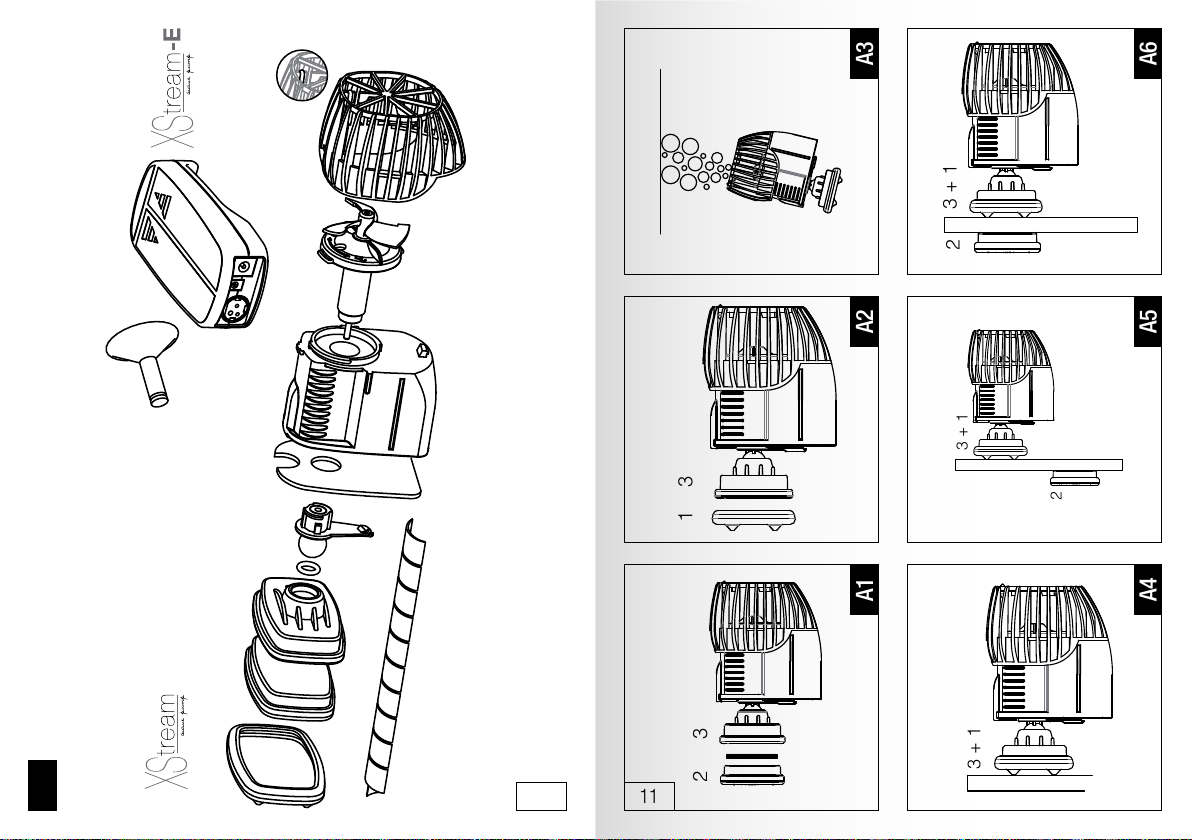
COMPONENTS
[1] Anti-vibration rubber case [2] External Magnet Holder [3] Internal Magnet
Holder [4] Shaft holder [4.1] O ring [4.2] Rotating System [5] Pump cover [6]
Pump Body [7] Rotor Kit [8] Prefilter grid [8.1] Grid O Ring [9] Suction Cup
(XSTREAM-E Version) [10] Electronic Mini Controller (XSTREAM-E Version) [11]
Anti-vibration cord cover
INSTALLATION
To install XSTREAM Pump proceed as follows:
1) Check the pump for damage.
2) Clean the aquarium glass where the pump will be attached.
3) Disconnect 2 from 3 removing the separator magnet (fig. A.1).
4) Place the antivibration rubber case 1 on the magnet holder 3 (fig. A.2).
5) Fully submerge the pump into the water keeping it in vertical position to release
air trapped in the rotor and prevent some noise in the start up phase. (fig A.3).
6) To avoid resonances and vibrations, do not put the pump directly in contact with
the lateral surfaces nearby. Do not place the pump too close to sand and gravel
at the bottom of the tank.
7) Place the pump in the desired location with holder 3 adherent to the glass.
(fig. A.4).
8)
Attach the external magnetic support 2 to the tank at a 10 cm (3.93 inches) distance from
the centre of the internal support
force. Position the centre of the supports 2 and 3 on the same axis
ATTENTION: Strong magnets. Use caution attaching the pump to the aquarium.
Keep hands and fingers clear.
9) Turn the pump so that the flow is directed where desired.
10) Connect it to the electricity supply.
1) Connect the jack plug of the pump to the central plug b of the Mini Controller
(fig. B).
2) Connect the jack d (fig. C) to the inlet on the right side c of the Mini controller
(fig. B).
The pump will start from MVC Mode (Constant Speed Mode) at 5.500 l/h - 1450 US
gph. For the correct use of the Mini Controller please read instruction at page 10.
To disconnect the pump unplug the transformer (fig. C) from the electrical network.
HOW TO SET UP XSTREAM-E
The Mini Controller works by pressing the arrows for at least 1 sec., without
crushing. If the touch is too fast, the Mini Controller will not feel the input given.
To give the input to the Mini Controller press the arrows and move along the desired
pre-set timing program (fig. 2 - pag. 13).
Touch arrow UP to increase the pump’s speed and water flow, arrow DOWN
to decrease them. Each single touch gives a new input, underlined by the blu LED
Light, to the Mini Controller.
3 (fig. A.5).
Drag it until feeling of the opposite magnetic
(fig. A.6).
IT
EN EN
DE DE
FR FR
ES ES
NL NL
PT PT
RU RU
CN CN
To move from MVC (Constant Speed Mode) to MPP (pre-set Timing Programs)
and viceversa, press both arrows . The blu LED lights will put in evidence the
selected program as per the diagram (fig. 3 pag. 13).
In program E the Mini Controller modifies the pump flow according to the electrical
input 0-10V sourced by an external Controller/Driver with this type of electrical
IT
connection (0-10V).
When you are in MPP move along the different programs by pressing arrow UP
and arrow DOWN . According to the speed you set, the MPP cycles will reach the
max flow according to the chart (fig. 4 pag. 13).
HOW TO USE THE MINI CONTROLLER
The Mini Controller cannot be submersed into water and has to be taken close to
the tank avoiding accidental drops. It can be hang on the glass tank by using the
sucker 9 (fig. D) or placed on the cabinet. We suggest to leave a drip loop in the
Mini Controller and pump’s cable to prevent water running down and reaching the
power source. Handle the Mini Controller with dry hands. The Mini Controller can
be used only with XSTREAM-E made by SICCE and can be powered only by the
included transformer. Any other use could damage this electronic device making
void the warranty.
Mini Controller WARRANTY: 2 years.
REGULAR MAINTENANCE
For the periodic maintenance, unplug the pump from the electric outlet/socket and
remove the pump from the tank.
Clean the pump and the rotor at regular intervals.
Lime build up or heavy detritus in the water may necessitate more frequent
cleaning.
Remove the prefilter grid 8 from the pump 6 with light pressure to the sides by
pulling it down (fig. B.1).
Rotate the front counterclockwise and remove the rotor 7 (fig. B.2/B.3).
Carefully clean the pump’s components with fresh water or using a soft brush with
soap or vinegar.
Rinse all parts well before returning the pump to the tank.
After cleaning, re-assemble all components making certain the small black O-ring
8.1 is fitted into its proper position. If the O-ring is not properly seated, the rotor
may make noise. Replace a lost or damaged O-ring, spare part 8.1.
SICCE products are designed for a long life and high, reliable service. Nevertheless,
wear over time can create a little noise even after regular maintenance.
Replacements parts are available.
ADDITIONAL MAINTENANCE
1) Unplug the plug from the electric socket and then take the pump out of water.
2)
Turn the lever counterclockwise until the end lifting it slightly to remove the
magnet holders from the pump (fig. C.1/ C.2).
3) Clean the ceramic bearing (fig. C.3) with a soft brush to remove any residue or
deposits of salt or organic material, being careful not to remove it from its seat.
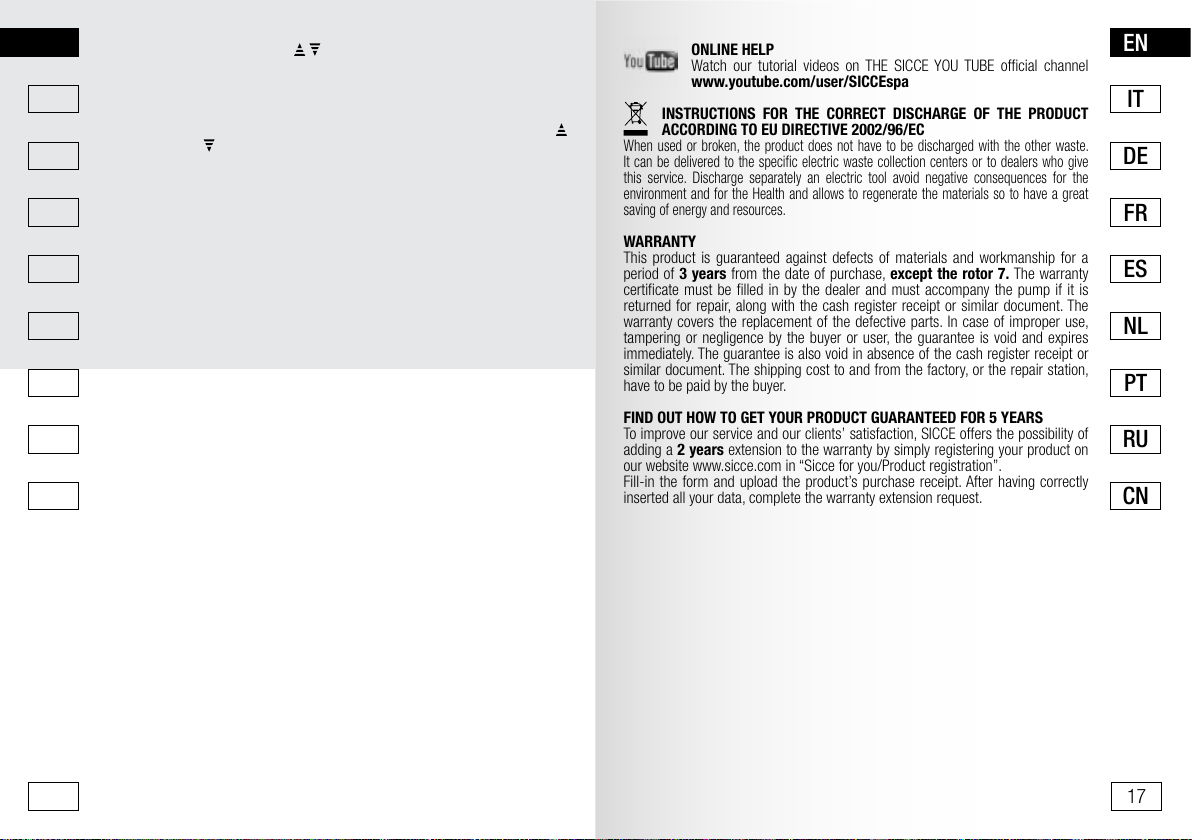
ONLINE HELP
Watch our tutorial videos on THE SICCE YOU TUBE official channel
www.youtube.com/user/SICCEspa
INSTRUCTIONS FOR THE CORRECT DISCHARGE OF THE PRODUCT
ACCORDING TO EU DIRECTIVE 2002/96/EC
When used or broken, the product does not have to be discharged with the other waste.
It can be delivered to the specific electric waste collection centers or to dealers who give
this service. Discharge separately an electric tool avoid negative consequences for the
environment and for the Health and allows to regenerate the materials so to have a great
saving of energy and resources.
WARRANTY
This product is guaranteed against defects of materials and workmanship for a
period of 3 years from the date of purchase, except the rotor 7. The warranty
certificate must be filled in by the dealer and must accompany the pump if it is
returned for repair, along with the cash register receipt or similar document. The
warranty covers the replacement of the defective parts. In case of improper use,
tampering or negligence by the buyer or user, the guarantee is void and expires
immediately. The guarantee is also void in absence of the cash register receipt or
similar document. The shipping cost to and from the factory, or the repair station,
have to be paid by the buyer.
FIND OUT HOW TO GET YOUR PRODUCT GUARANTEED FOR 5 YEARS
To improve our service and our clients’ satisfaction, SICCE offers the possibility of
adding a 2 years extension to the warranty by simply registering your product on
our website www.sicce.com in “Sicce for you/Product registration”.
Fill-in the form and upload the product’s purchase receipt. After having correctly
inserted all your data, complete the warranty extension request.
IT
16 17
EN EN
DE
FR FR
ES ES
NL NL
PT PT
RU RU
CN CN
Gentile Cliente grazie per aver scelto le pompe di movimento XSTREAM/
XSTREAM-E, sinonimo di eccellenza per l’acquario! Le pompe di movimento
XSTREAM sono un prodotto tecnologicamente avanzato, caratterizzato da grande
affidabilità, elevate prestazioni, basso consumo energetico e dimensioni molto
compatte. La versione elettronica XSTREAM-E dotata di Mini Controller Elettronico
IT IT
e programmazione pre-impostata, saprà soddisfare le aspettative dell’acquariofilo
più esigente coniugando massima silenziosità, armonia nell’acquario e semplicità
d’uso. Il prodotto da Lei acquistato è stato interamente progettato e prodotto in
Italia a garanzia di qualità e controllo dei materiali usati.
NORME DI SICUREZZA
Le pompe della linea XSTREAM sono conformi alle norme di sicurezza nazionali
ed internazionali. Per la Vostra sicurezza e per mantenere l’integrità del prodotto, Vi
chiediamo di leggere con cura le seguenti indicazioni.
1) Controllare che la tensione riportata sull’etichetta della pompa corrisponda alla
tensione di rete. L’apparecchio deve essere alimentato attraverso un interruttore
differenziale (salvavita), la cui corrente nominale sia inferiore o uguale a 30mA.
2) La pompa può funzionare solo sommersa in acqua ed è esclusivamente per
uso interno. La pompa non deve funzionare senz’acqua per evitare danni non
riparabili al motore.
3) Prima di collegare l’apparecchio alla rete controllare che il cavo e la pompa non
risultino in qualche modo danneggiati.
4) La pompa è costruita con un collegamento di tipo Z. Il cavo e la spina non
possono essere sostituiti o riparati. In caso di danneggiamento sostituire l’intero
apparecchio.
5) ATTENZIONE: scollegare tutti gli apparecchi elettrici sommersi prima di
eseguire qualsiasi tipo di manutenzione nell’acqua; nel caso in cui la spina di
connessione o la presa di corrente fossero bagnate, scollegare l’interruttore
generale prima di staccare il cavo dell’alimentazione.
6) La pompa può essere utilizzata con liquidi (acqua dolce o salata) e in ambienti
con temperatura non superiore ai 35 °C / 95° F.
7) Non utilizzare la pompa con liquidi corrosivi ed abrasivi.
8) Non utilizzare l’apparecchio per scopi diversi da quelli per i quali è stato realizzato,
come ad esempio in stanze da bagno o applicazioni simili. Per qualsiasi utilizzo
differente si prega di contattare il rivenditore.
9) Questo dispositivo non è progettato per essere utilizzato da persone (inclusi
bambini) con ridotte capacità fisiche, sensoriali e mentali a meno che non siano
supervisionati ed istruiti da persone responsabili per la loro sicurezza. Tenere il
dispositivo lontano dalla portata dei bambini.
10) Non avvicinarsi con lame, oggetti taglienti, o altri magneti per evitare di attivare
le forze magnetiche esercitate dai supporti procurando ferite accidentali.
11) I magneti possono provocare danni permanenti ad apparecchi elettronici e ad
altri oggetti sensibili al campo magnetico, come pacemaker cardiaci, carte di
credito e chiavi: mantenere sempre una distanza di almeno 30 cm (12 inches).
12) I magneti potrebbero perdere parte o tutta la loro energia di trazione se
conservati ad una temperatura superiore a 50° C (122° F).
13) Per evitare che accidentali gocciolamenti bagnino la spina o la presa di
18 19
corrente, realizzare con il cavo un’ansa sotto il livello della presa (fig. 1).
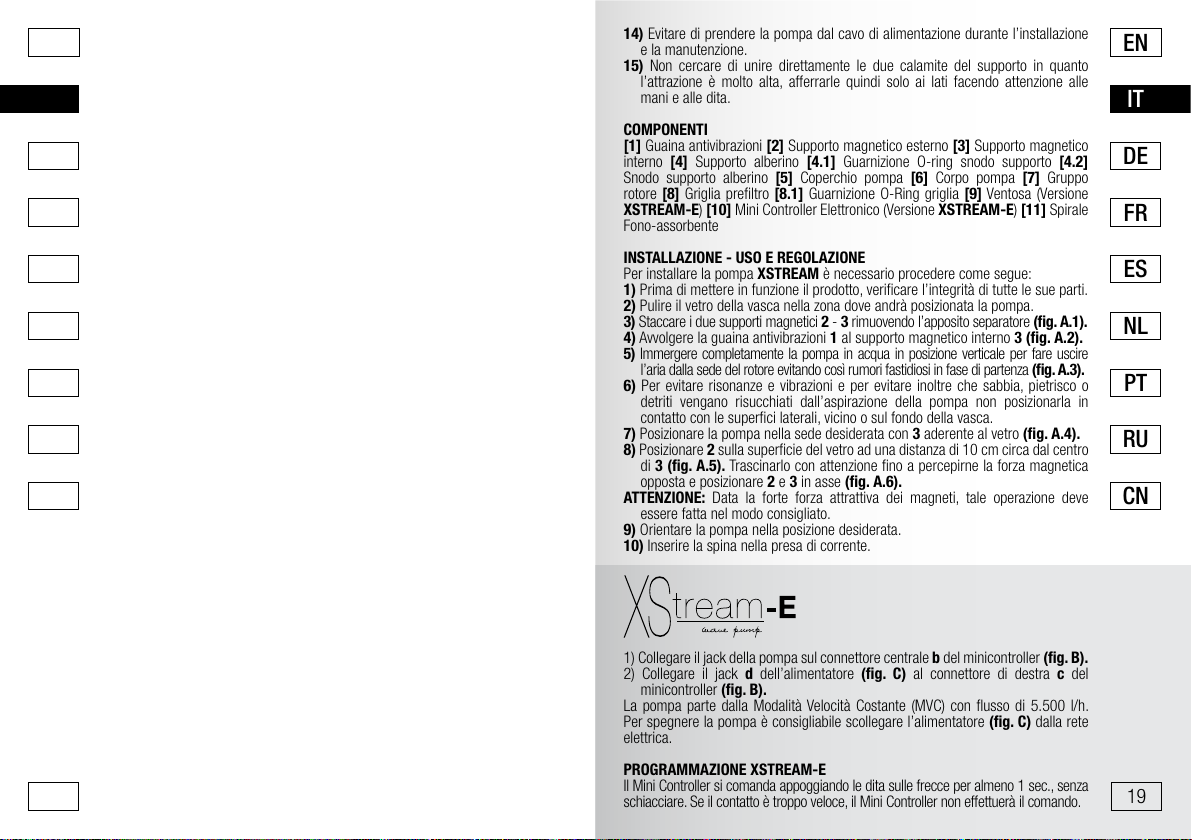
14) Evitare di prendere la pompa dal cavo di alimentazione durante l’installazione
e la manutenzione.
15) Non cercare di unire direttamente le due calamite del supporto in quanto
l’attrazione è molto alta, afferrarle quindi solo ai lati facendo attenzione alle
mani e alle dita.
COMPONENTI
[1] Guaina antivibrazioni [2] Supporto magnetico esterno [3] Supporto magnetico
interno [4] Supporto alberino [4.1] Guarnizione O-ring snodo supporto [4.2]
Snodo supporto alberino [5] Coperchio pompa [6] Corpo pompa [7] Gruppo
rotore [8] Griglia prefiltro [8.1] Guarnizione O-Ring griglia [9] Ventosa (Versione
XSTREAM-E) [10] Mini Controller Elettronico (Versione XSTREAM-E) [11] Spirale
Fono-assorbente
INSTALLAZIONE - USO E REGOLAZIONE
Per installare la pompa XSTREAM è necessario procedere come segue:
1) Prima di mettere in funzione il prodotto, verificare l’integrità di tutte le sue parti.
2) Pulire il vetro della vasca nella zona dove andrà posizionata la pompa.
3) Staccare i due supporti magnetici 2 - 3 rimuovendo l’apposito separatore (fig. A.1).
4) Avvolgere la guaina antivibrazioni 1 al supporto magnetico interno 3 (fig. A.2).
5) Immergere completamente la pompa in acqua in posizione verticale per fare uscire
l’aria dalla sede del rotore evitando così rumori fastidiosi in fase di partenza (fig. A.3).
6) Per evitare risonanze e vibrazioni e per evitare inoltre che sabbia, pietrisco o
detriti vengano risucchiati dall’aspirazione della pompa non posizionarla in
contatto con le superfici laterali, vicino o sul fondo della vasca.
7) Posizionare la pompa nella sede desiderata con 3 aderente al vetro (fig. A.4).
8) Posizionare 2 sulla superficie del vetro ad una distanza di 10 cm circa dal centro
di 3 (fig. A.5). Trascinarlo con attenzione fino a percepirne la forza magnetica
opposta e posizionare 2 e 3 in asse (fig. A.6).
ATTENZIONE: Data la forte forza attrattiva dei magneti, tale operazione deve
essere fatta nel modo consigliato.
9) Orientare la pompa nella posizione desiderata.
10) Inserire la spina nella presa di corrente.
1) Collegare il jack della pompa sul connettore centrale b del minicontroller (fig. B).
2) Collegare il jack d dell’alimentatore (fig. C) al connettore di destra c del
minicontroller (fig. B).
La pompa parte dalla Modalità Velocità Costante (MVC) con flusso di 5.500 l/h.
Per spegnere la pompa è consigliabile scollegare l’alimentatore (fig. C) dalla rete
elettrica.
PROGRAMMAZIONE XSTREAM-E
Il Mini Controller si comanda appoggiando le dita sulle frecce per almeno 1 sec., senza
schiacciare. Se il contatto è troppo veloce, il Mini Controller non effettuerà il comando.
DE

EN EN
DE
FR FR
ES ES
NL NL
PT PT
RU RU
CN CN
Per trasferire il comando al Mini Controller sfiorare il pulsante capacitivo (fig. B)
con il dito e ripetere l’operazione fino alla modalità desiderata.
Appoggiare il dito sulla freccia su per passare a flussi superiore o sulla freccia
giù per passare a flussi inferiori (fig. 2 pag. 13). Ogni singolo tocco del pulsante
capacitivo genera un nuovo input al Mini Controller che verrà evidenziato dalla luce
IT IT
blu del LED.
Per passare dalla Modalita Velocità Costante (MVC) alla Modalità Programmi
Preimpostati (MPP) e viceversa, appoggiare le dita su entrambe le frecce .
La luce Blu del LED metterà in evidenza il programma selezionato come da (fig.
3 pag. 13).
In MPP appoggiare il dito sulla freccia su o sulla freccia giù per passare da un
programma all’altro. In base alla velocità impostata in MVC, i cicli MPP avranno il
flusso massimo come da tabella (fig. 4 pag. 13).
In modalità E il Mini Controller modifica il flusso della pompa in base al segnale
0-10V proveniente da un controller/driver ESTERNO che presenti questo tipo di
uscita (0-10V).
INDICAZIONI D’USO Mini Controller XSTREAM-E
Il Mini Controller non è sommergibile e va tenuto in luogo asciutto e protetto contro
gli spruzzi accidentali. Appoggiare il Mini Controller su un piano o appenderlo,
tramite la ventosa 9 in dotazione, al vetro della vasca (fig. D). È consigliabile
eseguire un’ansa sui cavi (drip loop - fig. 1) in modo da evitare che l’acqua possa
correre lungo il cavo e giungere al Mini Controller. Comandare il Mini Controller solo
con le mani asciutte. Il Mini Controller può pilotare solo le pompe XSTREAM-E
SICCE e può essere alimentato solo con il trasformatore in dotazione. Qualsiasi
altro utilizzo potrebbe danneggiare in maniera irreparabile il dispositivo e far
decadere la garanzia.
GARANZIA Mini Controller: 2 anni.
MANUTENZIONE PERIODICA ORDINARIA
Per eseguire la manutenzione periodica ordinaria della pompa è necessario
innanzitutto staccare la spina dalla presa di corrente elettrica e poi estrarre
completamente la pompa dall’acqua.
Pulire regolarmente e con cura il corpo pompa e il rotore.
In caso di acqua molto calcarea, con sale e/o con molti residui, si consiglia una
pulizia più frequente procedendo nel modo seguente:
Togliere 8 da 6 applicando una leggera pressione ai lati e sfilandolo dal basso
(fig. B.1).
Ruotare il disco del gruppo rotore 7 in senso antiorario ed estrarre il rotore (fig.
B.2/B.3).
Pulire accuratamente tutte le parti e le loro sedi con acqua corrente.
Non usare oggetti duri per togliere eventuali incrostazioni ma uno spazzolino
morbido con aceto.
L’uso di altri prodotti detergenti per la pulizia della pompa, se non risciacquati
accuratamente, potrebbero alterare i valori normali dell’ acqua.
Dopo la pulizia,assemblare tutto in ordine inverso verificando che il piccolo O-ring
inserito in un raggio della griglia frontale sia rimasto nella sua sede. La rimozione
20 21
accidentale di questo O-ring potrebbe alterare la silenziosità del prodotto. Nel caso
in cui venga perso si consiglia l’acquisto del pezzo di ricambio 8.1.
I nostri prodotti sono stati progettati per una lunga durata, tuttavia l’usura nel tempo,
del gruppo rotore potrebbe produrre un leggero rumore anche dopo le ordinarie
operazioni di manutenzione. In questo caso si consiglia la semplice sostituzione di
questo componente 7, disponibile nei punti vendita come pezzo di ricambio
MANUTENZIONE STRAORDINARIA
1) Staccare la spina dalla presa di corrente elettrica e poi estrarre completamente
la pompa dall’acqua.
2) Sollevare leggermente la levetta e ruotarla di 90° in senso antiorario. Tirare per
estrarre dalla pompa i componenti 3 e 4 (fig. C.1/ C.2).
3) Pulire la boccola in ceramica (fig. C.3) con uno spazzolino morbido per togliere
eventuali residui o incrostazioni di sale o materiale organico facendo attenzione a
non rimuoverla dalla sua sede.
ASSISTENZA
Vi consigliamo di prendere visione dei nostri video Tutorial a supporto
dell’installazione e manutenzione dei prodotti, disponibili nel canale
ufficiale www.youtube.com/user/SICCEspa
AVVERTENZE PER IL CORRETTO SMALTIMENTO DEL PRODOTTO AI
SENSI DELLA DIRETTIVA EUROPEA 2002/96/EC
Alla fine della sua vita utile, il prodotto non deve essere smaltito insieme ai rifiuti
urbani. Può essere consegnato presso gli appositi centri di raccolta differenziata
predisposti dalle amministrazioni comunali, oppure presso i rivenditori che
forniscono questo servizio. Smaltire separatamente un elettrodomestico consente
di evitare possibili conseguenze negative per l’ambiente e per la Salute favorendo il
recupero dei materiali ed un importante risparmio energetico.
GARANZIA
Questo prodotto, con l’esclusione del gruppo rotore 7, è garantito per un
periodo di 3 anni dalla data di acquisto, da difetti di materiale e lavorazione. Il
certificato di garanzia deve essere compilato in ogni sua parte dal rivenditore,
e dovrà accompagnare l’apparecchio nel caso in cui venga restituito per la
riparazione, assieme allo scontrino fiscale o equivalente. La garanzia consiste
nella sostituzione delle parti difettose qualora non siano stati rilevati uso improprio,
manomissione o negligenza da parte dell’acquirente o utente rendendo nulla la
garanzia con decadenza immediata. La garanzia è inoltre nulla in caso di mancanza
dello scontrino fiscale d’acquisto o equivalente. Le spese di spedizione e rinvio sono
a carico dell’acquirente.
SCOPRI COME OTTENERE 5 ANNI DI GARANZIA SUL TUO PRODOTTO
Per migliorare il servizio e la soddisfazione dei clienti, SICCE offre la possibilità di
applicare 2 anni extra di garanzia semplicemente registrando il prodotto nel sito
web www.sicce.com alla sessione “Sicce for you/ Registrazione prodotto”.
Compilare quindi il modulo nelle sue parti e caricare elettronicamente la ricevuta
d’acquisto del prodotto.
DE

EN EN
DE DE
FR
ES ES
NL NL
PT PT
RU RU
CN CN
Vielen Dank, dass Ihre Wahl auf ein Produkt von SICCE fiel. Die neue
Strömungspumpen XSTREAM/XSTREAM-E sind für Meer- und SüßwasserAquarien geeignet. Die Hochtechnologie MADE in ITALY garantiert einen kraftvollen
Wasserfluss. Besondere Merkmale dieser Pumpe sind das innovative 360°
Drehsystem für die Wasserströmung und die hohe Leistung. Bei der Entwicklung
IT IT
der XSTREAM Pumpen sind die neuesten technischen Kenntnisse zum Einsatz
gekommen. Sie sind sehr zuverlässig, wartungsarm und haben einen niedrigen
Energieverbrauch. Für einen effizienten Einsatz der Pumpen XSTREAM und
XSTREAM-E mit Mini Controller lesen Sie bitte sorgfältig diese Anleitungen.
SICHERHEITSVORSCHRIFTEN:
XSTREAM/XSTREAM-E entsprechen den aktuellen internationalen
Sicherheitsnormen.
Damit Sie die Eigenschaften dieses Qualitätsprodukts optimal ausnützen können,
bitten wir Sie folgende Hinweise aufmerksam zu lesen.
1) Vor Gebrauch der Pumpe ist die auf dem Etikett angegebene Netzspannung zu
überprüfen. Die Pumpe sollte über FI- Schutzschalter <30mA betrieben werden.
2) Die Pumpe darf nur unter Wasser verwendet werden und ist nicht für eine
Verwendung im Freien geeignet.
3) Nicht installieren wenn Kabel oder Pumpe in irgendeiner Weise defekt erscheinen.
4) Die Pumpe ist mit einem Z-Anschluss gebaut. Die Anschlussleitung dieses
Gerätes kann nicht ersetzt werden; bei Beschädigung der Leitung sollte das
Gerät vernichtet werden.
5) ACHTUNG: Vor jedem Eingriff an der Pumpe die Stromversorgung aller
elektrischen, im Wasser eingetauchten Apparate abschalten.
6) Schalten Sie die Pumpe niemals ein, wenn die Kammer des Pumpenrads kein
Wasser enthält oder die Flussigkeitstemperatur über 35° C (95° F) liegt.
7) Die Pumpe darf nicht mit ätzenden oder abrasiven Flüssigkeiten verwendet
werden.
8) Die Pumpe darf nicht für andere Anwendungen eingesezt werden.
9) Die Pumpe darf ohne Aufsicht nicht von behinderten Menschen und von Kindern
benutzt werden.
10) Aufgrund der hohen magnetischen Zugkraft des Magnethalters ist er außer
Rechtweite von Kindern zu halten.
11) Die Magneten können bei elektronischen und anderen Geräte, die auf
Magnetfelder empfindlich sind, wie z.B. Herzschrittmacher, Kreditkarten und
Schlüssel, permanente Schäden verursachen: Halten Sie ihnen deshalb immer
auf einer Distanz von mindestens 30 cm (12 inches)
12) Bei einem Temperatureinsatzbereich von 50° C (122° F) könnte der Magnet
seine Zugkraft teilweise, wenn nicht sogar ganz, verlieren.
13) Zu Ihrer eigenen Sicherheit empfiehlt es sich, mit dem Netzkabel eine
Tropfschlaufe zu bilden, die verhindert, dass evtl. am Kabel entlang laufendes
Wasser in die Steckdose gelangt (Abb.1).
14) Das Kabel ist weder durchzuschneiden noch ist daran zu ziehen um die
Stromspeisung zu unterbrechen.
15) Nur zur Verwendung in Räumen. Für aquaristische Einsatzbereiche.
22 23
BESTANDTEILE
[1] Anti-Vibrationsmatte [2] Externe Magnetische Halterung [3] Interne
Magnetische Halterung [4] Achse Halterung [4.1] O-Ring [4.2] Rotierendes
System [5] Pumpedeckel [6] Pumpegehäuse [7] Propeller Kit [8] Schutzgitter
[8.1] Schutzgitter O-Ring [9] Saugnapf (XSTREAM-E Version) [10] Elektronischer
Mini-Controller (XSTREAM-E Version) [11] Lärmabsorbierende Verkleidung
INSTALLATION
Um die XSTREAM-Pumpe zu installieren, gehen Sie bitte wie folgt vor:
1) Vor Anschluss des Geräts, vergewissern Sie sich Unversehrtheit des Produkts.
Insbesondere dürfen das Kabel und die Pumpe keinerlei Beschädigungen
aufweisen.
2) Reinigen Sie bitte die betroffene Stelle, bevor Sie den Magnethalter an der
Aquariumsscheibe befestigen.
3) Trennen Sie 2 von 3 und der Trennmagnet entfernen (Abb. A.1).
4) Legen Sie die Anti-Vibrationsmatte 1 in die magnetische Halterung 3 ein (Abb. A2).
5) Tauchen Sie die Pumpe vollständig ins Wasser ein und lassen Sie die in
der Pumpenkammer enthaltene Luft entweichen indem Sie die Pumpe in
senkrechter Position halten (Abb. A.3).
6) Um Resonanzen oder Vibrationen zu vermeiden empfehlen wir die Pumpe so
einzubauen, dass kein seitlicher Kontakt mit der Aquariumsscheibe zustande
kommt auch dann nicht, wenn sie senkrecht auf dem Boden steht.
7) Setzen Sie und orientieren Sie die Pumpe in die gewünschte Position und
Richtung (Abb. A.4).
8) Während man die Pumpe am inneren Halter 2 mit einer Hand festhält, wird der äußere
Magnethalter 3 in einem Abstand von ca. 10 cm (4 inches) von der Mitte des inneren
Halters auf die Scheibe des Aquariums gesetzt und dann verschoben (Abb. A.5)
bis die Anziehungskraft des entgegensetzen Magneten spürbar wird. Verschieben
Sie vorsichtig den externen Magnet-Saugnapfhalter so, dass die Zentren beider
Magnethalter übereinstimmen und somit auf gleicher Achse liegen. (Abb. A.6).
ACHTUNG: Die Magneten dürfen nur wie beschreibt eingeführt werden, um
Zerbrechen der Scheibe zu vermeiden.
9) Befestigen Sie nun die Pumpe mit dem internen Magnethalter an der
gewünschten Stelle auf der Aquariumsscheibe.
10) Schließen Sie den Netzstecker an.
1) Verbinden Sie den Klinkenstecker der Pumpe mit der Buchse b des Mini-
Controllers (Abb. B).
2) Verbinden Sie den Klinkenstecker d (Abb. C) mit der Buchse c des Mini-
Controllers (Abb. B).
Die Pumpe startet in Betriebsart MVC mit konstanter Leistung vom 5500 l/h. Hinweise
für den Betrieb des Mini-Controllers finden Sie in der Anleitung auf Seite 10.
Um die Pumpe vom Netz zu nehmen, trennen Sie den Trafo (Abb. C) vom Stromnetz.
FR

EN EN
DE DE
FR
ES ES
NL NL
PT PT
RU RU
CN CN
DAS EINRICHTEN EINER XSTREAM-E
Der Mini-Controller startet, wenn Sie die Pfeiltasten für mindestens eine Sekunde
drücken.
Zur Wahl des gewünschten Programms drücken Sie die Pfeiltasten, (Abb. 2 auf
Seite 13).
IT IT
Die Pfeiltaste “UP” erhöht Geschwindigkeit und Durchfluss. Die Pfeiltaste
“DOWN” verringert Geschwindigkeit und Durchfluss. Jeder einzelne Tastendruck
führt zu einer Eingabe, die durch die blaue LEDs am Mini-Controller bestätigt wird.
Ein gleichzeitiger Druck auf beide Pfeiltasten führt zu einem Wechsel der Betriebsart
von MVC (= konstanter Wasserfluss) zu MPP (= Zeitsteuerung) und zurück. Die
blauen LEDs zeigen die gewählte Betriebsart wie in dem Diagramm (Abb. 3 auf
Seite 13).
In Programm E regelt der Mini-Controller den Wasserfluss anhand des elektrischen
Impulses eines externen Steuergeräts von 0 - 10 V.
In der Betriebsart MPP wechseln Sie die Programme durch die Pfeiltasten “UP”
und “DOWN” . Abhängig vom gewählten Programm erreichen die DurchflussCyclen ihre maximale Leistung wie dargestellt in (Abb.4 auf Seite 13).
GEBRAUCHSINFORMATIONEN ZUM MINI-CONTROLLER
Der Mini-Controller kann nicht unter Wasser betrieben werden. Er sollte in der
Nähe des Aquariums platziert werden. Er kann mit Hilfe der Sauger 9 (Abb. D)
am Aquarium befestigt oder im Aquarienschrank platziert werden. Verlegen Sie
die Netzkabel von Mini-Controller und Pumpe mit einer Tropfschleife, die das
Herunterlaufen von Wassertropfen in die Steckdose verhindert. Bedienen Sie den
Mini-Controller nur mit trockenen Händen. Der Mini-Controller ist nur für den
Betrieb mit der Pumpe SICCE XSTREAM-E zugelassen und darf nur mit dem
eingebauten Transformator betrieben werden. Jeder andere Gebrauch kann die
Elektronik beschädigen und führt zum Erlöschen jeglicher Garantieansprüche.
Mini-Controller Garantie: 2 Jahre
PFLEGE UND WARTUNG
Zuerst den Netzstecker der Pumpe ziehen. Die Pumpe gemäß Zeichnung zerlegen.
Reinigen und pflegen Sie die Pumpe und den Rotor regelmäßig.
Kalkaufbauten oder schweres Gestein im Wasser können eine häufigere Reinigung
und periodische Pumpenwartung erforderlich machen.
Entfernen Sie das Gitter 8 von der Pumpe 6 mit leichtem Druck auf die Seiten
(Abb. B.1).
Drehen Sie den vorderen Teil des Propellers und entfernen Sie den Rotor 7 (Abb.
B.2/B.3).
Das Laufrad und seinen Sitz mit einer weichen Bürste von Kalkrückständen
befreien, ohne Reinigungsmittel oder Lösungsmittel zu verwenden.
Vor dem Einsetzen der Pumpe in das Aquarium alle Teile gut spülen.
Nach der Pumpereinigung bauen Sie alle Komponenten wieder zusammen.
Montieren Sie den kleinen, schwarzen O-Ring 8.1 in der richtigen Position. Wenn
der O-Ring nicht richtig positioniert ist, kann der Rotor Lärm machen. Ersetzen Sie
einen verlorenen oder beschädigten O-Ring, Ersatzteil 8.1.
SICCE Produkte sind für eine lange Lebensdauer und zuverlässigen Betrieb
24 25
konzipiert. Auch mit periodischer Pumpenwartungen, empfehlen wir die
Verschleißteile je nach Bedarf zu ersetzen. Ersatzteile sind verfügbar.
ZUSÄTZLICHE PUMPENWARTUNG
1) Zuerst Netzstecker der Pumpe ziehen. Erst danach dürfen Sie die Pumpe vom
Wasser entfernen.
2) Die Pumpe vom Halter befreien (Abb. C.1/C.2).
Die Keramikbuchse (Abb. C.3) mit einer weichen Bürste von Kalkrückständen
befreien, ohne Reinigungsmittel oder Lösungsmittel zu verwenden.
ONLINEHILFE UND SUPPORT
Schauen Sie sich unsere Tutorial Videos auf dem offiziellen SICCE
YOUTUBE Kanal an: www.youtube.com/user/SICCEspa
ENTSORGUNG (NACH RL2002/96/EC)
Gerät darf nicht dem normalen Hausmüll beigefügt werden, sondern
muss fachgerecht entsorgt werden. Wichtig für Deutschland: Gerät über Ihre
kommunale Entsorgungsstelle entsorgen. Entsorgung von Altgeräten: Wenn dieses
Symbol eines durchgestrichenen Abfalleimers auf einem Produkt angebracht ist,
unterliegt dieses Produkt der europäischen Richtlinie 2002/96/EC. Alle Elektro-
und Elektronik-Altgeräte müssen getrennt vom Hausmüll über die dafür staatlich
vorgesehenen Stellen entsorgt werden. Mit der ordnungsgemäßen Entsorgung des
alten Geräts vermeiden Sie Umweltschäden und eine Gefährdung der persönlichen
Gesundheit. Weitere Informationen zur Entsorgung des alten Geräts erhalten Sie
bei der Stadtverwaltung, beim Entsorgungsamt oder in dem Geschäft, wo Sie das
Produkt erworben haben.
GARANTIE
Wir garantieren für 3 Jahre ab Kaufdatum (ausschließlich dem Rotor 7) für
fehlerhaftes Material und Fabrikationsfehler. Im Garantiefall schicken Sie bitte
das reklamierte Gerät mit der vom Händler ausgefüllten Garantiekarte und der
datierten Kaufquittung oder Rechnung zu dem Händler ein. Mangelnde Pflege und
unsachgemäße Behandlung haben einen Garantieverlust zur Folge. Die Garantie
besteht im Austausch der schadhaften Teile. Die Kosten für Versand und die
Rücksendung gehen zu Lasten des Käufers.
SO KÖNNEN SIE DIE GARANTIE FÜR IHR PRODUKT AUF 5 JAHRE
VERLÄNGERN
Um unseren Service zu verbessern und die Zufriedenheit unserer Kundinnen und
Kunden zu erhöhen, bietet SICCE Ihnen die Möglichkeit, die Garantie um 2 Jahre
zu verlängern. Hierfür müssen Sie das Produkt lediglich auf unserer Website www.
sicce.com beim „Quality Control Department“ registrieren.
Füllen Sie dazu einfach das Formular aus und laden Sie den Kaufbeleg des
Produkts hoch. Im Anschluss an die korrekte Eingabe der Daten können Sie die
Garantie-Anforderung ausfüllen.
FR
EN EN
DE DE
FR FR
ES
NL NL
PT PT
RU RU
CN CN
Cher Client / Chère Cliente, merci d’avoir choisi une pompe de brassage de la
nouvelle génération SICCE XSTREAM/XSTREAM-E, l’excellence pour votre
aquarium. Les pompes XSTREAM sont un produit d’haute technologie qui se
démarquent pour leur grande fiabilité, hautes performances, consommation
énergétique réduite et des dimensions très compactes. Le modèle électronique
IT IT
XSTREAM-E, équipé de Mini-Contrôleur Electronique et programmes prédéfinis,
réponde aux attentes des aquariophiles les plus exigeantes, en combinant absence
de bruit, esthétisme et facilité d’utilisation. Ce produit a été entièrement conçue
et fabriqué en Italie, à garantie de sa qualité et du control attentif aux matériaux
utilisés.
NORMES DE SECURITE
Les pompe XSTREAM/XSTREAM-E son conforme aux normes de sécurité
nationales et internationales.
Pour votre sécurité et pour préserver l’intégrité du produit, nous vous demandons
de bien vouloir lire attentivement les informations suivantes:
1) Veuillez vérifier que la tension indiquée sur l’étiquette de la pompe corresponde
bien à celle de votre réseau électrique. Cet appareil électrique doit être alimenté
par l’intermédiaire d’un disjoncteur différentiel (dit de sécurité) avec un seuil de
déclenchement inférieure ou égal à 30mA.
2) La pompe peut fonctionner uniquement immergée dans l’eau et exclusivement
à l’intérieur de la maison. La pompe ne doit pas fonctionner sans eau pour éviter
d’endommager le moteur.
3) Avant de connecter l’appareil électrique au réseau, veuillez vérifier que le câble
d’alimentation ne soit pas endommagé.
4) La pompe est construite avec une connexion électrique de type «Z». Le câble et
la prise ne peuvent être ni remplacés ni réparés. En cas de dommages du câble
ou de la prise, il est nécessaire de remplacer toute la pompe.
5) ATTENTION: déconnecter tous les appareils électriques immergés avant une
quelconque manutention dans l’eau. Si la prise de courant est mouillée ou
humide, déconnecter l’interrupteur général avant de débrancher la prise.
6) La pompe peut être utilisée dans des liquides ou des ambiances dont les
températures ne dépassent pas 35° C/95° F.
7) Ne pas utiliser l’appareil avec des liquides corrosifs ou abrasifs.
8) Ne pas utiliser l’appareil pour des applications différentes de celles pour
lesquelles il a été conçu. Pour des utilisation différents, contacter votre revendeur.
9) Cet appareil n’a pas été conçu pour une utilisation par des personnes ayant une
capacité physique, sensorielle ou mentale réduite, y compris des enfants, sauf
en cas de surveillance par une tierce personne responsable de leur sécurité.
S’assurer que les enfants ne touchent pas cet appareil.
10) Pour ne pas se blesser, éviter d’approcher accidentellement des lames, des
objets pointus ou d’autres aimants près des aimants du support. Ces aimants
attirent fortement les objets métalliques ou les autres aimants.
11) Les aimants peuvent endommager définitivement les appareils électroniques
ainsi que d’autres objets sensibles aux champs magnétiques, comme cartes
bancaires ou stimulateurs cardiaques. Tenir ces appareils au moins à une
distance de 30 cm.
12) Les aimants peuvent perdre toute ou partie de leur attraction s’ils sont
26 27
maintenus à une température supérieure à 50° C (122° F).
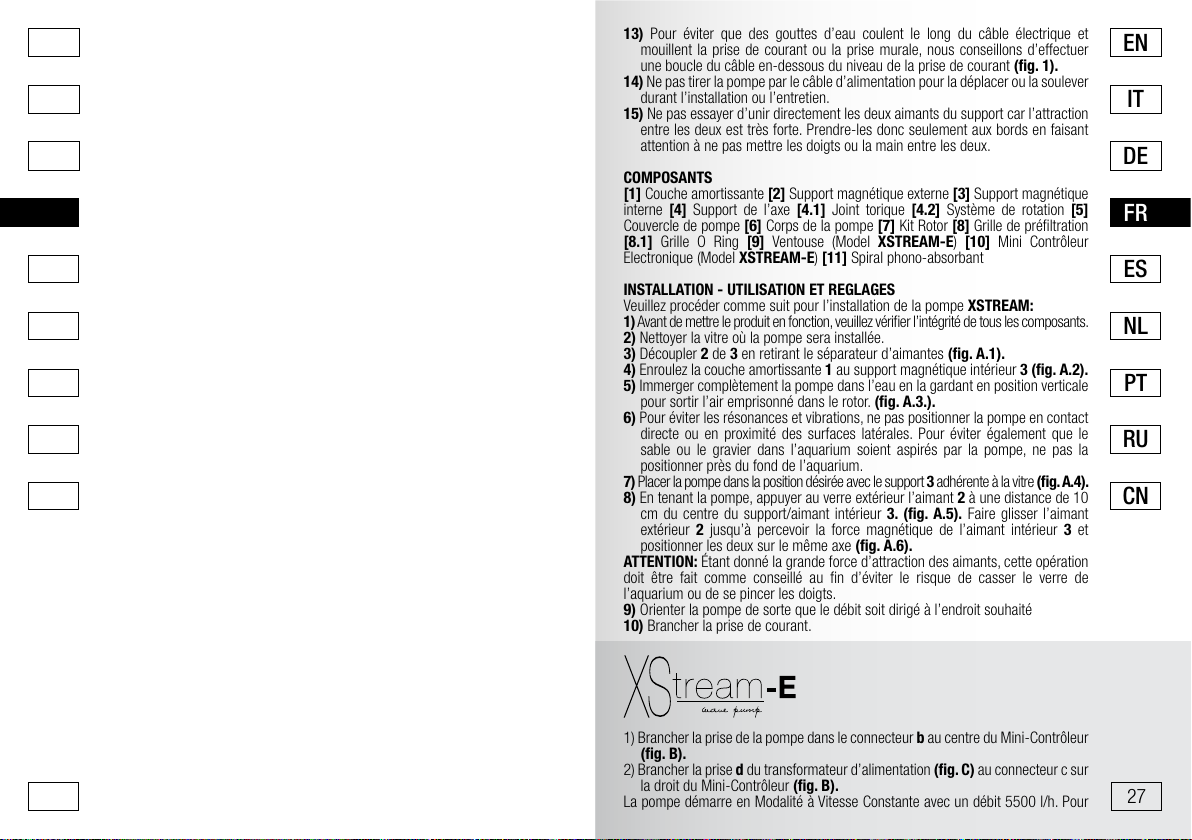
13) Pour éviter que des gouttes d’eau coulent le long du câble électrique et
mouillent la prise de courant ou la prise murale, nous conseillons d’effectuer
une boucle du câble en-dessous du niveau de la prise de courant (fig. 1).
14) Ne pas tirer la pompe par le câble d’alimentation pour la déplacer ou la soulever
durant l’installation ou l’entretien.
15) Ne pas essayer d’unir directement les deux aimants du support car l’attraction
entre les deux est très forte. Prendre-les donc seulement aux bords en faisant
attention à ne pas mettre les doigts ou la main entre les deux.
COMPOSANTS
[1] Couche amortissante [2] Support magnétique externe [3] Support magnétique
interne [4] Support de l’axe [4.1] Joint torique [4.2] Système de rotation [5]
Couvercle de pompe [6] Corps de la pompe [7] Kit Rotor [8] Grille de préfiltration
[8.1] Grille O Ring [9] Ventouse (Model XSTREAM-E) [10] Mini Contrôleur
Electronique (Model XSTREAM-E) [11] Spiral phono-absorbant
INSTALLATION - UTILISATION ET REGLAGES
Veuillez procéder comme suit pour l’installation de la pompe XSTREAM:
1) Avant de mettre le produit en fonction, veuillez vérifier l’intégrité de tous les composants.
2) Nettoyer la vitre où la pompe sera installée.
3) Découpler 2 de 3 en retirant le séparateur d’aimantes (fig. A.1).
4) Enroulez la couche amortissante 1 au support magnétique intérieur 3 (fig. A.2).
5) Immerger complètement la pompe dans l’eau en la gardant en position verticale
pour sortir l’air emprisonné dans le rotor. (fig. A.3.).
6) Pour éviter les résonances et vibrations, ne pas positionner la pompe en contact
directe ou en proximité des surfaces latérales. Pour éviter également que le
sable ou le gravier dans l’aquarium soient aspirés par la pompe, ne pas la
positionner près du fond de l’aquarium.
7) Placer la pompe dans la position désirée avec le support 3 adhérente à la vitre (fig. A.4).
8) En tenant la pompe, appuyer au verre extérieur l’aimant 2 à une distance de 10
cm du centre du support/aimant intérieur 3. (fig. A.5). Faire glisser l’aimant
extérieur 2 jusqu’à percevoir la force magnétique de l’aimant intérieur 3 et
positionner les deux sur le même axe (fig. A.6).
ATTENTION: Étant donné la grande force d’attraction des aimants, cette opération
doit être fait comme conseillé au fin d’éviter le risque de casser le verre de
l’aquarium ou de se pincer les doigts.
9) Orienter la pompe de sorte que le débit soit dirigé à l’endroit souhaité
10) Brancher la prise de courant.
1) Brancher la prise de la pompe dans le connecteur b au centre du Mini-Contrôleur
(fig. B).
2) Brancher la prise d du transformateur d’alimentation (fig. C) au connecteur c sur
la droit du Mini-Contrôleur (fig. B).
La pompe démarre en Modalité à Vitesse Constante avec un débit 5500 l/h. Pour
ES

EN EN
DE DE
FR FR
ES
NL NL
PT PT
RU RU
CN CN
l’emplacement du Mini-Contrôleur voir les indications à page 10. Pour éteindre
la pompe, il est conseillé de débrancher le transformateur (fig. C) de la prise
électrique.
PROGRAMMATION XSTREAM-E
IT IT
Le Mini-Contrôleur fonctionne de façon tactile et peut être contrôlé en plaçant les
doigts sur les flèches pour au moins 1 sec. sans appuyer. Si le contact est trop
rapide, le Mini-Contrôleur n’effectue pas la commande.
Utiliser les boutons tactiles pour choisire le reglage desiré (fig. 2 à page 13).
Mettre le doigt sur la flèche vers le haut pour augmenter le débit ou sur la flèche
vers le bas pour le réduire. Chaque contact donne une nouvelle commande au
Mini-Contrôleur, ce qui sera souligné par les voyantes LED bleus.
Pour passer de la Modalité à Vitesse Constante (MVC) à la Modalité Programmes
Prédéfinis (MPP) et vice-versa, mettre les doigts sur les deux flèches au même
temps . Une voyant LED bleu mettra en évidence le programme sélectionné
selon le schéma (fig. 3 à page 13).
En programme E, le Mini-Contrôleur modifie le débit de la pompe en fonction du
signal 0-10V donné par un contrôleur générale séparé qui présente ce type de
sortie (0-10V)
En MPP mettre le doigt sur la flèche vers le haut ou sur la flèche vers le bas
pour passer d’un programme à l’autre. Selon la vitesse définie en MVC, les cycles
MPP auront le débit maximale indiqué dans le tableau (fig. 4 à page 13).
MODE D’EMPLOI Mini-Contrôleur XSTREAM-E
Le Mini-Contrôleur n’est pas submersible et doit être conservé dans un endroit
sec et protégé contre toute éclaboussure accidentelle. Placer le Mini-Contrôleur
dans le cabinet ou l’accrocher à l’aquarium par la ventouse 9 fournie avec (fig.
D). Il est conseillé d’effectuer une boucle avec les câbles (boucle d’égouttement)
afin d’éviter que l’eau puisse s’écouler le câble et atteindre le Mini-Contrôleur.
Utiliser le Mini-Contrôleur seulement avec les mains sèches. Le Mini-Contrôleur
est conçu pour utilisation qu’avec les pompes XSTREAM-E SICCE et ne peut être
alimenté qu’avec l’adaptateur d’alimentation fourni. Toute autre utilisation pourrait
endommager irrémédiablement votre appareil et annuler la garantie.
GARANTIE Mini-Contrôleur: 2 ans
ENTRETIEN PÉRIODIQUE
Avant d’effectuer un entretien périodique de la pompe, il est nécessaire de
débrancher la prise de courant et de retirer entièrement la pompe de l’aquarium.
Nettoyer régulièrement la pompe et le rotor.
En cas d’eau très calcaire ou très chargée, un nettoyage plus fréquent est conseillé.
Retirer la grille 8 du corps de pompe 6 en appliquant une légère pression sur les
côtés en tirant vers le bas (fig. B.1).
Tourner l’avant en sens antihoraire et retirer le rotor 7 (fig. B.2/B.3).
Ne pas utiliser des objets pointus pour enlever des incrustations éventuelles mais
utiliser une petite brosse souple avec du savon ou du vinaigre.
Rincer l’ensemble sous l’eau courante.
Si la pompe n’est pas rincée soigneusement, l’utilisation de produits détergent de
28 29
nettoyage pourrait modifier les valeurs normales de l’eau.
Après le nettoyage, remonter tous composants en faisant attention que le petit
joint noire 8.1 soit dans sa position correcte. Si le joint n’est pas dans le bon
emplacement, la turbine peut créer du bruit. Si endommagé, le joint peut être
remplacé, pièce détachée 8.1.
Les produits SICCE sont conçus pour une longue durée de vie et une haute
fiabilité. L’usure peut néanmoins rendre le produit bruyant; pièces de rechange
sont disponibles.
ENTRETIEN SUPPLEMENTAIRE
1) Débranchez la fiche de la prise électrique, puis sortir la pompe de l’eau.
2) Tourner le levier en sens antihoraire en soulevant légèrement pour enlever les
supports aimantée de la pompe (fig. C.1/C.2).
3) Nettoyez la bague en céramique (fig. C.3) avec une brosse souple pour enlever
tout résidu ou dépôts de sel ou de matière organique, en faisant attention de ne pas
enlever la bague de son logement.
SUPPORT EN LIGNE
Regarder nos vidéos-notices sur le canal officiel YOUTUBE SICCE
www.youtube.com/user/SICCEspa
INSTRUCTIONS POUR LA DÉCHARGE CORRECTE DU PRODUIT SELON
L’EU 2002/96/EC DIRECTIF
Cet appareil ne doit pas être jeté dans les poubelles domestiques mais doit
suivre les procédures d’élimination prévues pour les déchets électriques. La
décharge séparément d’un outil électrique évite des conséquences négatives pour
l’environnement et pour la santé et permets de régénérer les matériaux pour avoir
une grande économie d’énergie et des ressources.
GARANTIE
Ce produit, à l’exclusion du rotor 7, est garanti pendant une période de 3 ans à
compter de la date de l’achat, contre les défauts du matériel et de fabrication. Le
certificat de garantie doit être rempli dans toutes ses parties par le revendeur et
devra accompagner l’appareil s’il est restitué pour la réparation, avec le ticket de
caisse ou autre titre d’achat équivalent. La garantie consiste dans le remplacement
des pièces défectueuses. En cas d’utilisation incorrecte, de manipulation ou de
négligence de la part de l’acheteur ou de l’utilisateur, la garantie s’annule et perd
son effet immédiatement. D’autre part, la garantie s’annule également en cas
d’absence du ticket de caisse ou d’un titre d’achat équivalent. Les frais d’expédition
et de renvoi sont à la charge de l’acheteur
DECOUVREZ COMMENT OBTENIR 5 ANS DE GARANTIE SUR VOTRE PRODUIT
Pour améliorer le service et la satisfaction de nos clients, SICCE offre la possibilité
d’obtenir 2 ans de garantie supplémentaire simplement en enregistrant votre
produit sur notre site Internet www.sicce.com dans la section “Quality Control
Department”.
Remplir le formulaire et charger électroniquement le reçu d’achat du produit. Après
avoir rempli correctement vos données, vous aurez ensuite la possibilité de remplir
la demande de garantie supplémentaire.
ES

EN EN
DE DE
FR FR
ES ES
NL
PT PT
RU RU
CN CN
Apreciado cliente, gracias por elegir las bombas SICCE XSTREAM/XSTREAM-E,
la última generación de bombas para acuarios marinos y de agua dulce. XSTREAM,
diseñada y fabricada en Italia bajo unos rigurosos estándares de calidad en sus
componentes y en su producción, es una bomba tecnológicamente avanzada de
alto rendimiento, larga duración, bajo consumo, de fácil uso y mantenimiento. La
IT IT
versión electrónica, XSTREAM-E, con Mini Controller electrónico y programas
de tiempo preestablecidos, satisfará las expectativas del cliente más exigente
que busca combinar el máximo silencio con los ambientes acuáticos naturales y
paisajísticos. El producto que ha adquirido ha sido diseñado y fabricado en Italia,
para garantizar el control y la calidad de los materiales utilizados.
NORMAS DE SEGURIDAD:
XSTREAM/XSTREAM-E están fabricadas de acuerdo con las normas de
seguridad nacionales e internacionales.
Por su seguridad y para mantener la integridad del producto, lea atentamente la
siguiente información.
1) Verifique que la tensión eléctrica indicada en la etiqueta de datos tècnicos
coincida con la de la red elèctrica local. El aparato tiene que ser conectado a un
interruptor diferencial (cortacircuitos), cuya corriente sea inferior o igual a 30mA.
2) La bomba puede utilizarse sólo sumergida en agua y no es apta para su uso en
exteriores. La bomba no debe funcionar sin agua para evitar daños en el motor.
3) Antes de poner en funcionamiento la bomba, compruebe que el cable y la bomba
no están dañados.
4) La bomba tiene una conexión tipo Z. El cable y el conector no pueden ser sustituidos
o reparados. En caso de daños en alguno de ellos, sustituya toda la unidad.
5) ATENCIÓN: siempre debe desconectar la bomba de la corriente antes de
manipularla; si el enchufe o la toma de corriente están mojados, apague el
interruptor principal antes de desconectar el cable de alimentación.
6) La bomba no puede funcionar en seco o con líquidos a temperaturas superiores
a 35° C / 95° F.
7) Evite el uso de la bomba en líquidos corrosivos y abrasivos.
8) No utilizar la bomba para aplicaciones diferentes para las que ha sido fabricada.
Para cualquier otro uso, por favor, póngase en contacto con su distribuidor.
9) Esta bomba no puede ser utilizada por personas con discapacidad ni por niños
sin supervisión de una persona responsable de su seguridad. Mantenga el
dispositivo fuera del alcance de los niños.
10) Evite la proximidad con objetos afilados u otros imanes para evitar heridas accidentales,
ya que los imanes atraen a objetos metàlicos y a otros imanes con fuerza.
11) Los imanes pueden provocar daños permanentes en aparatos electrónicos y en
otros objetos sensibles al campo magnético, como marcapasos, tarjetas de crédito
y llaves. Manténgalos siempre a una distancia mínima de 30 cm (12 inches).
12) Los imanes pueden perder parte o toda su energía de tracción si se exponen a
una temperatura superior a 50° C (122° F).
13) Al conectar la bomba a la toma de corriente, el punto más bajo del cable tiene
que estar por debajo del la toma de corriente, con el fin de evitar que las gotas de
agua presentes en el cable puedan entrar accidentalmente en el enchufe (fig. 1).
14) Evite coger la bomba por el cable de alimentación durante su uso y su
30 31
mantenimiento.
15) No intente unir los dos imanes directamente porque su atracción es muy alta.
Simplemente, sujételos por la parte exterior, teniendo cuidado de no interponer
su mano o sus dedos entre las superficies de contacto.
COMPONENTES
[1] Goma anti-vibración [2] Imán de sujección externo [3] Imán de sujección
interno [4] Soporte del eje [4.1] Junta tórica [4.2] Sistema de rotación [5] Cubierta
de la bomba [6] Cuerpo de la bomba [7] Kit del rotor [8] Rejilla Prefiltro [8.1]
Rejilla Junta tórica [9] Ventosa (XSTREAM-E) [10] Mini Controller Eléctronico
(XSTREAM-E) [11] Cobertura antivibración del cable
INSTALACIÓN - USO Y REGULACIÓN
Para la instalación de la bomba XSTREAM proceda según se indica a continuación:
1) Antes de poner en funcionamiento el producto compruebe todas las partes del mismo.
2) Limpie el cristal del acuario donde colocará la bomba.
3) Separe el 2 del 3 retirando el separador del imán (fig. A.1).
4) Coloque la goma anti-vibración 1 en el soporte magnético 3 (fig. A.2).
5) Sumerja completamente la bomba en el agua manteniéndola en posición vertical
para liberar el aire atrapado en el rotor (fig. A.3).
6) Para evitar resonancias o vibraciones, no coloque la bomba en contacto con las
superficies laterales. No coloque la bomba demasiado cerca de arena o grava
en la parte inferior del acuario.
7) Coloque la bomba en la ubicación deseada adheriendo el soporte 3 al cristal (fig. A.4).
8) Coloque suavemente el soporte magnético externo 2 sobre el cristal del acuario a
una distancia aproximada de 10 cm (3.93 inches) del centro del soporte interno
3 (fig. A.5) arrástrelo hasta notar la fuerza magnética opuesta y posicione el
centro de los soportes 2 y 3 a la misma altura (fig. A.6).
ATENCIÓN: Imanes muy fuertes. Tenga cuidado al colocar la bomba en el acuario
y hágalo según el modo aconsejado, de otro modo, podría romperse el cristal del
acuario o bien provocarse lesiones en los dedos de la mano.
9) Oriente la bomba dirigiendo el flujo hacia donde desee.
10) Conecte la bomba a la corriente elèctrica.
1) Conecte el conector jack de la bomba al enchufe central b del Mini Controller (fig. B).
2) Conecte el jack d (fig. C) a la entrada en el lado derecho c del Mini Controller (fig. B).
La bomba se iniciará según el Modo MVC (Modo de velocidad constante) a 5500
l/h. Para un uso adecuado del Mini Controller, por favor lea las instrucciones de la
página 10. Para desconectar la bomba desconecte el transformador (fig. C) de la
red eléctrica.
COMO PROGRAMAR XSTREAM-E
El Mini Controller funciona pulsando las flechas durante al menos 1 seg., sin
presionar demasiado. Si el pulsado es demasiado rápido, el Mini Controller no
reconocerá la señal.
Para activar el Mini Controller pulse las flechas y seleccione el programa de tiempo
NL

EN EN
DE DE
FR FR
ES ES
NL
PT PT
RU RU
CN CN
preestablecido que desee (fig. 2 página 13).
Pulse la flecha UP para aumentar la velocidad y el flujo de agua de la bomba
y la flecha DOWN para disminuirlos. Cada pulsación da un nuevo nivel al Mini
Controller, resaltado por la luz de LED azul.
Para pasar de MVC (Modo de velocidad constante) a MPP (Programas de tiempo
IT IT
preestablecidos) y viceversa, pulse las dos flechas a la vez . Las luces de LED
azul mostrarán el programa seleccionado según el diagrama (fig. 3 página 13).
En el programa E el Mini Controller modifica el caudal de la bomba según la entrada
eléctrica 0-10V seleccionada por un controlador/driver externo con este tipo de
conexión eléctrica (0-10V).
Cuando usted esté en MPP múevase por los diferentes programas pulsando las
flechas UP y DOWN . De acuerdo con la velocidad que configure, los ciclos de
MPP alcanzarán el flujo máximo según la tabla (fig. 4 página 13).
CÓMO UTILIZAR EL MINI CONTROLLER
El Mini Controller no se puede sumergir en agua y debe estar ubicado cerca del
acuario evitando las salpicaduras accidentales. Se puede colgar en el cristal del
acuario usando la ventosa 9 (fig. D) o instalarlo en el mueble. Le recomendamos
que deje una curva de goteo entre el Mini Controller y el cable de la bomba para
evitar que el agua se deslice por el cable y llegue hasta la fuente de alimentación.
Manipule el Mini Controller con las manos secas. El Mini Controller sólo se puede
utilizar con XSTREAM-E fabricada por SICCE y sólo puede ser alimentado por el
transformador incluido en ésta. Cualquier otro uso puede dañar este dispositivo
electrónico invalidando así su garantía.
Garantía del Mini Controller: 2 años
MANTENIMIENTO
Para realizar el mantenimiento períodico de la bomba, desconéctela de la corriente elèctrica
y sáquela del acuario. Limpiar regularmente la bomba, el rotor y su compartimiento.
En el caso de agua con elevada dureza, sal o detritos, será necesario realizar la
limpieza con más frecuencia.
Retire la rejilla del prefiltro 8 de la bomba 6 presionando ligeramente a los lados y
tirando de ella hacia abajo (fig. B.1).
Gire la parte frontal hacia la izquierda y retire el rotor 7 (fig. B.2/B.3).
Limpie cuidadosamente los componentes de la bomba con un cepillo suave en agua dulce
(o agua con vinagre), y aclárelos bien antes de volver a colocar la bomba en el acuario.
El desgaste del rotor puede producir un ligero ruido. Si tras la limpieza, la bomba
continua haciendo ruido, le aconsejamos sustituir el rotor.
El uso de otros productos de limpieza para limpiar la bomba, si no se enjuagan bien,
podría producir alteraciones en los valores del agua.
Después de la limpieza, vuelva a montar todos los componentes asegurándose
de que la pequeña junta tórica negra 8.1 está en la posición adecuada. Si la junta
tórica no está colocada correctamente, el rotor puede hacer ruido. Sustituya una
junta tórica perdida o deteriorada, repuesto 8.1.
Los productos SICCE están diseñados para una larga vida útil y un funcionamiento
de calidad y fiable. Sin embargo con el tiempo, el desgaste de las piezas puede
causar un poco de ruido, incluso después del mantenimiento regular. Hay piezas
32 33
de recambio disponibles.
MANTENIMIENTO ADICIONAL
1) Desenchufe la bomba de la toma eléctrica antes de sacar la bomba del agua.
2) Gire la palanca hacia la izquierda hasta el final levantándola ligeramente para
quitar los soportes magnéticos de la bomba (fig. C.1/C.2).
3) Limpie los cojinetes de cerámica (fig. C.3) con un cepillo suave para eliminar
cualquier residuo o depósito de sal o material orgánico, teniendo cuidado de no
moverlo de su sitio.
AYUDA ON-LINE
Vea nuestros videos tutoriales en el canal oficial de YOU TUBE de
SICCE: www.youtube.com/user/SICCEspa
INSTRUCCIONES PARA DESHACERSE DEL PRODUCTO DE ACUERDO
CON LA DIRECTIVA EUROPEA 2002/96/EC
Si en un producto aparece el símbolo de un contenedor de basura tachado, significa
que éste se acoge a la Directiva 2002/96/EC. Todos los aparatos eléctricos o
electrónicos se deben desechar de forma distinta al servicio municipal de recogida
de basuras, a través de los puntos de recogida designados por el gobierno o
las autoridades locales. La correcta recogida y tratamiento de los dispositivos
inservibles contribuye a evitar riesgos potenciales para el medio ambiente y la
salud pública. Para obtener más información sobre cómo deshacerse de sus
aparatos eléctricos y electrónicos viejos, póngase en contacto con su ayuntamiento,
el servicio de recogida de basuras o el establecimiento donde adquirió el producto.
GARANTÍA
Este producto, excepto el rotor 7, está garantizado por un período de 3 años,
a partir de la fecha de compra, contra defectos de materiales y fabricación. El
certificado de garantía debe ser cumplimentado debidamente por el vendedor, y
se entregará junto a la bomba en caso de entregarla para ser reparada, junto
con el recibo de la compra o equivalente. La garantía cubre la sustitución de las
piezas defectuosas. En caso de uso impropio, manipulación indebida o negligencia
por parte del comprador o del usuario, la garantía se anulará y perderá su validez
inmediatamente. Asimismo, la garantía se anulará en el caso de que falte el recibo
de compra o equivalente. Los gastos de envío, a y desde la fábrica, o el taller de
reparaciones, correrán a cargo del comprador.
CÓMO OBTENER 5 AÑOS DE GARANTIA EN SU PRODUCTO
Para mejorar nuestro servicio y la satisfacción de nuestros clientes, SICCE ofrece
la posibilidad de añadir 2 años adicionales de garantía, registrando el producto
en nuestra página web www.sicce.com “SICCE FOR YOU/Registro del Producto”.
Rellene el formulario y adjunte el recibo de compra del producto. Después de
introducir correctamente todos sus datos, complete la solicitud de extensión de
garantía.
NL

EN EN
DE DE
FR FR
ES ES
NL NL
PT
RU RU
CN CN
Geachte klant, Bedankt dat u gekozen heeft voor de XSTREAM/XSTREAM-E
pomp, de nieuwste generatie stromingspompen voor zoet- en zoutwater aquaria.
De XSTREAM pompen zijn ontworpen en geproduceerd in Italie en worden
voortdurend onderworpen aan strenge kwaliteitscontroles tijdens het productie
proces. Het is een technisch geavanceerde pomp met hoge prestaties, duurzaam
IT IT
en betrouwbaar, heeft een minimaal energieverbruik en compacte afmetingen. De
elektronische versie XSTREAM-E is inclusief Elektronische Mini-Controller met
voorgeprogrammeerde programma’s en voldoet aan de verwachtingen van de
meest veeleisende eindgebruiker door middel van de combinatie tussen maximale
stilte en natuurlijke stromingen.
ALGEMENE VEILIGHEIDSINSTRUCTIES
XSTREAM/XSTREAM-E voldoet aan de nationale en internationale veiligheid
normen.
Lees aandachtig en bewaar de volgende instructies om de XSTREAM pomp op de
beste manier te gebruiken
1) Controleer of de spanning die staat aangegeven op het technische etiket van de
pomp overeenkomt met de spanning van de elektrische installatie;
2) De pomp werkt alleen onder water;
3) Controleer voordat u de pomp aansluit of de kabel en de pomp geen
beschadigingen hebben;
4) De pomp heeft een kabel van het type Z. De kabel en de stekker kunnen niet
worden vervangen of gerepareerd; als één van beide beschadigd is, moet u de
hele pomp vervangen;
5) LET OP: haal de stekker van alle elektrische producten uit het stopcontact
voordat u onderhoud gaat uitvoeren of uw handen in het water steekt; als de
stekker of de kabel nat zijn, sluit de hoofdschakelaar dan af voordat u de stekker
uit het stopcontact haalt;
6) De pomp mag niet worden gebruikt in vloeistoffen of in een omgeving met een
temperatuur hoger dan 35° C;
7) Gebruik de pomp niet met corrosieve of schurende vloeistoffen;
8) Gebruik de pomp niet voor andere doeleinden dan waarvoor de pomp is
ontworpen, in badkuipen of dergelijke toepassingen;
9) De pomp is niet ontworpen voor gebruik door gehandicapten of kinderen, buiten
hun gebruik houden of het gebruik alleen toestaan onder toezicht;
10) Leg het snoer onder het stopcontact in een bocht om te voorkomen dat er
druppels op het contact of de stekker vallen;
11) De magneten kunnen permanente schade veroorzaken aan elektronische
apparaten en voorwerpen die gevoelig zijn voor magnetische velden, zoals
pacemakers, creditcards en sleutels: daarom altijd minstens 30 cm (12 inch)
afstand houden;
12) De magneten kunnen gedeeltelijk of geheel hun kracht verliezen indien deze
blootgesteld zijn aan temperaturen boven 50° C (122° F);
13) Om te voorkomen dat de stekker of het stopcontact nat worden kan er een lus
in de kabel gemaakt worden onder het water niveau (fig. 1);
14) Trek niet aan de kabel van de pomp tijdens de installatie of het onderhoud;
15) Probeer niet de 2 magneten buiten het water te bevestigen, omdat de
34 35
magnetische aantrekkingskracht zeer hoog loop je het risico om er met uw
handen of vingers tussen te komen.
ONDERDELEN
[1] Anti-Vibratie afdekking [2] Externe Magneethouder [3] Interne magneet houder
[4] Rotor houder [4.1] O-ring [4.2] Rroterend systeem [5] Pompbehuizing [6]
Pomp [7] Rotor kit [8] Voorfilter rooster [8.1] Voorfilter O-ring [9] Zuignap (Model
XSTREAM-E) [10]
Vibratie kabel afdekking
INSTALLATIE - GEBRUIK EN INSTELLING
De XSTREAM moet als volgt geïnstalleerd worden:
1) Controleer, voordat u het product in gebruik neemt eerst of alle onderdelen
onbeschadigd zijn.
2) Maak het aquarium glas schoon waar u de pomp gaat bevestigen.
3) Disconnect de 2 magneet houders van elkaar. (fig. A.1).
4) Plaats de magneethouder afdekking 1 over de magneethouder 3 (fig. A2).
5) Dompel de pomp volledig onder water in verticale positie om de lucht te laten
ontsnappen die aanwezig is in de rotor. (fig A.3).
6) Om resonantie en trillingen te voorkomen en ook wanneer de pomp door externe
apparatuur gecontroleerd zal worden dient u:
7) Plaats de pomp in de gewenste positie met magneet houder 3 adherent aan
het glas. (fig. A.4).
8) Bevestig de externe magneet houder 2 aan het aquarium ongeveer 10 cm (3,93
inches) van de interne magneet houder 3 (fig. A.5). Sleep daarna de externe
magneet houder in de richting van de interne magneet houder totdat u het
gevoel heeft van de tegengestelde magnetische kracht. Plaats daarna de interne
en externe magneet houder 2 en 3 op dezelfde hoogte (fig. A.6).
LET OP: Zeer sterke magneten. Wees voorzichtig met het bevestigen van de pomp
aan het aquarium. Let op voor uw handen en vingers.
9) Draai de pomp in de gewenste stroomrichting.
10) Steek de stekker in het stopcontact.
1) Sluit de jack plug van de pomp aan op de centrale stekker b van de Mini
Controller (fig. B).
2) Sluit de jack plug d (fig. C) aan op de inlaat aan de rechterzijde c van de Mini
Controller (fig. B).
De pomp zal starten in de MVC Mode (Constant Speed Mode) op 5500l / h.
Voor het juiste gebruik van de Mini Controller lees de instructies op pagina 10.
Het los koppelen van de pomp kan gebeuren door de transformator (fig. C) van het
elektriciteitsnet te verwijderen.
XSTREAM -E DE ELEKTRONISCHE VERSIE
De besturing werkt door minimaal 1 sec op de pijlen te drukken, zonder deze te
beschadigen. Zodra de druk te hoog is, zal de besturing niet het juiste input signaal
ontvangen.
Om de juiste input te geven aan de Mini Controller drukt u op de pijlen en gaat u
Elektronische Mini Controller
(Model XSTREAM-E) [11] Anti-
PT

EN EN
DE DE
FR FR
ES ES
NL NL
PT
RU RU
CN CN
langs de gewenste voorgeprogrammeerde programma’s (fig. 2 pagina 13).
Druk op de pijl omhoog om de stroming van de pomp te verhogen, druk op de pijl
omlaag om de stroming van de pomp te verlagen. Ledere afzonderlijke aanraking
van de pijlen heeft invloed op de stroming. Let daarom goed op de positie van de
Blauwe LED-verlichting op de Mini Controller.
IT IT
Om van MVC (Constant Speed Mode) naar MPP (pre-set Timing Programs) te gaan
en omgekeerd, druk dan tegelijkertijd op beide pijlen. De blauwe LED-verlichting
geeft aan welk programma u geselecteerd heeft, meer informatie staat beschreven
in schema (fig. 3 pagina 13).
In programma E wijzigt de Mini Controller de stroming van de de pomp door middel
van de elektrische input 0-10 V afkomstig van een externe controller / driver met
dit type van elektrische aansluiting (0-10V)
Wanneer u in MPP door middel van de pijl omhoog of pijl omlaag langs de
verschillende programma’s beweegt kunt u de maximale stroming van de MPP
programma’s regelen. Zie de tabel voor meer informatie (fig. 4 pagina 13).
HOE GEBRUIK IK DE MINI CONTROLLER
De Mini Controller kan niet worden ondergedompeld in het water, plaats hem
daarom niet te dicht bij de rand van het aquarium. Hij kan bevestigd worden door
middel van de zuignap 9 (fig. D) aan het aquarium glas of in de onderkast. Wij
raden u daarom aan om een lus in de kabel van de Mini Controller naar de pomp
te maken om te voorkomen dat water naar beneden loopt en de stroombron kan
bereiken. Raak de Mini Controller alleen aan met droge handen. De Mini Controller
kan alleen worden gebruikt in combinatie met de XSTREAM-E geproduceerd door
SICCE en kan alleen worden gevoed door de bijgeleverde transformator. Leder
ander gebruik kan leiden tot het beschadigen van dit elektronisch apparaat en
maakt de garantie ongeldig.
Mini Controller GARANTIE: 2 jahren
ONDERHOUD
Voor het uitvoeren van het periodieke onderhoud van de pomp, moet u eerst de
stekker uit het stopcontact halen om daarna de gehele pomp uit het water te
nemen.
Reinig de pomp en de rotor regelmatig
Bij zeer hard water of water met veel vuil erin, wordt aangeraden de pomp vaker
te reinigen.
Verwijder het rooster 8 van de pomp 6 met een lichte druk aan de zijkanten en het
daarna naar beneden te bewegen (fig. B1).
Draai de voorkant van de pomp naar links om de rotor 7 te verwijderen (fig. B.2/B.3).
Reinig de onderdelen van de pomp zorgvuldig met schoon water of met een zachte
borstel met zeep of azijn.
Spoel alle onderdelen goed af met schoon water alvorens de pomp terug te
plaatsen in het aquarium.
Na het reinigen van de onderdelen moet u deze opnieuw monteren, start met de
kleine zwarte O-ring 8.1 deze moet op de juiste positie gemonteerd worden. Als de
O-ring niet op de juiste manier gemonteerd is zal de rotor geluid maken. Vervang
daarom altijd een verloren of beschadigde O-ring 8.1.
36 37
SICCE producten zijn ontworpen voor een lange levensduur. Toch kan het
voorkomen dat na verloop van tijd en na regelmatig onderhoud er meer lawaai
ontstaat. Daarom zijn vervangende onderdelen verkrijgbaar.
EXTRA ONDERHOUD
1) Haal de stekker uit het stopcontact en neem de pomp uit het water.
2) Draai de hendel tegen de klok in tot het einde om de magneet houders uit de
pomp te verwijderen (fig. C.1/C.2).
3) Reinig de keramische lagers (fig. C.3) met een zachte borstel om eventuele
resten of afzettingen van zout of organisch materiaal te verwijderen. Let Op: Dat de
keramische lagers niet verschuiven.
ONLINE HULP
Bekijk onze instructievideo’s op het SICCE YOU TUBE officiële kanaal
www.youtube.com/user/SICCEspa
AANWIJZINGEN VOOR EEN JUISTE AFVOER VAN HET PRODUCT
VOLGENS DE EUROPESE RICHTLIJN 2002/96/EG
Aan het einde van zijn bruikbaarheidsduur, mag het product niet samen met het
gemeentelijk afval worden afgevoerd. Het kan worden afgegeven bij de speciale
gemeentelijke centra voor gescheiden afvalinzameling of bij verkopers die deze
service aanbieden. Door huishoudelijke apparaten gescheiden te verwerken,
kunnen mogelijk negatieve gevolgen voor het milieu en de gezondheid door een
onjuiste verwerking worden vermeden en kunnen de materialen waaruit het bestaat
worden teruggewonnen voor een aanzienlijke besparing van energie en bronnen.
GARANTIE
Dit product, met uitzondering van de rotor 7, is gegarandeerd voor een periode
van 3 jaren vanaf de datum van aankoop tegen gebreken van het materiaal en
van de bewerking. Het certificaat van garantie dient in elke gedeelte van het
formulier door. voor reparatie teruggegeven wordt tezamen met de fiscale bon van
aankoop of een gelijkwaardig document. De garantie betreft de vervanging van de
gebrekkige delen. In geval van een verkeerd gebruik,openbreking of nalatigheid
van de koper of van de verbruiker is de garantie nietig en vervalt onmiddellijk. De
garantie is tevens nietig in geval van ontbreking van de fiscale bon van aankoop of
van een gelijkwaardig document. De kosten van verzending en terugzending komen
ten laste van de koper.
ONTDEK HOE JE 5 JAAR GARANTIE KUNT KRIJGEN OP HET PRODUCT
Om onze dienstverlening en de tevredenheid van onze klanten te verbeteren, biedt
SICCE de mogelijkheid om de Grantie periode te verlenging met 2 jaren. U hoeft
simpelweg alleen uw product te registreren op onze website www.sicce.com in
“Sicce for you / Productregistratie”. Vul het formulier in en upload de aankoopbon
van het product. Na het correct invullen van al uw gegevens, moet u het garantie-
uitbreiding verzoek indienen.
PT

EN EN
DE DE
FR FR
ES ES
NL NL
PT PT
RU
CN CN
Caro cliente, obrigado por ter adquirido a bomba XSTREAM/XSTREAM-E da
SICCE. É a última geração de bombas de movimento de água, quer para aquários
de água salgada, quer para aquários de água doce. XSTREAM desenhado e
fabricado em Itália, com rigoroso controlo de qualidade quer dos componentes
quer na produção , é um produto tecnológicamente avançado, caracterizado por
IT IT
uma grande fiabilidade de elevadas prestações, baixo consumo energético, com
tamanho compacto e necessidade mínima de manutenção. A versão eletrónica
XSTREAM-E, com o Mini Controlador Eletrónico e programas com temporização
pré definidos, satisfará as expetativas do usuário mais exigente, combinando o
silêncio com o ambiente aquático natural. O produto adquirido foi inteiramente
projetado e fabricado na Itália, com garantia da qualidade e controle dos materiais
utilizados. De maneira a apreciar plenamente a qualidade e exclusividade deste
produto pedimos que você leia e siga atentamente as instruções seguintes.
INSTRUÇÕES GERAIS DE SEGURANÇA:
XSTREAM/ XSTREAM-E están em conformidade com as leis de segurança
nacionais e internacionais.
Por favor, leia cuidadosamente e guarde as seguintes instruções para usar sua
XSTREAM da melhor maneira.
1) Verifique se a tensão do rótulo da bomba corresponde com a da rede de energia.
A bomba deve ser provida de um interruptor diferencial (protetor) através do
qual a corrente nominal seja igual ou inferior a 30mA.
2) A bomba só pode trabalhar dentro da água e é somente para uso interno. Não
deverá ser posta fora de água, pois, causará danos irreparáveis no motor.
3) Antes de ligar a bomba à rede elétrica, certifique-se que o cabo ou a bomba
não estão danificados.
4) A bomba tem uma ligação do Tipo Z. O cabo ou o plugue não podem ser
reparados ou substituídos. Em caso de avaria, substitua a bomba por completo.
5) ATENÇÃO: Desligue todos os componentes elétricos que estejam imersos
antes de fazer qualquer manutenção em qualquer aparelho que esteja dentro
do aquário, ou antes de mergulhar as mãos na água por qualquer razão; no
caso do plugue ficar molhado, desligue a rede elétrica antes de tocar no cabo.
6) A bomba só pode ser utilizada em líquidos (água doce ou salgada) e em
ambientes com temperaturas que não sejam superiores a 35º C / 95º F.
7) Evite utilizar a bomba com líquidos corrosivos ou abrasivos.
8) Não utilize a bomba para aplicações para as quais não foi projetada.
9) Crianças ou pessoas portadoras de deficiências devem ser supervisionados por
alguém responsável pela sua segurança quando da utilização desta bomba.
10) Evite aproximação com lâminas, objetos pontiagudos ou magnéticos para
evitar acidentes, pois os magnetos do suporte atraem objetos de metal e outros
magnetos com bastante força.
11) Os magnetos podem provocar danos permanentes em equipamentos
eletrônicos e a outros objetos que sejam sensíveis a campos magnéticos como
marca-passos, cartões de crédito e chaves: mantenha-os a pelo menos 30 cm
de distância.
12) Os magnetos podem perder parcial ou totalmente o seu poder de atração se
expostos a temperaturas maiores do que 50º C.
13)
38 39
Para evitar que gotas de água cheguem acidentalmente até o plugue, faça uma
volta no cabo abaixo do nível da tomada
(fig. 1).
14) Evite pegar na bomba pelo cabo.
15) Não tente combinar os dois ímãs diretamente porque a atração é muito forte.
Pegar pelos lados, certificando-se que não vai entalar os dedos.
COMPONENTES
[1] Caixa borracha anti vibração [2] Suporte magnético externo [3] Suporte
magnético interno [4] Pós suporte [4.1] O-ring de apoio [4.2] O-ring de apoio
a pós suporte [5] Tampa da bomba [6] Corpo da bomba [7] Rotor [8] Grelha
pré filtro [8.1] Oring grelha [9] Copo de sucção (Versão XSTREAM-E) [10] Mini
Controlador Elecrónico (Versão XSTREAM-E) [11] Capa anti vibração
INSTALAÇÃO – FUNCIONAMENTO E REGULAÇÃO
Proceda como descrito em seguida para instalar a bomba XSTREAM.
1) Antes de colocar os equipamentos em funcionamento certifique-se da
integridade de todas as peças.
2) Limpar o vidro do tanque vai ser posicionado na região onde a bomba.
3 ) Retirar 2 a partir de 3 por remoção dos separadores de magnetos (fig . A.1).
4) Coloque a caixa de borracha anti vibração 1 no suporte magnético 3 (fig. A.2).
5 )
Imergir a bomba completamente na água, em posição vertical, para garantir que
o ar sai do assento do rotor
6) Para evitar ressonância e vibração, evite colocar a bomba em contato com as
superfícies laterais ou no fundo do aquário para evitar que areia ou cascalho do
aquário sejam sugados pela bomba.
7) Colocar a bomba no local desejado 3 aderente ao vidro (fig. A.4).
8) Fixe o suporte magnético exterior 2 no aquário a uma distância de 10 cm do
centro do suporte interior 3 (fig. A.5). Arraste-o até perceber que as forças
magnéticas opostas estão firmes e centralize os dois suportes (fig. A.6).
ATENÇÃO: Dada a grande força atrativa do ímãn, isto deve ser feito cuidadosamente,
para evitar a quebra do vidro do aquário ou que você venha a entalar os seus dedos.
9) Orientar a bomba de forma que o fluxo seja direccionado para onde pretendido.
10) Ligue a bomba à rede elétrica.
1)Conecte a ficha jack da bomba à ficha central b do Mini Controlador (fig. B).
2 )Conecte a ficha jack d (fig. C) na entrada do lado direito c do Mini Controlador
(fig. B).
A bomba começará a trabalhar em MVC Mode (Modo Velocidade Constante) a
5500l/h. Para um correcto uso do Mini Controlador por favor siga as instruções
da página 10. Para desligar a bomba, desligue o transformador (fig. C) da rede
electrica.
COMO INSTALAR A XSTREAM-E
O Mini Controlador começará a trabalhar assim que as setas foram pressionadas
por pelo menos 1 segundo, sem no entanto serem demasiado pressionadas, pois
se a pressão for muito forte, o Mini Controlador não conseguirá ter a sensibilidade
(fig. A.3).
RU

EN EN
DE DE
FR FR
ES ES
NL NL
PT PT
RU
CN CN
necessária para iniciar-se.
Para iniciar o Mini Controlador, pressione as setas e escolha a programação
desejada (fig. 2 página 13).
Para aumentar a velocidade e o fluxo, pressione a seta UP , no caso de querer
diminuir, pressione a seta DOWN . Cada toque siginifica uma nova entrada de
IT IT
informação, notificada pela luz do LED do Mini Controlador.
Para sair do modo MVC (Modo Velocidade Constante) para o modo MPP (Programas
com temporização pré definida) e vice versa, pressiona ambas as setas . A luz
do LED porá em evidência os programas pré selecionados como pode verificar no
diagrama (fig. 3 página 13).
Em programa E o Mini Controlador modifica o fluxo da bomba de acordo com a
entrada elétrica 0-10V com origem na parte externa do Controlador/Driver com
este tipo de conexão elétrica (0-10V)
Quando está no modo MPP escolha entre os diferentes programas pressionando
as setas UP e DOWN . De acordo com a velocidade escolhida, o MPP chegará
ao fluxo máximo de acordo com a tabela (fig. 4 página 13).
COMO USAR O MINI CONTROLADOR
O Mini Controlador não poderá ser submerso e tem de estar perto do aquário sem
levar com salpicos. Poderá estar pendurado no vidro do aquário, com a ajuda do
copo de sucção 9 (fig. D) ou posto no móvel. Sugerimos que use um anti gotas no
Mini Controlador e no cabo da bomba de maneira a evitar que a água escorra e que
possa afectar a fonte. O Mini Controlador só pode ser usado com a XSTREAM-E
fabricada pela SICCE e só pode usar o transformador que vem incluído. Qualquer
outro uso poderá danificar este aparelho eletrónico fazendo com que a garantia do
mesmo deixe de ser aplicável.
GARANTIA Mini Controlador: 2 anos
MANUTENÇÃO PERIÓDICA
Para a manutenção periódica da bomba, desligue o plugue da rede elétrica e
depois retire a bomba. Limpe regularmente a bomba e o rotor. Em caso de muita
sujeira ou muitos detritos, recomendamos limpeza mais freqüente.
Retirar o 8 do 6 por aplicação de uma ligeira pressão sobre os lados e puxando-o
da parte inferior (fig. B.1).
Rode o disco in senso anti-horário e puxe o rotor 7 (fig. B.2/B.3).
Limpe todas as partes com água corrente
Use uma escova macia com sabão ou vinagre (para desfazer detritos sólidos - de
calcário ou outros).
O uso de outros produtos de limpeza para limpar a bomba, se não for bem
enxaguada, poderia alterar os valores normais de‘ água.
Após a limpeza, montar tudo na ordem inversa, certificando-se de que o O-ring
inserido em um pequeno raio da grade dianteira permaneceu no lugar. A remoção
acidental deste O -ring poderia alterar a tranquilidade do produto. No caso em que
ele está perdido recomendar a compra de peças de reposição 8.1.
Os nossos produtos são projetados para uma vida longa, mas com o desgaste ao
longo do tempo, o rotor pode produzir um ruído leve, mesmo aquando as operações
de manutenção comuns. Neste caso, recomendamos a simples substituição deste
40 41
componente 7, que está disponível em lojas como peça de substituição.
MANUTENÇÃO EXTRAORDINÁRIA
Desligue a bomba da tomada e retire-a da água.
Gire a alavanca para a esquerda até que ela páre levantando-a ligeiramente para
remover o suporte magnético da bomba (fig. C.1/C.2).
Limpe a cerâmica (fig. C.3) com uma escova macia para remover qualquer
resíduo ou depósitos de sal ou material orgânico com cuidado para não removê-la
do seu local.
ASSISTÊNCIA
Sugerimos que veja nossos tutoriais em vídeo para apoiar a instalação
e manutenção de produtos , disponível no canal oficial www.youtube.
com/user/SICCEspa
PRECAUÇÕES PARA DESCARTE CORRETO DO PRODUTO NOS TERMOS
DA DIRECTIVA CE 2002/96/CE.
Se usada ou quebrada, esta bomba não pode ser descartada como lixo comum.
Verifique a legislação vigente e procure centros apropriados para descartar
a bomba, ou devolva-a ao revendedor. Descarte separadamente qualquer
components elétrico para não causar danos ao ambiente . Procure centros de
reciclagem desse tipo de material.
GARANTIA
Este produto é totalmente coberto pela lei do consumidor vigente. A garantia do
produto só será cumprida pelo revendedor ou importador no caso de apresentação
de nota fiscal comprobatória da compra que prove que o material comprado está no
prazo de garantia de 3 anos da data da compra. O rotor da bomba 7 não possui
garantia. Este produto é totalmente coberto pela lei do consumidor vigente.
DESCUBRA COM OBTER 5 ANOS DE GARANTIA NO SEU PRODUTO
Para melhorar o nosso serviço e aumentar a satisfação dos nossos clientes, a
SICCE oferece a possibilidade de aplicar 2 anos extra de garantia, registando o
produto na nossa página Web www.sicce.com em “Quality Control Department”.
Preencha o formulário em todas as suas partes e envie electrónicamente o
comprovante de compra do produto.
RU

EN EN
DE DE
FR FR
ES ES
NL NL
PT PT
RU RU
CN
Уважаемые покупатели! Благодарим вас за выбор
течения последнего поколения, прменяемых в морских и пресноводных аквариумах. Помпа
XSTREAM
разработана и произведена в Италии в соответствии всех стандартов качества,
действующими как для продукта в целом, так и для его отдельных частей. Все насосы этой серии
обладают высокой производительностью, надежны и долговечны в использовании, отличаются
IT IT
низкими эксплутатационными издержками и компактными размерами. Электронная модель
XSTREAM-E
синхронизации, сочетающая в себе максимально бесшумную работу и естественность живописной
водной среды, оправдает ожидания наиболее требовательных пользователей.
ВАЖНАЯ ИНФОРМАЦИЯ ПО БЕЗОПАСНОСТИ - ВНИМАТЕЛЬНО ИЗУЧИТЕ И
СЛЕДУЙТЕ ВСЕМ РЕКОМЕНДАЦИЯМ ПО БЕЗОПАСНОСТИ
Помпа течения
правилами безопасности.
1)
2)
3)
4)
5) ПРЕДУПРЕЖДЕНИЕ:
6)
7)
8)
9)
10)
11)
12)
13)
14)
15)
с электронным мини-контроллером и предварительно установленными программами
XSTREAM
создана в соответствии со всеми национальными и международными
Перед установкой или любыми ремонтно-эксплуатационными работами обязательно отключите
насос от электросети. Подключать насос к сети можно только через устройство защитного
отключения (УЗО) с рабочей силой тока, не превышающей 30мА.
Насос предназначен для использования исключительно в закрытых помещениях и не может
устанавливаться на открытых пространствах.
Перед подключением насоса к электросети проверьте, нет ли каких-либо повреждений шнура,
штепселя и розетки.
В насосе испльзуется кабельное соединение типа Z. Ни в коем случае не меняйте и не
ремонтируйте шнур и штепсель: в случае их повреждения замените насос.
поврежден провод или штепсельная вилка, а также при его неправильной работе и каких-либо
повреждениях.
Ни в коем случае не включайте насос при отсутствии воды в камере крыльчатки насоса либо если
температура жидкости превышает 95° F/35° C.
Не используйте насос с агрессивными и абразивными жидкостями.
Не используйте насос в непредназначенных для этого местах (в ванной и т.п.).
Не позволяйте пользоваться насосом людям с ограниченными возможностями и детям без
присмотра лиц, ответственных за их безопасность.
Во избежание повреждений не размещайте вблизи насоса лезвия, острые предметы и магниты,
поскольку магниты основания насоса с больой силой притягивают металлические предметы и
другие магниты.
Магниты могут привести к значительным повреждениям электронных приборов и других
предметов, чувствительных к магнитному полю, таких как кардиостимуляторы, кредитные
карточки и ключи. Держите их не ближе 30 м от насоса.
Магниты могут полностью или частично утратить силу притяжения при температуре выше 50°
С (122° F).
Всегда оставляйте на шнуре каплеуловительную кабельную петлю во избежание стекания
конденсата или воды по кабелю к источнику питания
Ни в коем случае не тяните насос за шнур во время установки или ремонтно-эксплуатационных
работ.
Не пытайтесь присоединить сразу 2 магнитных держателя, поскольку сила притяжения между
ними очень высока. Крепите их исключительно с внешних сторон, не забывая поставить между
ними руку и пальцы.
Ни в коем случайте не используйте устройство, если у него
42 43
SICCE XSTREAM/ XSTREAM-E
(рис. 1).
- помпы
КОМПЛЕКТАЦИЯ
[1]
Виброзащитный резиновый корпус
магнитный держатель
[5]
Крышка насоса
Уплотнительное кольцо решетки
контроллер
УСТАНОВКА
Для установки насоса XSTREAM:
1)
Проверьте насос на наличие повреждений и дефектов.
2)
Перед установкой насоса тщательно очистите стекло аквариума.
3)
Отсоедините 2 от 3, удалив существующий разделитель.
Установите виброзащитный резиновый корпус 1 на магнитный держатель
4)
Полностью погрузите насос в воду, удерживая его в вертикальном положении, чтобы из ротора
5)
вышел попавший в него воздух.
Не допускайте прямого контакта насоса с боковыми поверхностями во избежание резонанса и
6)
излишней вибрации. Не размещайте насос слишком близко к песку и гравию на дне аквариума.
7)
При помощи держателя 3 закрепите насос на стекле
Прикрепите магнитную опору 2 к аквариуме на расстоянии 10 см от центра внутренней опоры
8)
3 (рис. А.5).
магнитное притяжение. Разместите центры опор
ВНИМАНИЕ:
прищемите пальцы рук.
9)
Поверните насос таким образом, чтобы получить желаемое направление потока воды.
10)
Подключите насос к электросети.
1) Подсоедините штепсельную колодку насоса к центральному штепселю b мини-контроллера
(pис. В)
2) Подсоедините разъем d (pис. С) к впускному отверстию с правой стороны с мини-контроллера
(pис. В)
Насос начинает работу в Режиме MVC (Режим постоянной скорости) - 5500 л/час
Во избежание ошибок при использовании мини-контроллера внимательно прочитайте инструкцию
на странице 10.
Чтобы отключить насос от сети, выньте штепсель трансформатора (pис. С) из электросети.
НАСТРОЙКА НАСОСА XSTREAM-E
Мини-контроллер срабатывает при нажатии на стрелки в течение 1 или более секунд без излишнего
давления. Если прикосновение будет слишком быстрым, мини-контроллер может на него не
среагировать.
Для приведение мини-контроллера в действие нажмите на стрелку и запустите нужную программу
из предустановленных программ синхронизации
Нажмите стрелку ВВЕРХ , чтобы увеличить скорость работы и объем потока воды, и стрелку
, чтобы их уменьшить. При каждом нажатии в мини-контроллер вводится новое значение,
ВНИЗ
которое имеет световую индикацию голубым светодиодом.
[4]
Держатель вала
[6]
Корпус насоса
(
Модель
XSTREAM-E) [11]
Потяните ее и перемещайте до тех пор, пока не почувствуете противоположное
Мощные магниты. Крепите насос к аквариуму очень осторожно. Осторожно, не
[2]
Наружный магнитный держатель
[4.1]
Уплотнительное кольцо
[7]
Комплект ротора
[9]
Присоска (Модель
Виброзащитное силиконове покрытие шнура
(рис. А.3)
[8]
Решетка входного фильтра
XSTREAM-E) [10]
(рис. А.1).
(рис. А.4)
2
и 3 на одной и той же оси.
pис. 2 странице
[3]
[4.2]
Роторная система
3 (pис. А.2)
(рис. А.6)
Внутренний
[8.1]
Электронный мини-
CN

EN EN
DE DE
FR FR
ES ES
NL NL
PT PT
RU RU
CN
Чтобы перейти из режима MVC (Режим постоянной скорости) в режим MMP (предустановленные
программы синхронизации) и наоборот, нажмите обе стрелки. Голубая светодиодная подсветка
укажет, какая из программ выбрана, как показано на рисунке ниже
В программе Е мини-контроллер меняет скорость потока воды в зависимости от силы тока на
входе 0-10 В, поступающей от внешнего контроллера/пускового устройства с данным типом
IT IT
электрического соединения (0-10 В).
В режиме МPР переключение между различными программами осуществляется нажатием стрелки
ВВЕРХ и ВНИЗ
максимума в соответствии со следующей схемой
ИСПОЛЬЗОВАНИЕ МИНИ-КОНТРОЛЛЕРА
Мини-контроллер нельзя погружать в воду. Его необходимо размещать близко к аквариуму и
принять меры безопасности, чтобы не допускать его падения на пол. Контроллер можно прикрепить
к стеклу аквариума или на тумбе при помощи присоски
каплеуловительную петлю на шнурах мини-контроллера и насоса во избежание стекания воды и
ее попадания на источник электроэнергии. Устанавливайте мини-контроллер сухими руками. Миниконтроллер можно использовать исключительно с насосами
подключать исключительно через адаптер питания, поставляемого в комплекте. Нарушение этих
правил использования может привести к повреждению электронного прибора и отмене гарантийных
обязательств.
ГАРАНТИЙНЫЕ ОБЯЗАТЕЛЬСТВА НА МИНИ-КОНТРОЛЛЕР: 2 года
РЕГУЛЯРНЫЙ УХОД
Для чистки или других работ по уходу за насосом отключите его от электросети, вынув штепсель из
розетки, и выньте насос из аквариума.
Регулярно чистите насос и ротор.
При известковых отложениях или наличии твердых частиц может потребоваться более частая и
тщательная чистка. См. рисунок ниже.
Выньте решетку входного фильтра
Поверните переднюю часть против часовой стрелки и снимите ротор
Тщательно почистите все детали насоса мягкой щеткой с мылом или уксусом в чистой воде.
Перед повторной установкой насоса в аквариум тщательно промойте все части водой.
После чистки соберите все части насоса, следя за тем, чтобы уплотнительное кольцо
установлено в правильном положении. Если уплотнительное кольцо установлено неправильно,
ротор может работать слишком шумно. Замените утерянное или поврежденное уплотнительное
кольцо, запчасть
Вся продукция
частей может вызвать незначительный шум даже при регулярном уходе. Для замены можно
приобрести запчасти.
ДОПОЛНИТЕЛЬНЫЙ УХОД
1) Отключите насос от электропитания, вынув штепсель из розетки.
2) Поверните рычаг против часовой стрелки до упора, слегка приподнимая его, чтобы вынуть
магнитные держатели из насоса
3) Почистите керамическое основание мягкой щеткой (
отложения, а также твердые и органические частицы. Будьте осторожны, чтобы не сдвинуть
основание со своего места.
44 45
. В зависимости от установленной скорости, ток воды в цикле МPР достигает
8
из насоса 6, слегка нажав с боков и потянув решетку вниз
8.1.
SICCE
долговечна и надежна в работе. Тем не менее, с течением времени износ
(pис. C.1/C.2).
pис. 4 странице
pис. 3 странице
9 (pис. D).
XSTREAM-E
pис. C3).
Рекомендуем оставить
производства
7 (pис. В.2 и В.3).
, чтобы удалить соляные
SICCE
(pис. В1).
8.1
было
Нельзя утилизировать использованный или поломанный товар вместе с бытовыми отходами.
Его необходимо доставить в специальный центр утилизации электрических отходов. Отнеситесь
к утилизации фильтра ответственно. Узнайте всю необходимую информацию у своих местных
представителей.
ГАРАНТИЙНЫЕ ОБЯЗАТЕЛЬСТВА
На данную продукцию
3 года
насосу при его возврате для ремонта вместе с чеком, подтверждающим покупку товара. Гарантия
и
распространяется на замену всех дефектных частей. В случае неправильного использования,
несанкционированного вмешательства в конструкцию или небрежности покупателя или
пользователя, гарантийные обязательства немедленно утрачивают силу. Изделие также не
подлежит гарантийному обслуживанию в случае отсутствия чека или другого подтверждения
покупки. Стоимость отправки насоса производителю или в место ремонта оплачивается
покупателем.
УЗНАЙТЕ, КАК ПОЛУЧИТЬ ГАРАНТИЮ НА ВАШ ТОВАРО СРОКОМ НА 5 ЛЕТ
С целью улучшения обслуживания и для более полного удовлетворения запросов наших клиентов,
компания SICCE предлагает возможность дополнительного гарантированного обслуживания
сроком на
для вас / Регистрация товара”.
Заполните форму и загрузите чек на приобретенный товар. После того, как вы правильно введете
всю информацию, заполните заявку на продление гарантийного срока.
ОНЛАЙН-СПРАВКА
Смотрите обучающие видеоролики на официальном канале THE SICCE YOUTUBE
www.youtube.com/user/SICCEspa
ИНСТРУКЦИИ ПО ПРАВИЛЬНОЙ УТИЛИЗАЦИИ ПРОДУКЦИИ В
СООТВЕТСТВИИ С ДИРЕКТИВОЙ ЕС 2002/96/EC
с момента покупки. Гарантийный талон должен быть заполнен продавцом и прилагаться к
(кроме лопастного колеса 7)
2 года.
Просто зарегистрируйте свой товар на вебсайте www.sicce.com в разедел “Sicce
распространяется гарантия сроком на
CN

EN EN
DE DE
FR FR
ES ES
NL NL
PT PT
RU RU
CN CN
非常感谢您选择新一代的 SICCE XSTREAM 系列造流泵。XSTREAM系列全部在意大利设计和制造,按照最严格的质量标准
生产。SICCE运用了最先进的技术,使得这款产品性能优秀、可
靠耐用、功耗低而且容易维护。特殊的旋转引擎能让造流泵方
向360度调整,强力的磁吸系统在恶劣的环境下也能进行固定。
IT IT
XSTREAM-E 系列拥有微型的电子控制器,能够控制流量和调整预
设的程序控制,能够满足发烧玩家希望自由控制水流的苛刻追求。
安全信息-请仔细阅读 - XSTREAM 系列符合国家和国际安全法律。
1)在安装或者进行任何的维护动作之前,请先切断电源。请确保
水泵体供电场所有安装漏电保护装置,且额定的剩余动作电流
不超过30mA。
2)本产品是为室内使用而设计,并不适合在户外使用。
3)在连接电源之前请检查插头和电缆是否有损坏。
4)本产品包含一个Z型电缆连接,电缆和插头不能进行替换和维
修,如果发生故障需要整体更换。
5)注意:如果发生故障或者任何形式的损坏时,请不要在电缆和
插头有破损的情况下进行任何操作。
6)切勿在脱水或者水温高于35摄氏度的情况下使用。
7)切勿在有腐蚀性或者研磨性的液体中使用。
8)请勿在本产品设计的用途以外的场合使用(例如在浴缸内或者
其他应用)
9)如果没有监护人负责安全的情况下,本产品请勿让有功能障碍
的人士或者儿童独立操作。
10)请与刀、尖锐的物品或者其他磁铁保持距离以防这些金属物
体被强磁吸系统吸引而造成意外伤害。
11)磁铁可能会对电子设备或者其他物品造成永久性的损坏,对
磁场敏感的物品(如:心脏起搏器、银行卡和钥匙等)请永远
保持至少30厘米的距离。
12)磁铁如果暴露在50摄氏度或以上的环境下,可能会完全失去
吸力。
13)连接电源时候请留下一个滴水圈,防止滴水到达插头和供电
电源。(如图:1)
14)在安装和维护的时候请勿用电源线提起整个泵体。
15)由于磁吸系统十分强力,因此不要直接将两个磁铁连接起
来。只接触他们的外壳并留意不要将手或手指放在两个磁铁
之间。
组件
[1] 减震橡胶 [2] 外部磁吸座 [3] 内部磁吸座 [4] 转轴座 [4.1] 密封圈
[4.2] 旋转系统 [5] 水泵后盖 [6] 泵体 [7] 转子 [8] 前罩 [8.1] 前罩密封
圈 [9] 吸盘 (XSTREAM-E) [10] 微型电子控制器 (XSTREAM-E) [11] 减震
电缆套
安装方式
安装步骤:
1)检查水泵是否有损坏。
2)确定安装的位置,并清洁水族箱内相应的玻璃表面。
3)将 2 和3 分离并取出磁铁分离器(图 A.1)
4)将1.减震橡胶和3.内部磁吸座组合(图A.2)
5)将泵体完全浸没在水中,并向上垂直,排除内部空气,可避免
启动时发出噪音。(图A.3)
6)为了避免振动和共振,不要把泵体安装在太靠近水面或者底部
的沙石部分。
7)将水泵放置在您设定的位置并让3 磁吸座靠近玻璃。(图A.4)
8)与内部磁吸座(3)中心保持10cm的距离,将外部磁吸座(2
)贴近水族箱玻璃外部(图A.5)。慢慢拖动靠近,直至吸牢并确认
(2)和(3)的中心在同一位置(图.A.5)
警告:强力磁铁。在安装的时候请谨慎操作,避免手和手指受伤。
9)将水泵方向调整到需要的角度。
10)接上电源
1)将水泵插头连接到微型控制器中间的插座b (图.B)
2)将变压器的插头d,与微型控制器的插座c 连接(图B)
水泵将从MVC(恒速模式)开始工作,流量为 3000l/h .
要正确使用微型控制器,请阅读教程(在 10 页)
需要断电的时候,拔出变压器(图C)即可。
如何设定XSTREAM-E
控制微型控制器工作的时候,每次按键的时间至少1秒,若时间太
短,控制会判断为非有效输入。
按下微型控制器上的箭头按键,选择所需的预设程序。
按下箭头 UP 增加水泵的转速和水流量,箭头DOWN 则相反。
每次按压都会给出一个新指令,流量大小会通过蓝色Led灯显示。
同时按下 UP 和DOWN 箭头,可控制水泵从MVC(恒速模
式)到MPP(预设程序)之间互相转换。蓝色的led灯可通过不同
的亮灯组合指出当前的预设模式,如下图)
预设程序E ,可以用外置总控制器进行微调。
46 47
当在MPP模式下选择不同的预设程序时,根据你设定的速

EN EN
DE DE
FR FR
ES ES
NL NL
PT PT
RU RU
CN CN
度,MPP程序会按照一定的周期来进行流量控制,如下图:如何
使用微型控制器
微型控制器不能浸泡在水中,尽量靠近鱼缸避免意外掉落。可以使
用吸盘(9)(图D)挂在鱼缸外侧或放置在底柜内。我们建议在控制
器和水泵电缆之间留下一个滴水圈,避免水滴弄湿控制器和电源。
IT IT
在控制器上进行操作时,请保持双手干燥。微型控制器只可以用于
XSTREAM—E 造浪泵,且由原装变压器提供动力。在其他领域内
使用可能会对设备造成损害,此情况不属于保修范围。
微型控制器保修期:2年
日常维护
定期保养,切断电源并把造浪泵拿出
定期清洗造浪泵外壳和转子
在石灰质和碎屑比较多的环境下,需要更加频繁的清洗维护.请看
下图:
把前罩(8)从造浪泵体(6)上拆卸,轻微的在前罩两端挤压一
下即可将其拆下。
逆时针旋转前方锁扣,即可把转子拆卸
仔细清洗各个组件,可以使用添加了清洁剂的淡水或者醋,用毛
刷轻轻擦拭。
在重新使用之前,请将所有部件清洗干净。
清洗后,重新组装时请请确保黑色的密封圈 (8.1)被重新安装到
正确的位置。如果O形密封圈没有被正确安装,可能会造成噪音。
如果不慎遗失,可重新购买此配件。
SICCE 的产品设计耐用,可靠,随着使用时间的增加,只需要进
行定期的维护,都能保持安静的工作效果。同时我们也提供可购买
的配件,方便客户进行维护。
当产品被使用或者损坏后,产品不需要和其他废品一起丢弃,可以
将其交给特定的电子废品手机中心或者提供这个服务的经销商。
分类处理电子废品可避免影响环境和卫生,提供可再生材料、能源
和节约资源。
本产品保修期为3年,转子除外。保修证书需要由经销商填写,如
果水泵需要维修,请提供购买发票或者相关凭证。保修包括了更换
有缺陷的零件。使用不当、私自改造,维修或者因为疏忽而导致意
外损坏,不属于保修范围,保修期即时停止。保修时所需要支付的
运费、保险等相关费用,由买方支付。
如何能延长您的产品保修期间到5年
只需要在我们的网站www.sicce.com 进行产品注册,即可帮助
我们服务并表达您对我们的满意程度。我们会额外提供一个2年期
的保修服务。
填写好表格并上传购买发票,正确输入所有数据之后,完成整个
延保请求。
在线帮助
请在我们的官方频道观看我们的教学视频,网址:www.
youtube.com/user/SICCEspa
说明书所标示的产品正确放电数据,
根据欧盟颁布指令 2002/96/EC
额外的维护工作:
1)切断电源并将造浪泵拿出
2)将锁杆逆时针转动,把内置磁铁座和泵体分离(图c.1/c.2)
3)清洗陶瓷轴承(图C.3),可以用软毛刷去除残留在表面的盐
或者有机物,注意不要移动它的位置。
48 49

NOTES

© Sicce S.r.l: all rights reserved
SICCE S.r.l.
Via V. Emanuele, 115 - 36050 Pozzoleone (VI) - Italy
Tel. +39 0444 462826 - Fax +39 0444 462828 - P. IVA / VAT 02883090249
info@sicce.com - www.sicce.com
SICCE USA
1737 Louisville Drive - Knoxville, Tennessee 37921, USA
Ph. +1 865 291-3202 - Fax +1 865 291-3203
sales@sicceus.com - www.sicce.com
SICCE AUSTRALIA Pty Ltd
Perth, WA · Australia
info@sicce.com.au
www.sicce.com
80N398-B 09-2017
 Loading...