

Sicce Voyager HP Series,Voyager HP 8,Voyager HP 9,Voyager HP 10,Voyager HP 7 Instruction Manual
Voyager HP
Instruction manual
7 / 8 / 9 / 10
EN • DE • FR • I • ES • NL • PT • RU
VOYAGER 7
VOYAGER 8
VOYAGER 9
VOYAGER 10
Version
230 - 240 V
~ 50 Hz
120 V
~ 60 Hz
230 - 240 V
~ 50 Hz
120 V
~ 60 Hz
230 - 240 V
~ 50 Hz
120 V
~ 60 Hz
230 - 240 V
~ 50 Hz
120 V
~ 60 Hz
TECHNICAL DATA
Power
absorbed
17 W
18 W
24 W
25 W
Flow rate
10500 l/h 350-700 l 700-1200 l
2800 US gph
12000 l/h 400-850 l 800-1500 l
3200 US gph
13500 l/h 500-900 l 900-1700 l
3600 US gph
15000 l/h 800-1000 l 1000-2000 l
4000 US gph
Fig. 4
Marine
water
92-185 US gal 185-317 US gal
105-224 US gal 211-396 US gal
132-238 US gal 238-449 US gal
158-264 US gal 264-528 US gal
Fresh
water
S
T
• SPARE PARTS • ERSATZTEILE • PIECES DE RECHANGE
RICAMBI • PIEZAS DE REPUESTOS • ЗАПАСНЫЕ ЧАСТИ
B
C
VOYAGER 7 VOYAGER 8 VOYAGER 9 VOYAGER 10
SGR0103 (230V) SGR0105 (230V) SGR0107 (230V) SGR0109 (230V)
A
SGR0104 (120V) SGR0106 (120V) SGR0108 (120V) SGR0110 (120V)
B
C
SPL0062
SPL0063
A
IMPORTANT SAFETY INSTRUCTIONS
WARNING - To guard against injury, basic safety precautions should be observed, including
the following:
READ AND FOLLOW
ALL SAFETY INSTRUCTIONS
DANGER: To avoid possible electric shock, special care should be taken since water
is employed in the use of aquarium equipment. For each of the following situations, do
not attempt repairs by yourself; return the appliance to an authorized service facility for
service or discard the appliance.
1) CAUTION: If electrical components of the appliance get wet, unplug the appliance
immediately.
2) If the appliance shows any sign of abnormal water leakage, immediately unplug it from
the power source.
3) Carefully examine the appliance after installation. It should not be plugged in if there
is water on parts not intended to be wet.
4) Do not operate any appliance if it has a damaged cord or plug, or if it is malfunctioning
or has been dropped or damaged in any manner.
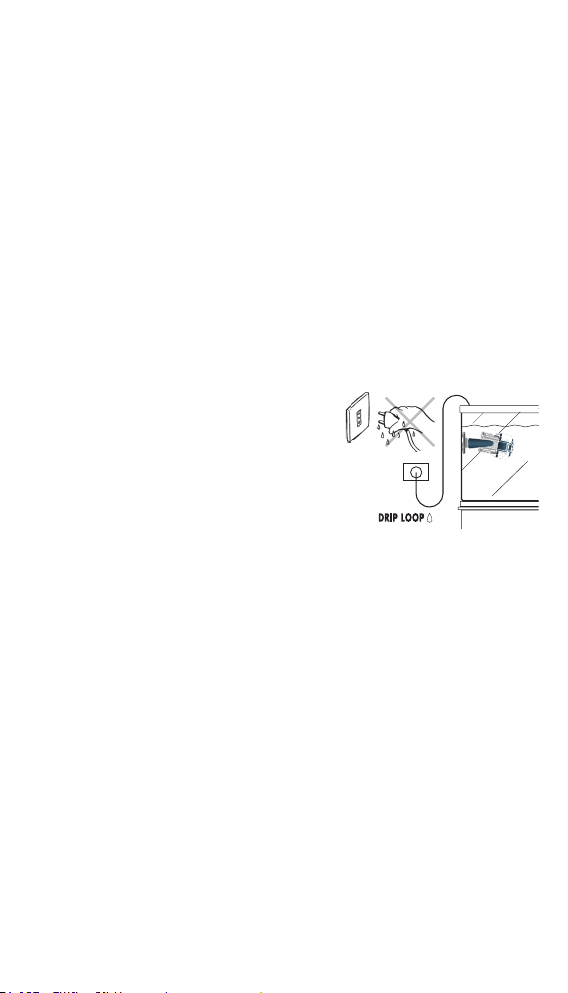
5) To avoid the possibility of the appliance plug or receptacle getting wet, position
aquarium stand and tank or the fountain to one side of a wall-mounted receptacle
to prevent water from dripping onto the receptacle
or plug. A “drip-loop” shown in g. A should be
arranged by the user for each cord connecting
an aquarium appliance to a receptacle. The “driploop” is the part of the cord below the level of the
receptacle or the connector if an extension cord is
used, to prevent water traveling along the cord and
coming in contact with the receptacle. If the plug or
receptacle does get wet, DON’T unplug the cord.
Disconnect the fuse or circuit breaker that supplies
power to appliance. Then unplug and examine for
presence of water in the receptacle.
6) Close supervision is necessary when any appliance is used by or near children.
7) To avoid injury, do not contact moving parts or hot parts such as heaters, reectors,
lamp bulbs and the like.
8) Always unplug an appliance from an outlet when not in use, before putting on or
taking off parts and before cleaning. Never yank cord to pull plug from outlet. Grasp
the plug and pull to disconnect.
9) Do not use an appliance for other than intended use. The use of attachments not
recommended or sold by the appliance manufacturer may cause an unsafe condition.
10) Do not install or store the appliances where it will be exposed to the weather or to
temperatures below freezing.
11) Make sure an appliance mounted on a tank is securely installed before operating it.
12) Read and observe all the important notices of the appliance.
13) If an extension cord is necessary, a cord with a proper rating should be used. A
cord rated for less amperes or watts than the appliance rating may overheat. Care
should be taken to arrange the cord so that it will not be tripped over or pulled.
14) This appliance has a polarized plug (one blade is wider than other). As a safety
feature, this plug will t in a polarized outlet only one way. If the plug does not t fully
in the outlet, reverse the plug. If it still does not t, contact a qualied electrician. Never
use with an extension cord unless plug can be fully inserted. Do no attempt to defeat
this safety feature.
CAUTION: Pump is to be connected to a circuit that is protected by a Ground Fault Circuit
Interrupter.
WARNING: To reduce the risk of electric shock, use only on portable self-contained
fountains no larger than 5 feet in any dimension.
Fig. A
SAVE THESE INSTRUCTIONS

CONSIGNES DE SÉCURITÉ
IMPORTANTES
MISE EN GARDE : An de se protéger contre les blessures, des mesures de sécurité de base
doivent être observées, y compris les suivantes.
LIRE ET OBSERVER TOUTES
LES CONSIGNES DE SÉCURITÉ
DANGER
que l’eau est impliquée dans l’utilisation des appareils pour aquarium. Dans chacune
des situations suivantes, ne pas essayer de réparer l’appareil soi-même; l’expédier au
fabricant pour réparation ou jeter-le.
1) MISE EN GARDE:
débranchez immédiatement l’appareil.
2) Si l’appareil montre un quelconque signal de fuite d’eau anormale, débrancher-le
immédiatement de la prise de courant.
3) Examiner soigneusement l’appareil après l’installation. Il ne doit pas être branché s’il y
a de l’eau sur les pièces qui ne doivent pas être mouillées.
4) Ne pas faire fonctionner un appareil défectueux, dont le câble électrique ou la che
sont endommagés, ou qui a été échappé ou abîmé d’une quelconque façon.
5) An d’éviter que l’appareil ou la prise de courant soient mouillés, installer le cabinet
de aquarium et le bac à côté d’une prise de courant pour empêcher l’eau de dégoutter
sur la prise. L’utilisateur devrait faire une boucle d’égouttement (g. A DRIP LOOP) pour
chaque cordon électrique branché d’un aquarium à une prise de courant. La boucle
d’égouttement est la partie du cordon se trouvant sous le niveau de la prise de courant ou
le raccord si une rallonge électrique est utilisée, an d’empêcher que l’eau circule le long
du cordon électrique et entre en contact avec la prise de courant. Si la che ou la prise
de courant sont mouillées, NE PAS débrancher le cordon électrique : débrancher d’abord
le fusible ou disjoncteur qui fournit l’électricité à l’appareil et débrancher ensuite l’appareil
en vériant qu’il n’y a pas d’eau dans la prise.
6) Une surveillance étroite est nécessaire lorsque l’appareil est utilisé par des enfants ou
en leur présence.
7) Pour éviter les accidents, ne pas toucher les pièces en mouvement ou chaudes
comme chauffages, réecteurs, ampoules, etc.
8) Toujours débrancher l’appareil quand il n’est pas utilisé, quand des pièces doivent être
enlevées ou remplacées et avant l’entretien. Ne jamais tirer par le l pour débrancher
l’appareil ; prendre la che et débrancher l’appareil.
9) Ne pas utiliser un appareil pour un emploi autre que celui pour lequel il a été fabriqué.
Les pièces non vendues ou non recommandées par le fabricant pourraient compromettre
la sécurité de l’appareil.
10)
11) S’assurer qu’un appareil monté sur un aquarium soit bien installé avant de le faire
fonctionner.
12) Lire et observer tous les avis importants et les notices sur l’appareil.
13) Si une rallonge électrique est nécessaire, s’assurer qu’elle soit de la bonne taille. Un
cordon électrique de taille inférieur ou de moins d’ampères ou de watts que l’appareil
peut surchauffer. Le cordon doit être placé de façon à éviter que quelqu’un trébuche ou
le tire involontairement.
14) Cet appareil possède une che polarisée (une lame est plus large que les autres). Par
mesure de sécurité, cette che s’insère dans la prise polarisée que dans un sens. Si la
che n’entre pas complètement dans la prise, inverser la che. Si elle ne rentre toujours
pas, contactez un électricien qualié. Ne jamais utiliser une rallonge si la che peut être
insérée complètement. Ne pas essayer de contourner ce dispositif de sécurité.
ATTENTION: La pompe doit être connectée à un circuit qui est protégé par un disjoncteur
différentiel.
AVERTISSEMENT: Pour réduire le risque de choc électrique, produit à utiliser
uniquement dans fontaines portables autonomes ne dépassant pas 5 pieds dans
n’importe quelle dimension.
- Pour éviter tout choc électrique, une grande prudence est de rigueur dès
Dans le cas les composants électriques de l’appareil se mouillent,
Ne pas exposer cet appareil aux intempéries ou à une température en dessous de 0 ºC.
CONSERVER CES INSTRUCTIONS

EN
performances, a powerful water ow that can be adjusted using the included diffuser,
and a rotor made of materials extremely resistant to wear.
VOYAGER HP pumps can be rotated 360° and turned both upwards and downwards.
The special magnetic support guarantees perfect stability, even on thickness (up to 20
mm) and dirty glass, making VOYAGER HP the ideal product for water recirculation in
marine and fresh water aquariums.
Thanks to an electronic sensor, in case of abnormal conditions or if the rotor
accidentally blocks, the pump automatically turns the pump off, avoiding the
pump to overheat. To turn the pump on again, just unplug and than plug the device to
the power socket. In order to fully appreciate VOYAGER HP uniqueness and qualities,
please read and carefully follow the instructions hereunder.
GENERAL SAFETY INSTRUCTIONS:
VOYAGER HP range are made in conformity with the national and international
security laws.
1) Always isolate the pump from the mains electricity before installing or carrying out
any maintenance. Power to the pump must be supplied through a Residual Current
Device (RCD) with a rated residual operating current not exceeding 30mA.
2) This pump is designed to be used indoors and is not suitable for any outdoor
applications.
3) Before connecting the pump to the electricity supply, check there are any damages
on cord or plug.
4) The pump has a type Z cable link. The cable and the plug cannot be substituted or
repaired; in case of damages replace the entire pump.
5) ATTENTION: do not operate any appliance if it has a damaged cord or plug, if it is
malfunctioning, or if it has been dropped or damaged in any way.
6) Never operate the pump without water inside the impeller chamber or with liquids at
a temperature higher than 35° C / 95° F.
7) Do not use the pump with corrosive and abrasive liquids.
8) Do not use the pump for uses different (i.e. in bathroom or other applications) to
those for which it has been designed.
9) The pump cannot be used by people with handicaps or by children if they are not
supervised by a person responsible for their safety.
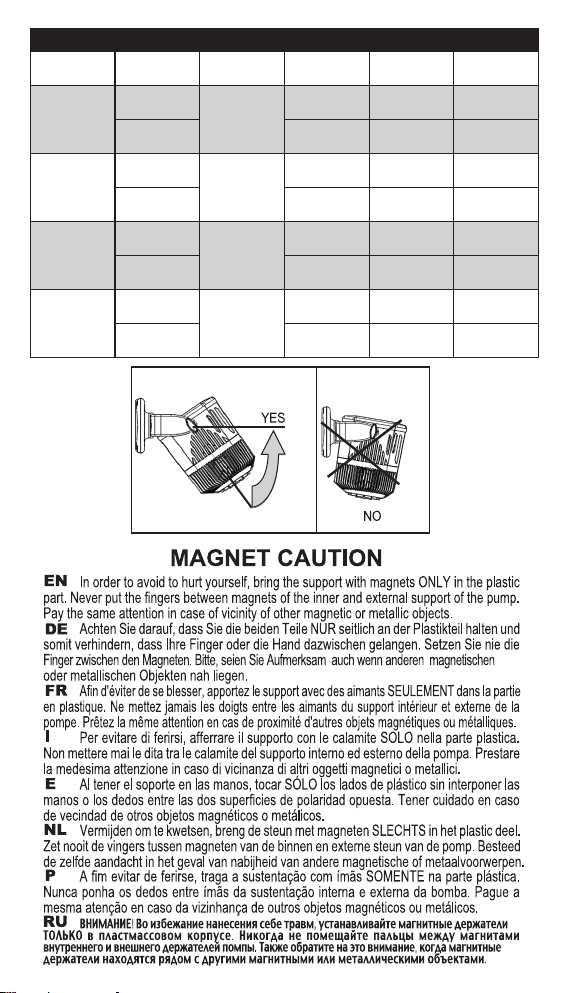
10) Avoid closeness with blades, sharp objects or other magnets to prevent accidental injuries
as the magnets of the support attract metal objects and other magnets with high force.
11) The magnets can provoke permanent damages to electronic devices and to other
objects that are sensitive to magnetic eld such as pacemakers, credit cards and keys:
always keep them at least 30 cm (12 inches) distance.
12) The magnets could loose partially or completely their attracting power if exposed
to temperature higher than 50° C / 122° F.
13) Always leave a drip-loop in the pump cable to prevent water running down the
cable and reaching the power source (Pic. A).
14) Avoid taking the pump by the cord during the installation or maintenance.
15) Do not try to attach directly the two magnets holder because the magnetic
attraction is very high. Hold them only on the external sides paying attention not to put
your hands or ngers in between.
16) When using the ow diffuser, always make sure it is correctly inserted in the front
cover. If not, it could hit the rotor and break it .
17) In case you want to control the pump with an electronic controller , we advise you
to use cycle regulators. In time, the continuous use of simple on-off switches with very
brief cycling times could harm the rotor.
PUMP INSTALLATION: USE AND REGULATION
To install VOYAGER HP, proceed as described below:
ATTENTION: before using the product, make sure that all parts are undamaged.
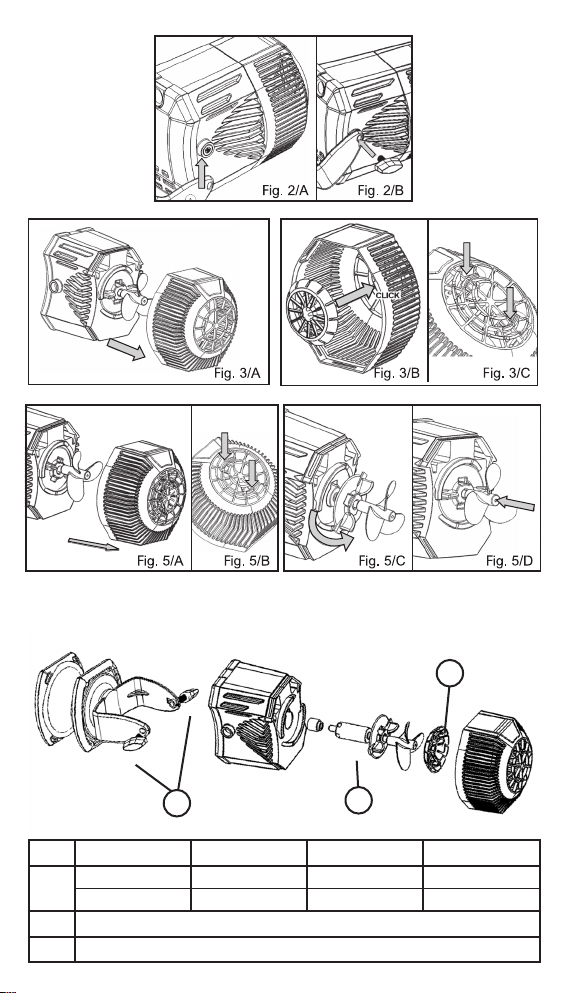
1) To connect the magnetic support to the pump, insert the pump into the staple
overlapping the holes (Pic. 2/A). Insert the handles in the staple in the holes (Pic.
2/B), screwing them in so to keep the pump in place.
2) To increase water ow, use the diffuser that comes with the pump (Pic. B). To insert
the diffuser, before placing the pump in the tank, take off the front cover (Pic. 3/A) and
place the diffuser inside, where the grill is. Make sure that the joints are well inserted
(Pic. 3/B - 3/C), so that, once reassembled the front cover, the diffuser does not touch
Dear Client,
thank you for choosing VOYAGER HP 7-8-9-10, a new generation of
stream pumps, extremely reliable though requiring minimum maintenance.
With their attractive design, VOYAGER HP pumps guarantee high

ONLINE HELP
SICCE TUTORIAL VIDEO
the impeller.
Warning: make sure that the diffuser is correctly inserted on the front cover. If not, it
could hit the impeller, causing damages.
3) Place the product inside the tank. Then, xing the external support at 10 cm / 3.93
inches from the centre of the internal support, carefully drag it until you start to feel the
opposite magnetic force.
Attention: the magnetic support has an elevated magnetic power, so attaching the
external magnet directly to the internal one may cause the glass to break or injure
your ngers.
4) Turn the pump so that the ow is directed where desired, then secure the lateral
handles tightly, so to keep the product in position.
5) To avoid vibrations and resonances or in case the product is connected and
controlled through external electronic meters, do not place the pump in contact with
lateral surfaces, near or on the bottom of the tank
6) Position the pump as advised (Pic. 4).
It is advisable to place the pump at an adequate distance from the bottom of the tank,
in order to avoid the suction of sand or other deposits that could block the rotor.
7) Insert the plug in the power socket.
MAINTENANCE
To carry out periodical maintenance operations, rst of all unplug the pump from the
power socket and then take the device completely out of the water.
In case of particularly calcareous water, we advise you to clean the pump more frequently.
Proceed as follows:
Take off the front cover (Pic. 5/A) and the diffuser (when used), applying light pressure
on the upper joints, from outside the front cover towards the inside (Pic. 5/B). Unscrew
the whole of the rotor (Pic. 5/C) and take it out of the motor body.
Thoroughly clean all pump parts under fresh water, using particular care for the front cover,
the whole of the rotor and its chamber and for the bush placed inside the motor body.
To remove tough deposits, use only a soft brush and vinegar, never hard objects.
Place the whole of the rotor in its original position, screwing it clockwise and making
sure it’s fastened tightly.
Make sure that the rotor spins freely, with a slightly axial movement. If the shaft is
completely blocked (Pic. 5/D), apply a light pressure on the centre (not on the rotor’s
blades) of the axis. Once again, check it the rotor spins. Reassemble all following the
instructions backwards.
ONLINE HELP
Watch our tutorial videos on THE SICCE YOU TUBE ofcial channel www.
youtube.com/SICCEspa.
INSTRUCTIONS FOR THE CORRECT DISCHARGE OF THE PRODUCT
ACCORDING TO EU DIRECTIVE 2002/96/EC
When used or broken, the product does not have to be discharged with
the other waste. It can be delivered to the specic electric waste collection
centers or to dealers who give this service. Discharge separately an electric
tool avoid negative consequences for the environment and for the Health and allows to
regenerate the materials so to have a great saving of energy and resources.
WARRANTY
This product is guaranteed against defects of materials and workmanship for a period
of 3 years from the date of purchase, except the rotor A. The warranty certicate must
be lled in by the dealer and must accompany the pump if it is returned for repair,
along with the cash register receipt or similar document. The warranty covers the
replacement of the defective parts. In case of improper use, tampering or negligence
by the buyer or user, the guarantee is void and expires immediately. The guarantee is
also void in absence of the cash register receipt or similar document. The shipping cost
to and from the factory, or the repair station, have to be paid by the buyer.
ATTENTION!
The limestone deposits and the natural wear-out of the components might cause a
raise of the pump’s noise. However, they do not affect the good functioning of the
pump. In this case, we recommend you to replace the rotor.

DE
Neben einem ansprechenden Design garantiert VOYAGER HP sehr hohe Leistung: ein
starker Wasseruss, dessen Menge durch den mitgelieferten Diffusor reguliert werden
kann, und ein Rotor, der aus besonders verschleissfesten Materialien besteht.
VOYAGER HP kann ganz nach oben und unten ausgerichtet und um 360° gedreht werden.
Durch die spezielle Magnethalterung wird der perfekte Halt und die Stabilität der Pumpe
gewährleistet, auch bei einer Glasstärke bis zu 20 mm und bei stark verschmutztem Glas.
Dadurch wird VOYAGER HP zum idealen Produkt für die Wasserzirkulation in allen Süß- und
Salzwasseraquarien.
Betrieb oder bei versehentlicher Blockierung des Rotors der Motor nicht überhitzt, da
die Pumpe automatisch abgeschaltet wird. Zum Wiederanschalten genügt es, den Stecker
herauszuziehen und wieder einzustecken. Um die Vorzüge und Besonderheiten von VOYAGER
HP möglichst gut zu nutzen, bitten wir Sie, die nachfolgenden Anweisungen aufmerksam zu
lesen und zu befolgen.
SICHERHEITSVORSCHRIFTEN:
VOYAGER HP entsprechen den aktuellen internationalen Sicherheitsnormen.
1) Vor Gebrauch der Pumpe ist die auf dem Etikett angegebene Netzspannung zu
überprüfen. Die Pumpe sollte über FI- Schutzschalter <30mA betrieben werden.
2) Die Pumpe darf nur unter Wasser verwendet werden und ist nicht für eine Verwendung
im Freien geeignet.
3) Nicht installieren wenn Kabel oder Pumpe in irgendeiner Weise defekt erscheinen.
4) Die Pumpe ist mit einem Z-Anschluss gebaut. Die Anschlussleitung dieses Gerätes kann
nicht ersetzt werden; bei Beschädigung der Leitung sollte das Gerät vernichtet werden.
5) ACHTUNG: Vor jedem Eingriff an der Pumpe die Stromversorgung aller elektrischen, im
Wasser eingetauchten Apparate abschalten.
6) Schalten Sie die Pumpe niemals ein, wenn die Kammer des Pumpenrads kein Wasser
enthält oder die Flussigkeitstemperatur über 35° C / 95° F liegt.
7) Die Pumpe darf nicht mit ätzenden oder abrasiven Flüssigkeiten verwendet werden.
8) Die Pumpe darf nicht für andere Anwendungen eingesezt werden.
9)
10) Aufgrund der hohen magnetischen Zugkraft des Magnethalters ist er außer Rechtweite
von Kindern zu halten.
11) Die Magneten können bei elektronischen und anderen Geräte, die auf Magnetfelder
empndlich sind, wie z.B. Herzschrittmacher, Kreditkarten und Schlüssel, permanente
Schäden verursachen: Halten Sie ihnen deshalb immer auf einer Distanz von mindestens
30 cm (12 inches)
12) Bei einem Temperatureinsatzbereich von 50° C / 122° F könnte der Magnet seine
Zugkraft teilweise, wenn nicht sogar ganz, verlieren.
13) Zu Ihrer eigenen Sicherheit empehlt es sich, mit dem Netzkabel eine Tropfschlaufe zu bilden,
die verhindert, dass evtl. am Kabel entlang laufendes Wasser in die Steckdose gelangt (Abb. A).
14) Das Kabel ist weder durchzuschneiden noch ist daran zu ziehen um die Stromspeisung
zu unterbrechen.
15) Nur zur Verwendung in Räumen. Für aquaristische Einsatzbereiche.
16) Bei der Verwendung der Flussdiffuser, immer darauf achten, dass sie ordnungsgemäß
in die vordere Abdeckung eingelegt ist. Wenn nicht, könnte es den Rotor brechen.
17) Wenn die Pumpe mit externen elektronischen Zählern gesteuert werden soll, sollten
dazu vorzugsweise Drehzahlregler verwendet werden, eine dauerhafte erzwungene
Verwendung einfacher On-Off-Schalter mit sehr geringen Zykluszeiten könnte langfristig
den Rotorblock belasten.
INBETRIEBNAHME
Um die Pumpe VOYAGER HP zu installieren, wie folgt vorgehen:
ACHTUNG: Vor der Inbetriebnahme des Produkts alle Teile auf Unversehrtheit prüfen.
1) Um die Magnethalterung mit der Pumpe zu verbinden, die Pumpe in die Gabel einlegen, dabei die
Öffnungen übereinander legen (Abb. 2/A). Die Befestigungsgriffe an der Gabel gegenüberliegend
befestigen (Abb. 2/B) und so anziehen, dass die Pumpe in ihrem Sitz gehalten wird.
2) Für einen stärkeren Fluss den mitgelieferten Diffusor verwenden (Abb. B) und vor dem
Einführen der Pumpe in das Becken wie nachfolgend beschrieben einsetzen: Frontplatte
abnehmen (Abb. 3/A), den Diffusor im Inneren in Gitternähe anbringen, darauf achten,
dass die Verbindungen richtig eingesteckt sind (Abb. 3/B - 3/C), damit der Diffusor nach
dem Wiederanbringen der Frontplatte nicht an das Laufrad stößt.
Achtung: Sicherstellen, dass der Diffusor richtig auf der Frontplatte eingesetzt ist. Ist dies
Sehr geehrte Kundin / Sehr geehrter Kunde,
vielen Dank, dass Sie sich für VOYAGER HP 7-8-9-10 entschieden haben.
Eine neue Pumpengeneration, charakterisiert durch hohe Zuverlässigkeit und
minimalem Wartungsbedarf.
Dank eines elektronischen Fühlers wird bei Unregelmäßigkeiten im
Die Pumpe darf ohne Aufsicht nicht von behinderten Menschen und von Kindern benutzt werden.
 Loading...