

Tidal
55 - 75 - 110
Owner’s Manual
Made by
Seachem Laboratories, Inc.
1000 Seachem Drive, Madison, GA 30052 USA
888-SEACHEM • www.seachem.com


English 1
Español 15
Français 27
Português 41
Italiano 53
Deutsche 65
Nederlands 77
Русский 89

1
IMPORTANT SAFETY INSTRUCTIONS
WARNING - To guard against injury, basic safety precautions should be observed, including the following:
READ AND FOLLOW ALL SAFETY INSTRUCTIONS
DANGER: To avoid possible electric shock, special care should be taken since water is employed in the
use of aquarium equipment. For each of the following situations, do not attempt repairs by yourself.; return the appliance to an authorized service facility for service or discard the appliance.
1. CAUTION: If electrical components of the appliance get wet, unplug the appliance immediately.
2. If the appliance shows any sign of abnormal water leakage, immediately unplug it from the power source.
3. Carefully examine the appliance after installation. It should not be plugged in if there is water on parts not
intended to be wet.
4. Do not operate any appliance if it has a damaged cord or plug, or if it is malfunctioning or has been dropped
or damaged in any manner.
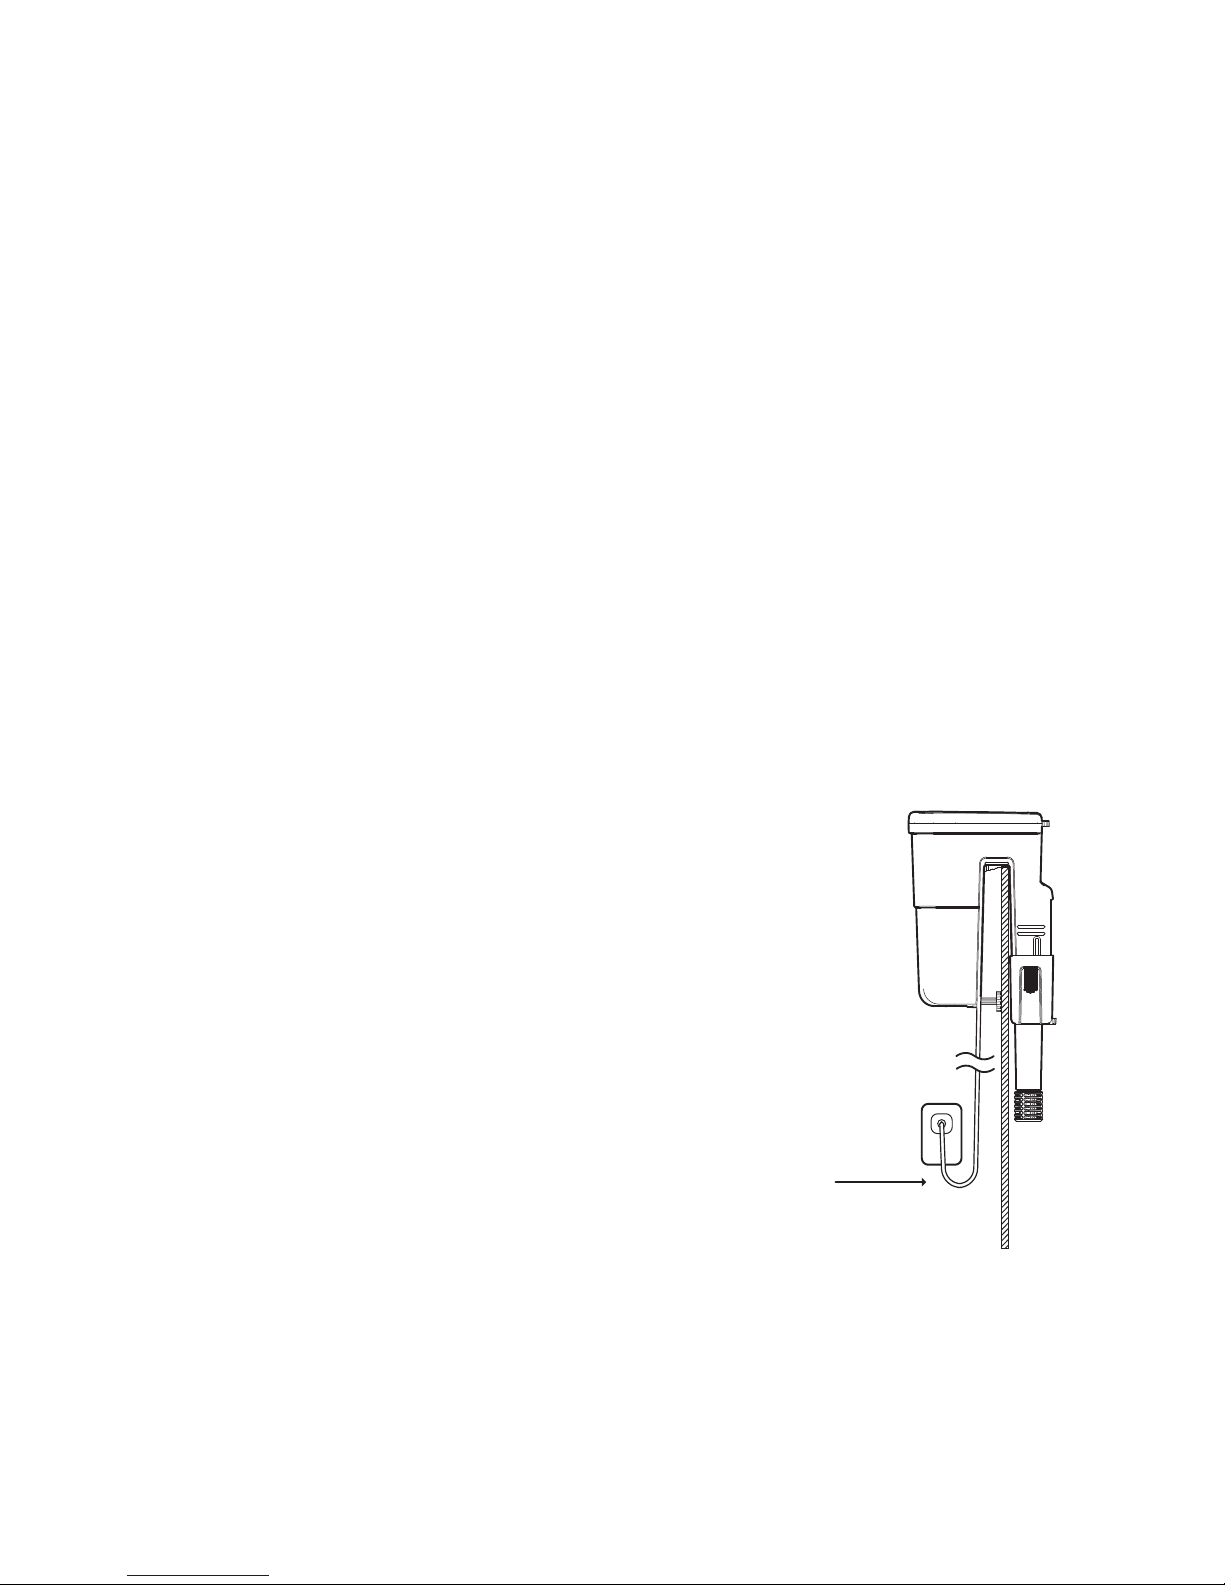
5. To avoid the possibility of the appliance plug or receptacle getting wet, position aquarium stand and tank or
the fountain to one side of a wall-mounted receptacle to prevent water from dripping onto the receptacle or
plug. A “drip-loop” shown in g. A should be arranged by the user for each cord connecting an aquarium
appliance to a receptacle. The “drip-loop” is the part of the cord below the level of the receptacle or the
connector if an extension cord is used, to prevent water traveling along the cord and coming in contact with
the receptacle. If the plug or receptacle does get wet, DON’T unplug the cord. Disconnect the fuse or circuit
breaker that supplies power to appliance. Then unplug and examine for presence of water in the receptacle.
6. Close supervision is necessary when any appliance is used by or near children.
7. To avoid injury, do not contact moving parts or hot parts such as heaters, reectors, lamp bulbs and the like.
8. Always unplug an appliance from an outlet when not in use, before putting on or taking o parts and before
cleaning. Never yank cord to pull plug from outlet. Grasp the plug and pull to disconnect.
9. Do not use an appliance for other than intended use. The use of attachments not recommended or sold by
the appliance manufacturer may cause an unsafe condition.
10. Do not install or store the appliances where it will be exposed to the weather or to temperatures below
freezing.
11. Make sure an appliance mounted on a tank is securely installed before operating it.
12. Read and observe all the important notices of the appliance.
13. If an extension cord is necessary, a cord with a proper rating should be used. A cord rated for less amperes
or watts than the appliance rating may overheat. Care should be taken to arrange the cord so that it will not
be tripped over or pulled.
14. 14) This appliance has a polarized plug (one blade is wider than other). As a safety feature, this plug will t in
a polarized outlet only one way. If the plug does not t fully in the outlet, reverse the plug. If it still does not
t, contact a qualied electrician. Never use with an extension cord unless plug can be fully inserted. Do no
attempt to defeat this safety feature.
CAUTION: Pump is to be connected to a circuit that is protected by a Ground Fault Circuit Interrupter.
WARNING: To reduce the risk of electric shock, use only on portable self-contained fountains no larger than 5
feet in any dimension.
SAVE THESE INSTRUCTIONS
2
TIDAL FILTERS are made in conformity with the national and international security laws.
READ AND FOLLOW ALL SAFETY INSTRUCTIONS
1. Check that the current on the pump’s label matches the outlet current. The pump has a dierential switch
(protector) through which the nominal current must be lower or equal to 30 mA.
2. Never operate the pump without water to avoid damage to the pump motor.
3. Before plugging in the pump, check that the cord and pump are not damaged.
4. The pump has a type Z cable link. The cable and plug cannot be substituted or repaired. In case of
damage, replace the entire pump
5. CAUTION: disconnect all submerged electrical products before doing maintenance in the water; in
case the plug or electrical outlet is damaged, switch o the circuit breaker before disconnecting the
plug from the outlet.
6. The lter can be run in liquids or in any environment with a maximum
temperature of 35°C/95° F.
7. Do not use the lter for purposes (i.e. in bathroom or similar applications)
other than for which it was designed for.
8. Avoid lter use with corrosive or abrasive liquids.
9. The lter has not been designed for use by children or mentally
challenged individuals. Appropriate adult supervision or persons
responsible for personal safety is required.
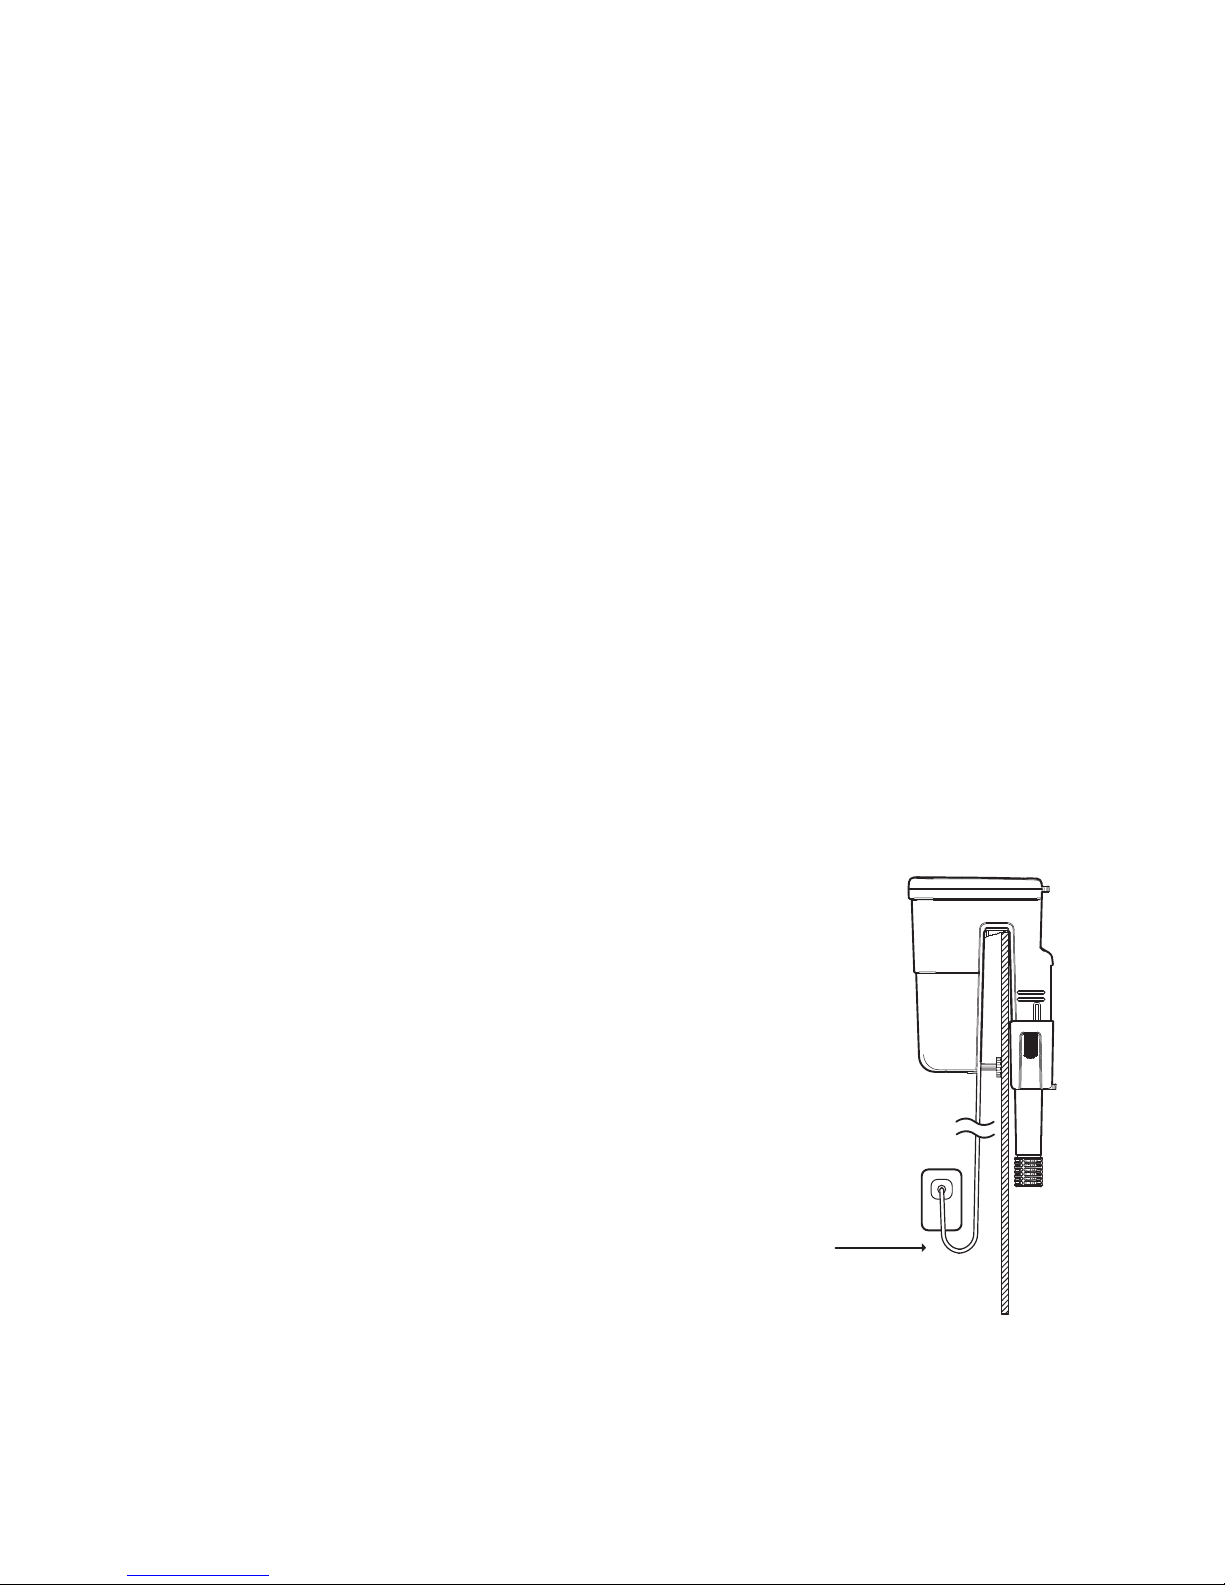
10. To prevent water from accidentally wetting the plug or electrical outlet,
make a loop in the cord under the electrical outlet level (see Pic. A)
11. Do not disconnect the lter from an electrical outlet by pulling the cord.
12. The lter can only be used in the above-mentioned applications and is
only for indoor use.
INSTRUCTIONS FOR THE CORRECT DISPOSAL OF THE PRODUCT ACCORDING TO EU DIRECTIVE
2002/96/EC
When used or broken, this product does not have to be disposed with other waste. It can be delivered to
specic electrical waste collection centers or to dealers who provide this service. Disposal of electrical
products separately avoids negative consequences for the environment and for overall public health and
allows the reuse of materials providing savings of energy and resources.
A.

3
LIMITED WARRANTY
Seachem guarantees this product (see Exclusions below) to the original purchaser against defects of
materials and workmanship for a period of ve (5) years from the date of original purchase, except for
the pump’s impeller, which is guaranteed for a period of six (6) months. This warranty is limited to repair
or replacement (at Seachem’s option) of defective product only and does not cover loss of aquarium life,
personal injury, property loss, or damage arising from the use of the product. You must retain original
proof of purchase to validate the warranty. Any warranty herein shall run concurrently with, and not in
addition to, any minimum warranty periods established by applicable law.
Claims made under warranty shall be led online at www.seachem.com by the original purchaser
and who must provide proof of purchase at the time of ling. The claimant must obtain a “Return
Merchandise Authorization” at the time of ling before sending any product for warranty or technical
service. The purchaser bears the cost of shipping to and from the service center or repair station.
EXCLUSIONS. This warranty does not cover the following: *Damage resulting from accident, misuse,
abuse, lack of reasonable care, use of the product that is other than normal or ordinary, using the
project in abnormal working conditions or any other failures not resulting from defects in materials or
workmanship. *Damage resulting from modication, tampering with or attempted repair by anyone other
than Seachem or its designee. * Transfer of the product to someone other than the original purchaser.
* Subjecting the product to electrical service not specied in the packaging; the original purchaser is
responsible for providing adequate electrical facilities.
EXCLUSION DAMAGES AND LIMITATION OF IMPLIED WARRANTIES
Your sole and exclusive remedy is product repair or replacement as provided in this Limited Warranty.
The company disclaims any liability for incidental and consequential damages for breach of any express
or implied warranty or conditions, including the implied warranties or conditions of merchantability,
merchantable quality, tness for a particular purpose, or of satisfactory quality with respect to this
product. This writing constitutes the entire warranty agreement of the parties with respect to the subject
matter hereof, no waiver or amendment shall be valid unless in writing signed by Seachem. Any implied
warranties herein are limited to one year or the shortest period allowed by the law of your jurisdiction.
TECHNICAL SPECIFICATIONS
Tidal 55
Tidal 75
Tidal 110
Aquarium Size
Up to 55 US
Gal
Up to 200
Liters
Up to 75 US
Gal
Up to 300
Liters
Up to 110 US
Gal
Up to 400
Liters
Flow Rate 250 US GPH 1000 L/H 350 US GPH 1500 L/H 450 US GPH 2000 L/H
6 5 8 7 12 10
Watts
(120 v - 60Hz) (230 v - 50Hz) (120 v - 60Hz) (230 v - 50Hz) (120 v - 60Hz) (230 v - 50Hz)
Filter Volume 0.32 US Gal 1.2 Liters 0.50 US Gal 1.9 Liters 0.85 US Gal 3.2 Liters

4
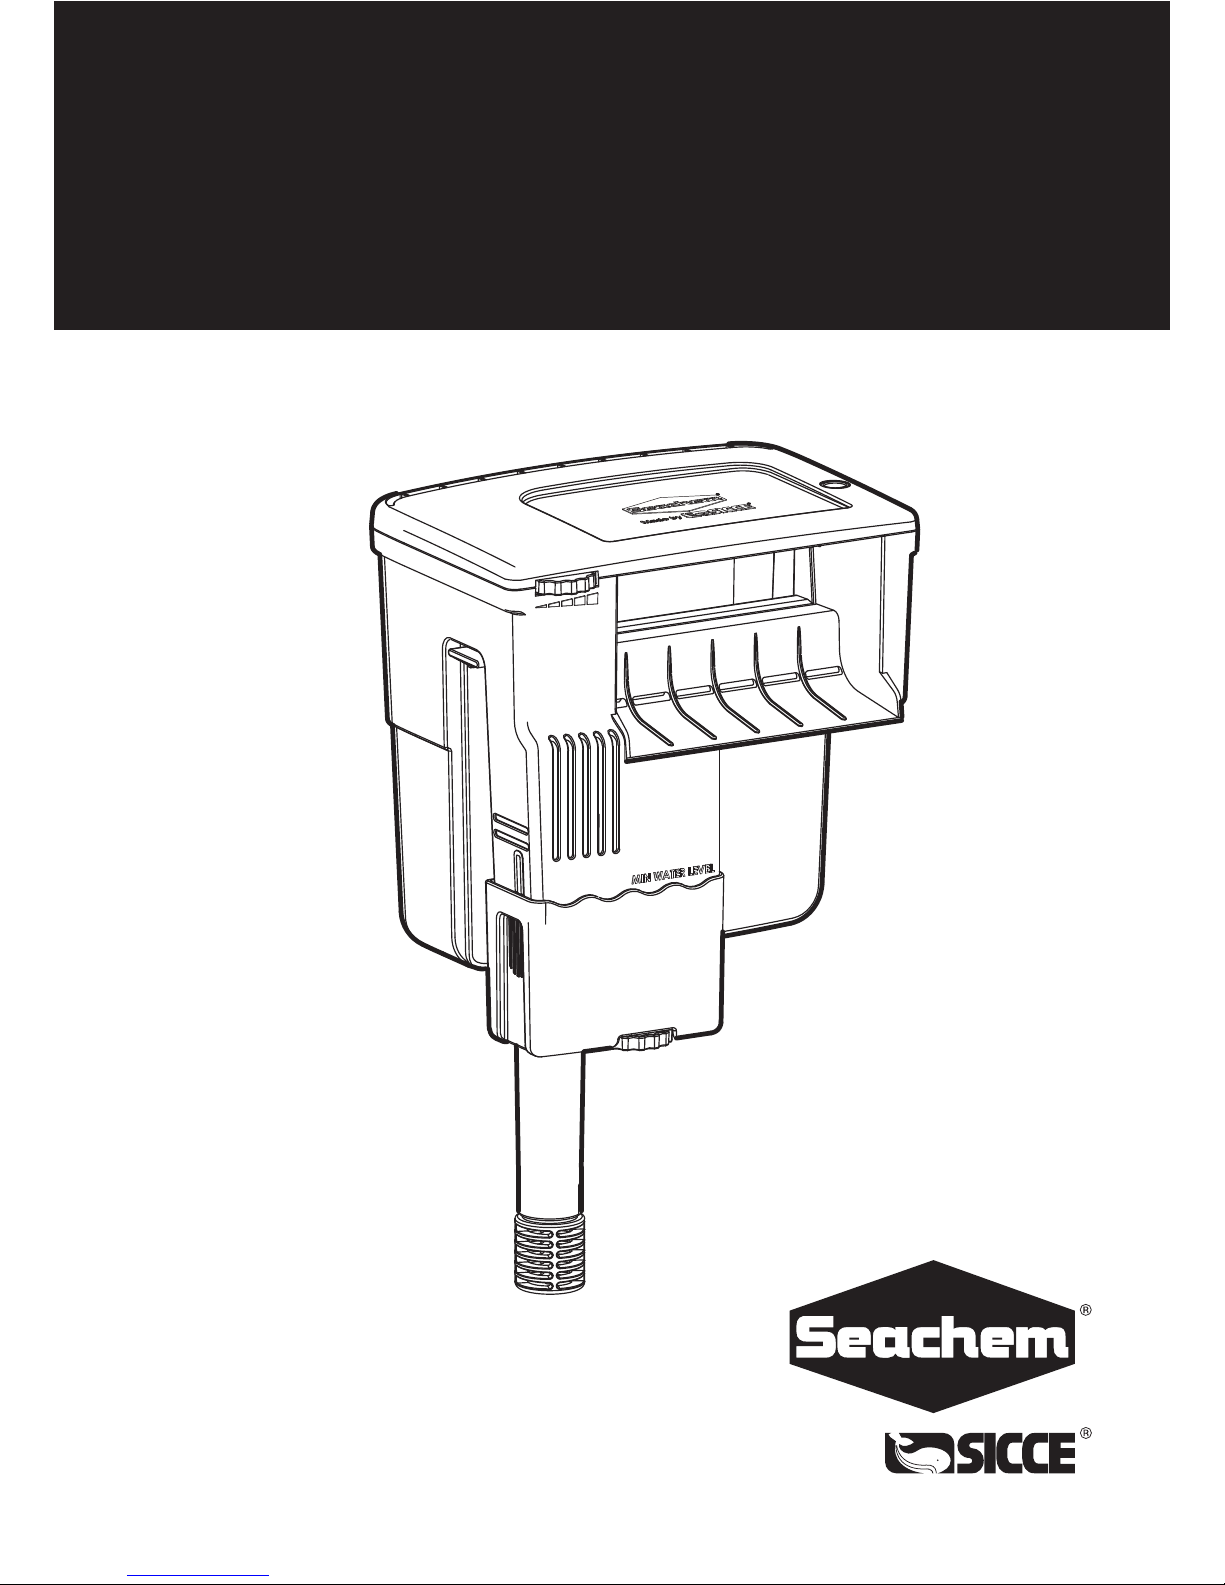
Congratulations on the purchase of your new Seachem Tidal™ hang on power lter. You can be
completely condent that you have invested in a well-engineered premium lter that will keep your
aquarium clean and healthy with minimal maintenance for years to come. The Seachem Tidal™
range of lters has been designed and made specically for Seachem by Sicce in Italy to insure the
highest quality and top performance possible.
Features:
1. Low wattage to high ow ratio allows for power savings with excellent circulation
2. Silent operation for even the quietest home or oce environment
3. Self-priming pump allows for reliable easy start up
4. Low maintenance for ease of long-term aquarium care
5. Self-cleaning impeller reducing need for pump maintenance
6. Non-corrosive parts allow for use in freshwater or saltwater aquariums
7. Exceptional high capacity lter basket allows for use of virtually any lter media
8. Included Seachem Matrix™ bio-media completely removes ammonia, nitrite and nitrate
9. Removable lter basket allows for easy remote cleaning
10. Filter cover doubles as a secure tray for lter basket to avoid spilling while remote cleaning
11. Ventilation slots allow even airow and enhanced gas exchange
12. Compressed prole reduces interference with aquarium placement
13. Leveling dial allows for exact positioning on aquarium wall
14. Surface skimming pulls oating organics and scum from aquarium surface
15. Adjustable ow rate allows for versatile use in a range of aquarium environments
16. Adjustable intake from surface vs. depth allows for focus on specic ltered area
17. Telescoping intake allows for intake at any depth
18. Heater holder clip allows for secure and even heat dispersion through the lter’s ow
19. Return ow wall oers aeration slots to increase redox and aeration of aquarium
20. Maintenance monitor shows when the lter basket needs cleaning
Simply put, you have purchased the best hang on lter available. Thank you.
INTRODUCTION
5
PARTS CHECKLIST
Maintenance alert device
Seachem Matrix™ bio-media
Bottom foam filter
Filter basket
Flow regulation dial
Surface skimmer intake
Low wattage,
self-priming pump
Self-cleaning impeller
Dual intake regulation dial
Telescoping intake tube
Reversible filter cover snaps to
filter basket during maintenance
1
2
4
5
3
6
8
Aerating return flow7
10
Leveling dial9
11
12
Heater holder
14
Pump housing13
15

6
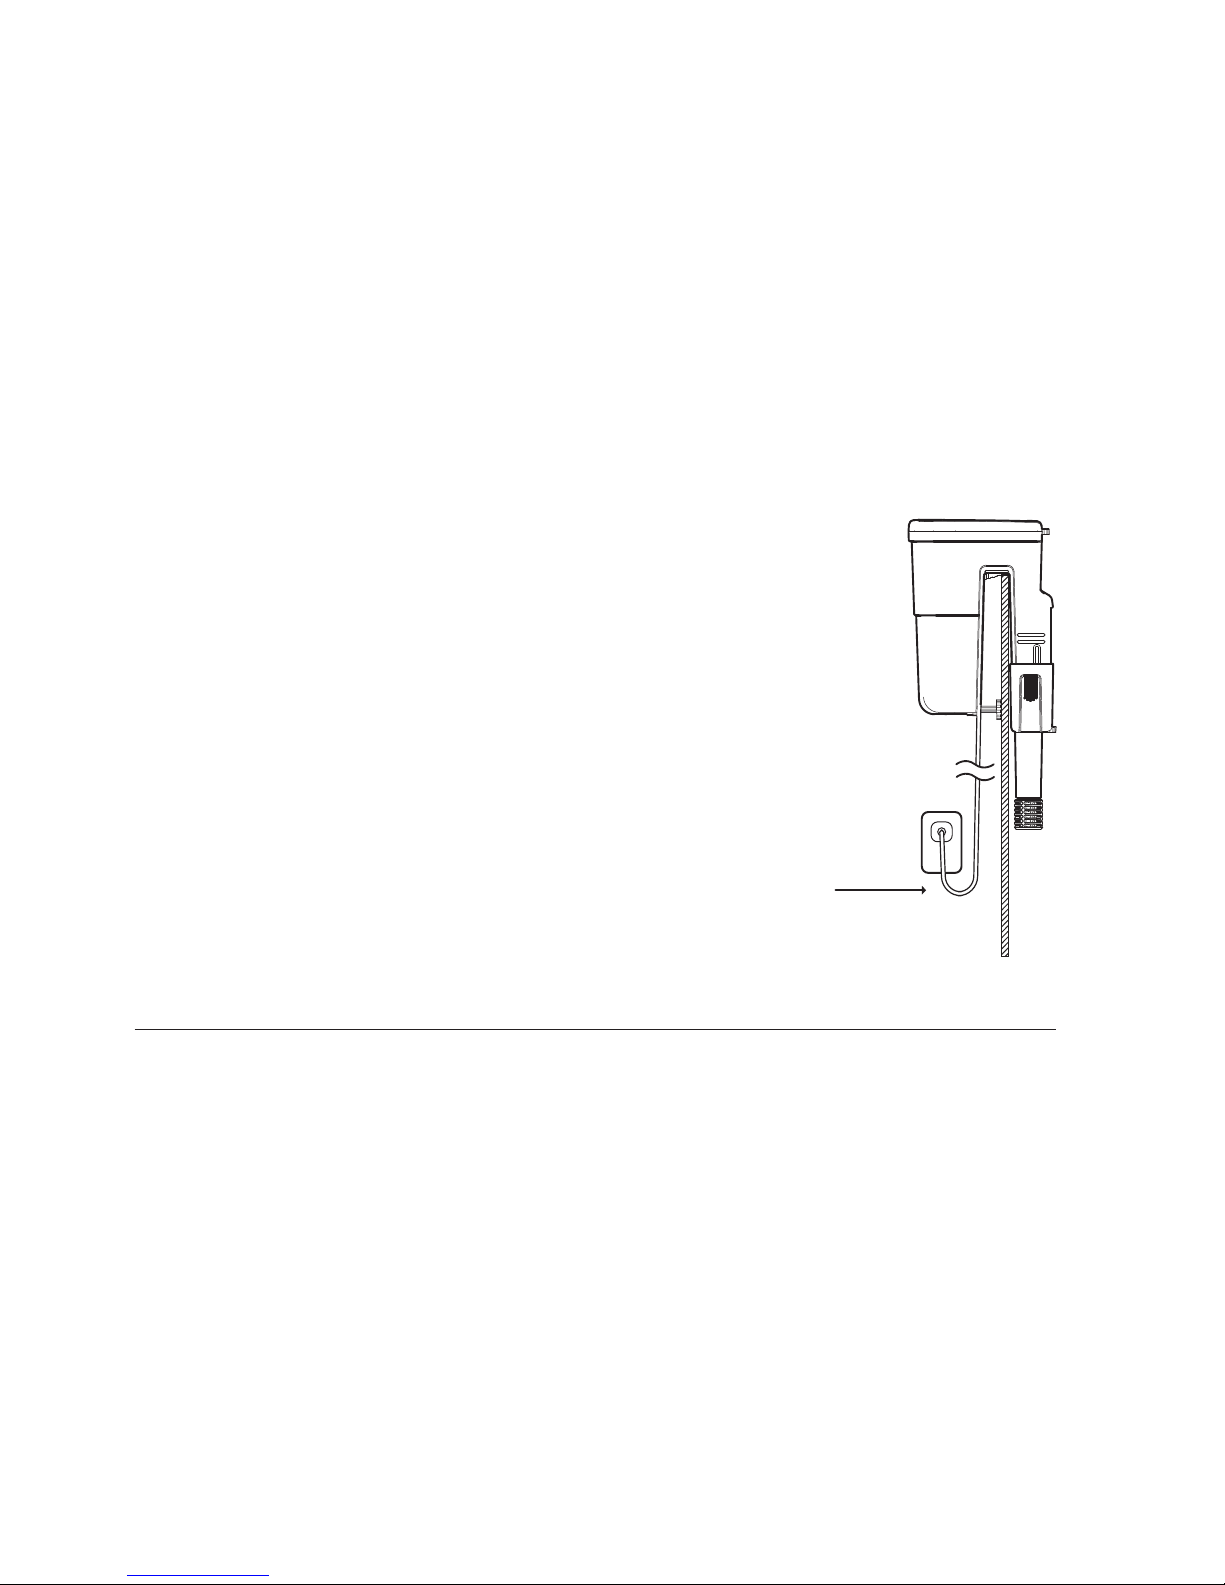
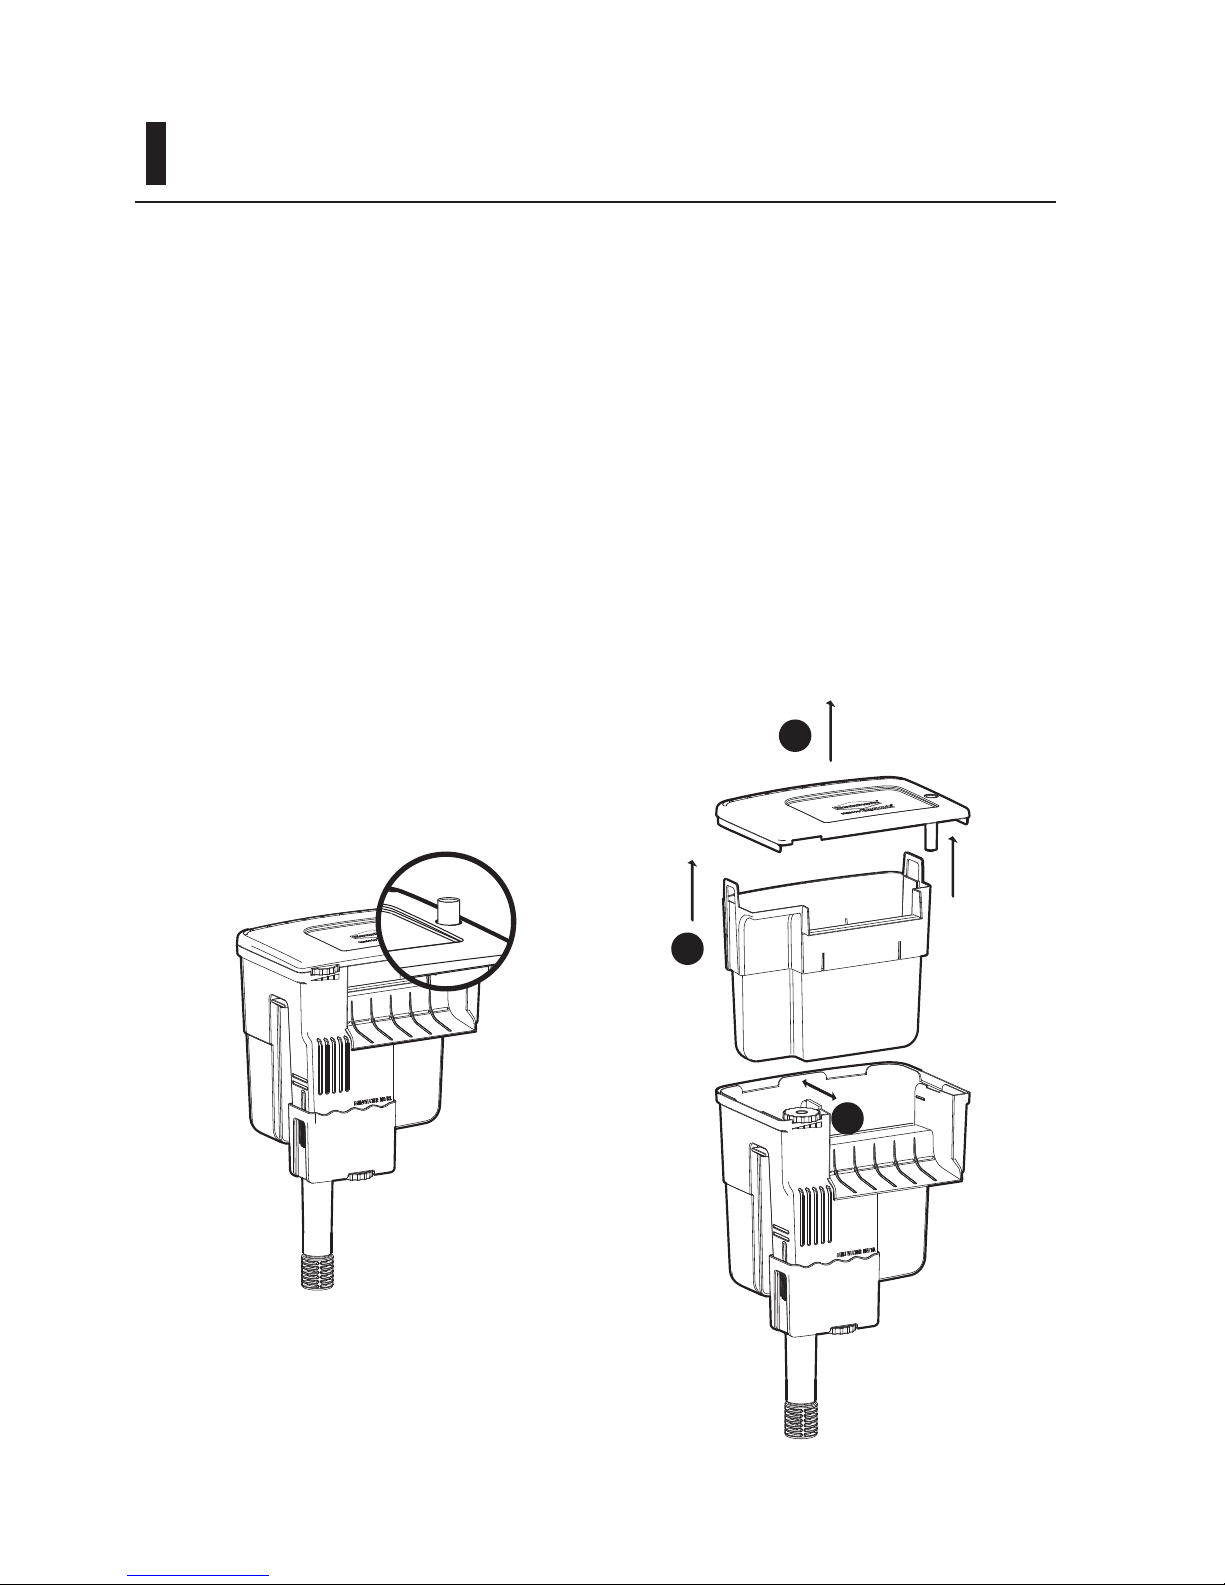
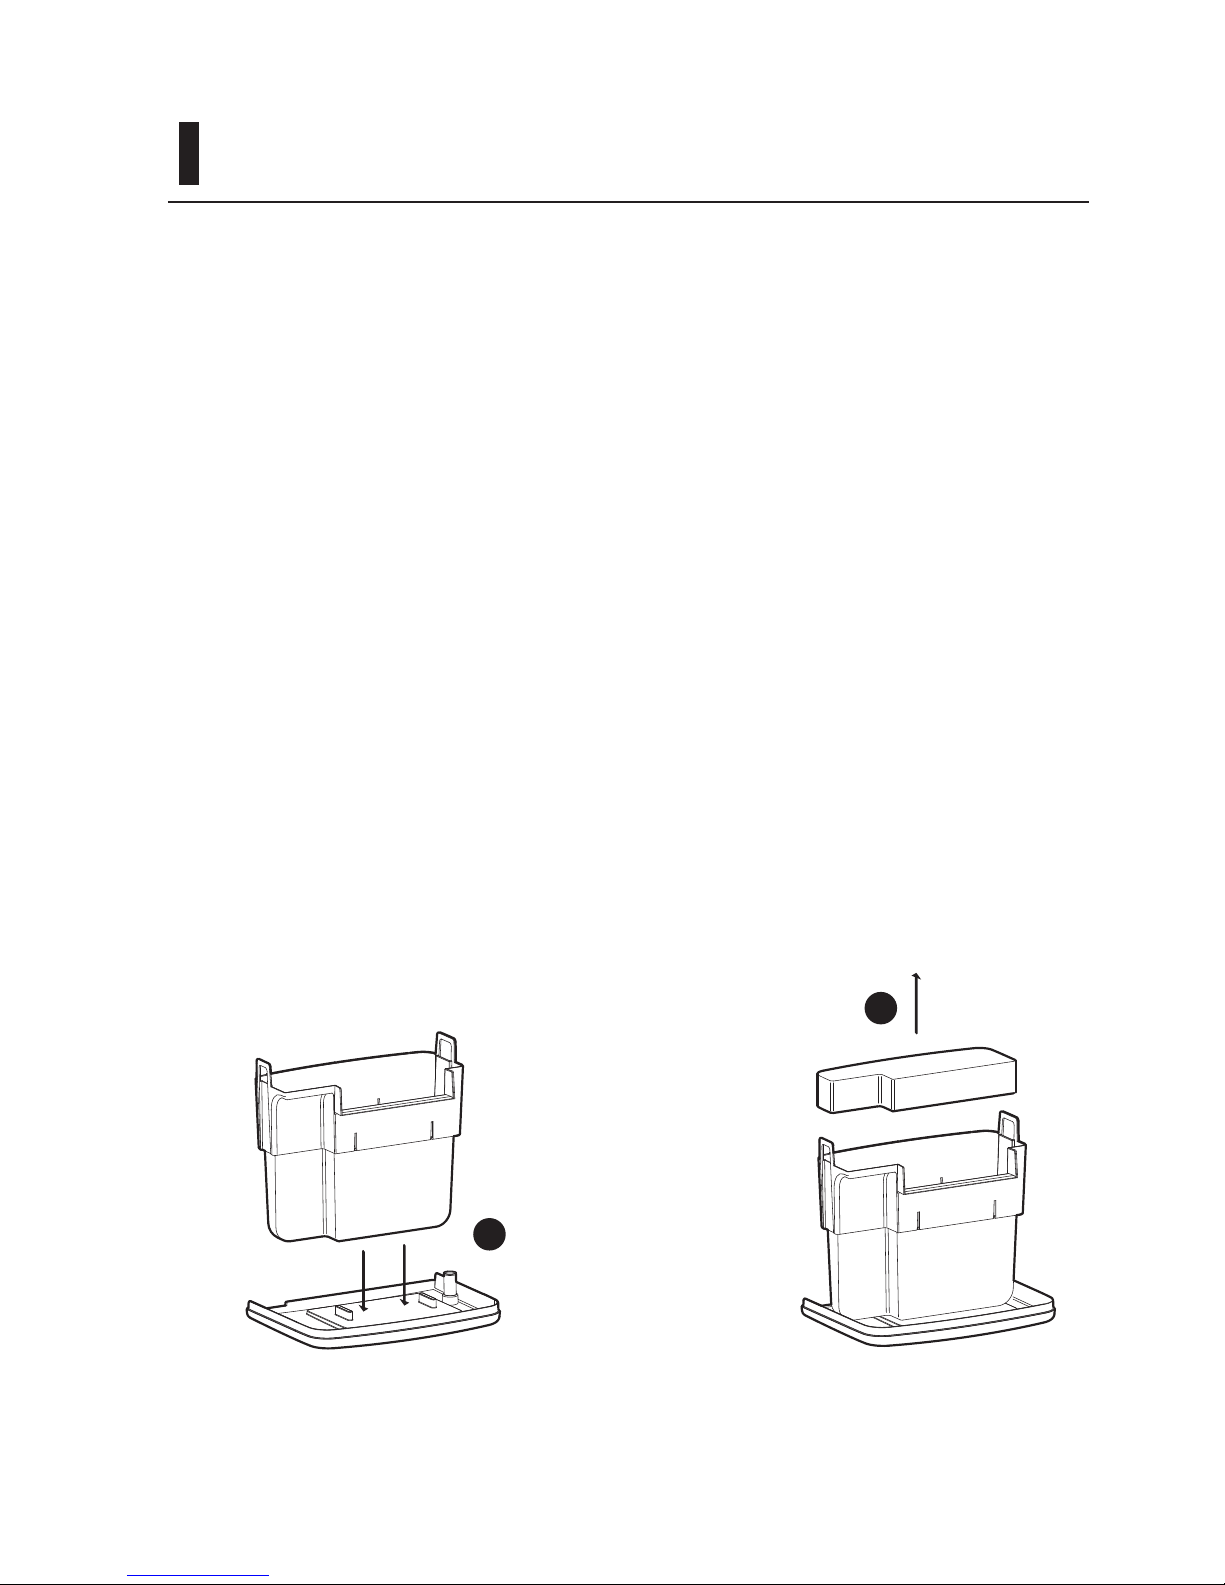
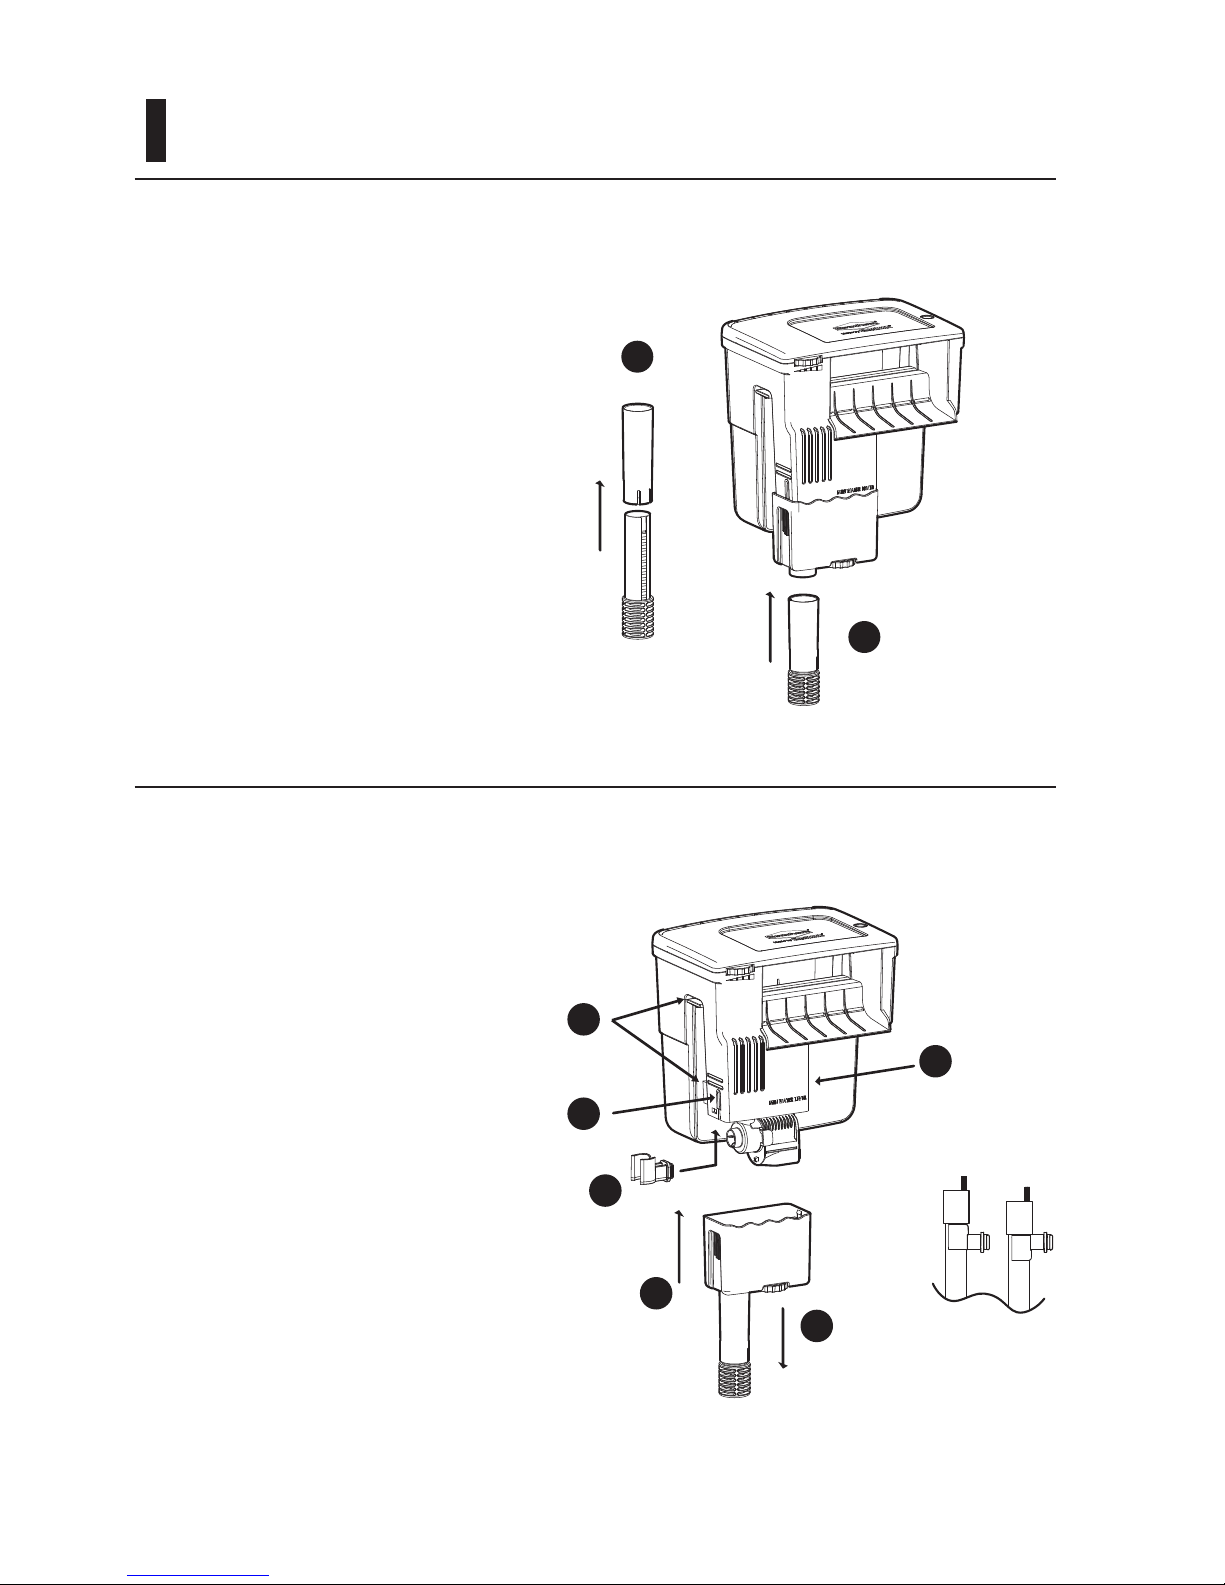
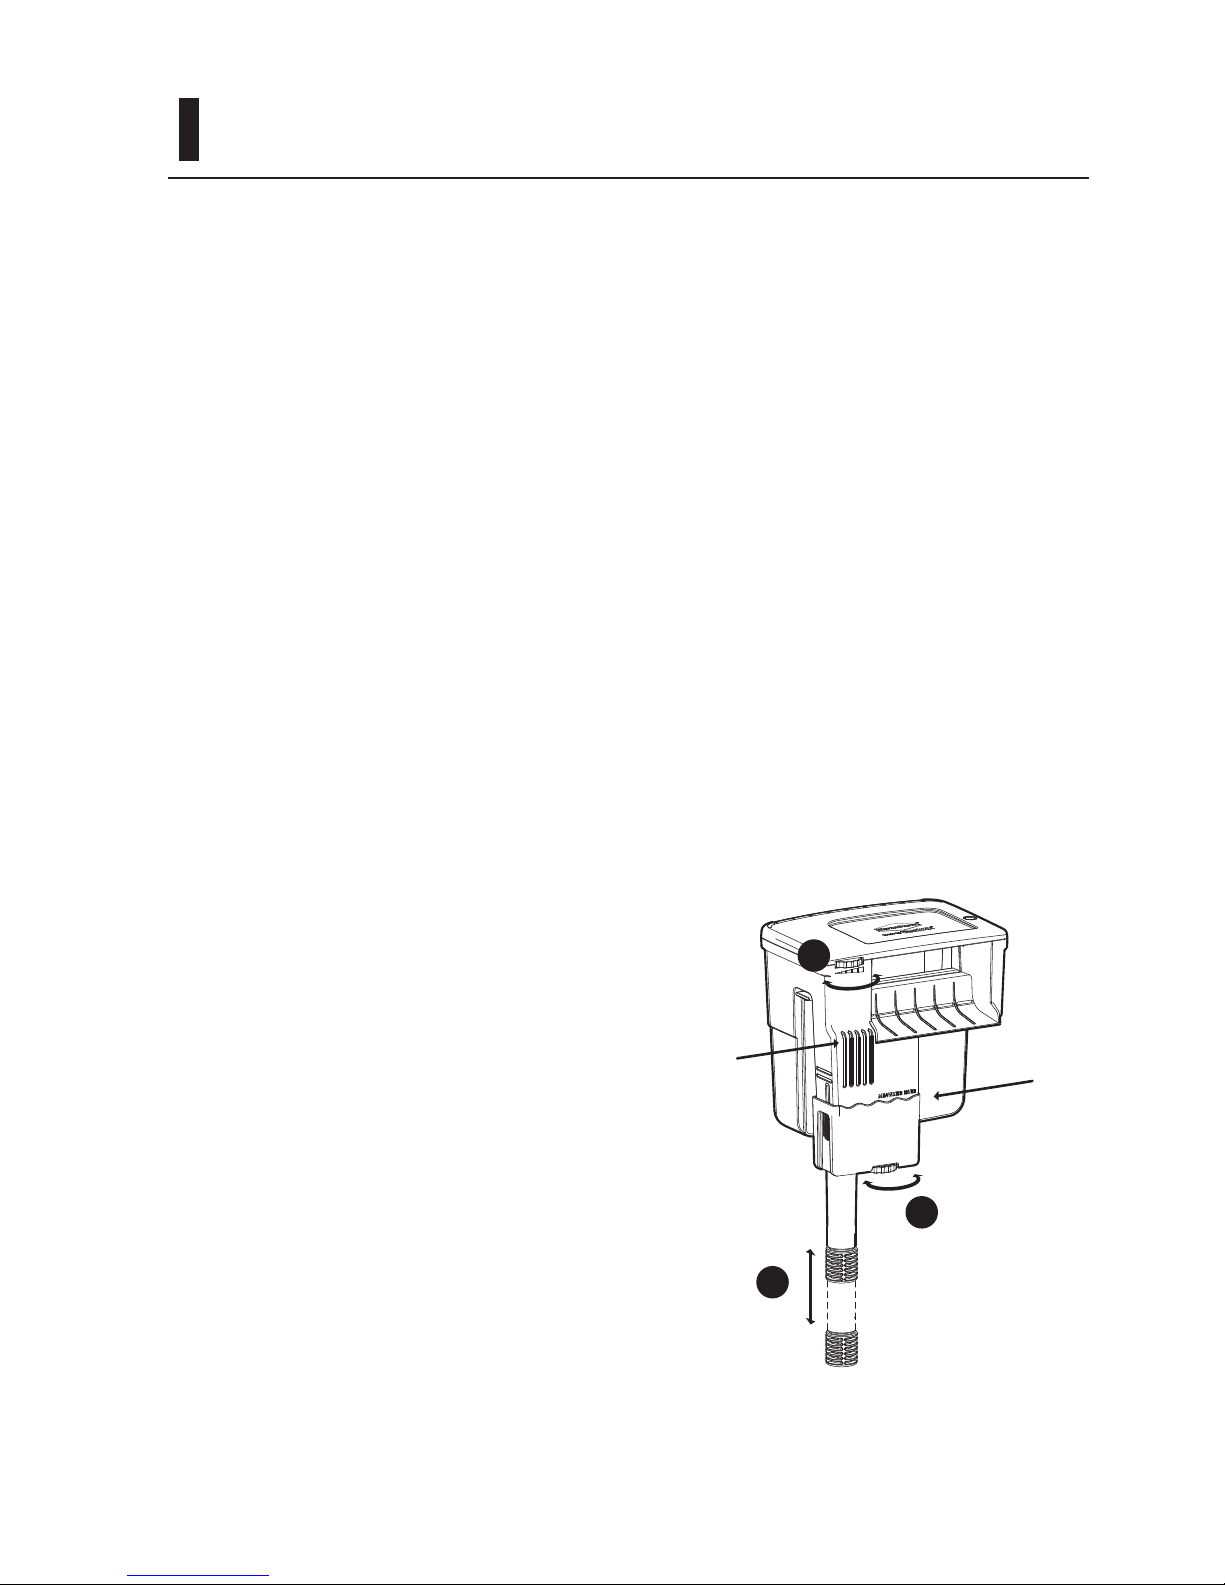
ASSEMBLY AND STARTUP
Figure 1
Figure 2
High Low
Insert bottom half of the
telescoping intake tube into
the top half (1). Then, insert the
telescoping intake tube in place
on the pump case (2). (Figure 1)
If you wish to hang a heater on
the lter (Figure 2), press the
sides of the lter (1), pull down
to remove the pump housing
(2), slide in the heater holder to
the bottom of the lter housing
(3). The heater holder can be
inserted to face up or down
depending on the desired
position of the heater. Insert the
pump’s cable into the guides
(4) before re-placing the pump’s
housing (5).
1
2
1
1
3
2
5
4

7
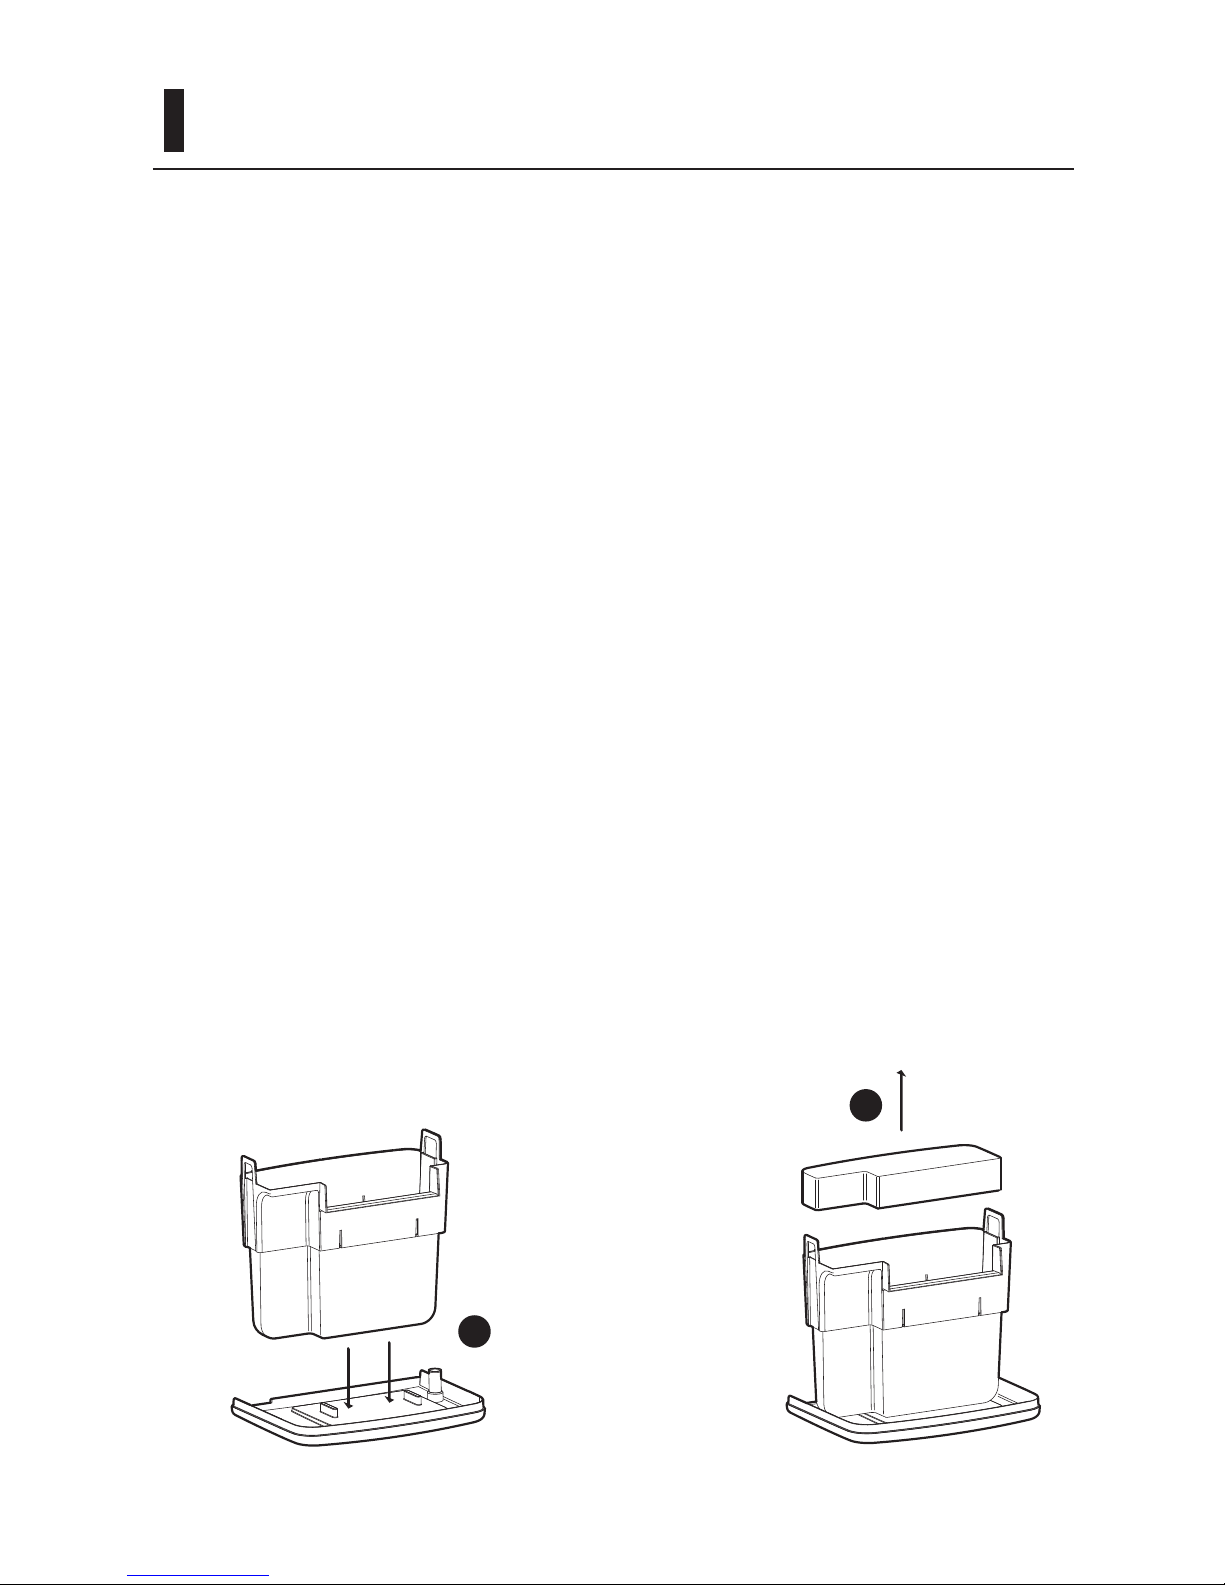
Figure 3
Figure 4-A Figure 4-B
Screw the lter leveling dial into
the bottom of the lter housing
to prepare to hang and level the
lter.
Place the lter on the aquarium
edge (Figure 4-A) and adjust
the leveling dial by screwing or
unscrewing it until the lter is
level with the aquarium.
Insert the pump cord into the
guides as shown (Figure 4-B)
and run the cord to the outlet
making certain to form a drip
loop as shown in the Safety
Instructions and in Figure 4-B.
ASSEMBLY AND STARTUP

8
Filling the Filter Media Basket
Remove all plastic bags containing ltration
media prior to starting the lter. All Tidal™
Filters have been designed to hold any type
of lter media. In general there are three types
of ltration used in most aquaria – mechanical,
chemical, and biological.
Mechanical ltration includes media that
capture waste for removal directly from the lter.
Chemical ltration includes ltration media,
which work to chemically remove dissolved
compounds from the water. Biological ltration
provides a housing for bacteria to grow and
breakdown organic waste.
All Tidal™ Filters include a bottom foam lter
for mechanical ltration and Matrix™ bio
media for exceptional biological ltration.
There are a variety of chemical ltration options
available for many diering purposes given a
variety of aquarium environments. Seachem
MatrixCarbon™ is a preferred option in almost
any aquarium setup. MatrixCarbon™ is
available pre-bagged for any size Tidal™ Filter.
Thoroughly rinse the foam lter and all lter
media under running water before placing
them in the lter basket. Layer the media with
the foam lter on the bottom, then any chemical
ltration media such as MatrixCarbon™ and
lastly the Matrix™ biological media. Do not
remove Matrix™ from its mesh bag. The
bag is packaged folded over; lay mesh bag
lengthwise and distribute Matrix™ evenly
before placing in it in the lter basket. In order
to more quickly seed Matrix™ with bacteria,
we recommend the addition of Seachem
Stability™ to your aquarium. The internal
basket prevents water bypass and allows for
quick removal and cleaning of the foam lter
and any media used. To avoid interfering with
proper ow through the lter do not overll the
lter media basket. An indication of this will be
activation of the maintenance alert or dripping
from the right side of the return ow wall (see
Figure 10, page 12).
1 2 3
Figure 5: Layering Filtration Media (bottom to top)
Mechanical
(Foam Filter)
Chemical
(MatrixCarbon)
Biological
(Matrix)

9
After assembly and installation of
the Tidal™ Filter on a lled aquarium
connect the power cord to the intended
outlet. The lter is self-priming and will
immediately begin ltering water. Adjust
the three possible settings according to
preferences or needs (Figure 6):
1. Raise or lower the telescoping
intake to the desired depth in the
aquarium.
2. Adjust the total amount of
ow through the lter. Adjust
performance to a specic aquarium
volume, type, or provide an
environment for sh which prefer
more or less water movement or
oxygenation. This feature oers up
to 80% reduction of maximum ow
intake while making continuous
full use of the lter motor. When
reduced intake ows are selected,
the reltration grid allows for
water to re-circulate through the
lter media to maximize ltration
performance through increased
contact time
3. Adjust the amount of ow intake
from the surface vs. the telescoping
intake.
Figure 6
2
3
1
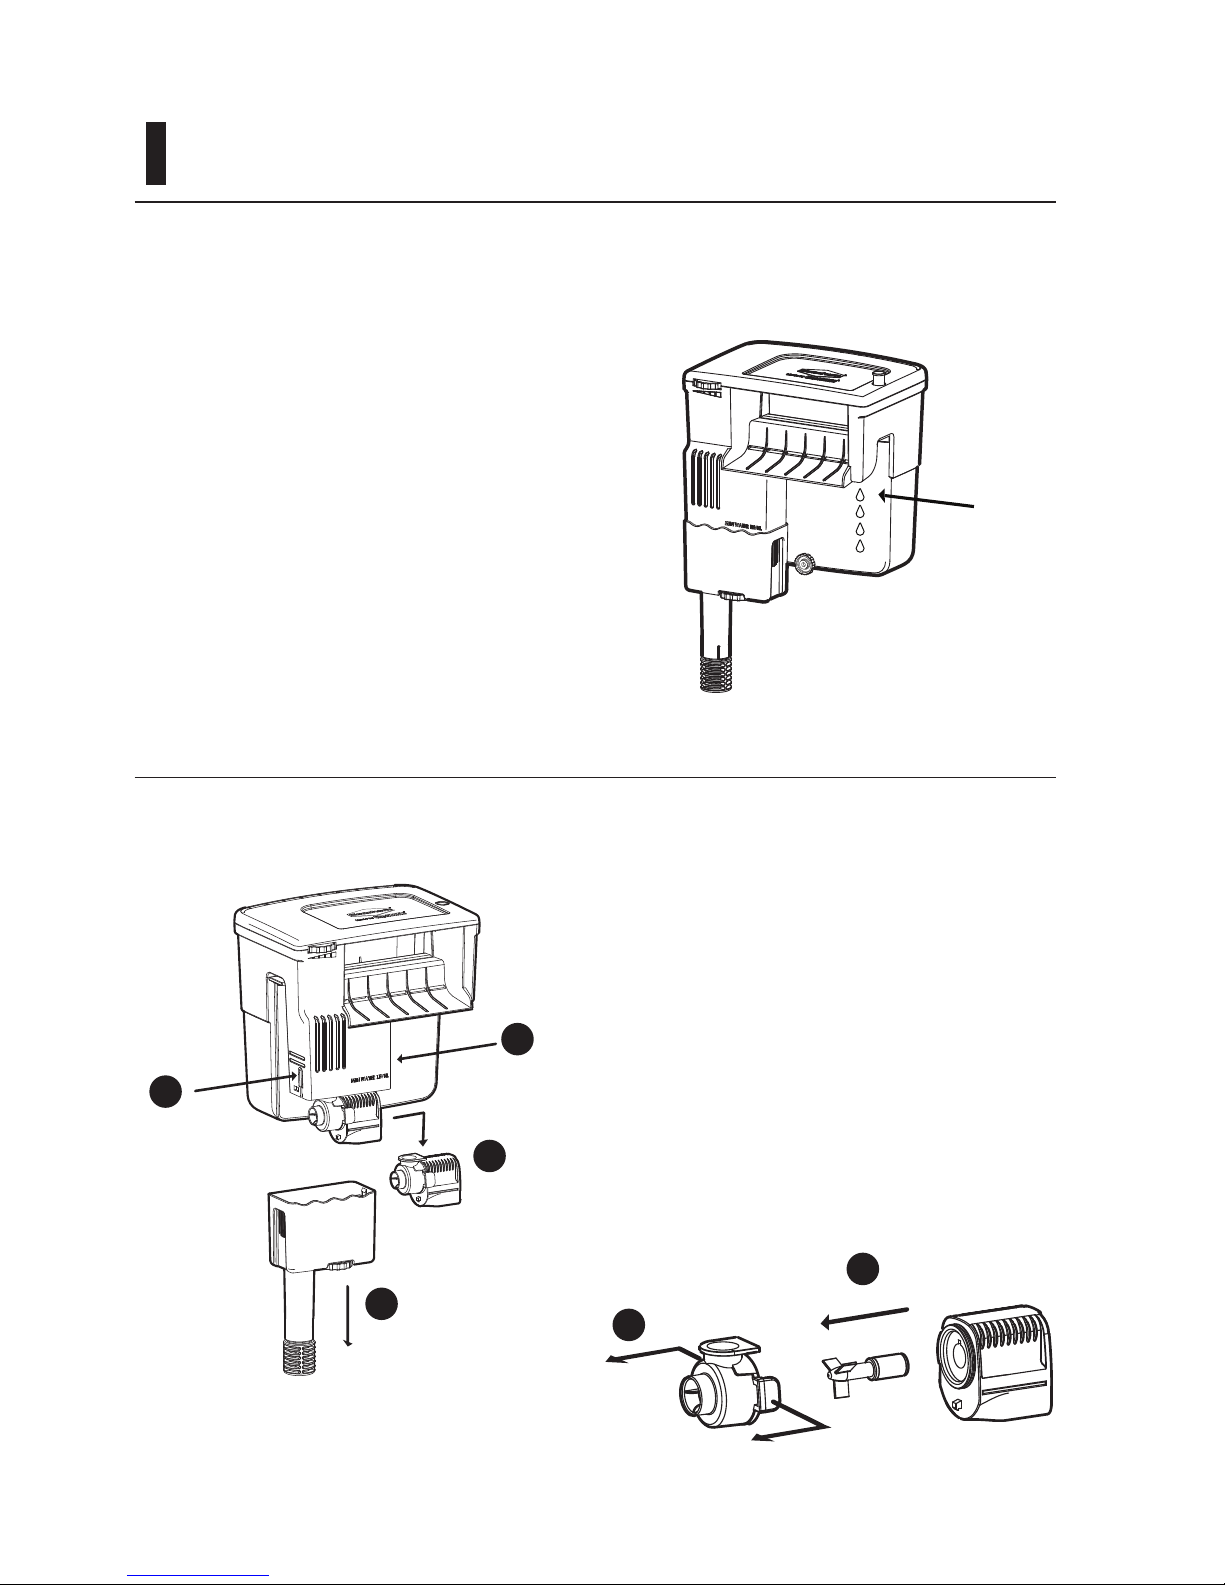
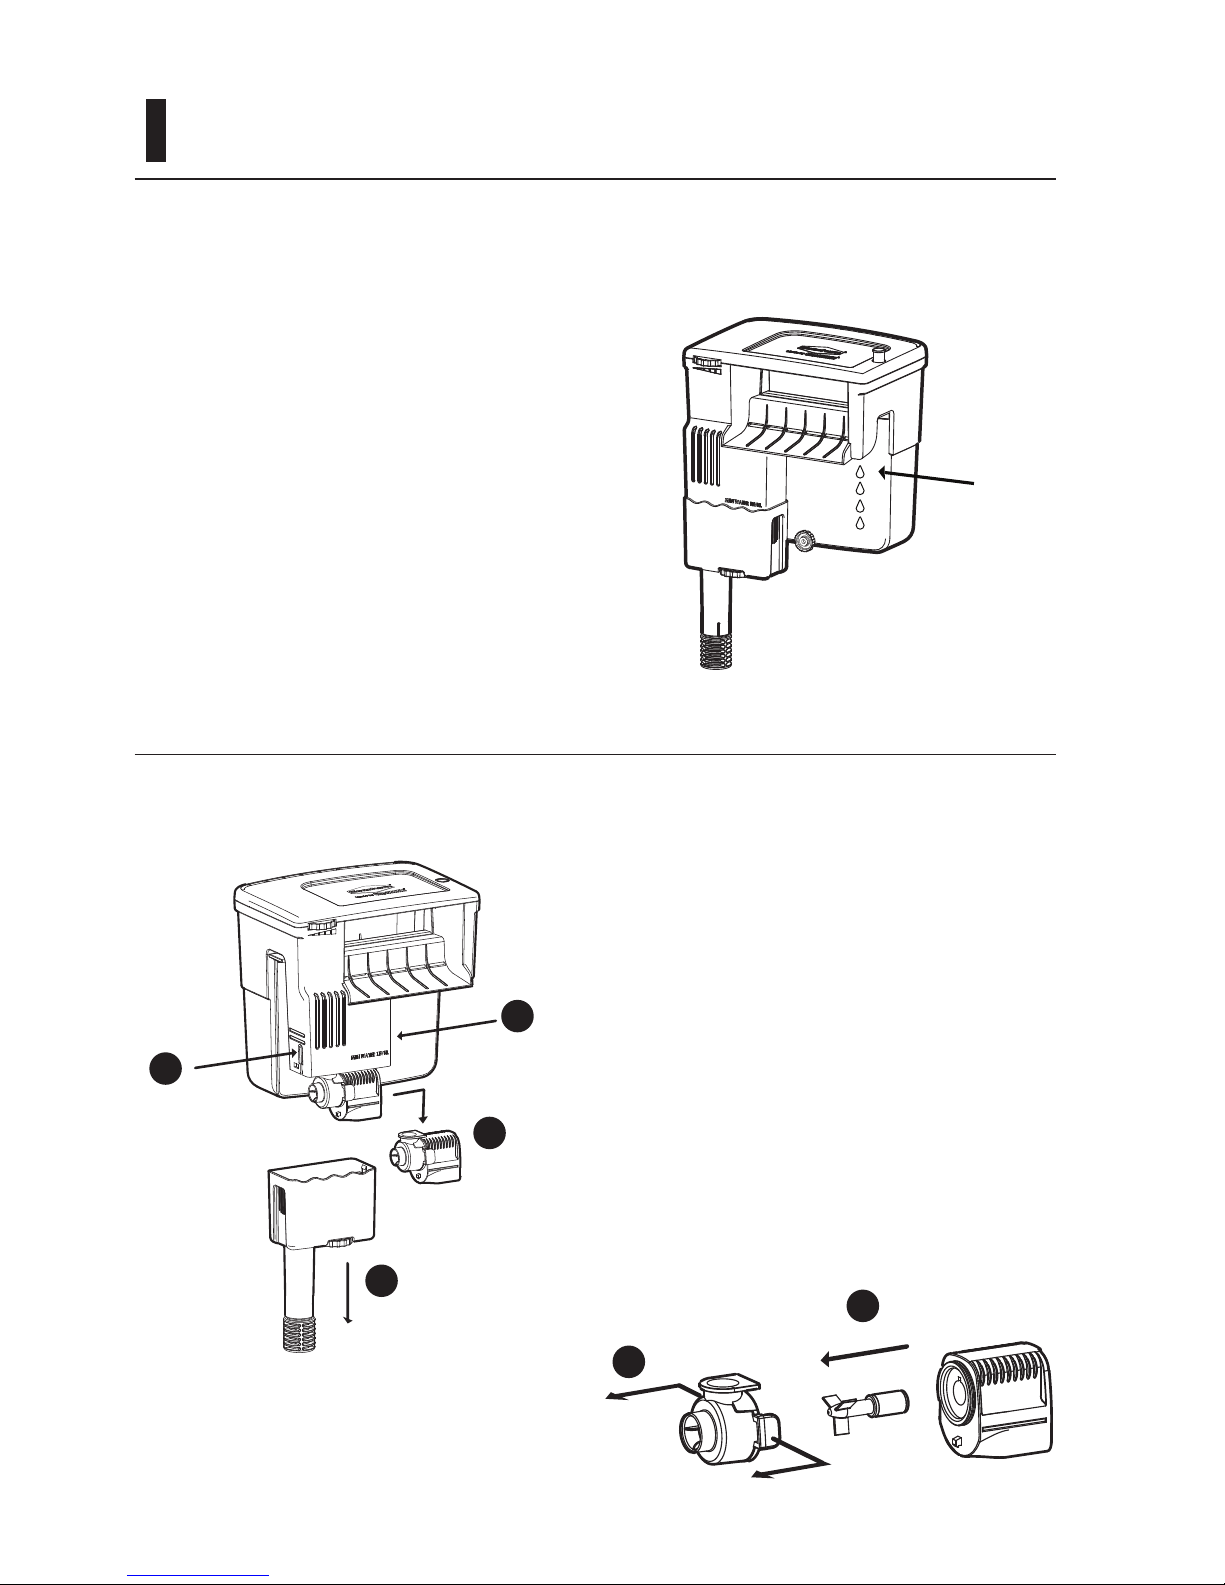
STARTING THE FILTER
The minimum water level in the
aquarium should not fall below the
“Minimum Water Level” mark. A lower
level might stop the ow of water and
cause damage to the pump – do not
allow the pump to run dry. There is
no maximum water level although it is
recommended that the level not exceed
the height of the of the surface skimmer
slots.
Minimum
Water Level
Surface
Skimmer
10
Tidal™ Filters are made to oer excellent
function with low maintenance. However,
regular maintenance can aid dramatically
in the overall health and well being of your
aquarium. The maintenance alert device
oers an excellent signal to perform routine
maintenance on the Tidal™ Filter. The
maintenance alert device indicates that
ow is unable to move freely through the
Figure 7
Figure 8
lter media basket. When the maintenance
alert rises above the lter cover to about ½”
or 1 cm (Figure 7), it is time to clean the lter.
To begin cleaning the lter, (see Figure 8) lift
the cover (1), slide the blue lter basket lock
(2) to the front of the lter and remove the
lter media basket by pulling up on the two
side handles (3).
MAINTENANCE
WARNING: Before any maintenance on the Tidal™ Filter, unplug it from the outlet.
1
3
2
11
MAINTENANCE
Turn the cover over (Figure 9-A) and set
the lter media basket into the slots on the
cover (1). You can now carry the lter media
basket to a cleaning area without spilling or
dripping water.
Remove the bag of Matrix™ biological
media, any chemical ltration media and
the foam lter (Figure 9-B).
Rinse the foam lter thoroughly. Do not use
any soaps or detergents as these can harm
aquarium inhabitants. Rinse or replace any
chemical ltration media as necessary.
Replacement ltration packs designed
specically for Tidal™ Filter units (Matrix™,
MatrixCarbon™, and Zeolite) are sold
separately.
The bag of Matrix™ biological media
contains important bacteria for the stability
of the aquarium environment. Do not allow
the media to dry out. The media can be
rinsed gently in a container with some of
the water from the aquarium to remove
any slime coating that may build up on the
media over time. If the Matrix™ media is
replaced it is advisable to replace no more
than half of the media at any time so as to
protect the bacteria culture that allows for a
stable aquarium environment. At this time
we would suggest re-seeding the aquarium
with Seachem Stability™. Rinse the lter
media basket. Reassemble media and all
components in reverse order.
1
1
Figure 9-A Figure 9-B
12
MAINTENANCE
If the lter starts to drip from the right side
(Figure 10) of the return ow wall, it indicates
that the lter media basket is completely
clogged. Water in this case is bypassing
lter media and a thorough cleaning is
necessary to maintain the overall health of
the aquarium.
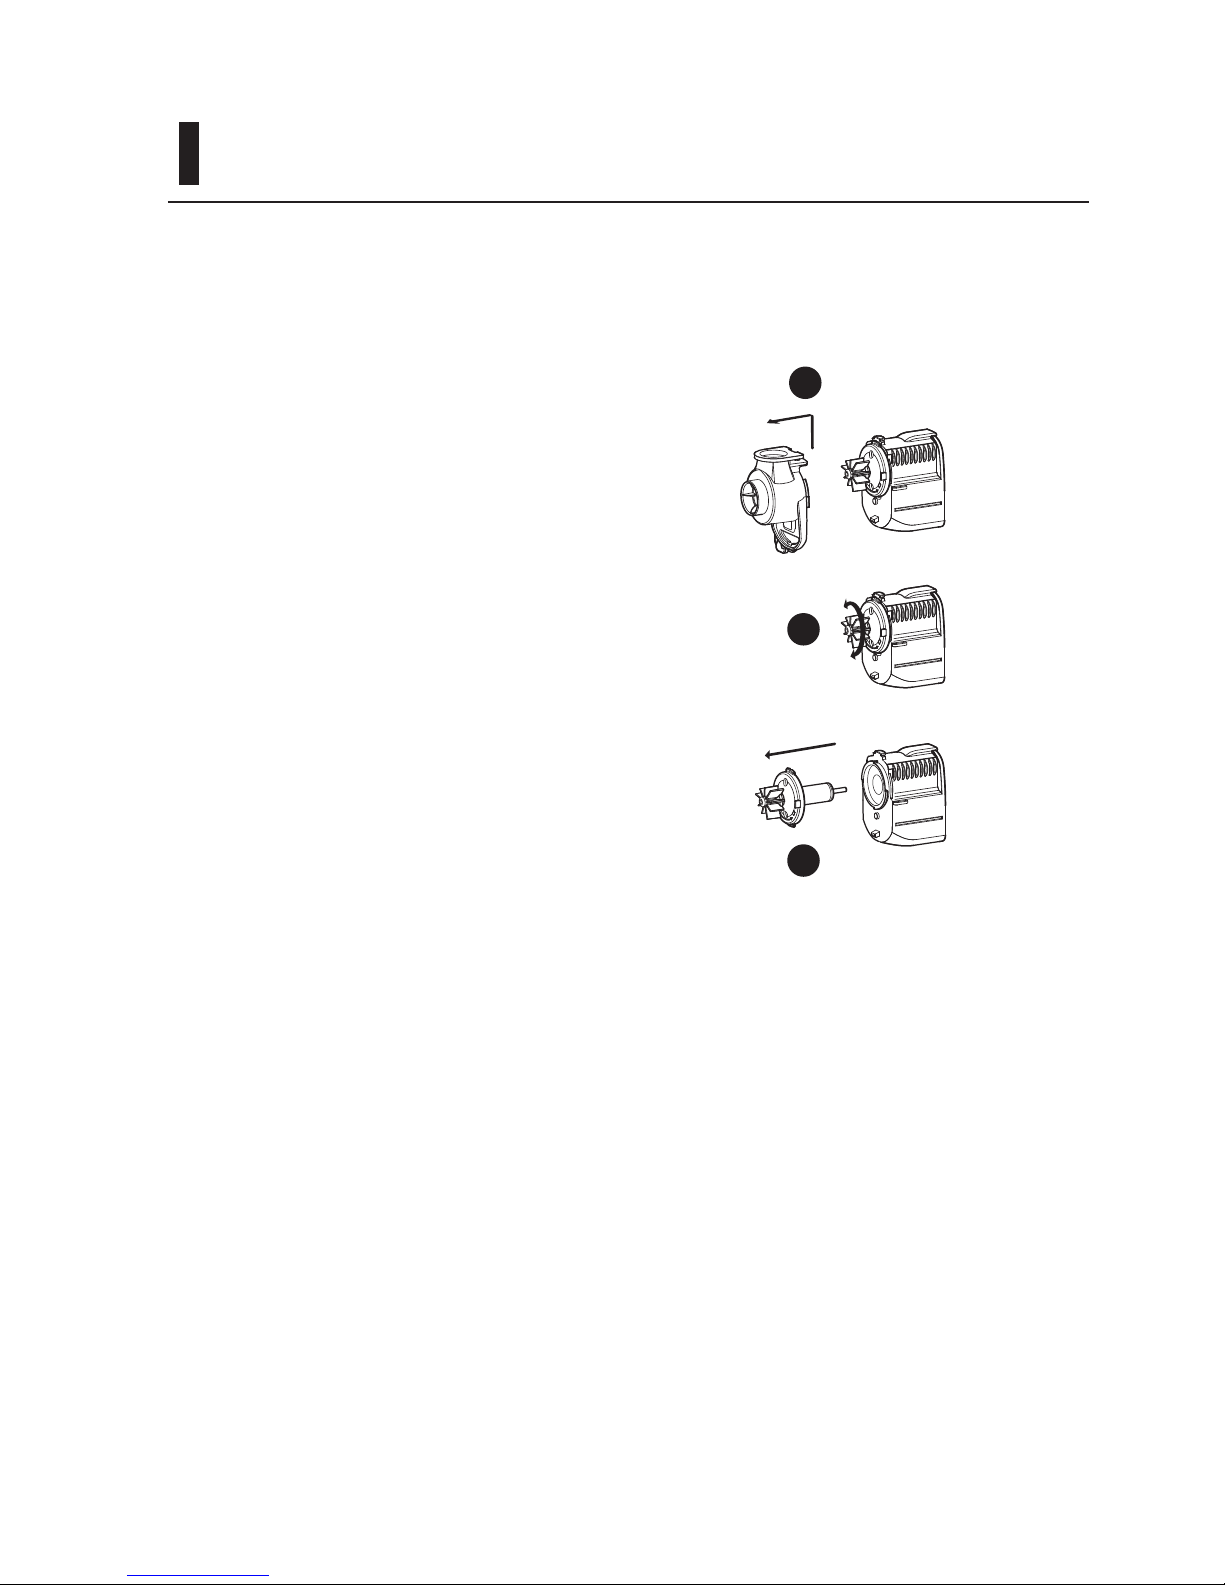
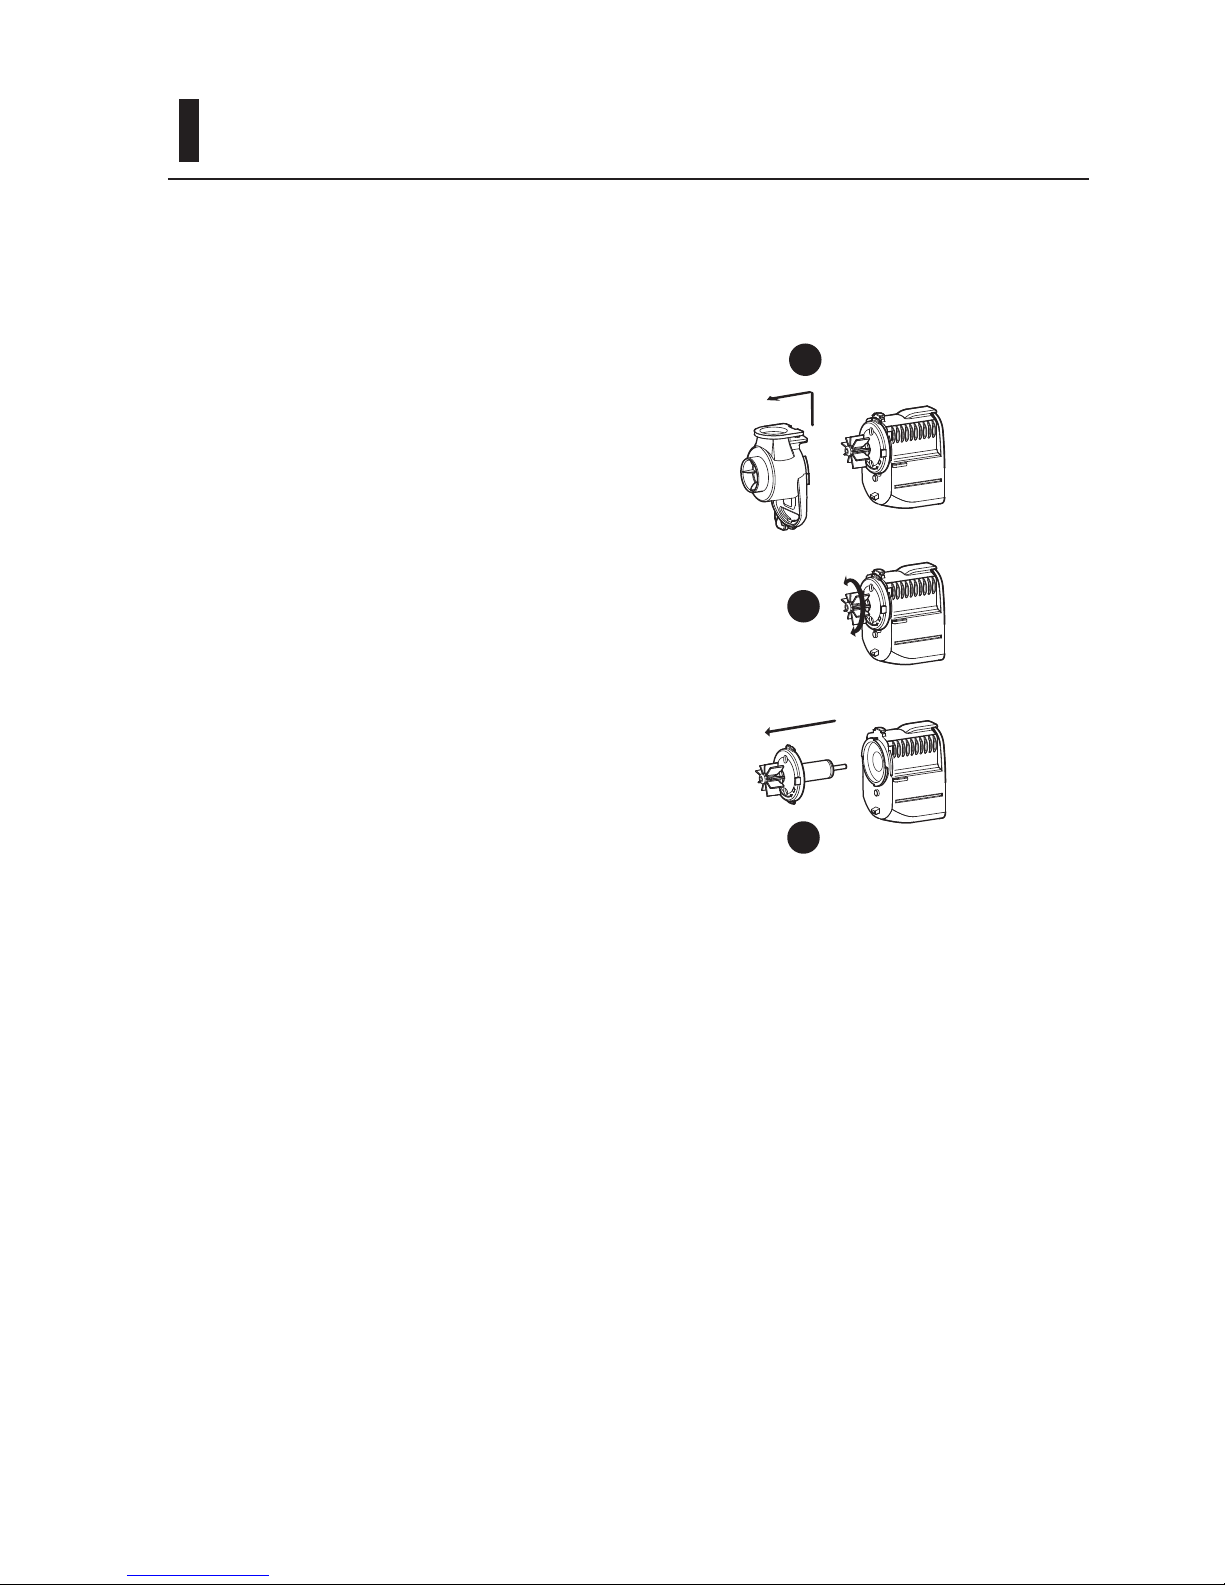
To service the pump, proceed as follows
(Figure 11): Press the side of the lter
(1), pull down on the pump housing (2),
pull the power cord from the lter body
and push the pump to the right until it
clicks and releases (3). For Tidal 55 units,
gently pull the intake cover of the pump
(4, Figure 11-B) away. This will reveal the
impeller (5).
Figure 10
Figure 11-A
Figure 11-B
(Tidal 55)
1
1
3
2
4
5
13
MAINTENANCE
Wash the impeller thoroughly to remove any slime or scales build up. Do not use soap or
detergent. If desired a dilute solution of vinegar and water can be used to breakup any scale
or lime buildup.
After cleaning, replace the impeller insuring that it rotates freely around the shaft and
replace the intake cover of the pump. Reassemble remaining components in the reverse
order. Scale and limestone deposits and the natural wear-out of components might cause
the silent nature of the pump to diminish. However, they do not aect the proper function of
the lter. In such cases it is advisable to replace the impeller to return to the silent operation.
For Tidal 75 and 110 units, pull up and
back on the top clip of the impeller cover
(4, Figure 11-C). Twist the base of the
impeller counter-clockwise to unlock it
(5), and then pull it free of it’s housing (6).
Figure 11-C
(Tidal 75 & 110)
4
5
6

14

15
INSTRUCCIONES DE SEGURIDAD IMPORTANTES
ADVERTENCIA: Para evitar lesiones, se deben tomar precauciones básicas de seguridad,
incluyendo las siguientes normas de seguridad:
Los FILTROS TIDAL están fabricados de conformidad con las legislaciones sobre seguridad nacionales e internacionales
LEA Y SIGA TODAS LAS INSTRUCCIONES DE SEGURIDAD
1. Comprobar que el voltaje de la bomba que se indica en la etiqueta sea igual al de la red eléctrica.
El aparato debe recibir la alimentación a través de un interruptor diferencial (protector) con una
corriente nominal inferior o igual a 30mA.
2. La bomba nunca debe funcionar sin agua para evitar daños en el motor.
3. Antes de conectar el aparato a la red eléctrica, comprobar que ni el cable ni la bomba presenten
daños.
4. La bomba cuenta con una conexión de tipo Z. El cable y el enchufe no pueden sustituirse ni
repararse. En caso de daño se deberá sustituir la bomba completa.
5. PRECAUCIÓN: Desconecte todos los aparatos eléctricos sumergidos antes de realizar trabajos
de mantenimiento en el agua; en caso de que la clavija o la toma de corriente estén dañados,
apague el interruptor automático antes de desconectar el enchufe de la toma.
6. El ltro se puede utilizar en líquidos o en ambientes con una temperatura máxima de 35 °C /
95 °F.
7. No utilizar el aparato con nes distintos al n con el que se ha
fabricado, como, por ejemplo, en cuartos de baño o aplicaciones
similares.
8. No utilizar los ltro con líquidos corrosivos o abrasivos.
9. Este dispositivo no ha sido diseñado para su uso por niños o por
personas con problemas mentales. Se requiere la supervisión
adecuada de un adulto o de personas responsables de la seguridad
personal.
10. Para evitar que el agua pueda accidentalmente mojar el enchufe o
la toma de corriente, realizar un bucle con el cable justo debajo del
nivel de la toma (Fig. A).
11. No desconecte el ltro de una toma de corriente tirando del cable.
12. El ltro puede utilizarse únicamente para las aplicaciones indicadas
y solo puede funcionar en interior.
13. NO EXTRAVÍE ESTAS INSTRUCCIONES
A.

16
ADVERTENCIAS PARA UNA ELIMINACIÓN CORRECTA DEL PRODUCTO SEGÚN LA
DIRECTIVA EUROPEA 2002/96/EC
Al nal de su vida útil o su avería, el producto no debe eliminarse junto con los otros desechos.
Pueden llevarse a un centro de gestión de residuos eléctricos o a un vendedor que ofrezca estos
servicios. Reciclar los electrodomésticos separadamente evita consecuencias negativas para el
medio ambiente y para la salud pública en general, permite la reutilización de los materiales y
supone un ahorro energético y de recursos.
GARANTÍA LIMITADA
Seachem garantiza este producto (ver Exclusiones abajo) al comprador original contra defectos de
materiales y mano de obra durante un período de tres (3) años desde la fecha de compra original y
puede ser extendida por dos (2) años adicionales con el registro del producto en www.seachem.com;
todos los términos excepto para el impulsor de la bomba, que está garantizado por un período de seis
(6) meses. Esta garantía se limita a reparar o reemplazar (a elección de Seachem) el producto defectuoso
y no cubre la pérdida de la vida del acuario, lesiones personales, pérdida de propiedad o daño causado
por el uso del producto. Debe conservar el comprobante de compra para validar la garantía. Cualquier
garantía en este documento deberá transcurrir al mismo tiempo, y no además, de cualquier período de
garantía mínimo establecido por la legislación aplicable.
Las reclamaciones bajo garantía deberán ser presentadas en línea en www.seachem.com por el
comprador original y deben presentar prueba de compra en el momento de la presentación. El
solicitante debe obtener una “Return Merchandise Authorization” en el momento del registro antes de
enviar cualquier producto para garantía o servicio técnico. El comprador corre con los gastos de envío
desde y hacia el centro de servicio o taller de reparaciones.
EXCLUSIONES. Esta garantía no cubre lo siguiente: * Los daños causados por accidentes, mal uso,
abuso, falta de cuidado razonable, que el uso del producto sea distinta de la normal u ordinara, usado en
proyectos en condiciones anormales de trabajo o cualesquiera otros fallos que no resulten de defectos
en los materiales o mano de obra. * Los daños derivados de la modicación, alteración o intento de
reparación por cualquiera que no sea Seachem o su representante. * La transferencia del producto a una
persona distinta del comprador original. * Someter el producto a un servicio eléctrico no especicado en
el envase; el comprador original es responsable de proporcionar las instalaciones eléctricas adecuadas.
EXCLUSIÓN DE DAÑOS Y LIMITACIÓN DE GARANTÍAS IMPLÍCITAS
Su único y exclusivo derecho es la reparación o el reemplazo del producto como se indica en esta Garantía
Limitada. La empresa se exime de cualquier responsabilidad por daños incidentales y consecuentes por
incumplimiento de cualquier garantía o condición expresa o implícita, incluyendo las garantías implícitas
o condiciones de comerciabilidad, calidad comercializable, aptitud para un propósito particular o de
calidad satisfactoria con respecto a este producto. Este escrito constituye el acuerdo de garantía de las
partes con respecto al objeto del mismo, ninguna renuncia o enmienda será válida a menos que esté
por escrito rmada por Seachem. Cualquier garantía implícita en este documento está limitada a un año
o el período más corto permitido por la ley de su jurisdicción

17
Felicitaciones por la compra de su nuevo ltro de cascada Tidal™ de Seachem. Puede estar completamente
seguro de que usted ha invertido en un ltro de alta calidad bien diseñado que mantendrá su acuario limpio y
saludable con un mantenimiento mínimo en los próximos años. la línea de ltros Tidal™ de Seachem ha sido
diseñada y fabricada especícamente para Seachem por Sicce en Italia para asegurar la más alta calidad y el
mayor rendimiento posible.
Características
1. Su bajo consumo para un ujo alto permite un ahorro de energía con una excelente circulación.
2. Operación silenciosa, incluso para el entorno de hogar u ocina más tranquilo.
3. El autocebado de la bomba permite una fácil puesta en marcha able.
4. Bajo mantenimiento para facilitar el cuidado del acuario a largo plazo.
5. La auto limpieza del impulsor reduce la necesidad de mantenimiento de la bomba.
6. Materiales no corrosibles permiten su uso en acuarios de agua dulce o salada.
7. La excepcional capacidad de la cesta de ltración permite el uso de virtualmente cualquier medio ltrante.
8. Incluye bio-medio Matrix™ de Seachem, que elimina por completo amoniaco, nitrito y nitrato.
9. Cesta del ltración removible que permite una limpieza remota fácil.
10. La cubierta del ltro funciona como una bandeja segura para la cesta de ltración, para evitar que se
derrame agua durante la limpieza remota.Las ranuras de ventilación permiten incluso el ujo de aire y un
intercambio gaseoso mejorado.
11. Su perl comprimido reduce las interferencias para su colocación en el acuario.
12. El dial de nivel permite un posicionamiento exacto en la pared del acuario.
13. El skimmer de supercie retira orgánicos otantes y espuma de la supercie del acuario.
14. Su velocidad de toma de agua ajustable permite un uso versátil en una gran gama de entornos de
acuarios.
15. Su velocidad de toma de agua de supercie ajustable en relación con la toma de agua de profundidad
permite el enfoque hacia un área de ltración especíca.
16. La toma de agua telescópica permite la admisión a cualquier profundidad.
17. El clip de sujeción para calentador permite la dispersión segura y uniforme del calor a través del ujo del
ltro.
18. El retorno de agua por la pared trasera ofrece ranuras de aireación para aumentar el redox y la aireación
del acuario.
19. El monitor de mantenimiento muestra cuando la cesta de ltración necesita ser limpiada
En pocas palabras, usted ha comprado el mejor ltro colgable disponible. Gracias.
INTRODUCCIÓN

18
LISTA DE COMPONENTES
Maintenance alert device
Seachem Matrix™ bio-media
Bottom foam filter
Filter basket
Flow regulation dial
Surface skimmer intake
Low wattage,
self-priming pump
Self-cleaning impeller
Dual intake regulation dial
Telescoping intake tube
Reversible filter cover snaps to
filter basket during maintenance
1
2
4
5
3
6
8
Aerating return flow7
10
Leveling dial9
11
12
Heater holder
14
Pump housing13
15
Dispositivo de alerta de mantenimiento
Bio-medio Matrix™ de Seachem
Esponja del ltro situada en la base
Cesta de ltración
Dial de regulación de ujo
Aireación del ujo de retorno
Toma de agua mediante skimmer de
supercie
Dial de nivelación
Bajo consumo, bomba autocebante
Impulsor con autolimpieza
Sujeción para calentador
Carcasa de la bomba
Dial de regulación de toma de agua dual
Toma de agua mediante tubo telescópico
Tapa del ltro reversible para el encaje de la cesta
de ltración durante el mantenimiento
19
1
1
3
2
5
4
MONTAJE Y PUESTA EN MARCHA
Figura 1
Figura 2
Alto Bajo
Inserte la mitad inferior del
tubo de admisión en la mitad
superior. Inserte el tubo de
aspiración telescópico en su
lugar en la caja de la bomba.
(Fig 1)
Si desea colgar un calentador
en el ltro (Fig 2), presione los
lados del ltro (1), tire hacia
abajo para quitar la cubierta de
la caja de la bomba (2), deslice
el soporte para calentador
por la parte inferior de la
carcasa (3). La sujeción del
calentador se puede insertar
cara hacia arriba o hacia abajo
dependiendo de la posición
deseada del calentador. Inserte
el cable de la bomba en las
guías (4) antes de volver a
colocar la caja de la bomba (5).
1
2

20
Figura 3
Figura 4-A Figura 4-B
Gire el dial de nivel del ltro en
la parte inferior de la carcasa
del ltro para prepararse para
colgar y nivelar el ltro. (Fig.3)
Coloque el ltro en el borde del
acuario (Fig. 4-A) y ajuste el
dial de nivelación atornillando
y desatornillando hasta que el
ltro esté al nivel del acuario.
Inserte el cable de la bomba en
las guías como se muestra (Fig
4-B) y lleve el cable a la toma
de corrientea formando un lazo
de goteo como se muestra en
las instrucciones de seguridad
y en la Figura 4-B.
MONTAJE Y PUESTA EN MARCHA

21
LLENANDO LA CESTA DE MEDIOS DE FILTRACIÓN
Elimine todas las bolsas de plástico que
contienen medios de ltración antes de iniciar
el ltro. Todos los ltros Tidal™ han sido
diseñados para contener cualquier tipo de
medios de ltración. En general hay tres tipos
de ltración utilizados en la mayoría de los
acuarios - mecánica, química y biológica.
La ltración mecánica incluye medios de
ltración que capturan los residuos para la
eliminación directamente desde el ltro. La
ltración química incluye medios de ltración
que trabajan para eliminar químicamente
los compuestos disueltos del agua. La
ltración biológica ofrece un alojamiento para
el crecimiento de bacterias y la ruptura de
residuos orgánicos.
Todos los ltros Tidal™ incluyen un ltro de
esponja inferior para la ltración mecánica y bio
medios Matrix™ para una ltración biológica
excepcional. Hay una gran variedad de
opciones de ltración química disponibles para
muchos propósitos diferentes propuestos para
una gran variedad de ambientes de acuario.
MatrixCarbon™ de Seachem es la opción
preferida en casi cualquier conguración de
acuario. Matrix Carbon™ está disponible preempaquetado para cualquier tamaño de ltro
Tidal™.
Enjuague bien la esponja y todos los medios
de ltración con agua corriente antes de
colocarlos en la canasta del ltro. Coloque los
medios de ltración con el ltro de esponja en
la parte inferior, sitúe entonces cualquier medio
de ltración química como MatrixCarbon™ y
por último el medio biológico Matrix™. No
retire Matrix™ de su bolsa de malla. La bolsa
de malla se envasa plegada; estirelá a toda su
longitud y distribuya uniformemente Matrix™
antes de colocarla en la canasta del ltro. Con
el n de sembrar más rápidamente Matrix™
con bacterias se recomienda la adición de
Stability™ de Seachem a su acuario. La
cesta interna impide que el agua se desvíe y
permite una extracción rápida y la limpieza de
la esponja del ltro inferior y cualquier medio
de ltración utilizado. Para evitar interferencias
con el ujo adecuado a través del ltro no
sobrecargue la cesta de los medios de
ltración. Una indicación de esto será la
activación de la alerta de mantenimiento
o goteo en el lado derecho de la pared de
retorno (Fig 10, página 25).
1 2 3
Fig 5: Capas de medios de ltración (de abajo a arriba)
Mecánico
(Esponja del ltro)
Químico
(MatrixCarbon)
Biológico
(Matrix)
22
Tras el montaje y la instalación del ltro
Tidal™ en un acuario lleno, conecte
el cable de alimentación a la toma de
corriente prevista. El ltro es autocebante
e inmediatamente comenzará a ltrar el
agua. Ajuste las tres conguraciones
posibles de acuerdo a las preferencias
o necesidades (Fig 6):
1. Alarge o reduzca la toma
telescópica a la profundidad
deseada en el acuario.
2. Ajuste la cantidad total de ujo
a través del ltro. Ajustar el
rendimiento para un determinado
volumen del acuario, tipo o para
proporcionar un entorno para
peces que preeran más o menos
movimiento de agua u oxigenación.
Esta característica ofrece una
reducción de hasta el 80% sobre
la tasa máxima de ujo, mientras
que continúa haciendo pleno uso
del motor del ltro. Cuando se
seleccionan ujos reducidos, el
sistema de re-ltración permite
que el agua pueda volver a circular
a través de los medios de ltro
para maximizar el rendimiento de
la ltración a través de un aumento
del tiempo de contacto.
Figura 6
2
3
1
INICIANDO EL FILTRO
3. Ajustar la cantidad de la tasa de
ujo de la supercie en relación
con la tasa de ujo de la toma
telescópica.
El nivel mínimo de agua en el acuario
no debe caer por debajo de la marca
“Minimum Water Level”. Un nivel más
bajo podría detener el ujo de agua y
causar daños en la bomba - no permita
que la bomba funcione en seco. No
hay un nivel máximo de agua, aunque
se recomienda que el nivel no sea
superior a la altura de la de las ranuras
de skimmer de supercie.
Nivel Mínimo
de Agua
Skimmer de
Supercie

23
Los ltros Tidal™ están diseñados para
ofrecer una excelente función con un
bajo mantenimiento. Sin embargo, el
mantenimiento regular puede ayudar
drásticamente en la salud general y en
el bienestar de su acuario. El dispositivo
de alerta de mantenimiento ofrece
una excelente señal para realizar el
mantenimiento de rutina en el ltro Tidal™.
El dispositivo de alerta de mantenimiento
indica que el ujo no es capaz de moverse
libremente a través de la cesta de ltración.
Figura 7
Figura 8
Cuando la alerta de mantenimiento se
eleva por encima de la tapa del ltro en
aproximadamente ½” o 1 cm (Fig 7), es el
momento de limpiar el ltro.
Para empezar la limpieza del ltro, (Fig 8)
levante la tapa (1), deslice el bloqueo de
la cesta de ltración azul (2) hacia la parte
delantera del ltro y retire el cesto de los
medios de ltración tirando hacia arriba de
las dos asas laterales (3).
MANTENIMIENTO
ADVERTENCIA: Antes de cualquier mantenimiento en el ltro Tidal™, desenchúfelo de la toma de corriente.
1
3
2
24
MANTENIMIENTO
De la vuelta a la tapa superior (Fig 9-A) y
coloque la cesta de material de ltración en
las guías de la tapa (1). Ahora puede llevar
la cesta de medios de ltración a una zona
de limpieza sin que se derrame o gotee
agua.
Retire la bolsa del medio de ltración
biológica Matrix™, todos los medios de
ltración química y la esponja de ltración
mecánica inferior (Fig 9-B).
Enjuague la esponja de ltración inferior a
fondo. No utilice jabones o detergentes,
ya que pueden dañar a los habitantes del
acuario. Enjuague o reemplace cualquier
medio de ltración química cuando sea
necesario. Reemplace los paquetes de
ltración de diseñados especícamente
para las unidades de ltro Tidal™ (Matrix™,
MatrixCarbon™ y zeolita), se venden por
separado.
La bolsa del medio biológico Matrix™
contiene bacterias importantes para la
estabilidad del ambiente del acuario. No
deje que el material se seque. Los medios
de ltración pueden ser enjuagados con
suavidad en un recipiente con un poco de
agua del acuario para eliminar cualquier
recubrimiento de limo que se pueda
acumular en el medio con el tiempo. Si se
sustituye el medio Matrix™ es aconsejable
sustituir no más de la mitad del medio
de ltración cada vez, a n de proteger
el cultivo de bacterias que permite un
ambiente del acuario estable. En este
momento, sugerimos volver a sembrar
el acuario con Stability™ de Seachem.
Enjuague la canasta de los medios de
ltración. Vuelva a montar los medios y
todos los componentes en orden inverso.
1
1
Figura 9-A Figura 9-B
25
MANTENIMIENTO
Si el ltro comienza a gotear desde el lado
derecho (Fig 10) de la pared de retorno,
indica que la cesta de medios de ltración
está completamente obstruida. El agua
en este caso está haciendo bypass sobre
los medios de ltración y es necesaria una
limpieza a fondo para mantener la salud
general del acuario.
Para dar servicio a la bomba, proceda
de la siguiente manera (Fig 11): Pulse el
lateral del ltro (1), tire hacia abajo de la
carcasa de la bomba (2), tire del cable
de alimentación del cuerpo del ltro y
empuje la bomba a la derecha hasta
que haga clic y libérela (3). Para las
unidades de Tidal 55, tire suavemente de
la cubierta de entrada de la bomba (4, Fig
11-B). Esto mostrará el impulsor (5).
Figura 10
Figura 11-A
Figura 11-B
(Tidal 55)
1
1
3
2
4
5
26
MANTENIMIENTO
Lave el impulsor a fondo para eliminar cualquier limo o incrustaciones acumuladas. No use
jabón o detergente. Si se desea se puede utilizar una solución diluida de vinagre y agua
para limpiar cualquier acumulación de sarro o cal.
Después de la limpieza, vuelva a colocar el impulsor asegurándose de que gira libremente
alrededor del eje y coloque la tapa de aspiración de la bomba. Reensamble los componentes
restantes en orden inverso. Las incrustaciones y los depósitos de cal y el desgaste natural
de los componentes pueden causar que la naturaleza silenciosa de la bomba pueda
disminuir. Sin embargo no afectan a una función apropiada del ltro. En tales casos, es
aconsejable sustituir el impulsor para volver a una operación silenciosa.
Para las unidades Tidal 75 y 110, tire
hacia arriba y hacia atrás el clip superior
de la tapa del impulsor (4, Figura 11-C).
Gire la base del impulsor en sentido
antihorario para desbloquearlo (5), y tire
de ella de forma que quede libre de su
alojamiento (6).
Figura 11-C
(Tidal 75 & 110)
4
5
6

27
CONSIGNES DE SÉCURITÉ IMPORTANTES
MISE EN GARDE : An de se protéger contre les blessures, des mesures de sécurité de base doivent être
observées, y compris les suivantes.
LIRE ET OBSERVER TOUTES LES CONSIGNES DE SÉCURITÉ
DANGER - Pour éviter tout choc électrique, une grande prudence est de rigueur. Dans chacune des situations suivantes, ne pas essayer de réparer l’appareil soi-même; l’expédier au fabricant pour réparation
ou le jeter.
1. MISE EN GARDE: Si la pompe à eau montre un quelconque signal de fuite d’eau anormale, la débrancher
immédiatement de la prise de courant.
2. Examiner soigneusement l’appareil après l’installation. Il ne doit pas être branché s’il y a de l’eau sur les
pièces qui ne doivent pas être mouillées.
3. Ne pas faire fonctionner un appareil défectueux, dont le cordon électrique ou la che sont endommagés, ou
qui a été échappé ou abîmé d’une façon quelconque.
4. An d’éviter que l’appareil ou la prise de courant soient mouillés, installer le cabinet de aquarium et le bac
à côté d’une prise de courant pour empêcher l’eau de dégoutter sur la prise. L’utilisateur devrait faire une
boucle d’égouttement (g. A DRIP LOOP) pour chaque cordon électrique branché d’un aquarium à une prise
de courant. La boucle d’égouttement est la partie du cordon se trouvant sous le niveau de la prise de courant
ou le raccord si une rallonge électrique est utilisée, an d’empêcher que l’eau circule le long du cordon
électrique et entre en contact avec la prise de courant. Si la che ou la prise de courant sont mouillées, NE
PAS débrancher le cordon électrique : débrancher d’abord le fusible ou disjoncteur qui fournit l’électricité à
l’appareil et débrancher ensuite l’appareil en vériant qu’il n’y a pas d’eau dans la prise.
5. Une surveillance étroite est requise lorsque l’appareil est utilisé par des enfants ou en leur présence.
6. Pour éviter les accidents, ne pas toucher les pièces en mouvement ou chaudes comme chauages,
réecteurs, ampoules, etc.
7. Toujours débrancher l’appareil quand il n’est pas utilisé, quand des pièces doivent être enlevées ou
remplacées et avant l’entretien. Ne jamais tirer par le l pour débrancher l’appareil ; prendre la che et
débrancher l’appareil.
8. Ne pas utiliser un appareil pour un emploi autre que celui pour lequel il a été fabriqué. Les pièces non vendues
ou non recommandées par le fabricant pourraient compromettre la sécurité de l’appareil.
9. Ne pas exposer cet appareil aux intempéries ou à une température en dessous de 0 ºC.
10. S’assurer qu’un appareil monté sur un aquarium soit bien installé avant de le faire fonctionner.
11. Lire et observer tous les avis importants sur l’appareil.
12. Si une rallonge électrique est nécessaire, s’assurer qu’elle soit de la bonne taille. Un cordon électrique de
taille inférieur ou de moins d’ampères ou de watts que l’appareil peut surchauer. Le cordon doit être placé
de façon à éviter que quelqu’un trébuche ou le tire involontairement.
13. Cet appareil possède une che polarisée (une lame est plus large que les autres). Par mesure de sécurité,
cette che s’insère dans la prise polarisée que dans un sens. Si la che n’entre pas complètement dans la
prise, inverser la che. Si elle ne rentre toujours pas, contactez un électricien qualié. Ne jamais utiliser une
rallonge si la che peut être insérée complètement. Ne pas essayer de contourner ce dispositif de sécurité.
14. Cet appareil possède une che polarisée (une lame est plus large que les autres). Par mesure de sécurité,
cette che s’insère dans la prise polarisée que dans un sens. Si la che n’entre pas complètement dans la
prise, inverser la che. Si elle ne rentre toujours pas, contactez un électricien qualié. Ne jamais utiliser une
rallonge si la che peut être insérée complètement. Ne pas essayer de contourner ce dispositif de sécurité.
ATTENTION: La pompe doit être connectée à un circuit qui est protégé par un disjoncteur diérentiel.
AVERTISSEMENT: Pour réduire le risque de choc électrique, produit à utiliser uniquement dans fontaines
portables autonomes ne dépassant pas 5 pieds dans n’importe quelle dimension.
CONSERVER CES INSTRUCTIONS
28
Les FILTRES TIDAL sont conforme aux normes de sécurité nationales et internationales.
LEA Y SIGA TODAS LAS INSTRUCCIONES DE SEGURIDAD
1. Vérier que la tension indiquée sur l’étiquette de transformateur corresponde bien à celle de votre
réseau électrique. Cet appareil électrique doit être alimenté par l’intermédiaire d’un disjoncteur
diérentiel (dit de sécurité) avec un seuil de déclenchement inférieure ou égal à 30mA.
2. Pour éviter tout risque de dommage au moteur, la pompe ne doit jamais fonctionner sans eau.
3. Avant de connecter l’appareil électrique au réseau, vérier que le câble d’alimentation ne soit pas
endommagé.
4. La pompe est construite avec une liaison électrique de type «Z». Le câble et la prise ne peuvent
être ni remplacés ni réparés. En cas de dommages du câble ou de la prise, il est nécessaire de
remplacer toute la pompe.
5. Avant de connecter l’appareil électrique au réseau, vérier que le câble d’alimentation ne soit pas
endommagé.
6. Le ltre peut être utilisée dans des liquides ou des ambiances dont les températures ne dépassent
pas 35° / 95 °F.
7. Ne pas utiliser l’appareil pour des applications diérentes de celles pour lesquelles il à été conçu,
comme par exemple un fonctionnement en salles de bain ou équivalent.
8. Eviter un fonctionnement du ltre avec des liquides corrosifs ou abrasifs.
9. Cet appareil n’a pas été conçu pour une utilisation par des personnes (y compris des enfants) ayant
une capacité physique, sensorielle ou mentale réduite, sauf en cas
de surveillance par une tierce personne responsable de leur sécurité.
S’assurer que les enfants ne touchent pas cet appareil.
10. Pour éviter que des gouttes d’eau coulent le long du câble électrique
et mouillent la che de courant ou la prise murale, nous conseillons
d’eectuer une boucle du câble en-dessous du niveau de la prise de
courant (Fig. A).
11. Ne pas tirer la pompe par le câble d’alimentation pour la déplacer ou
la retirer de l’eau pendant l’installation ou l’entretien.
12. Le ltre ne peut être utilisée que pour les applications ci-dessus;
si doté de câble bipolaire elle est destinée au fonctionnement en
intérieur.
A.

29
INSTRUCTIONS POUR LA DÉCHARGE CORRECTE DU PRODUIT SELON LA DIRECTIVE EU
2002/96/EC
Cet appareil ne doit pas être jeté dans les poubelles domestiques mais doit suivre les procédures
d’élimination prévues pour les déchets électriques. Il peut être pris à un centre spécial de collecte
des déchets spéciaux, mis en place par les autorités locales ou à un revendeur orant ce service.
La décharge séparément d’un outil électrique évite des conséquences négatives pour l’environnement et pour la santé et permets de régénérer les matériaux pour avoir une grande économie
d’énergie et des ressources.
LIMITATIONS DE GARANTIE
Seachem garantit ce produit (voir Exclusions ci-dessous) à l’acheteur initial contre les défauts de
matériaux et de fabrication pour une période de trois (3) ans à compter de la date de l’achat originale,
et peut être prolongée pour une période de deux (2) ans supplémentaires avec l’enregistrement du
produit à www.seachem.com; sauf le rotor de la pompe, qui est garanti pour une période de six (6)
mois. Cette garantie est limitée à la réparation ou le remplacement (à la discrétion de Seachem) du
produit défectueux et ne couvre pas la perte de poissons, blessures aux personnes, perte de biens, ou
les dommages résultant de l’utilisation du produit. Il est nécessaire de conserver une preuve d’achat
originale pour valider la garantie. Toute garantie est à considérer en même temps, et non en plus, des
périodes de garantie minimales établies par la loi applicable.
Toutes réclamations de garantie doivent être déposées en ligne à www.seachem.com par l’acheteur
original, qui doit fournir une preuve d’achat au moment de la réclamations. Le demandeur doit obtenir
une «Autorisation de retour de marchandise» au moment de la réclamation avant d’envoyer tout produit
pour la garantie ou le service technique. L’acheteur assume le coût d’expédition vers et depuis le centre
de service ou d’une station de réparation.
EXCLUSIONS. Cette garantie ne couvre pas ce qui suit: * Les dommages résultant d’un accident, une
mauvaise utilisation, un manque de diligence raisonnable, une utilisation du produit ne pas normal ou
ordinaire, une utilisation du produit dans des conditions de travail anormales ou d’autres défaillances ne
pas résultant de défauts de matériaux ou de fabrication. * Les dommages résultant d’une modication,
altération ou tentative de réparation par une personne autre que Seachem ou son représentant. *
Transfert du produit à une personne autre que l’acheteur original. * Utiliser le produit avec des paramètres
électriques diérents de ceux spéciés dans l’emballage; l’acheteur originale est responsable de la
fourniture d’électricité adéquate.
EXCLUSION DE DOMMAGES ET LIMITATION DE GARANTIE IMPLICITE
Votre seul et unique recours est la réparation du produit ou de remplacement tel que prévu dans cette
Garantie Limitée. La Société décline toute responsabilité pour les dommages accessoires et indirects
pour violation de toute garantie ou condition expresse ou implicite, y compris les garanties implicites
ou conditions de qualité marchande, d’adéquation à un usage particulier ou de qualité satisfaisante par
rapport à ce produit. Cette écriture constitue l’intégralité de l’accord de garantie des parties relativement
à l’objet des présentes, aucune renonciation ou amendement ne sera valable que si par écrit et signée
par Seachem. Toute garantie implicite ici sont limitées à un an ou la période la plus courte autorisée par
la loi de votre juridiction.

30
Congratulation pour l’achat de votre nouveau ltre cascade Seachem Tidal ™. Vous pouvez être
absolument sûr que vous avez investi dans un ltre haut de gamme, bien conçu, qui va garder votre
aquarium propre et sain avec un entretien minimal pour les années à venir. La gamme de ltres Seachem
Tidal™ a été conçu et fabriqué en Italie spéciquement pour Seachem par Sicce, pour assurer la
meilleure qualité et les meilleures performances possibles.
Caractéristiques
1. Le wattage réduit avec un haute débit permet des économies d’énergie, tout avec une excellente
circulation de l’eau
2. Fonctionnement silencieux, même pour la maison ou le bureau le plus silencieux.
3. Pompe auto-amorçante qui permet un démarrage simple et able.
4. Basse nécessité d’entretien pour la facilité de tenue de l’aquarium à long terme.
5. Rotor auto-nettoyant qui réduise le besoin d’entretien de la pompe.
6. Les parties non-corrosives permettent l’utilisation en eau douce ou eau de mer
7. Panier de capacité exceptionnelle, permettant d’utiliser pratiquement toute masse de ltration
8. Masse biologique Seachem Matrix™ inclue: élimine complètement l’ammoniac, les nitrites et les
nitrates
9. Panier de ltre amovible pour un facile déplacement pour le nettoyage.
10. Le couvercle du ltre devient un plateau pour sécuriser le panier ltrant et éviter toute chute d’eau
pendant le déplacement pour le nettoyage.
11. Les fentes d’aération permettent le ux d’air et un échange gazeux amélioré.
12. Prol compact pour réduire les interférences avec le placement de l’aquarium.
13. La molette de nivellement permet un positionnement correct sur le verre de l’aquarium.
14. L’écumage de surface retire les particules organiques ottantes et l’écume de la surface de
l’aquarium.
15. Le débit réglable permet l’utilisation dans plusieurs typologies d’aquarium.
16. Aspiration de surface réglable par rapport à l’aspiration en profondeur, qui permet de concentrer la
ltration dans la zone souhaité.
17. Aspiration télescopique qui permet d’atteindre à toute profondeur.
18. Pince porte-chauage qui permet une distribution uniforme de la chaleur grâce au ux du ltre.
19. La cascade du ux de retour augmente le redox et l’aération de l’aquarium.
20. Le dispositif d’Alerte Entretien montre quand il est nécessaire de nettoyer le panier.
Simplicando, você comprou o melhor ltro externo disponível. Obrigado.
INTRODUCTION

31
LISTE DES PIECES
Maintenance alert device
Seachem Matrix™ bio-media
Bottom foam filter
Filter basket
Flow regulation dial
Surface skimmer intake
Low wattage,
self-priming pump
Self-cleaning impeller
Dual intake regulation dial
Telescoping intake tube
Reversible filter cover snaps to
filter basket during maintenance
1
2
4
5
3
6
8
Aerating return flow7
10
Leveling dial9
11
12
Heater holder
14
Pump housing13
15
1. Dispositif d’Alerte Entretien
Masse biologique Seachem Matrix™
Mousse du fonde
Panier ltrant à grand capacité
Roue de réglage du débit
Cascade de retour et aération
Entrée de l’écumeur de surface
Molette de nivellement
Pompe auto-amorçante à basse
consommati
Rotor auto-nettoyant
Porte-chauage
Boîtier de la pompe
Roue de réglage de l’aspiration partagé
(surface - profondeur)
Tuyau d’aspiration télescopique
2. Couvercle réversible qui s’accroche au
panier du ltre lors de l’entretien

32
1
1
3
2
5
4
MONTAGE ET DÉMARRAGE
Figure 1
Figure 2
Haute Bas
Insérez la moitié inférieure
du tube d’aspiration dans la
moitié supérieure. Insérez le
tube d’aspiration télescopique
en place sur le boîtier de la
pompe. (Fig. 1)
Si l’on souhaite accrocher un
chauage sur le ltre (Fig. 2),
appuyer sur les côtés du ltre
(1), tirer vers le bas pour retirer
le couvercle du boîtier de la
pompe (2), insérer le support
du chauage jusqu’au fond
du boîtier (3). Le support du
chauage peut être inséré
vers le haut ou vers le bas en
fonction de la position souhaitée
de l’élément chauant et de sa
longueur. Insérer le câble de
la pompe dans les guides (4)
avant de remonter le boîtier de la
pompe (5).
1
2

33
Figure 3
Figure 4-A Figure 4-B
Visser la molette de mise à
niveau du ltre dans la partie
inférieure du boîtier du ltre
pour se préparer à l’accrocher
et niveler. (Fig. 3)
Placer le ltre sur le bord de
l’aquarium (Fig. 4-A) et régler
la molette de nivellement par
vissage et dévissage jusqu’à
ce que le ltre soit parfaitement
vertical.
Insérez le câble de la pompe
dans les guides comme indiqué
(Fig. 4-B) et passer le câble
jusqu’à la sortie en payant
attention à former une boucle
d’égouttement comme indiqué
dans les consignes de sécurité
et sur la Fig. 4-B.
MONTAGE ET DÉMARRAGE

34
REMPLIR LE PANIER FILTRANT
Retirer tous les sacs en plastique contenant les
masses de ltration avant le démarrer du ltre.
Tous les ltres Tidal™ ont été conçus pour
contenir tout type de média ltrant. En général,
il existe trois types de ltration utilisés dans la
plupart des aquariums - mécanique, chimique
et biologique.
La ltration mécanique inclut les médias qui
capturent les déchets pour leur élimination
directement par ltre. La ltration chimique
comprend des milieux de ltration députés à
l’élimination chimique des composés dissous
dans l’eau. La ltration biologique fournit un
logement de développement pour les bactéries
et la décomposition des déchets organiques.
Tous les ltres Tidal™ incluent une éponge
ltrant de fond pour la ltration mécanique et
Matrix™ masse biologique pour une ltration
exceptionnelle. Il existe une variété d’options
de ltration chimique disponibles pour des
nombreuses applications diérentes, compte
tenu de la variété d’environnements d’aquarium.
MatrixCarbon™ de Seachem est une option
privilégiée dans presque toute conguration
d’aquarium. MatrixCarbon™ est disponible en
sachet pour toute taille de Filtre Tidal™.
Rincer soigneusement l’éponge et tous les
masses de ltration sous l’eau courante avant
de les placer dans le panier du ltre. Coucher
les médias avec la mousse du fond en bas,
puis tous les médias de ltration chimique
tels que MatrixCarbon™ et enn la masse
biologique Matrix™. Ne pas retirer Matrix™
de son sac en let. Le sac en let est emballé
repliée; poser-le dans le sens de la longueur et
distribuer uniformément Matrix ™ avant de le
placer dans le panier du ltre. An de propager
plus rapidement les bactéries dans Matrix™,
nous recommandons l’ajout de Seachem
Stability™ à votre aquarium. Le panier interne
empêche le contournement de l’eau et
permet un retrait rapide et le nettoyage de la
mousse du fond et tout autre média Utilisés.
Pour éviter toute interférence avec un bon
débit de ltration, ne surchargez pas le panier
de médias ltrants. Une indication de cette
surcharge sera l’activation de l’Alerte Entretien
dans la côté droit de la paroi de retour (Fig. 10,
page 38).
1 2 3
Fig. 5: Disposition des Masses de Filtration (de bas en haut)
Mécanique
(Mousse du fonde)
Chimique
(MatrixCarbon)
Biologique
(Matrix)

35
Après l’assemblage et l’installation du
ltre Tidal™ sur l’aquarium, brancher
le câble d’alimentation à la prise
prévue. Le ltre est auto-amorçage
et il commencera immédiatement à
ltrer l’eau. Régler les trois paramètres
possibles en fonction des préférences
ou des besoins (Fig. 6):
1. Monter ou baisser l’aspiration
télescopique à la profondeur
désirée dans l’aquarium.
2. Régler le débit à travers le ltre.
Régler la performance selon le
volume spécique de l’aquarium,
la typologie, ou la spécique
préférence de brassage et
oxygénation des poissons. Cette
fonctionnalité ore une réduction
du débit maximal jusqu’au 80%,
tout en faisant plein utilisation
du moteur de ltre. Lorsque des
débits d’aspiration réduits sont
sélectionnés, la grille de préltration
permet la récirculation de l’eau à
travers les médias de ltration pour
un temps de contact plus long
pour optimiser les performances
de ltration.
3. Régler la quantité d’aspiration par
la surface par rapport à l’aspiration
en profondeur.
Figure 6
2
3
1
DEMARRER LE FILTRE
Le niveau d’eau minimal dans
l’aquarium ne devrait pas baisser en
dessous de l’inscription «Minimum
Water Level»; un niveau inférieur
pourrait arrêter l’écoulement de l’eau et
causer des dommages à la pompe - ne
pas faire fonctionner la pompe à sec.
Il n’y a pas de niveau d’eau maximal,
mais il est recommandé que le niveau
ne dépasse pas la hauteur des fentes
de l’écumeur de surface.
Le Niveau
d’eau Minimal
L’écumeur
de Surface

36
Les Filtres Tidal™ sont faits pour orir
une excellente ltration avec très peu
d’entretien. Cependant, un entretien régulier
aide considérablement la santé et le bienêtre de votre aquarium. Le dispositif d’Alerte
Entretien ore un excellent signal pour ne
pas oublier d’eectuer la maintenance de
routine sur le ltre Tidal™. Le dispositif
d’Alerte Entretien indique que le débit est
incapable de se déplacer susamment à
travers le panier de ltration.
Figure 7
Figure 8
Lorsque l’Alerte Entretien sort d’environ
1 cm au-dessus du couvercle du ltre (Fig.
7), il est temps de nettoyer le ltre.
Pour commencer le nettoyage du ltre,
(Fig. 8) soulever le couvercle (1), faire glisser
la partie bleu de blocage du panier (2) à
l’avant du ltre et retirer le panier de ltration
en soulevant les deux poignées latérales (3).
ENTRETIEN
ATTENTION: Avant toute opération de maintenance sur le Filtre Tidal™,
débrancher-le de la prise de courante.
1
3
2

37
ENTRETIEN
Tourner le couvercle à l’invers (Fig. 9-A) et
xer le panier de ltration dans les fentes
du couvercle (1). Il est maintenant possible
de porter le panier de ltration dans la place
de nettoyage sans que de gouttes d’eau
coulent sur le plancher.
Retirer le sac de la masse biologique
Matrix™, tous les médias de ltration
chimique et la mousse du fond. (Fig. 9-B)
Rincer soigneusement la mousse du fond.
Ne pas utiliser de savon ou de détergents,
car ils peuvent nuire aux habitants de
l’aquarium. Rincer ou remplacer tous les
médias de ltration chimique si nécessaire:
packs de masses de remplacement conçus
spéciquement pour les Filtres Tidal™
(Matrix™, MatrixCarbon™ et Zeolite) sont
vendus séparément.
Le sac de masse biologique Matrix™
contient des bactéries importantes pour la
stabilité de l’environnement de l’aquarium.
Ne pas laisser que les médias sèchent. Les
médias peuvent être rincés doucement
dans un récipient avec une partie d’eau
de l’aquarium pour éliminer toute couche
visqueuse qui peut construire sur les
médias au l du temps.
Si la masse Matrix™ est remplacée, il est
recommandé de ne pas remplacer plus de
la moitié des supports au même moment,
de manière à protéger la culture de bactéries
qui permet un environnement d’aquarium
stable. À ce moment-là, nous suggérons
le réensemencement de l’aquarium avec
Seachem Stability™. Rincer le panier des
médias ltrants. Remonter les médias et
tous les composants dans l’ordre inverse.”
1
1
Figure 9-A Figure 9-B

38
ENTRETIEN
Si le ltre commence à couler du côté
droit (Fig. 10) de la cascade de retour, ça
signie que le panier de média ltrant est
complètement colmaté. L’eau dans ce cas
contourne les masses de ltration et un
nettoyage soigneux est nécessaire pour
maintenir la santé globale de l’aquarium.
Pour entretenir la pompe, procéder
comme suit (Fig. 11): appuyer sur le côté
du ltre (1), tirer vers le bas le boîtier de la
pompe (2), retirer le câble d’alimentation
du corps de ltre et pousser la pompe
vers la droite jusqu’à ce qu’elle clics et
les rejets (3). Pour le modèle Tidal 55, tirer
doucement sur le couvercle d’aspiration
de la pompe jusqu’à le retirer (4, Fig 11B). Cela révélera le rotor (5).
Figure 10
Figure 11-A
Figure 11-B
(Tidal 55)
1
1
3
2
4
5

39
ENTRETIEN
Laver la turbine soigneusement pour enlever toutes boues ou incrustations accumulées.
Ne pas utiliser de savon ou de détergent. Si l’on désire, une solution diluée de vinaigre et
d’eau peut être utilisée pour enlever toute saleté incrustée.
Après le nettoyage, réinsérer le rotor en s’assurant qu’il tourne librement autour de l’arbre
et appliquer le couvercle d’aspiration de la pompe. Remonter les composants restants
dans l’ordre inverse. Saleté, dépôts de calcaire et la naturelle usure des composants
pourraient causer l’apparition de bruit de la pompe. Cependant, ils n’aectent pas le bon
fonctionnement du ltre. Dans de tels cas, il est conseille de remplacer le rotor pour revenir
au fonctionnement silencieux.
Pour les modèles Tidal 75 et 110, tirer
vers le haut et à l’arrière sur le clip en
dessus du couvercle du rotor (4, Fig. 11C). Tourner la base du rotor dans le sens
antihoraire pour le déverrouiller (5), puis
retirer-le de son boîtier (6).
Figure 11-C
(Tidal 75 & 110)
4
5
6

40
41
IMPORTANTES INSTRUÇÕES DE SEGURANÇA
Advertência: Para se evitar lesões, precauções básicas de segurança devem ser observadas, incluindo as seguintes orientações de segurança:
Os Filtros Tidal são fabricados dentro das conformidades de legislações sobre segurança nacionais e internacionais
LEIA E SIGA TODAS AS INSTRUÇÕES DE SEGURANÇA
1. Verique se a tensão elétrica do rótulo da bomba corresponde com a da rede de energia. A bomba
deve ser provida de um interruptor diferencial (protetor) através do qual a corrente nominal seja
igual ou inferior a 30mA.
2. A bomba não pode funcionar sem água para não danicar o motor.
3. Antes de ligar a bomba à rede elétrica, verique se o cabo elétrico ou a bomba não estão
danicados.
4. A bomba tem uma ligação de cabo tipo Z. O cabo e/ou o plugue não podem ser substituídos ou
consertados; em caso de danos, substitua a bomba inteira.
5. CUIDADO: desligue todos os equipamentos elétricos submersos antes de fazer manutenção na
água; no caso do plug ou parte elétrica danicados, desligue o disjuntor antes de desligar o plug
da tomada.
6. O ltro pode ser usada em líquidos ou ambientes com temperaturas máxima de 35°C / 95 °F.
7. Não use o ltro para diferentes nalidades, daquelas para as quais ela foi projetado (como por
exemplo, em banheiros ou aplicações semelhantes)
8. Não utilize o ltro em líquidos abrasives ou corrosives.
9. O ltro não foi projetado para ser utilizado por crianças ou pessoas
com problemas mentais. A supervisão de um adulto adequado ou
pessoas responsável pela segurança é necessário.
10. Para evitar que a água molhe acidentalmente o plugue ou a tomada
elétrica, faça um laço no cabo abaixo do nível tomada elétrica (foto A)
11. Não desligue o ltro puxando o cabo da tomada durante a instalação
ou manutenção.
12. O ltro só pode ser utilizado nas aplicações acima mencionadas e é
apenas para uso interno.
NAO PERCA ESSAS INSTRUÇÕES
A.

42
INSTRUÇÕES DE ELIMINAÇÃO CORRETA DO PRODUTO NOS TERMOS DA DIRETIVA DA UE
(UNIAO EUROPEIA) 2002/96/EC
Quando usado ou quebrado, este produto não deve ser eliminado juntamente com outros resíduos. Pode ser entregue aos centros de recolha de resíduos de equipamentos elétricos especícos
ou aos revendedores que fornecem este serviço. A eliminação de produtos elétricos evita consequências negativas para o ambiente e para a saúde pública em geral e permite a reutilização de
materiais, poupando energia e recursos.
GARANTIA LIMITADA
As Seachem da garantia ao comprador original deste produto contra defeitos materiais e mão de obra
por um período de três (3) anos a partir da data da compra original, e pode ser prorrogado por mais
dois (2) anos, com o registro do produto em www.seachem.com; todos os termos exceto pra o impeller
da bomba, o que é garantido por um período de seis (6) meses. Esta garantia é limitada a reparação
ou substituição (a critério da Seachem) do produto defeituoso e faz não cobrir a perda de vida do
aquário, danos pessoais, perda de propriedade ou dano decorrente da ultimação do produto. Você deve
guardar o recibo original de compra para validar a garantia, qualquer garantia aqui deve ser executada
simultaneamente com, e não além, de qualquer período mínimo de garantia estabelecida pela legislação
aplicável.
Reivindicações feitas sob a garantia deverá ser arquivadas “on-line” em www.seachem.com pelo
comprador original e quem deverá fornecer a prova da compra no momento do registro. O requerente
deve obter uma “Autorização de Retorno de Mercadorias” no momento do registro antes de enviar
qualquer produto para a garantia ou assistência técnica. O custo do transporte para o centro de
serviços, ou centro de reparação, tem que ser pago pelo comprador.
EXCLUSÕES: Esta garantia não cobre o seguinte: * Os danos resultantes de acidentes, uso indevido,
abuso, falta de cuidado razoável, o uso de produtos que são diferentes do normal ou comum, usado
em projetos de condições anormais de trabalho ou quaisquer outras falhas não resultante de defeitos
em materiais ou mão-de-obra. *Danos resultantes de modicações, alterações ou tentativas de reparo
por alguém que não seja da Seachem ou um de seus representantes. * A transferência do produto para
alguém que não seja o comprador original. * Submeter o produto a serviços elétricos não especicados
na embalagem; o comprador original é responsável pelo fornecimento de instalações elétricas
adequadas.
EXCLUSÃO DE DANOS E LIMITAÇÃO DE GARANTIA IMPLÍCITA
Sua única e exclusiva solução é a reparação ou substituição, como previsto nesta garantia limitada do
produto. A empresa se exime de qualquer responsabilidade por danos acidentais ou consequentes da
quebra de qualquer garantia ou condições expressas ou implícitas, incluindo as garantias implícitas ou
condições de comercialização, de qualquer comercializável, adequação de um propósito particular, ou
de qualidade satisfatória, em relação a este produto. Esta escrita constitui o acordo de garantia das
partes com relação ao assunto aqui tratado, nenhuma renúncia ou alteração será válida a menos por
escrito assinado pela Seachem. Quaisquer garantias implícitas aqui são limitados a um ano ou menor
período permitido pela lei de sua jurisdição

43
Parabéns pela aquisição do seu novo ltro externo Seachem Tidal™. Pode car completamente seguro
de que você investiu em um ltro com alta tecnologia que irá manter seu aquário limpo e saudável com
o mínimo de manutenção pelos próximos anos. A gama Seachem Tidal ™ de ltros foi desenvolvida
especicamente para Seachem por Sicce na Itália para garantir a mais alta qualidade e alto desempenho
possível.
Características
1. Baixo consumo em relação ao grande uxo de água permite economia de energia com excelente
circulação
2. Funcionamento silencioso, mesmo para os mais silenciosos ambientes da casa ou do escritório
3. A bomba permite arranque fácil e conável
4. Baixa manutenção para a facilidade e cuidado do aquário em longo prazo
5. Impeller auto limpante reduzindo necessidade de manutenção da bomba
6. Partes e peças não corrosivas, permite o uso em aquários de água doce ou salgada
7. Alta capacidade da cesta de ltração permite a utilização de praticamente todas as mídias ltrantes
8. Inclui Seachem Matrix ™ que remove completamente amônia, nitrito e nitrato
9. A cesta de ltração removível permite fácil limpeza
10. A tampa do ltro funciona como uma bandeja segura para cesta de ltração, evitando derramamento
de água durante a limpeza remota
11. Frestas de ventilação permitem reforçar o uxo de ar e as trocas gasosas
12. Perl comprimido reduz a interferência na xação do aquário
13. O sistema de nivelamento permite o posicionamento exato na parede do aquário
14. Skimmer de superfície ltra orgânicos e espuma da superfície da água do aquário
15. Fluxo ajustável permite utilização versátil em uma variedade de aquários
16. Captação de água ajustável pela superfície vs. profundidade permite o foco em áreas especícas
a ser ltrada
17. Tudo de captação telescópico permite regular em qualquer profundidade
18. O suporte para aquecedor permite a dispersão segura do calor através do uxo de água do ltro
19. O retorno de água pela parede transversa oferece fendas de aeração para aumentar redox e
aeração do aquário
20. O monitor de manutenção mostra quando o ltro precisa de limpo
Simplicando, você comprou o melhor ltro externo disponível. Obrigado.
INTRODUÇÃO

44
VERIFICAÇÃO DE PEÇAS
Maintenance alert device
Seachem Matrix™ bio-media
Bottom foam filter
Filter basket
Flow regulation dial
Surface skimmer intake
Low wattage,
self-priming pump
Self-cleaning impeller
Dual intake regulation dial
Telescoping intake tube
Reversible filter cover snaps to
filter basket during maintenance
1
2
4
5
3
6
8
Aerating return flow7
10
Leveling dial9
11
12
Heater holder
14
Pump housing13
15
Dispositivo de alerta de manutenção
Mídia biológica Seachem Matrix™
Esponja, situada na base
Cesta de ltração
Regulagem do uxo
Aeração do uxo de retorno
Skimmer de superfície
Seletor de nivelamento
Baixo consumo
Impeller auto-limpante
Suporte para aquecedor
Carcaça da bomba
Botão de regulação da entrada dupla
Tubo de entrada telescópico
Tampa do ltro reversível se encaixa na
cesta de ltração durante a manutenção

45
MONTAGEM E INICIO DE FUNCIONAMENTO
Figura 1
Figura 2
Alto Baixo
Insira metade inferior do tubo
de entrada na metade superior.
Insira o tubo de entrada
telescópica na entrada bomba
(Fig 1).
Se pretender colocar um
aquecedor no ltro (Fig. 2),
pressione os lados do ltro (1),
puxe para baixo para remover
a tampa da caixa da bomba
(2), deslize no suporte de
aquecedor para o fundo do
alojamento (3). O suporte de
aquecedor pode ser inserido na
face voltada para cima ou para
baixo dependendo da posição
desejada para o aquecedor.
Insira o cabo da bomba nas
guias (4) antes de recolocar a
câmara da bomba (5).
1
2
1
1
3
2
5
4

46
Figura 3
Figura 4-A Figura 4-B
Encaixe o mostrador de
nivelamento do ltro na parte
inferior da caixa do ltro para
se preparar para encaixar e
nivelar o ltro. (Fig.3)
Colocar o ltro na borda
do aquário ( Fig. 4-A)
e ajustar o disco de
nivelamento, parafusando ou
desparafurando até que o ltro
esteja nivelado com o aquário .
Insira o cabo da bomba nas
guias, conforme mostrado
(Fig. 4-B) e ligar o cabo
à tomada certicando-se
de formar uma malha de
gotejamento, como mostrado
nas instruções de segurança e
na Figura 4-B .
MONTAGEM E INICIO DE FUNCIONAMENTO

47
Encher o cesto de filtração com as mídias
Remover todos os sacos de plástico das
mídias antes de se iniciar o ltro . Todos os
ltros Tidal ™ foram desenvolvidos para conter
qualquer tipo de mídia ltrante. Em geral,
existem três tipos de ltração usadas na maioria
aquários - mecânica, química e biológica.
A ltragem mecânica inclui mídia de remoção
que capturam os resíduos diretamente no ltro.
A ltragem química inclui mídias de ltração,
que trabalham para remover quimicamente
compostos dissolvidos na água. A ltragem
biológica proporciona a habitação para que
as bactérias cresçam e quebrem resíduos
orgânicos.
Todos os ltros Tidal™ incluem uma esponja
para ltragem mecânica e mídia biológica
Seachem Matrix™ para ltragem biológica.
Há uma variedade de opções de ltragem
química disponíveis para muitas nalidades
diferentes, dadas uma variedade de ambientes
de aquários. O Seachem MatrixCarbon™ é a
opção preferida em quase todos os aquários.
MatrixCarbon™ está disponível pré-ensacado
para qualquer tamanho dos ltros Tidal™.
Enxaguar a esponja e todas as mídias do
ltro sob água corrente antes de colocálos no cesto do ltro. Colocar a camada da
mídia com a esponja no fundo do ltro, então
colocar as mídias de ltragem química, tais
como MatrixCarbon™ e por último a mídia
biológica Matrix™. Não remova Matrix™ da
sua bolsa de malha; coloque-o no sentido
de comprimento e distribua Matrix™
uniformemente antes de colocá-lo na cesta de
ltragem. A m de aumentar mais rapidamente
as bactérias no Matrix™, recomendamos a
adição de Seachem Stability™ para o seu
aquário.
A cesta interna impede o desvio de água
e permite a rápida remoção e limpeza da
esponja do ltro e quaisquer mídias de
ltração utilizadas. Para evitar a interferência
do uxo de água adequado do ltro, não
sobrecarregar o cesto de mídias ltrantes.
Uma indicação disso será
a ativação do
alerta de manutenção ou se começar
a pingar do lado direito da parede do
u x o d e r e t o r n o ( F i g 1 0 , p á g i n a 5 1 ) .
1 2 3
Figura 5: Camadas das mídias ltrantes (de baixo para cima)
Mecânica
(Esponja)
Química
(MatrixCarbon)
Biológica
(Matrix)

48
Após a instalação do ltro Tidal™,
iniciar a montagem em um aquário cheio
de água e conectar o cabo de alimentação
elétrica na tomada. O filtro começará
imediatamente a filtragem da água. Ajustar
as três configurações possíveis de acordo
com as preferências ou necessidades
(Fig. 6) .
1. Aumentar ou diminuir a entrada
telescópica para a profundidade
desejada no aquário.
2. Ajustar a quantidade total de fluxo
através do filtro. Ajuste o desempenho
para um volume específico de aquário,
de forma a proporcionar o ambiente
correto para os peixes que preferem
mais ou menos o movimento da água
ou oxigenação. Este recurso oferece
uma redução de até 80% do consumo
máximo de fluxo ao fazer pleno uso
contínuo do motor do filtro. Quando
os fluxos de entrada reduzidos são
selecionados, a grade refiltração
permite que a água recircule através
das mídias filtrantes para maximizar o
desempenho de filtração através de
um maior tempo de contato.
3. Ajustar a quantidade de entrada de
fluxo a partir da superfície telescópica .
Figura 6
2
3
1
INICIANDO O FILTRO
O nível mínimo de água no aquário
não deve cair abaixo da marca “ nível
de água mínimo “. Um nível mais
baixo pode interromper o uxo de
água e causar danos na bomba - não
permitir que a bomba funcione a seco.
Não existe um nível máximo de água
embora seja recomendável que o nível
não exceda a altura da das ranhuras do
skimmer de superfície.
Nível ínimo
de Água
Skimmer de
superfície

49
Os ltros Tidal™ são feitos para oferecer
excelente função com baixa manutenção.
No entanto, a manutenção regular pode
ajudar muito na saúde geral e bem-estar
de seu aquário. O dispositivo de alerta de
manutenção oferece um excelente sinal
para realizar a manutenção de rotina no
ltro Tidal™. O dispositivo de alerta de
manutenção indica que o uxo não é capaz
de mover-se livremente através da cesta
Figura 7
Figura 8
de meios ltrantes. Quando o alerta de
manutenção se eleva acima da tampa do
ltro de cerca de ½ “ou 1 cm (Fig. 7) , é hora
de limpar o ltro.
Para começar a limpeza do ltro, (Fig. 8)
levantar a tampa (1) , deslizar o bloqueio azul
cesta de ltro à frente do ltro (2) e remover
o cesto de mídias do ltro, puxando para
cima sobre as duas alças laterais (3)
MANUTENÇÃO
ATENÇÃO: Antes de qualquer manutenção no ltro Tidal ™ , desligue-o da tomada.
1
3
2

50
MANUTENÇÃO
Vire a tampa (Fig. 9-A) e encaixe a cesta do
ltro de mídia nas guias da tampa (1). Agora
você pode levar a cesta de mídias do ltro
para uma área de limpeza sem derramar ou
pingar de água.
Retire a embalagem de Matrix™ mídia
de ltração biológica, todos as mídias de
ltragem química e a esponja de ltração
mecânica da parte inferior do ltro. (Fig. 9-B)
Lave a esponja da parte inferior do ltro
completamente. Não use nenhum sabão
ou detergente, pois podem prejudicar os
habitantes do aquário. Lavar ou substituir
quaisquer meios de ltração química, se
necessário. Mídias de ltração projetadas
especicamente podem ser substituídas
para as unidades de ltro Tidal™ (Matrix™,
MatrixCarbon™ e zeolite) são vendidos
separadamente.
A bolsa de Matrix™ mídia de ltragem
biológica, contém bactérias importantes
para a estabilidade do ambiente do
aquário. Não permita que a mídia que
seca. As mídias podem ser enxaguadas
suavemente em um recipiente com alguma
da água do aquário para remover qualquer
revestimento de lodo que podem acumularse nos meios ao longo do tempo. Se a mídia
Matrix™ for substituída, é aconselhável
substituir não mais do que a metade de
cada mídia de ltração a cada vez, de
modo a preservar a cultura de bactérias
que permitem um ambiente estável do
aquário. Nesse momento sugerimos o uso
novamente de Seachem Stability™. Lave a
cesta de ltração. Remonte a cesta e todas
as mídias na ordem inversa.
1
1
Figura 9-A Figura 9-B

51
MANUTENÇÃO
Se o ltro começar a pingar a partir do
lado direito (Fig. 10) da parede de uxo
de retorno, indica que o cesto de mídias
ltrantes está completamente obstruído.
Água, neste caso, não está passando pelas
mídias de forma correta e uma limpeza
minuciosa é necessária para manter a
saúde geral do aquário .
Para fazer a manutenção da bomba,
proceda da seguinte forma (Fig 11) :
Pressione o lado do ltro (1), puxe para
baixo na caixa da bomba (2), puxe o cabo
de alimentação do corpo do ltro e empurre
a bomba para a direita até escutar o clique
e, em seguida, puxe para baixo (3). Para os
Tidal 55, puxe cuidadosamente a tampa
da entrada da bomba (4, Fig 11 -B). Isto irá
mostrar o impeller (5) .
Figura 10
Figura 11-A
Figura 11-B
(Tidal 55)
1
1
3
2
4
5

52
MANUTENÇÃO
Lave o impeller completamente para remover qualquer lodo ou sujeiras. Não use sabão
ou detergente. Se desejar, uma solução diluída de água e vinagre pode ser usada para a
dissolver qualquer acúmulo de crosta de cal
Após a limpeza, recoloque o impeller assegurando que gire livremente em torno do eixo
e recoloque a tampa de entrada da bomba. Monte os componentes restantes na ordem
inversa. Depósitos de calcário e o desgaste natural dos componentes podem causar o
aumento de barulhos. No entanto, eles não afetam o bom funcionamento do ltro. Em tais
casos, é aconselhável substituir o impeller para retornar para a operação silenciosa.
Para Tidal 75 e 110, puxar para cima e para
trás sobre o grampo superior da tampa do
rotor (4, Fig11-C). Girar a base do rotor antihorário para destravá-lo (5), e, em seguida,
puxe-o livre de sua caixa (6).
Figura 11-C
(Tidal 75 & 110)
4
5
6

53
NORME DI SICUREZZA
Per evitare infortuni, precauzioni di sicurezza dovrebbero essere osservate quando si utilizzano apparecchi elettrici
I FILTRI TIDAL sono conformi alle norme di sicurezza nazionali ed internazionali.
LEGGETE ATTENTAMENTE LE SEGUENTI ISTRUZIONI PER UN CORRETTO UTILIZZO DEL PRODOTTO
1. Controllare che la tensione riportata sull’etichetta della pompa corrisponda alla tensione di rete.
L’apparecchio deve essere alimentato attraverso un interruttore dierenziale (salvavita), la cui
corrente nominale sia inferiore o uguale a 30mA.
2. La pompa non deve mai funzionare senza acqua per evitare danni al motore.
3. Prima di collegare l’apparecchio alla rete controllare che il cavo e la pompa non risultino in qualche
modo danneggiati.
4. La pompa è costruita con un collegamento di tipo Z. Il cavo e la spina non possono essere sostituiti
o riparati; in caso di danneggiamento sostituire l’intero apparecchio.
5. Prima di collegare l’apparecchio alla rete controllare che il cavo e la pompa non risultino in qualche
modo danneggiati.
6. Il ltro può essere utilizzato in liquidi o in ambienti con temperatura
non superiore ai 35 °C / 95 °F.
7. Non utilizzare l’apparecchio per scopi diversi da quelli per i quali è
stato realizzato, come ad es. in stanze da bagno o applicazioni simili.
8. Evitare di far funzionare il ltro con liquidi corrosivi ed abrasivi.
9. Questo dispositivo non è progettato per essere utilizzato da persone
(inclusi bambini) con ridotte capacità siche, sensoriali e mentali a
meno che non siano accompagnati da persone responsabili per la
loro sicurezza.
10. Per evitare che accidentali gocciolamenti bagnino la spina o la presa
di corrente realizzare con il cavo un’ansa sotto il livello della presa
(Fig. A).
11. Evitare di sollevare il ltro dal cavo di alimentazione durante
l’installazione e la manutenzione.
12. Il ltro può essere utilizzato solamente nelle applicazioni suddette ed è destinato esclusivamente ad
uso in ambiente interno, se dotatp di cavo bipolare..
DO NOT DISCARD THESE INSTRUCTIONS.
A.

54
AVVERTENZE PER IL CORRETTO SMALTIMENTO DEL PRODOTTO AI SENSI DELLA
DIRETTIVA EUROPEA 2002/96/EC
Alla ne della sua vita utile, il prodotto non deve essere smaltito insieme ai riuti urbani. Può essere
consegnato presso gli appositi centri di raccolta dierenziata predisposti dalle amministrazioni
comunali, oppure presso i rivenditori che forniscono questo servizio. Smaltire separatamente un
elettrodomestico consente di evitare possibili conseguenze negative per l’ambiente e per la salute
favorendo il recupero dei materiali ed un importante risparmio energetico.
LIMITI NELLA GARANZIA
Seachem ore una garanzia per questo prodotto (vedi ESCLUSIONI come di seguito) all’acquirente
originale, contro difetti di materiali e di manodopera per un periodo di tre (3) anni dalla data di acquisto
originale, con possibilità di un’estensione per due (2) anni tramite la registrazione del prodotto su www.
seachem.com; questo vale per tutte le parti del prodotto, eccetto la girante, che è coperta da una
garanzia di sei (6) mesi. Questa garanzia si limita alla riparazione o sostituzione (a sola discrezione di
Seachem) del prodotto difettoso e non copre le perdite subite dell’acquario, lesioni personali, perdite
o danni causate dall’utilizzo del prodotto. È necessario conservare la prova di acquisto originale per
convalidare la garanzia. Qualsiasi garanzia qui decorre in concomitanza con, e non in aggiunta a,
qualsiasi periodo minimo di garanzia stabilito dalla legge applicabile.
I reclami coperti da garanzia devono essere compilati on-line nel sito www. seachem.com da parte
dell’acquirente originale, che deve fornire la prova di acquisto al momento della sottoscrizione. Il
richiedente deve ottenere un’autorizzazione di reso “RMA” al momento della richiesta prima di inviare
qualsiasi prodotto per richiesta sostituzione o assistenza tecnica. L’acquirente sostiene il costo di
spedizione da e per il centro di assistenza o stazione di riparazione.
ESCLUSIONI. Questa garanzia non copre i seguenti : * Danni derivanti da incidenti, uso improprio,
abuso, mancanza di ragionevole cura, uso del prodotto diverso da normale o ordinario, utilizzando il
progetto in condizioni di lavoro anomali o altri guasti non derivanti da difetti del materiale o di lavorazione.
*Danni derivanti da modiche, manomissioni o tentativi di riparazione da parte di soggetti diversi da
Seachem o suo designato. * Trasferimenti del prodotto a qualcuno che non sia l’acquirente originale.
* Assoggettamento del prodotto a servizio elettrico non come indicato dalla confezione; l’acquirente
originale è responsabile di fornire un adeguato impianto elettrico.
DANNI ESCLUSI E LIMITI DI GARANZIA
La vostra unica ed esclusiva soluzione è la riparazione o la sostituzione del prodotto, come prevede
questa garanzia limitata. La società declina ogni responsabilità per danni incidentali e consequenziali
per violazione di qualsiasi garanzia o condizioni espressa o implicita, comprese le garanzie implicite
o condizioni di commerciabilità, di qualità mercantile, idoneità per uno scopo particolare, o di qualità
soddisfacente rispetto a questo prodotto. Questa scrittura costituisce l’intero accordo di garanzia delle
parti in relazione alla materia oggetto del presente documento, nessuna rinuncia o modica è valida se
non sottoscritta e rmata da Seachem. Tutte le garanzie implicite nel presente documento sono limitate
a un anno o più breve periodo consentito dalla legge del vostro paese.

55
Congratulazioni per l’acquisto del nuovo ltro appeso Seachem Tidal ™ . Siate certi di aver investito in un ltro
di qualità, ben ingegnerizzato che manterrà il vostro acquario sano e pulito, con una manutenzione minima
per gli anni a venire. La gamma di ltri Seachem Tidal ™ è stata progettata e realizzata appositamente per
Seachem da Sicce in Italia per assicurare la massima qualità e prestazioni al top.
Caratteristiche
1. Basso consumo in rapporto ad un usso abbondante consente una circolazione importante con
risparmio energetico
2. Funzionamento silenzioso anche per l’ambiente domestio o l’ucio più silenzioso
3. Pompa auto innescante per consentire un’installazione facile ed adabile
4. Bassa manutenzione per la facilità della cura dell’acquario
5. Girante auto-pulente per ridurre la manutenzione della pompa
6. Componenti non corrosive per consentire l’applicazione del ltro in acqua dolce o marina
7. Cestello ad ampio volume ltrante che consente l’utilizzo di qualsiasi materiale ltrante.
8. Seachem Matrix ™ bio-media incluso per rimuovere completamente ammoniaca, nitriti e nitrati
9. Cestello removimibile per una facile pulizia
10. Coperchio reversibile con doppio utilizzo nelle operazioni di pulizia, diventa vassoio antigoccia per l’
appoggio del cestello durante la manutenzione.
11. La cascata consente un’extra aerazione dell’acquario
12. Il prolo contenuto riduce l’interferenza con il posizionamento in acquairo
13. La ghiera di livellamento consente un esatto posizionamento sulla parete dell’acquario
14. Lo skimmer di supercie trattiene sostanze organiche pulendo la supercie dell’acquario
15. La portata regolabile del usso consente un utilizzo versatile per diverse esigenze di acquario
16. La doppia aspirazione dalla supercie o dal fondo permette di concentrarsi su un’area specica per la
pulizia dell’acquario
17. Il tubo telescopico regolabile consente l’aspirazione da qualsiasi profondità
18. La clip di supporto per il riscaldatore consente la dispersione sicura del calore attraverso il usso d’acqua
creato dal ltro
19. La cascata di ritorno è dotata di feritoie di aerazione per aumentare il redox e l’aerazione dell’ acquario.
20. Spia di manutenzione, segnala quando il cestello ha necessità di manutenzione
In breve, avete acquistato il miglior ltro appeso disponibile nel mercato! Grazie.
INTRODUZIONE
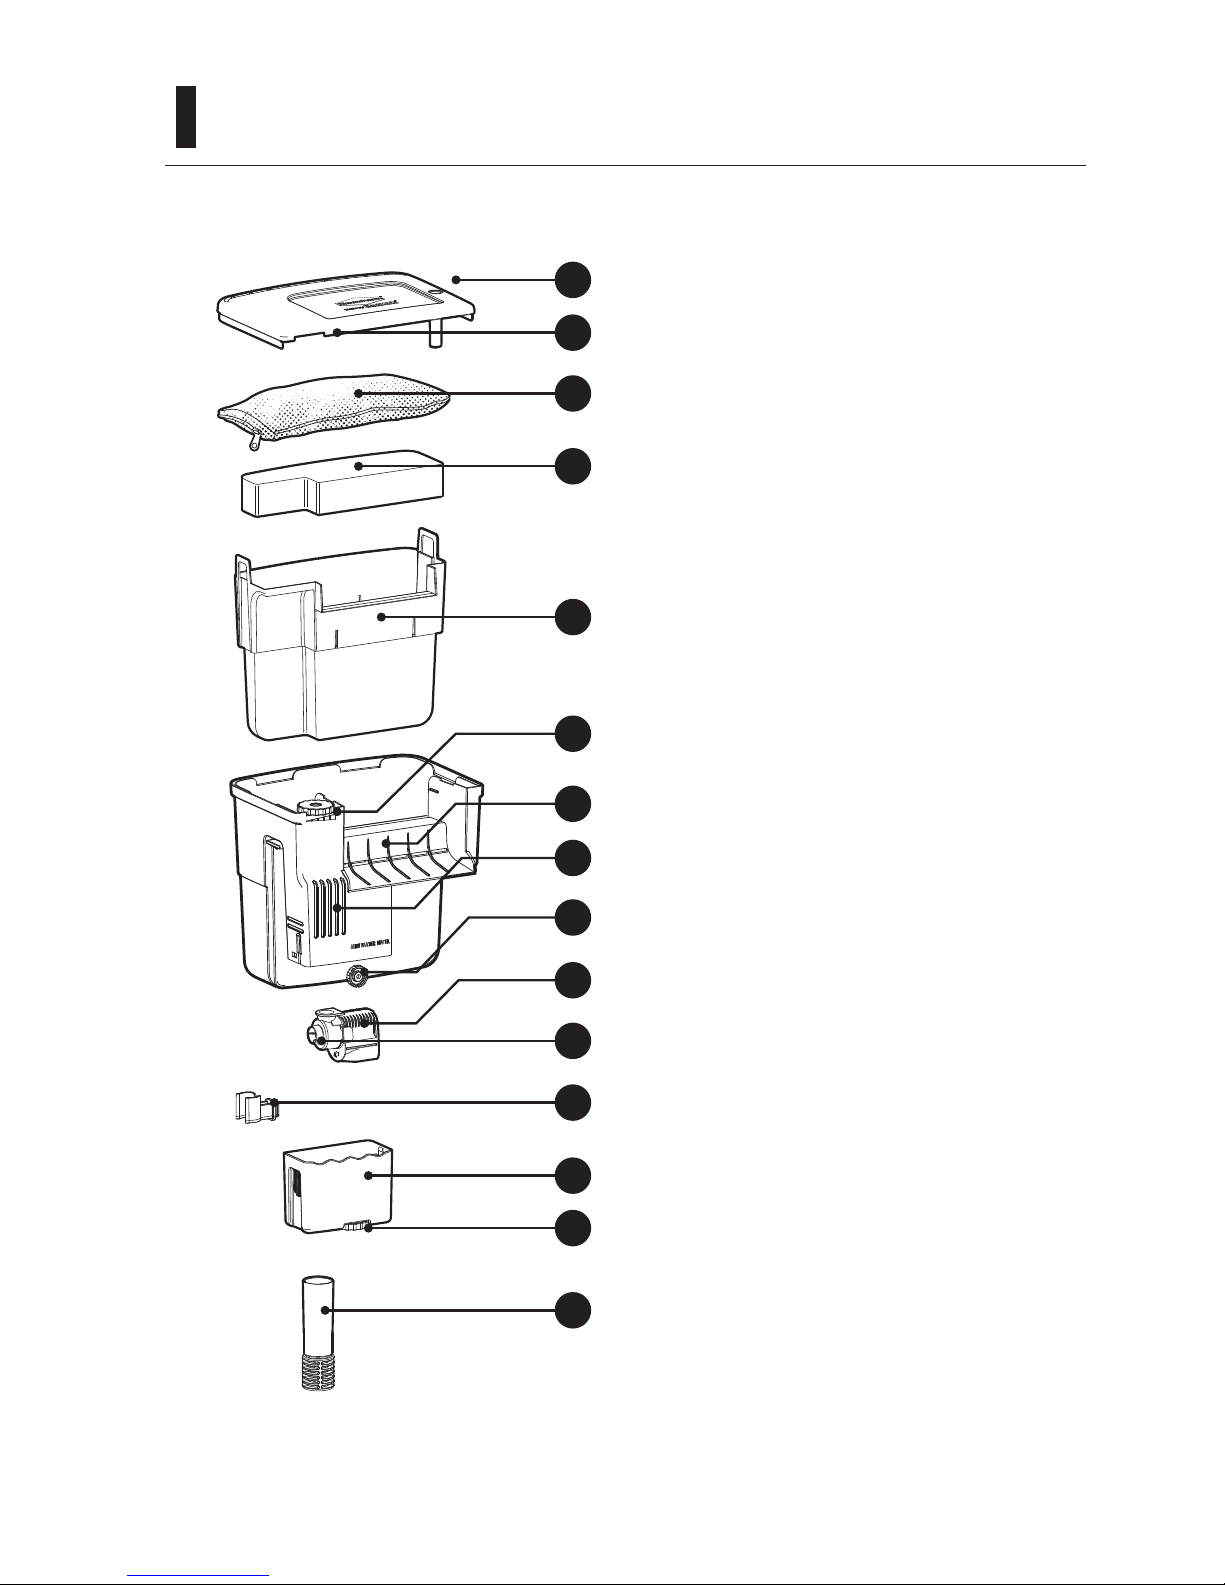
56
ELENCO DEI COMPONENTI
Maintenance alert device
Seachem Matrix™ bio-media
Bottom foam filter
Filter basket
Flow regulation dial
Surface skimmer intake
Low wattage,
self-priming pump
Self-cleaning impeller
Dual intake regulation dial
Telescoping intake tube
Reversible filter cover snaps to
filter basket during maintenance
1
2
4
5
3
6
8
Aerating return flow7
10
Leveling dial9
11
12
Heater holder
14
Pump housing13
15
Dispositivo di Allerta Manutenzione
Seachem Matrix ™ Bio-media
Spugna ltrante nel fondo
Cestello
Regolazione di usso
Cascata con areazione
Aspirazione con skimmer di supercie
Regolatore di posizionamento ltro
Pompa auto innescante con basso
Girante auto pulente
Supporto per riscaldatore
Contenitore della pompa
Regolatore per la doppia aspirazione
Tubo telescopio di aspirazione
Coperchio reversibile diventa un vassoio
per la manutenzione

57
1
1
3
2
5
4
ASSEMBLAGGIO e INNESCO
Figura 1
Figura 2
Alto Basso
Assemblare le due parti del
tubo telescopico. Agganciare
il tubo telescopico nel
contenitore della pompa. (Fig 1)
Se si desidera inserire un
riscaldatore sul ltro (Fig
2), premere i lati del ltro
(1), tirare verso il basso per
rimuovere il coperchio del vano
pompa (2), insere il supporto
del riscaldatore nel suo
alloggiamento (3 ). Il supporto
riscaldatore può essere
inserito a faccia in su o in giù
a seconda della lunghezza del
riscaldatore. Inserire il cavo
nelle apposite sedi (4) prima di
riposizionare il vano pompa (5).
1
2

58
Figura 3
Figura 4-A Figura 4-B
Fissare la manopola del ltro
di livellamento nella parte
inferiore del ltro per preparare
il posizionamento e livellare con
l’acquario il ltro stesso. (Fig.3)
Posizionare il ltro sul
bordo dell’acquario (Fig.
4-A) e regolare la ghiera di
livellamento avvitando o
svitando nché il ltro è a livello
con l’acquario.
Inserire il cavo della pompa
nelle guide come mostrato
(Fig 4-B) ed collegare il cavo
alla presa assicurandosi di
formare un anello a goccia
come mostrato nelle istruzioni
di sicurezza e in Figura 4-B.
ASSEMBLAGGIO e INNESCO

59
PREPARAZIONE DEL CESTELLO
Rimuovere tutti i sacchetti di plastica contenenti
supporti di ltrazione prima di innescare il ltro.
Tutti i ltri TIDAL™ sono stati progettati per
contenere qualsiasi tipo di materiale ltrante.
In generale ci sono tre tipi di ltrazione utilizzati
nella maggior parte degli acquari - meccanica,
chimica e biologica.
La ltrazione meccanica comprende materiali
ltranti che rimuovono i residui grossolani .
La ltrazione chimica comprende materiale
ltrante che rimuove chimicamente composti
disciolti dall’acqua. La ltrazione biologica ore
un alloggiamento per la crescita dei batteri e
ripartizione dei riuti organici.
Tutti i ltri TIDAL™ includono una spugna
ltrante di fondo per la ltrazione meccanica
e Matrix™ per un’ eccezionale ltrazione
biologica. Ci sono una varietà di opzioni di
ltrazione chimici disponibili per scopi dierenti
a seconda della varietà di ambienti acquario.
Seachem MatrixCarbon ™ è una delle opzioni
preferite perchè adatta ad una vastissima
varietà di ambienti acquario. MatrixCarbon ™
è disponibile per qualsiasi modello del ltro
TIDAL™ .
RIsciacquare abbondantemente la spugna e
tutti i materiali ltranti sotto l’acqua corrente
prima di inserirli nel ltro. Straticare i
matariali ltranti sopra la spugna posizionata
nel fondo del ltro, e a seguire i materiali di
ltrazione chimica, come MatrixCarbon™ ed
inne il materiale ltrante biologico Matrix™.
Non rimuovere Matrix™ dalla sua rete. La
confezione a rete è stata piegata; aprire la
confezione nella sua lunghezza e distribuire
Matrix™ in modo uniforme prima di inserirlo
nel ltro. Al ne di seminare più rapidamente
Matrix™ con i batteri, si consiglia l’aggiunta
di Seachem Stability ™ per il vostro acquario.
Il cestello interno impedisce l’aggiramento
dell’acqua , consentendo la rimozione rapida e
la pulizia della spugna ltro inferiore e qualsiasi
supporto utilizzato. Per evitare interferenze
con il corretto usso attraverso il ltro non
sovraccaricare il cestello media ltrante.
Un’ indicazione sarà data dall’attivazione
della segnalazione di manutenzione o
gocciolamento dal lato destro della parete di
ritorno (Fig 10, pagina 63).
1 2 3
Fig 5: Posizionamento materiale ltrante (dal basso all’alto)
Meccanico
(Spugna ltrante)
Chimico
(MatrixCarbon)
Biologico
(Matrix)

60
Dopo aver assemblato e installato il
ltro Tidal™ in un acquario completo
d’acqua e collegato adeguatamente
alla corrente. Il ltro si innesca
automaticamente e inizia a ltrare
l’acqua. Regolare le tre possibili
impostazioni in base alle preferenze o
esigenze (Figura 6):
1. Alzare o abbassare l’aspirazione
del tubo telescopico alla profondità
desiderata in base all’altezza
dell’acquario.
2. Regolare la quantità di usso
desiderato del ltro. Regolare le
prestazioni in base al: volume
dell’acquario, il tipo, o per
fornire un ambiente adeguato
ai pesci che preferiscono più o
meno il movimento dell’acqua
e di ossigenazione. Questa
caratteristica ore una riduzione
no al 80% del usso massimo.
Quando il usso in aspirazione
è ridotto, la griglia permette all’
acqua di ri-circolare attraverso i
materiali ltranti, massimizzando le
prestazioni di ltrazione attraverso
un maggiore tempo di contatto.
Figura 6
2
3
1
INNESCO DEL FILTRO
3. Regolare la quantità di aspirazione
dalla supercie dell’acqua
chiudendo l’aspirazione dal fondo
nel tubo telescopico.
Il livello minimo di acqua in acquario
non dovrebbe scendere al di sotto il
marchio “Minimum Water Level”. Un
livello inferiore potrebbe fermare il usso
di acqua e provocare danni alla pompa
- non consentire che la pompa lavori a
secco. Non esiste un livello massimo
dell’acqua anche se si consiglia che
il livello non superi l’altezza della
supercie delle ferritorie dello skimmer.
Livello
minimo
dell’acqua
Skimmer di
Supercie
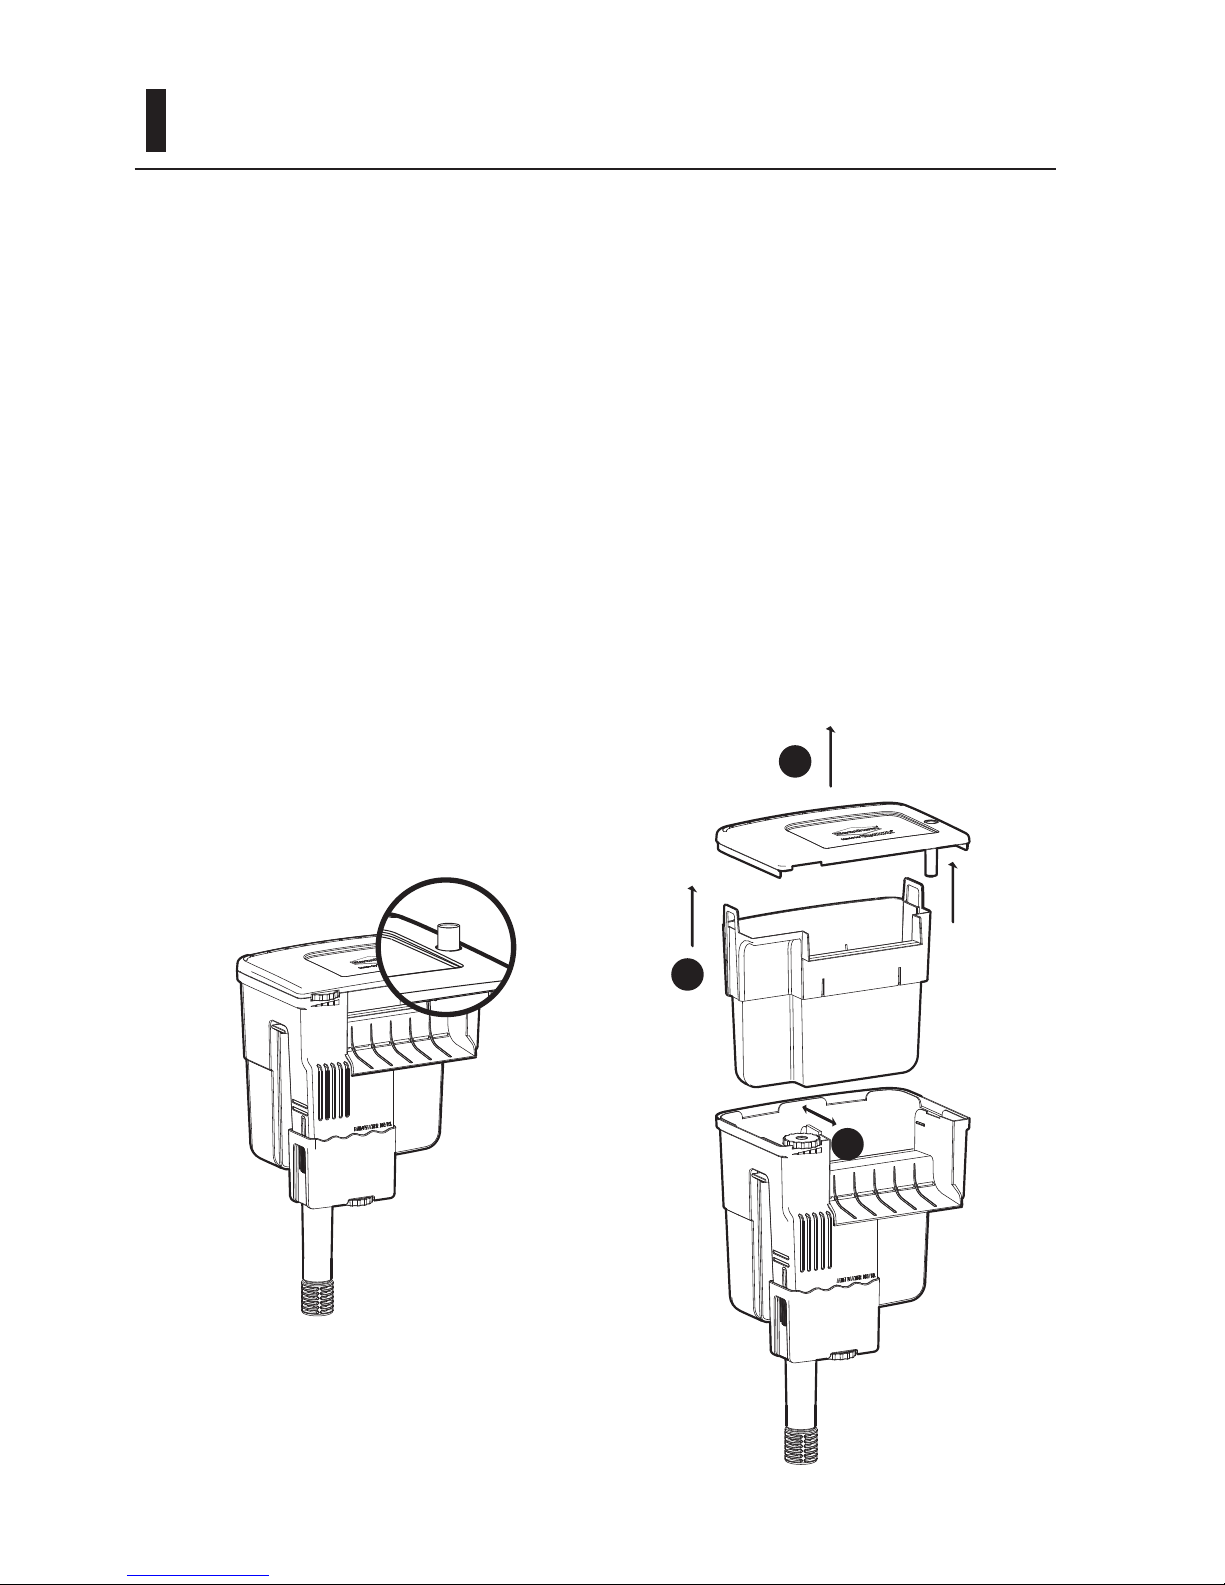
61
I ltri di Tidal™ sono realizzati per orire
un eccellente funzionamento con bassa
manutenzione. Tuttavia, una manutenzione
regolare può aiutare notevolmente nella
salute generale e il benessere del vostro
acquario. Il dispositivo di allarme di
manutenzione ore un ottimo segnale per
eseguire la manutenzione ordinaria sul
ltro Tidal ™. Il dispositivo di allarme di
manutenzione indica che il usso non è in
grado di muoversi ecacemente attraverso
Figura 7
Figura 8
i materiali ltranti. Quando l’avviso di
manutenzione supera il coperchio del ltro
a circa ½ “o 1 cm (Fig. 7), è il momento di
pulire il ltro.
Per iniziare la pulizia del ltro, (Fig 8)
sollevare il coperchio (1), far scorrere il
blocco cestello ltro blu (2) verso la parte
anteriore del ltro e rimuovere il cestello
sollevando le due maniglie laterali (3).
MANUTENZIONE
ATTENZIONE : Prima di eetturare qualsiasi manutenzione del ltro Tidal™, sconnettere la spina dalla presa elettrica.
1
3
2

62
MANUTENZIONE
Girare il coperchio sopra (Figura 9-A) ed
agganciare il cestello materiale ltrante nelle
fessure sul coperchio (1). Ora è possibile
portare il cestello con il materiale ltrante in
una zona di servizio per la pulizia del ltro
senza spargere acqua.
Rimuovere cartuccia di Matrix™, tutti i
materiali di ltrazione chimica e la spugna
inferiore. (Fig 9-B)
Lavare la spugna posizionata nel fondo. Non
utilizzare saponi o detergenti che possono
danneggiare gli abitanti dell’acquario.
Risciacquare o sostituire qualsiasi supporto
di ltrazione chimica, se necessario.
Materiali ltranti di ricambio sono stati
progettati specicamente per le unità
ltranti Tidal™ (Matrix™, MatrixCarbon™,
e Zeolite) e sono venduti separatamente.
Il sacchetto di Matrix ™ contiene batteri
importanti per la stabilità dell’ambiente
dell’acquario. Non permettere al materiale
di asciugarsi. I supporti possono essere
lavati delicatamente in un contenitore con
dell’acqua dall’acquario per rimuovere
qualsiasi rivestimento che si può formare
nel tempo. Se si vuole sostituire il materiale
Matrix™ è consigliabile sostituire non
più della metà del materiale in qualsiasi
momento in modo da proteggere la cultura
batterica che permette un ambiente stabile.
In questo momento vorremmo suggerire
la reintroduzione nell’acquario di Seachem
Stability™. Lavare il cestello. Rimontare
i materiali e tutti i componenti in ordine
inverso.
1
1
Figura 9-A Figura 9-B

63
MANUTENZIONE
Se il ltro inizia a gocciolare dal lato destro
(Fig 10) della parete , signica che il cestello
è completamente intasato. L’ acqua
in questo caso non passa attraverso il
materiale ltrante ed è necessaria una
pulizia approfondita per mantenere la salute
generale dell’acquario .
Per la manutenzione della pompa,
procedere come segue (Figura 11):
Premere il lato del ltro (1), tirare verso
il basso sul corpo della pompa (2),
svincolare il cavo di alimentazione dal
corpo ltro e spingere la pompa verso
destra (3). Per il modello Tidal 55 , tirare
delicatamente il coperchio di aspirazione
della pompa (4, Fig 11-B) per avere
accesso alla girante (5).
Figura 10
Figura 11-A
Figura 11-B
(Tidal 55)
1
1
3
2
4
5

64
MANUTENZIONE
Lavare la girante accuratamente per rimuovere qualsiasi sporcizia o calcare. Non utilizzare
sapone o detergente. Se si desidera, una soluzione diluita di aceto e acqua può essere
usata per rimuovere il calcare in accumulo.
Dopo la pulizia, riposizionare la girante accertandosi che ruoti liberamente attorno all’albero
e il coperchio di aspirazione della pompa. Rimontare i restanti componenti in ordine inverso.
Depositi di calcare e l’usura normale possono ridurre la silenziosità. Tuttavia, esse non
compromettono il corretto funzionamento del ltro. In questi casi è consigliabile sostituire
la girante per il funzionamento silenzioso del ltro.
Per Tidal 75 e 110, tirare in alto e indietro
sulla clip superiore del coperchio girante
(4, Figura 11-C). Ruotare la base della
girante in senso antiorario per sbloccarlo
(5), e poi liberarlo dalla sua sede (6).
Figura 11-C
(Tidal 75 & 110)
4
5
6

65
WICHTIGE SICHERHEITSHINWEISE
ADVERTENCIA: Para evitar lesiones, se deben tomar precauciones básicas de seguridad,
incluyendo las siguientes normas de seguridad:
TIDAL FILTER entsprichen den nationalen und internationalen gesetzlichen Sicherheitsvorschriften.
LESEN UND BEFOLGEN SIE ALLE SICHERHEITSHINWEISE
1. Vor Gebrauch des Filters ist die auf dem Etikett angegebene Netzspannung zu überprüfen. Das
Filter sollte über FI- Schutzschalter < 30 mA betrieben werden.
2. Das Filter darf nicht trocken laufen um Beschädigungen am Rotor zu vermeiden.
3. Vor Anschluss des Geräts vergewissern Sie sich Unversehrtheit des Produkts. Insbesondere dürfen
das Kabel und das Filter keinerlei Beschädigungen aufweisen.
4. Netzkabel dürfen nicht verändert oder beschädigt werden . Das Netzkabel darf nicht zum
Befestigen des Filters verwendet werden. Liegt eine Beschädigung des Netzkabels vor, ist die
Pumpe auszuwechseln.
5. Vor Anschluss des Geräts vergewissern Sie sich Unversehrtheit des Produkts. Insbesondere dürfen
das Kabel und das Filter keinerlei Beschädigungen aufweisen.
6. Die maximale Flüssigkeitstemperatur darf 35° C / 95° F nicht überschreiten.
7. Das Filter darf nicht in ätzender Säure verwendet werden. Wenn sich das Filter in Betrieb bendet, ist
außerdem sicherzustellen, dass sie keinen Sand ansaugt, der die Innenteile ernsthaft beschädigen
und folglich zum Ausschluss des Produktes von der Garantie führen kann.
8. Das Filter darf nicht mit korrosiven und abrasiven Flüssigkeiten
verwendet werden.
9. Das Filter darf nicht von ohne Aufsicht von Kindern oder persönlich
eingeschränkten Menschen benutzt werden. Außerhalb der
Reichweite von Kindern aufbewahren.
10. Beim Anschluss des Filter an das Stromnetz ist so vorzugehen, dass
sich der niedrigste Punkt des Kabels unterhalb der Netzsteckdose
bendet, damit nicht zufällig Wassertropfen vom Kabel in die
Steckdose gelangen können (Abb. A - DRIP LOOP).
11. Das Kabel ist weder durchzuschneiden noch ist daran zu ziehen, um
die Stromspeisung zu unterbrechen.
12. Das Filter darf nur im Innenbereich eingesetzt werden.
DIESE ANWEISUNGEN NICHT WEGWERFEN.
A.

66
ENTSORGUNG (NACH RL2002/96/EC)
Gerät darf nicht dem normalen Hausmüll beigefügt werden, sondern muss fachgerecht entsorgt werden.
Wichtig für Deutschland: Gerät über Ihre kommunale Entsorgungsstelle entsorgen. Entsorgung von Altgeräten: Wenn dieses Symbol eines durchgestrichenen Abfalleimers auf einem Produkt angebracht ist,
unterliegt dieses Produkt der europäischen Richtlinie 2002/96/EC. Alle Elektro- und Elektronik-Altgeräte
müssen getrennt vom Hausmüll über die dafür staatlich vorgesehenen Stellen entsorgt werden. Mit der
ordnungsgemäßen Entsorgung des alten Geräts vermeiden Sie Umweltschäden und eine Gefährdung
der persönlichen Gesundheit. Weitere Informationen zur Entsorgung des alten Geräts erhalten Sie bei
der Stadtverwaltung, beim Entsorgungsamt oder in dem Geschäft, wo Sie das Produkt erworben haben.
BESCHRÄNKTE GARANTIE
Seachem gewährt dem Originalkäufer auf dieses Produkt eine Garantie für Material- und Verarbeitungsmängel
(Ausnahmen s. unten) für einen Zeitraum von drei (3) Jahren vom Kaufdatum an, die durch Registrierung des
Produkts auf www.seachem.com für weitere zwei (2) Jahre verlängert werden kann; gilt für alles bis auf das
Pumpen-Laufrad, das eine Garantiezeit von sechs (6) Monaten hat. Diese Garantie beschränkt sich auf die
Reparatur und den Ersatz defekter Produkte (durch Seachem) und deckt nicht den Verlust von Aquariumsleben,
Personenschäden, Vermögensschäden oder Schäden durch die Verwendung des Produkts. Sie müssen
den originalen Kaufbeleg behalten, um den Garantieanspruch zu bestätigen. Jegliche Gewährleistung läuft
gleichzeitig mit, aber nicht zusätzlich zu, der durch das geltende Recht geregelten, minimalen Garantiezeit ab.
Garantieansprüche sind vom Originalkäufer online auf www.seachem.com zu stellen. Dort muss auch ein
Kaufbeleg bereitgestellt werden. Der Anspruchsberechtigte muss eine “Warenrücksendungsgenehmigung”
haben, bevor ein Artikel für die Garantie oder für technischen Service abgeschickt werden kann. Der Käufer
trägt die Kosten für den Versand zum Service-Center oder zur Reparaturwerkstatt und für den Rückversand.
AUSNAHMEN: Diese Garantie deckt das Folgende nicht ab: *Schäden, die durch Unfall, Fehlgebrauch,
Missbrauch oder Mangel an angemessener Sorgfalt entstehen sowie solche, die durch unnormalen, unüblichen
Gebrauch oder durch Verwendung in anormalen Betriebsbedingungen verschuldet sind, sowie jegliche andere
Ausfälle, die nicht aus Material- oder Verabeitungsdefekten resultieren. *Schäden, die durch Modizierung,
Pfusch oder versuchte Reparatur durch jemand anderes als Seachem oder dessen Bevollmächtigte entstehen.
*Weitergabe des Produkts an jemand anderes als den Originalkäufer. *Das Aussetzen des Prdouktes einer nicht
in der Verpackung spezizierten Elektrizität; der Originalkäufer ist dafür verantwortlich, adäquate elektrische
Einrichtungen zur Verfügung zu stellen.
AUSGESCHLOSSENE SCHÄDEN UND BEGRENZUNG DER STILLSCHWIGENDEN GARANTIEN
Ihr einziges und exklusives Rechtsmittel sind Produktreparatur und Produktersatz wie in dieser beschränkten
Garantie dargestellt. Das Unternehmen lehnt jegliche Haftung für Nebenschäden oder Folgeschäden durch
den Verstoß gegen explizite oder stillschwiegende Garantien oder Bedingungen ab, einschließlich der
stillschweigenden Garantien oder Bedingungen bzgl. Handelsüblichkeit, handelüblicher Qualität, Eignung für
einen bestimmten Zweck oder der zufriedenstellenden Qualität in Bezug auf dieses Produkt. Dieses Schreiben
stellt die gesamte Garantie-Übereinkunft zwischen den Perteien hinsichtlich des Vertragsgegenstands
dar. Kein Verzicht und keine Änderung sind ohne schriftliche Bestätigung durch Seachem gültig. Jegliche
stillschweigenden Garantien sind begrenzt auf ein Jahr bzw. die kürzeste, im Rahmen des geltenden Rechts
gültige Zeitspanne.

67
Herzlichen Glückwunsch zum Erwerb Ihres neuen Seachem Tidal™ Hänglters. Sie können sich
absolut sicher sein, dass Sie in einen ausgereiften Premium-Filter investiert haben, der Ihr Aquarium
mit minimalem Wartungsaufwand über Jahre hinweg sauber und gesund halten wird. Die Filterreihe von
Seachem Tidal™ wurde durch SICCE in Italien speziell für Seachem angefertigt, um die höchstmögliche
Qualität und Leistung sicherzustellen.
Eigenschaften:
1. Die niedrige Wattzahl bei hoher Fließgeschwindigkeit erlaubt Energieeinsparung bei exzellenter
Zirkulation.
2. Geräuscharmer Betrieb selbst für das stillste Zuhause oder Büro.
3. Die selbstansaugende Pumpe erlaubt verlässliches Starten.
4. Geringer Wartungsaufwand für langzeitige Aquariumspege.
5. Das selbstreinigende Laufrad reduziert den Wartungsbedarf der Pumpe.
6. Nicht-korrosive Bauteile erlauben den Einsatz in Süßwasser- oder Salzwasseraquarien.
7. Ein Filterkorb mit außergewöhnlich hohem Fassungsvermögen erlaubt den Einsatz eines jeden
Filtermoduls.
8. Das integrierte Seachem Matrix™ Bio-Modul entfernt vollständig Ammonium, Nitrite und Nitrate.
9. Der entfernbare Filterkorb ermöglicht eine einfache Reinigung.
10. Die Filterabdeckung dient auch als Sicherheitsauang für den Filterkorb, um Spritzer während der
Reinigung zu vermeiden.
11. Ventilationsschlitze ermöglichen gleichmäßigen Luftstrom und verbessern den Gasaustausch.
12. Das komprimierte Prol reduziert Schwierigkeiten bei der Platzierung des Aquariums.
13. Ein Nivellierungsschalter an der Wand des Aquariums erlaubt das exakte Platzieren.
14. Das Abschöpfen der Oberäche nimmt umherschwimmende organische Stoe und Schaum von
der Wasseroberäche.
15. Anpassbare Durchussraten ermöglichen den vielseitigen Einsatz in einer Reihe von
Aquariumsumgebungen.
16. Anpassbarer Zustrom an der Oberäche oder in der Tiefe ermöglicht, auf spezische gelterte
Gebiete zu fokussieren.
17. Teleleskop-Zustrom erlaubt Zustrom in jeder Tiefe.
18. Halterungsclips der Heizung sorgen für eine sichere und gleichmäßige Wärmeverteilung durch die
Filterströmung.
19. 19. Eine Rücklaufwand bietet Belüftungsschlitze, um Redoxpotential und die Belüftung des
Aquariums zu verbessern.
20. 20. Der Wartungsmonitor zeigt an, wenn der Korb gereinigt werden muss.
Vereinfacht gesagt, haben Sie den besten Hänglter, den es gibt, erworben. Vielen Dank.
EINLEITUNG

68
ZUBEHÖRTEILE CHECKLISTE
Maintenance alert device
Seachem Matrix™ bio-media
Bottom foam filter
Filter basket
Flow regulation dial
Surface skimmer intake
Low wattage,
self-priming pump
Self-cleaning impeller
Dual intake regulation dial
Telescoping intake tube
Reversible filter cover snaps to
filter basket during maintenance
1
2
4
5
3
6
8
Aerating return flow7
10
Leveling dial9
11
12
Heater holder
14
Pump housing13
15
Wartungsalarmgerät
Seachem Matrix™ Bio-Modul Filter
Unterer Filterschwamm
Filterkorb
Stromregulierungsschalter
Belüftender Rückstrom
Zustrom zur Abschöpfung der Oberäche
Nivellierungsschalter
Bei Niedrigwatt selbstreinigende Pumpe
Selbstreinigendes Laufrad
Heizungshalter
Pumpengehäuse
Regulationsschalter für dualen Zustrom
Teleskop-Zustromschlauch
Reversibler Filterdeckel, der während der Wartung
auf den Filterkorb geklickt wird

69
1
1
3
2
5
4
MONTAGE UND INBETRIEBSETZUNG
Abbildung 1
Abbildung 2
Hoch Niedrig
Setzen Sie die untere Hälfte
des Zustromschlauchs in die
obere Hälfte ein. Setzen Sie
den Teleskop-Zustromschlauch
auf dem Pumpengehäuse ein
(Abb. 1).
Wenn Sie einen Heizkörper an
den Filter hängen möchten (Abb.
2), dann drücken Sie auf die
Seiten des Filters (1), ziehen Sie
nach unten, um die Abdeckung
des Pumpengehäuses zu
entfernen (2), schieben Sie
den Heizkörperhalter an den
Boden des Gehäuses (3). Der
Heizkörperhalter kann nach unten
oder oben zeigend angebracht
werden, je nach gewünschter
Position des Heizkörpers.
Stecken Sie das Pumpenkabel in
die Führungen (4) ein, bevor Sie
das Pumpengehäuse (5) wieder
einsetzen.
1
2
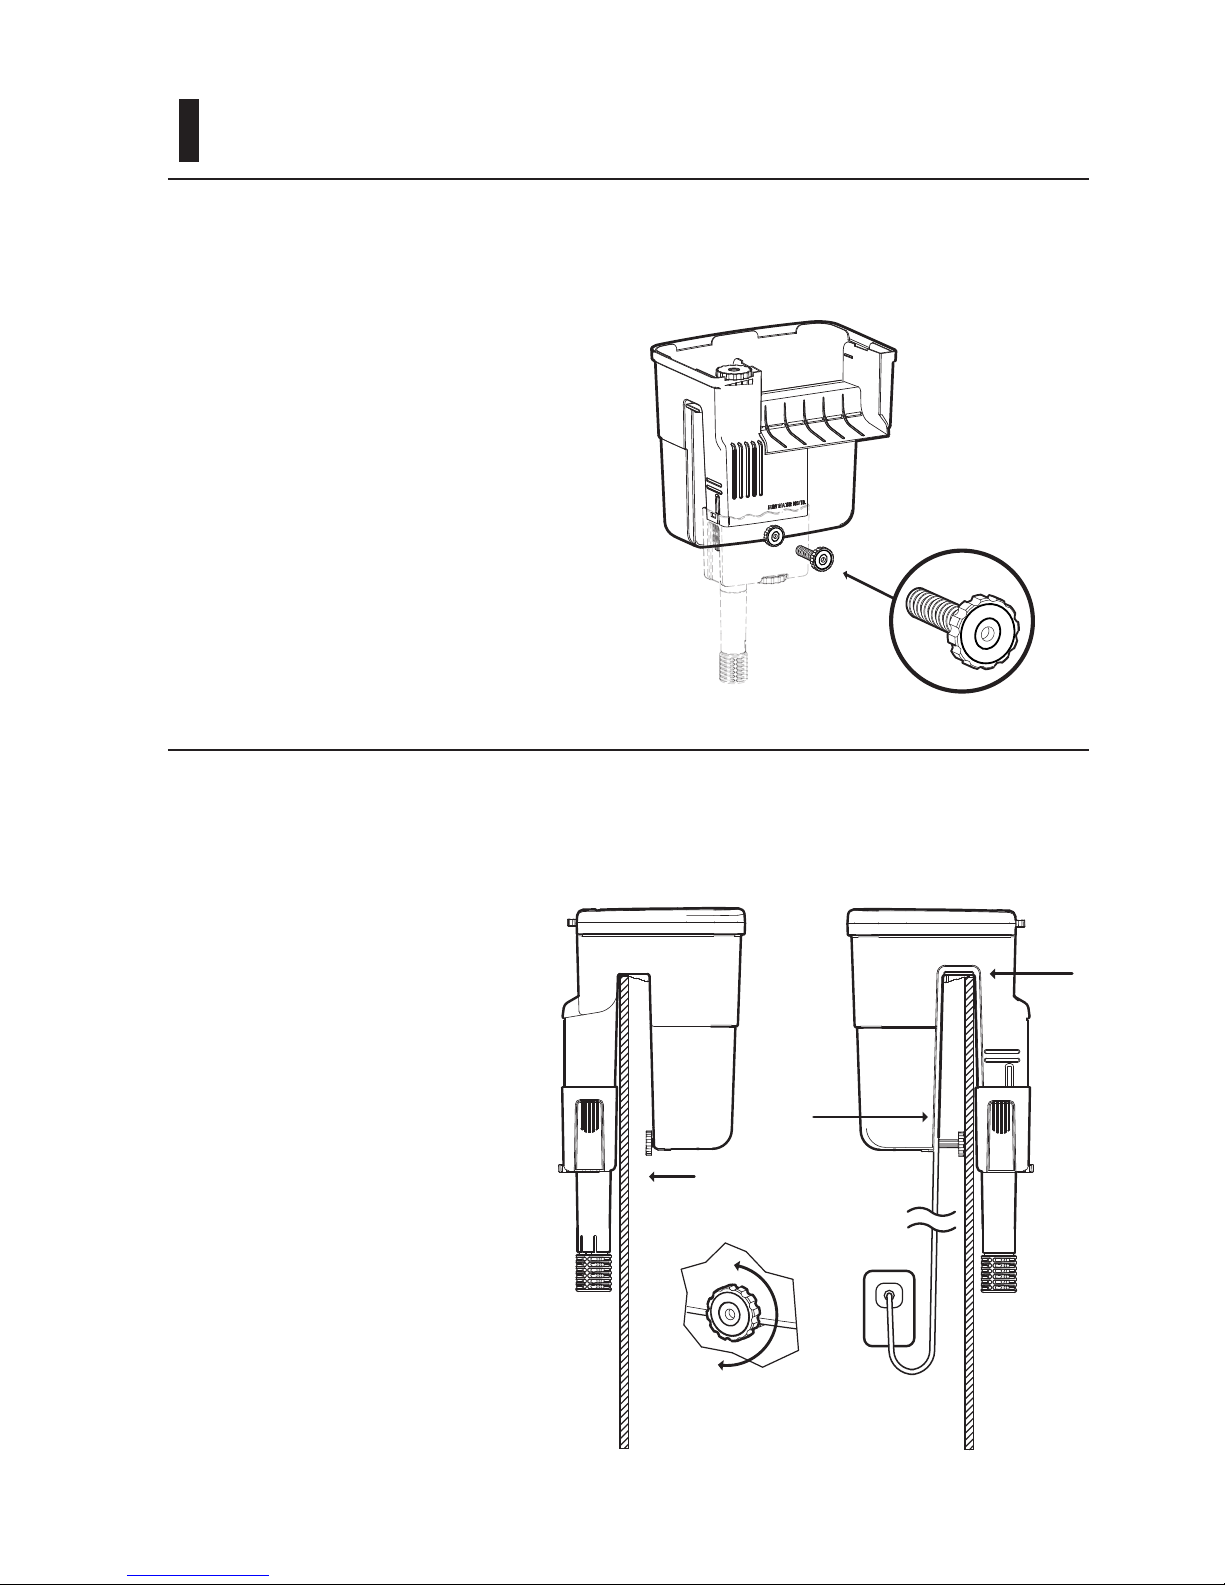
70
Abbildung 3
Abbildung 4-A Abbildung 4-B
Drehen Sie den
Nivellierungsschalter des
Filters in den Boden des
Filtergehäuses, als Vorbereitung
den Filter einzuhängen und zu
nivellieren (Abb. 3).
Platzieren Sie den Filter an
der Kante des Aquariums
(Abb. 4-A) und passen Sie
den Nievellierungsschalter
an, indem Sie ihn auf- oder
abschrauben bis der Filter auf
der passenden Höhe mit dem
Aquarium ist.
Setzen Sie das Pumpenkabel
wie dargestellt in die
Führung ein (Abb. 4-B) und
führen Sie das Kabel zur
Steckdose. Stellen Sie dabei
sicher, dass Sie dabei eine
Tropfschleife drehen, wie in den
Sicherheitsvorschriften und in
Abb. 4-B dargestellt.
MONTAGE UND INBETRIEBSETZUNG

71
BEFÜLLEN DES FILTERMODULKORBS
Bevor Sie den Filter starten, entfernen Sie alle
Plastiktüten, die Filtrationsmodule beinhalten.
Alle Tidal™ Filter wurden so hergestellt, dass sie
alle Filtermodule enthalten können. Allgemein
gibt es drei Filtrationsarten, die in den meisten
Aquarien eingesetzt werden – mechanisch,
chemisch und biologisch.
Mechanische Filtration enthält Module, die
Abfall direkt vom Filter einfangen. Chemische
Filtration enthält Filtermodule, die durch eine
chemische Reaktion gelöste Verbindungen aus
dem Wasser entfernen. Biologische Filter bieten
Bakterien ein Zuhause an, um organischen
Abfall aufzubrechen.
Alle Tidal™ Filter enthalten einen unteren
Filterschwamm für mechanische Filtration und
Matrix™ Bio-Module für eine hervorragende
biologische Filtration. Es gibt eine Vielzahl
an Optionen für chemische Filtration, die
aufgrund verschiedener Aquarienumgebungen
für unterschiedliche Zwecke geeignet sind.
Seachems MatrixCarbon™ ist die präferierte
Option für beinahe alle Aquarieneinrichtungen.
MatrixCarbon™ ist fertig abgepackt für Tidal™
Filter jeglicher Größe erhältlich.
Reinigen Sie den Schwamm und alle
Filtermodule gründlich unter ießendem
Wasser bevor Sie sie in den Filterkorb
einsetzen. Schichten Sie die Module so,
dass der Schwammlter am Boden liegt,
darauf ein chemisches Filtrationsmodul wie
MatrixCarbon™ und letztlich das biologische
Matrix™ Modul. Entfernen Sie Matrix™
nicht aus der Netztasche. Die Netztasche ist
übergeklappt gepackt; legen Sie sie längs
hin und verteilen Sie Matrix™ gleichmäßg
bevor Sie es im Filerkorb platzieren. Um
Matrix™ schneller mit Bakterien anzusiedeln,
empfehlen wir, Seachems Stability™ Ihrem
Aquarium hinzuzufügen. Der interne Korb
verhindert Wasserumleitung und erlaubt das
schnelle Entfernen und Reinigen des unteren
Filterschwamms und jeder benutzten Moduls.
Um eine Behinderung des ordnungsgemäßen
Durchstroms zu vermeiden, überfüllen Sie
den Filterkorb nicht. Ein Anzeichen dafür
ist die Aktivierung des Wartungsalarms
oder ein Tropfen von der rechten Seite der
Rückstromwand (Abb. 10, Seite 75).
1 2 3
Abb. 5: Schichten der Filtrationsmodule (von unten nach oben)
Mechanisch
(Filterschwamm)
Chemisch
(MatrixCarbon)
Biologisch
(Matrix)
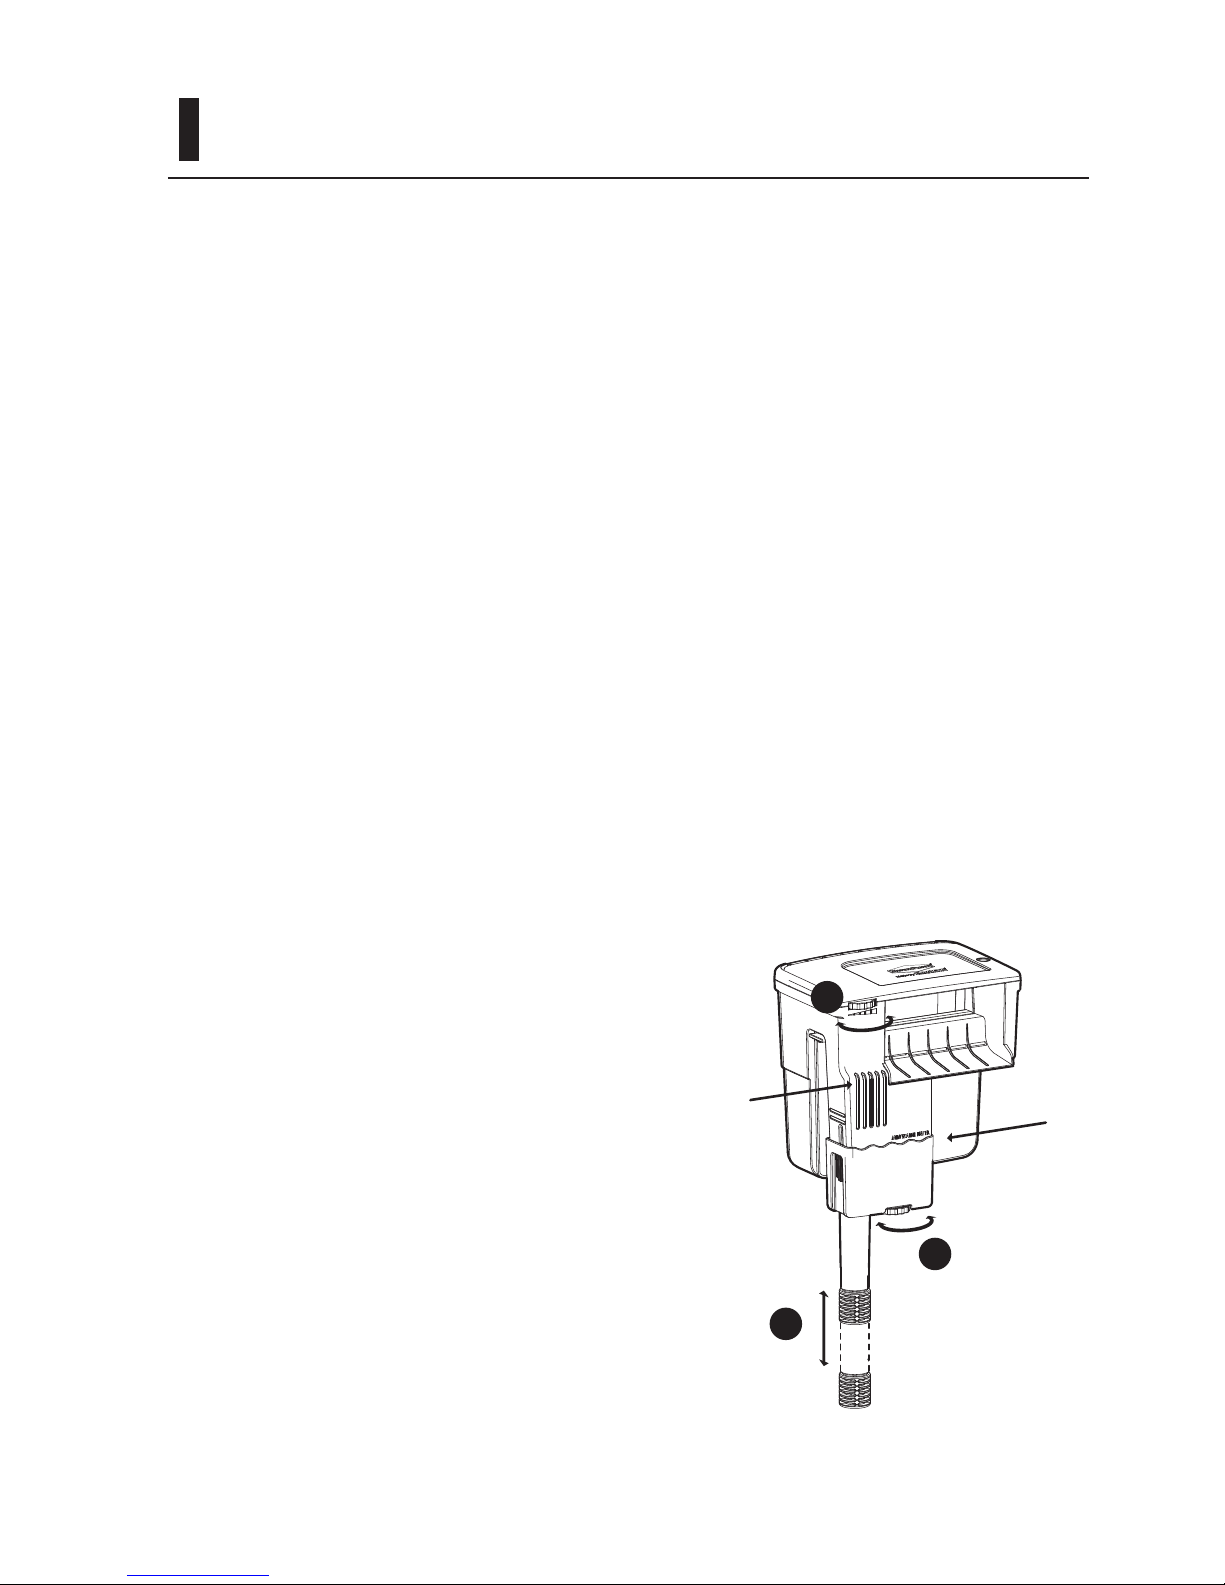
72
Nach der Montage und Installation
des Tidal™ Filters auf einem gefüllten
Aquarium, verbinden Sie das Netzkanel
mit der Steckdose. Der Filter ist selbstansaugend und wird sofort mit der
Filtration des Wassers beginnen. Passen
Sie die drei möglichen Einstellungen
entsprechend der Vorliebe und des
Bedarfs an (Abb. 6):
1. Setzen Sie den Teleskop-Ansauger
zu der gewünschten Tiefe im
Aquarium hinauf oder hinab.
2. Passen Sie die Gesamtmenge
des Wasserstroms durch den
Filter an. Passen Sie die Leistung
entsprechend des spezischen
Aquariumsvolumen und -typ an
und stellen Sie den Fischen eine
adäquate Umgebung bereit;
angepasst daran, ob sie mehr oder
weniger Wasserbewegung oder
Sauerstozufuhr präferieren. Diese
Einstellung bietet eine Einsparung
von bis zu 80% der maximalen
Einstroms bei voller Nutzung des
Filtermotors. Wenn der rdeuzierte
Einstrom ausgewählt wurde,
erlaubt das Reltrationsnetz
dem Wasser durch den Filter
zu zirkulieren und dabei die
Filtrationsleistung durch erweiterte
Kontaktzeit zu maximieren.
Abbildung 6
2
3
1
INBETRIEBSETZEN DES FILTERS
3. Stellen Sie die Menge des Zustroms
von der Oberäche gegenüber des
Teleskop-Zustroms ein
Der minimale Wasserstand innerhalb
des Aquriums sollte nicht unter die
Markierung “Minimal Water Level”
fallen. Ein niedrigerer Stand könnte das
Fließen des Wassers stoppen und ein
Problem mit der Pumpe verursachen-
lassen Sie die Pumpe nicht trocken
laufen. Es gibt keinen maximalen
Wasserstand, allerdings ist es zu
empfehlen, dass das Wasser nicht die
Höhe der Abschöpf-Schlitze an der
Oberäche übersteigt.
Minimaler
Wasserstand
Zustrom zur
Abschöpfung
der Oberäche

73
Tidal™ Filter sind so ausgelegt, dass sie
exzellente Funktionalität bei geringem
Wartungsaufwand bieten. Jedoch kann
die regelmäßige Wartung maßgeblich
dazu beitragen, die allgemeine Gesundheit
und das Wohl des Aquariums zu
gewährleisten. Der Wartungsalarm bietet
ein hervorragendes Signal, um eine
Routine-Wartung des Tidal™ Filters
auszuführen. Der Wartungsalarm zeigt an,
dass er Wasserstrom nicht frei durch den
Filtermodulkorb ießen kann. Wenn der
Abbildung 7
Abbildung 8
Wartungsalarm die Filterabdeckung um ½”
oder 1 cm (Abb. 7) übersteigt, ist es an der
Zeit, den Filter zu reinigen.
Um den Filter zu reinigen (Abb. 8), heben
Sie die Abdeckung (1), schieben Sie
den blauen Filterkorbverschluss (2) zur
Vorderseite des Filters and entfernen Sie
den Filtermodulkorb, indem Sie ihn an den
beiden seitlichen Henkeln hochziehen (3).
WARTUNG
WARNUNG: Ziehen Sie immer den Netzstecker aus der Steckdose, bevor Sie eine
Wartung am Tidal™ Filter vornehmen.
1
3
2

74
WARTUNG
Drehen Sie die Abdeckung um (Abb.
9-A) und setzen Sie den Filtermodulkorb
in die Schlitze der Abdeckung (1). Sie
können nun den Filtermodulkorb zu einem
Reinigungsbereich tragen, ohne Wasser zu
verschütten oder zu tropfen.
Entfernen Sie die Tasche mit dem
biologischen Matrix™ Modul, jegliche
chemische Filtrationsmodule und den
unteren Filterschwamm (Abb. 9-B).
Spülen Sie den unteren Filterschwamm
gründlich aus. Benutzen Sie keine Seife oder
Reinigungsmittel, da diese den Bewohnern
des Aquariums schaden können. Reinigen
oder ersetzen Sie jegliche chemischen
Filtrationsmodule wenn nötig. ErsatzFiltrationspacks, die speziell für Tidal™
Filtereinheiten (Matrix™, MatrixCarbon™
und Zeolite) hergestellt wurden, sind
separat erhältlich.
Die Tasche mit dem biologischen Matrix™
Modul enthält Bakterien, die wichtig für
due Aquariumsumgebung sind. Erlauben
Sie dem Modul nicht auszutrocknen. Das
Modul kann vorsichtig in einem Behälter
mit etwas Wasser aus dem Aquarium
gereinigt werden, um eine Schleimschicht,
die sich möglicherweise nach einer Zeit
dort absetzt, zu entfernen. Wenn Sie
das Matrix™ ersetzen möchten, ist es
ratsam, nicht mehr als die Hälfte des
Moduls gleichzeitig zu ersetzen, um die
Bakterienkultur zu schützen, die eine stabile
Aquariumsumgebung gewährleistet. An
dieser Stelle empfehlen wir, das Aquarium
mit Seachem Stability™ zu neu auszusäen.
Spülen Sie den Fiktermodulkorb ab.
Bauen Sie alle Module und Komponenten
ind umgekehrter Reihenfolge wieder
zusammen.
1
1
Abbildung 9-A Abbildung 9-B

75
WARTUNG
Wenn der Filter beginnt, an der rechten Seite
der Rücklaufwand zu tropfen (Abb. 10),
bedeutet dies, dass der Filtermodulkorb
komplett verstopft ist. In diesem Fall läuft
das Wasser an dem Filtermodul vorbei und
eine gründliche Reinigung ist vonnöten, um
die allgemeine Gesundheit des Aquariums
beizubehalten.
Um die Pumpe zu warten, gehen Sie
wie folgt vor (Abb. 11): Drücken Sie auf
die Seite des Filters (1), ziehen Sie das
Pumpengehäuse nach unten (2), ziehen
Sie das Netzkabel des Filtergehäuses
und drücken Sie die Pumpe nach rechts
bis sie klickt und sich löst (3). Für Tidal
55 Einheiten, ziehen Sie vorsichtig die
Zustromabdeckung der Pumpe (4. Abb.
11-B) weg. So wird das Laufrad freigelegt.
Abbildung 10
Abbildung 11-A
Abbildung 11-B
(Tidal 55)
1
1
3
2
4
5

76
WARTUNG
Waschen Sie das Laufrad gründlich, um abgelagerten Schleim oder Schuppen zu
entfernen. Benutzen Sie keine Seife oder Reinigungsmittel. Wenn gewünscht, kann eine
verdünnte Lösung aus Essig und Wasser verwendet werden, um abgelagerten Schleim
oder Schuppen zu entfernen.
Setzen Sie nach der Reinigung das Laufrad wieder ein und stellen Sie sicher, dass es sich
frei um den Schaft bewegen kann und setzen Sie die Zustrom-Abdeckung der Pumpe
wieder auf. Montieren Sie die verbleibenden Komponenten in umgekehrter Reihenfolge.
Scchuppen- und Kalkablagerungen sowie die natürliche Abnutzung der Komponenten
können möglicherweise die Lautlosigkeit der Pumpe verringern. Jedoch beeinussen sie
die korrekte Funktion des Filters nicht. In diesem Fall ist es ratsam, das Laufrad zu ersetzen,
um wieder einen geräuschlosen Betrieb zu gewährleisten.
Für Tidal 75 und 110 Einheiten, ziehen Sie
die obere Klammer der Laufradabdeckung
nach oben und nach hinten (4, Abb. 11C). Drehen Sie die Basis des Laufrads
gegen den Uhrzeigersinn, um sie zu
entsperren (5) und ziehen Sie es aus
seinem Gehäuse hinaus (6).
Abbildung 11-C
(Tidal 75 & 110)
4
5
6

77
BELANGRIJKE VEILIGHEIDSINSTRUCTIES
ADVERTENCIA: Para evitar lesiones, se deben tomar precauciones básicas de seguridad, incluyendo las siguientes normas de seguridad:
TIDAL FILTER met zijn vele gebruiksmogelijkheden is conform de nationale en internationale
veiligheidsnormen.
LEES EN VOLG ALLE VEILIGHEIDSVOORSCHRIFTEN
1. Controleer of de op het etiket van het lter aangeduide spanning overeenkomt met de spanning
van het net. Het apparaat dient gevoed te worden door middel van een dierentiële schakelaar
(levenbeschermer) waarvan de nominale stroom lager of gelijk is aan 30mA.
2. Het lter mag niet in werking worden gesteld zonder water om schade aan de motor te voorkomen.
3. Alvorens het apparaat op het net aan te sluiten, controleer of de kabel en/of het lter beschadigd zijn.
4. Het lter is vervaardigd met een verbinding van het type Z. De kabel en de stekker kunnen niet
vervangen of gerepareerd worden; Bij beschadiging dient het hele apparaat vervangen te worden.
5. Alvorens het apparaat op het net aan te sluiten, controleer of de kabel en/of het lter beschadigd zijn.
6. Het lter mag niet worden gebruikt in vloeistoen of in een omgeving met een temperatuur hoger
dan 35°; / 95 °F).
7. Gebruik het lter niet voor andere doeleinden dan waarvoor het lter is ontworpen zoals in badkamers
of dergelijke toepassingen;
8. Laat het apparaat niet functioneren met uitbijtende- of
wegvretendemiddelen.
9. Dit apparaat is niet ontworpen om gebruikt te worden door personen
(inclusief kinderen) met gereduceerde fysische, zinnelijke en geestelijke
capaciteiten, tenzij deze begeleid zijn door verantwooordijke personen
die zorg dragen voor hun veiligheid.
10. Om te voorkomen dat druppels de stekker of het stopcontact nat
maken, realiseer met de kabel een lus onder het niveau van het
stopcontact (Afb.A).
11. Dit apparaat niet optillen middels de voedingskabel tijdens de
installatie en het onderhoud.
12. Het lter moet alleen gebruikt worden voor de hierboven genoemde
applicaties en is uitsluitend bestemd voor intern gebruik.
GOOI DEZE INSTRUCTIES NIET WEG
A.

78
AANWIJZINGEN VOOR EEN JUISTE AFVOER VAN HET PRODUCT VOLGENS DE EUROPESE
RICHTLIJN 2002/96/EC
Aan het einde van zijn bruikbaarheidsduur, mag het product niet samen met het gemeentelijk afval
worden afgevoerd. Het kan worden afgegeven bij de speciale gemeentelijke centra voor gescheiden
afvalinzameling of bij verkopers die deze service aanbieden. Door huishoudelijke apparaten gescheiden
te verwerken, kunnen mogelijk negatieve gevolgen voor het milieu en de gezondheid door een onjuiste
verwerking worden vermeden en kunnen de materialen waaruit het bestaat worden teruggewonnen voor
een aanzienlijke besparing van energie en bronnen.
BEPERKTE GARANTIE
Seachem garandeert dit product (zie hieronder uitsluitingen) voor de oorspronkelijke koper tegen defecten van
materialen en afwerking voor een periode van drie (3) jaar vanaf de oorspronkelijke datum van aankoop, en kan
worden verlengd met nog eens twee (2) jaar met de registratie van het product op www.seachem.com;. Deze
voorwaarden zijn geldig mt uitzondering van de rotor van de pomp, die wordt gegarandeerd voor een periode
van zes (6) maanden. Deze garantie is beperkt tot reparatie of vervanging (naar keuze Seachem’s) van defecte
aan het product en doet geen betrekking op het verlies van het aquarium leven, persoonlijk letsel, verlies van
eigendom, of schade die voortvloeit uit het gebruik van het product. U moet beschikken over het originele
aankoopbewijs om de garantie te valideren. Elke garantie is afzonderlijk, en is geen aanvulling op eventuele
minimale garantietermijnen opgericht of toepasselijke wetgeving .
Garantie claims moeten online worden ingediend bij www.seachem.com door de oorspronkelijke koper die
in het bezit moet zijn van het bewijs van aankoop op het moment van indiening. De koper moet een “”Return
Merchandise Authorization”” aanvragen voordat u het product indiend voor garantie of technische service. De
koper is verantwoordelijk voor de transport kosten van en naar het service center of reparatie punt.
UITSLUITINGEN. Deze garantie geldt niet in de volgende situaties: * Schade als gevolg van een ongeluk,
verkeerd gebruik, misbruik, gebrek aan redelijke zorg, ongewoon gebruik van het product, met behulp van het
project in abnormale werkomstandigheden of andere storingen die niet het gevolg van gebreken in materialen
of vakmanschap. * Schade als gevolg van de wijziging, vervalsen of pogingen tot reparatie door iemand anders
dan door Seachem zijn aangewezen. * Overdracht van het product naar andere dan de oorspronkelijke koper.
* Het product geven aan een elektrische dienst die niet staat aangegeven op de verpakking; de oorspronkelijke
koper is verantwoordelijk voor het leveren van adequate elektrische installaties.
UITSLUITING SCHADE EN BEPERKING VAN IMPLICIETE GARANTIES
Uw enige en exclusieve remedie is om het product ter reparatie of vervanging, zoals bepaald in deze garantie.
Het bedrijf aanvaardt geen enkele aansprakelijkheid voor incidentele en gevolgschade door schending van
enige expliciete of impliciete garantie of voorwaarden, met inbegrip van de impliciete garanties of voorwaarden
van verkoopbaarheid, handelskwaliteit, geschiktheid voor een bepaald doel of van voldoende kwaliteit met
betrekking tot dit product. Dit schrijven vormt de volledige garantie instemming van de partijen met betrekking
tot het onderwerp ervan, geen vrijstelling of wijziging geldig, tenzij schriftelijk ondertekend door Seachem. Elke
impliciete garanties hierin zijn beperkt tot één jaar of de kortste toegestaan door de wet van uw jurisdictie
periode

79
Gefeliciteerd met de aankoop van uw nieuwe Seachem Tidal™ hang on lter. U kunt volledig
vertrouwen dat u heeft geïnvesteerd in een goed ontworpen premium lter die uw aquarium schoon
en gezond doet houden met een minimum aan onderhoud voor de komende jaren. De Seachem
Tidal™ lijn is ontworpen en speciaal gemaakt voor Seachem door Sicce in Italië om u van de
hoogste kwaliteit en topprestaties te verzekeren.
Kenmerken
1. Lage wattage maar hoge stroming zorgen voor energiebesparing maar met uitstekende
circulatie.
2. Stille werking zelfs in het stilste thuis of op kantoor te gebruiken.
3. 3.Zelfaanzuigende pomp zorgt voor een betrouwbare en gemakkelijke opstart.
4. Weinig en gemakkelijk onderhoud voor een langdurige aquaristiek.
5. Zelfreinigende rotor verminderd de noodzaak van onderhoud aan de pomp.
6. Geen oxiderende onderdelen en dus geschikt voor gebruik in zoet of zout water aquariu.ms
7. Extreem hoge capaciteit ltermand, geschikt voor vrijwel elke lter media.
8. Inclusief Seachem Matri™ bio-media verwijdert volledig ammoniak, nitriet en nitraat
9. Uitneembare lter mand zorgt voor eenvoudig reinigen op afstand.
10. Filter deksel fungeert als een veilige tray voor de ltermand om druppels te voorkomen tijdens
het schoonmaken op afstand.
11. Ventilalie slots verbeteren de luchtstroom en gasuitwisseling.
12. Compressie proel vermindert de interferentie met aquarium plaatsing.
13. Gelijkmatige steun zorgt voor een exacte positionering op aquariumglas.
14. Oppervlakte skimmer trekt drijvend organisch afval aan van het wateroppervlak.
15. Regelbare stroming zorgt voor veelzijdig gebruik in diverse aquarium omgevingen.
16. Regelbare inlaat voor wateroppervlak versus diepte zorgt voor focus op specieke gelterd
gebied.
17. Telescoopbuis zorgt voor een inlaat op elke diepte.
18. Verwarming houder clip zorgt voor een veilige bevestiging en verdeeld de warmte door de
stroming.
19. Waterval uitstroom voor extra beluchting en zuurstof in het aquarium.
20. Onderhoud waarschuwing geeft aan wanneer de ltermand moet worden gereinigd.
Simpel gezegd, je hebt de beste hang on lter gekocht die beschikbaar is. Dank u.
INTRODUCTIE

80
ONDERDELEN CHECKLIST
Maintenance alert device
Seachem Matrix™ bio-media
Bottom foam filter
Filter basket
Flow regulation dial
Surface skimmer intake
Low wattage,
self-priming pump
Self-cleaning impeller
Dual intake regulation dial
Telescoping intake tube
Reversible filter cover snaps to
filter basket during maintenance
1
2
4
5
3
6
8
Aerating return flow7
10
Leveling dial9
11
12
Heater holder
14
Pump housing13
15
Waarschuwing voor onderhoud
Seachem Matrix™ bio-media
Onderkant lterspons
Filtermand
Stromingsregelaar
Waterval uitstroom
Inlaat oppervlakte skimmer
Gelijkmatige steun
Lage wattage, zelfaanzuigende pomp
Selbstreinigendes Laufrad
Verwarming houder
Pomphuis
Regelbare tweede inlaat
Telescoopbuis inlaat
Omkeerbare lterdeksel waar u de ltermand
inklikt gedurende het onderhoud

81
1
1
3
2
5
4
MONTAGE EN OPSTART
Afbeelding 1
Afbeelding 2
Hoog Laag
Steek de onderste helft van de
inlaat buis in de bovenste helft.
Plaats de telescoopbuis inlaat
op het pomphuis. (Afb 1)
Als u een verwarming wenst
te bevestigen op het lter (Afb
2), drukt u op de zijkanten
van het lter (1), beweeg het
pomphuis naar onder (2), schuif
de verwarming houder vanaf
onder in de behuizing (3 ). De
verwarming houder kunt u naar
boven of naar beneden bewegen
afhankelijk van de gewenste
positie van de verwarming.
Bevestig de kabel van de pomp
eerst in de geleiders (4) voordat u
de behuizing van de pomp doet
terug plaatsen (5).
1
2

82
Afbeelding 3
Afbeelding 4-A Afbeelding 4-B
Schroef de gelijkmatige steun
in de bodem van het lterhuis,
daarna kunt u hem hangen op
de gewenste plaats. (Afb 3)
Plaats het lter op de aquarium
rand (Afb. 4-A) en stel de
gelijkmatige steun in door de
schroef in of uit te schroeven
totdat het lter de juiste hoogte
van het aquarium bereikt.
Plaats de pomp zoals
weergegeven in (Afb 4-B) en
voer de kabel naar de uitlaat
waarna u het beste een lus kunt
maken zoals aangegeven in de
veiligheidsvoorschriften en in
Afb 4-B.
MONTAGE UND INBETRIEBSETZUNG

83
HET VULLEN VAN DE FILTERMAND
Verwijder alle plastic zakken met lter media
voorafgaand aan het starten van het lter.
Alle Tidal ™ lters zijn ontworpen voor ieder
type ltermateriaal. In het algemeen worden
er drie typen ltratie gebruikt in de meeste
aquaria - mechanische, chemische en
biologische.
Mechanische ltratie omvat media dat het
afval direct doet verwijderen uit het lter.
Chemische ltratie omvat media, die de
chemisch opgeloste stoen uit het water
doet verwijderen. Biologische ltratie zorgt
voor een huisvesting vangoede bacteriën
om te groeien en een afbraak van organisch
afval.
Alle Tidal™ Filters zijn voorzien van een
bodem lter spons voor de mechanische
ltratie, Matrix™ bio media voor een
uitzonderlijke biologische ltratie en er
zijn verschillende chemische ltratie
mogelijkheden voor vele verschillende
doeleinden en verschillende aquarium
omgevingen. Seachem’s MatrixCarbon™ is
een voorkeursoptie in bijna elke aquarium
opstart. Matrix Carbon™ is beschikbaar
in voorgepakte zakken voor elke grootte
Tidal™ Filter.
Spoel de spons en alle lter media onder
stromend water schoon voordat u ze in de
ltermand doet. Plaats de media met de
lterspons op de bodem, dan de chemische
ltratie media zoals MatrixCarbon™ en
tenslotte de Matrix ™ biologische media.
Haal de Matrix™ niet uit zijn netje. Het
netje wordt verpakt omgevouwen; leg het
in de lengte en verdeel Matrix™ gelijkmatig
voordat u het in de ltermand plaatst. Voor
een sneller resultaat kunt u ook bacteriën
toevoegen aan Matrix™, zoals bijvoorbeeld
Seachem’s Stability™. De interne
ltermand voorkomt dat er water bypass
en zorgt voor een snelle verwijdering bij
het schoonmaken van de lterspons en de
overige media. Voorkom interfereren van de
stroming door de ltermand niet te vol met
media te doen. Een indicatie hiervan kunt u
zien aan de rechterkant van de uitstroom,
op het moment dat er druppels uitkomen
(Afb 10, blz 87) .
1 2 3
Afb 5: Lagen Filter Media (van beneden naar boven)
Mechanisch
(Filterspons)
Chemisch
(MatrixCarbon)
Biologisch
(Matrix)

84
Na de montage en installatie van de
Tidal ™ Filter op een gevuld aquarium
sluit u het netsnoer aan in het beoogde
stopcontact. Het lter is zelf-startend
en zal dus onmiddellijk beginnen met
het lteren van het water. Pas de drie
mogelijke instellingen toe op basis van
u voorkeuren en behoeften (Afb 6):
1. Maak de telescoopbuis van
de inlaat langer of korter tot de
gewenste diepte in uw aquarium.
2. Regel de stroming door het lter.
Pas de prestaties aan voor u
specieke aquarium volume,
type, of gewenste omgeving voor
de vis die meer of minder water
beweging of zuurstof wenst. Deze
functie biedt tot 80% reductie van
de maximale stroming gedurende
het continu volledig gebruik van
de lter motor. Een langzamere
stroming zorgt ervoor dat het
water langer aanwezig is in de lter
media en verhoogd dus de ltratie
prestaties.
3. Regel de hoeveelheid water van de
inlaat oppervlak vs. de telescoop
inlaat.
Afbeelding 6
2
3
1
STARTEN VAN HET FILTER
Het minimale waterniveau in het
aquarium mag niet onder de “Minimum
Water Level” markering komen. Een
lager niveau kan de doorstroming van het
water stoppen en schade aan de pomp
veroorzaken - het is niet toegestaan
om de pomp te laten drooglopen. Er
is geen maximum waterniveau hoewel
het wordt aanbevolen dat het niveau de
hoogte van de van de inlaat oppervlakte
skimmer slots niet doet overschrijden.
Minimale
Waterniveau
Oppervlakte
Skimmer

85
Tidal™ lters zijn gemaakt vvor een
uitstekende werking met weinig onderhoud
te bieden. Echter, regelmatig onderhoud
helpt bij de algemene gezondheid en het
welzijn van het aquarium. De waarschuwing
voor onderhoud biedt een uitstekend
signaal om routine-onderhoud uit te voeren
aan de Tidal™ Filter. De waarschuwing voor
onderhoud geeft aan dat de stroming niet
in staat is om vrij door de lter media te
verplaatsen.
Afbeelding 7
Afbeelding 8
Wanneer de waarschuwing voor onderhoud
signalering boven de lterdeksel tot
ongeveer ½ “en 1 cm (Afb 7), is het tijd om
het lter te reinigen.
Het reinigen van het lter (Afb 8) til het
deksel op (1), schuif de blauwe lterhouder
vergrendeling (2) naar de voorkant van het
lter en verwijder de ltermand door te
trekken aan de beide handgrepen (3).
ONDERHOUD
LET OP: Voordat u overgaat op enig onderhoud aan de Tidal ™ Filter, verwijder dan
eerst de stekker uit het stopcontact.
1
3
2

86
ONDERHOUD
Draai het deksel om (Afb 9-A) en plaats de
ltermand in de sleuven op het deksel (1). U
kunt deze nu dragen naar een ruimte voor
het schoonmaken zonder te morsen of
druppels van water.
Verwijder de zak van Matrix™ biologische
media, chemische ltratie media en de
onderkant lter spons. (Afb 9-B)
Spoel de onderkant lter spons grondig.
Gebruik geen zeep of detergenten,
aangezien deze de aquariumbewoners
kunnen schaden. Spoel ook de chemische
ltratie media als dat nodig is. Vervang
de speciaal ontworpen voor Tidal™ Filter
Matrix™, MatrixCarbon™, en Zeolite deze
worden afzonderlijk verkocht.
De zakken van Matrix™ biologische
media bevat belangrijke bacteriën voor de
stabiliteit van het aquarium milieu. Laat de
media niet uit drogen. De media kunnen
voorzichtig worden gespoeld in een bak
met wat water uit het aquarium dit om de
slijm coating die aanwezig kan zijn op het
materiaal in de loop der tijd te verwijderen.
Als de Matrix™ -media wordt vervangen is
het raadzaam om niet meer dan de helft te
vervangen, dit om de bacteriecultuur die
zorgt voor een stabiele aquarium milieu
te handhaven. Op dit moment suggesten
wij om opnieuw Seachem Stability™ aan
het aquarium toe te voegen. Spoel de
ltermand en plaats daarna de media en
alle onderdelen in omgekeerde volgorde.
1
1
Afbeelding 9-A Afbeelding 9-B

87
ONDERHOUD
Op het moment dat de lter start met
druppelen aan de rechterzijde (Afb 10) of de
stroming van de waterval loopt terug, is het
een indicatie dat de ltermand compleet vol
is. Op dit moment is het water bypassing de
lter media en moet u de lter schoonmaken
dit is belangrijk voor een gezond aquarium.
Om de pomp te onderhouden, gaat u als
volgt te werk (Afb 11): Druk op de zijkant
van het lter (1), trek dan het pomphuis
omlaag (2), haal de stekker uit het lter
en duw de pomp naar rechts totdat het
klikt en loslaat (3). Voor Tidal 55, trek
de voorkant van de pomp (4, Afb 11-B).
Hierdoor wordt de rotor (5) zichtbaar.
Afbeelding 10
Afbeelding 11-A
Afbeelding 11-B
(Tidal 55)
1
1
3
2
4
5

88
ONDERHOUD
Spoel de rotor grondig af om eventueel vuil en slijm te verwijderen. Gebruik geen zeep of
wasmiddel. Indien gewenst kan een verdunde oplossing van azijn en water worden gebruikt
voor het verwijderen van mogelijke kalkaanslag.
Na het schoonmaken, plaatst u de rotor terug maar zorg ervoor dat deze vrij kan draaien
rond de as en plaats de voorkant van de pomp terug. Monteer overige onderdelen in
omgekeerde volgorde. Kalkaanslag en de natuurlijke slijtage van de componenten kan
leiden tot een minder stille werking van de pomp. Echter, hebben ze geen invloed op
de goede werking van het lter. Mocht u wederom een compleet stil lter wensen, is het
raadzaam om de rotor te vervangen.die korrekte Funktion des Filters nicht. In diesem
Fall ist es ratsam, das Laufrad zu ersetzen, um wieder einen geräuschlosen Betrieb zu
gewährleisten.
Voor Tidal 75 en 110, trek en beweeg
terug de top clip van de voorkant (4, Afb
11-C). Draai de basis van de rotor tegen
de klok in om het te (5) ontgrendelen en
trek deze dan uit het pomphuis (6).
Afbeelding 11-C
(Tidal 75 & 110)
4
5
6

89
ИНСТРУКЦИИ ПО БЕЗОПАСНОСТИ
ВНИМАНИЕ: Во время работы с электрическими приборами/сетями необходимо
придерживаться общих правил безопасности для предотвращения нанесения травм,
включая изложенные ниже:
ФИЛЬТРЫ TIDAL изготовлены в соответствии с национальными и международным нормами
безопасности.
ВНИМАТЕЛЬНО ОЗНАКОМЬТЕСЬ И ВЫПОЛНЯЙТЕ СЛЕДУЮЩИЕ ПРАВИЛА БЕЗОПАСНОСТИ
1. Проверьте напряжение, указанное на ярлыке насоса, которое должно соответствовать
напряжению сети. Питание прибора должно осуществляться посредством
дифференциального выключателя (УЗО) с номинальным током, значение которого
соответствует или ниже 30 мA.
2. Запрещена эксплуатация работы насоса всухую во избежание нанесения повреждений
двигателю.
3. Перед подключением насоса к электрической сети, убедитесь, что кабель и насос не
повреждены.
4. Насос состоит из “Z”-образных соединений. Кабель и штепсельная вилка не подлежат
замене и/или ремонту; в случае их повреждения необходимо заменить прибор.
5. Перед подключением насоса к электрической сети убедитесь, что кабель и насос не
повреждены.
6. Запрещено использовать фильтр в помещениях или в жидкостях,
температура которых превышает 35 °C / 95 °F.
7. Не используйте прибор в целях, отличающихся от указанных
производителем, например в ванных комнатах и другое.
8. Не используйте фильтр в разъедающих и абразивных жидкостях.
9. Данный прибор не предназначен для эксплуатации лицами
(включая детей) с ограниченными физическими или умственными
способностями без сопровождения лиц, отвечающих за их
безопасность.
10. Чтобы избежать попадания случайных капель на штепсель или в
розетку, сделайте петлю из шнура ниже уровня розетки (рис. A).
11. Не допускайте отключения фильтра от кабеля питания во время
установки и обслуживания прибора.
12. Фильтр может быть использован исключительно в указанных выше случаях и исключительно
в закрытых помещениях если он оснащен биполярным кабелем.
A.

90
ИНСТРУКЦИЯ ПО УТИЛИЗАЦИИ ПРОДУКЦИИ В СООТВЕТСТВИИ С ДИРЕКТИВОЙ ЕС
2002/96/EC
После окончания срока эксплуатации прибора не утилизируйте его вместе с городскими отходами.
Устройство должно быть утилизировано в специально предназначенныхдля этого пунктах сбора
при муниципалитете города или при пунктах продажи, предоставляющих эту услугу. Утилизация
бытовых приборов в специальных пунктах сбора позволяет избежать негативных последствий
для окружающей среды и здоровья населения, реутилизировать материалы и сэкономить
энергетические ресурсы..
ОГРАНИЧЕНИЕ ГАРАНТИЙНЫХ ОБЯЗАТЕЛЬСТВ
Компания Seachem предоставляет гарантию на этот продукт (смотрите изложенные ниже
ИСКЛЮЧЕНИЯ) непосредственному покупателю, касающуюся дефектов материалов и производства
сроком на три (3) года от даты приобретения продукта с возможностью её продления на два (2) года
посредством регистрации продукта на сайте www.seachem.com; гарантия распространяется на все
части продукта, за исключением рабочего колеса насоса, срок гарантии на который составляет 6
месяцев. Гарантийное обслуживание ограничивается ремонтом или заменой (исключительно с согласия
Seachem) бракованного устройства и не распространяется на утечку воды из аквариума, нанесение
личных повреждений, ущерба или убытков, касающихся эксплуатации продукта. Для использования
гарантийных условий необходимо сохранять документ, подтверждающий покупку продукта.
Гарантия входит в силу одновременно, и не дополнительно, с минимальными периодами гарантии,
предусмотренными действующим законодательством. Запрос на гарантийное обслуживание должен
быть заполнен прямым покупателем онлайн на сайте компании www.seachem.com с одновременным
предоставлением документа, подтверждающим покупку продукта. Лицо, запрашивающее гарантийное
обслуживание продукта должно получить разрешение на возврат/замену продукта “RMA” до момента
его отправления на замену или ремонт. Покупатель несёт затраты по отправке на/из офиса сервисного
обслуживания или ремонтной мастерской.
ИСКЛЮЧЕНИЯ. Эта гарантия не распространяется на:*Нанесение случайных повреждений,
эксплуатацию не по назначению, злоупотребление, отсутствие ухода, использование устройства
не по его назначению, используя проект аномальных условий работы или другие повреждения, не
имеющие отношение к дефектам материалов или производства.* *Повреждения, вследствие внесения
изменений, правок или попыток ремонта прибора лицами, не являющимися персоналом компании
Seachem или уполномоченными ею*. *Передача продукта лицу, не являющемуся прямым покупателем
продукта*. *Подключение продукта к электрической сети способом, отличающимся от указанного
в инструкции; прямой покупатель продукта должен позаботиться о соответствии электрической
системы*.
ОГРАНИЧЕНИЕ ГАРАНТИЙНЫХ ОБЯЗАТЕЛЬСТВ И ПОВРЕЖДЕНИЯ, НА КОТОРЫЕ ГАРАНТИЯ НЕ
РАСПРОСТРАНЯЕТСЯ
Согласно ограничениям настоящей гарантии возможно только отремонтировать или заменить
продукт. Компания не несет ответственность за причинение случайных и логических повреждений
с целью нарушения гарантии или изложенных или подразумевающихся в ней условий, включая
вытекающие из общего смысла гарантии или коммерческие условия, а также за коммерческие
качества, пригодность для особого применения или удовлетворительное качество по сравнению
с этим продуктом. Этот документ является полным соглашением по гарантийным обязательствам
сторон в соответствии с предметом настоящего документа; любой отказ или внесенные изменения
не являются действительными без письменного и заверенного разрешения компании Seachem. Все
гарантии, исходящие из этого документа ограничиваются одним календарным годом или более
коротким сроком в соответствии с законодательством вашей страны.

91
Поздравляем вас с покупкой нового подвесного фильтра Seachem Tidal™. Мы можем с уверенностью
утверждать, что вы приобрели фильтр высокого качества, безупречно разработанный, который
будет поддерживать чистоту и здоровье вашего аквариума на протяжении длительного периода
времени с минимальными затратами на обслуживание. Линия фильтров Seachem Tidal ™ была
разработана и изготовлена для Seachem компанией Sicce (Италия), что гарантирует высочайшее
качество продукта и его эксплуатационных характеристик.
Характеристики
1. Низкое энергопотребление при обильном потоке обеспечивает хорошую циркуляцию воды и
экономию электроэнергии.
2. Бесшумная работа фильтра позволяет его эксплуатацию в домашних и офисных помещениях.
3. Самозаливающийся насос обеспечивает простую и надежную установку прибора.
4. Минимальное обслуживание упрощает уход за аквариумом.
5. Самоочищающееся рабочее колесо значительно упрощает уход за насосом.
6. Не подвергающиеся коррозии рабочие части позволяют устанавливать фильтр в морской и
пресной воде.
7. Объёмный стакан фильтра позволяет использование любого фильтрующего материала
8. Seachem Matrix ™ bio-media необходим для полного удаления аммиака, нитритов и нитратов.
9. Съёмный стакан фильтра упрощает его очистку.
10. Крышка двойного назначения необходима для полноценной очистки стакана фильтра во
время обслуживания.
11. Система «водопад» позволяет осуществлять экстра аэрацию аквариума.
12. Компактность прибора позволяет установить его в аквариумах любой формы.
13. Специальный фиксатор позволяет осуществлять точную установку фильтра на стенке
аквариума.
14. Поверхностный скиммер осуществляет сбор органических веществ, очищая поверхность
аквариума.
15. Регуляция потока воды обеспечивает универсальность использования фильтра для разных
потребностей аквариума.
16. Двойная аспирация поверхности или дна обеспечивает тщательную очистку определенного
участка аквариума.
17. Регулируемая телескопическая трубка осуществляет всасывание частиц на любой глубине.
18. Крепежные клипсы обогревателя обеспечивают равномерное распределение тепла
посредством течения воды, создаваемом фильтром.
19. Аэрационные вырезы стенок рециркуляции воды осуществляют увеличение окислительно-
восстановительного потенциала и аэрации аквариума.
20. Индикатор технического обслуживания указывает на необходимость осуществления очистки
стакана фильтра.
Всё это говорит о том, что Вы приобрели наилучший, имеющийся на рынке, фильтр! Благодарим
Вас!
ВВЕДЕНИЕ
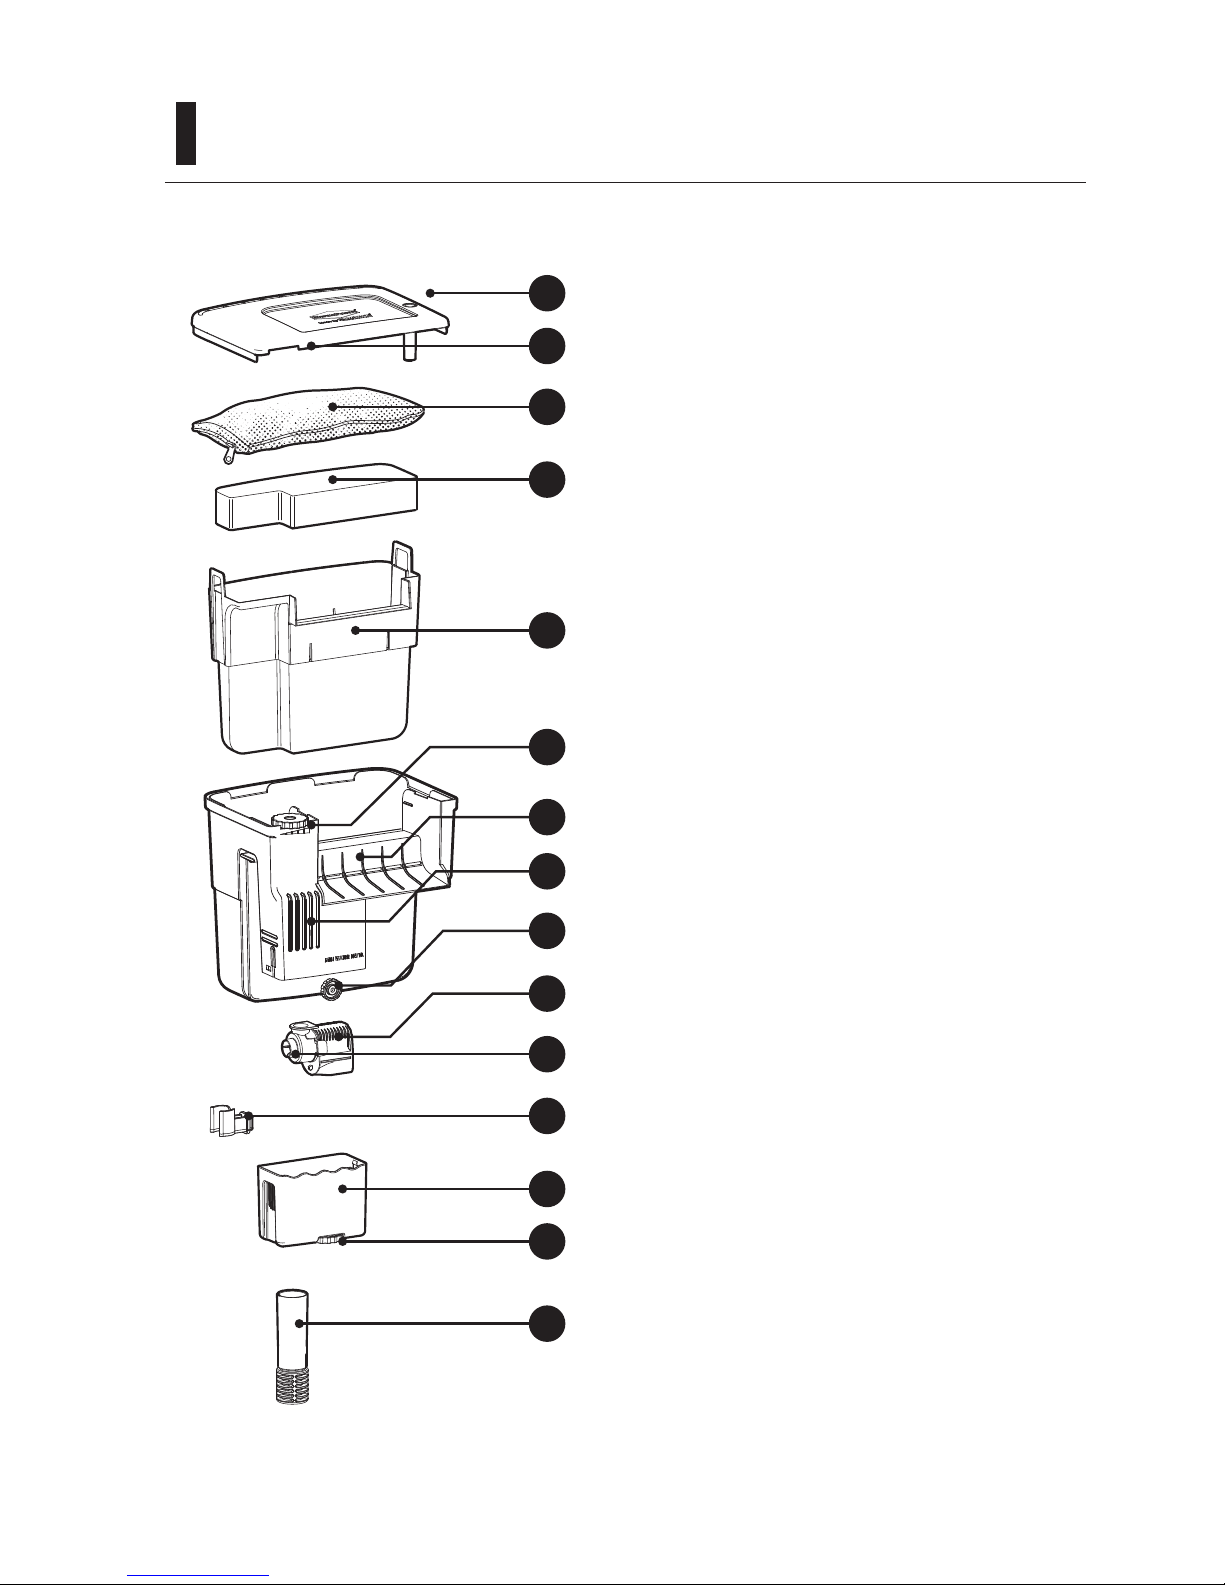
92
СПИСОК КОМПЛЕКТУЮЩИХ
Maintenance alert device
Seachem Matrix™ bio-media
Bottom foam filter
Filter basket
Flow regulation dial
Surface skimmer intake
Low wattage,
self-priming pump
Self-cleaning impeller
Dual intake regulation dial
Telescoping intake tube
Reversible filter cover snaps to
filter basket during maintenance
1
2
4
5
3
6
8
Aerating return flow7
10
Leveling dial9
11
12
Heater holder
14
Pump housing13
15
Сигнал, предупреждающий об опасности.
Seachem Matrix ™ bio-media
Фильтрующая губка для дна
Стакан фильтра
Регулятор мощности потока
Вентиляционная система «водопад»
Всасывание частиц поверхностным
скиммером
Регулятор позиции фильтра
Самозаливающийся насос и низким
энергопотреблением
Самоочищающееся рабочее колесо
Крепление для обогревателя
Корпус насоса
Регулятор двойного всасывания
Всасывающая телескопическая трубка
Двухсторонняя крышка, используемая в
качестве лотка во время обслуживания

93
1
1
3
2
5
4
Рисунок 1
Рисунок 2
Верх Низ
Соедините две части
телескопической трубы.
Прикрепите телескопическую
трубку к корпусу насоса
(Рис.1)
Если вам необходимо
подсоединить к фильтру
обогреватель (Рис.2), слегка
нажмите пальцами на края
фильтра (1), слегка потяните
вниз и снимите крышку
(голову) насоса (2), вставьте
крепление обогревателя в
соответствующие пазы (3) и
установите на место крышку
насоса. В зависимости от
необходимости обогрева
крепление обогревателя может
быть осуществлено “лицом
вниз” или “лицом вверх”.
1
2
СБОРКА И ПОДКЛЮЧЕНИЕ

94
Рисунок 3
Рисунок 4-A Рисунок 4-B
Зафиксируйте регулятор
выравнивания фильтра,
расположенный в его нижней
части, для его подготовки
к позиционированию и
выравниванию по отношению
к уровню воды в аквариуме
(Рис.3)
Позиционируйте фильтр
на краю одной из стенок
аквариума (Рис. 4-А) и
отрегулируйте регулятором
выравнивания его уровень,
который должен совпадать с
уровнем аквариума.
Вставьте кабель насоса
в соответствующие
направляющие как указано
на рисунке (Рис.4-В) и
подсоедините его к розетке,
согнув предварительно
кабель, как указано в
инструкции по безопасности
и на Рисунке 4-В.
СПИСОК КОМПЛЕКТУЮЩИХ

95
Прежде, чем приступить к запуску фильтра,
удалите из ёмкости все полиэтиленовые упаковки,
содержащие фильтрующие элементы. Все
фильтры TIDAL™ предусматривает использование
любого фильтрующего материала. В большинстве
аквариумов задействованы только три вида
фильтрации: механическая, химическая и
биологическая.
Механическая фильтрация предусматривает
удаление крупных осадков/частиц посредством
фильтрующих материалов. Химическая
фильтрация предусматривает химическое
удаление растворенных в воде частиц посредством
фильтрующих материалов. Биологическая
фильтрация создает благоприятные условия для
роста аэробных бактерий и предусматривает
распределение органических отходов.
Все фильтры TIDAL™ вмещают фильтрующую
губку, расположенную на дне фильтра для
механической фильтрации и Matrix™ для
высокоэффективной биологической фильтрации.
Существуют различные решения химической
фильтрации, предназначенные для различных
целей в зависимости от среды аквариума. Seachem
MatrixCarbon™ - это наилучшее решение для
аквариумов с различной средой. MatrixCarbon™
соответствует всем моделям фильтров TIDAL™.
Тщательно промойте губку и другие
фильтрующие материалы под проточной водой
перед помещением их в фильтр. Поместите
фильтрующие материалы слоями на губку,
расположенную на дне фильтра, после
чего выложите материалы для химической
фильтрации, например MatrixCarbon™ и
последним слоем – материал для биологической
фильтрации Matrix ™. Не извлекайте Matrix ™из
сетки. Аккуратно разложите сетку и равномерно
распределите её содержимое до размещения
Matrix™ в фильтре. Для ускорения посева
бактерий Matrix ™ рекомендуем добавить в
ваш аквариум Seachem Stability™ . Внутренний
стакан фильтра предотвращает вращение
воды, позволяя быстрое извлечение и очистку
губки нижнего фильтра и его наполнителя.
Для обеспечения свободного движения воды
через фильтр не перегружайте его стакан
фильтрующими материалами. В случае
перегрузки фильтра активизируется индикатор
техобслуживания или возникает каплепадение
на стенках рециркуляции воды справа. (Рис. 10,
страница 99)
1 2 3
Рис.5: Размещение фильтрующего материала (снизу вверх)
Механический
(Фильтрующая
губка)
Химический
(MatrixCarbon)
Биологический
(Matrix)
ПОДГОТОВКА СТАКАНА ФИЛЬТРА

96
После сборки и установки фильтра
Tidal™ в аквариуме, наполненном водой
и корректно подключенном к сети
питания, подключение и запуск работы
фильтра осуществляется автоматически.
Отрегулируйте три предусмотренные
настройки в зависимости от ваших
потребностей или предпочтений
(Рисунок 6):
1. Поднимите или опустите
всасывающее сопло
телескопической трубки
на необходимую глубину в
зависимости от высоты аквариума.
2. Отрегулируйте мощность потока
фильтра. Отрегулируйте рабочие
характеристики фильтра в
зависимости от объёма аквариума,
его вида, или же необходимости
создания оптимальных условий
для жизни рыб (течение воды
и насыщение кислородом). Эта
настройка позволяет уменьшить
максимальную мощность
течения на 80%. Когда на
момент всасывания сила течения
уменьшается, сетка фильтра
обеспечивает рециркуляцию воды
через фильтрующие материалы,
усиливая их фильтрующие качества
на протяжении максимального
периода времени.
Рисунок 6
2
3
1
3. Отрегулируйте мощность
всасывания с поверхности воды,
закрыв сопло всасывания с дна
телескопической трубки.
Минимальный уровень воды
аквариума не должен быть ниже
отметки «Минимальный уровень
воды». Более низкий уровень воды
может спровоцировать остановку
течения воды и повредить насос.
Эксплуатация насоса всухую запрещена.
Ограничение максимального уровня
воды, отсутствует, но мы рекомендуем
поддерживать уровень воды, не
превышающий отверстия скиммера.
Minimale
Waterniveau
Oppervlakte
Skimmer
ПОДКЛЮЧЕНИЕ ФИЛЬТРА

97
Фильтры Tidal™ обладают
высококачественными и эффективными
эксплуатационными характеристиками при
минимальном обслуживании. Но, регулярное
обслуживание прибора значительно
улучшит здоровье и благосостояние
вашего аквариума. Индикатор
технического обслуживания напомнит
вам о необходимости осуществления
планового обслуживания фильтра Tidal™.
Индикатор, напоминающий о необходимости
выполнения обслуживания указывает на
отсутствие эффективного движения потока
воды через фильтрующие материалы
Рисунок 7
Рисунок 8
Когда отметка, предупреждающая
о необходимости осуществления
очистки, превышает крышку фильтра на
приблизительно ½ “ или 1 см (рисунок 7),
необходимо приступить к его очистке.
Для того, чтобы начать очистку фильтра
(Рис. 8) необходимо поднять крышку (голову)
(1) переместить блок стакана синего фильтра
(2) к задней стенке фильтра и извлечь
стакан, слегка подняв две боковые ручки (3).
ВНИМАНИЕ: Прежде, чем приступить к техническому обслуживанию фильтра
Tidal™ извлеките штепсельную вилку из розетки электрической сети.
1
3
2
ТЕХНИЧЕСКОЕ ОБСЛУЖИВАНИЕ
 Loading...